Embed Size (px)
Citation preview
Getting Started Guide
Chapter 2 Setting up
OpenOffice.orgChoosing options to suit the way you work
This PDF is designed to be read onscreen, two pages at a time. If you want to print a copy, your PDF viewer should have an option for printing two pages on one sheet of paper, but you may need to start with page 2 to get it to print facing pages correctly. (Print this cover page separately.)
CopyrightThis document is Copyright © 2005–2009 by its contributors as listed in the section titled Authors. You may distribute it and/or modify it under the terms of either the GNU General Public License, version 3 or later, or the Creative Commons Attribution License, version 3.0 or later.
All trademarks within this guide belong to their legitimate owners.
AuthorsAgnes BelzunceDaniel CarreraPeter Hillier-BrookStefan A. KeelJean Hollis WeberMichele Zarri
FeedbackPlease direct any comments or suggestions about this document to: [email protected]
AcknowledgmentsMuch of this chapter is updated from material first published in Taming OpenOffice.org Writer 1.1, by Jean Hollis Weber, © 2003.
Publication date and software versionPublished 20 December 2009. Based on OpenOffice.org 3.2.
You can download an editable version of this document from
http://oooauthors.org/english/userguide3/published/
ContentsCopyright...............................................................................................2
Choosing options for all of OOo.............................................................4
User Data options...............................................................................4
General options...................................................................................5
Memory options..................................................................................7
View options........................................................................................7
Print options.....................................................................................10
Path options......................................................................................11
Color options.....................................................................................12
Font options......................................................................................13
Security options................................................................................14
Appearance options..........................................................................16
Accessibility options.........................................................................17
Java options.......................................................................................18
Online Update options......................................................................19
Improvement program......................................................................19
Choosing options for loading and saving documents...........................20
General Load/Save options...............................................................20
VBA Properties Load/Save options....................................................22
Microsoft Office Load/Save options..................................................23
HTML compatibility Load/Save options............................................23
Choosing language settings.................................................................25
Install the required dictionaries........................................................25
Change locale and language settings................................................26
Choose spelling options....................................................................27
Choosing Internet options....................................................................28
Controlling OOo’s AutoCorrect functions.............................................29
Setting up OpenOffice.org 3
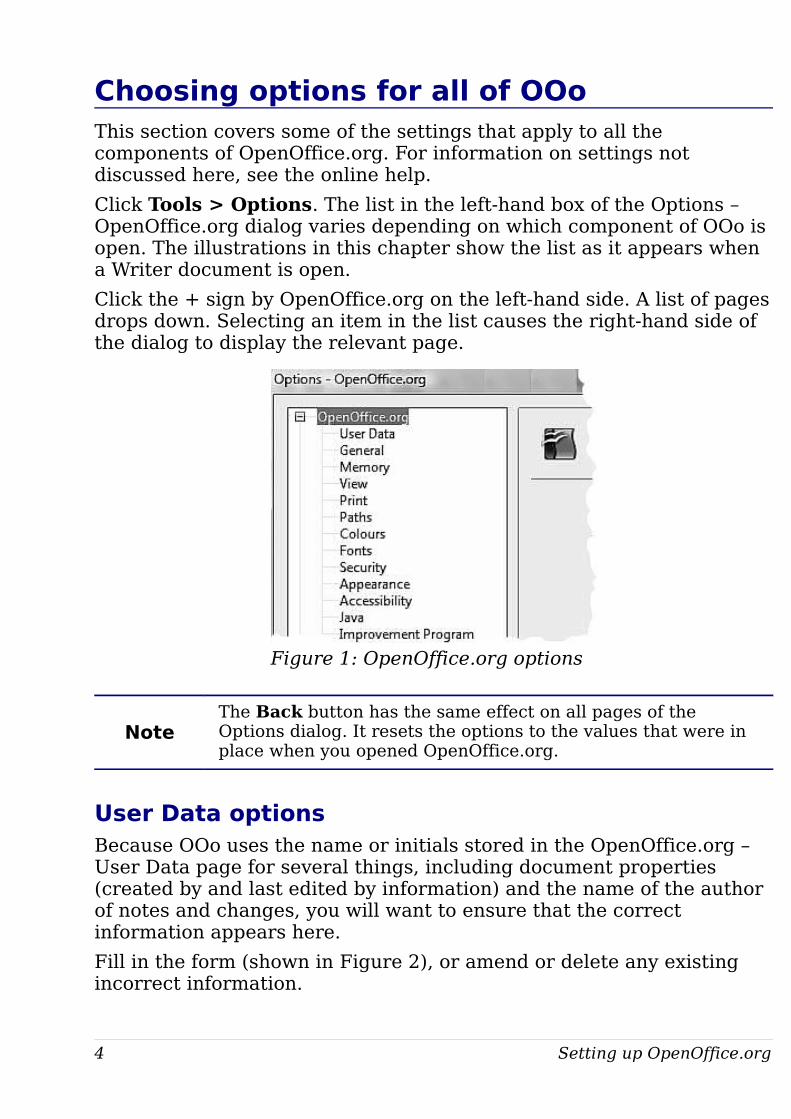
Choosing options for all of OOoThis section covers some of the settings that apply to all the components of OpenOffice.org. For information on settings not discussed here, see the online help.
Click Tools > Options. The list in the left-hand box of the Options – OpenOffice.org dialog varies depending on which component of OOo is open. The illustrations in this chapter show the list as it appears when a Writer document is open.
Click the + sign by OpenOffice.org on the left-hand side. A list of pages drops down. Selecting an item in the list causes the right-hand side of the dialog to display the relevant page.
Figure 1: OpenOffice.org options
NoteThe Back button has the same effect on all pages of the Options dialog. It resets the options to the values that were in place when you opened OpenOffice.org.
User Data optionsBecause OOo uses the name or initials stored in the OpenOffice.org – User Data page for several things, including document properties (created by and last edited by information) and the name of the author of notes and changes, you will want to ensure that the correct information appears here.
Fill in the form (shown in Figure 2), or amend or delete any existing incorrect information.
4 Setting up OpenOffice.org
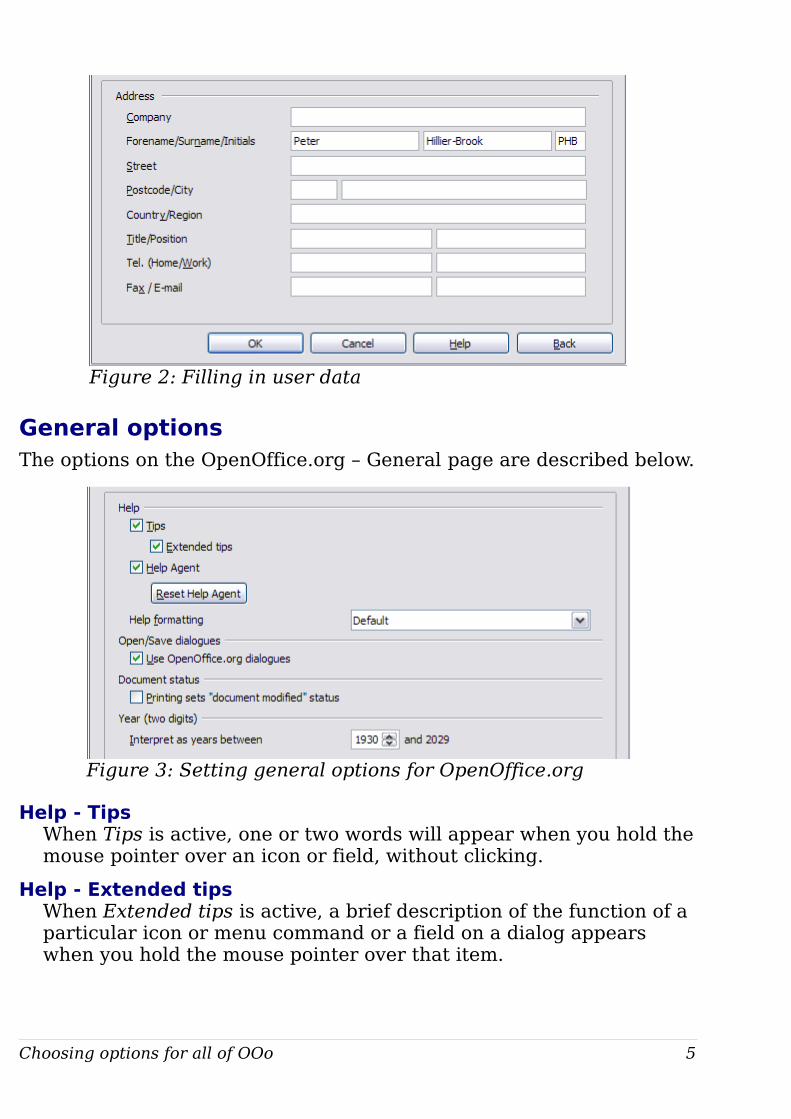
Figure 2: Filling in user data
General optionsThe options on the OpenOffice.org – General page are described below.
Figure 3: Setting general options for OpenOffice.org
Help - TipsWhen Tips is active, one or two words will appear when you hold the mouse pointer over an icon or field, without clicking.
Help - Extended tipsWhen Extended tips is active, a brief description of the function of a particular icon or menu command or a field on a dialog appears when you hold the mouse pointer over that item.
Choosing options for all of OOo 5

Help AgentTo turn off the Help Agent (similar to Microsoft’s Office Assistant), deselect this option. To restore the default behavior, click Reset Help Agent.
Help formattingHigh contrast is an operating system setting that changes the system color scheme to improve readability. To display Help in high contrast (if your computer’s operating system supports this), choose one of the high-contrast style sheets from the pull-down list.
High-contrast style Visual effect
Default Black text on white background
High Contrast #1 Yellow text on black background
High Contrast #2 Green text on black background
High Contrast Black White text on black background
High Contrast White Black text on white background
Open/Save dialogsTo use the standard Open and Save dialogs for your operating system, deselect the Use OpenOffice.org dialogs option. When this option is selected, the Open and Save dialogs supplied with OpenOffice.org will be used. See Chapter 1 (Introducing OpenOffice.org) for more about the OOo Open and Save dialogs. This book uses the OOo Open and Save dialogs in illustrations.
Document statusIf this option is selected, then the next time you close the document after printing, the print date is recorded in the document properties as a change and you will be prompted to save the document again, even if you did not make any other changes.
Year (two digits)Specifies how two-digit years are interpreted. For example, if the two-digit year is set to 1930, and you enter a date of 1/1/30 or later into your document, the date is interpreted as 1/1/1930 or later. An “earlier” date is interpreted as being in the following century; that is, 1/1/20 is interpreted as 1/1/2020.
6 Setting up OpenOffice.org
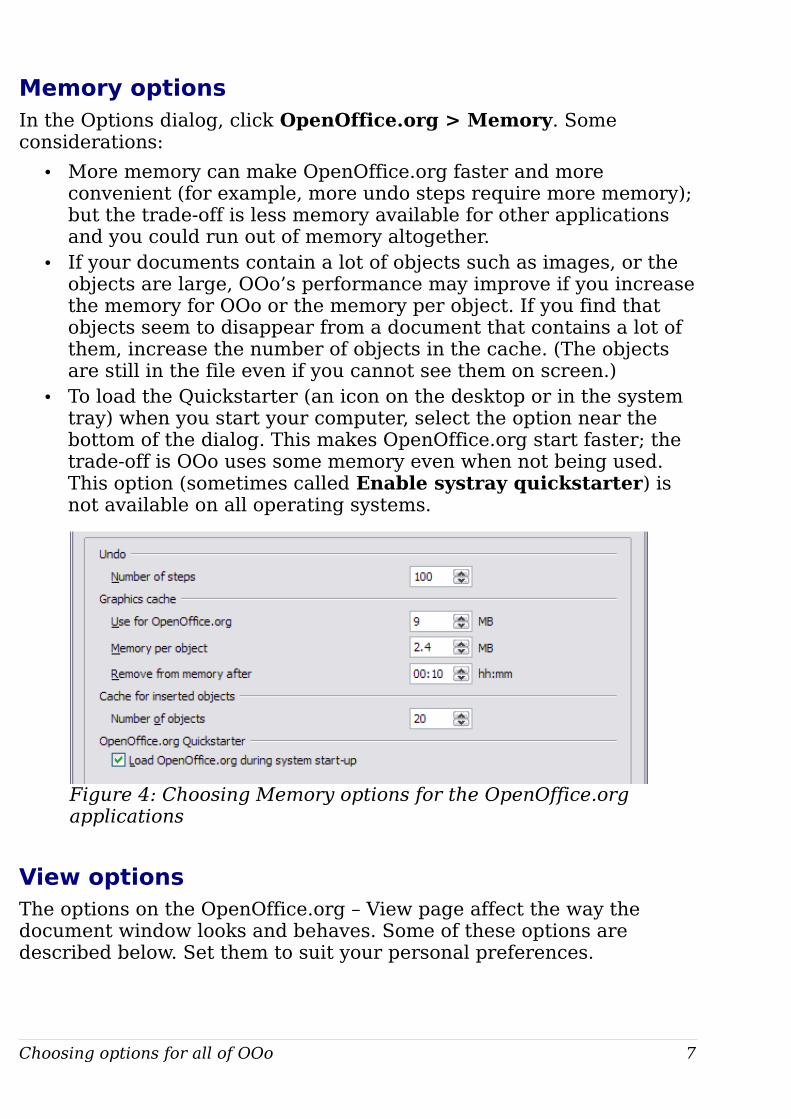
Memory optionsIn the Options dialog, click OpenOffice.org > Memory. Some considerations:
• More memory can make OpenOffice.org faster and more convenient (for example, more undo steps require more memory); but the trade-off is less memory available for other applications and you could run out of memory altogether.
• If your documents contain a lot of objects such as images, or the objects are large, OOo’s performance may improve if you increase the memory for OOo or the memory per object. If you find that objects seem to disappear from a document that contains a lot of them, increase the number of objects in the cache. (The objects are still in the file even if you cannot see them on screen.)
• To load the Quickstarter (an icon on the desktop or in the system tray) when you start your computer, select the option near the bottom of the dialog. This makes OpenOffice.org start faster; the trade-off is OOo uses some memory even when not being used. This option (sometimes called Enable systray quickstarter) is not available on all operating systems.
Figure 4: Choosing Memory options for the OpenOffice.org applications
View optionsThe options on the OpenOffice.org – View page affect the way the document window looks and behaves. Some of these options are described below. Set them to suit your personal preferences.
Choosing options for all of OOo 7
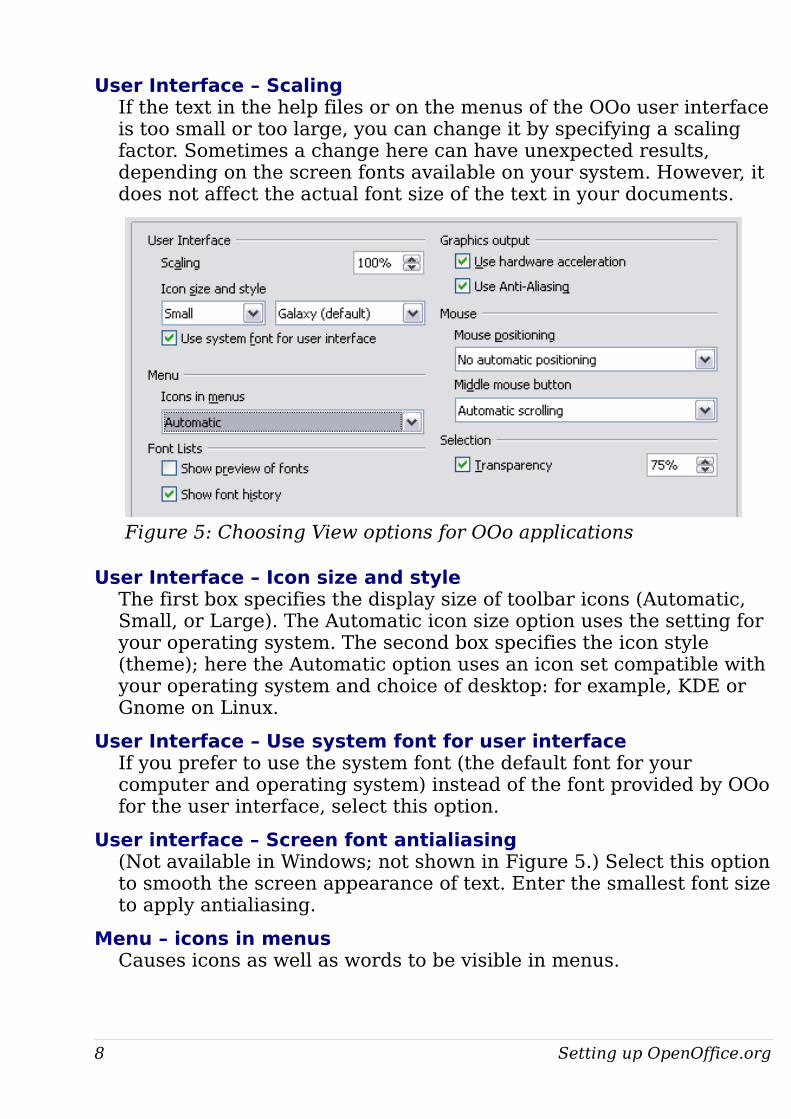
User Interface – ScalingIf the text in the help files or on the menus of the OOo user interface is too small or too large, you can change it by specifying a scaling factor. Sometimes a change here can have unexpected results, depending on the screen fonts available on your system. However, it does not affect the actual font size of the text in your documents.
Figure 5: Choosing View options for OOo applications
User Interface – Icon size and styleThe first box specifies the display size of toolbar icons (Automatic, Small, or Large). The Automatic icon size option uses the setting for your operating system. The second box specifies the icon style (theme); here the Automatic option uses an icon set compatible with your operating system and choice of desktop: for example, KDE or Gnome on Linux.
User Interface – Use system font for user interfaceIf you prefer to use the system font (the default font for your computer and operating system) instead of the font provided by OOo for the user interface, select this option.
User interface – Screen font antialiasing(Not available in Windows; not shown in Figure 5.) Select this option to smooth the screen appearance of text. Enter the smallest font size to apply antialiasing.
Menu – icons in menusCauses icons as well as words to be visible in menus.
8 Setting up OpenOffice.org
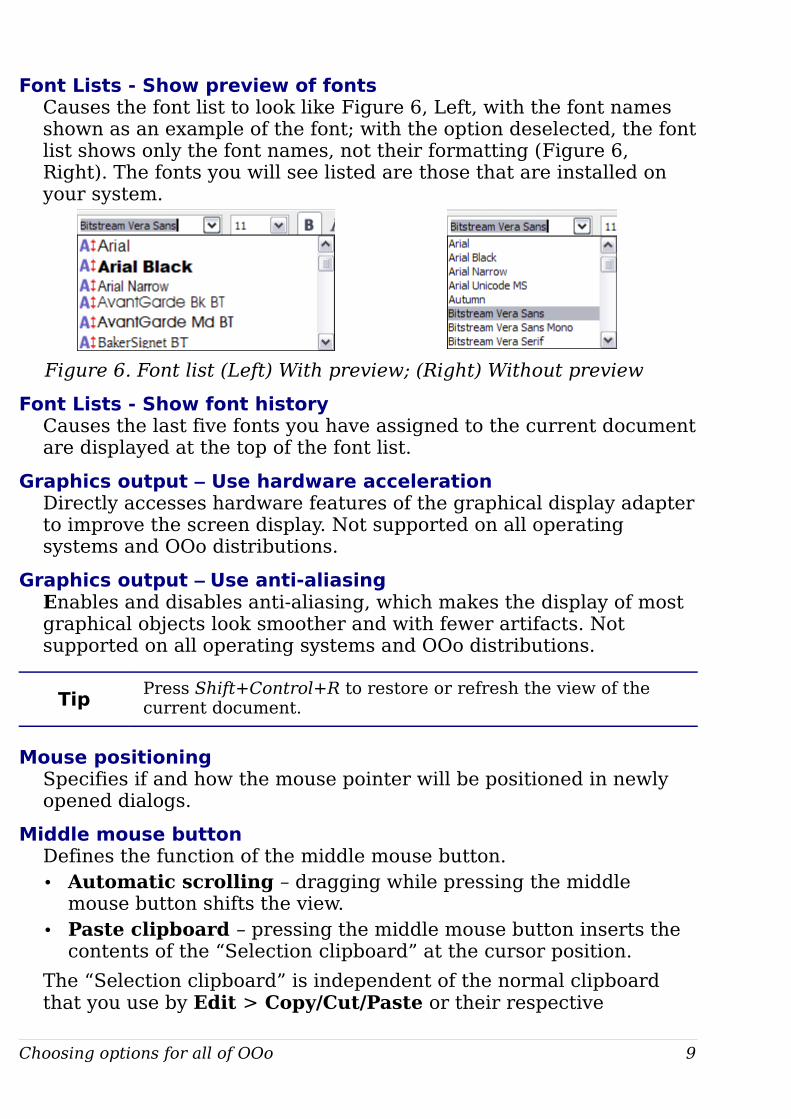
Font Lists - Show preview of fontsCauses the font list to look like Figure 6, Left, with the font names shown as an example of the font; with the option deselected, the font list shows only the font names, not their formatting (Figure 6, Right). The fonts you will see listed are those that are installed on your system.
Figure 6. Font list (Left) With preview; (Right) Without preview
Font Lists - Show font historyCauses the last five fonts you have assigned to the current document are displayed at the top of the font list.
Graphics output – Use hardware accelerationDirectly accesses hardware features of the graphical display adapter to improve the screen display. Not supported on all operating systems and OOo distributions.
Graphics output – Use anti-aliasingEnables and disables anti-aliasing, which makes the display of most graphical objects look smoother and with fewer artifacts. Not supported on all operating systems and OOo distributions.
TipPress Shift+Control+R to restore or refresh the view of the current document.
Mouse positioningSpecifies if and how the mouse pointer will be positioned in newly opened dialogs.
Middle mouse buttonDefines the function of the middle mouse button.• Automatic scrolling – dragging while pressing the middle
mouse button shifts the view.• Paste clipboard – pressing the middle mouse button inserts the
contents of the “Selection clipboard” at the cursor position.
The “Selection clipboard” is independent of the normal clipboard that you use by Edit > Copy/Cut/Paste or their respective
Choosing options for all of OOo 9
keyboard shortcuts. Clipboard and “Selection clipboard” can contain different contents at the same time.
Function Clipboard Selection clipboard
Copy content Edit > Copy Control+C
Select text, table, or object.
Paste content Edit > Paste Control+V pastes at the cursor position.
Clicking the middle mouse button pastes at the mouse pointer position.
Pasting into another document
No effect on the clipboard contents.
The last marked selection is the content of the selection clipboard.
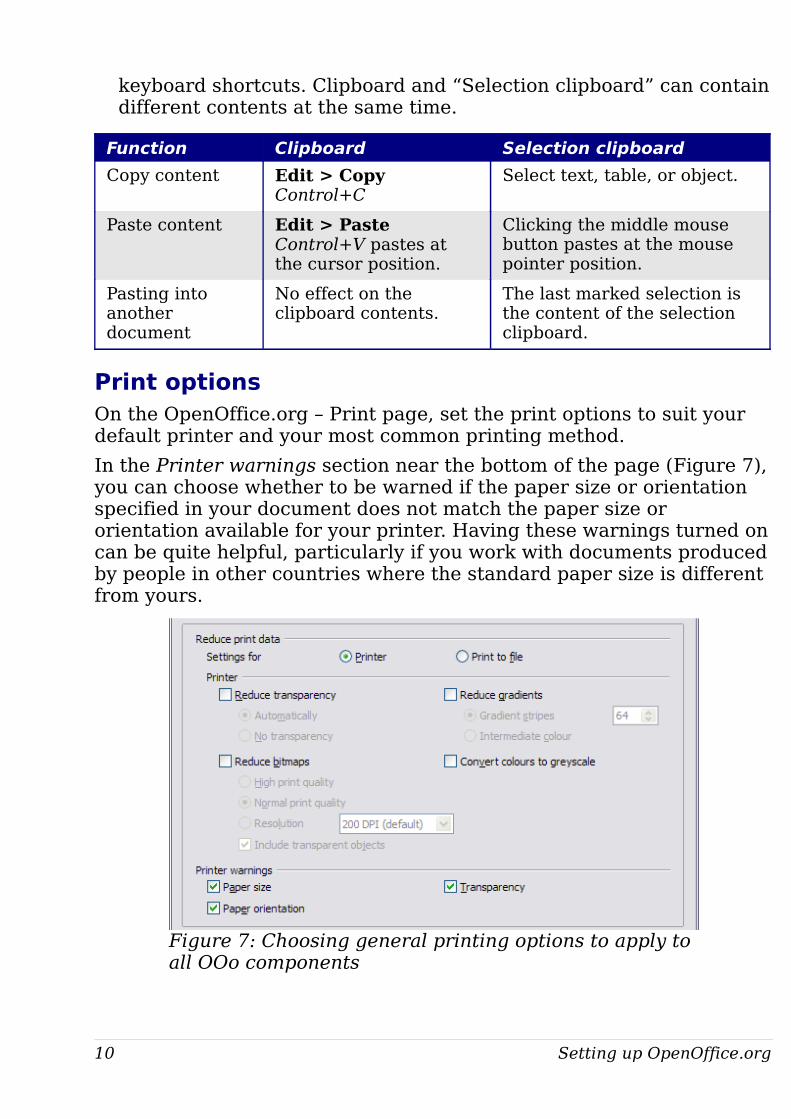
Print optionsOn the OpenOffice.org – Print page, set the print options to suit your default printer and your most common printing method.
In the Printer warnings section near the bottom of the page (Figure 7), you can choose whether to be warned if the paper size or orientation specified in your document does not match the paper size or orientation available for your printer. Having these warnings turned on can be quite helpful, particularly if you work with documents produced by people in other countries where the standard paper size is different from yours.
Figure 7: Choosing general printing options to apply to all OOo components
10 Setting up OpenOffice.org
TipIf your printouts are incorrectly placed on the page or chopped off at the top, bottom, or sides, or the printer is refusing to print, the most likely cause is page size incompatibility.
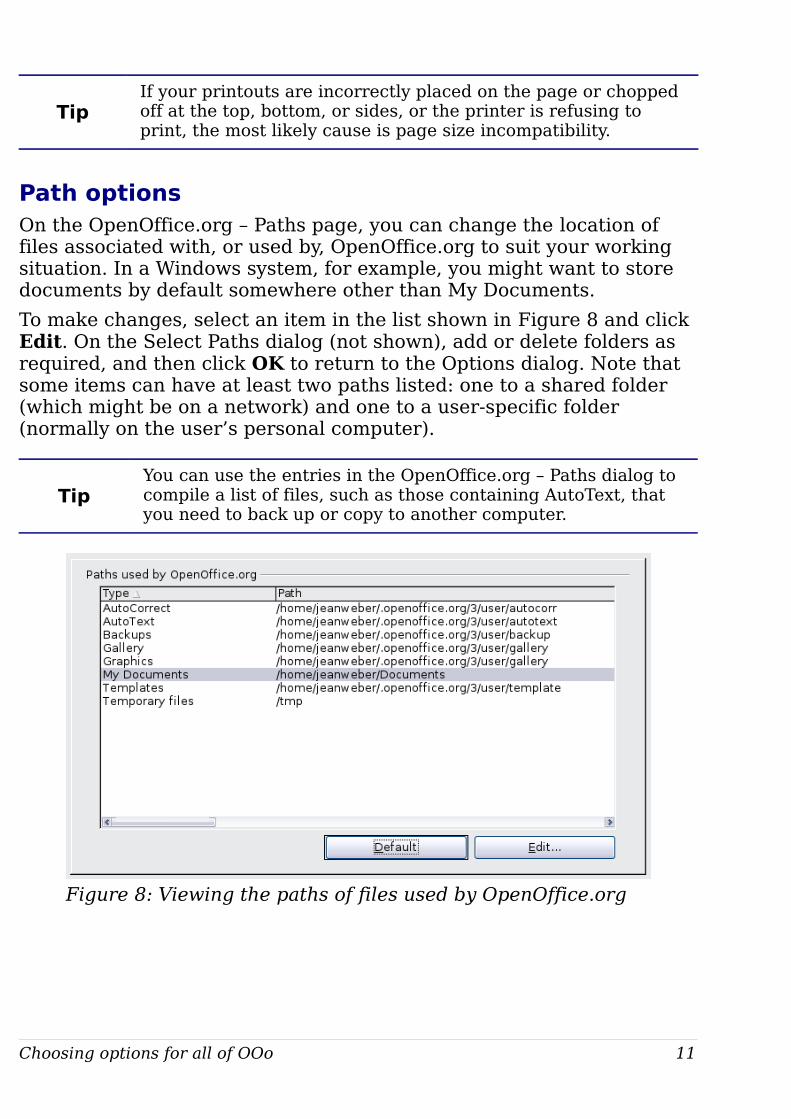
Path optionsOn the OpenOffice.org – Paths page, you can change the location of files associated with, or used by, OpenOffice.org to suit your working situation. In a Windows system, for example, you might want to store documents by default somewhere other than My Documents.
To make changes, select an item in the list shown in Figure 8 and click Edit. On the Select Paths dialog (not shown), add or delete folders as required, and then click OK to return to the Options dialog. Note that some items can have at least two paths listed: one to a shared folder (which might be on a network) and one to a user-specific folder (normally on the user’s personal computer).
TipYou can use the entries in the OpenOffice.org – Paths dialog to compile a list of files, such as those containing AutoText, that you need to back up or copy to another computer.
Figure 8: Viewing the paths of files used by OpenOffice.org
Choosing options for all of OOo 11

Color optionsOn the OpenOffice.org – Colors page (Figure 9), you can specify colors to use in OOo documents. You can select a color from a color table, edit an existing color, and define new colors. These colors are stored in your color palette and are then available in all components of OOo.
Figure 9: Defining colors to use in color palettes in OOo
To modify a color:1) Select the color to modify from the list or the color table.2) Enter the new values that define the color. If necessary, change
the settings from RGB (Red, Green, Blue) to CMYK (Cyan, Magenta, Yellow, Black) or vice versa. The changed color appears in the lower of the two color preview boxes at the top.
3) Modify the Name as required.4) Click the Modify button. The newly defined color is now listed in
the Color table.
Alternatively, click the Edit button to open the Color dialog, shown in Figure 10. Here you can select a color from one of the color windows in the upper area, or you can enter values in the lower area using your choice of RGB, CMYK, or HSB (Hue, Saturation and Brightness) values.
The upper right color window is linked directly with the color input fields in the lower area; as you choose a color in the upper window, the numbers change accordingly. The two color fields at the lower right show the value of the selected color on the left and the currently set value from the color value fields on the right.
12 Setting up OpenOffice.org
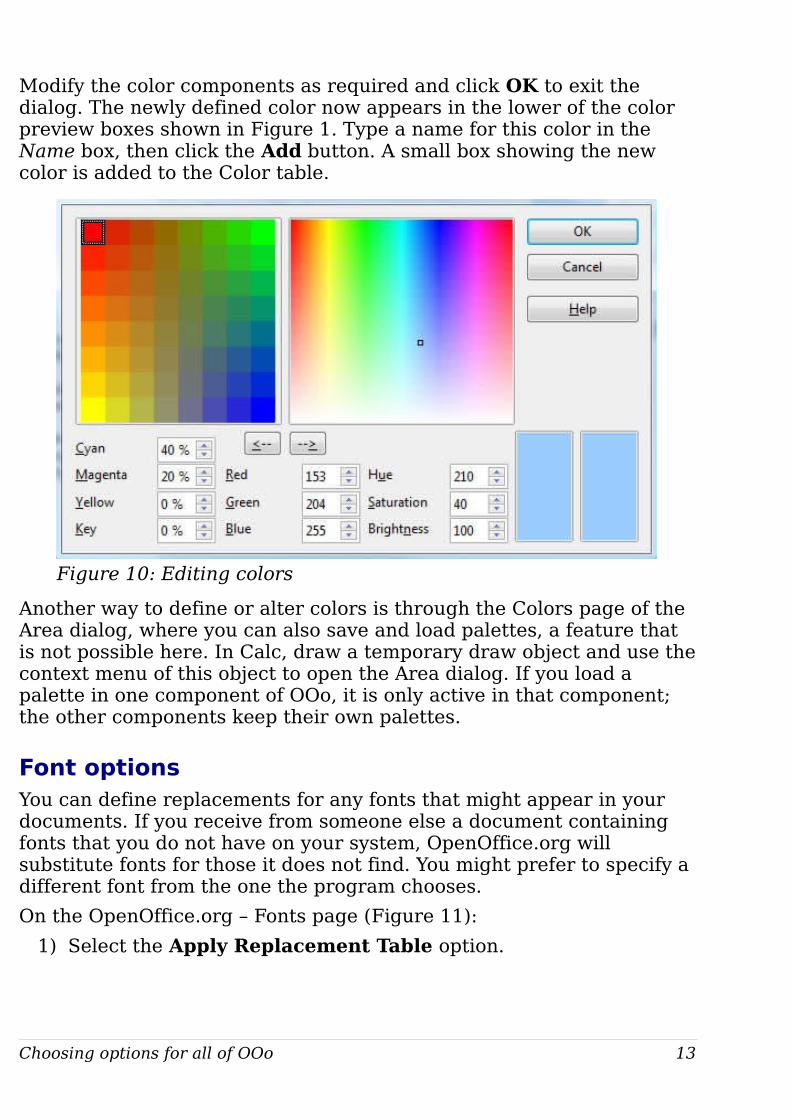
Modify the color components as required and click OK to exit the dialog. The newly defined color now appears in the lower of the color preview boxes shown in Figure 1. Type a name for this color in the Name box, then click the Add button. A small box showing the new color is added to the Color table.
Figure 10: Editing colors
Another way to define or alter colors is through the Colors page of the Area dialog, where you can also save and load palettes, a feature that is not possible here. In Calc, draw a temporary draw object and use the context menu of this object to open the Area dialog. If you load a palette in one component of OOo, it is only active in that component; the other components keep their own palettes.
Font optionsYou can define replacements for any fonts that might appear in your documents. If you receive from someone else a document containing fonts that you do not have on your system, OpenOffice.org will substitute fonts for those it does not find. You might prefer to specify a different font from the one the program chooses.
On the OpenOffice.org – Fonts page (Figure 11):
1) Select the Apply Replacement Table option.
Choosing options for all of OOo 13
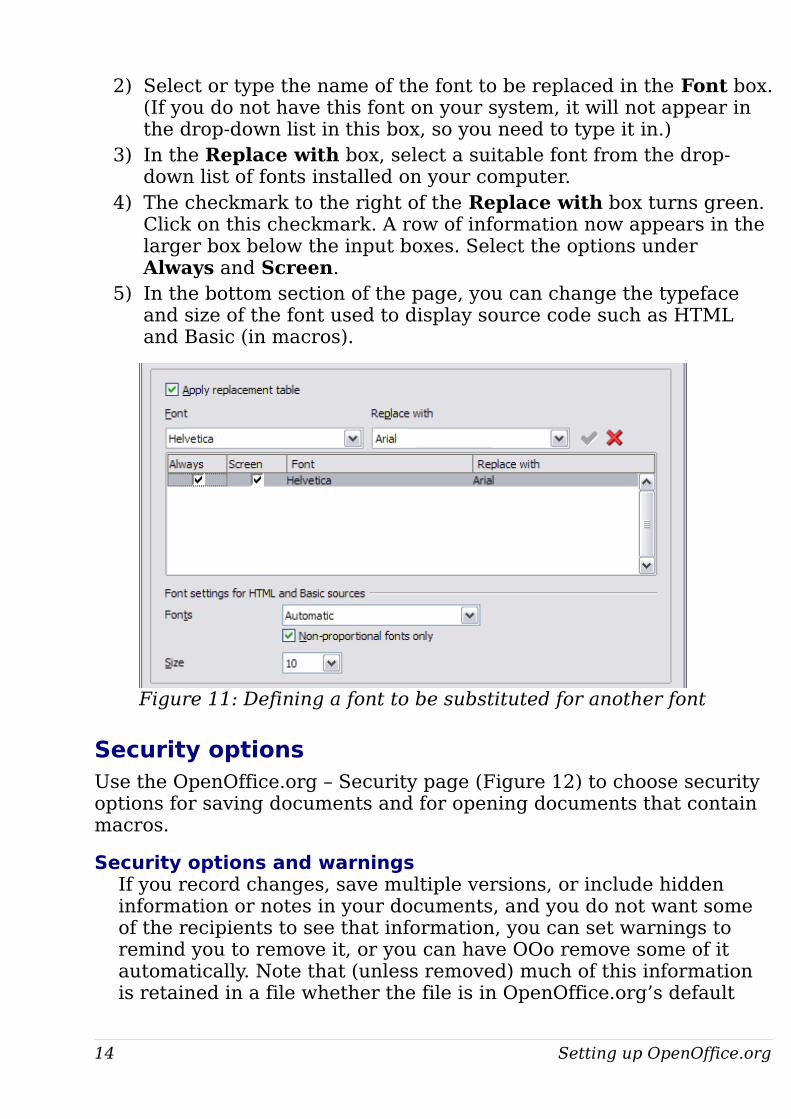
2) Select or type the name of the font to be replaced in the Font box. (If you do not have this font on your system, it will not appear in the drop-down list in this box, so you need to type it in.)
3) In the Replace with box, select a suitable font from the drop-down list of fonts installed on your computer.
4) The checkmark to the right of the Replace with box turns green. Click on this checkmark. A row of information now appears in the larger box below the input boxes. Select the options under Always and Screen.
5) In the bottom section of the page, you can change the typeface and size of the font used to display source code such as HTML and Basic (in macros).
Figure 11: Defining a font to be substituted for another font
Security optionsUse the OpenOffice.org – Security page (Figure 12) to choose security options for saving documents and for opening documents that contain macros.
Security options and warningsIf you record changes, save multiple versions, or include hidden information or notes in your documents, and you do not want some of the recipients to see that information, you can set warnings to remind you to remove it, or you can have OOo remove some of it automatically. Note that (unless removed) much of this information is retained in a file whether the file is in OpenOffice.org’s default
14 Setting up OpenOffice.org
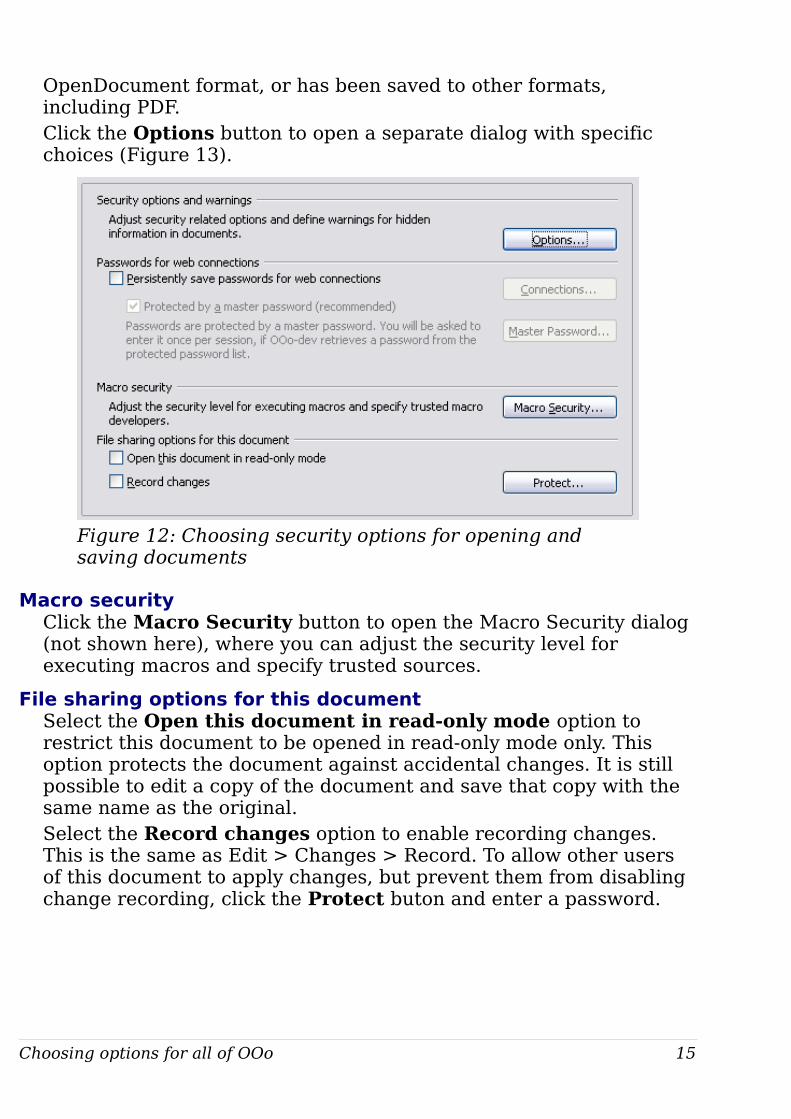
OpenDocument format, or has been saved to other formats, including PDF.Click the Options button to open a separate dialog with specific choices (Figure 13).
Figure 12: Choosing security options for opening and saving documents
Macro securityClick the Macro Security button to open the Macro Security dialog (not shown here), where you can adjust the security level for executing macros and specify trusted sources.
File sharing options for this documentSelect the Open this document in read-only mode option to restrict this document to be opened in read-only mode only. This option protects the document against accidental changes. It is still possible to edit a copy of the document and save that copy with the same name as the original.Select the Record changes option to enable recording changes. This is the same as Edit > Changes > Record. To allow other users of this document to apply changes, but prevent them from disabling change recording, click the Protect buton and enter a password.
Choosing options for all of OOo 15
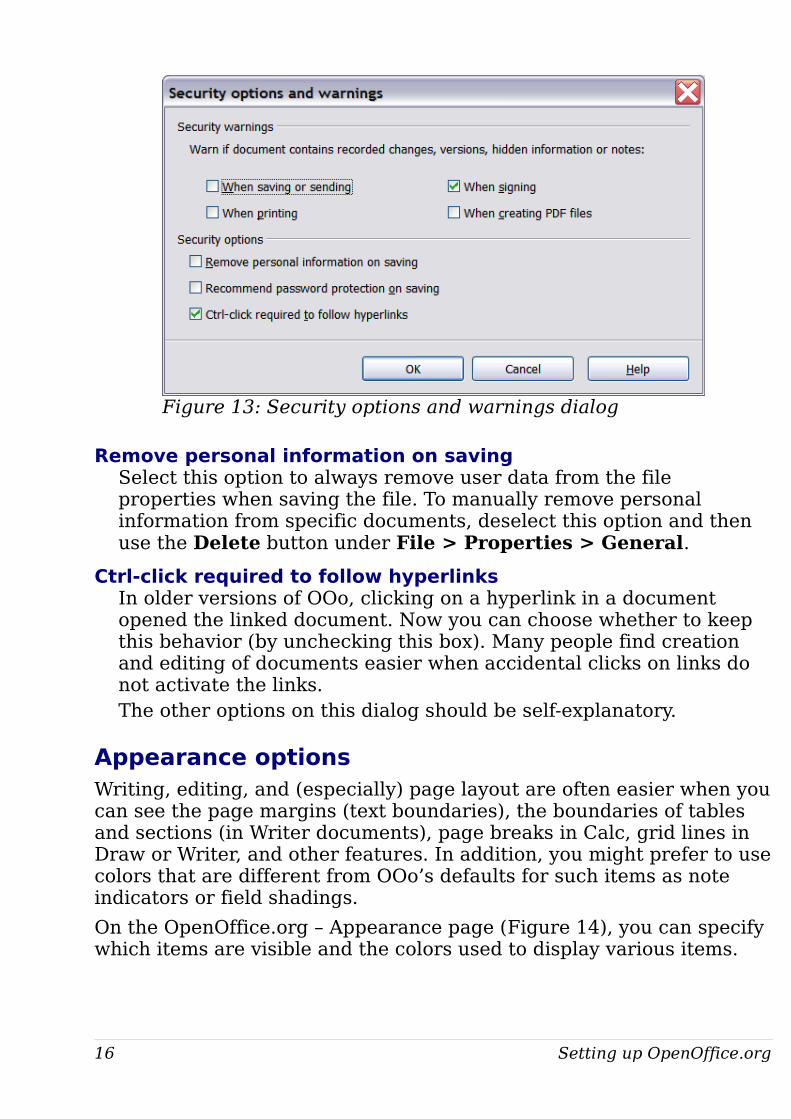
Figure 13: Security options and warnings dialog
Remove personal information on savingSelect this option to always remove user data from the file properties when saving the file. To manually remove personal information from specific documents, deselect this option and then use the Delete button under File > Properties > General.
Ctrl-click required to follow hyperlinksIn older versions of OOo, clicking on a hyperlink in a document opened the linked document. Now you can choose whether to keep this behavior (by unchecking this box). Many people find creation and editing of documents easier when accidental clicks on links do not activate the links.The other options on this dialog should be self-explanatory.
Appearance optionsWriting, editing, and (especially) page layout are often easier when you can see the page margins (text boundaries), the boundaries of tables and sections (in Writer documents), page breaks in Calc, grid lines in Draw or Writer, and other features. In addition, you might prefer to use colors that are different from OOo’s defaults for such items as note indicators or field shadings.
On the OpenOffice.org – Appearance page (Figure 14), you can specify which items are visible and the colors used to display various items.
16 Setting up OpenOffice.org
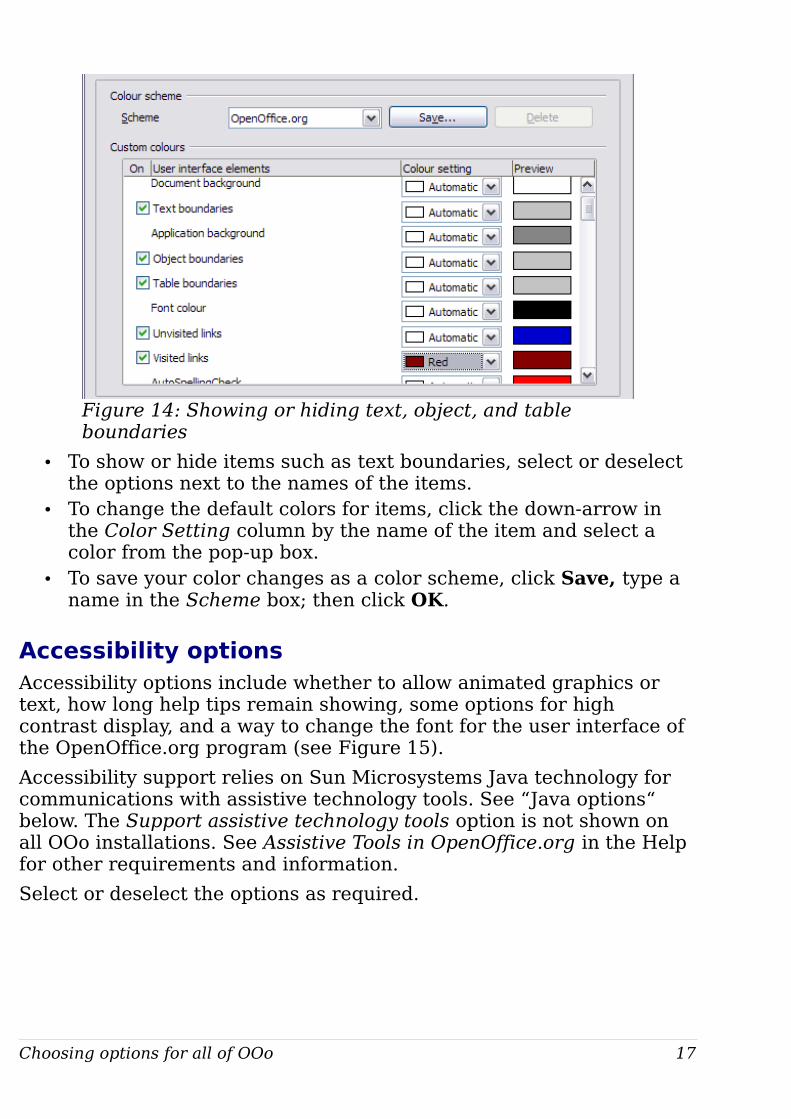
Figure 14: Showing or hiding text, object, and table boundaries
• To show or hide items such as text boundaries, select or deselect the options next to the names of the items.
• To change the default colors for items, click the down-arrow in the Color Setting column by the name of the item and select a color from the pop-up box.
• To save your color changes as a color scheme, click Save, type a name in the Scheme box; then click OK.
Accessibility optionsAccessibility options include whether to allow animated graphics or text, how long help tips remain showing, some options for high contrast display, and a way to change the font for the user interface of the OpenOffice.org program (see Figure 15).
Accessibility support relies on Sun Microsystems Java technology for communications with assistive technology tools. See “Java options“ below. The Support assistive technology tools option is not shown on all OOo installations. See Assistive Tools in OpenOffice.org in the Help for other requirements and information.
Select or deselect the options as required.
Choosing options for all of OOo 17
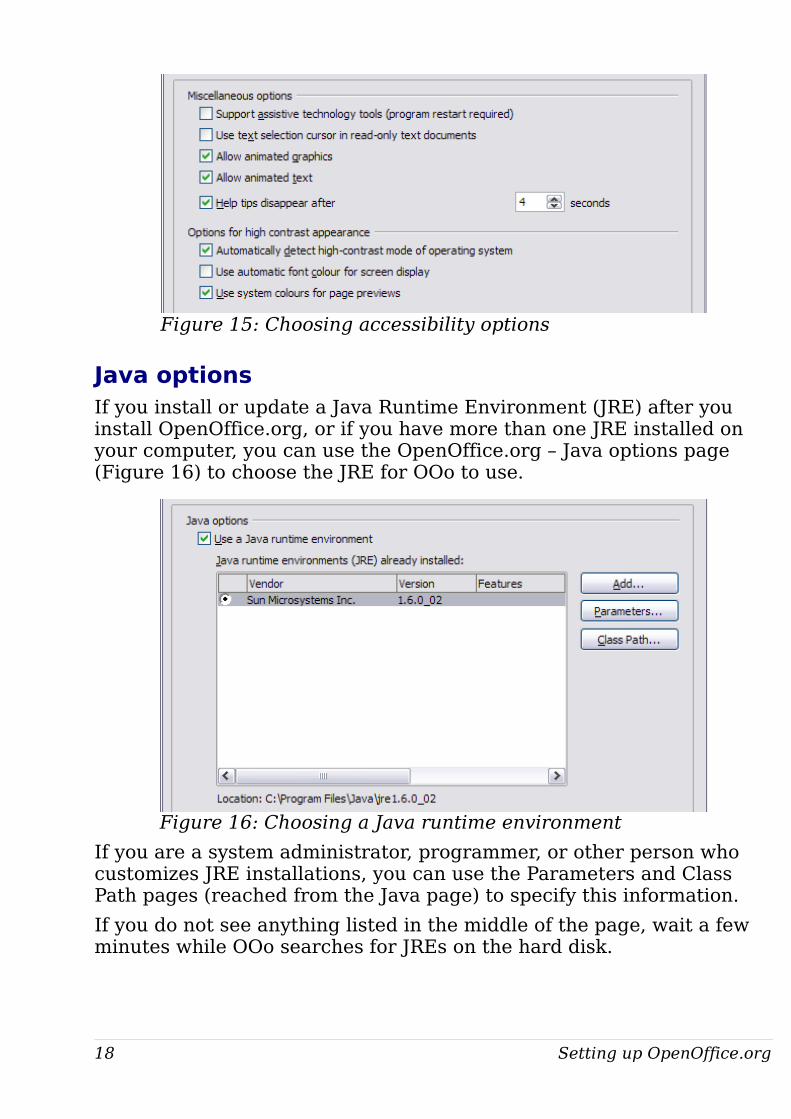
Figure 15: Choosing accessibility options
Java optionsIf you install or update a Java Runtime Environment (JRE) after you install OpenOffice.org, or if you have more than one JRE installed on your computer, you can use the OpenOffice.org – Java options page (Figure 16) to choose the JRE for OOo to use.
Figure 16: Choosing a Java runtime environment
If you are a system administrator, programmer, or other person who customizes JRE installations, you can use the Parameters and Class Path pages (reached from the Java page) to specify this information.
If you do not see anything listed in the middle of the page, wait a few minutes while OOo searches for JREs on the hard disk.
18 Setting up OpenOffice.org
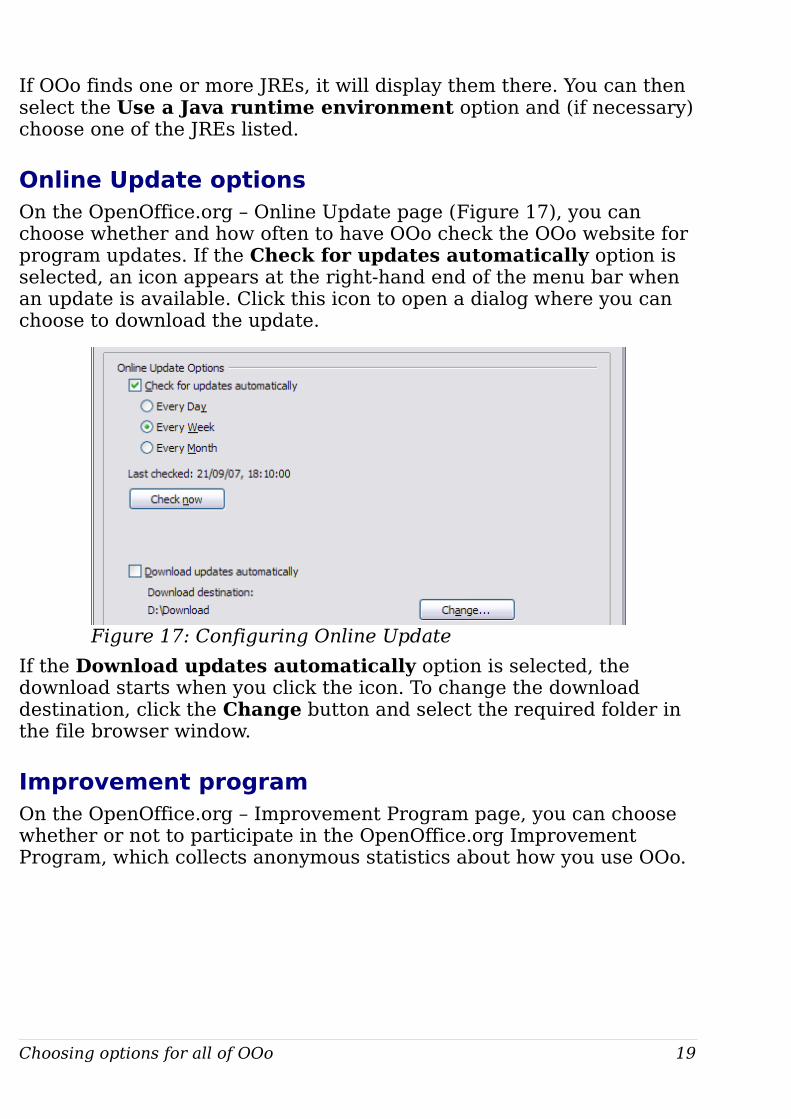
If OOo finds one or more JREs, it will display them there. You can then select the Use a Java runtime environment option and (if necessary) choose one of the JREs listed.
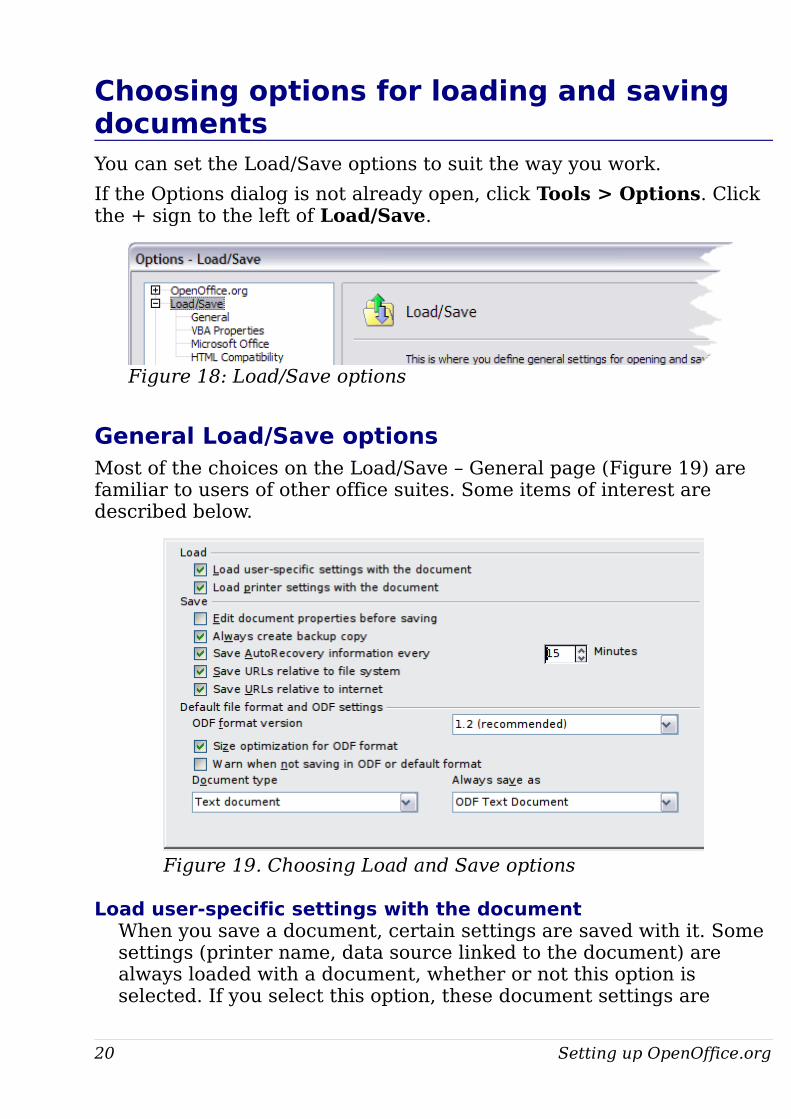
Online Update optionsOn the OpenOffice.org – Online Update page (Figure 17), you can choose whether and how often to have OOo check the OOo website for program updates. If the Check for updates automatically option is selected, an icon appears at the right-hand end of the menu bar when an update is available. Click this icon to open a dialog where you can choose to download the update.
Figure 17: Configuring Online Update
If the Download updates automatically option is selected, the download starts when you click the icon. To change the download destination, click the Change button and select the required folder in the file browser window.
Improvement programOn the OpenOffice.org – Improvement Program page, you can choose whether or not to participate in the OpenOffice.org Improvement Program, which collects anonymous statistics about how you use OOo.
Choosing options for all of OOo 19
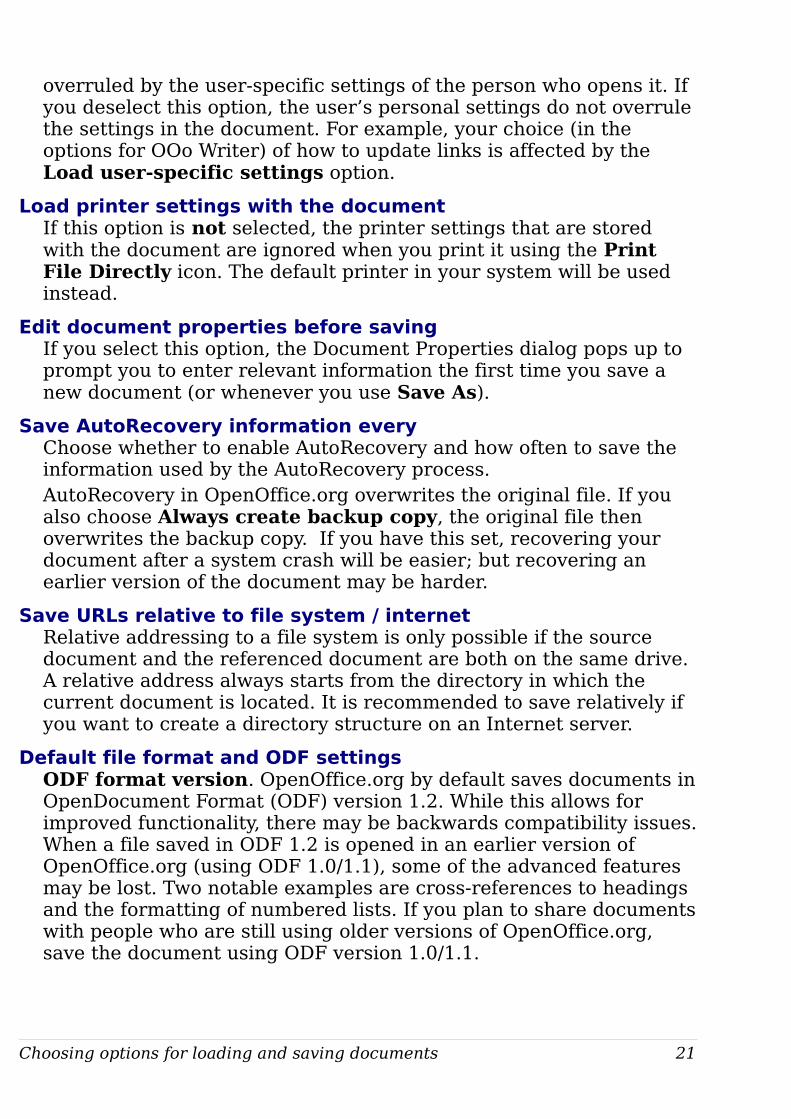
Choosing options for loading and saving documentsYou can set the Load/Save options to suit the way you work.
If the Options dialog is not already open, click Tools > Options. Click the + sign to the left of Load/Save.
Figure 18: Load/Save options
General Load/Save optionsMost of the choices on the Load/Save – General page (Figure 19) are familiar to users of other office suites. Some items of interest are described below.
Figure 19. Choosing Load and Save options
Load user-specific settings with the documentWhen you save a document, certain settings are saved with it. Some settings (printer name, data source linked to the document) are always loaded with a document, whether or not this option is selected. If you select this option, these document settings are
20 Setting up OpenOffice.org
overruled by the user-specific settings of the person who opens it. If you deselect this option, the user’s personal settings do not overrule the settings in the document. For example, your choice (in the options for OOo Writer) of how to update links is affected by the Load user-specific settings option.
Load printer settings with the documentIf this option is not selected, the printer settings that are stored with the document are ignored when you print it using the Print File Directly icon. The default printer in your system will be used instead.
Edit document properties before savingIf you select this option, the Document Properties dialog pops up to prompt you to enter relevant information the first time you save a new document (or whenever you use Save As).
Save AutoRecovery information everyChoose whether to enable AutoRecovery and how often to save the information used by the AutoRecovery process.AutoRecovery in OpenOffice.org overwrites the original file. If you also choose Always create backup copy, the original file then overwrites the backup copy. If you have this set, recovering your document after a system crash will be easier; but recovering an earlier version of the document may be harder.
Save URLs relative to file system / internetRelative addressing to a file system is only possible if the source document and the referenced document are both on the same drive. A relative address always starts from the directory in which the current document is located. It is recommended to save relatively if you want to create a directory structure on an Internet server.
Default file format and ODF settingsODF format version. OpenOffice.org by default saves documents in OpenDocument Format (ODF) version 1.2. While this allows for improved functionality, there may be backwards compatibility issues. When a file saved in ODF 1.2 is opened in an earlier version of OpenOffice.org (using ODF 1.0/1.1), some of the advanced features may be lost. Two notable examples are cross-references to headings and the formatting of numbered lists. If you plan to share documents with people who are still using older versions of OpenOffice.org, save the document using ODF version 1.0/1.1.
Choosing options for loading and saving documents 21
Size optimization for ODF format. OpenOffice.org documents are XML files. When you select this option, OOo writes the XML data without indents and line breaks. If you want to be able to read the XML files in a text editor in a structured form, deselect this option.Document type. If you routinely share documents with users of Microsoft Office, you might want to change the Always save as attribute for documents to one of the Microsoft Office formats.
NoteAlthough OOo can open files in the .docx, .xlsx, and .pptx formats produced by Microsoft Office 2007, it cannot save in those formats. This capability is planned for a future release.
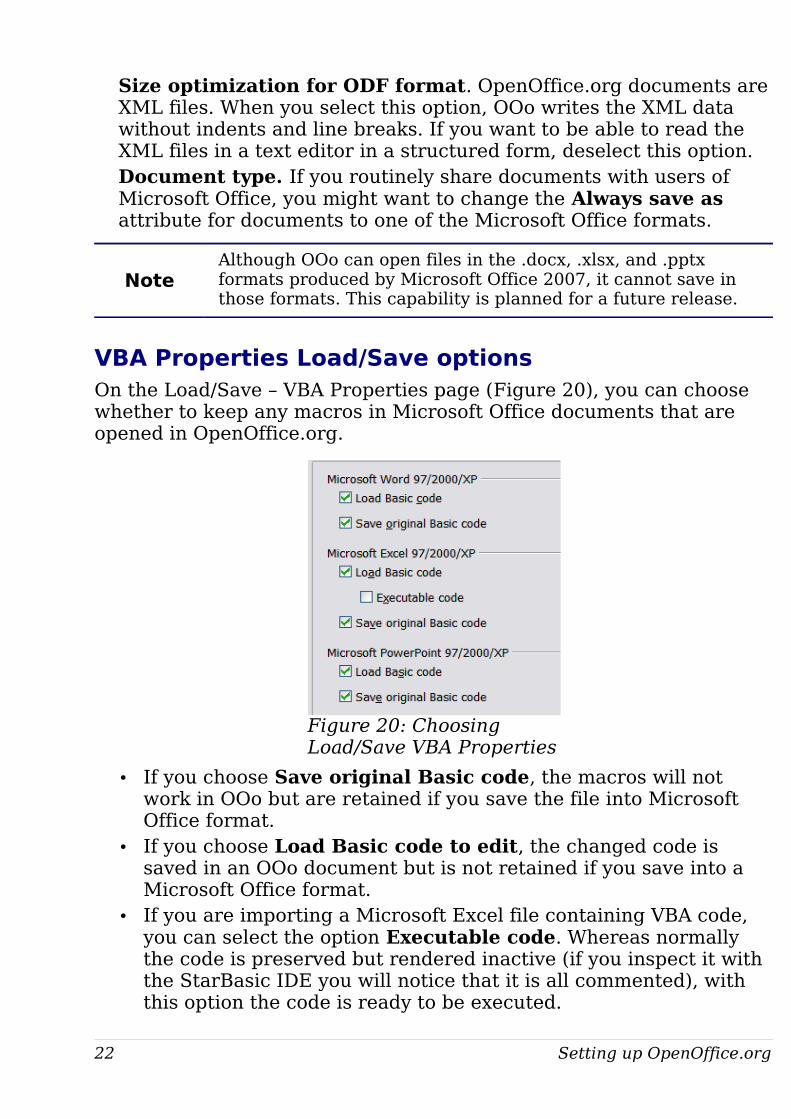
VBA Properties Load/Save optionsOn the Load/Save – VBA Properties page (Figure 20), you can choose whether to keep any macros in Microsoft Office documents that are opened in OpenOffice.org.
Figure 20: Choosing Load/Save VBA Properties
• If you choose Save original Basic code, the macros will not work in OOo but are retained if you save the file into Microsoft Office format.
• If you choose Load Basic code to edit, the changed code is saved in an OOo document but is not retained if you save into a Microsoft Office format.
• If you are importing a Microsoft Excel file containing VBA code, you can select the option Executable code. Whereas normally the code is preserved but rendered inactive (if you inspect it with the StarBasic IDE you will notice that it is all commented), with this option the code is ready to be executed.
22 Setting up OpenOffice.org
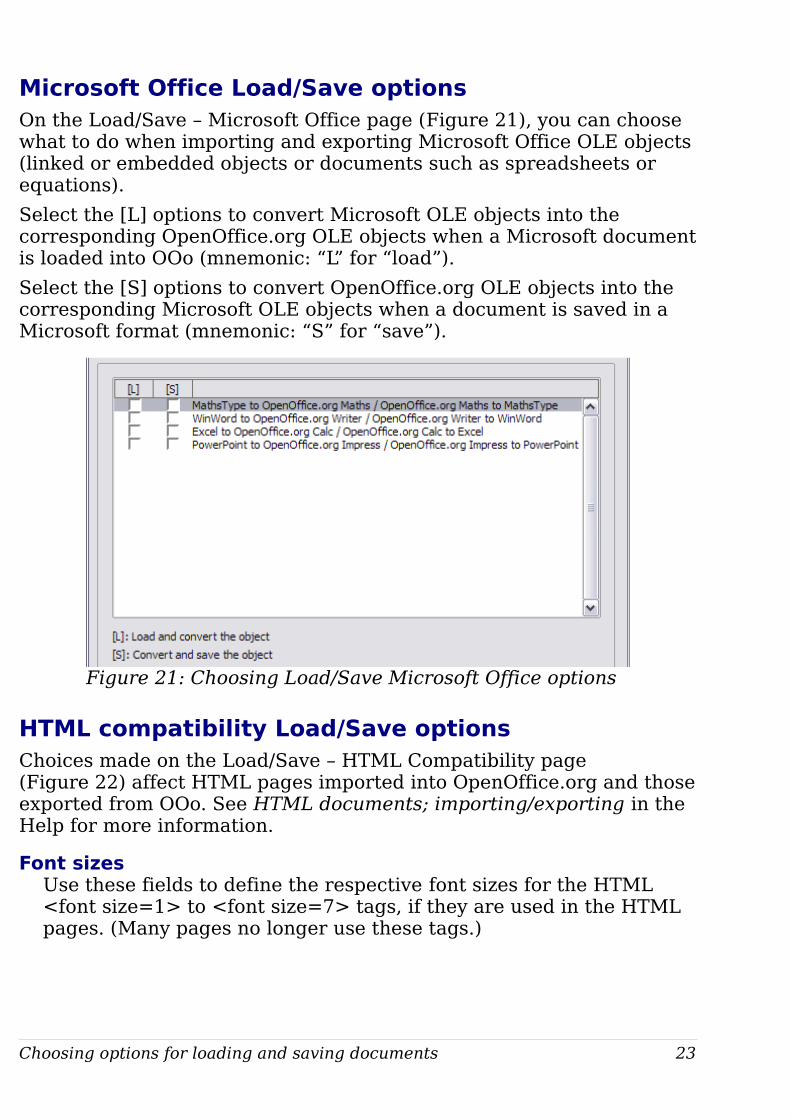
Microsoft Office Load/Save optionsOn the Load/Save – Microsoft Office page (Figure 21), you can choose what to do when importing and exporting Microsoft Office OLE objects (linked or embedded objects or documents such as spreadsheets or equations).
Select the [L] options to convert Microsoft OLE objects into the corresponding OpenOffice.org OLE objects when a Microsoft document is loaded into OOo (mnemonic: “L” for “load”).
Select the [S] options to convert OpenOffice.org OLE objects into the corresponding Microsoft OLE objects when a document is saved in a Microsoft format (mnemonic: “S” for “save”).
Figure 21: Choosing Load/Save Microsoft Office options
HTML compatibility Load/Save optionsChoices made on the Load/Save – HTML Compatibility page (Figure 22) affect HTML pages imported into OpenOffice.org and those exported from OOo. See HTML documents; importing/exporting in the Help for more information.
Font sizesUse these fields to define the respective font sizes for the HTML <font size=1> to <font size=7> tags, if they are used in the HTML pages. (Many pages no longer use these tags.)
Choosing options for loading and saving documents 23
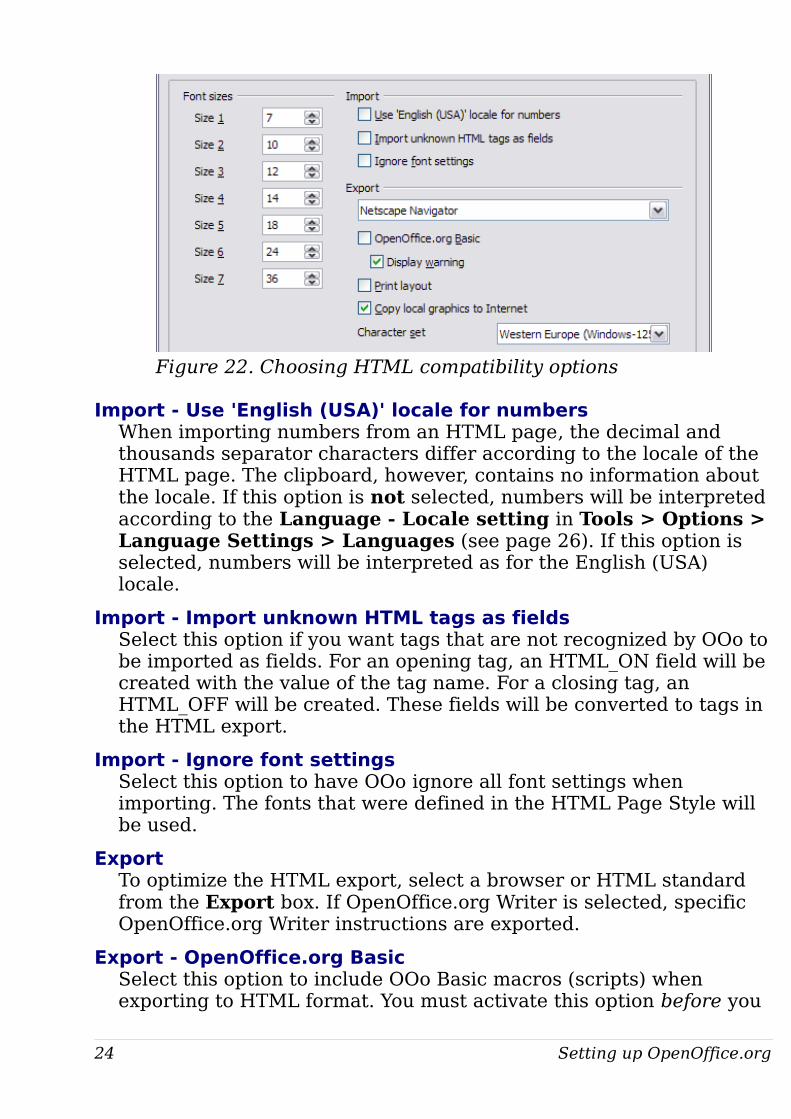
Figure 22. Choosing HTML compatibility options
Import - Use 'English (USA)' locale for numbersWhen importing numbers from an HTML page, the decimal and thousands separator characters differ according to the locale of the HTML page. The clipboard, however, contains no information about the locale. If this option is not selected, numbers will be interpreted according to the Language - Locale setting in Tools > Options > Language Settings > Languages (see page 26). If this option is selected, numbers will be interpreted as for the English (USA) locale.
Import - Import unknown HTML tags as fieldsSelect this option if you want tags that are not recognized by OOo to be imported as fields. For an opening tag, an HTML_ON field will be created with the value of the tag name. For a closing tag, an HTML_OFF will be created. These fields will be converted to tags in the HTML export.
Import - Ignore font settingsSelect this option to have OOo ignore all font settings when importing. The fonts that were defined in the HTML Page Style will be used.
ExportTo optimize the HTML export, select a browser or HTML standard from the Export box. If OpenOffice.org Writer is selected, specific OpenOffice.org Writer instructions are exported.
Export - OpenOffice.org BasicSelect this option to include OOo Basic macros (scripts) when exporting to HTML format. You must activate this option before you
24 Setting up OpenOffice.org
create the OpenOffice.org Basic macro; otherwise the script will not be inserted. OpenOffice.org Basic macros must be located in the header of the HTML document. Once you have created the macro in the OpenOffice.org Basic IDE, it appears in the source text of the HTML document in the header.If you want the macro to run automatically when the HTML document is opened, choose Tools > Customize > Events. See Chapter 13 (Getting Started with Macros) for more information.
Export - Display warningWhen the OpenOffice.org Basic option (see above) is not selected, the Display warning option becomes available. If the Display warning option is selected, then when exporting to HTML a warning is shown that OpenOffice.org Basic macros will be lost.
Export - Print layoutSelect this option to export the print layout of the current document as well. The HTML filter supports CSS2 (Cascading Style Sheets Level 2) for printing documents. These capabilities are only effective if print layout export is activated.
Export - Copy local graphics to InternetSelect this option to automatically upload the embedded pictures to the Internet server when uploading using FTP.
Export - Character setSelect the appropriate character set for the export.
Choosing language settingsYou may need to do several things to set the language settings to what you want:
• Install the required dictionaries• Change some locale and language settings• Choose spelling options
Install the required dictionariesOOo3 automatically installs several dictionaries with the program. To add other dictionaries, be sure you are connected to the Internet, and then use Tools > Language > More Dictionaries Online. OOo will open your default web browser to a page containing links to additional dictionaries that you can install. Follow the prompts to select and install the ones you want.
Choosing language settings 25
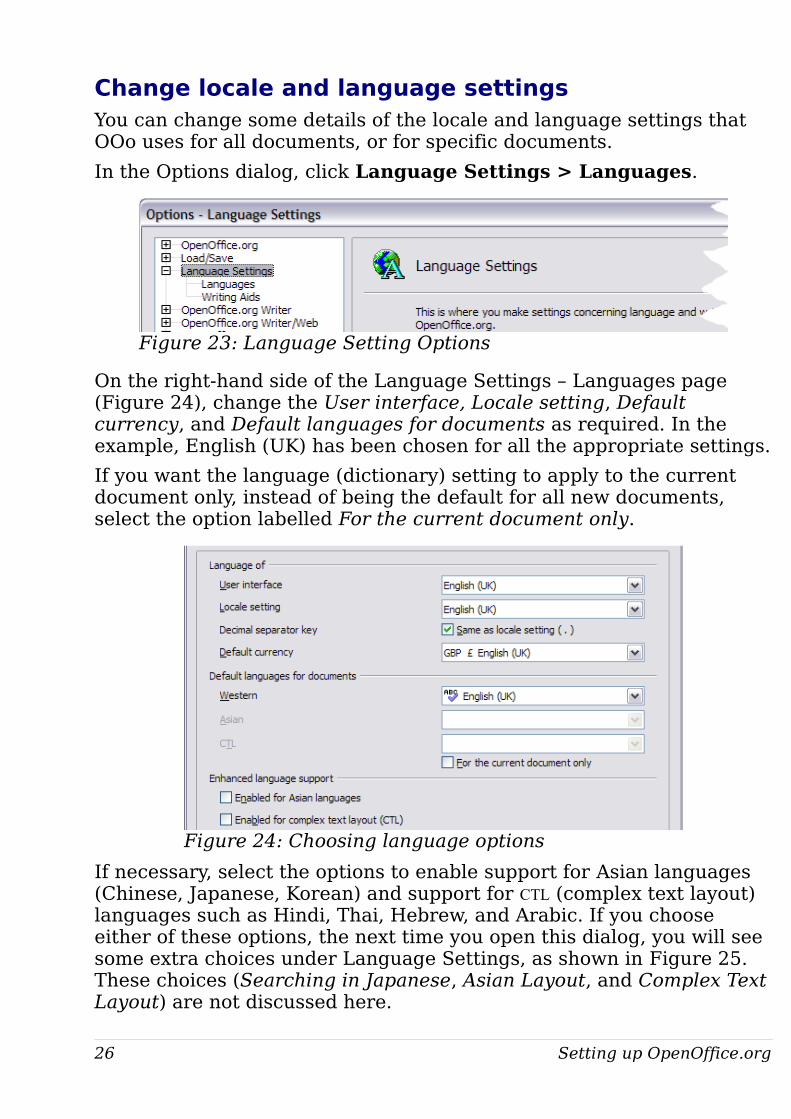
Change locale and language settingsYou can change some details of the locale and language settings that OOo uses for all documents, or for specific documents.
In the Options dialog, click Language Settings > Languages.
Figure 23: Language Setting Options
On the right-hand side of the Language Settings – Languages page (Figure 24), change the User interface, Locale setting, Default currency, and Default languages for documents as required. In the example, English (UK) has been chosen for all the appropriate settings.
If you want the language (dictionary) setting to apply to the current document only, instead of being the default for all new documents, select the option labelled For the current document only.
Figure 24: Choosing language options
If necessary, select the options to enable support for Asian languages (Chinese, Japanese, Korean) and support for CTL (complex text layout) languages such as Hindi, Thai, Hebrew, and Arabic. If you choose either of these options, the next time you open this dialog, you will see some extra choices under Language Settings, as shown in Figure 25. These choices (Searching in Japanese, Asian Layout, and Complex Text Layout) are not discussed here.
26 Setting up OpenOffice.org
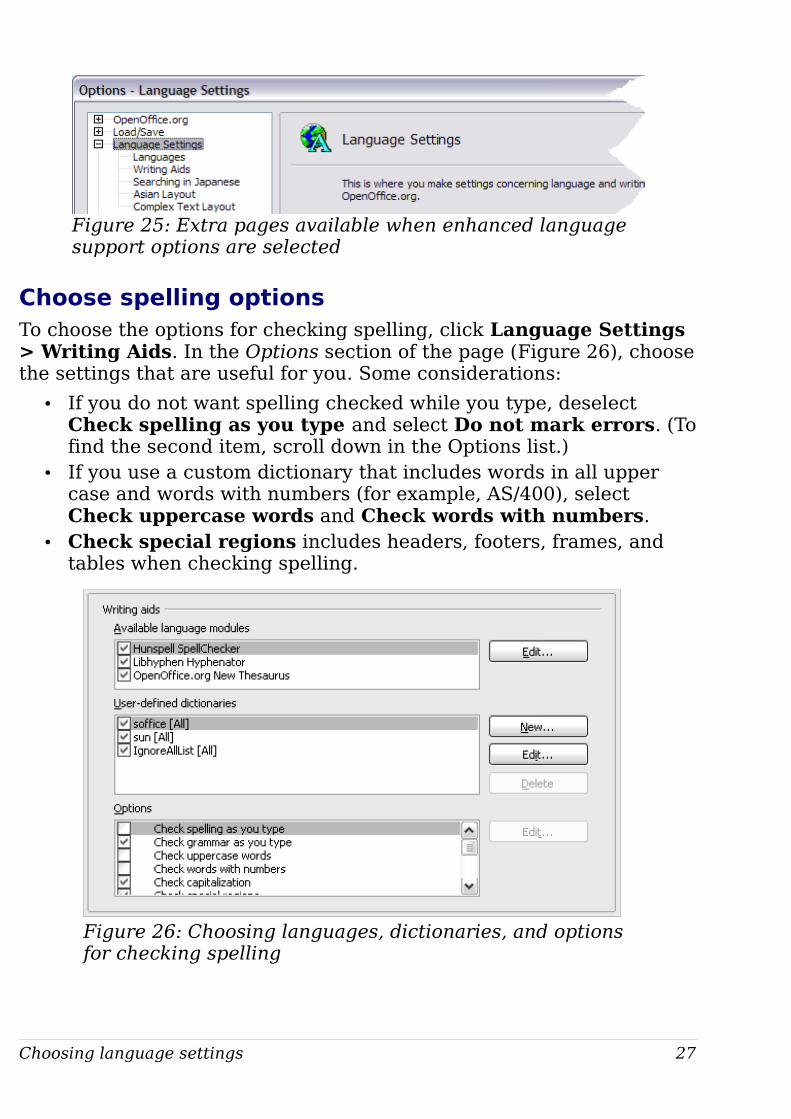
Figure 25: Extra pages available when enhanced language support options are selected
Choose spelling optionsTo choose the options for checking spelling, click Language Settings > Writing Aids. In the Options section of the page (Figure 26), choose the settings that are useful for you. Some considerations:
• If you do not want spelling checked while you type, deselect Check spelling as you type and select Do not mark errors. (To find the second item, scroll down in the Options list.)
• If you use a custom dictionary that includes words in all upper case and words with numbers (for example, AS/400), select Check uppercase words and Check words with numbers.
• Check special regions includes headers, footers, frames, and tables when checking spelling.
Figure 26: Choosing languages, dictionaries, and options for checking spelling
Choosing language settings 27

Here you can also check which user-defined (custom) dictionaries are active by default, and add or remove dictionaries, by clicking the New or Delete buttons.
Note
OpenOffice.org does not have a grammar checker, but you can install a grammar checker extension such as Language Tool and access that tool from Tools > Spelling and Grammar. See Chapter 14 for more about installing extensions.
Choosing Internet optionsUse the Internet Options pages to define search engines and save proxy settings for use with OpenOffice.org.
If you are using a Netscape or Mozilla browser (such as Firefox), you can enable the Mozilla Plug-in so you can open OOo files in your browser, print them, save them, and work with them in other ways.
If you are using a Unix- or Linux-based operating system (including Mac OS X), an additional page of E-mail options is available, where you can specify the e-mail program to use when you send the current document as e-mail (Figure 27). Under Windows the operating system’s default e-mail program is always used.
Figure 27: Internet options, showing E-mail page available to Linux users.
28 Setting up OpenOffice.org
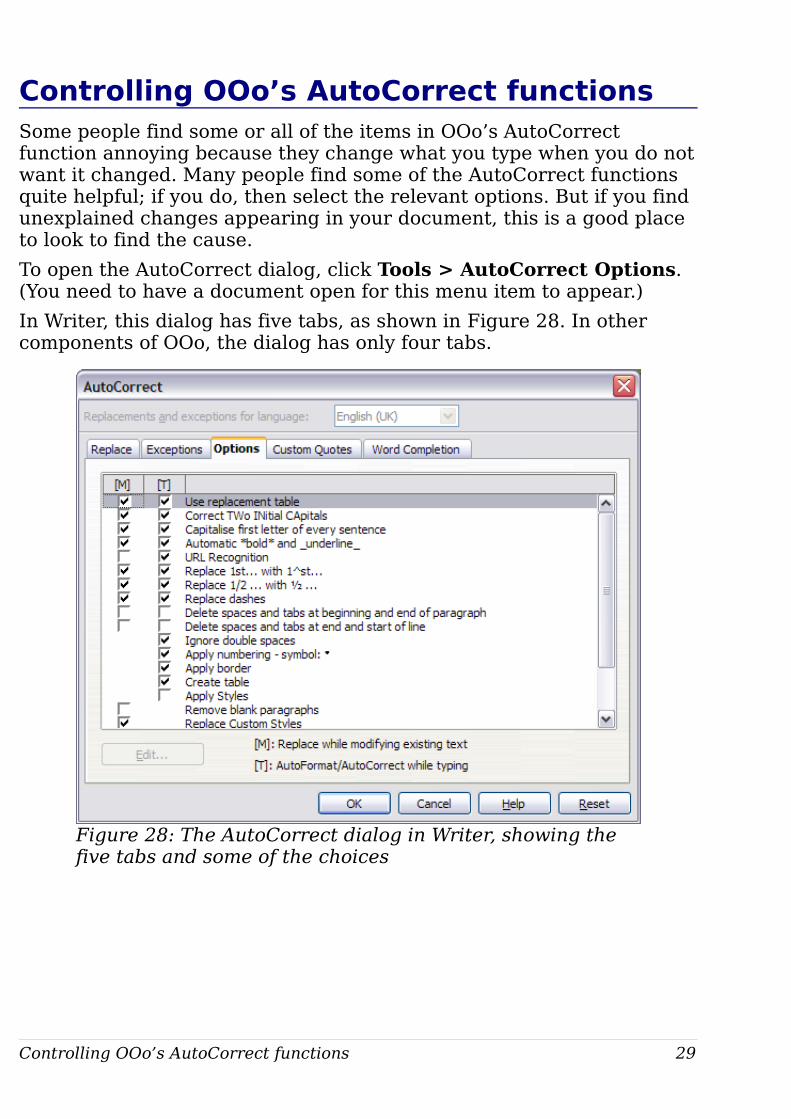
Controlling OOo’s AutoCorrect functionsSome people find some or all of the items in OOo’s AutoCorrect function annoying because they change what you type when you do not want it changed. Many people find some of the AutoCorrect functions quite helpful; if you do, then select the relevant options. But if you find unexplained changes appearing in your document, this is a good place to look to find the cause.
To open the AutoCorrect dialog, click Tools > AutoCorrect Options. (You need to have a document open for this menu item to appear.)
In Writer, this dialog has five tabs, as shown in Figure 28. In other components of OOo, the dialog has only four tabs.
Figure 28: The AutoCorrect dialog in Writer, showing the five tabs and some of the choices
Controlling OOo’s AutoCorrect functions 29