Embed Size (px)
Citation preview

i
Seven Steps to Creating an Accessible
Excel Worksheet
Disability Access Services

ii
About Disability Access Services
Centralized Resource and Information on Disability Access
Disability Access Services provides technical assistance and informational
guidance to promote the civil rights and equality for persons with disabilities
in the following areas:
Employment
Reasonable Accommodation
Physical Access of built environments
Access to private sector goods and services
Digital Access of electronic and information technology
Access to government programs, services, and activities
Disability Access Services Website www.dor.ca.gov/disabilityaccessinfo
Disability Access Services
CA Department of Rehabilitation
721 Capitol Mall, 4th Floor
Sacramento, CA 95814
DAS Email: [email protected] Voice (916) 558-5755
Fax (916) 558-5757
TTY (916) 558-5758
Telecommunications Relay Service 711
Promoting an Accessible Future through Education and Information

iii
Seven Steps to Creating an Accessible Excel Document
TABLE OF CONTENTS
STEP ONE: ADD ALTERNATIVE TEXT TO IMAGES AND OBJECTS ..... 1
STEP TWO: SPECIFY COLUMN HEADER INFO IN TABLES .................. 4
STEP THREE: CREATE MEANINGFUL HYPERLINK TEXT .................... 5
STEP FOUR: OTHER CONSTRUCTION CONSIDERATIONS .................. 7
STEP FIVE: GIVE ALL SHEET TABS UNIQUE NAMES ........................... 7
STEP SIX: INCLUDE ALTERNATE FORMATS FOR MULTIMEDIA ......... 8
STEP SEVEN: CHECK ACCESSIBILITY................................................... 8
Alternative Formats
In accordance with ADA requirements, this document can be made available in Braille or large print as a reasonable accommodation for an individual with a disability. To request a copy of alternative formats, please contact Disability Access Services.
Equal Opportunity Employer/Program
A Note About Hyperlinks in This Document
All links in this document have been created with meaningful text. The Uniform Resource Locator (URL) is also published to be available as a resource for those persons who print the document. The URL addresses that are spelled out in the document are not active links to avoid the confusion of presenting duplicate links.
iv
Introduction
It is estimated that up to 4% of the population relies on some sort of Assistive Technology to access electronic documents and Web pages. Assistive Technology includes; Screen Reading software, Refreshable Braille displays, and Screen Magnifiers. In the United States alone that equals 12.5 million people. If electronic documents are not created with accessibility issues in mind, they become very difficult if not impossible to read or navigate for this large number of people. Accessibility to electronic documents is a right that is protected by both Federal and State law. Creating accessible electronic documents is important to ensure access to persons with disabilities and the company or agency is protected against legal action. Additionally, it is just good business, when a very large segment of the population can equally participate and take advantage of the products or services that the company or agency provides. Disability Access Services of California Department of Rehabilitation has put together this list of seven easy steps to follow when creating Excel documents. Take a few moments to be acquainted with these seven simple steps to ensure that Excel documents are fully accessible to everyone. These steps are explained utilizing Microsoft Excel 2007 and 2010. The Menu map of other versions of Microsoft Excel may be different.
v
A Note About Excel and Section 508
Excel files must be Section 508 compliant or the content contained made
accessible through accommodation. The application of the Excel standard
will be dependent upon the purpose of the Excel file.
If the purpose of the Excel worksheet is to present a data set, the Excel file
should be presented on the internet as a Comma Separated Value (CSV)
file and not as an xls file. The link must clearly state that the CSV is a raw
data set. A separate data definition document must accompany all CSV
files. An Excel data set that would be presented as a CSV has the following
characteristics:
A single row of headings in the first row.
The data set contains no formulas.
Rationale
Excel is a widely used/distributed application used by both the general
public and business. While most site visitors have the full Microsoft Excel
program, which is 508 compliant, the free Microsoft Excel downloadable
reader is not compliant.
Exemptions
Excel files may be granted an accommodations waiver when files contain
program modules and macros developed to perform automated analysis or
to draw in data sets from external or legacy databases.
Sources
Section 508 Website
www.section508.gov Access Board Website www.access-board.gov/508.htm
1
Step One: Add Alternative Text to Images and Objects
Images, Charts and Graphics included in a worksheet need to have alternative text. Otherwise these items will not be perceived, nor properly understood by persons who have visual disabilities.
Alternative text is read by screen readers allowing the content and function of these images, charts or graphics to be accessible to those with visual or certain cognitive disabilities.
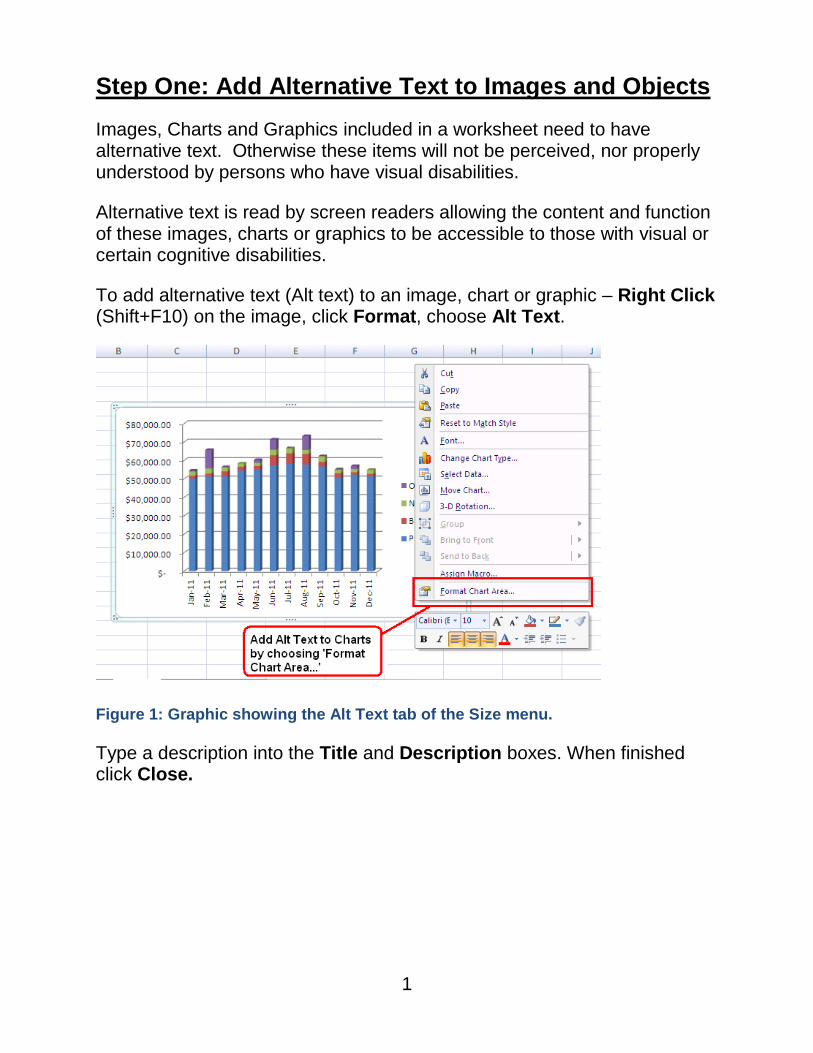
To add alternative text (Alt text) to an image, chart or graphic – Right Click (Shift+F10) on the image, click Format, choose Alt Text.
Figure 1: Graphic showing the Alt Text tab of the Size menu.
Type a description into the Title and Description boxes. When finished click Close.

2
Add Alternative Text to a Table
Beginning with Microsoft Office 2010 alternative text can be added to
Tables in Excel.
First Right Click (Shift+F10) anywhere within the table. Select ‘Table’,
then ‘Alternative Text’.
Figure 2: Drop down menu after 'Right Clicking' on Table.
3
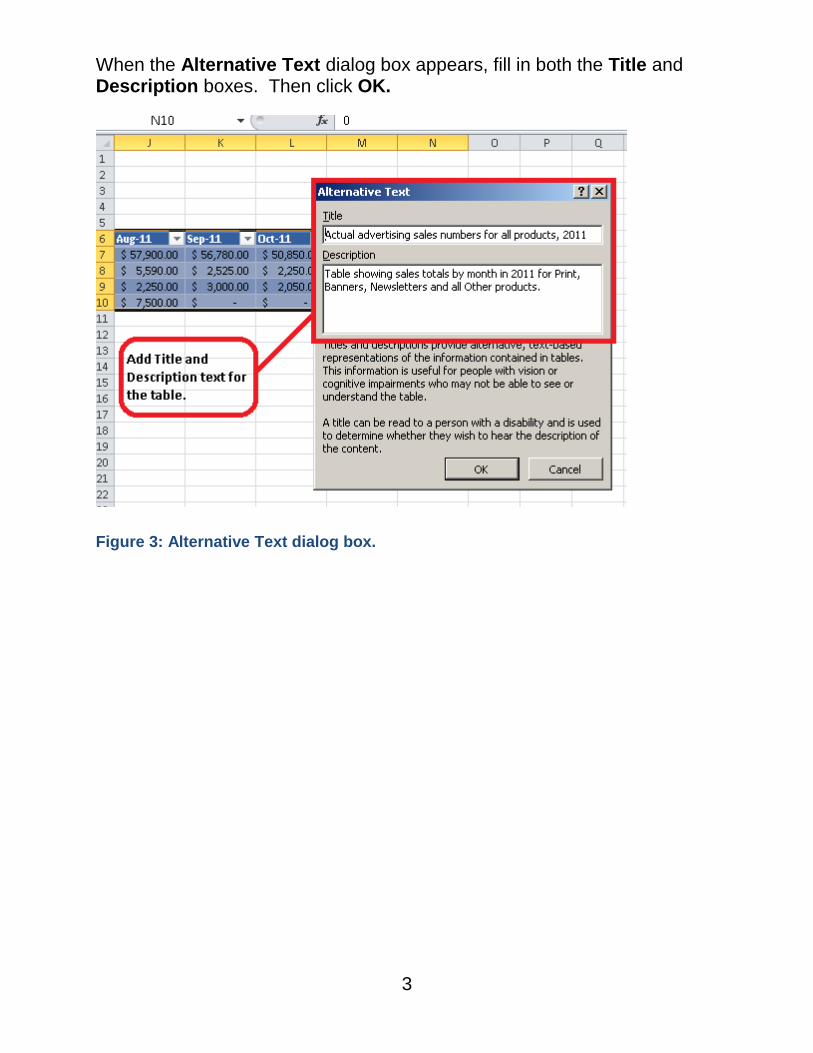
When the Alternative Text dialog box appears, fill in both the Title and Description boxes. Then click OK.
Figure 3: Alternative Text dialog box.
4
Step Two: Specify Column Header Info in Tables
Having clear column headings can help provide context and assist
navigation of the table’s contents.
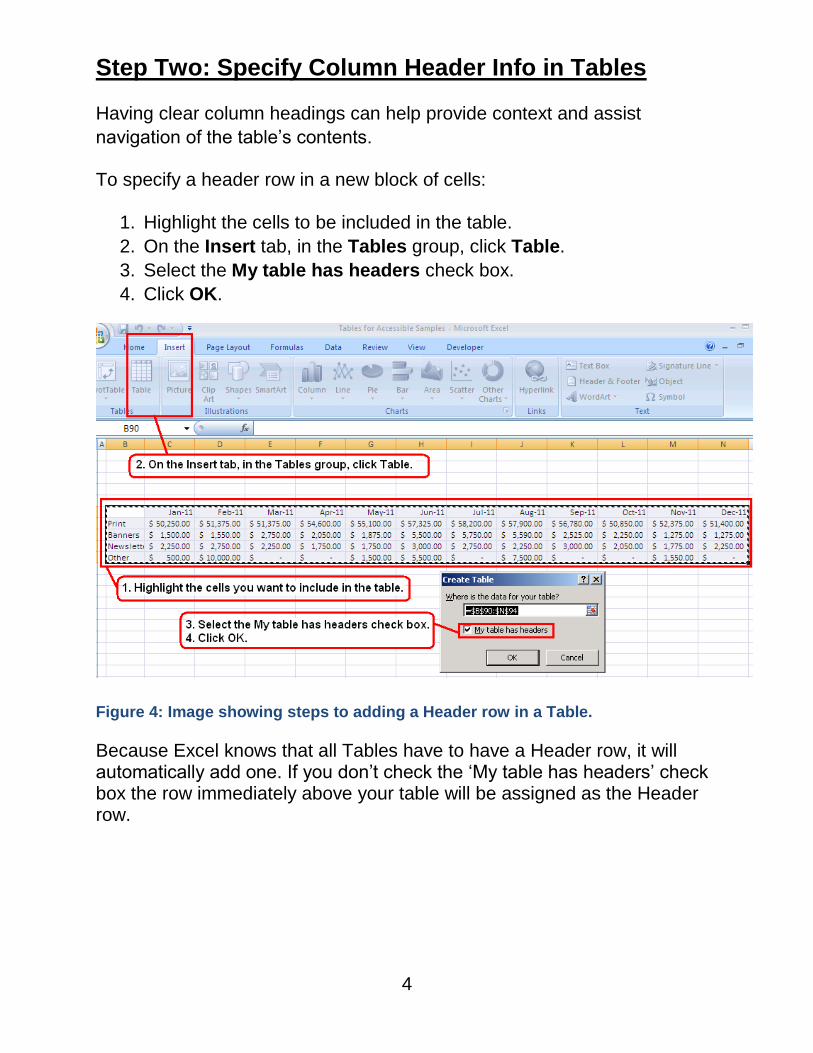
To specify a header row in a new block of cells:
1. Highlight the cells to be included in the table.
2. On the Insert tab, in the Tables group, click Table.
3. Select the My table has headers check box.
4. Click OK.
Figure 4: Image showing steps to adding a Header row in a Table.
Because Excel knows that all Tables have to have a Header row, it will automatically add one. If you don’t check the ‘My table has headers’ check box the row immediately above your table will be assigned as the Header row.
5
Step Three: Create Meaningful Hyperlink Text
Hyperlink text provides a clear description of the link destination, rather
than providing either the Uniform Resource Locator (URL) or simply words
such as, ‘Click Here’. People who utilize screen reading software can
navigate by going from ‘link’ to ‘link’. Meaningful text enables them to know
what each link is for, and where it will take them.
To add a hyperlink to a table:
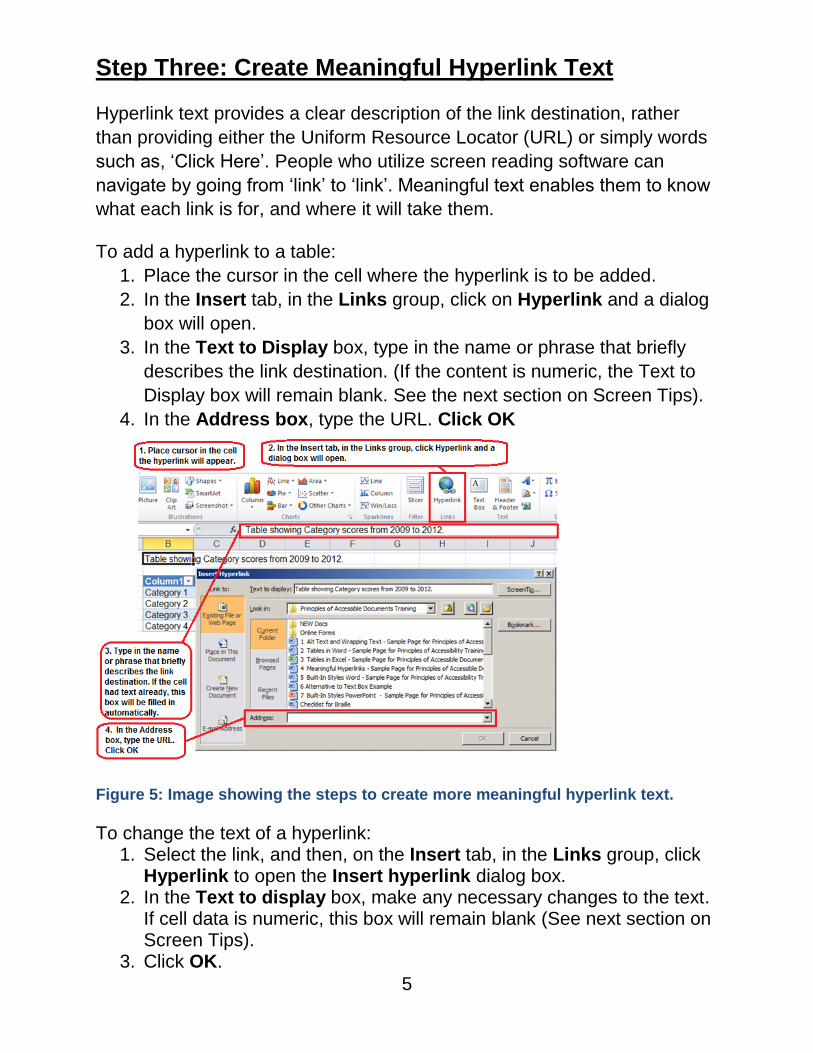
1. Place the cursor in the cell where the hyperlink is to be added.
2. In the Insert tab, in the Links group, click on Hyperlink and a dialog
box will open.
3. In the Text to Display box, type in the name or phrase that briefly
describes the link destination. (If the content is numeric, the Text to
Display box will remain blank. See the next section on Screen Tips).
4. In the Address box, type the URL. Click OK
Figure 5: Image showing the steps to create more meaningful hyperlink text.
To change the text of a hyperlink: 1. Select the link, and then, on the Insert tab, in the Links group, click
Hyperlink to open the Insert hyperlink dialog box. 2. In the Text to display box, make any necessary changes to the text.
If cell data is numeric, this box will remain blank (See next section on Screen Tips).
3. Click OK.
6
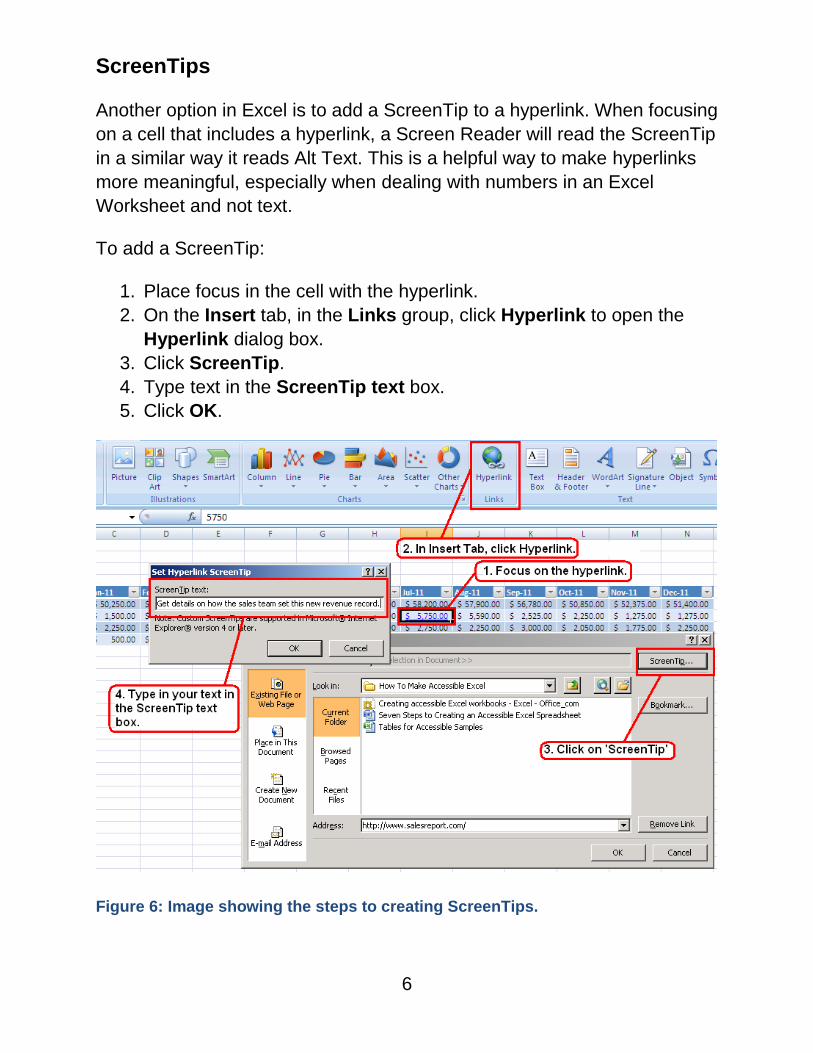
ScreenTips
Another option in Excel is to add a ScreenTip to a hyperlink. When focusing
on a cell that includes a hyperlink, a Screen Reader will read the ScreenTip
in a similar way it reads Alt Text. This is a helpful way to make hyperlinks
more meaningful, especially when dealing with numbers in an Excel
Worksheet and not text.
To add a ScreenTip:
1. Place focus in the cell with the hyperlink.
2. On the Insert tab, in the Links group, click Hyperlink to open the
Hyperlink dialog box.
3. Click ScreenTip.
4. Type text in the ScreenTip text box.
5. Click OK.
Figure 6: Image showing the steps to creating ScreenTips.
7
Step Four: Other Construction Considerations
Avoid Blank Cells, Rows and Columns
When navigating by keyboard a blank row, column or cell within an Excel
worksheet might lead someone to believe there is nothing more in the
table. If any blank rows and columns are not necessary, consider deleting
them. If they are not on the edges of the table, or they will be filled in later
with data, enter text explaining that they are blank. Some examples of
appropriate filler are; ‘N/A’, or ‘Intentionally Blank’.
HINT: Since Screen Readers do not announce the color or the size of text,
you can make your fillers the same color as the table background. Doing
this will essentially make them invisible to people who have the ability to
see the table, but will still provide helpful context for those who are using
screen reading software.
Do Not Merge or Split Cells
Merging or Splitting cells can make navigating Excel tables with Assistive
Technologies very difficult if not impossible. Always keep your tables
straightforward and simple and avoid this practice.
Step Five: Give All Sheet Tabs Unique Names
Sheet names in an Excel file should be unique and provide information
about what can be found on the worksheet. Unique sheet names make it
easier to navigate through a workbook.
To rename a sheet:
1. Right-click (Shift+F10) the sheet tab, and then click Rename.
2. Type a brief, unique name that is descriptive of the sheet contents.
Any blank sheets in a workbook should be deleted.
To delete a sheet:
1. Right click (Shift+F10) the sheet tab, and then click Delete.
8
Step Six: Include Alternate Formats for Multimedia
If any audio or video components are included in the worksheet, ensure
that the content is available in alternative formats for users with disabilities,
such as captions, audio descriptions and transcripts.
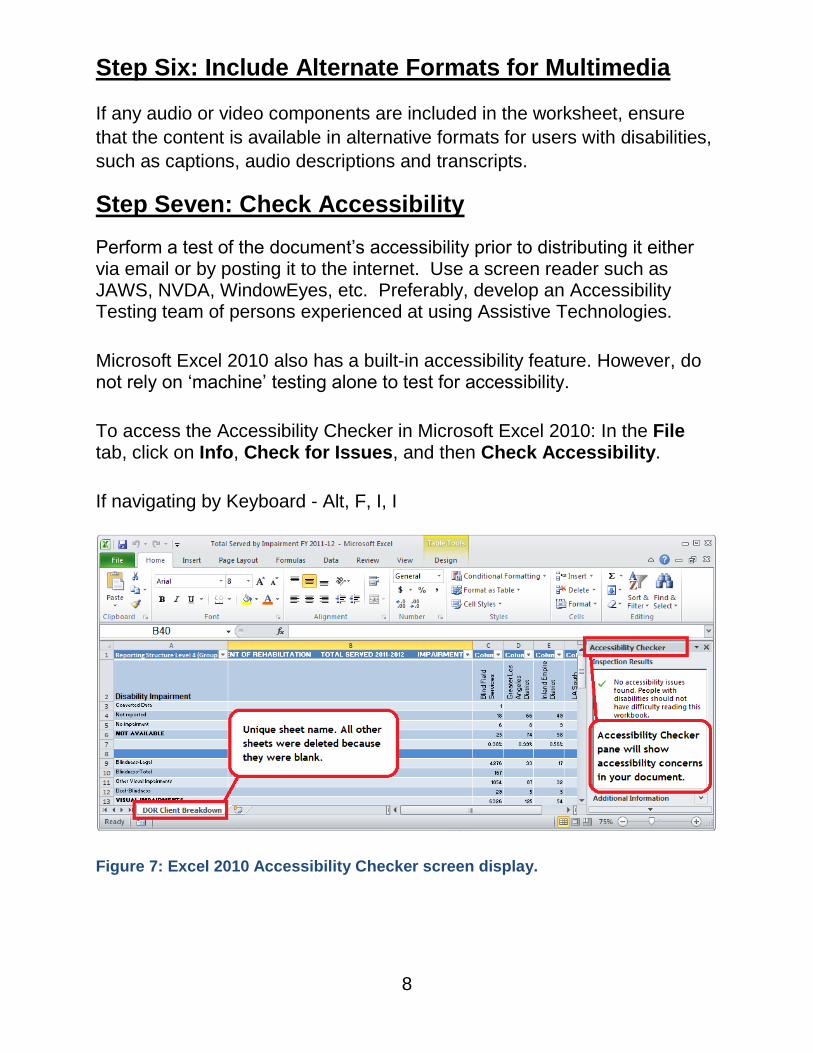
Step Seven: Check Accessibility
Perform a test of the document’s accessibility prior to distributing it either via email or by posting it to the internet. Use a screen reader such as JAWS, NVDA, WindowEyes, etc. Preferably, develop an Accessibility Testing team of persons experienced at using Assistive Technologies. Microsoft Excel 2010 also has a built-in accessibility feature. However, do not rely on ‘machine’ testing alone to test for accessibility. To access the Accessibility Checker in Microsoft Excel 2010: In the File tab, click on Info, Check for Issues, and then Check Accessibility. If navigating by Keyboard - Alt, F, I, I
Figure 7: Excel 2010 Accessibility Checker screen display.
9
References/More Resources
Creating Accessible Excel Workbooks http://office.microsoft.com/en-us/excel-help/creating-accessible-excel-workbooks-HA102013545.aspx Accessibility Features in Excel http://office.microsoft.com/en-us/excel-help/accessibility-features-in-excel-HP005198434.aspx
Accessible (508) Excel Presentations
http://www.hhs.gov/web/policies/webstandards/508excelpresentations.html
The California State University: Microsoft Excel Accessibility Resources
http://teachingcommons.cdl.edu/access/docs_multi/Excel_Resources.shtml
Office of the Governor, State of Texas
http://gov.texas.gov/disabilities/accessibledocs
Add Alt Text to an Image, Object or Table. http://office.microsoft.com/en-us/excel-help/add-alternative-text-to-a-shape-picture-chart-table-smartart-graphic-or-other-object-HA010354748.aspx Adding Column Header Information http://office.microsoft.com/en-us/excel-help/turn-excel-table-headers-on-or-off-HA010062136.aspx
For more information and technical assistance contact the Disability Access Services
This document may be reproduced without change and in its entirety for
redistribution purposes without prior permission from Disability Access Services. (January 2014)