Embed Size (px)
Citation preview
Sitecore Corporation
Sitecore. www.sitecore.net [email protected]
Content Delivery [email protected] +45 70 23 66 60
Sitecore Foundry User Guide
Author: Sitecore Corporation
Date: Friday, 08 August 2008
Sitecore® is a registered trademark. All other brand and product names are the property of their respective holders.
The contents of this document are the property of Sitecore. Copyright © 2001-2008 Sitecore. All rights reserved.
Sitecore Sitecore Foundry. User Manual Page 2 of 164 Sitecore® is a registered trademark. All other brand and product names are the property of their respective holders. The contents of this document are the property of Sitecore. Copyright © 2001-2008 Sitecore. All rights reserved.
Table of Contents
Chapter 1 Introduction 6
Chapter 2 Functionality 8 2.1 Site Skins 8 2.2 Modules 9 2.3 Site Backup 9 2.4 Features 9 2.4.1 Browser Compatibility 10 2.4.2 W3C Compatibility 11
Chapter 3 The Site Architecture 12 3.1 The Main Layout 13 3.2 Examples of the two and one column layouts 14 3.3 What is the local administration menu? 15 3.4 What is a Document? 15 3.5 What is a spot? 16 3.5.1 How do I add a spot? 16 3.5.2 How many spots can I have? 17 3.5.3 Where does the spot text come from? 17
If there is no Title field then it uses the spot’s Text field 17 3.5.4 Where does the spot link text come from? 18 3.5.5 Positioning 18 3.5.6 Random spots 18 3.5.7 Setting the number of random spots 19 3.5.8 No spots 19 3.6 What is an Article? 19 3.6.1 How do I add an Article? 19 3.6.2 How do I edit an article? 20 3.7 What is a File Attachment? 21 3.8 How do I Login? 21
Chapter 4 The Website Wizard 23 4.1 Introduction 23 4.2 The options 24
All of the wizard screens have standard buttons at the bottom of the page 24 4.2.1 Introduction 25 4.2.2 Theme 25 4.2.3 Design 26 4.2.4 Corporate Identity 26 4.2.5 Individual Identity 27 4.2.6 Background 28 4.2.7 Column borders 29 4.2.8 Column colors 30 4.2.9 Frontpage 31 4.2.10 Top and column bar design 32 4.2.11 Content and bottom bar design 32 4.2.12 Buttons and icons 33 4.2.13 Navigation 33 4.2.14 Contact Information 34 4.2.15 Languages 34 4.2.16 Module selection 35 4.2.17 Configuration 36 4.2.18 Finish 37
Chapter 5 Authoring Content 38
Sitecore Sitecore Foundry. User Manual Page 3 of 164 Sitecore® is a registered trademark. All other brand and product names are the property of their respective holders. The contents of this document are the property of Sitecore. Copyright © 2001-2008 Sitecore. All rights reserved.
5.1 Edit mode 38 5.2 Using Content Markers 38 5.2.1 Editing Content 39 5.2.2 Publishing 42 5.2.3 Document Types 43 5.2.4 Creating New Documents 43 5.2.5 Editing Fields 45 5.2.6 Change Document Presentation 53 5.2.7 Reorganize 54
Chapter 6 Security Administration 59 6.1 Accessing Security Administration 59 6.2 Creating a User Group 60 6.2.1 Read-only and Read & Write groups 61 6.3 Creating a User 61 6.4 Setting security on documents 63 6.5 Security Editor 66 6.5.1 Users Mode 67 6.5.2 Groups Mode 68 6.1 User Settings 71
Chapter 7 The Event Calendar 72 7.1 Introduction 72 7.2 Adding or deleting an event 72 7.2.1 Adding an event 72 7.2.2 Deleting an event 73 7.3 The Main Calendar View 73 7.3.1 Mini Calendar Spots 73 7.3.2 Subscribing to events 75
You will then be taken to a basic subscription form 76 7.3.3 Viewing other subscribers 76 7.3.4 Event Calendar and Security 77
Chapter 8 Image Collections 78 8.1 Introduction 78 8.2 Adding an image collection 78 8.3 Editing existing collections 81 8.3.1 Uploading to existing collections 81 8.3.2 Editing existing collections 81 8.4 Navigating through the images 82
Chapter 9 The News Module 84 9.1 Introduction 84 9.2 Adding and Editing a News article 84 9.3 Viewing news articles 86 9.4 Mailing List subscriptions 87 9.4.1 Adding the Subscribe to a Mailing List ability 87 9.4.2 Subscribing to a mailing list 88 9.5 News module management 88 9.5.1 Managing the mailing and subscriber lists 88 9.5.2 Editing Mailing Lists 89 9.5.3 Editing subscriber lists 90 9.5.4 Sending a message to the subscribers of a mailing list 91 9.6 Hints 93 9.6.1 Combining news and a newsletter 93
Chapter 10 The Forum module 94 10.1 Introduction 94 10.2 Creating a new thread 95
Sitecore Sitecore Foundry. User Manual Page 4 of 164 Sitecore® is a registered trademark. All other brand and product names are the property of their respective holders. The contents of this document are the property of Sitecore. Copyright © 2001-2008 Sitecore. All rights reserved.
10.3 Replying to a thread 97 10.4 Managing submissions 98
Chapter 11 Editing Content 99 11.1 Features 99 11.2 Overview 100 11.3 The Ribbon 101 11.4 The Home Tab 102 11.4.1 The Write Chunk 102 11.4.2 The Edit Chunk 102 11.4.3 The New Chunk 103 11.4.4 The Operations Chunk 104 11.4.5 The Clipboard Chunk 105 11.4.6 The Rename Chunk 105 11.4.7 The Sorting Chunk 105 11.5 The Navigate Tab 106 11.5.1 The Navigate Chunk 107 11.5.2 The Search Chunk 109 11.6 The Review Tab 110 11.6.1 The Validate Chunk 110 11.6.2 The Workflow Chunk 110 11.6.3 The Schedule Chunk 111 11.7 The Publish Tab 112 11.7.1 The Publish Chunk 112 11.7.2 The Restrictions Chunk 113 11.8 The Versions Tab 114 11.8.1 The Fields Chunk 114 11.8.2 The Versions Chunk 115 11.8.3 The Translate Chunk 116 11.9 The View Tab 117 11.9.1 The View Chunk 118 11.10 The Content Tree 119 11.10.1 Changing the Appearance of the Content Tree 120 11.11 The Item Title Bar 122 11.12 The Field Area 126 11.12.1 Changing the Appearance of the Field Area 126 11.13 The Media Library 127 11.13.1 Accessing the Media Library 128 11.13.2 Uploading Images 129 11.13.3 Restrictions on Media library items 130
Chapter 12 Using the Rich Text Editor 131 12.1 Starting The Rich Text Editor 131 12.2 Saving Content 133 12.3 Using Links 133 12.4 Creating a Link 133 12.4.1 Inserting a Link into Existing Text 133 12.4.2 Creating a Link without the Initial Text 134 12.5 Creating Anchor Links 135 12.6 Using Images 137 12.7 Managing an Image 138 12.7.1 Set Image Properties 139 12.7.2 Image Map Editor 140 12.8 Using Tables 141 12.8.1 Inserting a Table 141 12.8.2 Managing Tables 144 12.8.3 Managing Cells 148
Changing Cell Properties Using the Table Wizard Dialog 149 12.8.4 Managing Columns 155 12.8.5 Managing rows 156
Sitecore Sitecore Foundry. User Manual Page 5 of 164 Sitecore® is a registered trademark. All other brand and product names are the property of their respective holders. The contents of this document are the property of Sitecore. Copyright © 2001-2008 Sitecore. All rights reserved.
Chapter 13 Appendix 158 13.1 Tips & Tricks 158 13.1.1 Spots 158 13.1.2 The Content Tree 158 13.1.3 Local dictionary texts 159 13.2 FAQ 159 13.2.1 Question 1 159 13.2.2 Question 2 159 13.2.3 Question 3 159 13.2.4 Question 4 159 13.2.5 Question 5 160 13.3 Configuring Internet Explorer 160 13.3.1 Internet Explorer configuration 160 13.3.2 Disable Popup blockers. 160 13.3.3 Add the Sitecoreexpress.net site addresses to the local Intranet Zone 161 13.3.4 Set ActiveX Signing 163 13.3.5 Checking for new page versions 163
Sitecore Sitecore Foundry. User Manual Page 6 of 164 Sitecore® is a registered trademark. All other brand and product names are the property of their respective holders. The contents of this document are the property of Sitecore. Copyright © 2001-2008 Sitecore. All rights reserved.
Chapter 1 Introduction
Using Sitecore Foundry opens up a world of new possibilities for organizations wishing to create, deploy and manage an array of many web sites from a central location. Sitecore Foundry is a solution that builds upon the industry leading Sitecore CMS platform. Foundry delivers a compelling answer to one of the more difficult to solve challenges in web content management today: Multi-site management and distribution. Sitecore Foundry is a solution that can benefit many different types of organizations, from large government entities and municipalities, to regional school districts as well as corporate entities with many affiliate sub-organizations. Any type of organization that has a need to deploy many distributed websites to a variety of affiliated groups or organizations, whilst providing guidance and structure to those sites, this product is for you. The Foundry solution is also highly flexible, allowing you to configure and deploy it for all kinds of purposes quickly and easily.
The solution provides users with a powerful Content Management System platform that is able to manage all of an organization‟s affiliated websites from a central location. While the Foundry solution allows for central management of these many web properties, the product provides delegated and distributed site management to individual site owners and groups. Within each site, the integrated Website Wizard helps the site‟s manager, and web-editors to tailor their websites within minutes.
The maintenance of any site managed by Sitecore Foundry can be performed individually by a Site Manager for each site or by a central administrator. Local Web Editors and Site Managers can manage content, design, users and local functionality by tailoring their individual sites using the easy to use site controls offered by Foundry solution.
If the look and feel of any local site needs to be updated, the local site manager need only invoke Website Wizard to make changes to the sites design within a designated set of choices. Using the Website Wizard, a Site Manager can change; structural site graphics like headers and footers, text, colors and functionality for their individual site. The design choices and feature options presented to users in the Website Wizard are managed by Foundry Administrators, which enables organizations to limit the design choices and control branding of their affiliated sites, while providing a high degree of flexibility to the individual Site managers. Foundry supports the concept of Site Types which are preset categories of options that can be used when creating any new Foundry based site. The Website Wizard also provides language control options as well as the ability to preview the site and manage the sites status.
Sitecore Sitecore Foundry. User Manual Page 7 of 164 Sitecore® is a registered trademark. All other brand and product names are the property of their respective holders. The contents of this document are the property of Sitecore. Copyright © 2001-2008 Sitecore. All rights reserved.
The Foundry solution was designed to allow you to create and manage any number of sites, allowing organizations to provide flexible distributed websites as needed, with the security and control of a robust, centralized solution.
Sitecore Sitecore Foundry. User Manual Page 8 of 164 Sitecore® is a registered trademark. All other brand and product names are the property of their respective holders. The contents of this document are the property of Sitecore. Copyright © 2001-2008 Sitecore. All rights reserved.
Chapter 2 Functionality
This chapter provides a brief outline of the products functionality.
2.1 Site Skins
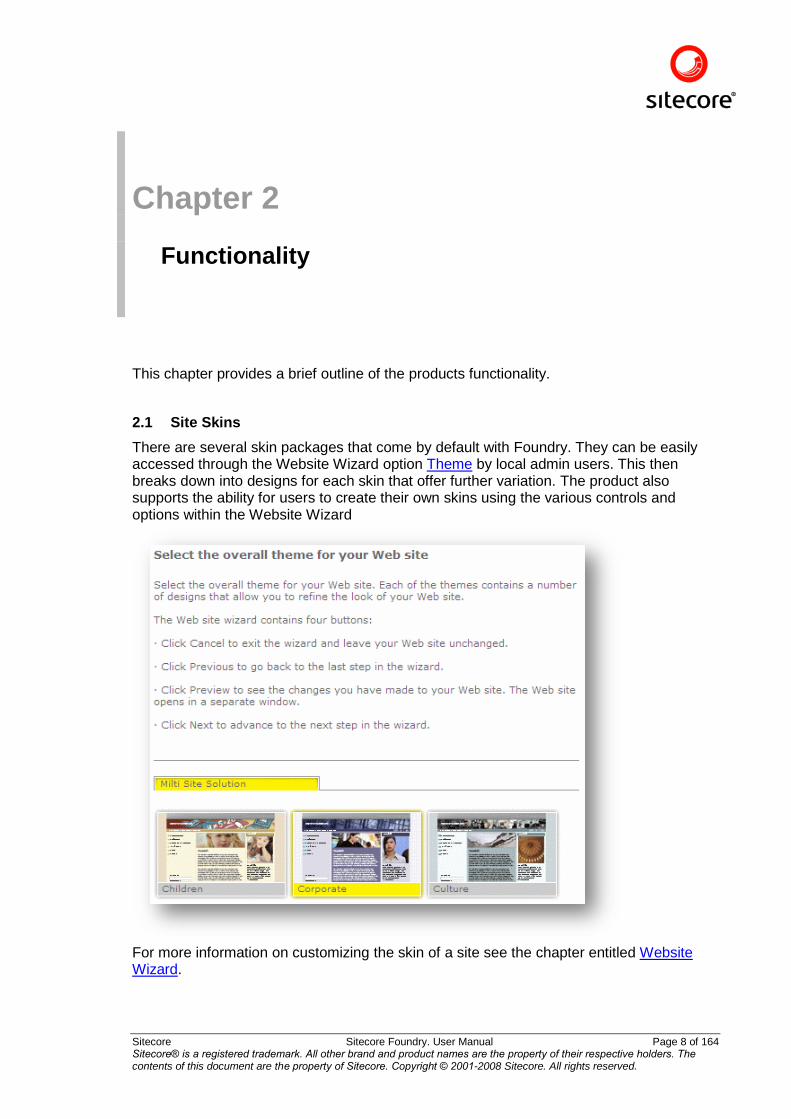
There are several skin packages that come by default with Foundry. They can be easily accessed through the Website Wizard option Theme by local admin users. This then breaks down into designs for each skin that offer further variation. The product also supports the ability for users to create their own skins using the various controls and options within the Website Wizard
For more information on customizing the skin of a site see the chapter entitled Website Wizard.
Sitecore Sitecore Foundry. User Manual Page 9 of 164 Sitecore® is a registered trademark. All other brand and product names are the property of their respective holders. The contents of this document are the property of Sitecore. Copyright © 2001-2008 Sitecore. All rights reserved.
2.2 Modules
The product, by default, contains the following modules:
Mini Forum – The Mini Forum module gives site users a great way to discuss events. Users can create threads and post replies to other threads. Overall control of the Forum, threads and individual postings is done by local administrators.
News and the News Archive – The two parts of the News modules give local administrators the ability to display a variety of news articles either globally or attached to individual parts of the site.
Newsletter – Newsletters created by local administrators can be subscribed to by users. This gives a business a great way to make sure that a whole group of interested users can receive product news and other information at the click of a button.
Event Calendar – A flexible events calendar that means that all news events of any importance can be effectively displayed for users to see.
Image Collections – An effective way to collect and display sets of images.
Most of the modules can be attached to various parts of the site allowing site designers great flexibility in the uniqueness of their individual web pages.
A more detailed explanation of the various modules along with screenshots is given in later chapters.
2.3 Site Backup
Site Backup is a feature of the Multi Site Control Centre and is accessed by the administrator. The administrator can back up individual sites as necessary or they can back up the whole solution as one back up. This gives end users additional control over their own sites as they do not have to wait for the whole product to be backed up. They can request a back up of their own site from the host.
A backup of existing web sites within the solution can be done through tools from the supplier of the actual database.
Note: If the product is run on a Microsoft SQL server then be sure to buy the SQL Server backup software which supports transactional backup routines.
2.4 Features
The product comes with default functionality as well as ready to use modules with specific functionality, to allow web designers to tailor the individual look and feel of their web sites. The modules can be individually turned on or off using the Website Wizard.
Some of the basic functionality provided with the product is;
Extranet The default installation comes with a built in extranet feature. Extranet users that have been validated on the web site automatically gain access to secured areas containing documents and files. When users are created they can be attached to the extranet group, which then gives all the necessary user-rights at once. The extranet secured parts of a site are part of the existing structure of Foundry. They cannot be viewed before users have been validated. There are no limits for the number of extranet users.
Sitecore Sitecore Foundry. User Manual Page 10 of 164 Sitecore® is a registered trademark. All other brand and product names are the property of their respective holders. The contents of this document are the property of Sitecore. Copyright © 2001-2008 Sitecore. All rights reserved.
Menu Functionality Dynamic, basic and breadcrumb menus are selectable within the Website Wizard. This provides a variety of different ways to display the sites menu and a user‟s location on a web page.
Search The search feature is a useful tool for any site, allowing users to locate items of related interest that maybe located in various places within the site.
Security The security level in the product is very high and easy to set up and maintain. User rights are part of the existing model of security in the product. It is very easy to manage users and groups and to assign security to specific areas of a web site. General customization of user setting is done via the security wizard. Local Administrators can create new local web editors and users that only have the possibility to change content. All other settings on the web site are done by web editors with extended user rights. The local Administrator is able to delegate rights to employees, members, parents or even the company's board of directors so they can maintain specific content on the web site.
Site contact A basic contact form is a useful part of any web site. It allows the users to provide feedback and questions to the site administrators.
Sitemap The sitemap provides users with a tree display of the site layout. If some document is locked and the current user has write access to it, the name of a user who locked the document will be displayed next to the document. If you have administration rights you can unlock any document using the sitemap, check-in link will be displayed next to the user name.
Website Wizard The Website Wizard allows local admin users to tailor the specific look and feel of a sites display. This includes a variety of skins, color manipulation tools, layout and language options and module selection controls.
Spots With Spots, news and other items of interest can be displayed in various parts of a site.
2.4.1 Browser Compatibility
It is recommended that web sites are run at a minimum resolution of 800*600. Users on the internet can use the following browsers on both MAC (system version 9) and PC (Windows version from 98 and Linux 9):
Internet Explorer from version 5.0
NetScape Navigator from version 6.01
Mozilla Firefox from version 1.6
Opera from version 6.0

Sitecore Sitecore Foundry. User Manual Page 11 of 164 Sitecore® is a registered trademark. All other brand and product names are the property of their respective holders. The contents of this document are the property of Sitecore. Copyright © 2001-2008 Sitecore. All rights reserved.
2.4.2 W3C Compatibility
This product complies with the W3C standards. The product conforms to the W3C standards for HTML (4.01 Transitional) and CSS (Level 1). These are all validated as a part of a standard implementation. The product also conforms to the W3C standard for availability on web sites WCAG (1.0).
Sitecore Sitecore Foundry. User Manual Page 12 of 164 Sitecore® is a registered trademark. All other brand and product names are the property of their respective holders. The contents of this document are the property of Sitecore. Copyright © 2001-2008 Sitecore. All rights reserved.
Chapter 3 The Site Architecture
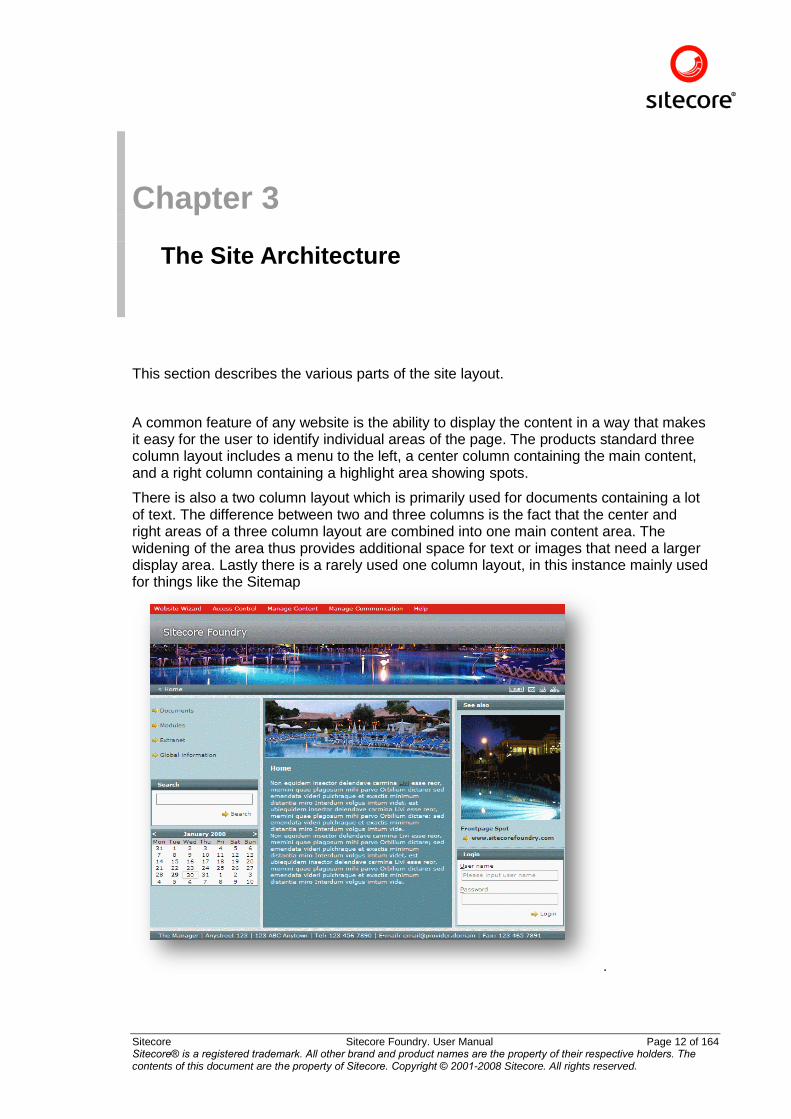
This section describes the various parts of the site layout.
A common feature of any website is the ability to display the content in a way that makes it easy for the user to identify individual areas of the page. The products standard three column layout includes a menu to the left, a center column containing the main content, and a right column containing a highlight area showing spots.
There is also a two column layout which is primarily used for documents containing a lot of text. The difference between two and three columns is the fact that the center and right areas of a three column layout are combined into one main content area. The widening of the area thus provides additional space for text or images that need a larger display area. Lastly there is a rarely used one column layout, in this instance mainly used for things like the Sitemap
.
Sitecore Sitecore Foundry. User Manual Page 13 of 164 Sitecore® is a registered trademark. All other brand and product names are the property of their respective holders. The contents of this document are the property of Sitecore. Copyright © 2001-2008 Sitecore. All rights reserved.
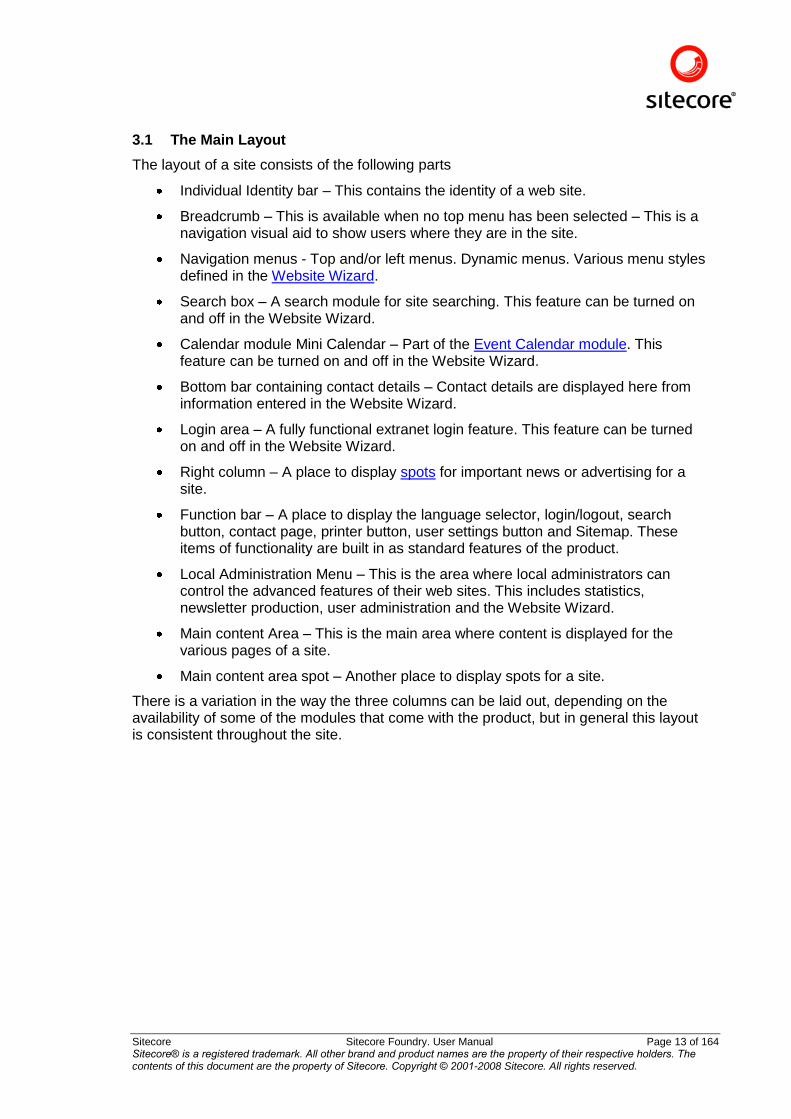
3.1 The Main Layout
The layout of a site consists of the following parts
Individual Identity bar – This contains the identity of a web site.
Breadcrumb – This is available when no top menu has been selected – This is a navigation visual aid to show users where they are in the site.
Navigation menus - Top and/or left menus. Dynamic menus. Various menu styles defined in the Website Wizard.
Search box – A search module for site searching. This feature can be turned on and off in the Website Wizard.
Calendar module Mini Calendar – Part of the Event Calendar module. This feature can be turned on and off in the Website Wizard.
Bottom bar containing contact details – Contact details are displayed here from information entered in the Website Wizard.
Login area – A fully functional extranet login feature. This feature can be turned on and off in the Website Wizard.
Right column – A place to display spots for important news or advertising for a site.
Function bar – A place to display the language selector, login/logout, search button, contact page, printer button, user settings button and Sitemap. These items of functionality are built in as standard features of the product.
Local Administration Menu – This is the area where local administrators can control the advanced features of their web sites. This includes statistics, newsletter production, user administration and the Website Wizard.
Main content Area – This is the main area where content is displayed for the various pages of a site.
Main content area spot – Another place to display spots for a site.
There is a variation in the way the three columns can be laid out, depending on the availability of some of the modules that come with the product, but in general this layout is consistent throughout the site.
Sitecore Sitecore Foundry. User Manual Page 14 of 164 Sitecore® is a registered trademark. All other brand and product names are the property of their respective holders. The contents of this document are the property of Sitecore. Copyright © 2001-2008 Sitecore. All rights reserved.
3.2 Examples of the two and one column layouts
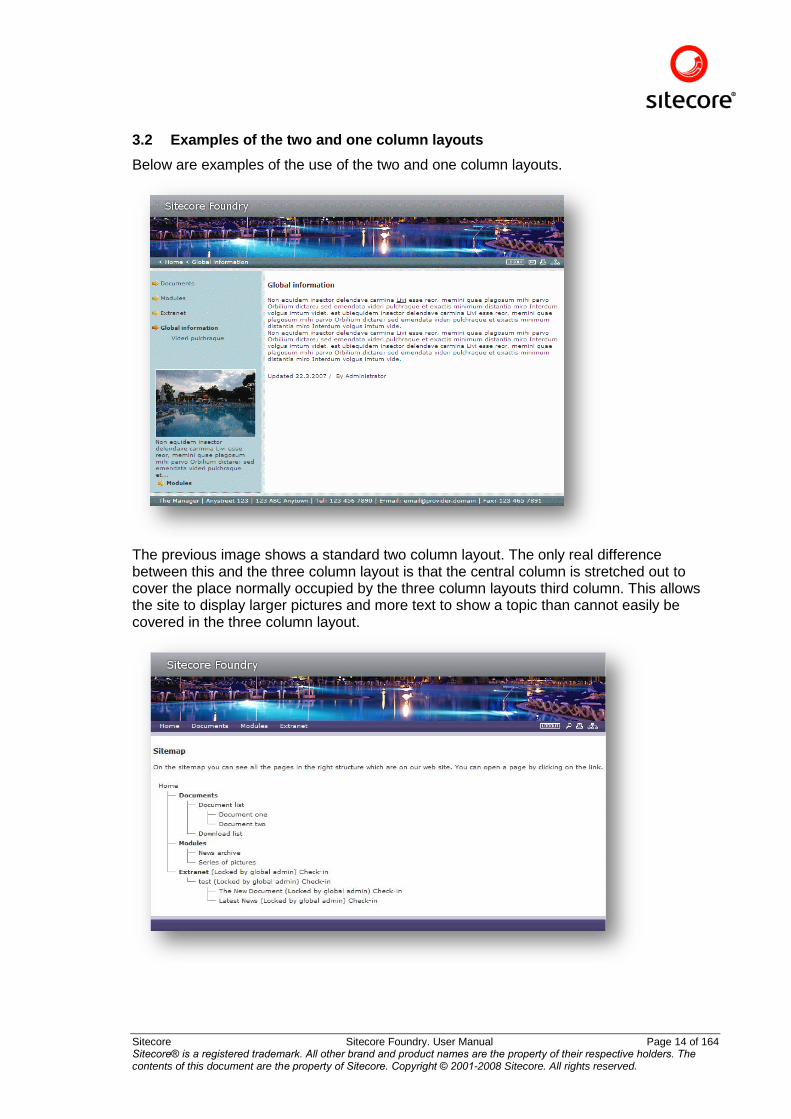
Below are examples of the use of the two and one column layouts.
The previous image shows a standard two column layout. The only real difference between this and the three column layout is that the central column is stretched out to cover the place normally occupied by the three column layouts third column. This allows the site to display larger pictures and more text to show a topic than cannot easily be covered in the three column layout.
Sitecore Sitecore Foundry. User Manual Page 15 of 164 Sitecore® is a registered trademark. All other brand and product names are the property of their respective holders. The contents of this document are the property of Sitecore. Copyright © 2001-2008 Sitecore. All rights reserved.
The previous image shows the one column layout. This layout shows the sitemap, and is useful when the sitemap is quite deep and has a lot of layers. The one column layout is also useful for displaying detailed images such as maps and charts.
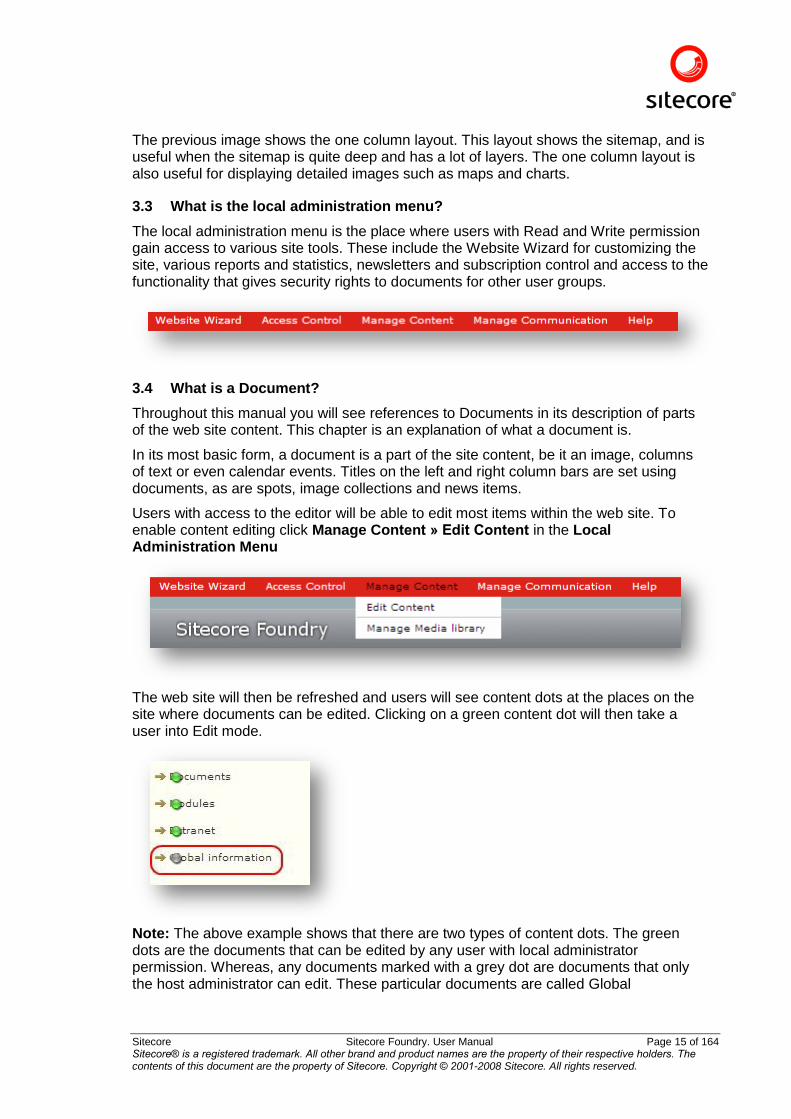
3.3 What is the local administration menu?
The local administration menu is the place where users with Read and Write permission gain access to various site tools. These include the Website Wizard for customizing the site, various reports and statistics, newsletters and subscription control and access to the functionality that gives security rights to documents for other user groups.
3.4 What is a Document?
Throughout this manual you will see references to Documents in its description of parts of the web site content. This chapter is an explanation of what a document is.
In its most basic form, a document is a part of the site content, be it an image, columns of text or even calendar events. Titles on the left and right column bars are set using documents, as are spots, image collections and news items.
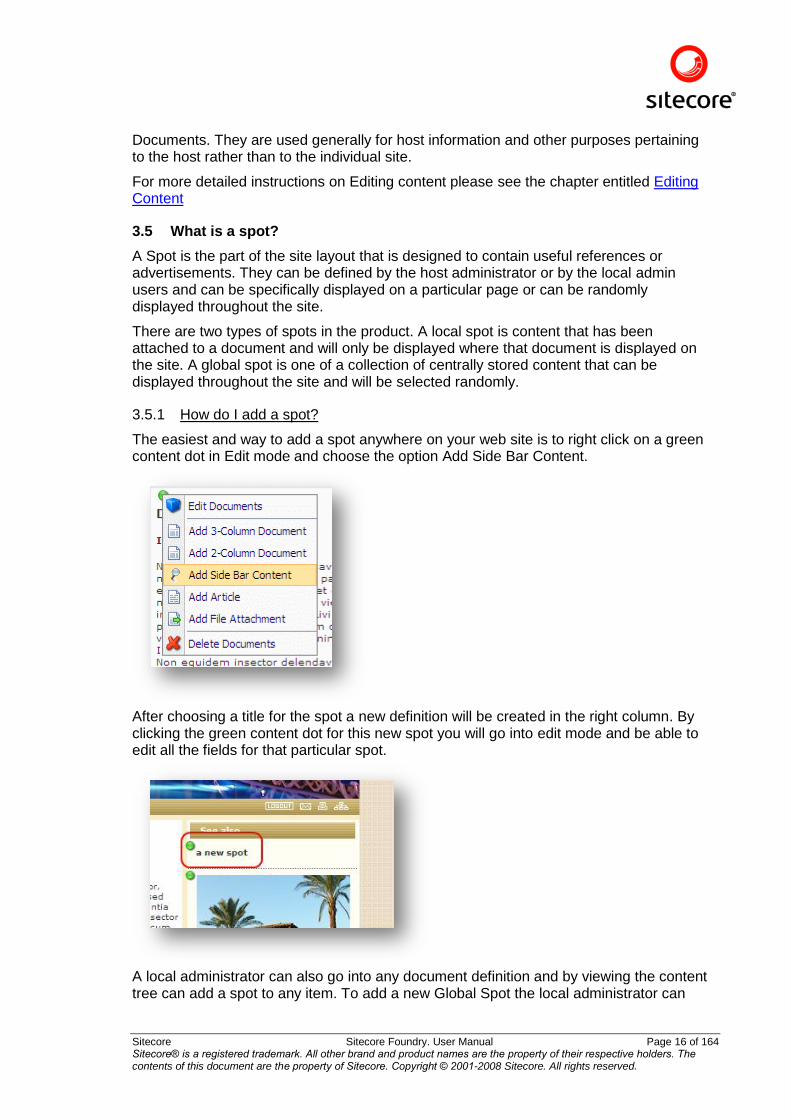
Users with access to the editor will be able to edit most items within the web site. To enable content editing click Manage Content » Edit Content in the Local Administration Menu
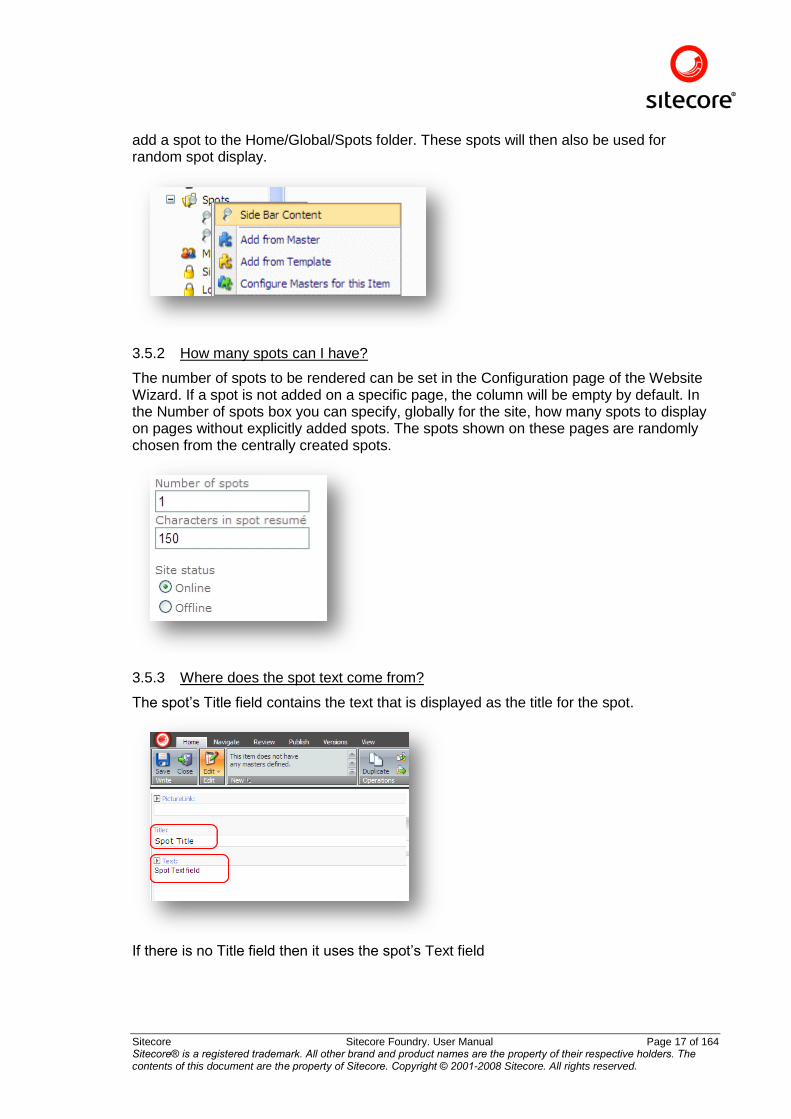
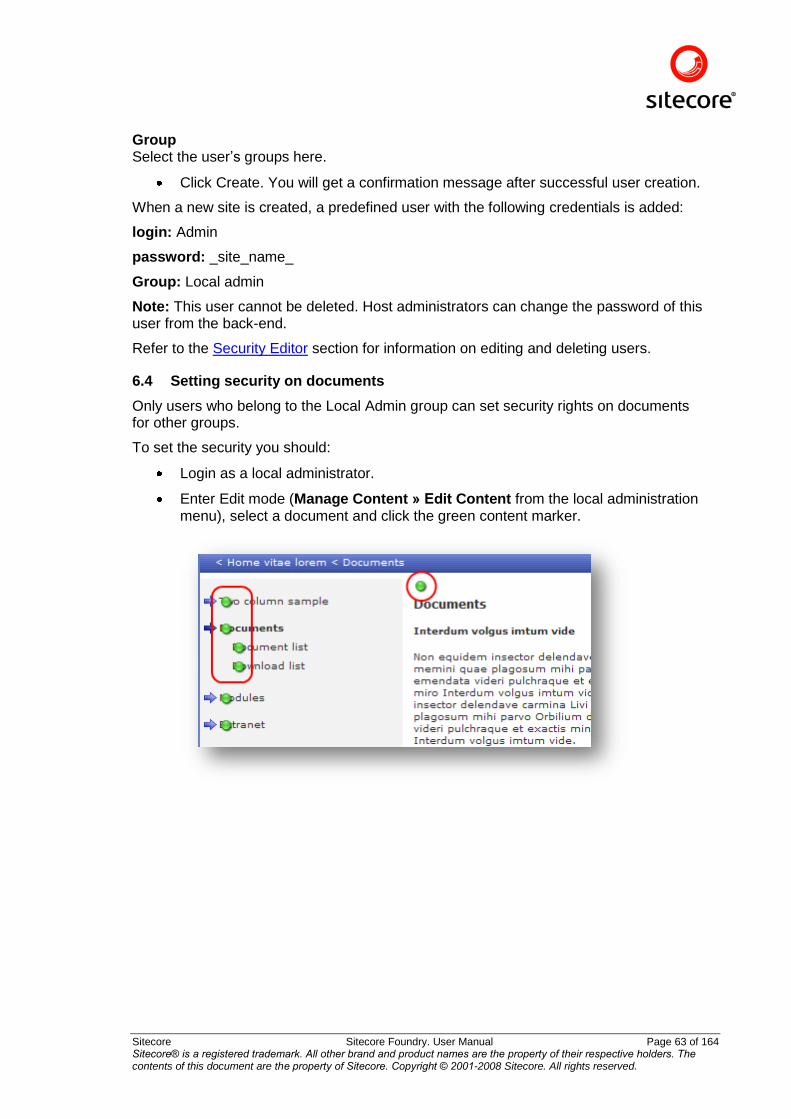
The web site will then be refreshed and users will see content dots at the places on the site where documents can be edited. Clicking on a green content dot will then take a user into Edit mode.
Note: The above example shows that there are two types of content dots. The green dots are the documents that can be edited by any user with local administrator permission. Whereas, any documents marked with a grey dot are documents that only the host administrator can edit. These particular documents are called Global
Sitecore Sitecore Foundry. User Manual Page 16 of 164 Sitecore® is a registered trademark. All other brand and product names are the property of their respective holders. The contents of this document are the property of Sitecore. Copyright © 2001-2008 Sitecore. All rights reserved.
Documents. They are used generally for host information and other purposes pertaining to the host rather than to the individual site.
For more detailed instructions on Editing content please see the chapter entitled Editing Content
3.5 What is a spot?
A Spot is the part of the site layout that is designed to contain useful references or advertisements. They can be defined by the host administrator or by the local admin users and can be specifically displayed on a particular page or can be randomly displayed throughout the site.
There are two types of spots in the product. A local spot is content that has been attached to a document and will only be displayed where that document is displayed on the site. A global spot is one of a collection of centrally stored content that can be displayed throughout the site and will be selected randomly.
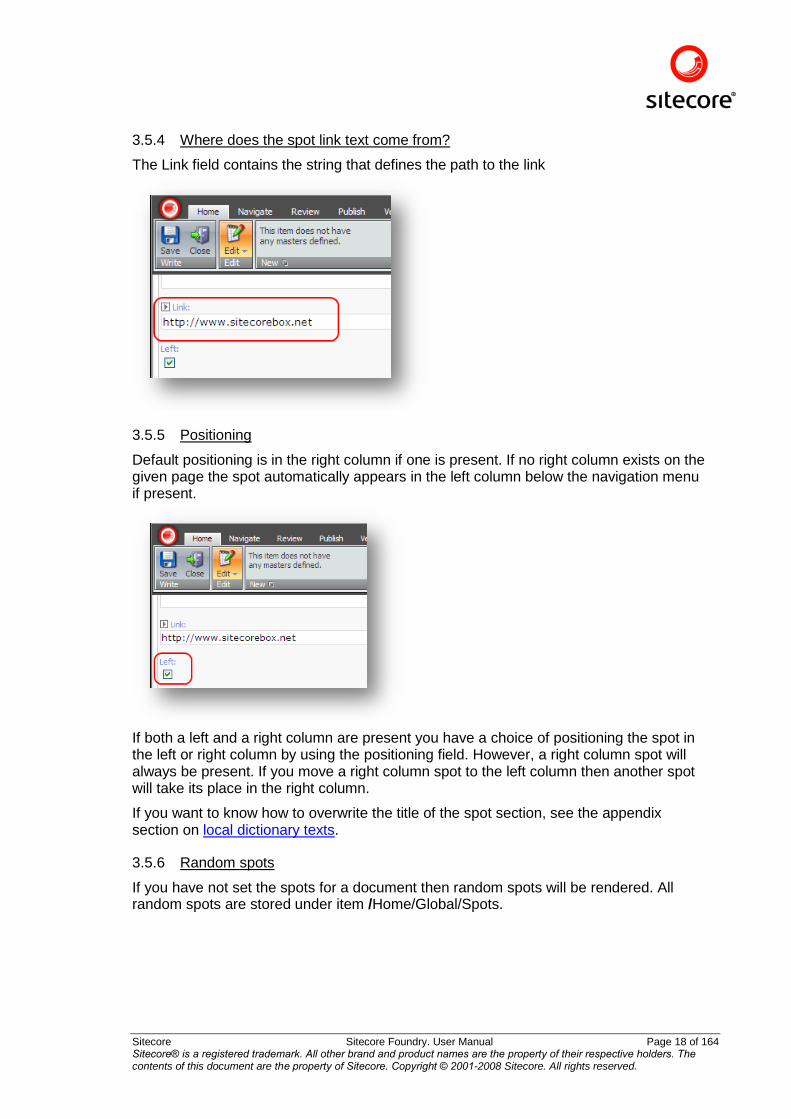
3.5.1 How do I add a spot?
The easiest and way to add a spot anywhere on your web site is to right click on a green content dot in Edit mode and choose the option Add Side Bar Content.
After choosing a title for the spot a new definition will be created in the right column. By clicking the green content dot for this new spot you will go into edit mode and be able to edit all the fields for that particular spot.
A local administrator can also go into any document definition and by viewing the content tree can add a spot to any item. To add a new Global Spot the local administrator can
Sitecore Sitecore Foundry. User Manual Page 17 of 164 Sitecore® is a registered trademark. All other brand and product names are the property of their respective holders. The contents of this document are the property of Sitecore. Copyright © 2001-2008 Sitecore. All rights reserved.
add a spot to the Home/Global/Spots folder. These spots will then also be used for random spot display.
3.5.2 How many spots can I have?
The number of spots to be rendered can be set in the Configuration page of the Website Wizard. If a spot is not added on a specific page, the column will be empty by default. In the Number of spots box you can specify, globally for the site, how many spots to display on pages without explicitly added spots. The spots shown on these pages are randomly chosen from the centrally created spots.
3.5.3 Where does the spot text come from?
The spot‟s Title field contains the text that is displayed as the title for the spot.
If there is no Title field then it uses the spot‟s Text field
Sitecore Sitecore Foundry. User Manual Page 18 of 164 Sitecore® is a registered trademark. All other brand and product names are the property of their respective holders. The contents of this document are the property of Sitecore. Copyright © 2001-2008 Sitecore. All rights reserved.
3.5.4 Where does the spot link text come from?
The Link field contains the string that defines the path to the link
3.5.5 Positioning
Default positioning is in the right column if one is present. If no right column exists on the given page the spot automatically appears in the left column below the navigation menu if present.
If both a left and a right column are present you have a choice of positioning the spot in the left or right column by using the positioning field. However, a right column spot will always be present. If you move a right column spot to the left column then another spot will take its place in the right column.
If you want to know how to overwrite the title of the spot section, see the appendix section on local dictionary texts.
3.5.6 Random spots
If you have not set the spots for a document then random spots will be rendered. All random spots are stored under item /Home/Global/Spots.
Sitecore Sitecore Foundry. User Manual Page 19 of 164 Sitecore® is a registered trademark. All other brand and product names are the property of their respective holders. The contents of this document are the property of Sitecore. Copyright © 2001-2008 Sitecore. All rights reserved.
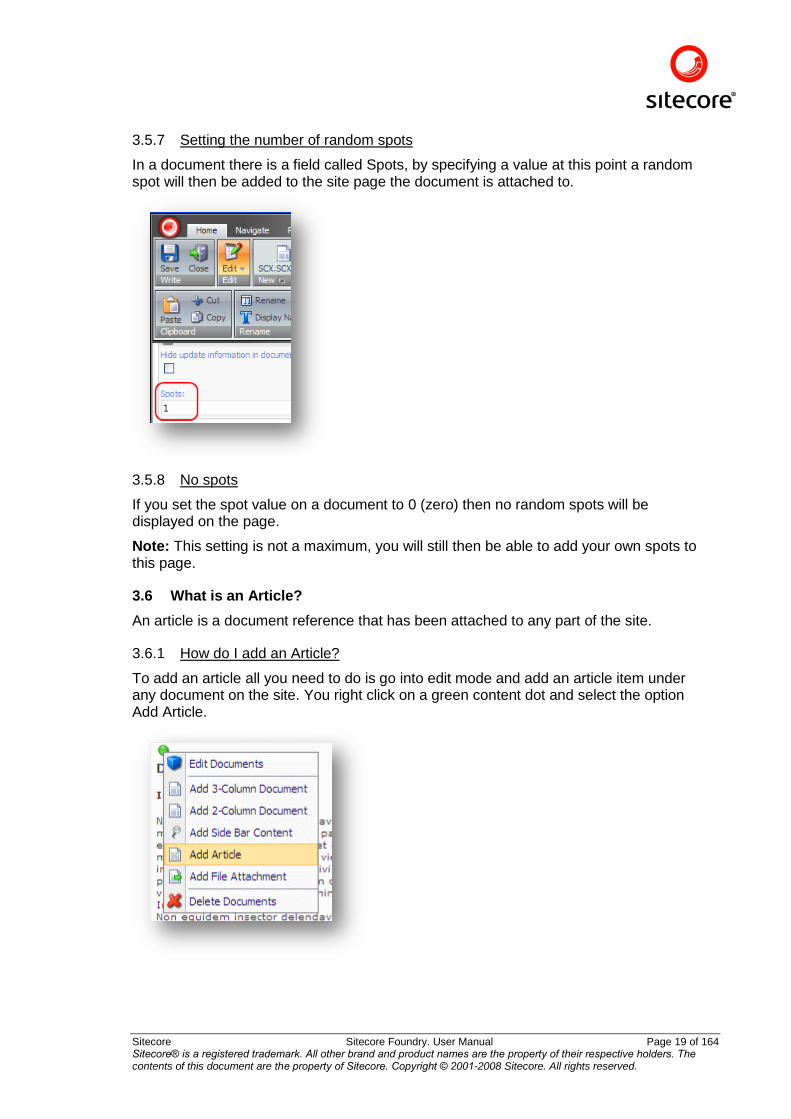
3.5.7 Setting the number of random spots
In a document there is a field called Spots, by specifying a value at this point a random spot will then be added to the site page the document is attached to.
3.5.8 No spots
If you set the spot value on a document to 0 (zero) then no random spots will be displayed on the page.
Note: This setting is not a maximum, you will still then be able to add your own spots to this page.
3.6 What is an Article?
An article is a document reference that has been attached to any part of the site.
3.6.1 How do I add an Article?
To add an article all you need to do is go into edit mode and add an article item under any document on the site. You right click on a green content dot and select the option Add Article.
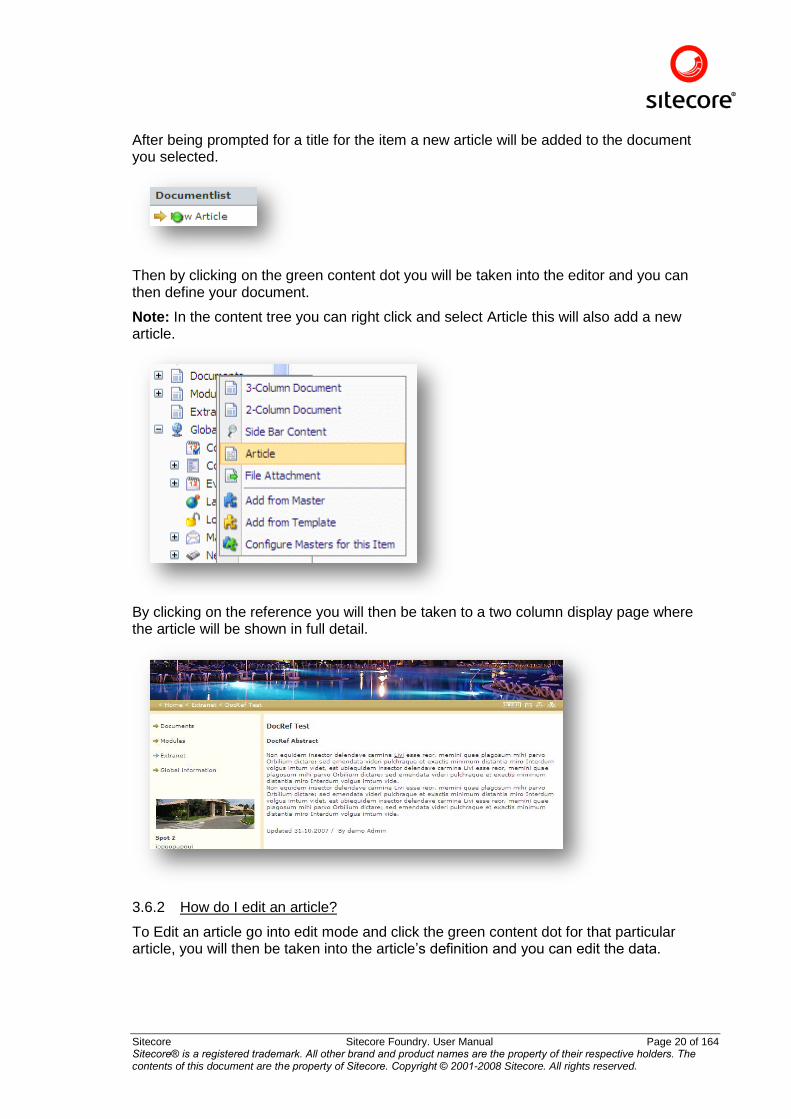
Sitecore Sitecore Foundry. User Manual Page 20 of 164 Sitecore® is a registered trademark. All other brand and product names are the property of their respective holders. The contents of this document are the property of Sitecore. Copyright © 2001-2008 Sitecore. All rights reserved.
After being prompted for a title for the item a new article will be added to the document you selected.
Then by clicking on the green content dot you will be taken into the editor and you can then define your document.
Note: In the content tree you can right click and select Article this will also add a new article.
By clicking on the reference you will then be taken to a two column display page where the article will be shown in full detail.
3.6.2 How do I edit an article?
To Edit an article go into edit mode and click the green content dot for that particular article, you will then be taken into the article‟s definition and you can edit the data.
Sitecore Sitecore Foundry. User Manual Page 21 of 164 Sitecore® is a registered trademark. All other brand and product names are the property of their respective holders. The contents of this document are the property of Sitecore. Copyright © 2001-2008 Sitecore. All rights reserved.
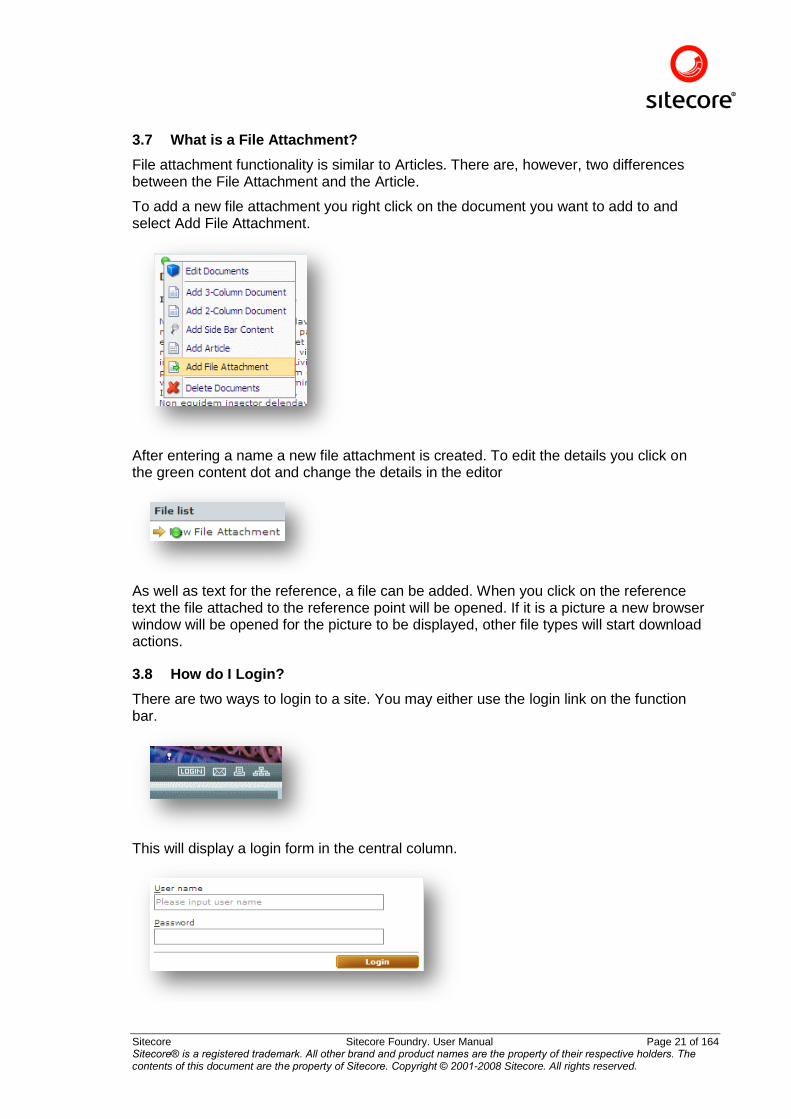
3.7 What is a File Attachment?
File attachment functionality is similar to Articles. There are, however, two differences between the File Attachment and the Article.
To add a new file attachment you right click on the document you want to add to and select Add File Attachment.
After entering a name a new file attachment is created. To edit the details you click on the green content dot and change the details in the editor
As well as text for the reference, a file can be added. When you click on the reference text the file attached to the reference point will be opened. If it is a picture a new browser window will be opened for the picture to be displayed, other file types will start download actions.
3.8 How do I Login?
There are two ways to login to a site. You may either use the login link on the function bar.
This will display a login form in the central column.
Sitecore Sitecore Foundry. User Manual Page 22 of 164 Sitecore® is a registered trademark. All other brand and product names are the property of their respective holders. The contents of this document are the property of Sitecore. Copyright © 2001-2008 Sitecore. All rights reserved.
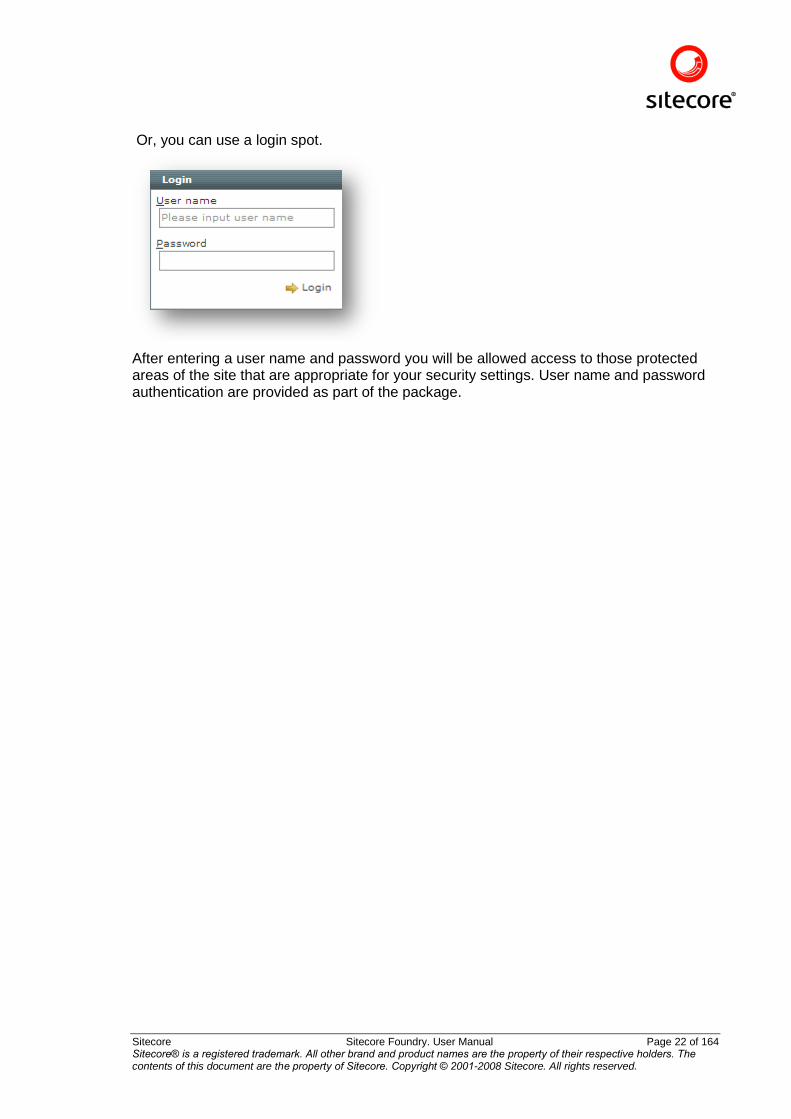
Or, you can use a login spot.
After entering a user name and password you will be allowed access to those protected areas of the site that are appropriate for your security settings. User name and password authentication are provided as part of the package.
Sitecore Sitecore Foundry. User Manual Page 23 of 164 Sitecore® is a registered trademark. All other brand and product names are the property of their respective holders. The contents of this document are the property of Sitecore. Copyright © 2001-2008 Sitecore. All rights reserved.
Chapter 4 The Website Wizard
This chapter deals with configuring the look and operation of your site through the built in Website Wizard
4.1 Introduction
The Website Wizard is the main place where administrators manage the look and feel of the site. On this set of pages it is possible to change a whole range of settings for your site. This includes the color scheme, images, selected modules, available languages and many more besides. This is the part of the product where you can give your sites that unique feeling.
Access to the Website Wizard is through the local admin menu option Website Wizard.
Sitecore Sitecore Foundry. User Manual Page 24 of 164 Sitecore® is a registered trademark. All other brand and product names are the property of their respective holders. The contents of this document are the property of Sitecore. Copyright © 2001-2008 Sitecore. All rights reserved.
4.2 The options
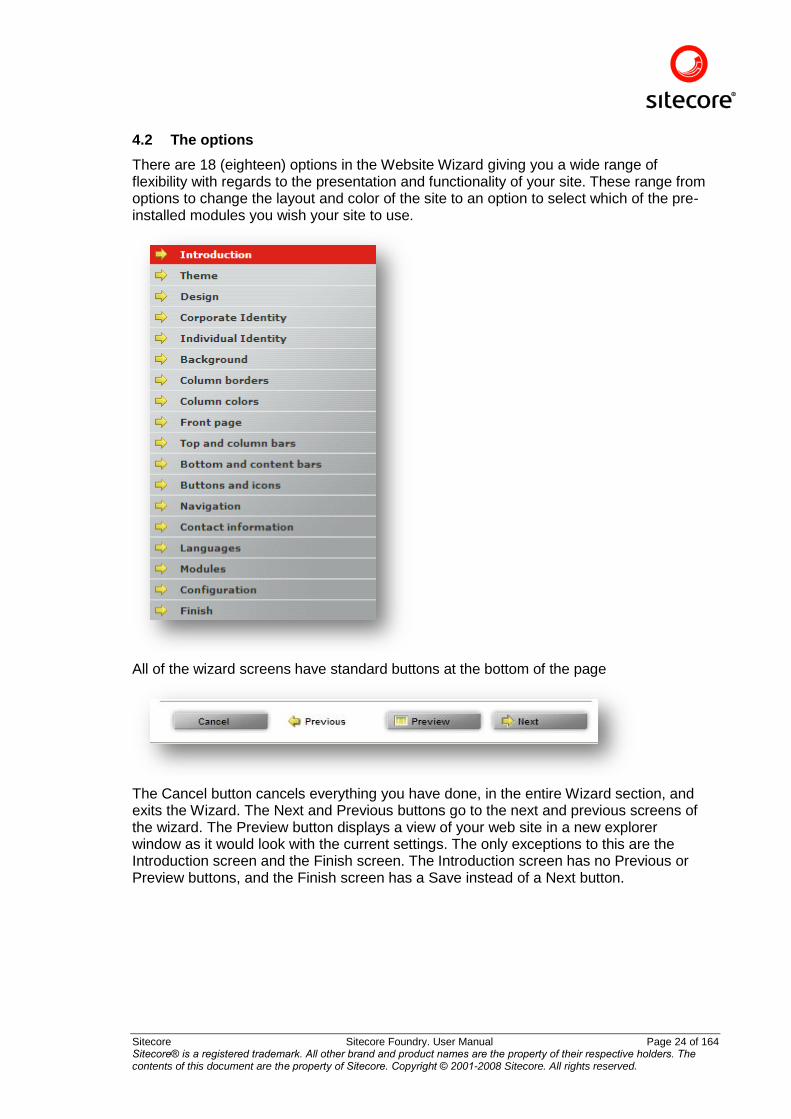
There are 18 (eighteen) options in the Website Wizard giving you a wide range of flexibility with regards to the presentation and functionality of your site. These range from options to change the layout and color of the site to an option to select which of the pre-installed modules you wish your site to use.
All of the wizard screens have standard buttons at the bottom of the page
The Cancel button cancels everything you have done, in the entire Wizard section, and exits the Wizard. The Next and Previous buttons go to the next and previous screens of the wizard. The Preview button displays a view of your web site in a new explorer window as it would look with the current settings. The only exceptions to this are the Introduction screen and the Finish screen. The Introduction screen has no Previous or Preview buttons, and the Finish screen has a Save instead of a Next button.
Sitecore Sitecore Foundry. User Manual Page 25 of 164 Sitecore® is a registered trademark. All other brand and product names are the property of their respective holders. The contents of this document are the property of Sitecore. Copyright © 2001-2008 Sitecore. All rights reserved.
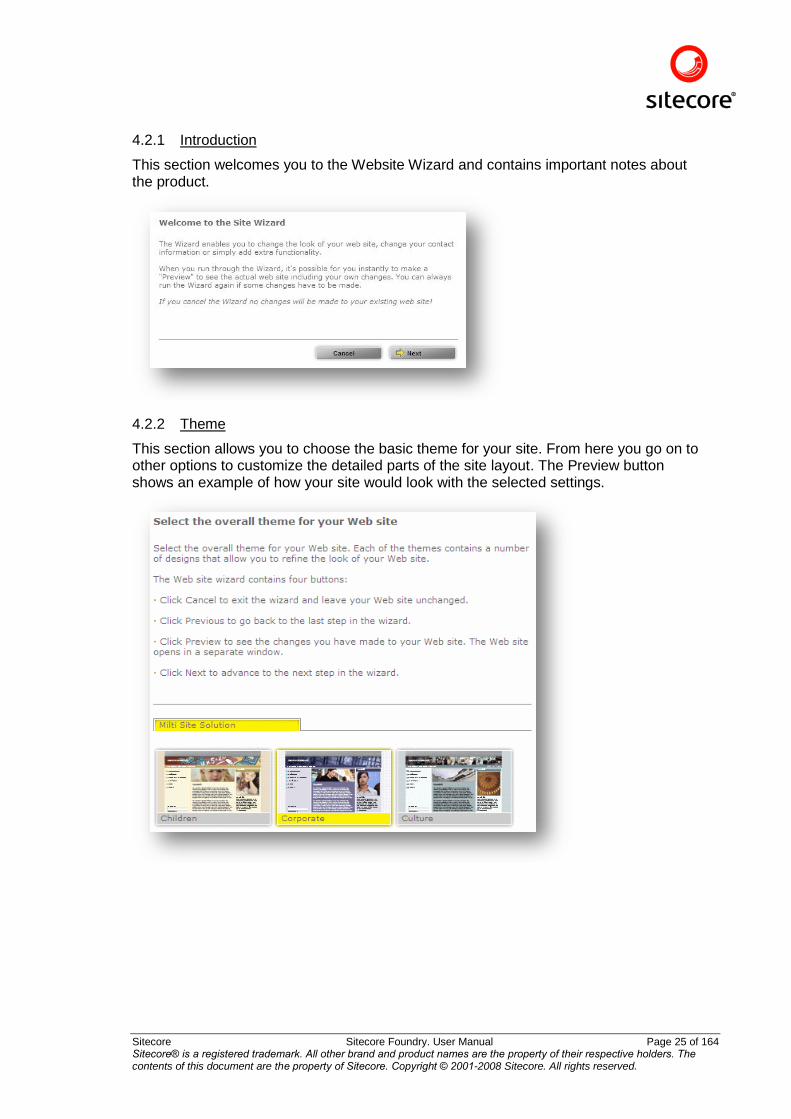
4.2.1 Introduction
This section welcomes you to the Website Wizard and contains important notes about the product.
4.2.2 Theme
This section allows you to choose the basic theme for your site. From here you go on to other options to customize the detailed parts of the site layout. The Preview button shows an example of how your site would look with the selected settings.
Sitecore Sitecore Foundry. User Manual Page 26 of 164 Sitecore® is a registered trademark. All other brand and product names are the property of their respective holders. The contents of this document are the property of Sitecore. Copyright © 2001-2008 Sitecore. All rights reserved.
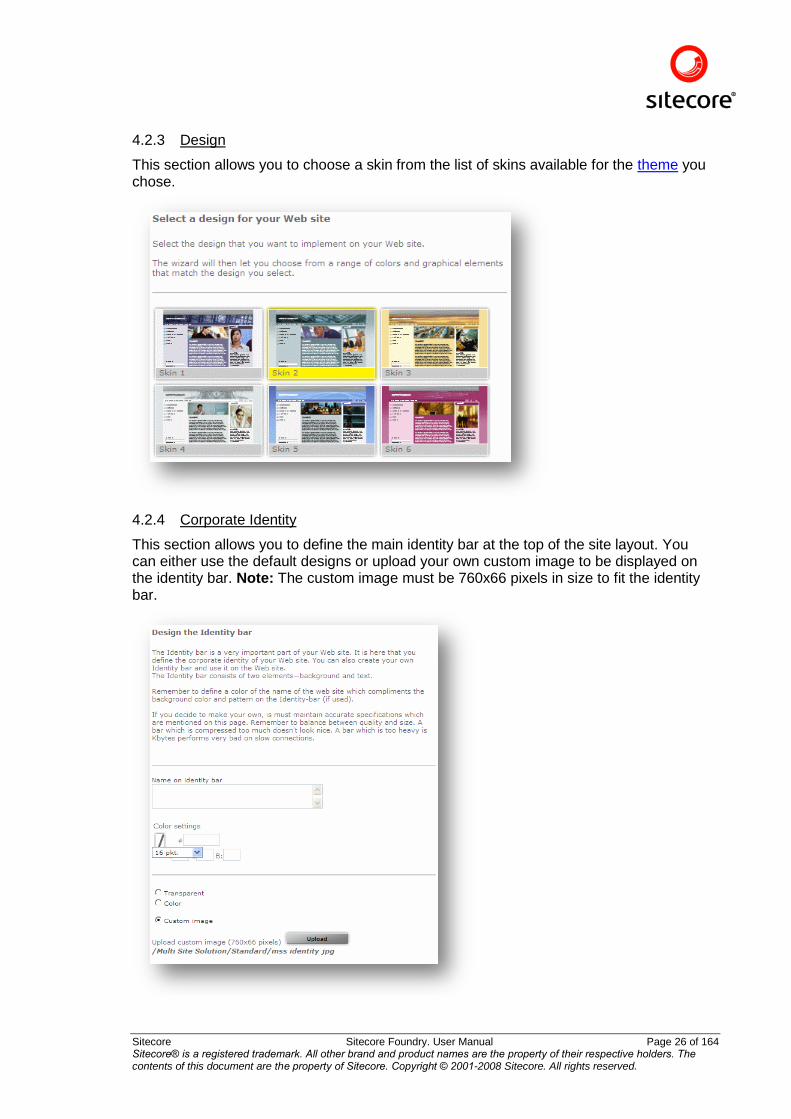
4.2.3 Design
This section allows you to choose a skin from the list of skins available for the theme you chose.
4.2.4 Corporate Identity
This section allows you to define the main identity bar at the top of the site layout. You can either use the default designs or upload your own custom image to be displayed on the identity bar. Note: The custom image must be 760x66 pixels in size to fit the identity bar.
Sitecore Sitecore Foundry. User Manual Page 27 of 164 Sitecore® is a registered trademark. All other brand and product names are the property of their respective holders. The contents of this document are the property of Sitecore. Copyright © 2001-2008 Sitecore. All rights reserved.
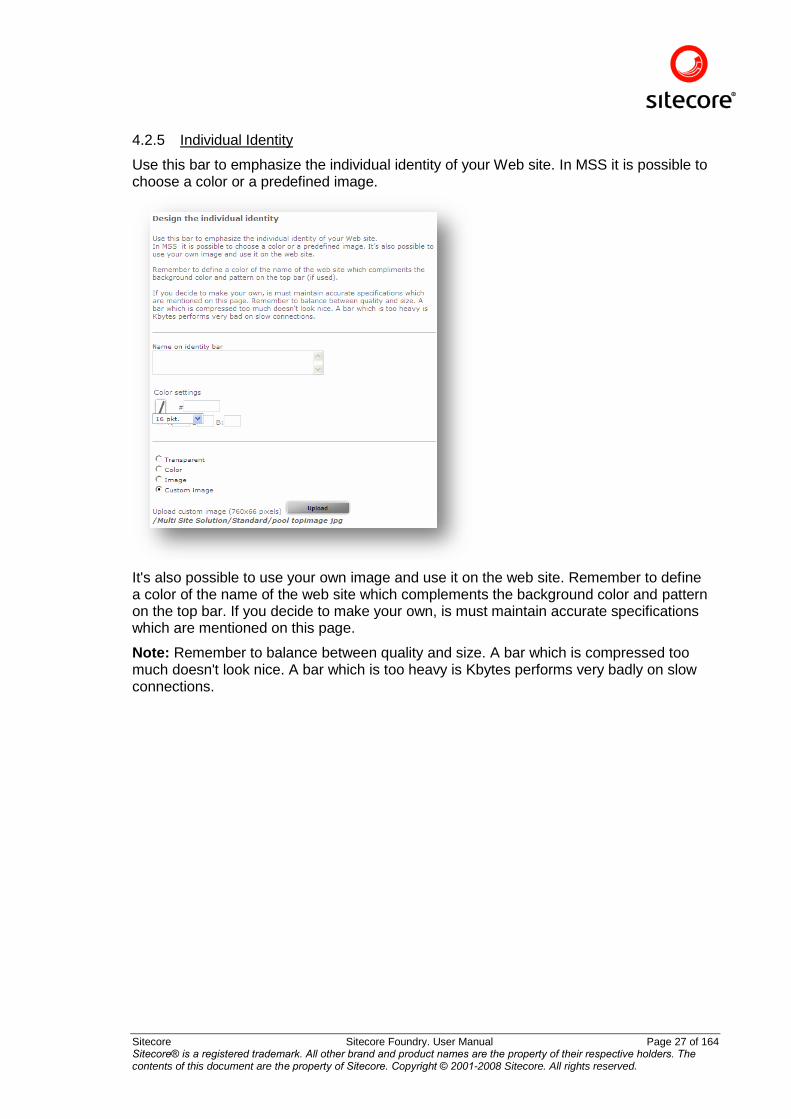
4.2.5 Individual Identity
Use this bar to emphasize the individual identity of your Web site. In MSS it is possible to choose a color or a predefined image.
It's also possible to use your own image and use it on the web site. Remember to define a color of the name of the web site which complements the background color and pattern on the top bar. If you decide to make your own, is must maintain accurate specifications which are mentioned on this page.
Note: Remember to balance between quality and size. A bar which is compressed too much doesn't look nice. A bar which is too heavy is Kbytes performs very badly on slow connections.
Sitecore Sitecore Foundry. User Manual Page 28 of 164 Sitecore® is a registered trademark. All other brand and product names are the property of their respective holders. The contents of this document are the property of Sitecore. Copyright © 2001-2008 Sitecore. All rights reserved.
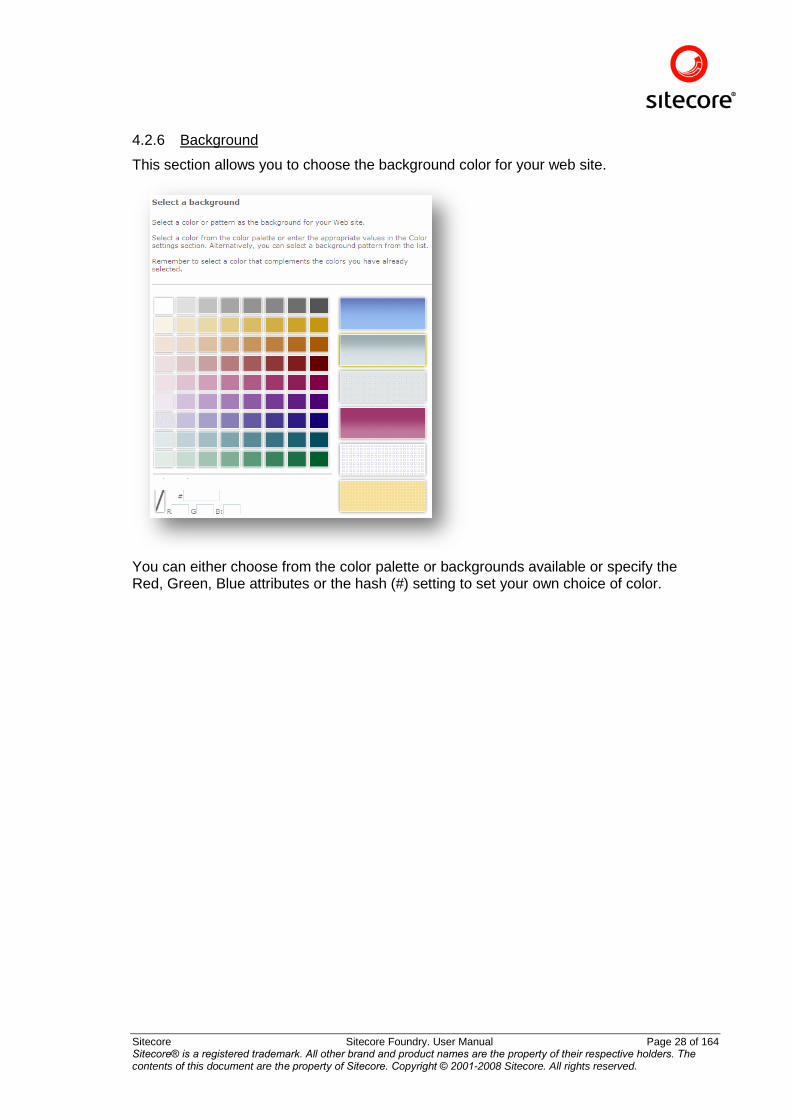
4.2.6 Background
This section allows you to choose the background color for your web site.
You can either choose from the color palette or backgrounds available or specify the Red, Green, Blue attributes or the hash (#) setting to set your own choice of color.
Sitecore Sitecore Foundry. User Manual Page 29 of 164 Sitecore® is a registered trademark. All other brand and product names are the property of their respective holders. The contents of this document are the property of Sitecore. Copyright © 2001-2008 Sitecore. All rights reserved.
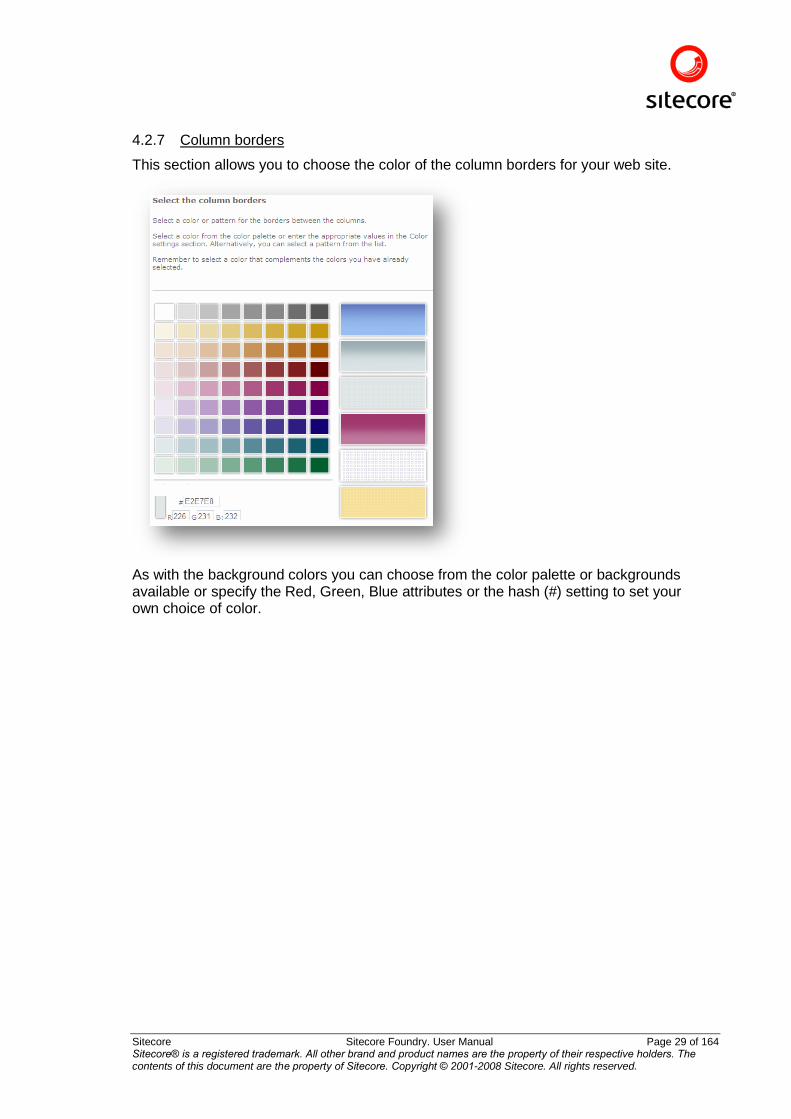
4.2.7 Column borders
This section allows you to choose the color of the column borders for your web site.
As with the background colors you can choose from the color palette or backgrounds available or specify the Red, Green, Blue attributes or the hash (#) setting to set your own choice of color.
Sitecore Sitecore Foundry. User Manual Page 30 of 164 Sitecore® is a registered trademark. All other brand and product names are the property of their respective holders. The contents of this document are the property of Sitecore. Copyright © 2001-2008 Sitecore. All rights reserved.
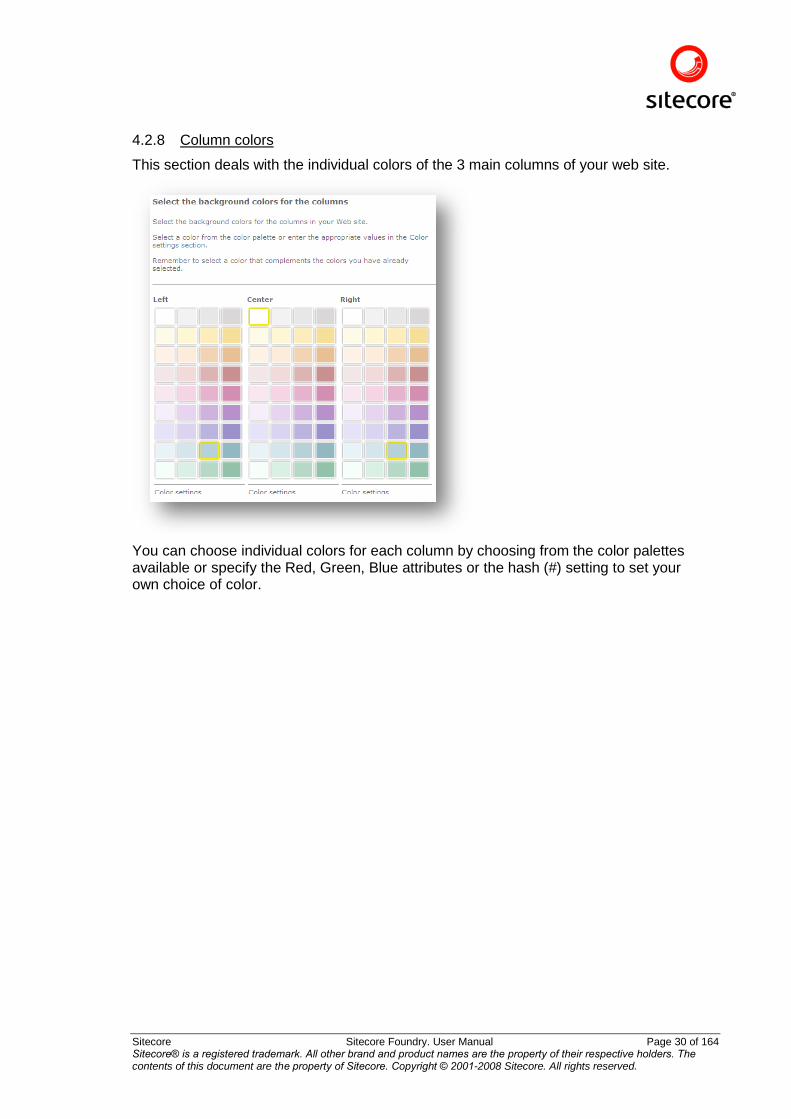
4.2.8 Column colors
This section deals with the individual colors of the 3 main columns of your web site.
You can choose individual colors for each column by choosing from the color palettes available or specify the Red, Green, Blue attributes or the hash (#) setting to set your own choice of color.
Sitecore Sitecore Foundry. User Manual Page 31 of 164 Sitecore® is a registered trademark. All other brand and product names are the property of their respective holders. The contents of this document are the property of Sitecore. Copyright © 2001-2008 Sitecore. All rights reserved.
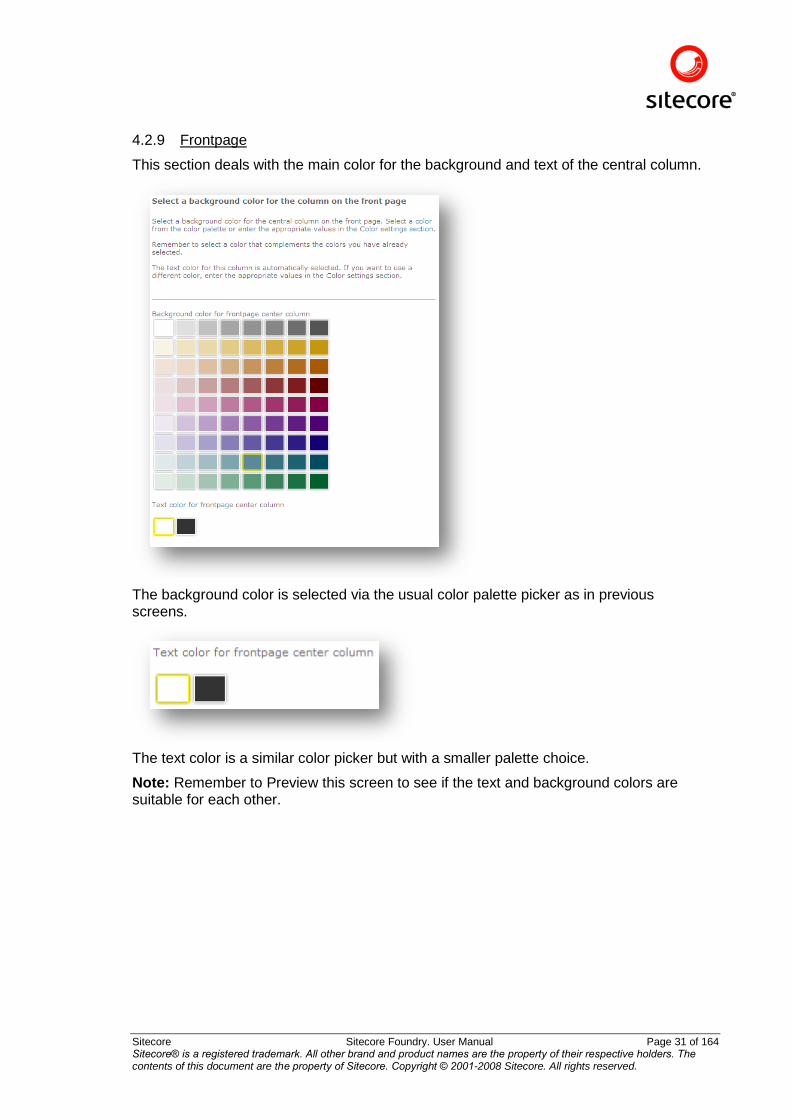
4.2.9 Frontpage
This section deals with the main color for the background and text of the central column.
The background color is selected via the usual color palette picker as in previous screens.
The text color is a similar color picker but with a smaller palette choice.
Note: Remember to Preview this screen to see if the text and background colors are suitable for each other.
Sitecore Sitecore Foundry. User Manual Page 32 of 164 Sitecore® is a registered trademark. All other brand and product names are the property of their respective holders. The contents of this document are the property of Sitecore. Copyright © 2001-2008 Sitecore. All rights reserved.
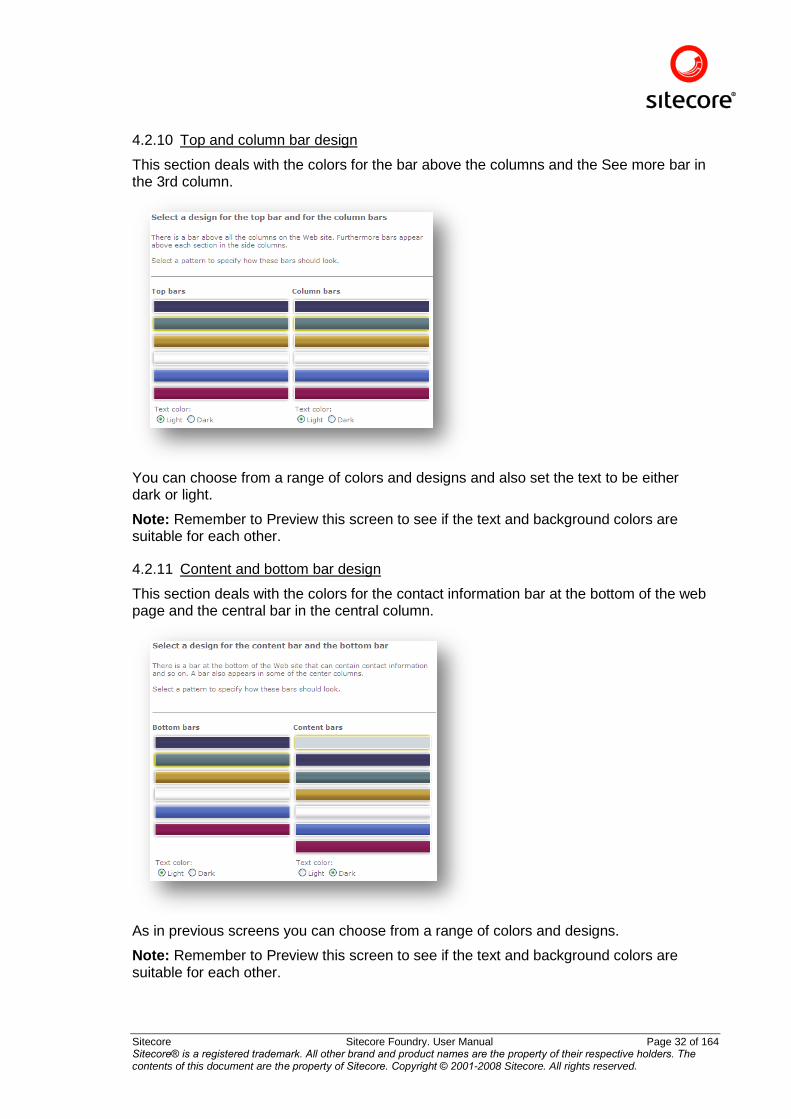
4.2.10 Top and column bar design
This section deals with the colors for the bar above the columns and the See more bar in the 3rd column.
You can choose from a range of colors and designs and also set the text to be either dark or light.
Note: Remember to Preview this screen to see if the text and background colors are suitable for each other.
4.2.11 Content and bottom bar design
This section deals with the colors for the contact information bar at the bottom of the web page and the central bar in the central column.
As in previous screens you can choose from a range of colors and designs.
Note: Remember to Preview this screen to see if the text and background colors are suitable for each other.
Sitecore Sitecore Foundry. User Manual Page 33 of 164 Sitecore® is a registered trademark. All other brand and product names are the property of their respective holders. The contents of this document are the property of Sitecore. Copyright © 2001-2008 Sitecore. All rights reserved.
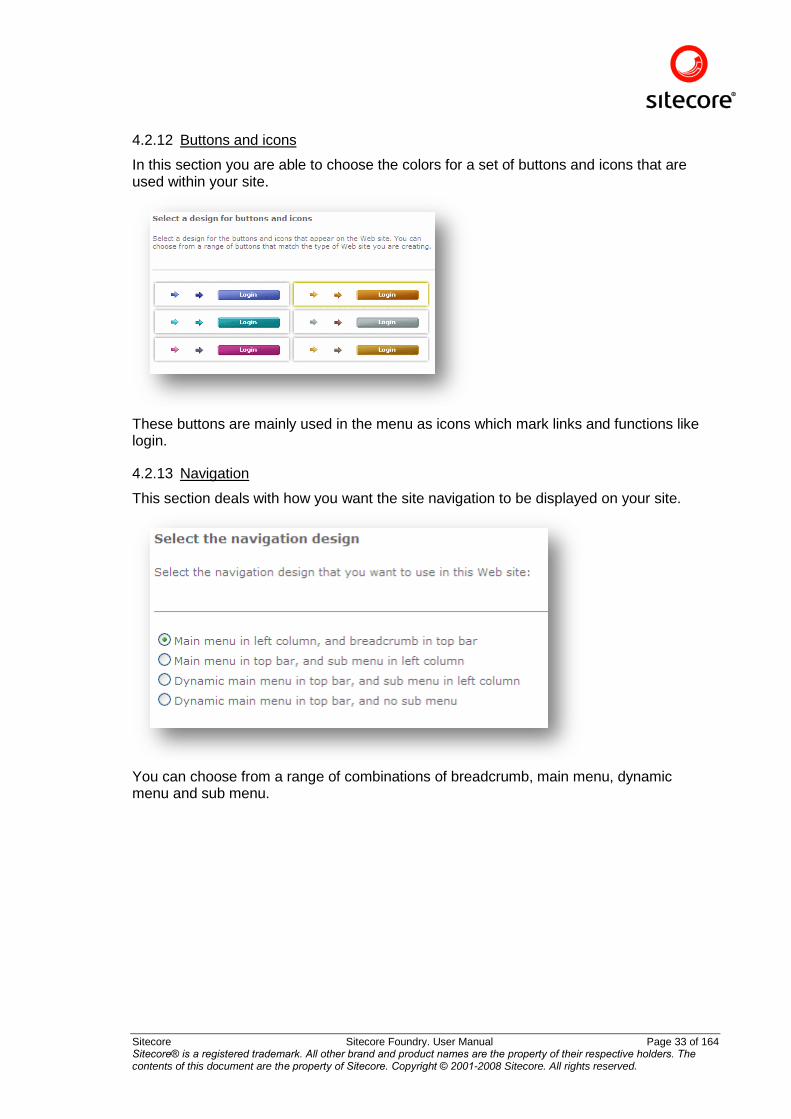
4.2.12 Buttons and icons
In this section you are able to choose the colors for a set of buttons and icons that are used within your site.
These buttons are mainly used in the menu as icons which mark links and functions like login.
4.2.13 Navigation
This section deals with how you want the site navigation to be displayed on your site.
You can choose from a range of combinations of breadcrumb, main menu, dynamic menu and sub menu.
Sitecore Sitecore Foundry. User Manual Page 34 of 164 Sitecore® is a registered trademark. All other brand and product names are the property of their respective holders. The contents of this document are the property of Sitecore. Copyright © 2001-2008 Sitecore. All rights reserved.
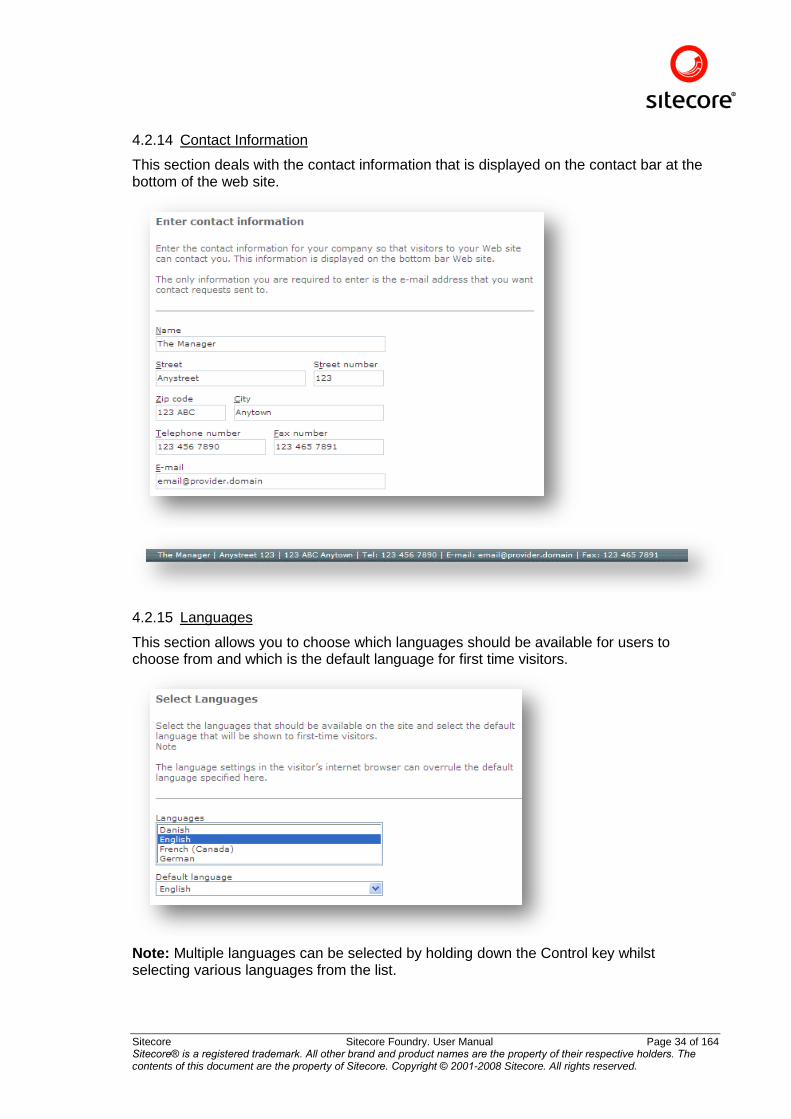
4.2.14 Contact Information
This section deals with the contact information that is displayed on the contact bar at the bottom of the web site.
4.2.15 Languages
This section allows you to choose which languages should be available for users to choose from and which is the default language for first time visitors.
Note: Multiple languages can be selected by holding down the Control key whilst selecting various languages from the list.
Sitecore Sitecore Foundry. User Manual Page 35 of 164 Sitecore® is a registered trademark. All other brand and product names are the property of their respective holders. The contents of this document are the property of Sitecore. Copyright © 2001-2008 Sitecore. All rights reserved.
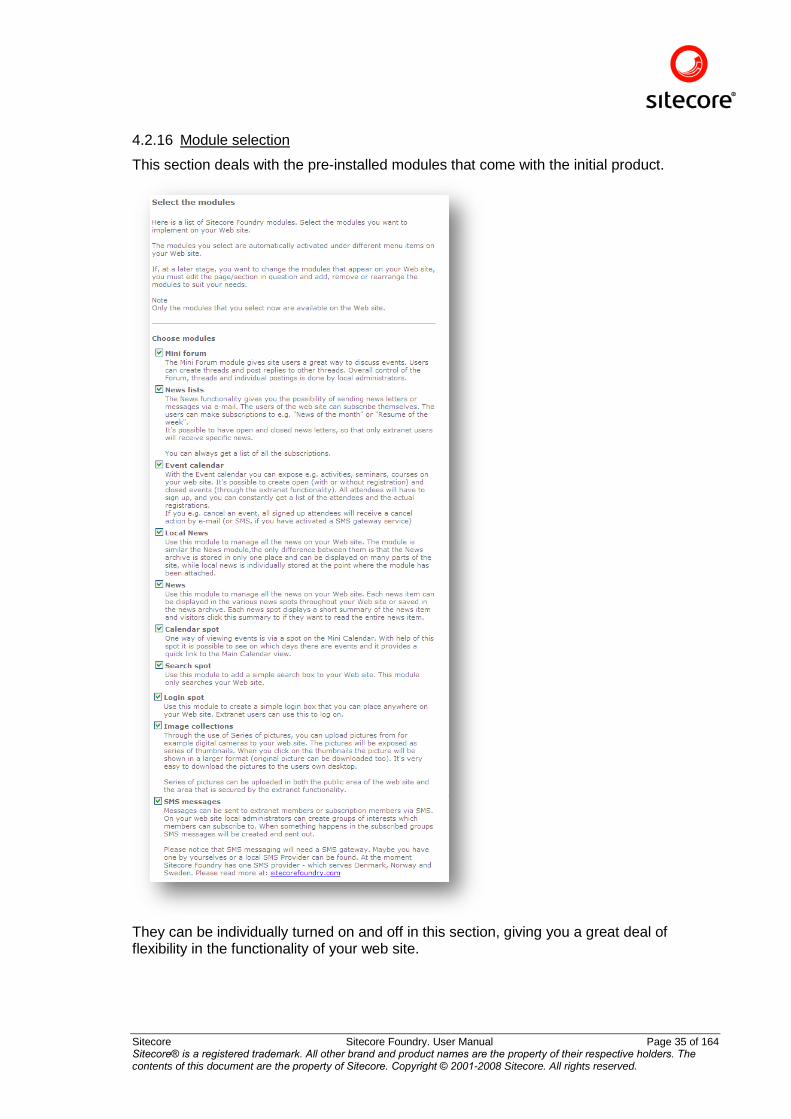
4.2.16 Module selection
This section deals with the pre-installed modules that come with the initial product.
They can be individually turned on and off in this section, giving you a great deal of flexibility in the functionality of your web site.
Sitecore Sitecore Foundry. User Manual Page 36 of 164 Sitecore® is a registered trademark. All other brand and product names are the property of their respective holders. The contents of this document are the property of Sitecore. Copyright © 2001-2008 Sitecore. All rights reserved.
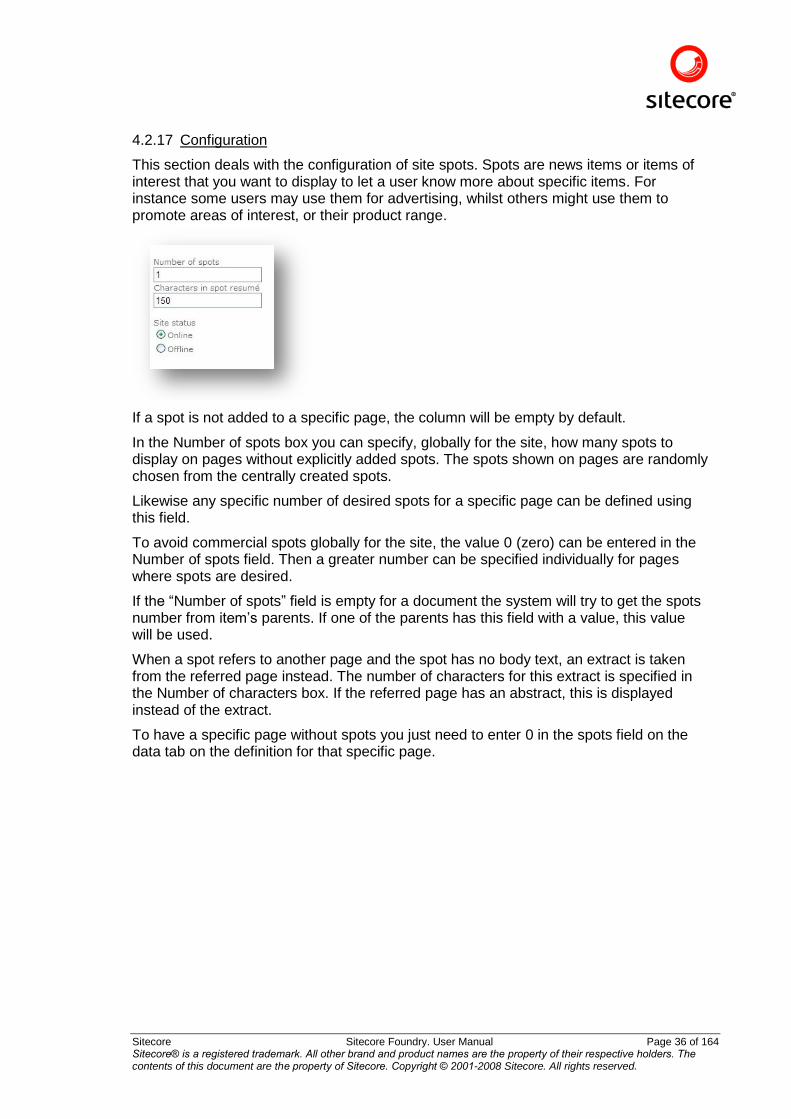
4.2.17 Configuration
This section deals with the configuration of site spots. Spots are news items or items of interest that you want to display to let a user know more about specific items. For instance some users may use them for advertising, whilst others might use them to promote areas of interest, or their product range.
If a spot is not added to a specific page, the column will be empty by default.
In the Number of spots box you can specify, globally for the site, how many spots to display on pages without explicitly added spots. The spots shown on pages are randomly chosen from the centrally created spots.
Likewise any specific number of desired spots for a specific page can be defined using this field.
To avoid commercial spots globally for the site, the value 0 (zero) can be entered in the Number of spots field. Then a greater number can be specified individually for pages where spots are desired.
If the “Number of spots” field is empty for a document the system will try to get the spots number from item‟s parents. If one of the parents has this field with a value, this value will be used.
When a spot refers to another page and the spot has no body text, an extract is taken from the referred page instead. The number of characters for this extract is specified in the Number of characters box. If the referred page has an abstract, this is displayed instead of the extract.
To have a specific page without spots you just need to enter 0 in the spots field on the data tab on the definition for that specific page.
Sitecore Sitecore Foundry. User Manual Page 37 of 164 Sitecore® is a registered trademark. All other brand and product names are the property of their respective holders. The contents of this document are the property of Sitecore. Copyright © 2001-2008 Sitecore. All rights reserved.
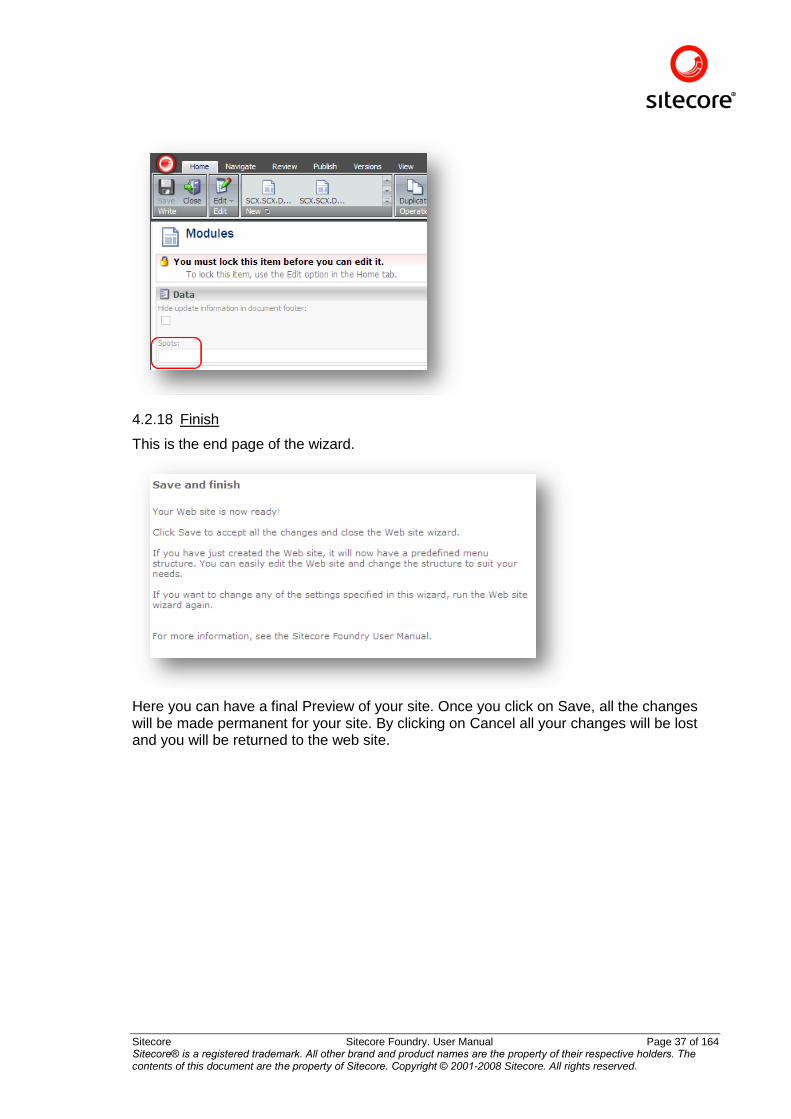
4.2.18 Finish
This is the end page of the wizard.
Here you can have a final Preview of your site. Once you click on Save, all the changes will be made permanent for your site. By clicking on Cancel all your changes will be lost and you will be returned to the web site.
Sitecore Sitecore Foundry. User Manual Page 38 of 164 Sitecore® is a registered trademark. All other brand and product names are the property of their respective holders. The contents of this document are the property of Sitecore. Copyright © 2001-2008 Sitecore. All rights reserved.
Chapter 5 Authoring Content
This chapter provides general information on how to use the editing facilities within the site.
5.1 Edit mode
The product provides an editing mode. This is the mode in which editors can create or change content directly on the site. Edit mode displays the website as it will appear when published, but provides a user interface for editing and authoring. Edit mode allows the user to navigate through the site using whatever navigation features the website itself provides.
Note: This document describes the basic functionality behind editing content. Please refer to the separate chapters Editing Content and Using the Rich Text Editor for more extensive details.
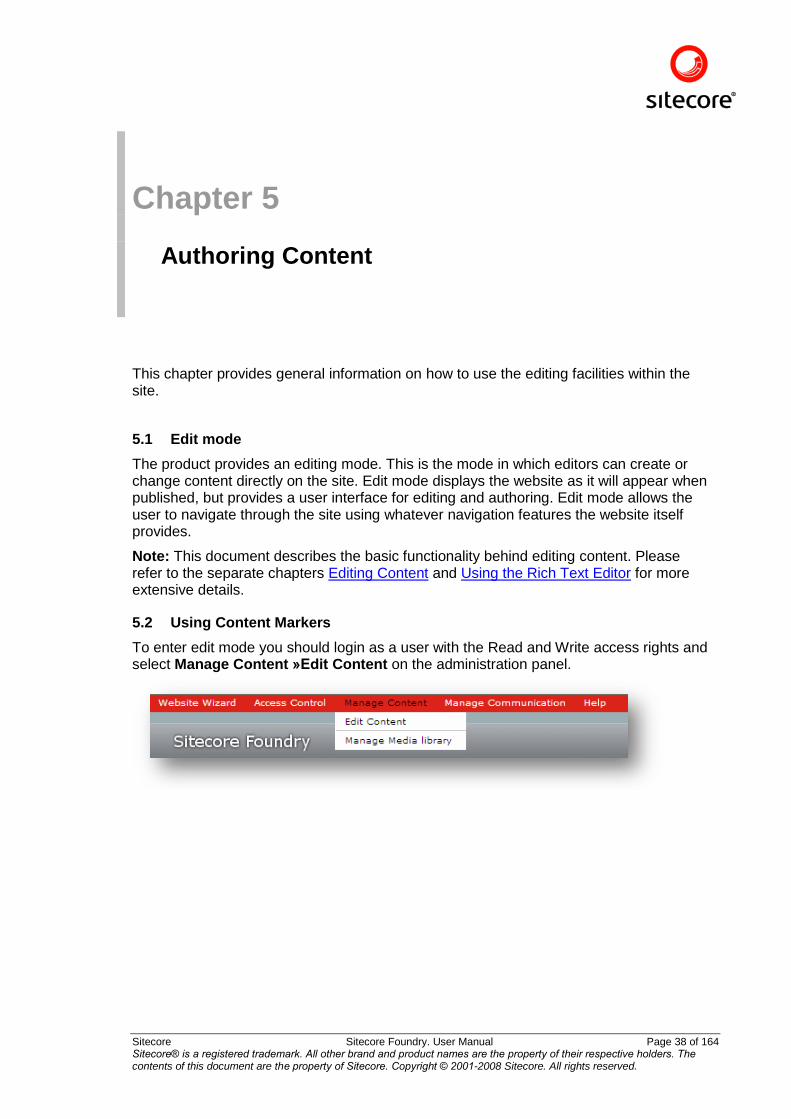
5.2 Using Content Markers
To enter edit mode you should login as a user with the Read and Write access rights and select Manage Content »Edit Content on the administration panel.
Sitecore Sitecore Foundry. User Manual Page 39 of 164 Sitecore® is a registered trademark. All other brand and product names are the property of their respective holders. The contents of this document are the property of Sitecore. Copyright © 2001-2008 Sitecore. All rights reserved.
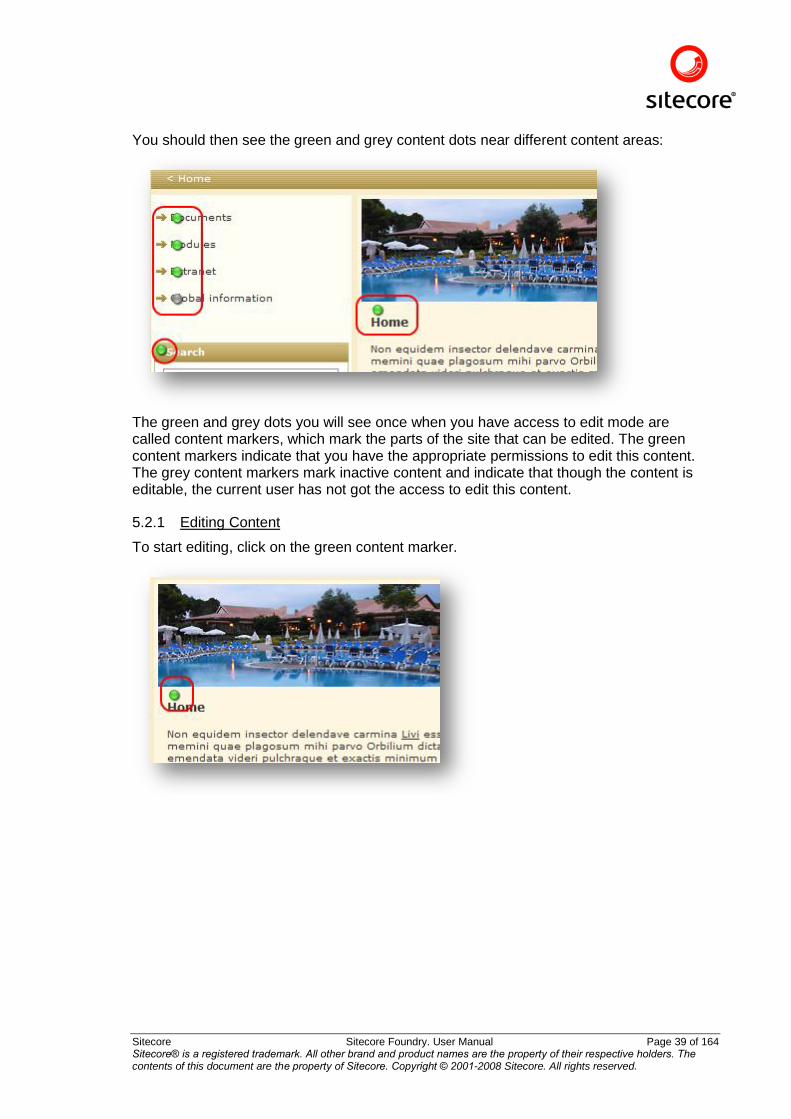
You should then see the green and grey content dots near different content areas:
The green and grey dots you will see once when you have access to edit mode are called content markers, which mark the parts of the site that can be edited. The green content markers indicate that you have the appropriate permissions to edit this content. The grey content markers mark inactive content and indicate that though the content is editable, the current user has not got the access to edit this content.
5.2.1 Editing Content
To start editing, click on the green content marker.
Sitecore Sitecore Foundry. User Manual Page 40 of 164 Sitecore® is a registered trademark. All other brand and product names are the property of their respective holders. The contents of this document are the property of Sitecore. Copyright © 2001-2008 Sitecore. All rights reserved.
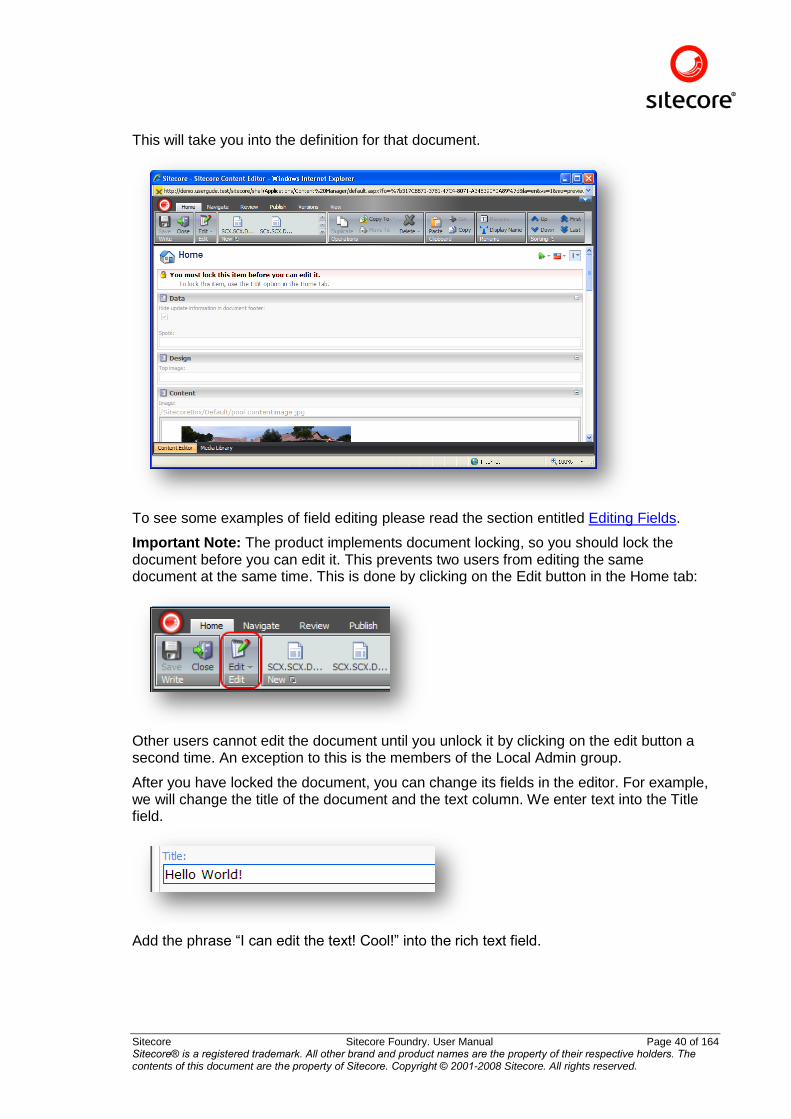
This will take you into the definition for that document.
To see some examples of field editing please read the section entitled Editing Fields.
Important Note: The product implements document locking, so you should lock the document before you can edit it. This prevents two users from editing the same document at the same time. This is done by clicking on the Edit button in the Home tab:
Other users cannot edit the document until you unlock it by clicking on the edit button a second time. An exception to this is the members of the Local Admin group.
After you have locked the document, you can change its fields in the editor. For example, we will change the title of the document and the text column. We enter text into the Title field.
Add the phrase “I can edit the text! Cool!” into the rich text field.
Sitecore Sitecore Foundry. User Manual Page 41 of 164 Sitecore® is a registered trademark. All other brand and product names are the property of their respective holders. The contents of this document are the property of Sitecore. Copyright © 2001-2008 Sitecore. All rights reserved.
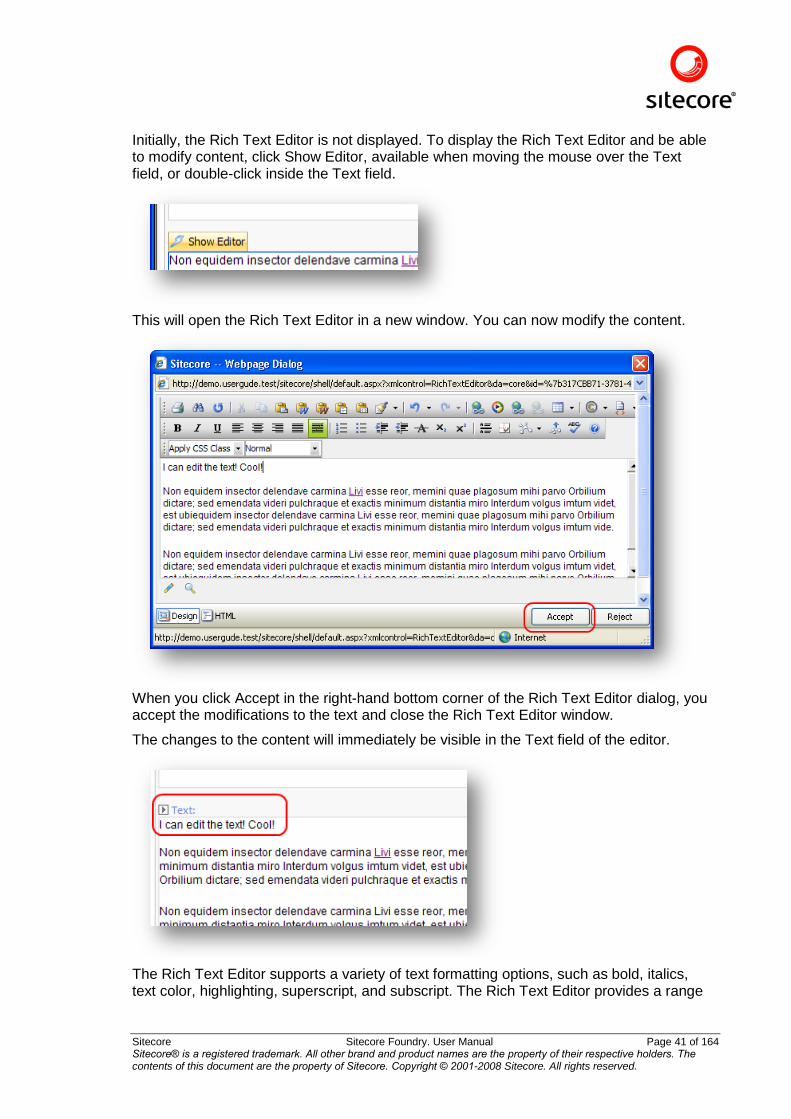
Initially, the Rich Text Editor is not displayed. To display the Rich Text Editor and be able to modify content, click Show Editor, available when moving the mouse over the Text field, or double-click inside the Text field.
This will open the Rich Text Editor in a new window. You can now modify the content.
When you click Accept in the right-hand bottom corner of the Rich Text Editor dialog, you accept the modifications to the text and close the Rich Text Editor window.
The changes to the content will immediately be visible in the Text field of the editor.
The Rich Text Editor supports a variety of text formatting options, such as bold, italics, text color, highlighting, superscript, and subscript. The Rich Text Editor provides a range
Sitecore Sitecore Foundry. User Manual Page 42 of 164 Sitecore® is a registered trademark. All other brand and product names are the property of their respective holders. The contents of this document are the property of Sitecore. Copyright © 2001-2008 Sitecore. All rights reserved.
of powerful features besides formatting. These include table management, undo and redo options, direct HTML editing, and many more.
When you are done, Save the document and Close it.
Remember to frequently save any changes. By saving work regularly, users ensure that they only lose relatively few changes if the network connection goes down, if power is lost, or other circumstances that might cause the loss of unsaved data.
There are two ways to save content in the editor. Changes may be saved by using the Save button available on the Ribbon or use <Ctrl+S>.
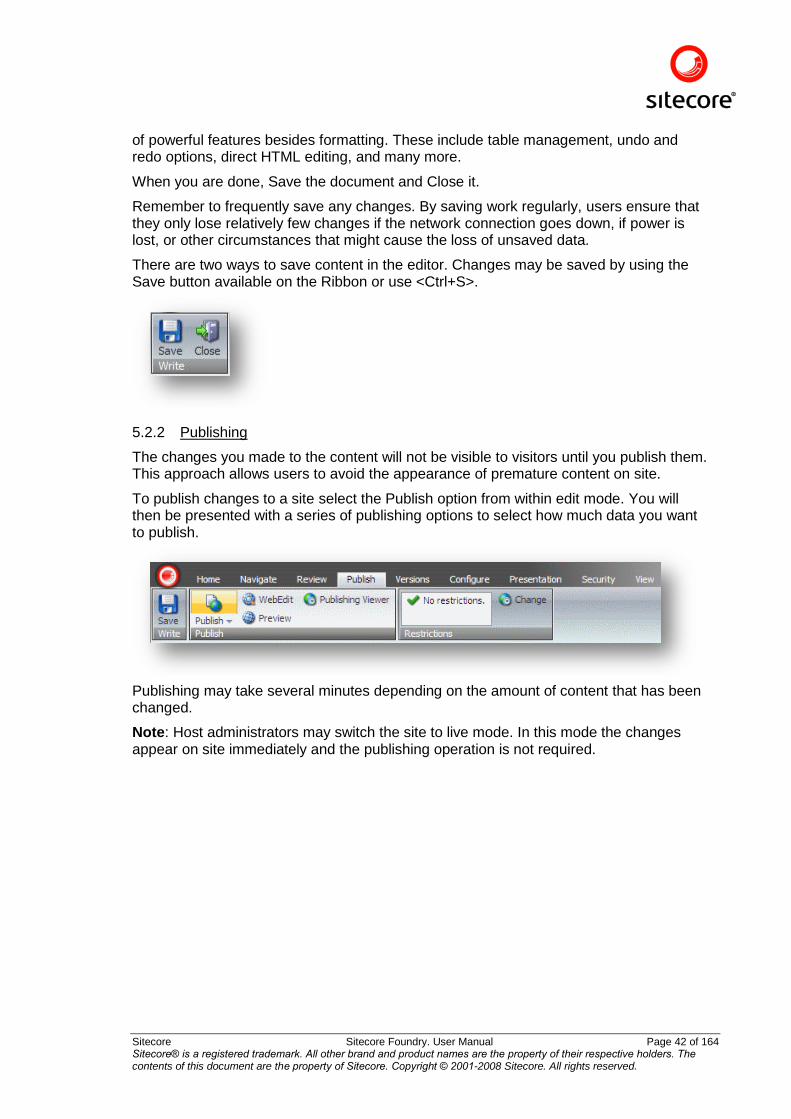
5.2.2 Publishing
The changes you made to the content will not be visible to visitors until you publish them. This approach allows users to avoid the appearance of premature content on site.
To publish changes to a site select the Publish option from within edit mode. You will then be presented with a series of publishing options to select how much data you want to publish.
Publishing may take several minutes depending on the amount of content that has been changed.
Note: Host administrators may switch the site to live mode. In this mode the changes appear on site immediately and the publishing operation is not required.
Sitecore Sitecore Foundry. User Manual Page 43 of 164 Sitecore® is a registered trademark. All other brand and product names are the property of their respective holders. The contents of this document are the property of Sitecore. Copyright © 2001-2008 Sitecore. All rights reserved.
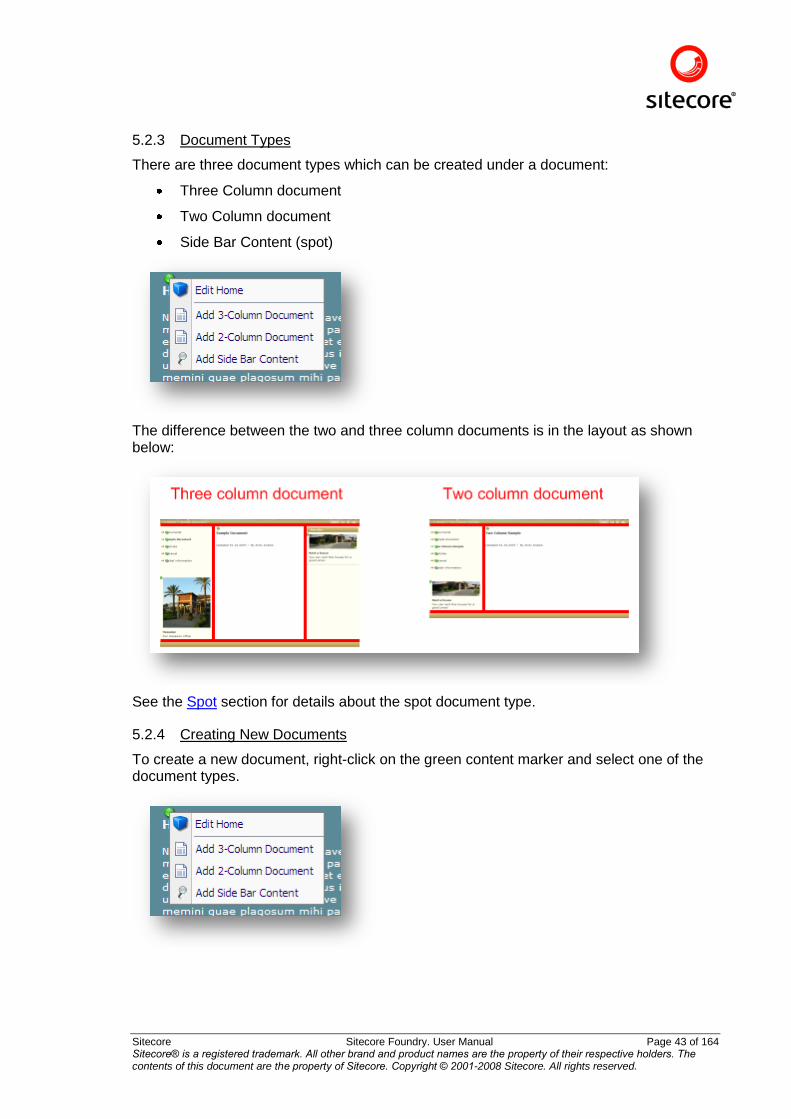
5.2.3 Document Types
There are three document types which can be created under a document:
Three Column document
Two Column document
Side Bar Content (spot)
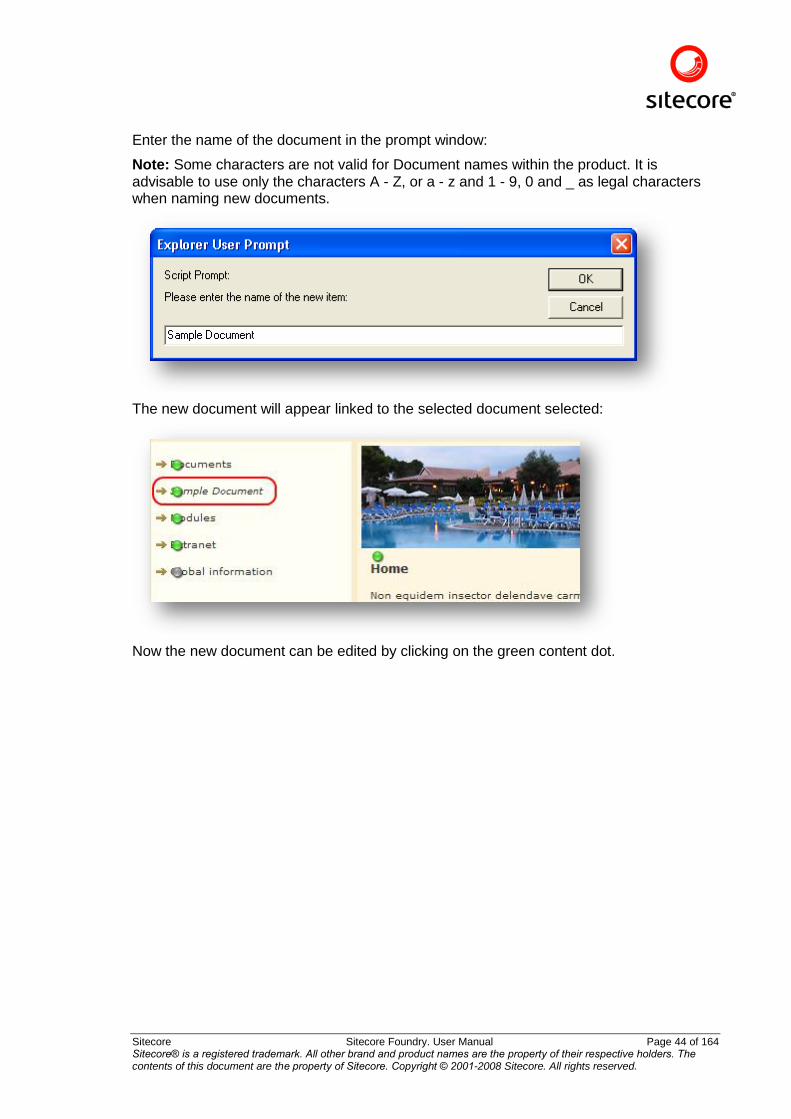
The difference between the two and three column documents is in the layout as shown below:
See the Spot section for details about the spot document type.
5.2.4 Creating New Documents
To create a new document, right-click on the green content marker and select one of the document types.
Sitecore Sitecore Foundry. User Manual Page 44 of 164 Sitecore® is a registered trademark. All other brand and product names are the property of their respective holders. The contents of this document are the property of Sitecore. Copyright © 2001-2008 Sitecore. All rights reserved.
Enter the name of the document in the prompt window:
Note: Some characters are not valid for Document names within the product. It is advisable to use only the characters A - Z, or a - z and 1 - 9, 0 and _ as legal characters when naming new documents.
The new document will appear linked to the selected document selected:
Now the new document can be edited by clicking on the green content dot.
Sitecore Sitecore Foundry. User Manual Page 45 of 164 Sitecore® is a registered trademark. All other brand and product names are the property of their respective holders. The contents of this document are the property of Sitecore. Copyright © 2001-2008 Sitecore. All rights reserved.
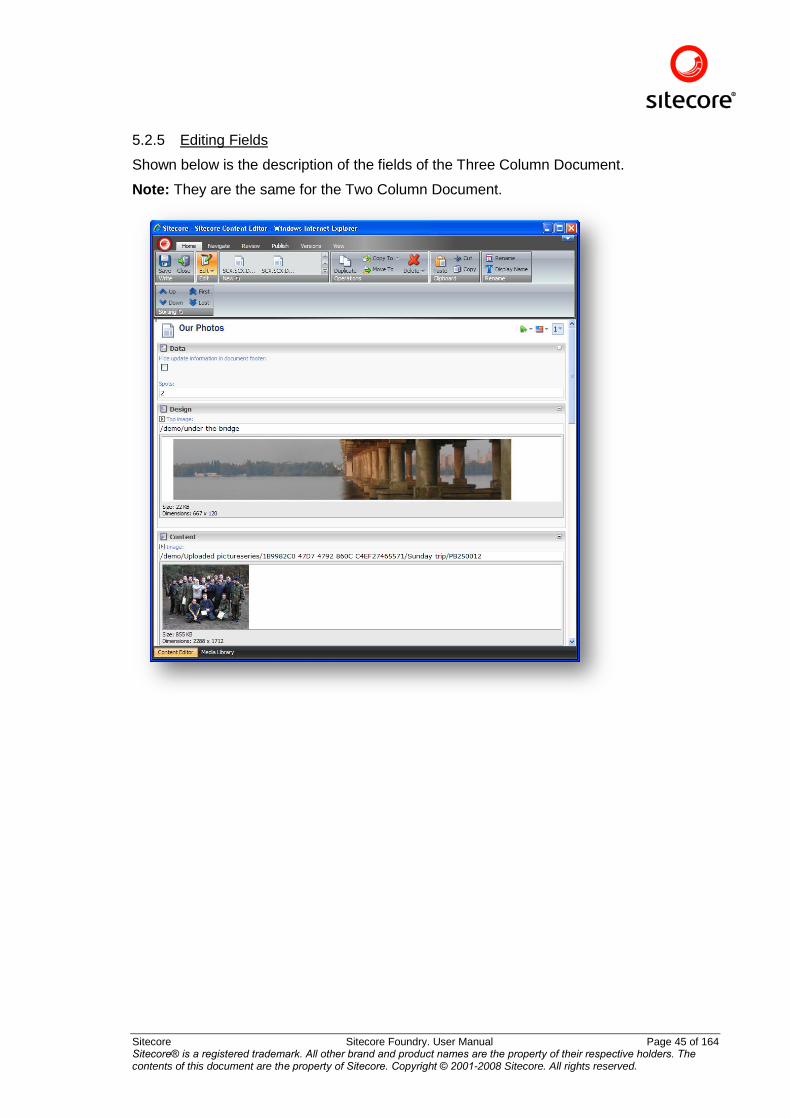
5.2.5 Editing Fields
Shown below is the description of the fields of the Three Column Document.
Note: They are the same for the Two Column Document.
Sitecore Sitecore Foundry. User Manual Page 46 of 164 Sitecore® is a registered trademark. All other brand and product names are the property of their respective holders. The contents of this document are the property of Sitecore. Copyright © 2001-2008 Sitecore. All rights reserved.
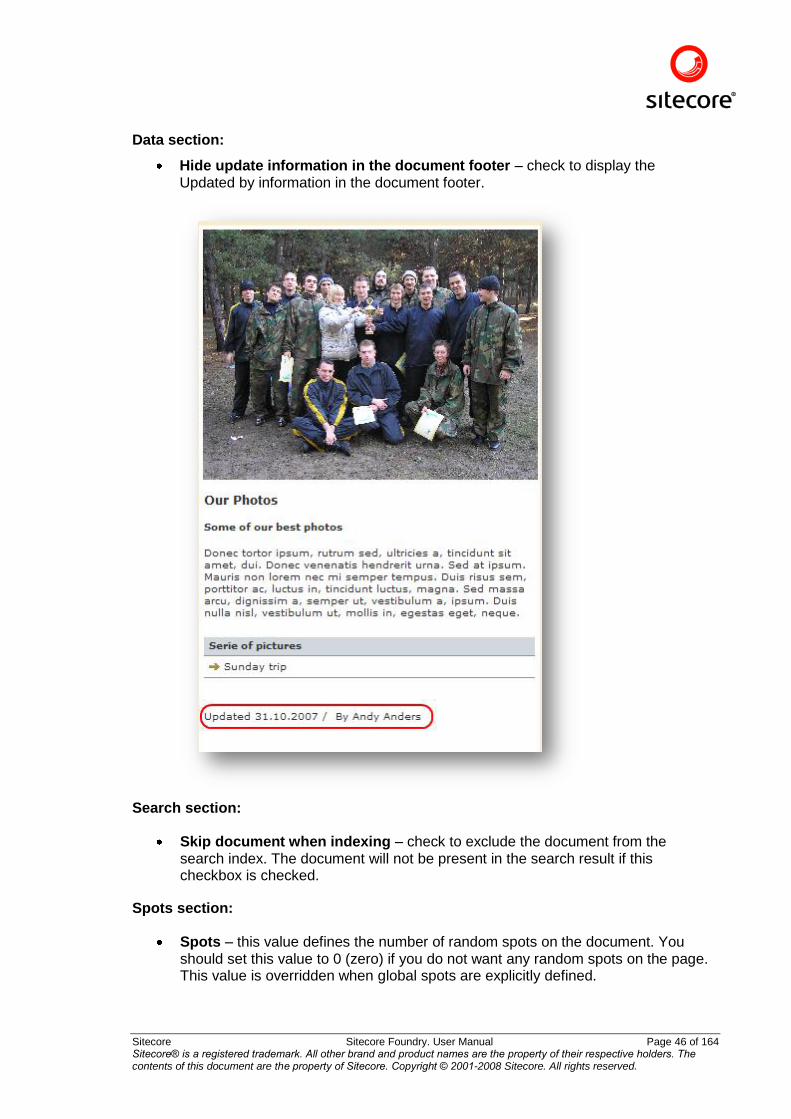
Data section:
Hide update information in the document footer – check to display the Updated by information in the document footer.
Search section:
Skip document when indexing – check to exclude the document from the search index. The document will not be present in the search result if this checkbox is checked.
Spots section:
Spots – this value defines the number of random spots on the document. You should set this value to 0 (zero) if you do not want any random spots on the page. This value is overridden when global spots are explicitly defined.
Sitecore Sitecore Foundry. User Manual Page 47 of 164 Sitecore® is a registered trademark. All other brand and product names are the property of their respective holders. The contents of this document are the property of Sitecore. Copyright © 2001-2008 Sitecore. All rights reserved.
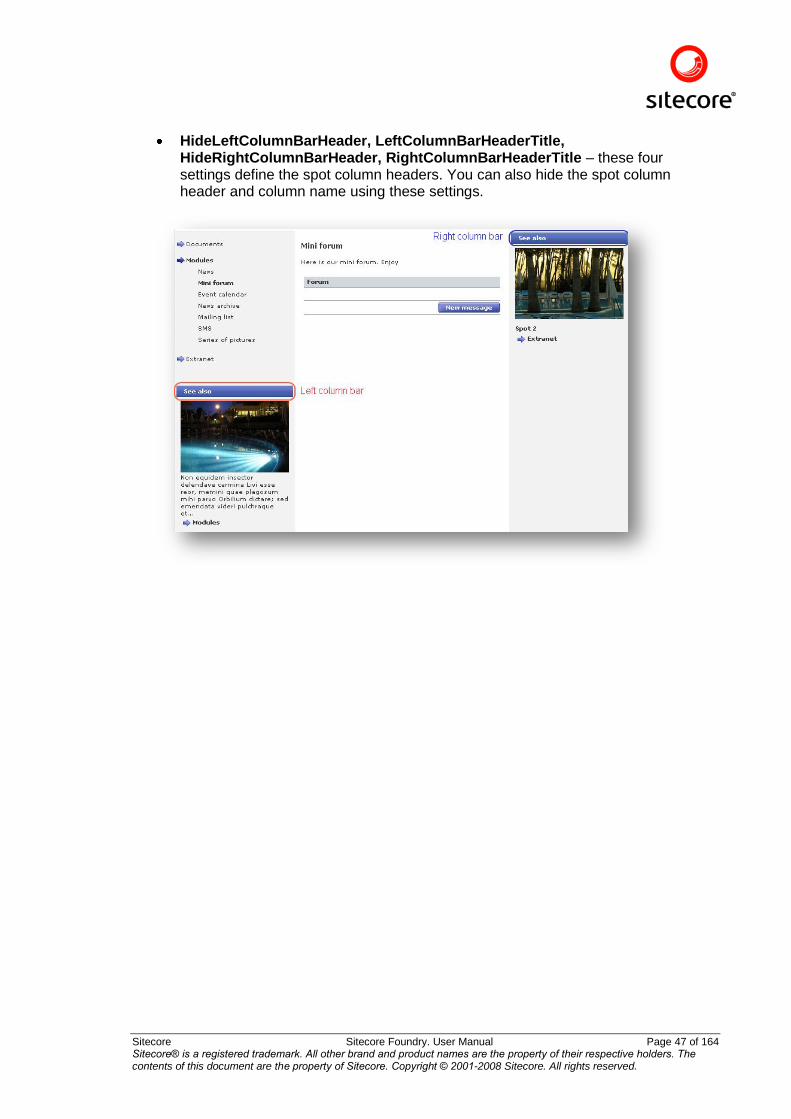
HideLeftColumnBarHeader, LeftColumnBarHeaderTitle, HideRightColumnBarHeader, RightColumnBarHeaderTitle – these four settings define the spot column headers. You can also hide the spot column header and column name using these settings.
Sitecore Sitecore Foundry. User Manual Page 48 of 164 Sitecore® is a registered trademark. All other brand and product names are the property of their respective holders. The contents of this document are the property of Sitecore. Copyright © 2001-2008 Sitecore. All rights reserved.
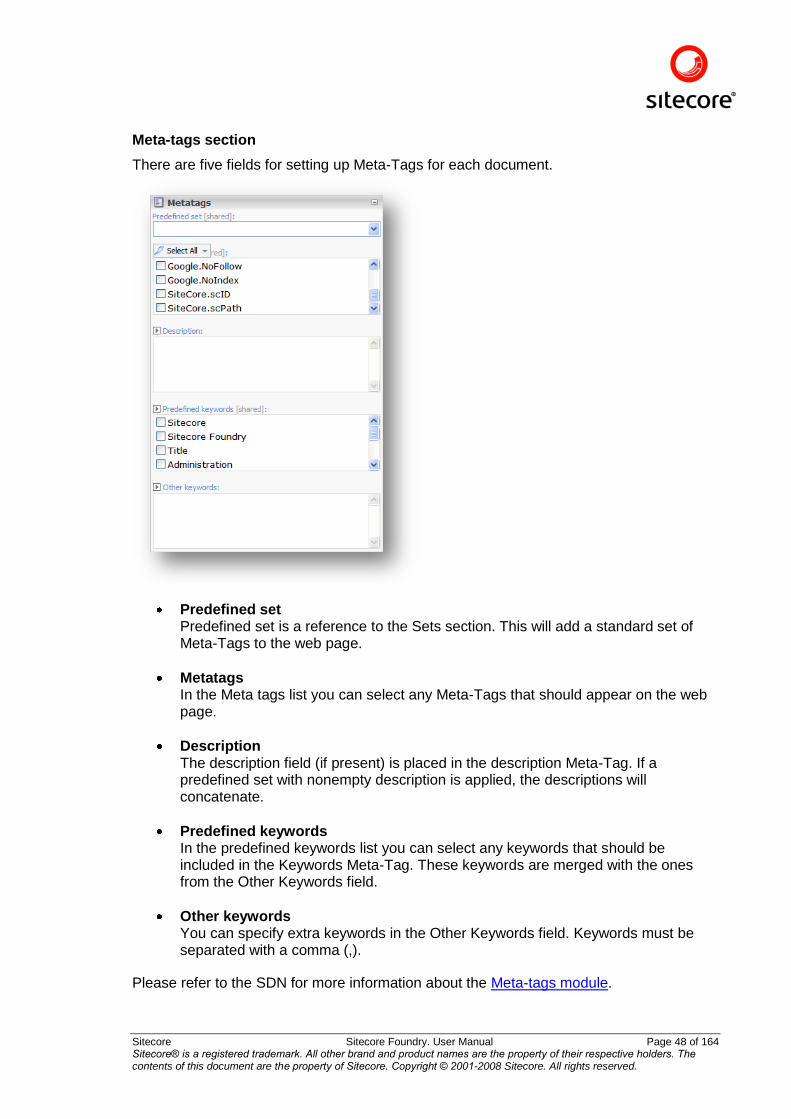
Meta-tags section
There are five fields for setting up Meta-Tags for each document.
Predefined set Predefined set is a reference to the Sets section. This will add a standard set of Meta-Tags to the web page.
Metatags In the Meta tags list you can select any Meta-Tags that should appear on the web page.
Description The description field (if present) is placed in the description Meta-Tag. If a predefined set with nonempty description is applied, the descriptions will concatenate.
Predefined keywords In the predefined keywords list you can select any keywords that should be included in the Keywords Meta-Tag. These keywords are merged with the ones from the Other Keywords field.
Other keywords You can specify extra keywords in the Other Keywords field. Keywords must be separated with a comma (,).
Please refer to the SDN for more information about the Meta-tags module.
Sitecore Sitecore Foundry. User Manual Page 49 of 164 Sitecore® is a registered trademark. All other brand and product names are the property of their respective holders. The contents of this document are the property of Sitecore. Copyright © 2001-2008 Sitecore. All rights reserved.
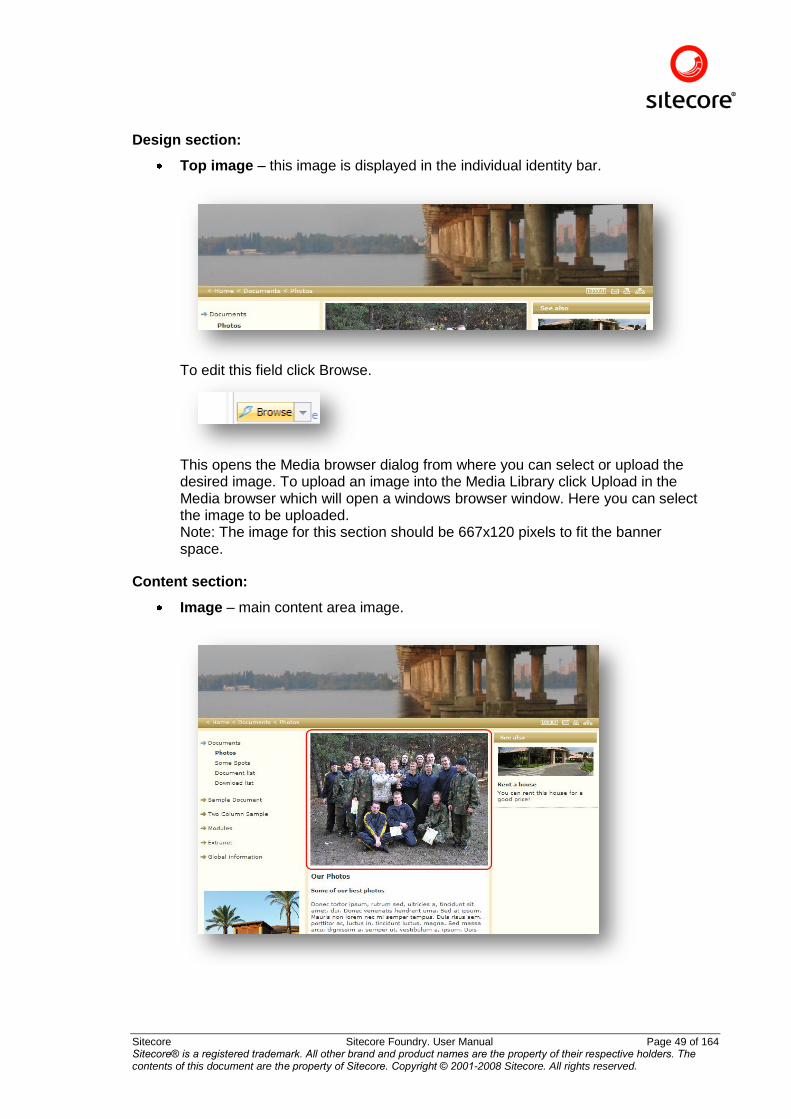
Design section:
Top image – this image is displayed in the individual identity bar.
To edit this field click Browse.
This opens the Media browser dialog from where you can select or upload the desired image. To upload an image into the Media Library click Upload in the Media browser which will open a windows browser window. Here you can select the image to be uploaded. Note: The image for this section should be 667x120 pixels to fit the banner space.
Content section:
Image – main content area image.
Sitecore Sitecore Foundry. User Manual Page 50 of 164 Sitecore® is a registered trademark. All other brand and product names are the property of their respective holders. The contents of this document are the property of Sitecore. Copyright © 2001-2008 Sitecore. All rights reserved.
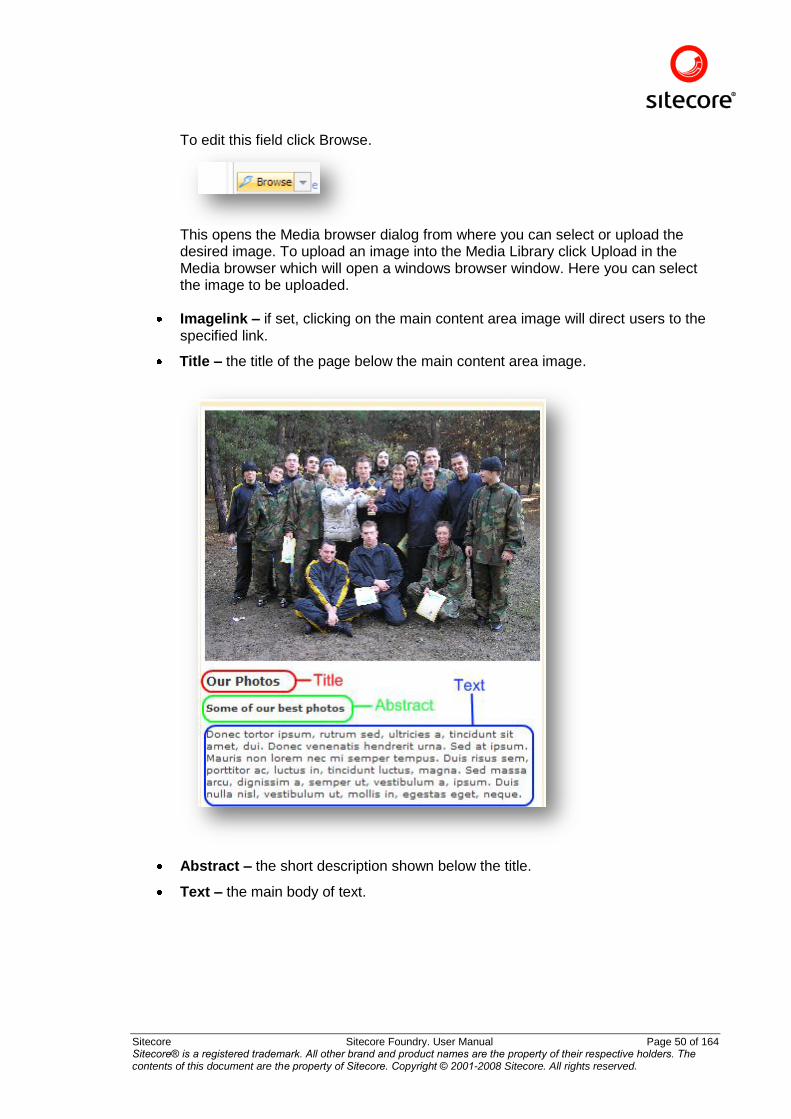
To edit this field click Browse.
This opens the Media browser dialog from where you can select or upload the desired image. To upload an image into the Media Library click Upload in the Media browser which will open a windows browser window. Here you can select the image to be uploaded.
Imagelink – if set, clicking on the main content area image will direct users to the specified link.
Title – the title of the page below the main content area image.
Abstract – the short description shown below the title.
Text – the main body of text.
Sitecore Sitecore Foundry. User Manual Page 51 of 164 Sitecore® is a registered trademark. All other brand and product names are the property of their respective holders. The contents of this document are the property of Sitecore. Copyright © 2001-2008 Sitecore. All rights reserved.
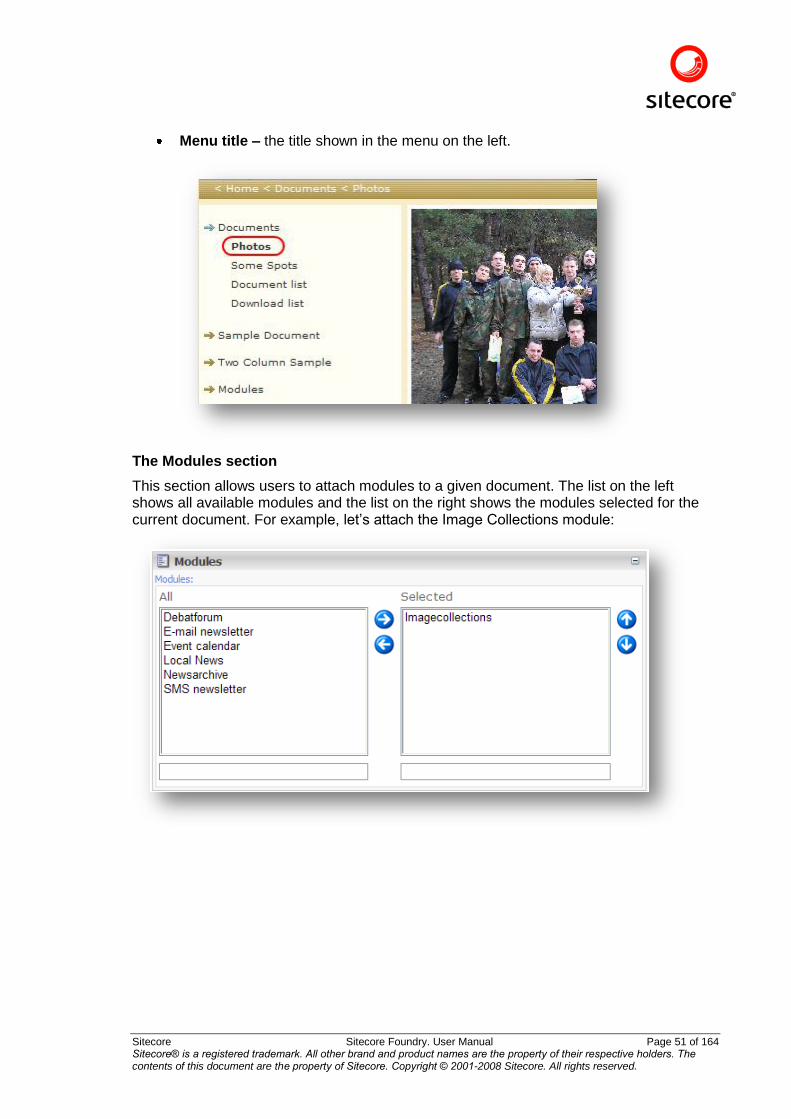
Menu title – the title shown in the menu on the left.
The Modules section
This section allows users to attach modules to a given document. The list on the left shows all available modules and the list on the right shows the modules selected for the current document. For example, let‟s attach the Image Collections module:
Sitecore Sitecore Foundry. User Manual Page 52 of 164 Sitecore® is a registered trademark. All other brand and product names are the property of their respective holders. The contents of this document are the property of Sitecore. Copyright © 2001-2008 Sitecore. All rights reserved.
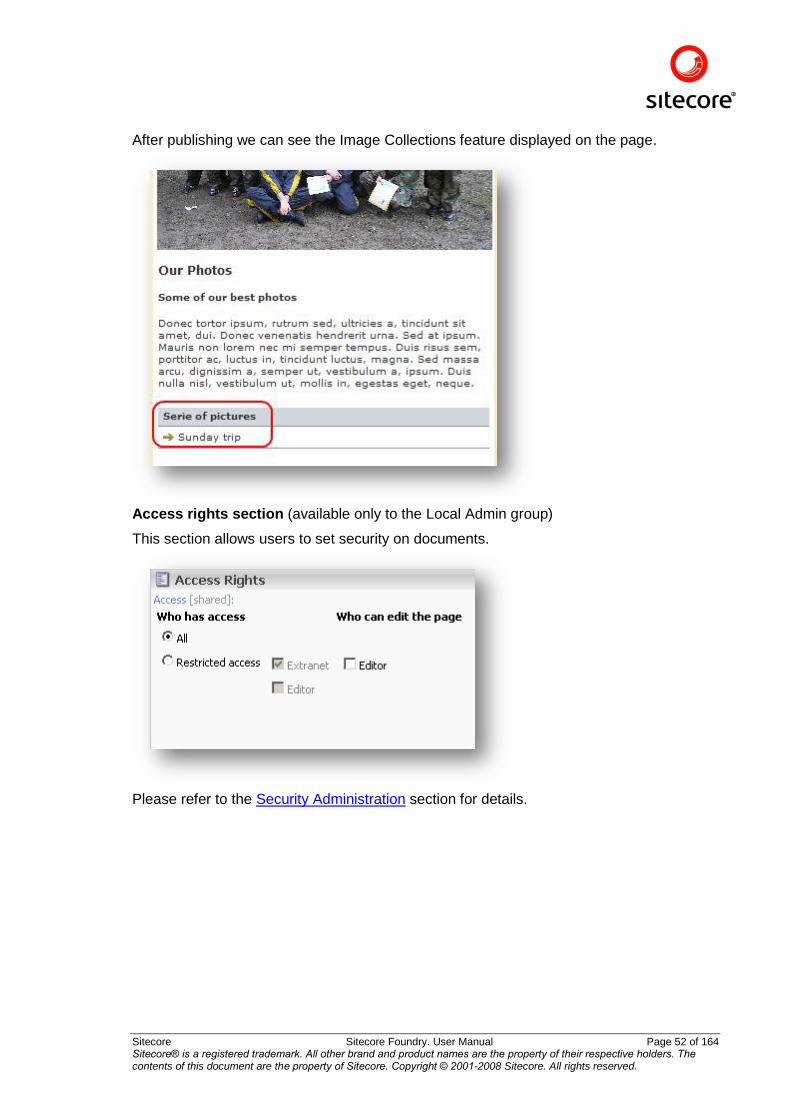
After publishing we can see the Image Collections feature displayed on the page.
Access rights section (available only to the Local Admin group)
This section allows users to set security on documents.
Please refer to the Security Administration section for details.
Sitecore Sitecore Foundry. User Manual Page 53 of 164 Sitecore® is a registered trademark. All other brand and product names are the property of their respective holders. The contents of this document are the property of Sitecore. Copyright © 2001-2008 Sitecore. All rights reserved.
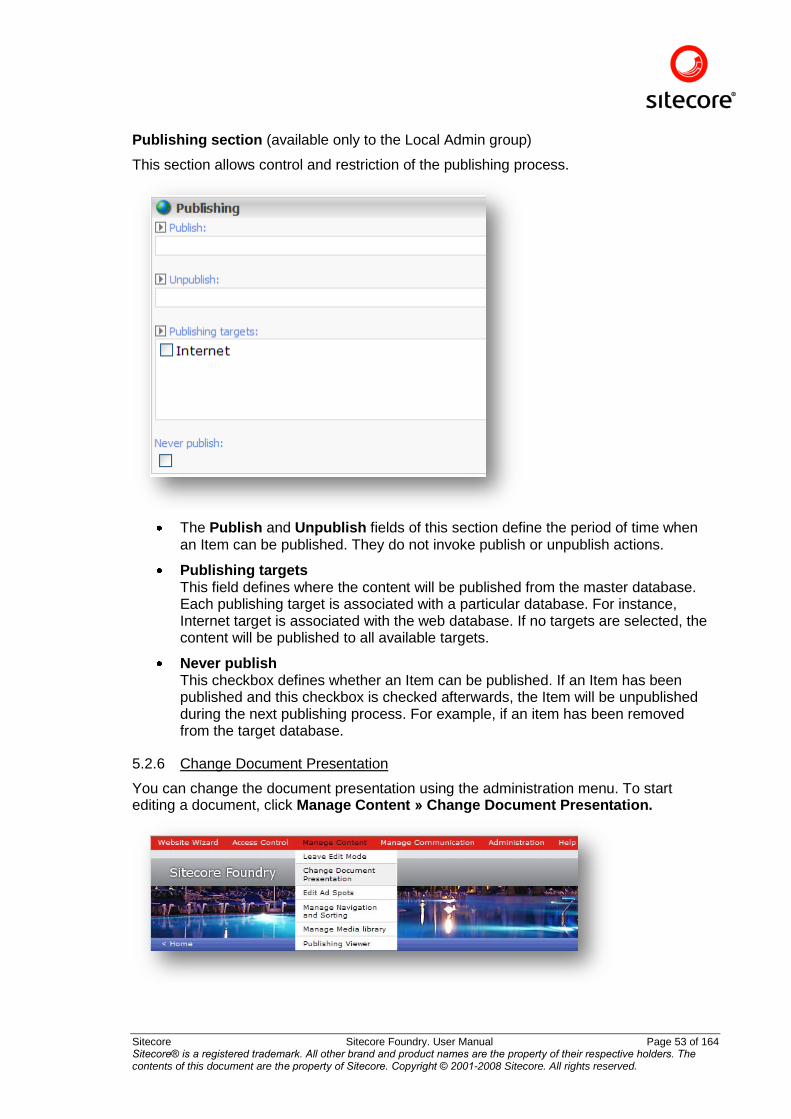
Publishing section (available only to the Local Admin group)
This section allows control and restriction of the publishing process.
The Publish and Unpublish fields of this section define the period of time when an Item can be published. They do not invoke publish or unpublish actions.
Publishing targets This field defines where the content will be published from the master database. Each publishing target is associated with a particular database. For instance, Internet target is associated with the web database. If no targets are selected, the content will be published to all available targets.
Never publish This checkbox defines whether an Item can be published. If an Item has been published and this checkbox is checked afterwards, the Item will be unpublished during the next publishing process. For example, if an item has been removed from the target database.
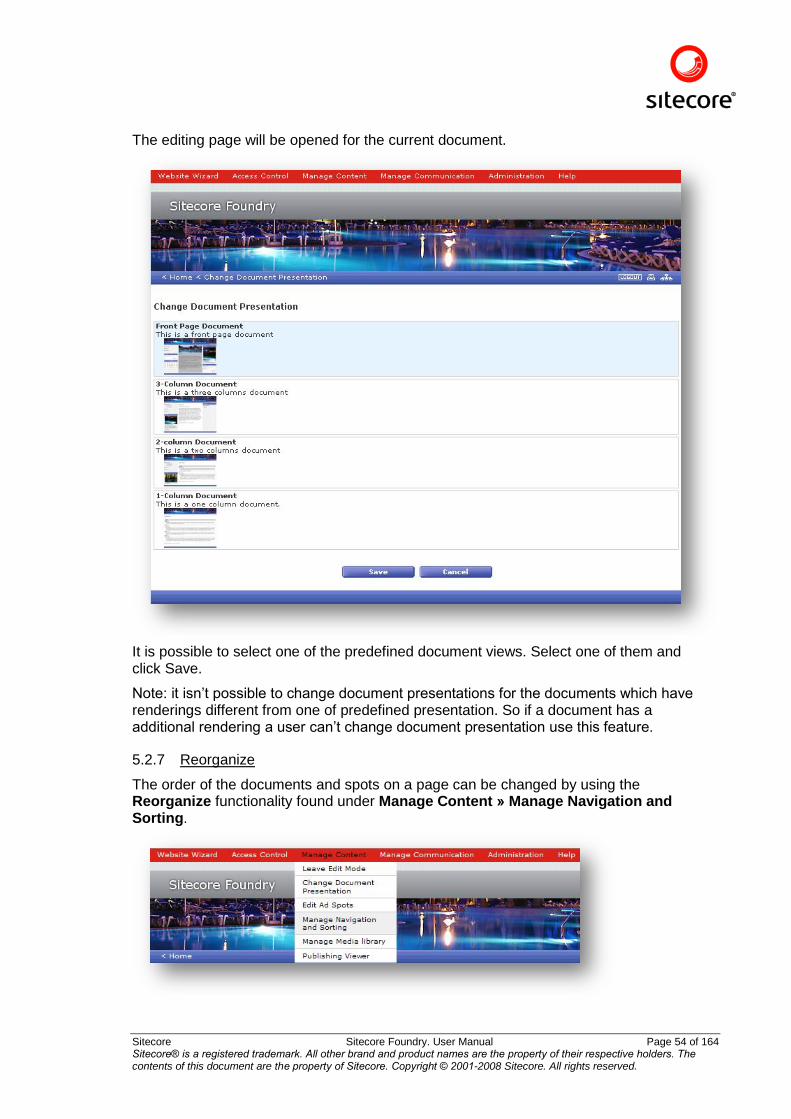
5.2.6 Change Document Presentation
You can change the document presentation using the administration menu. To start editing a document, click Manage Content » Change Document Presentation.
Sitecore Sitecore Foundry. User Manual Page 54 of 164 Sitecore® is a registered trademark. All other brand and product names are the property of their respective holders. The contents of this document are the property of Sitecore. Copyright © 2001-2008 Sitecore. All rights reserved.
The editing page will be opened for the current document.
It is possible to select one of the predefined document views. Select one of them and click Save.
Note: it isn‟t possible to change document presentations for the documents which have renderings different from one of predefined presentation. So if a document has a additional rendering a user can‟t change document presentation use this feature.
5.2.7 Reorganize
The order of the documents and spots on a page can be changed by using the Reorganize functionality found under Manage Content » Manage Navigation and Sorting.
Sitecore Sitecore Foundry. User Manual Page 55 of 164 Sitecore® is a registered trademark. All other brand and product names are the property of their respective holders. The contents of this document are the property of Sitecore. Copyright © 2001-2008 Sitecore. All rights reserved.
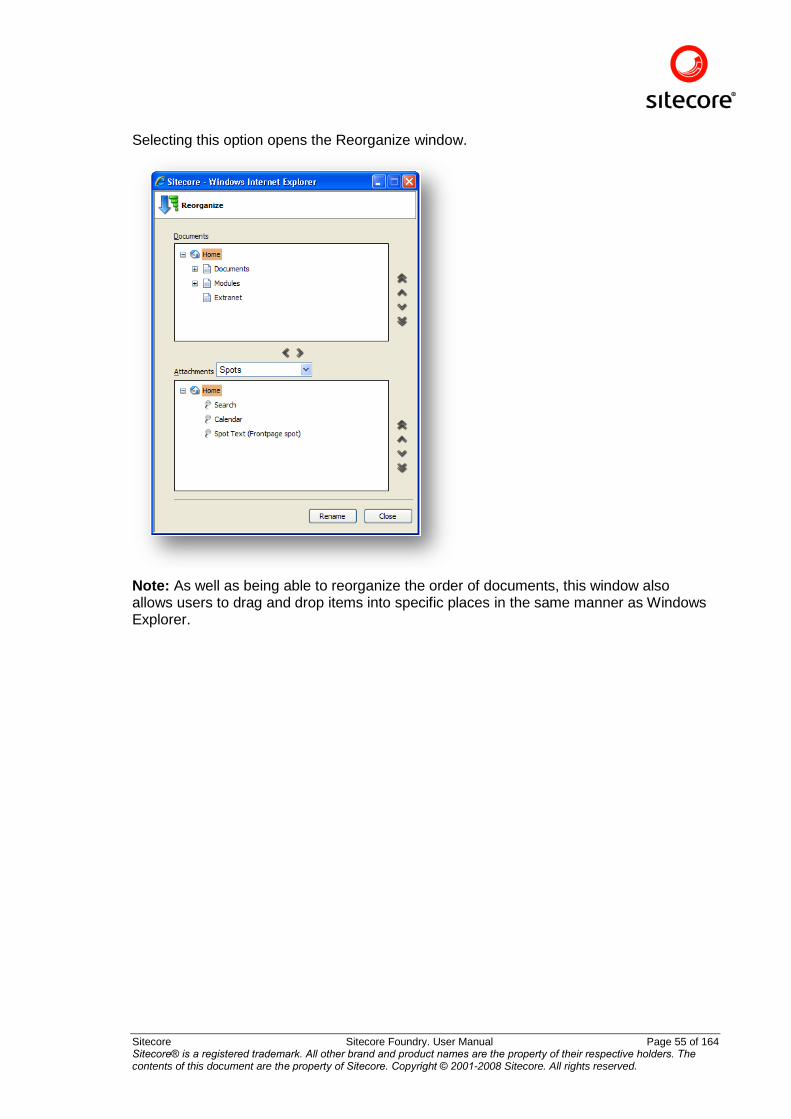
Selecting this option opens the Reorganize window.
Note: As well as being able to reorganize the order of documents, this window also allows users to drag and drop items into specific places in the same manner as Windows Explorer.
Sitecore Sitecore Foundry. User Manual Page 56 of 164 Sitecore® is a registered trademark. All other brand and product names are the property of their respective holders. The contents of this document are the property of Sitecore. Copyright © 2001-2008 Sitecore. All rights reserved.
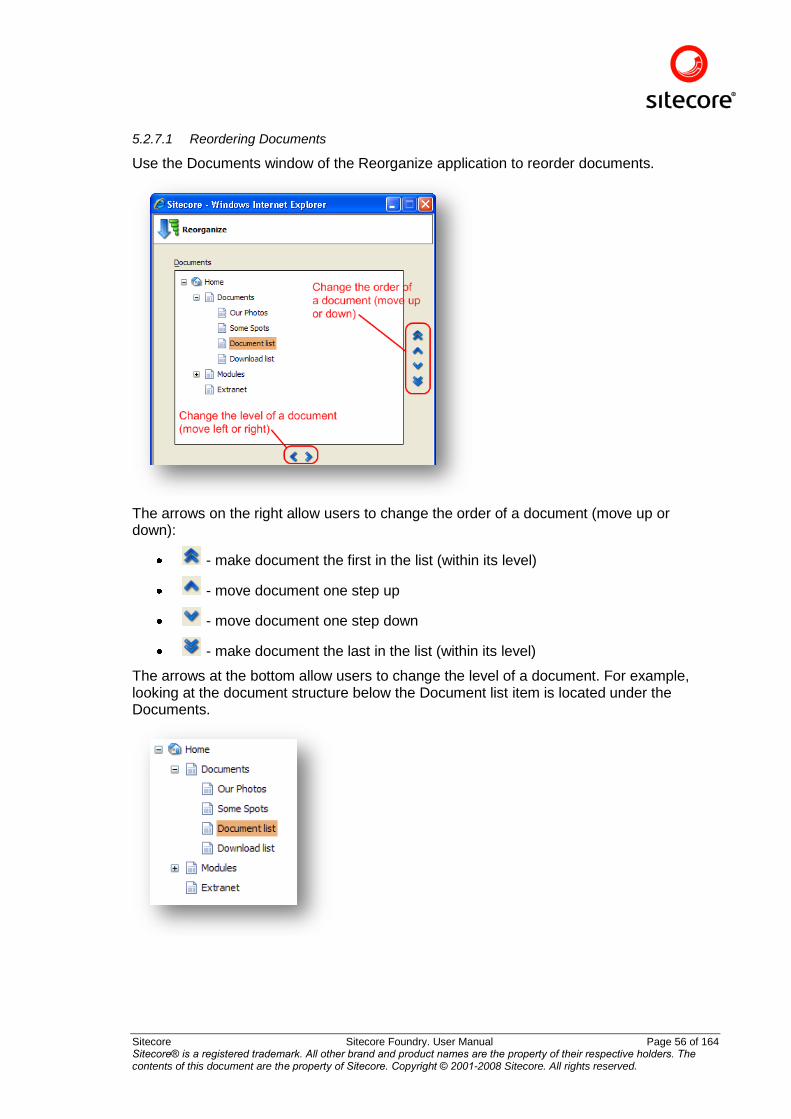
5.2.7.1 Reordering Documents
Use the Documents window of the Reorganize application to reorder documents.
The arrows on the right allow users to change the order of a document (move up or down):
- make document the first in the list (within its level)
- move document one step up
- move document one step down
- make document the last in the list (within its level)
The arrows at the bottom allow users to change the level of a document. For example, looking at the document structure below the Document list item is located under the Documents.
Sitecore Sitecore Foundry. User Manual Page 57 of 164 Sitecore® is a registered trademark. All other brand and product names are the property of their respective holders. The contents of this document are the property of Sitecore. Copyright © 2001-2008 Sitecore. All rights reserved.
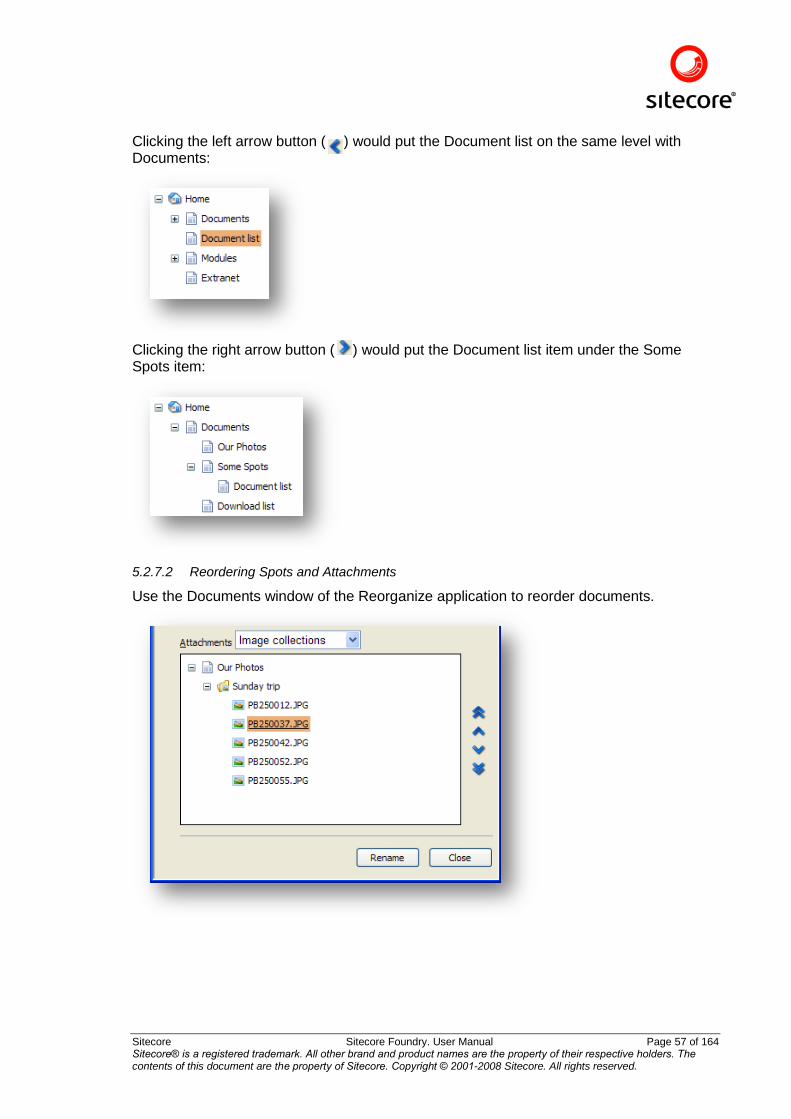
Clicking the left arrow button ( ) would put the Document list on the same level with Documents:
Clicking the right arrow button ( ) would put the Document list item under the Some Spots item:
5.2.7.2 Reordering Spots and Attachments
Use the Documents window of the Reorganize application to reorder documents.
Sitecore Sitecore Foundry. User Manual Page 58 of 164 Sitecore® is a registered trademark. All other brand and product names are the property of their respective holders. The contents of this document are the property of Sitecore. Copyright © 2001-2008 Sitecore. All rights reserved.
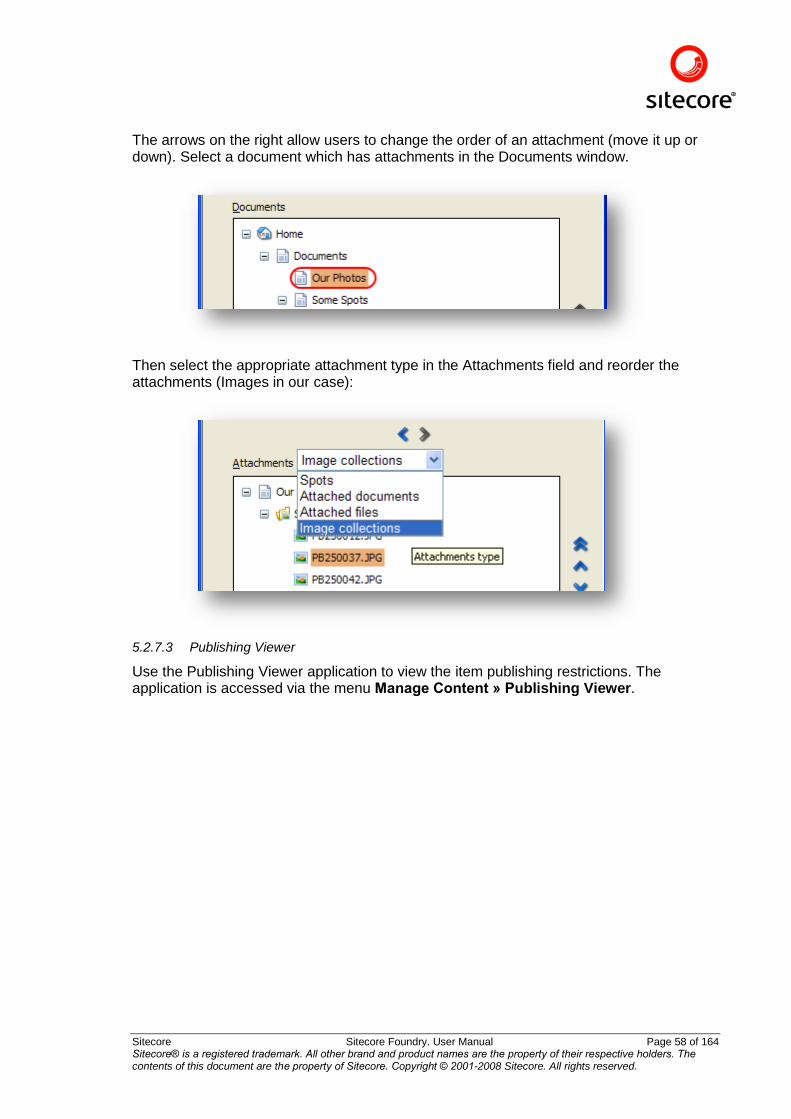
The arrows on the right allow users to change the order of an attachment (move it up or down). Select a document which has attachments in the Documents window.
Then select the appropriate attachment type in the Attachments field and reorder the attachments (Images in our case):
5.2.7.3 Publishing Viewer
Use the Publishing Viewer application to view the item publishing restrictions. The application is accessed via the menu Manage Content » Publishing Viewer.
Sitecore Sitecore Foundry. User Manual Page 59 of 164 Sitecore® is a registered trademark. All other brand and product names are the property of their respective holders. The contents of this document are the property of Sitecore. Copyright © 2001-2008 Sitecore. All rights reserved.
Chapter 6 Security Administration
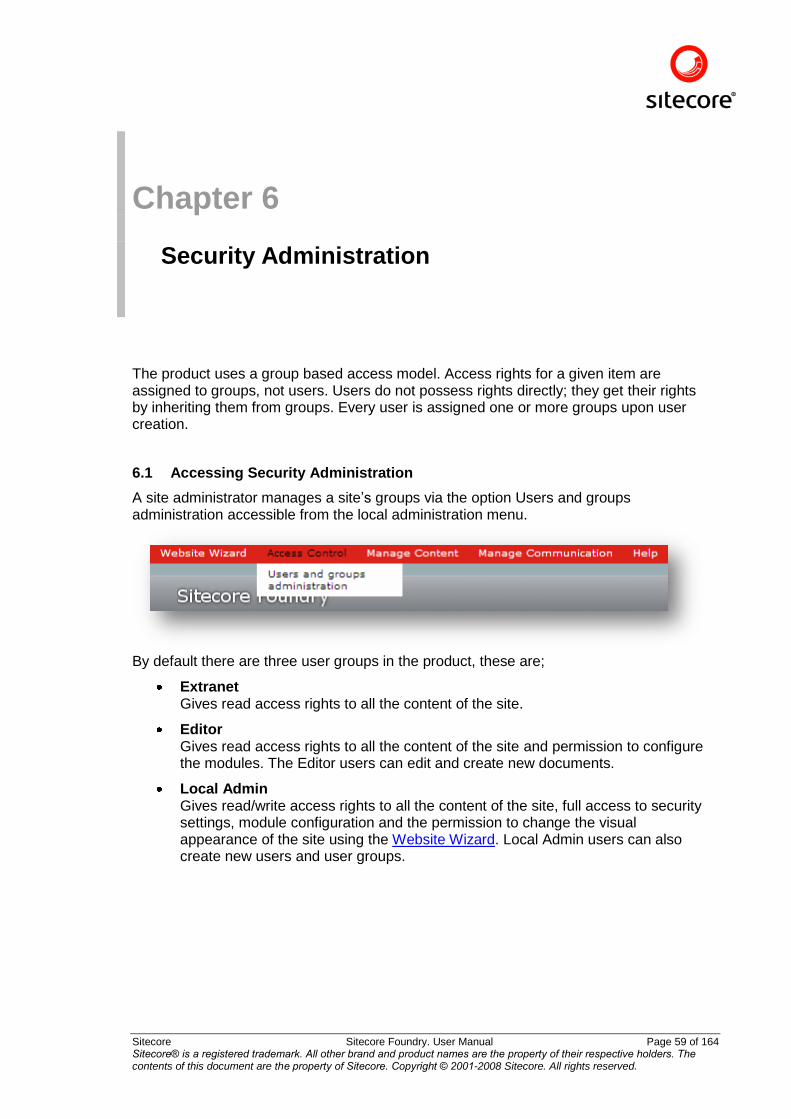
The product uses a group based access model. Access rights for a given item are assigned to groups, not users. Users do not possess rights directly; they get their rights by inheriting them from groups. Every user is assigned one or more groups upon user creation.
6.1 Accessing Security Administration
A site administrator manages a site‟s groups via the option Users and groups administration accessible from the local administration menu.
By default there are three user groups in the product, these are;
Extranet Gives read access rights to all the content of the site.
Editor Gives read access rights to all the content of the site and permission to configure the modules. The Editor users can edit and create new documents.
Local Admin Gives read/write access rights to all the content of the site, full access to security settings, module configuration and the permission to change the visual appearance of the site using the Website Wizard. Local Admin users can also create new users and user groups.
Sitecore Sitecore Foundry. User Manual Page 60 of 164 Sitecore® is a registered trademark. All other brand and product names are the property of their respective holders. The contents of this document are the property of Sitecore. Copyright © 2001-2008 Sitecore. All rights reserved.
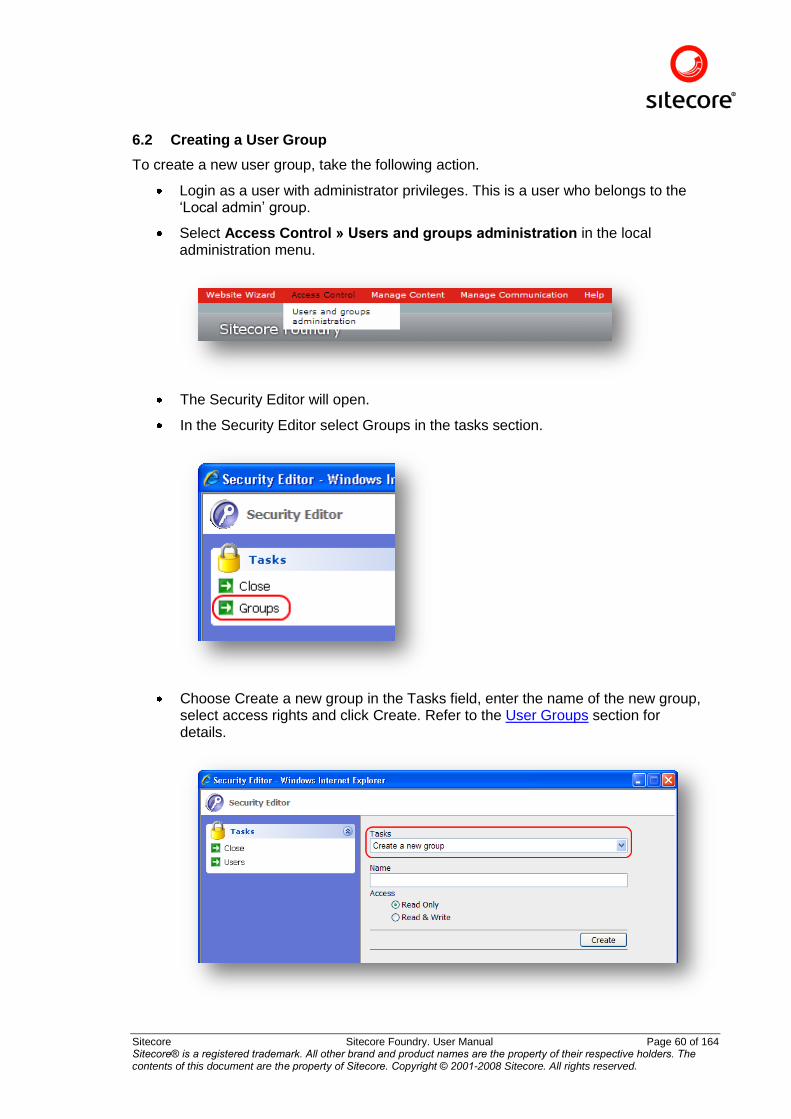
6.2 Creating a User Group
To create a new user group, take the following action.
Login as a user with administrator privileges. This is a user who belongs to the „Local admin‟ group.
Select Access Control » Users and groups administration in the local administration menu.
The Security Editor will open.
In the Security Editor select Groups in the tasks section.
Choose Create a new group in the Tasks field, enter the name of the new group, select access rights and click Create. Refer to the User Groups section for details.
Sitecore Sitecore Foundry. User Manual Page 61 of 164 Sitecore® is a registered trademark. All other brand and product names are the property of their respective holders. The contents of this document are the property of Sitecore. Copyright © 2001-2008 Sitecore. All rights reserved.
Note: if you create a group with Read Only rights, you will get the extranet group, while a group with Read/Write rights will give you the Editor group. To customize a group further you can deny or allow group access to specific items.
Note: Local administrators cannot create groups which have access to security administration. In other words they cannot create groups that have the rights of Local Admin group, only the rights of the Editor or Extranet groups.
Predefined groups cannot be deleted.
6.2.1 Read-only and Read & Write groups
The product allows the creation of groups with two access types – Read Only and Read & Write.
6.2.1.1 Read Only
This group only has Read access to documents. The only way Local administrators can give Write access to a single document for this group is by changing the users group to Read & Write.
Upon creation this group will provide no more rights than an anonymous user has. For instance, users of such a group will only see documents which have the All checkbox checked in the Security Rights section (see the Setting security on documents section for details). Administrators should allow read access to specific documents for this group manually.
6.2.1.2 Read & Write
This group has read and write access to any document. By default this group has access to the following modules:
Calendar
Newsletter
SMS
A new Read & Write group will have no write access on any document immediately after creation. Administrators should set specific rights on documents manually.
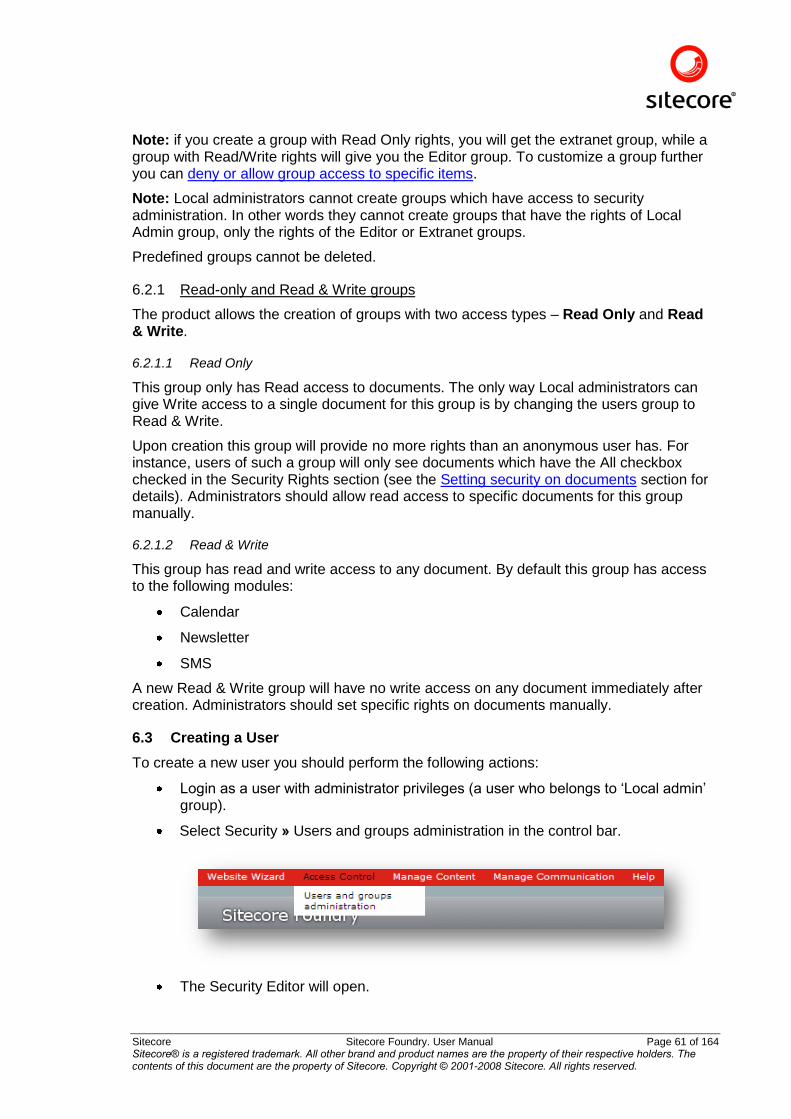
6.3 Creating a User
To create a new user you should perform the following actions:
Login as a user with administrator privileges (a user who belongs to „Local admin‟ group).
Select Security » Users and groups administration in the control bar.
The Security Editor will open.
Sitecore Sitecore Foundry. User Manual Page 62 of 164 Sitecore® is a registered trademark. All other brand and product names are the property of their respective holders. The contents of this document are the property of Sitecore. Copyright © 2001-2008 Sitecore. All rights reserved.
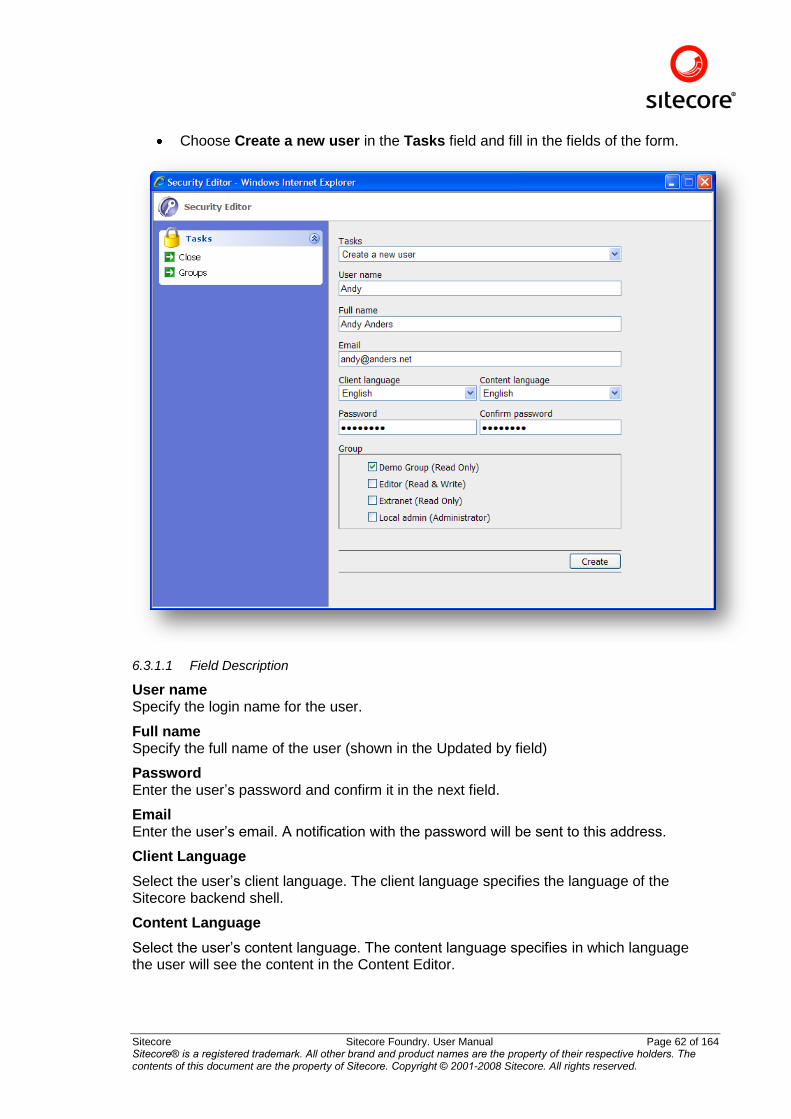
Choose Create a new user in the Tasks field and fill in the fields of the form.
6.3.1.1 Field Description
User name Specify the login name for the user.
Full name Specify the full name of the user (shown in the Updated by field)
Password Enter the user‟s password and confirm it in the next field.
Email Enter the user‟s email. A notification with the password will be sent to this address.
Client Language
Select the user‟s client language. The client language specifies the language of the Sitecore backend shell.
Content Language
Select the user‟s content language. The content language specifies in which language the user will see the content in the Content Editor.
Sitecore Sitecore Foundry. User Manual Page 63 of 164 Sitecore® is a registered trademark. All other brand and product names are the property of their respective holders. The contents of this document are the property of Sitecore. Copyright © 2001-2008 Sitecore. All rights reserved.
Group Select the user‟s groups here.
Click Create. You will get a confirmation message after successful user creation.
When a new site is created, a predefined user with the following credentials is added:
login: Admin
password: _site_name_
Group: Local admin
Note: This user cannot be deleted. Host administrators can change the password of this user from the back-end.
Refer to the Security Editor section for information on editing and deleting users.
6.4 Setting security on documents
Only users who belong to the Local Admin group can set security rights on documents for other groups.
To set the security you should:
Login as a local administrator.
Enter Edit mode (Manage Content » Edit Content from the local administration menu), select a document and click the green content marker.
Sitecore Sitecore Foundry. User Manual Page 64 of 164 Sitecore® is a registered trademark. All other brand and product names are the property of their respective holders. The contents of this document are the property of Sitecore. Copyright © 2001-2008 Sitecore. All rights reserved.
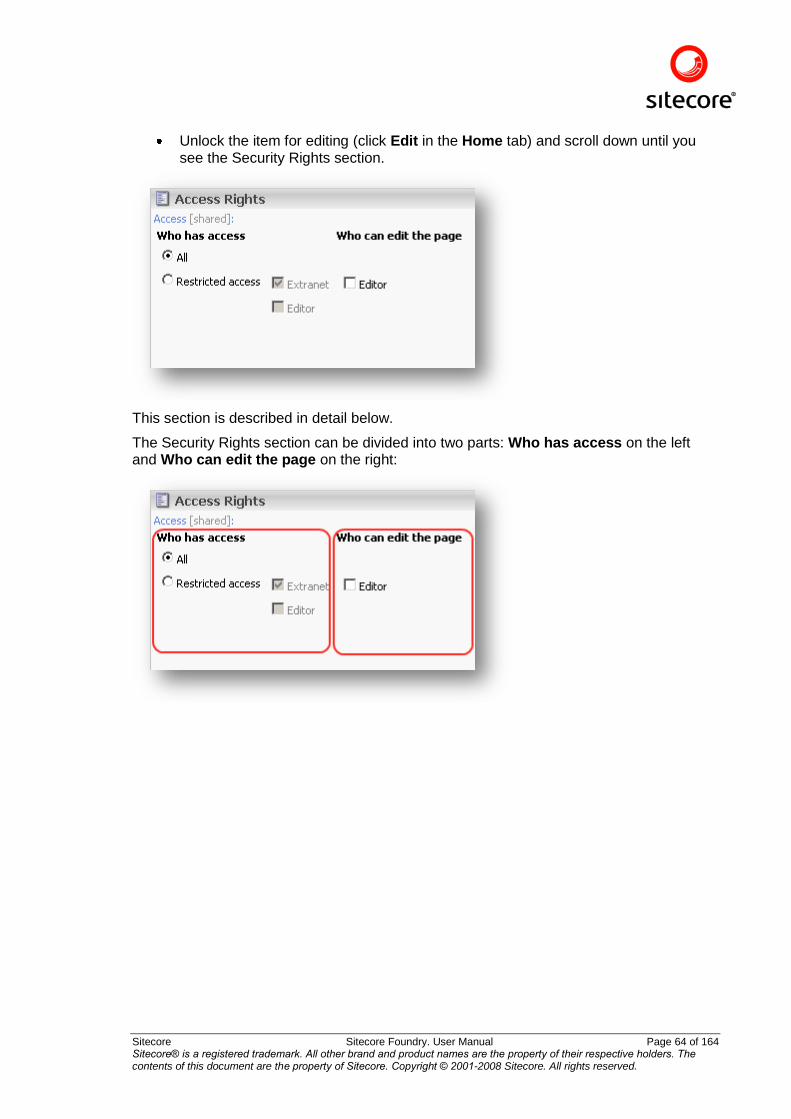
Unlock the item for editing (click Edit in the Home tab) and scroll down until you see the Security Rights section.
This section is described in detail below.
The Security Rights section can be divided into two parts: Who has access on the left and Who can edit the page on the right:
Sitecore Sitecore Foundry. User Manual Page 65 of 164 Sitecore® is a registered trademark. All other brand and product names are the property of their respective holders. The contents of this document are the property of Sitecore. Copyright © 2001-2008 Sitecore. All rights reserved.
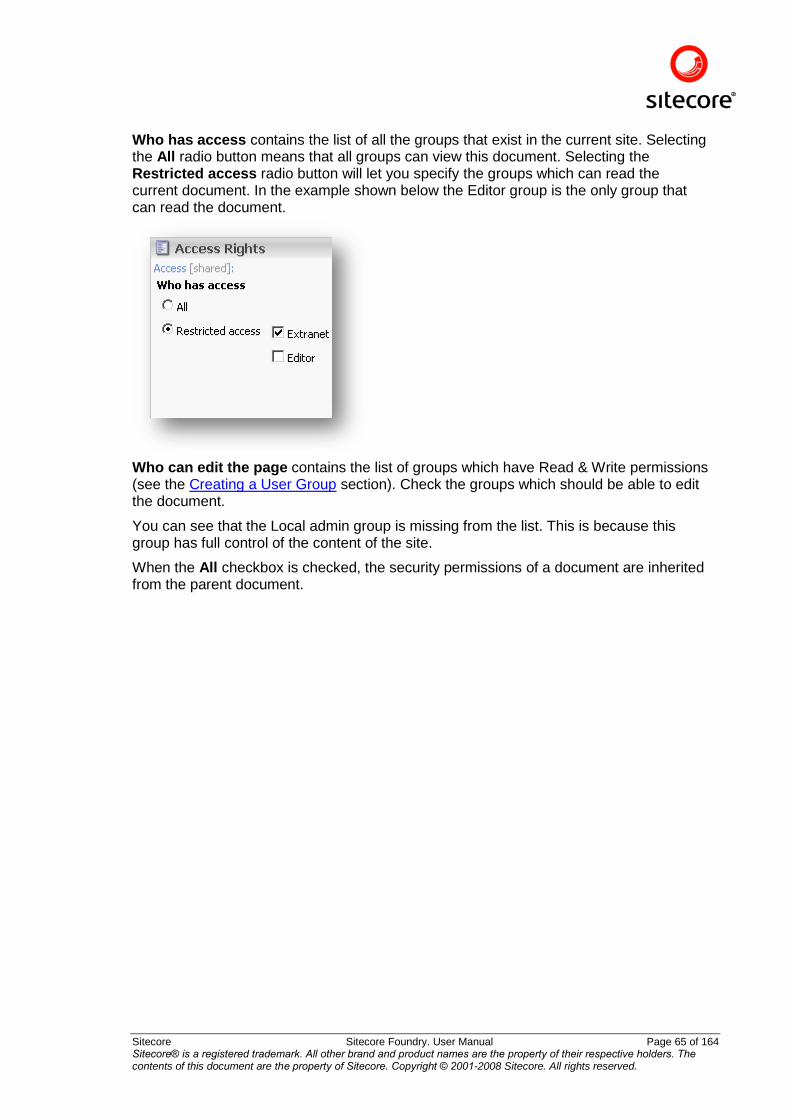
Who has access contains the list of all the groups that exist in the current site. Selecting the All radio button means that all groups can view this document. Selecting the Restricted access radio button will let you specify the groups which can read the current document. In the example shown below the Editor group is the only group that can read the document.
Who can edit the page contains the list of groups which have Read & Write permissions (see the Creating a User Group section). Check the groups which should be able to edit the document.
You can see that the Local admin group is missing from the list. This is because this group has full control of the content of the site.
When the All checkbox is checked, the security permissions of a document are inherited from the parent document.
Sitecore Sitecore Foundry. User Manual Page 66 of 164 Sitecore® is a registered trademark. All other brand and product names are the property of their respective holders. The contents of this document are the property of Sitecore. Copyright © 2001-2008 Sitecore. All rights reserved.
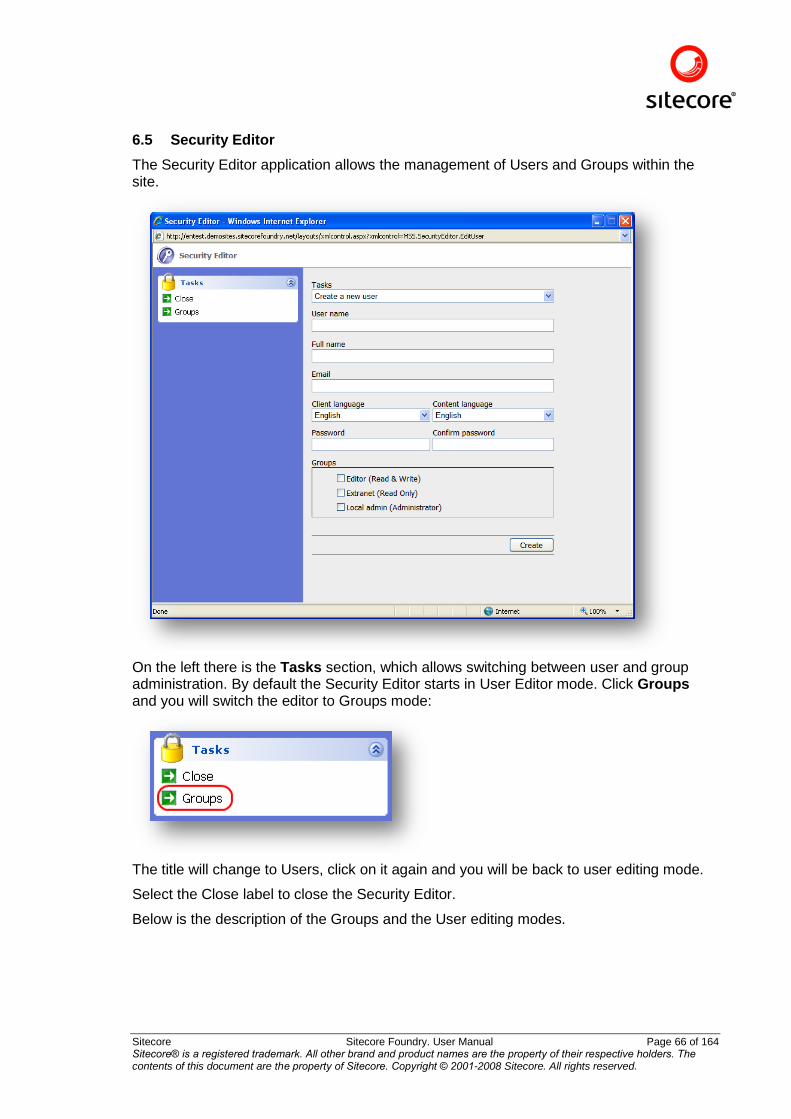
6.5 Security Editor
The Security Editor application allows the management of Users and Groups within the site.
On the left there is the Tasks section, which allows switching between user and group administration. By default the Security Editor starts in User Editor mode. Click Groups and you will switch the editor to Groups mode:
The title will change to Users, click on it again and you will be back to user editing mode.
Select the Close label to close the Security Editor.
Below is the description of the Groups and the User editing modes.
Sitecore Sitecore Foundry. User Manual Page 67 of 164 Sitecore® is a registered trademark. All other brand and product names are the property of their respective holders. The contents of this document are the property of Sitecore. Copyright © 2001-2008 Sitecore. All rights reserved.
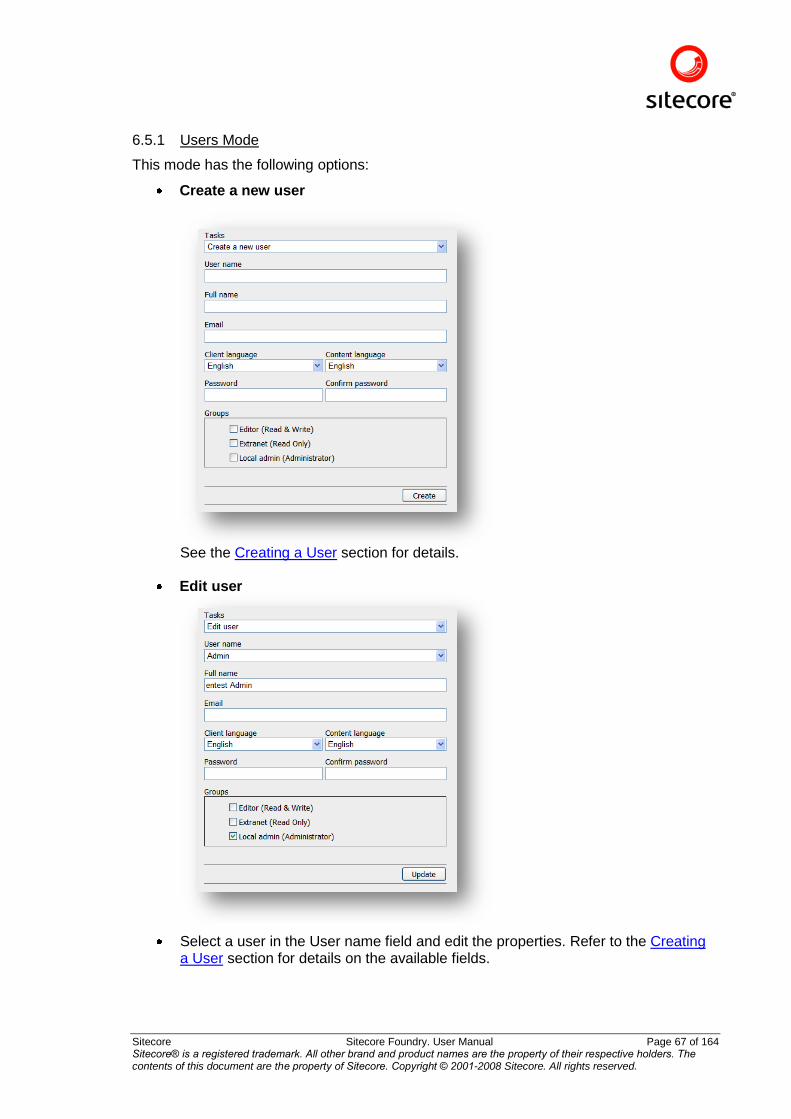
6.5.1 Users Mode
This mode has the following options:
Create a new user
See the Creating a User section for details.
Edit user
Select a user in the User name field and edit the properties. Refer to the Creating a User section for details on the available fields.
Sitecore Sitecore Foundry. User Manual Page 68 of 164 Sitecore® is a registered trademark. All other brand and product names are the property of their respective holders. The contents of this document are the property of Sitecore. Copyright © 2001-2008 Sitecore. All rights reserved.
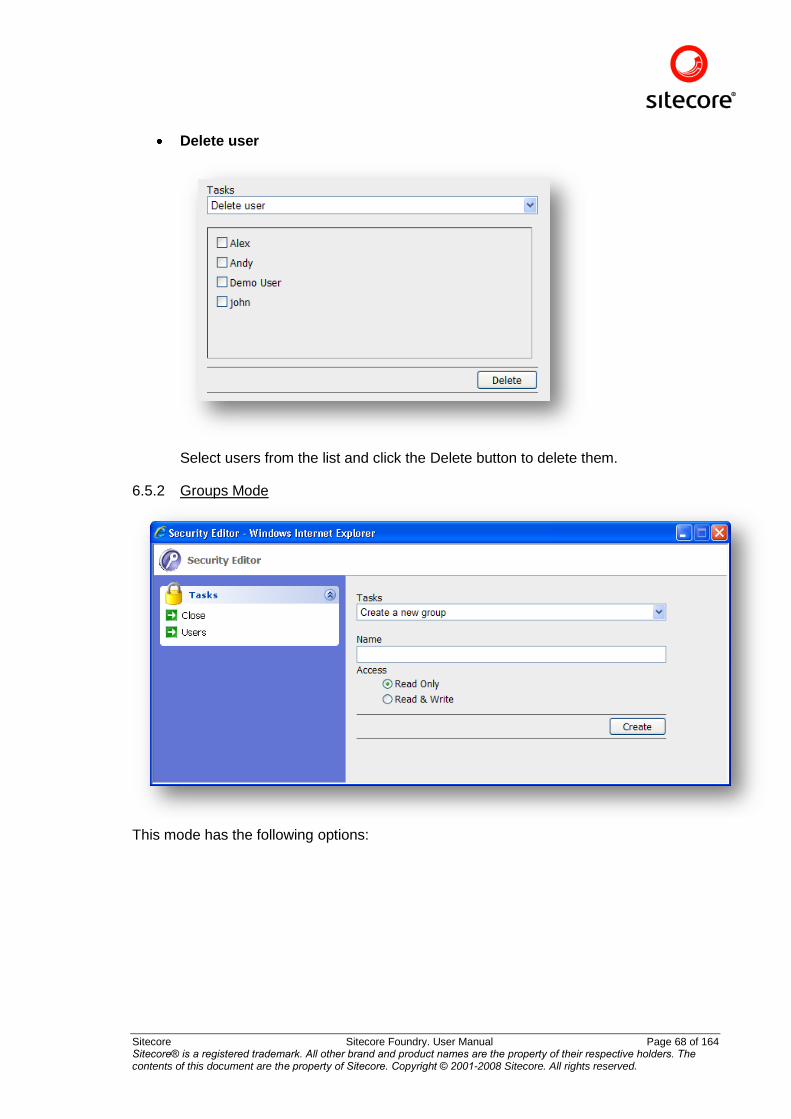
Delete user
Select users from the list and click the Delete button to delete them.
6.5.2 Groups Mode
This mode has the following options:
Sitecore Sitecore Foundry. User Manual Page 69 of 164 Sitecore® is a registered trademark. All other brand and product names are the property of their respective holders. The contents of this document are the property of Sitecore. Copyright © 2001-2008 Sitecore. All rights reserved.
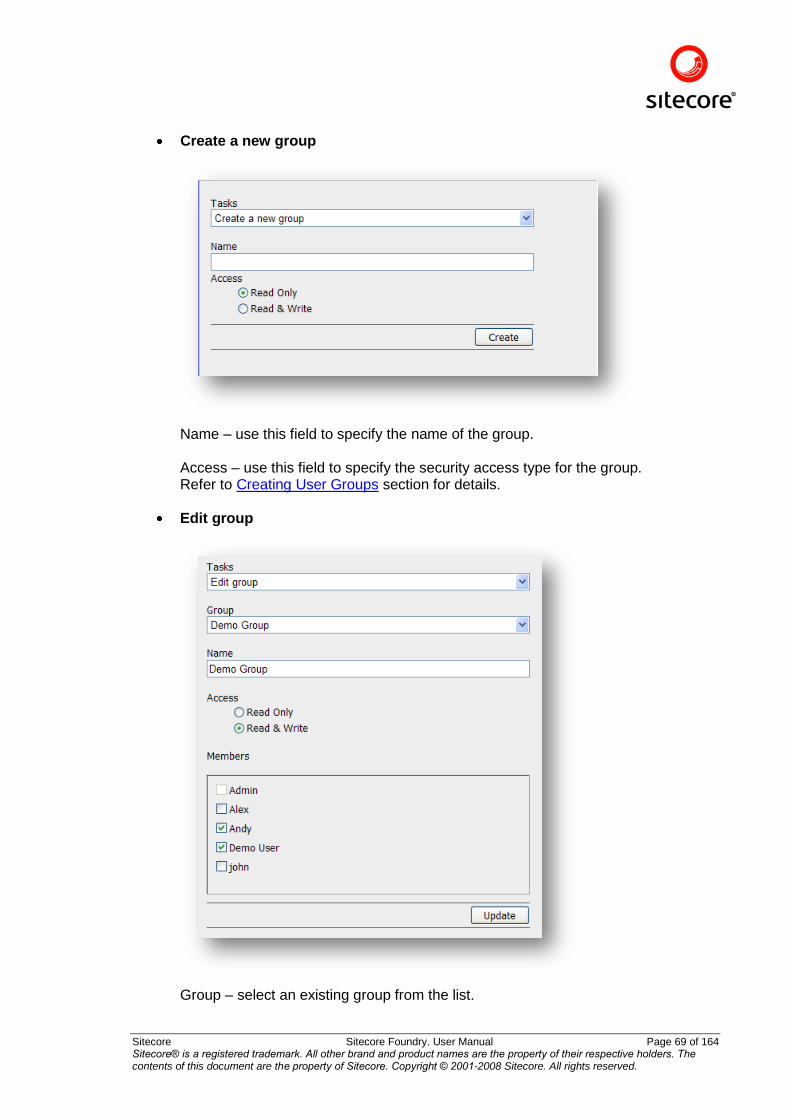
Create a new group
Name – use this field to specify the name of the group. Access – use this field to specify the security access type for the group. Refer to Creating User Groups section for details.
Edit group
Group – select an existing group from the list.
Sitecore Sitecore Foundry. User Manual Page 70 of 164 Sitecore® is a registered trademark. All other brand and product names are the property of their respective holders. The contents of this document are the property of Sitecore. Copyright © 2001-2008 Sitecore. All rights reserved.
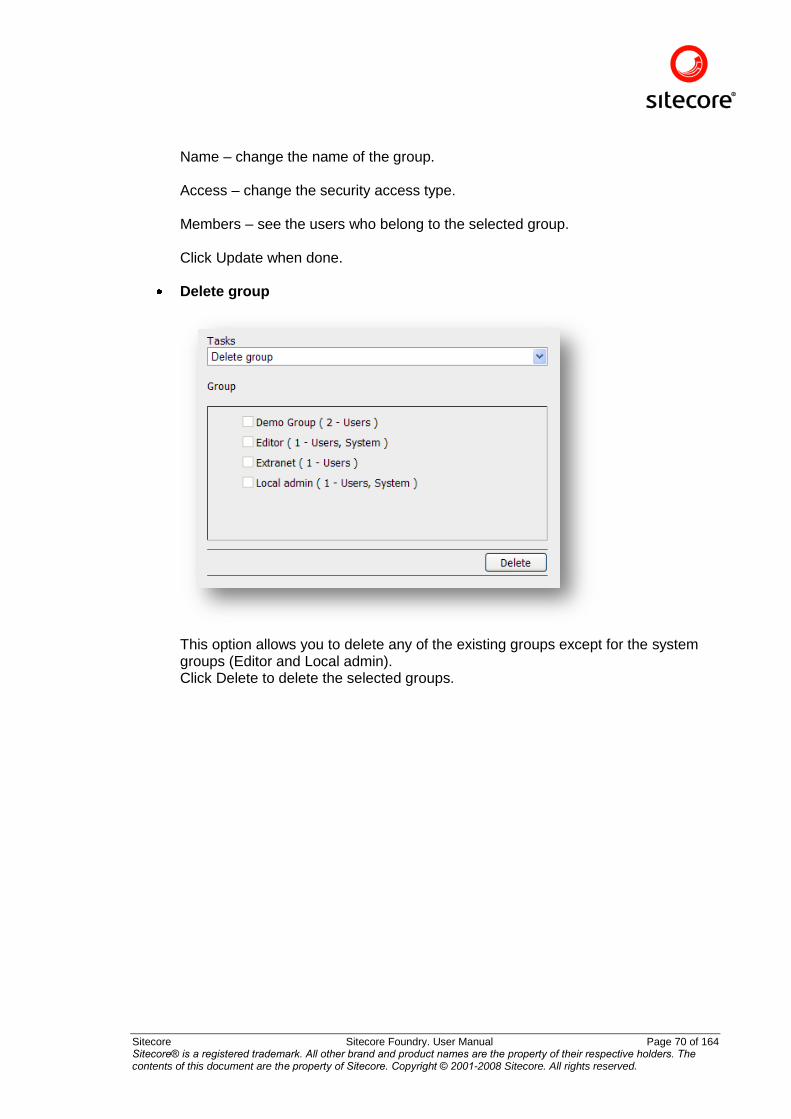
Name – change the name of the group. Access – change the security access type. Members – see the users who belong to the selected group. Click Update when done.
Delete group
This option allows you to delete any of the existing groups except for the system groups (Editor and Local admin). Click Delete to delete the selected groups.
Sitecore Sitecore Foundry. User Manual Page 71 of 164 Sitecore® is a registered trademark. All other brand and product names are the property of their respective holders. The contents of this document are the property of Sitecore. Copyright © 2001-2008 Sitecore. All rights reserved.
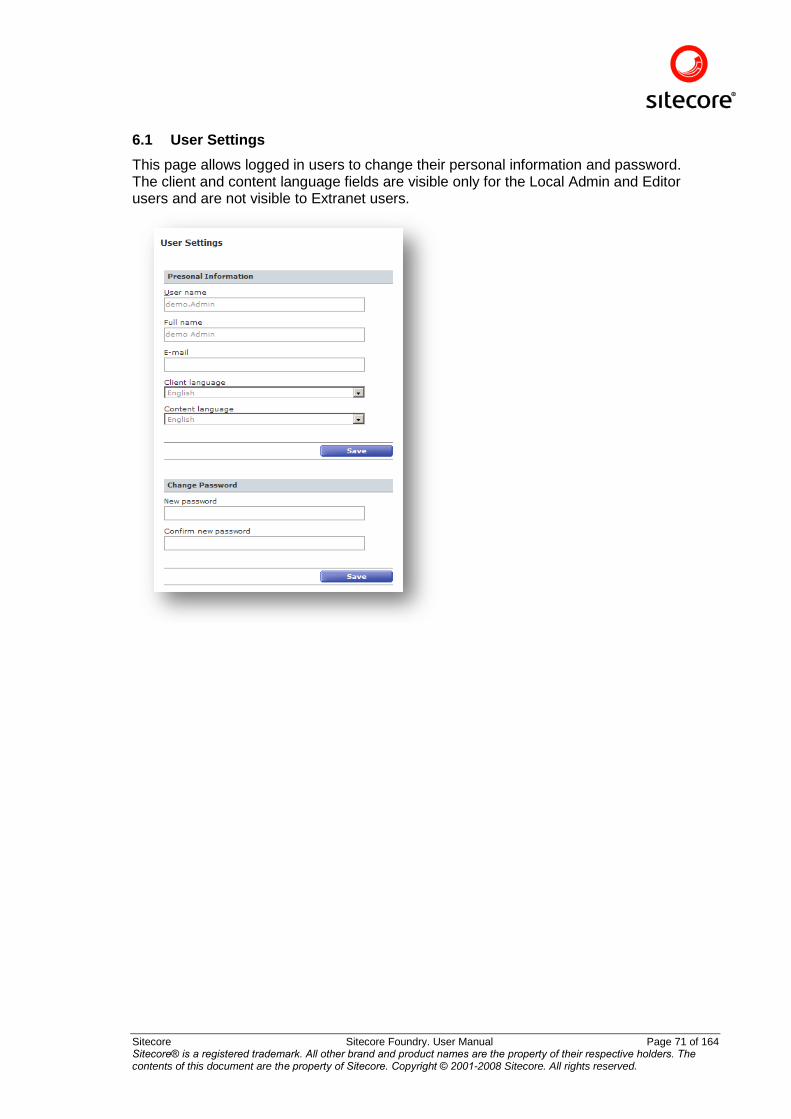
6.1 User Settings
This page allows logged in users to change their personal information and password. The client and content language fields are visible only for the Local Admin and Editor users and are not visible to Extranet users.
Sitecore Sitecore Foundry. User Manual Page 72 of 164 Sitecore® is a registered trademark. All other brand and product names are the property of their respective holders. The contents of this document are the property of Sitecore. Copyright © 2001-2008 Sitecore. All rights reserved.
Chapter 7 The Event Calendar
This chapter describes the Event Calendar module.
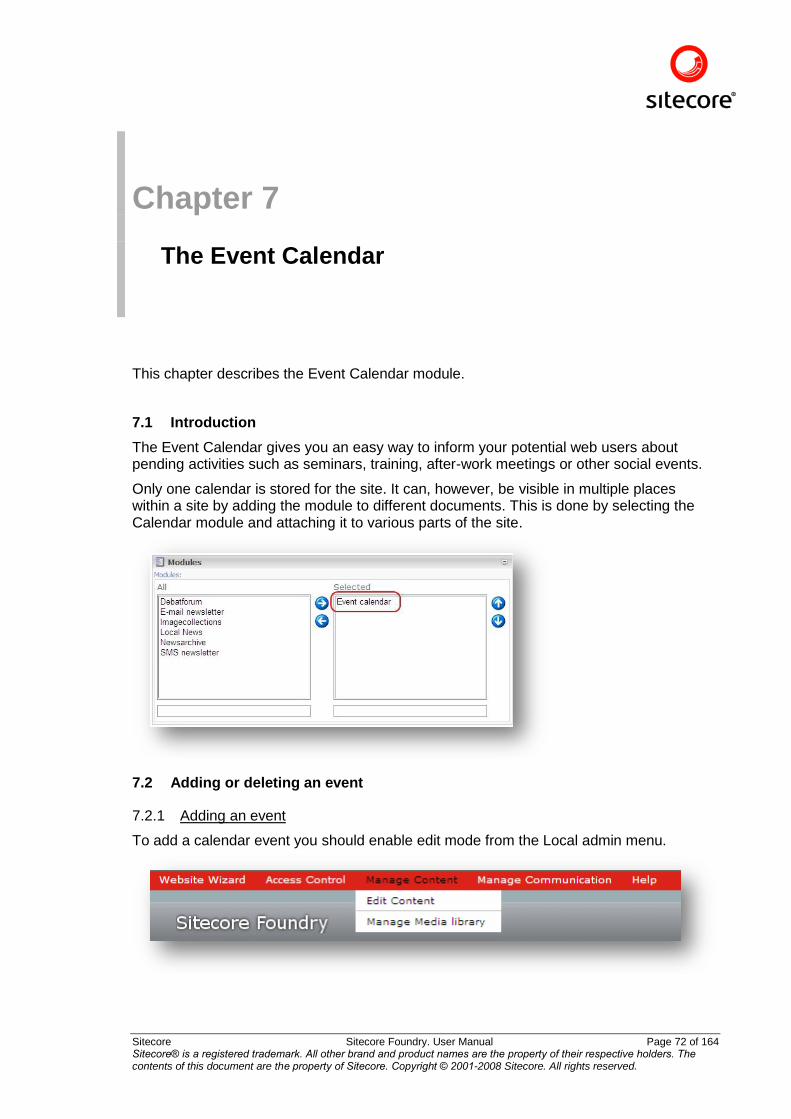
7.1 Introduction
The Event Calendar gives you an easy way to inform your potential web users about pending activities such as seminars, training, after-work meetings or other social events.
Only one calendar is stored for the site. It can, however, be visible in multiple places within a site by adding the module to different documents. This is done by selecting the Calendar module and attaching it to various parts of the site.
7.2 Adding or deleting an event
7.2.1 Adding an event
To add a calendar event you should enable edit mode from the Local admin menu.
Sitecore Sitecore Foundry. User Manual Page 73 of 164 Sitecore® is a registered trademark. All other brand and product names are the property of their respective holders. The contents of this document are the property of Sitecore. Copyright © 2001-2008 Sitecore. All rights reserved.
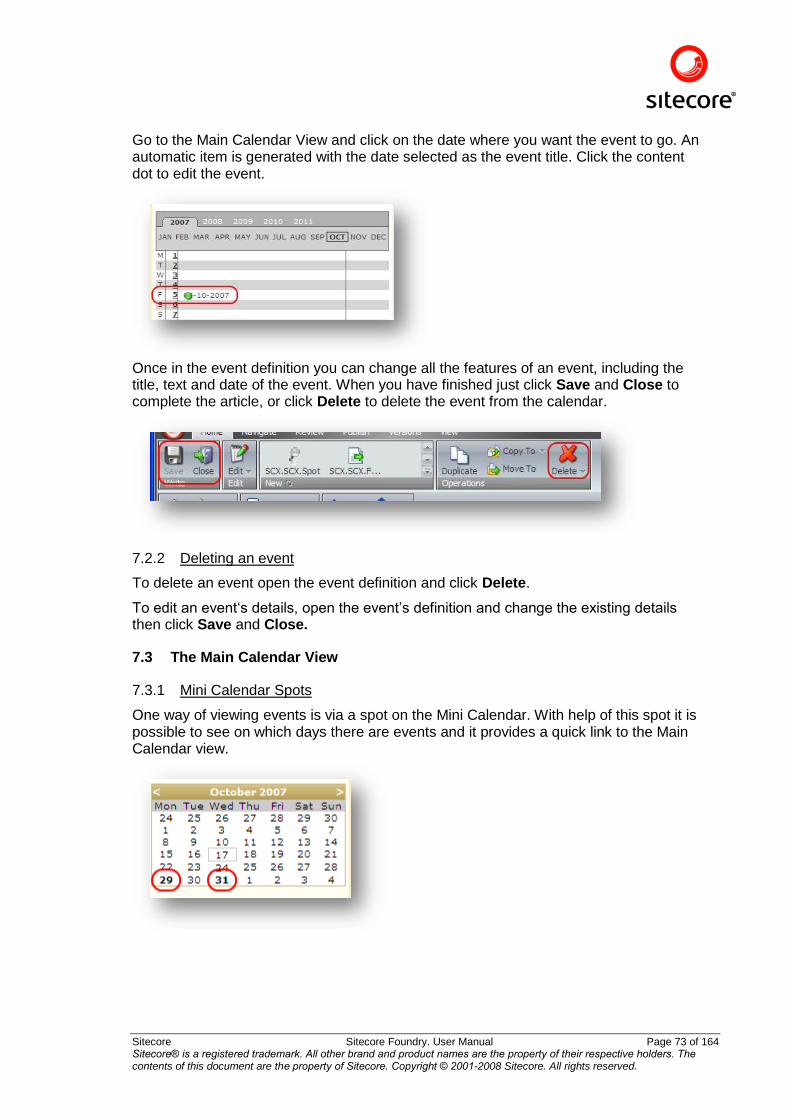
Go to the Main Calendar View and click on the date where you want the event to go. An automatic item is generated with the date selected as the event title. Click the content dot to edit the event.
Once in the event definition you can change all the features of an event, including the title, text and date of the event. When you have finished just click Save and Close to complete the article, or click Delete to delete the event from the calendar.
7.2.2 Deleting an event
To delete an event open the event definition and click Delete.
To edit an event„s details, open the event‟s definition and change the existing details then click Save and Close.
7.3 The Main Calendar View
7.3.1 Mini Calendar Spots
One way of viewing events is via a spot on the Mini Calendar. With help of this spot it is possible to see on which days there are events and it provides a quick link to the Main Calendar view.
Sitecore Sitecore Foundry. User Manual Page 74 of 164 Sitecore® is a registered trademark. All other brand and product names are the property of their respective holders. The contents of this document are the property of Sitecore. Copyright © 2001-2008 Sitecore. All rights reserved.
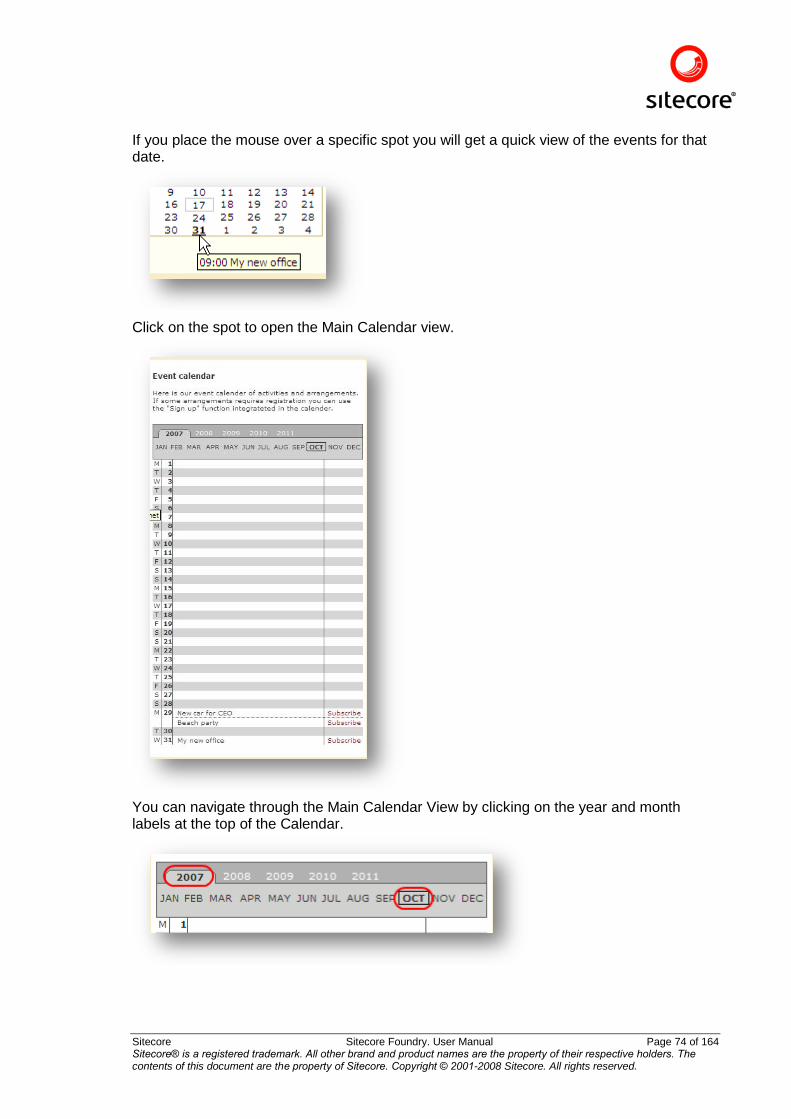
If you place the mouse over a specific spot you will get a quick view of the events for that date.
Click on the spot to open the Main Calendar view.
You can navigate through the Main Calendar View by clicking on the year and month labels at the top of the Calendar.
Sitecore Sitecore Foundry. User Manual Page 75 of 164 Sitecore® is a registered trademark. All other brand and product names are the property of their respective holders. The contents of this document are the property of Sitecore. Copyright © 2001-2008 Sitecore. All rights reserved.
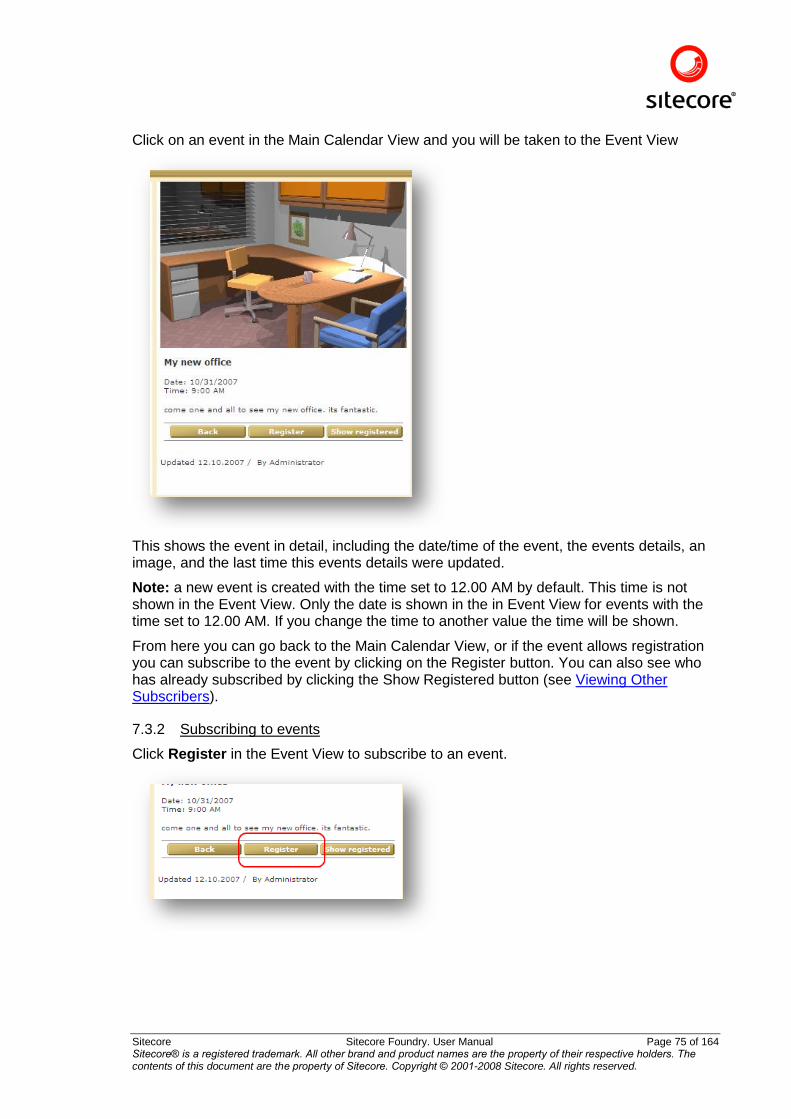
Click on an event in the Main Calendar View and you will be taken to the Event View
This shows the event in detail, including the date/time of the event, the events details, an image, and the last time this events details were updated.
Note: a new event is created with the time set to 12.00 AM by default. This time is not shown in the Event View. Only the date is shown in the in Event View for events with the time set to 12.00 AM. If you change the time to another value the time will be shown.
From here you can go back to the Main Calendar View, or if the event allows registration you can subscribe to the event by clicking on the Register button. You can also see who has already subscribed by clicking the Show Registered button (see Viewing Other Subscribers).
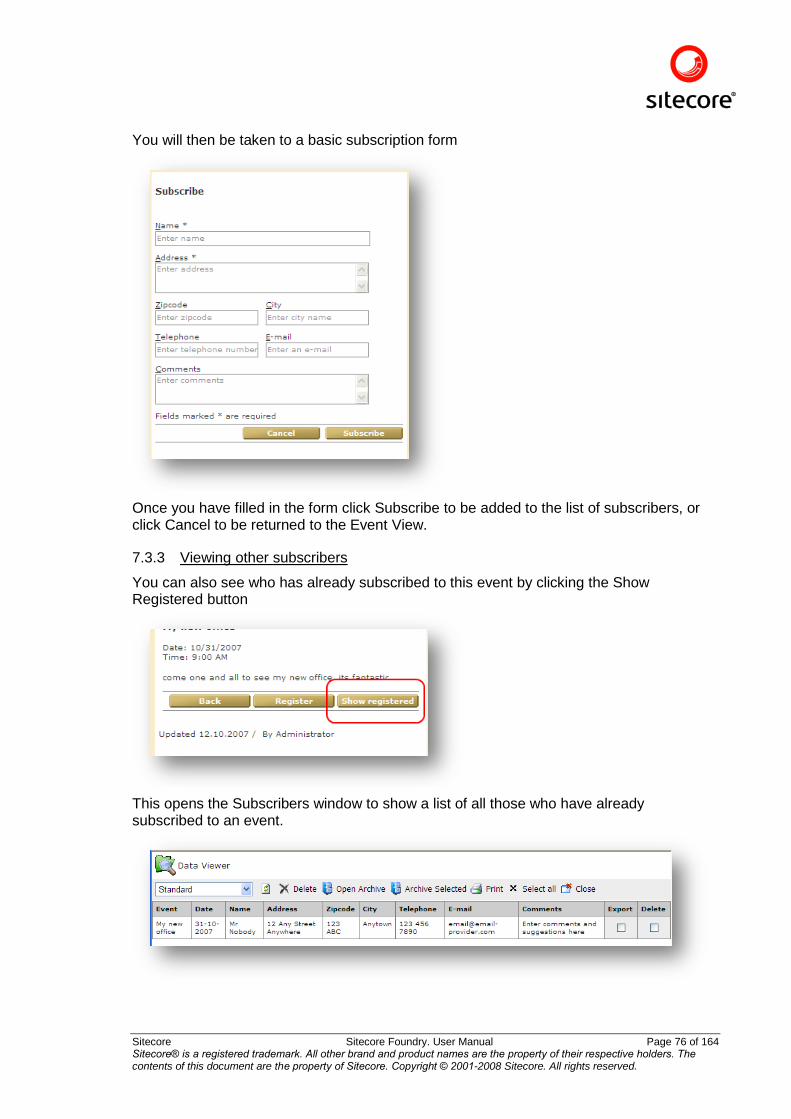
7.3.2 Subscribing to events
Click Register in the Event View to subscribe to an event.
Sitecore Sitecore Foundry. User Manual Page 76 of 164 Sitecore® is a registered trademark. All other brand and product names are the property of their respective holders. The contents of this document are the property of Sitecore. Copyright © 2001-2008 Sitecore. All rights reserved.
You will then be taken to a basic subscription form
Once you have filled in the form click Subscribe to be added to the list of subscribers, or click Cancel to be returned to the Event View.
7.3.3 Viewing other subscribers
You can also see who has already subscribed to this event by clicking the Show Registered button
This opens the Subscribers window to show a list of all those who have already subscribed to an event.
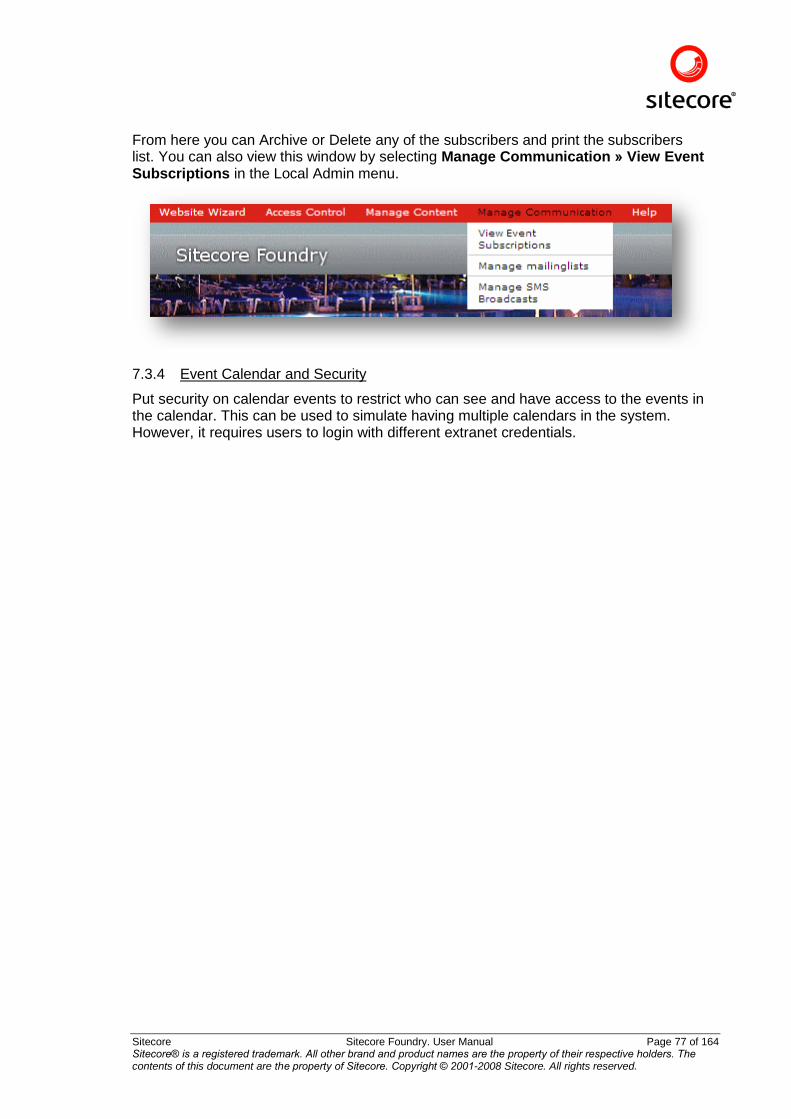
Sitecore Sitecore Foundry. User Manual Page 77 of 164 Sitecore® is a registered trademark. All other brand and product names are the property of their respective holders. The contents of this document are the property of Sitecore. Copyright © 2001-2008 Sitecore. All rights reserved.
From here you can Archive or Delete any of the subscribers and print the subscribers list. You can also view this window by selecting Manage Communication » View Event Subscriptions in the Local Admin menu.
7.3.4 Event Calendar and Security
Put security on calendar events to restrict who can see and have access to the events in the calendar. This can be used to simulate having multiple calendars in the system. However, it requires users to login with different extranet credentials.
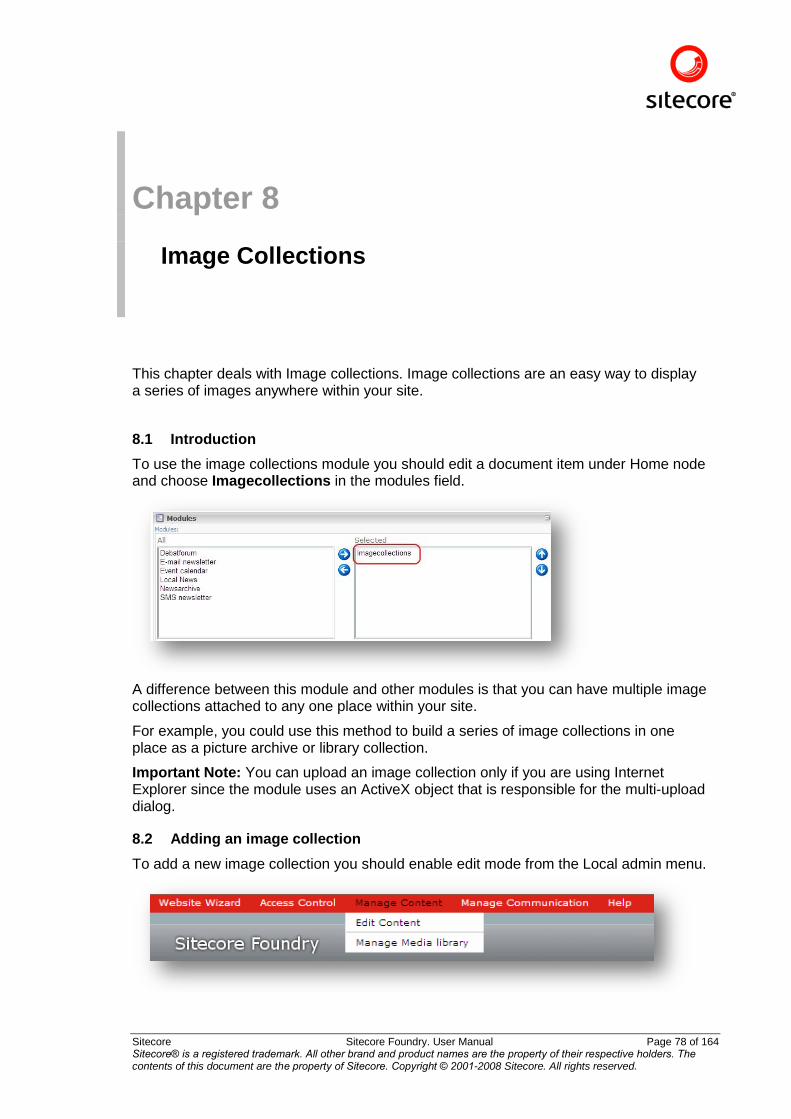
Sitecore Sitecore Foundry. User Manual Page 78 of 164 Sitecore® is a registered trademark. All other brand and product names are the property of their respective holders. The contents of this document are the property of Sitecore. Copyright © 2001-2008 Sitecore. All rights reserved.
Chapter 8 Image Collections
This chapter deals with Image collections. Image collections are an easy way to display a series of images anywhere within your site.
8.1 Introduction
To use the image collections module you should edit a document item under Home node and choose Imagecollections in the modules field.
A difference between this module and other modules is that you can have multiple image collections attached to any one place within your site.
For example, you could use this method to build a series of image collections in one place as a picture archive or library collection.
Important Note: You can upload an image collection only if you are using Internet Explorer since the module uses an ActiveX object that is responsible for the multi-upload dialog.
8.2 Adding an image collection
To add a new image collection you should enable edit mode from the Local admin menu.
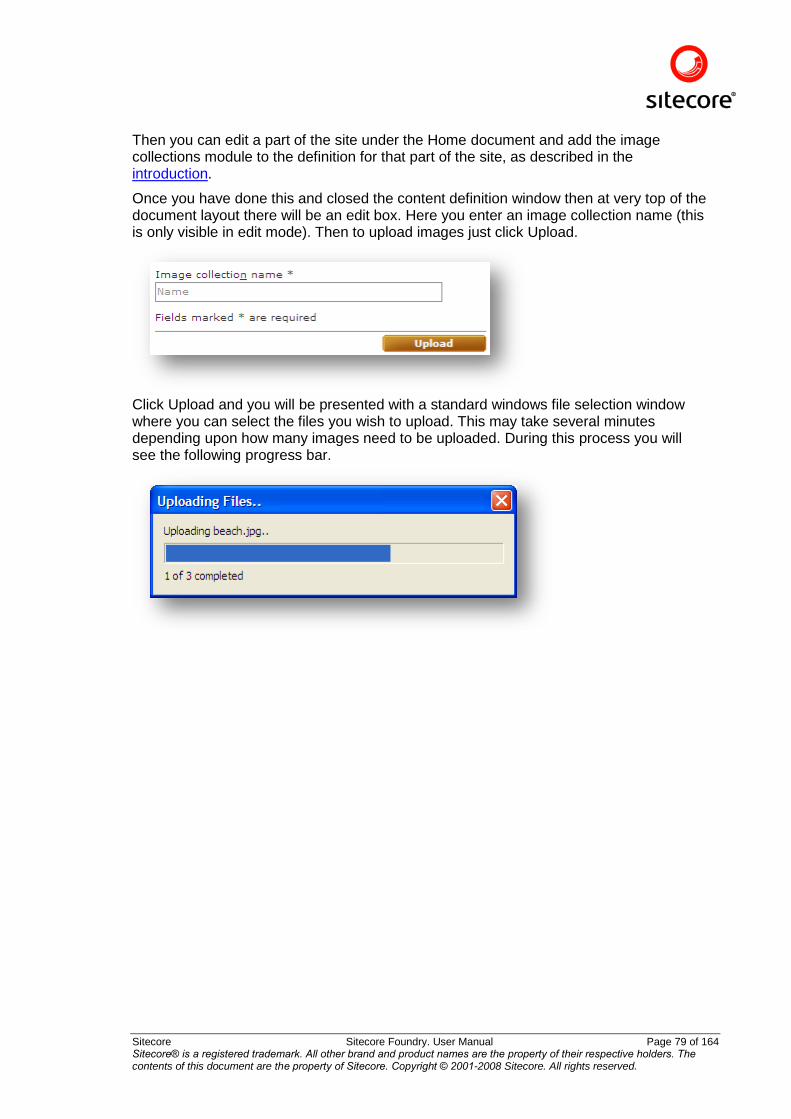
Sitecore Sitecore Foundry. User Manual Page 79 of 164 Sitecore® is a registered trademark. All other brand and product names are the property of their respective holders. The contents of this document are the property of Sitecore. Copyright © 2001-2008 Sitecore. All rights reserved.
Then you can edit a part of the site under the Home document and add the image collections module to the definition for that part of the site, as described in the introduction.
Once you have done this and closed the content definition window then at very top of the document layout there will be an edit box. Here you enter an image collection name (this is only visible in edit mode). Then to upload images just click Upload.
Click Upload and you will be presented with a standard windows file selection window where you can select the files you wish to upload. This may take several minutes depending upon how many images need to be uploaded. During this process you will see the following progress bar.
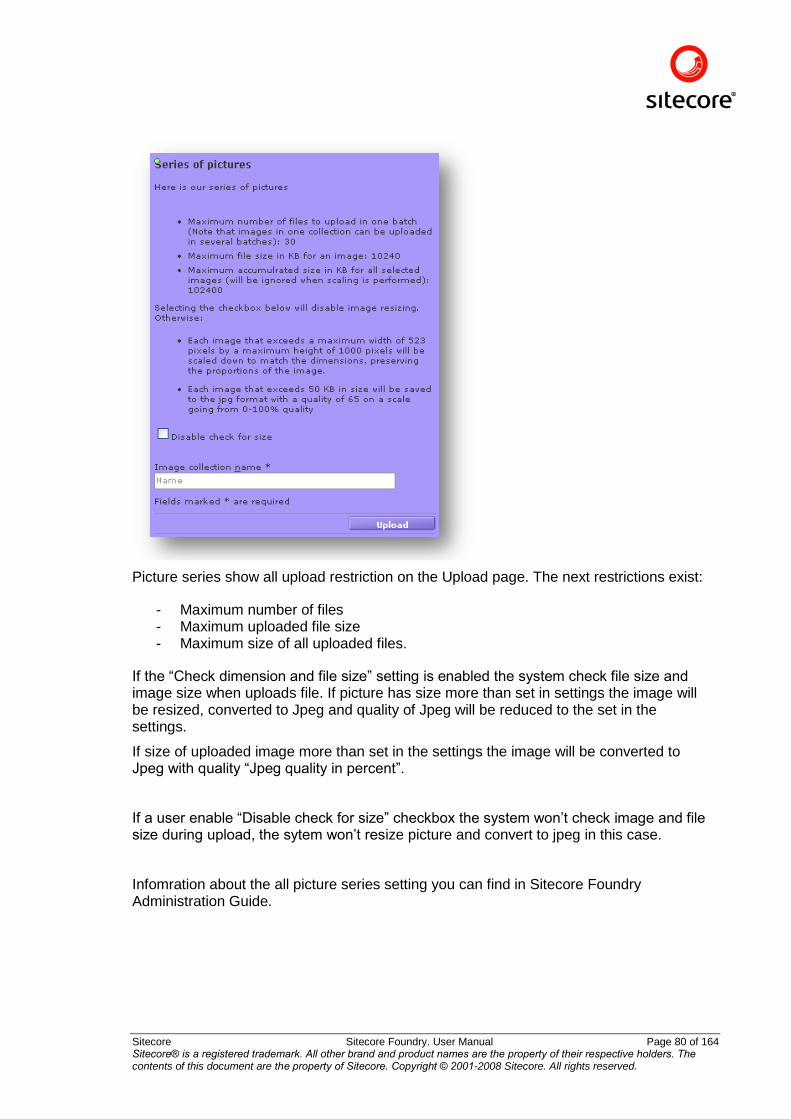
Sitecore Sitecore Foundry. User Manual Page 80 of 164 Sitecore® is a registered trademark. All other brand and product names are the property of their respective holders. The contents of this document are the property of Sitecore. Copyright © 2001-2008 Sitecore. All rights reserved.
Picture series show all upload restriction on the Upload page. The next restrictions exist:
- Maximum number of files - Maximum uploaded file size - Maximum size of all uploaded files.
If the “Check dimension and file size” setting is enabled the system check file size and image size when uploads file. If picture has size more than set in settings the image will be resized, converted to Jpeg and quality of Jpeg will be reduced to the set in the settings.
If size of uploaded image more than set in the settings the image will be converted to Jpeg with quality “Jpeg quality in percent”.
If a user enable “Disable check for size” checkbox the system won‟t check image and file size during upload, the sytem won‟t resize picture and convert to jpeg in this case.
Infomration about the all picture series setting you can find in Sitecore Foundry Administration Guide.
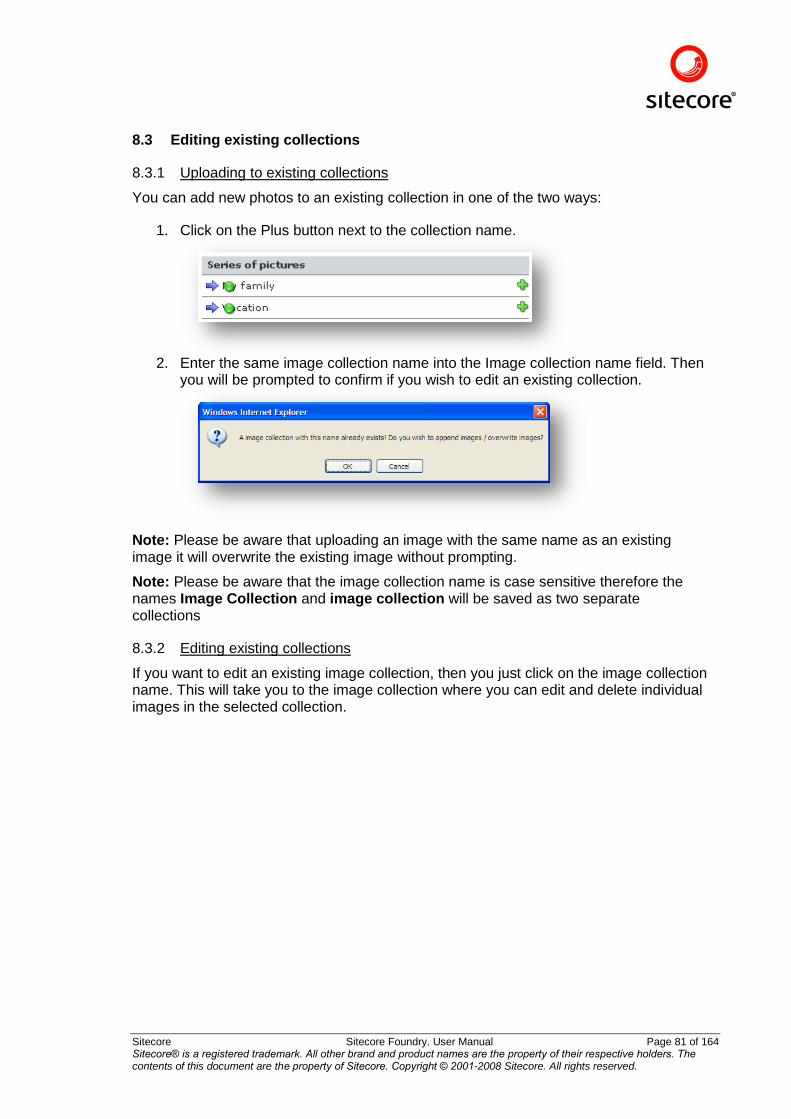
Sitecore Sitecore Foundry. User Manual Page 81 of 164 Sitecore® is a registered trademark. All other brand and product names are the property of their respective holders. The contents of this document are the property of Sitecore. Copyright © 2001-2008 Sitecore. All rights reserved.
8.3 Editing existing collections
8.3.1 Uploading to existing collections
You can add new photos to an existing collection in one of the two ways:
1. Click on the Plus button next to the collection name.
2. Enter the same image collection name into the Image collection name field. Then
you will be prompted to confirm if you wish to edit an existing collection.
Note: Please be aware that uploading an image with the same name as an existing image it will overwrite the existing image without prompting.
Note: Please be aware that the image collection name is case sensitive therefore the names Image Collection and image collection will be saved as two separate collections
8.3.2 Editing existing collections
If you want to edit an existing image collection, then you just click on the image collection name. This will take you to the image collection where you can edit and delete individual images in the selected collection.
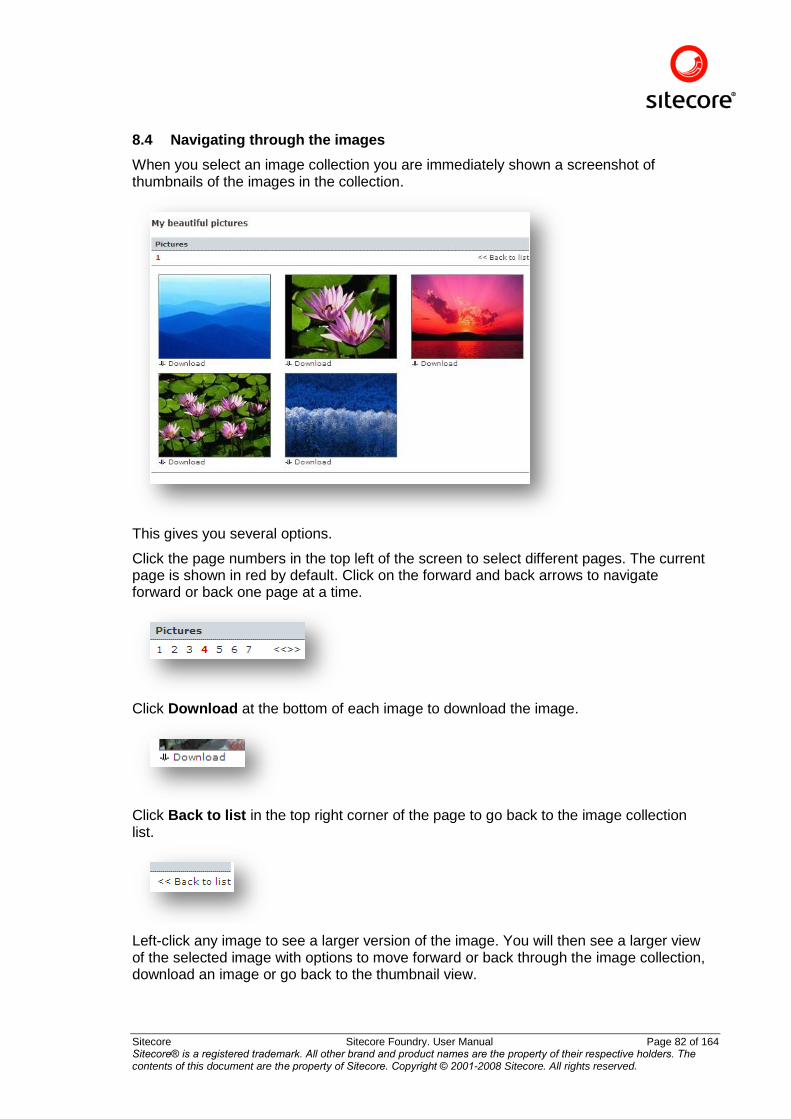
Sitecore Sitecore Foundry. User Manual Page 82 of 164 Sitecore® is a registered trademark. All other brand and product names are the property of their respective holders. The contents of this document are the property of Sitecore. Copyright © 2001-2008 Sitecore. All rights reserved.
8.4 Navigating through the images
When you select an image collection you are immediately shown a screenshot of thumbnails of the images in the collection.
This gives you several options.
Click the page numbers in the top left of the screen to select different pages. The current page is shown in red by default. Click on the forward and back arrows to navigate forward or back one page at a time.
Click Download at the bottom of each image to download the image.
Click Back to list in the top right corner of the page to go back to the image collection list.
Left-click any image to see a larger version of the image. You will then see a larger view of the selected image with options to move forward or back through the image collection, download an image or go back to the thumbnail view.
Sitecore Sitecore Foundry. User Manual Page 83 of 164 Sitecore® is a registered trademark. All other brand and product names are the property of their respective holders. The contents of this document are the property of Sitecore. Copyright © 2001-2008 Sitecore. All rights reserved.
Note: Click on an enlarged image to also trigger the download option.
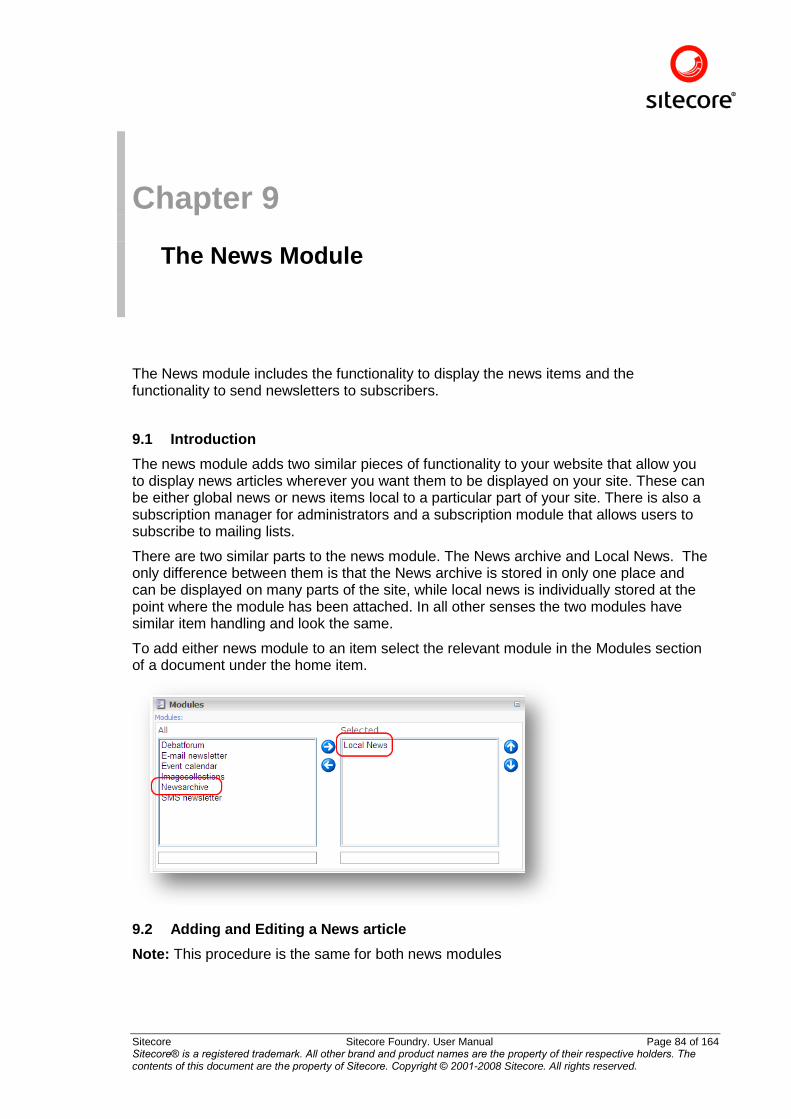
Sitecore Sitecore Foundry. User Manual Page 84 of 164 Sitecore® is a registered trademark. All other brand and product names are the property of their respective holders. The contents of this document are the property of Sitecore. Copyright © 2001-2008 Sitecore. All rights reserved.
Chapter 9 The News Module
The News module includes the functionality to display the news items and the functionality to send newsletters to subscribers.
9.1 Introduction
The news module adds two similar pieces of functionality to your website that allow you to display news articles wherever you want them to be displayed on your site. These can be either global news or news items local to a particular part of your site. There is also a subscription manager for administrators and a subscription module that allows users to subscribe to mailing lists.
There are two similar parts to the news module. The News archive and Local News. The only difference between them is that the News archive is stored in only one place and can be displayed on many parts of the site, while local news is individually stored at the point where the module has been attached. In all other senses the two modules have similar item handling and look the same.
To add either news module to an item select the relevant module in the Modules section of a document under the home item.
9.2 Adding and Editing a News article
Note: This procedure is the same for both news modules
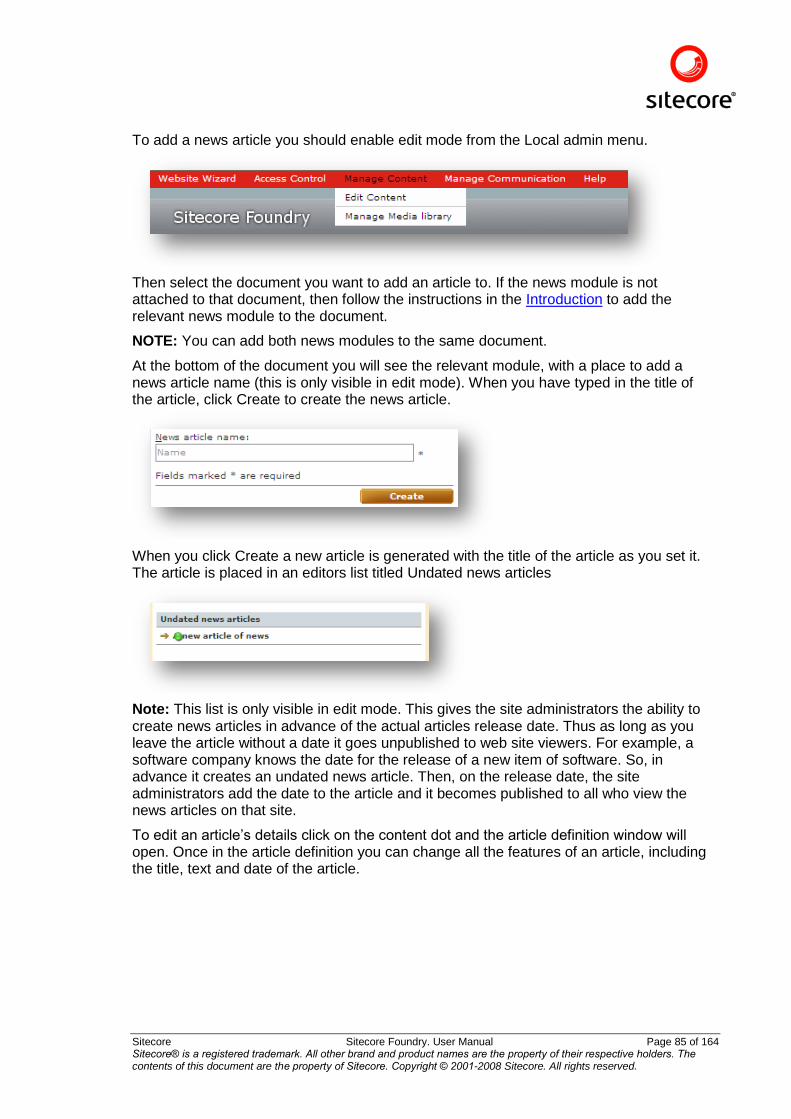
Sitecore Sitecore Foundry. User Manual Page 85 of 164 Sitecore® is a registered trademark. All other brand and product names are the property of their respective holders. The contents of this document are the property of Sitecore. Copyright © 2001-2008 Sitecore. All rights reserved.
To add a news article you should enable edit mode from the Local admin menu.
Then select the document you want to add an article to. If the news module is not attached to that document, then follow the instructions in the Introduction to add the relevant news module to the document.
NOTE: You can add both news modules to the same document.
At the bottom of the document you will see the relevant module, with a place to add a news article name (this is only visible in edit mode). When you have typed in the title of the article, click Create to create the news article.
When you click Create a new article is generated with the title of the article as you set it. The article is placed in an editors list titled Undated news articles
Note: This list is only visible in edit mode. This gives the site administrators the ability to create news articles in advance of the actual articles release date. Thus as long as you leave the article without a date it goes unpublished to web site viewers. For example, a software company knows the date for the release of a new item of software. So, in advance it creates an undated news article. Then, on the release date, the site administrators add the date to the article and it becomes published to all who view the news articles on that site.
To edit an article‟s details click on the content dot and the article definition window will open. Once in the article definition you can change all the features of an article, including the title, text and date of the article.
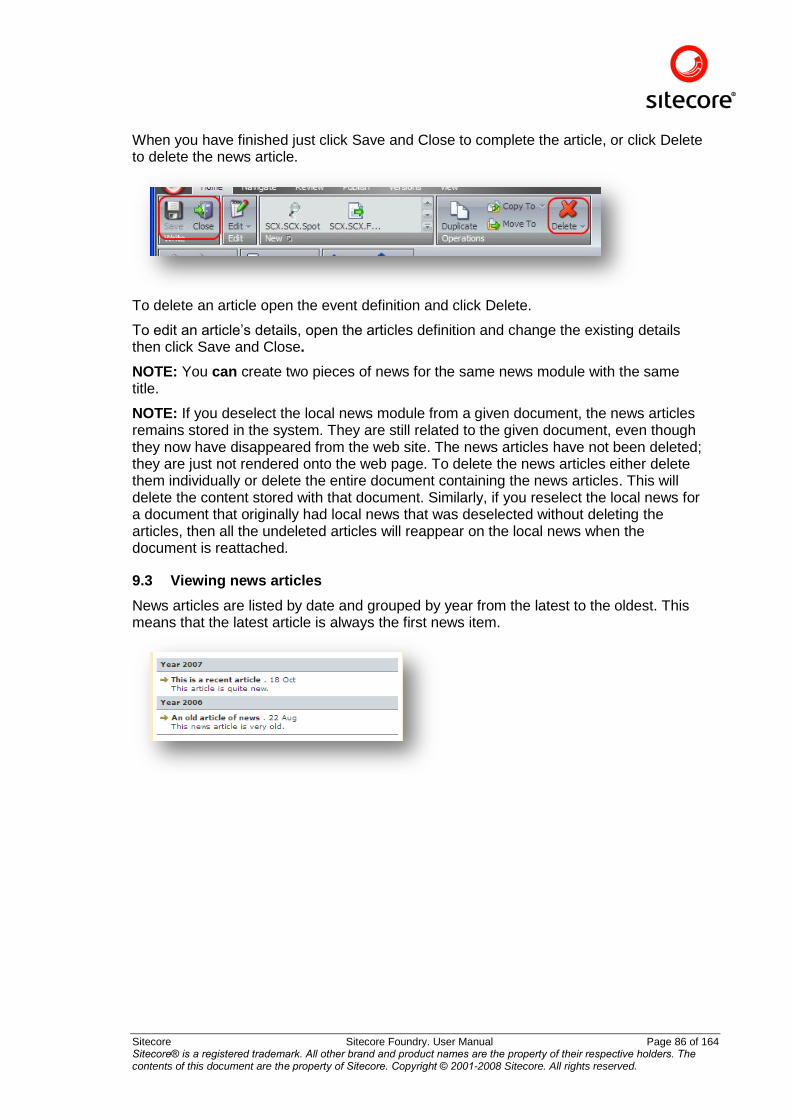
Sitecore Sitecore Foundry. User Manual Page 86 of 164 Sitecore® is a registered trademark. All other brand and product names are the property of their respective holders. The contents of this document are the property of Sitecore. Copyright © 2001-2008 Sitecore. All rights reserved.
When you have finished just click Save and Close to complete the article, or click Delete to delete the news article.
To delete an article open the event definition and click Delete.
To edit an article‟s details, open the articles definition and change the existing details then click Save and Close.
NOTE: You can create two pieces of news for the same news module with the same title.
NOTE: If you deselect the local news module from a given document, the news articles remains stored in the system. They are still related to the given document, even though they now have disappeared from the web site. The news articles have not been deleted; they are just not rendered onto the web page. To delete the news articles either delete them individually or delete the entire document containing the news articles. This will delete the content stored with that document. Similarly, if you reselect the local news for a document that originally had local news that was deselected without deleting the articles, then all the undeleted articles will reappear on the local news when the document is reattached.
9.3 Viewing news articles
News articles are listed by date and grouped by year from the latest to the oldest. This means that the latest article is always the first news item.
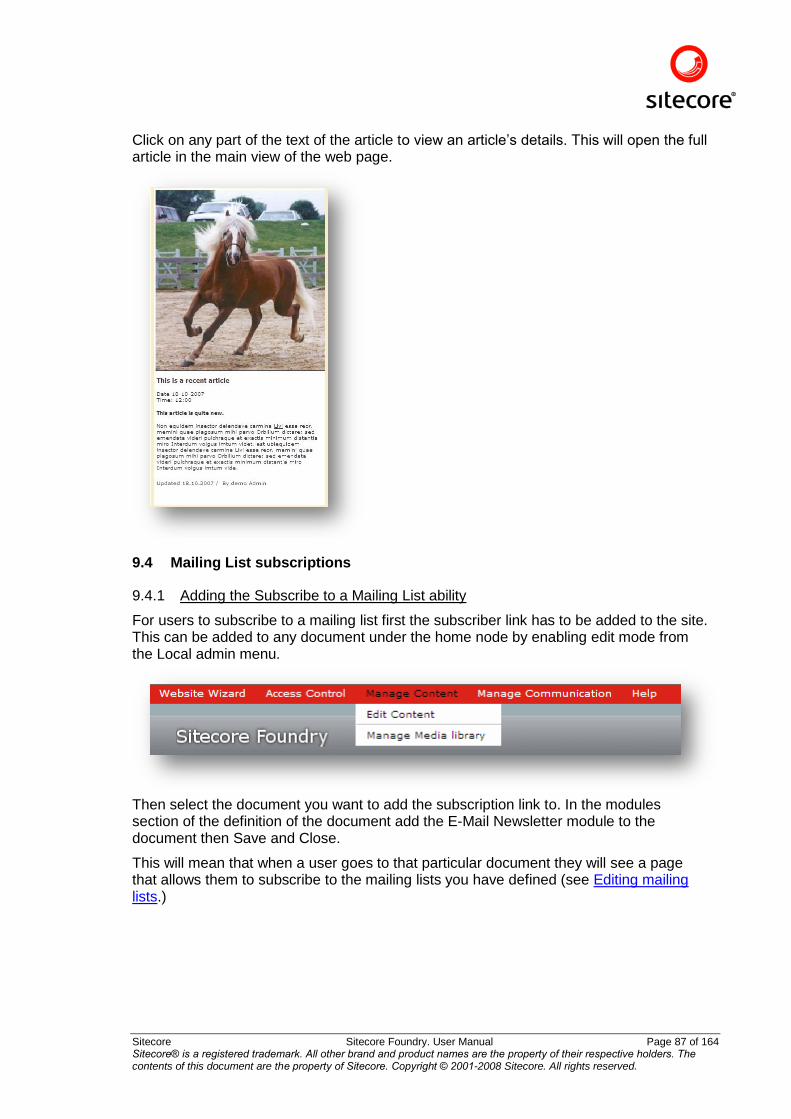
Sitecore Sitecore Foundry. User Manual Page 87 of 164 Sitecore® is a registered trademark. All other brand and product names are the property of their respective holders. The contents of this document are the property of Sitecore. Copyright © 2001-2008 Sitecore. All rights reserved.
Click on any part of the text of the article to view an article‟s details. This will open the full article in the main view of the web page.
9.4 Mailing List subscriptions
9.4.1 Adding the Subscribe to a Mailing List ability
For users to subscribe to a mailing list first the subscriber link has to be added to the site. This can be added to any document under the home node by enabling edit mode from the Local admin menu.
Then select the document you want to add the subscription link to. In the modules section of the definition of the document add the E-Mail Newsletter module to the document then Save and Close.
This will mean that when a user goes to that particular document they will see a page that allows them to subscribe to the mailing lists you have defined (see Editing mailing lists.)
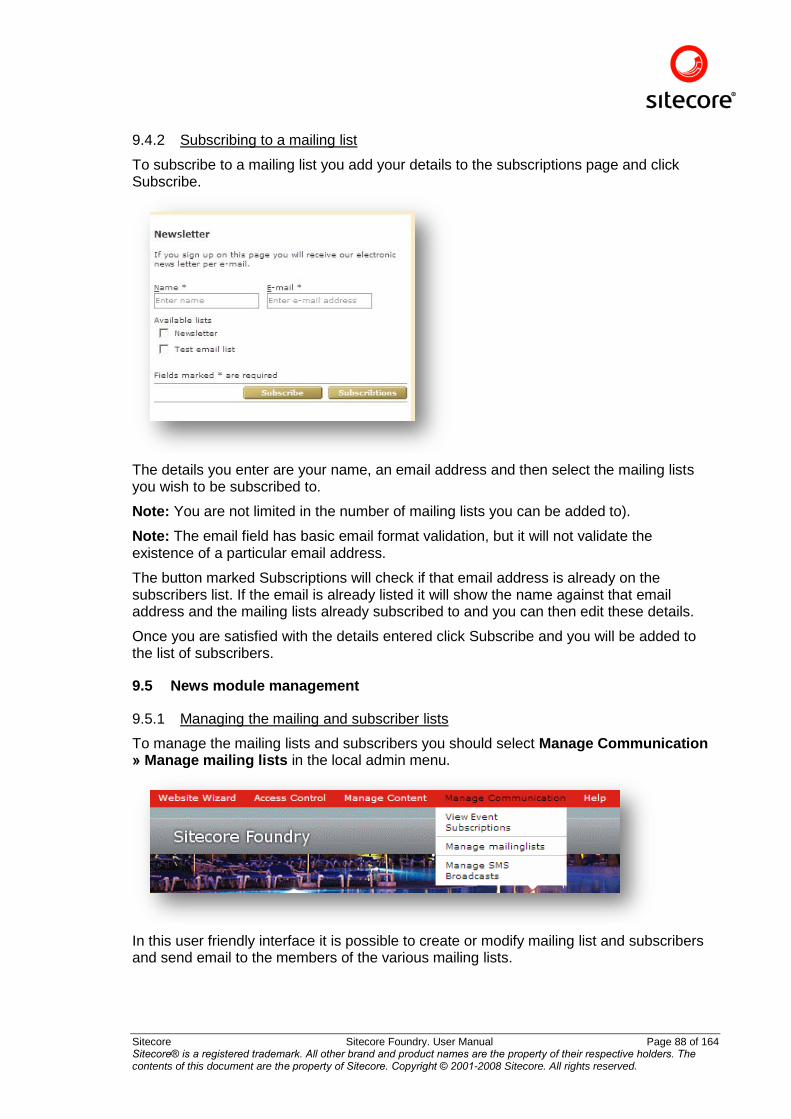
Sitecore Sitecore Foundry. User Manual Page 88 of 164 Sitecore® is a registered trademark. All other brand and product names are the property of their respective holders. The contents of this document are the property of Sitecore. Copyright © 2001-2008 Sitecore. All rights reserved.
9.4.2 Subscribing to a mailing list
To subscribe to a mailing list you add your details to the subscriptions page and click Subscribe.
The details you enter are your name, an email address and then select the mailing lists you wish to be subscribed to.
Note: You are not limited in the number of mailing lists you can be added to).
Note: The email field has basic email format validation, but it will not validate the existence of a particular email address.
The button marked Subscriptions will check if that email address is already on the subscribers list. If the email is already listed it will show the name against that email address and the mailing lists already subscribed to and you can then edit these details.
Once you are satisfied with the details entered click Subscribe and you will be added to the list of subscribers.
9.5 News module management
9.5.1 Managing the mailing and subscriber lists
To manage the mailing lists and subscribers you should select Manage Communication » Manage mailing lists in the local admin menu.
In this user friendly interface it is possible to create or modify mailing list and subscribers and send email to the members of the various mailing lists.
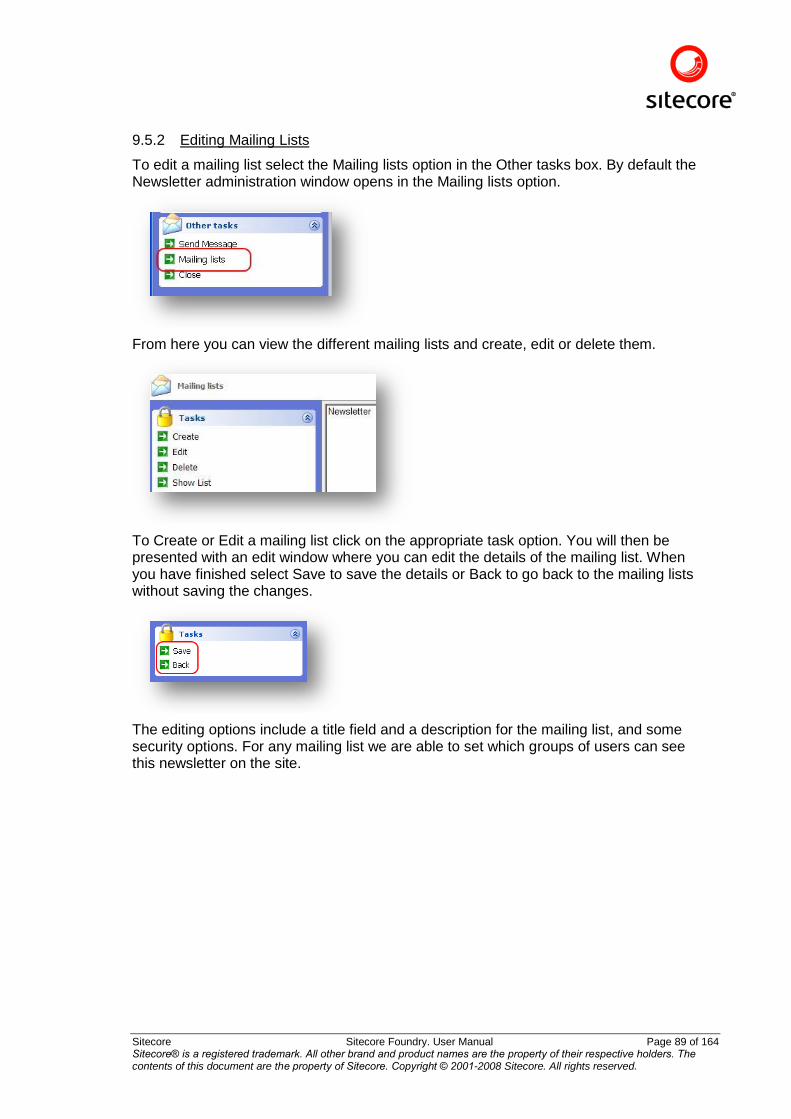
Sitecore Sitecore Foundry. User Manual Page 89 of 164 Sitecore® is a registered trademark. All other brand and product names are the property of their respective holders. The contents of this document are the property of Sitecore. Copyright © 2001-2008 Sitecore. All rights reserved.
9.5.2 Editing Mailing Lists
To edit a mailing list select the Mailing lists option in the Other tasks box. By default the Newsletter administration window opens in the Mailing lists option.
From here you can view the different mailing lists and create, edit or delete them.
To Create or Edit a mailing list click on the appropriate task option. You will then be presented with an edit window where you can edit the details of the mailing list. When you have finished select Save to save the details or Back to go back to the mailing lists without saving the changes.
The editing options include a title field and a description for the mailing list, and some security options. For any mailing list we are able to set which groups of users can see this newsletter on the site.
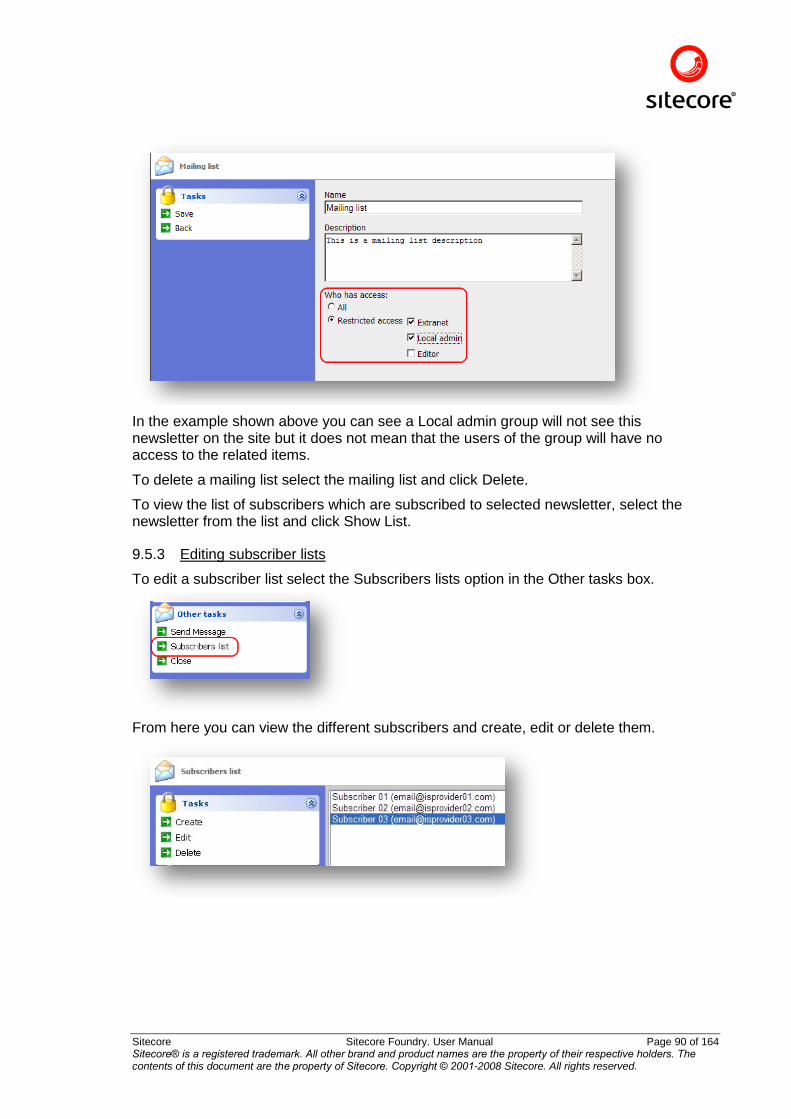
Sitecore Sitecore Foundry. User Manual Page 90 of 164 Sitecore® is a registered trademark. All other brand and product names are the property of their respective holders. The contents of this document are the property of Sitecore. Copyright © 2001-2008 Sitecore. All rights reserved.
In the example shown above you can see a Local admin group will not see this newsletter on the site but it does not mean that the users of the group will have no access to the related items.
To delete a mailing list select the mailing list and click Delete.
To view the list of subscribers which are subscribed to selected newsletter, select the newsletter from the list and click Show List.
9.5.3 Editing subscriber lists
To edit a subscriber list select the Subscribers lists option in the Other tasks box.
From here you can view the different subscribers and create, edit or delete them.
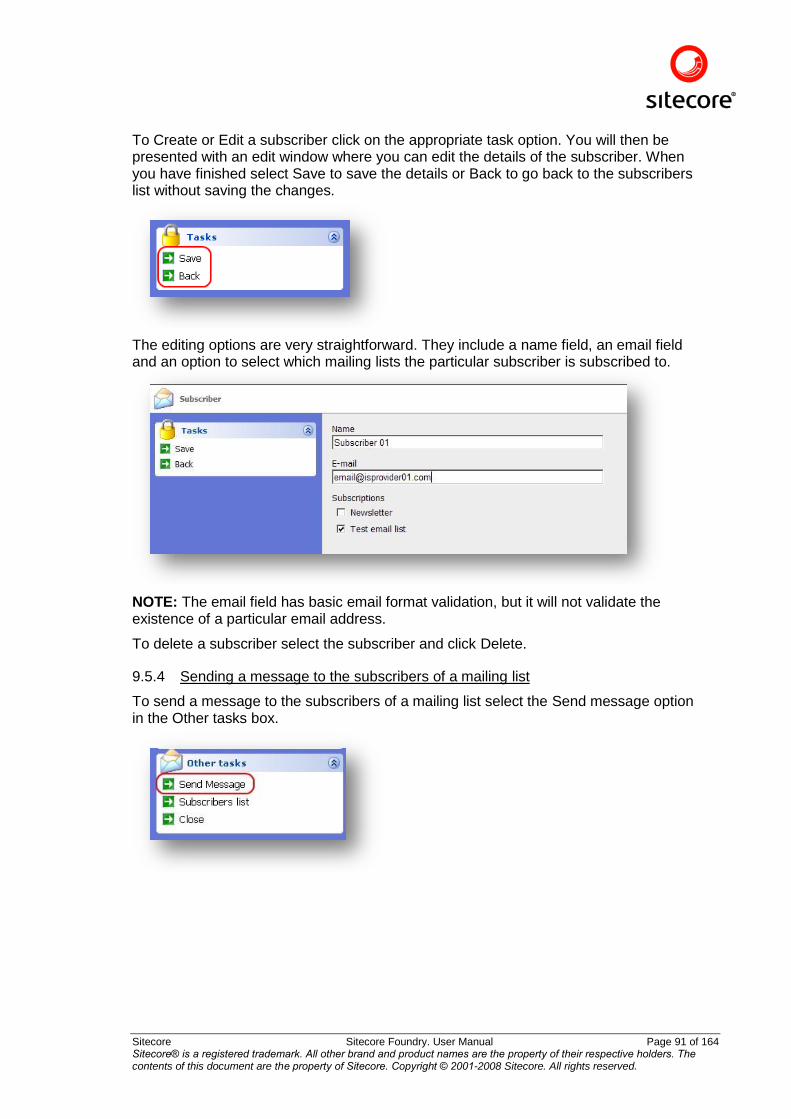
Sitecore Sitecore Foundry. User Manual Page 91 of 164 Sitecore® is a registered trademark. All other brand and product names are the property of their respective holders. The contents of this document are the property of Sitecore. Copyright © 2001-2008 Sitecore. All rights reserved.
To Create or Edit a subscriber click on the appropriate task option. You will then be presented with an edit window where you can edit the details of the subscriber. When you have finished select Save to save the details or Back to go back to the subscribers list without saving the changes.
The editing options are very straightforward. They include a name field, an email field and an option to select which mailing lists the particular subscriber is subscribed to.
NOTE: The email field has basic email format validation, but it will not validate the existence of a particular email address.
To delete a subscriber select the subscriber and click Delete.
9.5.4 Sending a message to the subscribers of a mailing list
To send a message to the subscribers of a mailing list select the Send message option in the Other tasks box.
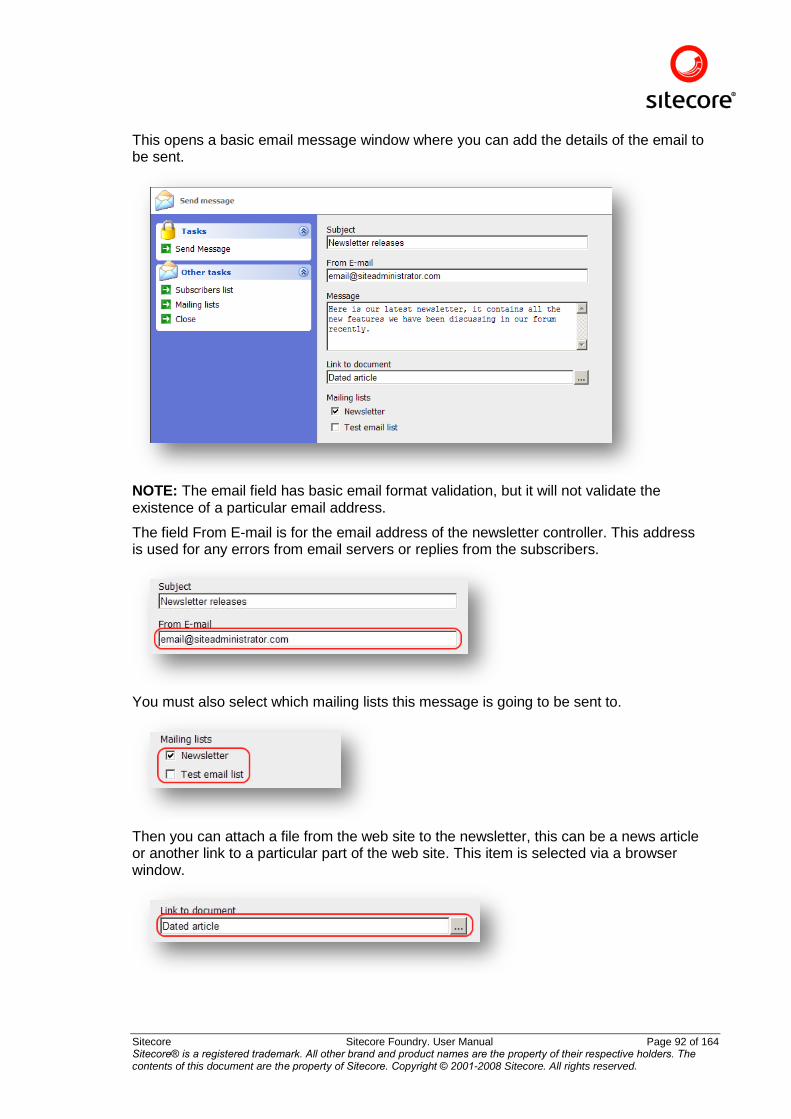
Sitecore Sitecore Foundry. User Manual Page 92 of 164 Sitecore® is a registered trademark. All other brand and product names are the property of their respective holders. The contents of this document are the property of Sitecore. Copyright © 2001-2008 Sitecore. All rights reserved.
This opens a basic email message window where you can add the details of the email to be sent.
NOTE: The email field has basic email format validation, but it will not validate the existence of a particular email address.
The field From E-mail is for the email address of the newsletter controller. This address is used for any errors from email servers or replies from the subscribers.
You must also select which mailing lists this message is going to be sent to.
Then you can attach a file from the web site to the newsletter, this can be a news article or another link to a particular part of the web site. This item is selected via a browser window.
Sitecore Sitecore Foundry. User Manual Page 93 of 164 Sitecore® is a registered trademark. All other brand and product names are the property of their respective holders. The contents of this document are the property of Sitecore. Copyright © 2001-2008 Sitecore. All rights reserved.
NOTE: By linking an email to a web site news article the article is available both as a regular news item on the site and used in the newsletter at the same time. It also creates a history of sent out newsletters. The news article attached to an email can be either from local news or a news archive.
9.6 Hints
9.6.1 Combining news and a newsletter
Create the letter you want the subscriber to see in the news module. When sending the newsletter make the link refer to the news item. That way the news is available both as a regular news item on the site and used in the newsletter at the same time. It also creates a history of sent out newsletters. If the newsletters should not be available on the site, use the global news module. If it should be available on the site, you can choose both global and local news.
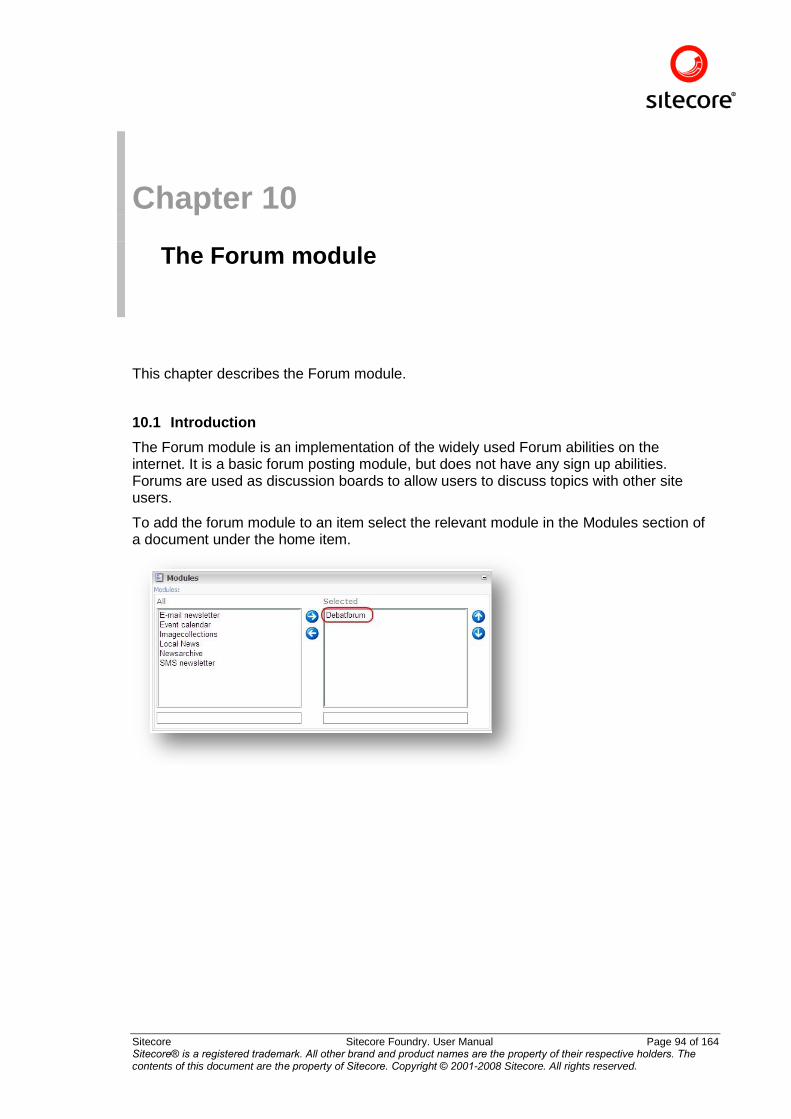
Sitecore Sitecore Foundry. User Manual Page 94 of 164 Sitecore® is a registered trademark. All other brand and product names are the property of their respective holders. The contents of this document are the property of Sitecore. Copyright © 2001-2008 Sitecore. All rights reserved.
Chapter 10 The Forum module
This chapter describes the Forum module.
10.1 Introduction
The Forum module is an implementation of the widely used Forum abilities on the internet. It is a basic forum posting module, but does not have any sign up abilities. Forums are used as discussion boards to allow users to discuss topics with other site users.
To add the forum module to an item select the relevant module in the Modules section of a document under the home item.
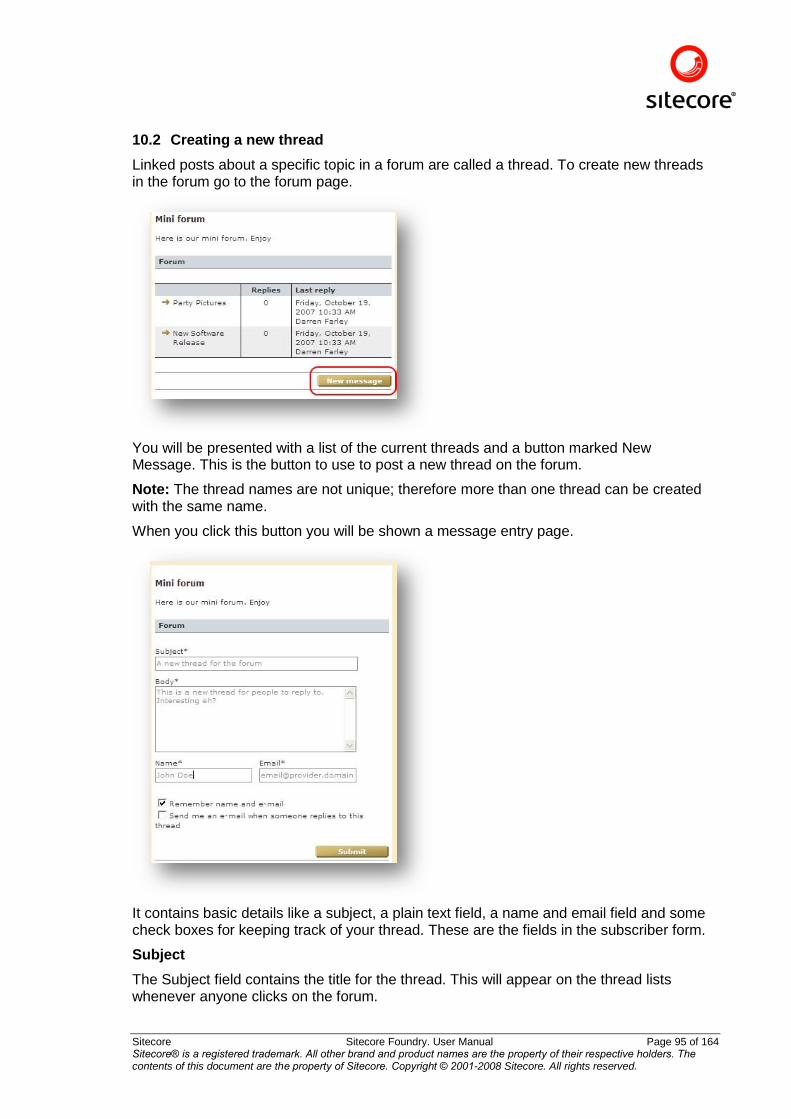
Sitecore Sitecore Foundry. User Manual Page 95 of 164 Sitecore® is a registered trademark. All other brand and product names are the property of their respective holders. The contents of this document are the property of Sitecore. Copyright © 2001-2008 Sitecore. All rights reserved.
10.2 Creating a new thread
Linked posts about a specific topic in a forum are called a thread. To create new threads in the forum go to the forum page.
You will be presented with a list of the current threads and a button marked New Message. This is the button to use to post a new thread on the forum.
Note: The thread names are not unique; therefore more than one thread can be created with the same name.
When you click this button you will be shown a message entry page.
It contains basic details like a subject, a plain text field, a name and email field and some check boxes for keeping track of your thread. These are the fields in the subscriber form.
Subject
The Subject field contains the title for the thread. This will appear on the thread lists whenever anyone clicks on the forum.
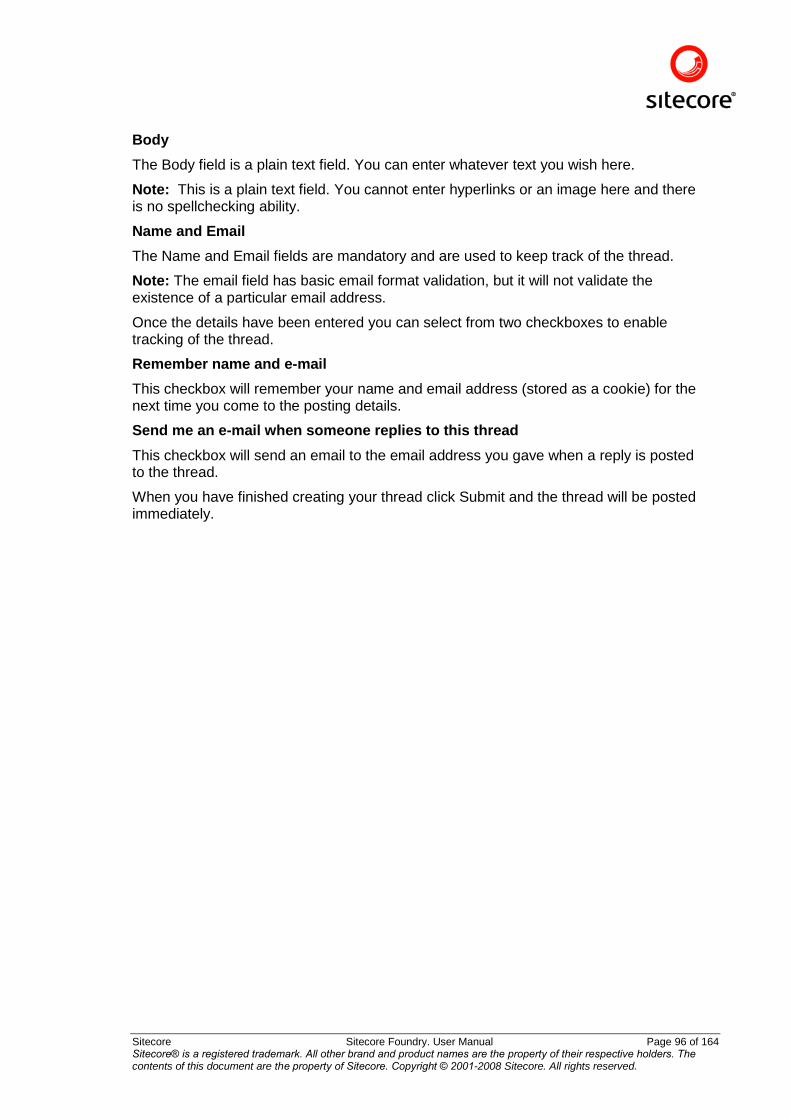
Sitecore Sitecore Foundry. User Manual Page 96 of 164 Sitecore® is a registered trademark. All other brand and product names are the property of their respective holders. The contents of this document are the property of Sitecore. Copyright © 2001-2008 Sitecore. All rights reserved.
Body
The Body field is a plain text field. You can enter whatever text you wish here.
Note: This is a plain text field. You cannot enter hyperlinks or an image here and there is no spellchecking ability.
Name and Email
The Name and Email fields are mandatory and are used to keep track of the thread.
Note: The email field has basic email format validation, but it will not validate the existence of a particular email address.
Once the details have been entered you can select from two checkboxes to enable tracking of the thread.
Remember name and e-mail
This checkbox will remember your name and email address (stored as a cookie) for the next time you come to the posting details.
Send me an e-mail when someone replies to this thread
This checkbox will send an email to the email address you gave when a reply is posted to the thread.
When you have finished creating your thread click Submit and the thread will be posted immediately.
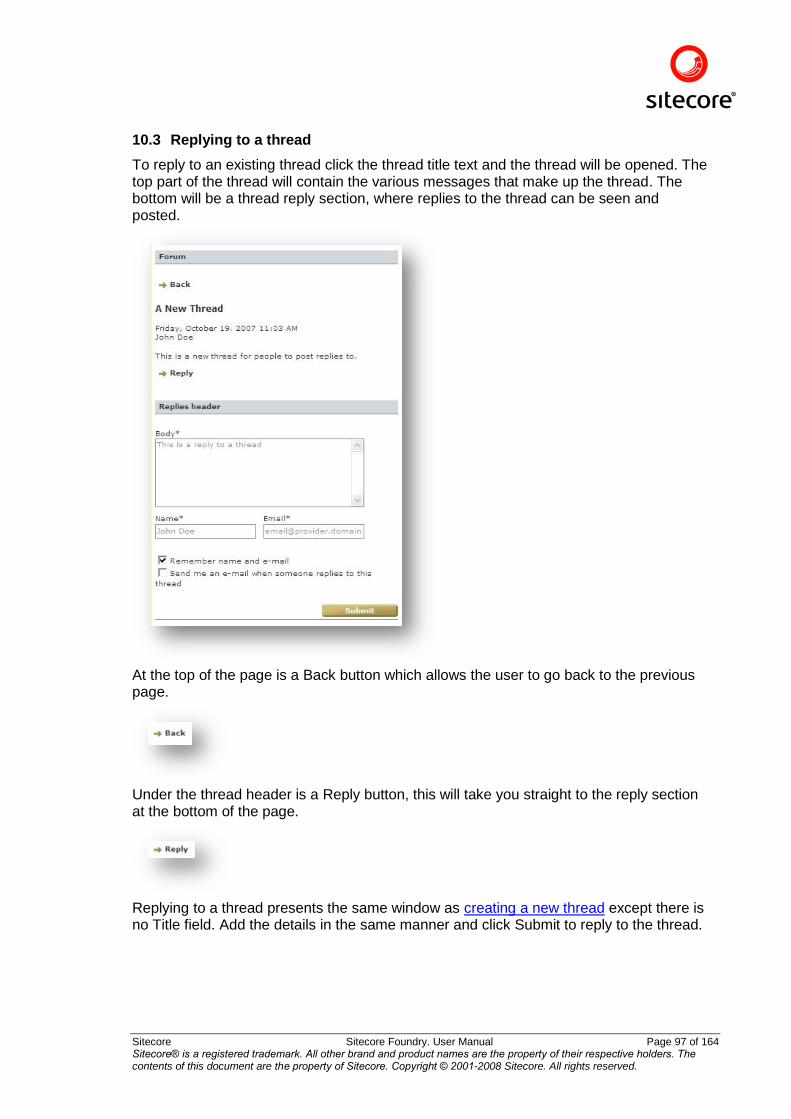
Sitecore Sitecore Foundry. User Manual Page 97 of 164 Sitecore® is a registered trademark. All other brand and product names are the property of their respective holders. The contents of this document are the property of Sitecore. Copyright © 2001-2008 Sitecore. All rights reserved.
10.3 Replying to a thread
To reply to an existing thread click the thread title text and the thread will be opened. The top part of the thread will contain the various messages that make up the thread. The bottom will be a thread reply section, where replies to the thread can be seen and posted.
At the top of the page is a Back button which allows the user to go back to the previous page.
Under the thread header is a Reply button, this will take you straight to the reply section at the bottom of the page.
Replying to a thread presents the same window as creating a new thread except there is no Title field. Add the details in the same manner and click Submit to reply to the thread.
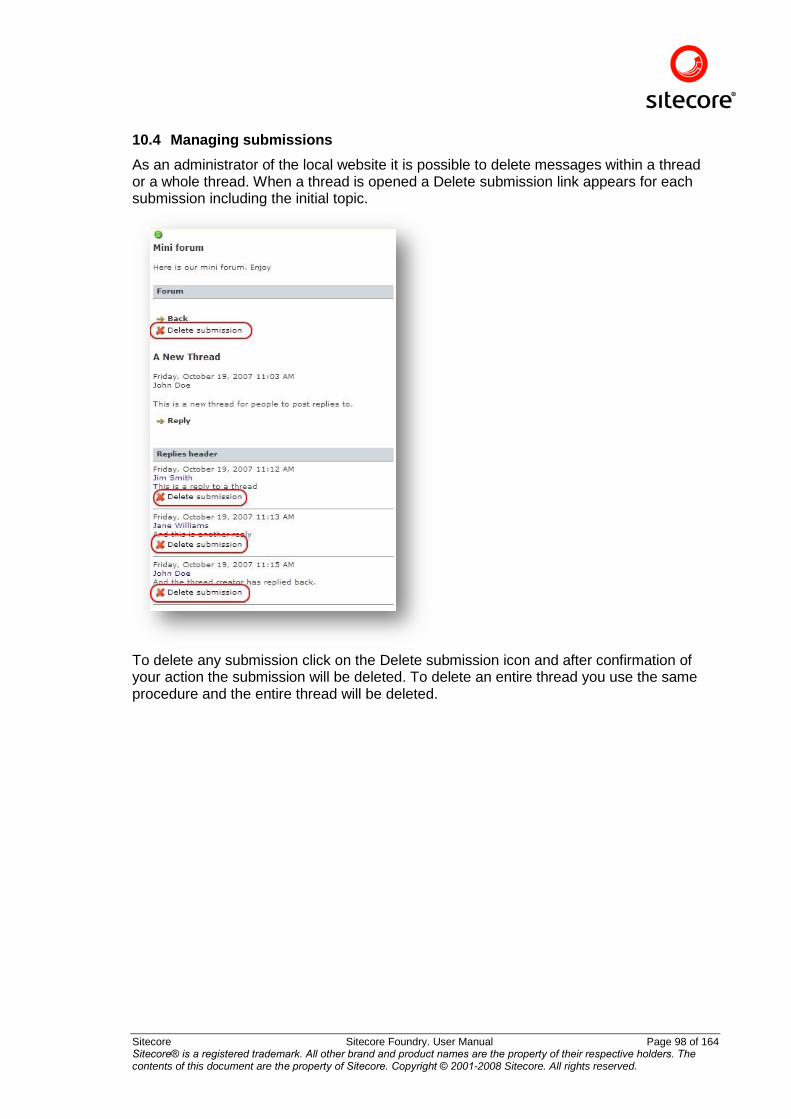
Sitecore Sitecore Foundry. User Manual Page 98 of 164 Sitecore® is a registered trademark. All other brand and product names are the property of their respective holders. The contents of this document are the property of Sitecore. Copyright © 2001-2008 Sitecore. All rights reserved.
10.4 Managing submissions
As an administrator of the local website it is possible to delete messages within a thread or a whole thread. When a thread is opened a Delete submission link appears for each submission including the initial topic.
To delete any submission click on the Delete submission icon and after confirmation of your action the submission will be deleted. To delete an entire thread you use the same procedure and the entire thread will be deleted.

Sitecore Sitecore Foundry. User Manual Page 99 of 164 Sitecore® is a registered trademark. All other brand and product names are the property of their respective holders. The contents of this document are the property of Sitecore. Copyright © 2001-2008 Sitecore. All rights reserved.
Chapter 11 Editing Content
This chapter deals with the more detailed aspects of content editing.
11.1 Features
The editor provides a multitude of features that allow you to create and maintain the content of your site. It gives the user full control over site content. Styling and functionality are inspired by Microsoft Office 2007. This allows editors to simultaneously use the system and have the editing options at hand. This document describes how to use the various editor features.
To see some examples of field editing please read the section titled 5.2.5 Editing Fields.
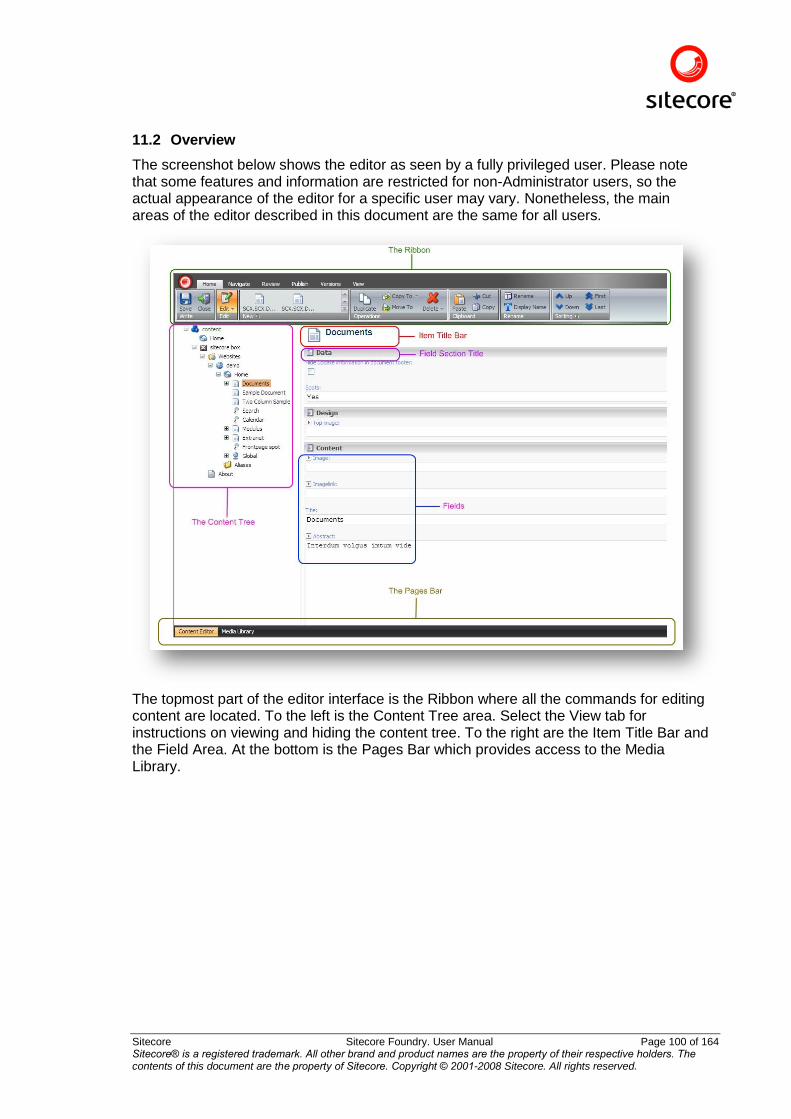
Sitecore Sitecore Foundry. User Manual Page 100 of 164 Sitecore® is a registered trademark. All other brand and product names are the property of their respective holders. The contents of this document are the property of Sitecore. Copyright © 2001-2008 Sitecore. All rights reserved.
11.2 Overview
The screenshot below shows the editor as seen by a fully privileged user. Please note that some features and information are restricted for non-Administrator users, so the actual appearance of the editor for a specific user may vary. Nonetheless, the main areas of the editor described in this document are the same for all users.
The topmost part of the editor interface is the Ribbon where all the commands for editing content are located. To the left is the Content Tree area. Select the View tab for instructions on viewing and hiding the content tree. To the right are the Item Title Bar and the Field Area. At the bottom is the Pages Bar which provides access to the Media Library.
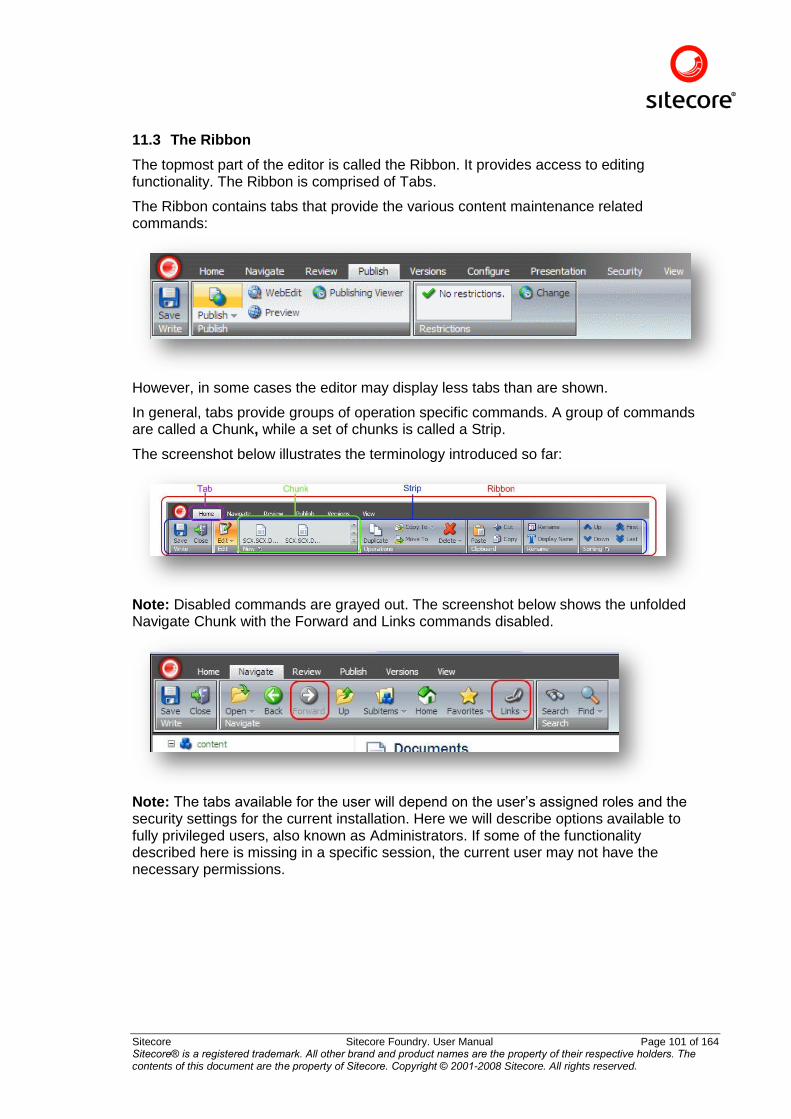
Sitecore Sitecore Foundry. User Manual Page 101 of 164 Sitecore® is a registered trademark. All other brand and product names are the property of their respective holders. The contents of this document are the property of Sitecore. Copyright © 2001-2008 Sitecore. All rights reserved.
11.3 The Ribbon
The topmost part of the editor is called the Ribbon. It provides access to editing functionality. The Ribbon is comprised of Tabs.
The Ribbon contains tabs that provide the various content maintenance related commands:
However, in some cases the editor may display less tabs than are shown.
In general, tabs provide groups of operation specific commands. A group of commands are called a Chunk, while a set of chunks is called a Strip.
The screenshot below illustrates the terminology introduced so far:
Note: Disabled commands are grayed out. The screenshot below shows the unfolded Navigate Chunk with the Forward and Links commands disabled.
Note: The tabs available for the user will depend on the user‟s assigned roles and the security settings for the current installation. Here we will describe options available to fully privileged users, also known as Administrators. If some of the functionality described here is missing in a specific session, the current user may not have the necessary permissions.
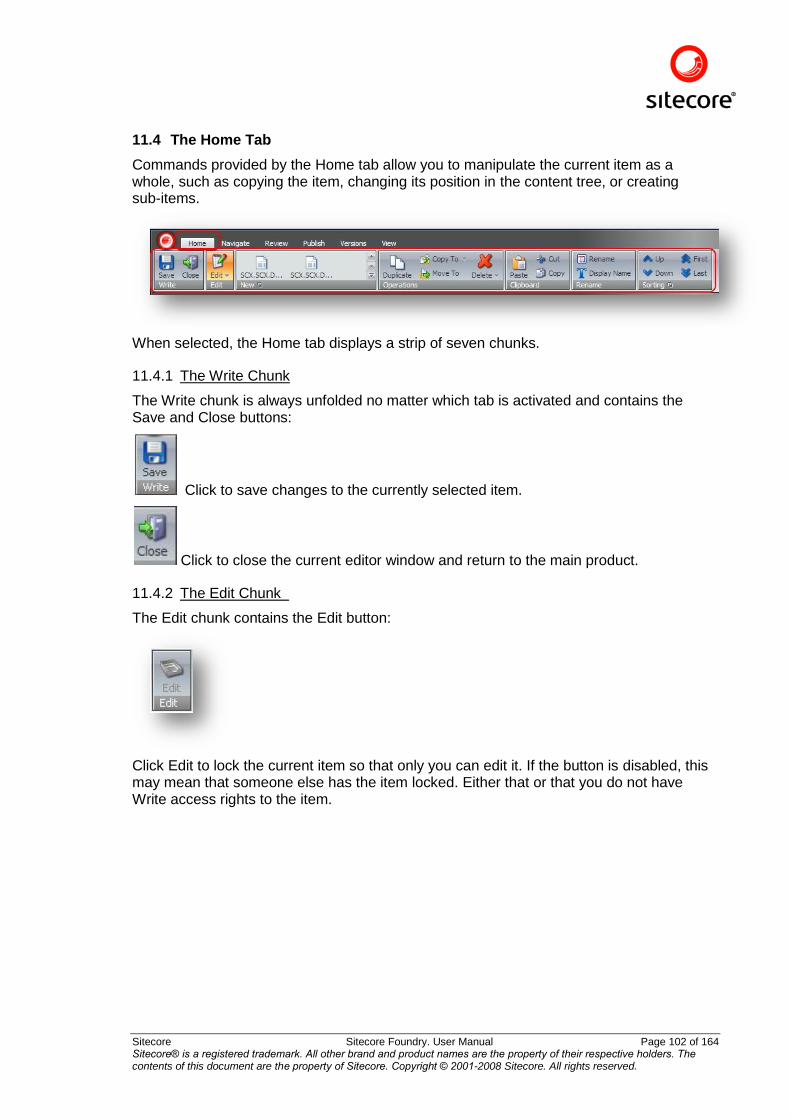
Sitecore Sitecore Foundry. User Manual Page 102 of 164 Sitecore® is a registered trademark. All other brand and product names are the property of their respective holders. The contents of this document are the property of Sitecore. Copyright © 2001-2008 Sitecore. All rights reserved.
11.4 The Home Tab
Commands provided by the Home tab allow you to manipulate the current item as a whole, such as copying the item, changing its position in the content tree, or creating sub-items.
When selected, the Home tab displays a strip of seven chunks.
11.4.1 The Write Chunk
The Write chunk is always unfolded no matter which tab is activated and contains the Save and Close buttons:
Click to save changes to the currently selected item.
Click to close the current editor window and return to the main product.
11.4.2 The Edit Chunk
The Edit chunk contains the Edit button:
Click Edit to lock the current item so that only you can edit it. If the button is disabled, this may mean that someone else has the item locked. Either that or that you do not have Write access rights to the item.
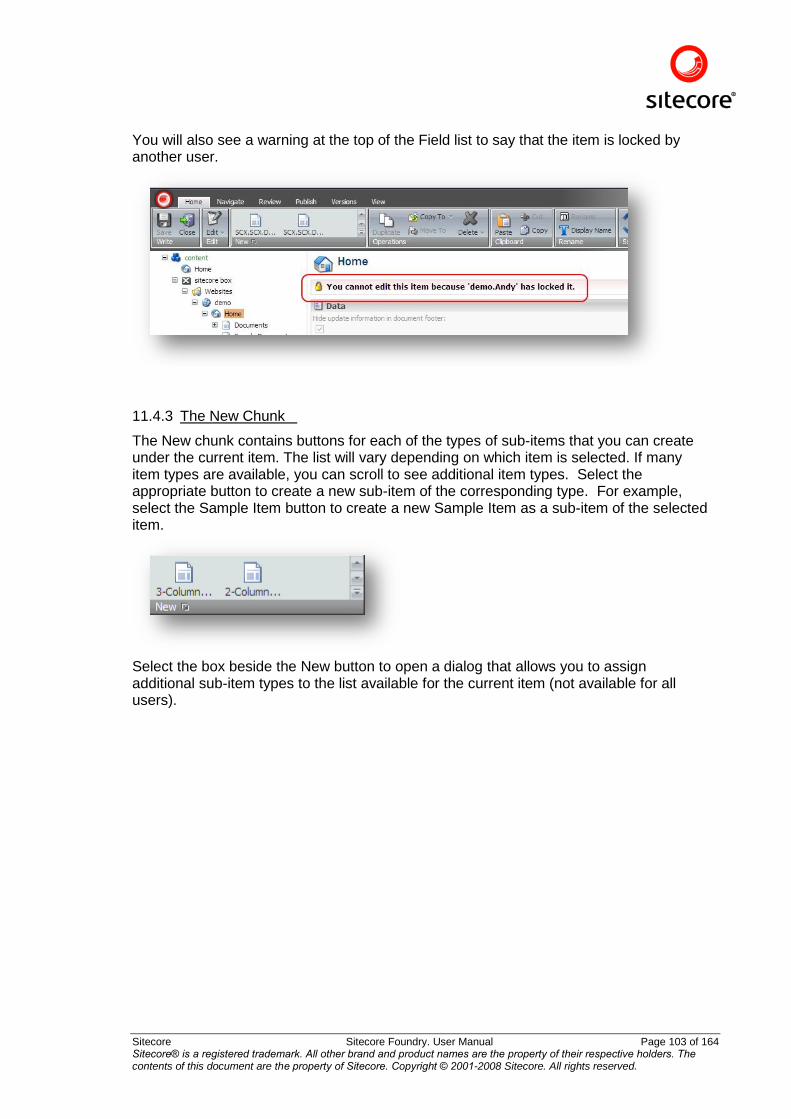
Sitecore Sitecore Foundry. User Manual Page 103 of 164 Sitecore® is a registered trademark. All other brand and product names are the property of their respective holders. The contents of this document are the property of Sitecore. Copyright © 2001-2008 Sitecore. All rights reserved.
You will also see a warning at the top of the Field list to say that the item is locked by another user.
11.4.3 The New Chunk
The New chunk contains buttons for each of the types of sub-items that you can create under the current item. The list will vary depending on which item is selected. If many item types are available, you can scroll to see additional item types. Select the appropriate button to create a new sub-item of the corresponding type. For example, select the Sample Item button to create a new Sample Item as a sub-item of the selected item.
Select the box beside the New button to open a dialog that allows you to assign additional sub-item types to the list available for the current item (not available for all users).
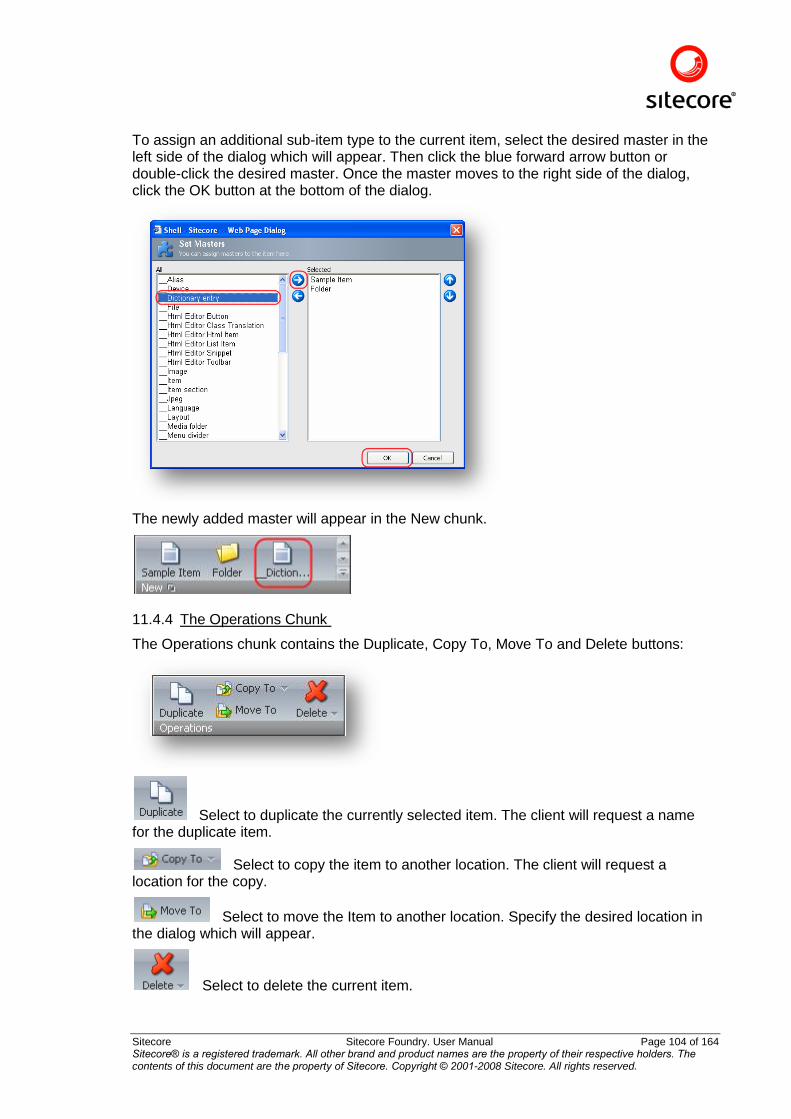
Sitecore Sitecore Foundry. User Manual Page 104 of 164 Sitecore® is a registered trademark. All other brand and product names are the property of their respective holders. The contents of this document are the property of Sitecore. Copyright © 2001-2008 Sitecore. All rights reserved.
To assign an additional sub-item type to the current item, select the desired master in the left side of the dialog which will appear. Then click the blue forward arrow button or double-click the desired master. Once the master moves to the right side of the dialog, click the OK button at the bottom of the dialog.
The newly added master will appear in the New chunk.
11.4.4 The Operations Chunk
The Operations chunk contains the Duplicate, Copy To, Move To and Delete buttons:
Select to duplicate the currently selected item. The client will request a name for the duplicate item.
Select to copy the item to another location. The client will request a location for the copy.
Select to move the Item to another location. Specify the desired location in the dialog which will appear.
Select to delete the current item.
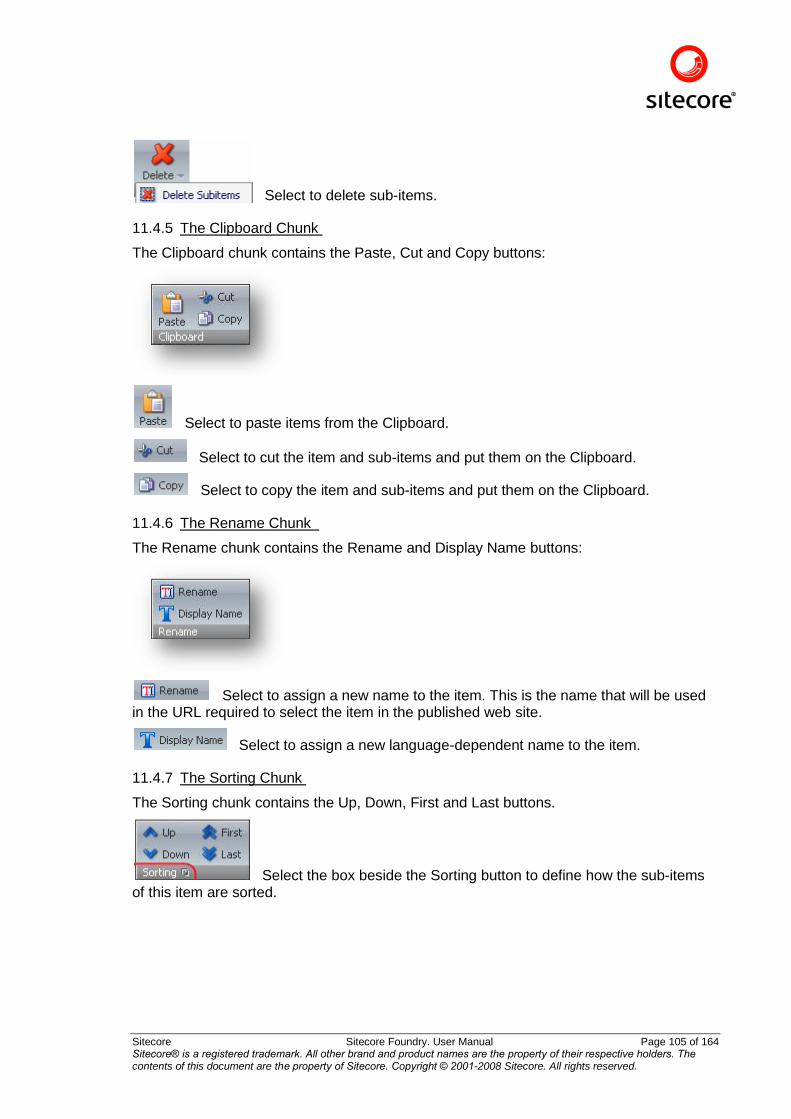
Sitecore Sitecore Foundry. User Manual Page 105 of 164 Sitecore® is a registered trademark. All other brand and product names are the property of their respective holders. The contents of this document are the property of Sitecore. Copyright © 2001-2008 Sitecore. All rights reserved.
Select to delete sub-items.
11.4.5 The Clipboard Chunk
The Clipboard chunk contains the Paste, Cut and Copy buttons:
Select to paste items from the Clipboard.
Select to cut the item and sub-items and put them on the Clipboard.
Select to copy the item and sub-items and put them on the Clipboard.
11.4.6 The Rename Chunk
The Rename chunk contains the Rename and Display Name buttons:
Select to assign a new name to the item. This is the name that will be used in the URL required to select the item in the published web site.
Select to assign a new language-dependent name to the item.
11.4.7 The Sorting Chunk
The Sorting chunk contains the Up, Down, First and Last buttons.
Select the box beside the Sorting button to define how the sub-items of this item are sorted.
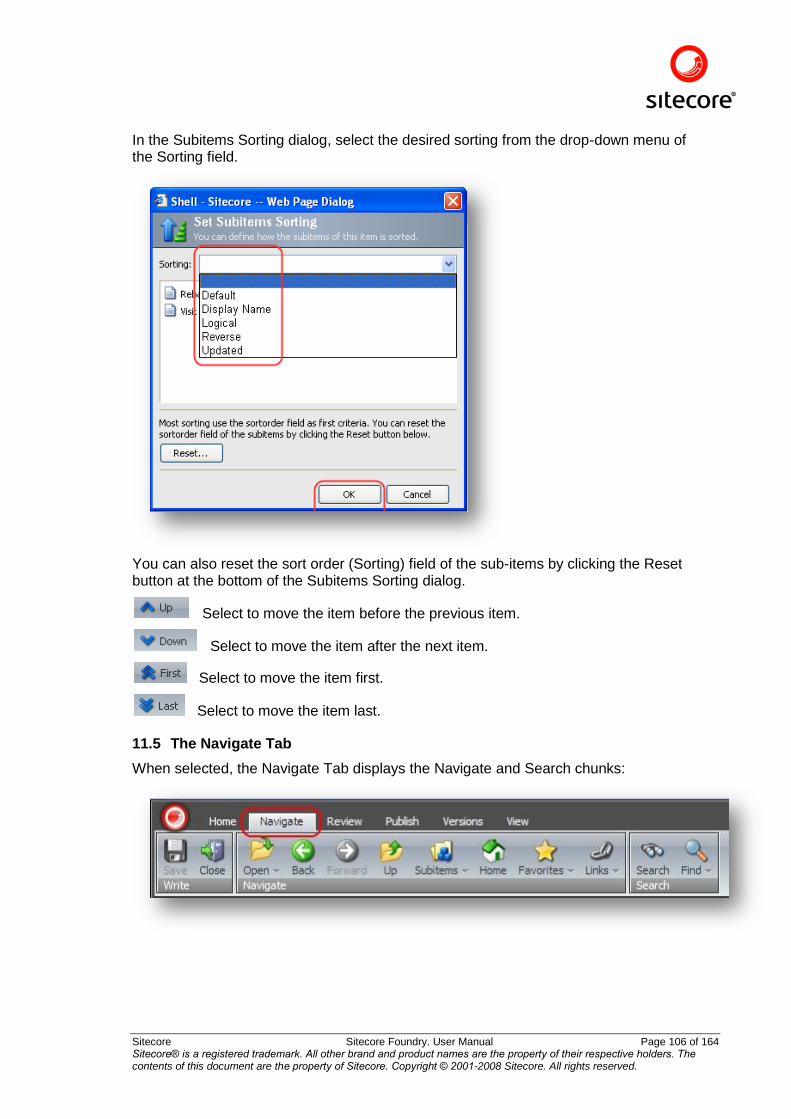
Sitecore Sitecore Foundry. User Manual Page 106 of 164 Sitecore® is a registered trademark. All other brand and product names are the property of their respective holders. The contents of this document are the property of Sitecore. Copyright © 2001-2008 Sitecore. All rights reserved.
In the Subitems Sorting dialog, select the desired sorting from the drop-down menu of the Sorting field.
You can also reset the sort order (Sorting) field of the sub-items by clicking the Reset button at the bottom of the Subitems Sorting dialog.
Select to move the item before the previous item.
Select to move the item after the next item.
Select to move the item first.
Select to move the item last.
11.5 The Navigate Tab
When selected, the Navigate Tab displays the Navigate and Search chunks:
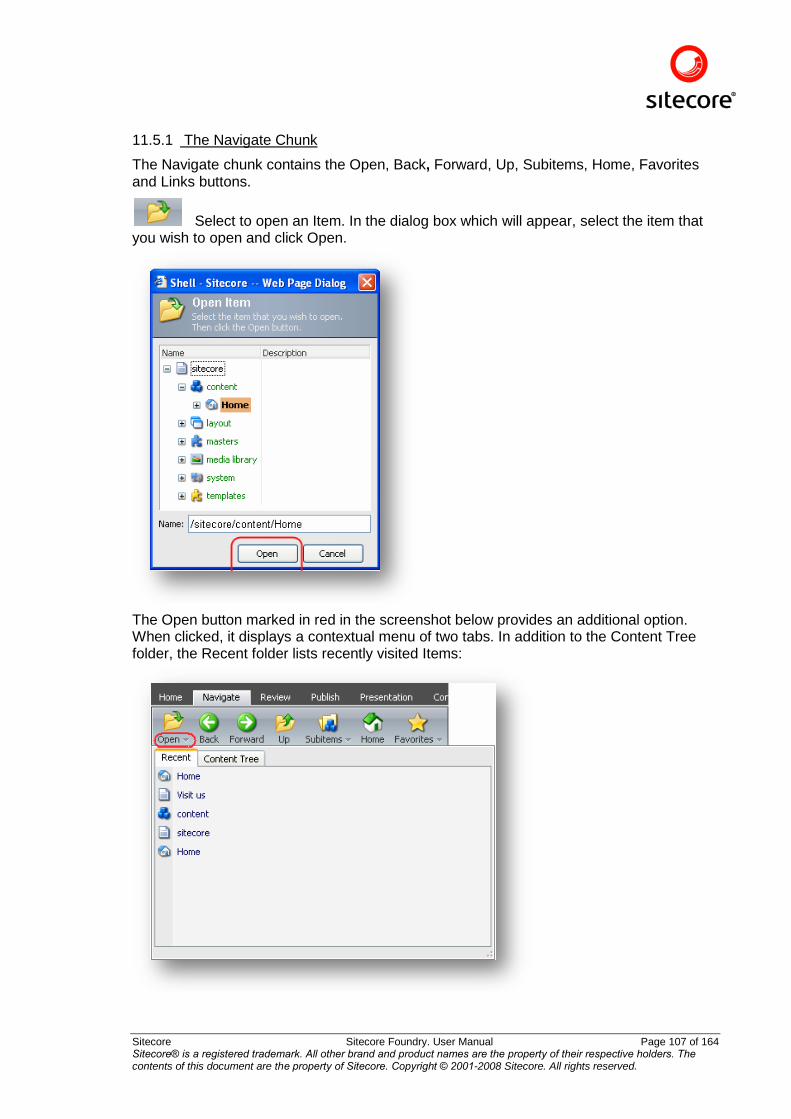
Sitecore Sitecore Foundry. User Manual Page 107 of 164 Sitecore® is a registered trademark. All other brand and product names are the property of their respective holders. The contents of this document are the property of Sitecore. Copyright © 2001-2008 Sitecore. All rights reserved.
11.5.1 The Navigate Chunk
The Navigate chunk contains the Open, Back, Forward, Up, Subitems, Home, Favorites and Links buttons.
Select to open an Item. In the dialog box which will appear, select the item that you wish to open and click Open.
The Open button marked in red in the screenshot below provides an additional option. When clicked, it displays a contextual menu of two tabs. In addition to the Content Tree folder, the Recent folder lists recently visited Items:
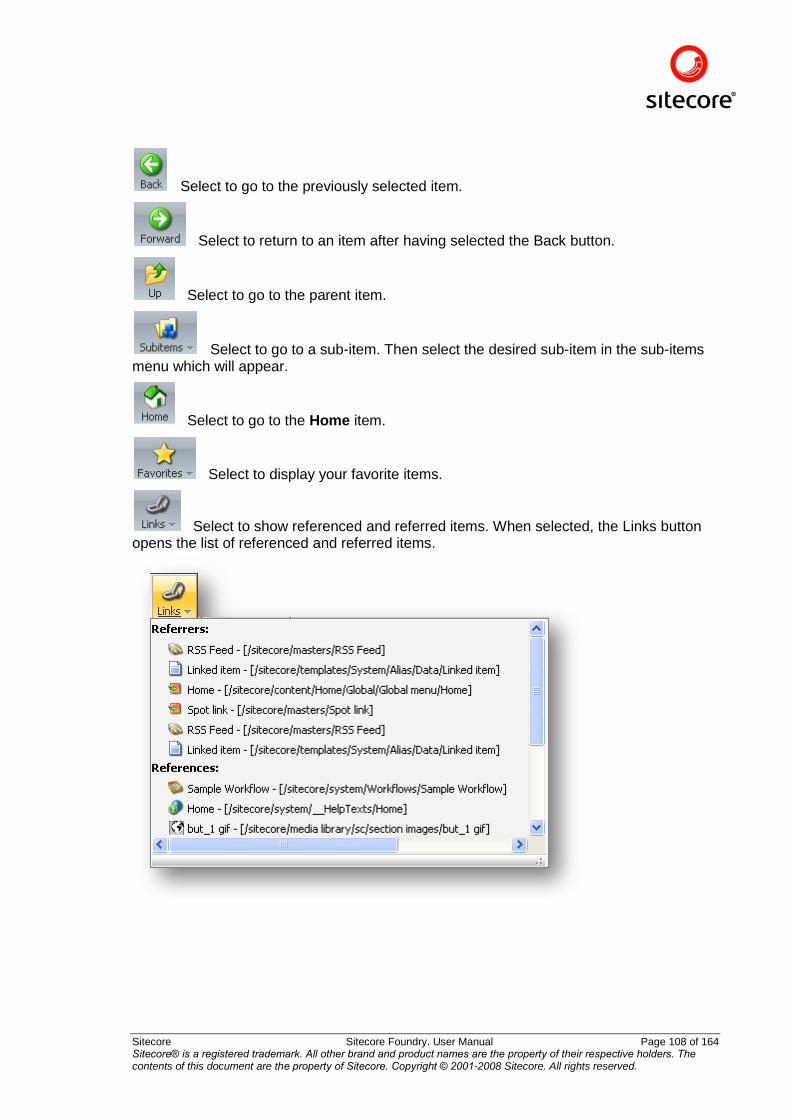
Sitecore Sitecore Foundry. User Manual Page 108 of 164 Sitecore® is a registered trademark. All other brand and product names are the property of their respective holders. The contents of this document are the property of Sitecore. Copyright © 2001-2008 Sitecore. All rights reserved.
Select to go to the previously selected item.
Select to return to an item after having selected the Back button.
Select to go to the parent item.
Select to go to a sub-item. Then select the desired sub-item in the sub-items menu which will appear.
Select to go to the Home item.
Select to display your favorite items.
Select to show referenced and referred items. When selected, the Links button opens the list of referenced and referred items.
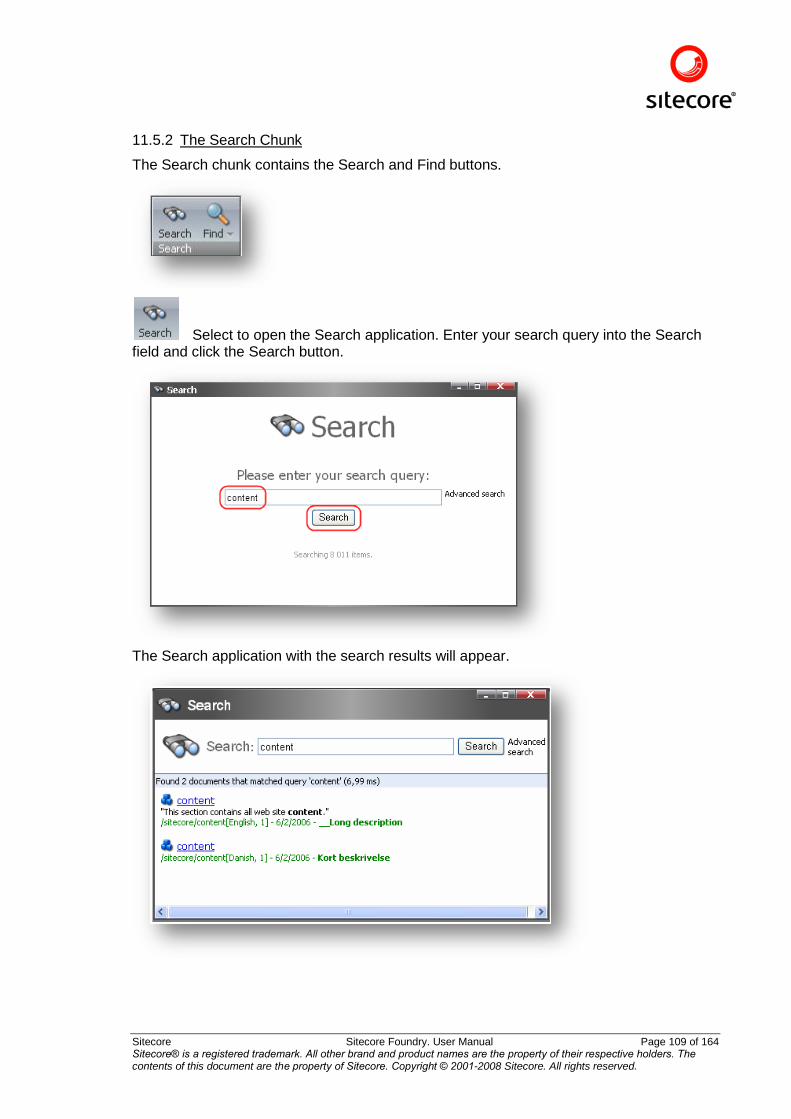
Sitecore Sitecore Foundry. User Manual Page 109 of 164 Sitecore® is a registered trademark. All other brand and product names are the property of their respective holders. The contents of this document are the property of Sitecore. Copyright © 2001-2008 Sitecore. All rights reserved.
11.5.2 The Search Chunk
The Search chunk contains the Search and Find buttons.
Select to open the Search application. Enter your search query into the Search field and click the Search button.
The Search application with the search results will appear.
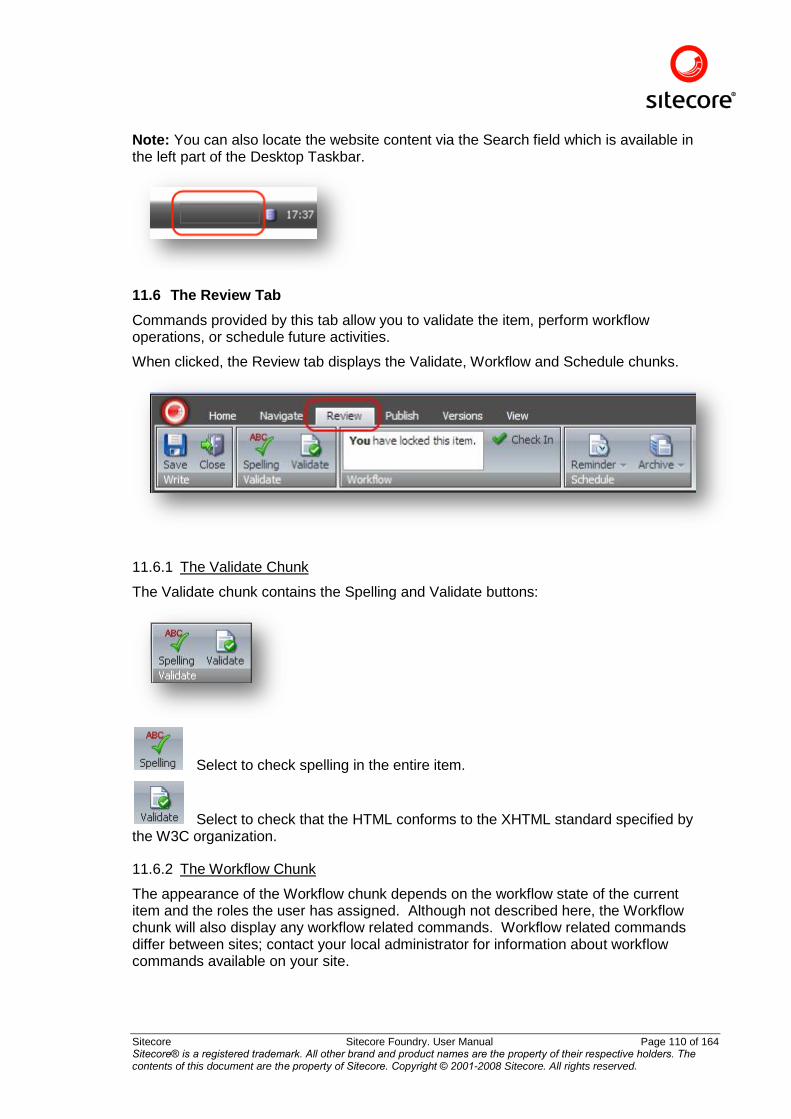
Sitecore Sitecore Foundry. User Manual Page 110 of 164 Sitecore® is a registered trademark. All other brand and product names are the property of their respective holders. The contents of this document are the property of Sitecore. Copyright © 2001-2008 Sitecore. All rights reserved.
Note: You can also locate the website content via the Search field which is available in the left part of the Desktop Taskbar.
11.6 The Review Tab
Commands provided by this tab allow you to validate the item, perform workflow operations, or schedule future activities.
When clicked, the Review tab displays the Validate, Workflow and Schedule chunks.
11.6.1 The Validate Chunk
The Validate chunk contains the Spelling and Validate buttons:
Select to check spelling in the entire item.
Select to check that the HTML conforms to the XHTML standard specified by the W3C organization.
11.6.2 The Workflow Chunk
The appearance of the Workflow chunk depends on the workflow state of the current item and the roles the user has assigned. Although not described here, the Workflow chunk will also display any workflow related commands. Workflow related commands differ between sites; contact your local administrator for information about workflow commands available on your site.
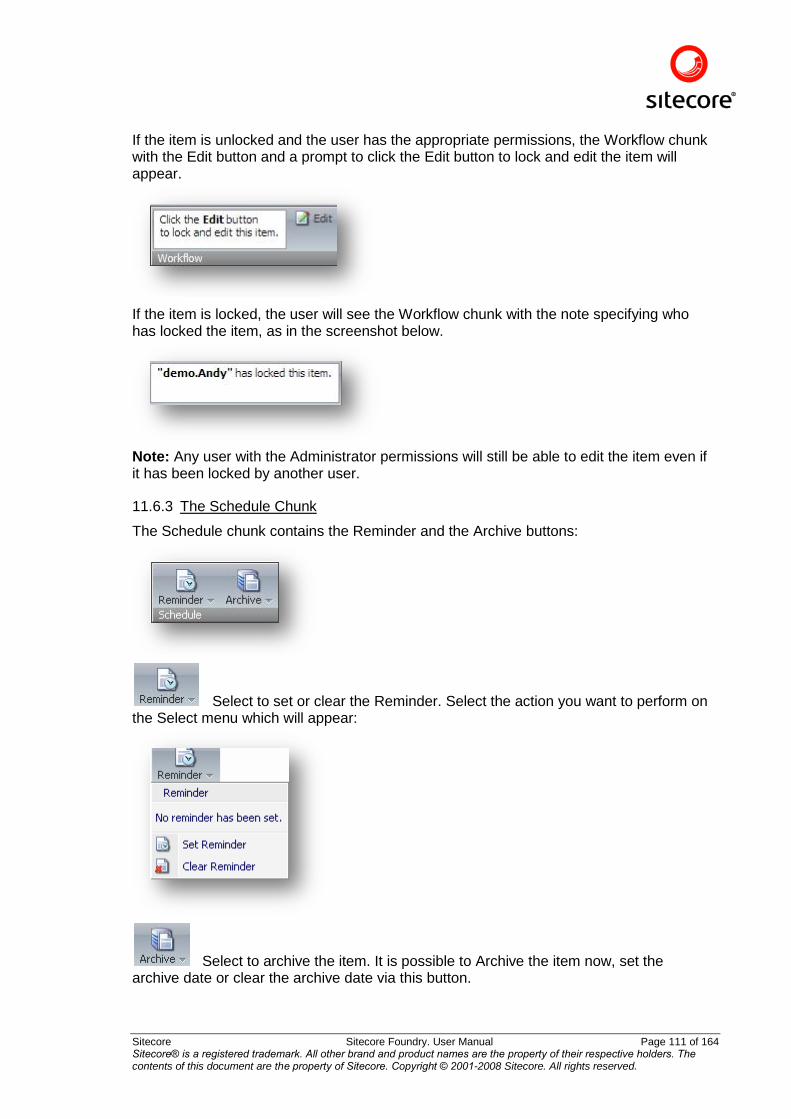
Sitecore Sitecore Foundry. User Manual Page 111 of 164 Sitecore® is a registered trademark. All other brand and product names are the property of their respective holders. The contents of this document are the property of Sitecore. Copyright © 2001-2008 Sitecore. All rights reserved.
If the item is unlocked and the user has the appropriate permissions, the Workflow chunk with the Edit button and a prompt to click the Edit button to lock and edit the item will appear.
If the item is locked, the user will see the Workflow chunk with the note specifying who has locked the item, as in the screenshot below.
Note: Any user with the Administrator permissions will still be able to edit the item even if it has been locked by another user.
11.6.3 The Schedule Chunk
The Schedule chunk contains the Reminder and the Archive buttons:
Select to set or clear the Reminder. Select the action you want to perform on the Select menu which will appear:
Select to archive the item. It is possible to Archive the item now, set the archive date or clear the archive date via this button.
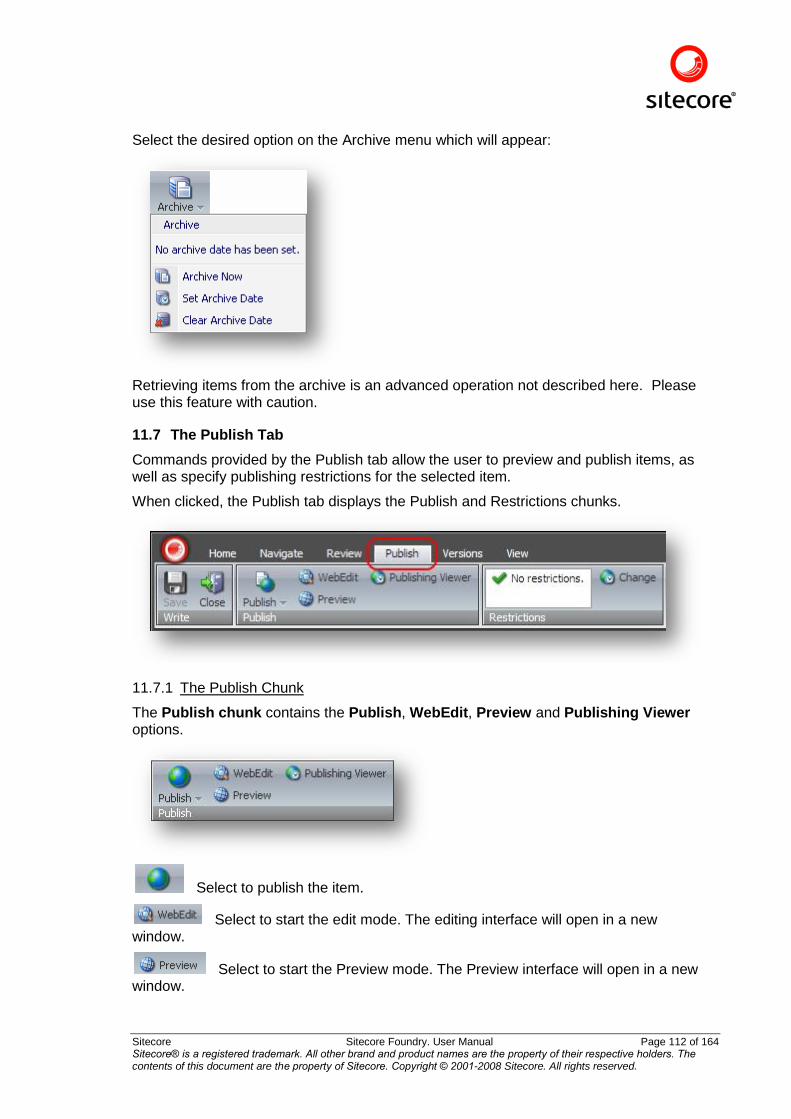
Sitecore Sitecore Foundry. User Manual Page 112 of 164 Sitecore® is a registered trademark. All other brand and product names are the property of their respective holders. The contents of this document are the property of Sitecore. Copyright © 2001-2008 Sitecore. All rights reserved.
Select the desired option on the Archive menu which will appear:
Retrieving items from the archive is an advanced operation not described here. Please use this feature with caution.
11.7 The Publish Tab
Commands provided by the Publish tab allow the user to preview and publish items, as well as specify publishing restrictions for the selected item.
When clicked, the Publish tab displays the Publish and Restrictions chunks.
11.7.1 The Publish Chunk
The Publish chunk contains the Publish, WebEdit, Preview and Publishing Viewer options.
Select to publish the item.
Select to start the edit mode. The editing interface will open in a new window.
Select to start the Preview mode. The Preview interface will open in a new window.
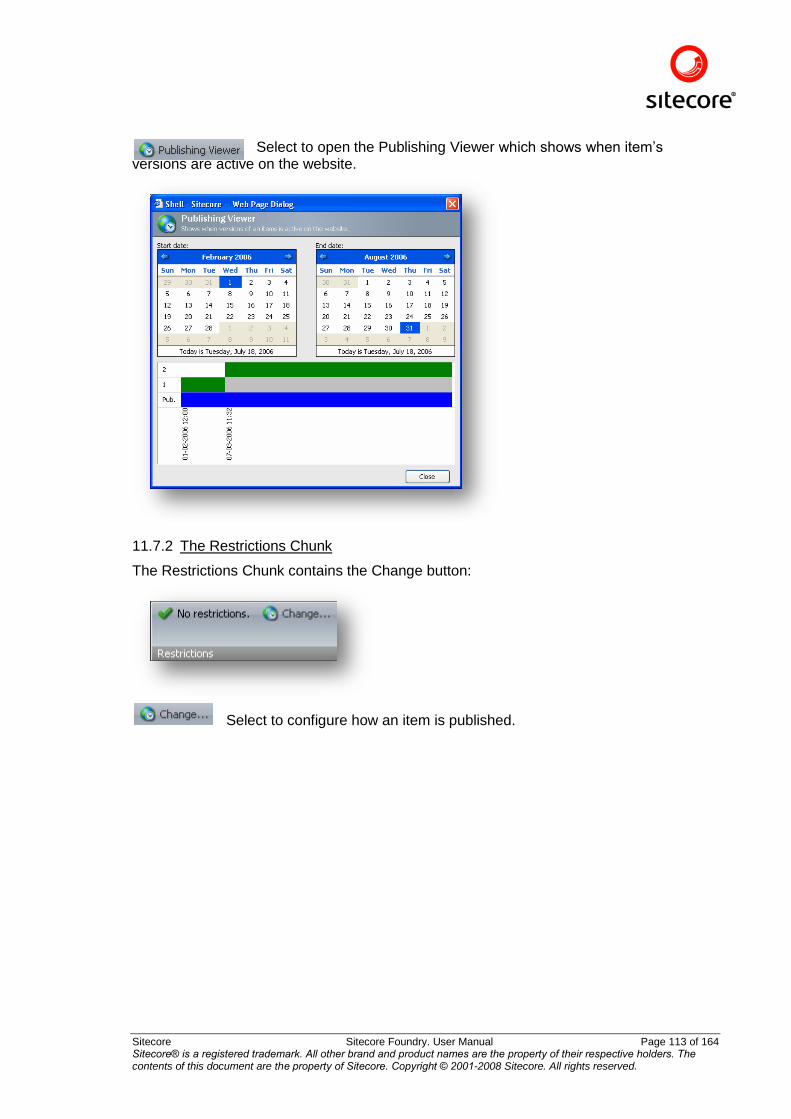
Sitecore Sitecore Foundry. User Manual Page 113 of 164 Sitecore® is a registered trademark. All other brand and product names are the property of their respective holders. The contents of this document are the property of Sitecore. Copyright © 2001-2008 Sitecore. All rights reserved.
Select to open the Publishing Viewer which shows when item‟s versions are active on the website.
11.7.2 The Restrictions Chunk
The Restrictions Chunk contains the Change button:
Select to configure how an item is published.
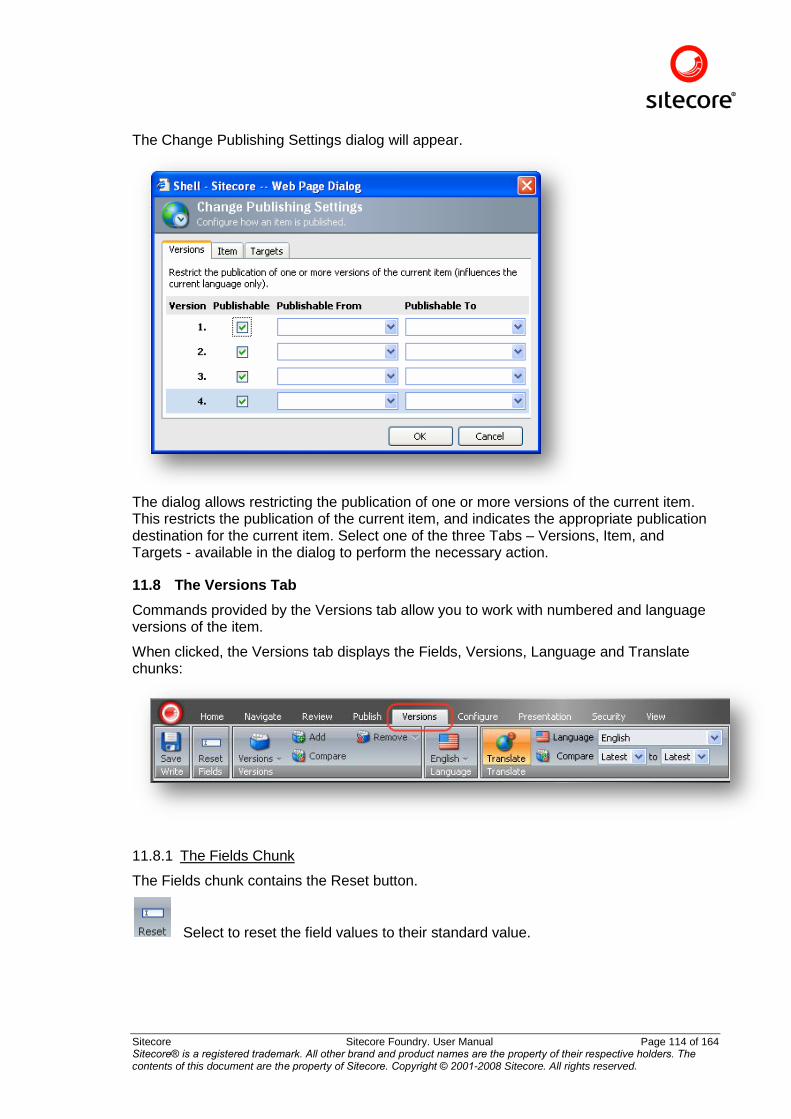
Sitecore Sitecore Foundry. User Manual Page 114 of 164 Sitecore® is a registered trademark. All other brand and product names are the property of their respective holders. The contents of this document are the property of Sitecore. Copyright © 2001-2008 Sitecore. All rights reserved.
The Change Publishing Settings dialog will appear.
The dialog allows restricting the publication of one or more versions of the current item. This restricts the publication of the current item, and indicates the appropriate publication destination for the current item. Select one of the three Tabs – Versions, Item, and Targets - available in the dialog to perform the necessary action.
11.8 The Versions Tab
Commands provided by the Versions tab allow you to work with numbered and language versions of the item.
When clicked, the Versions tab displays the Fields, Versions, Language and Translate chunks:
11.8.1 The Fields Chunk
The Fields chunk contains the Reset button.
Select to reset the field values to their standard value.
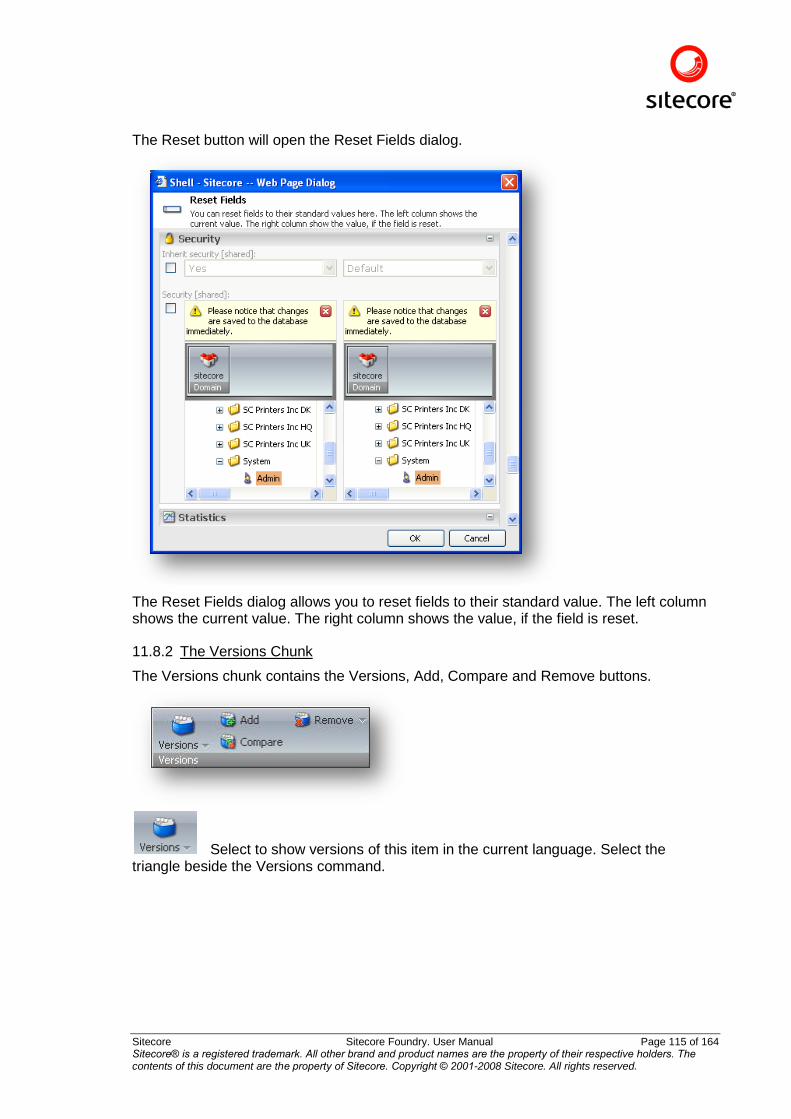
Sitecore Sitecore Foundry. User Manual Page 115 of 164 Sitecore® is a registered trademark. All other brand and product names are the property of their respective holders. The contents of this document are the property of Sitecore. Copyright © 2001-2008 Sitecore. All rights reserved.
The Reset button will open the Reset Fields dialog.
The Reset Fields dialog allows you to reset fields to their standard value. The left column shows the current value. The right column shows the value, if the field is reset.
11.8.2 The Versions Chunk
The Versions chunk contains the Versions, Add, Compare and Remove buttons.
Select to show versions of this item in the current language. Select the triangle beside the Versions command.
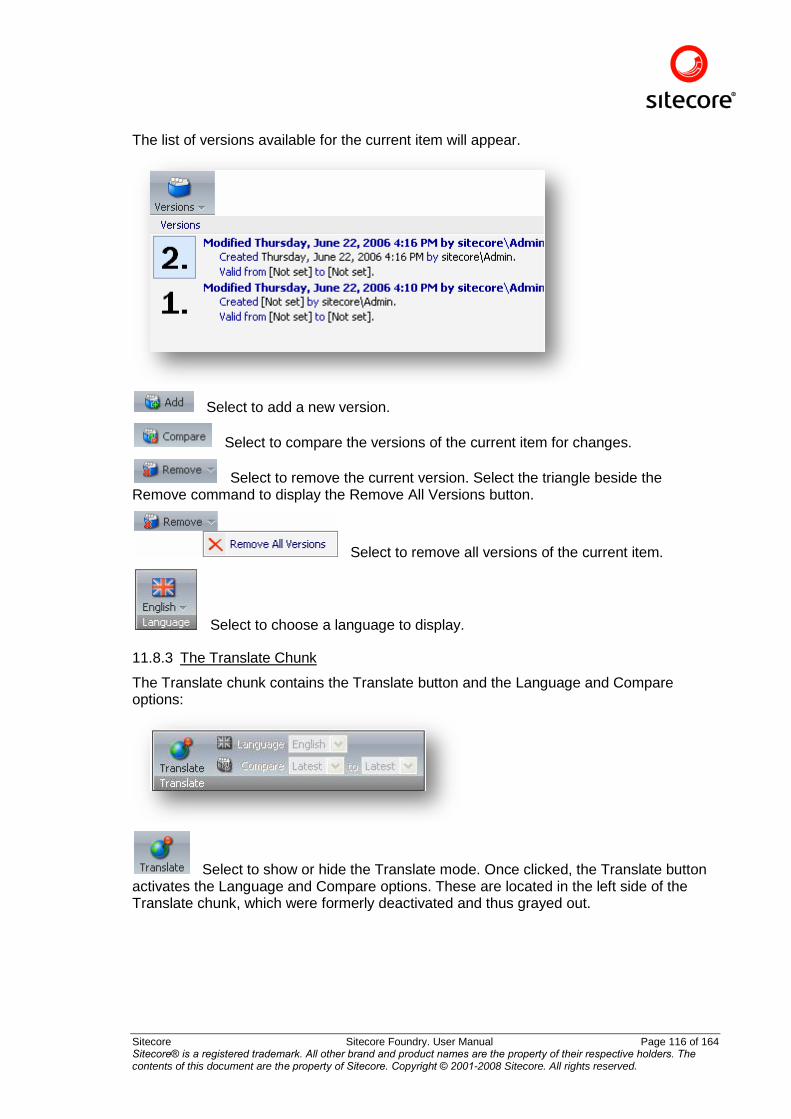
Sitecore Sitecore Foundry. User Manual Page 116 of 164 Sitecore® is a registered trademark. All other brand and product names are the property of their respective holders. The contents of this document are the property of Sitecore. Copyright © 2001-2008 Sitecore. All rights reserved.
The list of versions available for the current item will appear.
Select to add a new version.
Select to compare the versions of the current item for changes.
Select to remove the current version. Select the triangle beside the Remove command to display the Remove All Versions button.
Select to remove all versions of the current item.
Select to choose a language to display.
11.8.3 The Translate Chunk
The Translate chunk contains the Translate button and the Language and Compare options:
Select to show or hide the Translate mode. Once clicked, the Translate button activates the Language and Compare options. These are located in the left side of the Translate chunk, which were formerly deactivated and thus grayed out.
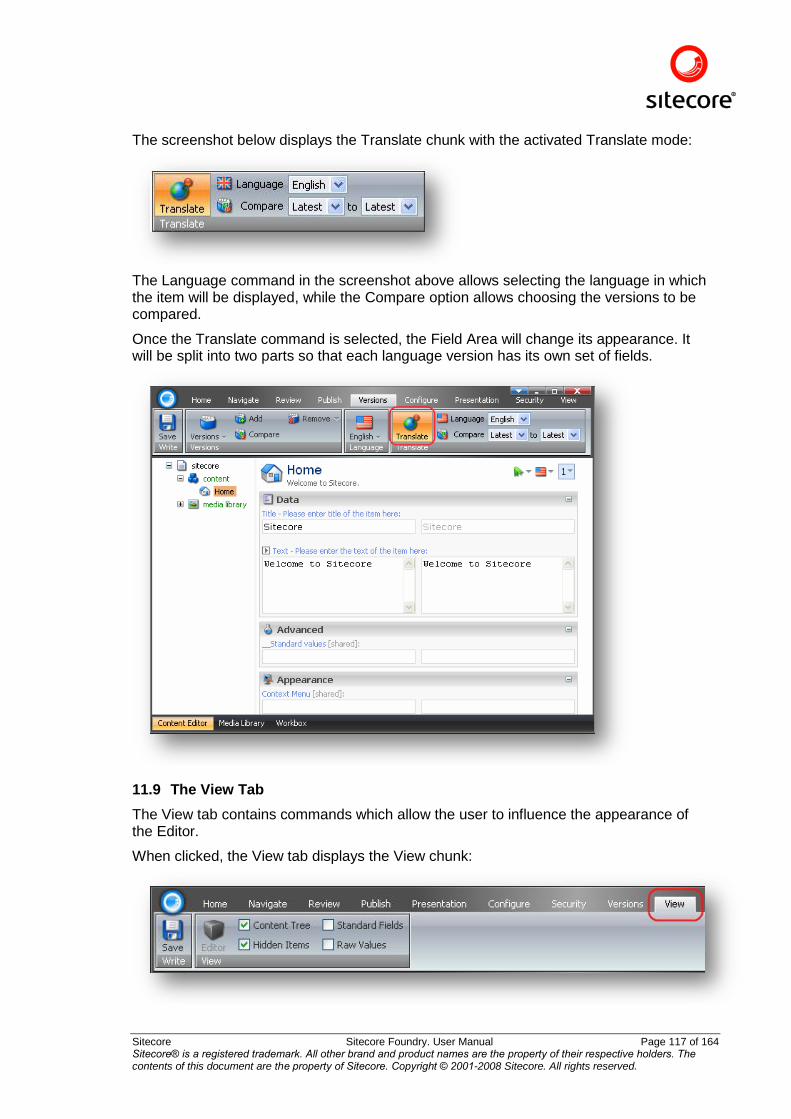
Sitecore Sitecore Foundry. User Manual Page 117 of 164 Sitecore® is a registered trademark. All other brand and product names are the property of their respective holders. The contents of this document are the property of Sitecore. Copyright © 2001-2008 Sitecore. All rights reserved.
The screenshot below displays the Translate chunk with the activated Translate mode:
The Language command in the screenshot above allows selecting the language in which the item will be displayed, while the Compare option allows choosing the versions to be compared.
Once the Translate command is selected, the Field Area will change its appearance. It will be split into two parts so that each language version has its own set of fields.
11.9 The View Tab
The View tab contains commands which allow the user to influence the appearance of the Editor.
When clicked, the View tab displays the View chunk:
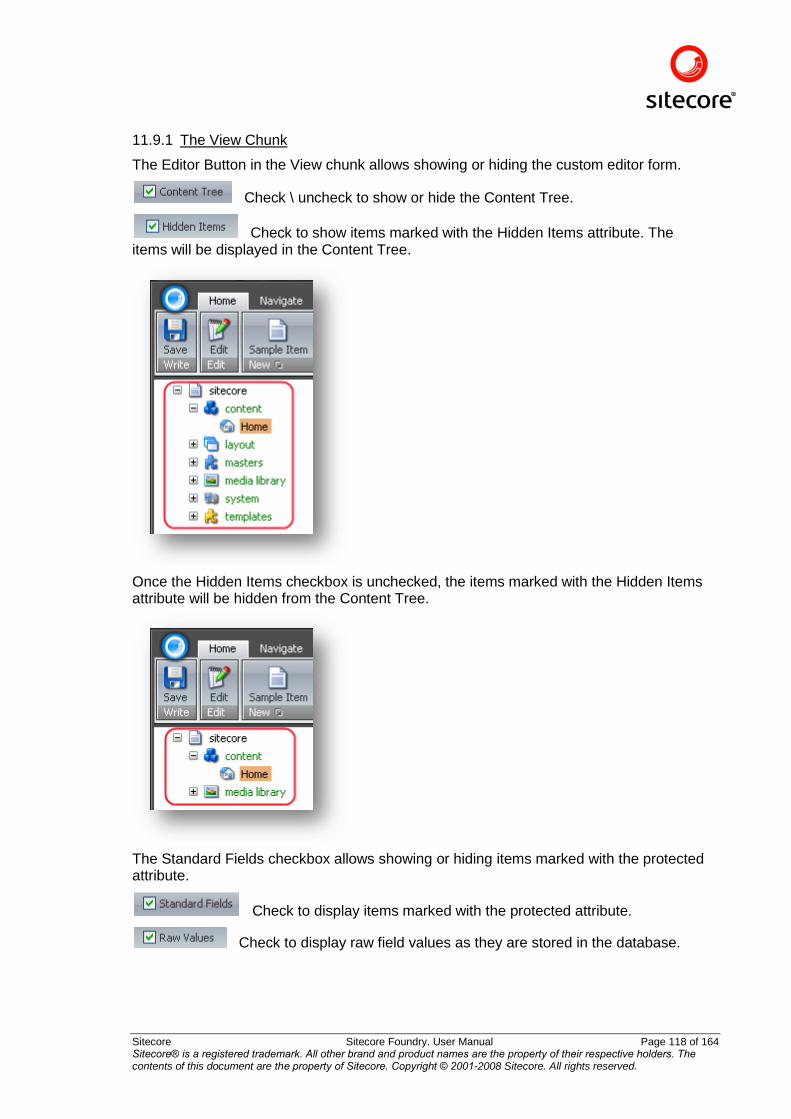
Sitecore Sitecore Foundry. User Manual Page 118 of 164 Sitecore® is a registered trademark. All other brand and product names are the property of their respective holders. The contents of this document are the property of Sitecore. Copyright © 2001-2008 Sitecore. All rights reserved.
11.9.1 The View Chunk
The Editor Button in the View chunk allows showing or hiding the custom editor form.
Check \ uncheck to show or hide the Content Tree.
Check to show items marked with the Hidden Items attribute. The items will be displayed in the Content Tree.
Once the Hidden Items checkbox is unchecked, the items marked with the Hidden Items attribute will be hidden from the Content Tree.
The Standard Fields checkbox allows showing or hiding items marked with the protected attribute.
Check to display items marked with the protected attribute.
Check to display raw field values as they are stored in the database.
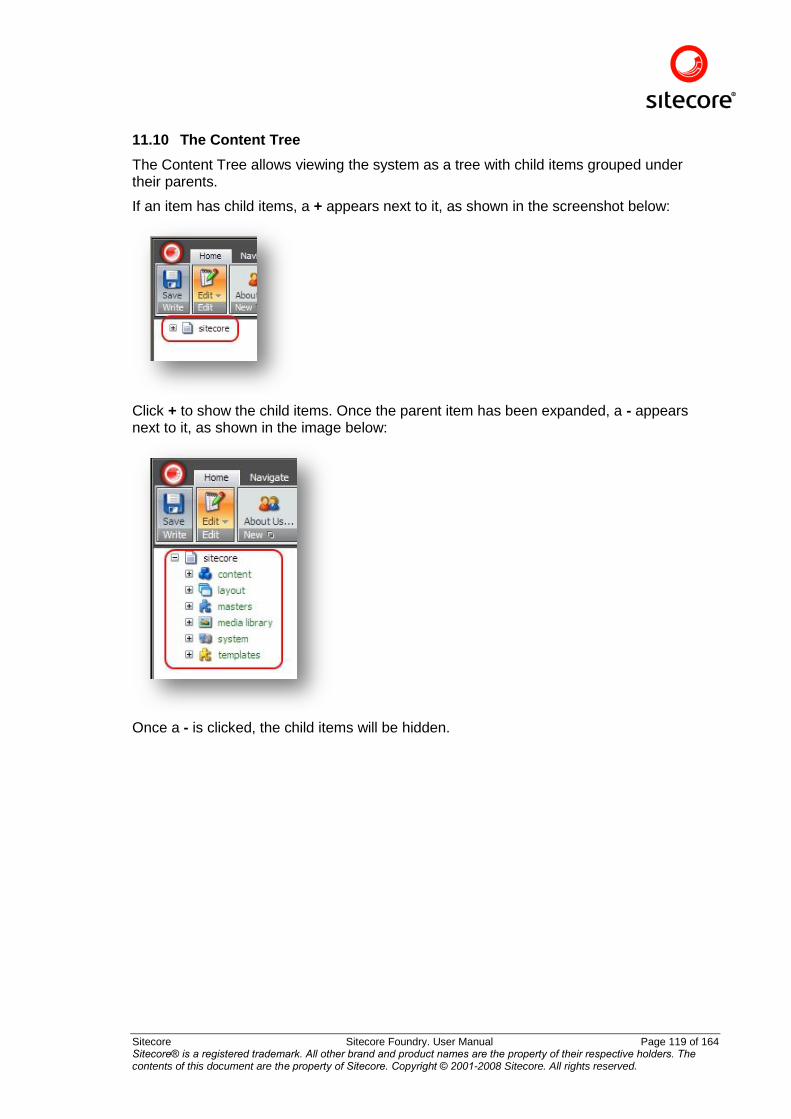
Sitecore Sitecore Foundry. User Manual Page 119 of 164 Sitecore® is a registered trademark. All other brand and product names are the property of their respective holders. The contents of this document are the property of Sitecore. Copyright © 2001-2008 Sitecore. All rights reserved.
11.10 The Content Tree
The Content Tree allows viewing the system as a tree with child items grouped under their parents.
If an item has child items, a + appears next to it, as shown in the screenshot below:
Click + to show the child items. Once the parent item has been expanded, a - appears next to it, as shown in the image below:
Once a - is clicked, the child items will be hidden.
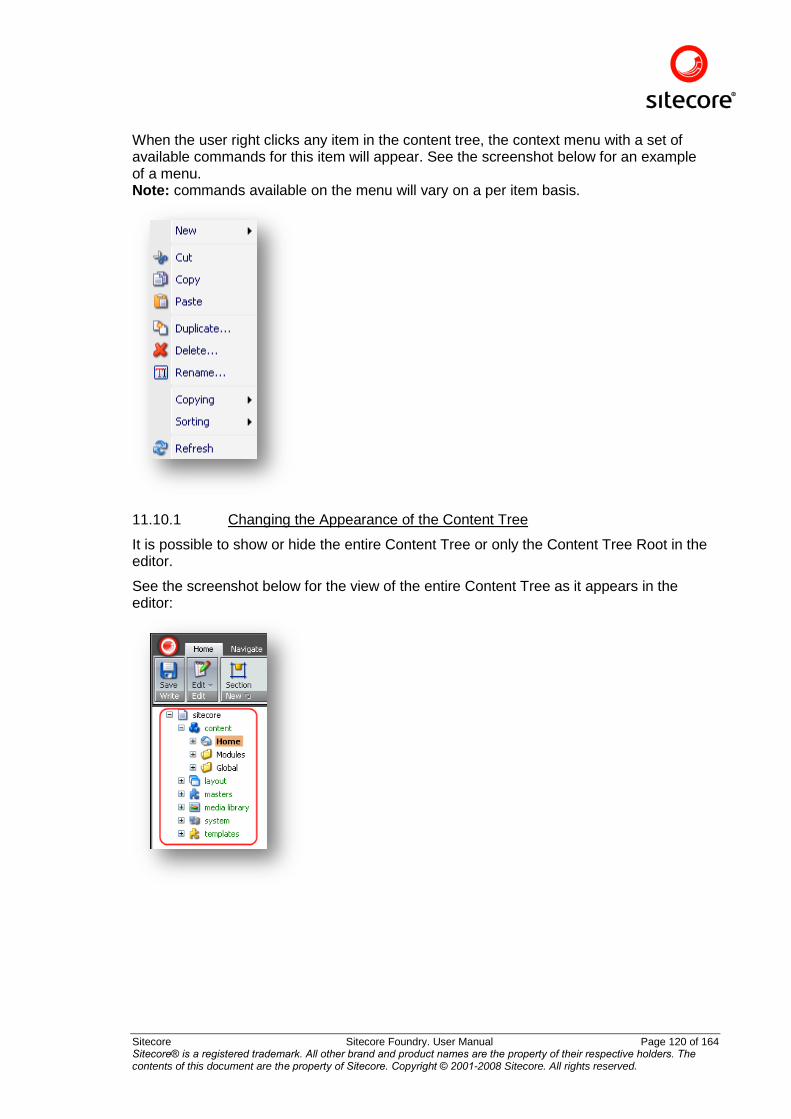
Sitecore Sitecore Foundry. User Manual Page 120 of 164 Sitecore® is a registered trademark. All other brand and product names are the property of their respective holders. The contents of this document are the property of Sitecore. Copyright © 2001-2008 Sitecore. All rights reserved.
When the user right clicks any item in the content tree, the context menu with a set of available commands for this item will appear. See the screenshot below for an example of a menu. Note: commands available on the menu will vary on a per item basis.
11.10.1 Changing the Appearance of the Content Tree
It is possible to show or hide the entire Content Tree or only the Content Tree Root in the editor.
See the screenshot below for the view of the entire Content Tree as it appears in the editor:
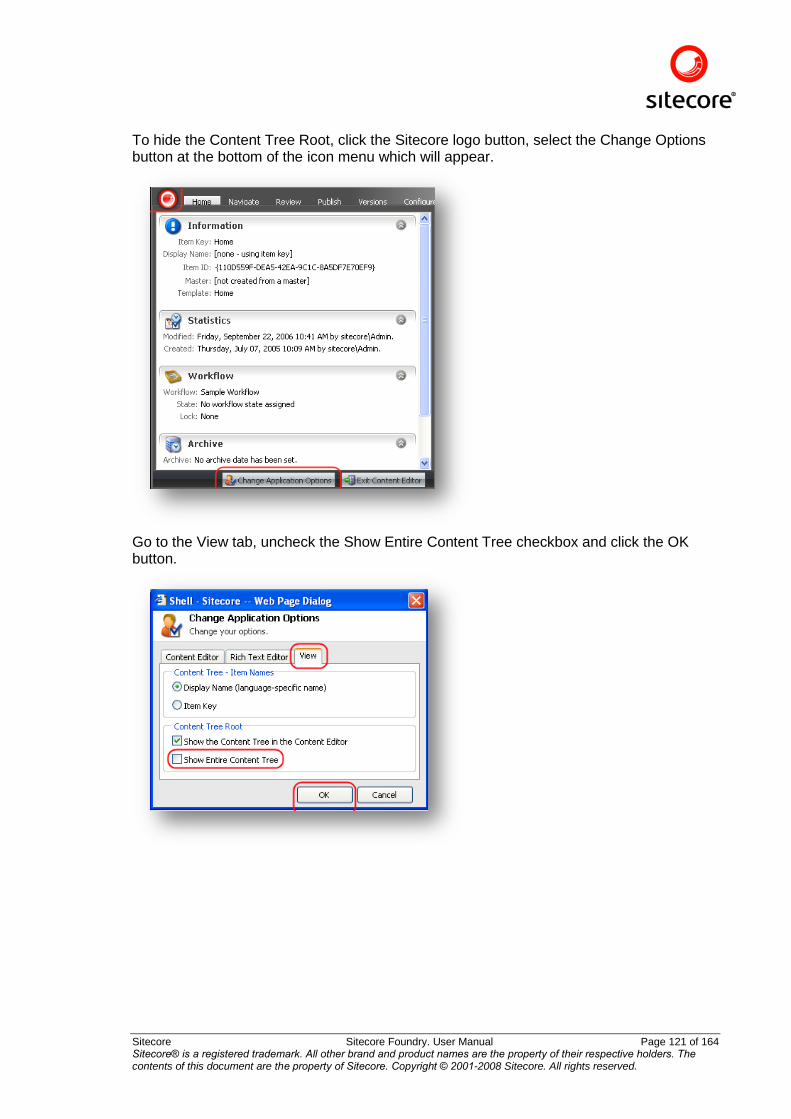
Sitecore Sitecore Foundry. User Manual Page 121 of 164 Sitecore® is a registered trademark. All other brand and product names are the property of their respective holders. The contents of this document are the property of Sitecore. Copyright © 2001-2008 Sitecore. All rights reserved.
To hide the Content Tree Root, click the Sitecore logo button, select the Change Options button at the bottom of the icon menu which will appear.
Go to the View tab, uncheck the Show Entire Content Tree checkbox and click the OK button.
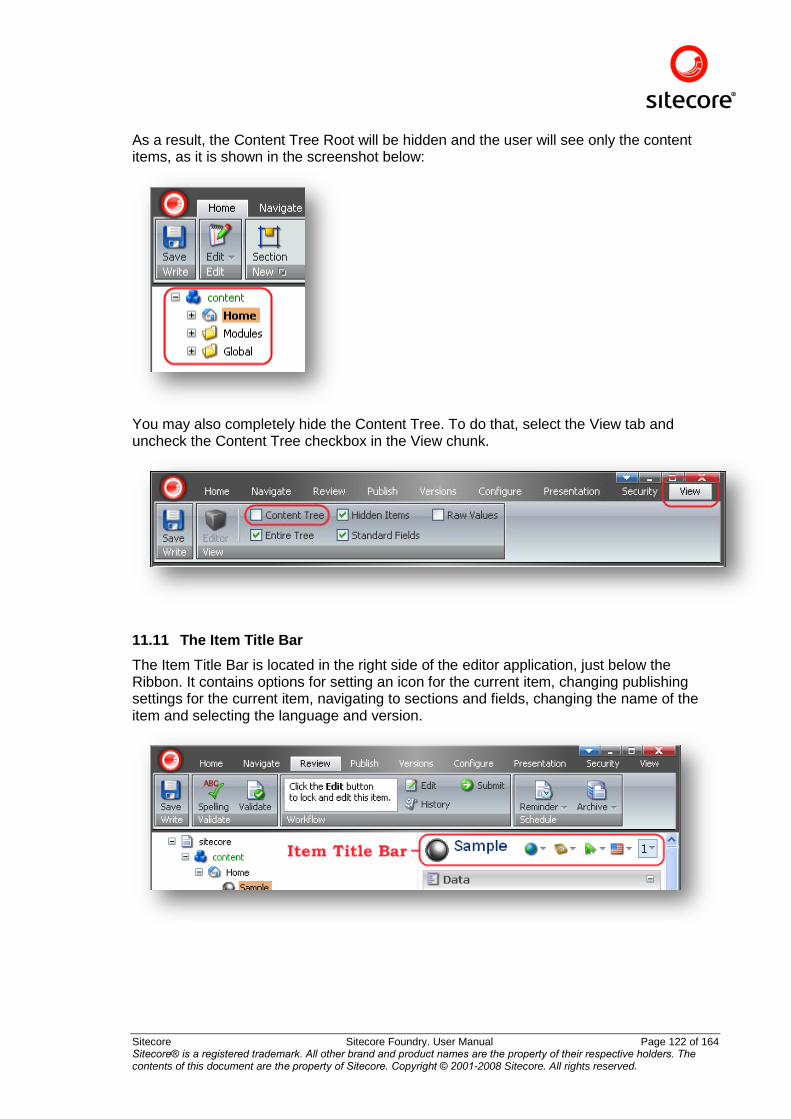
Sitecore Sitecore Foundry. User Manual Page 122 of 164 Sitecore® is a registered trademark. All other brand and product names are the property of their respective holders. The contents of this document are the property of Sitecore. Copyright © 2001-2008 Sitecore. All rights reserved.
As a result, the Content Tree Root will be hidden and the user will see only the content items, as it is shown in the screenshot below:
You may also completely hide the Content Tree. To do that, select the View tab and uncheck the Content Tree checkbox in the View chunk.
11.11 The Item Title Bar
The Item Title Bar is located in the right side of the editor application, just below the Ribbon. It contains options for setting an icon for the current item, changing publishing settings for the current item, navigating to sections and fields, changing the name of the item and selecting the language and version.
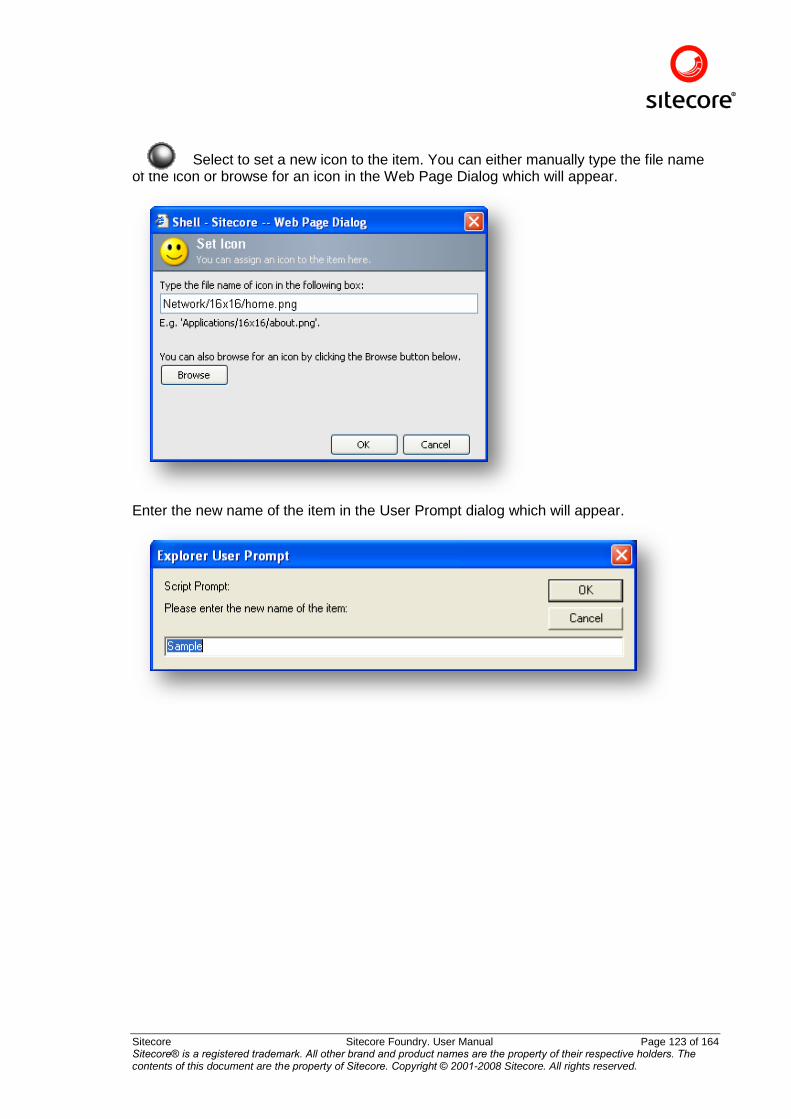
Sitecore Sitecore Foundry. User Manual Page 123 of 164 Sitecore® is a registered trademark. All other brand and product names are the property of their respective holders. The contents of this document are the property of Sitecore. Copyright © 2001-2008 Sitecore. All rights reserved.
Select to set a new icon to the item. You can either manually type the file name of the icon or browse for an icon in the Web Page Dialog which will appear.
Enter the new name of the item in the User Prompt dialog which will appear.
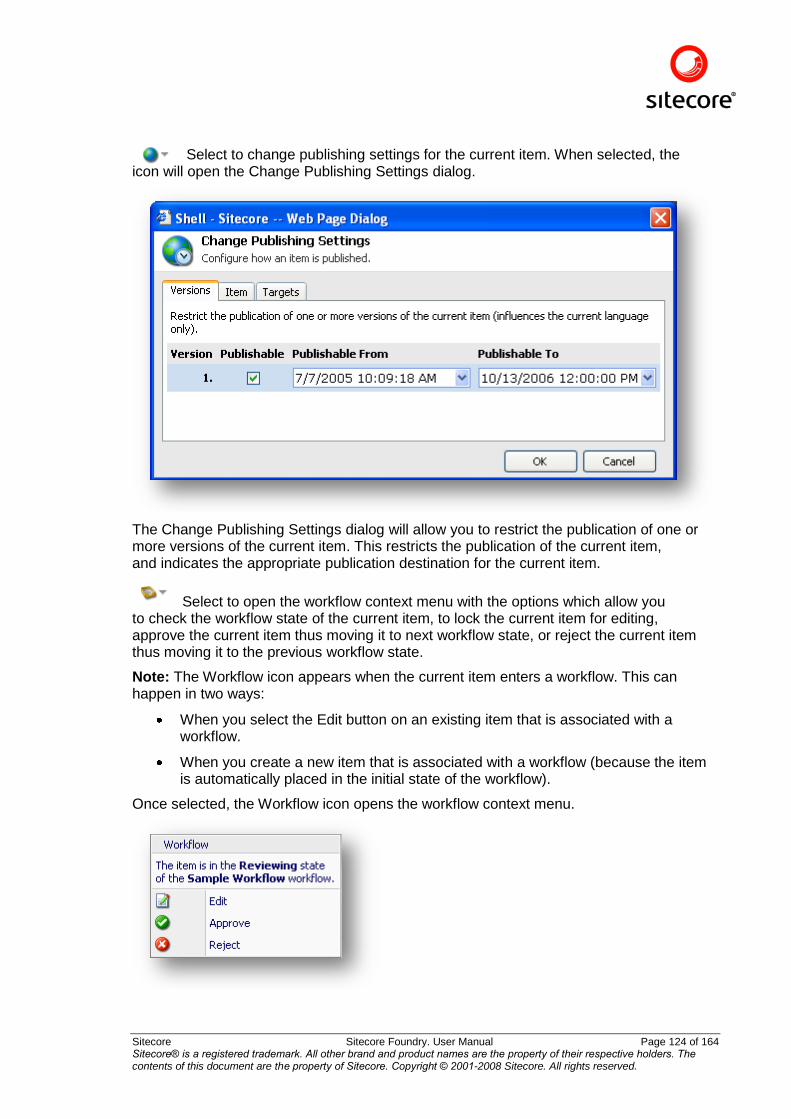
Sitecore Sitecore Foundry. User Manual Page 124 of 164 Sitecore® is a registered trademark. All other brand and product names are the property of their respective holders. The contents of this document are the property of Sitecore. Copyright © 2001-2008 Sitecore. All rights reserved.
Select to change publishing settings for the current item. When selected, the icon will open the Change Publishing Settings dialog.
The Change Publishing Settings dialog will allow you to restrict the publication of one or more versions of the current item. This restricts the publication of the current item, and indicates the appropriate publication destination for the current item.
Select to open the workflow context menu with the options which allow you to check the workflow state of the current item, to lock the current item for editing, approve the current item thus moving it to next workflow state, or reject the current item thus moving it to the previous workflow state.
Note: The Workflow icon appears when the current item enters a workflow. This can happen in two ways:
When you select the Edit button on an existing item that is associated with a workflow.
When you create a new item that is associated with a workflow (because the item is automatically placed in the initial state of the workflow).
Once selected, the Workflow icon opens the workflow context menu.
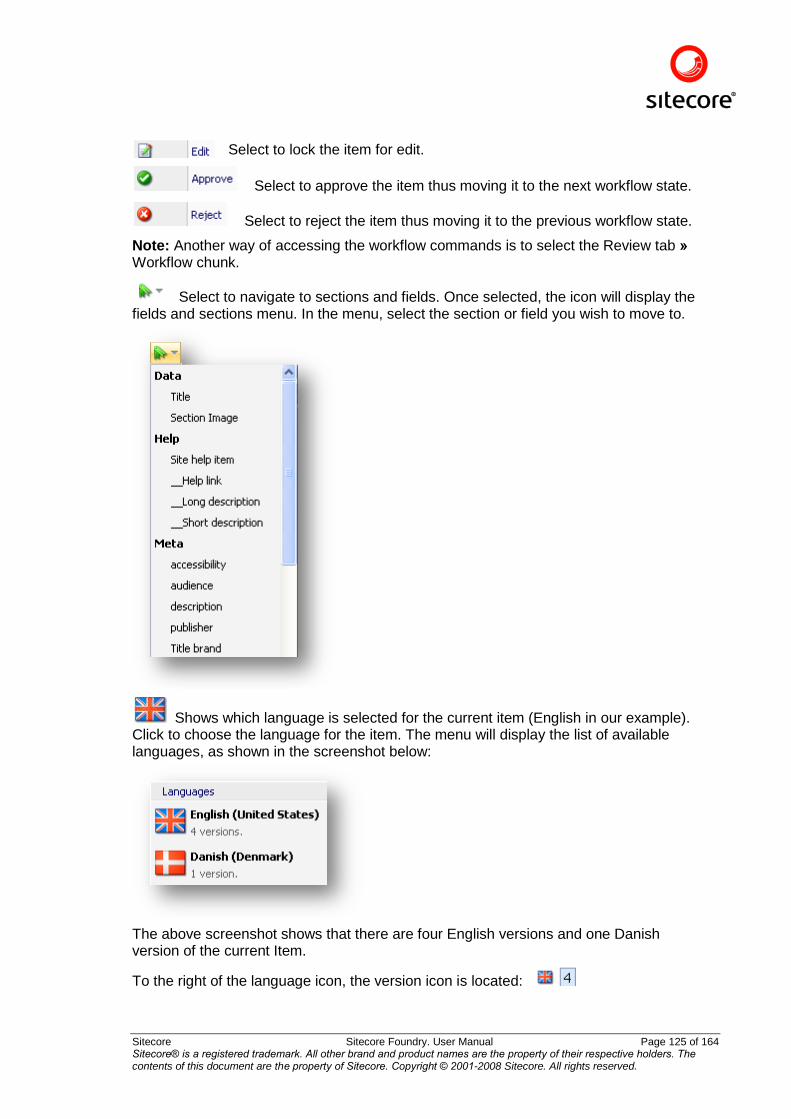
Sitecore Sitecore Foundry. User Manual Page 125 of 164 Sitecore® is a registered trademark. All other brand and product names are the property of their respective holders. The contents of this document are the property of Sitecore. Copyright © 2001-2008 Sitecore. All rights reserved.
Select to lock the item for edit.
Select to approve the item thus moving it to the next workflow state.
Select to reject the item thus moving it to the previous workflow state.
Note: Another way of accessing the workflow commands is to select the Review tab » Workflow chunk.
Select to navigate to sections and fields. Once selected, the icon will display the fields and sections menu. In the menu, select the section or field you wish to move to.
Shows which language is selected for the current item (English in our example). Click to choose the language for the item. The menu will display the list of available languages, as shown in the screenshot below:
The above screenshot shows that there are four English versions and one Danish version of the current Item.
To the right of the language icon, the version icon is located:
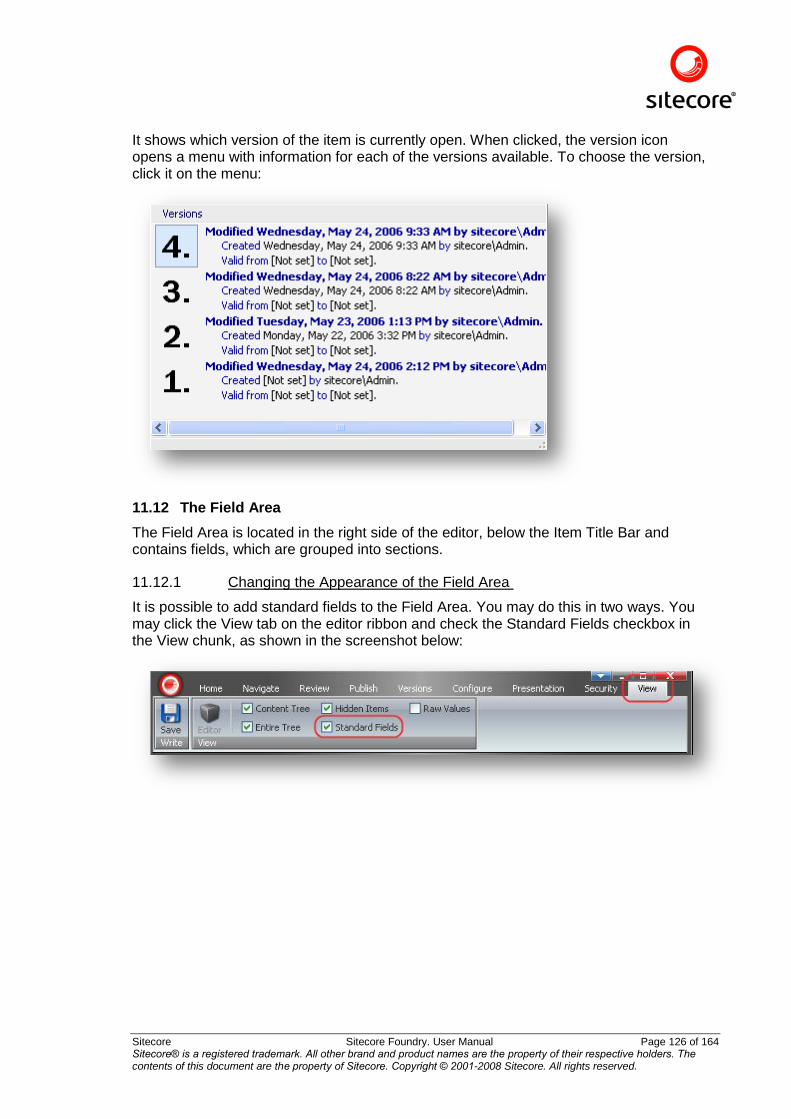
Sitecore Sitecore Foundry. User Manual Page 126 of 164 Sitecore® is a registered trademark. All other brand and product names are the property of their respective holders. The contents of this document are the property of Sitecore. Copyright © 2001-2008 Sitecore. All rights reserved.
It shows which version of the item is currently open. When clicked, the version icon opens a menu with information for each of the versions available. To choose the version, click it on the menu:
11.12 The Field Area
The Field Area is located in the right side of the editor, below the Item Title Bar and contains fields, which are grouped into sections.
11.12.1 Changing the Appearance of the Field Area
It is possible to add standard fields to the Field Area. You may do this in two ways. You may click the View tab on the editor ribbon and check the Standard Fields checkbox in the View chunk, as shown in the screenshot below:
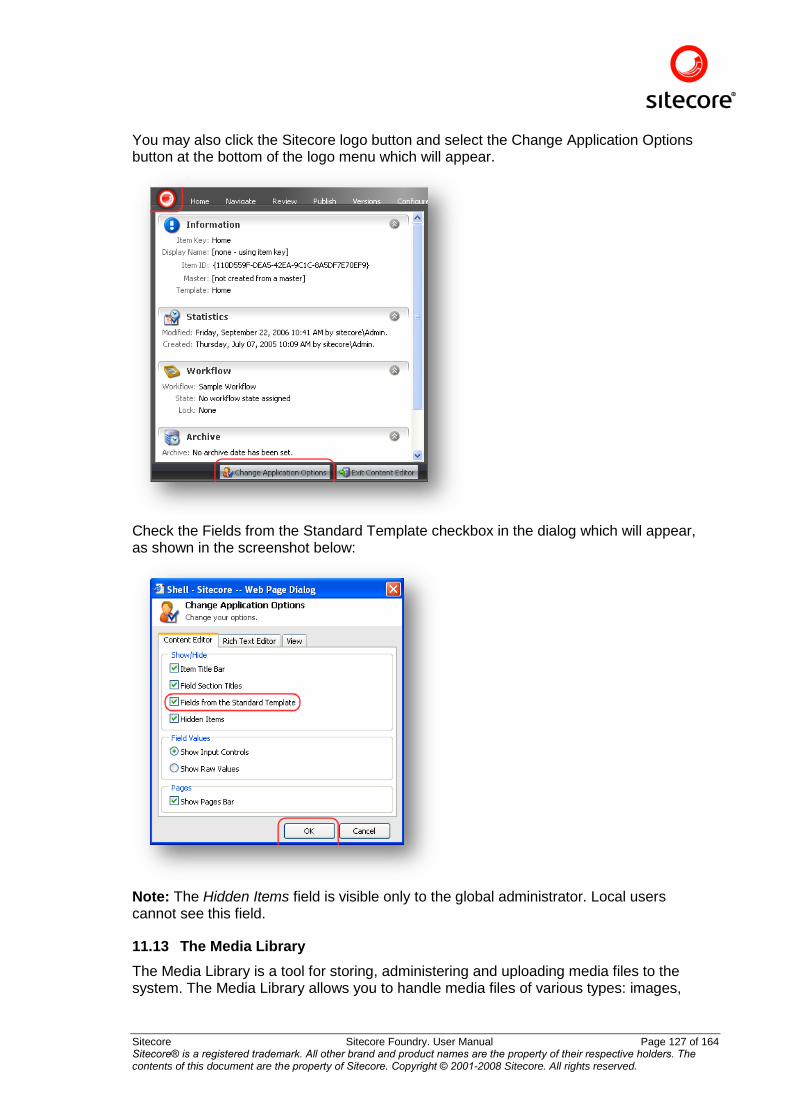
Sitecore Sitecore Foundry. User Manual Page 127 of 164 Sitecore® is a registered trademark. All other brand and product names are the property of their respective holders. The contents of this document are the property of Sitecore. Copyright © 2001-2008 Sitecore. All rights reserved.
You may also click the Sitecore logo button and select the Change Application Options button at the bottom of the logo menu which will appear.
Check the Fields from the Standard Template checkbox in the dialog which will appear, as shown in the screenshot below:
Note: The Hidden Items field is visible only to the global administrator. Local users cannot see this field.
11.13 The Media Library
The Media Library is a tool for storing, administering and uploading media files to the system. The Media Library allows you to handle media files of various types: images,
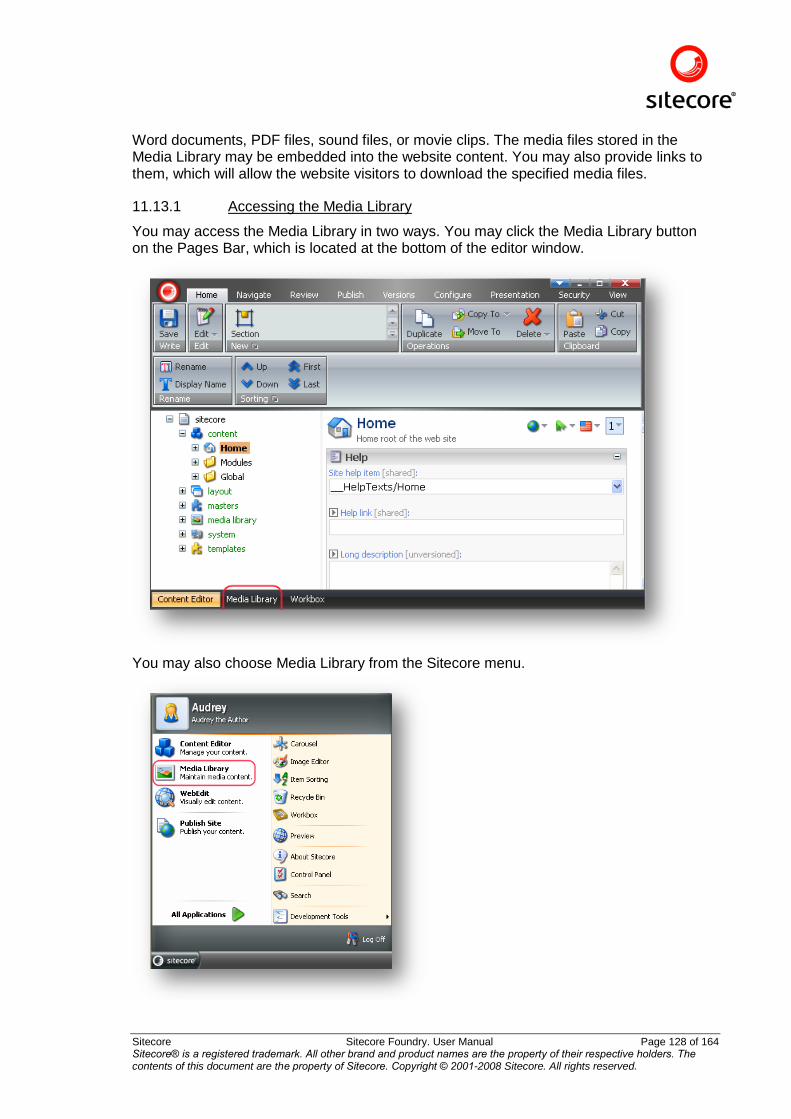
Sitecore Sitecore Foundry. User Manual Page 128 of 164 Sitecore® is a registered trademark. All other brand and product names are the property of their respective holders. The contents of this document are the property of Sitecore. Copyright © 2001-2008 Sitecore. All rights reserved.
Word documents, PDF files, sound files, or movie clips. The media files stored in the Media Library may be embedded into the website content. You may also provide links to them, which will allow the website visitors to download the specified media files.
11.13.1 Accessing the Media Library
You may access the Media Library in two ways. You may click the Media Library button on the Pages Bar, which is located at the bottom of the editor window.
You may also choose Media Library from the Sitecore menu.
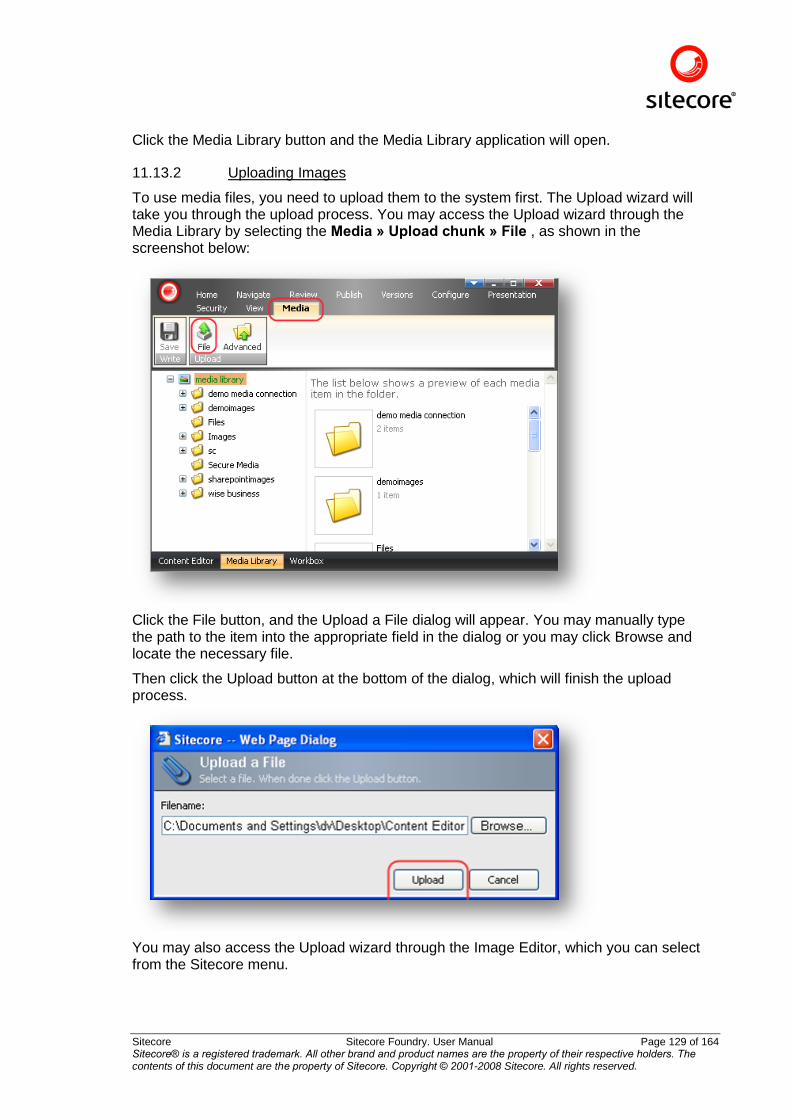
Sitecore Sitecore Foundry. User Manual Page 129 of 164 Sitecore® is a registered trademark. All other brand and product names are the property of their respective holders. The contents of this document are the property of Sitecore. Copyright © 2001-2008 Sitecore. All rights reserved.
Click the Media Library button and the Media Library application will open.
11.13.2 Uploading Images
To use media files, you need to upload them to the system first. The Upload wizard will take you through the upload process. You may access the Upload wizard through the Media Library by selecting the Media » Upload chunk » File , as shown in the screenshot below:
Click the File button, and the Upload a File dialog will appear. You may manually type the path to the item into the appropriate field in the dialog or you may click Browse and locate the necessary file.
Then click the Upload button at the bottom of the dialog, which will finish the upload process.
You may also access the Upload wizard through the Image Editor, which you can select from the Sitecore menu.
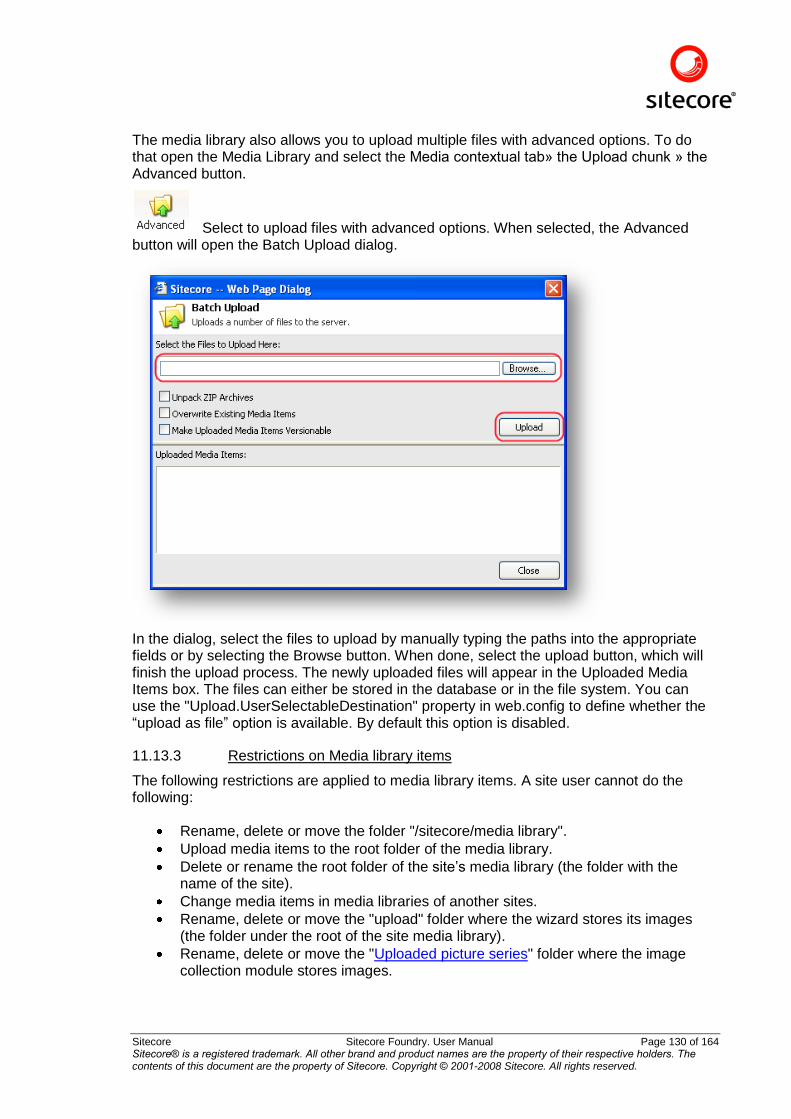
Sitecore Sitecore Foundry. User Manual Page 130 of 164 Sitecore® is a registered trademark. All other brand and product names are the property of their respective holders. The contents of this document are the property of Sitecore. Copyright © 2001-2008 Sitecore. All rights reserved.
The media library also allows you to upload multiple files with advanced options. To do that open the Media Library and select the Media contextual tab» the Upload chunk » the Advanced button.
Select to upload files with advanced options. When selected, the Advanced button will open the Batch Upload dialog.
In the dialog, select the files to upload by manually typing the paths into the appropriate fields or by selecting the Browse button. When done, select the upload button, which will finish the upload process. The newly uploaded files will appear in the Uploaded Media Items box. The files can either be stored in the database or in the file system. You can use the "Upload.UserSelectableDestination" property in web.config to define whether the “upload as file” option is available. By default this option is disabled.
11.13.3 Restrictions on Media library items
The following restrictions are applied to media library items. A site user cannot do the following:
Rename, delete or move the folder "/sitecore/media library".
Upload media items to the root folder of the media library.
Delete or rename the root folder of the site‟s media library (the folder with the name of the site).
Change media items in media libraries of another sites.
Rename, delete or move the "upload" folder where the wizard stores its images (the folder under the root of the site media library).
Rename, delete or move the "Uploaded picture series" folder where the image collection module stores images.
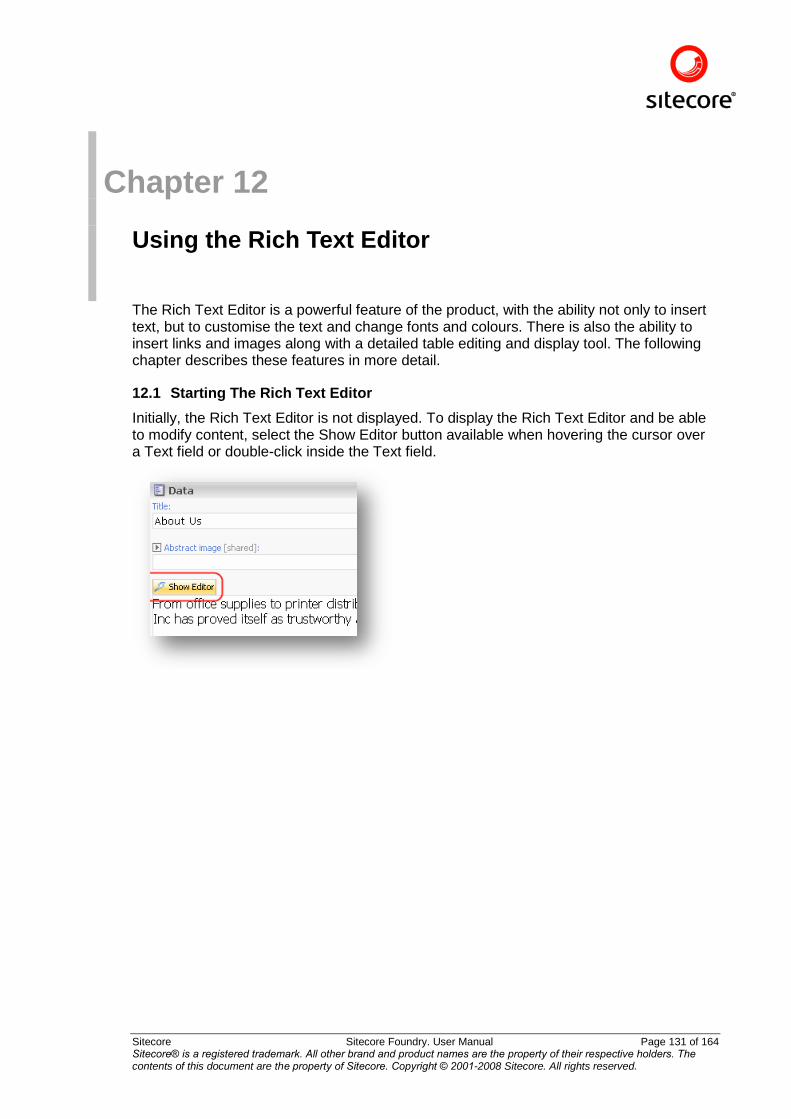
Sitecore Sitecore Foundry. User Manual Page 131 of 164 Sitecore® is a registered trademark. All other brand and product names are the property of their respective holders. The contents of this document are the property of Sitecore. Copyright © 2001-2008 Sitecore. All rights reserved.
Chapter 12 Using the Rich Text Editor
The Rich Text Editor is a powerful feature of the product, with the ability not only to insert text, but to customise the text and change fonts and colours. There is also the ability to insert links and images along with a detailed table editing and display tool. The following chapter describes these features in more detail.
12.1 Starting The Rich Text Editor
Initially, the Rich Text Editor is not displayed. To display the Rich Text Editor and be able to modify content, select the Show Editor button available when hovering the cursor over a Text field or double-click inside the Text field.
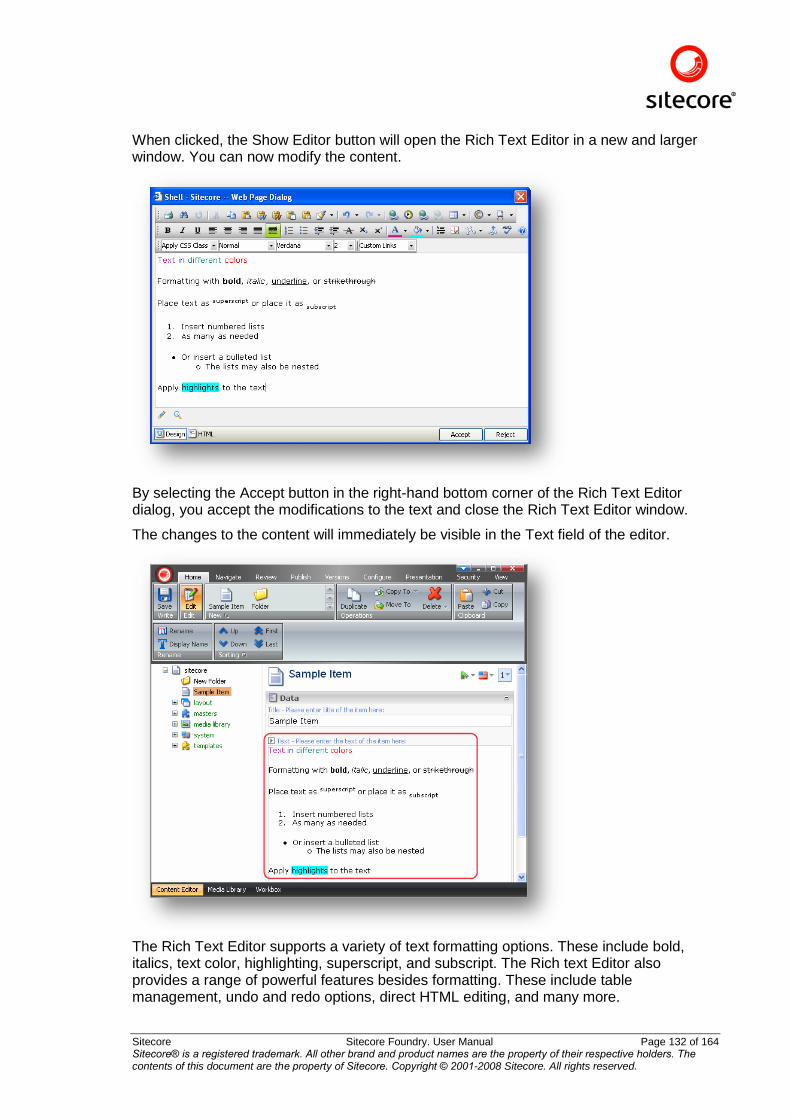
Sitecore Sitecore Foundry. User Manual Page 132 of 164 Sitecore® is a registered trademark. All other brand and product names are the property of their respective holders. The contents of this document are the property of Sitecore. Copyright © 2001-2008 Sitecore. All rights reserved.
When clicked, the Show Editor button will open the Rich Text Editor in a new and larger window. You can now modify the content.
By selecting the Accept button in the right-hand bottom corner of the Rich Text Editor dialog, you accept the modifications to the text and close the Rich Text Editor window.
The changes to the content will immediately be visible in the Text field of the editor.
The Rich Text Editor supports a variety of text formatting options. These include bold, italics, text color, highlighting, superscript, and subscript. The Rich text Editor also provides a range of powerful features besides formatting. These include table management, undo and redo options, direct HTML editing, and many more.

Sitecore Sitecore Foundry. User Manual Page 133 of 164 Sitecore® is a registered trademark. All other brand and product names are the property of their respective holders. The contents of this document are the property of Sitecore. Copyright © 2001-2008 Sitecore. All rights reserved.
12.2 Saving Content
Remember to always save the changes made to any content. By saving your work regularly, you ensure that you only lose relatively few changes. For instance, if the network connection goes down, if power is lost, or under any other circumstances which might cause the loss of unsaved data.
There are two ways to save content in the editor. You may save your changes with the Save button available on the Ribbon or use <Ctrl+S>.
12.3 Using Links
Links offer a way of referring to other material on the Internet or on another web page. A link can lead to a source on the same website or a source on another website.
12.4 Creating a Link
12.4.1 Inserting a Link into Existing Text
To insert a link into already existing text open the appropriate content in the Rich Text Editor and highlight the text to be used as the link text.
12.4.1.1 To Create an External Link (referring to another source on the Internet):
Select the Hyperlink Manager button available in the upper toolbar and the Hyperlink Manager dialog will appear. Fill in the fields with the appropriate values and click the OK button.
Note: You may also create an internal link via the Hyperlink Manager following the same procedure.
12.4.1.2 To Create an Internal Link (referring to a source on the same website):
Select the Insert Link button available in the upper toolbar and the Insert a Link dialog will appear. The Insert a Link dialog allows linking to another item (select the Internal Link tab) or a media item (select the Media Items tab).
In the content tree, select the item the link should lead to and click the Link button in the right-hand bottom corner of the dialog.
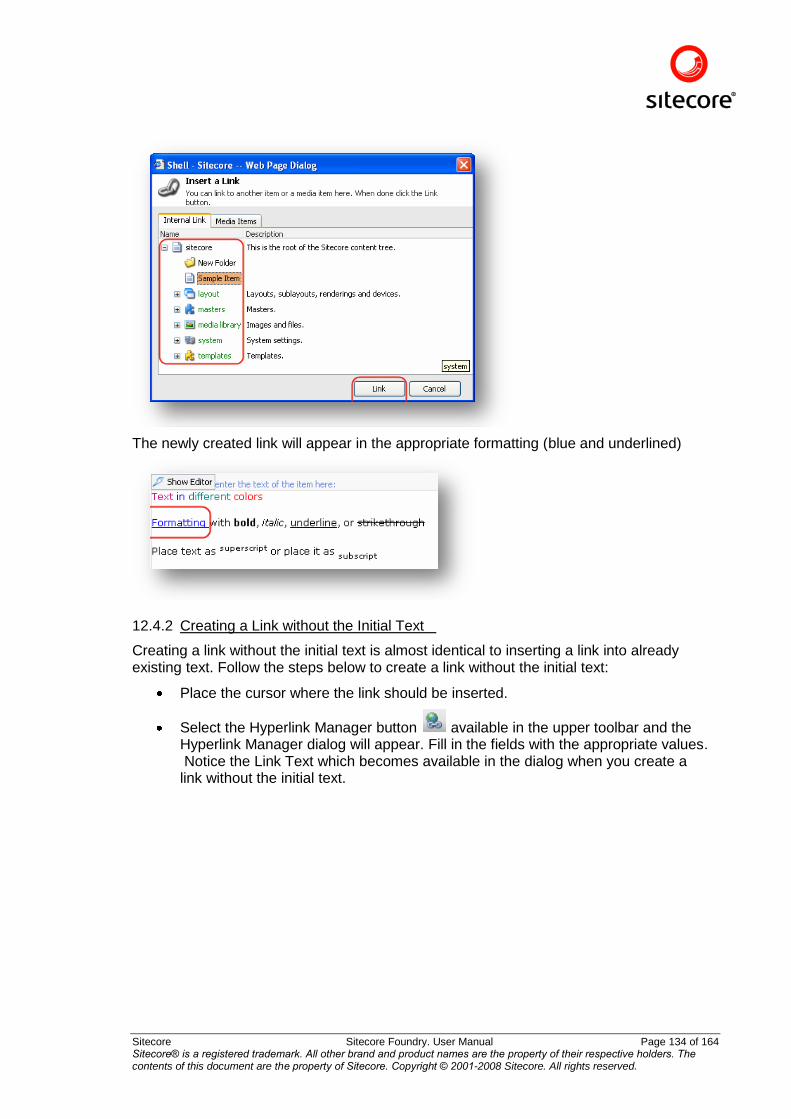
Sitecore Sitecore Foundry. User Manual Page 134 of 164 Sitecore® is a registered trademark. All other brand and product names are the property of their respective holders. The contents of this document are the property of Sitecore. Copyright © 2001-2008 Sitecore. All rights reserved.
The newly created link will appear in the appropriate formatting (blue and underlined)
12.4.2 Creating a Link without the Initial Text
Creating a link without the initial text is almost identical to inserting a link into already existing text. Follow the steps below to create a link without the initial text:
Place the cursor where the link should be inserted.
Select the Hyperlink Manager button available in the upper toolbar and the Hyperlink Manager dialog will appear. Fill in the fields with the appropriate values. Notice the Link Text which becomes available in the dialog when you create a link without the initial text.
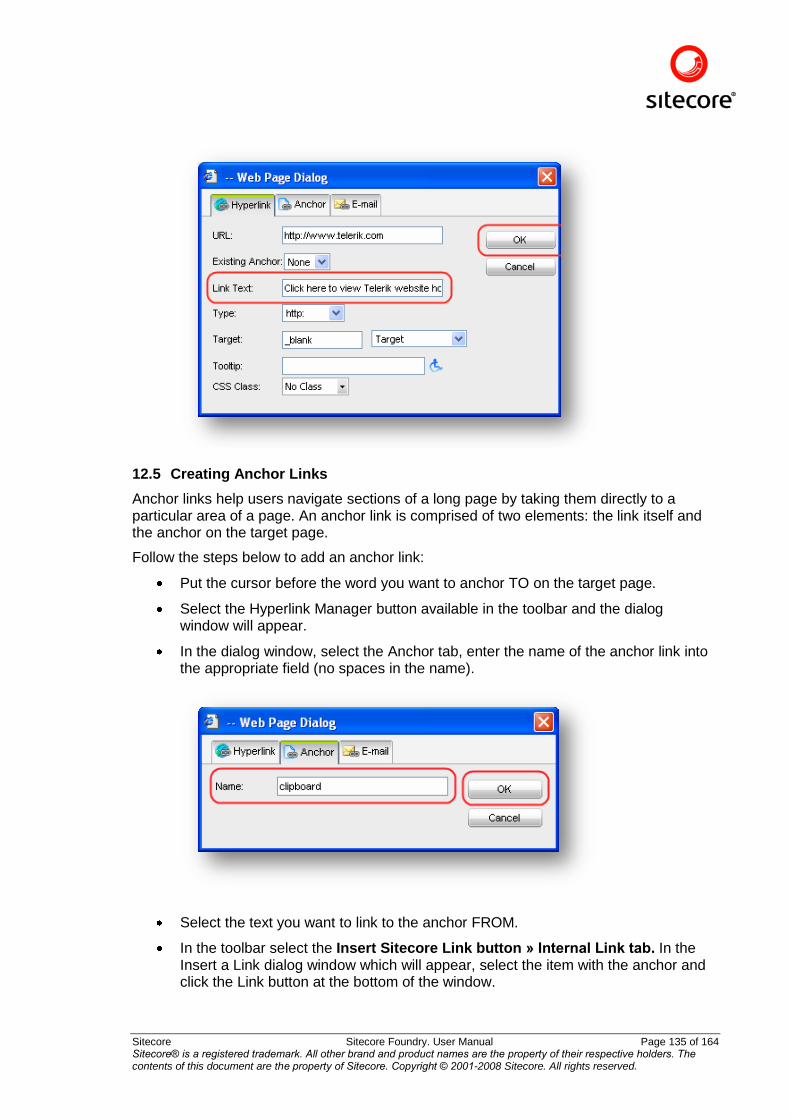
Sitecore Sitecore Foundry. User Manual Page 135 of 164 Sitecore® is a registered trademark. All other brand and product names are the property of their respective holders. The contents of this document are the property of Sitecore. Copyright © 2001-2008 Sitecore. All rights reserved.
12.5 Creating Anchor Links
Anchor links help users navigate sections of a long page by taking them directly to a particular area of a page. An anchor link is comprised of two elements: the link itself and the anchor on the target page.
Follow the steps below to add an anchor link:
Put the cursor before the word you want to anchor TO on the target page.
Select the Hyperlink Manager button available in the toolbar and the dialog window will appear.
In the dialog window, select the Anchor tab, enter the name of the anchor link into the appropriate field (no spaces in the name).
Select the text you want to link to the anchor FROM.
In the toolbar select the Insert Sitecore Link button » Internal Link tab. In the Insert a Link dialog window which will appear, select the item with the anchor and click the Link button at the bottom of the window.
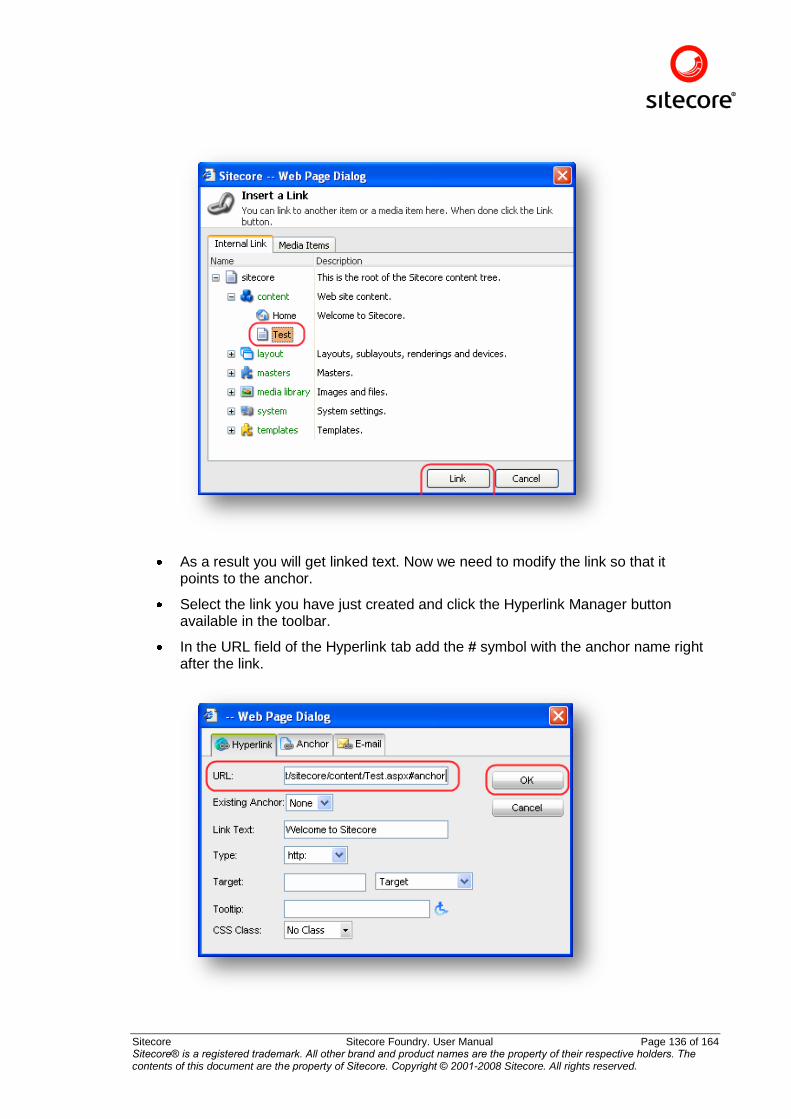
Sitecore Sitecore Foundry. User Manual Page 136 of 164 Sitecore® is a registered trademark. All other brand and product names are the property of their respective holders. The contents of this document are the property of Sitecore. Copyright © 2001-2008 Sitecore. All rights reserved.
As a result you will get linked text. Now we need to modify the link so that it points to the anchor.
Select the link you have just created and click the Hyperlink Manager button available in the toolbar.
In the URL field of the Hyperlink tab add the # symbol with the anchor name right after the link.
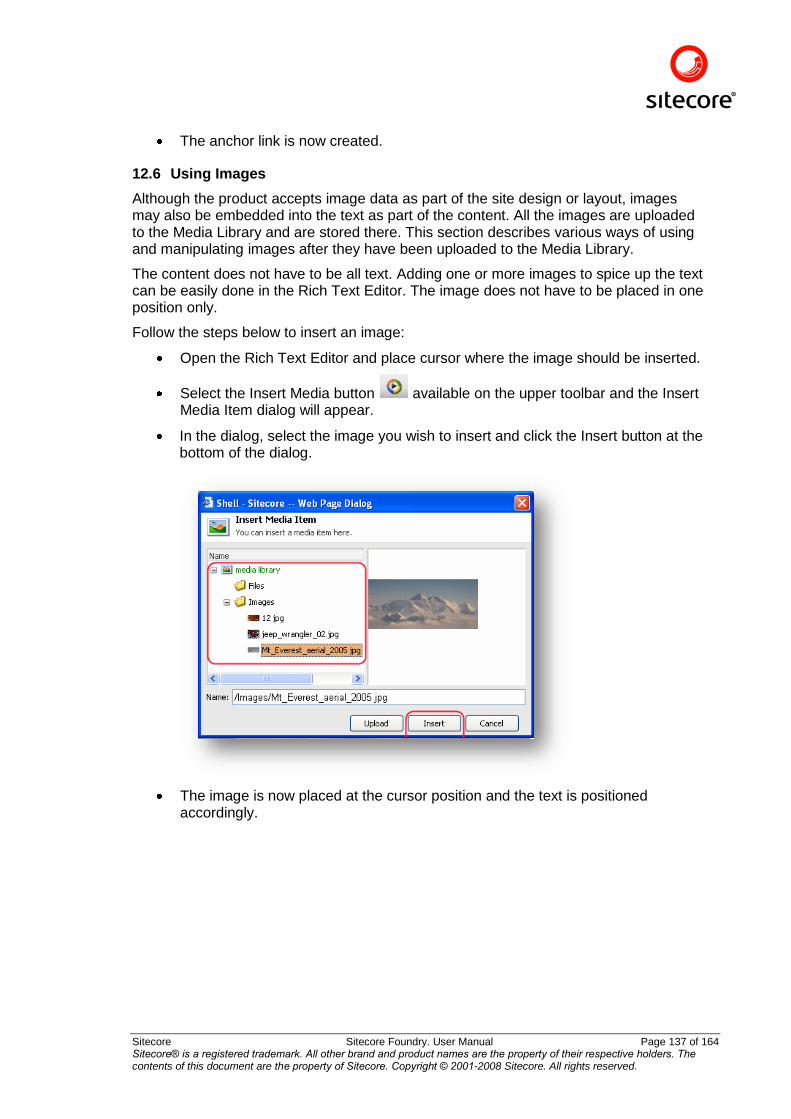
Sitecore Sitecore Foundry. User Manual Page 137 of 164 Sitecore® is a registered trademark. All other brand and product names are the property of their respective holders. The contents of this document are the property of Sitecore. Copyright © 2001-2008 Sitecore. All rights reserved.
The anchor link is now created.
12.6 Using Images
Although the product accepts image data as part of the site design or layout, images may also be embedded into the text as part of the content. All the images are uploaded to the Media Library and are stored there. This section describes various ways of using and manipulating images after they have been uploaded to the Media Library.
The content does not have to be all text. Adding one or more images to spice up the text can be easily done in the Rich Text Editor. The image does not have to be placed in one position only.
Follow the steps below to insert an image:
Open the Rich Text Editor and place cursor where the image should be inserted.
Select the Insert Media button available on the upper toolbar and the Insert Media Item dialog will appear.
In the dialog, select the image you wish to insert and click the Insert button at the bottom of the dialog.
The image is now placed at the cursor position and the text is positioned accordingly.
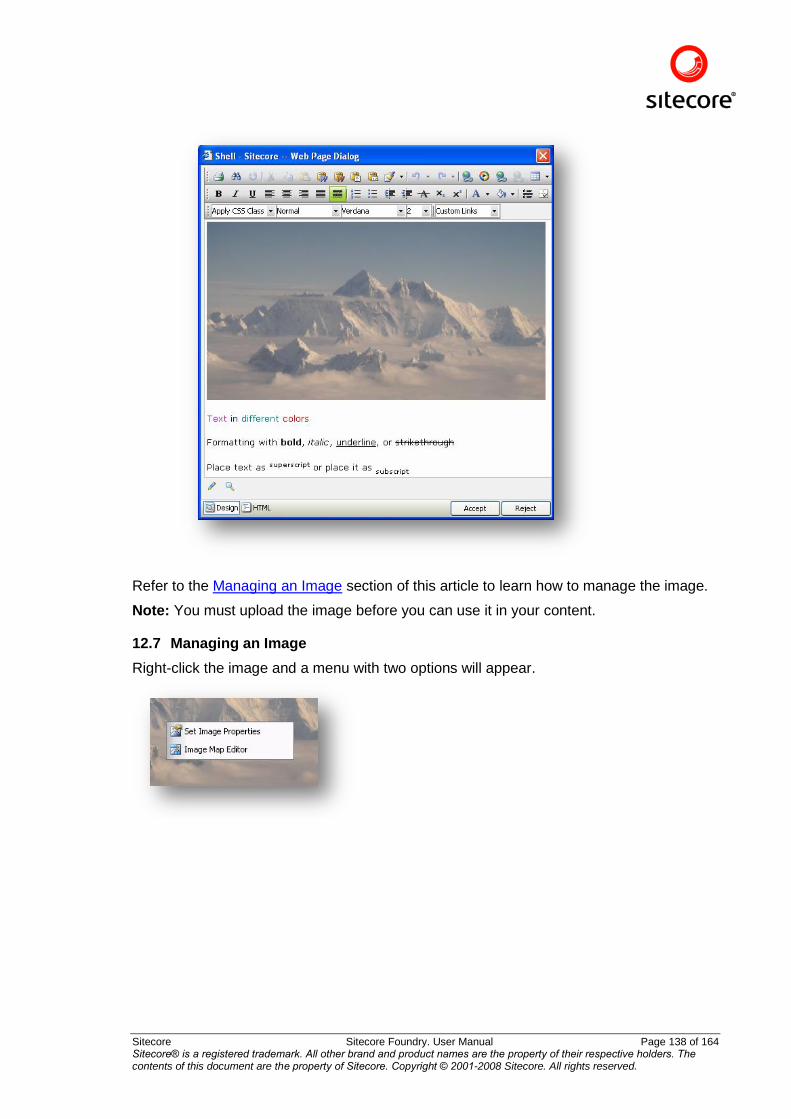
Sitecore Sitecore Foundry. User Manual Page 138 of 164 Sitecore® is a registered trademark. All other brand and product names are the property of their respective holders. The contents of this document are the property of Sitecore. Copyright © 2001-2008 Sitecore. All rights reserved.
Refer to the Managing an Image section of this article to learn how to manage the image.
Note: You must upload the image before you can use it in your content.
12.7 Managing an Image
Right-click the image and a menu with two options will appear.
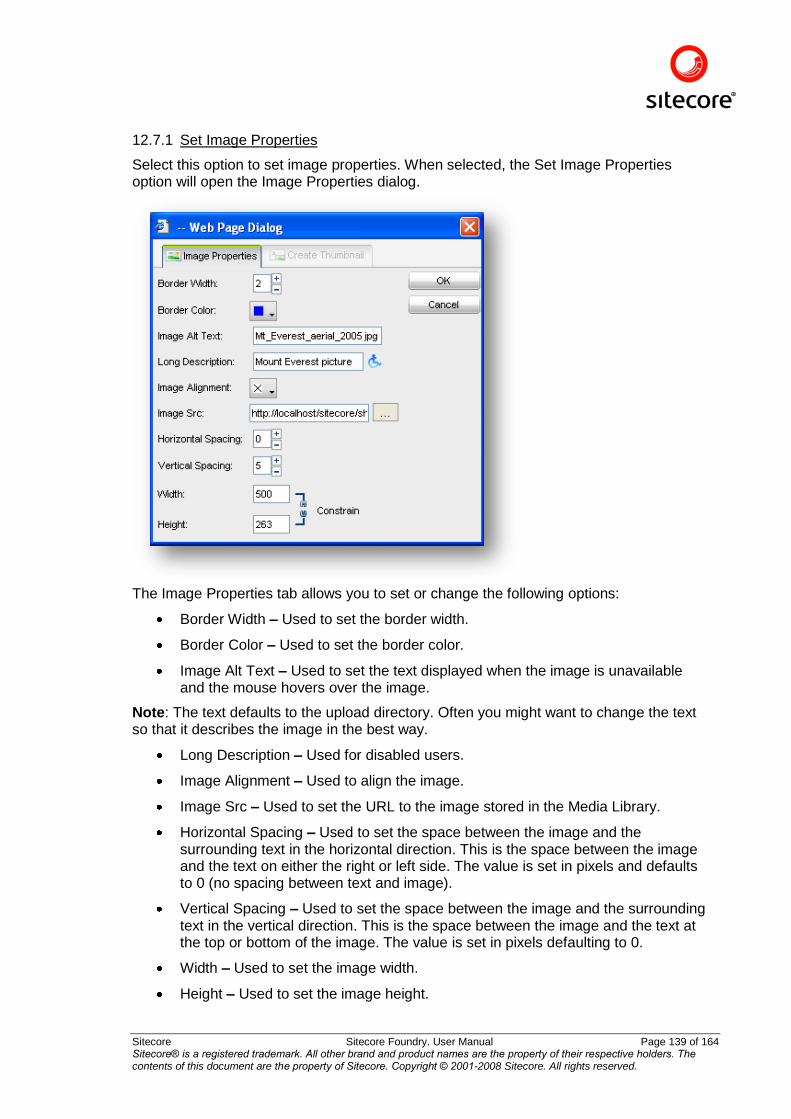
Sitecore Sitecore Foundry. User Manual Page 139 of 164 Sitecore® is a registered trademark. All other brand and product names are the property of their respective holders. The contents of this document are the property of Sitecore. Copyright © 2001-2008 Sitecore. All rights reserved.
12.7.1 Set Image Properties
Select this option to set image properties. When selected, the Set Image Properties option will open the Image Properties dialog.
The Image Properties tab allows you to set or change the following options:
Border Width – Used to set the border width.
Border Color – Used to set the border color.
Image Alt Text – Used to set the text displayed when the image is unavailable and the mouse hovers over the image.
Note: The text defaults to the upload directory. Often you might want to change the text so that it describes the image in the best way.
Long Description – Used for disabled users.
Image Alignment – Used to align the image.
Image Src – Used to set the URL to the image stored in the Media Library.
Horizontal Spacing – Used to set the space between the image and the surrounding text in the horizontal direction. This is the space between the image and the text on either the right or left side. The value is set in pixels and defaults to 0 (no spacing between text and image).
Vertical Spacing – Used to set the space between the image and the surrounding text in the vertical direction. This is the space between the image and the text at the top or bottom of the image. The value is set in pixels defaulting to 0.
Width – Used to set the image width.
Height – Used to set the image height.
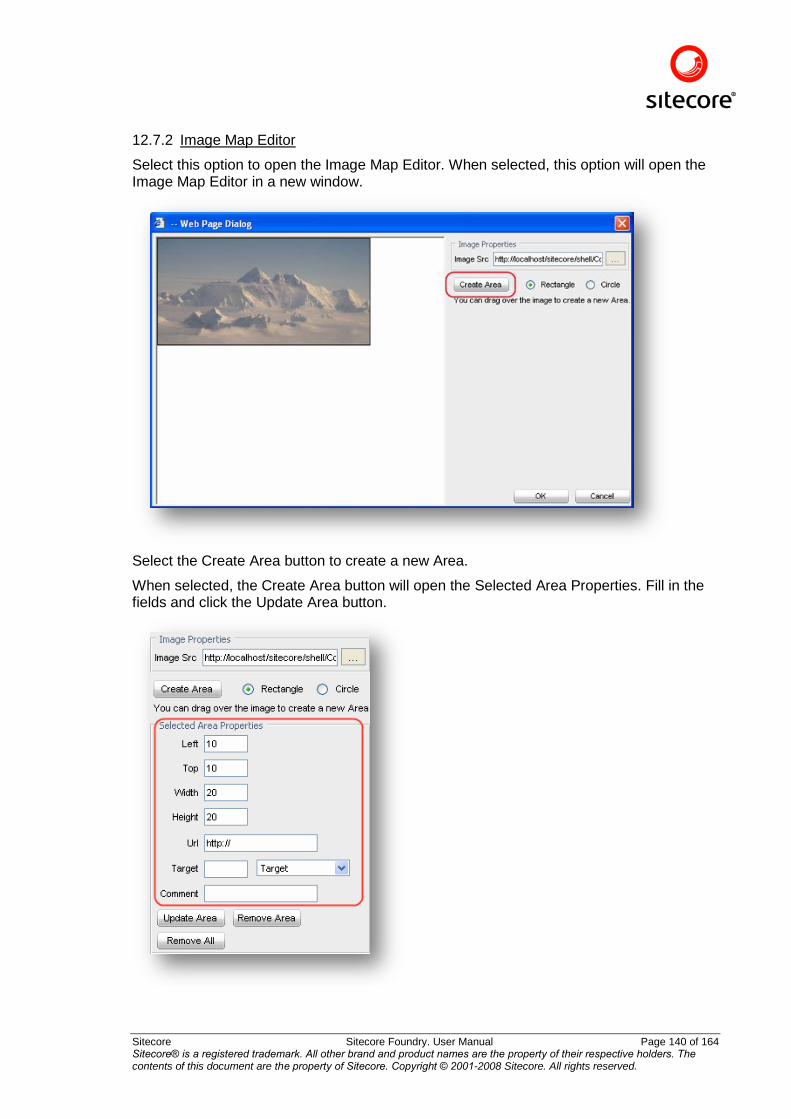
Sitecore Sitecore Foundry. User Manual Page 140 of 164 Sitecore® is a registered trademark. All other brand and product names are the property of their respective holders. The contents of this document are the property of Sitecore. Copyright © 2001-2008 Sitecore. All rights reserved.
12.7.2 Image Map Editor
Select this option to open the Image Map Editor. When selected, this option will open the Image Map Editor in a new window.
Select the Create Area button to create a new Area.
When selected, the Create Area button will open the Selected Area Properties. Fill in the fields and click the Update Area button.
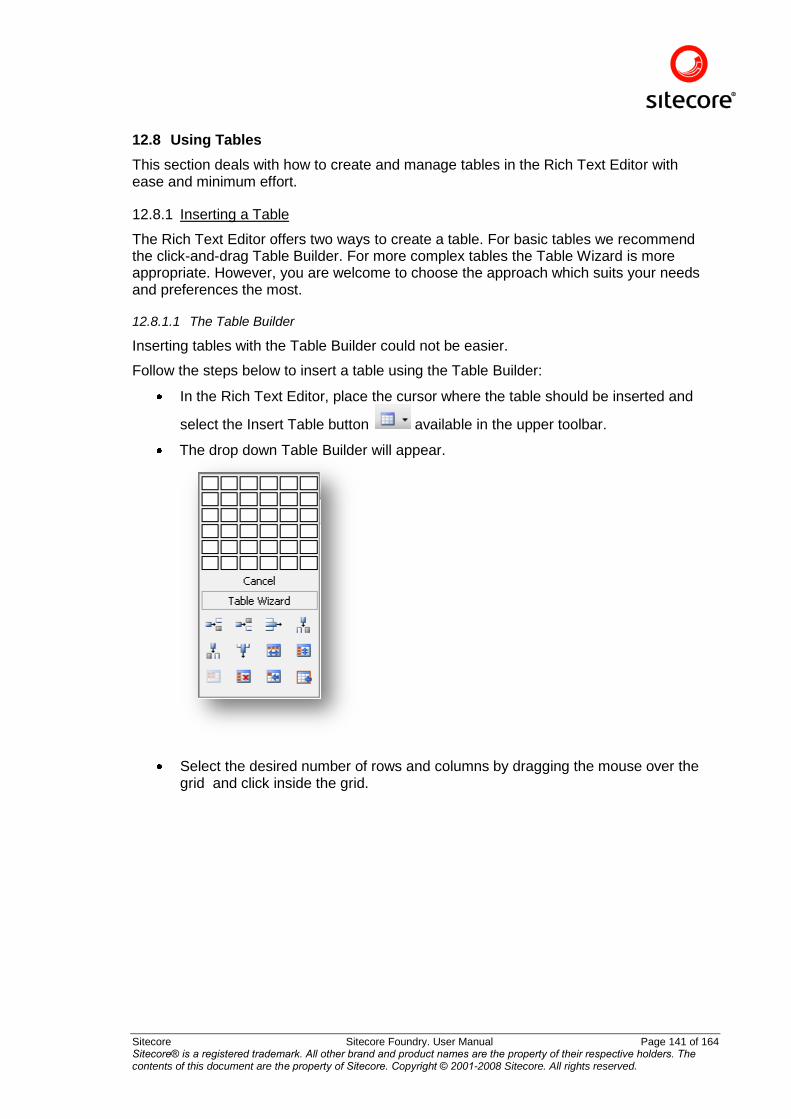
Sitecore Sitecore Foundry. User Manual Page 141 of 164 Sitecore® is a registered trademark. All other brand and product names are the property of their respective holders. The contents of this document are the property of Sitecore. Copyright © 2001-2008 Sitecore. All rights reserved.
12.8 Using Tables
This section deals with how to create and manage tables in the Rich Text Editor with ease and minimum effort.
12.8.1 Inserting a Table
The Rich Text Editor offers two ways to create a table. For basic tables we recommend the click-and-drag Table Builder. For more complex tables the Table Wizard is more appropriate. However, you are welcome to choose the approach which suits your needs and preferences the most.
12.8.1.1 The Table Builder
Inserting tables with the Table Builder could not be easier.
Follow the steps below to insert a table using the Table Builder:
In the Rich Text Editor, place the cursor where the table should be inserted and
select the Insert Table button available in the upper toolbar.
The drop down Table Builder will appear.
Select the desired number of rows and columns by dragging the mouse over the grid and click inside the grid.
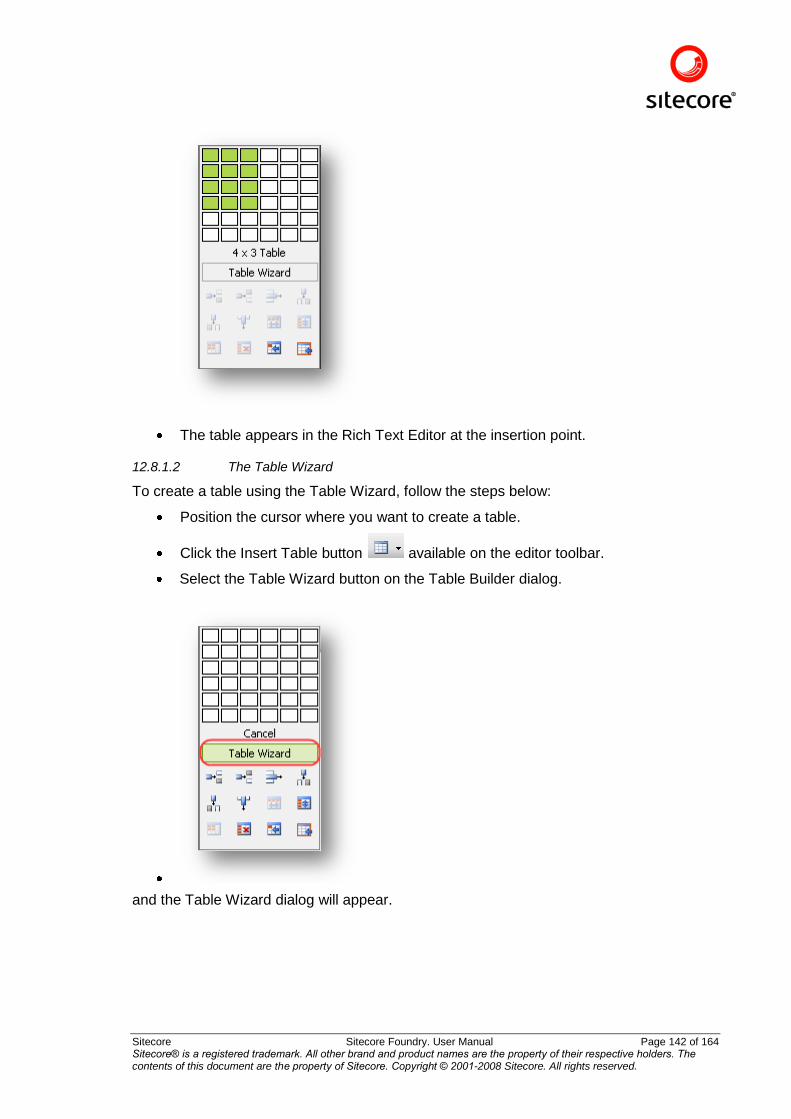
Sitecore Sitecore Foundry. User Manual Page 142 of 164 Sitecore® is a registered trademark. All other brand and product names are the property of their respective holders. The contents of this document are the property of Sitecore. Copyright © 2001-2008 Sitecore. All rights reserved.
The table appears in the Rich Text Editor at the insertion point.
12.8.1.2 The Table Wizard
To create a table using the Table Wizard, follow the steps below:
Position the cursor where you want to create a table.
Click the Insert Table button available on the editor toolbar.
Select the Table Wizard button on the Table Builder dialog.
and the Table Wizard dialog will appear.
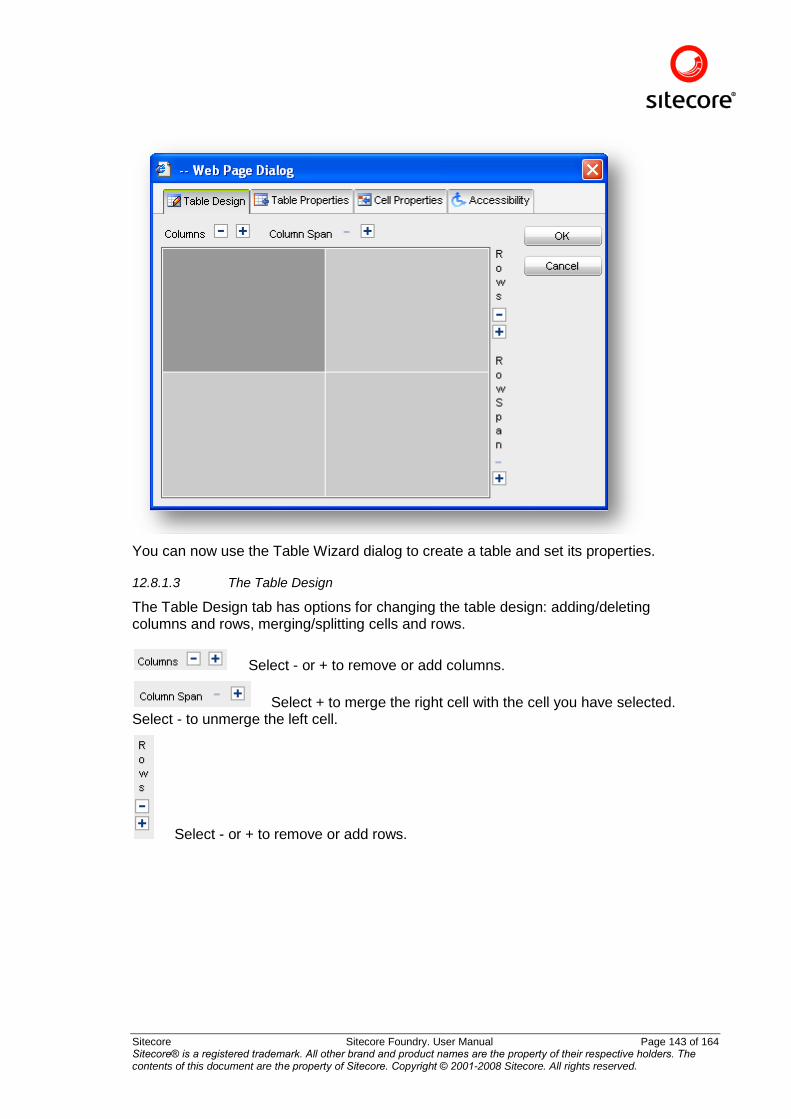
Sitecore Sitecore Foundry. User Manual Page 143 of 164 Sitecore® is a registered trademark. All other brand and product names are the property of their respective holders. The contents of this document are the property of Sitecore. Copyright © 2001-2008 Sitecore. All rights reserved.
You can now use the Table Wizard dialog to create a table and set its properties.
12.8.1.3 The Table Design
The Table Design tab has options for changing the table design: adding/deleting columns and rows, merging/splitting cells and rows.
Select - or + to remove or add columns.
Select + to merge the right cell with the cell you have selected. Select - to unmerge the left cell.
Select - or + to remove or add rows.
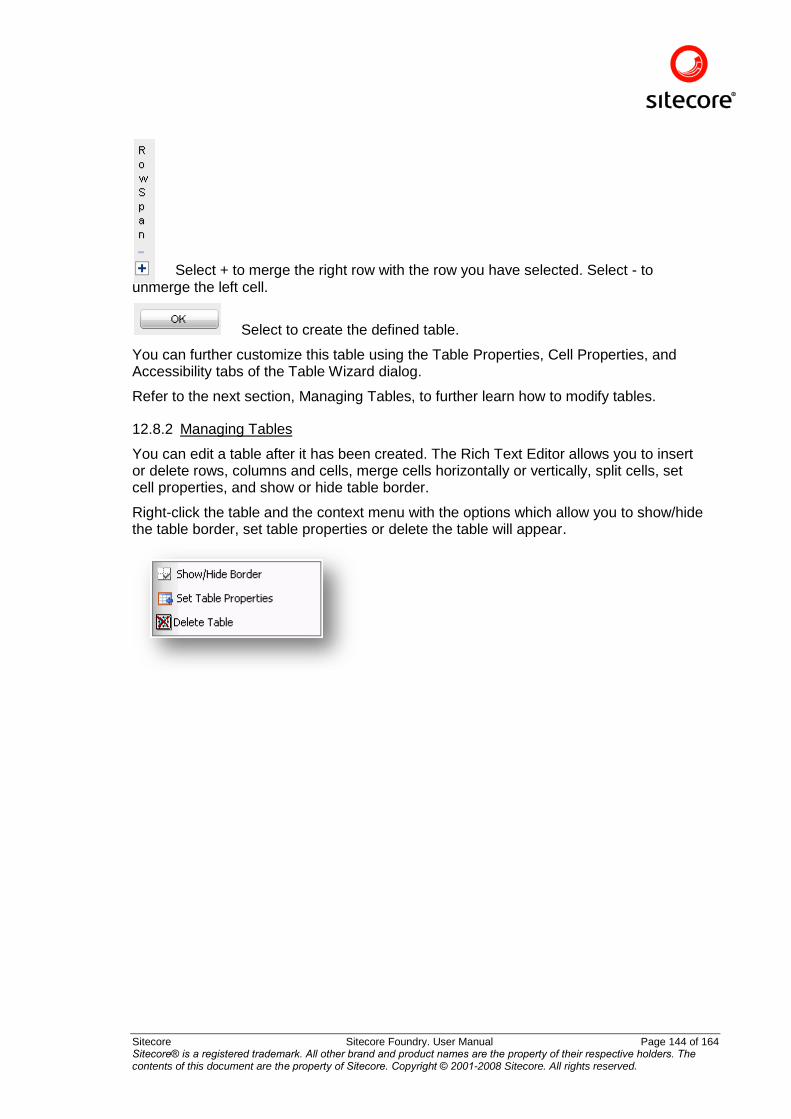
Sitecore Sitecore Foundry. User Manual Page 144 of 164 Sitecore® is a registered trademark. All other brand and product names are the property of their respective holders. The contents of this document are the property of Sitecore. Copyright © 2001-2008 Sitecore. All rights reserved.
Select + to merge the right row with the row you have selected. Select - to unmerge the left cell.
Select to create the defined table.
You can further customize this table using the Table Properties, Cell Properties, and Accessibility tabs of the Table Wizard dialog.
Refer to the next section, Managing Tables, to further learn how to modify tables.
12.8.2 Managing Tables
You can edit a table after it has been created. The Rich Text Editor allows you to insert or delete rows, columns and cells, merge cells horizontally or vertically, split cells, set cell properties, and show or hide table border.
Right-click the table and the context menu with the options which allow you to show/hide the table border, set table properties or delete the table will appear.
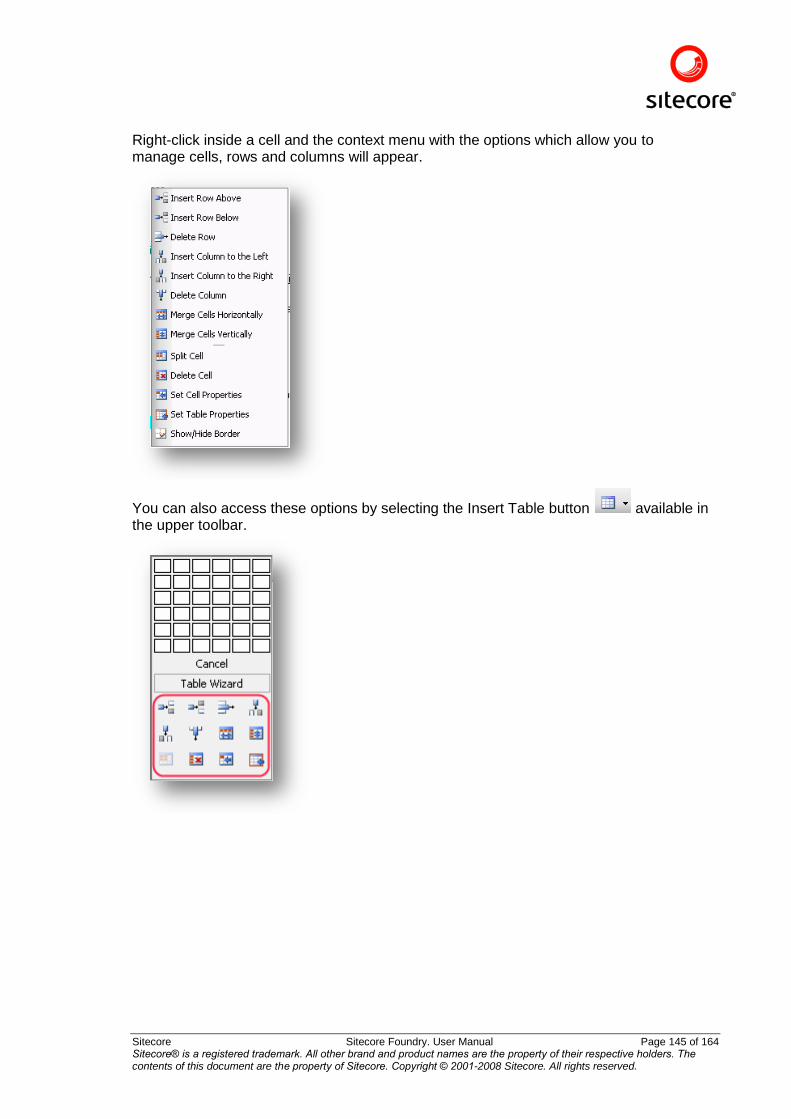
Sitecore Sitecore Foundry. User Manual Page 145 of 164 Sitecore® is a registered trademark. All other brand and product names are the property of their respective holders. The contents of this document are the property of Sitecore. Copyright © 2001-2008 Sitecore. All rights reserved.
Right-click inside a cell and the context menu with the options which allow you to manage cells, rows and columns will appear.
You can also access these options by selecting the Insert Table button available in the upper toolbar.
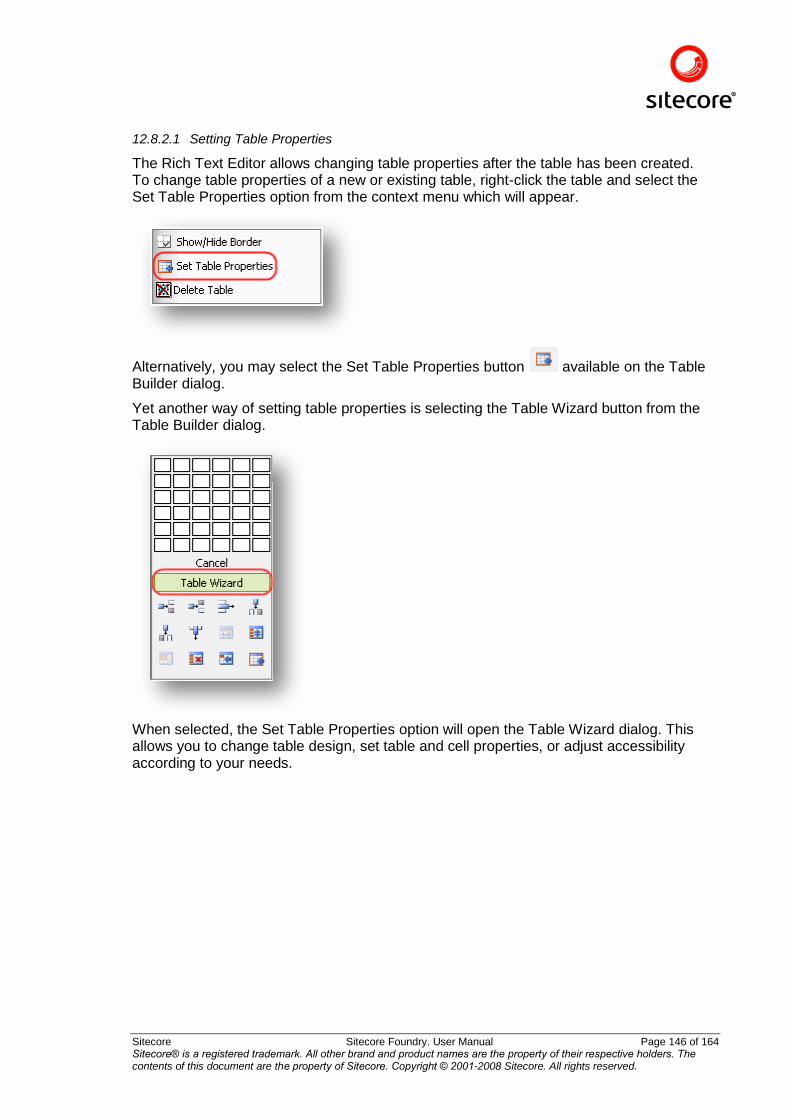
Sitecore Sitecore Foundry. User Manual Page 146 of 164 Sitecore® is a registered trademark. All other brand and product names are the property of their respective holders. The contents of this document are the property of Sitecore. Copyright © 2001-2008 Sitecore. All rights reserved.
12.8.2.1 Setting Table Properties
The Rich Text Editor allows changing table properties after the table has been created. To change table properties of a new or existing table, right-click the table and select the Set Table Properties option from the context menu which will appear.
Alternatively, you may select the Set Table Properties button available on the Table Builder dialog.
Yet another way of setting table properties is selecting the Table Wizard button from the Table Builder dialog.
When selected, the Set Table Properties option will open the Table Wizard dialog. This allows you to change table design, set table and cell properties, or adjust accessibility according to your needs.
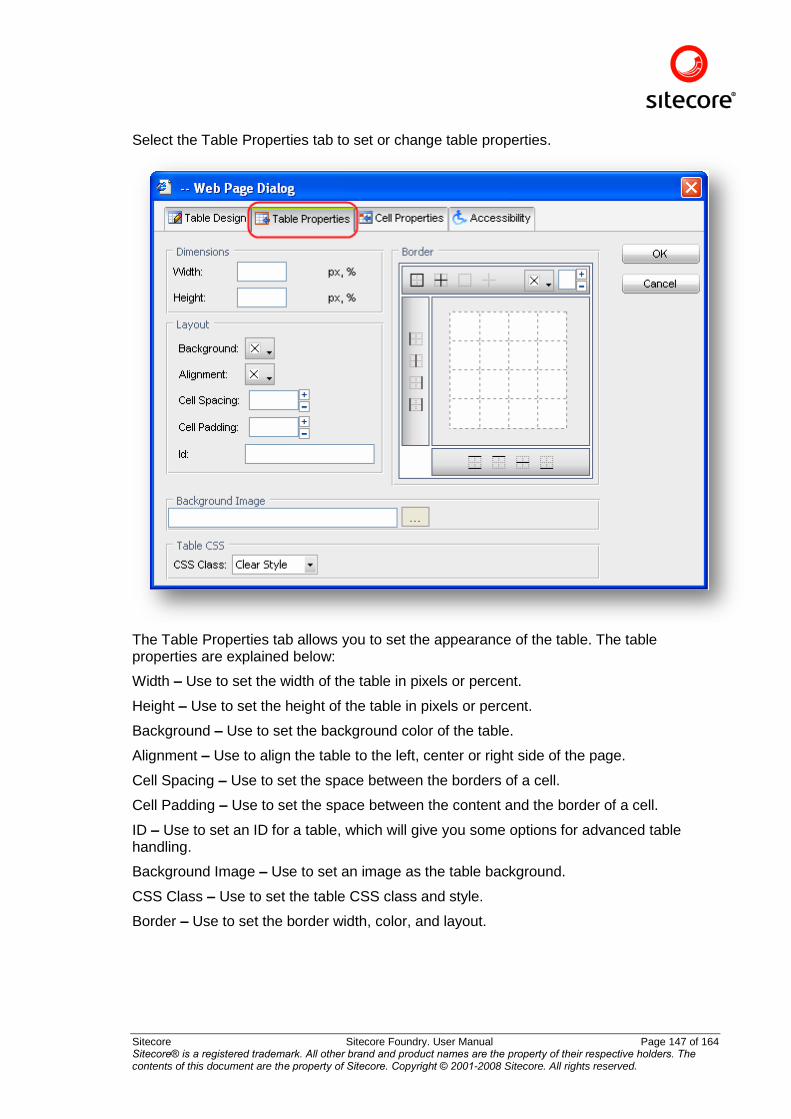
Sitecore Sitecore Foundry. User Manual Page 147 of 164 Sitecore® is a registered trademark. All other brand and product names are the property of their respective holders. The contents of this document are the property of Sitecore. Copyright © 2001-2008 Sitecore. All rights reserved.
Select the Table Properties tab to set or change table properties.
The Table Properties tab allows you to set the appearance of the table. The table properties are explained below:
Width – Use to set the width of the table in pixels or percent.
Height – Use to set the height of the table in pixels or percent.
Background – Use to set the background color of the table.
Alignment – Use to align the table to the left, center or right side of the page.
Cell Spacing – Use to set the space between the borders of a cell.
Cell Padding – Use to set the space between the content and the border of a cell.
ID – Use to set an ID for a table, which will give you some options for advanced table handling.
Background Image – Use to set an image as the table background.
CSS Class – Use to set the table CSS class and style.
Border – Use to set the border width, color, and layout.
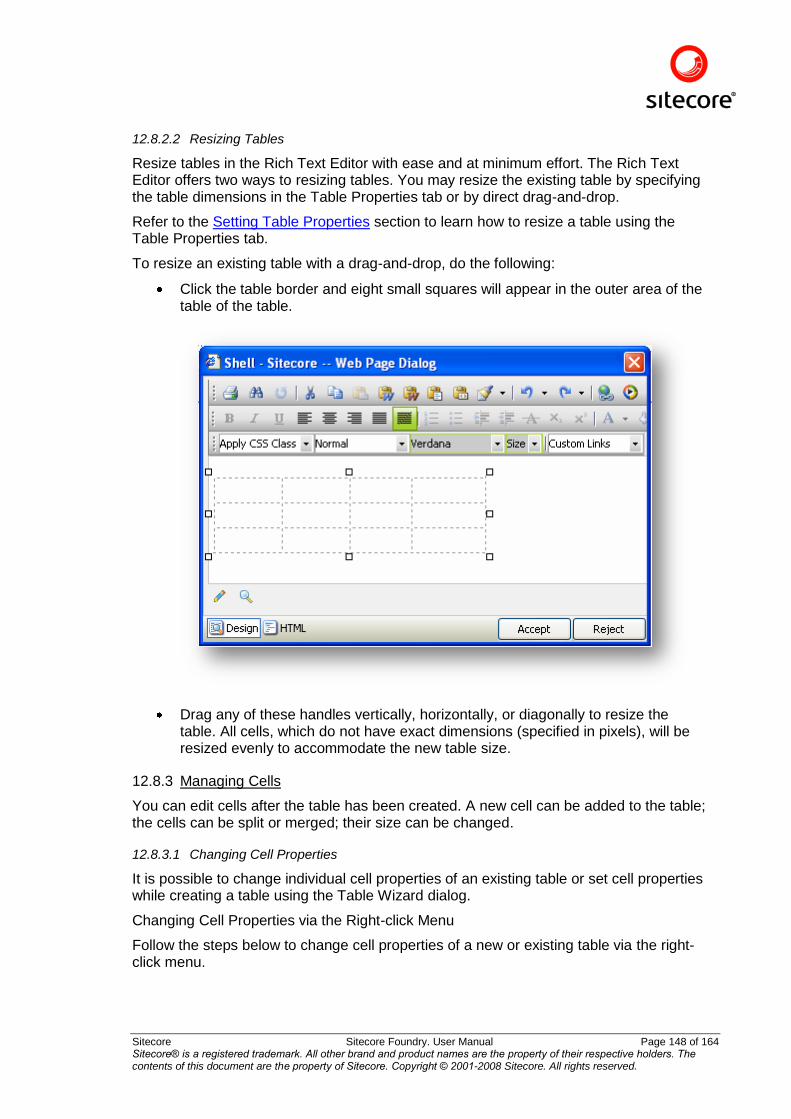
Sitecore Sitecore Foundry. User Manual Page 148 of 164 Sitecore® is a registered trademark. All other brand and product names are the property of their respective holders. The contents of this document are the property of Sitecore. Copyright © 2001-2008 Sitecore. All rights reserved.
12.8.2.2 Resizing Tables
Resize tables in the Rich Text Editor with ease and at minimum effort. The Rich Text Editor offers two ways to resizing tables. You may resize the existing table by specifying the table dimensions in the Table Properties tab or by direct drag-and-drop.
Refer to the Setting Table Properties section to learn how to resize a table using the Table Properties tab.
To resize an existing table with a drag-and-drop, do the following:
Click the table border and eight small squares will appear in the outer area of the table of the table.
Drag any of these handles vertically, horizontally, or diagonally to resize the table. All cells, which do not have exact dimensions (specified in pixels), will be resized evenly to accommodate the new table size.
12.8.3 Managing Cells
You can edit cells after the table has been created. A new cell can be added to the table; the cells can be split or merged; their size can be changed.
12.8.3.1 Changing Cell Properties
It is possible to change individual cell properties of an existing table or set cell properties while creating a table using the Table Wizard dialog.
Changing Cell Properties via the Right-click Menu
Follow the steps below to change cell properties of a new or existing table via the right-click menu.
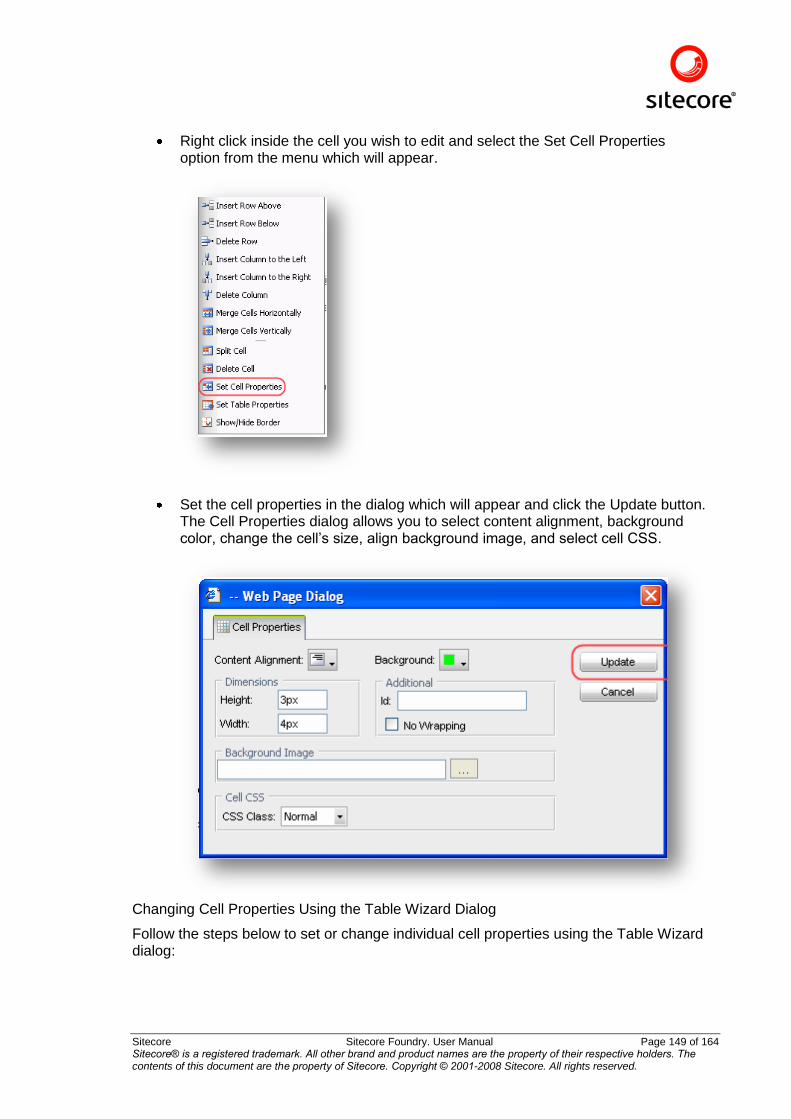
Sitecore Sitecore Foundry. User Manual Page 149 of 164 Sitecore® is a registered trademark. All other brand and product names are the property of their respective holders. The contents of this document are the property of Sitecore. Copyright © 2001-2008 Sitecore. All rights reserved.
Right click inside the cell you wish to edit and select the Set Cell Properties option from the menu which will appear.
Set the cell properties in the dialog which will appear and click the Update button. The Cell Properties dialog allows you to select content alignment, background color, change the cell‟s size, align background image, and select cell CSS.
Changing Cell Properties Using the Table Wizard Dialog
Follow the steps below to set or change individual cell properties using the Table Wizard dialog:
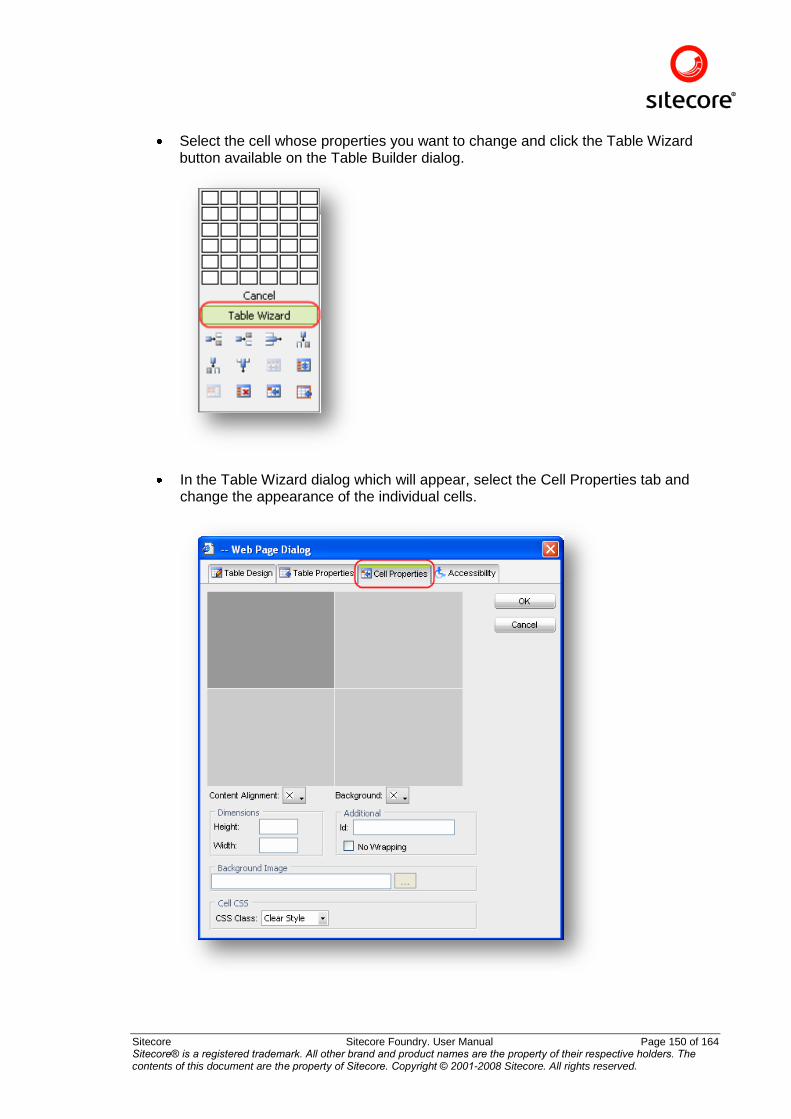
Sitecore Sitecore Foundry. User Manual Page 150 of 164 Sitecore® is a registered trademark. All other brand and product names are the property of their respective holders. The contents of this document are the property of Sitecore. Copyright © 2001-2008 Sitecore. All rights reserved.
Select the cell whose properties you want to change and click the Table Wizard button available on the Table Builder dialog.
In the Table Wizard dialog which will appear, select the Cell Properties tab and change the appearance of the individual cells.
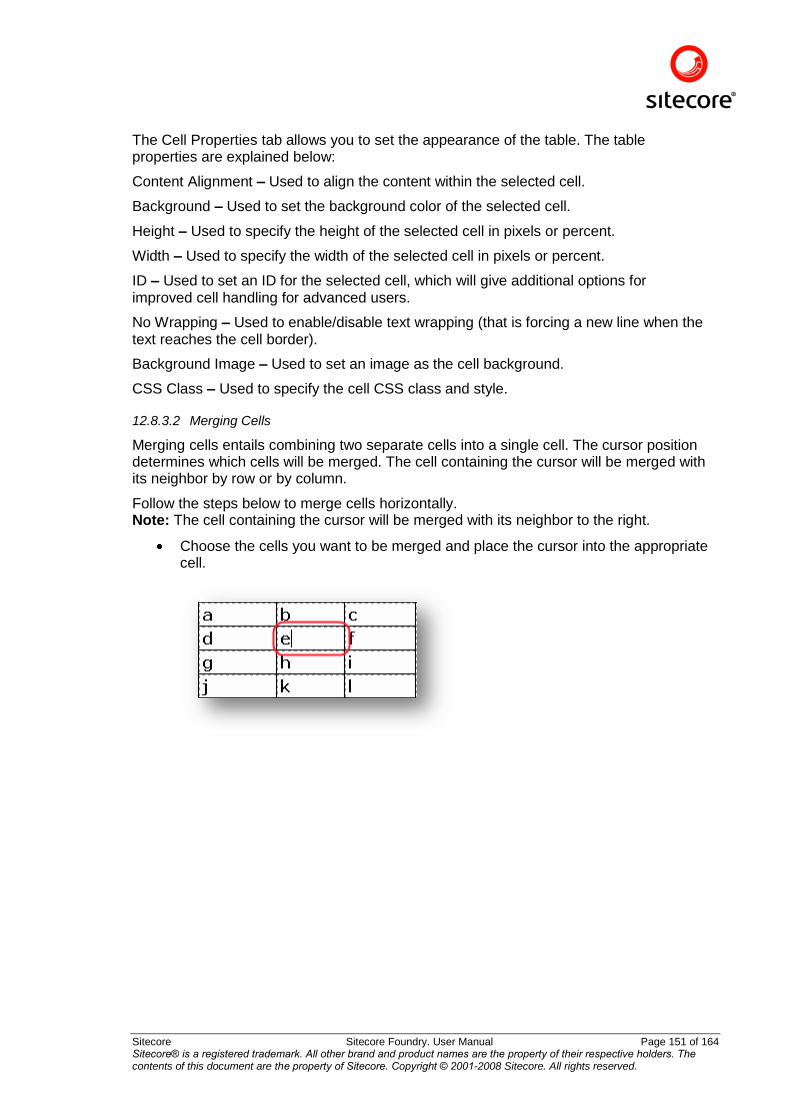
Sitecore Sitecore Foundry. User Manual Page 151 of 164 Sitecore® is a registered trademark. All other brand and product names are the property of their respective holders. The contents of this document are the property of Sitecore. Copyright © 2001-2008 Sitecore. All rights reserved.
The Cell Properties tab allows you to set the appearance of the table. The table properties are explained below:
Content Alignment – Used to align the content within the selected cell.
Background – Used to set the background color of the selected cell.
Height – Used to specify the height of the selected cell in pixels or percent.
Width – Used to specify the width of the selected cell in pixels or percent.
ID – Used to set an ID for the selected cell, which will give additional options for improved cell handling for advanced users.
No Wrapping – Used to enable/disable text wrapping (that is forcing a new line when the text reaches the cell border).
Background Image – Used to set an image as the cell background.
CSS Class – Used to specify the cell CSS class and style.
12.8.3.2 Merging Cells
Merging cells entails combining two separate cells into a single cell. The cursor position determines which cells will be merged. The cell containing the cursor will be merged with its neighbor by row or by column.
Follow the steps below to merge cells horizontally. Note: The cell containing the cursor will be merged with its neighbor to the right.
Choose the cells you want to be merged and place the cursor into the appropriate cell.
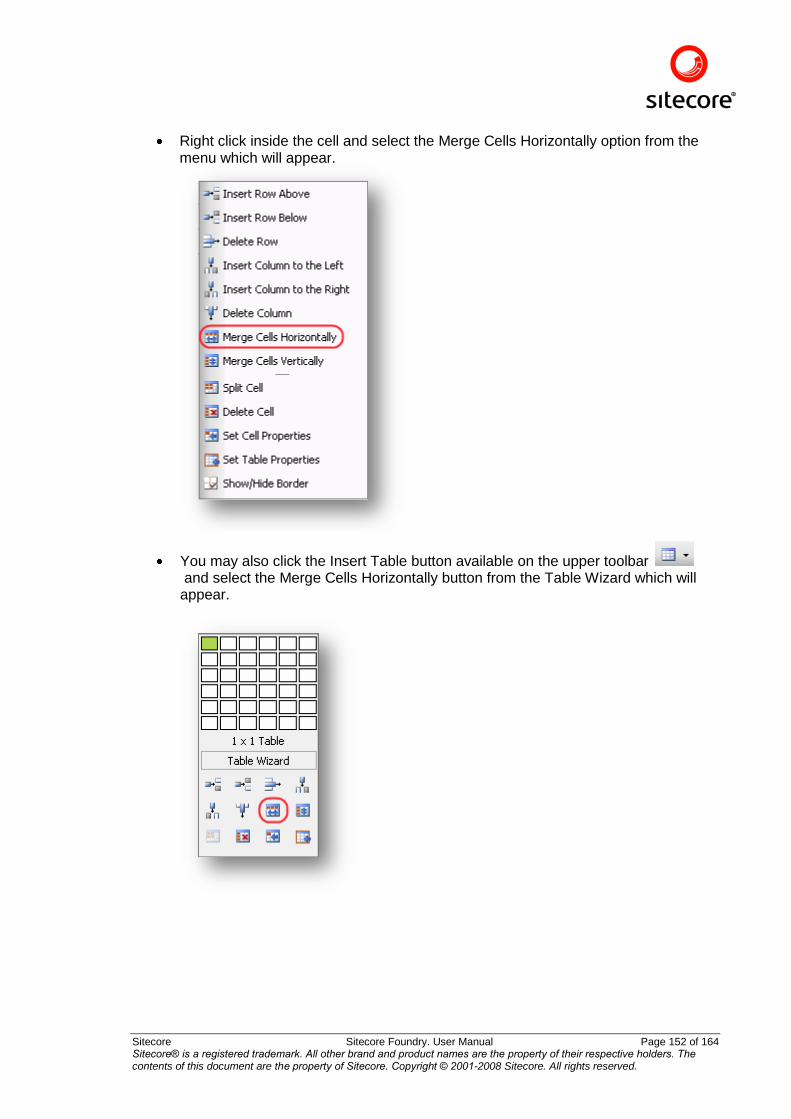
Sitecore Sitecore Foundry. User Manual Page 152 of 164 Sitecore® is a registered trademark. All other brand and product names are the property of their respective holders. The contents of this document are the property of Sitecore. Copyright © 2001-2008 Sitecore. All rights reserved.
Right click inside the cell and select the Merge Cells Horizontally option from the menu which will appear.
You may also click the Insert Table button available on the upper toolbar and select the Merge Cells Horizontally button from the Table Wizard which will appear.
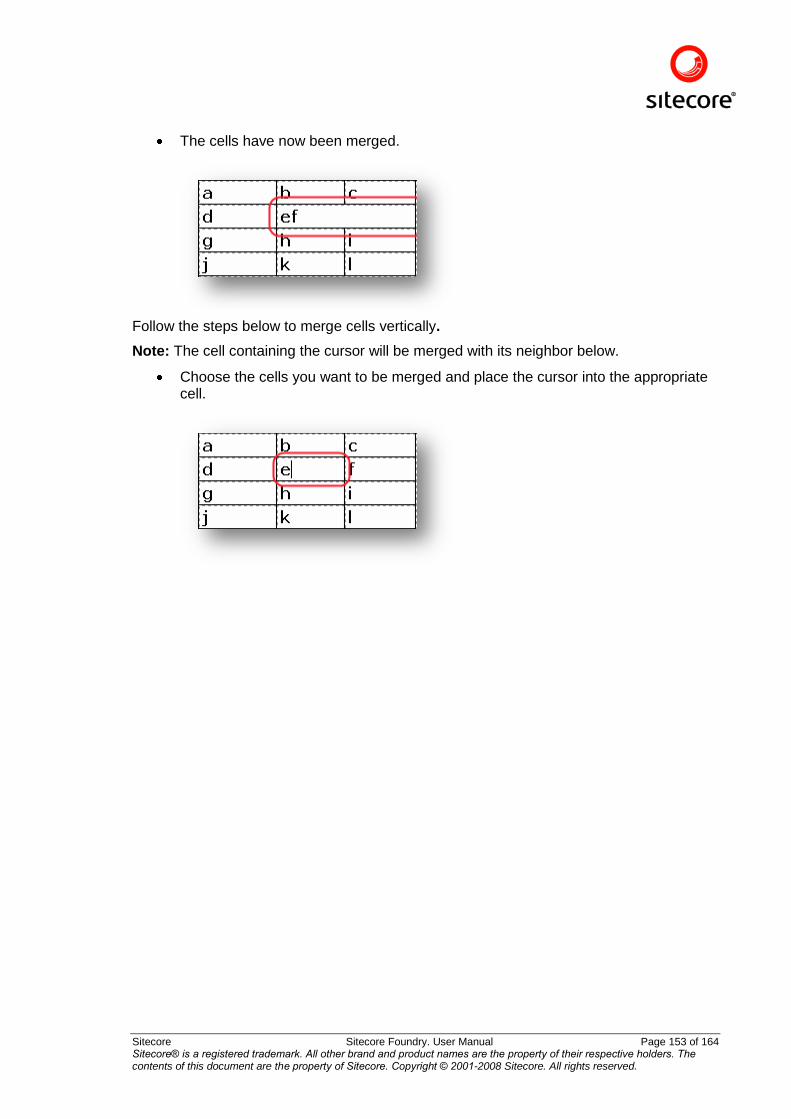
Sitecore Sitecore Foundry. User Manual Page 153 of 164 Sitecore® is a registered trademark. All other brand and product names are the property of their respective holders. The contents of this document are the property of Sitecore. Copyright © 2001-2008 Sitecore. All rights reserved.
The cells have now been merged.
Follow the steps below to merge cells vertically.
Note: The cell containing the cursor will be merged with its neighbor below.
Choose the cells you want to be merged and place the cursor into the appropriate cell.
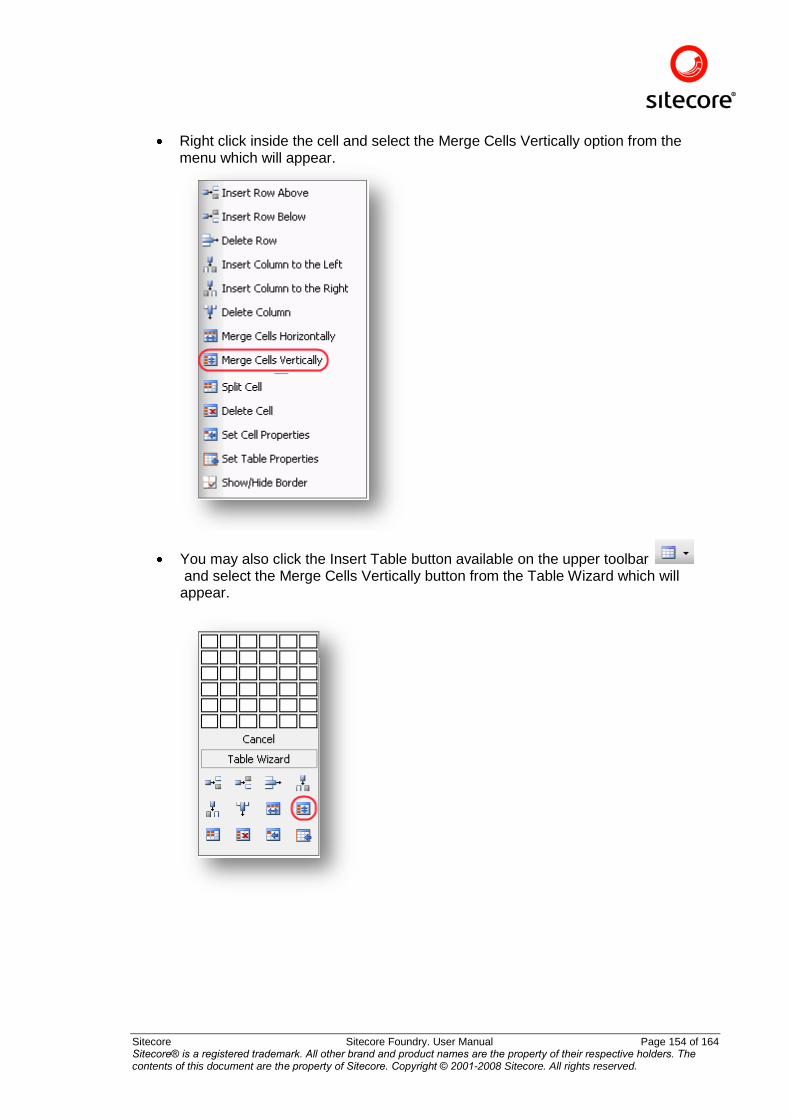
Sitecore Sitecore Foundry. User Manual Page 154 of 164 Sitecore® is a registered trademark. All other brand and product names are the property of their respective holders. The contents of this document are the property of Sitecore. Copyright © 2001-2008 Sitecore. All rights reserved.
Right click inside the cell and select the Merge Cells Vertically option from the menu which will appear.
You may also click the Insert Table button available on the upper toolbar and select the Merge Cells Vertically button from the Table Wizard which will appear.
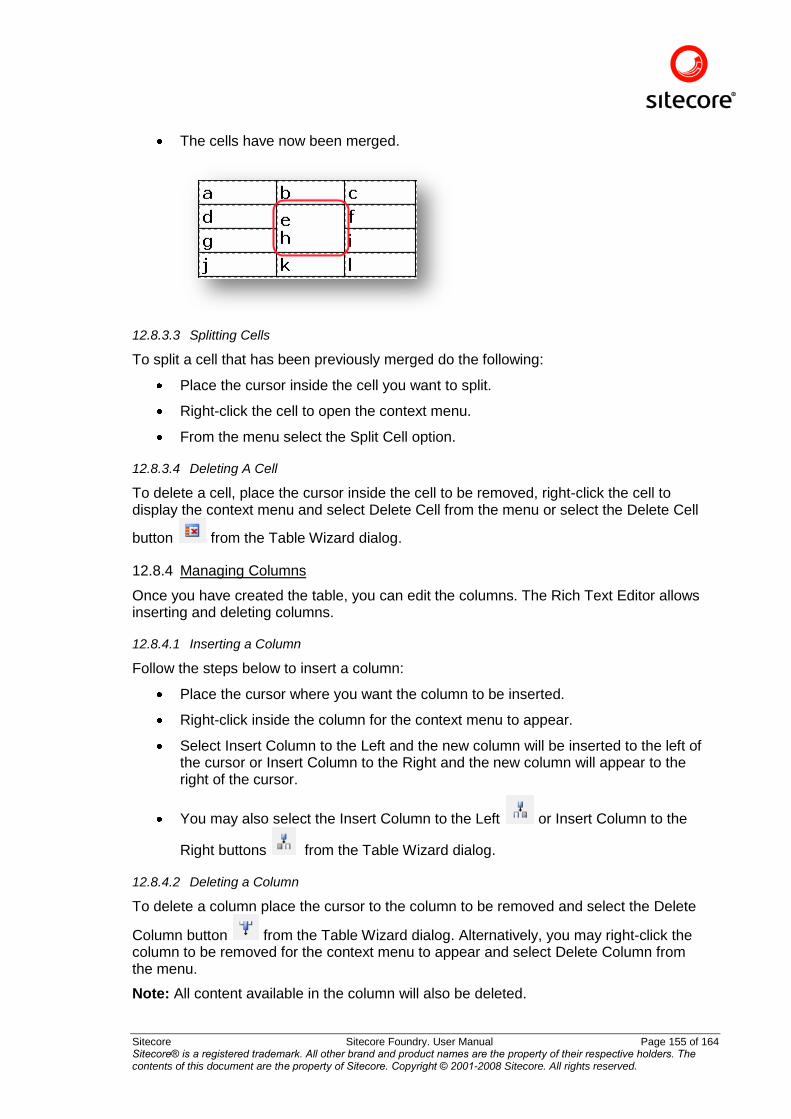
Sitecore Sitecore Foundry. User Manual Page 155 of 164 Sitecore® is a registered trademark. All other brand and product names are the property of their respective holders. The contents of this document are the property of Sitecore. Copyright © 2001-2008 Sitecore. All rights reserved.
The cells have now been merged.
12.8.3.3 Splitting Cells
To split a cell that has been previously merged do the following:
Place the cursor inside the cell you want to split.
Right-click the cell to open the context menu.
From the menu select the Split Cell option.
12.8.3.4 Deleting A Cell
To delete a cell, place the cursor inside the cell to be removed, right-click the cell to display the context menu and select Delete Cell from the menu or select the Delete Cell
button from the Table Wizard dialog.
12.8.4 Managing Columns
Once you have created the table, you can edit the columns. The Rich Text Editor allows inserting and deleting columns.
12.8.4.1 Inserting a Column
Follow the steps below to insert a column:
Place the cursor where you want the column to be inserted.
Right-click inside the column for the context menu to appear.
Select Insert Column to the Left and the new column will be inserted to the left of the cursor or Insert Column to the Right and the new column will appear to the right of the cursor.
You may also select the Insert Column to the Left or Insert Column to the
Right buttons from the Table Wizard dialog.
12.8.4.2 Deleting a Column
To delete a column place the cursor to the column to be removed and select the Delete
Column button from the Table Wizard dialog. Alternatively, you may right-click the column to be removed for the context menu to appear and select Delete Column from the menu.
Note: All content available in the column will also be deleted.
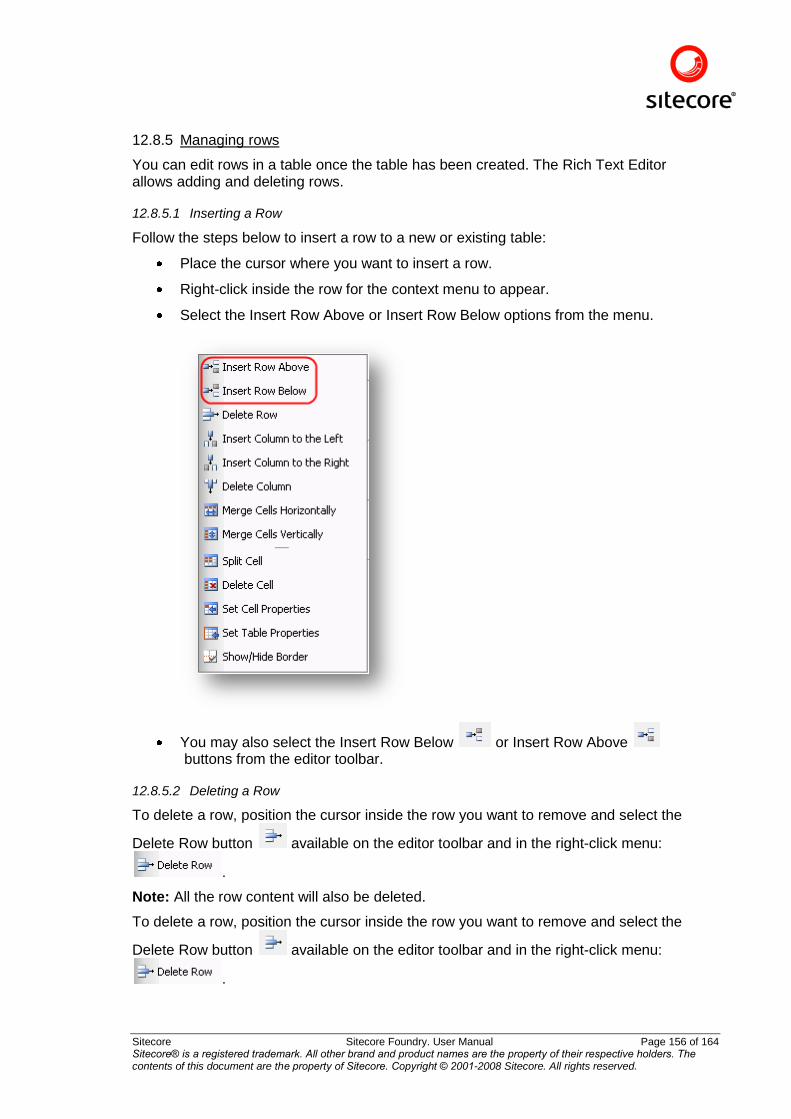
Sitecore Sitecore Foundry. User Manual Page 156 of 164 Sitecore® is a registered trademark. All other brand and product names are the property of their respective holders. The contents of this document are the property of Sitecore. Copyright © 2001-2008 Sitecore. All rights reserved.
12.8.5 Managing rows
You can edit rows in a table once the table has been created. The Rich Text Editor allows adding and deleting rows.
12.8.5.1 Inserting a Row
Follow the steps below to insert a row to a new or existing table:
Place the cursor where you want to insert a row.
Right-click inside the row for the context menu to appear.
Select the Insert Row Above or Insert Row Below options from the menu.
You may also select the Insert Row Below or Insert Row Above buttons from the editor toolbar.
12.8.5.2 Deleting a Row
To delete a row, position the cursor inside the row you want to remove and select the
Delete Row button available on the editor toolbar and in the right-click menu:
.
Note: All the row content will also be deleted.
To delete a row, position the cursor inside the row you want to remove and select the
Delete Row button available on the editor toolbar and in the right-click menu:
.

Sitecore Sitecore Foundry. User Manual Page 157 of 164 Sitecore® is a registered trademark. All other brand and product names are the property of their respective holders. The contents of this document are the property of Sitecore. Copyright © 2001-2008 Sitecore. All rights reserved.
Note: All the row content will also be deleted.
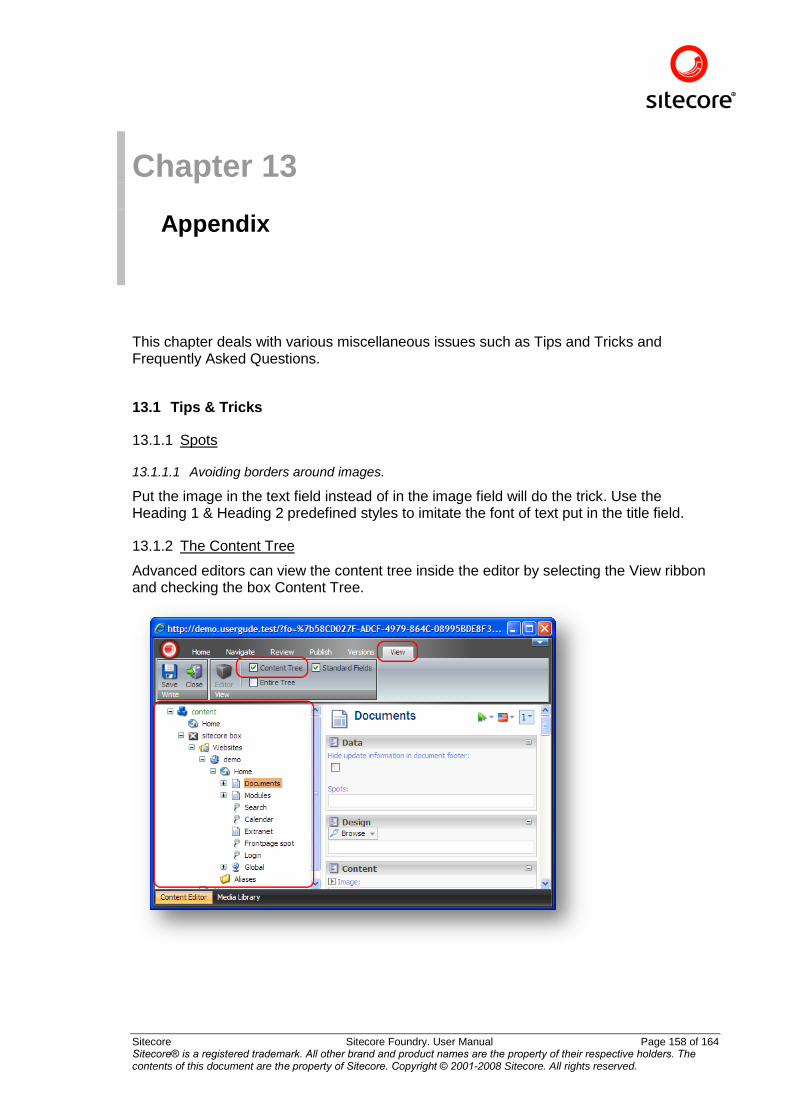
Sitecore Sitecore Foundry. User Manual Page 158 of 164 Sitecore® is a registered trademark. All other brand and product names are the property of their respective holders. The contents of this document are the property of Sitecore. Copyright © 2001-2008 Sitecore. All rights reserved.
Chapter 13 Appendix
This chapter deals with various miscellaneous issues such as Tips and Tricks and Frequently Asked Questions.
13.1 Tips & Tricks
13.1.1 Spots
13.1.1.1 Avoiding borders around images.
Put the image in the text field instead of in the image field will do the trick. Use the Heading 1 & Heading 2 predefined styles to imitate the font of text put in the title field.
13.1.2 The Content Tree
Advanced editors can view the content tree inside the editor by selecting the View ribbon and checking the box Content Tree.
Sitecore Sitecore Foundry. User Manual Page 159 of 164 Sitecore® is a registered trademark. All other brand and product names are the property of their respective holders. The contents of this document are the property of Sitecore. Copyright © 2001-2008 Sitecore. All rights reserved.
13.1.3 Local dictionary texts
It is possible to alter the texts that are shown on the website from button texts to column bar text etc. In order to do that; consult the administrator of the website, since it is not possible for the local website administrator do that.
13.2 FAQ
13.2.1 Question 1
The E-mail sent while creating a new website was lost. Is it possible to locate a copy of the e-mail within the system, in order to resend it, and be able to read the password assigned to the local administrator, to enable me to login to the new site?
Answer:
The e-mails are not stored within the system at this point in time. When creating a new site it is possible to enter multiple e-mail addresses. Make a habit of always adding the webmaster's address besides the local administrator's. Multiple addresses are separated by semicolon ; and no blank spaces.
13.2.2 Question 2
When selecting modules for the site, I only have a certain number available! Why can‟t I choose more modules?
Answer:
The remaining modules are probably not selected in the Wizard on the page Choose modules. Log into the site and choose Graphical settings & Choose modules and select the desired modules to be made available on the site.
13.2.3 Question 3
After editing a document, saving and closing the editor does not save the changes!
Answer:
Opening a document in edit mode usually takes between 2 and 10 seconds, depending on whether the dialog has been opened before in the session, and items have been cached. It is not always clear if the dialog has finished loading, because the dialog windows says finished in the lower left corner of the status bar. Changing the content of the document before the software has finished loading, results in the fact that it does not register the changes. The solution is to wait until the document has completely finished loading the dialog. Watch the status bar.
13.2.4 Question 4
When I delete a branch of the content tree I get a screen saying the document was not found!
Answer:
You were probably located at a document on the branch you were deleting. When that happens the product is unable to find a new document to display in the browser. Edit the URL in the browser address bar to the home page.
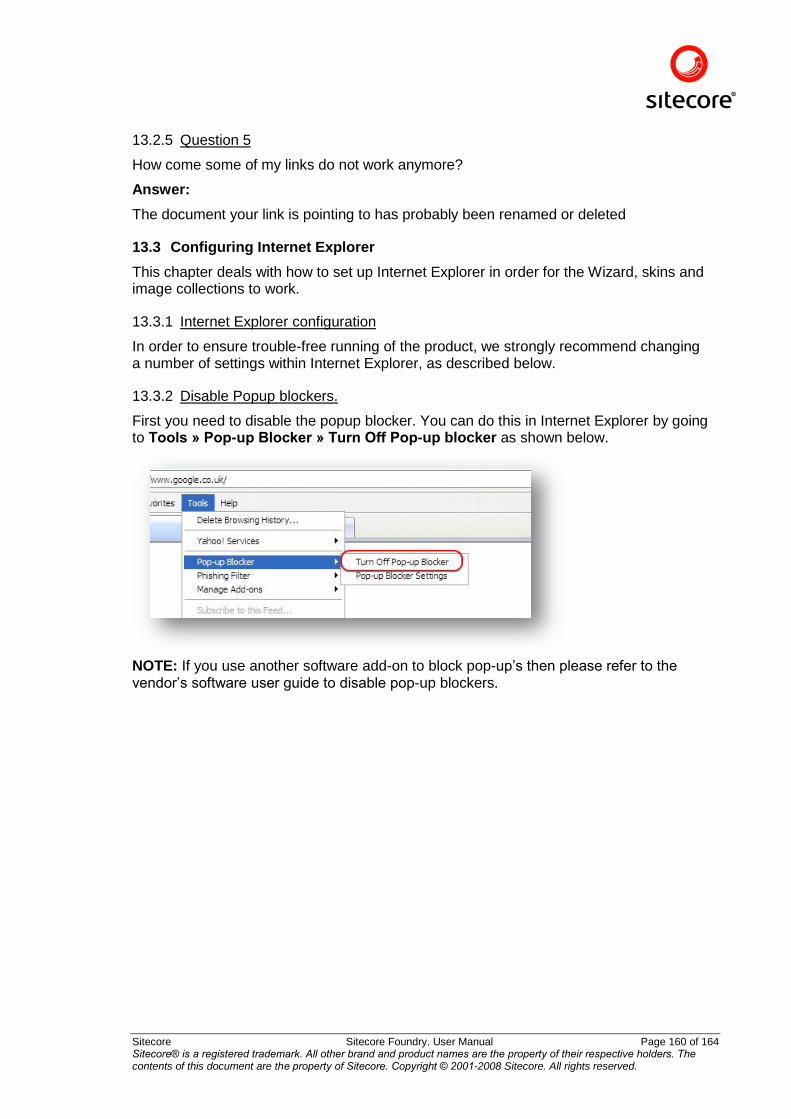
Sitecore Sitecore Foundry. User Manual Page 160 of 164 Sitecore® is a registered trademark. All other brand and product names are the property of their respective holders. The contents of this document are the property of Sitecore. Copyright © 2001-2008 Sitecore. All rights reserved.
13.2.5 Question 5
How come some of my links do not work anymore?
Answer:
The document your link is pointing to has probably been renamed or deleted
13.3 Configuring Internet Explorer
This chapter deals with how to set up Internet Explorer in order for the Wizard, skins and image collections to work.
13.3.1 Internet Explorer configuration
In order to ensure trouble-free running of the product, we strongly recommend changing a number of settings within Internet Explorer, as described below.
13.3.2 Disable Popup blockers.
First you need to disable the popup blocker. You can do this in Internet Explorer by going to Tools » Pop-up Blocker » Turn Off Pop-up blocker as shown below.
NOTE: If you use another software add-on to block pop-up‟s then please refer to the vendor‟s software user guide to disable pop-up blockers.
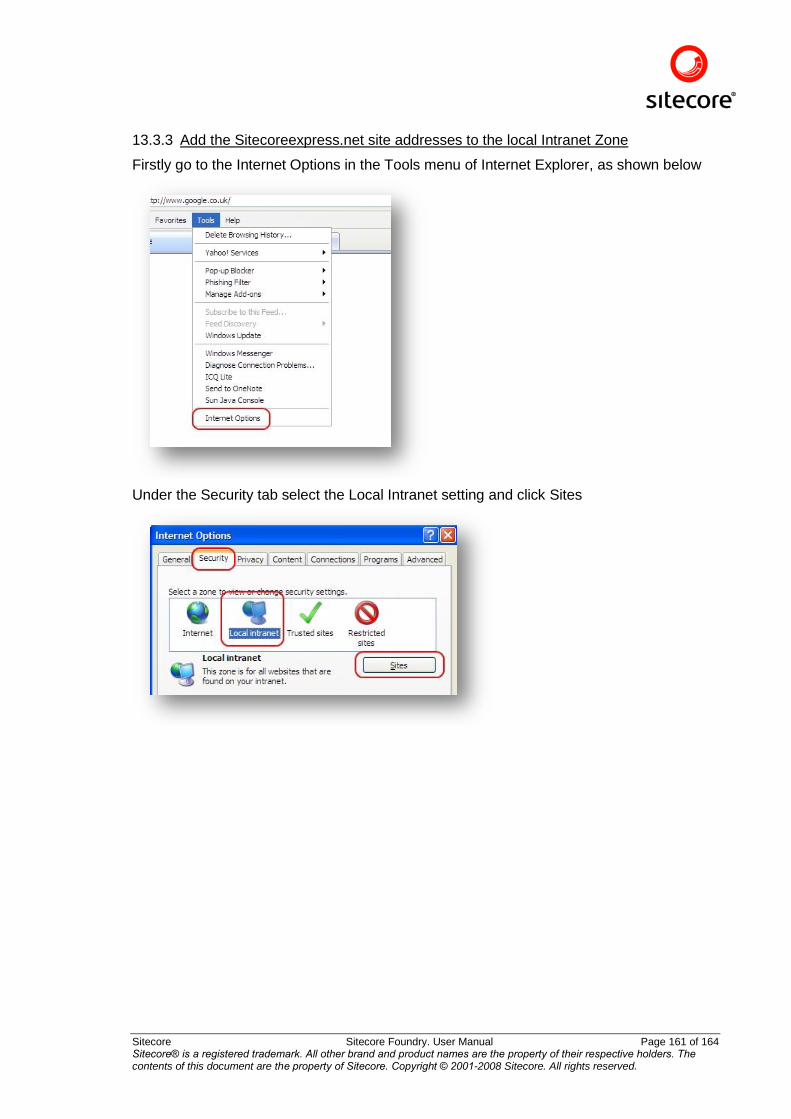
Sitecore Sitecore Foundry. User Manual Page 161 of 164 Sitecore® is a registered trademark. All other brand and product names are the property of their respective holders. The contents of this document are the property of Sitecore. Copyright © 2001-2008 Sitecore. All rights reserved.
13.3.3 Add the Sitecoreexpress.net site addresses to the local Intranet Zone
Firstly go to the Internet Options in the Tools menu of Internet Explorer, as shown below
Under the Security tab select the Local Intranet setting and click Sites
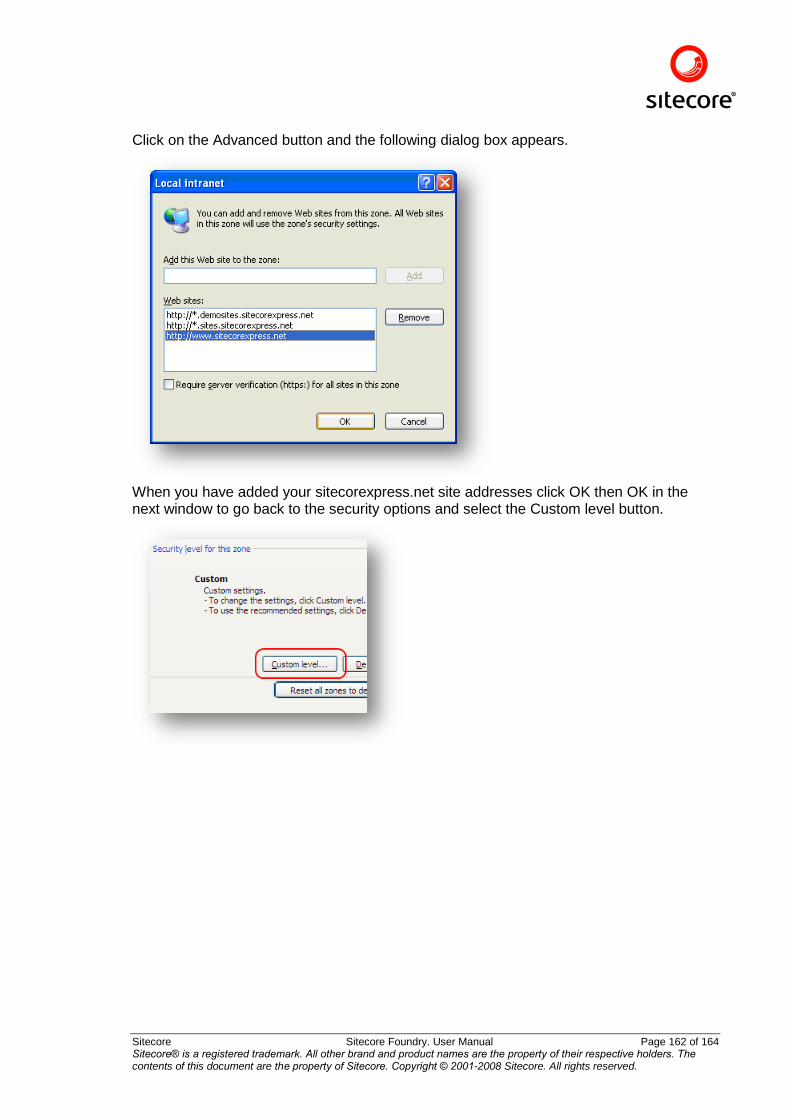
Sitecore Sitecore Foundry. User Manual Page 162 of 164 Sitecore® is a registered trademark. All other brand and product names are the property of their respective holders. The contents of this document are the property of Sitecore. Copyright © 2001-2008 Sitecore. All rights reserved.
Click on the Advanced button and the following dialog box appears.
When you have added your sitecorexpress.net site addresses click OK then OK in the next window to go back to the security options and select the Custom level button.
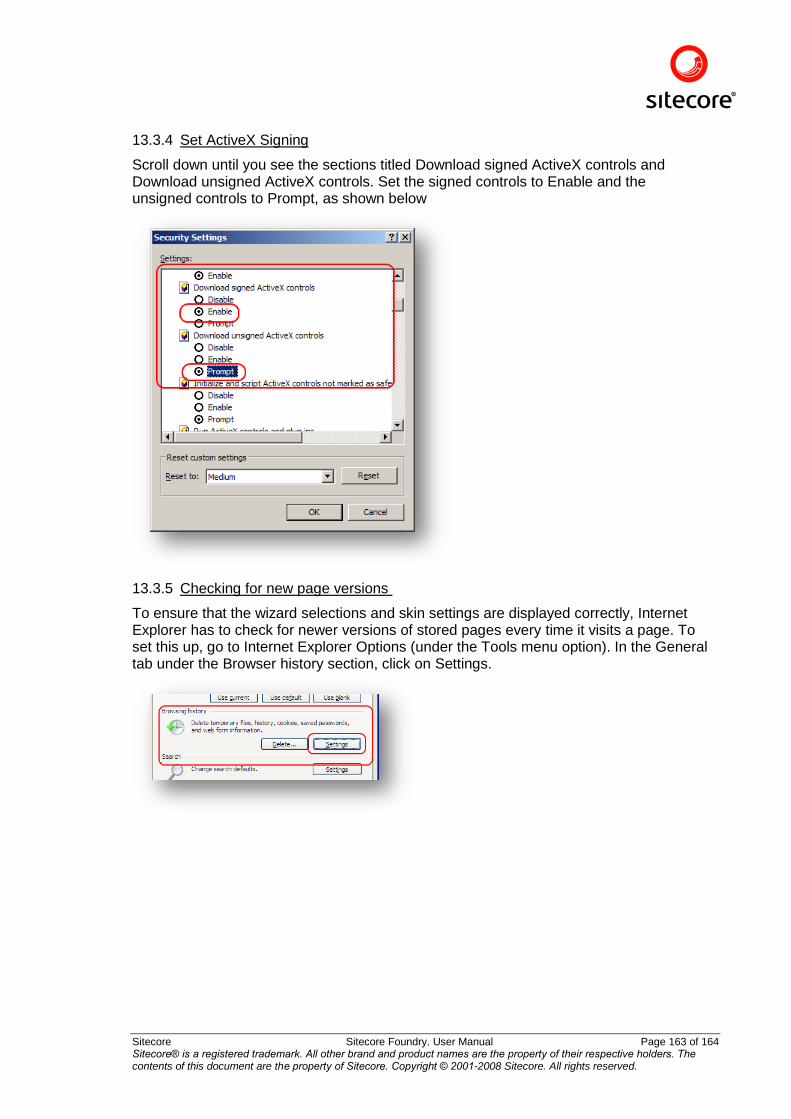
Sitecore Sitecore Foundry. User Manual Page 163 of 164 Sitecore® is a registered trademark. All other brand and product names are the property of their respective holders. The contents of this document are the property of Sitecore. Copyright © 2001-2008 Sitecore. All rights reserved.
13.3.4 Set ActiveX Signing
Scroll down until you see the sections titled Download signed ActiveX controls and Download unsigned ActiveX controls. Set the signed controls to Enable and the unsigned controls to Prompt, as shown below
13.3.5 Checking for new page versions
To ensure that the wizard selections and skin settings are displayed correctly, Internet Explorer has to check for newer versions of stored pages every time it visits a page. To set this up, go to Internet Explorer Options (under the Tools menu option). In the General tab under the Browser history section, click on Settings.
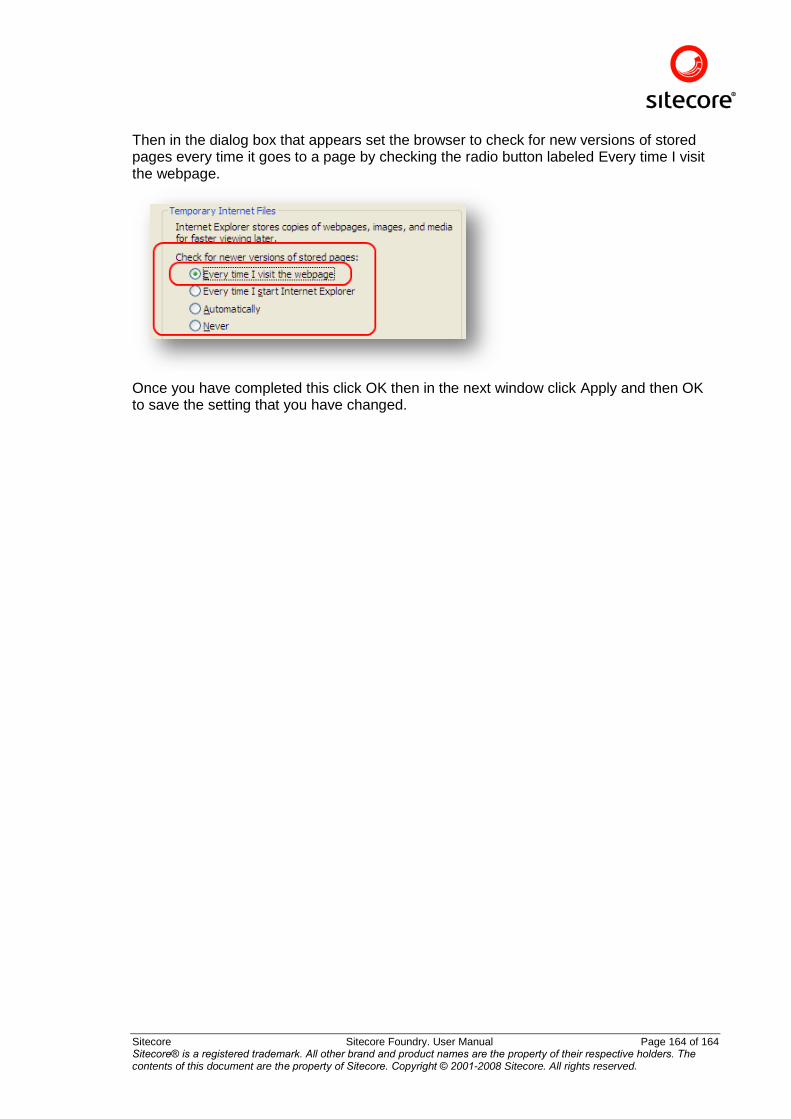
Sitecore Sitecore Foundry. User Manual Page 164 of 164 Sitecore® is a registered trademark. All other brand and product names are the property of their respective holders. The contents of this document are the property of Sitecore. Copyright © 2001-2008 Sitecore. All rights reserved.
Then in the dialog box that appears set the browser to check for new versions of stored pages every time it goes to a page by checking the radio button labeled Every time I visit the webpage.
Once you have completed this click OK then in the next window click Apply and then OK to save the setting that you have changed.