Embed Size (px)
Citation preview

Slackware Linux Basics
For Slackware Linux 10.0
Daniël de Kok
Slackware Linux Basics: For Slackware Linux 10.0by Daniël de Kok
Copyright © 2002, 2003, 2004 by Daniël de Kok
License
Redistribution and use in source and binary forms, with or without modification, are permitted provided that the following conditions are met:
1. Redistributions of this book must retain the above copyright notice, this list of conditions and the followingdisclaimer.
2. All advertising materials mentioning features or use of this book must display the followingacknowledgement: This product includes content written by Daniël de Kok.
3. The name of the author may not be used to endorse or promote products derived from this book withoutspecific prior written permission.
THIS BOOK IS PROVIDED BY THE COPYRIGHT HOLDERS AND CONTRIBUTORS "AS IS" AND ANY EXPRESS OR IMPLIED
WARRANTIES, INCLUDING, BUT NOT LIMITED TO, THE IMPLIED WARRANTIES OF MERCHANTABILITY AND FITNESS
FOR A PARTICULAR PURPOSE ARE DISCLAIMED. IN NO EVENT SHALL THE COPYRIGHT OWNER OR CONTRIBUTORS BE
LIABLE FOR ANY DIRECT, INDIRECT, INCIDENTAL, SPECIAL, EXEMPLARY, OR CONSEQUENTIAL DAMAGES (INCLUDING,
BUT NOT LIMITED TO, PROCUREMENT OF SUBSTITUTE GOODS OR SERVICES; LOSS OF USE, DATA, OR PROFITS; OR
BUSINESS INTERRUPTION) HOWEVER CAUSED AND ON ANY THEORY OF LIABILITY, WHETHER IN CONTRACT, STRICT
LIABILITY, OR TORT (INCLUDING NEGLIGENCE OR OTHERWISE) ARISING IN ANY WAY OUT OF THE USE OF THIS BOOK,
EVEN IF ADVISED OF THE POSSIBILITY OF SUCH DAMAGE.
Linux is a registered trademark of Linus Torvalds. Slackware Linux is a registered trademark of Patrick Volkerding and Slackware Linux, Inc.
Table of ContentsPreface .................................................................................................................................................. iI. Getting started.................................................................................................................................. i
1. About this book....................................................................................................................... 1Availability ........................................................................................................................ 1Conventions ....................................................................................................................... 1
File names ................................................................................................................ 1Commands ............................................................................................................... 1Screen output ........................................................................................................... 1Notes ........................................................................................................................ 1
2. An introduction to Slackware Linux ....................................................................................... 2What is Linux? .................................................................................................................. 2What is GNU/Linux?......................................................................................................... 2What is Slackware Linux?................................................................................................. 2Slackware Linux 10.0 features .......................................................................................... 2Slackware Linux on CD-ROM .......................................................................................... 3
3. Sources of help........................................................................................................................ 4On your system.................................................................................................................. 4
Linux HOWTO’s...................................................................................................... 4Manual pages ........................................................................................................... 4
On the internet ................................................................................................................... 44. General concepts ..................................................................................................................... 6
Multitasking....................................................................................................................... 6Introduction.............................................................................................................. 6Processes and threads............................................................................................... 6
Filesystem hierarchy.......................................................................................................... 7Structure................................................................................................................... 7Mounting.................................................................................................................. 8Common directories................................................................................................. 8
Devices .............................................................................................................................. 9Introduction.............................................................................................................. 9ATA and SCSI devices ........................................................................................... 10
5. Installing Slackware Linux ................................................................................................... 11Booting the installation CD-ROM................................................................................... 11Partitioning a hard disk.................................................................................................... 11Installing Slackware Linux.............................................................................................. 12
II. GNU/Linux Basics ....................................................................................................................... 206. The Bash shell ....................................................................................................................... 21
Introduction ..................................................................................................................... 21Starting the shell .............................................................................................................. 21Shell basics ...................................................................................................................... 21
Executing commands ............................................................................................. 21Browsing through shell commands........................................................................ 21Completion............................................................................................................. 22Wildcards ............................................................................................................... 22
Matching a string of characters .................................................................... 22Matching single characters........................................................................... 23Matching characters from a set .................................................................... 23
Redirections and pipes ........................................................................................... 23Redirection ................................................................................................... 23
i
pipes ............................................................................................................. 247. Files and directories .............................................................................................................. 25
Introduction ..................................................................................................................... 25The basics ........................................................................................................................ 25Permissions...................................................................................................................... 27Archives........................................................................................................................... 29
Introduction............................................................................................................ 29Extracting archives................................................................................................. 29Creating archives.................................................................................................... 30
Extended attributes .......................................................................................................... 30Introduction............................................................................................................ 31Installing the necessary utilities ............................................................................. 31Showing extended attributes .................................................................................. 31Setting extended attributes ..................................................................................... 31
Mounting filesystems....................................................................................................... 32Introduction............................................................................................................ 32mount ..................................................................................................................... 32umount ................................................................................................................... 32The fstab file .......................................................................................................... 33
fs_spec.......................................................................................................... 33fs_file............................................................................................................ 33fs_vfstype ..................................................................................................... 33fs_mntops ..................................................................................................... 33fs_freq........................................................................................................... 34fs_passno ...................................................................................................... 34
8. Text Utilities.......................................................................................................................... 35Introduction ..................................................................................................................... 35The basics ........................................................................................................................ 35
cat........................................................................................................................... 35echo ........................................................................................................................ 36wc........................................................................................................................... 36tr ............................................................................................................................. 36sort.......................................................................................................................... 37uniq ........................................................................................................................ 38
9. Process management ............................................................................................................. 39Introduction ..................................................................................................................... 39Process basics .................................................................................................................. 39
ps ............................................................................................................................ 39kill .......................................................................................................................... 40
Advanced process management....................................................................................... 40Background processes............................................................................................ 41Stopping processes................................................................................................. 41Altering priorities................................................................................................... 41
III. System administration ............................................................................................................... 4310. User management................................................................................................................ 44
Introduction ..................................................................................................................... 44Adding and removing users............................................................................................. 44
useradd ................................................................................................................... 44passwd.................................................................................................................... 45adduser ................................................................................................................... 45userdel .................................................................................................................... 46
ii
Avoiding root usage......................................................................................................... 46Disk quota........................................................................................................................ 47
Introduction............................................................................................................ 47Enabling quota ....................................................................................................... 47Editing quota.......................................................................................................... 48
11. Printer configuration ........................................................................................................... 49Introduction ..................................................................................................................... 49Preparations ..................................................................................................................... 49Configuration................................................................................................................... 49
12. X11...................................................................................................................................... 51X Configuration ............................................................................................................... 51Window manager............................................................................................................. 51
13. Package Management.......................................................................................................... 53Pkgtools ........................................................................................................................... 53
Introduction............................................................................................................ 53pkgtool ................................................................................................................... 53installpkg................................................................................................................ 53upgradepkg............................................................................................................. 53removepkg.............................................................................................................. 53
Slackpkg .......................................................................................................................... 54Introduction............................................................................................................ 54Configuration ......................................................................................................... 54Importing the Slackware Linux GPG key.............................................................. 54Updating the package lists ..................................................................................... 55Upgrading packages............................................................................................... 55Installing packages................................................................................................. 56
14. Building a kernel ................................................................................................................. 57Introduction ..................................................................................................................... 57Configuration................................................................................................................... 57Compilation ..................................................................................................................... 58Installation ....................................................................................................................... 58
Installing the kernel................................................................................................ 58Configuring LILO .................................................................................................. 59
15. Security ............................................................................................................................... 61Introduction ..................................................................................................................... 61E-Mail security ................................................................................................................ 61
Introduction............................................................................................................ 61Configuring and using GnuPG............................................................................... 62
Generating your private and public keys...................................................... 62Exporting your public key............................................................................ 64Signatures ..................................................................................................... 65
Closing services............................................................................................................... 65Introduction............................................................................................................ 66Finding open ports ................................................................................................. 66inetd........................................................................................................................ 66
IV. Network administration............................................................................................................. 6816. Networking configuration ................................................................................................... 69
Hardware ......................................................................................................................... 69Configuration of interfaces .............................................................................................. 69Configuration of interfaces (IPv6)................................................................................... 70
Introduction............................................................................................................ 70
iii

Slackware Linux IPv6 support............................................................................... 71Adding an IPv6 address to an interface ................................................................. 71
Resolving......................................................................................................................... 71IPv4 Forwarding .............................................................................................................. 73
17. IPsec .................................................................................................................................... 75Theory.............................................................................................................................. 75Kernel configuration ........................................................................................................ 75Installing IPsec-Tools ...................................................................................................... 75The configuration of ipsec ............................................................................................... 76
Introduction............................................................................................................ 76Writing the configuration file................................................................................. 76Activating the IPsec configuration ......................................................................... 77
18. The internet super server..................................................................................................... 79Introduction ..................................................................................................................... 79Configuration................................................................................................................... 79TCP wrappers .................................................................................................................. 79
19. Apache ................................................................................................................................ 81Introduction ..................................................................................................................... 81Installation ....................................................................................................................... 81User directories................................................................................................................ 81Virtual hosts..................................................................................................................... 81
20. BIND................................................................................................................................... 83Introduction ..................................................................................................................... 83
Delegation .............................................................................................................. 83DNS records........................................................................................................... 83Masters and slaves ................................................................................................. 83
Making a caching nameserver ......................................................................................... 83
iv
List of Tables6-1. Bash wildcards ............................................................................................................................ 227-1. Archive file extensions ................................................................................................................ 298-1. Special tr character sequences..................................................................................................... 3616-1. Important IPv6 Prefixes............................................................................................................. 7120-1. DNS records .............................................................................................................................. 83
List of Figures4-1. Forking a process........................................................................................................................... 64-2. The filesystem structure................................................................................................................. 75-1. The cfdisk parition tool ............................................................................................................... 115-2. The setup tool .............................................................................................................................. 125-3. Setting up the swap partition ....................................................................................................... 135-4. Selecting a partition to initialize.................................................................................................. 135-5. Formatting the partition............................................................................................................... 145-6. Selecting a filesystem type .......................................................................................................... 145-7. Selecting the source medium....................................................................................................... 155-8. Selecting the disk sets.................................................................................................................. 155-9. Installing the kernel ..................................................................................................................... 165-10. Installing the kernel ................................................................................................................... 165-11. Selecting the default modem ..................................................................................................... 175-12. Enabling hotplugging ................................................................................................................ 175-13. Selecting the kind of LILO installation..................................................................................... 185-14. Choosing the framebuffer resolution......................................................................................... 186-1. Standard input and output............................................................................................................ 236-2. A pipeline .................................................................................................................................... 2416-1. The anatomy of an IPv6 address ............................................................................................... 7016-2. Router example.......................................................................................................................... 73
i

PrefaceThis book aims to provide an introduction to Slackware Linux. It addresses people who have little orno GNU/Linux experience. It aims to cover the Slackware Linux installation, basic GNU/Linuxcommands and the configuration of Slackware Linux. As you can see the book is still work inprogress, but the first bits are released in the “release early, release often” spirit.
This book was written by Daniël de Kok and is freely available under a BSDL-like license. It iscontinually under development, not just to keep up with the latest Slackware Linux versions, but alsoto refine the documentation, and extend it where it is deemed necessary.
I wish everybody a good time with Slackware Linux, and I hope this book is useful for you.
i

I. Getting started
Chapter 1. About this book
AvailabilityThis book was written in DocBook/XML, and converted to HTML and PDF with Jade. The latestversion of the book is always available from: http://daniel.taickim.net/slackware-basics/.
ConventionsThis section gives a short summary of the conventions in this book.
File namesFile or directory names are printed as: /path/to/file. For example: /etc/fstab
CommandsCommands are printed as bold text. For example: ls -l
Screen outputScreen output is printed like this:
Hello world!
If commands are being entered in the screen output the commands will be printed as bold text:
$ commandOutput
If a command is executed as root, the shell will be displayed as “#”. If a command is executed as anormal non-privileged user, the shell will be displayed as “$”.
NotesSome sections contain extra notes. It is not necessary to know the information in notes, but notesmay provide valuable information, or pointers to information. Notes are printed like this:
Note: This is a note.
1
Chapter 2. An introduction to Slackware Linux
What is Linux?Linux is a Unix-like kernel which is written by Linus Torvalds and other developers, whocommunicate using the internet. Linux runs on many different architectures, for example on manyIA32, IA64, Alpha, m68k, SPARC and PowerPC machines. The latest kernel and more informationcan be found at: http://www.kernel.org
Linux is often confused with the GNU/Linux system. Linux is only a kernel, not a completeoperating system. GNU/Linux consists of the GNU operating system with the Linux kernel. Pleaseread the following section for a more detailed explanation of GNU/Linux.
What is GNU/Linux?At the beginning of the eighties Richard Stallman started an ambitious project with the goal to writea free Unix-like operating system. The name of this system is GNU (GNU is Not Unix). At thebeginning of the nineties most important components of the GNU oparating system were written,except for the kernel, which is still under development under the name HURD. HURD consists ofsome servers which provide Unix-like kernel functionality. In turn these servers run under the Machmicrokernel. At the beginning at the nineties the HURD team still had to wait till the Mach sourceswere released as free software. In the meanwhile Linus started filling the gap with the Linux kernel.GNU/Linux thus refers to the GNU system running on the Linux kernel. Right now the HURD kernelis also in a usable state and can be downloaded in the form of the GNU/HURD operating system.The Debian (http://www.debian.org/) project has even developed a version of the GNU operatingsystem which works with the NetBSD (http://www.netbsd.org/) kernel. We should call “Linuxdistributions” “GNU/Linux distributions”, because GNU is a substantial part of most distributions.
What is Slackware Linux?Slackware Linux is a GNU/Linux distribution which is maintained and developed by PatrickVolkerding. In contrast to many other distributions Slackware Linux adheres to the so-called KISS(keep it simple stupid) principle. This means that Slackware Linux does not have complex graphicaltools for configuring a system. For newbies this can be somwhat harsh, but it provides moretransperancy and flexibility. Besides that you will get to learn GNU/Linux to the bones withSlackware Linux.
Another distinguishing aspect of Slackware Linux, that also “complies” with the KISS principe isthe Slackware Linux package manager. Slackware Linux does not have complex package managerlike RPM. Packages are normal tgz (tar/gzip) files, mostly with an additional installation script and apackage description. Tgz is much more powerful than RPM for novice users and avoids dependencyproblems. Another famous feature of Slackware Linux are the BSD-like initialization scripts ofSlackware Linux. Slackware Linux has one initialization script for each runlevel insteas of a scriptfor eacht daemon. It allow you to tweak with your system easily, without the need to write net initscripts yourself.
The packages in Slackware Linux are compiled with as little modifications as possible. This meansyou can use most general GNU/Linux documentation.
2
Chapter 2. An introduction to Slackware Linux
Slackware Linux 10.0 features
• Linux 2.4.26 - Slackware Linux uses the proven 2.4 Linux kernel as the default kernel. SlackwareLinux 10.0 provides Linux 2.6.7 as an option. When a 2.6 kernel is booted, Slackware Linux willautomatically use udev, which is a daemon that automatically generates /dev device entries.
• X11R6.7.0 - This is the first Slackware Linux to provide the X Window System provided by theX.org Foundation. X11R6.7.0 is based on XFree86 4.4.0RC2, and is expanded with additionalhardware support, enhancements, and bug fixes.
• GCC 3.3.4 - Version 3.3.4 of the GNU Compiler Collection is provided. GCC provides C, C++,Objective-C, Fortran-77, and Ada 95 compilers.
• The K Desktop Environment (KDE) 3.2.3 - The full KDE environment is provided, whichincludes KOffice, the Konqueror web browser, multimedia programs, development tools, andmany more useful applications.
• The GNU Network Object Model Environment (GNOME) 2.6.1 - GNOME is a popular GTK2based desktop environment.
• Improved wireless support - Slackware Linux 10.0 features a new initialization script for WLANnetwork cards. These cards can now be configured through /etc/rc.d/rc.wireless.
Slackware Linux on CD-ROMSlackware Linux can be purchased at quite many (internet) shops. It is important to make adistinction between the official CD-ROM set and cheap copies. When you buy the official CD setyou are financially supporting the development of Slackware Linux. So, if you would like to seecontinuing development of Slackware Linux, buy the CD set! The Slackware Store can be found at:http://store.slackware.com/
3
Chapter 3. Sources of help
On your system
Linux HOWTO’sThe famous Linux HOWTOs are a collection of documents which cover specific parts of aGNU/Linux system. Most HOWTOs are distribution independent, and therefore very useful forusing them with Slackware Linux. The "linux-howtos" package in from the “f” disk set contains theHOWTO collection. After installing this package the HOWTOs can be found in the/usr/doc/Linux-HOWTOs/ directory. Slackware Linux also contains a collection ofMini-HOWTOs, which are shorter and cover narrower topics. The Mini-HOWTOs can be found inthe /usr/doc/Linux-mini-HOWTOs/ directory after installing the “linux-mini-howtos” package.
Manual pagesMost Unix-like commands are covered by the a traditional *nix help system called the manual pages.You can read the manual page of a program by using the man command. Executing man with thename of the command as a parameter shows the manual page for that command. For example:
$ man ls
If you do not know the exact name of a manual page or command, you can search a page using thekeyword (-k) parameter:
$ man -k routingNETLINK_ROUTE [rtnetlink] (7) - Linux IPv4 routing socketnetstat (8) - Print network connections, routing tables, interface statistics, masquerade connections, and multicast membershipsroute (8) - show / manipulate the IP routing tablerouted (8) - network routing daemonrtnetlink (7) - Linux IPv4 routing socket
We have to add that there are also manual pages that cover other things than commands. Thesesections of manual pages are available:
1 Executable programs or shell commands2 System calls (functions provided by the kernel)3 Library calls (functions within program libraries)4 Special files (usually found in /dev)5 File formats and conventions eg /etc/passwd6 Games7 Miscellaneous (including macro packages and conven-
tions), e.g. man(7), groff(7)8 System administration commands (usually only for root)9 Kernel routines [Non standard]
4

Chapter 3. Sources of help
On the internet
alt.os.linux.slackwarealt.os.linux.slackware is a Slackware Linux newsgroup. You can read newsgroups with a newsreaderlike tin or knode. Be careful: it is expected that you have read all necessary documentation beforeposting to this newsgroup. If you have not the chance of getting “flamed” is really big.
5
Chapter 4. General conceptsThis chapter gives an introduction to some general Unix and GNU/Linux concepts. It is a good ideato read this chapter thoroughly if you do not have any UNIX or GNU/Linux experience. Manyconcepts covered in this chapter are used in this book and in GNU/Linux.
Multitasking
IntroductionOne of Linux’ strengths is multi-tasking. Multi-tasking means that multiple processes can run at thesame time. You might wonder why this is important to you, because most people are using oneapplication at a time. Besides the more obvious reason that it is just handy to browse while you havea word processor running in the background, multi-tasking is a bare necessity for Unix-like systems.Even if you have launched no applications there are a bunch of processes running in the background.Some processes might provide network services, others sit there showing a login prompt on otherconsoles, and there is even a process that executes scheduled tasks. These processes that are runningin the background are often called daemon (not to be confused with the word demon, a daemon is aprotective angel). At a later stage we are going to look at how you can move processes to thebackground yourself (see Chapter 9).
Note: Note that on single-processor systems processes are not really running simultaneously. Inreality a smart scheduler in the kernel is dividing CPU time between processes, giving theillusion that processes are running simultaneously.
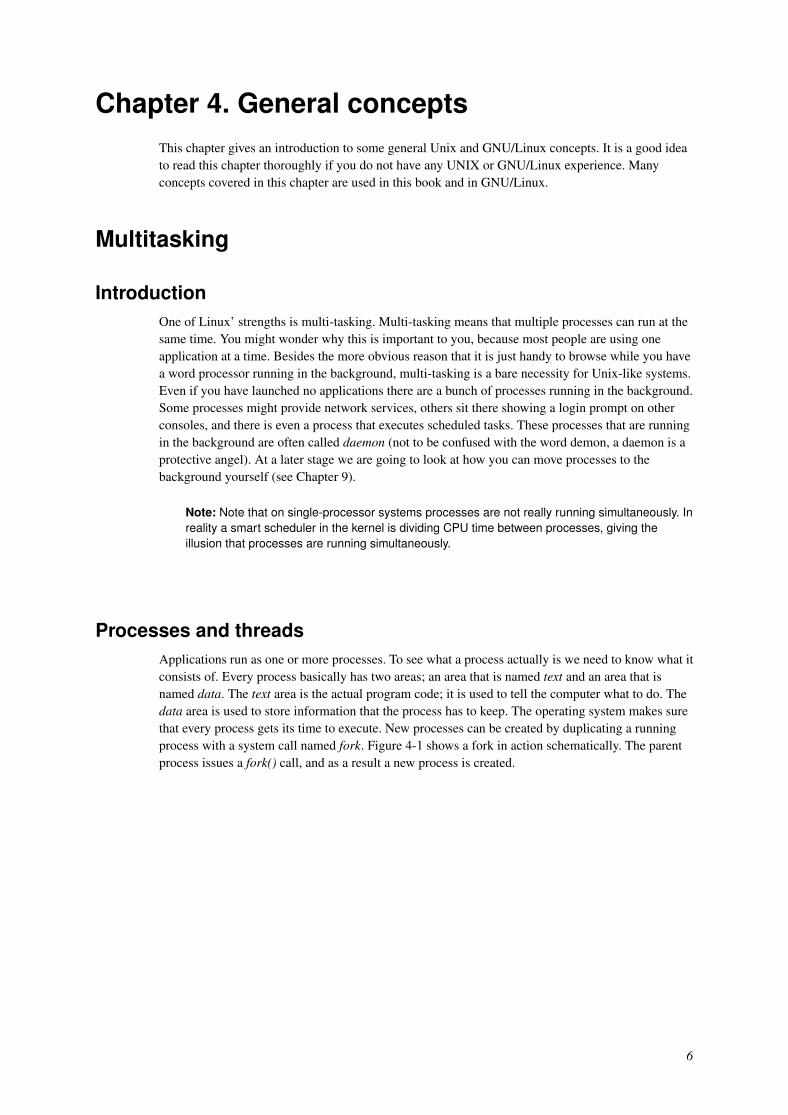
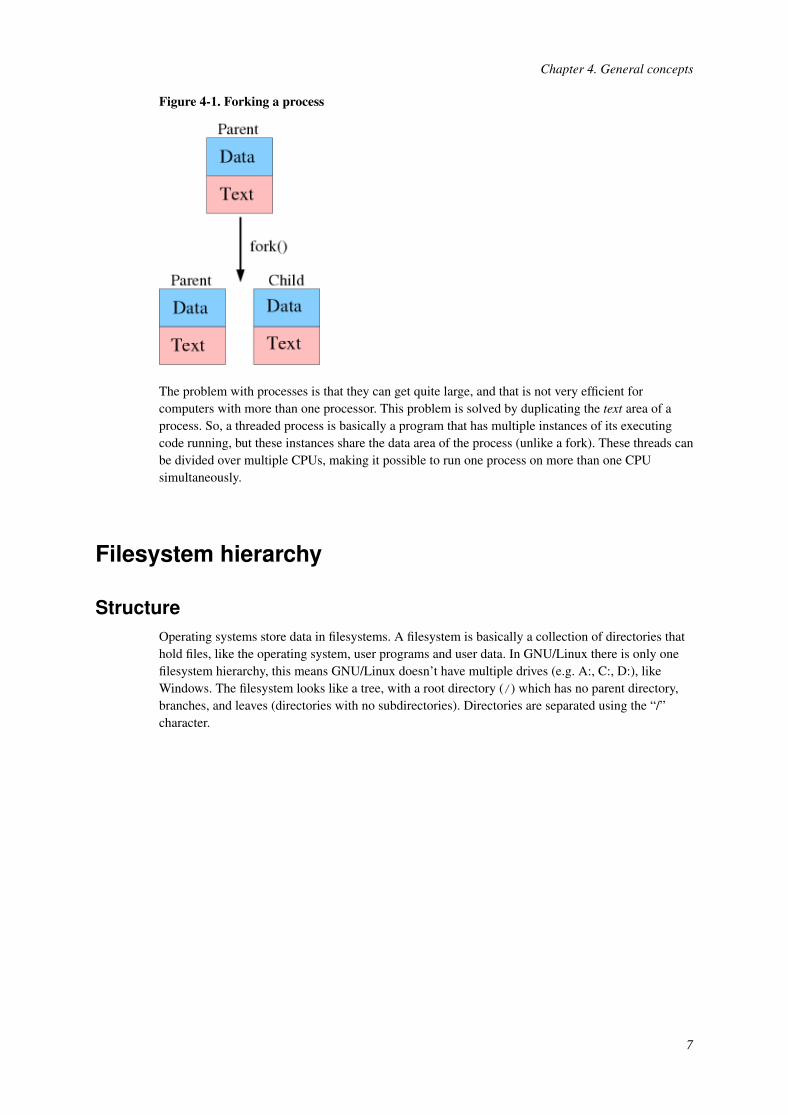
Processes and threadsApplications run as one or more processes. To see what a process actually is we need to know what itconsists of. Every process basically has two areas; an area that is named text and an area that isnamed data. The text area is the actual program code; it is used to tell the computer what to do. Thedata area is used to store information that the process has to keep. The operating system makes surethat every process gets its time to execute. New processes can be created by duplicating a runningprocess with a system call named fork. Figure 4-1 shows a fork in action schematically. The parentprocess issues a fork() call, and as a result a new process is created.
6
Chapter 4. General concepts
Figure 4-1. Forking a process
The problem with processes is that they can get quite large, and that is not very efficient forcomputers with more than one processor. This problem is solved by duplicating the text area of aprocess. So, a threaded process is basically a program that has multiple instances of its executingcode running, but these instances share the data area of the process (unlike a fork). These threads canbe divided over multiple CPUs, making it possible to run one process on more than one CPUsimultaneously.
Filesystem hierarchy
StructureOperating systems store data in filesystems. A filesystem is basically a collection of directories thathold files, like the operating system, user programs and user data. In GNU/Linux there is only onefilesystem hierarchy, this means GNU/Linux doesn’t have multiple drives (e.g. A:, C:, D:), likeWindows. The filesystem looks like a tree, with a root directory (/) which has no parent directory,branches, and leaves (directories with no subdirectories). Directories are separated using the “/”character.
7
Chapter 4. General concepts
Figure 4-2. The filesystem structure
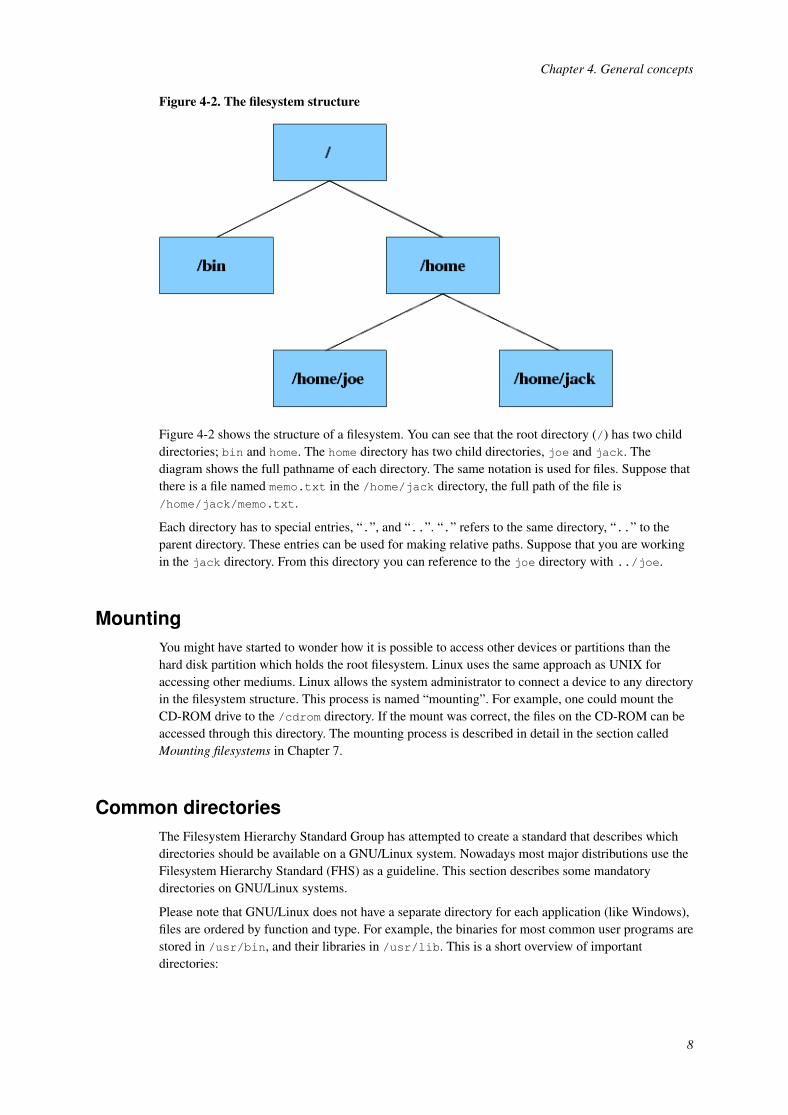
Figure 4-2 shows the structure of a filesystem. You can see that the root directory (/) has two childdirectories; bin and home. The home directory has two child directories, joe and jack. Thediagram shows the full pathname of each directory. The same notation is used for files. Suppose thatthere is a file named memo.txt in the /home/jack directory, the full path of the file is/home/jack/memo.txt.
Each directory has to special entries, “.”, and “..”. “.” refers to the same directory, “..” to theparent directory. These entries can be used for making relative paths. Suppose that you are workingin the jack directory. From this directory you can reference to the joe directory with ../joe.
MountingYou might have started to wonder how it is possible to access other devices or partitions than thehard disk partition which holds the root filesystem. Linux uses the same approach as UNIX foraccessing other mediums. Linux allows the system administrator to connect a device to any directoryin the filesystem structure. This process is named “mounting”. For example, one could mount theCD-ROM drive to the /cdrom directory. If the mount was correct, the files on the CD-ROM can beaccessed through this directory. The mounting process is described in detail in the section calledMounting filesystems in Chapter 7.
Common directoriesThe Filesystem Hierarchy Standard Group has attempted to create a standard that describes whichdirectories should be available on a GNU/Linux system. Nowadays most major distributions use theFilesystem Hierarchy Standard (FHS) as a guideline. This section describes some mandatorydirectories on GNU/Linux systems.
Please note that GNU/Linux does not have a separate directory for each application (like Windows),files are ordered by function and type. For example, the binaries for most common user programs arestored in /usr/bin, and their libraries in /usr/lib. This is a short overview of importantdirectories:
8
Chapter 4. General concepts
• /bin: essential user binaries that should still be available in case the /usr is not mounted.
• /dev: device files. These are special files used to access certain devices.
• /etc: the /etc directory contains all important configuration files.
• /home: contains home directories for individual users.
• /lib: essential system libraries (like glibc), and kernel modules.
• /root: home directory for the root user.
• /sbin: essential binaries that are used for system administration.
• /tmp: a world-writable directory for temporary files.
• X11R6: the X Window System.
• /usr/bin: stores the majority of the user binaries.
• /usr/lib: libraries that are not essential for the system to boot.
• /usr/sbin: non-essential system administration binaries.
• /var: variable data files, like logs.
Devices
IntroductionIn UNIX and Linux almost everything is represented as a file, including devices. Each GNU/Linuxsystem has a a directory with special files, named /dev. Each file in the /dev directory represents adevice. You might wonder how this is done; a device file is a special file because it has two specialnumbers, the major and the minor number. The kernel knows which device a device file representsby these numbers. The following example shows these numbers for a device:
$ ls -l /dev/zerocrw-rw-rw- 1 root root 1, 5 Apr 22 2003 /dev/zero
The ls lists files and information about files. In this example information about the /dev/zerodevice is listed. This particular device has 1 as the major device number, and 5 as the minor devicenumber.
Note: If you have the kernel sources unpacked after installing Slackware Linux, you can find acomprehensive list of all major devices with their minor and major numbers in/usr/src/linux/Documentation/devices.txt. An up-to-date list is also available online at:ftp://ftp.kernel.org/pub/linux/docs/device-list/
For the Linux kernel there are two types of devices: character and block devices. Character devicescan be read byte by byte, block devices can not. Block devices are read per block (for example 4096bytes at a time). Whether a device is a character or block device is determined by the nature of thedevice. For example, most storage media are block devices, and most input devices are characterdevices. Block devices have one distinctive advantage, namely that they can be cached. This meansthat commonly read or written blocks are stored in a special area of the system memory, named thecache. Memory is much faster than most storage media, so it is a huge performance benefit to
9
Chapter 4. General concepts
perform read and write operations on commonly used blocks in memory. Of course, eventuallychanges have to be written to the storage medium.
ATA and SCSI devicesThere are two categories of devices that we are going to look into in detail, because understandingthe naming of these devices can be crucial for partitioning a hard disk, or for mounting. Almost allmodern computers use ATA hard disks and CD-ROMs. Under Linux these devices are named in thefollowing way:
/dev/hda - master device on the first ATA channel/dev/hdb - slave device on the first ATA channel/dev/hdc - master device on the second ATA channel/dev/hdd - slave device on the second ATA channel
On most computers the hard disk is the master device on the first ATA channel (/dev/hda), and theCD-ROM the master device on the second ATA channel. Hard disk partitions have the device nameplus a number. For example, /dev/hda1 is the first partition on the /dev/hda disk.
Most average PCs do not have SCSI hard disks or CD-ROM drives, but SCSI is often used for USBdrives. For SCSI drives the following notation is used:
/dev/sda - First SCSI disk/dev/sdb - Second SCSI disk/dev/sdc - Third SCSI disk/dev/scd0 - First CD-ROM/dev/scd1 - Second CD-ROM/dev/scd2 - Third CD-ROM
Partitions are notated in the same way as ATA disks; /dev/sda1 is the first partition on the firstSCSI disk.
10
Chapter 5. Installing Slackware Linux
Booting the installation CD-ROMThe easiest method for booting the installation system is by using the installation CD-ROM. TheSlackware Linux installation CD-ROM is a bootable CD, which means that the BIOS can boot theCD, just like it can boot, for example, a floppy disk. Most modern systems have a BIOS whichsupports CD-ROM booting.
If the CD is booted when you have the CD inserted in the CD-ROM drive during the system boot,the boot sequence is probably not correctly configured in the BIOS. Enter the BIOS setup (usuallyby this can be done by holding the <Del> or <Esc> key when the BIOS screen appears) and makesure the CD-ROM is on the top of the list in the boot sequence. If you are using a SCSI CD-ROMyou may have to set the boot sequence in the SCSI BIOS instead of the system BIOS. Consult theSCSI card manual for more information.
After booting the installation system, you will be asked whether you are using a special (national)keyboard layout or not. If you have a normal US/International keyboard, which are the mostcommon, you can just press <Enter> at this question. After that the login prompt will appear. Log onas “root”, no password will be requested. After logging on the shell is started, and you can startinstalling Slackware Linux. The installation procedure will be explained briefly in this chapter.
Partitioning a hard diskInstalling Slackware Linux requires at least one Linux partition, creating a swap partition is alsorecommended. To be able to create a partition there has to be free unpartitioned space on the disk.There are some programs that can resize partitions. For example, FIPS can resize FAT partitions.Commercial programs like Partition Magic can also resize other partition types.
After booting the Slackware Linux CD-ROM and logging on, there are two partitioning programs atyour disposal: fdisk and cfdisk. cfdisk is the easiest of both, because it is controlled by a menuinterface. This section describes the cfdisk program.
To partition the first harddisk you can simply execute cfdisk. If you want to partition another disk ora SCSI disk you have to specify which disk you want to partition (cfdisk /dev/device). An ATA harddisks have the following device naming: /dev/hdn, “n” is replaced by a character. E.g. the “primarymaster” is named /dev/hda, the “secondary slave” is named /dev/hdd. SCSI disks are named inthe following way: /dev/sdn, “n” is replaced by the device character (the first SCSI disk = a, thefourth SCSI disk = d).
11
Chapter 5. Installing Slackware Linux
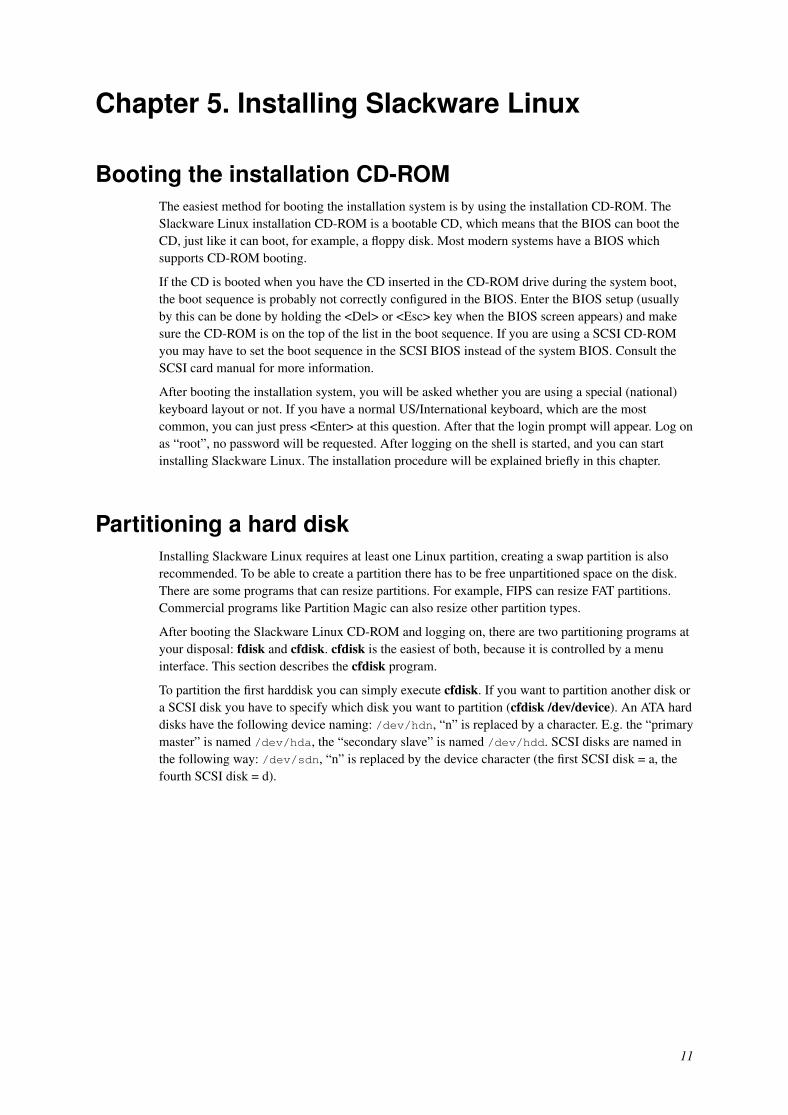
Figure 5-1. The cfdisk parition tool
After starting cfdisk currently existing partitions are shown, as well as the amount of free space. Thelist of partitions can be navigated with the “up” and “down” arrow keys. At the bottom of the screensome commands are displayed, which can be browsed with the “left” and “right” arrow keys. Acommand can be executed with the <Enter> key.
You can create a Linux partition by selecting “Free Space” and executing the “New” command.cfdisk will ask you whether you want to create a primary or logical partition. The number of primarypartitions is limited to four. Linux can be installed on both primary and logical partitions. If youwant to install other operating systems besides Slackware Linux that require primary partitions, it isa good idea to install Slackware Linux onto a logical partition. The type of the new partition isautomatically set to “Linux Native”, so it is not necessary to set the partition type.
The creation of a swap partition involves the same steps as a normal Linux partition, but the type ofthe partition has to be changed to “Linux Swap” after the partition is created. The suggested size ofthe swap partition depends on your own needs. The swap partition is used to store programs if themain (RAM) memory is full. If you have a harddisk of a reasonable size, it is a good idea to make a256MB or 512MB swap partition, which should be enough for normal usage. After creating thepartition the partition type can be changed to “Linux Swap”, by selecting the “Type” command. Thecfdisk program will ask for the type number, “Linux Swap” partitions have type number 82.Normally number 82 is already selected, so you can go ahead by pressing the <Enter> key.
If you are satisfied with the partitioning you can save the changes by executing the “Write”command. This operation has to be confirmed by entering yes. After saving the changes you canquite cfdisk with the Quit command. It is a good idea to reboot the computer before starting theinstallation, to make sure that the partitioning changes are active. Press <ctrl> + <alt> + <del> toshut Linux down and restart the computer.
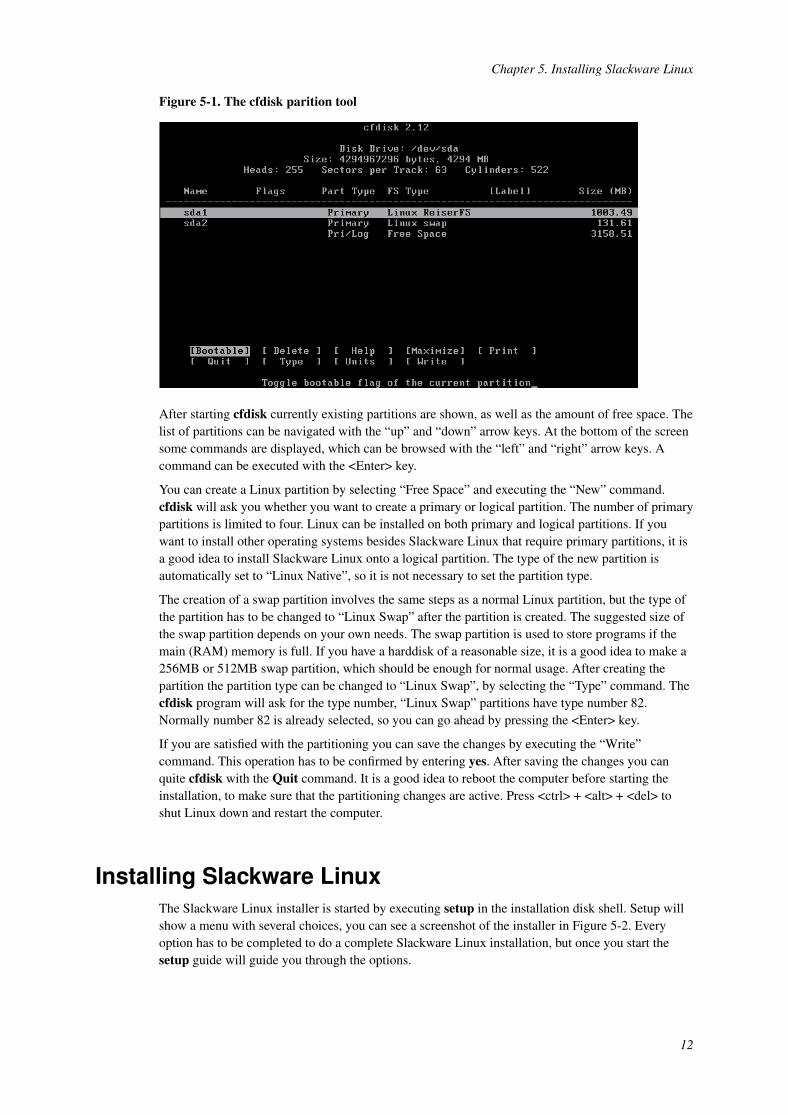
Installing Slackware LinuxThe Slackware Linux installer is started by executing setup in the installation disk shell. Setup willshow a menu with several choices, you can see a screenshot of the installer in Figure 5-2. Everyoption has to be completed to do a complete Slackware Linux installation, but once you start thesetup guide will guide you through the options.
12
Chapter 5. Installing Slackware Linux
Figure 5-2. The setup tool
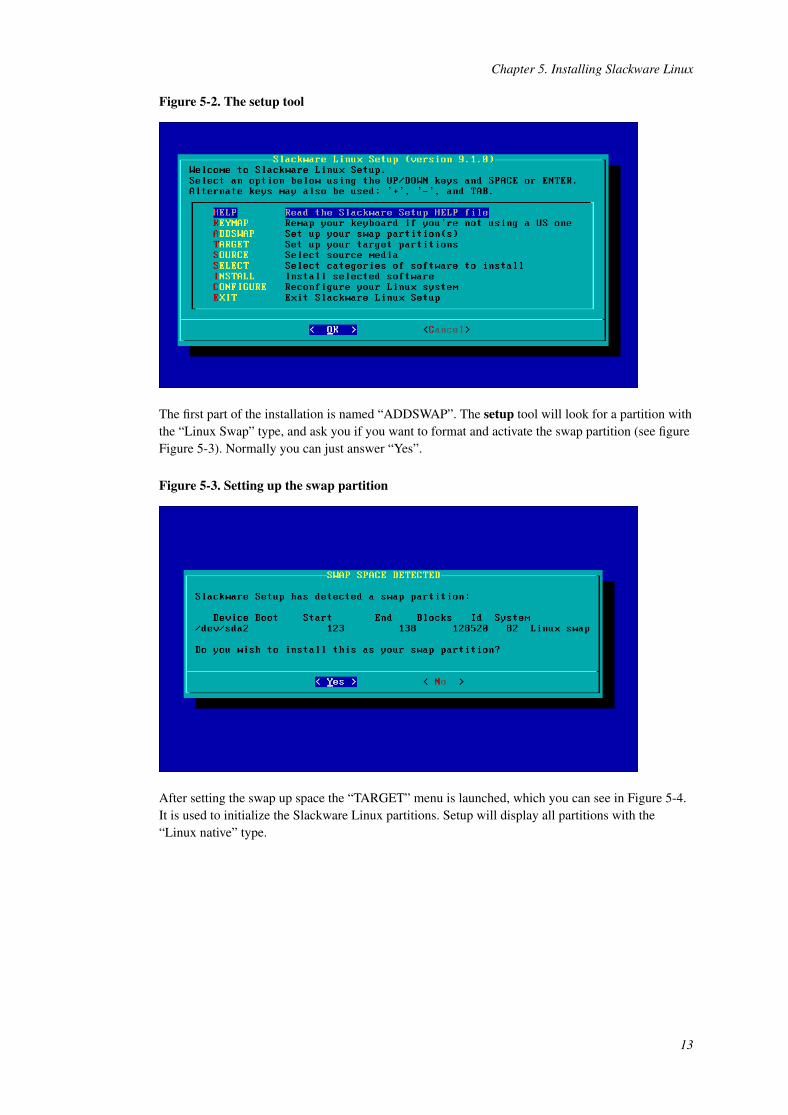
The first part of the installation is named “ADDSWAP”. The setup tool will look for a partition withthe “Linux Swap” type, and ask you if you want to format and activate the swap partition (see figureFigure 5-3). Normally you can just answer “Yes”.
Figure 5-3. Setting up the swap partition
After setting the swap up space the “TARGET” menu is launched, which you can see in Figure 5-4.It is used to initialize the Slackware Linux partitions. Setup will display all partitions with the“Linux native” type.
13

Chapter 5. Installing Slackware Linux
Figure 5-4. Selecting a partition to initialize
After selecting one partition, the setup tool will ask whether you want to format a partition or not,and if you want to format it, whether you want to check the disk for bad sectors or not (Figure 5-5).Checking the disk can take a lot of time.
Figure 5-5. Formatting the partition
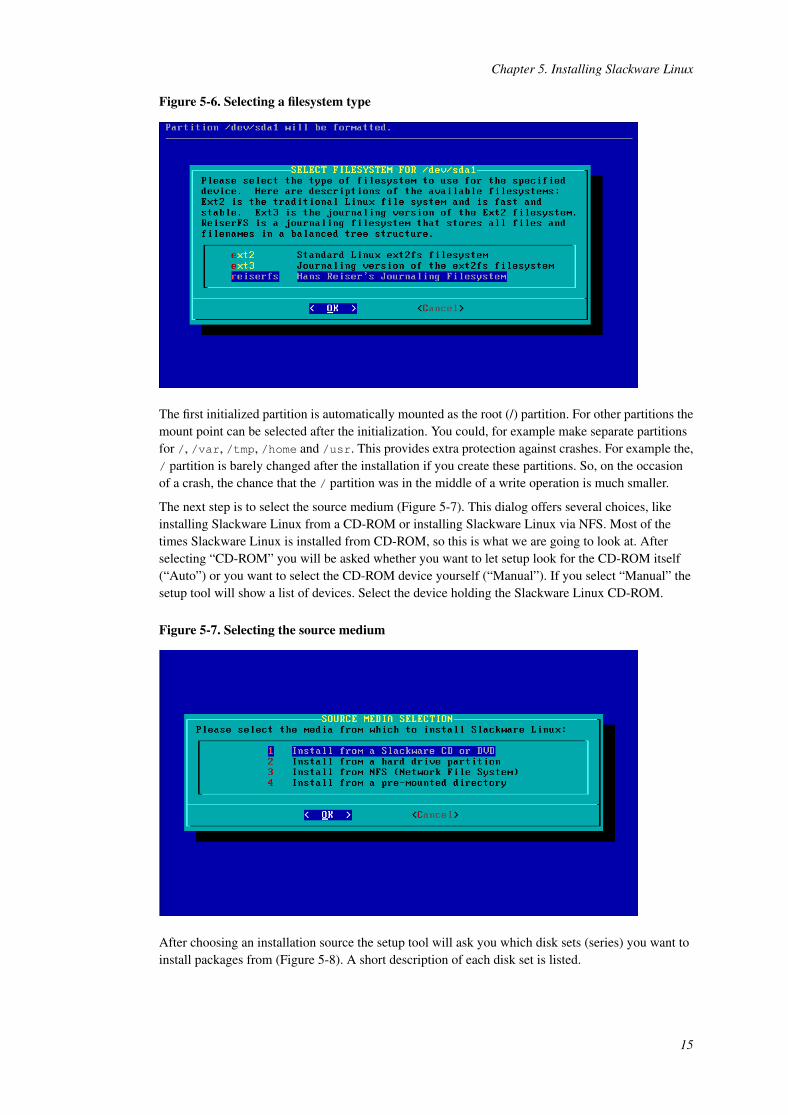
After selecting whether you want to filesystem or not, you can specify which filesystem should beused (Figure 5-6). Normally you can choose the ext2, ext3 and reiserfs filesystems. Ext2 was thestandard Linux filesystem for many years, the disadvantage is that Ext2 does not support journaling.A journal is a special file or area of a partition in which all filesystem operations are logged. Whenthe system crashes the filesystem can be repaired rapidly, because the kernel can use the log to seewhat disk operations were performed. Ext3 is the same filesystem as Ext2, but adds journaling.Reiserfs is a newer filesystem, that also provides journaling. Besides that Reiserfs uses balancedtrees, which make many filesystem operations, especially when you are working with many smallfiles, faster than with Ext2 or Ext3. A disadvantage is that Reiserfs is newer, that is why it can be abit more unstable.
14
Chapter 5. Installing Slackware Linux
Figure 5-6. Selecting a filesystem type
The first initialized partition is automatically mounted as the root (/) partition. For other partitions themount point can be selected after the initialization. You could, for example make separate partitionsfor /, /var, /tmp, /home and /usr. This provides extra protection against crashes. For example the,/ partition is barely changed after the installation if you create these partitions. So, on the occasionof a crash, the chance that the / partition was in the middle of a write operation is much smaller.
The next step is to select the source medium (Figure 5-7). This dialog offers several choices, likeinstalling Slackware Linux from a CD-ROM or installing Slackware Linux via NFS. Most of thetimes Slackware Linux is installed from CD-ROM, so this is what we are going to look at. Afterselecting “CD-ROM” you will be asked whether you want to let setup look for the CD-ROM itself(“Auto”) or you want to select the CD-ROM device yourself (“Manual”). If you select “Manual” thesetup tool will show a list of devices. Select the device holding the Slackware Linux CD-ROM.
Figure 5-7. Selecting the source medium
After choosing an installation source the setup tool will ask you which disk sets (series) you want toinstall packages from (Figure 5-8). A short description of each disk set is listed.
15
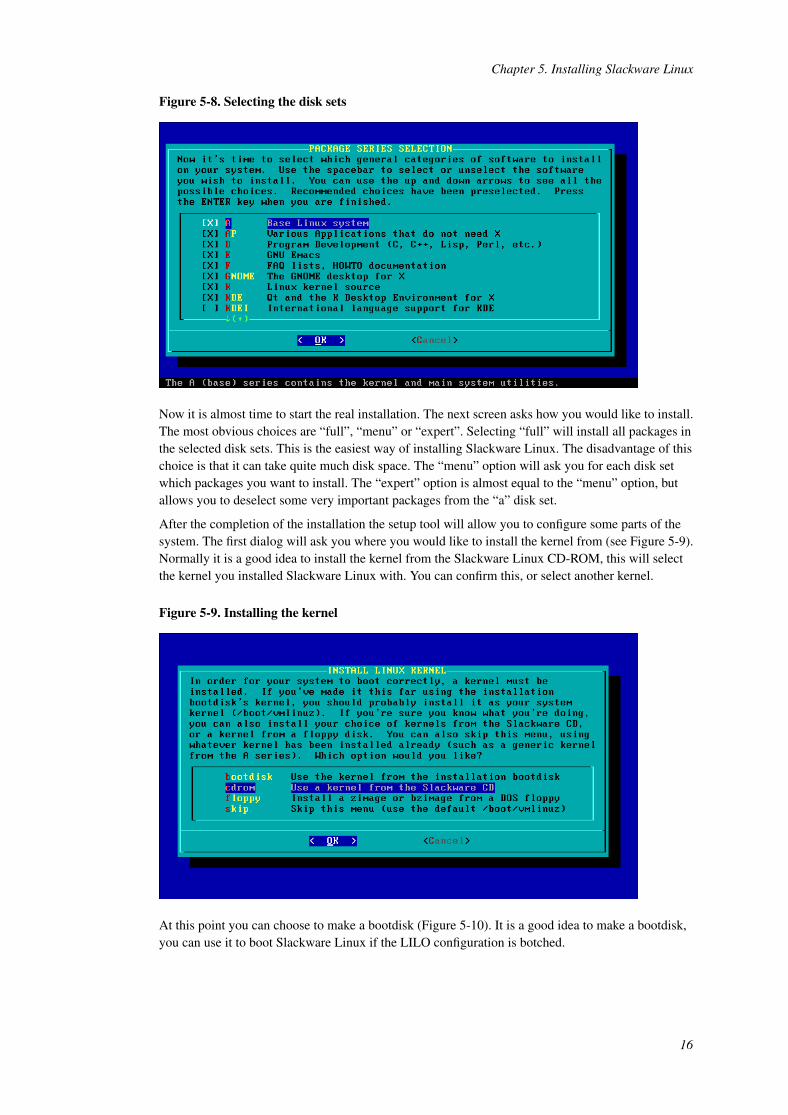
Chapter 5. Installing Slackware Linux
Figure 5-8. Selecting the disk sets
Now it is almost time to start the real installation. The next screen asks how you would like to install.The most obvious choices are “full”, “menu” or “expert”. Selecting “full” will install all packages inthe selected disk sets. This is the easiest way of installing Slackware Linux. The disadvantage of thischoice is that it can take quite much disk space. The “menu” option will ask you for each disk setwhich packages you want to install. The “expert” option is almost equal to the “menu” option, butallows you to deselect some very important packages from the “a” disk set.
After the completion of the installation the setup tool will allow you to configure some parts of thesystem. The first dialog will ask you where you would like to install the kernel from (see Figure 5-9).Normally it is a good idea to install the kernel from the Slackware Linux CD-ROM, this will selectthe kernel you installed Slackware Linux with. You can confirm this, or select another kernel.
Figure 5-9. Installing the kernel
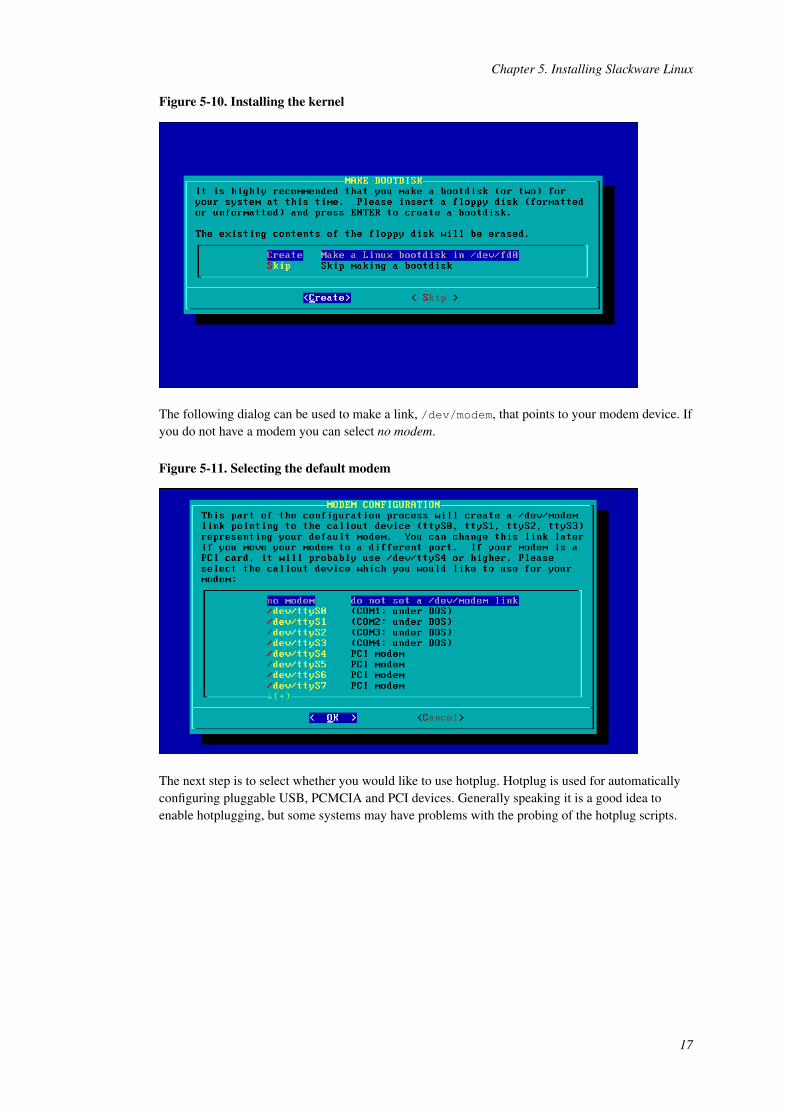
At this point you can choose to make a bootdisk (Figure 5-10). It is a good idea to make a bootdisk,you can use it to boot Slackware Linux if the LILO configuration is botched.
16
Chapter 5. Installing Slackware Linux
Figure 5-10. Installing the kernel
The following dialog can be used to make a link, /dev/modem, that points to your modem device. Ifyou do not have a modem you can select no modem.
Figure 5-11. Selecting the default modem
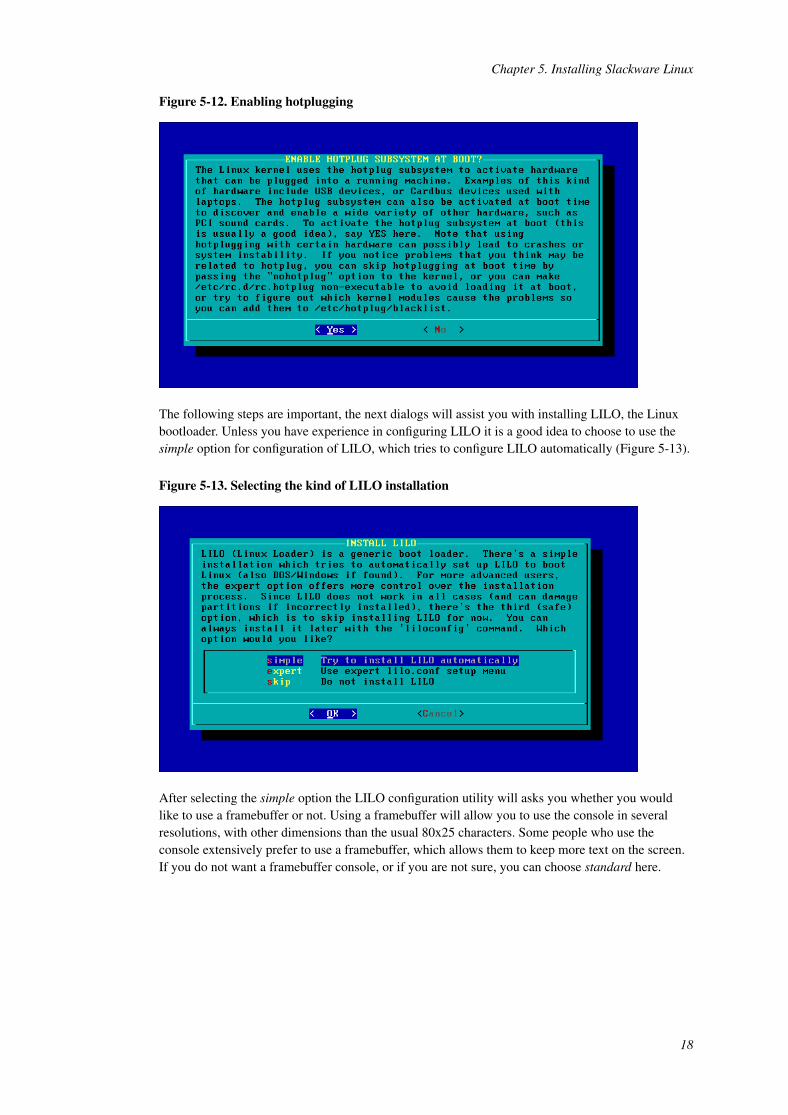
The next step is to select whether you would like to use hotplug. Hotplug is used for automaticallyconfiguring pluggable USB, PCMCIA and PCI devices. Generally speaking it is a good idea toenable hotplugging, but some systems may have problems with the probing of the hotplug scripts.
17
Chapter 5. Installing Slackware Linux
Figure 5-12. Enabling hotplugging
The following steps are important, the next dialogs will assist you with installing LILO, the Linuxbootloader. Unless you have experience in configuring LILO it is a good idea to choose to use thesimple option for configuration of LILO, which tries to configure LILO automatically (Figure 5-13).
Figure 5-13. Selecting the kind of LILO installation
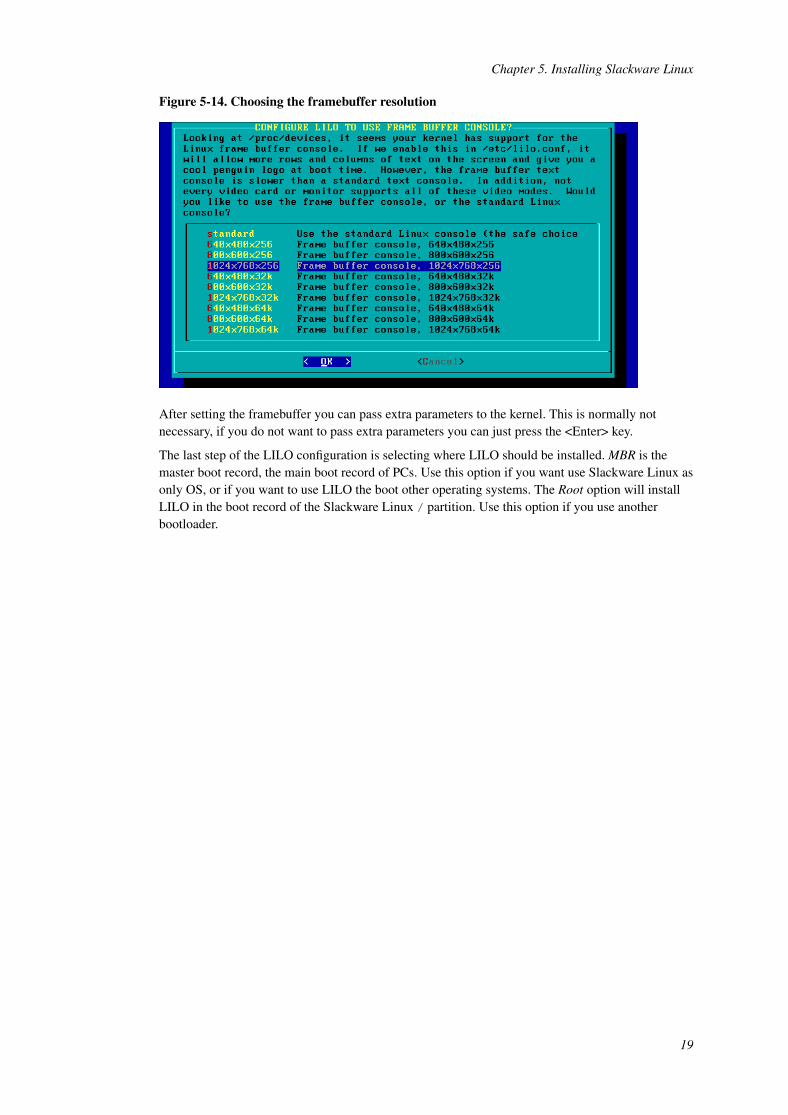
After selecting the simple option the LILO configuration utility will asks you whether you wouldlike to use a framebuffer or not. Using a framebuffer will allow you to use the console in severalresolutions, with other dimensions than the usual 80x25 characters. Some people who use theconsole extensively prefer to use a framebuffer, which allows them to keep more text on the screen.If you do not want a framebuffer console, or if you are not sure, you can choose standard here.
18
Chapter 5. Installing Slackware Linux
Figure 5-14. Choosing the framebuffer resolution
After setting the framebuffer you can pass extra parameters to the kernel. This is normally notnecessary, if you do not want to pass extra parameters you can just press the <Enter> key.
The last step of the LILO configuration is selecting where LILO should be installed. MBR is themaster boot record, the main boot record of PCs. Use this option if you want use Slackware Linux asonly OS, or if you want to use LILO the boot other operating systems. The Root option will installLILO in the boot record of the Slackware Linux / partition. Use this option if you use anotherbootloader.
19

II. GNU/Linux Basics
Chapter 6. The Bash shell
IntroductionThe shell is the traditional interface used by UNIX and GNU/Linux. In contrast to the X WindowSystem it is an interface that works with commands. In the beginning this can be a bit awkward, butthe shell is very powerful. Even in these days the shell is almost unavoidable ;).
The default shell on Slackware Linux is Bash. Bash means “Bourne-Again SHell”, which is a pun onthe name of one of the traditional UNIX shells, the “Bourne Shell”. Slackware Linux also providessome other shells, but Bash is the main topic of this chapter.
Starting the shellThe procedure for starting the shell depends on whether you use a graphical or text-mode login. Ifyou are logging on in text-mode the shell is immediately started after entering the (correct)password. If you are using a graphical login manager like gdm, log on as you would normally, andlook in your window manager or desktop environment menu for an entry named “XTerm”. XTerm isa terminal emulator, after the terminal emulator is started the shell comes up.
The shell might remind some people of MS-DOS. Be happy, it has nothing to do with DOS, the onlysimilarity is that you can enter commands ;).
Shell basicsThis chapter might be a difficult to read for the first time, because you might not know any shellcommands. Many important commands are described in the next chapters, but those chapters are notreally useful without any knowledge of the shell. So, it is not a bad idea to browse quickly throughthis chapter, and the next few chapters, to get an idea what this shell thing is all about. After thatquick overview you should be able to understand this chapter.
Executing commandsThe most important job for the shell is to execute your commands. Let’s look at a simple example.Most UNIX variants have a command named whoami, which shows as which user you are loggedin. Try typing whoami, and press the <Enter> after that. The <Enter> tells the shell that it shouldexecute the command that you have typed on the current line. The output looks like this:
daniel@tazzy:~$ whoamidanieldaniel@tazzy:~$
As you can see the control is handed back to the shell after the command is finished.
21
Chapter 6. The Bash shell
Browsing through shell commandsIt often happens that you have to execute commands that you executed earlier. Fortunately, you donot have to type them all over again. You can browse through the history of executed commands withthe up and down arrows. Besides that it is also possible to search for a command. Press <Control> +<r> and start typing the command you want to execute. You will notice that bash will display the firstmatch it can find. If this is not the match you were looking for you can continue typing the command(till it is unique and a match appears), or press <Control> + <r> once more to get the next match.When you have found the command you were looking for, you can execute it by pressing <Enter>.
CompletionCompletion is one of the most useful functionalities of Unix-like shells. Suppose that you have adirectory with two files named websites and recipe. And suppose you want to cat the filewebsites (cat shows the contents of a file), by specifying websites as a parameter to cat.Normally you would type “cat websites”, and execute the command. Try typing “cat w”, and hit the<Tab> key. Bash will automatically expand what you typed to “cat websites”.
But what happens if you have files that start with the same letter? Suppose that you have therecipe1.txt and recipe2.txt files. Type “cat r” and hit <Tab>, Bash will complete the filenameas far as it can. It would leave you with “cat recipe”. Try hitting <Tab> again, and Bash will showyou a list of filenames that start with “recipe”, in this case both recipe files. At this point you have tohelp Bash by typing the next character of the file you need. Suppose you want to cat recipe2, youcan push the <2> key. After that there are no problems completing the filename, and hitting <Tab>completes the command to “cat recipe2.txt”.
It is worth noting that completion also works with commands. Most GNU/Linux commands arequite short, so it will not be of much use most of the time.
It is a good idea to practice a bit with completion, it can save alot of keystrokes if you can handlecompletion well. You can make some empty files to practive with using the touch command. Forexample, to make a file named recipe3.txt, execute touch recipe3.txt.
WildcardsMost shells, including Bash, support wildcards. Wildcards are special characters that can be used todo pattern matching. The table listed below displays some commonly used wildcards. We are goingto look at several examples to give a general idea how wildcards work.
Table 6-1. Bash wildcards
Wildcard Matches* A string of characters
? A single character
[] A character in an array of characters
Matching a string of characters
As you can see in the table above the “*” character matches a string of characters. For example,*.html matches everything ending with .html, d*.html matches everything starting with a d andending with .html.
22
Chapter 6. The Bash shell
Suppose that you would like to list all files in the current directory with the .html extension, thefollowing command will do the job:
$ ls *.htmlbook.html installation.html pkgmgmt.html usermgmt.htmlfilesystem.html internet.html printer.html xfree86.htmlgfdl.html introduction.html proc.htmlhelp.html slackware-basics.html shell.html
Likewise we could remove all files starting with an in:
$ rm in*
Matching single characters
The “?” wildcard works as the “*” wildcard, but matches single characters. Suppose that we havethree files, file1.txt, file2.txt and file3.txt. The string file?.txt matches all three of thesefiles, but it does not match file10.txt (“10” are two characters).
Matching characters from a set
The “[]” wildcard matches every character between the brackets. Suppose we have the files from theprevious example, file1.txt, file2.txt and file3.txt. The string file[23].txt matchesfile2.txt and file3.txt, but not file1.txt.
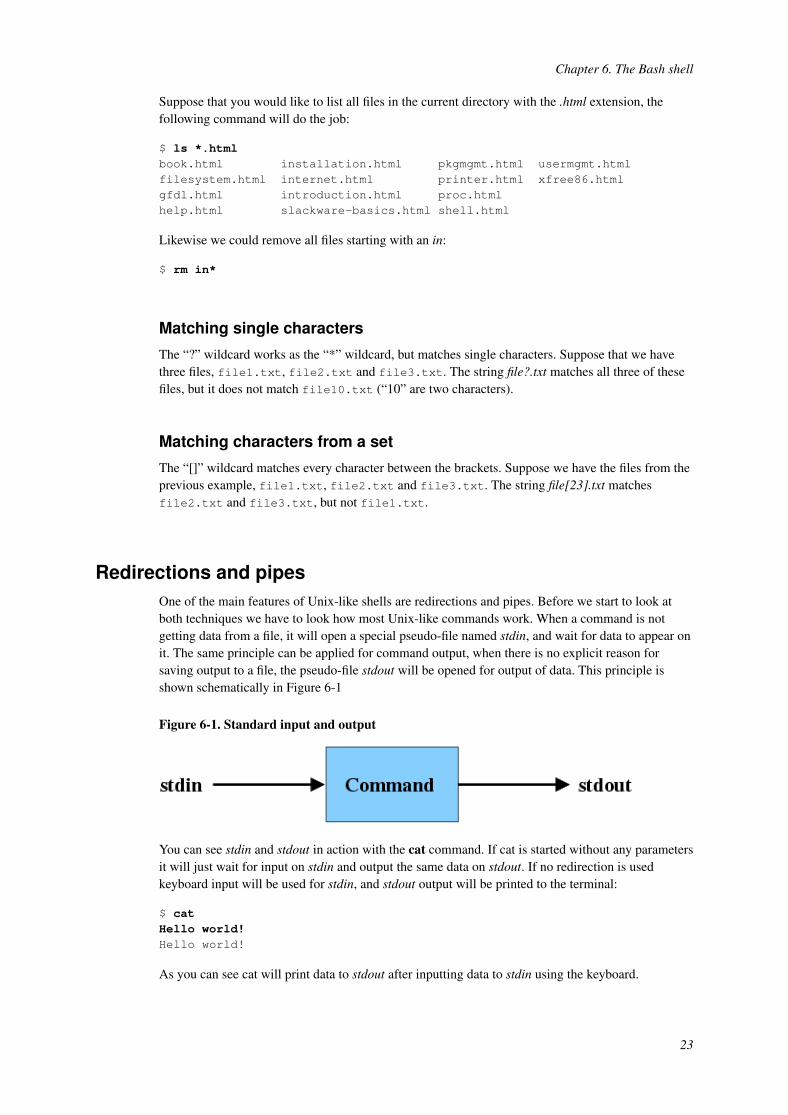
Redirections and pipesOne of the main features of Unix-like shells are redirections and pipes. Before we start to look atboth techniques we have to look how most Unix-like commands work. When a command is notgetting data from a file, it will open a special pseudo-file named stdin, and wait for data to appear onit. The same principle can be applied for command output, when there is no explicit reason forsaving output to a file, the pseudo-file stdout will be opened for output of data. This principle isshown schematically in Figure 6-1
Figure 6-1. Standard input and output
You can see stdin and stdout in action with the cat command. If cat is started without any parametersit will just wait for input on stdin and output the same data on stdout. If no redirection is usedkeyboard input will be used for stdin, and stdout output will be printed to the terminal:
$ catHello world!Hello world!
As you can see cat will print data to stdout after inputting data to stdin using the keyboard.
23
Chapter 6. The Bash shell
Redirection
The shell allows you to take use of stdin and stdout using the “<” and “>”. Data is redirected inwhich way the sharp bracket points. In the following example we will redirect the md5 summariescalculated for a set of files to a file named md5sums:
$ md5sum * > md5sums$ cat md5sums6be249ef5cacb10014740f61793734a8 test1220d2cc4d5d5fed2aa52f0f48da38ebe test2631172a1cfca3c7cf9e8d0a16e6e8cfe test3
As we can see in the cat output the output of the md5sum * output was redirected to the md5sumsfile. We can also use redirection to provide input to a command:
$ md5sum < test16be249ef5cacb10014740f61793734a8 -
This feeds the contents of the test1 to md5sum.
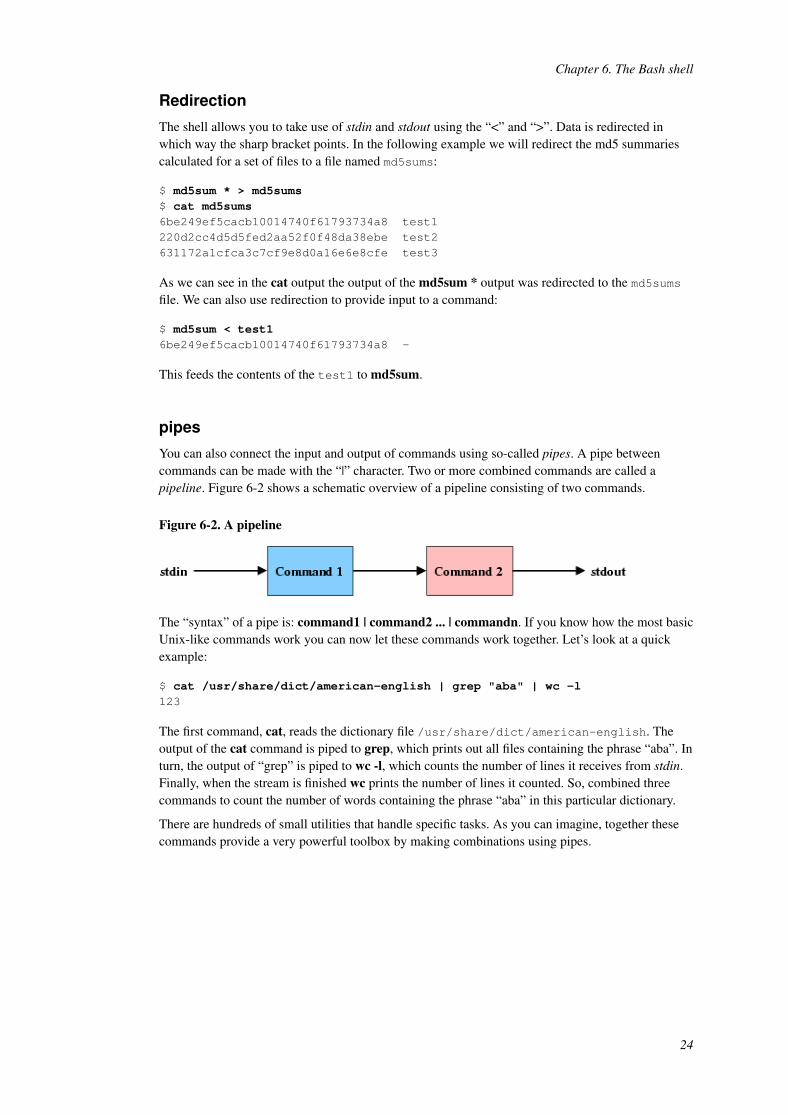
pipes
You can also connect the input and output of commands using so-called pipes. A pipe betweencommands can be made with the “|” character. Two or more combined commands are called apipeline. Figure 6-2 shows a schematic overview of a pipeline consisting of two commands.
Figure 6-2. A pipeline
The “syntax” of a pipe is: command1 | command2 ... | commandn. If you know how the most basicUnix-like commands work you can now let these commands work together. Let’s look at a quickexample:
$ cat /usr/share/dict/american-english | grep "aba" | wc -l123
The first command, cat, reads the dictionary file /usr/share/dict/american-english. Theoutput of the cat command is piped to grep, which prints out all files containing the phrase “aba”. Inturn, the output of “grep” is piped to wc -l, which counts the number of lines it receives from stdin.Finally, when the stream is finished wc prints the number of lines it counted. So, combined threecommands to count the number of words containing the phrase “aba” in this particular dictionary.
There are hundreds of small utilities that handle specific tasks. As you can imagine, together thesecommands provide a very powerful toolbox by making combinations using pipes.
24
Chapter 7. Files and directories
IntroductionUnix-like operating systems use a hierarchical filesystem to store files and directories. Directoriescan contain files and other directories, the top directory (/) is named the root directory (not to beconfused with the /root directory). Most filesystems also support file links (which providealternative names for a file) and soft links. Other filesystems can be “connected” to an arbitrarydirectory. This process is named “mounting”, and the directory in which the filesystem is mounted isnamed the “mount point”.
This chapter covers the basic navigation of the filesystem, commands which are used to remove andcreate directories, filesystem permissions, links and mounting.
The basics
pwdpwd(1) is a simple utility which shows the directory you are currently working in. The pwd does notrequire any parameters. This is an example output of pwd:
$ pwd/home/danieldk
lsls is similar to the dir command in DOS and Windows. ls can be used to display files and directorieslocated in specific directories. Running the ls command without any parameters shows the contentsof the current directory:
$ lsCOPYING CVS Makefile README html images pdf src tex
Naturally it is also possible to show the contents of other directories. You can do this by specifyingthe path as a parameter tot the ls command:
$ ls /bin cdrom dev floppy initrd lost+found opt root sys usr windowsboot cdrom1 etc home lib mnt proc sbin tmp var
A disadvantage of the default output is that it provides little information about files and directories.For example, it is not possible to see whether some entry is a file or directory, what size a file is, orwho the owner of the file is. The ls has the -l parameter to show more information:
$ ls -ltotal 52-rw-r--r-- 1 daniel daniel 20398 Jul 16 14:28 COPYINGdrwxr-xr-x 2 daniel daniel 4096 Jul 16 14:28 CVS-rw-r--r-- 1 daniel daniel 768 Jul 16 14:28 Makefile-rw-r--r-- 1 daniel daniel 408 Jul 16 14:28 README
25

Chapter 7. Files and directories
drwxr-xr-x 3 daniel daniel 4096 Jul 16 14:28 htmldrwxr-xr-x 3 daniel daniel 4096 Jul 16 14:28 imagesdrwxr-xr-x 3 daniel daniel 4096 Jul 16 14:28 pdfdrwxr-xr-x 3 daniel daniel 4096 Jul 20 00:11 srcdrwxr-xr-x 3 daniel daniel 4096 Jul 16 14:28 tex
cdAnother important command is the cd command. It can be used to change the current workingdirectory:
$ cd /home/danieldk/
With the pwd command you can see it worked:
$ pwd/home/danieldk
mkdirAs you might have guessed, the mkdir(1) command can be used to create directories. For example:
$ pwd/home/danieldk$ mkdir test$ cd test$ pwd/home/danieldk/test
It might happen that you want to create a directory in a parent directory which does not exist yet. Forexample, if you want to create the test2/hello/ directory, but the test2 directory does not yetexist. In this case you can make both directories with only one mkdir command:
$ mkdir -p test2/hello
cpFiles can be copied with the cp(1) command, the basic syntax is cp source destination. Forexample, suppose that we have a file named memo which we would like to copy to the writingsdirectory. You can do this with the following command:
$ cp memo writings/
It is also possible to copy a file in the same directory. For example, if we would like to make a newmemo based on memo, named memo2, we could execute the following command:
$ cp memo memo2
It is also possible to copy directories recursively, this can be done by adding the -r parameter. Thefollowing command copies the memos directory, and all subdirectories, and (sub)files to thewritings directory:
$ cp -r memos writings/
26
Chapter 7. Files and directories
mvThe mv(1) command is comparable to cp, but it is used to move files. Suppose that we have the samesituation as in the first cp example, but you would rather like to move memo to the writingsdirectory. The following command would do that:
$ mv memo writings/
It is also possible to move directories. But, mv always works recursively. For example, the followingcommand will move the memos directory to the writings directory:
$ mv memos writings/
rmThe rm(1) command is used to remove files and directories. Let’s look at a simple example:
$ rm hello.c
This commands removes the file hello.c. Sometimes the rm asks for a confirmation. You canignore this with the -f parameter:
$ rm -f *
This command removes all files in the current directory without asking for confirmation. It is alsopossible to delete directories or even whole directory trees. rm provides the -r parameter to do this.Suppose that we want to delete the ogle directory and all subdirectories and files in that directory,this can be done in the following way:
$ rm -r -f ogle/
Many commands allow you to combine parameters. The following example is equivalent to the lastone:
$ rm -rf ogle/
Permissions
A short introductionEvery file in GNU/Linux has permissions. As you might have noticed, file permissions can be shownwith the ls -l command:
$ ls -l logo.jpg-rw-r--r-- 1 danieldk users 9253 Dec 23 19:12 logo.jpg
The permissions are shown in the first column. Permissions that can be set are read(r), write(w) andexecute(x). These permissions can we set for three classes: owner(u), group(g) and others(o). Thepermissions are visible in the second to ninth character in the first column. These nine characters aredivided in three groups. The first three characters represent the permissions for the owner, the nextthree characters represent the permissions for the group, finally the last three characters represent the
27
Chapter 7. Files and directories
permissions for other users. Thus, the example file shown above can be written to by the owner andcan be read by all three classes of users (owner, group and others).
Each GNU/Linux system has many distinct users (a list of users can be found in /etc/passwd), anda user can be a member of certain groups. This kind of user management provides makes it possibleto manage detailed permissions for each file. In the example shown above danieldk is the owner ofthe file and group permissions apply to the group users. In this example groups rights do not differfrom the rights of other users.
chownThe chown(1) command is used to set the file owner and to which group group permissions shouldapply to. Suppose we want to make danieldk the owner of the file logo2.jpg, this can be done withthe chown:
$ chown danieldk logo2.jpg
Using the ls we can see that the owner is now danieldk:
$ ls -l logo2.jpg-rw-r--r-- 1 root root 9253 Dec 29 11:35 logo2.jpg$ chown danieldk logo2.jpg$ ls -l logo2.jpg-rw-r--r-- 1 danieldk root 9253 Dec 29 11:35 logo2.jpg
But group permissions still apply for the root group. This group can be changed by adding a dot afterthe owner, followed by the name of the group (in this example the group is nedslackers):
$ chown danieldk.nedslackers logo2.jpg$ ls -l logo2.jpg-rw-r--r-- 1 danieldk nedslackers 9253 Dec 29 11:35 logo2.jpg
It is also possible to change ownership recursively, this can be done with the recursive (-R)parameter:
$ chown -R danieldk.users oggs/
chmodFile permissions can be manipulated using the chmod(1) command. The most basic syntax of chmodis chmod [u,g,o][+/-][r,w,x] filename. The first parameter consists of the following elements: 1.which classes this manipulation permission applies to, 2. if the permissions should be added (+) orremoved (-), and 3. which permissions should be manipulated. Suppose we want to make the filememo writable for the owner of the file and the groups for which the group permissions apply. Thiscan be done with the following command:
$ chmod ug+w memo
As you can see below the memo is now writable for the file owner and group:
$ ls -l notes-r--r--r-- 1 daniel users 12 Mar 9 16:28 memobash-2.05b$ chmod ug+w memobash-2.05b$ ls -l notes-rw-rw-r-- 1 daniel users 12 Mar 9 16:28 momo
28
Chapter 7. Files and directories
Just like the chown command it is also possible to do recursive (-R) operations. In the followingexample the secret/, including subdirectories and files in this directory, is made unreadable for thegroup set for this directory and other users:
$ chmod -R go-r secret/
Archives
IntroductionSooner or later a GNU/Linux user will encounter tar archives, tar is the standard format for archivingfiles on GNU/Linux. It is often used in conjunction with gzip or bzip2. Both commands cancompress files and archives. Table 7-1 lists frequently used archive extensions, and what they mean.
Table 7-1. Archive file extensions
Extension Meaning.tar An uncompressed tar archive
.tar.gz A tar archive compressed with gzip
.tgz A tar archive compressed with gzip
.tar.bz2 A tar archive compressed with bzip2
.tbz A tar archive compressed with bzip2
The difference between bzip2 and gzip is that bzip2 can find repeating information in larger blocks,resulting in better compression. But bzip2 is also a lot slower, because it does more data analysis.
Extracting archivesSince many software and data in the GNU/Linux world is archived with tar it is important to getused to extracting tar archives. The first thing you will often want to do when you receive a tararchive is to list its contents. This can be achieved by using the t parameter. However, if we justexecute tar with this parameter and the name of the archive it will just sit and wait until you entersomething to the standard input:
$ tar t test.tar
This happens because tar reads data from its standard input. If you forgot how redirection works, itis a good idea to reread the section called Redirections and pipes in Chapter 6. Let’s see whathappens if we redirect our tar archive to tar:
$ tar t < test.tartest/test/test2test/test1
That looks more like the output you probably expected. This archive seems to contain a directorytest, which contains the files test2 and test2. It is also possible to specify the archive file nameas an parameter to tar, by using the f parameter:
29
Chapter 7. Files and directories
$ tar tf test.tartest/test/test2test/test1
This looks like an archive that contains useful files ;). We can now go ahead, and extract this archiveby using the x parameter:
$ tar xf test.tar
We can now verify that tar really extracted the archive by listing the contents of the directory with ls:
$ ls test/test1 test2
Extracting or listing files from a gzipped or bzipped archive is not much more difficult. This can bedone by adding a z or b for respectively archives compressed with gzip or bzip2. For example, wecan list the contents of a gzipped archive with:
$ tar ztf archive2.tar.gz
And a bzipped archive can be extracted with:
$ tar bxf archive3.tar.bz2
Creating archivesYou can create archives with the c parameter. Suppose that we have the directory test shown in theprevious example. We can make an archive with the test directory and the files in this directorywith:
$ tar cf important-files.tar test
This will create the important-files.tar archive (which is specified with the f parameter). Wecan now verify the archive:
$ tar tf important-files.tartest/test/test2test/test1
Creating a gzipped or bzipped archive goes along the same lines as extracting compressed archives:add a z for gzipping an archive, or b for bzipping an archive. Suppose that we wanted to create agzip compressed version of the archive created above. We can do this with:
tar zcf important-files.tar.gz test
30

Chapter 7. Files and directories
Extended attributes
IntroductionExtended attributes (EAs) are relatively new on GNU/Linux. Extended attributes are a special kindof values that are associated with a file or directory. EAs provide the means to add extra attributesbesides the common attributes (modification time, traditional file permissions, etc.). For example,one could add the attribute “Photographer” to a collection of JPEG files. Extended attributes are notphysically stored in the file, but as meta-data in the filesystem.
Extended attributes are only supported by 2.6.x and newer 2.4.x kernels. Besides that they are notsupported on all filesystems, the commonly used Ext2, Ext3 and XFS filesystems do supportextended attributes.
Installing the necessary utilitiesThe extended attribute software is available in Slackware Linux through the xfsprogs package, whichcan be found in the “a” disk set. Don’t be misled by the name of the package, the extended attributetools also work with other filesystems, like Ext3.
Showing extended attributesExtended attributes can be queried using the getfattr command. Just using getfattr with a file as aparameter will show the attributes that are known for that particular file, without the values set forthe attributes. For example:
$ getfattr note.txt# file: note.txtuser.Author
This file has one extended attribute, “user.Author”. An attribute has the following form:“namespace.attribute”. There are four defined namespaces: “security”, “system”, “trusted”, and“user”. The role of these namespaces are described in the attr(5) manual page. The “user” namespaceis of particular interest to us, because this namespace is used to assign arbitrary attributes to files.
The values associated with an attribute can be shown using the -d (dump) parameter. For example:
$ getfattr -d note.txt# file: note.txtuser.Author="Daniel"
In this example the attribute “user.Author” has the value “Daniel” for the file note.txt.
Setting extended attributesAttributes are set with the setfattr command. An attribute can be added to a file using the -n (name)parameter, be sure to specify the namespace and the attribute name, for example:
$ setfattr -n user.Author note2.txt
The value of the attribute can be set using the -v (value) parameter:
31
Chapter 7. Files and directories
$ setfattr -n user.Author -v Mike note2.txt
But it is also possible to add an attribute and setting its value in one run, by specifying both the -nand -v parameters. For example, the following command adds the MD5 sum of the file as anextended attribute:
$ setfattr -n user.MD5 -v ‘md5sum note2.txt‘ note2.txt$ getfattr -d note2.txt# file: note2.txtuser.Author="Mike"user.MD5="78be7a3148027ae7a897aad95e7d9c58"
Mounting filesystems
IntroductionLike most Unices Linux uses a technique named “mounting” to access filesystems. Mounting meansthat a filesystem is connected to a directory in the root filesystem. One could for example mount aCD-ROM drive to the /mnt/cdrom directory. Linux supports many kinds of filesystems, like Ext2,Ext3, ReiserFS, JFS, XFS, ISO9660 (used for CD-ROMs), UDF (used on some DVDs) andDOS/Windows filesystems, like FAT, FAT32 and NTFS. These filesystems can reside on many kindsof media, for example hard drives, CD-ROMs and Flash drives. This section explains howfilesystems can be mounted and unmounted.
mountThe mount(8) is used to mount filesystems. The basic syntax is: “mount /dev/devname/mountpoint”. The device name can be any block device, like hard disks or CD-ROM drives. Themount point can be an arbitrary point in the root filesystem. Let’s look at an example:
# mount /dev/cdrom /mnt/cdrom
This mounts the /dev/cdrom on the /mnt/cdrom mountpoint. The /dev/cdrom device name isnormally a link to the real CD-ROM device name (for example, /dev/hdc). As you can see, theconcept is actually very simple, it just takes some time to learn the device names ;). Sometimes it isnecessary to specify which kind of filesystem you are trying to mount. The filesystem type can bespecified by adding the -t parameter:
# mount -t vfat /dev/sda1 /mnt/flash
This mounts the vfat filesystem on /dev/sda1 to /mnt/flash.
umountThe umount(1) command is used to unmount filesystems. umount accepts two kinds of parameters,mount points or devices. For example:
# umount /mnt/cdrom# umount /dev/sda1
32
Chapter 7. Files and directories
The first command unmounts the filesystem that was mounted on /mnt/cdrom, the secondcommands unmounts the filesystem on /dev/sda1.
The fstab fileThe GNU/Linux system has a special file, /etc/fstab, that specifies which filesystems should bemounted during the system boot. Let’s look at an example:
/dev/hda10 swap swap defaults 0 0/dev/hda5 / xfs defaults 1 1/dev/hda6 /var xfs defaults 1 2/dev/hda7 /tmp xfs defaults 1 2/dev/hda8 /home xfs defaults 1 2/dev/hda9 /usr xfs defaults 1 2/dev/cdrom /mnt/cdrom iso9660 noauto,owner,ro 0 0/dev/fd0 /mnt/floppy auto noauto,owner 0 0devpts /dev/pts devpts gid=5,mode=620 0 0proc /proc proc defaults 0 0
As you can see each entry in the fstab file has five entries: fs_spec, fs_file, fs_vfstype, fs_mntops,fs_freq, and fs_passno. We are now going to look at each entry.
fs_spec
The fs_spec option specifies the block device, or remote filesystem that should be mounted. As youcan see in the example several /dev/hda partitions are specified, as well as the CD-ROM drive andfloppy drive. When NFS volumes are mounted an IP address and directory can be specified, forexample: 192.168.1.10:/exports/data.
fs_file
fs_file specifies the mount point. This can be an arbitrary directory in the filesystem.
fs_vfstype
This option specifies what kind of filesystem the entry represents. For example this can be: ext2,ext3, reiserfs, xfs, nfs, vfat, or ntfs.
fs_mntops
The fs_mntops option specifies which parameters should be used for mounting the filesystem. Themount(8) manual page has an extensive description of the available options. These are the mostinteresting options:
• noauto: filesystems that are listed in /etc/fstab are normally mounted automatically. When the“noauto” option is specified, the filesystem will not be mounted during the system boot, but onlyafter issuing a mount command. When mounting such filesystem, only the mount point or devicename has to be specified, for example: mount /mnt/cdrom
• user: adding the “user” option will allow normal users to mount the filesystem (normally only thesuperuser is allowed to mount filesystems).
33
Chapter 7. Files and directories
• owner: the “owner” option will allow the owner of the specified device to mount the specifieddevice. You can see the owner of a device using ls, e.g. ls -l /dev/cdrom.
• noexec: with this option enabled users can not run files from the mounted filesystem. This can beused to provide more security.
• nosuid: this option is comparable to the “noexec” option. With “nosuid” enabled SUID bits onfiles on the filesystem will not be allowed. SUID is used for certain binaries to provide a normaluser to do something privileged. This is certainly a security threat, so this option should really beused for removable media, etc. A normal user mount will force the nosuid option, but a mount bythe superuser will not!
• unhide: this option is only relevant for normal CD-ROMs with the ISO9660 filesystem. If“unhide” is specified hidden files will also be visible.
fs_freq
If the “fs_freq” is set to 1 or higher, it specifies after how many days a filesystem dump (backup) hasto be made. This option is only used when dump(8) is set up correctly to handle this.
fs_passno
This field us used by fsck(8) to determine the order in which filesystems are checked during thesystem boot.
34
Chapter 8. Text Utilities
IntroductionOn of the central ideas of UNIX(-like) operating systems is that “everything is a file”. Even devicescan be treated as a file. Basically there are three types of files in UNIX:
• Binary files, for example executables, and libraries.
• Device files, for example /dev/zero, and /dev/hda.
• Text files, pretty much anything else.
Due to the fact that text files have such an important role in UNIX-like operating systems, likeGNU/Linux, this book has a separate chapter dedicated to the subject of processing text files. In thebeginning its use may not be that obvious, but once you get used to these tools you will see that youwill probably use some of these tools on a daily basis.
Note: This chapter relies heavily on the use of pipes and redirection, so it it a good idea to readthe section called Redirections and pipes in Chapter 6 if you have not done that yet.
The basics
catThe cat command is one of the simplest commands around. Its default behaviour is just to sendanything it receives on the standard input to the standard input until the end of file character (^D) issent to the standard input. You can see this by executing cat, and entering some text:
$ catHello world!Hello world!Testing... 1 2 3Testing... 1 2 3
You can also concatenate files with cat, by providing the files you would like to concatenate as anargument. The concatenated files will be sent to the standard output:
$ cat test1This is the content of test1.$ cat test2This is the content of test2.$ cat test1 test2This is the content of test1.This is the content of test2.
35
Chapter 8. Text Utilities
As you can see it is also possible to send a file to the standard output by specifying one file as cat’sargument. This is an alternative to redirection. For example, one could either of these command:
$ less < test1$ cat test1 | less
echoThe echo is used to send something to the standard output by specifying it as an argument to echo.For example, one could use echo to send a simple message to the standard output:
$ echo "Hello world!"Hello world!
wcOne of the common things people often want to do with a text is counting the number of words, orlines in a text. The wc command can be used for this purpose. The file to be counted can be specifiedas an argument to wc
$ wc essay.txt174 1083 8088 essay.txt
As you can see the default output returns three numbers. These are (in order): the number of lines,the number of words, and the number of characters. It is also possibly to return only one of thesenumbers, with respectively -l, -w , and -m. For example, if we only want to know the number oflines in the file, we could do the following:
$ wc -l essay.txt174 essay.txt
In some situations you might want to use the output of wc in a pipeline, or as an argument to anothercommand. The problem with specifying the file name as an argument is that wc will also show thename of the file (as you can see in the example above). You can work around this behavior byredirecting the file contents to wc. For example:
$ wc -l < essay.txt174
trThe tr is used to translate or delete characters. All uses of tr require one or two sets. A set is a stringof characters. You can specify most characters in a set. The tr(1) manual page provides an overviewof some character sequences with a special meaning. Table 8-1 describes some of the fequently usedspecial character sequences.
36

Chapter 8. Text Utilities
Table 8-1. Special tr character sequences
Sequence Meaning\\ backslash (\)
\n new line
char1-char2 All characters from char1 to char2 (e.g. “a-z”)
[:alnum:] All alphanumeric characters
[:alpha:] All letters in the alphabet
[:punct:] Punctuation characters
Characters can be deleted from one text with the -d, and a set that specifies the characters thatshould be deleted. Let’s start with an easy example: suppose that you want to remove all the new linecharacters from a text stored in text, and that you would like to redirect the output to a file namedtext-continuous. Obviously, we need a set with only one character, namely the new linecharacter, which is specified with “\n”. This can be accomplished with the following command:
$ cat text | tr -d "\n" > text-continuous
It happens quite often that you want to delete everything, but the characters that are specified in a set.You can do this by using the -c, which automatically complements the specified set. For example, ifyou would like to remove every character from a text, except for alphabetical characters, new lines,and spaces, you can use the -c, and the following set: “[:alpha:]\n ”. Combined in a command itwould look like this:
$ cat text | tr -c -d "[:alpha:]\n "
Using tr for translating characters does not require any extra parameters, but two sets. In the two setsthe first character of the first set is replaced with the first character of the second set, etc. Supposethat we use these two sets: “abc” and “def”. With these sets the following translations occur: “a ->d”, “b -> e”, and “c -> f”. If the first set is longer than the second set, then the second set is expandedby repeating the last character of the second set. If the second set is longer than the first set, extracharacters in the second set are ignored.
Translations can be useful for many purposes. For example, it can be used to make a wordlist from atext. This can be done by replacing all spaces with a newline:
$ cat essay.txt | tr " " "\n" | less
As you can imagine the output might still contain non-alphabetic characters. We can combine thecommand above with the delete functionality of tr to make a wordlist without unwanted characters:
$ cat essay.txt | tr " " "\n" | tr -c -d "[:alpha:]\n" > wordlist
sortThe command is used to sort lines in a file. To sort a text alphabetically, you can just pipe or redirectthe data to sort. sort also accepts file names as its parameters. When multiple files are specified, thefiles will be concatenated before sorting the lines. Suppose that you have a word list that is
37
Chapter 8. Text Utilities
unordered, which is stored in the file wordlist_unsorted. You can sort the contents of the file,and output it to wordlist_sorted with:
$ sort wordlist_unsorted > wordlist_sorted
The sort accepts many different parameters, which are all described in the sort(1) manual page. Anoften-used parameter we will shortly discuss is -u. With this parameter only unique words will besent to stdout (in other words: double occurences will be ignored). By combining sort -u and the tr,discussed in the section called tr, you can make a sorted wordlist of a text:
$ cat essay.txt | tr " " "\n" | tr -c -d "[:alpha:]\n" | sort -u > wordlist_sorted
If the command listed in this example is combined with wc, one could count the size of the usedvocabulary in the text. In the sorted word list each line represents an unique word from the originaltext. So, we can count the total number of words that were used, by counting the total number oflines in the sorted list:
$ cat essay.txt | tr " " "\n" | tr -c -d "[:alpha:]\n" | sort -u | wc -l
uniqThe uniq can be compared to the -u parameter of the sort; it removes all but one entry of successiveidentical lines (in a sorted list). The main difference is that it provides some extra parameters that canbe used to manipulate the output. The default behavior works like sort -u, and reduces duplicateentries:
$ sort wordlist_unsorted | uniq > wordlist_sorted
To make a list of how often a line occurs in a text, one could count how many identical lines thesorted list contains of every line. Uniq can add the number of identical lines with the -c parameter.To make a list of how many times each word occurs in a text, you can combine tr, sort, and uniq:
$ cat essay.txt | tr " " "\n" | tr -c -d "[:alpha:]\n" | sort | uniq -c > wordlist_sorted
38
Chapter 9. Process management
IntroductionUnix-like operating systems work with processes. A process is an unit the operating systemschedules for CPU time and the memory manager manages memory for. Basically a process consistsof program code (named text), data (used by a program) and a stack. The stack is used by theprogram to store variables. Programs are at least one process. A program/process can ask the systemto create a new copy of itself, which is called a fork. For example, a web server could fork itself tolet the new process handle a request.
A process can be parted in threads. The difference between forking a process and creating a thread isthat different threads share the address space of the process. A forked process is a separate processwith its own address space. Forking is more expensive in terms of memory requirement and CPUtime.
A user can control a process by sending signals to the process. For example, the SIGTERMcommand is used to terminate a process, and the SIGHUP signal to restart a process.
Process basicsThis section describes some basic commands that are used for process management.
psThe ps(1) command is used to report which processes are currently active. By running ps withoutany parameters you can see which processes are active in the current user session. Let’s look at anexample:
$ psPID TTY TIME CMD
1191 pts/2 00:00:00 bash1216 pts/2 00:00:00 ps
In this example the bash and ps commands are running. As you can see each process has a processID (PID). You will need the process number if you want to send a signal to a process, for example akill signal. The ps has many parameters to modify the output. For example, the x shows all processeswithout a controlling tty:
$ ps xPID TTY STAT TIME COMMAND
1044 tty1 S 0:00 -bash1089 tty1 S 0:00 /bin/sh /usr/X11R6/bin/startx1100 tty1 S 0:00 xinit /home/daniel/.xinitrc --1108 tty1 S 0:00 /usr/bin/wmaker1113 tty1 S 0:00 sylpheed1114 tty1 S 0:00 /bin/sh /opt/firefox/run-mozilla.sh /opt/firefox/fire1120 tty1 S 0:52 /opt/firefox/firefox-bin1125 tty1 S 0:00 /usr/libexec/gconfd-2 201146 tty1 S 0:00 xchat1161 tty1 S 0:00 xterm -sb
39
Chapter 9. Process management
1163 pts/0 S 0:00 bash1170 pts/0 S 0:00 vi proc.xml1189 tty1 S 0:00 xterm -sb1191 pts/2 S 0:00 bash1275 pts/2 R 0:00 ps x
Have a look at the ps(1) manual page for a summary of available parameters.
killThe kill(1) sends a signal to a process. If no signal is specified the TERM signal is send, which asksa process to exit gracefully. Let’s have a look at the normal mode of execution:
$ ps ax | grep mc1045 tty4 S 0:00 /usr/bin/mc -P /tmp/mc-daniel/mc.pwd.756
$ kill 1045$ ps ax | grep mc$
As you can see the ps is used to look for the mc process. There is one occurrence of mc running withPID 1045. This process is killed, and the second ps command shows that the process is indeedterminated.
As we said earlier the kill command can also be used to send other signals. The kill -l displays a listof signals that can be sent:
1) SIGHUP 2) SIGINT 3) SIGQUIT 4) SIGILL5) SIGTRAP 6) SIGABRT 7) SIGBUS 8) SIGFPE9) SIGKILL 10) SIGUSR1 11) SIGSEGV 12) SIGUSR2
13) SIGPIPE 14) SIGALRM 15) SIGTERM 17) SIGCHLD18) SIGCONT 19) SIGSTOP 20) SIGTSTP 21) SIGTTIN22) SIGTTOU 23) SIGURG 24) SIGXCPU 25) SIGXFSZ26) SIGVTALRM 27) SIGPROF 28) SIGWINCH 29) SIGIO30) SIGPWR 31) SIGSYS
The SIGKILL signal is often used to kill processes that refuse to terminate with the defaultSIGTERM signal. The signal can be specified by using the number as a parameter, for example, thefollowing command would send a SIGKILL signal to PID 1045:
$ kill -9 1045
It is also possible to specify the signal without the “SIG” letters as a parameter. In the followingexample the SIGHUP signal is sent to the inetd to restart it:
# ps ax | grep inetd727 ? S 0:00 /usr/sbin/inetd
# kill -HUP 727
40
Chapter 9. Process management
Advanced process management
Background processesNormally a process takes over the screen and keyboard after it is started. It is also possible to startprocesses as a background process, this means that the shell starts the process, but keeps control overthe terminal. In most shells a process can be started as a background process by placing anampersand (&) after the command. For example:
$ rm -rf ~/bunch/of/files &
A process that runs in the background can be brought to the foreground using the fg %<job ID>command. You can see which jobs are running, with their job numbers, using the jobs command. Forexample:
$ sleep 1000 &[1] 947$ jobs[1]+ Running sleep 1000 &$ fg %1sleep 1000
The first command, sleep 1000 &, starts sleep in the background. sleep is a command does nothingbut waiting the number of seconds that are specified as a parameter. The output of the jobs commandshows that sleep is indeed running, with Job ID 1. Finally we move sleep to the foreground. As youcan see, the shell will print which command is moved to the foreground.
Stopping processesA process that is running can be stopped by pressing the <Control> and <z> keys simultaneously.Stopped processes can be moved to the foreground with the fg command. Running fg without anyparameters moves the last process that was stopped to the foreground. Other processes can be movedto the foreground by specifying the job ID as a parameter to fg.
A stopped process can also be told to continue as a background process, by executing bg <job ID>.Executing fg without any parameter will move the last stopped process to the background.
Altering prioritiesThe Linux kernel allows a user to change the priority of a program. For example, suppose that youwant to run a process that requires a lot of CPU time, but you do not want to hinder other users. Inthis case you can start the process with a low priority, the process will only get CPU time when thereare not many other processes demanding CPU time. Or you can give processes that are important ahigher priority.
GNU/Linux provides two commands to alter the priority of a process. The nice(1) command can beused to specify the priority when you are launching a process. With the renice(1) command you canalter the priority of a process that is already running. The priority is a numerical value from -20(highest priority) to 19 (lowest priority). Let’s start with an example of nice in action:
$ nice -n 19 ./setiathome
41
Chapter 9. Process management
As you can see the -n parameter is used to specify the priority value. In this case the ./setiathomewill have a very low priority. Be aware that only the superuser can use negative priority values. Thus,a normal user cannot give a process a higher priority, as illustrated by this example:
$ nice -n -1 nicenice: cannot set priority: Permission denied
But it will work as the root user:
$ su -c "nice -n -1 nice"Password:-1
The renice command has a somewhat different syntax. The easiest way to use it is to specify the newpriority and the process ID as parameters to the renice command, as is shown in the followingexample:
$ renice +5 58115811: old priority 0, new priority 5
As with nice a non-root user cannot set negative priority values:
$ renice -5 5811renice: 5811: setpriority: Permission denied
Note: A normal user can not increase the priority of the process beyond the default priority of 0.Such facilities could be misused by careless users. After all, the command nice is derived frombeing nice to the other users on the system ;^).
42

III. System administration
Chapter 10. User management
IntroductionGNU/Linux is a multi-user operating system. This means that multiple users can use the system, andthey can use the system simultaneously. The GNU/Linux concepts for user management are quitesimple. First of all, there are several user accounts on each system. Even on a single user systemthere are multiple user accounts, because GNU/Linux uses unique accounts for some tasks. Userscan be members of groups. Groups are used for more fine grained permissions, for example, youcould make a file readable by a certain group. There are a few reserved users and groups on eachsystem. The most important of these is the root account. The root user is the system administrator. Itis a good idea to avoid logging in as root, because this greatly enlarges security risks. You can justlog in as a normal user, and perform system administration tasks using the su and sudo commands.
The available user accounts are specified in the /etc/passwd. You can have a look at this file to getan idea of which user account are mandatory. As you will probably notice, there are no passwords inthis file. Passwords are kept in the separate /etc/shadow file, as an encrypted string. Informationabout groups is stored in /etc/group. It is generally speaking not a good idea to edit these filesdirectly. There are some excellent tools that can help you with user and group administration. Thischapter will describe some of these tools.
Adding and removing users
useraddThe useradd is used to add user accounts to the system. Running useradd with a user name asparameter will create the user on the system. For example:
# useradd bob
Creates the user account bob. Please be aware that this does not create a home directory for the user.Add the -m parameter to create a home directory. For example:
# useradd -m bob
This would add the user bob to the system, and create the /home/bob home directory for this user.Normally the user is made a member of the users group. Suppose that we would like to make crewthe primary group for the user bob. This can be done using the -g parameter. For example:
# useradd -g crew -m bob
It is also possible to add this user to secondary groups during the creation of the account with the -G.Group names can be separated with a comma. The following command would create the user bob,which is a member of the crew group, and the www-admins and ftp-admins secondary groups:
# useradd -g crew -G www-admins,ftp-admins -m bob
44
Chapter 10. User management
By default the useradd only adds users, it does not set a password for the added user. Passwords canbe set using the passwd command.
passwdAs you probably guessed the passwd command is used to set a password for a user. Running thiscommand as a user without a parameter will change the password for this user. The passwordcommand will ask for the old password,once and twice for the new password:
$ passwdChanging password for bob(current) UNIX password:Enter new UNIX password:Retype new UNIX password:passwd: password updated successfully
The root user can set passwords for users by specifying the user name as a parameter. The passwdcommand will only ask for the new password. For example:
# passwd bobEnter new UNIX password:Retype new UNIX password:passwd: password updated successfully
adduserThe adduser command combines useradd and passwd in an interactive script. It will ask you to fillin information about the account to-be created. After that it will create an account based on theinformation you provided. The screen listing below shows a sample session.
# adduser
Login name for new user []: john
User ID (’UID’) [ defaults to next available ]: <Enter>
Initial group [ users ]: <Enter>
Additional groups (comma separated) []: staff
Home directory [ /home/john ] <Enter>
Shell [ /bin/bash ] <Enter>
Expiry date (YYYY-MM-DD) []: <Enter>
New account will be created as follows:
---------------------------------------Login name.......: johnUID..............: [ Next available ]Initial group....: users
45
Chapter 10. User management
Additional groups: [ None ]Home directory...: /home/johnShell............: /bin/bashExpiry date......: [ Never ]
This is it... if you want to bail out, hit Control-C. Otherwise, pressENTER to go ahead and make the account.<Enter>
Creating new account...
Changing the user information for johnEnter the new value, or press ENTER for the default
Full Name []: John DoeRoom Number []: <Enter>Work Phone []: <Enter>Home Phone []: <Enter>Other []: <Enter>
Changing password for johnEnter the new password (minimum of 5, maximum of 127 characters)Please use a combination of upper and lower case letters and numbers.New password: passwordRe-enter new password: password
Account setup complete.
You can use the default values, or leave some fields empty, by tapping the <Enter> key.
userdelSometimes it is necessary to remove a user account from the system. GNU/Linux offers the userdeltool to do this. Just specify the username as a parameter to remove that user from the system. Forexample, the following command will remove the user account bob from the system:
# userdel bob
This will only remove the user account, not the user’s home directory and mail spool. Just add the-r parameter to delete the user’s home directory and mail spool too. For example:
# userdel -r bob
Avoiding root usageIt is a good idea to avoid logging in as root. There are many reasons for not doing this. Accidentallytyping a wrong command could cause bad things to happen, and malicious programs can make a lotof damage when you are logged in as root. Still, there are many situations in which you need to have
46
Chapter 10. User management
root access. For example, to do system administration, or to install new software. Fortunately the sucan give you temporal root privileges.
Using su is very simple. Just executing su will ask you for the root password, and will start a shellwith root privileges after the password is correctly entered:
$ whoamibob$ suPassword:# whoamiroot# exitexit$ whoamibob
In this example the user bob is logged on, the whoami output reflects this. The user executes su andenters the root password. su launches a shell with root privileges, this is confirmed by the whoamioutput. After exiting the root shell, control is returned to the original running shell running with theprivileges of the user bob.
It is also possible to execute just one command as the root user with the -c parameter. The followingexample will run lilo:
$ su -c lilo
If you want to give parameters to the command you would like to run, use quotes (e.g. su -c "ls -l/"). Without quotes su cannot determine whether the parameters should be used by the specifiedcommand, or by su itself.
Disk quota
IntroductionDisk quota is a mechanism that allows the system administrator to restrict the number of disk blocksand inodes that a particular user and group can use. Not all filesystems supported by Linux supportquota, widely used filesystems that support quota are ext2, ext3 and XFS. Quota are turned on andmanaged on a per filesystem basis.
Enabling quotaQuota can be enabled per filesystem in /etc/fstab, by using the usrquota and grpquotafilesystem options. For example, suppose that we have the following entry for the /home partition in/etc/fstab:
/dev/hda8 /home xfs defaults 1 2
We can now enable user quota by adding the usrquota filesystem option:
47
Chapter 10. User management
/dev/hda8 /home xfs defaults,usrquota 1 2
At this point the machine can be rebooted, to let the Slackware Linux initialization scripts enablequota. You can also enable quota without rebooting the machine, by remounting the partition, andrunning the quotaon command:
# mount -o remount /home# quotaon -avug
Editing quotaUser and group quotas can be edited with the “edquota” utility. This program allows you to editquotas interactively with the vi editor. The most basic syntax of this command is edquotausername. For example:
# edquota joe
This will launch the vi editor with the quota information for the user joe. It will look like this:
Disk quotas for user joe (uid 1143):Filesystem blocks soft hard inodes soft hard/dev/hda5 2136 0 0 64 0 0
In this example quotas are only turned on for one file system, namely the filesystem on /dev/hda5.As you can see there are multiple columns. The blocks column shows how many block the user useson the file system, and the inodes column the number of inodes a user occupies. Besides that thereare soft and hard columns after both blocks and inodes. These columns specify the soft and hardlimits on blocks and inodes. A user can exceed the soft limit for a grace period, but the user cannever exceed the hard limit. If the value of a limit is 0, there is no limit.
Note: The term “blocks” might be a bit confusing in this context. In the quota settings a block is1KB, not the block size of the file system.
Let’s look at a simple example. Suppose that we would like to set the soft limit for the user joe to250000, and the hard limit to 300000. We could change the quotas listed above to:
Disk quotas for user joe (uid 1143):Filesystem blocks soft hard inodes soft hard/dev/hda5 2136 250000 300000 64 0 0
The new quota settings for this user will be active after saving the file, and quitting vi.
48
Chapter 11. Printer configuration
IntroductionGNU/Linux supports a large share of the available USB, parallel and network printers. SlackwareLinux provides two printing systems, CUPS (Common UNIX Printing System) and LPRNG (LPRNext Generation). This chapter covers the CUPS system.
Independent of which printing system you are going to use, it is a good idea to install some printerfilter collections. These can be found in the “ap” disk set. If you want to have support for mostprinters, make sure the following packages are installed:
a2psenscriptespgsgimp-printgnu-gs-fontshpijsifhp
Both printing systems have their own advantages and disadvantages. If you do not have muchexperience with configuring printers under GNU/Linux, it is a good idea to use CUPS, becauseCUPS provides a comfortable web interface which can be accessed through a web browser.
PreparationsTo be able to use CUPS the “cups” package from the “a” disk set has to be installed. After theinstallation CUPS can be started automatically during each system boot by making/etc/rc.d/rc.cups executable. This can be done with the following command:
# chmod a+x /etc/rc.d/rc.cups
After restarting the system CUPS will also be restarted automatically. You can start CUPS on arunning system by executing the following command:
# /etc/rc.d/rc.cups start
ConfigurationCUPS can be configured via a web interface. The configuration interface can be accessed with a webbrowser at the following URL: http://localhost:631/. Some parts of the web interface require that youauthenticate yourself. If an authentication window pops up you can enter “root” as the user name,and fill in the root account password.
A printer can be added to the CUPS configuration by clicking on “Administrate”, and clicking on the“Add Printer” button after that. The web interface will ask for three options:
• Name - the name of the printer. Use a simple name, for example “epson”.
49

Chapter 11. Printer configuration
• Location - the physical location of the printer. This setting is not crucial, but handy for largerorganizations.
• Description - a description of the printer, for example “Epson Stylus Color C42UX”.
You can proceed by clicking the “Continue” button. On the next page you can configure how theprinter is connected. If you have an USB printer which is turned on, the web interface will show thename of the printer next to the USB port that is used. After configuring the printer port you canselect the printer brand and model. After that the printer configuration is finished, and the printer willbe added to the CUPS configuration.
An overview of the configured printers can be found on the “Printers” page. On this page you canalso do some printer operations. For example, “Print Test Page” can be used to check the printerconfiguration by printing a test page.
50
Chapter 12. X11
X ConfigurationThe X11 configuration is stored in /etc/X11/xorg.conf. Many distributions provide specialconfiguration tools for X, but Slackware Linux only provides the standard X11 tools (which areactually quite easy to use). In most cases X can be configured automatically, but sometimes it isnecessary to edit /etc/X11/xorg.conf manually.
Automatical configurationThe X11 server provides an option to automatically generate a configuration file. X11 will load allavailable driver modules, and will try to detect the hardware, and generate a configuration file.Execute the following command to generate a xorg.conf configuration file:
$ X -configure
If X does not output any errors, the generated configuration can be copied to the /etc/X11directory. And X can be started to test the configuration:
$ cp /root/xorg.conf /etc/X11/$ startx
Interactive configurationX11 provides two tools for configuring X interactively, xorgcfg and xorgconfig. xorgcfg tries todetect the video card automatically, and starts a tool which can be used to tune the configuration.Sometimes xorgcfg switches to a video mode which is not supported by the monitor. In that casexorgcfg can also be used in text-mode, by starting it with xorgcfg -textmode.
xorgconfig differs from the tools described above, it does not detect hardware and will ask detailedquestions about your hardware. If you only have little experience configuring X11 it is a good idea toavoid xorgconfig.
Window managerThe “look and feel” of X11 is managed by a so-called window manager. Slackware Linux providesthe following widely user window managers:
• WindowMaker: A relatively light window manager, which is part of the GNUStep project.
• BlackBlox: Light window manager, BlackBox has no dependencies except the X11 libraries.
• KDE: A complete desktop environment, including browser, e-mail program and an office suite(KOffice).
• GNOME: Like KDE a complete desktop environment. It is worth noting that Dropline Systems(http://www.dropline.net/) provides a special GNOME environment for Slackware Linux.
51

Chapter 12. X11
If you are used to a desktop environment, using KDE or GNOME is a logical choice. But it is a goodidea to try some of the lighter window managers. They are faster, and consumer less memory, besidesthat most KDE and GNOME applications are perfectly usable under other window managers.
On Slackware Linux the following command can be used to select a window manager:
$ xwmconfig
This configuration program shows the installed window managers, from which you can choose one.You can set the window manager globally by executing xwmconfig as root.
52
Chapter 13. Package Management
Pkgtools
IntroductionSlackware Linux does not use a complex package system, unlike many other Linux distributions.Package have the .tgz extension, and are usually ordinary tarballs which contain two extra files: aninstallation script and a package description file. Due to the simplicity of the packages the SlackwareLinux package tools do not have the means to handle dependencies. But many Slackware Linuxusers prefer this approach, because dependencies often cause more problems than they solve.
Slackware Linux has a few tools to handle packages. The most important tools will be covered inthis chapter. To learn to understand the tools we need to have a look at package naming. Let’s have alook at an example, imagine that we have a package with the file name bash-2.05b-i386-2.tgz.In this case the name of the package is bash-2.05b-i386-2. In the package name information aboutthe package is separated by the ’-’ character. A package name has the following meaning:programname-version-architecture-packagerevision
pkgtoolThe pkgtool command provides a menu interface for some package operations. De most importantmenu items are Remove and Setup. The Remove option presents a list of installed packages. You canselect which packages you want to remove with the space bar and confirm your choices with thereturn key. You can also deselect a package for removal with the space bar.
The Setup option provides access to a few tools which can help you with configuring your system,for example: netconfig, pppconfig and xwmconfig.
installpkgThe installpkg command is used to install packages. installpkg needs a package file as a parameter.For example, if you want to install the package bash-2.05b-i386-2.tgz execute:
# installpkg bash-2.05b-i386-2.tgz
upgradepkgupgradepkg can be used to upgrade packages. In contrast to installpkg it only installs packageswhen there is an older version available on the system. The command syntax is comparable toinstallpkg. For example, if you want to upgrade packages using package in a directory execute:
# upgradepkg *.tgz
As said only those packages will be installed of which an other version is already installed on thesystem.
53
Chapter 13. Package Management
removepkgThe removepkg can be used to remove installed packages. For example, if you want to remove the“bash” package (it is not recommended to do that!), you can execute:
# removepkg bash
As you can see only the name of the package is specified in this example. You can also remove apackage by specifying its full name:
# removepkg bash-2.05b-i386-2
Slackpkg
IntroductionSlackpkg is a package tool written by Roberto F. Batista and Evaldo Gardenali. It helps users toinstall and upgrade Slackware Linux packages using one of the Slackware Linux mirrors. Slackpkgis included in the extra/ directory on the second CD of the Slackware Linux CD set.
ConfigurationSlackpkg is configured through some files in /etc/slackpkg. The first thing you should do isconfiguring which mirror slackpkg should use. This can be done by editing the/etc/slackpkg/mirrors. This file already contains a list of mirrors, you can just uncomment amirror close to you. For example:
ftp://ftp.nluug.nl/pub/os/Linux/distr/slackware/slackware-10.0/
This will use the Slackware Linux 10.0 tree on the ftp.nluug.nl mirror. Be sure to use a tree thatmatches your Slackware Linux version. If you would like to track slackware-current you woulduncomment the following line instead (when you would like to use the NLUUG mirror):
ftp://ftp.nluug.nl/pub/os/Linux/distr/slackware/slackware-current/
Slackpkg will only accept one mirror. Commenting out more mirrors will not work.
Importing the Slackware Linux GPG keyBy default slackpkg checks packages using the package signatures and the public Slackware LinuxGPG key. Since this is a good idea from a security point of view, you probably do not want to changethis behaviour. To be able to verify packages you have to import the [email protected] GPGkey. If you have not used GPG before you have to create the GPG directory in the home directory ofthe root user:
# mkdir ~/.gnupg
The next step is to search for the public key of [email protected]. We will do this by queryingthe pgp.mit.edu server:
54
Chapter 13. Package Management
# gpg --keyserver pgp.mit.edu --search [email protected]: keyring ‘/root/.gnupg/secring.gpg’ createdgpg: keyring ‘/root/.gnupg/pubring.gpg’ createdgpg: searching for "[email protected]" from HKP server pgp.mit.eduKeys 1-2 of 2 for "[email protected]"(1) Slackware Linux Project <[email protected]>
1024 bit DSA key 40102233, created 2003-02-25(2) Slackware Linux Project <[email protected]>
1024 bit DSA key 40102233, created 2003-02-25Enter number(s), N)ext, or Q)uit >
As you can see we have got two (identical) hits. Select the first one by entering “1”. GnuPG willimport this key in the keyring of the root user:
Enter number(s), N)ext, or Q)uit > 1gpg: key 40102233: duplicated user ID detected - mergedgpg: /root/.gnupg/trustdb.gpg: trustdb createdgpg: key 40102233: public key "Slackware Linux Project <[email protected]>" importedgpg: Total number processed: 1gpg: imported: 1
Be sure to double check the key you received. The key ID and fingerprint of this particular key canbe found on the Internet on many trustworthy sites. The key ID is, as mentioned above 40102233.You can get the key fingerprint with the --fingerprint parameter:
# gpg --fingerprint [email protected] 1024D/40102233 2003-02-26 Slackware Linux Project <[email protected]>
Key fingerprint = EC56 49DA 401E 22AB FA67 36EF 6A44 63C0 4010 2233sub 1024g/4E523569 2003-02-26 [expires: 2012-12-21]
Onced you have imported and checked this key you can start to use slackpkg, and install packagessecurely.
Updating the package listsBefore upgrading and installing packages you have to let slackpkg download the package lists fromthe mirror you are using. It is a good idea to do this regularly to keep these lists up to date. The latestpackage lists can be fetched with:
$ slackpkg update
Upgrading packagesThe upgrade parameter is used to upgrade installed packages. You have to add an extra parameterto actually tell slackpkg what you want to upgrade, this differs for a stable Slackware Linux versionand slackware-current. Upgrades for stable Slackware Linux releases are in the patches directoryof FTP mirrors. You can update a slackware-stable installation (e.g. Slackware Linux 10.0) with:
# slackpkg upgrade patches
In this case slackpkg will use the packages from the patches directory. In slackware-currentupdated packages are put in the normal slackware package sub-directories. So, we can pass that asan parameter to slackpkg upgrade:
55
Chapter 13. Package Management
# slackpkg upgrade slackware
You can also upgrade individual packages by specifying the name of the package to be upgraded, forexample:
# slackpkg upgrade pine
Installing packagesThe install is used to install packages:
# slackpkg install rexima
Be aware that neither slackpkg, nor the Slackware Linux package tools do dependency checking. Ifsome program does not work due to missing libraries, you have to add them yourself with slackpkg.
56
Chapter 14. Building a kernel
IntroductionThe Linux kernel is shortly discussed in the section called What is Linux? in Chapter 2. One of theadvantages of Linux is that the full sources are available (as most of the Slackware Linux system).This means that you can recompile the kernel. There are many situations in which recompiling thekernel is useful. For example:
• Making the kernel leaner: One can disable certain functionality of the kernel, to decrease its size.This is especially useful in environments where memory is scarce.
• Optimizing the kernel: it is possible to optimize the kernel. For instance, by compiling it for aspecific processor.
• Hardware support: Support for some hardware is not enabled by default in the Linux kernelprovided by Slackware Linux. A common example is support for SMP systems.
• Using custom patches: There are many unofficial patches for the Linux kernel. Generallyspeaking it is a good idea to avoid unofficial patches. But some third party software, like Win4Lin(http://www.netraverse.com), require that you install an additional kernel patch.
This chapter focuses on the default kernel series used in Slackware Linux 10.0, Linux 2.4, thoughmost of these instructions also apply to Linux 2.6. Compiling a kernel is not really difficult, just keeparound a backup kernel that you can use when something goes wrong. Kernel compilation involvesthese steps:
• Configuring the kernel.
• Making dependencies.
• Building the kernel.
• Building modules.
• Installing the kernel and modules.
• Updating the LILO configuration.
In this chapter, we suppose that the kernel sources are available in /usr/src/linux. If you haveinstalled the kernel sources from the “k” disk set, the kernel sources are available in/usr/src/linux-kernelversion, and /usr/src/linux is a symbolic link to the real kernelsource directory. So, if you use the standards Slackware Linux kernel package you are set to go.
ConfigurationAs laid out above, the first step is to configure the kernel source. To ease the configuration of thekernel, it is a good idea to copy the default Slackware Linux kernel configuration to the kernelsources. The Slackware Linux kernel configuration files are stored on the distribution medium askernels/<Kernel>/config. Suppose that you use the bare.i kernel (which is the defaultkernel), and that you have a Slackware Linux CD-ROM mounted at /mnt/cdrom, you can copy theSlackware Linux kernel configuration with:
# cp /mnt/cdrom/kernels/bare.i/config /usr/src/linux/.config
57
Chapter 14. Building a kernel
At this point you can start to configure the kernel. There are three configuration front-ends to thekernel configuration. The first one is config, which just asks you what you want to do for eachkernel option. This takes a lot of time. So, normally this is not a good way to configure the kernel. Amore user friendly approach is the menuconfig front-end, which uses a menuing system that youcan use to configure the kernel. There is also an X front-end, named xconfig. You can start aconfiguration front-end by going to the kernel source directory, and executing make <front-end>.For example, to configure the kernel with the menu front-end you can use the following commands:
# cd /usr/src/linux# make menuconfig
In the kernel configuration there are basically three options for each choice: “n” disablesfunctionality, “y” enables functionality, and “m” compiles the functionality as a module. The defaultSlackware Linux kernel configuration is a very good configuration, it compiles only the barefunctionality needed to boot the system in the kernel, the rest is compiled as a module. Whateverchoices you make, you need to make sure that both the driver for your IDE/SCSI chip set is availablein the kernel and the filesystem driver. If they are not, the kernel is not able to mount the rootfilesystem, and no further modules can be loaded.
CompilationThe first step of the kernel compilation is to let the kernel build infrastructure check thedependencies. This can be done with make depend:
# cd /usr/src/linux# make depend
If make depend quits because there are errors, you have to recheck the kernel configuration. Theoutput of this command will usually give some clues where things went wrong. If everything wentfine, you can start compiling the kernel with:
This will compile the kernel and make a compressed kernel image named bzImage in/usr/src/linux/arch/i386/boot. After compiling the kernel you have to compile the modulesseparately:
# make modules
When the module compilation is done you are ready to install the kernel and the kernel modules.
Installation
Installing the kernelThe next step is to install the kernel and the kernel modules. We will start with installing the kernelmodules, because this can be done with one command within the kernel source tree:
58
Chapter 14. Building a kernel
# make modules_install
This will install the modules in /lib/modules/<kernelversion>. If you are replacing a kernelwith the same version number, it is a good idea to remove the old modules before installing the newones. E.g.:
# rm -rf /lib/modules/2.4.26
You can “install” the kernel by copying it to the /boot directory. You can give it any name youwant, but it is a good idea to use some naming convention. E.g. vmlinuz-somename-version. Forinstance, if we would name it vmlinuz-custom-2.4.28, we can copy it from within the kernelsource tree with:
# cp arch/i386/boot/bzImage /boot/vmlinuz-custom-2.4.28
At this point you are almost finished. The last step is to add the new kernel to the Linux boot loader.
Configuring LILOLILO (Linux Loader) is the default boot loader that Slackware Linux uses. The configuration ofLILO works in two steps; the first step is to alter the LILO configuration in /etc/lilo.conf. Thesecond step is to run the lilo, which will write the LILO configuration to the boot loader. The LILOconfiguration already has an entry for the current kernel you are running. It is a good idea to keepthis entry, as a fall-back option if your new kernel does not work. If you scroll down to the bottom of/etc/lilo.conf you will see this entry, it looks comparable to this:
# Linux bootable partition config beginsimage = /boot/vmlinuz
root = /dev/hda5label = Slackread-only # Non-UMSDOS filesystems should be mounted read-only for checking
# Linux bootable partition config ends
The easiest way to add the new kernel is to duplicate the existing entry, and then editing the firstentry, changing the image, and label options. After changing the example above it would looklike this:
# Linux bootable partition config beginsimage = /boot/vmlinuz-custom-2.4.28
root = /dev/hda5label = Slackread-only # Non-UMSDOS filesystems should be mounted read-only for checking
image = /boot/vmlinuzroot = /dev/hda5label = SlackOldread-only # Non-UMSDOS filesystems should be mounted read-only for checking
# Linux bootable partition config ends
59

Chapter 14. Building a kernel
As you can see the image points to the new kernel in the first entry, and we changed the label of thesecond entry to “SlackOld”. LILO will automatically boot the first image. You can now install thisnew LILO configuration with the lilo command:
# liloAdded Slack *Added SlackOld
The next time you boot both entries will be available, and the “Slack” entry will be booted by default.
60
Chapter 15. Security
IntroductionWith the increasing usage of the Internet and wireless networks security is getting more importantevery day. It is impossible to cover this subject in a single chapter of an introduction to GNU/Linux.This chapter covers some basic security techniques that provide a good start for desktop and serversecurity.
Before we go on to specific subjects, it is a good idea to make some remarks about passwords.Computer authorization largely relies on passwords. Be sure to use good passwords in all situations.Avoid using words, names, birth dates and short passwords. These passwords can easily be crackedwith dictionary attacks or brute force attacks against hosts or password hashes. Use long passwords,ideally eight characters or longer, consisting of random letters (including capitals) and numbers.
E-Mail security
IntroductionGNU/Linux supports two major methods of securing e-mails, but before we will look into thesespecifically we are going to look what e-mail security provides. There are two ways in which youcan secure e-mails: signing e-mail and encrypting e-mail. Signing e-mail means that a special digitalsignature is added to the e-mail by the mail user agent. The recipient can use the signature to checkwhether an e-mail is really from the sender it claims to be from or not, and that the message is not inany way changed during the transmission. E-Mail encryption codes the e-mail in a way that only theintended recipient can decode it.
This system relies on two keys: the private and the public key. Public keys are used to encryptmessages, and messages can only be decrypted with the private key. This means that one can sent hispublic key out to people. People can use this key to send encrypted e-mails, that only the person withthe private key can decode. Of course, this means that the security of this system depends on howwell the private is kept secret.
One might wonder why he or she should use one of these techniques. While most people do not feelthe need to encrypt most of their e-mails, it generally is a good idea to sign your e-mails. There are,for example, a lot of viruses these days that use other people’s e-mail addresses in the From: field ofviruses. If the people who you are communicating with know that you sign your e-mails, they willnot open fake e-mail from viruses. Besides that it looks much more professional if people can checkyour identity, especially in business transactions. For example, who would you rather trust,[email protected], or someone using a professional e-mail address with digitallysigned e-mails?
GnuPG or S/MIMEAt the moment there two major standards that are supported by GNU/Linux, the OpenPGP standard,by the GnuPG tool, and S/MIME. Both are about equally good concerning the strength of the usedencryption algorithms. The big difference is that S/MIME relies on a certificate authority (CA),GnuPG does not. A certificate authority is an organization that is authorized to hand out keys. This
61
Chapter 15. Security
means that the certificate authority validates that the e-mail address and/or name in the certificate isauthentic. This means that either:
• The certificate (aka private and public key) belongs to the owner of the e-mail address. E-Mailverification is used by the certificate authority to check this.
• The certificate belongs to the owner of the e-mail address, and to the name in the certificate. Thisinvolves an extra step than e-mail verification. To have a certificate with a name, your identity hasto be checked by the certificate authority.
As you can see this system is quite bullet-proof, and you can reasonably expect that a certificate isauthentically representing the e-mail address and/or person. GnuPG does not use a certificateauthority. This means that anybody can make a key with your name and e-mail address. Trust isestablished by signing keys. For example, person A verifies that person B’s key really belongs toperson B, by meeting him in real life, and he signs his key. The authenticity of a key is more certainif it is signed by people who you trust. As you can guess this system is not completely bullet proof,and it can take some time to get your key trusted by other people. Besides, if you use another e-mailaddress, ant want to use a new key you will have to start all over again. The advantage of thisapproach is that your private key is not known to a certificate authority.
GnuPG used to be supported a lot better on GNU/Linux, but more and more e-mail clients supportS/MIME these days. On Windows S/MIME is better supported, because Outlook Express andMozilla Mail (two commonly used e-mail clients) both have S/MIME support. If you arecommunicating with many people that use Windows, it is a good choice to go for S/MIME, becauseit is worthless to use signed e-mails if the recipient can not verify them by default.
Configuring and using GnuPGThis section gives a short introduction on how to configure and use GnuPG. Make sure you haveGnuPG installed. If you have not, you can install it from the “n” disk set.
Generating your private and public keys
Generating public and private keys is a bit complicated, because GnuPG uses DSA keys by default.DSA is an encryption algorithm, the problem is that the maximum key length of DSA is 1024 bits,this is considered too short for the longer term. That is why it is a good idea to use 2048 bit RSAkeys. This section describers how this can be done.
Note: 1024-bit keys were believed to be secure for a long time. But Bernstein’s paper Circuits forInteger Factorization: a Proposal contests this, the bottom line is that it is quite feasible fornational security agencies to produce hardware that can break keys in a relatively short amountof time. Besides that it has be shown that 512-bit RSA keys can be broken in a relatively shorttime using common hardware. More information about these issues can by found in this e-mail tothe cypherpunks list: http://lists.saigon.com/vault/security/encryption/rsa1024.html
We can generate a key by executing:
$ gpg --gen-key
The first question is what kind of key you would like to make. We will choose (4) RSA (sign only):
Please select what kind of key you want:
62
Chapter 15. Security
(1) DSA and ElGamal (default)(2) DSA (sign only)(4) RSA (sign only)
Your selection? 4
You will then be asked what the size of the key you want to generate has to be. Type in 2048 togenerate a 2048 bit key, and press enter to continue.
What keysize do you want? (1024) 2048
The next question is simple to answer, just choose what you like. Generally speaking it is not a badidea to let the key be valid infinitely. You can always deactivate the key with a special revocationcertificate.
Please specify how long the key should be valid.0 = key does not expire
<n> = key expires in n days<n>w = key expires in n weeks<n>m = key expires in n months<n>y = key expires in n years
Key is valid for? (0) 0
GnuPG will then ask for confirmation. After confirming your name and e-mail address will berequested. GnuPG will also ask for a comment, you can leave this blank, or you could fill insomething like “Work” or “Private”, to indicate what the key is used for. For example:
Real name: John DoeEmail address: [email protected]: WorkYou selected this USER-ID:
"John Doe (Work) <[email protected]>"
GnuPG will the ask you to confirm your user ID. After confirming it GnuPG will ask you to enter apassword. Be sure to use a good password:
You need a Passphrase to protect your secret key.
Enter passphrase:
After entering the password twice GnuPG will generate the keys. But we are not done yet. GnuPGhas only generated a key for signing information, not for encryption of information. To continue,have a look at the output, and look for the key ID. In the information about the key you will see pub2048R/ . The key ID is printed after this fragment. In this example:
public and secret key created and signed.key marked as ultimately trusted.
pub 2048R/8D080768 2004-07-16 John Doe (Work) <[email protected]>Key fingerprint = 625A 269A 16B9 C652 B953 8B64 389A E0C9 8D08 0768
the key ID is 8D080768. If you lost the output of the key generation you can still find the key ID inthe output of the gpg --list-keys command. Use the key ID to tell GnuPG that you want to edit yourkey:
$ gpg --edit-key <Key ID>
With the example key above the command would be:
63
Chapter 15. Security
$ gpg --edit-key 8D080768
GnuPG will now display a command prompt. Execute the addkey command on this commandprompt:
Command> addkey
GnuPG will now ask the password you used for your key:
Key is protected.
You need a passphrase to unlock the secret key foruser: "John Doe (Work) <[email protected]>"2048-bit RSA key, ID 8D080768, created 2004-07-16
Enter passphrase:
After entering the password GnuPG will ask you what kind of key you would like to create. ChooseRSA (encrypt only), and fill in the information like you did earlier (be sure to use a 2048 bit key). Forexample:
Please select what kind of key you want:(2) DSA (sign only)(3) ElGamal (encrypt only)(4) RSA (sign only)(5) RSA (encrypt only)
Your selection? 5What keysize do you want? (1024) 2048Requested keysize is 2048 bitsPlease specify how long the key should be valid.
0 = key does not expire<n> = key expires in n days<n>w = key expires in n weeks<n>m = key expires in n months<n>y = key expires in n years
Key is valid for? (0) 0
And confirm that the information is correct. After the key is generated you can leave the GnuPGcommand prompt, and save the new key with the save command:
Command> save
Congratulations! You have now generated the necessary keys to encrypt and decrypt e-mails andfiles. You can now configure your e-mail client to use GnuPG. It is a good idea to store the contentsof the .gnupg directory on some reliable medium, and store that in a safe place! If your private keyis lost you can’t decrypt files and messages that were encrypted with your public key. If the privatekey, and your password are stolen, the security of this system is completely compromised.
Exporting your public key
To make GnuPG useful, you have to give your public key to people who send you files or e-mails.They can use your public key to encrypt files, or use it to verify whether a file has a correct signatureor not. The key can be exported using the --export parameter. It is also a good idea to specify the--output parameter, this will save the key in a file. The following command would save the publickey of John Doe, used in earlier examples, to the file key.gpg:
64
Chapter 15. Security
$ gpg --output key.gpg --export [email protected]
This saves the key in binary format. Often it is more convenient to use the so-called “ASCII armoredoutput”, which fits better for adding the key to e-mails, or websites. You export an ASCII armoredversion of the key by adding the --armor parameter:
$ gpg --armor --output key.gpg --export [email protected]
If you look at the key.gpg file you will notice that the ASCII armored key is a much morecomfortable format.
Signatures
With GPG you can make a signature for a file. This signature is unique, because your signature canonly be made with your private key. This means that other people can check whether the file wasreally sent by you, and whether it was in any way altered or not. Files can be signed with the--detach-sign parameter. Let us look at an example. This command will make a signature forthe memo.txt file. The signature will be stored in memo.txt.sig.
$ gpg --output memo.txt.sig --detach-sign memo.txt
You need a passphrase to unlock the secret key foruser: "John Doe (Work) <[email protected]>"2048-bit RSA key, ID 8D080768, created 2004-07-16
Enter passphrase:
As you can see, GnuPG will ask you to enter the password for your private key. After you haveentered the right key the signature file (memo.txt.sig) will be created.
You can verify a file with its signature using the --verify parameter. Specify the signature file asa parameter to the --verify parameter. The file that needs to be verified can be specified as thefinal parameter:
$ gpg --verify memo.txt.sig memo.txtgpg: Signature made Tue Jul 20 23:47:45 2004 CEST using RSA key ID 8D080768gpg: Good signature from "John Doe (Work) <[email protected]>"
This will confirm that the file was indeed signed by John Doe (Work) <[email protected]>, with thekey 8D080768, and that the file is unchanged. Suppose the file was changed, GnuPG would havecomplained about it loudly:
$ gpg --verify memo.txt.sig memo.txtgpg: Signature made Tue Jul 20 23:47:45 2004 CEST using RSA key ID 8D080768gpg: BAD signature from "John Doe (Work) <[email protected]>"
65
Chapter 15. Security
Closing services
IntroductionMany GNU/Linux run some services that are open to a local network or the Internet. Other hosts canconnect to these services by connecting to specific ports. For example, port 80 is used for WWWtraffic. The /etc/services file contains a table with all commonly used services, and the portnumbers that are used for these services.
A secure system should only run the services that are necessary. So, suppose that a host is acting as aweb server, it should not have ports open (thus servicing) FTP or SMTP. With more open portssecurity risks increase very fast, because there is a bigger chance that the software servicing a porthas a vulnerability, or is badly configured. The following few sections will help you tracking downwhich ports are open, and closing them.
Finding open portsOpen ports can be found using a port scanner. Probably the most famous port scanner forGNU/Linux is nmap. nmap is available through the “n” disk set.
The basic nmap syntax is: nmap host. The host parameter can either be a hostname or IP address.Suppose that we would like to scan the host that nmap is installed on. In this case we could specifythe localhost IP address, 127.0.0.1:
$ nmap 127.0.0.1
Starting nmap V. 3.00 ( www.insecure.org/nmap/ )Interesting ports on localhost (127.0.0.1):(The 1596 ports scanned but not shown below are in state: closed)Port State Service21/tcp open ftp22/tcp open ssh23/tcp open telnet80/tcp open http6000/tcp open X11
Nmap run completed -- 1 IP address (1 host up) scanned in 0 seconds
In this example you can see that the host has five open ports that are being serviced; ftp, ssh, telnet,http and X11.
inetdThere are two ways to offer TCP/IP services: by running server applications stand-alone as a daemonor by using the internet super server, inetd(8). inetd is a daemon which monitors a range of ports. Ifa client attempts to connect to a port inetd handles the connection and forwards the connection to theserver software which handles that kind of connection. The advantage of this approach is that it addsan extra layer of security and it makes it easier to log incoming connections. The disadvantage is thatit is somewhat slower than using a stand-alone daemon. It is thus a good idea to run a stand-alonedaemon on, for example, a heavily loaded FTP server.
You can check whether inetd is running on a host or not with ps, for example:
66
Chapter 15. Security
$ ps ax | grep inetd2845 ? S 0:00 /usr/sbin/inetd
In this example inetd is running with PID (process ID) 2845. inetd can be configured using the/etc/inetd.conf file. Let’s have a look at an example line from inetd.conf:
# File Transfer Protocol (FTP) server:ftp stream tcp nowait root /usr/sbin/tcpd proftpd
This line specifies that inetd should accept FTP connections and pass them to tcpd. This may seem abit odd, because proftpd normally handles FTP connections. You can also specify to use proftpddirectly in inetd.conf, but it is a good idea to give the connection to tcpd. This program passes theconnection to proftpd in turn, as specified. tcpd is used to monitor services and to provide hostbased access control.
Services can be disabled by adding the comment character (#) at the beginning of the line. It is agood idea to disable all services and enable services you need one at a time. After changing/etc/inetd.conf inetd needs to be restarted to activate the changes. This can be done by sendingthe HUP signal to the inetd process:
# ps ax | grep ’inetd’2845 ? S 0:00 /usr/sbin/inetd
# kill -HUP 2845
If you do not need inetd at all, it is a good idea to remove it. If you want to keep it installed, but donot want Slackware Linux to load it at the booting process, execute the following command as root:
# chmod a-x /etc/rc.d/rc.inetd
67

IV. Network administration
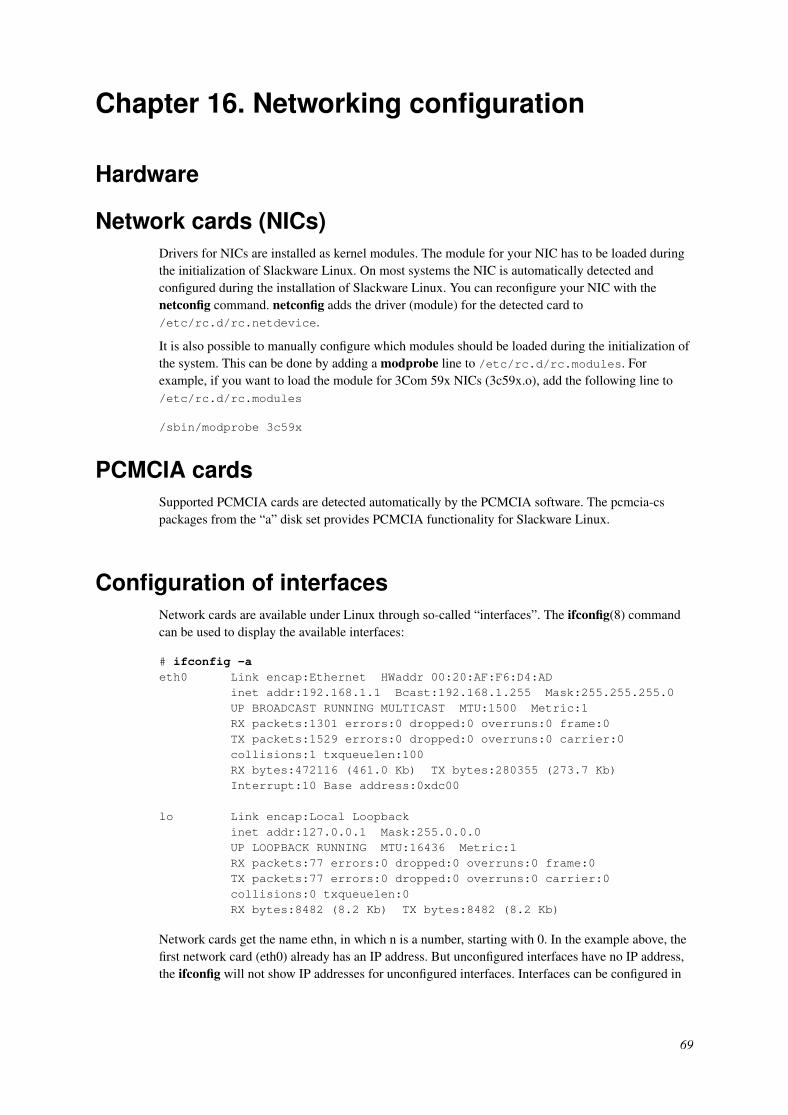
Chapter 16. Networking configuration
Hardware
Network cards (NICs)Drivers for NICs are installed as kernel modules. The module for your NIC has to be loaded duringthe initialization of Slackware Linux. On most systems the NIC is automatically detected andconfigured during the installation of Slackware Linux. You can reconfigure your NIC with thenetconfig command. netconfig adds the driver (module) for the detected card to/etc/rc.d/rc.netdevice.
It is also possible to manually configure which modules should be loaded during the initialization ofthe system. This can be done by adding a modprobe line to /etc/rc.d/rc.modules. Forexample, if you want to load the module for 3Com 59x NICs (3c59x.o), add the following line to/etc/rc.d/rc.modules
/sbin/modprobe 3c59x
PCMCIA cardsSupported PCMCIA cards are detected automatically by the PCMCIA software. The pcmcia-cspackages from the “a” disk set provides PCMCIA functionality for Slackware Linux.
Configuration of interfacesNetwork cards are available under Linux through so-called “interfaces”. The ifconfig(8) commandcan be used to display the available interfaces:
# ifconfig -aeth0 Link encap:Ethernet HWaddr 00:20:AF:F6:D4:AD
inet addr:192.168.1.1 Bcast:192.168.1.255 Mask:255.255.255.0UP BROADCAST RUNNING MULTICAST MTU:1500 Metric:1RX packets:1301 errors:0 dropped:0 overruns:0 frame:0TX packets:1529 errors:0 dropped:0 overruns:0 carrier:0collisions:1 txqueuelen:100RX bytes:472116 (461.0 Kb) TX bytes:280355 (273.7 Kb)Interrupt:10 Base address:0xdc00
lo Link encap:Local Loopbackinet addr:127.0.0.1 Mask:255.0.0.0UP LOOPBACK RUNNING MTU:16436 Metric:1RX packets:77 errors:0 dropped:0 overruns:0 frame:0TX packets:77 errors:0 dropped:0 overruns:0 carrier:0collisions:0 txqueuelen:0RX bytes:8482 (8.2 Kb) TX bytes:8482 (8.2 Kb)
Network cards get the name ethn, in which n is a number, starting with 0. In the example above, thefirst network card (eth0) already has an IP address. But unconfigured interfaces have no IP address,the ifconfig will not show IP addresses for unconfigured interfaces. Interfaces can be configured in
69
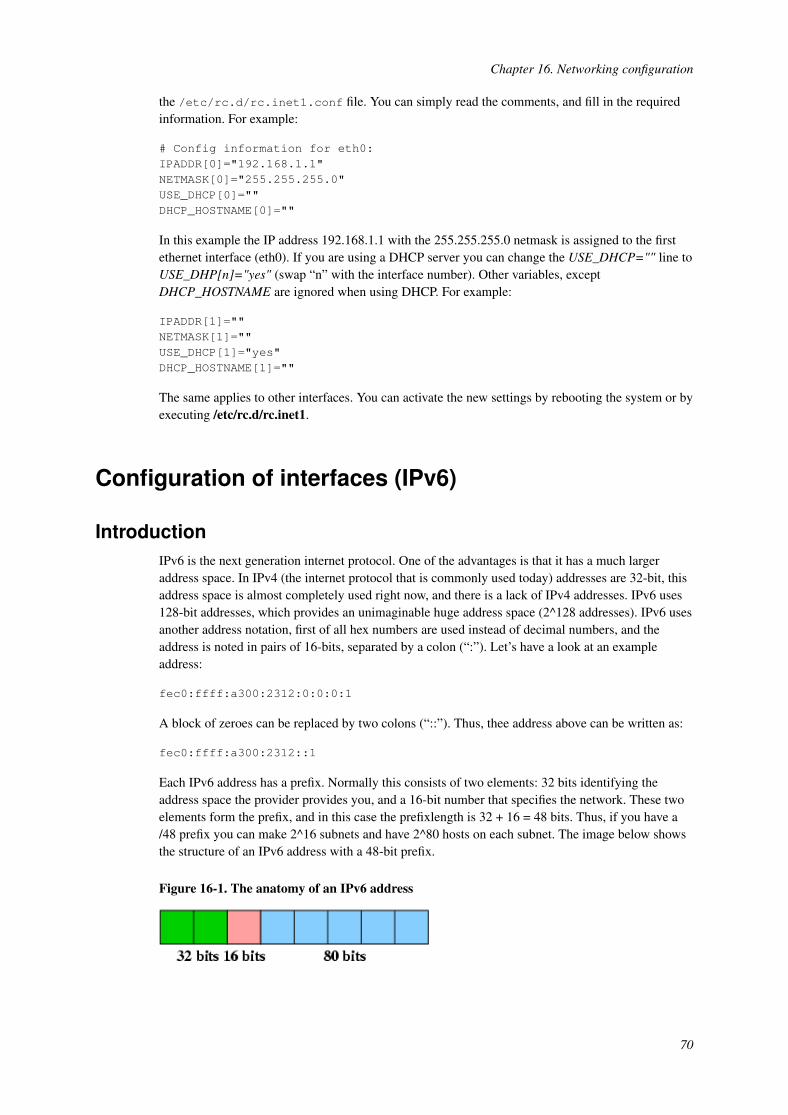
Chapter 16. Networking configuration
the /etc/rc.d/rc.inet1.conf file. You can simply read the comments, and fill in the requiredinformation. For example:
# Config information for eth0:IPADDR[0]="192.168.1.1"NETMASK[0]="255.255.255.0"USE_DHCP[0]=""DHCP_HOSTNAME[0]=""
In this example the IP address 192.168.1.1 with the 255.255.255.0 netmask is assigned to the firstethernet interface (eth0). If you are using a DHCP server you can change the USE_DHCP="" line toUSE_DHP[n]="yes" (swap “n” with the interface number). Other variables, exceptDHCP_HOSTNAME are ignored when using DHCP. For example:
IPADDR[1]=""NETMASK[1]=""USE_DHCP[1]="yes"DHCP_HOSTNAME[1]=""
The same applies to other interfaces. You can activate the new settings by rebooting the system or byexecuting /etc/rc.d/rc.inet1.
Configuration of interfaces (IPv6)
IntroductionIPv6 is the next generation internet protocol. One of the advantages is that it has a much largeraddress space. In IPv4 (the internet protocol that is commonly used today) addresses are 32-bit, thisaddress space is almost completely used right now, and there is a lack of IPv4 addresses. IPv6 uses128-bit addresses, which provides an unimaginable huge address space (2^128 addresses). IPv6 usesanother address notation, first of all hex numbers are used instead of decimal numbers, and theaddress is noted in pairs of 16-bits, separated by a colon (“:”). Let’s have a look at an exampleaddress:
fec0:ffff:a300:2312:0:0:0:1
A block of zeroes can be replaced by two colons (“::”). Thus, thee address above can be written as:
fec0:ffff:a300:2312::1
Each IPv6 address has a prefix. Normally this consists of two elements: 32 bits identifying theaddress space the provider provides you, and a 16-bit number that specifies the network. These twoelements form the prefix, and in this case the prefixlength is 32 + 16 = 48 bits. Thus, if you have a/48 prefix you can make 2^16 subnets and have 2^80 hosts on each subnet. The image below showsthe structure of an IPv6 address with a 48-bit prefix.
Figure 16-1. The anatomy of an IPv6 address
70
Chapter 16. Networking configuration
There are a some specially reserved prefixes, most notable include:
Table 16-1. Important IPv6 Prefixes
Prefix Descriptionfe80:: Link local addresses, which are not routed.
fec0:: Site local addresses, which are locally routed,but not on or to the internet.
2002:: 6to4 addresses, which are used for the transitionfrom IPv4 to IPv6.
Slackware Linux IPv6 supportThe Linux kernel binaries included in Slackware Linux do not support IPv6 by default, but support isincluded as a kernel module. This module can be loaded using modprobe:
# modprobe ipv6
You can verify if IPv6 support is loaded correctly by looking at the kernel output using the dmesg:
$ dmesg[..]IPv6 v0.8 for NET4.0
IPv6 support can be enabled permanently by adding the following line to /etc/rc.d/rc.modules:
/sbin/modprobe ipv6
Interfaces can be configured using ifconfig. But it is recommended to make IPv6 settings using theip command, which is part of the “iputils” package that can be found in the extra/ directory of theSlackware Linux tree.
Adding an IPv6 address to an interfaceIf there are any router advertisers on a network there is a chance that the interfaces on that networkalready received an IPv6 address when the IPv6 kernel support was loaded. If this is not the case anIPv6 address can be added to an interface using the ip utility. Suppose we want to add the address“fec0:0:0:bebe::1” with a prefix length of 64 (meaning “fec0:0:0:bebe” is the prefix). This can bedone with the following command syntax:
# ip -6 addr add <ip6addr>/<prefixlen> dev <device>
For example:
# ip -6 addr add fec0:0:0:bebe::1/64 dev eth0
71
Chapter 16. Networking configuration
Resolving
HostnameEach computer on the internet has a hostname. If you do not have a hostname that is resolvable withDNS, it is still a good idea to configure your hostname, because some software uses it. You canconfigure the hostname in /etc/HOSTNAME. A single line with the hostname of the machine willsuffice. Normally a hostname has the following form: host.domain.tld, for exampledarkstar.slackfans.org. Be aware that the hostname has to be resolvable, meaning that GNU/Linuxshould be able to convert the hostname to an IP address. You can make sure the hostname isresolvable by adding it to /etc/hosts. Read the following section for more information about thisfile.
/etc/hosts/etc/hosts is a table of IP addresses with associated hostnames. This file can be used to namecomputers in a small network. Let’s look at an example of the /etc/hosts file:
127.0.0.1 localhost192.168.1.1 tazzy.slackfans.org tazzy192.168.1.2 gideon.slackfans.org
The localhost line should always be present. It assigns the name localhost to a special interface, theloopback. In this example the names tazzy.slackfans.org and tazzy are assigned to the IP address192.168.1.1, and the name gideon.slackfans.org is assigned to the IP address 192.168.1.2. On thesystem with this file both computers are available via the mentioned hostnames.
It is also possible to add IPv6 addresses, which will be used if your system is configured for IPv6.This is an example of a /etc/hosts file with IPv4 and IPv6 entries:
# IPv4 entries127.0.0.1 localhost192.168.1.1 tazzy.slackfans.org tazzy192.168.1.2 gideon.slackfans.org
# IPv6 entries::1 localhostfec0:0:0:bebe::2 flux.slackfans.org
Please note that “::1” is the default IPv6 loopback.
/etc/resolv.confThe /etc/resolv.conf file is used to specify which nameservers the system should use. Anameserver converts hostnames to IP addresses. Your provider should have given you at least twoname name server addresses (DNS servers). You can add these nameservers to /etc/resolv.conf
by adding the line nameserver ipaddress for each nameserver. For example:
nameserver 192.168.1.1nameserver 192.168.1.69
72
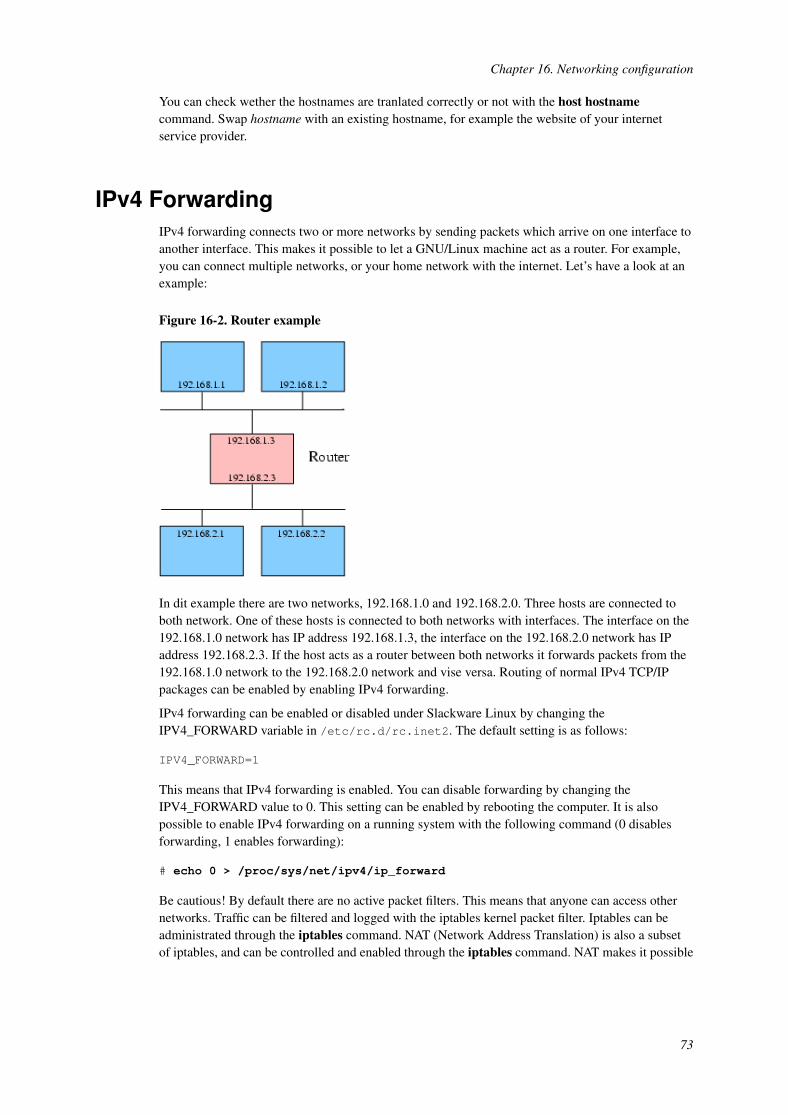
Chapter 16. Networking configuration
You can check wether the hostnames are tranlated correctly or not with the host hostnamecommand. Swap hostname with an existing hostname, for example the website of your internetservice provider.
IPv4 ForwardingIPv4 forwarding connects two or more networks by sending packets which arrive on one interface toanother interface. This makes it possible to let a GNU/Linux machine act as a router. For example,you can connect multiple networks, or your home network with the internet. Let’s have a look at anexample:
Figure 16-2. Router example
In dit example there are two networks, 192.168.1.0 and 192.168.2.0. Three hosts are connected toboth network. One of these hosts is connected to both networks with interfaces. The interface on the192.168.1.0 network has IP address 192.168.1.3, the interface on the 192.168.2.0 network has IPaddress 192.168.2.3. If the host acts as a router between both networks it forwards packets from the192.168.1.0 network to the 192.168.2.0 network and vise versa. Routing of normal IPv4 TCP/IPpackages can be enabled by enabling IPv4 forwarding.
IPv4 forwarding can be enabled or disabled under Slackware Linux by changing theIPV4_FORWARD variable in /etc/rc.d/rc.inet2. The default setting is as follows:
IPV4_FORWARD=1
This means that IPv4 forwarding is enabled. You can disable forwarding by changing theIPV4_FORWARD value to 0. This setting can be enabled by rebooting the computer. It is alsopossible to enable IPv4 forwarding on a running system with the following command (0 disablesforwarding, 1 enables forwarding):
# echo 0 > /proc/sys/net/ipv4/ip_forward
Be cautious! By default there are no active packet filters. This means that anyone can access othernetworks. Traffic can be filtered and logged with the iptables kernel packet filter. Iptables can beadministrated through the iptables command. NAT (Network Address Translation) is also a subsetof iptables, and can be controlled and enabled through the iptables command. NAT makes it possible
73

Chapter 16. Networking configuration
to “hide” a network behind one IP address. This allows you to use the internet on a completenetwork with only one IP address.
74
Chapter 17. IPsec
TheoryIPsec is a standard for securing IP communication through authentication, and encryption. Besidesthat it can compress packets, reducing traffic. The following protocols are part of the IPsec standard:
• AH (Authentication Header) provides authenticity guarantee for transported packets. This is doneby checksumming the packages using a cryptographic algorithm. If the checksum is found to becorrect by the receiver, the receiver can be assured that the packet is not modified, and that thepacket really originated from the reported sender (provided that the keys are only known by thesender and receiver).
• ESP (Encapsulating Security Payload) is used to encrypt packets. This makes the data of thepacket confident, and only readable by the host with the right decryption key.
• IPcomp (IP payload compression) provides compression before a packet is encrypted. This isuseful, because encrypted data generally compresses worse than unencrypted data.
• IKE (Internet Key Exchange) provides the means to negotiate keys in secrecy. Please note thatIKE is optional, keys can be configured manually.
There are actually two modes of operation: transport mode is used to encrypt normal connectionsbetween two hosts, tunnel mode encapsulates the original package in a new header. In this chapterwe are going to look at the transport mode, because the primary goal of this chapter is to show howto set up a secure connection between two hosts.
Kernel configurationThis chapter only applies to Linux 2.6.x kernels. Earlier kernels have no native IPsec support. So,make sure that you have a 2.6.x kernel. Configure the kernel as you would do normally, and makesure the following options are enabled:
Device Drivers -> Networking support -> Networking options:
<*> PF_Key sockets<*> IP: AH transformation<*> IP: ESP transformation<*> IP: IPComp transformation
In this article we are only going to use AH and ESP transformations, but it is not a bad idea to enableIPComp transformation for further configuration of IPsec.
Compile the kernel as usual and boot it.
Installing IPsec-ToolsThe next step is to install the IPsec-Tools. These tools are ports of the KAME (http://www.kame.net)IPsec utilities. Download the latest sources and unpack, configure and install them:
# tar zxf ipsec-tools-x.y.z.tar.gz
75
Chapter 17. IPsec
# cd ipsec-tools-x.y.z# ./configure --prefix=/usr --sysconfdir=/etc# make# make install
Replace x.y.z with the version of the downloaded sources, for example 0.2.3.
The configuration of ipsec
IntroductionWe will use an example as the guideline for setting up an encrypted connection between to hosts.The hosts have the IP addresses 192.168.1.1 and 192.168.1.169. The “transport mode” of operationwill be used with AH and ESP transformations and manual keys.
Writing the configuration fileThe first step is to write a configuration file we will name /etc/ipsec.conf. On the first host(192.168.1.1) the following /etc/ipsec.conf configuration will be used:
#!/usr/sbin/setkey -f
# Flush the SAD and SPDflush;spdflush;
add 192.168.1.1 192.168.1.169 ah 0x200 -A hmac-md50xa731649644c5dee92cbd9c2e7e188ee6;add 192.168.1.169 192.168.1.1 ah 0x300 -A hmac-md50x27f6d123d7077b361662fc6e451f65d8;
add 192.168.1.1 192.168.1.169 esp 0x201 -E 3des-cbc0x656c8523255ccc23a66c1917aa0cf30991fce83532a4b224;add 192.168.1.169 192.168.1.1 esp 0x301 -E 3des-cbc0xc966199f24d095f3990a320d749056401e82b26570320292
spdadd 192.168.1.1 192.168.1.169 any -P out ipsecesp/transport//requireah/transport//require;
spdadd 192.168.1.169 192.168.1.1 any -P in ipsecesp/transport//requireah/transport//require;
The first line (a line ends with a “;”) adds a key for the header checksumming for packets comingfrom 192.168.1.1 going to 192.168.1.169. The second line does the same for packets coming from192.168.1.169 to 192.168.1.1. The third and the fourth line define the keys for the data encryptionthe same way as the first two lines. Finally the “spadd” lines define two policies, namely packetsgoing out from 192.168.1.1 to 192.168.1.169 should be (require) encoded (esp) and “signed” withthe authorization header. The second policy is for incoming packets and it is the same as outgoingpackages.
76
Chapter 17. IPsec
Please be aware that you should not use these keys, but your own secretly kept unique keys. You cangenerate keys using the /etc/random device:
# dd if=/dev/random count=16 bs=1 | xxd -ps
This command uses dd to output 16 bytes from /dev/random. Don’t forget to add “0x” at thebeginning of the line in the configuration files. You can use the 16 byte (128 bits) for the hmac-md5algorithm that is used for AH. The 3des-cbc algorithm that is used for ESP in the example should befed with a 24 byte (192 bits) key. These keys can be generated with:
# dd if=/dev/random count=24 bs=1 | xxd -ps
Make sure that the /etc/ipsec.conf file can only be read by the root user. If normal users canread the keys IPsec provides no security at all. You can do this with:
# chmod 600 /etc/ipsec.conf
The same /etc/ipsec.conf can be created on the 192.168.1.169 host, with inverted -P in and-P out options. So, the /etc/ipsec.conf will look like this:
#!/usr/sbin/setkey -f
# Flush the SAD and SPDflush;spdflush;
add 192.168.1.1 192.168.1.169 ah 0x200 -A hmac-md50xa731649644c5dee92cbd9c2e7e188ee6;add 192.168.1.169 192.168.1.1 ah 0x300 -A hmac-md50x27f6d123d7077b361662fc6e451f65d8;
add 192.168.1.1 192.168.1.169 esp 0x201 -E 3des-cbc0x656c8523255ccc23a66c1917aa0cf30991fce83532a4b224;add 192.168.1.169 192.168.1.1 esp 0x301 -E 3des-cbc0xc966199f24d095f3990a320d749056401e82b26570320292
spdadd 192.168.1.1 192.168.1.169 any -P in ipsecesp/transport//requireah/transport//require;
spdadd 192.168.1.169 192.168.1.1 any -P out ipsecesp/transport//requireah/transport//require;
Activating the IPsec configurationThe IPsec configuration can be activated with the setkey command:
# setkey -f /etc/ipsec.conf
If you want to enable IPsec permanently you can add the following line to /etc/rc.d/rc.local
on both hosts:
/usr/sbin/setkey -f /etc/ipsec.conf
77

Chapter 17. IPsec
After configuring IPsec you can test the connection by running tcpdump and simultaneouslypinging the other host. You can see if AH and ESP are actually used in the tcpdump output:
# tcpdump -i eth0tcpdump: listening on eth011:29:58.869988 tazzy.slackfiles.org > 192.168.1.169: AH(spi=0x00000200,seq=0x40f): ESP(spi=0x00000201,seq=0x40f) (DF)11:29:58.870786 192.168.1.169 > tazzy.slackfiles.org: AH(spi=0x00000300,seq=0x33d7): ESP(spi=0x00000301,seq=0x33d7)
78

Chapter 18. The internet super server
IntroductionThere are two ways to offer TCP/IP services: by running server applications standalone as a daemonor by using the internet super server, inetd(8). inetd is a daemon which monitors a range of ports. Ifa client attempts to connect to a port inetd handles the connection and forwards the connection to theserver software which handles that kind of connection. The advantage of this approach is that it addsan extra layer of security and it makes it easier to log incoming connections. The disadvantage is thatit is somewhat slower than using a standalone daemon. It is thus a good idea to run a standalonedaemon on, for example, a heavily loaded FTP server.
Configurationinetd can be configured using the /etc/inetd.conf file. Let’s have a look at an example line frominetd.conf:
# File Transfer Protocol (FTP) server:ftp stream tcp nowait root /usr/sbin/tcpd proftpd
This line specifies that inetd should accept FTP connections and pass them to tcpd. This may seem abit odd, because proftpd normally handles FTP connections. You can also specify to use proftpddirectly in inetd.conf, but Slackware Linux normally passes the connection to tcpd. This programpasses the connection to proftpd in turn, as specified. tcpd is used to monitor services and toprovide host based access control.
Services can be disabled by adding the comment character (#) at the beginning of the line. It is agood idea to disable all services and enable services you need one at a time. After changing/etc/inetd.conf inetd needs to be restarted to activate the changes. This can be done by sendingthe HUP signal to the inetd process:
# ps ax | grep ’inetd’64 ? S 0:00 /usr/sbin/inetd
# kill -HUP 64
TCP wrappersAs you can see in /etc/inetd.conf connections for most protocols are made through tcpd,instead of directly passing the connection to a service program. For example:
# File Transfer Protocol (FTP) server:ftp stream tcp nowait root /usr/sbin/tcpd proftpd
In this example ftp connections are passed through tcpd. tcpd logs the connection through syslogand allows for additional checks. One of the most used features of tcpd is host-based access control.Hosts that should be denied are controlled via /etc/hosts.deny, hosts that should be allowed via/etc/hosts.allow. Both files have one rule on each line of the following form:
service: hosts
79

Chapter 18. The internet super server
Hosts can be specified by hostname or IP address. The ALL keyword specifies all hosts or allservices.
Suppose we want to block access to all services managed through tcpd, except for host“trusted.example.org”. To do this the following hosts.deny and hosts.allow files should becreated.
/etc/hosts.deny:
ALL: ALL
/etc/hosts.allow:
ALL: trusted.example.org
In the hosts.deny access is blocked to all (ALL) services for all (ALL) hosts. But hosts.allowspecifies that all (ALL) services should be available to “trusted.example.org”.
80
Chapter 19. Apache
IntroductionApache is the most popular web server since April 1996. It was originally based on NCSA httpd, andhas grown into a full-featured HTTP server. Slackware Linux currently uses the 1.3.x branch ofApache. This chapter is based on Apache 1.3.x.
InstallationApache can be installed by adding the apache pacakge from the “n” disk set. If you also want to usePHP, the php (“n” disk set) and mysql (“ap” disk set) are also required. MySQL is required, becausethe precompiled PHP depends on MySQL shared libraries. You do not have to run MySQL itself.After installing Apache it can be started automatically while booting the system by making the/etc/rc.d/rc.httpd file executable. You can do this by executing:
# chmod a+x /etc/rc.d/rc.httpd
The Apache configuration can be altered in the /etc/apache/httpd.conf file. Apache can bestopped/started/restarted every moment with the apachectl command, and the stop, start andrestart parameters. For example, execute the following command to restart Apache:
# apachectl restart/usr/sbin/apachectl restart: httpd restarted
User directoriesApache provides support for so-call user directories. This means every user gets webspace in theform of http://host/~user/ . The contents of “~user/” is stored in a subdirectory in the home directoryof the user. This directory can be specified using the “UserDir” option in httpd.conf, for example:
UserDir public_html
This specifies that the public_html directory should be used for storing the webpages. Forexample, the webpages at URL http://host/~snail/ are stored in /home/snail/public_html.
Virtual hostsThe default documentroot for apache under Slackware Linux is /var/www/htdocs. Without usingvirtual hosts every client connecting to the Apache server will receive the website in this directory.So, if we have two hostnames pointing to the server, “www.example.org” and “forum.example.org”,both will display the same website. You can make seperate sites for different hostnames by usingvirtual hosts.
In this example we are going to look how you can make two virtual hosts, one for“www.example.org”, with the documentroot /var/www/htdocs-www, and “forum.example.org”,with the documentroot /var/www/htdocs-forum. First of all we have to specify which IP
81
Chapter 19. Apache
addresses Apache should listen to. Somewhere in the /etc/apache/httpd.conf configurationfile you will find the following line:
#NameVirtualHost *:80
This line has to be commented out to use name-based virtual hosts. Remove the comment character(#) and change the parameter to “BindAddress IP:port”, or “BindAddress *:port” if you wantApache to bind to all IP addresses the host has. Suppose we want to provide virtual hosts for IPaddress 192.168.1.201 port 80 (the default Apache port), we would change the line to:
NameVirtualHost 192.168.1.201:80
Somewhere below the NameVirtualHost line you can find a commented example of a virtualhost:
#<VirtualHost *:80># ServerAdmin [email protected]# DocumentRoot /www/docs/dummy-host.example.com# ServerName dummy-host.example.com# ErrorLog logs/dummy-host.example.com-error_log# CustomLog logs/dummy-host.example.com-access_log common#</VirtualHost>
You can use this example as a guideline. For example, if we want to use all the default values, andwe want to write the logs for both virtual hosts to the default Apache logs, we would add these lines:
<VirtualHost 192.168.1.201:80>DocumentRoot /var/www/htdocs-wwwServerName www.example.org
</VirtualHost>
<VirtualHost 192.168.1.201:80>DocumentRoot /var/www/htdocs-forumServerName forum.example.org
</VirtualHost>
82
Chapter 20. BIND
IntroductionThe domain name system (DNS) is used to convert human-friendly host names (for examplewww.slackware.com) to IP addresses. BIND (Berkeley Internet Name Domain) is the most widelyused DNS daemon, and will be covered in this chapter.
DelegationOne of the main features is that DNS requests can be delegated. For example, suppose that you ownthe “linuxcorp.com” domain. You can provide the authorized nameservers for this domain, younameservers are authorative for the “linuxcorp.com”. Suppose that there are different brancheswithin your company, and you want to give each branch authority over their own zone, that is noproblem with DNS. You can delegate DNS for e.g. “sales.linuxcorp.com” to another nameserverwithin the DNS configuration for the “linuxcorp.com” zone.
The DNS system has so-called root servers, which delegate the DNS for millions of domain namesand extensions (for example, country specific extensions, like “.nl” or “.uk”) to authorized DNSservers. This system allows a branched tree of delegation, which is very flexible, and distributesDNS traffic.
DNS recordsThe following types are common DNS records:
Table 20-1. DNS records
Prefix DescriptionA An A records points to an IP address.
CNAME A CNAME record points to another DNS entry.
MX A MX record specifies which should handle mailfor the domain.
Masters and slavesTwo kinds of nameservers can be provided for a domain name: a master and slaves. The masterserver DNS records are authorative. Slave servers download their DNS record from the masterservers. Using slave servers besides a master server is recommended for high availability and can beused for load-balancing.
Making a caching nameserverA caching nameserver provides DNS services for a machine or a network, but does not provide DNS
83

Chapter 20. BIND
for a domain. That means it can only be used to convert hostnames to IP addresses. Setting up anameserver with Slackware Linux is fairly easy, because BIND is configured as a cachingnameserver by default. Enabling the caching nameserver takes just two steps: you have to installBIND and alter the initialization scripts. BIND can be installed by adding the bind package from the“n” disk set. After that bind can be started by executing the named(8) command. If want to startBIND by default, make the /etc/rc.d/rc.bind file executable. This can be done by executing thefollowing command as root:
# chmod a+x /etc/rc.d/rc.bind
If you want to use the nameserver on the machine that runs BIND, you also have to alter/etc/resolv.conf.
84