Embed Size (px)
Citation preview
2013
SPHOL327SPHOL319:
Hands on with the
Content Search web part
in SharePoint 2013
Hands-On Lab
Lab Manual

This document is provided “as-is”. Information and views expressed in this document, including URL and
other Internet Web site references, may change without notice. You bear the risk of using it.
This document does not provide you with any legal rights to any intellectual property in any Microsoft
product. You may copy and use this document for your internal, reference purposes.
© 2012 Microsoft. All rights reserved.
Microsoft Confidential Page 1
Contents Lab Objectives ........................................................................................................................................................ 2 Technologies .......................................................................................................................................................... 2 Audience ................................................................................................................................................................ 2 Scenario ................................................................................................................................................................. 2 Getting Started ....................................................................................................................................................... 2
Connect to the Lab Environment ....................................................................................................................... 2 Open the Lab Environment ................................................................................................................................ 2
Exercise 1 – Explore the Content Search Web Part .............................................................................................. 4 Scenario ............................................................................................................................................................. 4 Task 1 – Add a Content Search web part .......................................................................................................... 4 Task 2 – Configure the Content Search web part.............................................................................................. 7
Exercise 2 – Customize the Content Search Web Part ....................................................................................... 11 Scenario ........................................................................................................................................................... 11 Task 1 – Add Recommendations ..................................................................................................................... 11 Task 2 – Add query rules to change results .................................................................................................... 15 Task 3 - Add Discounted Items content search web part ................................................................................ 19 Task 4 – Use different result sources .............................................................................................................. 24
Summary .............................................................................................................................................................. 25
Hands-on Lab Hands on with the Content Search web part in SharePoint 2013
Microsoft Confidential Page 2
Hands on with the Content Search web part in SharePoint 2013
Estimated time to complete this lab: 30 minutes
Lab Objectives
This lab will teach you how to add a content search web part to a page and then configure the web part
using the query builder feature to pull custom information into the web part from a separate site
collection. The lab then steps through enabling recommendations and refiners.
After completing this lab, you will be better able to:
Add Content Search web part to a page
Use the query builder to configure a Content Search Web Part
Enable and configure refiners
Enable and configure recommendations
Create a query rule and web part to display promoted results
Technologies
SharePoint 2013
Audience
SharePoint Site Administrators and SharePoint IT Professionals
Scenario
The Content Search Web Part shows items that are results of a search query you specify. When you add it to the page, this Web Part will show recently modified items from the current site. You can change this setting to show items from another site or list by editing the Web Part and changing its search criteria. As new content is discovered by search, this Web Part will display an updated list of items each time the page is viewed.
Getting Started
Connect to the Lab Environment
Log on to the SharePoint (SP) virtual machine (VM) as Garth Fort, with the credentials CONTOSO\GarthF, pass@word1.
Open the Lab Environment
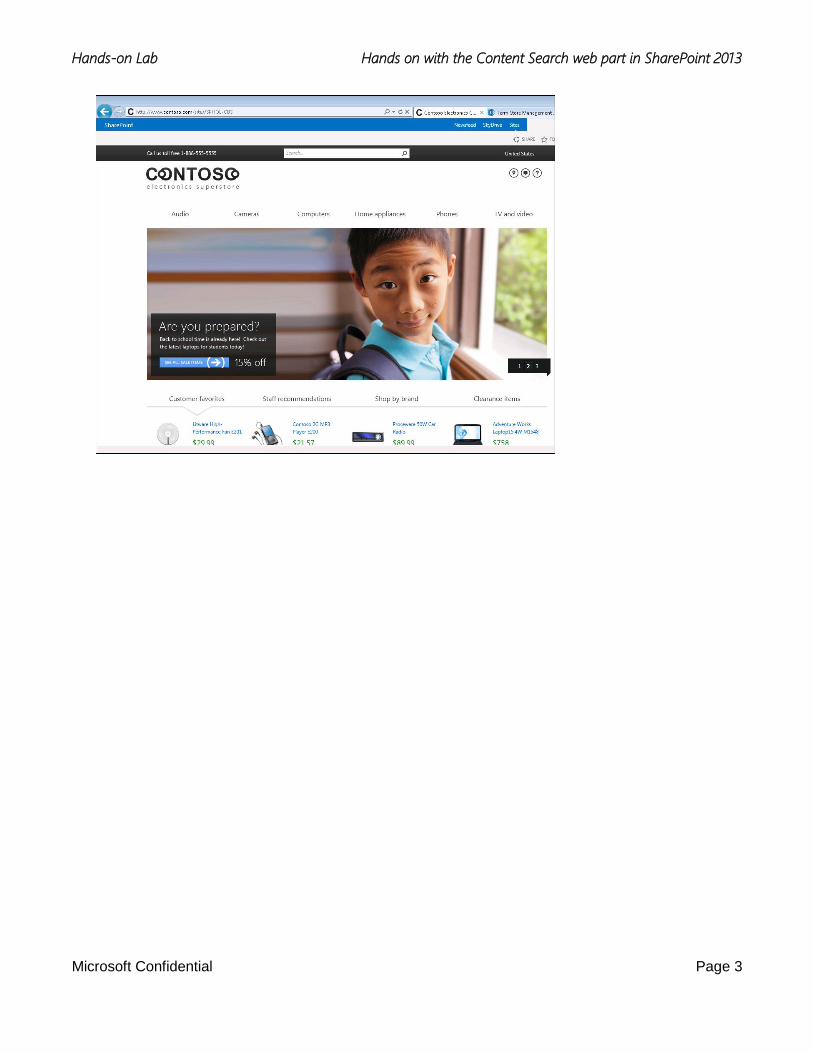
1. To begin the lab, open Internet Explorer, navigate to the demo home page at http://www.contoso.com/sites/SPHOL-CBS and log into SharePoint as Garth Fort with the following credentials:
Username: CONTOSO\GarthF
Password: pass@word1
SPHOL-CBS home page
Hands-on Lab Hands on with the Content Search web part in SharePoint 2013
Microsoft Confidential Page 3
Hands-on Lab Hands on with the Content Search web part in SharePoint 2013
Microsoft Confidential Page 4
Exercise 1 – Explore the Content Search Web Part
Estimated time to complete this exercise: 10 minutes
Scenario
In this exercise, you will learn how to add the Content Search web part to a page, and then build a query to pull data from a product catalog located in a separate site collection.
Task 1 – Add a Content Search web part
In this task, you will learn to add a Content Search web part to a product sub-category (Digital SLR cameras) web page.
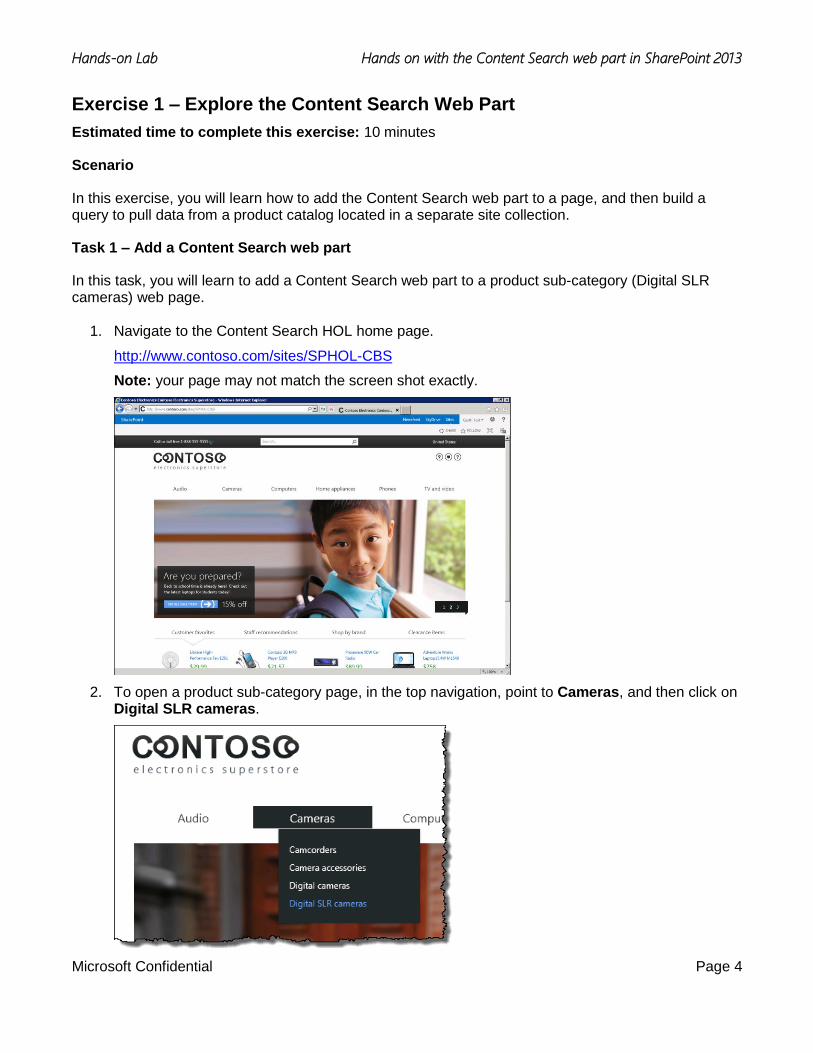
1. Navigate to the Content Search HOL home page.
http://www.contoso.com/sites/SPHOL-CBS
Note: your page may not match the screen shot exactly.
2. To open a product sub-category page, in the top navigation, point to Cameras, and then click on Digital SLR cameras.
Hands-on Lab Hands on with the Content Search web part in SharePoint 2013
Microsoft Confidential Page 5
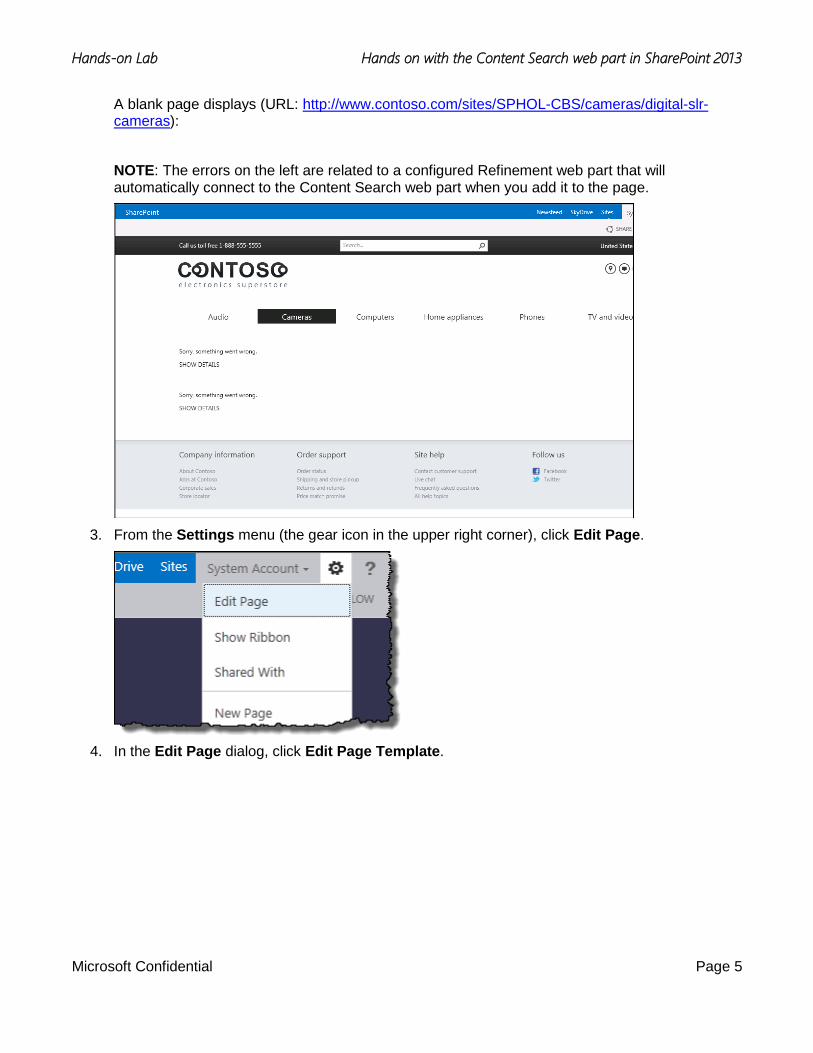
A blank page displays (URL: http://www.contoso.com/sites/SPHOL-CBS/cameras/digital-slr-cameras):
NOTE: The errors on the left are related to a configured Refinement web part that will automatically connect to the Content Search web part when you add it to the page.
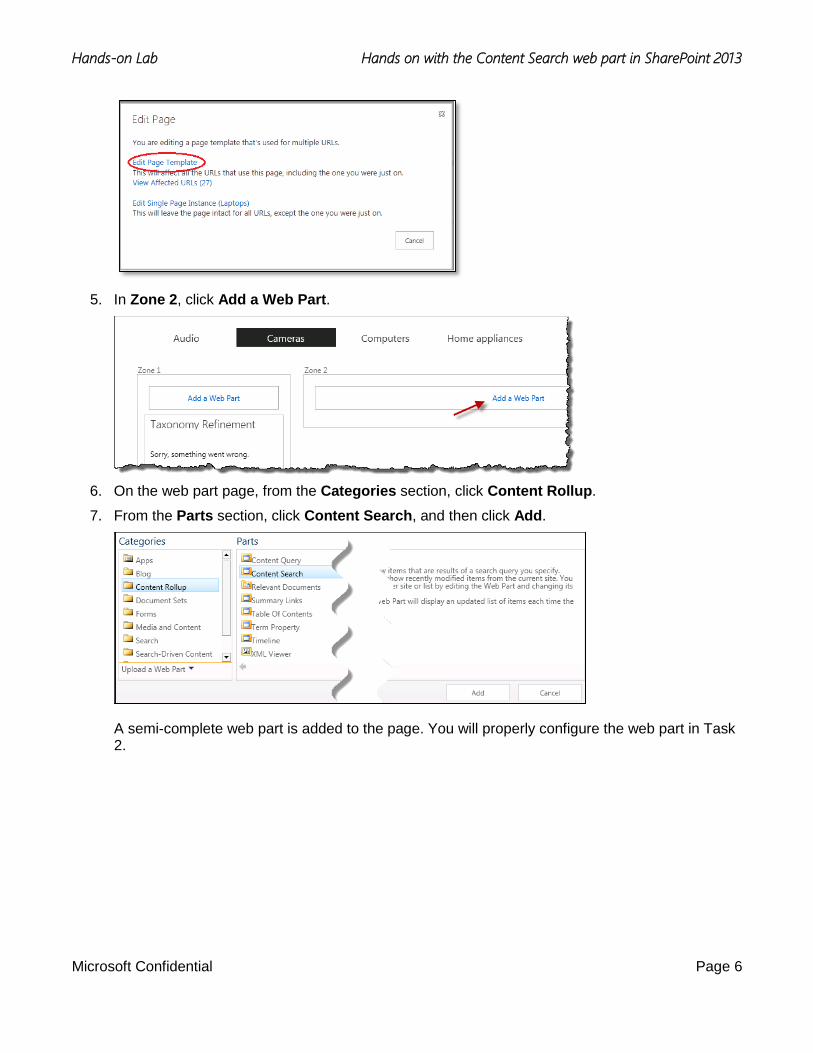
3. From the Settings menu (the gear icon in the upper right corner), click Edit Page.
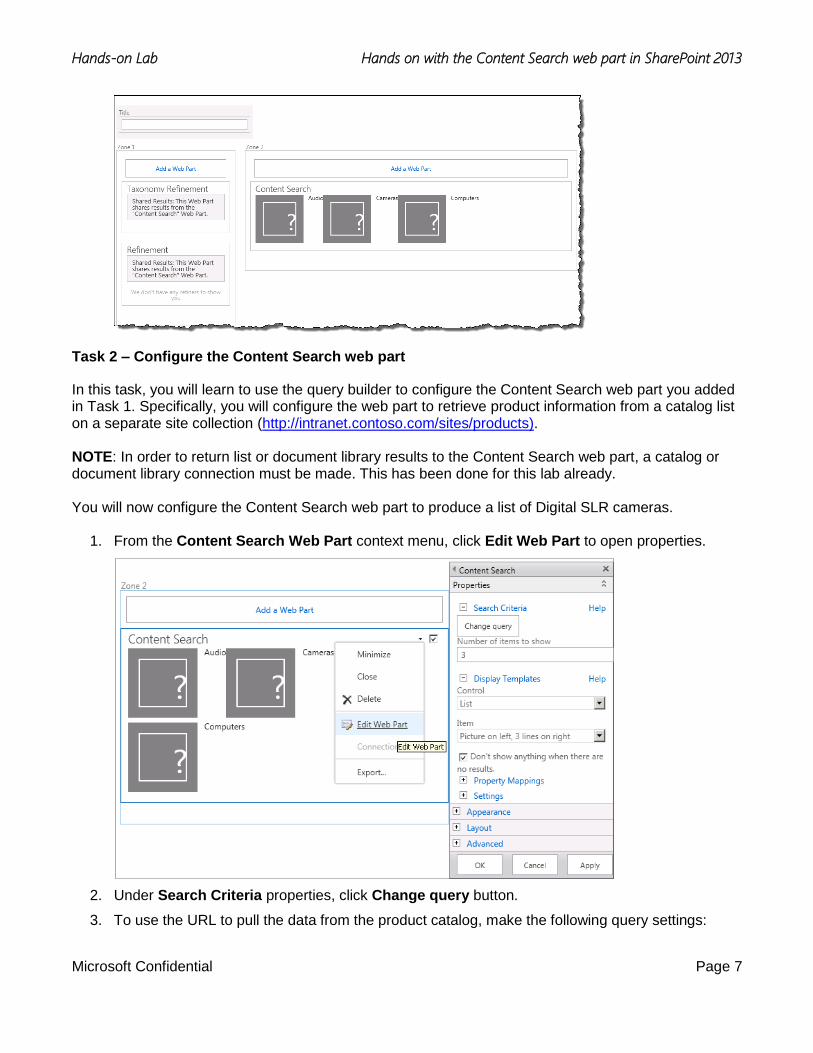
4. In the Edit Page dialog, click Edit Page Template.
Hands-on Lab Hands on with the Content Search web part in SharePoint 2013
Microsoft Confidential Page 6
5. In Zone 2, click Add a Web Part.
6. On the web part page, from the Categories section, click Content Rollup.
7. From the Parts section, click Content Search, and then click Add.
A semi-complete web part is added to the page. You will properly configure the web part in Task 2.
Hands-on Lab Hands on with the Content Search web part in SharePoint 2013
Microsoft Confidential Page 7
Task 2 – Configure the Content Search web part
In this task, you will learn to use the query builder to configure the Content Search web part you added in Task 1. Specifically, you will configure the web part to retrieve product information from a catalog list on a separate site collection (http://intranet.contoso.com/sites/products). NOTE: In order to return list or document library results to the Content Search web part, a catalog or document library connection must be made. This has been done for this lab already. You will now configure the Content Search web part to produce a list of Digital SLR cameras.
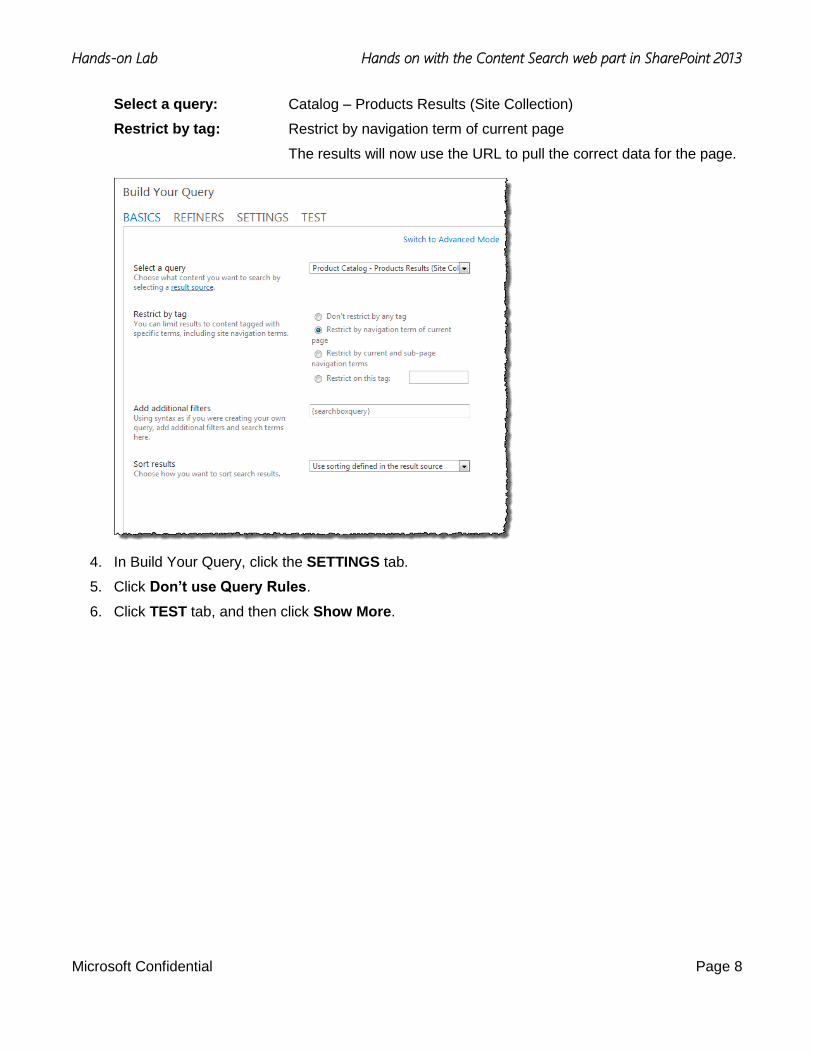
1. From the Content Search Web Part context menu, click Edit Web Part to open properties.
2. Under Search Criteria properties, click Change query button.
3. To use the URL to pull the data from the product catalog, make the following query settings:
Hands-on Lab Hands on with the Content Search web part in SharePoint 2013
Microsoft Confidential Page 8
Select a query: Catalog – Products Results (Site Collection)
Restrict by tag: Restrict by navigation term of current page
The results will now use the URL to pull the correct data for the page.
4. In Build Your Query, click the SETTINGS tab.
5. Click Don’t use Query Rules.
6. Click TEST tab, and then click Show More.
Hands-on Lab Hands on with the Content Search web part in SharePoint 2013
Microsoft Confidential Page 9
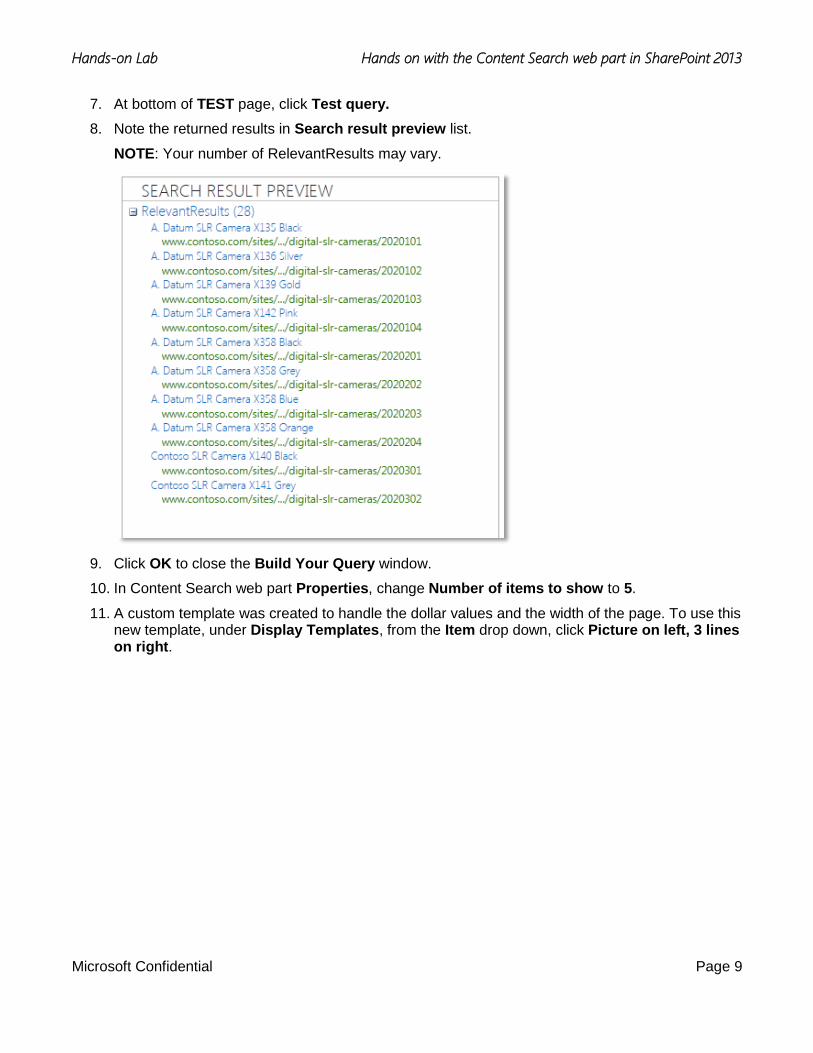
7. At bottom of TEST page, click Test query.
8. Note the returned results in Search result preview list.
NOTE: Your number of RelevantResults may vary.
9. Click OK to close the Build Your Query window.
10. In Content Search web part Properties, change Number of items to show to 5.
11. A custom template was created to handle the dollar values and the width of the page. To use this new template, under Display Templates, from the Item drop down, click Picture on left, 3 lines on right.
Hands-on Lab Hands on with the Content Search web part in SharePoint 2013
Microsoft Confidential Page 10
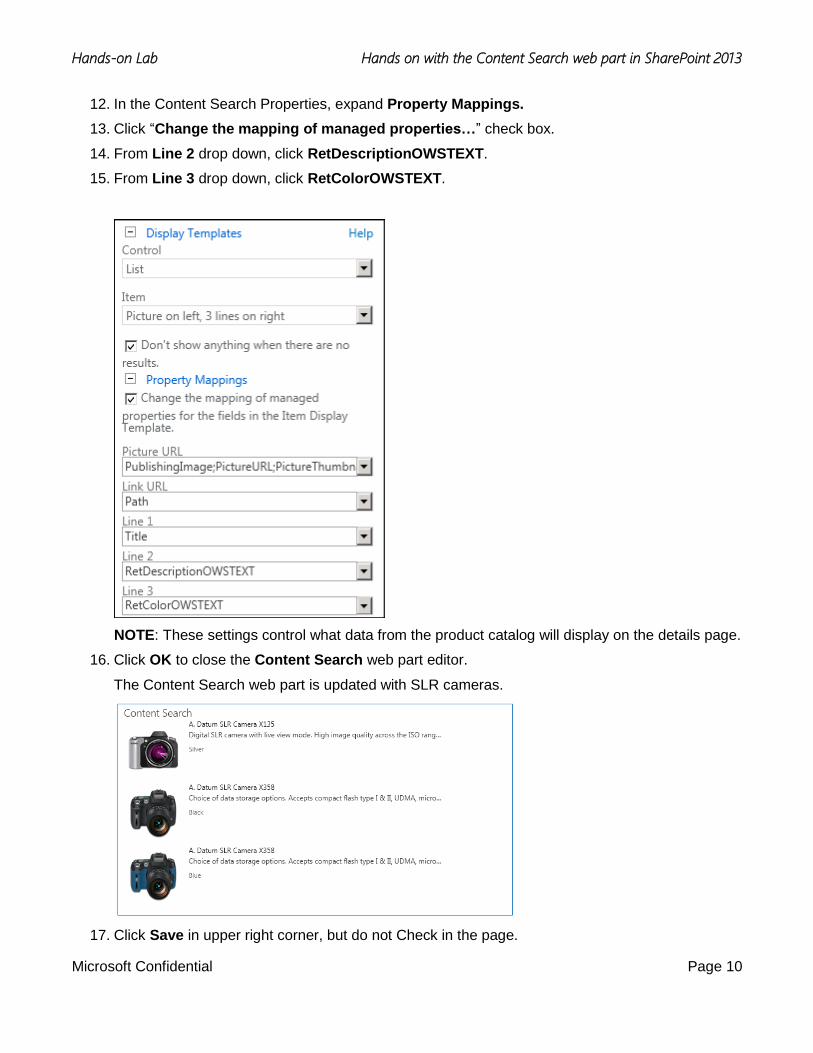
12. In the Content Search Properties, expand Property Mappings.
13. Click “Change the mapping of managed properties…” check box.
14. From Line 2 drop down, click RetDescriptionOWSTEXT.
15. From Line 3 drop down, click RetColorOWSTEXT.
NOTE: These settings control what data from the product catalog will display on the details page.
16. Click OK to close the Content Search web part editor.
The Content Search web part is updated with SLR cameras.
17. Click Save in upper right corner, but do not Check in the page.
Hands-on Lab Hands on with the Content Search web part in SharePoint 2013
Microsoft Confidential Page 11
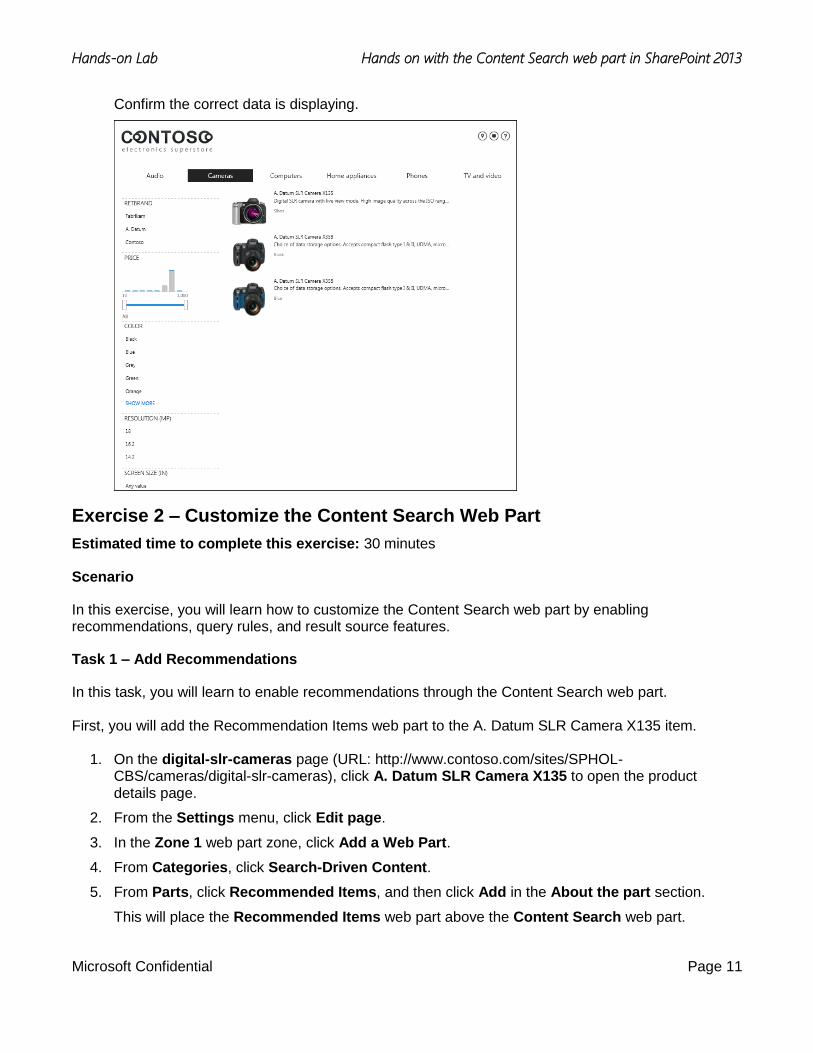
Confirm the correct data is displaying.
Exercise 2 – Customize the Content Search Web Part
Estimated time to complete this exercise: 30 minutes
Scenario
In this exercise, you will learn how to customize the Content Search web part by enabling recommendations, query rules, and result source features.
Task 1 – Add Recommendations
In this task, you will learn to enable recommendations through the Content Search web part. First, you will add the Recommendation Items web part to the A. Datum SLR Camera X135 item.
1. On the digital-slr-cameras page (URL: http://www.contoso.com/sites/SPHOL-CBS/cameras/digital-slr-cameras), click A. Datum SLR Camera X135 to open the product details page.
2. From the Settings menu, click Edit page.
3. In the Zone 1 web part zone, click Add a Web Part.
4. From Categories, click Search-Driven Content.
5. From Parts, click Recommended Items, and then click Add in the About the part section.
This will place the Recommended Items web part above the Content Search web part.
Hands-on Lab Hands on with the Content Search web part in SharePoint 2013
Microsoft Confidential Page 12
6. Drag and drop the Content Search web part above the Recommended Items web part.
Next, you will edit the Recommended Items web part to build the appropriate query.
7. From the Recommended Items web part context menu, select Edit Web Part.
8. Under Search Criteria, at top of Property dialog, click Change query button.
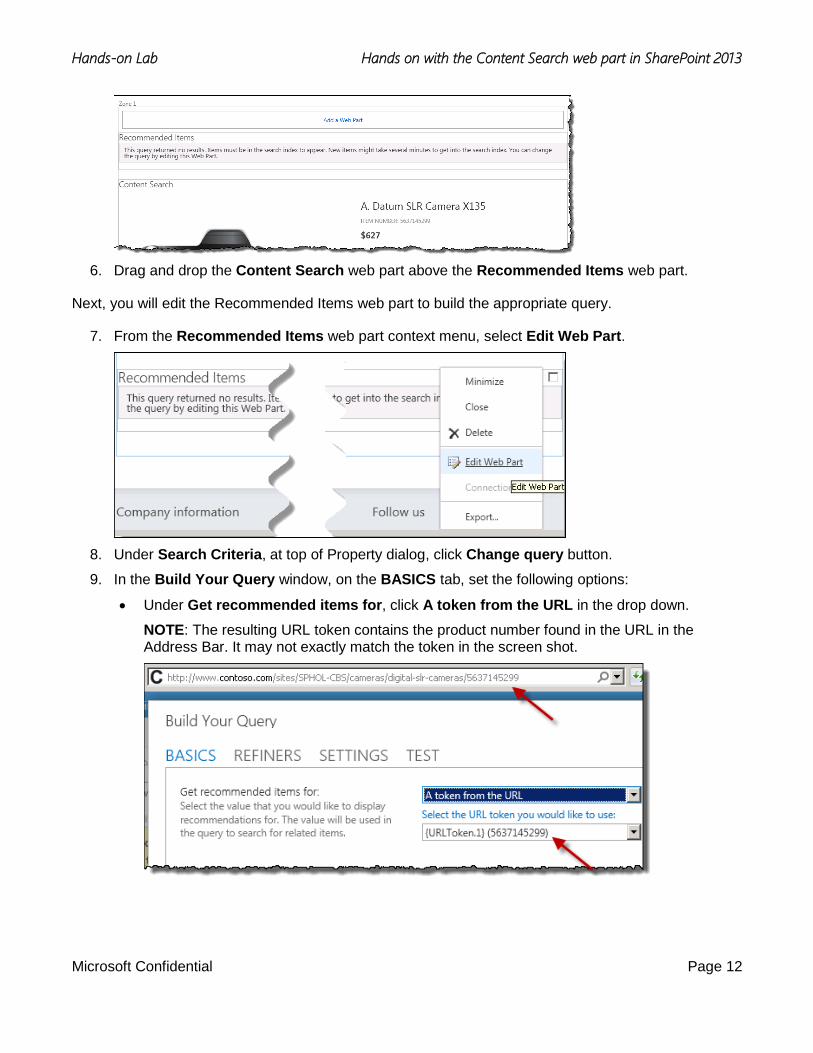
9. In the Build Your Query window, on the BASICS tab, set the following options:
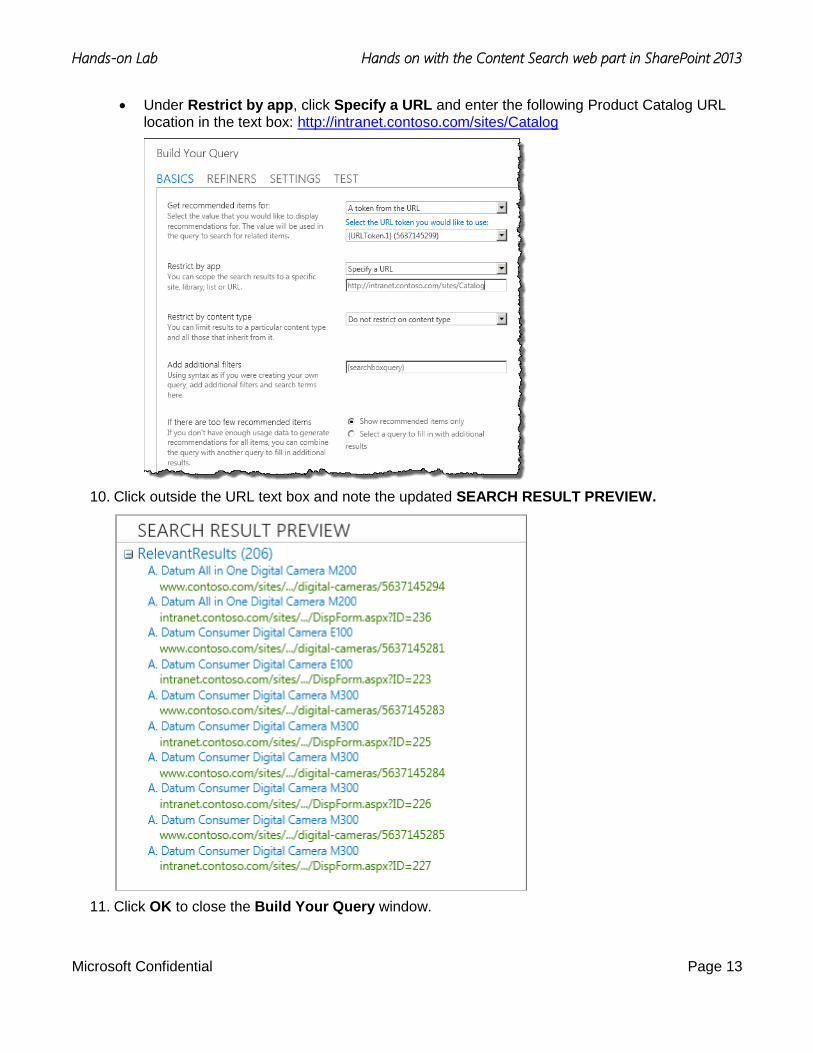
Under Get recommended items for, click A token from the URL in the drop down.
NOTE: The resulting URL token contains the product number found in the URL in the Address Bar. It may not exactly match the token in the screen shot.
Hands-on Lab Hands on with the Content Search web part in SharePoint 2013
Microsoft Confidential Page 13
Under Restrict by app, click Specify a URL and enter the following Product Catalog URL location in the text box: http://intranet.contoso.com/sites/Catalog
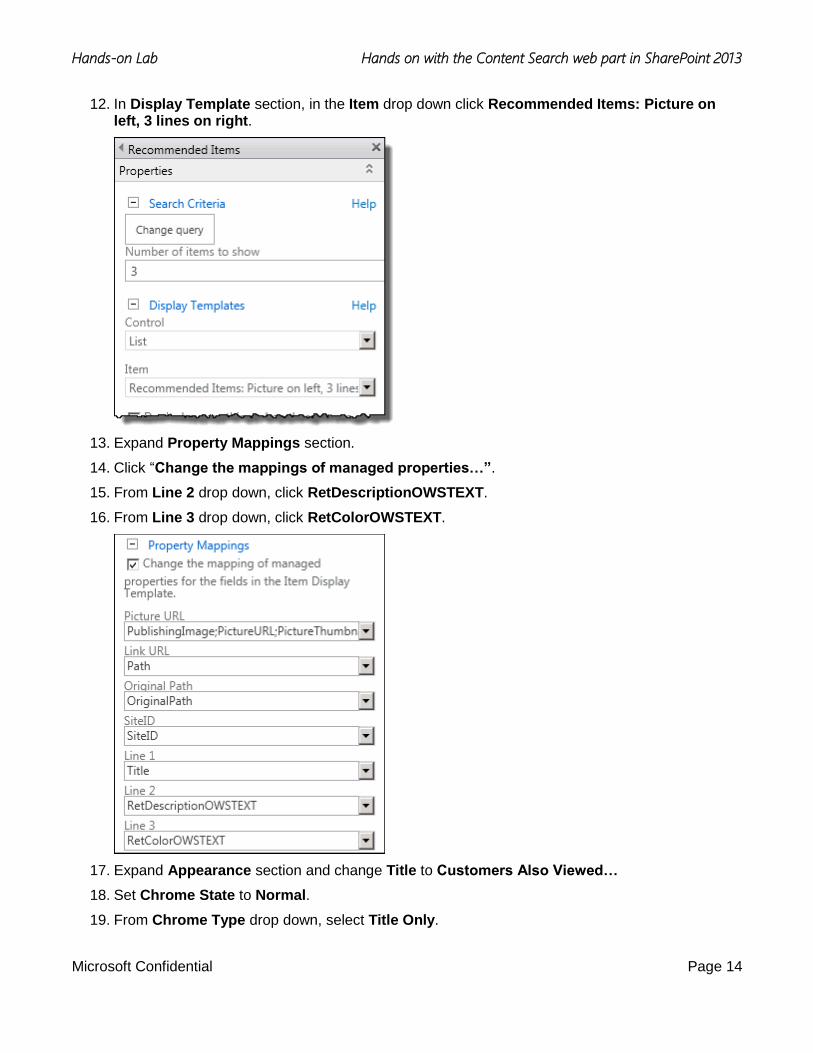
10. Click outside the URL text box and note the updated SEARCH RESULT PREVIEW.
11. Click OK to close the Build Your Query window.
Hands-on Lab Hands on with the Content Search web part in SharePoint 2013
Microsoft Confidential Page 14
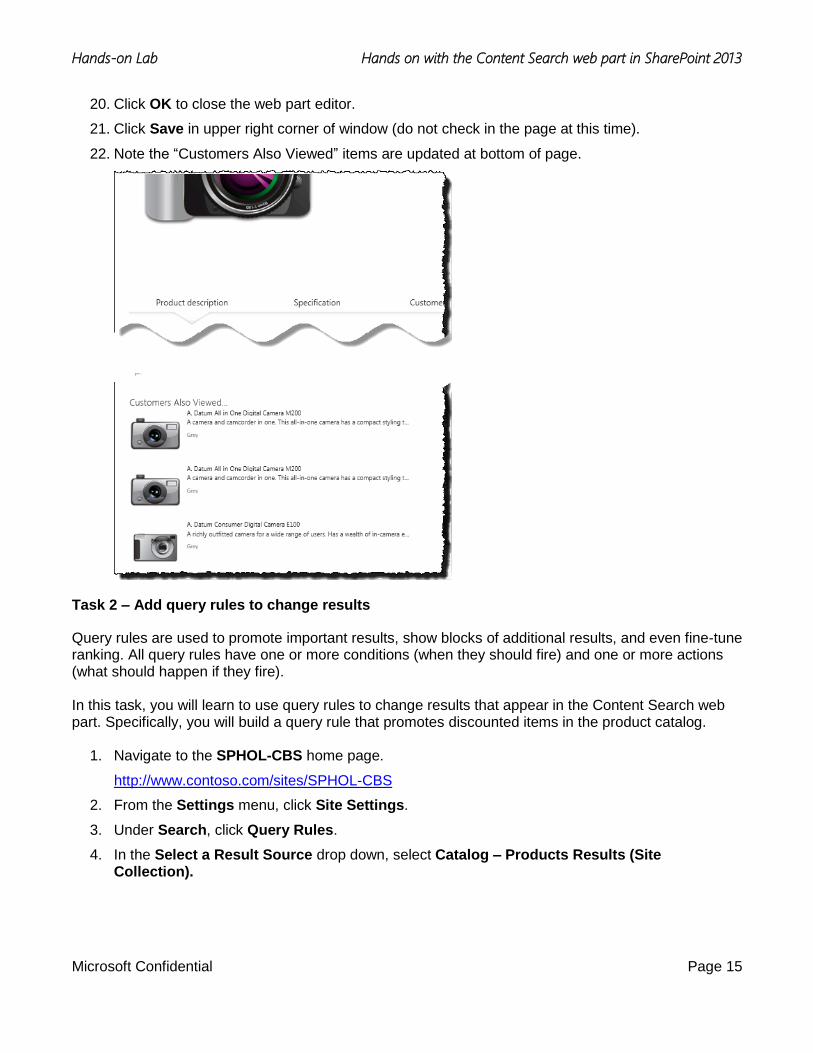
12. In Display Template section, in the Item drop down click Recommended Items: Picture on left, 3 lines on right.
13. Expand Property Mappings section.
14. Click “Change the mappings of managed properties…”.
15. From Line 2 drop down, click RetDescriptionOWSTEXT.
16. From Line 3 drop down, click RetColorOWSTEXT.
17. Expand Appearance section and change Title to Customers Also Viewed…
18. Set Chrome State to Normal.
19. From Chrome Type drop down, select Title Only.
Hands-on Lab Hands on with the Content Search web part in SharePoint 2013
Microsoft Confidential Page 15
20. Click OK to close the web part editor.
21. Click Save in upper right corner of window (do not check in the page at this time).
22. Note the “Customers Also Viewed” items are updated at bottom of page.
Task 2 – Add query rules to change results
Query rules are used to promote important results, show blocks of additional results, and even fine-tune ranking. All query rules have one or more conditions (when they should fire) and one or more actions (what should happen if they fire). In this task, you will learn to use query rules to change results that appear in the Content Search web part. Specifically, you will build a query rule that promotes discounted items in the product catalog.
1. Navigate to the SPHOL-CBS home page.
http://www.contoso.com/sites/SPHOL-CBS
2. From the Settings menu, click Site Settings.
3. Under Search, click Query Rules.
4. In the Select a Result Source drop down, select Catalog – Products Results (Site Collection).
Hands-on Lab Hands on with the Content Search web part in SharePoint 2013
Microsoft Confidential Page 16
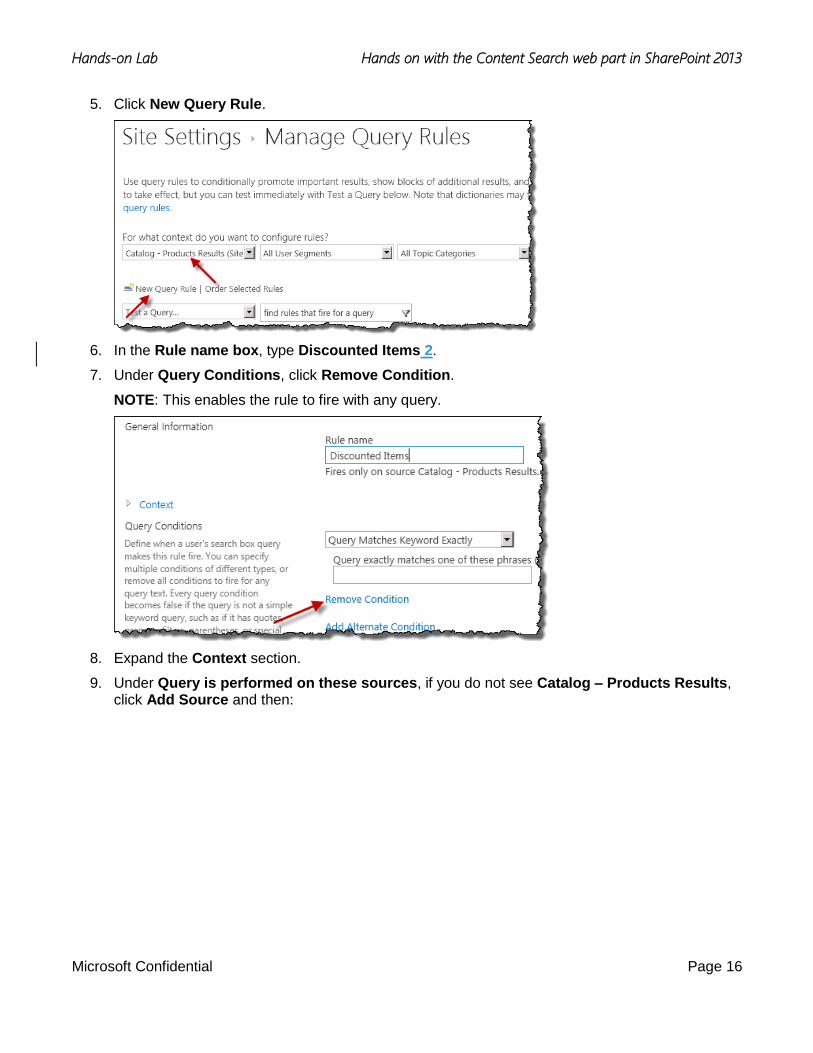
5. Click New Query Rule.
6. In the Rule name box, type Discounted Items 2.
7. Under Query Conditions, click Remove Condition.
NOTE: This enables the rule to fire with any query.
8. Expand the Context section.
9. Under Query is performed on these sources, if you do not see Catalog – Products Results, click Add Source and then:
Hands-on Lab Hands on with the Content Search web part in SharePoint 2013
Microsoft Confidential Page 17
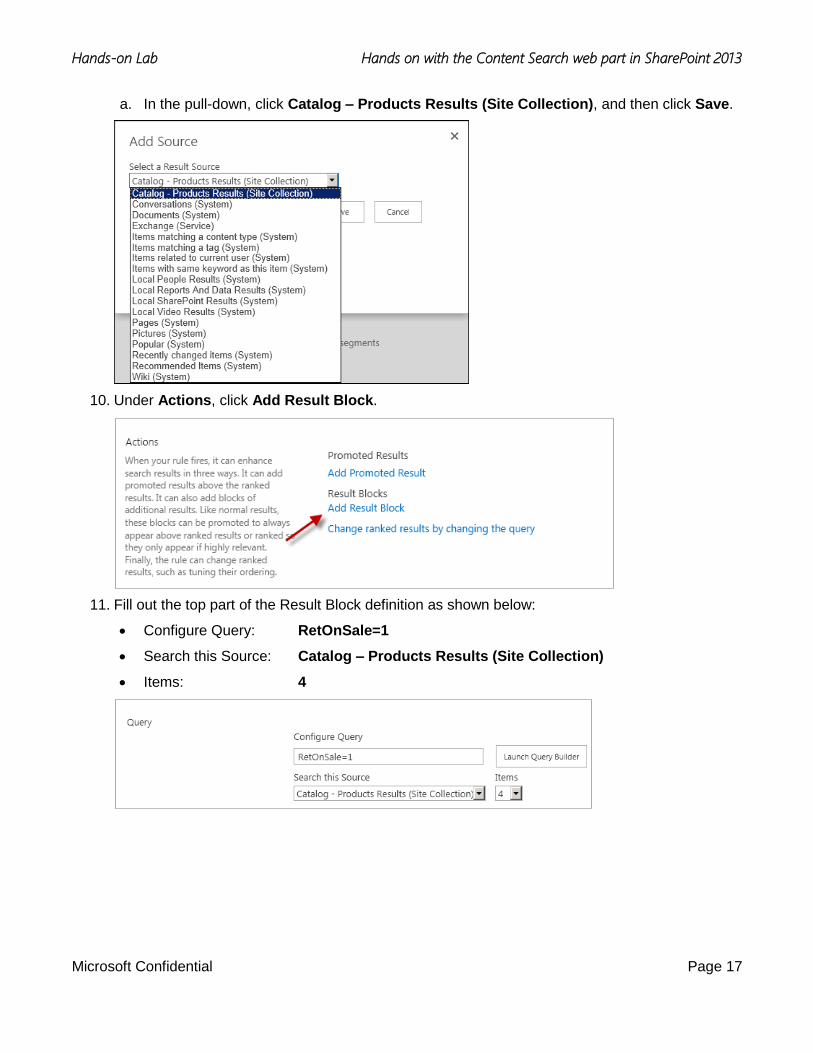
a. In the pull-down, click Catalog – Products Results (Site Collection), and then click Save.
10. Under Actions, click Add Result Block.
11. Fill out the top part of the Result Block definition as shown below:
Configure Query: RetOnSale=1
Search this Source: Catalog – Products Results (Site Collection)
Items: 4
Hands-on Lab Hands on with the Content Search web part in SharePoint 2013
Microsoft Confidential Page 18
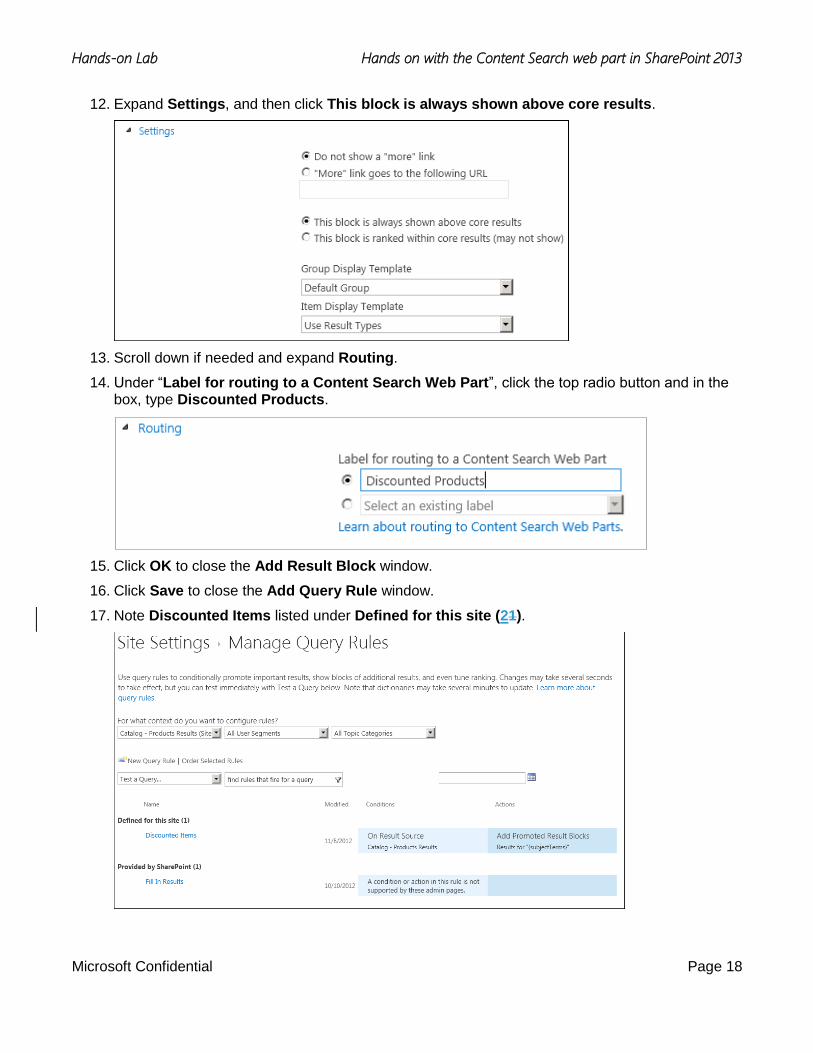
12. Expand Settings, and then click This block is always shown above core results.
13. Scroll down if needed and expand Routing.
14. Under “Label for routing to a Content Search Web Part”, click the top radio button and in the box, type Discounted Products.
15. Click OK to close the Add Result Block window.
16. Click Save to close the Add Query Rule window.
17. Note Discounted Items listed under Defined for this site (21).
Hands-on Lab Hands on with the Content Search web part in SharePoint 2013
Microsoft Confidential Page 19
You will now edit the results page to modify the existing Content Search web part and name it More Items. You will add a new content search web part, named Discounted Items, which will be the focus of the page.
18. In Internet Explorer, open a new tab and return to the SPHOL-CBS home page at http://www.contoso.com/sites/SPHOL-CBS .
19. In the top navigation, point to Computers, and then click Laptops.
20. From the Settings menu, click Edit page, and in the dialog that opens, click Edit Page Template.
21. Locate the Content Search web part, and then from its context menu, click Edit Web Part.
22. If needed, change the Number of items to show to 3.
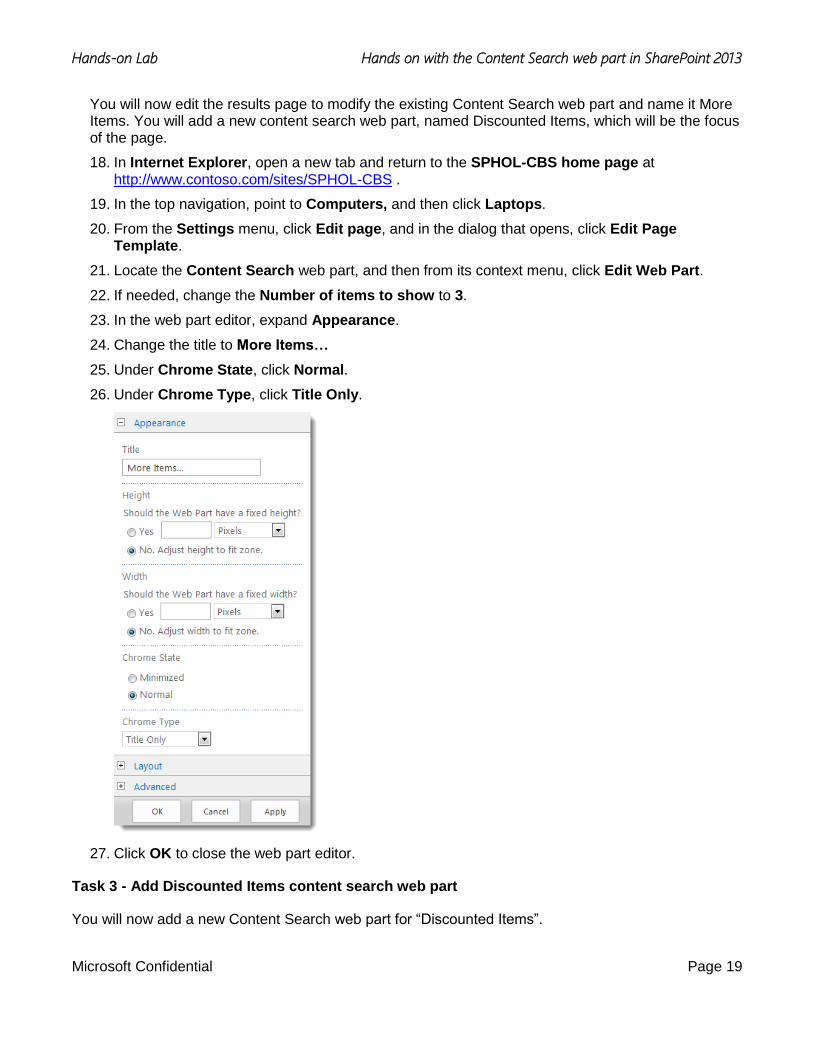
23. In the web part editor, expand Appearance.
24. Change the title to More Items…
25. Under Chrome State, click Normal.
26. Under Chrome Type, click Title Only.
27. Click OK to close the web part editor.
Task 3 - Add Discounted Items content search web part
You will now add a new Content Search web part for “Discounted Items”.
Hands-on Lab Hands on with the Content Search web part in SharePoint 2013
Microsoft Confidential Page 20
1. In Zone 2, click Add a Web Part.
2. In the Categories section, click Content Rollup.
3. In the Parts section, click Content Search.
4. Click Add.
5. From the Content Search Web Part context menu, click Edit Web Part to open properties.
6. In the Content Search Properties, in the Search Criteria section, click Change query.
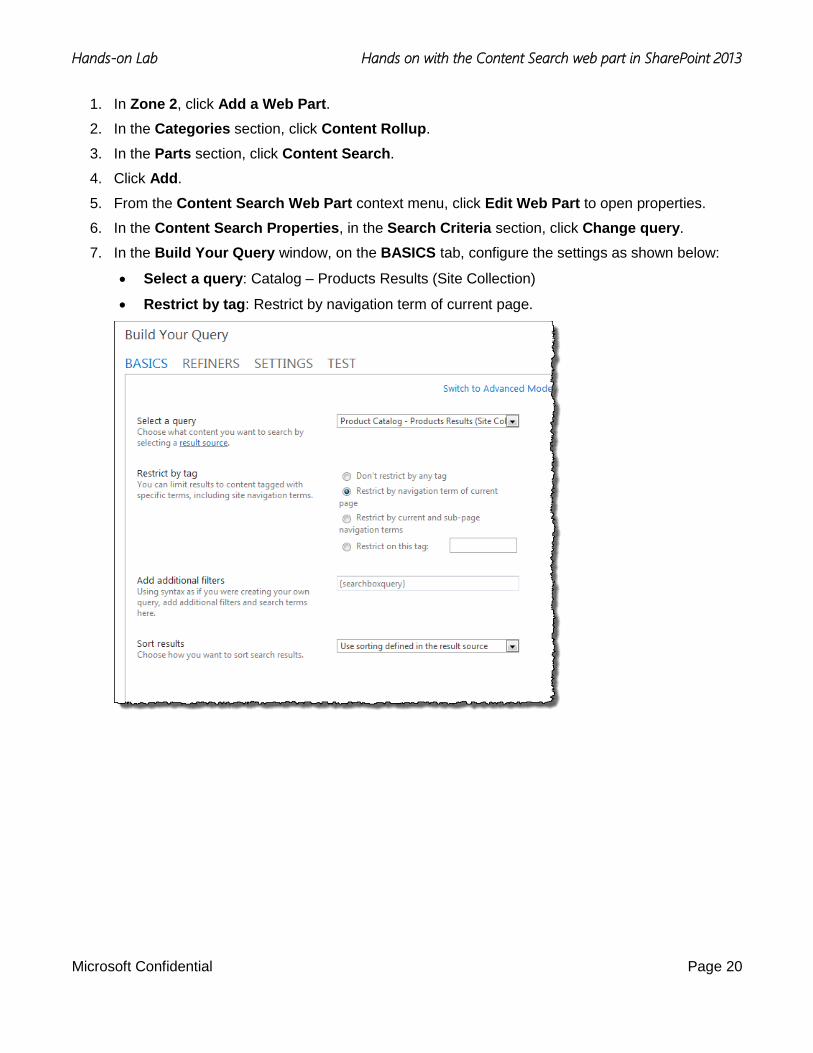
7. In the Build Your Query window, on the BASICS tab, configure the settings as shown below:
Select a query: Catalog – Products Results (Site Collection)
Restrict by tag: Restrict by navigation term of current page.
Hands-on Lab Hands on with the Content Search web part in SharePoint 2013
Microsoft Confidential Page 21
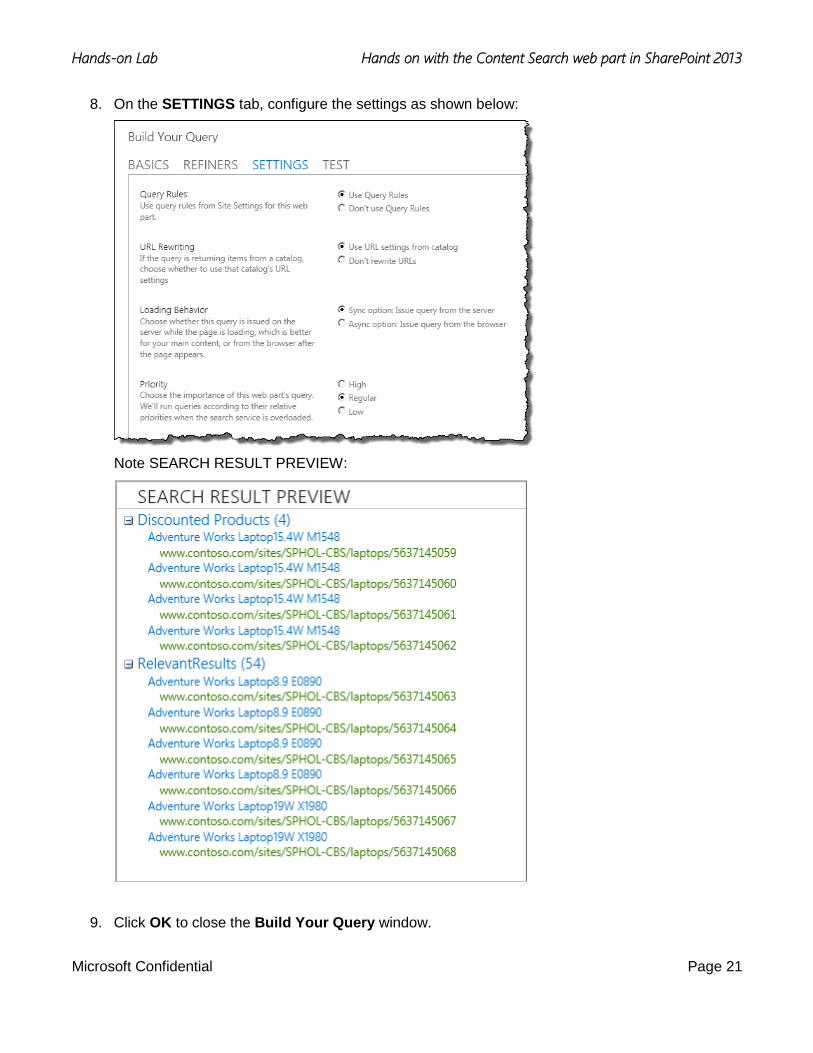
8. On the SETTINGS tab, configure the settings as shown below:
Note SEARCH RESULT PREVIEW:
9. Click OK to close the Build Your Query window.
Hands-on Lab Hands on with the Content Search web part in SharePoint 2013
Microsoft Confidential Page 22
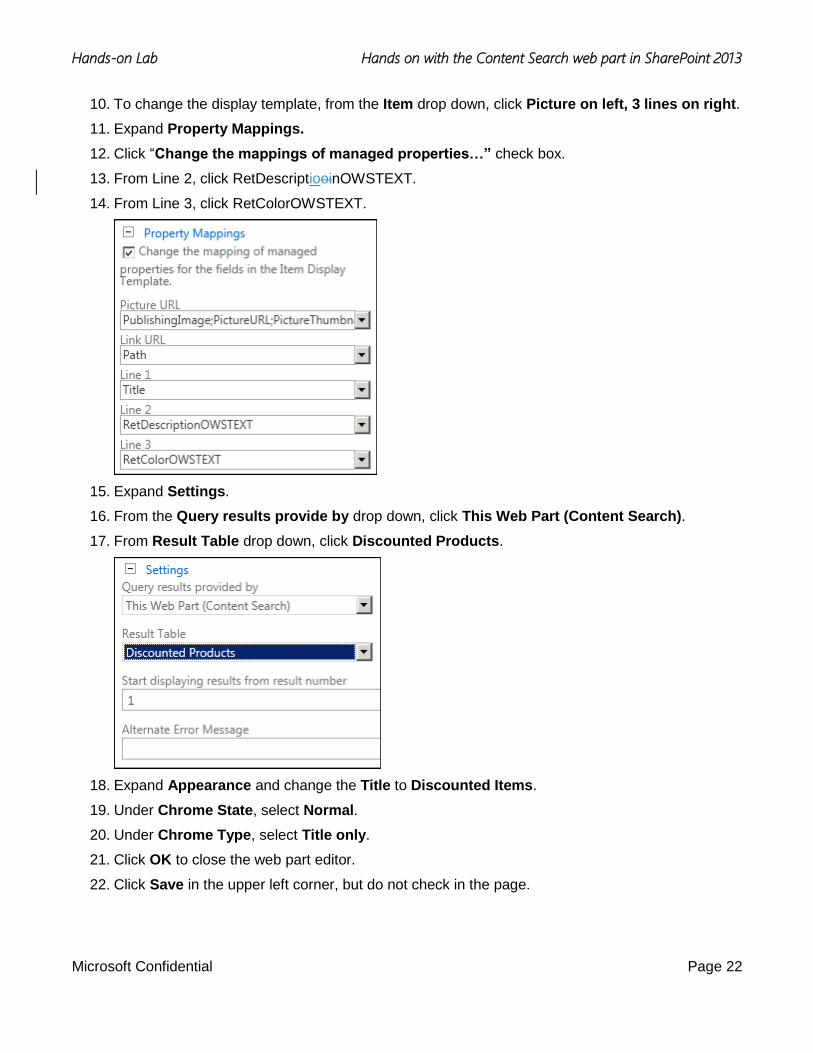
10. To change the display template, from the Item drop down, click Picture on left, 3 lines on right.
11. Expand Property Mappings.
12. Click “Change the mappings of managed properties…” check box.
13. From Line 2, click RetDescriptiooinOWSTEXT.
14. From Line 3, click RetColorOWSTEXT.
15. Expand Settings.
16. From the Query results provide by drop down, click This Web Part (Content Search).
17. From Result Table drop down, click Discounted Products.
18. Expand Appearance and change the Title to Discounted Items.
19. Under Chrome State, select Normal.
20. Under Chrome Type, select Title only.
21. Click OK to close the web part editor.
22. Click Save in the upper left corner, but do not check in the page.

Hands-on Lab Hands on with the Content Search web part in SharePoint 2013
Microsoft Confidential Page 23
23. Scroll down to view the new and updated Content Search web parts “Discounted Items” and “More Items…” displaying three discounted laptops, and three other laptops.
NOTE: If one of the web parts displays a Sorry something went wrong error message, press browser Refresh button to refresh the page.
24. In the top navigation, point at Computers, and then click Desktops.
Note that there are no discounted Desktops.
Hands-on Lab Hands on with the Content Search web part in SharePoint 2013
Microsoft Confidential Page 24
Task 4 – Use different result sources
In this task, you will learn to change the results source in the web part editor and view the effects of those changes. You will do so by observing changes in the Search Result Preview as you change the result source.
1. From the Settings menu, select Edit Page.
2. On the Edit Page dialog, click Edit Page Template.
3. From the More Items… Web Part context menu, click Edit Web Part to open properties.
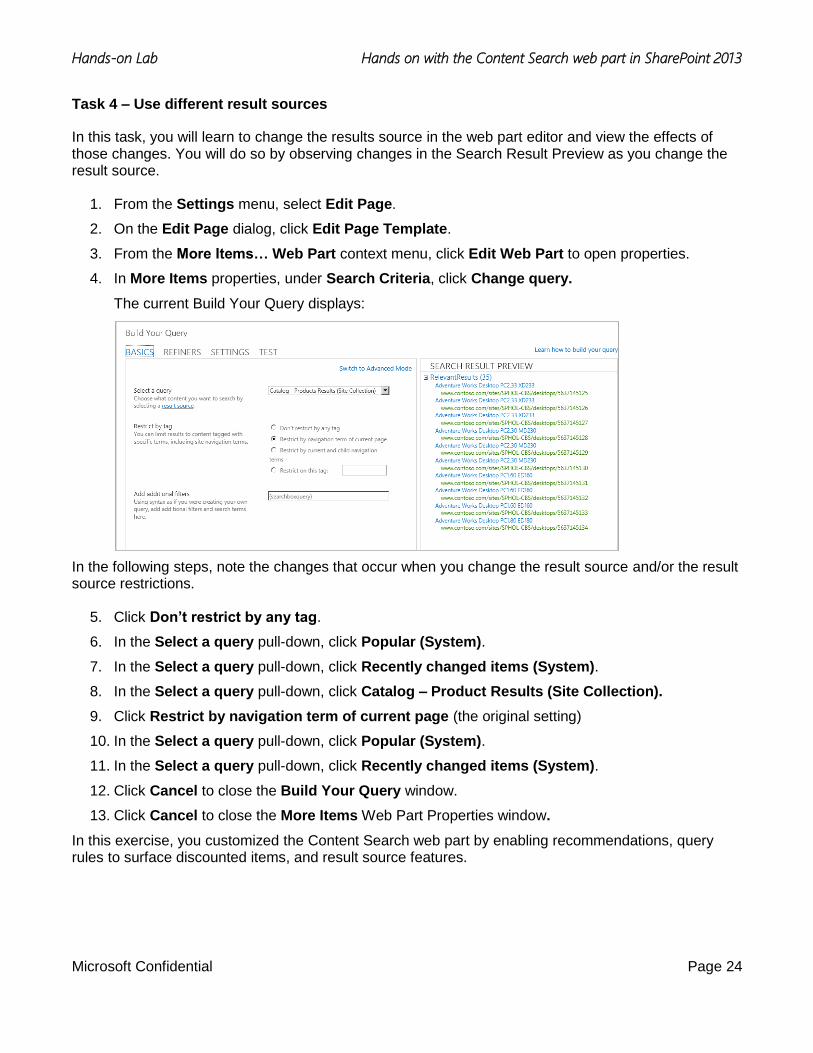
4. In More Items properties, under Search Criteria, click Change query.
The current Build Your Query displays:
In the following steps, note the changes that occur when you change the result source and/or the result source restrictions.
5. Click Don’t restrict by any tag.
6. In the Select a query pull-down, click Popular (System).
7. In the Select a query pull-down, click Recently changed items (System).
8. In the Select a query pull-down, click Catalog – Product Results (Site Collection).
9. Click Restrict by navigation term of current page (the original setting)
10. In the Select a query pull-down, click Popular (System).
11. In the Select a query pull-down, click Recently changed items (System).
12. Click Cancel to close the Build Your Query window.
13. Click Cancel to close the More Items Web Part Properties window.
In this exercise, you customized the Content Search web part by enabling recommendations, query rules to surface discounted items, and result source features.
Hands-on Lab Hands on with the Content Search web part in SharePoint 2013
Microsoft Confidential Page 25
Summary
You have completed a deep dive of the Content Search web part in SharePoint 2013. Specifically, you learned to:
Add Content Search web part to a page
Use the query builder to configure a Content Search Web Part
Enable and configure recommendations
Create a query rule and a Content Search web part to display promoted results from the product catalog