Embed Size (px)
Citation preview
Exercise1–GettingStartedwithArcGISPro
In this exercise, you will explore some of the basic properties and methods for using ArcGIS Pro to
produce a map suitable to publish to ArcGIS Online. This exercise is only designed to give the student an
introduction to ArcGIS Pro and some of the basic operations and process available in the application.
The materials and maps used in this exercise are only for demonstration purposes and are not intended
to represent any real or existing workflows, standards or practices for your agency.
StartingArcGISProFrom your desktop icon or from the Windows start menu, activate the ArcGIS Pro application. When the
ArcGIS pro application opens, you will be presented with a list of recent projects, as well as the ability to
create a new project based on the type of map you will be using including Blank, Global Scenes, Local
Scenes and Maps.
CreateaNewProject1. Start ArcGIS Pro application.
2. In the Upper right corner, click Sign In to sign into an ArcGIS Online Account.
3. Enter your username/password and click Sign in with your Organizational Account. If you do not
have one, the Instructor can provide a temporary account.
4. On the Right hand side of the ArcGIS Pro application window, click on Blank to start a new project.
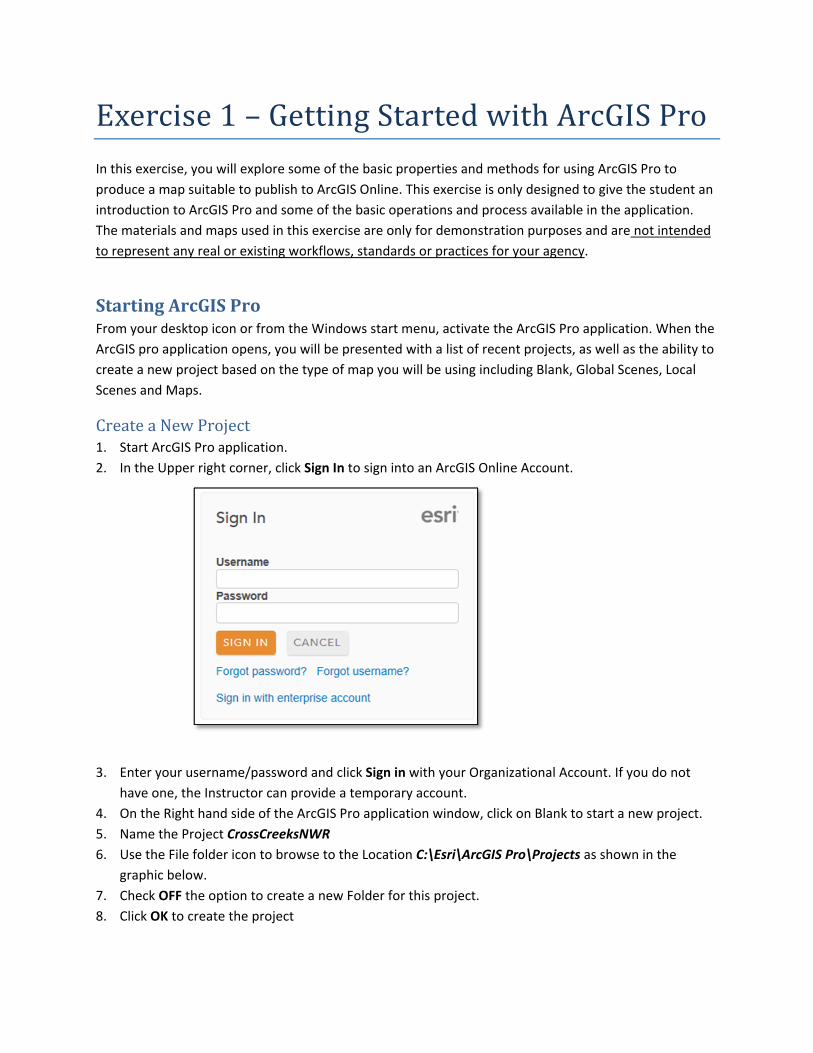
5. Name the Project CrossCreeksNWR
6. Use the File folder icon to browse to the Location C:\Esri\ArcGIS Pro\Projects as shown in the
graphic below.
7. Check OFF the option to create a new Folder for this project.
8. Click OK to create the project
ExploreArcGISProapplicationinterfaceThe ArcGIS Pro application was created to provide users with many enhancements that were not
possible in the ArcGIS Desktop environment. These enhancements include things like 64x architecture,
multi‐threaded processing, and many improvements to the User interface. In this section, you will
explore some of the basic properties of ArcGIS Pro.
Just like many other modern applications, ArcGIS Pro is controlled through a ribbon interface that has
multiple tabs representing grouped functionality. In most instances, ArcGIS Pro tools, buttons and
wizards are context based and available depending on the active window or selected object in your
project.
Take a few moments to explore the various tabs in the application:
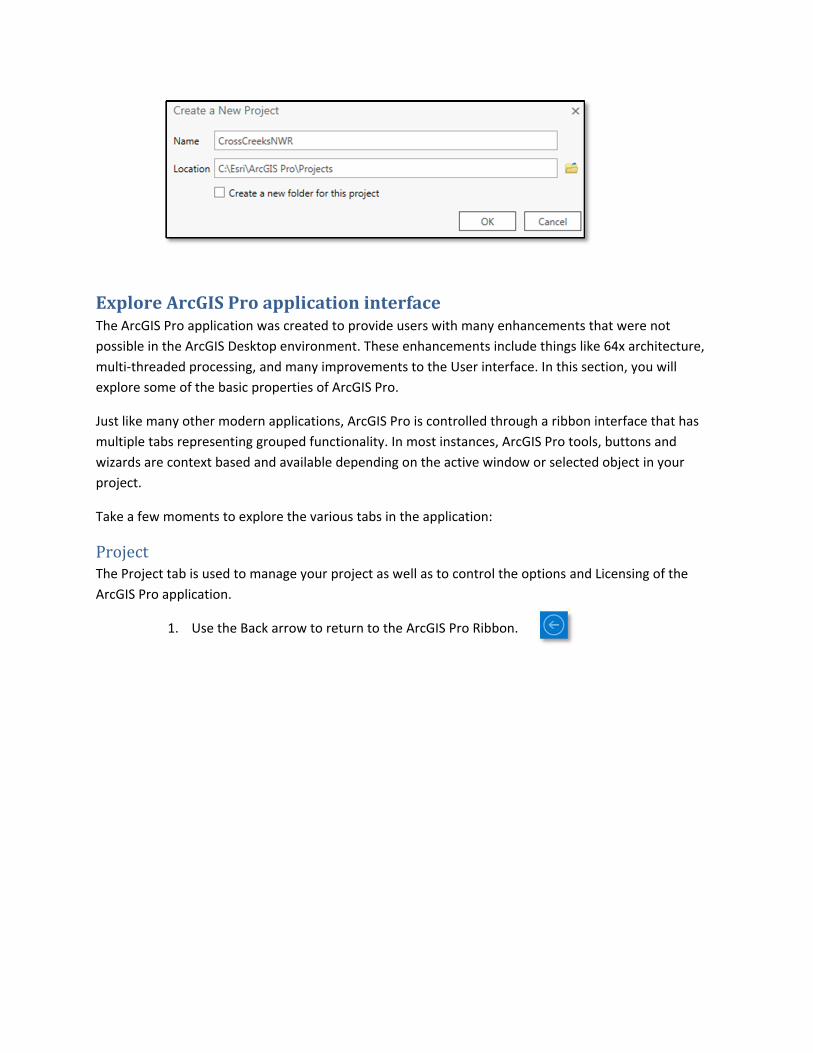
ProjectThe Project tab is used to manage your project as well as to control the options and Licensing of the
ArcGIS Pro application.
1. Use the Back arrow to return to the ArcGIS Pro Ribbon.
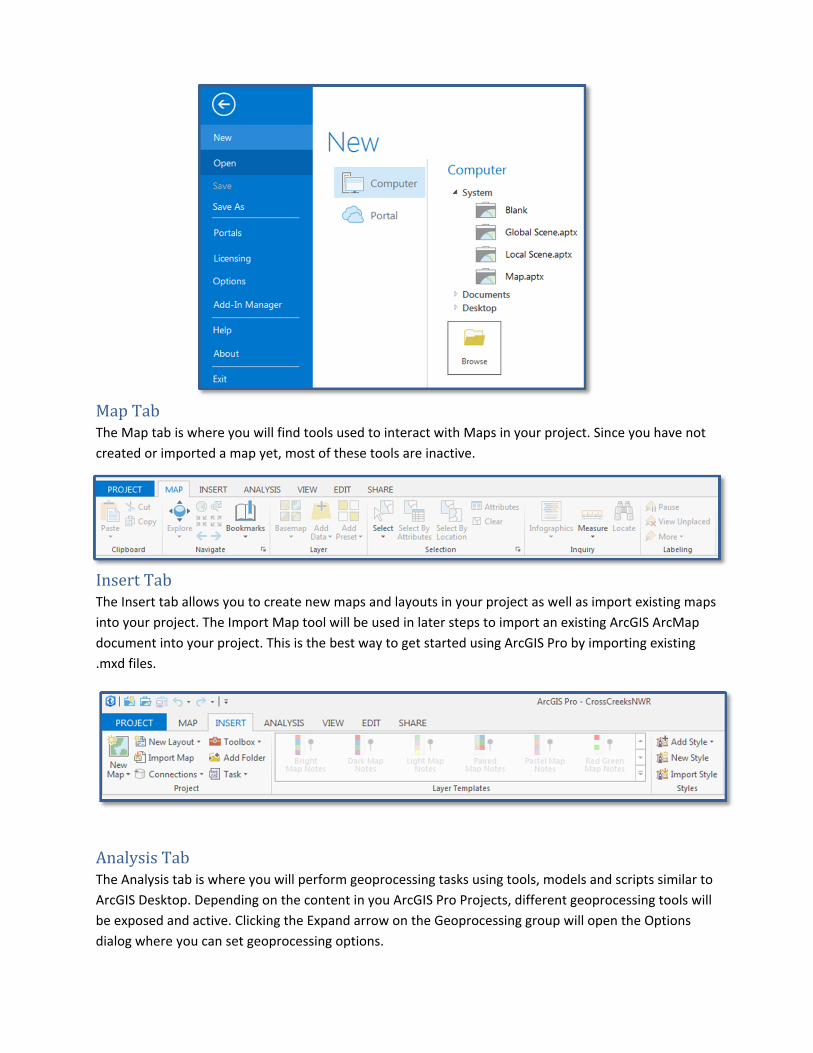
MapTabThe Map tab is where you will find tools used to interact with Maps in your project. Since you have not
created or imported a map yet, most of these tools are inactive.
InsertTabThe Insert tab allows you to create new maps and layouts in your project as well as import existing maps
into your project. The Import Map tool will be used in later steps to import an existing ArcGIS ArcMap
document into your project. This is the best way to get started using ArcGIS Pro by importing existing
.mxd files.
AnalysisTabThe Analysis tab is where you will perform geoprocessing tasks using tools, models and scripts similar to
ArcGIS Desktop. Depending on the content in you ArcGIS Pro Projects, different geoprocessing tools will
be exposed and active. Clicking the Expand arrow on the Geoprocessing group will open the Options
dialog where you can set geoprocessing options.
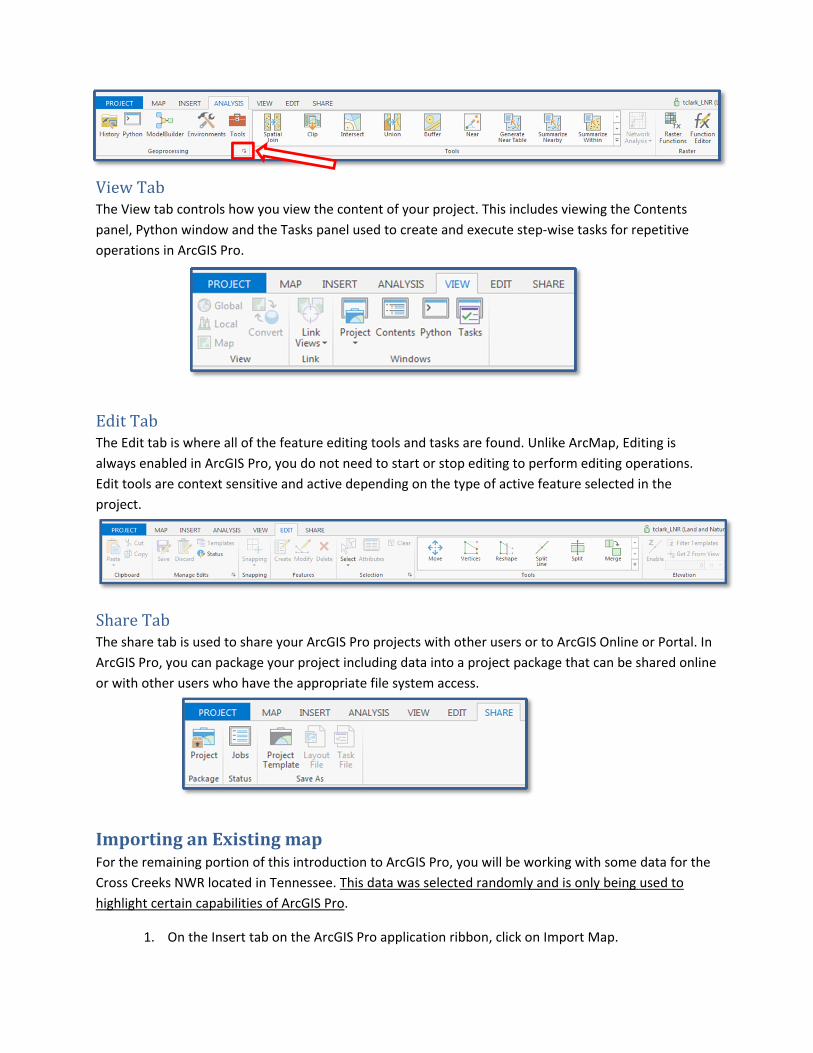
ViewTabThe View tab controls how you view the content of your project. This includes viewing the Contents
panel, Python window and the Tasks panel used to create and execute step‐wise tasks for repetitive
operations in ArcGIS Pro.
EditTabThe Edit tab is where all of the feature editing tools and tasks are found. Unlike ArcMap, Editing is
always enabled in ArcGIS Pro, you do not need to start or stop editing to perform editing operations.
Edit tools are context sensitive and active depending on the type of active feature selected in the
project.
ShareTabThe share tab is used to share your ArcGIS Pro projects with other users or to ArcGIS Online or Portal. In
ArcGIS Pro, you can package your project including data into a project package that can be shared online
or with other users who have the appropriate file system access.
ImportinganExistingmapFor the remaining portion of this introduction to ArcGIS Pro, you will be working with some data for the
Cross Creeks NWR located in Tennessee. This data was selected randomly and is only being used to
highlight certain capabilities of ArcGIS Pro.
1. On the Insert tab on the ArcGIS Pro application ribbon, click on Import Map.
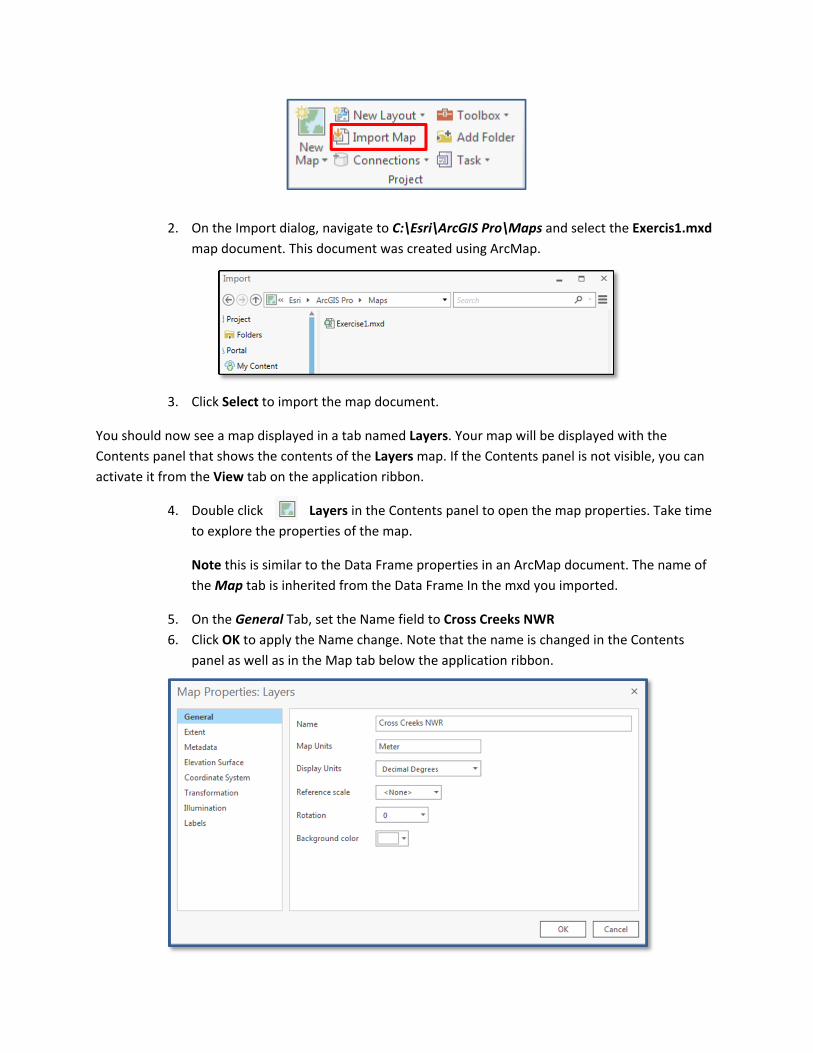
2. On the Import dialog, navigate to C:\Esri\ArcGIS Pro\Maps and select the Exercis1.mxd
map document. This document was created using ArcMap.
3. Click Select to import the map document.
You should now see a map displayed in a tab named Layers. Your map will be displayed with the
Contents panel that shows the contents of the Layers map. If the Contents panel is not visible, you can
activate it from the View tab on the application ribbon.
4. Double click Layers in the Contents panel to open the map properties. Take time
to explore the properties of the map.
Note this is similar to the Data Frame properties in an ArcMap document. The name of
the Map tab is inherited from the Data Frame In the mxd you imported.
5. On the General Tab, set the Name field to Cross Creeks NWR
6. Click OK to apply the Name change. Note that the name is changed in the Contents
panel as well as in the Map tab below the application ribbon.
You have successfully created your first map in ArcGIS Pro.
Next, you are going to create another map in the project that is zoomed into a small area on the
Cross Creeks NWR containing a wildlife viewing trail.
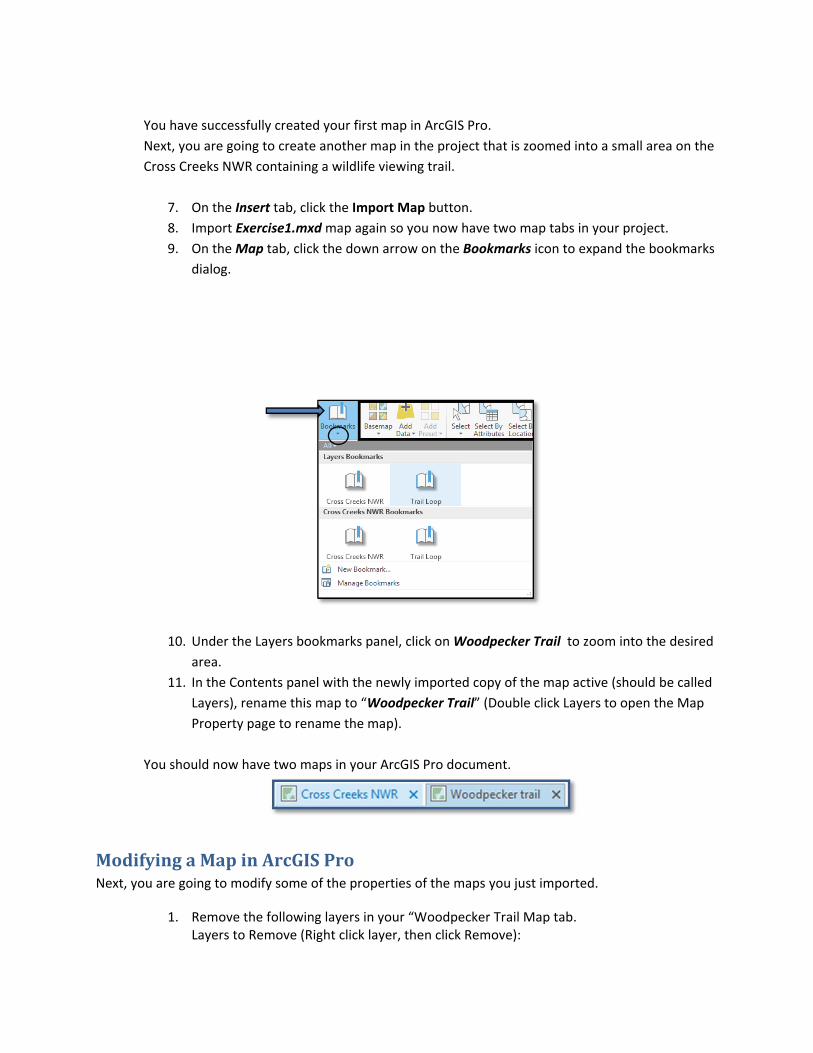
7. On the Insert tab, click the Import Map button.
8. Import Exercise1.mxd map again so you now have two map tabs in your project.
9. On the Map tab, click the down arrow on the Bookmarks icon to expand the bookmarks
dialog.
10. Under the Layers bookmarks panel, click on Woodpecker Trail to zoom into the desired
area.
11. In the Contents panel with the newly imported copy of the map active (should be called
Layers), rename this map to “Woodpecker Trail” (Double click Layers to open the Map
Property page to rename the map).
You should now have two maps in your ArcGIS Pro document.
ModifyingaMapinArcGISProNext, you are going to modify some of the properties of the maps you just imported.
1. Remove the following layers in your “Woodpecker Trail Map tab. Layers to Remove (Right click layer, then click Remove):
Wetlands
FWS_Interest
Special Designation
NLCD
Hillshade
NHD Water Bodies
2. Make sure the GrounDEM Layer is turned off and above any Basemaps (Click and Drag the layer above the basemap).
3. On the Map tab, select Imagery from the Basemap pull down menu.
4. Zoom the Map to 1:5,000 scale and center/pan the map on the Woodpecker Trail.
Note: in the Lower left portion of the map is a Scale display, you can select 1:5,000 from the
pull down list or zoom in/out with the thumb wheel to get to
1:5,000 scale.
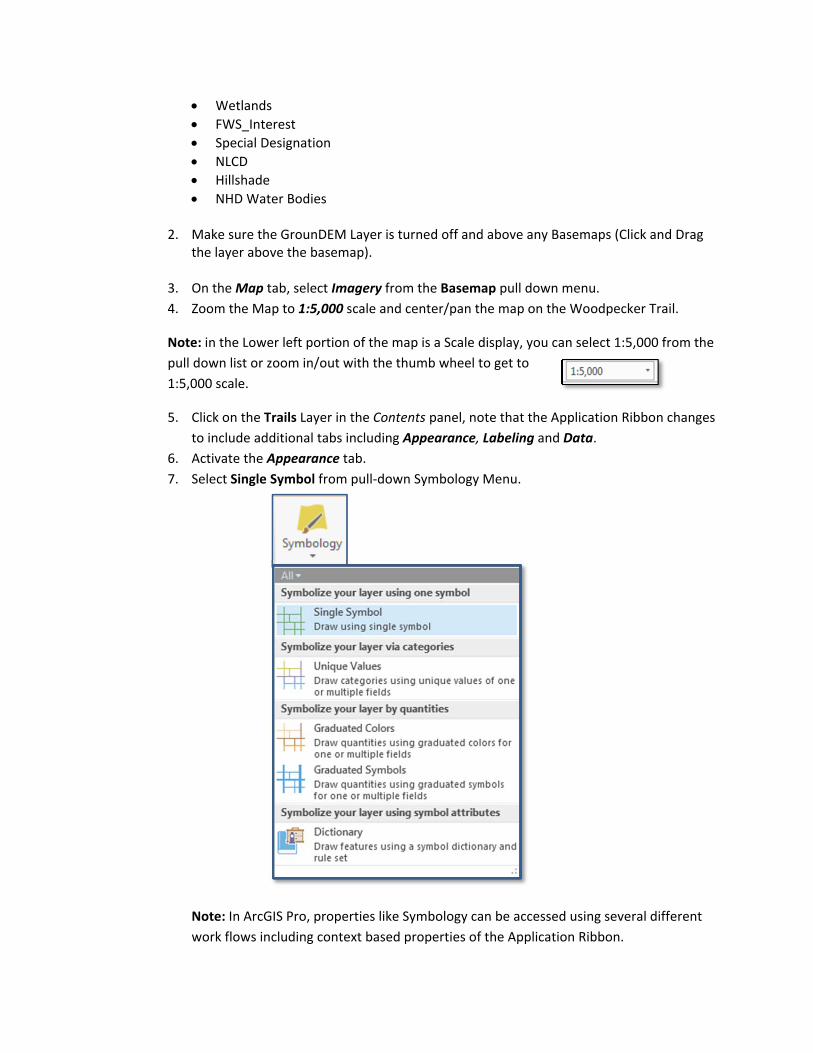
5. Click on the Trails Layer in the Contents panel, note that the Application Ribbon changes
to include additional tabs including Appearance, Labeling and Data.
6. Activate the Appearance tab.
7. Select Single Symbol from pull‐down Symbology Menu.
Note: In ArcGIS Pro, properties like Symbology can be accessed using several different
work flows including context based properties of the Application Ribbon.
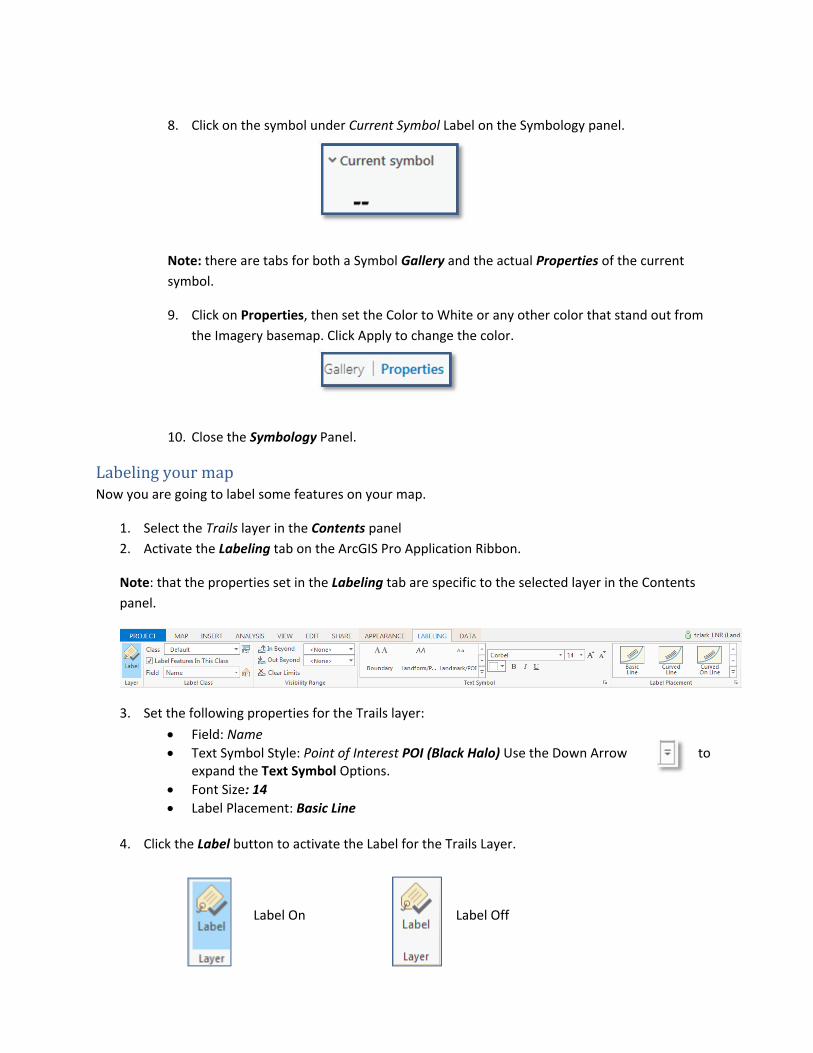
8. Click on the symbol under Current Symbol Label on the Symbology panel.
Note: there are tabs for both a Symbol Gallery and the actual Properties of the current
symbol.
9. Click on Properties, then set the Color to White or any other color that stand out from
the Imagery basemap. Click Apply to change the color.
10. Close the Symbology Panel.
LabelingyourmapNow you are going to label some features on your map.
1. Select the Trails layer in the Contents panel
2. Activate the Labeling tab on the ArcGIS Pro Application Ribbon.
Note: that the properties set in the Labeling tab are specific to the selected layer in the Contents
panel.
3. Set the following properties for the Trails layer:
Field: Name
Text Symbol Style: Point of Interest POI (Black Halo) Use the Down Arrow to expand the Text Symbol Options.
Font Size: 14
Label Placement: Basic Line
4. Click the Label button to activate the Label for the Trails Layer.
Label On Label Off
For our map, we only want to display and label the Trailhead for the Woodpecker trail, not the other
points in the Trails_Pts layer. To do this, you will apply a Definition Query to select only the desired
points in the Trailhead layer.
5. Right click the Trails_Pts layer and select Properties.
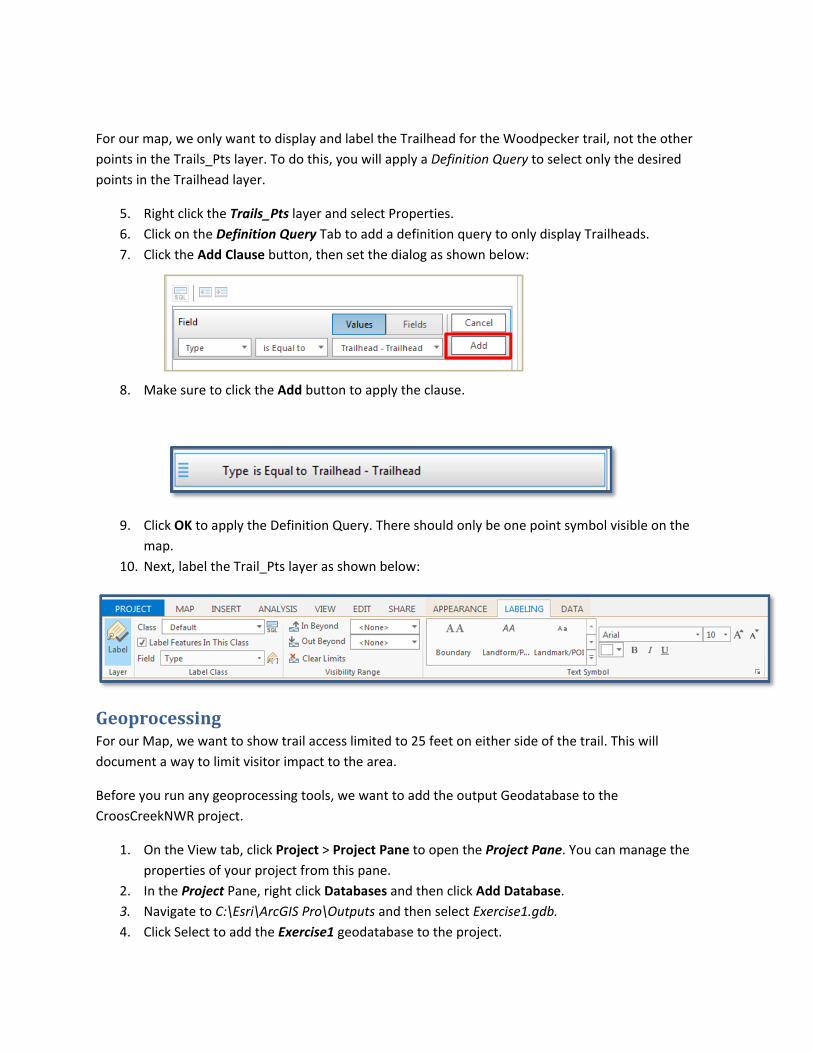
6. Click on the Definition Query Tab to add a definition query to only display Trailheads.
7. Click the Add Clause button, then set the dialog as shown below:
8. Make sure to click the Add button to apply the clause.
9. Click OK to apply the Definition Query. There should only be one point symbol visible on the
map.
10. Next, label the Trail_Pts layer as shown below:
GeoprocessingFor our Map, we want to show trail access limited to 25 feet on either side of the trail. This will
document a way to limit visitor impact to the area.
Before you run any geoprocessing tools, we want to add the output Geodatabase to the
CroosCreekNWR project.
1. On the View tab, click Project > Project Pane to open the Project Pane. You can manage the
properties of your project from this pane.
2. In the Project Pane, right click Databases and then click Add Database.
3. Navigate to C:\Esri\ArcGIS Pro\Outputs and then select Exercise1.gdb.
4. Click Select to add the Exercise1 geodatabase to the project.
5. Expand the Databases tab and you should now have two geodatabases references in your
project.
Next you will buffer the Trails layer.
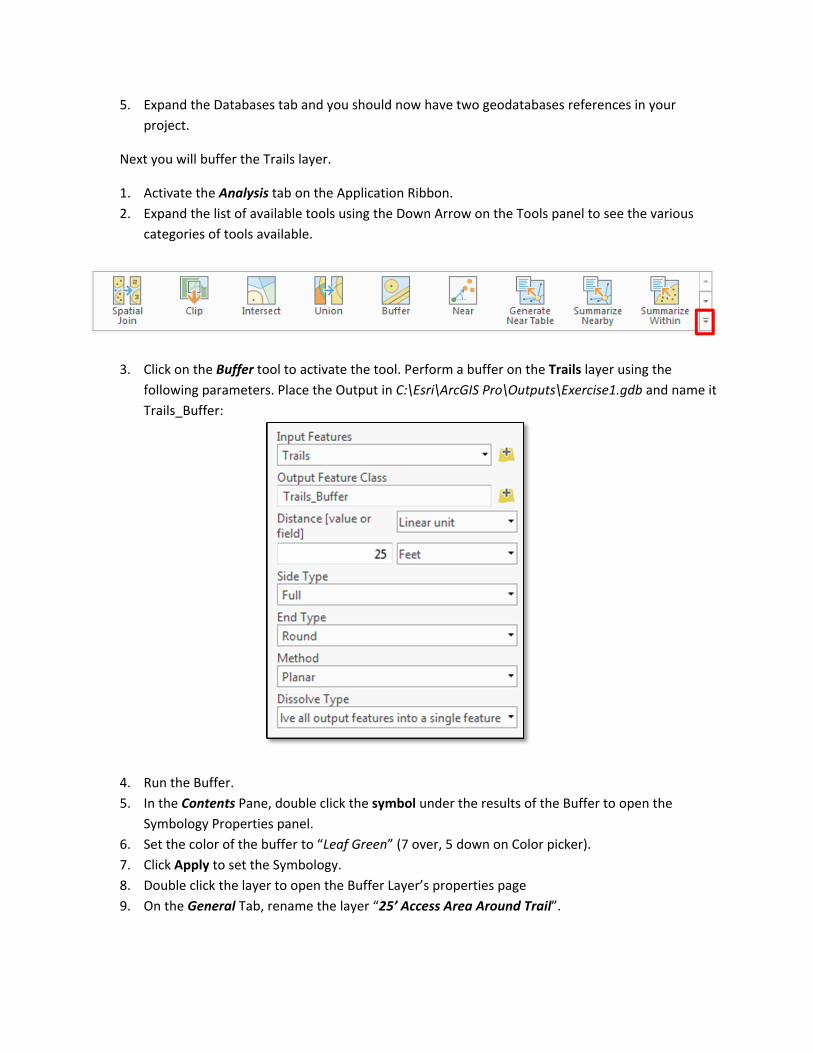
1. Activate the Analysis tab on the Application Ribbon.
2. Expand the list of available tools using the Down Arrow on the Tools panel to see the various
categories of tools available.
3. Click on the Buffer tool to activate the tool. Perform a buffer on the Trails layer using the
following parameters. Place the Output in C:\Esri\ArcGIS Pro\Outputs\Exercise1.gdb and name it
Trails_Buffer:
4. Run the Buffer.
5. In the Contents Pane, double click the symbol under the results of the Buffer to open the
Symbology Properties panel.
6. Set the color of the buffer to “Leaf Green” (7 over, 5 down on Color picker).
7. Click Apply to set the Symbology.
8. Double click the layer to open the Buffer Layer’s properties page
9. On the General Tab, rename the layer “25’ Access Area Around Trail”.
ViewyourMapsSidebySide.ArcGIS Pro allows you to view your maps in several different ways. In the next step, you will configure
your maps to be side‐by‐side.
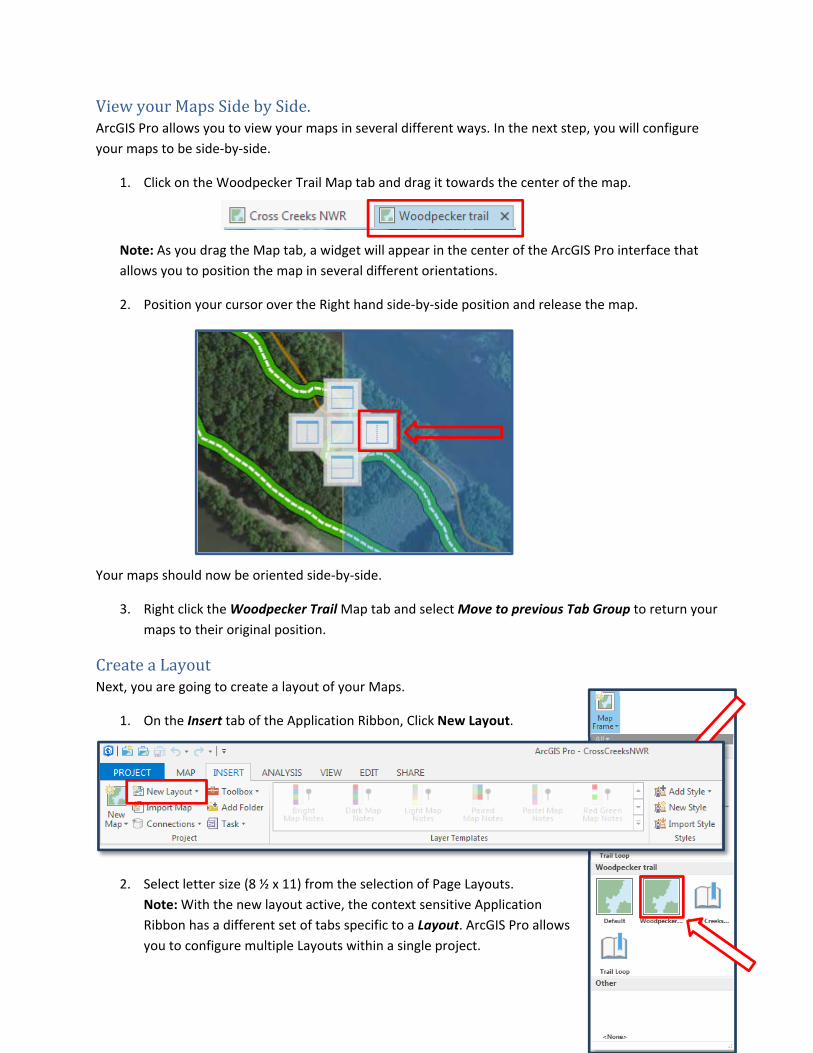
1. Click on the Woodpecker Trail Map tab and drag it towards the center of the map.
Note: As you drag the Map tab, a widget will appear in the center of the ArcGIS Pro interface that
allows you to position the map in several different orientations.
2. Position your cursor over the Right hand side‐by‐side position and release the map.
Your maps should now be oriented side‐by‐side.
3. Right click the Woodpecker Trail Map tab and select Move to previous Tab Group to return your
maps to their original position.
CreateaLayoutNext, you are going to create a layout of your Maps.
1. On the Insert tab of the Application Ribbon, Click New Layout.
2. Select letter size (8 ½ x 11) from the selection of Page Layouts.
Note: With the new layout active, the context sensitive Application
Ribbon has a different set of tabs specific to a Layout. ArcGIS Pro allows
you to configure multiple Layouts within a single project.
3. On the Insert tab, click on the arrow next to Map Frame to activate the Map Frame selection
panel.
4. Click on the Cross Creeks NWR Map.
5. The Map will now appear in your Layout, reshape the map to fit into the lower half of your
layout page.
6. Repeat the Insert > Map Frame Process and add the Woodpecker Trail Map to your layout.
7. Make sure the Woodpecker Trail Map is selected in your Layout.
8. On the Design Tab on the Application Interface, Select the Ellipse option under Reshape.
9. Draw an Ellipse over in the upper half of your layout.
10. Reshape and re‐position the map ellipse to fit the Layout, leaving room at the top for a map
title.
11. With the Woodpecker Trail map selected in the Layout, click Activate on the Layout tab. This will
place the selected map in the layout into Map mode.
12. Use the Pan/zoom tools, or your mouse to center the full extent of the trail in the map.
13. Activate the Layout tab on the application ribbon, then click Close Activation once your map is
centered the way you want it. This will return you to the Layout mode.
14. Activate the Insert tab on the application ribbon and select Text. Add the title “Woodpecker
Trail Map” at the top of your layout. Use the Element panel to set the properties to something
appropriate.
15. Select Picture on the Insert tab Graphics group to insert the agency logo on the Layout. Navigate
to C:\Esri\ArcGIS Pro\Images and select the fws.png file.
16. Position the logo in the upper left corner of the layout.
Note: For each element you add to the layout, you will see the item in the Contents pane.
Double clicking on any element in the Contents pane will open the element properties panel.
You can set all of the properties for each element in the layout. For example, you can specify the
appropriate Map frame for map specific items like scale bars and North arrows.
17. Experiment with adding other layout items like Scale bars, and North arrows.
When completed, your map should appear similar to the example on the next page:
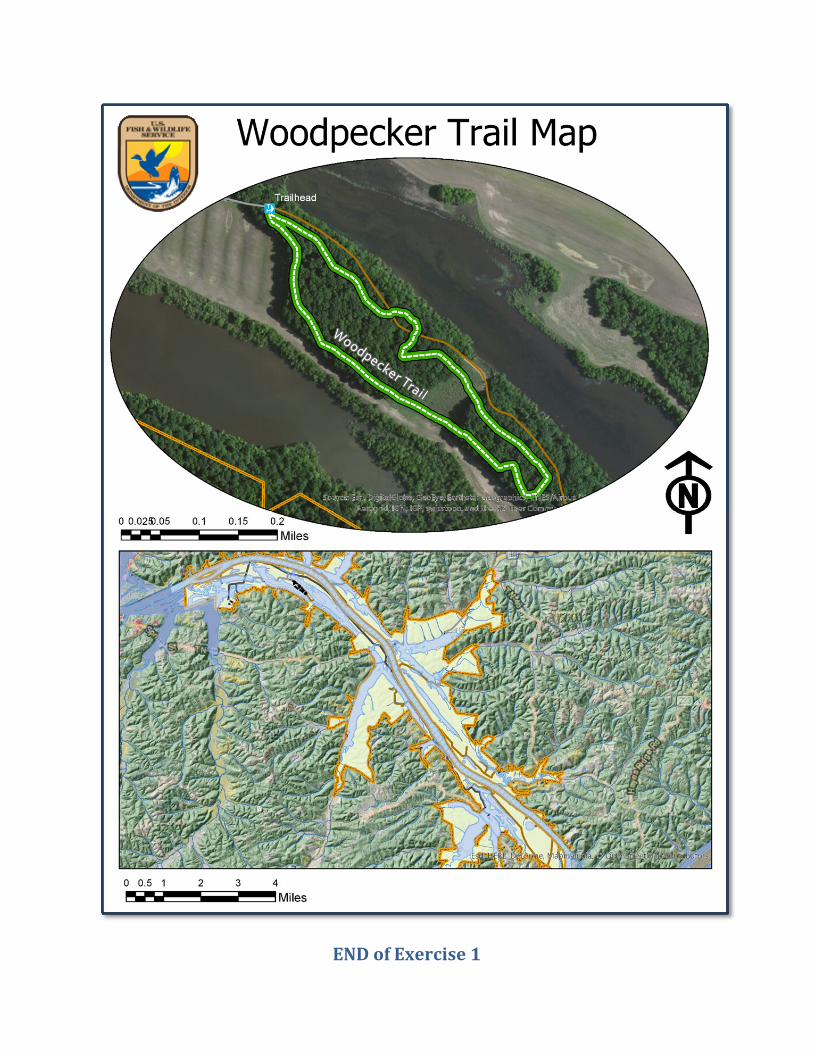
ENDofExercise1