Embed Size (px)
Citation preview
Step by Step Virtual
Machine in Azure
Hussain Shakir
LinkedIn: https://www.linkedin.com/in/mrhussain
Twitter: https://twitter.com/hshakir_ms
Blog: http://mstechguru.blogspot.com/
Table of Contents
About Author ........................................................................................................................................................ 2
Product Overview ................................................................................................................................................. 3
Access Your Azure Portal ..................................................................................................................................... 4
Create Your First Resource Group ....................................................................................................................... 4
Create Your First Storage Account ...................................................................................................................... 7
Create Your First Virtual Network ...................................................................................................................... 10
Create Your First Virtual Machine ...................................................................................................................... 14
About Author
Shakir is IT Consultant with over 13 years of extensive experience working with Microsoft
Technologies AD, Exchange, O365, Windows Azure, PowerShell, Skype for Business, SQL,
SharePoint and Microsoft public clouds, and providing solutions to different local & international
Enterprise customers.
Shakir has been involved in Infrastructure Designing and Implementation, Virtualization, and
Disaster Recovery. Extensive hands-on experience in Core Server Infrastructure, Cloud Computing,
Virtualization/ Management and Information Protection. Analysis and Support of Microsoft
Windows Server based Client / Server network, AD, Messaging, Skype for Business, SQL Always ON,
Virtualization and System Center Infrastructure Products. Shakir has various industry certifications:
MCT, MCTS, MCITP, MCSA, MCSE: Messaging, MCPS, MCSE: Cloud Platform and Infrastructure
and also providing trainings on Microsoft Based Technologies.
Product Overview
Azure Virtual Machines (VM) is one of several types of on-demand, scalable computing resources that
Azure offers. Typically, you choose a VM when you need more control over the computing environment
than the other choices offer. This article gives you information about what you should consider before you
create a VM, how you create it, and how you manage it.
An Azure VM gives you the flexibility of virtualization without having to buy and maintain the physical
hardware that runs it. However, you still need to maintain the VM by performing tasks, such as configuring,
patching, and installing the software that runs on it.
Azure virtual machines can be used in various ways. Some examples are:
Development and test – Azure VMs offer a quick and easy way to create a computer with specific configurations
required to code and test an application.
Applications in the cloud – Because demand for your application can fluctuate, it might make economic sense to
run it on a VM in Azure. You pay for extra VMs when you need them and shut them down when you don’t.
Extended datacenter – Virtual machines in an Azure virtual network can easily be connected to your
organization’s network.
The number of VMs that your application uses can scale up and out to whatever is required to meet your
needs. In this article we will walk through the steps of creating Virtual Machine from scratch with Resource
Group, Storage Account and Virtual Network.

Access Your Azure Portal
Create Your First Resource Group
Azure Resource Manager enables you to work with the resources in your solution as a group. You can
deploy, update, or delete all the resources for your solution in a single, coordinated operation. You use a
template for deployment and that template can work for different environments such as testing, staging, and
production. Resource Manager provides security, auditing, and tagging features to help you manage your
resources after deployment.
Click on Add to create the new Resource group.
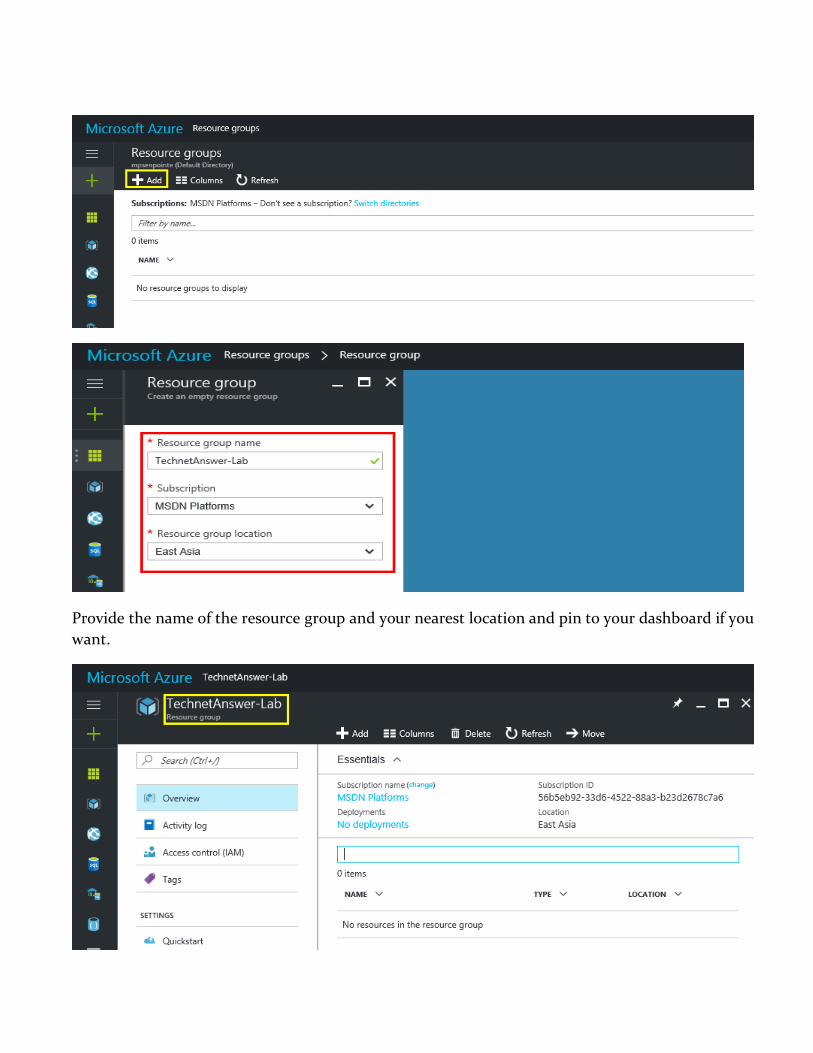
Provide the name of the resource group and your nearest location and pin to your dashboard if you
want.
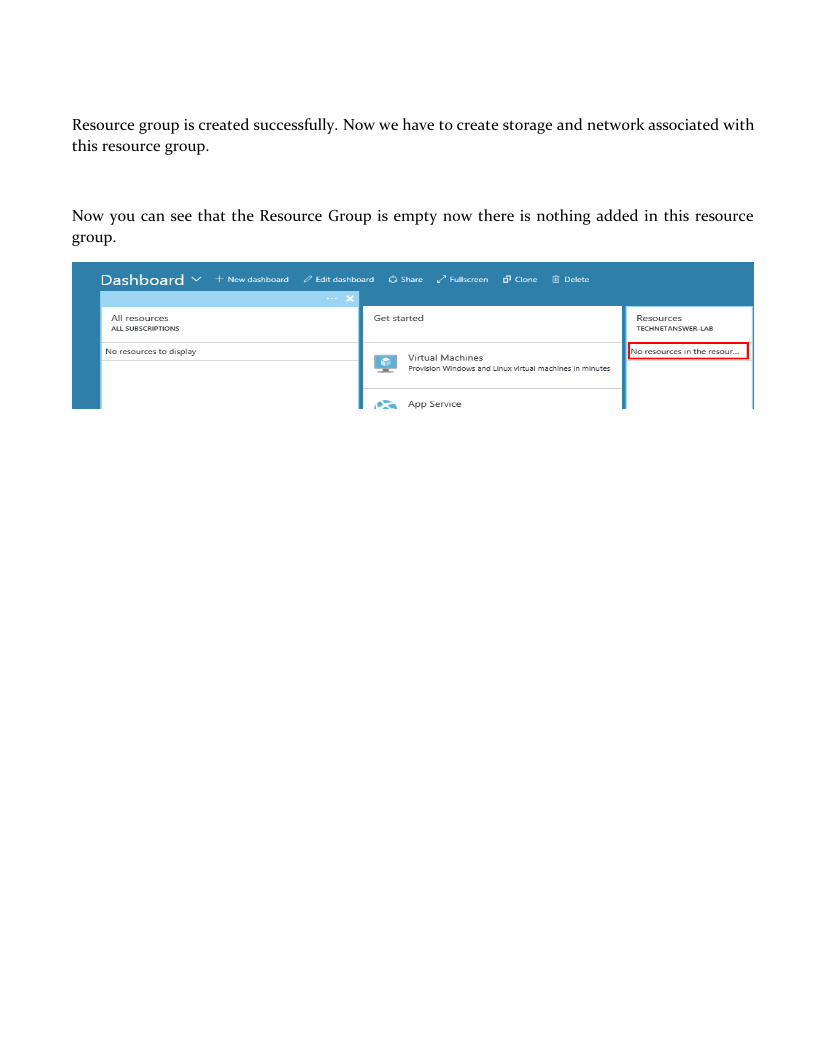
Resource group is created successfully. Now we have to create storage and network associated with
this resource group.
Now you can see that the Resource Group is empty now there is nothing added in this resource
group.
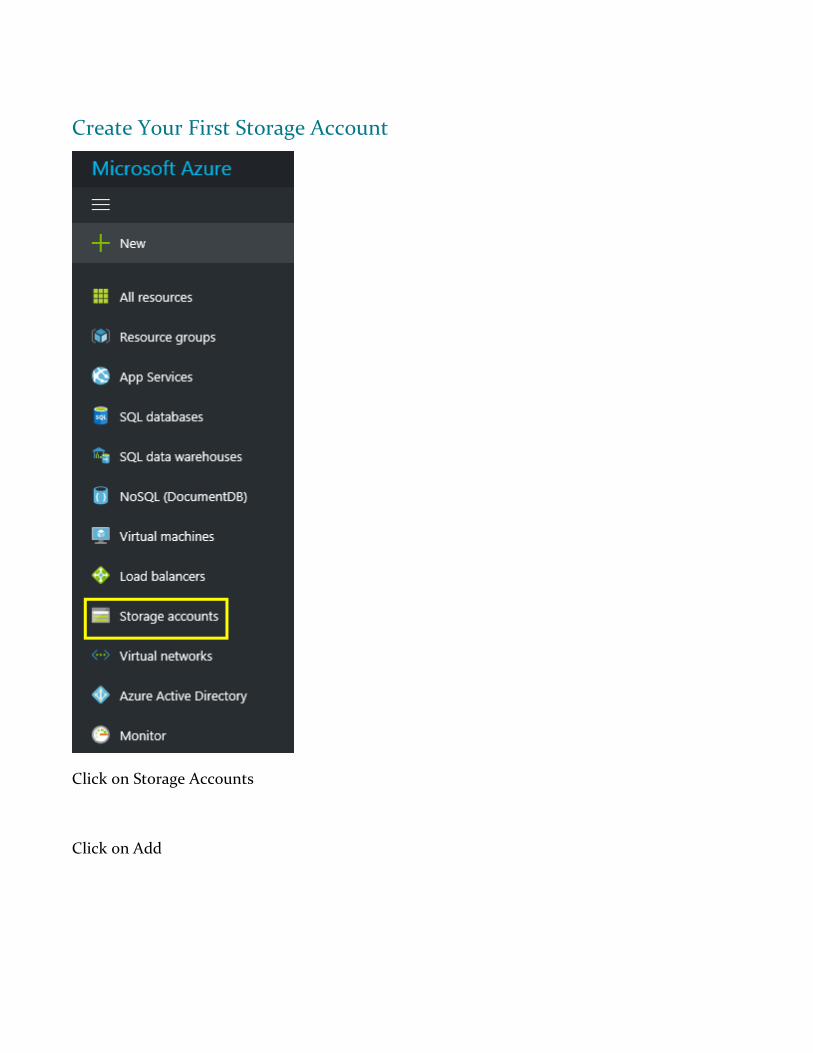
Create Your First Storage Account
Click on Storage Accounts
Click on Add
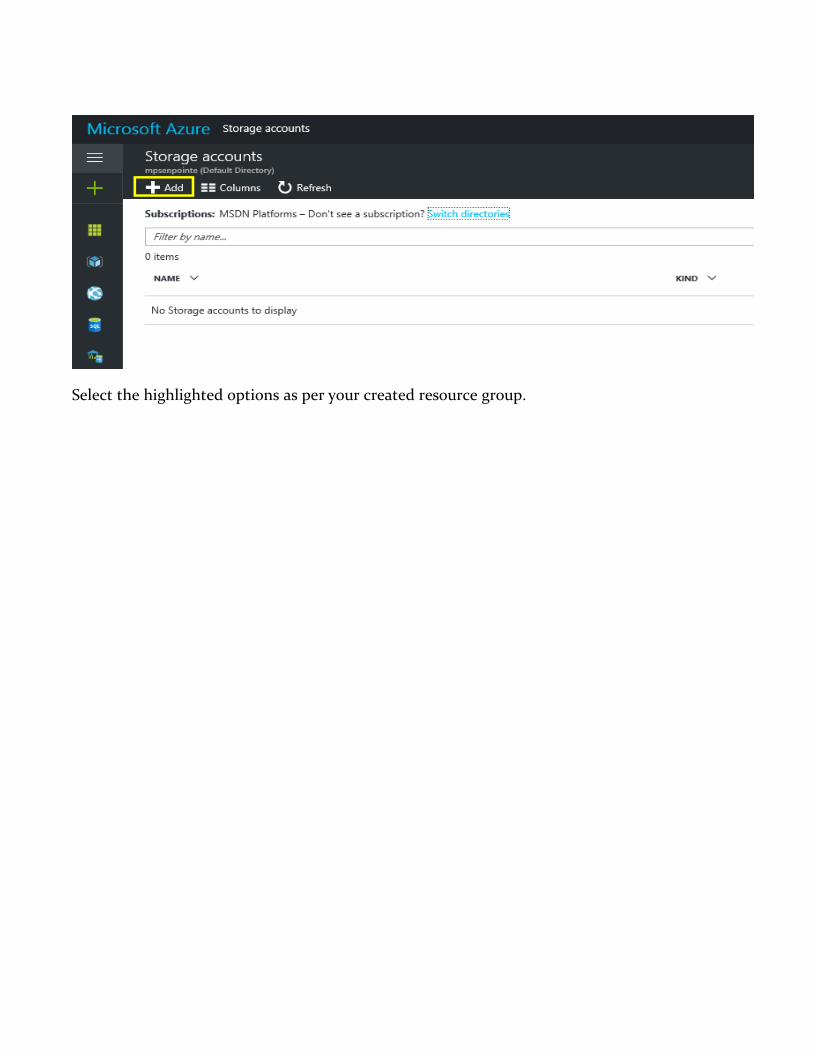
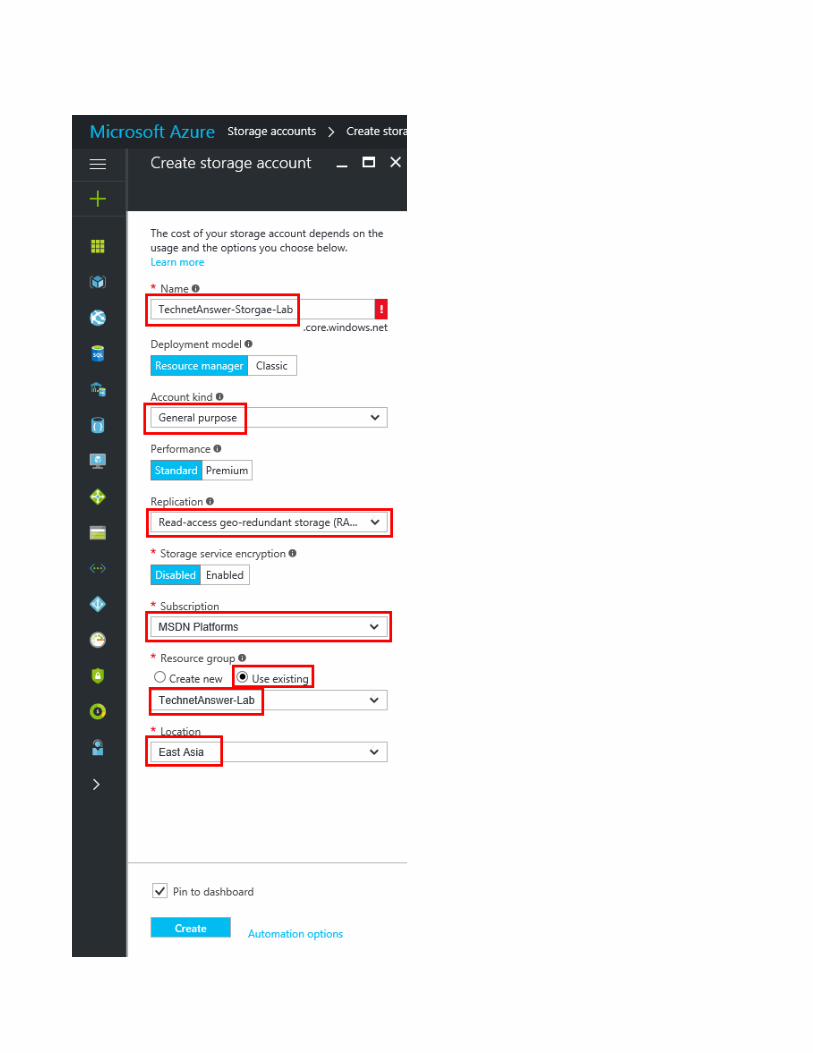
Select the highlighted options as per your created resource group.
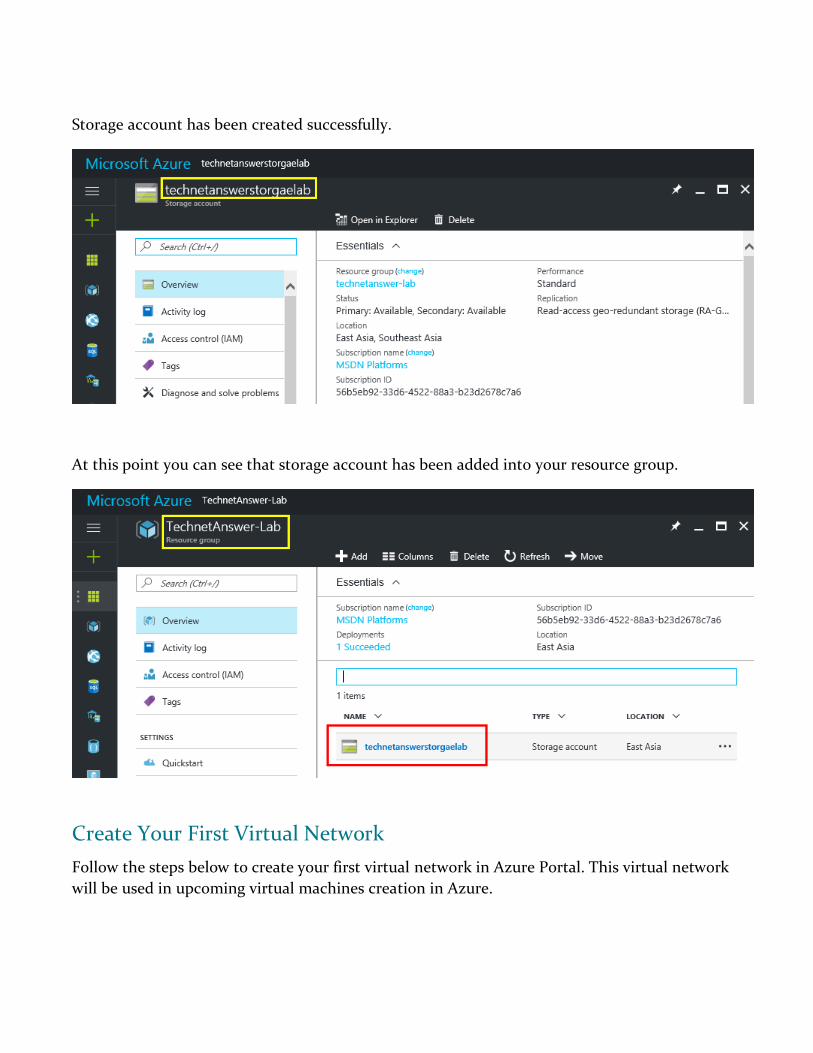
Storage account has been created successfully.
At this point you can see that storage account has been added into your resource group.
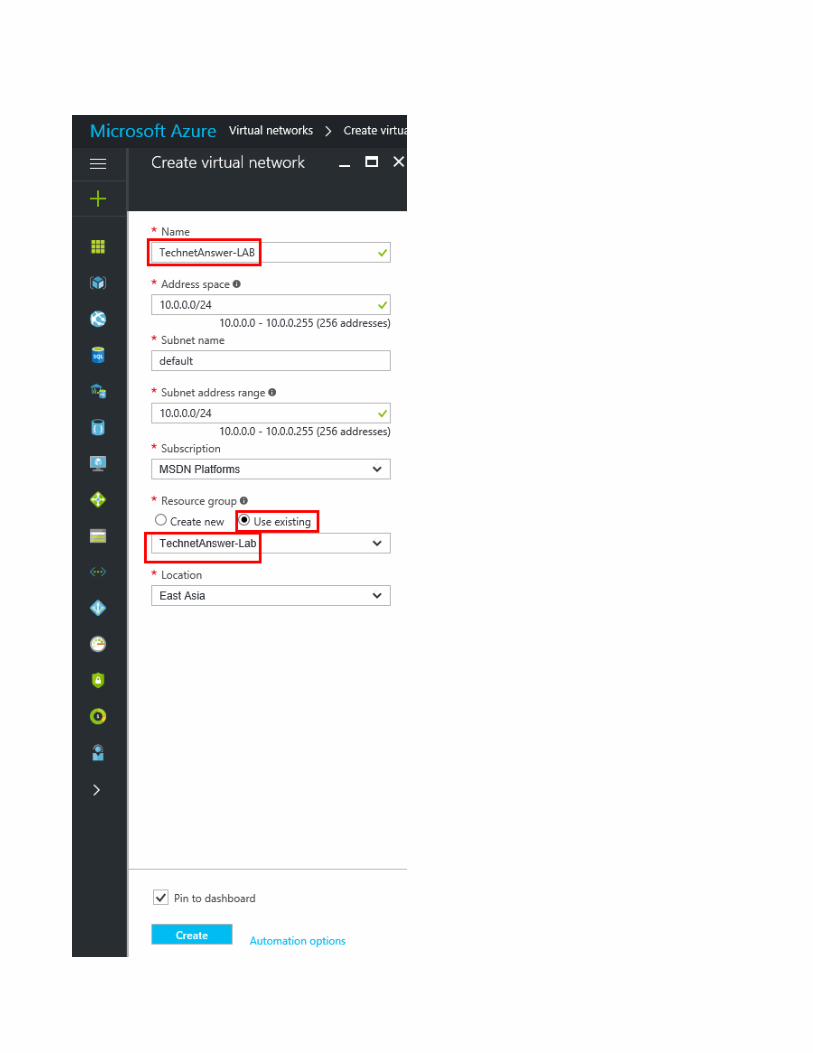
Create Your First Virtual Network
Follow the steps below to create your first virtual network in Azure Portal. This virtual network
will be used in upcoming virtual machines creation in Azure.
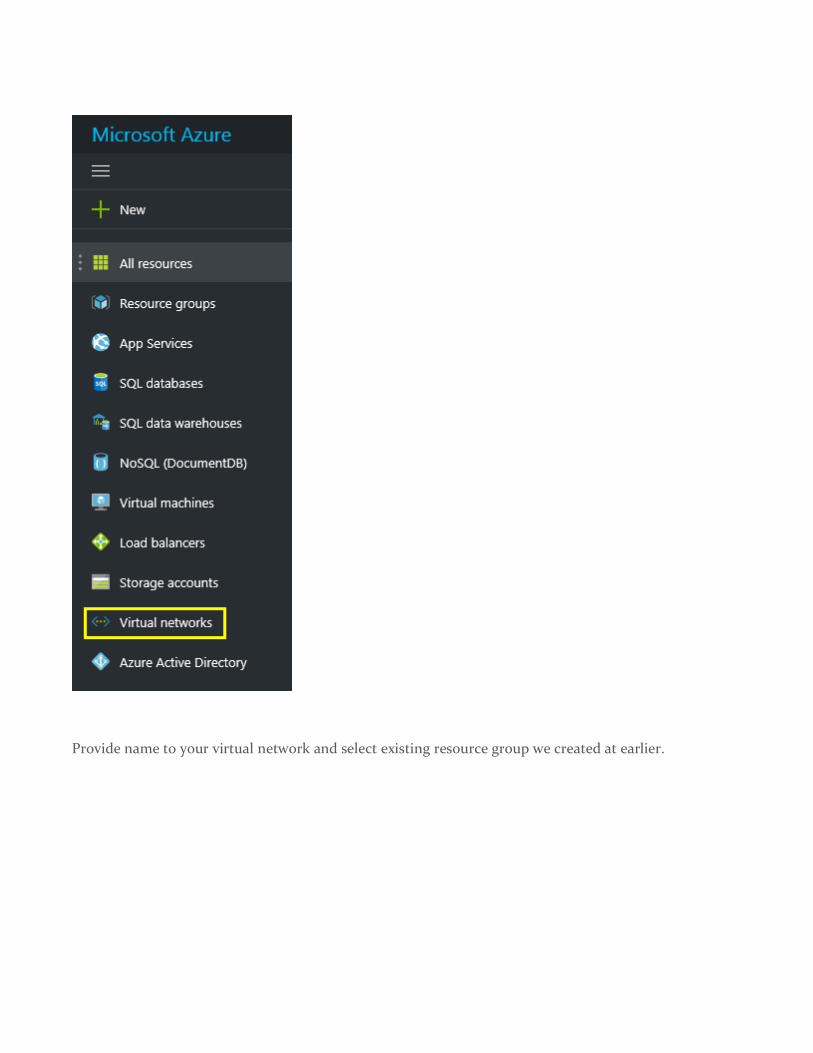
Provide name to your virtual network and select existing resource group we created at earlier.
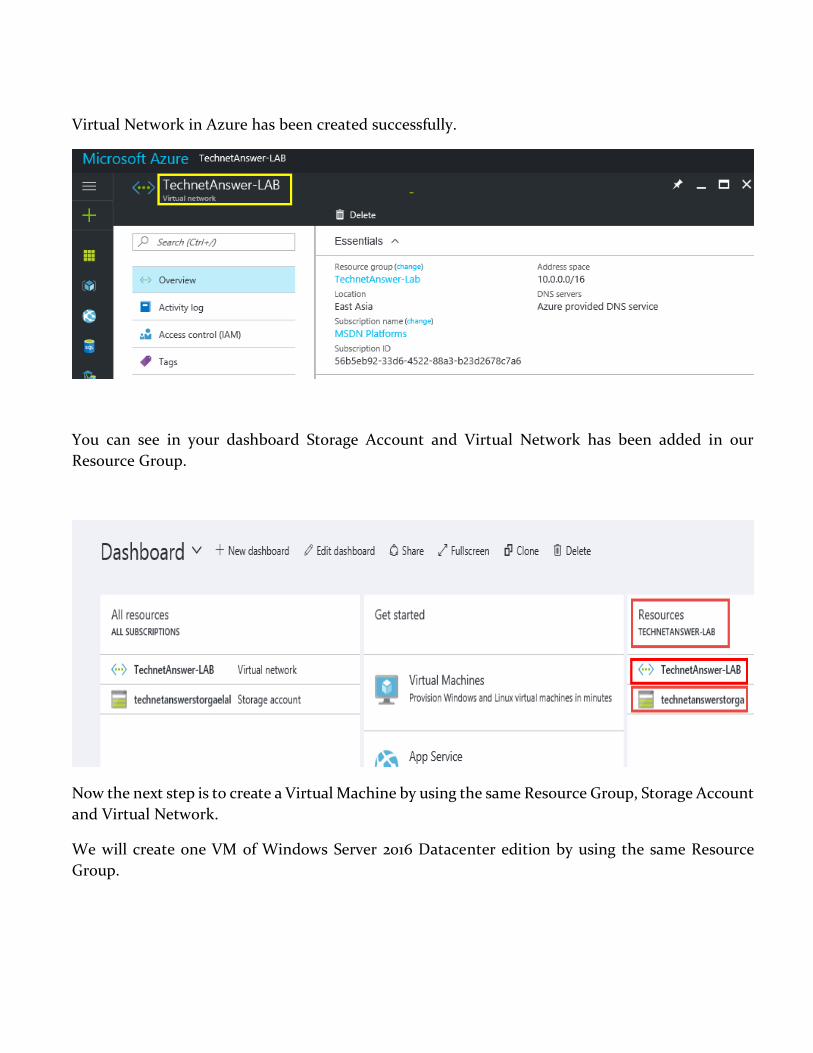
Virtual Network in Azure has been created successfully.
You can see in your dashboard Storage Account and Virtual Network has been added in our
Resource Group.
Now the next step is to create a Virtual Machine by using the same Resource Group, Storage Account
and Virtual Network.
We will create one VM of Windows Server 2016 Datacenter edition by using the same Resource
Group.
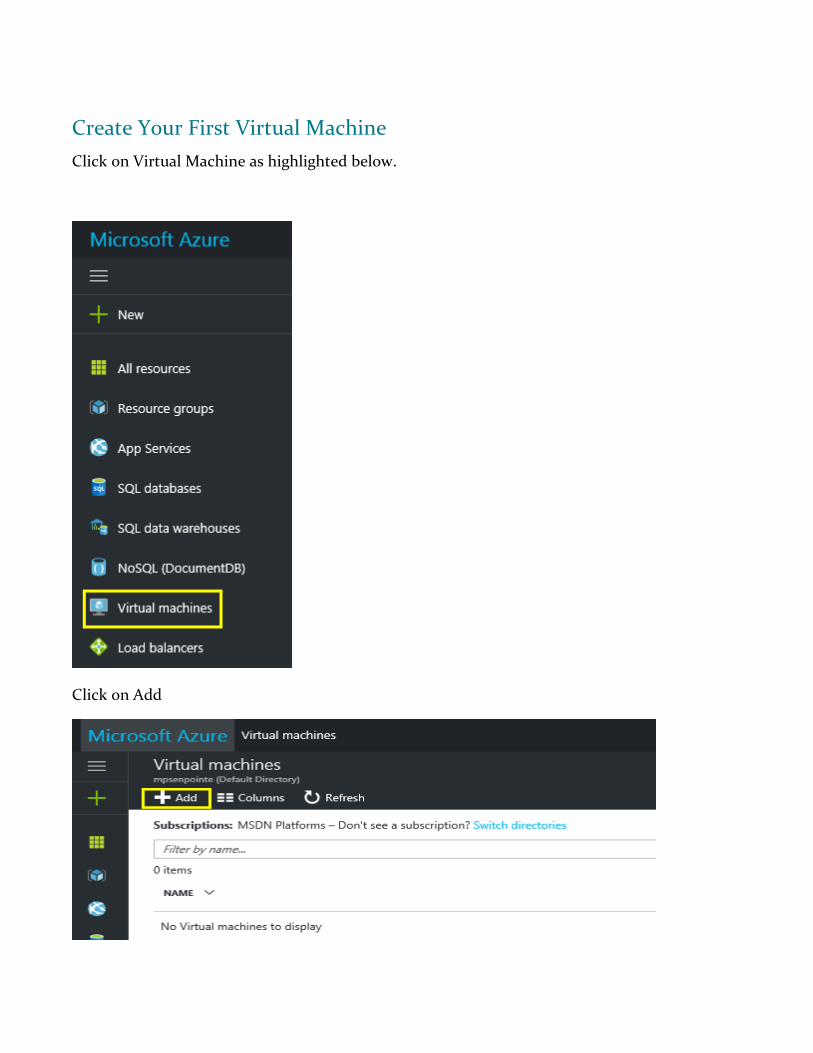
Create Your First Virtual Machine
Click on Virtual Machine as highlighted below.
Click on Add
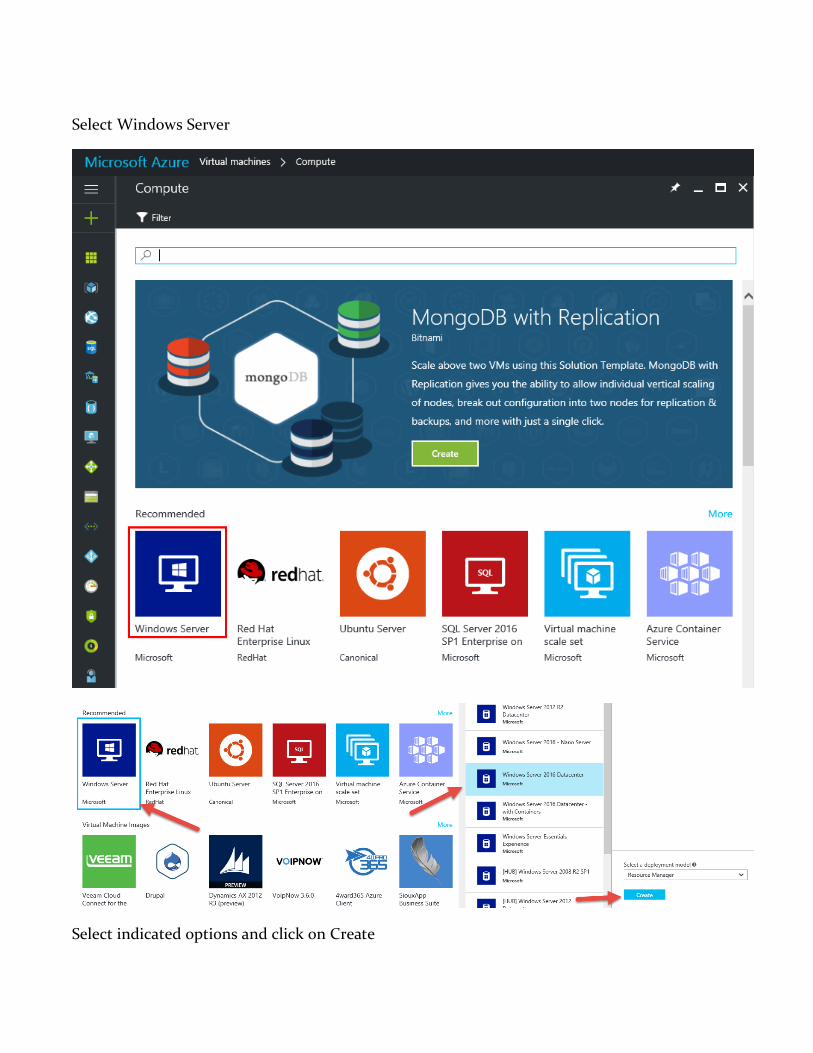
Select Windows Server
Select indicated options and click on Create
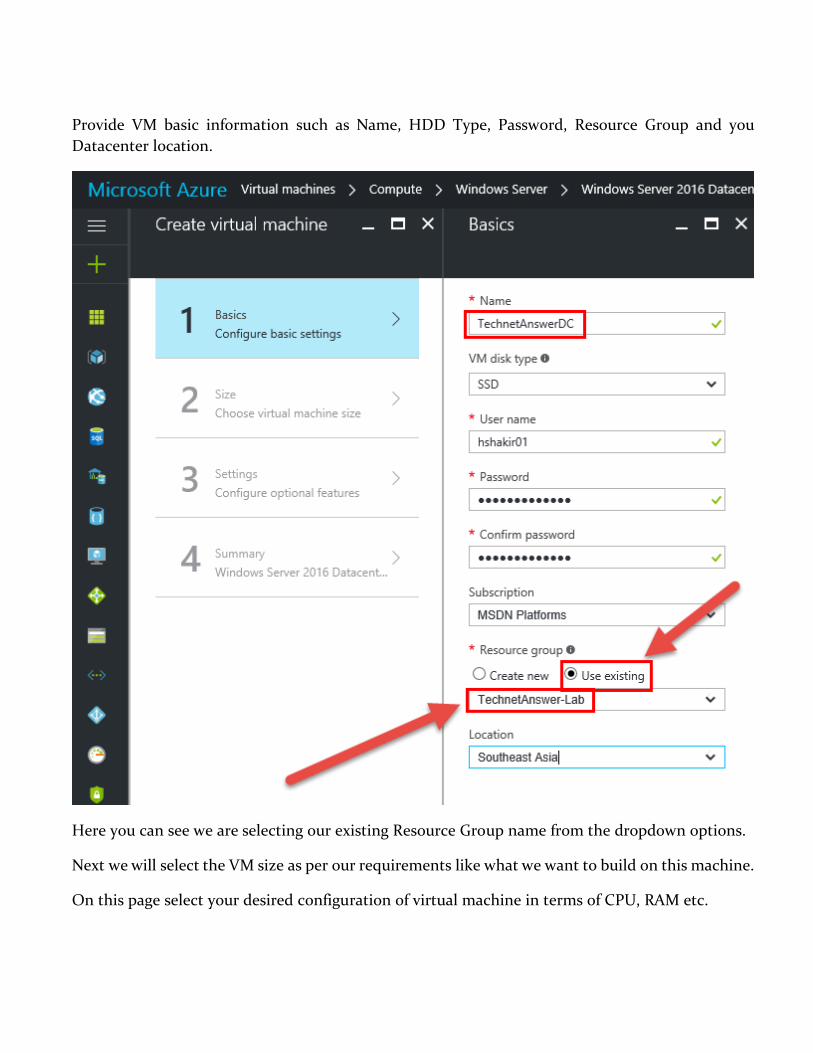
Provide VM basic information such as Name, HDD Type, Password, Resource Group and you
Datacenter location.
Here you can see we are selecting our existing Resource Group name from the dropdown options.
Next we will select the VM size as per our requirements like what we want to build on this machine.
On this page select your desired configuration of virtual machine in terms of CPU, RAM etc.
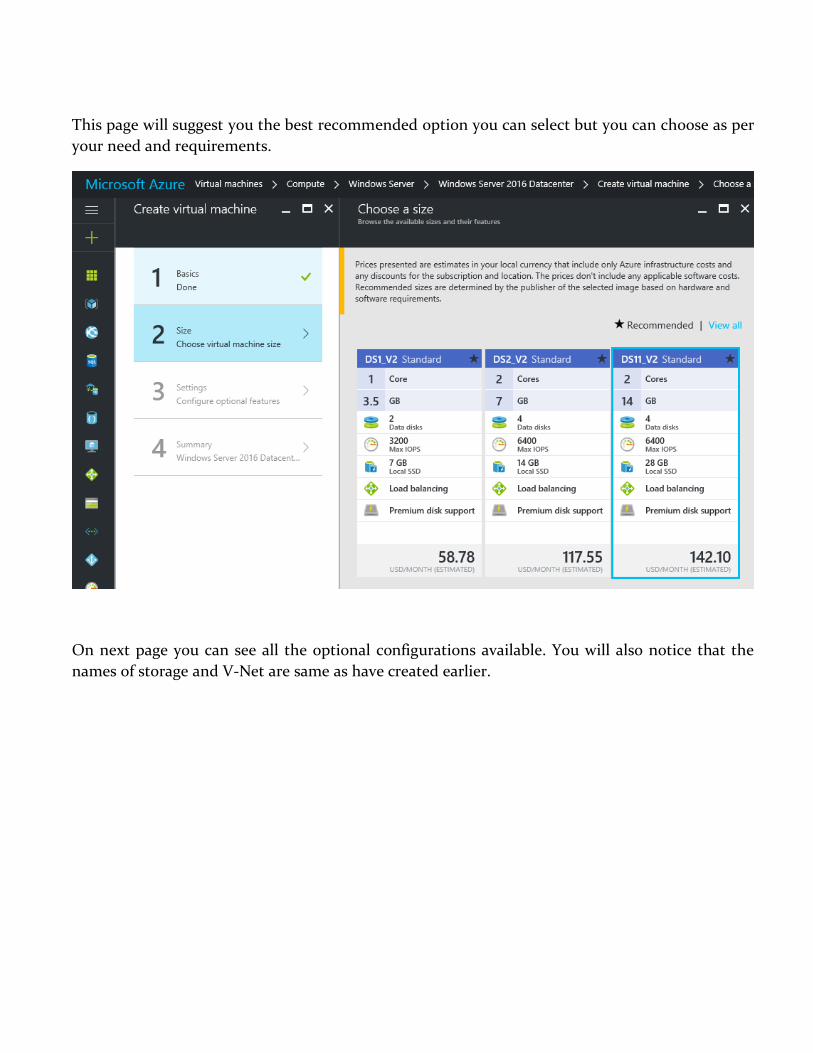
This page will suggest you the best recommended option you can select but you can choose as per
your need and requirements.
On next page you can see all the optional configurations available. You will also notice that the
names of storage and V-Net are same as have created earlier.

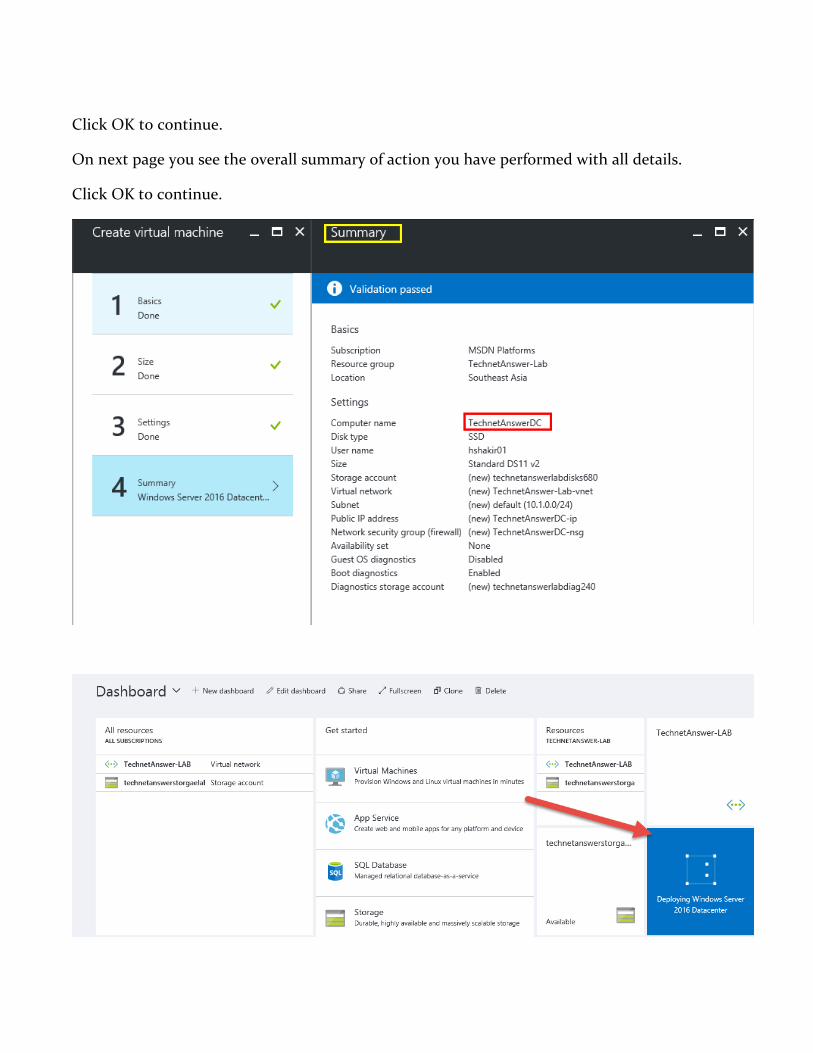
Click OK to continue.
On next page you see the overall summary of action you have performed with all details.
Click OK to continue.
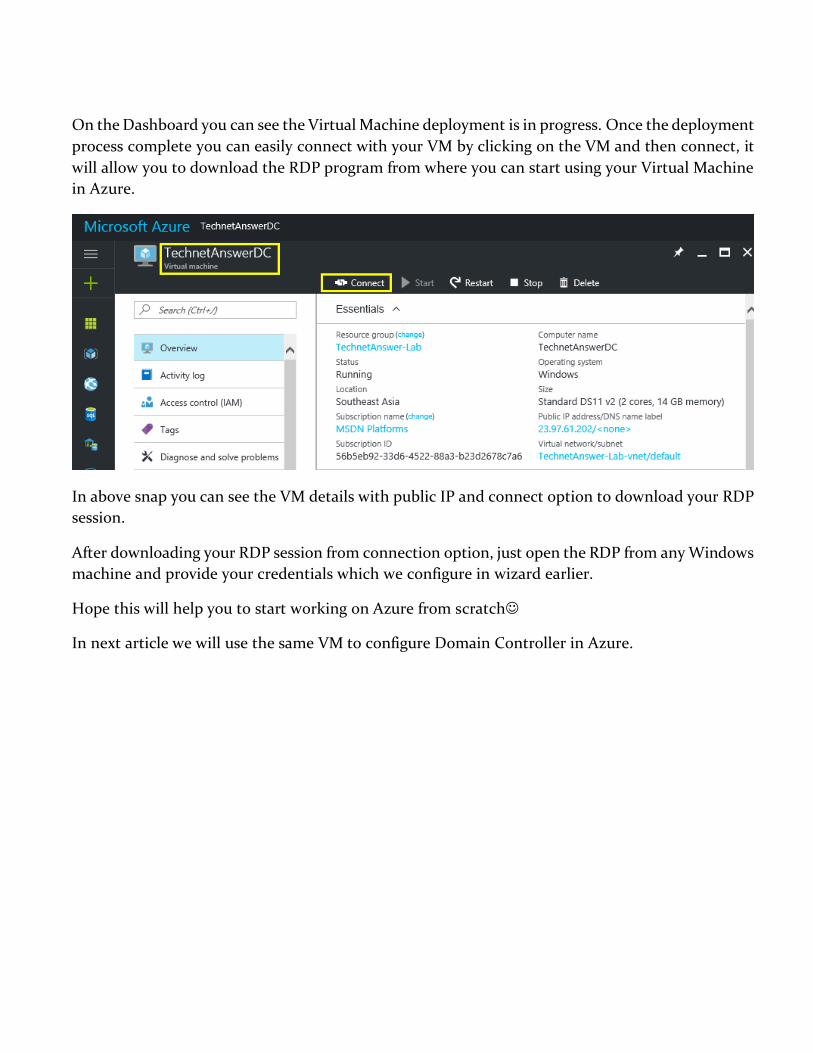
On the Dashboard you can see the Virtual Machine deployment is in progress. Once the deployment
process complete you can easily connect with your VM by clicking on the VM and then connect, it
will allow you to download the RDP program from where you can start using your Virtual Machine
in Azure.
In above snap you can see the VM details with public IP and connect option to download your RDP
session.
After downloading your RDP session from connection option, just open the RDP from any Windows
machine and provide your credentials which we configure in wizard earlier.
Hope this will help you to start working on Azure from scratch
In next article we will use the same VM to configure Domain Controller in Azure.