Embed Size (px)
Citation preview
STUH42 GUNNERY GUIDE
How to Fight, Survive, & Win using the most infrequently
spawned fighting platform in WW2OL
How To Kill at range:
MOST BRITISH & FRENCH ARMOR
THE EXCEPTIONS BEING THE “USUAL SUSPECTS”
DON’T BELIEvE
The StuH is as worthless as the Cru IIICS or the Vickers. In
other words, they have pretty narrow windows of opportunity.
REALIzE THAT AND mOvE ON.”
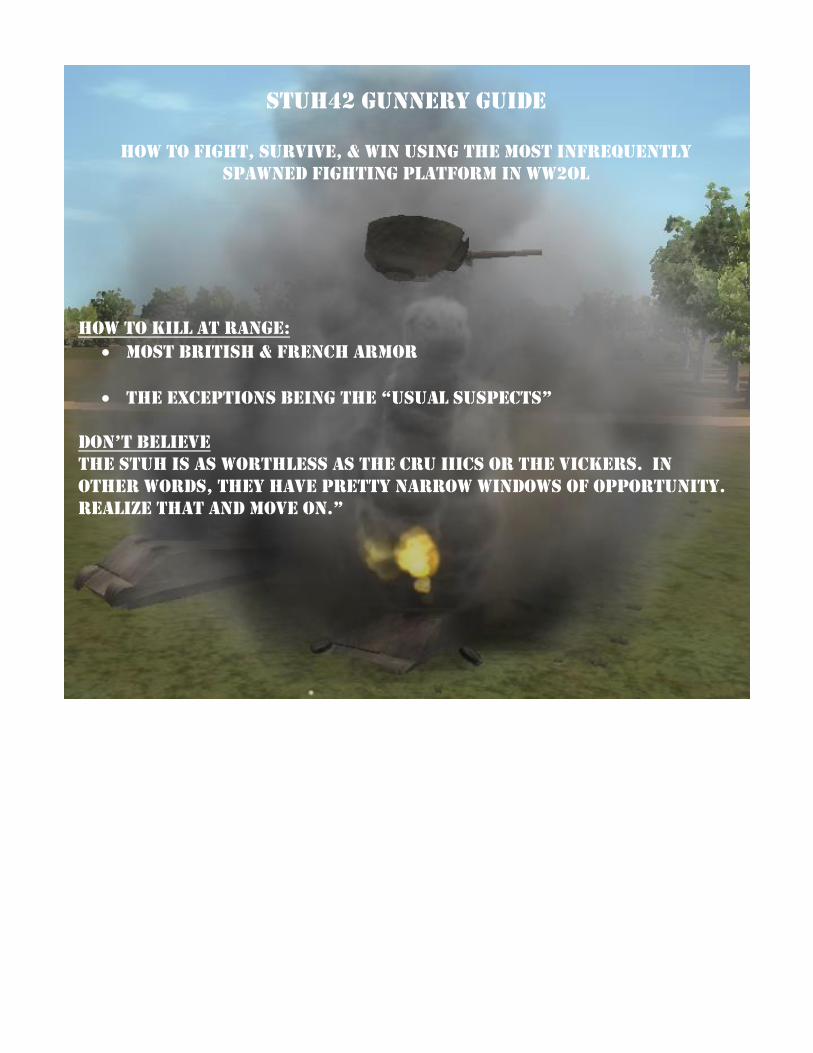
STUH42 GUNNERY GUIDE INDEX
SECTION DESCRIPTION PG I Introduction of the StuH42
3
II Specifications & Fundamentals
5
III Cover & Concealment
7
IV Tactics
Scouting
Ambush
Hide
7
V Best Uses
Infantry support
Shelling concentrated enemy equipment
Direct Fire Support
Covering the assault with HE & Smoke
8
VI The Logistical Tail
Reload & Resupply Times
Ammo Support
Resupply Timer
9
VII Ammunition – not all rounds are created equal
High-Explosive Rounds
Armor-Piercing Rounds
High-Explosive Anti-Tank (HEAT) Rounds
Penetration Abnormalities given the ammunition
10
VIII Range Tables
11
IX Aiming Points & Gunsight / Commander Views
14
X The StuH42 Target Engagement Table
15
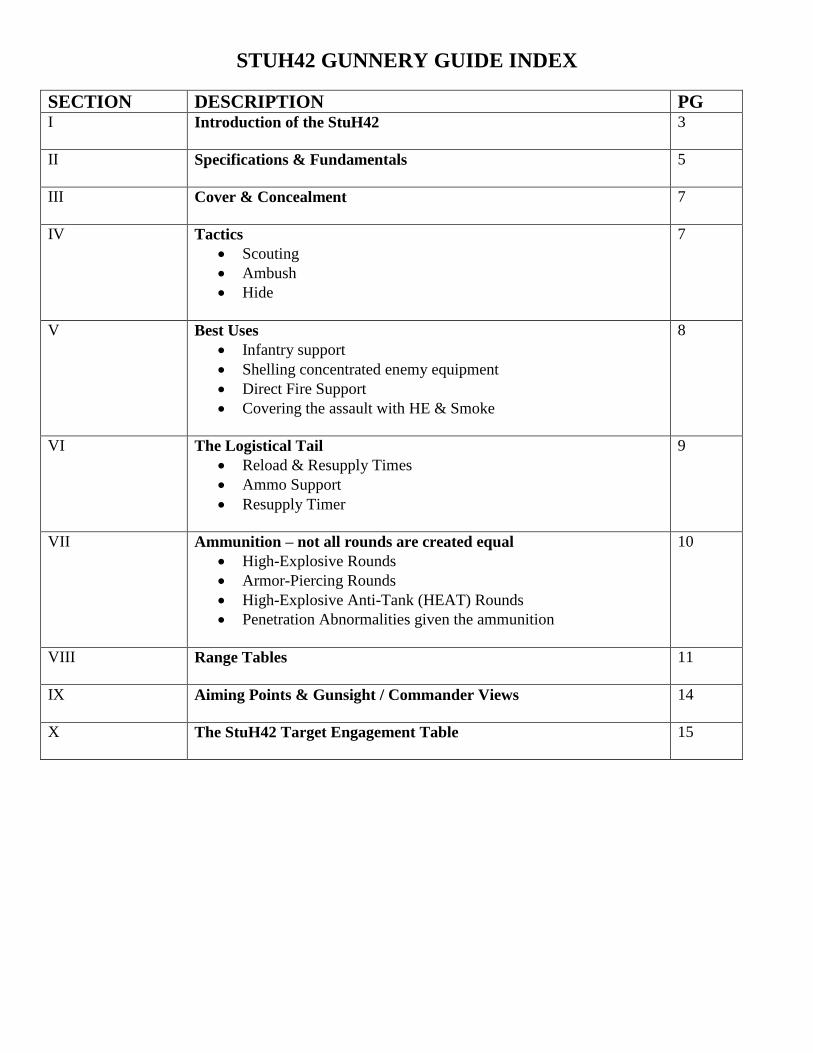
SECTION DESCRIPTION PG XI How to Kill
a) Sherman 75 / 76 & Firefly . . . . . . . . . . . . . . . . . . . . . . . . . . . . . . .
b) M10 (3in Gun) . . . . . . . . . . . . . . . . . . . . . . . . . . . . . . . . . . . . . . . .
c) M10 Achilles TD . . . . . . . . . . . . . . . . . . . . . . . . . . . . . . . . . . . . . .
d) Crusader II/II CS, III/III CS. . . . . . . . . . . . . . . . . . . . . . . . . . . . . .
e) A13 . . . . . . . . . . . . . . . . . . . . . . . . . . . . . . . . . . . . . . . . . . . . . . . .
f) Stuart V . . . . . . . . . . . . . . . . . . . . . . . . . . . . . . . . . . . . . . . . . . . . .
g) Daimler Armored Car. . . . . . . . . . . . . . . . . . . . . . . . . . . . . . . . . . .
h) Vickers VIb . . . . . . . . . . . . . . . . . . . . . . . . . . . . . . . . . . . . . . . . . .
i) Char 1b Bis . . . . . . . . . . . . . . . . . . . . . . . . . . . . . . . . . . . . . . . . . . .
j) Somou S35 . . . . . . . . . . . . . . . . . . . . . . . . . . . . . . . . . . . . . . . . . . .
k) Hotchkiss H39 . . . . . . . . . . . . . . . . . . . . . . . . . . . . . . . . . . . . . . . .
l) Renault R35 . . . . . . . . . . . . . . . . . . . . . . . . . . . . . . . . . . . . . . . . . .
m) Panhard 178 AMD . . . . . . . . . . . . . . . . . . . . . . . . . . . . . . . . . . . . .
16
17
19
20
21
22
23
24
25
26
27
28
29
30
XII Additional Information
Massed Fires (Assault Battery Formation)
StuH42 Assault Platoon Deployment
31
XIII Supporting Responsibilities
Security
The Role of Engineers
Supply
33
XIV Importance of Plunging Fire
Depots
Forward Bases
Open / Walled Army Bases
34
XV Demolition
Building Demolition Table
Bridges
35
XVI The Future
Custom Ammo Loadouts
Indirect Fire & How-To Tools
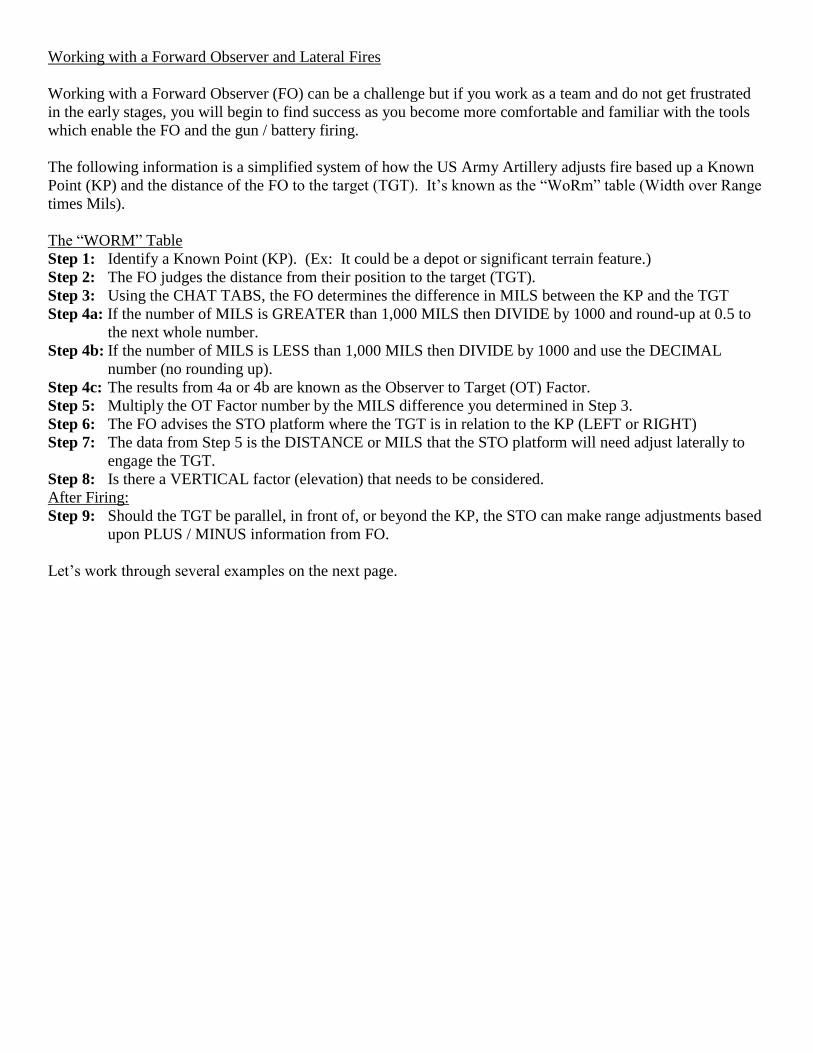
Working with a Forward Observer and Lateral Fires
o The “WORM” Table
o Chat Tabs MILS Table
o Interpreting the FO Data
o StuH42 Traverse Table
o Observer to TGT (OT Factor) Range Table
Elevation Ranging and Firing
38
38
38
40
40
41
42
42
44
45
XVII Funny Pictures
46
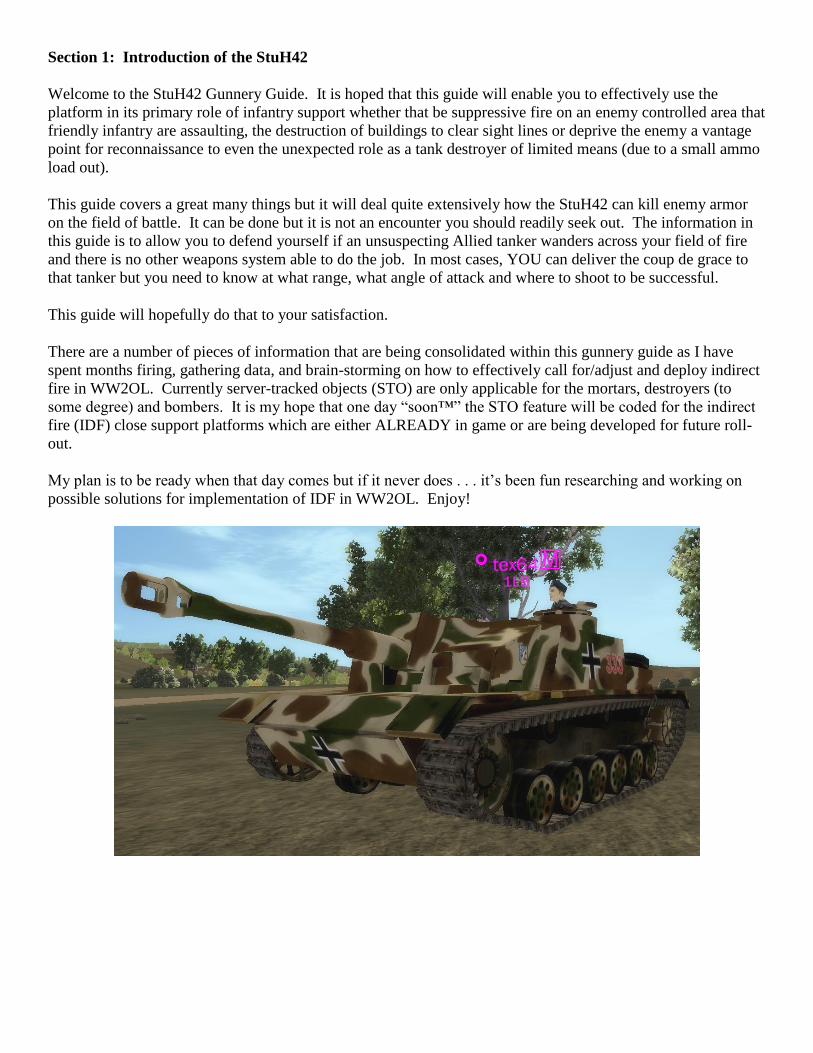
Section 1: Introduction of the StuH42
Welcome to the StuH42 Gunnery Guide. It is hoped that this guide will enable you to effectively use the
platform in its primary role of infantry support whether that be suppressive fire on an enemy controlled area that
friendly infantry are assaulting, the destruction of buildings to clear sight lines or deprive the enemy a vantage
point for reconnaissance to even the unexpected role as a tank destroyer of limited means (due to a small ammo
load out).
This guide covers a great many things but it will deal quite extensively how the StuH42 can kill enemy armor
on the field of battle. It can be done but it is not an encounter you should readily seek out. The information in
this guide is to allow you to defend yourself if an unsuspecting Allied tanker wanders across your field of fire
and there is no other weapons system able to do the job. In most cases, YOU can deliver the coup de grace to
that tanker but you need to know at what range, what angle of attack and where to shoot to be successful.
This guide will hopefully do that to your satisfaction.
There are a number of pieces of information that are being consolidated within this gunnery guide as I have
spent months firing, gathering data, and brain-storming on how to effectively call for/adjust and deploy indirect
fire in WW2OL. Currently server-tracked objects (STO) are only applicable for the mortars, destroyers (to
some degree) and bombers. It is my hope that one day “soon™” the STO feature will be coded for the indirect
fire (IDF) close support platforms which are either ALREADY in game or are being developed for future roll-
out.
My plan is to be ready when that day comes but if it never does . . . it’s been fun researching and working on
possible solutions for implementation of IDF in WW2OL. Enjoy!
Section II: Specifications & Fundamentals
Official Name: 10.5cm Sturmhaubitze 42 (Sd Kfs 142/2)
Abbreviation: StuH42
Type: Assault howitzer
Weight (tons): 24
Length (meters): 6.14
Width (meters: 2.95
Height (meters): 2.16
Future Option: (1) 7.92mm MG34 (like the Stug3G – MG34)
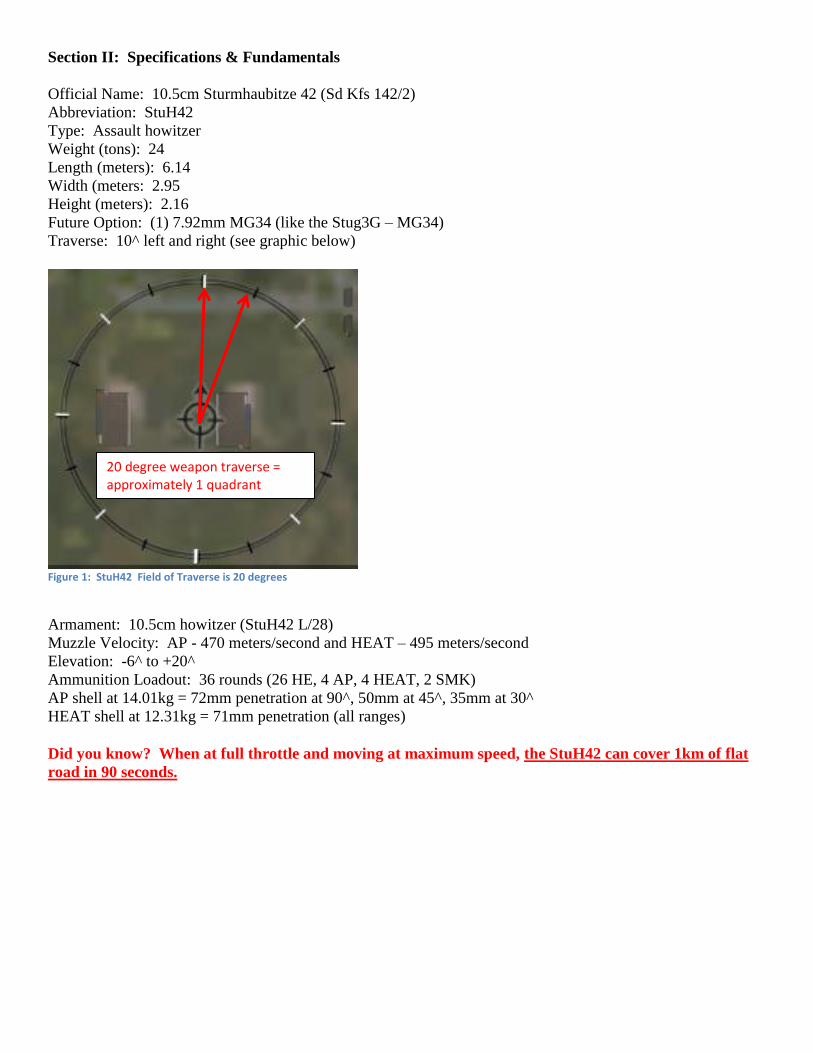
Traverse: 10^ left and right (see graphic below)
Figure 1: StuH42 Field of Traverse is 20 degrees
Armament: 10.5cm howitzer (StuH42 L/28)
Muzzle Velocity: AP - 470 meters/second and HEAT – 495 meters/second
Elevation: -6^ to +20^
Ammunition Loadout: 36 rounds (26 HE, 4 AP, 4 HEAT, 2 SMK)
AP shell at 14.01kg = 72mm penetration at 90^, 50mm at 45^, 35mm at 30^
HEAT shell at 12.31kg = 71mm penetration (all ranges)
Did you know? When at full throttle and moving at maximum speed, the StuH42 can cover 1km of flat
road in 90 seconds.
20 degree weapon traverse = approximately 1 quadrant
Fundamentals to “live” by:
Does it feel like your shots seems to be astray more than usual?
Go to driver’s position and pull back / hold your joystick; continue to hold the joystick while switching to the
gunner position. For whatever reason, this action seems to keep the platform from drifting ever so slightly
when firing. The individual rounds will still have dispersion but this one step help lower the tendency of wild
rounds when firing on target.
Exact kill shots are lucky shots on the StuH42.
This is an area weapon, a howitzer, so if you happen to hit where you aimed on a Sherman 76 frontally from
1,000 meters to strike the gunner side of the turret for an instant-kill, count your blessings. That is a rare event
and pure luck.
After ranging the target - TRUST your range table.
Thousands of rounds have been fired to ensure its accuracy. While you have to make small corrections, of
course, but the table removes the guess-work and allows YOU greater success.
Make dispersion work for you – not against you.
The hard thing to do, in the beginning, is to learn to trust the general aiming points for each target platform and
let the dispersion of the round work for YOU. Large 10.5cm rounds with plunging fire will smash through hull
armor, turret rings, and deck armor with explosive results.
The aiming points are to be applied at ALL ranges.
Whether near range (under 500m), to intermediate range (1km) to extreme range (up to 2.4km) just because a
target is close to you, do not instinctively aim for the turret – you will most likely fail. Stick to your aiming
points, kill the tank and live to fight on.
A limited engagement . . .
The StuH42 does have anti-armor capability but recognize you likely have only sufficient ammo to engage a
SINGLE enemy tank. With only four rounds each of AP and HEAT, if you survive a tank engagement seek
immediate resupply if possible.
The Matilda & Churchill Rule.
The StuH42 simply cannot penetrate the hull, flank or turret of the Matilda II or Churchill-series tanks. It is
beyond the reach of the StuH42 to kill them. Immobilizing the tank is your only card to play and your abundant
High-Explosive rounds can do the trick if you hit the track idlers or a 90^ shot onto the treads.
Remember - you are fighting in an infantry support vehicle that has the capability of killing enemy
armor WHEN you fight WITHIN the capabilities of the platform.

Section III: Cover & Concealment
The StuH42 platform is squatty and has a low profile. Use it to your advantage behind berms and bushes. Due
to the arc of fire from the 10.5cm howitzer, firing behind a berm can be extremely effective. You may even be
able to use clearings in forests as concealment if you have some line of sight (LOS) to the target. Of course,
when/if STOs are implemented LOS will not be necessary.
Periscope View – 800m target Gunner View – 800m target Target View – 800m
Section IV: Tactics
Scouting
By using the excellent commander periscope you can easily scout for enemy units and provide accurate contact
reports for others units to succeed and not to mention the proper range to the targets due to the range finder. Of
particular importance is the screening and elimination of enemy infantry as they move through your zone of
control.
Ambush
One of the keys to ambushing in WW2OL is patience. It is very easy to want to move from an established
position when no enemy contacts show up in your zone and others are having fun. However, your platform is
limited with no co-ax or surface mounted MG for protection so a) being patient, b) well-camouflaged, c) no
unnecessary engine start-ups/noise discipline, d) engaging only meaningful targets that you can confidently kill
within your traverse of fire are ALL components of success. You may not get kills as you develop this skill of
patience in the twitchy-world of Player-versus-Player but it does produce results. More so, if you are working
with a group of like-minded players plus using voice-communications your chances of success
skyrocket. These are force multipliers that work decidedly in your favor.
Hide
Be creative, try different things to find what works. Watch what other tankers and StuG drivers do. Ask others
for their critique of your position – is a part of your StuH42 sticking out from a bush, is it readily visible even
though you think you are concealed? Ask questions when you can so you can get better.
Section V: Best Uses
Infantry support
Whether shelling a critical terrain feature, depot, spawn point, or army base – the 10.5cm High-Explosive is the
most effective anti-personnel round the Axis have at their disposal. The StuG IIIB 75mm short-barrel is a
distant second. Ideally when you fire you want to kill the infantry, wound/stun them, even confuse them to the
point of running into other killing lanes of fire. Remember, there is a gamer on the other end of your
connection and if they are infantry, they will either move or keep their head down which allows your friendly
infantry to move up and storm the objective.
Remember, aiming “short” of a soft target to include trucks ensures that the high-explosive ‘cone’ of shrapnel
passes to and through your target. HE rounds have been modeled more accurate and with the recent patches
their effectiveness has DRAMATICALLY increased. Use it to your advantage!
Shelling concentrated enemy equipment
The StuH42 High-Explosive shell can be very effective to deter anti-aircraft guns or anti-tank guns; especially
at extreme ranges as their own lethality is reduced to the point of ineffectiveness. If they are moving to get
away from your fire they are very vulnerable to air and ground attack. Effective coordination with other units
on the defense or attack will reap rewards as when they are moving – they ain’t shooting. You can even engage
anti-aircraft guns within the AB walls from ranges over 2km and they have no LOS on your position but you
WILL get the kill.
Direct Fire Support
Due to the long reload time with the StuH42, I recommend when possible to operate in pairs (which constitutes
as a StuH42 platoon in the Wehrmacht ORBAT) which increases the combined firepower plus if fired
alternatively, every few seconds there is a round hitting the target and provides a longer bombardment time on
the objective. If possible, have a plan of what you want to accomplish before beginning bombardment instead
of just rolling up and firing indiscriminately. Targeted, focused fire is much more effective and helps with the
assault to the objective.
Covering the assault with HE & Smoke
The farther away from the objective the greater coverage with the StuH42 20 degree traverse. This becomes
readily evident when assisting with firing High-Explosive and providing cover with a smoke barrage. This is
where working with a dedicated group with the correct composition of equipment is CRITICAL for specific
missions on the assault or recapture. The StuH42 has only TWO smoke rounds so a platoon of StuH42s has a
whopping FOUR smoke rounds but each of these armored units has smoke in their inventory so they should
also be included in your battle group: Pz IVD (7), StuG IIIB (7), and Pzr IIIN (4) smoke rounds.
If you are going to be throwing some serious smoke to cover a large assault on a bunker, etc – you need to make
sure you have ammo caches or trucks immediately available to restock upon firing your inventory.
FYI – each smoke round lasts approximately 50 seconds and is fully deployed within 7 seconds once it strikes
the ground and at 45 seconds it begins to rapidly dissipate.

Section VI: The Logistical Tail
Reload & Resupply Times
The StuH42 takes approximately 10 seconds to reload once fired. This is why using your range finder through
the commander is key. Deploy your commander and as soon as you start determining range, button up your
commander. Once you have ranged your target, load the appropriate ammunition, aim, and fire. If you know
what type of round you will be using you can begin loading that round while the Commander is still
determining range.
When you have exhausted each type of round that the StuH42 carries, it will automatically load a High-
Explosive round. What this means if you are in combat and exhaust your AP load out, you need to cycle your
ammo until HEAT is showing then it will load HEAT; otherwise you will fire the default round of HE then you
have to select HEAT and start another reload sequence. All of this takes TIME and the enemy is very likely
firing at YOU!!
Ammo Support
As mentioned earlier, your StuH42 carries the following shell load-out:
High-Explosive 26
Armor Piercing 4
High-Explosive Anti-Tank (HEAT) 4
Smoke 2
TOTAL 36
A second account or friendly truck driver can resupply or drop an ammo cache near your position. A DLC
NCO can also place an ammo cache to keep you in the field fighting and killing. Of course, mobile spawns
provide ammo resupply but they are actively hunted by the enemy so you must assume you are likely under
observation when resupplying which eliminates your element of surprise when you drive back to your hunting
place.
Resupply Timer
The resupply timer is approximately 30 seconds with a new round being resupplied every 2 seconds after the
initial 30 seconds. If you fire during the resupply, the timer is reset and you must wait another seconds before
resupply begins again.
Section VII: Ammunition – not all rounds are created equal
High-Explosive Rounds
The StuH42 HE round is the HIGHEST arcing round and has NO anti-tank penetration capabilities thru the
entire spectrum of Allied armor down to the Vickers tankettes. The only thing the HE round can do is to track
an armored vehicle with a direct hit on the sprocket but this is not an easy task given the howitzer’s
characteristics.
Armor-Piercing Rounds
The AP round does have an arc to it as well but not as pronounced as the HE round. Your most effective anti-
tank round is the AP round. It consistently penetrates across most platforms; particularly at the flank, generally
on the rear, and is platform dependent when attacking frontally.
High-Explosive Anti-Tank (HEAT) Rounds
The HEAT round has a relatively flat trajectory, almost like a tank round and is most often used on frontal
engagements and sometimes on rear shots. It is the most consistent KILLING round from the FRONT against
heavily armored turrets / gun mantlets. The HEAT round is most successful when striking surfaces at 90
degrees but given that the gun itself is a howitzer and not particularly accurate to hit a 90 degree surface which
can lead to some frustrating results when you hit the target. This is why in most cases it is encouraged to use
the AP rounds when possible.
Penetration Abnormalities given the ammunition
As you read through the information you will discover odd circumstances that on the face make no sense but
reason needs to prevail, so trust the collected data.
The StuH42 rounds do struggle to penetrate and kill several platforms from specific attack angles such as killing
the A-13 from the rear whether using AP or HEAT rounds. Different armor angles and various nooks and
crannies whether it be the rear of the A-13 or angled rear armor from the deck of the M-10 – such disparities
have a significant impact on the penetration capability of the StuH42s 10.5cm howitzer rounds.
The kill-data information was gathered at ranges from 500m to 1,000 meters and the intermittent ranges in-
between to ensure reliable data at a consistent range. A fair portion of the kills do NOT visually demonstrate a
kill (no exploding turret or burning tank); particularly for turret kills. If the turret ceases to move to acquire
new targets, the gunner is dead but the commander, driver, and hull gunner could be alive.
When the StuH42 rounds strike on target, the tank is either - immediately burning, exploding or has a non-
traversing dead turret. White or brown smoke simply means a damaged or burned out engine with a
FUNCTIONAL tank turret.

Section VIII: Range Tables
The StuH42 range tables on continued on the next two pages with direct Links to WW2OL Wikipedia for the
StuH42 single page pdf located here - StuH42 Ranging Table - 1 page PDF
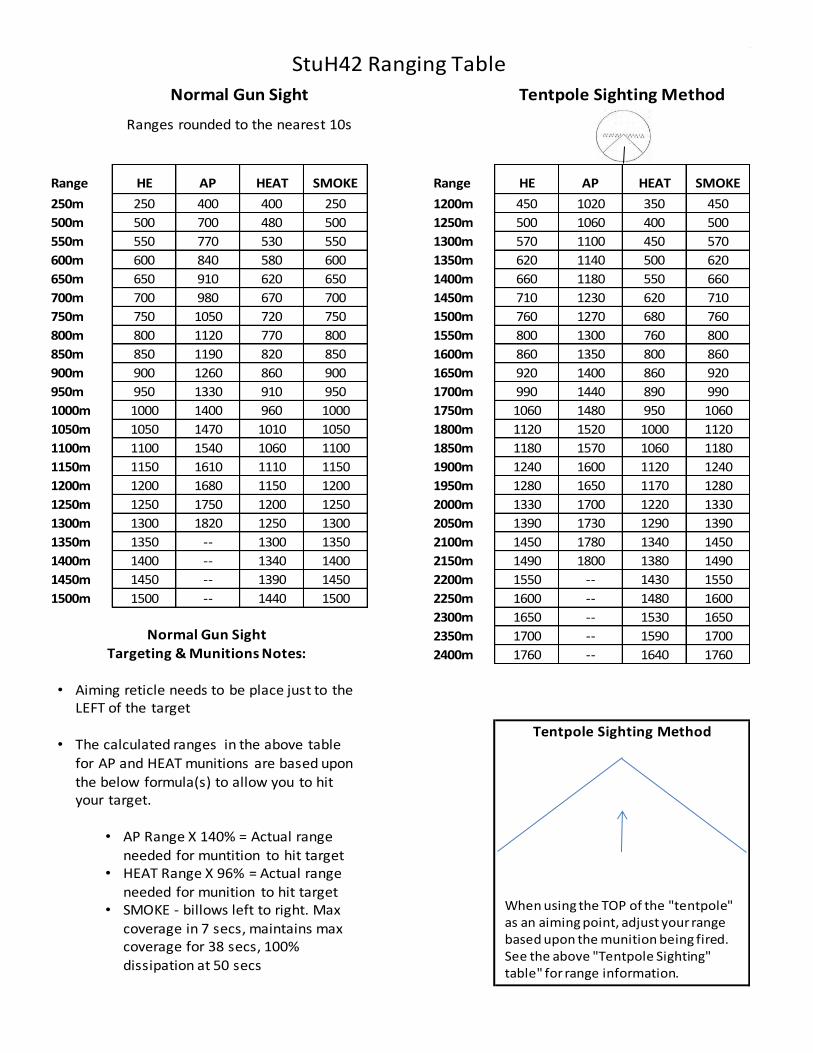
Range HE AP HEAT SMOKE Range HE AP HEAT SMOKE
250m 250 400 400 250 1200m 450 1020 350 450
500m 500 700 480 500 1250m 500 1060 400 500
550m 550 770 530 550 1300m 570 1100 450 570
600m 600 840 580 600 1350m 620 1140 500 620
650m 650 910 620 650 1400m 660 1180 550 660
700m 700 980 670 700 1450m 710 1230 620 710
750m 750 1050 720 750 1500m 760 1270 680 760
800m 800 1120 770 800 1550m 800 1300 760 800
850m 850 1190 820 850 1600m 860 1350 800 860
900m 900 1260 860 900 1650m 920 1400 860 920
950m 950 1330 910 950 1700m 990 1440 890 990
1000m 1000 1400 960 1000 1750m 1060 1480 950 1060
1050m 1050 1470 1010 1050 1800m 1120 1520 1000 1120
1100m 1100 1540 1060 1100 1850m 1180 1570 1060 1180
1150m 1150 1610 1110 1150 1900m 1240 1600 1120 1240
1200m 1200 1680 1150 1200 1950m 1280 1650 1170 1280
1250m 1250 1750 1200 1250 2000m 1330 1700 1220 1330
1300m 1300 1820 1250 1300 2050m 1390 1730 1290 1390
1350m 1350 -- 1300 1350 2100m 1450 1780 1340 1450
1400m 1400 -- 1340 1400 2150m 1490 1800 1380 1490
1450m 1450 -- 1390 1450 2200m 1550 -- 1430 1550
1500m 1500 -- 1440 1500 2250m 1600 -- 1480 1600
2300m 1650 -- 1530 1650
2350m 1700 -- 1590 1700
2400m 1760 -- 1640 1760
StuH42 Ranging Table
Tentpole Sighting Method
Normal Gun Sight
Ranges rounded to the nearest 10s
Tentpole Sighting Method
Normal Gun Sight Targeting & Munitions Notes:
• Aiming reticle needs to be place just to the LEFT of the target
• The calculated ranges in the above table
for AP and HEAT munitions are based upon the below formula(s) to allow you to hit your target.
• AP Range X 140% = Actual range
needed for muntition to hit target• HEAT Range X 96% = Actual range
needed for munition to hit target• SMOKE - billows left to right. Max
coverage in 7 secs, maintains max coverage for 38 secs, 100% dissipation at 50 secs
When using the TOP of the "tentpole" as an aiming point, adjust your range based upon the munition being fired. See the above "Tentpole Sighting" table" for range information.
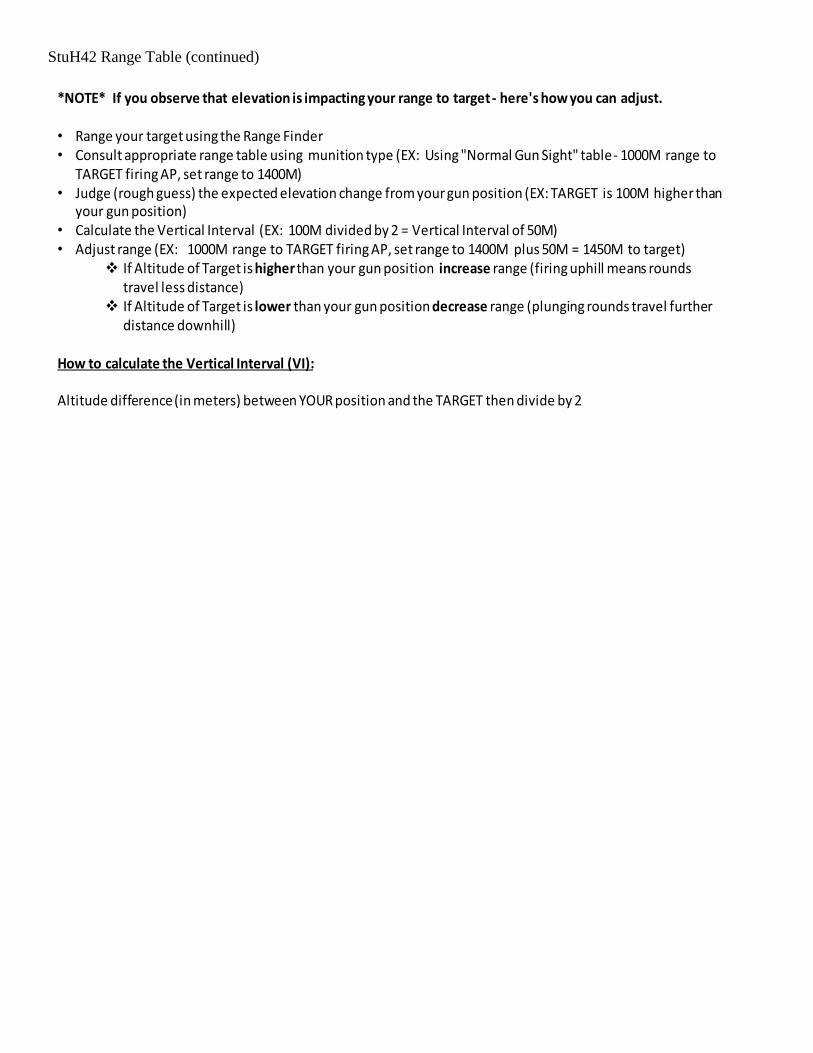
*NOTE* If you observe that elevation is impacting your range to target - here's how you can adjust.
• Range your target using the Range Finder• Consult appropriate range table using munition type (EX: Using "Normal Gun Sight" table - 1000M range to
TARGET firing AP, set range to 1400M)• Judge (rough guess) the expected elevation change from your gun position (EX: TARGET is 100M higher than
your gun position)• Calculate the Vertical Interval (EX: 100M divided by 2 = Vertical Interval of 50M)• Adjust range (EX: 1000M range to TARGET firing AP, set range to 1400M plus 50M = 1450M to target)
If Altitude of Target is higher than your gun position increase range (firing uphill means rounds travel less distance)
If Altitude of Target is lower than your gun position decrease range (plunging rounds travel further distance downhill)
How to calculate the Vertical Interval (VI):
Altitude difference (in meters) between YOUR position and the TARGET then divide by 2
StuH42 Range Table (continued)
Range HE AP HEAT SMOKE Range HE AP HEAT SMOKE
250m 250 400 400 250 1200m 450 1020 350 450
500m 500 700 480 500 1250m 500 1060 400 500
550m 550 770 530 550 1300m 570 1100 450 570
600m 600 840 580 600 1350m 620 1140 500 620
650m 650 910 620 650 1400m 660 1180 550 660
700m 700 980 670 700 1450m 710 1230 620 710
750m 750 1050 720 750 1500m 760 1270 680 760
800m 800 1120 770 800 1550m 800 1300 760 800
850m 850 1190 820 850 1600m 860 1350 800 860
900m 900 1260 860 900 1650m 920 1400 860 920
950m 950 1330 910 950 1700m 990 1440 890 990
1000m 1000 1400 960 1000 1750m 1060 1480 950 1060
1050m 1050 1470 1010 1050 1800m 1120 1520 1000 1120
1100m 1100 1540 1060 1100 1850m 1180 1570 1060 1180
1150m 1150 1610 1110 1150 1900m 1240 1600 1120 1240
1200m 1200 1680 1150 1200 1950m 1280 1650 1170 1280
1250m 1250 1750 1200 1250 2000m 1330 1700 1220 1330
1300m 1300 1820 1250 1300 2050m 1390 1730 1290 1390
1350m 1350 -- 1300 1350 2100m 1450 1780 1340 1450
1400m 1400 -- 1340 1400 2150m 1490 1800 1380 1490
1450m 1450 -- 1390 1450 2200m 1550 -- 1430 1550
1500m 1500 -- 1440 1500 2250m 1600 -- 1480 1600
2300m 1650 -- 1530 1650
2350m 1700 -- 1590 1700
2400m 1760 -- 1640 1760
StuH42 Ranging Table
Tentpole Sighting Method
Normal Gun Sight
Ranges rounded to the nearest 10s
Tentpole Sighting Method
Normal Gun Sight Targeting & Munitions Notes:
• Aiming reticle needs to be place just to the LEFT of the target
• The calculated ranges in the above table
for AP and HEAT munitions are based upon the below formula(s) to allow you to hit your target.
• AP Range X 140% = Actual range
needed for muntition to hit target• HEAT Range X 96% = Actual range
needed for munition to hit target• SMOKE - billows left to right. Max
coverage in 7 secs, maintains max coverage for 38 secs, 100% dissipation at 50 secs
When using the TOP of the "tentpole" as an aiming point, adjust your range based upon the munition being fired. See the above "Tentpole Sighting" table" for range information.
*NOTE* If you observe that elevation is impacting your range to target - here's how you can adjust.
• Range your target using the Range Finder• Consult appropriate range table using munition type (EX: Using "Normal Gun Sight" table - 1000M range to
TARGET firing AP, set range to 1400M)• Judge (rough guess) the expected elevation change from your gun position (EX: TARGET is 100M higher than
your gun position)• Calculate the Vertical Interval (EX: 100M divided by 2 = Vertical Interval of 50M)• Adjust range (EX: 1000M range to TARGET firing AP, set range to 1400M plus 50M = 1450M to target)
If Altitude of Target is higher than your gun position increase range (firing uphill means rounds travel less distance)
If Altitude of Target is lower than your gun position decrease range (plunging rounds travel further distance downhill)
How to calculate the Vertical Interval (VI):
Altitude difference (in meters) between YOUR position and the TARGET then divide by 2
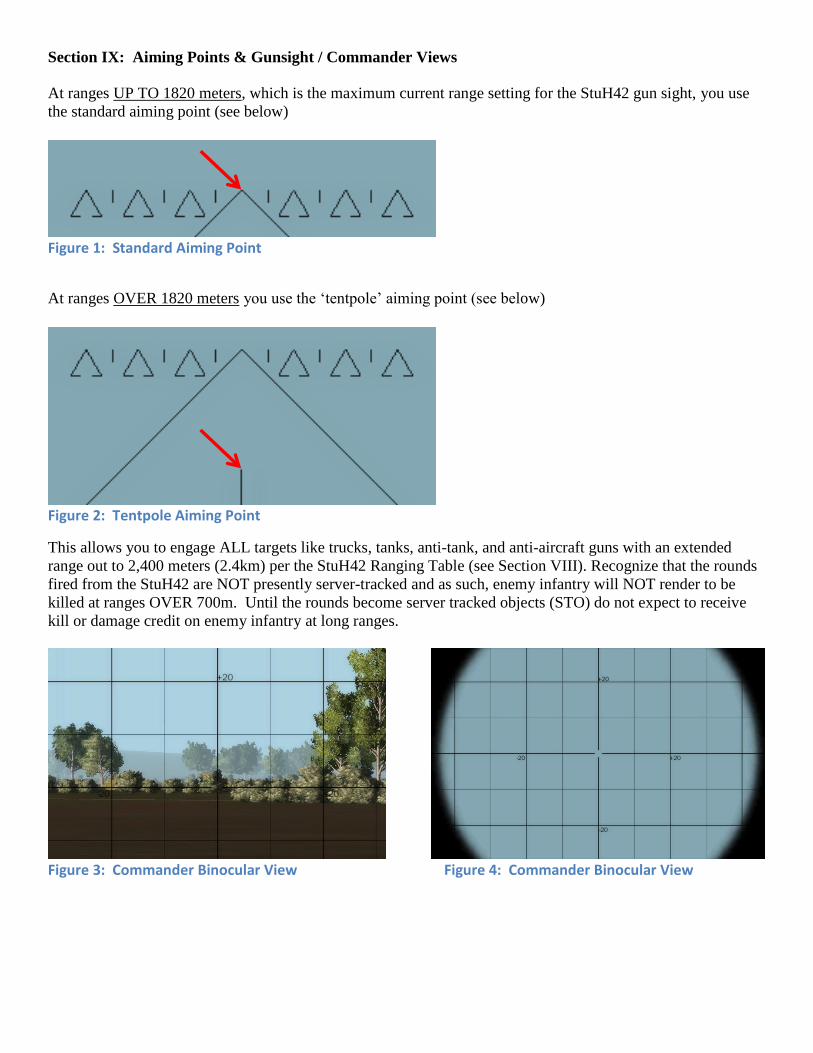
Section IX: Aiming Points & Gunsight / Commander Views
At ranges UP TO 1820 meters, which is the maximum current range setting for the StuH42 gun sight, you use
the standard aiming point (see below)
Figure 1: Standard Aiming Point
At ranges OVER 1820 meters you use the ‘tentpole’ aiming point (see below)
Figure 2: Tentpole Aiming Point
This allows you to engage ALL targets like trucks, tanks, anti-tank, and anti-aircraft guns with an extended
range out to 2,400 meters (2.4km) per the StuH42 Ranging Table (see Section VIII). Recognize that the rounds
fired from the StuH42 are NOT presently server-tracked and as such, enemy infantry will NOT render to be
killed at ranges OVER 700m. Until the rounds become server tracked objects (STO) do not expect to receive
kill or damage credit on enemy infantry at long ranges.
Figure 3: Commander Binocular View Figure 4: Commander Binocular View
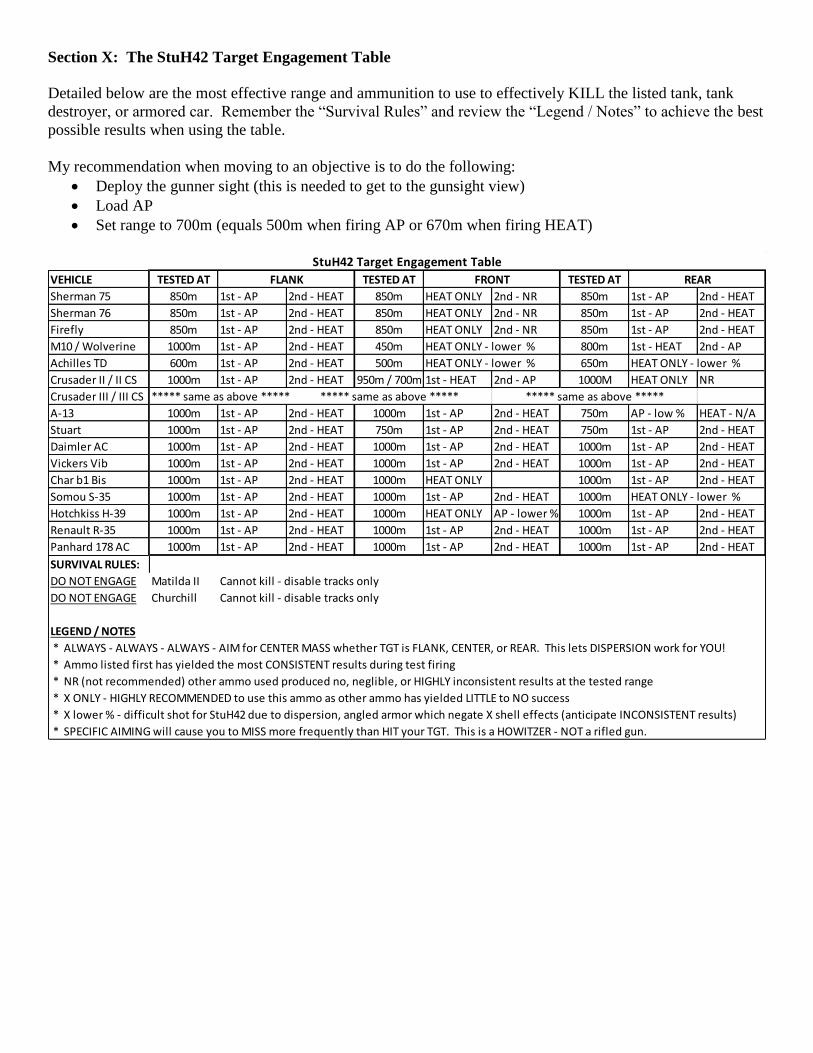
Section X: The StuH42 Target Engagement Table
Detailed below are the most effective range and ammunition to use to effectively KILL the listed tank, tank
destroyer, or armored car. Remember the “Survival Rules” and review the “Legend / Notes” to achieve the best
possible results when using the table.
My recommendation when moving to an objective is to do the following:
Deploy the gunner sight (this is needed to get to the gunsight view)
Load AP
Set range to 700m (equals 500m when firing AP or 670m when firing HEAT)
VEHICLE TESTED AT TESTED AT TESTED AT
Sherman 75 850m 1st - AP 2nd - HEAT 850m HEAT ONLY 2nd - NR 850m 1st - AP 2nd - HEAT
Sherman 76 850m 1st - AP 2nd - HEAT 850m HEAT ONLY 2nd - NR 850m 1st - AP 2nd - HEAT
Firefly 850m 1st - AP 2nd - HEAT 850m HEAT ONLY 2nd - NR 850m 1st - AP 2nd - HEAT
M10 / Wolverine 1000m 1st - AP 2nd - HEAT 450m HEAT ONLY - lower % 800m 1st - HEAT 2nd - AP
Achilles TD 600m 1st - AP 2nd - HEAT 500m HEAT ONLY - lower % 650m HEAT ONLY - lower %
Crusader II / II CS 1000m 1st - AP 2nd - HEAT 950m / 700m 1st - HEAT 2nd - AP 1000M HEAT ONLY NR
Crusader III / III CS ***** same as above ***** ***** same as above ***** ***** same as above *****
A-13 1000m 1st - AP 2nd - HEAT 1000m 1st - AP 2nd - HEAT 750m AP - low % HEAT - N/A
Stuart 1000m 1st - AP 2nd - HEAT 750m 1st - AP 2nd - HEAT 750m 1st - AP 2nd - HEAT
Daimler AC 1000m 1st - AP 2nd - HEAT 1000m 1st - AP 2nd - HEAT 1000m 1st - AP 2nd - HEAT
Vickers Vib 1000m 1st - AP 2nd - HEAT 1000m 1st - AP 2nd - HEAT 1000m 1st - AP 2nd - HEAT
Char b1 Bis 1000m 1st - AP 2nd - HEAT 1000m HEAT ONLY 1000m 1st - AP 2nd - HEAT
Somou S-35 1000m 1st - AP 2nd - HEAT 1000m 1st - AP 2nd - HEAT 1000m HEAT ONLY - lower %
Hotchkiss H-39 1000m 1st - AP 2nd - HEAT 1000m HEAT ONLY AP - lower % 1000m 1st - AP 2nd - HEAT
Renault R-35 1000m 1st - AP 2nd - HEAT 1000m 1st - AP 2nd - HEAT 1000m 1st - AP 2nd - HEAT
Panhard 178 AC 1000m 1st - AP 2nd - HEAT 1000m 1st - AP 2nd - HEAT 1000m 1st - AP 2nd - HEAT
SURVIVAL RULES:
DO NOT ENGAGE Matilda II Cannot kill - disable tracks only
DO NOT ENGAGE Churchill Cannot kill - disable tracks only
LEGEND / NOTES
* ALWAYS - ALWAYS - ALWAYS - AIM for CENTER MASS whether TGT is FLANK, CENTER, or REAR. This lets DISPERSION work for YOU!
* Ammo listed first has yielded the most CONSISTENT results during test firing
* NR (not recommended) other ammo used produced no, neglible, or HIGHLY inconsistent results at the tested range
* X ONLY - HIGHLY RECOMMENDED to use this ammo as other ammo has yielded LITTLE to NO success
* X lower % - difficult shot for StuH42 due to dispersion, angled armor which negate X shell effects (anticipate INCONSISTENT results)
* SPECIFIC AIMING will cause you to MISS more frequently than HIT your TGT. This is a HOWITZER - NOT a rifled gun.
FLANK FRONT REAR
StuH42 Target Engagement Table
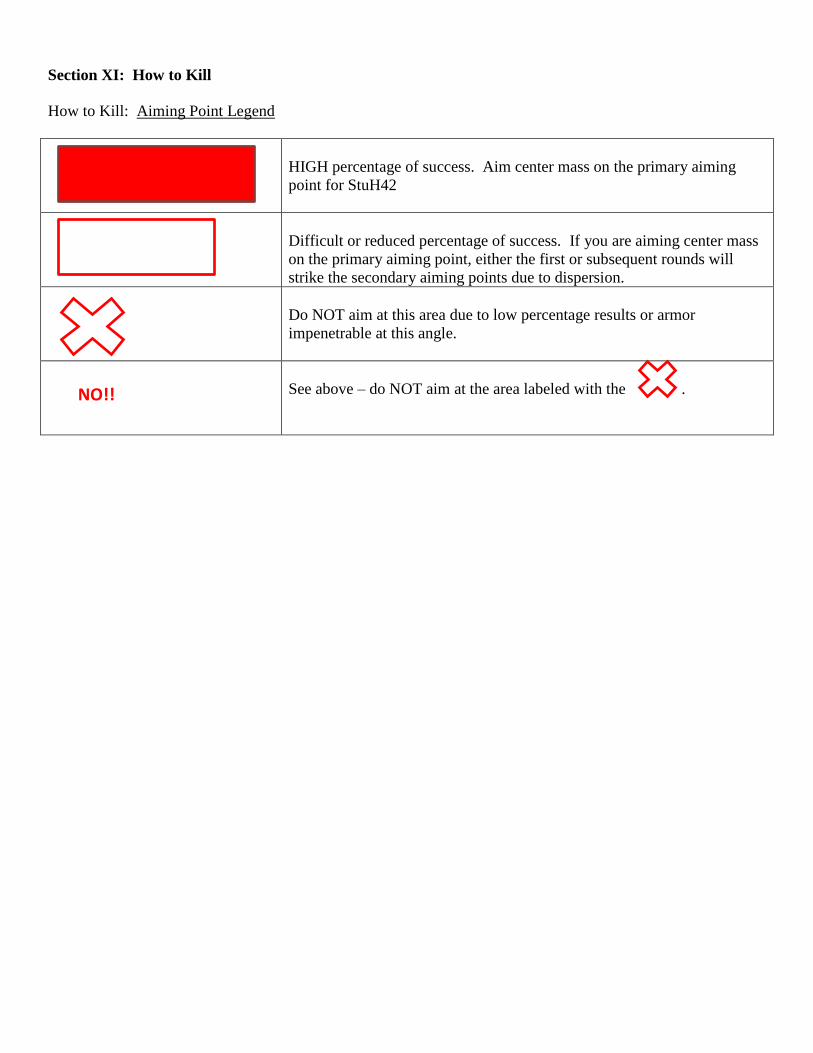
Section XI: How to Kill
How to Kill: Aiming Point Legend
HIGH percentage of success. Aim center mass on the primary aiming
point for StuH42
Difficult or reduced percentage of success. If you are aiming center mass
on the primary aiming point, either the first or subsequent rounds will
strike the secondary aiming points due to dispersion.
Do NOT aim at this area due to low percentage results or armor
impenetrable at this angle.
See above – do NOT aim at the area labeled with the .
NO!!
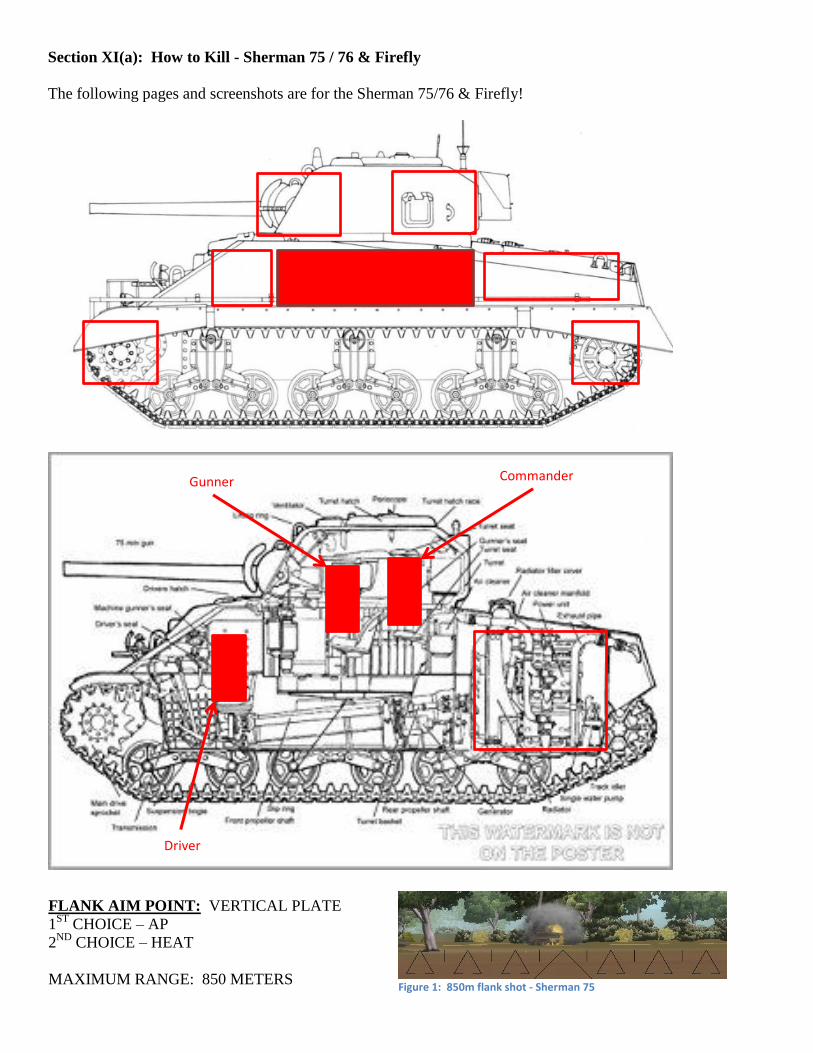
Section XI(a): How to Kill - Sherman 75 / 76 & Firefly
The following pages and screenshots are for the Sherman 75/76 & Firefly!
Driver
Gunner Commander
FLANK AIM POINT: VERTICAL PLATE
1ST
CHOICE – AP
2ND
CHOICE – HEAT
MAXIMUM RANGE: 850 METERS
Figure 1: 850m flank shot - Sherman 75
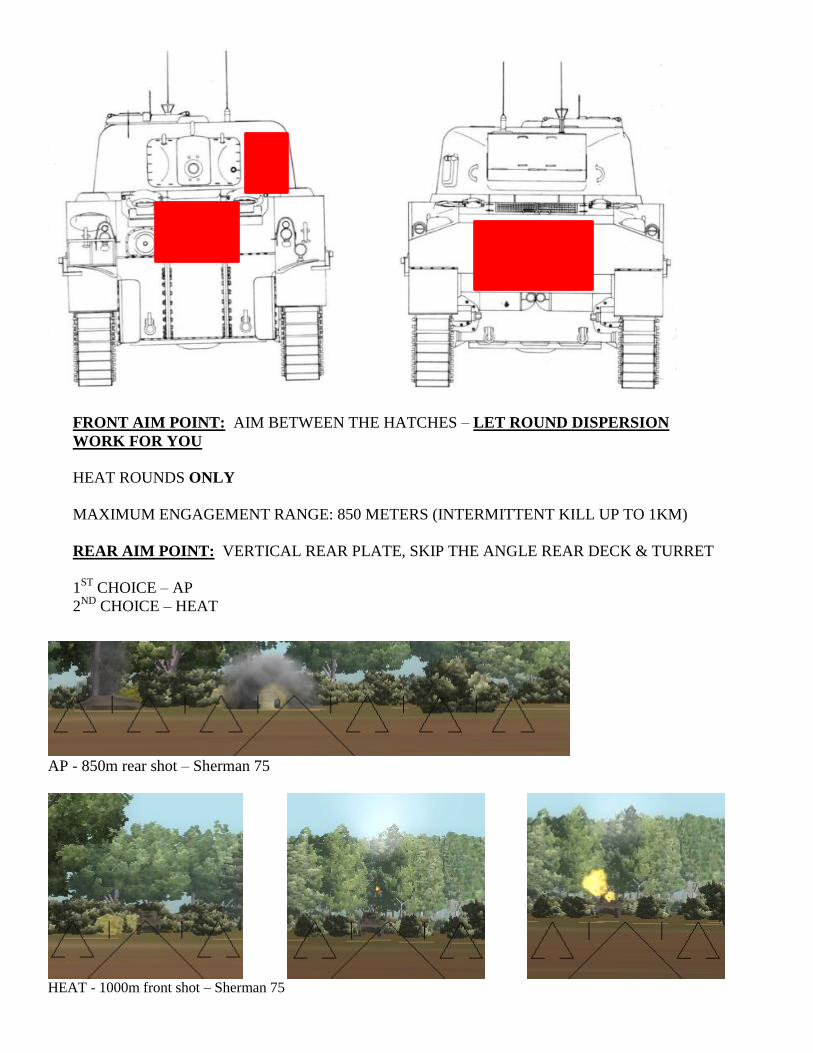
AP - 850m rear shot – Sherman 75
HEAT - 1000m front shot – Sherman 75
FRONT AIM POINT: AIM BETWEEN THE HATCHES – LET ROUND DISPERSION
WORK FOR YOU
HEAT ROUNDS ONLY
MAXIMUM ENGAGEMENT RANGE: 850 METERS (INTERMITTENT KILL UP TO 1KM)
REAR AIM POINT: VERTICAL REAR PLATE, SKIP THE ANGLE REAR DECK & TURRET
1ST
CHOICE – AP
2ND
CHOICE – HEAT
MAXIMUM ENGAGEMENT RANGE: 850 METERS
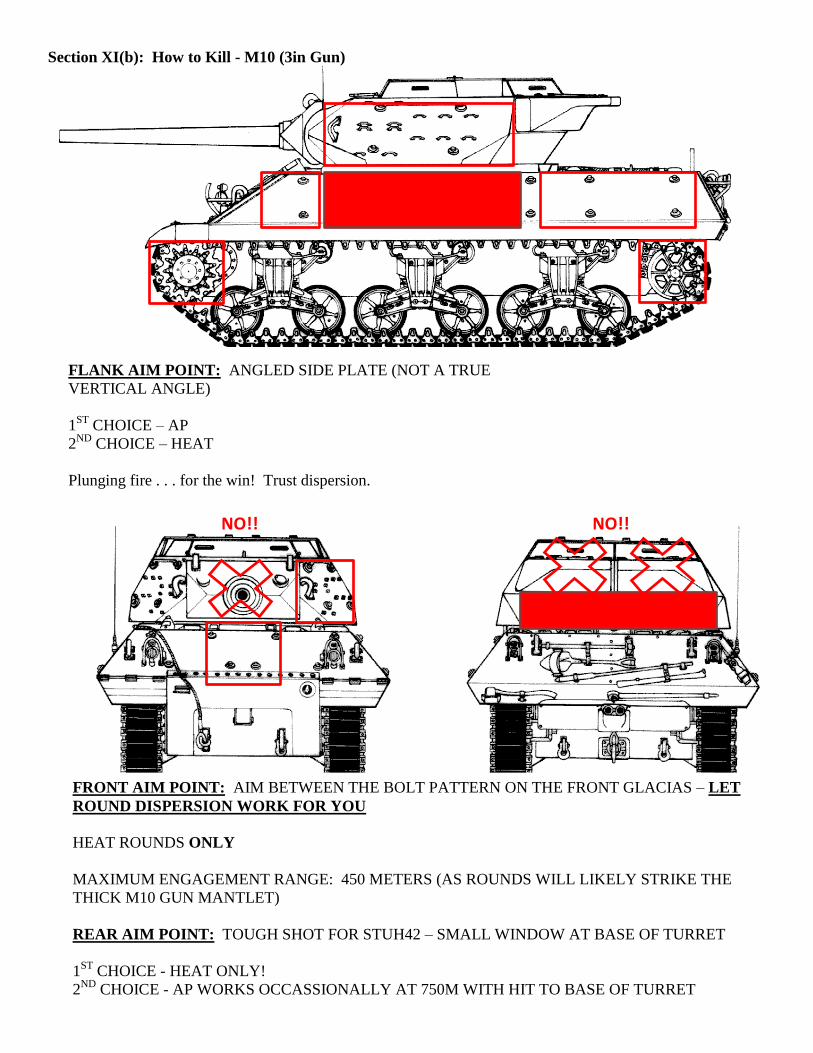
Section XI(b): How to Kill - M10 (3in Gun)
FLANK AIM POINT: ANGLED SIDE PLATE (NOT A TRUE
VERTICAL ANGLE)
1ST
CHOICE – AP
2ND
CHOICE – HEAT
Plunging fire . . . for the win! Trust dispersion.
MAXIMUM RANGE: 1,000 METERS
NO!! NO!!
FRONT AIM POINT: AIM BETWEEN THE BOLT PATTERN ON THE FRONT GLACIAS – LET
ROUND DISPERSION WORK FOR YOU
HEAT ROUNDS ONLY
MAXIMUM ENGAGEMENT RANGE: 450 METERS (AS ROUNDS WILL LIKELY STRIKE THE
THICK M10 GUN MANTLET)
REAR AIM POINT: TOUGH SHOT FOR STUH42 – SMALL WINDOW AT BASE OF TURRET
1ST
CHOICE - HEAT ONLY!
2ND
CHOICE - AP WORKS OCCASSIONALLY AT 750M WITH HIT TO BASE OF TURRET
MAXIMUM ENGAGEMENT RANGE: 800 METERS
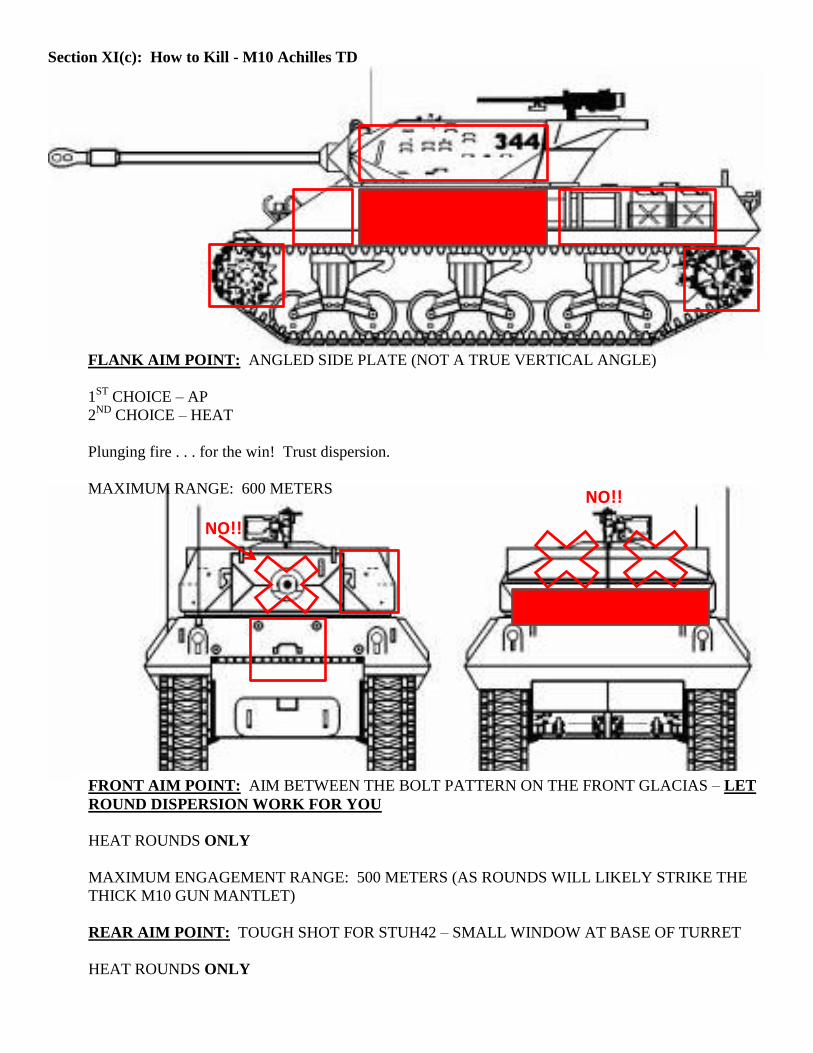
Section XI(c): How to Kill - M10 Achilles TD
FLANK AIM POINT: ANGLED SIDE PLATE (NOT A TRUE VERTICAL ANGLE)
1ST
CHOICE – AP
2ND
CHOICE – HEAT
Plunging fire . . . for the win! Trust dispersion.
MAXIMUM RANGE: 600 METERS
FRONT AIM POINT: AIM BETWEEN THE BOLT PATTERN ON THE FRONT GLACIAS – LET
ROUND DISPERSION WORK FOR YOU
HEAT ROUNDS ONLY
MAXIMUM ENGAGEMENT RANGE: 500 METERS (AS ROUNDS WILL LIKELY STRIKE THE
THICK M10 GUN MANTLET)
REAR AIM POINT: TOUGH SHOT FOR STUH42 – SMALL WINDOW AT BASE OF TURRET
HEAT ROUNDS ONLY
MAXIMUM ENGAGEMENT RANGE: 650 METERS
NO!!
NO!!
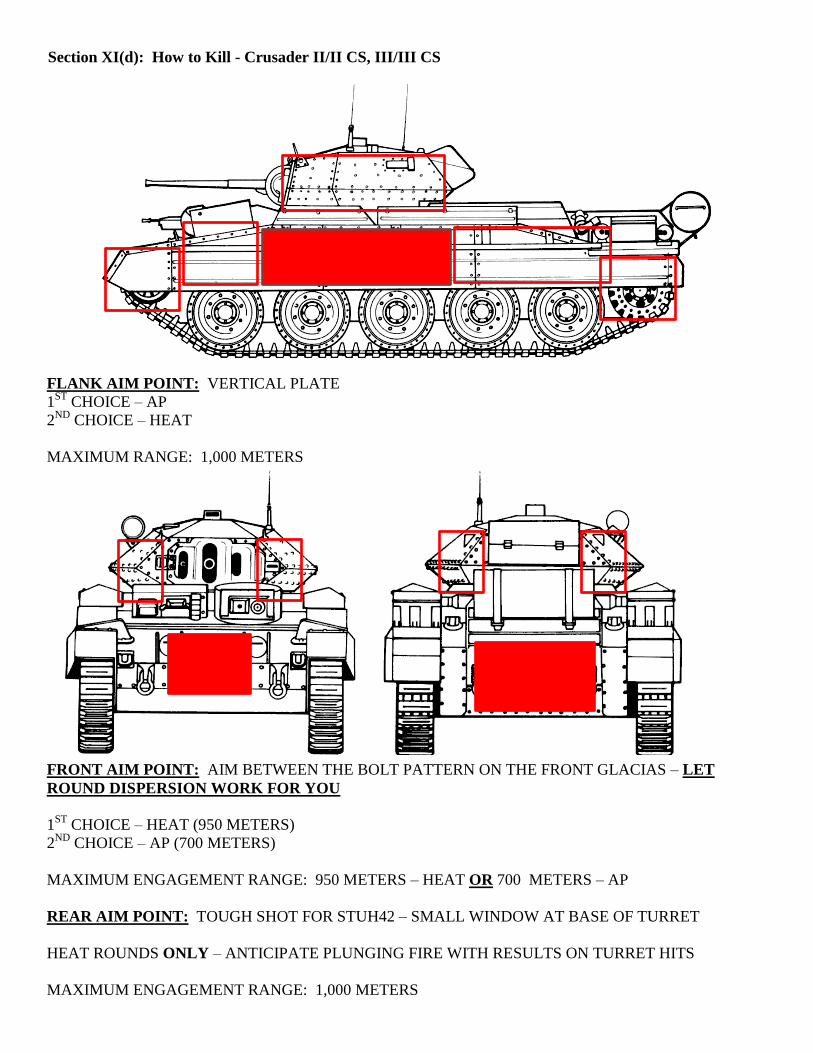
Section XI(d): How to Kill - Crusader II/II CS, III/III CS
FLANK AIM POINT: VERTICAL PLATE
1ST
CHOICE – AP
2ND
CHOICE – HEAT
MAXIMUM RANGE: 1,000 METERS
FRONT AIM POINT: AIM BETWEEN THE BOLT PATTERN ON THE FRONT GLACIAS – LET
ROUND DISPERSION WORK FOR YOU
1ST
CHOICE – HEAT (950 METERS)
2ND
CHOICE – AP (700 METERS)
MAXIMUM ENGAGEMENT RANGE: 950 METERS – HEAT OR 700 METERS – AP
REAR AIM POINT: TOUGH SHOT FOR STUH42 – SMALL WINDOW AT BASE OF TURRET
HEAT ROUNDS ONLY – ANTICIPATE PLUNGING FIRE WITH RESULTS ON TURRET HITS
MAXIMUM ENGAGEMENT RANGE: 1,000 METERS
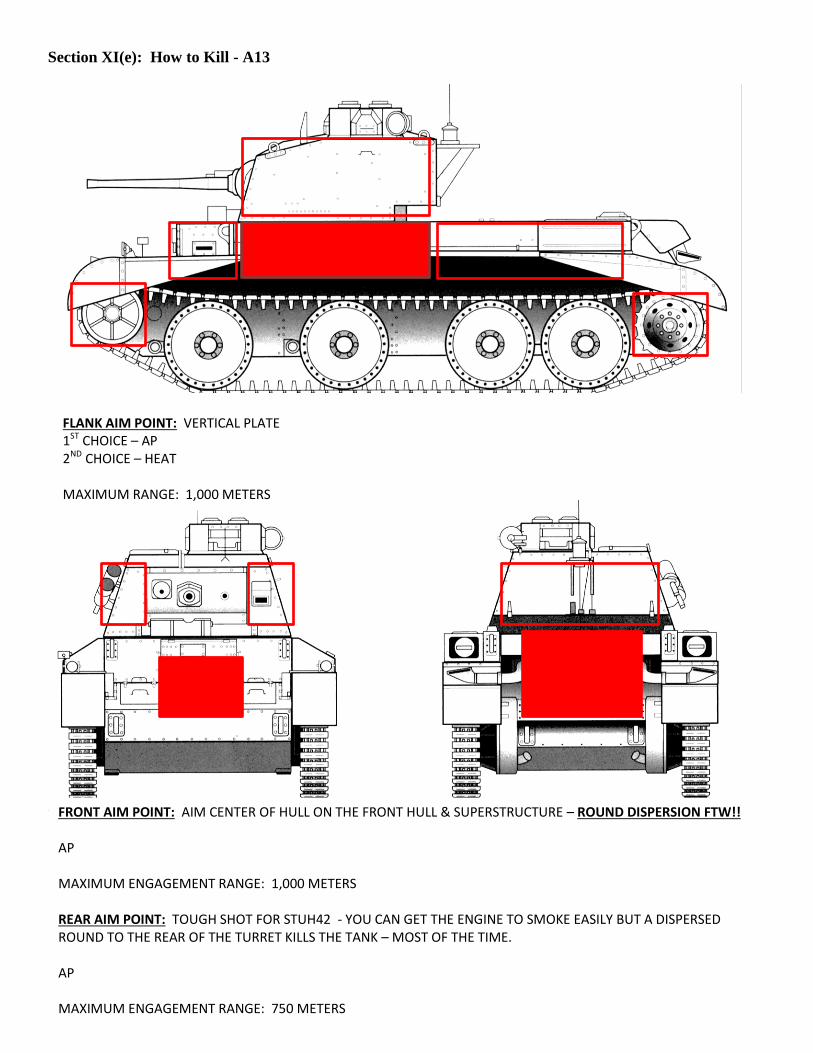
Section XI(e): How to Kill - A13
FLANK AIM POINT: VERTICAL PLATE 1ST CHOICE – AP 2ND CHOICE – HEAT MAXIMUM RANGE: 1,000 METERS
FRONT AIM POINT: AIM CENTER OF HULL ON THE FRONT HULL & SUPERSTRUCTURE – ROUND DISPERSION FTW!! AP MAXIMUM ENGAGEMENT RANGE: 1,000 METERS REAR AIM POINT: TOUGH SHOT FOR STUH42 - YOU CAN GET THE ENGINE TO SMOKE EASILY BUT A DISPERSED ROUND TO THE REAR OF THE TURRET KILLS THE TANK – MOST OF THE TIME. AP MAXIMUM ENGAGEMENT RANGE: 750 METERS
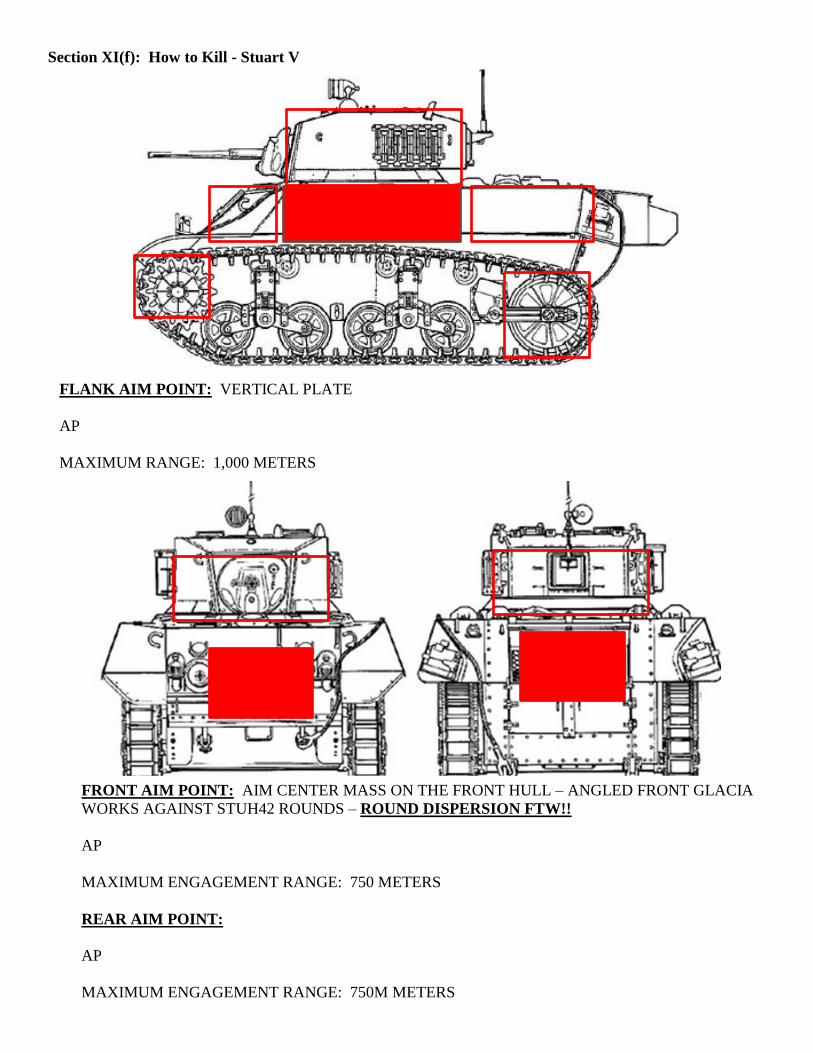
Section XI(f): How to Kill - Stuart V
FLANK AIM POINT: VERTICAL PLATE
AP
MAXIMUM RANGE: 1,000 METERS
FRONT AIM POINT: AIM CENTER MASS ON THE FRONT HULL – ANGLED FRONT GLACIA
WORKS AGAINST STUH42 ROUNDS – ROUND DISPERSION FTW!!
AP
MAXIMUM ENGAGEMENT RANGE: 750 METERS
REAR AIM POINT:
AP
MAXIMUM ENGAGEMENT RANGE: 750M METERS
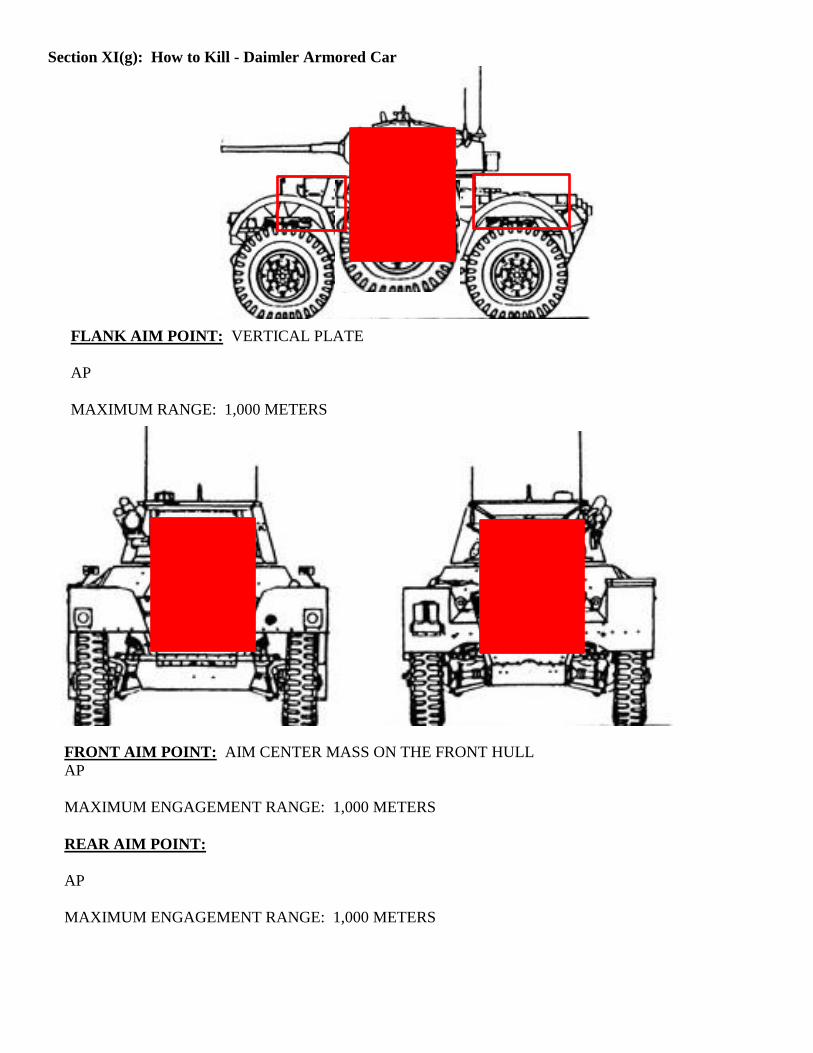
Section XI(g): How to Kill - Daimler Armored Car
FLANK AIM POINT: VERTICAL PLATE
AP
MAXIMUM RANGE: 1,000 METERS
FRONT AIM POINT: AIM CENTER MASS ON THE FRONT HULL
AP
MAXIMUM ENGAGEMENT RANGE: 1,000 METERS
REAR AIM POINT:
AP
MAXIMUM ENGAGEMENT RANGE: 1,000 METERS
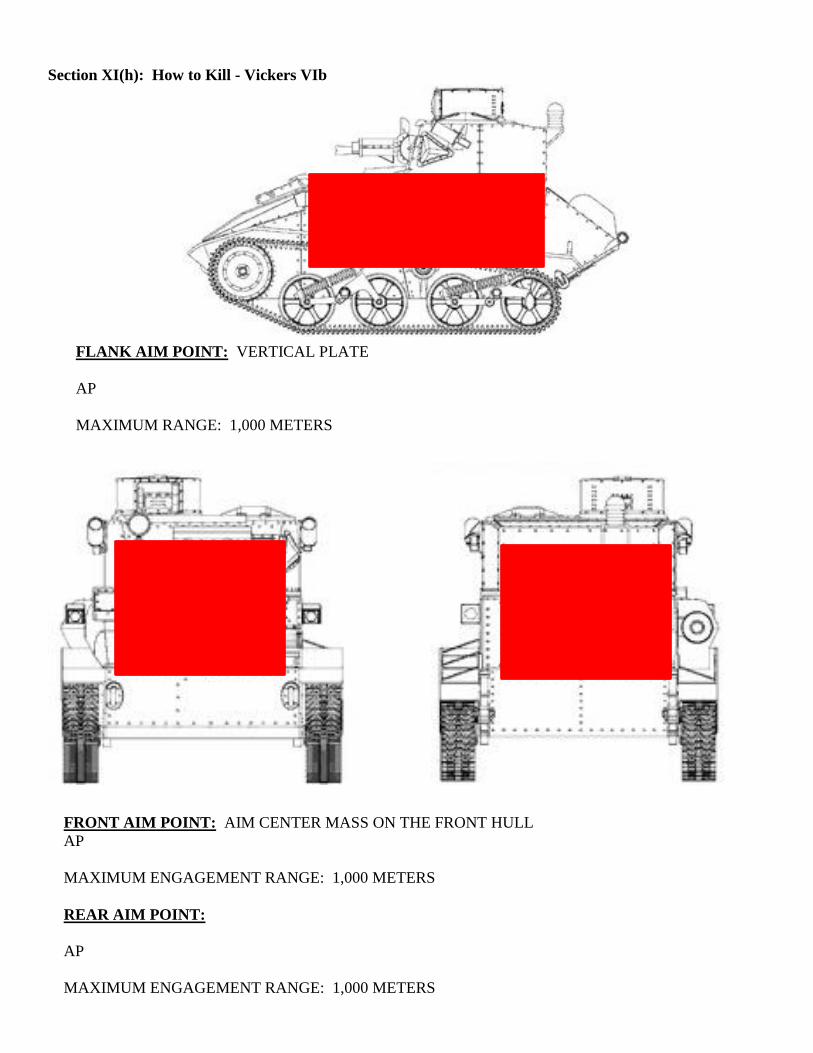
Section XI(h): How to Kill - Vickers VIb
FLANK AIM POINT: VERTICAL PLATE
AP
MAXIMUM RANGE: 1,000 METERS
FRONT AIM POINT: AIM CENTER MASS ON THE FRONT HULL
AP
MAXIMUM ENGAGEMENT RANGE: 1,000 METERS
REAR AIM POINT:
AP
MAXIMUM ENGAGEMENT RANGE: 1,000 METERS
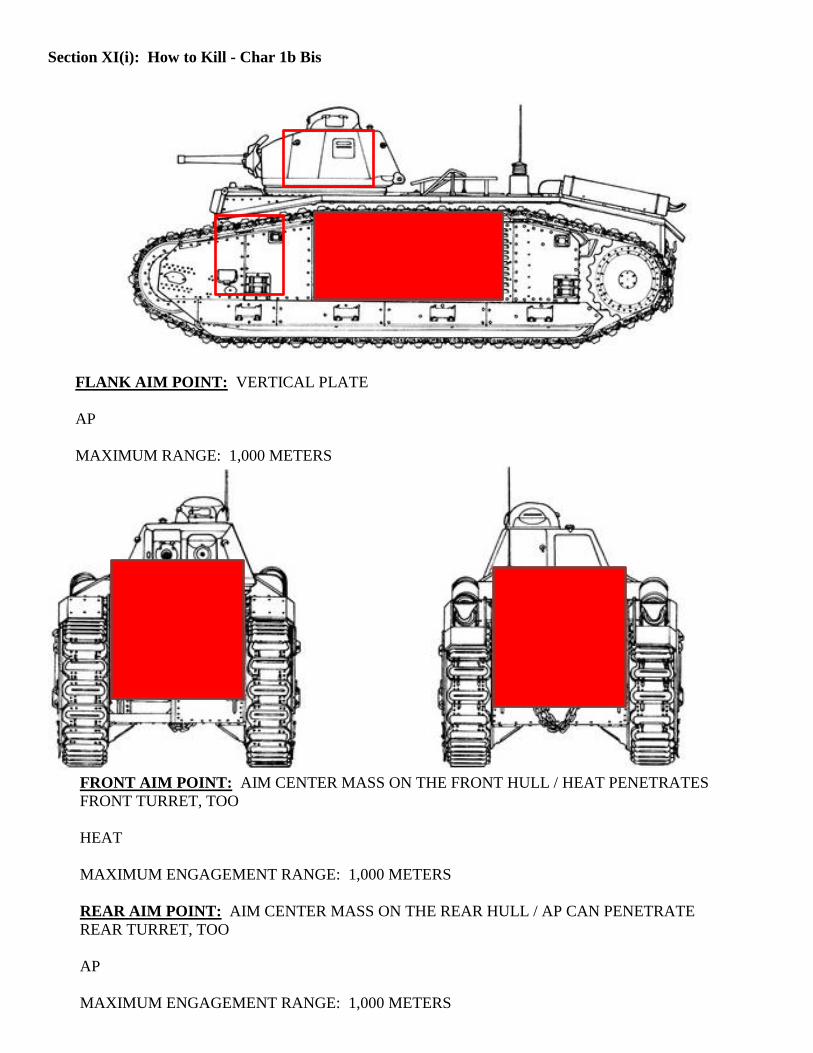
Section XI(i): How to Kill - Char 1b Bis
FLANK AIM POINT: VERTICAL PLATE
AP
MAXIMUM RANGE: 1,000 METERS
FRONT AIM POINT: AIM CENTER MASS ON THE FRONT HULL / HEAT PENETRATES
FRONT TURRET, TOO
HEAT
MAXIMUM ENGAGEMENT RANGE: 1,000 METERS
REAR AIM POINT: AIM CENTER MASS ON THE REAR HULL / AP CAN PENETRATE
REAR TURRET, TOO
AP
MAXIMUM ENGAGEMENT RANGE: 1,000 METERS
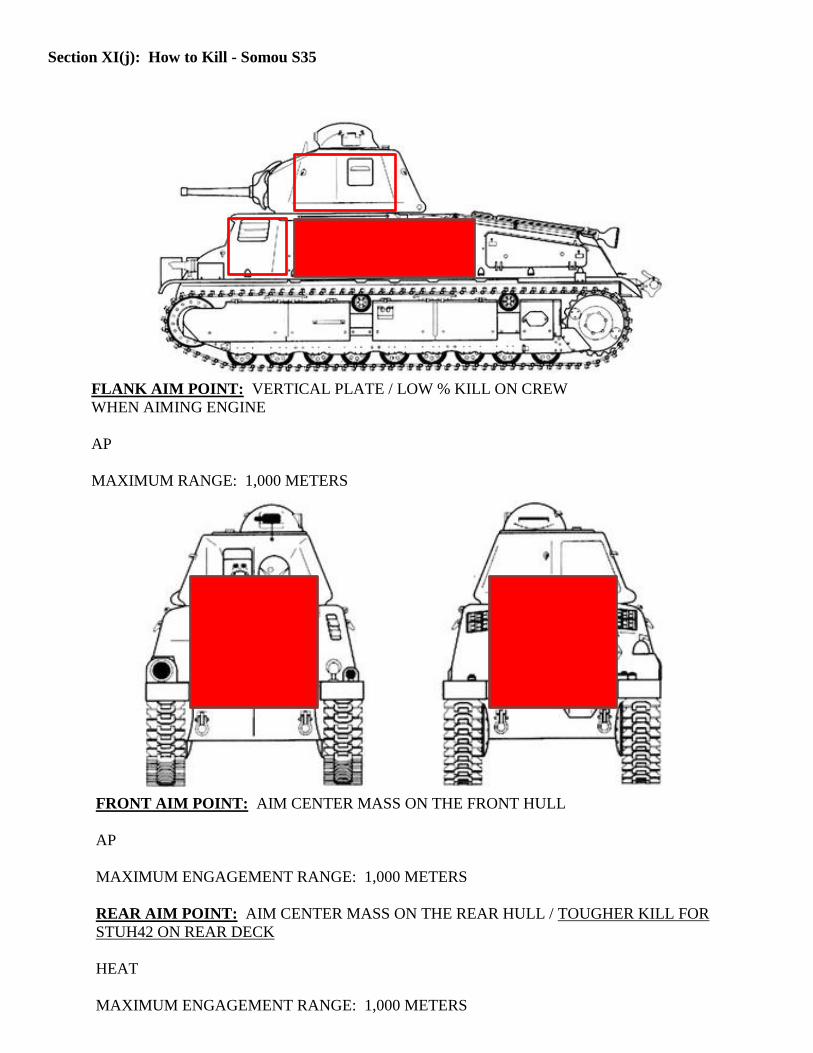
Section XI(j): How to Kill - Somou S35
FLANK AIM POINT: VERTICAL PLATE / LOW % KILL ON CREW
WHEN AIMING ENGINE
AP
MAXIMUM RANGE: 1,000 METERS
FRONT AIM POINT: AIM CENTER MASS ON THE FRONT HULL
AP
MAXIMUM ENGAGEMENT RANGE: 1,000 METERS
REAR AIM POINT: AIM CENTER MASS ON THE REAR HULL / TOUGHER KILL FOR
STUH42 ON REAR DECK
HEAT
MAXIMUM ENGAGEMENT RANGE: 1,000 METERS
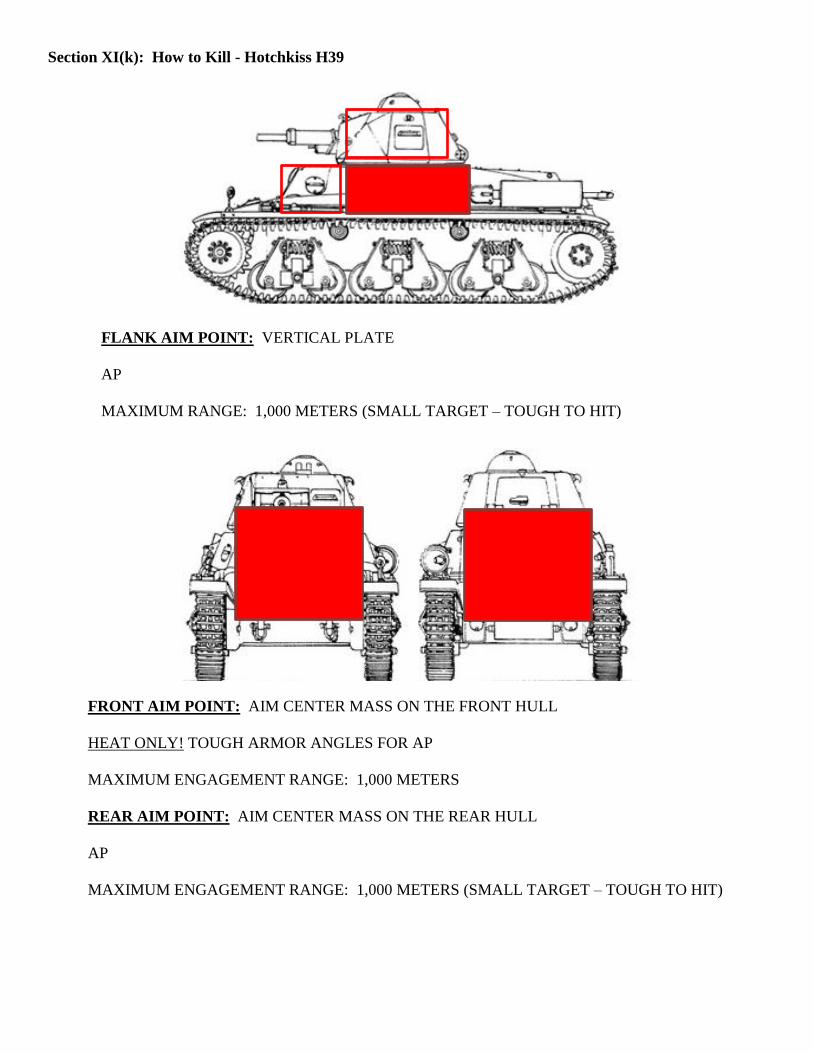
Section XI(k): How to Kill - Hotchkiss H39
FLANK AIM POINT: VERTICAL PLATE
AP
MAXIMUM RANGE: 1,000 METERS (SMALL TARGET – TOUGH TO HIT)
FRONT AIM POINT: AIM CENTER MASS ON THE FRONT HULL
HEAT ONLY! TOUGH ARMOR ANGLES FOR AP
MAXIMUM ENGAGEMENT RANGE: 1,000 METERS
REAR AIM POINT: AIM CENTER MASS ON THE REAR HULL
AP
MAXIMUM ENGAGEMENT RANGE: 1,000 METERS (SMALL TARGET – TOUGH TO HIT)
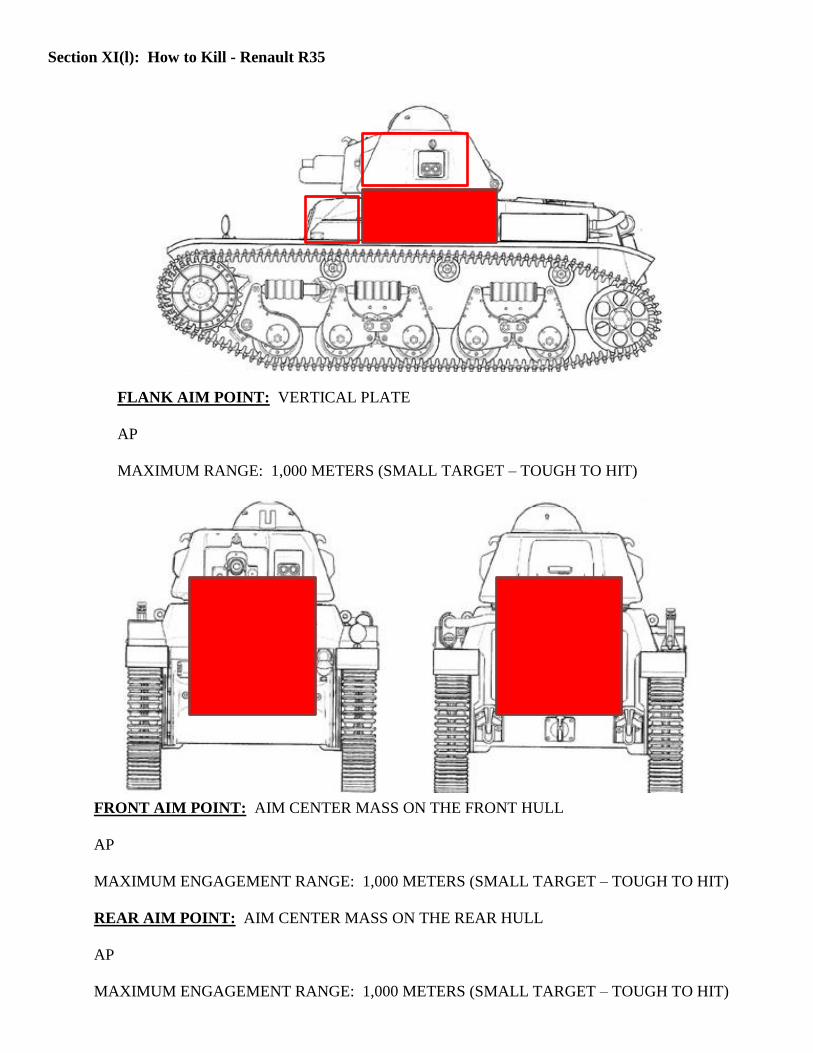
Section XI(l): How to Kill - Renault R35
FLANK AIM POINT: VERTICAL PLATE
AP
MAXIMUM RANGE: 1,000 METERS (SMALL TARGET – TOUGH TO HIT)
FRONT AIM POINT: AIM CENTER MASS ON THE FRONT HULL
AP
MAXIMUM ENGAGEMENT RANGE: 1,000 METERS (SMALL TARGET – TOUGH TO HIT)
REAR AIM POINT: AIM CENTER MASS ON THE REAR HULL
AP
MAXIMUM ENGAGEMENT RANGE: 1,000 METERS (SMALL TARGET – TOUGH TO HIT)
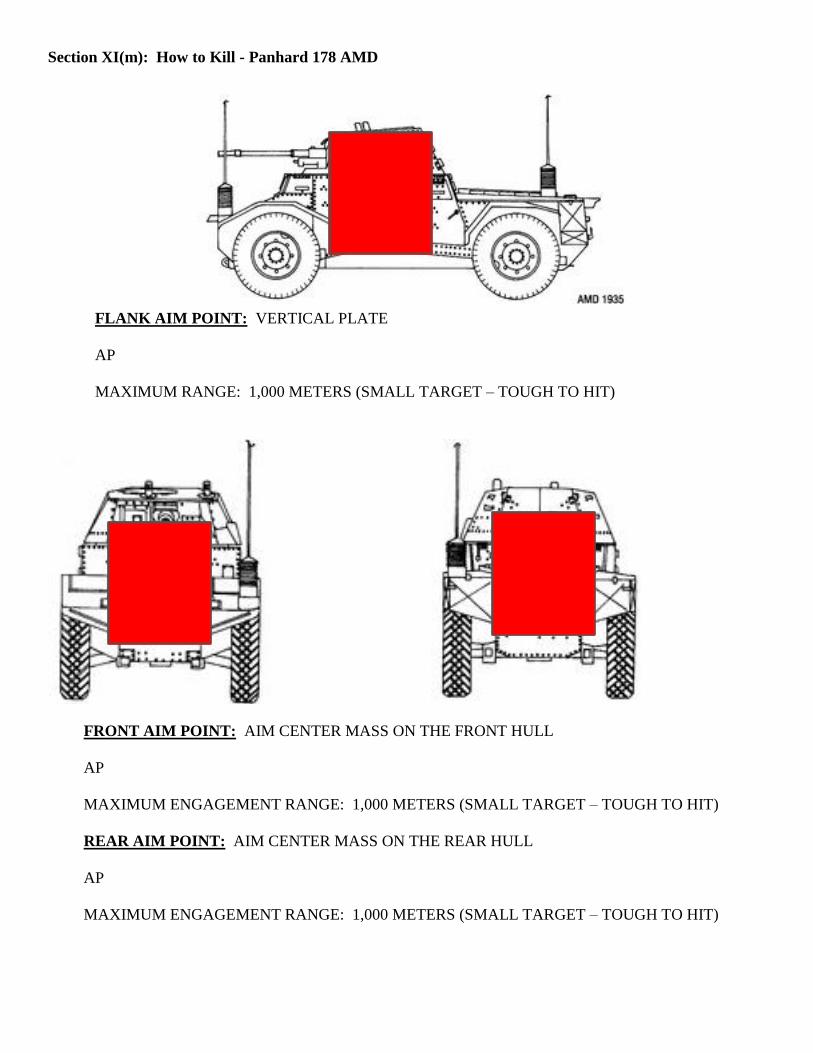
Section XI(m): How to Kill - Panhard 178 AMD
FLANK AIM POINT: VERTICAL PLATE
AP
MAXIMUM RANGE: 1,000 METERS (SMALL TARGET – TOUGH TO HIT)
FRONT AIM POINT: AIM CENTER MASS ON THE FRONT HULL
AP
MAXIMUM ENGAGEMENT RANGE: 1,000 METERS (SMALL TARGET – TOUGH TO HIT)
REAR AIM POINT: AIM CENTER MASS ON THE REAR HULL
AP
MAXIMUM ENGAGEMENT RANGE: 1,000 METERS (SMALL TARGET – TOUGH TO HIT)
Section XII: Additional Information
Massed Fires (Assault Battery Formation)
Direct Line of Sight (LOS) is still needed at this time so a clear, unobstructed view is best when using the
StuH42. Given the dense foliage that dominates the majority of all terrain in WW2OL, the best advice would
be to find an open field or the most open space which forces enemy anti-tank troops to close on your position
without cover. Allowing you to either retreat (which is comical but an in-game reality) or provide your security
element the opportunity to quickly and easily identify and kill the sapper prior to him placing any charges.
A staggered firing line is best as it provides greater peripheral vision for the trailing position. A working theory
is that a StuH42 platoon of 2 StuH42s deployed in a staggered alignment with a squared shaped formation of
250m WIDE x 300m DEPTH could provide some temporary level of security should separate each StuH42 to
the front, sides, and rear.
Until the security element arrives or if none is forthcoming, the StuH42 is simply trading space for time when
assaulted either by a sapper or a bazooka anti-tank soldier(s). Security of your position will be discussed in
Section XIII: Supporting Responsibilities - Security.
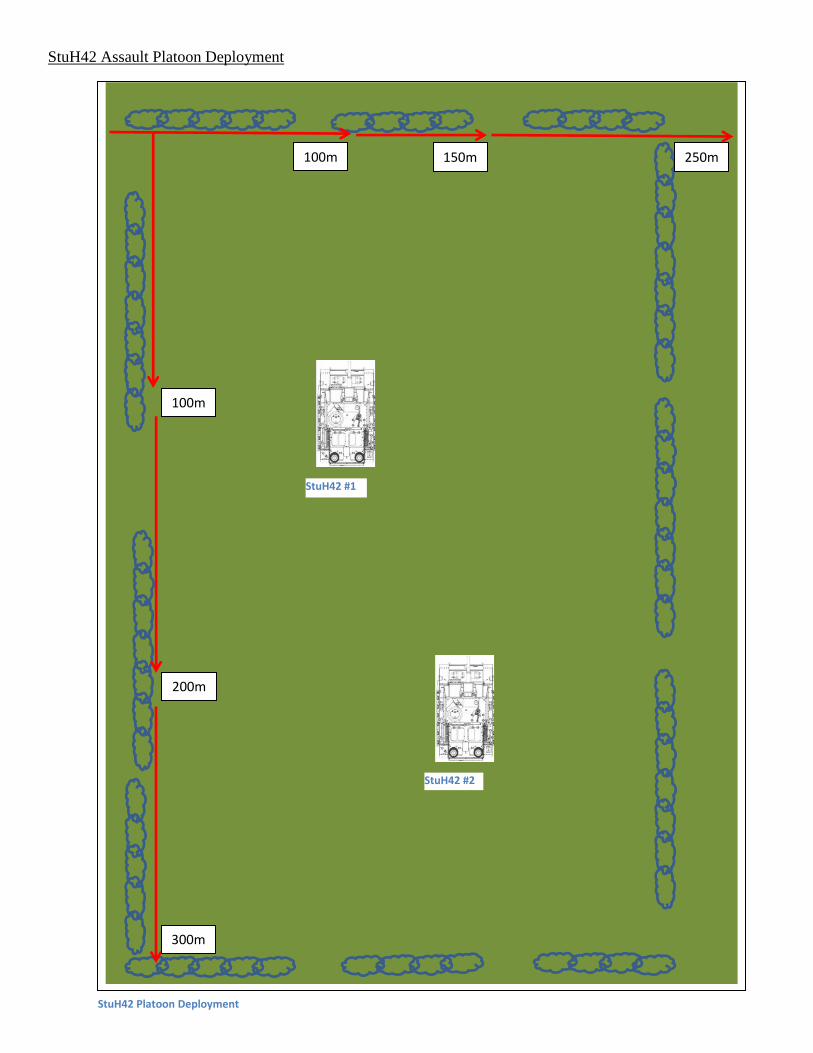
StuH42 Assault Platoon Deployment
v
v
100m
300m
200m
250m 150m 100m
StuH42 #1
StuH42 #2
StuH42 Platoon Deployment
Section XIII: Supporting Responsibilities
Security
A security element is highly advisable to all tanks and self-propelled guns in WW2OL. The game is so vast and
so much cover for enemy infantry and anti-tank guns that the more friendly eyes watching the flanks or “six”
can only improve your platform lethality, ability to impact the battle, AND sustain your time on the battlefield.
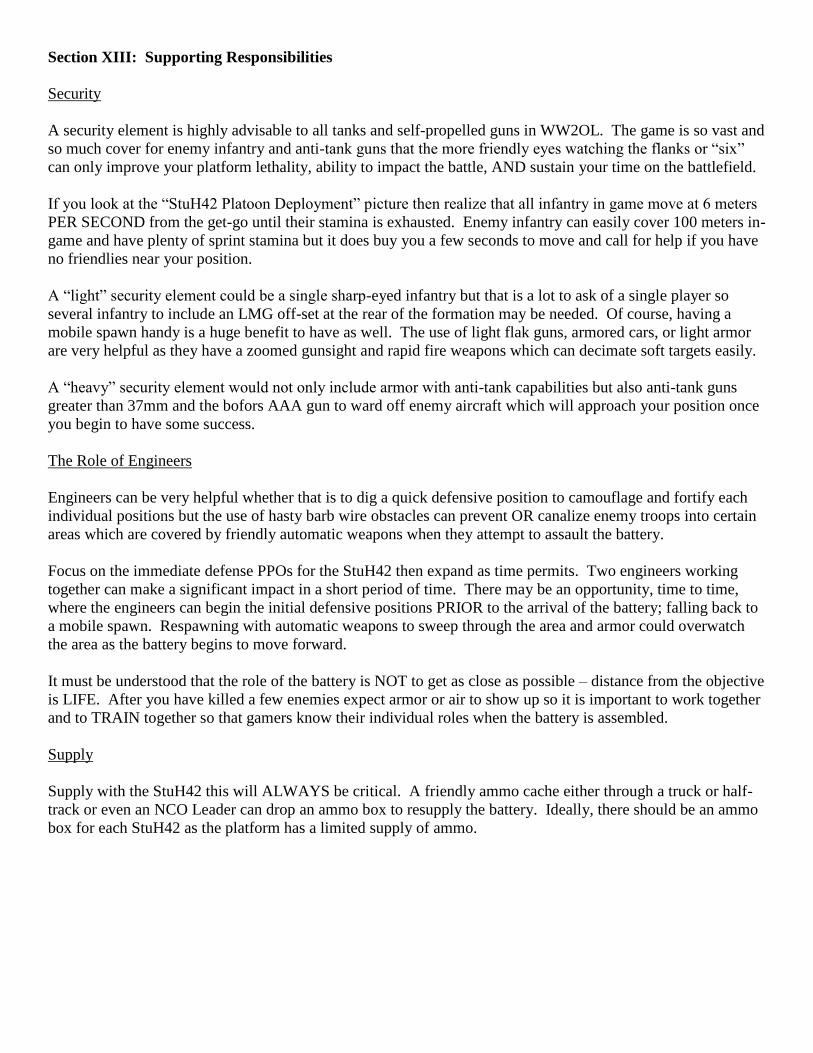
If you look at the “StuH42 Platoon Deployment” picture then realize that all infantry in game move at 6 meters
PER SECOND from the get-go until their stamina is exhausted. Enemy infantry can easily cover 100 meters in-
game and have plenty of sprint stamina but it does buy you a few seconds to move and call for help if you have
no friendlies near your position.
A “light” security element could be a single sharp-eyed infantry but that is a lot to ask of a single player so
several infantry to include an LMG off-set at the rear of the formation may be needed. Of course, having a
mobile spawn handy is a huge benefit to have as well. The use of light flak guns, armored cars, or light armor
are very helpful as they have a zoomed gunsight and rapid fire weapons which can decimate soft targets easily.
A “heavy” security element would not only include armor with anti-tank capabilities but also anti-tank guns
greater than 37mm and the bofors AAA gun to ward off enemy aircraft which will approach your position once
you begin to have some success.
The Role of Engineers
Engineers can be very helpful whether that is to dig a quick defensive position to camouflage and fortify each
individual positions but the use of hasty barb wire obstacles can prevent OR canalize enemy troops into certain
areas which are covered by friendly automatic weapons when they attempt to assault the battery.
Focus on the immediate defense PPOs for the StuH42 then expand as time permits. Two engineers working
together can make a significant impact in a short period of time. There may be an opportunity, time to time,
where the engineers can begin the initial defensive positions PRIOR to the arrival of the battery; falling back to
a mobile spawn. Respawning with automatic weapons to sweep through the area and armor could overwatch
the area as the battery begins to move forward.
It must be understood that the role of the battery is NOT to get as close as possible – distance from the objective
is LIFE. After you have killed a few enemies expect armor or air to show up so it is important to work together
and to TRAIN together so that gamers know their individual roles when the battery is assembled.
Supply
Supply with the StuH42 this will ALWAYS be critical. A friendly ammo cache either through a truck or half-
track or even an NCO Leader can drop an ammo box to resupply the battery. Ideally, there should be an ammo
box for each StuH42 as the platform has a limited supply of ammo.
Section XIV: Importance of Plunging Fire
Depots
Plunging fire into destroyed capture points (CP) or depots wreak havoc on infantry and anti-tank guns trying to
leave the spawn facility. Once you have blown the depot (3 HE rounds from the StuH42), you can concentrate
raining HE between the depot and the CP; being careful not to blow the CP if it has not yet been blown as it will
kill friendlies insides and may help enemy infantry suppress the CP you are trying to capture with small arms
fire, grenades and leaping infantry onto the roof or second floor.
Forward Bases
There are visual rendering limits for enemy infantry so if you are engaging an FB from a great distance you
need to focus on armor, anti-tank guns, or triple-a guns which come from the vehicle spawn at the FB. At
present, enemy infantry at greater than 700 meters are unlikely to be killed by a HE shell from the StuH42; at
least not until the rounds become STO (server tracked objects). Imagine plunging fire into the infantry spawn
as that big 10.5cm round comes arcing down onto its target – fantastic explosions and shrapnel galore!
Open / Walled Army Bases
Army Bases are overwhelmed with consistent tank and air firepower on the objective followed closely by
massed infantry on the final objective. That one sentence is so easily written and so hard to execute;
particularly in a walled AB town which is the vast majority of the towns on the map. This is really where
several dedicated units working together can tip the scales decidedly in favor of the Axis when we have
sufficient numbers to secure the depots and still exerting pressure on the AB. Many times we attack in lemming
waves bleeding massive amounts of infantry, in particular, automatic weapons.
It is critical to deploying a few high-arcing guns combined with some terrain elevation can effectively place
plunging rounds that can kill, disable, or force a despawn of a tank that is tucked into a corner, near a building,
etc that friendly aircraft or sappers cannot access. This is where a combination of 75mm stump-cannons from
the Stug3B, PzrIVD, Pzr IIIN, or the large 10.5cm howitzer StuH42 firing AP and HEAT rounds onto the rear
decks of enemy tanks will experience great success; not to mention the HE shells to cut down enemy infantry,
anti-tank or aaa-guns which prevents our infantry or airplanes during the final assault.
A dominating and elevated field of fire combined with some defensive works make for an excellent position to
exert maximum carnage and suppression onto your enemy.
Exerting a similar formula for an open AB will yield the same results – VICTORY!
Make sure you have your security in-place to protect this artillery element!! But we’ve already talked about that
previously.
Section XV: Demolition
The 10.5cm howitzer HE shell has the most destructive power of any Axis platform and the StuH42 is made for
building destruction. Why is this important? Clearing sight lines for other supporting guns is helpful plus
destruction of the buildings does make it easier for friendly infantry to sweep thru buildings without being
surprised. An additional benefit of this is enemy sappers and anti-tank soldiers will have a more difficult time
to reach our tanks in an urban environment as the enemy is more likely seen when moving through devastate
city blocks. Of course, the building destruction does provide unique enemy sniper and LMG hiding places so it
is important to spot, sweep and secure dominating field of fire position particularly when moving to assault the
bunker. Knowing the when and how many that are attacking is precious intel for the enemy. Deny them this
intel and secure the bunker for a victory!
Below is a wide-ranging Demolition Table which indicates how many StuH42 HE rounds it takes to implode a
particular structure in WW2OL. Uniquely, sometimes it really matters whether or not you are firing into the
flank of a building or firing on it frontally. This table may not be 100% complete but I think you will find this
information helpful and comprehensive. As always when beginning to demolish a building, make sure you
have ammo and security on-hand!
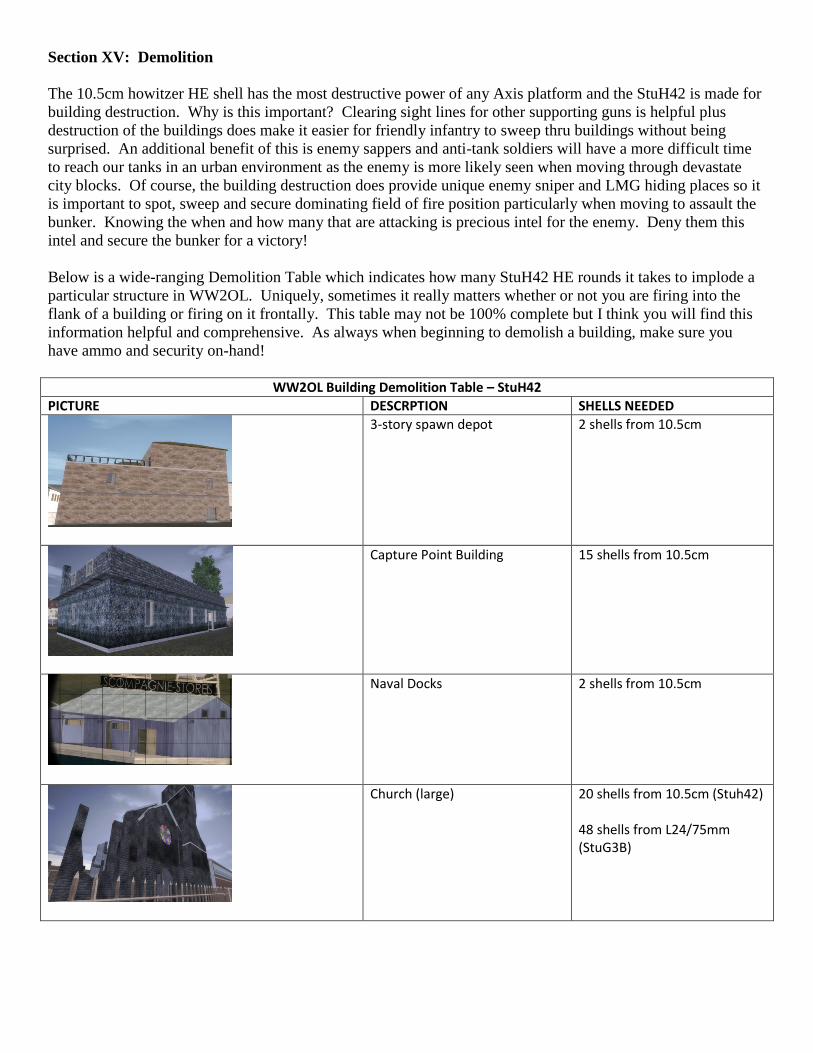
WW2OL Building Demolition Table – StuH42
PICTURE DESCRPTION SHELLS NEEDED
3-story spawn depot 2 shells from 10.5cm
Capture Point Building 15 shells from 10.5cm
Naval Docks 2 shells from 10.5cm
Church (large) 20 shells from 10.5cm (Stuh42) 48 shells from L24/75mm (StuG3B)
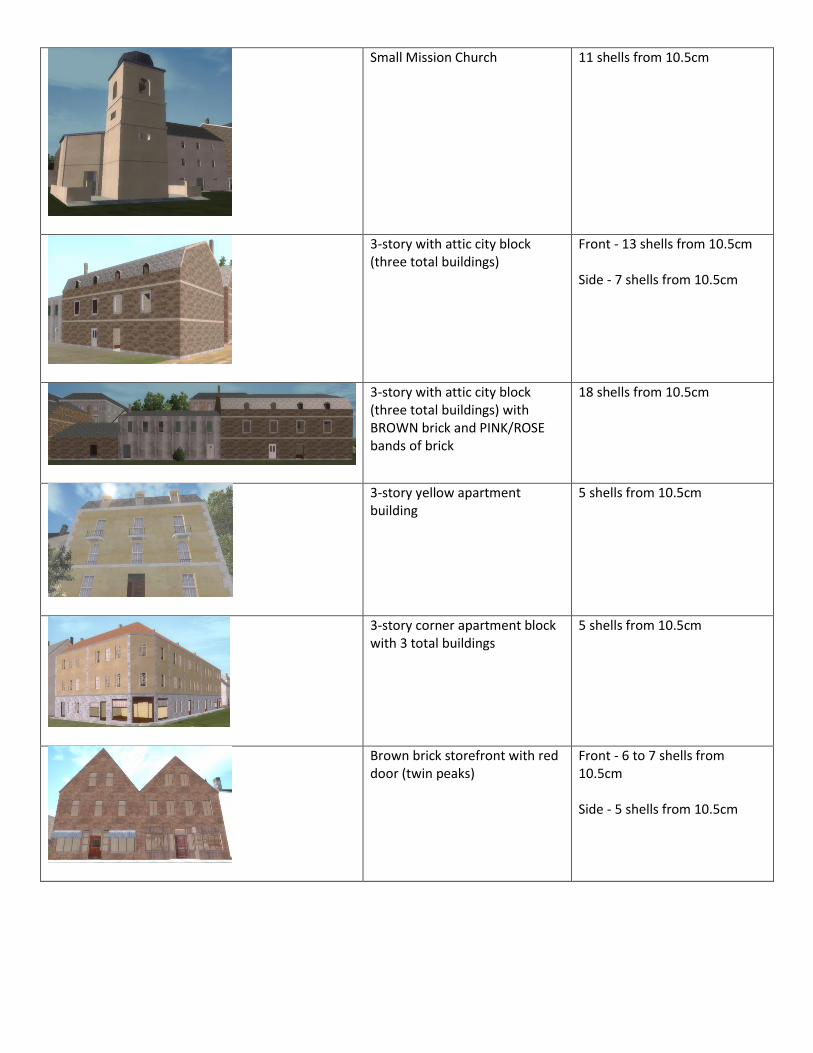
Small Mission Church 11 shells from 10.5cm
3-story with attic city block (three total buildings)
Front - 13 shells from 10.5cm Side - 7 shells from 10.5cm
3-story with attic city block (three total buildings) with BROWN brick and PINK/ROSE bands of brick
18 shells from 10.5cm
3-story yellow apartment building
5 shells from 10.5cm
3-story corner apartment block with 3 total buildings
5 shells from 10.5cm
Brown brick storefront with red door (twin peaks)
Front - 6 to 7 shells from 10.5cm Side - 5 shells from 10.5cm
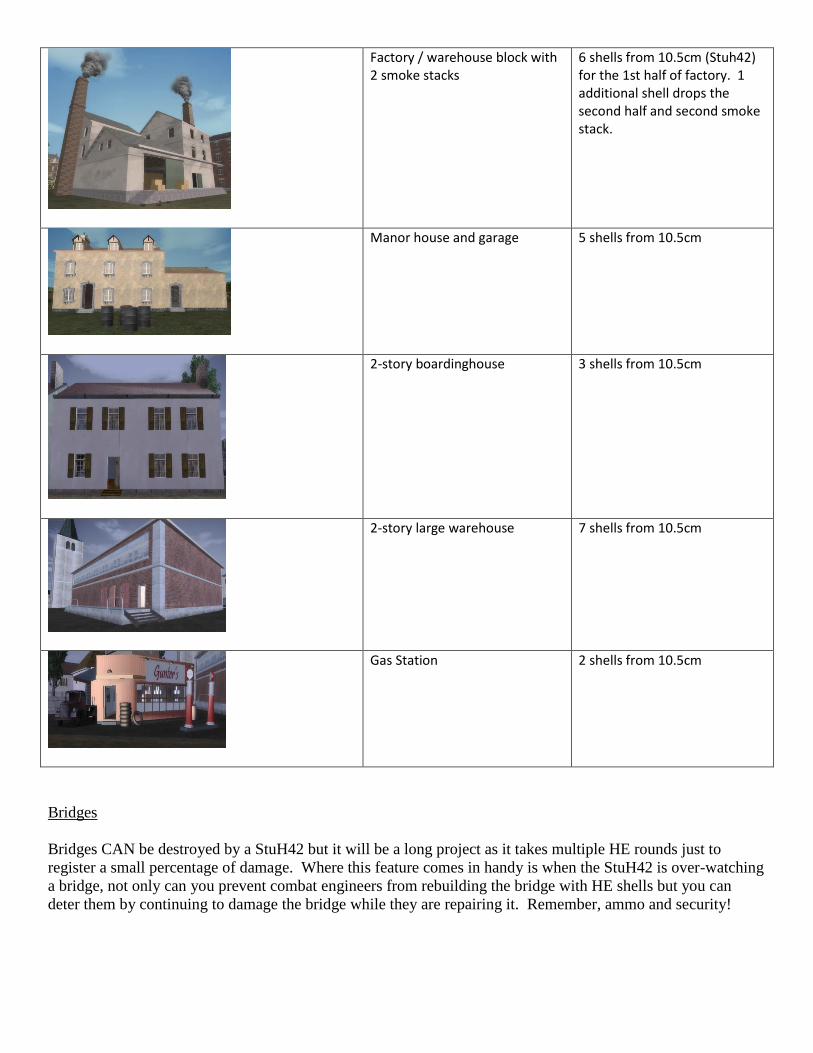
Factory / warehouse block with 2 smoke stacks
6 shells from 10.5cm (Stuh42) for the 1st half of factory. 1 additional shell drops the second half and second smoke stack.
Manor house and garage 5 shells from 10.5cm
2-story boardinghouse 3 shells from 10.5cm
2-story large warehouse 7 shells from 10.5cm
Gas Station 2 shells from 10.5cm
Bridges
Bridges CAN be destroyed by a StuH42 but it will be a long project as it takes multiple HE rounds just to
register a small percentage of damage. Where this feature comes in handy is when the StuH42 is over-watching
a bridge, not only can you prevent combat engineers from rebuilding the bridge with HE shells but you can
deter them by continuing to damage the bridge while they are repairing it. Remember, ammo and security!
Section XVI: The Future
Custom Ammo Loadouts
I think the load-outs below provide some flexibility for the platform to function in various roles. Due to the
demonstrated tank killing capabilities of the AP round at 1000 meters or less the “Assault” load-out is weighted
more to the AP shell with a nice handful of HEAT for those situations and platforms that require HEAT for
success. The biggest win for the “Support” load-out is more Smoke shells. Smoke is key during assaults on
important objectives such as a spawnable depot or bunker. With the time it takes to resupply, the StuH42 can
restock via an ammo cache to sustain an effective smoke screen when needed. I even considered dropping the
four anti-tank rounds altogether for a “true” Support load-out of only HE and Smoke shells at 26 and 10 shells
respectively.
Standard load-out: 26 HE, 4 AP, 4 HEAT, & 2 SMK = 36 shells
Assault load-out: 10 HE, 16 AP, 6 HEAT & 4 SMK = 36 shells
Support load-out: 26 HE, 2 AP, 2 HEAT, & 6 SMK = 36 shells
Indirect Fire & How-To Tools
The next page is an aid in how a Forward Observer (FO)can work NOW in WW2OL with STO weapons such
as mortars and destroyers.
The following pages after the FO Aid show how the information gained by the FO and relayed back to the
server tracked object (STO) platform are interpreted then implemented into adjusting the fire of the STO
platform; subsequently onto the target.
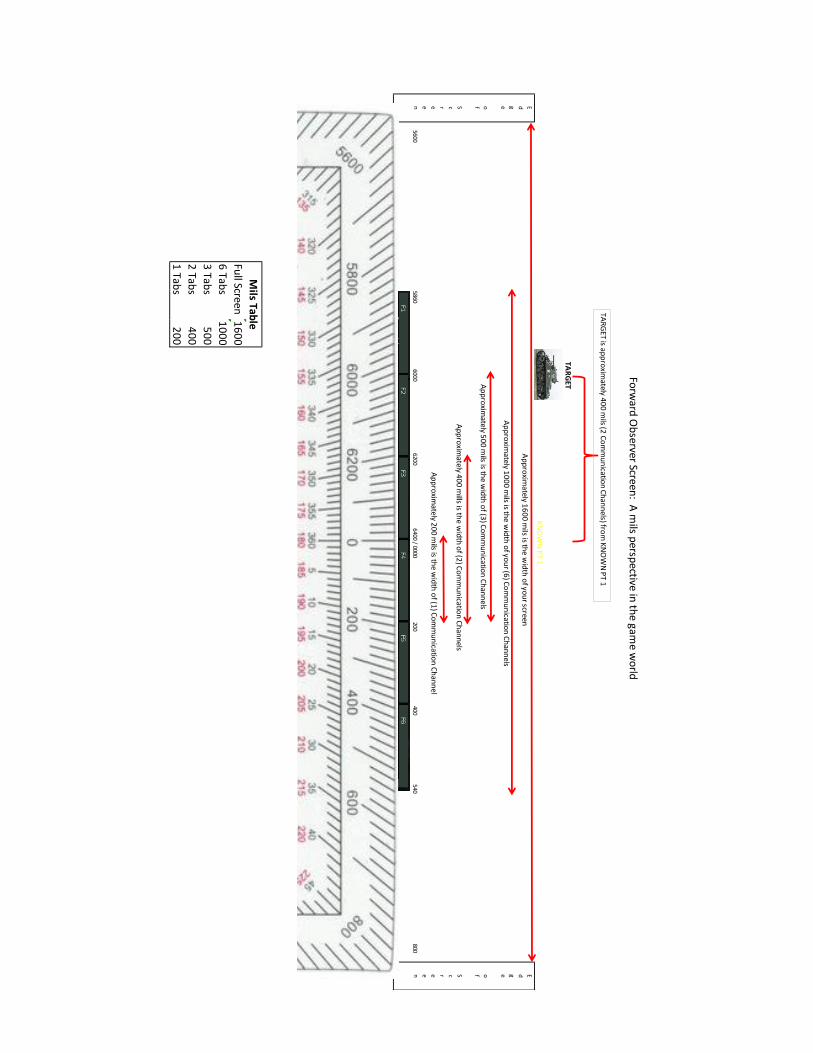
Edge of Screen5600
5860540
800
Edge of Screen
Full Screen
16
00
6 Tab
s1
00
0
3 Tab
s5
00
2 Tab
s4
00
1 Tab
s2
00
Mils Tab
le
Forw
ard O
bserver Screen
: A m
ils persp
ective in th
e game w
orld
400
KN
OW
N P
T 1
TAR
GET
6400 / 00006200
6000200
Ap
pro
ximately 1
60
0 m
ils is the w
idth
of yo
ur screen
Ap
pro
ximately
10
00
mils is th
e wid
tho
f you
r (6) C
om
mu
nicatio
n C
han
nels
TAR
GET is ap
pro
ximately 4
00
mils (2
Co
mm
un
ication
Ch
ann
els) from
KN
OW
N P
T 1
Ap
pro
ximately
50
0 m
ils is the w
idth
of (3
) Co
mm
un
ication
Ch
ann
els
Ap
pro
ximately
40
0 m
ills is the w
idth
of (2
) Co
mm
un
ication
Ch
ann
els
Ap
pro
ximately
20
0 m
ils is the w
idth
of (1
) Co
mm
un
ication
Ch
ann
el
Working with a Forward Observer and Lateral Fires
Working with a Forward Observer (FO) can be a challenge but if you work as a team and do not get frustrated
in the early stages, you will begin to find success as you become more comfortable and familiar with the tools
which enable the FO and the gun / battery firing.
The following information is a simplified system of how the US Army Artillery adjusts fire based up a Known
Point (KP) and the distance of the FO to the target (TGT). It’s known as the “WoRm” table (Width over Range
times Mils).
The “WORM” Table
Step 1: Identify a Known Point (KP). (Ex: It could be a depot or significant terrain feature.)
Step 2: The FO judges the distance from their position to the target (TGT).
Step 3: Using the CHAT TABS, the FO determines the difference in MILS between the KP and the TGT
Step 4a: If the number of MILS is GREATER than 1,000 MILS then DIVIDE by 1000 and round-up at 0.5 to
the next whole number.
Step 4b: If the number of MILS is LESS than 1,000 MILS then DIVIDE by 1000 and use the DECIMAL
number (no rounding up).
Step 4c: The results from 4a or 4b are known as the Observer to Target (OT) Factor.
Step 5: Multiply the OT Factor number by the MILS difference you determined in Step 3.
Step 6: The FO advises the STO platform where the TGT is in relation to the KP (LEFT or RIGHT)
Step 7: The data from Step 5 is the DISTANCE or MILS that the STO platform will need adjust laterally to
engage the TGT.
Step 8: Is there a VERTICAL factor (elevation) that needs to be considered.
After Firing:
Step 9: Should the TGT be parallel, in front of, or beyond the KP, the STO can make range adjustments based
upon PLUS / MINUS information from FO.
Let’s work through several examples on the next page.
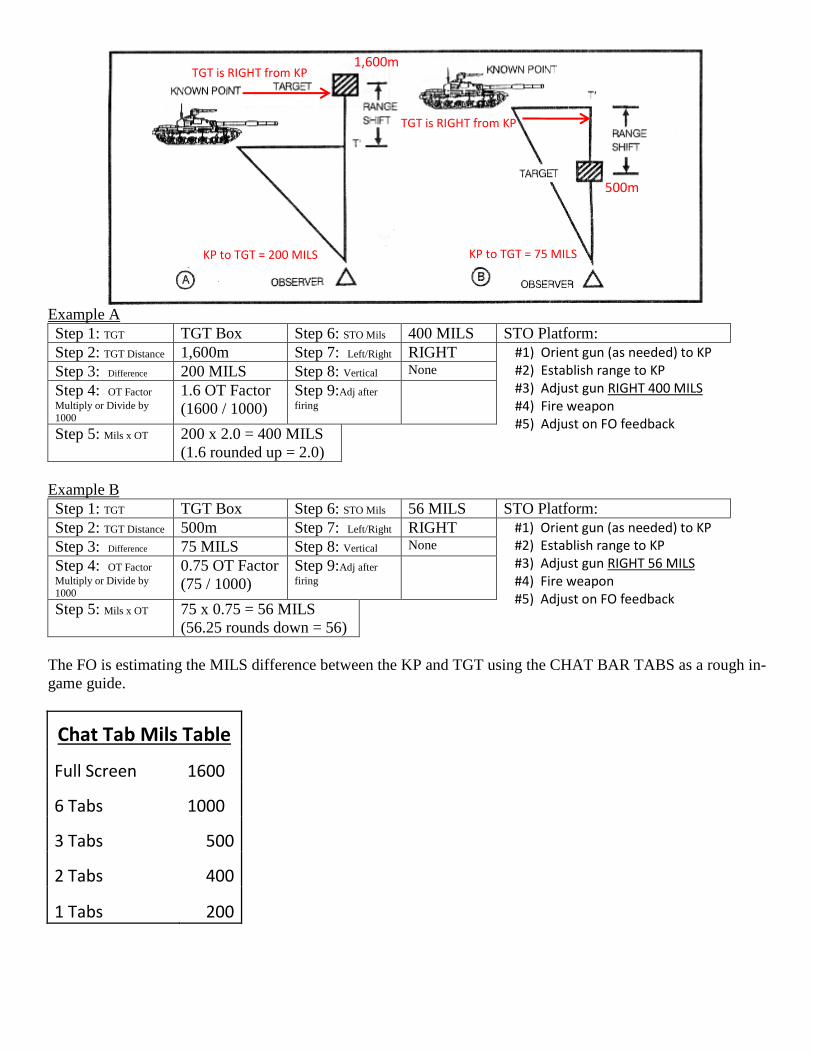
Example A
Step 1: TGT TGT Box Step 6: STO Mils 400 MILS STO Platform:
Step 2: TGT Distance 1,600m Step 7: Left/Right RIGHT
Step 3: Difference 200 MILS Step 8: Vertical None
Step 4: OT Factor
Multiply or Divide by
1000
1.6 OT Factor
(1600 / 1000)
Step 9:Adj after
firing
Step 5: Mils x OT 200 x 2.0 = 400 MILS
(1.6 rounded up = 2.0)
Example B
Step 1: TGT TGT Box Step 6: STO Mils 56 MILS STO Platform:
Step 2: TGT Distance 500m Step 7: Left/Right RIGHT
Step 3: Difference 75 MILS Step 8: Vertical None
Step 4: OT Factor
Multiply or Divide by
1000
0.75 OT Factor
(75 / 1000)
Step 9:Adj after
firing
Step 5: Mils x OT 75 x 0.75 = 56 MILS
(56.25 rounds down = 56)
The FO is estimating the MILS difference between the KP and TGT using the CHAT BAR TABS as a rough in-
game guide.
Chat Tab Mils Table
Full Screen 1600
6 Tabs 1000
3 Tabs 500
2 Tabs 400
1 Tabs 200
#1) Orient gun (as needed) to KP #2) Establish range to KP #3) Adjust gun RIGHT 400 MILS #4) Fire weapon #5) Adjust on FO feedback
1,600m
KP to TGT = 200 MILS
500m
KP to TGT = 75 MILS
#1) Orient gun (as needed) to KP #2) Establish range to KP #3) Adjust gun RIGHT 56 MILS #4) Fire weapon #5) Adjust on FO feedback
TGT is RIGHT from KP
TGT is RIGHT from KP
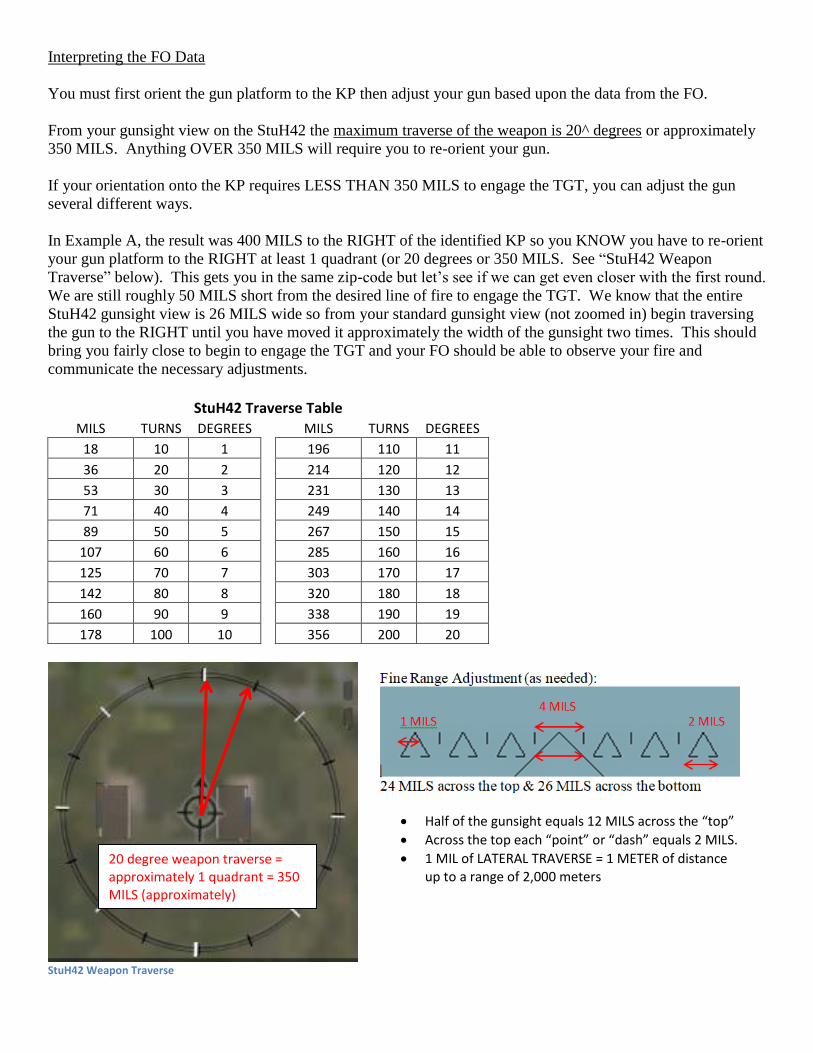
Interpreting the FO Data
You must first orient the gun platform to the KP then adjust your gun based upon the data from the FO.
From your gunsight view on the StuH42 the maximum traverse of the weapon is 20^ degrees or approximately
350 MILS. Anything OVER 350 MILS will require you to re-orient your gun.
If your orientation onto the KP requires LESS THAN 350 MILS to engage the TGT, you can adjust the gun
several different ways.
In Example A, the result was 400 MILS to the RIGHT of the identified KP so you KNOW you have to re-orient
your gun platform to the RIGHT at least 1 quadrant (or 20 degrees or 350 MILS. See “StuH42 Weapon
Traverse” below). This gets you in the same zip-code but let’s see if we can get even closer with the first round.
We are still roughly 50 MILS short from the desired line of fire to engage the TGT. We know that the entire
StuH42 gunsight view is 26 MILS wide so from your standard gunsight view (not zoomed in) begin traversing
the gun to the RIGHT until you have moved it approximately the width of the gunsight two times. This should
bring you fairly close to begin to engage the TGT and your FO should be able to observe your fire and
communicate the necessary adjustments.
StuH42 Traverse Table
MILS TURNS DEGREES
MILS TURNS DEGREES
18 10 1
196 110 11
36 20 2
214 120 12
53 30 3
231 130 13
71 40 4
249 140 14
89 50 5
267 150 15
107 60 6
285 160 16
125 70 7
303 170 17
142 80 8
320 180 18
160 90 9
338 190 19
178 100 10
356 200 20
StuH42 Weapon Traverse
20 degree weapon traverse = approximately 1 quadrant = 350 MILS (approximately)
Half of the gunsight equals 12 MILS across the “top”
Across the top each “point” or “dash” equals 2 MILS.
1 MIL of LATERAL TRAVERSE = 1 METER of distance up to a range of 2,000 meters
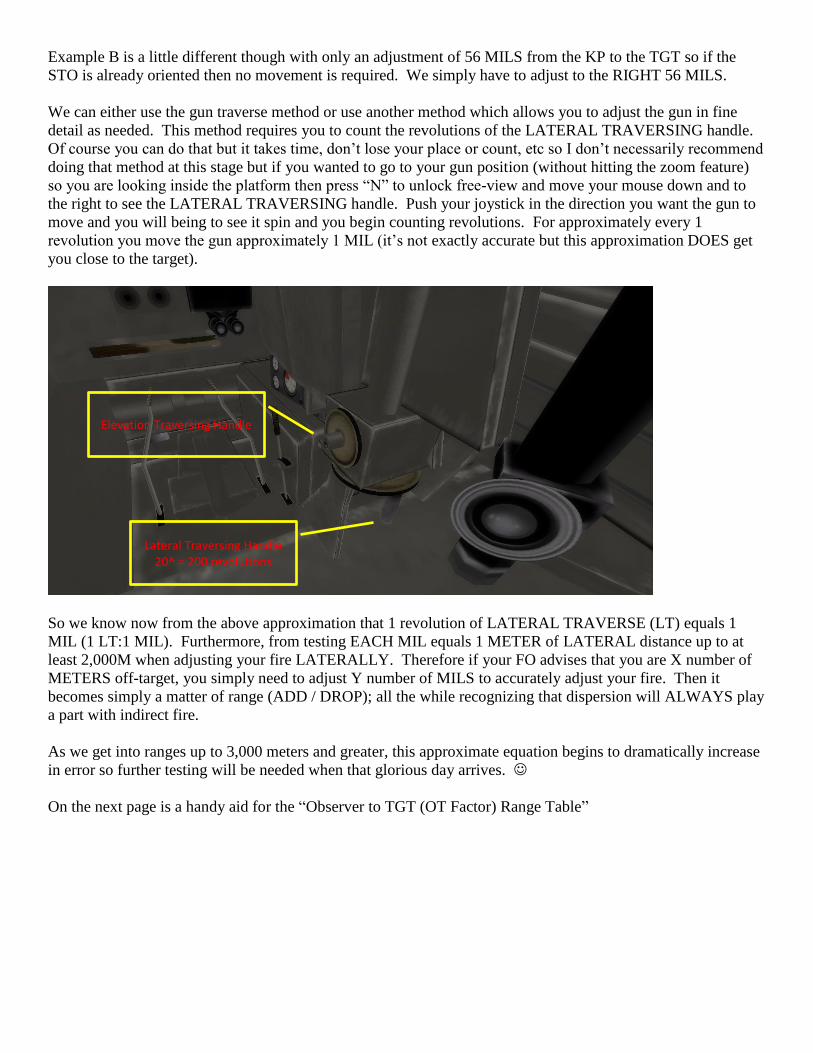
Example B is a little different though with only an adjustment of 56 MILS from the KP to the TGT so if the
STO is already oriented then no movement is required. We simply have to adjust to the RIGHT 56 MILS.
We can either use the gun traverse method or use another method which allows you to adjust the gun in fine
detail as needed. This method requires you to count the revolutions of the LATERAL TRAVERSING handle.
Of course you can do that but it takes time, don’t lose your place or count, etc so I don’t necessarily recommend
doing that method at this stage but if you wanted to go to your gun position (without hitting the zoom feature)
so you are looking inside the platform then press “N” to unlock free-view and move your mouse down and to
the right to see the LATERAL TRAVERSING handle. Push your joystick in the direction you want the gun to
move and you will being to see it spin and you begin counting revolutions. For approximately every 1
revolution you move the gun approximately 1 MIL (it’s not exactly accurate but this approximation DOES get
you close to the target).
So we know now from the above approximation that 1 revolution of LATERAL TRAVERSE (LT) equals 1
MIL (1 LT:1 MIL). Furthermore, from testing EACH MIL equals 1 METER of LATERAL distance up to at
least 2,000M when adjusting your fire LATERALLY. Therefore if your FO advises that you are X number of
METERS off-target, you simply need to adjust Y number of MILS to accurately adjust your fire. Then it
becomes simply a matter of range (ADD / DROP); all the while recognizing that dispersion will ALWAYS play
a part with indirect fire.
As we get into ranges up to 3,000 meters and greater, this approximate equation begins to dramatically increase
in error so further testing will be needed when that glorious day arrives.
On the next page is a handy aid for the “Observer to TGT (OT Factor) Range Table”
Lateral Traversing Handle 20^ = 200 revolutions
Elevation Traversing Handle

Tips: M
ore
than
likely yo
u w
ill use
the
"Less th
an 1km
" table
du
e to
no
lon
g-range
STO ro
un
ds cu
rren
tly.
FO &
Gu
nn
er W
orkin
g Toge
the
r - Step
s:
Step
1)ID
Kn
ow
n P
oin
t (KP
)
Step
2)Estim
ated
range
from
OB
SERV
ER to
TAR
GET (TG
T) divid
ed
by 1000 = O
T Factor
Step
3)U
sing th
e C
HA
T TAB
S, FO d
ete
rmin
es th
e M
ILS diffe
ren
ce b
etw
ee
n th
e K
NO
WN
PO
INT (K
P) an
d TG
T
Step
4)B
ased
on
Ran
ge to
TGT co
nsu
lt the
app
rop
riate 'G
reate
r than
/ Less th
an 1km
' table
to d
ete
rmin
OT Facto
r
Step
5)O
T Factor X
MILS = D
istance
of TG
T from
KP
in M
ILS
Step
6)D
ete
rmin
e LA
TERA
L shift (LEFT o
r RIG
HT) . w
ith M
ILS OT Facto
r data
Step
7)STO
range
s to K
P an
d ad
justs w
ith M
ILS OT Facto
r data
Step
8)C
on
side
r terrain
ele
vation
to TG
T (if app
licable
)
Step
9)U
PD
ATE ran
ge in
form
ation
(AD
D/SU
BTR
AC
T range
to TG
T in re
lation
to K
P - in
fron
t of, e
ven
with
, or b
eyo
nd
)
+ OT
MILS
SHIFT (M
)M
ILSSH
IFT (M)
MILS
SHIFT (M
)M
ILSSH
IFT (M)
MILS
SHIFT (M
)M
ILSSH
IFT (M)
MILS
SHIFT (M
)M
ILSSH
IFT (M)
MILS
SHIFT (M
)M
ILSSH
IFT (M)
1.0100
100200
200300
300400
400500
500600
600700
700800
800900
9001000
1000
2.0100
200200
400300
600400
800500
1000600
1200700
1400800
1600900
18001000
2000
3.0100
300200
600300
900400
1200500
1500600
1800700
2100800
2400900
27001000
3000
4.0100
400200
800300
1200400
1600500
2000600
2400700
2800800
3200900
36001000
4000
5.0100
500200
1000300
1500400
2000500
2500600
3000700
3500800
4000900
45001000
5000
6.0100
600200
1200300
1800400
2400500
3000600
3600700
4200800
4800900
54001000
6000
7.0100
700200
1400300
2100400
2800500
3500600
4200700
4900800
5600900
63001000
7000
8.0100
800200
1600300
2400400
3200500
4000600
4800700
5600800
6400900
72001000
8000
9.0100
900200
1800300
2700400
3600500
4500600
5400700
6300800
7200900
81001000
9000
10.0100
1000200
2000300
3000400
4000500
5000600
6000700
7000800
8000900
90001000
10000
- OT
MILS
SHIFT (M
)M
ILSSH
IFT (M)
MILS
SHIFT (M
)M
ILSSH
IFT (M)
MILS
SHIFT (M
)M
ILSSH
IFT (M)
MILS
SHIFT (M
)M
ILSSH
IFT (M)
MILS
SHIFT (M
)M
ILSSH
IFT (M)
0.1100
10200
20300
30400
40500
50600
60700
70800
80900
901000
100
0.2100
20200
40300
60400
80500
100600
120700
140800
160900
1801000
200
0.3100
30200
60300
90400
120500
150600
180700
210800
240900
2701000
300
0.4100
40200
80300
120400
160500
200600
240700
280800
320900
3601000
400
0.5100
50200
100300
150400
200500
250600
300700
350800
400900
4501000
500
0.6100
60200
120300
180400
240500
300600
360700
420800
480900
5401000
600
0.7100
70200
140300
210400
280500
350600
420700
490800
560900
6301000
700
0.8100
80200
160300
240400
320500
400600
480700
560800
640900
7201000
800
0.9100
90200
180300
270400
360500
450600
540700
630800
720900
8101000
900
1.0100
100200
200300
300400
400500
500600
600700
700800
800900
9001000
1000
Ob
server to Target (O
T Factor) R
ange Tab
le
Ran
ge G
reate
r than
1km
from
Ob
server to Target Tab
le: Divid
e by 1
00
0 To
Get W
ho
le Nu
mb
er (EX: 1
.5 b
ecom
es 2 an
d 1
.4 b
ecom
es 1.0
)
Ran
ge Le
ss than
1km
from
Ob
server to Target Tab
le: Divid
e by 1
00
0 To
Get D
ecimal N
um
ber (EX
: Ran
ge 80
0 / 1
00
0 = 0
.8)
EXA
MP
LES#1 &
#2:In
dire
ct Fire fire
s at a KN
OW
N P
OIN
T (KP
) -it cou
ld b
e a b
uild
ing o
r a way p
oin
t on
the
map
that is
ne
ar TAR
GET.
Step
1) Ran
ge O
BSER
VER
to TG
T is 2000m (EX
1: 2000 / 1000 = 2.0) OR
800m (EX
2: 800 / 1000 = 0.8)** 2.0 o
r 0.8 are th
e kn
ow
n valu
es id
en
tified as th
e O
T factor **
Step
2) OB
SERV
ER d
ete
rmin
es the
re are
200 MILS fro
m th
e K
NO
WN
PO
INT to
TGT
Step
3) Co
nsu
lt "Gre
ater th
an 1km
" table
and
cross-in
de
x the
OT facto
r of 2.0 to
200 MILS = 400m
late
ral shift (th
e TG
T is 400m le
ft or righ
t from
the
KP
) or co
nsu
lt the
"Less th
an 1km
" table
and
cro
ss-ind
ex th
e O
T factor o
f 0.8 to 200 M
ILS = 160m late
ral shift (th
e TG
T is 160m le
ft or righ
t from
th
e K
P)
Step
4) From
locatio
n o
f wh
ere
Ind
irect Fire
land
ed , ad
vise th
e LA
TERA
L SHIFT o
r AD
D/SU
BTR
AC
T as
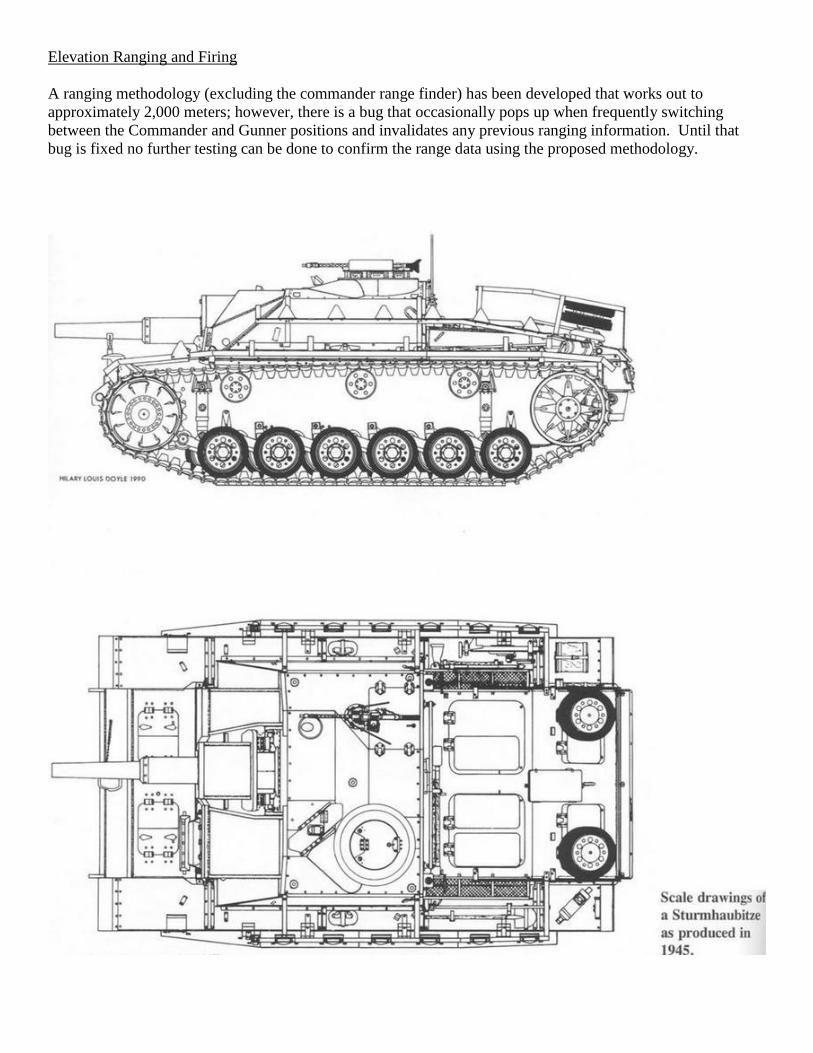
Elevation Ranging and Firing
A ranging methodology (excluding the commander range finder) has been developed that works out to
approximately 2,000 meters; however, there is a bug that occasionally pops up when frequently switching
between the Commander and Gunner positions and invalidates any previous ranging information. Until that
bug is fixed no further testing can be done to confirm the range data using the proposed methodology.
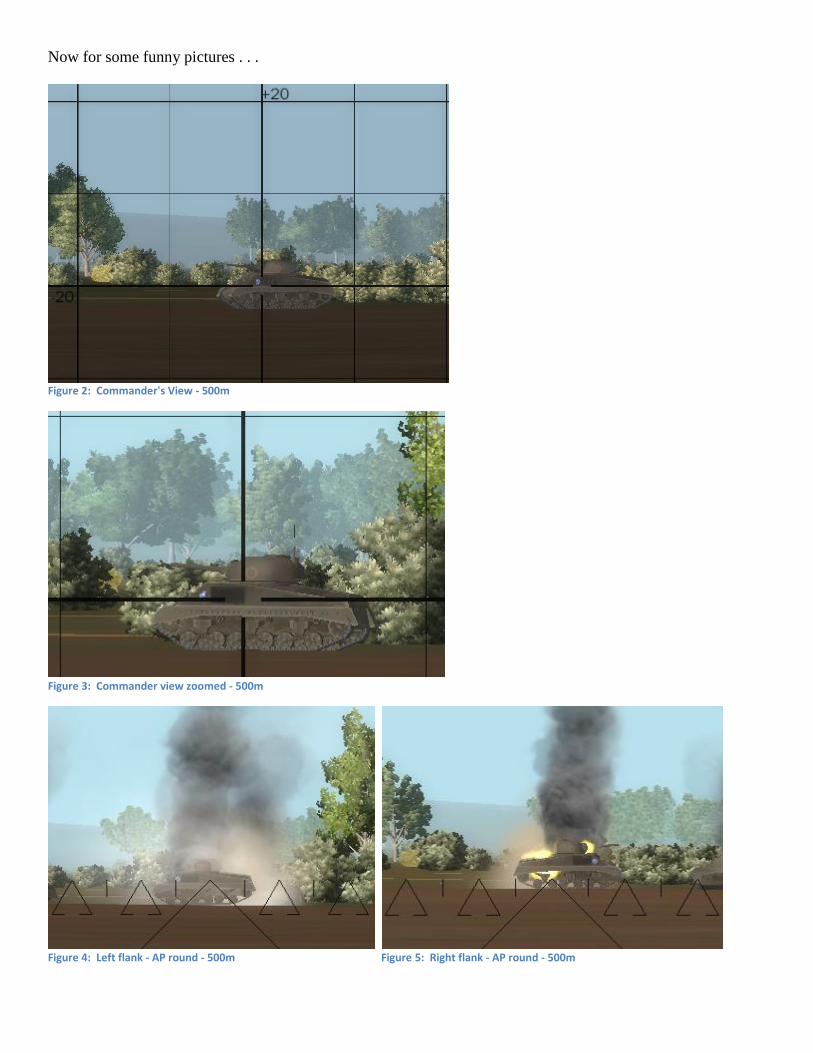
Now for some funny pictures . . .
Figure 2: Commander's View - 500m
Figure 3: Commander view zoomed - 500m
Figure 4: Left flank - AP round - 500m Figure 5: Right flank - AP round - 500m
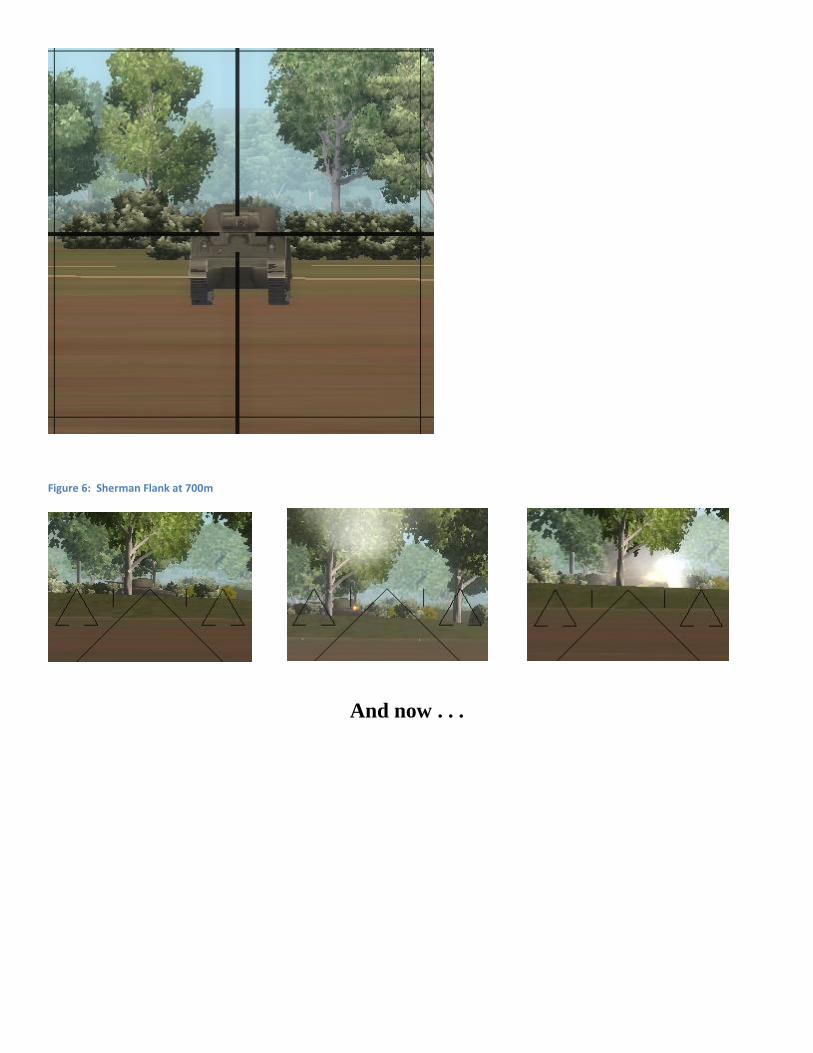
Figure 6: Sherman Flank at 700m
And now . . .
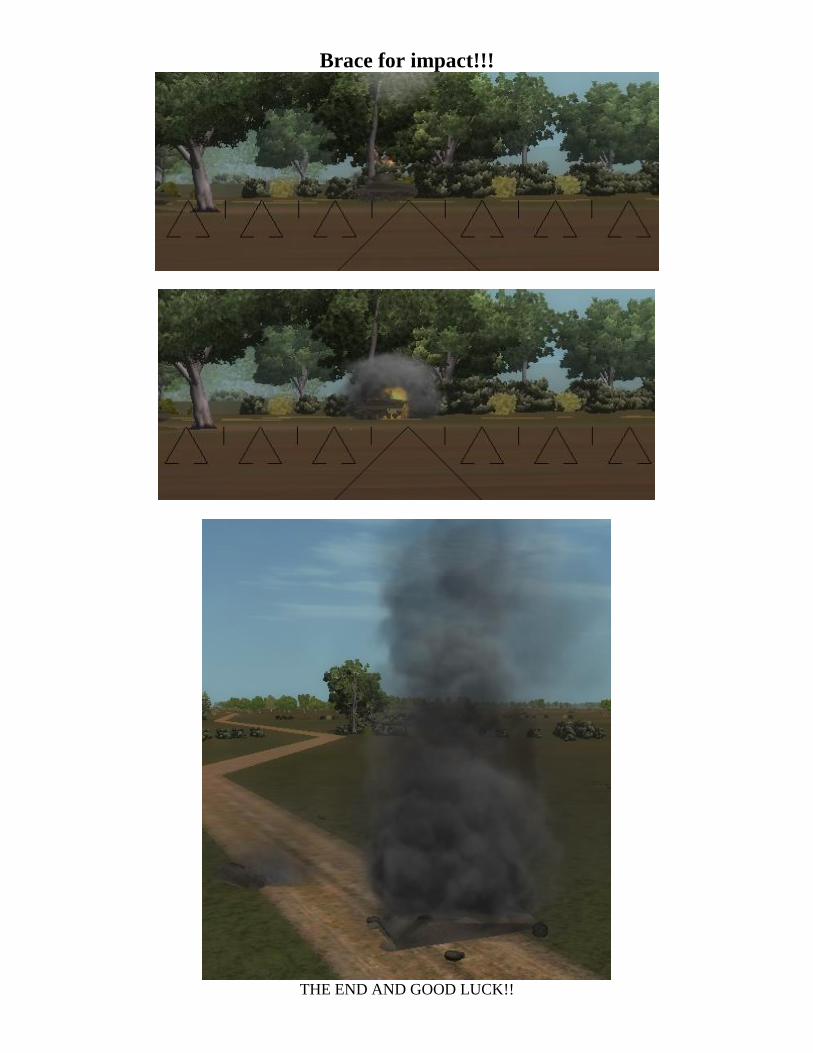
Brace for impact!!!
THE END AND GOOD LUCK!!