Embed Size (px)
Citation preview
User’s Manual ENGLISH E
Support Software for YAMAHA RCX Series Robot Controllers
VIP+
IM Operations882 Soude, Naka-ku, Hamamatsu, Shizuoka 435-0054.JapanURL http://www.yamaha-motor.jp/robot/index.html
YAMAHA MOTOR CO., LTD.
E110-Ver. 1.02

Before getting started 1
Before getting started
■ About this manualThis manual describes how to install VIP+ support software for YAMAHA RCX series robot
controllers as well as major functions you can run with VIP+ support software (simply called
"VIP+" or "this software" from now on). Before installing VIP+ be sure to read this manual and
follow the instructions. For detailed information on how to use VIP+ and its functions, refer to
help in the VIP+ software.
■ Software license agreementThis software may be used only when you agree to the terms stipulated below. By using this
software or installing it in a computer, you are consenting to the terms stipulated below. Please
read the following terms carefully.
1. The copyrights to this software are owned by YAMAHA MOTOR CO., LTD., IM Operations
(hereafter "our company").
2. One software package is licensed for use only on a single PC and cannot be used on two or
more computers at the same time.
3. This software, help, and this manual may not be copied in part or whole without permission
from our company. However, you may make a copy of this software only for use as a backup.
4. Reverse engineering, decompiling, altering or modifying this software is prohibited.
5. Transfer, rental or leasing of this software to a third party, whether for profit or not, is
prohibited without permission from our company.
6. Please note that we accept no responsibility for any results that might occur from use of this
software, help or this manual.
7. Every effort was made to ensure that this software is free of defects and that the contents of
help and this manual are accurate. However, we cannot guarantee that there are absolutely
no errors or mistakes.
8. The specifications of this software and the contents of help and this manual are subject to
change without prior notice.
■ CAUTION• When operating a robot in Auto mode or Manual mode, make sure the robot movement range
is clear and be prepared to press the emergency stop button if necessary.
• This software alone cannot perform all RCX series robot controller operations (via serial
communication). You will need a MPB or RPB programming box for the robot setup.
• For information on how to operate the robot controller and robots including precautions,
refer to the user's manuals that come with the controller and the robot you are going to use
and follow the instructions in those manuals.
2 Before getting started
■ VIP+ package contents● Setup disk (CD-ROM) … 1
The setup disk contains the following:
• VIP+ installation data
• VIP+ user's manual (PDF file)
• USB cable driver
• USB cable setup user's manual (PDF file)
wWARNINGTHE SETUP DISK (CD) IS NOT AN AUDIO CD. NEVER PLAY IT IN AN AUDIO CD PLAYER. THE LOUD VOLUME MIGHT SERIOUSLY DAMAGE YOUR HEARING AND/OR THE AUDIO EQUIPMENT. WE TAKE NO RESPONSIBILITY FOR ANY DAMAGE OR INJURY ARISING FROM USE OF THE SETUP DISK.
■ System requirementsThe following hardware and software are required to install and use VIP+.
● System requirements
• Operating system (OS) : Microsoft Windows 2000/XP/Vista
* 64-bit version is not supported.
• CPU : Performance matching the OS being used
• RAM memory : Capacity sufficient for the OS being used
• Hard disk : 40MB or more free space for VIP+ installation
• CD-ROM drive
• Serial communication port
• Color display monitor supporting VGA or higher resolution
• Serial communication cable (connects between computer and robot controller)
● Robot and robot controller
• RCX series robot controller
• YAMAHA robot that connects to RCX series controller
* To operate the robot from the computer, the robot must be connected to the robot
controller and the setup already completed.
● When using a network connection (Ethernet connection)
• LAN port, LAN cable, and hub
• Ethernet unit for RCX series
• Microsoft, Windows, Windows XP, and Windows Vista are either registered trademarks or
trademarks of Microsoft Corporation in the United States and/or other countries.
• Other company names and product names listed in this manual may be the trademarks or
registered trademarks of their respective companies.
General contents i
General contents General contents
1. About VIP+ 1-1
2. Installing and uninstalling VIP+ 2-1
3. Starting and exiting VIP+ 3-1
4. VIP+ main window 4-14.1 Controller Tree 4-3
4.2 Document Tree 4-4
5. Online robot operation 5-15.1 Adding a controller 5-2
5.2 Returning the robot to origin position 5-5
5.3 Operating the robot in Manual mode 5-6
5.4 Operating the robot in Auto mode 5-7
5.5 Initializing the controller data 5-9
6. Data backup and restore 6-16.1 Backing up controller data 6-1
6.2 Restoring controller data 6-4
6.3 Transmitting controller data using drag & drop 6-76.3.1 Transmitting controller data to document using drag & drop 6-7
6.3.2 Transmitting a document to controller using drag & drop 6-9
7. Editing online controller data 7-17.1 Creating a new program 7-2
7.2 Editing programs 7-3
7.3 Editing point data 7-4
7.4 Editing parameters 7-5
7.5 Editing Shift data 7-6
7.6 Editing Hand data 7-7
7.7 Editing Pallet definition data 7-8
8. Editing offline documents 8-18.1 Creating a new document 8-2
8.2 Opening documents 8-4
8.3 Editing a document 8-58.3.1 Editing a program 8-5
8.3.2 Editing point data 8-6
8.3.3 Editing parameters 8-7
8.3.4 Editing Shift data 8-8
8.3.5 Editing Hand data 8-9
8.3.6 Editing Pallet data 8-10
ii General contents
8.4 Deleting a document 8-11
8.5 Document properties 8-12
9. VIP+ Projects 9-1
4
1
2
3
5
6
7
8
9
1. About VIP+ 1-1
1. About VIP+
■ VIP+ is…VIP+ is support software for YAMAHA RCX series robot controllers. In addition to the functions
of the previously released "VIP Windows" software, VIP+ includes an easy-to-use GUI (graphical
user interface). VIP+ also allows control by 2 or more controllers or access to a controller from
2 or more clients via Ethernet connection.
● With VIP+ you can:
• Do offline editing of all data used on robot controllers
• Operate and monitor robots connected to robot controllers
• Do online editing of all data used with robot controllers
• Back up and restore robot controller data
● Functions and features newly added to VIP+:
• Ethernet connection to controllers
• Supports data input in spreadsheet software format
• Seamless backup and restoring of controller information such as point data
• Syntax coloring
• Data transfer between the online controller and an offline document by drag & drop
• Executes online commands using a terminal window
• Controller tree and document tree functions similar to Windows Explorer
TIP
Refer to VIP+ help to fi nd detailed information on VIP+ functions and operation.
■ Compatible robot controllersVIP+ supports the following YAMAHA RCX series robot controllers:
• RCX240, RCX142, RCX141, RCX222, and RCX221
4
1
2
3
5
6
7
8
9
1-2 1. About VIP+
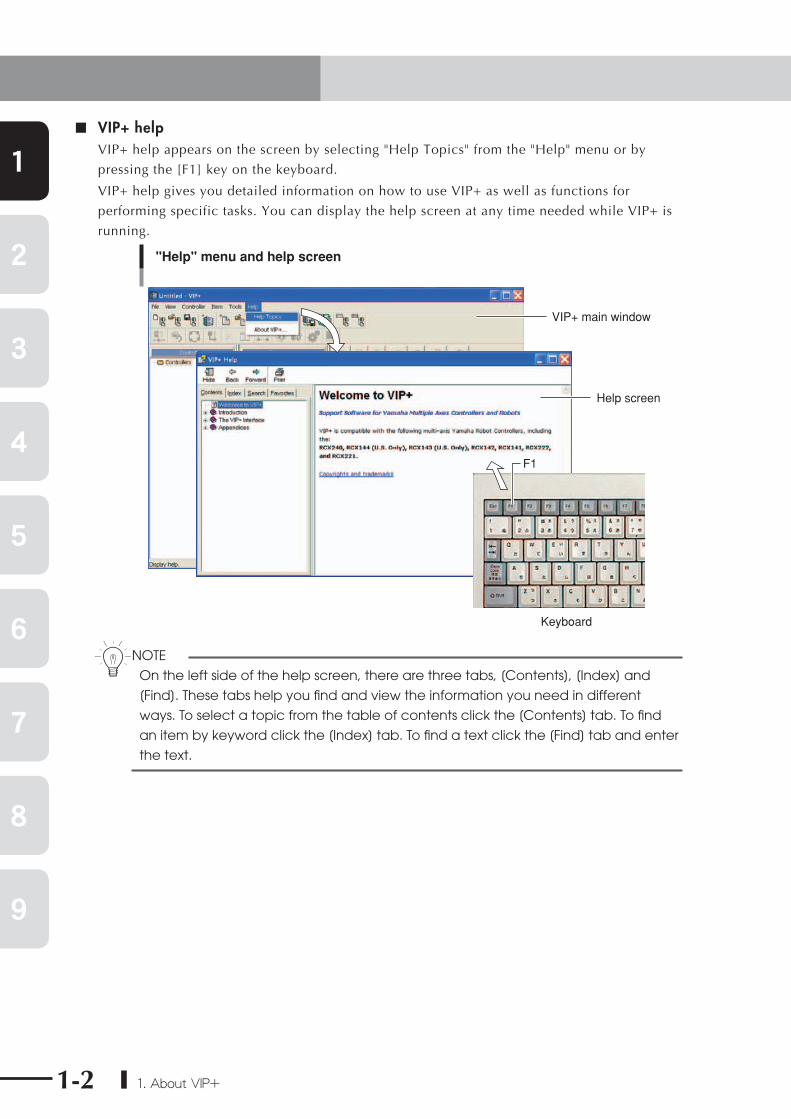
■ VIP+ helpVIP+ help appears on the screen by selecting "Help Topics" from the "Help" menu or by
pressing the [F1] key on the keyboard.
VIP+ help gives you detailed information on how to use VIP+ as well as functions for
performing specific tasks. You can display the help screen at any time needed while VIP+ is
running.
"Help" menu and help screen
VIP+ main window
Help screen
F1
Keyboard
nNOTE
On the left side of the help screen, there are three tabs, [Contents], [Index] and
[Find]. These tabs help you fi nd and view the information you need in different
ways. To select a topic from the table of contents click the [Contents] tab. To fi nd
an item by keyword click the [Index] tab. To fi nd a text click the [Find] tab and enter
the text.

2. Installing and uninstalling VIP+ 2-1
4
1
2
3
5
6
7
8
9
2. Installing and uninstalling VIP+To use VIP+ on your computer, you must install the VIP+ application in your computer. If an older
version of VIP+ is already installed in your computer, then you must first of all uninstall it. (VIP+
can be installed even if "VIP Windows" is already installed.)
■ To install VIP+
1 Turn on the computer where you will install VIP+.
2 Insert the setup disk into the CD-ROM drive of the computer.The installer wizard starts up automatically.
TIP
If the installer wizard does not start, double-click the "My Computer" icon on the
desktop and then double-click the "CD-ROM" icon to open it. Then double-click
"VIP_plus_Setup".
3 When the installer wizard screen appears, click the [Next] button.
4 Follow the instructions that appear on the screen to continue the
installation.
5 When installation is complete, click the [Finish] button.
The above completes the installation of VIP+. Check that the "VIP+" icon now appears on the
desktop.
"VIP+" icon
cCAUTIONYou may need to restart the PC depending on the PC settings.
2-2 2. Installing and uninstalling VIP+
4
1
2
3
5
6
7
8
9
■ To uninstall VIP+
1 Open the Windows Control Panel.
2 Double-click the "Add or Remove Programs" icon.A list of the currently installed programs then appears.
3 Select "VIP+" from the program list and click the [Remove] button.
4 When a confirmation message appears, click the [Yes] button.Uninstall action of VIP+ is then performed.
4
1
2
3
5
6
7
8
9
3. Starting and exiting VIP+ 3-1
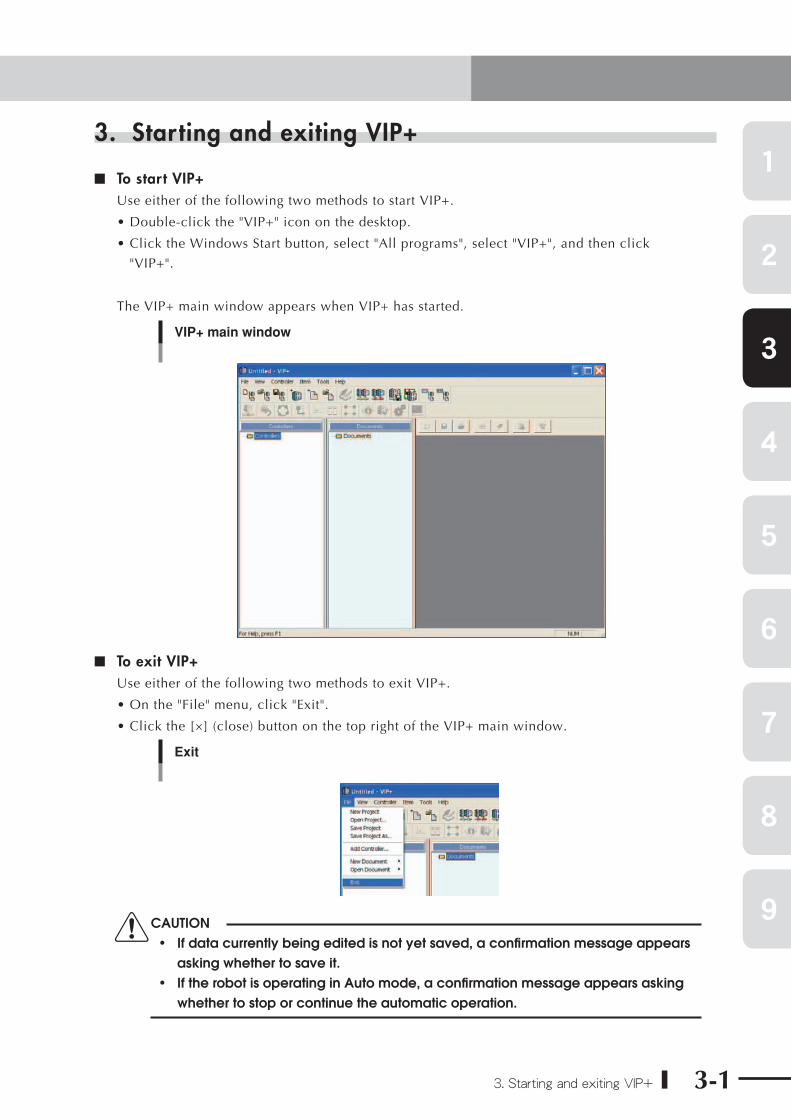
3. Starting and exiting VIP+
■ To start VIP+Use either of the following two methods to start VIP+.
• Double-click the "VIP+" icon on the desktop.
• Click the Windows Start button, select "All programs", select "VIP+", and then click
"VIP+".
The VIP+ main window appears when VIP+ has started.
VIP+ main window
■ To exit VIP+Use either of the following two methods to exit VIP+.
• On the "File" menu, click "Exit".
• Click the [×] (close) button on the top right of the VIP+ main window.
Exit
cCAUTION• If data currently being edited is not yet saved, a confi rmation message appears asking whether to save it.• If the robot is operating in Auto mode, a confi rmation message appears asking whether to stop or continue the automatic operation.
MEMO
3-2 3. Starting and exiting VIP+
4
1
2
3
5
6
7
8
9
4. VIP+ main window 4-1
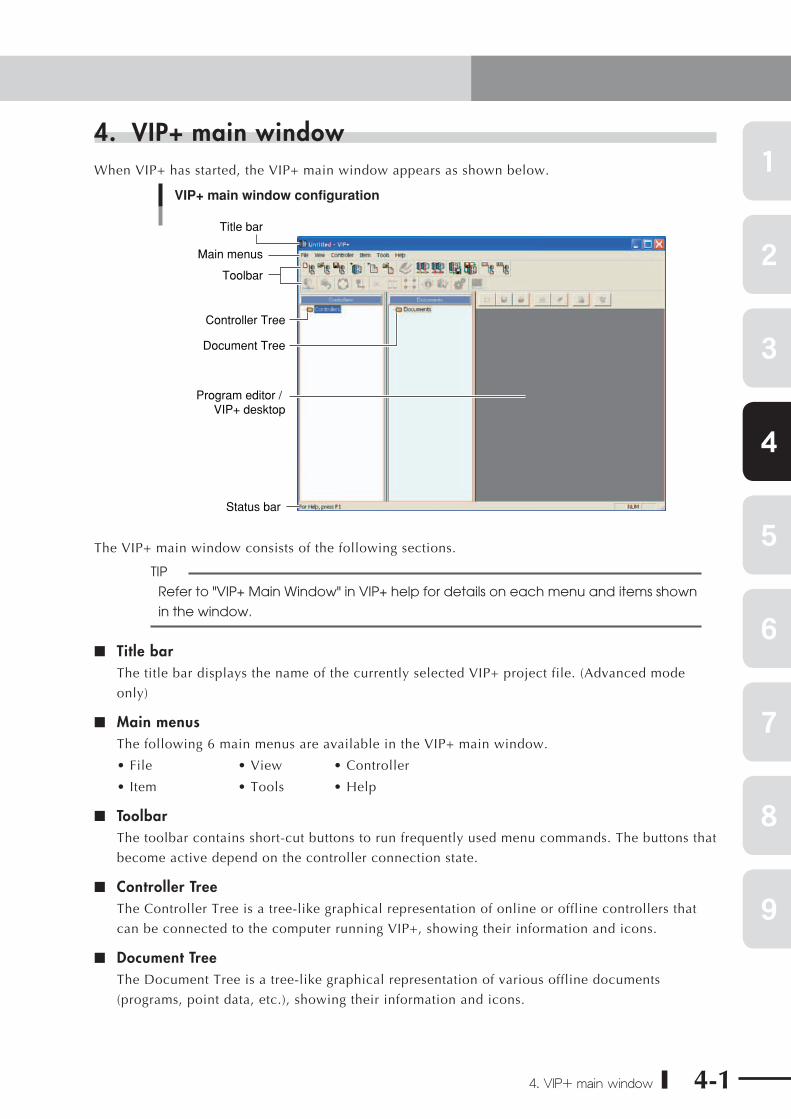
4. VIP+ main windowWhen VIP+ has started, the VIP+ main window appears as shown below.
VIP+ main window configuration
Title bar
Main menus
Toolbar
Controller Tree
Document Tree
Program editor / VIP+ desktop
Status bar
The VIP+ main window consists of the following sections.
TIP
Refer to "VIP+ Main Window" in VIP+ help for details on each menu and items shown
in the window.
■ Title barThe title bar displays the name of the currently selected VIP+ project file. (Advanced mode
only)
■ Main menusThe following 6 main menus are available in the VIP+ main window.
• File • View • Controller
• Item • Tools • Help
■ ToolbarThe toolbar contains short-cut buttons to run frequently used menu commands. The buttons that
become active depend on the controller connection state.
■ Controller TreeThe Controller Tree is a tree-like graphical representation of online or offline controllers that
can be connected to the computer running VIP+, showing their information and icons.
■ Document TreeThe Document Tree is a tree-like graphical representation of various offline documents
(programs, point data, etc.), showing their information and icons.
4
1
2
3
5
6
7
8
9
4-2 4. VIP+ main window
■ Program editor / VIP+ desktopThis section of the VIP+ main window is used for creating, viewing, and editing programs that
control the robot motion and functions.
■ Status barThe status bar displays helpful instructions for users and also displays information about data
transmission between the computer and connected controllers.
4
1
2
3
5
6
7
8
9
4. VIP+ main window 4-3
4.1 Controller TreeThe Controller Tree is displayed while VIP+ is running, and is docked at the left side of the VIP+
main window. The Controller Tree is a graphical representation of online or offline controllers
that can be connected to the computer running VIP+, showing their information and icons. The
Controller Tree pane can be docked at the right side of the VIP+ main window as needed.
■ Controller Tree displayAn example of Controller Tree with the "Controllers" folder expanded is shown below. This
Controller Tree contains 2 controllers, "Controller1" and "Controller2". The "Controller1"
is connected (online) to the computer and its information is displayed. The "Controller2" is
disconnected (offline) and only its icon is displayed.
Example of Controller Tree
"Controllers" folderContains all controllers (represented by controller icons) you added to the Controller Tree. An unlimited number of controllers can be stored in the "Controllers" folder, but no data can be uploaded from the controller unless it is connected or online.
"Programs" listDisplays a list of program files stored in the controller.
Handle barDrag this handle bar to move the Controller Tree where needed.
"Parameters" folderContains sets of parameters pertaining to the robot.
"Monitors" folderContains dedicated and general purpose I/O monitors and variables monitors for the controller.
"Coordinate System" folderContains sets of data (point data, shift data, hand data, and palette data) that define point coordinates or transposition of coordinates within the robot movement range.
Controller icon
4.1 Controller Tree
4
1
2
3
5
6
7
8
9
4-4 4. VIP+ main window
4.2 Document TreeThe Document Tree is displayed while VIP+ is running, and is docked next to the Controller Tree at
the left side of the VIP+ main window. The Document Tree is a graphical representation of various
folders containing different offline document types such as robot programs and point data.
The Document Tree pane can be moved and docked at the right or right side of the VIP+ main
window as needed.
■ Document Tree display An example of Document Tree with the "Documents" folder expanded is shown below. The
"Documents" folder contains various types of documents.
Example of Document Tree
"System (*.all)" document folderThis folder stores "System" documents when they are created. Each system document is represented by a "controller" icon. ("LineA" in the example shown at right). When the "controller" icon is expanded, its folder hierarchy is displayed and is very similar to the expanded "controller" icon.
"Documents" folderThis folder contains all documents you added to the Document Tree.
Handle barDrag this handle bar to move the Document Tree where needed.
"Points (*.pnt)" document folder
This folder stores "Point" documents when they are created.
"Point Comments (*.pcm)" document folder
This folder stores "Point Comment" documents when they are created.
"Programs (*.pgm)" document folder
This folder stores "Program" documents when they are created.
"Hands (*.hnd)" document folder
This folder stores "Hand" documents when they are created.
"Pallets (*.plt)" document folder
This folder stores "Pallet" documents when they are created.
"Parameters (*.prm)" document folder
This folder stores "Parameter" documents when they are created.
4.2 Document Tree
4
1
2
3
5
6
7
8
9
4. VIP+ main window 4-5
■ About documents"Documents" used in VIP+ are graphical representations of various types of controller data files
such as robot programs and point data. Documents are grouped in folders on the Document
Tree in the VIP+ main window according to document type. These can be created, saved, and
edited in the VIP+ main window.
Please note that each document on the Document Tree is only a graphical representation
of its associated data file and is not the actual file. Therefore, deleting a document from the
Document Tree will not delete the associated data file. (For more information on documents
and associated data files, refer to "Introduction to Documents" in VIP+ help.)
TIP
A pop-up menu appears when you right-click a document icon in a folder
displayed in the Document Tree and allows you to select a related command.
cCAUTIONEven when a document is removed from the Document Tree, the associated data fi le still exists in its stored location. However, deleting a "Program" document allows overwriting of the associated fi le or deletes that program.
4.2 Document Tree
MEMO
4-6 4. VIP+ main window
4
1
2
3
5
6
7
8
9
5. Online robot operation 5-1
5. Online robot operationYou can remotely control robots connected to the controller and monitor their operating status
from the computer running VIP+. The following sections describe how to register and connect
controllers to VIP+ as well as how to control the online robot operation.
5.1
5.2
5.3
5.4
5.5
Returning the robot to origin position
Operating the robot in Manual mode
Operating the robot in Auto mode
Initializing the controller data
Adding a controller
wWARNINGWHEN OPERATING A ROBOT, MAKE SURE THE ROBOT MOVEMENT RANGE IS CLEAR AND BE PREPARED TO PRESS THE EMERGENCY STOP BUTTON IF NECESSARY.
4
1
2
3
5
6
7
8
9
5-2 5. Online robot operation
5.1 Adding a controllerThis section describes how to register a robot controller to the VIP+ Controller Tree and connect
(online) to the computer.
1 Connect the computer to the robot controller.First make sure the robot controller is not in automatic operation and then connect the
computer to the robot controller. For information on how to make connections, refer to
the user's manual that comes with the robot controller and the "Ethernet for RCX series"
user's manual.
2 Start VIP+.The VIP+ main window opens.
3 From the "File" menu, select "Add Controller".The "Add New Controller" dialog box appears.
TIP
You can also click the button on the toolbar or right-click the "Controllers"
folder in the Controller Tree and select "New Controller…" from the pop-up menu.
"Add New Controller" dialog box
4 Enter a name for the controller.In the "Name" box, enter a name for the controller as you want it to appear in the
Controller Tree. Names can be any combination of up to 25 characters.
5 Check the "Connect On Add" check box.If you want VIP+ to start connecting to the controller as soon as it is added to the
Controller Tree, check the "Connect On Add" check box. If not, clear this check box.
5.1 Adding a controller
4
1
2
3
5
6
7
8
9
5. Online robot operation 5-3
6 Select the "Connection Type".Select "Serial" when using a serial connection, or select "Ethernet" when using a network
connection. Parameters for the selected item then become active.
7 Select the communication port and settings.Make sure that the communication settings and parameters match those assigned to
the controller.
8 Click the [OK] button.The new controller will be registered in VIP+ and its icon and name appear ("Controller1"
in the example below) in the Controller Tree.
If the "Connect On Add" check box was checked in step 5, then VIP+ will automatically
connect to the controller, and the component folders (programs, coordinate system,
parameters, monitors) will automatically open and appear in the Controller Tree.
TIP
Even when the new controller is registered in VIP+, each menu button located on
the bottom line of the toolbar does not become active. To make each menu
button active, click the desired controller in the Controller Tree. However, note that
the buttons that become active may vary depending on the controller connection
status.
Example of Controller Tree
Connected to controller
5.1 Adding a controller
4
1
2
3
5
6
7
8
9
5-4 5. Online robot operation
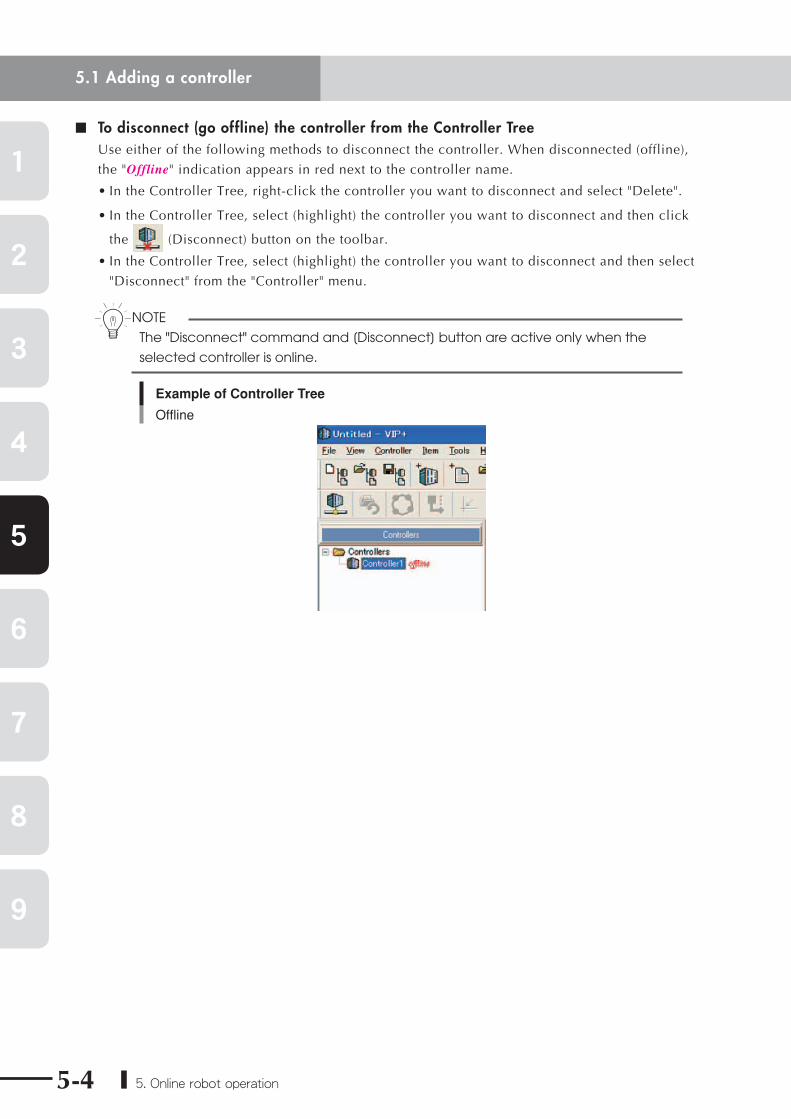
■ To disconnect (go offline) the controller from the Controller TreeUse either of the following methods to disconnect the controller. When disconnected (offline),
the "Offline" indication appears in red next to the controller name.
• In the Controller Tree, right-click the controller you want to disconnect and select "Delete".
• In the Controller Tree, select (highlight) the controller you want to disconnect and then click
the (Disconnect) button on the toolbar.
• In the Controller Tree, select (highlight) the controller you want to disconnect and then select
"Disconnect" from the "Controller" menu.
nNOTE
The "Disconnect" command and [Disconnect] button are active only when the
selected controller is online.
Example of Controller Tree
Offline
5.1 Adding a controller
4
1
2
3
5
6
7
8
9
5. Online robot operation 5-5
5.2 Returning the robot to origin positionBefore operating the robot, make sure it is correctly connected to the controller.
1 Make sure that the desired controller is connected (online) to VIP+.If not online, make a connection (online) by using either of the following methods.
• Right-click the desired controller in the Controller Tree and select "Connect".
• Select (highlight) the desired controller in the Controller Tree and then click the (Connect) button on the toolbar.
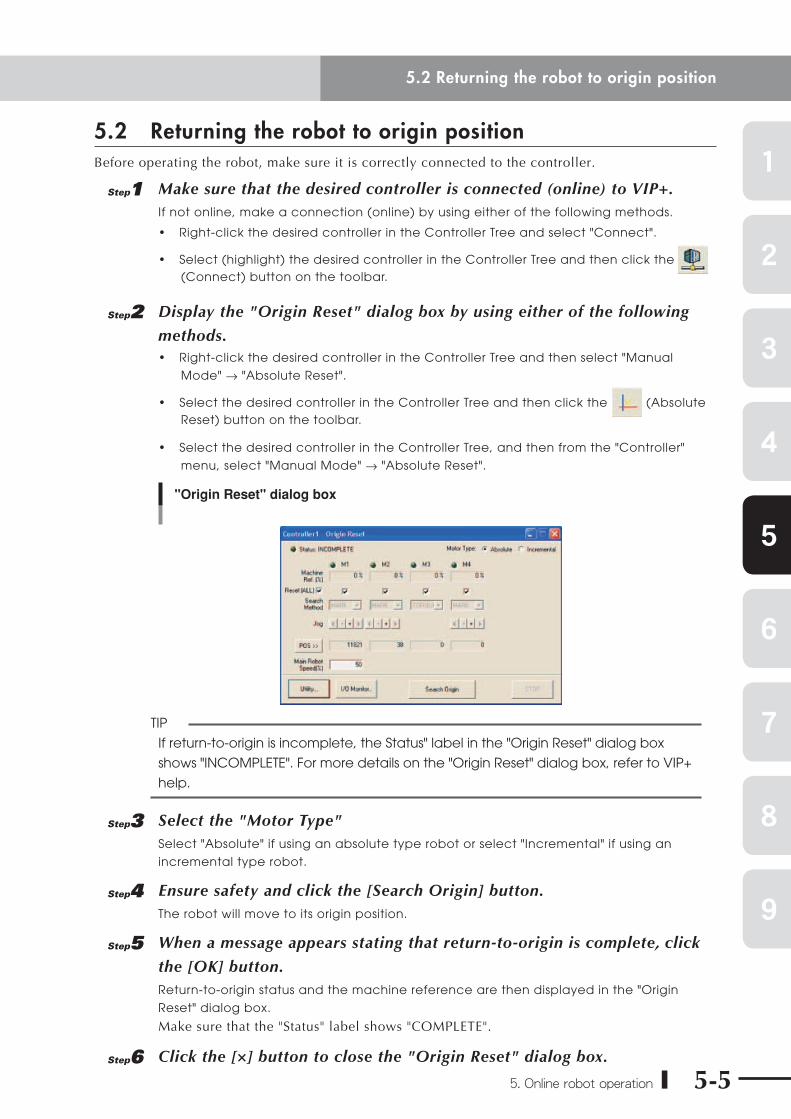
2 Display the "Origin Reset" dialog box by using either of the following
methods.• Right-click the desired controller in the Controller Tree and then select "Manual
Mode" → "Absolute Reset".
• Select the desired controller in the Controller Tree and then click the (Absolute Reset) button on the toolbar.
• Select the desired controller in the Controller Tree, and then from the "Controller"
menu, select "Manual Mode" → "Absolute Reset".
"Origin Reset" dialog box
TIP
If return-to-origin is incomplete, the Status" label in the "Origin Reset" dialog box
shows "INCOMPLETE". For more details on the "Origin Reset" dialog box, refer to VIP+
help.
3 Select the "Motor Type"Select "Absolute" if using an absolute type robot or select "Incremental" if using an
incremental type robot.
4 Ensure safety and click the [Search Origin] button.The robot will move to its origin position.
5 When a message appears stating that return-to-origin is complete, click
the [OK] button.Return-to-origin status and the machine reference are then displayed in the "Origin
Reset" dialog box.
Make sure that the "Status" label shows "COMPLETE".
6 Click the [×] button to close the "Origin Reset" dialog box.
5.2 Returning the robot to origin position
4
1
2
3
5
6
7
8
9
5-6 5. Online robot operation
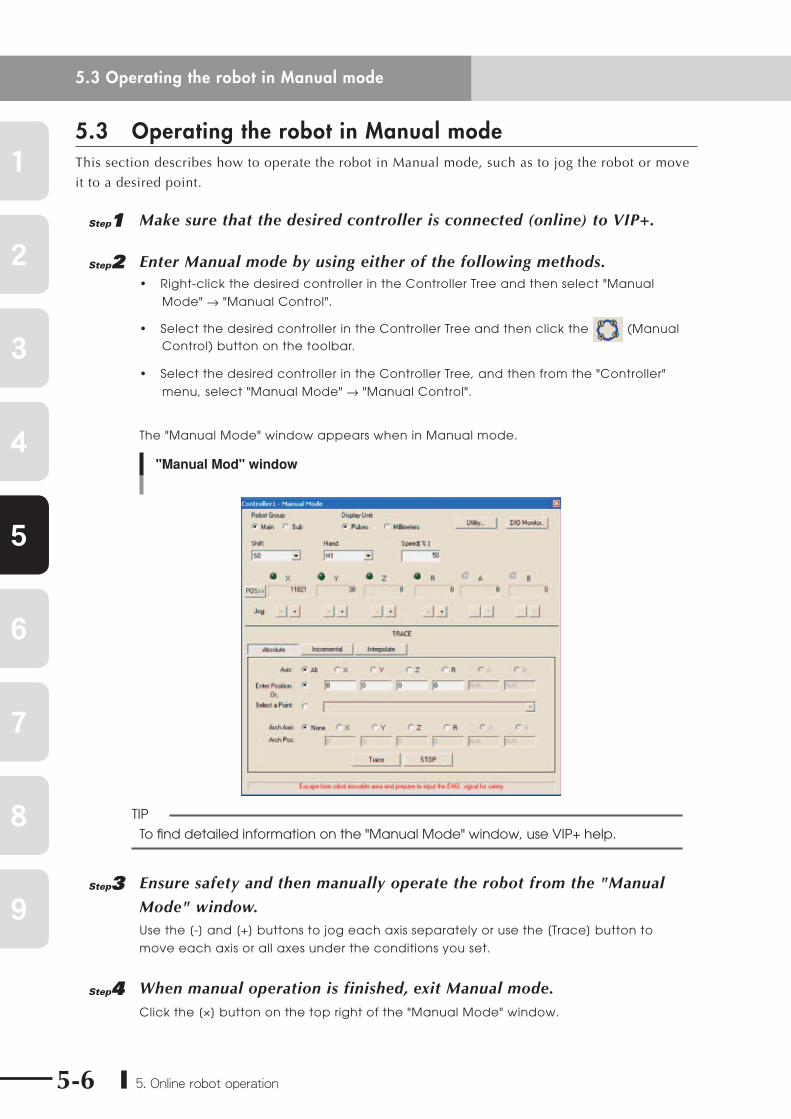
5.3 Operating the robot in Manual modeThis section describes how to operate the robot in Manual mode, such as to jog the robot or move
it to a desired point.
1 Make sure that the desired controller is connected (online) to VIP+.
2 Enter Manual mode by using either of the following methods.• Right-click the desired controller in the Controller Tree and then select "Manual
Mode" → "Manual Control".
• Select the desired controller in the Controller Tree and then click the (Manual Control) button on the toolbar.
• Select the desired controller in the Controller Tree, and then from the "Controller"
menu, select "Manual Mode" → "Manual Control".
The "Manual Mode" window appears when in Manual mode.
"Manual Mod" window
TIP
To fi nd detailed information on the "Manual Mode" window, use VIP+ help.
3 Ensure safety and then manually operate the robot from the "Manual
Mode" window.Use the [-] and [+] buttons to jog each axis separately or use the [Trace] button to
move each axis or all axes under the conditions you set.
4 When manual operation is finished, exit Manual mode.Click the [×] button on the top right of the "Manual Mode" window.
5.3 Operating the robot in Manual mode
4
1
2
3
5
6
7
8
9
5. Online robot operation 5-7
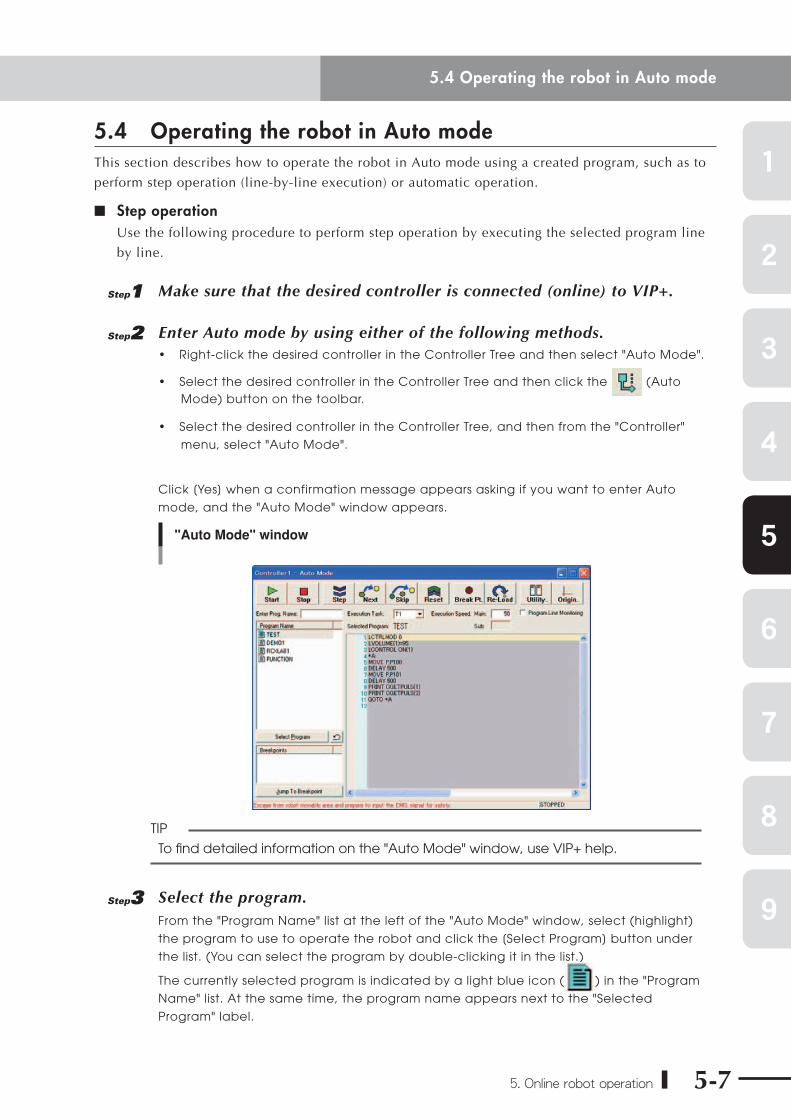
5.4 Operating the robot in Auto modeThis section describes how to operate the robot in Auto mode using a created program, such as to
perform step operation (line-by-line execution) or automatic operation.
■ Step operationUse the following procedure to perform step operation by executing the selected program line
by line.
1 Make sure that the desired controller is connected (online) to VIP+.
2 Enter Auto mode by using either of the following methods.• Right-click the desired controller in the Controller Tree and then select "Auto Mode".
• Select the desired controller in the Controller Tree and then click the (Auto Mode) button on the toolbar.
• Select the desired controller in the Controller Tree, and then from the "Controller"
menu, select "Auto Mode".
Click [Yes] when a confirmation message appears asking if you want to enter Auto
mode, and the "Auto Mode" window appears.
"Auto Mode" window
TIP
To fi nd detailed information on the "Auto Mode" window, use VIP+ help.
3 Select the program.From the "Program Name" list at the left of the "Auto Mode" window, select (highlight)
the program to use to operate the robot and click the [Select Program] button under
the list. (You can select the program by double-clicking it in the list.)
The currently selected program is indicated by a light blue icon ( ) in the "Program
Name" list. At the same time, the program name appears next to the "Selected
Program" label.
5.4 Operating the robot in Auto mode
4
1
2
3
5
6
7
8
9
5-8 5. Online robot operation
4 Specify the "Execution Task" and "Execution Speed".
5 Ensure safety and then click the [Step] button.Only the highlighted statement of the program is executed and the highlight moves to
the next statement. (If the highlighted statement calls a sub-routine, the first statement
of that sub-routine will be executed.)
TIP
Pressing the [Skip] button advances to the next statement without executing the
highlighted statement.
Pressing the [Next] button executes the highlighted statement the same way as the
[Step] button. However, if the highlighted statement calls a sub-routine, the entire
sub-routine will be executed.
6 Click the [Step] button to execute the next statement.One statement is executed each time you click the [Step] button.
If you want to return to the first statement of the program, click the [Reset] button.
■ Automatic operationAutomatic operation executes the selected program statements sequentially from the first to the
last line.
1 Enter Auto mode and select the program.Follow the same procedure as described in steps 1 to 3 in the preceding section "Step
operation".
2 Specify the "Execution Task" and "Execution Speed".
3 Ensure safety and then click the [Start] button.Automatic operation of the robot starts in accordance with the selected program. The
operation will automatically stop when the program execution is complete.
If you want to stop the automatic operation before it is complete, click the [Stop]
button. To resume the automatic operation, click the [Start] button again.
4 When the robot operation is finished, exit Auto mode.Click the [×] button on the top right of the "Auto Mode" window.
5.4 Operating the robot in Auto mode
4
1
2
3
5
6
7
8
9
5. Online robot operation 5-9
5.5 Initializing the controller dataInitialization provides a quick and easy way to clear all or selected portions of a controller's
memory.
1 Make sure that the desired controller is connected (online) to VIP+.
2 Select the "Initialize" command by using either of the following
methods.• Right-click the desired controller in the Controller Tree and then select "System
Mode" → "Initialize".
• Select the desired controller in the Controller Tree, and then from the "Controller"
menu, select "System Mode" → "Initialize.
The "Initialize" dialog box then appears.
"Initialize" dialog box
3 Select the data items you want to initialize.Check the "Initialize All" checkbox to clear all of the controller data, or uncheck the
"Initialize All" checkbox and check the data items you want to clear.
cCAUTIONIf you initialize parameter data, you will have to use the "generation" function to reload the robot confi guration data.
4 Click the [Initialize] button.The selected data is then initialized.
5 Close the "Initialize" dialog box.After initialization is complete, click the [Done] button to close the dialog box.
5.5 Initializing the controller data

5-10 5. Online robot operation
MEMO
4
1
2
3
5
6
7
8
9
6. Data backup and restore 6-1
6. Data backup and restoreVIP+ includes a handy utility for backing up controller data to any desired location. Backup data
can then be restored to the controller.
nNOTE
To back up or restore controller data, the desired controller must be connected
(online) to the PC running VIP+.
6.1 Backing up controller dataThis section describes how to back up data from a controller to any desired location. Backup files
of controller data are saved with an extension of "*.all".
1 Make sure that the desired controller is connected (online) to VIP+.
2 Execute the "Controller Backup…" command by using either of the
following methods. The "Controller Backup" dialog box then appears.
• Select "Controller Backup…" from the "Tools" menu.
• Click the (Backup Controller Data) button on the toolbar.
"Controller Backup" dialog box
3 Select the controller whose data you want to back up.From the "Device to Backup" list, click to select the controller whose data you want to
back up.
6.1 Backing up controller data
4
1
2
3
5
6
7
8
9
6-2 6. Data backup and restore
4 Select the data you want to back up.From the "Data to Backup" list, select the folders (Programs, Points, Point Comments,
Parameters, etc.) you want to back up, by checking the checkbox next to the folder
name.
The "Programs" folder can be expanded to allow selective backup of specified
programs. By default, all folders and programs are selected for backup.
5 Click the [Done] button.The "Save As" dialog box then appears as shown below.
"Save As" dialog box
6 In the "File name" box, enter a name for the backup file.
nNOTE
An extension "*.all" is automatically assigned to controller backup fi les. You do not
have to select the fi le extension in the "Save as type" box.
7 Specify the location to save the backup file.From the "Save in" drop-down list, select the location where you want to save the
backup file.
8 Click the [Save] button.Backup of the files then starts.
The progress indicator is displayed during saving of backup data.
Backup in progress
6.1 Backing up controller data
4
1
2
3
5
6
7
8
9
6. Data backup and restore 6-3
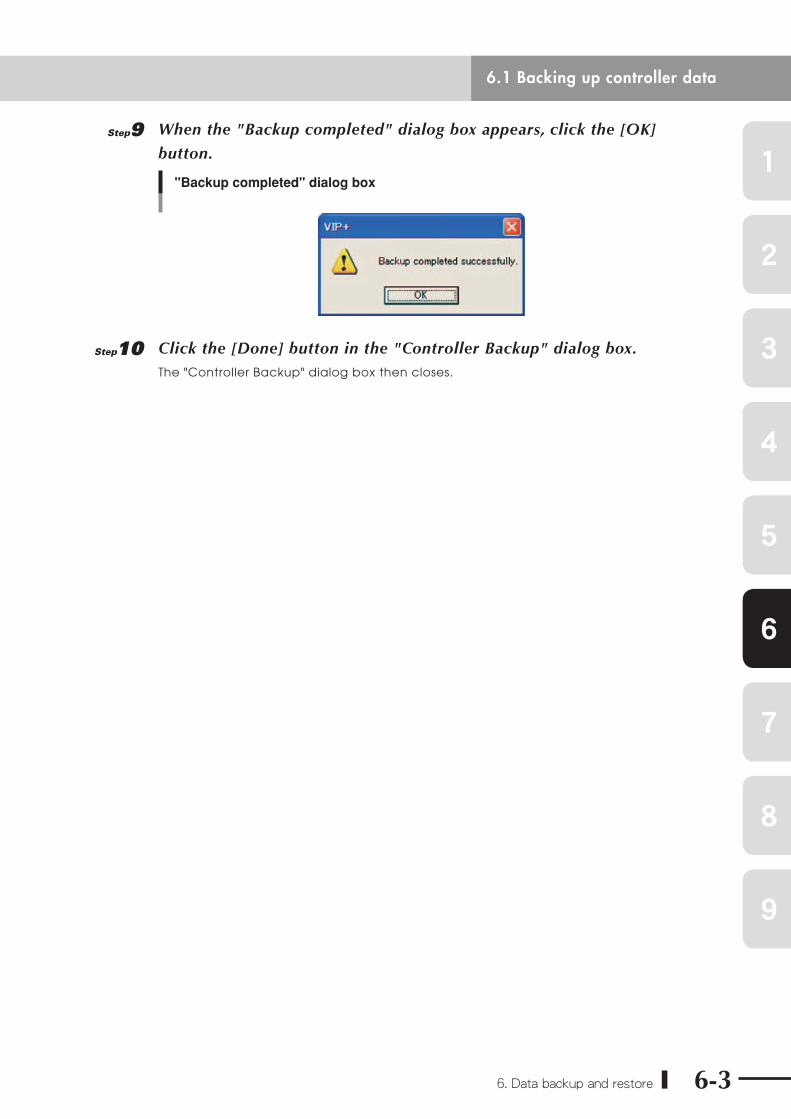
9 When the "Backup completed" dialog box appears, click the [OK]
button.
"Backup completed" dialog box
0 Click the [Done] button in the "Controller Backup" dialog box.The "Controller Backup" dialog box then closes.
6.1 Backing up controller data

4
1
2
3
5
6
7
8
9
6-4 6. Data backup and restore
6.2 Restoring controller dataBackup data can be restored to the controller as described below.
1 Make sure that the desired controller is connected (online) to VIP+.
2 Execute the "Controller Restore…" command by using either of the
following methods. The "Controller Restore" dialog box then appears.
• Select "Controller Restore…" from the "Tools" menu.
• Click the (Restore Controller Data) button on the toolbar.
"Controller Restore" dialog box
3 Display the "Open" dialog box.
Click the button in the "Controller Restore" dialog box to open the "Open" dialog box.
"Open" dialog box
6.2 Restoring controller data
4
1
2
3
5
6
7
8
9
6. Data backup and restore 6-5
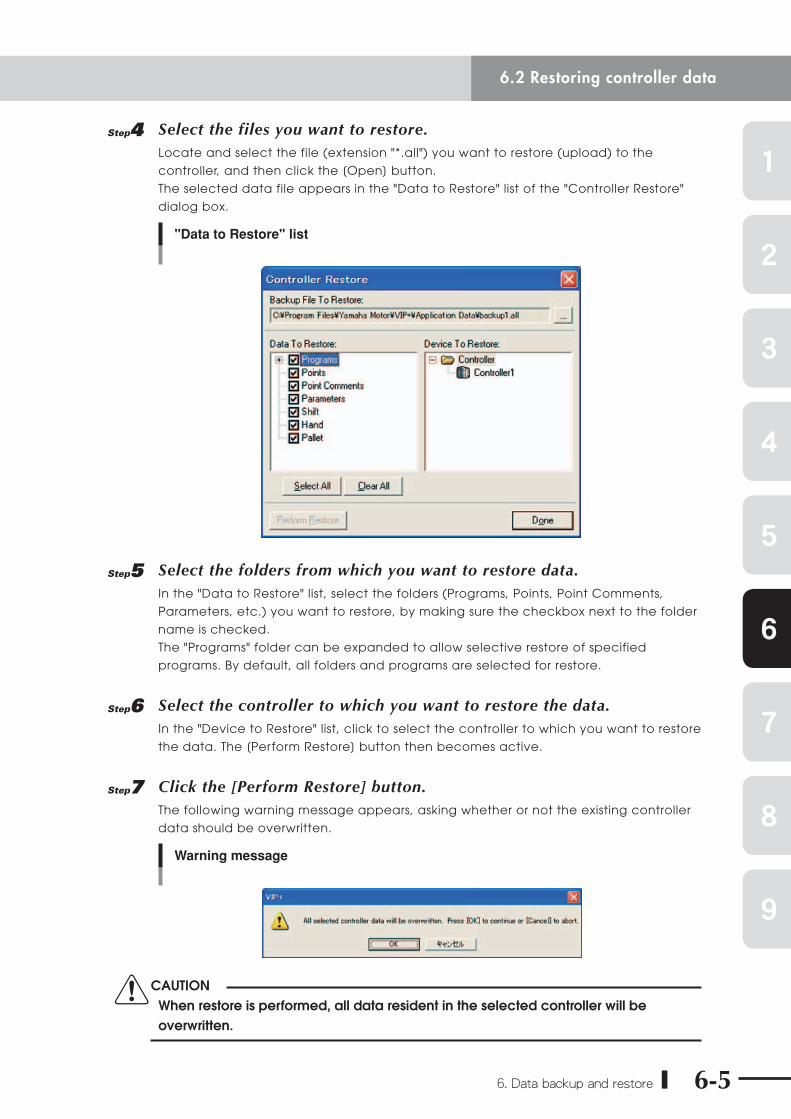
4 Select the files you want to restore.Locate and select the file (extension "*.all") you want to restore (upload) to the
controller, and then click the [Open] button.
The selected data file appears in the "Data to Restore" list of the "Controller Restore"
dialog box.
"Data to Restore" list
5 Select the folders from which you want to restore data.In the "Data to Restore" list, select the folders (Programs, Points, Point Comments,
Parameters, etc.) you want to restore, by making sure the checkbox next to the folder
name is checked.
The "Programs" folder can be expanded to allow selective restore of specified
programs. By default, all folders and programs are selected for restore.
6 Select the controller to which you want to restore the data.In the "Device to Restore" list, click to select the controller to which you want to restore
the data. The [Perform Restore] button then becomes active.
7 Click the [Perform Restore] button.The following warning message appears, asking whether or not the existing controller
data should be overwritten.
Warning message
cCAUTIONWhen restore is performed, all data resident in the selected controller will be overwritten.
6.2 Restoring controller data
4
1
2
3
5
6
7
8
9
6-6 6. Data backup and restore
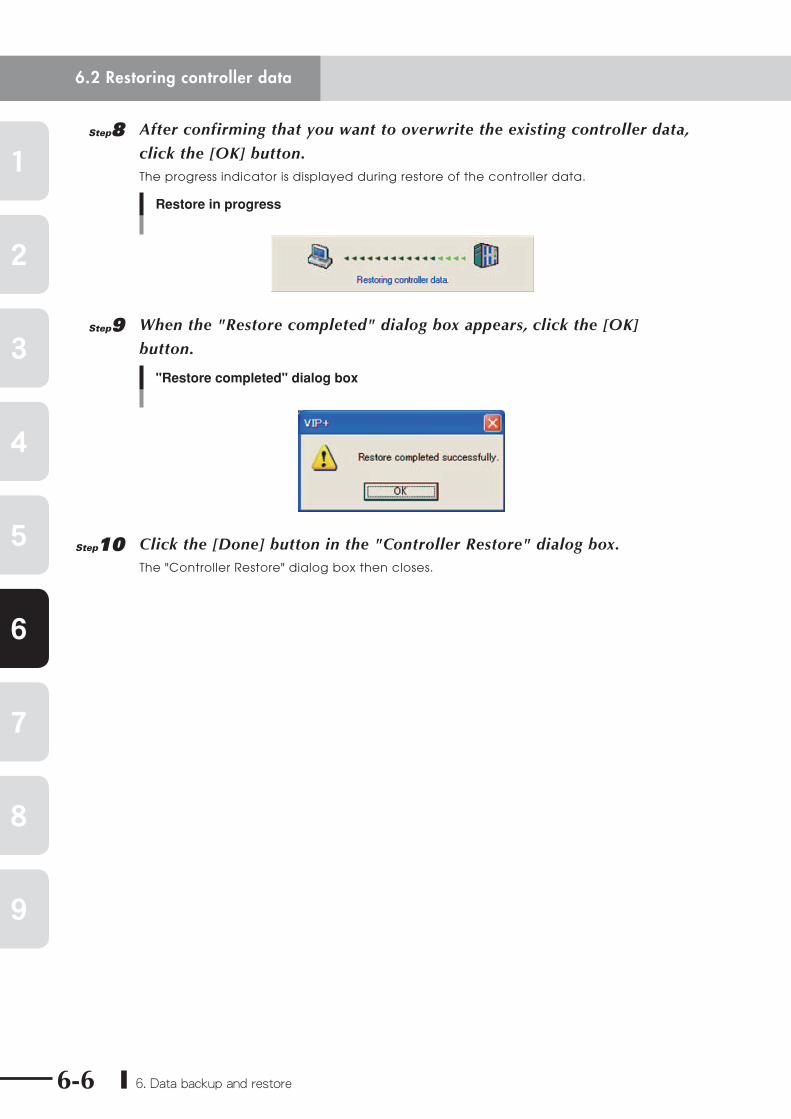
8 After confirming that you want to overwrite the existing controller data,
click the [OK] button.The progress indicator is displayed during restore of the controller data.
Restore in progress
9 When the "Restore completed" dialog box appears, click the [OK]
button.
"Restore completed" dialog box
0 Click the [Done] button in the "Controller Restore" dialog box.The "Controller Restore" dialog box then closes.
6.2 Restoring controller data
4
1
2
3
5
6
7
8
9
6. Data backup and restore 6-7
6.3 Transmitting controller data using drag & drop
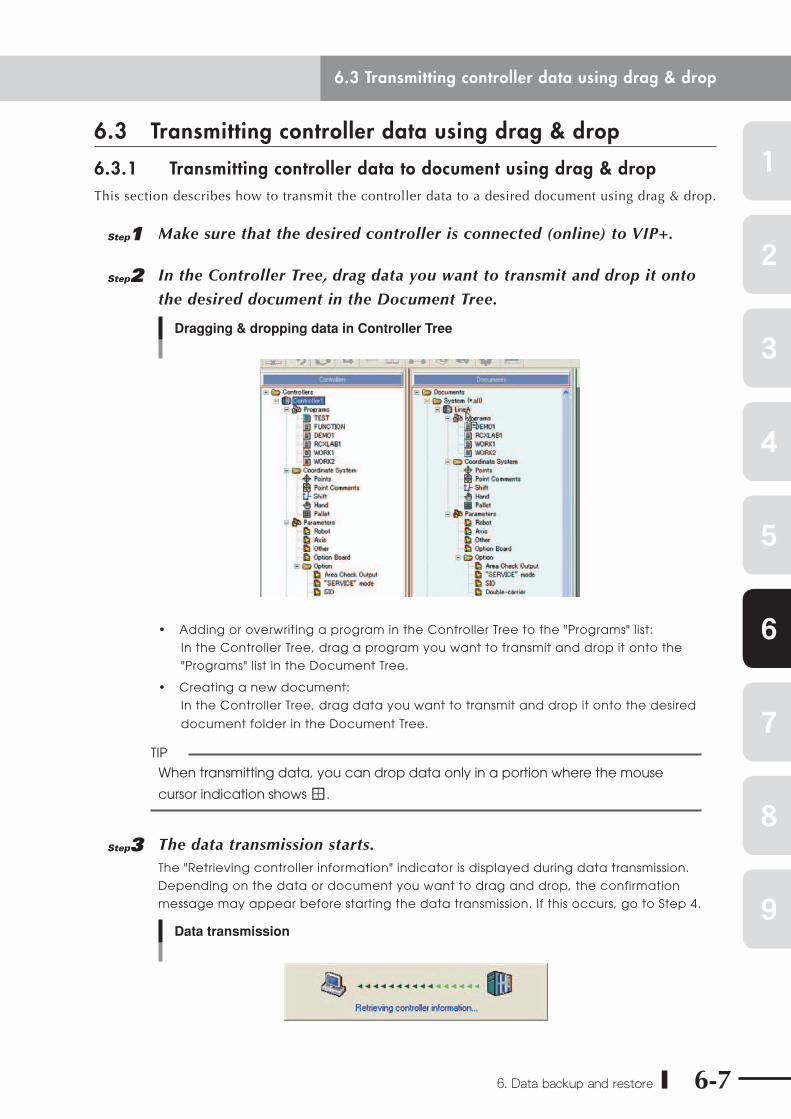
6.3.1 Transmitting controller data to document using drag & dropThis section describes how to transmit the controller data to a desired document using drag & drop.
1 Make sure that the desired controller is connected (online) to VIP+.
2 In the Controller Tree, drag data you want to transmit and drop it onto
the desired document in the Document Tree.
Dragging & dropping data in Controller Tree
• Adding or overwriting a program in the Controller Tree to the "Programs" list:
In the Controller Tree, drag a program you want to transmit and drop it onto the
"Programs" list in the Document Tree.
• Creating a new document:
In the Controller Tree, drag data you want to transmit and drop it onto the desired
document folder in the Document Tree.
TIP
When transmitting data, you can drop data only in a portion where the mouse
cursor indication shows □+ .
3 The data transmission starts.The "Retrieving controller information" indicator is displayed during data transmission.
Depending on the data or document you want to drag and drop, the confirmation
message may appear before starting the data transmission. If this occurs, go to Step 4.
Data transmission
6.3 Transmitting controller data using drag & drop
4
1
2
3
5
6
7
8
9
6-8 6. Data backup and restore
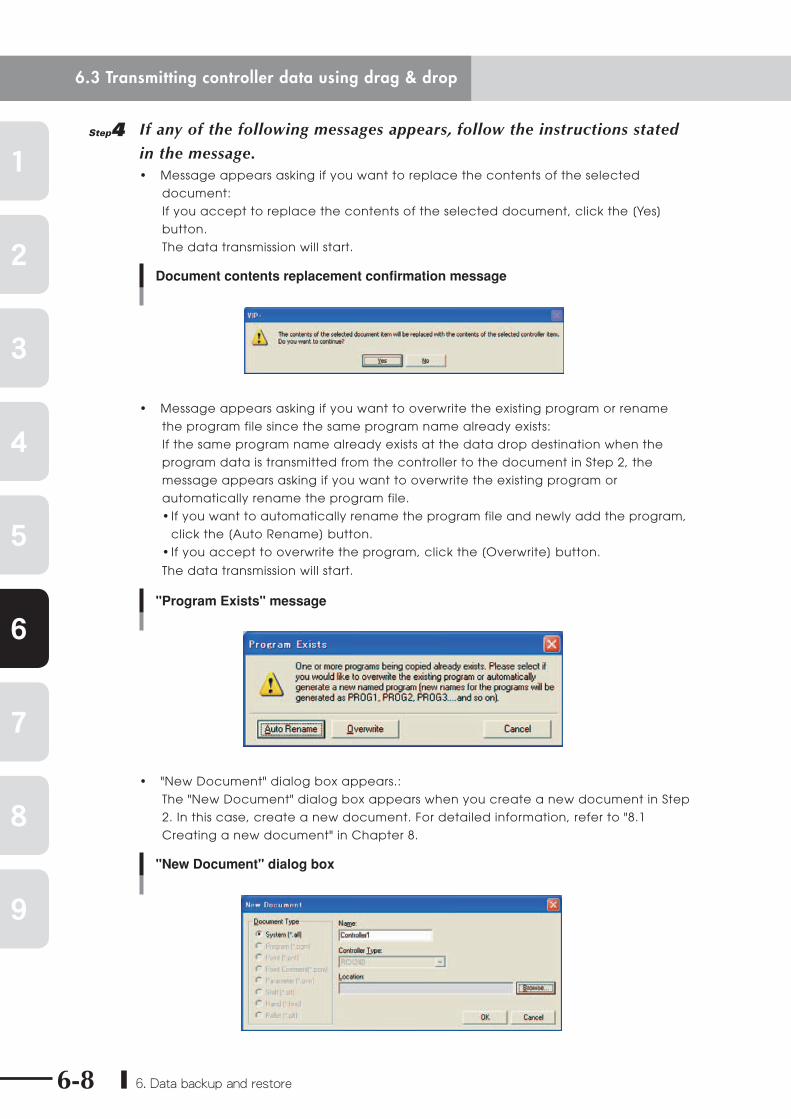
4 If any of the following messages appears, follow the instructions stated
in the message.• Message appears asking if you want to replace the contents of the selected
document:
If you accept to replace the contents of the selected document, click the [Yes]
button.
The data transmission will start.
Document contents replacement confirmation message
• Message appears asking if you want to overwrite the existing program or rename
the program file since the same program name already exists:
If the same program name already exists at the data drop destination when the
program data is transmitted from the controller to the document in Step 2, the
message appears asking if you want to overwrite the existing program or
automatically rename the program file.
• If you want to automatically rename the program file and newly add the program,
click the [Auto Rename] button.
• If you accept to overwrite the program, click the [Overwrite] button.
The data transmission will start.
"Program Exists" message
• "New Document" dialog box appears.:
The "New Document" dialog box appears when you create a new document in Step
2. In this case, create a new document. For detailed information, refer to "8.1
Creating a new document" in Chapter 8.
"New Document" dialog box
6.3 Transmitting controller data using drag & drop
4
1
2
3
5
6
7
8
9
6. Data backup and restore 6-9
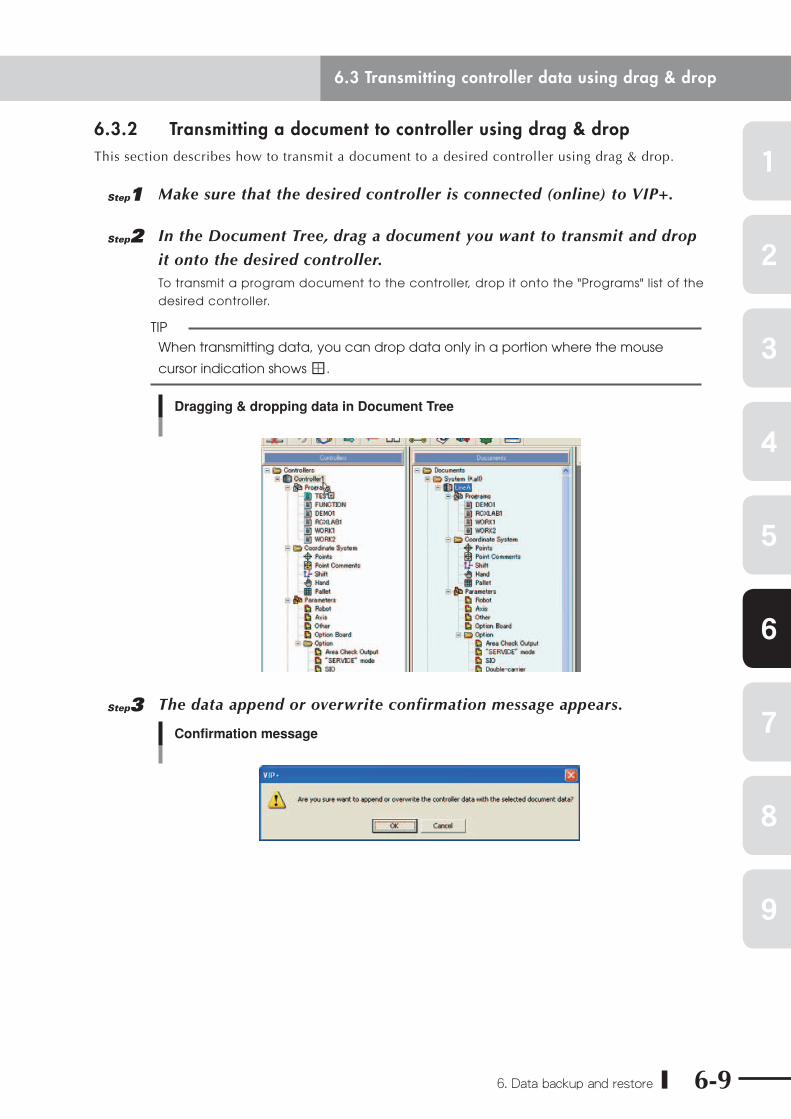
6.3.2 Transmitting a document to controller using drag & dropThis section describes how to transmit a document to a desired controller using drag & drop.
1 Make sure that the desired controller is connected (online) to VIP+.
2 In the Document Tree, drag a document you want to transmit and drop
it onto the desired controller.To transmit a program document to the controller, drop it onto the "Programs" list of the
desired controller.
TIP
When transmitting data, you can drop data only in a portion where the mouse
cursor indication shows □+ .
Dragging & dropping data in Document Tree
3 The data append or overwrite confirmation message appears.
Confirmation message
6.3 Transmitting controller data using drag & drop
4
1
2
3
5
6
7
8
9
6-10 6. Data backup and restore
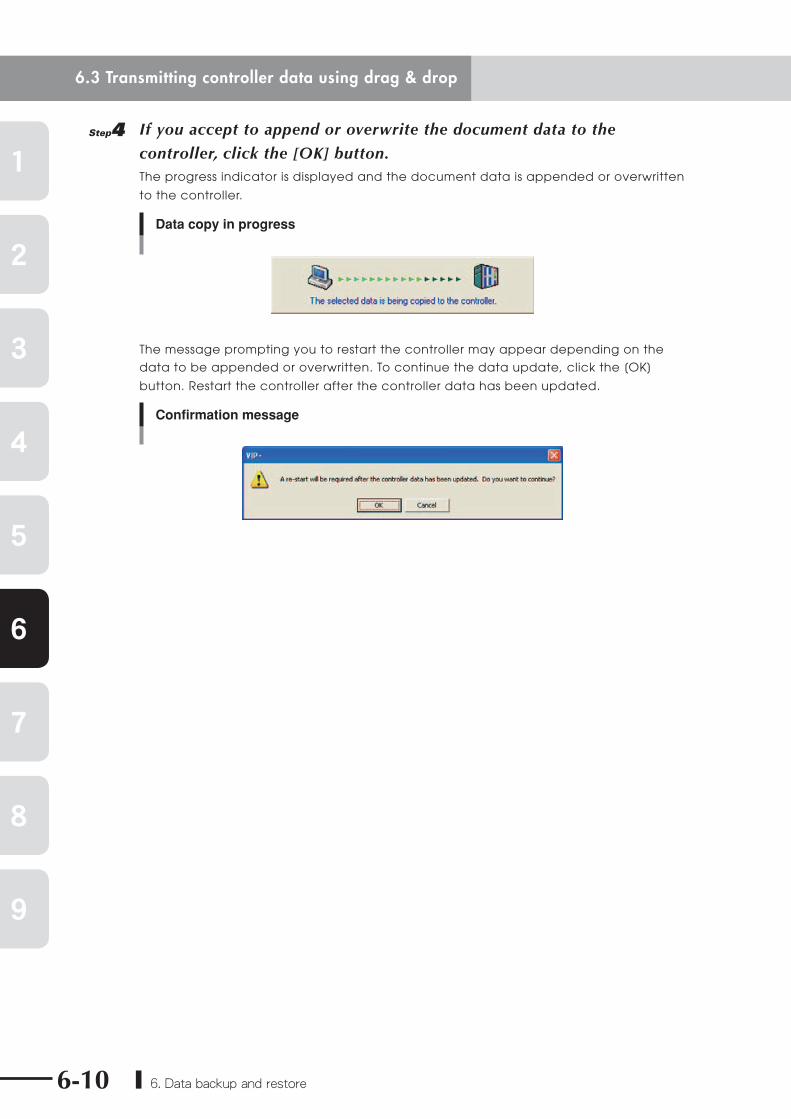
4 If you accept to append or overwrite the document data to the
controller, click the [OK] button.The progress indicator is displayed and the document data is appended or overwritten
to the controller.
Data copy in progress
The message prompting you to restart the controller may appear depending on the
data to be appended or overwritten. To continue the data update, click the [OK]
button. Restart the controller after the controller data has been updated.
Confirmation message
6.3 Transmitting controller data using drag & drop
7. Editing online controller data 7-1
4
1
2
3
5
6
7
8
9
7. Editing online controller dataVIP+ allows you to directly edit programs, point data, parameters, shift data, hand data, and pallet
data stored in robot controllers. This section describes the following online editing tasks.
7.1
7.2
7.3
7.4
7.5
7.6
7.7
Editing programs
Editing point data
Editing parameters
Editing Hand data
Editing Pallet definition data
Editing Shift data
Creating a new program
nNOTE
To edit online controller data, VIP+ must be connected (online) to the desired
controller.
7-2 7. Editing online controller data
4
1
2
3
5
6
7
8
9
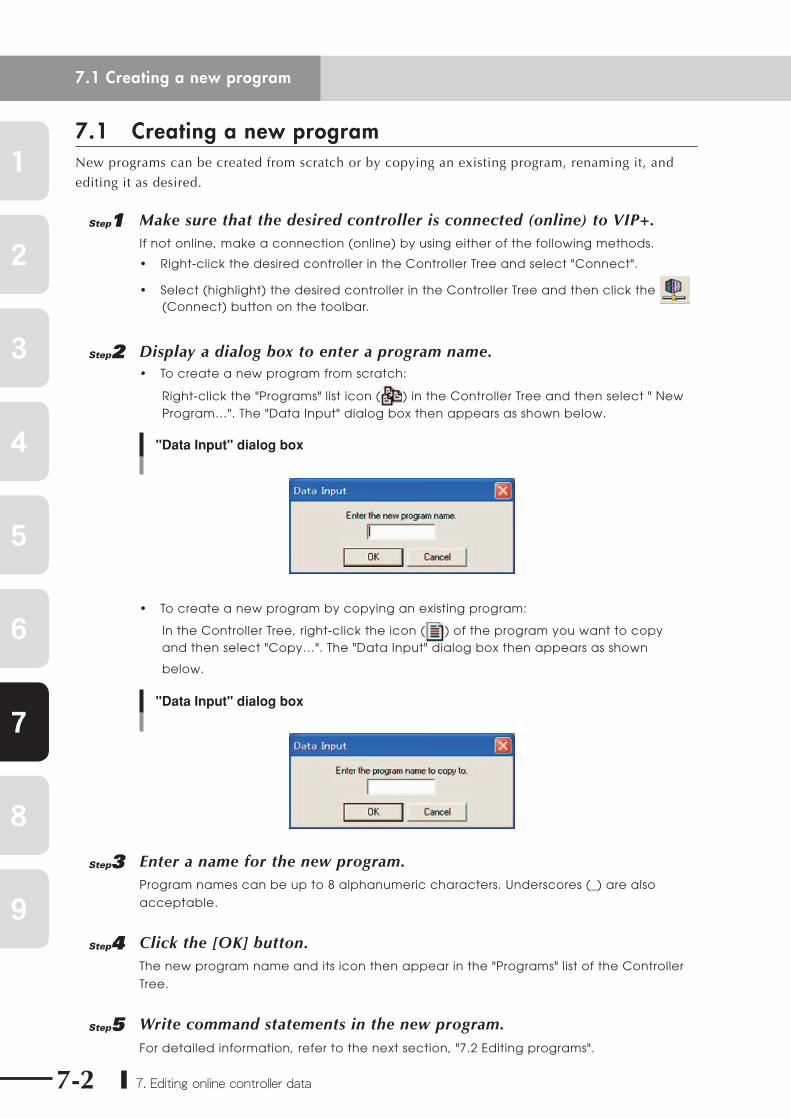
7.1 Creating a new programNew programs can be created from scratch or by copying an existing program, renaming it, and
editing it as desired.
1 Make sure that the desired controller is connected (online) to VIP+.If not online, make a connection (online) by using either of the following methods.
• Right-click the desired controller in the Controller Tree and select "Connect".
• Select (highlight) the desired controller in the Controller Tree and then click the (Connect) button on the toolbar.
2 Display a dialog box to enter a program name.• To create a new program from scratch:
Right-click the "Programs" list icon ( ) in the Controller Tree and then select " New Program…". The "Data Input" dialog box then appears as shown below.
"Data Input" dialog box
• To create a new program by copying an existing program:
In the Controller Tree, right-click the icon ( ) of the program you want to copy and then select "Copy…". The "Data Input" dialog box then appears as shown
below.
"Data Input" dialog box
3 Enter a name for the new program.Program names can be up to 8 alphanumeric characters. Underscores (_) are also
acceptable.
4 Click the [OK] button.The new program name and its icon then appear in the "Programs" list of the Controller
Tree.
5 Write command statements in the new program.For detailed information, refer to the next section, "7.2 Editing programs".
7.1 Creating a new program
7. Editing online controller data 7-3
4
1
2
3
5
6
7
8
9
7.2 Editing programsVIP+ has a "Program Editor" that allows you to easily edit programs.
1 In the Controller Tree, click to highlight the program you want to edit.
2 Open the "Program Editor" window by using either of the following
methods.
• Right-click the Program icon ( ) of the program you want to edit and select "Edit…" from the pop-up menu.
• Double-click the Program icon ( ) of the program you want to edit
• From the "Item" menu, select "Edit…".
• Click the (Edit Program) button on the toolbar.
"Program Editor" window
When the "Program Editor" window has opened, the program editor toolbar becomes
active.
For detailed information on the program editor toolbar, refer to "Editing Programs" in
VIP+ help.
Program editor toolbar
3 Edit the program.Using the program editor toolbar, insert command statements in the "Program Editor"
window. You can check syntax errors and delete blank lines as needed.
4 After editing the program, save it in the controller.
Click the (Save) button on the program editor toolbar to save the program.
7.2 Editing programs
7-4 7. Editing online controller data
4
1
2
3
5
6
7
8
9
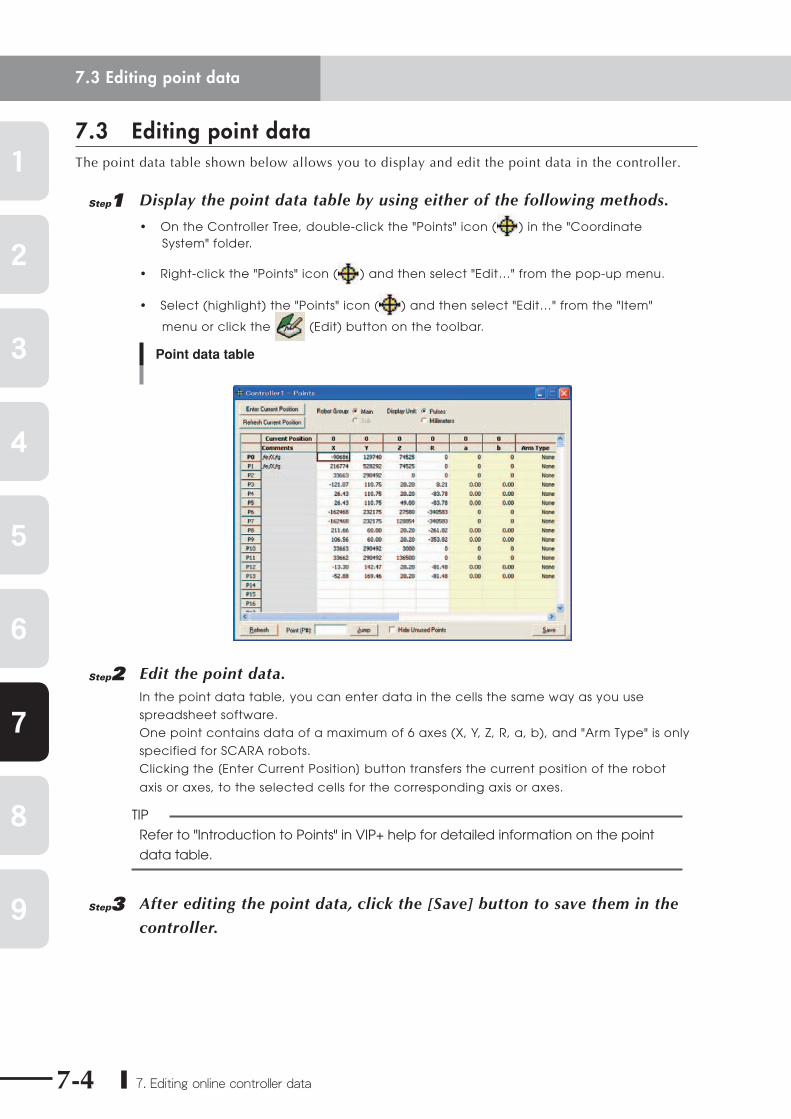
7.3 Editing point dataThe point data table shown below allows you to display and edit the point data in the controller.
1 Display the point data table by using either of the following methods.
• On the Controller Tree, double-click the "Points" icon ( ) in the "Coordinate System" folder.
• Right-click the "Points" icon ( ) and then select "Edit…" from the pop-up menu.
• Select (highlight) the "Points" icon ( ) and then select "Edit…" from the "Item"
menu or click the (Edit) button on the toolbar.
Point data table
2 Edit the point data.In the point data table, you can enter data in the cells the same way as you use
spreadsheet software.
One point contains data of a maximum of 6 axes (X, Y, Z, R, a, b), and "Arm Type" is only
specified for SCARA robots.
Clicking the [Enter Current Position] button transfers the current position of the robot
axis or axes, to the selected cells for the corresponding axis or axes.
TIP
Refer to "Introduction to Points" in VIP+ help for detailed information on the point
data table.
3 After editing the point data, click the [Save] button to save them in the
controller.
7.3 Editing point data

7. Editing online controller data 7-5
4
1
2
3
5
6
7
8
9
7.4 Editing parametersParameters are grouped into "robot parameters", "axis parameters", "other parameters", and
"option parameters". The edit window for each parameter group allows you to display and edit the
parameters.
1 Display the parameter edit window by using either of the following
methods.
• On the Controller Tree, double-click the desired parameter icon ( ) in the "Parameters" folder.
• Right-click the desired parameter icon ( ) and then select "Edit…" from the pop-up menu.
• Select (highlight) the parameter icon ( ) and then select "Edit…" from the "Item"
menu or click the (Edit) button on the toolbar.
"Robot Parameters" edit window
TIP
The above shows the "Robot Parameters" edit window as an example. To fi nd
detailed information on the edit window for each parameter group, refer to "Robot
Parameters", "Axis Parameters", and "Other Parameters" in VIP+ help.
2 Edit the parameters.In the parameter edit window, you can enter parameters in the cells the same way as
you use spreadsheet software. If the cell requires the entry of a particular setting (text
or character string), double-click the cell and select the desired setting from the drop-
down list.
3 After editing the parameters, click the [Save] button to save them in the
controller.
7.4 Editing parameters
7-6 7. Editing online controller data
4
1
2
3
5
6
7
8
9
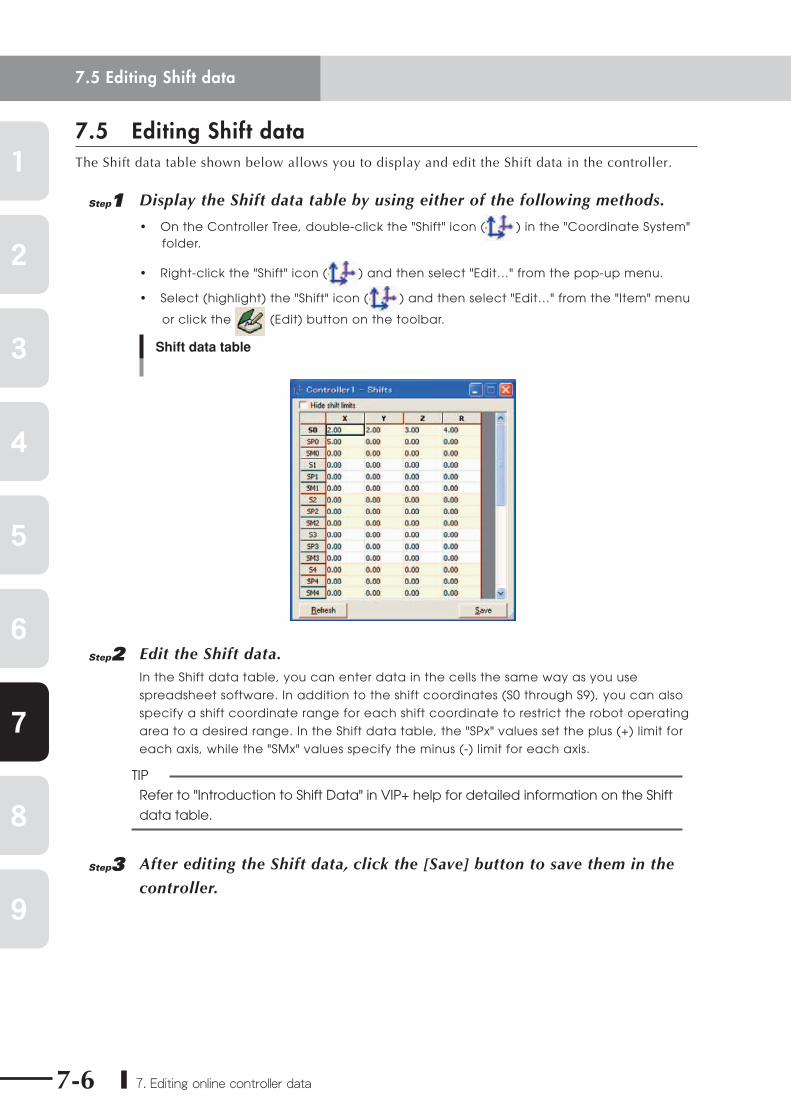
7.5 Editing Shift dataThe Shift data table shown below allows you to display and edit the Shift data in the controller.
1 Display the Shift data table by using either of the following methods.
• On the Controller Tree, double-click the "Shift" icon ( ) in the "Coordinate System" folder.
• Right-click the "Shift" icon ( ) and then select "Edit…" from the pop-up menu.
• Select (highlight) the "Shift" icon ( ) and then select "Edit…" from the "Item" menu
or click the (Edit) button on the toolbar.
Shift data table
2 Edit the Shift data.In the Shift data table, you can enter data in the cells the same way as you use
spreadsheet software. In addition to the shift coordinates (S0 through S9), you can also
specify a shift coordinate range for each shift coordinate to restrict the robot operating
area to a desired range. In the Shift data table, the "SPx" values set the plus (+) limit for
each axis, while the "SMx" values specify the minus (-) limit for each axis.
TIP
Refer to "Introduction to Shift Data" in VIP+ help for detailed information on the Shift
data table.
3 After editing the Shift data, click the [Save] button to save them in the
controller.
7.5 Editing Shift data
7. Editing online controller data 7-7
4
1
2
3
5
6
7
8
9
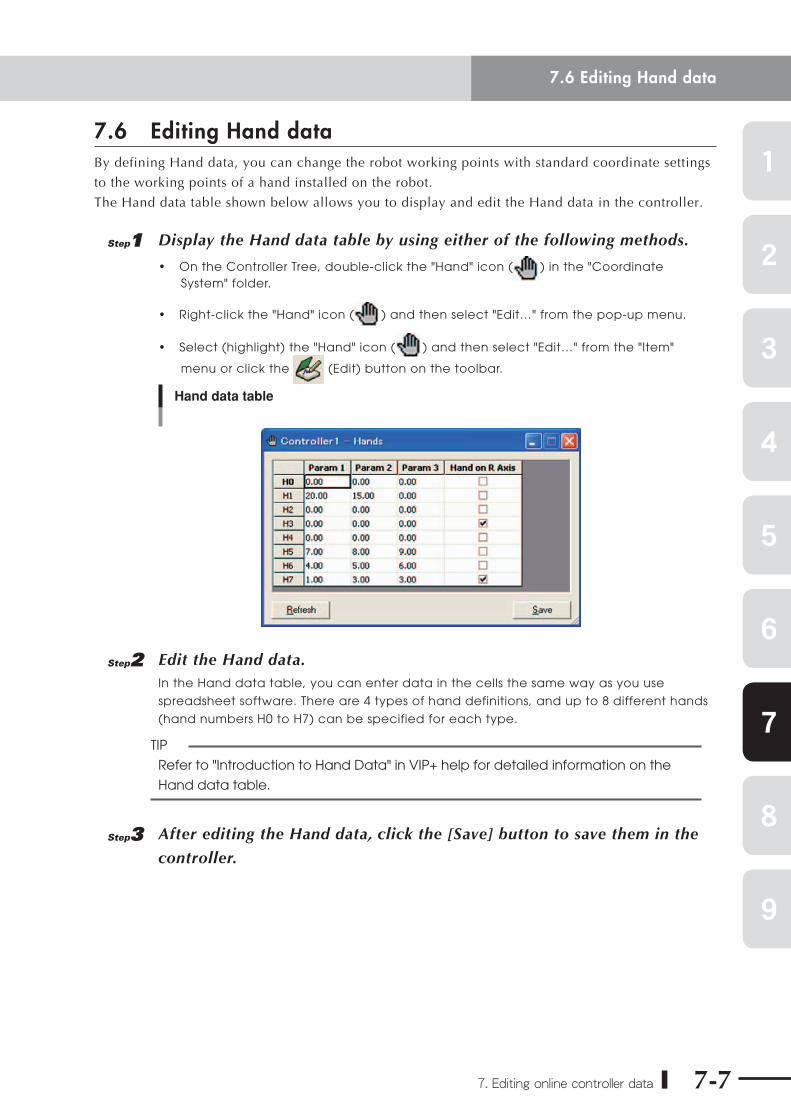
7.6 Editing Hand dataBy defining Hand data, you can change the robot working points with standard coordinate settings
to the working points of a hand installed on the robot.
The Hand data table shown below allows you to display and edit the Hand data in the controller.
1 Display the Hand data table by using either of the following methods.
• On the Controller Tree, double-click the "Hand" icon ( ) in the "Coordinate System" folder.
• Right-click the "Hand" icon ( ) and then select "Edit…" from the pop-up menu.
• Select (highlight) the "Hand" icon ( ) and then select "Edit…" from the "Item"
menu or click the (Edit) button on the toolbar.
Hand data table
2 Edit the Hand data.In the Hand data table, you can enter data in the cells the same way as you use
spreadsheet software. There are 4 types of hand definitions, and up to 8 different hands
(hand numbers H0 to H7) can be specified for each type.
TIP
Refer to "Introduction to Hand Data" in VIP+ help for detailed information on the
Hand data table.
3 After editing the Hand data, click the [Save] button to save them in the
controller.
7.6 Editing Hand data

7-8 7. Editing online controller data
4
1
2
3
5
6
7
8
9
7.7 Editing Pallet definition dataThe Pallet data table shown below allows you to display and edit the Pallet data in the controller.
1 Display the Pallet data table by using either of the following methods.
• On the Controller Tree, double-click the "Pallet" icon ( ) in the "Coordinate System" folder.
• Right-click the "Pallet" icon ( ) and then select "Edit…" from the pop-up menu.
• Select (highlight) the "Pallet" icon ( ) and then select "Edit…" from the "Item"
menu or click the (Edit) button on the toolbar.
Pallet data table
2 Edit the Pallet data.In the Pallet data table, you can enter data in the cells the same way as you use
spreadsheet software.
Pallet data can easily be created or transferred to another pallet by copying entire
pallet definitions.
TIP
Refer to "Introduction to Pallet Data" in VIP+ help for detailed information on the
Pallet data table.
3 After editing the Pallet data, click the [Save] button to save them in the
controller.
7.7 Editing Pallet definition data
4
1
2
3
5
6
7
8
9
8. Editing offline documents 8-1
8. Editing offline documentsVIP+ allows you to edit offline documents such as programs, point data, parameters, shift data,
hand data, and pallet data which are displayed in the Document Tree of the VIP+ main window.
8.1
8.2
8.3
8.4
8.5
Opening documents
Editing a document
Deleting a document
Document properties
Creating a new document

4
1
2
3
5
6
7
8
9
8-2 8. Editing offline documents
8.1 Creating a new document
8.1 Creating a new documentThis section describes how to create a new offline document such as a program or point data.
nNOTE
Creating a new offl ine document means that you create and save a data fi le
associated with that document and then add the document icon representing that
fi le to the Document Tree.
TIP
By dragging a program or point data icon displayed in the Controller Tree into the
desired location in the Document Tree, you can easily create a document for offl ine
editing and its associated data fi le.
1 Display the "New Document" dialog box by using either of the following
methods. • From the "File" menu, select "New Document" and then the desired document type
(System, Program, Point, etc.) you want to create.
• In the Document Tree, right-click the "Documents" folder and then select "New
Document" → "document type (System, Program, Point, etc.)" you want to create.
• Click the (New Document) button on the toolbar.
"New Document" dialog box
2 Select the document type.When you selected a document type in step 1 using a method other than the toolbar
button, only the selected document type is enabled.
3 Enter a name for the new document. Document names can be any combination of up to 25 characters.
4 Select the controller type.
5 Click the [Browse] button to specify the location to save the document.The "Save As" dialog box then appears. Specify the location to save the document.
You do not have to select the file extension in the "Save as type" box, since the file
extension will be assigned automatically based on the selected document type.
4
1
2
3
5
6
7
8
9
8. Editing offline documents 8-3
8.1 Creating a new document
6 Click the [Save] button in the "Save As" dialog box.The file associated with the new document is then saved
7 Click the [OK] button in the "New Document" dialog box.The new document now appears in the Document Tree, in the appropriate subfolder.
nNOTE
If the new document is a "System (*.all)" document or a "Program (*.pgm)", a dialog
box appears asking you to enter a name for the new program. Enter the program
name.
4
1
2
3
5
6
7
8
9
8-4 8. Editing offline documents
8.2 Opening documents
8.2 Opening documentsThis section describes how to open an offline document such as a program or point data.
nNOTE
Opening a document means that you specify the fi le where the associated data is
stored, and add the document icon representing that fi le to the Document Tree. At
this point, therefore, you need to assign a name to the document as you want it to
appear in the Document Tree.
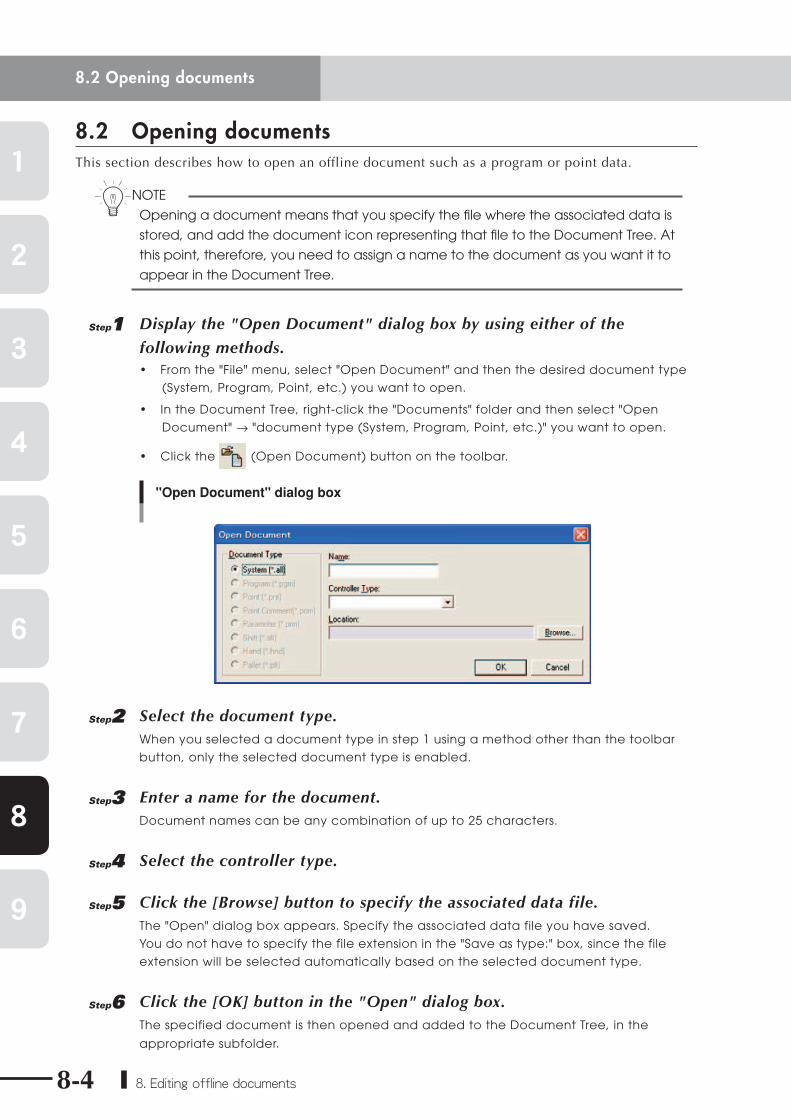
1 Display the "Open Document" dialog box by using either of the
following methods. • From the "File" menu, select "Open Document" and then the desired document type
(System, Program, Point, etc.) you want to open.
• In the Document Tree, right-click the "Documents" folder and then select "Open
Document" → "document type (System, Program, Point, etc.)" you want to open.
• Click the (Open Document) button on the toolbar.
"Open Document" dialog box
2 Select the document type.When you selected a document type in step 1 using a method other than the toolbar
button, only the selected document type is enabled.
3 Enter a name for the document. Document names can be any combination of up to 25 characters.
4 Select the controller type.
5 Click the [Browse] button to specify the associated data file.The "Open" dialog box appears. Specify the associated data file you have saved.
You do not have to specify the file extension in the "Save as type:" box, since the file
extension will be selected automatically based on the selected document type.
6 Click the [OK] button in the "Open" dialog box.The specified document is then opened and added to the Document Tree, in the
appropriate subfolder.
4
1
2
3
5
6
7
8
9
8. Editing offline documents 8-5
8.3 Editing a documentYou can edit offline documents such as programs and point data in the Document Tree.
8.3.1 Editing a programUse the "Program Editor" when editing an offline document.
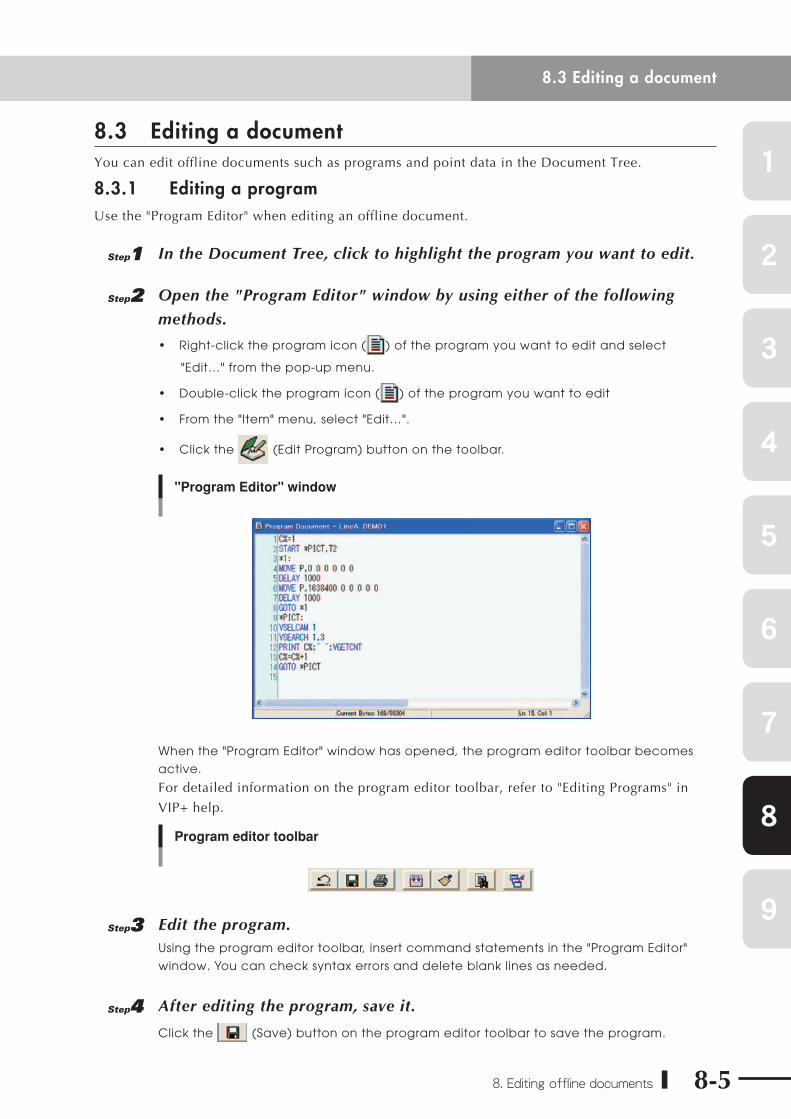
1 In the Document Tree, click to highlight the program you want to edit.
2 Open the "Program Editor" window by using either of the following
methods.
• Right-click the program icon ( ) of the program you want to edit and select
"Edit…" from the pop-up menu.
• Double-click the program icon ( ) of the program you want to edit
• From the "Item" menu, select "Edit…".
• Click the (Edit Program) button on the toolbar.
"Program Editor" window
When the "Program Editor" window has opened, the program editor toolbar becomes
active.
For detailed information on the program editor toolbar, refer to "Editing Programs" in
VIP+ help.
Program editor toolbar
3 Edit the program.Using the program editor toolbar, insert command statements in the "Program Editor"
window. You can check syntax errors and delete blank lines as needed.
4 After editing the program, save it.
Click the (Save) button on the program editor toolbar to save the program.
8.3 Editing a document
4
1
2
3
5
6
7
8
9
8-6 8. Editing offline documents
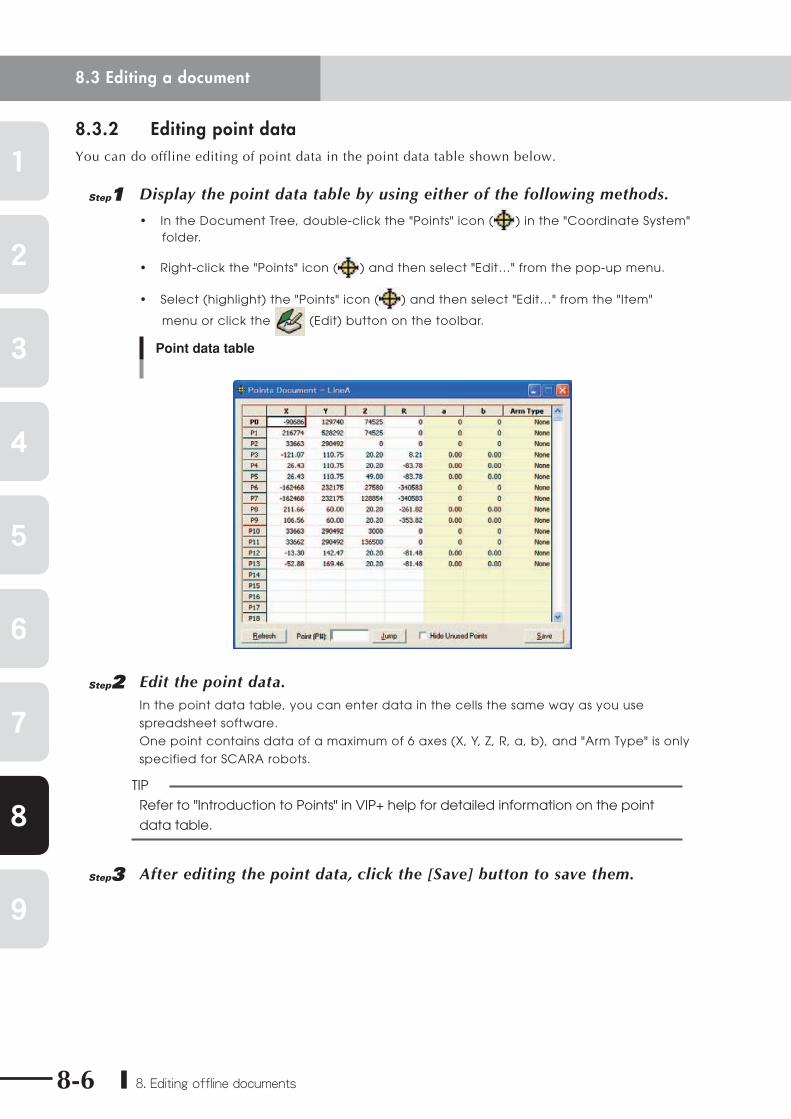
8.3.2 Editing point dataYou can do offline editing of point data in the point data table shown below.
1 Display the point data table by using either of the following methods.
• In the Document Tree, double-click the "Points" icon ( ) in the "Coordinate System" folder.
• Right-click the "Points" icon ( ) and then select "Edit…" from the pop-up menu.
• Select (highlight) the "Points" icon ( ) and then select "Edit…" from the "Item"
menu or click the (Edit) button on the toolbar.
Point data table
2 Edit the point data.In the point data table, you can enter data in the cells the same way as you use
spreadsheet software.
One point contains data of a maximum of 6 axes (X, Y, Z, R, a, b), and "Arm Type" is only
specified for SCARA robots.
TIP
Refer to "Introduction to Points" in VIP+ help for detailed information on the point
data table.
3 After editing the point data, click the [Save] button to save them.
8.3 Editing a document

4
1
2
3
5
6
7
8
9
8. Editing offline documents 8-7
8.3.3 Editing parametersParameters are grouped into "robot parameters", "axis parameters", "other parameters", and "option
parameters". You can do offline editing in the edit window for each parameter group.
1 Display the parameter edit window by using either of the following
methods.
• In the Document Tree, double-click the desired parameter icon ( ) in the "Parameters" folder.
• Right-click the desired parameter icon ( ) and then select "Edit…" from the pop-up menu.
• Select (highlight) the parameter icon ( ) and then select "Edit…" from the "Item"
menu or click the (Edit) button on the toolbar.
"Robot Parameters" edit window
TIP
The above shows the "Robot Parameters" edit window as an example. To fi nd
detailed information on the edit window for each parameter group, refer to "Robot
Parameters", "Axis Parameters", and "Other Parameters" in VIP+ help.
2 Edit the parameters.In the parameter edit window, you can enter parameters in the cells the same way as
you use spreadsheet software. If the cell requires the entry of a particular setting (text
or character string), double-click the cell and select the desired setting from the drop-
down list.
3 After editing the parameters, click the [Save] button to save them.
8.3 Editing a document
4
1
2
3
5
6
7
8
9
8-8 8. Editing offline documents
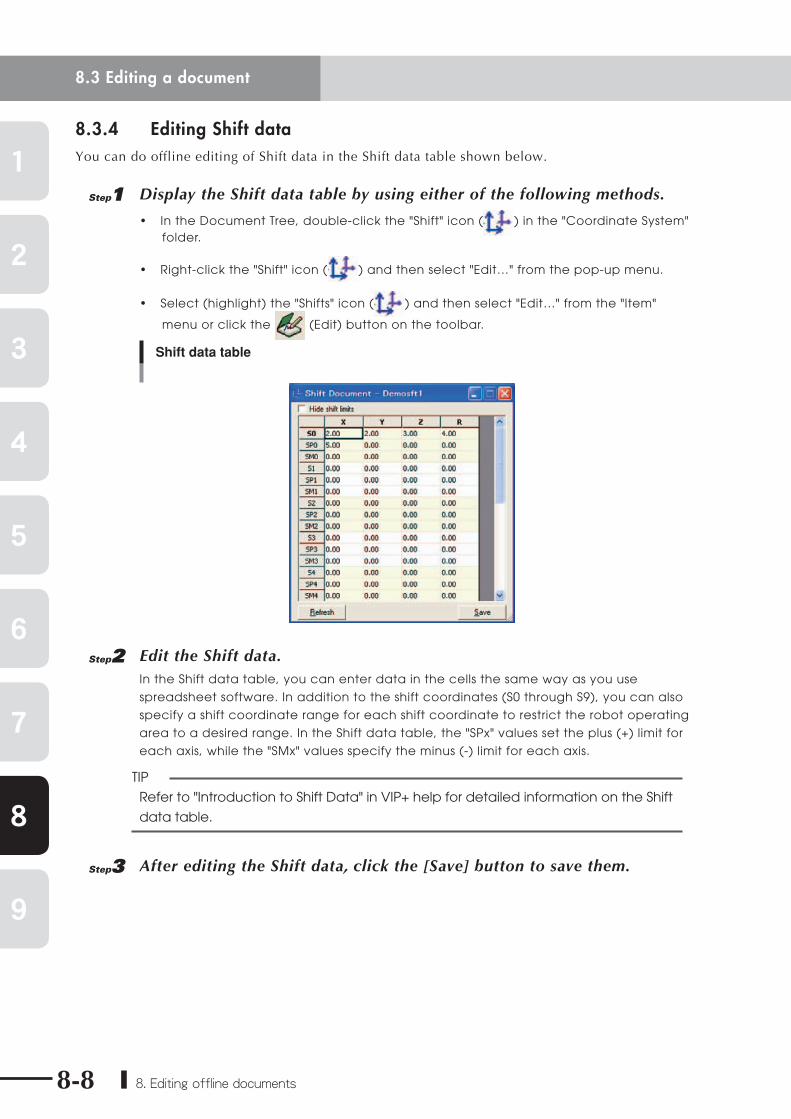
8.3.4 Editing Shift dataYou can do offline editing of Shift data in the Shift data table shown below.
1 Display the Shift data table by using either of the following methods.
• In the Document Tree, double-click the "Shift" icon ( ) in the "Coordinate System" folder.
• Right-click the "Shift" icon ( ) and then select "Edit…" from the pop-up menu.
• Select (highlight) the "Shifts" icon ( ) and then select "Edit…" from the "Item"
menu or click the (Edit) button on the toolbar.
Shift data table
2 Edit the Shift data.In the Shift data table, you can enter data in the cells the same way as you use
spreadsheet software. In addition to the shift coordinates (S0 through S9), you can also
specify a shift coordinate range for each shift coordinate to restrict the robot operating
area to a desired range. In the Shift data table, the "SPx" values set the plus (+) limit for
each axis, while the "SMx" values specify the minus (-) limit for each axis.
TIP
Refer to "Introduction to Shift Data" in VIP+ help for detailed information on the Shift
data table.
3 After editing the Shift data, click the [Save] button to save them.
8.3 Editing a document
4
1
2
3
5
6
7
8
9
8. Editing offline documents 8-9
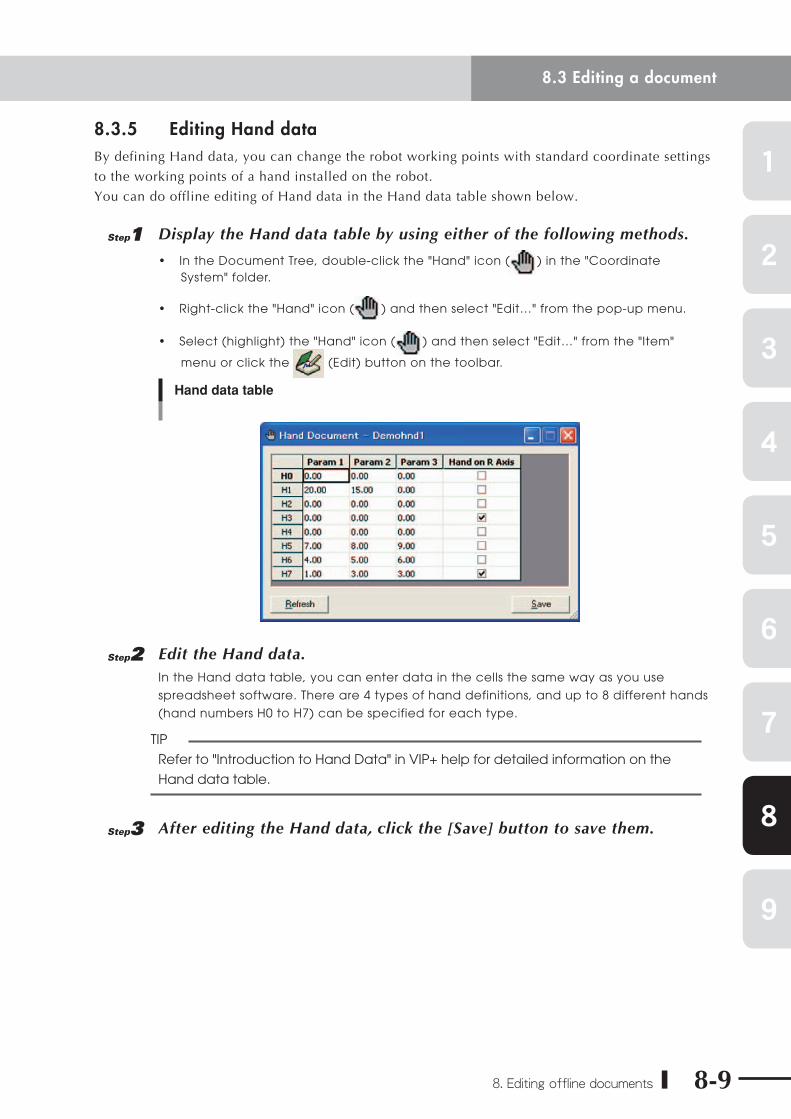
8.3.5 Editing Hand dataBy defining Hand data, you can change the robot working points with standard coordinate settings
to the working points of a hand installed on the robot.
You can do offline editing of Hand data in the Hand data table shown below.
1 Display the Hand data table by using either of the following methods.
• In the Document Tree, double-click the "Hand" icon ( ) in the "Coordinate System" folder.
• Right-click the "Hand" icon ( ) and then select "Edit…" from the pop-up menu.
• Select (highlight) the "Hand" icon ( ) and then select "Edit…" from the "Item"
menu or click the (Edit) button on the toolbar.
Hand data table
2 Edit the Hand data.In the Hand data table, you can enter data in the cells the same way as you use
spreadsheet software. There are 4 types of hand definitions, and up to 8 different hands
(hand numbers H0 to H7) can be specified for each type.
TIP
Refer to "Introduction to Hand Data" in VIP+ help for detailed information on the
Hand data table.
3 After editing the Hand data, click the [Save] button to save them.
8.3 Editing a document
4
1
2
3
5
6
7
8
9
8-10 8. Editing offline documents
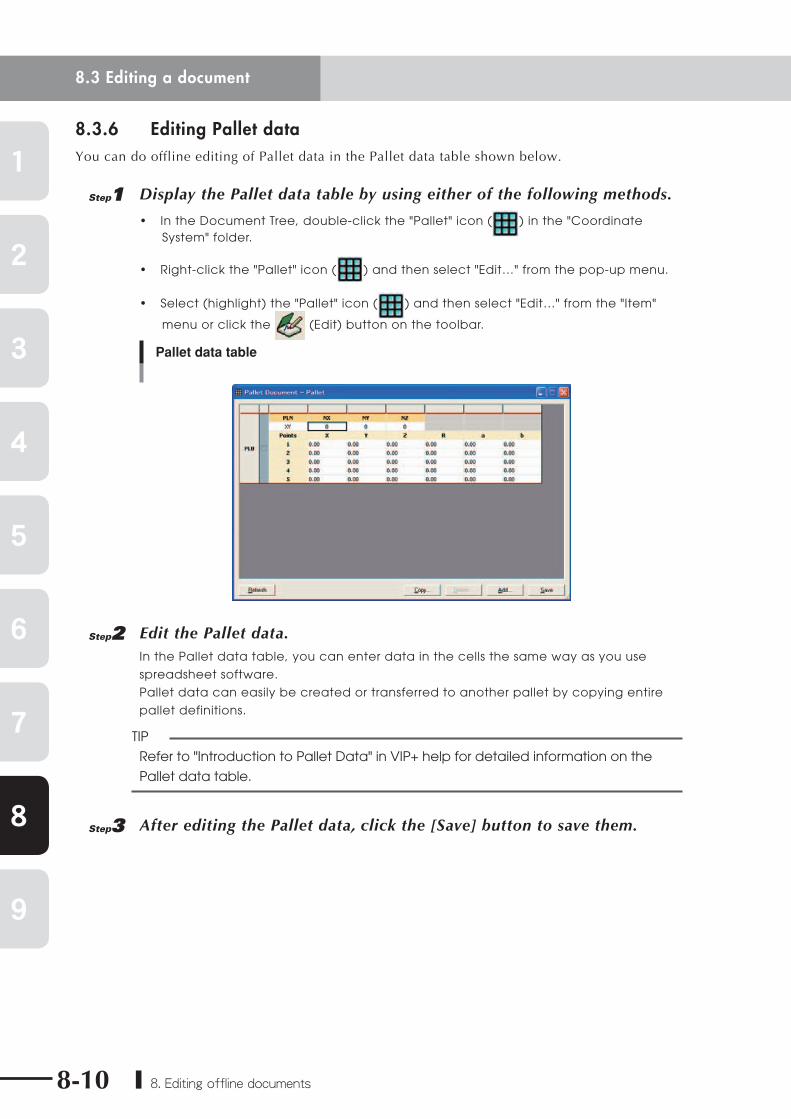
8.3.6 Editing Pallet dataYou can do offline editing of Pallet data in the Pallet data table shown below.
1 Display the Pallet data table by using either of the following methods.
• In the Document Tree, double-click the "Pallet" icon ( ) in the "Coordinate System" folder.
• Right-click the "Pallet" icon ( ) and then select "Edit…" from the pop-up menu.
• Select (highlight) the "Pallet" icon ( ) and then select "Edit…" from the "Item"
menu or click the (Edit) button on the toolbar.
Pallet data table
2 Edit the Pallet data.In the Pallet data table, you can enter data in the cells the same way as you use
spreadsheet software.
Pallet data can easily be created or transferred to another pallet by copying entire
pallet definitions.
TIP
Refer to "Introduction to Pallet Data" in VIP+ help for detailed information on the
Pallet data table.
3 After editing the Pallet data, click the [Save] button to save them.
8.3 Editing a document
4
1
2
3
5
6
7
8
9
8. Editing offline documents 8-11
8.4 Deleting a documentThis section describes how to delete documents displayed in the Document Tree. The documents
deleted here can be redisplayed in the Document Tree with the procedure described in section 8.2,
"Opening documents".
nNOTE
Even when a document is removed from the Document Tree, the associated data
fi le still exists in its stored location. However, deleting a "Program" document ( ),
which is part of a "System (*.all)" or "Programs (*.pgm)" fi le, overwrite the associated
fi le or deletes the program of the "System (*.all)" or "Programs (*.pgm)" fi le.
1 In the Document Tree, select (highlight) the document you want to
delete.
2 Execute the "Delete" command by using either of the following
methods.• Right-click the selected document and select "Delete" from the pop-up menu.
• Select "Delete" from the "Item" menu.
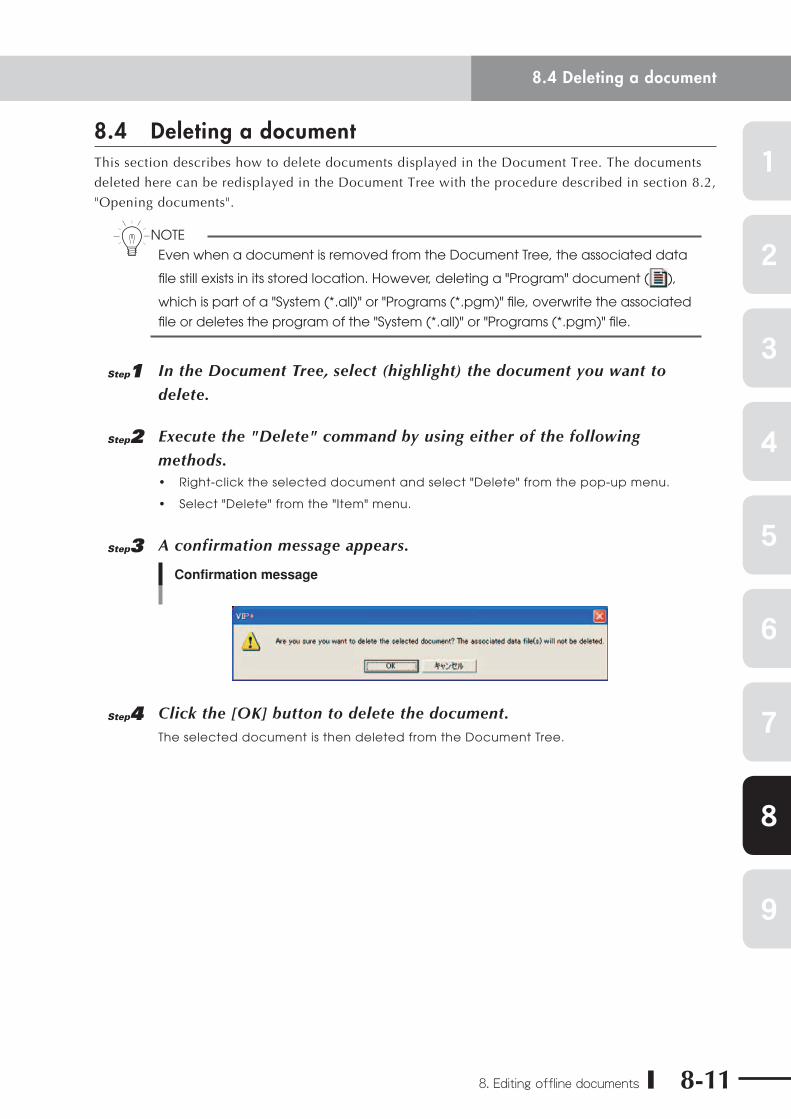
3 A confirmation message appears.
Confirmation message
4 Click the [OK] button to delete the document.The selected document is then deleted from the Document Tree.
8.4 Deleting a document
4
1
2
3
5
6
7
8
9
8-12 8. Editing offline documents
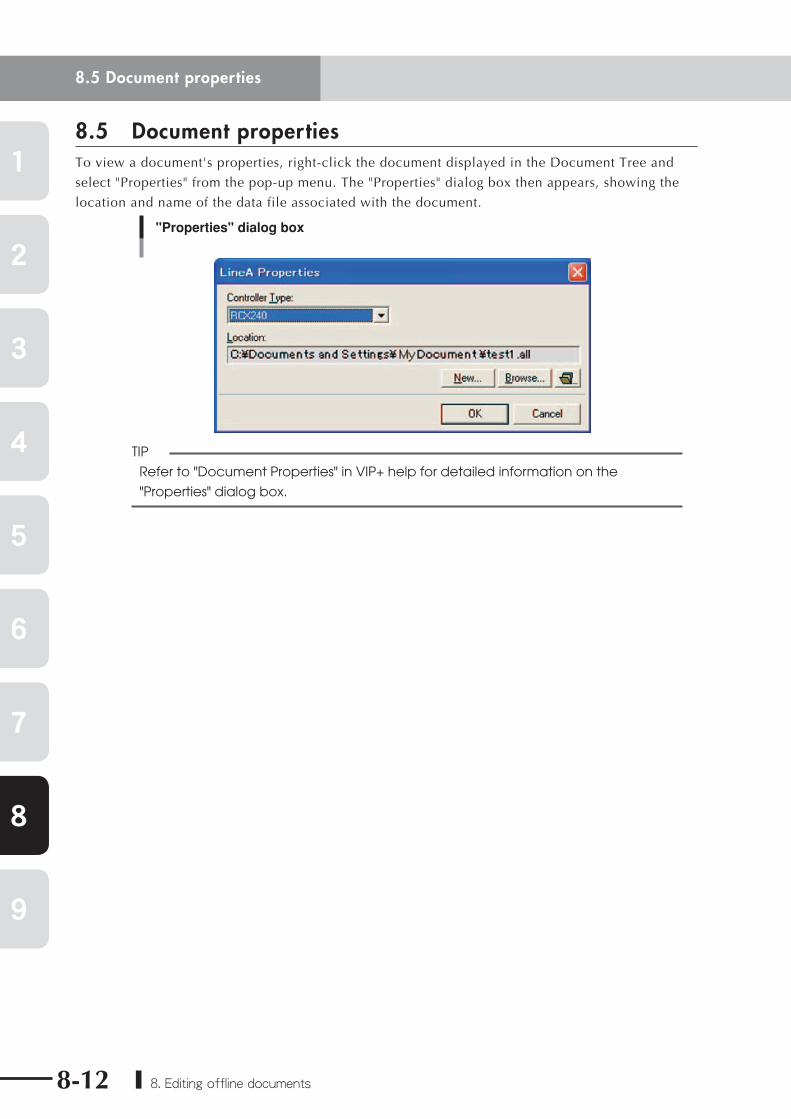
8.5 Document propertiesTo view a document's properties, right-click the document displayed in the Document Tree and
select "Properties" from the pop-up menu. The "Properties" dialog box then appears, showing the
location and name of the data file associated with the document.
"Properties" dialog box
TIP
Refer to "Document Properties" in VIP+ help for detailed information on the
"Properties" dialog box.
8.5 Document properties
4
1
2
3
5
6
7
8
9
9. VIP+ Projects 9-1
9. VIP+ ProjectsThe VIP+ Project function allows you to save various types of controllers and data files (documents)
you have configured in the Controller Tree and Document Tree as project files (designated by file
extension "*.yvp"). Just opening a project file will redisplay its same settings and tree configurations
in the VIP+ main window. This eliminates the need to retrieve and reconstruct the controller data
and documents in the Controller Tree and Document Tree.
nNOTE
The VIP+ Project function is only available when VIP+ is running in Advanced mode.
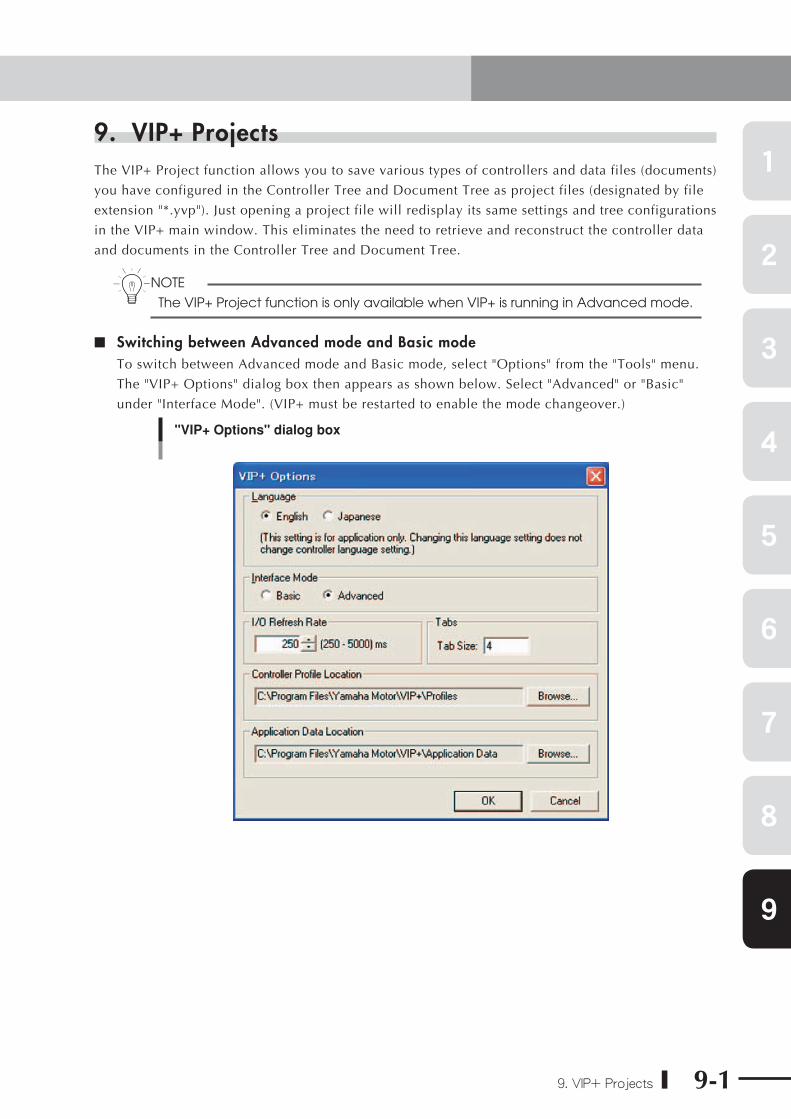
■ Switching between Advanced mode and Basic modeTo switch between Advanced mode and Basic mode, select "Options" from the "Tools" menu.
The "VIP+ Options" dialog box then appears as shown below. Select "Advanced" or "Basic"
under "Interface Mode". (VIP+ must be restarted to enable the mode changeover.)
"VIP+ Options" dialog box
4
1
2
3
5
6
7
8
9
9-2 9. VIP+ Projects
The following commands and toolbar buttons are displayed in Advanced mode.
File menu commandToolbar
buttonDescription
New Project Creates a new VIP+ project file.
Open Project
Locates and opens VIP+ project files that are
stored on either the computer running VIP+ or on
the network.
Save ProjectSaves changes that have been made to the
currently selected VIP+ project file.
Save Project As —
Saves the currently selected VIP+ project file and
any changes made to that file, under a new
filename and in the desired location on the
computer or network.
TIP
Refer to "Introduction to VIP+ Projects" in VIP+ help for detailed information on the
VIP+ Project function.

MEMO
© YAMAHA MOTOR CO., LTD. IM Operations
All rights reserved. No part of this publication may be reproduced in any form without the permission of YAMAHA MOTOR CO., LTD. Information furnished by YAMAHA in this manual is believed to be reliable. However, no responsibility is assumed for possible inaccuracies or omissions. If you find any part unclear in this manual, please contact YAMAHA or YAMAHA sales representatives.
User's Manual
VIP+Support Software for YAMAHA RCX Series Robot Controllers
VIP+
Revision record
Manual version Issue date Description
Ver. 1.00 Apr. 2009
Ver. 1.01 Aug. 2010 Explanation about data transmission by drag & drop was added. Some clerical errors were corrected, etc.
Ver. 1.02 Apr. 2011 Clerical error corrections.
Apr. 2011Ver. 1.02This manual is based on Ver. 1.02 of Japanese manual.