Embed Size (px)
Citation preview
Table of ContentsImportant Safeguards.................................................................................................................................................. 2Product Features........................................................................................................................................................... 2Product Layout............................................................................................................................................................... 3
Parts & Accessories................................................................................................................................................. 3Measuring Cup.......................................................................................................................................................... 3
Quick Cooking Guide................................................................................................................................................... 4Control Panel................................................................................................................................................................... 5
Menu............................................................................................................................................................................. 5Loaf............................................................................................................................................................................... 5Colour........................................................................................................................................................................... 5Start/Stop/Pause..................................................................................................................................................... 5+...................................................................................................................................................................................... 5-....................................................................................................................................................................................... 5Working States......................................................................................................................................................... 5
Operating Guide............................................................................................................................................................. 6First Use....................................................................................................................................................................... 6Removing Bread....................................................................................................................................................... 6"Jam" Operation....................................................................................................................................................... 7Fruit Dispenser Use................................................................................................................................................. 7
Specific Functions......................................................................................................................................................... 7Reservation Function.............................................................................................................................................. 7Buzzer Sounds........................................................................................................................................................... 7Memory Function..................................................................................................................................................... 8Keep Warm................................................................................................................................................................ 8Internal Light.............................................................................................................................................................. 8
Recipes.............................................................................................................................................................................. 8Soft................................................................................................................................................................................ 8Sweet............................................................................................................................................................................ 8Natural Curing........................................................................................................................................................... 9French.......................................................................................................................................................................... 9Whole Wheat............................................................................................................................................................. 9Quick............................................................................................................................................................................. 9No Sugar.................................................................................................................................................................... 10Multigrain Bread..................................................................................................................................................... 10Milk Loaf.................................................................................................................................................................... 10Cake............................................................................................................................................................................ 10Raw Dough................................................................................................................................................................. 11Leaven Dough........................................................................................................................................................... 11Jam............................................................................................................................................................................... 11Yoghurt....................................................................................................................................................................... 11Rice Wine.................................................................................................................................................................... 11Sticky Rice................................................................................................................................................................. 12
Hints & Tips..................................................................................................................................................................... 12Yeast .......................................................................................................................................................................... 12Water/Flour Ratio.................................................................................................................................................. 12Other Recipes.......................................................................................................................................................... 12
Cleaning and Maintenance........................................................................................................................................ 13Keeping the Surface Clean.................................................................................................................................. 13Keep Accessories Clean....................................................................................................................................... 13Environment for Use.............................................................................................................................................. 13
Technical Specifications............................................................................................................................................. 13Troubleshooting............................................................................................................................................................ 13
1
Please read all instructions before use, and save a copy for future reference.
Important Safeguards• Before using this appliance, the following basic precautions should always be followed:• The appliance can be used by children aged from 8 years and above, and persons with
reduced physical, sensory or mental capabilities or lack of experience and knowledge if they have been given supervision or instruction concerning the use of the appliance in a safe way, and understand the hazards involved. Children should not play with the appliance. Cleaning and maintenance should not be performed by children unless they are older than 8 and supervised.
• Keep the appliance and its supply cord out of reach of children.• If the power supply cord is damaged, it must be replaced by a Kogan.com technician in
order to avoid a hazard.• CAUTION: hot surfaces! Do not touch hot surfaces. Use the handles or knobs. Do not let
the cord hang over the edge of a table or hot surface.• The appliance is not designed to be operated by means of an external timer or separate
remote control system.• Clean all surfaces that come into contact with food.• Before use, check that the rating plate on the product matches the voltage of your wall
outlets.• To protect against electric shock or fire, do not immerse the cord, plugs or housing in
water or any other liquid.• Unplug from the outlet when not in use, before putting on or taking off parts, or before
cleaning.• Do not place appliance on or near a hot gas or electric burner, or in a heated oven.• Extreme caution must be used when moving an appliance containing hot ingredients.• Do not touch any moving or spinning parts of the machine when baking.• Never switch on the appliance without the bread pan placed correctly and filled with
ingredients.• Never beat the bread pan on the top or edge to remove the pan, as this may damage it.• Always attack the plug to the appliance first, then plug the cord into the wall outlet. To
disconnect, turn all controls to OFF, then remove the plug from the wall outlet.• This appliance is not intended to be operated by means of an external timer or separate
remote-control system.• Do not operate the unit without the bread pan placed in the chamber to avoid damaging
the appliance.• This appliace is intended to be used in households, and for similar applications such as:
◦ Staff kitchen areas in shops, offices and other working environments◦ Farm houses◦ By clients in hotels, motels and other residential type environments◦ Bed and breakfast type environments
Product Features1. LCD Indicator2. Automatic functions to make bread, cake, jam etc.3. Multiple taste selections, including sweet bread, french bread etc.4. Automatic fruit/nut dispenser for creative bread making5. Internal light6. Easy-touch buttons
2
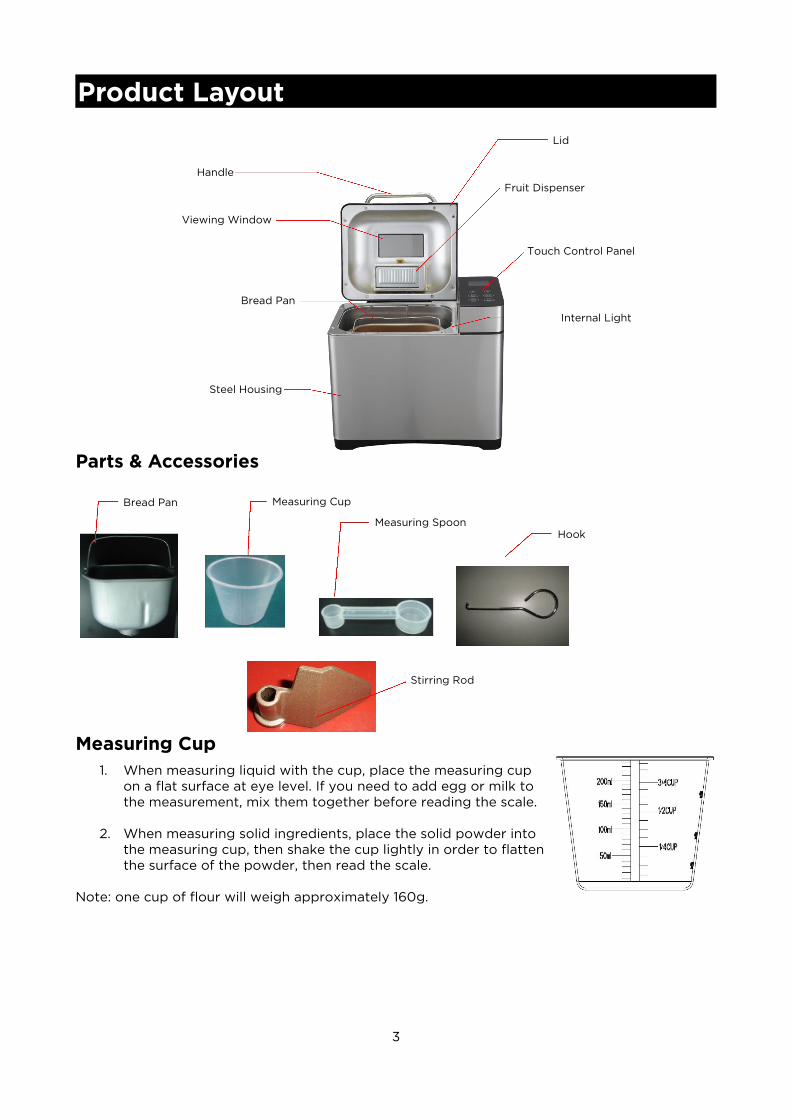
Product Layout
Parts & Accessories
Measuring Cup1. When measuring liquid with the cup, place the measuring cup
on a flat surface at eye level. If you need to add egg or milk tothe measurement, mix them together before reading the scale.
2. When measuring solid ingredients, place the solid powder intothe measuring cup, then shake the cup lightly in order to flattenthe surface of the powder, then read the scale.
Note: one cup of flour will weigh approximately 160g.
3
Lid
Handle
Viewing Window
Bread Pan
Steel Housing
Fruit Dispenser
Touch Control Panel
Internal Light
Bread Pan Measuring Cup
Measuring SpoonHook
Stirring Rod
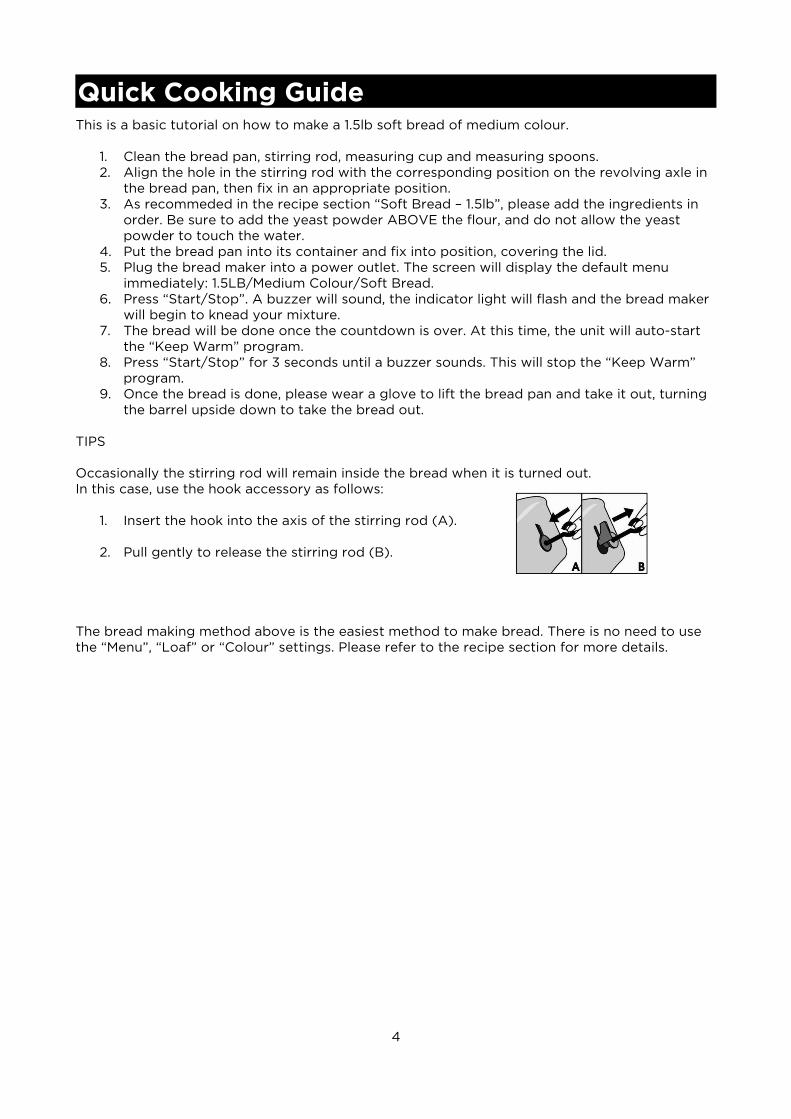
Quick Cooking GuideThis is a basic tutorial on how to make a 1.5lb soft bread of medium colour.
1. Clean the bread pan, stirring rod, measuring cup and measuring spoons.2. Align the hole in the stirring rod with the corresponding position on the revolving axle in
the bread pan, then fix in an appropriate position.3. As recommeded in the recipe section “Soft Bread – 1.5lb”, please add the ingredients in
order. Be sure to add the yeast powder ABOVE the flour, and do not allow the yeast powder to touch the water.
4. Put the bread pan into its container and fix into position, covering the lid.5. Plug the bread maker into a power outlet. The screen will display the default menu
immediately: 1.5LB/Medium Colour/Soft Bread.6. Press “Start/Stop”. A buzzer will sound, the indicator light will flash and the bread maker
will begin to knead your mixture.7. The bread will be done once the countdown is over. At this time, the unit will auto-start
the “Keep Warm” program.8. Press “Start/Stop” for 3 seconds until a buzzer sounds. This will stop the “Keep Warm”
program.9. Once the bread is done, please wear a glove to lift the bread pan and take it out, turning
the barrel upside down to take the bread out.
TIPS
Occasionally the stirring rod will remain inside the bread when it is turned out.In this case, use the hook accessory as follows:
1. Insert the hook into the axis of the stirring rod (A).
2. Pull gently to release the stirring rod (B).
The bread making method above is the easiest method to make bread. There is no need to use the “Menu”, “Loaf” or “Colour” settings. Please refer to the recipe section for more details.
4
Control Panel
MenuWhen selecting from the menu in the control panel, the LCD indicator will show the following settings:
1. Soft Bread 2. Sweet Bread 3. Natural Sourdough
4. French Bread 5. Whole-wheat 6. Quick Bread
7. Sugar-free 8. Multigrain 9. Milky Loaf
10. Cake 11. Raw Dough 12. Leaven Dough
13. Jam 14. Bake 15. Yogurt
16. Rice Wine 17. Sticky Rice 18. Stir-Fry
19. Ferment
LoafIn the settings, select either 1.0LB/1.5LB/2.0LB as the bread weight.This setting can only be altered for options 1-9 in the menu.
ColourSelect bread colour by selecting Light/Medium/Dark.
Start/Stop/PausePress this button to start or stop the bread maker from working. Press the button quickly to pause operations, or hold the button down to stop the entire program from functioning.When paused, the program will stop any countdowns or timers, allowing you time to add any further ingredients or make any desired adjustments.
+In settings, pressing this button will add 1, 5 or 10 minutes delay. If you hold the button down, the program will rapidly add the delay time up to the maximum delay time.
-In settings, pressing this button will reduce 1, 5 or 10 minutes of delay.If you hold the button down, the program will rapidly reduce the delay time to the minimum time.
Working StatesReservation (optional) Preheat Stir1 Rest Stir2 Ferment 1, 2, 3 Bake Keep Warm → → → → → → → →End
5
Operating GuidePlease be careful during use:Check the power cord and plug prior to use.
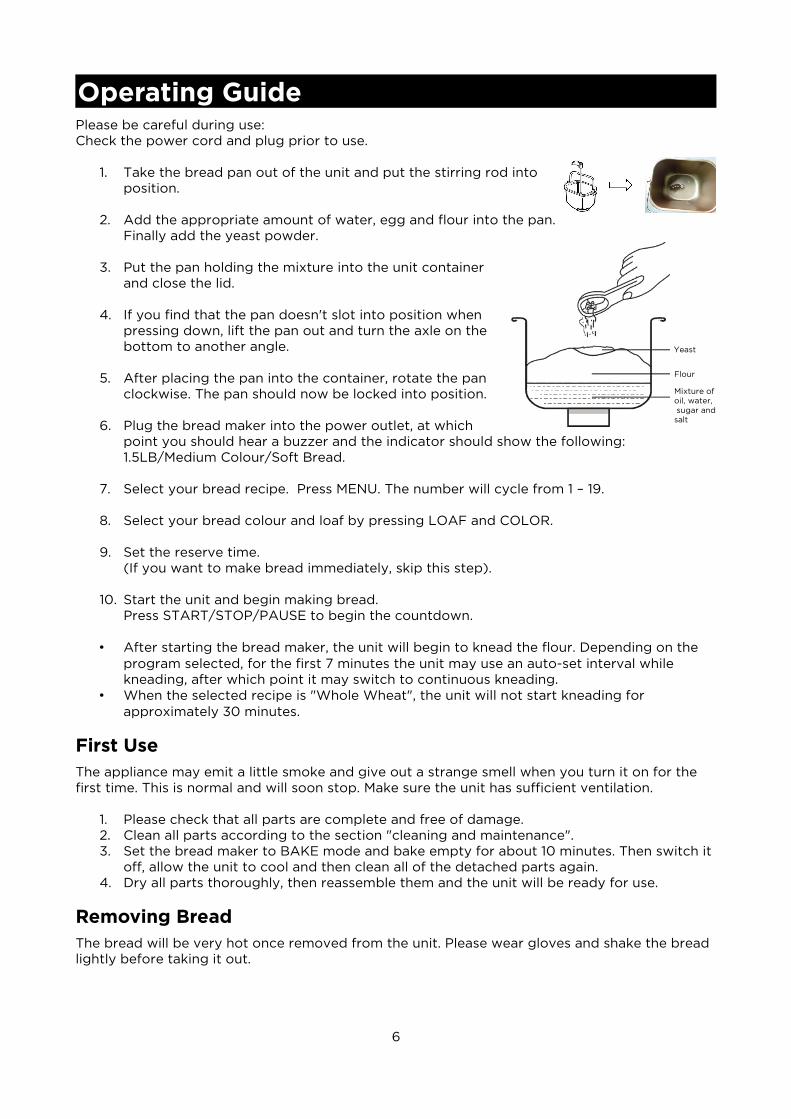
1. Take the bread pan out of the unit and put the stirring rod intoposition.
2. Add the appropriate amount of water, egg and flour into the pan.Finally add the yeast powder.
3. Put the pan holding the mixture into the unit containerand close the lid.
4. If you find that the pan doesn't slot into position whenpressing down, lift the pan out and turn the axle on thebottom to another angle.
5. After placing the pan into the container, rotate the panclockwise. The pan should now be locked into position.
6. Plug the bread maker into the power outlet, at whichpoint you should hear a buzzer and the indicator should show the following: 1.5LB/Medium Colour/Soft Bread.
7. Select your bread recipe. Press MENU. The number will cycle from 1 – 19.
8. Select your bread colour and loaf by pressing LOAF and COLOR.
9. Set the reserve time.(If you want to make bread immediately, skip this step).
10. Start the unit and begin making bread.Press START/STOP/PAUSE to begin the countdown.
• After starting the bread maker, the unit will begin to knead the flour. Depending on the program selected, for the first 7 minutes the unit may use an auto-set interval while kneading, after which point it may switch to continuous kneading.
• When the selected recipe is "Whole Wheat", the unit will not start kneading for approximately 30 minutes.
First UseThe appliance may emit a little smoke and give out a strange smell when you turn it on for the first time. This is normal and will soon stop. Make sure the unit has sufficient ventilation.
1. Please check that all parts are complete and free of damage.2. Clean all parts according to the section "cleaning and maintenance".3. Set the bread maker to BAKE mode and bake empty for about 10 minutes. Then switch it
off, allow the unit to cool and then clean all of the detached parts again.4. Dry all parts thoroughly, then reassemble them and the unit will be ready for use.
Removing BreadThe bread will be very hot once removed from the unit. Please wear gloves and shake the bread lightly before taking it out.
6
Yeast
Flour
Mixture of oil, water, sugar and salt
"Jam" OperationYou can make delicious fruit jams with this bread maker. In making jam, you have to prepare the desirable fruits like orange, pineapple, apple or strawberry to the amounts recommended in the recipe section. Firstly, clean the fruits, peel and remove the cores, cutting them into 3cm pieces.With a fruit mixer, squeeze or crush the fruit pieces then add to the unit and press the JAM selection to start.No Color or Time can be selected. When the jam is finished, the buzzer will sound. Take the bread pan out of the unit and allow it to cool, then pour the jam out of the pan.Please keep young children away when preparing the jam as it can burn.
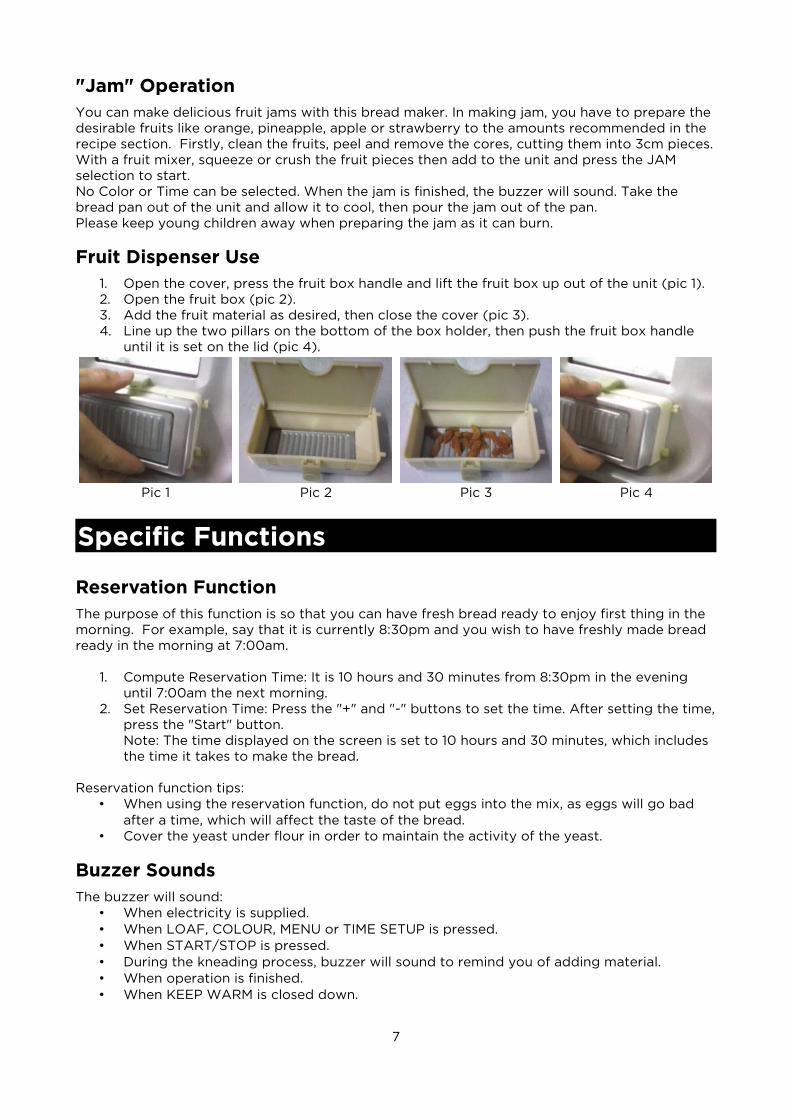
Fruit Dispenser Use1. Open the cover, press the fruit box handle and lift the fruit box up out of the unit (pic 1).2. Open the fruit box (pic 2).3. Add the fruit material as desired, then close the cover (pic 3).4. Line up the two pillars on the bottom of the box holder, then push the fruit box handle
until it is set on the lid (pic 4).
Pic 1 Pic 2 Pic 3 Pic 4
Specific Functions
Reservation FunctionThe purpose of this function is so that you can have fresh bread ready to enjoy first thing in the morning. For example, say that it is currently 8:30pm and you wish to have freshly made bread ready in the morning at 7:00am.
1. Compute Reservation Time: It is 10 hours and 30 minutes from 8:30pm in the evening until 7:00am the next morning.
2. Set Reservation Time: Press the "+" and "-" buttons to set the time. After setting the time,press the "Start" button.Note: The time displayed on the screen is set to 10 hours and 30 minutes, which includes the time it takes to make the bread.
Reservation function tips:• When using the reservation function, do not put eggs into the mix, as eggs will go bad
after a time, which will affect the taste of the bread.• Cover the yeast under flour in order to maintain the activity of the yeast.
Buzzer SoundsThe buzzer will sound:
• When electricity is supplied.• When LOAF, COLOUR, MENU or TIME SETUP is pressed.• When START/STOP is pressed.• During the kneading process, buzzer will sound to remind you of adding material.• When operation is finished.• When KEEP WARM is closed down.
7
Memory FunctionThe unit holds a 15 minute memory in the event of electrical disconnection due to a blackout or afuse blowing. After starting the bread maker, if an electrical disconnection occurs that lasts for less than 15 minutes, upon reconnecting the electricity the bread maker will continue to work.If the duration of the electrical disconnection is longer than 15 minutes, then the bread maker willnot be able to resume the operating function.
Keep WarmWhen bread or other snacks are finished but are not removed from the unit, the "Keep Warm" function will keep them fresh at a certain temperature.
• After the bread is done, the program will automatically enter "Keep Warm", with a flashing : symbol displaying. The maximum time for the "Keep Warm" function to operateis 1 hour. After 1 hour, the function will cease and a buzzer will sound.
• You can press ON/OFF for 3 seconds until the buzzer sounds to stop this function.
Internal LightWith the built-in internal light, you can check on the progress of your bread. Press + and – together to turn the light on. Press them together again to turn the light off.
Recipes
Soft
Material 1LB 1.5LB 2LB
Water 160ml 240ml 290ml
Butter 2 Tablespoons 2 Tablespoons 3 Tablespoons
Table Salt 1/2 Teaspoon 1/2 Teaspoon 1 Teaspoon
Sugar 1 Tablespoon 2 Tablespoons 3 Tablespoons
Milk Powder 2 Tablespoons 3 Tablespoons 5 Tablespoons
Flour 300g 400g 475g
Yeast Powder 1 Teaspoon 1 Teaspoon 1 Teaspoon
Sweet
Material 1LB 1.5LB 2LB
Water 160ml 240ml 310ml
Butter 2 Tablespoons 2 Tablespoons 3 Tablespoons
Table Salt 1/2 Teaspoon 1/2 Teaspoon 1/2 Teaspoon
Sugar 4 Tablespoons 6 Tablespoons 6 Tablespoons
Milk Powder 2 Tablespoons 3 Tablespoons 4 Tablespoons
Flour 300g 400g 500g
Yeast Powder 1 Teaspoon 1 Teaspoon 1 Teaspoon
8
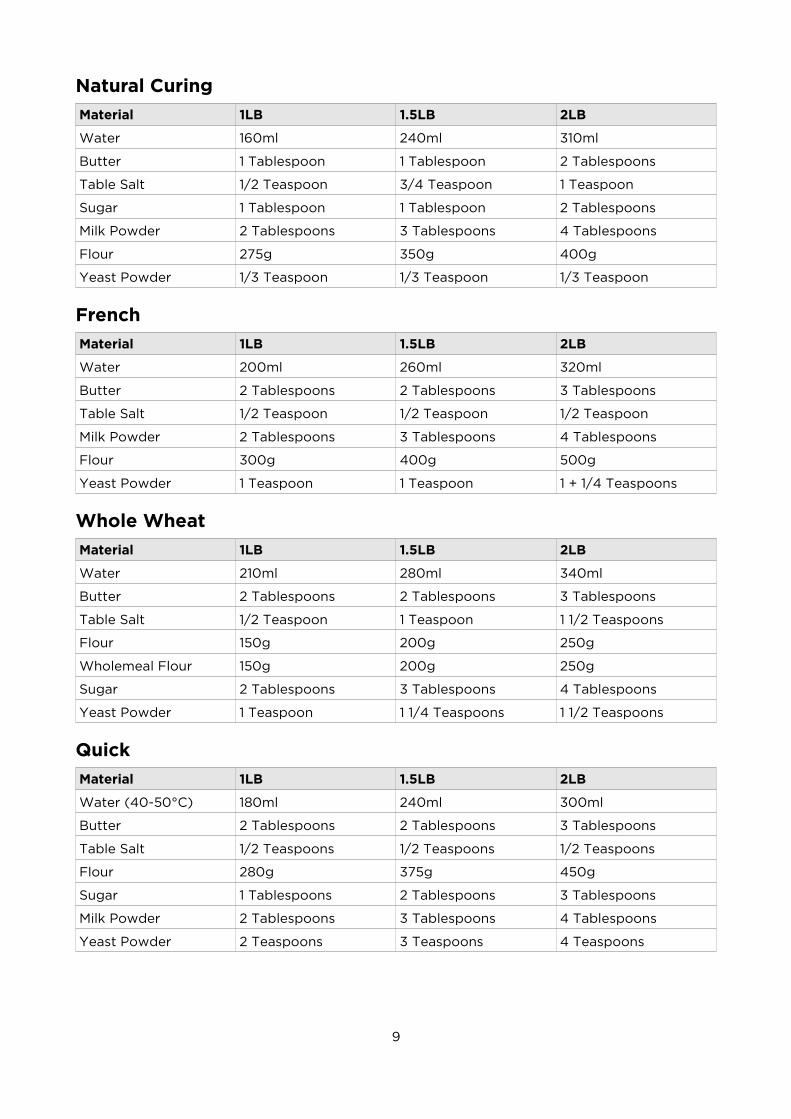
Natural Curing
Material 1LB 1.5LB 2LB
Water 160ml 240ml 310ml
Butter 1 Tablespoon 1 Tablespoon 2 Tablespoons
Table Salt 1/2 Teaspoon 3/4 Teaspoon 1 Teaspoon
Sugar 1 Tablespoon 1 Tablespoon 2 Tablespoons
Milk Powder 2 Tablespoons 3 Tablespoons 4 Tablespoons
Flour 275g 350g 400g
Yeast Powder 1/3 Teaspoon 1/3 Teaspoon 1/3 Teaspoon
French
Material 1LB 1.5LB 2LB
Water 200ml 260ml 320ml
Butter 2 Tablespoons 2 Tablespoons 3 Tablespoons
Table Salt 1/2 Teaspoon 1/2 Teaspoon 1/2 Teaspoon
Milk Powder 2 Tablespoons 3 Tablespoons 4 Tablespoons
Flour 300g 400g 500g
Yeast Powder 1 Teaspoon 1 Teaspoon 1 + 1/4 Teaspoons
Whole Wheat
Material 1LB 1.5LB 2LB
Water 210ml 280ml 340ml
Butter 2 Tablespoons 2 Tablespoons 3 Tablespoons
Table Salt 1/2 Teaspoon 1 Teaspoon 1 1/2 Teaspoons
Flour 150g 200g 250g
Wholemeal Flour 150g 200g 250g
Sugar 2 Tablespoons 3 Tablespoons 4 Tablespoons
Yeast Powder 1 Teaspoon 1 1/4 Teaspoons 1 1/2 Teaspoons
Quick
Material 1LB 1.5LB 2LB
Water (40-50°C) 180ml 240ml 300ml
Butter 2 Tablespoons 2 Tablespoons 3 Tablespoons
Table Salt 1/2 Teaspoons 1/2 Teaspoons 1/2 Teaspoons
Flour 280g 375g 450g
Sugar 1 Tablespoons 2 Tablespoons 3 Tablespoons
Milk Powder 2 Tablespoons 3 Tablespoons 4 Tablespoons
Yeast Powder 2 Teaspoons 3 Teaspoons 4 Teaspoons
9
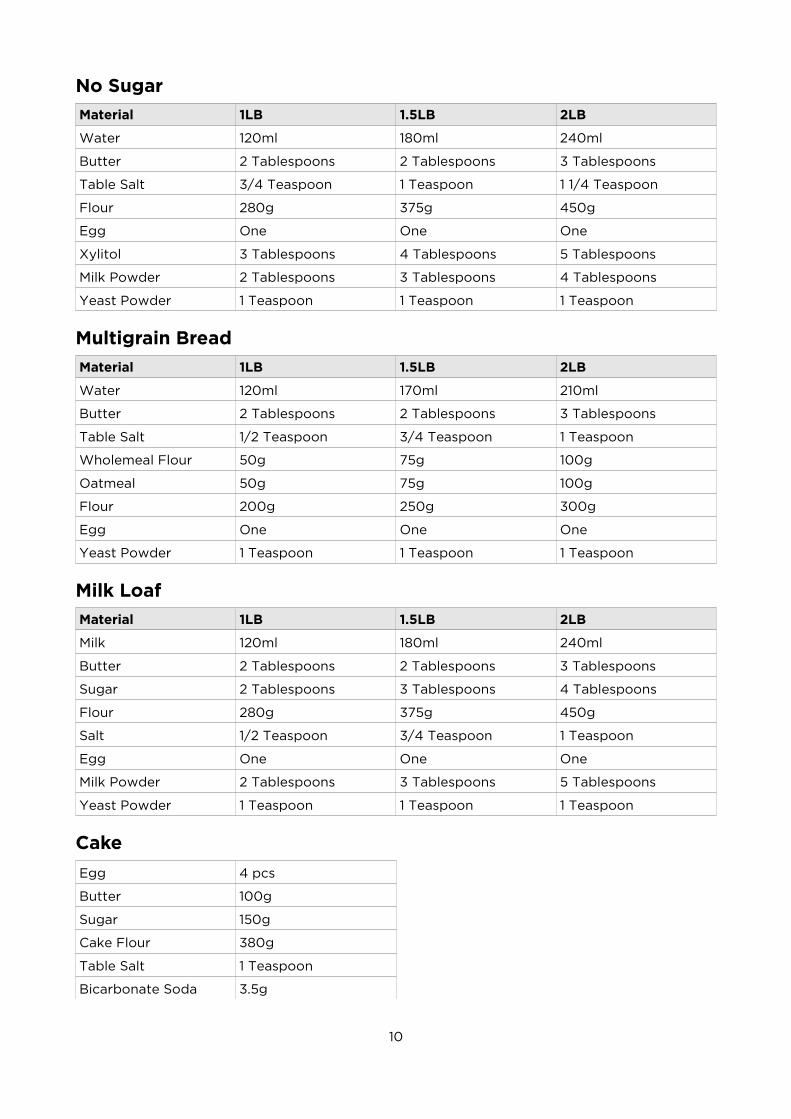
No Sugar
Material 1LB 1.5LB 2LB
Water 120ml 180ml 240ml
Butter 2 Tablespoons 2 Tablespoons 3 Tablespoons
Table Salt 3/4 Teaspoon 1 Teaspoon 1 1/4 Teaspoon
Flour 280g 375g 450g
Egg One One One
Xylitol 3 Tablespoons 4 Tablespoons 5 Tablespoons
Milk Powder 2 Tablespoons 3 Tablespoons 4 Tablespoons
Yeast Powder 1 Teaspoon 1 Teaspoon 1 Teaspoon
Multigrain Bread
Material 1LB 1.5LB 2LB
Water 120ml 170ml 210ml
Butter 2 Tablespoons 2 Tablespoons 3 Tablespoons
Table Salt 1/2 Teaspoon 3/4 Teaspoon 1 Teaspoon
Wholemeal Flour 50g 75g 100g
Oatmeal 50g 75g 100g
Flour 200g 250g 300g
Egg One One One
Yeast Powder 1 Teaspoon 1 Teaspoon 1 Teaspoon
Milk Loaf
Material 1LB 1.5LB 2LB
Milk 120ml 180ml 240ml
Butter 2 Tablespoons 2 Tablespoons 3 Tablespoons
Sugar 2 Tablespoons 3 Tablespoons 4 Tablespoons
Flour 280g 375g 450g
Salt 1/2 Teaspoon 3/4 Teaspoon 1 Teaspoon
Egg One One One
Milk Powder 2 Tablespoons 3 Tablespoons 5 Tablespoons
Yeast Powder 1 Teaspoon 1 Teaspoon 1 Teaspoon
Cake
Egg 4 pcs
Butter 100g
Sugar 150g
Cake Flour 380g
Table Salt 1 Teaspoon
Bicarbonate Soda 3.5g
10
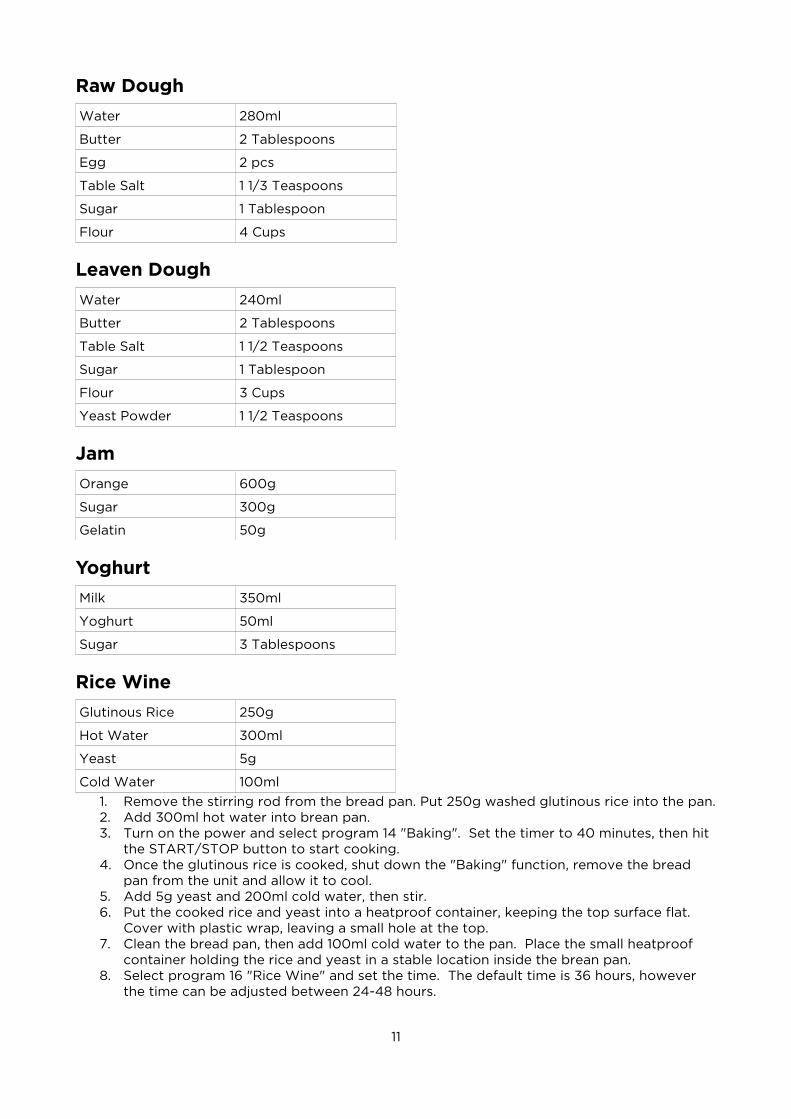
Raw Dough
Water 280ml
Butter 2 Tablespoons
Egg 2 pcs
Table Salt 1 1/3 Teaspoons
Sugar 1 Tablespoon
Flour 4 Cups
Leaven Dough
Water 240ml
Butter 2 Tablespoons
Table Salt 1 1/2 Teaspoons
Sugar 1 Tablespoon
Flour 3 Cups
Yeast Powder 1 1/2 Teaspoons
Jam
Orange 600g
Sugar 300g
Gelatin 50g
Yoghurt
Milk 350ml
Yoghurt 50ml
Sugar 3 Tablespoons
Rice Wine
Glutinous Rice 250g
Hot Water 300ml
Yeast 5g
Cold Water 100ml
1. Remove the stirring rod from the bread pan. Put 250g washed glutinous rice into the pan.2. Add 300ml hot water into brean pan.3. Turn on the power and select program 14 "Baking". Set the timer to 40 minutes, then hit
the START/STOP button to start cooking.4. Once the glutinous rice is cooked, shut down the "Baking" function, remove the bread
pan from the unit and allow it to cool.5. Add 5g yeast and 200ml cold water, then stir.6. Put the cooked rice and yeast into a heatproof container, keeping the top surface flat.
Cover with plastic wrap, leaving a small hole at the top.7. Clean the bread pan, then add 100ml cold water to the pan. Place the small heatproof
container holding the rice and yeast in a stable location inside the brean pan.8. Select program 16 "Rice Wine" and set the time. The default time is 36 hours, however
the time can be adjusted between 24-48 hours.
11
TIPS• When fermenting the rice wine, the container should be kept clean to avoid oil.• While making rice wine, the lid of the unit cannot be opened at all during operation.
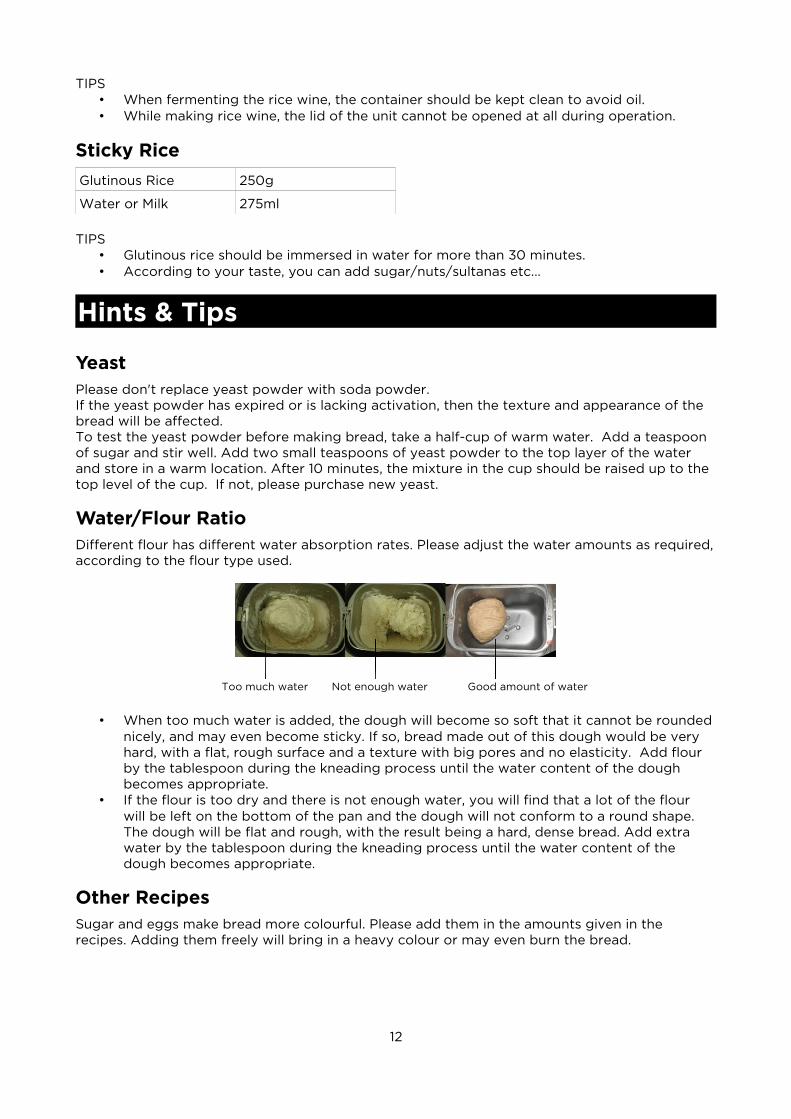
Sticky Rice
Glutinous Rice 250g
Water or Milk 275ml
TIPS• Glutinous rice should be immersed in water for more than 30 minutes.• According to your taste, you can add sugar/nuts/sultanas etc...
Hints & Tips
Yeast Please don't replace yeast powder with soda powder.If the yeast powder has expired or is lacking activation, then the texture and appearance of the bread will be affected.To test the yeast powder before making bread, take a half-cup of warm water. Add a teaspoon of sugar and stir well. Add two small teaspoons of yeast powder to the top layer of the water and store in a warm location. After 10 minutes, the mixture in the cup should be raised up to the top level of the cup. If not, please purchase new yeast.
Water/Flour RatioDifferent flour has different water absorption rates. Please adjust the water amounts as required,according to the flour type used.
• When too much water is added, the dough will become so soft that it cannot be roundednicely, and may even become sticky. If so, bread made out of this dough would be very hard, with a flat, rough surface and a texture with big pores and no elasticity. Add flour by the tablespoon during the kneading process until the water content of the dough becomes appropriate.
• If the flour is too dry and there is not enough water, you will find that a lot of the flour will be left on the bottom of the pan and the dough will not conform to a round shape. The dough will be flat and rough, with the result being a hard, dense bread. Add extra water by the tablespoon during the kneading process until the water content of the dough becomes appropriate.
Other RecipesSugar and eggs make bread more colourful. Please add them in the amounts given in the recipes. Adding them freely will bring in a heavy colour or may even burn the bread.
12
Too much water Not enough water Good amount of water
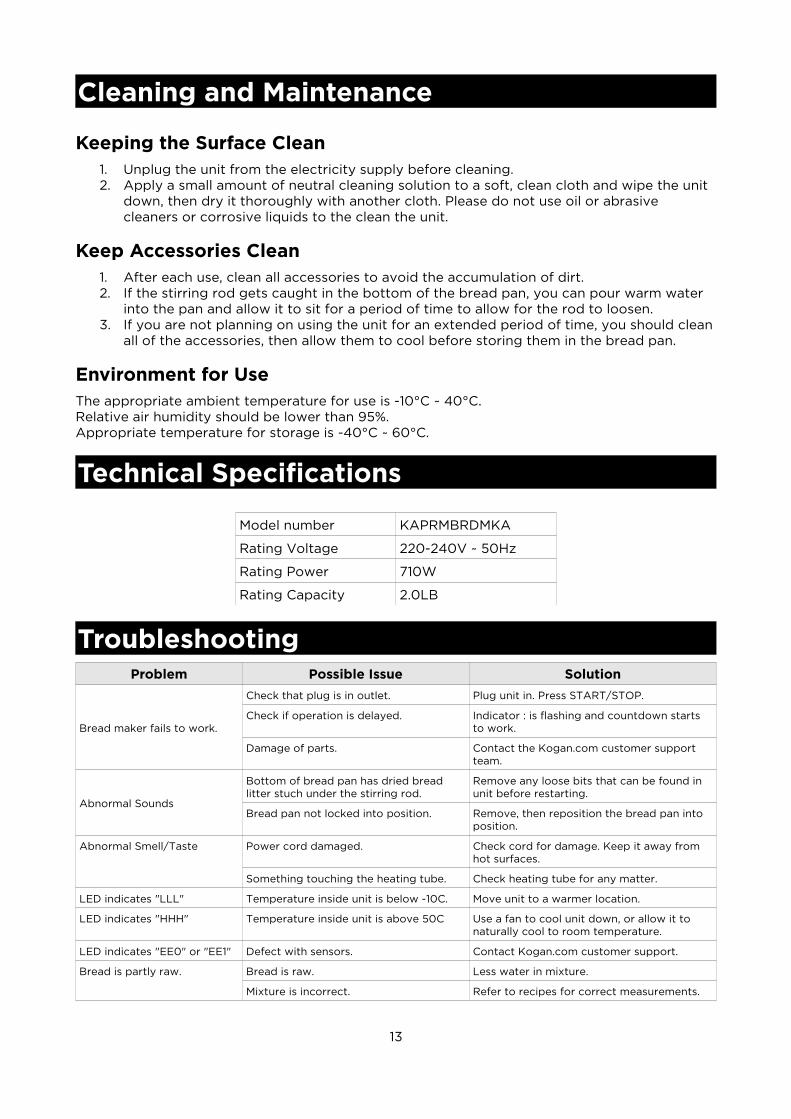
Cleaning and Maintenance
Keeping the Surface Clean1. Unplug the unit from the electricity supply before cleaning.2. Apply a small amount of neutral cleaning solution to a soft, clean cloth and wipe the unit
down, then dry it thoroughly with another cloth. Please do not use oil or abrasive cleaners or corrosive liquids to the clean the unit.
Keep Accessories Clean1. After each use, clean all accessories to avoid the accumulation of dirt.2. If the stirring rod gets caught in the bottom of the bread pan, you can pour warm water
into the pan and allow it to sit for a period of time to allow for the rod to loosen.3. If you are not planning on using the unit for an extended period of time, you should clean
all of the accessories, then allow them to cool before storing them in the bread pan.
Environment for UseThe appropriate ambient temperature for use is -10°C ~ 40°C.Relative air humidity should be lower than 95%.Appropriate temperature for storage is -40°C ~ 60°C.
Technical Specifications
Model number KAPRMBRDMKA
Rating Voltage 220-240V ~ 50Hz
Rating Power 710W
Rating Capacity 2.0LB
TroubleshootingProblem Possible Issue Solution
Bread maker fails to work.
Check that plug is in outlet. Plug unit in. Press START/STOP.
Check if operation is delayed. Indicator : is flashing and countdown starts to work.
Damage of parts. Contact the Kogan.com customer support team.
Abnormal Sounds
Bottom of bread pan has dried bread litter stuch under the stirring rod.
Remove any loose bits that can be found in unit before restarting.
Bread pan not locked into position. Remove, then reposition the bread pan into position.
Abnormal Smell/Taste Power cord damaged. Check cord for damage. Keep it away from hot surfaces.
Something touching the heating tube. Check heating tube for any matter.
LED indicates "LLL" Temperature inside unit is below -10C. Move unit to a warmer location.
LED indicates "HHH" Temperature inside unit is above 50C Use a fan to cool unit down, or allow it to naturally cool to room temperature.
LED indicates "EE0" or "EE1" Defect with sensors. Contact Kogan.com customer support.
Bread is partly raw. Bread is raw. Less water in mixture.
Mixture is incorrect. Refer to recipes for correct measurements.
13

14