Embed Size (px)
Citation preview
GoldWave Manual file:///C:/Program%20Files/GoldWave/goldwave.htm
1 sur 73 17/09/2007 10:01
GoldWave ManualCopyright © 2007 GoldWave Inc.
Do not upload or include this document on a website.
April 2007
Note: Images and figures are not included with the evaluation version.Licensed users may request download instructions here.
Table of ContentsIntroduction
Features1.How to Use This Manual2.Notation3.
I.
Getting StartedSystem Requirements1.Installation
Installation From a Downloaded Program (Exe) Filea.General Installation Instructions
Setting Audio Devicesi.Additional Settingsii.
b.
2.
II.
Using GoldWaveInterface Overview
Main Windowa.Tool Barb.Status Barc.Sound Windowsd.Control Windowe.Progress Windowf.Mouse Wheel
Zoom In/Outi.Scroll And Selectii.Playback Speediii.
g.
Entering Timesh.
1.
Control OverviewProperties
Play Propertiesi.Record Propertiesii.Volume Propertiesiii.Visual Propertiesiv.Device Propertiesv.Test Propertiesvi.
a.
Playing Soundsb.Pausing Playbackc.Stopping Playbackd.Rewinding and Fast Forwardinge.Recording Soundsf.Volume and Balance Fadersg.Speed Faderh.
2.
Editing OverviewSelecting Part of a Sounda.Redrawing the Waveform with the Mouseb.Cut & Paste, Mixing and Crossfading
Cut & Pastei.Mixingii.Crossfadingiii.
c.
3.
Storage OverviewHard Drivea.
4.
III.
GoldWave Manual file:///C:/Program%20Files/GoldWave/goldwave.htm
2 sur 73 17/09/2007 10:01
RAMb.File Overview
File Formata.File Format Plug-insb.
5.
Effects OverviewCommon Controls for Effects
Presetsi.Shape Controlsii.Preview Controlsiii.
a.
Effect Plug-insb.
6.
File Menu CommandsNewa.Openb.Closec.Informationd.Batch Processing
Batch Command Linei.e.
Savef.Save Asg.Save Selection Ash.Exiti.File Historyj.
7.
Edit Menu CommandsUndoa.Redob.Cutc.Copyd.Copy Toe.Paste Newf.Paste and Paste Atg.Mixh.Crossfadei.Overwritej.Replacek.Deletel.Trimm.AutoTrimn.Muteo.Insert Silencep.Select Viewq.Select Allr.Channels.Marker
Seti.Previousii.Drop Start/Finishiii.Recall Selection Positionsiv.Store Selection Positionsv.Snap To Zero-Crossingvi.
t.
Cue PointEdit Cue Pointsi.Drop Cueii.Jump To Next Cueiii.Jump To Previous Cueiv.Split Filev.
u.
8.
Effect Menu CommandsDopplera.Dynamicsb.Echoc.Compressor/Expanderd.Filter
Bandpass/stopi.Equalizerii.Low/Highpassiii.Noise Reductioniv.Parametric EQv.Pop/Clickvi.Silence Reductionvii.Smootherviii.
e.
Flangerf.Interpolateg.Inverth.Mechanizei.
9.
GoldWave Manual file:///C:/Program%20Files/GoldWave/goldwave.htm
3 sur 73 17/09/2007 10:01
Offsetj.Pitchk.Plug-inl.Reverbm.Reversen.Stereo
Channel Mixeri.MaxMatchii.Paniii.Reduce Vocalsiv.
o.
Time Warpp.Volume
Change Volumei.Fade Inii.Fade Outiii.Match Volumeiv.Maximize Volume(Normalize)v.Shape Volumevi.
q.
Playback Rater.Resamples.
View Menu CommandsAlla.Specifyb.Selectionc.Presetd.Previouse.Zoom Inf.Zoom Outg.Zoom 10:1h.Zoom 1:1i.Zoom 1 Second, 10 Seconds, 1 Minute, 1 Hourj.Vertical Zoom Allk.Vertical Zoom Inl.Vertical Zoom Outm.Start and Finishn.
10.
Tool Menu CommandsCD Readera.Controlb.Cue Pointsc.Effect Chain Editord.Expression Evaluatore.File Mergerf.
11.
Options Menu CommandsColoura.Control Propertiesb.File Formatsc.Plug-in
DirectX Audio Plug-in Configurationi.GoldWave Audio Plug-in Configurationii.
d.
Storagee.Tool Barf.Windowg.
12.
Window Menu CommandsCascade, Tile, Minimize, Arrangea.Classic, Horizontal, Vertical Controlb.Window Listc.
13.
Help Menu CommandsContentsa.Manualb.Aboutc.
14.
Command Line Parameters15.
General InformationWarranty, Trademarks, and Copyright1.Support and Updates2.
IV.
Appendix: An Introduction to Digital AudioDigital Audio Basics
Samplesa.1.
Digital Audio AttributesSampling Ratea.Bits
Signed and Unsignedi.b.
2.
A.
GoldWave Manual file:///C:/Program%20Files/GoldWave/goldwave.htm
4 sur 73 17/09/2007 10:01
Big and Little Endianii.Channelsc.
Digital Audio LimitationsAliasinga.Clippingb.Quantizationc.Noised.
3.
Volume ScalesAmplitude (y)a.Percent (%)b.Decibel (dB)c.Relative vs. Absoluted.
4.
Frequency and PitchFrequency Rangesa.Frequency Range and Sampling Rateb.Frequency Spectrum Graphsc.
5.
File CompressionBitratea.Constant Bitrateb.Variable Bitratec.
6.
Appendix: Keyboard CommandsB.
Appendix: Expression EvaluatorOverview1.Evaluation Range, Variables, and Constants
Using Time in an Expressiona.Using the Sample Index in an Expressionb.User Constants x, y, and fc.Conversion Between Variablesd.
2.
Presets3.Evaluator Operators and Functions4.Signal Generation5.Custom Filters6.
C.
Appendix: TutorialFrom Turntable to CD-R
Make Connectionsa.Setup Recordingb.Restorationc.Split into Tracksd.
1.D.
Appendix: Troubleshooting and Q&ATroubleshooting1.Common Questions and Answers2.
E.
I. IntroductionGoldWave is a professional digital audio editor that plays, records, edits, processes, and converts audio on your computer. This section listssome of the features of GoldWave and outlines the notation and organization of the manual.
Features
GoldWave includes a complete set of audio processing features.
An intuitive and customizable user interface makes editing easy.An independent Controlwindow provides direct access to audio devices. It contains controls for playback, rewind & fast forward, recording, volume, balance,and speed. Real-time visuals display the sound during playback and recording.A multiple document interface (MDI) allows several files to be opened at one time, simplifying file-to-file editing.Huge files are edited efficiently using a advanced virtual editing system, with configurable hard disk or RAM based storage.Sounds are displayed graphically as a waveform and the level of detail can be changed by zooming in or out. The waveform can bereshaped directly with the mouse when zoomed in.Many audio effects, such as Dynamics, Echo, Flanger, Mechanize, Reverse, Pan, and Time Warp, enhance, distort, or alter sounds invarious ways.Sophisticated filters such as the Noise Reduction, and Pop/Click, filters help restore and remaster audio.
GoldWave Manual file:///C:/Program%20Files/GoldWave/goldwave.htm
5 sur 73 17/09/2007 10:01
The Batch Processing command converts a group of sound files to a different format and type and applies any number of effects.The CD Reader tool digitally copies audio from a CD to a file on your system.An Expression Evaluatorgenerates everything from simple tones to complex filters. Expressions for telephone dial tones, waves, and effects are included.For maximum extensibility, several plug-in interfaces are supported for file formats, visuals, and effects.
How to Use This Manual
Familiarity with the Windows interface, such as property windows, tool bars, scroll bars, etc., is recommended before reading this manual.
For those who are unfamiliar with digital audio, Appendix A briefly introduces some of the fundamentals of computer audio. Appendix Dgives a tutorial for recording audio from a turntable, removing noise, and splitting the file into tracks for CD-R burning. Appendix E containstroubleshooting information and answers to common questions.
Section II: Getting Started, covers system requirements and installation. Section III: Using GoldWave explains the interface and menu structure in detail. Topics are covered in the order that they appear in GoldWave's menu. Section IV: General Information, provides support, copyright, and warranty information.
Notation
Bold or link coloured text and a vertical bar are used to denote menu commands. File | New, for example, means to select the New command from the Filemenu. This notation is used to refer to other sections within this manual as well. In the above example, you can find information by looking forNew under the File Menu Commands section. If the first word is Start, then select the command from the main Windows task bar menustructure instead.
Options and settings are given in a fixed width font or in quotes.
A information icon emphasizes helpful information and techniques.
An exclamation mark emphasizes warnings and other important information.
II. Getting StartedThe following sections give instructions for installing and configuring GoldWave on your computer.
System Requirements
The minimum system requirements for GoldWave are:
Pentium based PC or compatibleMicrosoft® Windows® ME, 2000, XP or later128 Megabytes of RAM (256 MB recommended)100 Megabytes of hard disk spaceMouseSound card with a Windows compatible driver
If you need to edit large files, you will need a large amount of hard drive space. One minute of CD-quality sound requires 20 megabytes ofstorage. Editing a full CD requires at least 1GB of storage.
For editing audio in movie files and editing mp3 files, you must have a recent version of Windows Media Player installed.
Installation
The following section gives instructions for installing GoldWave on your system. Before running GoldWave make sure that you have anappropriate Windows sound driver installed. If you need to add one, use the "Add New Hardware" item under Start | Settings | ControlPanel. The driver and installation instructions should be included with your sound card. The current settings for your sound card are listedunder the "Sound, video, and game controllers" item of the Device Manager. The Device Manager is found under "My Computer" Propertiesor the System icon in the Control Panel.
GoldWave Manual file:///C:/Program%20Files/GoldWave/goldwave.htm
6 sur 73 17/09/2007 10:01
Installation From a Downloaded Program (Exe) File
If you downloaded the self-installing version of GoldWave, simply run the download. It prompts you to provide a destination folder whereGoldWave will be installed. A desktop shortcut and Windows Start menu items are created automatically, if desired.
General Installation Instructions
Check the readme.txt file for any additional information not available at the time this manual was created. New versions of GoldWave will beavailable from the web site:
http://www.goldwave.com
Setting Audio Devices
To choose which audio devices to use for playback and recording, use the properties button on GoldWave's Control window, thenchoose the Device tab. Drop down lists of installed playback and recording devices are presented. Select appropriate devices from thelists. Use the "PCM 16 bit" quality setting unless your card supports the higher settings.
Additional Settings
Use Options | Storage to set a sound folder and temporary storage folder.Use Options | Tool Bar to customize tool bars.Use Options | Colours to change Sound window colours.
To associate file types with GoldWave, such as wav or mp3 files:
Run Windows Explorer1.Choose Folder Options from the Tool menu.2.Choose the File Types tab.3.Select the file type from the list or use the New button to create a file type.4.Choose the Advanced button. If there is no Advanced button, choose the Restore button first, then the Advanced button that appears in its place.
5.
Select Open from the Actions list, then choose the Edit button. If Open is not listed, or choose the New button then enter Open in the Action box.
6.
Choose the Browse button to find the GoldWave program (usually in C:\Program Files\GoldWave).7.Choose the Open button.8.Add any command line parameters to the end of the "Application used to perform action" box.9.Add "%1" (with quotes) to the end of the line.Examples:
"C:\Program Files\GoldWave\GoldWave.exe" -same "%1""C:\Program Files\GoldWave\GoldWave.exe" -play "%1"
10.
Choose the OK button.11.Optional: Choose the Set Default button.12.Choose the OK button to close each of the remaining windows.13.
See Windows help for more information about file type associations.
III. Using GoldWaveThe following sections give information about GoldWave's user interface, features, and menu structure. The first few sections provide generaloverviews, while subsequent sections provide details on menu commands.
Interface Overview
GoldWave is composed of three windows: the Main window, Sound windows, and the Control window.
Main Window
The Main window contains the main menu, two rows of tool bar buttons, and status bars (see Main Window figure below). It groups togetherand manages all the Sound windows.

GoldWave Manual file:///C:/Program%20Files/GoldWave/goldwave.htm
7 sur 73 17/09/2007 10:01
Figure: Main Window
Tool Bar
The tool bar buttons provide quick access to many of the frequently used commands. The upper bar holds File, Edit, View, and Toolcommands, while the lower bar contains Effect commands. The function of each button is displayed in the lower status bar when the mousepointer is positioned directly over it. Use the Options | Tool Bar command to configure the tool bar.
Status Bar
The status bars show attributes of the Sound window, including the sampling rate, length, selected region, channels, and general file formatinformation. By right-clicking the mouse pointer over any status item that has a menu icon on its right side, the unit or format for that statusitem can be changed. If you right-click the mouse pointer over the length item, for example, you are presented with a menu showing length interms of storage size, time, and samples. If you right-click on the channels item, then you can select a single channel or both channels of astereo file.
Figure: Status Bar Contents
Sound Windows
Sound windows are created when you open a file. These windows contain a waveform graph of the sound with a time axis near the bottom. Forstereo sounds, two separate graphs are shown. The top green graph is the left channel and the bottom red graph is the right channel. Theselected part of the sound is highlighted with a blue background between two cyan markers.
A cue pointslot is located just below the graph. Cue points are shown as inverted yellow and blue triangles. Overlapping cue points are shown in slightlydifferent colours.
Near the bottom of the Sound window, a small Overview area shows the entire sound with the selected part in highlighted green and/or redwith a blue background and the rest with a black background. A beveled frame indicates what part of the sound is currently displayed andzoomed. Initially, the entire sound is selected.
You can change the selection by using the mouse buttons. See Editing Overview for details. You can configure the window size and axesformat of Sound windows using the Options | Window command. The Options | Colours command sets the colour scheme.
Control Window
The Control window interacts directly with your sound card. It contains buttons to play and record sounds as well as controls for volume,
GoldWave Manual file:///C:/Program%20Files/GoldWave/goldwave.htm
8 sur 73 17/09/2007 10:01
balance, and playback speed. Real-time visuals display audio data whenever a sound is played or recorded. See Control Overview for more details.
Progress Window
When performing time consuming processing, such as decoding a compressed file when opening it, or encoding a file when saving it, or usingmost effects, a progress window appears showing the amount of processing done and the estimated time remaining to complete it. Use theCancel button to abort processing at any time. Use the Priority setting to reduce the load on the computer's processor to give more time to otherprograms.
Some poorly designed (or overclocked) computers overheat when performing complex processing, such as Noise Reduction and saving inMP3 or other compressed formats. Reducing the Priority setting helps to avoid thermal related errors.
Mouse Wheel
In GoldWave the mouse wheel supports zooming, scrolling and selection, or playback speed adjustments. Click the middle mouse button or thewheel button to display a menu to configure the behaviour of the mouse wheel. The mouse wheel works only when the Main window is activeand only on the currently active Sound window.
Zoom In/Out
Zooms in and out of the waveform when the wheel is rotated up or down. The location of the mouse pointer is used as the focal point.Position the mouse over the area of interest when using the wheel. See View Menu Commands for information about viewing parts ofthe waveform in more detail.
Scroll and Select
When zoomed in, rotating the wheel up or down scrolls the waveform left or right. Holding the shift key moves the start marker. Holdingboth the shift and control keys moves the finish marker. Holding just the control key scrolls vertically, when zoomed in vertically. SeeEditing Overview for more information about selecting part of a file.
Playback Speed
Increases or decreases the playback speed by changing the Speed fader on the Control window.
Entering Times
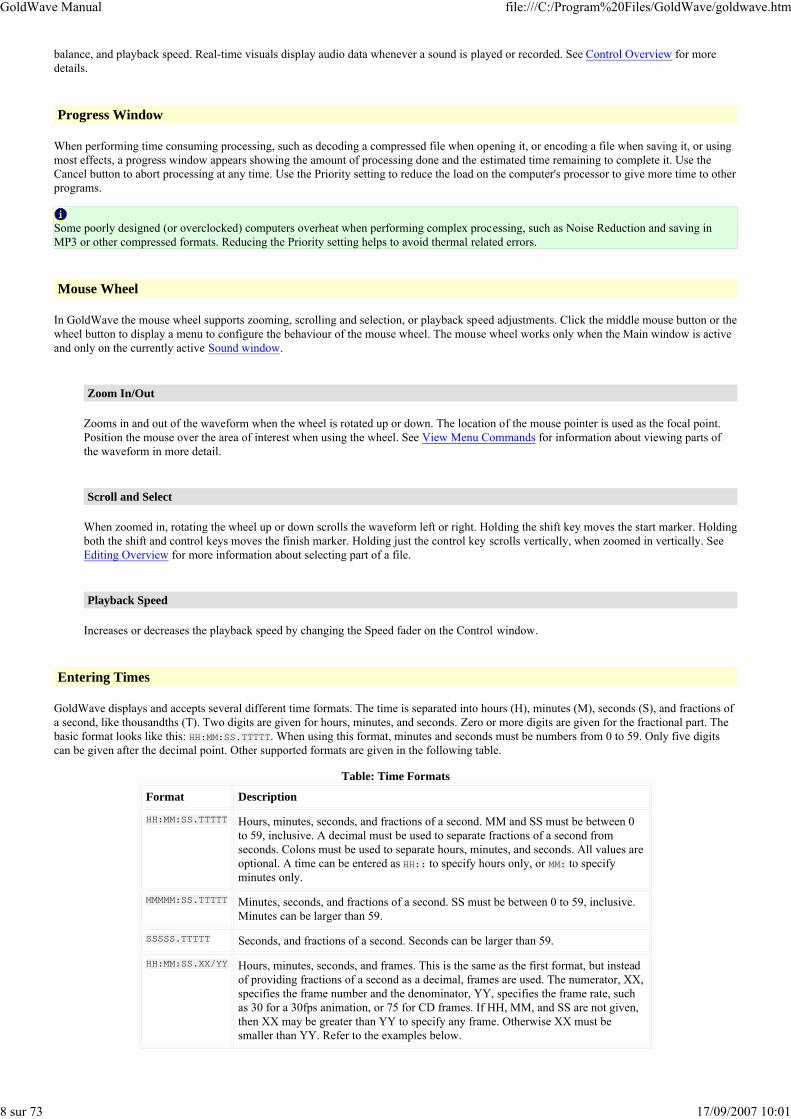
GoldWave displays and accepts several different time formats. The time is separated into hours (H), minutes (M), seconds (S), and fractions ofa second, like thousandths (T). Two digits are given for hours, minutes, and seconds. Zero or more digits are given for the fractional part. Thebasic format looks like this: HH:MM:SS.TTTTT. When using this format, minutes and seconds must be numbers from 0 to 59. Only five digitscan be given after the decimal point. Other supported formats are given in the following table.
Table: Time Formats
Format Description
HH:MM:SS.TTTTT Hours, minutes, seconds, and fractions of a second. MM and SS must be between 0to 59, inclusive. A decimal must be used to separate fractions of a second fromseconds. Colons must be used to separate hours, minutes, and seconds. All values areoptional. A time can be entered as HH:: to specify hours only, or MM: to specify minutes only.
MMMMM:SS.TTTTT Minutes, seconds, and fractions of a second. SS must be between 0 to 59, inclusive.Minutes can be larger than 59.
SSSSS.TTTTT Seconds, and fractions of a second. Seconds can be larger than 59.
HH:MM:SS.XX/YY Hours, minutes, seconds, and frames. This is the same as the first format, but insteadof providing fractions of a second as a decimal, frames are used. The numerator, XX,specifies the frame number and the denominator, YY, specifies the frame rate, suchas 30 for a 30fps animation, or 75 for CD frames. If HH, MM, and SS are not given,then XX may be greater than YY to specify any frame. Otherwise XX must besmaller than YY. Refer to the examples below.
GoldWave Manual file:///C:/Program%20Files/GoldWave/goldwave.htm
9 sur 73 17/09/2007 10:01
Table: Time Examples
Example Meaning
5 Five seconds
3:00 Three minutes
9: Nine minutes
2:: Two hours
7.1/2 Seven and a half seconds
5123/60 Frame number five thousand one hundred twenty-three in a sixty frames per second file
34:25.15/75 The fifteenth CD aligned frame beyond thirty-four minutes and twenty-five seconds.
1::.3/4 One hour and three-quarters of a second.
12:34:56.789 Twelve hours, thirty-four minutes, fifty-six seconds, and seven hundred eighty-ninethousandths of a second.
.67 Sixty-seven hundredths of a second.
Control Overview
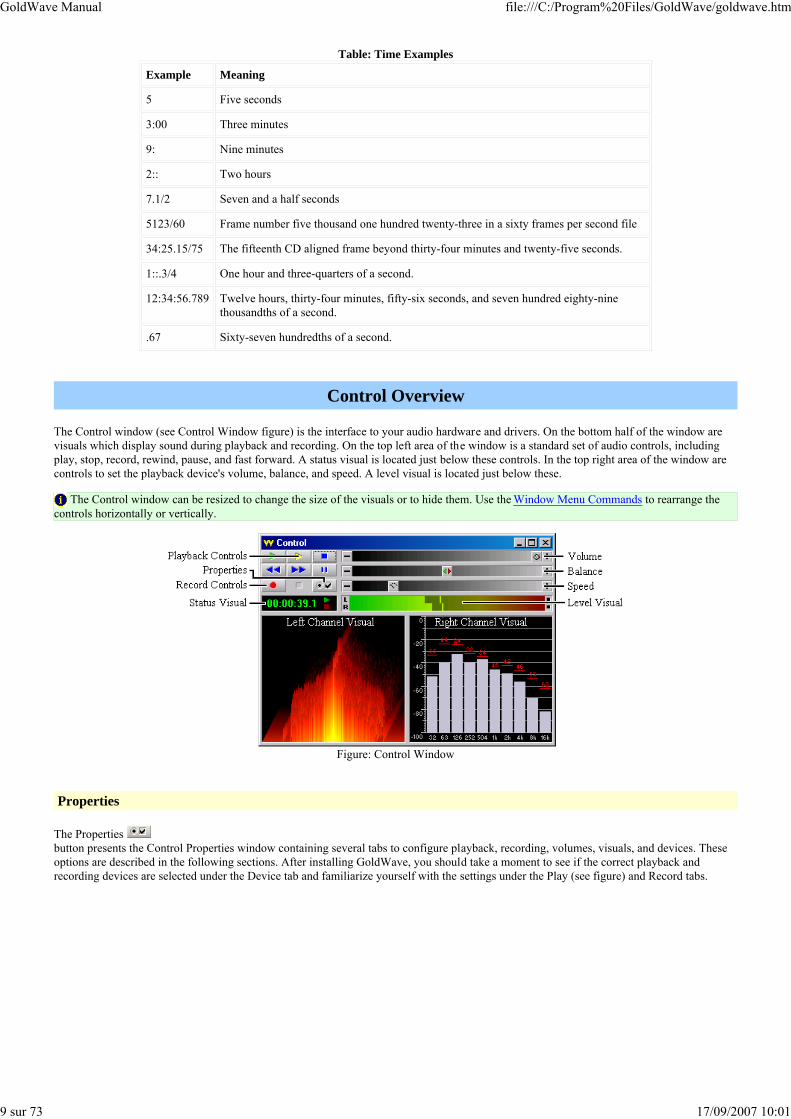
The Control window (see Control Window figure) is the interface to your audio hardware and drivers. On the bottom half of the window arevisuals which display sound during playback and recording. On the top left area of the window is a standard set of audio controls, includingplay, stop, record, rewind, pause, and fast forward. A status visual is located just below these controls. In the top right area of the window arecontrols to set the playback device's volume, balance, and speed. A level visual is located just below these.
The Control window can be resized to change the size of the visuals or to hide them. Use the Window Menu Commands to rearrange thecontrols horizontally or vertically.
Figure: Control Window
Properties
The Properties button presents the Control Properties window containing several tabs to configure playback, recording, volumes, visuals, and devices. Theseoptions are described in the following sections. After installing GoldWave, you should take a moment to see if the correct playback andrecording devices are selected under the Device tab and familiarize yourself with the settings under the Play (see figure) and Record tabs.
GoldWave Manual file:///C:/Program%20Files/GoldWave/goldwave.htm
10 sur 73 17/09/2007 10:01
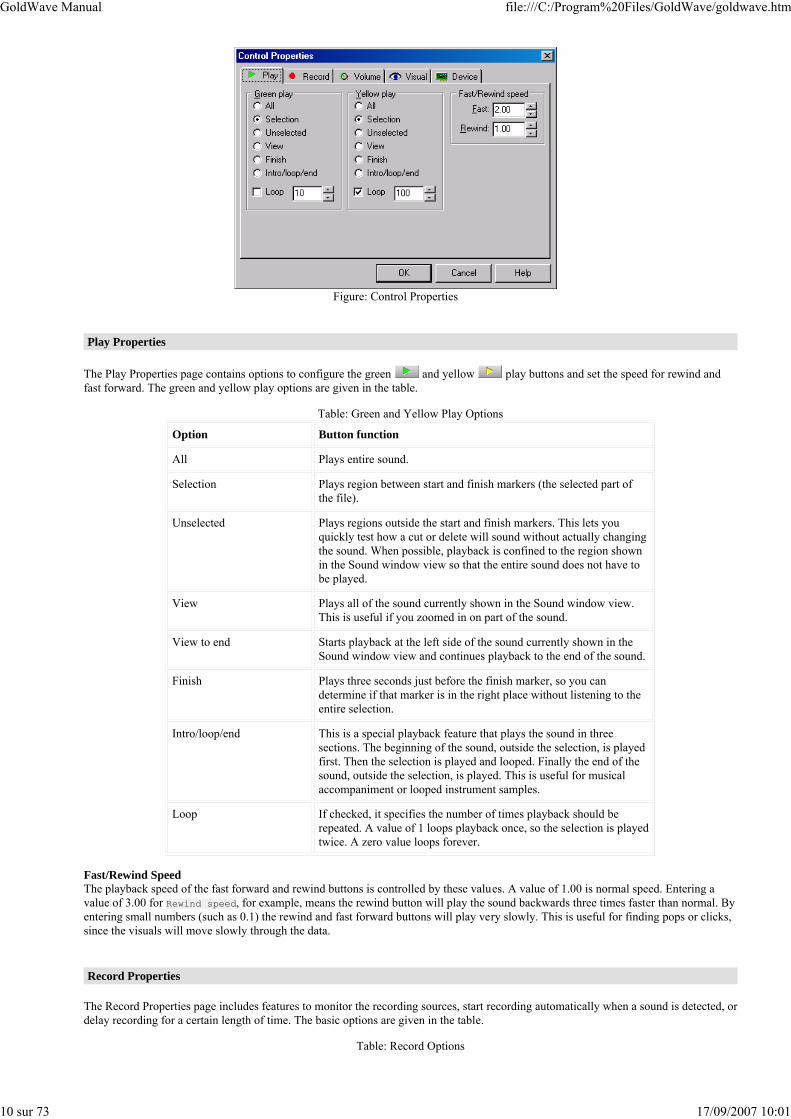
Figure: Control Properties
Play Properties
The Play Properties page contains options to configure the green and yellow play buttons and set the speed for rewind andfast forward. The green and yellow play options are given in the table.
Table: Green and Yellow Play Options
Option Button function
All Plays entire sound.
Selection Plays region between start and finish markers (the selected part ofthe file).
Unselected Plays regions outside the start and finish markers. This lets youquickly test how a cut or delete will sound without actually changingthe sound. When possible, playback is confined to the region shownin the Sound window view so that the entire sound does not have tobe played.
View Plays all of the sound currently shown in the Sound window view.This is useful if you zoomed in on part of the sound.
View to end Starts playback at the left side of the sound currently shown in theSound window view and continues playback to the end of the sound.
Finish Plays three seconds just before the finish marker, so you candetermine if that marker is in the right place without listening to theentire selection.
Intro/loop/end This is a special playback feature that plays the sound in threesections. The beginning of the sound, outside the selection, is playedfirst. Then the selection is played and looped. Finally the end of thesound, outside the selection, is played. This is useful for musicalaccompaniment or looped instrument samples.
Loop If checked, it specifies the number of times playback should berepeated. A value of 1 loops playback once, so the selection is playedtwice. A zero value loops forever.
Fast/Rewind SpeedThe playback speed of the fast forward and rewind buttons is controlled by these values. A value of 1.00 is normal speed. Entering avalue of 3.00 for Rewind speed, for example, means the rewind button will play the sound backwards three times faster than normal. Byentering small numbers (such as 0.1) the rewind and fast forward buttons will play very slowly. This is useful for finding pops or clicks,since the visuals will move slowly through the data.
Record Properties
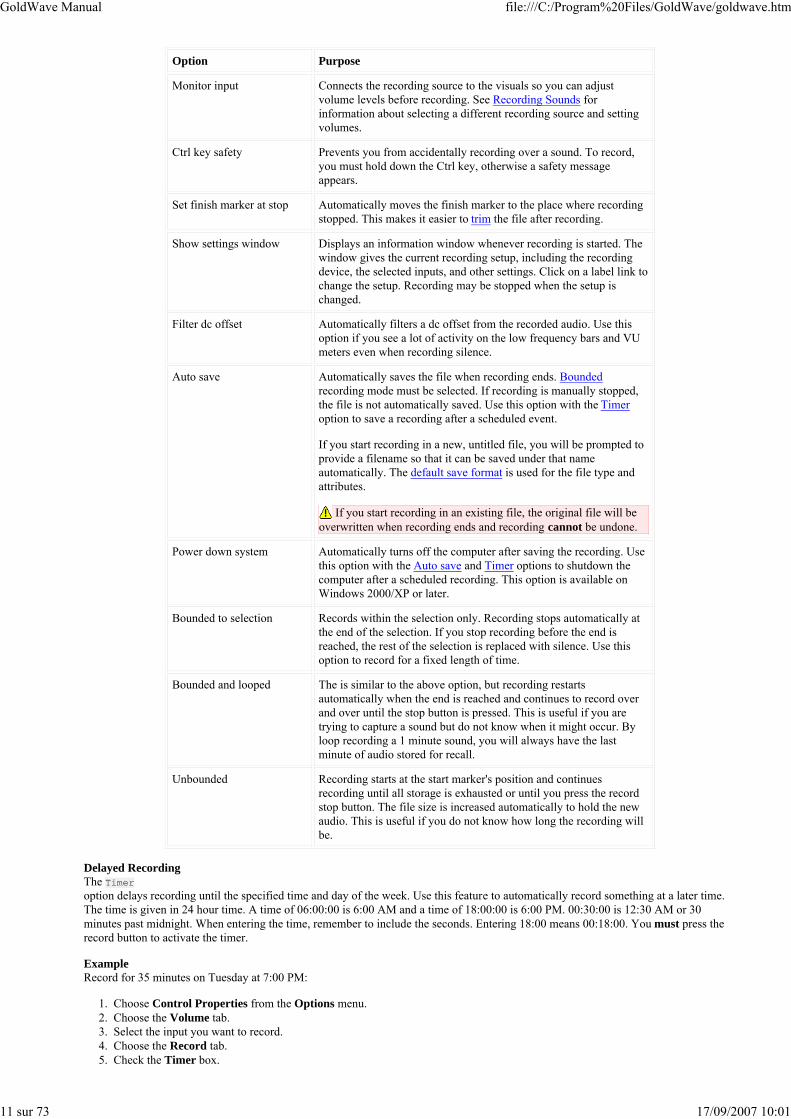
The Record Properties page includes features to monitor the recording sources, start recording automatically when a sound is detected, ordelay recording for a certain length of time. The basic options are given in the table.
Table: Record Options
GoldWave Manual file:///C:/Program%20Files/GoldWave/goldwave.htm
11 sur 73 17/09/2007 10:01
Option Purpose
Monitor input Connects the recording source to the visuals so you can adjustvolume levels before recording. See Recording Sounds for information about selecting a different recording source and settingvolumes.
Ctrl key safety Prevents you from accidentally recording over a sound. To record,you must hold down the Ctrl key, otherwise a safety messageappears.
Set finish marker at stop Automatically moves the finish marker to the place where recordingstopped. This makes it easier to trim the file after recording.
Show settings window Displays an information window whenever recording is started. Thewindow gives the current recording setup, including the recordingdevice, the selected inputs, and other settings. Click on a label link tochange the setup. Recording may be stopped when the setup ischanged.
Filter dc offset Automatically filters a dc offset from the recorded audio. Use thisoption if you see a lot of activity on the low frequency bars and VUmeters even when recording silence.
Auto save Automatically saves the file when recording ends. Boundedrecording mode must be selected. If recording is manually stopped,the file is not automatically saved. Use this option with the Timeroption to save a recording after a scheduled event.
If you start recording in a new, untitled file, you will be prompted toprovide a filename so that it can be saved under that nameautomatically. The default save format is used for the file type andattributes.
If you start recording in an existing file, the original file will beoverwritten when recording ends and recording cannot be undone.
Power down system Automatically turns off the computer after saving the recording. Usethis option with the Auto save and Timer options to shutdown thecomputer after a scheduled recording. This option is available onWindows 2000/XP or later.
Bounded to selection Records within the selection only. Recording stops automatically atthe end of the selection. If you stop recording before the end isreached, the rest of the selection is replaced with silence. Use thisoption to record for a fixed length of time.
Bounded and looped The is similar to the above option, but recording restartsautomatically when the end is reached and continues to record overand over until the stop button is pressed. This is useful if you aretrying to capture a sound but do not know when it might occur. Byloop recording a 1 minute sound, you will always have the lastminute of audio stored for recall.
Unbounded Recording starts at the start marker's position and continuesrecording until all storage is exhausted or until you press the recordstop button. The file size is increased automatically to hold the newaudio. This is useful if you do not know how long the recording willbe.
Delayed RecordingThe Timeroption delays recording until the specified time and day of the week. Use this feature to automatically record something at a later time.The time is given in 24 hour time. A time of 06:00:00 is 6:00 AM and a time of 18:00:00 is 6:00 PM. 00:30:00 is 12:30 AM or 30minutes past midnight. When entering the time, remember to include the seconds. Entering 18:00 means 00:18:00. You must press the record button to activate the timer.
ExampleRecord for 35 minutes on Tuesday at 7:00 PM:
Choose Control Properties from the Options menu.1.Choose the Volume tab.2.Select the input you want to record.3.Choose the Record tab.4.Check the Timer box.5.
GoldWave Manual file:///C:/Program%20Files/GoldWave/goldwave.htm
12 sur 73 17/09/2007 10:01
Enter 19:00:00 in the Time box.6.Select Tuesday from the Day drop down list.7.Make sure the Level activated box is not checked.8.Make sure the Bounded to selection Record mode is selected.9.Choose OK.10.Choose New from the File menu.11.Select the quality settings you want.12.Enter 35:00 in the Initial file length box.13.Choose OK.14.Press the record button to start the timer. The elapsed time should start counting down or show 99:99:99.9.15.
Remember to press the record button to activate delayed recording (timer or level activated).
Turn off any power management settings that may power down the computer.
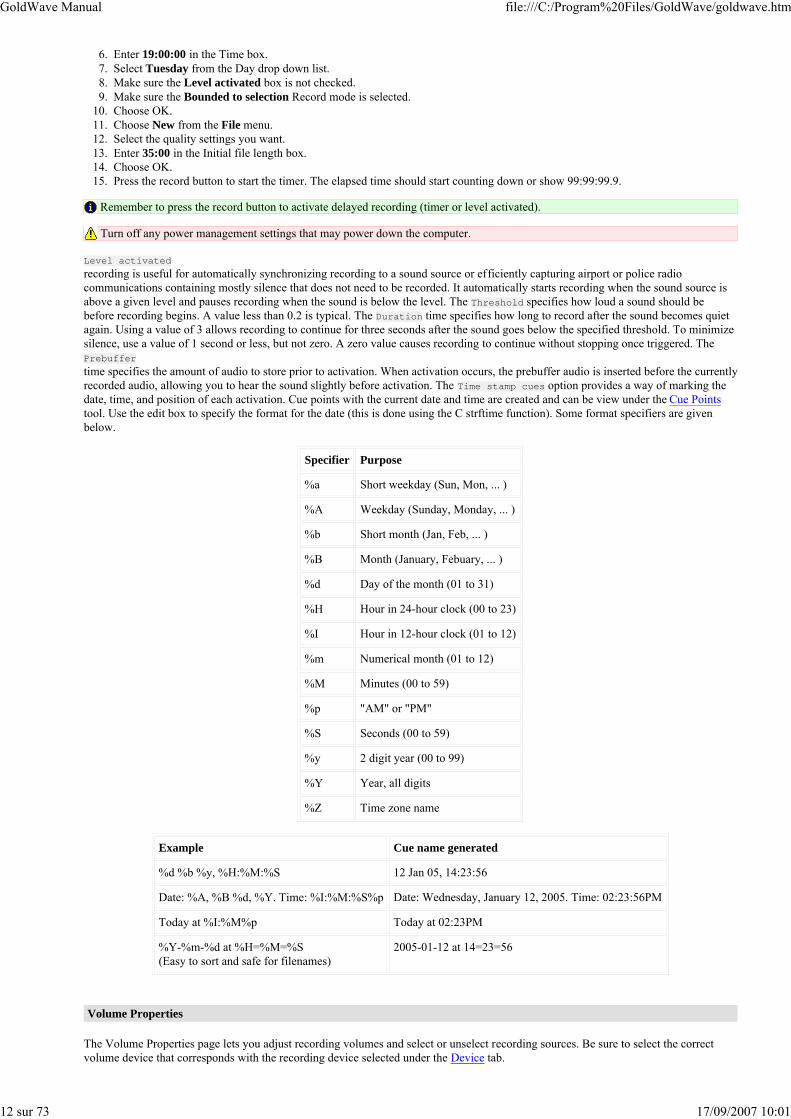
Level activatedrecording is useful for automatically synchronizing recording to a sound source or efficiently capturing airport or police radiocommunications containing mostly silence that does not need to be recorded. It automatically starts recording when the sound source isabove a given level and pauses recording when the sound is below the level. The Threshold specifies how loud a sound should bebefore recording begins. A value less than 0.2 is typical. The Duration time specifies how long to record after the sound becomes quietagain. Using a value of 3 allows recording to continue for three seconds after the sound goes below the specified threshold. To minimizesilence, use a value of 1 second or less, but not zero. A zero value causes recording to continue without stopping once triggered. ThePrebuffertime specifies the amount of audio to store prior to activation. When activation occurs, the prebuffer audio is inserted before the currentlyrecorded audio, allowing you to hear the sound slightly before activation. The Time stamp cues option provides a way of marking the date, time, and position of each activation. Cue points with the current date and time are created and can be view under the Cue Pointstool. Use the edit box to specify the format for the date (this is done using the C strftime function). Some format specifiers are givenbelow.
Specifier Purpose
%a Short weekday (Sun, Mon, ... )
%A Weekday (Sunday, Monday, ... )
%b Short month (Jan, Feb, ... )
%B Month (January, Febuary, ... )
%d Day of the month (01 to 31)
%H Hour in 24-hour clock (00 to 23)
%I Hour in 12-hour clock (01 to 12)
%m Numerical month (01 to 12)
%M Minutes (00 to 59)
%p "AM" or "PM"
%S Seconds (00 to 59)
%y 2 digit year (00 to 99)
%Y Year, all digits
%Z Time zone name
Example Cue name generated
%d %b %y, %H:%M:%S 12 Jan 05, 14:23:56
Date: %A, %B %d, %Y. Time: %I:%M:%S%p Date: Wednesday, January 12, 2005. Time: 02:23:56PM
Today at %I:%M%p Today at 02:23PM
%Y-%m-%d at %H=%M=%S(Easy to sort and safe for filenames)
2005-01-12 at 14=23=56
Volume Properties
The Volume Properties page lets you adjust recording volumes and select or unselect recording sources. Be sure to select the correctvolume device that corresponds with the recording device selected under the Device tab.
GoldWave Manual file:///C:/Program%20Files/GoldWave/goldwave.htm
13 sur 73 17/09/2007 10:01
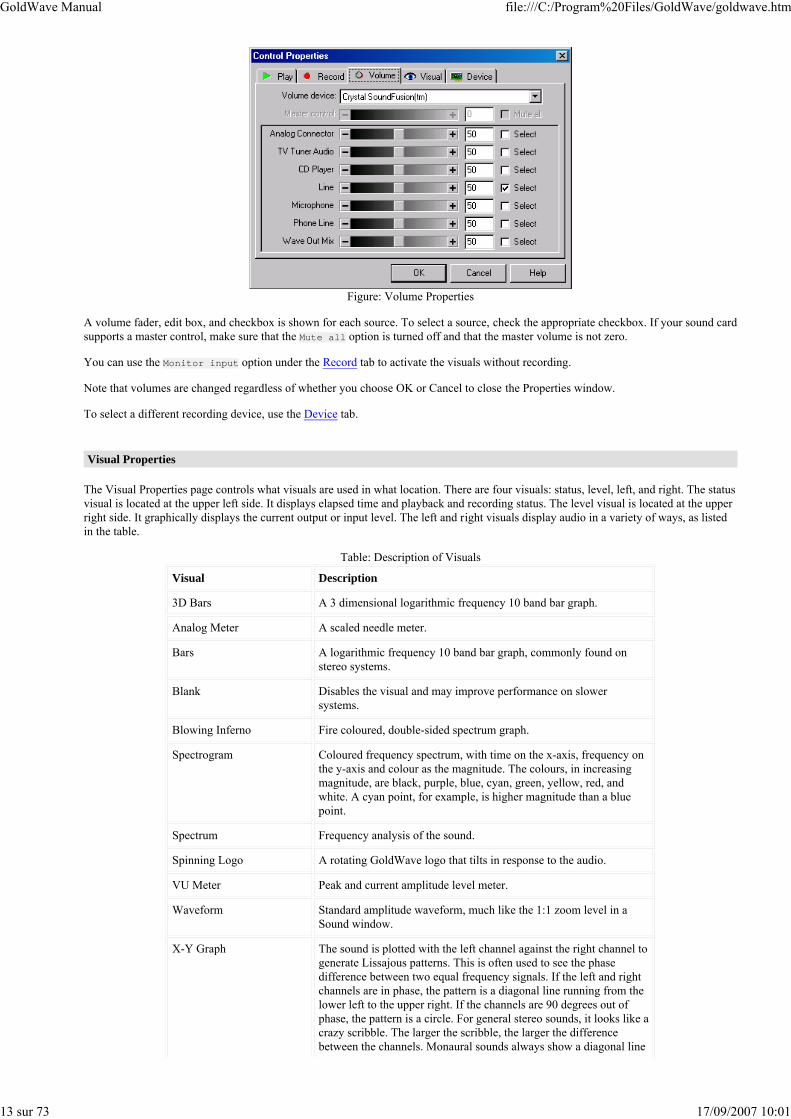
Figure: Volume Properties
A volume fader, edit box, and checkbox is shown for each source. To select a source, check the appropriate checkbox. If your sound cardsupports a master control, make sure that the Mute all option is turned off and that the master volume is not zero.
You can use the Monitor input option under the Record tab to activate the visuals without recording.
Note that volumes are changed regardless of whether you choose OK or Cancel to close the Properties window.
To select a different recording device, use the Device tab.
Visual Properties
The Visual Properties page controls what visuals are used in what location. There are four visuals: status, level, left, and right. The statusvisual is located at the upper left side. It displays elapsed time and playback and recording status. The level visual is located at the upperright side. It graphically displays the current output or input level. The left and right visuals display audio in a variety of ways, as listedin the table.
Table: Description of Visuals
Visual Description
3D Bars A 3 dimensional logarithmic frequency 10 band bar graph.
Analog Meter A scaled needle meter.
Bars A logarithmic frequency 10 band bar graph, commonly found on stereo systems.
Blank Disables the visual and may improve performance on slower systems.
Blowing Inferno Fire coloured, double-sided spectrum graph.
Spectrogram Coloured frequency spectrum, with time on the x-axis, frequency onthe y-axis and colour as the magnitude. The colours, in increasingmagnitude, are black, purple, blue, cyan, green, yellow, red, andwhite. A cyan point, for example, is higher magnitude than a bluepoint.
Spectrum Frequency analysis of the sound.
Spinning Logo A rotating GoldWave logo that tilts in response to the audio.
VU Meter Peak and current amplitude level meter.
Waveform Standard amplitude waveform, much like the 1:1 zoom level in a Sound window.
X-Y Graph The sound is plotted with the left channel against the right channel togenerate Lissajous patterns. This is often used to see the phasedifference between two equal frequency signals. If the left and rightchannels are in phase, the pattern is a diagonal line running from thelower left to the upper right. If the channels are 90 degrees out ofphase, the pattern is a circle. For general stereo sounds, it looks like acrazy scribble. The larger the scribble, the larger the differencebetween the channels. Monaural sounds always show a diagonal line
GoldWave Manual file:///C:/Program%20Files/GoldWave/goldwave.htm
14 sur 73 17/09/2007 10:01
since the left and right data are the same.
Some visuals have properties you can set, such as axes ranges, colours, display modes, etc. Right-click on a visual and selectProperties from the popup menu to see these properties. You can resize the Control window to make the visuals larger or smaller.
Quick Select MenuUse the quick select menu list to select your favourite visuals. The selected visuals appear in the popup menu when you right-click on avisual in the Control window.
Frame RateThe frame rate sets the number of times per second that visuals are updated and drawn. A value of 60 or less gives good results, but youmay want to use higher values to get an extra detailed spectrogram. The actual frame rate is limited by your system's speed. Use a lowerframe rate for older systems.
FFT WindowWhen calculating any frequency related graphs, a window function must be used to smooth out analysis at the endpoints. The Kaiser 7 orHamming windows are usually the best, but you can try the other windows just to compare the results.
Device Properties
The Device Properties page contains drop down lists for playback and recording devices. Normally you do not need to change thesesettings unless you have more than one sound card or you encounter a problem.
The Quality settings control the bit depthto use. Most cards support 16 bit quality, but more recent cards support 24 bit quality. Sound card drivers on recent versions of Windowsshould support the IEEE 32 bit floating point setting, but often that is not the case, so that setting should not be used until properlysupported by the industry (probably never).
The playback Prebuffer/latencyfader sets the amount of audio to store before sending it to the device. Using a higher value may eliminate gaps and stutters on a slowsystem, but it increases the delay between changing effect settings and hearing those changes during previewing. Using lower valuesmakes effect previewing more responsive, but may cause gaps and stutters if the system is too slow to process all the audio or emulatedDirectX drivers are selected. This setting does not apply to recording. Values between 0.4 and 0.8 are recommended.
The Alternative playback initializationoption helps to avoid some of the many problems with sound drivers and can eliminate deadlock (freezes) when previewing certainDirectX Audio Plug-ins. It eliminates a loud click that occurs at the start of playback on some drivers. This option causes the DirectXsound buffer to be recreated each time playback is started rather than reusing the same buffer. It begins playback on a separate threadwithout pausing or holding up the main program thread. This makes the interface seem more responsive when starting playback.
The Mono source options specify the channel to use when recording a mono file: Left channel captures audio on the left channel only;Right channel captures audio on the right channel only; Average captures audio on both channels and averages it into a single channel.
Joystick controlallows playback and recording to be controlled using a game controller or a foot pedal. The first controller detected is used. Thefollowing table lists the modes of operation.
Table: Joystick Control
Mode Description
None Joystick control is disabled.
Game controller The main directional pad controls playback. Left is rewind, right isfast forward, down is pause, and up unpauses. The first button(button 1 or A) starts or stops playback. The second button (button 2or B) starts or stops recording.
Foot pedal, hold A three switch pedal controls playback, rewind, and fast forward.The pedal must be held down. Playback pauses when the pedal isreleased.
Foot pedal, toggle A three switch pedal controls playback, rewind, and fast forward.Tapping the pedal starts or pauses playback.
Use the Configurebutton to configure foot pedal controls. Different brands of foot pedals use different switch combinations. After choosing the Configurebutton, hold down each pedal for two seconds starting with the play pedal, then the rewind pedal, and finally the fast forward pedal. If arewind or fast forward pedal is not available, wait for five seconds and that pedal will be skipped. The OK button becomes enabled whenall pedals are assigned or skipped.
Test Properties
GoldWave Manual file:///C:/Program%20Files/GoldWave/goldwave.htm
15 sur 73 17/09/2007 10:01
Use the Troubleshootbutton to test audio devices and list status information. The information may be helpful in tracking down recording or playbackproblems.
Playing Sounds
After opening a sound (see File | Open), you use the green play button or the yellow play button to play it. Both buttons play theselection by default, but you can configure these buttons under the Play tab of the Control Properties window to play different parts of the file.Right-click on the button to quickly access some of those settings.
To start playback at any point in the sound, click on the time line under the waveform in the Sound window or right-click on the waveform andchoose the Play From Here command from the popup menu. You can right-click-and-drag to select a part of the sound to play as well.
While a sound is playing, it is displayed on the visuals. The current position is displayed in the Sound window as a white, vertical line on thewaveform. You can move the start and finish selection markers to the playback position by using the bracket keys, [ and ] orEdit | Marker | Drop... commands. See Editing Overviewfor more information about changing the selection. You can set cue points by using the Ctrl+Q key or the Edit | Cue Point | Drop Cuecommand.
To play the entire sound, configure the Yellow play button to All. To play the selection, configure the Yellow play button to Selection.
Pausing Playback
While a sound is playing, you can pause it with the pause button. Remember to use either play or stop later. Pause freezes the visuals andthe current position marker so you can see the shape of the sound in the visuals or move the selection markers.
Stopping Playback
Playback can be stopped immediately with the stop button. The current position is reset to the beginning. Note that recording is stopped using a different button.
Rewinding and Fast Forwarding
Use the rewind button or fast forward button to quickly move back and forward through the sound. The current position is displayed in the Sound window as a white, vertical line onthe waveform. You can adjust the speed of rewind and fast forward with the Play tab of the Control Properties window, as describedpreviously.
Recording Sounds
Use the record button to record your own sounds. Before you start, you need to create a new file using the File | New command. You canmake room for recording in an existing sound by using the Edit | Insert Silence command. Audio is recorded into the selection of the Soundwindow replacing any audio that was previously there. Recording stops automatically when the end of the selection is reached (bounded mode) or when no more storage is available (unbounded mode). You can stop recording at any time with the recording stop button. A recordingpause buttons appears in place of the record button so that you can pause recording. Many recording options are available in the Recordtab of the Control Properties window. Right-click on the record button to quickly access some of these options.
Sound cards usually have several recording sources, such as microphone, line-in, CD, and MIDI. To select and adjust a recording source, usethe Volume tab of the Control Properties window or the Windows Volume Control accessory. To use the Volume Control accessory, useStart | Programs | Accessories | Entertainment | Volume Control (it may be under Multimedia). Next, use the Options | Propertiescommand in the Volume Control window. In the Properties window, select the Recording option and make sure all the items in the list arechecked. Finally, choose OK to see the Recording Control. You can select a recording source and adjust the volume. To adjust the volumebefore recording, use the Monitor input option under the Record tab of the Control Properties window.
Remember to press the playback button on the cassette player, record player, or CD player when recording from an external device. See theAppendix D for a tutorial.
If you want to record vocals over existing music, you'll need to use two files in GoldWave. You can record in one file while playing the other.Some sound cards have a "Stereo Mix" (or "What U Hear" or similar) recording source you can select that will allow you to record both themicrophone input and the playing sound at the same time. If that source is not available, you'll need to mix the two files after recording instead.
For long recordings, turn off any power management settings that may power down the computer.
GoldWave Manual file:///C:/Program%20Files/GoldWave/goldwave.htm
16 sur 73 17/09/2007 10:01
Volume and Balance Faders
Use the top volume fader to change the playback volume. Move the fader right or click the plus button to increase the volume. Move it left todecrease the volume. The current volume is shown numerically in a popup tip window to the left of the fader. A value of 100% is full volume.
Use the middle balance fader to change the left/right balance. Move the fader in the direction you want to shift the balance. Right-click on thefader to display a popup menu to quickly set the balance left, right, or center.
Note that these faders do not change the recording volume. See Recording Sounds for more information.
Speed Fader
The playback speed of the audio device can be changed with the bottom speed fader. Move the fader right to increase the speed, and left todecrease it. The relative speed is shown numerically to the left of the fader in a popup tip window. Right-click on the fader to display a popupmenu to quickly set the speed to commonly used ratios. Note that changing the speed also changes the pitch like spinning a vinyl record fasteror slower.
Editing Overview
Selecting Part of a Sound
Almost all commands in GoldWave operate on the currently selected part of a sound. The selected part, or selection, is the highlighted part of the sound graph between two vertical markers (see Main Window figure). The vertical markers are cyan lines located to the left side (startmarker) and right side (finish marker) of the view.
GoldWave provides several ways of setting the selection. You can:
Use the standard click-and-drag method used in most other Windows programs.Click the right mouse button to display a menu where you can choose Set Start Marker or Set Finish Marker.Click-and-drag the left mouse button over one of the cyan markers to drag it (useful for precise adjustments of the end points).Click-and-drag using the right mouse button, then choose Select from the menu that appears.Use the Edit | Marker | Set command.Use the Edit | Channel submenu to select one channel of a stereo file.
If you just click the left mouse button without dragging, the start marker is moved. If you just click the right mouse button, a context menuappears, which can be used to start playback at any position. If you click-and-drag with the right mouse button, you can play or zoom in on thatarea without altering the current selection.
Additional notes and techniques:
To use the old style of selecting part of a sound (in v4 and earlier), enable the setting under the Options | Window command. Note thatnone of the new selection features work if you enable that setting.You cannot place the finish marker before the start marker. The same is true for setting the start marker after the finish marker.Mouse selection methods work in both the large sound graph or in the small Overview graph.The Edit | Marker | Snap to zero-crossingfeature helps to minimize pops and clicks between edit points by finding a point where the waveform is close to zero amplitude.To select a certain part of the sound while playing it by using the [ and ] (bracket) keys or the Drop commands under the Edit | Markersubmenu. You can use the rewind and fast forward buttons to quickly find a sound.In most cases, editing and effects are performed only on the selection. Some effects, such as the Resample, and Playback Rate alter theentire sound.
Redrawing the Waveform with the Mouse
You can redraw the waveform with the mouse to remove pops/clicks or other small defects. To do this, you must first zoom in so thatindividual samples are visible (see View | Zoom 1:1 or View | Zoom 10:1).
Zoom in 1:1 or closer.1.Place the mouse arrow directly over the waveform. The arrow will change into a target crosshair.2.Click and hold the left mouse button.3.Move the mouse to redraw the waveform.4.Release the mouse button to finish the changes.5.
Cut & Paste, Mixing, and Crossfading
Cutting and pasting audio in GoldWave works much the same way as cutting and pasting text in a word processor. Mixing and cross-fading
GoldWave Manual file:///C:/Program%20Files/GoldWave/goldwave.htm
17 sur 73 17/09/2007 10:01
involves combining two or more sound together so that they play at the same time.
Cut & Paste
The Edit | Cut command removes sections of audio. The Edit | Paste command inserts sections of audio from the clipboard. Before youcan paste, you need to use Edit | Cut or Edit | Copy to place some audio into the clipboard.
To join several files together:
Open the first song.1.Open the second song.2.Choose Copy from the Edit menu.3.Close the second song.4.Choose End from the Edit | Paste At submenu.5.Open the third song.6.Choose Copy from the Edit menu.7.Close the third song.8.Choose End from the Edit | Paste At submenu.9.Repeat steps 6 to 9 for each song you want to join.10.
If you want to split a large file into smaller section, use the Cue Points tool, which has a Split File button.
Mixing
The Edit | Mix command mixes one sound with another so they both play at the same time.
To add vocals to music:
Open the sound containing the vocals.1.Choose Copy from the Edit menu.2.Open the sound containing the music.3.Choose Mix from the Edit menu.4.Enter a volume to mix the vocals (0dB = full volume).5.Adjust the mix time to align the vocals with the music, using the preview button as needed.6.Choose OK to process the mix.7.
When mixing more than a couple of sounds, you should reduce the mixing volume and the destination volume to prevent clippingdistortion. The volume of the destination sound can be reduced before mixing by using the Effect | Volume | Change Volume command.
Crossfading
A crossfade occurs when one sound fades out while another sound fades in. Radio stations often use crossfades to fade out the end of onesong while fading in the next song so there is no break in the music. GoldWave's Edit | Crossfade command does the same thing byusing the clipboard audio as the second song. The entire song to fade in must be copied to the clipboard before using the command.
To do a crossfade in GoldWave, follow these steps:
Open the first song (the one that will fade out at the end).1.Open the second song (the one that will fade in at the beginning).2.Choose Copy from the Edit menu.3.Close the second song (or activate the first song window).4.Choose Crossfade from the Edit menu.5.Set Duration to 5.00 second (or whatever you prefer).6.Select the End of file, and Linear fade curves settings.7.Choose OK to process the mix.8.
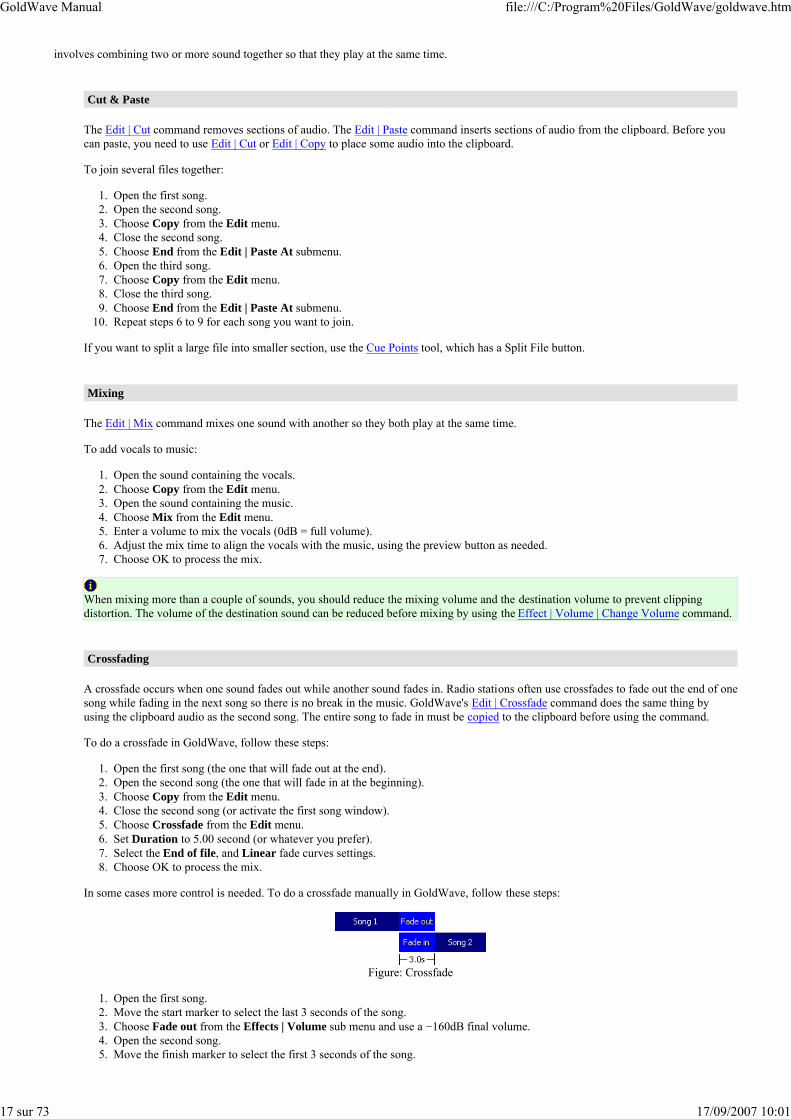
In some cases more control is needed. To do a crossfade manually in GoldWave, follow these steps:
Figure: Crossfade
Open the first song.1.Move the start marker to select the last 3 seconds of the song.2.Choose Fade out from the Effects | Volume sub menu and use a −160dB final volume.3.Open the second song.4.Move the finish marker to select the first 3 seconds of the song.5.
GoldWave Manual file:///C:/Program%20Files/GoldWave/goldwave.htm
18 sur 73 17/09/2007 10:01
Choose Fade in from the Effects | Volume sub menu and use an initial volume of −160dB.6.Choose Select all from the Edit menu.7.Choose Copy from the Edit menu.8.Click on the first song to activate that Sound window.9.Choose Mix from the Edit menu and use a volume of 0dB.10.Choose OK to process the mix.11.
For extra control, use the Effect | Volume | Shape Volume create custom fades before mixing.
Storage Overview
GoldWave supports both hard drive based editing and RAM based editing. These features are described below. Hard drive storage is enabledby default. Use the Options | Storageto configure the storage mode. For uncompressed files, GoldWave will read the audio directly from the original file. It does not copy a file totemporary storage until it is edited or modified. The original file is not changed until it is saved. For most compressed files, the data has to bedecompressed to temporary storage when the file is opened.
Working with compressed files may take much more storage than expected. MP3 files, for example, have to be decompressed into temporarystorage before GoldWave can edit them. Such files may require over 20 times the amount of compressed storage when opened. A 10MB MP3file could require over 200MB of storage space.
Hard Drive
In hard drive based editing, the entire sound is stored in a temporary file on your hard drive where it can be modified. This allows you to edithuge files provided the required drive space is available. Only a small amount of RAM is required for each opened sound. The drawback is thatediting and effects processing take more time since audio data must be transferred to and from the drive.
RAM
In RAM based editing, the entire sound is stored in your computer's memory. This allows you to edit and process files very quickly. It savestime and reduces the load on your hard drive. The drawback is that the size of the files must be small enough to fit in the available RAM. If youedit or record large files, Windows will start swapping memory to the hard drive, which significantly degrades performance and may causedefects when recording. Also note that in the event of a system crash, it will not be possible to recover a file stored in RAM. Editing files largerthan 1GB in RAM is not recommended due to limitations in Windows.
File Overview
This section explains file formats and gives general information about how files are handled by GoldWave. Several features for storing andhandling files can be configured using Options | Storage and Options | File Formats.
File Format
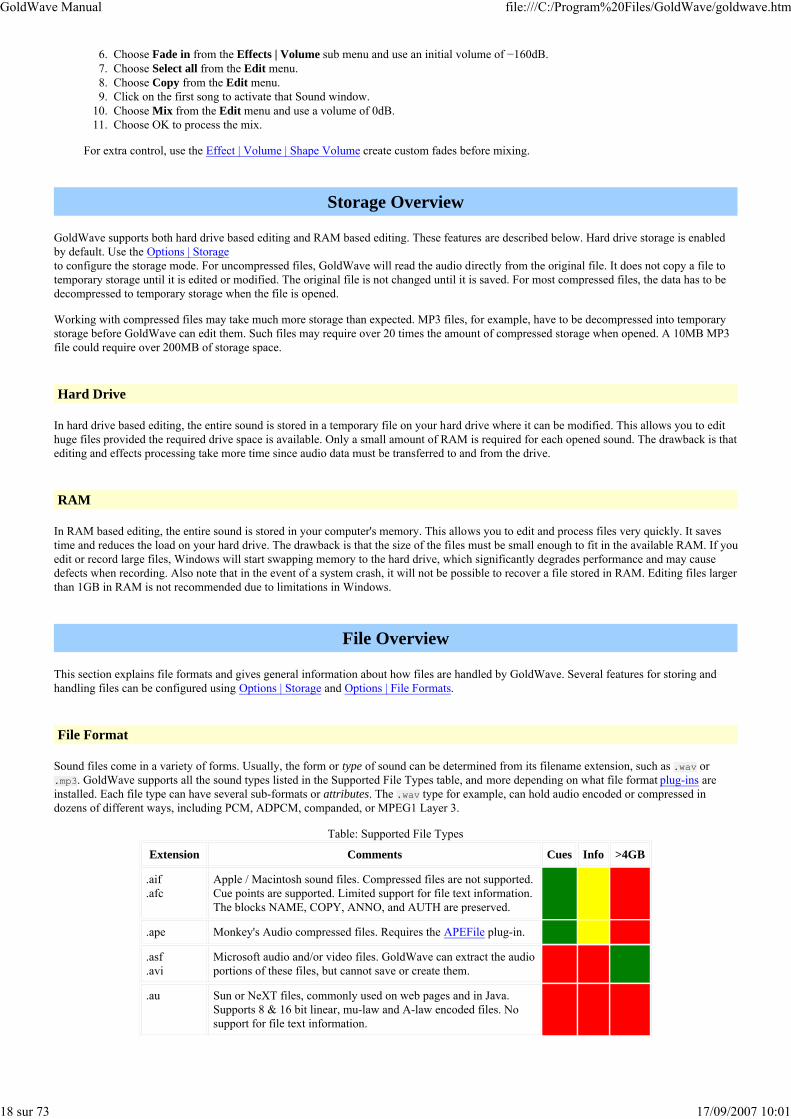
Sound files come in a variety of forms. Usually, the form or type of sound can be determined from its filename extension, such as .wav or .mp3. GoldWave supports all the sound types listed in the Supported File Types table, and more depending on what file format plug-ins areinstalled. Each file type can have several sub-formats or attributes. The .wav type for example, can hold audio encoded or compressed indozens of different ways, including PCM, ADPCM, companded, or MPEG1 Layer 3.
Table: Supported File Types
Extension Comments Cues Info >4GB
.aif
.afcApple / Macintosh sound files. Compressed files are not supported.Cue points are supported. Limited support for file text information.The blocks NAME, COPY, ANNO, and AUTH are preserved.
.ape Monkey's Audio compressed files. Requires the APEFile plug-in.
.asf
.aviMicrosoft audio and/or video files. GoldWave can extract the audioportions of these files, but cannot save or create them.
.au Sun or NeXT files, commonly used on web pages and in Java.Supports 8 & 16 bit linear, mu-law and A-law encoded files. Nosupport for file text information.
GoldWave Manual file:///C:/Program%20Files/GoldWave/goldwave.htm
19 sur 73 17/09/2007 10:01
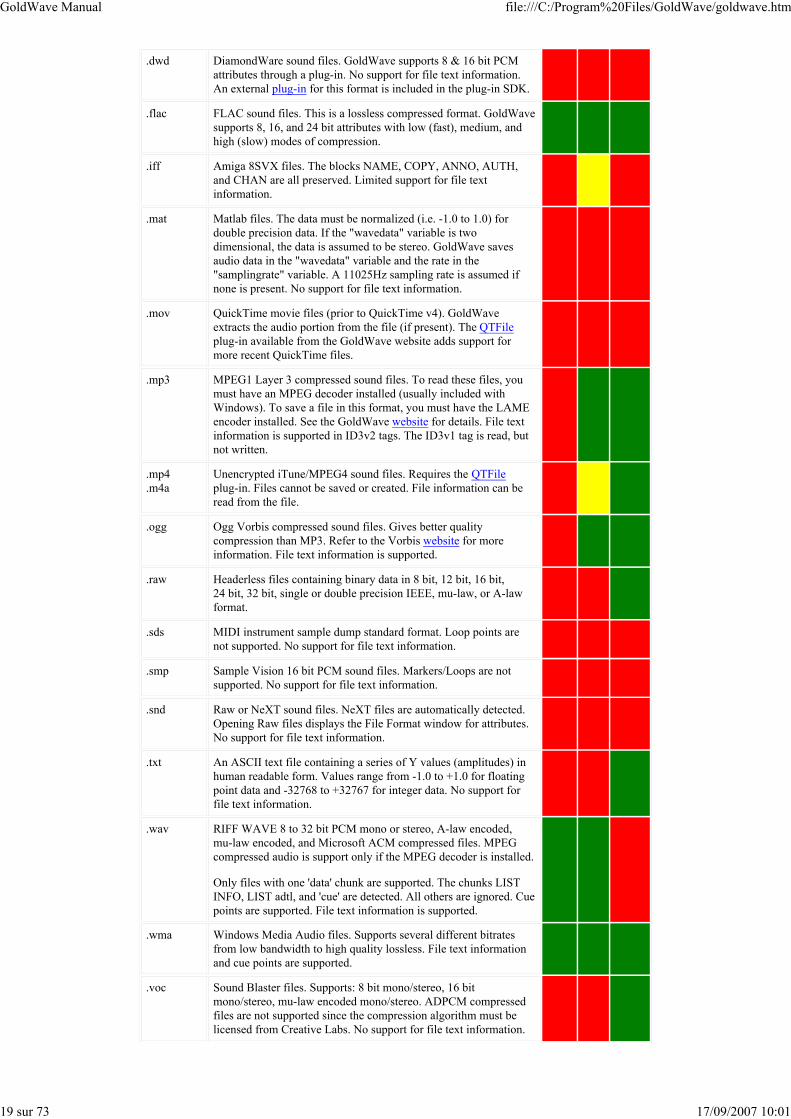
.dwd DiamondWare sound files. GoldWave supports 8 & 16 bit PCMattributes through a plug-in. No support for file text information.An external plug-in for this format is included in the plug-in SDK.
.flac FLAC sound files. This is a lossless compressed format. GoldWavesupports 8, 16, and 24 bit attributes with low (fast), medium, and high (slow) modes of compression.
.iff Amiga 8SVX files. The blocks NAME, COPY, ANNO, AUTH,and CHAN are all preserved. Limited support for file textinformation.
.mat Matlab files. The data must be normalized (i.e. -1.0 to 1.0) fordouble precision data. If the "wavedata" variable is twodimensional, the data is assumed to be stereo. GoldWave savesaudio data in the "wavedata" variable and the rate in the"samplingrate" variable. A 11025Hz sampling rate is assumed ifnone is present. No support for file text information.
.mov QuickTime movie files (prior to QuickTime v4). GoldWaveextracts the audio portion from the file (if present). The QTFileplug-in available from the GoldWave website adds support formore recent QuickTime files.
.mp3 MPEG1 Layer 3 compressed sound files. To read these files, youmust have an MPEG decoder installed (usually included withWindows). To save a file in this format, you must have the LAMEencoder installed. See the GoldWave website for details. File textinformation is supported in ID3v2 tags. The ID3v1 tag is read, butnot written.
.mp4
.m4aUnencrypted iTune/MPEG4 sound files. Requires the QTFileplug-in. Files cannot be saved or created. File information can beread from the file.
.ogg Ogg Vorbis compressed sound files. Gives better qualitycompression than MP3. Refer to the Vorbis website for moreinformation. File text information is supported.
.raw Headerless files containing binary data in 8 bit, 12 bit, 16 bit,24 bit, 32 bit, single or double precision IEEE, mu-law, or A-lawformat.
.sds MIDI instrument sample dump standard format. Loop points arenot supported. No support for file text information.
.smp Sample Vision 16 bit PCM sound files. Markers/Loops are notsupported. No support for file text information.
.snd Raw or NeXT sound files. NeXT files are automatically detected.Opening Raw files displays the File Format window for attributes.No support for file text information.
.txt An ASCII text file containing a series of Y values (amplitudes) inhuman readable form. Values range from -1.0 to +1.0 for floatingpoint data and -32768 to +32767 for integer data. No support forfile text information.
.wav RIFF WAVE 8 to 32 bit PCM mono or stereo, A-law encoded, mu-law encoded, and Microsoft ACM compressed files. MPEGcompressed audio is support only if the MPEG decoder is installed.
Only files with one 'data' chunk are supported. The chunks LISTINFO, LIST adtl, and 'cue' are detected. All others are ignored. Cuepoints are supported. File text information is supported.
.wma Windows Media Audio files. Supports several different bitratesfrom low bandwidth to high quality lossless. File text informationand cue points are supported.
.voc Sound Blaster files. Supports: 8 bit mono/stereo, 16 bitmono/stereo, mu-law encoded mono/stereo. ADPCM compressedfiles are not supported since the compression algorithm must belicensed from Creative Labs. No support for file text information.
GoldWave Manual file:///C:/Program%20Files/GoldWave/goldwave.htm
20 sur 73 17/09/2007 10:01
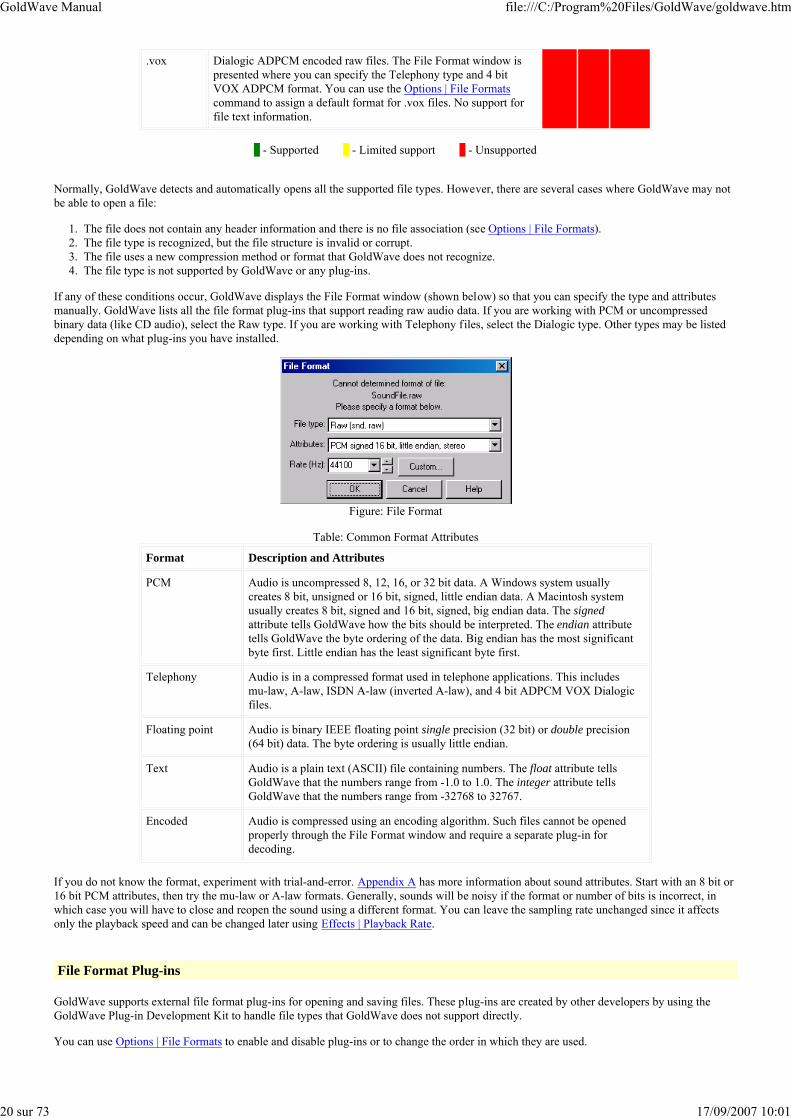
.vox Dialogic ADPCM encoded raw files. The File Format window ispresented where you can specify the Telephony type and 4 bit VOX ADPCM format. You can use the Options | File Formatscommand to assign a default format for .vox files. No support forfile text information.
- Supported - Limited support - Unsupported
Normally, GoldWave detects and automatically opens all the supported file types. However, there are several cases where GoldWave may notbe able to open a file:
The file does not contain any header information and there is no file association (see Options | File Formats).1.The file type is recognized, but the file structure is invalid or corrupt.2.The file uses a new compression method or format that GoldWave does not recognize.3.The file type is not supported by GoldWave or any plug-ins.4.
If any of these conditions occur, GoldWave displays the File Format window (shown below) so that you can specify the type and attributesmanually. GoldWave lists all the file format plug-ins that support reading raw audio data. If you are working with PCM or uncompressedbinary data (like CD audio), select the Raw type. If you are working with Telephony files, select the Dialogic type. Other types may be listeddepending on what plug-ins you have installed.
Figure: File Format
Table: Common Format Attributes
Format Description and Attributes
PCM Audio is uncompressed 8, 12, 16, or 32 bit data. A Windows system usuallycreates 8 bit, unsigned or 16 bit, signed, little endian data. A Macintosh systemusually creates 8 bit, signed and 16 bit, signed, big endian data. The signedattribute tells GoldWave how the bits should be interpreted. The endian attribute tells GoldWave the byte ordering of the data. Big endian has the most significantbyte first. Little endian has the least significant byte first.
Telephony Audio is in a compressed format used in telephone applications. This includesmu-law, A-law, ISDN A-law (inverted A-law), and 4 bit ADPCM VOX Dialogicfiles.
Floating point Audio is binary IEEE floating point single precision (32 bit) or double precision (64 bit) data. The byte ordering is usually little endian.
Text Audio is a plain text (ASCII) file containing numbers. The float attribute tellsGoldWave that the numbers range from -1.0 to 1.0. The integer attribute tells GoldWave that the numbers range from -32768 to 32767.
Encoded Audio is compressed using an encoding algorithm. Such files cannot be openedproperly through the File Format window and require a separate plug-in fordecoding.
If you do not know the format, experiment with trial-and-error. Appendix A has more information about sound attributes. Start with an 8 bit or16 bit PCM attributes, then try the mu-law or A-law formats. Generally, sounds will be noisy if the format or number of bits is incorrect, inwhich case you will have to close and reopen the sound using a different format. You can leave the sampling rate unchanged since it affectsonly the playback speed and can be changed later using Effects | Playback Rate.
File Format Plug-ins
GoldWave supports external file format plug-ins for opening and saving files. These plug-ins are created by other developers by using theGoldWave Plug-in Development Kit to handle file types that GoldWave does not support directly.
You can use Options | File Formats to enable and disable plug-ins or to change the order in which they are used.
GoldWave Manual file:///C:/Program%20Files/GoldWave/goldwave.htm
21 sur 73 17/09/2007 10:01
When you open a file in GoldWave, these steps are followed:
If the file type is a CD audio (CDA) track, you are advised to use the CD Reader tool and no further processing occurs.1.For all other file types, the file is passed to each file format plug-in module until one is able to handle the file. The order is configuredunder the File Plug-in Precedence tab of the File Format Options window.
2.
If none of the plug-ins support the file format, then the Undetectable Types list under the File Format Options window is used todetermine if type and attributes have been associated with the file type. If so, the file is open automatically using those attributes.
3.
If there are no associations, then the File Formatwindow (see previous section) is displayed so that the attributes can be specified manually. Chances are that compressed files cannot beopen and decoded properly unless a new plug-in is installed for that file type.
4.
Effects Overview
Effects modify, enhance, and change sounds in a variety of ways. These commands are similar to font menu commands in word processors.For example, using font commands, you can change the size of the letters. In GoldWave, using the Volume | Change Volume effect changesthe "size" of a sound. Changing the colour of a font would be similar to changing the pitch of a sound.
For an introduction to some of the terms used in this section, refer to the Editing Overview section and Appendix A. A variety of volume scalesmay be used by effects.
Most effects in GoldWave are cumulative. This means that if you use the same effect with the same settings, then the sound is changed eachtime. For example, if you use the Volume | Change Volumeeffect with a value of -6.02dB, then the volume of the sound decreases to half its current level. If you use that effect again, the volume decreaseagain, giving one quarter the original volume.
Another example is the Time Warpeffect. If you specify a change of 50%, then time is slowed to half and the sound is twice as long. Using the effect again at 50% makes thesound four times as long.
There are a few exceptions. The Maximize Volumeeffect has an absolute setting. Maximizing the volume to 0dB sets the sound's peak volume to 0dB. Using the effect again at 0dB has no affect.
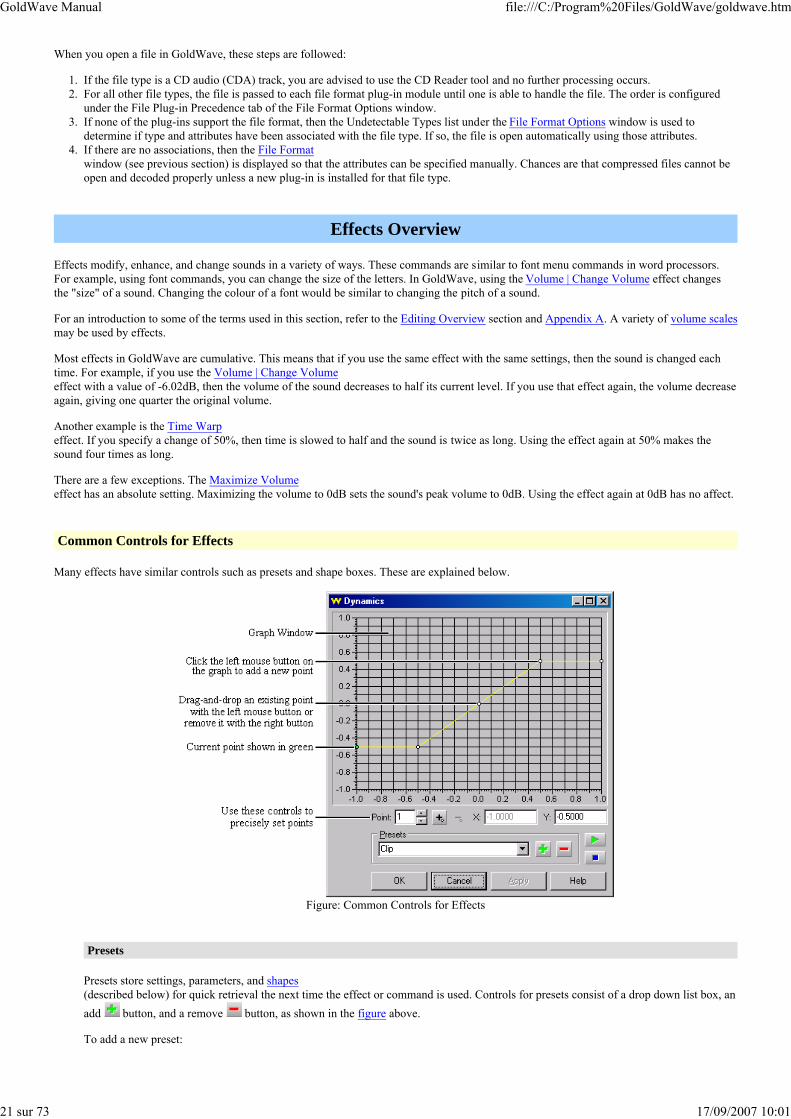
Common Controls for Effects
Many effects have similar controls such as presets and shape boxes. These are explained below.
Figure: Common Controls for Effects
Presets
Presets store settings, parameters, and shapes(described below) for quick retrieval the next time the effect or command is used. Controls for presets consist of a drop down list box, anadd button, and a remove button, as shown in the figure above.
To add a new preset:
GoldWave Manual file:///C:/Program%20Files/GoldWave/goldwave.htm
22 sur 73 17/09/2007 10:01
Enter in all the new parameters and/or draw the new shape.1.Type in a new name for the preset in the drop down list. This name should be the same as one currently in the list unless youintend to replace it.
2.
Choose the add button.3.
To delete a preset:
Select the preset from the drop down list.1.Choose the remove button.2.Choose the Yes button to confirm deletion.3.
To change a preset:
Select the preset from the drop down list.1.Change the parameters.2.Choose the add button.3.Choose the Yes button to overwrite the preset when prompted.4.
Shape Controls
Several effects in GoldWave use Shape Controls to set graphical parameters or dynamically alter the effect across the selection. ShapeControls usually consist of a graph window and a set of controls, including a point number box, an add point button, a remove pointbutton, an X value box, and a Y value box as shown in the figure above.
Graph WindowThe graph window initially contains a single line with two endpoints, shown as large dots. By clicking the left mouse buttonanywhere inside this window, you can add new points to bend the line into a variety of zigzag shapes. To move a point, click on itand drag it to a new location. To remove a point, click the right mouse button over the point. Note that endpoints cannot beremoved.
ControlsPoints can be added, moved, and removed by using these controls. Use the Point box to select the current point. Change the X andY values to move the point. Use the add point button to insert a new point between the current point and the next point. Use theremove point button to remove the current point, except if it is an endpoint.
Some dynamic effects, such as Doppler, Pan, and Shape Volume start previewing audio based on the current point's time value. If the Xvalue of the current point is 1:00, for example, then preview playback starts at that time rather than at the beginning of the selection. Thislets you preview the point's settings without playing the entire selection.
To save a shape, use the Presets controls, explained above.
Preview Controls
Previewing is a way of listening to how the current effect settings will sound without having to process the entire selection first. PreviewControls consist of a play button and a stop button. When you press the play button previewing usually starts at the beginning of the selection. In some cases, such as effects thathave time based shapes, previewing will start at the current point's time rather than at the beginning of the selection.
In most cases, you can change the effect settings while the preview plays and hear the changes as they are made. For more complexeffects and most shape based effects, you will need to use the Apply button to apply the changes or shape while previewing.
The Apply button is used only for previewing. It does not apply the effect to the sound file. Use the OK button.
Effect Plug-ins
Effect plug-ins are modules developed by other companies that can be used within GoldWave. These appear under the Effect | Plug-in menu. ADirectX plug-in wrapper is included with GoldWave to add support for many of the existing DirectX Audio Plug-ins. Other plug-ins aredesigned to work with GoldWave directly and will appear as separate items under the plug-in menu, each with its own submenu of effects. Insome cases settings for effect plug-ins can be changed using the Options | Plug-in menu.
If any errors or exceptions occur while using a plug-in, you'll need to contact the plug-in creator for assistance. GoldWave Inc. does notprovide support for plug-ins created by separate developers.
File Menu Commands
This section explains commands under the GoldWave's File menu. The File Overview section provides general information about how
GoldWave Manual file:///C:/Program%20Files/GoldWave/goldwave.htm
23 sur 73 17/09/2007 10:01
GoldWave handles files.
New
Use New to create a new sound with attributes you specify. These attributes are discussed in Appendix A. Note that GoldWave allows you tocreate and edit sounds that may not be playable with your audio hardware. For CD quality, use stereo, with a sampling rate of 44100Hz.Several commonly used settings are provided in the Presets list. Use the Initial file length box to specify the time length of the file. Youcan alter the length later with Edit | Trim or Edit | Inserting Silence.
To change the default save format shown in the status bar, see File Formats. To change the recording bit depth, see Device Properties
Open
The Open command presents a list of files in your sound folder. The sound folder can be set using the Options | Storage command. Allrecognized file types are listed. After you select a file, a Sound window is opened and details about the sound are displayed in the status bar.See the File Format section above if GoldWave could not open the file.
The Storage Overviewsection explains how the files are stored for editing. Depending on the size of the file, you may want to change the storage setting underOptions | Storage.
Close
Use Close to close the current sound. If any changes were made, you are asked to save them.
Information
This command assigns or changes text information stored in the file, such as artist, title, copyright, and date. Information is stored in certain filetypes only, such as .wav, .wma, .aiff, .ogg and .mp3. Some file types only store a subset of all the items given in the File Informationwindow. There is no verification of the information entered. It is up to you how to use these items and to follow any guidelines required for aparticular file type.
Use the Copy and Paste buttons to copy information from one file and paste it into another.
Batch Processing
Batch Processing converts a set of files from one format to another and applies effects. Use this feature to compress all your .wav files to .mp3to save disk space or convert from .mp3 to .wavto prepare for writing to a CD-R audio disc. You can remove pops/clicks, equalize, and maximize volume levels of all your vinyl album or taperecordings. Or you can add copyright and other text information to all your own files.
Add files with the Add Files button or drag-and-drop a group of files from Windows Explorer. Add an entire folder (including subfolders) orall the files in a folder of a specific type by using the Add Folder button. Remove items from the list by selecting one or more of them andchoosing the Remove button. The Remove All button removes all files and folders from the list.
The tabbed pages along the bottom let you configure conversions, effects, destination folder, and file information. These are explained below.
When everything is configured, you can use the presetcontrols to save all the settings, then choose the Begin button to start processing all the files. A status window will appear showing the progressand listing any errors that occur.
Use the Apply button to start processing directly on the current sound already opened in GoldWave. Only the items listed on the Process tabwill be applied to the sound. The sound is not converted and file information is not changed. This button is enabled only when a sound isopened, there are items in the process list, and no files have been added to the file list.
If you are trying to convert raw files, such as .vox, you'll need to use Options | File Formats to assign a format for that type first.
Convert TabIf you check the "Convert files to this format" box, then files are converted to the format specified on this tab. Otherwise no conversionis performed and a processed file will have the same format as the original file, if possible. If the same format cannot be used, then anerror is reported.
Use the "Save as type" drop down list to select the destination format for the conversion, then use the Attributes drop down list to select the specific attributes to use for the destination type. If a save type supports customized attributes, then the Attributes label willbecome a link you can choose to display a configuration window.
If the attributes allow any sampling rate to be used, you can specify the destination rate to use by checking the Rate box and entering the
GoldWave Manual file:///C:/Program%20Files/GoldWave/goldwave.htm
24 sur 73 17/09/2007 10:01
rate in the box. Some attributes have a fixed rate, so a separate rate cannot be specified for those. If no rate conversion is needed, makesure the Rate box is not checked. In that case, a processed file will have the same rate as the original file.
Process TabIf you want to apply effects or edits to a group of files, use this tab to add a set of effects, edits, or chains to the list. If no effectprocessing is required, remove all effects by using the Remove All button on this tab. To remove a single effect from the list, select theeffect and use the Remove button. To change the order of processing, drag-and-drop items within the list.
To add an effect, use the Add Effect button. It presents a tree list of all effects available and their presets. Select the preset you want touse. Chains can be added by using the Add Chain button. Effects and chains are performed on the entire file by default. To perform themon part of the file only, add an edit to set the selection first (see the fade in/out example below).
To add an edit, use the Add Edit button. The "Set Marker/Selection" edit command specifies what part of the file (the selection) will beuse for all subsequent effects and edits during processing.
To change settings for an edit or effect, remove it, add a new one with the correct settings, then drag-and-drop it to the correct position inthe process list (if necessary). If you require effect settings that are not available in any of the current presets, open a file and use theEffect menu or the Effect Chain Editortool to create a new preset or chain with the settings you require prior to using the Batch Processing command.
Process ExampleYou have hundreds of songs and want to create a 10 second sample file for each song, with the beginning faded in, the end fadedout, and the volume maximized. To set up that processing requires adding eight edits and effects, as explained below.
Trim the file to 10 seconds:Choose the Add Edit button.1.Select the "Set Marker/Selection" edit command.2.In the "Finish marker position" group, set the Time to 10 and choose the From beginning radio button.3.Choose the Add button.4.Select the "Trim" edit command.5.Choose the Add button.6.Choose the Close button.7.
Fade-in the beginning of the file:Choose the Add Edit button.1.Select the "Set Marker/Selection" edit command.2.In the "Finish marker position" group, set the Time to 1 and choose the From beginning radio button.3.Choose the Add button.4.Choose the Close button.5.Choose the Add Effect button.6.Expand the "Fade In" branch.7.Select the "Silence to full volume, linear" item.8.Choose the Add button.9.Choose the Close button.10.
Fade-out the end of the file:Choose the Add Edit button.1.Select the "Set Marker/Selection" edit command.2.In the "Start marker position" group, set the Time to 1 and choose the From end radio button.3.Choose the Add button.4.Choose the Close button.5.Choose the Add Effect button.6.Expand the "Fade Out" branch.7.Select the "Full volume to silence, linear" item.8.Choose the Add button.9.Choose the Close button.10.
Maximize the volume of the entire file:Choose the Add Edit button.1.Select the "Set Marker/Selection" edit command. Settings select the entire file by default.2.Choose the Add button.3.Choose the Close button.4.Choose the Add Effect button.5.Expand the "Maximize Volume" branch.6.Select the "Full dynamic range" item.7.Choose the Add button.8.Choose the Close button.9.
After performing all these steps, the process list will contain eight edit and effect items. Use the Convert and Folder tabs to set thefile type and destination folder for the 10 second sample files (so the original files are not overwritten). Add all the songs to theFiles list and begin processing.
To use clipboard related edit commands, it may be necessary to open a file and copy it prior to using Batch Processing. For example, topaste or mix an announcement at the beginning of many files, first open the file containing the announcement, use the Edit | Copycommand, then use the Batch Processing command and add a "Paste" or "Mix" edit command to the Process list.
Folder Tab
GoldWave Manual file:///C:/Program%20Files/GoldWave/goldwave.htm
25 sur 73 17/09/2007 10:01
If you want all processed files to be stored in the same folder where they currently reside, select "Store all files in their original folder".
If you want all processed files to be stored in a specific folder, select "Store all files in this folder" and specify a folder in the boxprovided. You can click on the folder button to browse for a folder.
When adding an entire folder with subfolders by using the Add Folder button, use the "Preserve subfolder structure" box to ensure thatthe relative subfolders are maintained when storing processed files in a different destination folder. If this box is not checked, all fileswill be stored in the destination folder and no subfolders will be created. Folders listed in the file list will have double backslashes. Thepart before the double backslashes will be replaced by the destination folder. For example, if the destination folder is C:\Folder1\ and the added folder (with subfolders included) is C:\Source1\Source2\, then the file list may look something like this:
C:\Source1\Source2\*.*C:\Source1\Source2\\Source3\*.*C:\Source1\Source2\\Source4\*.*C:\Source1\Source2\\Source4\Source5\*.*
Note the double backslashes. The destination folders will be:
C:\Folder1\*.*C:\Folder1\Source3\*.*C:\Folder1\Source4\*.*C:\Folder1\Source4\Source5\*.*
Taking the last item, the folder is divided into three parts with the following colour coding: the original source root folders, the subfolders, and the pattern. C:\Source1\Source2\\Source4\Source5\*.* The destination folder is:C:\Folder1\ The original source folders are replaced by the destination folder to give:C:\Folder1\Source4\Source5\*.*
Using the Add Folder button more than once when preserving subfolders is not recommended unless you fully understand how thesource folder, subfolders, and destination folder are manipulated.
To overwrite any files having the same name and folder as the processed file, check the "Overwrite existing files" box. GoldWave fullyprocesses original files before overwriting them.
Information TabUse this tab to control how information is processed. See File | Information. Select "Retain information currently in each file" if you donot want the file's information to be changed. Select "Replace information in all files" and use the Set Info button to provide all the information. Any blank entries are removed from the file. Select "Replace specified information only in all files" to replace some of theinformation. Use the Set Info button to enter the information to replace. Any blank entries are not removed or changed in the file.
If the Track number is set to ##, GoldWave replaces it with a sequential number based on the order in which the files are processed.The first processed file will have a track number of 01, then the next file will have 02, etc.
Depeding on the settings used, all processed files may have exactly the same information (except for ## track numbering mentioned above), so care must be taken when specifying file specific information such as Title. Also note that not all file types can store information.
When retaining information and converting to a different file type, some information from the old file type may not be valid for the newfile type. GoldWave does not verify any information, so care must be taken when retaining information while converting.
Command Line
The /process command line parameter starts GoldWave in Batch Processing mode and processes files given on the command line. Thesyntax is as follows:
"C:\Program File\GoldWave\GoldWave.exe" /process[:preset] <filespec> [<filespec> ...]
If no preset is specified, then the default (previous) settings are used. The filespec can specify a single file or contain wildcard characters (* and ?). Quotes are required if the filespec contains any spaces.
To convert all Wave files to MP3 on the command line, for example, you'd first use the Batch Processing command to create a presetwith conversion set to the "MPEG Audio" file type and save that preset as "MP3". On the command line, enter the following parameters:
/process:MP3 "C:\My Music\*.wav"
If the preset name contains spaces, use quotes around the entire parameter:
"/process:Trim and convert" "C:\My Music\*.wav"
During processing the progress windows is displayed in minimized form, usually just above the Windows Start button. Double-click onit to open it to monitor processing. If no errors occur, the window will disappear and GoldWave will close automatically. Otherwise theprogress window opens so that errors can be viewed. To use a log file instead, so that GoldWave always closes regardless of errors, use
GoldWave Manual file:///C:/Program%20Files/GoldWave/goldwave.htm
26 sur 73 17/09/2007 10:01
the /proclog command line parameter to specify the name of the log file:
/proclog:<filename>
Quotes are needed around the entire parameter if the filename contains spaces. An example would be:
"/proclog:C:\Log Files\Batch.log"
All messages and errors are written to the log file. If you do not require a log file, but still need GoldWave to always close, use nul as thefilename:
/proclog:nul
Save
The sound is saved in a file using its original name and type. If memory or disk space is low, the file may not be saved successfully. GoldWavewill inform you if this happens. If Save fails, try deleting some unneeded files or close other applications. Make sure that the file is savedsuccessfully before closing GoldWave, otherwise the changes will be lost. Note that audio from video and movie files cannot be saved. Youmust save those files in an "audio only" format. You will see the Save As window if you need to save the file in a different type.
Cue points are saved only in certain file types. If you added cue points to a file that does not support them, you can use File | Save As to save it in a different type.
Save As
Save As saves a sound using a different filename or file type. To save the sound using a different name, simply type in the new name in theFile name box. To save the sound using a different type, select the type from the "Save as type" list box, then select attributes from theAttributes list box. If a file type supports customized attributes, then the Attributes label will become a link you can choose to display aconfiguration window.
Since each file type supports different attributes, always select the type before selecting attributes. Java and Web sounds, for example, shouldbe saved using the "Sun (*.au)" type and the "Java/Web" attributes.
You can use Save As to compress a sound as well. Select the "Ogg (*.ogg)" type and one of the many Vorbis attributes. The smaller the bitrate(kbps number), the smaller the file will be. Note that quality may be reduced as well.
Use Options | File Formats to assign a default format if you always prefer to use a specific file type and attributes.
Unless the number of channels or sampling rate has changed, GoldWave does not use the compressed audio data after saving. It continues touse the original audio stored in temporary storage. You must close and reopen the file in GoldWave (or play it in a separate program) to hearhow the compressed audio sounds. It is strongly recommended that you listen to the compressed file before discarding the original to ensure itsquality is acceptable.
The correct type must be selected from the type box. Typing in a different extension by hand for the filename does not convert the sound to thetype associated with that extension.
Save Selection As
Save Selection As saves the selected part of the sound to a file. Use this command to save parts of a large file. The Save As window appears where you can specify the new filename, type, and attributes for the file.
Exit
Exit closes all Sound windows then closes GoldWave. Any playback or recording is stopped. You are asked to save any changed files.
File History
A list of several recently used files is appended to the File menu. You can quickly reopen one of these files by selecting it from the menu.
Edit Menu Commands
Edit commands remove, insert, copy, and move sections of sound. For an introduction to the concepts and terms used in this section, refer tothe Editing Overview section.
GoldWave Manual file:///C:/Program%20Files/GoldWave/goldwave.htm
27 sur 73 17/09/2007 10:01
Undo
The Undo command reverses the most recent change made to a sound. The undo feature keeps a copy of the original data in a temporary file.The temporary folder and the number of undo levels are determined by the Options | Storage settings. To disable Undo, set the number of undolevels to zero.
Redo
The Redo command reverses the most recent undo. It restores the the last undone command without any processing. The is helpful if youaccidentally undo a change (such as a recording) and want to recover the change or if you want to do a quick "before and after" comparison.Redo is possible only immediately after undo. If you make any other changes to the sound, Redo cannot be used again until you Undo one ormore of those changes. Many levels of Undo and Redo are possible. In other words, you can undo several changes and redo them all.
Cut
Use Cut to remove the selection from the sound and put it in the clipboard. The contents of the clipboard can then be superimposed or insertedinto a Sound window using Mix or Paste. If you just want to remove the selection and do not need to paste or mix it, you should use the Deletecommand instead.
Note that if only one channel is selected in a stereo sound, then only that channel is removed. Since it is not possible for one channel to belonger than the other, the end of the cut channel is padded with silence (this is also true for Delete).
To cut:
Select the part of the sound you want to cut.1.Choose Cut from the Edit menu.2.
Copy
The Copy command copies the selection into the clipboard. The selection is not removed from the sound. The contents of the clipboard canthen be mixed or placed into another sound using Mix, Paste, Paste New or Replace.
To copy:
Select the part of the sound you want to copy.1.Choose Copy from the Edit menu or click on the Copy button.2.
You can copy individual channels of a stereo sound by using the Edit | Channel menu to select a single channel.
Copy To
The Copy To command copies the selection to a new file. Use this command to divide a large file into smaller sections or save a piece of a file.The selection is not removed from the sound. The Save Aswindow appears where you can specify the filename, type, and attributes for the file. This is the same as the File | Save Selection As command.To automatically split a large file into several smaller pieces, use the Cue Points tool.
To copy the selection to the file "section.wav":
Select the part of the sound you want to copy.1.Choose Copy To from the Edit menu.2.Enter the filename: section3.Select "Wave (*.wav)" from the type list.4.Choose Save.5.
You can save individual channels of a stereo sound by using the Edit | Channel menu.
Paste New
The Paste New command creates a new Sound window containing the sound copied into the clipboard. The new sound will have the attributesand length of the clipboard sound. This command is useful when you need to alter or save the clipboard audio.
To paste part of a sound into a new sound:
Select the part of the sound you want to copy.1.Choose Copy from the Edit menu.2.Choose Paste New from the Edit menu.3.

GoldWave Manual file:///C:/Program%20Files/GoldWave/goldwave.htm
28 sur 73 17/09/2007 10:01
Paste and Paste At
After copying a sound into the clipboard, you can use these commands to insert it into another sound. The Paste command inserts the clipboardat the start marker's position. Paste At inserts the clipboard at the location you specify: at the beginning of the file, at the finish marker, or at theend of the file. The length of the sound is increased so that the clipboard will fit. The clipboard is automatically converted to match theattributes of the sound.
To insert the clipboard into the sound:
Move the start marker to the place where you want to paste the clipboard sound.1.Choose Paste from the Edit menu.2.
To append the clipboard to the end of the sound:
Choose Paste At from the Edit menu.1.Choose End from the Paste At submenu.2.
Copying a small selection and pasting it several times creates a stutter effect.
Mix
Use Mix to blend (combine) the clipboard with the sound. Note that before you can use Mix, you need to use the Copy command to copy audiointo the clipboard. Mixing essentially allows two sounds to be played at the same time, such as vocals and music or voiceovers. You areprompted for the mix volume applied to the clipboard and the start time. A volume of 0dB is full volume. Lower values make the clipboardsound quieter. Adjust the start time to synchronize the clipboard audio with the Sound window audio you are mixing with.
To mix the clipboard with the sound:
Move the start marker to the place where you want to start mixing the clipboard.1.Choose Mix from the Edit menu.2.Enter the mix volume for the clipboard.3.Adjust the start time as required.4.Choose OK.5.
Crossfade
Use Crossfade to fade and mix the ends of two sounds, such as fading out one song while fading in another. Note that before you can useCrossfade, you need to use the Edit | Copy command to copy the entire song into the clipboard. See the Crossfading overview for step-by-stepinstructions.
The Duration specifies how long the transition between the clipboard audio and file audio lasts. The Clipboard position setting specifieswhich end of the file to fade the clipboard audio. If End of file is selected, then the clipboard is pasted and crossfaded at the end of the file.If Beginning of file is selected, then the clipboard is pasted and crossfaded at the beginning of the file. The Fade curve settings controlhow the audio is faded. If the song being faded out already has a fade out at the end, use the None fade out curve setting. The fade is showngraphically and can be previewed. Note that any changes made while previewing will not take effect until preview is restarted.
The selection is used when performing a crossfade. Use the Edit | Select All command before using Crossfade unless you intend tocrossfade within a certain part of the sound.
Replace
Use Replace to replace the selection with the clipboard. The selection is deleted and the clipboard is inserted in its place. If the clipboard islonger or shorter than the selection, the length of the file is adjusted as required. To avoid changing the length of the file or altering the timingof the sound following the selection, use Overwrite instead.
To replace part of a sound with the clipboard:
Select the part of the sound you want to replace.1.Choose Replace from the Edit menu.2.
Overwrite
Use Overwrite to overwrite part of the sound with the clipboard beginning at the start marker's position. The amount of sound overwrittendepends on the length of the clipboard. The length of the file is not changed (unless the clipboard would go beyond the length of the file) andno shifting is performed. Note that if the clipboard is longer than the current selection, then some sound outside the selection will beoverwritten as well. The finish marker will be placed at the end of the overwritten sound.
Use Overwrite instead of Replace when you need to preserve tempo, timing, or alignment of the sound following the selection.
GoldWave Manual file:///C:/Program%20Files/GoldWave/goldwave.htm
29 sur 73 17/09/2007 10:01
To overwrite part of a sound with the clipboard:
Move the start marker to the beginning of the sound you want to overwrite.1.Choose Overwrite from the Edit menu.2.
Delete
The Delete command removes the selection from the sound. The selection is not copied to the clipboard. You should always use Delete insteadof Cut when the selection is not needed. The Delete command is faster because it does not copy the selection to the clipboard.
Note that if only one channel is selected in a stereo sound, then only that channel is removed. Since it is not possible for one channel to belonger than the other, the end of the deleted channel is padded with silence (this is also true for Cut).
To delete:
Select the part of the sound you want to delete.1.Choose Delete from the Edit menu.2.
Trim
The Trim command removes everything outsidethe selection. The selection is not affected. Use this command to keep part of a sound and discard everything else. This command is frequentlyused after recording to trim any leading or trailing silence. Note that if only one channel of a stereo sound is trimmed, the end of that channel ispadded with silence. As an alternative, you can use the Copy To command to save the selection to a separate file or use the AutoTrimcommand to automatically trim silences.
To trim:
Select the part of the sound you want to keep.1.Choose Trim from the Edit menu.2.
AutoTrim
The AutoTrim command removes leading and trailing silences from the ends of the selection. Unlike the Trim command, this command works only on the selection and does not remove silences outside the selection.
Silence to keep controls how much silence to leave on the ends. Use zero to remove all silence. Extra silence is not added if the existingsilence is less than this amount. The Thresholdspecifies the minimum level of audio that should not be considered silence. If the audio has a lot of background noise or hiss, use values above-30dB. If the audio is clean, values below -40dB.
Leading silence, trailing silence, or both will be removed depending on the Trim option you select.
Note that if only the left or right channel is selected in a stereo sound, then only that channel is trimmed. Since it is not possible for one channelto be longer than the other, the end of the trimmed channel is padded with silence, which results in trailing silence.
To trim silences from the ends of the entire file:
Select the entire file by using the Edit | Select All command.1.Choose AutoTrim from the Edit menu.2.Enter the length of silence to keep and the threshold for the the silence.3.Choose OK.4.
Mute
The Mute command replaces the selection with silence. Unlike Delete or Cut, the length of the sound is not changed. Use this to removeoffensive language from music without interrupting the overall beat.
Insert Silence
The Insert Silence command inserts some blank space in the sound at the start marker's position. You are prompted to specify the length of thesilence. Use this command to make room for recording or to insert a delay.
Select View
GoldWave Manual file:///C:/Program%20Files/GoldWave/goldwave.htm
30 sur 73 17/09/2007 10:01
Use Select View to select all of the sound currently shown in the Sound window's graph. The start and finish markers are moved to the far leftand far right of the view.
Select All
Use Select All to select the entire sound. The start and finish markers are moved to the beginning and end of the sound.
Channel
The Channel submenu sets which channel of a stereo sound to use or modify for editing or effects. Use this feature to copy a single channelfrom a stereo sound or apply an effect to only one channel. The currently selected channel is shown in the status bar. When recording or usingeffects such as Resample, Playback Rate, or stereo effects, the channel setting does not apply and both the left and right channels are modified.
You can right-click on the channel item in the status bar to quickly select a channel or use Options | Tool Bar to add a "Channel" toggle buttonto the tool bar.
Marker
The Marker submenu lists commands for changing the positions of the start and finish markers for adjusting the selection.
Set
Sets the start and finish markers to an exact time or sample position. To specify a time, choose the Time option and enter the time inhours, minutes, seconds, and thousandths of a second. For example, you could enter 1:04:27.873. To specify a sample position, choosethe Sample option and enter the position.
If you want the length of the selection to be aligned to a CD sector or 1 kilobyte, select the appropriate option. When the OK button ispressed, the finish marker is adjusted to align the selection length.
Previous
Moves the start and finish markers to their previous positions. The last five positions are stored automatically whenever the markers aremoved. Using this command repeatedly sets the selection back to each of those five positions. Note that absolute positions are stored, so any modifications, such as deleting part of the sound will not be factored into the previous positions. In such situations the previouspositions may not select the same part of the sound that was previously selected (that part may be deleted).
Drop Start/Finish
When playing or recording a file, you can drop the start or finish marker at the current position. You can use the bracket keys, [ and ] todrop the start and finish markers respectively. Note that the start marker cannot be dropped after the finish marker.
Recall Selection Positions
Moves the start and finish markers to previously stored positions. These positions are set using the Store Selection Positions command.Hold the Ctrl key to recall the positions stored within a different Sound window.
Store Selection Positions
Saves the current positions of the start and finish markers. Use the Recall Selection Positions command to move the markers back tothese positions. Hold the Ctrl key to store the positions so they can be recalled in a different Sound window.
Snap To Zero-Crossing
When editing, it is important that the waveform not change suddenly from one amplitude to the next, otherwise a click will occur. Thiscan happen when deleting the selection. The amplitude of the waveform at the start marker may be completely different from theamplitude at finish marker. After deleting the selection, these two different amplitude will be right next to each other, causing a click.
The "Snap To Zero-Crossing" feature helps to minimize the problem by making sure that the markers are always near zero amplitudesamples. When you drag and release a marker, it is automatically moved to a position where the amplitude approaches zero. This meansthat when you delete the selection, the amplitudes at both the start and finish markers will be more closely matched (near zero).
GoldWave Manual file:///C:/Program%20Files/GoldWave/goldwave.htm
31 sur 73 17/09/2007 10:01
Since stereo sounds can have very different left and right channels, it is not always possible to find an ideal zero-crossing position.However, you can use the Edit | Channel menu to limit the snap feature to a single channel.
Note that if you zoom in close enough so that the true shape of the waveform is shown (such as View | Zoom 1:1), the snap feature isautomatically turned off so that markers can be placed at any position.
Cue Point
This submenu lists commands for working with cue points.
Edit Cue Points
Displays the Cue Points tool.
Drop Cue
Drops a cue point at the current playback, recording, or start marker position. The name of the cue point is set to the time position bydefault, but that can be changed by the Auto Cue settings under the Cue Points tool.
Jump To Next Cue
Moves the start marker to the next cue point or to the end of the file.
Jump To Previous Cue
Moves the start marker to the previous cue point or to the beginning of the file.
Split File
Divides the file into smaller sections using cue points at split points. See Split File Button under the Cue Points tool for moreinformation.
Effect Menu Commands
This section explains commands under the GoldWave's Effect menu. Please see the Effects Overview section for general information abouthow GoldWave employs effects.
Doppler
A Doppler effect is defined as a change in frequency of a wave caused by motion. You often hear it when police or ambulance sirens drop inpitch as they pass near by.
In GoldWave the Doppler effect dynamically alters or bends the pitch of the selection. It does this by altering the speed at which the waveformis played. Note that both pitch and tempo are changed. Shape Controls are presented where the pitch/speed can be varied over the selectionfrom 0.25 to 2.0 times normal. You can use Effects | Volume | Shape Volume to dynamically alter the volume as well.
The "Slow down" preset gives you a good idea of what it sounds like when the batteries start to fail in a portable tape player. Other presets canchange your voice to a smurf ("Faster") or a giant ("Slower").
Dynamics
Dynamics alters the amplitudemapping of the selection. It can limit, compress, or expand a range of amplitudes. The amplitude mapping is set using Shape Controls, where x-axis and y-axis both have a range of -1 to 1. When the line stretches diagonally from the lower left corner to the upper right corner, the inputamplitude (x) and output amplitude (y) are the same for every point on the line. By changing the line, the output will differ from the input.
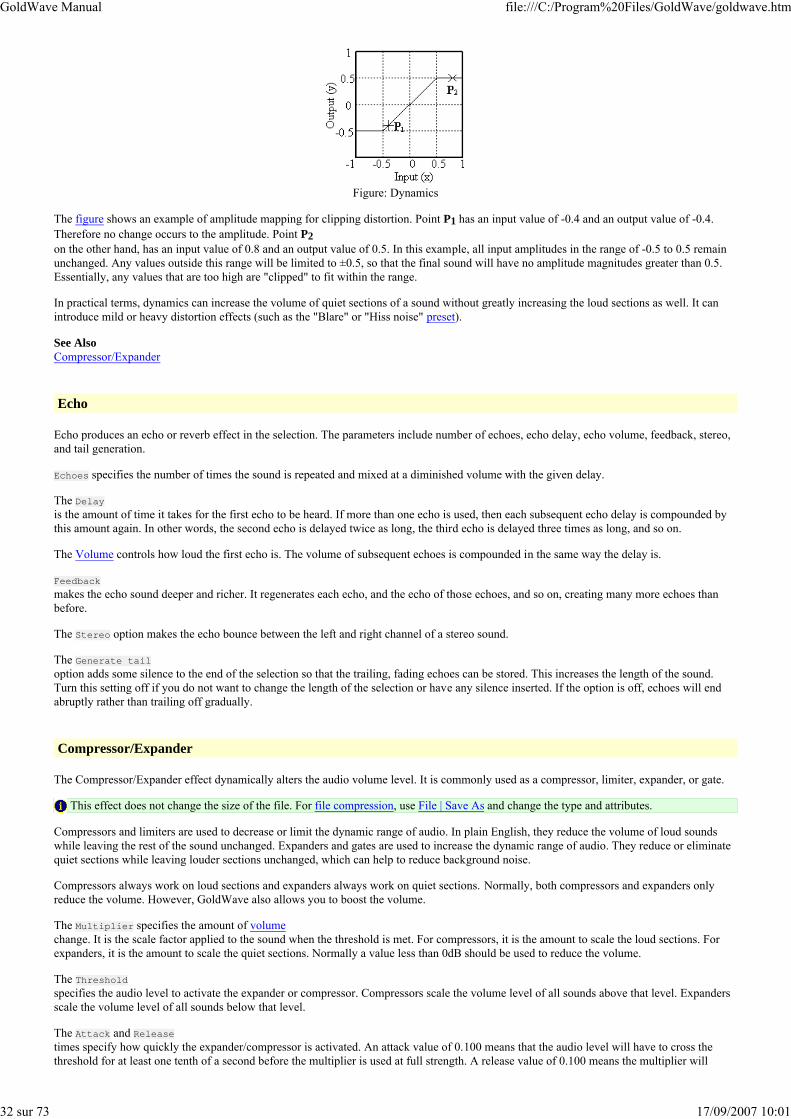
GoldWave Manual file:///C:/Program%20Files/GoldWave/goldwave.htm
32 sur 73 17/09/2007 10:01
Figure: Dynamics
The figure shows an example of amplitude mapping for clipping distortion. Point P1 has an input value of -0.4 and an output value of -0.4.Therefore no change occurs to the amplitude. Point P2on the other hand, has an input value of 0.8 and an output value of 0.5. In this example, all input amplitudes in the range of -0.5 to 0.5 remainunchanged. Any values outside this range will be limited to ±0.5, so that the final sound will have no amplitude magnitudes greater than 0.5.Essentially, any values that are too high are "clipped" to fit within the range.
In practical terms, dynamics can increase the volume of quiet sections of a sound without greatly increasing the loud sections as well. It canintroduce mild or heavy distortion effects (such as the "Blare" or "Hiss noise" preset).
See Also Compressor/Expander
Echo
Echo produces an echo or reverb effect in the selection. The parameters include number of echoes, echo delay, echo volume, feedback, stereo,and tail generation.
Echoes specifies the number of times the sound is repeated and mixed at a diminished volume with the given delay.
The Delayis the amount of time it takes for the first echo to be heard. If more than one echo is used, then each subsequent echo delay is compounded bythis amount again. In other words, the second echo is delayed twice as long, the third echo is delayed three times as long, and so on.
The Volume controls how loud the first echo is. The volume of subsequent echoes is compounded in the same way the delay is.
Feedbackmakes the echo sound deeper and richer. It regenerates each echo, and the echo of those echoes, and so on, creating many more echoes thanbefore.
The Stereo option makes the echo bounce between the left and right channel of a stereo sound.
The Generate tailoption adds some silence to the end of the selection so that the trailing, fading echoes can be stored. This increases the length of the sound.Turn this setting off if you do not want to change the length of the selection or have any silence inserted. If the option is off, echoes will endabruptly rather than trailing off gradually.
Compressor/Expander
The Compressor/Expander effect dynamically alters the audio volume level. It is commonly used as a compressor, limiter, expander, or gate.
This effect does not change the size of the file. For file compression, use File | Save As and change the type and attributes.
Compressors and limiters are used to decrease or limit the dynamic range of audio. In plain English, they reduce the volume of loud soundswhile leaving the rest of the sound unchanged. Expanders and gates are used to increase the dynamic range of audio. They reduce or eliminatequiet sections while leaving louder sections unchanged, which can help to reduce background noise.
Compressors always work on loud sections and expanders always work on quiet sections. Normally, both compressors and expanders onlyreduce the volume. However, GoldWave also allows you to boost the volume.
The Multiplier specifies the amount of volumechange. It is the scale factor applied to the sound when the threshold is met. For compressors, it is the amount to scale the loud sections. Forexpanders, it is the amount to scale the quiet sections. Normally a value less than 0dB should be used to reduce the volume.
The Thresholdspecifies the audio level to activate the expander or compressor. Compressors scale the volume level of all sounds above that level. Expandersscale the volume level of all sounds below that level.
The Attack and Releasetimes specify how quickly the expander/compressor is activated. An attack value of 0.100 means that the audio level will have to cross thethreshold for at least one tenth of a second before the multiplier is used at full strength. A release value of 0.100 means the multiplier will
GoldWave Manual file:///C:/Program%20Files/GoldWave/goldwave.htm
33 sur 73 17/09/2007 10:01
continue to be used for one tenth of a second after the audio level no longer crosses the threshold.
Use the Expander or Compressor mode to specify what processing is required.
The Anticipate attack setting tells the effect to scan ahead for audio that crosses the threshold. If the Attack time is set to 0.100, then theeffect scans ahead by 0.100 seconds. This means that the multiplier will be at full force the instant the threshold is crossed rather than buildingto full force 0.100 seconds later. The Use smoothersetting smooths out any sudden volume changes which may occur during processing with small attack/release times.
Compressor ExampleYou have recorded some music that has a few loud moments, but you want to raise the overall volume without distorting the loud parts.Select the "Reduce loud parts" preset. After compression, use the Maximize Volume effect to stretch the volume to the full dynamicrange. Alternatively you could use the "Boost quiet parts" preset.
Expander ExampleYou have recorded someone talking and notice background noise during the quiet parts. To reduce the noise, select the "Noise gate"preset or the "Reduce quite parts" preset.
See Also Dynamics
Filter
Filters are used to remove a range of frequencies from a sound and can produce a variety of effects. The submenu contains several filter relatedeffects.
Bandpass/stop
Bandpass filters block all frequenciesoutside a specified range, keeping only frequencies within the range. Bandstop filters block all frequencies within a specified range,keeping all other frequencies outside the range.
Frequency RangeThe From and Toboxes specify the initial frequency range of the filter. If the Dynamic option is selected, then a final frequency range can be givenin the other From and Toboxes, allowing you to fade from on frequency range to another. Otherwise the initial range remains constant for all processing.
SettingsSelect Bandpass if you want to keep only the frequencies within the range. Select Bandstop if you want to block all the frequenciesin the range. The remaining Static, Dynamic, and Steepness options are explained under Low/Highpass filter.
ExampleTo remove hum and hiss from a voice recording:
Set From to 200.1.Set To to 3800.2.Choose the Bandpass option.3.Choose the Static option.4.Set Steepness to 10 or higher.5.Choose OK.6.
Equalizer
Equalizers are commonly found on stereo systems. They boost or reduces certain ranges of frequencies. Simple equalizers control onlytreble and bass. GoldWave's equalizer controls 7 bands, as shown in the figure.
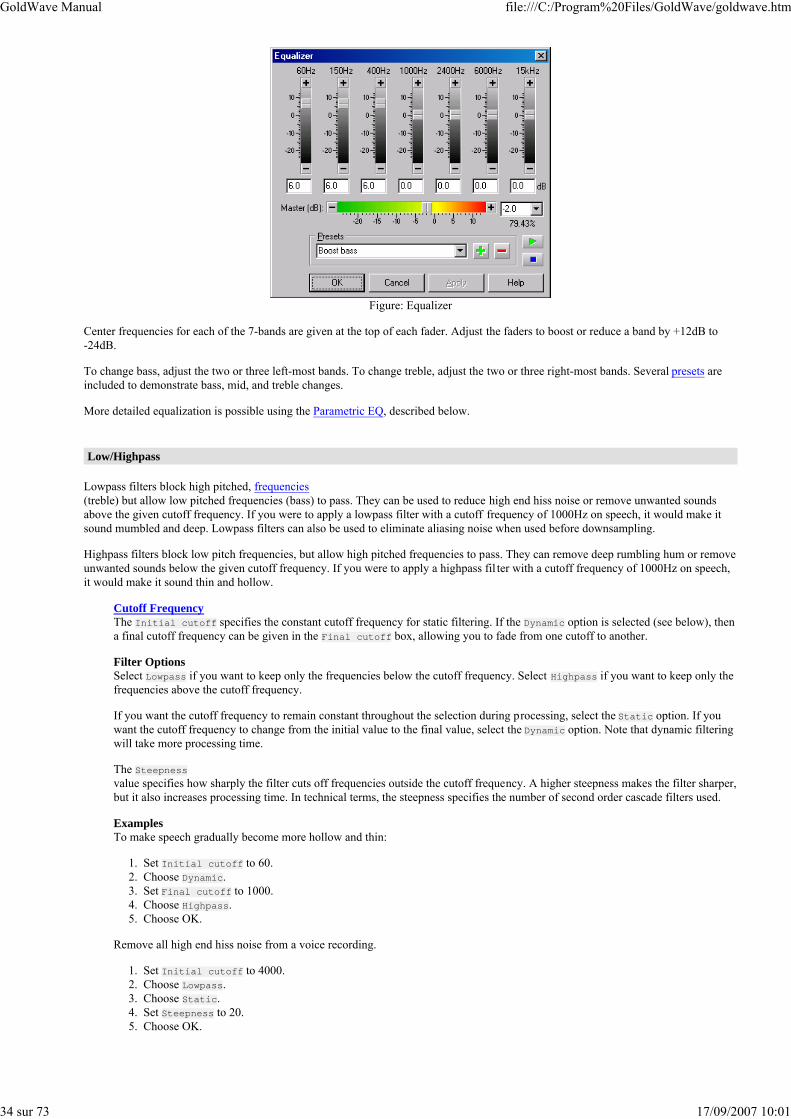
GoldWave Manual file:///C:/Program%20Files/GoldWave/goldwave.htm
34 sur 73 17/09/2007 10:01
Figure: Equalizer
Center frequencies for each of the 7-bands are given at the top of each fader. Adjust the faders to boost or reduce a band by +12dB to-24dB.
To change bass, adjust the two or three left-most bands. To change treble, adjust the two or three right-most bands. Several presets areincluded to demonstrate bass, mid, and treble changes.
More detailed equalization is possible using the Parametric EQ, described below.
Low/Highpass
Lowpass filters block high pitched, frequencies(treble) but allow low pitched frequencies (bass) to pass. They can be used to reduce high end hiss noise or remove unwanted soundsabove the given cutoff frequency. If you were to apply a lowpass filter with a cutoff frequency of 1000Hz on speech, it would make itsound mumbled and deep. Lowpass filters can also be used to eliminate aliasing noise when used before downsampling.
Highpass filters block low pitch frequencies, but allow high pitched frequencies to pass. They can remove deep rumbling hum or removeunwanted sounds below the given cutoff frequency. If you were to apply a highpass fil ter with a cutoff frequency of 1000Hz on speech,it would make it sound thin and hollow.
Cutoff FrequencyThe Initial cutoff specifies the constant cutoff frequency for static filtering. If the Dynamic option is selected (see below), thena final cutoff frequency can be given in the Final cutoff box, allowing you to fade from one cutoff to another.
Filter OptionsSelect Lowpass if you want to keep only the frequencies below the cutoff frequency. Select Highpass if you want to keep only thefrequencies above the cutoff frequency.
If you want the cutoff frequency to remain constant throughout the selection during processing, select the Static option. If youwant the cutoff frequency to change from the initial value to the final value, select the Dynamic option. Note that dynamic filteringwill take more processing time.
The Steepnessvalue specifies how sharply the filter cuts off frequencies outside the cutoff frequency. A higher steepness makes the filter sharper,but it also increases processing time. In technical terms, the steepness specifies the number of second order cascade filters used.
ExamplesTo make speech gradually become more hollow and thin:
Set Initial cutoff to 60.1.Choose Dynamic.2.Set Final cutoff to 1000.3.Choose Highpass.4.Choose OK.5.
Remove all high end hiss noise from a voice recording.
Set Initial cutoff to 4000.1.Choose Lowpass.2.Choose Static.3.Set Steepness to 20.4.Choose OK.5.
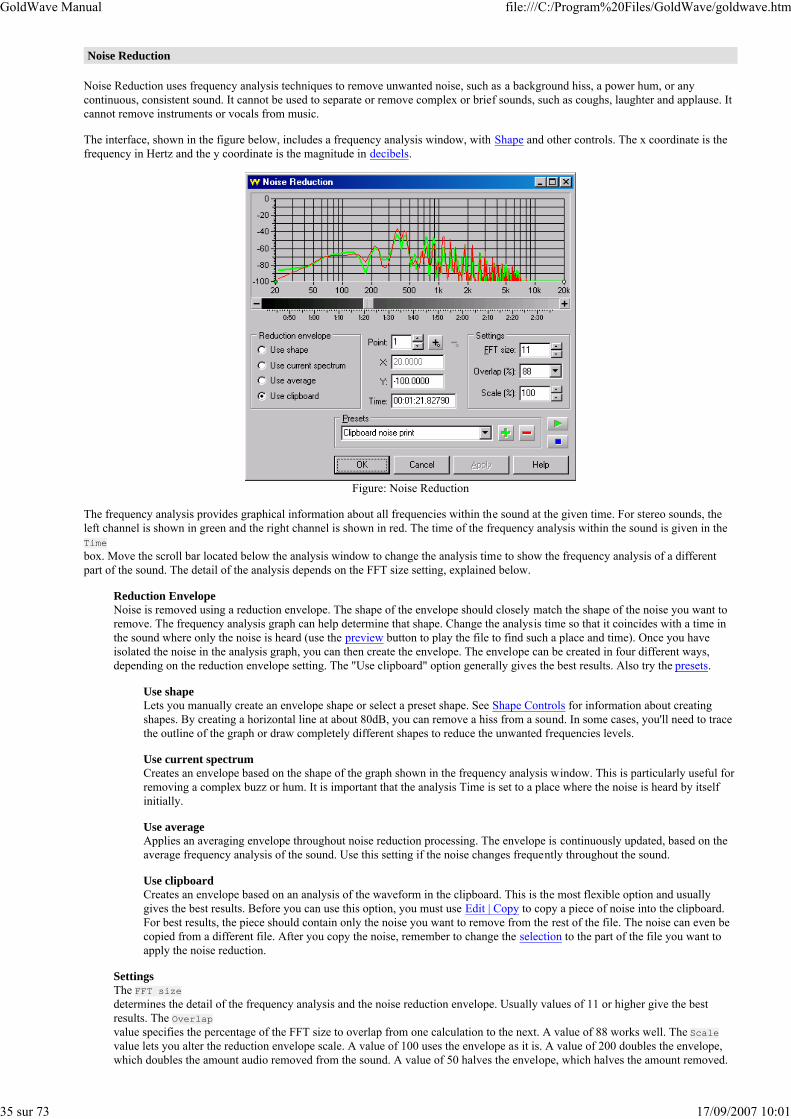
GoldWave Manual file:///C:/Program%20Files/GoldWave/goldwave.htm
35 sur 73 17/09/2007 10:01
Noise Reduction
Noise Reduction uses frequency analysis techniques to remove unwanted noise, such as a background hiss, a power hum, or anycontinuous, consistent sound. It cannot be used to separate or remove complex or brief sounds, such as coughs, laughter and applause. Itcannot remove instruments or vocals from music.
The interface, shown in the figure below, includes a frequency analysis window, with Shape and other controls. The x coordinate is thefrequency in Hertz and the y coordinate is the magnitude in decibels.
Figure: Noise Reduction
The frequency analysis provides graphical information about all frequencies within the sound at the given time. For stereo sounds, theleft channel is shown in green and the right channel is shown in red. The time of the frequency analysis within the sound is given in theTimebox. Move the scroll bar located below the analysis window to change the analysis time to show the frequency analysis of a differentpart of the sound. The detail of the analysis depends on the FFT size setting, explained below.
Reduction EnvelopeNoise is removed using a reduction envelope. The shape of the envelope should closely match the shape of the noise you want toremove. The frequency analysis graph can help determine that shape. Change the analysis time so that it coincides with a time inthe sound where only the noise is heard (use the preview button to play the file to find such a place and time). Once you haveisolated the noise in the analysis graph, you can then create the envelope. The envelope can be created in four different ways,depending on the reduction envelope setting. The "Use clipboard" option generally gives the best results. Also try the presets.
Use shapeLets you manually create an envelope shape or select a preset shape. See Shape Controls for information about creatingshapes. By creating a horizontal line at about 80dB, you can remove a hiss from a sound. In some cases, you'll need to tracethe outline of the graph or draw completely different shapes to reduce the unwanted frequencies levels.
Use current spectrumCreates an envelope based on the shape of the graph shown in the frequency analysis window. This is particularly useful forremoving a complex buzz or hum. It is important that the analysis Time is set to a place where the noise is heard by itselfinitially.
Use averageApplies an averaging envelope throughout noise reduction processing. The envelope is continuously updated, based on theaverage frequency analysis of the sound. Use this setting if the noise changes frequently throughout the sound.
Use clipboardCreates an envelope based on an analysis of the waveform in the clipboard. This is the most flexible option and usuallygives the best results. Before you can use this option, you must use Edit | Copy to copy a piece of noise into the clipboard.For best results, the piece should contain only the noise you want to remove from the rest of the file. The noise can even becopied from a different file. After you copy the noise, remember to change the selection to the part of the file you want toapply the noise reduction.
SettingsThe FFT sizedetermines the detail of the frequency analysis and the noise reduction envelope. Usually values of 11 or higher give the bestresults. The Overlapvalue specifies the percentage of the FFT size to overlap from one calculation to the next. A value of 88 works well. The Scalevalue lets you alter the reduction envelope scale. A value of 100 uses the envelope as it is. A value of 200 doubles the envelope,which doubles the amount audio removed from the sound. A value of 50 halves the envelope, which halves the amount removed.
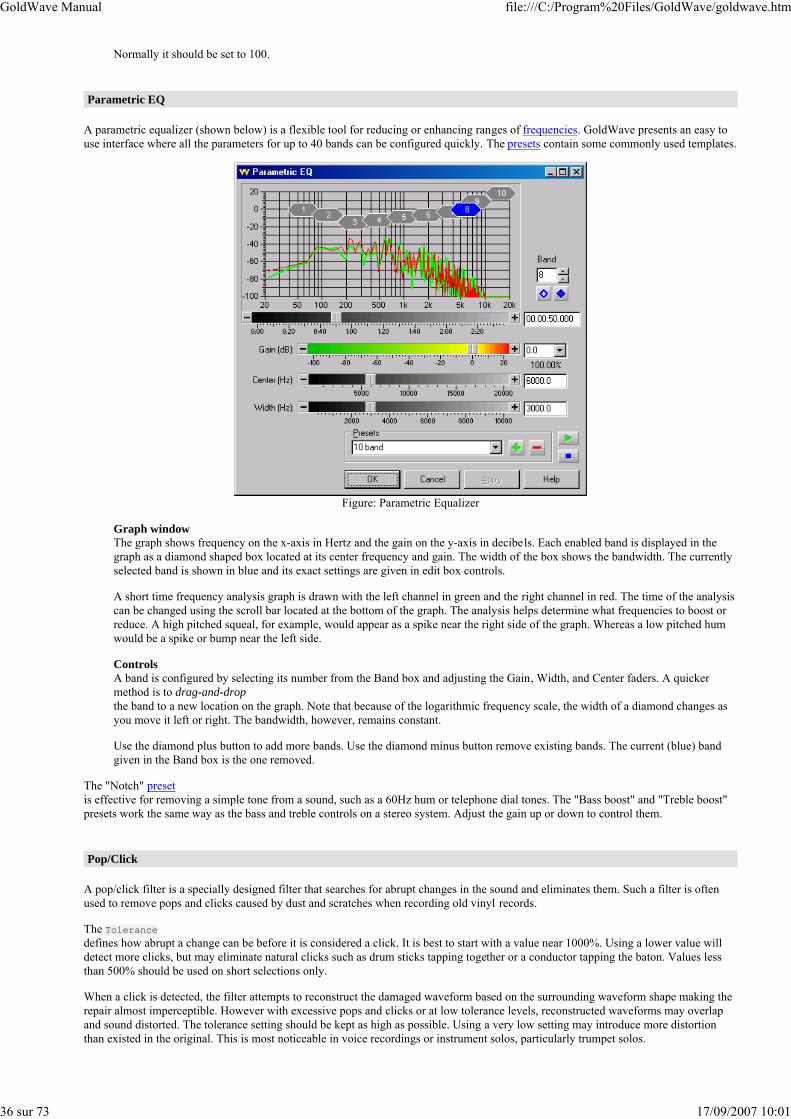
GoldWave Manual file:///C:/Program%20Files/GoldWave/goldwave.htm
36 sur 73 17/09/2007 10:01
Normally it should be set to 100.
Parametric EQ
A parametric equalizer (shown below) is a flexible tool for reducing or enhancing ranges of frequencies. GoldWave presents an easy touse interface where all the parameters for up to 40 bands can be configured quickly. The presets contain some commonly used templates.
Figure: Parametric Equalizer
Graph windowThe graph shows frequency on the x-axis in Hertz and the gain on the y-axis in decibels. Each enabled band is displayed in thegraph as a diamond shaped box located at its center frequency and gain. The width of the box shows the bandwidth. The currentlyselected band is shown in blue and its exact settings are given in edit box controls.
A short time frequency analysis graph is drawn with the left channel in green and the right channel in red. The time of the analysiscan be changed using the scroll bar located at the bottom of the graph. The analysis helps determine what frequencies to boost orreduce. A high pitched squeal, for example, would appear as a spike near the right side of the graph. Whereas a low pitched humwould be a spike or bump near the left side.
ControlsA band is configured by selecting its number from the Band box and adjusting the Gain, Width, and Center faders. A quickermethod is to drag-and-dropthe band to a new location on the graph. Note that because of the logarithmic frequency scale, the width of a diamond changes asyou move it left or right. The bandwidth, however, remains constant.
Use the diamond plus button to add more bands. Use the diamond minus button remove existing bands. The current (blue) bandgiven in the Band box is the one removed.
The "Notch" presetis effective for removing a simple tone from a sound, such as a 60Hz hum or telephone dial tones. The "Bass boost" and "Treble boost"presets work the same way as the bass and treble controls on a stereo system. Adjust the gain up or down to control them.
Pop/Click
A pop/click filter is a specially designed filter that searches for abrupt changes in the sound and eliminates them. Such a filter is oftenused to remove pops and clicks caused by dust and scratches when recording old vinyl records.
The Tolerancedefines how abrupt a change can be before it is considered a click. It is best to start with a value near 1000%. Using a lower value willdetect more clicks, but may eliminate natural clicks such as drum sticks tapping together or a conductor tapping the baton. Values lessthan 500% should be used on short selections only.
When a click is detected, the filter attempts to reconstruct the damaged waveform based on the surrounding waveform shape making therepair almost imperceptible. However with excessive pops and clicks or at low tolerance levels, reconstructed waveforms may overlapand sound distorted. The tolerance setting should be kept as high as possible. Using a very low setting may introduce more distortionthan existed in the original. This is most noticeable in voice recordings or instrument solos, particularly trumpet solos.
GoldWave Manual file:///C:/Program%20Files/GoldWave/goldwave.htm
37 sur 73 17/09/2007 10:01
The filter requires a minimum selectionof 4000 samples (about one tenth of a second at CD quality) to establish a base line. Using the filter on a shorter selection has no effect.
Silence Reduction
This filter automatically removes long silences from a sound and helps save storage space. The Silence threshold specifies the volumelevel for the silence. Any audio below this level is considered silence and is subject to removal, provided it has a long enough duration."Reduce to length" specifies how short to make the silence. If you use a value of 1.0, then any silences longer than one second isshortened to one second in length.
Use this effect on speeches or police/airport radio recordings to remove long pauses.
Smoother
Use this filter to reduce hiss and crackle. Lengthsets the length of the smoother filter. The larger the value, the more averaging is applied to the audio and the duller it will sound. Use theVolume setting to help offset the loss in volume for larger Length values.
Flanger
A flanger effect is similar to an echo effect in that the original sound is mixed with a delayed copy of itself. Unlike an echo, where the delay isconstant, a flanger varies the delay over a given range. The speed, or frequency, at which the delay varies is controlled as well. The Flangereffect presents a window where you can set the depth, frequency, and fixed delay parameters and control how the sound is mixed. Manypresets are included to demonstrate the kinds of unusual audio effects that are possible.
VolumesThe Sourcevolume specifies the volume of the original sound to mix with the final sound. A value of 0 means the original sound will not be mixedat all with the final sound. If this value is set to 100 and all other volumes are 0, no change is made to the sound. A value of -100 invertsthe source, which is equivalent to subtracting the original instead of adding it to the final sound.
The Flangervolume specifies the volume of the delayed sound to mix with the final sound. Usually, this value should be in the range of 25 to 100, or-25 to -100 for an inverted mix.
Feedbackspecifies the level of feedback (previously generated output) to mix with the final sound. This makes the effect more full andpronounced. Set this value to 0 if you do not want any feedback. In general the feedback should be set to between -75 to 75.
Flanger SettingsVariable delayspecifies the maximum variable delay in milliseconds. A value of 40 will allow the delay to vary from 0 to 40 milliseconds.
Frequencyspecifies how fast to vary the delay. A value of 2 will vary the delay over from 0 to its maximum twice a second. For a value of 0.2, themaximum delay is reached every five seconds.
The Fixed delayis added to the depth to change the minimum delay. If the variable delay is 40 and the fixed delay is 10, the delay will vary from 10 to 50milliseconds.
The Sine modulator and Triangular modulator settings control how the delay is varied. If sine is selected, then the delay varies on asinusoidal pattern. If triangular is selected, then the delay varies in a simple linear pattern.
The Stereooption allows the flanger and feedback audio to be bounced between the left and right channels of a stereo sound, giving a morepronounced stereo effect.
Interpolate
Interpolate (see figure below) uses linear interpolation to smooth out the waveform within the selection. Use this command on a tiny selectionto remove a pop or click. This command should not be used on a large selection.
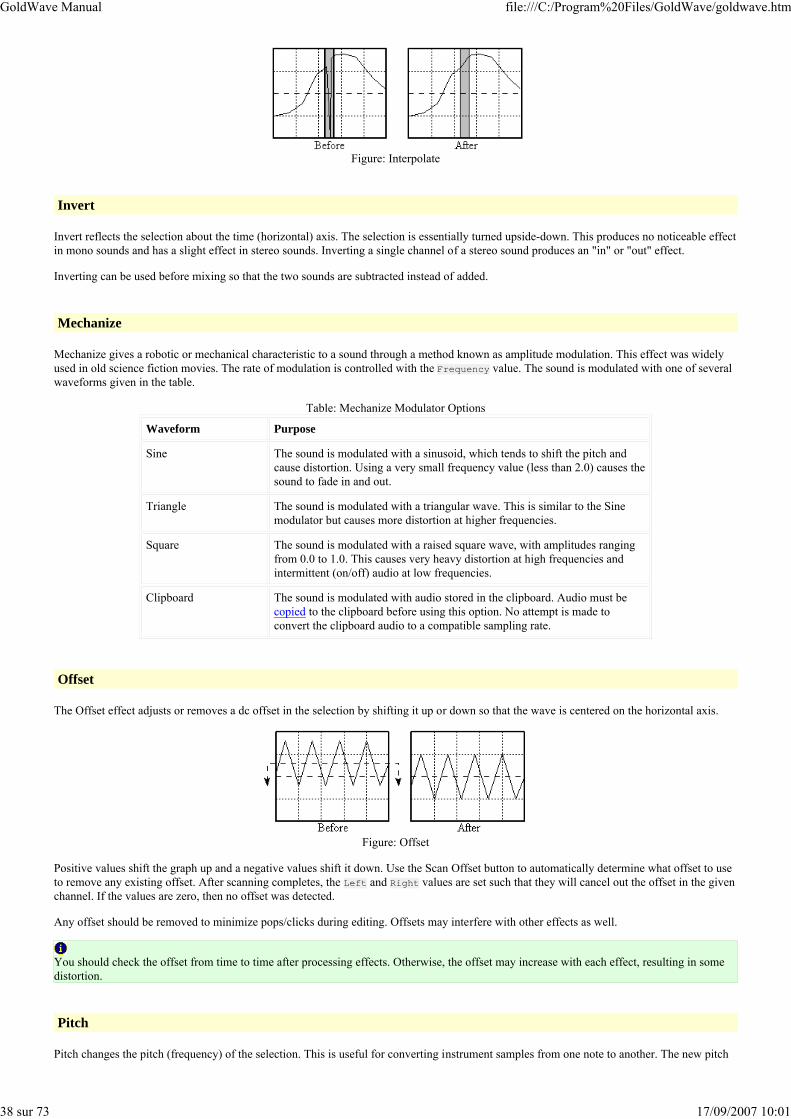
GoldWave Manual file:///C:/Program%20Files/GoldWave/goldwave.htm
38 sur 73 17/09/2007 10:01
Figure: Interpolate
Invert
Invert reflects the selection about the time (horizontal) axis. The selection is essentially turned upside-down. This produces no noticeable effectin mono sounds and has a slight effect in stereo sounds. Inverting a single channel of a stereo sound produces an "in" or "out" effect.
Inverting can be used before mixing so that the two sounds are subtracted instead of added.
Mechanize
Mechanize gives a robotic or mechanical characteristic to a sound through a method known as amplitude modulation. This effect was widelyused in old science fiction movies. The rate of modulation is controlled with the Frequency value. The sound is modulated with one of severalwaveforms given in the table.
Table: Mechanize Modulator Options
Waveform Purpose
Sine The sound is modulated with a sinusoid, which tends to shift the pitch andcause distortion. Using a very small frequency value (less than 2.0) causes thesound to fade in and out.
Triangle The sound is modulated with a triangular wave. This is similar to the Sinemodulator but causes more distortion at higher frequencies.
Square The sound is modulated with a raised square wave, with amplitudes rangingfrom 0.0 to 1.0. This causes very heavy distortion at high frequencies andintermittent (on/off) audio at low frequencies.
Clipboard The sound is modulated with audio stored in the clipboard. Audio must becopied to the clipboard before using this option. No attempt is made toconvert the clipboard audio to a compatible sampling rate.
Offset
The Offset effect adjusts or removes a dc offset in the selection by shifting it up or down so that the wave is centered on the horizontal axis.
Figure: Offset
Positive values shift the graph up and a negative values shift it down. Use the Scan Offset button to automatically determine what offset to useto remove any existing offset. After scanning completes, the Left and Right values are set such that they will cancel out the offset in the givenchannel. If the values are zero, then no offset was detected.
Any offset should be removed to minimize pops/clicks during editing. Offsets may interfere with other effects as well.
You should check the offset from time to time after processing effects. Otherwise, the offset may increase with each effect, resulting in somedistortion.
Pitch
Pitch changes the pitch (frequency) of the selection. This is useful for converting instrument samples from one note to another. The new pitch

GoldWave Manual file:///C:/Program%20Files/GoldWave/goldwave.htm
39 sur 73 17/09/2007 10:01
is specified using a scale factor or using semitone and fine tune values.
ScaleThis option scales the pitch by a percentage value. If you set the scale to 50, that is equivalent to a downward shift by one octave. Avalue of 200 is the same as an upward shift of one octave and would make a voice sound like a chipmunk. A value of 75 would make awoman's voice sound like a man's.
SemitoneThis option changes the pitch by semitones (notes on a piano). If your sound is a note at middle C and the semitone value is 2, the note ischanged to D. A value of -1 changes the note to B. A value of 12 make the note one octave above middle C. The Fine tune value lets youmake a slight pitch adjustment in hundredths of a semitone. For example, a value of 50 changes a note from C to halfway between C andC#.
Preserve lengthIf this option is checked, a complex algorithm is used to keep the length of the original note the same as the new note. In other words, thetempo will not be changed. In terms of a voice recording, this changes the pitch of the voice without changing the speed at which thewords are spoken. This option requires a substantial amount of processing time and will affect the quality of the sound.
The FFT sizedetermines how much of the sound to process at one time, based on a power of 2. A value of 10, for example means that 1024 (210) samples are processed at a time. Values from 11 and up give good results. The Overlap determines what percentage of the processedsamples are recalculated. It should be at least 88. Values of 90 and 95 will give better results, but require more processing time.
Plug-in
This menu lists all plug-insdetected by GoldWave. If any compatible DirectX plug-ins are detected, then they are listed under a DirectX submenu.
Reverse
This command reverses the selection so that it plays backward. Now you have an easy way to capture all those "satanic verses" or reversespeech messages. You can play a sound backwards by using the rewind button on the Control window as well.
Reverb
Reverb adds body and richness to the sound by simulating the acoustic reverberation and echoes within a chamber or room.
The Reverb time sets the size of the reverb. A longer time simulates a larger chamber or room.
The Volume controls how loud the reverb is. Values less than -18dB give good results.
The Delay scale alters the delay of the reverb for fine tuning. Use 1.0 for a standard reverb.
Stereo
The Stereo submenu contains commands that apply to stereo files, such as swapping channels and left/right panning.
Channel Mixer
This command swaps, mixes, inverts, or combines the left and right channels in a variety of ways. The left and right channels arereplaced with a mixed combination of both channels, depending on the volume levels set. Use the controls in the Left channel box toset the mixing volume percentages for the left channel. Use the controls in the Right channel box to set the mixing volume percentagesfor the right channel.
To swap the left and right channels:
In the Left channel box, set the Left volume fader to 0 and the Right volume fader to 100.1.In the Right channel box, set the Left volume fader to 100 and the Right volume fader to 0.2.Choose OK.3.
MaxMatch
This command automatically balances the left and right channels and maximizes the volume levels. Essentially, this effect uses theMatch Volume effect internally on the left and right channels, then uses the Maximize Volume effect.
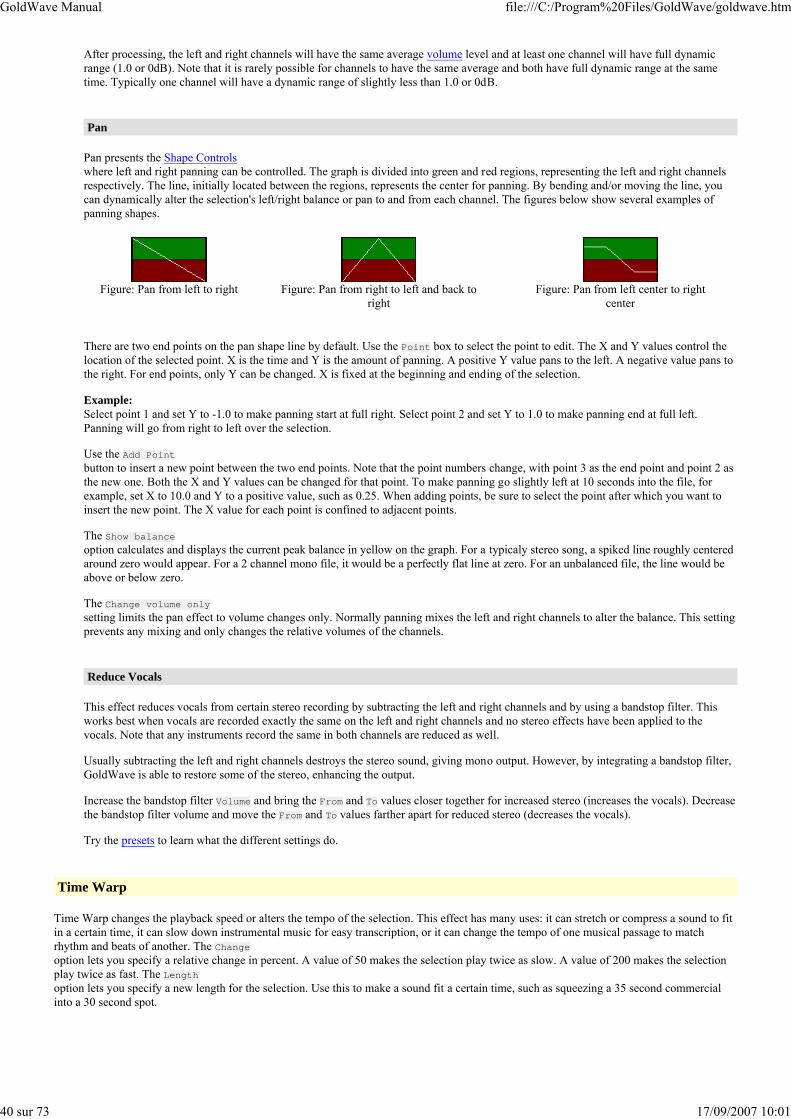
GoldWave Manual file:///C:/Program%20Files/GoldWave/goldwave.htm
40 sur 73 17/09/2007 10:01
After processing, the left and right channels will have the same average volume level and at least one channel will have full dynamicrange (1.0 or 0dB). Note that it is rarely possible for channels to have the same average and both have full dynamic range at the sametime. Typically one channel will have a dynamic range of slightly less than 1.0 or 0dB.
Pan
Pan presents the Shape Controlswhere left and right panning can be controlled. The graph is divided into green and red regions, representing the left and right channelsrespectively. The line, initially located between the regions, represents the center for panning. By bending and/or moving the line, youcan dynamically alter the selection's left/right balance or pan to and from each channel. The figures below show several examples ofpanning shapes.
Figure: Pan from left to right Figure: Pan from right to left and back to right
Figure: Pan from left center to right center
There are two end points on the pan shape line by default. Use the Point box to select the point to edit. The X and Y values control thelocation of the selected point. X is the time and Y is the amount of panning. A positive Y value pans to the left. A negative value pans tothe right. For end points, only Y can be changed. X is fixed at the beginning and ending of the selection.
Example:Select point 1 and set Y to -1.0 to make panning start at full right. Select point 2 and set Y to 1.0 to make panning end at full left.Panning will go from right to left over the selection.
Use the Add Pointbutton to insert a new point between the two end points. Note that the point numbers change, with point 3 as the end point and point 2 asthe new one. Both the X and Y values can be changed for that point. To make panning go slightly left at 10 seconds into the file, forexample, set X to 10.0 and Y to a positive value, such as 0.25. When adding points, be sure to select the point after which you want toinsert the new point. The X value for each point is confined to adjacent points.
The Show balanceoption calculates and displays the current peak balance in yellow on the graph. For a typicaly stereo song, a spiked line roughly centeredaround zero would appear. For a 2 channel mono file, it would be a perfectly flat line at zero. For an unbalanced file, the line would beabove or below zero.
The Change volume onlysetting limits the pan effect to volume changes only. Normally panning mixes the left and right channels to alter the balance. This settingprevents any mixing and only changes the relative volumes of the channels.
Reduce Vocals
This effect reduces vocals from certain stereo recording by subtracting the left and right channels and by using a bandstop filter. Thisworks best when vocals are recorded exactly the same on the left and right channels and no stereo effects have been applied to thevocals. Note that any instruments record the same in both channels are reduced as well.
Usually subtracting the left and right channels destroys the stereo sound, giving mono output. However, by integrating a bandstop filter,GoldWave is able to restore some of the stereo, enhancing the output.
Increase the bandstop filter Volume and bring the From and To values closer together for increased stereo (increases the vocals). Decreasethe bandstop filter volume and move the From and To values farther apart for reduced stereo (decreases the vocals).
Try the presets to learn what the different settings do.
Time Warp
Time Warp changes the playback speed or alters the tempo of the selection. This effect has many uses: it can stretch or compress a sound to fitin a certain time, it can slow down instrumental music for easy transcription, or it can change the tempo of one musical passage to matchrhythm and beats of another. The Changeoption lets you specify a relative change in percent. A value of 50 makes the selection play twice as slow. A value of 200 makes the selectionplay twice as fast. The Lengthoption lets you specify a new length for the selection. Use this to make a sound fit a certain time, such as squeezing a 35 second commercialinto a 30 second spot.

GoldWave Manual file:///C:/Program%20Files/GoldWave/goldwave.htm
41 sur 73 17/09/2007 10:01
Figure: Time Warp
Three different time altering algorithms are provided, each with certain advantages and disadvantages.
SpeedThe Speed algorithm simply changes the sampling rate of the entire sound so that it plays back at a different speed, similar to spinning avinyl record faster or slower. It works the same way as the speed fader in the Control window, but in this case, the sound itself ischanged. This technique is very fast and produces excellent quality, however, the pitch of the sound is changed as well. In other words, ifyou were to speed up a voice, the pitch becomes higher, making the voice sound like a chipmunk.
SimilarityThe Similarity algorithm uses correlation to add and overlap small, similar sections of the sound. This technique preserves the pitch. Itgenerally produces high quality voice and fair quality music when using small speed or time changes. A fair amount of time may berequire for processing, depending on the Search range value. For voice, the Window size should be set between 20 and 30 and the Searchrange set to between 5 and 10. For music, a larger Window size and Search range gives better results, such as 60 and 25.
FFTThe FFT algorithm uses Fourier transforms and interpolates or decimates the frequency analysis to change the length. This techniquepreserves the pitch, but can introduce some artifacts into the sound. Best quality is obtained by using the Oscillator synthesis option, butthat requires significant processing time. The FFT size should be set from 11 to 12 and the Overlap should be at least 75, but can be setto 88, 90, or 95 for better quality. The FFT size and Overlap settings are explained under the Noise Reduction filter section.
If you changed the speed fader in the Control window, remember to set it back to 1.00 so that the device plays at the correct speed.
Volume
The Volume submenu contains several volume related commands. Volumes are usually specified in decibels (dB) or by a percentage (%) of thesound's original amplitude. For more information about volumes, see Volume Scales in Appendix A. Unlike the volume fader in the Controlwindow, which changes the device playback volume, these commands scale the sound's data to change the volume.
Change Volume
This command modifies the selection so that it sounds louder or quieter. You need to enter the new relative volume. Values less than0dB make the selection quieter. Values greater than 0dB make it louder. A value of 0dB leaves the volume unchanged.
If you are trying to make the volumes of several different songs sound the same, use Effect | Volume | Match Volume instead.
Fade In
Fade In gradually increases the volume throughout the selection. You need to specify the initial volume. Normally to fade in fromcomplete silence, you'd use the lowest possible value of −160dB.
The Logarithmic and Linear options control the shape of the fade. A Logarithmic fade will fade in more rapidly than a Linear fade.
To fade in the first 5 seconds of a sound from silence:
Select the first 5 seconds of the sound.1.Choose Fade In from the Effect | Volume submenu.2.
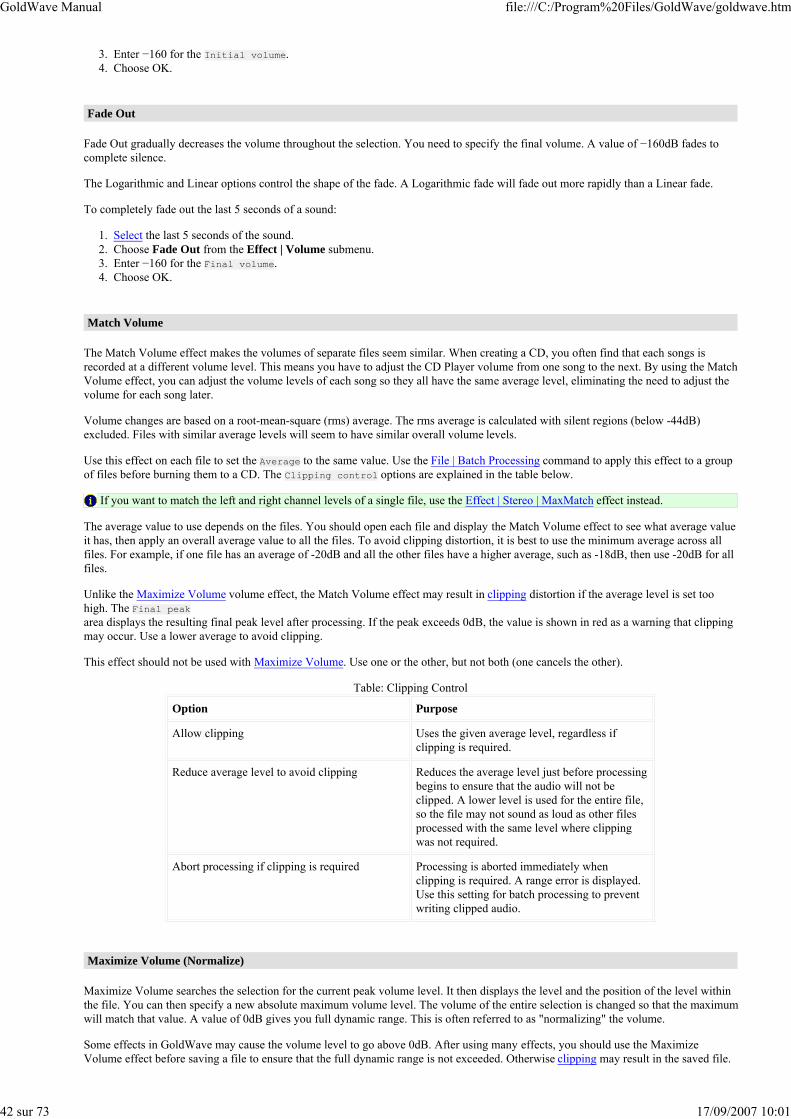
GoldWave Manual file:///C:/Program%20Files/GoldWave/goldwave.htm
42 sur 73 17/09/2007 10:01
Enter −160 for the Initial volume.3.Choose OK.4.
Fade Out
Fade Out gradually decreases the volume throughout the selection. You need to specify the final volume. A value of −160dB fades tocomplete silence.
The Logarithmic and Linear options control the shape of the fade. A Logarithmic fade will fade out more rapidly than a Linear fade.
To completely fade out the last 5 seconds of a sound:
Select the last 5 seconds of the sound.1.Choose Fade Out from the Effect | Volume submenu.2.Enter −160 for the Final volume.3.Choose OK.4.
Match Volume
The Match Volume effect makes the volumes of separate files seem similar. When creating a CD, you often find that each songs isrecorded at a different volume level. This means you have to adjust the CD Player volume from one song to the next. By using the MatchVolume effect, you can adjust the volume levels of each song so they all have the same average level, eliminating the need to adjust thevolume for each song later.
Volume changes are based on a root-mean-square (rms) average. The rms average is calculated with silent regions (below -44dB)excluded. Files with similar average levels will seem to have similar overall volume levels.
Use this effect on each file to set the Average to the same value. Use the File | Batch Processing command to apply this effect to a groupof files before burning them to a CD. The Clipping control options are explained in the table below.
If you want to match the left and right channel levels of a single file, use the Effect | Stereo | MaxMatch effect instead.
The average value to use depends on the files. You should open each file and display the Match Volume effect to see what average valueit has, then apply an overall average value to all the files. To avoid clipping distortion, it is best to use the minimum average across allfiles. For example, if one file has an average of -20dB and all the other files have a higher average, such as -18dB, then use -20dB for allfiles.
Unlike the Maximize Volume volume effect, the Match Volume effect may result in clipping distortion if the average level is set toohigh. The Final peakarea displays the resulting final peak level after processing. If the peak exceeds 0dB, the value is shown in red as a warning that clippingmay occur. Use a lower average to avoid clipping.
This effect should not be used with Maximize Volume. Use one or the other, but not both (one cancels the other).
Table: Clipping Control
Option Purpose
Allow clipping Uses the given average level, regardless if clipping is required.
Reduce average level to avoid clipping Reduces the average level just before processing begins to ensure that the audio will not beclipped. A lower level is used for the entire file,so the file may not sound as loud as other files processed with the same level where clippingwas not required.
Abort processing if clipping is required Processing is aborted immediately when clipping is required. A range error is displayed.Use this setting for batch processing to preventwriting clipped audio.
Maximize Volume (Normalize)
Maximize Volume searches the selection for the current peak volume level. It then displays the level and the position of the level withinthe file. You can then specify a new absolute maximum volume level. The volume of the entire selection is changed so that the maximumwill match that value. A value of 0dB gives you full dynamic range. This is often referred to as "normalizing" the volume.
Some effects in GoldWave may cause the volume level to go above 0dB. After using many effects, you should use the MaximizeVolume effect before saving a file to ensure that the full dynamic range is not exceeded. Otherwise clipping may result in the saved file.
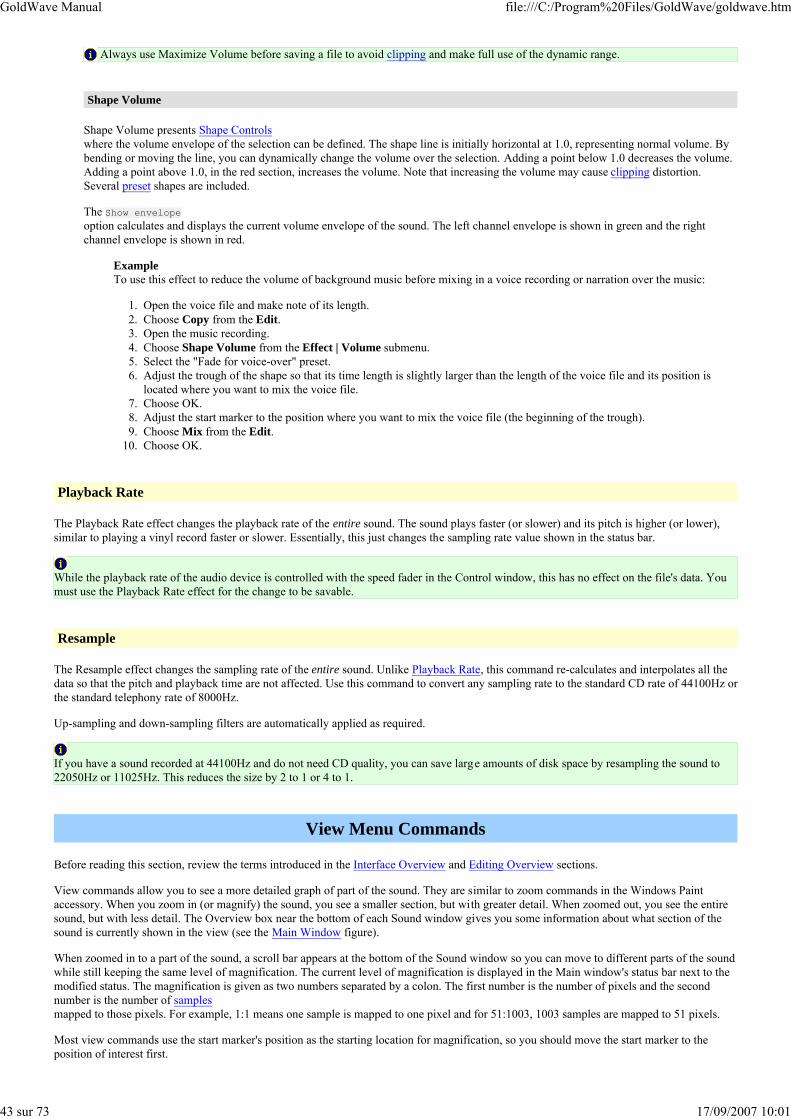
GoldWave Manual file:///C:/Program%20Files/GoldWave/goldwave.htm
43 sur 73 17/09/2007 10:01
Always use Maximize Volume before saving a file to avoid clipping and make full use of the dynamic range.
Shape Volume
Shape Volume presents Shape Controlswhere the volume envelope of the selection can be defined. The shape line is initially horizontal at 1.0, representing normal volume. Bybending or moving the line, you can dynamically change the volume over the selection. Adding a point below 1.0 decreases the volume.Adding a point above 1.0, in the red section, increases the volume. Note that increasing the volume may cause clipping distortion.Several preset shapes are included.
The Show envelopeoption calculates and displays the current volume envelope of the sound. The left channel envelope is shown in green and the rightchannel envelope is shown in red.
ExampleTo use this effect to reduce the volume of background music before mixing in a voice recording or narration over the music:
Open the voice file and make note of its length.1.Choose Copy from the Edit.2.Open the music recording.3.Choose Shape Volume from the Effect | Volume submenu.4.Select the "Fade for voice-over" preset.5.Adjust the trough of the shape so that its time length is slightly larger than the length of the voice file and its position islocated where you want to mix the voice file.
6.
Choose OK.7.Adjust the start marker to the position where you want to mix the voice file (the beginning of the trough).8.Choose Mix from the Edit.9.Choose OK.10.
Playback Rate
The Playback Rate effect changes the playback rate of the entire sound. The sound plays faster (or slower) and its pitch is higher (or lower),similar to playing a vinyl record faster or slower. Essentially, this just changes the sampling rate value shown in the status bar.
While the playback rate of the audio device is controlled with the speed fader in the Control window, this has no effect on the file's data. Youmust use the Playback Rate effect for the change to be savable.
Resample
The Resample effect changes the sampling rate of the entire sound. Unlike Playback Rate, this command re-calculates and interpolates all thedata so that the pitch and playback time are not affected. Use this command to convert any sampling rate to the standard CD rate of 44100Hz orthe standard telephony rate of 8000Hz.
Up-sampling and down-sampling filters are automatically applied as required.
If you have a sound recorded at 44100Hz and do not need CD quality, you can save large amounts of disk space by resampling the sound to22050Hz or 11025Hz. This reduces the size by 2 to 1 or 4 to 1.
View Menu Commands
Before reading this section, review the terms introduced in the Interface Overview and Editing Overview sections.
View commands allow you to see a more detailed graph of part of the sound. They are similar to zoom commands in the Windows Paintaccessory. When you zoom in (or magnify) the sound, you see a smaller section, but with greater detail. When zoomed out, you see the entiresound, but with less detail. The Overview box near the bottom of each Sound window gives you some information about what section of thesound is currently shown in the view (see the Main Window figure).
When zoomed in to a part of the sound, a scroll bar appears at the bottom of the Sound window so you can move to different parts of the soundwhile still keeping the same level of magnification. The current level of magnification is displayed in the Main window's status bar next to themodified status. The magnification is given as two numbers separated by a colon. The first number is the number of pixels and the secondnumber is the number of samplesmapped to those pixels. For example, 1:1 means one sample is mapped to one pixel and for 51:1003, 1003 samples are mapped to 51 pixels.
Most view commands use the start marker's position as the starting location for magnification, so you should move the start marker to theposition of interest first.
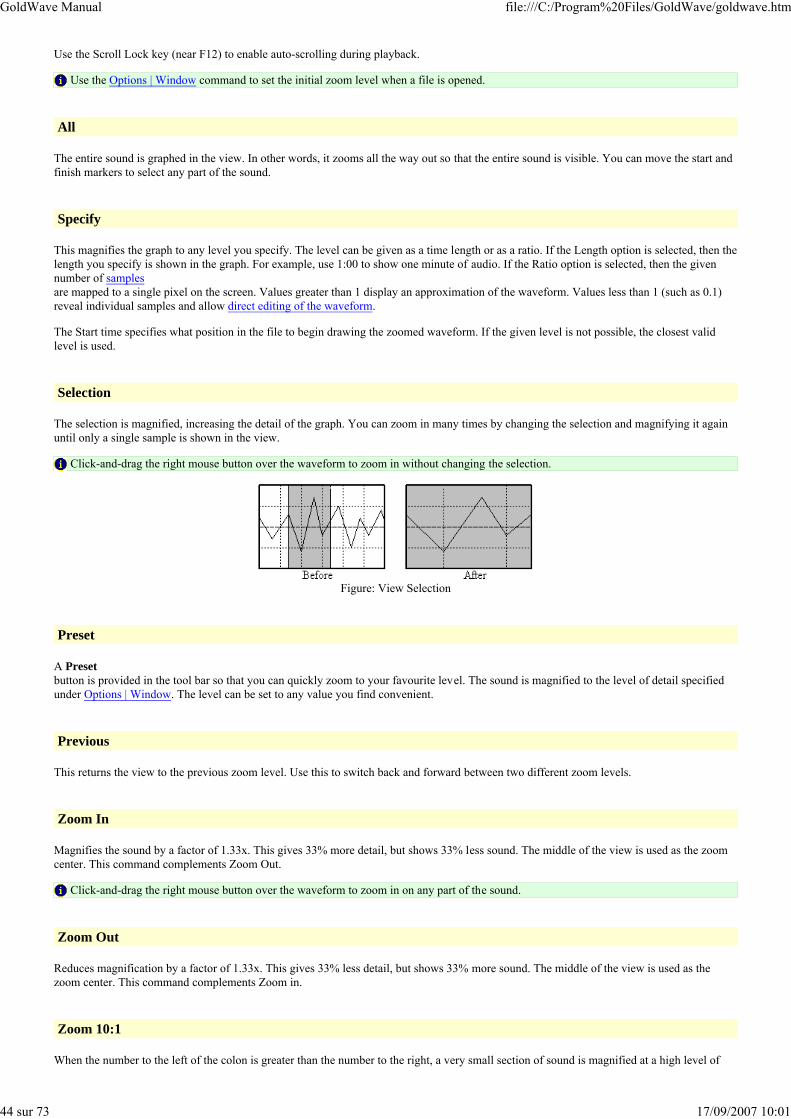
GoldWave Manual file:///C:/Program%20Files/GoldWave/goldwave.htm
44 sur 73 17/09/2007 10:01
Use the Scroll Lock key (near F12) to enable auto-scrolling during playback.
Use the Options | Window command to set the initial zoom level when a file is opened.
All
The entire sound is graphed in the view. In other words, it zooms all the way out so that the entire sound is visible. You can move the start andfinish markers to select any part of the sound.
Specify
This magnifies the graph to any level you specify. The level can be given as a time length or as a ratio. If the Length option is selected, then thelength you specify is shown in the graph. For example, use 1:00 to show one minute of audio. If the Ratio option is selected, then the givennumber of samplesare mapped to a single pixel on the screen. Values greater than 1 display an approximation of the waveform. Values less than 1 (such as 0.1)reveal individual samples and allow direct editing of the waveform.
The Start time specifies what position in the file to begin drawing the zoomed waveform. If the given level is not possible, the closest validlevel is used.
Selection
The selection is magnified, increasing the detail of the graph. You can zoom in many times by changing the selection and magnifying it againuntil only a single sample is shown in the view.
Click-and-drag the right mouse button over the waveform to zoom in without changing the selection.
Figure: View Selection
Preset
A Presetbutton is provided in the tool bar so that you can quickly zoom to your favourite level. The sound is magnified to the level of detail specifiedunder Options | Window. The level can be set to any value you find convenient.
Previous
This returns the view to the previous zoom level. Use this to switch back and forward between two different zoom levels.
Zoom In
Magnifies the sound by a factor of 1.33x. This gives 33% more detail, but shows 33% less sound. The middle of the view is used as the zoomcenter. This command complements Zoom Out.
Click-and-drag the right mouse button over the waveform to zoom in on any part of the sound.
Zoom Out
Reduces magnification by a factor of 1.33x. This gives 33% less detail, but shows 33% more sound. The middle of the view is used as thezoom center. This command complements Zoom in.
Zoom 10:1
When the number to the left of the colon is greater than the number to the right, a very small section of sound is magnified at a high level of
GoldWave Manual file:///C:/Program%20Files/GoldWave/goldwave.htm
45 sur 73 17/09/2007 10:01
detail. At these levels, individual samples are easily visible and direct waveform editing with the mouse is possible.
Zoom 1:1
At a level of 1:1, each audio sample is represented as a single pixel on the screen. This reveals a true representation of the shape of the sound.
Zoom 1 Second, 10 Seconds, 1 Minute, 1 Hour
These show the given amount of time of audio beginning at the start marker's position. You can use View | Finish to see the audio at the end.
Vertical Zoom All
Vertically zooms all the way out so that the entire vertical amplitude range of the sound is shown.
Vertical Zoom In
Magnifies the graph vertically to show 1.33 times as much amplitude detail. Zooming is centered on the horizontal center of the view.
Vertical Zoom Out
Reduces vertical magnification to show 1.33 times less amplitude detail. This show a larger range of the amplitude. Zooming is centered on thehorizontal center of the view.
Start and Finish
These commands scroll the view to either the start or finish marker's position. The view is centered over the marker's position provided itsposition and the level of magnification permit it to be centered. These commands are especially useful when you need to move a marker to aprecise position. For example, you can zoom in 1:1 and move the start marker to an exact position and then use View | Finish to set the finishmarker's position.
Tool Menu Commands
GoldWave includes several tools for working with audio files. These are described in the following sections.
CD Reader
The CD Reader tool digitally copies audio directly from an audio CD to a file on your hard drive, without using your sound card. This featureshas several advantages over normal recording:
There is no need to create and initialize a new file.Audio can be compressed while extracting, saving of hard drive space.Recording volume controls do not have to be selected or adjusted.Synchronizing sound card recording with CD playback is not required.Many CD-ROM drives read audio several times faster than sound card recording.Information such as artist, title, and album can be downloaded and saved automatically.
The CD-ROM drive must be MMC compliant (Multimedia Command Standard). For Windows 95, 98, and ME you must have an ASPI driverinstalled. For Windows 2000, XP, or later, support is built-in. Due to the wide variety of interfaces and inconsistent device standards,incompatibilities may arise that will require a system reset. It is recommended that you close all other programs before proceeding.
If your system is configured correctly, the window allows you to select a CD device and to specify tracks to copy. If you have only oneCD-ROM drive, only one device is listed in the drop down list. If you already have an audio CD in the drive, the track times are shown in thelists. Otherwise you will need to insert an audio CD and re-select the device from the list.
Read Tracks TabUse this tab to copy several tracks to separate files. The Get Titles button downloads information (album, titles, etc.) about the CD froman Internet database. An active connection to the Internet is required. You can select a single track from the list and use the Renamebutton (or Alt+R) to manually rename it. Use the Save Tracks button (the one with the diskette icon) to save all titles and discinformation to the hard drive.
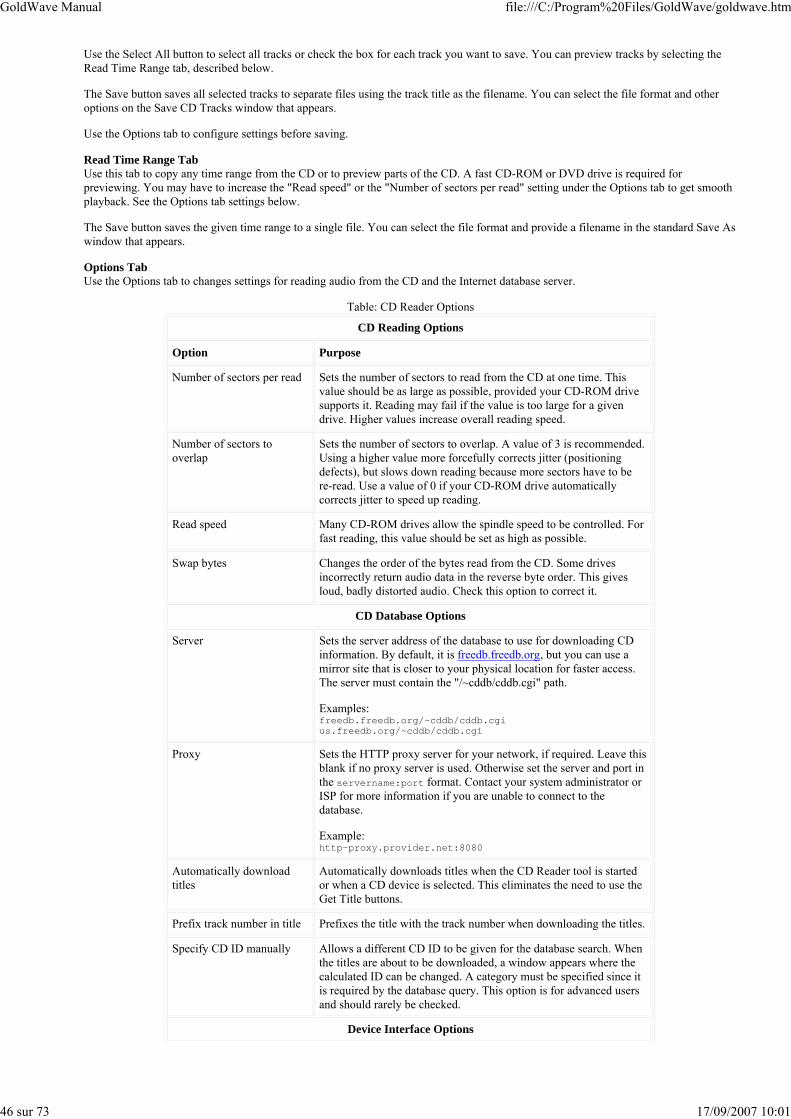
GoldWave Manual file:///C:/Program%20Files/GoldWave/goldwave.htm
46 sur 73 17/09/2007 10:01
Use the Select All button to select all tracks or check the box for each track you want to save. You can preview tracks by selecting theRead Time Range tab, described below.
The Save button saves all selected tracks to separate files using the track title as the filename. You can select the file format and otheroptions on the Save CD Tracks window that appears.
Use the Options tab to configure settings before saving.
Read Time Range TabUse this tab to copy any time range from the CD or to preview parts of the CD. A fast CD-ROM or DVD drive is required forpreviewing. You may have to increase the "Read speed" or the "Number of sectors per read" setting under the Options tab to get smoothplayback. See the Options tab settings below.
The Save button saves the given time range to a single file. You can select the file format and provide a filename in the standard Save Aswindow that appears.
Options TabUse the Options tab to changes settings for reading audio from the CD and the Internet database server.
Table: CD Reader Options
CD Reading Options
Option Purpose
Number of sectors per read Sets the number of sectors to read from the CD at one time. Thisvalue should be as large as possible, provided your CD-ROM drivesupports it. Reading may fail if the value is too large for a givendrive. Higher values increase overall reading speed.
Number of sectors to overlap
Sets the number of sectors to overlap. A value of 3 is recommended.Using a higher value more forcefully corrects jitter (positioning defects), but slows down reading because more sectors have to bere-read. Use a value of 0 if your CD-ROM drive automaticallycorrects jitter to speed up reading.
Read speed Many CD-ROM drives allow the spindle speed to be controlled. Forfast reading, this value should be set as high as possible.
Swap bytes Changes the order of the bytes read from the CD. Some drivesincorrectly return audio data in the reverse byte order. This givesloud, badly distorted audio. Check this option to correct it.
CD Database Options
Server Sets the server address of the database to use for downloading CDinformation. By default, it is freedb.freedb.org, but you can use amirror site that is closer to your physical location for faster access.The server must contain the "/~cddb/cddb.cgi" path.
Examples:freedb.freedb.org/~cddb/cddb.cgius.freedb.org/~cddb/cddb.cgi
Proxy Sets the HTTP proxy server for your network, if required. Leave thisblank if no proxy server is used. Otherwise set the server and port inthe servername:port format. Contact your system administrator orISP for more information if you are unable to connect to the database.
Example:http-proxy.provider.net:8080
Automatically download titles
Automatically downloads titles when the CD Reader tool is startedor when a CD device is selected. This eliminates the need to use theGet Title buttons.
Prefix track number in title Prefixes the title with the track number when downloading the titles.
Specify CD ID manually Allows a different CD ID to be given for the database search. Whenthe titles are about to be downloaded, a window appears where the calculated ID can be changed. A category must be specified since itis required by the database query. This option is for advanced usersand should rarely be checked.
Device Interface Options
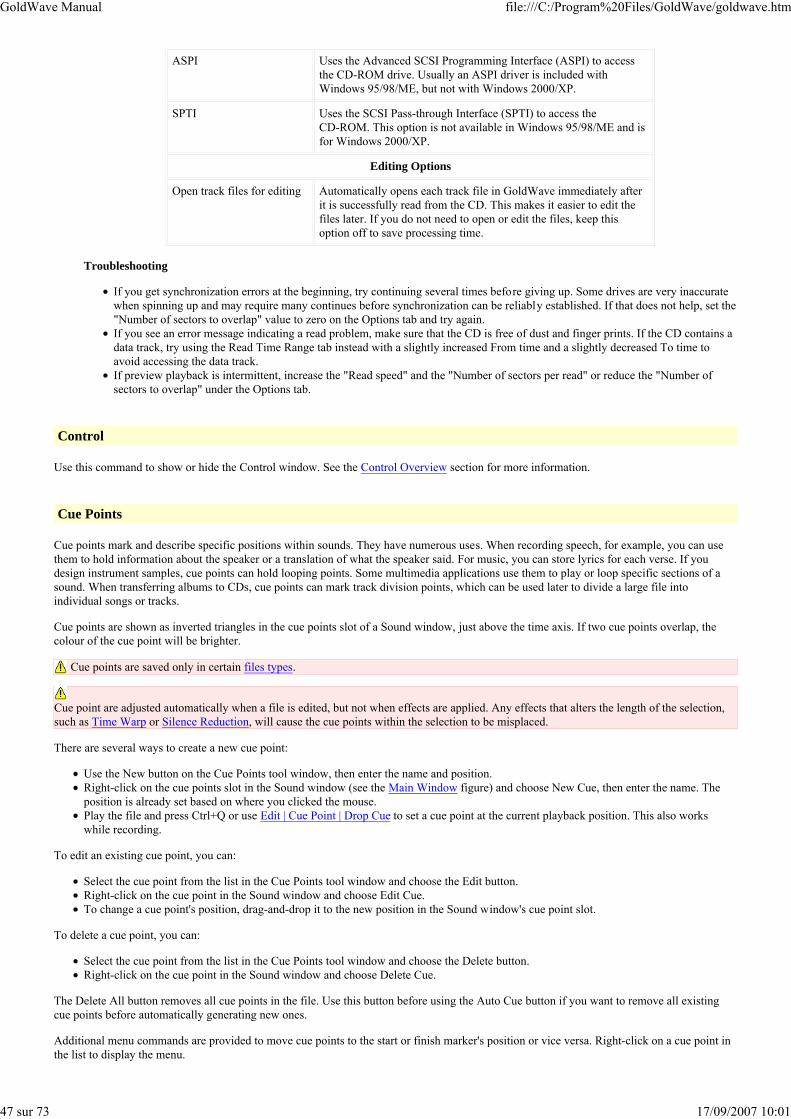
GoldWave Manual file:///C:/Program%20Files/GoldWave/goldwave.htm
47 sur 73 17/09/2007 10:01
ASPI Uses the Advanced SCSI Programming Interface (ASPI) to access the CD-ROM drive. Usually an ASPI driver is included withWindows 95/98/ME, but not with Windows 2000/XP.
SPTI Uses the SCSI Pass-through Interface (SPTI) to access the CD-ROM. This option is not available in Windows 95/98/ME and isfor Windows 2000/XP.
Editing Options
Open track files for editing Automatically opens each track file in GoldWave immediately after it is successfully read from the CD. This makes it easier to edit thefiles later. If you do not need to open or edit the files, keep thisoption off to save processing time.
Troubleshooting
If you get synchronization errors at the beginning, try continuing several times before giving up. Some drives are very inaccuratewhen spinning up and may require many continues before synchronization can be reliably established. If that does not help, set the"Number of sectors to overlap" value to zero on the Options tab and try again.If you see an error message indicating a read problem, make sure that the CD is free of dust and finger prints. If the CD contains adata track, try using the Read Time Range tab instead with a slightly increased From time and a slightly decreased To time toavoid accessing the data track.If preview playback is intermittent, increase the "Read speed" and the "Number of sectors per read" or reduce the "Number ofsectors to overlap" under the Options tab.
Control
Use this command to show or hide the Control window. See the Control Overview section for more information.
Cue Points
Cue points mark and describe specific positions within sounds. They have numerous uses. When recording speech, for example, you can usethem to hold information about the speaker or a translation of what the speaker said. For music, you can store lyrics for each verse. If youdesign instrument samples, cue points can hold looping points. Some multimedia applications use them to play or loop specific sections of asound. When transferring albums to CDs, cue points can mark track division points, which can be used later to divide a large file intoindividual songs or tracks.
Cue points are shown as inverted triangles in the cue points slot of a Sound window, just above the time axis. If two cue points overlap, thecolour of the cue point will be brighter.
Cue points are saved only in certain files types.
Cue point are adjusted automatically when a file is edited, but not when effects are applied. Any effects that alters the length of the selection,such as Time Warp or Silence Reduction, will cause the cue points within the selection to be misplaced.
There are several ways to create a new cue point:
Use the New button on the Cue Points tool window, then enter the name and position.Right-click on the cue points slot in the Sound window (see the Main Window figure) and choose New Cue, then enter the name. Theposition is already set based on where you clicked the mouse.Play the file and press Ctrl+Q or use Edit | Cue Point | Drop Cue to set a cue point at the current playback position. This also workswhile recording.
To edit an existing cue point, you can:
Select the cue point from the list in the Cue Points tool window and choose the Edit button.Right-click on the cue point in the Sound window and choose Edit Cue.To change a cue point's position, drag-and-drop it to the new position in the Sound window's cue point slot.
To delete a cue point, you can:
Select the cue point from the list in the Cue Points tool window and choose the Delete button.Right-click on the cue point in the Sound window and choose Delete Cue.
The Delete All button removes all cue points in the file. Use this button before using the Auto Cue button if you want to remove all existingcue points before automatically generating new ones.
Additional menu commands are provided to move cue points to the start or finish marker's position or vice versa. Right-click on a cue point inthe list to display the menu.
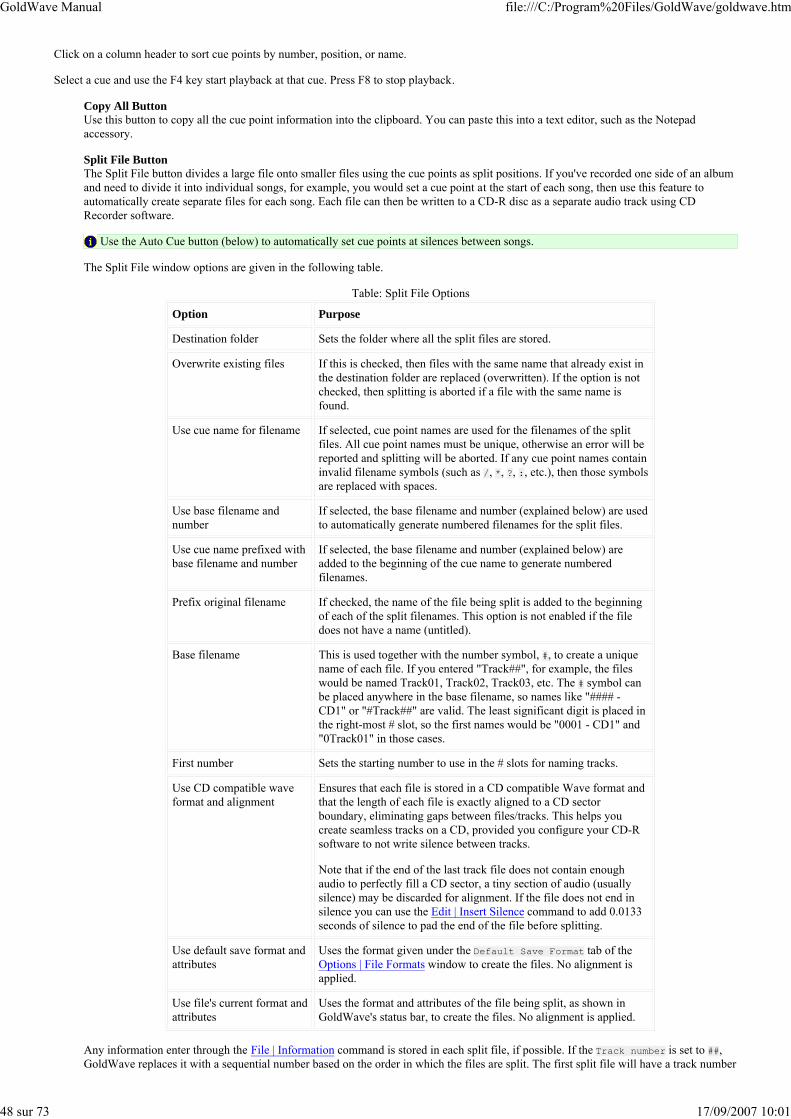
GoldWave Manual file:///C:/Program%20Files/GoldWave/goldwave.htm
48 sur 73 17/09/2007 10:01
Click on a column header to sort cue points by number, position, or name.
Select a cue and use the F4 key start playback at that cue. Press F8 to stop playback.
Copy All ButtonUse this button to copy all the cue point information into the clipboard. You can paste this into a text editor, such as the Notepadaccessory.
Split File ButtonThe Split File button divides a large file onto smaller files using the cue points as split positions. If you've recorded one side of an albumand need to divide it into individual songs, for example, you would set a cue point at the start of each song, then use this feature toautomatically create separate files for each song. Each file can then be written to a CD-R disc as a separate audio track using CDRecorder software.
Use the Auto Cue button (below) to automatically set cue points at silences between songs.
The Split File window options are given in the following table.
Table: Split File Options
Option Purpose
Destination folder Sets the folder where all the split files are stored.
Overwrite existing files If this is checked, then files with the same name that already exist inthe destination folder are replaced (overwritten). If the option is notchecked, then splitting is aborted if a file with the same name isfound.
Use cue name for filename If selected, cue point names are used for the filenames of the splitfiles. All cue point names must be unique, otherwise an error will bereported and splitting will be aborted. If any cue point names containinvalid filename symbols (such as /, *, ?, :, etc.), then those symbols are replaced with spaces.
Use base filename and number
If selected, the base filename and number (explained below) are usedto automatically generate numbered filenames for the split files.
Use cue name prefixed with base filename and number
If selected, the base filename and number (explained below) are added to the beginning of the cue name to generate numberedfilenames.
Prefix original filename If checked, the name of the file being split is added to the beginningof each of the split filenames. This option is not enabled if the filedoes not have a name (untitled).
Base filename This is used together with the number symbol, #, to create a uniquename of each file. If you entered "Track##", for example, the fileswould be named Track01, Track02, Track03, etc. The # symbol canbe placed anywhere in the base filename, so names like "#### -CD1" or "#Track##" are valid. The least significant digit is placed inthe right-most # slot, so the first names would be "0001 - CD1" and"0Track01" in those cases.
First number Sets the starting number to use in the # slots for naming tracks.
Use CD compatible wave format and alignment
Ensures that each file is stored in a CD compatible Wave format and that the length of each file is exactly aligned to a CD sectorboundary, eliminating gaps between files/tracks. This helps youcreate seamless tracks on a CD, provided you configure your CD-Rsoftware to not write silence between tracks.
Note that if the end of the last track file does not contain enough audio to perfectly fill a CD sector, a tiny section of audio (usuallysilence) may be discarded for alignment. If the file does not end insilence you can use the Edit | Insert Silence command to add 0.0133seconds of silence to pad the end of the file before splitting.
Use default save format and attributes
Uses the format given under the Default Save Format tab of theOptions | File Formats window to create the files. No alignment isapplied.
Use file's current format and attributes
Uses the format and attributes of the file being split, as shown inGoldWave's status bar, to create the files. No alignment is applied.
Any information enter through the File | Information command is stored in each split file, if possible. If the Track number is set to ##, GoldWave replaces it with a sequential number based on the order in which the files are split. The first split file will have a track number
GoldWave Manual file:///C:/Program%20Files/GoldWave/goldwave.htm
49 sur 73 17/09/2007 10:01
of 1, then the next file will have 2, etc.
Auto Cue ButtonUse the Auto Cue button to automatically create cue points. It operates in two modes: Mark Silence and Spacing.
The Split File button on the Cue Point window can be used later to split a file into individual pieces based on these cue points.
Mark Silence ModeThis mode sets cue points at silences, such as marking quiet sections between songs. A single cue point is added in the center ofeach detected silent region.
The Threshold value sets the volumelevel for the silence. In most cases, like vinyl recordings, the value should be -40dB or higher so that any background hiss, pops,or clicks are treated as silence. Otherwise no silence would be marked at all. If you find that no cue points appear, try increasingthis value to -30dB or higher. If you find that too many points appear, delete them, then decrease this value or change the valuesbelow. Using the Pop/Click and Noise Reduction filters effect first may improve silence detection.
Silence lengthspecifies how much silence is required before it is marked. Some songs contain brief silences that you usually do not want marked.This value helps to avoid marking any brief pauses within a song. Try values between 1.0 to 1.5 seconds to ignore these briefsilences and mark only the longer silences between songs.
Minimum separation between cuescontrols the minimum amount of time between one cue point and the next. If you know all the songs are longer than 2 minutes, forexample, then you can set this value to 2:00 to ensure no silences within a song are marked. All cue points will be at least twominutes apart.
Cue placement within areaspecifies where to place the cue point within the detected silent area. A value of 0 means at the beginning of the silence, a value of100 means at the end of the silence. The default value of 50 places the cue point in the center of the silence area.
Spacing ModeThis mode sets cue points at fixed intervals, such as having cue points every 5 minutes. Cue points are added at the specificinterval, starting at the given time.
Start time sets the time to begin marking the file. If you enter 1:00, then the first cue point is inserted at time 00:01:00 in the file.Normally this value would be zero.
Intervalspecifies the time interval to use between each cue point. A value of 5:00 would set cue points at five minute intervals (00:05:00,00:10:00, 00:15:00, etc.).
Cue NamingThe Cue naming options specify how cue points will be named as they are added. Select Time based to name each cue pointbased on its time position within the file. A cue point added at two minutes into the file, for example, will have the name2:00.00000.
Select Numberedto sequentially number each cue point as they are added. The names will be 001, 002, 003, etc. The starting number depends onhow many cue points are already in the file.
Select Letteredto name each cue point alphabetically, with three letters, such as AAA, AAB, AAC, etc. The starting name depends on how manycue points are already in the file.
Import/Export ButtonsUse the Import button to read cue points from a CD cue file. Use the Export button to save all cue points to a CD cue file. The name ofthe cue file depends on the name of the current Sound file. For example, if the file you are working on is "music.wav", then the cue file is"music.cue" by default. See Options | Storage for a setting to use cue files automatically.
A CD cue file contains track information that some CD Recorder programs, such as CDRWIN and Nero, use when creating a table ofcontents for a CD. Creating a cue file may eliminate the need to split a large file into separate track files. You can open the cue file inNotepad to edit or view its contents.
Cue point positions in a cue file are accurate only to 1/75 of a second, which is the size of a single CD sector. They are stored moreaccurately within some sound file types.
Effect Chain Editor
The Effect Chain Editor allows a number of effects to be chained together so they are all processed at once. There are many advantages tousing chains, such as:
GoldWave Manual file:///C:/Program%20Files/GoldWave/goldwave.htm
50 sur 73 17/09/2007 10:01
Easier automation, less work. You can apply many effects with just a few mouse clicks.Less storage requirements. Extra temporary storage is not required for each effect in the chain.Faster, more efficient processing. Audio data is read from storage, processed, then written to temporary storage only once for the entirechain rather than for each effect.Create new effects. Chaining effects is a way of creating new effects.Advanced previewing. Preview how a series of effects will sound without ever having to process the entire file.
The left window is a tree list showing all the effect plug-in modules, with the GoldWave branch expanded initially. Only effects that can bechained are listed. Effects requiring special access to the audio data (like scans) or ones that are time based cannot be chained.
You can drag-and-drop effects to the right "chain list" window or select an effect and choose the Add button. Effects are always added to theend of the chain list. Expand the branch of other listed modules to use effects in those plug-ins.
Use the Remove Last button to remove an effect from the chain list. Note that only the last effect in the list can be removed. An effect in themiddle of the list cannot be removed unless all effects below it are removed first. Use the Remove All button to remove all effects in the chainlist.
When an effect is added to the chain list, it appears as a button. Use the button to change settings for that effect. Settings can be changed whilepreviewing the audio.
When you have finished creating the chain, use the Presetscontrols near the bottom of the Effect Chain Editor window to save the entire chain as a single preset.
Expression Evaluator
The Expression Evaluator is a general purpose tool for manipulating and generating audio data. For a detailed explanation, see Appendix C.
File Merger
Use the File Merger tool to join together separate files into a single file. Add files to the list by using the Add Files button. More than one filecan be added at a time by selecting multple files. Files can be added via drag-and-drop or copy-and-paste from Windows Explorer as well. UseCtrl+V on the keyboard to paste files.
Remove a file by selecting it and choosing the Remove button. The Remove All button removes all files from the list.
Files are joined in the order they are listed. Drag-and-drop files within the list to change their order.
Set the "Preferred sampling rate" for the merged file. This rate is used only if a rate is not specified in the attributes selected after you choosethe Merge button. Many attributes have a predefined rate. The preferred rate will be ignored for those attributes.
Choose the Mergebutton to specify a filename, a file type, and attributes for the merged file. Merge processing begins immediately after you choose the Savebutton.
To split a file into smaller sections, see the Split File section under the Cue Points tool.
Options Menu Commands
These command configure and customize GoldWave.
Colour
Use this command to change the colour scheme of Sound windows. A preview window shows the Sound's current colour scheme. Use the Itemdrop down list and the Colour button to change the colours or select a different scheme from the preset Schemes drop down list. You can clickthe mouse in the preview window to select an item you want to customize.
Control Properties
Displays the Control Properties window.
File Formats
Use File Format Options to:
GoldWave Manual file:///C:/Program%20Files/GoldWave/goldwave.htm
51 sur 73 17/09/2007 10:01
Associate a filename extension (such as .snd or .vox) with an audio type and attributes.Change the precedence or enable and disable File Format Plug-ins used by GoldWave.Set a default format for saving files.
These options are contained under separate tabs.
Undetectable Types TabUse this feature to associate a filename extension with an audio type and specific attributes. This is useful for automatically opening filesthat do not contain any information describing their format (raw files). For example, if you work with Dialogic telephony files, you canassociate the .vox extension with a specific plug-in type. In this case, you'd use the Dialogic type, usually with "ADPCM 4 bit, 8000Hz,32 kbps, mono" attributes. Whenever you open a .vox file, GoldWave will assume that format without asking you to specify it each time.This must be done prior to using File | Batch Processing when working with raw files.
The list shows all current associations, if any. Use the Add button to create a new association. Use the Edit button to modify an existingassociation. Use the Remove button to remove an old association.
ExampleTo associate .vox with Dialogic ADPCM decoding:
Choose File Formats from the Options menu.1.Choose the Undetectable Types tab.2.Choose the Add button.3.Enter "vox" in the Extension box. Do not enter a leading period.4.Select "Dialogic (vox)" from the File type drop down list.5.Select "ADPCM 4 bit, 8000 Hz, 32 kbps, mono" from the Attributes drop down list.6.Choose the OK button.7.
See Appendix A for additional information about file attributes.
File Plug-in Precedence TabUse this feature to change the order that audio files are passed to plug-ins for opening, or to enable and disable plug-ins. By default allplug-ins found in the File plug-in folder are listed and enabled, with the built-in GoldWave plug-in listed first.
Select an item in the list and use the Lower and Higher buttons to change the order. The plug-in at the top of the list is the first one to begiven the opportunity to open a file, if it recognizes the format. Otherwise, the file is passed to the next plug-in and so on until the filecan be opened or no plug-ins are left. See File Format Plug-ins for more information. Check or uncheck an item to enable or disable thatplug-in module.
Default Save Format TabUse this feature to set a default save format for new files when using the File | Save command. The same format can be used for all"save" related commands (Save As, Save Selection As, etc.) if you check the "Use this format for..." box. Use the Save as type drop down list to select the type first, then use the Attributes drop down list to select specific attributes. Whenever you create and save afile, this format will be selected by default. Note that when creating a new file, you can select attributes (sampling rate and number ofchannels) that differ from the default save format. Be sure to select appropriate attributes to avoid conversions later when saving.
The "Do not allow other file types..." option disables the file type and attributes boxes under "save" related commands to prevent themfrom being changed. It forces the use of the default format.
Plug-in
Presents a submenu for configuring effect, file, and visual plug-ins, if any. Plug-ins may be created by different developers. Consult thedocumentation included with the plug-in for more information. GoldWave Inc. does not provide technical support for plug-ins developed byother companies or individuals.
DirectX Audio Plug-in Configuration
Shows a list of compatible DirectX Audio Plug-ins currently installed on your system. Use this configuration to control what plug-insGoldWave lists under the Effect | Plug-in | DirectXmenu and to associate a different icon with a plug-in. Check the box next to an item in the Plug-in list to add it to the menu. Uncheck thebox to remove it from the menu. Select an item, then choose an icon from the Icon list to associate that icon with the item. Note thatGoldWave must be restarted before changes are acknowledged.
GoldWave requires plug-ins that process in IEEE 32 bit floating point audio (WAVE_FORMAT_IEEE_FLOAT) format. It will not listplug-ins that process only in PCM 16 bit audio format.
If you are unable to get a particular DirectX Audio Plug-in working, please contact the plug-in developer, not GoldWave Inc.
GoldWave Audio Plug-in Configuration
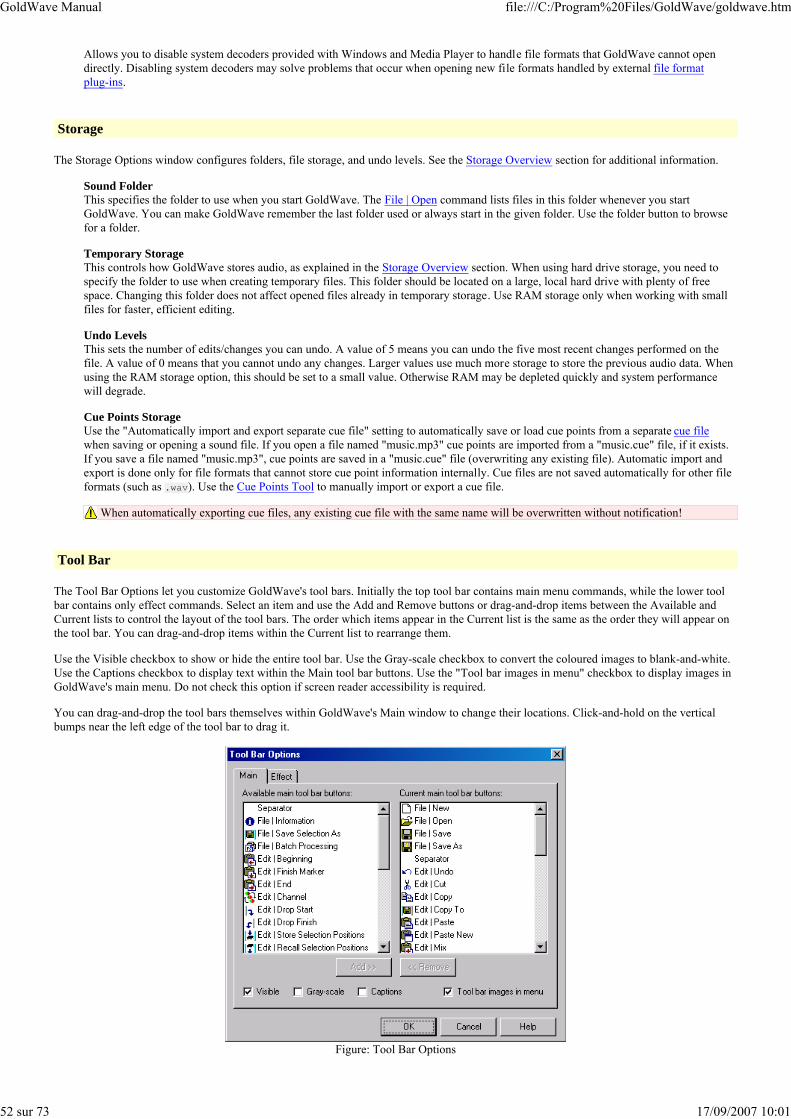
GoldWave Manual file:///C:/Program%20Files/GoldWave/goldwave.htm
52 sur 73 17/09/2007 10:01
Allows you to disable system decoders provided with Windows and Media Player to handle file formats that GoldWave cannot opendirectly. Disabling system decoders may solve problems that occur when opening new file formats handled by external file format plug-ins.
Storage
The Storage Options window configures folders, file storage, and undo levels. See the Storage Overview section for additional information.
Sound FolderThis specifies the folder to use when you start GoldWave. The File | Open command lists files in this folder whenever you startGoldWave. You can make GoldWave remember the last folder used or always start in the given folder. Use the folder button to browsefor a folder.
Temporary StorageThis controls how GoldWave stores audio, as explained in the Storage Overview section. When using hard drive storage, you need tospecify the folder to use when creating temporary files. This folder should be located on a large, local hard drive with plenty of freespace. Changing this folder does not affect opened files already in temporary storage. Use RAM storage only when working with smallfiles for faster, efficient editing.
Undo LevelsThis sets the number of edits/changes you can undo. A value of 5 means you can undo the five most recent changes performed on thefile. A value of 0 means that you cannot undo any changes. Larger values use much more storage to store the previous audio data. Whenusing the RAM storage option, this should be set to a small value. Otherwise RAM may be depleted quickly and system performancewill degrade.
Cue Points StorageUse the "Automatically import and export separate cue file" setting to automatically save or load cue points from a separate cue filewhen saving or opening a sound file. If you open a file named "music.mp3" cue points are imported from a "music.cue" file, if it exists.If you save a file named "music.mp3", cue points are saved in a "music.cue" file (overwriting any existing file). Automatic import andexport is done only for file formats that cannot store cue point information internally. Cue files are not saved automatically for other fileformats (such as .wav). Use the Cue Points Tool to manually import or export a cue file.
When automatically exporting cue files, any existing cue file with the same name will be overwritten without notification!
Tool Bar
The Tool Bar Options let you customize GoldWave's tool bars. Initially the top tool bar contains main menu commands, while the lower toolbar contains only effect commands. Select an item and use the Add and Remove buttons or drag-and-drop items between the Available andCurrent lists to control the layout of the tool bars. The order which items appear in the Current list is the same as the order they will appear onthe tool bar. You can drag-and-drop items within the Current list to rearrange them.
Use the Visible checkbox to show or hide the entire tool bar. Use the Gray-scale checkbox to convert the coloured images to blank-and-white.Use the Captions checkbox to display text within the Main tool bar buttons. Use the "Tool bar images in menu" checkbox to display images inGoldWave's main menu. Do not check this option if screen reader accessibility is required.
You can drag-and-drop the tool bars themselves within GoldWave's Main window to change their locations. Click-and-hold on the verticalbumps near the left edge of the tool bar to drag it.
Figure: Tool Bar Options
GoldWave Manual file:///C:/Program%20Files/GoldWave/goldwave.htm
53 sur 73 17/09/2007 10:01
Window
Use Window Options to configure the positions of the Main and Sound windows, set axis options, specify preset and initial zoom values, andset miscellaneous options.
Main Window SizeThis controls the Main window's position and size when GoldWave is started. Normal gives control to Windows. Maximize makes theMain window occupy the entire screen. Save positionsaves the Main window's position and size when GoldWave is closed so that it will appear in the same location next time.
Sound Window SizeThis controls the position and size of Sound windows. Normal gives control to Windows, which usually results in cascaded windows.Maximize makes a Sound window occupy the entire Main window. Auto-tile resizes all Sound windows whenever a new sound isopened or closed so that every one is visible. Arrangement is the same as the Window | Tile Horizontally command.
Y Amplitude Axis NumberingDisplays or sets the units of the vertical axis in Sound windows. Selecting Off hides the axis completely. Normalized shows an axis witha range of -1.0 to 1.0. Signed 16 bit shows an axis ranging from -32768 to 32767, which is the range of a 16 bit sample. Unsigned 8 bit shows an axis with a range of 0 to 255.
X Time Axis NumberingSets the format for displaying the horizontal time axis near the bottom of Sound windows. "Hours : minutes : seconds" gives the time asthree sets of numbers separated by colons, such as 12:23:56. "Minutes : seconds" gives the time as two sets of numbers separated bycolons, such as 1234:56. Seconds gives the time as a floating point number, such as 1234.56.
ZoomThe Preset zoom value is used to for the View | Preset command. See View | Specify for more information about zoom values. TheInitial zoom specifies the zoom level to use when a file is opened. If you choose All, then the entire waveform is shown usingwhatever zoom level is required.
MiscellaneousIf the "Always confirm before saving" option is checked, you are asked to confirm saving whenever you use the File | Save command.
If the "Draw overview graph" option is checked, then the overview is graphed based on audio from the file. Otherwise it is drawn assimple lines, which is quicker since the entire file does not have to be scanned.
If the "Use left and right mouse button selection method" option is checked, then the start marker is set by using the left mouse buttonand the finish marker is set by using the right mouse button. No context menu appears. You will not be able to use the newright-click-and-drag features. This is the way older versions of GoldWave worked.
If the "Update default effect settings after each use" options is checked, then the last settings you use for an effect will be used the nexttime the effect window is shown. Essentially the "Default" preset is automatically updated when you choose the OK button on an effectwindow.
Window Menu Commands
These commands organize Sound windows and the Control window. See Interface Overview for additional information.
Cascade, Tile, Minimize, Arrange
Cascade layers Sound windows on top of each other so that their title bars are visible. Tile Horizontally arranges Sound windows above and below each other (or side by side if necessary) so that all windows are visible. Tile Vertically arranges Sound windows side by side (orabove and below each other if necessary) so that all windows are visible. Minimize All minimizes all Sound windows so only a small title bar is shown. Arrange All arranges minimized Sound window in rows on the bottom of the Main window.
Classic, Horizontal, Vertical Control
Classic Controlplaces the Control window in the bottom right corner of the screen and arranges the controls and visuals in a square layout similar to previousversions of GoldWave. The Control window can be resized in any direction. Horizontal Control places the Control window along the bottom of the Main window and arranges the controls and visuals horizontally. Makes the visuals small. The Control window cannot be resizedvertically in this mode. Vertical Controlplaces the Control window along the right side of the Main window and arranges the controls and visuals vertically. Makes the visuals large.The Control window can be resized in any direction.
Window List
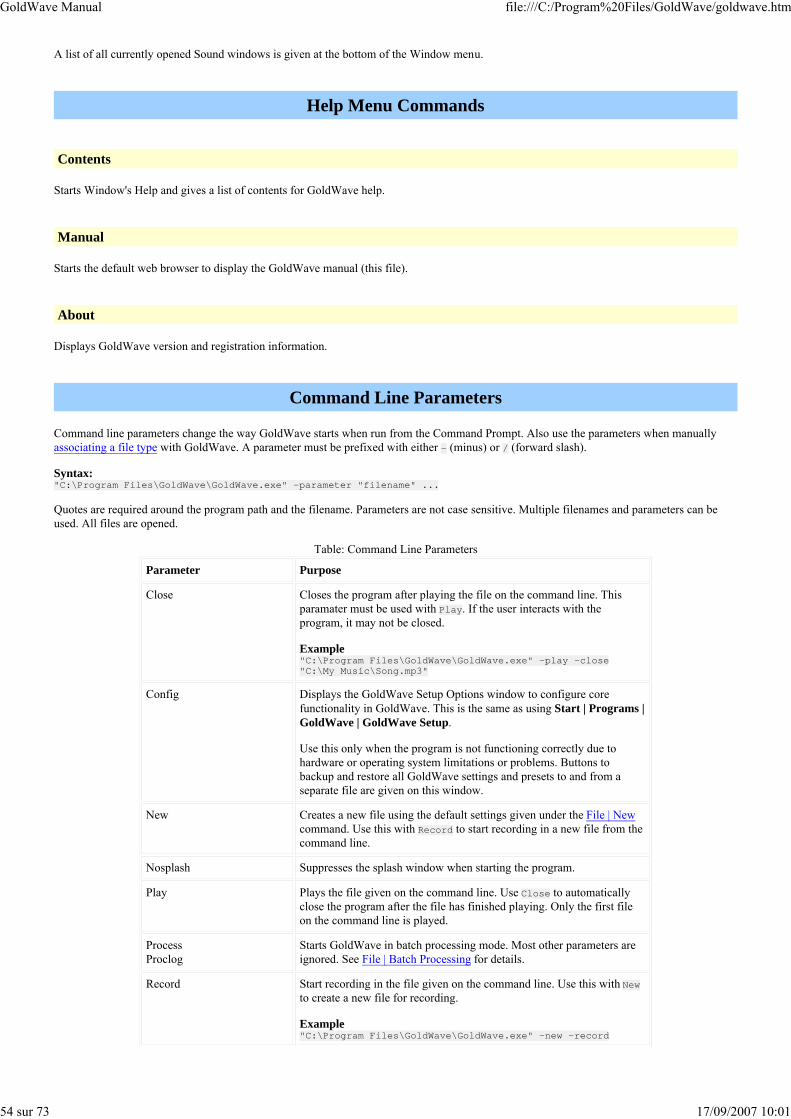
GoldWave Manual file:///C:/Program%20Files/GoldWave/goldwave.htm
54 sur 73 17/09/2007 10:01
A list of all currently opened Sound windows is given at the bottom of the Window menu.
Help Menu Commands
Contents
Starts Window's Help and gives a list of contents for GoldWave help.
Manual
Starts the default web browser to display the GoldWave manual (this file).
About
Displays GoldWave version and registration information.
Command Line Parameters
Command line parameters change the way GoldWave starts when run from the Command Prompt. Also use the parameters when manuallyassociating a file type with GoldWave. A parameter must be prefixed with either - (minus) or / (forward slash).
Syntax:"C:\Program Files\GoldWave\GoldWave.exe" -parameter "filename" ...
Quotes are required around the program path and the filename. Parameters are not case sensitive. Multiple filenames and parameters can beused. All files are opened.
Table: Command Line Parameters
Parameter Purpose
Close Closes the program after playing the file on the command line. Thisparamater must be used with Play. If the user interacts with theprogram, it may not be closed.
Example"C:\Program Files\GoldWave\GoldWave.exe" -play -close "C:\My Music\Song.mp3"
Config Displays the GoldWave Setup Options window to configure corefunctionality in GoldWave. This is the same as using Start | Programs |GoldWave | GoldWave Setup.
Use this only when the program is not functioning correctly due tohardware or operating system limitations or problems. Buttons tobackup and restore all GoldWave settings and presets to and from aseparate file are given on this window.
New Creates a new file using the default settings given under the File | Newcommand. Use this with Record to start recording in a new file from the command line.
Nosplash Suppresses the splash window when starting the program.
Play Plays the file given on the command line. Use Close to automaticallyclose the program after the file has finished playing. Only the first fileon the command line is played.
ProcessProclog
Starts GoldWave in batch processing mode. Most other parameters areignored. See File | Batch Processing for details.
Record Start recording in the file given on the command line. Use this with Newto create a new file for recording.
Example"C:\Program Files\GoldWave\GoldWave.exe" -new -record
GoldWave Manual file:///C:/Program%20Files/GoldWave/goldwave.htm
55 sur 73 17/09/2007 10:01
Same Opens a file in the current running instance of GoldWave rather thanstarting another copy of the program. Use this when associating a file type with the program.
IV. General Information
Warranty, Trademarks, and Copyright
GoldWave ("the package") includes the following software and documentation:
GoldWave.exe GoldWave application fileGoldWave.hlp GoldWave helpGoldWave.htm GoldWave manual textImages (*.PNG) All images associated with this manualGWPreset.reg Presets and shapesReadMe.txt Important informationWhatsNew.txt Revision historyDirectX.pig DirectX Audio plug-in wrapperFLACFile.pig FLAC file plug-inOggFile.pig Ogg Vorbis file plug-inWMAFile.pig Windows Media Audio file plug-in
The package is provided as is, without warranty of any kind. GoldWave Inc. shall not be liable for damages of any kind. Use of this softwareindicates you agree to this.
The package and this documentation are copyright © 2007 by GoldWave Inc. All rights reserved. This document and associated images maynot be shown on a public website.
GoldWave is a trademark of GoldWave Inc.
Matlab is a trademark of The Math Works Incorporated.
Windows & Microsoft are registered trademarks of Microsoft Corporation.
Sound Blaster is a trademark of Creative Labs Incorporated.
All other trademarks/registered names acknowledged.
Support and Updates
The latest information and updates can be found on the GoldWave website:
http://www.goldwave.com
If you encounter any problems, please check the following information:
Appendix E: Troubleshooting and Q&AThe GoldWave website under Frequently Asked Questions
If a problem still cannot be resolved, please send a detailed description to the address below.
Questions, comments, and suggestions are welcome. You can find contact information here:
http://www.goldwave.com/contact.php
Postal AddressGoldWave Inc.P.O. Box 51St. John's, NFCANADA A1C 5H5
Appendix A: An Introduction to Digital Audio
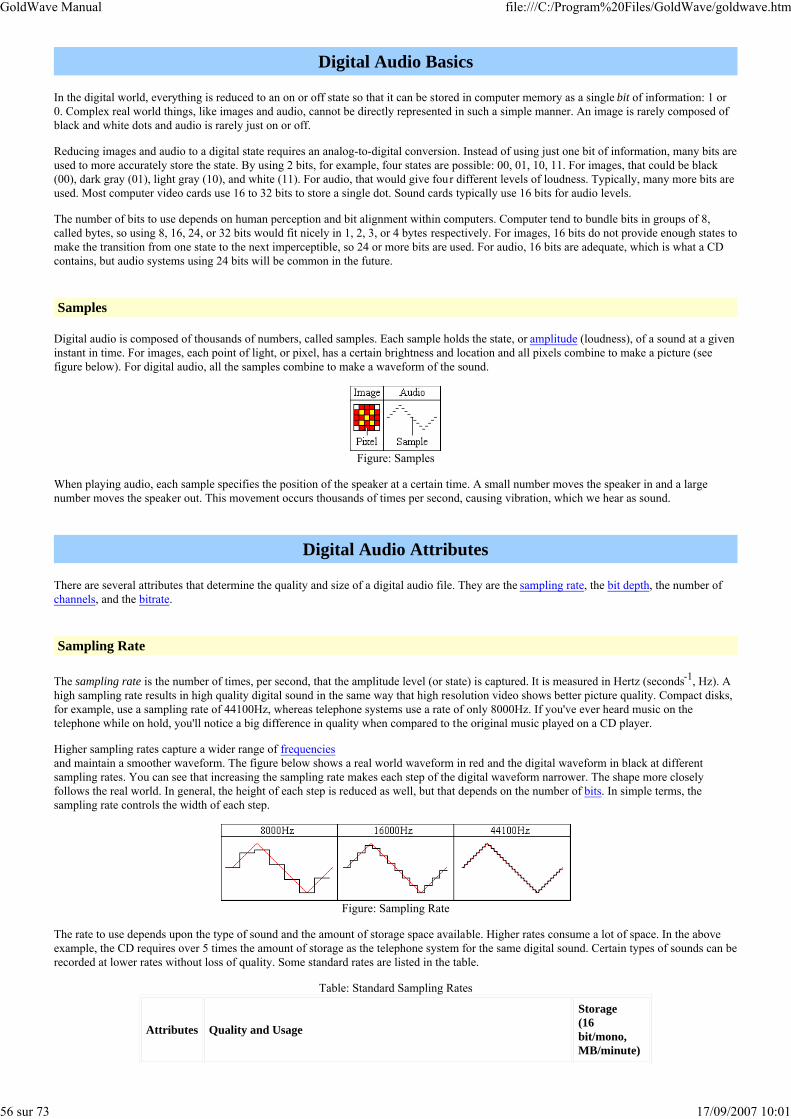
GoldWave Manual file:///C:/Program%20Files/GoldWave/goldwave.htm
56 sur 73 17/09/2007 10:01
Digital Audio Basics
In the digital world, everything is reduced to an on or off state so that it can be stored in computer memory as a single bit of information: 1 or0. Complex real world things, like images and audio, cannot be directly represented in such a simple manner. An image is rarely composed ofblack and white dots and audio is rarely just on or off.
Reducing images and audio to a digital state requires an analog-to-digital conversion. Instead of using just one bit of information, many bits areused to more accurately store the state. By using 2 bits, for example, four states are possible: 00, 01, 10, 11. For images, that could be black(00), dark gray (01), light gray (10), and white (11). For audio, that would give four different levels of loudness. Typically, many more bits areused. Most computer video cards use 16 to 32 bits to store a single dot. Sound cards typically use 16 bits for audio levels.
The number of bits to use depends on human perception and bit alignment within computers. Computer tend to bundle bits in groups of 8,called bytes, so using 8, 16, 24, or 32 bits would fit nicely in 1, 2, 3, or 4 bytes respectively. For images, 16 bits do not provide enough states tomake the transition from one state to the next imperceptible, so 24 or more bits are used. For audio, 16 bits are adequate, which is what a CDcontains, but audio systems using 24 bits will be common in the future.
Samples
Digital audio is composed of thousands of numbers, called samples. Each sample holds the state, or amplitude (loudness), of a sound at a giveninstant in time. For images, each point of light, or pixel, has a certain brightness and location and all pixels combine to make a picture (seefigure below). For digital audio, all the samples combine to make a waveform of the sound.
Figure: Samples
When playing audio, each sample specifies the position of the speaker at a certain time. A small number moves the speaker in and a largenumber moves the speaker out. This movement occurs thousands of times per second, causing vibration, which we hear as sound.
Digital Audio Attributes
There are several attributes that determine the quality and size of a digital audio file. They are the sampling rate, the bit depth, the number ofchannels, and the bitrate.
Sampling Rate
The sampling rate is the number of times, per second, that the amplitude level (or state) is captured. It is measured in Hertz (seconds-1, Hz). Ahigh sampling rate results in high quality digital sound in the same way that high resolution video shows better picture quality. Compact disks,for example, use a sampling rate of 44100Hz, whereas telephone systems use a rate of only 8000Hz. If you've ever heard music on thetelephone while on hold, you'll notice a big difference in quality when compared to the original music played on a CD player.
Higher sampling rates capture a wider range of frequenciesand maintain a smoother waveform. The figure below shows a real world waveform in red and the digital waveform in black at differentsampling rates. You can see that increasing the sampling rate makes each step of the digital waveform narrower. The shape more closelyfollows the real world. In general, the height of each step is reduced as well, but that depends on the number of bits. In simple terms, thesampling rate controls the width of each step.
Figure: Sampling Rate
The rate to use depends upon the type of sound and the amount of storage space available. Higher rates consume a lot of space. In the aboveexample, the CD requires over 5 times the amount of storage as the telephone system for the same digital sound. Certain types of sounds can berecorded at lower rates without loss of quality. Some standard rates are listed in the table.
Table: Standard Sampling Rates
Attributes Quality and Usage
Storage(16 bit/mono,MB/minute)
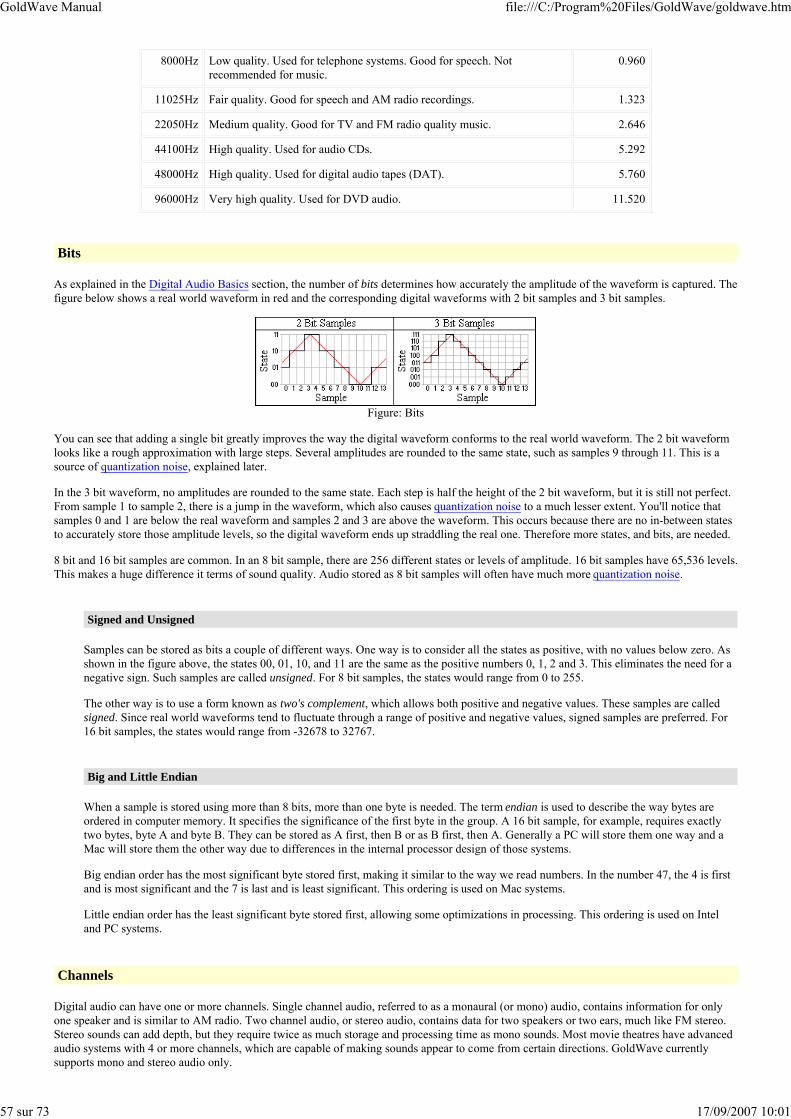
GoldWave Manual file:///C:/Program%20Files/GoldWave/goldwave.htm
57 sur 73 17/09/2007 10:01
8000Hz Low quality. Used for telephone systems. Good for speech. Notrecommended for music.
0.960
11025Hz Fair quality. Good for speech and AM radio recordings. 1.323
22050Hz Medium quality. Good for TV and FM radio quality music. 2.646
44100Hz High quality. Used for audio CDs. 5.292
48000Hz High quality. Used for digital audio tapes (DAT). 5.760
96000Hz Very high quality. Used for DVD audio. 11.520
Bits
As explained in the Digital Audio Basics section, the number of bits determines how accurately the amplitude of the waveform is captured. Thefigure below shows a real world waveform in red and the corresponding digital waveforms with 2 bit samples and 3 bit samples.
Figure: Bits
You can see that adding a single bit greatly improves the way the digital waveform conforms to the real world waveform. The 2 bit waveformlooks like a rough approximation with large steps. Several amplitudes are rounded to the same state, such as samples 9 through 11. This is asource of quantization noise, explained later.
In the 3 bit waveform, no amplitudes are rounded to the same state. Each step is half the height of the 2 bit waveform, but it is still not perfect.From sample 1 to sample 2, there is a jump in the waveform, which also causes quantization noise to a much lesser extent. You'll notice thatsamples 0 and 1 are below the real waveform and samples 2 and 3 are above the waveform. This occurs because there are no in-between statesto accurately store those amplitude levels, so the digital waveform ends up straddling the real one. Therefore more states, and bits, are needed.
8 bit and 16 bit samples are common. In an 8 bit sample, there are 256 different states or levels of amplitude. 16 bit samples have 65,536 levels.This makes a huge difference it terms of sound quality. Audio stored as 8 bit samples will often have much more quantization noise.
Signed and Unsigned
Samples can be stored as bits a couple of different ways. One way is to consider all the states as positive, with no values below zero. Asshown in the figure above, the states 00, 01, 10, and 11 are the same as the positive numbers 0, 1, 2 and 3. This eliminates the need for anegative sign. Such samples are called unsigned. For 8 bit samples, the states would range from 0 to 255.
The other way is to use a form known as two's complement, which allows both positive and negative values. These samples are calledsigned. Since real world waveforms tend to fluctuate through a range of positive and negative values, signed samples are preferred. For16 bit samples, the states would range from -32678 to 32767.
Big and Little Endian
When a sample is stored using more than 8 bits, more than one byte is needed. The term endian is used to describe the way bytes areordered in computer memory. It specifies the significance of the first byte in the group. A 16 bit sample, for example, requires exactlytwo bytes, byte A and byte B. They can be stored as A first, then B or as B first, then A. Generally a PC will store them one way and aMac will store them the other way due to differences in the internal processor design of those systems.
Big endian order has the most significant byte stored first, making it similar to the way we read numbers. In the number 47, the 4 is firstand is most significant and the 7 is last and is least significant. This ordering is used on Mac systems.
Little endian order has the least significant byte stored first, allowing some optimizations in processing. This ordering is used on Inteland PC systems.
Channels
Digital audio can have one or more channels. Single channel audio, referred to as a monaural (or mono) audio, contains information for onlyone speaker and is similar to AM radio. Two channel audio, or stereo audio, contains data for two speakers or two ears, much like FM stereo.Stereo sounds can add depth, but they require twice as much storage and processing time as mono sounds. Most movie theatres have advancedaudio systems with 4 or more channels, which are capable of making sounds appear to come from certain directions. GoldWave currentlysupports mono and stereo audio only.
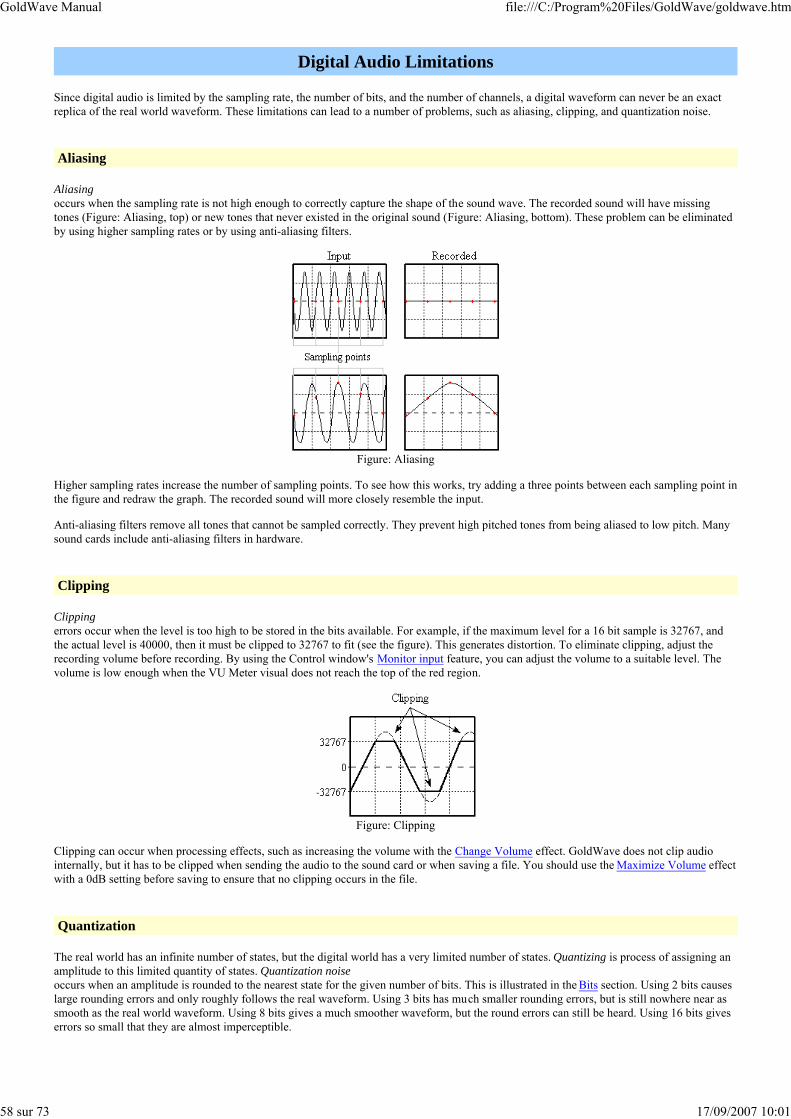
GoldWave Manual file:///C:/Program%20Files/GoldWave/goldwave.htm
58 sur 73 17/09/2007 10:01
Digital Audio Limitations
Since digital audio is limited by the sampling rate, the number of bits, and the number of channels, a digital waveform can never be an exactreplica of the real world waveform. These limitations can lead to a number of problems, such as aliasing, clipping, and quantization noise.
Aliasing
Aliasingoccurs when the sampling rate is not high enough to correctly capture the shape of the sound wave. The recorded sound will have missingtones (Figure: Aliasing, top) or new tones that never existed in the original sound (Figure: Aliasing, bottom). These problem can be eliminatedby using higher sampling rates or by using anti-aliasing filters.
Figure: Aliasing
Higher sampling rates increase the number of sampling points. To see how this works, try adding a three points between each sampling point inthe figure and redraw the graph. The recorded sound will more closely resemble the input.
Anti-aliasing filters remove all tones that cannot be sampled correctly. They prevent high pitched tones from being aliased to low pitch. Manysound cards include anti-aliasing filters in hardware.
Clipping
Clippingerrors occur when the level is too high to be stored in the bits available. For example, if the maximum level for a 16 bit sample is 32767, andthe actual level is 40000, then it must be clipped to 32767 to fit (see the figure). This generates distortion. To eliminate clipping, adjust therecording volume before recording. By using the Control window's Monitor input feature, you can adjust the volume to a suitable level. Thevolume is low enough when the VU Meter visual does not reach the top of the red region.
Figure: Clipping
Clipping can occur when processing effects, such as increasing the volume with the Change Volume effect. GoldWave does not clip audiointernally, but it has to be clipped when sending the audio to the sound card or when saving a file. You should use the Maximize Volume effect with a 0dB setting before saving to ensure that no clipping occurs in the file.
Quantization
The real world has an infinite number of states, but the digital world has a very limited number of states. Quantizing is process of assigning an amplitude to this limited quantity of states. Quantization noiseoccurs when an amplitude is rounded to the nearest state for the given number of bits. This is illustrated in the Bits section. Using 2 bits causeslarge rounding errors and only roughly follows the real waveform. Using 3 bits has much smaller rounding errors, but is still nowhere near assmooth as the real world waveform. Using 8 bits gives a much smoother waveform, but the round errors can still be heard. Using 16 bits giveserrors so small that they are almost imperceptible.
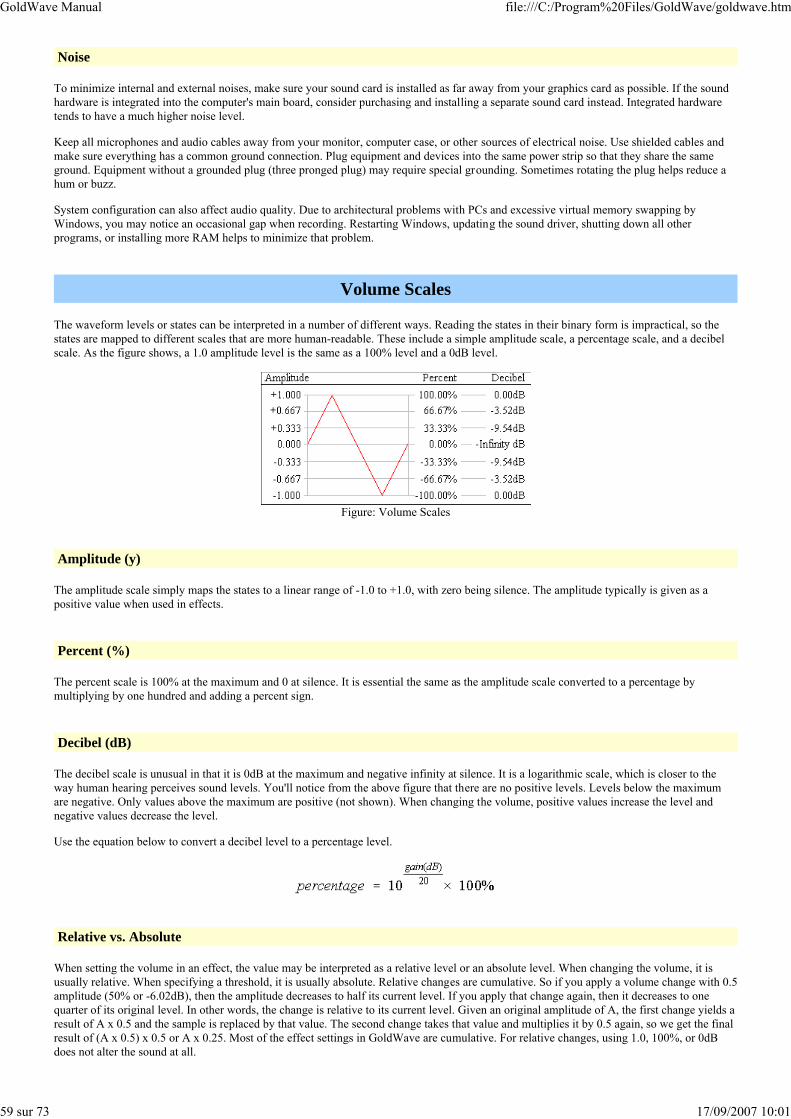
GoldWave Manual file:///C:/Program%20Files/GoldWave/goldwave.htm
59 sur 73 17/09/2007 10:01
Noise
To minimize internal and external noises, make sure your sound card is installed as far away from your graphics card as possible. If the soundhardware is integrated into the computer's main board, consider purchasing and installing a separate sound card instead. Integrated hardwaretends to have a much higher noise level.
Keep all microphones and audio cables away from your monitor, computer case, or other sources of electrical noise. Use shielded cables andmake sure everything has a common ground connection. Plug equipment and devices into the same power strip so that they share the sameground. Equipment without a grounded plug (three pronged plug) may require special grounding. Sometimes rotating the plug helps reduce ahum or buzz.
System configuration can also affect audio quality. Due to architectural problems with PCs and excessive virtual memory swapping byWindows, you may notice an occasional gap when recording. Restarting Windows, updating the sound driver, shutting down all otherprograms, or installing more RAM helps to minimize that problem.
Volume Scales
The waveform levels or states can be interpreted in a number of different ways. Reading the states in their binary form is impractical, so thestates are mapped to different scales that are more human-readable. These include a simple amplitude scale, a percentage scale, and a decibelscale. As the figure shows, a 1.0 amplitude level is the same as a 100% level and a 0dB level.
Figure: Volume Scales
Amplitude (y)
The amplitude scale simply maps the states to a linear range of -1.0 to +1.0, with zero being silence. The amplitude typically is given as apositive value when used in effects.
Percent (%)
The percent scale is 100% at the maximum and 0 at silence. It is essential the same as the amplitude scale converted to a percentage bymultiplying by one hundred and adding a percent sign.
Decibel (dB)
The decibel scale is unusual in that it is 0dB at the maximum and negative infinity at silence. It is a logarithmic scale, which is closer to theway human hearing perceives sound levels. You'll notice from the above figure that there are no positive levels. Levels below the maximumare negative. Only values above the maximum are positive (not shown). When changing the volume, positive values increase the level andnegative values decrease the level.
Use the equation below to convert a decibel level to a percentage level.
Relative vs. Absolute
When setting the volume in an effect, the value may be interpreted as a relative level or an absolute level. When changing the volume, it isusually relative. When specifying a threshold, it is usually absolute. Relative changes are cumulative. So if you apply a volume change with 0.5amplitude (50% or -6.02dB), then the amplitude decreases to half its current level. If you apply that change again, then it decreases to onequarter of its original level. In other words, the change is relative to its current level. Given an original amplitude of A, the first change yields aresult of A x 0.5 and the sample is replaced by that value. The second change takes that value and multiplies it by 0.5 again, so we get the finalresult of (A x 0.5) x 0.5 or A x 0.25. Most of the effect settings in GoldWave are cumulative. For relative changes, using 1.0, 100%, or 0dBdoes not alter the sound at all.
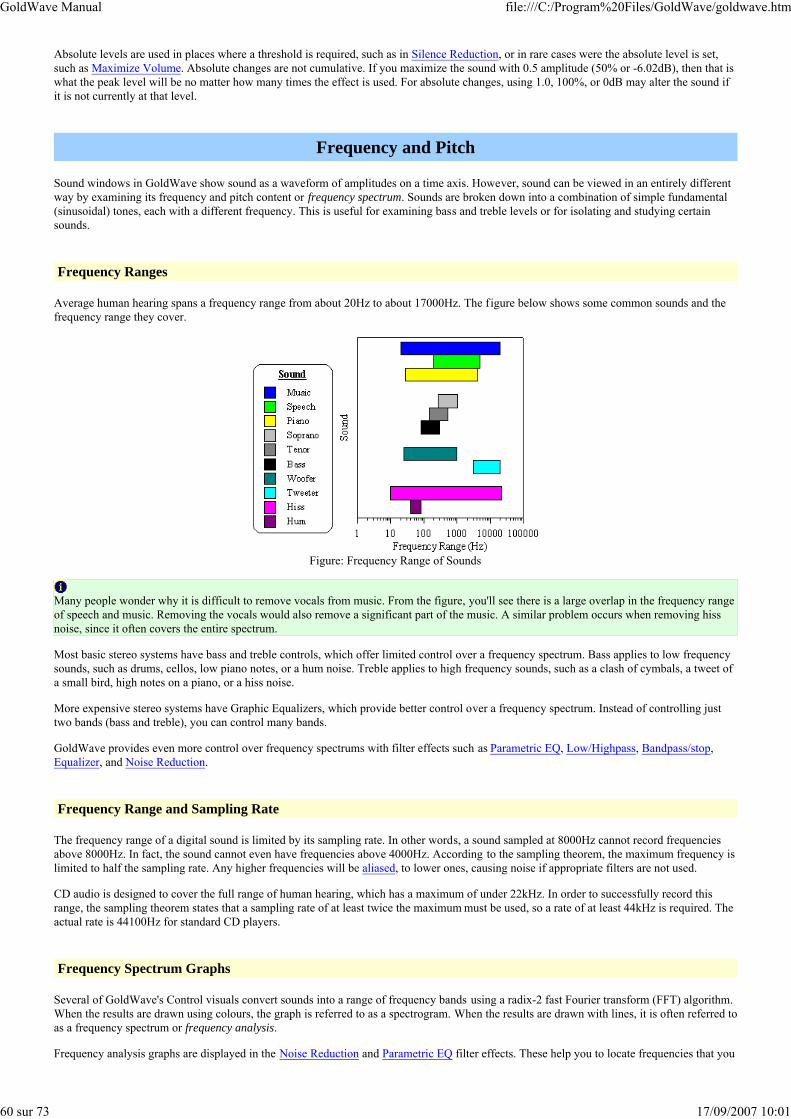
GoldWave Manual file:///C:/Program%20Files/GoldWave/goldwave.htm
60 sur 73 17/09/2007 10:01
Absolute levels are used in places where a threshold is required, such as in Silence Reduction, or in rare cases were the absolute level is set,such as Maximize Volume. Absolute changes are not cumulative. If you maximize the sound with 0.5 amplitude (50% or -6.02dB), then that iswhat the peak level will be no matter how many times the effect is used. For absolute changes, using 1.0, 100%, or 0dB may alter the sound ifit is not currently at that level.
Frequency and Pitch
Sound windows in GoldWave show sound as a waveform of amplitudes on a time axis. However, sound can be viewed in an entirely differentway by examining its frequency and pitch content or frequency spectrum. Sounds are broken down into a combination of simple fundamental(sinusoidal) tones, each with a different frequency. This is useful for examining bass and treble levels or for isolating and studying certainsounds.
Frequency Ranges
Average human hearing spans a frequency range from about 20Hz to about 17000Hz. The figure below shows some common sounds and thefrequency range they cover.
Figure: Frequency Range of Sounds
Many people wonder why it is difficult to remove vocals from music. From the figure, you'll see there is a large overlap in the frequency rangeof speech and music. Removing the vocals would also remove a significant part of the music. A similar problem occurs when removing hissnoise, since it often covers the entire spectrum.
Most basic stereo systems have bass and treble controls, which offer limited control over a frequency spectrum. Bass applies to low frequencysounds, such as drums, cellos, low piano notes, or a hum noise. Treble applies to high frequency sounds, such as a clash of cymbals, a tweet ofa small bird, high notes on a piano, or a hiss noise.
More expensive stereo systems have Graphic Equalizers, which provide better control over a frequency spectrum. Instead of controlling justtwo bands (bass and treble), you can control many bands.
GoldWave provides even more control over frequency spectrums with filter effects such as Parametric EQ, Low/Highpass, Bandpass/stop,Equalizer, and Noise Reduction.
Frequency Range and Sampling Rate
The frequency range of a digital sound is limited by its sampling rate. In other words, a sound sampled at 8000Hz cannot record frequenciesabove 8000Hz. In fact, the sound cannot even have frequencies above 4000Hz. According to the sampling theorem, the maximum frequency islimited to half the sampling rate. Any higher frequencies will be aliased, to lower ones, causing noise if appropriate filters are not used.
CD audio is designed to cover the full range of human hearing, which has a maximum of under 22kHz. In order to successfully record thisrange, the sampling theorem states that a sampling rate of at least twice the maximum must be used, so a rate of at least 44kHz is required. Theactual rate is 44100Hz for standard CD players.
Frequency Spectrum Graphs
Several of GoldWave's Control visuals convert sounds into a range of frequency bands using a radix-2 fast Fourier transform (FFT) algorithm.When the results are drawn using colours, the graph is referred to as a spectrogram. When the results are drawn with lines, it is often referred toas a frequency spectrum or frequency analysis.
Frequency analysis graphs are displayed in the Noise Reduction and Parametric EQ filter effects. These help you to locate frequencies that you
GoldWave Manual file:///C:/Program%20Files/GoldWave/goldwave.htm
61 sur 73 17/09/2007 10:01
want to remove or enhance.
GoldWave applies a windowing function to the data before performing the FFT (see Control Visual Properties section). This reduces"discontinuity" errors that occur when dividing data into small chunks. A Kaiser window is used by default.
To make the spectrum more realistic to human hearing, magnitudes are scaled logarithmically. This means that if one frequency "sounds" twiceas loud as another, it is graphed with twice the height (or the corresponding colour for the spectrogram).
File Compression
Uncompressed audio files tend to be large. CD quality audio requires ten megabytes per minute. That is not a problem with large computerhard drives available today, but it is a problem if you want to save many songs on a portable player or if you want to transfer files over theInternet. Unlike most computer data, audio data does not compress very well using typical compression methods such as those found inprograms like PKZIP or WinZip. These methods preserve the data exactly so there is no loss of quality. Such compression is called losslesscompression.
To make audio files smaller, complex algorithms have to used. Most of these algorithms sacrifice some quality so that when the data isdecompressed, you do not get exactly the same quality you had originally. This type of compression is known as lossy compression. Ideally thequality that is lost is not perceptible, so you do not notice the difference.
The most common method of lossy audio compression is MPEG Layer-3, better known as MP3. It is capable of getting near CD quality audioin less than one tenth the size, which is about one megabyte per minute. More recent algorithms, such as Ogg Vorbis and Windows Media Audio, get even better quality in a smaller size.
Software and hardware that compress audio using complex algorithms are referred to as codecs (from coder/decoder). Compression is the sameas encoding and decompression is the same as decoding.
To control the level of compression in GoldWave, use File | Save As and select a different file type and/or attributes. The lower the bitrate (the kbps number, see below), the smaller the file will be, usually at reduced quality.
When opening, editing, and saving a file repeatedly, it is best to use a lossless file format. Every time a lossy compressed file is re-opened andsaved, some quality is lost. For long term editing, use the Wave type with "PCM 16 bit" attributes or one of the lossless compressed formatssuch as FLAC or Windows Media Audio with "lossless" attributes.
Bitrate
Many compressed audio formats measure the compressed size as a bitrate. The bitrate is the number of bits per second (bps) required to storethe audio. Usually the number is given in kilobits or one thousand bits. Divide that number by 8 to determine the number of kilobytes requiredper second.
Internet connection speed (bandwidth) is often measured in bitrates as well. A 56k modem is capable of receiving 56 kilobits per second. If youwant people to stream your MP3 audio over a modem, you'll need to compress the file using a maximum bitrate of 56kbps. Due to theconnection overhead and Internet protocol, a lower rate would have to be used to ensure the audio can be downloaded fast enough. For DSLand Cable Internet connections, the standard 128kbps MP3 rate can be used.
Audio files can contain a wide range of sounds, from noisy cymbal clashes to silence. Algorithms typically get much better compression onsilence or simple audio sections than on complex, noisy audio. This means that the bitrate depending on whether constant bitrate or variablebitrate compression is used.
Constant Bitrate
When using constant bitrate, each section of audio compresses to exactly the same size, regardless of the content. If the audio contains silence,then the data may be padded to fill the required bitrate. If the audio contains complex music, then quality may be decreased until it fits withinthe bitrate.
Constant bitrate is useful for broadcast systems where the transmission rate is fixed. It also make is easy to seek to arbitrary positions withinthe audio stream or file.
Variable Bitrate
Variable bitrate compression uses the smallest size possible for each section of audio. If the audio contains silence, then the bitrate will be verylow. If the audio contains complex music, the bitrate will be at its maximum.
Variable bitrate gives the best compression and quality. However, it makes it difficult to seek within the stream or file since there is no directrelation between time and size.
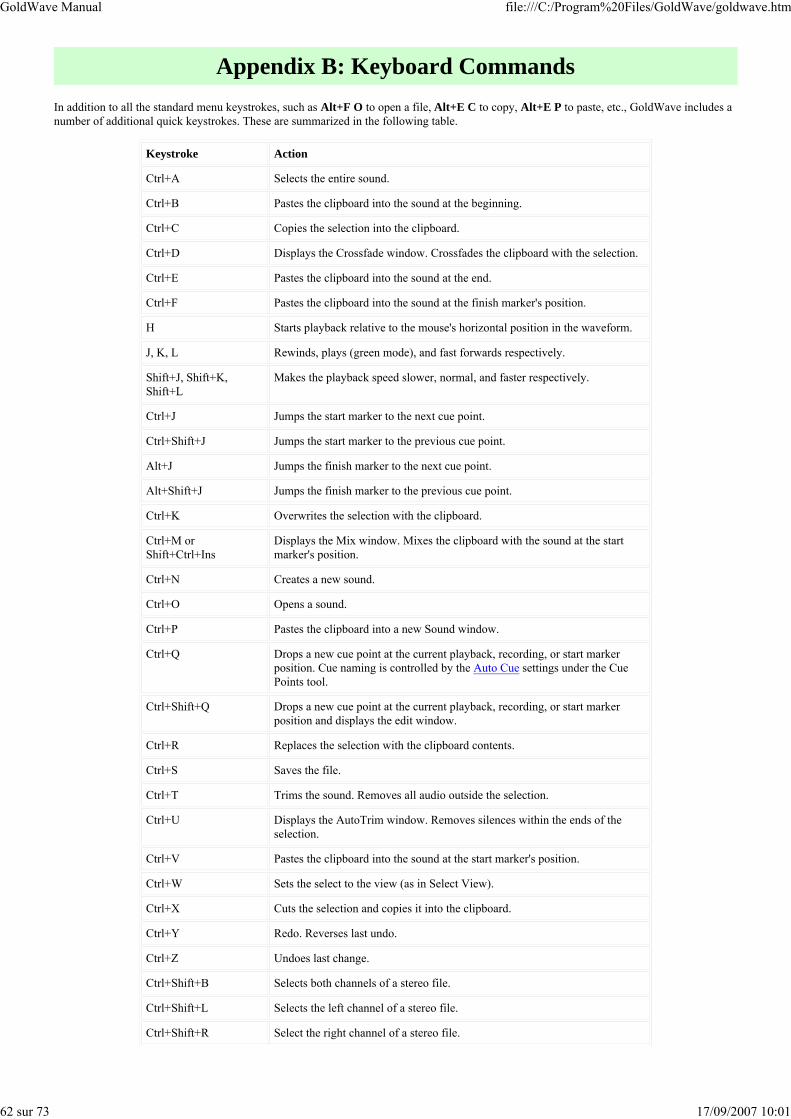
GoldWave Manual file:///C:/Program%20Files/GoldWave/goldwave.htm
62 sur 73 17/09/2007 10:01
Appendix B: Keyboard CommandsIn addition to all the standard menu keystrokes, such as Alt+F O to open a file, Alt+E C to copy, Alt+E P to paste, etc., GoldWave includes a number of additional quick keystrokes. These are summarized in the following table.
Keystroke Action
Ctrl+A Selects the entire sound.
Ctrl+B Pastes the clipboard into the sound at the beginning.
Ctrl+C Copies the selection into the clipboard.
Ctrl+D Displays the Crossfade window. Crossfades the clipboard with the selection.
Ctrl+E Pastes the clipboard into the sound at the end.
Ctrl+F Pastes the clipboard into the sound at the finish marker's position.
H Starts playback relative to the mouse's horizontal position in the waveform.
J, K, L Rewinds, plays (green mode), and fast forwards respectively.
Shift+J, Shift+K, Shift+L
Makes the playback speed slower, normal, and faster respectively.
Ctrl+J Jumps the start marker to the next cue point.
Ctrl+Shift+J Jumps the start marker to the previous cue point.
Alt+J Jumps the finish marker to the next cue point.
Alt+Shift+J Jumps the finish marker to the previous cue point.
Ctrl+K Overwrites the selection with the clipboard.
Ctrl+M orShift+Ctrl+Ins
Displays the Mix window. Mixes the clipboard with the sound at the startmarker's position.
Ctrl+N Creates a new sound.
Ctrl+O Opens a sound.
Ctrl+P Pastes the clipboard into a new Sound window.
Ctrl+Q Drops a new cue point at the current playback, recording, or start marker position. Cue naming is controlled by the Auto Cue settings under the Cue Points tool.
Ctrl+Shift+Q Drops a new cue point at the current playback, recording, or start marker position and displays the edit window.
Ctrl+R Replaces the selection with the clipboard contents.
Ctrl+S Saves the file.
Ctrl+T Trims the sound. Removes all audio outside the selection.
Ctrl+U Displays the AutoTrim window. Removes silences within the ends of theselection.
Ctrl+V Pastes the clipboard into the sound at the start marker's position.
Ctrl+W Sets the select to the view (as in Select View).
Ctrl+X Cuts the selection and copies it into the clipboard.
Ctrl+Y Redo. Reverses last undo.
Ctrl+Z Undoes last change.
Ctrl+Shift+B Selects both channels of a stereo file.
Ctrl+Shift+L Selects the left channel of a stereo file.
Ctrl+Shift+R Select the right channel of a stereo file.
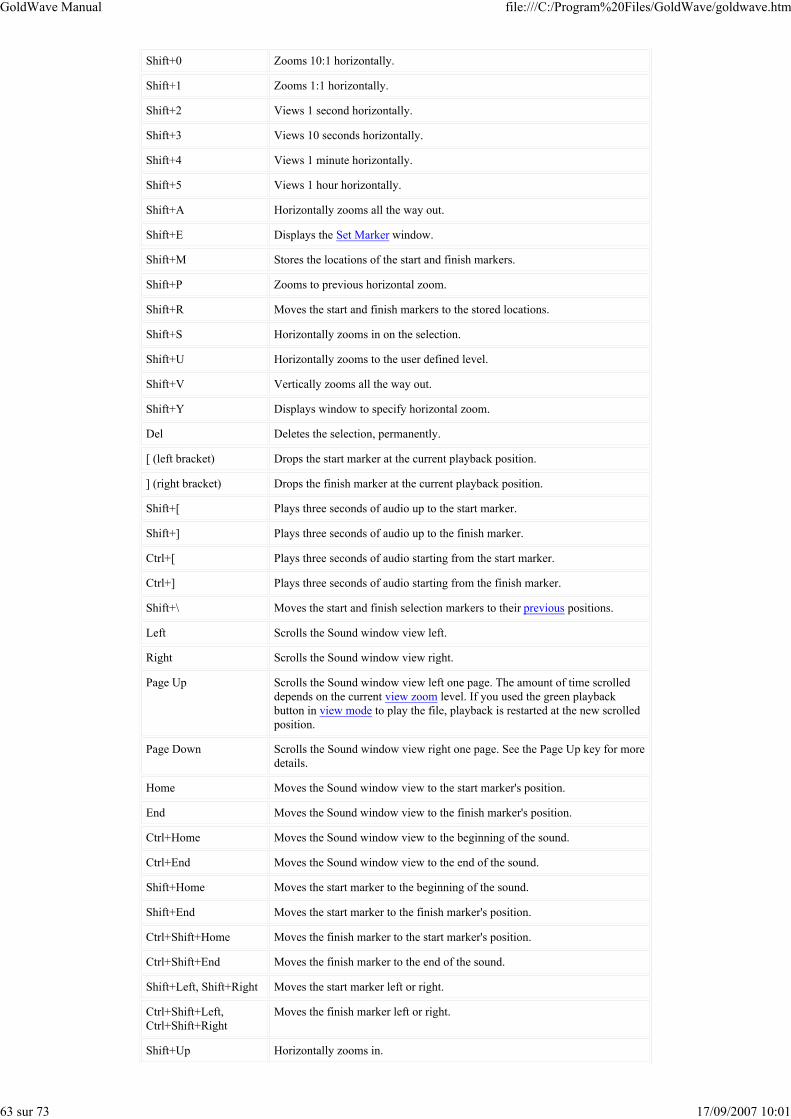
GoldWave Manual file:///C:/Program%20Files/GoldWave/goldwave.htm
63 sur 73 17/09/2007 10:01
Shift+0 Zooms 10:1 horizontally.
Shift+1 Zooms 1:1 horizontally.
Shift+2 Views 1 second horizontally.
Shift+3 Views 10 seconds horizontally.
Shift+4 Views 1 minute horizontally.
Shift+5 Views 1 hour horizontally.
Shift+A Horizontally zooms all the way out.
Shift+E Displays the Set Marker window.
Shift+M Stores the locations of the start and finish markers.
Shift+P Zooms to previous horizontal zoom.
Shift+R Moves the start and finish markers to the stored locations.
Shift+S Horizontally zooms in on the selection.
Shift+U Horizontally zooms to the user defined level.
Shift+V Vertically zooms all the way out.
Shift+Y Displays window to specify horizontal zoom.
Del Deletes the selection, permanently.
[ (left bracket) Drops the start marker at the current playback position.
] (right bracket) Drops the finish marker at the current playback position.
Shift+[ Plays three seconds of audio up to the start marker.
Shift+] Plays three seconds of audio up to the finish marker.
Ctrl+[ Plays three seconds of audio starting from the start marker.
Ctrl+] Plays three seconds of audio starting from the finish marker.
Shift+\ Moves the start and finish selection markers to their previous positions.
Left Scrolls the Sound window view left.
Right Scrolls the Sound window view right.
Page Up Scrolls the Sound window view left one page. The amount of time scrolleddepends on the current view zoom level. If you used the green playbackbutton in view mode to play the file, playback is restarted at the new scrolledposition.
Page Down Scrolls the Sound window view right one page. See the Page Up key for moredetails.
Home Moves the Sound window view to the start marker's position.
End Moves the Sound window view to the finish marker's position.
Ctrl+Home Moves the Sound window view to the beginning of the sound.
Ctrl+End Moves the Sound window view to the end of the sound.
Shift+Home Moves the start marker to the beginning of the sound.
Shift+End Moves the start marker to the finish marker's position.
Ctrl+Shift+Home Moves the finish marker to the start marker's position.
Ctrl+Shift+End Moves the finish marker to the end of the sound.
Shift+Left, Shift+Right Moves the start marker left or right.
Ctrl+Shift+Left,Ctrl+Shift+Right
Moves the finish marker left or right.
Shift+Up Horizontally zooms in.
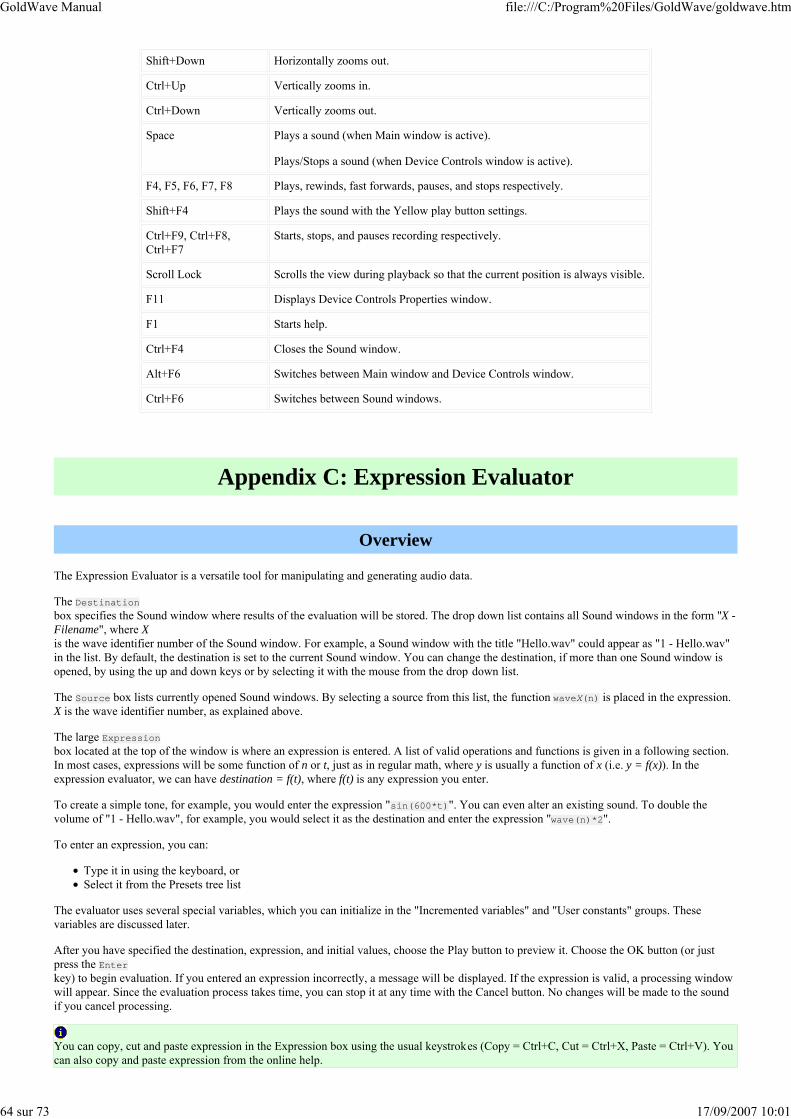
GoldWave Manual file:///C:/Program%20Files/GoldWave/goldwave.htm
64 sur 73 17/09/2007 10:01
Shift+Down Horizontally zooms out.
Ctrl+Up Vertically zooms in.
Ctrl+Down Vertically zooms out.
Space Plays a sound (when Main window is active).
Plays/Stops a sound (when Device Controls window is active).
F4, F5, F6, F7, F8 Plays, rewinds, fast forwards, pauses, and stops respectively.
Shift+F4 Plays the sound with the Yellow play button settings.
Ctrl+F9, Ctrl+F8, Ctrl+F7
Starts, stops, and pauses recording respectively.
Scroll Lock Scrolls the view during playback so that the current position is always visible.
F11 Displays Device Controls Properties window.
F1 Starts help.
Ctrl+F4 Closes the Sound window.
Alt+F6 Switches between Main window and Device Controls window.
Ctrl+F6 Switches between Sound windows.
Appendix C: Expression Evaluator
Overview
The Expression Evaluator is a versatile tool for manipulating and generating audio data.
The Destinationbox specifies the Sound window where results of the evaluation will be stored. The drop down list contains all Sound windows in the form "X -Filename", where Xis the wave identifier number of the Sound window. For example, a Sound window with the title "Hello.wav" could appear as "1 - Hello.wav"in the list. By default, the destination is set to the current Sound window. You can change the destination, if more than one Sound window isopened, by using the up and down keys or by selecting it with the mouse from the drop down list.
The Source box lists currently opened Sound windows. By selecting a source from this list, the function waveX(n) is placed in the expression.X is the wave identifier number, as explained above.
The large Expressionbox located at the top of the window is where an expression is entered. A list of valid operations and functions is given in a following section.In most cases, expressions will be some function of n or t, just as in regular math, where y is usually a function of x (i.e. y = f(x)). In theexpression evaluator, we can have destination = f(t), where f(t) is any expression you enter.
To create a simple tone, for example, you would enter the expression "sin(600*t)". You can even alter an existing sound. To double thevolume of "1 - Hello.wav", for example, you would select it as the destination and enter the expression "wave(n)*2".
To enter an expression, you can:
Type it in using the keyboard, orSelect it from the Presets tree list
The evaluator uses several special variables, which you can initialize in the "Incremented variables" and "User constants" groups. Thesevariables are discussed later.
After you have specified the destination, expression, and initial values, choose the Play button to preview it. Choose the OK button (or justpress the Enterkey) to begin evaluation. If you entered an expression incorrectly, a message will be displayed. If the expression is valid, a processing windowwill appear. Since the evaluation process takes time, you can stop it at any time with the Cancel button. No changes will be made to the soundif you cancel processing.
You can copy, cut and paste expression in the Expression box using the usual keystrokes (Copy = Ctrl+C, Cut = Ctrl+X, Paste = Ctrl+V). Youcan also copy and paste expression from the online help.
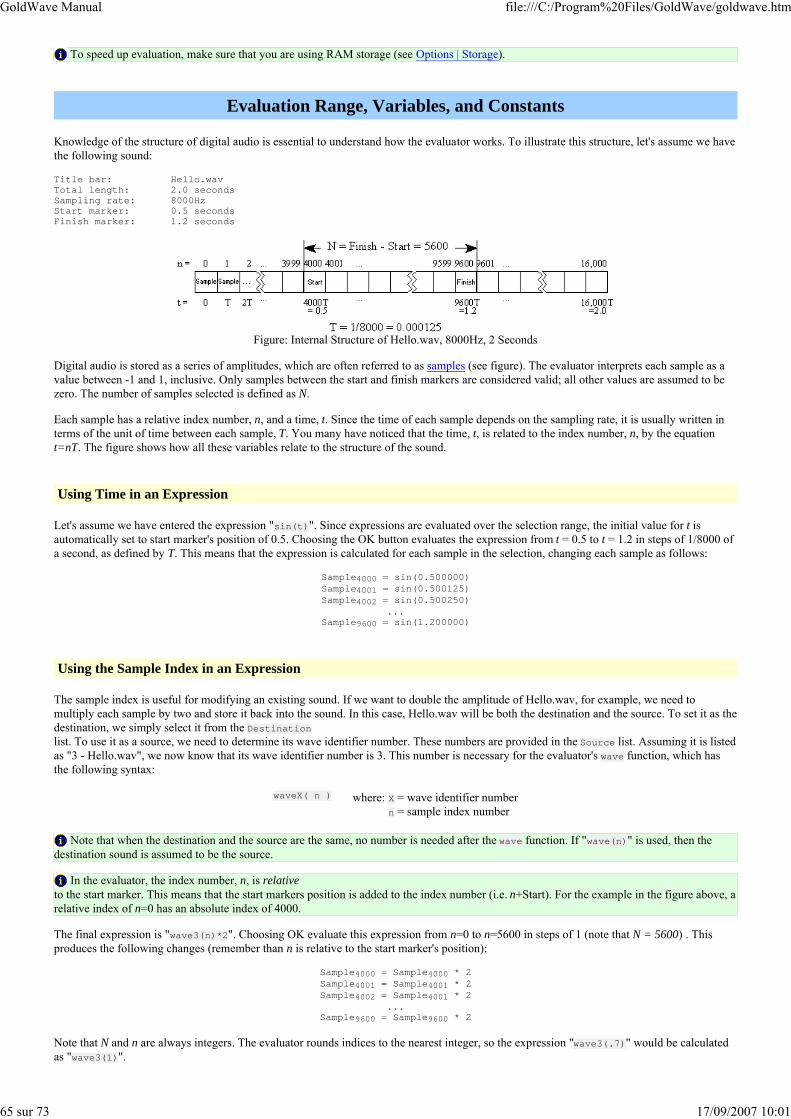
GoldWave Manual file:///C:/Program%20Files/GoldWave/goldwave.htm
65 sur 73 17/09/2007 10:01
To speed up evaluation, make sure that you are using RAM storage (see Options | Storage).
Evaluation Range, Variables, and Constants
Knowledge of the structure of digital audio is essential to understand how the evaluator works. To illustrate this structure, let's assume we havethe following sound:
Title bar: Hello.wavTotal length: 2.0 secondsSampling rate: 8000HzStart marker: 0.5 secondsFinish marker: 1.2 seconds
Figure: Internal Structure of Hello.wav, 8000Hz, 2 Seconds
Digital audio is stored as a series of amplitudes, which are often referred to as samples (see figure). The evaluator interprets each sample as avalue between -1 and 1, inclusive. Only samples between the start and finish markers are considered valid; all other values are assumed to bezero. The number of samples selected is defined as N.
Each sample has a relative index number, n, and a time, t. Since the time of each sample depends on the sampling rate, it is usually written interms of the unit of time between each sample, T. You many have noticed that the time, t, is related to the index number, n, by the equationt=nT. The figure shows how all these variables relate to the structure of the sound.
Using Time in an Expression
Let's assume we have entered the expression "sin(t)". Since expressions are evaluated over the selection range, the initial value for t is automatically set to start marker's position of 0.5. Choosing the OK button evaluates the expression from t = 0.5 to t = 1.2 in steps of 1/8000 of a second, as defined by T. This means that the expression is calculated for each sample in the selection, changing each sample as follows:
Sample4000 = sin(0.500000)Sample4001 = sin(0.500125)Sample4002 = sin(0.500250)
...Sample9600 = sin(1.200000)
Using the Sample Index in an Expression
The sample index is useful for modifying an existing sound. If we want to double the amplitude of Hello.wav, for example, we need tomultiply each sample by two and store it back into the sound. In this case, Hello.wav will be both the destination and the source. To set it as thedestination, we simply select it from the Destinationlist. To use it as a source, we need to determine its wave identifier number. These numbers are provided in the Source list. Assuming it is listedas "3 - Hello.wav", we now know that its wave identifier number is 3. This number is necessary for the evaluator's wave function, which has the following syntax:
waveX( n ) where: X = wave identifier numbern = sample index number
Note that when the destination and the source are the same, no number is needed after the wave function. If "wave(n)" is used, then the destination sound is assumed to be the source.
In the evaluator, the index number, n, is relativeto the start marker. This means that the start markers position is added to the index number (i.e. n+Start). For the example in the figure above, arelative index of n=0 has an absolute index of 4000.
The final expression is "wave3(n)*2". Choosing OK evaluate this expression from n=0 to n=5600 in steps of 1 (note that N = 5600) . Thisproduces the following changes (remember than n is relative to the start marker's position):
Sample4000 = Sample4000 * 2Sample4001 = Sample4001 * 2Sample4002 = Sample4001 * 2
...Sample9600 = Sample9600 * 2
Note that N and n are always integers. The evaluator rounds indices to the nearest integer, so the expression "wave3(.7)" would be calculated as "wave3(1)".

GoldWave Manual file:///C:/Program%20Files/GoldWave/goldwave.htm
66 sur 73 17/09/2007 10:01
You can use the sample index number and the wavefunction to mix two or more wave together. If you have several sounds opened, you can obtain the wave identifier number for each sound fromthe Source list. If the sounds you wanted to mix were identified as 2 and 3, you would enter the expression:
wave2(n) + wave3(n)
Care must be taken when indexing signals with different sampling rates. If wave1 is a voice recorded at 11025Hz and wave2 is music recordedat 22050Hz, then with wave1 as the destination you'd need to use this expression to correctly mix them:
wave1(n) + wave2(n*2)
Ideally, wave2 would have to be low-pass filtered first. If wave2 is the destination, the expression would be:
wave1(n/2) + wave2(n)
The variable N has several uses, such as reversing a sample. If wave2 is a new sound that has the same sampling rate and length of wave1, then setting the destination to wave2 and using the expression
wave1(N-n)
makes wave2 the reverse of wave1.
User Constants x, y, and f
User constants can be set to any values you choose. None of these values change during evaluation. They just provide a way of easily changingparameters within an expression without having to edit the expression directly. The constant f is typically used for frequency values. By usingthe expression
y*sin(2*pi*f*t)
you can generate any tone by specifying the frequency in the f box and the amplitude in the y box.
Conversion Between Variables
The following equations convert between time and sample index number. The start value is the position of the start marker (in seconds).
n = (t - start) / Tt = nT + startT = 1 / (sampling rate)
Presets
The Presetstree list in the Expression Evaluator window organizes expressions in a number of groups, such as Dial Tones, Effects, Noise, and Waves. Youcan create new groups or add expression to existing groups.
To retrieve an expression:
Expand the group containing the expression in the Presets list.1.Select the expression from the expanded list.2.
To add an expression:
Enter the expression in the Expression box.1.Choose the add button in the Presets box.2.Select an existing group name or type in a new group name.3.Type in a preset name for the expression.4.Choose the OK button.5.
To delete an expression:
Expand the group containing the expression in the Presets list.1.Select the expression from the expanded list.2.Choose the remove button in the Presets box.3.
Evaluator Operators and Functions
The following table summarizes evaluator operators and functions.
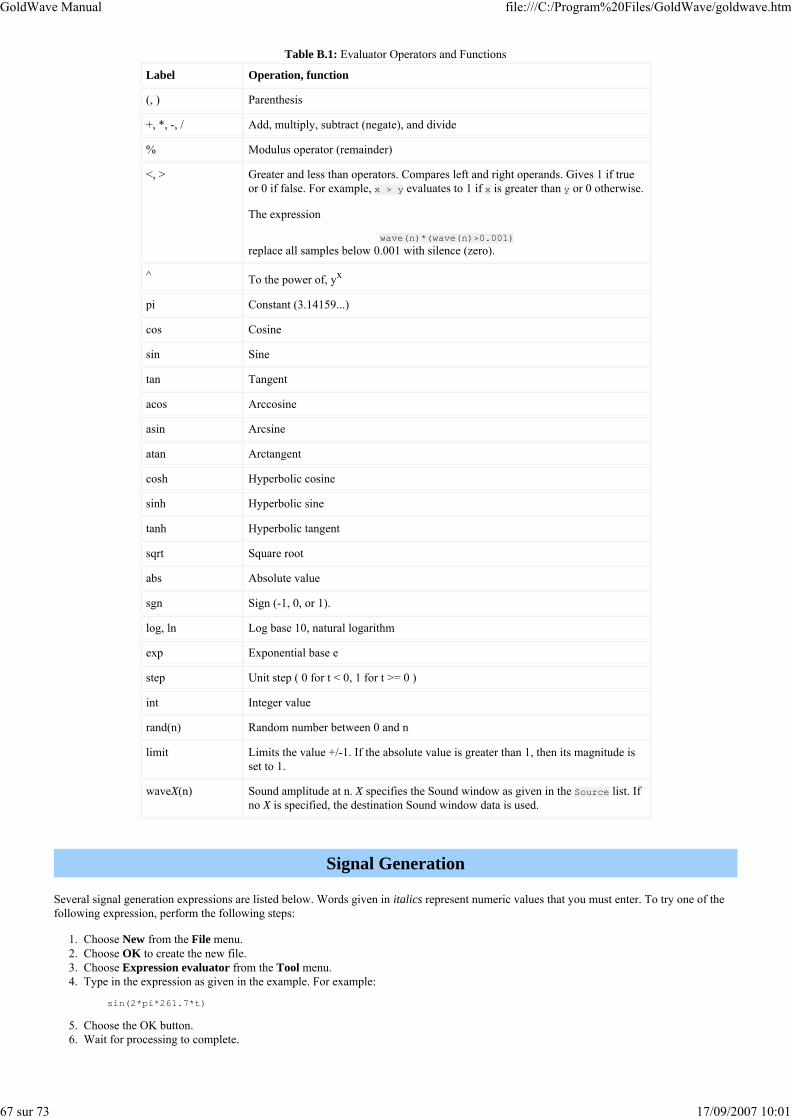
GoldWave Manual file:///C:/Program%20Files/GoldWave/goldwave.htm
67 sur 73 17/09/2007 10:01
Table B.1: Evaluator Operators and Functions
Label Operation, function
(, ) Parenthesis
+, *, -, / Add, multiply, subtract (negate), and divide
% Modulus operator (remainder)
<, > Greater and less than operators. Compares left and right operands. Gives 1 if trueor 0 if false. For example, x > y evaluates to 1 if x is greater than y or 0 otherwise.
The expression
wave(n)*(wave(n)>0.001)replace all samples below 0.001 with silence (zero).
^ To the power of, yx
pi Constant (3.14159...)
cos Cosine
sin Sine
tan Tangent
acos Arccosine
asin Arcsine
atan Arctangent
cosh Hyperbolic cosine
sinh Hyperbolic sine
tanh Hyperbolic tangent
sqrt Square root
abs Absolute value
sgn Sign (-1, 0, or 1).
log, ln Log base 10, natural logarithm
exp Exponential base e
step Unit step ( 0 for t < 0, 1 for t >= 0 )
int Integer value
rand(n) Random number between 0 and n
limit Limits the value +/-1. If the absolute value is greater than 1, then its magnitude isset to 1.
waveX(n) Sound amplitude at n. X specifies the Sound window as given in the Source list. Ifno X is specified, the destination Sound window data is used.
Signal Generation
Several signal generation expressions are listed below. Words given in italics represent numeric values that you must enter. To try one of thefollowing expression, perform the following steps:
Choose New from the File menu.1.Choose OK to create the new file.2.Choose Expression evaluator from the Tool menu.3.Type in the expression as given in the example. For example:
sin(2*pi*261.7*t)
4.
Choose the OK button.5.Wait for processing to complete.6.
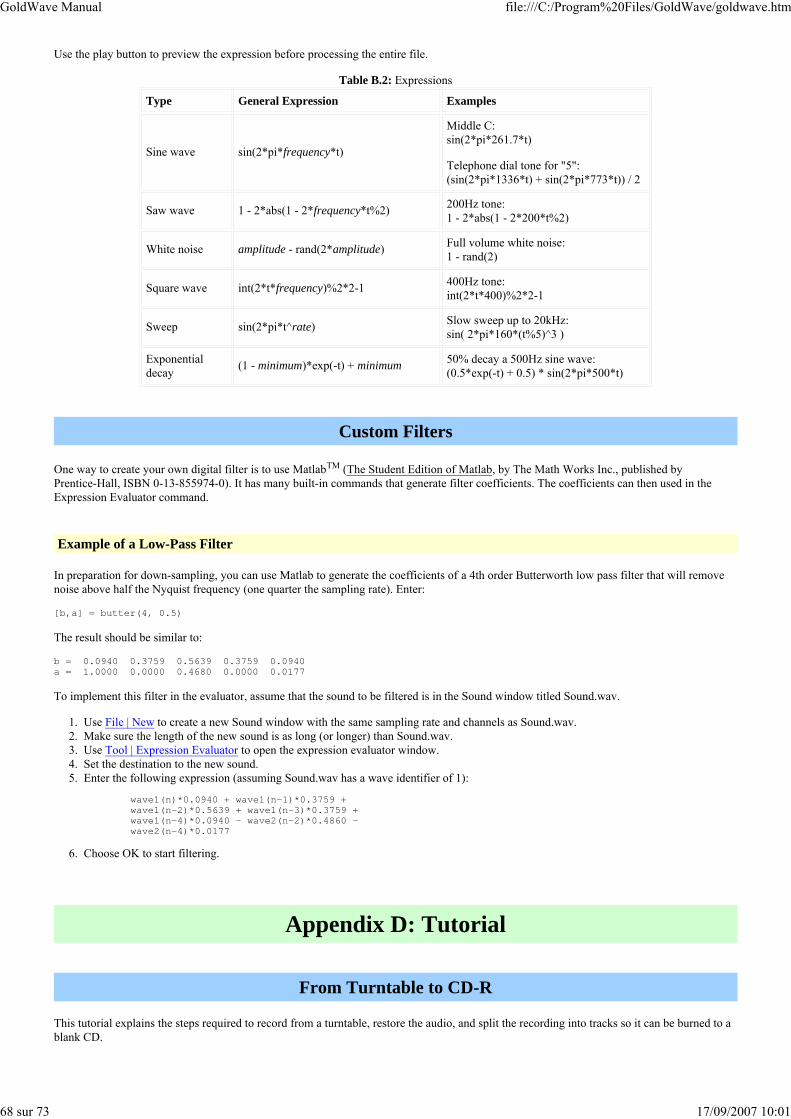
GoldWave Manual file:///C:/Program%20Files/GoldWave/goldwave.htm
68 sur 73 17/09/2007 10:01
Use the play button to preview the expression before processing the entire file.
Table B.2: Expressions
Type General Expression Examples
Sine wave sin(2*pi*frequency*t)
Middle C:sin(2*pi*261.7*t)
Telephone dial tone for "5":(sin(2*pi*1336*t) + sin(2*pi*773*t)) / 2
Saw wave 1 - 2*abs(1 - 2*frequency*t%2) 200Hz tone: 1 - 2*abs(1 - 2*200*t%2)
White noise amplitude - rand(2*amplitude) Full volume white noise: 1 - rand(2)
Square wave int(2*t*frequency)%2*2-1 400Hz tone: int(2*t*400)%2*2-1
Sweep sin(2*pi*t^rate) Slow sweep up to 20kHz: sin( 2*pi*160*(t%5)^3 )
Exponentialdecay (1 - minimum)*exp(-t) + minimum 50% decay a 500Hz sine wave:
(0.5*exp(-t) + 0.5) * sin(2*pi*500*t)
Custom Filters
One way to create your own digital filter is to use MatlabTM (The Student Edition of Matlab, by The Math Works Inc., published byPrentice-Hall, ISBN 0-13-855974-0). It has many built-in commands that generate filter coefficients. The coefficients can then used in theExpression Evaluator command.
Example of a Low-Pass Filter
In preparation for down-sampling, you can use Matlab to generate the coefficients of a 4th order Butterworth low pass filter that will removenoise above half the Nyquist frequency (one quarter the sampling rate). Enter:
[b,a] = butter(4, 0.5)
The result should be similar to:
b = 0.0940 0.3759 0.5639 0.3759 0.0940a = 1.0000 0.0000 0.4680 0.0000 0.0177
To implement this filter in the evaluator, assume that the sound to be filtered is in the Sound window titled Sound.wav.
Use File | New to create a new Sound window with the same sampling rate and channels as Sound.wav.1.Make sure the length of the new sound is as long (or longer) than Sound.wav.2.Use Tool | Expression Evaluator to open the expression evaluator window.3.Set the destination to the new sound.4.Enter the following expression (assuming Sound.wav has a wave identifier of 1):
wave1(n)*0.0940 + wave1(n-1)*0.3759 + wave1(n-2)*0.5639 + wave1(n-3)*0.3759 + wave1(n-4)*0.0940 - wave2(n-2)*0.4860 - wave2(n-4)*0.0177
5.
Choose OK to start filtering.6.
Appendix D: Tutorial
From Turntable to CD-R
This tutorial explains the steps required to record from a turntable, restore the audio, and split the recording into tracks so it can be burned to ablank CD.
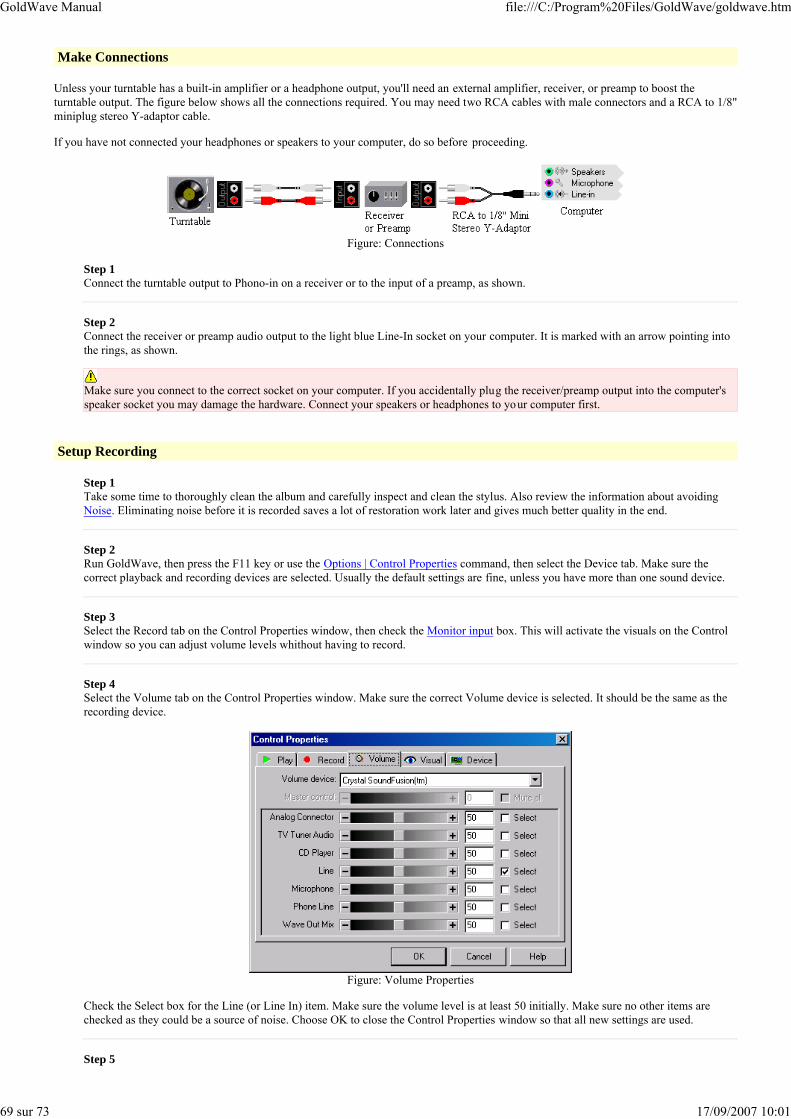
GoldWave Manual file:///C:/Program%20Files/GoldWave/goldwave.htm
69 sur 73 17/09/2007 10:01
Make Connections
Unless your turntable has a built-in amplifier or a headphone output, you'll need an external amplifier, receiver, or preamp to boost theturntable output. The figure below shows all the connections required. You may need two RCA cables with male connectors and a RCA to 1/8"miniplug stereo Y-adaptor cable.
If you have not connected your headphones or speakers to your computer, do so before proceeding.
Figure: Connections
Step 1Connect the turntable output to Phono-in on a receiver or to the input of a preamp, as shown.
Step 2Connect the receiver or preamp audio output to the light blue Line-In socket on your computer. It is marked with an arrow pointing intothe rings, as shown.
Make sure you connect to the correct socket on your computer. If you accidentally plug the receiver/preamp output into the computer'sspeaker socket you may damage the hardware. Connect your speakers or headphones to your computer first.
Setup Recording
Step 1Take some time to thoroughly clean the album and carefully inspect and clean the stylus. Also review the information about avoidingNoise. Eliminating noise before it is recorded saves a lot of restoration work later and gives much better quality in the end.
Step 2Run GoldWave, then press the F11 key or use the Options | Control Properties command, then select the Device tab. Make sure thecorrect playback and recording devices are selected. Usually the default settings are fine, unless you have more than one sound device.
Step 3Select the Record tab on the Control Properties window, then check the Monitor input box. This will activate the visuals on the Controlwindow so you can adjust volume levels whithout having to record.
Step 4Select the Volume tab on the Control Properties window. Make sure the correct Volume device is selected. It should be the same as therecording device.
Figure: Volume Properties
Check the Select box for the Line (or Line In) item. Make sure the volume level is at least 50 initially. Make sure no other items arechecked as they could be a source of noise. Choose OK to close the Control Properties window so that all new settings are used.
Step 5
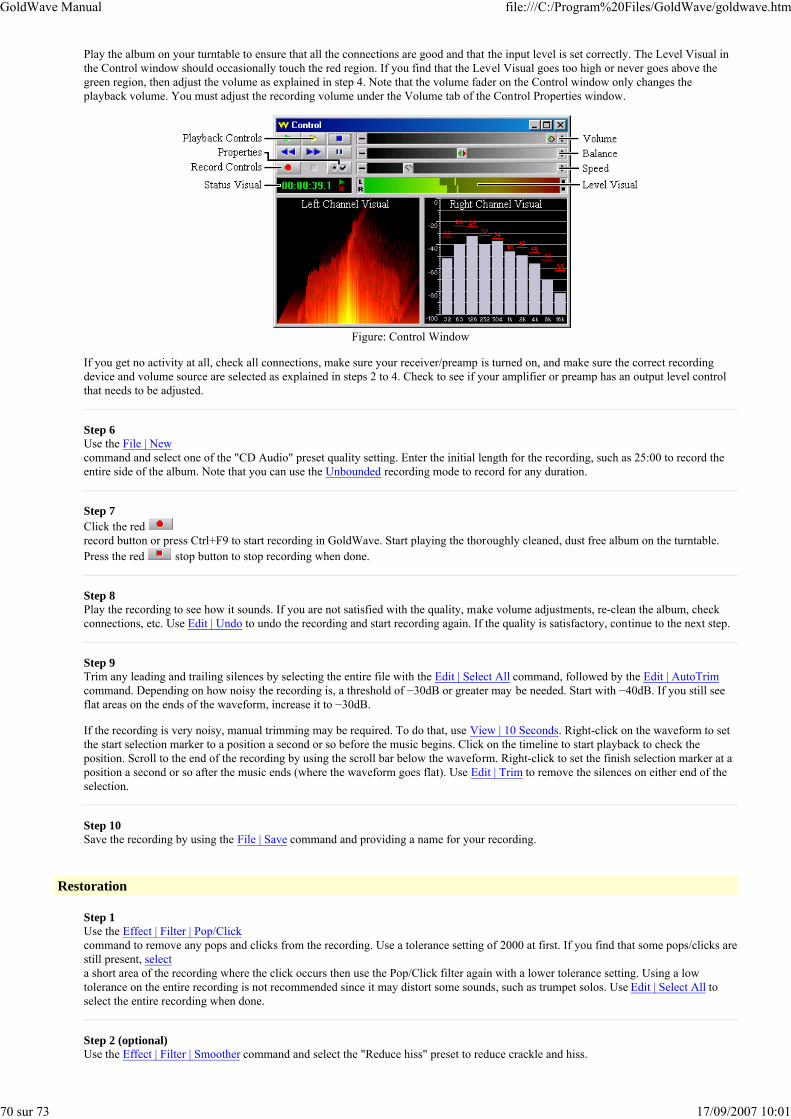
GoldWave Manual file:///C:/Program%20Files/GoldWave/goldwave.htm
70 sur 73 17/09/2007 10:01
Play the album on your turntable to ensure that all the connections are good and that the input level is set correctly. The Level Visual inthe Control window should occasionally touch the red region. If you find that the Level Visual goes too high or never goes above thegreen region, then adjust the volume as explained in step 4. Note that the volume fader on the Control window only changes theplayback volume. You must adjust the recording volume under the Volume tab of the Control Properties window.
Figure: Control Window
If you get no activity at all, check all connections, make sure your receiver/preamp is turned on, and make sure the correct recordingdevice and volume source are selected as explained in steps 2 to 4. Check to see if your amplifier or preamp has an output level controlthat needs to be adjusted.
Step 6Use the File | Newcommand and select one of the "CD Audio" preset quality setting. Enter the initial length for the recording, such as 25:00 to record theentire side of the album. Note that you can use the Unbounded recording mode to record for any duration.
Step 7Click the red record button or press Ctrl+F9 to start recording in GoldWave. Start playing the thoroughly cleaned, dust free album on the turntable.Press the red stop button to stop recording when done.
Step 8Play the recording to see how it sounds. If you are not satisfied with the quality, make volume adjustments, re-clean the album, checkconnections, etc. Use Edit | Undo to undo the recording and start recording again. If the quality is satisfactory, continue to the next step.
Step 9Trim any leading and trailing silences by selecting the entire file with the Edit | Select All command, followed by the Edit | AutoTrimcommand. Depending on how noisy the recording is, a threshold of −30dB or greater may be needed. Start with −40dB. If you still seeflat areas on the ends of the waveform, increase it to −30dB.
If the recording is very noisy, manual trimming may be required. To do that, use View | 10 Seconds. Right-click on the waveform to setthe start selection marker to a position a second or so before the music begins. Click on the timeline to start playback to check theposition. Scroll to the end of the recording by using the scroll bar below the waveform. Right-click to set the finish selection marker at aposition a second or so after the music ends (where the waveform goes flat). Use Edit | Trim to remove the silences on either end of theselection.
Step 10Save the recording by using the File | Save command and providing a name for your recording.
Restoration
Step 1Use the Effect | Filter | Pop/Clickcommand to remove any pops and clicks from the recording. Use a tolerance setting of 2000 at first. If you find that some pops/clicks arestill present, selecta short area of the recording where the click occurs then use the Pop/Click filter again with a lower tolerance setting. Using a lowtolerance on the entire recording is not recommended since it may distort some sounds, such as trumpet solos. Use Edit | Select All toselect the entire recording when done.
Step 2 (optional)Use the Effect | Filter | Smoother command and select the "Reduce hiss" preset to reduce crackle and hiss.
GoldWave Manual file:///C:/Program%20Files/GoldWave/goldwave.htm
71 sur 73 17/09/2007 10:01
Step 3Play the recording to find a few seconds of silence where only background noise can be heard. Select about a second of that noise, thenuse Edit | Copy to copy it to the clipboard. Select the entire recording by using Edit | Select All. Use Effect | Filter | Noise Reduction todisplay the Noise Reduction window. Choose the "Use clipboard" envelope option. Preview the settings by choosing the play button toensure the quality sounds good. If you notice too much tingling or warbling, then lower the Scale setting and Apply the settings whilepreviewing. Choose OK to remove the noise from the recording.
Step 4 (optional)Use the Effect | Compressor/Expandercommand and select the "Noise Gate 3" preset, then choose OK. This will eliminate any remaining noise in the silences between songs.
Step 5Use Effect | Filter | Equalizerto display the Equalizer window. Experiment with the presets and adjust the bands to boost or reduce bass and treble. Preview the audiountil you get the desired results, then choose OK to process the recording.
Step 6Use Effect | Volume | Maximize Volume and select the "Full dynamic range" preset, then choose OK.
Step 7Save the restored recording by using the File | Save command.
Split into Tracks
Step 1Use Tool | Cue Points to display the Cue Points window.
Step 2Choose the Auto Cue button. On the Auto Cue window, choose the Mark Silence button. Set the threshold to −40dB. Set the silencelength to 1 second. You may want to use a longer or shorter time depending on how long the silences are between each song. Set theminimum separation to about 1 minute (1:00). Use a longer or shorter time depending on the length of the shortest song. Choose OK toautomatically set cue points at the beginning of each song.
If no cue points appear in the list, choose Auto Cue again and increase the threshold (−30dB). If too many cue points appear, choose theDelete All button and use a lower threshold (−45dB) in Auto Cue. Note that if the album is a live recording with no silences betweensongs, you'll have to set cue points manually. Close the Cue Points window, then Play the recording and use Edit | Marker | Drop Cue todrop cue points at places where you want to split the recording into separate tracks.
Once cue points have been added, the Split File button becomes enabled.
Step 3Choose the Split File button on the Cue Points window. Provide a destination folder where each song/track will be saved. Check the"Use CD compatible wave format and alignment" box. Choose OK to create a set of track files for each song.
Step 4Use CD-R software, such as Easy CD Creator, Nero, etc. to write the track files to a blank CD as audio tracks. Note that you cannot justcopy the files to the CD using Windows Explorer. That will just create a data track. Each song must be written as a separate audio track.
End of Tutorial
Appendix E: Troubleshooting and Q&A
Troubleshooting
Problem Cause/Solution

GoldWave Manual file:///C:/Program%20Files/GoldWave/goldwave.htm
72 sur 73 17/09/2007 10:01
Cannot open large files Make sure that hard disk storage is enabled in Options | Storage.
Make sure that you have plenty of free RAM and hard drive space.CD quality sound requires 10MB per minute and 20MB per minutewhen editing.
Cannot play sounds Sound driver is incorrectly installed or needs to be updated.
Check that the Windows Sound Recorder accessory can play sounds.If it doesn't, the driver is not installed correctly.
Make sure that your audio device is selected by using the Device Properties tab under Control Properties.
Cannot record sounds See above.
Make sure you have the correct recording source selected. SeeRecording Sounds under Control Overview.
Make sure your audio hardware is capable of recording.
Sound may be in use by the playback device; click on the stop button.
Recording device may be in use by another program; close the otherprogram.
System seems slow or visualsdo not update smoothly
Your system may not be fast enough to draw the visuals. Try reducingthe frame rate in Visual Properties tab under Control Properties or set all visuals to blank.
System freezes or crashes or an exception occurs
Make sure that you have a Pentium III or better system.
If the crash occurs during recording or playback, install an updatedsound, video, and motherboard drivers.
If the crash occurs when you try to run GoldWave, use theStart | Programs | GoldWave | GoldWave Setup to disable some ofthe plug-ins or OpenGL.
You may have encountered a problem. If you can duplicate theproblem after restarting your system, contact GoldWave Inc. for moreassistance.
After a crash, there is less free space on the hard drive
Delete files in the temporary storage folder specified underOptions | Storage. These files usually have names likeGWXXX.TMP. Note that you may be able to recover the files byopening them in GoldWave and specifying the Raw type with "32 bitIEEE float, stereo (or mono), little endian" attributes.
Visuals are out of synchronization
Many audio drivers return inaccurate positions. Make sure you havethe most recent sound driver.
Pops, clicks, or stuttering during playback
Your sound card driver is rubbish. Get a new sound driver, or a newsound card, or tell your sound card manufacturer about the problem.
Pops and clicks can occur at the beginning or ending of a sound if thefirst or last sample is not silence. Fading in/out a small selection cansometimes fix this.
Enable the Edit | Marker | Snap to zero-crossing feature to avoid popsand clicks when editing.
Expression Evaluator slow Make sure that RAM storage is selected in Options | File. Rememberto close and reopen your sounds for this setting to apply.
Your crusty old 386 system does not have a co-processor. Go to acomputer junk yard and find a Pentium system.
Editing seems to be getting slower and disk activity isincreasing
Files on your hard disk are becoming fragmented. Use the WindowsDisk Defragmenter system tool.
Distortion in recording You need to lower the recording volume. See Volume Properties tab under Control Properties for information about selecting andcontrolling recording volume.
GoldWave Manual file:///C:/Program%20Files/GoldWave/goldwave.htm
73 sur 73 17/09/2007 10:01
Check that all connections are correct and firm (do not connect a"line-out" to "mic-in", for example).
Gaps in recording and playback The Windows virtual memory manager can sometimes cause gaps dueto excessive swapping. Installing more RAM may help.
Your system may be too slow to display the visuals. Try reducing theframe rate in the Visual Properties tab under Control Properties or set all visuals to blank.
Sound won't play for more thana few seconds.
Make sure you've selected the entire file.
Common Questions and Answers
Why do I get only silence when I try to record?
You have to select the correct recording source. See Volume Properties tab under Control Properties.
How do I record from an audio CD?
If you have a SCSI or MMC compliant CD-ROM drive (most are), use the Tool | CD Reader command. If you want to record using your soundcard, you need to select the CD-ROM as the recording source for your sound card. See Recording Sounds for more information.
How can I see and adjust recording volume levels without recording?
Use the Monitor input option under the Record Properties tab.
How can I avoid stuttering and glitches in recording?
Do not use disk compression. Set visuals to Blank. Close all other programs. Restart your system before (or between) recording for longperiods of time. Update your sound driver.
How do I select part of a sound?
See Editing Overview for more information.
How can I tell if the finish marker is in the right place without playing the entire selection?
Right click on the waveform just before the finish marker and choose the "Play from here" menu item. Or, go to the Play Properties tab and select the Finish option for one of the play buttons. That will play a few seconds before the finish marker.
How do I edit individual samples with the mouse?
See Redrawing the Waveform with the Mouse.
Why does GoldWave show the shareware messages?
GoldWave is not free software. If you are a licensed user and are still seeing shareware messages, you'll need to enter your license into theprogram again. Directions for entering the license are included with the license.
Can I convert sound files to MIDI?
No. MIDI files do not contain digital audio. They contain notes and timing information for instruments. In other words, they containinstructions for playing the music, but not the music itself.
How are you?
Fine, thanks.
How can I split a large recording into individual songs?
Use the Cue Points tool with the Auto Cue Button and the Split File Button.