Embed Size (px)
Citation preview
Copyright © 2011 USA Ultimate Boulder, Colorado
Phone: 303-447-3472 Fax: 303-447-3483
Information: [email protected] www.usaultimate.org
INTRODUCTION ................................................................................................................................................................................. 1
SPIRIT OF THE GAME® ....................................................................................................................................................................... 2
THE GAME OF ULTIMATE ................................................................................................................................................................... 3
TEACHING SELF-OFFICIATING ............................................................................................................................................................ 5
SKILLS, LESSONS & ASSESSMENT ....................................................................................................................................................... 8
LEVEL 1: PANCAKE CATCH, BASIC BACKHAND .................................................................................................................................................. 9 Pancake Catch .................................................................................................................................................................................... 9 Basic Backhand .................................................................................................................................................................................. 9
Level 1: Sample Unit Plan .................................................................................................................................................................................. 12 LEVEL 2: LOBSTER CATCH, BASIC FOREHAND, INTERMEDIATE BACKHAND ............................................................................................................ 15
Lobster Catch ................................................................................................................................................................................... 15 Basic Forehand ................................................................................................................................................................................. 16 Intermediate Backhand .................................................................................................................................................................... 18
Level 2: Sample Unit Plan .................................................................................................................................................................................. 19 LEVEL 3: HAMMER & INTERMEDIATE FOREHAND ........................................................................................................................................... 22
Hammer ........................................................................................................................................................................................... 22 Intermediate Forehand .................................................................................................................................................................... 32
Level 3: Sample Unit Plan .................................................................................................................................................................................. 33 LEVEL 4: ADVANCED THROWING, MARKING & READING THE DISC .................................................................................................................... 36
Advanced Throwing ......................................................................................................................................................................... 36 Introduction to Defense: Marking .................................................................................................................................................... 37 Reading the Disc ............................................................................................................................................................................... 38
Level 4: Sample Unit Plan .................................................................................................................................................................................. 39 LEVEL 5: “SKYING” & STACKING .................................................................................................................................................................. 42
“Skying” ............................................................................................................................................................................................ 42 Introduction to Offense: Stacking .................................................................................................................................................... 43
Level 5: Sample Unit Plan .................................................................................................................................................................................. 45
NOTES FROM AN EDUCATOR ........................................................................................................................................................... 47
GLOSSARY ....................................................................................................................................................................................... 49
ADVANCED TERM GLOSSARY .......................................................................................................................................................... 50
SPECIAL EDUCATION/PHYSICAL DISABILITY ACCOMMODATIONS .................................................................................................... 51
TEN THINGS YOU SHOULD KNOW ABOUT SPIRIT OF THE GAME® .................................................................................................... 52
USA ULTIMATE: RULES FOR INTRAMURAL ULTIMATE...................................................................................................................... 53
BIBLIOGRAPHY & CREDITS ............................................................................................................................................................... 56
USA Ultimate – Teaching Ultimate (2011) 1 | P a g e
The sport of Ultimate is growing by leaps and bounds at the youth and college levels, and with the help of educators such as you,
more and more athletes are getting hooked on Ultimate every day. According to the 2008 Sporting Goods & Manufactures’ Report,
Ultimate is the fastest-growing team sport, and it’s with good reason – the game is action packed, high-endurance, and just plain fun
to play. Playing Ultimate can easily become a lifelong passion, with playing opportunities existing on every level from local leagues to
national championships for multiple divisions. Elite teams require not only great technical skills, such as throwing and strategy, but
also great fitness and physical prowess. As you’ll see, Ultimate is a sport that requires everyone on the field to be engaged and
active, which makes for a fantastic experience!
This resource has been designed to help educators with limited or no experience with Ultimate and other disc sports find insight into
the physical skills (such as throwing, catching, and marking), the team strategies, and the unique officiating structure of Ultimate,
including Spirit of the Game®. The goal is to help educators teach the sport accurately and with detailed instruction and activities.
The “Skills, Lessons & Assessment” segment contains skill breakdowns, assessment rubrics, and model unit plans. It is organized for
simplicity and ease of use. The unit plans are divided into five levels, from basic to more advanced skills. It is possible to progress at
a pace appropriate to the age and experience of the class, so that students are able to develop the necessary skills to enjoy the game
of Ultimate.
The remainder of the material focuses on brainstorming ways to incorporate Ultimate into different models of physical education,
terminology and additional tools for teaching Spirit of the Game®. This also includes a few ideas for how to use technology,
explanations of Ultimate’s health benefits, and ideas for integrating students with special needs.
For those who are looking for more detailed strategies, a supplement entitled “Basic Skills, Strategy & Drills” is available from USA
Ultimate. To check out the game of Ultimate through high action video clips, visit http://www.usaultimate.org/multimedia.
Special thanks to William Smolinski, Wynne Scherf, Catherine Greenwald, Baker Pratt and Meredith Tosta for the writing, compilation
and editing of this material.
USA Ultimate – Teaching Ultimate (2011) 2 | P a g e
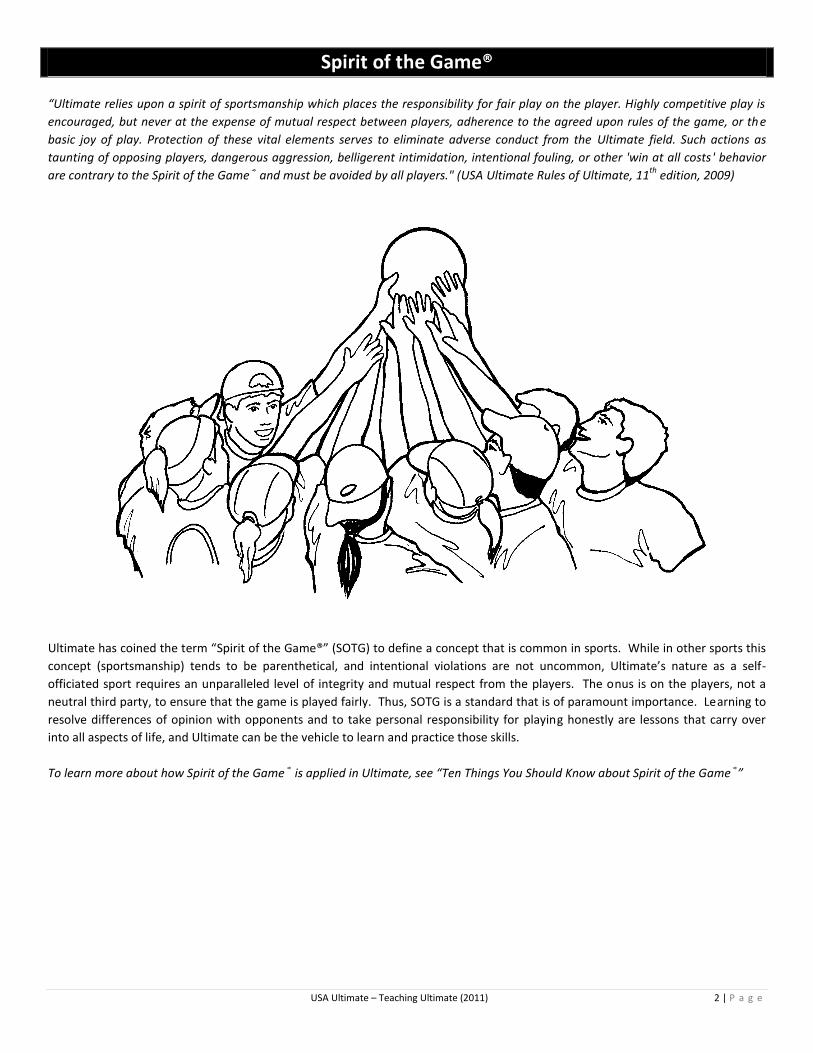
“Ultimate relies upon a spirit of sportsmanship which places the responsibility for fair play on the player. Highly competitive play is
encouraged, but never at the expense of mutual respect between players, adherence to the agreed upon rules of the game, or the
basic joy of play. Protection of these vital elements serves to eliminate adverse conduct from the Ultimate field. Such actions as
taunting of opposing players, dangerous aggression, belligerent intimidation, intentional fouling, or other 'win at all costs' behavior
are contrary to the Spirit of the Game® and must be avoided by all players." (USA Ultimate Rules of Ultimate, 11th
edition, 2009)
Ultimate has coined the term “Spirit of the Game®” (SOTG) to define a concept that is common in sports. While in other sports this
concept (sportsmanship) tends to be parenthetical, and intentional violations are not uncommon, Ultimate’s nature as a self-
officiated sport requires an unparalleled level of integrity and mutual respect from the players. The onus is on the players, not a
neutral third party, to ensure that the game is played fairly. Thus, SOTG is a standard that is of paramount importance. Learning to
resolve differences of opinion with opponents and to take personal responsibility for playing honestly are lessons that carry over
into all aspects of life, and Ultimate can be the vehicle to learn and practice those skills.
To learn more about how Spirit of the Game® is applied in Ultimate, see “Ten Things You Should Know about Spirit of the Game®”
USA Ultimate – Teaching Ultimate (2011) 3 | P a g e
Like many sports, Ultimate has an official set of rules that can seem daunting to new players. As in other sports, technicalities can be
set aside for the sake of fun and learning. Here is a basic summary of the rules:
ULTIMATE IN 10 SIMPLE RULES
The Field: A rectangular shape with end zones at each end. A regulation field is 70 yards by 40 yards, with end zones 25 yards deep.
Initiate Play: Each point begins with both teams lining up on the front of their respective end zone line. The defense throws ("pulls") the disc to the offense. A regulation game has seven players per team.
Scoring: Each time the offense completes a pass in the defense's end zone, the offense scores a point. Play is initiated after each score.
Movement of the Disc: The disc may be advanced in any direction by completing a pass to a teammate. Players may not run with the disc. The person with the disc ("thrower") has ten seconds to throw the disc. The defender guarding the thrower ("marker") counts out the stall count.
Change of Possession: When a pass is not completed (e.g. out of bounds, drop, block, interception), the defense immediately takes possession of the disc and becomes the offense.
Substitutions: Players not in the game may replace players in the game after a score and during an injury timeout.
Non-contact: No physical contact is allowed between players. Picks and screens are also prohibited. A foul occurs when contact is made.
Fouls: When a player initiates contact on another player a foul occurs. When a foul disrupts possession, the play resumes as if the possession was retained. If the player committing the foul disagrees with the foul call, the play is redone.
Self-Officiating: Players are responsible for their own foul and line calls. Players resolve their own disputes.
Spirit of the Game®: Ultimate stresses sportsmanship and fair play. Competitive play is encouraged, but never at the expense of respect between players, adherence to the rules, and the basic joy of play. Thanks to Steve Courlang and Neal Dambra, 1991, for the development of "Ultimate in Ten Simple Rules"
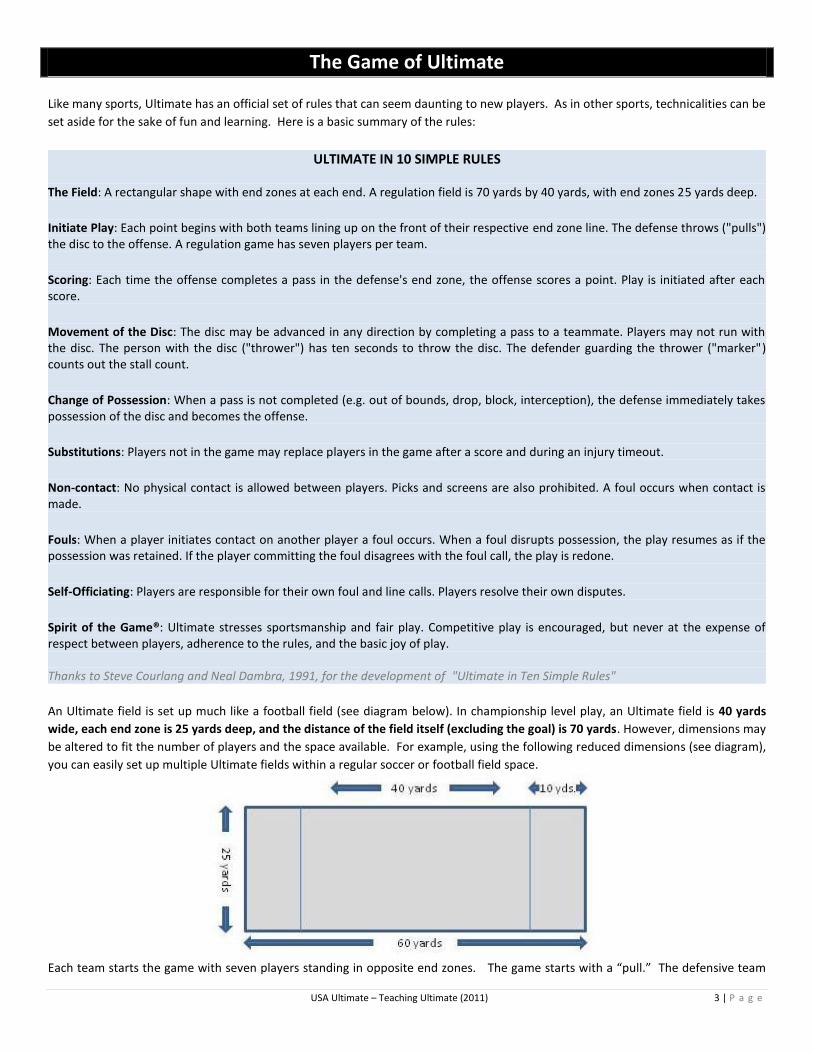
An Ultimate field is set up much like a football field (see diagram below). In championship level play, an Ultimate field is 40 yards
wide, each end zone is 25 yards deep, and the distance of the field itself (excluding the goal) is 70 yards. However, dimensions may
be altered to fit the number of players and the space available. For example, using the following reduced dimensions (see diagram),
you can easily set up multiple Ultimate fields within a regular soccer or football field space.
Each team starts the game with seven players standing in opposite end zones. The game starts with a “pull.” The defensive team

USA Ultimate – Teaching Ultimate (2011) 4 | P a g e
throws the disc (called “pulling”) toward the team starting on offense, similar to a football kickoff. Both teams are allowed to cross
their end zone line after the disc has been released.
Teams score when any one of their seven players catches a pass that crosses the front line of the opponent’s end zone. Since there
is no running with the disc, teams must complete one or more throws in order to advance toward their goal. The thrower cannot
complete a pass to herself and has only ten seconds to throw. The seconds, called a “stall count,” are counted aloud by the
“marker,” the person defending the thrower. The marker must begin the count with the word “stalling” and must count out loud
until she reaches ten or until the disc is thrown. The marker cannot stand any closer than the width of the disc, shield the throwers
eyes, or hit the disc while it is in the thrower’s hand. As soon as a new thrower catches the disc, the stall count begins again at
“stalling one” with a new marker. If there is no marker to count the stall, the thrower can hold the disc indefinitely.
The goal of the defensive team is to create turnovers so that they may take possession of the disc. There are five ways for the
defense to create a turnover:
Reach ten on the stall count
Force the offense to throw the disc out of bounds or to complete a pass to a receiver that is out of bounds
Intercept the disc while it is flying between offensive players from the offense
Knock a thrown disc to the ground
Force the offense to throw a pass that hits the ground
There is no contact in Ultimate, so tackling, holding, blocking, picking, screening, etc. are not appropriate ways to force a turnover or
make a play on the disc. Such actions constitute a foul and will be covered later.
Once the defense causes a turnover, it may pick up the disc and start playing offense. The team now attacks the opposite end zone
of its opponent’s. The team that was on offense immediately becomes defense. Other than in the case of injuries, substitutions
happen only in between points.
The team that scores stays in the end zone where it scored. Meanwhile, the team that did not score walks back to the opposite end
zone. Play resumes with the scoring team pulling the disc.
For more comprehensive rules to use in scrimmages, see the “Intramural Rules of Ultimate” at the end of the manual. For the
complete 11th
edition Rules of Ultimate, visit: www.usaultimate.org/resources/officiating/rules/default.aspx
USA Ultimate – Teaching Ultimate (2011) 5 | P a g e
-
Teaching self-officiating is one of the most challenging parts of learning the game of Ultimate. Many new and experienced
instructors find it hard to strike a balance between teaching the rules of the game while also allowing students to make their own
calls and resolve their conflicts independently. There are several strategies to facilitate learning while encouraging students to
retain ownership of the game.
The rules of Ultimate begin with the assumption that every player is going to play by the rules. There are no penalties for breaking
rules--only methods for continuing play as though the violation did not occur. Take for example a receiver who is knocked over
while trying to catch the disc. The receiver calls a foul, play stops, and the defender has an opportunity to agree with the call (“Yes, I
fouled you”) or disagree (“No, I contest that foul call. I believe you tripped on your own”). If the defender agrees with the call, then
the receiver takes the disc and play resumes as though the foul never happened. If the defender disagrees with the call, then the
disc goes back to the thrower for a replay. Students can develop an understanding of the rules by discussing their own calls on the
field. It is important for the instructor to allow some independent interaction between the students. If the students are not able to
come to an agreement within a reasonable period of time, the instructor may step in to mediate. By asking students critical
questions, you can guide their conversation and promote the development of independent problem-solving skills. While teaching
the self-officiating process in this way can be more time-consuming than simply giving students the answer, it can help them to
develop conflict-resolution strategies that will benefit them on and off the Ultimate field.
Common Frustrations
They Just Can’t Agree
The easiest solution to this problem is to step in and help the students recognize that mutual disagreement is possible and does not
mean that someone is playing unfairly. A potential response, “Both players have made their perspective clear. In cases like this we
can have a replay. Return the disc and let’s play some Ultimate”
One Team Is Blatantly Cheating
This usually happens when one team will not acknowledge foul calls or stop play for the other team. It can be helpful to address this
type of conflict in stages.
Stage 1: Repeat foul calls loudly and clearly when you hear them called. Make sure that both teams hear you. If play
does not stop then go to stage 2.
Stage 2: Question the students who were involved in the continuation of play. “Did you hear the foul call?” “What
should you do when a foul is called?” If either student still disregards the rules, go to stage 3.
Stage 3: Sideline discussion. Discuss your concerns discreetly with students who are disobeying the rules.
Violations are Occurring but Students Fail to Make Calls
Calling violations and using conflict-resolution strategies should be practiced just like the physical skills of throwing, catching,
cutting, and defense. You can teach these abstract skills by designing drills or activities that address a specific violation. Set up a
scenario that demonstrates a specific violation and ask the students to practice calling out the name of the violation. As students
become practiced at this, more violations can be added to the scenario so that students must think quickly and choose between
calls. Educators can weave these skills into all of their units, regardless of the sport.
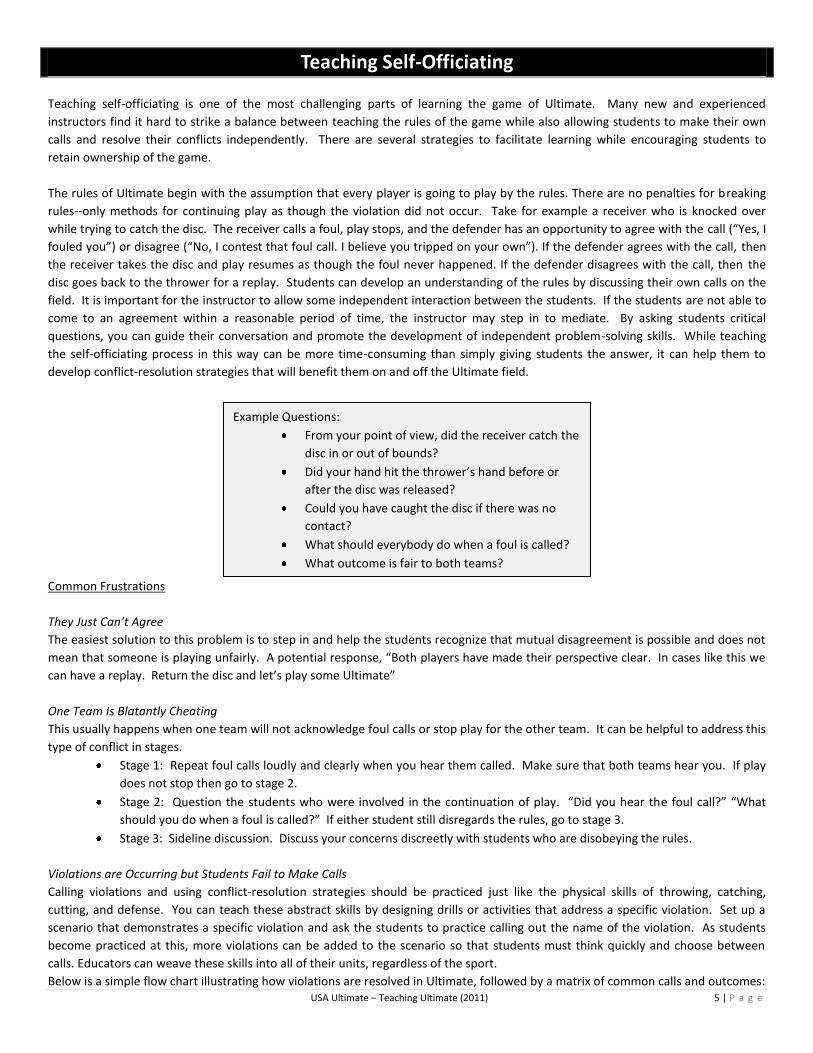
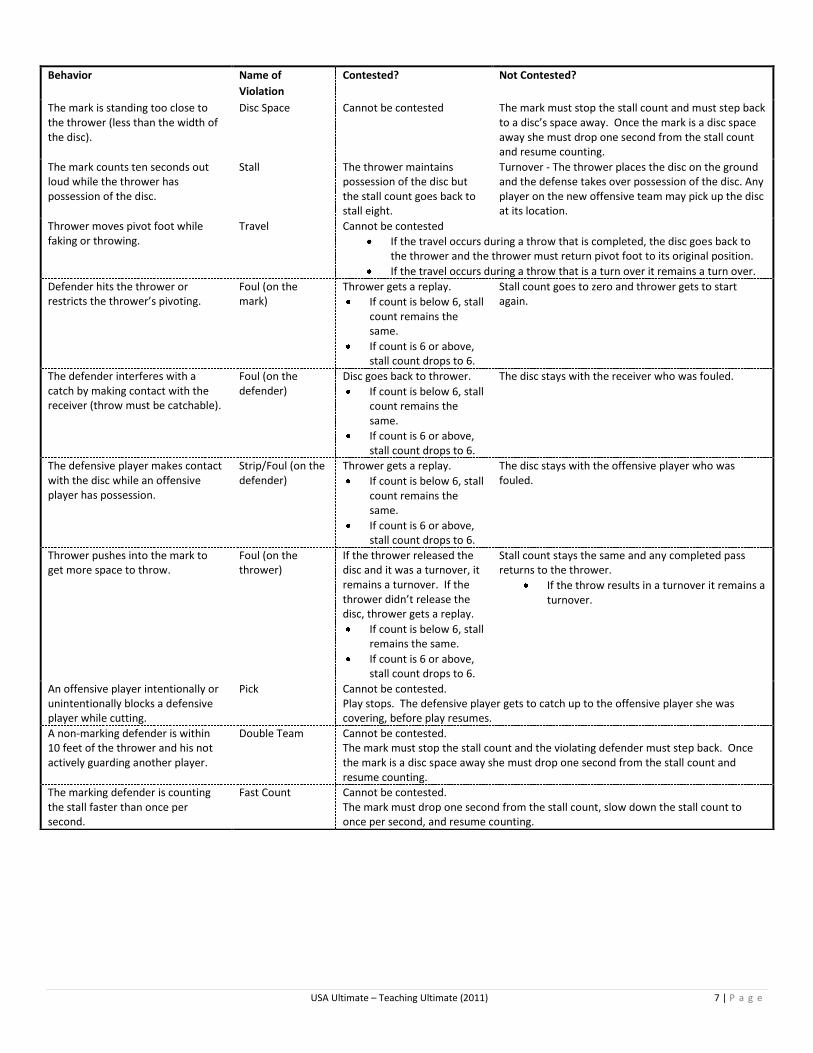
Below is a simple flow chart illustrating how violations are resolved in Ultimate, followed by a matrix of common calls and outcomes:
Example Questions:
From your point of view, did the receiver catch the
disc in or out of bounds?
Did your hand hit the thrower’s hand before or
after the disc was released?
Could you have caught the disc if there was no
contact?
What should everybody do when a foul is called?
What outcome is fair to both teams?

USA Ultimate – Teaching Ultimate (2011) 6 | P a g e
USA Ultimate – Teaching Ultimate (2011) 7 | P a g e
Behavior Name of
Violation
Contested? Not Contested?
The mark is standing too close to the thrower (less than the width of the disc).
Disc Space Cannot be contested The mark must stop the stall count and must step back to a disc’s space away. Once the mark is a disc space away she must drop one second from the stall count and resume counting.
The mark counts ten seconds out loud while the thrower has possession of the disc.
Stall The thrower maintains possession of the disc but the stall count goes back to stall eight.
Turnover - The thrower places the disc on the ground and the defense takes over possession of the disc. Any player on the new offensive team may pick up the disc at its location.
Thrower moves pivot foot while faking or throwing.
Travel Cannot be contested
If the travel occurs during a throw that is completed, the disc goes back to the thrower and the thrower must return pivot foot to its original position.
If the travel occurs during a throw that is a turn over it remains a turn over.
Defender hits the thrower or restricts the thrower’s pivoting.
Foul (on the mark)
Thrower gets a replay.
If count is below 6, stall count remains the same.
If count is 6 or above, stall count drops to 6.
Stall count goes to zero and thrower gets to start again.
The defender interferes with a catch by making contact with the receiver (throw must be catchable).
Foul (on the defender)
Disc goes back to thrower.
If count is below 6, stall count remains the same.
If count is 6 or above, stall count drops to 6.
The disc stays with the receiver who was fouled.
The defensive player makes contact with the disc while an offensive player has possession.
Strip/Foul (on the defender)
Thrower gets a replay.
If count is below 6, stall count remains the same.
If count is 6 or above, stall count drops to 6.
The disc stays with the offensive player who was fouled.
Thrower pushes into the mark to get more space to throw.
Foul (on the thrower)
If the thrower released the disc and it was a turnover, it remains a turnover. If the thrower didn’t release the disc, thrower gets a replay.
If count is below 6, stall remains the same.
If count is 6 or above, stall count drops to 6.
Stall count stays the same and any completed pass returns to the thrower.
If the throw results in a turnover it remains a turnover.
An offensive player intentionally or unintentionally blocks a defensive player while cutting.
Pick Cannot be contested. Play stops. The defensive player gets to catch up to the offensive player she was covering, before play resumes.
A non-marking defender is within 10 feet of the thrower and his not actively guarding another player.
Double Team Cannot be contested. The mark must stop the stall count and the violating defender must step back. Once the mark is a disc space away she must drop one second from the stall count and resume counting.
The marking defender is counting the stall faster than once per second.
Fast Count Cannot be contested. The mark must drop one second from the stall count, slow down the stall count to once per second, and resume counting.
USA Ultimate – Teaching Ultimate (2011) 8 | P a g e
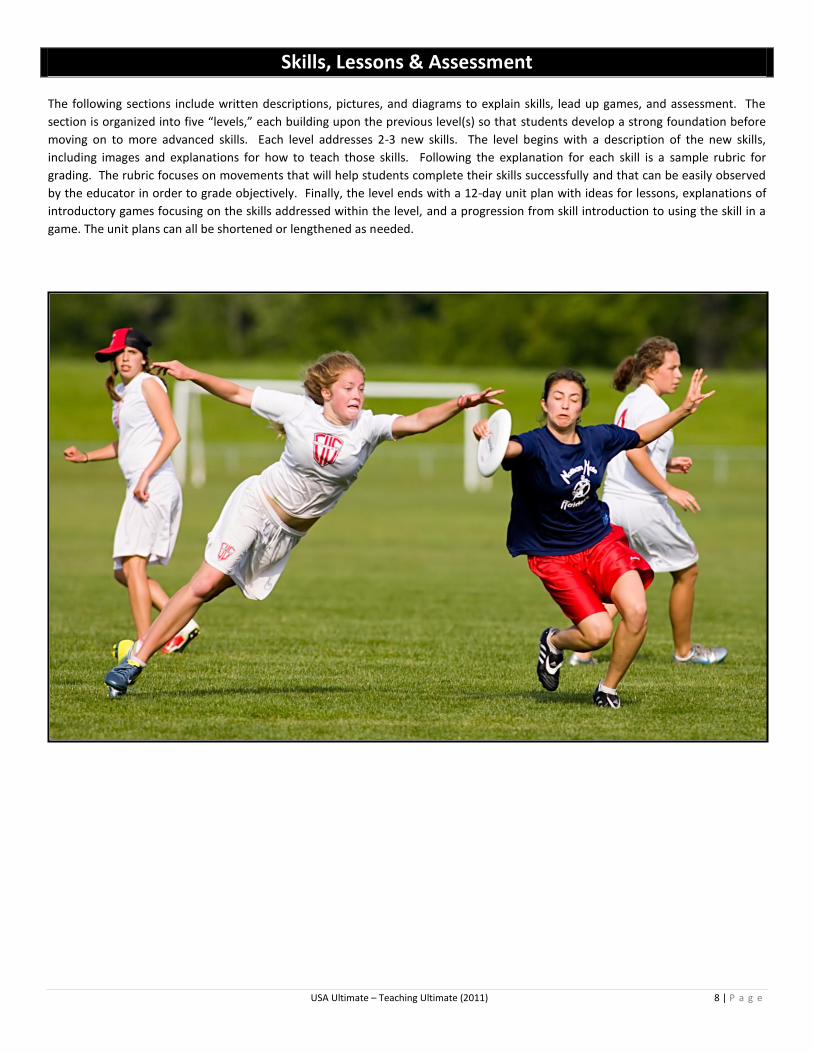
The following sections include written descriptions, pictures, and diagrams to explain skills, lead up games, and assessment. The
section is organized into five “levels,” each building upon the previous level(s) so that students develop a strong foundation before
moving on to more advanced skills. Each level addresses 2-3 new skills. The level begins with a description of the new skills,
including images and explanations for how to teach those skills. Following the explanation for each skill is a sample rubric for
grading. The rubric focuses on movements that will help students complete their skills successfully and that can be easily observed
by the educator in order to grade objectively. Finally, the level ends with a 12-day unit plan with ideas for lessons, explanations of
introductory games focusing on the skills addressed within the level, and a progression from skill introduction to using the skill in a
game. The unit plans can all be shortened or lengthened as needed.
USA Ultimate – Teaching Ultimate (2011) 9 | P a g e
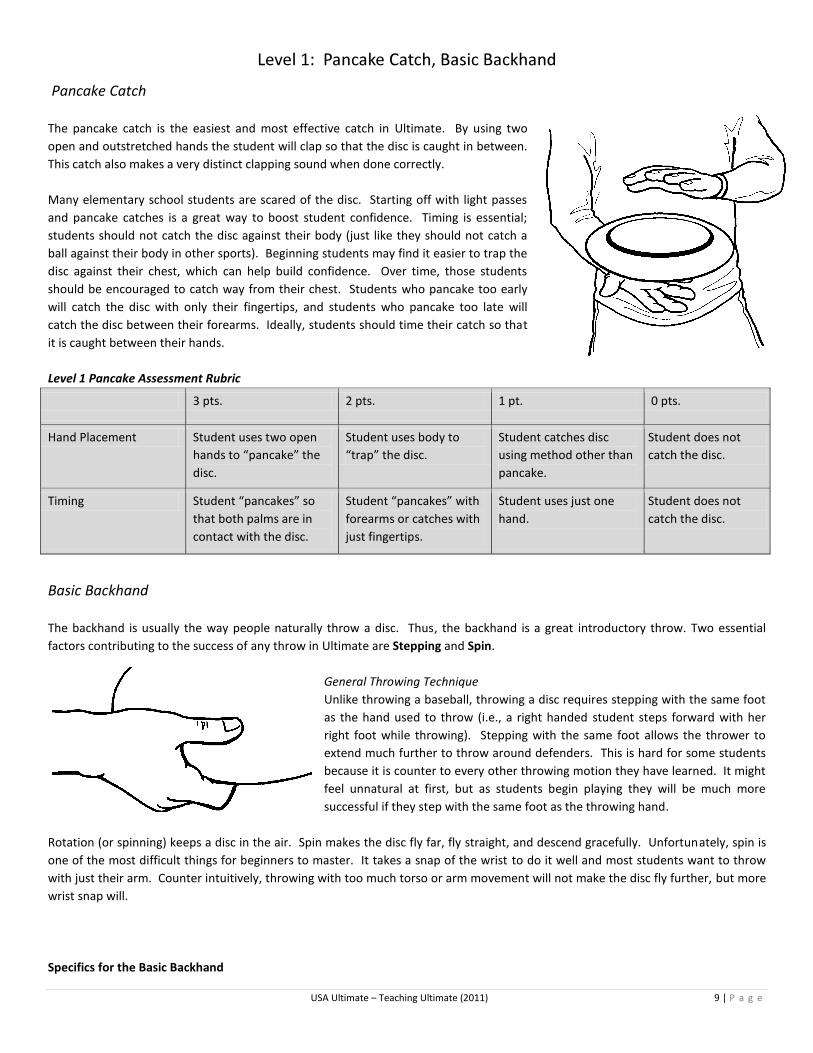
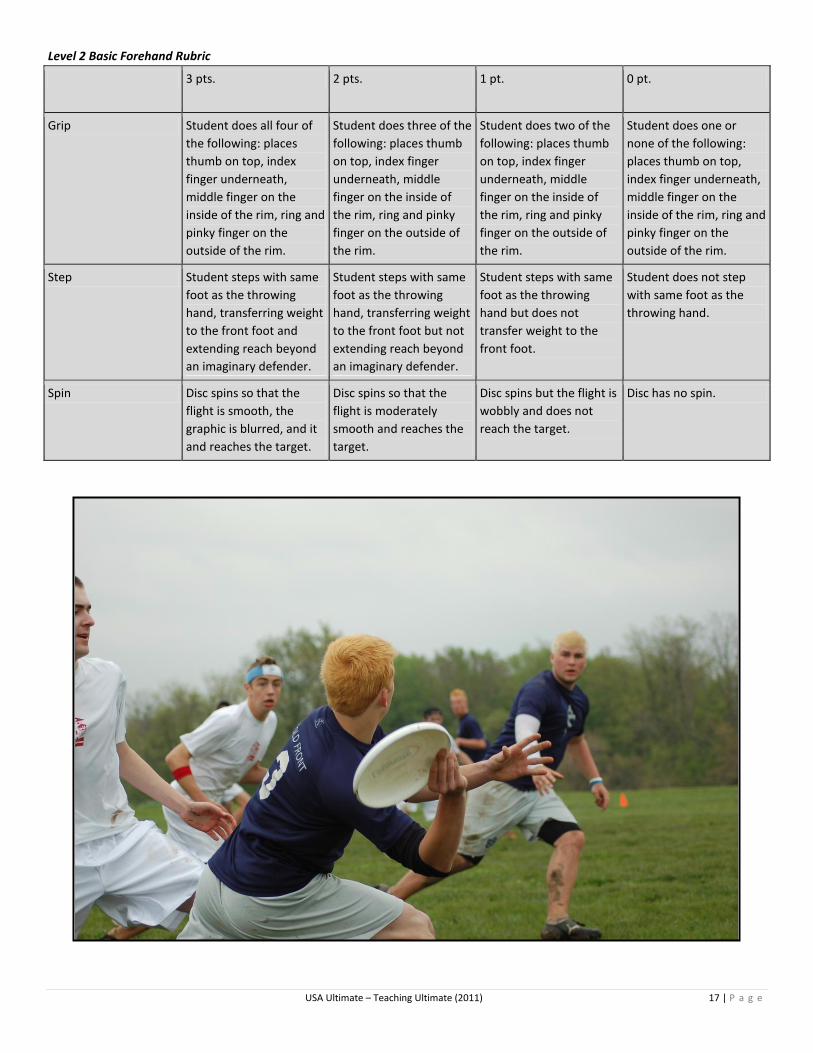
Pancake Catch
The pancake catch is the easiest and most effective catch in Ultimate. By using two
open and outstretched hands the student will clap so that the disc is caught in between.
This catch also makes a very distinct clapping sound when done correctly.
Many elementary school students are scared of the disc. Starting off with light passes
and pancake catches is a great way to boost student confidence. Timing is essential;
students should not catch the disc against their body (just like they should not catch a
ball against their body in other sports). Beginning students may find it easier to trap the
disc against their chest, which can help build confidence. Over time, those students
should be encouraged to catch way from their chest. Students who pancake too early
will catch the disc with only their fingertips, and students who pancake too late will
catch the disc between their forearms. Ideally, students should time their catch so that
it is caught between their hands.
Level 1 Pancake Assessment Rubric
3 pts. 2 pts. 1 pt. 0 pts.
Hand Placement Student uses two open
hands to “pancake” the
disc.
Student uses body to
“trap” the disc.
Student catches disc
using method other than
pancake.
Student does not
catch the disc.
Timing Student “pancakes” so
that both palms are in
contact with the disc.
Student “pancakes” with
forearms or catches with
just fingertips.
Student uses just one
hand.
Student does not
catch the disc.
Basic Backhand
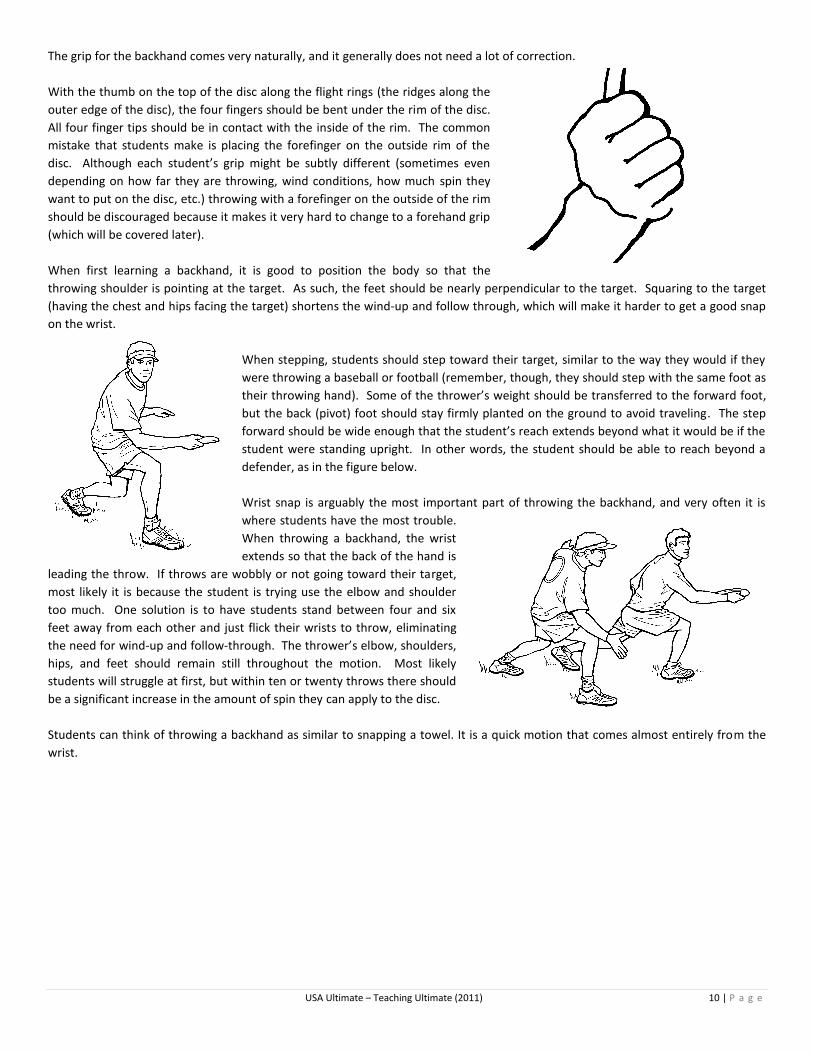
The backhand is usually the way people naturally throw a disc. Thus, the backhand is a great introductory throw. Two essential
factors contributing to the success of any throw in Ultimate are Stepping and Spin.
General Throwing Technique
Unlike throwing a baseball, throwing a disc requires stepping with the same foot
as the hand used to throw (i.e., a right handed student steps forward with her
right foot while throwing). Stepping with the same foot allows the thrower to
extend much further to throw around defenders. This is hard for some students
because it is counter to every other throwing motion they have learned. It might
feel unnatural at first, but as students begin playing they will be much more
successful if they step with the same foot as the throwing hand.
Rotation (or spinning) keeps a disc in the air. Spin makes the disc fly far, fly straight, and descend gracefully. Unfortunately, spin is
one of the most difficult things for beginners to master. It takes a snap of the wrist to do it well and most students want to throw
with just their arm. Counter intuitively, throwing with too much torso or arm movement will not make the disc fly further, but more
wrist snap will.
Specifics for the Basic Backhand
USA Ultimate – Teaching Ultimate (2011) 10 | P a g e
The grip for the backhand comes very naturally, and it generally does not need a lot of correction.
With the thumb on the top of the disc along the flight rings (the ridges along the
outer edge of the disc), the four fingers should be bent under the rim of the disc.
All four finger tips should be in contact with the inside of the rim. The common
mistake that students make is placing the forefinger on the outside rim of the
disc. Although each student’s grip might be subtly different (sometimes even
depending on how far they are throwing, wind conditions, how much spin they
want to put on the disc, etc.) throwing with a forefinger on the outside of the rim
should be discouraged because it makes it very hard to change to a forehand grip
(which will be covered later).
When first learning a backhand, it is good to position the body so that the
throwing shoulder is pointing at the target. As such, the feet should be nearly perpendicular to the target. Squaring to the target
(having the chest and hips facing the target) shortens the wind-up and follow through, which will make it harder to get a good snap
on the wrist.
When stepping, students should step toward their target, similar to the way they would if they
were throwing a baseball or football (remember, though, they should step with the same foot as
their throwing hand). Some of the thrower’s weight should be transferred to the forward foot,
but the back (pivot) foot should stay firmly planted on the ground to avoid traveling. The step
forward should be wide enough that the student’s reach extends beyond what it would be if the
student were standing upright. In other words, the student should be able to reach beyond a
defender, as in the figure below.
Wrist snap is arguably the most important part of throwing the backhand, and very often it is
where students have the most trouble.
When throwing a backhand, the wrist
extends so that the back of the hand is
leading the throw. If throws are wobbly or not going toward their target,
most likely it is because the student is trying use the elbow and shoulder
too much. One solution is to have students stand between four and six
feet away from each other and just flick their wrists to throw, eliminating
the need for wind-up and follow-through. The thrower’s elbow, shoulders,
hips, and feet should remain still throughout the motion. Most likely
students will struggle at first, but within ten or twenty throws there should
be a significant increase in the amount of spin they can apply to the disc.
Students can think of throwing a backhand as similar to snapping a towel. It is a quick motion that comes almost entirely from the
wrist.
USA Ultimate – Teaching Ultimate (2011) 11 | P a g e
Level 1 Basic Backhand Rubric
3 pts. 2 pts. 1 pt. 0 pts.
Grip Student places thumb on
top and folds all four
fingers under the disc so
that fingertips touch the
inside rim of the disc.
Student places thumb on
top, places the index
finger on the side of the
disc, and folds the three
remaining fingers under
the disc so that fingertips
touch the inside rim of
the disc.
Student places thumb on
top and folds fingers
under the disc, but fewer
than three fingertips
touch the inside rim of
the disc.
Student does not place
thumb on top of disc.
Step Student steps with same
foot as the throwing
hand, transferring weight
to the front foot and
extending reach beyond
an imaginary defender.
Student steps with same
foot as the throwing
hand. Weight is
transferred to the front
foot, but student does
not extend reach beyond
an imaginary defender.
Student steps with same
foot as the throwing
hand but does not
transfer weight to the
front foot.
Student does not step
with same foot as the
throwing hand.
Spin Disc spins so that the
flight is smooth, the
graphic is blurred, and it
and reaches the target.
Disc spins so that the
flight is moderately
smooth and reaches the
target.
Disc spins but the flight is
wobbly and does not
reach the target.
Disc has no spin.
USA Ultimate – Teaching Ultimate (2011) 12 | P a g e
Level 1: Sample Unit Plan
Days 1-3: Basic Backhand and Pancake Practice
Objective: Students will learn and practice throwing a basic backhand and making a pancake catch.
Day 1: Introduce/Demonstrate Pancake
Cues: Extend your arms and open your hands
Catch the disc with your palms, not your fingers
Introduce/Demonstrate Backhand
Cues: Snap your wrist and get a lot of spin
Make sure you’re stepping with the same foot as the throwing hand
Throwing and Catching in Partners
Description: In pairs, students practice throwing a basic backhand to a partner and catching using the pancake catch. Allow
students to explore different throws and use questions to help them figure out what makes the disc fly flat and far.
Closing Questions:
What foot should you step with when throwing a disc? (the same foot as the throwing hand)
Why do you think we step differently when throwing a disc? (you can reach farther)
If you are going to throw any kind of throw with a disc, what do you need for it to fly flat and far? (spin)
What must you do with your hand or arm to get that spin? (flick your wrist)
Day 2: Review Pancake and Backhand
Cues: Extend your arms and open your hands
Catch the disc with your palms, not your fingers
Snap your wrist and get a lot of spin
Make sure you’re stepping with the same foot as the throwing hand
Mini Disc Golf with Partners
Description: This activity is a variation of disc golf, another popular disc sport. In pairs, students count how many catches
and throws it takes to advance the disc to a particular target from a tee-off point. Students may not move their feet when
they have the disc, but they are allowed to move when it is their turn to catch. To help students be more successful it is
best to make the holes relatively short or “mini.” You can use cones to mark the tees and hula hoops to mark the end of
the holes.
For a greater challenge, require students to complete all of their passes before moving onto the next hole. Time
can also be used to challenge students.
Be creative with the course, but don’t make it too difficult. To spice up the course, you can design it so that
students must throw around trees, bushes, backstops, cones, or blacktop.
Closing Questions:
When you catch the disc, what were you required to do? (stop moving) [note that this is an opportune moment to
talk about the travel rule in Ultimate]
What was it easiest to catch the disc? (when it was flat, with it flew smoothly, when it came right to me)
What can you do if your partner asks you to throw too far? [talk about communication between teammates]
Day 3: Team Relay Races
Description: Set up a start line and a finish line fifty yards apart. Students are in teams of four or five and must complete a
series of passes to their teammates that take them from the starting line to the finish line. Just like in disc golf, students
may not move when they have the disc, but they are permitted to run freely when they are not holding the disc. According
USA Ultimate – Teaching Ultimate (2011) 13 | P a g e
to the rules, students may not hand off the disc. Use the following challenges to continually motivate the class. Consider
recording individual teams’ “best time” so that students can challenge their own team’s personal best.
Challenges:
First team to cross the finish line
Each student must catch and throw the disc at least 3 times
Each student must catch and throw the disc exactly 3 times
Any team dropping the disc must start over
One team member has to throw with her non-dominant hand and must throw at least once
First team to cross the finish line and then come back and cross the starting line
The team that is closest to the finish line when the teacher says “FREEZE!”
Use your imagination; there are a lot of different challenges
Cues: Set your feet before you throw
Concentrate on the catch
Extend your arms and open your hands
Catch the disc with your palms, not your fingers
Snap your wrist and get a lot of spin
Make sure you’re stepping with the same foot as the throwing hand
Closing Question:
Which challenge was the hardest today? Why? [lead discussion]
What helped your team get the best time? (communication, making short passes, running fast, etc.)
How did your team members communicate with one another today? [brainstorm good communication technique]
Days 4-7: Speed Ball
Objective: Students will learn the rules of Ultimate while playing a similar game using a bean bag or squishy ball.
Day 4: Introduce Basic Rules of Ultimate
Cues: You cannot run with the disc/ball
Keep looking up field to pass the disc/ball
If the disc/ball hits the ground, it’s a turnover
Speed Ball
Description: Students use the same basic rules as Ultimate but use a bean bag or squishy ball instead of a disc. The game
starts with a kickoff, just like in football, but there are no downs. The offense can move the ball by passing it to teammates
but is not allowed to hand off, run, or walk with the ball. Every time a team catches the ball in the end zone they get a
point. If the ball is thrown out of bounds, caught out of bounds, intercepted, or dropped, the defense gets its chance to
play offense. There is no contact, so tackling, blocking, pushing, shoving, or hacking will result in an automatic replay for
the team that was fouled. When one team catches the ball in the goal, the point is over and a new point starts with a
kickoff.
The purpose of this activity is to learn the rules and movement of Ultimate without the added pressure of throwing and
catching a disc. Students should make their own calls, but it is important to stop the game and regroup if the rules are not
being used and demonstrated appropriately.
Closing Questions:
Was there anything that was unfair that happened in your games today? [listen and help students problem solve]
What skills really helped your team score points today? [listen and reinforce skills that will carry over to a game of
Ultimate]
What can we do to make this game more fun? [listen to students]
Repeat “Speed Ball” on Days 5-7
USA Ultimate – Teaching Ultimate (2011) 14 | P a g e
Day 8: Foul Calling
Objective: Students will learn and practice self-officiating.
Day 8: Discuss “No Contact”
Cues: Any contact with the disc or the student holding the disc is a foul
If you are fouled yell “foul”
If you hear the word “foul,” freeze
Freeze Speed Ball
Description: Freeze Speed Ball has the exact same rules as real Speed Ball except there is one other way to score points. At
any point during play the teacher can yell the name of an animal. The first team to stop playing and freeze in the form of
the animal scores a point. The purpose of this game is to practice stopping play when a call is made.
Closing Questions:
How did you get your team to stop playing when freeze was called? [listen to students]
Whose responsibility is it to make sure everybody freezes? (player’s individual responsibility)
Days 9-12 Mini
Objective: Students will demonstrate their backhand throws and pancake catches while playing a competitive game of Ultimate.
3-on-3 Mini
Description: On a field (see below) that is about forty
yards long and twenty-five yards wide, with ten-yard end
zones, students use the rules of the rules of Ultimate to
play a game of three-on-three. Mini gives students more
chances to catch and throw the disc and requires all
students to be involved for the game to be successful.
Because of the small field size, throws are shorter and
thus more accurate, students do not tire as quickly from
running up and down field with each turnover, and
students are able to score more often. If students still
struggle with mini, the game can be adapted so that three “downs” equals a turnover. In other words, the disc can touch
the ground three times before the defense takes over on offense. Play until one team scores a set number of goals.
Cues: Freeze when a foul is called
Call out “turnover” to aid students’ recognition
Closing Questions:
What made Ultimate fun today? [listen to students]
What could we do to make Ultimate more fun tomorrow? [lead discussion]
What skills really came in handy? [listen to students]
USA Ultimate – Teaching Ultimate (2011) 15 | P a g e
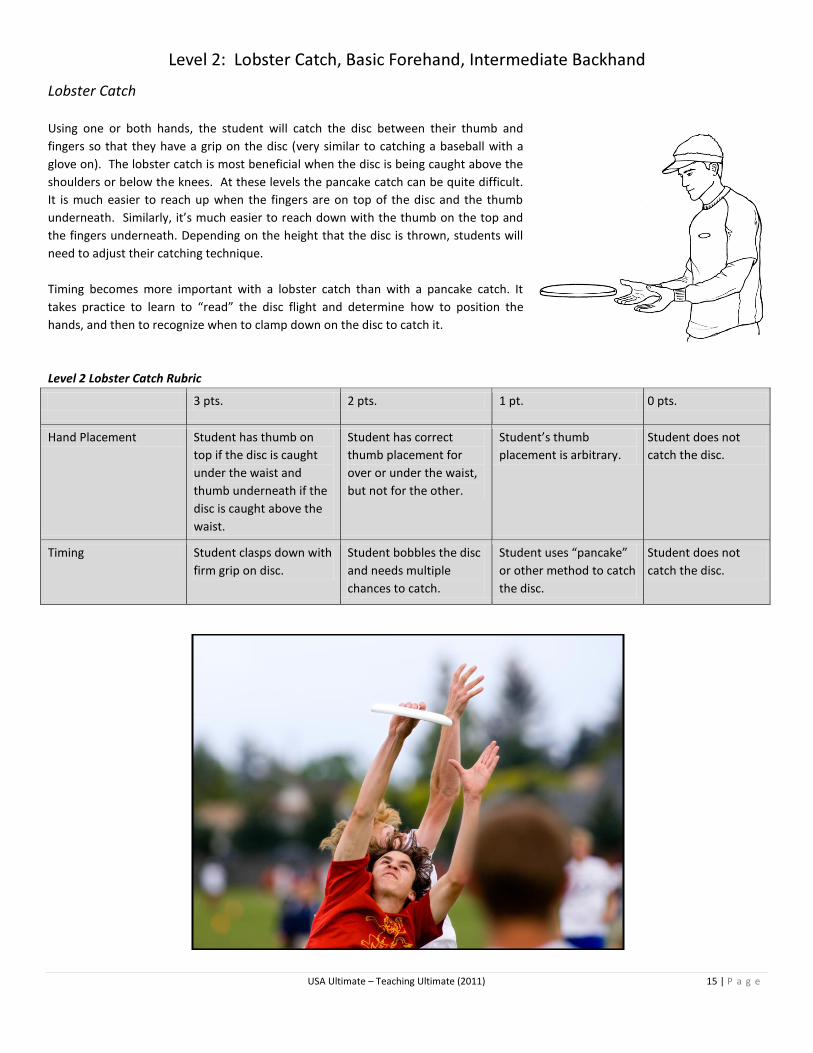
Lobster Catch
Using one or both hands, the student will catch the disc between their thumb and
fingers so that they have a grip on the disc (very similar to catching a baseball with a
glove on). The lobster catch is most beneficial when the disc is being caught above the
shoulders or below the knees. At these levels the pancake catch can be quite difficult.
It is much easier to reach up when the fingers are on top of the disc and the thumb
underneath. Similarly, it’s much easier to reach down with the thumb on the top and
the fingers underneath. Depending on the height that the disc is thrown, students will
need to adjust their catching technique.
Timing becomes more important with a lobster catch than with a pancake catch. It
takes practice to learn to “read” the disc flight and determine how to position the
hands, and then to recognize when to clamp down on the disc to catch it.
Level 2 Lobster Catch Rubric
3 pts. 2 pts. 1 pt. 0 pts.
Hand Placement Student has thumb on
top if the disc is caught
under the waist and
thumb underneath if the
disc is caught above the
waist.
Student has correct
thumb placement for
over or under the waist,
but not for the other.
Student’s thumb
placement is arbitrary.
Student does not
catch the disc.
Timing Student clasps down with
firm grip on disc.
Student bobbles the disc
and needs multiple
chances to catch.
Student uses “pancake”
or other method to catch
the disc.
Student does not
catch the disc.
USA Ultimate – Teaching Ultimate (2011) 16 | P a g e
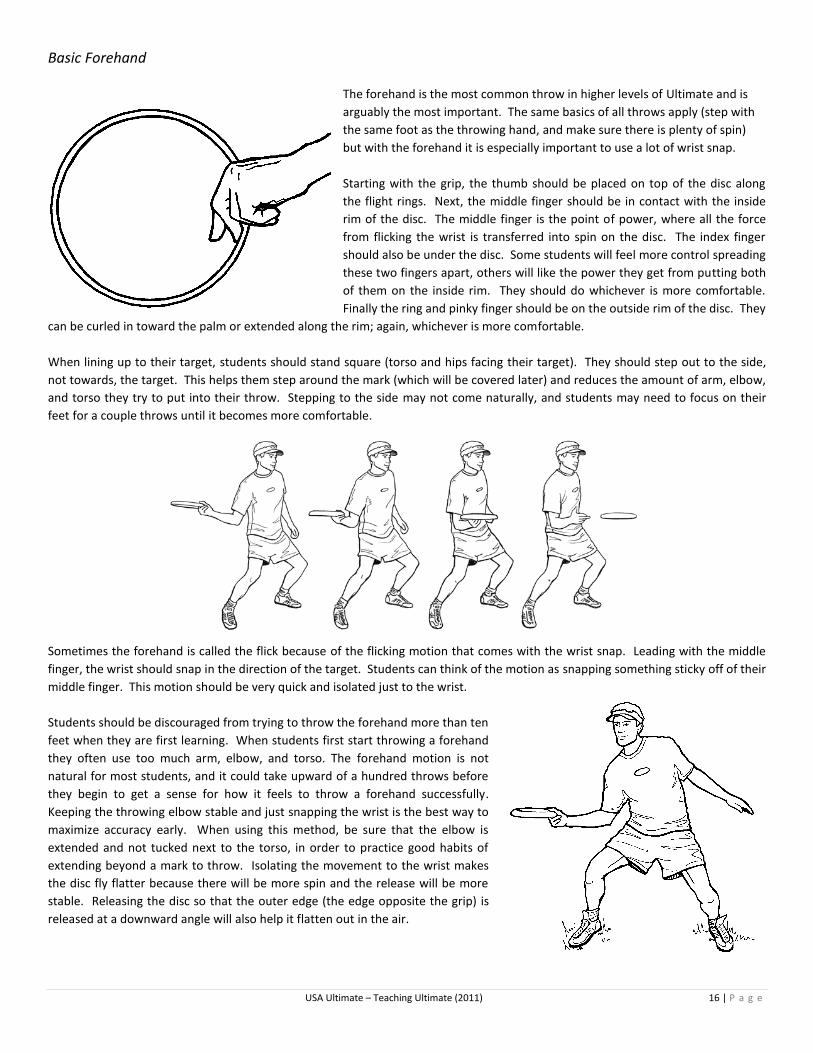
Basic Forehand
The forehand is the most common throw in higher levels of Ultimate and is
arguably the most important. The same basics of all throws apply (step with
the same foot as the throwing hand, and make sure there is plenty of spin)
but with the forehand it is especially important to use a lot of wrist snap.
Starting with the grip, the thumb should be placed on top of the disc along
the flight rings. Next, the middle finger should be in contact with the inside
rim of the disc. The middle finger is the point of power, where all the force
from flicking the wrist is transferred into spin on the disc. The index finger
should also be under the disc. Some students will feel more control spreading
these two fingers apart, others will like the power they get from putting both
of them on the inside rim. They should do whichever is more comfortable.
Finally the ring and pinky finger should be on the outside rim of the disc. They
can be curled in toward the palm or extended along the rim; again, whichever is more comfortable.
When lining up to their target, students should stand square (torso and hips facing their target). They should step out to the side,
not towards, the target. This helps them step around the mark (which will be covered later) and reduces the amount of arm, elbow,
and torso they try to put into their throw. Stepping to the side may not come naturally, and students may need to focus on their
feet for a couple throws until it becomes more comfortable.
Sometimes the forehand is called the flick because of the flicking motion that comes with the wrist snap. Leading with the middle
finger, the wrist should snap in the direction of the target. Students can think of the motion as snapping something sticky off of their
middle finger. This motion should be very quick and isolated just to the wrist.
Students should be discouraged from trying to throw the forehand more than ten
feet when they are first learning. When students first start throwing a forehand
they often use too much arm, elbow, and torso. The forehand motion is not
natural for most students, and it could take upward of a hundred throws before
they begin to get a sense for how it feels to throw a forehand successfully.
Keeping the throwing elbow stable and just snapping the wrist is the best way to
maximize accuracy early. When using this method, be sure that the elbow is
extended and not tucked next to the torso, in order to practice good habits of
extending beyond a mark to throw. Isolating the movement to the wrist makes
the disc fly flatter because there will be more spin and the release will be more
stable. Releasing the disc so that the outer edge (the edge opposite the grip) is
released at a downward angle will also help it flatten out in the air.
USA Ultimate – Teaching Ultimate (2011) 17 | P a g e
Level 2 Basic Forehand Rubric
3 pts. 2 pts. 1 pt. 0 pt.
Grip Student does all four of
the following: places
thumb on top, index
finger underneath,
middle finger on the
inside of the rim, ring and
pinky finger on the
outside of the rim.
Student does three of the
following: places thumb
on top, index finger
underneath, middle
finger on the inside of
the rim, ring and pinky
finger on the outside of
the rim.
Student does two of the
following: places thumb
on top, index finger
underneath, middle
finger on the inside of
the rim, ring and pinky
finger on the outside of
the rim.
Student does one or
none of the following:
places thumb on top,
index finger underneath,
middle finger on the
inside of the rim, ring and
pinky finger on the
outside of the rim.
Step Student steps with same
foot as the throwing
hand, transferring weight
to the front foot and
extending reach beyond
an imaginary defender.
Student steps with same
foot as the throwing
hand, transferring weight
to the front foot but not
extending reach beyond
an imaginary defender.
Student steps with same
foot as the throwing
hand but does not
transfer weight to the
front foot.
Student does not step
with same foot as the
throwing hand.
Spin Disc spins so that the
flight is smooth, the
graphic is blurred, and it
and reaches the target.
Disc spins so that the
flight is moderately
smooth and reaches the
target.
Disc spins but the flight is
wobbly and does not
reach the target.
Disc has no spin.
USA Ultimate – Teaching Ultimate (2011) 18 | P a g e
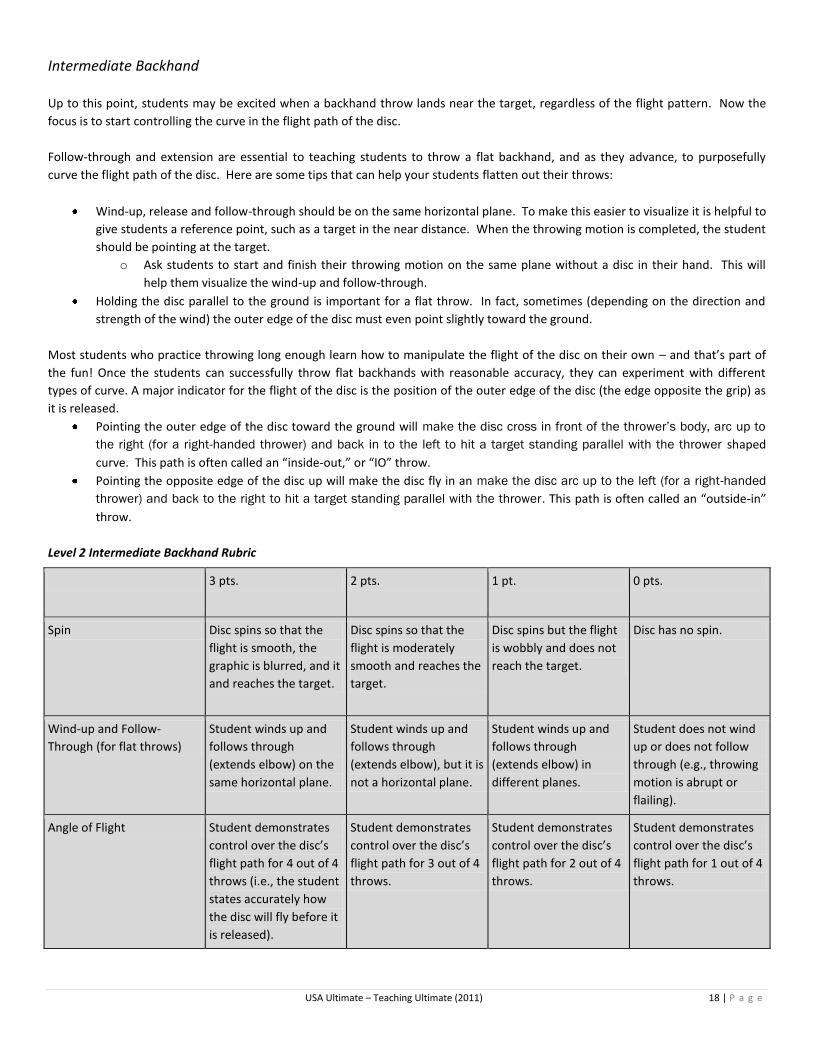
Intermediate Backhand
Up to this point, students may be excited when a backhand throw lands near the target, regardless of the flight pattern. Now the
focus is to start controlling the curve in the flight path of the disc.
Follow-through and extension are essential to teaching students to throw a flat backhand, and as they advance, to purposefully
curve the flight path of the disc. Here are some tips that can help your students flatten out their throws:
Wind-up, release and follow-through should be on the same horizontal plane. To make this easier to visualize it is helpful to
give students a reference point, such as a target in the near distance. When the throwing motion is completed, the student
should be pointing at the target.
o Ask students to start and finish their throwing motion on the same plane without a disc in their hand. This will
help them visualize the wind-up and follow-through.
Holding the disc parallel to the ground is important for a flat throw. In fact, sometimes (depending on the direction and
strength of the wind) the outer edge of the disc must even point slightly toward the ground.
Most students who practice throwing long enough learn how to manipulate the flight of the disc on their own – and that’s part of
the fun! Once the students can successfully throw flat backhands with reasonable accuracy, they can experiment with different
types of curve. A major indicator for the flight of the disc is the position of the outer edge of the disc (the edge opposite the grip) as
it is released.
Pointing the outer edge of the disc toward the ground will make the disc cross in front of the thrower’s body, arc up to
the right (for a right-handed thrower) and back in to the left to hit a target standing parallel with the thrower shaped
curve. This path is often called an “inside-out,” or “IO” throw.
Pointing the opposite edge of the disc up will make the disc fly in an make the disc arc up to the left (for a right-handed
thrower) and back to the right to hit a target standing parallel with the thrower. This path is often called an “outside-in”
throw.
Level 2 Intermediate Backhand Rubric
3 pts. 2 pts. 1 pt. 0 pts.
Spin Disc spins so that the
flight is smooth, the
graphic is blurred, and it
and reaches the target.
Disc spins so that the
flight is moderately
smooth and reaches the
target.
Disc spins but the flight
is wobbly and does not
reach the target.
Disc has no spin.
Wind-up and Follow-
Through (for flat throws)
Student winds up and
follows through
(extends elbow) on the
same horizontal plane.
Student winds up and
follows through
(extends elbow), but it is
not a horizontal plane.
Student winds up and
follows through
(extends elbow) in
different planes.
Student does not wind
up or does not follow
through (e.g., throwing
motion is abrupt or
flailing).
Angle of Flight Student demonstrates
control over the disc’s
flight path for 4 out of 4
throws (i.e., the student
states accurately how
the disc will fly before it
is released).
Student demonstrates
control over the disc’s
flight path for 3 out of 4
throws.
Student demonstrates
control over the disc’s
flight path for 2 out of 4
throws.
Student demonstrates
control over the disc’s
flight path for 1 out of 4
throws.
USA Ultimate – Teaching Ultimate (2011) 19 | P a g e
Level 2: Sample Unit Plan
Days 1-2: Intermediate Backhand, Basic Forehand, Lobster Catch
Objective: Students will learn and practice their intermediate backhand, basic forehand, and lobster catches.
Day 1: Review Intermediate Backhand
Cues: Wind up and follow through at wind up and follow through to point at your target
Snap your wrist so you get good spin
Control the outer edge of the disc
Introduce Basic Forehand
Cues: Keep your elbow still
Really flick your fingers
Step to the side
Introduce Lobster Catch
Cues: If it is over your waist, fingers on top
If it is under your waist, fingers on the bottom
Clamp down tight
Throwing and Catching in Pairs
Description: Students practice throwing both backhands and forehands to a partner and catching using the lobster catch.
Allow students to explore different throws and use questions to help them figure out how to throw and catch more
consistently. For a challenge, students can count how many throws and catches they complete.
Closing Questions:
What is different about your backhand from Level 1? (follow-through and outer edge of the disc)
Why do you think it is important to have a forehand throw? (to be able to throw to more parts of the field)
What is easier method for catching, lobster or pancake? (pancake, or depends on where the disc is)
Day 2: Review Basic Forehand Throw
Cues: Keep your elbow still
Really flick your fingers. Imagine getting something sticky off your finger.
Step to the side
All Lobster and Forehand Partner Disc Golf
Description: This activity is a variation of disc golf, another popular disc sport. In pairs, students count how many catches
and throws it takes to advance the disc to a particular target from a tee-off point. Students may not move their feet when
they have the disc, but are allowed to move when it is their turn to catch. You can use cones to mark the tees and hula
hoops to mark the end of the holes. The challenge in this activity is to use only forehands (no backhands) and to catch
using the lobster catch (no pancakes).
For a greater challenge, require students to complete all of their passes before moving onto the next hole. Time
can also be used to challenge students.
Be creative with the course, but don’t make it too difficult. To spice up the course, you can design it so that
students must throw around trees, bushes, backstops, cones, or blacktop.
Closing Questions:
What do you do to help keep your elbow still while throwing a forehand?
When does it make sense to use a lobster catch instead of a pancake? (when the body is extended, when you can’t
get a whole palm over or under the disc)
USA Ultimate – Teaching Ultimate (2011) 20 | P a g e
Day 3: Self-Officiating
Objective: Students will practice self-officiating in a competitive game.
All Lobster and Forehand Partner Disc Golf with violation calls
Description: Using the same disc golf format as above, students are allowed to call violations on their own partner.
Violations include traveling, using any throw but a forehand, using any catch but an alligator, or interfering with another
team’s play. Remember, all violations can be contested and students should agree on a fair outcome and make calls
respectfully. If a call is not contested, students must decide what outcome is fair (most likely also a replay).
Closing Questions:
What helps you throw the forehand flat? (limited elbow movement, snapping the wrist)
Why was it frustrating to have fouls called on you? (being picked on, sometimes people make calls up, got caught
cheating)
What class agreements can we make to ensure that self-officiating will be fair for everybody? [lead discussion]
Days 4-8: Base Games
Objective: Students will practice self-officiating while competing against an opposing team.
Day 4: Running Bases
Description: Two students are covering two bases, similar to baseball. These students are called the “taggers.” Taggers
throw the disc back and forth, trying to catch the disc and tag any one of two or three students running between the bases.
When the runners are on the base they are safe; when they are off the base they can be tagged. Once a runner is tagged,
the runner and tagger switch roles. Runners may not stay on base for more than three throws in a row, and taggers may
not hold the disc for more than ten seconds. Taggers are also limited to three steps each time they hold the disc. It is up to
the runners to monitor the throwers by counting the stall, and vice versa, by paying attention to how long the runners
remain on base. The disc must be in the hand of the tagger to count as a tag; students cannot throw the disc at one
another.
Closing Questions:
How did you decide which type of throw to use, backhand or forehand? (more comfortable with some throws,
another throw was blocked off by runners in the base path)
When did you decide to run, and when did you decide to stay on base? [help students develop field sense and
awareness of the disc]
How did you let throwers know that they had only a couple seconds left to throw, or let runners know they could
stay on base for only one or two more throws? (counting out loud/communicating, lead into discussion about stall
counting)
Day 5: Large Running Bases
Description: Students are divided into two teams: taggers and runners. Each team should have between four and six
students. There are five bases spread out all over the playing area (about a fifty foot by fifty foot square). Runners may not
be standing on a base when the disc is in the air, and they may not step on the same base twice in a row. In other words,
each time that the disc is thrown, the runners must switch bases. The taggers must tag three runners (or get three outs) for
the teams to switch roles.
Closing Questions:
What made this game so different from the original “Running Bases” game? [lead discussion]
How was it harder to call your own violations today? (more people with whom to communicate)
What changes could we make to make the game more fair? What changes would make it easier for us to call and
discuss violations? (have everybody freeze when violations are called and not commit violations)
USA Ultimate – Teaching Ultimate (2011) 21 | P a g e
Day 6-8: Ultimate Kickball
Description: The basic difference between kickball and Ultimate kickball is that there is no pitcher, and the batting team
throws the disc into the playing field instead of kicking the ball. Outfield students pass the disc to each other and attempt
to tag the runners or the base with the disc in hand. Students may not run with the disc, nor should they be allowed to
throw the disc at runners. The same out and scoring system for kickball applies to Ultimate kickball.
Closing Questions:
How was self-officiating easier or harder today? [lead discussion]
What skills really helped your team be successful today? [lead discussion]
Days 9-12: 4-on-4 Mini
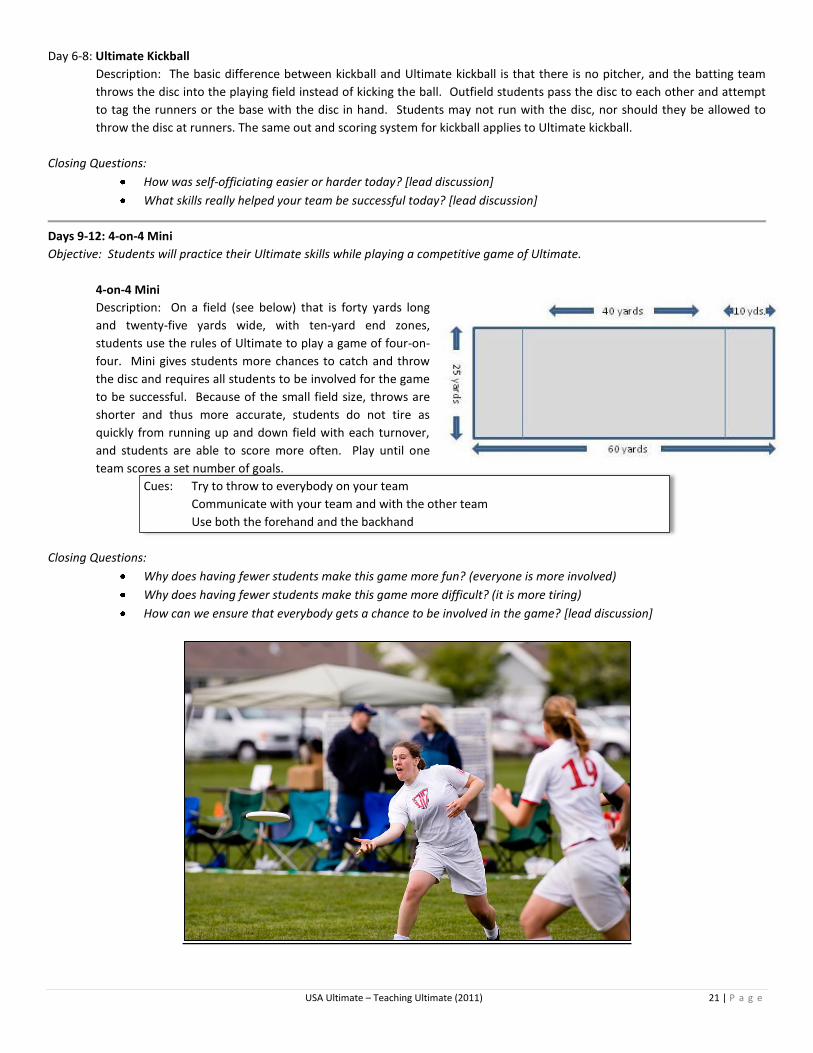
Objective: Students will practice their Ultimate skills while playing a competitive game of Ultimate.
4-on-4 Mini
Description: On a field (see below) that is forty yards long
and twenty-five yards wide, with ten-yard end zones,
students use the rules of Ultimate to play a game of four-on-
four. Mini gives students more chances to catch and throw
the disc and requires all students to be involved for the game
to be successful. Because of the small field size, throws are
shorter and thus more accurate, students do not tire as
quickly from running up and down field with each turnover,
and students are able to score more often. Play until one
team scores a set number of goals.
Cues: Try to throw to everybody on your team
Communicate with your team and with the other team
Use both the forehand and the backhand
Closing Questions:
Why does having fewer students make this game more fun? (everyone is more involved)
Why does having fewer students make this game more difficult? (it is more tiring)
How can we ensure that everybody gets a chance to be involved in the game? [lead discussion]
USA Ultimate – Teaching Ultimate (2011) 22 | P a g e
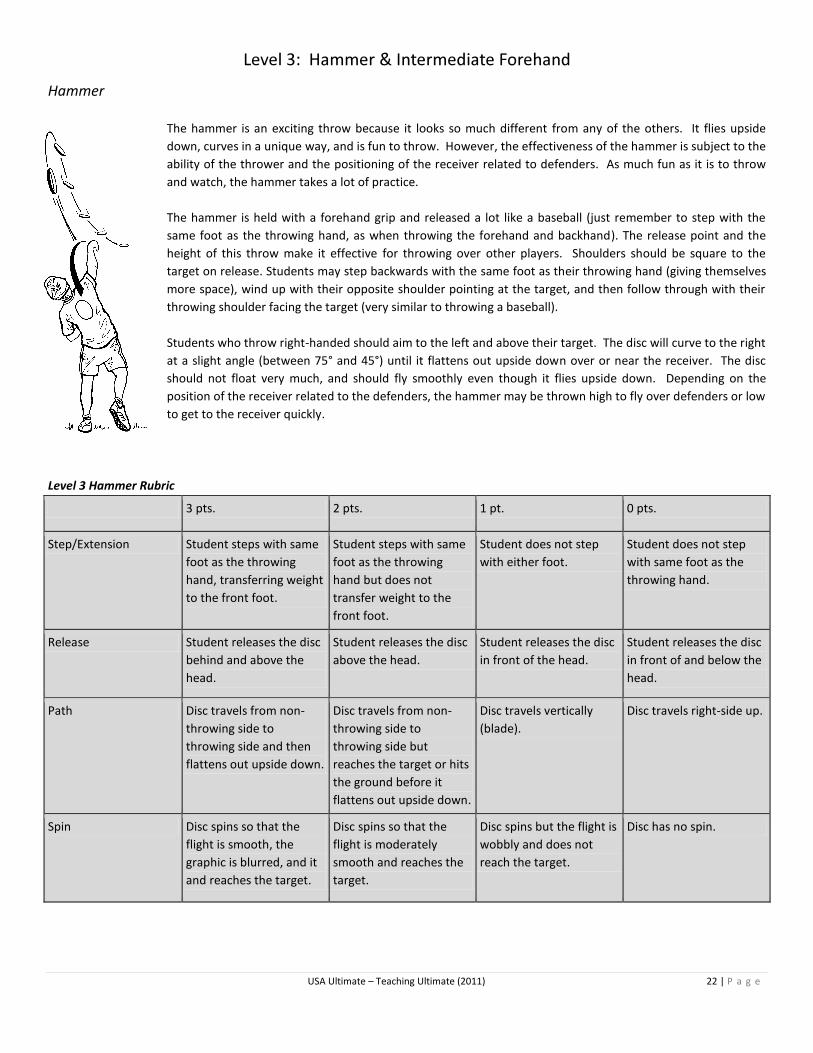
Hammer
The hammer is an exciting throw because it looks so much different from any of the others. It flies upside
down, curves in a unique way, and is fun to throw. However, the effectiveness of the hammer is subject to the
ability of the thrower and the positioning of the receiver related to defenders. As much fun as it is to throw
and watch, the hammer takes a lot of practice.
The hammer is held with a forehand grip and released a lot like a baseball (just remember to step with the
same foot as the throwing hand, as when throwing the forehand and backhand). The release point and the
height of this throw make it effective for throwing over other players. Shoulders should be square to the
target on release. Students may step backwards with the same foot as their throwing hand (giving themselves
more space), wind up with their opposite shoulder pointing at the target, and then follow through with their
throwing shoulder facing the target (very similar to throwing a baseball).
Students who throw right-handed should aim to the left and above their target. The disc will curve to the right
at a slight angle (between 75° and 45°) until it flattens out upside down over or near the receiver. The disc
should not float very much, and should fly smoothly even though it flies upside down. Depending on the
position of the receiver related to the defenders, the hammer may be thrown high to fly over defenders or low
to get to the receiver quickly.
Level 3 Hammer Rubric
3 pts. 2 pts. 1 pt. 0 pts.
Step/Extension Student steps with same
foot as the throwing
hand, transferring weight
to the front foot.
Student steps with same
foot as the throwing
hand but does not
transfer weight to the
front foot.
Student does not step
with either foot.
Student does not step
with same foot as the
throwing hand.
Release Student releases the disc
behind and above the
head.
Student releases the disc
above the head.
Student releases the disc
in front of the head.
Student releases the disc
in front of and below the
head.
Path Disc travels from non-
throwing side to
throwing side and then
flattens out upside down.
Disc travels from non-
throwing side to
throwing side but
reaches the target or hits
the ground before it
flattens out upside down.
Disc travels vertically
(blade).
Disc travels right-side up.
Spin Disc spins so that the
flight is smooth, the
graphic is blurred, and it
and reaches the target.
Disc spins so that the
flight is moderately
smooth and reaches the
target.
Disc spins but the flight is
wobbly and does not
reach the target.
Disc has no spin.
USA Ultimate – Teaching Ultimate (2011) 32 | P a g e
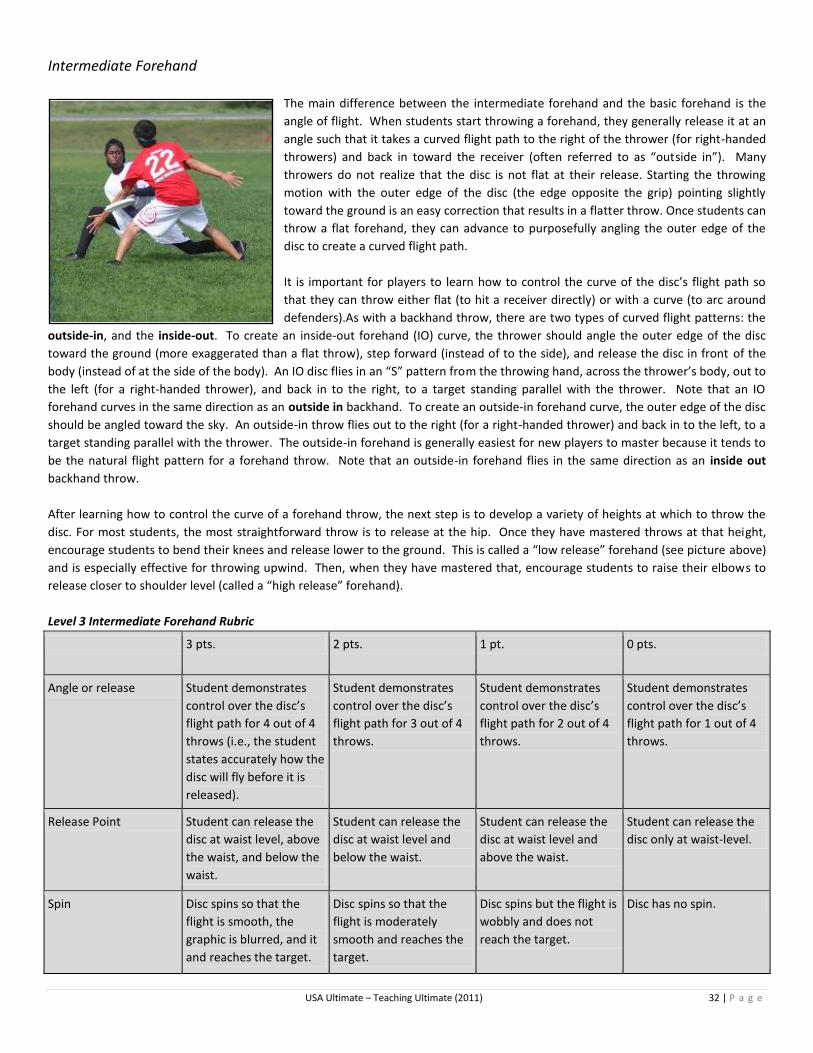
Intermediate Forehand
The main difference between the intermediate forehand and the basic forehand is the
angle of flight. When students start throwing a forehand, they generally release it at an
angle such that it takes a curved flight path to the right of the thrower (for right-handed
throwers) and back in toward the receiver (often referred to as “outside in”). Many
throwers do not realize that the disc is not flat at their release. Starting the throwing
motion with the outer edge of the disc (the edge opposite the grip) pointing slightly
toward the ground is an easy correction that results in a flatter throw. Once students can
throw a flat forehand, they can advance to purposefully angling the outer edge of the
disc to create a curved flight path.
It is important for players to learn how to control the curve of the disc’s flight path so
that they can throw either flat (to hit a receiver directly) or with a curve (to arc around
defenders).As with a backhand throw, there are two types of curved flight patterns: the
outside-in, and the inside-out. To create an inside-out forehand (IO) curve, the thrower should angle the outer edge of the disc
toward the ground (more exaggerated than a flat throw), step forward (instead of to the side), and release the disc in front of the
body (instead of at the side of the body). An IO disc flies in an “S” pattern from the throwing hand, across the thrower’s body, out to
the left (for a right-handed thrower), and back in to the right, to a target standing parallel with the thrower. Note that an IO
forehand curves in the same direction as an outside in backhand. To create an outside-in forehand curve, the outer edge of the disc
should be angled toward the sky. An outside-in throw flies out to the right (for a right-handed thrower) and back in to the left, to a
target standing parallel with the thrower. The outside-in forehand is generally easiest for new players to master because it tends to
be the natural flight pattern for a forehand throw. Note that an outside-in forehand flies in the same direction as an inside out
backhand throw.
After learning how to control the curve of a forehand throw, the next step is to develop a variety of heights at which to throw the
disc. For most students, the most straightforward throw is to release at the hip. Once they have mastered throws at that height,
encourage students to bend their knees and release lower to the ground. This is called a “low release” forehand (see picture above)
and is especially effective for throwing upwind. Then, when they have mastered that, encourage students to raise their elbows to
release closer to shoulder level (called a “high release” forehand).
Level 3 Intermediate Forehand Rubric
3 pts. 2 pts. 1 pt. 0 pts.
Angle or release Student demonstrates
control over the disc’s
flight path for 4 out of 4
throws (i.e., the student
states accurately how the
disc will fly before it is
released).
Student demonstrates
control over the disc’s
flight path for 3 out of 4
throws.
Student demonstrates
control over the disc’s
flight path for 2 out of 4
throws.
Student demonstrates
control over the disc’s
flight path for 1 out of 4
throws.
Release Point Student can release the
disc at waist level, above
the waist, and below the
waist.
Student can release the
disc at waist level and
below the waist.
Student can release the
disc at waist level and
above the waist.
Student can release the
disc only at waist-level.
Spin Disc spins so that the
flight is smooth, the
graphic is blurred, and it
and reaches the target.
Disc spins so that the
flight is moderately
smooth and reaches the
target.
Disc spins but the flight is
wobbly and does not
reach the target.
Disc has no spin.
33 | P a g e
Level 3: Sample Unit Plan
Day 1: Introducing the Hammer and Intermediate Forehand
Objective: Students will learn and practice the intermediate forehand and hammer throws as well as learn how to select the
appropriate catch for different situations.
Review Intermediate Forehand
Cues: Release the disc so that the outer edge of the disc is flat or pointing down
Try releasing the disc higher and lower
Flick your wrist to get that spin
Review Catches
Cues: Pancake when you can pancake
If the throw is high, fingers up
If the throw is low, fingers down
Introduce Hammer
Cues: Step with the same foot as the backhand and forehand
Use the same grip as the forehand
Release it just like a baseball but flick your wrist
Throwing and Catching in Partners
Description: In pairs, students practice throwing backhands, forehands, and hammers to a partner and catching using the
correct choice. Allow students to explore different throws and use questions to help them figure out what they need to do
in order to adjust the path of the disc.
Closing Questions:
What is different about the intermediate forehand compared to the basic forehand? (controlling the opposite edge,
changing the release point)
What is unique about the flight of a hammer? (flies upside down, doesn’t float as much, it should always curve a little
bit)
How will the hammer be an important tool in Ultimate? (throw over the defense)
Day 2: Practicing the Intermediate Forehand and Backhand, and Basic Hammer
Objective: Students will practice backhands, forehands, and hammers in a competitive game.
Individual Disc Golf
Description: This activity is a variation of disc golf, another popular disc sport. Students work as individuals and count how
many throws it takes to reach a particular target from a tee-off point. Students may not move their feet when they have
the disc, and they must set their pivot foot where the disc comes to rest. You can use cones to mark the tees and hula
hoops or natural landmarks to mark the end of the holes.
For a greater challenge, limit the types of throws the students can use (don’t let them use their strongest throw).
Time can also be used to challenge students, as can competing against another student.
Be creative with the course, but don’t make it too difficult. To spice up the course, you design it so that students
must throw around trees, bushes, backstops, cones, or blacktop.
Cues: Think about which throws feel more natural to you
Try different throws and curving the disc in different ways
Closing Questions:
When did it make more sense to throw hammers, forehands, or backhands? How did you pick your throws?[lead
discussion]
USA Ultimate – Teaching Ultimate (2011) 34 | P a g e
What challenges are in Ultimate but are not in disc golf? (defense, talk about playing the course/challenging self)
How can we get our heart rates up while playing disc golf? [See “Notes from an Educator” for more on use of heart rate
monitors]
Day 3: The Hammer, Outside-in, and Inside-out
Objective: Students will practice throwing around players.
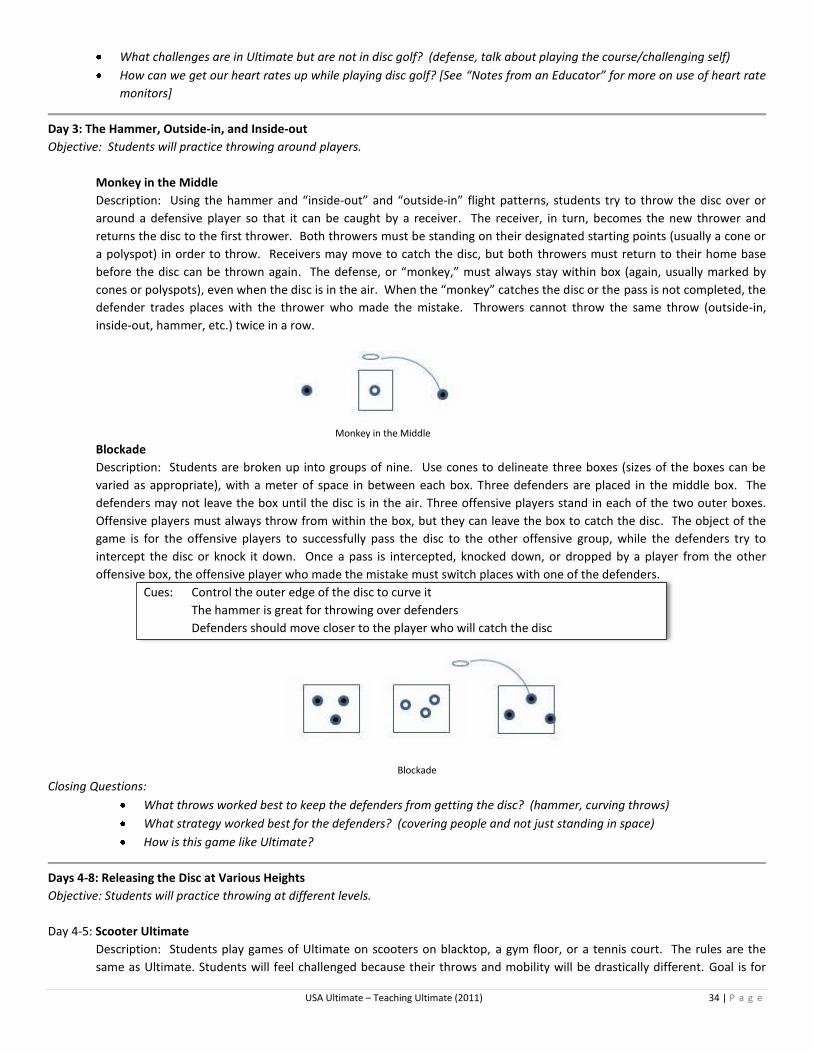
Monkey in the Middle
Description: Using the hammer and “inside-out” and “outside-in” flight patterns, students try to throw the disc over or
around a defensive player so that it can be caught by a receiver. The receiver, in turn, becomes the new thrower and
returns the disc to the first thrower. Both throwers must be standing on their designated starting points (usually a cone or
a polyspot) in order to throw. Receivers may move to catch the disc, but both throwers must return to their home base
before the disc can be thrown again. The defense, or “monkey,” must always stay within box (again, usually marked by
cones or polyspots), even when the disc is in the air. When the “monkey” catches the disc or the pass is not completed, the
defender trades places with the thrower who made the mistake. Throwers cannot throw the same throw (outside-in,
inside-out, hammer, etc.) twice in a row.
Monkey in the Middle
Blockade
Description: Students are broken up into groups of nine. Use cones to delineate three boxes (sizes of the boxes can be
varied as appropriate), with a meter of space in between each box. Three defenders are placed in the middle box. The
defenders may not leave the box until the disc is in the air. Three offensive players stand in each of the two outer boxes.
Offensive players must always throw from within the box, but they can leave the box to catch the disc. The object of the
game is for the offensive players to successfully pass the disc to the other offensive group, while the defenders try to
intercept the disc or knock it down. Once a pass is intercepted, knocked down, or dropped by a player from the other
offensive box, the offensive player who made the mistake must switch places with one of the defenders.
Cues: Control the outer edge of the disc to curve it
The hammer is great for throwing over defenders
Defenders should move closer to the player who will catch the disc
Blockade
Closing Questions:
What throws worked best to keep the defenders from getting the disc? (hammer, curving throws)
What strategy worked best for the defenders? (covering people and not just standing in space)
How is this game like Ultimate?
Days 4-8: Releasing the Disc at Various Heights
Objective: Students will practice throwing at different levels.
Day 4-5: Scooter Ultimate
Description: Students play games of Ultimate on scooters on blacktop, a gym floor, or a tennis court. The rules are the
same as Ultimate. Students will feel challenged because their throws and mobility will be drastically different. Goal is for
USA Ultimate – Teaching Ultimate (2011) 35 | P a g e
students to concentrate on putting spin on their throws, by isolating the upper body motion.
Cues: Use lots of wrist snap on your throws
Try releasing the disc much higher than usual
Make sure the thrower is not traveling
Closing Questions:
What throws worked best today? (the hammer)
When throwing with a higher release point, what part of throwing becomes even more important than before? (wrist
snap/spin)
Why was catching so much harder today than usual? (smaller target, can’t extend as easily)
Day 6-8: Ultimate Basketball
Description: The class is split into teams of five or six students. Set up basketball hoops at the end of each court (or
alternately, use garbage cans) where teams can score just like in basketball. The same turnover rules for Ultimate apply;
however, students can dribble by passing the disc to themselves. The defense can knock the disc down if it’s in the air, but
not if it’s in another student’s hands. Students will be very tempted to hand off and set picks, however neither of those are
allowed. If you are playing with garbage cans there should be a five or six foot perimeter around the can where no students
are allowed.
Cues: Only dribble when you have a lot of space
Try to pass to teammates that are posted in the lane
Figure out the best way to shoot
Closing Questions:
What strategies from this game can we use when we play Ultimate? [lead discussion]
How was throwing at different levels an advantage today? (release disc higher to shoot the disc, throw over defenders)
From where were you most successful shooting the disc? [this can be a good opportunity to discuss long versus short
throws and how short throws are more accurate]
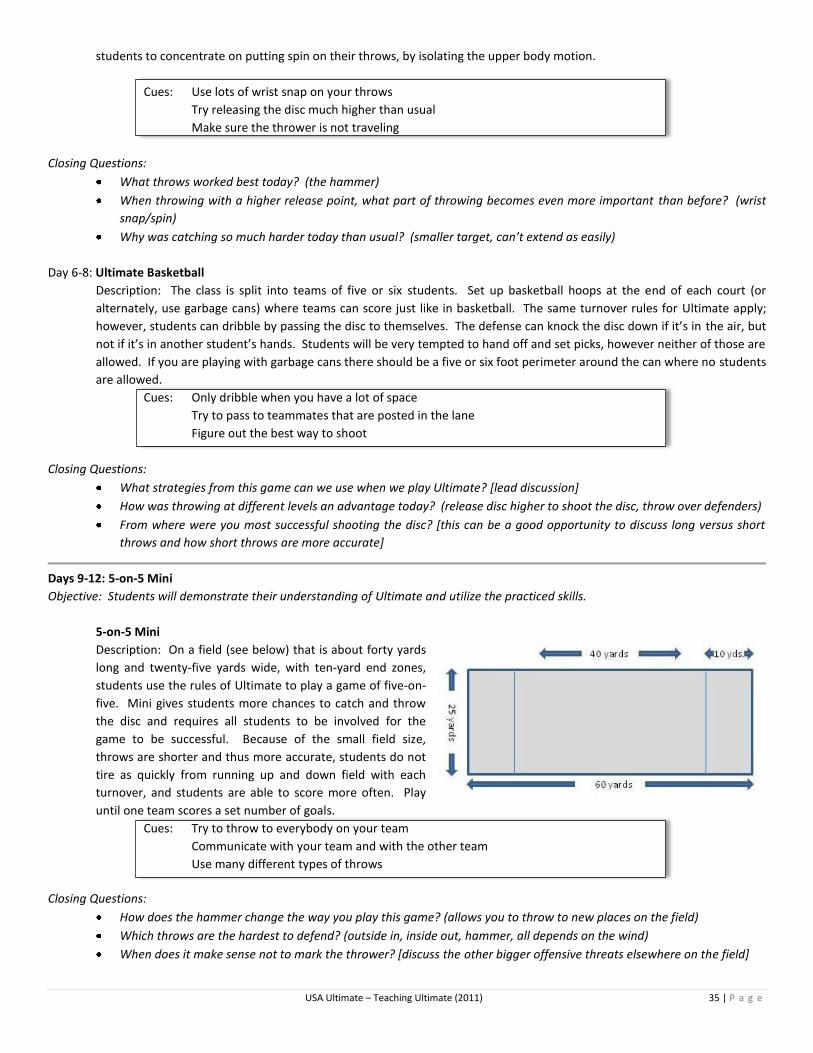
Days 9-12: 5-on-5 Mini
Objective: Students will demonstrate their understanding of Ultimate and utilize the practiced skills.
5-on-5 Mini
Description: On a field (see below) that is about forty yards
long and twenty-five yards wide, with ten-yard end zones,
students use the rules of Ultimate to play a game of five-on-
five. Mini gives students more chances to catch and throw
the disc and requires all students to be involved for the
game to be successful. Because of the small field size,
throws are shorter and thus more accurate, students do not
tire as quickly from running up and down field with each
turnover, and students are able to score more often. Play
until one team scores a set number of goals.
Cues: Try to throw to everybody on your team
Communicate with your team and with the other team
Use many different types of throws
Closing Questions:
How does the hammer change the way you play this game? (allows you to throw to new places on the field)
Which throws are the hardest to defend? (outside in, inside out, hammer, all depends on the wind)
When does it make sense not to mark the thrower? [discuss the other bigger offensive threats elsewhere on the field]
36 | P a g e
Advanced Throwing
Although it looks complicated, the following is a very basic rubric to help educators grade multiple throws at the same time. It
references the two essential factors for a successful throw in Ultimate: stepping and spin. By Level 4, students should be able to
develop their own throws using these two basic criteria.
So what makes throws different from one another? Major league pitchers can have three or four different curve balls and Ultimate
players are no different. A student might have six or seven different forehands. Students can develop their own throw variations by
changing the direction of the curve (“outside-in” or “inside-out”), releasing the disc at different levels (high release or low release),
using a different grip, releasing on a different side of the body, throwing with a non-dominant hand, or altering the flight pattern in
unique and alternative ways. The important point here is that the student should be able to repeat the throw several times to show
they have control of that throw.
Level 4 Advanced Throwing Rubric
3 pts. 2 pts. 1 pt. 0 pts.
Step Student steps with same foot
as the throwing hand and
transfers weight to front foot
for four throws that differ in
one of the following ways:
curve, release point, grip, side
of the body, hand used, or
flight pattern.
Student steps with same foot
as the throwing hand and
transfers weight to front foot
for three throws that differ in
one of the following ways:
curve, release point, grip,
side of the body, hand used,
or flight pattern.
Student steps with same foot
as the throwing hand and
transfers weight to front foot
for two throws that differ in
one of the following ways:
curve, release point, grip, side
of the body, hand used, or
flight pattern.
Student steps with same
foot as the throwing
hand and transfers
weight for one throw.
Spin Disc spins and flies in the
general direction of the target
for four throws that differ in
one of the following ways:
curve, release point, grip, side
of the body, hand used, or
flight pattern.
Disc spins and flies in the
general direction of the
target for three throws that
differ in one of the following
ways: curve, release point,
grip, side of the body, hand
used, or flight pattern.
Disc spins and flies in the
general direction of the target
for two throws that differ in
one of the following ways:
curve, release point, grip, side
of the body, hand used, or
flight pattern.
Disc spins and flies in
the general direction of
the target for one
throw.
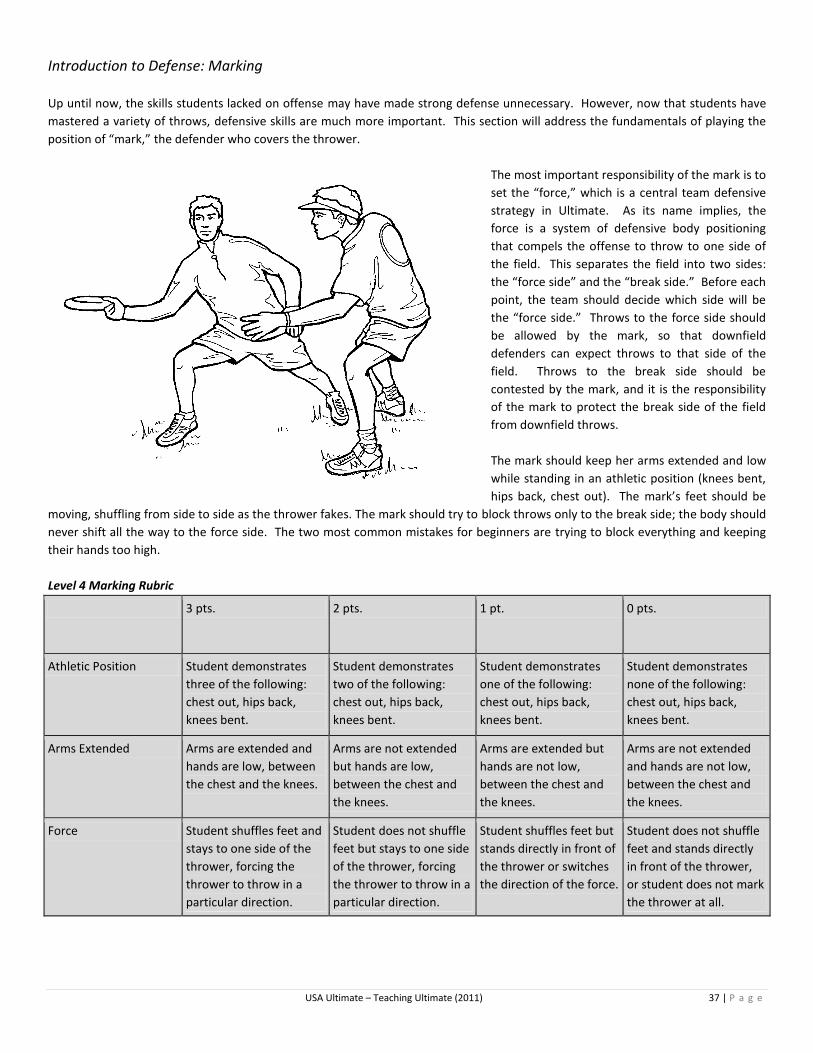
USA Ultimate – Teaching Ultimate (2011) 37 | P a g e
Introduction to Defense: Marking
Up until now, the skills students lacked on offense may have made strong defense unnecessary. However, now that students have
mastered a variety of throws, defensive skills are much more important. This section will address the fundamentals of playing the
position of “mark,” the defender who covers the thrower.
The most important responsibility of the mark is to
set the “force,” which is a central team defensive
strategy in Ultimate. As its name implies, the
force is a system of defensive body positioning
that compels the offense to throw to one side of
the field. This separates the field into two sides:
the “force side” and the “break side.” Before each
point, the team should decide which side will be
the “force side.” Throws to the force side should
be allowed by the mark, so that downfield
defenders can expect throws to that side of the
field. Throws to the break side should be
contested by the mark, and it is the responsibility
of the mark to protect the break side of the field
from downfield throws.
The mark should keep her arms extended and low
while standing in an athletic position (knees bent,
hips back, chest out). The mark’s feet should be
moving, shuffling from side to side as the thrower fakes. The mark should try to block throws only to the break side; the body should
never shift all the way to the force side. The two most common mistakes for beginners are trying to block everything and keeping
their hands too high.
Level 4 Marking Rubric
3 pts. 2 pts. 1 pt. 0 pts.
Athletic Position Student demonstrates
three of the following:
chest out, hips back,
knees bent.
Student demonstrates
two of the following:
chest out, hips back,
knees bent.
Student demonstrates
one of the following:
chest out, hips back,
knees bent.
Student demonstrates
none of the following:
chest out, hips back,
knees bent.
Arms Extended Arms are extended and
hands are low, between
the chest and the knees.
Arms are not extended
but hands are low,
between the chest and
the knees.
Arms are extended but
hands are not low,
between the chest and
the knees.
Arms are not extended
and hands are not low,
between the chest and
the knees.
Force Student shuffles feet and
stays to one side of the
thrower, forcing the
thrower to throw in a
particular direction.
Student does not shuffle
feet but stays to one side
of the thrower, forcing
the thrower to throw in a
particular direction.
Student shuffles feet but
stands directly in front of
the thrower or switches
the direction of the force.
Student does not shuffle
feet and stands directly
in front of the thrower,
or student does not mark
the thrower at all.
USA Ultimate – Teaching Ultimate (2011) 38 | P a g e
Reading the Disc
“Reading the disc” is the term for taking the most direct route to where the disc can be caught. The flight path of a disc can be
affected by any combination of factors, such as angle of release, spin, or wind. Thus, reading the disc in Ultimate takes practice
observing a disc in flight.
The following are helpful hints for learning to read the flight of a disc:
Change the speed of your running so that you can catch the disc at full speed without needing to stop and wait for it to
arrive.
o If the offense has to stop and wait for the disc, the defense has a greater chance of catching up and getting a block.
Take the most direct path to where the disc will eventually come down, rather than running underneath and following the
disc in the air.
Decide before the disc arrives what the best method of catching will be (e.g. pancake or lobster catch).
If the disc is angled in the air it will fly in the direction of its lower edge.
A disc being thrown into the wind will likely rise up higher as it travels. A disc being thrown the same direction of the wind
will likely sink to the ground quickly.
If the disc seems to have stalled in the air (hovering) it will go whichever way the wind is blowing
Level 4 Disc Reading Rubric
3 pts. 2 pts. 1 pt. 0 pts.
Timing Student changes speed
to catch disc while
running.
Student reaches position
early but is able to
approach disc with a few
running steps.
Student stands and waits
where they catch the
disc.
Student arrives late and
misses disc entirely.
Position Student runs directly to
the spot where disc can
be caught.
Student changes
direction once to reach
the spot where disc can
be caught.
Student “chases” disc to
the spot where it can be
caught.
Student does not run to a
spot where the disc can
be caught.
Catch Student chooses the
appropriate type of catch
and catches the disc.
Student chooses the
appropriate type of catch
but misses the disc.
Student does not choose
the appropriate type of
catch but still catches the
disc.
Student does not choose
the appropriate type of
catch and misses the
disc.
39 | P a g e
Level 4: Sample Unit Plan
Day 1: Improvisational Throwing
Objective: Students will practice the forehand, backhand, and hammer as well as develop new throws.
Review Throws
Cues: Step with same foot as the throwing hand
Flick your wrist for spin
Control the outer edge of the disc
Design your own throw day
Description: Students get into groups and try to develop throws that are different from the standard forehand, backhand,
and hammer. There are an infinite number of throws if you count release point, curve, grip changes, hand used, flight
pattern, and the side of the body from which disc is released.
Throwing and Catching in Pairs
Description: Students practice throwing any throw to a partner and catching the disc using the appropriate catch. Allow
students to explore different throws and use questions to help them figure out what makes one throw different from
another. Many students will make this into a competition and will enjoy the opportunity to be creative with it.
Closing Questions:
What did you change about the way you were throwing to make it a new throw? (angle of release, grip, height of
release, angle of curve, etc.)
What had to happen for the throw to work? (spin)
Does anybody want to demonstrate a new throw?[lead demonstration]
Day 2: Introduce “Reading the Disc”
Objective: Students will practice reading the disc.
Cues: Run to where the disc will be catchable
Try to catch the disc while running
Use the correct catch
Throw-Run-Catch
Description: This game pushes students to test throwing, running and catching skills. Students start shoulder to shoulder,
with one student holding the disc, and the other ready to receive. The object is to reach the maximum distance between
the thrower and the receiver, with a successfully completed pass. The pair with the most distance between thrower and
receiver wins.
Cues: Try starting with short passes
Anticipate where the disc is going to go
Throwers should try to throw the disc ahead of their receivers (called a “leading” pass)
Closing Questions:
How far away was your receiver from the thrower when the thrower released the disc? [lead discussion]
How is reading a disc different when you’re running toward it vs. running alongside it? [lead discussion]
Which is easier, catching a disc running toward it or running alongside it? (running toward it)
Day 3: Introduce Marking
Objective: Students will practice their marking skills in a competitive game.
Cues: Athletic position
Arms extended, hands low
Move your feet on defense

USA Ultimate – Teaching Ultimate (2011) 40 | P a g e
3-Person Marking Drill
Description: Students work in groups of three. Marks practice forcing the thrower to throw in one direction, and throwers
practice breaking the mark (throwing around the mark to the “break” side of the field). Two students set up twenty feet
away from each other as throwers. The third student is the mark.
The mark’s objective is to make the thrower throw a forehand, and not let the thrower successfully complete a
backhand.
The thrower’s objective is to “break” the mark by throwing a backhand.
If the throw is completed to the other thrower, the mark goes to mark the new thrower.
If the thrower must throw a forehand, throws an incomplete pass, or is blocked by the mark, the thrower becomes
the new mark.
This drill should also be run with the mark forcing the opposite direction (backhand) to develop both sets of skills.
Keep-Away
Description: The objective for each team is to maintain possession of the disc on offense for 10 consecutive passes in order
to earn a point. The first team to reach three points wins the round. The defense needs to force a turnover in order to earn
a chance on offense. There are no end zones. The game should be played in a large box, 15 yards x 15 yards, for a game of
four-on-four.
Cues: Make sure that you mark the thrower
Athletic position
Arms extended, hands low
Move your feet on defense
Closing Questions:
How is keep away just like Ultimate? (possession is very important)
How is keep away very different from Ultimate? (method of scoring)
What did the successful defenders do today? (set the mark so that it was forcing out of bounds, anticipated where
the next throw will go)
Days 4-5: Practice Reading the Disc
Objective: Students will utilize reading skills while playing a competitive game.
500
Description: This is a variation of the game 500 that is played among baseball and football players. One
student is the thrower and four or five students are vying for position to catch the disc. The group of
receiving students lines up about fifteen or twenty feet away from the thrower. Once the disc leaves the
thrower’s hand, the receivers must read the disc and try to make the catch. It is important that the
thrower does not throw the disc directly into the crowd of receivers. The receiver who makes the catch
switches places with the thrower for the next round.
Cues: Anticipate where the disc is going to go
Run to catch the disc
Throw to a spot where the receivers can get it
Closing Questions:
Which way was the disc traveling the most today? [solicit answers]
Why was it traveling that way? (wind, type of throw)
What else can influence where the disc goes? (angle of release, wind, wind-up/follow-through, spin, etc.)
USA Ultimate – Teaching Ultimate (2011) 41 | P a g e
Day 6-7: Practice Forcing
Objective: Students will utilize marking and forcing skills while playing a competitive game.
Hot Box
Description: There are two teams consisting of three to five students each. The field is set up with two boxes, a smaller box
of one yard by one yard inside of a larger box of five yards by five yards. Teams score by completing a pass in the smaller
box, but they must first “clear” the disc by completing a pass outside of the larger box (similar to checking the ball back in
half-court basketball). There is no out of bounds, but turnovers happen the same way as in Ultimate. Defenders are not
allowed to guard the box; each defender must guard a person.
Cues: Clear the disc before attempting to score
Mark the thrower
Force the thrower to throw away from the box
Closing Questions:
What is the best way to protect the box? (force the thrower to throw away from the box, stay close to the receivers so
that they can’t get open passes)
How should your team organize your defense tomorrow to better protect the box? [lead discussion]
Days 8-12: 5-on-5 Mini
Objective: Students will use and practice their throwing and marking skills in a game of Ultimate.
5-on-5 Mini
Description: On a field (see below) that is about forty yards
long and twenty-five yards wide, with ten- yard end zones,
students use the rules of Ultimate to play a game of five–on-
five. Mini gives students more chances to catch and throw the
disc and requires all students to be involved for the game to be
successful. Because of the small field size, throws are shorter
and thus more accurate, students do not tire as quickly from
running up and down field with each turnover, and students
are able to score more often. Play until one team scores a set number of goals.
Cues: Select a force and set a mark
Communicate with your team and with the other team
Use many different types of throws
Closing Questions:
How does using a force change the way you play defense? (requires less running, less knowledge of where the disc will
be)
If the mark doesn’t do his or her job, how is the rest of the defense affected?(cannot cover every throwing option)
What is difficult about reading the disc while playing Ultimate? (defenders, recognizing the flight path of the disc)
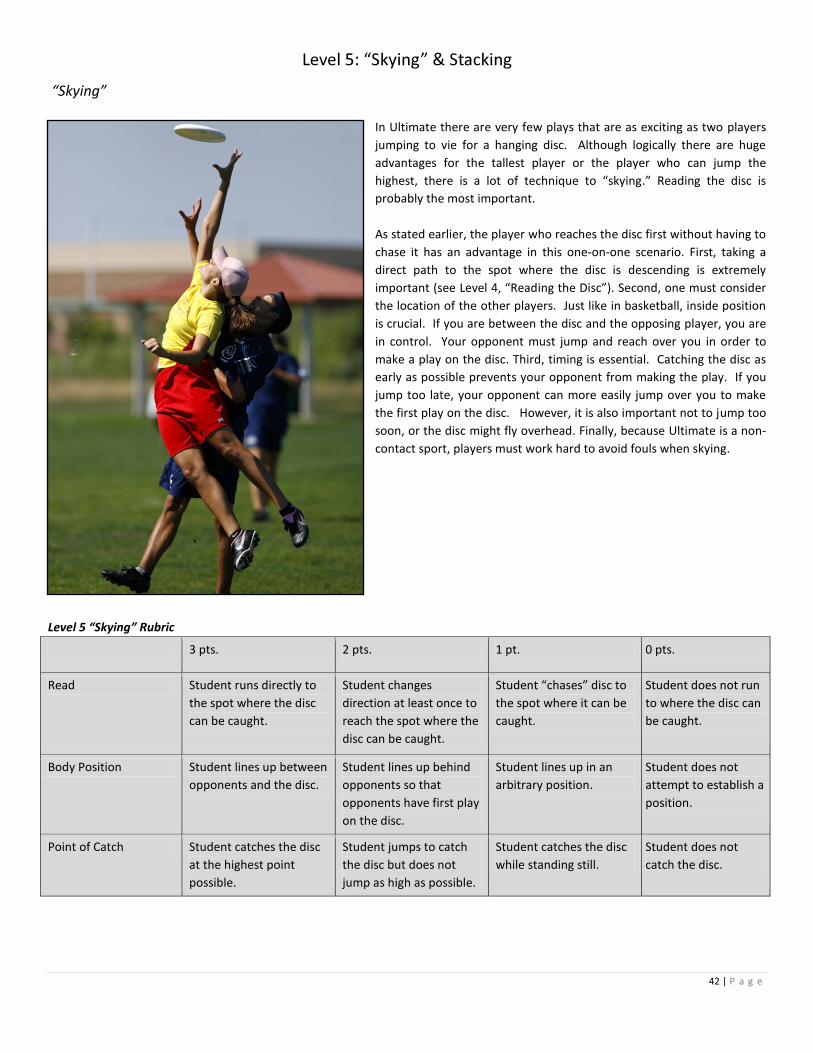
42 | P a g e
“Skying”
In Ultimate there are very few plays that are as exciting as two players
jumping to vie for a hanging disc. Although logically there are huge
advantages for the tallest player or the player who can jump the
highest, there is a lot of technique to “skying.” Reading the disc is
probably the most important.
As stated earlier, the player who reaches the disc first without having to
chase it has an advantage in this one-on-one scenario. First, taking a
direct path to the spot where the disc is descending is extremely
important (see Level 4, “Reading the Disc”). Second, one must consider
the location of the other players. Just like in basketball, inside position
is crucial. If you are between the disc and the opposing player, you are
in control. Your opponent must jump and reach over you in order to
make a play on the disc. Third, timing is essential. Catching the disc as
early as possible prevents your opponent from making the play. If you
jump too late, your opponent can more easily jump over you to make
the first play on the disc. However, it is also important not to jump too
soon, or the disc might fly overhead. Finally, because Ultimate is a non-
contact sport, players must work hard to avoid fouls when skying.
Level 5 “Skying” Rubric
3 pts. 2 pts. 1 pt. 0 pts.
Read Student runs directly to
the spot where the disc
can be caught.
Student changes
direction at least once to
reach the spot where the
disc can be caught.
Student “chases” disc to
the spot where it can be
caught.
Student does not run
to where the disc can
be caught.
Body Position Student lines up between
opponents and the disc.
Student lines up behind
opponents so that
opponents have first play
on the disc.
Student lines up in an
arbitrary position.
Student does not
attempt to establish a
position.
Point of Catch Student catches the disc
at the highest point
possible.
Student jumps to catch
the disc but does not
jump as high as possible.
Student catches the disc
while standing still.
Student does not
catch the disc.
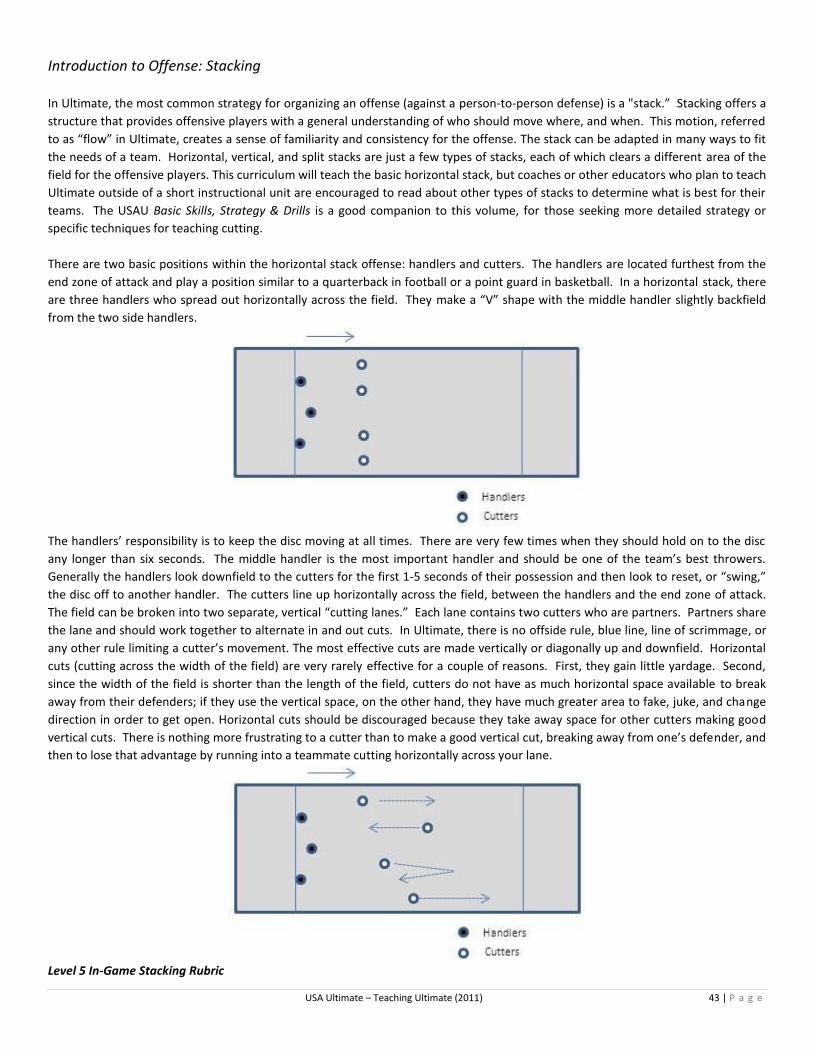
USA Ultimate – Teaching Ultimate (2011) 43 | P a g e
Introduction to Offense: Stacking
In Ultimate, the most common strategy for organizing an offense (against a person-to-person defense) is a "stack.” Stacking offers a
structure that provides offensive players with a general understanding of who should move where, and when. This motion, referred
to as “flow” in Ultimate, creates a sense of familiarity and consistency for the offense. The stack can be adapted in many ways to fit
the needs of a team. Horizontal, vertical, and split stacks are just a few types of stacks, each of which clears a different area of the
field for the offensive players. This curriculum will teach the basic horizontal stack, but coaches or other educators who plan to teach
Ultimate outside of a short instructional unit are encouraged to read about other types of stacks to determine what is best for their
teams. The USAU Basic Skills, Strategy & Drills is a good companion to this volume, for those seeking more detailed strategy or
specific techniques for teaching cutting.
There are two basic positions within the horizontal stack offense: handlers and cutters. The handlers are located furthest from the
end zone of attack and play a position similar to a quarterback in football or a point guard in basketball. In a horizontal stack, there
are three handlers who spread out horizontally across the field. They make a “V” shape with the middle handler slightly backfield
from the two side handlers.
The handlers’ responsibility is to keep the disc moving at all times. There are very few times when they should hold on to the disc
any longer than six seconds. The middle handler is the most important handler and should be one of the team’s best throwers.
Generally the handlers look downfield to the cutters for the first 1-5 seconds of their possession and then look to reset, or “swing,”
the disc off to another handler. The cutters line up horizontally across the field, between the handlers and the end zone of attack.
The field can be broken into two separate, vertical “cutting lanes.” Each lane contains two cutters who are partners. Partners share
the lane and should work together to alternate in and out cuts. In Ultimate, there is no offside rule, blue line, line of scrimmage, or
any other rule limiting a cutter’s movement. The most effective cuts are made vertically or diagonally up and downfield. Horizontal
cuts (cutting across the width of the field) are very rarely effective for a couple of reasons. First, they gain little yardage. Second,
since the width of the field is shorter than the length of the field, cutters do not have as much horizontal space available to break
away from their defenders; if they use the vertical space, on the other hand, they have much greater area to fake, juke, and change
direction in order to get open. Horizontal cuts should be discouraged because they take away space for other cutters making good
vertical cuts. There is nothing more frustrating to a cutter than to make a good vertical cut, breaking away from one’s defender, and
then to lose that advantage by running into a teammate cutting horizontally across your lane.
Level 5 In-Game Stacking Rubric
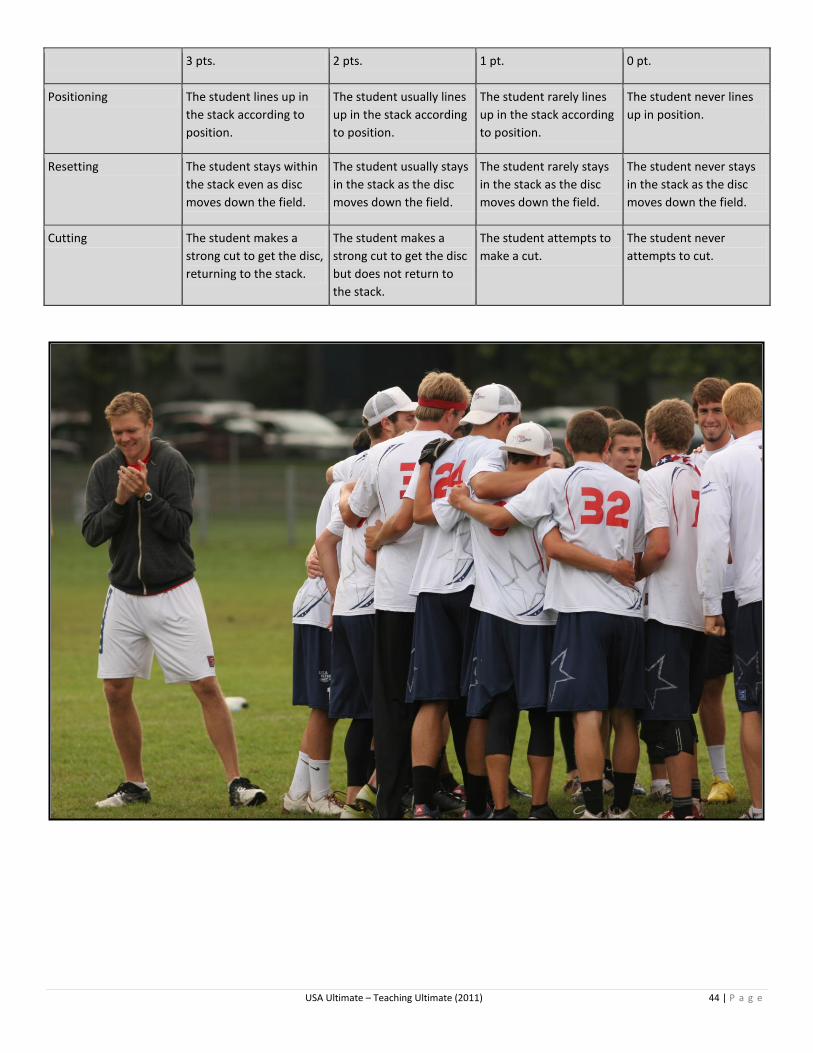
USA Ultimate – Teaching Ultimate (2011) 44 | P a g e
3 pts. 2 pts. 1 pt. 0 pt.
Positioning The student lines up in
the stack according to
position.
The student usually lines
up in the stack according
to position.
The student rarely lines
up in the stack according
to position.
The student never lines
up in position.
Resetting The student stays within
the stack even as disc
moves down the field.
The student usually stays
in the stack as the disc
moves down the field.
The student rarely stays
in the stack as the disc
moves down the field.
The student never stays
in the stack as the disc
moves down the field.
Cutting The student makes a
strong cut to get the disc,
returning to the stack.
The student makes a
strong cut to get the disc
but does not return to
the stack.
The student attempts to
make a cut.
The student never
attempts to cut.
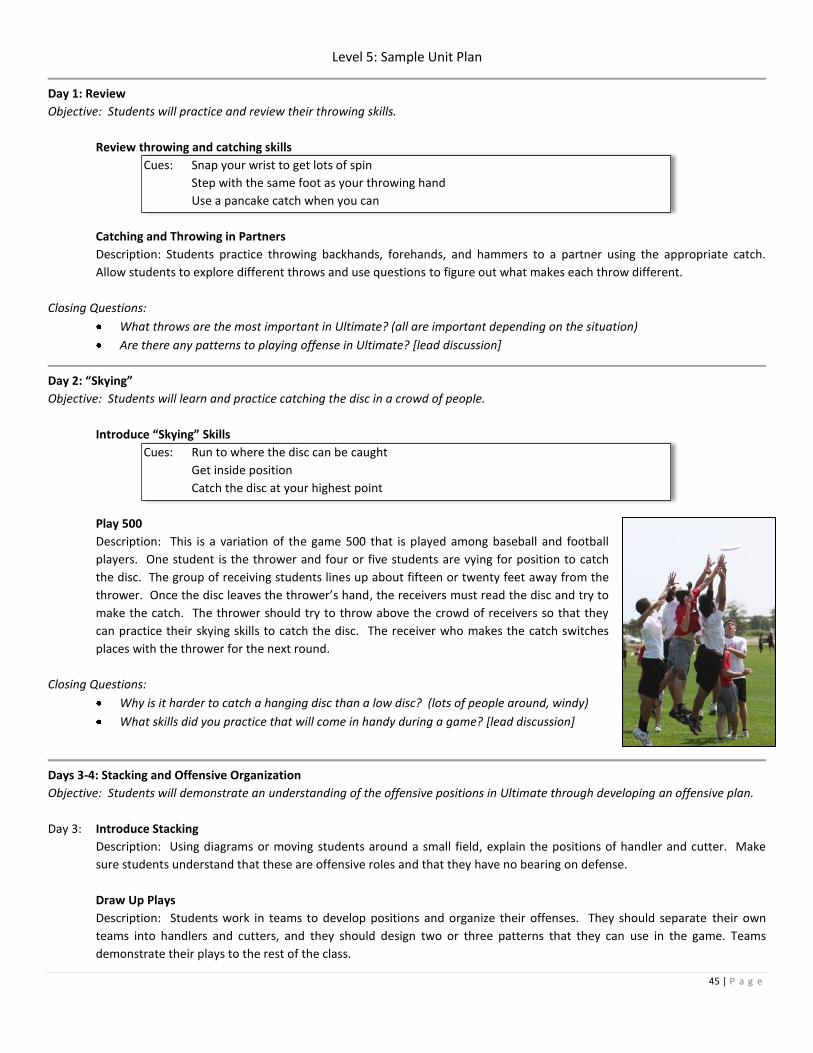
45 | P a g e
Level 5: Sample Unit Plan
Day 1: Review
Objective: Students will practice and review their throwing skills.
Review throwing and catching skills
Cues: Snap your wrist to get lots of spin
Step with the same foot as your throwing hand
Use a pancake catch when you can
Catching and Throwing in Partners
Description: Students practice throwing backhands, forehands, and hammers to a partner using the appropriate catch.
Allow students to explore different throws and use questions to figure out what makes each throw different.
Closing Questions:
What throws are the most important in Ultimate? (all are important depending on the situation)
Are there any patterns to playing offense in Ultimate? [lead discussion]
Day 2: “Skying”
Objective: Students will learn and practice catching the disc in a crowd of people.
Introduce “Skying” Skills
Cues: Run to where the disc can be caught
Get inside position
Catch the disc at your highest point
Play 500
Description: This is a variation of the game 500 that is played among baseball and football
players. One student is the thrower and four or five students are vying for position to catch
the disc. The group of receiving students lines up about fifteen or twenty feet away from the
thrower. Once the disc leaves the thrower’s hand, the receivers must read the disc and try to
make the catch. The thrower should try to throw above the crowd of receivers so that they
can practice their skying skills to catch the disc. The receiver who makes the catch switches
places with the thrower for the next round.
Closing Questions:
Why is it harder to catch a hanging disc than a low disc? (lots of people around, windy)
What skills did you practice that will come in handy during a game? [lead discussion]
Days 3-4: Stacking and Offensive Organization
Objective: Students will demonstrate an understanding of the offensive positions in Ultimate through developing an offensive plan.
Day 3: Introduce Stacking
Description: Using diagrams or moving students around a small field, explain the positions of handler and cutter. Make
sure students understand that these are offensive roles and that they have no bearing on defense.
Draw Up Plays
Description: Students work in teams to develop positions and organize their offenses. They should separate their own
teams into handlers and cutters, and they should design two or three patterns that they can use in the game. Teams
demonstrate their plays to the rest of the class.
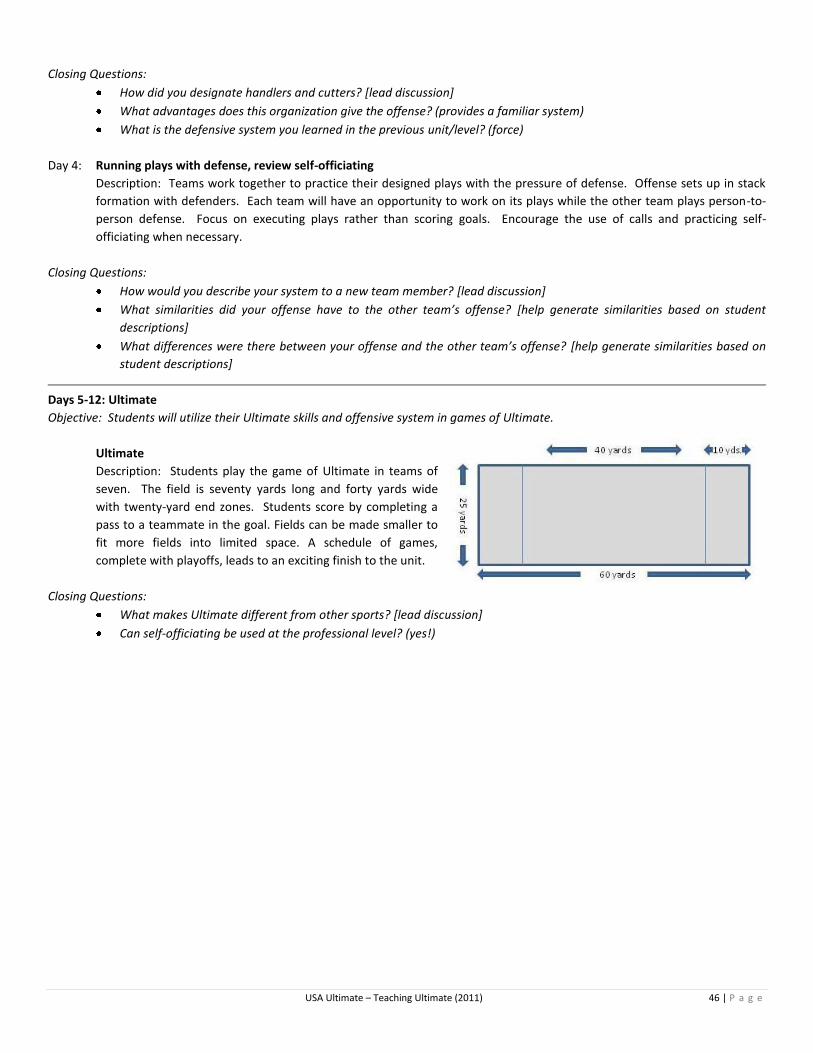
USA Ultimate – Teaching Ultimate (2011) 46 | P a g e
Closing Questions:
How did you designate handlers and cutters? [lead discussion]
What advantages does this organization give the offense? (provides a familiar system)
What is the defensive system you learned in the previous unit/level? (force)
Day 4: Running plays with defense, review self-officiating
Description: Teams work together to practice their designed plays with the pressure of defense. Offense sets up in stack
formation with defenders. Each team will have an opportunity to work on its plays while the other team plays person-to-
person defense. Focus on executing plays rather than scoring goals. Encourage the use of calls and practicing self-
officiating when necessary.
Closing Questions:
How would you describe your system to a new team member? [lead discussion]
What similarities did your offense have to the other team’s offense? [help generate similarities based on student
descriptions]
What differences were there between your offense and the other team’s offense? [help generate similarities based on
student descriptions]
Days 5-12: Ultimate
Objective: Students will utilize their Ultimate skills and offensive system in games of Ultimate.
Ultimate
Description: Students play the game of Ultimate in teams of
seven. The field is seventy yards long and forty yards wide
with twenty-yard end zones. Students score by completing a
pass to a teammate in the goal. Fields can be made smaller to
fit more fields into limited space. A schedule of games,
complete with playoffs, leads to an exciting finish to the unit.
Closing Questions:
What makes Ultimate different from other sports? [lead discussion]
Can self-officiating be used at the professional level? (yes!)
47 | P a g e
Contributed by William Smolinski
Integrating Ultimate into Adventure/Leadership Education
In the last several years there have been two main movements in physical education. There is the fitness movement (which will be
discussed later), and the adventure/leadership movement. One of the main objectives of this movement is to produce situations
where students can practice their team skills in an environment where they are physically, mentally, emotionally, and socially
challenged. Whether it’s a high ropes course, a low element course, or smaller challenges the entire team fails or succeeds together.
The adventure/leadership focuses on individual responsibility to the community, and SOTG works under the same dynamics. Using
the conflict resolution skills present in most leadership or adventure curriculums will help students be a step ahead in the violation
calling process. As long as both teams agree that the goals of the game are to have fun, be safe, and be fit, then both teams will be
able to work together and accomplish those goals within the Spirit of the Game®.
Integrating Ultimate into the Health Curriculum
During the social health unit most curriculums take time to discuss conflict resolution skills and communication. These skills can be
taught during any “pick up” game of any sport, and Ultimate’s tradition makes it easy. Referencing the conflict resolution skills in
the health curriculum will give students a chance to review those steps, practice Spirit of the Game®, and use that scaffolding to gain
deeper understanding of how and why these skills are so important. Knowing the steps to conflict resolution does not make a
person any healthier, just as knowing you’re supposed to eat your vegetables doesn’t either. It’s the practice and application of
health knowledge that contributes to that person’s overall wellbeing.
Spirit of the Game® can also be reviewed and practiced while covering the communication health standards. Communication
requires assertiveness, listening skills, respect, negotiation, conflict management, and collaboration. Not every student is going to
carry these skills into the classroom or gymnasium, so it’s important that they are instructed on how to use them effectively and get
a chance to use them in a controlled setting. Being an effective communicator will help on the Ultimate field and serve students
well into adulthood. The state of New York has even put a relationship management section into their state standards in which
students are supposed to:
"Demonstrate positive interpersonal and intra-personal behaviors when working with others."
"Predict short and long term benefits and harmful consequences of behaviors"
"Analyze possible causes of conflict and demonstrates win-win resolutions."
"Demonstrate win-win strategies to prevent and manage conflict in healthy and safe ways."
…. All of which can be covered while playing Ultimate.
Integrating Fitness Education
Like many sports and activities that require a lot of movement and energy to be successful, the sport of Ultimate can be used as a
vehicle for integrating technology and educating individuals about their fitness needs.
Pedometers
The rules of Ultimate and the designated boundaries make it so that there is a lot of movement up and down the field. Using
pedometers to measure movement can be a useful tool to motivate students, allow students to calculate their participation, and
even give teams that are putting in a lot of effort a better chance at “winning” the game. Here are some ideas on how to use
pedometers during Ultimate:
Every 10,000 steps (players add their steps together) = 1 point for their team
Players use their pedometer log to calculate calories burned/day or unit
Each player that records 25 minutes or more of activity = 1 point for their team
Every 10 minutes of activity (players add their time together) = 1 point for their team
All points recorded from fitness equipment add up. Teams compete for fitness champion as well as athletic champion.
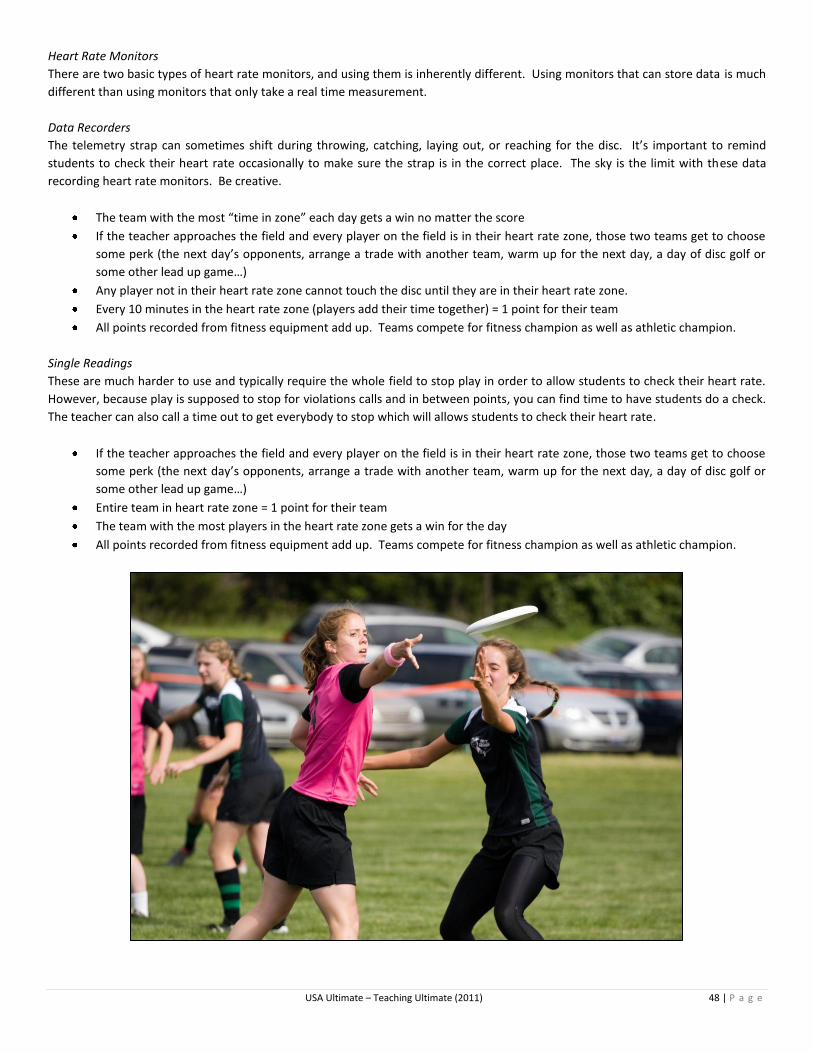
USA Ultimate – Teaching Ultimate (2011) 48 | P a g e
Heart Rate Monitors
There are two basic types of heart rate monitors, and using them is inherently different. Using monitors that can store data is much
different than using monitors that only take a real time measurement.
Data Recorders
The telemetry strap can sometimes shift during throwing, catching, laying out, or reaching for the disc. It’s important to remind
students to check their heart rate occasionally to make sure the strap is in the correct place. The sky is the limit with these data
recording heart rate monitors. Be creative.
The team with the most “time in zone” each day gets a win no matter the score
If the teacher approaches the field and every player on the field is in their heart rate zone, those two teams get to choose
some perk (the next day’s opponents, arrange a trade with another team, warm up for the next day, a day of disc golf or
some other lead up game…)
Any player not in their heart rate zone cannot touch the disc until they are in their heart rate zone.
Every 10 minutes in the heart rate zone (players add their time together) = 1 point for their team
All points recorded from fitness equipment add up. Teams compete for fitness champion as well as athletic champion.
Single Readings
These are much harder to use and typically require the whole field to stop play in order to allow students to check their heart rate.
However, because play is supposed to stop for violations calls and in between points, you can find time to have students do a check.
The teacher can also call a time out to get everybody to stop which will allows students to check their heart rate.
If the teacher approaches the field and every player on the field is in their heart rate zone, those two teams get to choose
some perk (the next day’s opponents, arrange a trade with another team, warm up for the next day, a day of disc golf or
some other lead up game…)
Entire team in heart rate zone = 1 point for their team
The team with the most players in the heart rate zone gets a win for the day
All points recorded from fitness equipment add up. Teams compete for fitness champion as well as athletic champion.
USA Ultimate – Teaching Ultimate (2011) 49 | P a g e
Break-Mark Throw – A throw that goes to the half of the field that the mark is trying to protect.
Downfield – The area of the playing field between the point of reference (usually the thrower, but not always) and the offensive team’s end zone of attack.
Reset Pass – A short lateral or backwards pass. A pass not necessarily intended to gain yards, but to move the disc to a better position on the field, or reset the stall count.
Force – The side of the field that the marker is trying to get the thrower to throw to. A marker does this by positioning himself on the opposite side.
Foul – Bodily contact inflicted on one player by a player from the opposing team. This is a violation in Ultimate. See rules for details of types of fouls and their consequences.
Leading Pass – A pass which is thrown in front of a receiver in motion, taking into account her/his speed and direction.
Mark – The defensive player who is guarding the thrower.
Pick – A violation that occurs when a defensive player cannot cover her/his opponent because of bodily interference by another player. Generally, it occurs when the offensive player runs so close to another player on either team that the defensive player must stop, slow down, or alter her/his course in order to avoid a collision, thus leaving the offensive player open to receive a pass. Although legal in basketball, it is a dangerous play in Ultimate because of the speed at which players are running.
Pivot Foot – The stationary foot upon which the thrower pivots. Usually, it is the foot opposite of the throwing hand.
Pull – The throw used to initiate play before each point of an Ultimate game. The defensive team throws the disc to the offensive team. The throw is made by a defensive player standing on or behind the end zone line. A pull is similar to a kick-off in American football.
Receiver – Any of the six offensive players in position to receive a pass from the thrower.
Spirit of the Game®– The underlying concept of fair play inherent in all sports, but made explicit in the rules of Ultimate. For
complete text, see the introduction to the Rules of Ultimate.
Stall – A situation wherein the marker reaches the end of the stall count (ten) before the offensive player has released the disc.
Stall Count – The count made by the mark to identify the amount of time the offensive player with the disc has to throw.
Strip – A violation in Ultimate, when the disc is forcibly knocked from the offensive player’s hands. The disc is returned to the offensive player’s possession and play is initiated with a check.
Upfield - The area of the playing field between the point of reference (usually the thrower but not always) and the defensive team’s
end zone of attack.
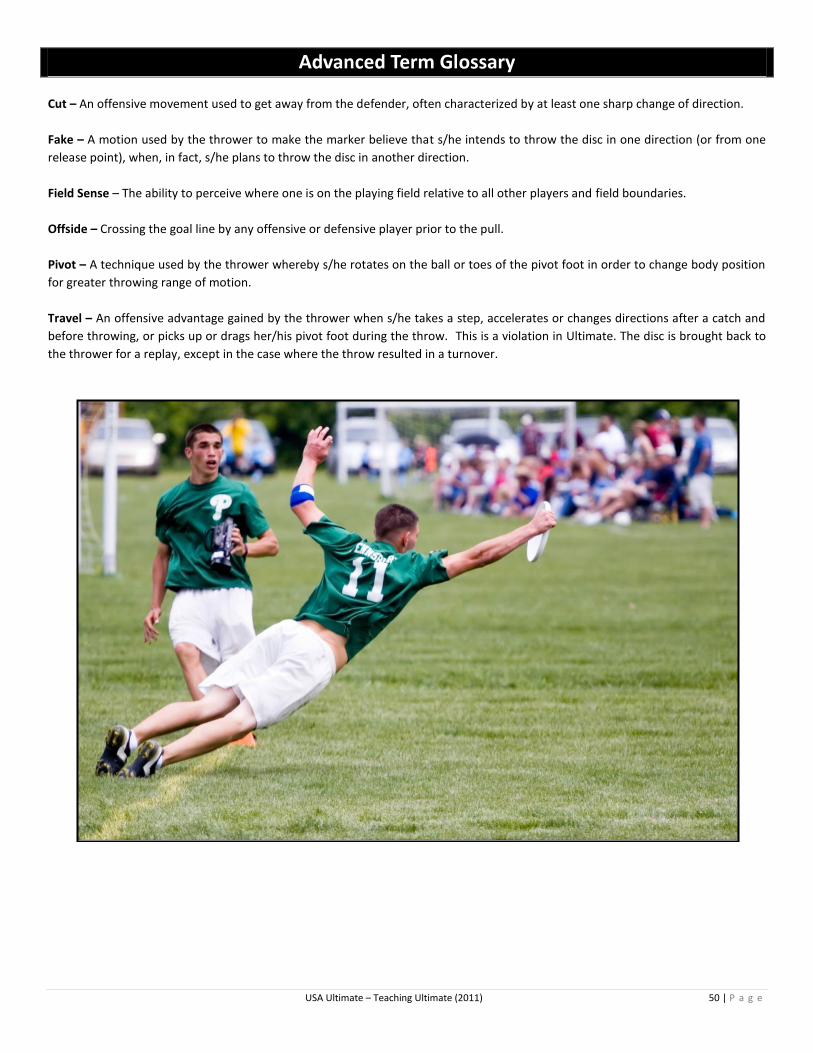
USA Ultimate – Teaching Ultimate (2011) 50 | P a g e
Cut – An offensive movement used to get away from the defender, often characterized by at least one sharp change of direction.
Fake – A motion used by the thrower to make the marker believe that s/he intends to throw the disc in one direction (or from one
release point), when, in fact, s/he plans to throw the disc in another direction.
Field Sense – The ability to perceive where one is on the playing field relative to all other players and field boundaries.
Offside – Crossing the goal line by any offensive or defensive player prior to the pull.
Pivot – A technique used by the thrower whereby s/he rotates on the ball or toes of the pivot foot in order to change body position
for greater throwing range of motion.
Travel – An offensive advantage gained by the thrower when s/he takes a step, accelerates or changes directions after a catch and
before throwing, or picks up or drags her/his pivot foot during the throw. This is a violation in Ultimate. The disc is brought back to
the thrower for a replay, except in the case where the throw resulted in a turnover.
USA Ultimate – Teaching Ultimate (2011) 51 | P a g e
Ultimate can easily be adapted to meet the needs of most students with physical or mental impairments.
The rules to Ultimate can be changed to accommodate students on crutches, in wheelchairs, or those that have motor control
impairments. Just like every other unit in physical education, participation is the most important thing. It is always important to
take each individual student’s social or emotional needs into consideration before adapting any games, but be creative. Any student
(even those without impairments) might learn or benefit from having any of the following accommodations.
Wheel Chair Accommodations
Playing the game inside or on tennis courts will make the game much more wheel chair friendly. Also allowing the student in the
wheel chair two feet of space at all times on offense will help increase their involvement in the game.
Gait Accommodations
The easiest way to change the game for students who cannot travel as quickly as other students is to make running against the rules.
Similarly, allowing the defense to move (or run) only when the disc is in the air will give students who have a slower gait or are
limited by crutches a chance to keep up and get into position on offense. Limiting the defense to the same number of steps as the
offense can help ensure that students who require crutches or cannot walk as quickly have a chance to get open on offense.
Coordination Accommodations
Teaching students who have coordination deficits or impairments with smooth motor control to throw and catch can take a lot of
time. Using a softer disc or a ball will allow them to play the game with other students and keep them from getting injured by the
hard plastic. Allowing the students who need accommodations more time to throw the disc and more distance from the defender
will provide more opportunity for success. Another adaptation could be allowing students a chance to pick up one drop per point, or
allowing each team to play the disc where it lands (even if it is not caught).
Mental Disability Accommodations
Ultimate moves very quickly and some of the rules can be confusing. Changing the game so that it resembles a more familiar game
can help. For example, allowing students to run with the disc until they are tagged might help students adapt because they are
familiar with football. Removing the end zones and asking students to count the number of throws they can complete in a row can
substitute as a scoring system. Students with mental disabilities are generally more productive, have more fun, and learn more from
cooperative games. Thus, instead of forming two separate teams, having everybody on one team and timing how quickly they can
score may be a good adaptation to standard Ultimate.
USA Ultimate – Teaching Ultimate (2011) 52 | P a g e
1. The golden rule: treat others as you would want to be treated.
Spirited games result from mutual respect among opponents. Assume the best of your opponent. Give him or her the
benefit of a doubt. You would want the same for yourself. But even if you are thick-skinned, do not assume that your
opponent is.
2. Control: SOTG takes real effort.
SOTG is not just some abstract principle that everyone adopts and then games run smoothly without effort. Close calls are
made in tight games. Hard fouls are committed. SOTG is about how you handle yourself under pressure: how you contain
your emotion, tame your temper, and modulate your voice. If you initiate or contribute to the unraveling of spirit, the
concept falls apart quickly. If you act to mend things (or at least not worsen the situation) by following (1) above, the game
heals itself.
3. Heckling and taunting are different.
Ultimate has a long tradition of good-natured heckling. Heckles are friendly barbs, typically from non-playing spectators.
Heckling can be fun, but taunting is un-spirited and wrong. Harassing remarks after an opponent's foul call or close play are
NOT heckling: they are abusive taunts which create unpleasant playing conditions and often escalate to acrimonious
disputes.
4. SOTG is compatible with championship play.
Competition and Spirit of the Game® complement each other and enhance the game. Time and again, great teams and star
players have shown that you can bring all your competitive and athletic zeal to a game without sacrificing fair play or
respect for your opponent.
5. Don't "give as you got."
There is no "eye for an eye." If you are wronged, you have no right to wrong someone in return. In the extreme case where
you were severely mistreated, you may bring the issue up with a captain, tournament director, or even lodge a complaint
with the governing body. If you retaliate in kind, however, a complaint may be filed against you. We recall point (1): treat
others as you would have them treat you, not as they have treated you. In the end, you are responsible for you.
6. Breathe.
After a hard foul, close call, or disputed play, take a step back, pause, and take a deep breath. In the heat of competition,
emotions run high. By giving yourself just a bit of time and space, you will gain enough perspective to compose yourself and
concentrate on the facts involved in the dispute (was she in or out; did you hit his hand or the disc; did that pick affect the
play). Your restraint will induce a more restrained response from your opponent. Conflagration averted, you may resume
business as usual.
7. When you do the right thing, people notice.
When you turn the other cheek, you you've done the right thing. You may not hear praise, there may be no standing
ovation, but people do notice. Eventually, their respect for you and their appreciation of the game will grow.
8. Be generous with praise.
Compliment an opponent on her good catch. Remark to a teammate that you admire his honesty in calling himself out of
bounds. Look players in the eye and congratulate them when you shake their hands after a game. These small acts boost
spirit greatly, a large payoff for little time and effort.
9. Impressions linger.
Not only does the realization that your actions will be remembered for a long time serve to curb poor behavior, it can also
inspire better conduct. Many old-timers enjoy the experience of meeting an elite player who remembers their first
rendezvous on the field and recalls the event in detail. A good first encounter with an impressionable young player can have
considerable long term positive impact.
10. Have fun.
All other things being equal, games are far more fun without the antipathy. Go hard. Play fair. Have fun.
Special thanks to Eric Zaslow and members of the 2005 Conduct Committee (Jeff Dunbar, Kate Bergeron, Eric Zaslow, Will Deaver) for
the development of this document. Adopted by UPA Executive Committee, March 29, 2005.
USA Ultimate – Teaching Ultimate (2011) 53 | P a g e
Preface
This simplified version of Ultimate rules is especially for intramural play. However, if there is any discrepancy between this version and the Official
Rules of Ultimate, the official rules govern. It is assumed that no player will intentionally violate the rules; thus, there are no harsh penalties for
inadvertent infractions, but rather a method to resume play simulating what most likely would have occurred absent the infraction. In Ultimate, an
intentional infraction is considered cheating and an offense against the spirit of sportsmanship. A player may be in a position to gain an advantage
by committing an infraction, but that player is morally bound to abide by the rules. Each player is responsible for upholding the Spirit of the Game®
(see below), and this responsibility should remain paramount.
1) Introduction a. Description: Ultimate is a non-contact disc sport played by two teams of seven players with the objective of scoring goals. A goal is
scored when a player catches the disc in the end zone that player is attacking. A player may not run while holding the disc. The disc is advanced by passing it to other players. The disc may be passed in any direction. If a pass is incomplete (i.e., hits the ground, is caught out-of-bounds, or is intercepted by a defensive player), a turnover occurs, resulting in an immediate change of the team in possession of the disc. An attempt to unfairly disadvantage an opponent through physical contact is a foul. Ultimate is self-officiated – there are no referees; players are responsible for making their own infraction and boundary (including scoring) calls.
b. Spirit of the Game®(SOTG): Ultimate relies upon a spirit of sportsmanship that places the responsibility for fair play on the player. Highly competitive play is encouraged, but never at the expense of mutual respect among competitors, adherence to the agreed upon rules, or the basic joy of play. Protection of these vital elements serves to eliminate unsportsmanlike conduct from the Ultimate field. Such actions as taunting opposing players, dangerous aggression, belligerent intimidation, intentional infractions, or other “win-at-all-costs” behavior are contrary to the SOTG and must be avoided by all players.
2) Playing Field The field is a rectangle with an end zone at each end. An official regulation-sized field is 120x40 yards, with a playing field length of 70 yards
and 25-yard end zones. Below are suggestions for shorter fields if space is limited. Width can be reduced, if necessary, but less than 35 yards
is not recommended.
a. 110 yards: 70 yard playing field and 20 yard end zones b. 105 yards: 65 yard playing field and 20 yard end zones c. 100 yards: 60 yard playing field and 20 yard end zones
3) Eligibility See the school’s rules for information on eligibility requirements and how to register for games.
4) Equipment a. Rubber and molded cleats, turf shoes, or running shoes may be worn. No metal cleats. b. Players must remove all jewelry. c. Teams must wear shirts or jerseys of matching color, or pennies. d. Any disc acceptable to both teams may be used. The standard competition disc is 175 grams.
5) Players a. A team consists of seven (7) players. b. A team may start and play a game with as few as five (5) players. c. It is recommended that in Co-Rec play there is a gender difference of one (1) (e.g., three males and four females, or three females and
four males, on the playing field), though this ratio can be adjusted based on the actual make-up of the teams. The receiving team generally decides the ratio and the pulling team (throwing the disc to initiate play) must match it. If a team cannot match the gender ratio, they may play with fewer players, so long as they do not exceed the number of players of either gender on the opposing team.
6) Playing the Game a. Length of Game: The game consists of two 20-minute halves with a 5-minute half time. Time is continuous for each half, except when
there is an injury time-out or a team calls time-out. b. Starting and Restarting Play
i. A fair method, such as a coin or disc toss, will be conducted by representatives of the two teams. ii. The winner chooses to either receive the initial pull, or select the end zone they wish to defend. The other team is given the
remaining choice. iii. After a point ends, it is recommended that players begin the next point within 90 seconds. iv. After a turnover, a player on the team becoming offense may immediately pick up the disc and put it back in to play by
establishing a pivot foot in-bounds. v. The second half begins with an automatic reversal of the initial choices.
vi. If the score is tied at the end of regulation, see overtime procedures in section 6.c.iii. c. Scoring
i. A goal is scored when an in-bounds player catches a pass in the end zone of attack. ii. The team with the most goals at the end of the game is declared the winner.
iii. If the score is tied at the end of regulation, play stops and overtime procedures are as follows:

USA Ultimate – Teaching Ultimate (2011) 54 | P a g e
(a) Regular Season Games: A 3-minute overtime period is played with a sudden death format. To begin an overtime period, teams must follow the rules for Restarting Play (6.b.i-ii). If no one has scored after the overtime, the game will be determined a tie.
(b) Playoffs: The overtime sudden-death period will continue until the first team scores. d. Time-outs
i. Each team has one 2-minute time-out per half. ii. Time-out may be called only by the team in possession of the disc, except that either team may call time-out between points
(after a goal, but before the ensuing pull). iii. No time-outs during overtime.
e. Pull i. Play starts at the beginning of each half and after each goal with a “pull” -- a player on the pulling team throws the disc toward
the opposite goal line to begin play. ii. Each time a goal is scored, the teams switch their direction of attack and the team that scored pulls to the opposing team.
iii. On a pull, players must remain in their end zone (not cross the goal line) until the disc is released. iv. A pull may not be made until a player on the receiving team indicates readiness to play by raising a hand. v. After the disc is released, all players may move in any direction.
vi. No player on the pulling team may touch the pull in the air before a member of the receiving team touches it. vii. If a member of the receiving team catches the pull on the playing field, that player must put the disc into play from that spot.
viii. If the receiving team allows the disc to fall untouched to the ground, and the disc initially lands inbounds, the receiving team gains possession of the disc where it stops if in-bounds or at the point on the playing field, excluding the end zone, nearest to where it crossed the out-of-bounds line.
ix. If the pull lands out-of-bounds the receiving team puts the disc into play at the point on the playing field, excluding the end zone, nearest to where it crossed the out-of-bounds line.
f. In and Out-of-Bounds i. The perimeter lines themselves are out-of-bounds.
ii. A disc is out-of-bounds when it first contacts an out-of-bounds area or anything which is out-of bounds. iii. For a receiver to be considered in-bounds after gaining possession of the disc, the first point of contact with the ground must be
completely in-bounds. If any portion of the first point of contact is out-of-bounds, the player is considered to be out-of-bounds. iv. If a player makes a catch in-bounds and momentum then carries him/her out-of-bounds, the player is considered in-bounds (to
continue play, the player carries the disc to the point where s/he went out-of-bounds and puts the disc into play at that point). v. The thrower may pivot in and out-of-bounds, provided that the pivot foot is in-bounds.
g. Turnovers i. A turnover occurs when:
i. A pass is incomplete (dropped, hits the ground, is caught out of bounds, blocked, intercepted). ii. A receiver must retain possession of the disc throughout all ground contact related to the catch (if a player falls to the
ground during a catch and drops the disc, it is incomplete). iii. The marker’s count reaches the maximum number (10) before the throw is released.
ii. When a turnover has occurs, any member of the team becoming offense may take possession of the disc. iii. To initiate play after a turnover, the person picking up the disc must put it into play at the spot of the turnover. If the disc
landed out of bounds, the offensive player puts the disc into play at the point where it crossed the out-of-bounds line. h. Substitutions: May be made after a goal and prior to the ensuing pull, before the beginning of a half, or to replace an injured or ejected
player. 7) The Thrower
a. Any member of the offensive team may take possession of the disc. b. The thrower must establish a pivot foot and may not change that pivot foot until the throw is released. c. The thrower may pivot in any direction, but once the marker has established a legal defensive position, the thrower may not pivot into
him/her. 8) The Marker
a. Only one player may guard the thrower at any one time; that player is the “marker.” b. The marker may not straddle the pivot foot of the thrower. c. There must be at least one disc's diameter between the bodies of the thrower and the marker at all times. d. The marker cannot position his/her arms in such a manner as to restrict the thrower from pivoting. e. Stall count: The period of time within which a thrower must release a throw. f. A player in possession of the disc has 10 seconds to release a throw.
i. The marker must be within 10 feet of the person with the disc before beginning the stall count. ii. The stall count consists of the marker counting to 10 audibly at one second intervals (e.g. “stalling one, two, three . . . .”).
iii. If the thrower has not released the disc by the count of 10, a turnover results. If this call is disputed, the thrower gets the disc back with the stall count coming in at “stalling 8.”
iv. If the defense switches markers, the new marker must restart the count at one. 9) The Receiver
a. After catching a pass, the receiver may take only the fewest number of steps required to come to a stop and establish a pivot foot. b. Exception: If the receiver catches the disc while running, s/he may throw a pass without coming to a stop, but only so long as s/he
releases the disc before the third ground contact after catching the disc. c. If offensive and defensive players catch the disc simultaneously, the offense retains possession.
USA Ultimate – Teaching Ultimate (2011) 55 | P a g e
10) Fouls and Violations A foul is the result of physical contact between opposing players; a violation generally is any other infraction of the rules. When an infraction
(a foul or violation) occurs:
a. The offending player loudly calls out the infraction (e.g., “Travel,” “Foul,” etc. b. A player called for an infraction may contest that call (by loudly calling “contest”), if that player believes that s/he did not commit the
infraction. c. After a call, play stops and players remain stationary until the parties involved have resolved the call. d. If a call is not disputed, play resumes in a way simulating what most likely would have occurred without the infraction. E.g., 1) If a
thrower was fouled while throwing and the pass was incomplete, the thrower gets the disc back with a new stall count, or 2) If a receiver is fouled on a reception attempt and the pass is incomplete, the receiver gets the disc at the point that the foul occurred.
e. If a call is disputed and the players cannot come to a resolution, the play is redone with each player returning to the position s/he occupied when the disputed infraction allegedly occurred.
f. Infractions include: i. Foul: Contact between opposing players.
ii. Fast count: When the marker counts at intervals of less than one second. iii. Double-team: When more than one defensive player is guarding the thrower within 10 feet. iv. Disc space: If the marker touches or is less than one disc diameter away from the thrower. v. Travel: When a thrower fails to establish a pivot foot at the appropriate spot on the field, and/or to keep in contact with that
spot until the throw is released. vi. Strip: When a defensive player knocks the disc out of a thrower’s hands.
vii. Pick: Obstructing the movement of a player on the opposing team. 1) Positioning
a. Each player is entitled to occupy any position on the field not occupied by another player. b. Picks: No player may establish a position, or move in such a manner, so as to obstruct the movement of any player on the opposing team;
to do so is a pick. c. When the disc is in the air, players must play the disc, not the opponent. d. Each player has the right to the space immediately above him/her. A player who has jumped is entitled to land at the same point of take
off without hindrance by opponents. 2) Forfeits
a. Game time is forfeit time. All teams must be signed in and ready to play at game time in order to not receive a forfeit. The supervisor’s watch is the official game time on the field.
b. In order to claim forfeit, a team must have the correct number of players present (minimum of 5) and be ready to play. c. If neither team is able to field a team, a double forfeit will be declared.
3) Player Conduct Acts of unsportsmanlike conduct, including unnecessary roughness, arguing with the Game Official, fighting, abusive language directed
towards officials/opponents, will result in a player(s) being ejected from the game. Recommended penalties include:
a. Warning: For unintentional unsportsmanlike conduct b. Ejection: For intentional unsportsmanlike conduct or following the issuance of a warning for a particular individual.
These are amended rules, intended for use in an intramural setting. For the complete 11
th edition Rules of Ultimate, please visit:
http://www.usaultimate.org/resources/officiating/rules/default.aspx
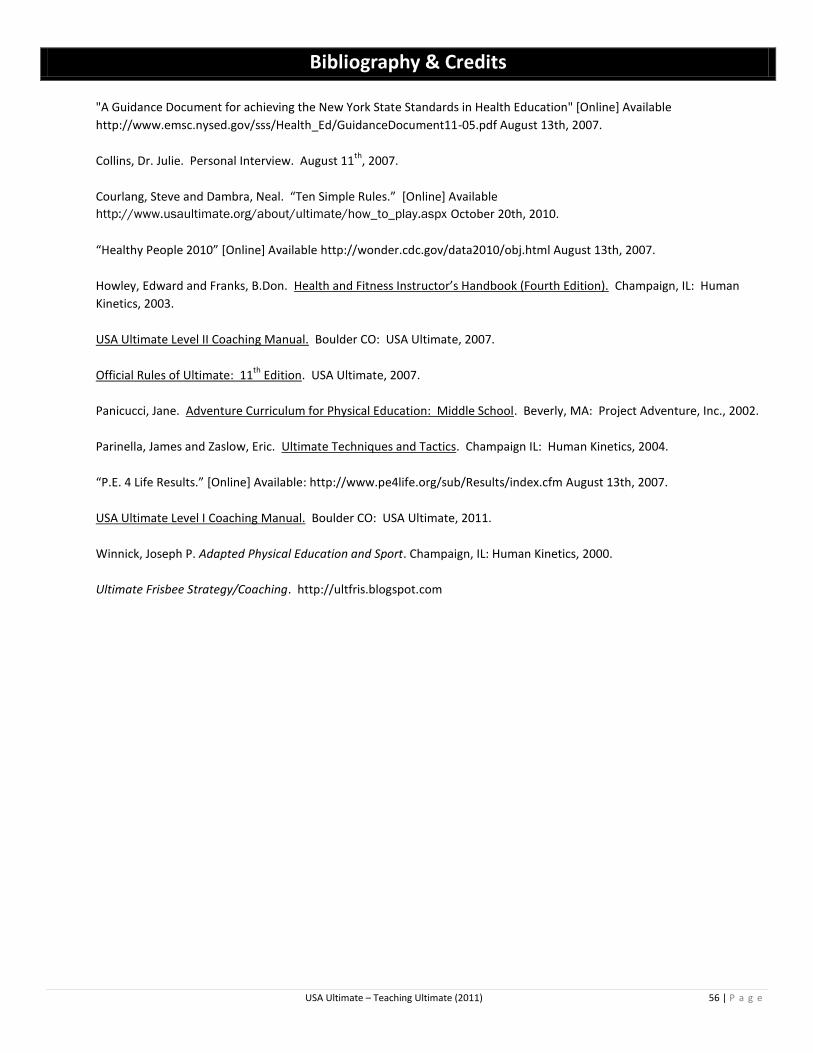
USA Ultimate – Teaching Ultimate (2011) 56 | P a g e
"A Guidance Document for achieving the New York State Standards in Health Education" [Online] Available
http://www.emsc.nysed.gov/sss/Health_Ed/GuidanceDocument11-05.pdf August 13th, 2007.
Collins, Dr. Julie. Personal Interview. August 11th
, 2007.
Courlang, Steve and Dambra, Neal. “Ten Simple Rules.” *Online+ Available
http://www.usaultimate.org/about/ultimate/how_to_play.aspx October 20th, 2010.
“Healthy People 2010” *Online+ Available http://wonder.cdc.gov/data2010/obj.html August 13th, 2007.
Howley, Edward and Franks, B.Don. Health and Fitness Instructor’s Handbook (Fourth Edition). Champaign, IL: Human
Kinetics, 2003.
USA Ultimate Level II Coaching Manual. Boulder CO: USA Ultimate, 2007.
Official Rules of Ultimate: 11th
Edition. USA Ultimate, 2007.
Panicucci, Jane. Adventure Curriculum for Physical Education: Middle School. Beverly, MA: Project Adventure, Inc., 2002.
Parinella, James and Zaslow, Eric. Ultimate Techniques and Tactics. Champaign IL: Human Kinetics, 2004.
“P.E. 4 Life Results.” *Online+ Available: http://www.pe4life.org/sub/Results/index.cfm August 13th, 2007.
USA Ultimate Level I Coaching Manual. Boulder CO: USA Ultimate, 2011.
Winnick, Joseph P. Adapted Physical Education and Sport. Champaign, IL: Human Kinetics, 2000.
Ultimate Frisbee Strategy/Coaching. http://ultfris.blogspot.com