Embed Size (px)
Citation preview
This handout is based on information from Worcester Polytechnic Institute Page 1
Teaching with Primary Sources Joining Educators and Students with Library of Congress Resources
Creating a Presentation with PowerPoint 2007 Benefits of using PowerPoint in lectures:
PowerPoint encourages a more active learning environment.
It brings greater clarity to lectures.
Lectures are easier to follow.
Research has shown it increases the effectiveness of lectures.
Best Practices for Presentation Design Benefits of applying best practices to your presentation design:
Your presentation can be easily viewed by your audience.
The audience will become more engaged in your presentation.
Your content will be presented clearly.
Your presentation will be more effective.
Presentation Considerations Slides and the presentation in general should be clean and simple.
Include a title slide, a slide with an agenda or objectives, and a blank slide at the end.
Use graphics to highlight points, explain concepts visually, or to add a bit of visual
interest to the presentation (but be careful to not overdo this!).
Don't put too much information in your presentation. You don't want your slides to be a
transcript of your narration!
Use animations, sound, and video sparingly to give them more impact when they are
used.
Tip
If your audience will include individuals with visual disabilities, see the last page for a reference linked for tips on how
to address disability issues in PowerPoint.
Color Schemes Color can add a certain atmosphere to your presentation or highlight important points. Your
subject matter may lend itself naturally to a color or two. You should also make color selections
based on readability and the location of your presentation.
Consider one of the following types of color schemes
o Achromatic: Black, white, and shades of grade
o Monochromatic: Different shades of the same color
o Analogous: Different colors next to each other on the color wheel
This handout is based on information from Worcester Polytechnic Institute Page 2
o Complimentary: Colors are opposite each other on the color wheel.
Select two or three colors and stick with them throughout the presentation.
Use the same colors consistently throughout the presentation (i.e. use the same color for
all titles, each level of text, and all backgrounds).
Use a dark background with lighter text if you are presenting in a dark room. Use a light
background with darker text if you are presenting in a bright room or if you are creating
overhead transparencies. If you use an image as a background, make sure it is not too
busy and does not distract from the content on the slides.
Make sure there is enough contrast between colors so they can be easily distinguished,
especially background and text colors.
Text Sans serif fonts (i.e. Arial, Helvetica, Verdana) are more readable than serif fonts (i.e.
Times New Roman, Garamond, Palatino).
Stick with standard fonts that can be found on most computers so you can be sure that
your presentation will display properly on different computers. Arial and Times New
Roman are standard fonts. If you use a non-standard font, embed the font in the
presentation to make sure the presentation will display properly on any computer.
Your text should be larger than 18 points so it is easily visible. Titles and headings are
usually slightly larger.
Large blocks of text are often ineffective. Use bulleted phrases instead.
Slides should have no more than 6-8 lines each.
Use bold, italics, or color for emphasis on specific words.
Use no more than two fonts in the presentation.
Leave space between lines for easier reading.
Avoid using all CAPS, except on a title slide.
This handout is based on information from Worcester Polytechnic Institute Page 3
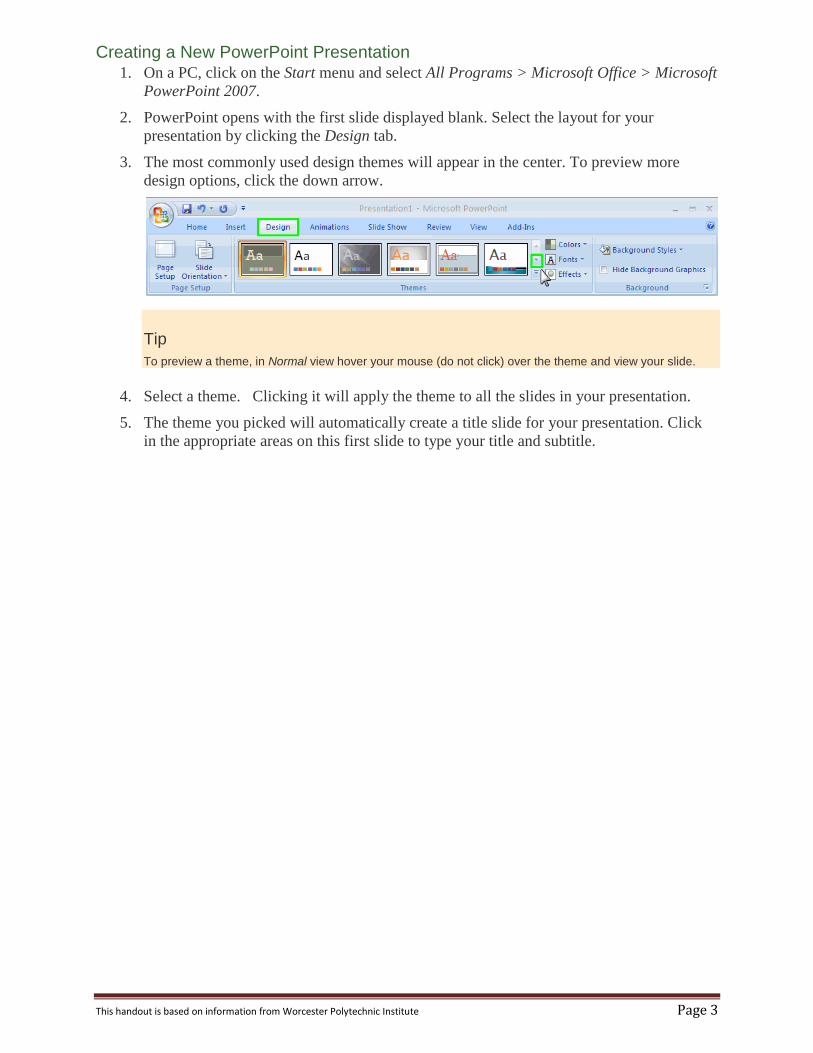
Creating a New PowerPoint Presentation 1. On a PC, click on the Start menu and select All Programs > Microsoft Office > Microsoft
PowerPoint 2007.
2. PowerPoint opens with the first slide displayed blank. Select the layout for your
presentation by clicking the Design tab.
3. The most commonly used design themes will appear in the center. To preview more
design options, click the down arrow.
Tip
To preview a theme, in Normal view hover your mouse (do not click) over the theme and view your slide.
4. Select a theme. Clicking it will apply the theme to all the slides in your presentation.
5. The theme you picked will automatically create a title slide for your presentation. Click
in the appropriate areas on this first slide to type your title and subtitle.
This handout is based on information from Worcester Polytechnic Institute Page 4
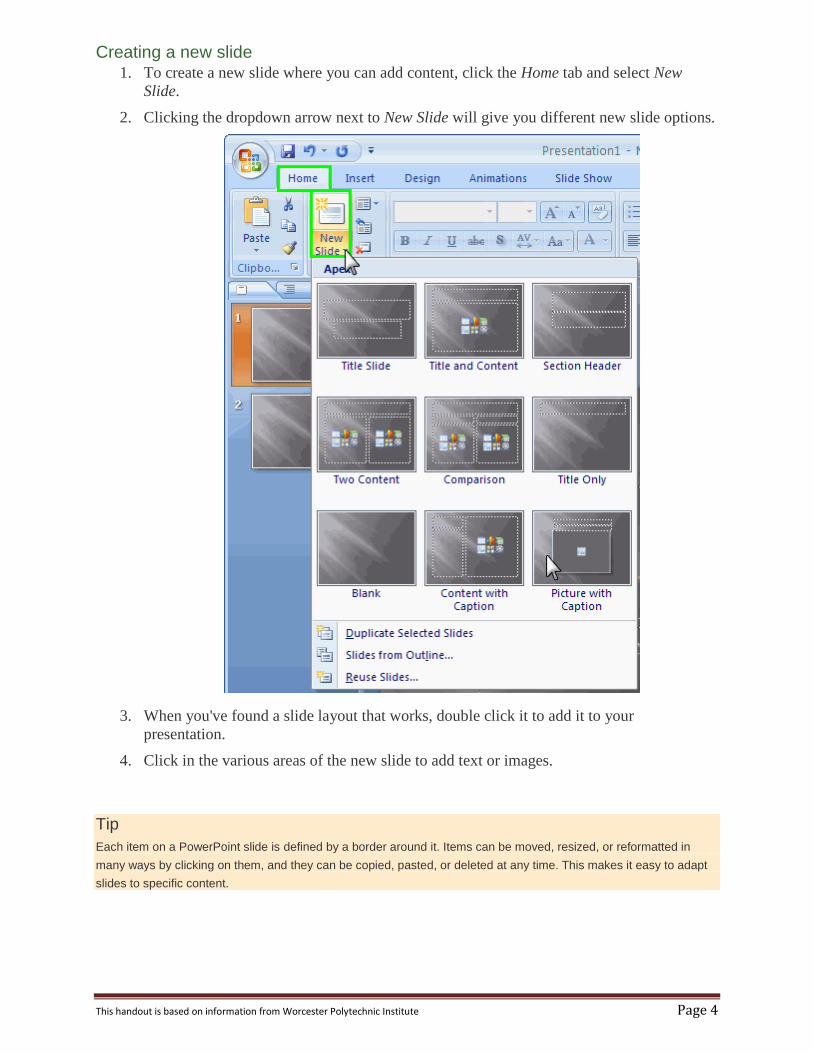
Creating a new slide 1. To create a new slide where you can add content, click the Home tab and select New
Slide.
2. Clicking the dropdown arrow next to New Slide will give you different new slide options.
3. When you've found a slide layout that works, double click it to add it to your
presentation.
4. Click in the various areas of the new slide to add text or images.
Tip
Each item on a PowerPoint slide is defined by a border around it. Items can be moved, resized, or reformatted in
many ways by clicking on them, and they can be copied, pasted, or deleted at any time. This makes it easy to adapt
slides to specific content.
This handout is based on information from Worcester Polytechnic Institute Page 5
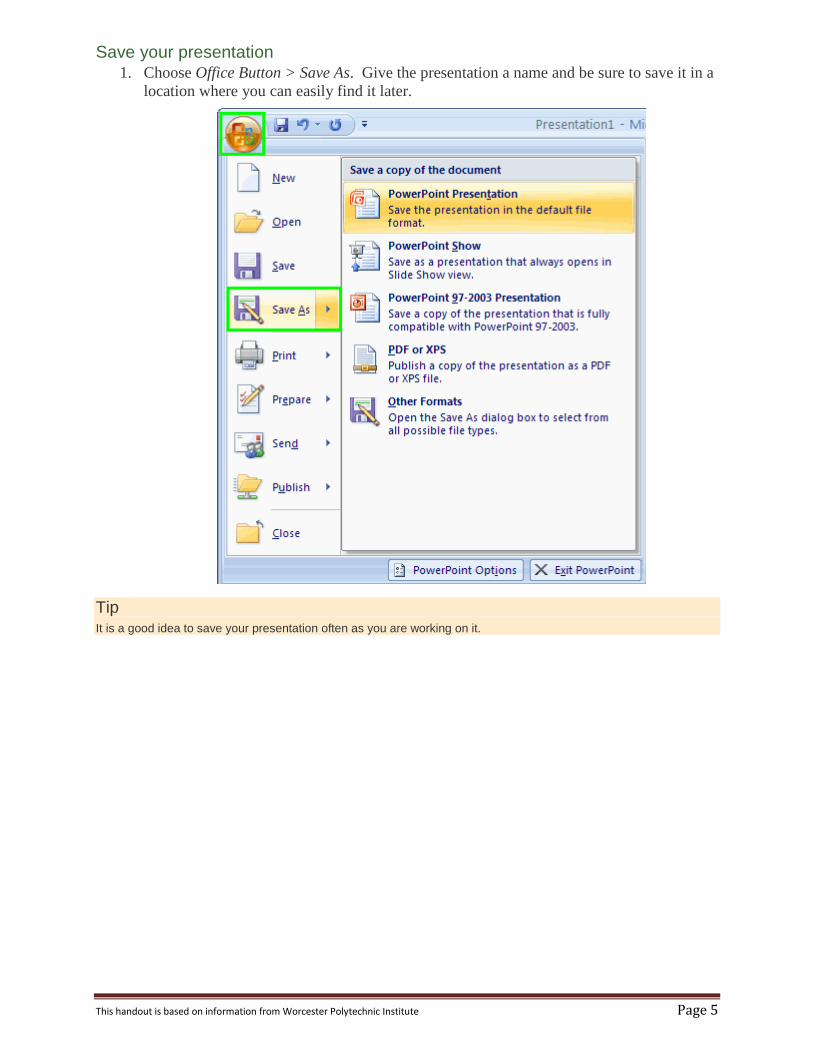
Save your presentation 1. Choose Office Button > Save As. Give the presentation a name and be sure to save it in a
location where you can easily find it later.
Tip
It is a good idea to save your presentation often as you are working on it.
This handout is based on information from Worcester Polytechnic Institute Page 6
Formatting Master Slides in PowerPoint 2007 Benefits of formatting master slides:
You can define the formatting for all slides at once, so the format will be consistent on all
slides.
Any changes you make to the master slides will be automatically applied to all slides in
the presentation.
Open the Slide Master 1. From the menu ribbon, select the View tab > Slide Master.
2. A new Slide Master tab will automatically appear.
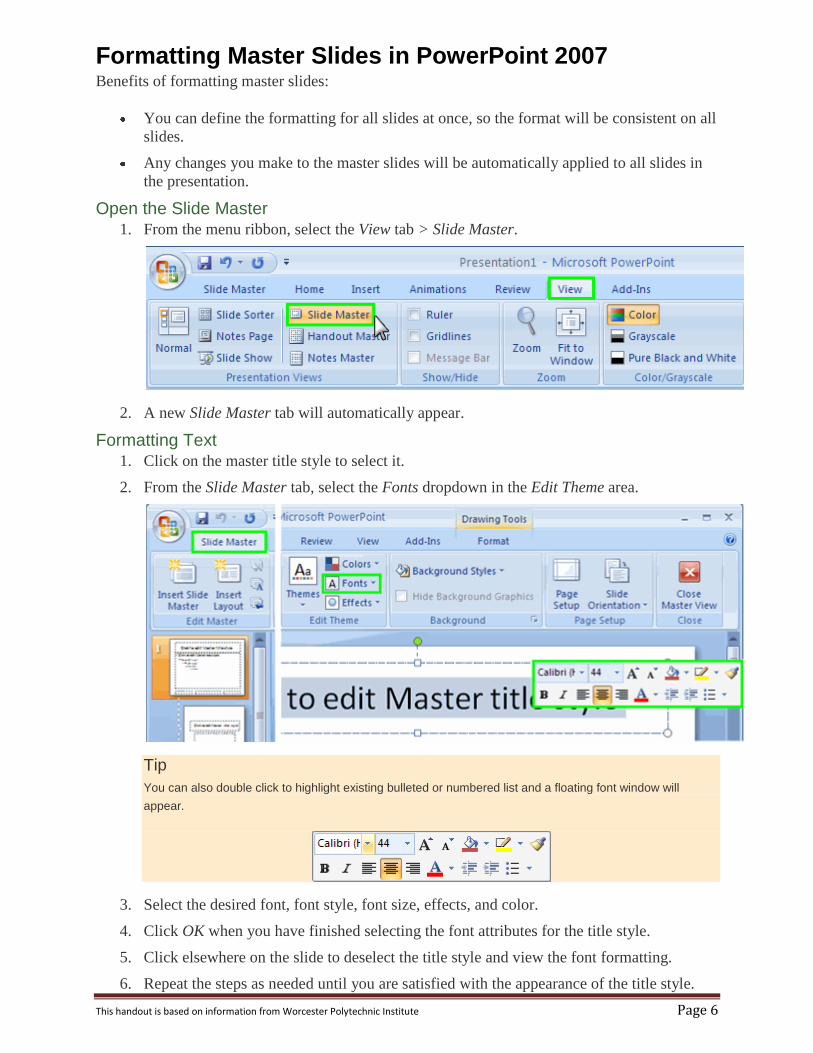
Formatting Text 1. Click on the master title style to select it.
2. From the Slide Master tab, select the Fonts dropdown in the Edit Theme area.
Tip
You can also double click to highlight existing bulleted or numbered list and a floating font window will
appear.
3. Select the desired font, font style, font size, effects, and color.
4. Click OK when you have finished selecting the font attributes for the title style.
5. Click elsewhere on the slide to deselect the title style and view the font formatting.
6. Repeat the steps as needed until you are satisfied with the appearance of the title style.
This handout is based on information from Worcester Polytechnic Institute Page 7
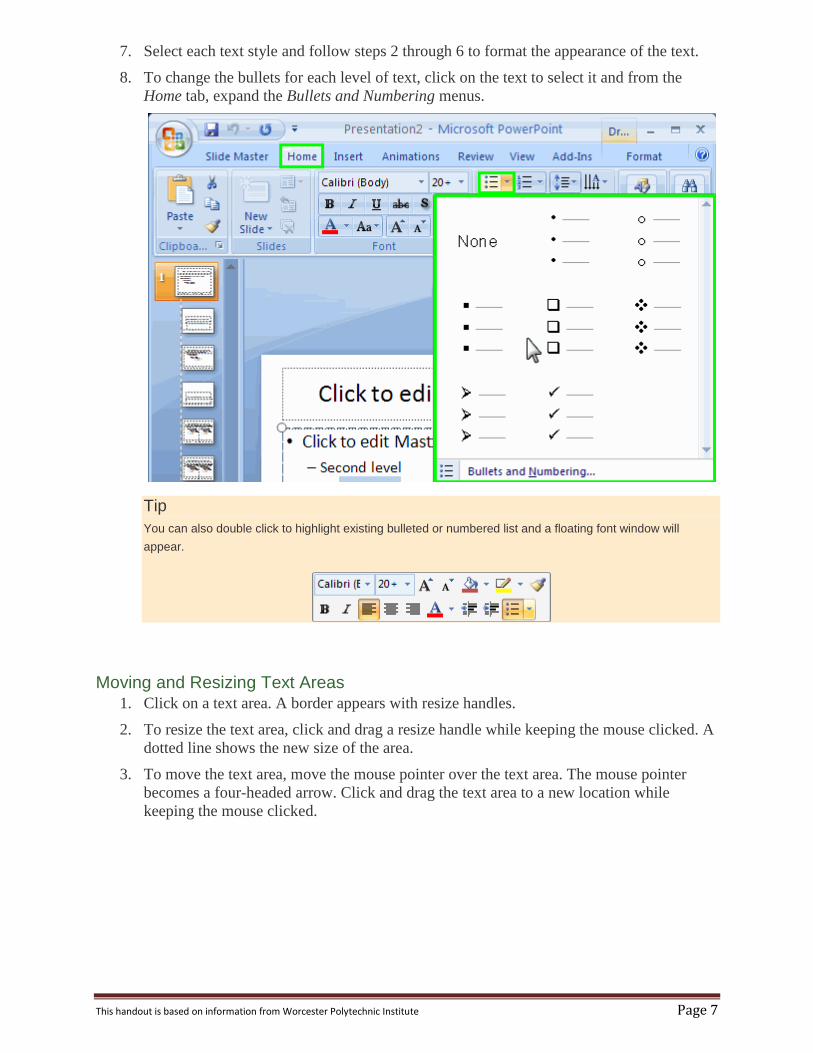
7. Select each text style and follow steps 2 through 6 to format the appearance of the text.
8. To change the bullets for each level of text, click on the text to select it and from the
Home tab, expand the Bullets and Numbering menus.
Tip
You can also double click to highlight existing bulleted or numbered list and a floating font window will
appear.
Moving and Resizing Text Areas 1. Click on a text area. A border appears with resize handles.
2. To resize the text area, click and drag a resize handle while keeping the mouse clicked. A
dotted line shows the new size of the area.
3. To move the text area, move the mouse pointer over the text area. The mouse pointer
becomes a four-headed arrow. Click and drag the text area to a new location while
keeping the mouse clicked.
This handout is based on information from Worcester Polytechnic Institute Page 8
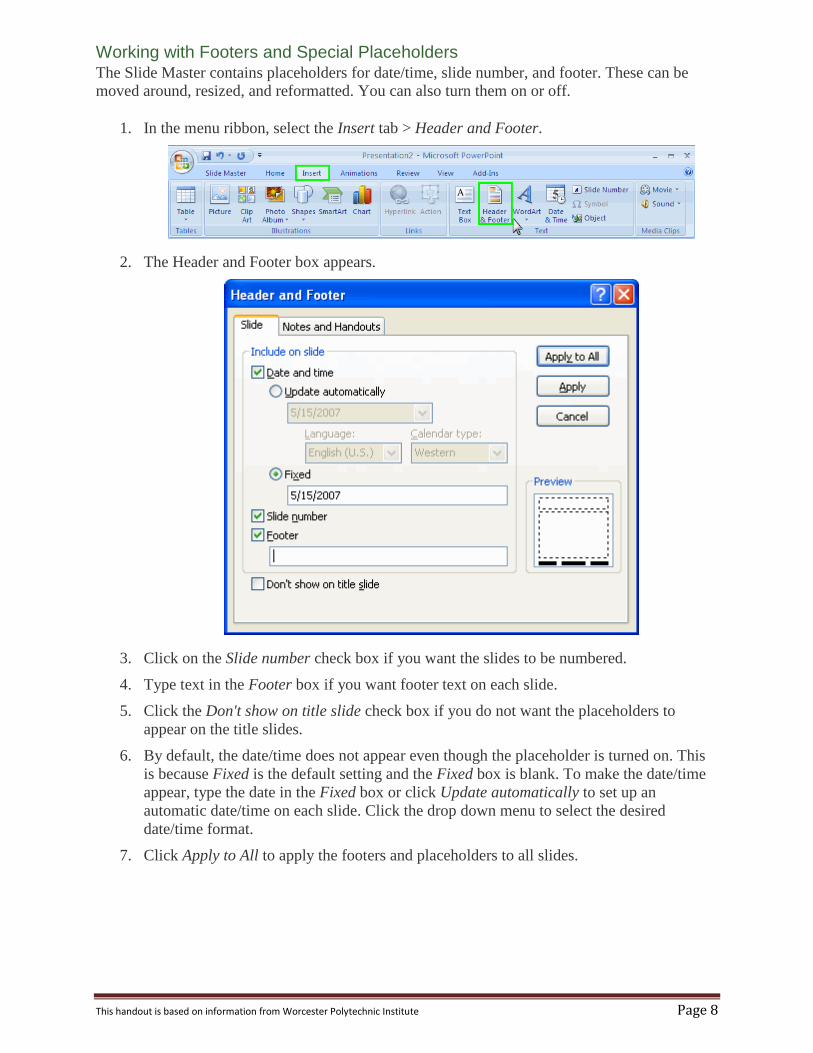
Working with Footers and Special Placeholders The Slide Master contains placeholders for date/time, slide number, and footer. These can be
moved around, resized, and reformatted. You can also turn them on or off.
1. In the menu ribbon, select the Insert tab > Header and Footer.
2. The Header and Footer box appears.
3. Click on the Slide number check box if you want the slides to be numbered.
4. Type text in the Footer box if you want footer text on each slide.
5. Click the Don't show on title slide check box if you do not want the placeholders to
appear on the title slides.
6. By default, the date/time does not appear even though the placeholder is turned on. This
is because Fixed is the default setting and the Fixed box is blank. To make the date/time
appear, type the date in the Fixed box or click Update automatically to set up an
automatic date/time on each slide. Click the drop down menu to select the desired
date/time format.
7. Click Apply to All to apply the footers and placeholders to all slides.
This handout is based on information from Worcester Polytechnic Institute Page 9
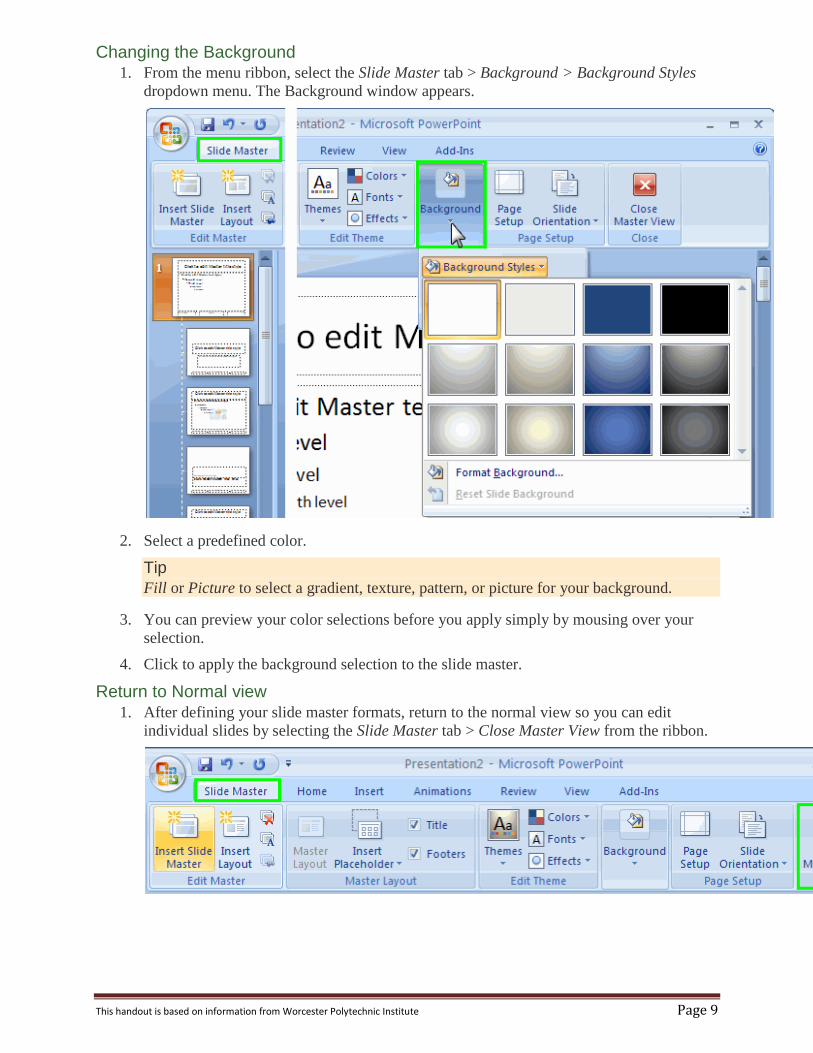
Changing the Background 1. From the menu ribbon, select the Slide Master tab > Background > Background Styles
dropdown menu. The Background window appears.
2. Select a predefined color.
Tip
Fill or Picture to select a gradient, texture, pattern, or picture for your background.
3. You can preview your color selections before you apply simply by mousing over your
selection.
4. Click to apply the background selection to the slide master.
Return to Normal view 1. After defining your slide master formats, return to the normal view so you can edit
individual slides by selecting the Slide Master tab > Close Master View from the ribbon.
This handout is based on information from Worcester Polytechnic Institute Page 10
Organizing and Previewing Slides Benefits of organizing and previewing slides:
You can see multiple slides at once.
You can rearrange, add, and delete slides.
You can see what the presentation will look like to your audience.
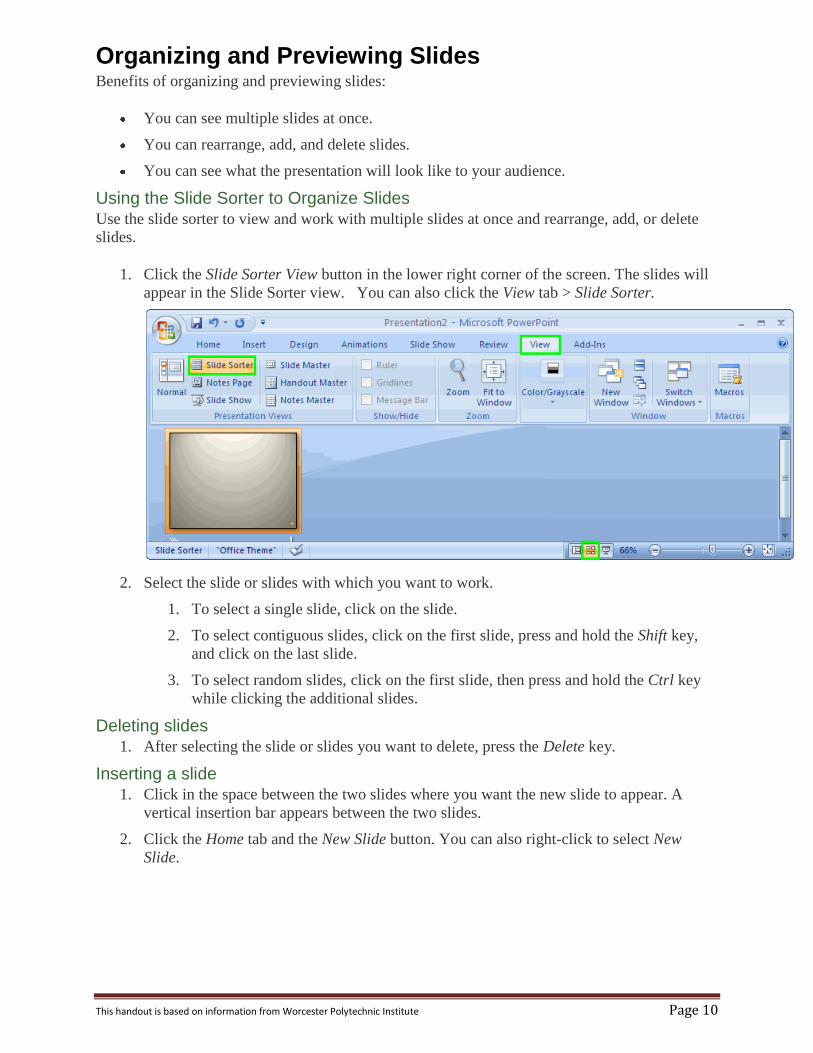
Using the Slide Sorter to Organize Slides Use the slide sorter to view and work with multiple slides at once and rearrange, add, or delete
slides.
1. Click the Slide Sorter View button in the lower right corner of the screen. The slides will
appear in the Slide Sorter view. You can also click the View tab > Slide Sorter.
2. Select the slide or slides with which you want to work.
1. To select a single slide, click on the slide.
2. To select contiguous slides, click on the first slide, press and hold the Shift key,
and click on the last slide.
3. To select random slides, click on the first slide, then press and hold the Ctrl key
while clicking the additional slides.
Deleting slides 1. After selecting the slide or slides you want to delete, press the Delete key.
Inserting a slide 1. Click in the space between the two slides where you want the new slide to appear. A
vertical insertion bar appears between the two slides.
2. Click the Home tab and the New Slide button. You can also right-click to select New
Slide.

This handout is based on information from Worcester Polytechnic Institute Page 11
Duplicating a slide 1. Select the slide you want to copy.
2. From the Home tab, select Insert Slide button > Duplicate Selected Slides. An identical
slide appears after the original slide.
Moving slides 1. Click and hold on the slide you want to move.
2. Drag the mouse to the new position for the slide. The insertion bar appears in the selected
place.
3. Release the mouse button. The slide appears in the new position.
This handout is based on information from Worcester Polytechnic Institute Page 12
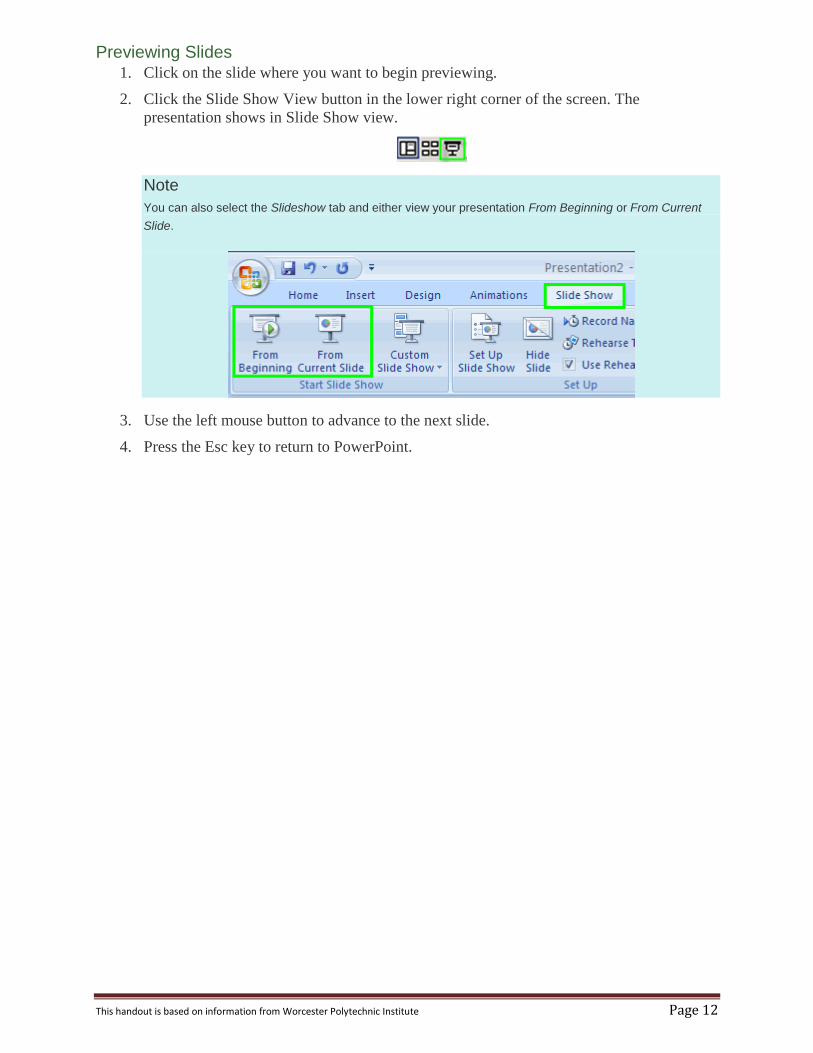
Previewing Slides 1. Click on the slide where you want to begin previewing.
2. Click the Slide Show View button in the lower right corner of the screen. The
presentation shows in Slide Show view.
Note
You can also select the Slideshow tab and either view your presentation From Beginning or From Current
Slide.
3. Use the left mouse button to advance to the next slide.
4. Press the Esc key to return to PowerPoint.
This handout is based on information from Worcester Polytechnic Institute Page 13
Inserting Graphics and Images Benefits of adding graphics and images to presentations:
Graphics may better demonstrate key points than text does for some content.
Some individuals learn best by seeing a visual representation of content.
Graphics and images provide visual interest to your presentation and capture learners'
attention.
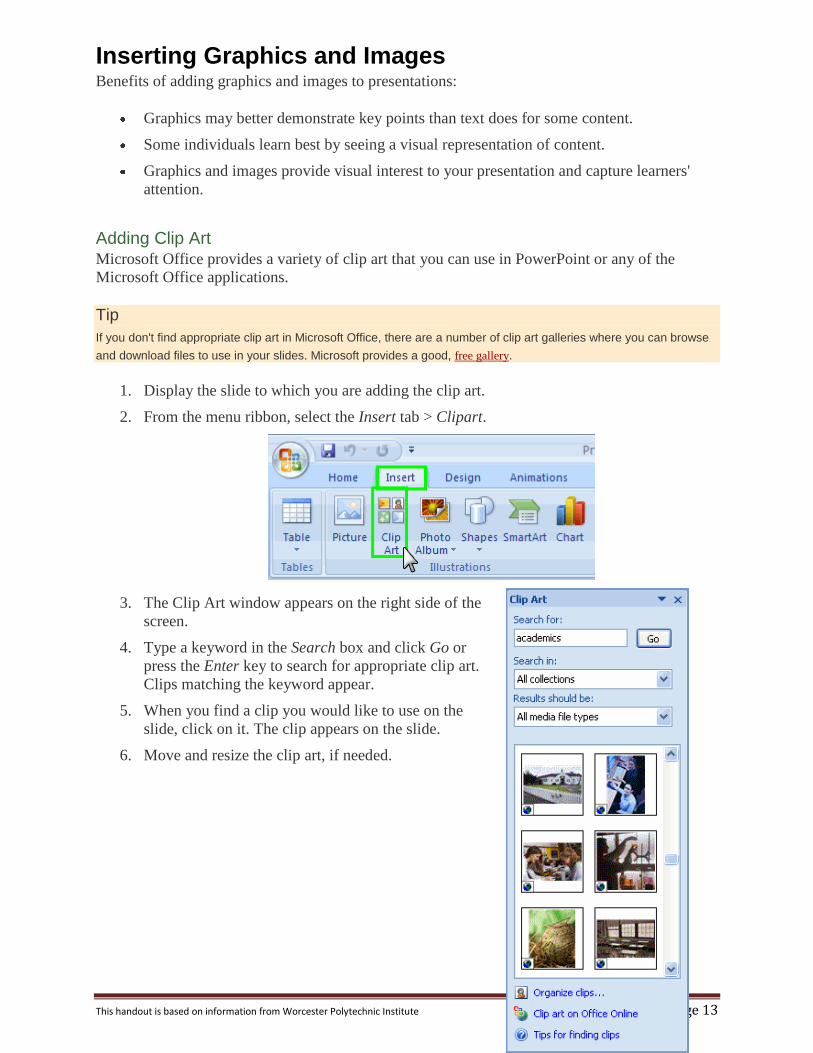
Adding Clip Art Microsoft Office provides a variety of clip art that you can use in PowerPoint or any of the
Microsoft Office applications.
Tip
If you don't find appropriate clip art in Microsoft Office, there are a number of clip art galleries where you can browse
and download files to use in your slides. Microsoft provides a good, free gallery.
1. Display the slide to which you are adding the clip art.
2. From the menu ribbon, select the Insert tab > Clipart.
3. The Clip Art window appears on the right side of the
screen.
4. Type a keyword in the Search box and click Go or
press the Enter key to search for appropriate clip art.
Clips matching the keyword appear.
5. When you find a clip you would like to use on the
slide, click on it. The clip appears on the slide.
6. Move and resize the clip art, if needed.
This handout is based on information from Worcester Polytechnic Institute Page 14
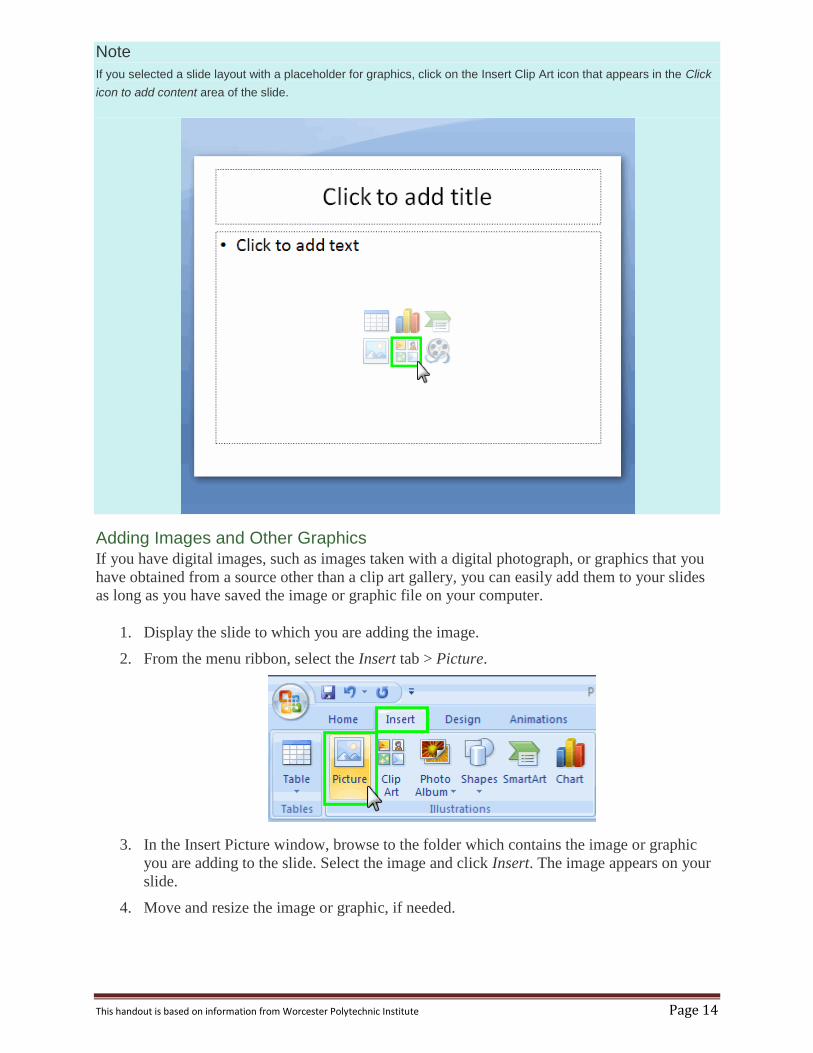
Note
If you selected a slide layout with a placeholder for graphics, click on the Insert Clip Art icon that appears in the Click
icon to add content area of the slide.
Adding Images and Other Graphics If you have digital images, such as images taken with a digital photograph, or graphics that you
have obtained from a source other than a clip art gallery, you can easily add them to your slides
as long as you have saved the image or graphic file on your computer.
1. Display the slide to which you are adding the image.
2. From the menu ribbon, select the Insert tab > Picture.
3. In the Insert Picture window, browse to the folder which contains the image or graphic
you are adding to the slide. Select the image and click Insert. The image appears on your
slide.
4. Move and resize the image or graphic, if needed.
This handout is based on information from Worcester Polytechnic Institute Page 15
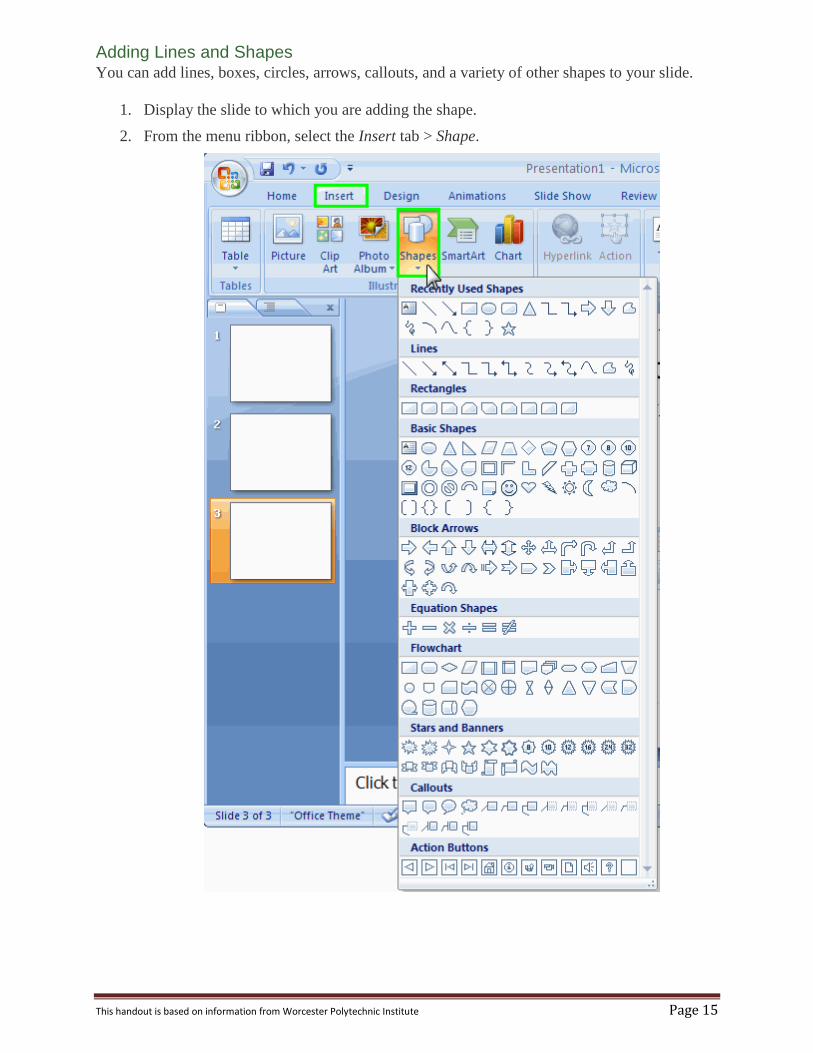
Adding Lines and Shapes You can add lines, boxes, circles, arrows, callouts, and a variety of other shapes to your slide.
1. Display the slide to which you are adding the shape.
2. From the menu ribbon, select the Insert tab > Shape.
This handout is based on information from Worcester Polytechnic Institute Page 16
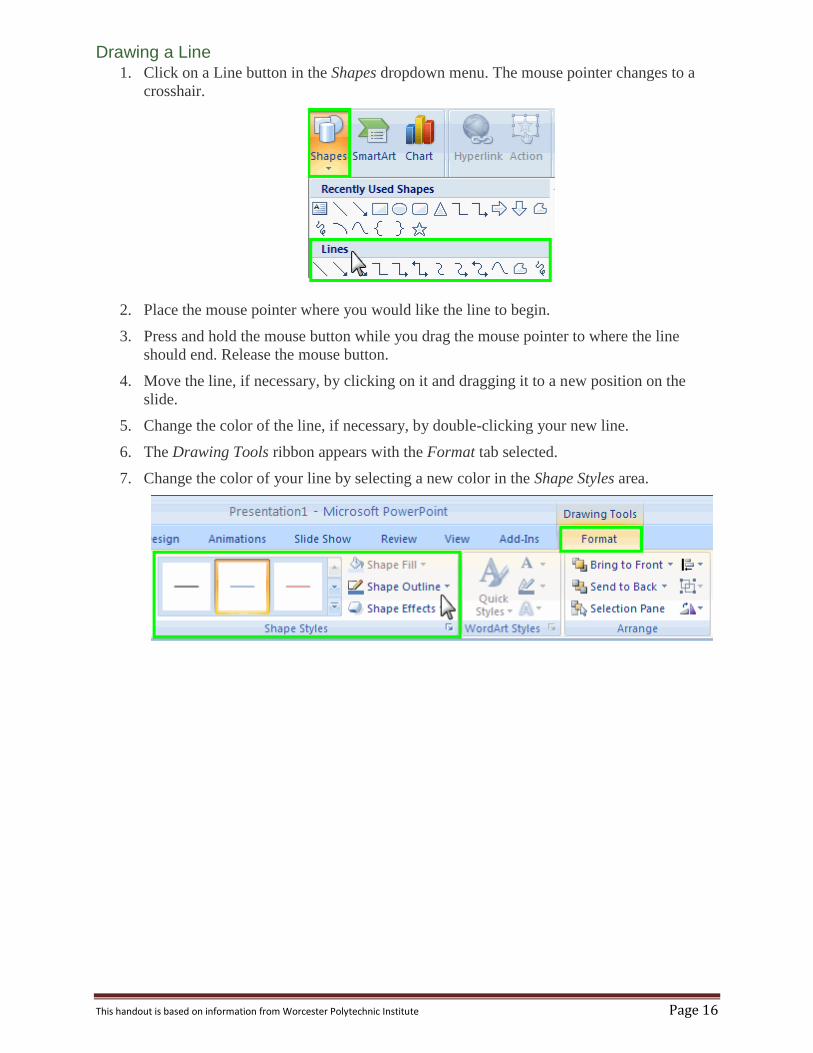
Drawing a Line 1. Click on a Line button in the Shapes dropdown menu. The mouse pointer changes to a
crosshair.
2. Place the mouse pointer where you would like the line to begin.
3. Press and hold the mouse button while you drag the mouse pointer to where the line
should end. Release the mouse button.
4. Move the line, if necessary, by clicking on it and dragging it to a new position on the
slide.
5. Change the color of the line, if necessary, by double-clicking your new line.
6. The Drawing Tools ribbon appears with the Format tab selected.
7. Change the color of your line by selecting a new color in the Shape Styles area.
This handout is based on information from Worcester Polytechnic Institute Page 17
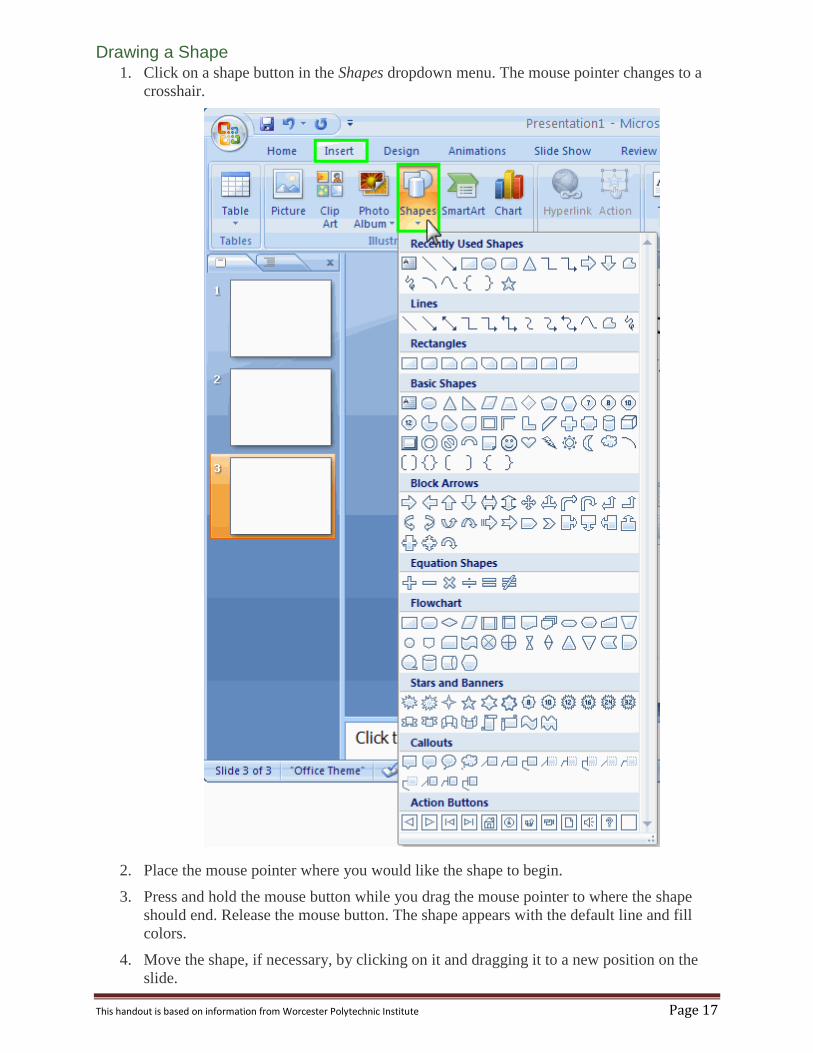
Drawing a Shape 1. Click on a shape button in the Shapes dropdown menu. The mouse pointer changes to a
crosshair.
2. Place the mouse pointer where you would like the shape to begin.
3. Press and hold the mouse button while you drag the mouse pointer to where the shape
should end. Release the mouse button. The shape appears with the default line and fill
colors.
4. Move the shape, if necessary, by clicking on it and dragging it to a new position on the
slide.
This handout is based on information from Worcester Polytechnic Institute Page 18
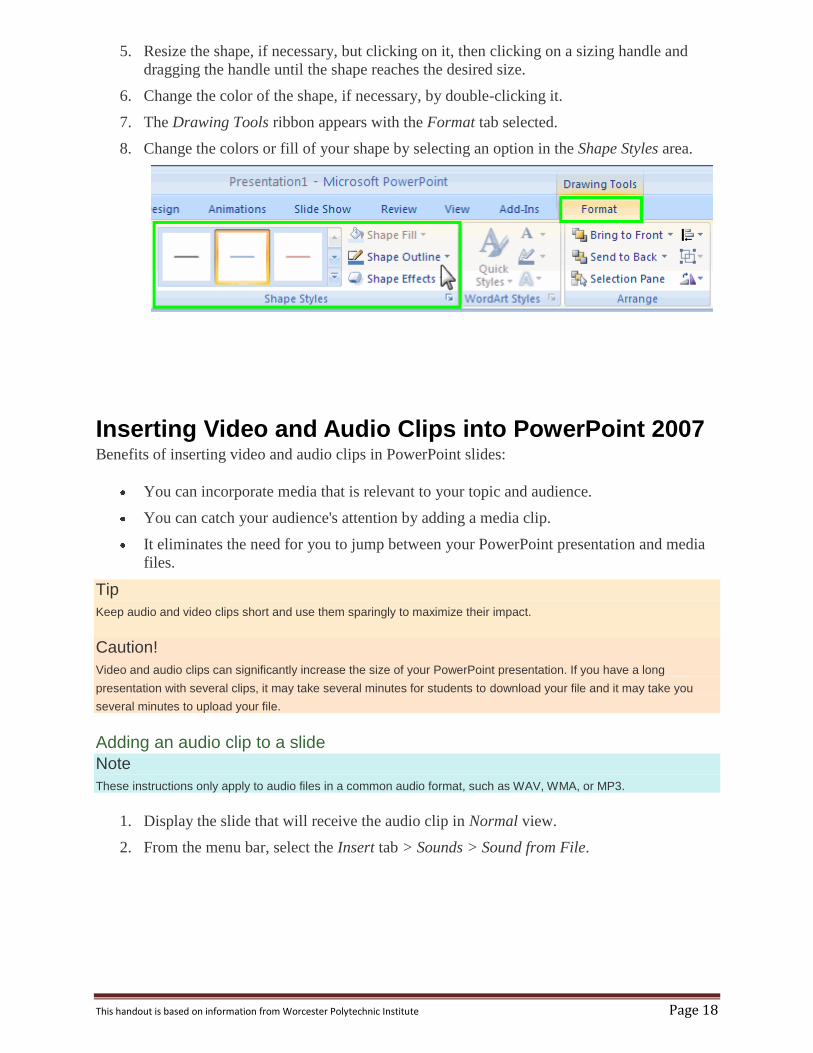
5. Resize the shape, if necessary, but clicking on it, then clicking on a sizing handle and
dragging the handle until the shape reaches the desired size.
6. Change the color of the shape, if necessary, by double-clicking it.
7. The Drawing Tools ribbon appears with the Format tab selected.
8. Change the colors or fill of your shape by selecting an option in the Shape Styles area.
Inserting Video and Audio Clips into PowerPoint 2007 Benefits of inserting video and audio clips in PowerPoint slides:
You can incorporate media that is relevant to your topic and audience.
You can catch your audience's attention by adding a media clip.
It eliminates the need for you to jump between your PowerPoint presentation and media
files.
Tip
Keep audio and video clips short and use them sparingly to maximize their impact.
Caution!
Video and audio clips can significantly increase the size of your PowerPoint presentation. If you have a long
presentation with several clips, it may take several minutes for students to download your file and it may take you
several minutes to upload your file.
Adding an audio clip to a slide
Note
These instructions only apply to audio files in a common audio format, such as WAV, WMA, or MP3.
1. Display the slide that will receive the audio clip in Normal view.
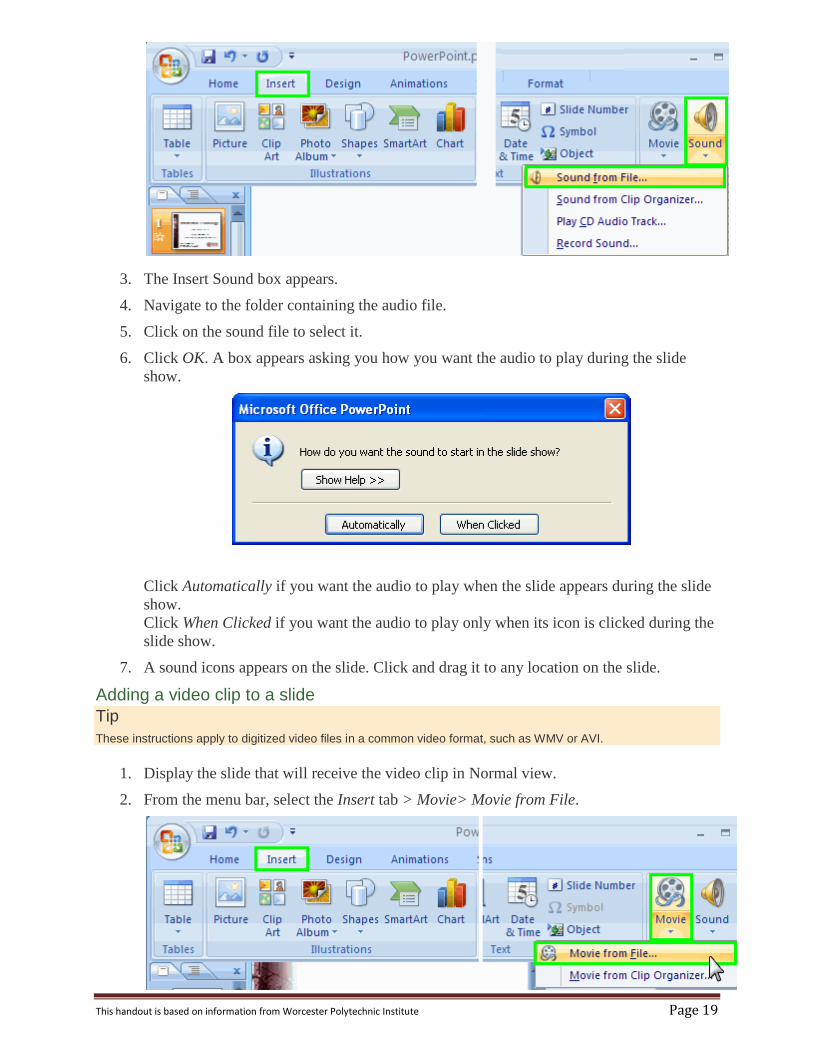
2. From the menu bar, select the Insert tab > Sounds > Sound from File.
This handout is based on information from Worcester Polytechnic Institute Page 19
3. The Insert Sound box appears.
4. Navigate to the folder containing the audio file.
5. Click on the sound file to select it.
6. Click OK. A box appears asking you how you want the audio to play during the slide
show.
Click Automatically if you want the audio to play when the slide appears during the slide
show.
Click When Clicked if you want the audio to play only when its icon is clicked during the
slide show.
7. A sound icons appears on the slide. Click and drag it to any location on the slide.
Adding a video clip to a slide
Tip
These instructions apply to digitized video files in a common video format, such as WMV or AVI.
1. Display the slide that will receive the video clip in Normal view.
2. From the menu bar, select the Insert tab > Movie> Movie from File.

This handout is based on information from Worcester Polytechnic Institute Page 20
3. The Insert Movie box appears.
4. Navigate to the folder containing the video file.
5. Click on the video file to select it.
6. Click OK. A box appears asking you how you want the video to play during the slide
show.
Click Automatically if you want the video to play when the slide appears during the slide
show.
Click When Clicked if you want the video to play only when your click on it during the
slide show.
7. Click on the video clip area and use the resize handles to resize it, if necessary.
Recording Narration in PowerPoint 2007 Benefits of recording narration in PowerPoint slides:
A recorded PowerPoint presentation can be played back by students at any time from any
location if stored in an accessible location.
Students can review the presentation over and over again until they grasp the content.
Tip
To record audio, you will need a microphone for your PC. Headset microphones can be purchased inexpensively at
most computer stores.
Caution
Recorded narration can significantly increase the size of your PowerPoint presentation. If you have a long
presentation with recorded narration, it may take several minutes for students to download your file.

This handout is based on information from Worcester Polytechnic Institute Page 21
Recording Narration 1. Open your presentation in PowerPoint.
2. From the menu bar, select Slide Show > Record Narration.
3. The Record Narration box appears.
4. Make sure the Link narrations in: box is unchecked.
5. Click Change Quality to adjust the sound. The Sound Selection box appears.
6. In the Attributes field, use the drop-down menu to select 16,000 kHz, 8 Bit, Mono.
7. Click OK.
8. Click Set Microphone Level to test your microphone before recording. The Microphone
Check box appears.

This handout is based on information from Worcester Polytechnic Institute Page 22
9. Use the slider bar to adjust the volume so you can hear it at an appropriate level.
10. Click OK.
11. On the Record Narration box, click OK to start recording. The slide show will begin.
Speak into the microphone to record your voice. Click to advance each slide as you
would if you were presenting live.
Note
If you did not have the first slide of the presentation selected when you started the recording process, a box
appears asking if you want to start your narration on the current slide or on the first slide.
12. When the slide show is done, the screen turns black. Click again. A box appears telling
you that your narrations have been saved. The box also asks if you would like to save the
slide timings as well. If you click Save, your presentation will be saved with times for
each slide. Slides will remain on the screen as long as the time indicated and will then
advance to the next slide. This works well if you want your presentation to cycle through
without a user having to click to advance each slide.

This handout is based on information from Worcester Polytechnic Institute Page 23
PowerPoint 2007: Animation and Slide Transitions Benefits of adding animation and slide transitions:
They provide visual interest to your presentation and grab the audience's attention (as
long as they are not overused).
You can reveal points on slides in a staggered way (i.e. one bullet displayed at a time) to
keep the audience focused only on the point which you are discussing at the given time.
You can automate the presentation so it runs on its own.
Adding Slide Transitions Slide transitions control how your presentation moves from slide to slide.
Note
You do not have to add slide transitions to your presentation. If you do not add transitions, your presentation will
move from slide to slide with a click of the left mouse button or by pressing Enter or the right arrow key. If you want
the presentation to play on its own, you must set slide transitions.
1. In either the Slide Sorter or Normal view, select the slide or slides which you want to
apply the transition to.
2. From the menu ribbon, select the Animations tab.
3. The most commonly used animations will appear in the center. To preview more
transition options, click the down arrow.
Tip
To preview a transition, in Normal view hover your mouse (do not click) over the transition and view your
slide transition in.
4. Select a transition from the list. Clicking it will apply the transition to the slide. You
can also select Apply to All to apply the same transition to all your slides.
5. In the Speed dropdown, select the speed at which you want the transition to play.
This handout is based on information from Worcester Polytechnic Institute Page 24
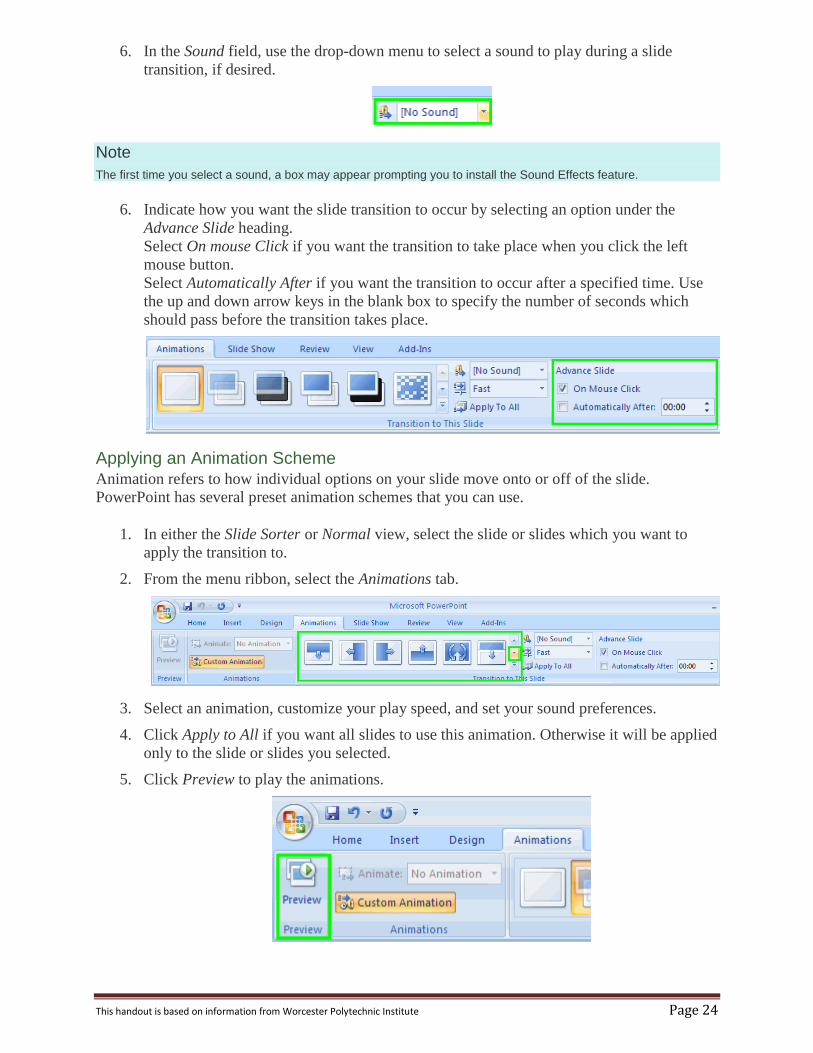
6. In the Sound field, use the drop-down menu to select a sound to play during a slide
transition, if desired.
Note
The first time you select a sound, a box may appear prompting you to install the Sound Effects feature.
6. Indicate how you want the slide transition to occur by selecting an option under the
Advance Slide heading.
Select On mouse Click if you want the transition to take place when you click the left
mouse button.
Select Automatically After if you want the transition to occur after a specified time. Use
the up and down arrow keys in the blank box to specify the number of seconds which
should pass before the transition takes place.
Applying an Animation Scheme Animation refers to how individual options on your slide move onto or off of the slide.
PowerPoint has several preset animation schemes that you can use.
1. In either the Slide Sorter or Normal view, select the slide or slides which you want to
apply the transition to.
2. From the menu ribbon, select the Animations tab.
3. Select an animation, customize your play speed, and set your sound preferences.
4. Click Apply to All if you want all slides to use this animation. Otherwise it will be applied
only to the slide or slides you selected.
5. Click Preview to play the animations.
This handout is based on information from Worcester Polytechnic Institute Page 25
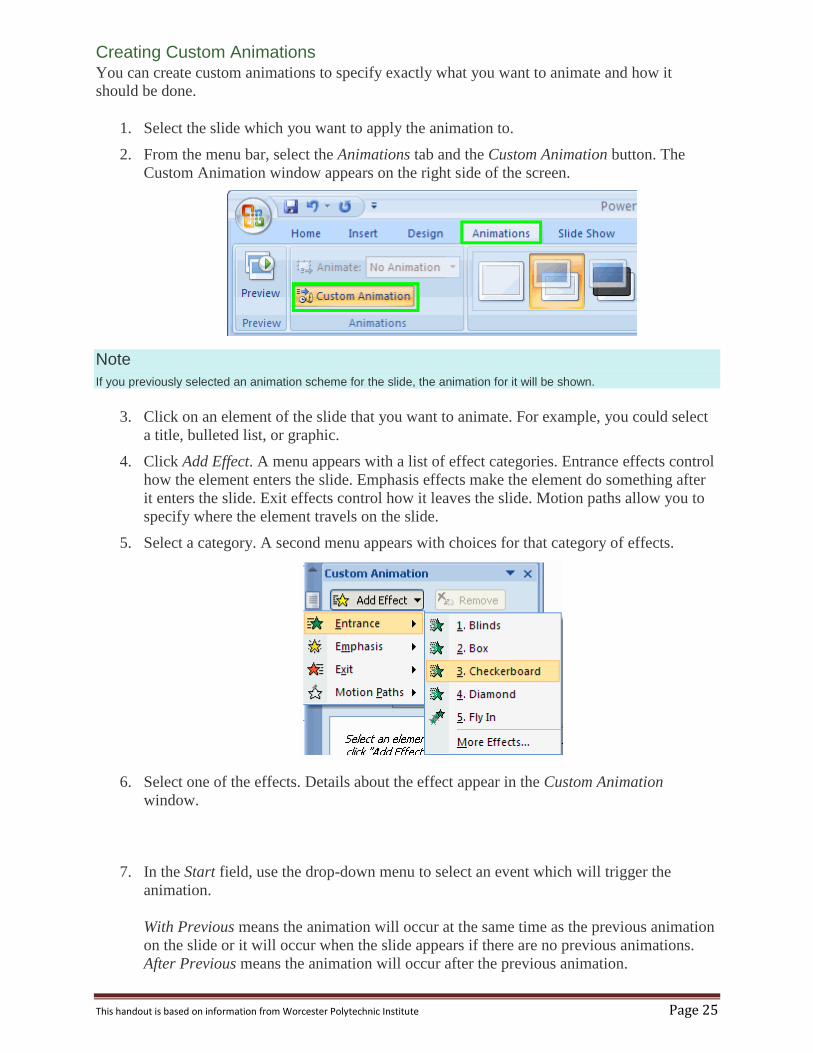
Creating Custom Animations You can create custom animations to specify exactly what you want to animate and how it
should be done.
1. Select the slide which you want to apply the animation to.
2. From the menu bar, select the Animations tab and the Custom Animation button. The
Custom Animation window appears on the right side of the screen.
Note
If you previously selected an animation scheme for the slide, the animation for it will be shown.
3. Click on an element of the slide that you want to animate. For example, you could select
a title, bulleted list, or graphic.
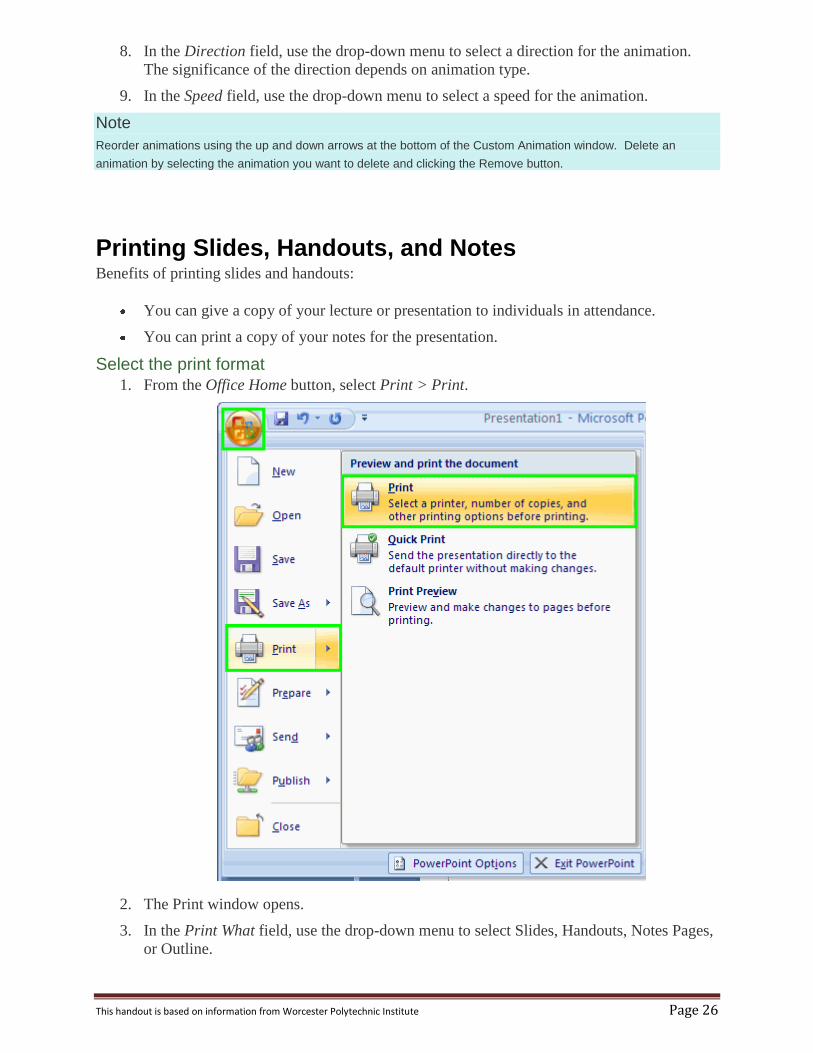
4. Click Add Effect. A menu appears with a list of effect categories. Entrance effects control
how the element enters the slide. Emphasis effects make the element do something after
it enters the slide. Exit effects control how it leaves the slide. Motion paths allow you to
specify where the element travels on the slide.
5. Select a category. A second menu appears with choices for that category of effects.
6. Select one of the effects. Details about the effect appear in the Custom Animation
window.
7. In the Start field, use the drop-down menu to select an event which will trigger the
animation.
With Previous means the animation will occur at the same time as the previous animation
on the slide or it will occur when the slide appears if there are no previous animations.
After Previous means the animation will occur after the previous animation.
This handout is based on information from Worcester Polytechnic Institute Page 26
8. In the Direction field, use the drop-down menu to select a direction for the animation.
The significance of the direction depends on animation type.
9. In the Speed field, use the drop-down menu to select a speed for the animation.
Note
Reorder animations using the up and down arrows at the bottom of the Custom Animation window. Delete an
animation by selecting the animation you want to delete and clicking the Remove button.
Printing Slides, Handouts, and Notes Benefits of printing slides and handouts:
You can give a copy of your lecture or presentation to individuals in attendance.
You can print a copy of your notes for the presentation.
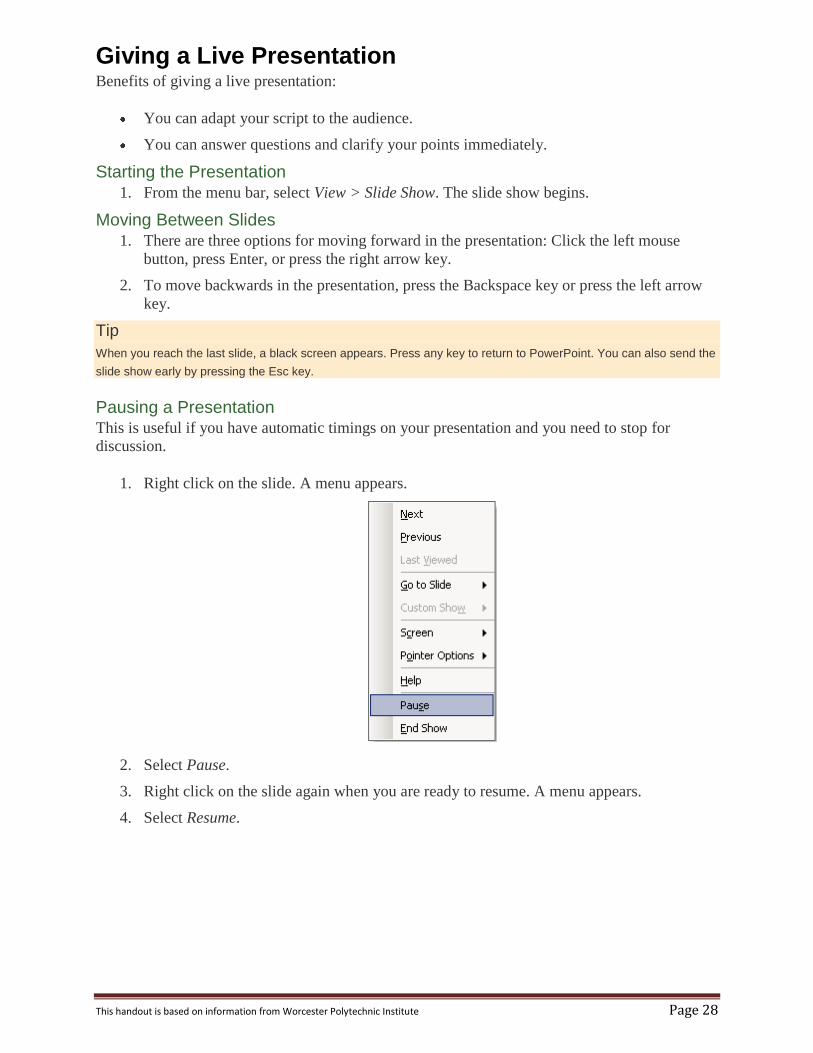
Select the print format 1. From the Office Home button, select Print > Print.
2. The Print window opens.
3. In the Print What field, use the drop-down menu to select Slides, Handouts, Notes Pages,
or Outline.

This handout is based on information from Worcester Polytechnic Institute Page 27
4. If you selected Handouts, select the number of slides you would like displayed on each
page.
Tip
If you select 3 slides per page, small versions of the slides will appear on the left side of the page and lines for taking
notes will appear to the right of each slide. This format is particularly useful for handouts.
Print the Presentation 1. Select the appropriate printer in the Name field in the Printer box.
2. Indicate the number of copies you would like to print in the Copies box.
3. If you would like to print only certain slides, select Slides in the Print Range box and
indicate the numbers of the desired slides in the Slides box.
4. Click OK.
This handout is based on information from Worcester Polytechnic Institute Page 28
Giving a Live Presentation Benefits of giving a live presentation:
You can adapt your script to the audience.
You can answer questions and clarify your points immediately.
Starting the Presentation 1. From the menu bar, select View > Slide Show. The slide show begins.
Moving Between Slides 1. There are three options for moving forward in the presentation: Click the left mouse
button, press Enter, or press the right arrow key.
2. To move backwards in the presentation, press the Backspace key or press the left arrow
key.
Tip
When you reach the last slide, a black screen appears. Press any key to return to PowerPoint. You can also send the
slide show early by pressing the Esc key.
Pausing a Presentation This is useful if you have automatic timings on your presentation and you need to stop for
discussion.
1. Right click on the slide. A menu appears.
2. Select Pause.
3. Right click on the slide again when you are ready to resume. A menu appears.
4. Select Resume.
This handout is based on information from Worcester Polytechnic Institute Page 29
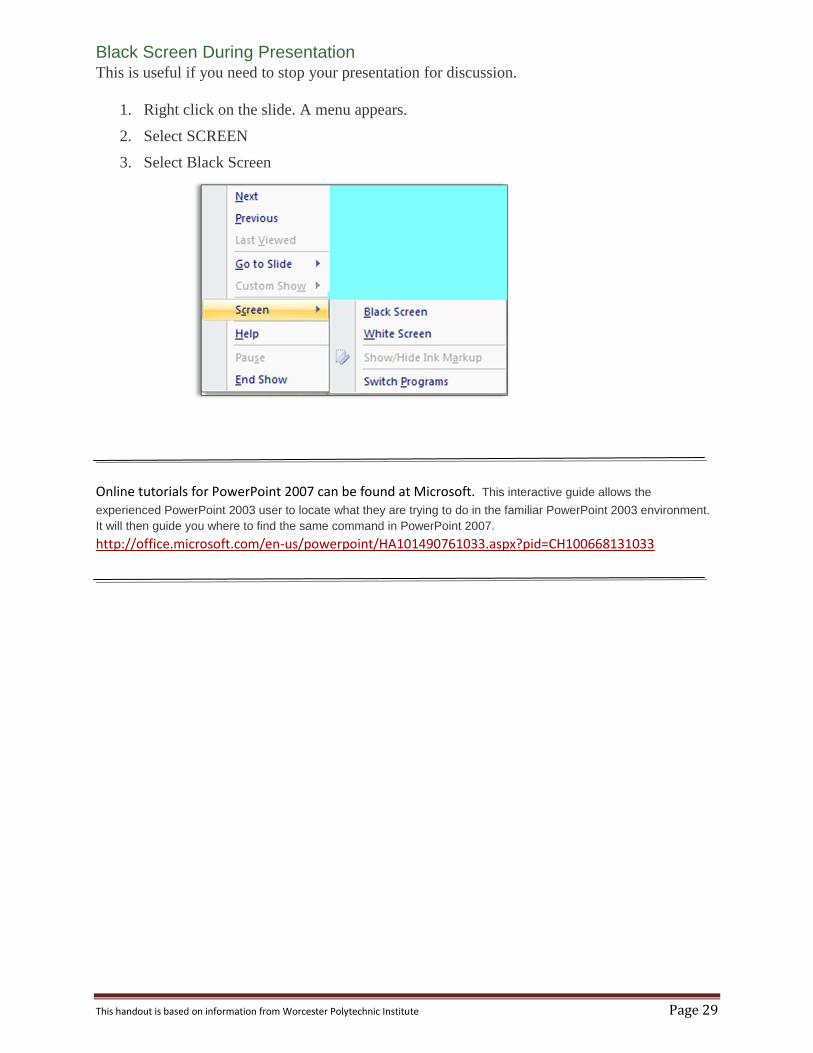
Black Screen During Presentation This is useful if you need to stop your presentation for discussion.
1. Right click on the slide. A menu appears.
2. Select SCREEN
3. Select Black Screen
Online tutorials for PowerPoint 2007 can be found at Microsoft. This interactive guide allows the
experienced PowerPoint 2003 user to locate what they are trying to do in the familiar PowerPoint 2003 environment.
It will then guide you where to find the same command in PowerPoint 2007.
http://office.microsoft.com/en-us/powerpoint/HA101490761033.aspx?pid=CH100668131033