Embed Size (px)
Citation preview
Configuration and Deploymentof an IMS Test Bed
Alton Kenneth MacDonald
Laboratorio de Redes AvanzadasInstituto Tecnológico Autónomo de México (ITAM)
Reporte Técnico LRAV 10809
August 2009
Contents
Preface 1
1 Introduction 21.1 Next Generation Networking . . . . . . . . . . . . . . . . . . . . . . . 21.2 Service Delivery Models . . . . . . . . . . . . . . . . . . . . . . . . . 31.3 IP Multimedia Subsystem . . . . . . . . . . . . . . . . . . . . . . . . 3
2 Static Routes 52.1 Initial State . . . . . . . . . . . . . . . . . . . . . . . . . . . . . . . . 52.2 Cisco Routers . . . . . . . . . . . . . . . . . . . . . . . . . . . . . . . 62.3 FreeBSD Routers . . . . . . . . . . . . . . . . . . . . . . . . . . . . . 72.4 Caronte . . . . . . . . . . . . . . . . . . . . . . . . . . . . . . . . . . 82.5 Vesta . . . . . . . . . . . . . . . . . . . . . . . . . . . . . . . . . . . 9
3 DNS Entries 11
4 IMS Realms 154.1 Requirements . . . . . . . . . . . . . . . . . . . . . . . . . . . . . . . 154.2 Compilation . . . . . . . . . . . . . . . . . . . . . . . . . . . . . . . . 154.3 Configuration . . . . . . . . . . . . . . . . . . . . . . . . . . . . . . . 164.4 Deployment . . . . . . . . . . . . . . . . . . . . . . . . . . . . . . . . 17
5 PSTN Gateway 215.1 Digium Hardware . . . . . . . . . . . . . . . . . . . . . . . . . . . . . 215.2 Asterisk Software . . . . . . . . . . . . . . . . . . . . . . . . . . . . . 235.3 Feature Setup . . . . . . . . . . . . . . . . . . . . . . . . . . . . . . . 25
5.3.1 Global Settings . . . . . . . . . . . . . . . . . . . . . . . . . . 265.3.2 Trunks . . . . . . . . . . . . . . . . . . . . . . . . . . . . . . 275.3.3 Incoming and Outgoing Calling Rules . . . . . . . . . . . . . 28
ii
CONTENTS CONTENTS
5.3.4 Dial Plan . . . . . . . . . . . . . . . . . . . . . . . . . . . . . 295.3.5 Users . . . . . . . . . . . . . . . . . . . . . . . . . . . . . . . 305.3.6 Finishing Touches . . . . . . . . . . . . . . . . . . . . . . . . 32
6 Content Server 366.1 Darwin Streaming Server . . . . . . . . . . . . . . . . . . . . . . . . . 366.2 UCT IPTV Streaming Server . . . . . . . . . . . . . . . . . . . . . . 37
7 Presence Server 387.1 OpenSIPS . . . . . . . . . . . . . . . . . . . . . . . . . . . . . . . . . 387.2 OpenSIPS-mi-proxy . . . . . . . . . . . . . . . . . . . . . . . . . . . 457.3 OpenXCAP . . . . . . . . . . . . . . . . . . . . . . . . . . . . . . . . 46
8 Configuration of Application Servers 518.1 Presence Server . . . . . . . . . . . . . . . . . . . . . . . . . . . . . . 518.2 Content Server . . . . . . . . . . . . . . . . . . . . . . . . . . . . . . 528.3 PSTN Gateway . . . . . . . . . . . . . . . . . . . . . . . . . . . . . . 538.4 Service Profile . . . . . . . . . . . . . . . . . . . . . . . . . . . . . . . 54
9 IMS Clients 55
Glossary 57
References 60
iii
List of Figures
2.1 Physical Topology . . . . . . . . . . . . . . . . . . . . . . . . . . . . 52.2 Static Routes in Caronte . . . . . . . . . . . . . . . . . . . . . . . . . 8
5.1 Wiring Diagram for RJ45 and RJ11 Compatibility . . . . . . . . . . 225.2 SIP Settings . . . . . . . . . . . . . . . . . . . . . . . . . . . . . . . . 265.3 Analog Trunk . . . . . . . . . . . . . . . . . . . . . . . . . . . . . . . 275.4 VOIP Trunk . . . . . . . . . . . . . . . . . . . . . . . . . . . . . . . 285.5 Outgoing Calling Rules . . . . . . . . . . . . . . . . . . . . . . . . . . 295.6 Incoming Calling Rules . . . . . . . . . . . . . . . . . . . . . . . . . . 295.7 FXS Asterisk User . . . . . . . . . . . . . . . . . . . . . . . . . . . . 305.8 SIP Asterisk User . . . . . . . . . . . . . . . . . . . . . . . . . . . . . 31
6.1 Playlist Configuration . . . . . . . . . . . . . . . . . . . . . . . . . . 36
8.1 Presence Application Server Configuration . . . . . . . . . . . . . . . 528.2 Presence Application Server Trigger Point . . . . . . . . . . . . . . . 528.3 Content Application Server Configuration . . . . . . . . . . . . . . . 538.4 Content Application Server Initial Filter Criteria . . . . . . . . . . . 538.5 Service Profile . . . . . . . . . . . . . . . . . . . . . . . . . . . . . . . 548.6 Service Profile Priorities . . . . . . . . . . . . . . . . . . . . . . . . . 54
9.1 IMS Client Configuration . . . . . . . . . . . . . . . . . . . . . . . . 56
iv
List of Tables
2.1 Names and IP Addresses . . . . . . . . . . . . . . . . . . . . . . . . . 6
4.1 Ports Used by the IMS Realms . . . . . . . . . . . . . . . . . . . . . 19
5.1 Ports Used by Asterisk . . . . . . . . . . . . . . . . . . . . . . . . . . 35
7.1 opensipsctlrc Value Substitution . . . . . . . . . . . . . . . . . . . . . 397.2 Ports Used by the Presece Server . . . . . . . . . . . . . . . . . . . . 50
8.1 Content Application Server Trigger Point . . . . . . . . . . . . . . . 538.2 PSTN Gateway Application Server Trigger Point . . . . . . . . . . . 54
v
Preface
This document serves as a guide presenting a step by step procedure for the installa-tion and configuration of an IP Multimedia Subsystem (IMS) test bed. Said test bedis capable of offering a basic telecommunications infrastructure through the creationof a Service Delivery Platform with the help of three Application Servers (ASs). TheIMS test bed described in this document is composed of the following:
1. Two IMS realms.
2. An AS serving as a Public Switched Telephone Network (PSTN) Gateway.
3. An AS serving as a Content Server.
4. An AS serving as a Presence Server.
5. Clients used to test the features of the test bed.
The information provided herein is specific to the test bed deployed at the Lab-oratorio de Redes Avanzadas located at the facilities of the Instituto TecnológicoAutónomo de México (ITAM). However, it may be used as a guide for the creationor improvement of other IMS test beds.
1
Chapter 1
Introduction
This Chapters serves as a brief introduction to the IP Multimedia Subsystem (IMS)and its importance in Next Generation Networks (NGN), which in turn, can helpexplain the need for the IMS test bed. The purpose of this Capter is to present thereader with available reference material for ruther reading. A longer, more detailed,version of this Capter can be consulted in my Bachelor’s thesis [14].
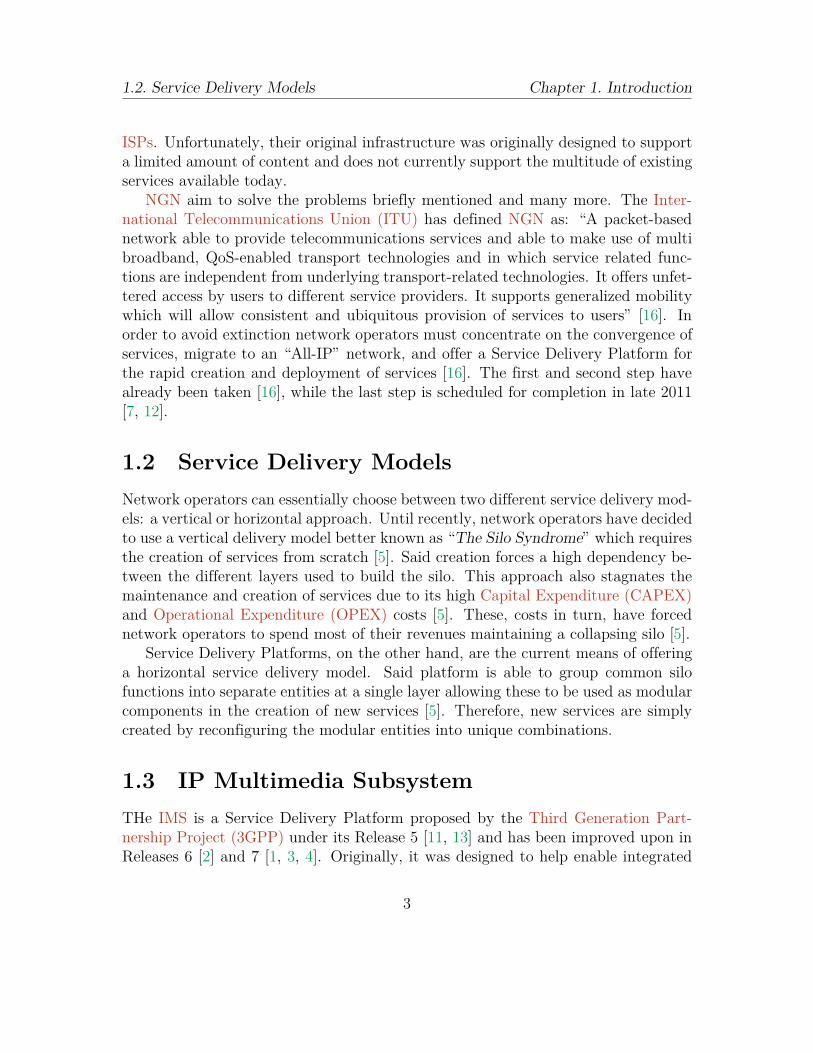
1.1 Next Generation NetworkingCurrently, there are two types of telecommunication service providers: network op-erators and Internet Service Providers (ISPs) [16]. The differences between thesetwo are many, but the main difference (at least for this document’s purpose) is thatthe former possess a physical infrastructure and their business model has a “WalledGarden” approach. Meanwhile, the latter does not necessarily possess it own infras-tructure and follows an “Open Plain” approach to new services. This means thatnetwork operators have complete control over the few services they provide whileISPs have very little control over the large array of services freely available. Thebusiness model followed by ISPs have enabled businesses to reach their customersthrough previously unimaginable channels [17]. An enormous array of new and in-novative services have been developed thanks to the open protocols provided by theInternet.
Users demand converged services from intelligent networks [17]. They have be-come active mobile users that expect the network to adapt to their needs and providethem with access to anything from anywhere at anytime on any device [17]. A newnetwork with a new set of rules has to be created to cater to new users with newdemands [17]. Network operators are slowly becoming nothing more than simple
2
1.2. Service Delivery Models Chapter 1. Introduction
ISPs. Unfortunately, their original infrastructure was originally designed to supporta limited amount of content and does not currently support the multitude of existingservices available today.
NGN aim to solve the problems briefly mentioned and many more. The Inter-national Telecommunications Union (ITU) has defined NGN as: “A packet-basednetwork able to provide telecommunications services and able to make use of multibroadband, QoS-enabled transport technologies and in which service related func-tions are independent from underlying transport-related technologies. It offers unfet-tered access by users to different service providers. It supports generalized mobilitywhich will allow consistent and ubiquitous provision of services to users” [16]. Inorder to avoid extinction network operators must concentrate on the convergence ofservices, migrate to an “All-IP” network, and offer a Service Delivery Platform forthe rapid creation and deployment of services [16]. The first and second step havealready been taken [16], while the last step is scheduled for completion in late 2011[7, 12].
1.2 Service Delivery ModelsNetwork operators can essentially choose between two different service delivery mod-els: a vertical or horizontal approach. Until recently, network operators have decidedto use a vertical delivery model better known as “The Silo Syndrome” which requiresthe creation of services from scratch [5]. Said creation forces a high dependency be-tween the different layers used to build the silo. This approach also stagnates themaintenance and creation of services due to its high Capital Expenditure (CAPEX)and Operational Expenditure (OPEX) costs [5]. These, costs in turn, have forcednetwork operators to spend most of their revenues maintaining a collapsing silo [5].
Service Delivery Platforms, on the other hand, are the current means of offeringa horizontal service delivery model. Said platform is able to group common silofunctions into separate entities at a single layer allowing these to be used as modularcomponents in the creation of new services [5]. Therefore, new services are simplycreated by reconfiguring the modular entities into unique combinations.
1.3 IP Multimedia SubsystemTHe IMS is a Service Delivery Platform proposed by the Third Generation Part-nership Project (3GPP) under its Release 5 [11, 13] and has been improved upon inReleases 6 [2] and 7 [1, 3, 4]. Originally, it was designed to help enable integrated
3
1.3. IP Multimedia Subsystem Chapter 1. Introduction
Internet services for mobile telephony. Contrary to Third Generation (3G) mobilenetwork, which are already Internet capable, IMS aims to improve the Quality ofService (QoS) and Quality of Experience (QoE) for the user, as well as improve thecontrol network operators have over service flows and reduce overall costs with thehelp of a thriving new business model. The IMS is also proposed by the Open MobileAlliance (OMA) as the first Service Delivery Model capable of supporting differentdata streams within a given network. It will ease the migration network operatorsmust forgo in order to avoid becoming mere transport networks [8].
IMS provides definitions for generic functions which can be used by any servicewithin its network [10]. Said functions eliminate the need for silo specialists; servicemaintenance can now be accomplished by someone with overall service knowledge[9]. This enables the creation of a Service Delivery Platform which among its manyaforementioned benefits, also reduces the Time to Market (TTM) for new servicesand reduces costs for both users and network operators. By migrating to IMS,network operators no longer have to maintain two parallel network architectures.
The world of promises presented by IMS has motivated the involvement of otherorganizations such as Third Generation Partnership Project 2 (3GPP2), InternetEngineering Task Force (IETF), Fraunhofer Institute for Open CommunicationsSystems (FOKUS), University of Cape Town (UCT), HP, T-Mobile, NTT DoCoMo,Ericsson, Intel, and OpenCloud, among others. For example, 3GPP2 has adoptedIMS specifications from Release 5 and modified them to fit current access technolo-gies [6]. On the other hand, IETF and 3GPP2 have been using open technologiesto specify a real world implementation of IMS. In conclusion, IMS is a critical com-ponent in the deployment of NGN due to its significant role in service convergence[6].
4
Chapter 2
Static Routes
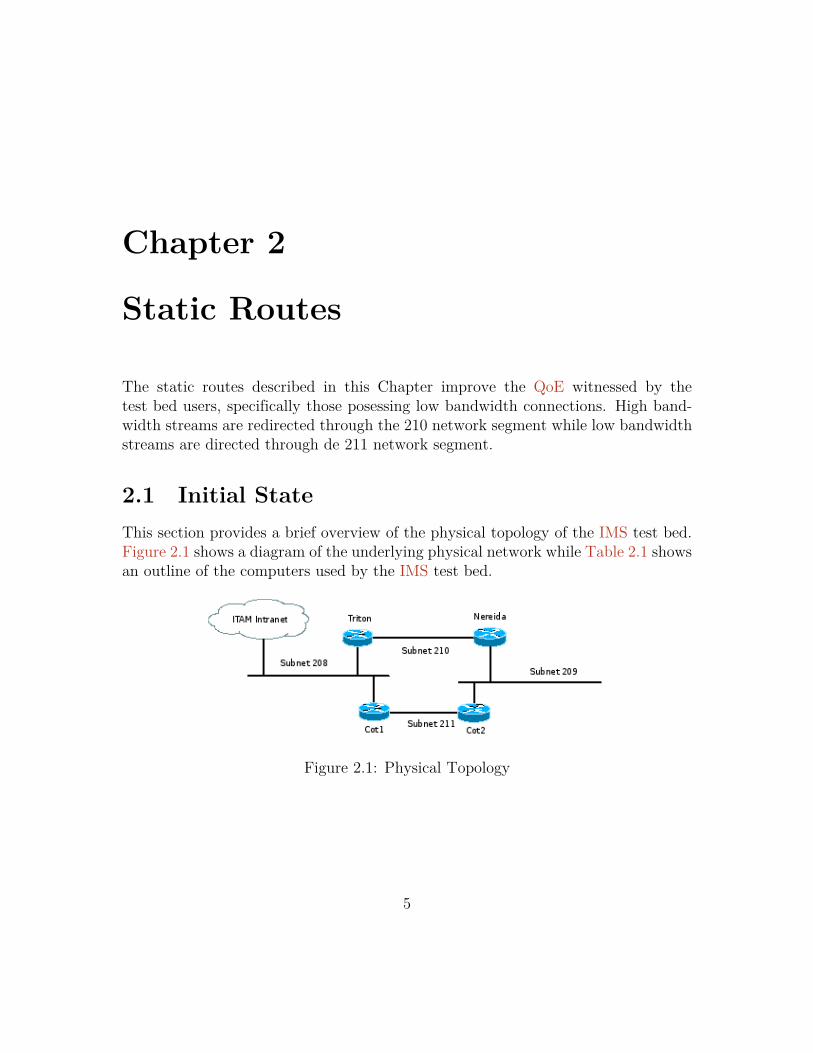
The static routes described in this Chapter improve the QoE witnessed by thetest bed users, specifically those posessing low bandwidth connections. High band-width streams are redirected through the 210 network segment while low bandwidthstreams are directed through de 211 network segment.
2.1 Initial StateThis section provides a brief overview of the physical topology of the IMS test bed.Figure 2.1 shows a diagram of the underlying physical network while Table 2.1 showsan outline of the computers used by the IMS test bed.
Figure 2.1: Physical Topology
5
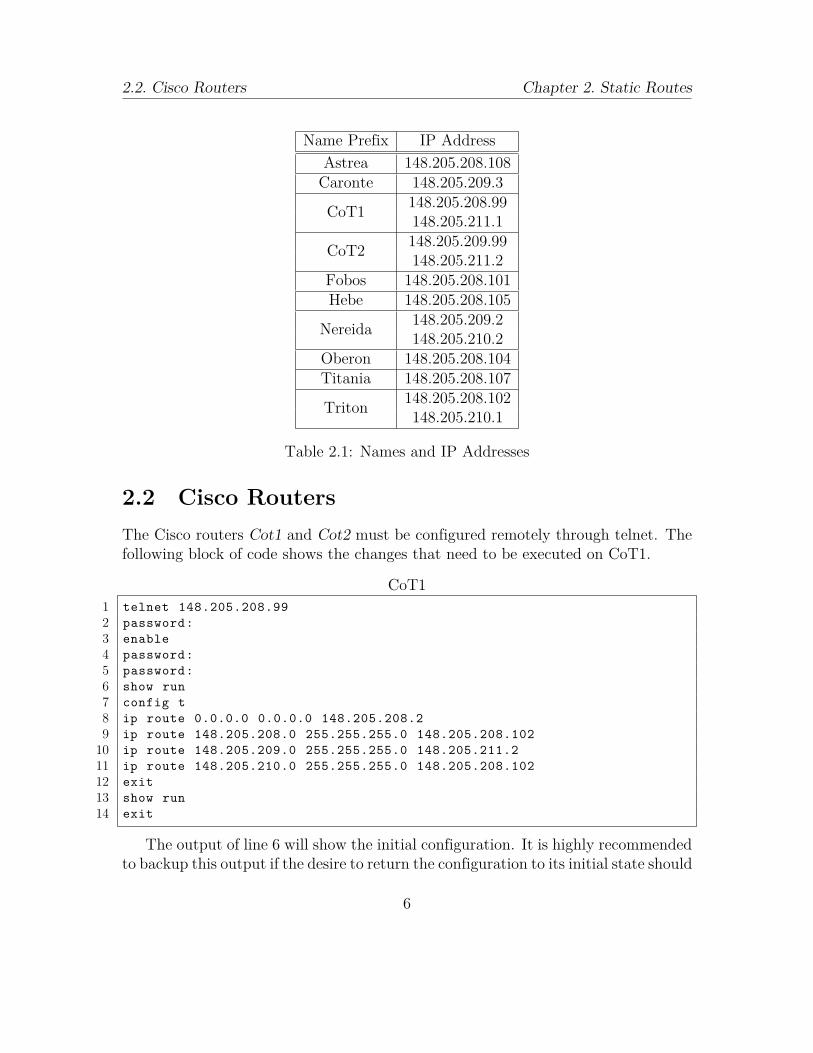
2.2. Cisco Routers Chapter 2. Static Routes
Name Prefix IP AddressAstrea 148.205.208.108
Caronte 148.205.209.3
CoT1 148.205.208.99148.205.211.1
CoT2 148.205.209.99148.205.211.2
Fobos 148.205.208.101Hebe 148.205.208.105
Nereida 148.205.209.2148.205.210.2
Oberon 148.205.208.104Titania 148.205.208.107
Triton 148.205.208.102148.205.210.1
Table 2.1: Names and IP Addresses
2.2 Cisco RoutersThe Cisco routers Cot1 and Cot2 must be configured remotely through telnet. Thefollowing block of code shows the changes that need to be executed on CoT1.
CoT11 telnet 148.205.208.992 password:3 enable4 password:5 password:6 show run7 config t8 ip route 0.0.0.0 0.0.0.0 148.205.208.29 ip route 148.205.208.0 255.255.255.0 148.205.208.102
10 ip route 148.205.209.0 255.255.255.0 148.205.211.211 ip route 148.205.210.0 255.255.255.0 148.205.208.10212 exit13 show run14 exit
The output of line 6 will show the initial configuration. It is highly recommendedto backup this output if the desire to return the configuration to its initial state should
6
2.3. FreeBSD Routers Chapter 2. Static Routes
arise. The output of line 13 is used to verify the changes made. The following blockof code shows the changes that need to be executed on CoT2.
CoT21 telnet 148.205.209.992 password:3 enable4 password:5 password:6 show run7 config t8 ip route 0.0.0.0 0.0.0.0 148.205.211.19 ip route 148.205.210.0 255.255.255.0 148.205.209.2
10 exit11 show run12 exit
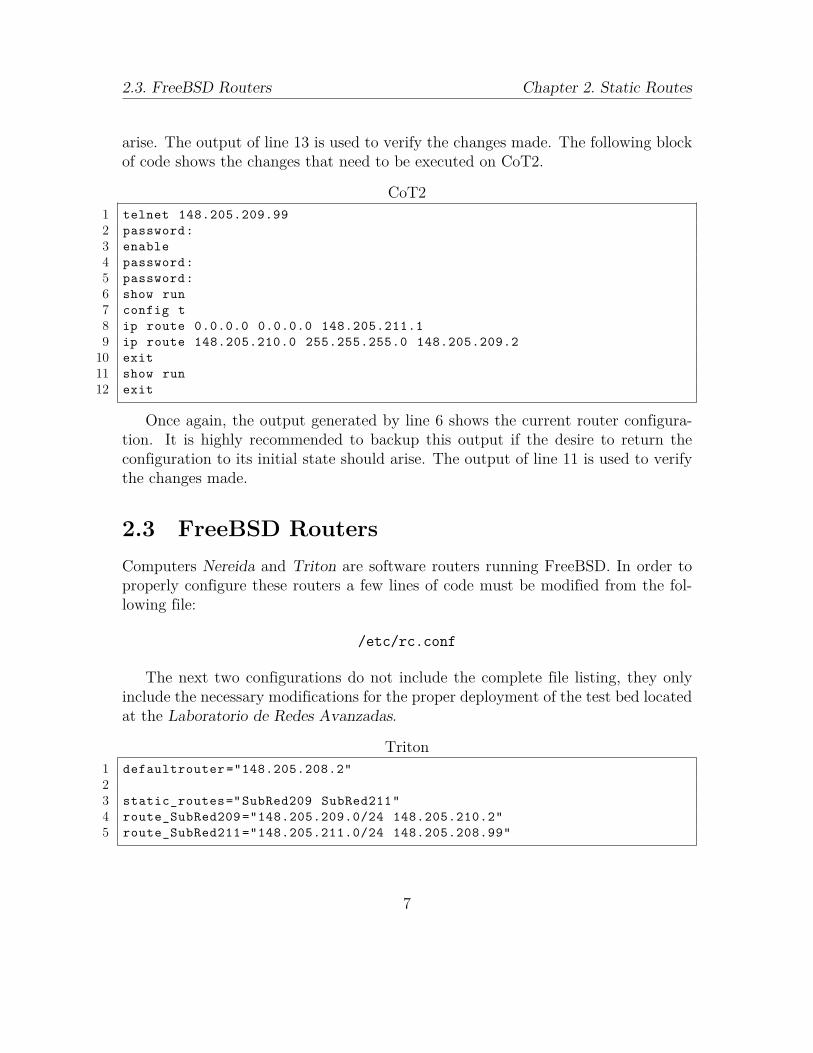
Once again, the output generated by line 6 shows the current router configura-tion. It is highly recommended to backup this output if the desire to return theconfiguration to its initial state should arise. The output of line 11 is used to verifythe changes made.
2.3 FreeBSD RoutersComputers Nereida and Triton are software routers running FreeBSD. In order toproperly configure these routers a few lines of code must be modified from the fol-lowing file:
/etc/rc.conf
The next two configurations do not include the complete file listing, they onlyinclude the necessary modifications for the proper deployment of the test bed locatedat the Laboratorio de Redes Avanzadas.
Triton1 defaultrouter="148.205.208.2"23 static_routes="SubRed209 SubRed211"4 route_SubRed209="148.205.209.0/24 148.205.210.2"5 route_SubRed211="148.205.211.0/24 148.205.208.99"
7
2.4. Caronte Chapter 2. Static Routes
Nereida1 defaultrouter="148.205.209.99"23 static_routes="SubRed208 SubRed211 ipTV asterisk"4 route_SubRed208="148.205.208.0/24 148.205.209.99"5 route_SubRed211="148.205.211.0/24 148.205.209.99"6 route_ipTV="148.205.208.103/32 148.205.210.1"7 route_asterisk="148.205.208.107/32 148.205.210.1"
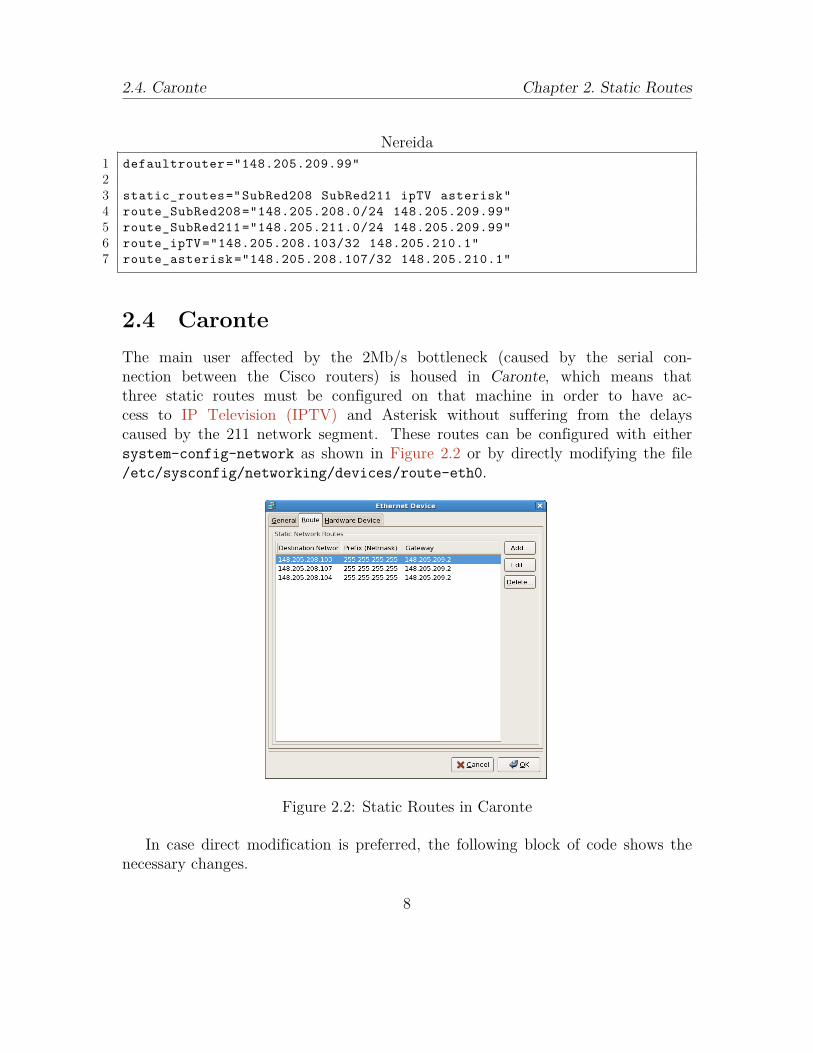
2.4 CaronteThe main user affected by the 2Mb/s bottleneck (caused by the serial con-nection between the Cisco routers) is housed in Caronte, which means thatthree static routes must be configured on that machine in order to have ac-cess to IP Television (IPTV) and Asterisk without suffering from the delayscaused by the 211 network segment. These routes can be configured with eithersystem-config-network as shown in Figure 2.2 or by directly modifying the file/etc/sysconfig/networking/devices/route-eth0.
Figure 2.2: Static Routes in Caronte
In case direct modification is preferred, the following block of code shows thenecessary changes.
8
2.5. Vesta Chapter 2. Static Routes
route-eth01 GATEWAY2=148.205.209.22 NETMASK2=255.255.255.2553 ADDRESS2=148.205.208.1044 GATEWAY1=148.205.209.25 NETMASK1=255.255.255.2556 ADDRESS1=148.205.208.1077 GATEWAY0=148.205.209.28 NETMASK0=255.255.255.2559 ADDRESS0=148.205.208.103
2.5 VestaA properly configured route must possess an incoming and outgoing route. Up to thispoint, the incoming route from the Content Server has not been taken into account.Therefore, it must be configured immediately. Due to the fact that the ContentServer is hosted on a Mac, the easiest way to do configure the new route is througha terminal. First, a new directory must be created as shown in the following blockof code.
Terminal1 cd /System/Library/StartupItems/2 sudo mkdir AddRoutes3 cd AddRoutes
Once these commands have been executed, two new files will be created and savedin this directory. The name of the files and their content is shown in the followingtwo blocks of code.
StartupParameters.plist1 {2 Description = "Add static routing tables";3 Provides = ("AddRoutes");4 Requires = ("Network");5 OrderPreference = "None";6 }
9
2.5. Vesta Chapter 2. Static Routes
AddRoutes1 #!/bin/sh2 # Set up static routing tables3 # Roark Holz, Thursday, April 6, 200645 . /etc/rc.common6 StartService ()7 {8 ConsoleMessage "Adding Static Routing Tables"9 route add -net 148.205.209.3/32 148.205.208.102
10 route add -net 148.205.209.0/24 148.205.208.9911 route add -net 148.205.211.0/24 148.205.208.9912 route add -net 148.205.210.0/24 148.205.208.10213 }14 StopService ()15 {16 return 017 }18 RestartService ()19 {20 return 021 }22 RunService "$1"
10
Chapter 3
DNS Entries
The modified configuration files presented in this Chapter were successfully testedusing named running on FreeBSD 4.4. All the files mentioned in this Chapter canbe found in the directory /etc/namedb/. First, a couple lines must be added to theDomain Name Server (DNS) configuration file named.conf as shown in the followingblock of code:
named.conf1 //configuraciones para usar openIMSCore y Asterisk2 zone "astrea.ipv6.itam.mx" {3 type master;4 file "open-ims.dnszone";5 notify no;6 allow-update { none ; };7 };8 zone "titania.ipv6.itam.mx" {9 type master;
10 file "open-ims2.dnszone";11 notify no;12 allow-update { none ; };13 };14 zone "hebe.ipv6.itam.mx" {15 type master;16 file "asterisk.dnszone";17 notify no;18 allow-update { none ; };19 };
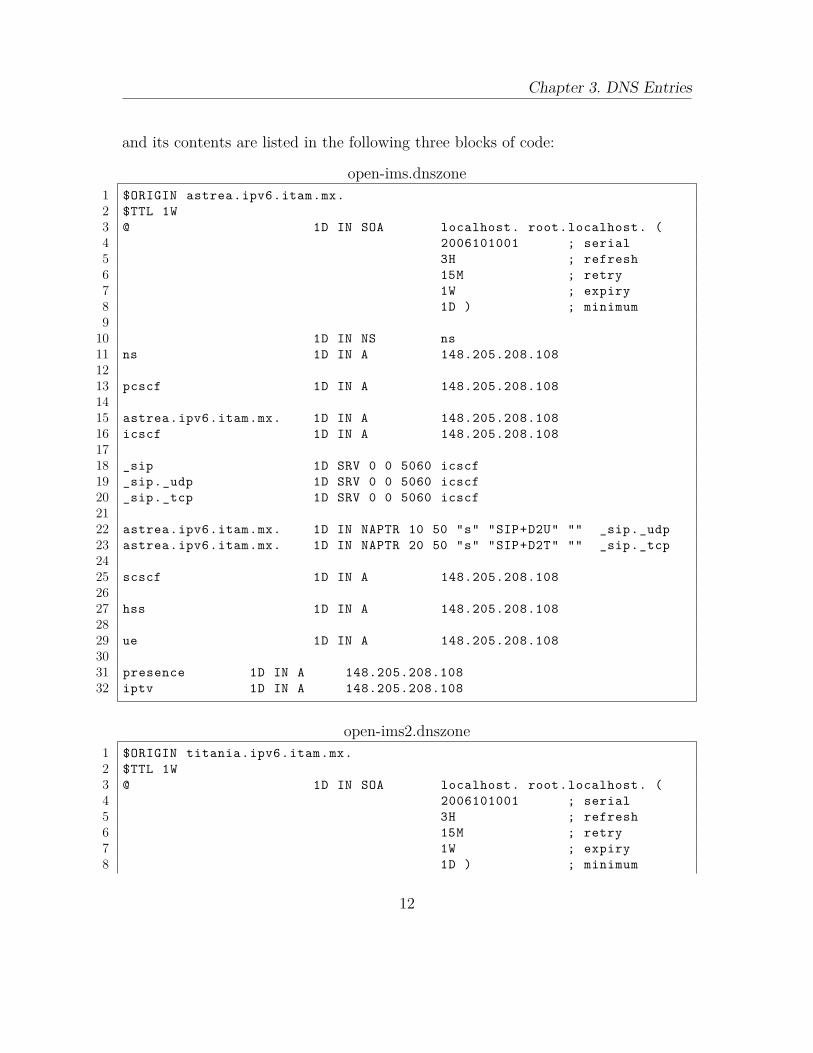
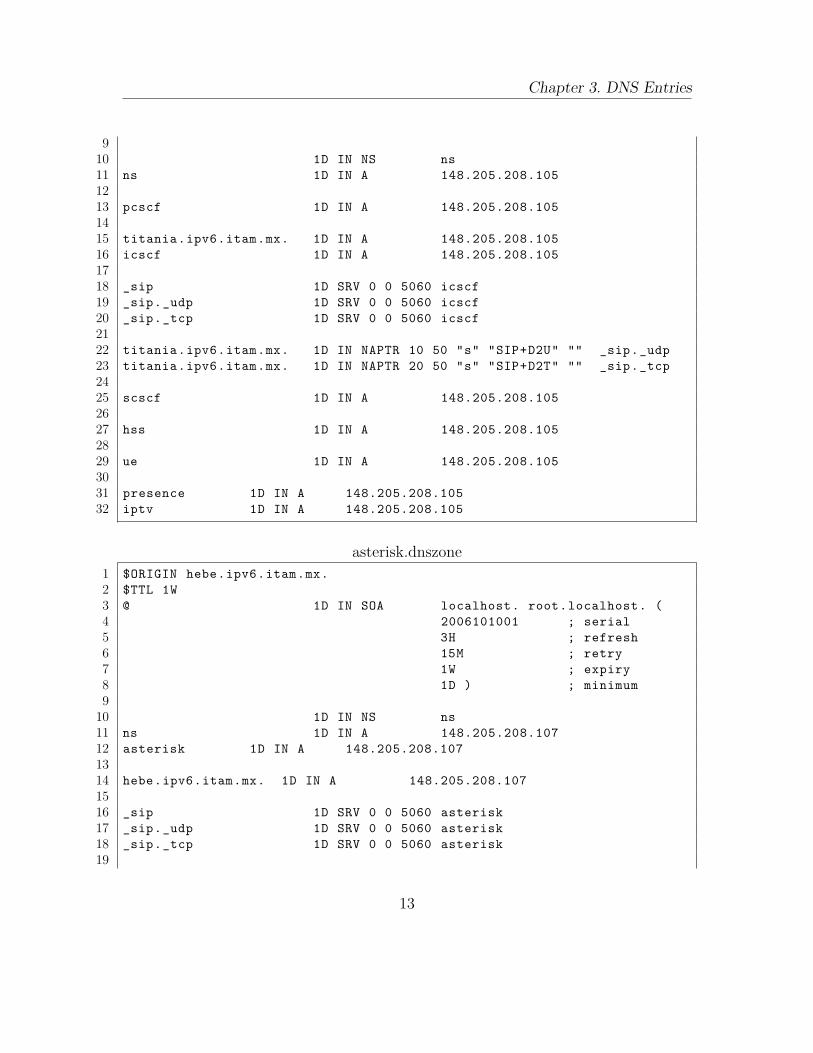
Next, three additional files must be created in the same directory. These filesregister the IMS realms and Asterisk within the DNS server. The name of each file
11
Chapter 3. DNS Entries
and its contents are listed in the following three blocks of code:
open-ims.dnszone1 $ORIGIN astrea.ipv6.itam.mx.2 $TTL 1W3 @ 1D IN SOA localhost. root.localhost. (4 2006101001 ; serial5 3H ; refresh6 15M ; retry7 1W ; expiry8 1D ) ; minimum9
10 1D IN NS ns11 ns 1D IN A 148.205.208.1081213 pcscf 1D IN A 148.205.208.1081415 astrea.ipv6.itam.mx. 1D IN A 148.205.208.10816 icscf 1D IN A 148.205.208.1081718 _sip 1D SRV 0 0 5060 icscf19 _sip._udp 1D SRV 0 0 5060 icscf20 _sip._tcp 1D SRV 0 0 5060 icscf2122 astrea.ipv6.itam.mx. 1D IN NAPTR 10 50 "s" "SIP+D2U" "" _sip._udp23 astrea.ipv6.itam.mx. 1D IN NAPTR 20 50 "s" "SIP+D2T" "" _sip._tcp2425 scscf 1D IN A 148.205.208.1082627 hss 1D IN A 148.205.208.1082829 ue 1D IN A 148.205.208.1083031 presence 1D IN A 148.205.208.10832 iptv 1D IN A 148.205.208.108
open-ims2.dnszone1 $ORIGIN titania.ipv6.itam.mx.2 $TTL 1W3 @ 1D IN SOA localhost. root.localhost. (4 2006101001 ; serial5 3H ; refresh6 15M ; retry7 1W ; expiry8 1D ) ; minimum
12
Chapter 3. DNS Entries
910 1D IN NS ns11 ns 1D IN A 148.205.208.1051213 pcscf 1D IN A 148.205.208.1051415 titania.ipv6.itam.mx. 1D IN A 148.205.208.10516 icscf 1D IN A 148.205.208.1051718 _sip 1D SRV 0 0 5060 icscf19 _sip._udp 1D SRV 0 0 5060 icscf20 _sip._tcp 1D SRV 0 0 5060 icscf2122 titania.ipv6.itam.mx. 1D IN NAPTR 10 50 "s" "SIP+D2U" "" _sip._udp23 titania.ipv6.itam.mx. 1D IN NAPTR 20 50 "s" "SIP+D2T" "" _sip._tcp2425 scscf 1D IN A 148.205.208.1052627 hss 1D IN A 148.205.208.1052829 ue 1D IN A 148.205.208.1053031 presence 1D IN A 148.205.208.10532 iptv 1D IN A 148.205.208.105
asterisk.dnszone1 $ORIGIN hebe.ipv6.itam.mx.2 $TTL 1W3 @ 1D IN SOA localhost. root.localhost. (4 2006101001 ; serial5 3H ; refresh6 15M ; retry7 1W ; expiry8 1D ) ; minimum9
10 1D IN NS ns11 ns 1D IN A 148.205.208.10712 asterisk 1D IN A 148.205.208.1071314 hebe.ipv6.itam.mx. 1D IN A 148.205.208.1071516 _sip 1D SRV 0 0 5060 asterisk17 _sip._udp 1D SRV 0 0 5060 asterisk18 _sip._tcp 1D SRV 0 0 5060 asterisk19
13

Chapter 3. DNS Entries
20 hebe.ipv6.itam.mx. 1D IN NAPTR 10 50 "s" "SIP+D2U" "" _sip._udp21 hebe.ipv6.itam.mx. 1D IN NAPTR 20 50 "s" "SIP+D2T" "" _sip._tcp
The modification of named.conf and the creation of the three additional files issuffice for the configuration of the DNS registries. In order to verify the changessuccessfully, Fobos (our DNS) must be rebooted. Subsequently, the following blockof code can be used to test the changes. The commands and proper output areincluded below.
Terminal1 $ nslookup asterisk.hebe.ipv6.itam.mx2 Server: 148.205.208.1013 Address: 148.205.208.101#5345 Name: asterisk.hebe.ipv6.itam.mx6 Address: 148.205.208.10778 $ nslookup hss.astrea.ipv6.itam.mx9 Server: 148.205.208.101
10 Address: 148.205.208.101#531112 Name: hss.astrea.ipv6.itam.mx13 Address: 148.205.208.1081415 $ nslookup hss.titania.ipv6.itam.mx16 Server: 148.205.208.10117 Address: 148.205.208.101#531819 Name: hss.titania.ipv6.itam.mx20 Address: 148.205.208.105
14
Chapter 4
IMS Realms
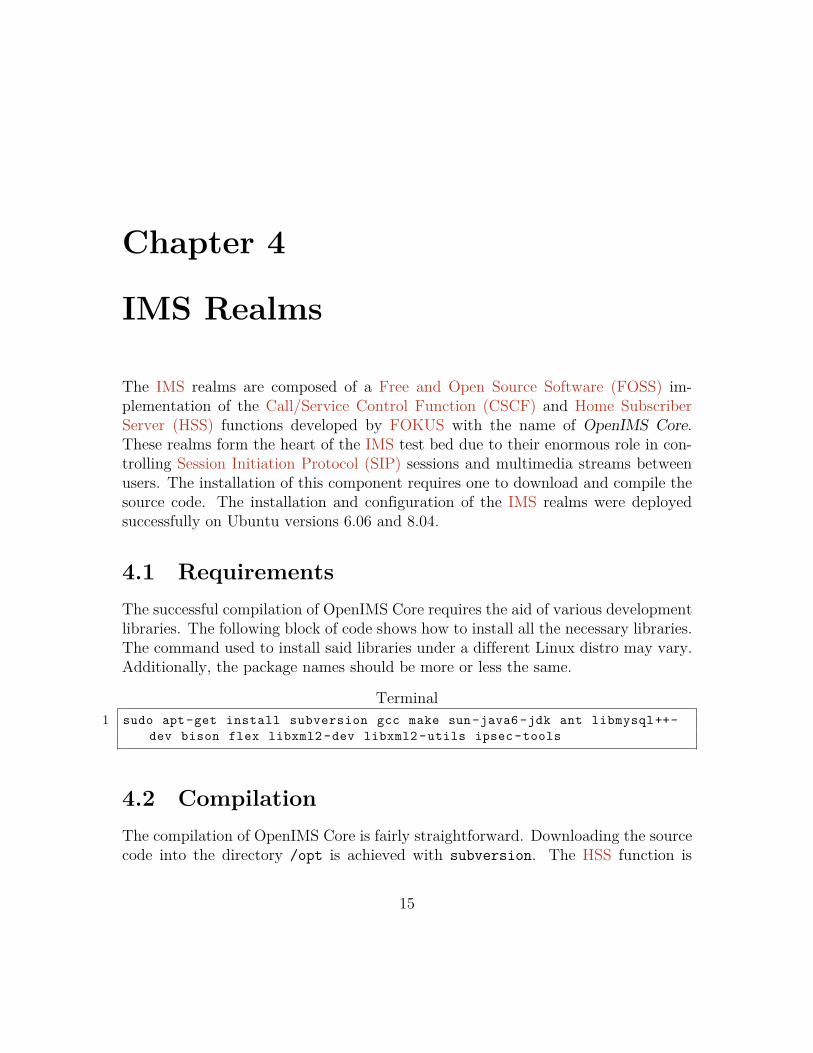
The IMS realms are composed of a Free and Open Source Software (FOSS) im-plementation of the Call/Service Control Function (CSCF) and Home SubscriberServer (HSS) functions developed by FOKUS with the name of OpenIMS Core.These realms form the heart of the IMS test bed due to their enormous role in con-trolling Session Initiation Protocol (SIP) sessions and multimedia streams betweenusers. The installation of this component requires one to download and compile thesource code. The installation and configuration of the IMS realms were deployedsuccessfully on Ubuntu versions 6.06 and 8.04.
4.1 RequirementsThe successful compilation of OpenIMS Core requires the aid of various developmentlibraries. The following block of code shows how to install all the necessary libraries.The command used to install said libraries under a different Linux distro may vary.Additionally, the package names should be more or less the same.
Terminal1 sudo apt-get install subversion gcc make sun-java6-jdk ant libmysql++-
dev bison flex libxml2-dev libxml2-utils ipsec-tools
4.2 CompilationThe compilation of OpenIMS Core is fairly straightforward. Downloading the sourcecode into the directory /opt is achieved with subversion. The HSS function is
15
4.3. Configuration Chapter 4. IMS Realms
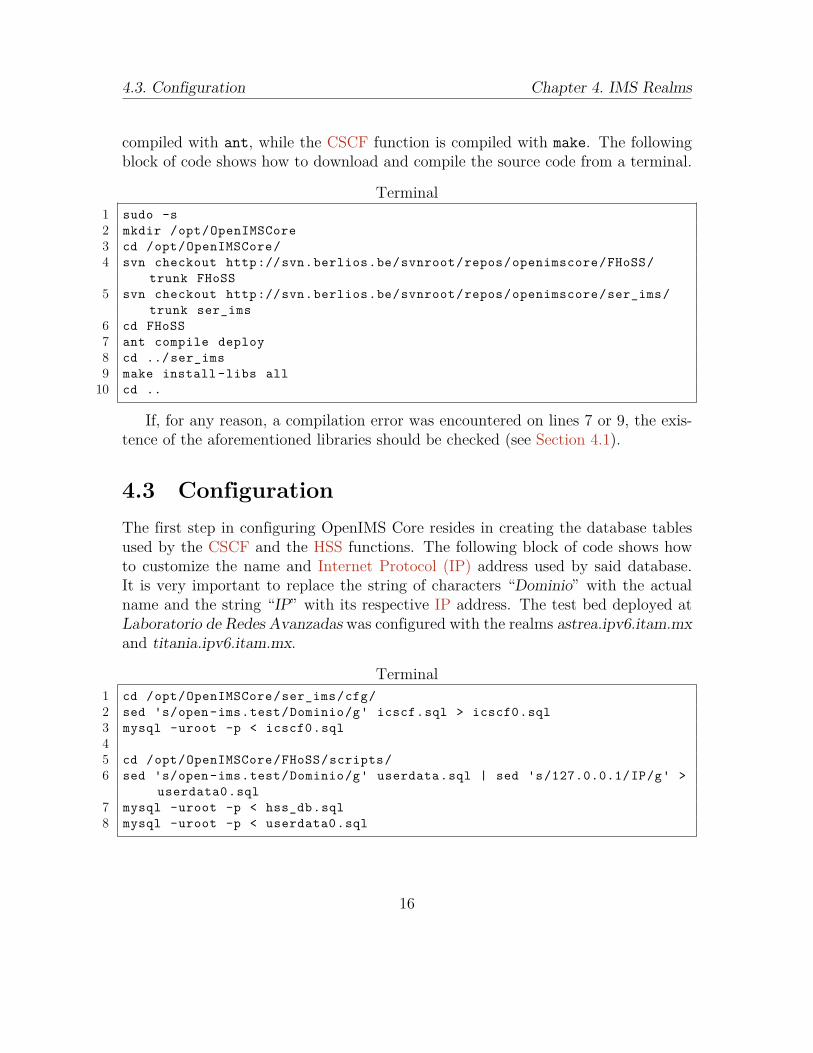
compiled with ant, while the CSCF function is compiled with make. The followingblock of code shows how to download and compile the source code from a terminal.
Terminal1 sudo -s2 mkdir /opt/OpenIMSCore3 cd /opt/OpenIMSCore/4 svn checkout http://svn.berlios.be/svnroot/repos/openimscore/FHoSS/
trunk FHoSS5 svn checkout http://svn.berlios.be/svnroot/repos/openimscore/ser_ims/
trunk ser_ims6 cd FHoSS7 ant compile deploy8 cd ../ser_ims9 make install-libs all
10 cd ..
If, for any reason, a compilation error was encountered on lines 7 or 9, the exis-tence of the aforementioned libraries should be checked (see Section 4.1).
4.3 ConfigurationThe first step in configuring OpenIMS Core resides in creating the database tablesused by the CSCF and the HSS functions. The following block of code shows howto customize the name and Internet Protocol (IP) address used by said database.It is very important to replace the string of characters “Dominio” with the actualname and the string “IP” with its respective IP address. The test bed deployed atLaboratorio de Redes Avanzadas was configured with the realms astrea.ipv6.itam.mxand titania.ipv6.itam.mx.
Terminal1 cd /opt/OpenIMSCore/ser_ims/cfg/2 sed 's/open-ims.test/Dominio/g' icscf.sql > icscf0.sql3 mysql -uroot -p < icscf0.sql45 cd /opt/OpenIMSCore/FHoSS/scripts/6 sed 's/open-ims.test/Dominio/g' userdata.sql | sed 's/127.0.0.1/IP/g' >
userdata0.sql7 mysql -uroot -p < hss_db.sql8 mysql -uroot -p < userdata0.sql
16
4.4. Deployment Chapter 4. IMS Realms
Next, copy the configuration files created after compilation to the directoryOpenIMSCore. Then execute a script that changes the name and IP address usedby the realm. The following block of code shows how to go about this procedure.
Terminal1 cd /opt/OpenIMSCore/2 cp ser_ims/cfg/*.cfg .3 cp ser_ims/cfg/*.xml .4 cp ser_ims/cfg/*.sh .56 ./configurator.sh
The IMS realms provide a web interface used to administer its users, applications,and services. The last configuration requires customizing the web interface availableat the address http://REALM:8080. The port number can be changed by modifyinga line in the file /opt/OpenIMSCore/FHoSS/deploy/hss.properties. The followingcode shows how to customize the name and IP used. Again, the strings “IP” and“Dominio” must be changed to their proper values.
Terminal1 cd /opt/OpenIMSCore/FHoSS/deploy/2 cp hss.properties hss.properties.bak3 sed 's/127.0.0.1/IP/g' hss.properties.bak > hss.properties4 cp DiameterPeerHSS.xml DiameterPeerHSS.xml.bak5 sed 's/open-ims.test/Dominio/g' DiameterPeerHSS.xml.bak | sed 's
/127.0.0.1/IP/g' > DiameterPeerHSS.xml
4.4 DeploymentOne final step is necessary before the IMS realm can be executed. Open file/opt/OpenIMSCore/FHoSS/deploy/startup.sh with your favorite text editor to ini-tialize the variable CLASSPATH and change the last line of code to match the blockof code shown below:
startup.sh1 #!/bin/bash2 # --------------------------------------------------------------3 # Include JAR Files4 # --------------------------------------------------------------56 echo "Building Classpath"
17
4.4. Deployment Chapter 4. IMS Realms
78 CLASSPATH="/usr/share/java/log4j.jar:/opt/OpenIMSCore/FHoSS/bin/:/usr/
share/tomcat5.5/server/lib/tomcat-util.jar:/opt/OpenIMSCore/FHoSS/tomcat/lib/commons-logging.jar:lib/xml-apis.jar:lib/xercesImpl.jar:lib/xerces -2.4.0.jar:lib/xalan -2.4.0.jar:lib/tomcat-util.jar:lib/tomcat-http.jar:lib/tomcat-coyote.jar:lib/struts.jar:lib/servlets-default.jar:lib/servlet-api.jar:lib/naming-resources.jar:lib/naming-factory.jar:lib/mysql-connector -java -3.1.12-bin.jar:lib/mx4j -3.0.1.jar:lib/log4j.jar:lib/junit.jar:lib/junitee.jar:lib/jta.jar:lib/jsp-api.jar:lib/jmx.jar:lib/jdp.jar:lib/jasper-runtime.jar:lib/jasper-compiler-jdt.jar:lib/jasper-compiler.jar:lib/hibernate3.jar:lib/FHoSS.jar:lib/ehcache -1.1.jar:lib/dom4j -1.6.1.jar:lib/commons-validator.jar:lib/commons-modeler.jar:lib/commons-logging.jar:lib/commons-logging -1.0.4.jar:lib/commons-lang.jar:lib/commons-fileupload.jar:lib/commons-el.jar:lib/commons-digester.jar:lib/commons-collections -3.1.jar:lib/commons-beanutils.jar:lib/cglib-2.1.3.jar:lib/catalina-optional.jar:lib/catalina.jar:lib/c3p0-0.9.1.jar:lib/base64.jar:lib/asm.jar:lib/asm-attrs.jar:lib/antlr-2.7.6.jar"
910 CLASSPATH=$CLASSPATH:log4j.properties:.11 for i in lib/*.jar; do CLASSPATH="$i":"$CLASSPATH"; done12 echo "Classpath is $CLASSPATH."1314 # --------------------------------------------------------------15 # Start-up16 # --------------------------------------------------------------1718 java -cp $CLASSPATH de.fhg.fokus.hss.main.HSSContainer $1 $2 $3 $4 $5
$6 $7 $8 $9
Finally, the realm can be initiated by executing the four commands shown belowas root on separate terminals.
• /opt/OpenIMSCore/fhoss.sh
• /opt/OpenIMSCore/icscf.sh
• /opt/OpenIMSCore/pcscf.sh
• /opt/OpenIMSCore/scscf.sh
The proper execution of each IMS function results in messages being exchangedbetween them. Table 4.1 shows an outline of the ports used by the IMS realm.
18
4.4. Deployment Chapter 4. IMS Realms
Function Port NumberP-CSCF 4060I-CSCF 5060S-CSCF 6060
HSS (Diameter) 3868, 3869, 3870, 8080
Table 4.1: Ports Used by the IMS Realms
It is important to note that OpenIMS Core comes pre-configured with two users:sip:alice@REALM and sip:bob@REALM with passwords alice and bob respectively.
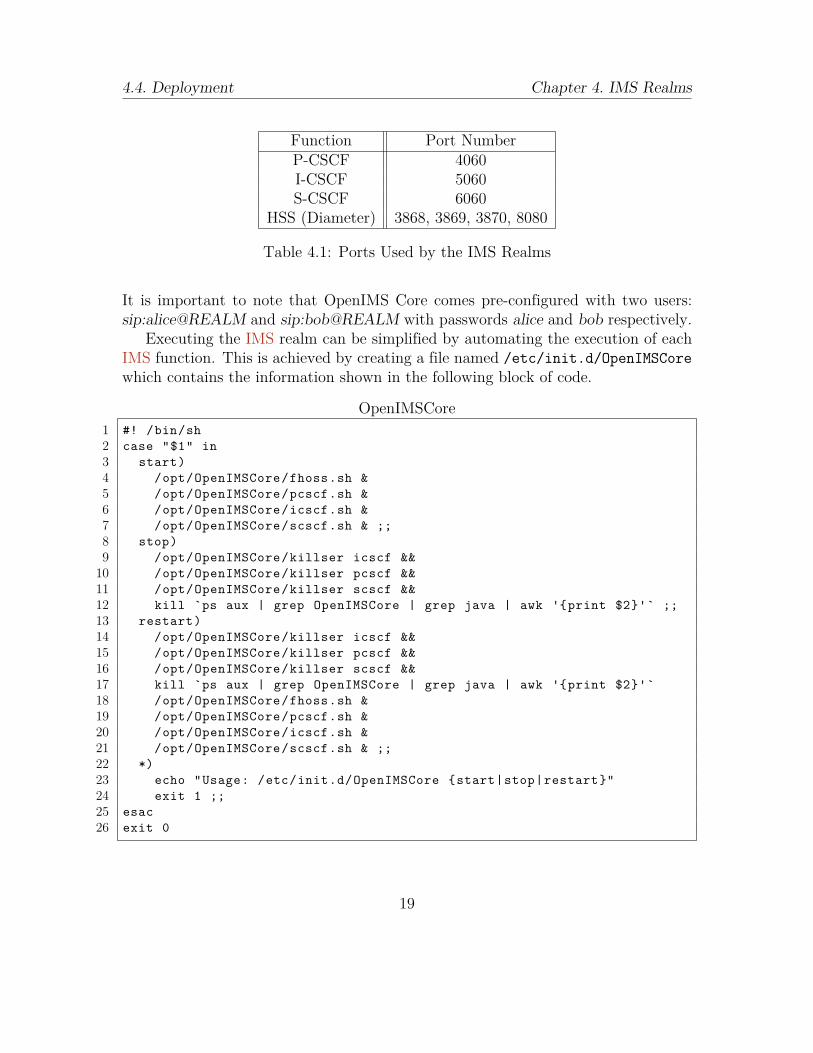
Executing the IMS realm can be simplified by automating the execution of eachIMS function. This is achieved by creating a file named /etc/init.d/OpenIMSCorewhich contains the information shown in the following block of code.
OpenIMSCore1 #! /bin/sh2 case "$1" in3 start)4 /opt/OpenIMSCore/fhoss.sh &5 /opt/OpenIMSCore/pcscf.sh &6 /opt/OpenIMSCore/icscf.sh &7 /opt/OpenIMSCore/scscf.sh & ;;8 stop)9 /opt/OpenIMSCore/killser icscf &&
10 /opt/OpenIMSCore/killser pcscf &&11 /opt/OpenIMSCore/killser scscf &&12 kill `ps aux | grep OpenIMSCore | grep java | awk '{print $2}'` ;;13 restart)14 /opt/OpenIMSCore/killser icscf &&15 /opt/OpenIMSCore/killser pcscf &&16 /opt/OpenIMSCore/killser scscf &&17 kill `ps aux | grep OpenIMSCore | grep java | awk '{print $2}'`18 /opt/OpenIMSCore/fhoss.sh &19 /opt/OpenIMSCore/pcscf.sh &20 /opt/OpenIMSCore/icscf.sh &21 /opt/OpenIMSCore/scscf.sh & ;;22 *)23 echo "Usage: /etc/init.d/OpenIMSCore {start|stop|restart}"24 exit 1 ;;25 esac26 exit 0
19
4.4. Deployment Chapter 4. IMS Realms
Now, the IMS realm can be controlled by simply executing the file created. Addi-tionally, symlinks can be set at the appropriate runlevel directories (i.e. /etc/rc*.d/)in order to automatically initiate the IMS realm on system boot. The following blockof code shows an example of how to establish the symlinks at runlevels 0 through 6.Only set up those which are useful to your organization.
Terminal1 ln -s /etc/init.d/OpenIMSCore /etc/rc0.d/K30OpenIMSCore2 ln -s /etc/init.d/OpenIMSCore /etc/rc1.d/K30OpenIMSCore3 ln -s /etc/init.d/OpenIMSCore /etc/rc2.d/S30OpenIMSCore4 ln -s /etc/init.d/OpenIMSCore /etc/rc3.d/S30OpenIMSCore5 ln -s /etc/init.d/OpenIMSCore /etc/rc4.d/S30OpenIMSCore6 ln -s /etc/init.d/OpenIMSCore /etc/rc5.d/S30OpenIMSCore7 ln -s /etc/init.d/OpenIMSCore /etc/rc6.d/K30OpenIMSCore
Once the IMS realm has been deployed any future configurations or customiza-tions can be done with the help of the web interface available at http://REALM:8080.This procedure is repeated as many times as necessary until all the IMS realms usedin the test bed have been successfully deployed.
20
Chapter 5
PSTN Gateway
The Public Switched Telephone Network (PSTN) Gateway is composed of two sep-arate entities: an Asterisk server and a Peripheral Component Interconnect (PCI)card capable of filling the void between the analog and digital worlds. Each of theseentities require its own installation. Asterisk’s source code must be modified in orderto achieve a successful integration with the IMS test bed. This forcefully requires thecompilation of both softare and hardware (driver) components. It is recommendedto approach this Chapter with a basic understanding of compilation tools for Linuxenvironments.
5.1 Digium HardwareThe PCI card used for the creation of the PSTN Gateway must be Asterisk certifiedand have at least one Foreign eXchange Office (FXO) port. The card used for thedeployment of this test bed is a Digium Wildcard TDM400P with three FXO portsand one Foreign eXchange Station (FXS) port used to connect an analog phone. Theextra FXO ports can be used to connect additional PSTN providers to Asterisk.
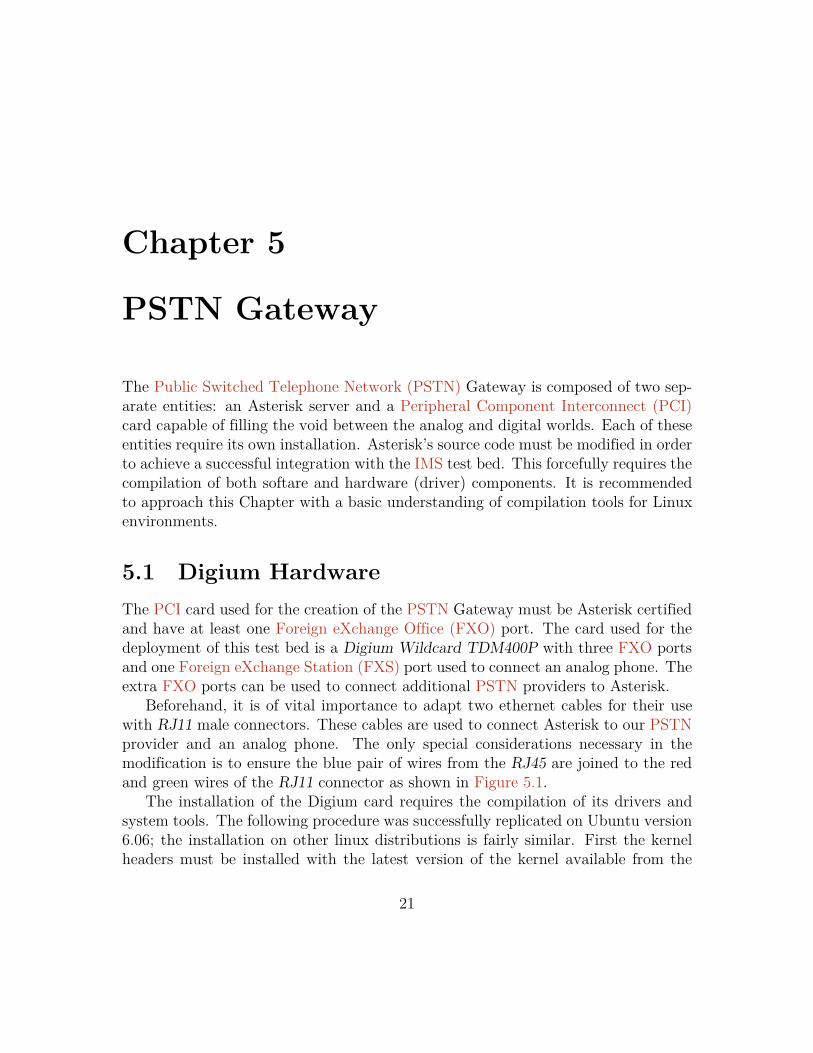
Beforehand, it is of vital importance to adapt two ethernet cables for their usewith RJ11 male connectors. These cables are used to connect Asterisk to our PSTNprovider and an analog phone. The only special considerations necessary in themodification is to ensure the blue pair of wires from the RJ45 are joined to the redand green wires of the RJ11 connector as shown in Figure 5.1.
The installation of the Digium card requires the compilation of its drivers andsystem tools. The following procedure was successfully replicated on Ubuntu version6.06; the installation on other linux distributions is fairly similar. First the kernelheaders must be installed with the latest version of the kernel available from the
21
5.1. Digium Hardware Chapter 5. PSTN Gateway
Figure 5.1: Wiring Diagram for RJ45 and RJ11 Compatibility
package manager. The following command shows how to install the kernel headersafter the kernel has been updated and the machine rebooted.
apt-get install linux-source linux-headers-`uname -r`
At the time of writing this document, the drivers and system tools were availableat the following urls for their successful download.
• http://downloads.asterisk.org/pub/telephony/dahdi-linux/dahdi-linux-current.tar.gz
• http://downloads.asterisk.org/pub/telephony/dahdi-tools/dahdi-tools-current.tar.gz
• http://downloads.asterisk.org/pub/telephony/libpri/libpri-1.4-current.tar.gz
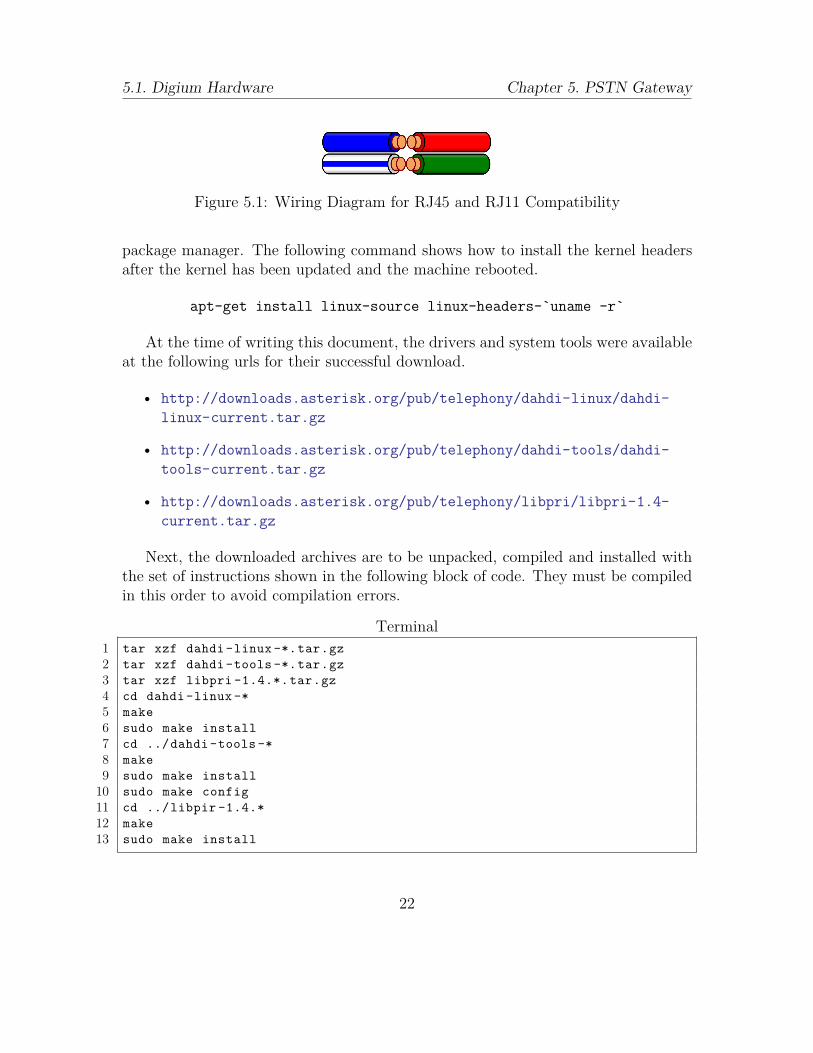
Next, the downloaded archives are to be unpacked, compiled and installed withthe set of instructions shown in the following block of code. They must be compiledin this order to avoid compilation errors.
Terminal1 tar xzf dahdi-linux -*.tar.gz2 tar xzf dahdi-tools -*.tar.gz3 tar xzf libpri -1.4.*.tar.gz4 cd dahdi-linux-*5 make6 sudo make install7 cd ../dahdi-tools-*8 make9 sudo make install
10 sudo make config11 cd ../libpir -1.4.*12 make13 sudo make install
22
5.2. Asterisk Software Chapter 5. PSTN Gateway
Fortunately, dahdi-tools is able to correctly identify the Digium card. Theload time of the dahdi modules can be reduced by commenting out all the linesfrom the file /etc/dahdi/modules, except the one containing the variable wctdm.Even though, the drivers have been successfully installed, it is recommended to finishinstalling Asterisk before proceeding to their configuration.
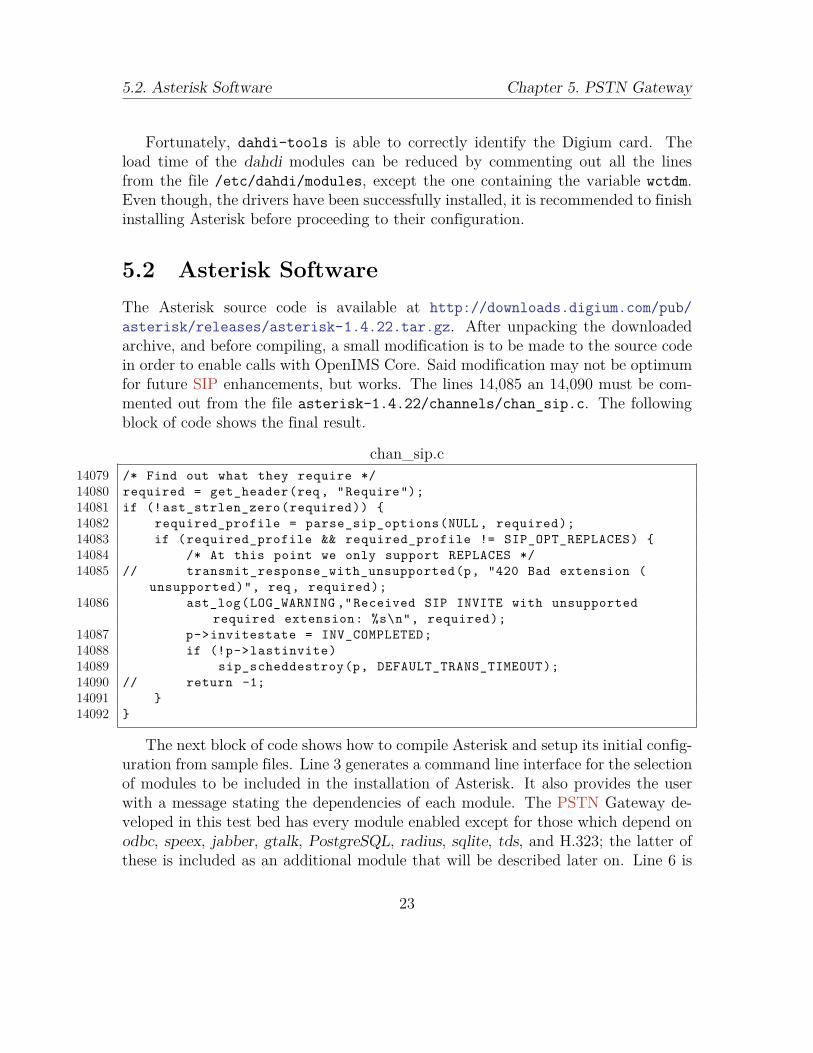
5.2 Asterisk SoftwareThe Asterisk source code is available at http://downloads.digium.com/pub/asterisk/releases/asterisk-1.4.22.tar.gz. After unpacking the downloadedarchive, and before compiling, a small modification is to be made to the source codein order to enable calls with OpenIMS Core. Said modification may not be optimumfor future SIP enhancements, but works. The lines 14,085 an 14,090 must be com-mented out from the file asterisk-1.4.22/channels/chan_sip.c. The followingblock of code shows the final result.
chan_sip.c14079 /* Find out what they require */14080 required = get_header(req, "Require");14081 if (!ast_strlen_zero(required)) {14082 required_profile = parse_sip_options(NULL, required);14083 if (required_profile && required_profile != SIP_OPT_REPLACES) {14084 /* At this point we only support REPLACES */14085 // transmit_response_with_unsupported(p, "420 Bad extension (
unsupported)", req, required);14086 ast_log(LOG_WARNING ,"Received SIP INVITE with unsupported
required extension: %s\n", required);14087 p->invitestate = INV_COMPLETED;14088 if (!p->lastinvite)14089 sip_scheddestroy(p, DEFAULT_TRANS_TIMEOUT);14090 // return -1;14091 }14092 }
The next block of code shows how to compile Asterisk and setup its initial config-uration from sample files. Line 3 generates a command line interface for the selectionof modules to be included in the installation of Asterisk. It also provides the userwith a message stating the dependencies of each module. The PSTN Gateway de-veloped in this test bed has every module enabled except for those which depend onodbc, speex, jabber, gtalk, PostgreSQL, radius, sqlite, tds, and H.323; the latter ofthese is included as an additional module that will be described later on. Line 6 is
23
5.2. Asterisk Software Chapter 5. PSTN Gateway
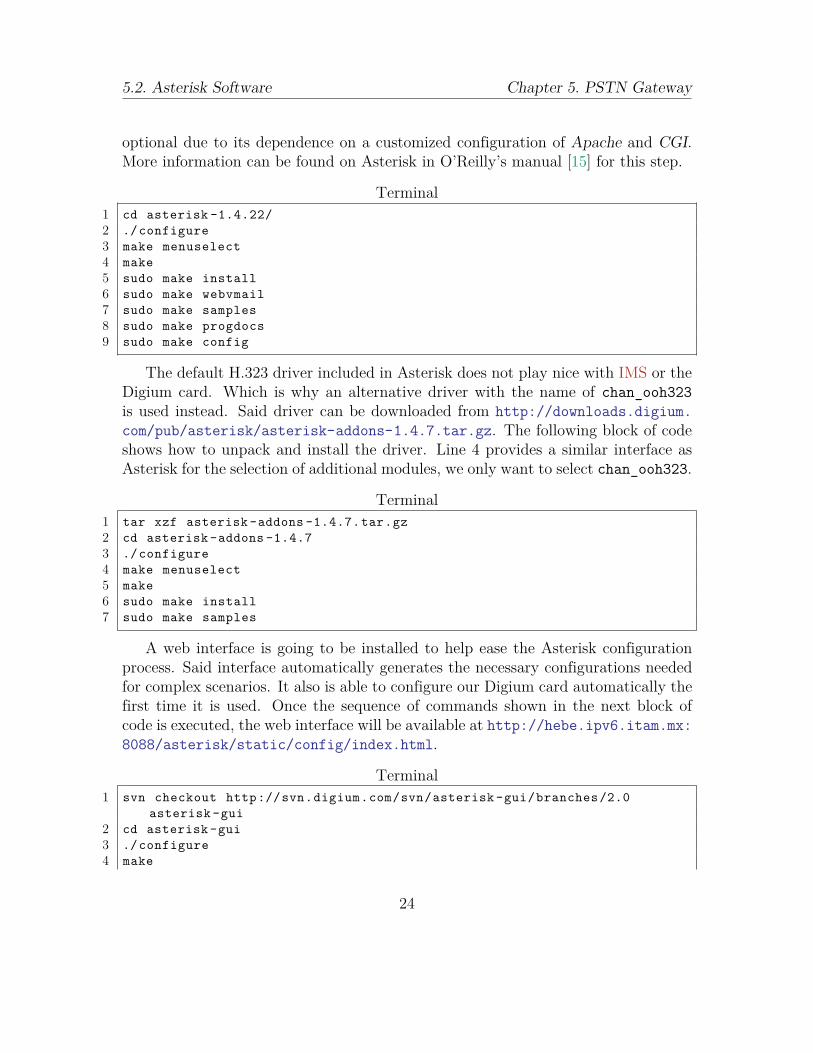
optional due to its dependence on a customized configuration of Apache and CGI.More information can be found on Asterisk in O’Reilly’s manual [15] for this step.
Terminal1 cd asterisk -1.4.22/2 ./configure3 make menuselect4 make5 sudo make install6 sudo make webvmail7 sudo make samples8 sudo make progdocs9 sudo make config
The default H.323 driver included in Asterisk does not play nice with IMS or theDigium card. Which is why an alternative driver with the name of chan_ooh323is used instead. Said driver can be downloaded from http://downloads.digium.com/pub/asterisk/asterisk-addons-1.4.7.tar.gz. The following block of codeshows how to unpack and install the driver. Line 4 provides a similar interface asAsterisk for the selection of additional modules, we only want to select chan_ooh323.
Terminal1 tar xzf asterisk-addons -1.4.7.tar.gz2 cd asterisk-addons -1.4.73 ./configure4 make menuselect5 make6 sudo make install7 sudo make samples
A web interface is going to be installed to help ease the Asterisk configurationprocess. Said interface automatically generates the necessary configurations neededfor complex scenarios. It also is able to configure our Digium card automatically thefirst time it is used. Once the sequence of commands shown in the next block ofcode is executed, the web interface will be available at http://hebe.ipv6.itam.mx:8088/asterisk/static/config/index.html.
Terminal1 svn checkout http://svn.digium.com/svn/asterisk-gui/branches/2.0
asterisk-gui2 cd asterisk-gui3 ./configure4 make
24
5.3. Feature Setup Chapter 5. PSTN Gateway
5 sudo make install6 sudo make samples7 make checkconfig
Finally, the driver configurations must be generated. The dahdi driver and As-terisk must be restarted afterwards as well. This process is done with the threecommands shown in the next block of code.
Terminal1 sudo dahdi_genconf2 sudo /etc/init.d/dahdi restart3 sudo /etc/init.d/asterisk restart
5.3 Feature SetupThe first step in configuring Asterisk consists of enabling the web interfaceand configuring the user that has access to it. This can be done by check-ing certain variables in the configuration files /etc/asterisk/http.conf and/etc/asterisk/manager.conf. The former is used to configure the web serverwhile the latter is used to configure the administrator. The following two blocksof code show the necessary modifications. Please note that the whole file is notincluded, only the relevant information.
http.conf1 [general]2 enabled = yes3 enablestatic = yes4 bindport = 8088
manager.conf1 [general]2 webenabled=yes34 [usuario]5 secret = claveDeAcceso6 read = system,call,log,verbose,command,agent,user,config7 write = system,call,log,verbose,command,agent,user,config
Obviously, lines 4 and 5 shown above must be changed to suit your organiza-tion. Additional users can be configured by following the example shown above andmodifying the read and write permitions.
25
5.3.1. Global Settings Chapter 5. PSTN Gateway
Now the Digium card is going to be configured by entering the web interface witha valid username and password at http://hebe.ipv6.itam.mx:8088/asterisk/static/config/index.html. The time has come to use the web interface to config-ure the majority of Asterisk. The following sections shall be configured with the aidof the menu located at the left hand side of the web interface.
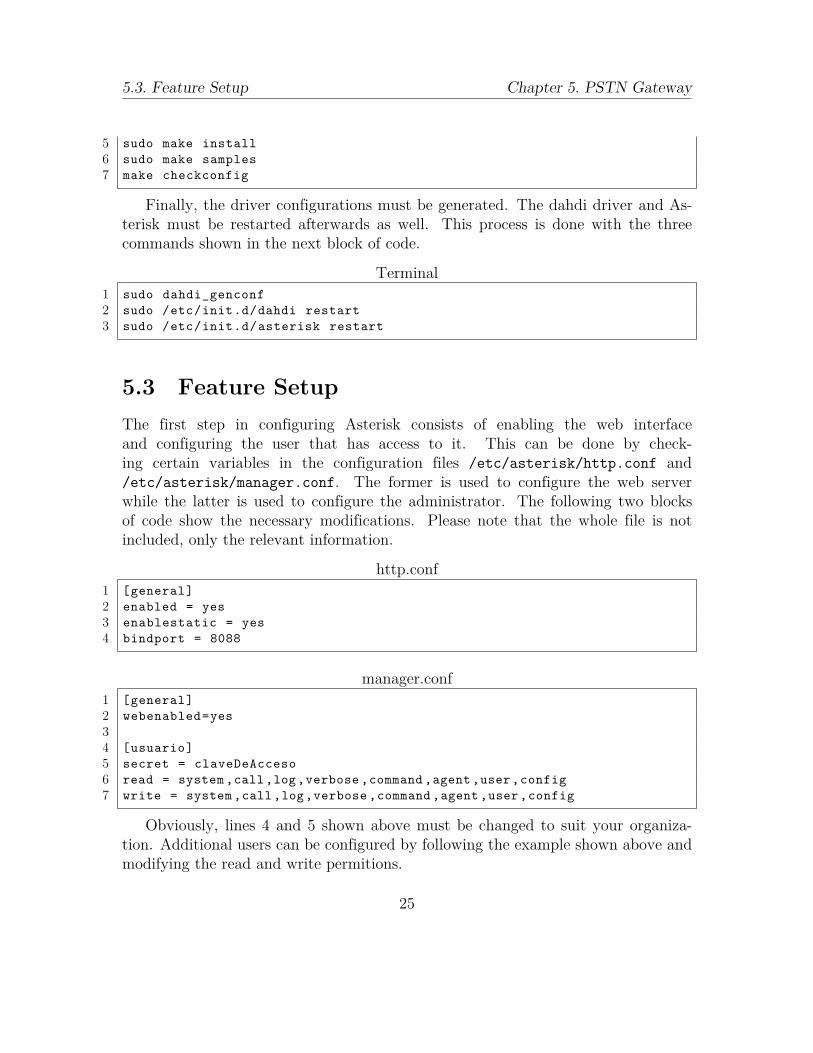
5.3.1 Global SettingsBefore any customizations are made to Asterisk, there are a few global settings thatmust be configured to enable special services within the software Private BrancheXchange (PBX). The first of which is Voicemail with extension 5000; it should havethe Say message Caller-ID feature disabled and the Play envelope feature enabled.Extension 4000 is then assigned to the Directory. Under the menu item Call Features,Blind Transfer is enabled and so is everything else under the tab Dial Options.Advanced Options must be enabled from the menu item Options in order to configureSIP global settings. Figure 5.2 finally shows the SIP settings used.
Figure 5.2: SIP Settings
Last but not least, restrictions are applied to the available codecs used by SIPto avoid communication problems present with UCT IMS Client due to a bug ingstreamer’s Global System for Mobile communications (GSM) codec. All codecsmust be disabled except for u-law, a-law, and GSM under the tab Codecs.
26
5.3.2. Trunks Chapter 5. PSTN Gateway
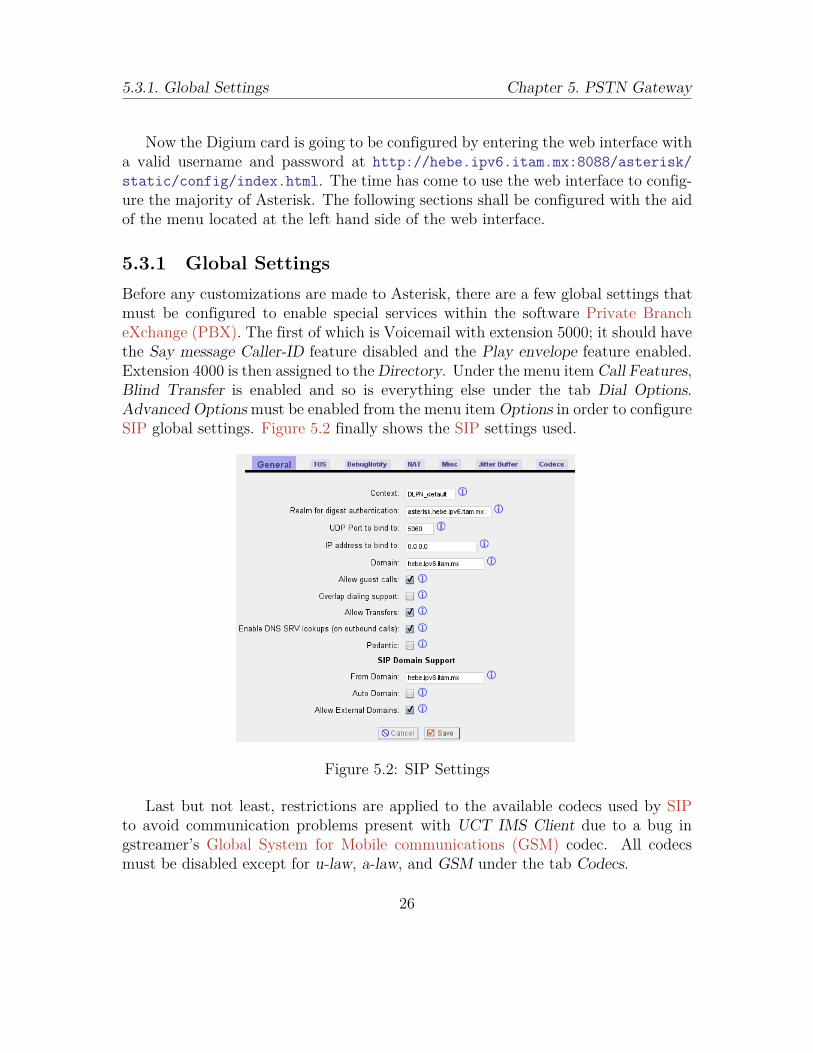
5.3.2 TrunksA total of three trunks are to be created: one analog and two digital (SIP). Theanalog trunk simply states the FXO channels used. The name given to this trunk iscanalesFXO which contains all the FXO channels. The configuration of said trunkshould look like Figure 5.3.
Figure 5.3: Analog Trunk
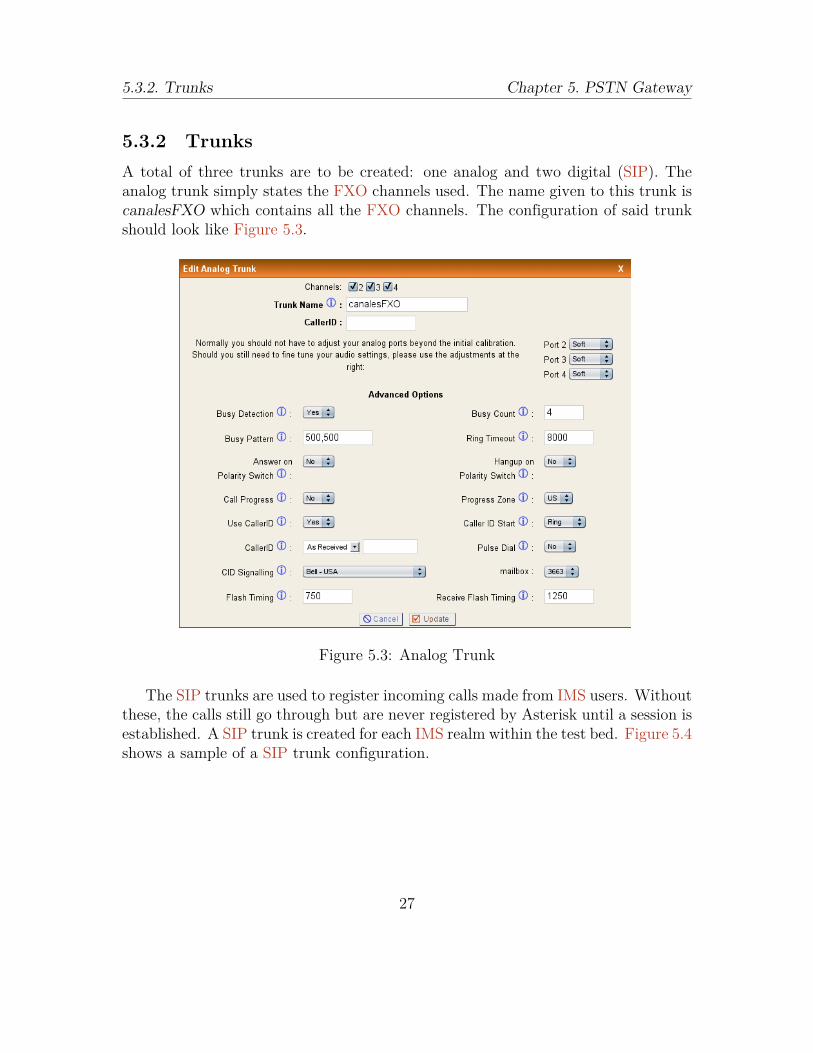
The SIP trunks are used to register incoming calls made from IMS users. Withoutthese, the calls still go through but are never registered by Asterisk until a session isestablished. A SIP trunk is created for each IMS realm within the test bed. Figure 5.4shows a sample of a SIP trunk configuration.
27
5.3.3. Incoming and Outgoing Calling Rules Chapter 5. PSTN Gateway
Figure 5.4: VOIP Trunk
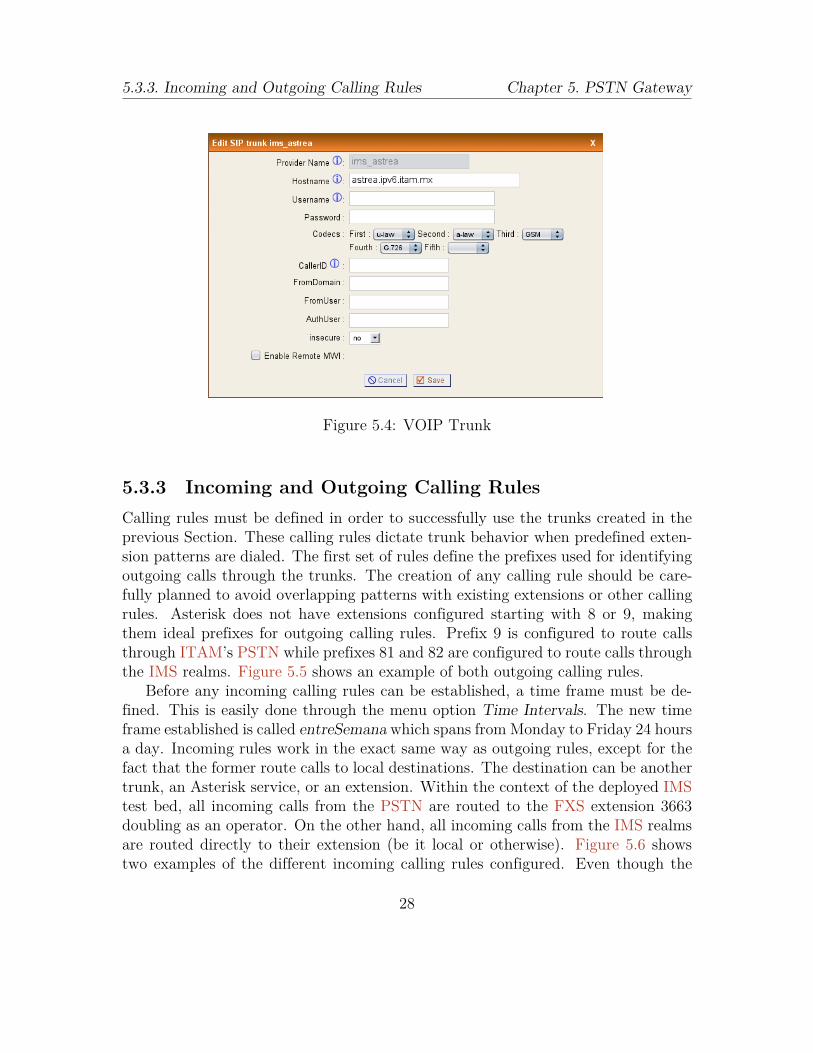
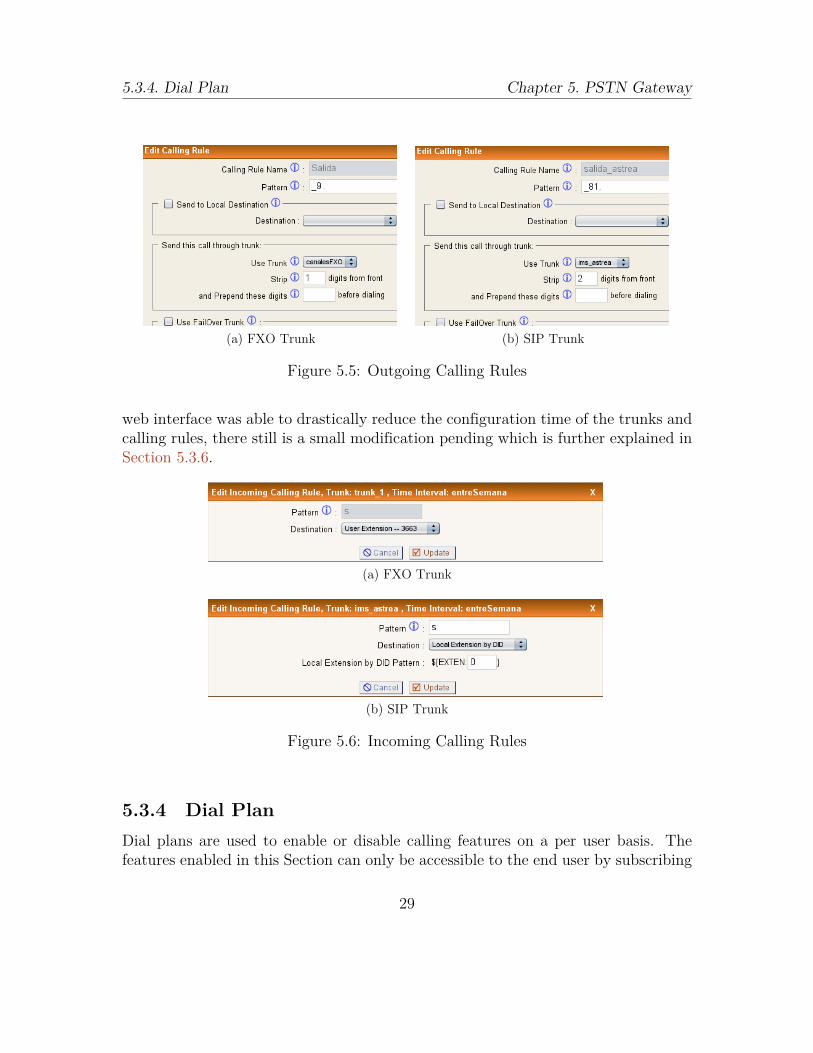
5.3.3 Incoming and Outgoing Calling RulesCalling rules must be defined in order to successfully use the trunks created in theprevious Section. These calling rules dictate trunk behavior when predefined exten-sion patterns are dialed. The first set of rules define the prefixes used for identifyingoutgoing calls through the trunks. The creation of any calling rule should be care-fully planned to avoid overlapping patterns with existing extensions or other callingrules. Asterisk does not have extensions configured starting with 8 or 9, makingthem ideal prefixes for outgoing calling rules. Prefix 9 is configured to route callsthrough ITAM’s PSTN while prefixes 81 and 82 are configured to route calls throughthe IMS realms. Figure 5.5 shows an example of both outgoing calling rules.
Before any incoming calling rules can be established, a time frame must be de-fined. This is easily done through the menu option Time Intervals. The new timeframe established is called entreSemana which spans from Monday to Friday 24 hoursa day. Incoming rules work in the exact same way as outgoing rules, except for thefact that the former route calls to local destinations. The destination can be anothertrunk, an Asterisk service, or an extension. Within the context of the deployed IMStest bed, all incoming calls from the PSTN are routed to the FXS extension 3663doubling as an operator. On the other hand, all incoming calls from the IMS realmsare routed directly to their extension (be it local or otherwise). Figure 5.6 showstwo examples of the different incoming calling rules configured. Even though the
28
5.3.4. Dial Plan Chapter 5. PSTN Gateway
(a) FXO Trunk (b) SIP Trunk
Figure 5.5: Outgoing Calling Rules
web interface was able to drastically reduce the configuration time of the trunks andcalling rules, there still is a small modification pending which is further explained inSection 5.3.6.
(a) FXO Trunk
(b) SIP Trunk
Figure 5.6: Incoming Calling Rules
5.3.4 Dial PlanDial plans are used to enable or disable calling features on a per user basis. Thefeatures enabled in this Section can only be accessible to the end user by subscribing
29
5.3.5. Users Chapter 5. PSTN Gateway
them to a dial plan that offers said features. Since the IMS test bed’s purpose is toenable as many features as possible, all these are included in the default dial plannamed default along with the calling rules. This can be configured through the webinterface easily.
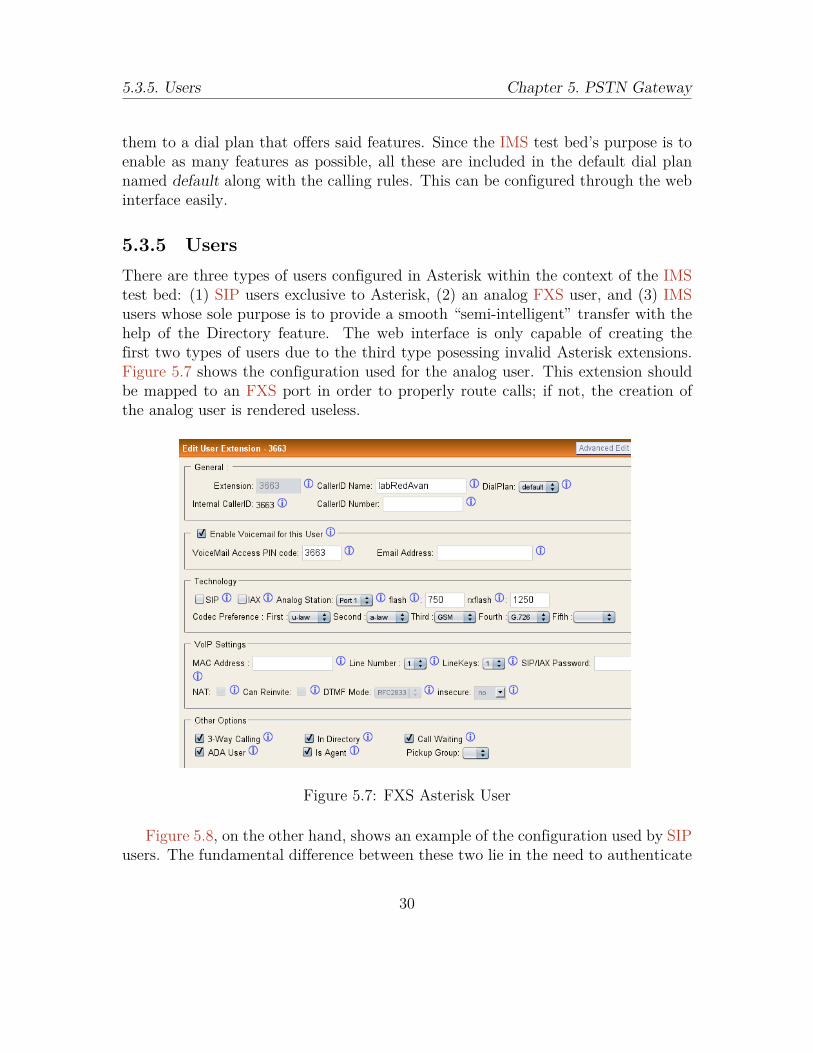
5.3.5 UsersThere are three types of users configured in Asterisk within the context of the IMStest bed: (1) SIP users exclusive to Asterisk, (2) an analog FXS user, and (3) IMSusers whose sole purpose is to provide a smooth “semi-intelligent” transfer with thehelp of the Directory feature. The web interface is only capable of creating thefirst two types of users due to the third type posessing invalid Asterisk extensions.Figure 5.7 shows the configuration used for the analog user. This extension shouldbe mapped to an FXS port in order to properly route calls; if not, the creation ofthe analog user is rendered useless.
Figure 5.7: FXS Asterisk User
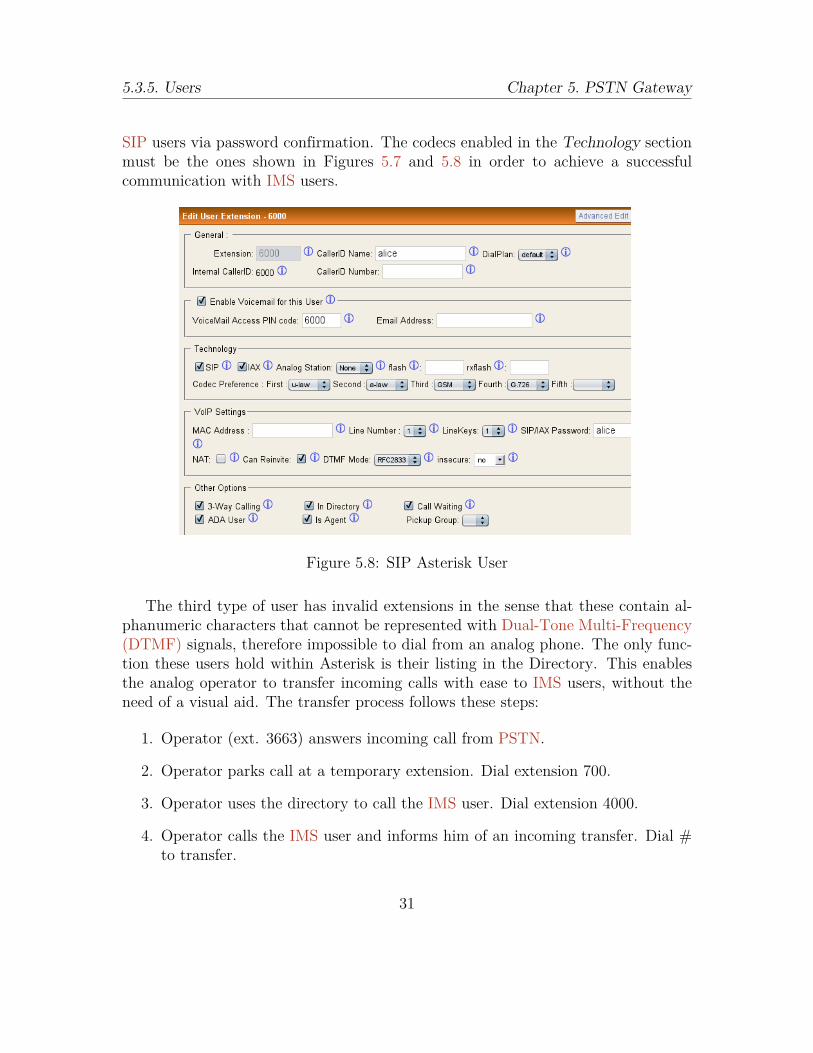
Figure 5.8, on the other hand, shows an example of the configuration used by SIPusers. The fundamental difference between these two lie in the need to authenticate
30
5.3.5. Users Chapter 5. PSTN Gateway
SIP users via password confirmation. The codecs enabled in the Technology sectionmust be the ones shown in Figures 5.7 and 5.8 in order to achieve a successfulcommunication with IMS users.
Figure 5.8: SIP Asterisk User
The third type of user has invalid extensions in the sense that these contain al-phanumeric characters that cannot be represented with Dual-Tone Multi-Frequency(DTMF) signals, therefore impossible to dial from an analog phone. The only func-tion these users hold within Asterisk is their listing in the Directory. This enablesthe analog operator to transfer incoming calls with ease to IMS users, without theneed of a visual aid. The transfer process follows these steps:
1. Operator (ext. 3663) answers incoming call from PSTN.
2. Operator parks call at a temporary extension. Dial extension 700.
3. Operator uses the directory to call the IMS user. Dial extension 4000.
4. Operator calls the IMS user and informs him of an incoming transfer. Dial #to transfer.
31
5.3.6. Finishing Touches Chapter 5. PSTN Gateway
5. Operator transfers IMS user to temporary extension where incoming call iswaiting. Dial extension 7XX. This extension is given by extension 700 whencall is parked.
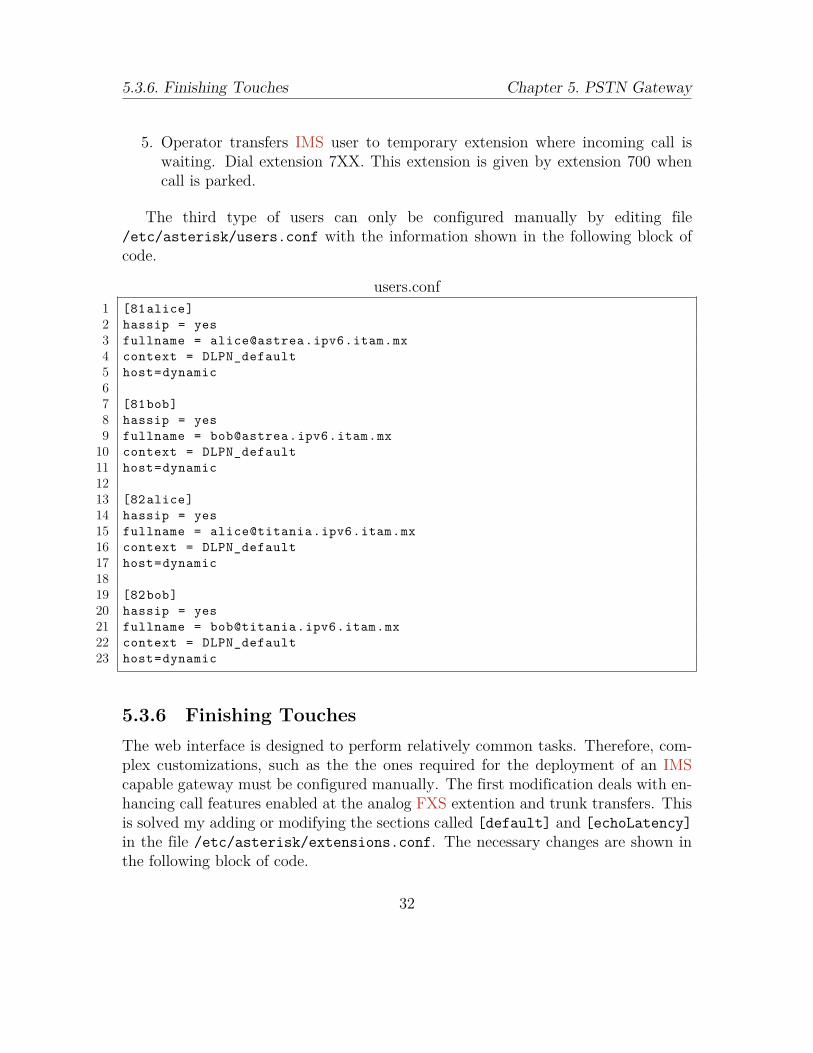
The third type of users can only be configured manually by editing file/etc/asterisk/users.conf with the information shown in the following block ofcode.
users.conf1 [81alice]2 hassip = yes3 fullname = [email protected] context = DLPN_default5 host=dynamic67 [81bob]8 hassip = yes9 fullname = [email protected]
10 context = DLPN_default11 host=dynamic1213 [82alice]14 hassip = yes15 fullname = [email protected] context = DLPN_default17 host=dynamic1819 [82bob]20 hassip = yes21 fullname = [email protected] context = DLPN_default23 host=dynamic
5.3.6 Finishing TouchesThe web interface is designed to perform relatively common tasks. Therefore, com-plex customizations, such as the the ones required for the deployment of an IMScapable gateway must be configured manually. The first modification deals with en-hancing call features enabled at the analog FXS extention and trunk transfers. Thisis solved my adding or modifying the sections called [default] and [echoLatency]in the file /etc/asterisk/extensions.conf. The necessary changes are shown inthe following block of code.
32

5.3.6. Finishing Touches Chapter 5. PSTN Gateway
extensions.conf1 [echoLatency];extension 1000, for evaluating echo latency.2 exten => 1000,1,Playback(demo-echotest) ; Let them know what's going
on3 exten => 1000,n,Echo ; Do the echo test4 exten => 1000,n,Playback(demo-echodone) ; Let them know it's over5 exten => 1000,n,Goto(s,6) ; Start over67 [default]8 include = echoLatency9 exten = 3663,1,Dial(DAHDI/1|10|tThHkK)
10 exten = 3663,2,Voicemail(3663,u)11 exten = 5000,1,VoiceMailMain(${CALLERID(num)}@default)
These changes fix a routing problem present with incoming calls directedto extension 3663 as mentioned in Section 5.3.3. In case the call is not an-swered by the operator in 10 seconds, the calling party is presented with an op-tion to leave a message. The extension 1000 is also created for echo latencytests. In order to enable transfers outside the Asterisk domain, i.e. throughtrunks, section [macro-trunkdial-failover-0.3] has to be modified in the file/etc/asterisk/extensions.conf. The relevant line can be appreciated on line 13in the following block of code.
extensions.conf1 [macro-trunkdial -failover -0.3]2 exten = s,1,GotoIf($[${LEN(${FMCIDNUM})} > 6]?1-fmsetcid ,1)3 exten = s,2,GotoIf($[${LEN(${GLOBAL_OUTBOUNDCIDNAME})} > 1]?1-
setgbobname ,1)4 exten = s,3,Set(CALLERID(num)=${IF($[${LEN(${CID_${CALLERID(num)}})} >
2]?${CID_${CALLERID(num)}}:)})5 exten = s,n,GotoIf($[${LEN(${CALLERID(num)})} > 6]?1-dial,1)6 exten = s,n,Set(CALLERID(all)=${IF($[${LEN(${CID_${ARG3}})} > 6]?${
CID_${ARG3}}:${GLOBAL_OUTBOUNDCID})})7 exten = s,n,Goto(1-dial,1)8 exten = 1-setgbobname ,1,Set(CALLERID(name)=${GLOBAL_OUTBOUNDCIDNAME})9 exten = 1-setgbobname ,n,Goto(s,3)
10 exten = 1-fmsetcid ,1,Set(CALLERID(num)=${FMCIDNUM})11 exten = 1-fmsetcid,n,Set(CALLERID(name)=${FMCIDNAME})12 exten = 1-fmsetcid,n,Goto(1-dial,1)13 exten = 1-dial,1,Dial(${ARG1}|10|tThHkK)14 exten = 1-dial,n,Gotoif(${LEN(${ARG2})} > 0 ?1-${DIALSTATUS},1:1-out,1)15 exten = 1-CHANUNAVAIL ,1,Dial(${ARG2})16 exten = 1-CHANUNAVAIL ,n,Hangup()17 exten = 1-CONGESTION ,1,Dial(${ARG2})
33
5.3.6. Finishing Touches Chapter 5. PSTN Gateway
18 exten = 1-CONGESTION ,n,Hangup()19 exten = 1-out,1,Hangup()
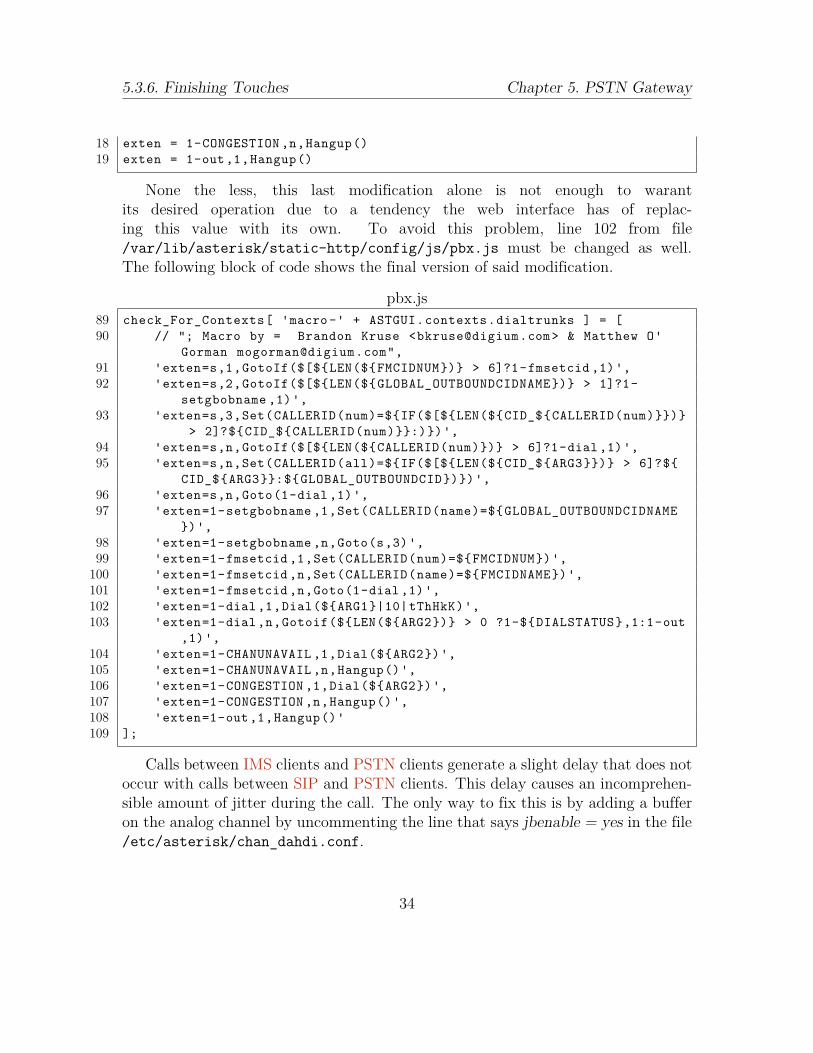
None the less, this last modification alone is not enough to warantits desired operation due to a tendency the web interface has of replac-ing this value with its own. To avoid this problem, line 102 from file/var/lib/asterisk/static-http/config/js/pbx.js must be changed as well.The following block of code shows the final version of said modification.
pbx.js89 check_For_Contexts[ 'macro-' + ASTGUI.contexts.dialtrunks ] = [90 // "; Macro by = Brandon Kruse <[email protected]> & Matthew O'
Gorman [email protected]",91 'exten=s,1,GotoIf($[${LEN(${FMCIDNUM})} > 6]?1-fmsetcid ,1)',92 'exten=s,2,GotoIf($[${LEN(${GLOBAL_OUTBOUNDCIDNAME})} > 1]?1-
setgbobname ,1)',93 'exten=s,3,Set(CALLERID(num)=${IF($[${LEN(${CID_${CALLERID(num)}})}
> 2]?${CID_${CALLERID(num)}}:)})',94 'exten=s,n,GotoIf($[${LEN(${CALLERID(num)})} > 6]?1-dial,1)',95 'exten=s,n,Set(CALLERID(all)=${IF($[${LEN(${CID_${ARG3}})} > 6]?${
CID_${ARG3}}:${GLOBAL_OUTBOUNDCID})})',96 'exten=s,n,Goto(1-dial,1)',97 'exten=1-setgbobname ,1,Set(CALLERID(name)=${GLOBAL_OUTBOUNDCIDNAME
})',98 'exten=1-setgbobname ,n,Goto(s,3)',99 'exten=1-fmsetcid ,1,Set(CALLERID(num)=${FMCIDNUM})',
100 'exten=1-fmsetcid,n,Set(CALLERID(name)=${FMCIDNAME})',101 'exten=1-fmsetcid,n,Goto(1-dial,1)',102 'exten=1-dial,1,Dial(${ARG1}|10|tThHkK)',103 'exten=1-dial,n,Gotoif(${LEN(${ARG2})} > 0 ?1-${DIALSTATUS},1:1-out
,1)',104 'exten=1-CHANUNAVAIL ,1,Dial(${ARG2})',105 'exten=1-CHANUNAVAIL ,n,Hangup()',106 'exten=1-CONGESTION ,1,Dial(${ARG2})',107 'exten=1-CONGESTION ,n,Hangup()',108 'exten=1-out,1,Hangup()'109 ];
Calls between IMS clients and PSTN clients generate a slight delay that does notoccur with calls between SIP and PSTN clients. This delay causes an incomprehen-sible amount of jitter during the call. The only way to fix this is by adding a bufferon the analog channel by uncommenting the line that says jbenable = yes in the file/etc/asterisk/chan_dahdi.conf.
34

5.3.6. Finishing Touches Chapter 5. PSTN Gateway
The successful deployment of the PSTN Gateway can be appreciated by makingcalls between the various IMS, SIP, and PSTN users. Table 5.1 shows the ports usedby Asterisk.
Function Port NumberSIP Requests 5060
H.323 Requests 1720Web Server 8088
Table 5.1: Ports Used by Asterisk
35
Chapter 6
Content Server
The Content Server doubles as a content provider within the IMS test bed. ThisApplication Server (AS) uses Darwin Streaming Server (DSS) for the delivery ofmultimedia content and UCT Advanced IPtv to establish SIP sessions. This Chaptercontains the configuration for each of its components.
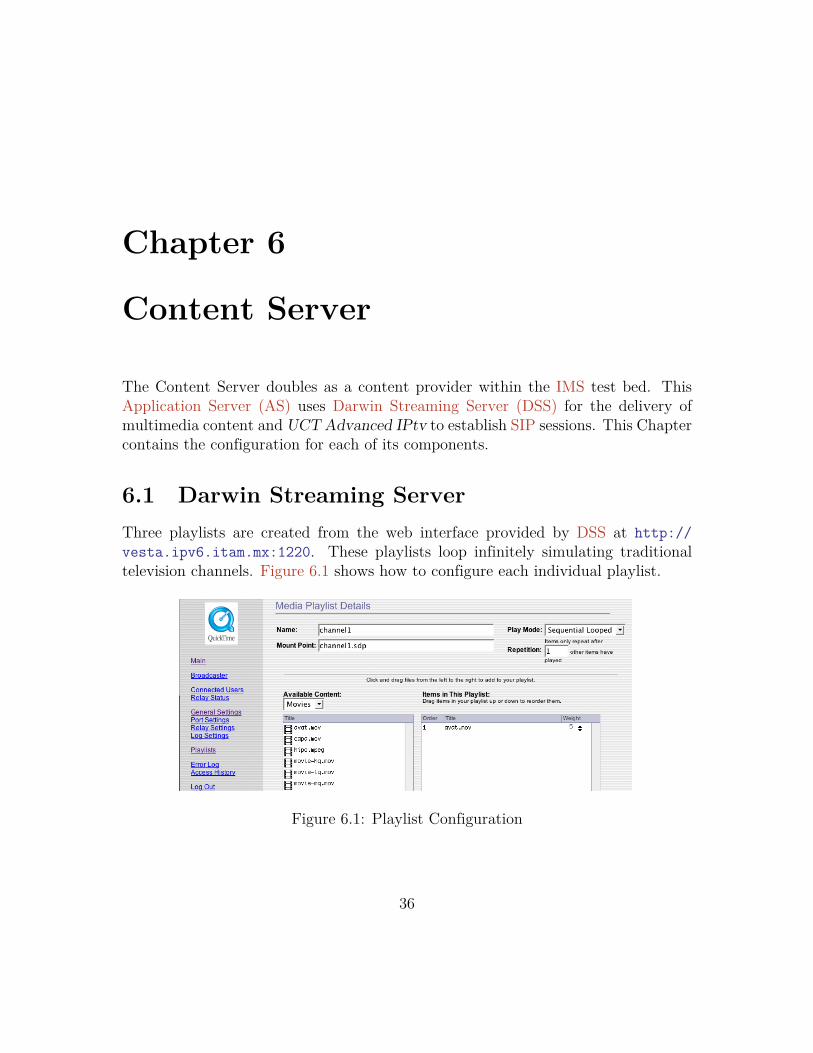
6.1 Darwin Streaming ServerThree playlists are created from the web interface provided by DSS at http://vesta.ipv6.itam.mx:1220. These playlists loop infinitely simulating traditionaltelevision channels. Figure 6.1 shows how to configure each individual playlist.
Figure 6.1: Playlist Configuration
36
6.2. UCT IPTV Streaming Server Chapter 6. Content Server
6.2 UCT IPTV Streaming ServerThe configuration presented in this section was tested successfully on Ubuntu 8.04and should work with any future releases. The installation of this componentconsists of downloading a deb archive located at http://prdownload.berlios.de/uctimsclient/uctiptv_advanced1.0.0.deb and installing with gdebi o dpkg.Then the playlists configured in Section 6.1 have to be mapped to Session InitiationProtocol Universal Resource Identifiers (SIP-URIs) which are used by the AS to es-tablish SIP sessions. The following block of code shows an example of three channelsconfigured in the file /usr/share/uctiptv_advanced/key_value_file.
key_value_file1 <?xml version="1.0" encoding="UTF-8"?>2 <key-value_pairs >3 <key-value_pair >4 <key>channel1 </key>5 <value>rtsp://vesta.ipv6.itam.mx/channel1.sdp</value>6 </key-value_pair >7 <key-value_pair >8 <key>channel2 </key>9 <value>rtsp://vesta.ipv6.itam.mx/channel2.sdp</value>
10 </key-value_pair >11 <key-value_pair >12 <key>channel3 </key>13 <value>rtsp://vesta.ipv6.itam.mx/channel3.sdp</value>14 </key-value_pair >15 </key-value_pairs >
The UCT IPTV Streaming Server is now ready to accept SIP INVITE requestsat port 8010. The AS can be started by executing the following command:
uctiptv_as /usr/share/uctiptv_advanced/key_value_file
37
Chapter 7
Presence Server
The AS that implements a Presence Server is created with the help of three ap-plications: OpenSIPS, OpenSIPS-mi-proxy, and OpenXCAP. Each one of these isinstalled differently and requires a slight modification to achieve the desired integra-tion. The installation and configuration presented in this Chapter was successfullytested on Ubuntu 8.04. The installation ad configuration process does not work onprevious versions. The rapid development of FOSS projects may render the processdescribed herein unnecessary. Never the less, the process can be used as a referencepoint in case unexpected errors occur.
The AS described in this Chapter was installed on a server that already hadan IMS realm. Therefore, the port numbers mentioned in this Chapter are notthe default ports used by the Presence Server. The names and IP addresses of theconfiguration files presented must be changed to suit your organization.
7.1 OpenSIPSAt the time of writing this document there were three available distribution methodssupported by OpenSIPS: (1) pre-compiled binaries, (2) source code, or (3) sourcecode with Transport Layer Security (TLS) support. The second and third optionscan be downloaded from http://opensips.org/pub/opensips/latest/src/. Thefirst distribution method was selected for use in the installation of OpenSIPS. Thedeb packages were downloaded from http://opensips.org/pub/opensips/1.4.4/packages/debian/stable/ (although newer versions are now available at http://opensips.org/pub/opensips/latest/packages/debian/). The following blockof code shows how to install the list of packages requiered by the Presence Server.Additional modules can be installed if desired.
38
7.1. OpenSIPS Chapter 7. Presence Server
Terminal1 sudo -s2 gdebi opensips_1.4.4-0_i386.deb3 gdebi opensips-jabber-module_1.4.4-0_i386.deb4 gdebi opensips-mysql-module_1.4.4-0_i386.deb5 gdebi opensips-presence-modules_1.4.4-0_i386.deb6 gdebi opensips-radius-modules_1.4.4-0_i386.deb7 gdebi opensips-xmlrpc-module_1.4.4-0_i386.deb8 gdebi opensips-xmpp-module_1.4.4-0_i386.deb
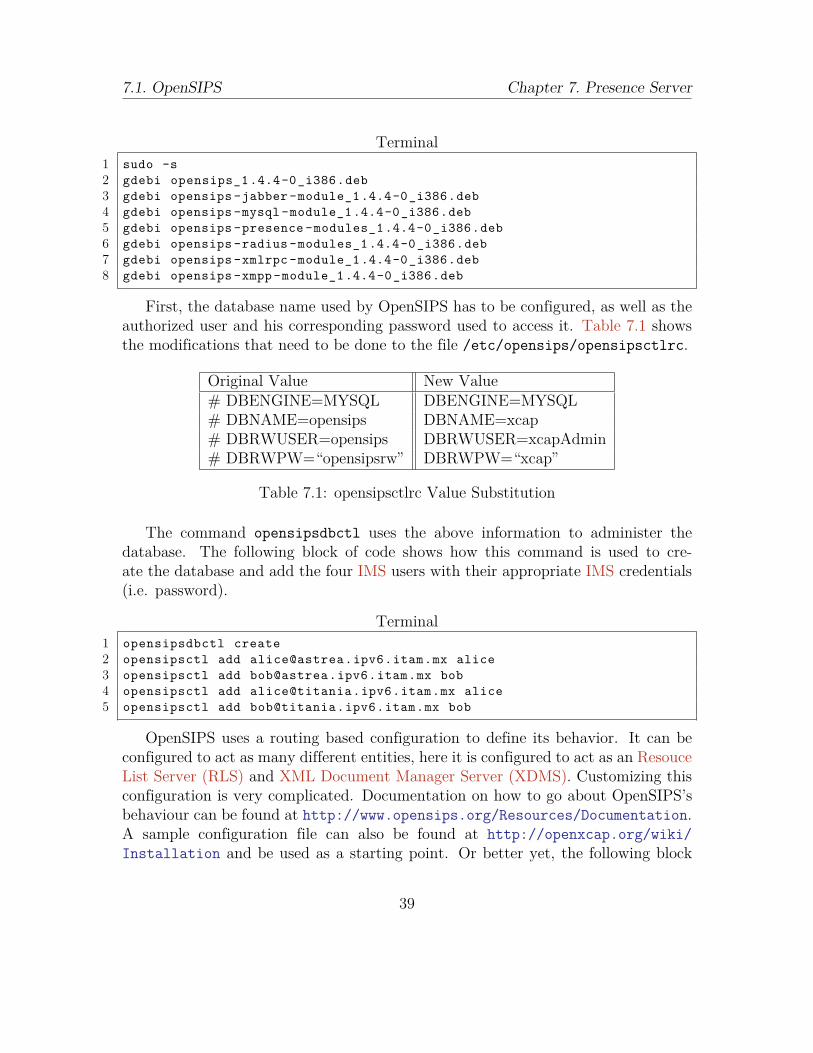
First, the database name used by OpenSIPS has to be configured, as well as theauthorized user and his corresponding password used to access it. Table 7.1 showsthe modifications that need to be done to the file /etc/opensips/opensipsctlrc.
Original Value New Value# DBENGINE=MYSQL DBENGINE=MYSQL# DBNAME=opensips DBNAME=xcap# DBRWUSER=opensips DBRWUSER=xcapAdmin# DBRWPW=“opensipsrw” DBRWPW=“xcap”
Table 7.1: opensipsctlrc Value Substitution
The command opensipsdbctl uses the above information to administer thedatabase. The following block of code shows how this command is used to cre-ate the database and add the four IMS users with their appropriate IMS credentials(i.e. password).
Terminal1 opensipsdbctl create2 opensipsctl add [email protected] alice3 opensipsctl add [email protected] bob4 opensipsctl add [email protected] alice5 opensipsctl add [email protected] bob
OpenSIPS uses a routing based configuration to define its behavior. It can beconfigured to act as many different entities, here it is configured to act as an ResouceList Server (RLS) and XML Document Manager Server (XDMS). Customizing thisconfiguration is very complicated. Documentation on how to go about OpenSIPS’sbehaviour can be found at http://www.opensips.org/Resources/Documentation.A sample configuration file can also be found at http://openxcap.org/wiki/Installation and be used as a starting point. Or better yet, the following block
39
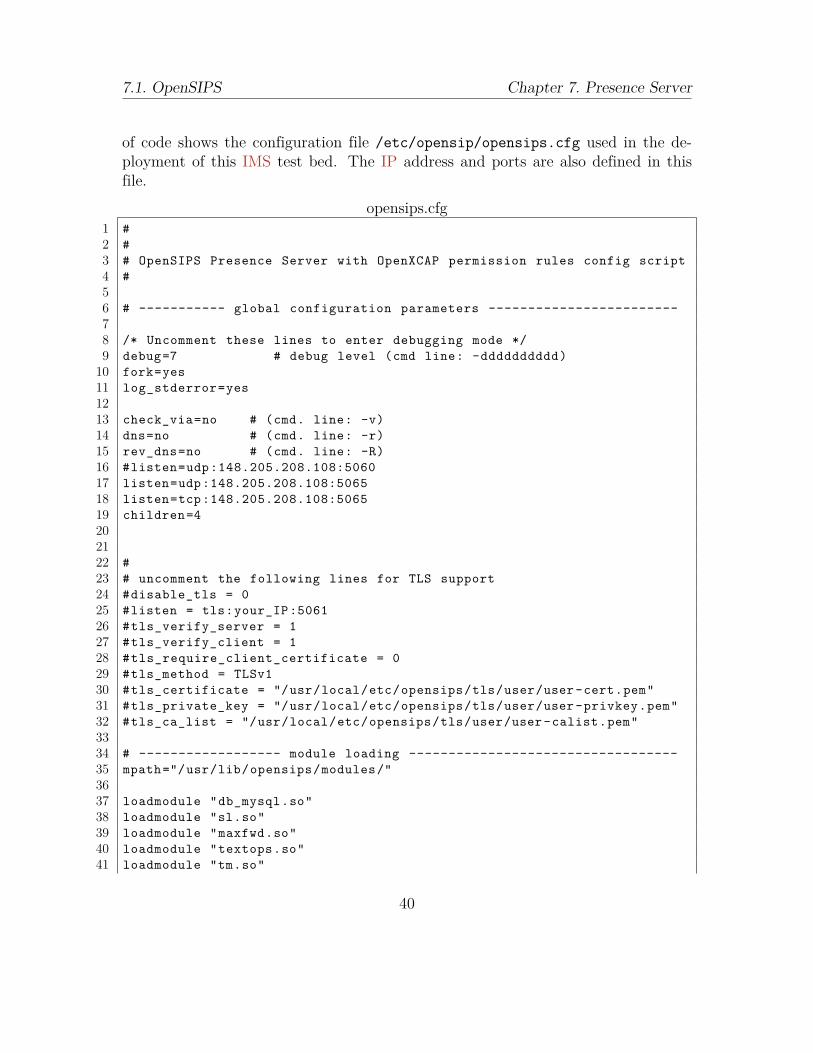
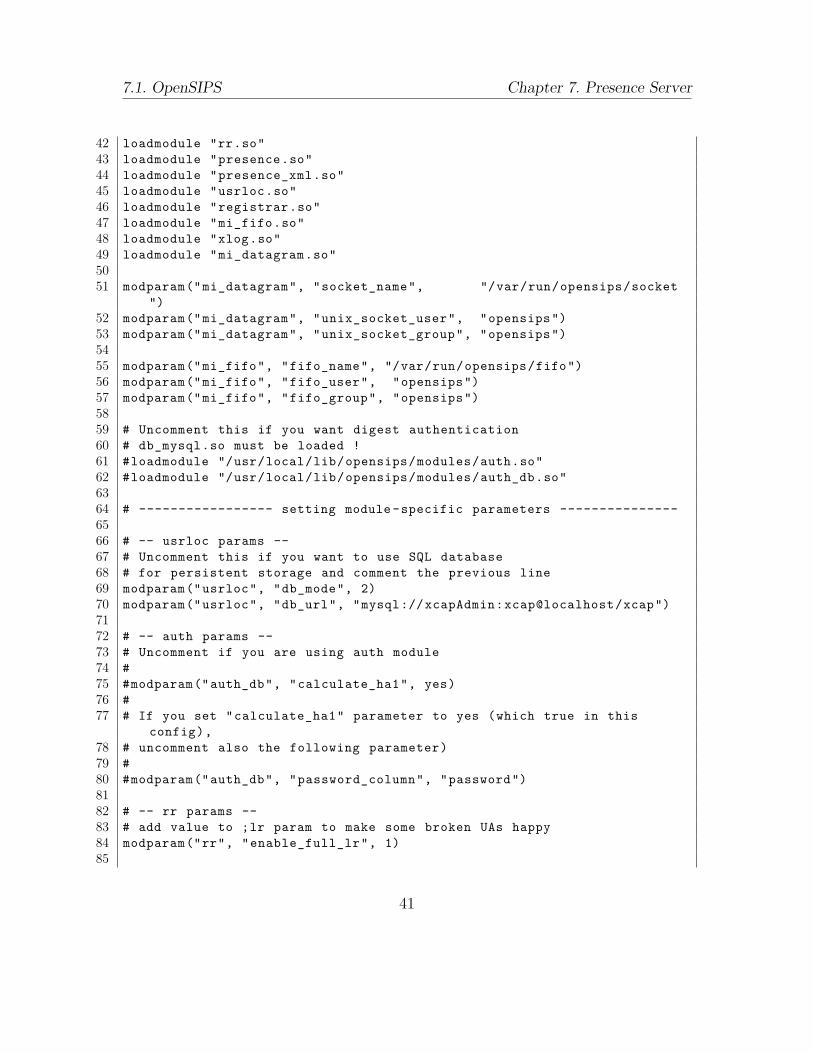
7.1. OpenSIPS Chapter 7. Presence Server
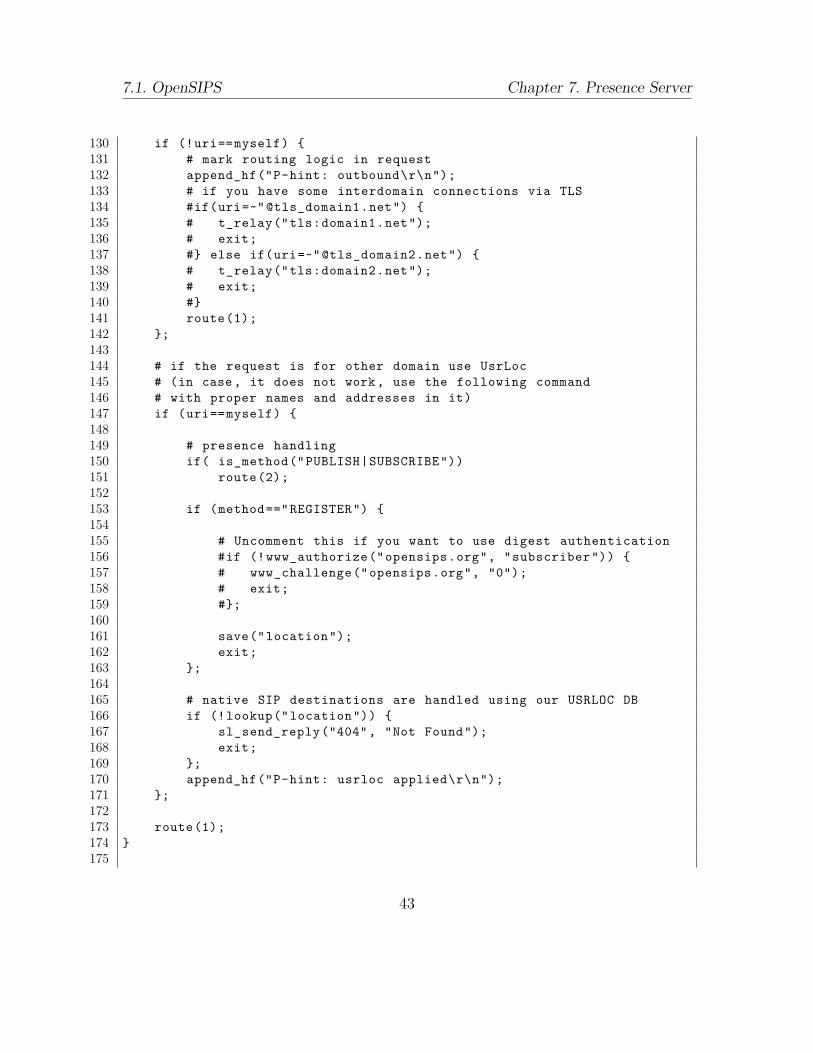
of code shows the configuration file /etc/opensip/opensips.cfg used in the de-ployment of this IMS test bed. The IP address and ports are also defined in thisfile.
opensips.cfg1 #2 #3 # OpenSIPS Presence Server with OpenXCAP permission rules config script4 #56 # ----------- global configuration parameters ------------------------78 /* Uncomment these lines to enter debugging mode */9 debug=7 # debug level (cmd line: -dddddddddd)
10 fork=yes11 log_stderror=yes1213 check_via=no # (cmd. line: -v)14 dns=no # (cmd. line: -r)15 rev_dns=no # (cmd. line: -R)16 #listen=udp:148.205.208.108:506017 listen=udp:148.205.208.108:506518 listen=tcp:148.205.208.108:506519 children=4202122 #23 # uncomment the following lines for TLS support24 #disable_tls = 025 #listen = tls:your_IP:506126 #tls_verify_server = 127 #tls_verify_client = 128 #tls_require_client_certificate = 029 #tls_method = TLSv130 #tls_certificate = "/usr/local/etc/opensips/tls/user/user-cert.pem"31 #tls_private_key = "/usr/local/etc/opensips/tls/user/user-privkey.pem"32 #tls_ca_list = "/usr/local/etc/opensips/tls/user/user-calist.pem"3334 # ------------------ module loading ----------------------------------35 mpath="/usr/lib/opensips/modules/"3637 loadmodule "db_mysql.so"38 loadmodule "sl.so"39 loadmodule "maxfwd.so"40 loadmodule "textops.so"41 loadmodule "tm.so"
40
7.1. OpenSIPS Chapter 7. Presence Server
42 loadmodule "rr.so"43 loadmodule "presence.so"44 loadmodule "presence_xml.so"45 loadmodule "usrloc.so"46 loadmodule "registrar.so"47 loadmodule "mi_fifo.so"48 loadmodule "xlog.so"49 loadmodule "mi_datagram.so"5051 modparam("mi_datagram", "socket_name", "/var/run/opensips/socket
")52 modparam("mi_datagram", "unix_socket_user", "opensips")53 modparam("mi_datagram", "unix_socket_group", "opensips")5455 modparam("mi_fifo", "fifo_name", "/var/run/opensips/fifo")56 modparam("mi_fifo", "fifo_user", "opensips")57 modparam("mi_fifo", "fifo_group", "opensips")5859 # Uncomment this if you want digest authentication60 # db_mysql.so must be loaded !61 #loadmodule "/usr/local/lib/opensips/modules/auth.so"62 #loadmodule "/usr/local/lib/opensips/modules/auth_db.so"6364 # ----------------- setting module-specific parameters ---------------6566 # -- usrloc params --67 # Uncomment this if you want to use SQL database68 # for persistent storage and comment the previous line69 modparam("usrloc", "db_mode", 2)70 modparam("usrloc", "db_url", "mysql://xcapAdmin:xcap@localhost/xcap")7172 # -- auth params --73 # Uncomment if you are using auth module74 #75 #modparam("auth_db", "calculate_ha1", yes)76 #77 # If you set "calculate_ha1" parameter to yes (which true in this
config),78 # uncomment also the following parameter)79 #80 #modparam("auth_db", "password_column", "password")8182 # -- rr params --83 # add value to ;lr param to make some broken UAs happy84 modparam("rr", "enable_full_lr", 1)85
41
7.1. OpenSIPS Chapter 7. Presence Server
86 # -- mi_xmlrpc params --87 # be careful to set the same port in OpenXCAP configuration file88 #modparam("mi_xmlrpc","port", 8888)8990 # -- presence params --91 modparam("presence|presence_xml", "db_url", "mysql://xcapAdmin:
xcap@localhost/xcap")92 modparam("presence", "server_address", "sip:presence.astrea.ipv6.itam.
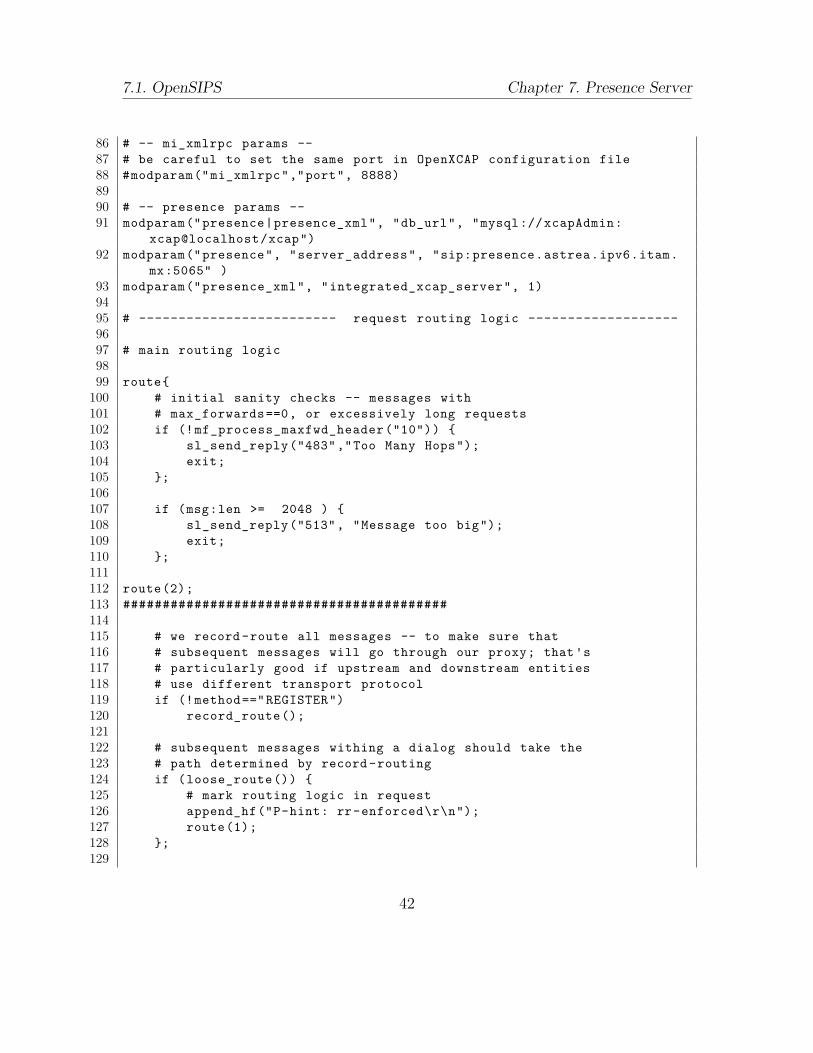
mx:5065" )93 modparam("presence_xml", "integrated_xcap_server", 1)9495 # ------------------------- request routing logic -------------------9697 # main routing logic9899 route{
100 # initial sanity checks -- messages with101 # max_forwards==0, or excessively long requests102 if (!mf_process_maxfwd_header("10")) {103 sl_send_reply("483","Too Many Hops");104 exit;105 };106107 if (msg:len >= 2048 ) {108 sl_send_reply("513", "Message too big");109 exit;110 };111112 route(2);113 #########################################114115 # we record-route all messages -- to make sure that116 # subsequent messages will go through our proxy; that's117 # particularly good if upstream and downstream entities118 # use different transport protocol119 if (!method=="REGISTER")120 record_route();121122 # subsequent messages withing a dialog should take the123 # path determined by record-routing124 if (loose_route()) {125 # mark routing logic in request126 append_hf("P-hint: rr-enforced\r\n");127 route(1);128 };129
42
7.1. OpenSIPS Chapter 7. Presence Server
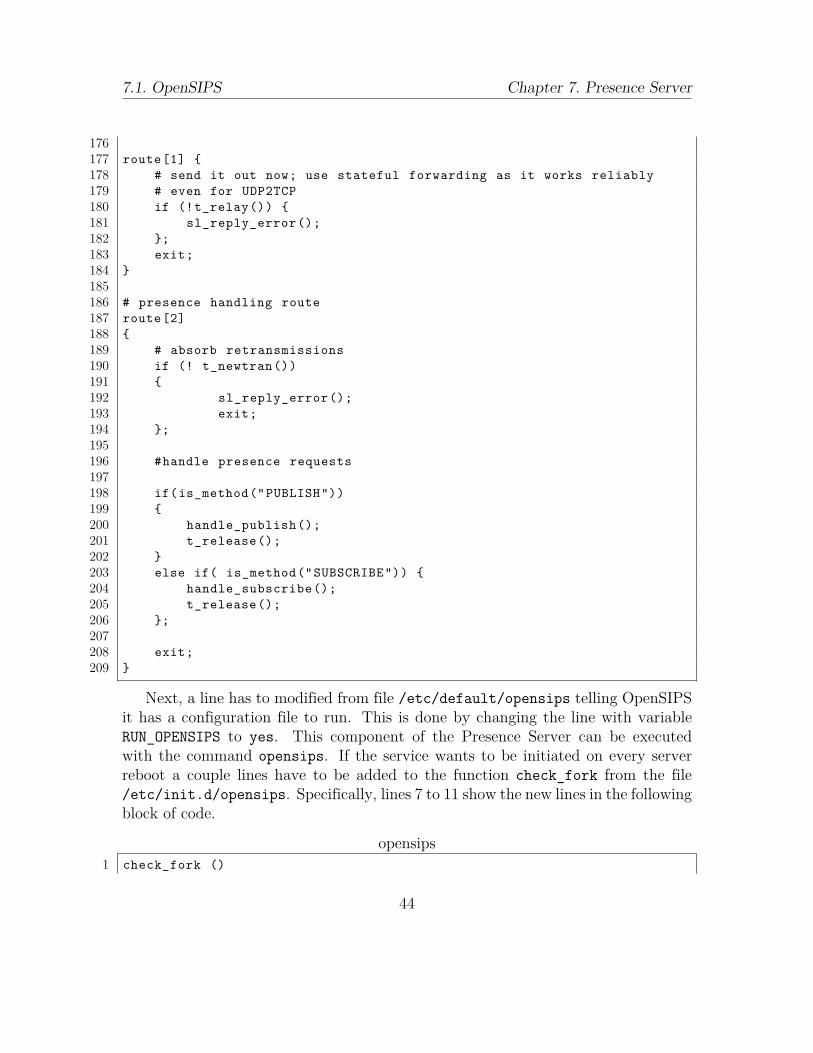
130 if (!uri==myself) {131 # mark routing logic in request132 append_hf("P-hint: outbound\r\n");133 # if you have some interdomain connections via TLS134 #if(uri=~"@tls_domain1.net") {135 # t_relay("tls:domain1.net");136 # exit;137 #} else if(uri=~"@tls_domain2.net") {138 # t_relay("tls:domain2.net");139 # exit;140 #}141 route(1);142 };143144 # if the request is for other domain use UsrLoc145 # (in case, it does not work, use the following command146 # with proper names and addresses in it)147 if (uri==myself) {148149 # presence handling150 if( is_method("PUBLISH|SUBSCRIBE"))151 route(2);152153 if (method=="REGISTER") {154155 # Uncomment this if you want to use digest authentication156 #if (!www_authorize("opensips.org", "subscriber")) {157 # www_challenge("opensips.org", "0");158 # exit;159 #};160161 save("location");162 exit;163 };164165 # native SIP destinations are handled using our USRLOC DB166 if (!lookup("location")) {167 sl_send_reply("404", "Not Found");168 exit;169 };170 append_hf("P-hint: usrloc applied\r\n");171 };172173 route(1);174 }175
43
7.1. OpenSIPS Chapter 7. Presence Server
176177 route[1] {178 # send it out now; use stateful forwarding as it works reliably179 # even for UDP2TCP180 if (!t_relay()) {181 sl_reply_error();182 };183 exit;184 }185186 # presence handling route187 route[2]188 {189 # absorb retransmissions190 if (! t_newtran())191 {192 sl_reply_error();193 exit;194 };195196 #handle presence requests197198 if(is_method("PUBLISH"))199 {200 handle_publish();201 t_release();202 }203 else if( is_method("SUBSCRIBE")) {204 handle_subscribe();205 t_release();206 };207208 exit;209 }
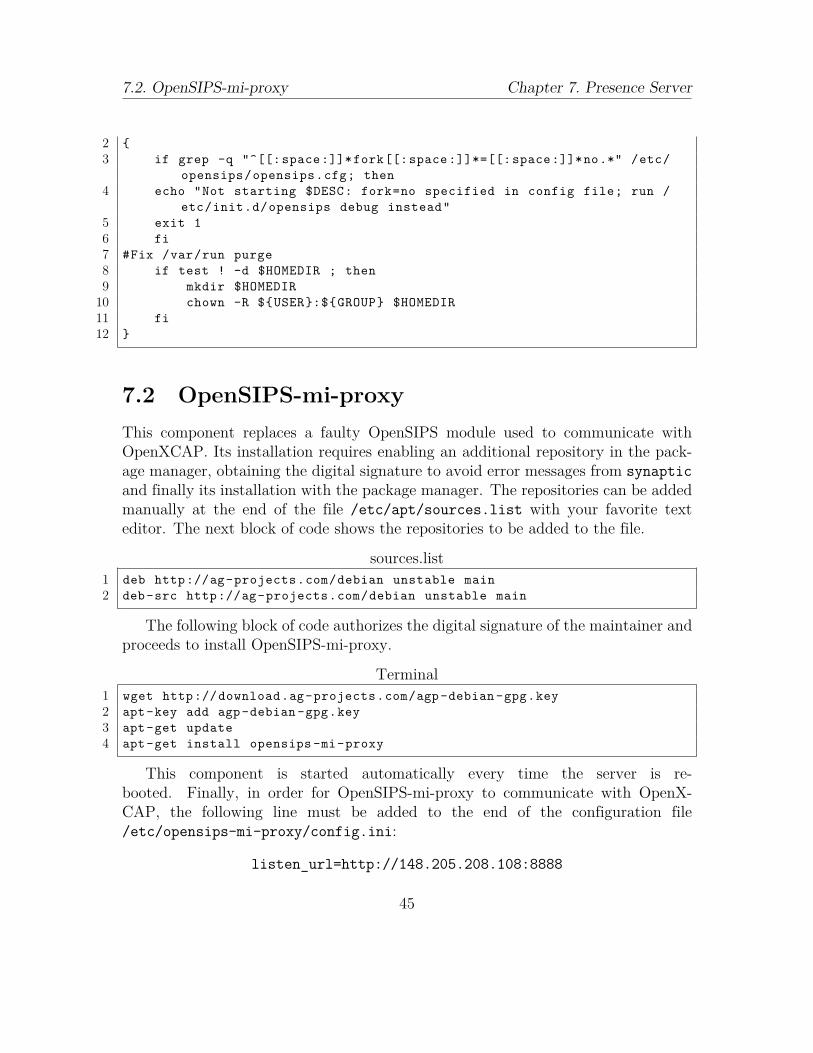
Next, a line has to modified from file /etc/default/opensips telling OpenSIPSit has a configuration file to run. This is done by changing the line with variableRUN_OPENSIPS to yes. This component of the Presence Server can be executedwith the command opensips. If the service wants to be initiated on every serverreboot a couple lines have to be added to the function check_fork from the file/etc/init.d/opensips. Specifically, lines 7 to 11 show the new lines in the followingblock of code.
opensips1 check_fork ()
44
7.2. OpenSIPS-mi-proxy Chapter 7. Presence Server
2 {3 if grep -q "^[[:space:]]*fork[[:space:]]*=[[:space:]]*no.*" /etc/
opensips/opensips.cfg; then4 echo "Not starting $DESC: fork=no specified in config file; run /
etc/init.d/opensips debug instead"5 exit 16 fi7 #Fix /var/run purge8 if test ! -d $HOMEDIR ; then9 mkdir $HOMEDIR
10 chown -R ${USER}:${GROUP} $HOMEDIR11 fi12 }
7.2 OpenSIPS-mi-proxyThis component replaces a faulty OpenSIPS module used to communicate withOpenXCAP. Its installation requires enabling an additional repository in the pack-age manager, obtaining the digital signature to avoid error messages from synapticand finally its installation with the package manager. The repositories can be addedmanually at the end of the file /etc/apt/sources.list with your favorite texteditor. The next block of code shows the repositories to be added to the file.
sources.list1 deb http://ag-projects.com/debian unstable main2 deb-src http://ag-projects.com/debian unstable main
The following block of code authorizes the digital signature of the maintainer andproceeds to install OpenSIPS-mi-proxy.
Terminal1 wget http://download.ag-projects.com/agp-debian-gpg.key2 apt-key add agp-debian-gpg.key3 apt-get update4 apt-get install opensips-mi-proxy
This component is started automatically every time the server is re-booted. Finally, in order for OpenSIPS-mi-proxy to communicate with OpenX-CAP, the following line must be added to the end of the configuration file/etc/opensips-mi-proxy/config.ini:
listen_url=http://148.205.208.108:8888
45
7.3. OpenXCAP Chapter 7. Presence Server
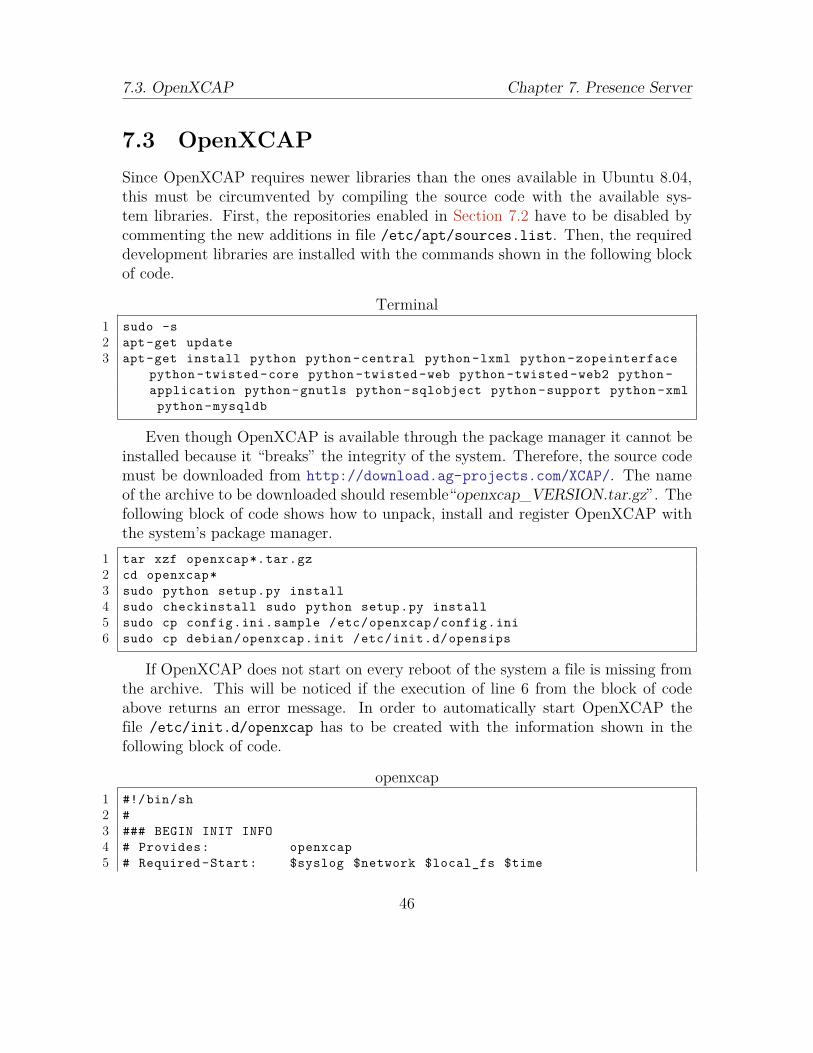
7.3 OpenXCAPSince OpenXCAP requires newer libraries than the ones available in Ubuntu 8.04,this must be circumvented by compiling the source code with the available sys-tem libraries. First, the repositories enabled in Section 7.2 have to be disabled bycommenting the new additions in file /etc/apt/sources.list. Then, the requireddevelopment libraries are installed with the commands shown in the following blockof code.
Terminal1 sudo -s2 apt-get update3 apt-get install python python-central python-lxml python-zopeinterface
python-twisted-core python-twisted-web python-twisted-web2 python-application python-gnutls python-sqlobject python-support python-xmlpython-mysqldb
Even though OpenXCAP is available through the package manager it cannot beinstalled because it “breaks” the integrity of the system. Therefore, the source codemust be downloaded from http://download.ag-projects.com/XCAP/. The nameof the archive to be downloaded should resemble“openxcap_VERSION.tar.gz”. Thefollowing block of code shows how to unpack, install and register OpenXCAP withthe system’s package manager.
1 tar xzf openxcap*.tar.gz2 cd openxcap*3 sudo python setup.py install4 sudo checkinstall sudo python setup.py install5 sudo cp config.ini.sample /etc/openxcap/config.ini6 sudo cp debian/openxcap.init /etc/init.d/opensips
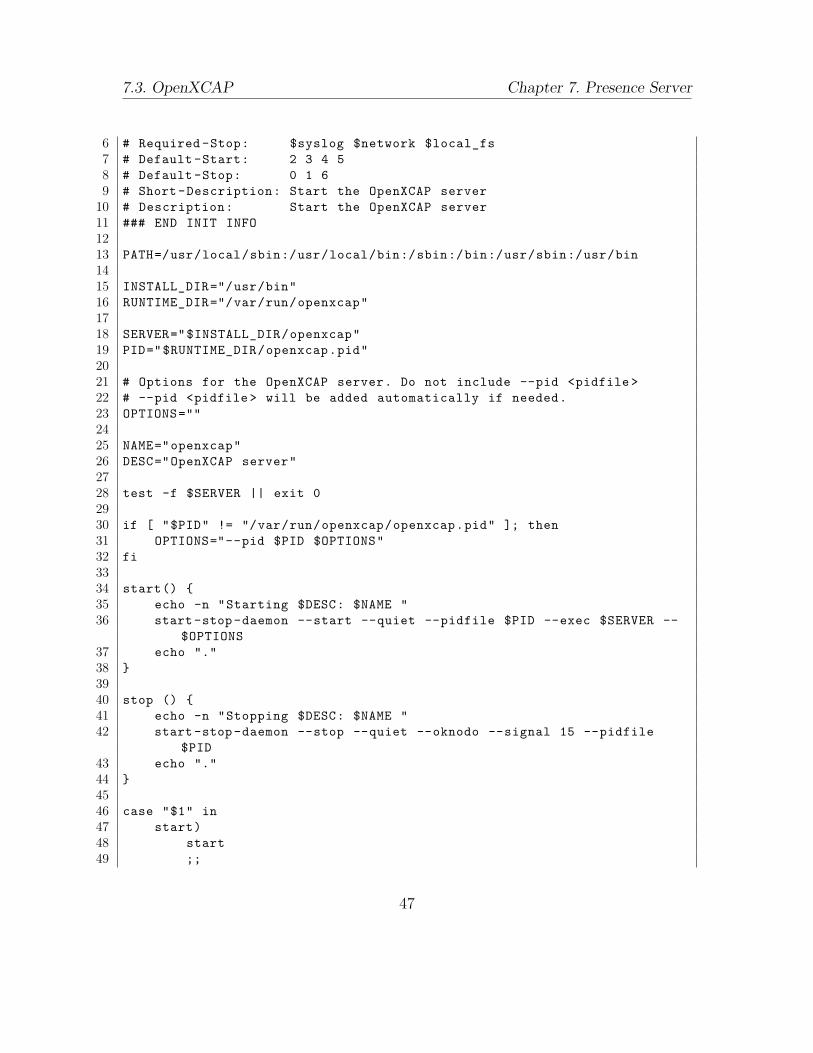
If OpenXCAP does not start on every reboot of the system a file is missing fromthe archive. This will be noticed if the execution of line 6 from the block of codeabove returns an error message. In order to automatically start OpenXCAP thefile /etc/init.d/openxcap has to be created with the information shown in thefollowing block of code.
openxcap1 #!/bin/sh2 #3 ### BEGIN INIT INFO4 # Provides: openxcap5 # Required-Start: $syslog $network $local_fs $time
46
7.3. OpenXCAP Chapter 7. Presence Server
6 # Required-Stop: $syslog $network $local_fs7 # Default-Start: 2 3 4 58 # Default-Stop: 0 1 69 # Short-Description: Start the OpenXCAP server
10 # Description: Start the OpenXCAP server11 ### END INIT INFO1213 PATH=/usr/local/sbin:/usr/local/bin:/sbin:/bin:/usr/sbin:/usr/bin1415 INSTALL_DIR="/usr/bin"16 RUNTIME_DIR="/var/run/openxcap"1718 SERVER="$INSTALL_DIR/openxcap"19 PID="$RUNTIME_DIR/openxcap.pid"2021 # Options for the OpenXCAP server. Do not include --pid <pidfile>22 # --pid <pidfile> will be added automatically if needed.23 OPTIONS=""2425 NAME="openxcap"26 DESC="OpenXCAP server"2728 test -f $SERVER || exit 02930 if [ "$PID" != "/var/run/openxcap/openxcap.pid" ]; then31 OPTIONS="--pid $PID $OPTIONS"32 fi3334 start() {35 echo -n "Starting $DESC: $NAME "36 start-stop-daemon --start --quiet --pidfile $PID --exec $SERVER --
$OPTIONS37 echo "."38 }3940 stop () {41 echo -n "Stopping $DESC: $NAME "42 start-stop-daemon --stop --quiet --oknodo --signal 15 --pidfile
$PID43 echo "."44 }4546 case "$1" in47 start)48 start49 ;;
47

7.3. OpenXCAP Chapter 7. Presence Server
50 stop)51 stop52 ;;53 restart|force-reload)54 stop55 #sleep 156 start57 ;;58 *)59 echo "Usage: /etc/init.d/$NAME {start|stop|restart|force-reload
}" >&260 exit 161 ;;62 esac6364 exit 0
Next, some source code has to be commented out to avoid prob-lems when running OpenXCAP on Ubuntu 8.04. Line 48 of file/usr/bin/openxcap which says start_log() has to be commented. Line 44 of file/usr/lib/python2.5/site-packages/xcap/element.py which says sys.exit(1)also has to be commented. This finishes the installation process of OpenXAP.
In order to configure OpenXCAP, first digital signatures and certificates used bythe HyperText Transfer Protocol over SSL (HTTPS) interface have to be created.This can easily be done with openssl as shown in the following block of code. Eachline containing openssl has data fields which must be filled in according to yourorganization.
Terminal1 sudo -s2 apt-get install openssl3 cd /etc/openxcap/tls4 openssl genrsa -des3 -out server.key 40965 openssl req -new -key server.key -out server.csr6 openssl x509 -req -days 365 -in server.csr -signkey server.key -out
server.crt7 openssl rsa -in server.key -out server.key.insecure8 mv server.key server.key.secure9 mv server.key.insecure server.key
10 openssl genrsa -des3 -out ca.key 409611 openssl req -new -x509 -days 365 -key ca.key -out ca.crt12 openssl genrsa -des3 -out server.key 409613 openssl req -new -key server.key -out server.csr
48
7.3. OpenXCAP Chapter 7. Presence Server
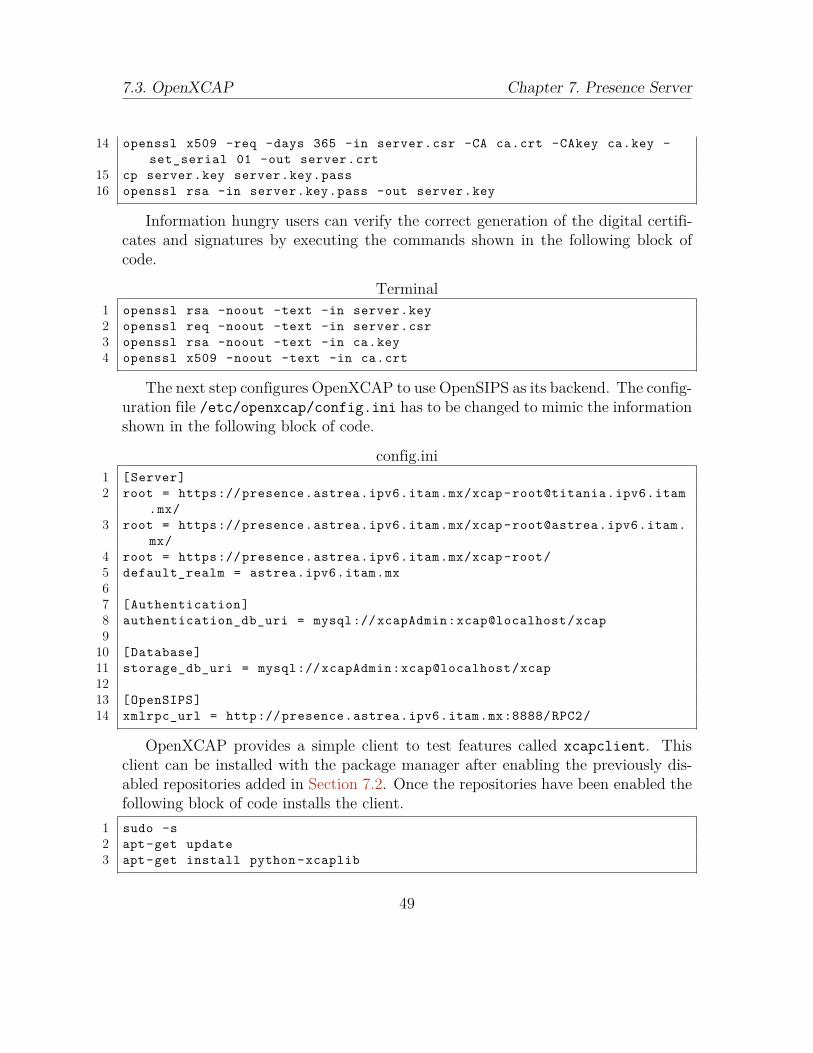
14 openssl x509 -req -days 365 -in server.csr -CA ca.crt -CAkey ca.key -set_serial 01 -out server.crt
15 cp server.key server.key.pass16 openssl rsa -in server.key.pass -out server.key
Information hungry users can verify the correct generation of the digital certifi-cates and signatures by executing the commands shown in the following block ofcode.
Terminal1 openssl rsa -noout -text -in server.key2 openssl req -noout -text -in server.csr3 openssl rsa -noout -text -in ca.key4 openssl x509 -noout -text -in ca.crt
The next step configures OpenXCAP to use OpenSIPS as its backend. The config-uration file /etc/openxcap/config.ini has to be changed to mimic the informationshown in the following block of code.
config.ini1 [Server]2 root = https://presence.astrea.ipv6.itam.mx/[email protected]
.mx/3 root = https://presence.astrea.ipv6.itam.mx/[email protected].
mx/4 root = https://presence.astrea.ipv6.itam.mx/xcap-root/5 default_realm = astrea.ipv6.itam.mx67 [Authentication]8 authentication_db_uri = mysql://xcapAdmin:xcap@localhost/xcap9
10 [Database]11 storage_db_uri = mysql://xcapAdmin:xcap@localhost/xcap1213 [OpenSIPS]14 xmlrpc_url = http://presence.astrea.ipv6.itam.mx:8888/RPC2/
OpenXCAP provides a simple client to test features called xcapclient. Thisclient can be installed with the package manager after enabling the previously dis-abled repositories added in Section 7.2. Once the repositories have been enabled thefollowing block of code installs the client.
1 sudo -s2 apt-get update3 apt-get install python-xcaplib
49
7.3. OpenXCAP Chapter 7. Presence Server
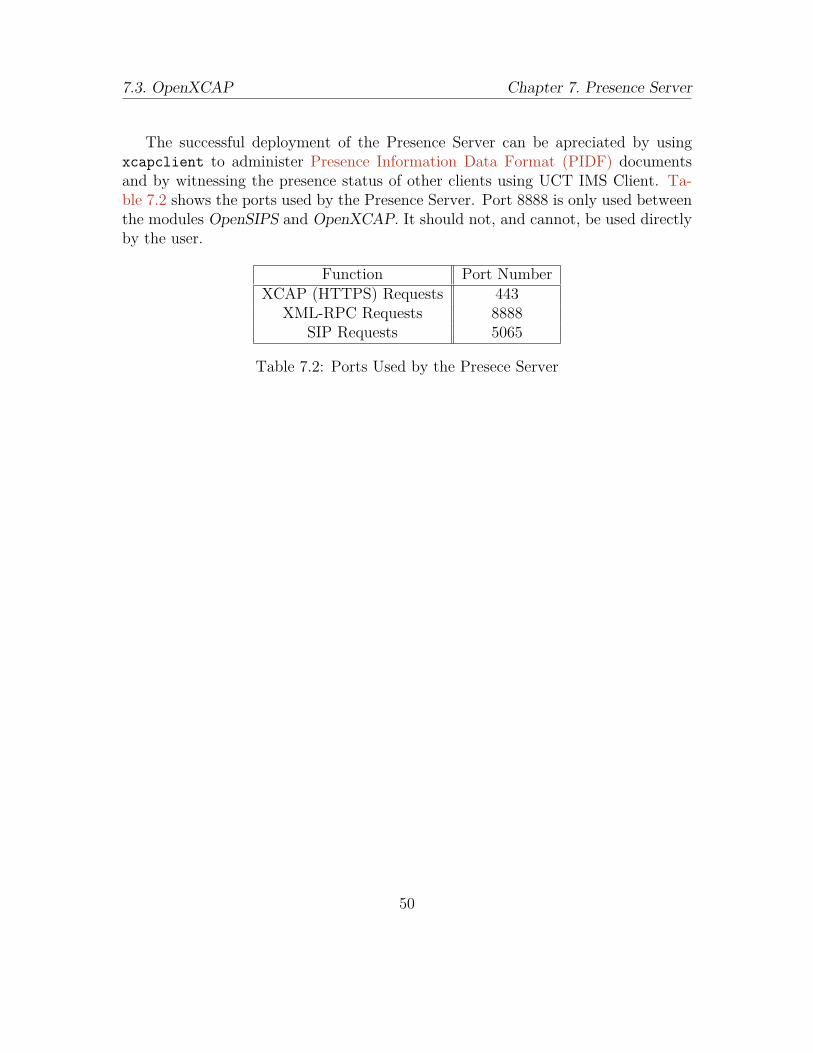
The successful deployment of the Presence Server can be apreciated by usingxcapclient to administer Presence Information Data Format (PIDF) documentsand by witnessing the presence status of other clients using UCT IMS Client. Ta-ble 7.2 shows the ports used by the Presence Server. Port 8888 is only used betweenthe modules OpenSIPS and OpenXCAP. It should not, and cannot, be used directlyby the user.
Function Port NumberXCAP (HTTPS) Requests 443
XML-RPC Requests 8888SIP Requests 5065
Table 7.2: Ports Used by the Presece Server
50
Chapter 8
Configuration of ApplicationServers
If the instructions in every Section of this document have been followed sequentially,the components of the IMS test bed should have been deployed. This Chapter joinseach component to the IMS realms and completes the creation of a Service DeliveryPlatform. The configurations mentioned in this Chapter cater to one IMS realm,and should be repeated for every realm within the IMS test bed. Each component isadded as an AS to the IMS realms by following these four steps:
1. Add the AS to the HSS registry.
2. Add a Trigger Point to the HSS registry. The Trigger Point defines a patternused by the Serving-CSCF (S-CSCF) to enable (or disable) services for givenSIP messages. The Trigger Point defines the behavior of the AS.
3. Join steps 1 and 2 with an Initial Filter Criteria (iFC), allowing the creationof a service route.
4. Add the iFC to a Service Profile. This profile is used to administer the servicesinto groups, which are later used to enable or disable services for users withcertain profiles.
8.1 Presence ServerThe installation of OpenIMS Core provides a default AS as a working example.Therefore, modifying said example is suffice for the registration of the first AS.
51
8.2. Content Server Chapter 8. Configuration of Application Servers
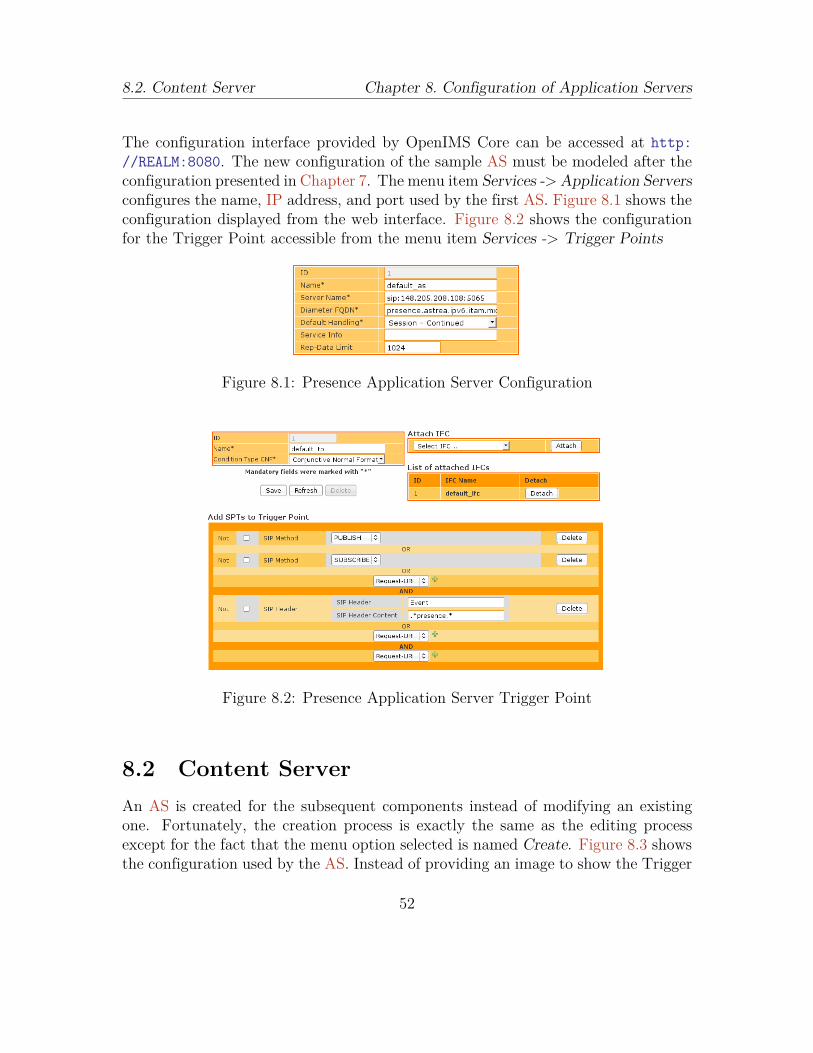
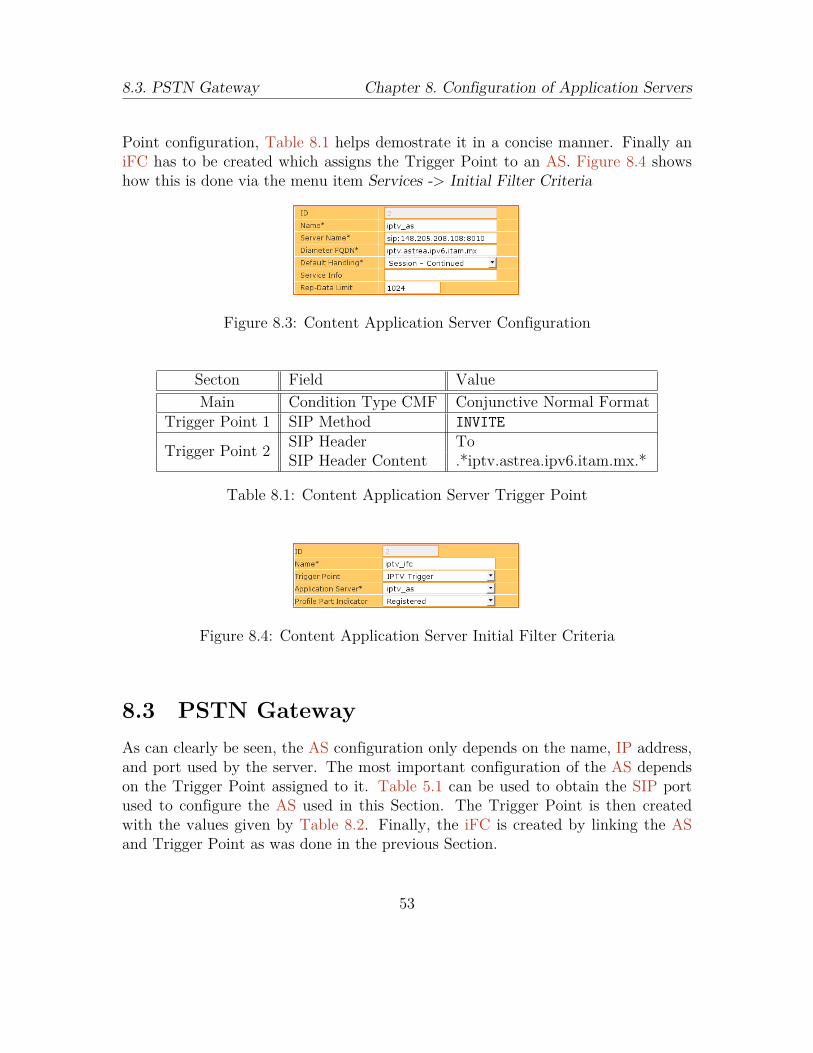
The configuration interface provided by OpenIMS Core can be accessed at http://REALM:8080. The new configuration of the sample AS must be modeled after theconfiguration presented in Chapter 7. The menu item Services ->Application Serversconfigures the name, IP address, and port used by the first AS. Figure 8.1 shows theconfiguration displayed from the web interface. Figure 8.2 shows the configurationfor the Trigger Point accessible from the menu item Services -> Trigger Points
Figure 8.1: Presence Application Server Configuration
Figure 8.2: Presence Application Server Trigger Point
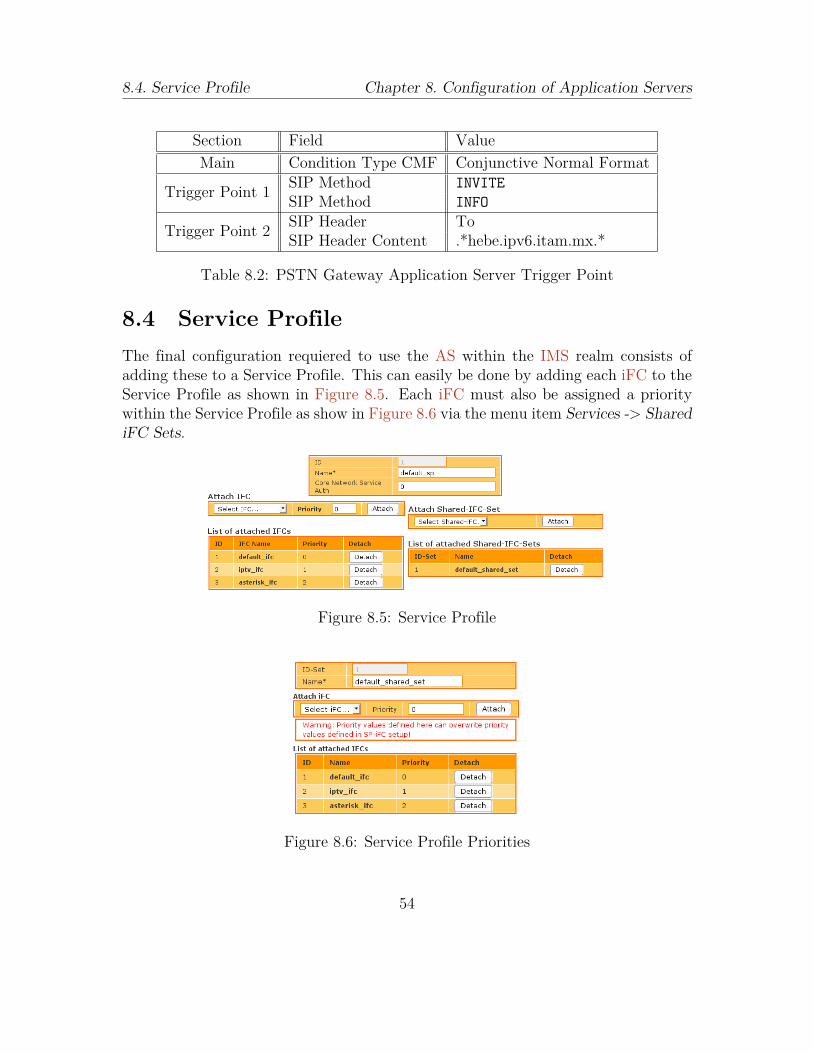
8.2 Content ServerAn AS is created for the subsequent components instead of modifying an existingone. Fortunately, the creation process is exactly the same as the editing processexcept for the fact that the menu option selected is named Create. Figure 8.3 showsthe configuration used by the AS. Instead of providing an image to show the Trigger
52
8.3. PSTN Gateway Chapter 8. Configuration of Application Servers
Point configuration, Table 8.1 helps demostrate it in a concise manner. Finally aniFC has to be created which assigns the Trigger Point to an AS. Figure 8.4 showshow this is done via the menu item Services -> Initial Filter Criteria
Figure 8.3: Content Application Server Configuration
Secton Field ValueMain Condition Type CMF Conjunctive Normal Format
Trigger Point 1 SIP Method INVITE
Trigger Point 2 SIP Header ToSIP Header Content .*iptv.astrea.ipv6.itam.mx.*
Table 8.1: Content Application Server Trigger Point
Figure 8.4: Content Application Server Initial Filter Criteria
8.3 PSTN GatewayAs can clearly be seen, the AS configuration only depends on the name, IP address,and port used by the server. The most important configuration of the AS dependson the Trigger Point assigned to it. Table 5.1 can be used to obtain the SIP portused to configure the AS used in this Section. The Trigger Point is then createdwith the values given by Table 8.2. Finally, the iFC is created by linking the ASand Trigger Point as was done in the previous Section.
53
8.4. Service Profile Chapter 8. Configuration of Application Servers
Section Field ValueMain Condition Type CMF Conjunctive Normal Format
Trigger Point 1 SIP Method INVITESIP Method INFO
Trigger Point 2 SIP Header ToSIP Header Content .*hebe.ipv6.itam.mx.*
Table 8.2: PSTN Gateway Application Server Trigger Point
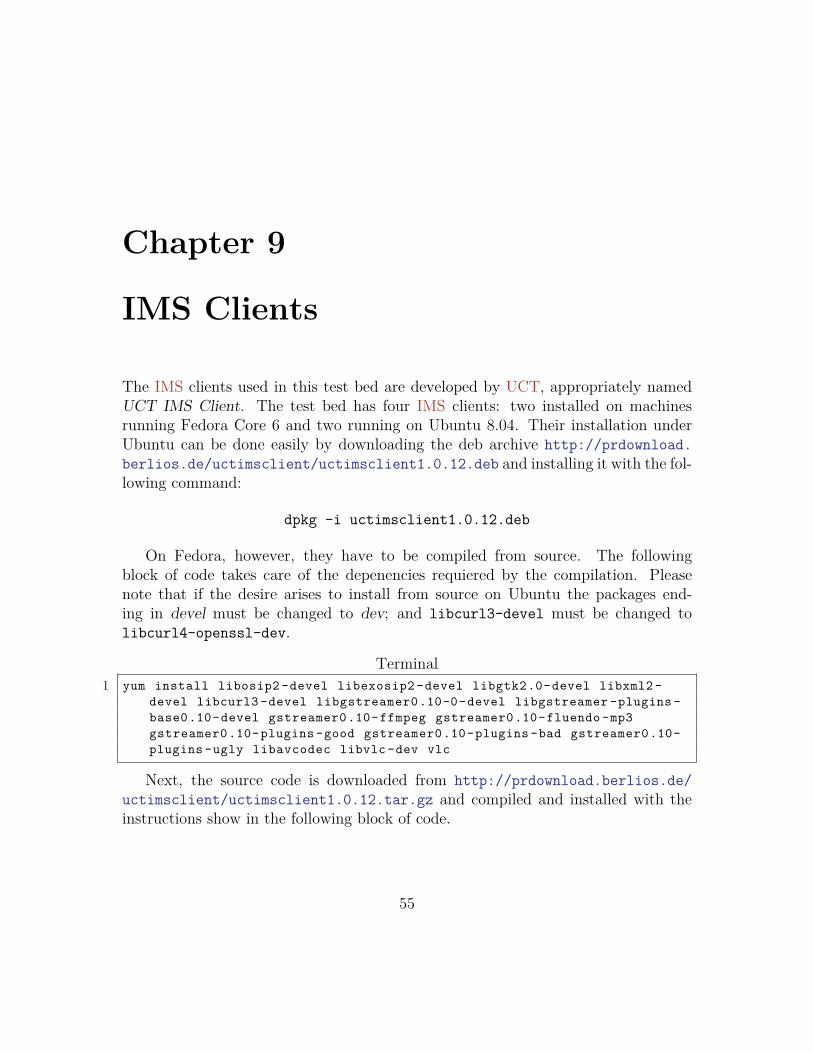
8.4 Service ProfileThe final configuration requiered to use the AS within the IMS realm consists ofadding these to a Service Profile. This can easily be done by adding each iFC to theService Profile as shown in Figure 8.5. Each iFC must also be assigned a prioritywithin the Service Profile as show in Figure 8.6 via the menu item Services -> SharediFC Sets.
Figure 8.5: Service Profile
Figure 8.6: Service Profile Priorities
54
Chapter 9
IMS Clients
The IMS clients used in this test bed are developed by UCT, appropriately namedUCT IMS Client. The test bed has four IMS clients: two installed on machinesrunning Fedora Core 6 and two running on Ubuntu 8.04. Their installation underUbuntu can be done easily by downloading the deb archive http://prdownload.berlios.de/uctimsclient/uctimsclient1.0.12.deb and installing it with the fol-lowing command:
dpkg -i uctimsclient1.0.12.deb
On Fedora, however, they have to be compiled from source. The followingblock of code takes care of the depenencies requiered by the compilation. Pleasenote that if the desire arises to install from source on Ubuntu the packages end-ing in devel must be changed to dev; and libcurl3-devel must be changed tolibcurl4-openssl-dev.
Terminal1 yum install libosip2-devel libexosip2 -devel libgtk2.0-devel libxml2-
devel libcurl3-devel libgstreamer0.10-0-devel libgstreamer -plugins-base0.10-devel gstreamer0.10-ffmpeg gstreamer0.10-fluendo-mp3gstreamer0.10-plugins-good gstreamer0.10-plugins-bad gstreamer0.10-plugins-ugly libavcodec libvlc-dev vlc
Next, the source code is downloaded from http://prdownload.berlios.de/uctimsclient/uctimsclient1.0.12.tar.gz and compiled and installed with theinstructions show in the following block of code.
55
Chapter 9. IMS Clients
Terminal1 mv uctimsclient1.0.12.tar.gz /usr/local/2 cd /usr/local3 tar xzf uctimsclient1.0.12.tar.gz4 rm uctimsclient1.0.12.tar.gz5 chmod +w -R uctimsclient/6 cd uctimsclient7 ./configure8 make9 cd /usr/local/bin
10 ln -s /usr/local/uctimsclient/uctimsclient .
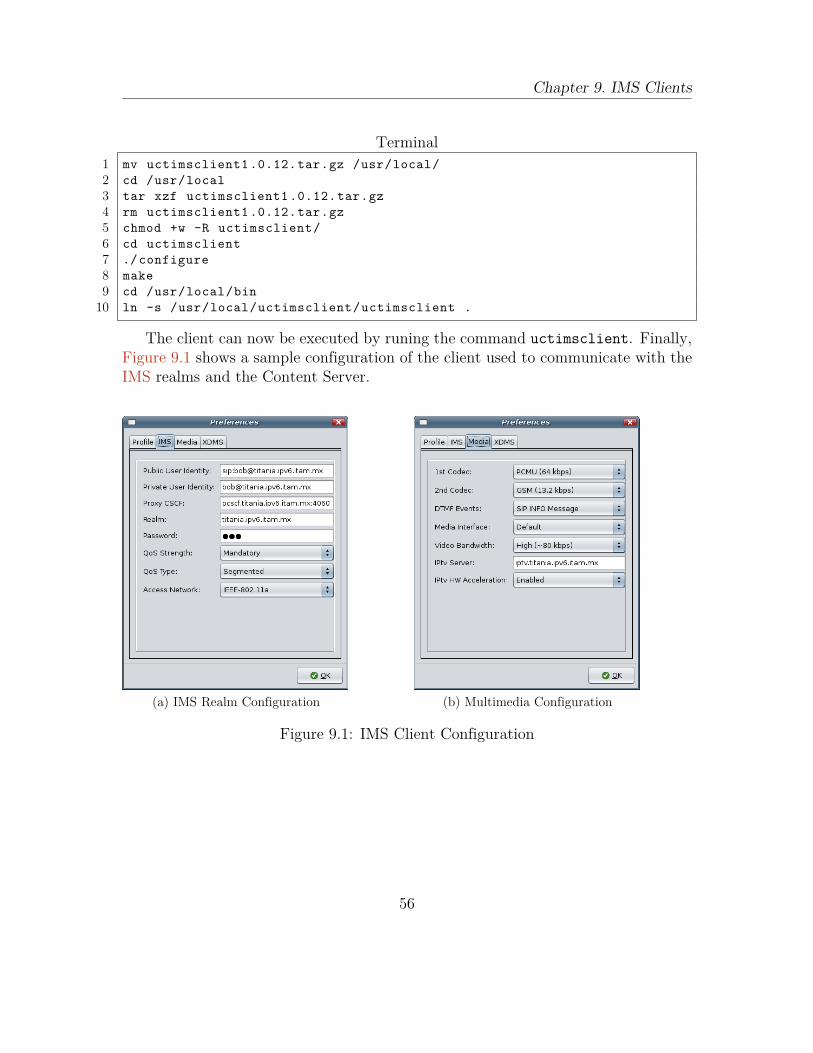
The client can now be executed by runing the command uctimsclient. Finally,Figure 9.1 shows a sample configuration of the client used to communicate with theIMS realms and the Content Server.
(a) IMS Realm Configuration (b) Multimedia Configuration
Figure 9.1: IMS Client Configuration
56
Glossary
3G Third Generation. 4
3GPP Third Generation Partnership Project. 3
3GPP2 Third Generation Partnership Project 2. 4
AS Application Server. 1, 36–38, 51–54
CAPEX Capital Expenditure. 3
CSCF Call/Service Control Function. 15, 16
DNS Domain Name Server. 11, 14
DSS Darwin Streaming Server. 36
DTMF Dual-Tone Multi-Frequency. 31
FOKUS Fraunhofer Institute for Open Communications Systems. 4, 15
FOSS Free and Open Source Software. 15, 38
FXO Foreign eXchange Office. 21, 27
FXS Foreign eXchange Station. 21, 28, 30, 32
GSM Global System for Mobile communications. 26
HSS Home Subscriber Server. 15, 16, 51
HTTPS HyperText Transfer Protocol over SSL. 48
57
Glossary Glossary
IETF Internet Engineering Task Force. 4
iFC Initial Filter Criteria. 51, 53, 54
IMS IP Multimedia Subsystem. 1–5, 11, 15, 17–21, 24, 27, 28, 30–32, 34–36, 38–40,51, 54–56
IP Internet Protocol. 16, 17, 38, 40, 52, 53
IPTV IP Television. 8
ISP Internet Service Provider. 2, 3
ITAM Instituto Tecnológico Autónomo de México. 1, 28
ITU International Telecommunications Union. 3
NGN Next Generation Networks. 2–4
OMA Open Mobile Alliance. 4
OPEX Operational Expenditure. 3
PBX Private Branch eXchange. 26
PCI Peripheral Component Interconnect. 21
PIDF Presence Information Data Format. 50
PSTN Public Switched Telephone Network. 1, 21, 23, 28, 31, 34, 35
QoE Quality of Experience. 4, 5
QoS Quality of Service. 4
RLS Resouce List Server. 39
S-CSCF Serving-CSCF. 51
SIP Session Initiation Protocol. 15, 23, 26, 27, 30, 31, 34–37, 51, 53
SIP-URI Session Initiation Protocol Universal Resource Identifier. 37
58
Glossary Glossary
TLS Transport Layer Security. 38
TTM Time to Market. 4
UCT University of Cape Town. 4, 55
XDMS XML Document Manager Server. 39
59
References
[1] 3GPP: Telecommunications and Internet converged Services and Protocols forAdvanced Networks (TISPAN); Support of Short Message Service (SMS) overNGN IMS subsystem; Stage 2; [Endorsement of 3GPP TS 23.204 Release 7]. Ts23.521, 3rd Generation Partnership Project (3GPP), Dec. 2007. http://www.3gpp.org/ftp/Specs/html-info/23521.htm.
[2] 3GPP: Messaging service using the IP Multimedia (IM) Core Network (CN)subsystem; Stage 3. Ts 24.247, 3rd Generation Partnership Project (3GPP),Mar. 2008. http://www.3gpp.org/ftp/Specs/html-info/24247.htm.
[3] 3GPP: TISPAN; IP Multimedia Call Control Protocol based on Session Initia-tion Protocol (SIP) and Session Description Protocol (SDP) Stage 3 [3GPPTS 24.229 (Release 7), modified]. Ts 24.503, 3rd Generation PartnershipProject (3GPP), Sept. 2008. http://www.3gpp.org/ftp/Specs/html-info/24503.htm.
[4] 3GPP: TISPAN; Support of SMS and MMS over NGN IMS subsystem; Stage3 [Endorsement of 3GPP TS 24.341 Release 7]. Ts 24.451, 3rd GenerationPartnership Project (3GPP), Mar. 2008. http://www.3gpp.org/ftp/Specs/html-info/24451.htm.
[5] M. Brenner and M. Unmehopa: The Open Mobile Alliance: Delivering Ser-vice Enablers for Next-Generation Applications. J. Wiley & Sons, Chichester,England; Hoboken, NJ, Apr. 2008.
[6] G. Camarillo and M.A. García-Martín: The 3G IP Multimedia Subsystem (IMS): Merging The Internet And The Cellular Worlds. J. Wiley & Sons, Chichester,England; Hoboken, NJ, 2nd ed., May 2006.
60
REFERENCES REFERENCES
[7] Content Team – BSNL Portal – Intelligroup Asia Pvt. Ltd.: IMS Invest-ment To Reach $10.1 Billion in 5 yrs, June 2006. [http://portal.bsnl.in/telecomnewsanalysis.asp?intNewsId=69133, accesado 12/10/08].
[8] A. Cuevas, J.I. Moreno, P. Vidales, and H. Einsiedler: The IMS Service Plat-form: A Solution For Next-Generation Network Operators To Be More ThanBit Pipes. Communications Magazine, IEEE, 44(8):75–81, 2006.
[9] Ericsson: IMS – IP Multimedia Subsystem. White Paper, Oct. 2004.
[10] Ericsson: Introduction to IMS. White Paper, Mar. 2007.
[11] M. Garcia-Martin: Input 3rd-Generation Partnership Project (3GPP) Release 5Requirements on the Session Initiation Protocol (SIP). Rfc 4083, Internet En-gineering Task Force, May 2005. http://www.rfc-editor.org/rfc/rfc4083.txt.
[12] A. Lotsson: Expect 4G Telephony In 2012 Says Ericsson Research Head, May2004. [http://www.arnnet.com.au/article/65267/expect_4g_telephony_2012_says_ericsson_research_head, accesado 12/10/08].
[13] J. Loughney: Diameter Command Codes for Third Generation PartnershipProject (3GPP) Release 5. Rfc 3589, Internet Engineering Task Force, Sept.2003. http://www.rfc-editor.org/rfc/rfc3589.txt.
[14] A.K. MacDonald: Servicios Personalizados de Multimedia Ofrecidos Sobre laPlataforma IP Multimedia Subsystem. Instituto Tecnológico Autónomo de Méx-ico (ITAM), Bachelor’s Thesis, 2009.
[15] J.V. Meggelen, L. Madsen, and J. Smith: Asterisk: The Future of Telephony.O’Reilly Media, Inc, 1005 Gravenstein Highway North, Sebastopol, CA, 2nd ed.,Aug. 2007.
[16] J.L. Salina and P. Salina: Next Generation Networks: Perspectives and Poten-tials. J. Wiley & Sons, Chichester, England; Hoboken, NJ, Feb. 2008.
[17] S. Shepard: IMS Crash Course. McGraw-Hill, New York, 2006.
61