Embed Size (px)
Citation preview
INTERMEDIATE GUIDE
INTRODUCTIONTO EMAIL Part 2
TECH SAVVY SENIORSThe NSW ‘Tech Savvy Seniors’ program is a key initiative of the NSW Ageing Strategy and the Telstra Digital Literacy Strategy.
‘Victorian Tech Savvy Seniors’ is a Seniors Card Age Friendly Partners program with Telstra delivering training through rural and remote libraries across Victoria.

INTRODUCTION TO EMAIL – PART 2
INTRODUCTION TO EMAIL – PART 2
PAGE 2
TOPIC
EMAIL FEATURES
WHAT YOU’LL LEARN
Now that you have an email account set up and learned the basics of addressing and typing up emails, it’s time to learn some of the tricks and traps of using email.
Did you know that you can send a single email to an infinite number of people at once, making it perfect for invitations and groups messages? And that when you send it, you can hide the names of the recipients? Or that you can set up an address book with groups for easy sending of multiple emails?
There’s a rich world of features in email, and it’s worth taking time to get to know them.
In this workshop you’ll learn how to add email addresses to your Address Book and how to send group emails, as well as some handy hints and tips to help your manage your email Address Book. You’ll also get you first guide to the weird and wonderful world of email etiquette.
You may be looking to follow-up what you learned in the Introduction to Email Part 1 workshop, or wanting to improve upon your existing understanding of email by exploring additional features. If so, this workshop is for you.
An internet-connected laptop or desktop computer; either your own or supplied by the workshop organisers. You may need to share a computer with others in the workshop.
An email account; either the Gmail account set up in the Introduction to Email Part 1 workshop, or another existing email account.
WHO IS THIS WORKSHOP FOR?
WHAT YOU’LL NEED
INTRODUCTION TO EMAIL – PART 2
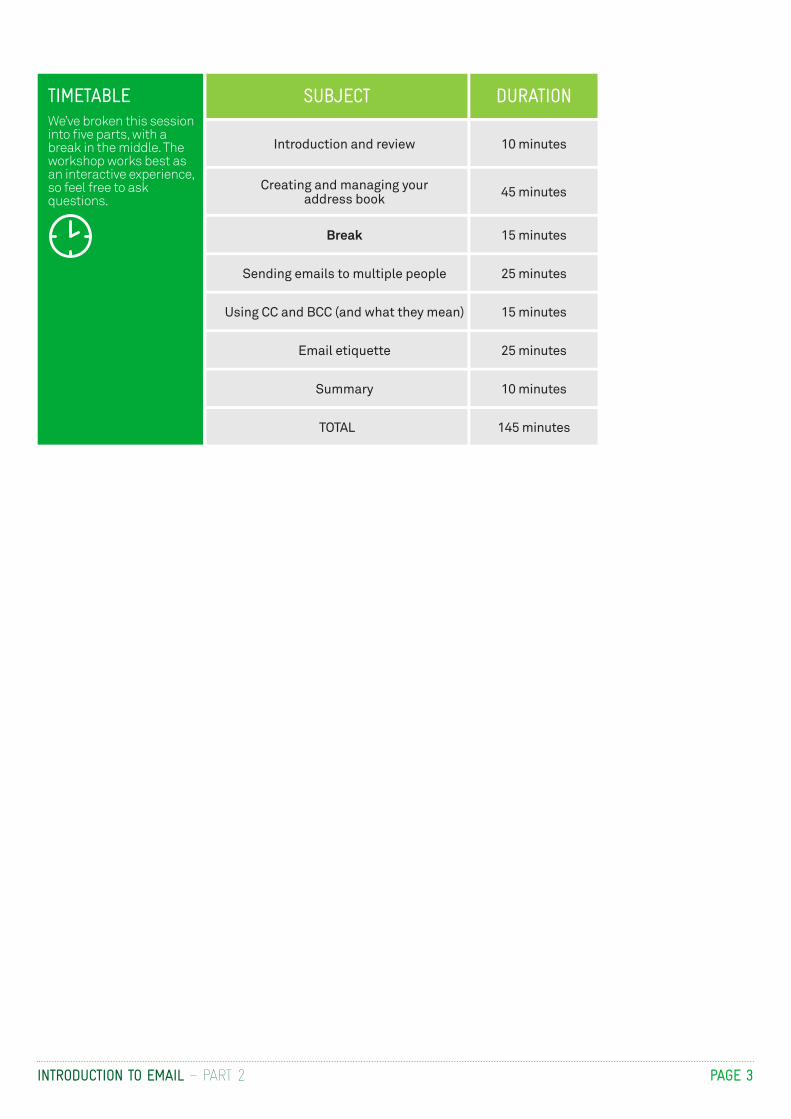
SUBJECT
Introduction and review
Creating and managing your address book
Break
Sending emails to multiple people
Using CC and BCC (and what they mean)
Email etiquette
Summary
TOTAL
10 minutes
45 minutes
15 minutes
25 minutes
15 minutes
25 minutes
10 minutes
145 minutes
DURATIONTIMETABLEWe’ve broken this session into five parts, with a break in the middle. The workshop works best as an interactive experience, so feel free to ask questions.
PAGE 3
INTRODUCTION TO EMAIL – PART 2 PAGE 4
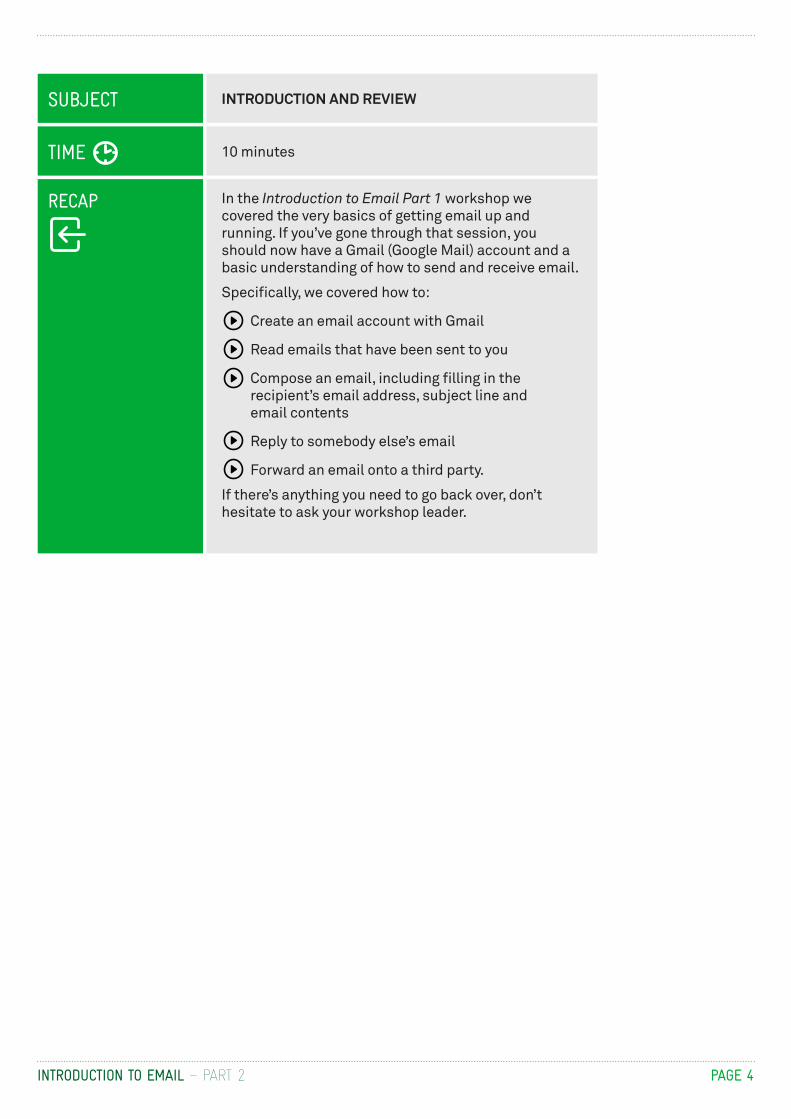
SUBJECT INTRODUCTION AND REVIEW
In the Introduction to Email Part 1 workshop we covered the very basics of getting email up and running. If you’ve gone through that session, you should now have a Gmail (Google Mail) account and a basic understanding of how to send and receive email.
Specifically, we covered how to:
Create an email account with Gmail
Read emails that have been sent to you
Compose an email, including filling in the recipient’s email address, subject line and email contents
Reply to somebody else’s email
Forward an email onto a third party.
If there’s anything you need to go back over, don’t hesitate to ask your workshop leader.
TIME 10 minutes
RECAP
INTRODUCTION TO EMAIL – PART 2 PAGE 5
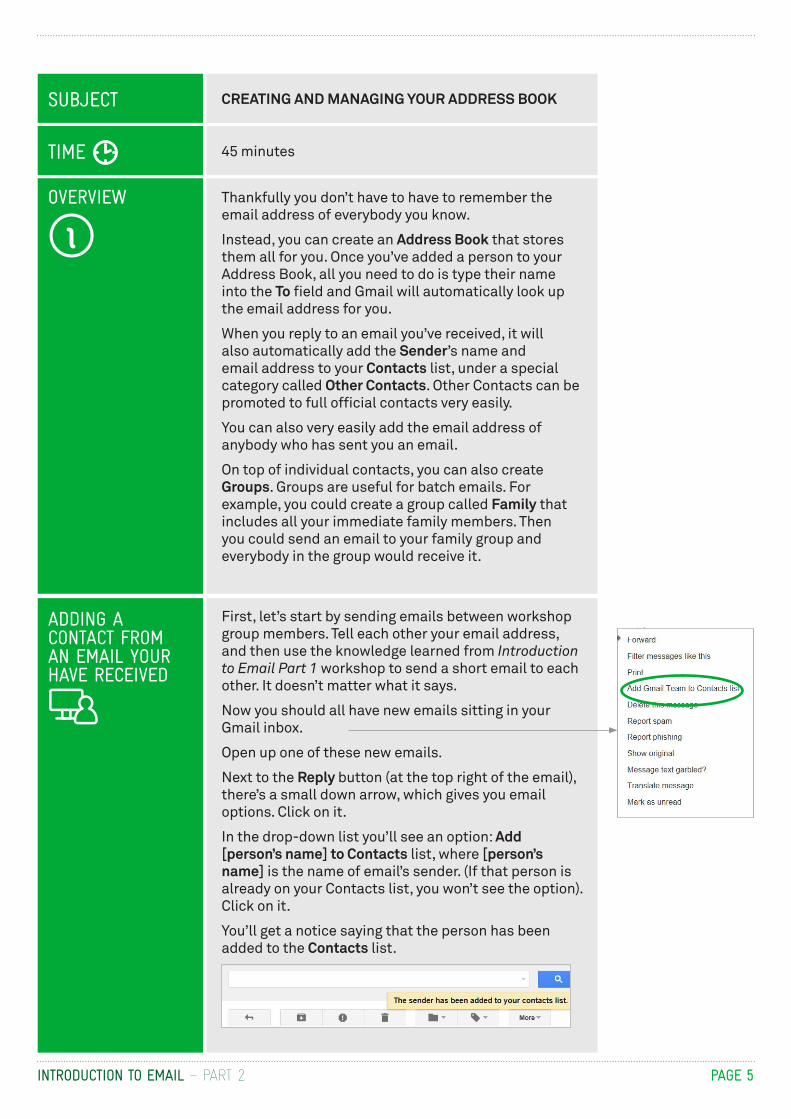
SUBJECT CREATING AND MANAGING YOUR ADDRESS BOOK
Thankfully you don’t have to have to remember the email address of everybody you know.
Instead, you can create an Address Book that stores them all for you. Once you’ve added a person to your Address Book, all you need to do is type their name into the To field and Gmail will automatically look up the email address for you.
When you reply to an email you’ve received, it will also automatically add the Sender’s name and email address to your Contacts list, under a special category called Other Contacts. Other Contacts can be promoted to full official contacts very easily.
You can also very easily add the email address of anybody who has sent you an email.
On top of individual contacts, you can also create Groups. Groups are useful for batch emails. For example, you could create a group called Family that includes all your immediate family members. Then you could send an email to your family group and everybody in the group would receive it.
TIME 45 minutes
OVERVIEW
ADDING A CONTACT FROM AN EMAIL YOUR HAVE RECEIVED
First, let’s start by sending emails between workshop group members. Tell each other your email address, and then use the knowledge learned from Introduction to Email Part 1 workshop to send a short email to each other. It doesn’t matter what it says.
Now you should all have new emails sitting in your Gmail inbox.
Open up one of these new emails.
Next to the Reply button (at the top right of the email), there’s a small down arrow, which gives you email options. Click on it.
In the drop-down list you’ll see an option: Add [person’s name] to Contacts list, where [person’s name] is the name of email’s sender. (If that person is already on your Contacts list, you won’t see the option). Click on it.
You’ll get a notice saying that the person has been added to the Contacts list.
INTRODUCTION TO EMAIL – PART 2 PAGE 6
ADDING A CONTACT FROM AN EMAIL YOUR HAVE RECEIVED
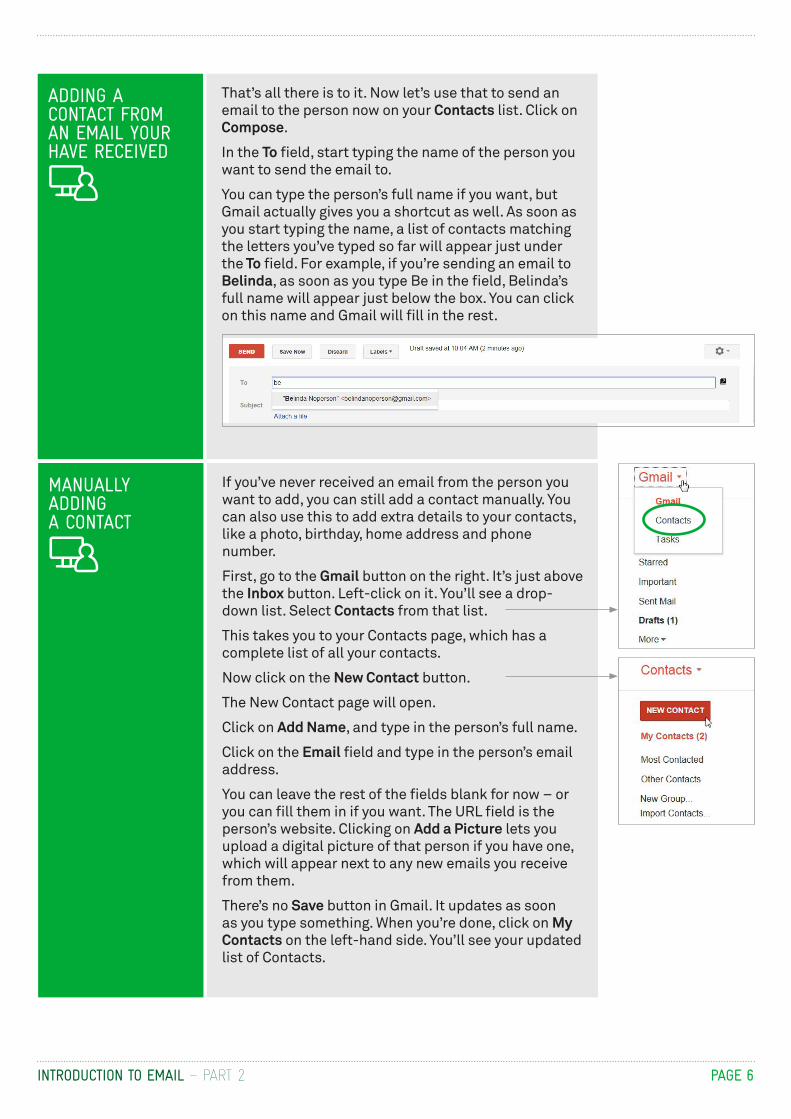
That’s all there is to it. Now let’s use that to send an email to the person now on your Contacts list. Click on Compose.
In the To field, start typing the name of the person you want to send the email to.
You can type the person’s full name if you want, but Gmail actually gives you a shortcut as well. As soon as you start typing the name, a list of contacts matching the letters you’ve typed so far will appear just under the To field. For example, if you’re sending an email to Belinda, as soon as you type Be in the field, Belinda’s full name will appear just below the box. You can click on this name and Gmail will fill in the rest.
If you’ve never received an email from the person you want to add, you can still add a contact manually. You can also use this to add extra details to your contacts, like a photo, birthday, home address and phone number.
First, go to the Gmail button on the right. It’s just above the Inbox button. Left-click on it. You’ll see a drop-down list. Select Contacts from that list.
This takes you to your Contacts page, which has a complete list of all your contacts.
Now click on the New Contact button.
The New Contact page will open.
Click on Add Name, and type in the person’s full name.
Click on the Email field and type in the person’s email address.
You can leave the rest of the fields blank for now – or you can fill them in if you want. The URL field is the person’s website. Clicking on Add a Picture lets you upload a digital picture of that person if you have one, which will appear next to any new emails you receive from them.
There’s no Save button in Gmail. It updates as soon as you type something. When you’re done, click on My Contacts on the left-hand side. You’ll see your updated list of Contacts.
MANUALLY ADDING A CONTACT
INTRODUCTION TO EMAIL – PART 2
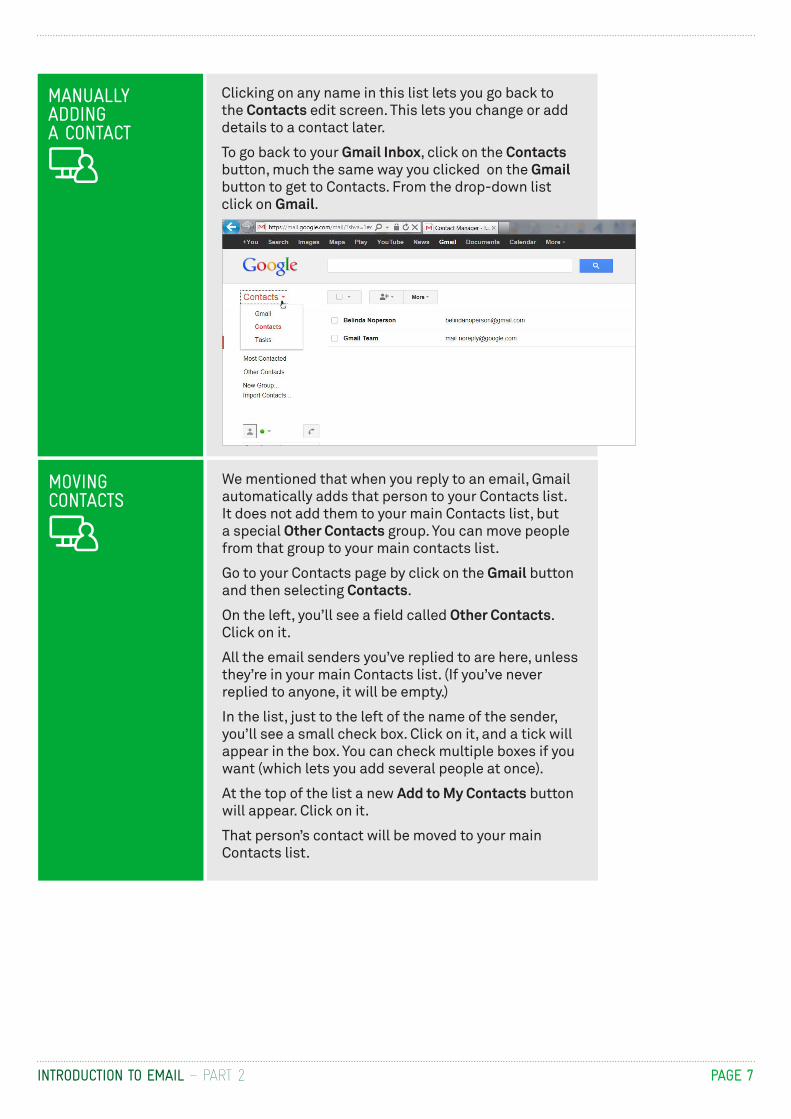
Clicking on any name in this list lets you go back to the Contacts edit screen. This lets you change or add details to a contact later.
To go back to your Gmail Inbox, click on the Contacts button, much the same way you clicked on the Gmail button to get to Contacts. From the drop-down list click on Gmail.
PAGE 7
MANUALLY ADDING A CONTACT
MOVING CONTACTS
We mentioned that when you reply to an email, Gmail automatically adds that person to your Contacts list. It does not add them to your main Contacts list, but a special Other Contacts group. You can move people from that group to your main contacts list.
Go to your Contacts page by click on the Gmail button and then selecting Contacts.
On the left, you’ll see a field called Other Contacts. Click on it.
All the email senders you’ve replied to are here, unless they’re in your main Contacts list. (If you’ve never replied to anyone, it will be empty.)
In the list, just to the left of the name of the sender, you’ll see a small check box. Click on it, and a tick will appear in the box. You can check multiple boxes if you want (which lets you add several people at once).
At the top of the list a new Add to My Contacts button will appear. Click on it.
That person’s contact will be moved to your main Contacts list.

INTRODUCTION TO EMAIL – PART 2
PAGE 8
CREATING GROUPS
In Gmail you can create Groups, which are categories of contacts. A contact can be in multiple groups (or none at all). Having a contact in a Group lets you quickly send an email to all the people in that group.
First go to Contacts (if you’re not already there), by clicking on Gmail and selecting Contacts.
Now, on the left, click on New Group.
In the box that pops up, give the group a name. It can be anything you want. For this example, you can just use Friends.
A new field for the group will appear on the left. Clicking on it will show a list of all the people in that group. For now there won’t be any, because we haven’t added people to the group yet.
Click on My Contacts on the left to go back to your main Contacts page.
Just to the left of each name in the list is a small box. This is actually a check box. When you click on it, a little tick will appear in the box. For every person that you want to add to the Friends group you just created, check the box.
Now click on the Groups button.
A drop-down list will appear. This list shows all the groups that the person or people you’ve selected are members of. If they are a member of a group, there will be a tick next to the group name (they won’t be member of the group you created just yet).
Now to add them to the group you just created, click on the check box next to the group name.
Click on Apply when you’re done adding them to groups.
That’s it. They’re now member of your Friends group. If you click on the group name on the left now, they will appear in the list of group members. We’ll use this in the next section to send a group email.
Groups button

INTRODUCTION TO EMAIL – PART 2 PAGE 9
SUBJECT SENDING EMAILS TO MULTIPLE PEOPLE
TIME 25 minutes
There is no limit on the number of people you can send an email to at once. You can send a single email to two, ten or 100 people, if you want. The email system will automatically make a copy for each person you want to send the email to.
You can send emails to multiple people by using groups, which we just created, or by simply listing multiple recipients in the To field.
This is very simple – all you have to do is separate the names in the To field with a comma.
Go to your Inbox and click on Compose.
In the To field, where you enter the name of the recipient, type in the name of the first person you want to send the email to. Next, type a comma ( , ) then the next email address, and so on. You can have as many people as you want.
In fact, if you use addresses from your Contacts list, Gmail automatically adds the commas at the end of the email addresses – so you just have to enter the names.
Type a subject and contents of the email and send. The email will go to every address in the list.
OVERVIEW
SENDING TO MULTIPLE RECIPIENTS
INTRODUCTION TO EMAIL – PART 2 PAGE 10
SENDING TO A GROUP
REPLYING TO A GROUP EMAIL
Sending an email to a group is functionally the same as sending it to multiple recipients, except that instead of having to type in the names individually, you just have to type in the name of the group you’ve created.
Go to your Inbox and click on Compose to start a new email.
In the To field, type in the name of the group you want to send it to. You’ll notice that, as it does with individual names, Gmail performs an advance lookup of names that you can click on. For example, if you created a group called Friends, as soon as you type Fr into the box, an option will appear just below offering Friends (group) and clicking on that will fill in the rest of the field for you.
Now you can just fill in the subject and body of the email as normal, and click send when you’re done. Gmail will automatically send the email to everybody in the group.
When an email is sent to multiple people, everybody can see the names and email addresses of all the other recipients (unless the sender uses the BCC field, which we’ll cover shortly).
When you get an email that was sent to multiple people, you may want to reply to it. Sometimes you want to reply just to the sender; sometimes you want your reply to go out to all the other recipients as well. There are options for both.
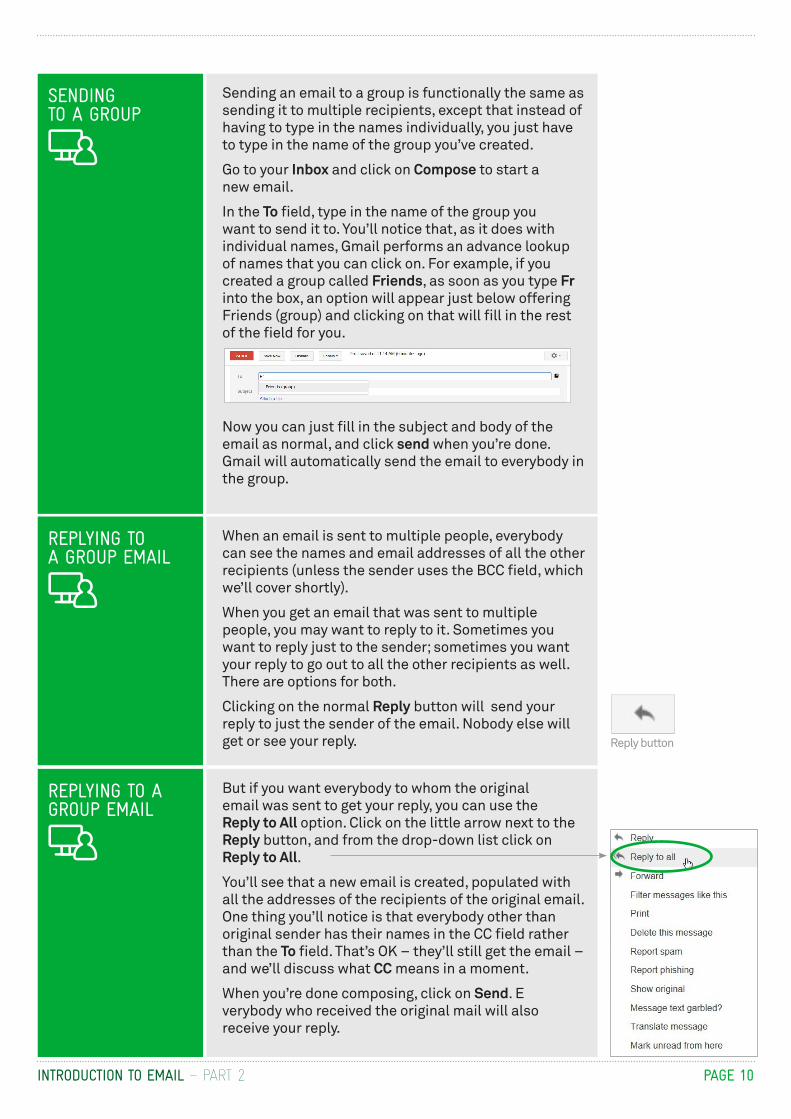
Clicking on the normal Reply button will send your reply to just the sender of the email. Nobody else will get or see your reply. Reply button
REPLYING TO A GROUP EMAIL
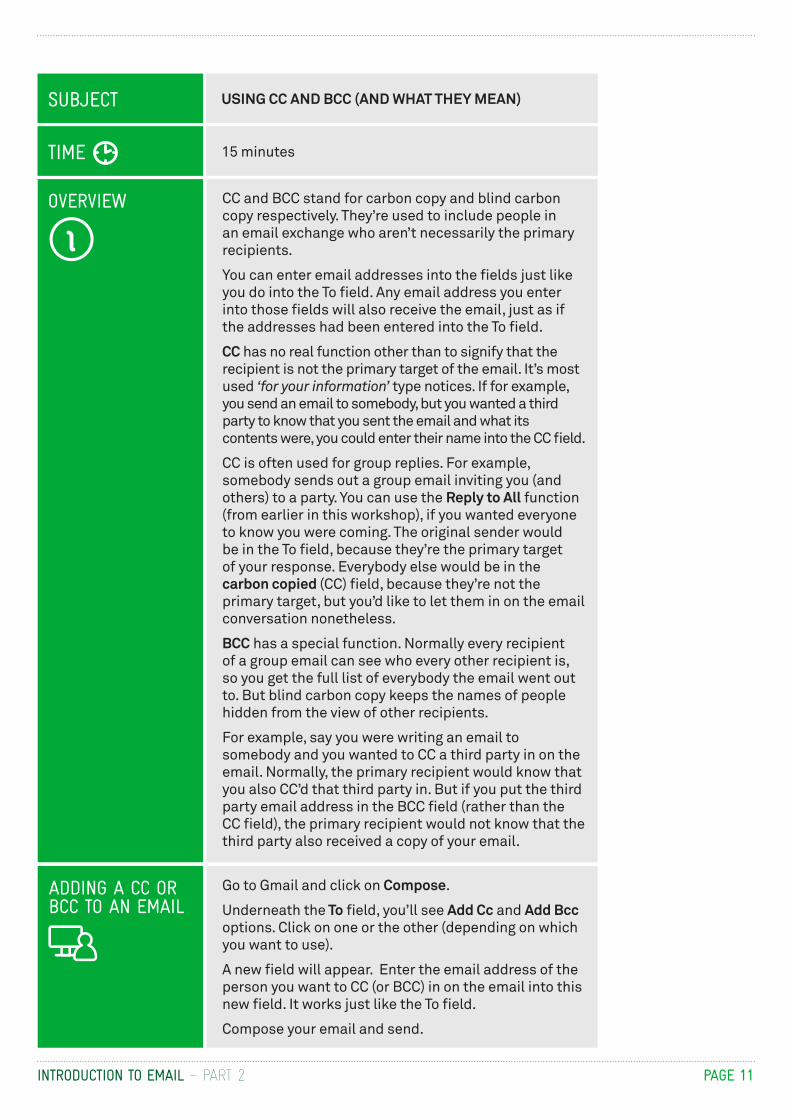
But if you want everybody to whom the original email was sent to get your reply, you can use the Reply to All option. Click on the little arrow next to the Reply button, and from the drop-down list click on Reply to All.
You’ll see that a new email is created, populated with all the addresses of the recipients of the original email. One thing you’ll notice is that everybody other than original sender has their names in the CC field rather than the To field. That’s OK – they’ll still get the email – and we’ll discuss what CC means in a moment.
When you’re done composing, click on Send. E verybody who received the original mail will also receive your reply.
INTRODUCTION TO EMAIL – PART 2 PAGE 11
TOPIC USING CC AND BCC (AND WHAT THEY MEAN)
TIME 10 minutes
OVERVIEW CC and BCC stand for carbon copy and blind carbon copy respectively. They’re used to include people in an email exchange who aren’t necessarily the primary recipients.
You can enter email addresses into the fields just like you do into the To field. Any email address you enter into those fields will also receive the email, just as if the addresses had been entered into the To field.
CC has no real function other than to signify that the recipient is not the primary target of the email. It’s most used ‘for your information’ type notices. If for example, you send an email to somebody, but you wanted a third party to know that you sent the email and what its contents were, you could enter their name into the CC field.
CC is often used for group replies. For example, somebody sends out a group email inviting you (and others) to a party. You can use the Reply to All function (from earlier in this workshop), if you wanted everyone to know you were coming. The original sender would be in the To field, because they’re the primary target of your response. Everybody else would be in the carbon copied (CC) field, because they’re not the primary target, but you’d like to let them in on the email conversation nonetheless.
BCC has a special function. Normally every recipient of a group email can see who every other recipient is, so you get the full list of everybody the email went out to. But blind carbon copy keeps the names of people hidden from the view of other recipients.
For example, say you were writing an email to somebody and you wanted to CC a third party in on the email. Normally, the primary recipient would know that you also CC’d that third party in. But if you put the third party email address in the BCC field (rather than the CC field), the primary recipient would not know that the third party also received a copy of your email.
Go to Gmail and click on Compose.
Underneath the To field, you’ll see Add Cc and Add Bcc options. Click on one or the other (depending on which you want to use).
A new field will appear. Enter the email address of the person you want to CC (or BCC) in on the email into this new field. It works just like the To field.
Compose your email and send.
ADDING A CC OR BCC TO AN EMAIL
SUBJECT USING CC AND BCC (AND WHAT THEY MEAN)
TIME 15 minutes
INTRODUCTION TO EMAIL – PART 2 PAGE 12
SUBJECT EMAIL ETIQUETTE
TIME 25 minutes
OVERVIEW
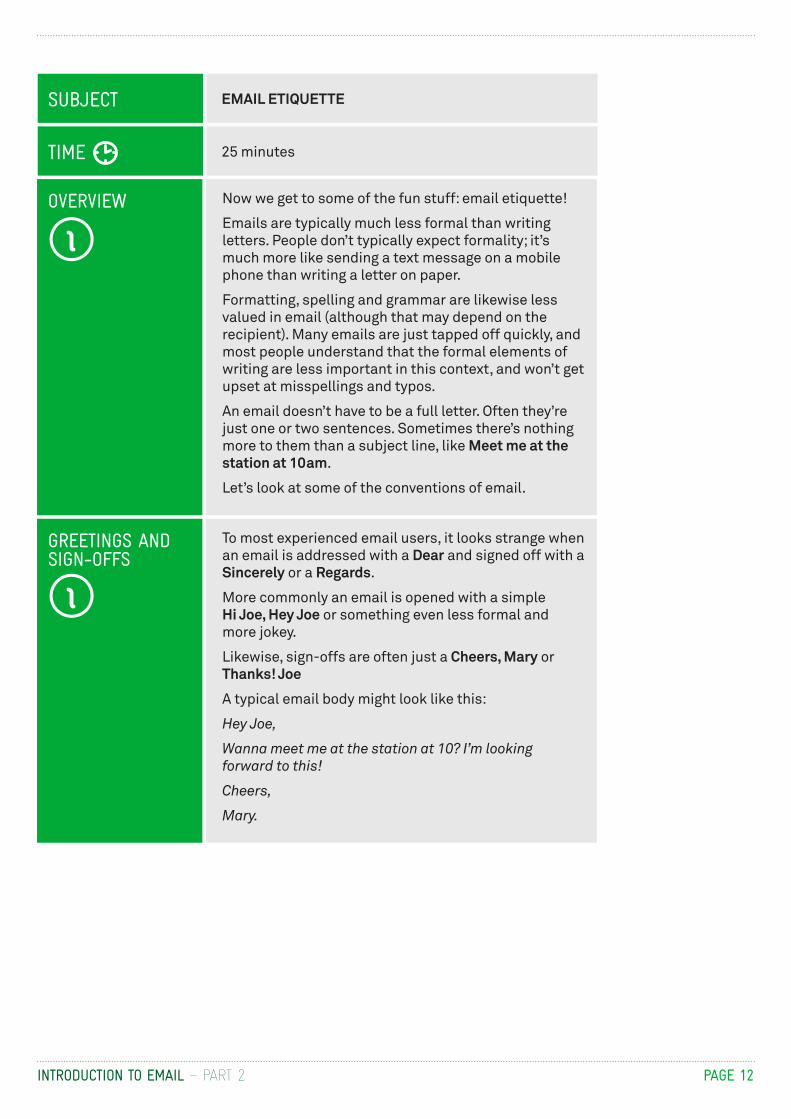
GREETINGS AND SIGN-OFFS
Now we get to some of the fun stuff: email etiquette!
Emails are typically much less formal than writing letters. People don’t typically expect formality; it’s much more like sending a text message on a mobile phone than writing a letter on paper.
Formatting, spelling and grammar are likewise less valued in email (although that may depend on the recipient). Many emails are just tapped off quickly, and most people understand that the formal elements of writing are less important in this context, and won’t get upset at misspellings and typos.
An email doesn’t have to be a full letter. Often they’re just one or two sentences. Sometimes there’s nothing more to them than a subject line, like Meet me at the station at 10am.
Let’s look at some of the conventions of email.
To most experienced email users, it looks strange when an email is addressed with a Dear and signed off with a Sincerely or a Regards.
More commonly an email is opened with a simple Hi Joe, Hey Joe or something even less formal and more jokey.
Likewise, sign-offs are often just a Cheers, Mary or Thanks! Joe
A typical email body might look like this:
Hey Joe,
Wanna meet me at the station at 10? I’m looking forward to this!
Cheers,
Mary.
INTRODUCTION TO EMAIL – PART 2 PAGE 13
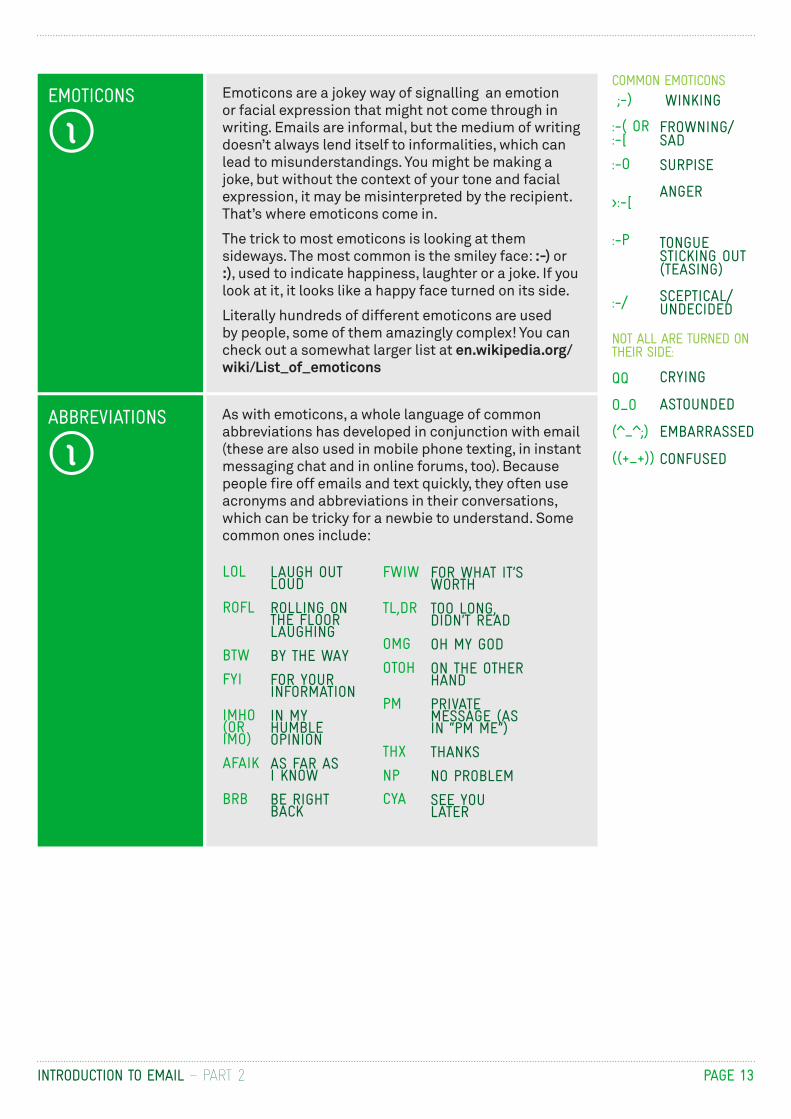
EMOTICONS
ABBREVIATIONS
Emoticons are a jokey way of signalling an emotion or facial expression that might not come through in writing. Emails are informal, but the medium of writing doesn’t always lend itself to informalities, which can lead to misunderstandings. You might be making a joke, but without the context of your tone and facial expression, it may be misinterpreted by the recipient. That’s where emoticons come in.
The trick to most emoticons is looking at them sideways. The most common is the smiley face: :-) or :), used to indicate happiness, laughter or a joke. If you look at it, it looks like a happy face turned on its side.
Literally hundreds of different emoticons are used by people, some of them amazingly complex! You can check out a somewhat larger list at en.wikipedia.org/wiki/List_of_emoticons
As with emoticons, a whole language of common abbreviations has developed in conjunction with email (these are also used in mobile phone texting, in instant messaging chat and in online forums, too). Because people fire off emails and text quickly, they often use acronyms and abbreviations in their conversations, which can be tricky for a newbie to understand. Some common ones include:
WINKING FROWNING/SAD
SURPISE ANGER
TONGUE STICKING OUT (TEASING) SCEPTICAL/UNDECIDED
CRYING
ASTOUNDED
EMBARRASSED
CONFUSED
LAUGH OUT LOUD ROLLING ON THE FLOOR LAUGHING BY THE WAY FOR YOUR INFORMATION IN MY HUMBLE OPINION AS FAR AS I KNOW BE RIGHT BACK
FOR WHAT IT’S WORTH TOO LONG, DIDN’T READ OH MY GOD ON THE OTHER HAND PRIVATE MESSAGE (AS IN “PM ME”) THANKS NO PROBLEM SEE YOU LATER
COMMON EMOTICONS
NOT ALL ARE TURNED ON THEIR SIDE:
;-) :-( OR :-[
:-O
>:-[
:-P
:-/
QQ O_O (^_^;) ((+_+))
LOL ROFL BTW FYI IMHO (OR IMO) AFAIK BRB
FWIW TL,DR OMG OTOH PM THX NP
CYA
INTRODUCTION TO EMAIL – PART 2 PAGE 14
FORWARD AND REPLIES
This can be a tricky area to navigate, since different people have different responses to email clutter.
It’s common for funny emails, sites and comments to be forwarded between friends. Some people enjoy this give and take; others get annoyed at their Inboxes being cluttered with jokes and email forwards.
A good rule of thumb is that if somebody forwards you a joke email then they’re OK with the idea of email forwards. If you find something online that you think they’d enjoy, feel free to send it to them and anybody else who’s happy with email forwards. If somebody doesn’t tend to participate in these kinds of forwards, it’s best to leave them out. Otherwise they might start to get annoyed at you for sending them all that email!
If this all seems to confusing for now, don’t worry. More exposure to email will familiarise you with its quirks and conventions, and most people are pretty understanding. For example, it’s not wrong to start an email with Dear, just a little strange.
INTRODUCTION TO EMAIL – PART 2 PAGE 15
Gmail: mail.google.com. Google Mail (Gmail), is one of a number of free, web-based email services you can find online. It’s very simple to set up an email account.
Gmail support: support.google.com/mail/. This includes guides on how to use all the features of Gmail, as well as how to set up a dedicated email program like Outlook or Mozilla Thunderbird to access Gmail.
Mozilla Thunderbird: www.mozilla.org/thunderbird/. A standalone email program. It saves you from having to start up a web browser to access your email, but can be a little technical to set up.
Hotmail: www.hotmail.com
Yahoo Mail: mail.yahoo.com
Inbox.com: www.inbox.com
Windows Live Mail: www.live.com
RECAP
USEFUL WEBSITES
SUMMARY
By now you should be pretty close to mastering the art of group emails. At the end of this workshop you should be able to:
Create an email account (not that you have to – you can keep on using the one you created here)
Read emails that have been sent to you
Compose an email, including filling in the recipient’s email address, subject line and email contents
Reply to somebody else’s email
Forward an email onto a third party.
TIME 10 minutes
INTRODUCTION TO EMAIL – PART 2
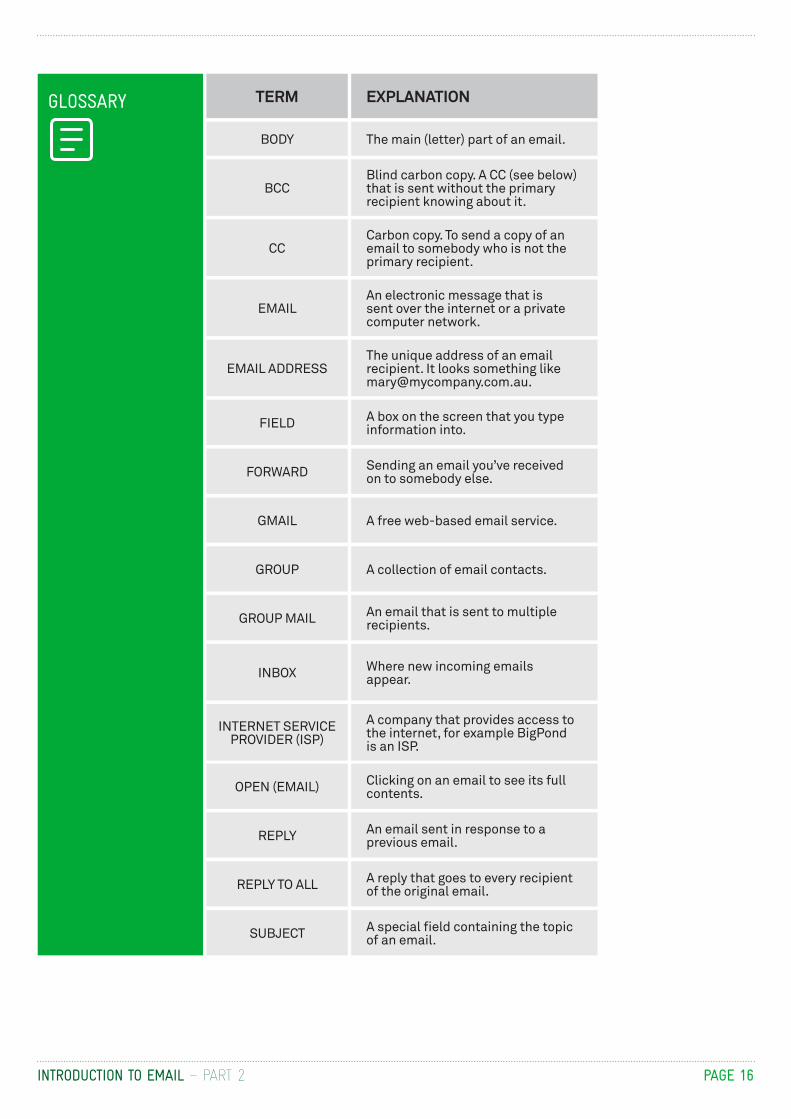
GLOSSARY
BODY
BCC
CC
GROUP MAIL
SUBJECT
GROUP
REPLY TO ALL
EMAIL ADDRESS
INBOX
FORWARD
OPEN (EMAIL)
GMAIL
REPLY
FIELD
INTERNET SERVICE PROVIDER (ISP)
The main (letter) part of an email.
Blind carbon copy. A CC (see below) that is sent without the primary recipient knowing about it.
Carbon copy. To send a copy of an email to somebody who is not the primary recipient.
An electronic message that is sent over the internet or a private computer network.
An email that is sent to multiple recipients.
A special field containing the topic of an email.
A collection of email contacts.
A reply that goes to every recipient of the original email.
The unique address of an email recipient. It looks something like [email protected].
Where new incoming emails appear.
Sending an email you’ve received on to somebody else.
Clicking on an email to see its full contents.
A free web-based email service.
An email sent in response to a previous email.
A box on the screen that you type information into.
A company that provides access to the internet, for example BigPond is an ISP.
PAGE 16
TERM EXPLANATION
under
DISCLAIMER
DISCLAIMERThe information contained in this publication and any accompanying materials is strictly for educational and informational purposes. The publication and any accompanying materials do not constitute the promotion, endorsement or approval of any product or service referred to, shown or demonstrated in the publication and any accompanying materials.
The publication and any accompanying materials are designed to be used as an initial reference only. They are not intended to be a comprehensive guide or to apply in all situations.
Reasonable endeavours have been made to ensure that information appearing in this publication and any accompanying materials was correct at the time of production. However, the authors, producers and presenters of this publication and any accompanying materials (the Relevant Persons)* make no representation or warranty as to the accuracy, reliability, completeness or currency of the information in this publication and any accompanying materials.
The information and any advice provided in this publication and any accompanying materials is provided solely on the basis that the audience will be responsible for making their own assessment of the matters discussed herein and are advised to verify all relevant representations, statements and information.
* The Relevant Persons:
• exclude, to the maximum extent permitted by law, all express or implied warranties of any kind in relation to any information in this publication and any accompanying materials;
• are no obligation to update any information in this publication and any accompanying materials or correct any inaccuracy on this publication and any accompanying materials which may become apparent at a later time; and
• reserve the right, in their absolute discretion, to delete, alter or move the publication (and any accompanying materials) and any of the contents therein (including the terms and conditions of this disclaimer) at any time without notice.
* The Relevant Persons include any individual, company, partnership or government department involved in the making of the publication and their respective officers, employees and agents.
TRADEMARK NOTICEAll product names or websites referred to in this instructional publication may be the trademarks of third parties.
INTELLECTUAL PROPERTY NOTICE AND DISCLAIMERCopyright© Telstra Corporation Limited (ABN 33 051 775 556) and the New South Wales Office of Ageing. All rights reserved. Third party copyright and trademarks reproduced with consent by Telstra Corporation Limited (ABN 33 051 775 556). The material is protected by copyright under the laws of Australia and, through international treaties, other countries. No part of these materials may be released, distributed, reproduced, copied, stored, or transmitted in any form or by any means whether electronic, mechanical, recording or otherwise except for your own information, research or study.
VICTORIAN TECH SAVVY SENIORSEveryone can benefit from being connected and online irrespective of their age, income, ability or geographical location. The Victorian Tech Savvy Seniors Program is a Seniors Card Age Friendly Partners Program in partnership with Telstra.