Embed Size (px)
Citation preview
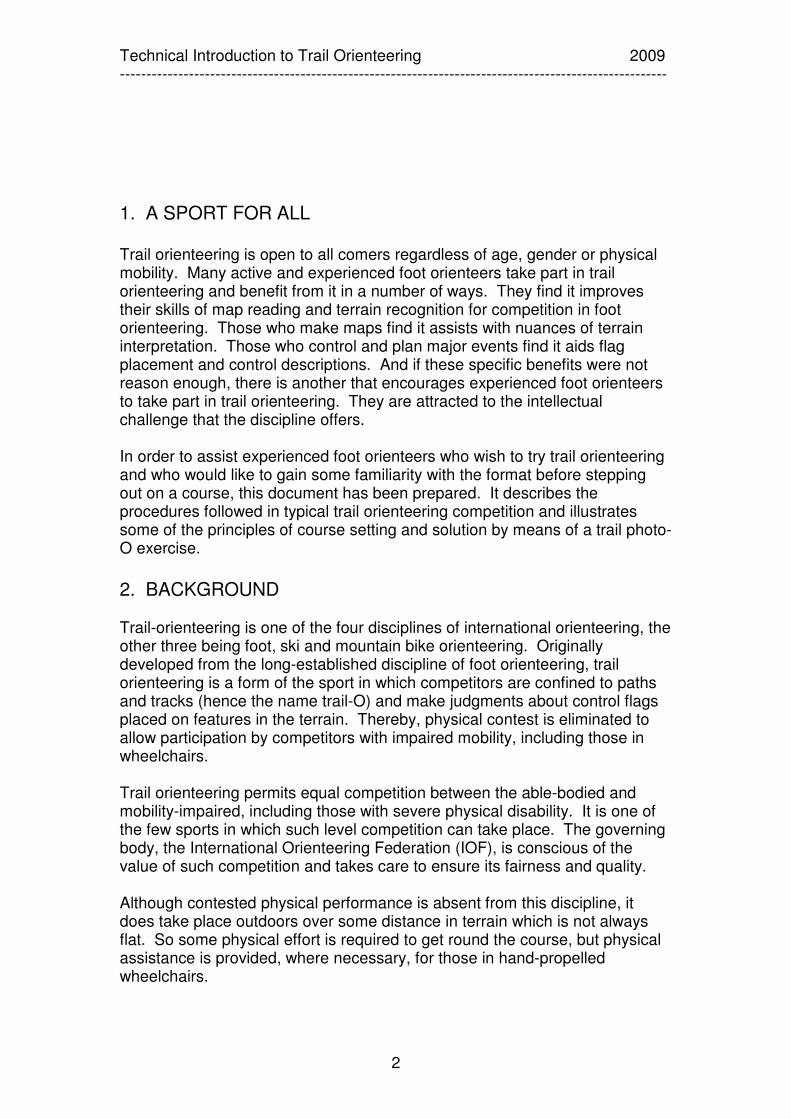
TECHNICAL INTRODUCTION to
TRAIL ORIENTEERING for
EXPERIENCED FOOT ORIENTEERS
Control 21 on Day 1 at 2009 World Championships, Miskolc, Hungary
IOF Trail Orienteering Commission
2010
INTERNATIONAL ORIENTEERING FEDERATION, RADIOKATU 20, FI-00093 SLU, FINLAND
Technical Introduction to Trail Orienteering 2009 -------------------------------------------------------------------------------------------------------
2
1. A SPORT FOR ALL Trail orienteering is open to all comers regardless of age, gender or physical mobility. Many active and experienced foot orienteers take part in trail orienteering and benefit from it in a number of ways. They find it improves their skills of map reading and terrain recognition for competition in foot orienteering. Those who make maps find it assists with nuances of terrain interpretation. Those who control and plan major events find it aids flag placement and control descriptions. And if these specific benefits were not reason enough, there is another that encourages experienced foot orienteers to take part in trail orienteering. They are attracted to the intellectual challenge that the discipline offers. In order to assist experienced foot orienteers who wish to try trail orienteering and who would like to gain some familiarity with the format before stepping out on a course, this document has been prepared. It describes the procedures followed in typical trail orienteering competition and illustrates some of the principles of course setting and solution by means of a trail photo-O exercise.
2. BACKGROUND Trail-orienteering is one of the four disciplines of international orienteering, the other three being foot, ski and mountain bike orienteering. Originally developed from the long-established discipline of foot orienteering, trail orienteering is a form of the sport in which competitors are confined to paths and tracks (hence the name trail-O) and make judgments about control flags placed on features in the terrain. Thereby, physical contest is eliminated to allow participation by competitors with impaired mobility, including those in wheelchairs. Trail orienteering permits equal competition between the able-bodied and mobility-impaired, including those with severe physical disability. It is one of the few sports in which such level competition can take place. The governing body, the International Orienteering Federation (IOF), is conscious of the value of such competition and takes care to ensure its fairness and quality. Although contested physical performance is absent from this discipline, it does take place outdoors over some distance in terrain which is not always flat. So some physical effort is required to get round the course, but physical assistance is provided, where necessary, for those in hand-propelled wheelchairs.
Technical Introduction to Trail Orienteering 2009 -------------------------------------------------------------------------------------------------------
3
As competitors move round the course, they meet orienteering problems which have to be solved by careful reading of the orienteering map and matching it to the features in the terrain. At introductory level the problems set are not complicated and previous orienteering experience is not essential. At higher levels of participation more and more orienteering skills are brought into play and at the highest level, in international competition, the courses are extremely testing and require enhanced skills normally beyond those needed for foot orienteering. When trail orienteering was originally designed for disabled competitors, it was necessary for the focus of attention to be on encouraging disabled participation. This initially gave rise to a common misconception that competition was confined to those with physical disability. That there is no such restriction with trail-O being open to all is now widely understood. Today the majority of participants in trail orienteering are able-bodied with a broad range of experience and ability, even including world champion foot orienteers, all attracted to its particular technical challenge. The World Trail Orienteering Championships (WTOC), first held in conjunction with the World Orienteering Championships (WOC) in Sweden in 2004, are open to all comers (provided they are selected by their national federations), irrespective of age, gender or physical ability. There is also a closed ‘Paralympic’ class restricted to those with eligible disability and with medically-certified IOF approval. Those entering trail orienteering with experience of foot orienteering have little difficulty in adjusting to the format. The maps are the same, the language is the same and the problems to be solved, although different in some respects, clearly belong to orienteering as they know it. The IOF Trail Orienteering Commission, responsible for maintaining and developing the discipline, is well aware of the need to retain this strong link with foot orienteering as both versions of the sport evolve. So, those interested in learning about trail orienteering are invited to follow the example course in this document then enter a real event. But be prepared to find it more testing than expected!
3. OUTLINE of a TRAIL ORIENTEERING COURSE How trail orienteering works is best explained by going through the routine of participating on a course. Much of this will be familiar to foot orienteers, but there are critical differences. Registration has the same function as at foot orienteering events. After the usual check-in procedures you will be given some means of recording your choices at the controls. Currently this is a control card, much larger than the traditional foot-O control card, because it has to provide multiple punching
Technical Introduction to Trail Orienteering 2009 -------------------------------------------------------------------------------------------------------
4
choices at each control. Electronic tag punching, as in widespread use in foot orienteering, is being adapted for trail orienteering events. You will need to take on the course a standard orienteering protractor compass and a watch. The watch is essential because there is a time limit to the course. As you might readily expect, optical aids (such as binoculars and range finders), position-fixing aids (such as GPS) and telecommunication aids (such as mobile ‘phones) are devices which could give unfair advantage and are forbidden. There are no formal clothing requirements in trail orienteering. Most participants wear clothing of a sporting character. If wearing standard orienteering competition clothing, remember that trail orienteering courses can be of two hours in duration, or even more. You will probably move quickly between the controls – and possibly become too warm – and then stand around analysing the controls – and possibly become too cold. For footwear a wide range of choice is possible. Some prefer rubber-studded running shoes (those with metal spike inserts are generally not suitable because the courses often follow hard surface tracks). Some prefer walking boots, useful if there are wet sections on the tracks. Report to the Pre-start at the time allocated at registration or when ready, depending on the system in operation. If the course contains timed controls (see discussion later), one or more of these may be between the Pre-start and the Start. At the Start your starting time is recorded. You will have been told the maximum time you are allowed for completing the course. You will need to calculate and remember your latest finish time. Later than this will result in penalty points. Although trail orienteering events are not races, they cannot be open-ended in time. A course closure time has to be set so that the competitors can all be checked in and the event concluded. A reasonably generous time is set. Sometimes disabled competitors are given an extra time allowance. Also at the Start you will be given the Map. This map, with its course markings, will appear identical in style to foot orienteering maps. The scale of the map will probably be 1:5000 or 1:4000 drawn to conventional (ISOM) specification with the symbol sizes enlarged to 150% (sometimes 200%) compared with 1:15000 scale maps. This scale and symbol size specification is similar to that for sprint orienteering (ISSOM) and the map may be drawn using sprint symbols. The Control descriptions are the same as those used in foot orienteering, except that the control codes are replaced by the number of flags at each control and direction of view arrows may be given in Column H.
Technical Introduction to Trail Orienteering 2009 -------------------------------------------------------------------------------------------------------
5
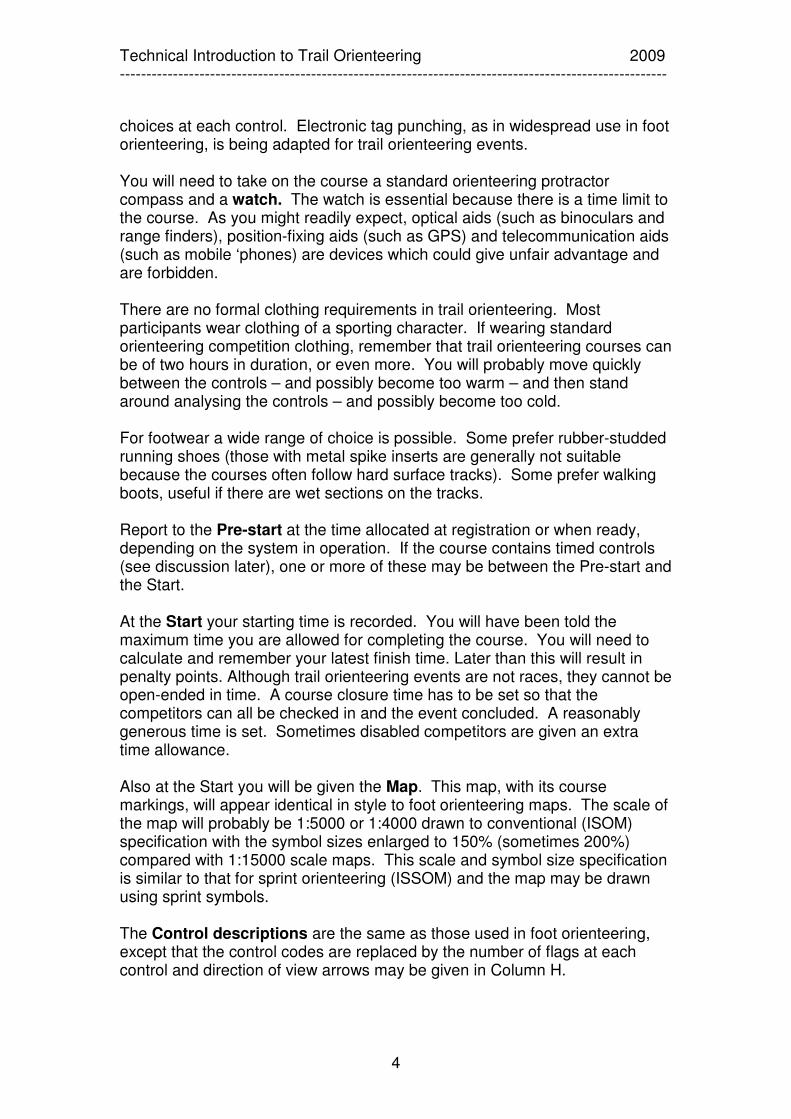
There is one very important difference in the way the map is used. In foot orienteering the straight lines linking control circles can, if the terrain permits, represent a possible route to be followed. In trail orienteering this is absolutely not the case. It is forbidden to enter the terrain off the tracks and paths (except where marked routes are laid out). To do so results in the risk of disqualification. The straight lines on the map are simply a means of sequencing the controls to remove, or reduce, the chance of missing one. Your task is to approach each of the control points as close as the track allows and solve the problem set there. The route to the vicinity of each control is normally very obvious and without choice. Where there is choice, with another track within viewing range of a control, the intended direction of view of the control from the viewing point is given in Column H. Sometimes it is necessary to place the alternative, or any other route, out of bounds. This is done by marking the map with a purple bar or cross on the track and repeating this in the terrain with barrier tape. At each control there are one or more flags, up to a maximum of five. The competitors are required to decide which flag marks the feature located at the centre of the circle on the map and defined in the control description. At elite competition level it is possible that no flag marks the centre of the circle, this ‘zero’ possibility adding an extra dimension to the standard of technical expertise necessary to solve problems. In viewing the controls, competitors may move up and down the permitted tracks in arriving at their decision. The chosen flag has to be identified for recording the answer. This is done from a Decision point (also named Viewing point) marked on the ground (usually by a numbered stake) but not marked on the map. The coding used is that the flag furthest to the left is referred to as A, the next to the right as B, and so on. This can be seen in the photograph of a set of three flags at the top of a steep sandy slope:
A B C
In this case the control description would contain the information ‘A-C’ in Column B. Note that there are no identifying marks on the flags. Having made your decision you move away from the viewing point a short distance along the course to a Recording point, currently consisting of a pin punch. This is used to mark the appropriate lettered box on the control card . The ‘no flag at
Technical Introduction to Trail Orienteering 2009 -------------------------------------------------------------------------------------------------------
6
the control point’ option is recorded as a zero (Z) answer. The control card is double layered so that the punch marks are duplicated on the second sheet, which is later returned to the competitor. An example of the control card is given in Appendix 1. If electronic recording is being used, the appropriate box in a set of boxes at the recording point is ‘punched’. You will need to know how we deal with mis-punching. See Appendix 1. Once all the controls have been visited and decisions recorded, competitors proceed to the Pre-Finish, where their course completion times are noted. Following the main course there may be one or more timed controls to be visited. After completion of any such timed controls the competitors then proceed to the Finish where control cards are handed in or electronic tags downloaded. In the Results list the score that a competitor is awarded is simply the number of correct controls, less any penalty for taking longer than the allowed maximum time. If timed controls are being included, the total times taken are used as tie breaks, to rank competitors with the same points score. In order that competitors may check any incorrect choices and also to advance their knowledge of trail orienteering, the Organiser may issue Solution maps, usually enlarged segments of the competition map, which show the positions of all the flags and the decision points. These, then, are the outlines of a typical trail orienteering competition, how to get round a course and the main procedures to be followed. To give some idea of the nature of control problems, the following photo-O trail orienteering course has been devised. Of necessity, it is simpler than real trail orienteering because only two-dimensional views of each control site are given. The controls begin at a simple introductory level but become more technical, introducing trail-O conventions, which may not be familiar to foot orienteers, as the course proceeds.
Technical Introduction to Trail Orienteering 2009 -------------------------------------------------------------------------------------------------------
7
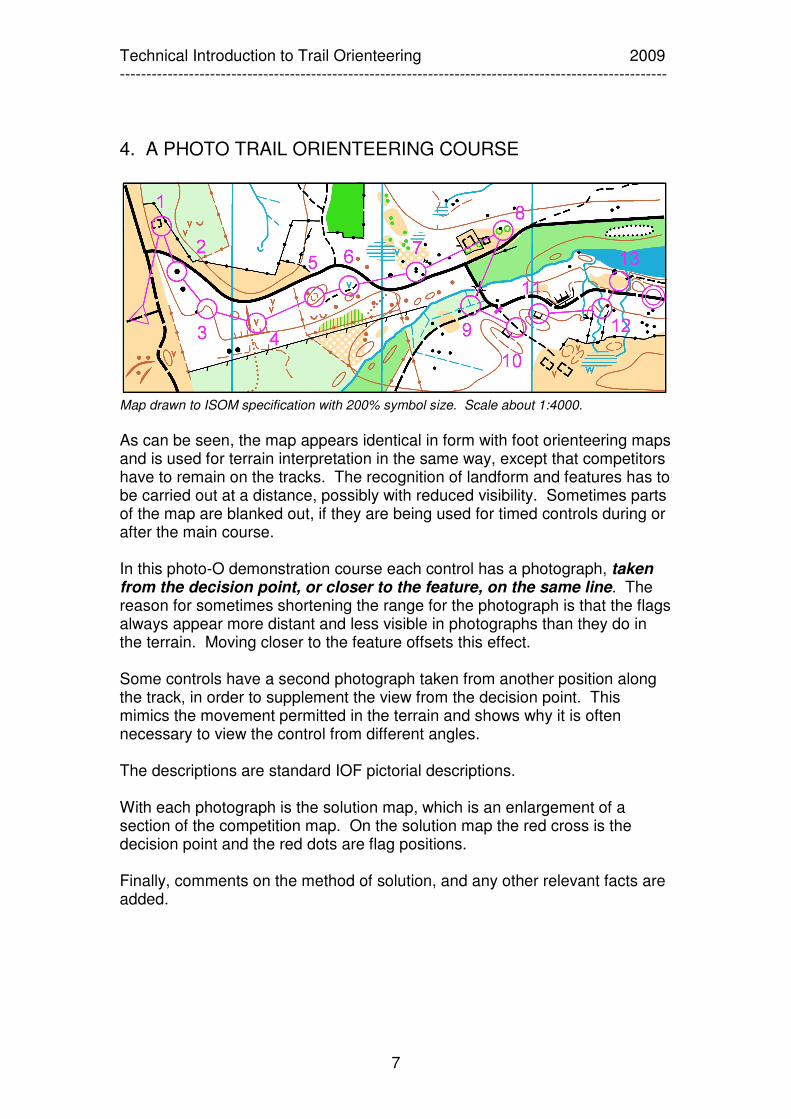
4. A PHOTO TRAIL ORIENTEERING COURSE
Map drawn to ISOM specification with 200% symbol size. Scale about 1:4000.
As can be seen, the map appears identical in form with foot orienteering maps and is used for terrain interpretation in the same way, except that competitors have to remain on the tracks. The recognition of landform and features has to be carried out at a distance, possibly with reduced visibility. Sometimes parts of the map are blanked out, if they are being used for timed controls during or after the main course. In this photo-O demonstration course each control has a photograph, taken from the decision point, or closer to the feature, on the same line. The reason for sometimes shortening the range for the photograph is that the flags always appear more distant and less visible in photographs than they do in the terrain. Moving closer to the feature offsets this effect. Some controls have a second photograph taken from another position along the track, in order to supplement the view from the decision point. This mimics the movement permitted in the terrain and shows why it is often necessary to view the control from different angles. The descriptions are standard IOF pictorial descriptions. With each photograph is the solution map, which is an enlargement of a section of the competition map. On the solution map the red cross is the decision point and the red dots are flag positions. Finally, comments on the method of solution, and any other relevant facts are added.
Technical Introduction to Trail Orienteering 2009 -------------------------------------------------------------------------------------------------------
8
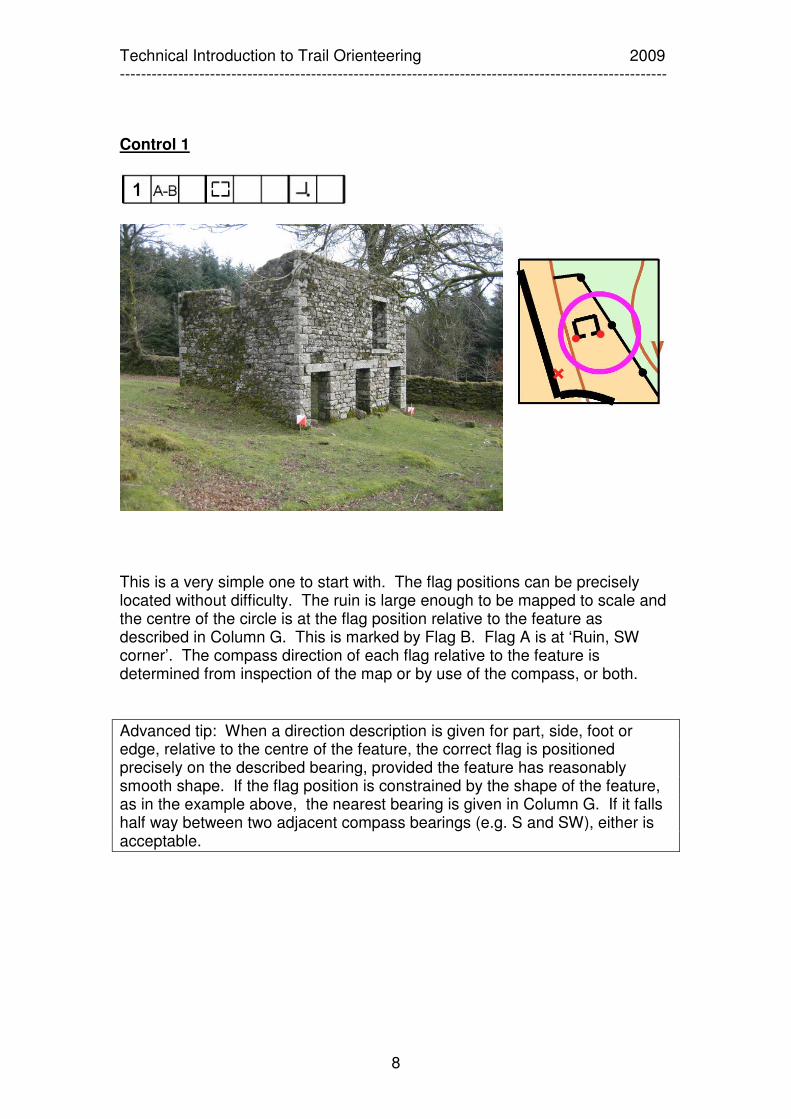
Control 1
This is a very simple one to start with. The flag positions can be precisely located without difficulty. The ruin is large enough to be mapped to scale and the centre of the circle is at the flag position relative to the feature as described in Column G. This is marked by Flag B. Flag A is at ‘Ruin, SW corner’. The compass direction of each flag relative to the feature is determined from inspection of the map or by use of the compass, or both.
Advanced tip: When a direction description is given for part, side, foot or edge, relative to the centre of the feature, the correct flag is positioned precisely on the described bearing, provided the feature has reasonably smooth shape. If the flag position is constrained by the shape of the feature, as in the example above, the nearest bearing is given in Column G. If it falls half way between two adjacent compass bearings (e.g. S and SW), either is acceptable.
Technical Introduction to Trail Orienteering 2009 -------------------------------------------------------------------------------------------------------
9
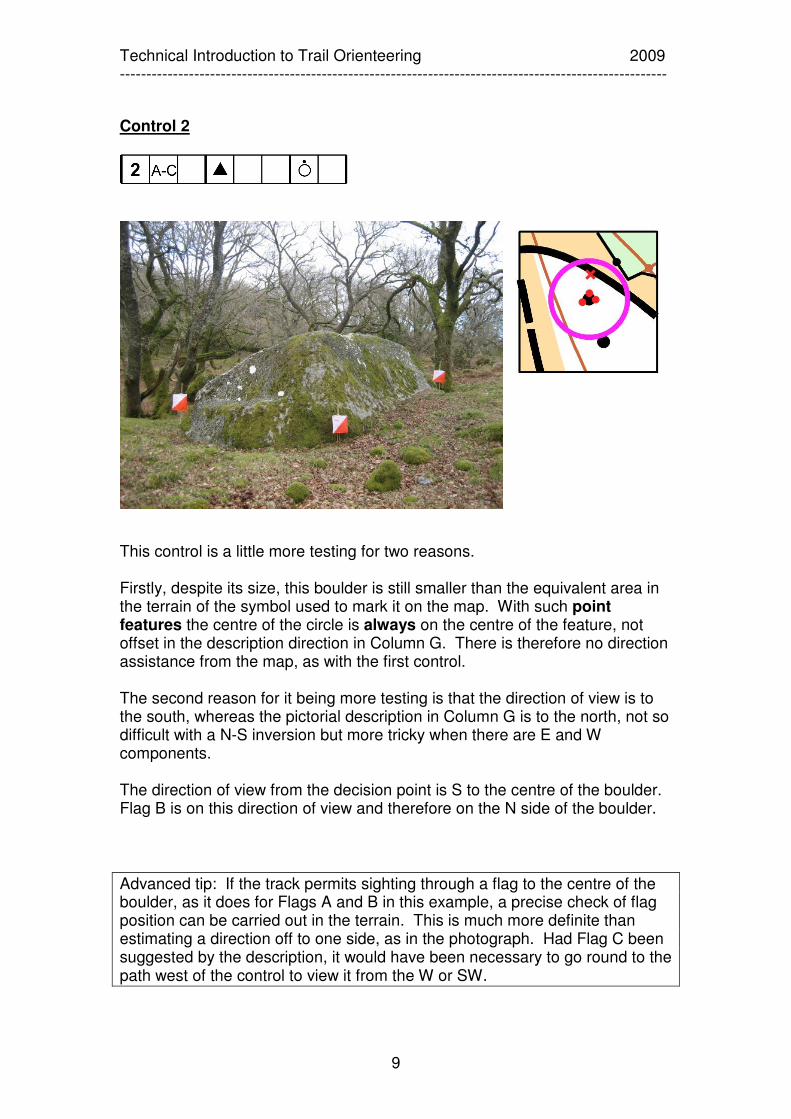
Control 2
This control is a little more testing for two reasons. Firstly, despite its size, this boulder is still smaller than the equivalent area in the terrain of the symbol used to mark it on the map. With such point features the centre of the circle is always on the centre of the feature, not offset in the description direction in Column G. There is therefore no direction assistance from the map, as with the first control. The second reason for it being more testing is that the direction of view is to the south, whereas the pictorial description in Column G is to the north, not so difficult with a N-S inversion but more tricky when there are E and W components. The direction of view from the decision point is S to the centre of the boulder. Flag B is on this direction of view and therefore on the N side of the boulder.
Advanced tip: If the track permits sighting through a flag to the centre of the boulder, as it does for Flags A and B in this example, a precise check of flag position can be carried out in the terrain. This is much more definite than estimating a direction off to one side, as in the photograph. Had Flag C been suggested by the description, it would have been necessary to go round to the path west of the control to view it from the W or SW.
Technical Introduction to Trail Orienteering 2009 -------------------------------------------------------------------------------------------------------
10
Control 3
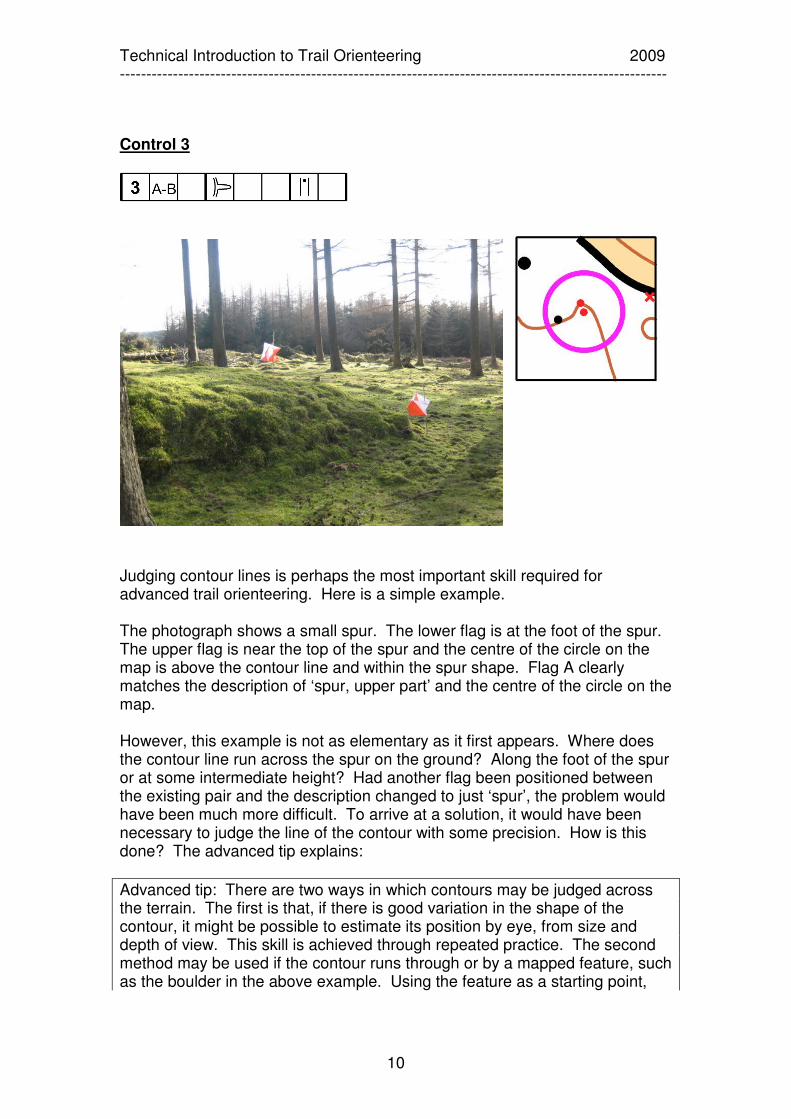
Judging contour lines is perhaps the most important skill required for advanced trail orienteering. Here is a simple example. The photograph shows a small spur. The lower flag is at the foot of the spur. The upper flag is near the top of the spur and the centre of the circle on the map is above the contour line and within the spur shape. Flag A clearly matches the description of ‘spur, upper part’ and the centre of the circle on the map. However, this example is not as elementary as it first appears. Where does the contour line run across the spur on the ground? Along the foot of the spur or at some intermediate height? Had another flag been positioned between the existing pair and the description changed to just ‘spur’, the problem would have been much more difficult. To arrive at a solution, it would have been necessary to judge the line of the contour with some precision. How is this done? The advanced tip explains:
Advanced tip: There are two ways in which contours may be judged across the terrain. The first is that, if there is good variation in the shape of the contour, it might be possible to estimate its position by eye, from size and depth of view. This skill is achieved through repeated practice. The second method may be used if the contour runs through or by a mapped feature, such as the boulder in the above example. Using the feature as a starting point,
Technical Introduction to Trail Orienteering 2009 -------------------------------------------------------------------------------------------------------
11
the contour may be traced across the terrain. This requires a good sense of the horizontal.
Control 4
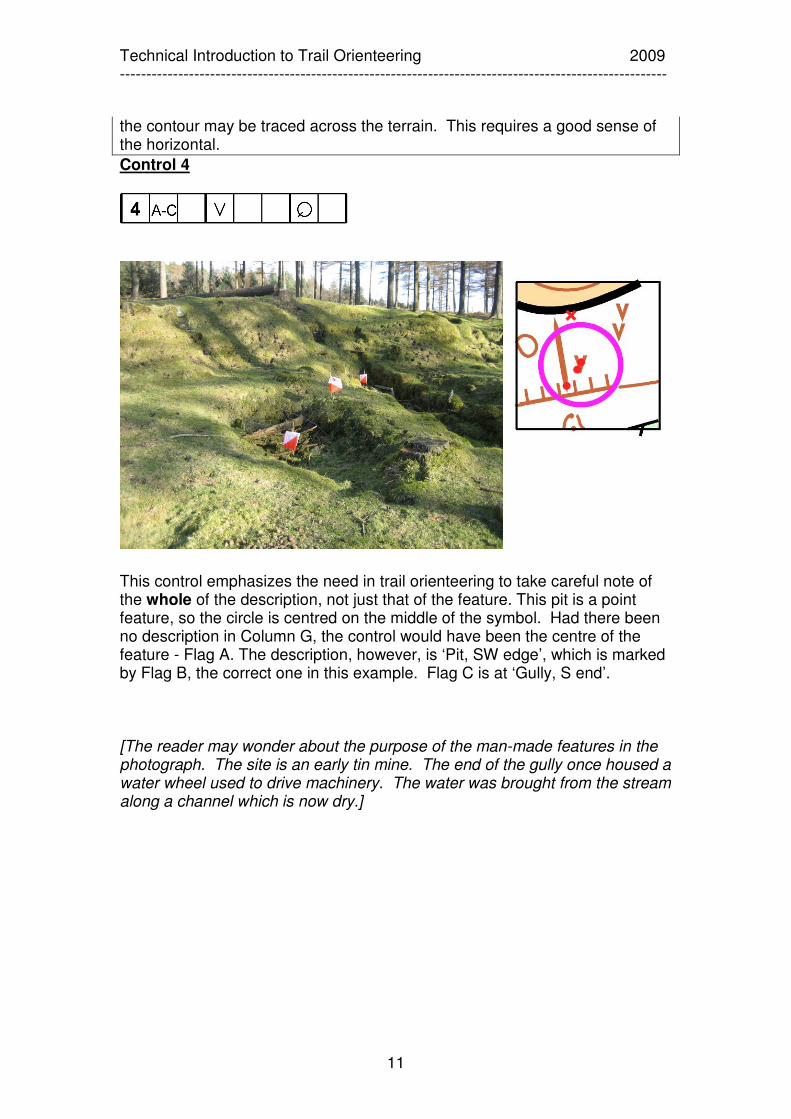
This control emphasizes the need in trail orienteering to take careful note of the whole of the description, not just that of the feature. This pit is a point feature, so the circle is centred on the middle of the symbol. Had there been no description in Column G, the control would have been the centre of the feature - Flag A. The description, however, is ‘Pit, SW edge’, which is marked by Flag B, the correct one in this example. Flag C is at ‘Gully, S end’. [The reader may wonder about the purpose of the man-made features in the photograph. The site is an early tin mine. The end of the gully once housed a water wheel used to drive machinery. The water was brought from the stream along a channel which is now dry.]

Technical Introduction to Trail Orienteering 2009 -------------------------------------------------------------------------------------------------------
12
Control 5
The simple description ‘Hill’ means the middle of the ring contour or form line surrounding the control point, in this case marked by Flag C within the form line ring. Otherwise the description is ‘part’. The description of Flag A is ‘Hill, NE part’, referring to the larger ring contour it lies inside. Flag B is on a dot knoll. Control 6
Technical Introduction to Trail Orienteering 2009 -------------------------------------------------------------------------------------------------------
13
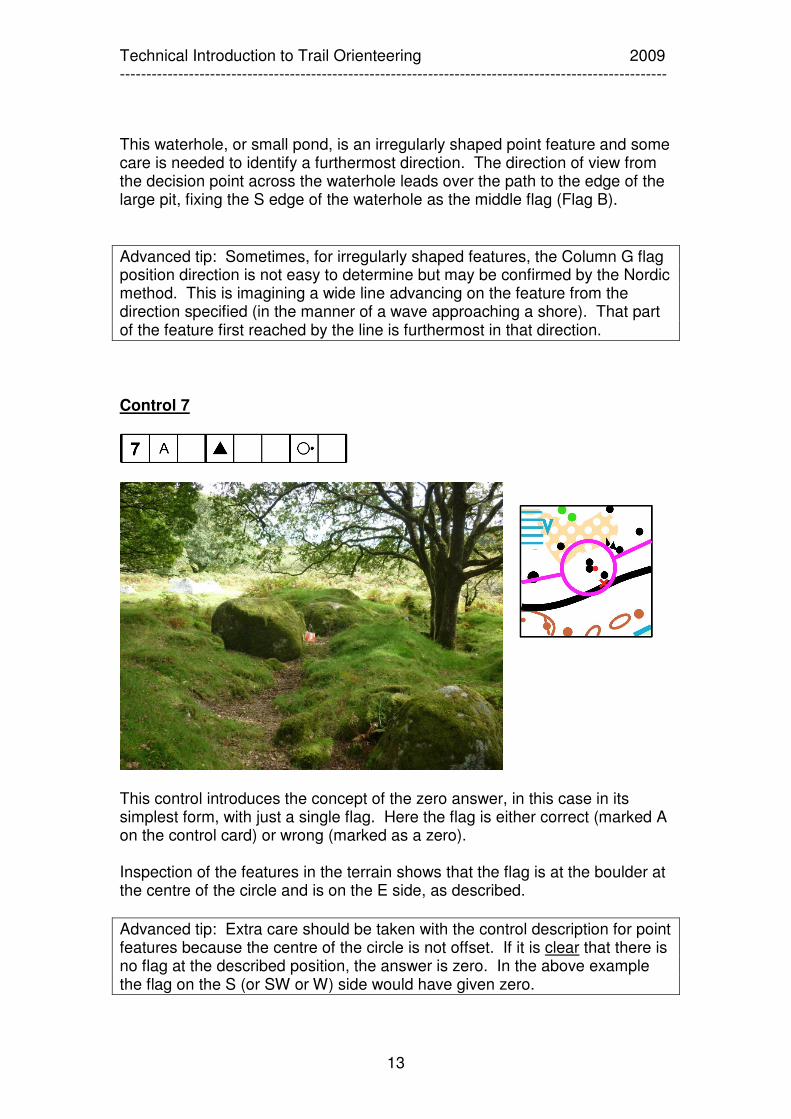
This waterhole, or small pond, is an irregularly shaped point feature and some care is needed to identify a furthermost direction. The direction of view from the decision point across the waterhole leads over the path to the edge of the large pit, fixing the S edge of the waterhole as the middle flag (Flag B).
Advanced tip: Sometimes, for irregularly shaped features, the Column G flag position direction is not easy to determine but may be confirmed by the Nordic method. This is imagining a wide line advancing on the feature from the direction specified (in the manner of a wave approaching a shore). That part of the feature first reached by the line is furthermost in that direction.
Control 7
This control introduces the concept of the zero answer, in this case in its simplest form, with just a single flag. Here the flag is either correct (marked A on the control card) or wrong (marked as a zero). Inspection of the features in the terrain shows that the flag is at the boulder at the centre of the circle and is on the E side, as described.
Advanced tip: Extra care should be taken with the control description for point features because the centre of the circle is not offset. If it is clear that there is no flag at the described position, the answer is zero. In the above example the flag on the S (or SW or W) side would have given zero.
Technical Introduction to Trail Orienteering 2009 -------------------------------------------------------------------------------------------------------
14
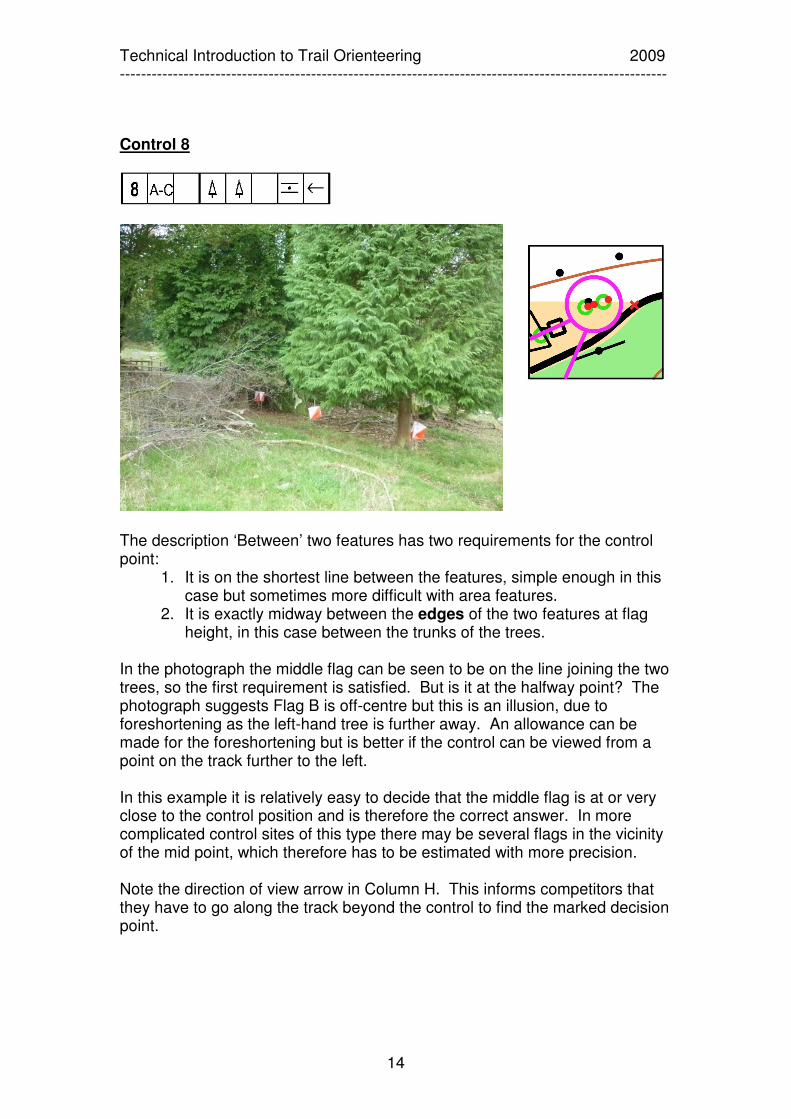
Control 8
The description ‘Between’ two features has two requirements for the control point:
1. It is on the shortest line between the features, simple enough in this case but sometimes more difficult with area features.
2. It is exactly midway between the edges of the two features at flag height, in this case between the trunks of the trees.
In the photograph the middle flag can be seen to be on the line joining the two trees, so the first requirement is satisfied. But is it at the halfway point? The photograph suggests Flag B is off-centre but this is an illusion, due to foreshortening as the left-hand tree is further away. An allowance can be made for the foreshortening but is better if the control can be viewed from a point on the track further to the left. In this example it is relatively easy to decide that the middle flag is at or very close to the control position and is therefore the correct answer. In more complicated control sites of this type there may be several flags in the vicinity of the mid point, which therefore has to be estimated with more precision. Note the direction of view arrow in Column H. This informs competitors that they have to go along the track beyond the control to find the marked decision point.

Technical Introduction to Trail Orienteering 2009 -------------------------------------------------------------------------------------------------------
15
Control 9
This control illustrates the principle of secondary viewing points. The left hand photograph, taken from the decision point, shows that all the flags are set in the long ditch. It is not possible to see the short ditch. In this case it is essential to find another sighting position from which the second ditch can be seen. This sighting position is known as a secondary viewing point. The path to the south of the control is not prohibited (there is no bar marked over the path on the map). So it is possible to move along this path and sight along the short ditch to confirm that one of the flags is indeed on the junction. If visibility permits, the competitor keeps a continuous eye on the flag while returning to the decision point. If this is not possible, any distinctive features in the terrain next to the flag are noted as markers. This second method can be carried out in the photographs to identify Flag C.
Advanced tip: Look out for parallax errors! When moving from a secondary viewing position to the decision point, the left to right order of the flags may change. In the example above the most distant flag is Flag B when viewed from the decision point but would be labelled Flag A from the secondary viewing point. In this case Flag C is the same from both positions.
Technical Introduction to Trail Orienteering 2009 -------------------------------------------------------------------------------------------------------
16
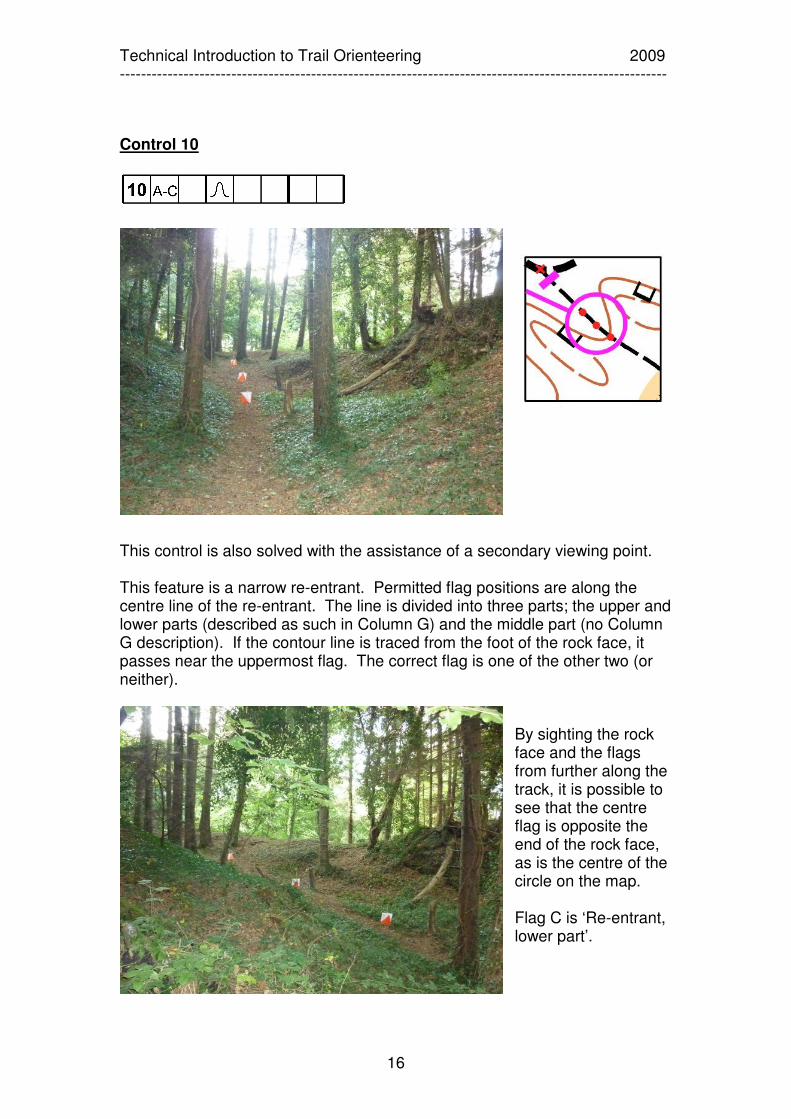
Control 10
This control is also solved with the assistance of a secondary viewing point. This feature is a narrow re-entrant. Permitted flag positions are along the centre line of the re-entrant. The line is divided into three parts; the upper and lower parts (described as such in Column G) and the middle part (no Column G description). If the contour line is traced from the foot of the rock face, it passes near the uppermost flag. The correct flag is one of the other two (or neither).
By sighting the rock face and the flags from further along the track, it is possible to see that the centre flag is opposite the end of the rock face, as is the centre of the circle on the map. Flag C is ‘Re-entrant, lower part’.
Technical Introduction to Trail Orienteering 2009 -------------------------------------------------------------------------------------------------------
17
Control 11
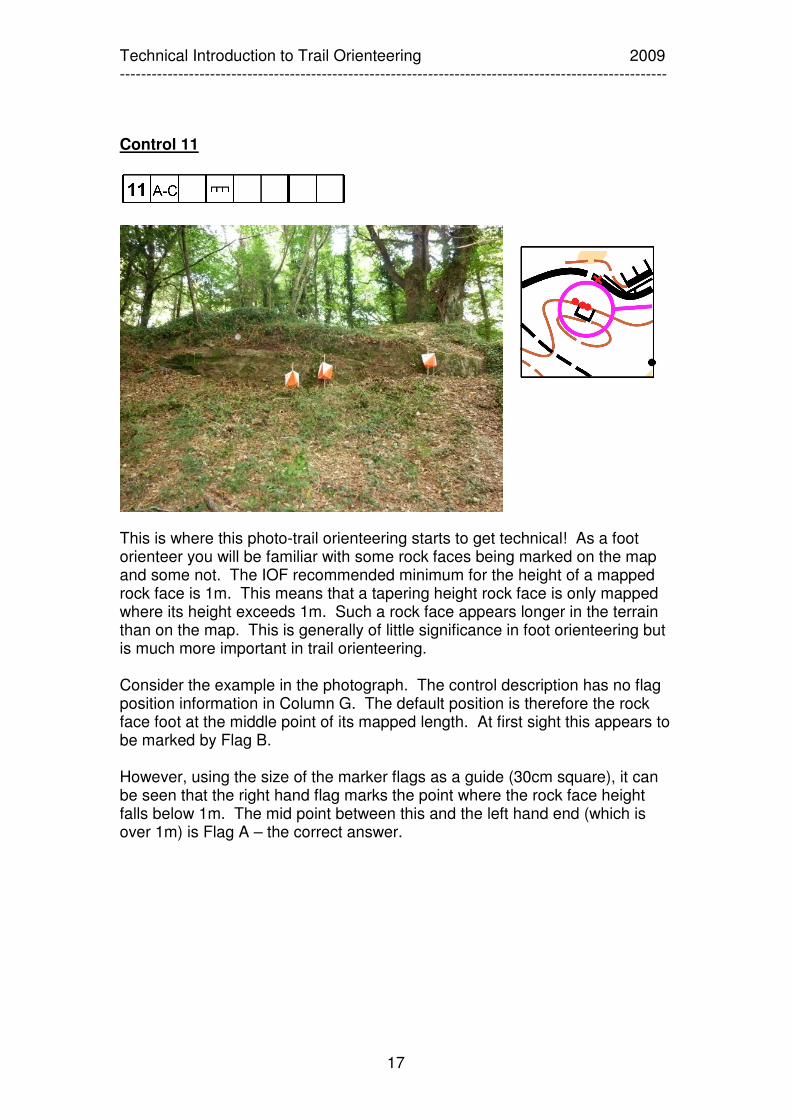
This is where this photo-trail orienteering starts to get technical! As a foot orienteer you will be familiar with some rock faces being marked on the map and some not. The IOF recommended minimum for the height of a mapped rock face is 1m. This means that a tapering height rock face is only mapped where its height exceeds 1m. Such a rock face appears longer in the terrain than on the map. This is generally of little significance in foot orienteering but is much more important in trail orienteering. Consider the example in the photograph. The control description has no flag position information in Column G. The default position is therefore the rock face foot at the middle point of its mapped length. At first sight this appears to be marked by Flag B. However, using the size of the marker flags as a guide (30cm square), it can be seen that the right hand flag marks the point where the rock face height falls below 1m. The mid point between this and the left hand end (which is over 1m) is Flag A – the correct answer.
Technical Introduction to Trail Orienteering 2009 -------------------------------------------------------------------------------------------------------
18
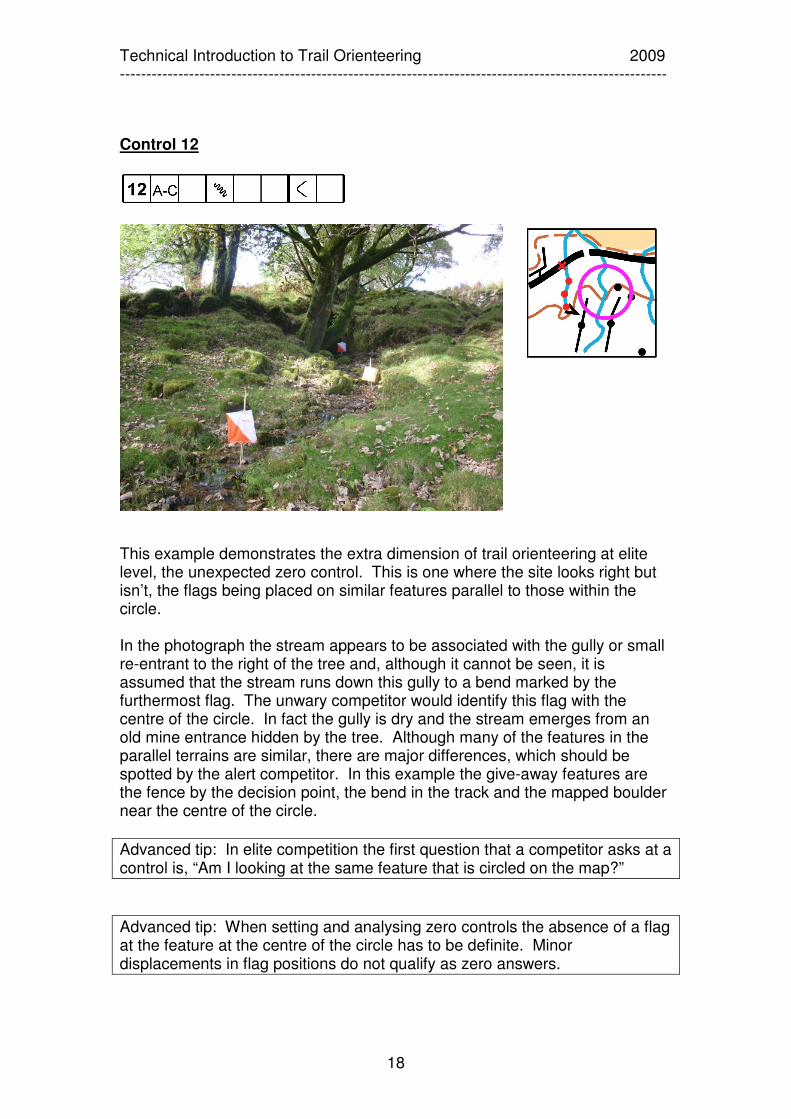
Control 12
This example demonstrates the extra dimension of trail orienteering at elite level, the unexpected zero control. This is one where the site looks right but isn’t, the flags being placed on similar features parallel to those within the circle. In the photograph the stream appears to be associated with the gully or small re-entrant to the right of the tree and, although it cannot be seen, it is assumed that the stream runs down this gully to a bend marked by the furthermost flag. The unwary competitor would identify this flag with the centre of the circle. In fact the gully is dry and the stream emerges from an old mine entrance hidden by the tree. Although many of the features in the parallel terrains are similar, there are major differences, which should be spotted by the alert competitor. In this example the give-away features are the fence by the decision point, the bend in the track and the mapped boulder near the centre of the circle.
Advanced tip: In elite competition the first question that a competitor asks at a control is, “Am I looking at the same feature that is circled on the map?”
Advanced tip: When setting and analysing zero controls the absence of a flag at the feature at the centre of the circle has to be definite. Minor displacements in flag positions do not qualify as zero answers.
Technical Introduction to Trail Orienteering 2009 -------------------------------------------------------------------------------------------------------
19
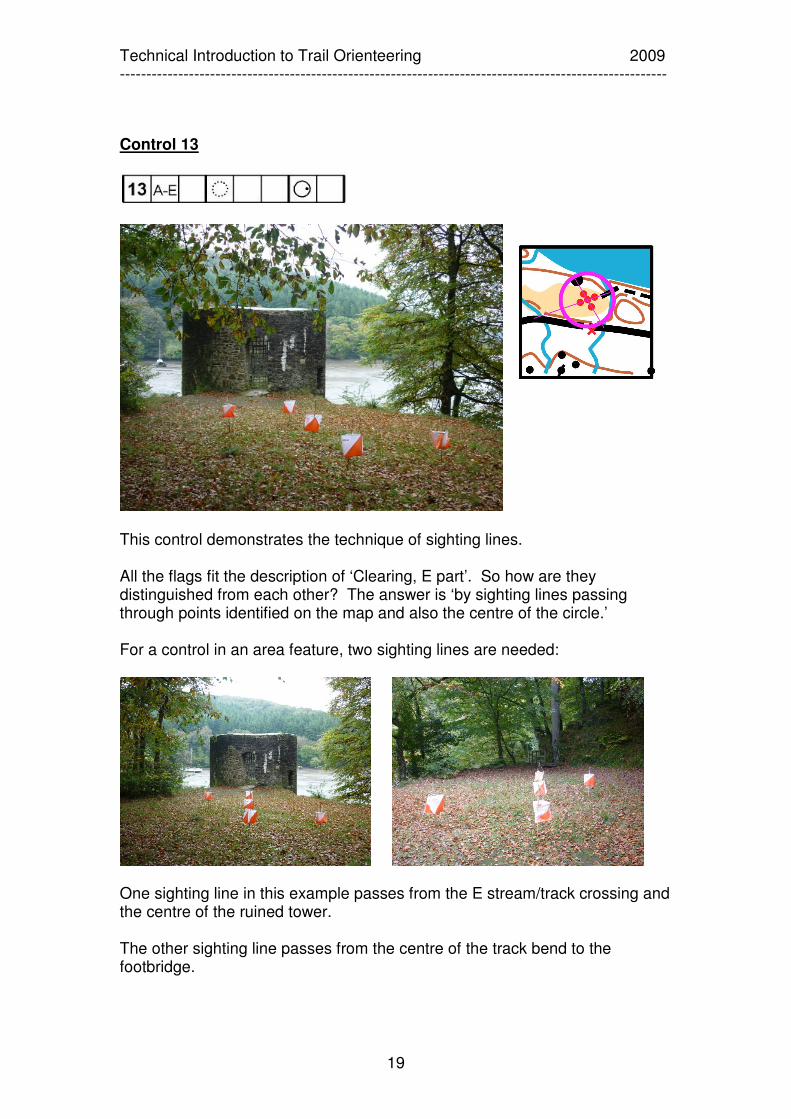
Control 13
This control demonstrates the technique of sighting lines. All the flags fit the description of ‘Clearing, E part’. So how are they distinguished from each other? The answer is ‘by sighting lines passing through points identified on the map and also the centre of the circle.’ For a control in an area feature, two sighting lines are needed:
One sighting line in this example passes from the E stream/track crossing and the centre of the ruined tower. The other sighting line passes from the centre of the track bend to the footbridge.
Technical Introduction to Trail Orienteering 2009 -------------------------------------------------------------------------------------------------------
20
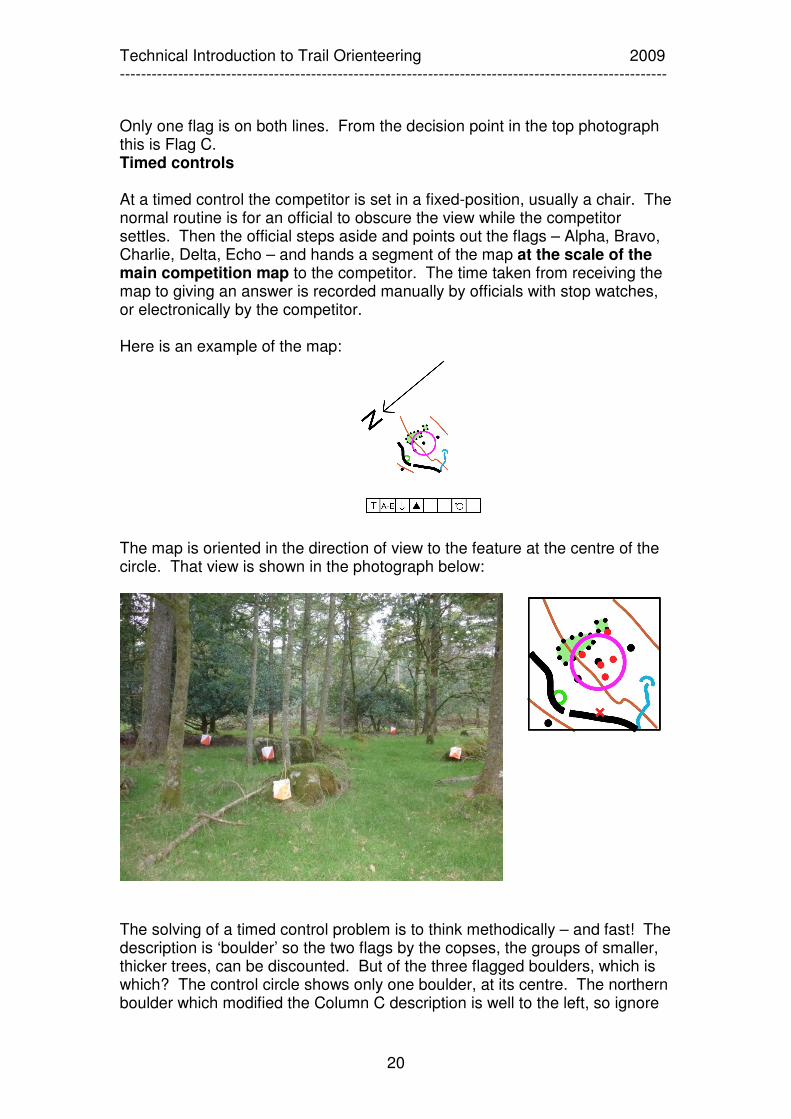
Only one flag is on both lines. From the decision point in the top photograph this is Flag C. Timed controls At a timed control the competitor is set in a fixed-position, usually a chair. The normal routine is for an official to obscure the view while the competitor settles. Then the official steps aside and points out the flags – Alpha, Bravo, Charlie, Delta, Echo – and hands a segment of the map at the scale of the main competition map to the competitor. The time taken from receiving the map to giving an answer is recorded manually by officials with stop watches, or electronically by the competitor. Here is an example of the map: The map is oriented in the direction of view to the feature at the centre of the circle. That view is shown in the photograph below:
The solving of a timed control problem is to think methodically – and fast! The description is ‘boulder’ so the two flags by the copses, the groups of smaller, thicker trees, can be discounted. But of the three flagged boulders, which is which? The control circle shows only one boulder, at its centre. The northern boulder which modified the Column C description is well to the left, so ignore
Technical Introduction to Trail Orienteering 2009 -------------------------------------------------------------------------------------------------------
21
that. Two flagged boulders must be unmapped because they are too small. The larger boulder at the rear of the trio looks the best candidate and it is in line with the gap between the copses. So that must be the one. Check, the flag is on the NW side. Flag B! Time stops. Phew! At world elite level it has been known for competitors to deliver a correct answer for an easier problem in as little as 5 seconds. Now, that is fast! Not all problems can be answered quickly but the maximum time allowed for giving an answer at a timed control is 60 sec. Failure to produce any answer in that time incurs a penalty. A warning is given at 50 seconds. Competitions normally have two timed controls, sometimes three or even four.
5. CONCLUSION Given an understanding of the techniques described in the photo-trail-O course, any experienced foot orienteer trying a real trail-O event for the first time should produce a creditable performance. So, if you are thinking about having a go, do take the opportunity when one arises. But be prepared to find it mentally tougher than you expect. But, having said that, there have been recent examples where accomplished foot orienteers have tried trail-O for the first time and have beaten many experienced trailers, much to the latter’s embarrassment. Some say that it is beginner’s luck. It might just be that it is sheer talent! Good luck!
6. ACKNOWLEDGEMENTS This document has been authored by Brian-Henry Parker (GBR), Technical Adviser to the IOF Trail Orienteering Commission. The comments and assistance from members of the Commission and other orienteers, foot and trail, is readily acknowledged. Clive Allen (DEN), Hannu Niemi (FIN) and Jari Turto (FIN) have also suggested useful corrections. Anyone wishing to make further comments on the document is welcome to do so. Please submit through the IOF website www.orienteering.org The photographs of control sites were taken in woodlands at Burrator on Dartmoor and at Old Mill Creek near Dartmouth, both in SW England. The map is a composite.
Technical Introduction to Trail Orienteering 2009 -------------------------------------------------------------------------------------------------------
22
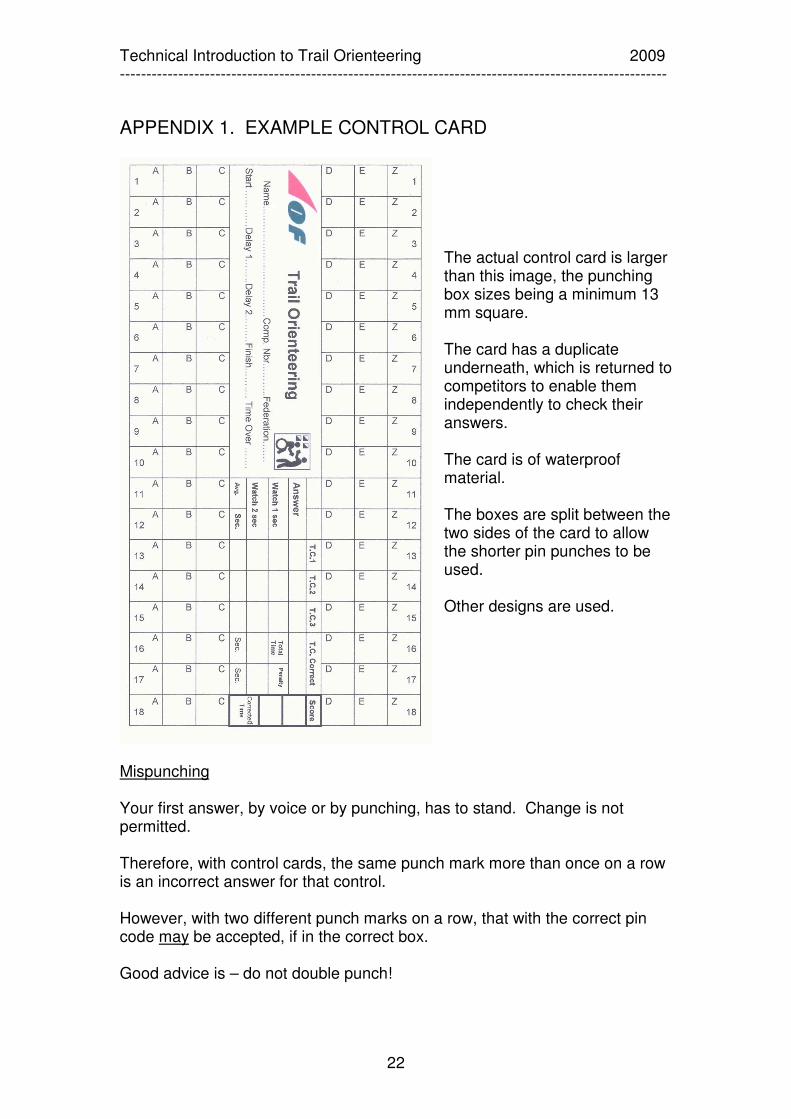
APPENDIX 1. EXAMPLE CONTROL CARD
The actual control card is larger than this image, the punching box sizes being a minimum 13 mm square. The card has a duplicate underneath, which is returned to competitors to enable them independently to check their answers. The card is of waterproof material. The boxes are split between the two sides of the card to allow the shorter pin punches to be used. Other designs are used.
Mispunching Your first answer, by voice or by punching, has to stand. Change is not permitted. Therefore, with control cards, the same punch mark more than once on a row is an incorrect answer for that control. However, with two different punch marks on a row, that with the correct pin code may be accepted, if in the correct box. Good advice is – do not double punch!