Embed Size (px)
Citation preview
Page 1 of 24
Oracle Enterprise Manager 11g Ops Center 2.5 Hands-on Lab
Introduction to Enterprise Manager 11g
Oracle Enterprise Manager 11g is the centerpiece of Oracle's integrated IT management strategy, which rejects the notion of management as an after-thought. At Oracle, we design manageability into each product from the start, enabling Oracle Enterprise Manager to then serve as the integrator of manageability across the entire stack encompassing Oracle and non-Oracle technologies. Fueled by this unique vision, Oracle Enterprise Manager 11g has introduced business-driven IT management to help IT deliver greater business value through three highly differentiated capabilities:
• Business-driven application management, which combines industry-leading capabilities in real user experience management, business transaction management and business service management to improve application users' productivity while enhancing business transaction availability
• Integrated application-to-disk management, which provides deep management across the entire Oracle stack to reduce IT management complexity and eliminate disparate point tools
• Integrated systems management and support, which utilizes industry-first technology bring support services into the IT management console; enabling proactive IT administration, increased application and system availability, and improved customer satisfaction
What is Oracle Enterprise Manager Ops Center? Oracle Enterprise Manager Ops Center provides the most comprehensive management across Oracle servers, operating systems, and Solaris virtualization technologies, and dramatically improves the efficiency of IT operations with its integrated lifecycle management and built-in automation. Ops Center simplifies complete system deployment by automating firmware and operating system provisioning. It allows IT administrators to actively manage and monitor infrastructure resources from virtually anywhere on the network. Ops Center also simplifies patch management of Oracle Solaris, Linux, and Windows using an advanced knowledgebase while enabling automated lifecycle processes for operating system software. Ops Center provides full lifecycle management of virtual guests, including resource management and mobility orchestration. It helps customers streamline operations and reduce downtime. Ops Center provides an end-to-end management solution for physical and virtual systems through a single Web-based console. This solution automates the lifecycle management of physical and virtual systems and is the most effective systems management solution for Oracle’s infrastructure technologies. Hardware. Software. Complete Ops Center offers the depth of features at the hardware layer our Enterprise Manager customers are use to experiencing at the business service layers. Oracle is committed to providing the most business driven IT management solution across all layer of operations. We understand that technology has a direct function in the bottom line and we are here to help offset the total cost of ownership you might be experiencing. We care about the “Complete” solution.
Page 2 of 24
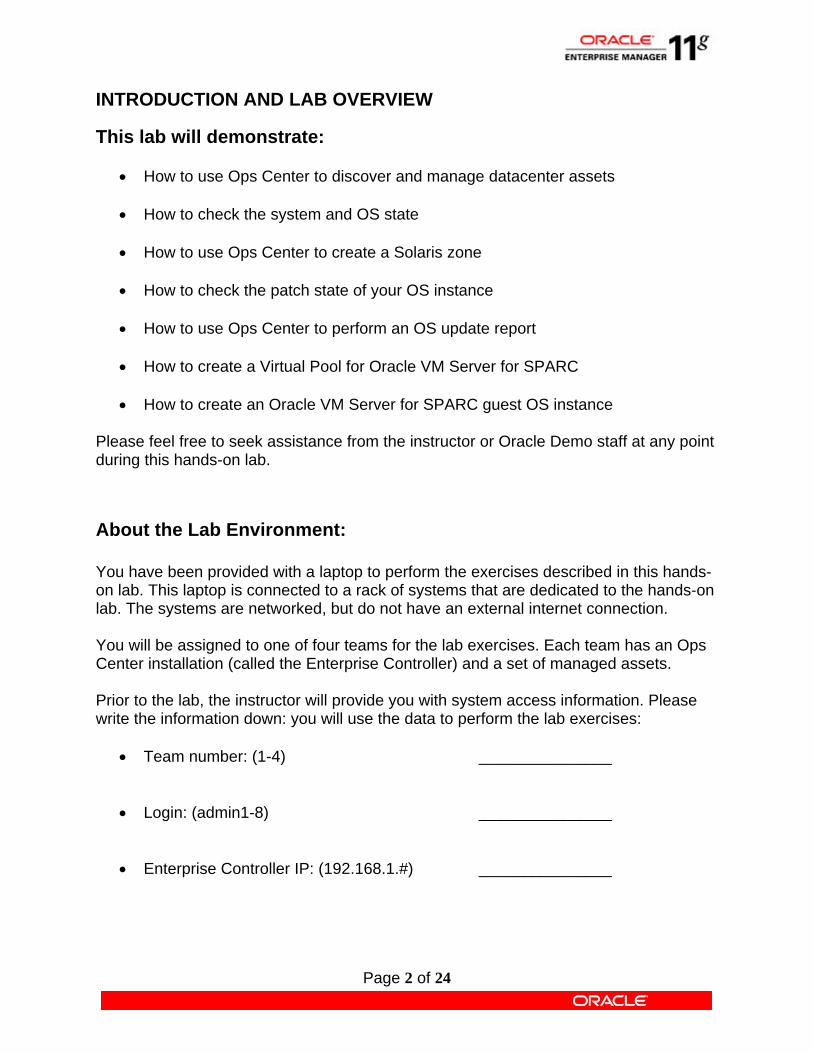
INTRODUCTION AND LAB OVERVIEW
This lab will demonstrate:
• How to use Ops Center to discover and manage datacenter assets
• How to check the system and OS state
• How to use Ops Center to create a Solaris zone
• How to check the patch state of your OS instance
• How to use Ops Center to perform an OS update report
• How to create a Virtual Pool for Oracle VM Server for SPARC
• How to create an Oracle VM Server for SPARC guest OS instance
Please feel free to seek assistance from the instructor or Oracle Demo staff at any point during this hands-on lab.
About the Lab Environment: You have been provided with a laptop to perform the exercises described in this hands-on lab. This laptop is connected to a rack of systems that are dedicated to the hands-on lab. The systems are networked, but do not have an external internet connection. You will be assigned to one of four teams for the lab exercises. Each team has an Ops Center installation (called the Enterprise Controller) and a set of managed assets. Prior to the lab, the instructor will provide you with system access information. Please write the information down: you will use the data to perform the lab exercises:
• Team number: (1-4) _______________
• Login: (admin1-8) _______________
• Enterprise Controller IP: (192.168.1.#) _______________
Page 3 of 24
EXERCISE 1: Discovering and Managing Assets In this exercise, you will log onto Ops Center, discover and manage assets for your environment.
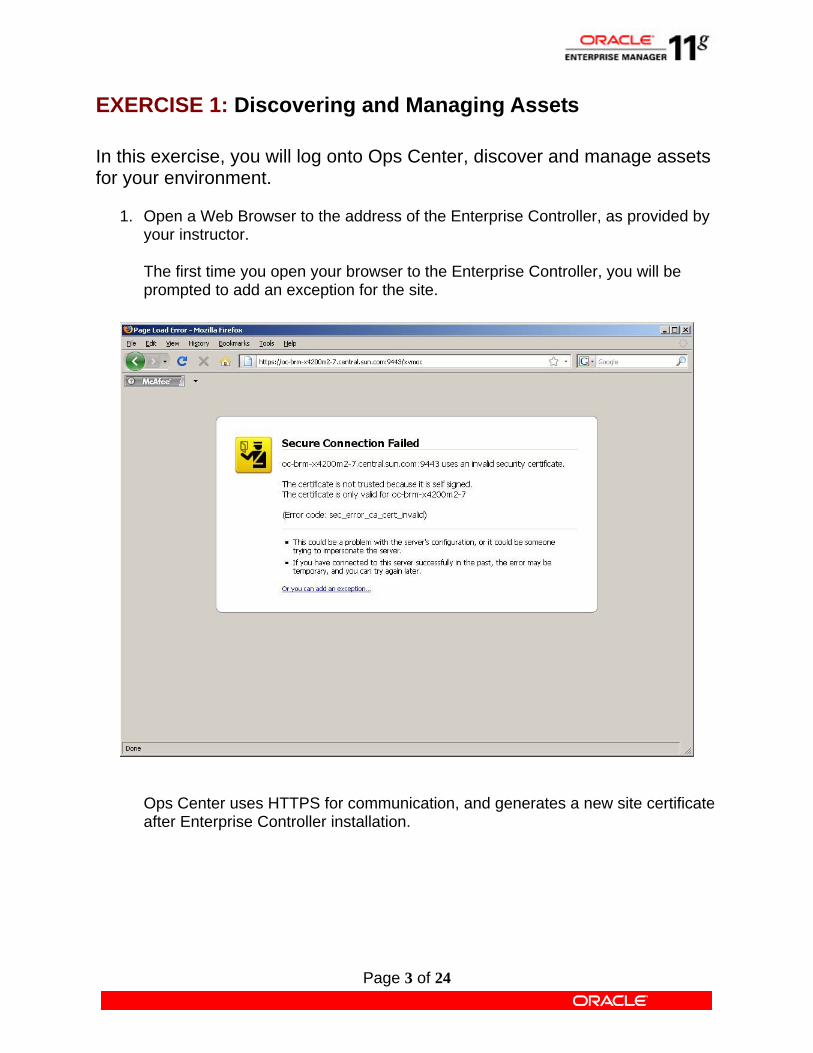
1. Open a Web Browser to the address of the Enterprise Controller, as provided by your instructor.
The first time you open your browser to the Enterprise Controller, you will be prompted to add an exception for the site.
Ops Center uses HTTPS for communication, and generates a new site certificate after Enterprise Controller installation.
Page 4 of 24
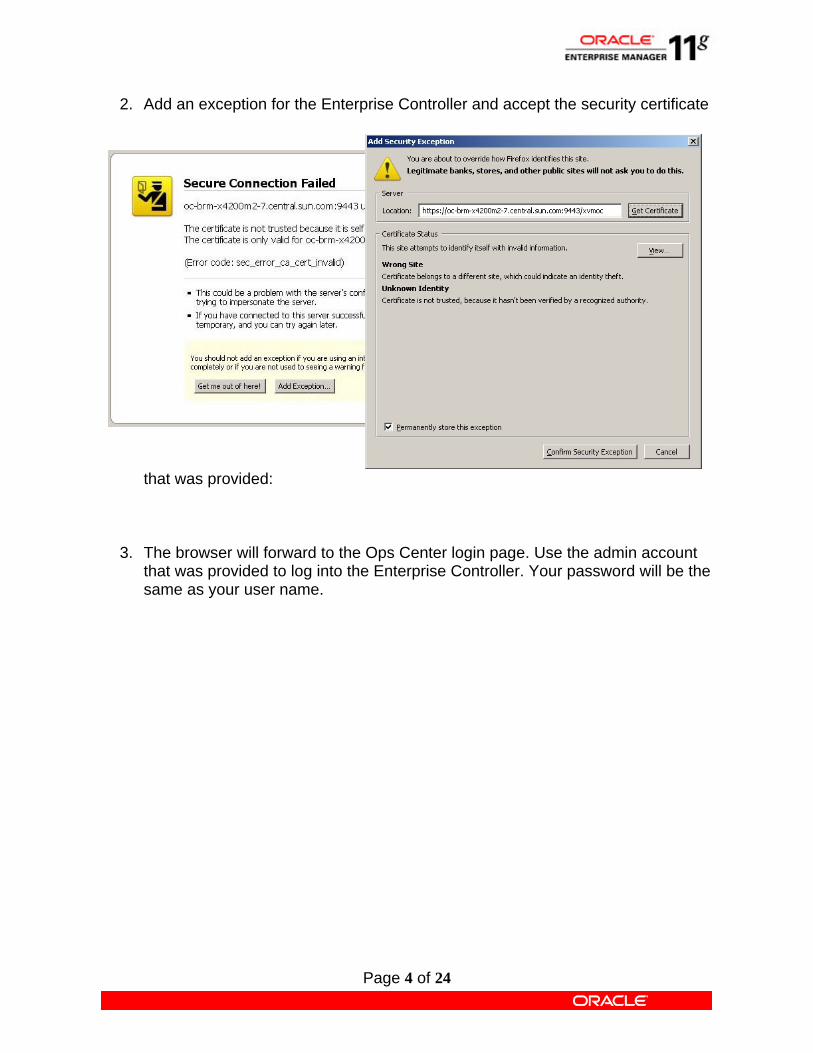
2. Add an exception for the Enterprise Controller and accept the security certificate
that was provided:
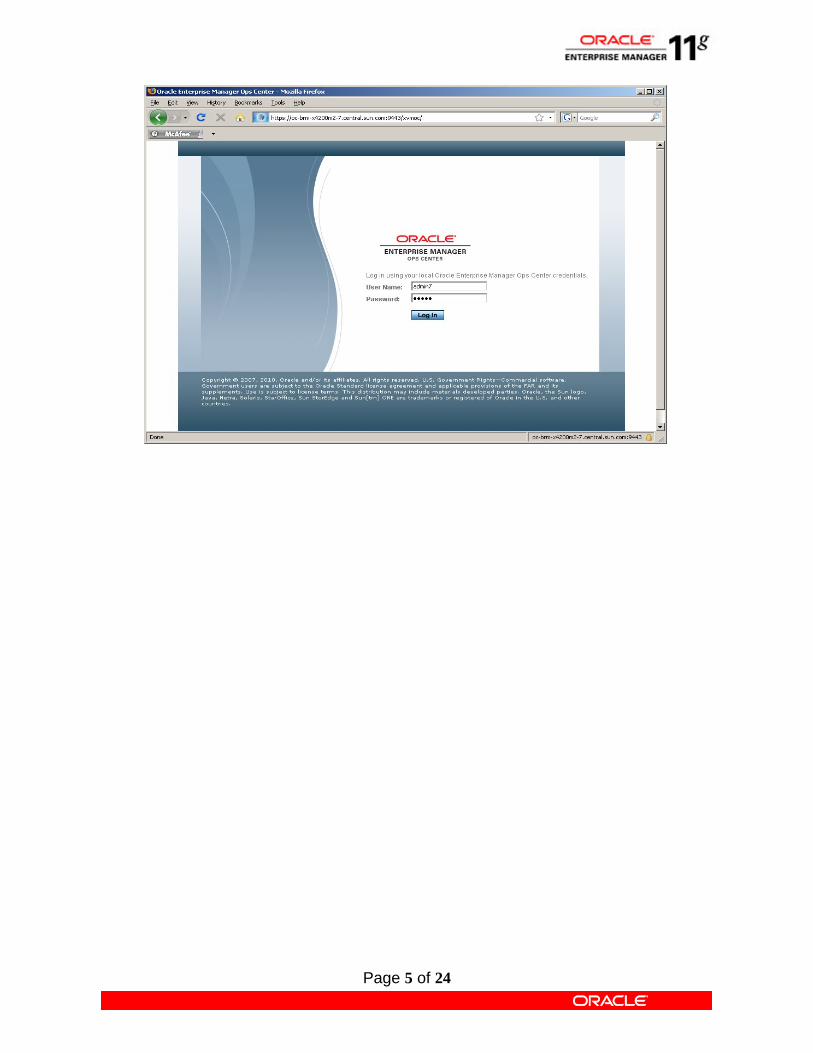
3. The browser will forward to the Ops Center login page. Use the admin account that was provided to log into the Enterprise Controller. Your password will be the same as your user name.
Page 5 of 24
Page 6 of 24
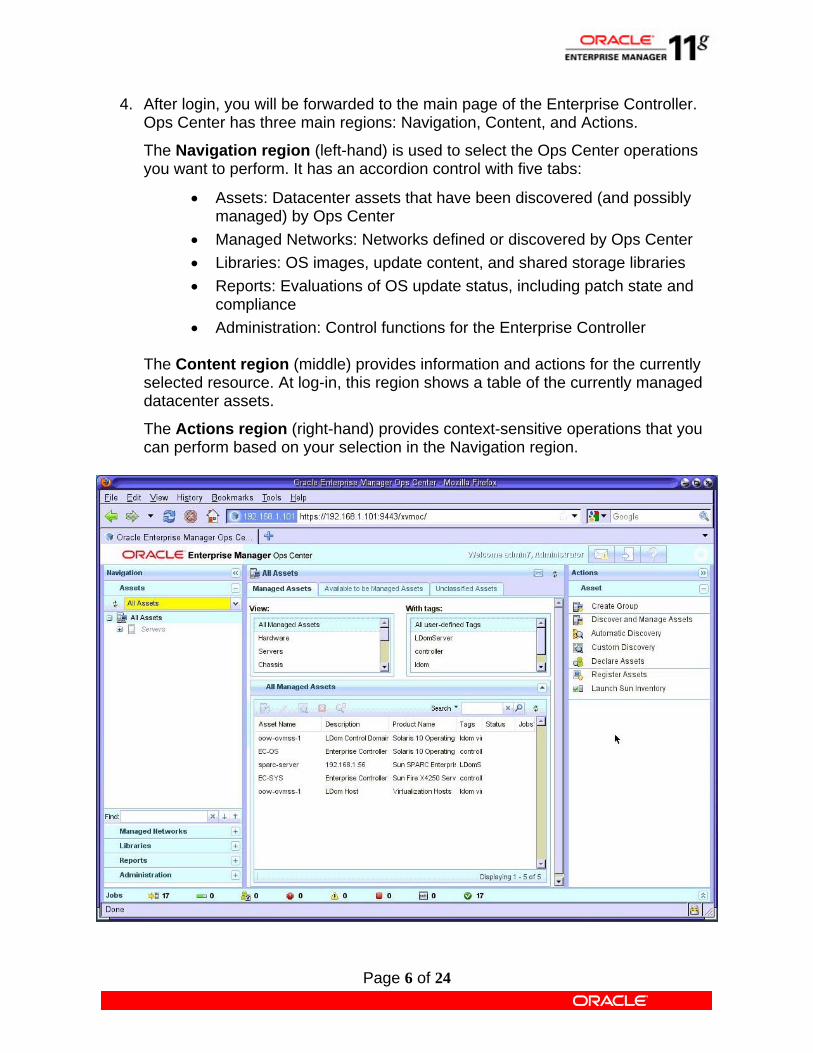
4. After login, you will be forwarded to the main page of the Enterprise Controller.
Ops Center has three main regions: Navigation, Content, and Actions.
The Navigation region (left-hand) is used to select the Ops Center operations you want to perform. It has an accordion control with five tabs:
• Assets: Datacenter assets that have been discovered (and possibly managed) by Ops Center
• Managed Networks: Networks defined or discovered by Ops Center • Libraries: OS images, update content, and shared storage libraries • Reports: Evaluations of OS update status, including patch state and
compliance • Administration: Control functions for the Enterprise Controller
The Content region (middle) provides information and actions for the currently selected resource. At log-in, this region shows a table of the currently managed datacenter assets.
The Actions region (right-hand) provides context-sensitive operations that you can perform based on your selection in the Navigation region.
Navigation Region
Actions Region
Content Region
Page 7 of 24
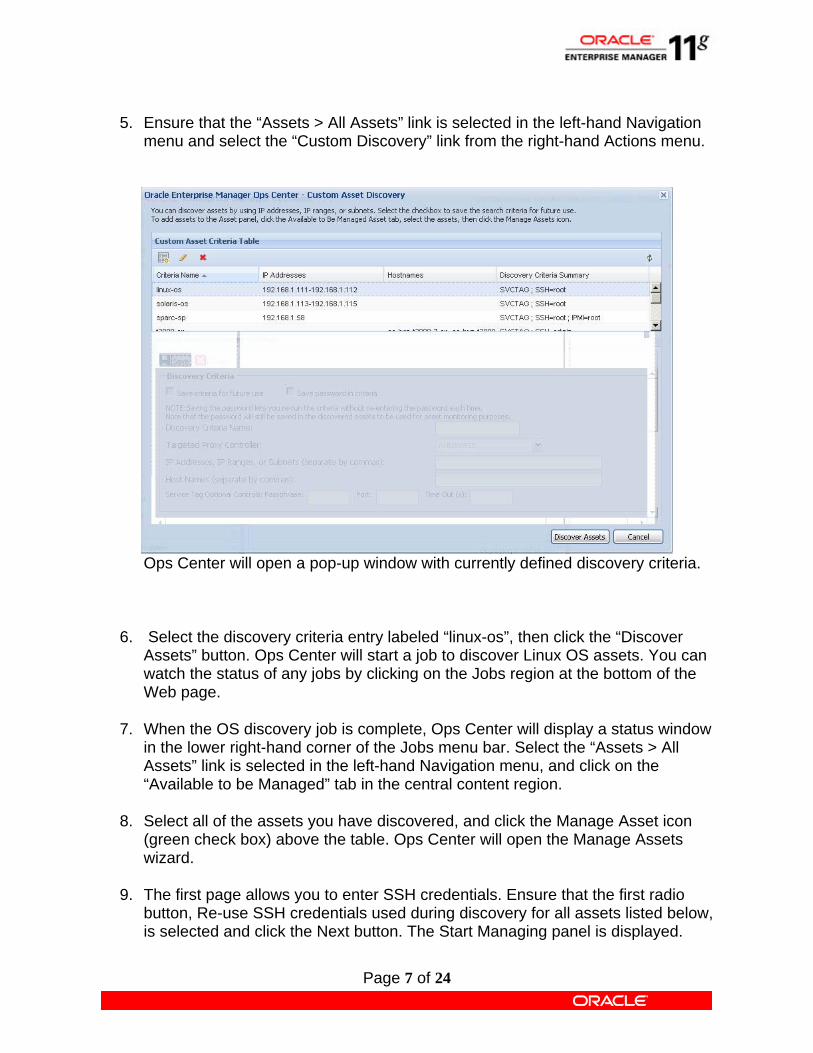
5. Ensure that the “Assets > All Assets” link is selected in the left-hand Navigation menu and select the “Custom Discovery” link from the right-hand Actions menu.
Ops Center will open a pop-up window with currently defined discovery criteria.
6. Select the discovery criteria entry labeled “linux-os”, then click the “Discover Assets” button. Ops Center will start a job to discover Linux OS assets. You can watch the status of any jobs by clicking on the Jobs region at the bottom of the Web page.
7. When the OS discovery job is complete, Ops Center will display a status window in the lower right-hand corner of the Jobs menu bar. Select the “Assets > All Assets” link is selected in the left-hand Navigation menu, and click on the “Available to be Managed” tab in the central content region.
8. Select all of the assets you have discovered, and click the Manage Asset icon (green check box) above the table. Ops Center will open the Manage Assets wizard.
9. The first page allows you to enter SSH credentials. Ensure that the first radio button, Re-use SSH credentials used during discovery for all assets listed below, is selected and click the Next button. The Start Managing panel is displayed.

Page 8 of 24
Click the Next Button to display the Summary page. Click the Finish button to close the wizard and start jobs to manage the assets.
Page 9 of 24
EXERCISE 2: Checking System and OS State In this exercise, you will use Ops Center to examine data for your managed assets.
1. In the Assets tab of the left-hand Navigation panel, use the dropdown list to select All Assets.
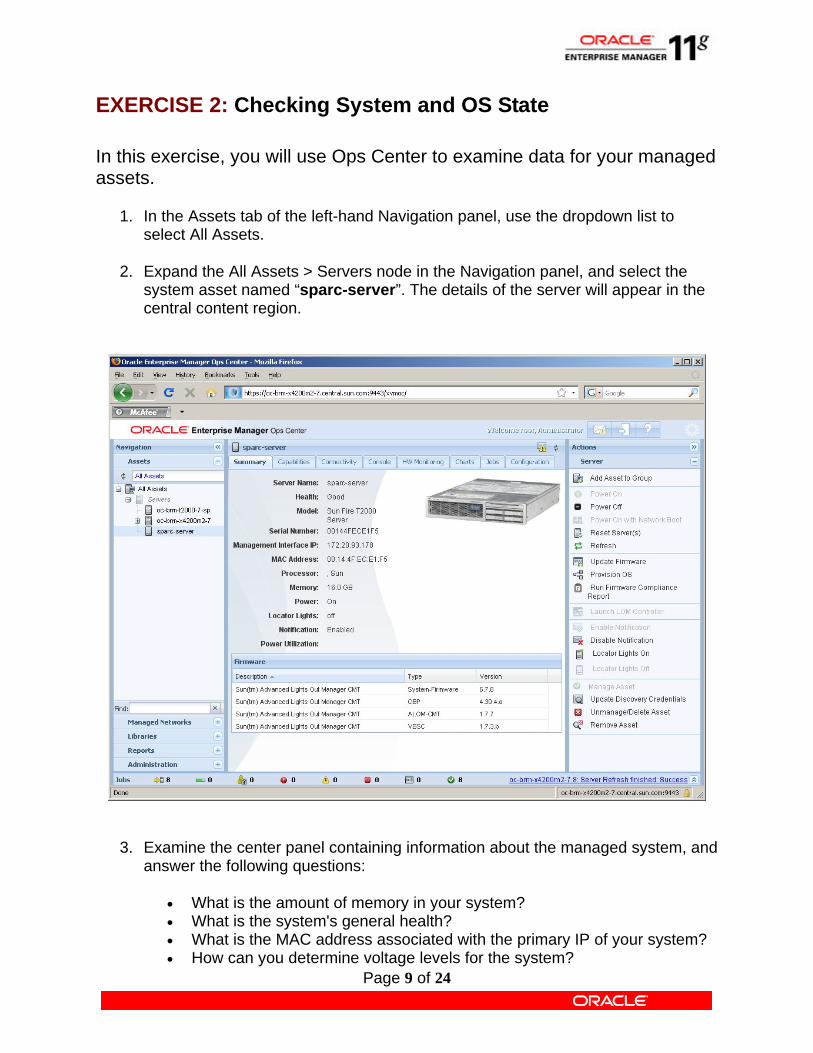
2. Expand the All Assets > Servers node in the Navigation panel, and select the system asset named “sparc-server”. The details of the server will appear in the central content region.
3. Examine the center panel containing information about the managed system, and answer the following questions:
• What is the amount of memory in your system? • What is the system's general health? • What is the MAC address associated with the primary IP of your system? • How can you determine voltage levels for the system?
Page 10 of 24
4. Examine the sparc-server node in the left-hand Navigation panel. What nodes are shown under the server?
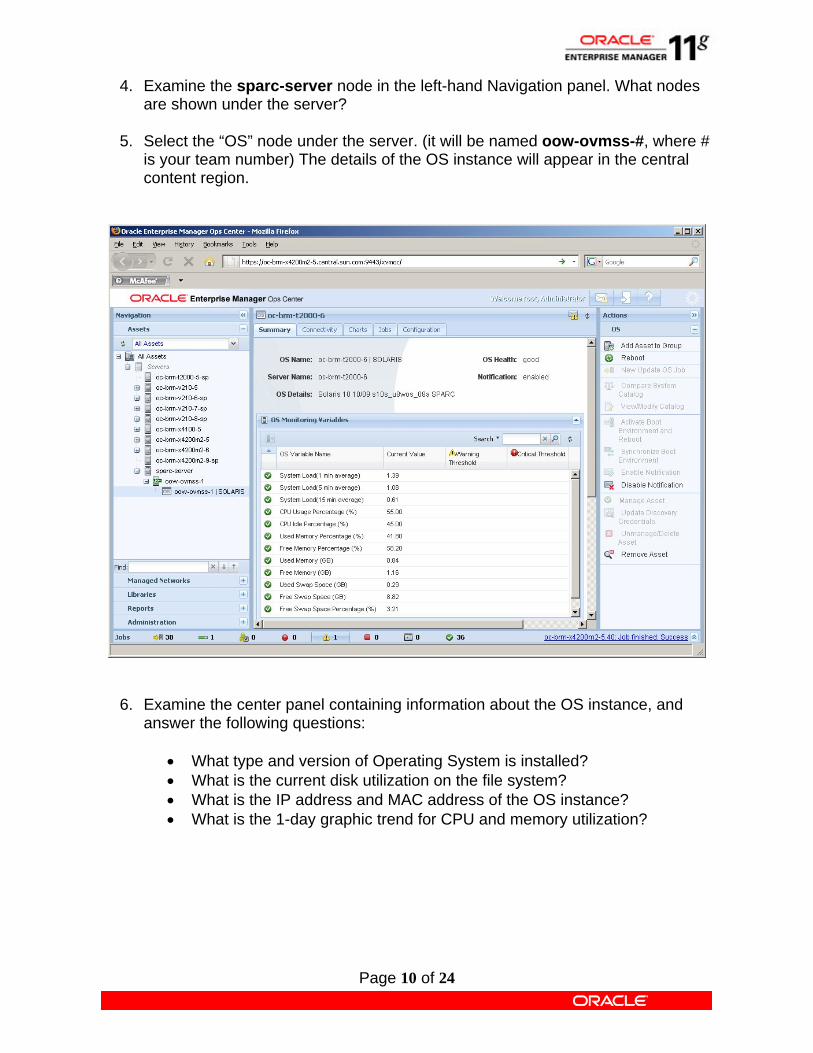
5. Select the “OS” node under the server. (it will be named oow-ovmss-#, where # is your team number) The details of the OS instance will appear in the central content region.
6. Examine the center panel containing information about the OS instance, and answer the following questions:
• What type and version of Operating System is installed? • What is the current disk utilization on the file system? • What is the IP address and MAC address of the OS instance? • What is the 1-day graphic trend for CPU and memory utilization?
Page 11 of 24
EXERCISE 3: Using Ops Center to Create a Solaris Zone In this exercise, you will create a Zone on your managed Solaris OS instance.
1. Expand the All Assets > Servers node in the Navigation panel, and select the system asset named “solaris-os”. The details of the OS instance will appear in the central content region.
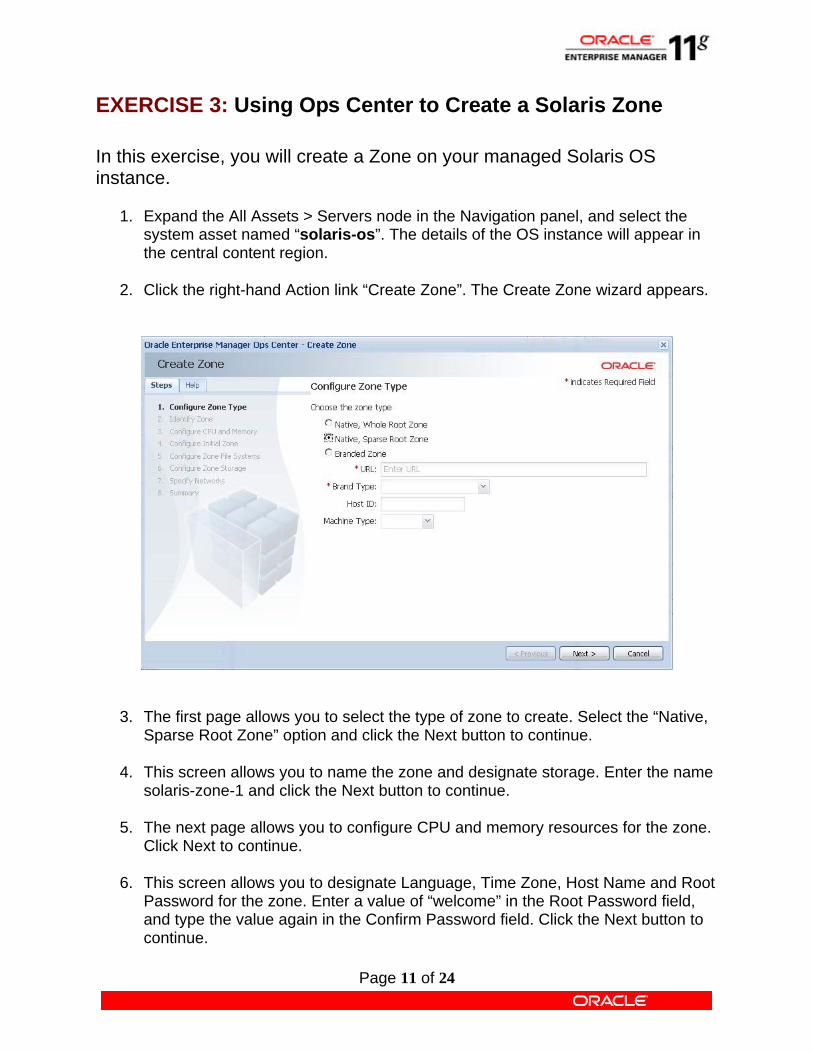
2. Click the right-hand Action link “Create Zone”. The Create Zone wizard appears.
3. The first page allows you to select the type of zone to create. Select the “Native, Sparse Root Zone” option and click the Next button to continue.
4. This screen allows you to name the zone and designate storage. Enter the name solaris-zone-1 and click the Next button to continue.
5. The next page allows you to configure CPU and memory resources for the zone. Click Next to continue.
6. This screen allows you to designate Language, Time Zone, Host Name and Root Password for the zone. Enter a value of “welcome” in the Root Password field, and type the value again in the Confirm Password field. Click the Next button to continue.
Page 12 of 24
7. The next page allows you to configure the zone file system. Click Next to advance to the next page, which allows you to configure zone storage. Click Next again to continue.
8. This screen lets you configure networking for the zone. Select the radio button labeled “Shared IP Stack” to use the same network interface as the Solaris OS instance. In the Zone IP field, enter one of the following values based on your team number:
• Team 1: 192.168.1.116 • Team 2: 192.168.1.126 • Team 3: 192.168.1.136 • Team 4: 192.168.1.146
After you have entered the Zone IP, click the Next button to continue.
9. The final page shows a summary of the zone you will create. Click the Finish button to exit the wizard and start a job to create the zone.
Page 13 of 24
EXERCISE 4: Using Ops Center to Patch an OS Instance In this exercise, you will check the patch state of an OS instance, and create a job to patch Solaris, and verify patch success.
1. In the Assets tab of the left-hand Navigation panel, use the drop-down list to select All Assets.
2. Expand the All Assets > Servers node in the Navigation panel, and select the system asset named “solaris-os”. The details of the OS instance will appear in the central content region.
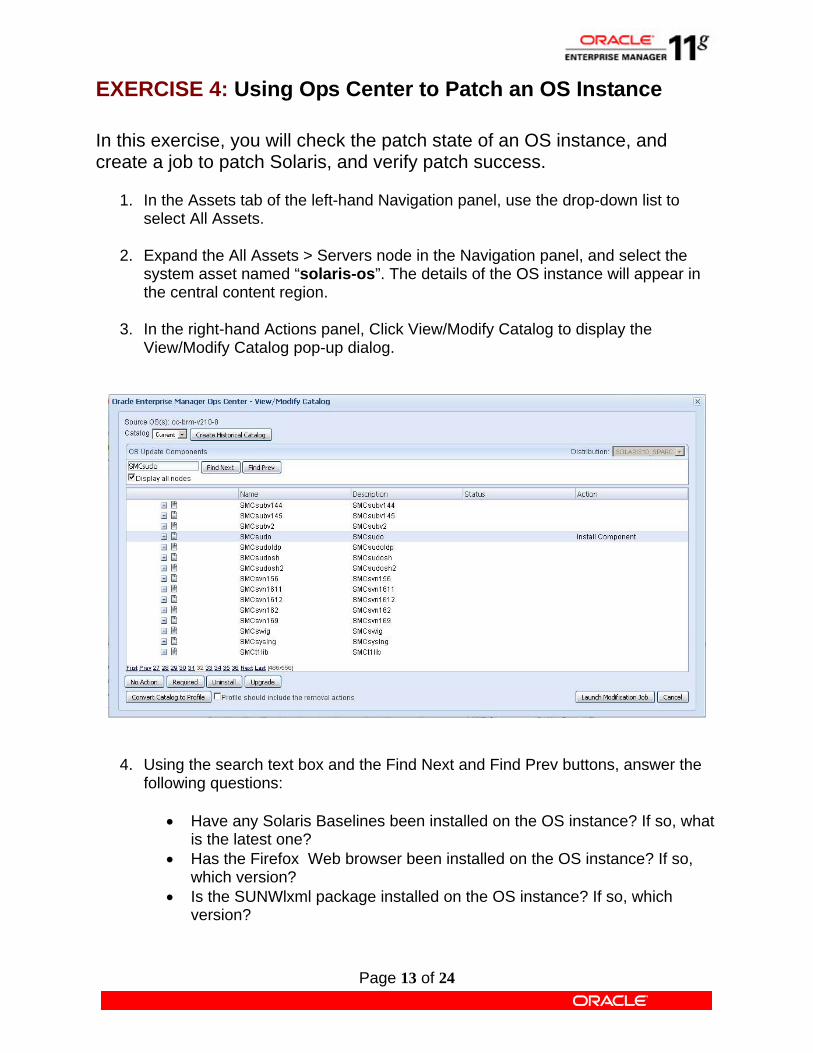
3. In the right-hand Actions panel, Click View/Modify Catalog to display the View/Modify Catalog pop-up dialog.
4. Using the search text box and the Find Next and Find Prev buttons, answer the following questions:
• Have any Solaris Baselines been installed on the OS instance? If so, what is the latest one?
• Has the Firefox Web browser been installed on the OS instance? If so, which version?
• Is the SUNWlxml package installed on the OS instance? If so, which version?
Page 14 of 24
5. Search for the Sudo package, SMCsudo. The package will be highlighted when found.
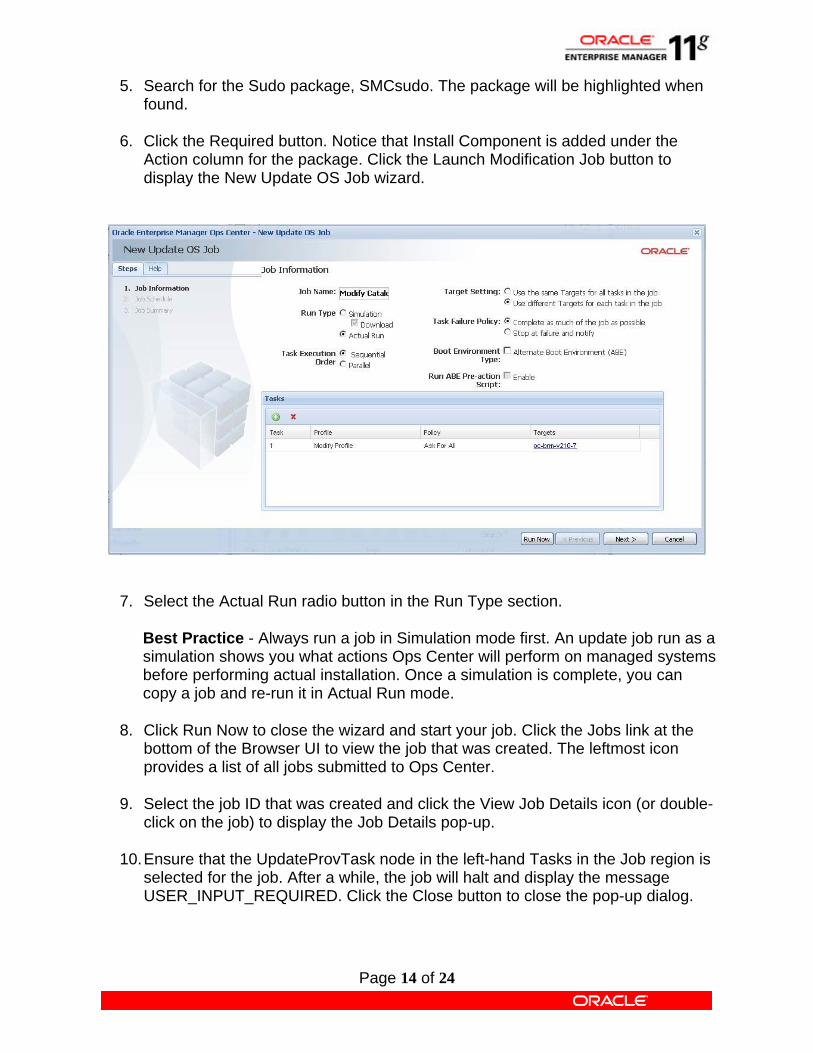
6. Click the Required button. Notice that Install Component is added under the Action column for the package. Click the Launch Modification Job button to display the New Update OS Job wizard.
7. Select the Actual Run radio button in the Run Type section.
Best Practice - Always run a job in Simulation mode first. An update job run as a simulation shows you what actions Ops Center will perform on managed systems before performing actual installation. Once a simulation is complete, you can copy a job and re-run it in Actual Run mode.
8. Click Run Now to close the wizard and start your job. Click the Jobs link at the bottom of the Browser UI to view the job that was created. The leftmost icon provides a list of all jobs submitted to Ops Center.
9. Select the job ID that was created and click the View Job Details icon (or double-click on the job) to display the Job Details pop-up.
10. Ensure that the UpdateProvTask node in the left-hand Tasks in the Job region is selected for the job. After a while, the job will halt and display the message USER_INPUT_REQUIRED. Click the Close button to close the pop-up dialog.
Page 15 of 24
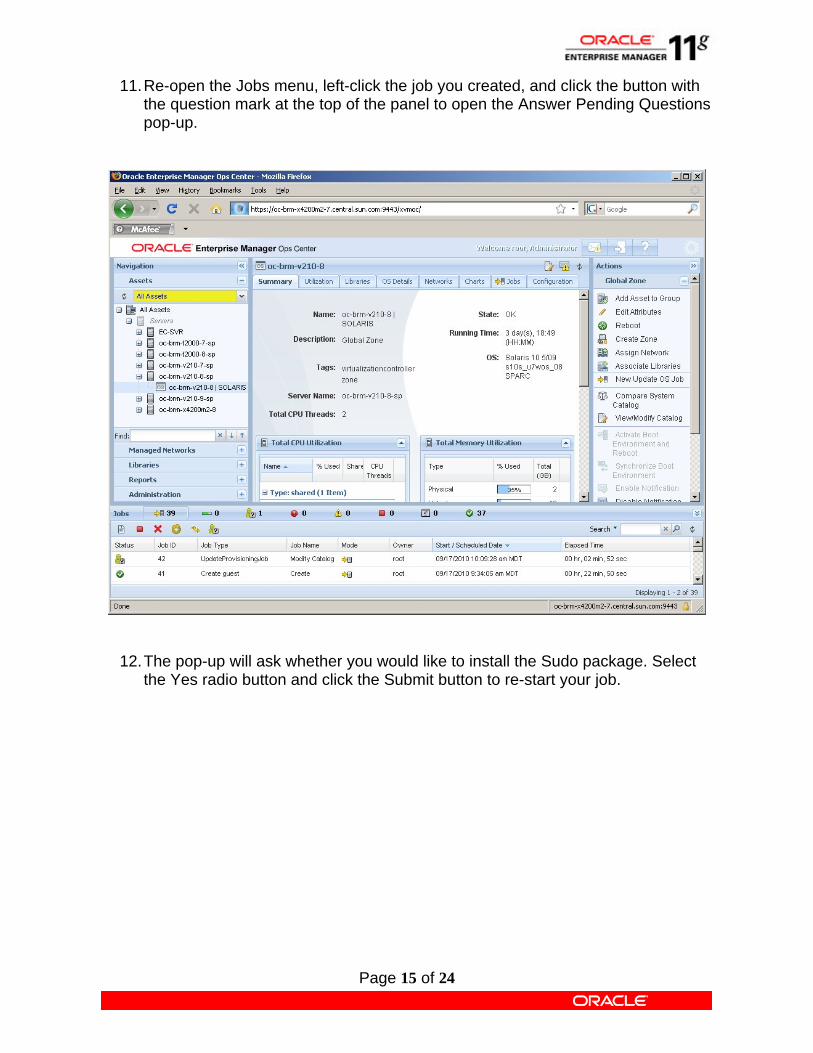
11. Re-open the Jobs menu, left-click the job you created, and click the button with the question mark at the top of the panel to open the Answer Pending Questions pop-up.
12. The pop-up will ask whether you would like to install the Sudo package. Select the Yes radio button and click the Submit button to re-start your job.
Page 16 of 24
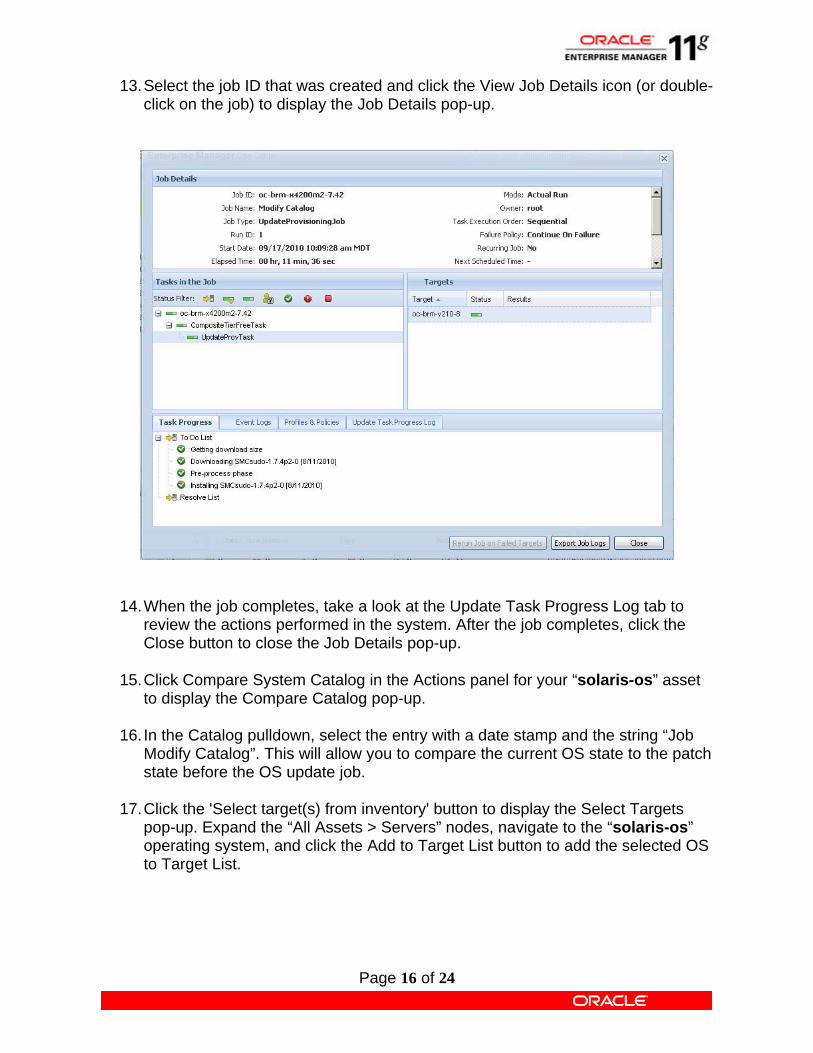
13. Select the job ID that was created and click the View Job Details icon (or double-click on the job) to display the Job Details pop-up.
14. When the job completes, take a look at the Update Task Progress Log tab to review the actions performed in the system. After the job completes, click the Close button to close the Job Details pop-up.
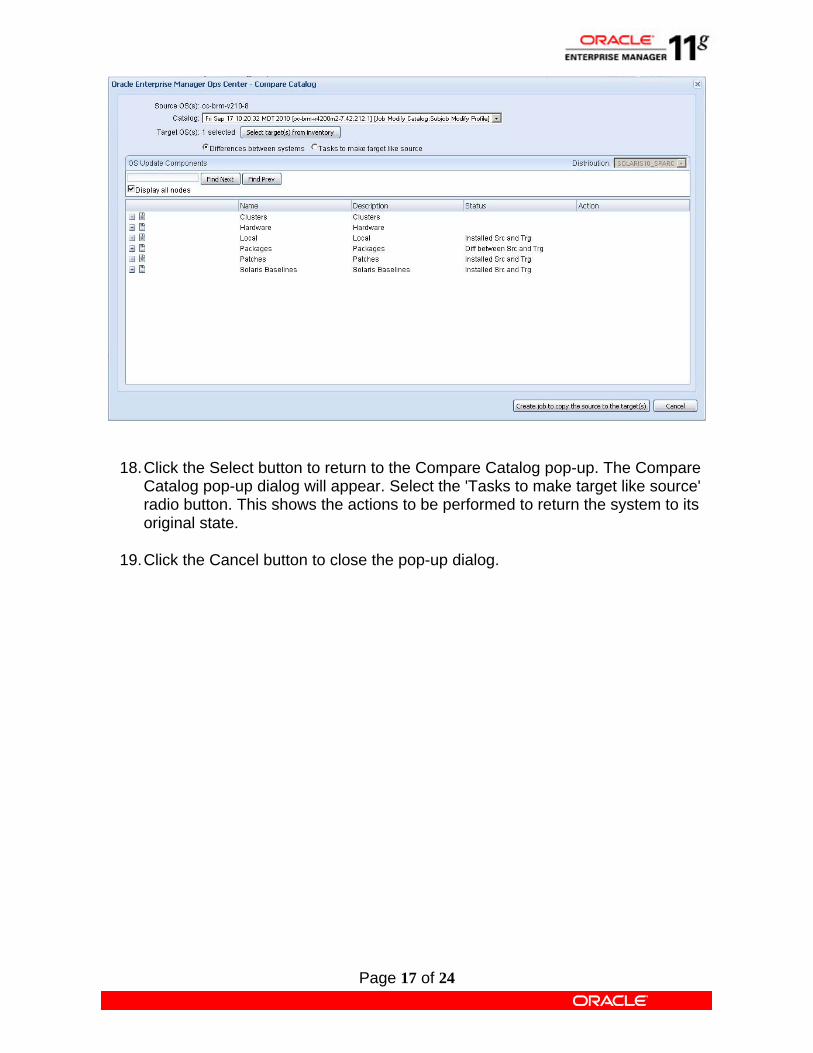
15. Click Compare System Catalog in the Actions panel for your “solaris-os” asset to display the Compare Catalog pop-up.
16. In the Catalog pulldown, select the entry with a date stamp and the string “Job Modify Catalog”. This will allow you to compare the current OS state to the patch state before the OS update job.
17. Click the 'Select target(s) from inventory' button to display the Select Targets pop-up. Expand the “All Assets > Servers” nodes, navigate to the “solaris-os” operating system, and click the Add to Target List button to add the selected OS to Target List.
Page 17 of 24
18. Click the Select button to return to the Compare Catalog pop-up. The Compare Catalog pop-up dialog will appear. Select the 'Tasks to make target like source' radio button. This shows the actions to be performed to return the system to its original state.
19. Click the Cancel button to close the pop-up dialog.
Page 18 of 24
EXERCISE 5: Using Ops Center to Perform an OS Update Report
In this exercise, you will run a report for the Oracle Enterprise Linux server you discovered in exercise 1. The Service Pack Compliance report allows you to compare the differences between installed Linux packages (RPMs) and the recommended versions for updates of a given OS version. In this lab, you will compare the current versions to the previous update of Oracle Enterprise Linux.
1. In the left-hand Navigation panel, select the Reports tab, and select the Solaris/Linux OS Updates node. The Solaris/Linux OS Updates reports page will appear in the central region.
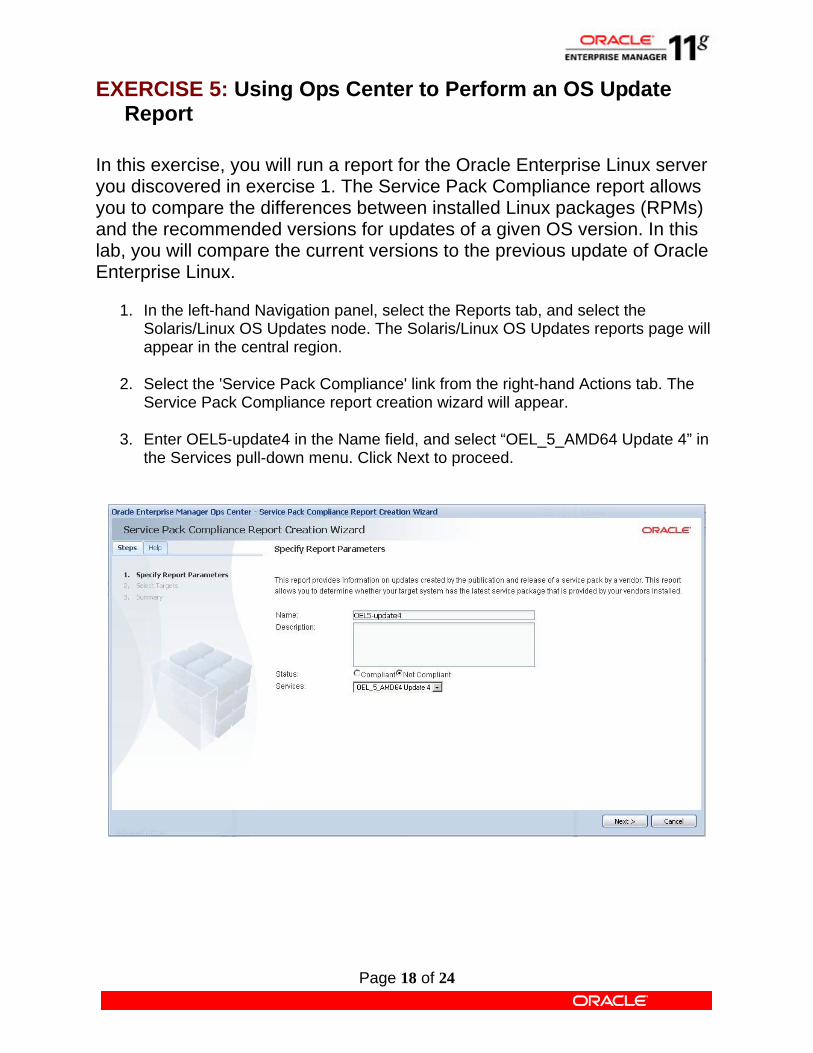
2. Select the 'Service Pack Compliance' link from the right-hand Actions tab. The Service Pack Compliance report creation wizard will appear.
3. Enter OEL5-update4 in the Name field, and select “OEL_5_AMD64 Update 4” in the Services pull-down menu. Click Next to proceed.
Page 19 of 24
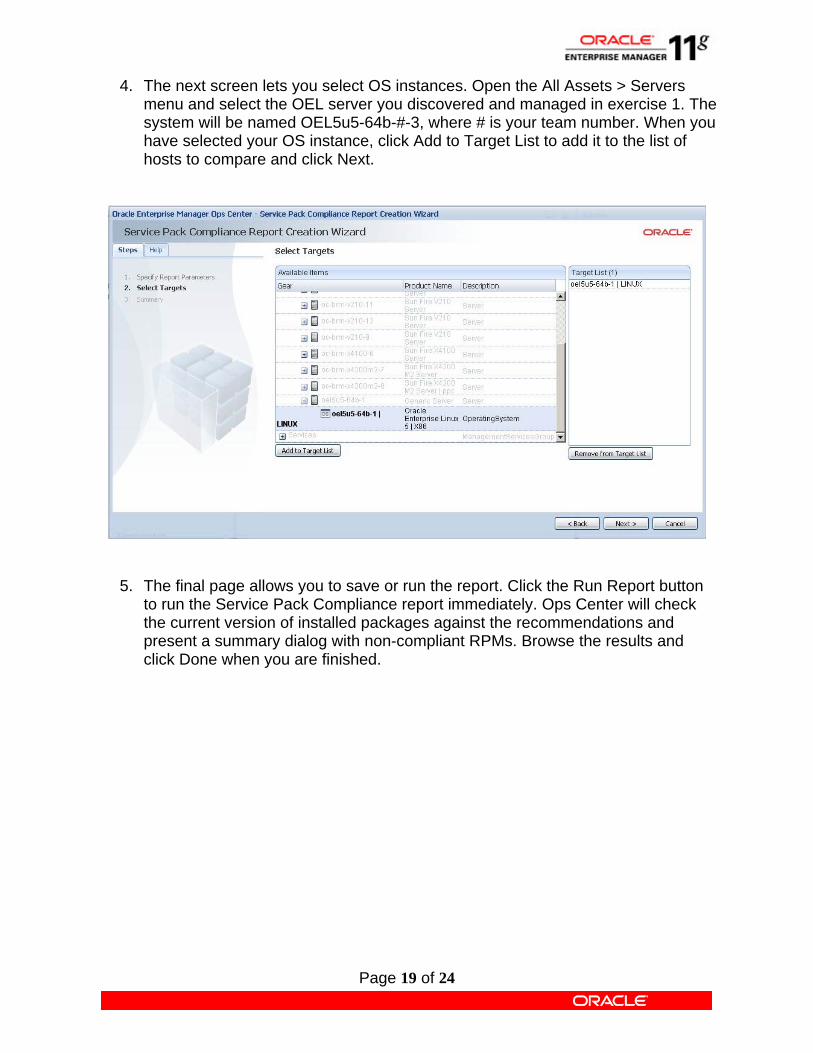
4. The next screen lets you select OS instances. Open the All Assets > Servers menu and select the OEL server you discovered and managed in exercise 1. The system will be named OEL5u5-64b-#-3, where # is your team number. When you have selected your OS instance, click Add to Target List to add it to the list of hosts to compare and click Next.
5. The final page allows you to save or run the report. Click the Run Report button to run the Service Pack Compliance report immediately. Ops Center will check the current version of installed packages against the recommendations and present a summary dialog with non-compliant RPMs. Browse the results and click Done when you are finished.

Page 20 of 24
Page 21 of 24
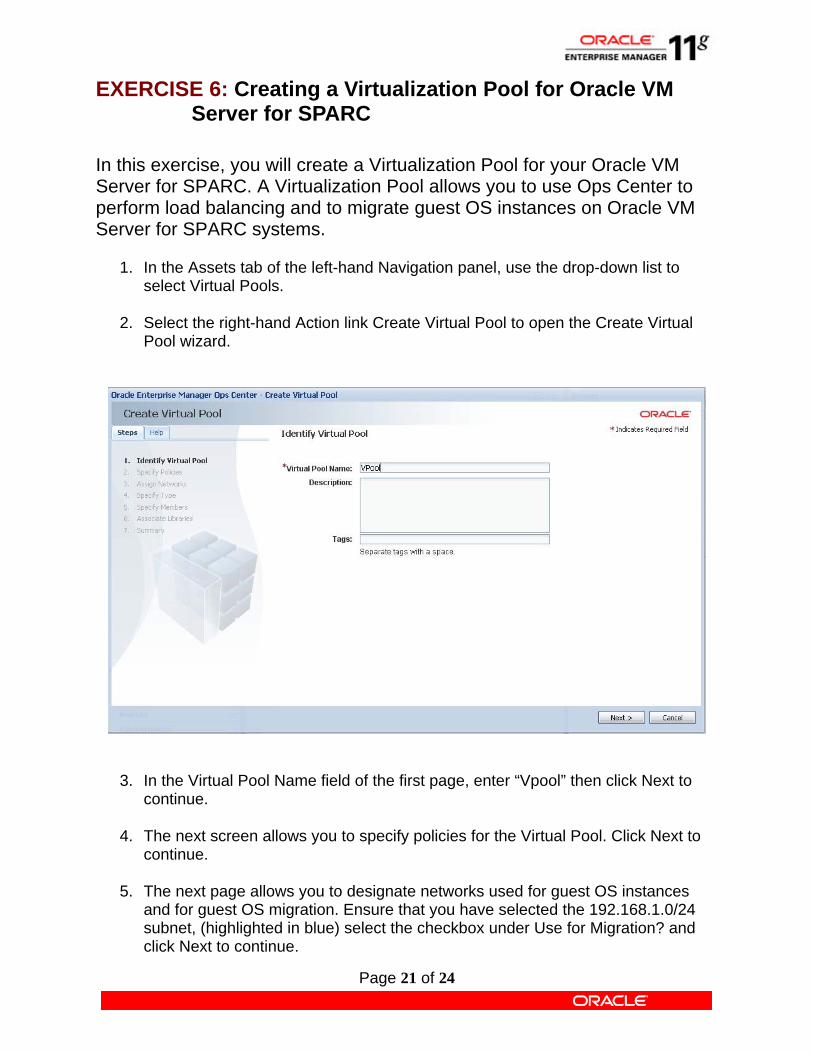
EXERCISE 6: Creating a Virtualization Pool for Oracle VM Server for SPARC
In this exercise, you will create a Virtualization Pool for your Oracle VM Server for SPARC. A Virtualization Pool allows you to use Ops Center to perform load balancing and to migrate guest OS instances on Oracle VM Server for SPARC systems.
1. In the Assets tab of the left-hand Navigation panel, use the drop-down list to select Virtual Pools.
2. Select the right-hand Action link Create Virtual Pool to open the Create Virtual Pool wizard.
3. In the Virtual Pool Name field of the first page, enter “Vpool” then click Next to continue.
4. The next screen allows you to specify policies for the Virtual Pool. Click Next to continue.
5. The next page allows you to designate networks used for guest OS instances and for guest OS migration. Ensure that you have selected the 192.168.1.0/24 subnet, (highlighted in blue) select the checkbox under Use for Migration? and click Next to continue.
Page 22 of 24
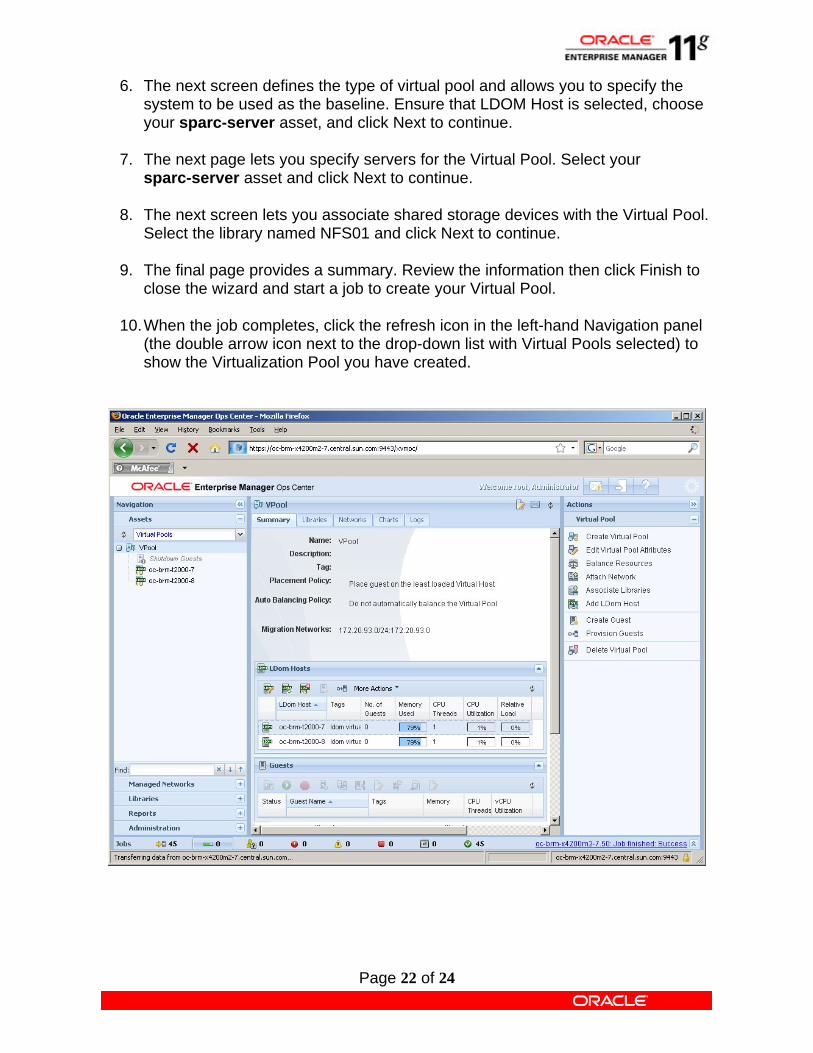
6. The next screen defines the type of virtual pool and allows you to specify the system to be used as the baseline. Ensure that LDOM Host is selected, choose your sparc-server asset, and click Next to continue.
7. The next page lets you specify servers for the Virtual Pool. Select your sparc-server asset and click Next to continue.
8. The next screen lets you associate shared storage devices with the Virtual Pool. Select the library named NFS01 and click Next to continue.
9. The final page provides a summary. Review the information then click Finish to close the wizard and start a job to create your Virtual Pool.
10. When the job completes, click the refresh icon in the left-hand Navigation panel (the double arrow icon next to the drop-down list with Virtual Pools selected) to show the Virtualization Pool you have created.
Page 23 of 24
EXERCISE 7: Creating an Oracle VM Server for SPARC Guest OS Instance
In this exercise, you will use Ops Center to create a Guest OS instance in the Virtualization Pool you configured in the previous exercise.
1. In the Assets tab of the left-hand Navigation panel, use the drop-down list to select Virtual Pools. Ensure that the “Vpool” icon is selected.
2. Select the right-hand Action link Provision Guests to open the Provision LDOM Guest wizard.
3. The first page allows you to select a guest profile. Click Next to continue.
4. The next screen allows you to configure the guest name and select storage for the OS you will provision. In the Guest Name field, enter “ovss-guest1” and click Next to continue.
5. The next page allows you to configure the network of the guest OS instance. Enter the following values in the networks table, then click Next to proceed:
• IP Address: Team 1: 192.168.1.151 Team 2: 192.168.1.161 Team 3: 192.168.1.171 Team 4: 192.168.1.181
• Netmask: 255.255.255.0 • Gateway: 192.168.1.1
6. The next screen allows you to configure the storage for the guest OS instance. Ensure that the first row has NFS01 selected for a Library and click Next to continue. The first row has a Virtual Disk Name of ovss-guest1-disk-0.
7. The final screen summarizes the guest provisioning information. Review the values and click Finish to close the wizard and start the job to provision your guest OS instance.
Page 24 of 24
This concludes the Oracle Enterprise Manager Ops Center Hands-on Lab. Additional information can be found at: Demo Booths located at {Location} Additional Sessions: Moscone South: Enterprise Manager # XXXX Moscone West: Enterprise Manager # XXXX For additional information, visit the following Web pages: Oracle Real User Experience Insight http://www.oracle.com/technology/products/oem/prod_focus/realuserexperienceinsight.html Oracle Application Management http://www.oracle.com/technology/products/oem/prod_focus/app_mgmt.html Oracle Enterprise Manager http://www.oracle.com/enterprise_manager/index.html Oracle Enterprise Manager Ops Center http://www.oracle.com/us/products/enterprise-manager/opscenter/index.html