Embed Size (px)
Citation preview
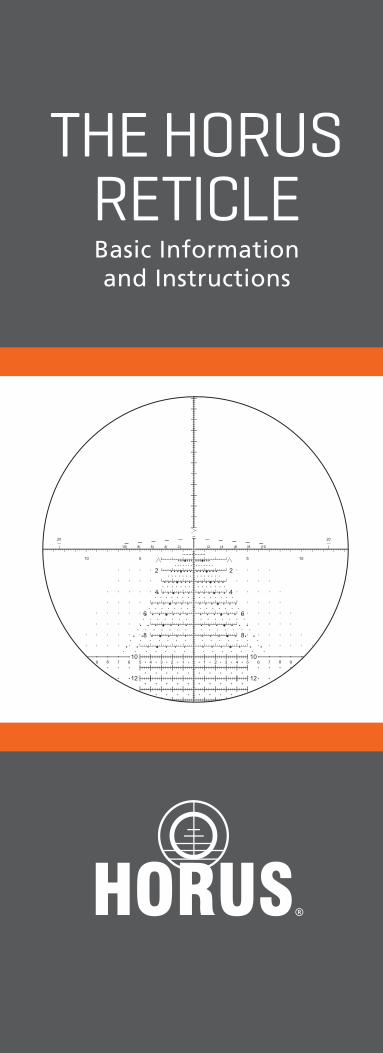
THE HORUSRETICLEBasic Informationand Instructions

Thank you for your interest in Horus reticles.
Horus reticles enable shooters to reach greater distances more effi ciently and more accurately.
Using Horus rifl e scope and spotting scope reticles in combination allows for precise communication between shooter and spotter.
Horus reticles are favored by top sportsmen and marksmen around the world.
When time is critical, exclusive Horus features such as Instant Second-Shot Correction and Rapid Ranging give you the edge—especially if you’re engaging multiple targets.
This booklet explains
• Basics of the Horus Reticle
• Rapid Ranging
• Instant Second-Shot Correction
• And much more
Horus reticles are available in many brands of rifl e scopes.
WARNING!
Follow rifl e and rifl e scope manufacturers’ instructions on the safe use and proper handling of fi rearms.
Please see inside back cover for more information on using fi rearms safely.
When using a rifl e scope, NEVER look directly at the sun or into bright lights. Doing so risks serious damage to your vision.
1
2017 Horus Vision
2
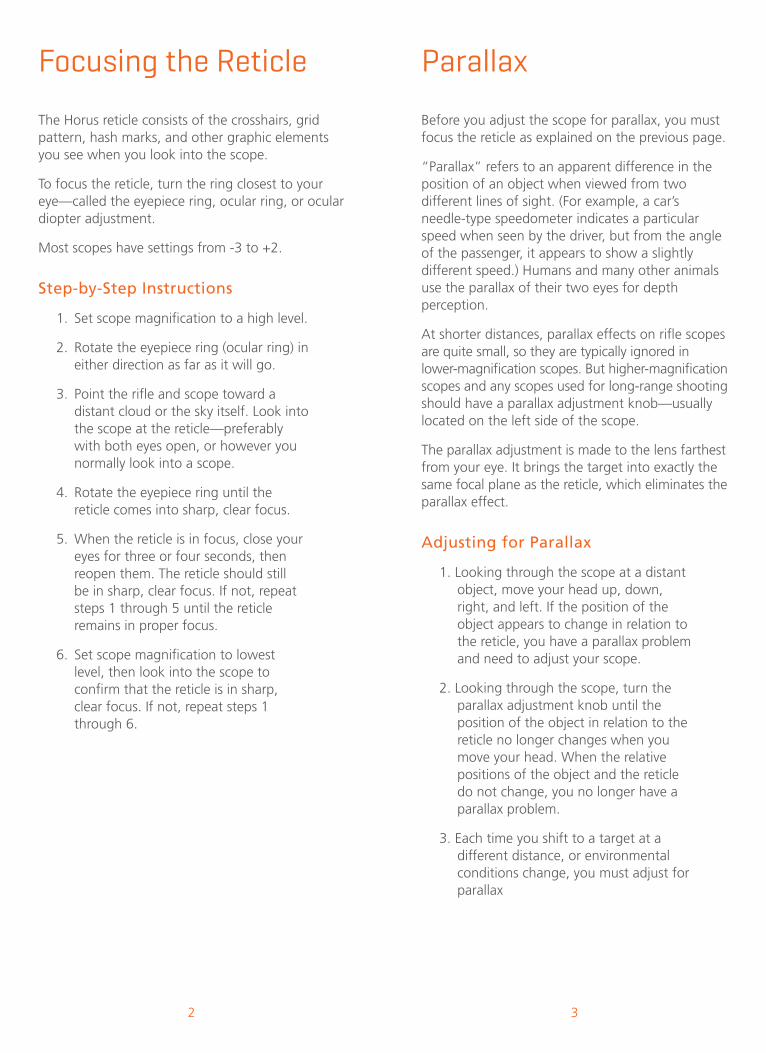
Focusing the Reticle
The Horus reticle consists of the crosshairs, grid pattern, hash marks, and other graphic elements you see when you look into the scope.
To focus the reticle, turn the ring closest to your eye—called the eyepiece ring, ocular ring, or ocular diopter adjustment.
Most scopes have settings from -3 to +2.
Step-by-Step Instructions
1. Set scope magnifi cation to a high level.
2. Rotate the eyepiece ring (ocular ring) in either direction as far as it will go.
3. Point the rifl e and scope toward a distant cloud or the sky itself. Look into the scope at the reticle—preferably with both eyes open, or however you normally look into a scope.
4. Rotate the eyepiece ring until the reticle comes into sharp, clear focus.
5. When the reticle is in focus, close your eyes for three or four seconds, then reopen them. The reticle should still be in sharp, clear focus. If not, repeat steps 1 through 5 until the reticle remains in proper focus.
6. Set scope magnifi cation to lowest level, then look into the scope to confi rm that the reticle is in sharp, clear focus. If not, repeat steps 1 through 6.
Parallax
Before you adjust the scope for parallax, you must focus the reticle as explained on the previous page.
“Parallax” refers to an apparent difference in the position of an object when viewed from two different lines of sight. (For example, a car’s needle-type speedometer indicates a particular speed when seen by the driver, but from the angle of the passenger, it appears to show a slightly different speed.) Humans and many other animals use the parallax of their two eyes for depth perception.
At shorter distances, parallax effects on rifl e scopes are quite small, so they are typically ignored in lower-magnifi cation scopes. But higher-magnifi cation scopes and any scopes used for long-range shooting should have a parallax adjustment knob—usually located on the left side of the scope.
The parallax adjustment is made to the lens farthest from your eye. It brings the target into exactly the same focal plane as the reticle, which eliminates the parallax effect.
Adjusting for Parallax
1. Looking through the scope at a distant object, move your head up, down, right, and left. If the position of the object appears to change in relation to the reticle, you have a parallax problem and need to adjust your scope.
2. Looking through the scope, turn the parallax adjustment knob until the position of the object in relation to the reticle no longer changes when you move your head. When the relative positions of the object and the reticle do not change, you no longer have a parallax problem.
3. Each time you shift to a target at a different distance, or environmental conditions change, you must adjust for parallax
3
2
4
1010
112 2
6
4 5 6 7 8
8
45678
102 4 6 810 2468
33
2
4
6
8
102 4 6 810 2468
4 5
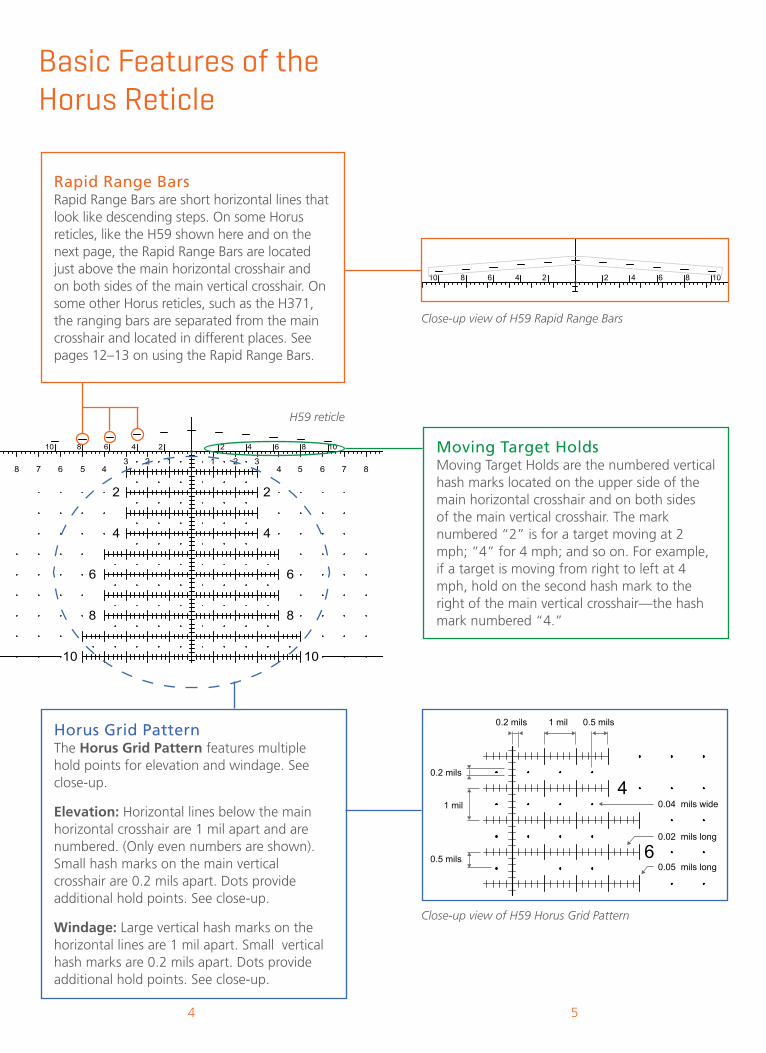
Basic Features of the Horus Reticle
Rapid Range BarsRapid Range Bars are short horizontal lines that look like descending steps. On some Horus reticles, like the H59 shown here and on the next page, the Rapid Range Bars are located just above the main horizontal crosshair and on both sides of the main vertical crosshair. On some other Horus reticles, such as the H371, the ranging bars are separated from the main crosshair and located in different places. See pages 12–13 on using the Rapid Range Bars.
Moving Target Holds Moving Target Holds are the numbered vertical hash marks located on the upper side of the main horizontal crosshair and on both sides of the main vertical crosshair. The mark numbered “2” is for a target moving at 2 mph; “4” for 4 mph; and so on. For example, if a target is moving from right to left at 4 mph, hold on the second hash mark to the right of the main vertical crosshair—the hash mark numbered “4.”
Horus Grid Pattern The Horus Grid Pattern features multiple hold points for elevation and windage. See close-up.
Elevation: Horizontal lines below the main horizontal crosshair are 1 mil apart and are numbered. (Only even numbers are shown). Small hash marks on the main vertical crosshair are 0.2 mils apart. Dots provide additional hold points. See close-up.
Windage: Large vertical hash marks on the horizontal lines are 1 mil apart. Small vertical hash marks are 0.2 mils apart. Dots provide additional hold points. See close-up.
0.2 mils
0.2 mils
1 mil
1 mil 0.04 mils wide
0.02 mils long
0.05 mils long
0.5 mils
0.5 mils
H59 reticle
Close-up view of H59 Horus Grid Pattern
Close-up view of H59 Rapid Range Bars
Point of Impact
76
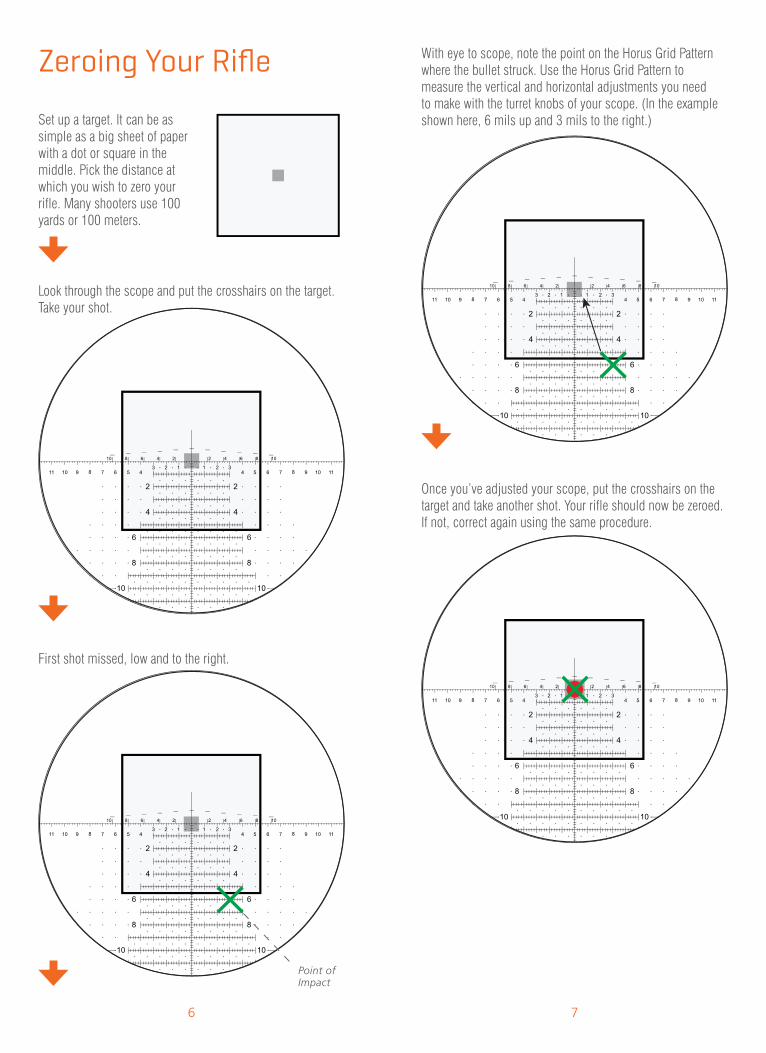
Zeroing Your Rifl e
Look through the scope and put the crosshairs on the target. Take your shot.
First shot missed, low and to the right.
With eye to scope, note the point on the Horus Grid Pattern where the bullet struck. Use the Horus Grid Pattern to measure the vertical and horizontal adjustments you need to make with the turret knobs of your scope. (In the example shown here, 6 mils up and 3 mils to the right.)Set up a target. It can be as
simple as a big sheet of paper with a dot or square in the middle. Pick the distance at which you wish to zero your rifle. Many shooters use 100 yards or 100 meters.
Once you’ve adjusted your scope, put the crosshairs on the target and take another shot. Your rifle should now be zeroed. If not, correct again using the same procedure.
98
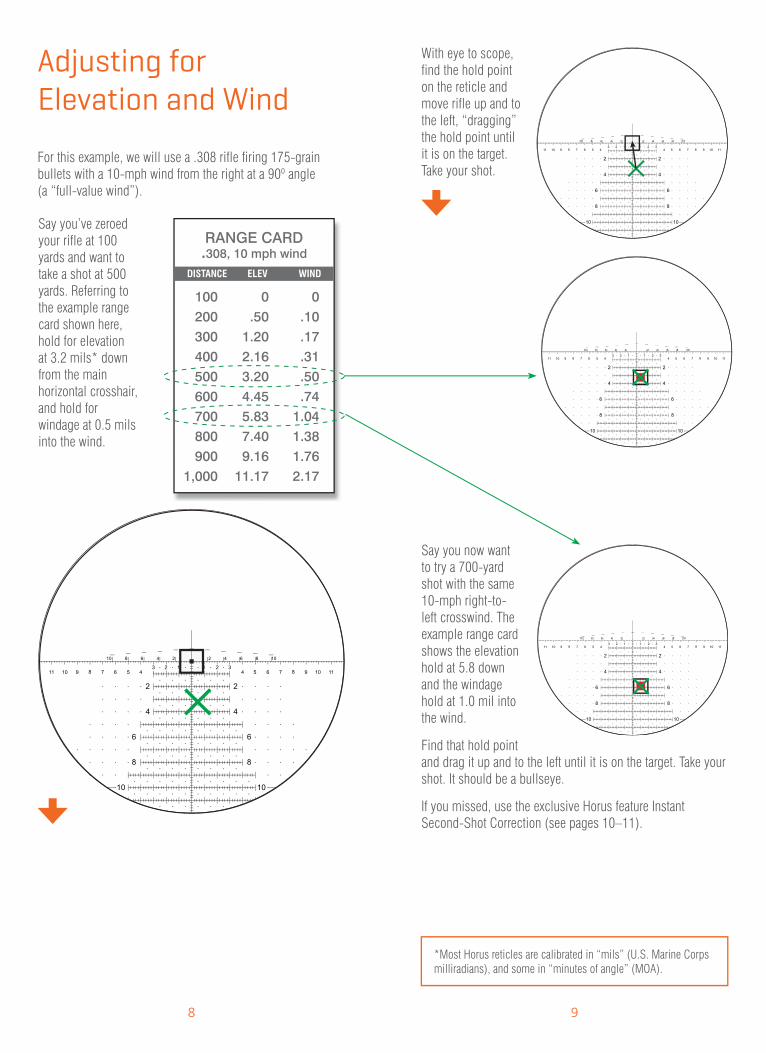
Adjusting for Elevation and Wind
For this example, we will use a .308 rifle firing 175-grain bullets with a 10-mph wind from the right at a 90o angle (a “full-value wind”).
With eye to scope, find the hold point on the reticle and move rifle up and to the left, “dragging” the hold point until it is on the target. Take your shot.
Say you now want to try a 700-yard shot with the same 10-mph right-to-left crosswind. The example range card shows the elevation hold at 5.8 down and the windage hold at 1.0 mil into the wind.
Find that hold point and drag it up and to the left until it is on the target. Take your shot. It should be a bullseye.
If you missed, use the exclusive Horus feature Instant Second-Shot Correction (see pages 10–11).
*Most Horus reticles are calibrated in “mils” (U.S. Marine Corps milliradians), and some in “minutes of angle” (MOA).
Say you’ve zeroed your rifle at 100 yards and want to take a shot at 500 yards. Referring to the example range card shown here, hold for elevation at 3.2 mils* down from the main horizontal crosshair, and hold for windage at 0.5 mils into the wind.
Point of Impact
Magnifi ed view
1110
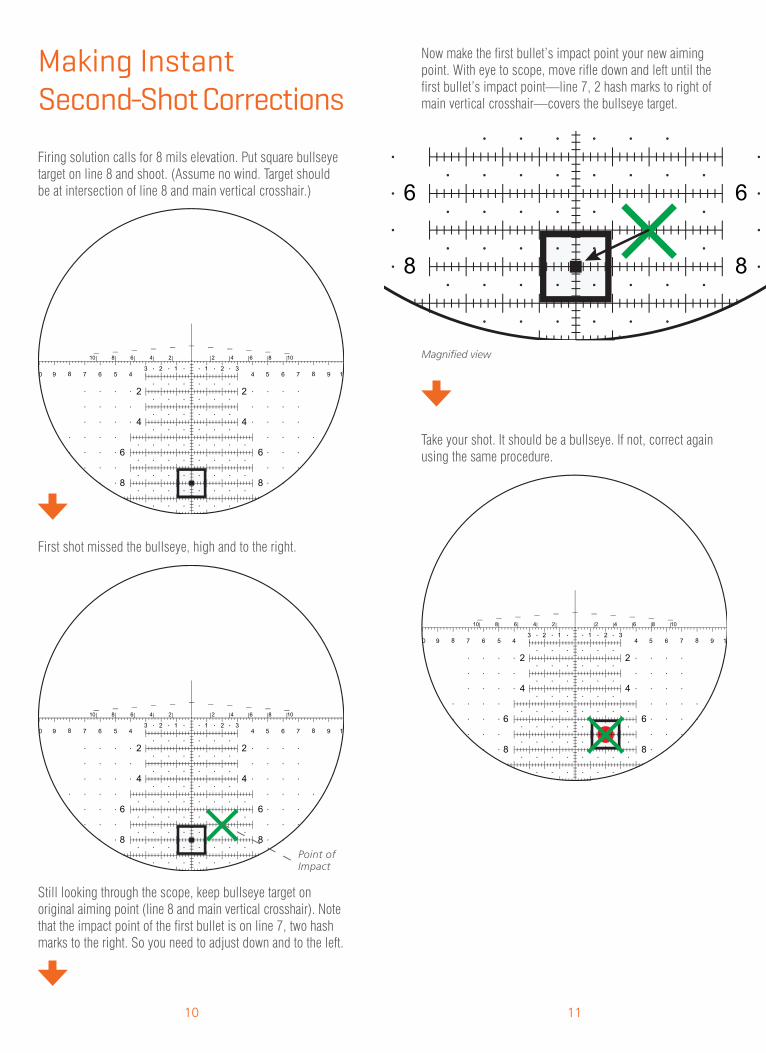
Making Instant Second-Shot Corrections
Firing solution calls for 8 mils elevation. Put square bullseye target on line 8 and shoot. (Assume no wind. Target should be at intersection of line 8 and main vertical crosshair.)
Now make the first bullet’s impact point your new aiming point. With eye to scope, move rifle down and left until the first bullet’s impact point—line 7, 2 hash marks to right of main vertical crosshair—covers the bullseye target.
Take your shot. It should be a bullseye. If not, correct again using the same procedure.
First shot missed the bullseye, high and to the right.
Still looking through the scope, keep bullseye target on original aiming point (line 8 and main vertical crosshair). Note that the impact point of the first bullet is on line 7, two hash marks to the right. So you need to adjust down and to the left.
6”12”18”24”30”36”72”
16733350066783310002000
18537055574192611112222
208416625833104212502500
238476714952119014292857
2785568331111138916673333
33366710001333166720004000
TargetSizeInches
HORUS RAPID RANGE BARS TABLE (YARDS)(1.0)0
(.9)1
(.8)2
(.7)3
(.6)4
(.5)5
6”12”18”24”30”36”72”
1533044576107619141828
16933850767784610152031
19038057176195211422285
218435653870108813072611
2545087611015127015243046
3046099141218152418283656
TargetSizeInches
HORUS RAPID RANGE BARS TABLE (METERS)(1.0)0
(.9)1
(.8)2
(.7)3
(.6)4
(.5)5
Horus provides free Rapid Range Bars Tables in either yards or meters. Request yours by calling (866) 568-2926.
For more detailed information, please visit the Horus Vision website: www.horusvision.com.
1312
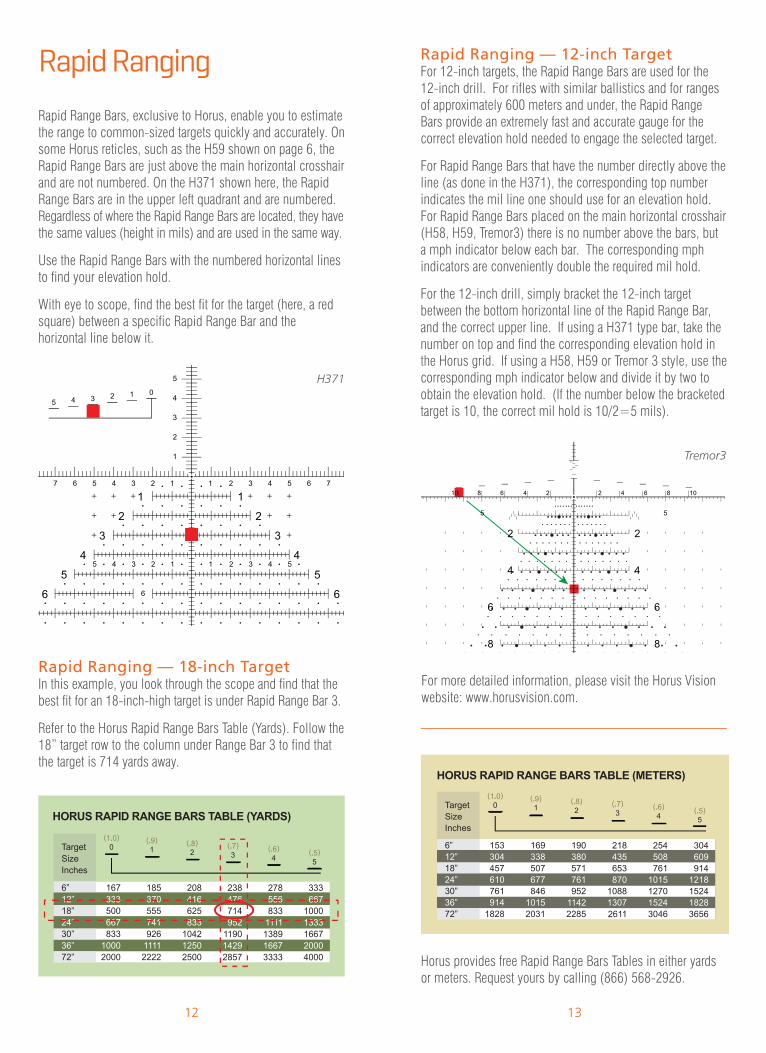
Rapid Range Bars, exclusive to Horus, enable you to estimate the range to common-sized targets quickly and accurately. On some Horus reticles, such as the H59 shown on page 6, the Rapid Range Bars are just above the main horizontal crosshair and are not numbered. On the H371 shown here, the Rapid Range Bars are in the upper left quadrant and are numbered. Regardless of where the Rapid Range Bars are located, they have the same values (height in mils) and are used in the same way.
Use the Rapid Range Bars with the numbered horizontal lines to find your elevation hold.
With eye to scope, find the best fit for the target (here, a red square) between a specific Rapid Range Bar and the horizontal line below it.
Rapid Ranging — 12-inch TargetFor 12-inch targets, the Rapid Range Bars are used for the 12-inch drill. For rifles with similar ballistics and for ranges of approximately 600 meters and under, the Rapid Range Bars provide an extremely fast and accurate gauge for the correct elevation hold needed to engage the selected target.
For Rapid Range Bars that have the number directly above the line (as done in the H371), the corresponding top number indicates the mil line one should use for an elevation hold. For Rapid Range Bars placed on the main horizontal crosshair (H58, H59, Tremor3) there is no number above the bars, but a mph indicator below each bar. The corresponding mph indicators are conveniently double the required mil hold.
For the 12-inch drill, simply bracket the 12-inch target between the bottom horizontal line of the Rapid Range Bar, and the correct upper line. If using a H371 type bar, take the number on top and find the corresponding elevation hold in the Horus grid. If using a H58, H59 or Tremor 3 style, use the corresponding mph indicator below and divide it by two to obtain the elevation hold. (If the number below the bracketed target is 10, the correct mil hold is 10/2=5 mils).
Rapid Ranging
Rapid Ranging — 18-inch TargetIn this example, you look through the scope and find that the best fit for an 18-inch-high target is under Rapid Range Bar 3.
Refer to the Horus Rapid Range Bars Table (Yards). Follow the 18” target row to the column under Range Bar 3 to find that the target is 714 yards away.
H371
Tremor3
14
36”
36”
15
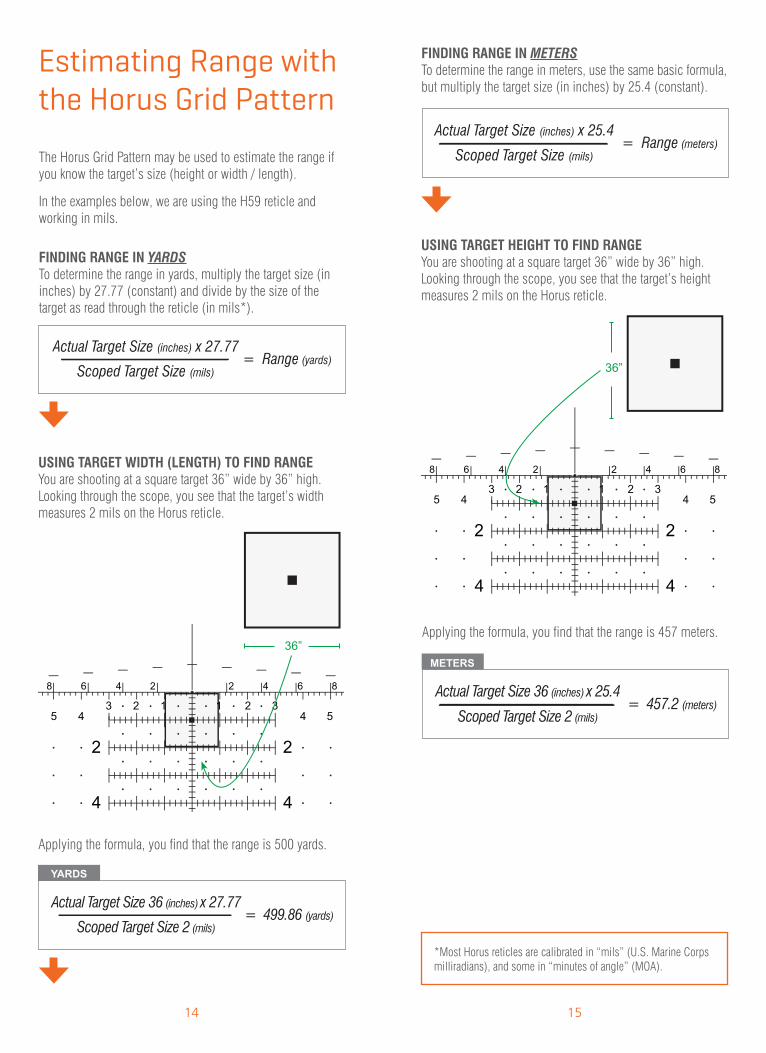
Estimating Range with the Horus Grid Pattern
The Horus Grid Pattern may be used to estimate the range if you know the target’s size (height or width / length).
In the examples below, we are using the H59 reticle and working in mils.
FINDING RANGE IN YARDSTo determine the range in yards, multiply the target size (in inches) by 27.77 (constant) and divide by the size of the target as read through the reticle (in mils*).
FINDING RANGE IN METERSTo determine the range in meters, use the same basic formula, but multiply the target size (in inches) by 25.4 (constant).
USING TARGET WIDTH (LENGTH) TO FIND RANGEYou are shooting at a square target 36” wide by 36” high. Looking through the scope, you see that the target’s width measures 2 mils on the Horus reticle.
USING TARGET HEIGHT TO FIND RANGEYou are shooting at a square target 36” wide by 36” high. Looking through the scope, you see that the target’s height measures 2 mils on the Horus reticle.
Applying the formula, you find that the range is 500 yards.
Applying the formula, you find that the range is 457 meters.
*Most Horus reticles are calibrated in “mils” (U.S. Marine Corps milliradians), and some in “minutes of angle” (MOA).
YARDS
METERS
36”
36”
1716
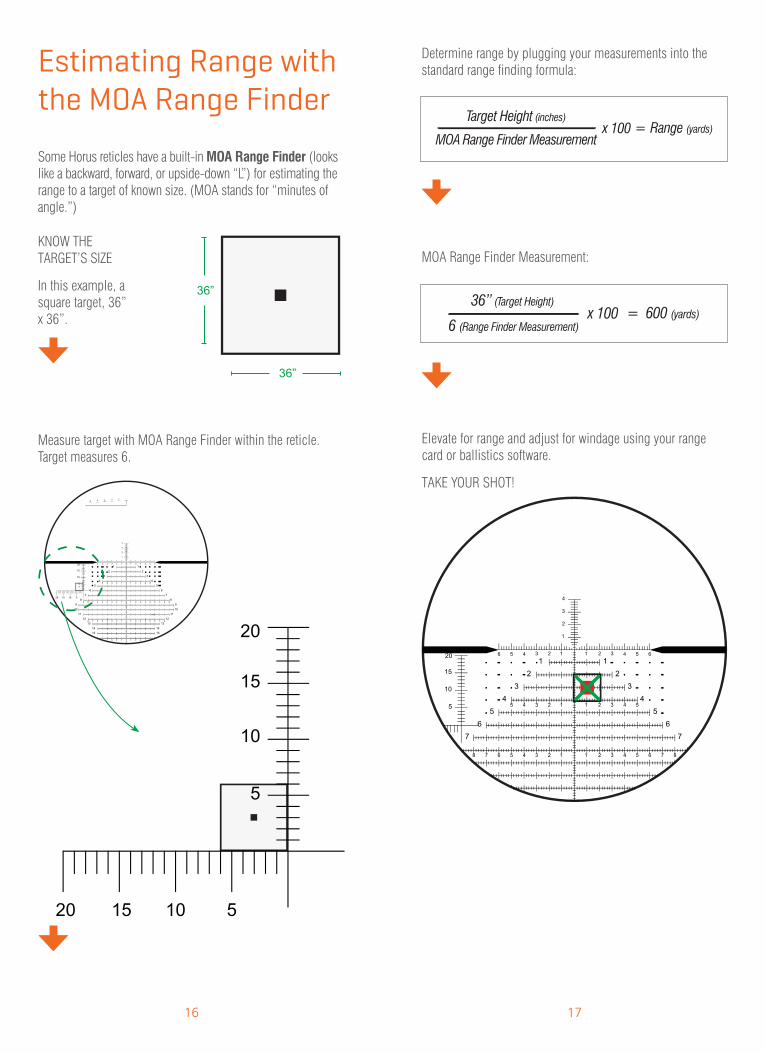
Estimating Range with the MOA Range Finder
Measure target with MOA Range Finder within the reticle. Target measures 6.
KNOW THE TARGET’S SIZE
In this example, a square target, 36” x 36”.
Determine range by plugging your measurements into the standard range finding formula:
MOA Range Finder Measurement:
Elevate for range and adjust for windage using your range card or ballistics software.
TAKE YOUR SHOT!
Some Horus reticles have a built-in MOA Range Finder (looks like a backward, forward, or upside-down “L”) for estimating the range to a target of known size. (MOA stands for “minutes of angle.”)
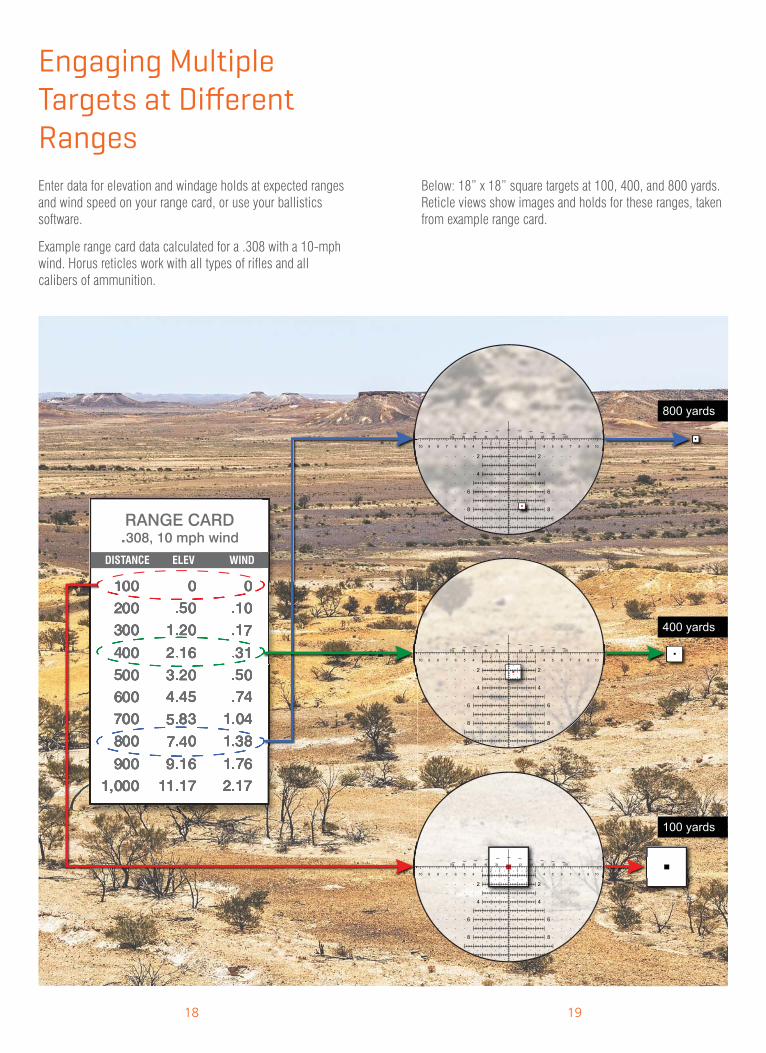
Engaging Multiple Targets at Diff erent Ranges
1918
Enter data for elevation and windage holds at expected ranges and wind speed on your range card, or use your ballistics software.
Example range card data calculated for a .308 with a 10-mph wind. Horus reticles work with all types of rifles and all calibers of ammunition.
Below: 18” x 18” square targets at 100, 400, and 800 yards. Reticle views show images and holds for these ranges, taken from example range card.
2
4
112 2
6
4 5 6 7 8 9 10
8
45678910
102 4 6 810 2468
33
2
4
6
8
2
4
112 2
6
4 5 6 7 8 9 10
8
45678910
102 4 6 810 2468
33
2
4
6
8
2
4
112 2
6
4 5 6 7 8 9 10
8
45678910
102 4 6 810 2468
33
2
4
6
8
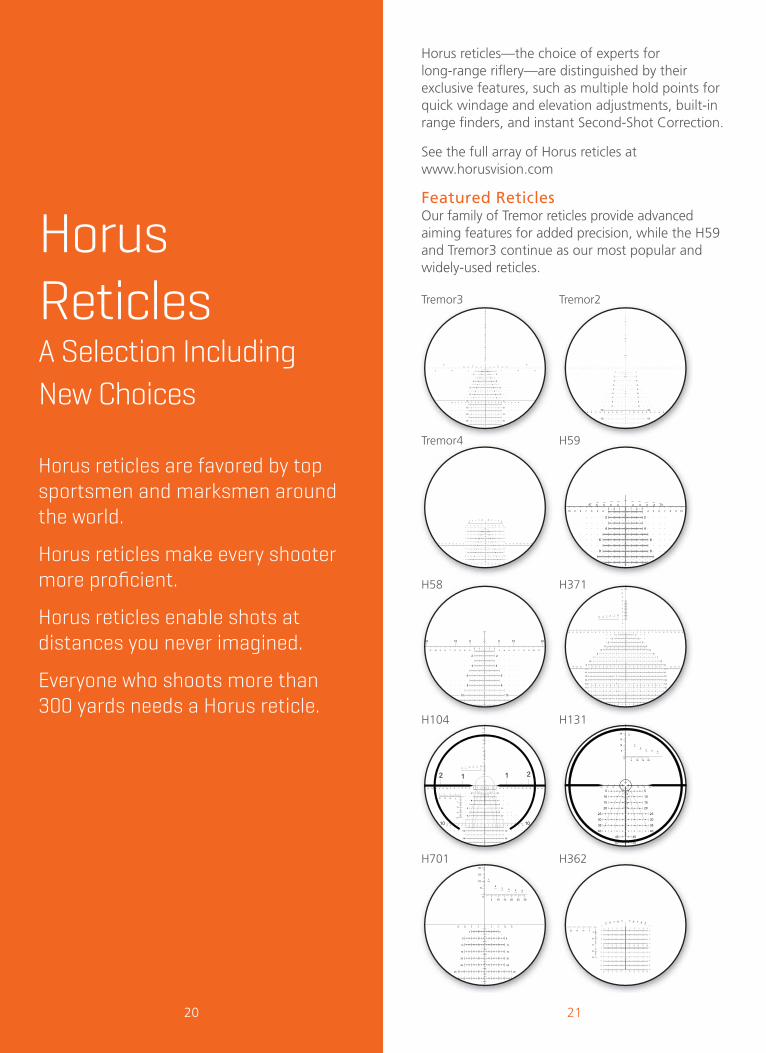
Horus reticles—the choice of experts for long-range rifl ery—are distinguished by their exclusive features, such as multiple hold points for quick windage and elevation adjustments, built-in range fi nders, and instant Second-Shot Correction.
See the full array of Horus reticles at www.horusvision.com
Featured ReticlesOur family of Tremor reticles provide advanced aiming features for added precision, while the H59 and Tremor3 continue as our most popular and widely-used reticles.
2120
HorusReticlesA Selection Including New Choices
Horus reticles are favored by top sportsmen and marksmen around the world.
Horus reticles make every shooter more profi cient.
Horus reticles enable shots at distances you never imagined.
Everyone who shoots more than 300 yards needs a Horus reticle.
Tremor3
Tremor4
H58
H104
H701
Tremor2
H59
H371
H131
H362
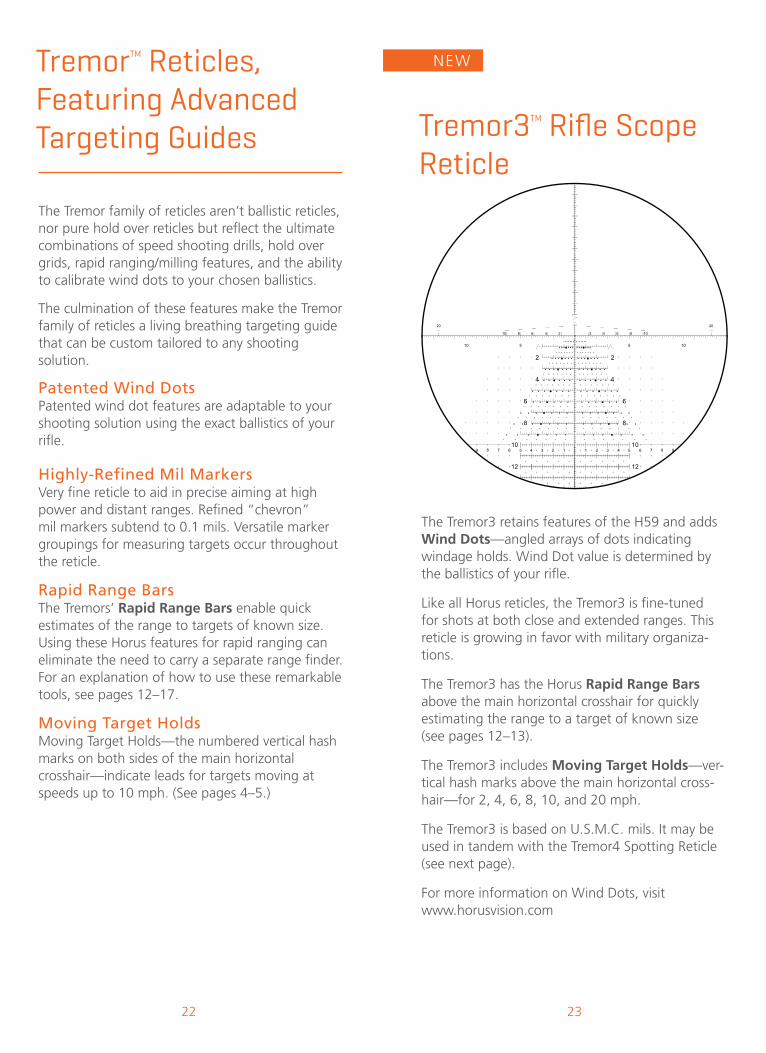
TremorTM Reticles, Featuring Advanced Targeting Guides
The Tremor family of reticles aren’t ballistic reticles, nor pure hold over reticles but refl ect the ultimate combinations of speed shooting drills, hold over grids, rapid ranging/milling features, and the ability to calibrate wind dots to your chosen ballistics.
The culmination of these features make the Tremor family of reticles a living breathing targeting guide that can be custom tailored to any shooting solution.
Patented Wind DotsPatented wind dot features are adaptable to your shooting solution using the exact ballistics of your rifl e.
Highly-Refined Mil MarkersVery fi ne reticle to aid in precise aiming at high power and distant ranges. Refi ned “chevron” mil markers subtend to 0.1 mils. Versatile marker groupings for measuring targets occur throughout the reticle.
Rapid Range BarsThe Tremors’ Rapid Range Bars enable quick estimates of the range to targets of known size. Using these Horus features for rapid ranging can eliminate the need to carry a separate range fi nder. For an explanation of how to use these remarkable tools, see pages 12–17.
Moving Target HoldsMoving Target Holds—the numbered vertical hash marks on both sides of the main horizontal crosshair—indicate leads for targets moving at speeds up to 10 mph. (See pages 4–5.)
Tremor3TM Rifl e Scope Reticle
The Tremor3 retains features of the H59 and adds Wind Dots—angled arrays of dots indicating windage holds. Wind Dot value is determined by the ballistics of your rifl e.
Like all Horus reticles, the Tremor3 is fi ne-tuned for shots at both close and extended ranges. This reticle is growing in favor with military organiza-tions.
The Tremor3 has the Horus Rapid Range Bars above the main horizontal crosshair for quickly estimating the range to a target of known size (see pages 12–13).
The Tremor3 includes Moving Target Holds—ver-tical hash marks above the main horizontal cross-hair—for 2, 4, 6, 8, 10, and 20 mph.
The Tremor3 is based on U.S.M.C. mils. It may be used in tandem with the Tremor4 Spotting Reticle (see next page).
For more information on Wind Dots, visit www.horusvision.com
2322
NEW
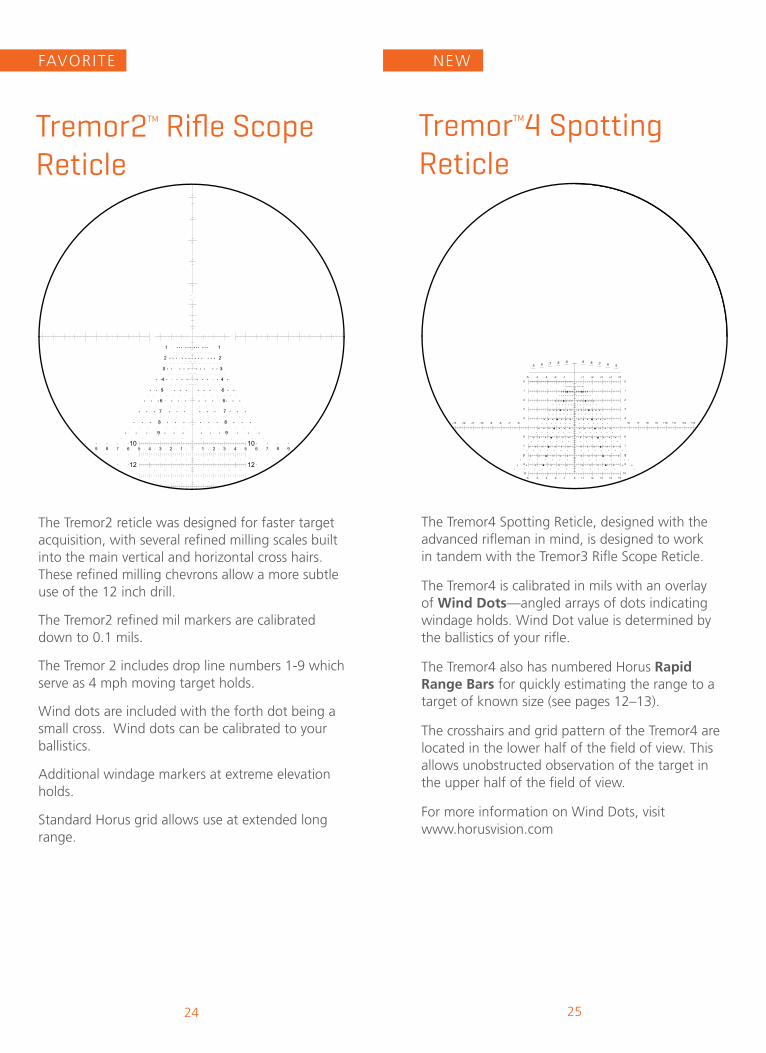
TremorTM4 Spotting Reticle
The Tremor4 Spotting Reticle, designed with the advanced rifl eman in mind, is designed to work in tandem with the Tremor3 Rifl e Scope Reticle.
The Tremor4 is calibrated in mils with an overlay of Wind Dots—angled arrays of dots indicating windage holds. Wind Dot value is determined by the ballistics of your rifl e.
The Tremor4 also has numbered Horus Rapid Range Bars for quickly estimating the range to a target of known size (see pages 12–13).
The crosshairs and grid pattern of the Tremor4 are located in the lower half of the fi eld of view. This allows unobstructed observation of the target in the upper half of the fi eld of view.
For more information on Wind Dots, visit www.horusvision.com
25
NEWFAVORITE
The Tremor2 reticle was designed for faster target acquisition, with several refi ned milling scales built into the main vertical and horizontal cross hairs. These refi ned milling chevrons allow a more subtle use of the 12 inch drill.
The Tremor2 refi ned mil markers are calibrated down to 0.1 mils.
The Tremor 2 includes drop line numbers 1-9 which serve as 4 mph moving target holds.
Wind dots are included with the forth dot being a small cross. Wind dots can be calibrated to your ballistics.
Additional windage markers at extreme elevation holds.
Standard Horus grid allows use at extended long range.
Tremor2TM Rifl e Scope Reticle
24
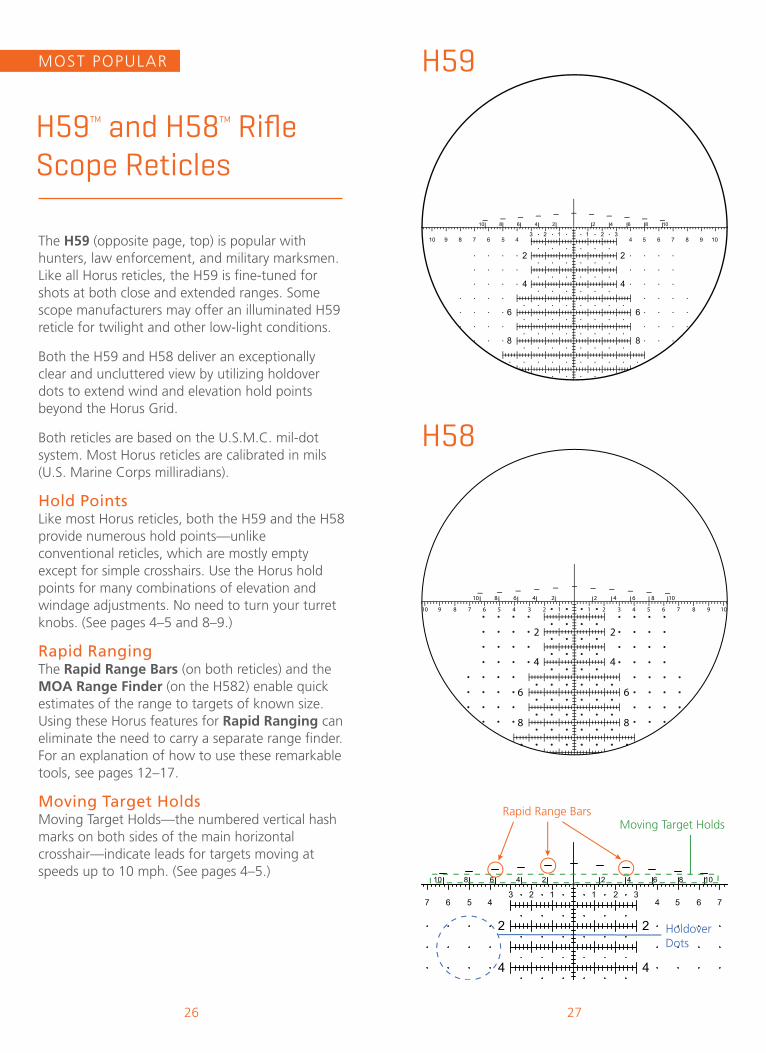
H59TM and H58TM Rifl e Scope Reticles
H59
H58
MOST POPULAR
The H59 (opposite page, top) is popular with hunters, law enforcement, and military marksmen. Like all Horus reticles, the H59 is fi ne-tuned for shots at both close and extended ranges. Some scope manufacturers may offer an illuminated H59 reticle for twilight and other low-light conditions.
Both the H59 and H58 deliver an exceptionally clear and uncluttered view by utilizing holdover dots to extend wind and elevation hold points beyond the Horus Grid.
Both reticles are based on the U.S.M.C. mil-dot system. Most Horus reticles are calibrated in mils (U.S. Marine Corps milliradians).
Hold PointsLike most Horus reticles, both the H59 and the H58 provide numerous hold points—unlikeconventional reticles, which are mostly empty except for simple crosshairs. Use the Horus hold points for many combinations of elevation and windage adjustments. No need to turn your turret knobs. (See pages 4–5 and 8–9.)
Rapid RangingThe Rapid Range Bars (on both reticles) and the MOA Range Finder (on the H582) enable quick estimates of the range to targets of known size. Using these Horus features for Rapid Ranging can eliminate the need to carry a separate range fi nder. For an explanation of how to use these remarkable tools, see pages 12–17.
Moving Target HoldsMoving Target Holds—the numbered vertical hash marks on both sides of the main horizontal crosshair—indicate leads for targets moving at speeds up to 10 mph. (See pages 4–5.)
26 27
2
4
112 24 5 6 74567
102 4 6 810 2468
33
2
4
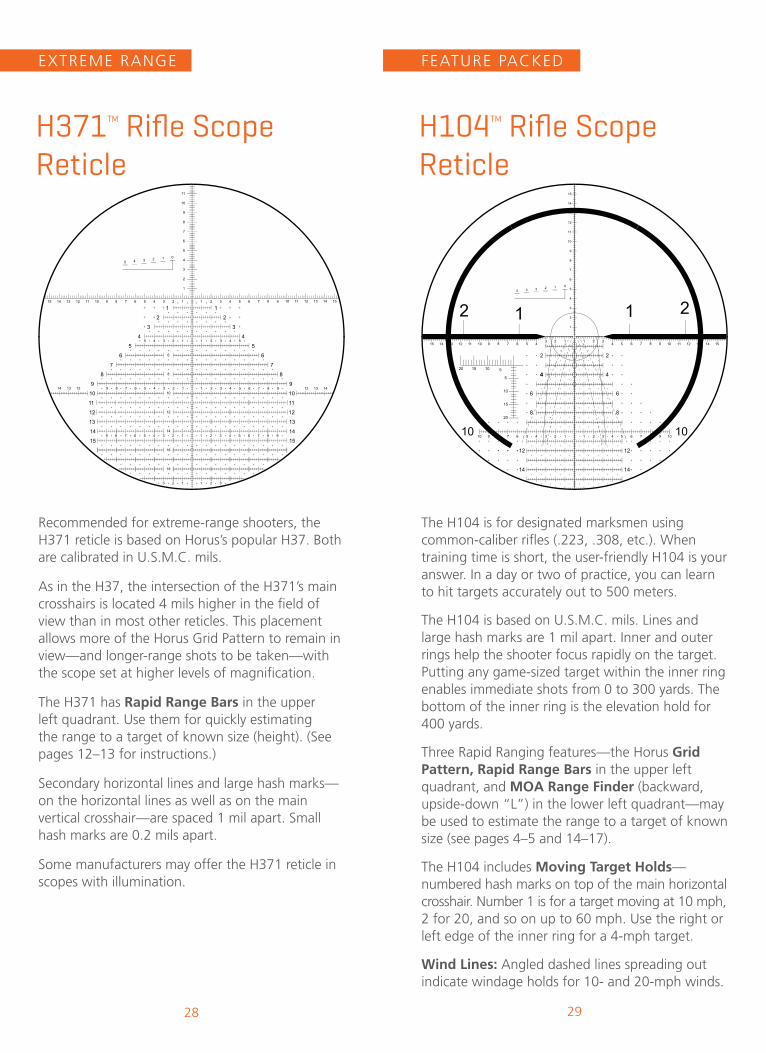
H104TM Rifl e Scope Reticle
EXTREME RANGE FEATURE PACKED
The H104 is for designated marksmen using common-caliber rifl es (.223, .308, etc.). When training time is short, the user-friendly H104 is your answer. In a day or two of practice, you can learn to hit targets accurately out to 500 meters.
The H104 is based on U.S.M.C. mils. Lines and large hash marks are 1 mil apart. Inner and outer rings help the shooter focus rapidly on the target. Putting any game-sized target within the inner ring enables immediate shots from 0 to 300 yards. The bottom of the inner ring is the elevation hold for 400 yards.
Three Rapid Ranging features—the Horus Grid Pattern, Rapid Range Bars in the upper left quadrant, and MOA Range Finder (backward, upside-down “L”) in the lower left quadrant—may be used to estimate the range to a target of known size (see pages 4–5 and 14–17).
The H104 includes Moving Target Holds—numbered hash marks on top of the main horizontal crosshair. Number 1 is for a target moving at 10 mph, 2 for 20, and so on up to 60 mph. Use the right or left edge of the inner ring for a 4-mph target.
Wind Lines: Angled dashed lines spreading out indicate windage holds for 10- and 20-mph winds.
Recommended for extreme-range shooters, the H371 reticle is based on Horus’s popular H37. Both are calibrated in U.S.M.C. mils.
As in the H37, the intersection of the H371’s main crosshairs is located 4 mils higher in the fi eld of view than in most other reticles. This placement allows more of the Horus Grid Pattern to remain in view—and longer-range shots to be taken—with the scope set at higher levels of magnifi cation.
The H371 has Rapid Range Bars in the upper left quadrant. Use them for quickly estimating the range to a target of known size (height). (See pages 12–13 for instructions.)
Secondary horizontal lines and large hash marks—on the horizontal lines as well as on the main vertical crosshair—are spaced 1 mil apart. Small hash marks are 0.2 mils apart.
Some manufacturers may offer the H371 reticle in scopes with illumination.
H371TM Rifl e Scope Reticle
2928
HUNTING HUNTING
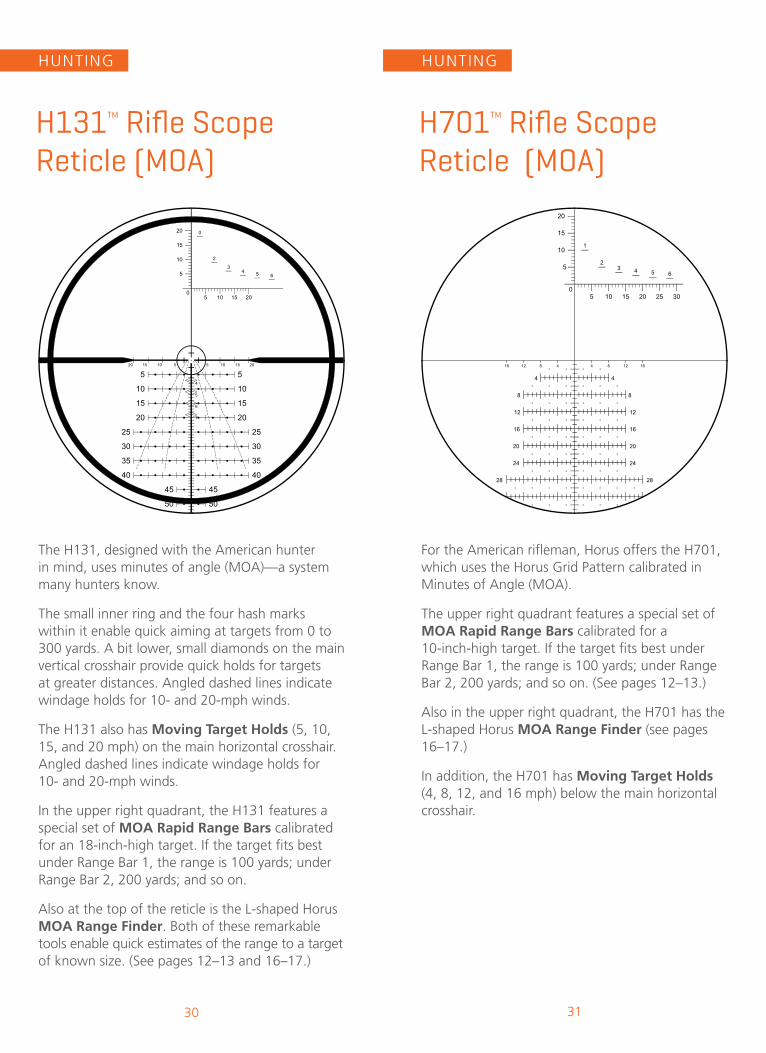
The H131, designed with the American hunter in mind, uses minutes of angle (MOA)—a system many hunters know.
The small inner ring and the four hash marks within it enable quick aiming at targets from 0 to 300 yards. A bit lower, small diamonds on the main vertical crosshair provide quick holds for targets at greater distances. Angled dashed lines indicate windage holds for 10- and 20-mph winds.
The H131 also has Moving Target Holds (5, 10, 15, and 20 mph) on the main horizontal crosshair. Angled dashed lines indicate windage holds for 10- and 20-mph winds.
In the upper right quadrant, the H131 features a special set of MOA Rapid Range Bars calibrated for an 18-inch-high target. If the target fi ts best under Range Bar 1, the range is 100 yards; under Range Bar 2, 200 yards; and so on.
Also at the top of the reticle is the L-shaped Horus MOA Range Finder. Both of these remarkable tools enable quick estimates of the range to a target of known size. (See pages 12–13 and 16–17.)
H131TM Rifl e Scope Reticle (MOA)
For the American rifl eman, Horus offers the H701, which uses the Horus Grid Pattern calibrated in Minutes of Angle (MOA).
The upper right quadrant features a special set of MOA Rapid Range Bars calibrated for a 10-inch-high target. If the target fi ts best under Range Bar 1, the range is 100 yards; under Range Bar 2, 200 yards; and so on. (See pages 12–13.)
Also in the upper right quadrant, the H701 has the L-shaped Horus MOA Range Finder (see pages 16–17.)
In addition, the H701 has Moving Target Holds (4, 8, 12, and 16 mph) below the main horizontal crosshair.
H701TM Rifl e Scope Reticle (MOA)
3130
SPOTTER
3332
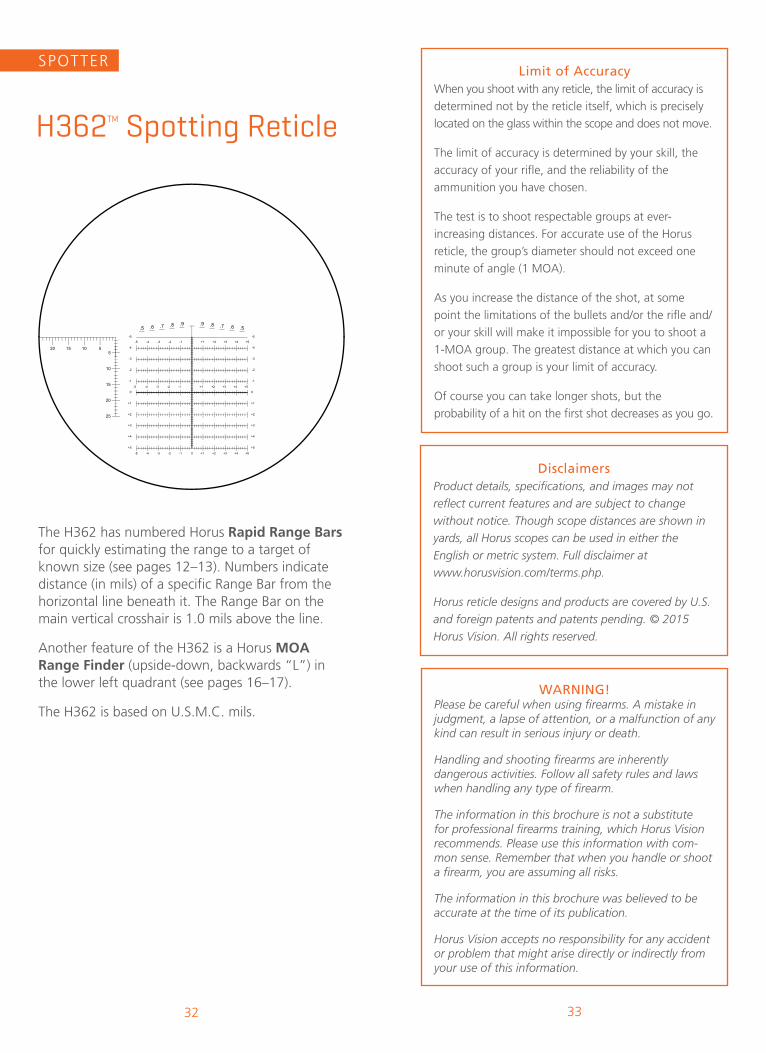
The H362 has numbered Horus Rapid Range Bars for quickly estimating the range to a target of known size (see pages 12–13). Numbers indicate distance (in mils) of a specifi c Range Bar from the horizontal line beneath it. The Range Bar on the main vertical crosshair is 1.0 mils above the line.
Another feature of the H362 is a Horus MOA Range Finder (upside-down, backwards “L”) in the lower left quadrant (see pages 16–17).
The H362 is based on U.S.M.C. mils.
H362TM Spotting Reticle
WARNING!Please be careful when using fi rearms. A mistake in judgment, a lapse of attention, or a malfunction of any kind can result in serious injury or death.
Handling and shooting fi rearms are inherently dangerous activities. Follow all safety rules and laws when handling any type of fi rearm.
The information in this brochure is not a substitute for professional fi rearms training, which Horus Vision recommends. Please use this information with com-mon sense. Remember that when you handle or shoot a fi rearm, you are assuming all risks.
The information in this brochure was believed to be accurate at the time of its publication.
Horus Vision accepts no responsibility for any accident or problem that might arise directly or indirectly from your use of this information.
Limit of AccuracyWhen you shoot with any reticle, the limit of accuracy is determined not by the reticle itself, which is precisely located on the glass within the scope and does not move.
The limit of accuracy is determined by your skill, the accuracy of your rifl e, and the reliability of the ammunition you have chosen.
The test is to shoot respectable groups at ever-increasing distances. For accurate use of the Horus reticle, the group’s diameter should not exceed one minute of angle (1 MOA).
As you increase the distance of the shot, at some point the limitations of the bullets and/or the rifl e and/or your skill will make it impossible for you to shoot a 1-MOA group. The greatest distance at which you can shoot such a group is your limit of accuracy.
Of course you can take longer shots, but the probability of a hit on the fi rst shot decreases as you go.
DisclaimersProduct details, specifi cations, and images may not refl ect current features and are subject to change without notice. Though scope distances are shown in yards, all Horus scopes can be used in either the English or metric system. Full disclaimer at www.horusvision.com/terms.php.
Horus reticle designs and products are covered by U.S. and foreign patents and patents pending. © 2015 Horus Vision. All rights reserved.

Horus VisionP.O. Box 616, Lewiston, ID 83501
(866) [email protected] | www.HorusVision.com
Instructional VideoTo learn more about
Horus reticles, watch our
instructional video.
www.HorusVision.com/Video