Embed Size (px)
Citation preview
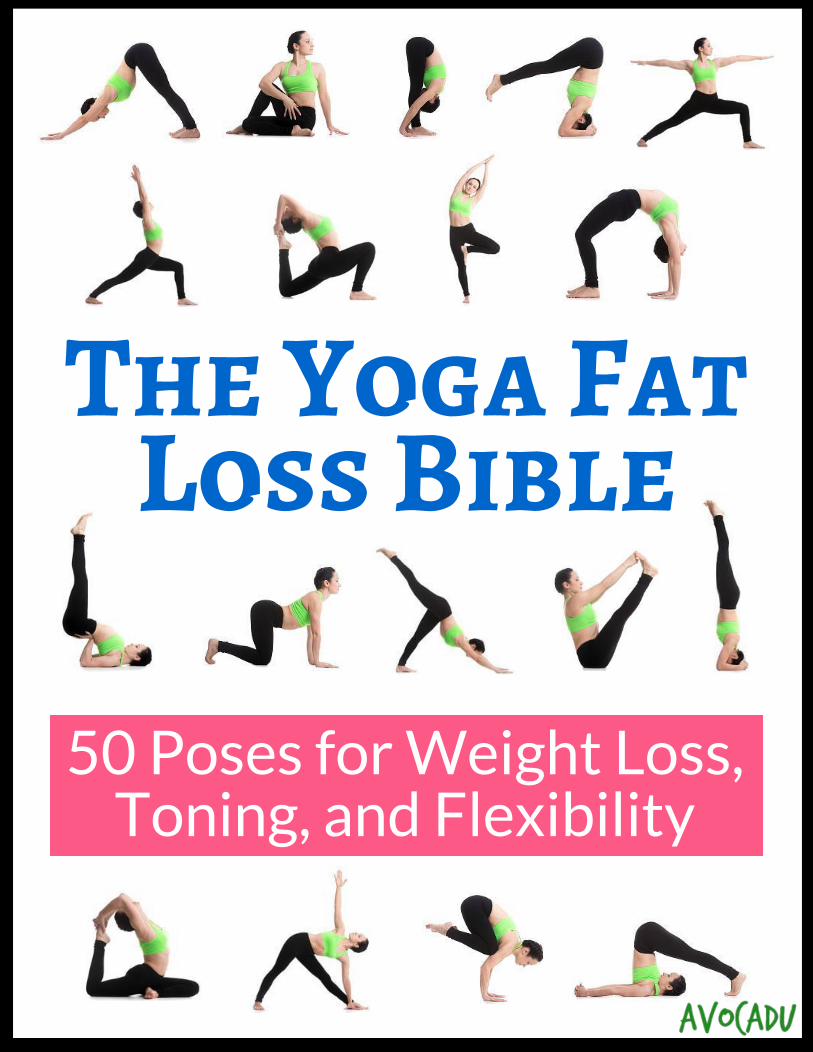
The Yoga Fat
Loss Bible
50 Poses for Weight Loss,Toning, and Flexibility
YOGA FAT LOSS BIBLE 1
Hello, and welcome to the Yoga Fat Loss Bible! We just wanted to give you a brief introduction into the book before we get started.
This book contains 50 fat-burning yoga poses! Please note that they are not all beginner poses. Most of them are, but we have also included some advanced variations as well. This is to help you set goals and to challenge you. One of the best ways to advance your practice quickly and effectively is to have a few “goal poses” that you can work towards. For me, it was the Splits and King Pigeon as well as a few others. I thought these poses were truly inspiring and beautiful, and I set a goal to be able to do them! The poses are generally listed in order of difficulty, and we tried to organize them so that they build off of each other. Don’t hesitate to try them, but know your limits. Try the beginner variations first, and work up to the more advanced poses. The most challenging poses will force you to work harder and burn more calories and fat! This is how you will succeed and progress in yoga! There are video workouts in the member area of this program as well as yoga workout cards included in the Workout Plan, and additional
beginner variations provided in the Flexibility Guide. Have fun with it, and don’t hesitate to ask us any questions in the community support group. That’s what we are here for!
YOGA FAT LOSS BIBLE 2
TABLE OF CONTENTS
Introduction…………………………………..…………………………………….………………………………….…………..….…… 3 Start Here……………………………………..…………………………………….……………………….…….…………….…….…… 5 Before and After Photos……………………………………..…………………………………….……………………..….…… 5 The Beginning – What is Yoga? ……………………………………………………………..………………..…….…… 10 The Many Proven Health Benefits of Yoga………………………………………………………….….…….…… 11 15 Beginner Yoga Tips………………………………………………………...……………………….…....................……… 16 Wrist Pain Chart…………………………………………………………………………………………………..……………….… 17 Suggested Equipment……………………..…………………………………………………………………………..………… 21 50 Yoga Poses……………………..………………………………………………………………………………..……..………… 23
YOGA FAT LOSS BIBLE 3
INTRODUCTION Everyone’s first yoga class starts off the same. When most people talk about yoga, they get visions of hippies, vegans, incense, and California. So when people begin their practice, they usually have a complete underestimation of what the practice can do for them and are a little confused about why everyone raves about it. And then, you do your first workout… And over those next 30 minutes to an hour, reality begins to set in…. Sweat is dripping on the mat, shaking limbs during every pose, and a deep humbling of one’s own abilities and limitations. It’s a strange self-discovery of what your body is capable of and the many things it is NOT. This is usually followed by the first time you have EVER meditated and a deep sense of calm that floods over the entire body. It’s quite a unique experience for most. The explosion of yoga in the recent years is not surprising. As social media moves to more image-focused platforms, such as Instagram and Pinterest, there has been a direct rise in the popularity of yoga. Why? Because yoga, when practiced correctly, is visually beautiful. Some poses are beautiful, because they show off the body’s flexible capabilities. Some poses are amazing, because of the sheer strength one needs to do them. Some poses are inspiring because of the balance required. There’s something special about yoga and its unique blend of strength, beauty, flexibility, and heart. And people find and do yoga for different reasons… Some seek to relieve stress and anxiety. Others are looking for enlightenment. And some seek to lose weight, burn fat, and improve their physique.
YOGA FAT LOSS BIBLE 4
You may be chasing after “all the above,” and that’s totally fine. The important thing is to find exactly WHY you want something. I’d encourage you to go a little deeper… Perhaps you’re here to be a better role model for your kids. Perhaps you’re here because you’re so SICK AND TIRED of feeling self-conscious about the way you look. Maybe you’re here to take sexy photos and make your ex jealous. J Or maybe you just want something that is your own, because yoga is a very personal practice and journey. It builds a different kind of relationship between your mind and your body. Whatever the reason, there’s no judgment in yoga. There is great beauty in knowing what you want, knowing why you want it, and chasing after it no matter what. We’d encourage you to chase fiercely after your yoga goals, and change your body forever. Ignore what others think of you, and focus in on what you think of yourself. This guide will help you along that journey, and we wish you the best. Cheers, Alex & Lauren Creators of the Yoga Fat Loss Bible
YOGA FAT LOSS BIBLE 5
START HERE Hey there! We have a few tips and suggestions that will help to fast track your results that we'd like to discuss before we get into the main program. We wanted to highlight some of the main points of this book, and then go into a little more detail about why we set it up this way. Before and Afters The #1 thing people regret during their fitness and weight loss journeys is not taking before and after photos! Before and after photos allow you to see the complete transformation your body has gone through and the huge success you have had, so why would you ever want to downplay that? You deserve every ounce of credit you earned! There is no better way to see the full progress than through photos. This applies to weight loss in general as well as flexibility and progress photos in yoga. It took me a few weeks to take my first photos in yoga, because I wasn't ready to put myself out there yet. But at the same time, I would get SO discouraged and frustrated when I felt like I wasn't progressing as fast as I should or wanted to. It wasn't until Alex would walk in on me doing yoga and say, "Wow you've gotten SO much more flexible in that pose!" I'd say "…Really? Because I really don't feel like I have…" So I started taking photos along the way, because I realized that it really is the only way to see small changes (and sometimes BIG changes for that matter). That has made ALL of the difference in my practice. So on that note, we have selected a few photos that we recommend for you to take before your journey begins as well as throughout the program. The first is a general weight loss photo. Here are some tips on taking a great before and after general weight loss photo:

YOGA FAT LOSS BIBLE 6
First of all, toss out all of your thoughts about feeling self-conscious. Be honest with yourself about where you're at, how your body looks, and where you want to be in 30 days. The best before and after photos are simple. Have a partner or friend take the photo of you (or use a self-timer) on a neutral background. Try to take your before and after photos in the same outfit (if it still fits!) when possible. A bikini works best, but a sports bra and short shorts will work as well.
If you really don't want your face exposed, you can go for this second best option: You can see that it doesn't look quite as good because of a few factors: She is wearing different outfits. There is busy background behind her. She is closer to the camera in the 2nd photo. Keep those factors in mind when taking photos. So that's how to do the general weight loss photo. The same concepts apply to the yoga photos as well, but the guidelines don’t matter as much. As you will see from my progress photos, the before photos were all taken inside at the same time. The after photos were taken on various occasions outside though. I had Alex take a bunch of me at the beginning of my practice. I of course hate the way that they look, because I've learned SO much and progressed so much since then. But that's the point! They will enable you to see growth and change! This is a photo of mine of Dancer pose. It's one that I have struggled with for a while now, but I couldn't believe how much progress I had made after I took the latest photo! This is 2 months progress à This pose in particular is great for before and after photos, because it's really hard to see where you're
YOGA FAT LOSS BIBLE 7
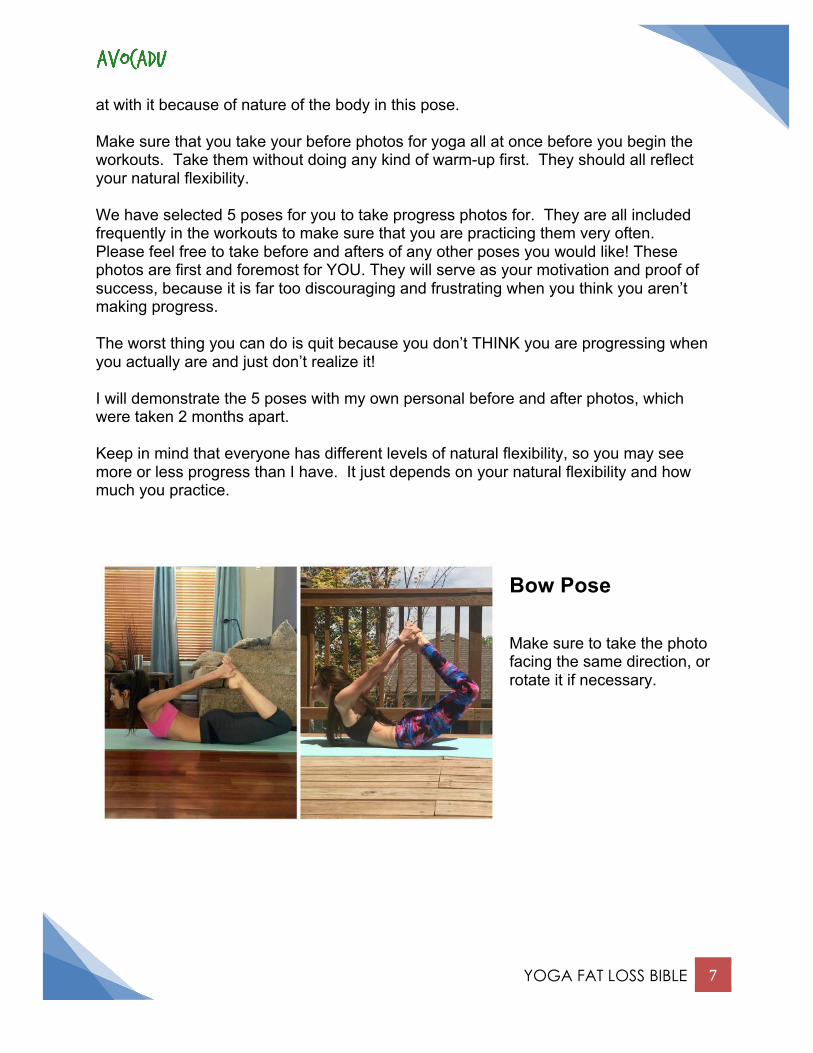
at with it because of nature of the body in this pose. Make sure that you take your before photos for yoga all at once before you begin the workouts. Take them without doing any kind of warm-up first. They should all reflect your natural flexibility. We have selected 5 poses for you to take progress photos for. They are all included frequently in the workouts to make sure that you are practicing them very often. Please feel free to take before and afters of any other poses you would like! These photos are first and foremost for YOU. They will serve as your motivation and proof of success, because it is far too discouraging and frustrating when you think you aren’t making progress. The worst thing you can do is quit because you don’t THINK you are progressing when you actually are and just don’t realize it! I will demonstrate the 5 poses with my own personal before and after photos, which were taken 2 months apart. Keep in mind that everyone has different levels of natural flexibility, so you may see more or less progress than I have. It just depends on your natural flexibility and how much you practice.
Bow Pose Make sure to take the photo facing the same direction, or rotate it if necessary.
YOGA FAT LOSS BIBLE 8
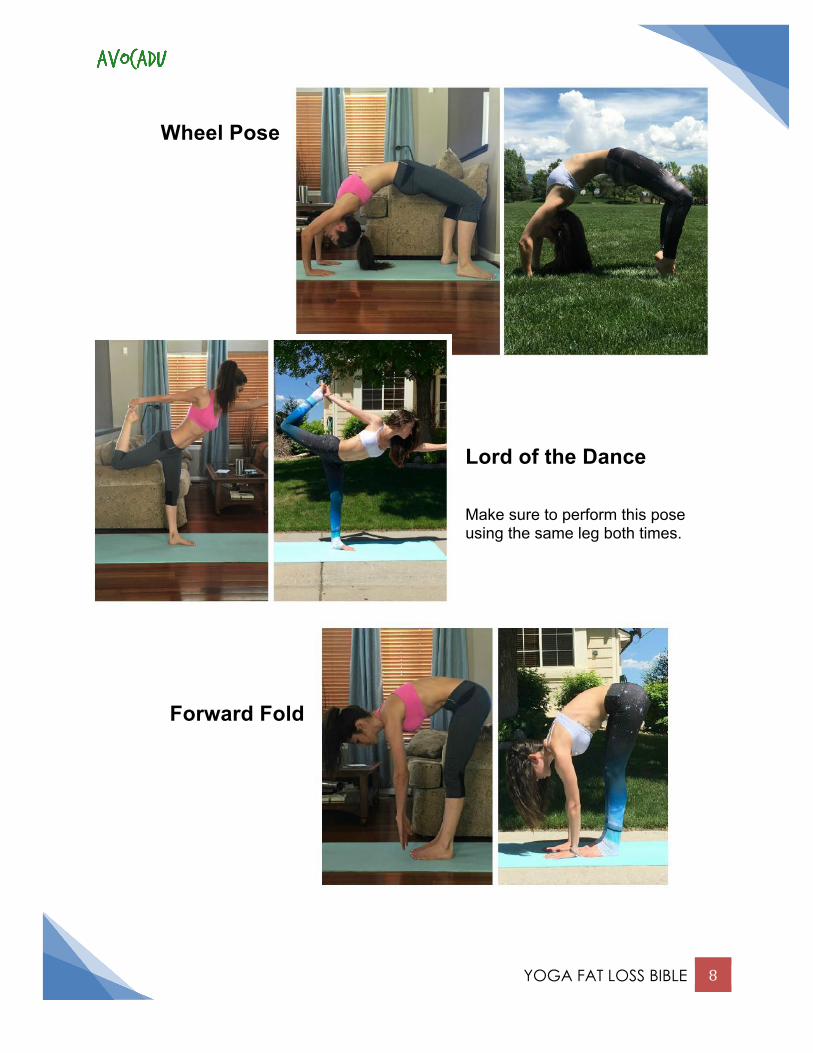
Wheel Pose
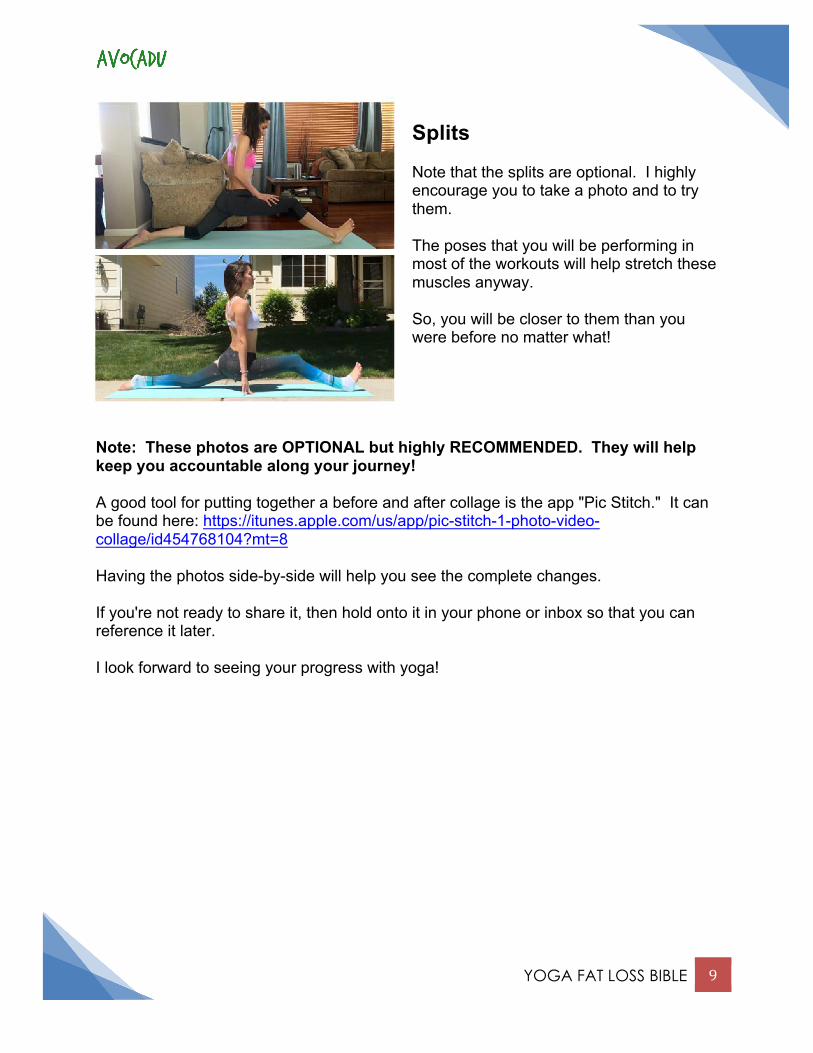
Lord of the Dance
Make sure to perform this pose using the same leg both times.
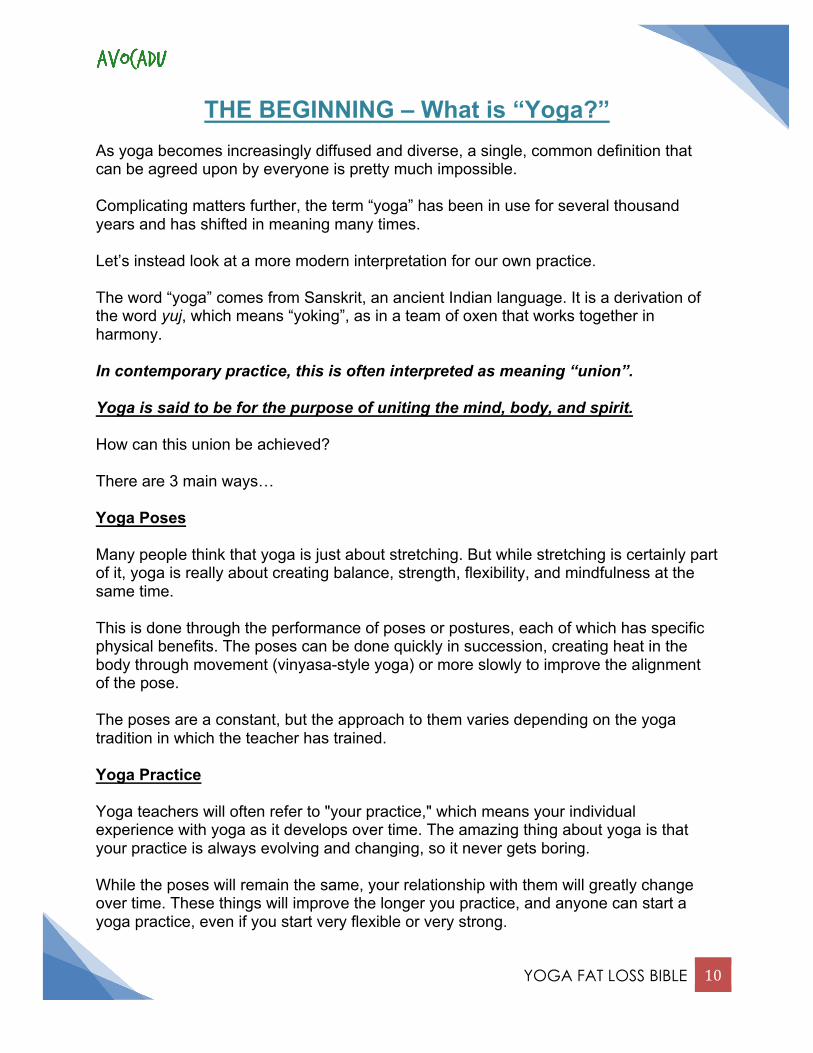
Forward Fold
YOGA FAT LOSS BIBLE 9
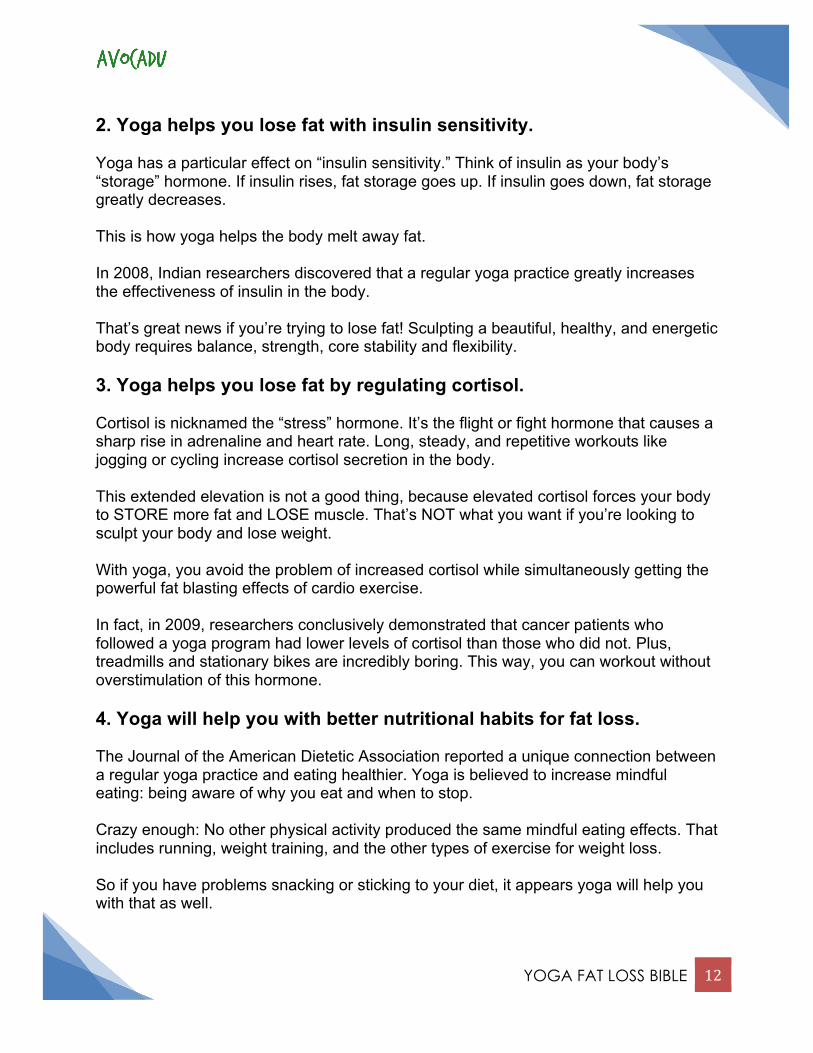
Splits Note that the splits are optional. I highly encourage you to take a photo and to try them. The poses that you will be performing in most of the workouts will help stretch these muscles anyway. So, you will be closer to them than you were before no matter what!
Note: These photos are OPTIONAL but highly RECOMMENDED. They will help keep you accountable along your journey! A good tool for putting together a before and after collage is the app "Pic Stitch." It can be found here: https://itunes.apple.com/us/app/pic-stitch-1-photo-video-collage/id454768104?mt=8 Having the photos side-by-side will help you see the complete changes. If you're not ready to share it, then hold onto it in your phone or inbox so that you can reference it later. I look forward to seeing your progress with yoga!
YOGA FAT LOSS BIBLE 10
THE BEGINNING – What is “Yoga?” As yoga becomes increasingly diffused and diverse, a single, common definition that can be agreed upon by everyone is pretty much impossible. Complicating matters further, the term “yoga” has been in use for several thousand years and has shifted in meaning many times. Let’s instead look at a more modern interpretation for our own practice. The word “yoga” comes from Sanskrit, an ancient Indian language. It is a derivation of the word yuj, which means “yoking”, as in a team of oxen that works together in harmony. In contemporary practice, this is often interpreted as meaning “union”. Yoga is said to be for the purpose of uniting the mind, body, and spirit. How can this union be achieved? There are 3 main ways… Yoga Poses Many people think that yoga is just about stretching. But while stretching is certainly part of it, yoga is really about creating balance, strength, flexibility, and mindfulness at the same time. This is done through the performance of poses or postures, each of which has specific physical benefits. The poses can be done quickly in succession, creating heat in the body through movement (vinyasa-style yoga) or more slowly to improve the alignment of the pose. The poses are a constant, but the approach to them varies depending on the yoga tradition in which the teacher has trained. Yoga Practice Yoga teachers will often refer to "your practice," which means your individual experience with yoga as it develops over time. The amazing thing about yoga is that your practice is always evolving and changing, so it never gets boring. While the poses will remain the same, your relationship with them will greatly change over time. These things will improve the longer you practice, and anyone can start a yoga practice, even if you start very flexible or very strong.

YOGA FAT LOSS BIBLE 11
Another great thing about thinking about "your practice" is that it encourages the mindfulness portion of yoga. Yoga is competition, but not in the general sense. It’s competition with yourself for daily improvement. It’s not focused on what others are doing, but on your own personal journey. Meditation Meditation is the way we connect the mind with the body. We slow down and listen to the things the body is telling us. We relax our minds and become more connected with ourselves, allowing us to also connect better with others. Make no mistake; meditation is an important part of any practice. These 3 things combine together to create yoga!
THE MANY PROVEN HEALTH BENEFITS OF YOGA Like many of you, when we first started out doing yoga, we had no idea about the many health benefits it has. Boy were we shocked. The following are just some of the proven health benefits yoga can have on the body. There are too many to write about! Additional benefits can be found on our website. For obvious reasons, we felt like we should start here: 1. Yoga helps you lose fat directly. How does having a “yoga butt” sound? No no, that’s not a made up term... It’s a real thing. In fact, the term comes from yoga practitioners being well known for having great butts! Yoga is a systematic approach to bodyweight training. While there is lots of sculpting involved, there is also plenty of research supporting how yoga can help you lose fat. Researchers from Seattle found that overweight people who practice yoga regularly tend to lose weight. “Those practicing yoga who were overweight to start with lost about 5 pounds during the same time period that those not practicing yoga gained 14 pounds,” says Kristal, the head researcher.
YOGA FAT LOSS BIBLE 12
2. Yoga helps you lose fat with insulin sensitivity. Yoga has a particular effect on “insulin sensitivity.” Think of insulin as your body’s “storage” hormone. If insulin rises, fat storage goes up. If insulin goes down, fat storage greatly decreases. This is how yoga helps the body melt away fat. In 2008, Indian researchers discovered that a regular yoga practice greatly increases the effectiveness of insulin in the body. That’s great news if you’re trying to lose fat! Sculpting a beautiful, healthy, and energetic body requires balance, strength, core stability and flexibility. 3. Yoga helps you lose fat by regulating cortisol. Cortisol is nicknamed the “stress” hormone. It’s the flight or fight hormone that causes a sharp rise in adrenaline and heart rate. Long, steady, and repetitive workouts like jogging or cycling increase cortisol secretion in the body. This extended elevation is not a good thing, because elevated cortisol forces your body to STORE more fat and LOSE muscle. That’s NOT what you want if you’re looking to sculpt your body and lose weight. With yoga, you avoid the problem of increased cortisol while simultaneously getting the powerful fat blasting effects of cardio exercise. In fact, in 2009, researchers conclusively demonstrated that cancer patients who followed a yoga program had lower levels of cortisol than those who did not. Plus, treadmills and stationary bikes are incredibly boring. This way, you can workout without overstimulation of this hormone. 4. Yoga will help you with better nutritional habits for fat loss. The Journal of the American Dietetic Association reported a unique connection between a regular yoga practice and eating healthier. Yoga is believed to increase mindful eating: being aware of why you eat and when to stop. Crazy enough: No other physical activity produced the same mindful eating effects. That includes running, weight training, and the other types of exercise for weight loss. So if you have problems snacking or sticking to your diet, it appears yoga will help you with that as well.
YOGA FAT LOSS BIBLE 13
We find it funny now when people wonder if yoga can help you lose weight. It seems to help every aspect of the weight loss process from your hormones to your calories burned to your eating habits! Other health benefits… Yoga doesn’t ONLY help you lose weight. There are many other health benefits for yoga that don’t just include weight loss. 5. Yoga improves flexibility. According to the latest Yoga in America study conducted by Sports Marketing Surveys USA on behalf of the Yoga Journal, 78.3% of people place flexibility in their top 5 reasons for starting a yoga practice. From what we have found, most people want to improve flexibility along with losing weight and getting healthy. The good thing is that yoga has been proven to be one of the most effective ways to improve flexibility. During your first class, you probably won’t be able to touch your toes, never mind do a backbend. But if you stick with it, you’ll notice a gradual loosening, and eventually, seemingly impossible poses will become possible. You’ll also probably notice that aches and pains start to disappear. That’s no coincidence. Tight hips can strain the knee joint due to improper alignment of the thigh and shin bones. So doing yoga will not only help with flexibility, but your aches and pains as well. 6. Yoga can give you better posture. Poor posture is the modern day plague, affecting millions of people every year. It has much to do with the constant sitting we do and being hunched over computer screens all day. Thankfully, yoga has been shown to help with posture through flexibility. By relieving the tightness in your hamstrings, hips, neck, and back, you will notice that you will begin to stand straighter. This will give you a more confident look and feel, while also having a positive effect on your hormones as well. 7. Yoga can improve your bone health.
YOGA FAT LOSS BIBLE 14
It’s well documented that weight-bearing exercise strengthens bones and helps ward off osteoporosis. Many postures in yoga require that you lift your own weight. And some, like Downward- and Upward-Facing Dog, help strengthen the arm bones, which are particularly vulnerable to osteoporotic fractures. In an unpublished study conducted at California State University, Los Angeles, yoga practice increased bone density in the vertebrae. Yoga’s ability to lower levels of the stress hormone, cortisol, may also help keep calcium in the bones. 8. Yoga can help with depression and anxiety and make you happier. Boston University’s School of Medicine discovered a 27% increase of the neurotransmitter GABA within the brain after just one sixty-minute yoga practice. Low levels of GABA have been tied to anxiety, depression, and Alzheimer’s. Yoga’s mood-enhancing benefits include deepening your breath and slowing down the heart rate to reduce the body’s stress response. By lowering down these fight or flight responses, you will notice a happier and calmer state in your own life. 9. Yoga helps your balance. Regularly practicing yoga increases proprioception (the ability to feel what your body is doing and where it is in space) and improves balance. People with bad posture or balance have been linked to having knee problems and lots of back pain. By increasing your balance, you should see improvements in both of these areas if you’re having problems. For the elderly, this translates into more independence and delayed admission to a nursing home or never entering one at all. For the rest of us, postures like Tree Pose can make us feel less wobbly on and off the mat. 10. Yoga can help with IBS and digestive issues. Ulcers, irritable bowel syndrome, constipation—all of these can be exacerbated by stress and your cortisol levels. So if you stress less, you’ll suffer less. Yoga, like any physical exercise, can ease constipation—and theoretically lower the risk of colon cancer—because moving the body facilitates more rapid transport of food and waste products through the bowels.
YOGA FAT LOSS BIBLE 15
Based on anecdotal evidence by lots of yogis around the world, yoga can greatly help with these problems and help you become more regular. 11. Yoga helps decrease joint pain and arthritis. The slow, controlled movements of a yoga practice have been shown to decrease chronic pain and joint swelling in both osteoarthritis and rheumatoid arthritis sufferers at Johns Hopkins Arthritis Center. So if you or any of your relatives has arthritis, yoga is a great for diminishing these problems. 12. Yoga can provide relief from back pain. A study at the West Virginia University School of Medicine found that after practicing yoga for three months, people reported 70% less lower-back pain, and 88% of them reduced or stopped taking pain medication. This, again, has lots to do with the increased flexibility in your back and hips from a consistent yoga practice. Alignment and body awareness during yoga practice have been shown to reduce numerous types of acute and chronic back pain, including scoliosis, sciatica, and herniated discs. 13. Yoga helps lower blood pressure. Yale School of Medicine found “significantly reduced” systolic and diastolic blood pressure levels in hypertension patients who practiced yoga and meditation therapies—results that were comparable to drug therapy. Increased circulation and oxygenation of the blood are important outcomes of a continuous yoga practice. This lowered blood pressure will also help to regulate your energy levels and give you more clean energy throughout your day. 14. Yoga can help you sleep better, which helps reduce fat. Regular physical activity has been proven to improve sleep, and yoga is no exception. Calming for both the body and the mind, restorative yoga poses are often recommended for those finding it difficult to fall or stay asleep.
YOGA FAT LOSS BIBLE 16
A small study on yoga practitioners at Harvard Medical School’s Brigham and Women’s Hospital found “statistically significant improvements” in all aspects of falling, staying, and awaking from sleep. Improved sleep will also lower your cortisol levels and help you reduce the fat off of your body. These are just tips of the iceberg. There are many more health benefits and too many to list in this small book. We just wanted to know how incredibly helpful it can be!
15 BEGINNER YOGA TIPS
TO HELP YOU BURN MORE FAT AND GET BETTER RESULTS FROM YOUR PRACTICE
1. Set aside a specific time to practice everyday. Practice some form of yoga everyday. Whether it’s meditating, breathing work, flexibility, a few poses, or an entire sequence. Pick a time every day, and stick with it. Doing it at the same time everyday will help you make it a habit. It’s a standing appointment with yourself. Set an alarm on your phone to remind you or consider posting written reminders of your commitment to practice. Remember, the hardest part of yoga is showing up on the mat every day! 2. Invest in a great sticky mat. This is a must. Sticky mats are the mats used for practicing yoga and are thinner and grippier (sometimes we make up words…) than other workout mats. They are used to help with balance and connectivity to the floor. You should invest in one for yourself, because they are inexpensive and will remind you of the commitment you made to practice yoga. Also, while most yoga studios clean their mats, there is never any guarantee on how they do it or if they missed a cleaning.
YOGA FAT LOSS BIBLE 17
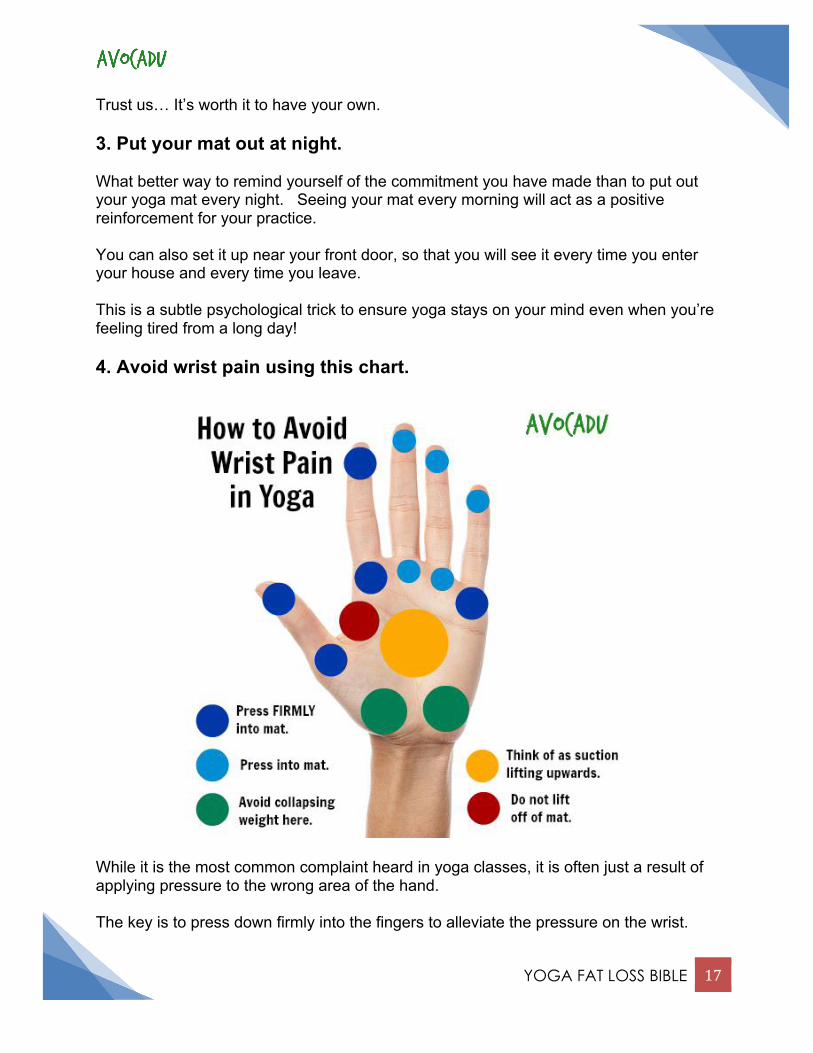
Trust us… It’s worth it to have your own. 3. Put your mat out at night. What better way to remind yourself of the commitment you have made than to put out your yoga mat every night. Seeing your mat every morning will act as a positive reinforcement for your practice. You can also set it up near your front door, so that you will see it every time you enter your house and every time you leave. This is a subtle psychological trick to ensure yoga stays on your mind even when you’re feeling tired from a long day! 4. Avoid wrist pain using this chart.
While it is the most common complaint heard in yoga classes, it is often just a result of applying pressure to the wrong area of the hand. The key is to press down firmly into the fingers to alleviate the pressure on the wrist.
YOGA FAT LOSS BIBLE 18
Practice it now by placing your hand on the table and pressing into your fingers. If you’re doing it right, you will notice your hand “connected” to the table with hardly any feeling in your wrist. Practice this a few times and if you notice your wrists hurting during yoga, you’ll be able to recognize this problem. Yoga blocks can also help alleviate some of the pressure placed on your wrists in the beginning until you are strong enough to support yourself. 5. Listen to music. Listening to music has been shown to improve workout performance and help people push themselves further. Also, you will want to find some good music to listen to during the meditation and relaxation part of your practice. We suggest the band “Explosion in the sky” for first timers to meditation or just use the “Headspace” app. If you’re not into that, try watching an episode of your favorite show while you’re stretching. It will keep you from getting bored, and can even help you stretch for longer. 6. Get a friend to join you. Teams are 3x as likely to complete tasks and goals than individuals. This is the ultimate way to keep yourself accountable and to have a little fun with your practice. Find a close friend with similar goals to yourself, and see if they want to “team up” with you! 7. Reward yourself for commitment to your yoga practice. Perhaps you have your eyes on a particular pair of yoga pants or maybe just want to treat yourself to a night out at your favorite restaurant. Set up a system that makes sense for you and the things you want. We suggest setting up a 1-month yoga goal. Once you have completed 1 month of yoga and have been diligent at your practice, reward yourself with some cute yoga pants or something fun! 8. Record your progress.
YOGA FAT LOSS BIBLE 19
We’ll talk more about this in the workout plan, but the best way to record your progress in yoga is via photos. It’s such a visually stimulating practice, and photos provide hard evidence of the progress you have made. When you practice everyday, it can be hard to see small changes in your body when it comes to weight loss and flexibility. This can be frustrating and discouraging and is often the reason why people give up. Read the section in the workout plan about taking progress photos. 9. Expect to see physical changes in 1 month. Results take time. As with all things, the real benefits come with time. While yoga classes will provide immediate benefit in the form of calorie burn and relaxation, improvements in flexibility and weight loss come with time. Commit to giving yoga a fair shot at becoming a habit in your life by regularly practicing it for 1 month. 10. Challenging poses burn the most calories. As with everything in life, in order to grow, we must be challenged. Some yoga poses will be easy for you. Others will be difficult and nearly impossible to do. It is the ones that cause you to push yourself and fail in the beginning that will give you the most benefit! Challenge yourself and try new things to burn more fat with yoga. 11. Breathe deeper through your routine. Have you ever wondered how fat actually leaves your body? The actual process is pretty crazy, but get this… Over 81% of the fat cells exit through the exhalation of your breath! The other 19% is from when you pee. So when you’re taking deep breaths with a proper diet, you’re actually helping shuttle the fat from your body!
YOGA FAT LOSS BIBLE 20
Also, deeper breathing causes your body to calm down and helps to relax your muscles. So take deeper and longer breaths during yoga for faster fat loss. 12. Try working out on an empty stomach. Your body’s regular energy source is carbohydrates. These carbohydrates are converted into glycogen, which the body then uses for fuel. Here’s the thing… if you have not eaten in awhile, your body won’t have a lot of glycogen to grab from! So if you workout on an empty stomach, your body will be forced to grab its energy from a different source. That source is your remaining fat stores! Try working out on an empty stomach to burn more fat! Another reason to do this in yoga is because you are stretching and twisting the body in ways that affect your internal organs. Don’t worry, it’s totally safe. But you will feel more comfortable if you don’t have a stomach full of food! 13. Claim a space for your routine. Once you find a space to properly practice yoga, claim it as YOUR yoga spot. Regardless of if it’s in your garage, your living room, or outside in the yard, remember that this is your place of refuge. This is where you’ll come to let go of the day-to-day nuisances, clear your mind, move your body, and burn some serious fat. 14. Practice strong “holds.” Yoga is about mastering your body’s weight and balance. One of the easiest ways to improve on this is to practice the important holds after your yoga workout. Practice these holds after your yoga workout for 1 minute at a time: Squat hold Plank hold Cobra Hold Lunge Hold
YOGA FAT LOSS BIBLE 21
These holds will strengthen your muscles, improve your yoga performance, and help you burn more fat. 15. Don’t Skip Relaxation The last 10 minutes of yoga practice is usually dedicated to meditation and relaxation. Don’t skip this. This relaxation process is one of the primary ways yoga helps to reduce the amount of cortisol in the body. And the less of the fat storing stress hormone you have, the better! Also, meditation and relaxation has been shown to help with craving control. So you will have more power over your daily eating decisions!
SUGGESTED EQUIPMENT
One of the beautiful things about yoga is that the only thing you need to practice is your own body. The following items are simply helpful additions. They are listed in order of importance. Yoga Mat As we said before, a yoga mat is a great investment to make in your future yoga practice. It can help remind you of your commitment to yoga and inspire you to get in your daily workout. To help you choose the mat that is right for you, we wrote an article about the Top 5 Yoga Mats for Beginner Yogis. You can check it out here: http://avocadu.com/5-best-yoga-mats-beginner-yogis/ This information will ensure you make the right decision for your practice. Yoga Strap Some of the poses will be very difficult to do your first time through, and many you will not be able to complete because of flexibility. A yoga strap is the #1 tool you can use to get more flexible. It will help you complete those hard to reach poses, which will help speed up your progress with yoga.
YOGA FAT LOSS BIBLE 22
Note that we have designed this program so that you won’t need a yoga strap. That being said, they are highly useful and I personally recommend getting one if flexibility is a big goal for your practice
Yoga Blocks Yoga blocks are designed to help you with stability and balance as you progress your yoga routine. Often you will find yourself in a position where you could use a little extra “leverage,” and that’s where the yoga block comes in. They help you perform the poses without sacrificing form while you’re working on your flexibility. These come in pretty standard sizes, and you really can’t go wrong buying one. Just make sure they are study and not a “squishy” material. Blanket The main benefit of having a blanket is to improve your sitting postures. Many people have lousy lower back stability, and this will help you keep your back straight when sitting on the mat. No need to buy anything here. You can easily accomplish your goals with a towel or blanket found at your home J Just make sure to have one handy when doing yoga.
YOGA FAT LOSS BIBLE 23
50 YOGA POSES (page numbers in blue)
Lotus Pose (Padmasana)…………………..………………………………………………………….….……… 25 Child’s Pose (Balasana)………………………………………………………………………………..……….… 25 Revolved Easy Pose or Spinal Twist (Parivrtta Sukhasana……………………..……..……… 26 Standing Half Forward Bend (Ardha Uttanasana)…………………………………….…………..… 26 Standing Forward Bend (Uttanasana)…………………………………….…………………………….… 27 Garland Pose (Malasana)…………………………………………………………………….………………...… 27 Cat Pose (Marjaryasana)…………………………………….…….……………………………….………...…… 28 Cow Pose (Bitilasana)…………………………………………………………….………….………….…..……… 28 Cobra Pose (Bhujangasana)…………………………………………..………….…….……….…….………… 29 Upward Facing Dog (Urdhva Mukha Svanasana)………………………….………………………… 29 Tree Pose (Vriksasana)………………………….…………………………………………..…………..………… 30 Warrior I (Virabhadrasana I)………………………….…………………………………………………..……… 30 Warrior II (Virabhadrasana II)………………………….……………………………………………...………… 31 Warrior III (Virabhadrasana III)………………………….…………………………………………...….……… 31 Reverse Warrior (Viparita Virabhadrasana)……………………………………………….………..…… 32 Half Moon Pose (Ardha Candrāsana)…………………………………………………………….………… 32 Downward Facing Dog (Adho Mukha Svanasana)………………………………………….….…… 33 One-Legged Downward Facing Dog (Eka Pada Adho Mukha Svanasana)……….…… 33 Revolved Downward Facing Dog (Parivrtta Adho Mukha Svanasana)….…………….……34 Chair Pose (Utkatasana)………………………………………………………………………………..…….…… 34 Revolved Chair Pose Variation (Parivrtta Utkatasana)………………………………..……..…… 35 Revolved Chair Pose Variation (Parivrtta Utkatasana)……………………………….……..….… 35 Plank Pose (Phalakasana)……………………………………………………………………..……..…….….… 36 Four-Limbed Staff Pose (Chaturanga Dandasana)…………………………………………….....… 36 Side Plank (Vasisthasana)…………………………………………….………………….…………………..….. 37 Sunbird Pose (Chakravakasana)…………………………………………………….….……………..…...… 37 Superman Pose (Viparita Shalabhasana)…………………………………………….…………...……… 38 Wide-Legged Boat Pose (Prasarita Navasana)……………………….…………………...….……… 38 One-legged Upward Plank (Eka Pada Ardha Purvottanasana)…………………………..…… 39 Upward (Reverse) Plank Pose (Purvottanasana)…………………………….……..….…….……… 39 Wild Thing (Camatkarasana)………………………………………………………………………….………… 40 Side Plank Variation (Vasisthasana)……………………………………………………...…..….………… 40 Extended Triangle Pose (Utthita Trikonasana)………………………………………...……………… 41 Revolved Triangle Pose (Parivrtta Trikonasana)…………………………………………...………… 41 Wide-Legged Forward Bend (Prasarita Padottanasana)…………………………………..…..… 42 Goddess Pose (Utkata Konasana)………………………………………………………….…………...…… 42 Low Crescent Lunge (Anjaneyasana)………………………………………………..…………….……… 43 Lizard Lunge (Utthan Pristhasana)………………………………………………………………..….……… 43 Extended Side Angle Pose (Utthita Parsvakonasana)………………………………………..…… 44 Pigeon Pose (Eka Pada Rajakapotasana)…………………………………………………………..…… 44 King Pigeon Pose Variation (Rajakapotasana)……………………………………………….……… 45 Mermaid Pose (Eka Pada Rajakapotasana)………………………………….…………..……….…..… 45 King Pigeon Pose (Eka Pada Rajakapotasana)……………….………….…………………….…….. 46
YOGA FAT LOSS BIBLE 24
Crow Pose (Bakasana)……………………………………………………………………...…..….……………… 46 Lord of the Dance Variation (Natarajasana)………………………………….…..……….…………… 47 Bow Pose (Dhanurasana)……………………………………………….……..….……………………………… 47 Camel Pose (Ustrasana)……………………………………………………………………….….…………….… 48 Monkey God Pose (Split) (Hanumanasana)………………………………….………………………… 48 Supported Headstand (Sirsasana)…………………………………………………….….………………… 49 Wheel Pose (Chakrasana)…………………………………………………………………………………...…… 51 A few final thoughts before we introduce the poses… Many of the poses will begin with Mountain Pose (Tadasana). This pose is simply a standing pose, usually with your feet together and your hands either at your sides, above your head, or at your heart. Remember to always engage your core during these poses. It will bring awareness to your body, help you burn more calories, and help you stay balanced. All of the poses are listed by their common name, with their name in Sanskrit in parentheses. Remember to breathe deeply through stretches. And always listen to your body first and foremost!
*There are many beginner modifications in the poses below. Please
note that the flexibility guide contains additional beginner modifications and more detailed instructions for some of the poses
that are not included below.
Please review the flexibility guide before beginning any of the poses.
YOGA FAT LOSS BIBLE 25
Lotus Pose (Padmasana)
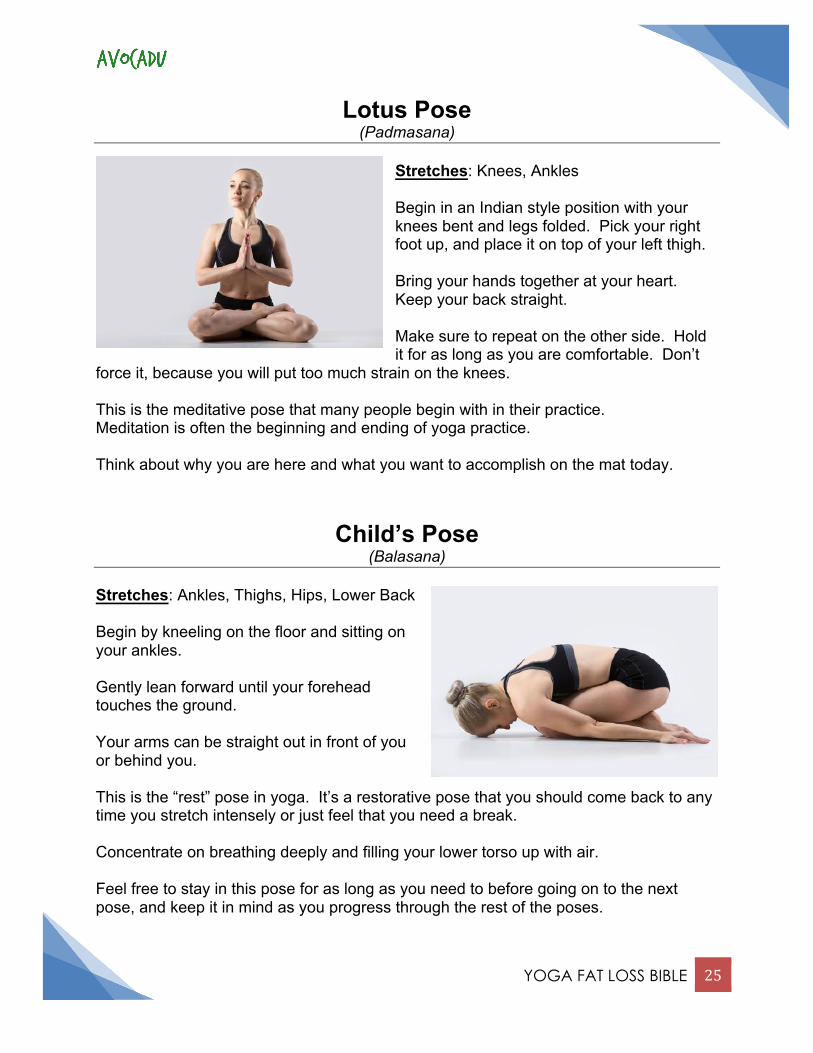
Stretches: Knees, Ankles Begin in an Indian style position with your knees bent and legs folded. Pick your right foot up, and place it on top of your left thigh. Bring your hands together at your heart. Keep your back straight. Make sure to repeat on the other side. Hold it for as long as you are comfortable. Don’t
force it, because you will put too much strain on the knees. This is the meditative pose that many people begin with in their practice. Meditation is often the beginning and ending of yoga practice. Think about why you are here and what you want to accomplish on the mat today.
Child’s Pose
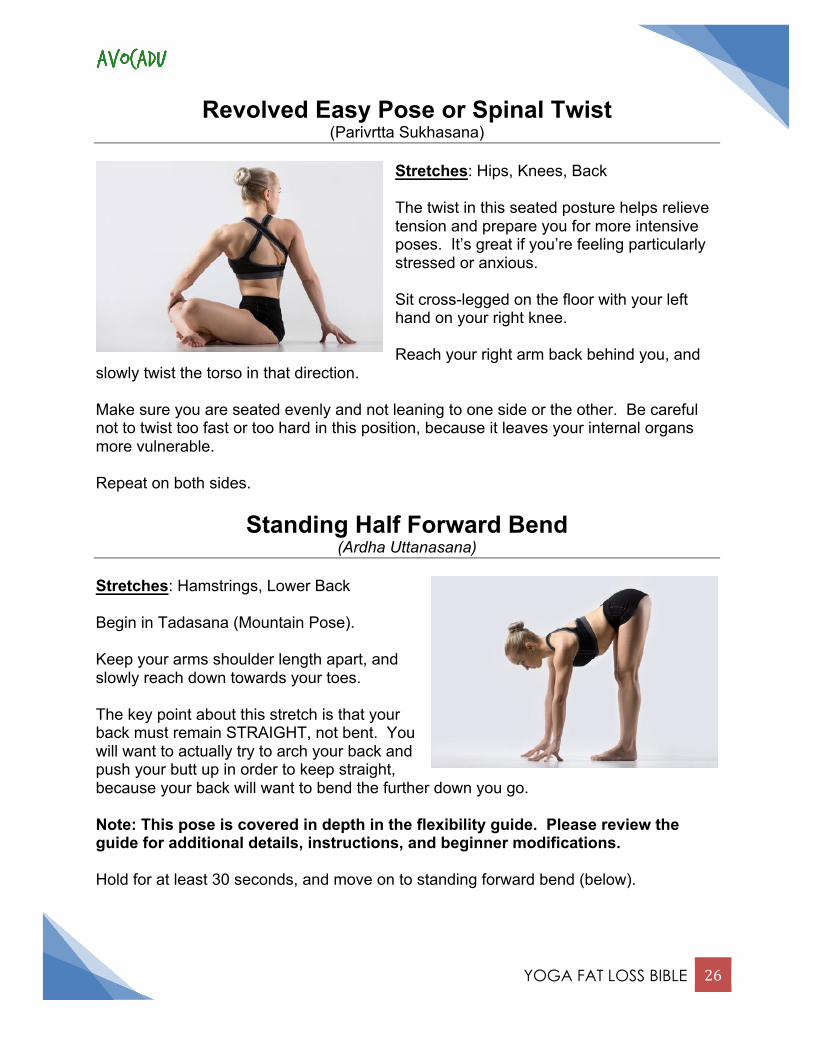
(Balasana) Stretches: Ankles, Thighs, Hips, Lower Back Begin by kneeling on the floor and sitting on your ankles. Gently lean forward until your forehead touches the ground. Your arms can be straight out in front of you or behind you. This is the “rest” pose in yoga. It’s a restorative pose that you should come back to any time you stretch intensely or just feel that you need a break. Concentrate on breathing deeply and filling your lower torso up with air. Feel free to stay in this pose for as long as you need to before going on to the next pose, and keep it in mind as you progress through the rest of the poses.
YOGA FAT LOSS BIBLE 26
Revolved Easy Pose or Spinal Twist (Parivrtta Sukhasana)
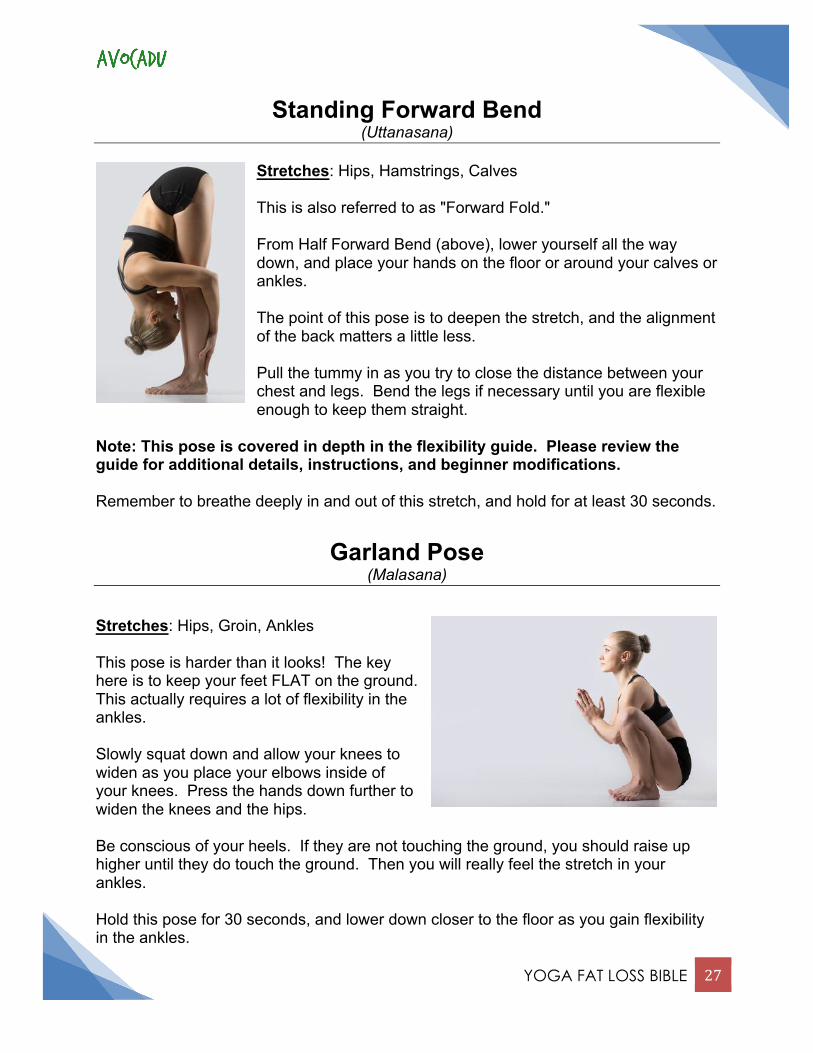
Stretches: Hips, Knees, Back The twist in this seated posture helps relieve tension and prepare you for more intensive poses. It’s great if you’re feeling particularly stressed or anxious. Sit cross-legged on the floor with your left hand on your right knee. Reach your right arm back behind you, and
slowly twist the torso in that direction. Make sure you are seated evenly and not leaning to one side or the other. Be careful not to twist too fast or too hard in this position, because it leaves your internal organs more vulnerable. Repeat on both sides.
Standing Half Forward Bend (Ardha Uttanasana)
Stretches: Hamstrings, Lower Back Begin in Tadasana (Mountain Pose). Keep your arms shoulder length apart, and slowly reach down towards your toes. The key point about this stretch is that your back must remain STRAIGHT, not bent. You will want to actually try to arch your back and push your butt up in order to keep straight, because your back will want to bend the further down you go. Note: This pose is covered in depth in the flexibility guide. Please review the guide for additional details, instructions, and beginner modifications. Hold for at least 30 seconds, and move on to standing forward bend (below).
YOGA FAT LOSS BIBLE 27
Standing Forward Bend (Uttanasana)
Stretches: Hips, Hamstrings, Calves This is also referred to as "Forward Fold." From Half Forward Bend (above), lower yourself all the way down, and place your hands on the floor or around your calves or ankles. The point of this pose is to deepen the stretch, and the alignment of the back matters a little less. Pull the tummy in as you try to close the distance between your chest and legs. Bend the legs if necessary until you are flexible enough to keep them straight.
Note: This pose is covered in depth in the flexibility guide. Please review the guide for additional details, instructions, and beginner modifications. Remember to breathe deeply in and out of this stretch, and hold for at least 30 seconds.
Garland Pose (Malasana)
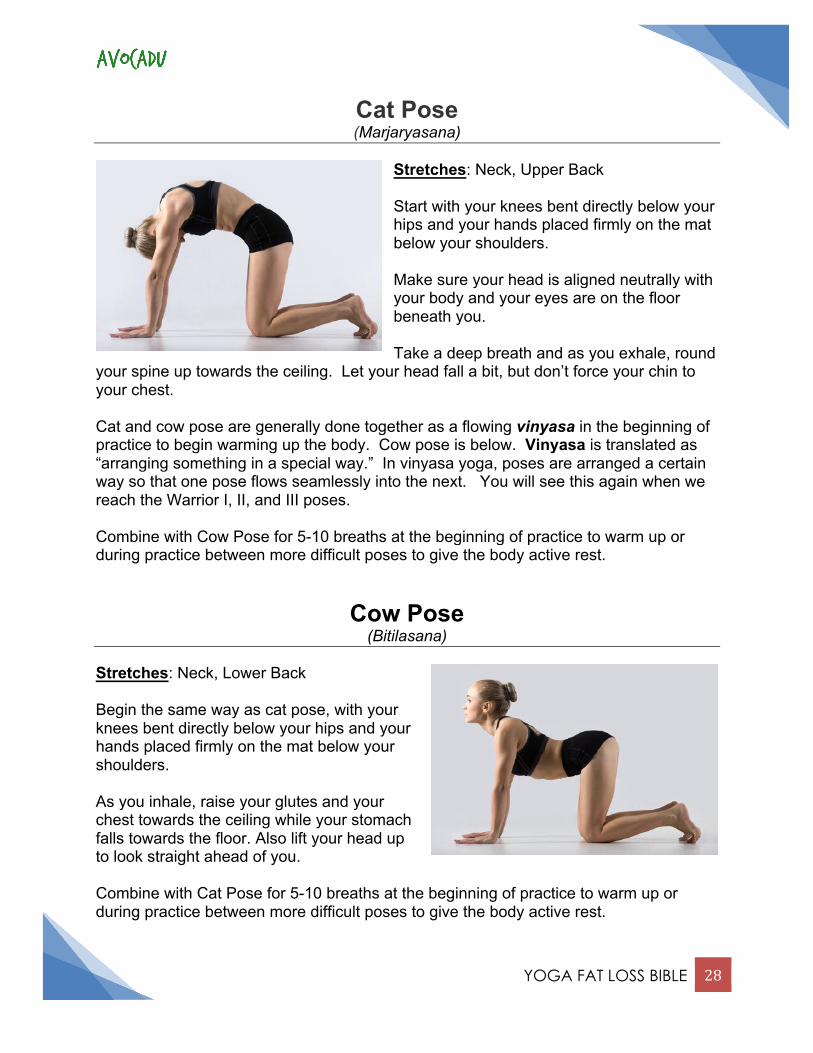
Stretches: Hips, Groin, Ankles This pose is harder than it looks! The key here is to keep your feet FLAT on the ground. This actually requires a lot of flexibility in the ankles. Slowly squat down and allow your knees to widen as you place your elbows inside of your knees. Press the hands down further to widen the knees and the hips. Be conscious of your heels. If they are not touching the ground, you should raise up higher until they do touch the ground. Then you will really feel the stretch in your ankles. Hold this pose for 30 seconds, and lower down closer to the floor as you gain flexibility in the ankles.
YOGA FAT LOSS BIBLE 28
Cat Pose (Marjaryasana)
Stretches: Neck, Upper Back Start with your knees bent directly below your hips and your hands placed firmly on the mat below your shoulders. Make sure your head is aligned neutrally with your body and your eyes are on the floor beneath you. Take a deep breath and as you exhale, round
your spine up towards the ceiling. Let your head fall a bit, but don’t force your chin to your chest. Cat and cow pose are generally done together as a flowing vinyasa in the beginning of practice to begin warming up the body. Cow pose is below. Vinyasa is translated as “arranging something in a special way.” In vinyasa yoga, poses are arranged a certain way so that one pose flows seamlessly into the next. You will see this again when we reach the Warrior I, II, and III poses. Combine with Cow Pose for 5-10 breaths at the beginning of practice to warm up or during practice between more difficult poses to give the body active rest.
Cow Pose (Bitilasana)
Stretches: Neck, Lower Back Begin the same way as cat pose, with your knees bent directly below your hips and your hands placed firmly on the mat below your shoulders. As you inhale, raise your glutes and your chest towards the ceiling while your stomach falls towards the floor. Also lift your head up to look straight ahead of you. Combine with Cat Pose for 5-10 breaths at the beginning of practice to warm up or during practice between more difficult poses to give the body active rest.
YOGA FAT LOSS BIBLE 29
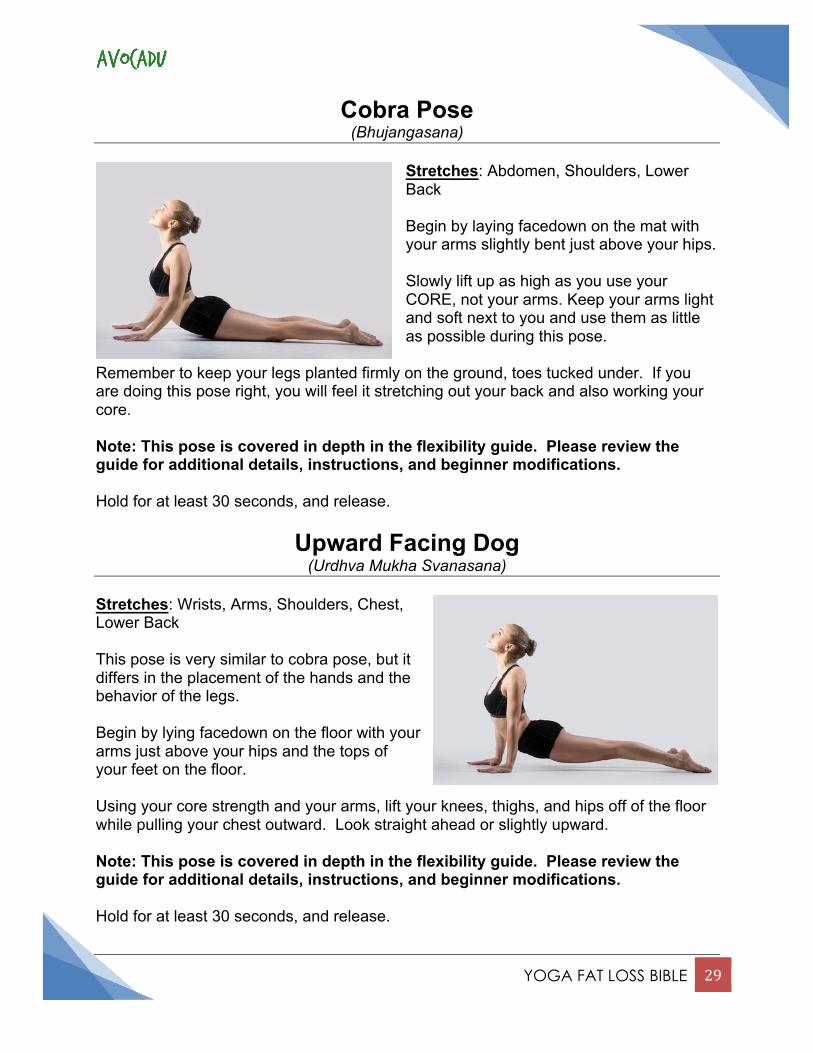
Cobra Pose (Bhujangasana)
Stretches: Abdomen, Shoulders, Lower Back Begin by laying facedown on the mat with your arms slightly bent just above your hips. Slowly lift up as high as you use your CORE, not your arms. Keep your arms light and soft next to you and use them as little as possible during this pose.
Remember to keep your legs planted firmly on the ground, toes tucked under. If you are doing this pose right, you will feel it stretching out your back and also working your core. Note: This pose is covered in depth in the flexibility guide. Please review the guide for additional details, instructions, and beginner modifications. Hold for at least 30 seconds, and release.
Upward Facing Dog (Urdhva Mukha Svanasana)
Stretches: Wrists, Arms, Shoulders, Chest, Lower Back This pose is very similar to cobra pose, but it differs in the placement of the hands and the behavior of the legs. Begin by lying facedown on the floor with your arms just above your hips and the tops of your feet on the floor. Using your core strength and your arms, lift your knees, thighs, and hips off of the floor while pulling your chest outward. Look straight ahead or slightly upward. Note: This pose is covered in depth in the flexibility guide. Please review the guide for additional details, instructions, and beginner modifications. Hold for at least 30 seconds, and release.
YOGA FAT LOSS BIBLE 30
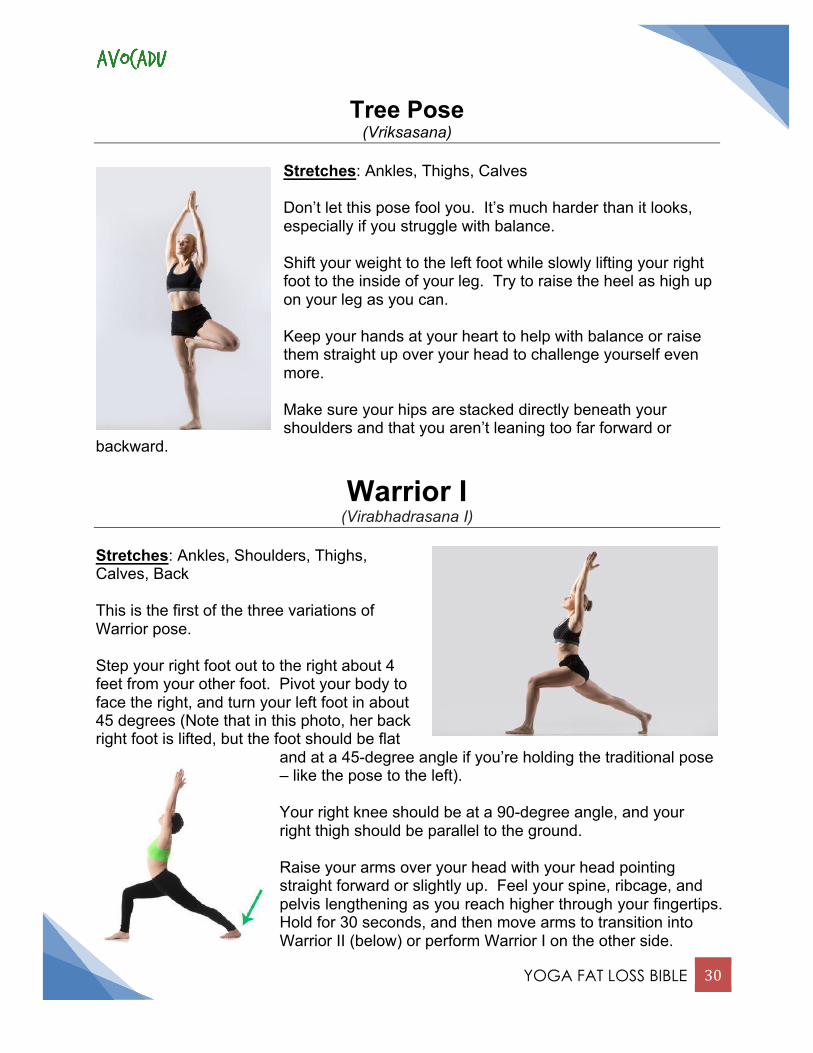
Tree Pose (Vriksasana)
Stretches: Ankles, Thighs, Calves Don’t let this pose fool you. It’s much harder than it looks, especially if you struggle with balance. Shift your weight to the left foot while slowly lifting your right foot to the inside of your leg. Try to raise the heel as high up on your leg as you can. Keep your hands at your heart to help with balance or raise them straight up over your head to challenge yourself even more. Make sure your hips are stacked directly beneath your shoulders and that you aren’t leaning too far forward or
backward.
Warrior I (Virabhadrasana I)
Stretches: Ankles, Shoulders, Thighs, Calves, Back This is the first of the three variations of Warrior pose. Step your right foot out to the right about 4 feet from your other foot. Pivot your body to face the right, and turn your left foot in about 45 degrees (Note that in this photo, her back right foot is lifted, but the foot should be flat
and at a 45-degree angle if you’re holding the traditional pose – like the pose to the left). Your right knee should be at a 90-degree angle, and your right thigh should be parallel to the ground. Raise your arms over your head with your head pointing straight forward or slightly up. Feel your spine, ribcage, and pelvis lengthening as you reach higher through your fingertips. Hold for 30 seconds, and then move arms to transition into Warrior II (below) or perform Warrior I on the other side.
YOGA FAT LOSS BIBLE 31
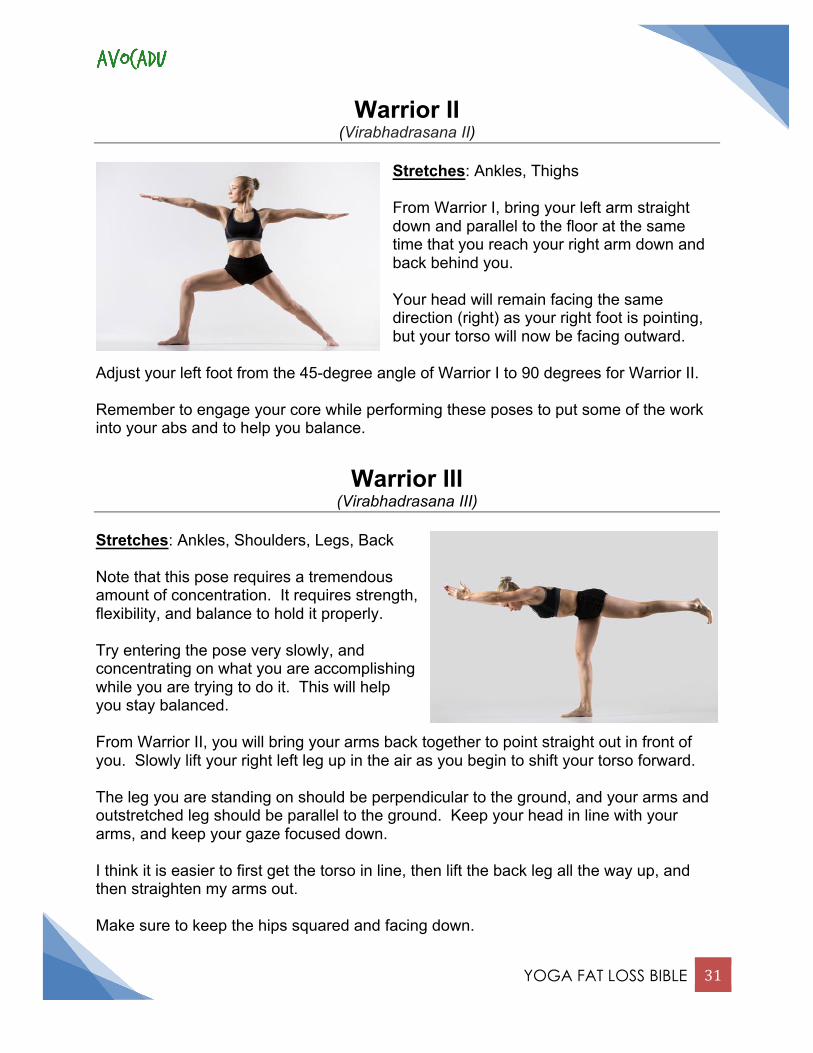
Warrior II (Virabhadrasana II)
Stretches: Ankles, Thighs From Warrior I, bring your left arm straight down and parallel to the floor at the same time that you reach your right arm down and back behind you. Your head will remain facing the same direction (right) as your right foot is pointing, but your torso will now be facing outward.
Adjust your left foot from the 45-degree angle of Warrior I to 90 degrees for Warrior II. Remember to engage your core while performing these poses to put some of the work into your abs and to help you balance.
Warrior III (Virabhadrasana III)
Stretches: Ankles, Shoulders, Legs, Back Note that this pose requires a tremendous amount of concentration. It requires strength, flexibility, and balance to hold it properly. Try entering the pose very slowly, and concentrating on what you are accomplishing while you are trying to do it. This will help you stay balanced. From Warrior II, you will bring your arms back together to point straight out in front of you. Slowly lift your right left leg up in the air as you begin to shift your torso forward. The leg you are standing on should be perpendicular to the ground, and your arms and outstretched leg should be parallel to the ground. Keep your head in line with your arms, and keep your gaze focused down. I think it is easier to first get the torso in line, then lift the back leg all the way up, and then straighten my arms out. Make sure to keep the hips squared and facing down.
YOGA FAT LOSS BIBLE 32
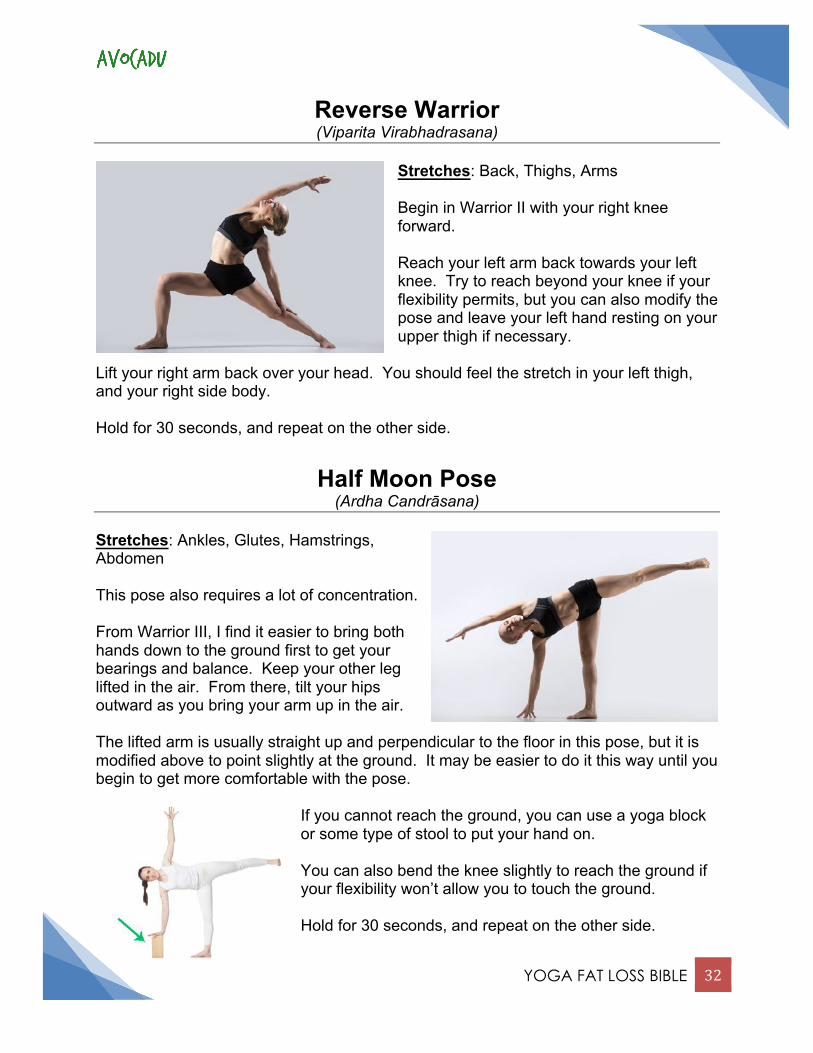
Reverse Warrior (Viparita Virabhadrasana)
Stretches: Back, Thighs, Arms Begin in Warrior II with your right knee forward. Reach your left arm back towards your left knee. Try to reach beyond your knee if your flexibility permits, but you can also modify the pose and leave your left hand resting on your upper thigh if necessary.
Lift your right arm back over your head. You should feel the stretch in your left thigh, and your right side body. Hold for 30 seconds, and repeat on the other side.
Half Moon Pose (Ardha Candrāsana)
Stretches: Ankles, Glutes, Hamstrings, Abdomen This pose also requires a lot of concentration. From Warrior III, I find it easier to bring both hands down to the ground first to get your bearings and balance. Keep your other leg lifted in the air. From there, tilt your hips outward as you bring your arm up in the air. The lifted arm is usually straight up and perpendicular to the floor in this pose, but it is modified above to point slightly at the ground. It may be easier to do it this way until you begin to get more comfortable with the pose.
If you cannot reach the ground, you can use a yoga block or some type of stool to put your hand on. You can also bend the knee slightly to reach the ground if your flexibility won’t allow you to touch the ground. Hold for 30 seconds, and repeat on the other side.
YOGA FAT LOSS BIBLE 33
Downward Facing Dog (Adho Mukha Svanasana)
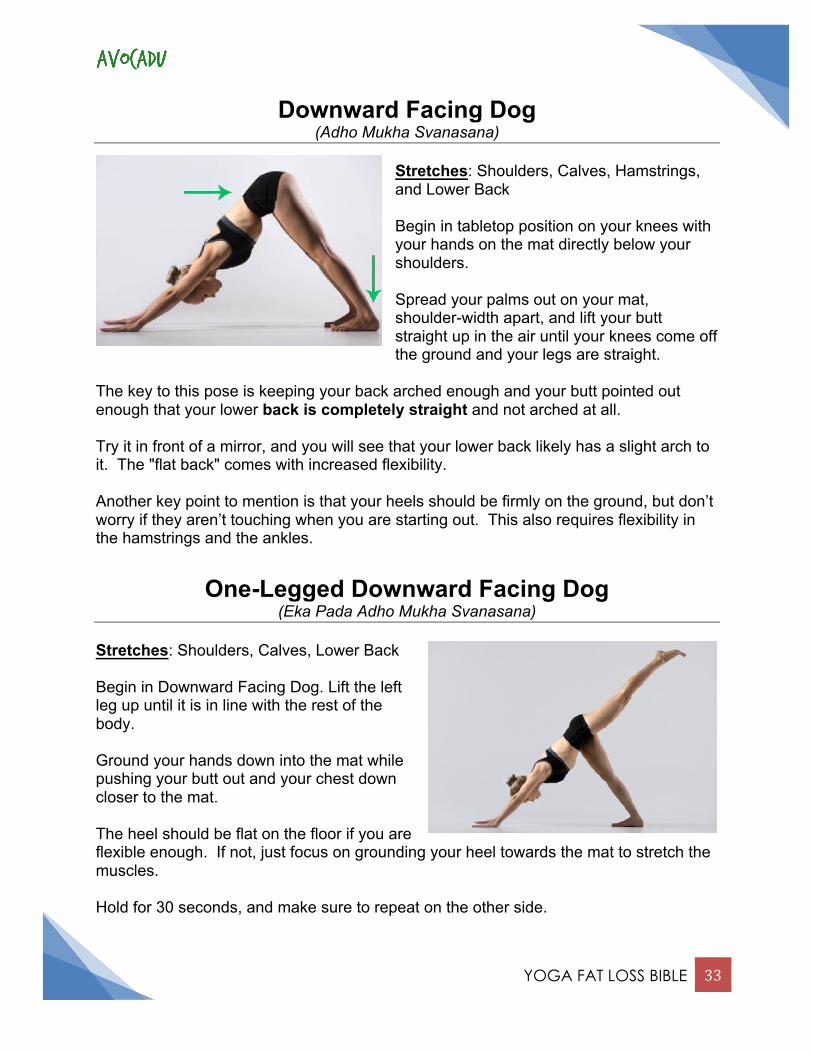
Stretches: Shoulders, Calves, Hamstrings, and Lower Back Begin in tabletop position on your knees with your hands on the mat directly below your shoulders. Spread your palms out on your mat, shoulder-width apart, and lift your butt straight up in the air until your knees come off the ground and your legs are straight.
The key to this pose is keeping your back arched enough and your butt pointed out enough that your lower back is completely straight and not arched at all. Try it in front of a mirror, and you will see that your lower back likely has a slight arch to it. The "flat back" comes with increased flexibility. Another key point to mention is that your heels should be firmly on the ground, but don’t worry if they aren’t touching when you are starting out. This also requires flexibility in the hamstrings and the ankles.
One-Legged Downward Facing Dog (Eka Pada Adho Mukha Svanasana)
Stretches: Shoulders, Calves, Lower Back Begin in Downward Facing Dog. Lift the left leg up until it is in line with the rest of the body. Ground your hands down into the mat while pushing your butt out and your chest down closer to the mat. The heel should be flat on the floor if you are flexible enough. If not, just focus on grounding your heel towards the mat to stretch the muscles. Hold for 30 seconds, and make sure to repeat on the other side.
YOGA FAT LOSS BIBLE 34
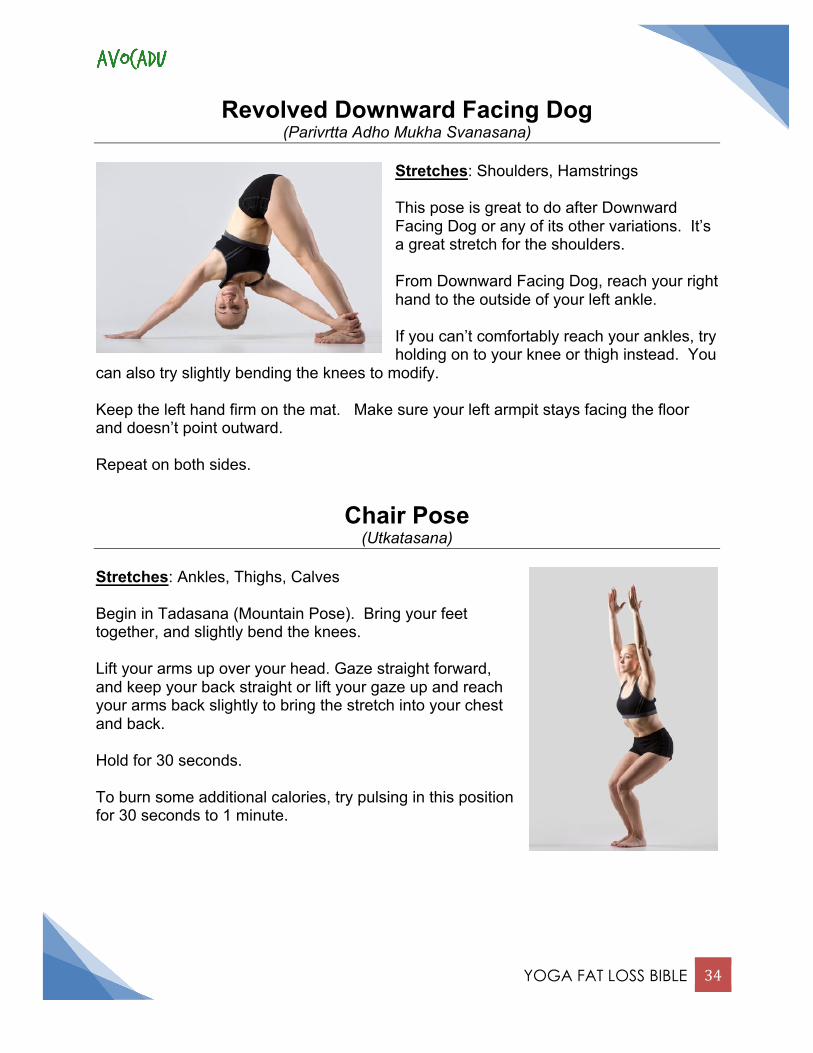
Revolved Downward Facing Dog (Parivrtta Adho Mukha Svanasana)
Stretches: Shoulders, Hamstrings This pose is great to do after Downward Facing Dog or any of its other variations. It’s a great stretch for the shoulders. From Downward Facing Dog, reach your right hand to the outside of your left ankle. If you can’t comfortably reach your ankles, try holding on to your knee or thigh instead. You
can also try slightly bending the knees to modify. Keep the left hand firm on the mat. Make sure your left armpit stays facing the floor and doesn’t point outward. Repeat on both sides.
Chair Pose (Utkatasana)
Stretches: Ankles, Thighs, Calves Begin in Tadasana (Mountain Pose). Bring your feet together, and slightly bend the knees. Lift your arms up over your head. Gaze straight forward, and keep your back straight or lift your gaze up and reach your arms back slightly to bring the stretch into your chest and back. Hold for 30 seconds. To burn some additional calories, try pulsing in this position for 30 seconds to 1 minute.
YOGA FAT LOSS BIBLE 35
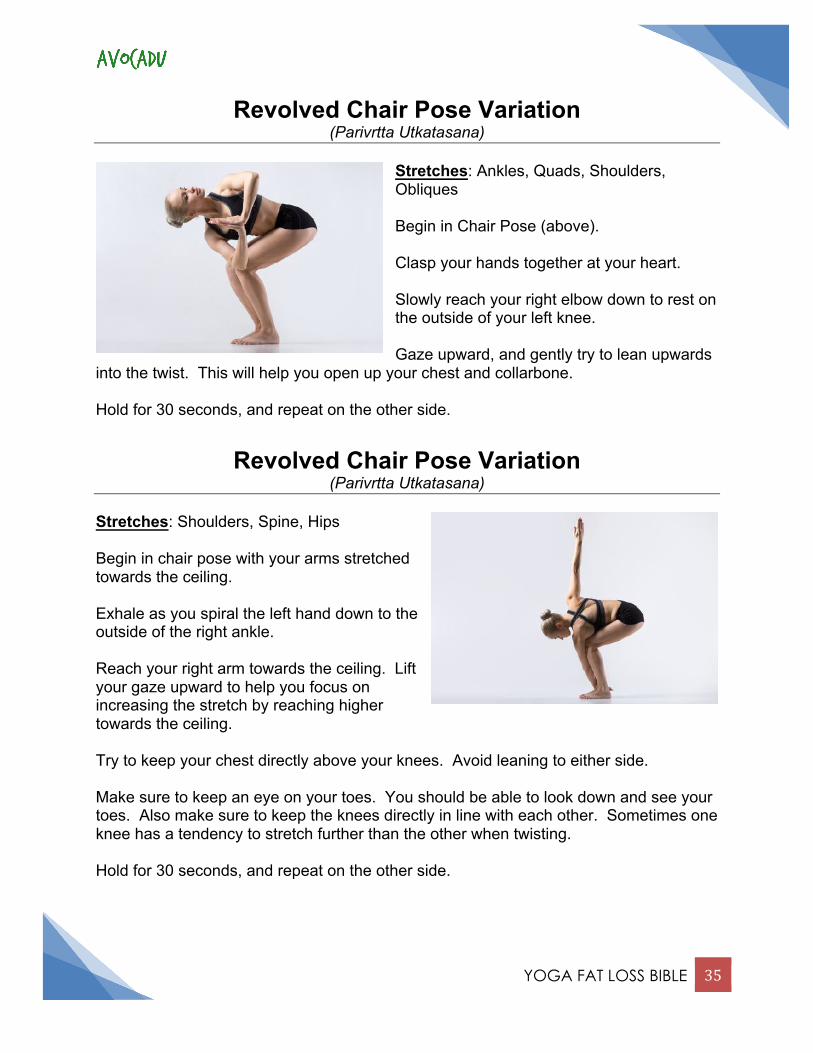
Revolved Chair Pose Variation (Parivrtta Utkatasana)
Stretches: Ankles, Quads, Shoulders, Obliques Begin in Chair Pose (above). Clasp your hands together at your heart. Slowly reach your right elbow down to rest on the outside of your left knee. Gaze upward, and gently try to lean upwards
into the twist. This will help you open up your chest and collarbone. Hold for 30 seconds, and repeat on the other side.
Revolved Chair Pose Variation (Parivrtta Utkatasana)
Stretches: Shoulders, Spine, Hips Begin in chair pose with your arms stretched towards the ceiling. Exhale as you spiral the left hand down to the outside of the right ankle. Reach your right arm towards the ceiling. Lift your gaze upward to help you focus on increasing the stretch by reaching higher towards the ceiling. Try to keep your chest directly above your knees. Avoid leaning to either side. Make sure to keep an eye on your toes. You should be able to look down and see your toes. Also make sure to keep the knees directly in line with each other. Sometimes one knee has a tendency to stretch further than the other when twisting. Hold for 30 seconds, and repeat on the other side.
YOGA FAT LOSS BIBLE 36
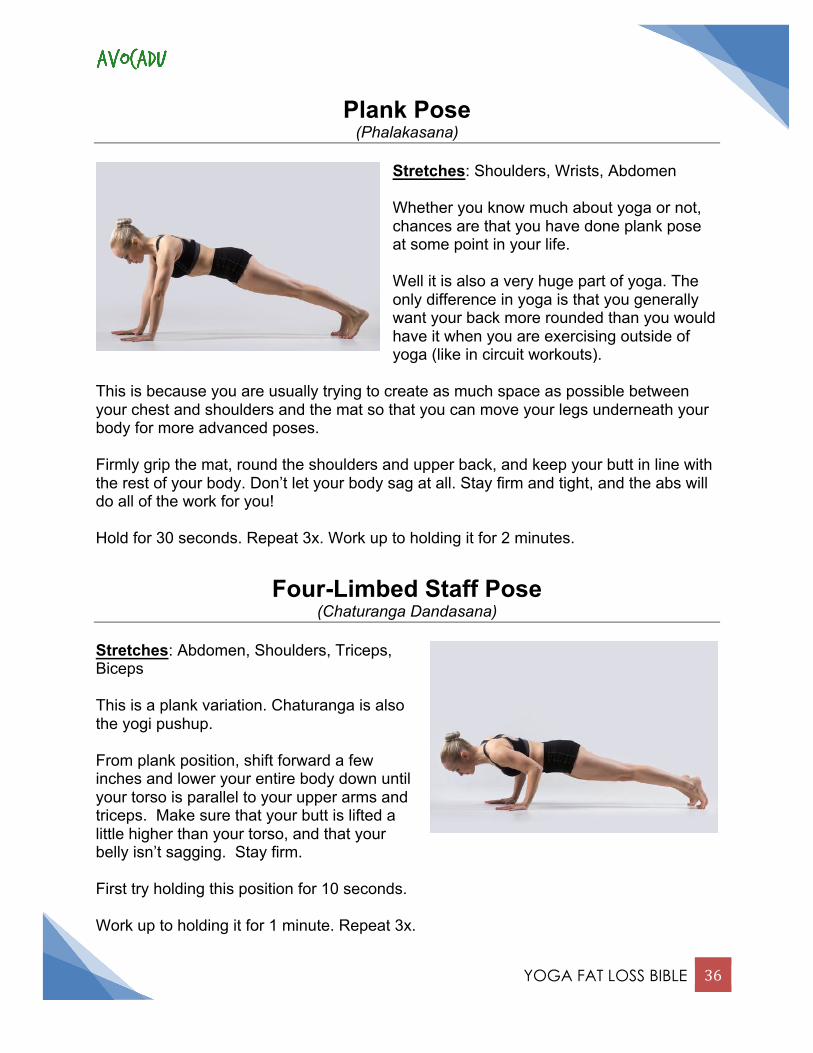
Plank Pose (Phalakasana)
Stretches: Shoulders, Wrists, Abdomen Whether you know much about yoga or not, chances are that you have done plank pose at some point in your life. Well it is also a very huge part of yoga. The only difference in yoga is that you generally want your back more rounded than you would have it when you are exercising outside of yoga (like in circuit workouts).
This is because you are usually trying to create as much space as possible between your chest and shoulders and the mat so that you can move your legs underneath your body for more advanced poses. Firmly grip the mat, round the shoulders and upper back, and keep your butt in line with the rest of your body. Don’t let your body sag at all. Stay firm and tight, and the abs will do all of the work for you! Hold for 30 seconds. Repeat 3x. Work up to holding it for 2 minutes.
Four-Limbed Staff Pose (Chaturanga Dandasana)
Stretches: Abdomen, Shoulders, Triceps, Biceps This is a plank variation. Chaturanga is also the yogi pushup. From plank position, shift forward a few inches and lower your entire body down until your torso is parallel to your upper arms and triceps. Make sure that your butt is lifted a little higher than your torso, and that your belly isn’t sagging. Stay firm. First try holding this position for 10 seconds. Work up to holding it for 1 minute. Repeat 3x.
YOGA FAT LOSS BIBLE 37
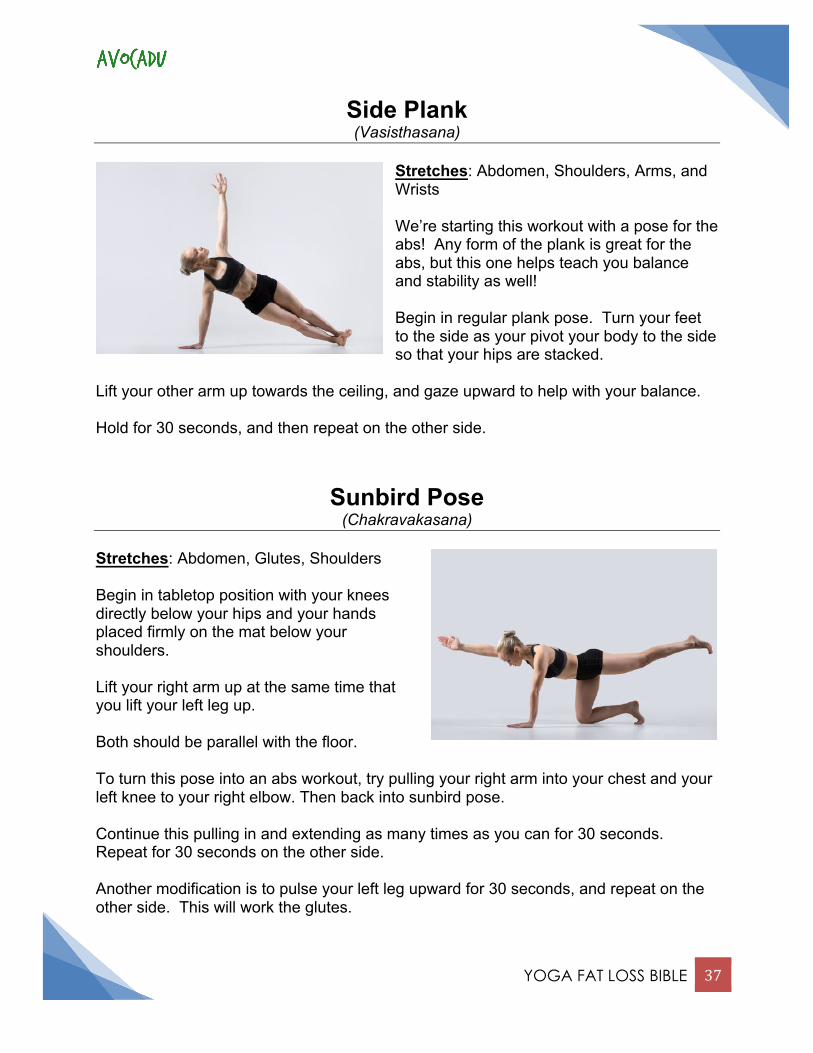
Side Plank (Vasisthasana)
Stretches: Abdomen, Shoulders, Arms, and Wrists We’re starting this workout with a pose for the abs! Any form of the plank is great for the abs, but this one helps teach you balance and stability as well! Begin in regular plank pose. Turn your feet to the side as your pivot your body to the side so that your hips are stacked.
Lift your other arm up towards the ceiling, and gaze upward to help with your balance. Hold for 30 seconds, and then repeat on the other side.
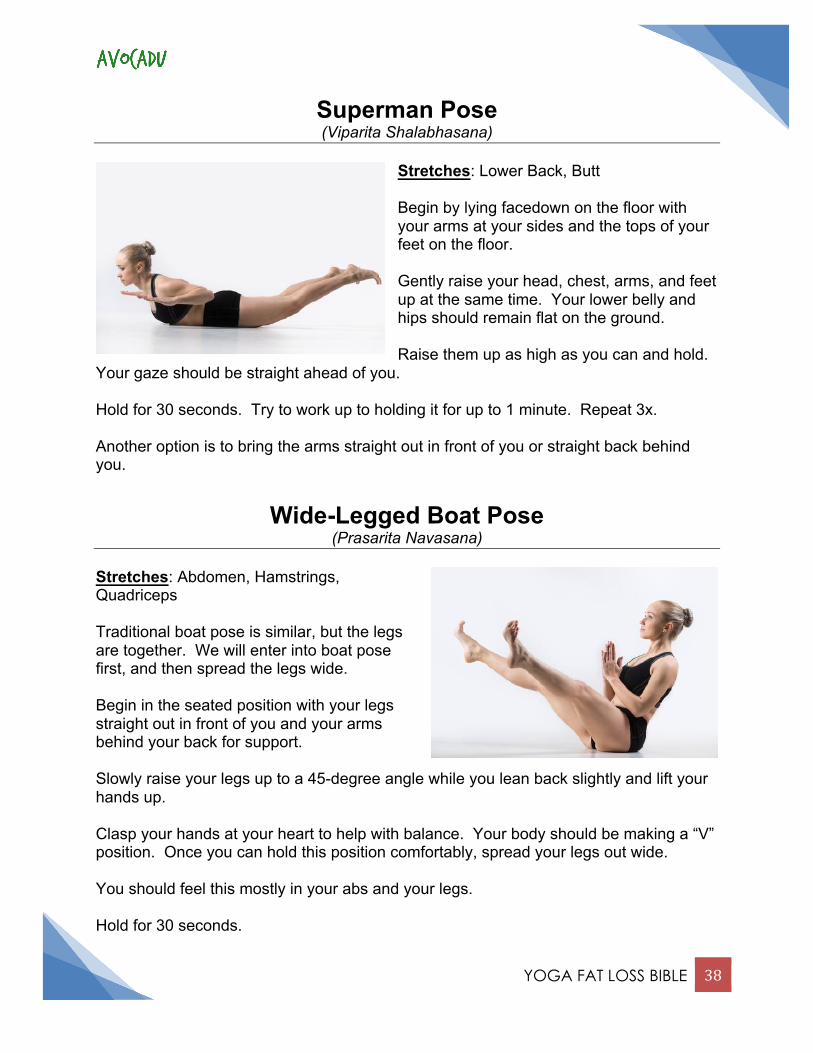
Sunbird Pose (Chakravakasana)
Stretches: Abdomen, Glutes, Shoulders Begin in tabletop position with your knees directly below your hips and your hands placed firmly on the mat below your shoulders. Lift your right arm up at the same time that you lift your left leg up. Both should be parallel with the floor. To turn this pose into an abs workout, try pulling your right arm into your chest and your left knee to your right elbow. Then back into sunbird pose. Continue this pulling in and extending as many times as you can for 30 seconds. Repeat for 30 seconds on the other side. Another modification is to pulse your left leg upward for 30 seconds, and repeat on the other side. This will work the glutes.
YOGA FAT LOSS BIBLE 38
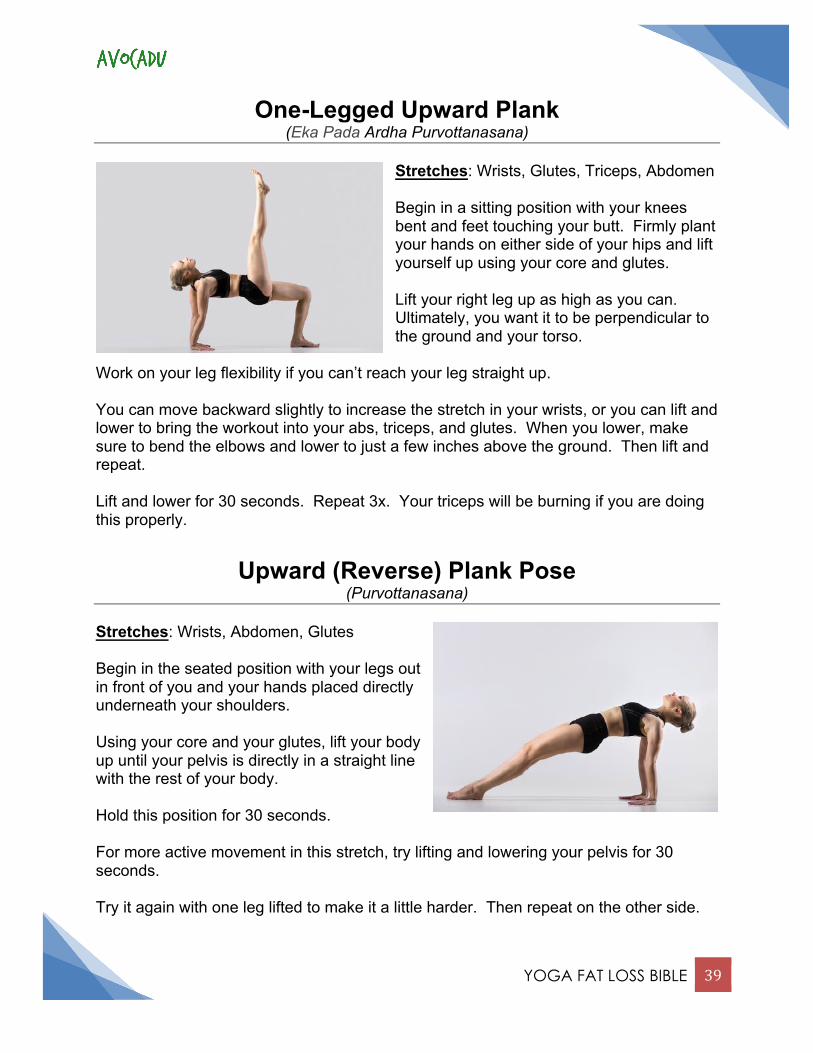
Superman Pose (Viparita Shalabhasana)
Stretches: Lower Back, Butt Begin by lying facedown on the floor with your arms at your sides and the tops of your feet on the floor. Gently raise your head, chest, arms, and feet up at the same time. Your lower belly and hips should remain flat on the ground. Raise them up as high as you can and hold.
Your gaze should be straight ahead of you. Hold for 30 seconds. Try to work up to holding it for up to 1 minute. Repeat 3x. Another option is to bring the arms straight out in front of you or straight back behind you.
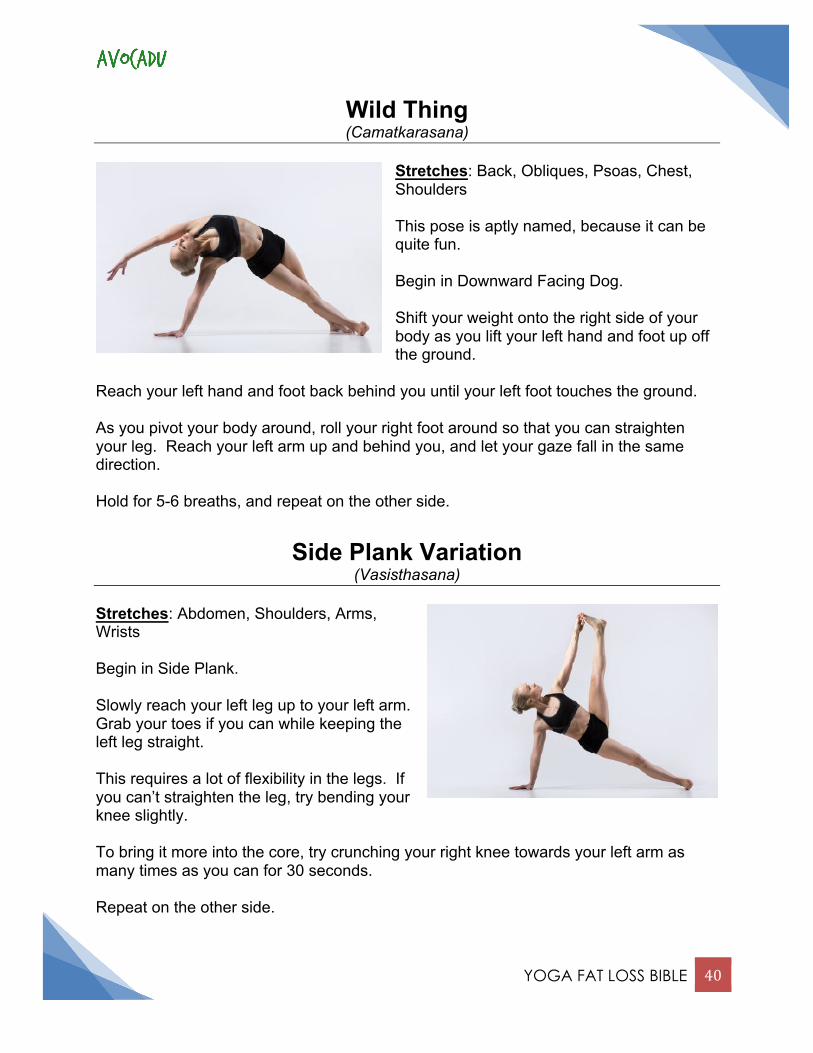
Wide-Legged Boat Pose (Prasarita Navasana)
Stretches: Abdomen, Hamstrings, Quadriceps Traditional boat pose is similar, but the legs are together. We will enter into boat pose first, and then spread the legs wide. Begin in the seated position with your legs straight out in front of you and your arms behind your back for support. Slowly raise your legs up to a 45-degree angle while you lean back slightly and lift your hands up. Clasp your hands at your heart to help with balance. Your body should be making a “V” position. Once you can hold this position comfortably, spread your legs out wide. You should feel this mostly in your abs and your legs. Hold for 30 seconds.
YOGA FAT LOSS BIBLE 39
One-Legged Upward Plank (Eka Pada Ardha Purvottanasana)
Stretches: Wrists, Glutes, Triceps, Abdomen Begin in a sitting position with your knees bent and feet touching your butt. Firmly plant your hands on either side of your hips and lift yourself up using your core and glutes. Lift your right leg up as high as you can. Ultimately, you want it to be perpendicular to the ground and your torso.
Work on your leg flexibility if you can’t reach your leg straight up. You can move backward slightly to increase the stretch in your wrists, or you can lift and lower to bring the workout into your abs, triceps, and glutes. When you lower, make sure to bend the elbows and lower to just a few inches above the ground. Then lift and repeat. Lift and lower for 30 seconds. Repeat 3x. Your triceps will be burning if you are doing this properly.
Upward (Reverse) Plank Pose (Purvottanasana)
Stretches: Wrists, Abdomen, Glutes Begin in the seated position with your legs out in front of you and your hands placed directly underneath your shoulders. Using your core and your glutes, lift your body up until your pelvis is directly in a straight line with the rest of your body. Hold this position for 30 seconds. For more active movement in this stretch, try lifting and lowering your pelvis for 30 seconds. Try it again with one leg lifted to make it a little harder. Then repeat on the other side.
YOGA FAT LOSS BIBLE 40
Wild Thing (Camatkarasana)
Stretches: Back, Obliques, Psoas, Chest, Shoulders This pose is aptly named, because it can be quite fun. Begin in Downward Facing Dog. Shift your weight onto the right side of your body as you lift your left hand and foot up off the ground.
Reach your left hand and foot back behind you until your left foot touches the ground. As you pivot your body around, roll your right foot around so that you can straighten your leg. Reach your left arm up and behind you, and let your gaze fall in the same direction. Hold for 5-6 breaths, and repeat on the other side.
Side Plank Variation (Vasisthasana)
Stretches: Abdomen, Shoulders, Arms, Wrists Begin in Side Plank. Slowly reach your left leg up to your left arm. Grab your toes if you can while keeping the left leg straight. This requires a lot of flexibility in the legs. If you can’t straighten the leg, try bending your knee slightly. To bring it more into the core, try crunching your right knee towards your left arm as many times as you can for 30 seconds. Repeat on the other side.
YOGA FAT LOSS BIBLE 41
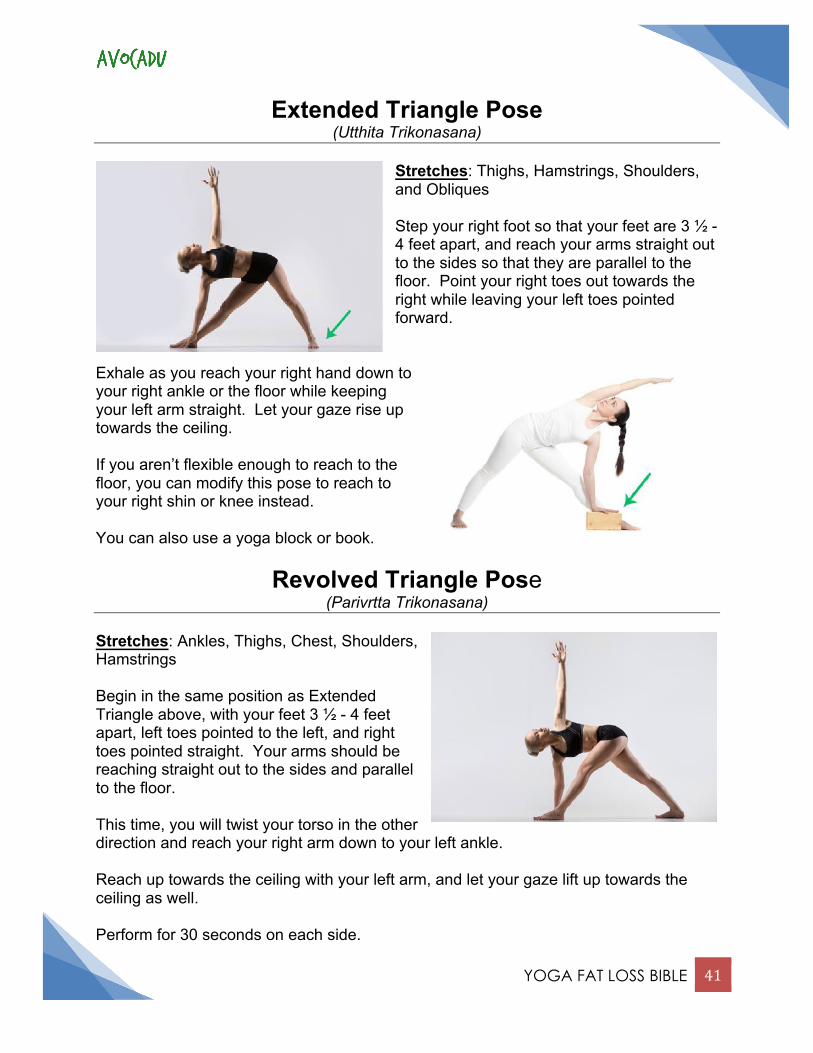
Extended Triangle Pose (Utthita Trikonasana)
Stretches: Thighs, Hamstrings, Shoulders, and Obliques Step your right foot so that your feet are 3 ½ - 4 feet apart, and reach your arms straight out to the sides so that they are parallel to the floor. Point your right toes out towards the right while leaving your left toes pointed forward.
Exhale as you reach your right hand down to your right ankle or the floor while keeping your left arm straight. Let your gaze rise up towards the ceiling. If you aren’t flexible enough to reach to the floor, you can modify this pose to reach to your right shin or knee instead. You can also use a yoga block or book.
Revolved Triangle Pose (Parivrtta Trikonasana)
Stretches: Ankles, Thighs, Chest, Shoulders, Hamstrings Begin in the same position as Extended Triangle above, with your feet 3 ½ - 4 feet apart, left toes pointed to the left, and right toes pointed straight. Your arms should be reaching straight out to the sides and parallel to the floor. This time, you will twist your torso in the other direction and reach your right arm down to your left ankle. Reach up towards the ceiling with your left arm, and let your gaze lift up towards the ceiling as well. Perform for 30 seconds on each side.
YOGA FAT LOSS BIBLE 42
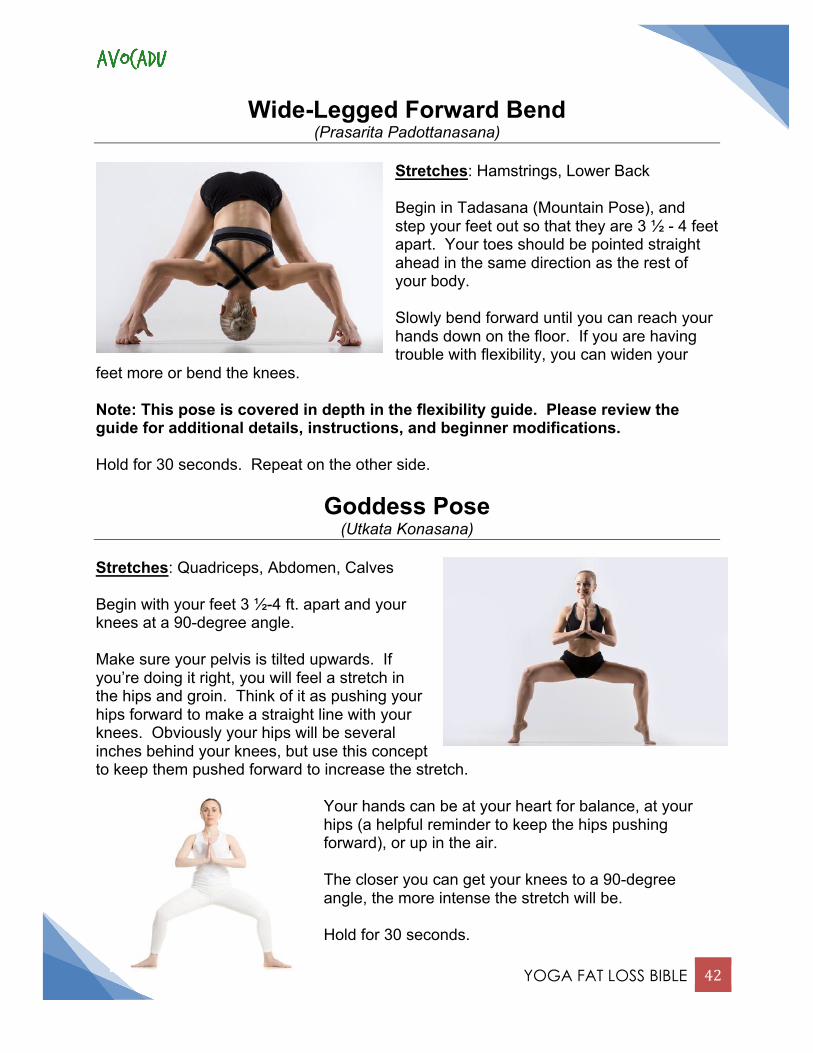
Wide-Legged Forward Bend (Prasarita Padottanasana)
Stretches: Hamstrings, Lower Back Begin in Tadasana (Mountain Pose), and step your feet out so that they are 3 ½ - 4 feet apart. Your toes should be pointed straight ahead in the same direction as the rest of your body. Slowly bend forward until you can reach your hands down on the floor. If you are having trouble with flexibility, you can widen your
feet more or bend the knees. Note: This pose is covered in depth in the flexibility guide. Please review the guide for additional details, instructions, and beginner modifications. Hold for 30 seconds. Repeat on the other side.
Goddess Pose (Utkata Konasana)
Stretches: Quadriceps, Abdomen, Calves Begin with your feet 3 ½-4 ft. apart and your knees at a 90-degree angle. Make sure your pelvis is tilted upwards. If you’re doing it right, you will feel a stretch in the hips and groin. Think of it as pushing your hips forward to make a straight line with your knees. Obviously your hips will be several inches behind your knees, but use this concept to keep them pushed forward to increase the stretch.
Your hands can be at your heart for balance, at your hips (a helpful reminder to keep the hips pushing forward), or up in the air. The closer you can get your knees to a 90-degree angle, the more intense the stretch will be. Hold for 30 seconds.
YOGA FAT LOSS BIBLE 43
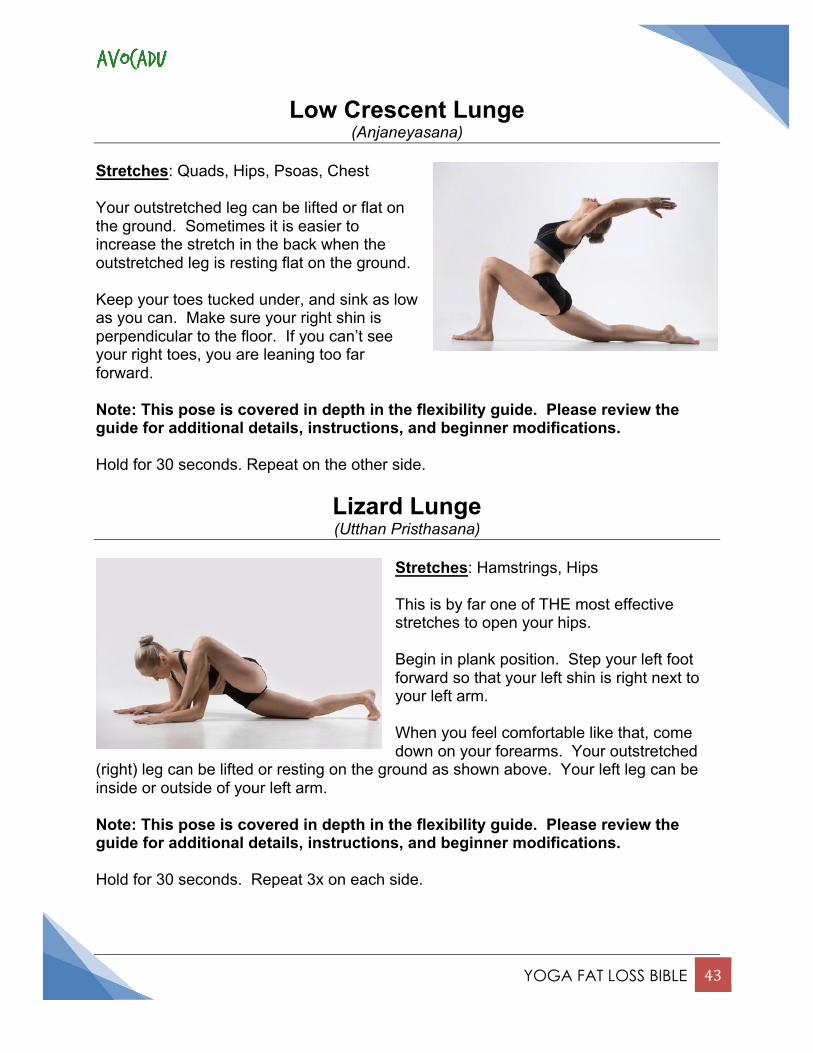
Low Crescent Lunge (Anjaneyasana)
Stretches: Quads, Hips, Psoas, Chest Your outstretched leg can be lifted or flat on the ground. Sometimes it is easier to increase the stretch in the back when the outstretched leg is resting flat on the ground. Keep your toes tucked under, and sink as low as you can. Make sure your right shin is perpendicular to the floor. If you can’t see your right toes, you are leaning too far forward. Note: This pose is covered in depth in the flexibility guide. Please review the guide for additional details, instructions, and beginner modifications. Hold for 30 seconds. Repeat on the other side.
Lizard Lunge (Utthan Pristhasana)
Stretches: Hamstrings, Hips This is by far one of THE most effective stretches to open your hips. Begin in plank position. Step your left foot forward so that your left shin is right next to your left arm. When you feel comfortable like that, come down on your forearms. Your outstretched
(right) leg can be lifted or resting on the ground as shown above. Your left leg can be inside or outside of your left arm. Note: This pose is covered in depth in the flexibility guide. Please review the guide for additional details, instructions, and beginner modifications. Hold for 30 seconds. Repeat 3x on each side.
YOGA FAT LOSS BIBLE 44
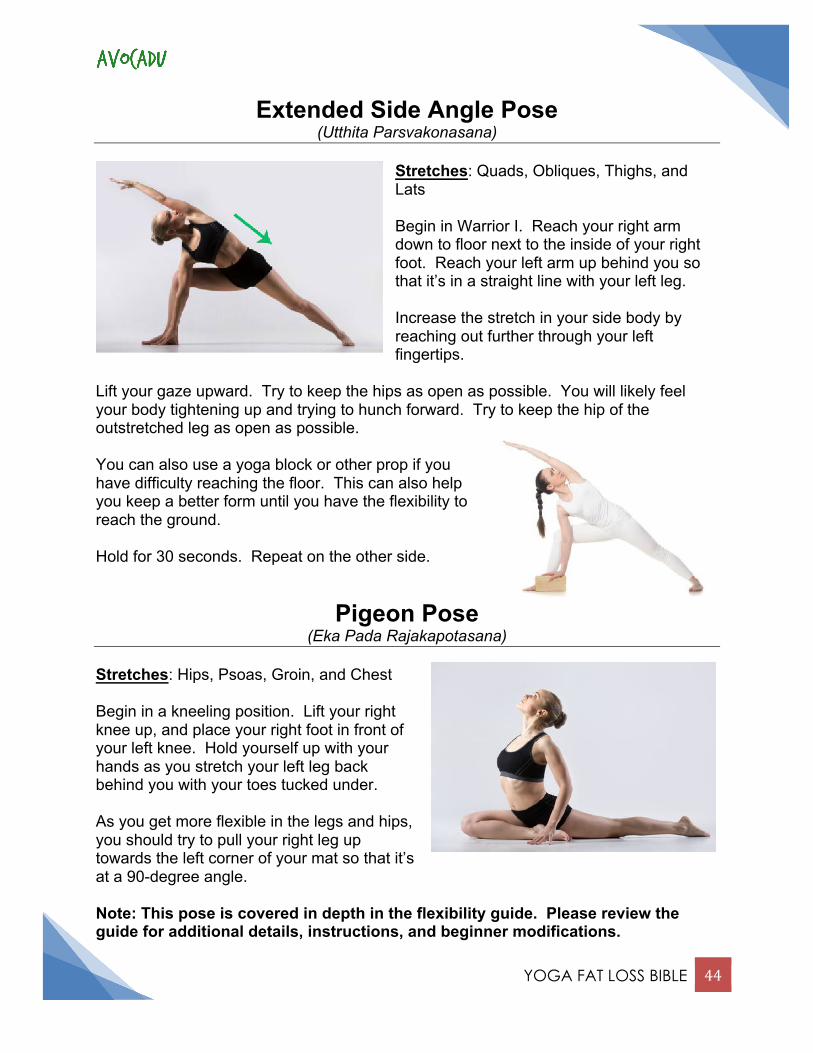
Extended Side Angle Pose (Utthita Parsvakonasana)
Stretches: Quads, Obliques, Thighs, and Lats Begin in Warrior I. Reach your right arm down to floor next to the inside of your right foot. Reach your left arm up behind you so that it’s in a straight line with your left leg. Increase the stretch in your side body by reaching out further through your left fingertips.
Lift your gaze upward. Try to keep the hips as open as possible. You will likely feel your body tightening up and trying to hunch forward. Try to keep the hip of the outstretched leg as open as possible. You can also use a yoga block or other prop if you have difficulty reaching the floor. This can also help you keep a better form until you have the flexibility to reach the ground. Hold for 30 seconds. Repeat on the other side.
Pigeon Pose
(Eka Pada Rajakapotasana) Stretches: Hips, Psoas, Groin, and Chest Begin in a kneeling position. Lift your right knee up, and place your right foot in front of your left knee. Hold yourself up with your hands as you stretch your left leg back behind you with your toes tucked under. As you get more flexible in the legs and hips, you should try to pull your right leg up towards the left corner of your mat so that it’s at a 90-degree angle. Note: This pose is covered in depth in the flexibility guide. Please review the guide for additional details, instructions, and beginner modifications.
YOGA FAT LOSS BIBLE 45
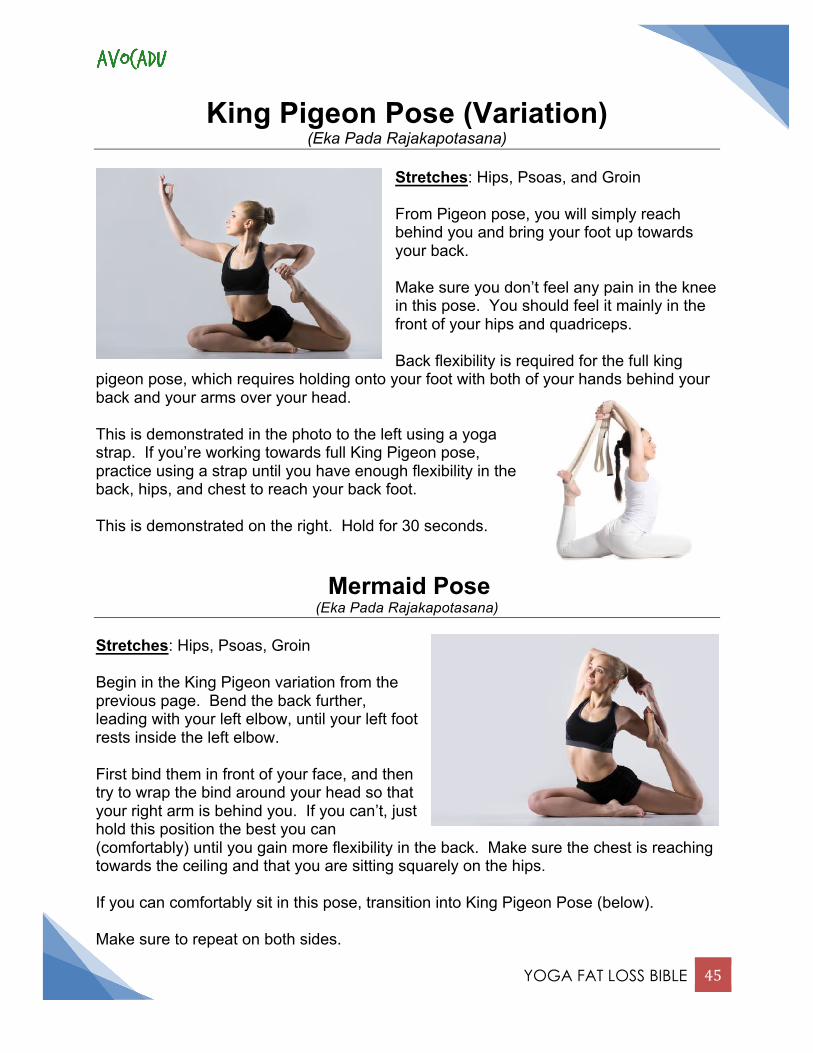
King Pigeon Pose (Variation) (Eka Pada Rajakapotasana)
Stretches: Hips, Psoas, and Groin From Pigeon pose, you will simply reach behind you and bring your foot up towards your back. Make sure you don’t feel any pain in the knee in this pose. You should feel it mainly in the front of your hips and quadriceps. Back flexibility is required for the full king
pigeon pose, which requires holding onto your foot with both of your hands behind your back and your arms over your head. This is demonstrated in the photo to the left using a yoga strap. If you’re working towards full King Pigeon pose, practice using a strap until you have enough flexibility in the back, hips, and chest to reach your back foot. This is demonstrated on the right. Hold for 30 seconds.
Mermaid Pose (Eka Pada Rajakapotasana)
Stretches: Hips, Psoas, Groin Begin in the King Pigeon variation from the previous page. Bend the back further, leading with your left elbow, until your left foot rests inside the left elbow. First bind them in front of your face, and then try to wrap the bind around your head so that your right arm is behind you. If you can’t, just hold this position the best you can (comfortably) until you gain more flexibility in the back. Make sure the chest is reaching towards the ceiling and that you are sitting squarely on the hips. If you can comfortably sit in this pose, transition into King Pigeon Pose (below). Make sure to repeat on both sides.
YOGA FAT LOSS BIBLE 46
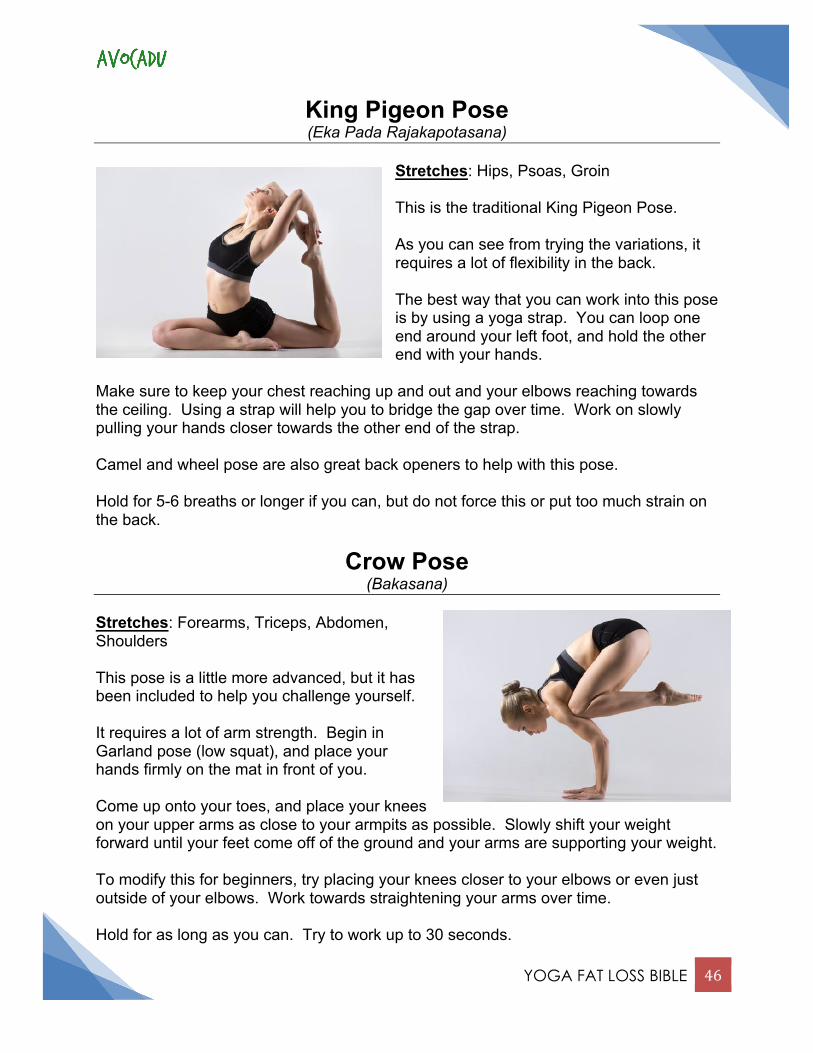
King Pigeon Pose (Eka Pada Rajakapotasana)
Stretches: Hips, Psoas, Groin This is the traditional King Pigeon Pose. As you can see from trying the variations, it requires a lot of flexibility in the back. The best way that you can work into this pose is by using a yoga strap. You can loop one end around your left foot, and hold the other end with your hands.
Make sure to keep your chest reaching up and out and your elbows reaching towards the ceiling. Using a strap will help you to bridge the gap over time. Work on slowly pulling your hands closer towards the other end of the strap. Camel and wheel pose are also great back openers to help with this pose. Hold for 5-6 breaths or longer if you can, but do not force this or put too much strain on the back.
Crow Pose (Bakasana)
Stretches: Forearms, Triceps, Abdomen, Shoulders This pose is a little more advanced, but it has been included to help you challenge yourself. It requires a lot of arm strength. Begin in Garland pose (low squat), and place your hands firmly on the mat in front of you. Come up onto your toes, and place your knees on your upper arms as close to your armpits as possible. Slowly shift your weight forward until your feet come off of the ground and your arms are supporting your weight. To modify this for beginners, try placing your knees closer to your elbows or even just outside of your elbows. Work towards straightening your arms over time. Hold for as long as you can. Try to work up to 30 seconds.
YOGA FAT LOSS BIBLE 47
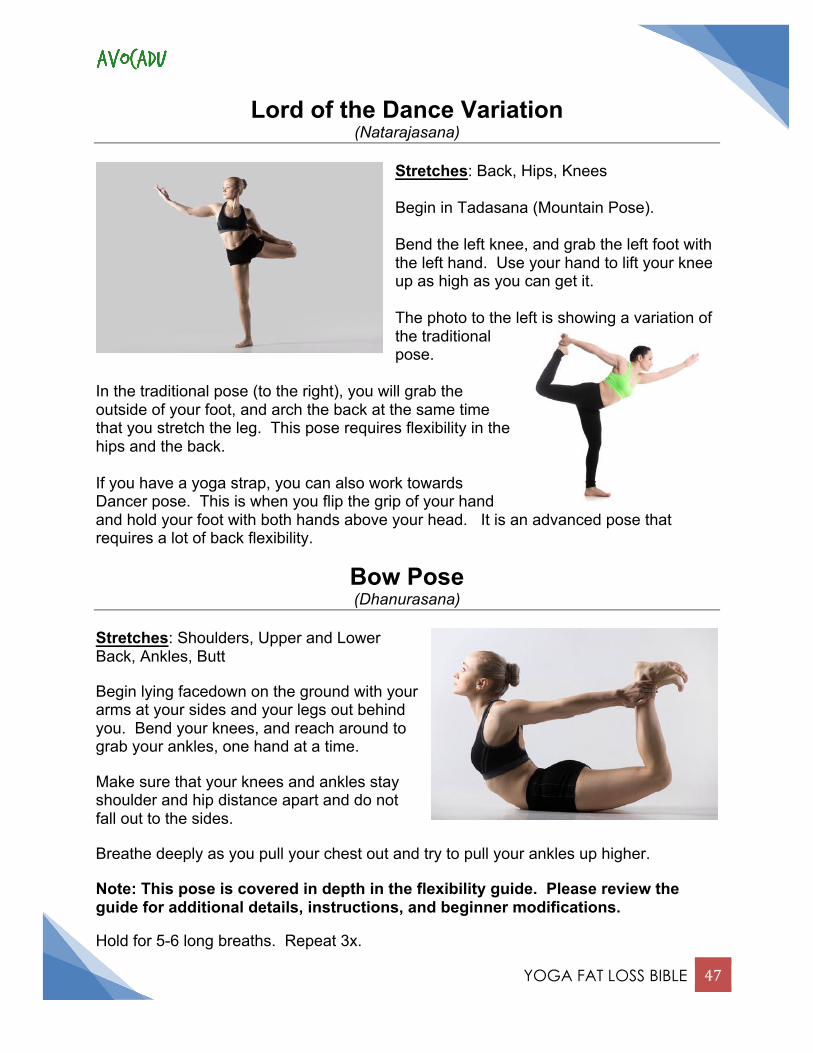
Lord of the Dance Variation (Natarajasana)
Stretches: Back, Hips, Knees Begin in Tadasana (Mountain Pose). Bend the left knee, and grab the left foot with the left hand. Use your hand to lift your knee up as high as you can get it. The photo to the left is showing a variation of the traditional pose.
In the traditional pose (to the right), you will grab the outside of your foot, and arch the back at the same time that you stretch the leg. This pose requires flexibility in the hips and the back. If you have a yoga strap, you can also work towards Dancer pose. This is when you flip the grip of your hand and hold your foot with both hands above your head. It is an advanced pose that requires a lot of back flexibility.
Bow Pose (Dhanurasana)
Stretches: Shoulders, Upper and Lower Back, Ankles, Butt Begin lying facedown on the ground with your arms at your sides and your legs out behind you. Bend your knees, and reach around to grab your ankles, one hand at a time. Make sure that your knees and ankles stay shoulder and hip distance apart and do not fall out to the sides. Breathe deeply as you pull your chest out and try to pull your ankles up higher. Note: This pose is covered in depth in the flexibility guide. Please review the guide for additional details, instructions, and beginner modifications. Hold for 5-6 long breaths. Repeat 3x.

YOGA FAT LOSS BIBLE 48
Camel Pose (Ustrasana)
Stretches: Back, Shoulders, Quadriceps, Knees, and Chest Begin in the kneeling position with your arms at your sides. Reach your right arm around to grab your right ankle. Arch your back and shift forward a bit before you reach around and grab your left ankle.
Make sure to keep your knees and legs hip distance apart. Lean into your pelvis and arch your back even more to open your chest further. When you feel comfortable enough, slowly reach one arm down to your ankle and then the other. First try holding this pose for 5-6 breaths, and remember to breathe. Come into a rest pose when you need to. Note: This pose is covered in depth in the flexibility guide. Please review the guide for additional details, instructions, and beginner modifications.
Monkey God Pose (Split) (Hanumanasana)
Stretches: Hamstring, Hips Again, we do not expect you to be able to perform this pose right now. We wanted to include it in here though in case you were interested in learning HOW to do. The key to splits is actually mastering two poses: Low Lunge and Half Splits. Make sure to warm up your legs with these stretches along with Pigeon Pose and Lizard Lunge to help warm up the hips. The other hamstring stretches (Forward Bends) are also very helpful as well. Note: This pose is covered in depth in the flexibility guide. Please review the guide for additional details, instructions, and beginner modifications.
YOGA FAT LOSS BIBLE 49
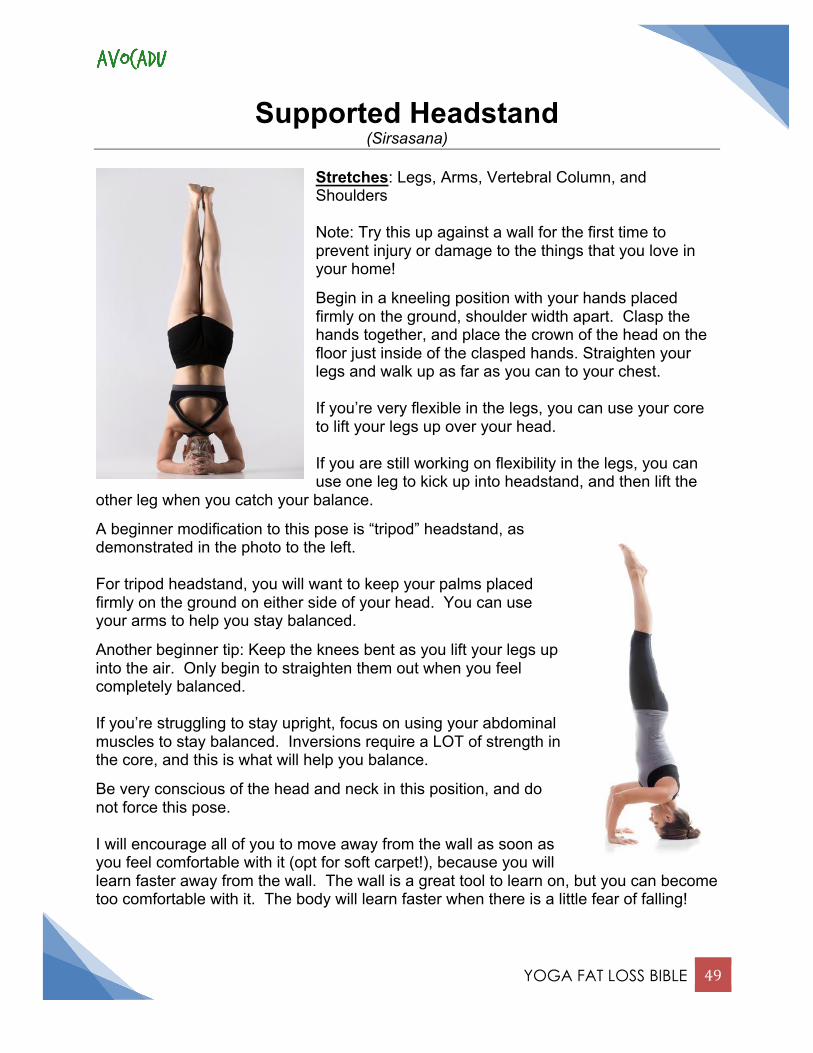
Supported Headstand (Sirsasana)
Stretches: Legs, Arms, Vertebral Column, and Shoulders Note: Try this up against a wall for the first time to prevent injury or damage to the things that you love in your home!
Begin in a kneeling position with your hands placed firmly on the ground, shoulder width apart. Clasp the hands together, and place the crown of the head on the floor just inside of the clasped hands. Straighten your legs and walk up as far as you can to your chest. If you’re very flexible in the legs, you can use your core to lift your legs up over your head. If you are still working on flexibility in the legs, you can use one leg to kick up into headstand, and then lift the
other leg when you catch your balance.
A beginner modification to this pose is “tripod” headstand, as demonstrated in the photo to the left. For tripod headstand, you will want to keep your palms placed firmly on the ground on either side of your head. You can use your arms to help you stay balanced.
Another beginner tip: Keep the knees bent as you lift your legs up into the air. Only begin to straighten them out when you feel completely balanced. If you’re struggling to stay upright, focus on using your abdominal muscles to stay balanced. Inversions require a LOT of strength in the core, and this is what will help you balance.
Be very conscious of the head and neck in this position, and do not force this pose. I will encourage all of you to move away from the wall as soon as you feel comfortable with it (opt for soft carpet!), because you will learn faster away from the wall. The wall is a great tool to learn on, but you can become too comfortable with it. The body will learn faster when there is a little fear of falling!
YOGA FAT LOSS BIBLE 50
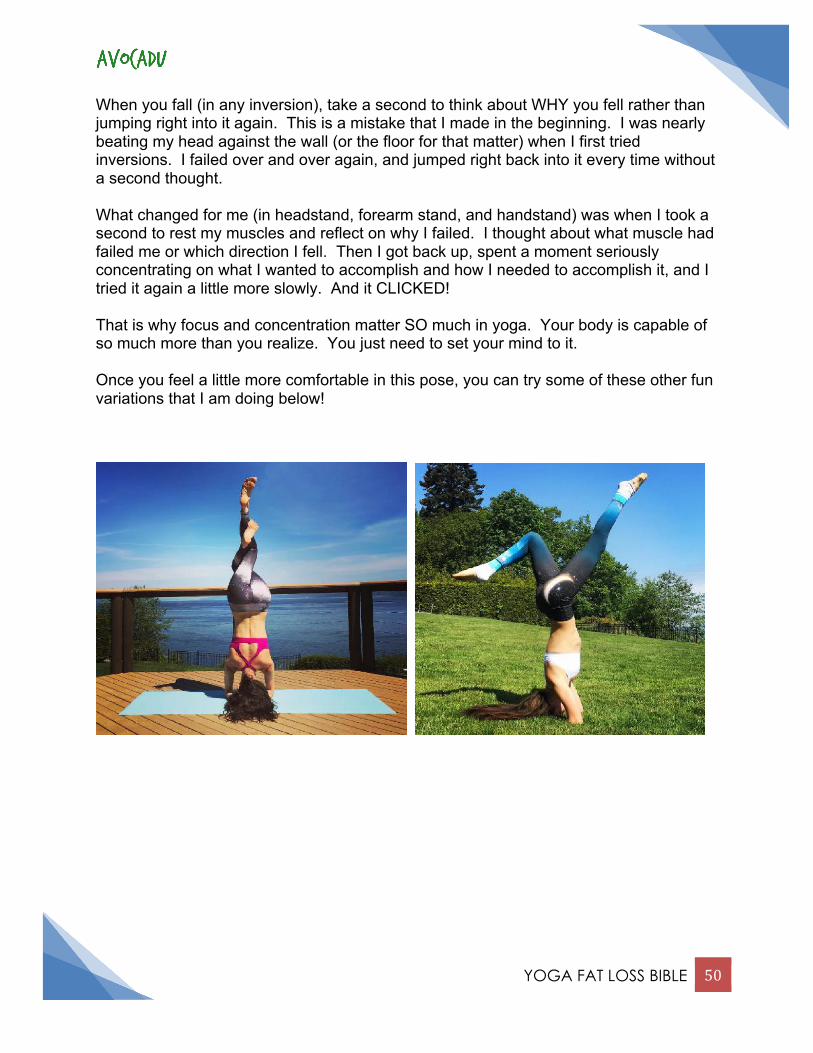
When you fall (in any inversion), take a second to think about WHY you fell rather than jumping right into it again. This is a mistake that I made in the beginning. I was nearly beating my head against the wall (or the floor for that matter) when I first tried inversions. I failed over and over again, and jumped right back into it every time without a second thought. What changed for me (in headstand, forearm stand, and handstand) was when I took a second to rest my muscles and reflect on why I failed. I thought about what muscle had failed me or which direction I fell. Then I got back up, spent a moment seriously concentrating on what I wanted to accomplish and how I needed to accomplish it, and I tried it again a little more slowly. And it CLICKED! That is why focus and concentration matter SO much in yoga. Your body is capable of so much more than you realize. You just need to set your mind to it. Once you feel a little more comfortable in this pose, you can try some of these other fun variations that I am doing below!
YOGA FAT LOSS BIBLE 51
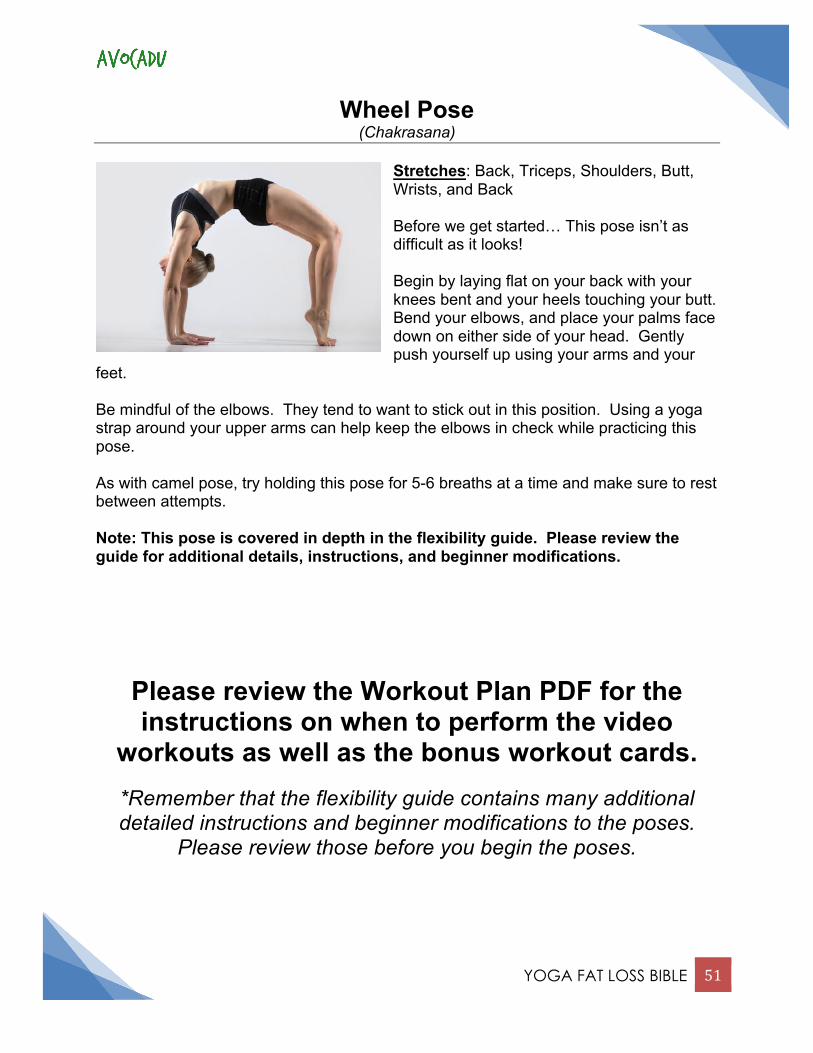
Wheel Pose (Chakrasana)
Stretches: Back, Triceps, Shoulders, Butt, Wrists, and Back Before we get started… This pose isn’t as difficult as it looks! Begin by laying flat on your back with your knees bent and your heels touching your butt. Bend your elbows, and place your palms face down on either side of your head. Gently push yourself up using your arms and your
feet. Be mindful of the elbows. They tend to want to stick out in this position. Using a yoga strap around your upper arms can help keep the elbows in check while practicing this pose. As with camel pose, try holding this pose for 5-6 breaths at a time and make sure to rest between attempts. Note: This pose is covered in depth in the flexibility guide. Please review the guide for additional details, instructions, and beginner modifications.
Please review the Workout Plan PDF for the instructions on when to perform the video
workouts as well as the bonus workout cards.
*Remember that the flexibility guide contains many additional detailed instructions and beginner modifications to the poses.
Please review those before you begin the poses.

DISCLAIMER
This book is not intended as a substitute for the medical advice of physicians. The reader should regularly consult a physician in matters relating to his/her health
and particularly with respect to any symptoms that may require diagnosis or medical attention. You are liable for any injuries or ailments received from this
program, even though we suspect you will have none!