Embed Size (px)
Citation preview
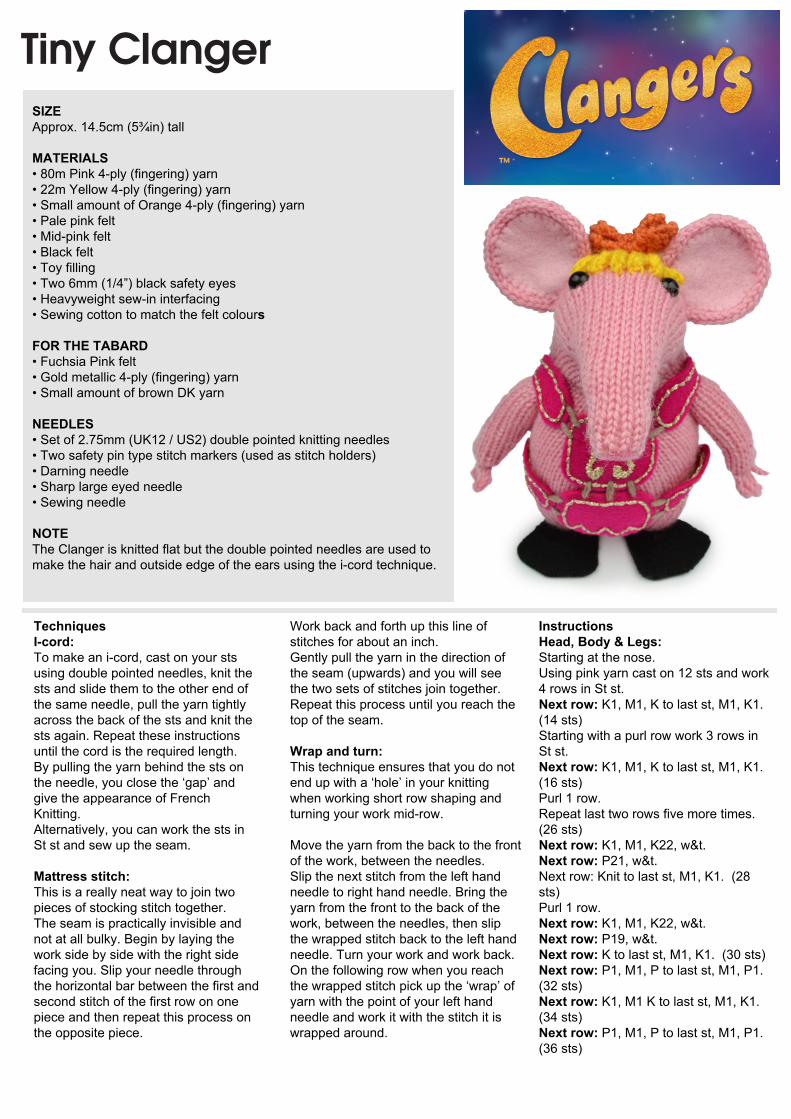
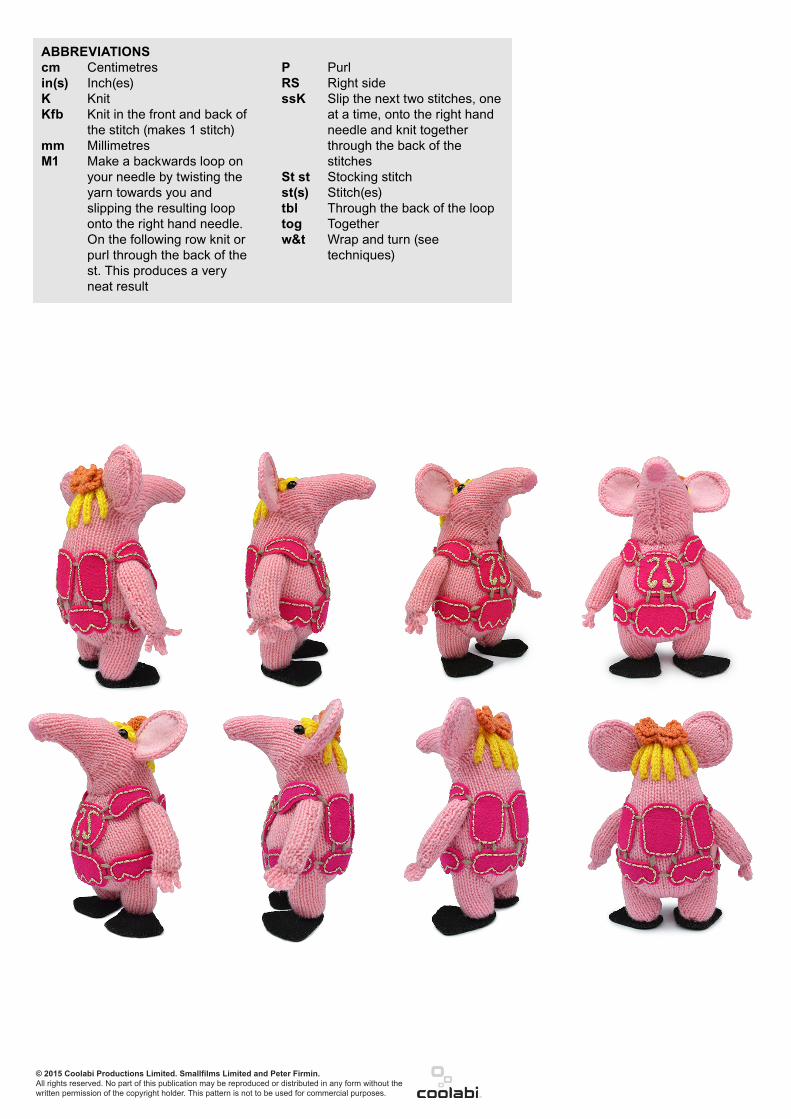
Tiny Clanger
TechniquesI-cord:To make an i-cord, cast on your sts using double pointed needles, knit the sts and slide them to the other end of the same needle, pull the yarn tightly across the back of the sts and knit the sts again. Repeat these instructions until the cord is the required length.By pulling the yarn behind the sts on the needle, you close the ‘gap’ and give the appearance of French Knitting.Alternatively, you can work the sts inSt st and sew up the seam.
Mattress stitch:This is a really neat way to join two pieces of stocking stitch together.The seam is practically invisible and not at all bulky. Begin by laying the work side by side with the right side facing you. Slip your needle through the horizontal bar between the first and second stitch of the first row on one piece and then repeat this process on the opposite piece.
Work back and forth up this line of stitches for about an inch. Gently pull the yarn in the direction of the seam (upwards) and you will see the two sets of stitches join together. Repeat this process until you reach the top of the seam. Wrap and turn:This technique ensures that you do not end up with a ‘hole’ in your knitting when working short row shaping and turning your work mid-row.
Move the yarn from the back to the front of the work, between the needles.Slip the next stitch from the left hand needle to right hand needle. Bring the yarn from the front to the back of the work, between the needles, then slip the wrapped stitch back to the left hand needle. Turn your work and work back. On the following row when you reach the wrapped stitch pick up the ‘wrap’ of yarn with the point of your left hand needle and work it with the stitch it is wrapped around.
InstructionsHead, Body & Legs:Starting at the nose.Using pink yarn cast on 12 sts and work 4 rows in St st.Next row: K1, M1, K to last st, M1, K1. (14 sts)Starting with a purl row work 3 rows in St st.Next row: K1, M1, K to last st, M1, K1. (16 sts)Purl 1 row.Repeat last two rows five more times. (26 sts)Next row: K1, M1, K22, w&t.Next row: P21, w&t.Next row: Knit to last st, M1, K1. (28 sts)Purl 1 row.Next row: K1, M1, K22, w&t.Next row: P19, w&t.Next row: K to last st, M1, K1. (30 sts)Next row: P1, M1, P to last st, M1, P1. (32 sts)Next row: K1, M1 K to last st, M1, K1. (34 sts)Next row: P1, M1, P to last st, M1, P1. (36 sts)
* Next row: K24, w&t.Next row: P12, w&t.Next row: K15, w&t.Next row: P18, w&t.Next row: Knit to end of row. *Purl 1 row. Repeat instructions between * and * once more.Mark either end of this row with a stitch marker or piece of contrasting yarn.Next row: P1, P2tog, P to last 3 sts, P2togtbl, P1. (34 sts)Next row: K1, ssK, K to last 3 sts, K2tog, K1. (32 sts)Next row: P1, P2tog, P to last 3 sts, P2togtbl, P1. (30 sts)Continuing in St st, cast on 3 sts at the beginning of the next two rows. (36 sts)Mark either end of this row with a stitch marker or piece of contrasting yarn.Next row: (K1, M1) three times, K to last 3 sts, (M1, K1) three times. (42 sts)Purl 1 row.Next row: K1, M1, K to last st, M1, K1. (44 sts)Purl 1 row.Repeat the last 2 rows six more times. (56 sts)Starting with a knit row work ten rows in St st.Next row: K11, slip the next 6 sts onto a stitch holder, turn work, cast on 4 sts, turn work, K22, slip the next 6 sts onto a stitch holder, turn work, cast on 4 sts, turn work, K11. (52 sts - plus 6 sts at either side of the body on holders)Continuing on the 52 sts only.Starting with a purl row work 3 rows in St st.Next row: K10, ssK, K2, K2tog, K20, ssK, K2, K2tog, K10. (48 sts)Purl 1 row.Next row: K9, ssK, K2, K2tog, K18, ssK, K2, K2tog, K9. (44 sts)Next row: P8, P2tog, P2, P2togtbl, P16, P2tog, P2, P2togtbl, P8. (40 sts)Next row: K7, ssK, K2, K2tog, K14, ssK, K2, K2, K2tog, K7. (36 sts)Next row: P6, P2tog, P2, P2togtbl, P12, P2tog, P2, P2togtbl, P6. (32 sts)Next row: K5, ssK, K2, K2tog, K10, ssK, K2, K2tog, K5. (28 sts)Next row: P4, P2tog, P2, P2togtbl, P8, P2tog, P2, P2togtbl, P4. (24 sts)Next row: K3, ssK, K2, K2tog, K6, ssK, K2, K2tog, K3. (20 sts)Purl 1 row.Cast off.
Work each leg as follows:Slip 6 sts from one stitch holder onto your needle. With WS facing rejoin pink yarn and purl 1 row.
Next row: K1, M1, K to last st, M1, K1. (8 sts)Purl 1 row.Repeat the last 2 rows four more times. (16 sts)Continuing in St st, cast on 2 sts at the beginning of the next two rows. (20 sts)Starting with a knit row work 2 rows in St st.Next row: K1, ssK, K to last 3 sts, K2tog, K1. (18 sts)Purl 1 row.Repeat last two rows once more.(16 sts)Cast off.
Repeat for the second leg.
Ears: (make two)Using pink yarn cast on 5 sts and purl 1 row.Next row: K1, M1, K to last st, M1, K1. (7 sts)Next row: P1, M1, P to last st, M1, P1. (9 sts)Next row: K1, M1, K to last st, M1, K1. (11 sts)Starting with a purl row work 5 rows in St st.Next row: ssK, K to last 2 sts, K2tog.(9 sts)Purl 1 row.Next row: ssK, K to last 2 sts, K2tog.(7 sts)Next row: P2tog, P to last 2 sts, P2togtbl. (5 sts)Next row: ssK, K1, K2tog. (3 sts)Cast off (WS).
Ear Edgings: (make two)Using pink yarn cast on 3 sts and work using the i-cord technique until the piece, when slightly stretched, fits around the outside edge of the ear (approximately 8cm (3 1/8”)).Tip: Do not cast off and leave a length of yarn in case you need to adjust the length once sewn around the edge of the ear.
Arms: (make two)Using pink yarn cast on 12 sts and work 6 rows in St st.Next row: K3, w&t.Next row: Purl to end of row.Knit 1 row.Next row: P3, w&t.Next row: Knit to end of row.Starting with a purl row work 11 rows in St st.Cast off.
Fingers: (make two sets)Using pink yarn cast on 6 sts.Next row: Cast off 5 sts.Next row: Cast on 5 sts.Next row: Cast off 5 sts. Repeat last two rows twice more to make a total of four fingers.Fasten off the remaining stitch.
Hair:Using yellow yarn cast on 3 sts and, using the i-cord technique, make six pieces in the following lengths:
2 x 4cm (1 1/2in)2 x 4.5cm (1 3/4in)2 x 5cm (2in)
To finish each piece thread the yarn through the sts and secure.
Bow:Top piece:Using orange yarn cast on 3 sts and knit 1 row.Next row: Kfb, K1, Kfb. (5 sts)Knit 3 rows.Next row: K2tog, K1, K2tog. (3 sts)Knit 6 rows.Next row: Kfb, K1, Kfb. (5 sts)Knit 3 rows.Next row: K2tog, K1, K2tog. (3 sts)Knit 1 row.Cast off.
Lower piece:Using orange yarn cast on 3 sts and knit 1 row.* Next row: Kfb, K1, Kfb. (5 sts)Knit 1 row.Next row: Kfb, K3, Kfb. (7 sts)Knit 4 rows.Next row: K2tog, K3, K2tog. (5 sts)Knit 1 row.Next row: K2tog, K1, K2tog. * (3 sts)Knit 3 rows.Repeat instructions from * to * once more. Knit 1 row.Cast off.
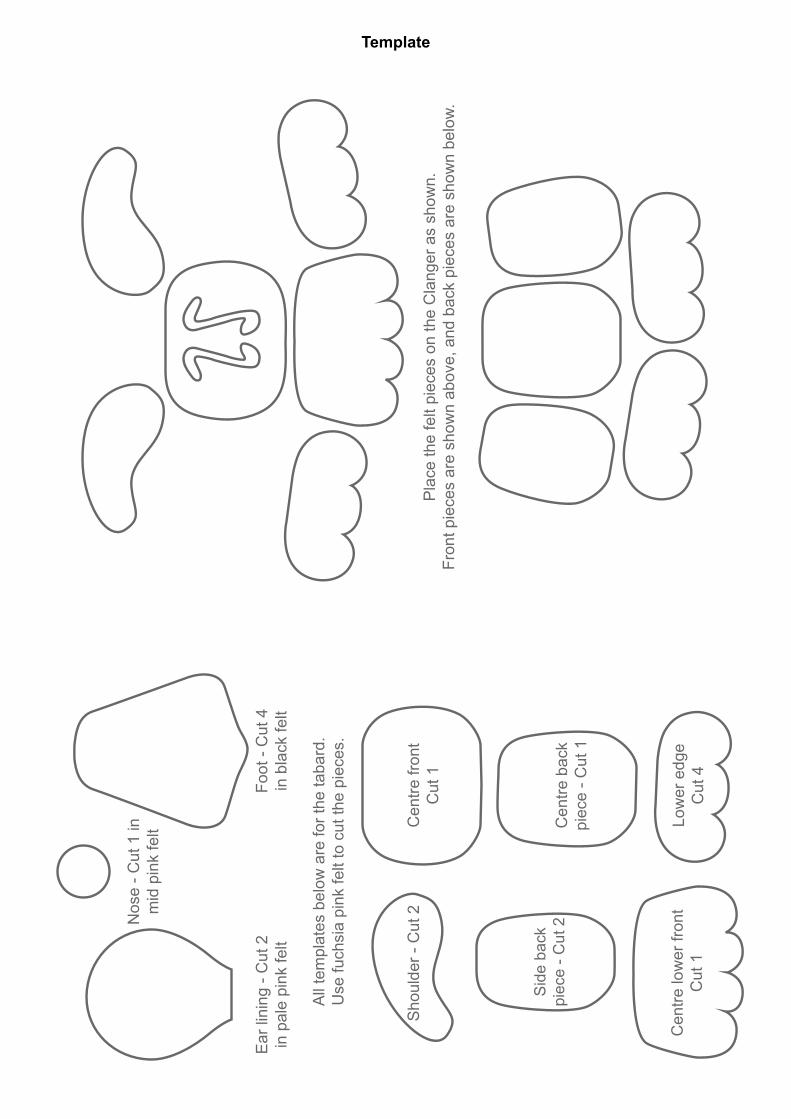
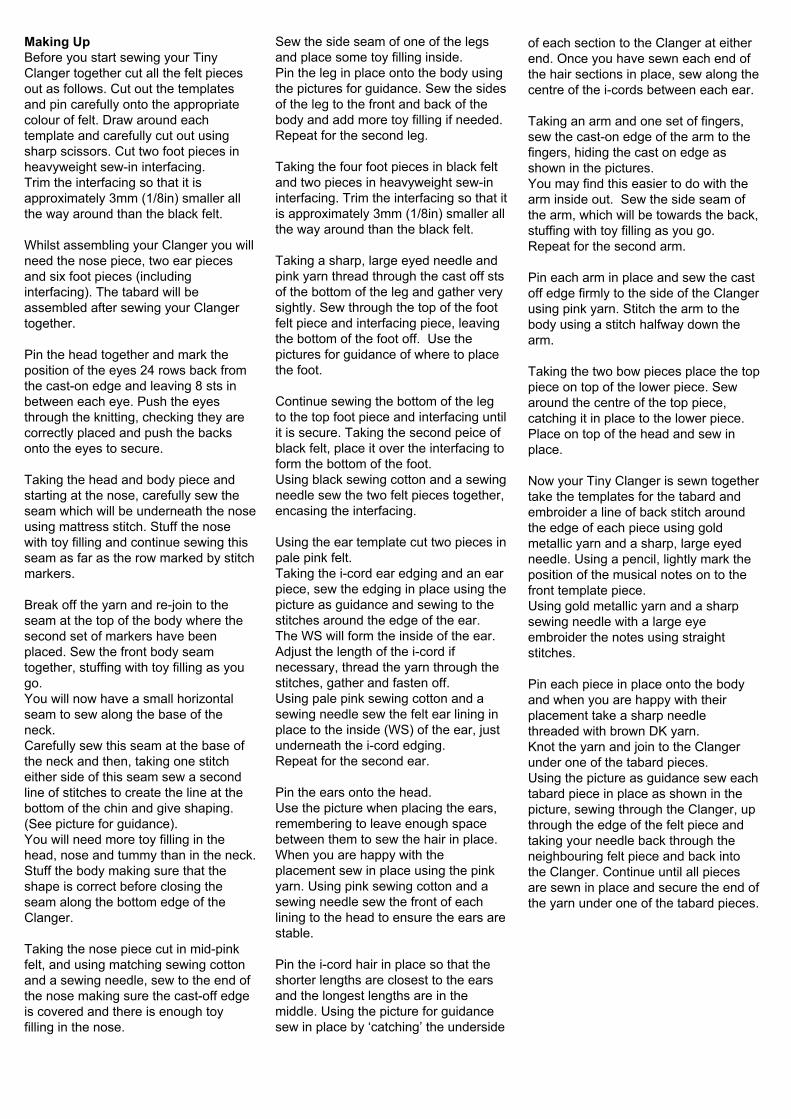
Making UpBefore you start sewing your Tiny Clanger together cut all the felt pieces out as follows. Cut out the templates and pin carefully onto the appropriate colour of felt. Draw around each template and carefully cut out using sharp scissors. Cut two foot pieces in heavyweight sew-in interfacing. Trim the interfacing so that it is approximately 3mm (1/8in) smaller all the way around than the black felt.
Whilst assembling your Clanger you will need the nose piece, two ear pieces and six foot pieces (including interfacing). The tabard will be assembled after sewing your Clanger together. Pin the head together and mark the position of the eyes 24 rows back from the cast-on edge and leaving 8 sts in between each eye. Push the eyes through the knitting, checking they are correctly placed and push the backs onto the eyes to secure.
Taking the head and body piece and starting at the nose, carefully sew the seam which will be underneath the nose using mattress stitch. Stuff the nose with toy filling and continue sewing this seam as far as the row marked by stitch markers.
Break off the yarn and re-join to the seam at the top of the body where the second set of markers have been placed. Sew the front body seam together, stuffing with toy filling as you go. You will now have a small horizontal seam to sew along the base of the neck.Carefully sew this seam at the base of the neck and then, taking one stitch either side of this seam sew a second line of stitches to create the line at the bottom of the chin and give shaping. (See picture for guidance).You will need more toy filling in the head, nose and tummy than in the neck. Stuff the body making sure that the shape is correct before closing the seam along the bottom edge of the Clanger.
Taking the nose piece cut in mid-pink felt, and using matching sewing cotton and a sewing needle, sew to the end of the nose making sure the cast-off edge is covered and there is enough toy filling in the nose.
Sew the side seam of one of the legs and place some toy filling inside. Pin the leg in place onto the body using the pictures for guidance. Sew the sides of the leg to the front and back of the body and add more toy filling if needed.Repeat for the second leg.
Taking the four foot pieces in black felt and two pieces in heavyweight sew-in interfacing. Trim the interfacing so that it is approximately 3mm (1/8in) smaller all the way around than the black felt.
Taking a sharp, large eyed needle and pink yarn thread through the cast off sts of the bottom of the leg and gather very sightly. Sew through the top of the foot felt piece and interfacing piece, leaving the bottom of the foot off. Use the pictures for guidance of where to place the foot.
Continue sewing the bottom of the leg to the top foot piece and interfacing until it is secure. Taking the second peice of black felt, place it over the interfacing to form the bottom of the foot.Using black sewing cotton and a sewing needle sew the two felt pieces together, encasing the interfacing.
Using the ear template cut two pieces in pale pink felt.Taking the i-cord ear edging and an ear piece, sew the edging in place using the picture as guidance and sewing to the stitches around the edge of the ear. The WS will form the inside of the ear. Adjust the length of the i-cord if necessary, thread the yarn through the stitches, gather and fasten off. Using pale pink sewing cotton and a sewing needle sew the felt ear lining in place to the inside (WS) of the ear, just underneath the i-cord edging.Repeat for the second ear.
Pin the ears onto the head. Use the picture when placing the ears, remembering to leave enough space between them to sew the hair in place. When you are happy with the placement sew in place using the pink yarn. Using pink sewing cotton and a sewing needle sew the front of each lining to the head to ensure the ears are stable.
Pin the i-cord hair in place so that the shorter lengths are closest to the ears and the longest lengths are in the middle. Using the picture for guidance sew in place by ‘catching’ the underside
of each section to the Clanger at either end. Once you have sewn each end of the hair sections in place, sew along the centre of the i-cords between each ear.
Taking an arm and one set of fingers, sew the cast-on edge of the arm to the fingers, hiding the cast on edge as shown in the pictures.You may find this easier to do with the arm inside out. Sew the side seam of the arm, which will be towards the back, stuffing with toy filling as you go. Repeat for the second arm.
Pin each arm in place and sew the cast off edge firmly to the side of the Clanger using pink yarn. Stitch the arm to the body using a stitch halfway down the arm.
Taking the two bow pieces place the top piece on top of the lower piece. Sew around the centre of the top piece, catching it in place to the lower piece. Place on top of the head and sew in place.
Now your Tiny Clanger is sewn together take the templates for the tabard and embroider a line of back stitch around the edge of each piece using gold metallic yarn and a sharp, large eyed needle. Using a pencil, lightly mark the position of the musical notes on to the front template piece. Using gold metallic yarn and a sharp sewing needle with a large eye embroider the notes using straight stitches.
Pin each piece in place onto the body and when you are happy with their placement take a sharp needle threaded with brown DK yarn.Knot the yarn and join to the Clanger under one of the tabard pieces.Using the picture as guidance sew each tabard piece in place as shown in the picture, sewing through the Clanger, up through the edge of the felt piece and taking your needle back through the neighbouring felt piece and back into the Clanger. Continue until all pieces are sewn in place and secure the end of the yarn under one of the tabard pieces.
SIZEApprox. 14.5cm (5¾in) tall
MATERIALS• 80m Pink 4-ply (fingering) yarn• 22m Yellow 4-ply (fingering) yarn• Small amount of Orange 4-ply (fingering) yarn• Pale pink felt• Mid-pink felt• Black felt• Toy filling• Two 6mm (1/4”) black safety eyes• Heavyweight sew-in interfacing• Sewing cotton to match the felt colours
FOR THE TABARD• Fuchsia Pink felt• Gold metallic 4-ply (fingering) yarn• Small amount of brown DK yarn
NEEDLES• Set of 2.75mm (UK12 / US2) double pointed knitting needles• Two safety pin type stitch markers (used as stitch holders)• Darning needle• Sharp large eyed needle• Sewing needle
NOTEThe Clanger is knitted flat but the double pointed needles are used tomake the hair and outside edge of the ears using the i-cord technique.
TechniquesI-cord:To make an i-cord, cast on your sts using double pointed needles, knit the sts and slide them to the other end of the same needle, pull the yarn tightly across the back of the sts and knit the sts again. Repeat these instructions until the cord is the required length.By pulling the yarn behind the sts on the needle, you close the ‘gap’ and give the appearance of French Knitting.Alternatively, you can work the sts inSt st and sew up the seam.
Mattress stitch:This is a really neat way to join two pieces of stocking stitch together.The seam is practically invisible and not at all bulky. Begin by laying the work side by side with the right side facing you. Slip your needle through the horizontal bar between the first and second stitch of the first row on one piece and then repeat this process on the opposite piece.
Work back and forth up this line of stitches for about an inch. Gently pull the yarn in the direction of the seam (upwards) and you will see the two sets of stitches join together. Repeat this process until you reach the top of the seam. Wrap and turn:This technique ensures that you do not end up with a ‘hole’ in your knitting when working short row shaping and turning your work mid-row.
Move the yarn from the back to the front of the work, between the needles.Slip the next stitch from the left hand needle to right hand needle. Bring the yarn from the front to the back of the work, between the needles, then slip the wrapped stitch back to the left hand needle. Turn your work and work back. On the following row when you reach the wrapped stitch pick up the ‘wrap’ of yarn with the point of your left hand needle and work it with the stitch it is wrapped around.
InstructionsHead, Body & Legs:Starting at the nose.Using pink yarn cast on 12 sts and work 4 rows in St st.Next row: K1, M1, K to last st, M1, K1. (14 sts)Starting with a purl row work 3 rows in St st.Next row: K1, M1, K to last st, M1, K1. (16 sts)Purl 1 row.Repeat last two rows five more times. (26 sts)Next row: K1, M1, K22, w&t.Next row: P21, w&t.Next row: Knit to last st, M1, K1. (28 sts)Purl 1 row.Next row: K1, M1, K22, w&t.Next row: P19, w&t.Next row: K to last st, M1, K1. (30 sts)Next row: P1, M1, P to last st, M1, P1. (32 sts)Next row: K1, M1 K to last st, M1, K1. (34 sts)Next row: P1, M1, P to last st, M1, P1. (36 sts)
* Next row: K24, w&t.Next row: P12, w&t.Next row: K15, w&t.Next row: P18, w&t.Next row: Knit to end of row. *Purl 1 row. Repeat instructions between * and * once more.Mark either end of this row with a stitch marker or piece of contrasting yarn.Next row: P1, P2tog, P to last 3 sts, P2togtbl, P1. (34 sts)Next row: K1, ssK, K to last 3 sts, K2tog, K1. (32 sts)Next row: P1, P2tog, P to last 3 sts, P2togtbl, P1. (30 sts)Continuing in St st, cast on 3 sts at the beginning of the next two rows. (36 sts)Mark either end of this row with a stitch marker or piece of contrasting yarn.Next row: (K1, M1) three times, K to last 3 sts, (M1, K1) three times. (42 sts)Purl 1 row.Next row: K1, M1, K to last st, M1, K1. (44 sts)Purl 1 row.Repeat the last 2 rows six more times. (56 sts)Starting with a knit row work ten rows in St st.Next row: K11, slip the next 6 sts onto a stitch holder, turn work, cast on 4 sts, turn work, K22, slip the next 6 sts onto a stitch holder, turn work, cast on 4 sts, turn work, K11. (52 sts - plus 6 sts at either side of the body on holders)Continuing on the 52 sts only.Starting with a purl row work 3 rows in St st.Next row: K10, ssK, K2, K2tog, K20, ssK, K2, K2tog, K10. (48 sts)Purl 1 row.Next row: K9, ssK, K2, K2tog, K18, ssK, K2, K2tog, K9. (44 sts)Next row: P8, P2tog, P2, P2togtbl, P16, P2tog, P2, P2togtbl, P8. (40 sts)Next row: K7, ssK, K2, K2tog, K14, ssK, K2, K2, K2tog, K7. (36 sts)Next row: P6, P2tog, P2, P2togtbl, P12, P2tog, P2, P2togtbl, P6. (32 sts)Next row: K5, ssK, K2, K2tog, K10, ssK, K2, K2tog, K5. (28 sts)Next row: P4, P2tog, P2, P2togtbl, P8, P2tog, P2, P2togtbl, P4. (24 sts)Next row: K3, ssK, K2, K2tog, K6, ssK, K2, K2tog, K3. (20 sts)Purl 1 row.Cast off.
Work each leg as follows:Slip 6 sts from one stitch holder onto your needle. With WS facing rejoin pink yarn and purl 1 row.
Next row: K1, M1, K to last st, M1, K1. (8 sts)Purl 1 row.Repeat the last 2 rows four more times. (16 sts)Continuing in St st, cast on 2 sts at the beginning of the next two rows. (20 sts)Starting with a knit row work 2 rows in St st.Next row: K1, ssK, K to last 3 sts, K2tog, K1. (18 sts)Purl 1 row.Repeat last two rows once more.(16 sts)Cast off.
Repeat for the second leg.
Ears: (make two)Using pink yarn cast on 5 sts and purl 1 row.Next row: K1, M1, K to last st, M1, K1. (7 sts)Next row: P1, M1, P to last st, M1, P1. (9 sts)Next row: K1, M1, K to last st, M1, K1. (11 sts)Starting with a purl row work 5 rows in St st.Next row: ssK, K to last 2 sts, K2tog.(9 sts)Purl 1 row.Next row: ssK, K to last 2 sts, K2tog.(7 sts)Next row: P2tog, P to last 2 sts, P2togtbl. (5 sts)Next row: ssK, K1, K2tog. (3 sts)Cast off (WS).
Ear Edgings: (make two)Using pink yarn cast on 3 sts and work using the i-cord technique until the piece, when slightly stretched, fits around the outside edge of the ear (approximately 8cm (3 1/8”)).Tip: Do not cast off and leave a length of yarn in case you need to adjust the length once sewn around the edge of the ear.
Arms: (make two)Using pink yarn cast on 12 sts and work 6 rows in St st.Next row: K3, w&t.Next row: Purl to end of row.Knit 1 row.Next row: P3, w&t.Next row: Knit to end of row.Starting with a purl row work 11 rows in St st.Cast off.
Fingers: (make two sets)Using pink yarn cast on 6 sts.Next row: Cast off 5 sts.Next row: Cast on 5 sts.Next row: Cast off 5 sts. Repeat last two rows twice more to make a total of four fingers.Fasten off the remaining stitch.
Hair:Using yellow yarn cast on 3 sts and, using the i-cord technique, make six pieces in the following lengths:
2 x 4cm (1 1/2in)2 x 4.5cm (1 3/4in)2 x 5cm (2in)
To finish each piece thread the yarn through the sts and secure.
Bow:Top piece:Using orange yarn cast on 3 sts and knit 1 row.Next row: Kfb, K1, Kfb. (5 sts)Knit 3 rows.Next row: K2tog, K1, K2tog. (3 sts)Knit 6 rows.Next row: Kfb, K1, Kfb. (5 sts)Knit 3 rows.Next row: K2tog, K1, K2tog. (3 sts)Knit 1 row.Cast off.
Lower piece:Using orange yarn cast on 3 sts and knit 1 row.* Next row: Kfb, K1, Kfb. (5 sts)Knit 1 row.Next row: Kfb, K3, Kfb. (7 sts)Knit 4 rows.Next row: K2tog, K3, K2tog. (5 sts)Knit 1 row.Next row: K2tog, K1, K2tog. * (3 sts)Knit 3 rows.Repeat instructions from * to * once more. Knit 1 row.Cast off.
Making UpBefore you start sewing your Tiny Clanger together cut all the felt pieces out as follows. Cut out the templates and pin carefully onto the appropriate colour of felt. Draw around each template and carefully cut out using sharp scissors. Cut two foot pieces in heavyweight sew-in interfacing. Trim the interfacing so that it is approximately 3mm (1/8in) smaller all the way around than the black felt.
Whilst assembling your Clanger you will need the nose piece, two ear pieces and six foot pieces (including interfacing). The tabard will be assembled after sewing your Clanger together. Pin the head together and mark the position of the eyes 24 rows back from the cast-on edge and leaving 8 sts in between each eye. Push the eyes through the knitting, checking they are correctly placed and push the backs onto the eyes to secure.
Taking the head and body piece and starting at the nose, carefully sew the seam which will be underneath the nose using mattress stitch. Stuff the nose with toy filling and continue sewing this seam as far as the row marked by stitch markers.
Break off the yarn and re-join to the seam at the top of the body where the second set of markers have been placed. Sew the front body seam together, stuffing with toy filling as you go. You will now have a small horizontal seam to sew along the base of the neck.Carefully sew this seam at the base of the neck and then, taking one stitch either side of this seam sew a second line of stitches to create the line at the bottom of the chin and give shaping. (See picture for guidance).You will need more toy filling in the head, nose and tummy than in the neck. Stuff the body making sure that the shape is correct before closing the seam along the bottom edge of the Clanger.
Taking the nose piece cut in mid-pink felt, and using matching sewing cotton and a sewing needle, sew to the end of the nose making sure the cast-off edge is covered and there is enough toy filling in the nose.
Sew the side seam of one of the legs and place some toy filling inside. Pin the leg in place onto the body using the pictures for guidance. Sew the sides of the leg to the front and back of the body and add more toy filling if needed.Repeat for the second leg.
Taking the four foot pieces in black felt and two pieces in heavyweight sew-in interfacing. Trim the interfacing so that it is approximately 3mm (1/8in) smaller all the way around than the black felt.
Taking a sharp, large eyed needle and pink yarn thread through the cast off sts of the bottom of the leg and gather very sightly. Sew through the top of the foot felt piece and interfacing piece, leaving the bottom of the foot off. Use the pictures for guidance of where to place the foot.
Continue sewing the bottom of the leg to the top foot piece and interfacing until it is secure. Taking the second peice of black felt, place it over the interfacing to form the bottom of the foot.Using black sewing cotton and a sewing needle sew the two felt pieces together, encasing the interfacing.
Using the ear template cut two pieces in pale pink felt.Taking the i-cord ear edging and an ear piece, sew the edging in place using the picture as guidance and sewing to the stitches around the edge of the ear. The WS will form the inside of the ear. Adjust the length of the i-cord if necessary, thread the yarn through the stitches, gather and fasten off. Using pale pink sewing cotton and a sewing needle sew the felt ear lining in place to the inside (WS) of the ear, just underneath the i-cord edging.Repeat for the second ear.
Pin the ears onto the head. Use the picture when placing the ears, remembering to leave enough space between them to sew the hair in place. When you are happy with the placement sew in place using the pink yarn. Using pink sewing cotton and a sewing needle sew the front of each lining to the head to ensure the ears are stable.
Pin the i-cord hair in place so that the shorter lengths are closest to the ears and the longest lengths are in the middle. Using the picture for guidance sew in place by ‘catching’ the underside
of each section to the Clanger at either end. Once you have sewn each end of the hair sections in place, sew along the centre of the i-cords between each ear.
Taking an arm and one set of fingers, sew the cast-on edge of the arm to the fingers, hiding the cast on edge as shown in the pictures.You may find this easier to do with the arm inside out. Sew the side seam of the arm, which will be towards the back, stuffing with toy filling as you go. Repeat for the second arm.
Pin each arm in place and sew the cast off edge firmly to the side of the Clanger using pink yarn. Stitch the arm to the body using a stitch halfway down the arm.
Taking the two bow pieces place the top piece on top of the lower piece. Sew around the centre of the top piece, catching it in place to the lower piece. Place on top of the head and sew in place.
Now your Tiny Clanger is sewn together take the templates for the tabard and embroider a line of back stitch around the edge of each piece using gold metallic yarn and a sharp, large eyed needle. Using a pencil, lightly mark the position of the musical notes on to the front template piece. Using gold metallic yarn and a sharp sewing needle with a large eye embroider the notes using straight stitches.
Pin each piece in place onto the body and when you are happy with their placement take a sharp needle threaded with brown DK yarn.Knot the yarn and join to the Clanger under one of the tabard pieces.Using the picture as guidance sew each tabard piece in place as shown in the picture, sewing through the Clanger, up through the edge of the felt piece and taking your needle back through the neighbouring felt piece and back into the Clanger. Continue until all pieces are sewn in place and secure the end of the yarn under one of the tabard pieces.
Ear
lini
ng -
Cut
2in
pal
e pi
nk fe
lt
Sho
ulde
r - C
ut 2
Cen
tre lo
wer
fron
tC
ut 1
Cen
tre fr
ont
Cut
1P
lace
the
felt
piec
es o
n th
e C
lang
er a
s sh
own.
Fron
t pie
ces
are
show
n ab
ove,
and
bac
k pi
eces
are
sho
wn
belo
w.
All
tem
plat
es b
elow
are
for t
he ta
bard
.U
se fu
chsi
a pi
nk fe
lt to
cut
the
piec
es.
Cen
tre b
ack
piec
e - C
ut 1
Sid
e ba
ckpi
ece
- Cut
2
Low
er e
dge
Cut
4
Foot
- C
ut 4
in b
lack
felt
Nos
e - C
ut 1
inm
id p
ink
felt
Template
TechniquesI-cord:To make an i-cord, cast on your sts using double pointed needles, knit the sts and slide them to the other end of the same needle, pull the yarn tightly across the back of the sts and knit the sts again. Repeat these instructions until the cord is the required length.By pulling the yarn behind the sts on the needle, you close the ‘gap’ and give the appearance of French Knitting.Alternatively, you can work the sts inSt st and sew up the seam.
Mattress stitch:This is a really neat way to join two pieces of stocking stitch together.The seam is practically invisible and not at all bulky. Begin by laying the work side by side with the right side facing you. Slip your needle through the horizontal bar between the first and second stitch of the first row on one piece and then repeat this process on the opposite piece.
Work back and forth up this line of stitches for about an inch. Gently pull the yarn in the direction of the seam (upwards) and you will see the two sets of stitches join together. Repeat this process until you reach the top of the seam. Wrap and turn:This technique ensures that you do not end up with a ‘hole’ in your knitting when working short row shaping and turning your work mid-row.
Move the yarn from the back to the front of the work, between the needles.Slip the next stitch from the left hand needle to right hand needle. Bring the yarn from the front to the back of the work, between the needles, then slip the wrapped stitch back to the left hand needle. Turn your work and work back. On the following row when you reach the wrapped stitch pick up the ‘wrap’ of yarn with the point of your left hand needle and work it with the stitch it is wrapped around.
InstructionsHead, Body & Legs:Starting at the nose.Using pink yarn cast on 12 sts and work 4 rows in St st.Next row: K1, M1, K to last st, M1, K1. (14 sts)Starting with a purl row work 3 rows in St st.Next row: K1, M1, K to last st, M1, K1. (16 sts)Purl 1 row.Repeat last two rows five more times. (26 sts)Next row: K1, M1, K22, w&t.Next row: P21, w&t.Next row: Knit to last st, M1, K1. (28 sts)Purl 1 row.Next row: K1, M1, K22, w&t.Next row: P19, w&t.Next row: K to last st, M1, K1. (30 sts)Next row: P1, M1, P to last st, M1, P1. (32 sts)Next row: K1, M1 K to last st, M1, K1. (34 sts)Next row: P1, M1, P to last st, M1, P1. (36 sts)
* Next row: K24, w&t.Next row: P12, w&t.Next row: K15, w&t.Next row: P18, w&t.Next row: Knit to end of row. *Purl 1 row. Repeat instructions between * and * once more.Mark either end of this row with a stitch marker or piece of contrasting yarn.Next row: P1, P2tog, P to last 3 sts, P2togtbl, P1. (34 sts)Next row: K1, ssK, K to last 3 sts, K2tog, K1. (32 sts)Next row: P1, P2tog, P to last 3 sts, P2togtbl, P1. (30 sts)Continuing in St st, cast on 3 sts at the beginning of the next two rows. (36 sts)Mark either end of this row with a stitch marker or piece of contrasting yarn.Next row: (K1, M1) three times, K to last 3 sts, (M1, K1) three times. (42 sts)Purl 1 row.Next row: K1, M1, K to last st, M1, K1. (44 sts)Purl 1 row.Repeat the last 2 rows six more times. (56 sts)Starting with a knit row work ten rows in St st.Next row: K11, slip the next 6 sts onto a stitch holder, turn work, cast on 4 sts, turn work, K22, slip the next 6 sts onto a stitch holder, turn work, cast on 4 sts, turn work, K11. (52 sts - plus 6 sts at either side of the body on holders)Continuing on the 52 sts only.Starting with a purl row work 3 rows in St st.Next row: K10, ssK, K2, K2tog, K20, ssK, K2, K2tog, K10. (48 sts)Purl 1 row.Next row: K9, ssK, K2, K2tog, K18, ssK, K2, K2tog, K9. (44 sts)Next row: P8, P2tog, P2, P2togtbl, P16, P2tog, P2, P2togtbl, P8. (40 sts)Next row: K7, ssK, K2, K2tog, K14, ssK, K2, K2, K2tog, K7. (36 sts)Next row: P6, P2tog, P2, P2togtbl, P12, P2tog, P2, P2togtbl, P6. (32 sts)Next row: K5, ssK, K2, K2tog, K10, ssK, K2, K2tog, K5. (28 sts)Next row: P4, P2tog, P2, P2togtbl, P8, P2tog, P2, P2togtbl, P4. (24 sts)Next row: K3, ssK, K2, K2tog, K6, ssK, K2, K2tog, K3. (20 sts)Purl 1 row.Cast off.
Work each leg as follows:Slip 6 sts from one stitch holder onto your needle. With WS facing rejoin pink yarn and purl 1 row.
Next row: K1, M1, K to last st, M1, K1. (8 sts)Purl 1 row.Repeat the last 2 rows four more times. (16 sts)Continuing in St st, cast on 2 sts at the beginning of the next two rows. (20 sts)Starting with a knit row work 2 rows in St st.Next row: K1, ssK, K to last 3 sts, K2tog, K1. (18 sts)Purl 1 row.Repeat last two rows once more.(16 sts)Cast off.
Repeat for the second leg.
Ears: (make two)Using pink yarn cast on 5 sts and purl 1 row.Next row: K1, M1, K to last st, M1, K1. (7 sts)Next row: P1, M1, P to last st, M1, P1. (9 sts)Next row: K1, M1, K to last st, M1, K1. (11 sts)Starting with a purl row work 5 rows in St st.Next row: ssK, K to last 2 sts, K2tog.(9 sts)Purl 1 row.Next row: ssK, K to last 2 sts, K2tog.(7 sts)Next row: P2tog, P to last 2 sts, P2togtbl. (5 sts)Next row: ssK, K1, K2tog. (3 sts)Cast off (WS).
Ear Edgings: (make two)Using pink yarn cast on 3 sts and work using the i-cord technique until the piece, when slightly stretched, fits around the outside edge of the ear (approximately 8cm (3 1/8”)).Tip: Do not cast off and leave a length of yarn in case you need to adjust the length once sewn around the edge of the ear.
Arms: (make two)Using pink yarn cast on 12 sts and work 6 rows in St st.Next row: K3, w&t.Next row: Purl to end of row.Knit 1 row.Next row: P3, w&t.Next row: Knit to end of row.Starting with a purl row work 11 rows in St st.Cast off.
Fingers: (make two sets)Using pink yarn cast on 6 sts.Next row: Cast off 5 sts.Next row: Cast on 5 sts.Next row: Cast off 5 sts. Repeat last two rows twice more to make a total of four fingers.Fasten off the remaining stitch.
Hair:Using yellow yarn cast on 3 sts and, using the i-cord technique, make six pieces in the following lengths:
2 x 4cm (1 1/2in)2 x 4.5cm (1 3/4in)2 x 5cm (2in)
To finish each piece thread the yarn through the sts and secure.
Bow:Top piece:Using orange yarn cast on 3 sts and knit 1 row.Next row: Kfb, K1, Kfb. (5 sts)Knit 3 rows.Next row: K2tog, K1, K2tog. (3 sts)Knit 6 rows.Next row: Kfb, K1, Kfb. (5 sts)Knit 3 rows.Next row: K2tog, K1, K2tog. (3 sts)Knit 1 row.Cast off.
Lower piece:Using orange yarn cast on 3 sts and knit 1 row.* Next row: Kfb, K1, Kfb. (5 sts)Knit 1 row.Next row: Kfb, K3, Kfb. (7 sts)Knit 4 rows.Next row: K2tog, K3, K2tog. (5 sts)Knit 1 row.Next row: K2tog, K1, K2tog. * (3 sts)Knit 3 rows.Repeat instructions from * to * once more. Knit 1 row.Cast off.
Making UpBefore you start sewing your Tiny Clanger together cut all the felt pieces out as follows. Cut out the templates and pin carefully onto the appropriate colour of felt. Draw around each template and carefully cut out using sharp scissors. Cut two foot pieces in heavyweight sew-in interfacing. Trim the interfacing so that it is approximately 3mm (1/8in) smaller all the way around than the black felt.
Whilst assembling your Clanger you will need the nose piece, two ear pieces and six foot pieces (including interfacing). The tabard will be assembled after sewing your Clanger together. Pin the head together and mark the position of the eyes 24 rows back from the cast-on edge and leaving 8 sts in between each eye. Push the eyes through the knitting, checking they are correctly placed and push the backs onto the eyes to secure.
Taking the head and body piece and starting at the nose, carefully sew the seam which will be underneath the nose using mattress stitch. Stuff the nose with toy filling and continue sewing this seam as far as the row marked by stitch markers.
Break off the yarn and re-join to the seam at the top of the body where the second set of markers have been placed. Sew the front body seam together, stuffing with toy filling as you go. You will now have a small horizontal seam to sew along the base of the neck.Carefully sew this seam at the base of the neck and then, taking one stitch either side of this seam sew a second line of stitches to create the line at the bottom of the chin and give shaping. (See picture for guidance).You will need more toy filling in the head, nose and tummy than in the neck. Stuff the body making sure that the shape is correct before closing the seam along the bottom edge of the Clanger.
Taking the nose piece cut in mid-pink felt, and using matching sewing cotton and a sewing needle, sew to the end of the nose making sure the cast-off edge is covered and there is enough toy filling in the nose.
Sew the side seam of one of the legs and place some toy filling inside. Pin the leg in place onto the body using the pictures for guidance. Sew the sides of the leg to the front and back of the body and add more toy filling if needed.Repeat for the second leg.
Taking the four foot pieces in black felt and two pieces in heavyweight sew-in interfacing. Trim the interfacing so that it is approximately 3mm (1/8in) smaller all the way around than the black felt.
Taking a sharp, large eyed needle and pink yarn thread through the cast off sts of the bottom of the leg and gather very sightly. Sew through the top of the foot felt piece and interfacing piece, leaving the bottom of the foot off. Use the pictures for guidance of where to place the foot.
Continue sewing the bottom of the leg to the top foot piece and interfacing until it is secure. Taking the second peice of black felt, place it over the interfacing to form the bottom of the foot.Using black sewing cotton and a sewing needle sew the two felt pieces together, encasing the interfacing.
Using the ear template cut two pieces in pale pink felt.Taking the i-cord ear edging and an ear piece, sew the edging in place using the picture as guidance and sewing to the stitches around the edge of the ear. The WS will form the inside of the ear. Adjust the length of the i-cord if necessary, thread the yarn through the stitches, gather and fasten off. Using pale pink sewing cotton and a sewing needle sew the felt ear lining in place to the inside (WS) of the ear, just underneath the i-cord edging.Repeat for the second ear.
Pin the ears onto the head. Use the picture when placing the ears, remembering to leave enough space between them to sew the hair in place. When you are happy with the placement sew in place using the pink yarn. Using pink sewing cotton and a sewing needle sew the front of each lining to the head to ensure the ears are stable.
Pin the i-cord hair in place so that the shorter lengths are closest to the ears and the longest lengths are in the middle. Using the picture for guidance sew in place by ‘catching’ the underside
of each section to the Clanger at either end. Once you have sewn each end of the hair sections in place, sew along the centre of the i-cords between each ear.
Taking an arm and one set of fingers, sew the cast-on edge of the arm to the fingers, hiding the cast on edge as shown in the pictures.You may find this easier to do with the arm inside out. Sew the side seam of the arm, which will be towards the back, stuffing with toy filling as you go. Repeat for the second arm.
Pin each arm in place and sew the cast off edge firmly to the side of the Clanger using pink yarn. Stitch the arm to the body using a stitch halfway down the arm.
Taking the two bow pieces place the top piece on top of the lower piece. Sew around the centre of the top piece, catching it in place to the lower piece. Place on top of the head and sew in place.
Now your Tiny Clanger is sewn together take the templates for the tabard and embroider a line of back stitch around the edge of each piece using gold metallic yarn and a sharp, large eyed needle. Using a pencil, lightly mark the position of the musical notes on to the front template piece. Using gold metallic yarn and a sharp sewing needle with a large eye embroider the notes using straight stitches.
Pin each piece in place onto the body and when you are happy with their placement take a sharp needle threaded with brown DK yarn.Knot the yarn and join to the Clanger under one of the tabard pieces.Using the picture as guidance sew each tabard piece in place as shown in the picture, sewing through the Clanger, up through the edge of the felt piece and taking your needle back through the neighbouring felt piece and back into the Clanger. Continue until all pieces are sewn in place and secure the end of the yarn under one of the tabard pieces.
P PurlRS Right side ssK Slip the next two stitches, one at a time, onto the right hand needle and knit together through the back of the stitchesSt st Stocking stitchst(s) Stitch(es)tbl Through the back of the looptog Togetherw&t Wrap and turn (see techniques)
ABBREVIATIONScm Centimetresin(s) Inch(es)K KnitKfb Knit in the front and back of the stitch (makes 1 stitch)mm MillimetresM1 Make a backwards loop on your needle by twisting the yarn towards you and slipping the resulting loop onto the right hand needle. On the following row knit or purl through the back of the st. This produces a very neat result
© 2015 Coolabi Productions Limited. Smallfilms Limited and Peter Firmin.All rights reserved. No part of this publication may be reproduced or distributed in any form without the written permission of the copyright holder. This pattern is not to be used for commercial purposes.
![Textured Cardigan Layout 1 - Knit Rowan · Textured Cardigan By Sarah Hatton. ... needles cast on 127 [137: 151: 165] sts. Rows 1 and 2: Purl. ... 11] sts in rev st st between cable](https://img.pdfslide.net/doc/110x75/5ad3ffda7f8b9a571e8babe3/textured-cardigan-layout-1-knit-rowan-cardigan-by-sarah-hatton-needles-cast.jpg)