Embed Size (px)
Citation preview
TIRE PRESURE MONITORING SYSTEM (TPMS)
Tires Overview
Tires are designed to operate within a specific range of air pressures. The recommended inflation pressure is printed on the decal on the driver’s door jam (B-Pillar). The decal specifies the proper tire inflation.
Tire pressure should be checked monthly as recommended in the Owner Guide because all tires lose pressure over time.
A tire's inflation pressure cannot be judged by appearance alone. For example; often by the time a low profile radial tire looks low it may be 10 to 15 PSI underinflated.
Some new inexpensive tire pressure gauges accuracy can be off by several PSI. Checking the tire inflation pressure requires an accurate tire pressure gauge.
TPMS Overview
Tire Pressure Monitoring System, or TPMS as it is typically referred to, uses an instrument panel warning light or message center to alert the driver to low tire pressure.
Congress passed the Transportation, Recall, Enhancement, Accountability and Documentation (TREAD) Act in 2000. Part of the TREAD Act addresses concerns of low tire pressure.
The TREAD Act legislated that vehicle manufacturers must equip all passenger vehicles and light trucks with TPMS by the start of the 2008 model year. Industry-wide compliance was phased in starting with the 2006 model year. The 2003 Explorer and Mountaineer were the first Ford Motor Company products to receive the TPMS system. These systems are required to alert the driver if the tire pressure falls to 25 percent below the manufacturer’s recommended tire pressure.
TPMS
TPMS TechnologyCurrently, Ford Motor Company vehicles utilize the direct measurement TPMS sensor. The sensors are very accurate, usually within .25 PSI or less.
Direct measurement TPMS sensors use a small pressure sensor with a built-in battery and transponder. There is one sensor per tire. (The spare tire does not have a sensor in it.) The sensor sends a radio signal at a pre- determined interval to a control module in the vehicle. The control module identifies the signal from each wheel and tracks the tire pressure. If the air pressure drops below a predetermined threshold, the control module turns on the warning light on the instrument panel.
When the vehicle begins to move, a switch inside the sensor activates the pressure measurement and signal sending function. At about 20 mph, the sensor begins measuring the pressure every 30 seconds and transmits the results once each minute to the control module.
Motorcraft sensors complete an electrical connection either by a roll switch or an accelerometer. The roll switch was used on the 2003-2005 Explorer/Mountaineer and 2003-2006 Expedition/Navigator. All other vehicles use the accelerometer type switch.
The sensors transmit tire pressure data to the control module at 315 Mhz. (Some early sensors used 433 Mhz.)
Each wheel sensor has a unique identification code so the control module can recognize each sensor. When the vehicle is parked and has not moved for 15 minutes, the sensors will stop transmitting.
If the tire pressure drops below the minimum setting, the module will turn on the warning light. The warning light will not indicate which tire is low. All tires need to be inspected for proper tire pressure using an accurate tire pressure gauge. The recommended tire pressure is located on the tire label on the driver’s door jam (Pillar behind the front door).
After inflating the tires to the recommended inflation pressure, the vehicle must be driven at 20 mph or more for a few minutes for the light to turn OFF.
Some heavier duty vehicles like F-150, F-Super Duty, or E-Series have tire pressures which are different in the front and rear tires. (Consult the tire label on the driver’s door jam for the recommended inflation pressures.) This is known as the split placard system.
When the tires are rotated on the split placard system, the TPMS system will need to be retrained to identify where the tires/sensors are located to determine the proper tire pressures.
All Ford and Lincoln/Mercury sensors can be retrained by using Rotunda Tool number 204-363 or Motorcraft Tool number TPMS-19. The valve mounted bolt-on sensors can also use Rotunda tool number 204-324.
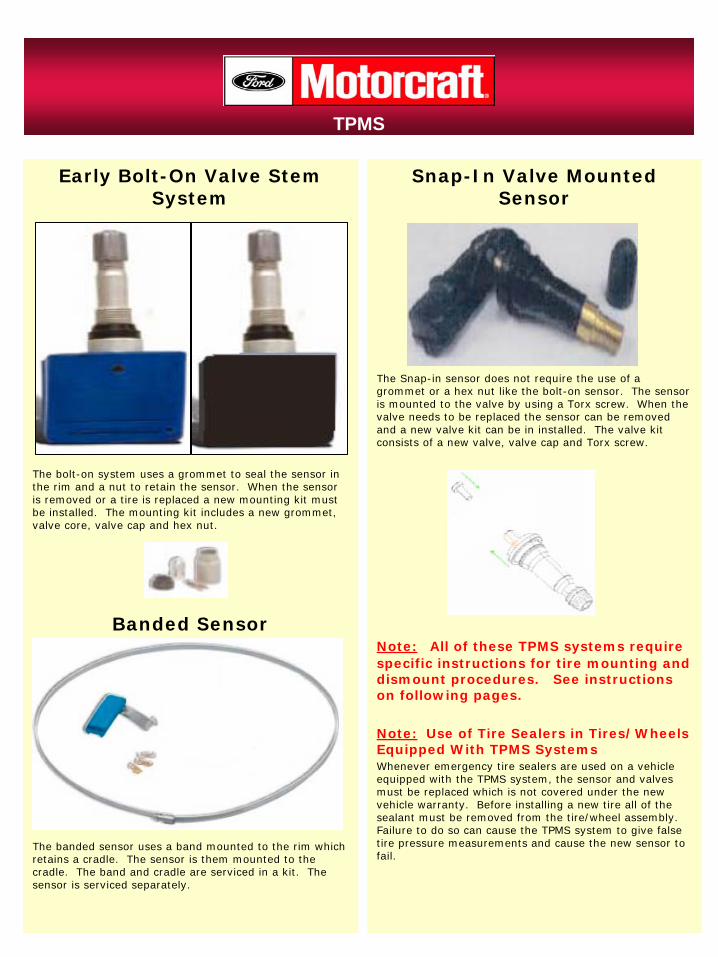
Ford Motor Company uses three different designs of TPMS sensor:• Valve mounted bolt-on sensors• Banded Sensor• Valve mounted Snap-in Sensors
Valve Mounted Bolt-On Sensors
The valve mounted sensors (also known as a Schrader Valve Sensor) are one-piece “bolt-on” valve mounted sensor where the sensor and valve stem are molded together. The sensor is secured in place by a hex nut and uses a rubber grommet to prevent any leaks. This sensor was replaced by the Banded Sensor.
Banded Sensors
The banded TPMS sensor assembly consists of:• A metal band around the center of the wheel• A cradle or bracket to hold the sensor• A tire pressure sensor
Valve Mounted Snap-In Sensor
Beginning in 2009 with the Escape and F-150, a two piece snap-in valve mounted sensor was used. The sensor and valve stem are separate pieces which are screwed together and can be replaced separately.
The sensor is referred to as “snap-in” because it uses a more traditional rubber valve stem for installation and does not use a hex nut fastener or rubber o-ring for attachment. NOTE: MUST USE NEW STYLE VALVE STEM. It also eliminates the need for an expensive stainless steel band and cradle. The sensor is smaller and lighter than previous sensors and less apt to cause tire balancing concerns.
NOTE: Although the three different system use similar methods for communicating, the tire pressure sensors are not interchangeable.
TPMS
Early Bolt-On Valve Stem System
The bolt-on system uses a grommet to seal the sensor in the rim and a nut to retain the sensor. When the sensor is removed or a tire is replaced a new mounting kit must be installed. The mounting kit includes a new grommet, valve core, valve cap and hex nut.
Banded Sensor
The banded sensor uses a band mounted to the rim which retains a cradle. The sensor is them mounted to the cradle. The band and cradle are serviced in a kit. The sensor is serviced separately.
Snap-In Valve Mounted Sensor
The Snap-in sensor does not require the use of a grommet or a hex nut like the bolt-on sensor. The sensor is mounted to the valve by using a Torx screw. When the valve needs to be replaced the sensor can be removed and a new valve kit can be in installed. The valve kit consists of a new valve, valve cap and Torx screw.
Note: All of these TPMS systems require specific instructions for tire mounting and dismount procedures. See instructions on following pages.
Note: Use of Tire Sealers in Tires/Wheels Equipped With TPMS SystemsWhenever emergency tire sealers are used on a vehicle equipped with the TPMS system, the sensor and valves must be replaced which is not covered under the new vehicle warranty. Before installing a new tire all of the sealant must be removed from the tire/wheel assembly. Failure to do so can cause the TPMS system to give false tire pressure measurements and cause the new sensor to fail.
TPMS
Things you should know about TPMS
Whether the vehicle that you are servicing uses Valve Mounted Bolt-On, Banded or Snap-In TPMS sensors, there are several key items you need to know to properly service the vehicle.
Cold Weather- During colder weather, a drop in ambient temperature will cause tire pressure to decrease because air molecules are closer together in the tire. This may cause the TPMS warning light to turn ON. Tire pressure drops 1 PSI for every 10˚
F drop in ambient temperature.
Mounting Tires onto Wheels- Special care must be taken when removing or installing tires on wheels with the TPMS system. The sensors can be damaged by the tire machine or the tire if the proper mounting and dismounting procedures are not used. For the proper procedure review the enclosed job aids or the appropriate workshop manual.
Sensor ID- Each Sensor has a unique identification code which is identified by the TPMS control module. The TPMS module uses this information to ensure that it is monitoring the proper vehicle tire pressure and does not receive a stray signal from another vehicle.
Sensor Reset/Training- The TPMS needs to indentify each sensor location.Heavy duty vehicles may have different tire pressures on the front and rear axles. This is known as split placard. To verify the vehicle has split placard review the tire label on the driver’s door or door jam. The TPMS system needs to identify the locations of each sensor to be able to determine the proper tire pressure setting. When the tires are rotated the system must be reset. A reset tool is included in the Owner Information Kit in the glovebox and the Owner Guide has the instructions on how to reset the TPMS system. The tool can be purchased and the Motorcraft number is TPMS-19.
For the 2010 model year, some vehicles with the split placard system have a new procedure to reset the TPMS system and do not require the use of the tool. The procedure can be found in the Owner Guide or the Workshop Manual.
Aerosol Inflators With Sealant- Tire inflators with sealant should only be used for emergencies. Use of these products can damage the TPMS sensor and cause the system to malfunction. If these products are used, the TPMS sensor will need to be replaced at the customer’s expense. When the tire is repaired or replaced all of the sealant must be cleaned from the tire and rim to ensure the new TPMS sensor is not damaged.
TPMS Sensor Batteries- All TPMS sensors contain a small battery to power the sensor and the transponder. The batteries are designed to have an estimated life of 10 years or 150,000 miles. When the batteries are at the end of the useful life the TPMS system may start setting diagnostic codes. If the vehicle requires replacement tire near 10 years or 150,000 miles, the TPMS sensors should be replaced as part of preventative maintenance.
Tire Pressure- When inspecting the tire pressure setting always use a high quality tire pressure gauge. Inexpensive gauges can be inaccurate. When filling the tire with air, always use clean dry air to prevent damage to the TPMS sensor.
Tire Changers- Tire should be mounted using a tire changer to guarantee a proper fit and to prevent damage to the TPMS sensor. The tire, rim, and changer should be clean of dust and dirt. If dirt or moisture gets into the tire, the TPMS sensor can malfunction. Always use the proper mounting and dismounting procedures outlined in this job aid or in the Workshop Manual.
Tire Replacement- Always replace the tires with the proper size that were installed on the vehicle as original equipment. This information can be found on the tire label located on the B-Pillar. Failure to do so can cause the TPMS system to operate improperly.
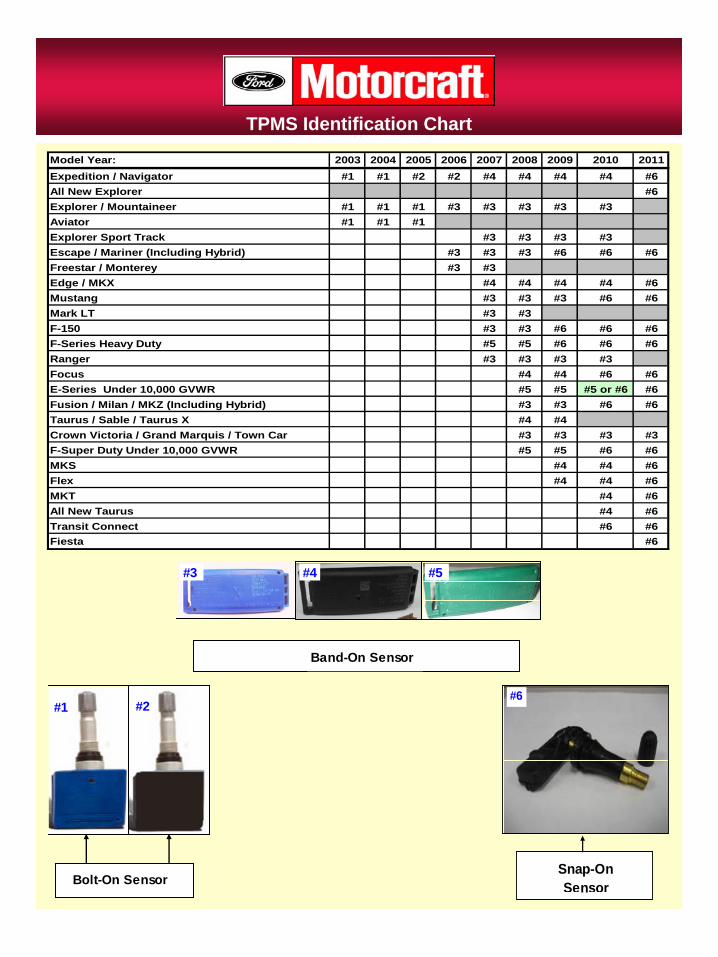
TPMS Identification Chart
Snap-On Sensor
#6#1 #2
Bolt-On Sensor
Band-On Sensor
#3 #4 #5
Model Year: 2003 2004 2005 2006 2007 2008 2009 2010 2011Expedition / Navigator #1 #1 #2 #2 #4 #4 #4 #4 #6All New Explorer #6Explorer / Mountaineer #1 #1 #1 #3 #3 #3 #3 #3Aviator #1 #1 #1Explorer Sport Track #3 #3 #3 #3Escape / Mariner (Including Hybrid) #3 #3 #3 #6 #6 #6Freestar / Monterey #3 #3Edge / MKX #4 #4 #4 #4 #6Mustang #3 #3 #3 #6 #6Mark LT #3 #3F-150 #3 #3 #6 #6 #6F-Series Heavy Duty #5 #5 #6 #6 #6Ranger #3 #3 #3 #3Focus #4 #4 #6 #6E-Series Under 10,000 GVWR #5 #5 #5 or #6 #6Fusion / Milan / MKZ (Including Hybrid) #3 #3 #6 #6Taurus / Sable / Taurus X #4 #4Crown Victoria / Grand Marquis / Town Car #3 #3 #3 #3F-Super Duty Under 10,000 GVWR #5 #5 #6 #6MKS #4 #4 #6Flex #4 #4 #6MKT #4 #6All New Taurus #4 #6Transit Connect #6 #6Fiesta #6
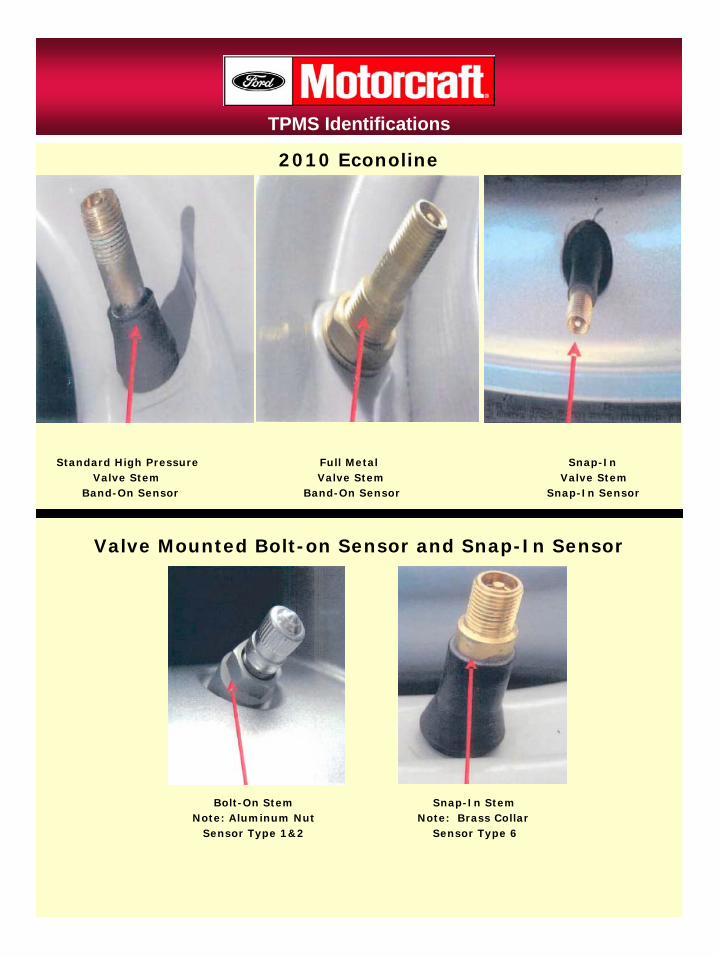
TPMS Identifications
2010 Econoline
Standard High Pressure Full Metal Snap-InValve Stem Valve Stem Valve Stem
Band-On Sensor Band-On Sensor Snap-In Sensor
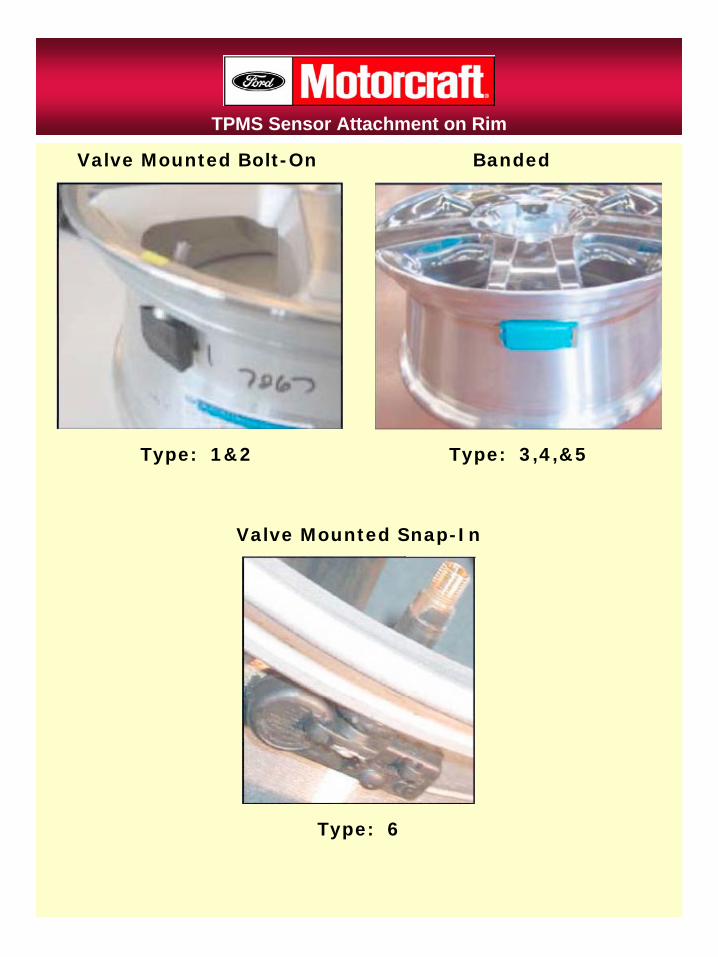
Valve Mounted Bolt-on Sensor and Snap-In Sensor
Bolt-On Stem Snap-In StemNote: Aluminum Nut Note: Brass Collar
Sensor Type 1&2 Sensor Type 6
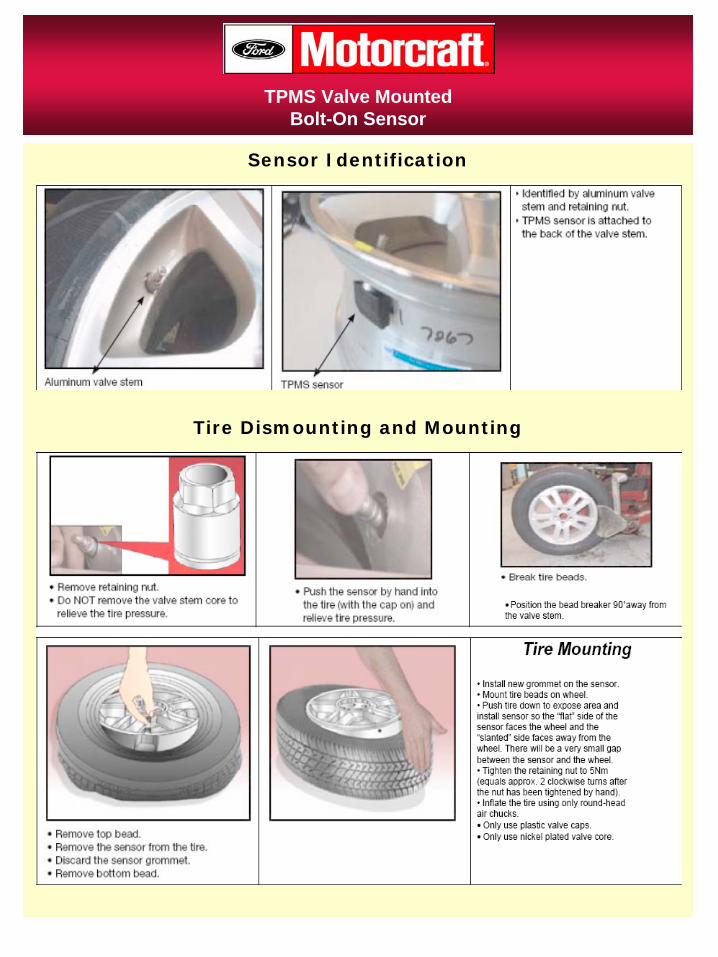
TPMS Sensor Attachment on Rim
Valve Mounted Bolt-On Banded
Type: 1&2 Type: 3,4,&5
Valve Mounted Snap-In
Type: 6
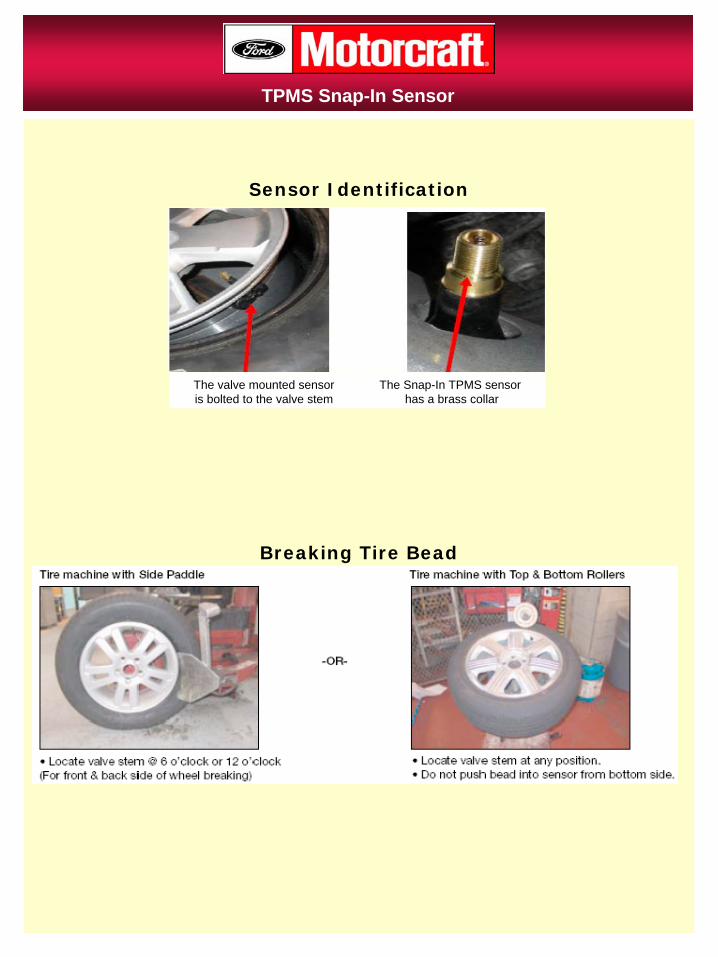
Sensor Identification
Tire Dismounting and Mounting
TPMS Valve Mounted Bolt-On Sensor

Breaking Tire Bead
Tire Dismounting Tire Mounting
TPMS Banded Sensor
Sensor Identification
Breaking Tire Bead
TPMS Snap-In Sensor
The valve mounted sensoris bolted to the valve stem
The Snap-In TPMS sensor has a brass collar
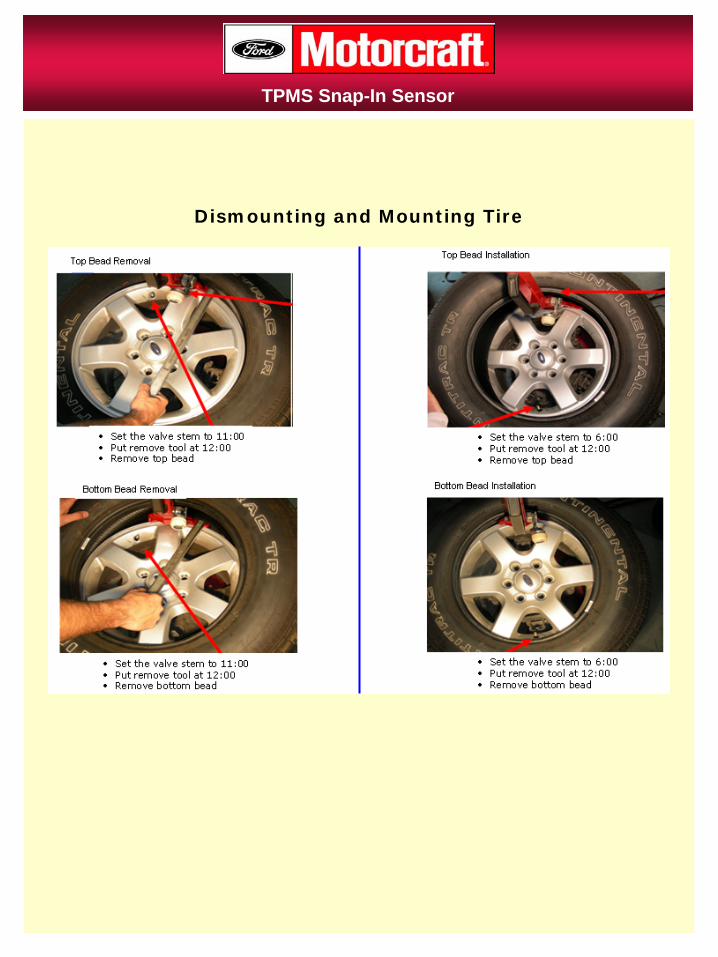
Dismounting and Mounting Tire
TPMS Snap-In Sensor
TPMS Warranty
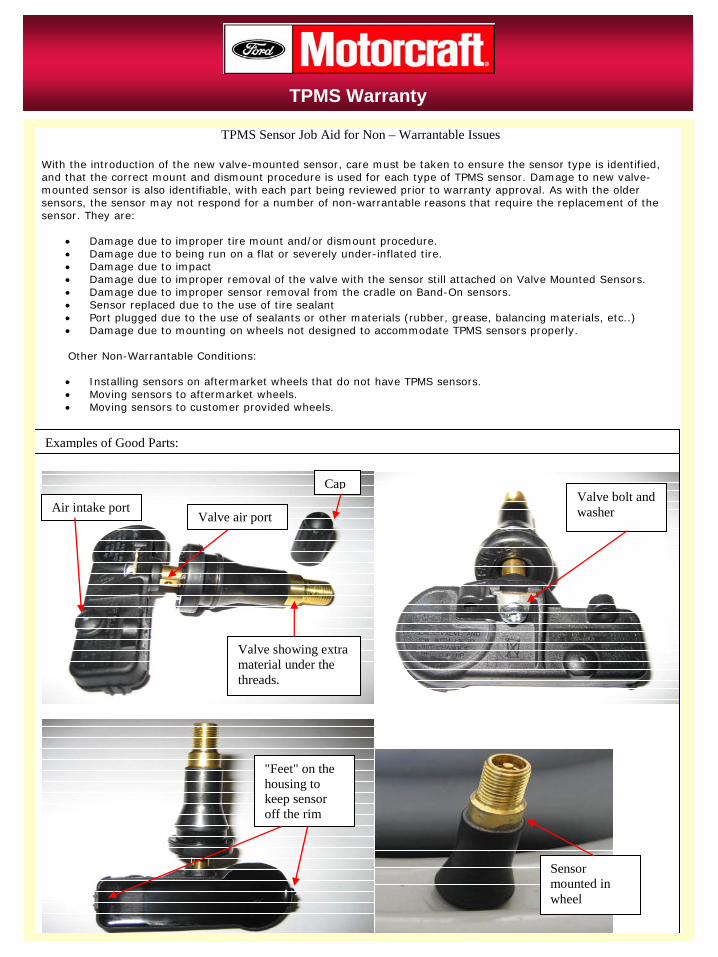
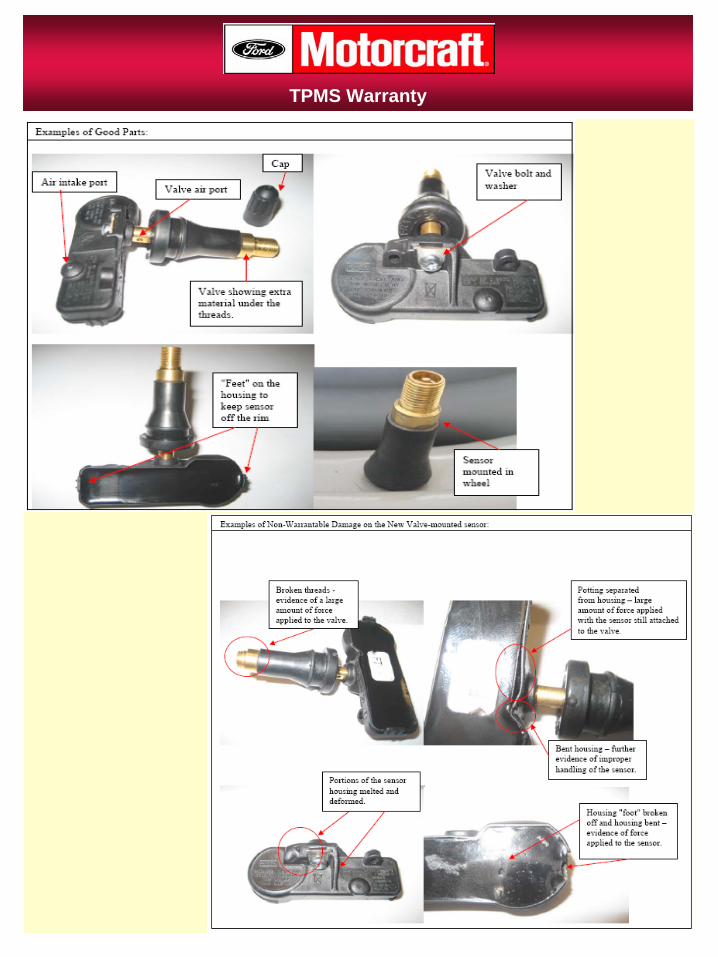
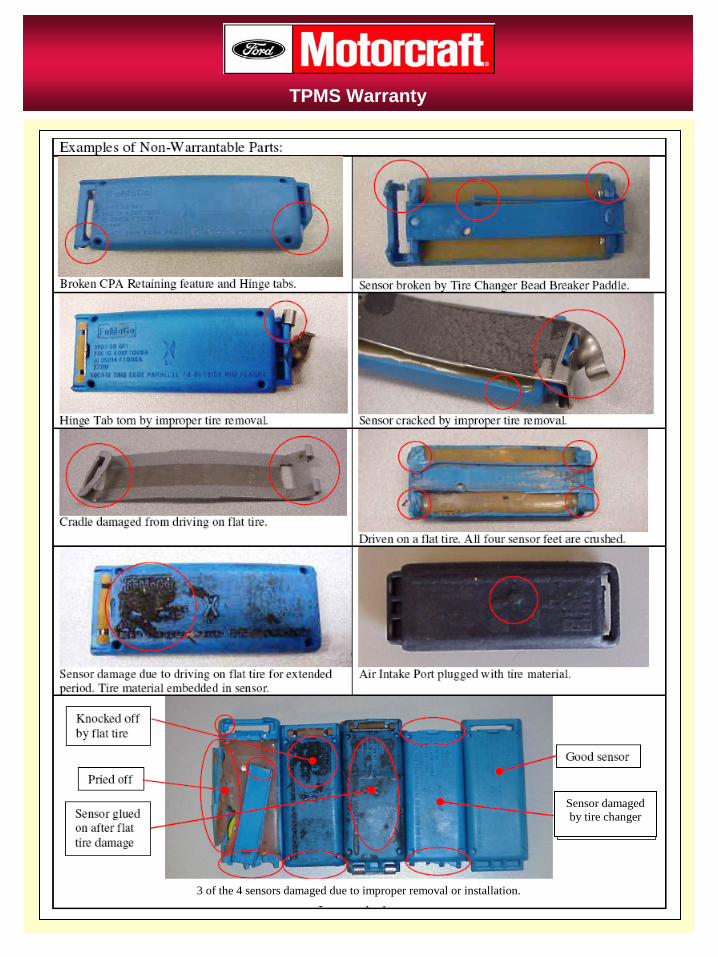
TPMS Sensor Job Aid for Non – Warrantable Issues
With the introduction of the new valve-mounted sensor, care must be taken to ensure the sensor type is identified, and that the correct mount and dismount procedure is used for each type of TPMS sensor. Damage to new valve-mounted sensor is also identifiable, with each part being reviewed prior to warranty approval. As with the older sensors, the sensor may not respond for a number of non-warrantable reasons that require the replacement of the sensor. They are:
• Damage due to improper tire mount and/or dismount procedure. • Damage due to being run on a flat or severely under-inflated tire. • Damage due to impact • Damage due to improper removal of the valve with the sensor still attached on Valve Mounted Sensors. • Damage due to improper sensor removal from the cradle on Band-On sensors. • Sensor replaced due to the use of tire sealant • Port plugged due to the use of sealants or other materials (rubber, grease, balancing materials, etc..) • Damage due to mounting on wheels not designed to accommodate TPMS sensors properly.
Other Non-Warrantable Conditions:
• Installing sensors on aftermarket wheels that do not have TPMS sensors. • Moving sensors to aftermarket wheels. • Moving sensors to customer provided wheels.
Valve showing extra material under the threads.
Cap
Air intake port Valve air port
Valve bolt and washer
"Feet" on the housing to keep sensor off the rim
Sensor mounted in wheel
Examples of Good Parts:
TPMS Warranty
TPMS Warranty
3 of the 4 sensors damaged due to improper removal or installation.
Sensor damaged by tire changer
TPMS Warranty
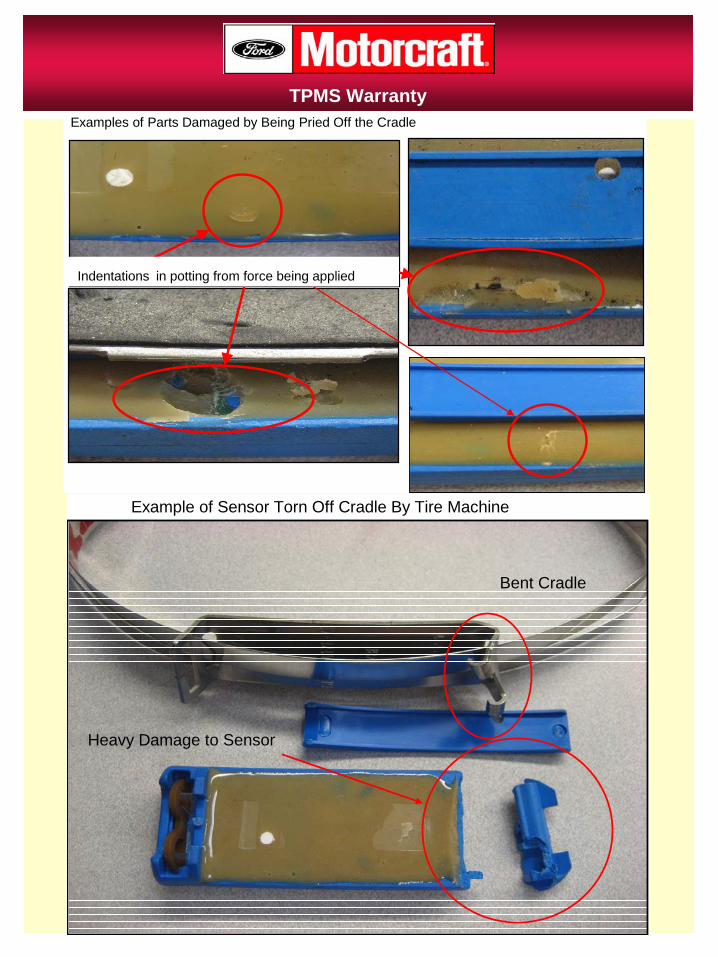
Example of Sensor Torn Off Cradle By Tire Machine
Bent Cradle
Heavy Damage to Sensor
Examples of Parts Damaged by Being Pried Off the Cradle
Indentations
in potting from force being applied
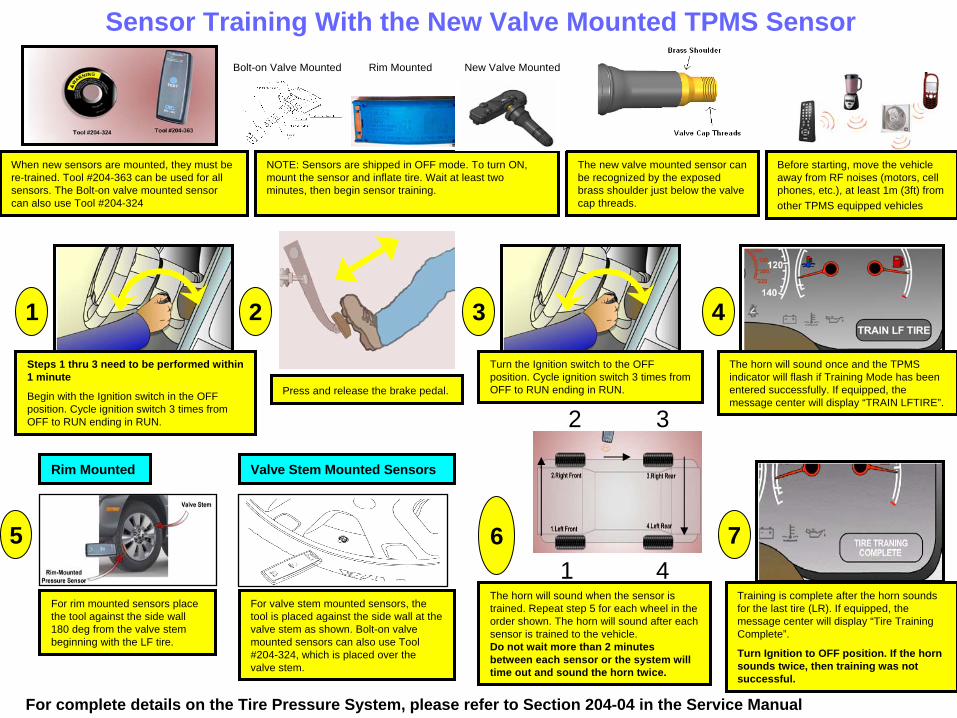
Sensor Training With the New Valve Mounted TPMS Sensor
When new sensors are mounted, they must be re-trained. Tool #204-363 can be used for all sensors. The Bolt-on valve mounted sensor can also use Tool #204-324
Before starting, move the vehicle away from RF noises (motors, cell phones, etc.), at least 1m (3ft) from other TPMS equipped vehicles
Steps 1 thru 3 need to be performed within 1 minute
Begin with the Ignition switch in the OFF position. Cycle ignition switch 3 times from OFF to RUN ending in RUN.
3
Press and release the brake pedal.
5
421
The horn will sound once and the TPMS indicator will flash if Training Mode has been entered successfully. If equipped, the message center will display “TRAIN LFTIRE”.
For rim mounted sensors place the tool against the side wall 180 deg from the valve stem beginning with the LF tire.
Training is complete after the horn sounds for the last tire (LR). If equipped, the message center will display “Tire Training Complete”.
Turn Ignition to OFF position. If the horn sounds twice, then training was not successful.
Valve Stem Mounted SensorsRim Mounted
The horn will sound when the sensor is trained. Repeat step 5 for each wheel in the order shown. The horn will sound after each sensor is trained to the vehicle.Do not wait more than 2 minutes between each sensor or the system will time out and sound the horn twice.
7
Turn the Ignition switch to the OFF position. Cycle ignition switch 3 times from OFF to RUN ending in RUN.
1
2 3
46
For complete details on the Tire Pressure System, please refer to Section 204-04 in the Service Manual
NOTE: Sensors are shipped in OFF mode. To turn ON, mount the sensor and inflate tire. Wait at least two minutes, then begin sensor training.
The new valve mounted sensor can be recognized by the exposed brass shoulder just below the valve cap threads.
For valve stem mounted sensors, the tool is placed against the side wall at the valve stem as shown. Bolt-on valve mounted sensors can also use Tool #204-324, which is placed over the valve stem.
Rim Mounted New Valve MountedBolt-on Valve Mounted
QUICK REFERENCE: TPMS Q&A
Q: How does TPMS work?
A: A vehicle’s TPMS continuously monitors tire pressurethrough sensors located in the tires (called a Direct System) orthrough the ABS sensors to measure wheel speed (called theIndirect System). The low tire pressure warning lamp illuminates when a tire pressure is low. If the lamp flashes then the system needs to be tested.
Q: What’s the TPMS warning lamp look like?
A: There are two different style icons approved by the TREAD Act as low tire pressure warning indicators. Ford and Lincoln Mercury vehicles use an image of a cross-section of a tire withan exclamation mark inside. (Some OE designs employthe alternate icon; an image of a top-down view of a vehicle showing all four tires.)
Q: Can low tire pressure be easilydetected visually?
A: Under-inflated tires are hard to detect with the eye.Consequently, tires should be inspected and checked monthlywith an accurate tire gauge. Note: TPM systems are not designed to be a substitute for regular tire maintenance. Drivers should be encouraged to review their Owner Guide for additional information on tire care and TPMS.
Q: What’s it mean if the TPMS warning lampcomes on?
A: When the TPMS warning Lamp on the instrument panel illuminates it means the system has detected at least one tire with pressure that is low. All the tires should be inspected and the tire pressures adjusted as soon as possible. The lamp will go out after the tires are properly inflated and the vehicle is driven two minutes over 20 mph (33 kph).
Q: What’s it mean if the warning lamp goes onand off?
A: The warning lamp may illuminate for a short period of time and then go out on cold mornings. This is generally caused bymarginally low tire pressure that drops below the minimum tire pressure overnight. As the vehicle is driven the air in the tire heats up and expands causing the tire pressure to rise above the minimum level. This causes the warning lamp to turn off. (Note: Every 10 degree drop in ambient air temperature results in a one psi drop in tire pressure).The tire pressure needs to be inspected when the tires are cold. The tire pressure needs to adjusted according to the pressures indicated on the tire label on the driver’s door jam.
TPMS FAQ
Q: What’s it mean if the warning lamp flashes onand off and then stays lit?
A: TPMS is designed to warn the driver when the system is not working properly. A system malfunction is indicated by a flashing of the TPMS warning lamp for 60 to 90 seconds. The warning lamp will stay lit after the flashing ends. This sequence repeats every time the vehicle is started until the concern is corrected. (Note: Prior to September 2007, the Ford system would flash and then go OFF to signal a fault.)
Q: Why is proper tire inflation important?
A: Proper tire inflation is important for safe vehicle operation.Vehicles with properly inflated tires exhibit the optimum in rideand handling characteristics, tire life, as well as fuel economy.
Q: Why does tire pressure change?
A: Tire pressure drops about one psi for every 10 degree F drop in ambient temperature. In addition, tires lose as much as 1.5 psi per month as air escapes naturally from the porosity of the tire and rim. (For those interested in the science behind this, it’s PV=nRT.)
Q: What is the TREAD Act?
A: The TREAD Act is a law administered by the National Highway Traffic Safety Administration that requires that all passenger cars, light trucks, and vans (Gross weight less than 10,000 pounds) be equipped with TPMS starting in model year 2008 (specifically September 1, 2007). Incomplete vehicles under 10,000 GVW have until September 1, 2008. The program was phased-in starting in the 2006 model year.
Q: Can other aftermarket devices affect the TPMS system?
A: Some aftermarket devices can cause radio frequency interference that will block the TPMS sensor signal causing an intermittent concern. This can cause the TPMS lamp to illuminate. Some of the more common items are: cell phone chargers, GPS power supplies, or any other aftermarket electronic device. Unplugging the aftermarket devices can help determine if they are the cause of an intermittent concern.