Embed Size (px)
DESCRIPTION
TOMCAR famous ATV Owners Manual
Citation preview
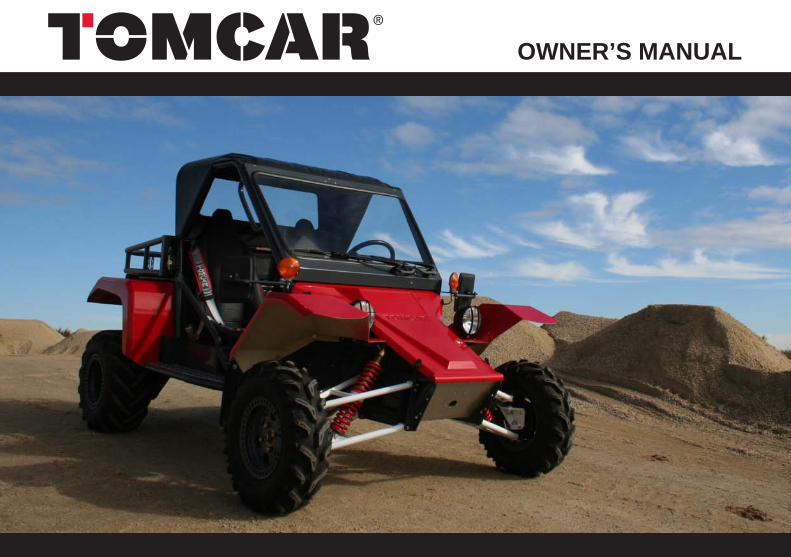
OWNER’S MANUAL
1
WELCOME
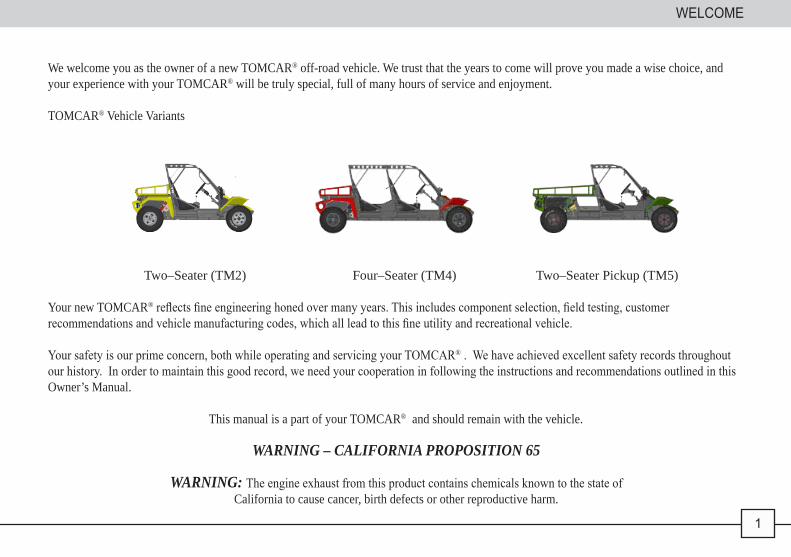
We welcome you as the owner of a new TOMCAR® off-road vehicle. We trust that the years to come will prove you made a wise choice, and your experience with your TOMCAR® will be truly special, full of many hours of service and enjoyment.
TOMCAR® Vehicle Variants
Two–Seater (TM2) Four–Seater (TM4) Two–Seater Pickup (TM5)
Your new TOMCAR® reflects fine engineering honed over many years. This includes component selection, field testing, customer recommendations and vehicle manufacturing codes, which all lead to this fine utility and recreational vehicle.
Your safety is our prime concern, both while operating and servicing your TOMCAR® . We have achieved excellent safety records throughout our history. In order to maintain this good record, we need your cooperation in following the instructions and recommendations outlined in this Owner’s Manual.
This manual is a part of your TOMCAR® and should remain with the vehicle.
WARNING – CALIFORNIA PROPOSITION 65
WARNING: The engine exhaust from this product contains chemicals known to the state of California to cause cancer, birth defects or other reproductive harm.
3
Vehicle Identification Numbers
Vehicle Identification Number
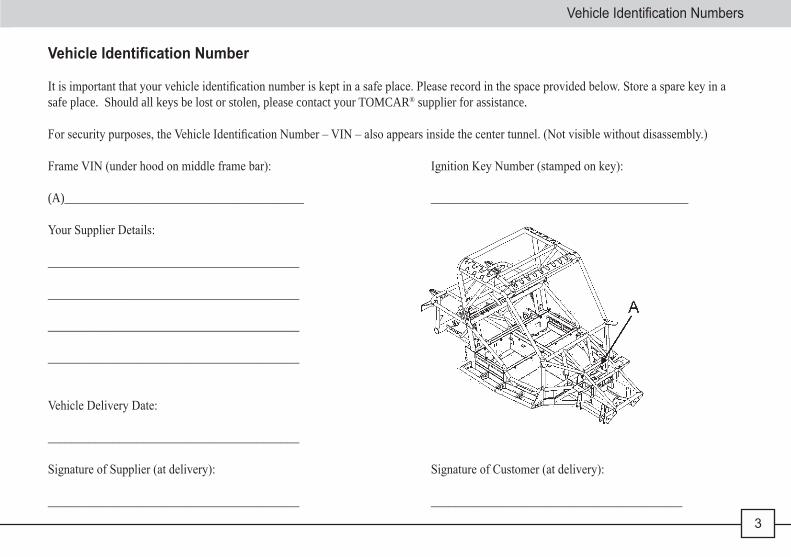
It is important that your vehicle identification number is kept in a safe place. Please record in the space provided below. Store a spare key in a safe place. Should all keys be lost or stolen, please contact your TOMCAR® supplier for assistance.
For security purposes, the Vehicle Identification Number – VIN – also appears inside the center tunnel. (Not visible without disassembly.)
Frame VIN (under hood on middle frame bar): Ignition Key Number (stamped on key):
(A)________________________________________ ___________________________________________
Your Supplier Details:
__________________________________________
__________________________________________
__________________________________________
__________________________________________
Vehicle Delivery Date:
__________________________________________
Signature of Supplier (at delivery): Signature of Customer (at delivery):
__________________________________________ __________________________________________
5
Table of Contents
Table of Contents
SAFETY 8Safe Operation Instructions 8Safety Decals and Locations 17Fuel Safety 21
FEATURES & CONTROLS 22Component Locations 22Towing Ball 26Fuel Cap/Fuel Gauge 27Dual Fuel Tank 28Load Compensators (if so equipped) 29Seat Belts 30Console 31Heater Operation (if so equipped) 33Seat Adjustment 34Steering Wheel Controls/Ignition Switch 35Lights/Horn/Signal Control 36Pedals 37Gear Selector 38Differential Lock Lever 39Parking Brake 40
OPERATIONS 42Emission Control System Warranty 42Guidelines/Vehicle Break-In Period 45Pre-Ride Inspection 46
Starting the Engine 49Shutting Off the Engine 51Braking 51Driving Procedures 52
MAINTENANCE & LUBRICATION 61Periodic Maintenance Chart 61Lubrication & Fluid Recommendations 65Engine Maintenance 69Engine Oil Change 71Transmission 74Cooling System 76Spark Plugs 80Continuous Variable Transmission (CVT) System 81Filter Systems 83Throttle System 85Brakes 86Steering Wheel 894-Point Harness 90Tires & Suspension 91Shock Air Pressure Adjustment 94Lights 95Battery 97Cleaning & Storing 99
SPECIFICATIONS 101
7
Model Legend
Model Legends
Throughout this Owner’s Manual when indication of a specific model is required, the model descriptor uses the “X” letter as a wild card (relating to several models available).
The following list elaborates the various models and how they are reflected within this manual: TMX7X – Six models are derived from this descriptor:
1. TM27CL2. TM47CL3. TM57CL4. TM27BL5. TM47BL6. TM57BL
(C – Gasoline Engine)(B – Diesel Engine) (L – High/Low Differential Lock Gearbox)
Safe Operation Instructions
8
SAFETY
Safe Operation Instructions
Reading and understanding the contents of this Owner’s Manual will protect you from injury and the vehicle from damage. Your knowledge of safe operation of this vehicle will help you train others who may operate it. This is a powerful vehicle and, as such, all driving rules, licenses and permits apply to all TOMCAR® models. Your TOMCAR® handles differently from other vehicles such as motorcycles, ATVs and cars. Therefore, the driver must undergo training prior to use. If you ignore the warnings contained in this Owner’s Manual and on the vehicle, and fail to take appropriate precautions, collisions or rollovers can happen quickly, even during routine driving maneuvers such as driving over obstacles, turning, or hill driving, and may result in severe injury or death.
TOMCAR® is intended to be used off-road, where special driving skills and know-how are essential for safe operation. Age Restrictions
Operation of this vehicle is limited to persons who are licensed and have been trained, including reading and understanding this Owner’s Manual. No one under the age of 16 should be allowed to operate a TOMCAR® . The minimum age recommendation for passengers is 16 years old. Young or inexperienced drivers may not be able to control the vehicle. Local regulations may also restrict the age of the driver.
Vehicle Awareness
This Owner’s Manual contains valuable information about all aspects of your vehicle which will enable you, as the driver of the vehicle, to be responsible for your personal safety, the safety of others and the protection of the environment. It is important that you read, familiarize yourself with and understand this manual.
The use of a TOMCAR® is subject to certain hazards that can only be protected against by the exercise of intelligence, care and common sense. It is therefore essential to have a driver who is competent and careful, physically and mentally fit, and thoroughly trained in the safe driving and controlling of a TOMCAR® off-road.
SAFETY Safe Operation Instructions
9
It is important that you are familiar with and follow all laws and regulations concerning the operation of an off-road vehicle, such as the TOMCAR®, which are in force in the area in which you use it. Follow the recommended maintenance program outlined in your Owner’s Manual in order to ensure that all critical components on your vehicle are thoroughly inspected at the specified intervals.
When you see the safety alert DANGER, it is an indication that there is an immediate hazard that will result in severe personal injury or death.
When you see the safety alert WARNING, it is an indication that there is an immediate hazard that may result in serious personal injury or death.
When you see the safety alert CAUTION, it is an indication that there is an immediate hazard that may result in minor personal injury or damage to the vehicle.
CAUTIONWhen you see CAUTION, without the safety symbol it is an indication that there is a situation that may potentially cause property damage.
SAFETYSafe Operation Instructions
10
• Fuel – Fuel is extremely flammable and is explosive under certain conditions. Always exercise extreme caution whenever handling fuel. Service the vehicle only in a well-ventilated area.
• Battery – Explosive. Keep sparks and flames away from the vehicle. Ventilate when charging the battery or operating the vehicle in an enclosed space.
• Always wear eye protection and gloves when handling the battery. • Carbon Monoxide – Fuel engine exhaust contains poisonous carbon monoxide which can cause serious illness and death. Never run the
engine in an enclosed area, such as a building, without proper ventilation. To ventilate, connect a pipe extension to the exhaust pipe and discharge the exhaust outdoors. Allow fresh air into the work area.
• Weather Hazards – Your TOMCAR® will not protect occupants from lightning, storm activity or flying objects. If operating in a storm, leave the vehicle and seek appropriate shelter.
Please follow all instructions and procedures outlined in further detail within your Owner’s Manual. Failure to do so may result in serious injury or death.
1. Please read this manual and all labels carefully and follow the operating procedures described.2. Never allow anyone without a valid driver’s license and appropriate TOMCAR® training to operate this vehicle.3. Drivers and passengers should wear their seat belts at all times. 4. When operating this vehicle, eye protection and helmets are recommended at all times.5. Should you wish a guest to operate this vehicle, please ensure that they read this Owner’s Manual and all product labels.6. In order to reduce the risk of rollover, be careful when encountering slopes and other obstacles, during turns and when braking.7. Ensure that drugs or alcohol are never consumed before or while operating this vehicle.8. Always travel at speeds proper for the terrain, visibility, operating conditions and your experience. Never operate at excessive speeds.9. Never attempt jumps or other stunts.
SAFETY Safe Operation Instructions
11
10. Always follow the inspection and maintenance procedures at schedules described in this manual. Inspect your vehicle each time you use it to make sure it is in safe operating condition.
11. Always use correct driving procedures when operating this vehicle. Keep both hands on the steering wheel and both feet on the floorboards of the vehicle during operation.
12. When operating on unfamiliar terrain, be alert to changes in that terrain, travel slowly and use extra caution for maximum safety.13. Use additional caution when driving on excessively loose, slippery or rough terrain.14. Always practice turning at slow speeds before attempting to turn at faster speeds. Follow procedures for turning as described in this manual.
Never turn at excessive speeds.15. Should this vehicle be involved in an accident, always have it thoroughly checked before continued use.16. Practice operating the TOMCAR® on smaller hills before attempting larger hills. Never operate TOMCAR® on hills that are too steep for
the vehicle or your abilities.17. Always check the terrain carefully before attempting to climb a hill and always follow the proper procedures for climbing hills as set out
in this manual. Never climb hills with excessively loose or slippery surfaces, never go over the top of hills at high speed. Never open the throttle suddenly.
18. Check the terrain carefully before descending a hill and always follow the proper procedures outlined in this manual before traveling downhill or braking on hills. Never travel downhill at excessive speeds, avoid going downhill at an angle which would cause the vehicle to lean sharply to one side, and travel straight down the hill where possible.
19. Always follow the proper procedures outlined in this manual when operating over obstacles and never attempt to drive over large obstacles such as rocks or fallen trees. Always check for obstacles before driving or operating the vehicle in an unfamiliar or new area.
20. On slippery surfaces such as ice or mud, travel slowly and be cautious in order to reduce the chances of skidding or sliding out of control. At all times, be careful and aware of the dangers of skidding or sliding.
21. Never operate your vehicle in water deeper than that specified in this manual or in fast-flowing water. Wet brakes may reduce stopping ability, so test your brakes after leaving water and, if necessary, apply them lightly several times to allow the friction to dry them out.
22. When reversing, in order to ensure that it is safe to proceed, always make sure that there are no obstacles or people behind you, move slowly when it is safe to do so, and avoid turning at sharp angles when in reverse.
23. Always use the correct type and size of tires specified in this manual, and maintain the correct tire pressure as specified in the maintenance and specification sections of this manual.
24. Never modify this vehicle through improper installation or use of accessories.25. When hauling cargo, ensure that the cargo is properly distributed and securely attached.
SAFETYSafe Operation Instructions
12
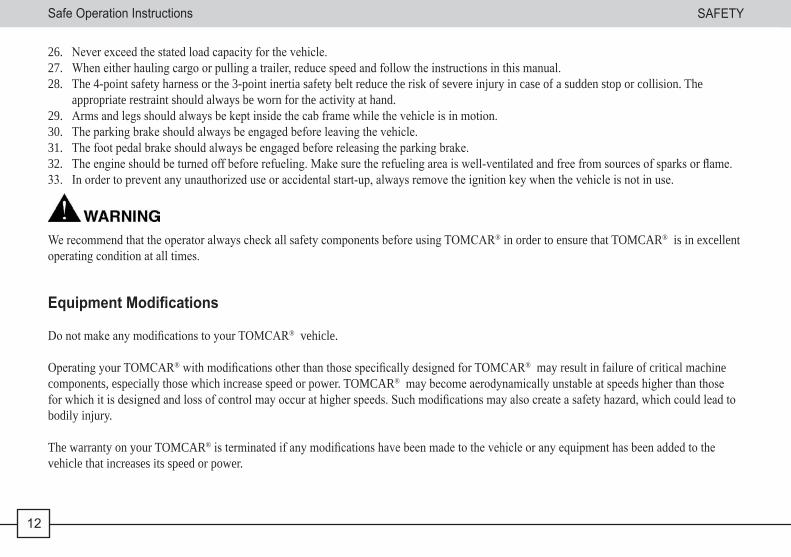
26. Never exceed the stated load capacity for the vehicle.27. When either hauling cargo or pulling a trailer, reduce speed and follow the instructions in this manual.28. The 4-point safety harness or the 3-point inertia safety belt reduce the risk of severe injury in case of a sudden stop or collision. The
appropriate restraint should always be worn for the activity at hand.29. Arms and legs should always be kept inside the cab frame while the vehicle is in motion.30. The parking brake should always be engaged before leaving the vehicle.31. The foot pedal brake should always be engaged before releasing the parking brake.32. The engine should be turned off before refueling. Make sure the refueling area is well-ventilated and free from sources of sparks or flame.33. In order to prevent any unauthorized use or accidental start-up, always remove the ignition key when the vehicle is not in use.
We recommend that the operator always check all safety components before using TOMCAR® in order to ensure that TOMCAR® is in excellent operating condition at all times.
Equipment Modifications
Do not make any modifications to your TOMCAR® vehicle.
Operating your TOMCAR® with modifications other than those specifically designed for TOMCAR® may result in failure of critical machine components, especially those which increase speed or power. TOMCAR® may become aerodynamically unstable at speeds higher than those for which it is designed and loss of control may occur at higher speeds. Such modifications may also create a safety hazard, which could lead to bodily injury.
The warranty on your TOMCAR® is terminated if any modifications have been made to the vehicle or any equipment has been added to the vehicle that increases its speed or power.
SAFETY Safe Operation Instructions
13
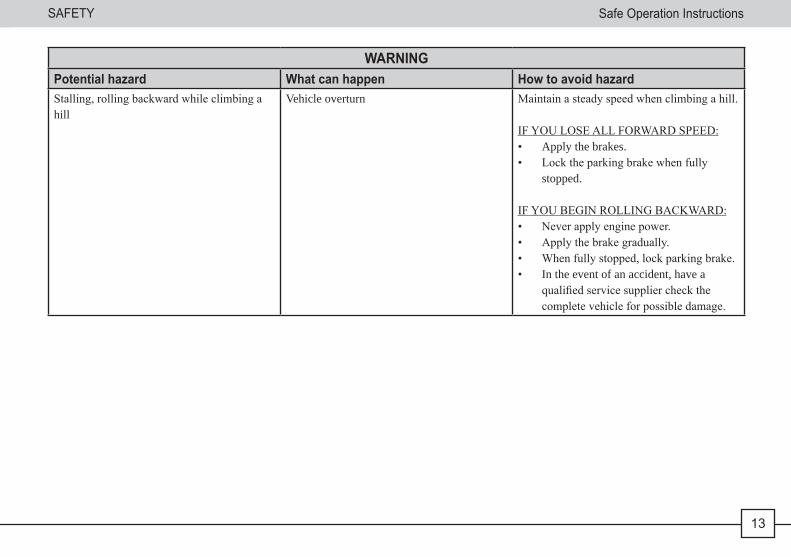
WARNINGPotential hazard What can happen How to avoid hazardStalling, rolling backward while climbing a hill
Vehicle overturn Maintain a steady speed when climbing a hill.
IF YOU LOSE ALL FORWARD SPEED:• Apply the brakes.• Lock the parking brake when fully
stopped.
IF YOU BEGIN ROLLING BACKWARD:• Never apply engine power.• Apply the brake gradually.• When fully stopped, lock parking brake.• In the event of an accident, have a
qualified service supplier check the complete vehicle for possible damage.
SAFETYSafe Operation Instructions
14
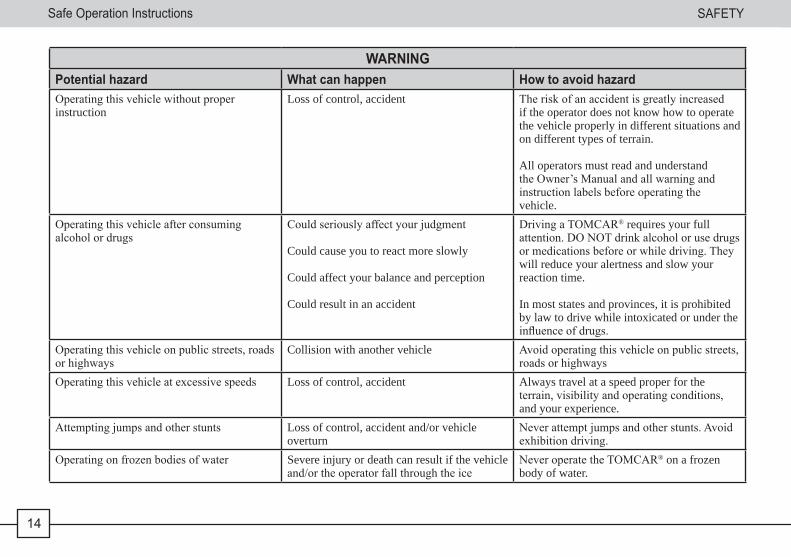
WARNINGPotential hazard What can happen How to avoid hazardOperating this vehicle without proper instruction
Loss of control, accident The risk of an accident is greatly increased if the operator does not know how to operate the vehicle properly in different situations and on different types of terrain.
All operators must read and understand the Owner’s Manual and all warning and instruction labels before operating the vehicle.
Operating this vehicle after consuming alcohol or drugs
Could seriously affect your judgment
Could cause you to react more slowly
Could affect your balance and perception
Could result in an accident
Driving a TOMCAR® requires your full attention. DO NOT drink alcohol or use drugs or medications before or while driving. They will reduce your alertness and slow your reaction time.
In most states and provinces, it is prohibited by law to drive while intoxicated or under the influence of drugs.
Operating this vehicle on public streets, roads or highways
Collision with another vehicle Avoid operating this vehicle on public streets, roads or highways
Operating this vehicle at excessive speeds Loss of control, accident Always travel at a speed proper for the terrain, visibility and operating conditions, and your experience.
Attempting jumps and other stunts Loss of control, accident and/or vehicle overturn
Never attempt jumps and other stunts. Avoid exhibition driving.
Operating on frozen bodies of water Severe injury or death can result if the vehicle and/or the operator fall through the ice
Never operate the TOMCAR® on a frozen body of water.
SAFETY Safe Operation Instructions
15
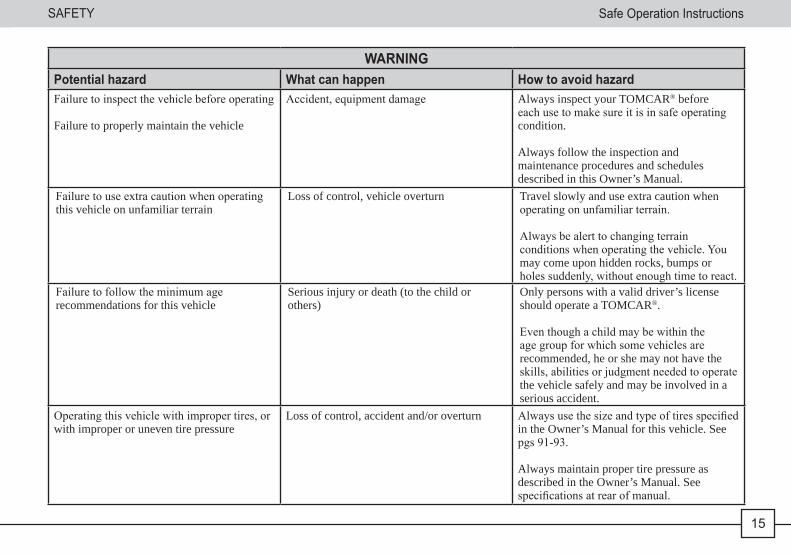
WARNINGPotential hazard What can happen How to avoid hazardFailure to inspect the vehicle before operating
Failure to properly maintain the vehicle
Accident, equipment damage Always inspect your TOMCAR® before each use to make sure it is in safe operating condition.
Always follow the inspection and maintenance procedures and schedules described in this Owner’s Manual.
Failure to use extra caution when operating this vehicle on unfamiliar terrain
Loss of control, vehicle overturn Travel slowly and use extra caution when operating on unfamiliar terrain.
Always be alert to changing terrain conditions when operating the vehicle. You may come upon hidden rocks, bumps or holes suddenly, without enough time to react.
Failure to follow the minimum age recommendations for this vehicle
Serious injury or death (to the child or others)
Only persons with a valid driver’s license should operate a TOMCAR®.
Even though a child may be within the age group for which some vehicles are recommended, he or she may not have the skills, abilities or judgment needed to operate the vehicle safely and may be involved in a serious accident.
Operating this vehicle with improper tires, or with improper or uneven tire pressure
Loss of control, accident and/or overturn Always use the size and type of tires specified in the Owner’s Manual for this vehicle. See pgs 91-93.
Always maintain proper tire pressure as described in the Owner’s Manual. See specifications at rear of manual.
SAFETYSafe Operation Instructions
16
SAFETYSafe Operation Instructions
16
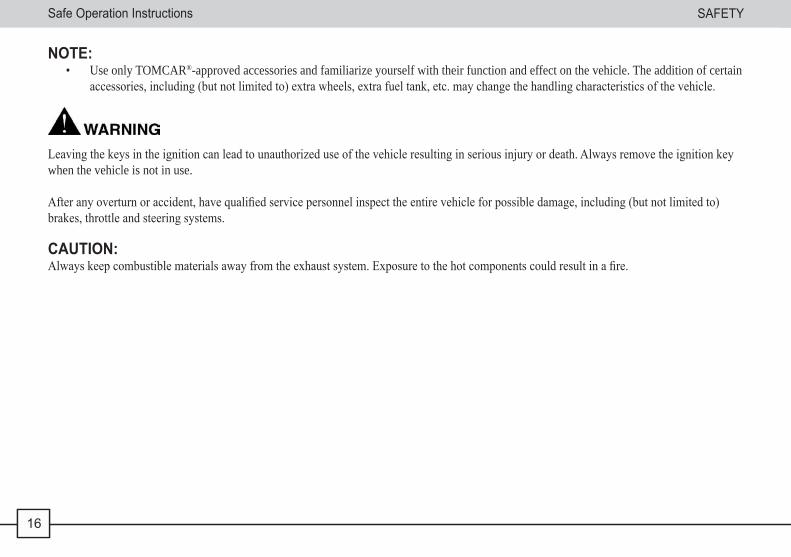
NOTE: • Use only TOMCAR®-approved accessories and familiarize yourself with their function and effect on the vehicle. The addition of certain
accessories, including (but not limited to) extra wheels, extra fuel tank, etc. may change the handling characteristics of the vehicle.
Leaving the keys in the ignition can lead to unauthorized use of the vehicle resulting in serious injury or death. Always remove the ignition key when the vehicle is not in use.
After any overturn or accident, have qualified service personnel inspect the entire vehicle for possible damage, including (but not limited to) brakes, throttle and steering systems.
CAUTION:Always keep combustible materials away from the exhaust system. Exposure to the hot components could result in a fire.
SAFETY Safe Operation Instructions
17
SAFETY Safety Decals and Locations
17
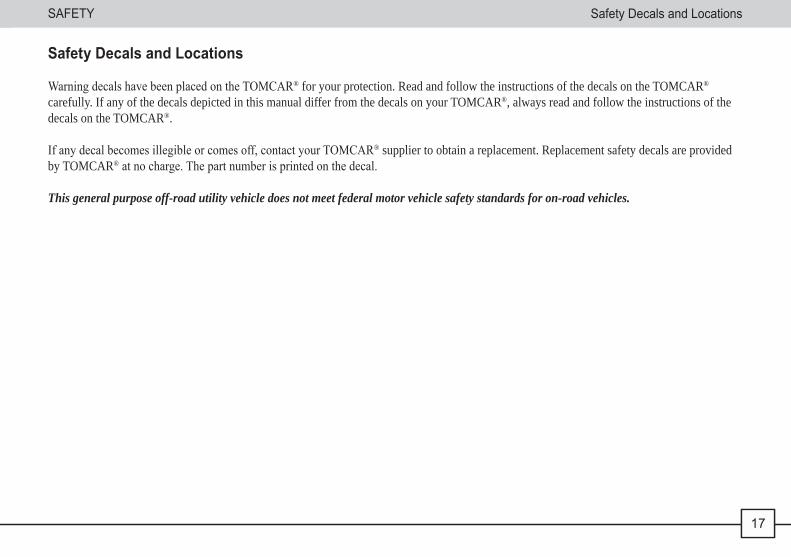
Safety Decals and Locations
Warning decals have been placed on the TOMCAR® for your protection. Read and follow the instructions of the decals on the TOMCAR® carefully. If any of the decals depicted in this manual differ from the decals on your TOMCAR®, always read and follow the instructions of the decals on the TOMCAR®.
If any decal becomes illegible or comes off, contact your TOMCAR® supplier to obtain a replacement. Replacement safety decals are provided by TOMCAR® at no charge. The part number is printed on the decal.
This general purpose off-road utility vehicle does not meet federal motor vehicle safety standards for on-road vehicles.
Safety Decals and LocationsSAFETY
SAFETYSafety Decals and Locations
18
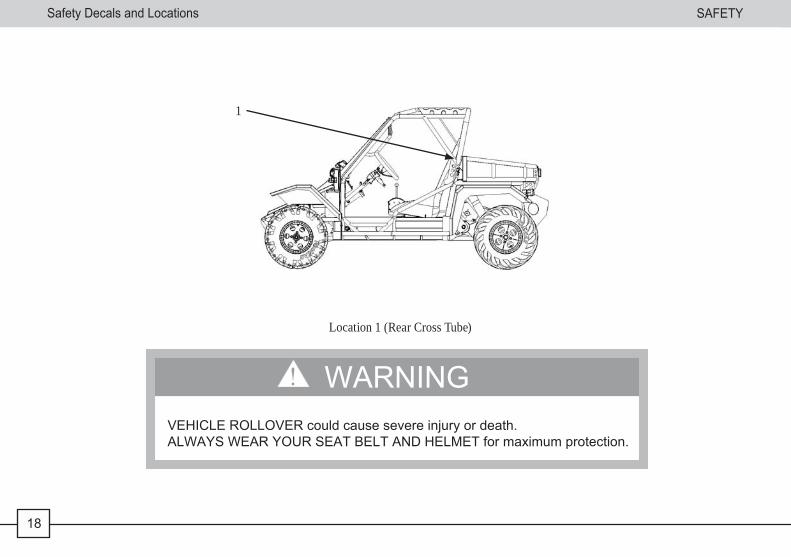
1
VEHICLE ROLLOVER could cause severe injury or death.ALWAYS WEAR YOUR SEAT BELT AND HELMET for maximum protection.
WARNING
Location 1 (Rear Cross Tube)
SAFETY Safety Decals and Locations
19
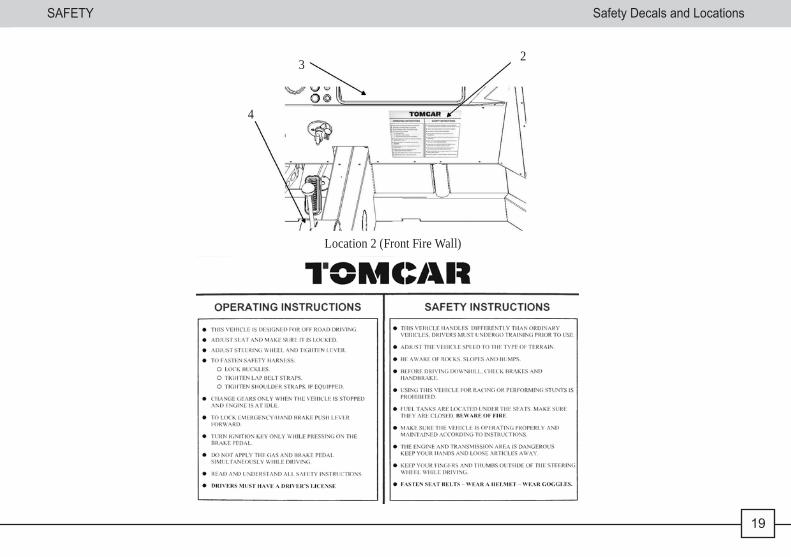
Location 2 (Front Fire Wall)
23
4
SAFETYSafety Decals and Locations
20
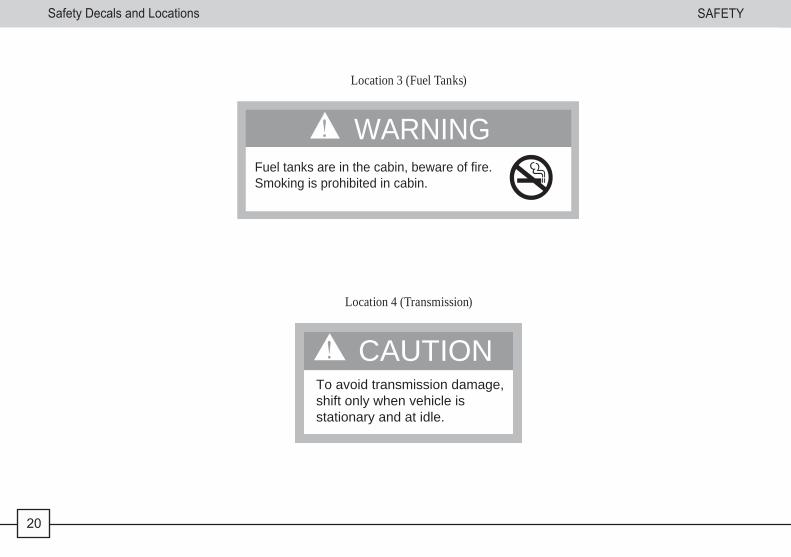
Fuel tanks are in the cabin, beware of fire.Smoking is prohibited in cabin.
WARNING
o
Location 3 (Fuel Tanks)
Location 4 (Transmission)
To avoid transmission damage,shift only when vehicle isstationary and at idle.
CAUTION
SAFETY Fuel Safety
21
Fuel Safety
• Fuel is extremely flammable and is explosive under certain conditions. Always exercise extreme caution whenever handling fuel.• Always stop the engine when refueling. (Make sure that the ignition switch is in the off position.) • Always refuel outdoors or in a well-ventilated area.• Do not smoke or allow open flames or sparks in or near the refueling area or where fuel is stored.• Do not overfill the tank. Do not fill the tank neck. If the neck is filled, heat may cause the fuel to expand and overflow from the tank vent
or around the fuel cap.• If fuel spills on your skin or clothing, immediately wash with soap and water and change clothing.• Engine exhaust fumes contain poisonous carbon monoxide which can cause serious illness and death. Never run the engine in an enclosed
area such as a building without proper ventilation. To ventilate, connect a pipe extension to the exhaust pipe and discharge the exhaust outdoors. Allow fresh air into the work area.
Fuel SafetySAFETY
Component Locations
22
Component Locations
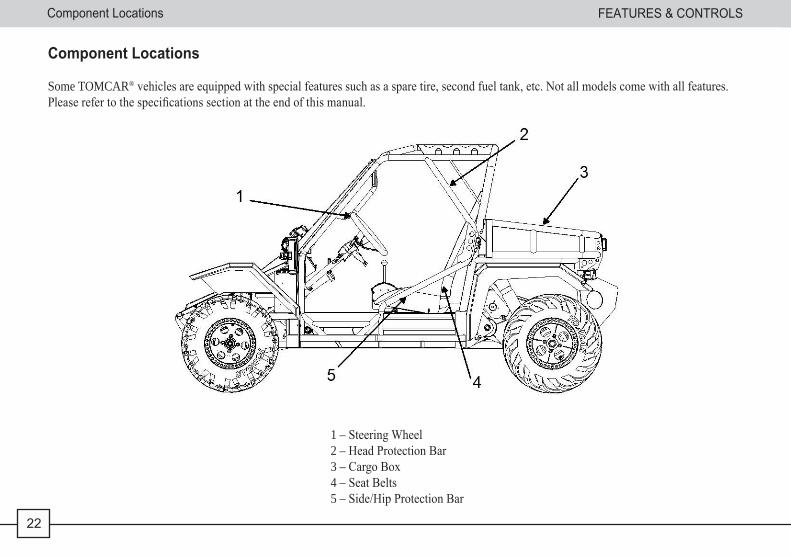
Some TOMCAR® vehicles are equipped with special features such as a spare tire, second fuel tank, etc. Not all models come with all features.Please refer to the specifications section at the end of this manual.
1 – Steering Wheel2 – Head Protection Bar3 – Cargo Box4 – Seat Belts5 – Side/Hip Protection Bar
FEATURES & CONTROLS
FEATURES & CONTROLS Component Locations
23
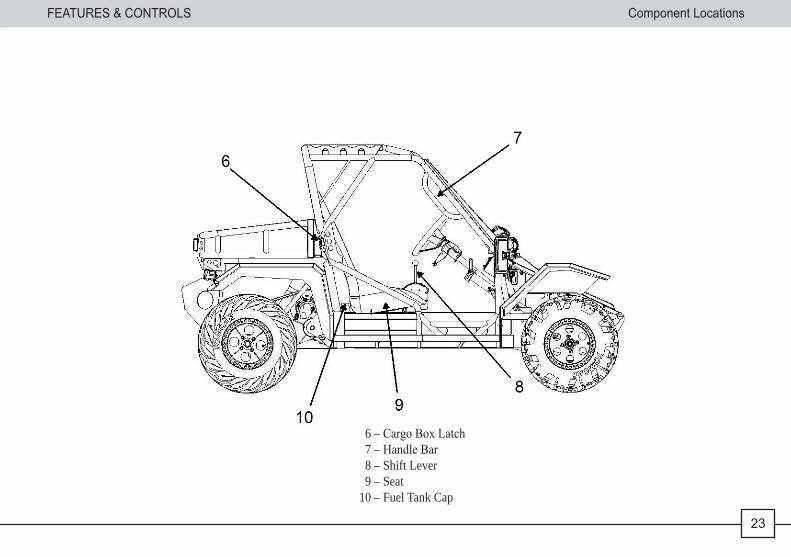
6 – Cargo Box Latch 7 – Handle Bar 8 – Shift Lever 9 – Seat10 – Fuel Tank Cap
FEATURES & CONTROLSComponent Locations
24
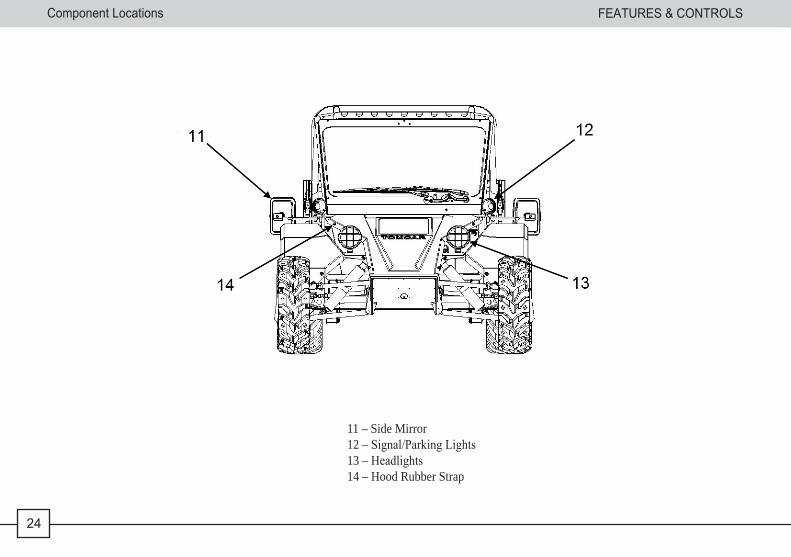
11 – Side Mirror12 – Signal/Parking Lights13 – Headlights14 – Hood Rubber Strap
FEATURES & CONTROLS Component Locations
25
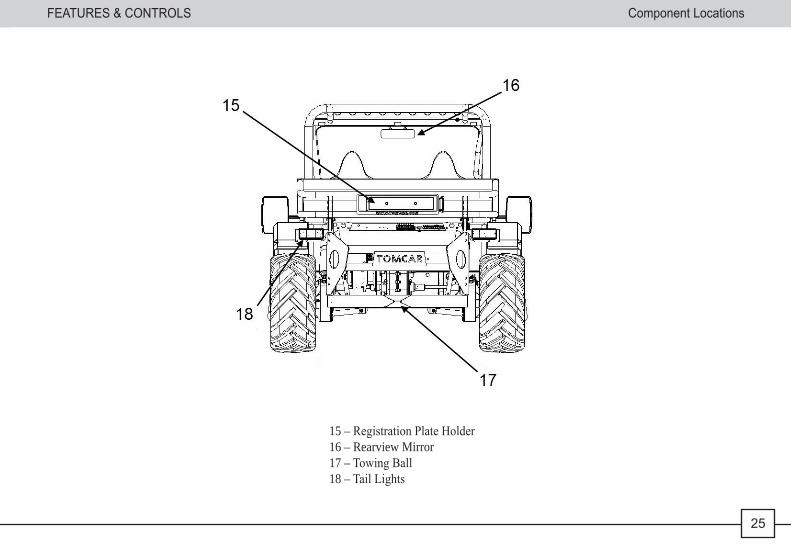
15 – Registration Plate Holder16 – Rearview Mirror17 – Towing Ball18 – Tail Lights
FEATURES & CONTROLSTowing Ball
26
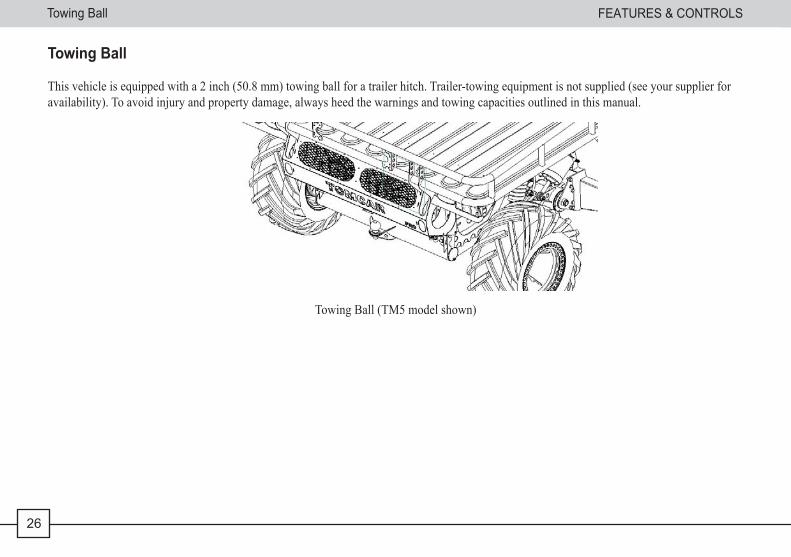
Towing Ball
This vehicle is equipped with a 2 inch (50.8 mm) towing ball for a trailer hitch. Trailer-towing equipment is not supplied (see your supplier for availability). To avoid injury and property damage, always heed the warnings and towing capacities outlined in this manual.
Towing Ball (TM5 model shown)
FEATURES & CONTROLS Fuel Cap/Fuel Gauge
27
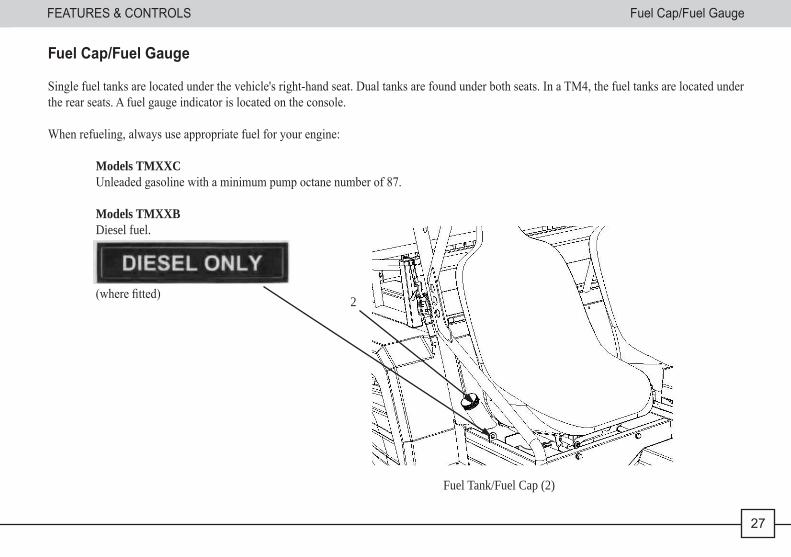
Fuel Cap/Fuel Gauge
Single fuel tanks are located under the vehicle's right-hand seat. Dual tanks are found under both seats. In a TM4, the fuel tanks are located under the rear seats. A fuel gauge indicator is located on the console.
When refueling, always use appropriate fuel for your engine:
Models TMXXC Unleaded gasoline with a minimum pump octane number of 87. Models TMXXB Diesel fuel.
(where fitted)
Fuel Tank/Fuel Cap (2)
2
FEATURES & CONTROLSDual Fuel Tank
28
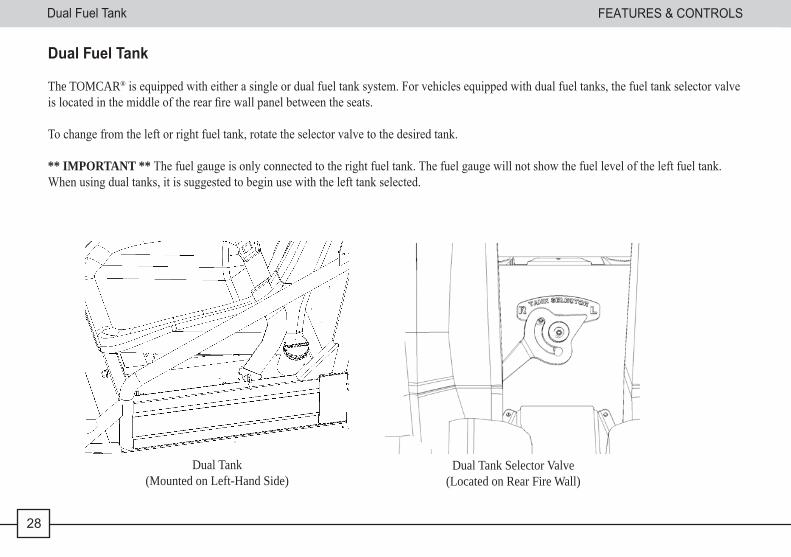
Dual Fuel Tank
The TOMCAR® is equipped with either a single or dual fuel tank system. For vehicles equipped with dual fuel tanks, the fuel tank selector valve is located in the middle of the rear fire wall panel between the seats.
To change from the left or right fuel tank, rotate the selector valve to the desired tank.
** IMPORTANT ** The fuel gauge is only connected to the right fuel tank. The fuel gauge will not show the fuel level of the left fuel tank. When using dual tanks, it is suggested to begin use with the left tank selected.
Dual Tank(Mounted on Left-Hand Side)
Dual Tank Selector Valve (Located on Rear Fire Wall)
FEATURES & CONTROLS Load Compensators
29
Load Compensators (if so equipped)
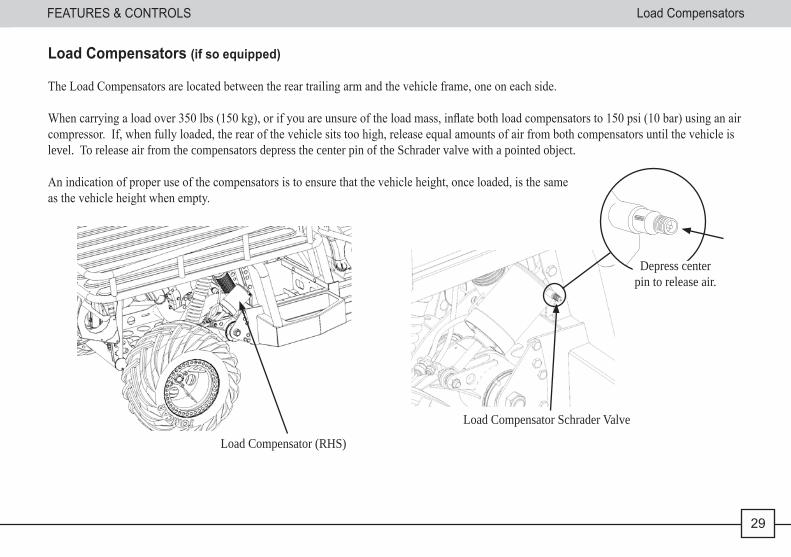
The Load Compensators are located between the rear trailing arm and the vehicle frame, one on each side.
When carrying a load over 350 lbs (150 kg), or if you are unsure of the load mass, inflate both load compensators to 150 psi (10 bar) using an air compressor. If, when fully loaded, the rear of the vehicle sits too high, release equal amounts of air from both compensators until the vehicle is level. To release air from the compensators depress the center pin of the Schrader valve with a pointed object.
An indication of proper use of the compensators is to ensure that the vehicle height, once loaded, is the same as the vehicle height when empty.
Load Compensator (RHS)
Load Compensator Schrader Valve
Depress center pin to release air.
FEATURES & CONTROLS
30
Seat Belts
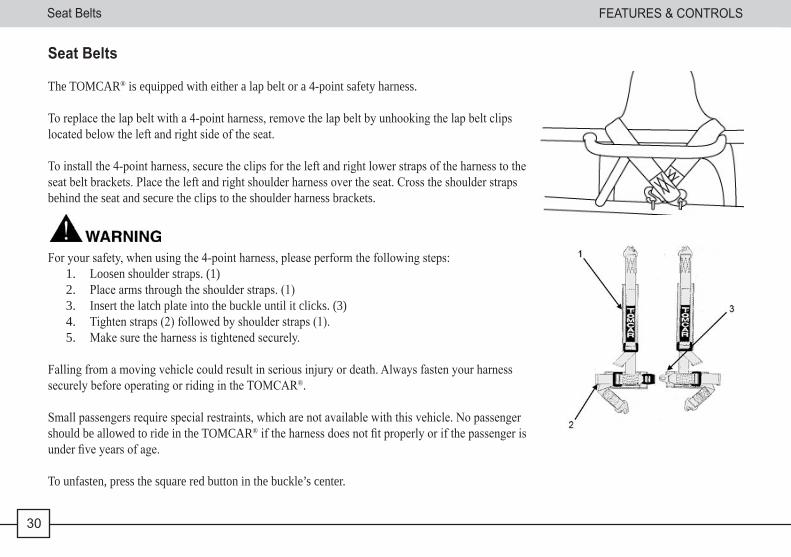
The TOMCAR® is equipped with either a lap belt or a 4-point safety harness.
To replace the lap belt with a 4-point harness, remove the lap belt by unhooking the lap belt clipslocated below the left and right side of the seat.
To install the 4-point harness, secure the clips for the left and right lower straps of the harness to theseat belt brackets. Place the left and right shoulder harness over the seat. Cross the shoulder strapsbehind the seat and secure the clips to the shoulder harness brackets.
For your safety, when using the 4-point harness, please perform the following steps: 1. Loosen shoulder straps. (1)2. Place arms through the shoulder straps. (1)3. Insert the latch plate into the buckle until it clicks. (3)4. Tighten straps (2) followed by shoulder straps (1).5. Make sure the harness is tightened securely.
Falling from a moving vehicle could result in serious injury or death. Always fasten your harness securely before operating or riding in the TOMCAR®.
Small passengers require special restraints, which are not available with this vehicle. No passenger should be allowed to ride in the TOMCAR® if the harness does not fit properly or if the passenger is under five years of age.
To unfasten, press the square red button in the buckle’s center.
Seat Belts
FEATURES & CONTROLS
31
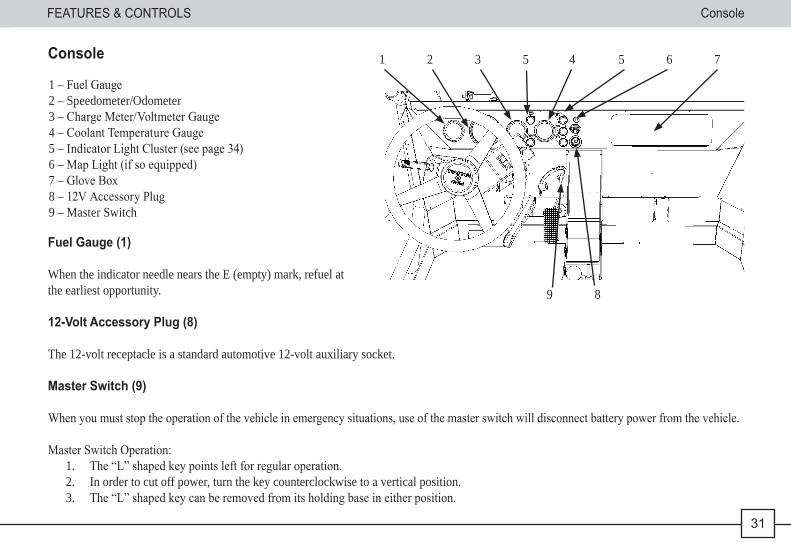
1 – Fuel Gauge 2 – Speedometer/Odometer 3 – Charge Meter/Voltmeter Gauge 4 – Coolant Temperature Gauge 5 – Indicator Light Cluster (see page 34) 6 – Map Light (if so equipped) 7 – Glove Box 8 – 12V Accessory Plug 9 – Master Switch
Console
1 2 3 5 4 5 6 7
9 8
Console
Fuel Gauge (1)
When the indicator needle nears the E (empty) mark, refuel at the earliest opportunity.
12-Volt Accessory Plug (8)
The 12-volt receptacle is a standard automotive 12-volt auxiliary socket.
Master Switch (9)
When you must stop the operation of the vehicle in emergency situations, use of the master switch will disconnect battery power from the vehicle.
Master Switch Operation:1. The “L” shaped key points left for regular operation.2. In order to cut off power, turn the key counterclockwise to a vertical position.3. The “L” shaped key can be removed from its holding base in either position.
FEATURES AND CONTROLS
32
Console FEATURES & CONTROLS
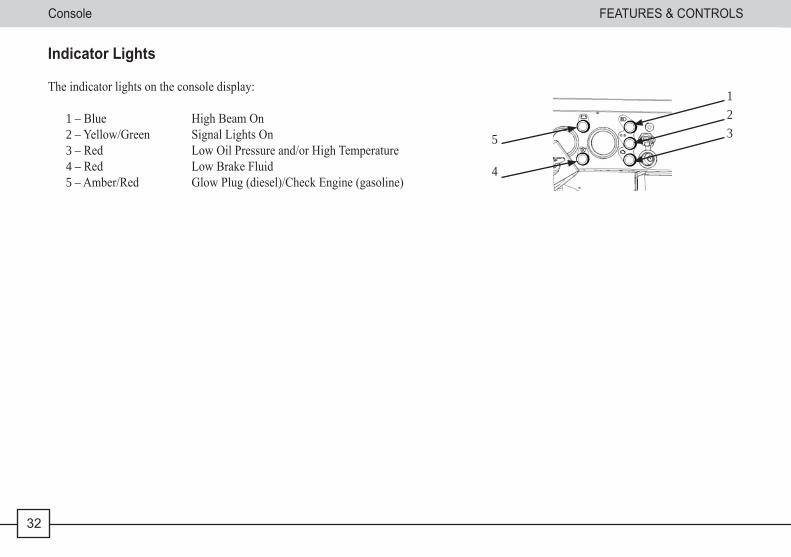
Indicator Lights
The indicator lights on the console display:
1 – Blue High Beam On2 – Yellow/Green Signal Lights On3 – Red Low Oil Pressure and/or High Temperature4 – Red Low Brake Fluid5 – Amber/Red Glow Plug (diesel)/Check Engine (gasoline)
1235
4
FEATURES AND CONTROLS
33
FEATURES & CONTROLS
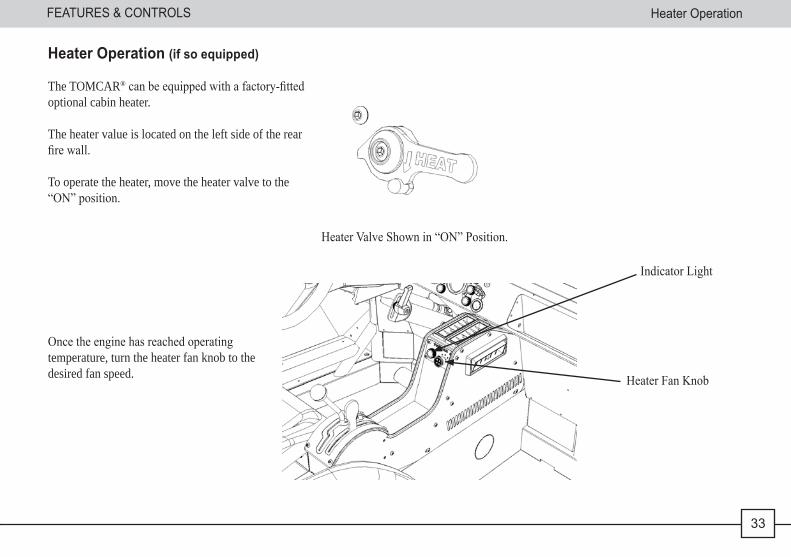
Heater Operation (if so equipped)
The TOMCAR® can be equipped with a factory-fitted optional cabin heater.
The heater value is located on the left side of the rear fire wall.
To operate the heater, move the heater valve to the “ON” position.
Once the engine has reached operating temperature, turn the heater fan knob to the desired fan speed.
Heater Valve Shown in “ON” Position.
Indicator Light
Heater Fan Knob
Heater OperationFEATURES & CONTROLS Heater Operation
FEATURES AND CONTROLS
34
Seat Adjustment
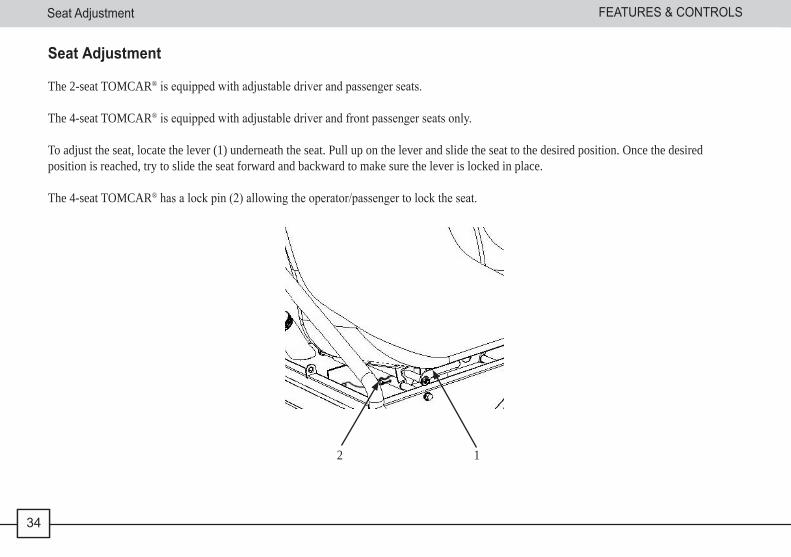
Seat Adjustment
The 2-seat TOMCAR® is equipped with adjustable driver and passenger seats.
The 4-seat TOMCAR® is equipped with adjustable driver and front passenger seats only.
To adjust the seat, locate the lever (1) underneath the seat. Pull up on the lever and slide the seat to the desired position. Once the desired position is reached, try to slide the seat forward and backward to make sure the lever is locked in place.
The 4-seat TOMCAR® has a lock pin (2) allowing the operator/passenger to lock the seat.
2 1
FEATURES & CONTROLS
34
FEATURES AND CONTROLS
35
Steering Wheel Controls/Ignition Switch
35
FEATURES & CONTROLS
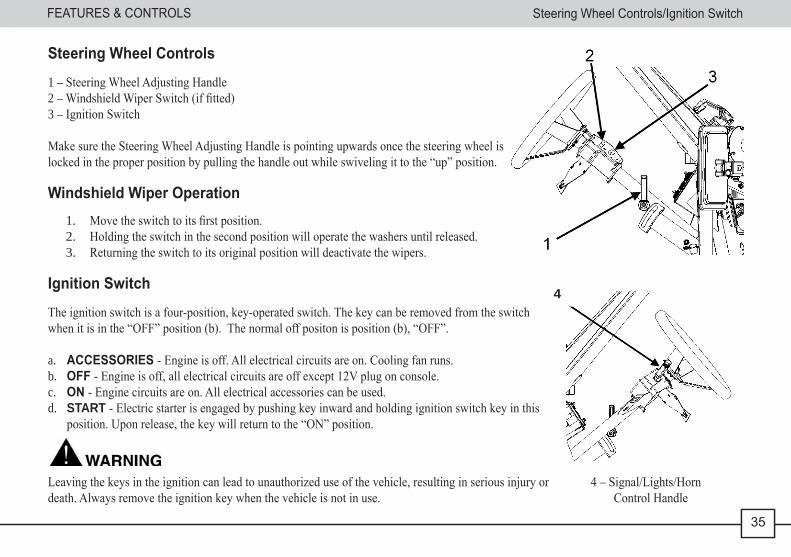
Steering Wheel Controls
1 – Steering Wheel Adjusting Handle2 – Windshield Wiper Switch (if fitted)3 – Ignition Switch
Make sure the Steering Wheel Adjusting Handle is pointing upwards once the steering wheel is locked in the proper position by pulling the handle out while swiveling it to the “up” position.
Windshield Wiper Operation 1. Move the switch to its first position.2. Holding the switch in the second position will operate the washers until released.3. Returning the switch to its original position will deactivate the wipers.
Ignition Switch
The ignition switch is a four-position, key-operated switch. The key can be removed from the switch when it is in the “OFF” position (b). The normal off positon is position (b), “OFF”.
a. ACCESSORIES - Engine is off. All electrical circuits are on. Cooling fan runs.b. OFF - Engine is off, all electrical circuits are off except 12V plug on console.c. ON - Engine circuits are on. All electrical accessories can be used.d. START - Electric starter is engaged by pushing key inward and holding ignition switch key in this
position. Upon release, the key will return to the “ON” position.
Leaving the keys in the ignition can lead to unauthorized use of the vehicle, resulting in serious injury or 4 – Signal/Lights/Horndeath. Always remove the ignition key when the vehicle is not in use. Control Handle
4
FEATURES AND CONTROLS
36
Lights/Horn/Signal Control FEATURES & CONTROLS
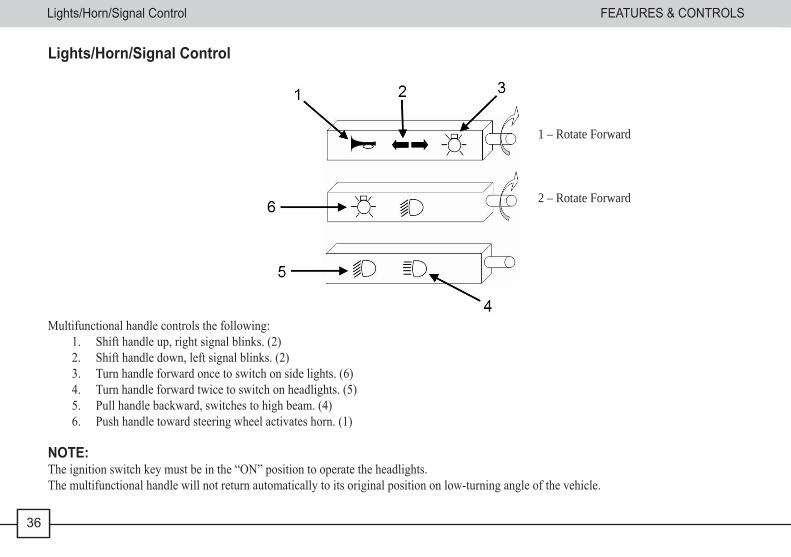
Lights/Horn/Signal Control
1 – Rotate Forward
2 – Rotate Forward
Multifunctional handle controls the following:1. Shift handle up, right signal blinks. (2)2. Shift handle down, left signal blinks. (2)3. Turn handle forward once to switch on side lights. (6)4. Turn handle forward twice to switch on headlights. (5)5. Pull handle backward, switches to high beam. (4)6. Push handle toward steering wheel activates horn. (1)
NOTE:The ignition switch key must be in the “ON” position to operate the headlights.The multifunctional handle will not return automatically to its original position on low-turning angle of the vehicle.
36
FEATURES AND CONTROLS
37
PedalsFEATURES & CONTROLS
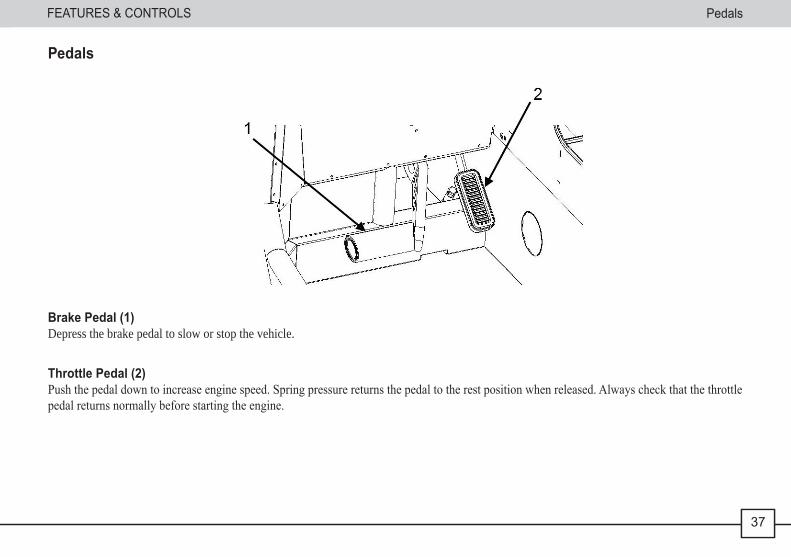
Pedals
Brake Pedal (1)Depress the brake pedal to slow or stop the vehicle.
Throttle Pedal (2)Push the pedal down to increase engine speed. Spring pressure returns the pedal to the rest position when released. Always check that the throttle pedal returns normally before starting the engine.
37
FEATURES AND CONTROLS
38
Gear Selector
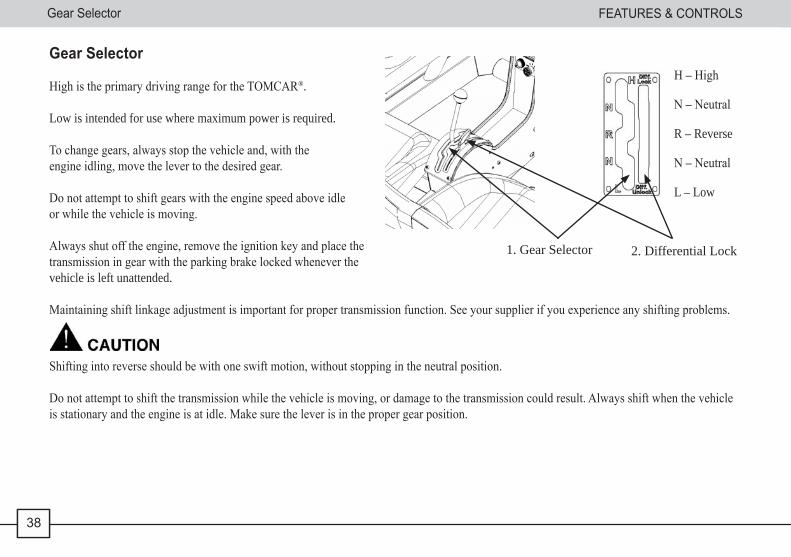
Gear Selector
High is the primary driving range for the TOMCAR®.
Low is intended for use where maximum power is required.
To change gears, always stop the vehicle and, with the engine idling, move the lever to the desired gear.
Do not attempt to shift gears with the engine speed above idle or while the vehicle is moving.
Always shut off the engine, remove the ignition key and place the transmission in gear with the parking brake locked whenever the vehicle is left unattended.
Maintaining shift linkage adjustment is important for proper transmission function. See your supplier if you experience any shifting problems.
Shifting into reverse should be with one swift motion, without stopping in the neutral position.
Do not attempt to shift the transmission while the vehicle is moving, or damage to the transmission could result. Always shift when the vehicle is stationary and the engine is at idle. Make sure the lever is in the proper gear position.
H – High N – Neutral R – Reverse N – Neutral L – Low
2. Differential Lock1. Gear Selector
FEATURES & CONTROLS
38
FEATURES AND CONTROLS
39
Differential Lock LeverFEATURES & CONTROLS
Differential Lock Lever (if so equipped)
The rear axle is equipped with a lockable differential that allows the driver to choose between a locked differential or unlocked differential. It is beneficial to lock the differential in low-traction situations. To lock the differential, while driving slowly, push the differential lever until it goes all the way forward into the locked position. Disengagement is simply the reversal of the engagement procedure.
Slight changes in direction of travel while operating the lever may assist in the engagement and disengagement of the differential lock.Damage to the differential can occur if the differential lock is engaged while the vehicle is traveling at high speeds or while the rear wheels are spinning without traction.
Using the differential lock feature requires special care. Using the vehicle incorrectly can cause rollover. The vehicle’s steering firms up while the differential lock is engaged.
While the differential lock is engaged, do not operate the vehicle at speeds greater than 10 mph.
39
FEATURES AND CONTROLS
40
Parking Brake FEATURES & CONTROLS
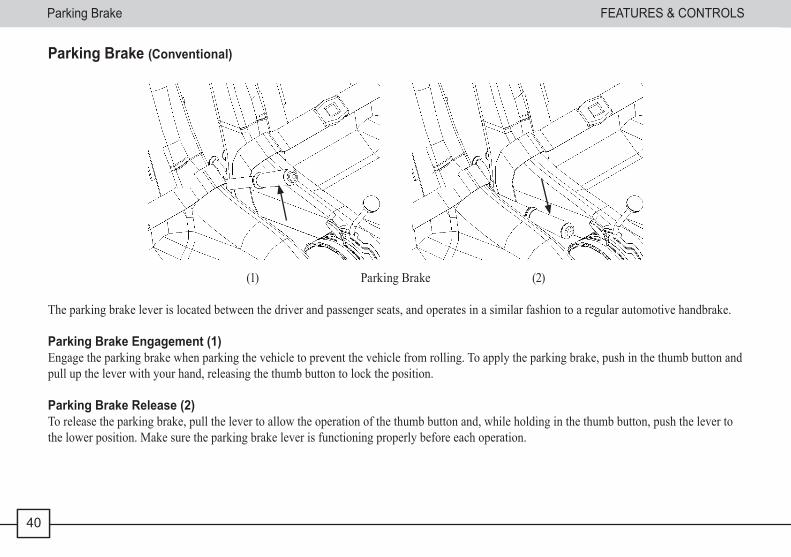
Parking Brake (Conventional)
(1) Parking Brake (2)
The parking brake lever is located between the driver and passenger seats, and operates in a similar fashion to a regular automotive handbrake.
Parking Brake Engagement (1)Engage the parking brake when parking the vehicle to prevent the vehicle from rolling. To apply the parking brake, push in the thumb button and pull up the lever with your hand, releasing the thumb button to lock the position.
Parking Brake Release (2)To release the parking brake, pull the lever to allow the operation of the thumb button and, while holding in the thumb button, push the lever to the lower position. Make sure the parking brake lever is functioning properly before each operation.
40

FEATURES AND CONTROLS
41
FEATURES AND CONTROLSFEATURES & CONTROLS
Parking Brake (TOMCAR®)
TOMCAR® Parking Brake
The parking brake lever is located between the driver and passenger seats.
When the parking brake handle is located in the upper position, as presented in the above illustration, the brakes are unlocked. To lock the brakes, shift the handle to a horizontal position (2).
Parking Brake Engagement (2)Engage the parking brake when parking the vehicle to prevent the vehicle from rolling. To apply the parking brake, push down the lever with your hand.
Parking Brake Lever (1)To release the parking brake, pull the lever up. Make sure the parking brake lever is functioning properly before each operation.
Parking Brake
41
OPERATIONS
42
Emission Control System Warranty OPERATIONS
Emission Control System WarrantyTOMCAR® USA Inc. – Emission Control System Warranty
Your Warranty Rights and Obligations
The Emission Control System Warranty period for this vehicle begins on the date the vehicle is delivered to the first purchaser other than an authorized dealer, or the date it is first used as a demonstrator, lease or company vehicle, whichever comes first, and continues for 30 months after that date, or 5,000 km, which ever comes first, provided there has been no abuse, neglect or improper maintenance of your vehicle. Where a warrantable condition exists, the distributor will repair your vehicle at no cost to you, including diagnosis, parts and labor. If an emission-related part on your vehicle is defective, the part will be repaired or replaced by the distributor. This is your emission control defects warranty.
Owner’s Warranty Responsibilities
As the vehicle owner, you are responsible for the performance of the required maintenance. You should maintain a record of all maintenance performed on your vehicle and retain all receipts covering maintenance on your vehicle. You may not be denied a warranty claim solely because of your failure to ensure the performance of all scheduled maintenance or lack of maintenance records or receipts. You are responsible for presenting your vehicle to an authorized dealer at the first sign of a problem. The warranty repairs should be completed in a reasonable amount of time, not to exceed 30 days.
As the vehicle owner, you should be aware that you may be denied your warranty coverage if your vehicle or a part has failed due to abuse, neglect, improper maintenance or unapproved modifications.
Warranty Coverage
The distributor warrants that each new 2008 and later vehicle:• Is designed, built and equipped so as to conform at the time of initial retail purchase with all applicable regulations of the United States
Environmental Protection Agency and the California Air Resources Board; and• Is free from defects in material and workmanship which cause such vehicle to fail to conform with applicable regulations of the United
States Environmental Protection Agency or the California Air Resources Board for the periods specified above.42
OPERATIONS
43
Emission Control System Warranty
Your Emission Control System Warranty covers original components whose failure would increase an engine’s emission, including electronic controls, fuel injection system, carburetor, the ignition system, catalytic converter, or any other system utilized in this vehicle to control emission. Also included may be hoses, connectors and other emission-related assemblies. Replacing or repairing other components (including parts, labor and other costs) not covered by this Emission Control System Warranty or the standard warranty is the responsibility of the owner.
Coverage of repairs under this warranty applies only when repairs are completed at an authorized dealer or repair facility. The distributor will not cover repairs performed outside of an authorized dealer or repair facility, except in an emergency situation. The use of replacement parts not equivalent to the original parts may impair the effectiveness of your vehicle’s emission control system. If such a replacement part is used and an authorized dealer determines it is defective or causes the failure of a warranted part, your claim for repair to bring your vehicle into compliance with applicable standards may be denied.
If an emergency situation exists when a warranted part or an authorized dealer is not reasonably available to the owner, repairs may be performed at any available service establishment, or by the owner, using any replacement part. The distributor shall reimburse the owner for the expenses, including diagnostic charges, not to exceed the distributor’s suggested retail price for all warranted parts replaced and labor charges based on the distributor’s recommended time allowance for the warranty repair and the geographically appropriate hourly labor rate. The owner may reasonably be required to keep receipts and failed parts in order to receive compensation.
This Emission Control System Warranty is in addition to the standard Limited Warranty.
Exclusions and Limitations
This warranty does not cover the following:• Failures or malfunctions of the emission control systems caused by abuse, alteration, accident, misuse or the use of leaded gasoline.• Replacement of expendable maintenance items, unless it is original equipment defective in material or workmanship under normal use,
and the first required replacement interval for the item has not been reached. Expendable maintenance items include, but are not limited to, spark plugs, filters, coolant, lubricants, gaskets, hoses and belts.
• Replacements of parts, and other services and adjustments for required maintenance.• Any vehicle equipped with an odometer or hour meter where the reading is altered so that actual mileage cannot be readily determined.
OPERATIONS
43
OPERATIONS
44
Emission Control System Warranty
• Repairs or replacements that are a result of:– Accident– Misuse– Use of replacement parts or accessories not conforming to the original specifications, which adversely affect performance.
• Physical damage, corrosion or defects caused by fire, explosions or similar causes beyond the control of the distributor.• Failures not caused by a defect in material or workmanship.
Use of the vehicle in any type of competitive racing or related events immediately and completely voids this and all other warranties.
Limited Liability
The liability of the distributor under this Emission Control System Warranty is limited solely to the remedying of defects in material or workmanship by an authorized dealer at his/her place of business during customary business hours. This warranty does not cover inconvenience or loss of use of the vehicle, or transportation of the vehicle to/from the authorized dealer. The distributor is not liable to any person for incidental, consequential or special damages of any description, whether arising out of express or implied warranty or any other contract, negligence, or other tort or otherwise.
No express Emission Control System Warranty is given by the distributor except as specifically set forth herein. Any Emission Control System Warranty implied by law, including any warranty of merchantability or fitness for a particular purpose, is limited to the express Emission Control System Warranty terms stated in this warranty. The foregoing statements of warranty are exclusive and in lieu of all other remedies. All express warranties not stated in this warranty are disclaimed. Some states do not allow limitations on how long an implied warranty lasts, so the above limitation may not apply if they are inconsistent with the controlling state law.
No dealer is authorized to modify this Emission Control System Warranty. If you have any questions regarding your warranty rights and responsibilities, you should contact TOMCAR® USA Inc. at 1727 E. Dear Valley Rd., Phoenix, AZ 85024 (1-623-587-7799) or the California Air Resources Board, 9528 Telstar Ave., El Monte, CA 91731 (for California registered vehicles only).
OPERATIONS
44
45
OPERATIONSOPERATIONS Guidelines/Vehicle Break-In Period
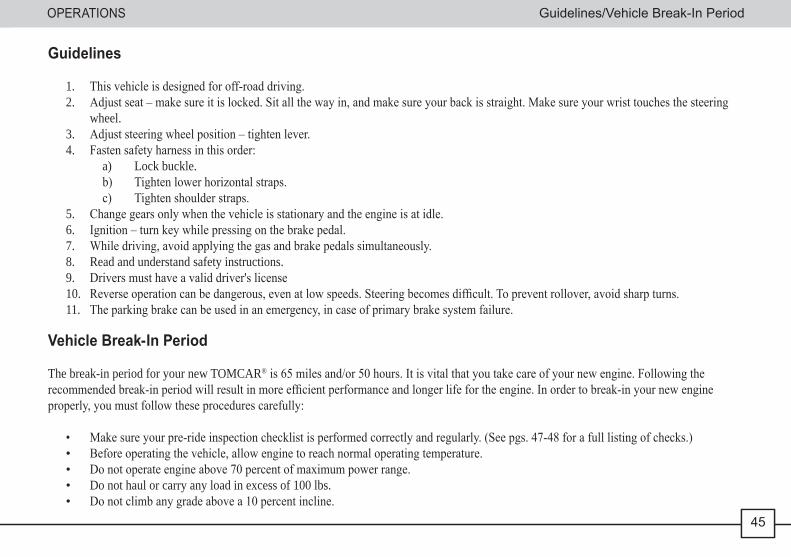
Guidelines
1. This vehicle is designed for off-road driving.2. Adjust seat – make sure it is locked. Sit all the way in, and make sure your back is straight. Make sure your wrist touches the steering
wheel.3. Adjust steering wheel position – tighten lever.4. Fasten safety harness in this order:
a) Lock buckle. b) Tighten lower horizontal straps. c) Tighten shoulder straps.
5. Change gears only when the vehicle is stationary and the engine is at idle.6. Ignition – turn key while pressing on the brake pedal.7. While driving, avoid applying the gas and brake pedals simultaneously.8. Read and understand safety instructions.9. Drivers must have a valid driver's license10. Reverse operation can be dangerous, even at low speeds. Steering becomes difficult. To prevent rollover, avoid sharp turns.11. The parking brake can be used in an emergency, in case of primary brake system failure.
Vehicle Break-In Period
The break-in period for your new TOMCAR® is 65 miles and/or 50 hours. It is vital that you take care of your new engine. Following the recommended break-in period will result in more efficient performance and longer life for the engine. In order to break-in your new engine properly, you must follow these procedures carefully:
• Make sure your pre-ride inspection checklist is performed correctly and regularly. (See pgs. 47-48 for a full listing of checks.)• Before operating the vehicle, allow engine to reach normal operating temperature.• Do not operate engine above 70 percent of maximum power range. • Do not haul or carry any load in excess of 100 lbs. • Do not climb any grade above a 10 percent incline.
45
OPERATIONS
46
Pre-Ride Inspection OPERATIONS
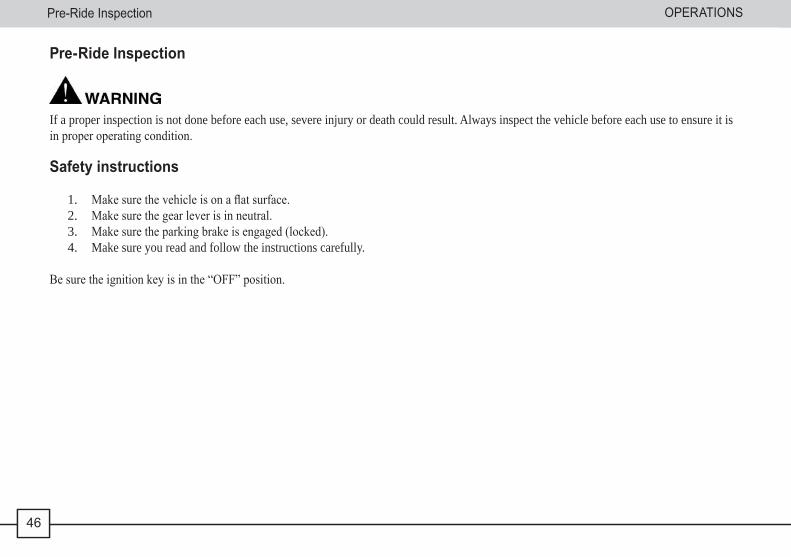
Pre-Ride Inspection
If a proper inspection is not done before each use, severe injury or death could result. Always inspect the vehicle before each use to ensure it is in proper operating condition.
Safety instructions
1. Make sure the vehicle is on a flat surface.2. Make sure the gear lever is in neutral.3. Make sure the parking brake is engaged (locked).4. Make sure you read and follow the instructions carefully.
Be sure the ignition key is in the “OFF” position.
46
OPERATIONS Pre-Ride Inspection
47
Pre-Ride InspectionOPERATIONS
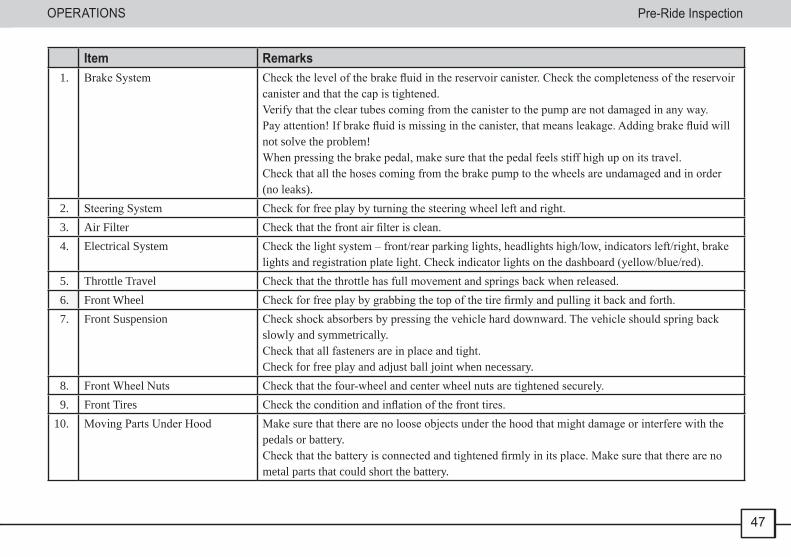
Item Remarks 1. Brake System Check the level of the brake fluid in the reservoir canister. Check the completeness of the reservoir
canister and that the cap is tightened. Verify that the clear tubes coming from the canister to the pump are not damaged in any way.Pay attention! If brake fluid is missing in the canister, that means leakage. Adding brake fluid will not solve the problem!When pressing the brake pedal, make sure that the pedal feels stiff high up on its travel.Check that all the hoses coming from the brake pump to the wheels are undamaged and in order (no leaks).
2. Steering System Check for free play by turning the steering wheel left and right. 3. Air Filter Check that the front air filter is clean. 4. Electrical System Check the light system – front/rear parking lights, headlights high/low, indicators left/right, brake
lights and registration plate light. Check indicator lights on the dashboard (yellow/blue/red). 5. Throttle Travel Check that the throttle has full movement and springs back when released. 6. Front Wheel Check for free play by grabbing the top of the tire firmly and pulling it back and forth. 7. Front Suspension Check shock absorbers by pressing the vehicle hard downward. The vehicle should spring back
slowly and symmetrically. Check that all fasteners are in place and tight. Check for free play and adjust ball joint when necessary.
8. Front Wheel Nuts Check that the four-wheel and center wheel nuts are tightened securely. 9. Front Tires Check the condition and inflation of the front tires.10. Moving Parts Under Hood Make sure that there are no loose objects under the hood that might damage or interfere with the
pedals or battery.Check that the battery is connected and tightened firmly in its place. Make sure that there are no metal parts that could short the battery.
47
OPERATIONSPre-Ride Inspection
48
Pre-Ride Inspection OPERATIONS
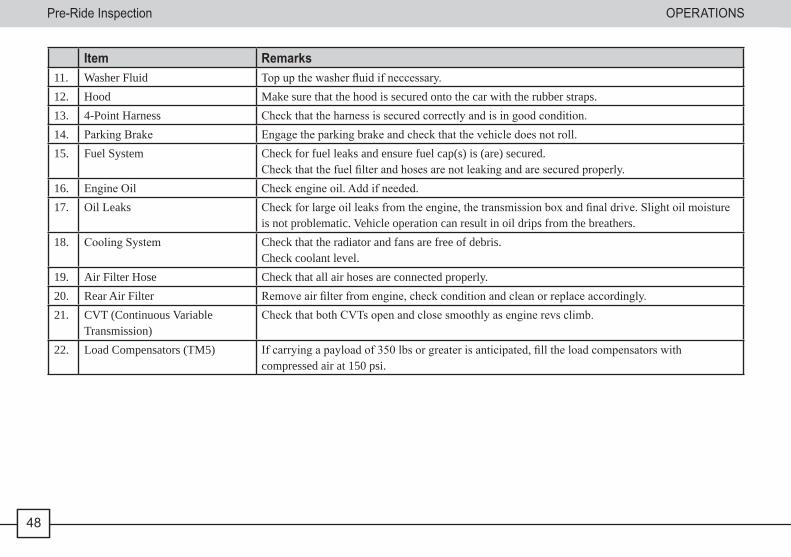
Item Remarks11. Washer Fluid Top up the washer fluid if neccessary.12. Hood Make sure that the hood is secured onto the car with the rubber straps.13. 4-Point Harness Check that the harness is secured correctly and is in good condition.14. Parking Brake Engage the parking brake and check that the vehicle does not roll.15. Fuel System Check for fuel leaks and ensure fuel cap(s) is (are) secured.
Check that the fuel filter and hoses are not leaking and are secured properly.16. Engine Oil Check engine oil. Add if needed.17. Oil Leaks Check for large oil leaks from the engine, the transmission box and final drive. Slight oil moisture
is not problematic. Vehicle operation can result in oil drips from the breathers.18. Cooling System Check that the radiator and fans are free of debris.
Check coolant level.19. Air Filter Hose Check that all air hoses are connected properly.20. Rear Air Filter Remove air filter from engine, check condition and clean or replace accordingly.21. CVT (Continuous Variable
Transmission)Check that both CVTs open and close smoothly as engine revs climb.
22. Load Compensators (TM5) If carrying a payload of 350 lbs or greater is anticipated, fill the load compensators with compressed air at 150 psi.
48

OPERATIONS
49
OPERATIONSPre-Ride InspectionOPERATIONS
Starting the Engine
Engine exhaust fumes contain poisonous carbon monoxide, which can cause serious illness and death. Never run the engine in an enclosed area such as a closed building without proper ventilation.
Do not press the throttle pedal while starting the engine.
Operating the vehicle immediately after starting could cause engine damage. Allow the engine to warm up before operating the vehicle.Never press the throttle pedal down all the way when in neutral; it may cause severe damage to the transmission.
Do not operate the starter continuously for more than five seconds or the starter will overheat and the battery power will drop temporarily. Wait at least five seconds between each operation of the starter to allow it to cool and to enable battery power recovery.
Do not turn the ignition switch key to the “START” position while the engine is running. Damage to the starter can result.
Starting the Engine
49
OPERATIONS
50
Starting the Engine OPERATIONS
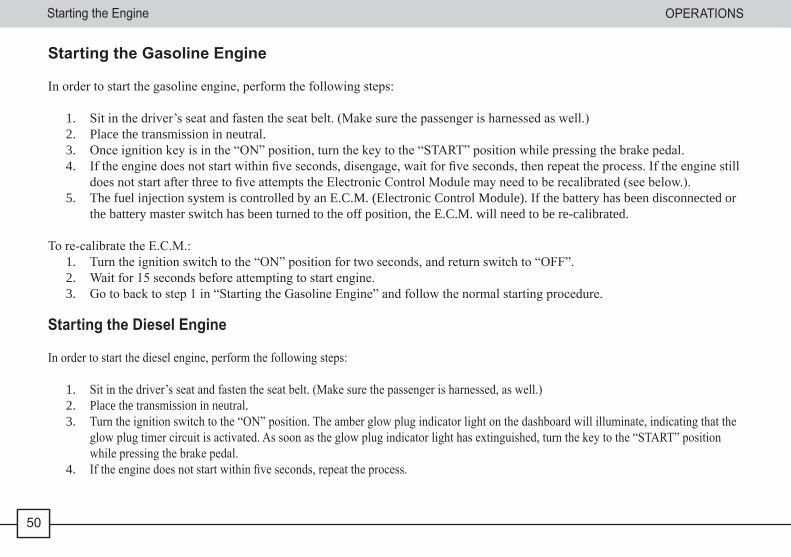
Starting the Gasoline Engine
In order to start the gasoline engine, perform the following steps:
1. Sit in the driver’s seat and fasten the seat belt. (Make sure the passenger is harnessed as well.)2. Place the transmission in neutral.3. Once ignition key is in the “ON” position, turn the key to the “START” position while pressing the brake pedal.4. If the engine does not start within five seconds, disengage, wait for five seconds, then repeat the process. If the engine still
does not start after three to five attempts the Electronic Control Module may need to be recalibrated (see below.).5. The fuel injection system is controlled by an E.C.M. (Electronic Control Module). If the battery has been disconnected or
the battery master switch has been turned to the off position, the E.C.M. will need to be re-calibrated.
To re-calibrate the E.C.M.:1. Turn the ignition switch to the “ON” position for two seconds, and return switch to “OFF”.2. Wait for 15 seconds before attempting to start engine.3. Go to back to step 1 in “Starting the Gasoline Engine” and follow the normal starting procedure.
Starting the Diesel Engine
In order to start the diesel engine, perform the following steps:
1. Sit in the driver’s seat and fasten the seat belt. (Make sure the passenger is harnessed, as well.)2. Place the transmission in neutral.3. Turn the ignition switch to the “ON” position. The amber glow plug indicator light on the dashboard will illuminate, indicating that the
glow plug timer circuit is activated. As soon as the glow plug indicator light has extinguished, turn the key to the “START” position while pressing the brake pedal.
4. If the engine does not start within five seconds, repeat the process.
50
OPERATIONS
51
OPERATIONS
Shutting Off the Engine
1. Release the throttle pedal completely.2. Brake to a complete stop.3. Shift vehicle into neutral.4. Engage the parking brake.5. Turn the ignition switch to the “OFF” position.
Braking
1. Release the throttle pedal completely.2. Press on the brake pedal evenly and firmly.
NOTE:Practice starting and stopping (using the brakes) until you are familiar with the controls.
A rolling vehicle can cause property damage and serious injury. Always apply the parking brake when the vehicle is parked.
Failure to allow for increased braking distance when hauling cargo, towing a trailer or in inclement weather may result in accident and injury. Always slow down and allow additional braking distance when towing, hauling cargo or in inclement weather.
Always drive appropriately for the conditions at hand. Allow enough braking distance to come to a complete stop safely.
Shutting Off the Engine/BrakingOPERATIONS
51
OPERATIONSDriving Proceedures
52
Driving Procedures OPERATIONS
Driving Safely
1. Sit in the driver’s seat and fasten the seat belt (as described earlier).2. After starting the engine and allowing it to warm up, press the brake pedal and shift the transmission into gear.3. Check your surroundings and determine your path of travel.4. Disengage the parking brake.5. Keeping both hands on the steering wheel, with thumbs on the outside, take your foot off the brake pedal and slowly press the throttle
with your right foot and begin driving. Vehicle speed is controlled by the amount the pedal is pressed.6. Practice maneuvering and using the throttle and brakes on level surfaces.7. Never operate at speeds too fast for your skills or the conditions at hand.
NOTE:The high/low transmission enables the driver to better control the vehicle on different terrains and applications. When driving with heavy loads, use the low gear.
52

OPERATIONS Driving Proceedures
53
Driving ProceduresOPERATIONS
Driving on Slippery Surfaces
When driving on slippery surfaces such as wet trails, loose gravel or ice, be alert for the possibility of skidding and sliding. Under these conditions, follow these precautions:
1. Slow down.2. Read the trail and avoid quick, sharp turns, which can cause skids. Keep alert at all times.3. In the event of skidding, correct a skid by turning the steering wheel in the direction of the skid.
• Failure to exercise care when operating on slippery surfaces can result in the loss of tire traction and cause loss of control, accident, and serious injury or death.
• Never apply the brakes during a skid.• Do not operate on excessively slippery surfaces.• Always reduce speed and use additional caution when operating on slippery surfaces.
53
OPERATIONSDriving Proceedures
54
Driving Procedures OPERATIONS
Driving Uphill
Whenever traveling uphill, follow these precautions:1. Always travel uphill in a straight line.2. Avoid steep hills (15° maximum).3. Keep feet and hands within the cabin at all times.4. Proceed at a constant speed.
• Climbing hills improperly can cause loss of control or vehicle overturn. Always check the terrain carefully before climbing a hill.• When operating on hilly terrain, braking and handling are greatly affected. Improper procedure could cause loss of control or overturn,
and result in serious injury or death.• Avoid climbing steep hills (15° maximum).• Use extreme caution when operating on hills, and follow proper operating procedures outlined in this Owner’s Manual.• Use caution when climbing hills with excessively slippery or loose surfaces.• Never go over the crest of a hill at a high speed; an obstacle could be on the other side of the hill.
54
OPERATIONS Driving Proceedures
55
Driving ProceduresOPERATIONS
Driving on Side Slopes
• Crossing hillsides or turning on hills can result in loss of control or vehicle rollover, resulting in severe injury or death.• When driving on side slopes, exercise extreme caution.• Avoid operating on steep hills (15° maximum).
Driving Downhill
Whenever driving down a hill, follow these precautions:1. Test the brake pedal and parking brake before descent.2. Keep in a straight line and proceed directly downhill.3. Maintain a safe speed in accordance with the conditions.4. Apply the brakes slightly and softly to aid in slowing.
• Traveling downhill improperly could cause loss of control or vehicle overturn. Always check the terrain carefully before descending a hill.
• Never descend a hill at high speed. Excessive speed may result in the loss of vehicle control and can lead to serious injury or death. Always operate slowly when traveling downhill.
• Avoid descending a hill at an angle, which could cause the vehicle to lean sharply to one side. Travel straight downhill when possible.
55
OPERATIONSDriving Proceedures
56
Driving Procedures OPERATIONS
Driving Through Water
• Driving the vehicle through water could result in the loss of vehicle control and may lead to serious injury or death. • Never cross deep or fast-flowing water with your TOMCAR®.• After leaving water and then traveling on a level surface, always dry the brakes by applying light pressure to the brake pedal repeatedly
until braking action is normal.
Your TOMCAR® can operate through water up to a maximum recommended depth equal to your TOMCAR®’s floor level.1. Always determine water depths and current before entering.2. Choose a crossing where both banks have inclines that are as gradual as possible.3. Proceed slowly, avoiding rocks and any other obstacles that might be in your way.
NOTE: After running your vehicle in water, it is critical that you perform the services outlined in the Periodic Maintenance Chart beginning on page 64. Give special attention to engine oil, transmission oil, final drive oil and all grease fittings.
Immersion can result in major damage if the vehicle is not serviced correctly and promptly. After immersion, always take the vehicle to your service supplier. Do not start the engine!
NEVER DRIVE IN SEAWATER!
56

OPERATIONS Driving Proceedures
57
Driving ProceduresOPERATIONS
Driving Over Obstacles
You must always be alert when driving your TOMCAR®. Look ahead to read the terrain and watch out for hazards such as rocks, holes and low- hanging branches.
Severe injury or death can result if your vehicle suddenly comes in contact with a hidden obstacle. Not all obstacles are immediately visible. Reduce speed and travel with caution in unfamiliar terrain.
Driving in Reverse
When driving in reverse, please follow the guidelines outlined below:1. Apply the brakes. 2. Put shift lever in the reverse position.3. Always look around you before reversing.4. Slowly release brake pedal, and gently apply the throttle pedal for movement.5. Reverse slowly.6. Apply the brakes lightly for stopping.7. Avoid turning at sharp angles.8. Never open the throttle suddenly while in reverse.
Failure to use caution when operating in reverse can result in serious injury or death. Before shifting into reverse, always check for obstacles or people behind the vehicle and follow the reverse operation procedures outlined in this manual. Always reverse slowly.
57
OPERATIONSDriving Proceedures
58
Driving Procedures OPERATIONS
Parking the TOMCAR®
Always apply the parking brake after stopping the engine.1. Stop the vehicle on a level surface. (If not on a level surface, see below.)2. Shut off the engine and apply the parking brake.3. Remove the ignition switch key to prevent unauthorized use.
Parking on an Incline
If possible, avoid parking on an incline. If it is unavoidable, follow the procedure below:1. Place the transmission in gear.2. Apply the parking brake.3. Block the rear wheels on the downhill side.
• A rolling vehicle can cause property damage and serious injury. Always apply the parking brake after stopping the engine. Always block the downhill side of the wheels if leaving the vehicle on a hill, or park the vehicle in a side-hill position instead.
• Operating the vehicle while the hand brake is engaged could cause loss of control and result in serious injury or death. Always disengage the parking brake before operating the vehicle.
• Fuel is extremely flammable and can be explosive under certain conditions. Once parked inside a garage or other structure, be sure that the structure is well-ventilated and that the vehicle is not close to any source of flames or sparks, including any appliances with pilot lights.
NOTE: The TOMCAR® transmission has no parking position as in a standard automatic transmission. Engaging the gear box will not hold the vehicle, as the belt will slip and no engine braking will be transferred to the road wheels. Be certain the parking brake is in good working condition. Do not rely solely on the parking brake. Place a rock or other obstacle under the wheels in case the hand brake is released accidentally.
58
OPERATIONS Driving Proceedures
59
Driving ProceduresOPERATIONS
Hauling Cargo
Hauling cargo improperly can alter vehicle handling and may cause loss of control or brake instability, which can result in serious injury or death. Always follow these precautions when hauling cargo:
• Always load the cargo box with the load as far forward as possible.• Always operate the vehicle with extreme care when hauling or towing loads.• Slow down.
The TOMCAR® has been designed to carry or tow specific capacities. Always read and understand the load distribution warnings listed on the warning labels. Driving with passengers in the cargo box can result in severe injury or death.
• Never allow passengers to ride in the cargo box.• Passengers must always ride in the cabin with their safety belts/harness fastened securely.
59
OPERATIONSDriving Proceedures
60
Driving Procedures OPERATIONS
Towing Loads
Towing improperly can alter vehicle handling and may cause loss of control or brake instability, which can result in serious injury or death. Always follow the precautions outlined below when towing:
1. Do not exceed the recommended maximum towing loads for your vehicle (see Specifications section, beginning on pg. 101).2. Make sure the vertical load on the trailer hitch never exceeds 100 kg or 220 lbs.3. Operate the vehicle slower than usual and take into consideration the terrain and the slope.4. Do not tow more than the recommended weight for the vehicle.
Attach a trailer to the trailer hitch bracket only. Do not attach a trailer to any other location or you may lose control of the vehicle.Never tow a trailer on a grade steeper than 15°.
Belt Life
To get the maximum belt life when towing, we recommend you use low gear for towing uphill.
60

MAINTENANCE & LUBRICATION
61
Periodic Maintenance Chart
61
MAINTENANCE & LUBRICATION Periodic Maintenance Chart
Periodic Maintenance Chart
Careful periodic maintenance will help keep your vehicle in the safest, most reliable condition.
Inspection, adjustment and lubrication instructions for important components are explained in the Periodic Maintenance Chart.
Inspect, clean, lubricate, adjust and replace parts as necessary. When inspection reveals the need for replacement parts, please use genuine TOMCAR® parts available from your TOMCAR® supplier.
NOTE: • Serviceandadjustmentsarecritical.Ifyouarenotfamiliarwithsafeserviceandadjustmentprocedures,haveaqualifiedperson
perform these operations.• Maintenance intervals in the following chart are based upon average riding conditions.• Vehicles subjected to severe use must be inspected and serviced more frequently.
Severe Use Definition
• Frequent immersion in mud, water or sand.• Operating at high engine speeds.• Prolonged low speed, heavy load operation.• Extended idle.• Short-trip cold weather operation.
Pay special attention to the oil level. A rise in oil level during cold weather can indicate contaminants collecting in the oil sump or crankcase. Change oil immediately if the oil level begins to rise. Monitor the oil level, and if it continues to rise, discontinue use and see your supplier.
MAINTENANCE & LUBRICATION
62
Periodic Maintenance Chart
Periodic Maintenance Chart
62
MAINTENANCE & LUBRICATION
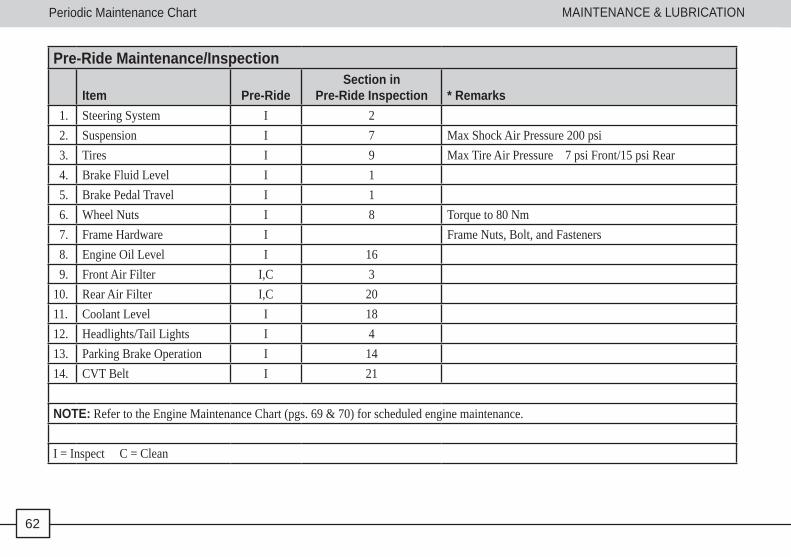
Pre-Ride Maintenance/Inspection
Item Pre-RideSection in
Pre-Ride Inspection * Remarks 1. Steering System I 2 2. Suspension I 7 Max Shock Air Pressure 200 psi 3. Tires I 9 Max Tire Air Pressure 7 psi Front/15 psi Rear 4. Brake Fluid Level I 1 5. Brake Pedal Travel I 1 6. Wheel Nuts I 8 Torque to 80 Nm 7. Frame Hardware I Frame Nuts, Bolt, and Fasteners 8. Engine Oil Level I 16 9. Front Air Filter I,C 310. Rear Air Filter I,C 2011. Coolant Level I 1812. Headlights/Tail Lights I 413. Parking Brake Operation I 1414. CVT Belt I 21
NOTE: Refer to the Engine Maintenance Chart (pgs. 69 & 70) for scheduled engine maintenance.
I = Inspect C = Clean
MAINTENANCE & LUBRICATION
63
Periodic Maintenance ChartPeriodic Maintenance Chart
63
MAINTENANCE & LUBRICATION
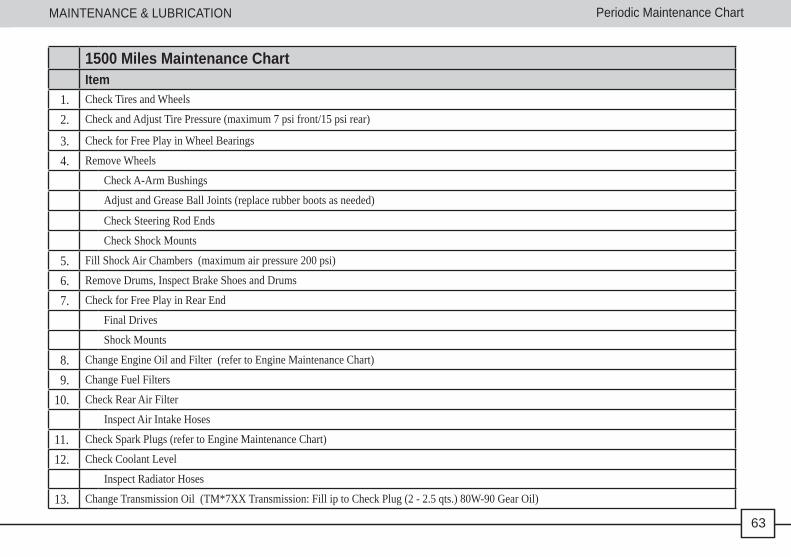
1500 Miles Maintenance ChartItem
1. Check Tires and Wheels
2. Check and Adjust Tire Pressure (maximum 7 psi front/15 psi rear)
3. Check for Free Play in Wheel Bearings
4. Remove Wheels
Check A-Arm Bushings
Adjust and Grease Ball Joints (replace rubber boots as needed)
Check Steering Rod Ends
Check Shock Mounts
5. Fill Shock Air Chambers (maximum air pressure 200 psi)
6. Remove Drums, Inspect Brake Shoes and Drums
7. Check for Free Play in Rear End
Final Drives
Shock Mounts
8. Change Engine Oil and Filter (refer to Engine Maintenance Chart)
9. Change Fuel Filters
10. Check Rear Air Filter
Inspect Air Intake Hoses
11. Check Spark Plugs (refer to Engine Maintenance Chart)
12. Check Coolant Level
Inspect Radiator Hoses
13. Change Transmission Oil (TM*7XX Transmission: Fill ip to Check Plug (2 - 2.5 qts.) 80W-90 Gear Oil)
MAINTENANCE & LUBRICATION
64
Periodic Maintenance Chart
Periodic Maintenance Chart MAINTENANCE & LUBRICATION
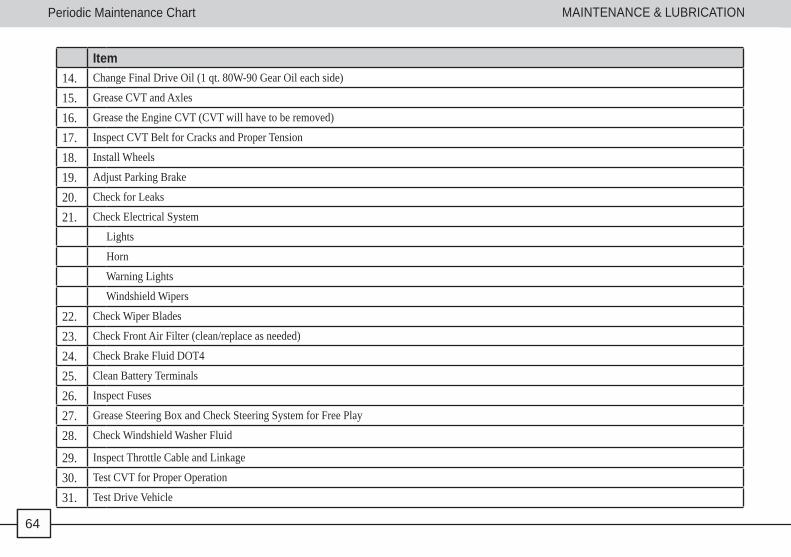
Item14. Change Final Drive Oil (1 qt. 80W-90 Gear Oil each side)
15. Grease CVT and Axles
16. Grease the Engine CVT (CVT will have to be removed)
17. Inspect CVT Belt for Cracks and Proper Tension
18. Install Wheels
19. Adjust Parking Brake
20. Check for Leaks
21. Check Electrical System
Lights
Horn
Warning Lights
Windshield Wipers
22. Check Wiper Blades
23. Check Front Air Filter (clean/replace as needed)
24. Check Brake Fluid DOT4
25. Clean Battery Terminals
26. Inspect Fuses
27. Grease Steering Box and Check Steering System for Free Play
28. Check Windshield Washer Fluid
29. Inspect Throttle Cable and Linkage
30. Test CVT for Proper Operation
31. Test Drive Vehicle
64
MAINTENANCE & LUBRICATION
65
Periodic Maintenance ChartLubrication and Fluid RecommendationsMAINTENANCE & LUBRICATION
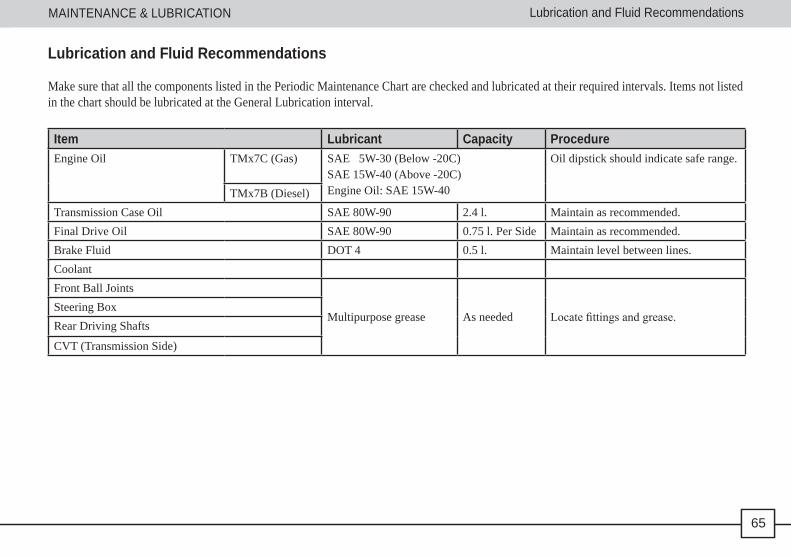
Lubrication and Fluid Recommendations
Make sure that all the components listed in the Periodic Maintenance Chart are checked and lubricated at their required intervals. Items not listed in the chart should be lubricated at the General Lubrication interval.Item Lubricant procedure
Item Lubricant Capacity ProcedureEngine Oil TMx7C (Gas) SAE 5W-30 (Below -20C)
SAE 15W-40 (Above -20C)Engine Oil: SAE 15W-40
Oil dipstick should indicate safe range.
TMx7B (Diesel)Transmission Case Oil SAE 80W-90 2.4 l. Maintain as recommended.Final Drive Oil SAE 80W-90 0.75 l. Per Side Maintain as recommended.Brake Fluid DOT 4 0.5 l. Maintain level between lines.CoolantFront Ball Joints
Multipurpose grease As needed Locatefittingsandgrease.Steering BoxRear Driving Shafts
CVT (Transmission Side)
65
MAINTENANCE & LUBRICATION
66
Lubrication Recommendations
MAINTENANCE & LUBRICATION Lubrication Recommendations
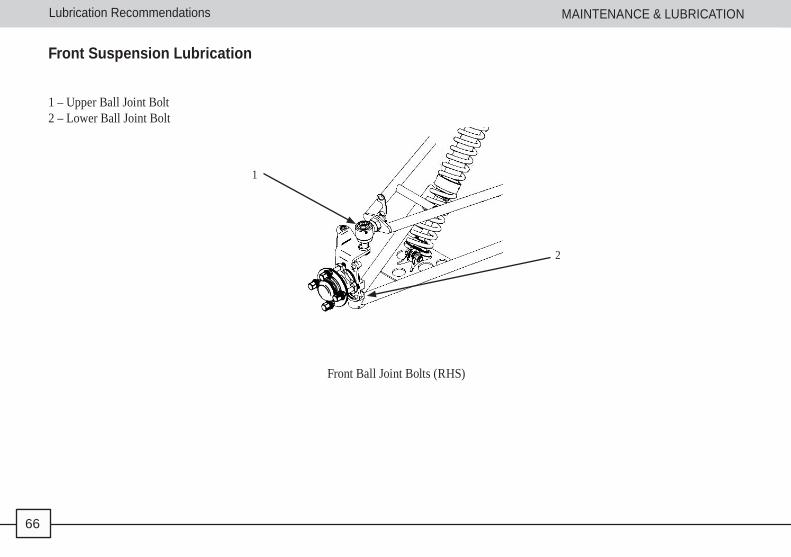
Front Suspension Lubrication
1 – Upper Ball Joint Bolt2 – Lower Ball Joint Bolt
Front Ball Joint Bolts (RHS)
1
2
Lubrication Recommendations MAINTENANCE & LUBRICATION
66
MAINTENANCE & LUBRICATION
67
Lubrication RecommendationsLubrication RecommendationsMAINTENANCE & LUBRICATION
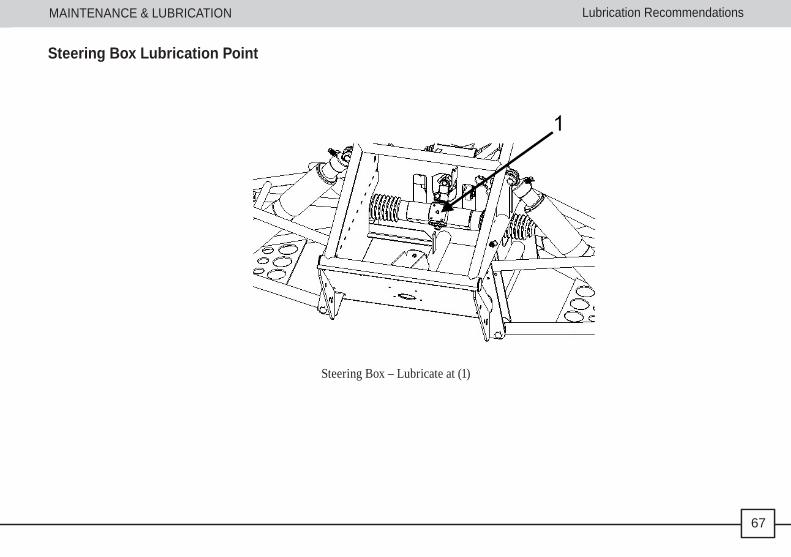
Steering Box Lubrication Point
Steering Box – Lubricate at (1)
67
MAINTENANCE & LUBRICATION
68
Lubrication Recommendations
Lubrication Recommendations MAINTENANCE & LUBRICATION
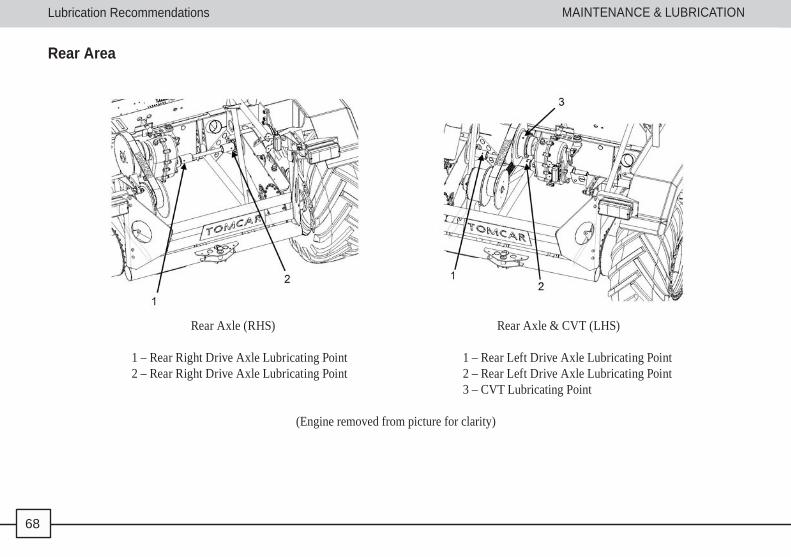
Rear Area
Rear Axle (RHS) Rear Axle & CVT (LHS)
1 – Rear Right Drive Axle Lubricating Point 1 – Rear Left Drive Axle Lubricating Point 2 – Rear Right Drive Axle Lubricating Point 2 – Rear Left Drive Axle Lubricating Point 3 – CVT Lubricating Point
(Engine removed from picture for clarity)
68
MAINTENANCE & LUBRICATION
69
Periodic Maintenance ChartEngine Maintenance ChartMAINTENANCE & LUBRICATION
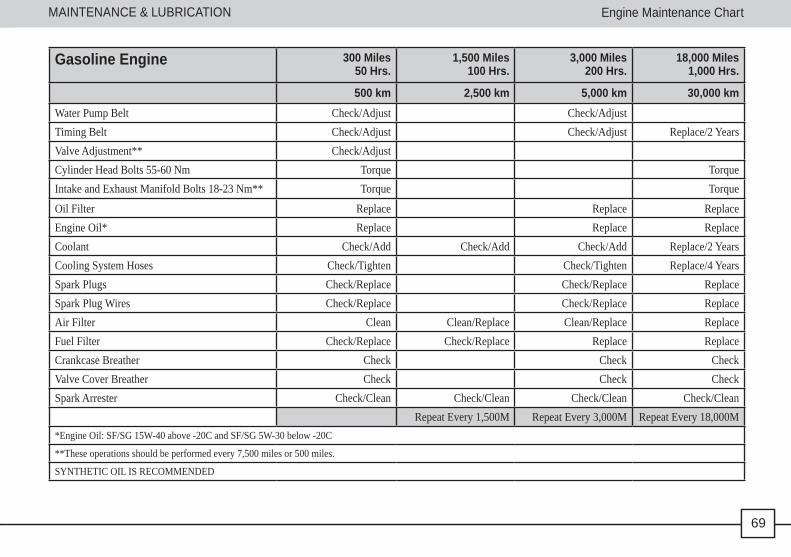
Gasoline Engine 300 Miles 50 Hrs.
1,500 Miles100 Hrs.
3,000 Miles200 Hrs.
18,000 Miles 1,000 Hrs.
500 km 2,500 km 5,000 km 30,000 kmWater Pump Belt Check/Adjust Check/AdjustTiming Belt Check/Adjust Check/Adjust Replace/2 YearsValve Adjustment** Check/AdjustCylinder Head Bolts 55-60 Nm Torque TorqueIntake and Exhaust Manifold Bolts 18-23 Nm** Torque Torque
Oil Filter Replace Replace ReplaceEngine Oil* Replace Replace ReplaceCoolant Check/Add Check/Add Check/Add Replace/2 YearsCooling System Hoses Check/Tighten Check/Tighten Replace/4 YearsSpark Plugs Check/Replace Check/Replace ReplaceSpark Plug Wires Check/Replace Check/Replace ReplaceAir Filter Clean Clean/Replace Clean/Replace ReplaceFuel Filter Check/Replace Check/Replace Replace ReplaceCrankcase Breather Check Check CheckValve Cover Breather Check Check CheckSpark Arrester Check/Clean Check/Clean Check/Clean Check/Clean
Repeat Every 1,500M Repeat Every 3,000M Repeat Every 18,000M*Engine Oil: SF/SG 15W-40 above -20C and SF/SG 5W-30 below -20C
**These operations should be performed every 7,500 miles or 500 miles.
SYNTHETIC OIL IS RECOMMENDED
69
MAINTENANCE & LUBRICATION
70
Periodic Maintenance Chart
Engine Maintenance Chart MAINTENANCE & LUBRICATION
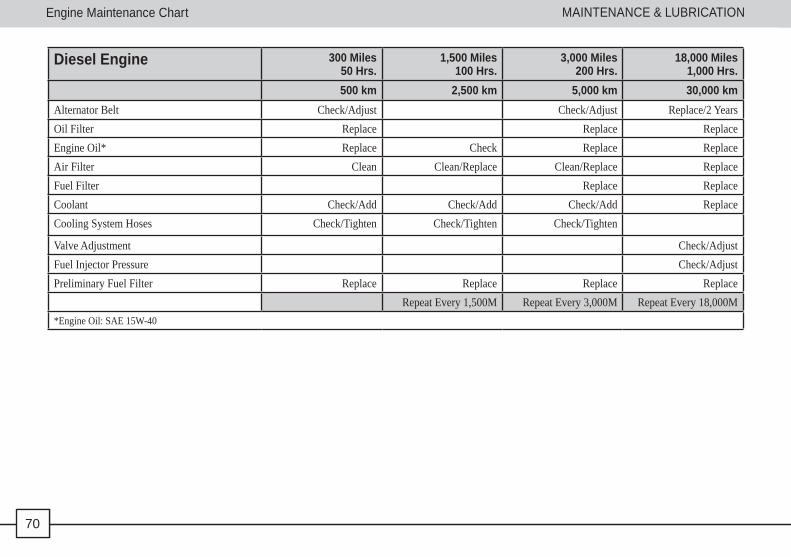
Diesel Engine 300 Miles 50 Hrs.
1,500 Miles100 Hrs.
3,000 Miles200 Hrs.
18,000 Miles 1,000 Hrs.
500 km 2,500 km 5,000 km 30,000 kmAlternator Belt Check/Adjust Check/Adjust Replace/2 YearsOil Filter Replace Replace ReplaceEngine Oil* Replace Check Replace ReplaceAir Filter Clean Clean/Replace Clean/Replace ReplaceFuel Filter Replace ReplaceCoolant Check/Add Check/Add Check/Add ReplaceCooling System Hoses Check/Tighten Check/Tighten Check/Tighten
Valve Adjustment Check/AdjustFuel Injector Pressure Check/AdjustPreliminary Fuel Filter Replace Replace Replace Replace
Repeat Every 1,500M Repeat Every 3,000M Repeat Every 18,000M*Engine Oil: SAE 15W-40
70
MAINTENANCE & LUBRICATION
71
Lubrication RecommendationsEngine Oil ChangeMAINTENANCE & LUBRICATION
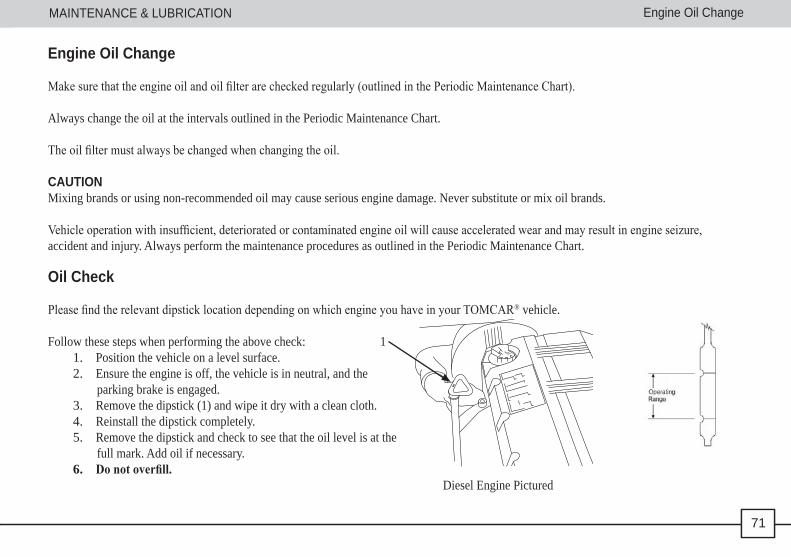
Engine Oil Change
Makesurethattheengineoilandoilfilterarecheckedregularly(outlinedinthePeriodicMaintenanceChart).
Always change the oil at the intervals outlined in the Periodic Maintenance Chart.
Theoilfiltermustalwaysbechangedwhenchangingtheoil.
CAUTIONMixing brands or using non-recommended oil may cause serious engine damage. Never substitute or mix oil brands.
Vehicleoperationwithinsufficient,deterioratedorcontaminatedengineoilwillcauseacceleratedwearandmayresultinengineseizure,accident and injury. Always perform the maintenance procedures as outlined in the Periodic Maintenance Chart.
Oil Check
PleasefindtherelevantdipsticklocationdependingonwhichengineyouhaveinyourTOMCAR® vehicle.
Follow these steps when performing the above check: 11. Position the vehicle on a level surface.2. Ensure the engine is off, the vehicle is in neutral, and the
parking brake is engaged.3. Remove the dipstick (1) and wipe it dry with a clean cloth.4. Reinstall the dipstick completely.5. Remove the dipstick and check to see that the oil level is at the
full mark. Add oil if necessary. 6. Do not overfill.
Diesel Engine Pictured
71
MAINTENANCE & LUBRICATION
72
Lubrication Recommendations
Engine Oil Change MAINTENANCE & LUBRICATION
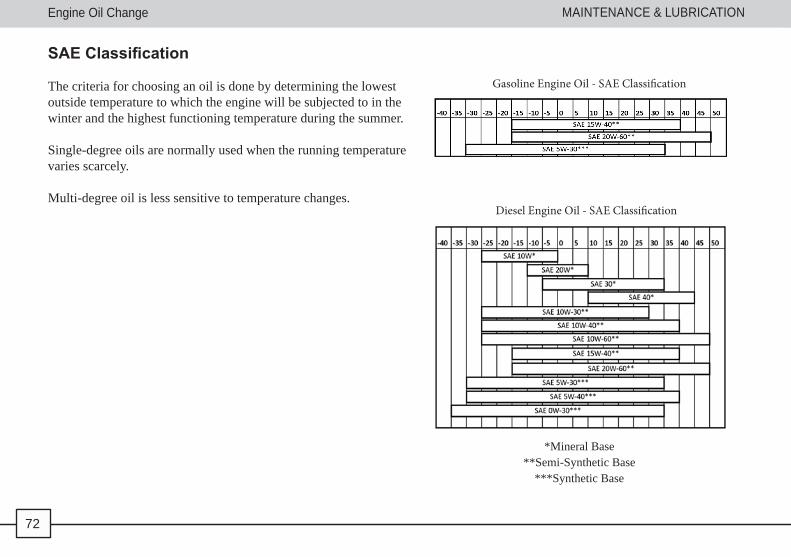
SAE Classification
The criteria for choosing an oil is done by determining the lowest outside temperature to which the engine will be subjected to in the winter and the highest functioning temperature during the summer.
Single-degree oils are normally used when the running temperature varies scarcely.
Multi-degree oil is less sensitive to temperature changes.
Gasoline Engine Oil - SAE Classification
Diesel Engine Oil - SAE Classification
*Mineral Base**Semi-Synthetic Base
***Synthetic Base
72
MAINTENANCE & LUBRICATION
73
Engine Oil Change
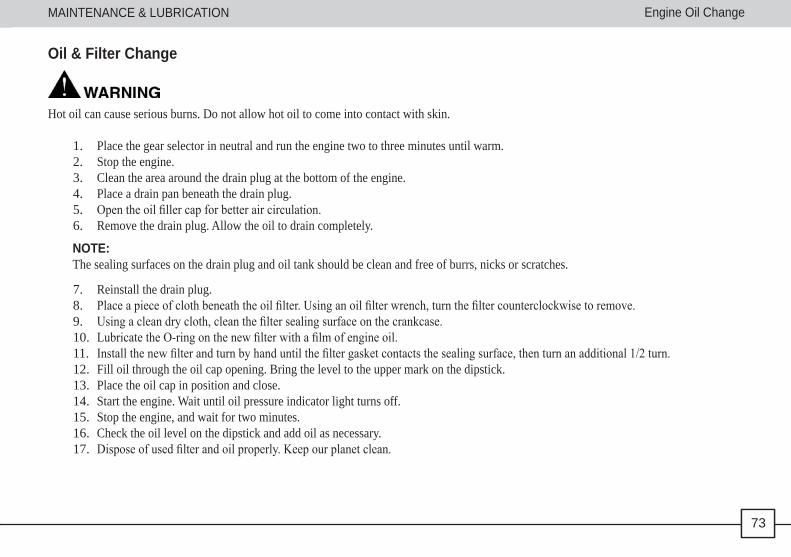
Oil & Filter Change
Hot oil can cause serious burns. Do not allow hot oil to come into contact with skin.
1. Place the gear selector in neutral and run the engine two to three minutes until warm. 2. Stop the engine.3. Clean the area around the drain plug at the bottom of the engine.4. Place a drain pan beneath the drain plug.5. Opentheoilfillercapforbetteraircirculation.6. Remove the drain plug. Allow the oil to drain completely.
7. Reinstall the drain plug.8. Placeapieceofclothbeneaththeoilfilter.Usinganoilfilterwrench,turnthefiltercounterclockwisetoremove.9. Usingacleandrycloth,cleanthefiltersealingsurfaceonthecrankcase.10. LubricatetheO-ringonthenewfilterwithafilmofengineoil.11. Installthenewfilterandturnbyhanduntilthefiltergasketcontactsthesealingsurface,thenturnanadditional1/2turn.12. Fill oil through the oil cap opening. Bring the level to the upper mark on the dipstick.13. Place the oil cap in position and close.14. Start the engine. Wait until oil pressure indicator light turns off.15. Stop the engine, and wait for two minutes.16. Check the oil level on the dipstick and add oil as necessary.17. Disposeofusedfilterandoilproperly.Keepourplanetclean.
NOTE: The sealing surfaces on the drain plug and oil tank should be clean and free of burrs, nicks or scratches.
73
MAINTENANCE & LUBRICATION
74
Transmission
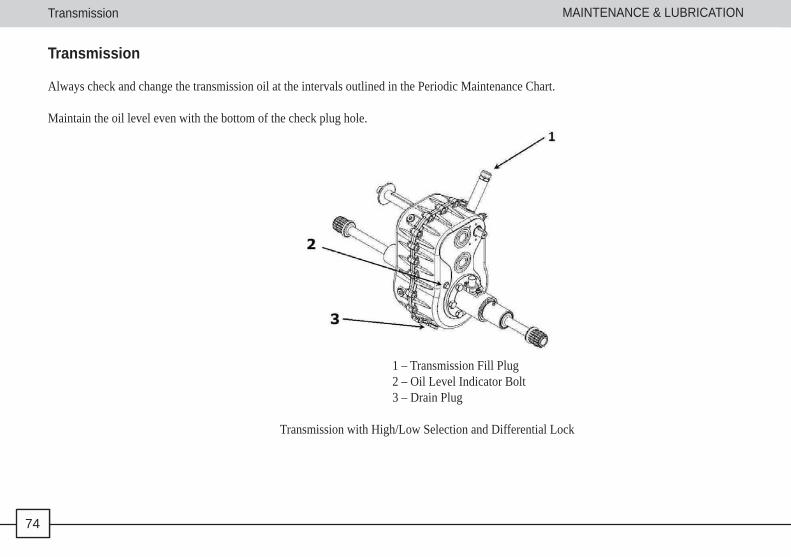
Transmission
Always check and change the transmission oil at the intervals outlined in the Periodic Maintenance Chart.
Maintain the oil level even with the bottom of the check plug hole.
1 – Transmission Fill Plug 2 – Oil Level Indicator Bolt 3 – Drain Plug
Transmission with High/Low Selection and Differential Lock
74
MAINTENANCE & LUBRICATION
75
Transmission
Transmission Oil Check
1. High/Low Gearbox2. Removetheoilindicatorbolt(4)andthefillplug(3).3. Add oil until the oil comes out of the opening (4).4. Reinstall the fuel plug.
Transmission Oil Change
1. Position the vehicle on a level surface.2. Removethefillplug.3. Remove the drain plug and drain the oil into a drain pan.4. Wipethemagneticendofthedrainplugcleantoremoveaccumulatedmetallicfilings.5. After the oil has drained completely, install a new sealing washer and reinstall the drain plug.6. Add 2.4 l. of oil (per Lubrication and Fluid Recommendations table, pg. 65)7. Reinstallthefillplug.8. Check for leaks.
75

MAINTENANCE & LUBRICATION
76
Cooling System
Cooling System Operation
Theenginecoolantleveliscontrolledbytherecoverysystem.Therecoverysystemcomponentsaretheoverflowbottle,radiatorfillerneck,radiator pressure cap and connecting hose.
As the coolant operating temperature increases, the expanding (heated) excess coolant is forced out of the radiator, past the pressure cap, and intotheoverflowbottle.Astheenginecoolanttemperaturedecreases,thecontracting(cooled)coolantisdrawnbackupfromthetank,pastthepressure cap, and into the radiator.
NOTE: Some coolant level drop on new vehicles is normal as the system is purging itself of trapped air. Observe coolant levels and maintain as recommendedbyaddingcoolanttotheoverflowbottle.
Adding or Changing Coolant
To ensure that the coolant maintains its ability to protect the engine, we recommend that the system be completely drained every two years and afreshmixtureofantifreezeandwateradded.TOMCAR®recommendstheuseofhigh-quality,aluminum-compatibleanti-freeze/coolantanddistilled water.
Any time the cooling system has been drained for maintenance or repair, replace the coolant. If the recovery bottle has run dry, the level in the radiator should be inspected. Add coolant as needed.
NOTE: Makesurethereisenoughantifreezeliquidtopreventthecoolantfromfreezing.Alwaysfollowthemanufacturer’smixingrecommendationsforthe level of protection required for your particular operating environment.
76

MAINTENANCE & LUBRICATION
77
Cooling System
Radiator and Cooling Fan
AlwayscheckandcleanthescreenandradiatorfinsattheintervalsoutlinedinthePeriodicMaintenanceChart.
Donotobstructordeflectairflowthroughtheradiatorbyinstallingunauthorizedaccessoriesinfrontoftheradiatororbehindthecoolingfan.Interferencewiththeradiatorairflowcanleadtooverheatingandconsequentenginedamage.
CAUTIONWashingthevehiclewithahigh-pressurehosecoulddamagetheradiatorfinsandimpairtheradiator’seffectiveness.Exercisecautionifahigh-pressure system is used for washing the vehicle.
77
MAINTENANCE & LUBRICATION
78
Cooling System
1
2
3
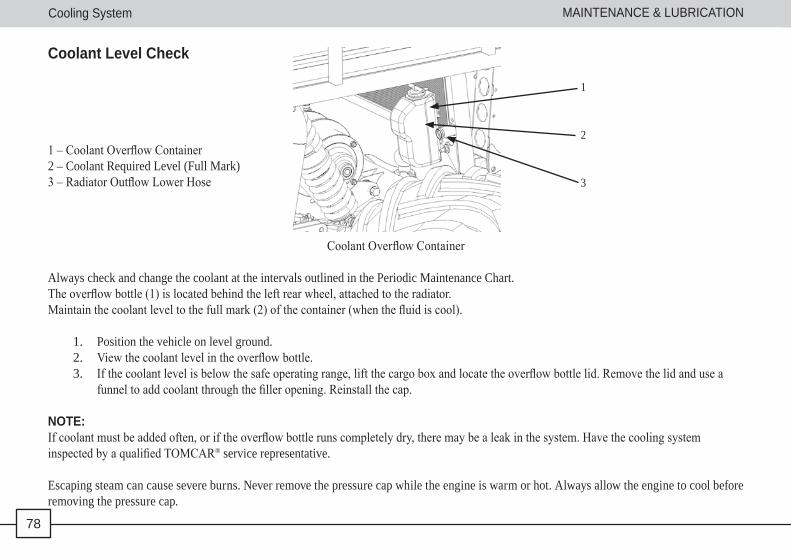
Coolant Level Check
1–CoolantOverflowContainer2 – Coolant Required Level (Full Mark)3–RadiatorOutflowLowerHose
CoolantOverflowContainer
Always check and change the coolant at the intervals outlined in the Periodic Maintenance Chart. Theoverflowbottle(1)islocatedbehindtheleftrearwheel,attachedtotheradiator.Maintainthecoolantleveltothefullmark(2)ofthecontainer(whenthefluidiscool).
1. Position the vehicle on level ground.2. Viewthecoolantlevelintheoverflowbottle.3. Ifthecoolantlevelisbelowthesafeoperatingrange,liftthecargoboxandlocatetheoverflowbottlelid.Removethelidandusea
funneltoaddcoolantthroughthefilleropening.Reinstallthecap.
NOTE: Ifcoolantmustbeaddedoften,oriftheoverflowbottlerunscompletelydry,theremaybealeakinthesystem.HavethecoolingsysteminspectedbyaqualifiedTOMCAR® service representative.
Escaping steam can cause severe burns. Never remove the pressure cap while the engine is warm or hot. Always allow the engine to cool before removing the pressure cap.
78
MAINTENANCE & LUBRICATION
79
Cooling System
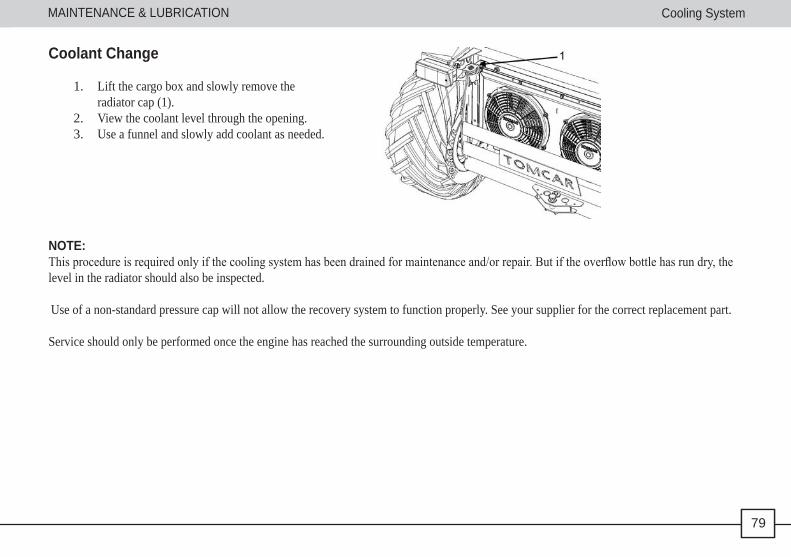
Coolant Change
1. Lift the cargo box and slowly remove the radiator cap (1).
2. View the coolant level through the opening.3. Use a funnel and slowly add coolant as needed.
NOTE:Thisprocedureisrequiredonlyifthecoolingsystemhasbeendrainedformaintenanceand/orrepair.Butiftheoverflowbottlehasrundry,thelevel in the radiator should also be inspected.
Use of a non-standard pressure cap will not allow the recovery system to function properly. See your supplier for the correct replacement part.
Service should only be performed once the engine has reached the surrounding outside temperature.
79
MAINTENANCE & LUBRICATION
80
Spark Plugs
Spark Plugs
CAUTIONUsing non-recommended spark plugs can result in serious engine damage. Always use TOMCAR® recommended spark plugs. Refer to the Specificationssection(pgs.101-102)fordetails.
Sparkplugconditionisindicativeofengineoperation.Thesparkplugfiringendconditionshouldbereadaftertheengineiswarmedupandthevehicle is driven at higher speeds. Immediately check the spark plug for correct color.
The spark plug gap recommendation is 0.09 cm.
Spark Plug Diagnosis
1. The normal insulator tip is gray, tan or light brown. There will be few combustion deposits. The electrodes are not burned or eroded. This indicates the proper type and heat range for the engine and the service. The tip should not be white. A white insulator tip indicates overheating, caused by the use of an improper spark plug or incorrect carburetion adjustments.
2. Thewetfouledinsulatortipisblack.Adampoilfilmcoversthefiringend.Theremaybeacarbonlayerovertheentirenose.Generally, the electrodes are not worn. General causes of fouling are excessive oil or incorrect fueling.
A hot exhaust system and engine can cause serious burns. Wear protective gloves when removing a spark plug for inspection.
Spark Plug Removal and Replacement
1. Lift cargo box to access the engine compartment.2. Remove the spark plug cap. Clean spark plug area carefully before removal, as dirt might fall into the engine during removal.
Remove the plug by rotating it in a counterclockwise direction.3. Reverse the procedure for spark plug installation.
80
MAINTENANCE & LUBRICATION
81
Continuous Variable Transmission (CVT) System
Continuous Variable Transmission (CVT) System
TheCVTisapreciselybalancedsystem,andisnottobemodified.Doingsomaycauseimbalance,severevibrationandmayreduceitsstrengthso failure can occur at a high speed and can result in severe injury or death.
The CVT system has been engineered and tested to ensure utmost safety as the system rotates at high speeds, creating large amounts of force on transmission components.
For ultimate safety, always follow all recommended maintenance procedures.
81

MAINTENANCE & LUBRICATION
82
Continuous Variable Transmission (CVT) System
CVT Belt Tension
Always check CVT belt tension and replace if required at the intervals outlined in the Periodic Maintenance Chart.1. Make sure the belt is not dried/cracked.2. When you apply pressure on the belt from the top and bottom, the gap between them should be between 2 - 2.75 in. (5 - 7 cm).3. Ifthebeltisloosened,contactyourqualifiedTOMCAR® service representative to tighten the belt.
CVT Belt TensionCVT Drying
• When you cross deep water the belt may get wet, which can cause it to lose the majority of its grip, and it can slip.• When leaving water, drive normally. The belt will dry and get normal grip back on its own.• During the drying process, it is normal to see water vapor and hear a squeal. No special maintenance is required.
82
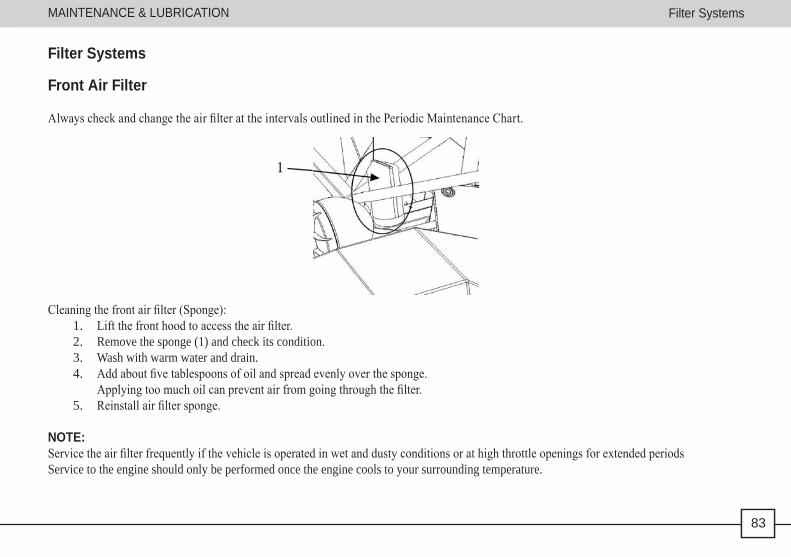
MAINTENANCE & LUBRICATION
83
Filter Systems
1
Filter Systems
Front Air Filter
AlwayscheckandchangetheairfilterattheintervalsoutlinedinthePeriodicMaintenanceChart.
Cleaningthefrontairfilter(Sponge):1. Liftthefronthoodtoaccesstheairfilter.2. Remove the sponge (1) and check its condition.3. Wash with warm water and drain.4. Addaboutfivetablespoonsofoilandspreadevenlyoverthesponge.
Applyingtoomuchoilcanpreventairfromgoingthroughthefilter.5. Reinstallairfiltersponge.
NOTE:ServicetheairfilterfrequentlyifthevehicleisoperatedinwetanddustyconditionsorathighthrottleopeningsforextendedperiodsService to the engine should only be performed once the engine cools to your surrounding temperature.
83
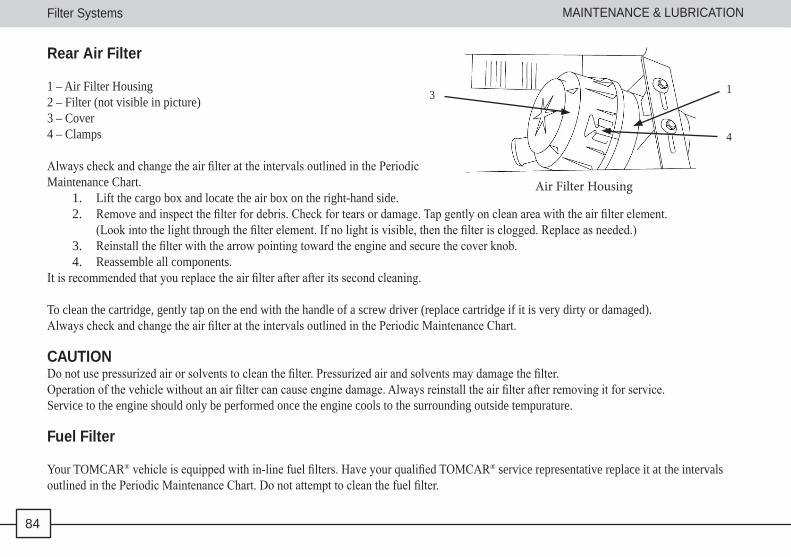
MAINTENANCE & LUBRICATION
84
Filter Systems
1
4
3
Rear Air Filter
1 – Air Filter Housing2 – Filter (not visible in picture)3 – Cover4 – Clamps
AlwayscheckandchangetheairfilterattheintervalsoutlinedinthePeriodicMaintenance Chart.
1. Lift the cargo box and locate the air box on the right-hand side.2. Removeandinspectthefilterfordebris.Checkfortearsordamage.Tapgentlyoncleanareawiththeairfilterelement.
(Lookintothelightthroughthefilterelement.Ifnolightisvisible,thenthefilterisclogged.Replaceasneeded.)3. Reinstallthefilterwiththearrowpointingtowardtheengineandsecurethecoverknob.4. Reassemble all components.
Itisrecommendedthatyoureplacetheairfilterafterafteritssecondcleaning.
To clean the cartridge, gently tap on the end with the handle of a screw driver (replace cartridge if it is very dirty or damaged).AlwayscheckandchangetheairfilterattheintervalsoutlinedinthePeriodicMaintenanceChart.
CAUTIONDonotusepressurizedairorsolventstocleanthefilter.Pressurizedairandsolventsmaydamagethefilter.Operationofthevehiclewithoutanairfiltercancauseenginedamage.Alwaysreinstalltheairfilterafterremovingitforservice.Service to the engine should only be performed once the engine cools to the surrounding outside tempurature.
Fuel Filter
Your TOMCAR®vehicleisequippedwithin-linefuelfilters.HaveyourqualifiedTOMCAR® service representative replace it at the intervals outlinedinthePeriodicMaintenanceChart.Donotattempttocleanthefuelfilter.
Air Filter Housing
84
MAINTENANCE & LUBRICATION
85
Throttle System
Throttle System
• Failure to check or maintain proper operation of the throttle system can result in an accident and lead to serious injury or death if the throttle pedal sticks during operation.
• Never start or operate this vehicle if it has a sticking or improperly operating throttle pedal.• Immediately contact your qualifiedTOMCAR® service representative if throttle problems arise.• Always check the pedal for free movement and return before starting the engine and occasionally during operation.
Throttle Free-Play
If the throttle pedal has excessive play due to cable stretch or misadjustment, it will cause a delay in throttle response, especially at low engine speed. In addition, the throttle may not open fully. If the throttle pedal has no free play, the throttle may be hard to control and the idle speed may be erratic.
Check the throttle pedal free-play at the intervals outlined in the Periodic Maintenance Chart.
Inspection1. Sit in the car, put it in neutral. Apply the brake with the left foot.2. Start the engine and warm it up thoroughly.3. Apply gas slowly and measure the distance the gas pedal moves before the engine begins to pick up speed. Free-play should be 1/16 in.
to 1/8 in. (1.5 mm - 3 mm)
85
MAINTENANCE & LUBRICATION
86
Brakes
Brakes
The front and rear brakes are hydraulic drum-type brakes and are activated by the brake pedal. Failure to check or maintain proper operation of the brake system can result in an accident and lead to serious injury or death if the brake pedal sticks during operation.
• Never start or operate this vehicle if it has a sticking or improperly operating brake pedal.• ImmediatelycontactyourqualifiedTOMCAR® service representative if brake problems arise.• Always check proper functionality of the brake system before and occasionally during driving.
Brake Inspection
1. Checkthebrakesystemforfluidleaks.2. Check the brake pedal for excessive travel or a spongy feel.
86
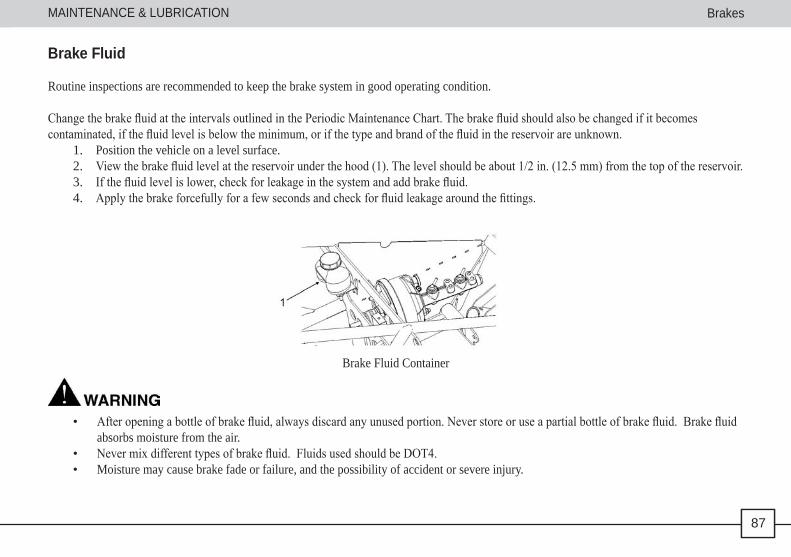
MAINTENANCE & LUBRICATION
87
Brakes
Brake Fluid
Routine inspections are recommended to keep the brake system in good operating condition.
ChangethebrakefluidattheintervalsoutlinedinthePeriodicMaintenanceChart.Thebrakefluidshouldalsobechangedifitbecomescontaminated,ifthefluidlevelisbelowtheminimum,orifthetypeandbrandofthefluidinthereservoirareunknown.
1. Position the vehicle on a level surface.2. Viewthebrakefluidlevelatthereservoirunderthehood(1).Thelevelshouldbeabout1/2in.(12.5mm)fromthetopofthereservoir.3. Ifthefluidlevelislower,checkforleakageinthesystemandaddbrakefluid.4. Applythebrakeforcefullyforafewsecondsandcheckforfluidleakagearoundthefittings.
Brake Fluid Container
• Afteropeningabottleofbrakefluid,alwaysdiscardanyunusedportion.Neverstoreoruseapartialbottleofbrakefluid.Brakefluidabsorbs moisture from the air.
• Nevermixdifferenttypesofbrakefluid.FluidsusedshouldbeDOT4.• Moisture may cause brake fade or failure, and the possibility of accident or severe injury.
87
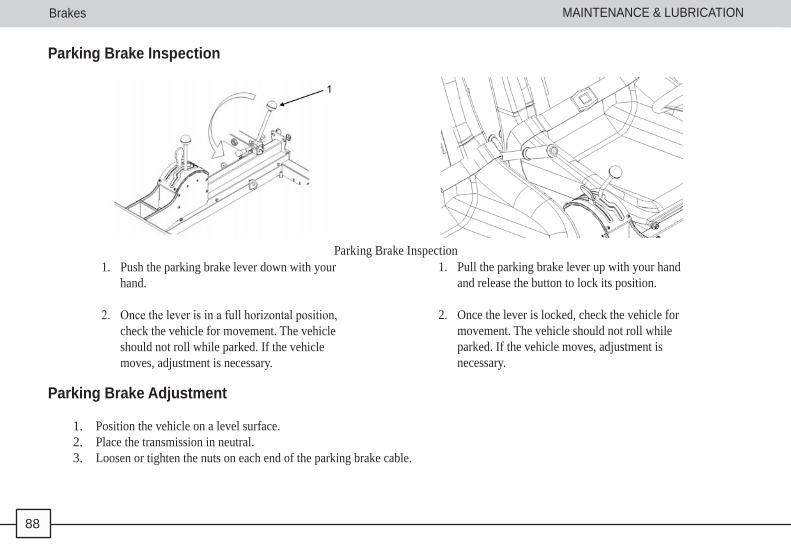
MAINTENANCE & LUBRICATION
88
Brakes
1. Pull the parking brake lever up with your hand and release the button to lock its position.
2. Once the lever is locked, check the vehicle for movement. The vehicle should not roll while parked. If the vehicle moves, adjustment is necessary.
1. Push the parking brake lever down with your hand.
2. Oncetheleverisinafullhorizontalposition,check the vehicle for movement. The vehicle should not roll while parked. If the vehicle moves, adjustment is necessary.
Parking Brake Inspection
Parking Brake Inspection
Parking Brake Adjustment
1. Position the vehicle on a level surface.2. Place the transmission in neutral.3. Loosen or tighten the nuts on each end of the parking brake cable.
88
MAINTENANCE & LUBRICATION
89
Steering Wheel
Steering Wheel
• Failure to check or maintain proper operation of the steering system can result in an accident and lead to serious injury or death if free-play exists when using the steering wheel.
• Never start driving the TOMCAR® if it has free play in the steering wheel.• ImmediatelycontactyourqualifiedTOMCAR® service representative if steering system problems arise.• Always check proper functionality of the steering system before driving.• While driving, ensure that your thumbs remain outside of the steering wheel.
Inspection1. Position the vehicle on level ground.2. Check slack in the steering wheel by moving it left and right.3. There should be no free play.4. Ifthereisfreeplayorstrangenoises,orthesteeringfeelsroughor“catchy,”havethesteeringsysteminspectedbyanauthorized
TOMCAR® supplier.
89
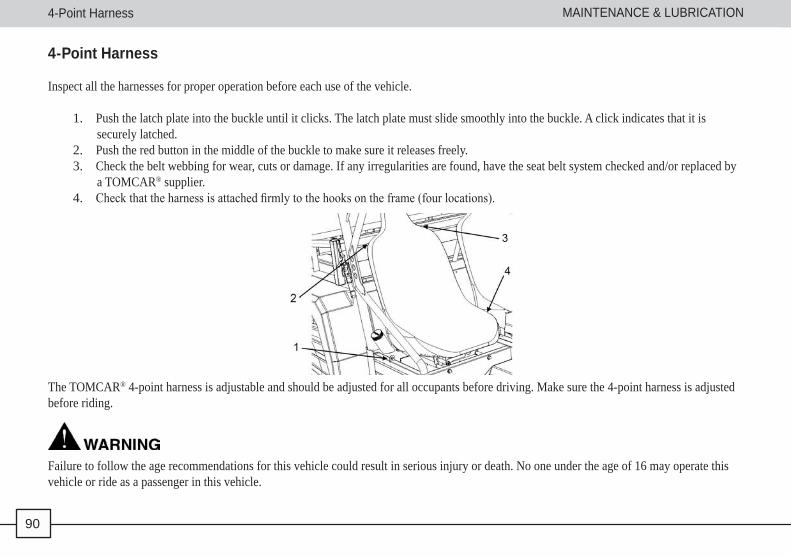
MAINTENANCE & LUBRICATION
90
4-Point Harness
4-Point Harness
Inspect all the harnesses for proper operation before each use of the vehicle.
1. Push the latch plate into the buckle until it clicks. The latch plate must slide smoothly into the buckle. A click indicates that it is securely latched.
2. Push the red button in the middle of the buckle to make sure it releases freely.3. Check the belt webbing for wear, cuts or damage. If any irregularities are found, have the seat belt system checked and/or replaced by
a TOMCAR® supplier.4. Checkthattheharnessisattachedfirmlytothehooksontheframe(fourlocations).
The TOMCAR® 4-point harness is adjustable and should be adjusted for all occupants before driving. Make sure the 4-point harness is adjusted before riding.
Failure to follow the age recommendations for this vehicle could result in serious injury or death. No one under the age of 16 may operate this vehicle or ride as a passenger in this vehicle.
90
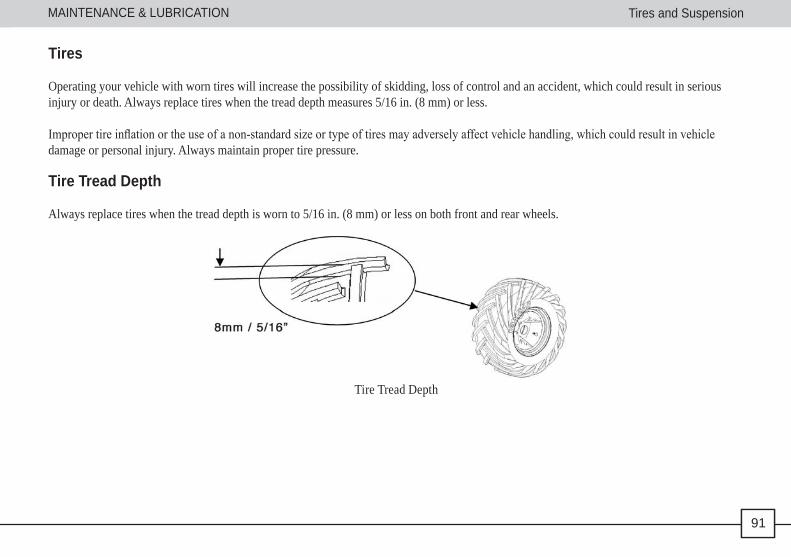
MAINTENANCE & LUBRICATION
91
Tires and Suspension
Tires
Operating your vehicle with worn tires will increase the possibility of skidding, loss of control and an accident, which could result in serious injury or death. Always replace tires when the tread depth measures 5/16 in. (8 mm) or less.
Impropertireinflationortheuseofanon-standardsizeortypeoftiresmayadverselyaffectvehiclehandling,whichcouldresultinvehicledamage or personal injury. Always maintain proper tire pressure.
Tire Tread Depth
Always replace tires when the tread depth is worn to 5/16 in. (8 mm) or less on both front and rear wheels.
Tire Tread Depth
91
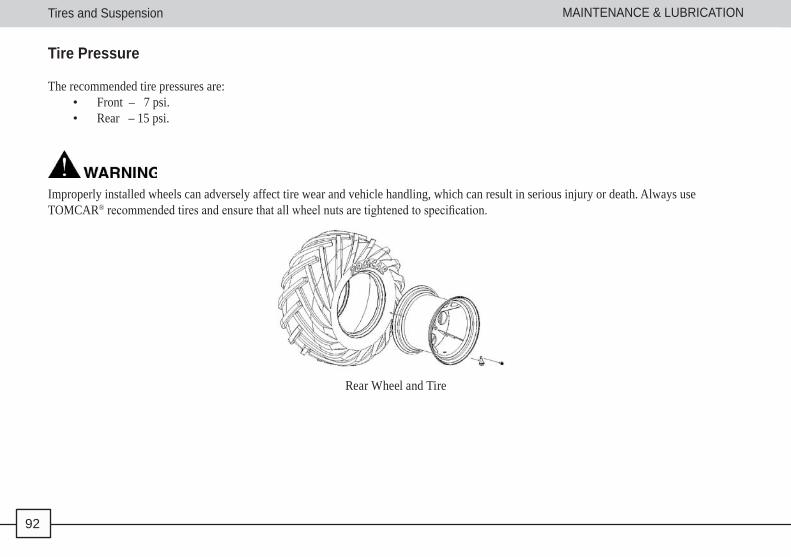
MAINTENANCE & LUBRICATION
92
Tires and Suspension
Tire Pressure
The recommended tire pressures are:• Front – 7 psi.• Rear – 15 psi.
Improperly installed wheels can adversely affect tire wear and vehicle handling, which can result in serious injury or death. Always use TOMCAR®recommendedtiresandensurethatallwheelnutsaretightenedtospecification.
Rear Wheel and Tire
92
MAINTENANCE & LUBRICATION
93
Tires and Suspension
Wheel Removal
1. Stoptheengineandlocktheparkingbrakeinthehorizontalposition.2. Place an obstacle behind the rear wheels (or behind whatever wheels are touching the ground if you are replacing a rear wheel).3. Loosen the wheel nuts slightly.4. Elevate the side of the vehicle by placing a suitable jack under the frame.5. Remove the wheel nuts. Remove the wheel.
Wheel Installation
1. With the parking brake locked, place the wheel in the correct position on the wheel hub. Be sure the valve stem is toward the outside and rotation arrows on the tire point toward forward rotation.
2. Attachthewheelnutsandfinger-tighten.3. Carefully lower the vehicle to the ground.4. Tightenthewheelnutsfirmly.
93
MAINTENANCE & LUBRICATION
94
Shock Air Pressure Adjustment
Shock Air Pressure Adjustment
CAUTIONDo not use an air compressor that has a maximum air pressure capacity above 200 psi.
Tofilltheshockairchamber,raisethewheelofftheground.Removethevalvecapfromtheshockairvalve.Attachtheairchucktotheshockairvalveandholdinplaceforfiveseconds.Reinstallthevalvecap.
Important: Duetothesizeoftheairchamberintheshock,thevolumeofairissmall.Donottrytochecktheairpressurewithapressuregauge.Attemptingtochecktheshockairpressurewillreleaseasignificantamountofair,resultinginpoorshockperformanceandpossibleshockdamage.
94
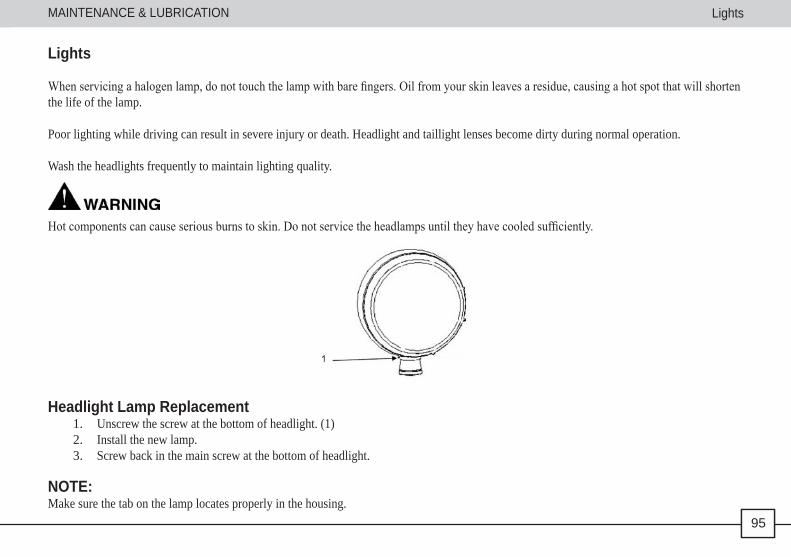
MAINTENANCE & LUBRICATION
95
Lights
Lights
Whenservicingahalogenlamp,donottouchthelampwithbarefingers.Oilfromyourskinleavesaresidue,causingahotspotthatwillshortenthe life of the lamp.
Poor lighting while driving can result in severe injury or death. Headlight and taillight lenses become dirty during normal operation.
Wash the headlights frequently to maintain lighting quality.
Hotcomponentscancauseseriousburnstoskin.Donotservicetheheadlampsuntiltheyhavecooledsufficiently.
Headlight Lamp Replacement1. Unscrew the screw at the bottom of headlight. (1)2. Install the new lamp. 3. Screw back in the main screw at the bottom of headlight.
NOTE: Make sure the tab on the lamp locates properly in the housing.
95
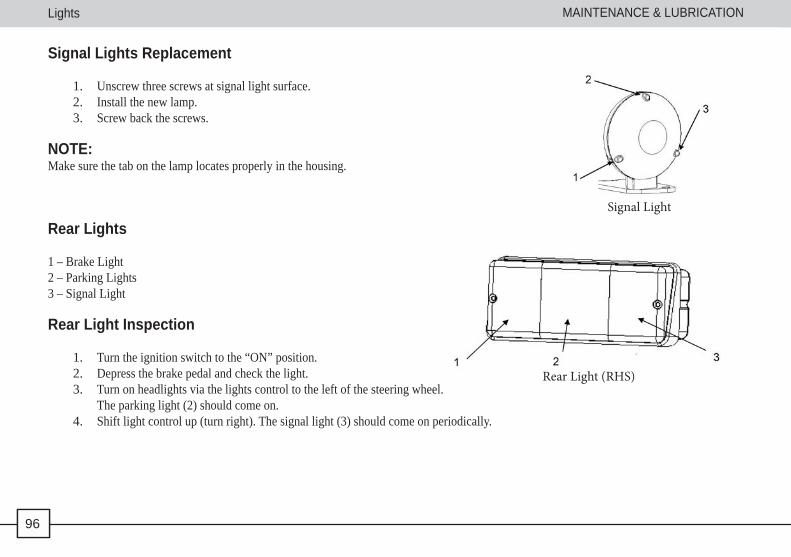
MAINTENANCE & LUBRICATION
96
Lights
Signal Lights Replacement
1. Unscrew three screws at signal light surface. 2. Install the new lamp. 3. Screw back the screws.
NOTE: Make sure the tab on the lamp locates properly in the housing.
Rear Lights
1 – Brake Light2 – Parking Lights3 – Signal Light
Rear Light Inspection
1. Turn the ignition switch to the “ON” position.2. Depress the brake pedal and check the light.3. Turn on headlights via the lights control to the left of the steering wheel.
The parking light (2) should come on.4. Shift light control up (turn right). The signal light (3) should come on periodically.
Rear Light (RHS)
Signal Light
96
MAINTENANCE & LUBRICATION
97
Battery
Battery
It is necessary to keep the battery terminals and connections free of corrosion. For cleaning, remove the corrosion with a stiff wire brush. Wash with hot water. Coat the terminals with dielectric grease or petroleum jelly.
Batteriescanexplode.Keepsparksandflamesawayfromvehicle.Ventilatewhenchargingbatteryoroperatingvehicleinanenclosedspace.Always wear eye protection and gloves when handling the battery. KEEP OUT OF REACH OF CHILDREN.
Battery electrolyte is poisonous. It contains sulfuric acid. Serious burns can result from contact with skin, eyes or clothing.
Battery Removal
1. Remove the hood.2. Disconnect the black (negative) battery cable.3. Remove the bracket on the battery.4. Disconnect the red (positive) battery cable next.5. Lift the battery out of the vehicle, being careful not to tip it sideways and spill any electrolyte.
If electrolyte spills, immediately wash it off with water to prevent damage to the vehicle.
97
MAINTENANCE & LUBRICATION
98
Battery
Battery Installation
1. Set the battery in its place.2. It must be free from obstructions and securely installed. If not, battery gases could accumulate and cause an explosion. Avoid skin
contact with electrolyte, as severe burns could result.3. Replace the tightened bar.4. First, connect and tighten the red (positive) cable.5. Second, connect and tighten the black (negative) cable.6. Verify that cables are properly routed.
NOTE: When installing a new battery, make sure it is fully charged prior to its initial use. Using a new battery that has not been fully charged can damage the battery and result in a shorter life. It can also hinder vehicle performance.
Battery Storage
When the vehicle is placed in storage for three months or more, the battery should be removed, stored out of the sun in a cool, dry place, and tested monthly. Before reusing, take the battery to a technical support center for testing and recharging.
98
MAINTENANCE & LUBRICATION
99
Cleaning & Storing
Keeping Your TOMCAR® Clean
The safest way to clean your vehicle is by using a hose and a pail of mild soap and water. Use a professional-type washing mitten, cleaning the upperbodyfirstandthelowerpartslast.Rinsewithwaterfrequentlyanddrywithachamoistopreventwaterspots.
By doing so, your TOMCAR® will not only improve in appearance, but it can also extend the life of various components. With a few precautions, your vehicle can be cleaned much like an automobile.
NOTE: If warning labels are damaged, contact your TOMCAR® supplier for a replacement.
If a high-pressure type car wash system is used, extreme care must be taken to avoid water damage to the wheel bearings, transmission seals, body panels, brakes, headlights and warning labels. Many expensive repair bills can result from using high-pressure detergent systems.
99
MAINTENANCE & LUBRICATION
100
Storing Your TOMCAR®
If your vehicle is to be placed in extended or off-season storage, the following steps should be taken to preserve its condition:1. Perform all necessary repairs and thoroughly clean the vehicle.2. Remove the spark plug and pour approximately one ounce of synthetic 20W-50 type of oil into the cylinder. Operate the starter for a
few seconds and reinstall the spark plug.3. Remove the battery. Store it in a cool, dry place out of the sun.4. Raise the vehicle so all tires are suspended off the ground.5. Spray oil on all unpainted metal surfaces to prevent rusting. Avoid getting oil on rubber parts or in the brakes.6. Lubricate all cables.7. Tie a plastic bag over the exhaust pipe and air cleaner inlet to prevent moisture or small animals from entering.8. Cover the vehicle with a canvas cover. Do not use plastic or coated materials, since they do not allow ventilation for the vehicle.
Remove Your TOMCAR® From Storage
• Check the battery electrolyte level and charge the battery if necessary. Install it in the vehicle.• Make sure the spark plug is tight.• Fill the fuel tank with fuel.• Perform a Pre-Ride Inspection, as described in this manual (see pgs. 47-48)• Lubricate at the intervals outlined in the Periodic Maintenance Chart (see pg. 62).
NOTE: • Tightness of the bolts, nuts and other fasteners should be checked by TOMCAR®qualifiedpersonnel.• Engine exhaust fumes contain poisonous carbon monoxide, which can cause serious illness and death. Never run the engine in an
enclosed area such as a closed building without proper ventilation. To ventilate, connect a pipe extension to the exhaust pipe and discharge the exhaust outdoors. Allow fresh air into the work area.
Cleaning & Storing
100

SPECIFICATIONS
101
Dimensions TM2 TM4 TM5Length 112.4 in. (2,856 mm) 146.3 in. (3,716 mm) 134.5 in. (3,416 mm)Width 70 in. (1,780 mm) 70 in. (1,780 mm) 70 in. (1,780 mm)Height 66.4 in. (1,686 mm) 66.4 in. (1,686 mm) 66.4 in. (1,686 mm)Wheel Base 80.8 in. (2,052 mm) 114.6 in. (2,912 mm) 100.8 in. (2,562 mm)Ground Clearance 15 in. (378 mm) 15 in. (378 mm) 15 in. (378 mm)Dry Weight (Gas)Dry Weight (Diesel)
1,540 lb. (700 kg)1,529 lb. (695 kg)
1,817 lb. (826 kg)1,806 lb. (821 kg)
1,848 lb. (840 kg)1,837 lb. (835 kg)
Technical InformationEngine TMxxC TMxxB
Gasoline 1000 cc, Fuel Injected, 4 Cylinder, Liquid CooledDiesel 1400 cc, Naturally Aspirated, 4 Cylinder, Liquid Cooled
Engine Oil (Gas) (Diesel)
SAE 5W-30 (Below -20C) SAE 15W-40 (Above -20C)SAE 15W-40
Transmission Automatic V-Belt CVT Rear Wheel Drive
Final Drive: Oil Bathed Double Chains High - Low - Reverse Transfer Case
Differential lockCargo Box (inside rails) 47.8 x 26.2 in. (1,214 x 666 mm) 66.3 x 52.9 in. (1,684 x 1,343 mm)Cargo Box Capacity 400 lb. (182 kg) 1,000 lb. (454 kg)Maximum Towing Load 1,397 lb. (635 kg) 1,742 lb. (792 kg) 1,894 lb. (861 kg)Maximum Total Weight 2,539 lb. (1,154 kg) 3,168 lb. (1,440 kg) 3,445 lb. (1,566 kg)Tires Front: AT 25 x 8 – 12 4 or 6 Ply
Rear: AT 26 x 12 – 12 8 or 10 PlyRecommended Pressures Front: 7 psi (0.5 bar) Rear: 15 psi (1.0 bar)
SPECIFICATIONS
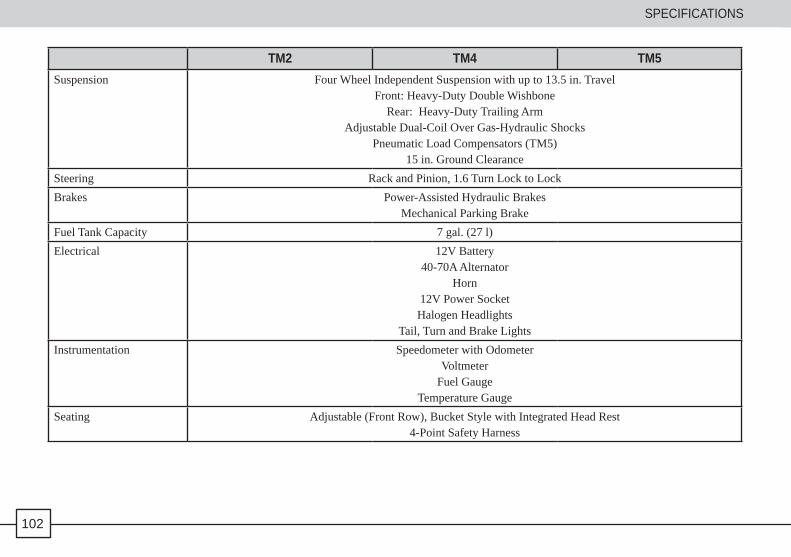
SPECIFICATIONS
102
TM2 TM4 TM5Suspension Four Wheel Independent Suspension with up to 13.5 in. Travel
Front: Heavy-Duty Double WishboneRear: Heavy-Duty Trailing Arm
Adjustable Dual-Coil Over Gas-Hydraulic ShocksPneumatic Load Compensators (TM5)
15 in. Ground ClearanceSteering Rack and Pinion, 1.6 Turn Lock to LockBrakes Power-Assisted Hydraulic Brakes
Mechanical Parking BrakeFuel Tank Capacity 7 gal. (27 l)Electrical 12V Battery
40-70A Alternator Horn
12V Power Socket Halogen Headlights
Tail, Turn and Brake LightsInstrumentation Speedometer with Odometer
Voltmeter Fuel Gauge
Temperature GaugeSeating Adjustable (Front Row), Bucket Style with Integrated Head Rest
4-Point Safety Harness
102
All text, illustrations and specifications in this manual are based on information and knowledge available at the time of printing. Specifications are subject to change without notice. No liability can be accepted for omissions or inaccuracies.
TOMCAR® reserves the right to make changes in the design and specifications, and to make additions or improvements to it’s products without incurring any obligation to install them on products previously manufactured.
© 2009 TOMCAR USA, Inc. All rights reserved.
May not be reproduced or translated in whole or in part without the expressed written consent of TOMCAR USA, Inc.
Printed in the USA.

WWW.TOMCAR.COM