Embed Size (px)
Citation preview
Module 8: Toolbars, Status Bars and ReBar
Program examples compiled using Visual C++ 6.0 (MFC 6.0) compiler on Windows XP Pro machine with Service Pack 2. Topics and sub topics for this Tutorial are listed below: Toolbars and Status Bars Control Bars and the Application Framework The Toolbar The Toolbar Bitmap Button States The Toolbar and Command Messages Toolbar Update Command UI Message Handlers ToolTips Locating the Main Frame Window The MYMFC11 Toolbar Example Bitmap Image example The Status Bar The Status Bar Definition The Message Line The Status Indicator Taking Control of the Status Bar The MYMFC12 Status Bar Example The Internet Explorer Rebar Toolbar Anatomy of a Rebar The MYMFC13 Rebar Example Toolbars and Status Bars All the Microsoft Visual C++ examples up to this point have included toolbars and status bars. AppWizard generated the code that initialized these application framework elements as long as you accepted the AppWizard default options Docking Toolbar and Initial Status Bar. The default toolbar provides graphics equivalents for many of the standard application framework menu selections, and the default status bar displays menu prompts together with the keyboard state indicators CAP, NUM, and SCRL. This module shows you how to customize the toolbar and the status bar for your application. You'll be able to add your own toolbar graphical buttons and control their appearance. You'll also learn how to disable the status bar's normal display of menu prompts and keyboard indicators. This allows your application to take over the status bar for its own use. Control Bars and the Application Framework The toolbar is an object of class CToolBar, and the status bar is an object of class CStatusBar. Both these classes are derived from class CControlBar, which is itself derived from CWnd. The CControlBar class supports control bar windows that are positioned inside frame windows. These control bar windows resize and reposition themselves as the parent frame moves and changes size. The application framework takes care of the construction, window creation, and destruction of the control bar objects. AppWizard generates control bar code for its derived frame class located in the files MainFrm.cpp and MainFrm.h. In a typical SDI application, a CToolBar object occupies the top portion of the CMainFrame client area and a CStatusBar object occupies the bottom portion. The view occupies the remaining (middle) part of the frame. Beginning with MFC Library version 4.0, the toolbar has been built around the toolbar common control that first became available with Microsoft Windows 95. Thus the toolbar is fully dockable. The programming interface is much the same as it was in earlier versions of the MFC library, however. The button images are easy to work with because a special resource type is supported by the resource editor. The old global buttons array is gone. Assuming that AppWizard has generated the control bar code for your application, the user can enable and disable the toolbar and the status bar individually by choosing commands from the application's View menu. When a control bar is
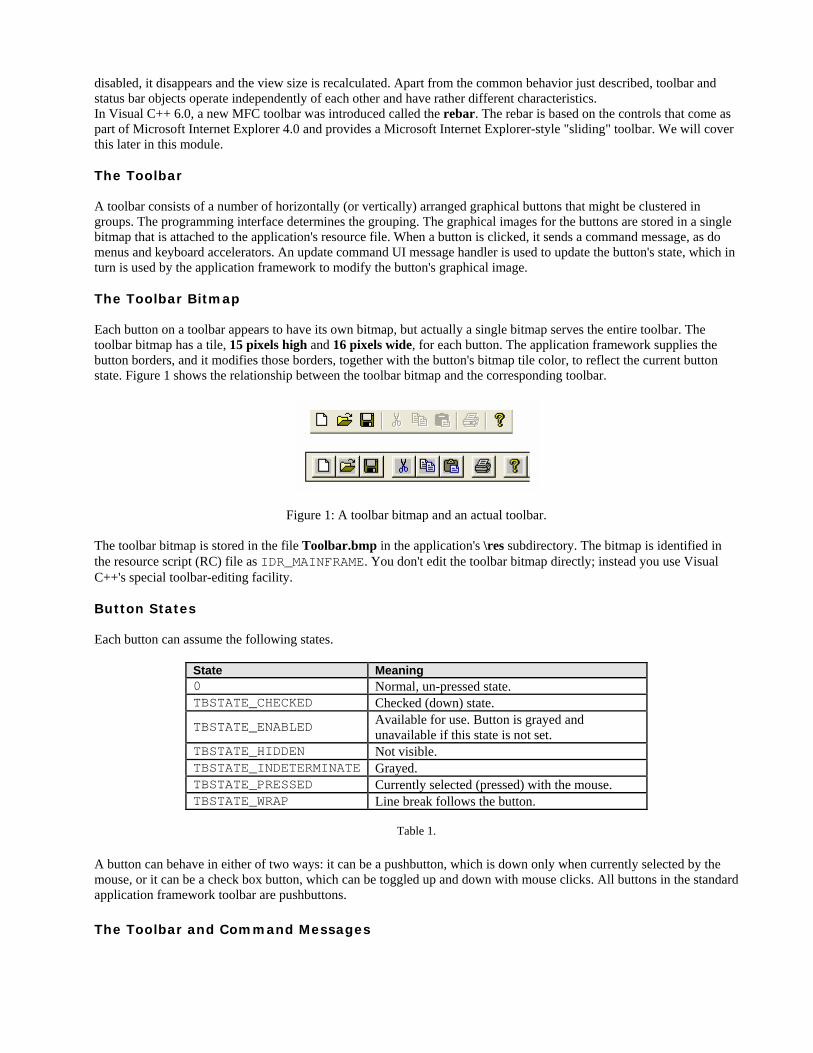
disabled, it disappears and the view size is recalculated. Apart from the common behavior just described, toolbar and status bar objects operate independently of each other and have rather different characteristics. In Visual C++ 6.0, a new MFC toolbar was introduced called the rebar. The rebar is based on the controls that come as part of Microsoft Internet Explorer 4.0 and provides a Microsoft Internet Explorer-style "sliding" toolbar. We will cover this later in this module. The Toolbar A toolbar consists of a number of horizontally (or vertically) arranged graphical buttons that might be clustered in groups. The programming interface determines the grouping. The graphical images for the buttons are stored in a single bitmap that is attached to the application's resource file. When a button is clicked, it sends a command message, as do menus and keyboard accelerators. An update command UI message handler is used to update the button's state, which in turn is used by the application framework to modify the button's graphical image. The Toolbar Bitmap Each button on a toolbar appears to have its own bitmap, but actually a single bitmap serves the entire toolbar. The toolbar bitmap has a tile, 15 pixels high and 16 pixels wide, for each button. The application framework supplies the button borders, and it modifies those borders, together with the button's bitmap tile color, to reflect the current button state. Figure 1 shows the relationship between the toolbar bitmap and the corresponding toolbar.
Figure 1: A toolbar bitmap and an actual toolbar. The toolbar bitmap is stored in the file Toolbar.bmp in the application's \res subdirectory. The bitmap is identified in the resource script (RC) file as IDR_MAINFRAME. You don't edit the toolbar bitmap directly; instead you use Visual C++'s special toolbar-editing facility. Button States Each button can assume the following states.
State Meaning 0 Normal, un-pressed state. TBSTATE_CHECKED Checked (down) state.
TBSTATE_ENABLED Available for use. Button is grayed and unavailable if this state is not set.
TBSTATE_HIDDEN Not visible. TBSTATE_INDETERMINATE Grayed. TBSTATE_PRESSED Currently selected (pressed) with the mouse. TBSTATE_WRAP Line break follows the button.
Table 1.
A button can behave in either of two ways: it can be a pushbutton, which is down only when currently selected by the mouse, or it can be a check box button, which can be toggled up and down with mouse clicks. All buttons in the standard application framework toolbar are pushbuttons.
The Toolbar and Command Messages
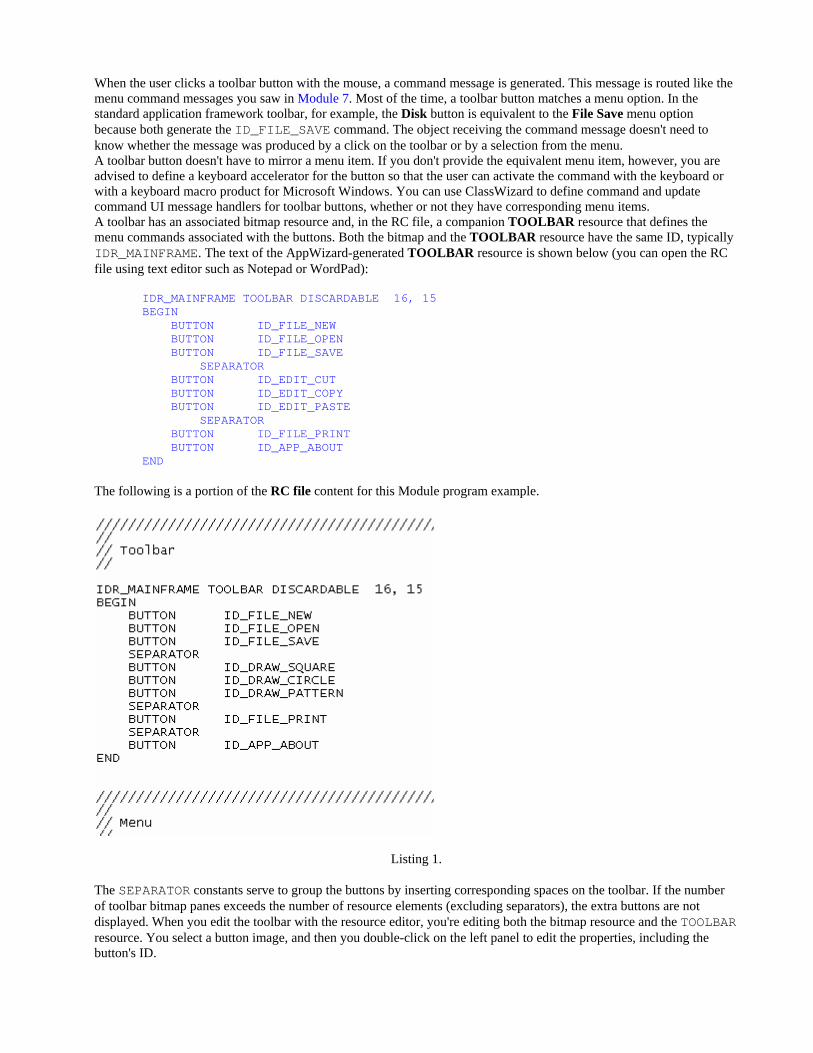
When the user clicks a toolbar button with the mouse, a command message is generated. This message is routed like the menu command messages you saw in Module 7. Most of the time, a toolbar button matches a menu option. In the standard application framework toolbar, for example, the Disk button is equivalent to the File Save menu option because both generate the ID_FILE_SAVE command. The object receiving the command message doesn't need to know whether the message was produced by a click on the toolbar or by a selection from the menu. A toolbar button doesn't have to mirror a menu item. If you don't provide the equivalent menu item, however, you are advised to define a keyboard accelerator for the button so that the user can activate the command with the keyboard or with a keyboard macro product for Microsoft Windows. You can use ClassWizard to define command and update command UI message handlers for toolbar buttons, whether or not they have corresponding menu items. A toolbar has an associated bitmap resource and, in the RC file, a companion TOOLBAR resource that defines the menu commands associated with the buttons. Both the bitmap and the TOOLBAR resource have the same ID, typically IDR_MAINFRAME. The text of the AppWizard-generated TOOLBAR resource is shown below (you can open the RC file using text editor such as Notepad or WordPad):
IDR_MAINFRAME TOOLBAR DISCARDABLE 16, 15 BEGIN BUTTON ID_FILE_NEW BUTTON ID_FILE_OPEN BUTTON ID_FILE_SAVE SEPARATOR BUTTON ID_EDIT_CUT BUTTON ID_EDIT_COPY BUTTON ID_EDIT_PASTE SEPARATOR BUTTON ID_FILE_PRINT BUTTON ID_APP_ABOUT END
The following is a portion of the RC file content for this Module program example.
Listing 1. The SEPARATOR constants serve to group the buttons by inserting corresponding spaces on the toolbar. If the number of toolbar bitmap panes exceeds the number of resource elements (excluding separators), the extra buttons are not displayed. When you edit the toolbar with the resource editor, you're editing both the bitmap resource and the TOOLBAR resource. You select a button image, and then you double-click on the left panel to edit the properties, including the button's ID.
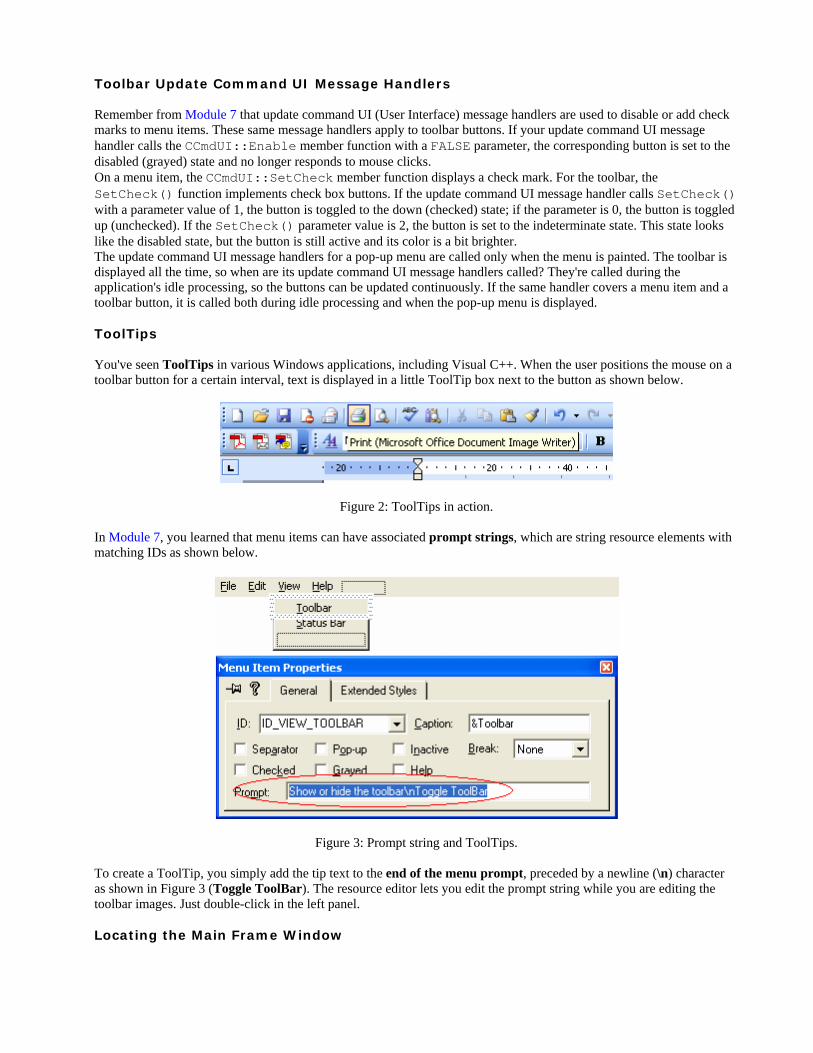
Toolbar Update Command UI Message Handlers Remember from Module 7 that update command UI (User Interface) message handlers are used to disable or add check marks to menu items. These same message handlers apply to toolbar buttons. If your update command UI message handler calls the CCmdUI::Enable member function with a FALSE parameter, the corresponding button is set to the disabled (grayed) state and no longer responds to mouse clicks. On a menu item, the CCmdUI::SetCheck member function displays a check mark. For the toolbar, the SetCheck() function implements check box buttons. If the update command UI message handler calls SetCheck() with a parameter value of 1, the button is toggled to the down (checked) state; if the parameter is 0, the button is toggled up (unchecked). If the SetCheck() parameter value is 2, the button is set to the indeterminate state. This state looks like the disabled state, but the button is still active and its color is a bit brighter. The update command UI message handlers for a pop-up menu are called only when the menu is painted. The toolbar is displayed all the time, so when are its update command UI message handlers called? They're called during the application's idle processing, so the buttons can be updated continuously. If the same handler covers a menu item and a toolbar button, it is called both during idle processing and when the pop-up menu is displayed. ToolTips You've seen ToolTips in various Windows applications, including Visual C++. When the user positions the mouse on a toolbar button for a certain interval, text is displayed in a little ToolTip box next to the button as shown below.
Figure 2: ToolTips in action. In Module 7, you learned that menu items can have associated prompt strings, which are string resource elements with matching IDs as shown below.
Figure 3: Prompt string and ToolTips. To create a ToolTip, you simply add the tip text to the end of the menu prompt, preceded by a newline (\n) character as shown in Figure 3 (Toggle ToolBar). The resource editor lets you edit the prompt string while you are editing the toolbar images. Just double-click in the left panel. Locating the Main Frame Window
The toolbar and status bar objects you'll be working with are attached to the application's main frame window, not to the view window. How does your view find its main frame window? In an SDI application, you can use the CWnd::GetParentFrame function. Unfortunately, this function won't work in an MDI application because the view's parent frame is the MDI child frame, not the MDI frame window. If you want your view class to work in both SDI and MDI applications, you must find the main frame window through the application object. The AfxGetApp() global function returns a pointer to the application object. You can use that pointer to get the CWinApp data member m_pMainWnd. In an MDI application, AppWizard generates code that sets m_pMainWnd, but in an SDI application, the framework sets m_pMainWnd during the view creation process. Once m_pMainWnd is set, you can use it in a view class to get the frame's toolbar with statements such as this:
CMainFrame* pFrame = (CMainFrame*) AfxGetApp()->m_pMainWnd; CToolBar* pToolBar = &pFrame->m_wndToolBar;
You'll need to cast m_pMainWnd from CFrameWnd* to CMainFrame* because m_wndToolBar is a member of that derived class. You'll also have to make m_wndToolBar public or make your class a friend of CMainFrame. You can use similar logic to locate menu objects, status bar objects, and dialog objects. In an SDI application, the value of m_pMainWnd is not set when the view's OnCreate() message handler is called. If you need to access the main frame window in your OnCreate() function, you must use the GetParentFrame() function. The MYMFC11 Toolbar Example In this example, you will replace the standard application framework Edit, Cut, Copy, and Paste toolbar buttons with three special-purpose buttons that control drawing in the view window. You will also construct a Draw menu with three corresponding menu items, as follows.
Menu Item Function Circle Draws a circle in the view window. Square Draws a square in the view window.
Pattern Toggles a diagonal line fill pattern for new squares and circles.
Table 2.
The menu and toolbar options force the user to alternate between drawing circles and squares. After the user draws a circle, the Circle menu item and toolbar button are disabled; after the user draws a square, the Square menu item and toolbar button are disabled. On the application's Draw menu, the Pattern menu item gets a check mark when pattern fill is active. On the toolbar, the corresponding button is a check box button that is down when pattern fill is active and up when it is not active. Figure 4 shows the application in action. The user has just drawn a square with pattern fill. Notice the states of the three drawing buttons.
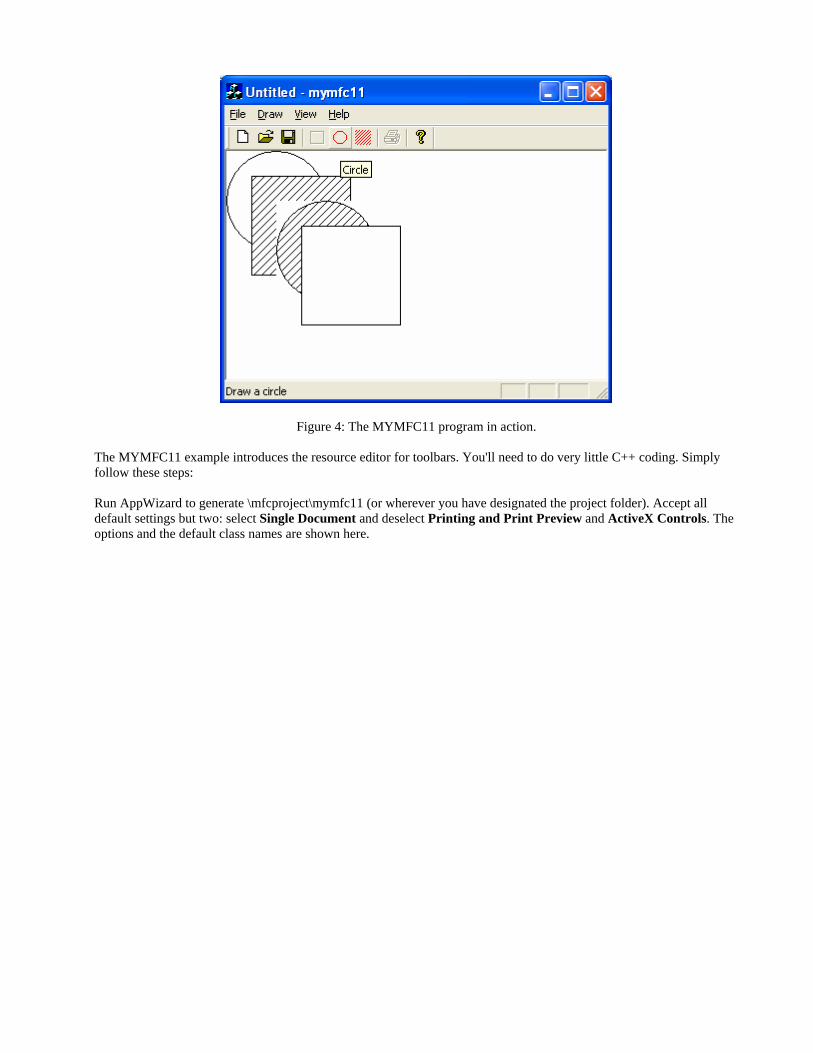
Figure 4: The MYMFC11 program in action. The MYMFC11 example introduces the resource editor for toolbars. You'll need to do very little C++ coding. Simply follow these steps: Run AppWizard to generate \mfcproject\mymfc11 (or wherever you have designated the project folder). Accept all default settings but two: select Single Document and deselect Printing and Print Preview and ActiveX Controls. The options and the default class names are shown here.
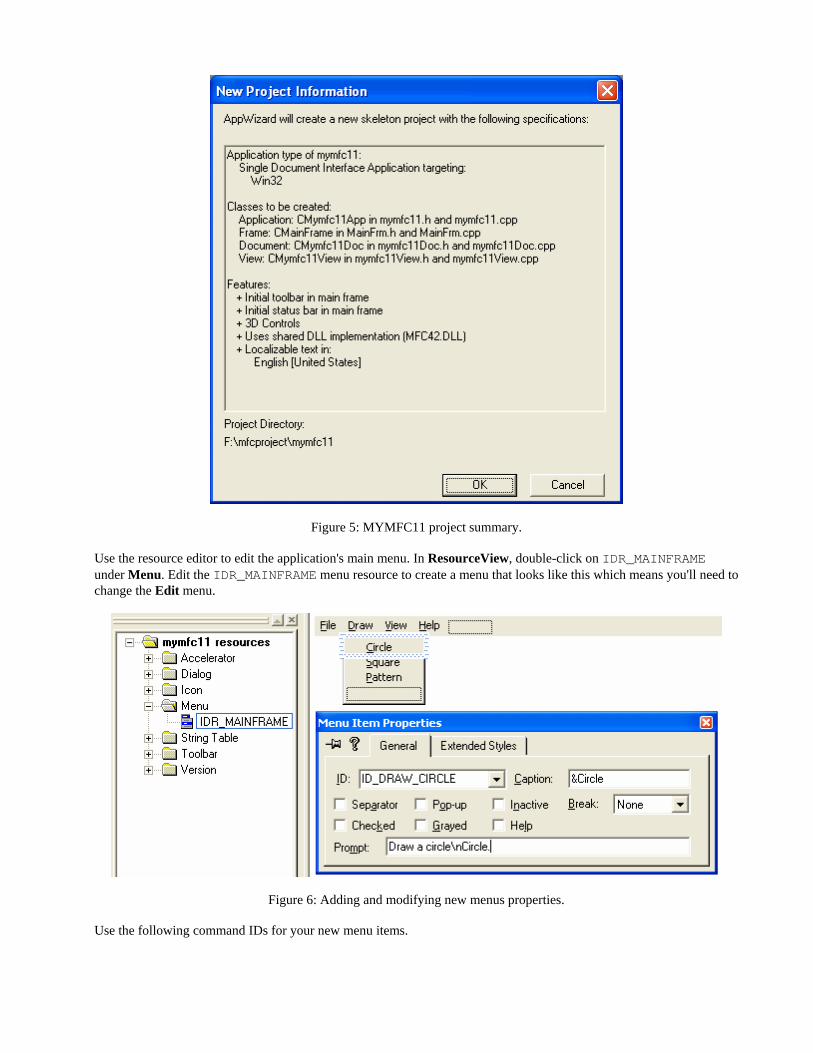
Figure 5: MYMFC11 project summary. Use the resource editor to edit the application's main menu. In ResourceView, double-click on IDR_MAINFRAME under Menu. Edit the IDR_MAINFRAME menu resource to create a menu that looks like this which means you'll need to change the Edit menu.
Figure 6: Adding and modifying new menus properties. Use the following command IDs for your new menu items.
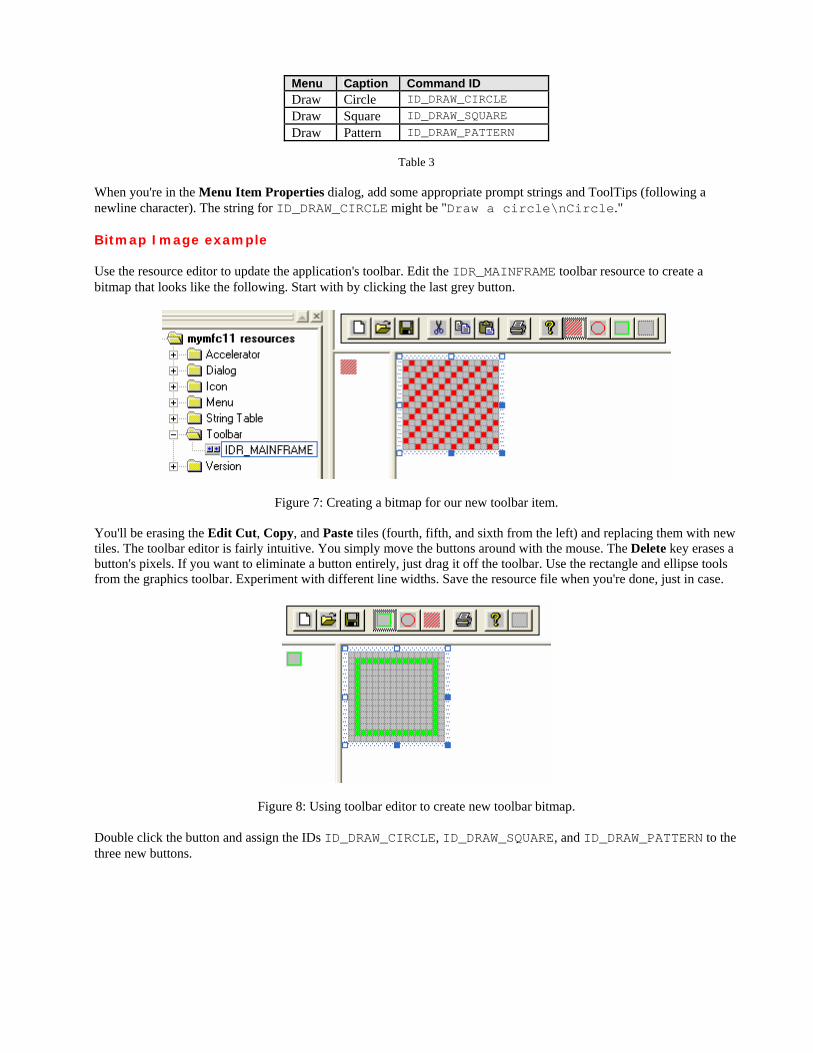
Menu Caption Command ID Draw Circle ID_DRAW_CIRCLE Draw Square ID_DRAW_SQUARE Draw Pattern ID_DRAW_PATTERN
Table 3
When you're in the Menu Item Properties dialog, add some appropriate prompt strings and ToolTips (following a newline character). The string for ID_DRAW_CIRCLE might be "Draw a circle\nCircle." Bitmap Image example Use the resource editor to update the application's toolbar. Edit the IDR_MAINFRAME toolbar resource to create a bitmap that looks like the following. Start with by clicking the last grey button.
Figure 7: Creating a bitmap for our new toolbar item. You'll be erasing the Edit Cut, Copy, and Paste tiles (fourth, fifth, and sixth from the left) and replacing them with new tiles. The toolbar editor is fairly intuitive. You simply move the buttons around with the mouse. The Delete key erases a button's pixels. If you want to eliminate a button entirely, just drag it off the toolbar. Use the rectangle and ellipse tools from the graphics toolbar. Experiment with different line widths. Save the resource file when you're done, just in case.
Figure 8: Using toolbar editor to create new toolbar bitmap. Double click the button and assign the IDs ID_DRAW_CIRCLE, ID_DRAW_SQUARE, and ID_DRAW_PATTERN to the three new buttons.
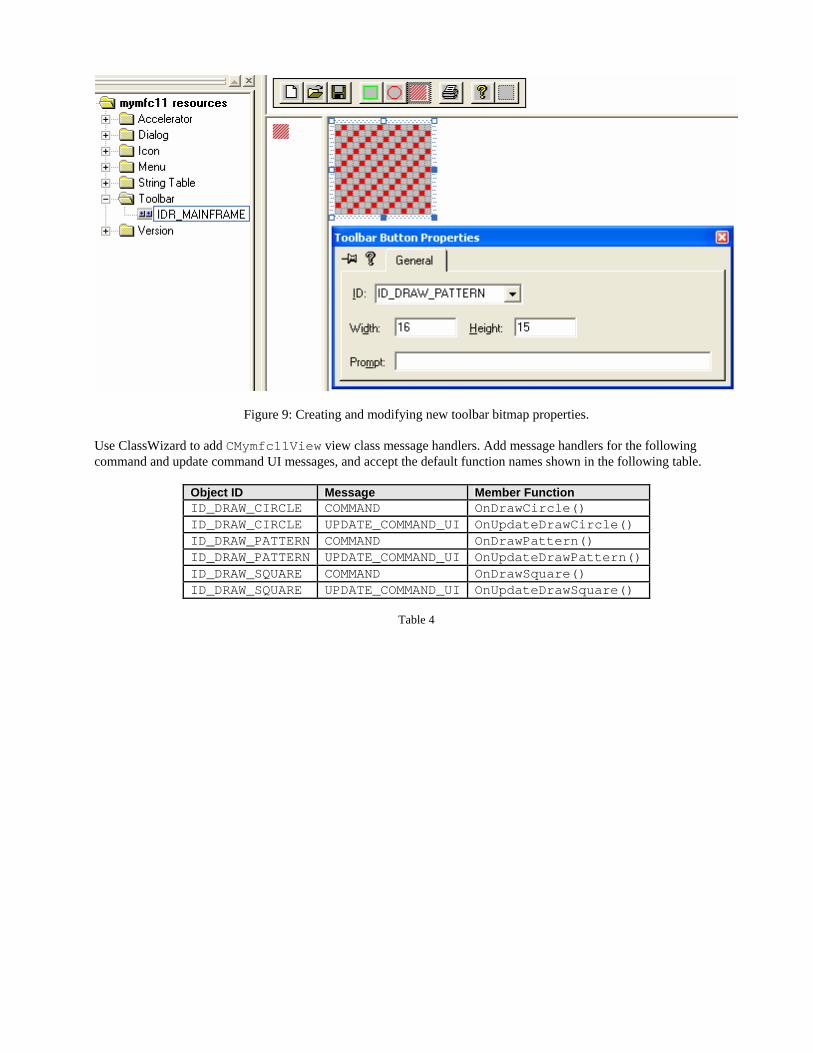
Figure 9: Creating and modifying new toolbar bitmap properties. Use ClassWizard to add CMymfc11View view class message handlers. Add message handlers for the following command and update command UI messages, and accept the default function names shown in the following table.
Object ID Message Member Function ID_DRAW_CIRCLE COMMAND OnDrawCircle() ID_DRAW_CIRCLE UPDATE_COMMAND_UI OnUpdateDrawCircle() ID_DRAW_PATTERN COMMAND OnDrawPattern() ID_DRAW_PATTERN UPDATE_COMMAND_UI OnUpdateDrawPattern() ID_DRAW_SQUARE COMMAND OnDrawSquare() ID_DRAW_SQUARE UPDATE_COMMAND_UI OnUpdateDrawSquare()
Table 4
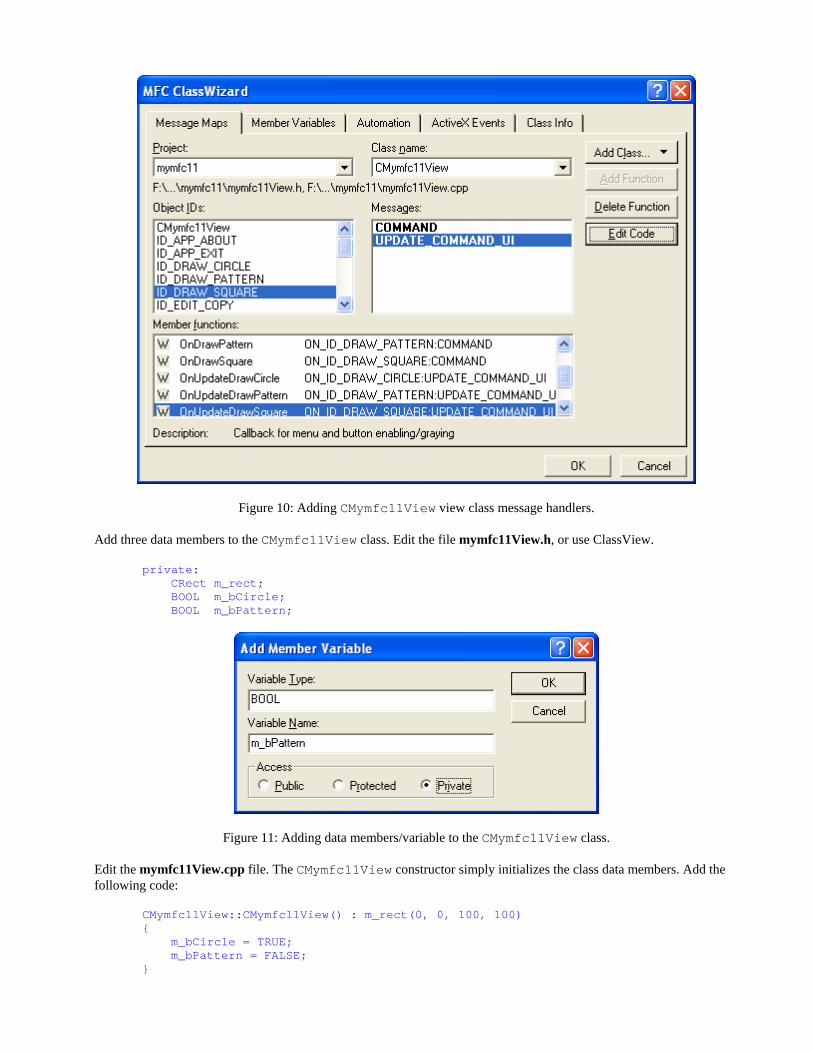
Figure 10: Adding CMymfc11View view class message handlers. Add three data members to the CMymfc11View class. Edit the file mymfc11View.h, or use ClassView.
private: CRect m_rect; BOOL m_bCircle; BOOL m_bPattern;
Figure 11: Adding data members/variable to the CMymfc11View class. Edit the mymfc11View.cpp file. The CMymfc11View constructor simply initializes the class data members. Add the following code:
CMymfc11View::CMymfc11View() : m_rect(0, 0, 100, 100) { m_bCircle = TRUE; m_bPattern = FALSE; }
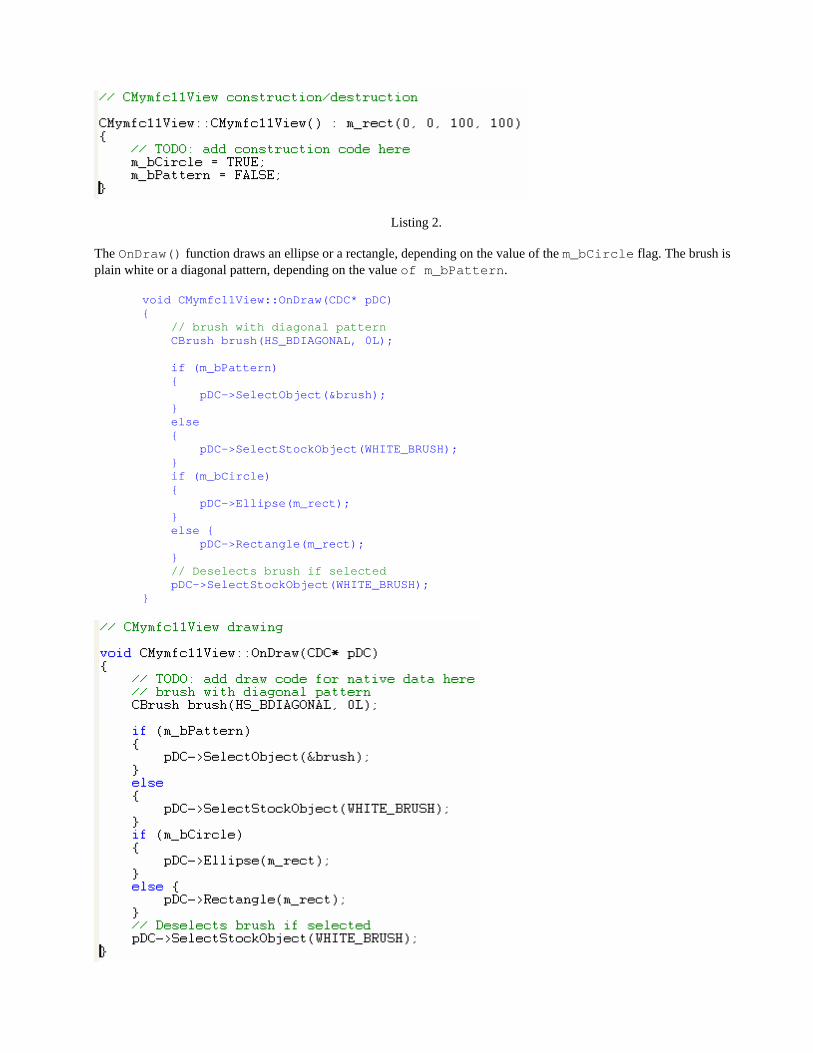
Listing 2. The OnDraw() function draws an ellipse or a rectangle, depending on the value of the m_bCircle flag. The brush is plain white or a diagonal pattern, depending on the value of m_bPattern.
void CMymfc11View::OnDraw(CDC* pDC) { // brush with diagonal pattern CBrush brush(HS_BDIAGONAL, 0L); if (m_bPattern) { pDC->SelectObject(&brush); } else { pDC->SelectStockObject(WHITE_BRUSH); } if (m_bCircle) { pDC->Ellipse(m_rect); } else { pDC->Rectangle(m_rect); } // Deselects brush if selected pDC->SelectStockObject(WHITE_BRUSH); }
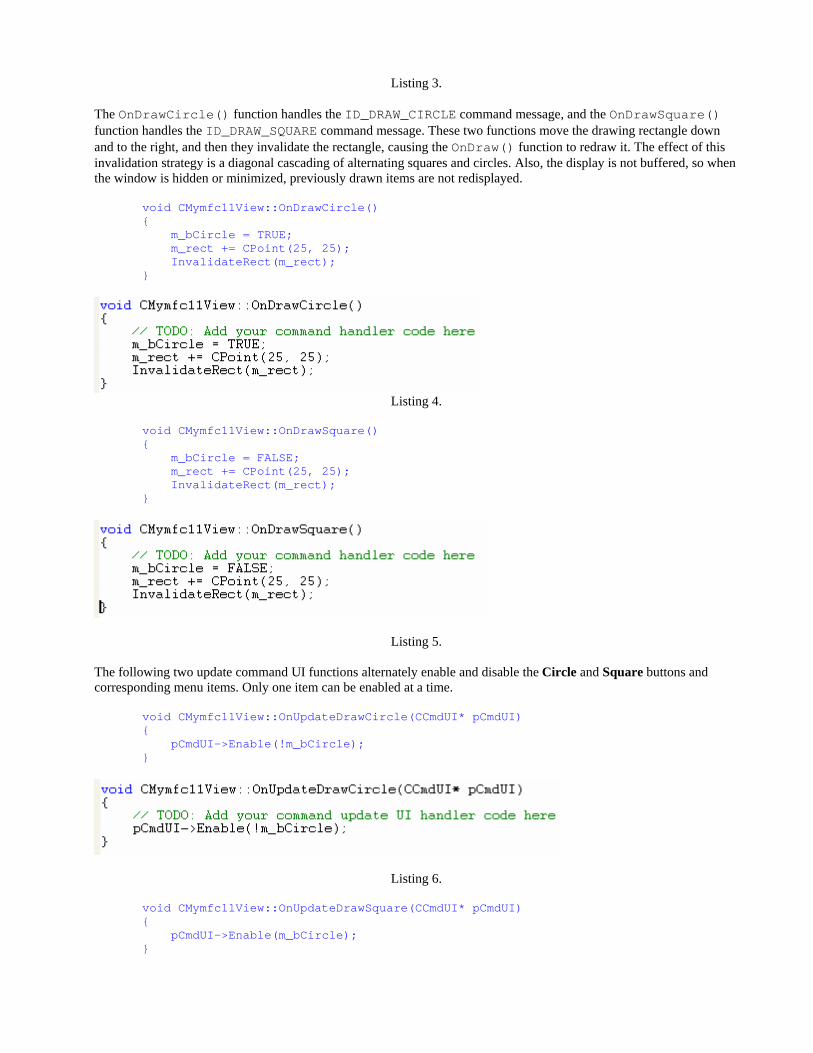
Listing 3. The OnDrawCircle() function handles the ID_DRAW_CIRCLE command message, and the OnDrawSquare() function handles the ID_DRAW_SQUARE command message. These two functions move the drawing rectangle down and to the right, and then they invalidate the rectangle, causing the OnDraw() function to redraw it. The effect of this invalidation strategy is a diagonal cascading of alternating squares and circles. Also, the display is not buffered, so when the window is hidden or minimized, previously drawn items are not redisplayed.
void CMymfc11View::OnDrawCircle() { m_bCircle = TRUE; m_rect += CPoint(25, 25); InvalidateRect(m_rect); }
Listing 4.
void CMymfc11View::OnDrawSquare() { m_bCircle = FALSE; m_rect += CPoint(25, 25); InvalidateRect(m_rect); }
Listing 5. The following two update command UI functions alternately enable and disable the Circle and Square buttons and corresponding menu items. Only one item can be enabled at a time.
void CMymfc11View::OnUpdateDrawCircle(CCmdUI* pCmdUI) { pCmdUI->Enable(!m_bCircle); }
Listing 6.
void CMymfc11View::OnUpdateDrawSquare(CCmdUI* pCmdUI) { pCmdUI->Enable(m_bCircle); }
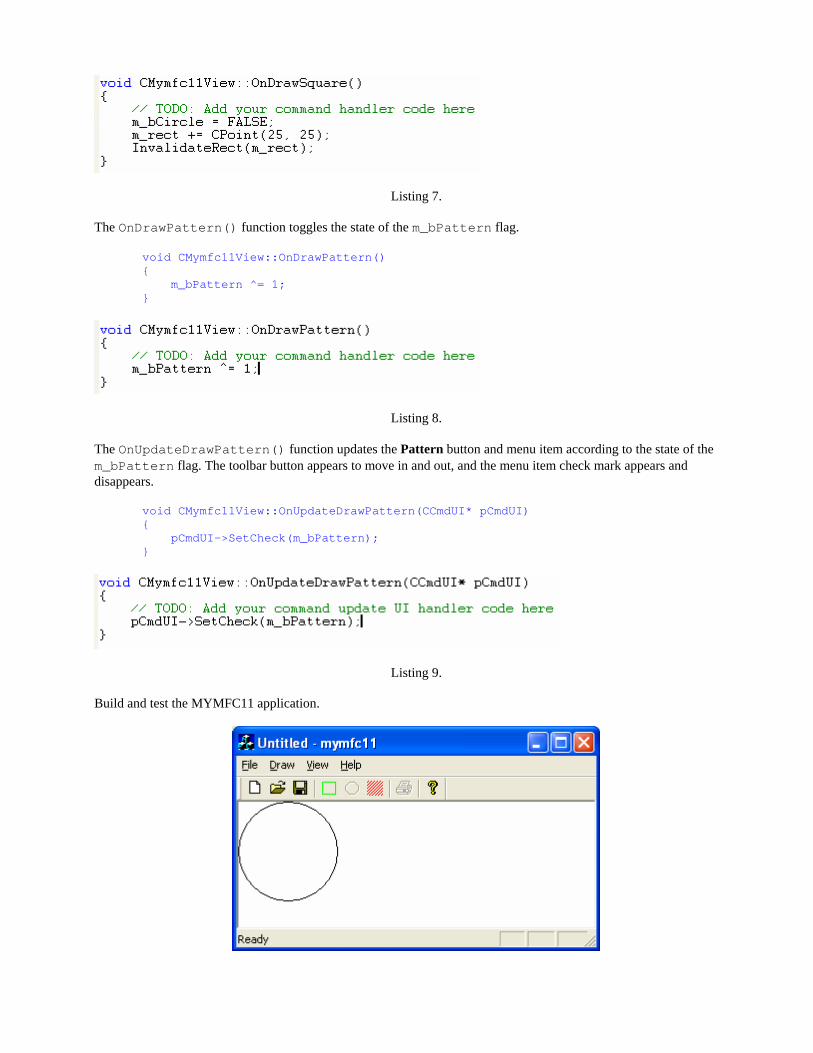
Listing 7. The OnDrawPattern() function toggles the state of the m_bPattern flag.
void CMymfc11View::OnDrawPattern() { m_bPattern ^= 1; }
Listing 8. The OnUpdateDrawPattern() function updates the Pattern button and menu item according to the state of the m_bPattern flag. The toolbar button appears to move in and out, and the menu item check mark appears and disappears.
void CMymfc11View::OnUpdateDrawPattern(CCmdUI* pCmdUI) { pCmdUI->SetCheck(m_bPattern); }
Listing 9. Build and test the MYMFC11 application.
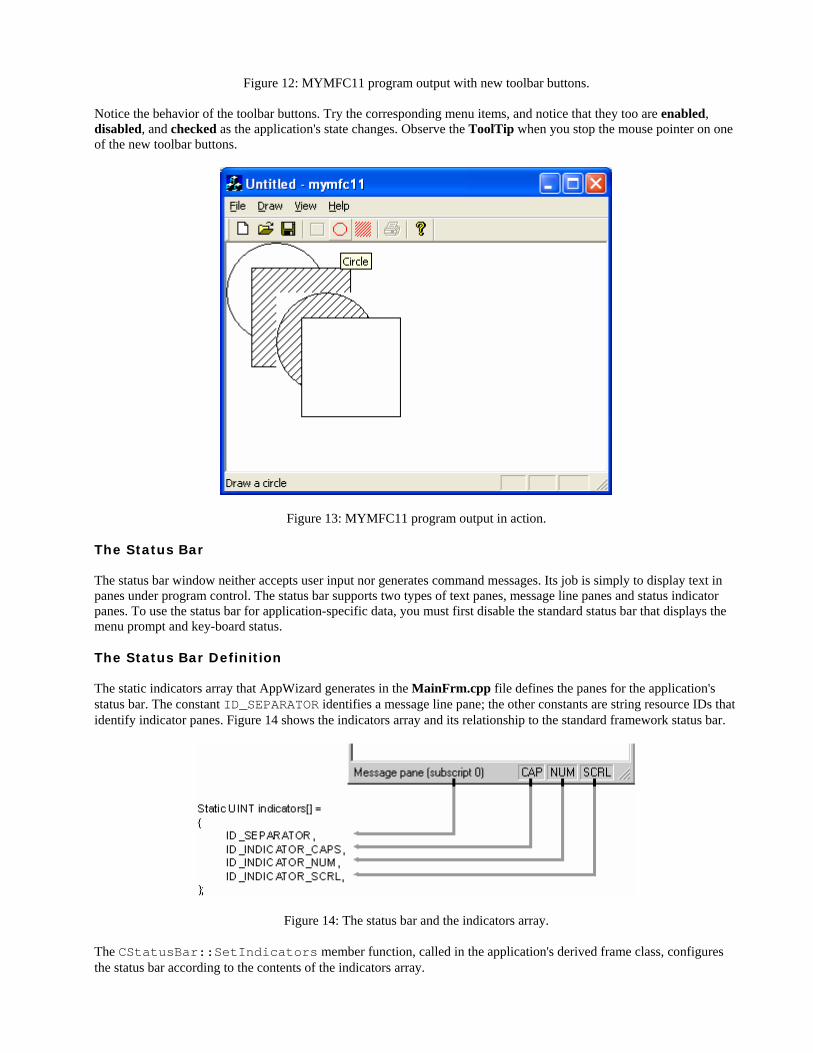
Figure 12: MYMFC11 program output with new toolbar buttons. Notice the behavior of the toolbar buttons. Try the corresponding menu items, and notice that they too are enabled, disabled, and checked as the application's state changes. Observe the ToolTip when you stop the mouse pointer on one of the new toolbar buttons.
Figure 13: MYMFC11 program output in action. The Status Bar The status bar window neither accepts user input nor generates command messages. Its job is simply to display text in panes under program control. The status bar supports two types of text panes, message line panes and status indicator panes. To use the status bar for application-specific data, you must first disable the standard status bar that displays the menu prompt and key-board status. The Status Bar Definition The static indicators array that AppWizard generates in the MainFrm.cpp file defines the panes for the application's status bar. The constant ID_SEPARATOR identifies a message line pane; the other constants are string resource IDs that identify indicator panes. Figure 14 shows the indicators array and its relationship to the standard framework status bar.
Figure 14: The status bar and the indicators array. The CStatusBar::SetIndicators member function, called in the application's derived frame class, configures the status bar according to the contents of the indicators array.
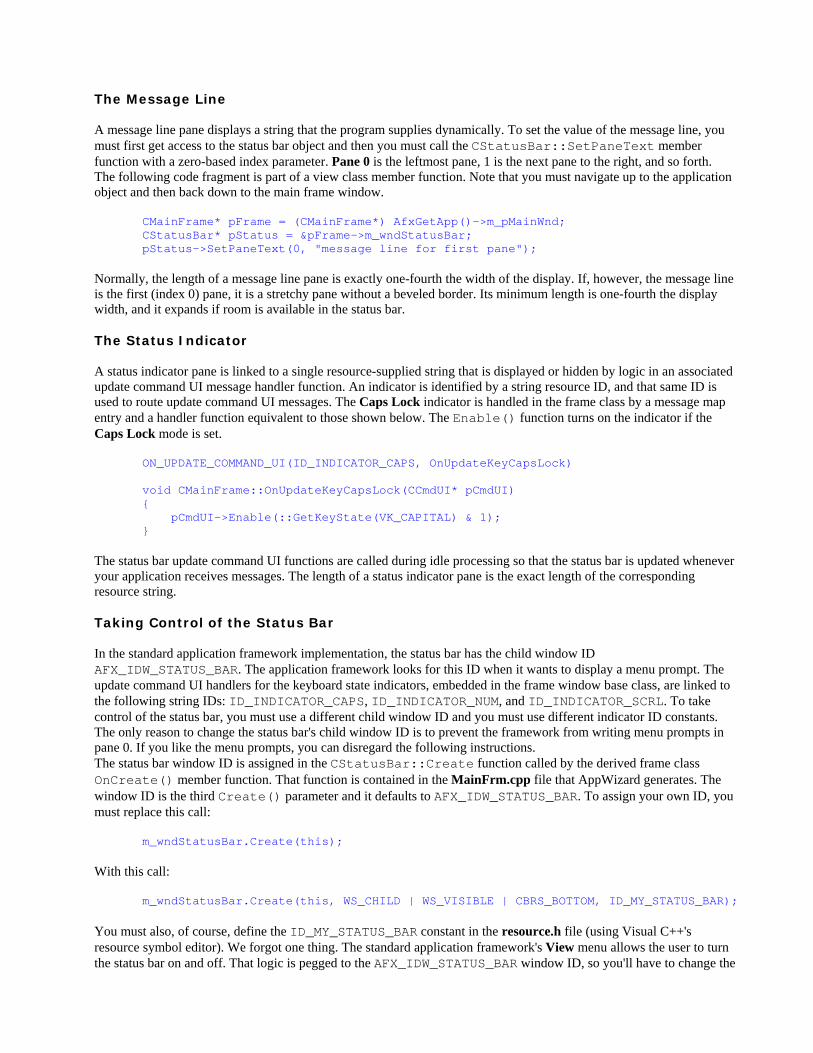
The Message Line A message line pane displays a string that the program supplies dynamically. To set the value of the message line, you must first get access to the status bar object and then you must call the CStatusBar::SetPaneText member function with a zero-based index parameter. Pane 0 is the leftmost pane, 1 is the next pane to the right, and so forth. The following code fragment is part of a view class member function. Note that you must navigate up to the application object and then back down to the main frame window.
CMainFrame* pFrame = (CMainFrame*) AfxGetApp()->m_pMainWnd; CStatusBar* pStatus = &pFrame->m_wndStatusBar; pStatus->SetPaneText(0, "message line for first pane");
Normally, the length of a message line pane is exactly one-fourth the width of the display. If, however, the message line is the first (index 0) pane, it is a stretchy pane without a beveled border. Its minimum length is one-fourth the display width, and it expands if room is available in the status bar. The Status Indicator A status indicator pane is linked to a single resource-supplied string that is displayed or hidden by logic in an associated update command UI message handler function. An indicator is identified by a string resource ID, and that same ID is used to route update command UI messages. The Caps Lock indicator is handled in the frame class by a message map entry and a handler function equivalent to those shown below. The Enable() function turns on the indicator if the Caps Lock mode is set.
ON_UPDATE_COMMAND_UI(ID_INDICATOR_CAPS, OnUpdateKeyCapsLock) void CMainFrame::OnUpdateKeyCapsLock(CCmdUI* pCmdUI) { pCmdUI->Enable(::GetKeyState(VK_CAPITAL) & 1); }
The status bar update command UI functions are called during idle processing so that the status bar is updated whenever your application receives messages. The length of a status indicator pane is the exact length of the corresponding resource string. Taking Control of the Status Bar In the standard application framework implementation, the status bar has the child window ID AFX_IDW_STATUS_BAR. The application framework looks for this ID when it wants to display a menu prompt. The update command UI handlers for the keyboard state indicators, embedded in the frame window base class, are linked to the following string IDs: ID_INDICATOR_CAPS, ID_INDICATOR_NUM, and ID_INDICATOR_SCRL. To take control of the status bar, you must use a different child window ID and you must use different indicator ID constants. The only reason to change the status bar's child window ID is to prevent the framework from writing menu prompts in pane 0. If you like the menu prompts, you can disregard the following instructions. The status bar window ID is assigned in the CStatusBar::Create function called by the derived frame class OnCreate() member function. That function is contained in the MainFrm.cpp file that AppWizard generates. The window ID is the third Create() parameter and it defaults to AFX_IDW_STATUS_BAR. To assign your own ID, you must replace this call:
m_wndStatusBar.Create(this); With this call:
m_wndStatusBar.Create(this, WS_CHILD | WS_VISIBLE | CBRS_BOTTOM, ID_MY_STATUS_BAR); You must also, of course, define the ID_MY_STATUS_BAR constant in the resource.h file (using Visual C++'s resource symbol editor). We forgot one thing. The standard application framework's View menu allows the user to turn the status bar on and off. That logic is pegged to the AFX_IDW_STATUS_BAR window ID, so you'll have to change the
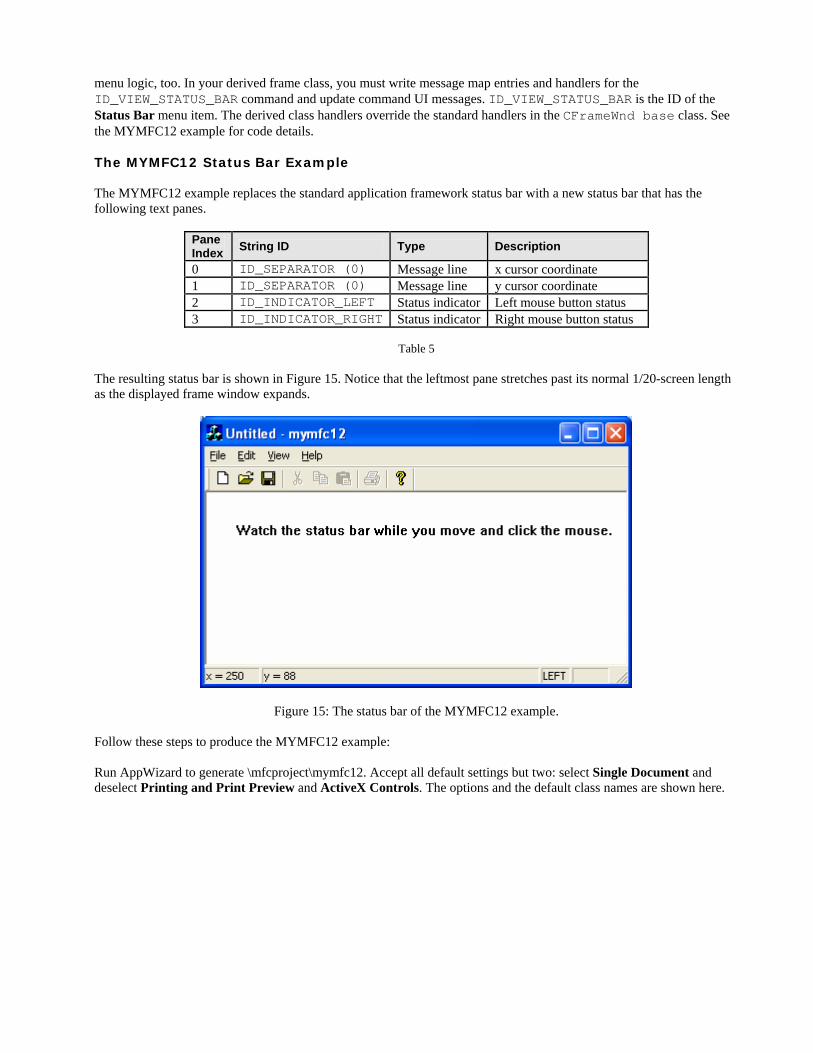
menu logic, too. In your derived frame class, you must write message map entries and handlers for the ID_VIEW_STATUS_BAR command and update command UI messages. ID_VIEW_STATUS_BAR is the ID of the Status Bar menu item. The derived class handlers override the standard handlers in the CFrameWnd base class. See the MYMFC12 example for code details. The MYMFC12 Status Bar Example The MYMFC12 example replaces the standard application framework status bar with a new status bar that has the following text panes.
Pane Index String ID Type Description
0 ID_SEPARATOR (0) Message line x cursor coordinate 1 ID_SEPARATOR (0) Message line y cursor coordinate 2 ID_INDICATOR_LEFT Status indicator Left mouse button status 3 ID_INDICATOR_RIGHT Status indicator Right mouse button status
Table 5
The resulting status bar is shown in Figure 15. Notice that the leftmost pane stretches past its normal 1/20-screen length as the displayed frame window expands.
Figure 15: The status bar of the MYMFC12 example. Follow these steps to produce the MYMFC12 example: Run AppWizard to generate \mfcproject\mymfc12. Accept all default settings but two: select Single Document and deselect Printing and Print Preview and ActiveX Controls. The options and the default class names are shown here.
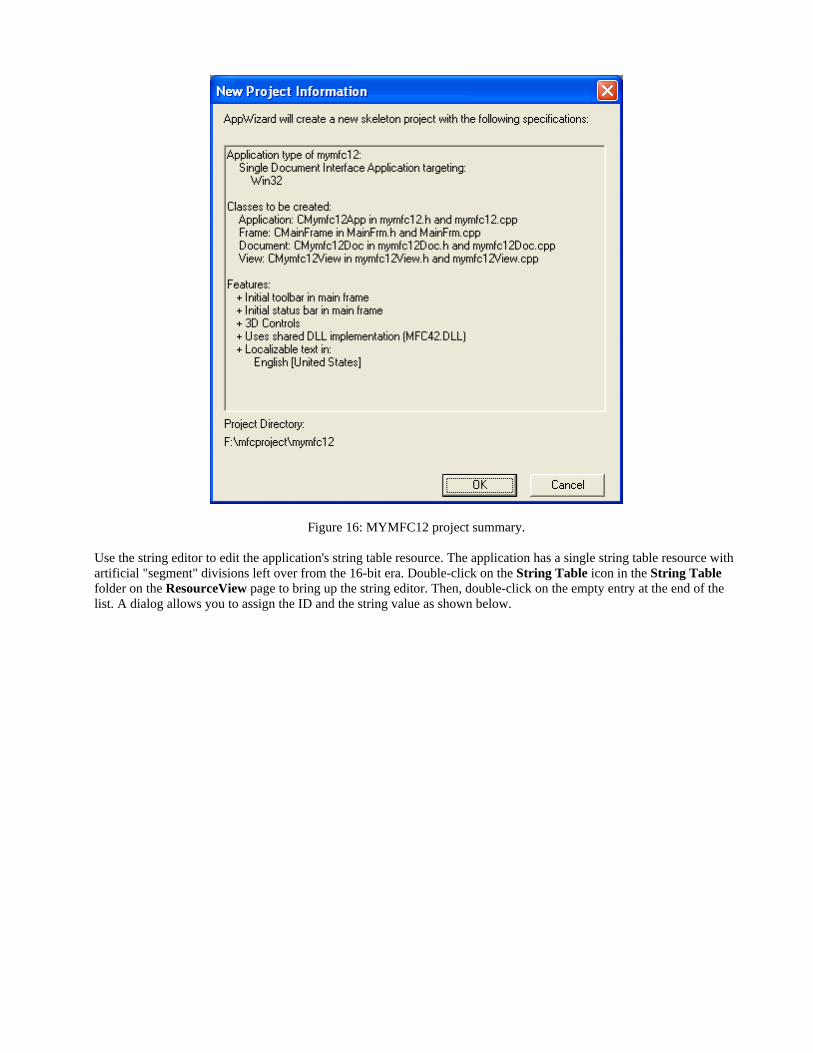
Figure 16: MYMFC12 project summary. Use the string editor to edit the application's string table resource. The application has a single string table resource with artificial "segment" divisions left over from the 16-bit era. Double-click on the String Table icon in the String Table folder on the ResourceView page to bring up the string editor. Then, double-click on the empty entry at the end of the list. A dialog allows you to assign the ID and the string value as shown below.
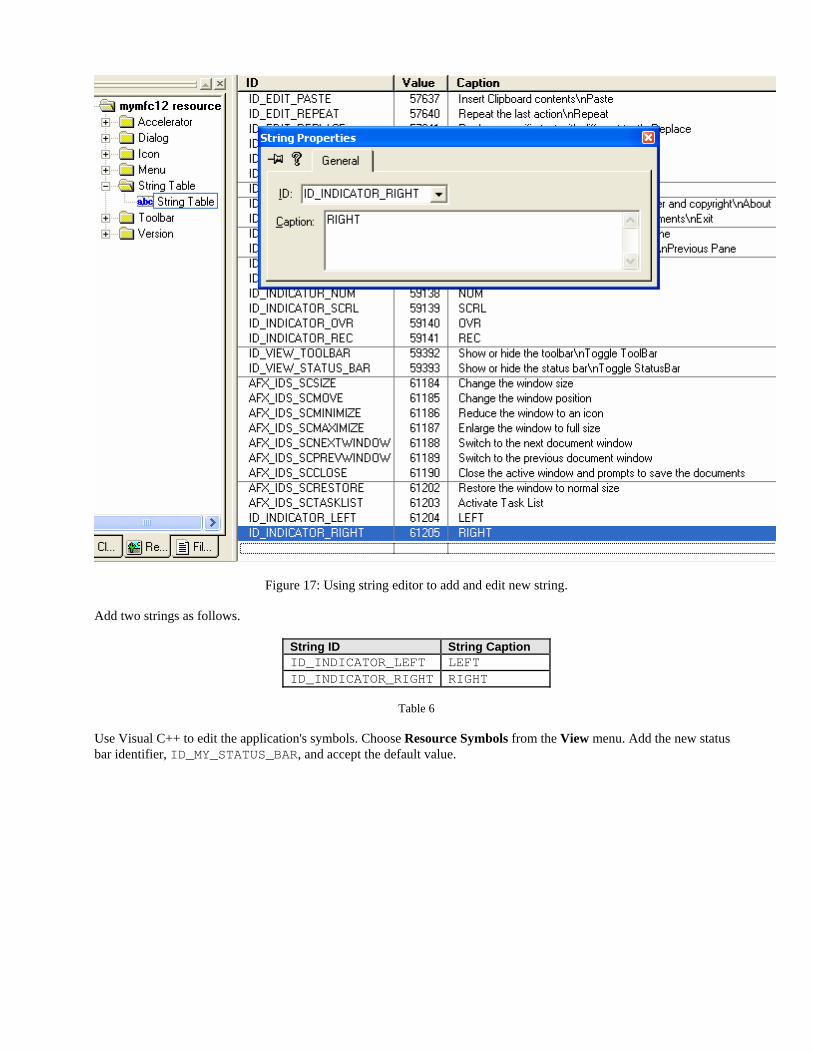
Figure 17: Using string editor to add and edit new string. Add two strings as follows.
String ID String Caption ID_INDICATOR_LEFT LEFT ID_INDICATOR_RIGHT RIGHT
Table 6
Use Visual C++ to edit the application's symbols. Choose Resource Symbols from the View menu. Add the new status bar identifier, ID_MY_STATUS_BAR, and accept the default value.
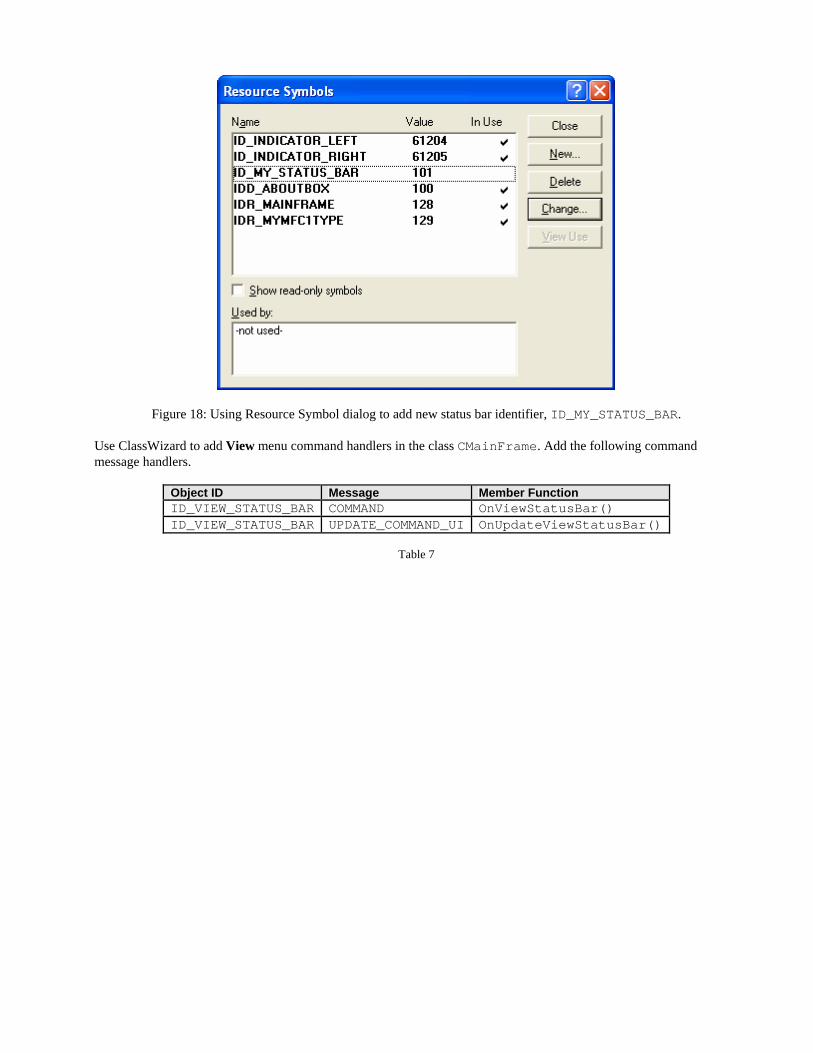
Figure 18: Using Resource Symbol dialog to add new status bar identifier, ID_MY_STATUS_BAR. Use ClassWizard to add View menu command handlers in the class CMainFrame. Add the following command message handlers.
Object ID Message Member Function ID_VIEW_STATUS_BAR COMMAND OnViewStatusBar() ID_VIEW_STATUS_BAR UPDATE_COMMAND_UI OnUpdateViewStatusBar()
Table 7
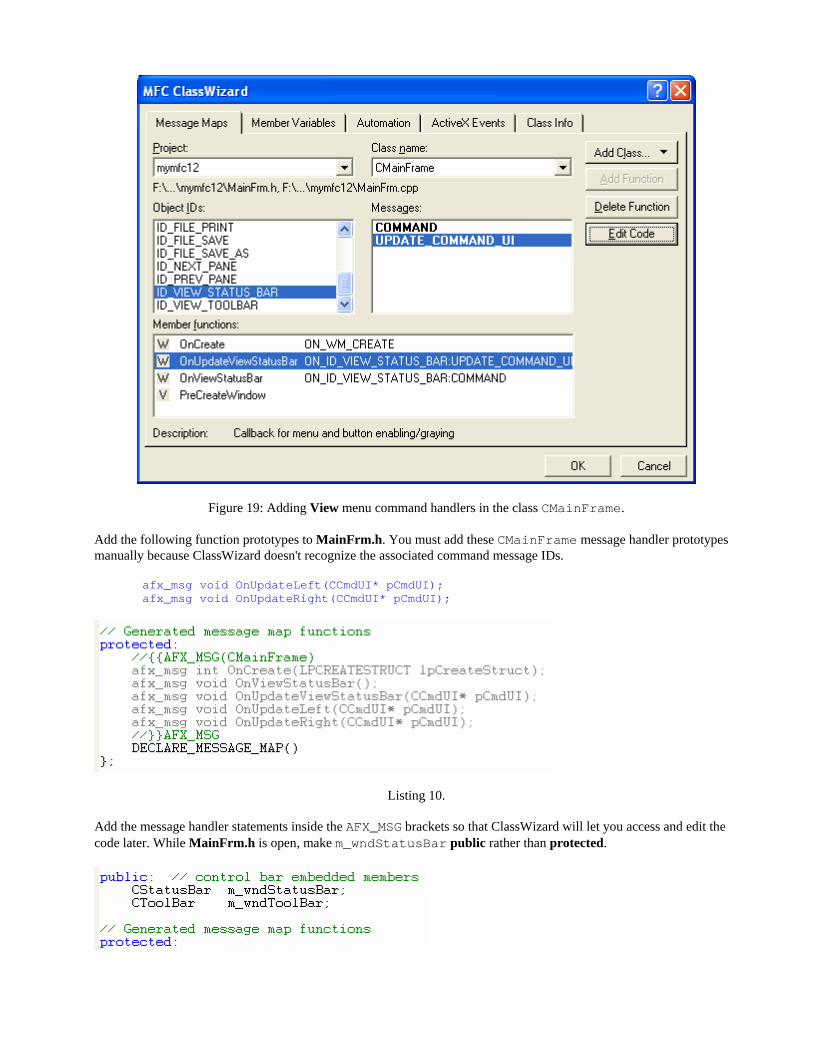
Figure 19: Adding View menu command handlers in the class CMainFrame. Add the following function prototypes to MainFrm.h. You must add these CMainFrame message handler prototypes manually because ClassWizard doesn't recognize the associated command message IDs.
afx_msg void OnUpdateLeft(CCmdUI* pCmdUI); afx_msg void OnUpdateRight(CCmdUI* pCmdUI);
Listing 10. Add the message handler statements inside the AFX_MSG brackets so that ClassWizard will let you access and edit the code later. While MainFrm.h is open, make m_wndStatusBar public rather than protected.
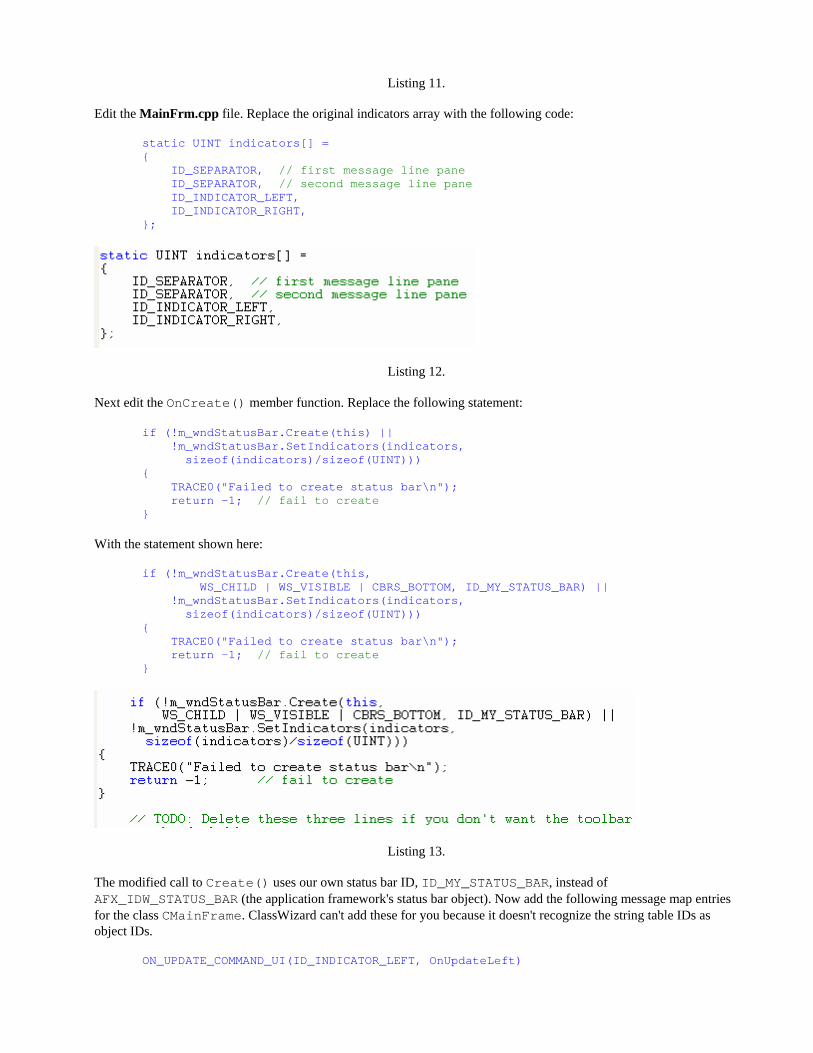
Listing 11. Edit the MainFrm.cpp file. Replace the original indicators array with the following code:
static UINT indicators[] = { ID_SEPARATOR, // first message line pane ID_SEPARATOR, // second message line pane ID_INDICATOR_LEFT, ID_INDICATOR_RIGHT, };
Listing 12. Next edit the OnCreate() member function. Replace the following statement:
if (!m_wndStatusBar.Create(this) || !m_wndStatusBar.SetIndicators(indicators, sizeof(indicators)/sizeof(UINT))) { TRACE0("Failed to create status bar\n"); return -1; // fail to create }
With the statement shown here:
if (!m_wndStatusBar.Create(this, WS_CHILD | WS_VISIBLE | CBRS_BOTTOM, ID_MY_STATUS_BAR) || !m_wndStatusBar.SetIndicators(indicators, sizeof(indicators)/sizeof(UINT))) { TRACE0("Failed to create status bar\n"); return -1; // fail to create }
Listing 13. The modified call to Create() uses our own status bar ID, ID_MY_STATUS_BAR, instead of AFX_IDW_STATUS_BAR (the application framework's status bar object). Now add the following message map entries for the class CMainFrame. ClassWizard can't add these for you because it doesn't recognize the string table IDs as object IDs.
ON_UPDATE_COMMAND_UI(ID_INDICATOR_LEFT, OnUpdateLeft)
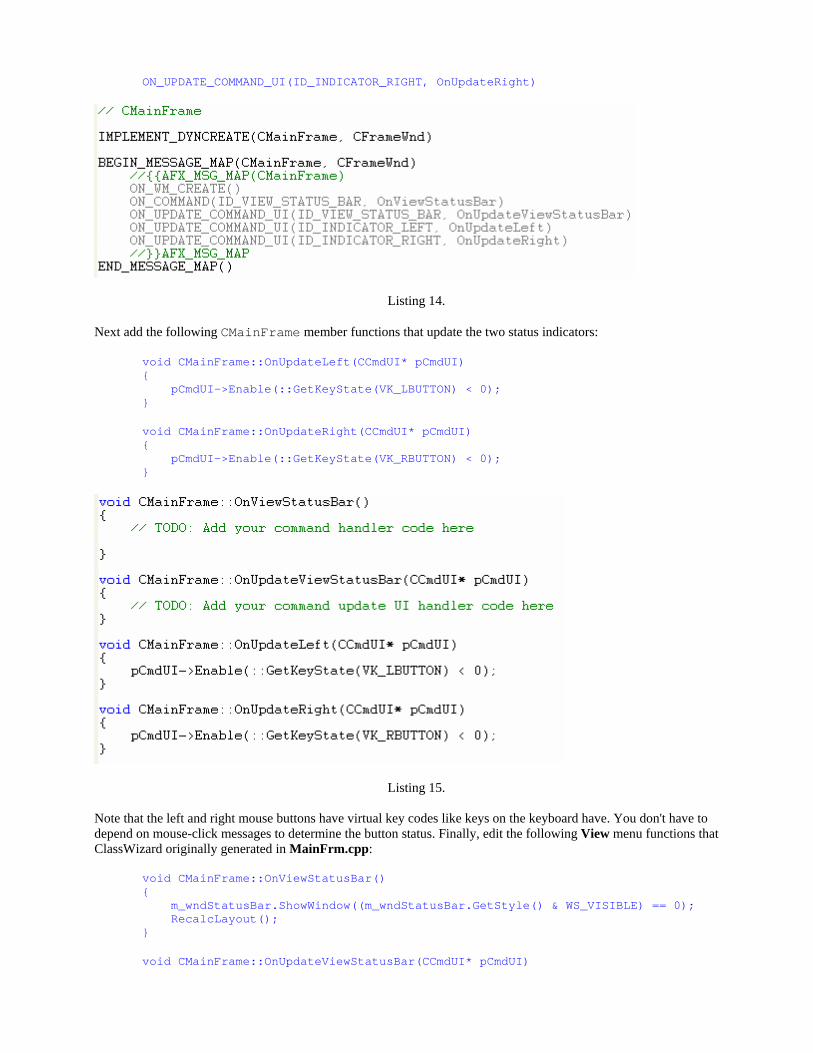
ON_UPDATE_COMMAND_UI(ID_INDICATOR_RIGHT, OnUpdateRight)
Listing 14. Next add the following CMainFrame member functions that update the two status indicators:
void CMainFrame::OnUpdateLeft(CCmdUI* pCmdUI) { pCmdUI->Enable(::GetKeyState(VK_LBUTTON) < 0); }
void CMainFrame::OnUpdateRight(CCmdUI* pCmdUI) { pCmdUI->Enable(::GetKeyState(VK_RBUTTON) < 0); }
Listing 15. Note that the left and right mouse buttons have virtual key codes like keys on the keyboard have. You don't have to depend on mouse-click messages to determine the button status. Finally, edit the following View menu functions that ClassWizard originally generated in MainFrm.cpp:
void CMainFrame::OnViewStatusBar() { m_wndStatusBar.ShowWindow((m_wndStatusBar.GetStyle() & WS_VISIBLE) == 0); RecalcLayout(); }
void CMainFrame::OnUpdateViewStatusBar(CCmdUI* pCmdUI)
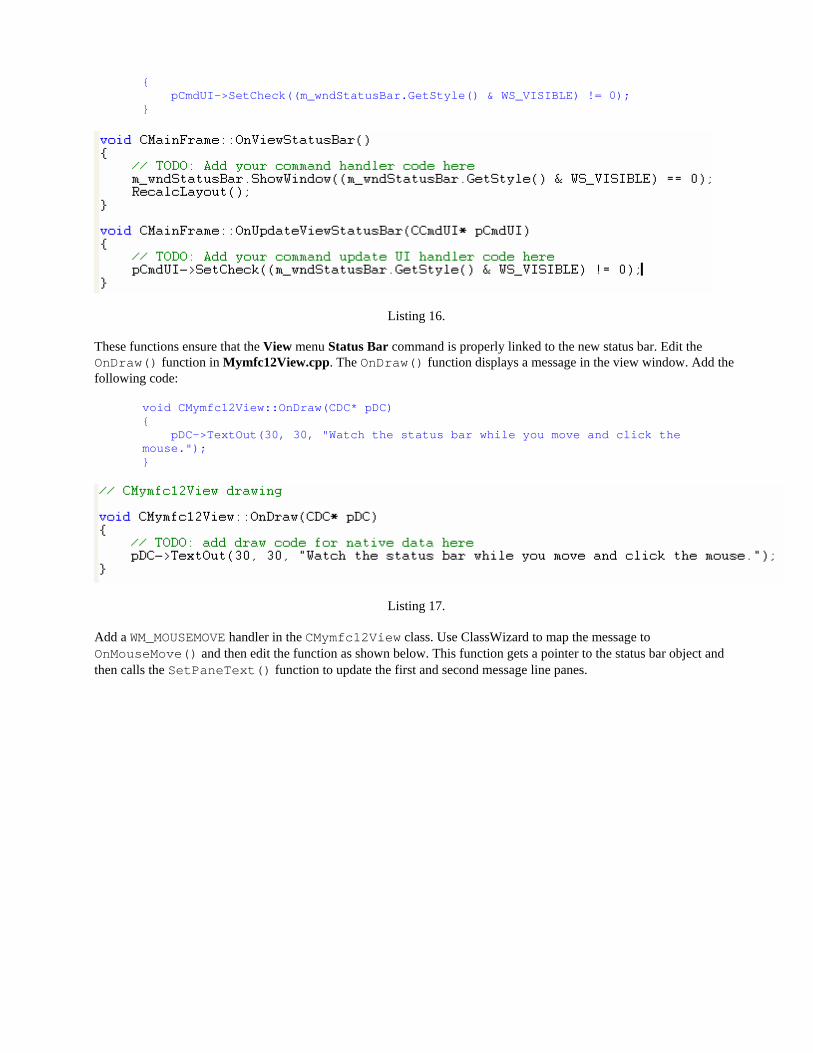
{ pCmdUI->SetCheck((m_wndStatusBar.GetStyle() & WS_VISIBLE) != 0); }
Listing 16. These functions ensure that the View menu Status Bar command is properly linked to the new status bar. Edit the OnDraw() function in Mymfc12View.cpp. The OnDraw() function displays a message in the view window. Add the following code:
void CMymfc12View::OnDraw(CDC* pDC) { pDC->TextOut(30, 30, "Watch the status bar while you move and click the mouse."); }
Listing 17. Add a WM_MOUSEMOVE handler in the CMymfc12View class. Use ClassWizard to map the message to OnMouseMove() and then edit the function as shown below. This function gets a pointer to the status bar object and then calls the SetPaneText() function to update the first and second message line panes.
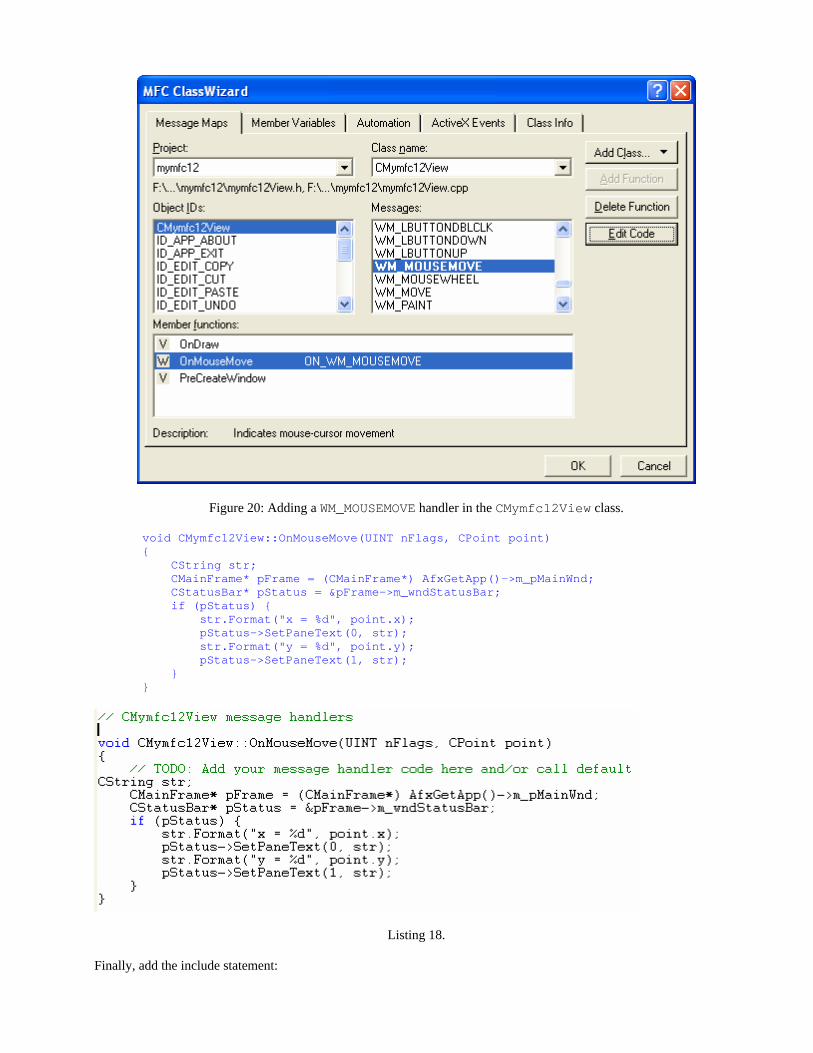
Figure 20: Adding a WM_MOUSEMOVE handler in the CMymfc12View class.
void CMymfc12View::OnMouseMove(UINT nFlags, CPoint point) { CString str; CMainFrame* pFrame = (CMainFrame*) AfxGetApp()->m_pMainWnd; CStatusBar* pStatus = &pFrame->m_wndStatusBar; if (pStatus) { str.Format("x = %d", point.x); pStatus->SetPaneText(0, str); str.Format("y = %d", point.y); pStatus->SetPaneText(1, str); } }
Listing 18. Finally, add the include statement:
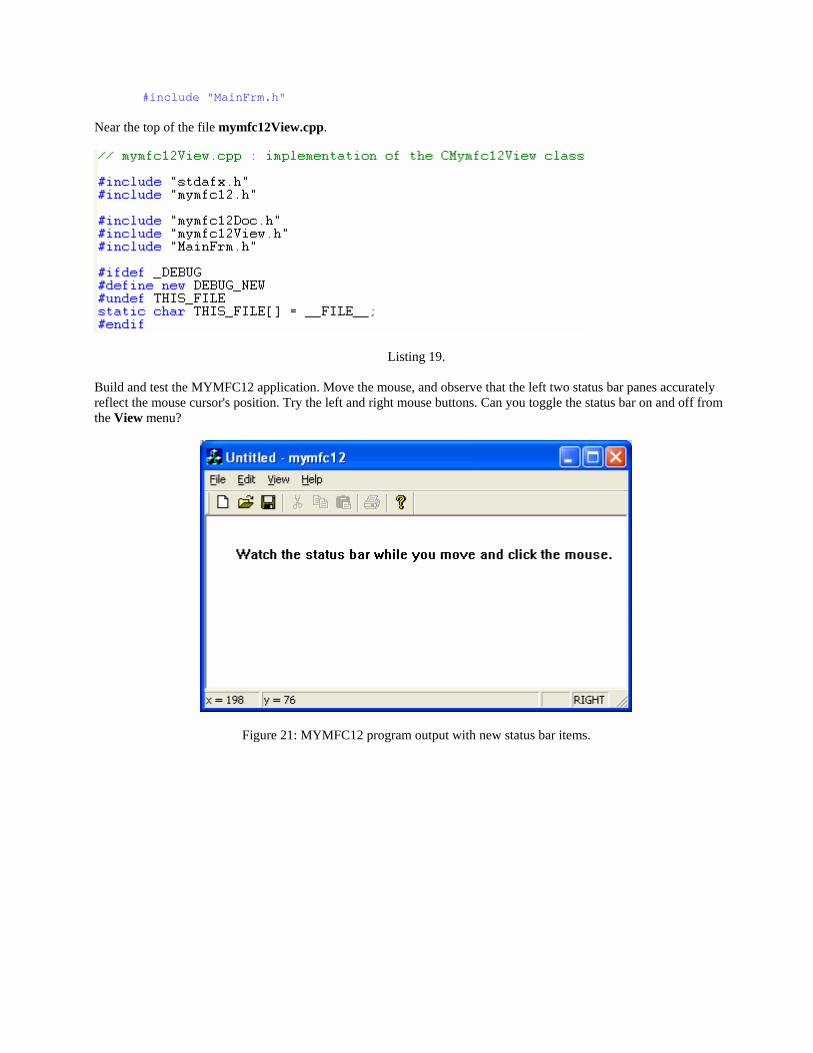
#include "MainFrm.h"
Near the top of the file mymfc12View.cpp.
Listing 19. Build and test the MYMFC12 application. Move the mouse, and observe that the left two status bar panes accurately reflect the mouse cursor's position. Try the left and right mouse buttons. Can you toggle the status bar on and off from the View menu?
Figure 21: MYMFC12 program output with new status bar items.
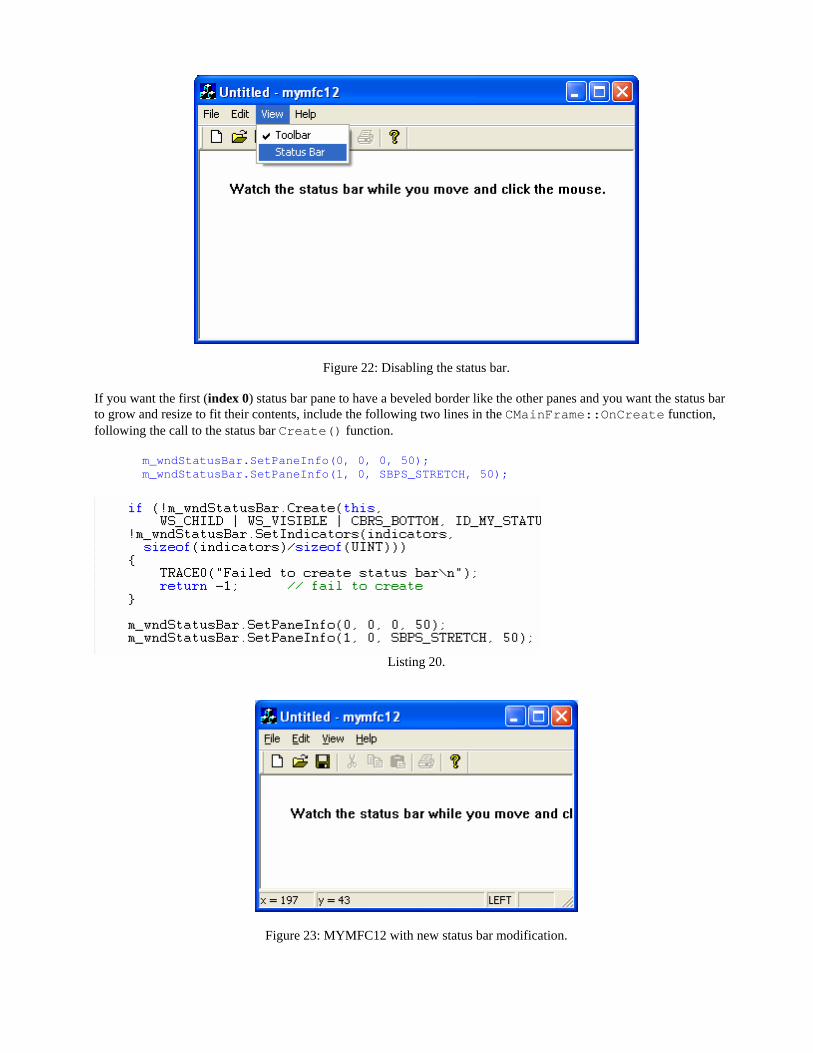
Figure 22: Disabling the status bar. If you want the first (index 0) status bar pane to have a beveled border like the other panes and you want the status bar to grow and resize to fit their contents, include the following two lines in the CMainFrame::OnCreate function, following the call to the status bar Create() function.
m_wndStatusBar.SetPaneInfo(0, 0, 0, 50); m_wndStatusBar.SetPaneInfo(1, 0, SBPS_STRETCH, 50);
Listing 20.
Figure 23: MYMFC12 with new status bar modification.
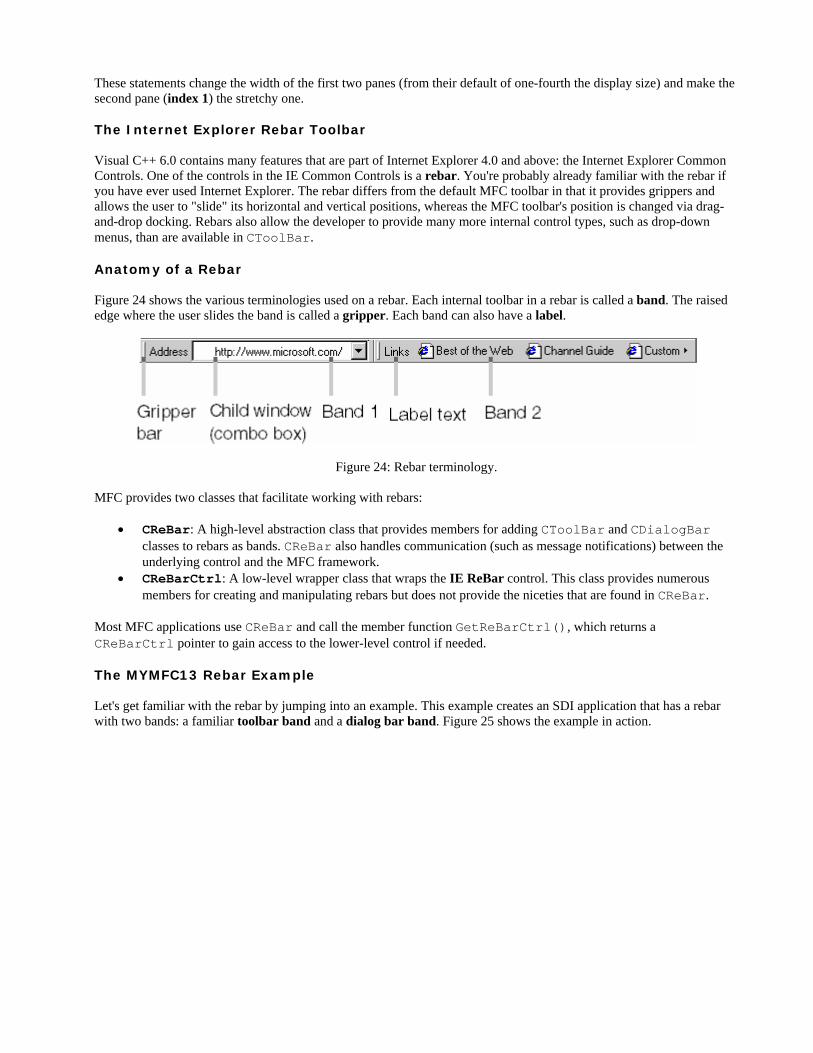
These statements change the width of the first two panes (from their default of one-fourth the display size) and make the second pane (index 1) the stretchy one. The Internet Explorer Rebar Toolbar Visual C++ 6.0 contains many features that are part of Internet Explorer 4.0 and above: the Internet Explorer Common Controls. One of the controls in the IE Common Controls is a rebar. You're probably already familiar with the rebar if you have ever used Internet Explorer. The rebar differs from the default MFC toolbar in that it provides grippers and allows the user to "slide" its horizontal and vertical positions, whereas the MFC toolbar's position is changed via drag-and-drop docking. Rebars also allow the developer to provide many more internal control types, such as drop-down menus, than are available in CToolBar. Anatomy of a Rebar Figure 24 shows the various terminologies used on a rebar. Each internal toolbar in a rebar is called a band. The raised edge where the user slides the band is called a gripper. Each band can also have a label.
Figure 24: Rebar terminology. MFC provides two classes that facilitate working with rebars:
• CReBar: A high-level abstraction class that provides members for adding CToolBar and CDialogBar classes to rebars as bands. CReBar also handles communication (such as message notifications) between the underlying control and the MFC framework.
• CReBarCtrl: A low-level wrapper class that wraps the IE ReBar control. This class provides numerous members for creating and manipulating rebars but does not provide the niceties that are found in CReBar.
Most MFC applications use CReBar and call the member function GetReBarCtrl(), which returns a CReBarCtrl pointer to gain access to the lower-level control if needed. The MYMFC13 Rebar Example Let's get familiar with the rebar by jumping into an example. This example creates an SDI application that has a rebar with two bands: a familiar toolbar band and a dialog bar band. Figure 25 shows the example in action.
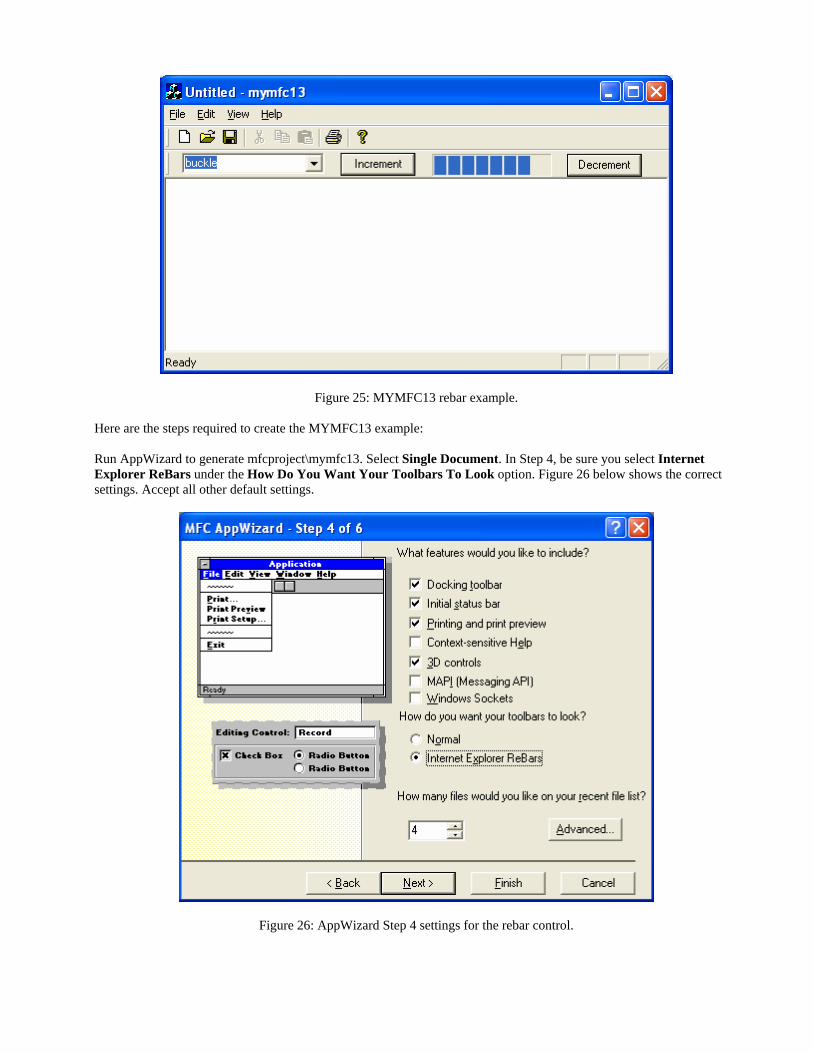
Figure 25: MYMFC13 rebar example. Here are the steps required to create the MYMFC13 example: Run AppWizard to generate mfcproject\mymfc13. Select Single Document. In Step 4, be sure you select Internet Explorer ReBars under the How Do You Want Your Toolbars To Look option. Figure 26 below shows the correct settings. Accept all other default settings.
Figure 26: AppWizard Step 4 settings for the rebar control.

Figure 27: MYMFC13 project summary. Compile and run the application. When you run the application, you will see that AppWizard has automatically created a rebar with two bands. One band contains a conventional toolbar and the other contains the text "TODO: layout dialog bar" in the band. Figure 28 below shows the initial rebar control.
Figure 28: Initial windows for MYMFC13 example with the default rebar controls. At this point, you can open the MainFrm.h header file and see the code below, which declares the CReBar data member m_ndReBar.
protected: // control bar embedded members
CStatusBar m_wndStatusBar; CToolBar m_wndToolBar; CReBar m_wndReBar; CDialogBar m_wndDlgBar;
Listing 21. In the MainFrm.cpp file, you can see the code that adds the toolbar and the dialog bar to the CReBar object: if (!m_wndReBar.Create(this) || !m_wndReBar.AddBar(&m_wndToolBar) || !m_wndReBar.AddBar(&m_wndDlgBar)) { TRACE0("Failed to create rebar\n"); return -1; // fail to create }
Listing 22. Lay out the Dialog Bar. Open the Visual C++ resource editor. Under the Dialog heading you'll find a dialog resource for the dialog bar with the ID IDR_MAINFRAME. Open IDR_MAINFRAME and you'll see the dialog bar with the text "TODO: layout dialog bar" as shown below.
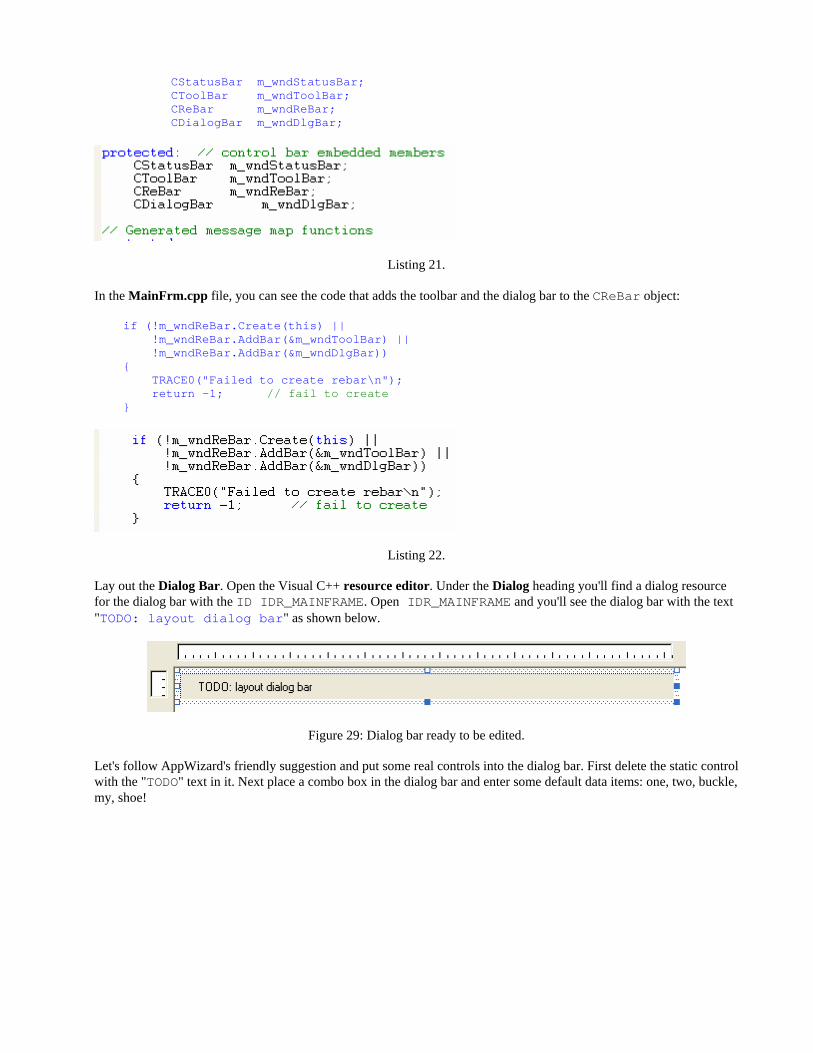
Figure 29: Dialog bar ready to be edited. Let's follow AppWizard's friendly suggestion and put some real controls into the dialog bar. First delete the static control with the "TODO" text in it. Next place a combo box in the dialog bar and enter some default data items: one, two, buckle, my, shoe!
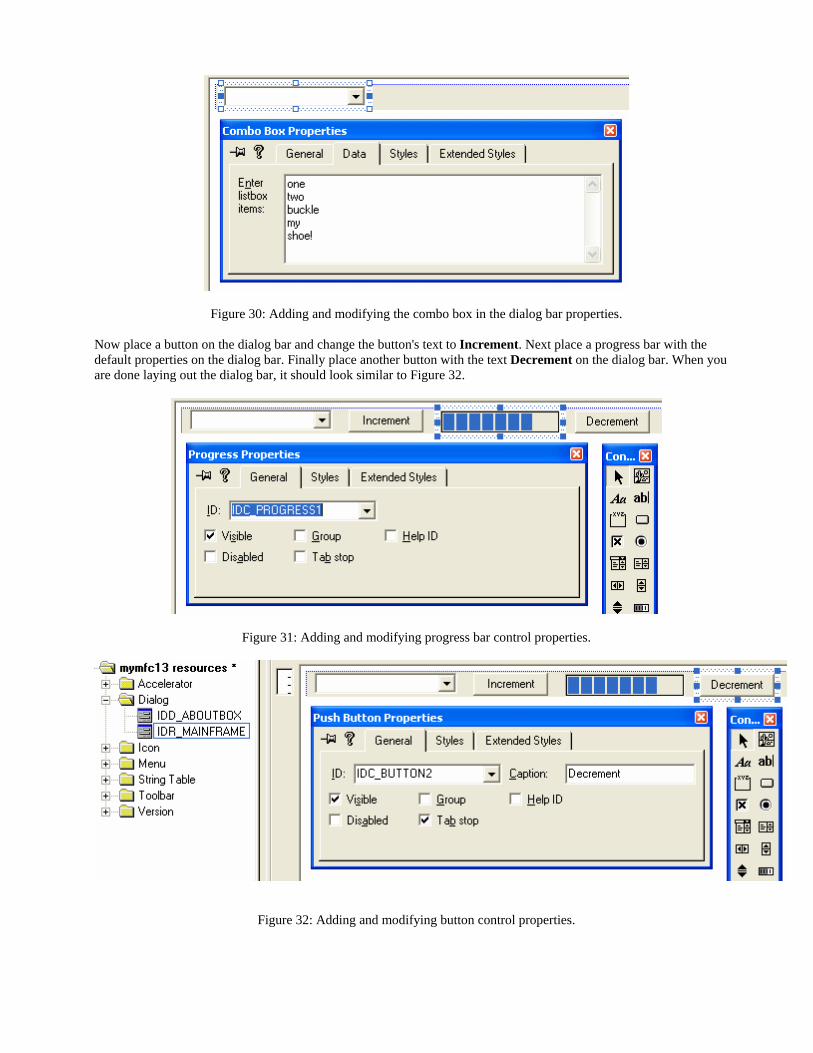
Figure 30: Adding and modifying the combo box in the dialog bar properties. Now place a button on the dialog bar and change the button's text to Increment. Next place a progress bar with the default properties on the dialog bar. Finally place another button with the text Decrement on the dialog bar. When you are done laying out the dialog bar, it should look similar to Figure 32.
Figure 31: Adding and modifying progress bar control properties.
Figure 32: Adding and modifying button control properties.

Associate the dialog bar with the CMainFrame class. Before we can program the handlers for the Increment and Decrement buttons, we need to attach the dialog bar to a class using ClassWizard. While in the resource editor, bring up ClassWizard by double-clicking on the Increment button. You will now see this dialog.
Figure 34: New class dialog prompt for IDR_NAINFRAME. Choose Select An Existing Class. We choose this option because we want our dialog resource to be a band in the toolbar, not a separate dialog class. Click OK and you will see these choices.
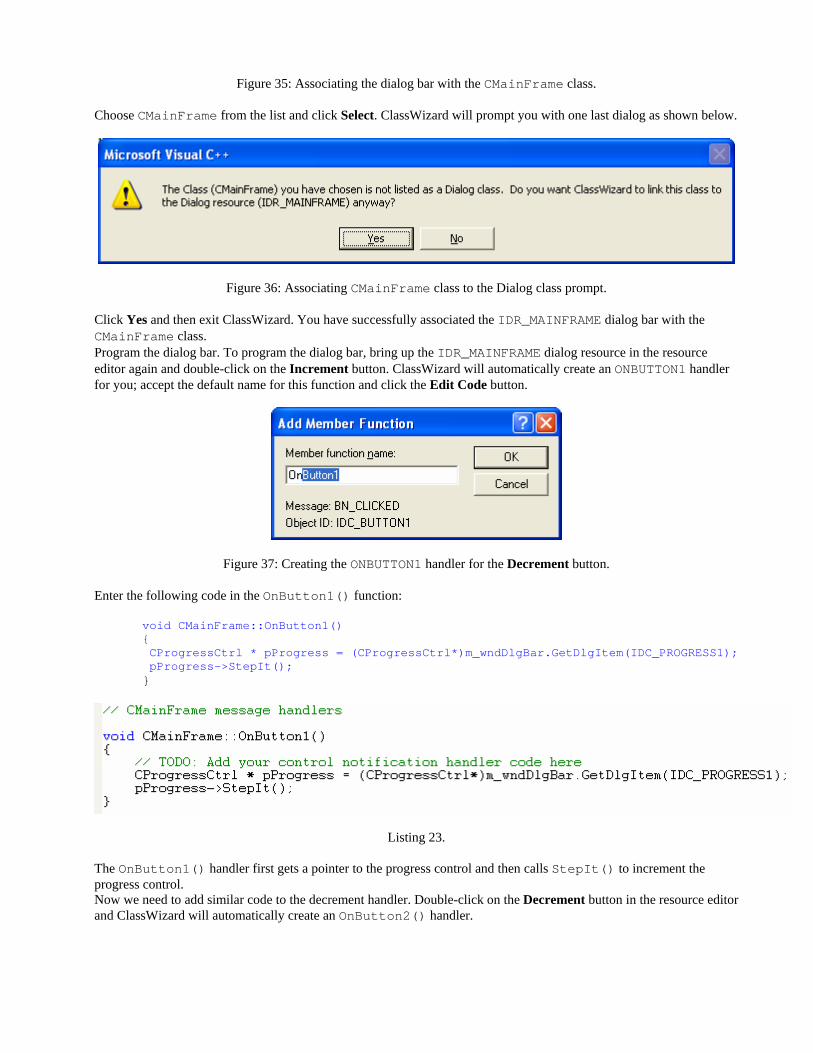
Figure 35: Associating the dialog bar with the CMainFrame class. Choose CMainFrame from the list and click Select. ClassWizard will prompt you with one last dialog as shown below.
Figure 36: Associating CMainFrame class to the Dialog class prompt. Click Yes and then exit ClassWizard. You have successfully associated the IDR_MAINFRAME dialog bar with the CMainFrame class. Program the dialog bar. To program the dialog bar, bring up the IDR_MAINFRAME dialog resource in the resource editor again and double-click on the Increment button. ClassWizard will automatically create an ONBUTTON1 handler for you; accept the default name for this function and click the Edit Code button.
Figure 37: Creating the ONBUTTON1 handler for the Decrement button. Enter the following code in the OnButton1() function:
void CMainFrame::OnButton1() { CProgressCtrl * pProgress = (CProgressCtrl*)m_wndDlgBar.GetDlgItem(IDC_PROGRESS1); pProgress->StepIt(); }
Listing 23. The OnButton1() handler first gets a pointer to the progress control and then calls StepIt() to increment the progress control. Now we need to add similar code to the decrement handler. Double-click on the Decrement button in the resource editor and ClassWizard will automatically create an OnButton2() handler.
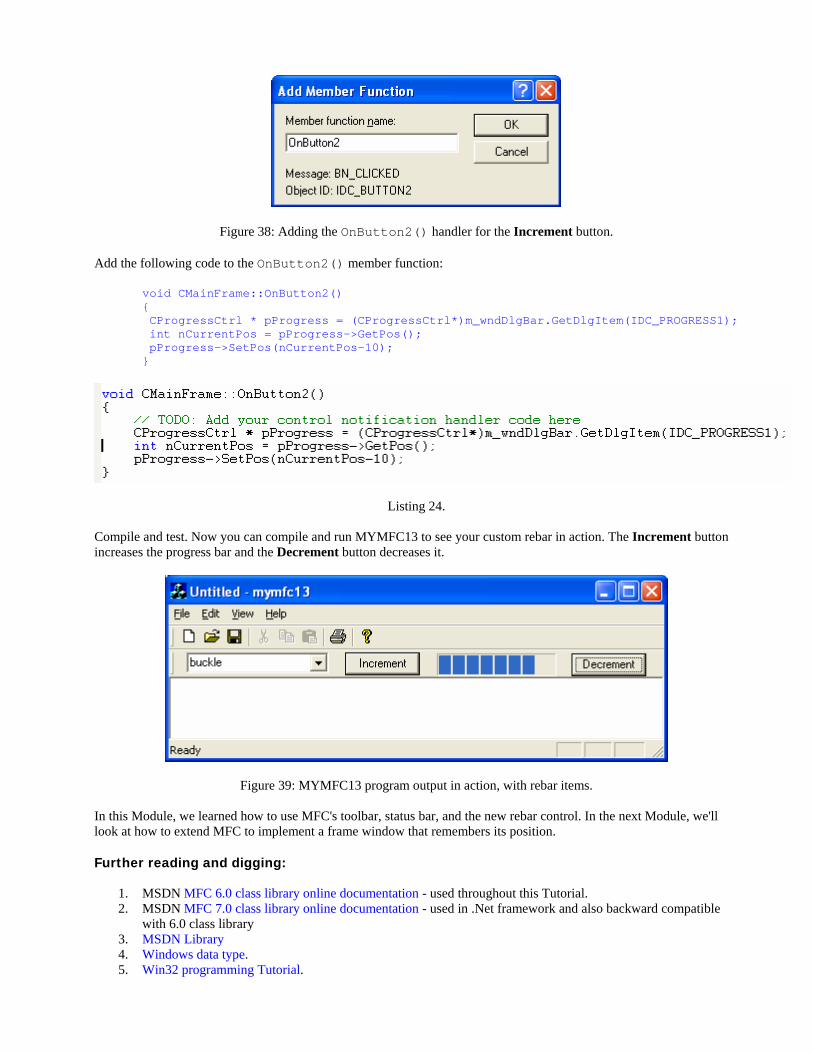
Figure 38: Adding the OnButton2() handler for the Increment button. Add the following code to the OnButton2() member function:
void CMainFrame::OnButton2() { CProgressCtrl * pProgress = (CProgressCtrl*)m_wndDlgBar.GetDlgItem(IDC_PROGRESS1); int nCurrentPos = pProgress->GetPos(); pProgress->SetPos(nCurrentPos-10); }
Listing 24. Compile and test. Now you can compile and run MYMFC13 to see your custom rebar in action. The Increment button increases the progress bar and the Decrement button decreases it.
Figure 39: MYMFC13 program output in action, with rebar items. In this Module, we learned how to use MFC's toolbar, status bar, and the new rebar control. In the next Module, we'll look at how to extend MFC to implement a frame window that remembers its position. Further reading and digging:
1. MSDN MFC 6.0 class library online documentation - used throughout this Tutorial. 2. MSDN MFC 7.0 class library online documentation - used in .Net framework and also backward compatible
with 6.0 class library 3. MSDN Library 4. Windows data type. 5. Win32 programming Tutorial.
6. The best of C/C++, MFC, Windows and other related books. 7. Unicode and Multibyte character set: Story and program examples.