Embed Size (px)
Citation preview
Tracheostomy What is a tracheostomy? A tracheostomy is a small opening through the skin into the windpipe (trachea). This opening is called a stoma. A small plastic tube called a tracheostomy (trach) tube is placed through this stoma into the trachea to help your child breathe.
Why does my child need a tracheostomy? A trach provides an airway that bypasses the nose, mouth, and throat. It helps the medical team support
your child’s breathing for a long period of time. A trach may be needed if: - There is a blockage in the breathing passages. - The airway and lungs produce thick mucus that is not easy to remove. - The breathing muscles are weak. - There is a neurological disorder.
What is happening inside? Normally, we breathe through the nose and mouth so that the air is warmed and moistened before it goes down the windpipe to the lungs. With a trach, air goes directly from the windpipe into the lungs. There is no cleaning, warming, or moistening. With the proper equipment and training about trach care, your child will be able to adjust. You will learn 5 main steps for giving safe, effective trach care to your child. These include caring for skin and stoma, adding moisture to the trach air (humidity system), suctioning mucus, changing the trach tube, and emergency care. You will also learn how to do CPR (cardiopulmonary resuscitation).
Suctioning a Tracheostomy
The upper airway warms, cleans and moistens the air we breathe. Because the trach tube is below the
upper airway, the air your child breathes is cooler, drier and not as clean. In response to this, the
breathing tubes make more mucus. The trach tube is suctioned to remove the mucus from the tube. A
child is usually suctioned every 4 to 6 hours and as needed. There may be large amounts of mucus with
a new tracheostomy. This is a normal reaction to the irritation of the tube in the airway. The heavy
secretions should decrease in a few weeks.
While a child is in the hospital, suctioning is done using sterile technique. Clean technique is usually
recommended for children at home. If your child has frequent respiratory infections, trach care and
suctioning techniques may need to be reviewed. The need for suctioning is different from child to child
and usually increases with respiratory tract infections. Try to avoid suctioning your child too frequently.
Frequent suctioning might produce more secretions.
Care Techniques Sterile Technique: sterile catheters and sterile gloves Modified Sterile Technique: sterile catheters and clean gloves Clean Technique: clean catheter and clean hands The size of the suction catheter depends on the size of the tracheostomy tube. Size 6, 8 or 10 French
(Fr) are typical sizes for neonatal and pediatric trach tubes (the larger the number, the larger the size
of the suction catheter). Your provider will recommend the catheter size.
Suction Depths
Shallow Suctioning: Suction secretions at the opening of the trach tube that the child has coughed up.
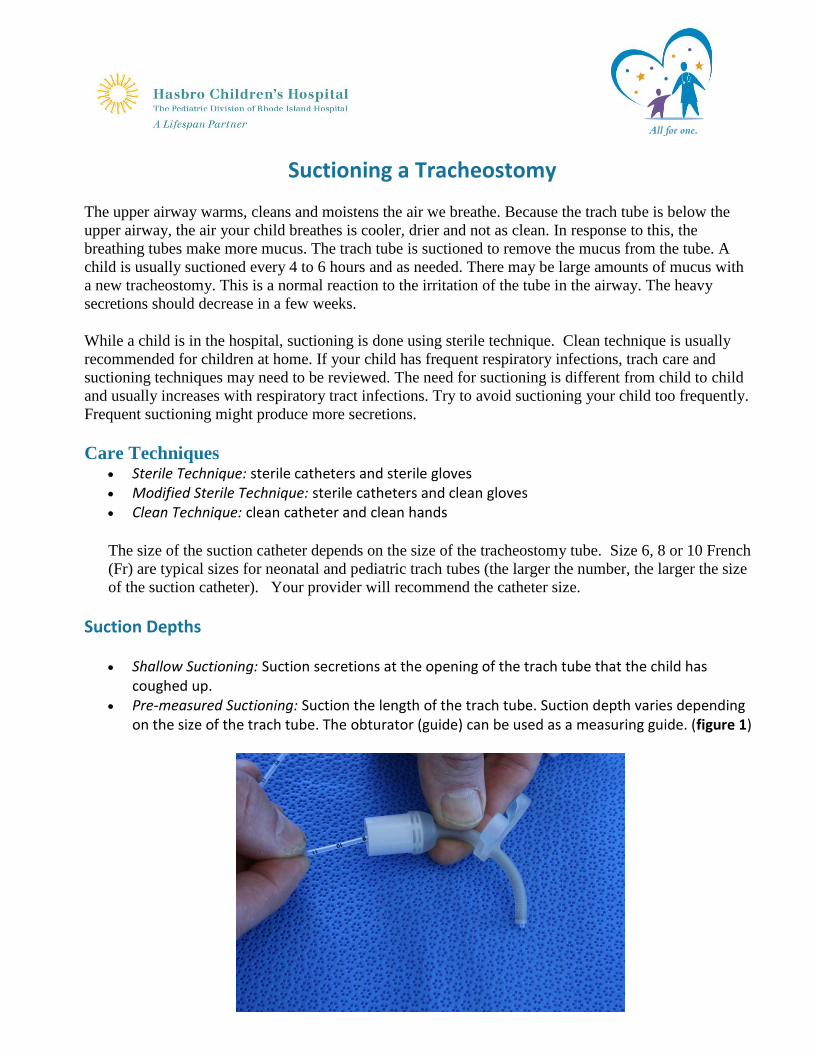
Pre-measured Suctioning: Suction the length of the trach tube. Suction depth varies depending on the size of the trach tube. The obturator (guide) can be used as a measuring guide. (figure 1)
Signs That a Child Needs Suctioning
Rattling mucus sounds from the trach Fast breathing Bubbles of mucus in trach opening Dry raspy breathing or a whistling noise from trach Older children may vocalize or signal a need to be suctioned. Signs of respiratory distress under Tracheostomy Complications
Equipment
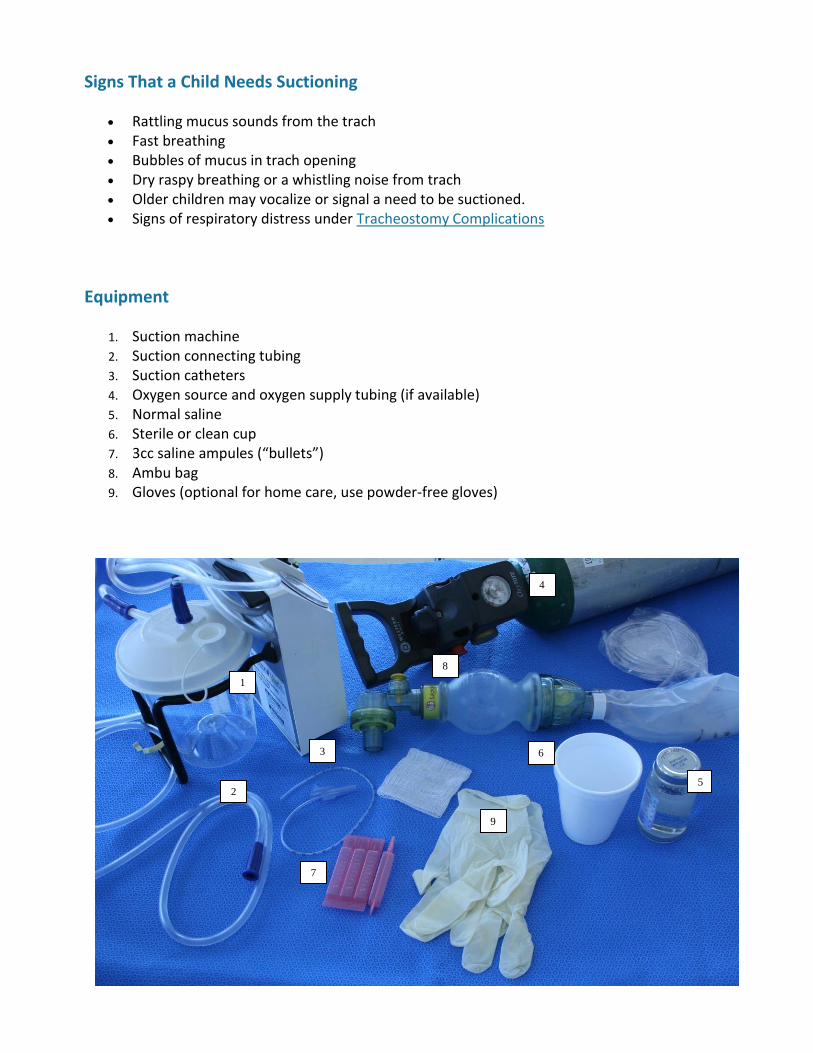
1. Suction machine 2. Suction connecting tubing 3. Suction catheters 4. Oxygen source and oxygen supply tubing (if available) 5. Normal saline 6. Sterile or clean cup 7. 3cc saline ampules (“bullets”) 8. Ambu bag 9. Gloves (optional for home care, use powder-free gloves)
6
5
8
9
7
4
3
2
1
Suctioning a Tracheostomy Procedure
Explain procedure in a way that your child will understand. Gather supplies and clean and clear the work area. Wash your hands. Set up equipment and connect suction catheter to the suction machine tubing. Pour normal saline into cup. Put on gloves (optional). Turn on suction machine (suction machine pressure for small children 80-100mm Hg, for older
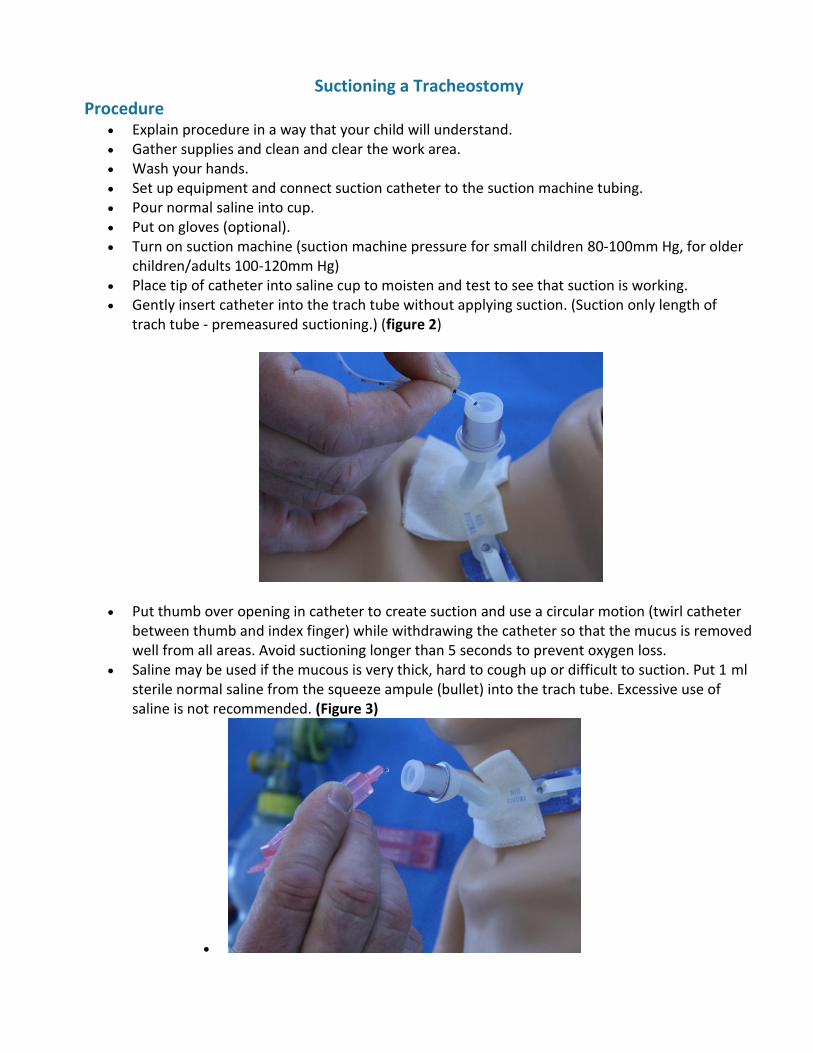
children/adults 100-120mm Hg) Place tip of catheter into saline cup to moisten and test to see that suction is working. Gently insert catheter into the trach tube without applying suction. (Suction only length of
trach tube - premeasured suctioning.) (figure 2)
Put thumb over opening in catheter to create suction and use a circular motion (twirl catheter between thumb and index finger) while withdrawing the catheter so that the mucus is removed well from all areas. Avoid suctioning longer than 5 seconds to prevent oxygen loss.
Saline may be used if the mucous is very thick, hard to cough up or difficult to suction. Put 1 ml sterile normal saline from the squeeze ampule (bullet) into the trach tube. Excessive use of saline is not recommended. (Figure 3)
Draw water from cup through catheter to clear catheter. For trach tubes with cuffs, it may be necessary to deflate the cuff periodically for suctioning to
prevent pooling of secretions above the trach cuff. Let your child rest and breath, then repeat suction if needed until clear (allow at least 30
seconds between suctioning passes). Oxygenate as ordered (extra oxygen may be given before and after suction to prevent low
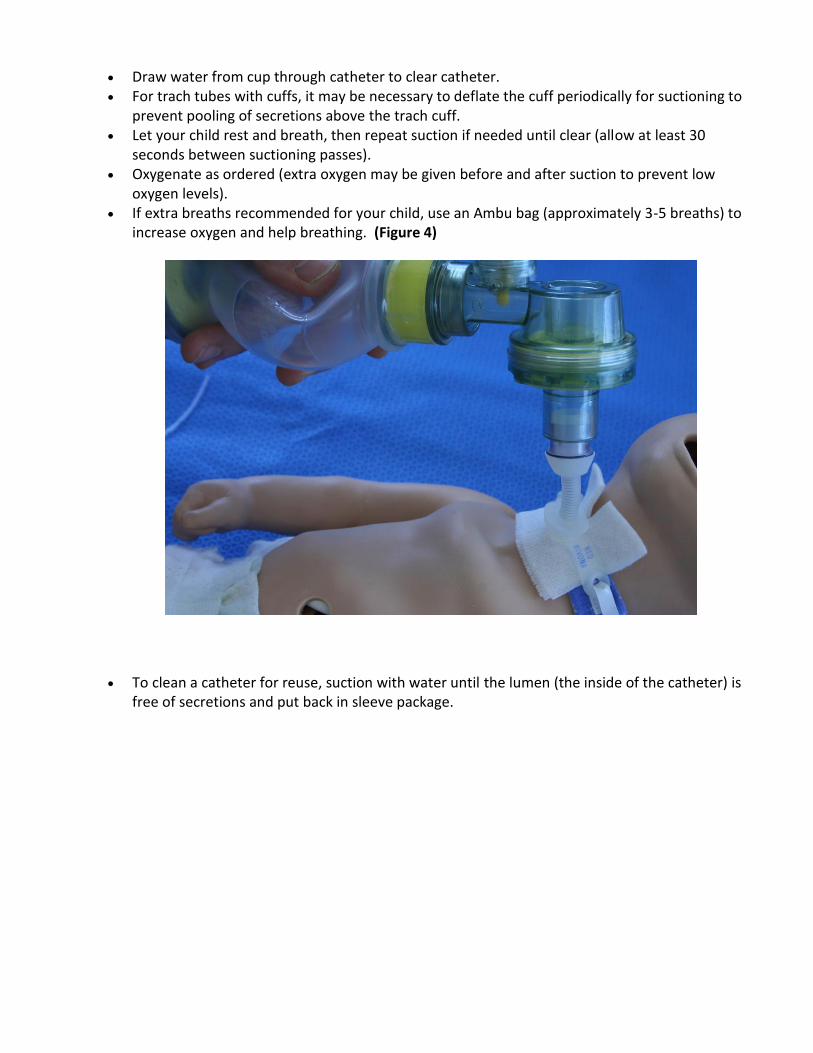
oxygen levels). If extra breaths recommended for your child, use an Ambu bag (approximately 3-5 breaths) to
increase oxygen and help breathing. (Figure 4)
To clean a catheter for reuse, suction with water until the lumen (the inside of the catheter) is free of secretions and put back in sleeve package.
Tracheostomy Care
Rubbing of the trach tube and build-up of secretions can irritate the skin around the stoma. Daily care of the trach site is needed to prevent infection and skin breakdown under the tracheostomy tube and ties. Care should be done at least twice a day; more often if needed. Children with new trachs or children on ventilators may need trach care more often. Tracheostomy dressings are used if there is drainage from the site or irritation from the tube rubbing on the skin.
It may be helpful to set up a designated spot in your home for equipment and routine tracheostomy care.
Procedure Wash your hands. Explain the procedure in a way that your child will understand. Lay your child in a comfortable position on his/her back with a small blanket or towel roll under
his/her shoulders to extend the neck. This position makes it easier to see the trach and do care.
Open Q-tips, trach gauze and regular gauze. If trach ties are to be changed, cut the new ties to the appropriate length. Pour sterile water into one cup. If 1/2 strength hydrogen peroxide is used, pour equal amounts of sterile water and hydrogen
peroxide into another cup. Clean the skin around the trach tube with Q-tips dampened in sterile water. Using a rolling
motion, work from the center outward using 4 swabs, one for each quarter around the stoma and under the flange of the tube. Do not allow any liquid to get into trach tube or stoma area under the tube.
To remove sticky, encrusted secretions, use Q-tip dampened in 1/2 strength hydrogen peroxide.
If ½ strength hydrogen peroxide was used rinse the area with Q-tip dampened in sterile water.
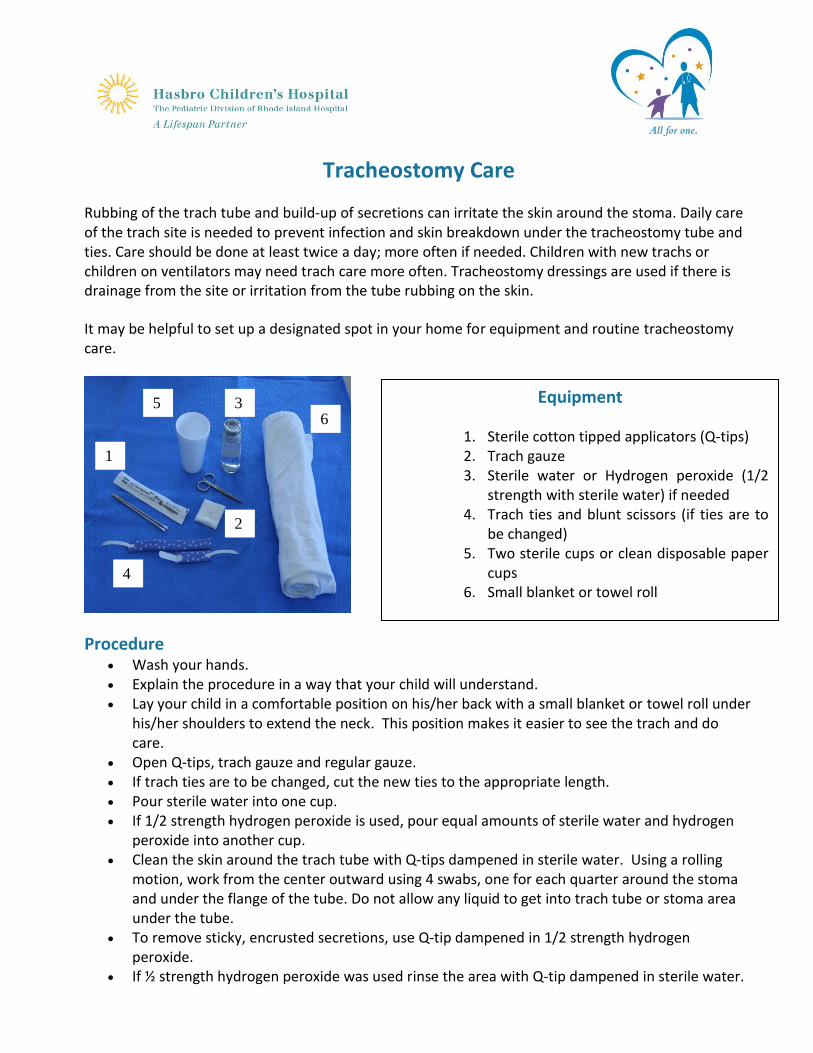
Equipment
1. Sterile cotton tipped applicators (Q-tips) 2. Trach gauze 3. Sterile water or Hydrogen peroxide (1/2
strength with sterile water) if needed 4. Trach ties and blunt scissors (if ties are to
be changed) 5. Two sterile cups or clean disposable paper
cups 6. Small blanket or towel roll
1
2
4
3 5 6
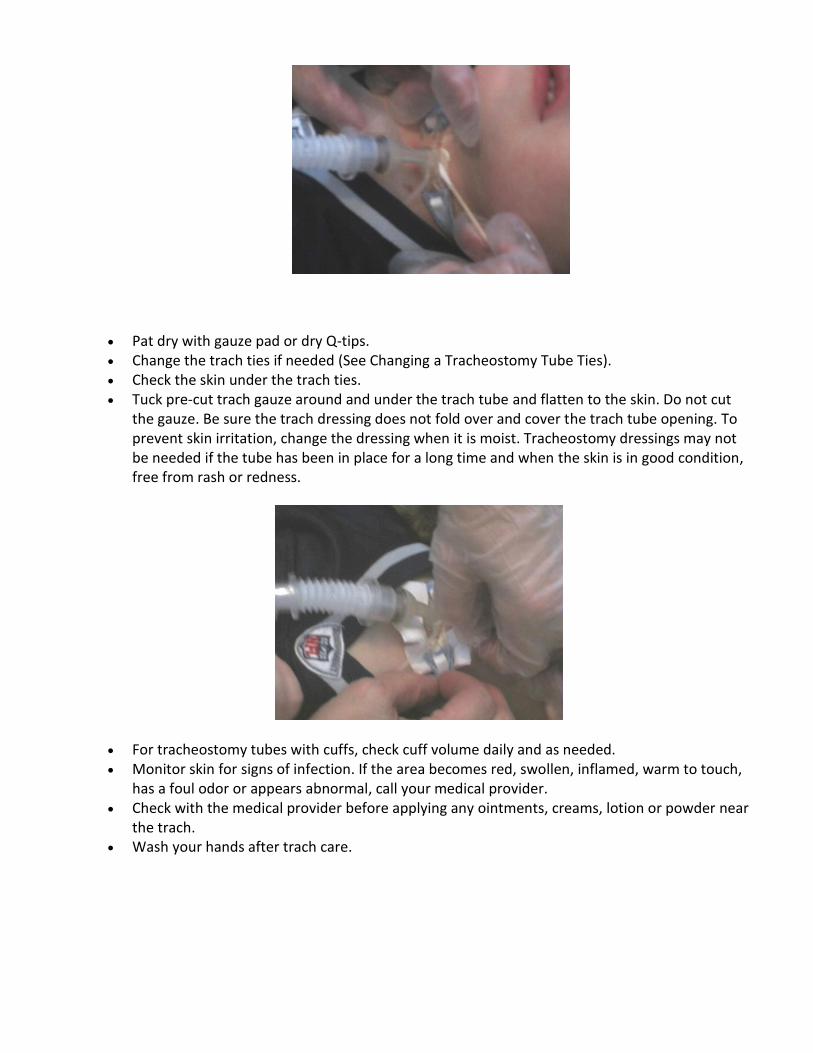
Pat dry with gauze pad or dry Q-tips. Change the trach ties if needed (See Changing a Tracheostomy Tube Ties). Check the skin under the trach ties. Tuck pre-cut trach gauze around and under the trach tube and flatten to the skin. Do not cut
the gauze. Be sure the trach dressing does not fold over and cover the trach tube opening. To prevent skin irritation, change the dressing when it is moist. Tracheostomy dressings may not be needed if the tube has been in place for a long time and when the skin is in good condition, free from rash or redness.
For tracheostomy tubes with cuffs, check cuff volume daily and as needed. Monitor skin for signs of infection. If the area becomes red, swollen, inflamed, warm to touch,
has a foul odor or appears abnormal, call your medical provider. Check with the medical provider before applying any ointments, creams, lotion or powder near
the trach. Wash your hands after trach care.
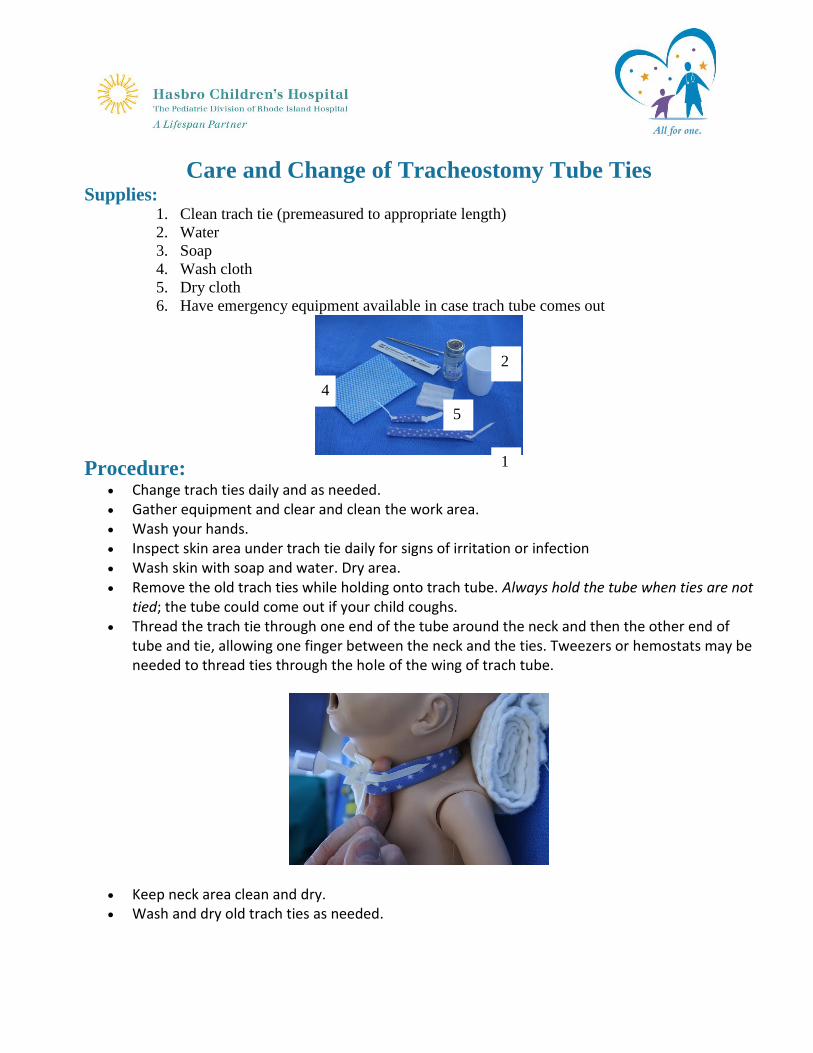
Care and Change of Tracheostomy Tube Ties Supplies:
1. Clean trach tie (premeasured to appropriate length)
2. Water
3. Soap
4. Wash cloth
5. Dry cloth
6. Have emergency equipment available in case trach tube comes out
Procedure:
Change trach ties daily and as needed. Gather equipment and clear and clean the work area. Wash your hands. Inspect skin area under trach tie daily for signs of irritation or infection Wash skin with soap and water. Dry area. Remove the old trach ties while holding onto trach tube. Always hold the tube when ties are not
tied; the tube could come out if your child coughs. Thread the trach tie through one end of the tube around the neck and then the other end of
tube and tie, allowing one finger between the neck and the ties. Tweezers or hemostats may be needed to thread ties through the hole of the wing of trach tube.
Keep neck area clean and dry. Wash and dry old trach ties as needed.
2
1
4
5
Changing the Tracheostomy Tube
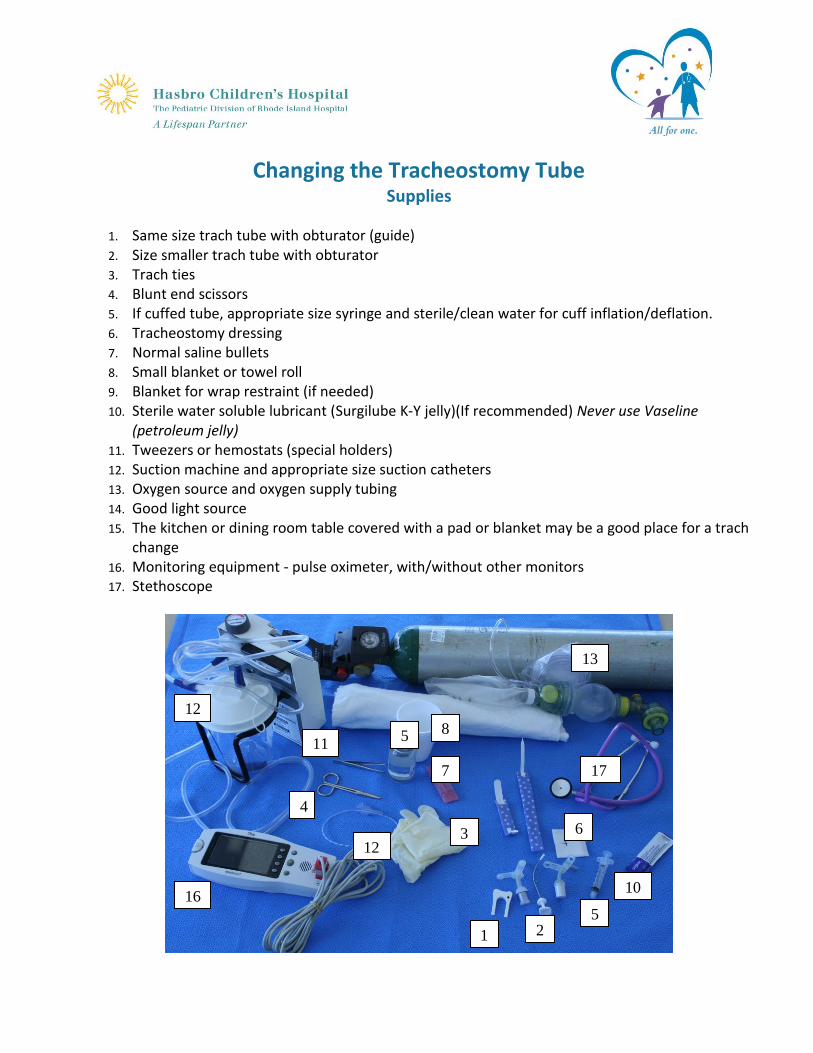
Supplies
1. Same size trach tube with obturator (guide) 2. Size smaller trach tube with obturator 3. Trach ties 4. Blunt end scissors 5. If cuffed tube, appropriate size syringe and sterile/clean water for cuff inflation/deflation. 6. Tracheostomy dressing 7. Normal saline bullets 8. Small blanket or towel roll 9. Blanket for wrap restraint (if needed) 10. Sterile water soluble lubricant (Surgilube K-Y jelly)(If recommended) Never use Vaseline
(petroleum jelly) 11. Tweezers or hemostats (special holders) 12. Suction machine and appropriate size suction catheters 13. Oxygen source and oxygen supply tubing 14. Good light source 15. The kitchen or dining room table covered with a pad or blanket may be a good place for a trach
change 16. Monitoring equipment - pulse oximeter, with/without other monitors 17. Stethoscope
1 2
3
10
8
7
6
5
4
12
17
16
13
12
11 5
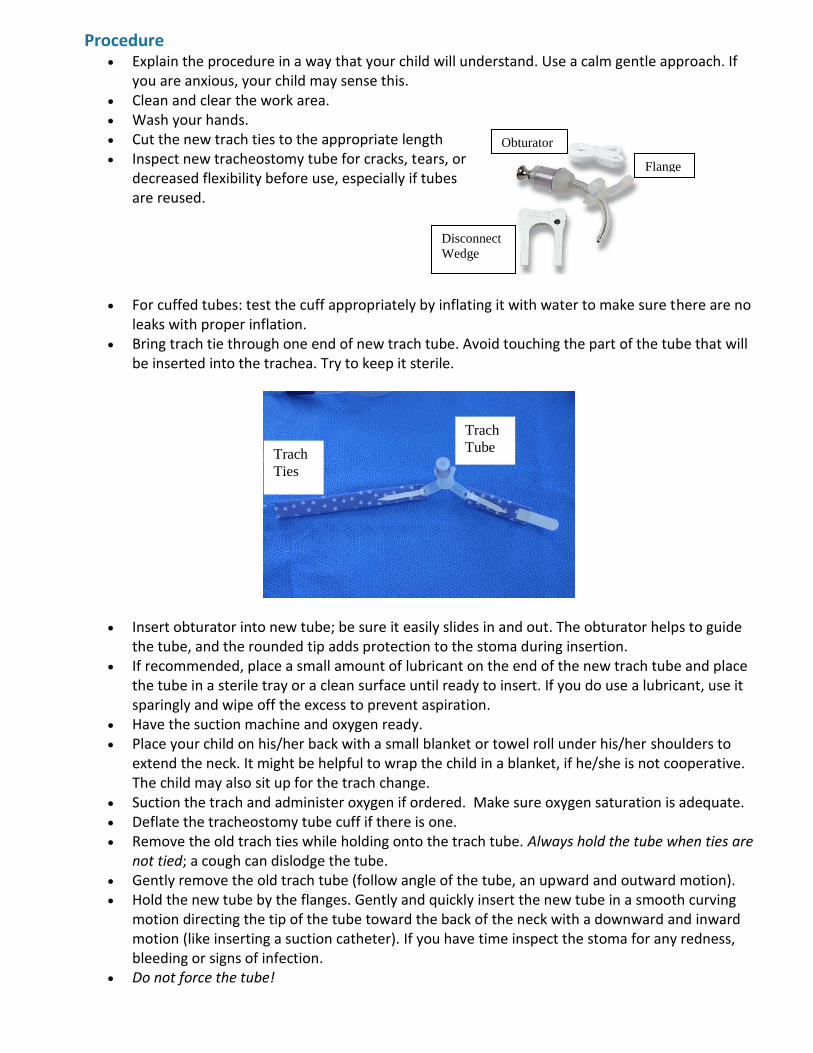
Procedure Explain the procedure in a way that your child will understand. Use a calm gentle approach. If
you are anxious, your child may sense this. Clean and clear the work area. Wash your hands. Cut the new trach ties to the appropriate length Inspect new tracheostomy tube for cracks, tears, or
decreased flexibility before use, especially if tubes are reused.
For cuffed tubes: test the cuff appropriately by inflating it with water to make sure there are no
leaks with proper inflation. Bring trach tie through one end of new trach tube. Avoid touching the part of the tube that will
be inserted into the trachea. Try to keep it sterile.
Insert obturator into new tube; be sure it easily slides in and out. The obturator helps to guide the tube, and the rounded tip adds protection to the stoma during insertion.
If recommended, place a small amount of lubricant on the end of the new trach tube and place the tube in a sterile tray or a clean surface until ready to insert. If you do use a lubricant, use it sparingly and wipe off the excess to prevent aspiration.
Have the suction machine and oxygen ready. Place your child on his/her back with a small blanket or towel roll under his/her shoulders to
extend the neck. It might be helpful to wrap the child in a blanket, if he/she is not cooperative. The child may also sit up for the trach change.
Suction the trach and administer oxygen if ordered. Make sure oxygen saturation is adequate. Deflate the tracheostomy tube cuff if there is one. Remove the old trach ties while holding onto the trach tube. Always hold the tube when ties are
not tied; a cough can dislodge the tube. Gently remove the old trach tube (follow angle of the tube, an upward and outward motion). Hold the new tube by the flanges. Gently and quickly insert the new tube in a smooth curving
motion directing the tip of the tube toward the back of the neck with a downward and inward motion (like inserting a suction catheter). If you have time inspect the stoma for any redness, bleeding or signs of infection.
Do not force the tube!
Flange
Obturator
Disconnect
Wedge
Trach
Ties
Trach
Tube
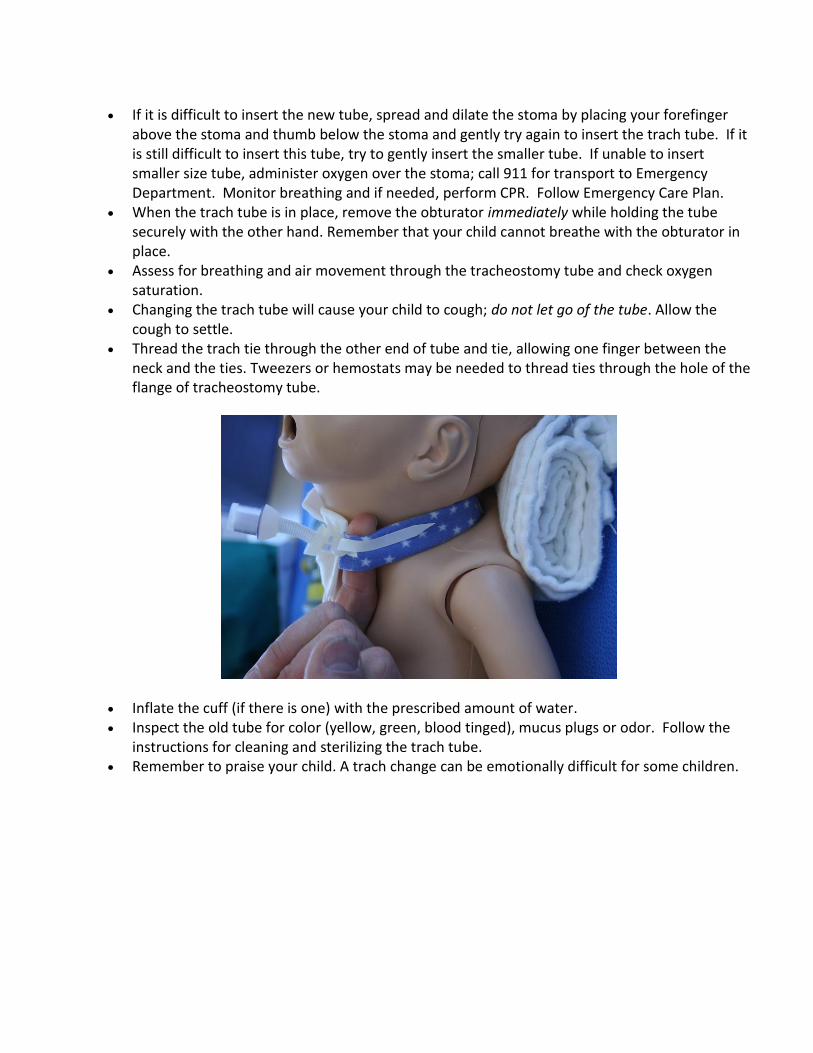
If it is difficult to insert the new tube, spread and dilate the stoma by placing your forefinger above the stoma and thumb below the stoma and gently try again to insert the trach tube. If it is still difficult to insert this tube, try to gently insert the smaller tube. If unable to insert smaller size tube, administer oxygen over the stoma; call 911 for transport to Emergency Department. Monitor breathing and if needed, perform CPR. Follow Emergency Care Plan.
When the trach tube is in place, remove the obturator immediately while holding the tube securely with the other hand. Remember that your child cannot breathe with the obturator in place.
Assess for breathing and air movement through the tracheostomy tube and check oxygen saturation.
Changing the trach tube will cause your child to cough; do not let go of the tube. Allow the cough to settle.
Thread the trach tie through the other end of tube and tie, allowing one finger between the neck and the ties. Tweezers or hemostats may be needed to thread ties through the hole of the flange of tracheostomy tube.
Inflate the cuff (if there is one) with the prescribed amount of water. Inspect the old tube for color (yellow, green, blood tinged), mucus plugs or odor. Follow the
instructions for cleaning and sterilizing the trach tube. Remember to praise your child. A trach change can be emotionally difficult for some children.
Humidification
The nose and mouth provide warmth, filtering and moisture for the air we breathe. A tracheostomy tube by-passes these structures. Humidification must be provided to keep secretions thin and to avoid mucus plugs. Children with tracheostomies do best in an environment of 50% humidity or higher.
Equipment
Aerosol tubing Trach mask or mist collar Sterile water Saline ampules (“bullets”) Heat Moisture Exchanger (HME) also known by several other terms including: Thermal
Humidifying Filters, Swedish nose, Artificial nose, Filter, Thermovent T. Room humidifiers
Humidity should be delivered while sleeping. Place a mist collar (trach mask) over the trach. Attach aerosol tubing to the collar on one end and to the nebulizer bottle and air compressor on the other end. Sterile water goes into the nebulizer bottle (do not overfill, note line guide). Oxygen can also be delivered with the mist collar if needed.
Heated mist may be ordered. Make sure the bottle does not go dry, as the heating element could
melt and this could be a potential fire hazard. More moisture will accumulate in the aerosol tubing with heated mist.
Moisture needs to be removed frequently from the tubing to prevent blocking the tube and/or
accidental aspiration. To remove fluid, disconnect the tubing at the trach end, empty into a container and discard. Do not drain fluid into the humidifying unit.
Fluid traps (or drainage bags) are helpful in preventing blocking and aspiration. Empty frequently.
Position the air compressor and tubing lower than the child to help prevent aspiration from moisture in the tubing. A mist collar can also be worn during the day when mucus is thick or blood tinged.
Sterile saline drops can be instilled into the trach tube if secretions become thick and difficult to suction. A saline nebulizer treatment is also helpful to loosen secretions if the child has a nebulizer machine.
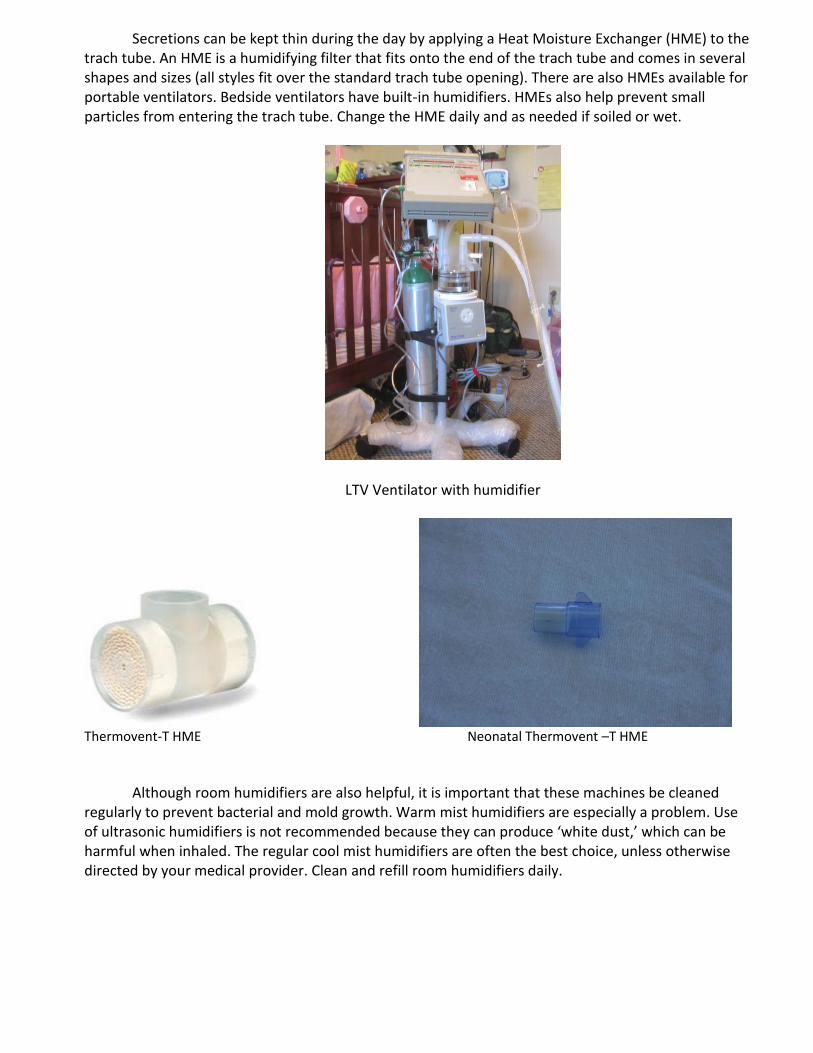
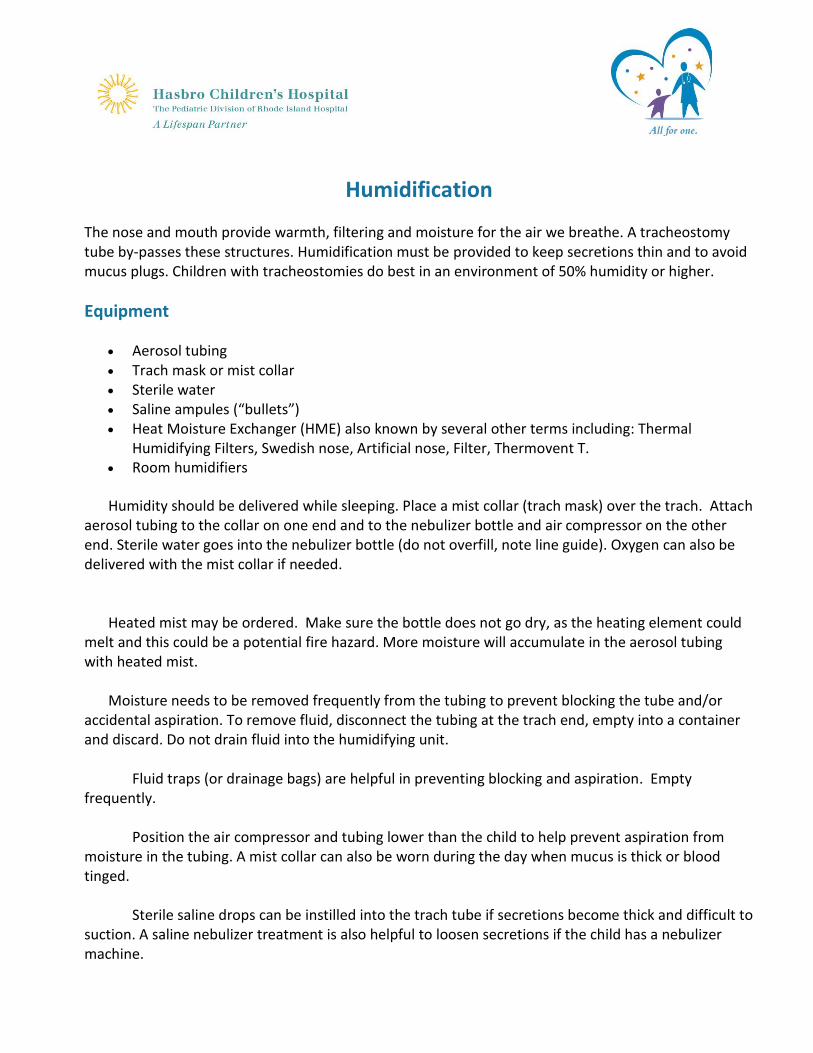
Secretions can be kept thin during the day by applying a Heat Moisture Exchanger (HME) to the trach tube. An HME is a humidifying filter that fits onto the end of the trach tube and comes in several shapes and sizes (all styles fit over the standard trach tube opening). There are also HMEs available for portable ventilators. Bedside ventilators have built-in humidifiers. HMEs also help prevent small particles from entering the trach tube. Change the HME daily and as needed if soiled or wet.
LTV Ventilator with humidifier
Thermovent-T HME Neonatal Thermovent –T HME
Although room humidifiers are also helpful, it is important that these machines be cleaned
regularly to prevent bacterial and mold growth. Warm mist humidifiers are especially a problem. Use of ultrasonic humidifiers is not recommended because they can produce ‘white dust,’ which can be harmful when inhaled. The regular cool mist humidifiers are often the best choice, unless otherwise directed by your medical provider. Clean and refill room humidifiers daily.
Travel Bag for the Child with a Tracheostomy
Pack a bag to take with you whenever you take your child away from home. Some items are listed here, although the list may change based on your child's needs.
Portable suction machine, connection tubing and suction catheters and Yankauer (oral) suction catheters. Keep portable suction machine plugged in whenever possible to preserve battery charge. You may want to keep a suction catheter attached to machine for quick use if needed. Keep the suction catheter inside the packaging for cleanliness.
Same size trach tube and one size smaller with obturator and ties (you may want to keep ties in place to save time in an emergency)
Saline bullets Normal saline in a screw top bottle Lubricant (not petroleum based) Blunt-nosed scissors Tweezers or hemostats (special holder) Syringes Trach tube ties Gloves Spare swivel adapter or extension tubing MDI holding chamber (if prescribed) MDI medications (if prescribed) HME Stethoscope Manual resuscitator (Ambu bag) Extra trach filters (HME) Tissues Shoulder roll Dressing supplies if needed Hand sanitizer (alcohol gel or foam) List of emergency phone numbers Note with child’s brief medical history , Respiratory Care Plan and Emergency Care Plan List of Medications Other supplies
Oxygen if ordered Pulse oximeter and probe Mobile phone
Addition supplies for Child with Tracheostomy and Ventilator External battery for ventilator and/or car adaptor Spare PEEP valve
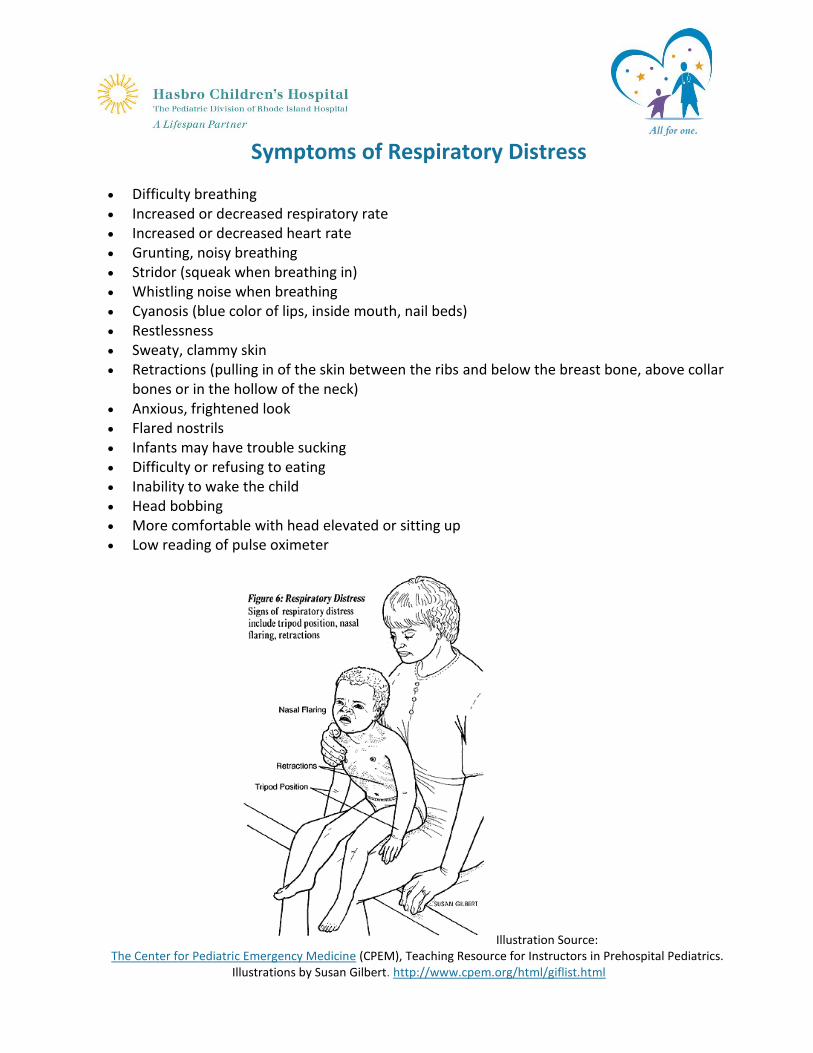
Symptoms of Respiratory Distress
Difficulty breathing Increased or decreased respiratory rate Increased or decreased heart rate Grunting, noisy breathing Stridor (squeak when breathing in) Whistling noise when breathing Cyanosis (blue color of lips, inside mouth, nail beds) Restlessness Sweaty, clammy skin Retractions (pulling in of the skin between the ribs and below the breast bone, above collar
bones or in the hollow of the neck) Anxious, frightened look Flared nostrils Infants may have trouble sucking Difficulty or refusing to eating Inability to wake the child Head bobbing More comfortable with head elevated or sitting up Low reading of pulse oximeter
Illustration Source: The Center for Pediatric Emergency Medicine (CPEM), Teaching Resource for Instructors in Prehospital Pediatrics.
Illustrations by Susan Gilbert. http://www.cpem.org/html/giflist.html
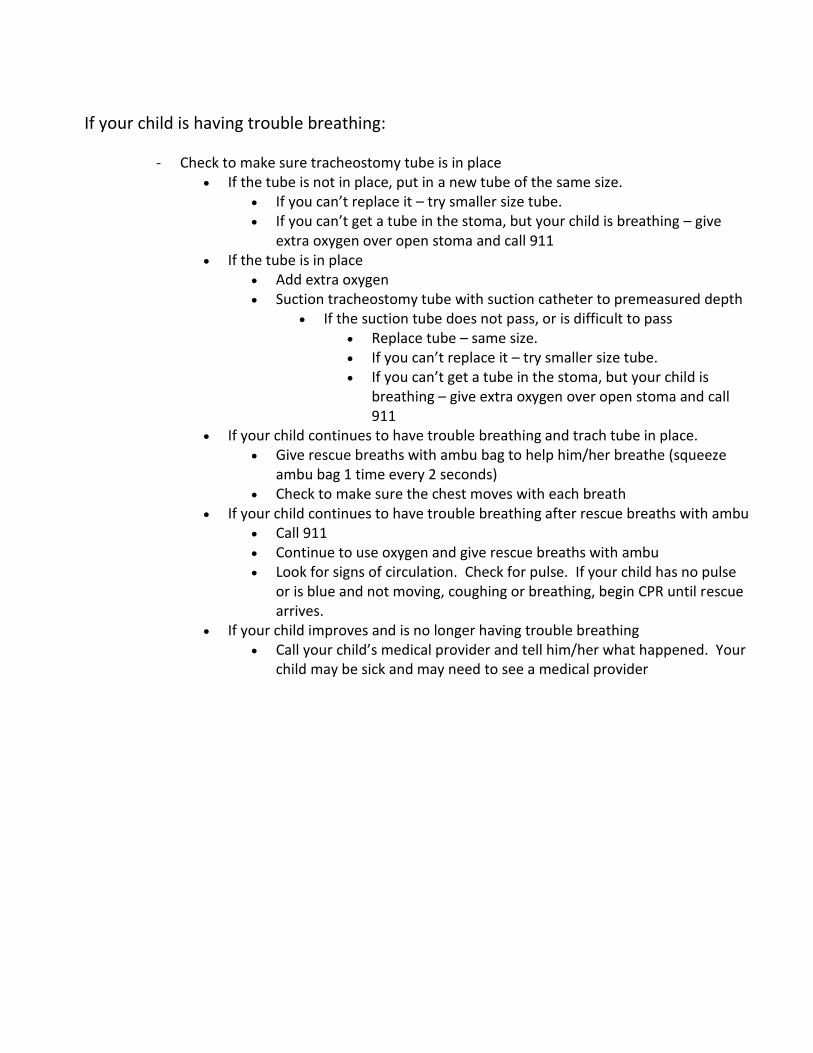
If your child is having trouble breathing:
- Check to make sure tracheostomy tube is in place If the tube is not in place, put in a new tube of the same size.
If you can’t replace it – try smaller size tube. If you can’t get a tube in the stoma, but your child is breathing – give
extra oxygen over open stoma and call 911 If the tube is in place
Add extra oxygen Suction tracheostomy tube with suction catheter to premeasured depth
If the suction tube does not pass, or is difficult to pass Replace tube – same size. If you can’t replace it – try smaller size tube. If you can’t get a tube in the stoma, but your child is
breathing – give extra oxygen over open stoma and call 911
If your child continues to have trouble breathing and trach tube in place. Give rescue breaths with ambu bag to help him/her breathe (squeeze
ambu bag 1 time every 2 seconds) Check to make sure the chest moves with each breath
If your child continues to have trouble breathing after rescue breaths with ambu Call 911 Continue to use oxygen and give rescue breaths with ambu Look for signs of circulation. Check for pulse. If your child has no pulse
or is blue and not moving, coughing or breathing, begin CPR until rescue arrives.
If your child improves and is no longer having trouble breathing Call your child’s medical provider and tell him/her what happened. Your
child may be sick and may need to see a medical provider
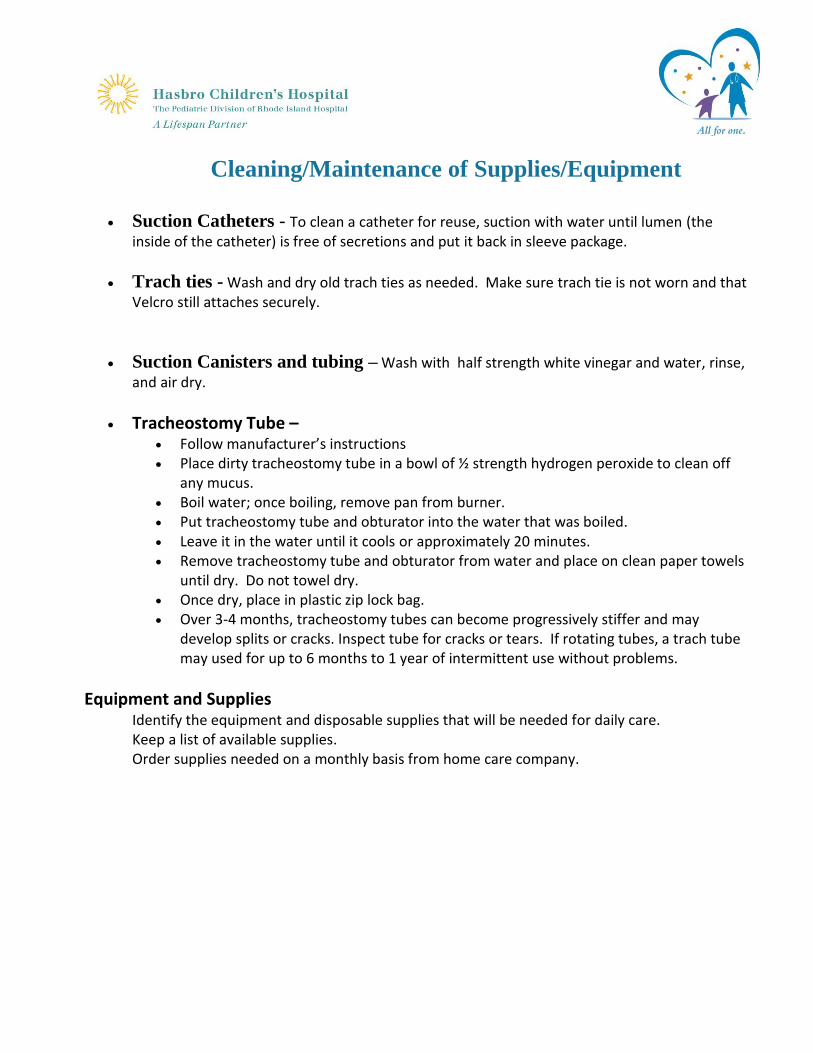
Cleaning/Maintenance of Supplies/Equipment
Suction Catheters - To clean a catheter for reuse, suction with water until lumen (the
inside of the catheter) is free of secretions and put it back in sleeve package.
Trach ties - Wash and dry old trach ties as needed. Make sure trach tie is not worn and that Velcro still attaches securely.
Suction Canisters and tubing – Wash with half strength white vinegar and water, rinse, and air dry.
Tracheostomy Tube – Follow manufacturer’s instructions Place dirty tracheostomy tube in a bowl of ½ strength hydrogen peroxide to clean off
any mucus. Boil water; once boiling, remove pan from burner. Put tracheostomy tube and obturator into the water that was boiled. Leave it in the water until it cools or approximately 20 minutes. Remove tracheostomy tube and obturator from water and place on clean paper towels
until dry. Do not towel dry. Once dry, place in plastic zip lock bag. Over 3-4 months, tracheostomy tubes can become progressively stiffer and may
develop splits or cracks. Inspect tube for cracks or tears. If rotating tubes, a trach tube may used for up to 6 months to 1 year of intermittent use without problems.
Equipment and Supplies Identify the equipment and disposable supplies that will be needed for daily care. Keep a list of available supplies. Order supplies needed on a monthly basis from home care company.
Potential Emergencies and How to Help Your Child
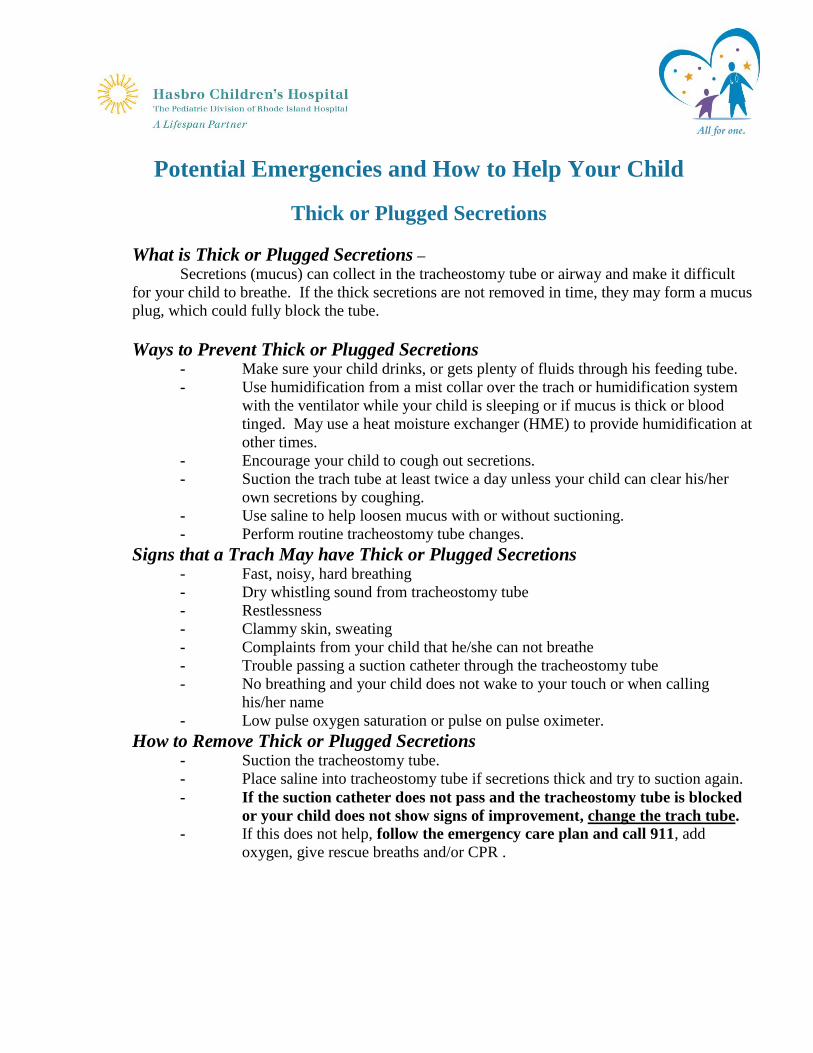
Thick or Plugged Secretions
What is Thick or Plugged Secretions –
Secretions (mucus) can collect in the tracheostomy tube or airway and make it difficult
for your child to breathe. If the thick secretions are not removed in time, they may form a mucus
plug, which could fully block the tube.
Ways to Prevent Thick or Plugged Secretions - Make sure your child drinks, or gets plenty of fluids through his feeding tube.
- Use humidification from a mist collar over the trach or humidification system
with the ventilator while your child is sleeping or if mucus is thick or blood
tinged. May use a heat moisture exchanger (HME) to provide humidification at
other times.
- Encourage your child to cough out secretions.
- Suction the trach tube at least twice a day unless your child can clear his/her
own secretions by coughing.
- Use saline to help loosen mucus with or without suctioning.
- Perform routine tracheostomy tube changes.
Signs that a Trach May have Thick or Plugged Secretions - Fast, noisy, hard breathing
- Dry whistling sound from tracheostomy tube
- Restlessness
- Clammy skin, sweating
- Complaints from your child that he/she can not breathe
- Trouble passing a suction catheter through the tracheostomy tube
- No breathing and your child does not wake to your touch or when calling
his/her name
- Low pulse oxygen saturation or pulse on pulse oximeter.
How to Remove Thick or Plugged Secretions - Suction the tracheostomy tube.
- Place saline into tracheostomy tube if secretions thick and try to suction again.
- If the suction catheter does not pass and the tracheostomy tube is blocked
or your child does not show signs of improvement, change the trach tube.
- If this does not help, follow the emergency care plan and call 911, add
oxygen, give rescue breaths and/or CPR .
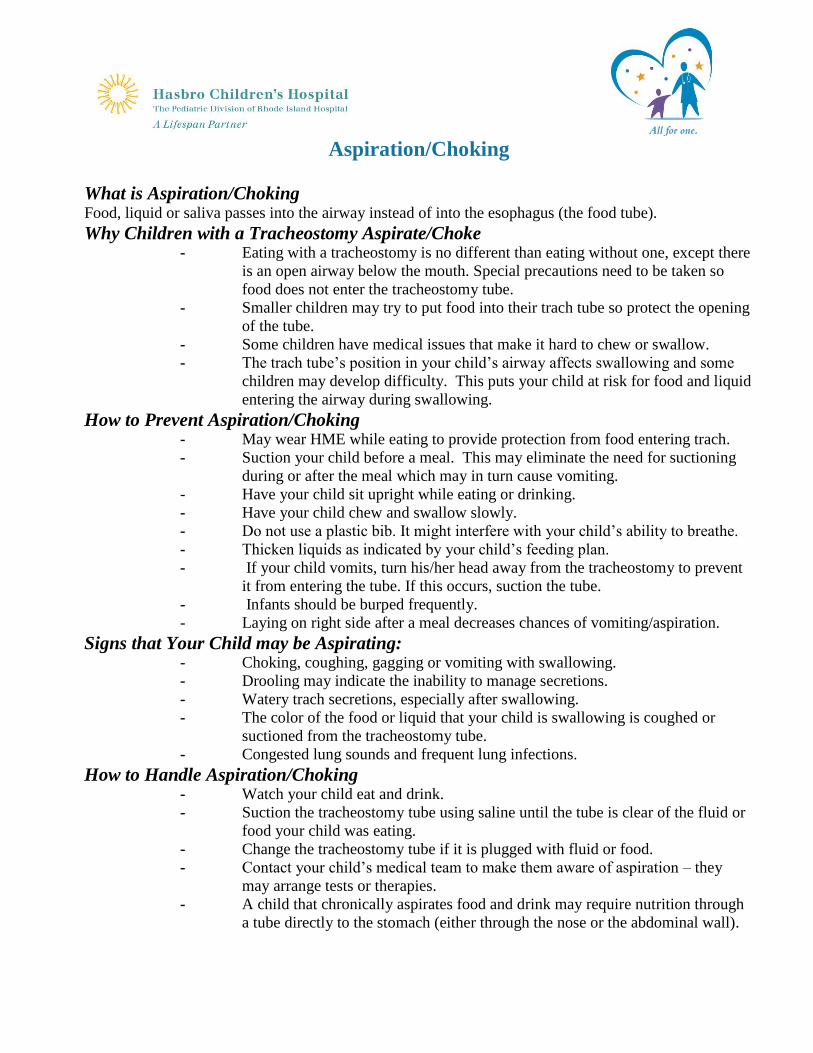
Aspiration/Choking
What is Aspiration/Choking Food, liquid or saliva passes into the airway instead of into the esophagus (the food tube).
Why Children with a Tracheostomy Aspirate/Choke - Eating with a tracheostomy is no different than eating without one, except there
is an open airway below the mouth. Special precautions need to be taken so
food does not enter the tracheostomy tube.
- Smaller children may try to put food into their trach tube so protect the opening
of the tube.
- Some children have medical issues that make it hard to chew or swallow.
- The trach tube’s position in your child’s airway affects swallowing and some
children may develop difficulty. This puts your child at risk for food and liquid
entering the airway during swallowing.
How to Prevent Aspiration/Choking - May wear HME while eating to provide protection from food entering trach.
- Suction your child before a meal. This may eliminate the need for suctioning
during or after the meal which may in turn cause vomiting.
- Have your child sit upright while eating or drinking.
- Have your child chew and swallow slowly.
- Do not use a plastic bib. It might interfere with your child’s ability to breathe.
- Thicken liquids as indicated by your child’s feeding plan.
- If your child vomits, turn his/her head away from the tracheostomy to prevent
it from entering the tube. If this occurs, suction the tube.
- Infants should be burped frequently.
- Laying on right side after a meal decreases chances of vomiting/aspiration.
Signs that Your Child may be Aspirating: - Choking, coughing, gagging or vomiting with swallowing.
- Drooling may indicate the inability to manage secretions.
- Watery trach secretions, especially after swallowing.
- The color of the food or liquid that your child is swallowing is coughed or
suctioned from the tracheostomy tube.
- Congested lung sounds and frequent lung infections.
How to Handle Aspiration/Choking - Watch your child eat and drink.
- Suction the tracheostomy tube using saline until the tube is clear of the fluid or
food your child was eating.
- Change the tracheostomy tube if it is plugged with fluid or food.
- Contact your child’s medical team to make them aware of aspiration – they
may arrange tests or therapies.
- A child that chronically aspirates food and drink may require nutrition through
a tube directly to the stomach (either through the nose or the abdominal wall).
Obstructed or Blocked Tube
What Causes an Obstructed or Blocked Tube
If unwanted particles or objects enter the trach tube, it could be extremely dangerous.
Filtering is important because a tracheostomy is an unprotected opening in your child’s trachea leading
straight into the lower airway and lungs.
The biggest threat is water, because a child with a tracheostomy has no defense against water.
Drowning can easily occur. Sand, soot or other powdery substances can cause serious damage to the
lung if they enter your child’s trach tube. Foreign object such as toys, food or insects could also enter
the tube and block your child’s airflow.
How to Prevent Obstructed or Blocked Tube - Use humidification from a mist collar over the trach or a humidification system
with the ventilator while child is sleeping or if mucus is thick or blood tinged.
- May use heat moisture exchanger (HME) to provide humidification at other
times. An HME can also be an effective filter that protects the opening of the
trach tube keeping out foreign objects.
- Do not let your child play with toys/objects that are small enough to fit into
trach tube.
- Encourage your child to cough out secretions.
- Suction at least twice a day unless your child can clear his/her own secretions
by coughing or as needed.
- Use saline to help loosen mucus with or without suctioning.
- Perform routine trach tube changes.
Signs that Your Child may have an Obstructed or Blocked Trach Tube - Fast, noisy, hard breathing
- Dry whistling sound from trach tube
- Restlessness
- Clammy skin, sweating
- Complaints from your child that he/she can not breathe
- Trouble passing a suction catheter through the trach tube
- No breathing and your child does not wake to your touch or when calling
his/her name
- Low pulse oxygen saturation or pulse on pulse oximeter
How to Handle an Obstructed or Blocked Trach Tube - Suction the trach tube.
- Place saline into trach tube if secretions thick and try to suction again.
- If the suction catheter does not pass and the trach tube is blocked or your
child does not show signs of improvement, change the trach tube.
- If this does not help, follow the emergency care plan and call 911, add
oxygen, give rescue breaths and/or CPR .
Bleeding From or Around Tracheostomy
What Causes Bleeding From or Around Tracheostomy
For the first few days after surgery, the stoma may bleed slightly. This is part of the healing
process and decreases within 24-48 hours. If you notice a significant amount of bleeding at any time
after this initial period, you should consult your specialist. This may be very dangerous and may require
immediate emergency treatment.
Bleeding can also be a sign of infection. The moist climate in the stoma and surrounding area
provides an ideal setting for bacteria to grow and can lead to infections. When trach dressings are soiled
or moist, bacteria can contribute to skin breakdown and increase the risk of infection. Symptoms that
may indicate an infection at the stoma include fever, redness, rash, swelling or bleeding.
How to Prevent Bleeding - Wash your hands before providing care.
- Make sure that the stoma area is clean and dry.
- Change the trach dressing as soon as it becomes wet or soiled. Examine the
stoma area closely. If it is soiled with blood or pus, there may be an infection.
- Use correct suction pressure; if it is set too high, this can cause damage to the
inside of the airway.
- Look at the suction catheter tip; if it is damaged, it can cause irritation.
- Use the pre-measured technique for suctioning. If suctioning too deeply or
vigorously, this can cause damage in the trachea.
- Humidification – presence of blood can indicate lack of humidity in airway.
- Changing a trach tube can cause minor bleeding as the stoma and trachea are
sensitive. This bleeding will clear up after a few hours. Never use excessive
force when inserting a trach tube into the stoma.
How to Handle Bright Red Bleeding from Tracheostomy Tube - Call 911.
- Gently suction the measured length of the trach tube.
- Use saline to help soothe the airway and prevent plugging.
- If bleeding subsides, use humidity until help arrives.
How to Handle Blood Streaked Mucous - Gently suction the measured length of the trach tube.
- Increase humidity.
- Use saline as needed.
- Wet the end of tracheostomy tube with saline or water based lubricant when
changing the tracheostomy tube.
- Contact medical provider if signs of infection or blood streaking continues.
Accidental Decannulation
What is Accidental Decannulation At some time, your child’s tracheostomy tube will come out accidentally. The trach tube is not
permanently put in the trachea. It is secured around the neck by trach ties. The tube can be coughed out,
tugged out or can fall out of the airway, especially if the trach ties are cut or undone.
Ways to Prevent Accidental Decannulation - A child with a tracheostomy must never be left alone and needs constant
supervision by someone fully trained in reinserting a tracheostomy tube.
- Great care must be taken when fastening the trach ties to minimize the danger
of accidental decannulation. If the ties are loose, tighten them. If they are
worn, replace them.
- Prevent your child from pulling at the tracheostomy tube or ties.
- Look at placement of tracheostomy tube.
Signs that a Trach Tube may have Come Out - Breathing faster
- Grunting sounds
- Using rib and/or abdominal muscles to breathe
- Nostrils flaring with each breath
- Blue color or cyanosis
- Oxygen saturation monitor reading decreased
- Periods of not breathing
- Complaints from your child that he/she cannot breathe
- Some children can make sounds louder that they could before it came out
- Trach outside the stoma
How to Replace Trach Tube - It is important to always have two spare tubes available, one in your child’s
current size and another tube one size smaller.
- Replace trach tube (refer to Tracheostomy Tube Handout).
- Follow emergency care plan.
Unexplained Worsening Status
When your child has trouble breathing at home, you may reach a point where you have done everything
possible to help your child without overcoming the problem.
At this point, your child will need the help of trained paramedics without further delay. Call 911.
Dealing with this type of distress is always a race against time. Judging when you have to call
emergency services is important. Remember that it is better to call for an ambulance too early or even
unnecessarily rather than waiting until it is too late.
Even when you have called emergency services and help is on its way, there is a certain amount of time
that you will have to provide life sustaining care for your child. This time span can range from 5-10
minutes in the inner cities to however long it will take rescuers to get to more remote locations.
Follow your emergency care plan until help arrives.
Activities Your Child Can Do and Activities to Avoid Home Care Tips
Always have your child under the supervision of someone that is fully trained in all areas of trach
care and CPR. Never leave your child alone.
Smoke is very irritating to your child’s airway, lungs and ears. Do not allow anyone to smoke around
your child.
Powders and aerosol sprays are also irritating to your child’s airway and lungs. Do not use powders or
aerosol sprays around your child. (unless prescribed for your child by medical provider)
Protect your child from infections. Keep a careful eye on the contact your child has with people with
the common cold and other infections. This becomes more difficult when your child goes to school and
comes in contact with other children. A good way to prevent illness would be for your child and family
members to get the flu vaccine every year. Anyone that comes into contact with your child should wash
or disinfect their hands.
While bathing your child, fill the tub with only 1-2 inches of water. Your child should not go under
water. Watch your child closely at bath time to prevent water from entering the tracheostomy tube.
Your child may wear an HME over the tracheostomy tube to prevent splash water from entering the
tube. When washing your child’s hair, carefully pour water over the hair with a cup as your child is
laying back with his/her head supported. Do not leave your child unattended near any water.
Do not use clothing that blocks trach tube like turtlenecks or shirts that button or zip up the back.
Avoid hairy or fuzzy clothing around the tracheostomy tube.
Beaches consist of both sand and water. Both can be dangerous to a child with a tracheostomy.
When considering a pet, choose one that does not shed or that can live outside.
Contact sports or swimming are not appropriate activities.
While it is important to be vigilant, there is a fine line between providing appropriate care and
overprotection. It is important to allow your child to play with other children, but ensure your child’s
safety at all time.