Embed Size (px)
Citation preview
Transferring the Emergence Profile of Single-ToothImplant Restorations
Iñaki Gamborena, DMD, MSD, FID* Markus B. Blatz, DMD, PhD**
QDT 2004
uccessful osseointegration and functionhave traditionally been the main goals ofimplant therapy.1,2 However, successful os-
seointegration does not automatically lead to anoptimal esthetic result, and inadequate treatmentplanning may severely compromise the esthetic re-sult regardless of biologic and functional integra-tion.3 Exact replication of the natural dentition,maintenance of a harmonious soft and hard tissuearchitecture,4,5 and imperceptible integration of thefinal implant prosthesis are among the challengesof modern implant dentistry.6
Provisional implant-supported restorations playa key role in achieving those goals, and manytechniques have been described to maximize theappearance of the tissues around implantsthrough alteration of the provisional restoration.7–16
The ideal emergence profile and morphology ofthe peri-implant soft tissues should be deter-mined during the preprosthetic laboratory phaseand then modified chairside. A proper impression
technique is key for an accurate transfer of theperi-implant tissue contour from the patient’smouth to the definitive cast.7 This article describesthree techniques to transfer the peri-implant softtissues in different clinical scenarios that are com-mon in daily practice: (1) transfer of the originalemergence profile established with a provisionalrestoration to the final restoration; (2) transfer of amodified emergence profile established throughsubsequent modification of a provisional restora-tion to the definitive restoration; and (3) transferof the natural emergence profile to the finalrestoration for immediate implant placement.
TRANSFER OF THE ORIGINAL EMERGENCEPROFILE TO THE FINAL RESTORATION
Accurate transfer of the peri-implant soft tissuecondition to the definitive cast is difficult withstandard impression copings even if a natural andharmonious emergence profile can be establishedwithout alteration of the provisional restoration.The step-by-step procedures for fabrication of acustomized impression coping are illustrated withan exemplary case of a 28-year-old male patientwho was referred for prosthetic restoration of asingle implant in the area of the maxillary rightcentral incisor. The soft tissue around the 5-mmhealing abutment appeared healthy except for arecession on the labial aspect and a scar on the
*Affiliate Associate Professor, University of WashingtonSchool of Dentistry, Seattle, Washington, USA; privatepractice, San Sebastián, Spain.
**Assistant Professor, Department of Prosthodontics,Louisiana State University School of Dentistry, New Or-leans, Louisiana, USA.
Correspondence to: Dr Iñaki Gamborena, Resureccion Made Azkue, 6, 20018 San Sebastián, Spain. E-mail: [email protected]
S
IMPLANT PROSTHODONTICS
GAMBORENA/BLATZ
QDT 2004
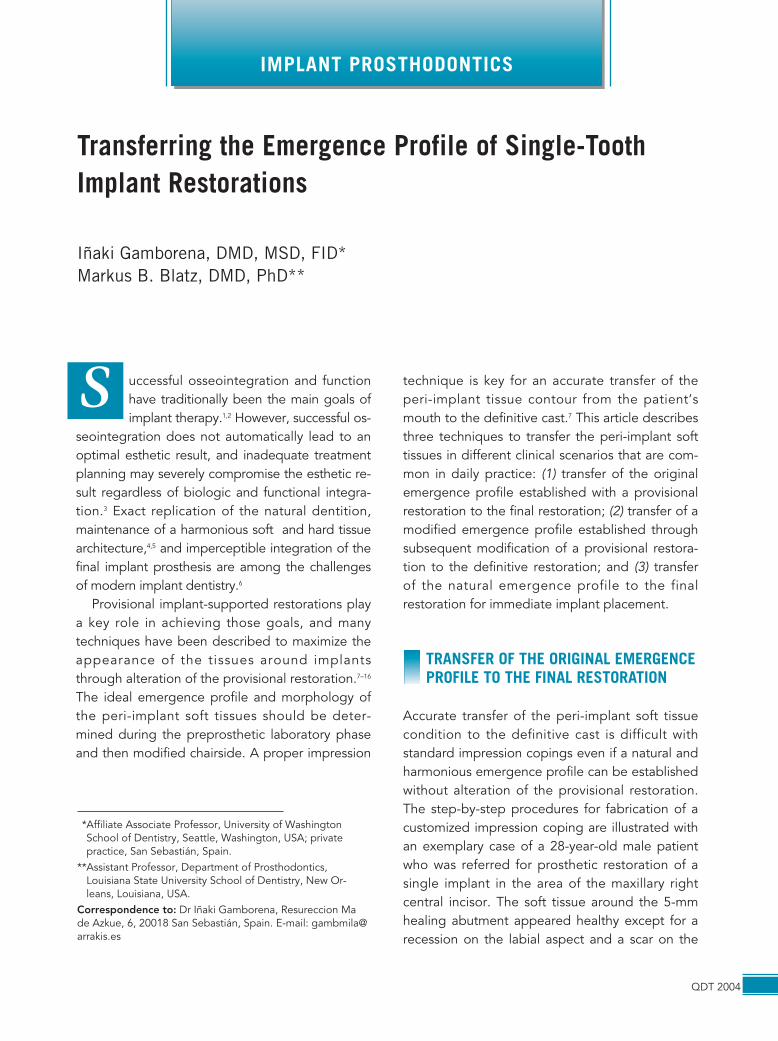
mesial line angle. A removable partial denture(RPD) served as the provisional restoration (Fig 1).An implant carrier was attached to the implant asa diagnostic tool to evaluate the implant positionwith respect to the free gingival margin and im-plant angulation (Fig 2). The labial soft tissue wasless than 1 mm in height and revealed unfavor-able scars.
Provisionalization
A provisional restoration (Fig 3) was made accord-ing to a diagnostic full-contour waxup, and a cir-cular emergence profile was carved on the castaround the implant analog to provide an idealtooth contour. A transfer coping served as a pro-visional abutment, and composite resin was
added to fill the space between the carved stoneand the coping. The abutment was prepared ac-cording to the silicone matrices of the waxup, anda provisional acrylic resin crown was fabricated.The crown was cemented to the provisional abut-ment on the implant. The pressure applied to thesurrounding soft tissue caused some initial blanch-ing, which may result in a dynamic tissue remodel-ing process and “creeping papilla formation.”4,8
The situation was evaluated after a healing periodof 3 months, particularly assessing the location ofthe gingival margins, papillary heights as com-pared to the adjacent teeth, and the emergenceprofile established in the laboratory (Fig 4). Figure5 shows the provisional abutment in relation tothe established tissue contour and improved tis-sue height.
Transfer of Original Emergence Profile to Final Restoration
Fig 1 Preoperative labial view. The patient was
referred with an implant in the area of the right
central incisor with a 5-mm-high healing abut-
ment and a removable partial denture (surgeon:
Dr J. Arruti, San Sebastián, Spain).
Fig 2 An implant carrier was inserted to evalu-
ate the position of the implant and to examine
the available soft tissue.
Fig 3 Labial view of the provisional restoration. Fig 4 Intraoral situation 3 months following pro-
visionalization reveals favorable tissue changes.
Transferring the Emergence Profile of Single-Tooth Implant Restorations
QDT 2004
Customized Impression Coping
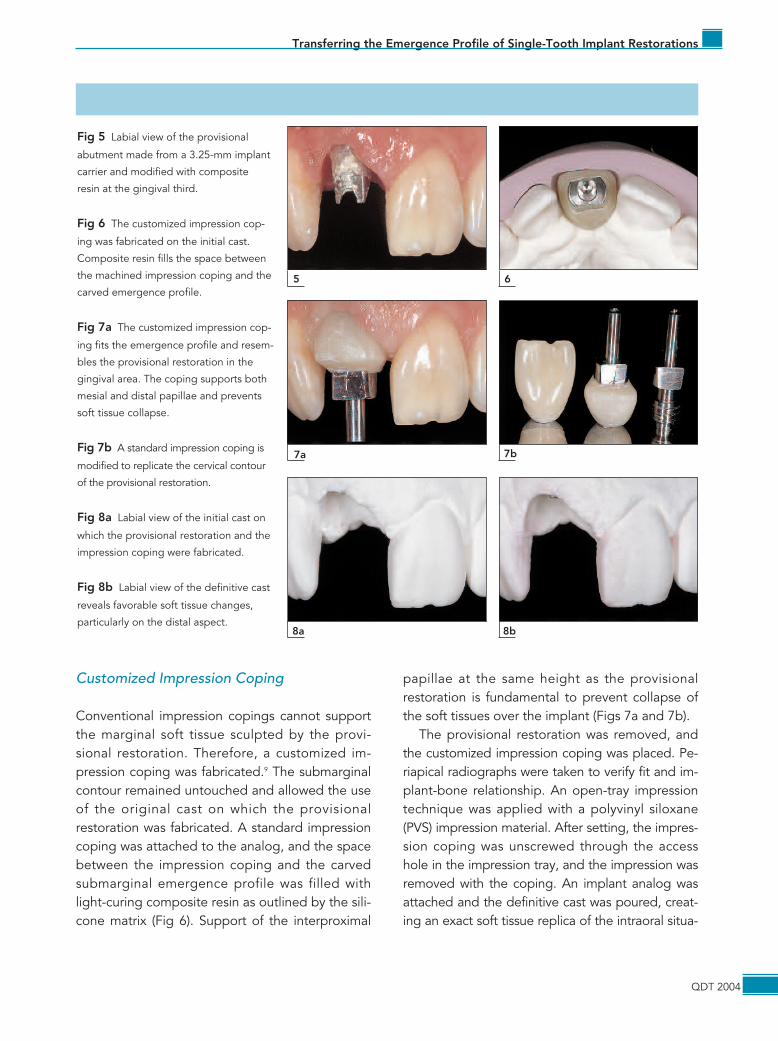
Conventional impression copings cannot supportthe marginal soft tissue sculpted by the provi-sional restoration. Therefore, a customized im-pression coping was fabricated.9 The submarginalcontour remained untouched and allowed the useof the original cast on which the provisionalrestoration was fabricated. A standard impressioncoping was attached to the analog, and the spacebetween the impression coping and the carvedsubmarginal emergence profile was filled withlight-curing composite resin as outlined by the sili-cone matrix (Fig 6). Support of the interproximal
papillae at the same height as the provisionalrestoration is fundamental to prevent collapse ofthe soft tissues over the implant (Figs 7a and 7b).
The provisional restoration was removed, andthe customized impression coping was placed. Pe-riapical radiographs were taken to verify fit and im-plant-bone relationship. An open-tray impressiontechnique was applied with a polyvinyl siloxane(PVS) impression material. After setting, the impres-sion coping was unscrewed through the accesshole in the impression tray, and the impression wasremoved with the coping. An implant analog wasattached and the definitive cast was poured, creat-ing an exact soft tissue replica of the intraoral situa-
65
7b7a
Fig 5 Labial view of the provisional
abutment made from a 3.25-mm implant
carrier and modified with composite
resin at the gingival third.
Fig 6 The customized impression cop-
ing was fabricated on the initial cast.
Composite resin fills the space between
the machined impression coping and the
carved emergence profile.
Fig 7a The customized impression cop-
ing fits the emergence profile and resem-
bles the provisional restoration in the
gingival area. The coping supports both
mesial and distal papillae and prevents
soft tissue collapse.
Fig 7b A standard impression coping is
modified to replicate the cervical contour
of the provisional restoration.
Fig 8a Labial view of the initial cast on
which the provisional restoration and the
impression coping were fabricated.
Fig 8b Labial view of the definitive cast
reveals favorable soft tissue changes,
particularly on the distal aspect.8b8a

tion. Figures 8a and 8b illustrate the changes in tis-sue topography after 3 months of healing.
Definitive Restoration
The shallow labial soft tissue necessitated a tooth-colored abutment to avoid discoloration of the tis-sue at the implant-restoration interface. A stan-dard UCLA-type abutment (Nobel Biocare,Göteborg, Sweden) was veneered with felds-pathic ceramic, and a CAD/CAM designed, high-purity, densely sintered aluminum oxide ceramiccrown (Procera AllCeram, Nobel Biocare) was fab-ricated on top of the abutment.
A double-scanning technique was used for fab-
rication of the high-strength ceramic coping: theabutment was scanned first, followed by scanningof the waxed-up coping (Figs 9 and 10). Crownmargins were defined 1 mm subgingivally on thelabial aspect of the abutment and 1 mm supragin-givally on the palatal aspect. The alumina ceramiccoping was veneered with feldspathic ceramic(Fig 11), and natural surface texture of the restora-tion was achieved with round-, tapered-, andflame-shaped diamond burs (Fig 12). A thin coatof glaze was applied, and a final polish was per-formed with a diamond paste.
Figure 13 shows the definitive abutment andcrown. After try-in, the abutment was secured at35 N/cm with an electric torque driver (Nobel Bio-care). The ceramic crown was luted with a self-cur-
QDT 2004
Transfer of Original Emergence Profile to Final Restoration (continued)
Fig 9 A silicone matrix of the full-
contour waxup is used as a reference
during waxing of the coping and en-
sures desired dimensions and ade-
quate porcelain support.
Fig 10 A CAD/CAM densely sintered alu-
minum oxide ceramic coping (Procera All-
Ceram, Nobel Biocare) was fabricated with
a double-scanning technique of the ce-
ramic abutment and the waxed-up coping.
Fig 11 The all-ceramic crown during
layering of the veneering feldspathic
ceramic.
Fig 12 Crown contour, line angles,
and surface texture are marked on
the adjacent tooth and on the crown
for final adjustments.
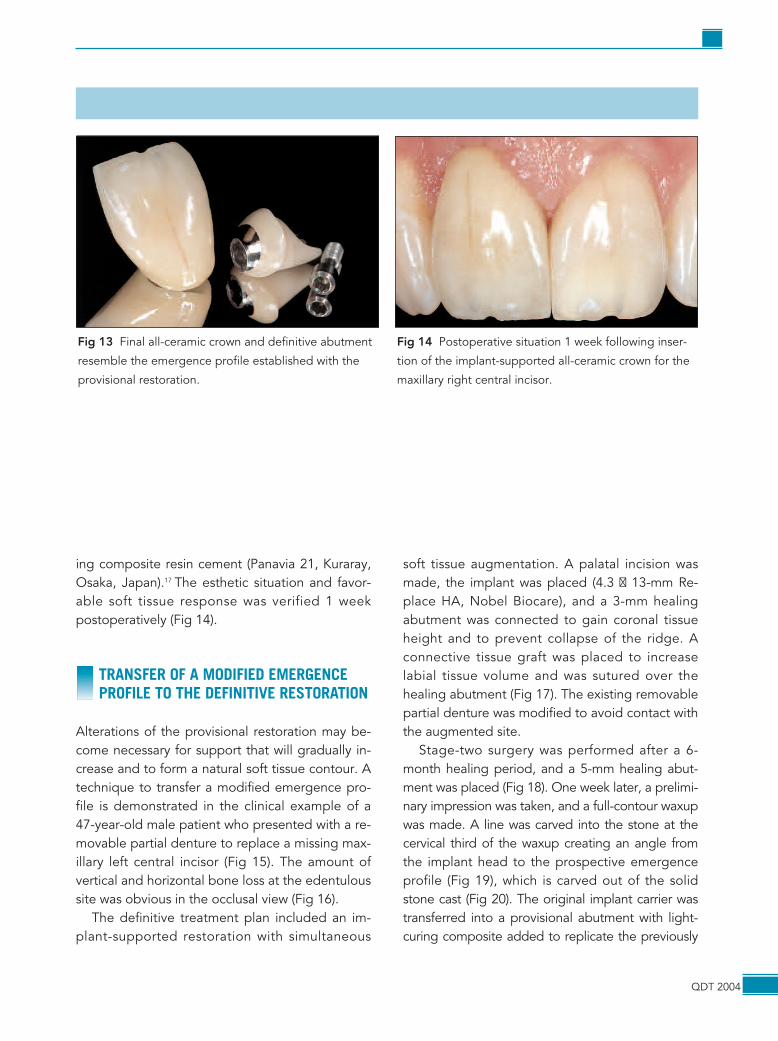
ing composite resin cement (Panavia 21, Kuraray,Osaka, Japan).17 The esthetic situation and favor-able soft tissue response was verified 1 weekpostoperatively (Fig 14).
TRANSFER OF A MODIFIED EMERGENCEPROFILE TO THE DEFINITIVE RESTORATION
Alterations of the provisional restoration may be-come necessary for support that will gradually in-crease and to form a natural soft tissue contour. Atechnique to transfer a modified emergence pro-file is demonstrated in the clinical example of a47-year-old male patient who presented with a re-movable partial denture to replace a missing max-illary left central incisor (Fig 15). The amount ofvertical and horizontal bone loss at the edentuloussite was obvious in the occlusal view (Fig 16).
The definitive treatment plan included an im-plant-supported restoration with simultaneous
soft tissue augmentation. A palatal incision wasmade, the implant was placed (4.3 � 13-mm Re-place HA, Nobel Biocare), and a 3-mm healingabutment was connected to gain coronal tissueheight and to prevent collapse of the ridge. Aconnective tissue graft was placed to increaselabial tissue volume and was sutured over thehealing abutment (Fig 17). The existing removablepartial denture was modified to avoid contact withthe augmented site.
Stage-two surgery was performed after a 6-month healing period, and a 5-mm healing abut-ment was placed (Fig 18). One week later, a prelimi-nary impression was taken, and a full-contour waxupwas made. A line was carved into the stone at thecervical third of the waxup creating an angle fromthe implant head to the prospective emergenceprofile (Fig 19), which is carved out of the solidstone cast (Fig 20). The original implant carrier wastransferred into a provisional abutment with light-curing composite added to replicate the previously
QDT 2004
Fig 13 Final all-ceramic crown and definitive abutment
resemble the emergence profile established with the
provisional restoration.
Fig 14 Postoperative situation 1 week following inser-
tion of the implant-supported all-ceramic crown for the
maxillary right central incisor.
QDT 2004
Transfer of Modified Emergence Profile to Final Restoration
15
16 17 18
19 20
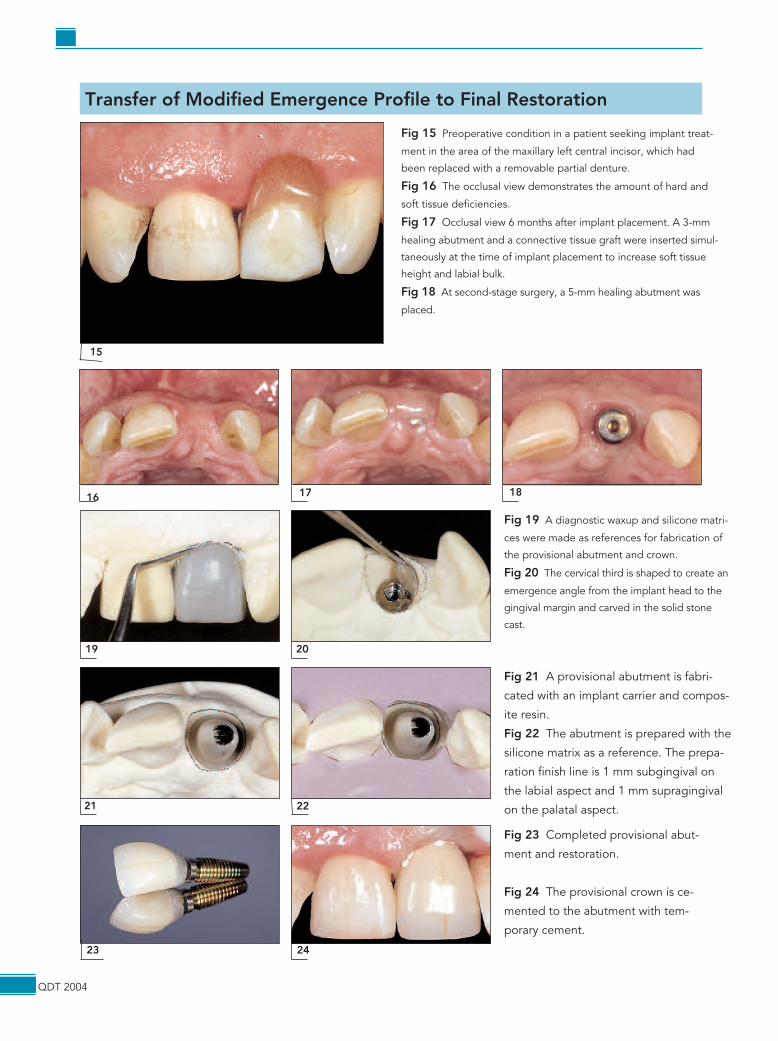
Fig 15 Preoperative condition in a patient seeking implant treat-
ment in the area of the maxillary left central incisor, which had
been replaced with a removable partial denture.
Fig 16 The occlusal view demonstrates the amount of hard and
soft tissue deficiencies.
Fig 17 Occlusal view 6 months after implant placement. A 3-mm
healing abutment and a connective tissue graft were inserted simul-
taneously at the time of implant placement to increase soft tissue
height and labial bulk.
Fig 18 At second-stage surgery, a 5-mm healing abutment was
placed.
Fig 19 A diagnostic waxup and silicone matri-
ces were made as references for fabrication of
the provisional abutment and crown.
Fig 20 The cervical third is shaped to create an
emergence angle from the implant head to the
gingival margin and carved in the solid stone
cast.
23 24
Fig 23 Completed provisional abut-
ment and restoration.
Fig 24 The provisional crown is ce-
mented to the abutment with tem-
porary cement.
21 22
Fig 21 A provisional abutment is fabri-
cated with an implant carrier and compos-
ite resin.
Fig 22 The abutment is prepared with the
silicone matrix as a reference. The prepa-
ration finish line is 1 mm subgingival on
the labial aspect and 1 mm supragingival
on the palatal aspect.
created emergence profile (Fig 21). The abutmentwas prepared (Fig 22), and the preparation verifiedwith a silicone matrix. The implant-supported provi-sional restoration was completed (Fig 23) andseated on the provisional abutment with temporarycement (Temp-Bond NE, Kerr, Romulus, MI) (Fig24).
Prosthesis-Guided Soft Tissue Management
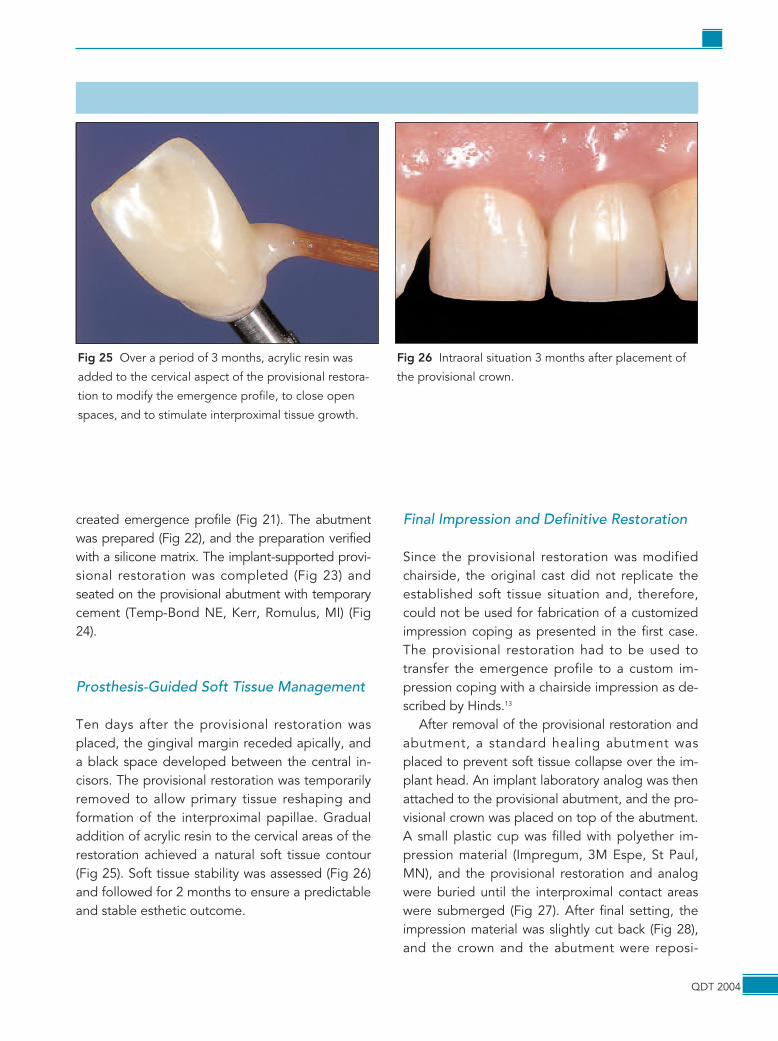
Ten days after the provisional restoration wasplaced, the gingival margin receded apically, anda black space developed between the central in-cisors. The provisional restoration was temporarilyremoved to allow primary tissue reshaping andformation of the interproximal papillae. Gradualaddition of acrylic resin to the cervical areas of therestoration achieved a natural soft tissue contour(Fig 25). Soft tissue stability was assessed (Fig 26)and followed for 2 months to ensure a predictableand stable esthetic outcome.
Final Impression and Definitive Restoration
Since the provisional restoration was modifiedchairside, the original cast did not replicate theestablished soft tissue situation and, therefore,could not be used for fabrication of a customizedimpression coping as presented in the first case.The provisional restoration had to be used totransfer the emergence profile to a custom im-pression coping with a chairside impression as de-scribed by Hinds.13
After removal of the provisional restoration andabutment, a standard healing abutment wasplaced to prevent soft tissue collapse over the im-plant head. An implant laboratory analog was thenattached to the provisional abutment, and the pro-visional crown was placed on top of the abutment.A small plastic cup was filled with polyether im-pression material (Impregum, 3M Espe, St Paul,MN), and the provisional restoration and analogwere buried until the interproximal contact areaswere submerged (Fig 27). After final setting, theimpression material was slightly cut back (Fig 28),and the crown and the abutment were reposi-
QDT 2004
Fig 25 Over a period of 3 months, acrylic resin was
added to the cervical aspect of the provisional restora-
tion to modify the emergence profile, to close open
spaces, and to stimulate interproximal tissue growth.
Fig 26 Intraoral situation 3 months after placement of
the provisional crown.
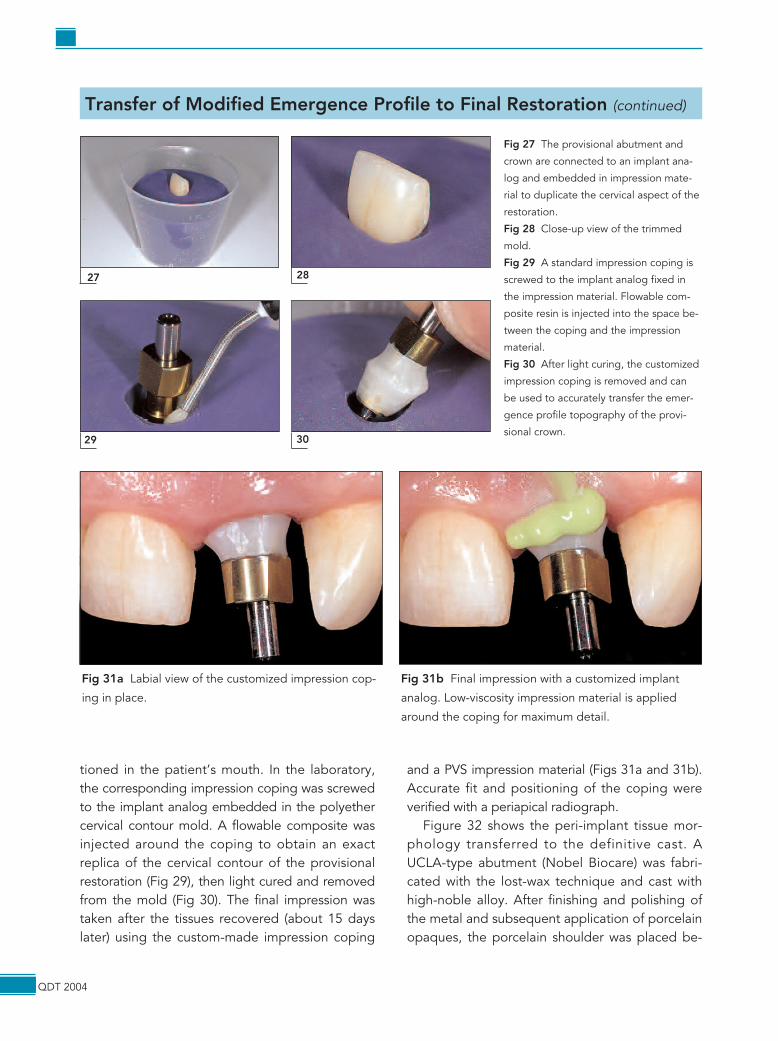
tioned in the patient’s mouth. In the laboratory,the corresponding impression coping was screwedto the implant analog embedded in the polyethercervical contour mold. A flowable composite wasinjected around the coping to obtain an exactreplica of the cervical contour of the provisionalrestoration (Fig 29), then light cured and removedfrom the mold (Fig 30). The final impression wastaken after the tissues recovered (about 15 dayslater) using the custom-made impression coping
and a PVS impression material (Figs 31a and 31b).Accurate fit and positioning of the coping wereverified with a periapical radiograph.
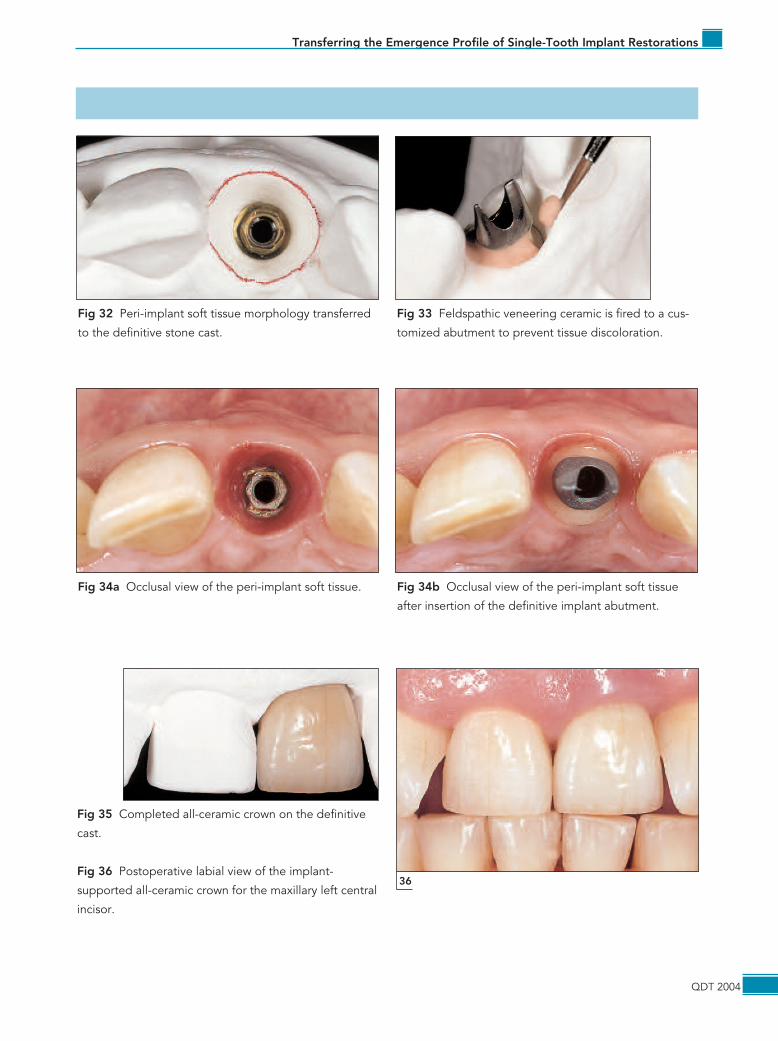
Figure 32 shows the peri-implant tissue mor-phology transferred to the definitive cast. AUCLA-type abutment (Nobel Biocare) was fabri-cated with the lost-wax technique and cast withhigh-noble alloy. After finishing and polishing ofthe metal and subsequent application of porcelainopaques, the porcelain shoulder was placed be-
QDT 2004
Transfer of Modified Emergence Profile to Final Restoration (continued)
27 28
Fig 27 The provisional abutment and
crown are connected to an implant ana-
log and embedded in impression mate-
rial to duplicate the cervical aspect of the
restoration.
Fig 28 Close-up view of the trimmed
mold.
Fig 29 A standard impression coping is
screwed to the implant analog fixed in
the impression material. Flowable com-
posite resin is injected into the space be-
tween the coping and the impression
material.
Fig 30 After light curing, the customized
impression coping is removed and can
be used to accurately transfer the emer-
gence profile topography of the provi-
sional crown.29 30
Fig 31a Labial view of the customized impression cop-
ing in place.
Fig 31b Final impression with a customized implant
analog. Low-viscosity impression material is applied
around the coping for maximum detail.
QDT 2004
Transferring the Emergence Profile of Single-Tooth Implant Restorations
Fig 32 Peri-implant soft tissue morphology transferred
to the definitive stone cast.
Fig 33 Feldspathic veneering ceramic is fired to a cus-
tomized abutment to prevent tissue discoloration.
Fig 34a Occlusal view of the peri-implant soft tissue. Fig 34b Occlusal view of the peri-implant soft tissue
after insertion of the definitive implant abutment.
Fig 35 Completed all-ceramic crown on the definitive
cast.
Fig 36 Postoperative labial view of the implant-
supported all-ceramic crown for the maxillary left central
incisor.
36
tween the abutment and the transferred cervicalcontour to prevent discolorations by the underly-ing metal (Fig 33). The provisional restoration wasremoved (Fig 34), and the customized definitiveabutment was placed (Figs 34a and 34b). An all-ceramic crown (Procera AllCeram) was fabricatedwith the exact emergence profile established dur-ing the provisional phase (Fig 35). The postopera-tive situation is demonstrated in Fig 36.
IMMEDIATE IMPLANT PLACEMENT ANDTRANSFER OF THE NATURAL EMERGENCEPROFILE TO THE FINAL RESTORATION
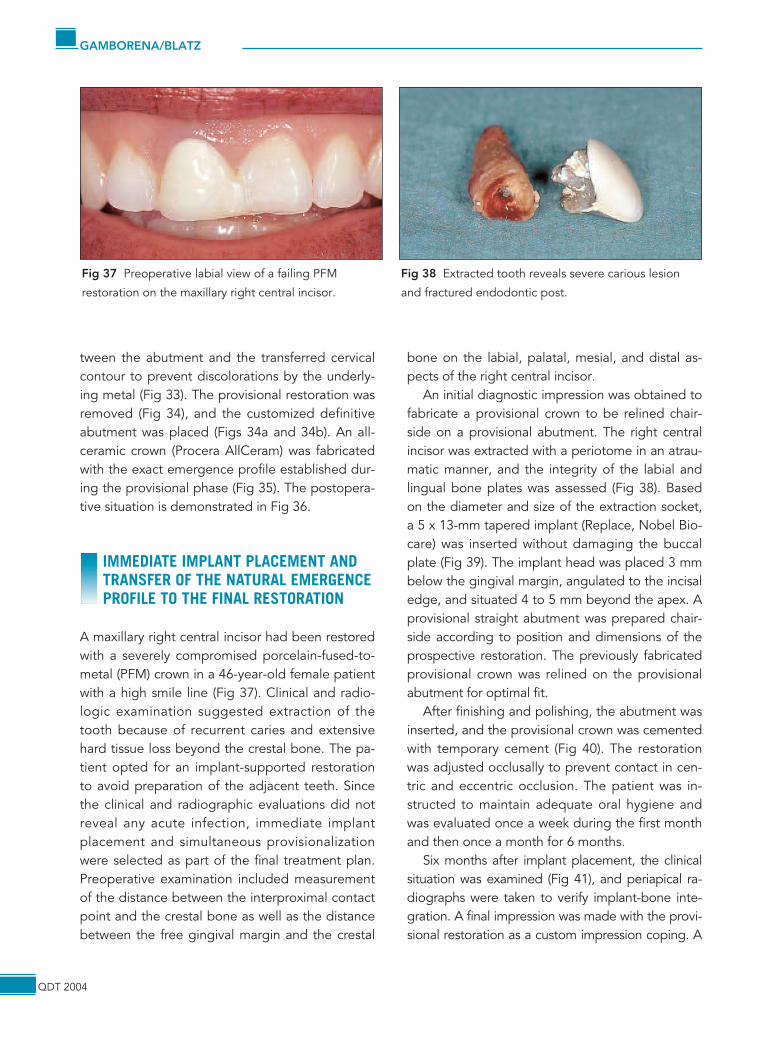
A maxillary right central incisor had been restoredwith a severely compromised porcelain-fused-to-metal (PFM) crown in a 46-year-old female patientwith a high smile line (Fig 37). Clinical and radio-logic examination suggested extraction of thetooth because of recurrent caries and extensivehard tissue loss beyond the crestal bone. The pa-tient opted for an implant-supported restorationto avoid preparation of the adjacent teeth. Sincethe clinical and radiographic evaluations did notreveal any acute infection, immediate implantplacement and simultaneous provisionalizationwere selected as part of the final treatment plan.Preoperative examination included measurementof the distance between the interproximal contactpoint and the crestal bone as well as the distancebetween the free gingival margin and the crestal
bone on the labial, palatal, mesial, and distal as-pects of the right central incisor.
An initial diagnostic impression was obtained tofabricate a provisional crown to be relined chair-side on a provisional abutment. The right centralincisor was extracted with a periotome in an atrau-matic manner, and the integrity of the labial andlingual bone plates was assessed (Fig 38). Basedon the diameter and size of the extraction socket,a 5 x 13-mm tapered implant (Replace, Nobel Bio-care) was inserted without damaging the buccalplate (Fig 39). The implant head was placed 3 mmbelow the gingival margin, angulated to the incisaledge, and situated 4 to 5 mm beyond the apex. Aprovisional straight abutment was prepared chair-side according to position and dimensions of theprospective restoration. The previously fabricatedprovisional crown was relined on the provisionalabutment for optimal fit.
After finishing and polishing, the abutment wasinserted, and the provisional crown was cementedwith temporary cement (Fig 40). The restorationwas adjusted occlusally to prevent contact in cen-tric and eccentric occlusion. The patient was in-structed to maintain adequate oral hygiene andwas evaluated once a week during the first monthand then once a month for 6 months.
Six months after implant placement, the clinicalsituation was examined (Fig 41), and periapical ra-diographs were taken to verify implant-bone inte-gration. A final impression was made with the provi-sional restoration as a custom impression coping. A
QDT 2004
GAMBORENA/BLATZ
Fig 37 Preoperative labial view of a failing PFM
restoration on the maxillary right central incisor.
Fig 38 Extracted tooth reveals severe carious lesion
and fractured endodontic post.
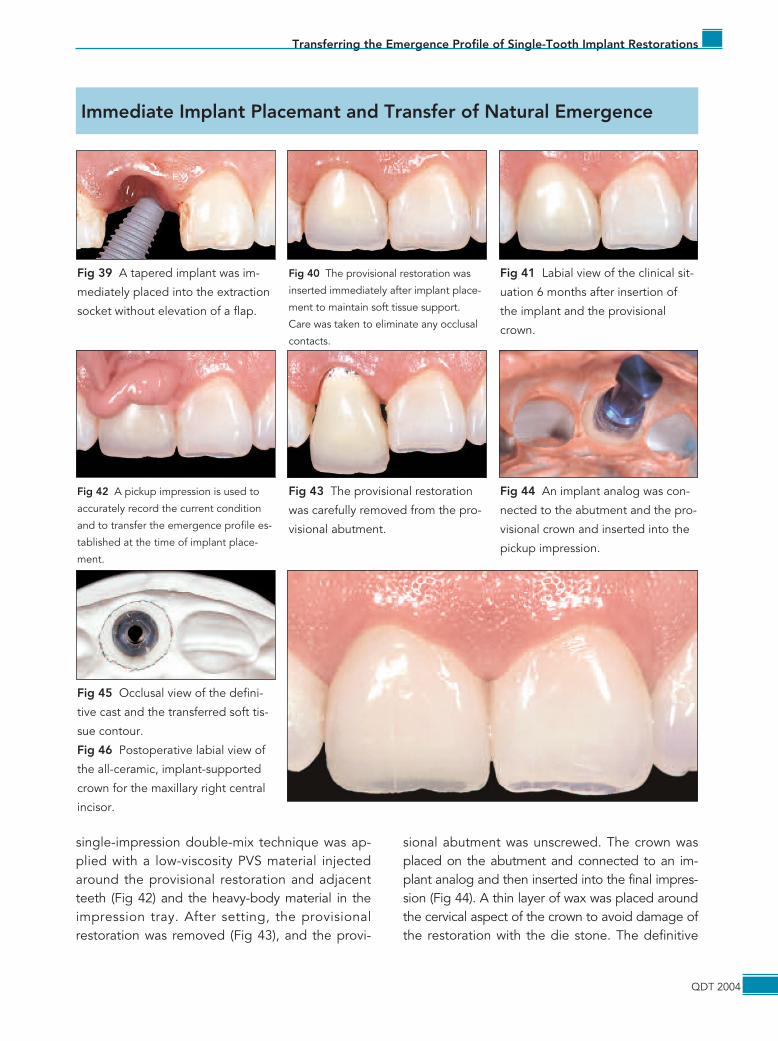
single-impression double-mix technique was ap-plied with a low-viscosity PVS material injectedaround the provisional restoration and adjacentteeth (Fig 42) and the heavy-body material in theimpression tray. After setting, the provisionalrestoration was removed (Fig 43), and the provi-
sional abutment was unscrewed. The crown wasplaced on the abutment and connected to an im-plant analog and then inserted into the final impres-sion (Fig 44). A thin layer of wax was placed aroundthe cervical aspect of the crown to avoid damage ofthe restoration with the die stone. The definitive
QDT 2004
Transferring the Emergence Profile of Single-Tooth Implant Restorations
Immediate Implant Placemant and Transfer of Natural Emergence
Fig 39 A tapered implant was im-
mediately placed into the extraction
socket without elevation of a flap.
Fig 40 The provisional restoration was
inserted immediately after implant place-
ment to maintain soft tissue support.
Care was taken to eliminate any occlusal
contacts.
Fig 41 Labial view of the clinical sit-
uation 6 months after insertion of
the implant and the provisional
crown.
Fig 42 A pickup impression is used to
accurately record the current condition
and to transfer the emergence profile es-
tablished at the time of implant place-
ment.
Fig 43 The provisional restoration
was carefully removed from the pro-
visional abutment.
Fig 44 An implant analog was con-
nected to the abutment and the pro-
visional crown and inserted into the
pickup impression.
Fig 45 Occlusal view of the defini-
tive cast and the transferred soft tis-
sue contour.
Fig 46 Postoperative labial view of
the all-ceramic, implant-supported
crown for the maxillary right central
incisor.
cast was poured, and the provisional restorationwas placed in the patient’s mouth immediately aftersetting of the stone. Figure 45 demonstrates theshape of the emergence profile on the cast. Adefinitive abutment was fabricated using ceramic forthe gingival third, and a Procera AllCeram crownwas fabricated and adhesively luted to the abut-ment. The postoperative situation (Fig 46) revealsoptimal soft tissue integration and morphology, em-phasizing the importance of adequate tissue sup-port in all stages of implant treatment.
DISCUSSION
A natural, harmonious gingival morphology is anintegral part of esthetic tooth- and implant-sup-ported prosthetic restorations. The surroundingsoft tissues (“pink esthetics”) are the natural frameof any restoration and are, therefore, just as im-portant for the final esthetic and functional out-come as the restoration itself (“white esthetics”).4
A natural soft tissue contour can be extremelychallenging to achieve in implant prosthodontics,where soft and hard tissue defects are often pres-ent. Even when an optimal tissue contour is estab-lished with an adequately shaped provisionalrestoration, accurate transfer of this shape to thefinal restoration may be difficult, especially withstandard implant impression copings. The cylindri-cal geometry of standard impression copings failsto transfer accurately the three-dimensional shapeof the natural emergence profile of incisorteeth.9,11,13,16 Multiple techniques have been de-scribed to overcome these problems with cus-tomized impression copings.7–16
This article has described techniques for accu-rate transfer of optimal emergence profiles for an-terior single-tooth implant restorations in threecommon clinical scenarios. In general, customizedimpression copings can be categorized into twomain groups: (1) the provisional restoration ismodified clinically to guide tissue and papilla for-mation and (2) the provisional restoration providesan optimal tissue contour without subsequent
modification. If the soft tissue reveals a satisfac-tory morphology without modifications, the samecast used for fabrication of the provisional restora-tion may be used to customize the impressioncoping for the final impression, eliminating theneed for multiple steps and appointments.
Transfer of an emergence profile establishedthrough chairside modifications of the provisionalrestoration may require extra steps. The restora-tion is embedded in impression material to recordits cervical shape. It is key to support the papillaeat least 1 or 0.5 mm coronal to their peaks. Anopen-tray technique is recommended and may re-quire a custom tray depending on the positionand angulation of the implant.
The pickup impression technique described inthe third case offers various advantages: it is sim-ple, easy to perform, and less time consuming(only one appointment needed). It may also bethe most accurate method, with maximum infor-mation but without the need for additional com-ponents, a full-contour waxup, or open-tray im-pression techniques.
Selection of a technique for transferring a natu-ral emergence profile is based on personal experi-ence, abilities, preferences, and the clinical situa-tion rather than on scientific evidence. Therefore,randomized clinical trials are needed to assesspredictability and stability of the esthetic andfunctional results and to provide scientific ratio-nale for technique selection.
ACKNOWLEDGMENT
The authors express their appreciation to Iñigo Casares, CDT,for his ceramic work in all three cases.
REFERENCES
1. Brånemark P-I. Osseointegration and its experimentalbackground. J Prosthet Dent 1983;50:399–410.
2. Albrektsson T, Zarb G, Worthington P, Eriksson AR. Thelong-term efficacy of currently used dental implants: A re-view and proposed criteria of success. Int J Oral Maxillo-fac Implants 1986;1:11–25.
QDT 2004
3. Chang M, Wennström JL, Odman P, Andersson B. Im-plant-supported single-tooth replacements compared tocontralateral natural teeth. Crown and soft tissue dimen-sions. Clin Oral Implants Res 1999;10:185–194.
4. Blatz MB, Hürzeler MB, Strub JR. Reconstruction of thelost interproximal papilla—Presentation of surgical andnonsurgical approaches. Int J Periodontics RestorativeDent 1999;19:395–406.
5. Kois JC, Kan JY. Predictable peri-implant gingival aes-thetics: Surgical and prosthodontics rationales. PractProced Aesthet Dent 2001;13:691–698.
6. Garber DA. The esthetic dental implant: Letting the restora-tion be the guide. J Am Dent Assoc 1995;126:319–325.
7. Attard N, Barzilay I. A modified impression technique foraccurate registration of peri-implant soft tissues. J CanDent Assoc 2003;69:80–83.
8. Bichacho N. Prosthetically guided soft tissue topographysurrounding single implant restorations: Cervical contour-ing concept. Int J Dent Symposia 1997;4:30–33.
9. Buskin R, Salinas TJ. Transferring emergence profile cre-ated from the provisional to the definitive restoration.Pract Periodontics Aesthet Dent 1998;10:1171–1179.
10. Chee WW, Cho GC, Ha S. Replicating soft tissue contourson working casts for implant restorations. J Prosthodont1997;6:218–220.
11. Davarpanah M, Martinez H, Celleti R, Tecucianu JF.Three-stage approach to aesthetic implant restoration:Emergence profile concept. Pract Proced Aesthet Dent2001;13:761–767.
12. Davidoff SR. Developing soft tissue contours for implant-supported restorations: A simplified method for enhancedaesthetics. Pract Periodontics Aesthet Dent 1996;8:507–513.
QDT 2004
13. Hinds KK. Custom impression coping for an exact regis-tration of the healed tissue esthetic implant restoration.Int J Periodontics Restorative Dent 1997;17:584–591.
14. Lee EA. Transitional custom abutments: Optimizing aes-thetic treatment in implant-supported restorations. PractPeriodontics Aesthet Dent 1999;11:1027–1034.
15. Neale D, Chee WW. Development of implant soft tissueemergence profile: A technique. J Prosthet Dent 1994;71:364–368.
16. Stumpel LJ, Haechler W, Bedrossian E. Customized abut-ments to shape and transfer peri-implant soft tissue con-tours. J Calif Dent Assoc 2000;28:301–309.
17. Blatz MB, Sadan A, Arch GH Jr, Lang BR. In vitro evalua-tion of long-term bonding of Procera AllCeram aluminarestorations with a modified resin luting agent. J ProsthetDent 2003;89:381–387.
QDT 2004


![All-ceramic front tooth restorations. Perfect Veneer Preparations. · 2020. 6. 30. · adjacent tooth [ see 6 ] . In response to this, special sonic tips are available that perfectly](https://img.pdfslide.net/doc/110x75/609f24a3b4838c661205a0ea/all-ceramic-front-tooth-restorations-perfect-veneer-2020-6-30-adjacent-tooth.jpg)