Embed Size (px)
Citation preview
txSuite Administrative Access
March 2012
Training Guide

Copyright © 2012 by Texas Computer Cooperative All rights reserved
Education Service Center, Region 20 1314 Hines Avenue
San Antonio, TX 78208-1899
This manual was prepared and published by Education Service Center, Region 20, San Antonio, TX in concert with participating Texas Computer Cooperative members.
Made in the United States of America
March 2012 txSuite Administrative Access
Texas Computer Cooperative 1
Contents Contents .................................................................................................................................... 1
Introduction ............................................................................................................................... 3
Known Issues .......................................................................................................................... 3
Administrative Access for txGradebook .................................................................................. 5
Administrator Options .............................................................................................................. 5
Update Admin Profile ............................................................................................................... 8
Admin Student Grades - Find Student ................................................................................... 11
Admin Student Grades .......................................................................................................... 12
Admin Skills-Referenced Courses (iTCCS only) .................................................................... 15
Elementary Skills-Based Grading .......................................................................................... 16
Admin Elementary Skills-Based Setup ........................................................................... 16 Admin Skills-Based Report Card Setup .......................................................................... 18 Admin Elementary Skills-Based Courses........................................................................ 22
Other Administrative Tasks .................................................................................................... 24
Copy Student Groups ..................................................................................................... 24
Administrator Reports ............................................................................................................ 27
Assignment Grades Last Updated Report ............................................................................. 27
Missing Averages Report ....................................................................................................... 29
UIL Report ............................................................................................................................. 30
Special Programs Report ....................................................................................................... 32
Teacher’s Disallowed Weighting Type Report ....................................................................... 34
Administrative Access for txConnect ..................................................................................... 37
Administrator Login ................................................................................................................ 37
Administrator Options ............................................................................................................ 37
User Administration ........................................................................................................ 38 Settings .......................................................................................................................... 40 Statistics ......................................................................................................................... 41
Form Management (iTCCS Only) .......................................................................................... 43
Forms Management ....................................................................................................... 43 Static Document Management ....................................................................................... 44 Form Column Management ............................................................................................ 46 Form Management ......................................................................................................... 47
txSuite Administrative Access Training Guid March 2012
2 Texas Computer Cooperative
Form Editor .................................................................................................................... 49 Form Group Management .............................................................................................. 50
Global Alert (TxEIS Only) ....................................................................................................... 53
Appendix A - Checklists ......................................................................................................... 55
Elementary Skills-Based Report Cards .................................................................................. 55
Form Management for Online Student Registration (iTCCS Only) ......................................... 57
Skills-Referenced Grading (iTCCS only) ................................................................................ 60
Appendix B - Configuration Files ........................................................................................... 63 txGradebook ........................................................................................................................... 63 txConnect ............................................................................................................................... 67 txMyZone ............................................................................................................................... 70
Alert Service .......................................................................................................................... 71
Transformation Service.......................................................................................................... 73
March 2012 txSuite Administrative Access
Texas Computer Cooperative 3
Introduction This guide describes the administration pages associated with txGradebook, txConnect, and txMyZone.
• The grade book application, txGradebook is an integrated classroom management system that allows teachers to maintain and post student data including attendance, grades, and discipline.
• The parent portal application, txConnect, provides parents and guardians Web access to information about their students including grades, attendance, and discipline. txConnect works in conjunction with txGradebook, allowing parents to see up-to-date information from txGradebook.
• The student portal application, txMyZone provides students Web access to their personal school-related information, including course requests and graduation plans.
There are various levels of administrative access for txGradebook. The districts control access to txGradebook through district and campus menus. Administrators can be given full maintenance access or inquiry-only access, and they can be given access to one campus or all campuses. Campus-level administrators can also be assigned Discipline-only access.
Teachers who have no administrative access are directed to the Announcements page when they log on. The Admin tab does not appear in the main menu, and some reports that require administrative access are not displayed in the Reports submenu.
There is one level of administrative access for txConnect, which allows you to log on as a parent (i.e., to impersonate a parent) in order to see the data a parent would see. Administrative users can also make the system active or inactive by date, allow student discipline data to be displayed for parents, and view overall usage statistics for txConnect. txMyZone has no administrative access. Settings are handled in the Student system or in the configuration file.
Known Issues There are no known issues at this time.

txSuite Administrative Access Training Guid March 2012
4 Texas Computer Cooperative

March 2012 txSuite Administrative Access
Texas Computer Cooperative 5
Administrative Access for txGradebook To log on as a registered user:
If you have already registered, you can enter your user ID and password and click the Login button. Your user ID is not case-sensitive. Your password is case-sensitive. The text typed in the Password field is hidden.
If you log on with a district- or campus-level administrative user ID, the Administrator Options page is displayed instead of the Announcements page. You can access the Announcements page by selecting Announcements from the Home menu.
Administrator Options Admin > Admin Options The Administrator Options page is only available to users who log on to txGradebook with a district- or campus-level security administrative user ID. The page allows you to select the teacher for whom you want to log on with administrative privileges. After you select a teacher from this page, you can access txGradebook as if you were that teacher; however, there are some differences:
• The Admin menu appears in the main menu. Select Admin to return to this page to select another teacher.
• In the Settings menu, the Update Admin Profile menu item appears instead of Update Profile.
Enter your administrative user ID and password on the Login page, and then click Login. Instead of going to the Announcements page, you are redirected to the Administrator Options page.
• If you have full maintenance access, you can perform all functions, including saving,
posting, and printing.

txSuite Administrative Access Training Guid March 2012
6 Texas Computer Cooperative
• If you have inquiry-only access, you can view all pages, but all buttons (except Print buttons) are disabled. Even if you change data in a field, you cannot save changes, so all changes are lost when you leave the page. Inquiry-only users can print data.
To access a teacher’s grade book:
If you logged on with a district-level administrative logon, you must select a campus from the Select Campus drop-down field. Then, select the teacher from the Select Teacher drop-down field. The list includes all teachers in the district who currently have a user ID for txGradebook.
• If a campus is not fully set up yet in txGradebook and Grade Reporting (i.e., a new campus), the campus is not included in the Select Campus drop down.
• If a teacher teaches at more than one campus, his name appears in the list for each campus.
• The teacher list is sorted alphabetically by the teacher’s last name and includes the instructor ID.
If you logged on with a campus-level administrative logon, the drop-down list includes all teachers at the campus who currently have a user ID for txGradebook. The list is sorted alphabetically by the teacher’s last name.
The campus ID and name of the teacher for whom you are using txGradebook are displayed on the right side of the main menu.
To synchronize data:
If you made changes to txGradebook settings in the iTCCS or TxEIS Student systems, the data must be synchronized to ensure that changes to the settings in the campus header are immediately transferred to txGradebook. To synchronize the data, click Synchronize Data. The data can be synchronized as often as necessary.
If the data was successfully synchronized, the page reloads with a message indicating that the data was successfully synchronized.
Campus header information is automatically refreshed every 30 minutes.
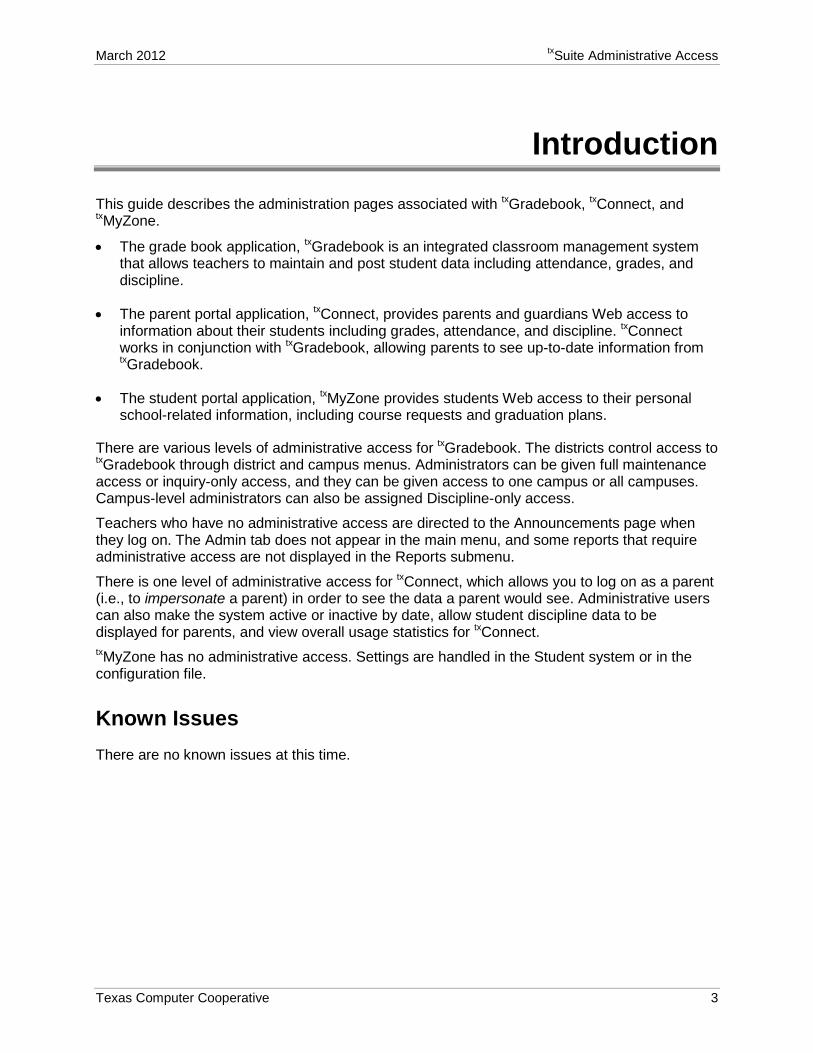
To mark all courses as ready to post:
The Mark Ready to Post button allows you to mark all courses at the campus as ready to post, including any courses for which the instructor has not clicked Mark grades as Ready to Post on the Cycle Grades page. The button is only displayed for current cycles that are open for posting.
The following data is also displayed:
• The campus, semester, and cycle for which you will be marking courses as ready to post.
• The number of courses that have already been marked as ready to post (before clicking the button).
March 2012 txSuite Administrative Access
Texas Computer Cooperative 7
• The number of courses that have not yet been marked as ready to post (before clicking the button).
1. Click Mark Ready to Post. A message is displayed prompting you to confirm that you want to mark all remaining courses as ready to post.
Click OK to continue. The message “Mark Ready to Post Completed” is displayed.
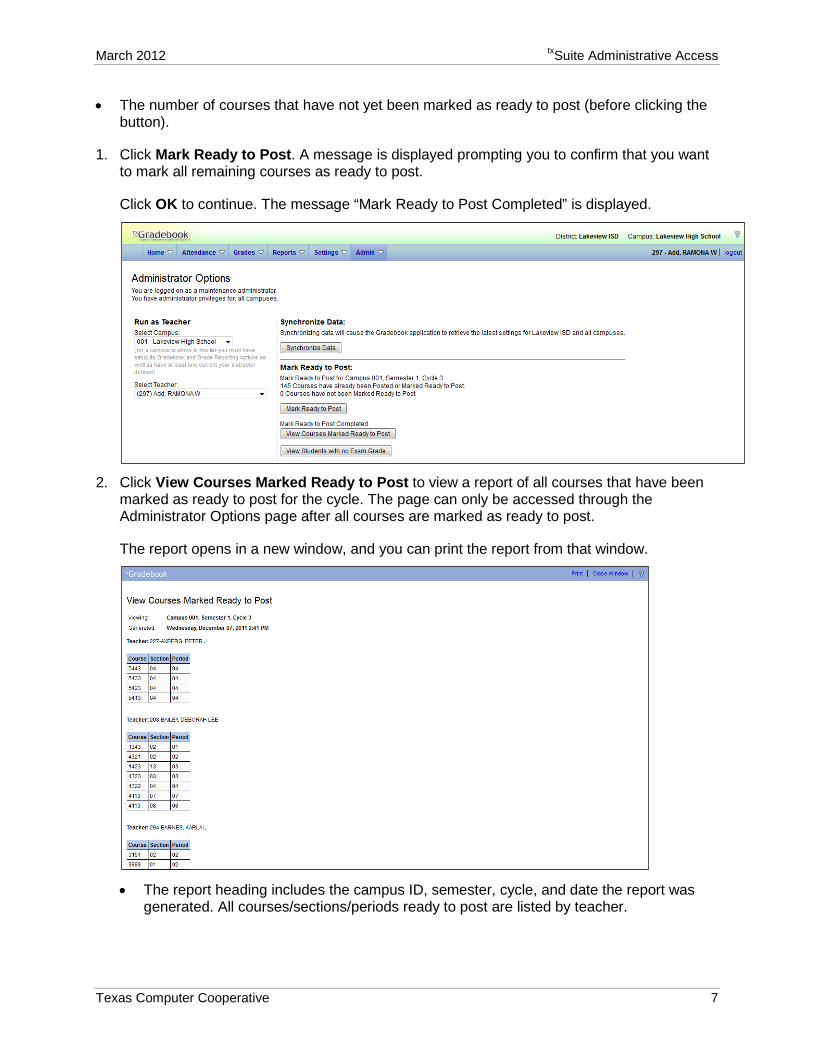
2. Click View Courses Marked Ready to Post to view a report of all courses that have been
marked as ready to post for the cycle. The page can only be accessed through the Administrator Options page after all courses are marked as ready to post.
The report opens in a new window, and you can print the report from that window.
• The report heading includes the campus ID, semester, cycle, and date the report was
generated. All courses/sections/periods ready to post are listed by teacher.
txSuite Administrative Access Training Guid March 2012
8 Texas Computer Cooperative
• To print the report displayed on the page, click Print. The Print dialog box opens allowing you to select your printer and settings. Click Print to continue, or click Cancel to cancel printing.
• To close the report, click Close Window in the report window. The Administrator Options page remains open on your desktop.
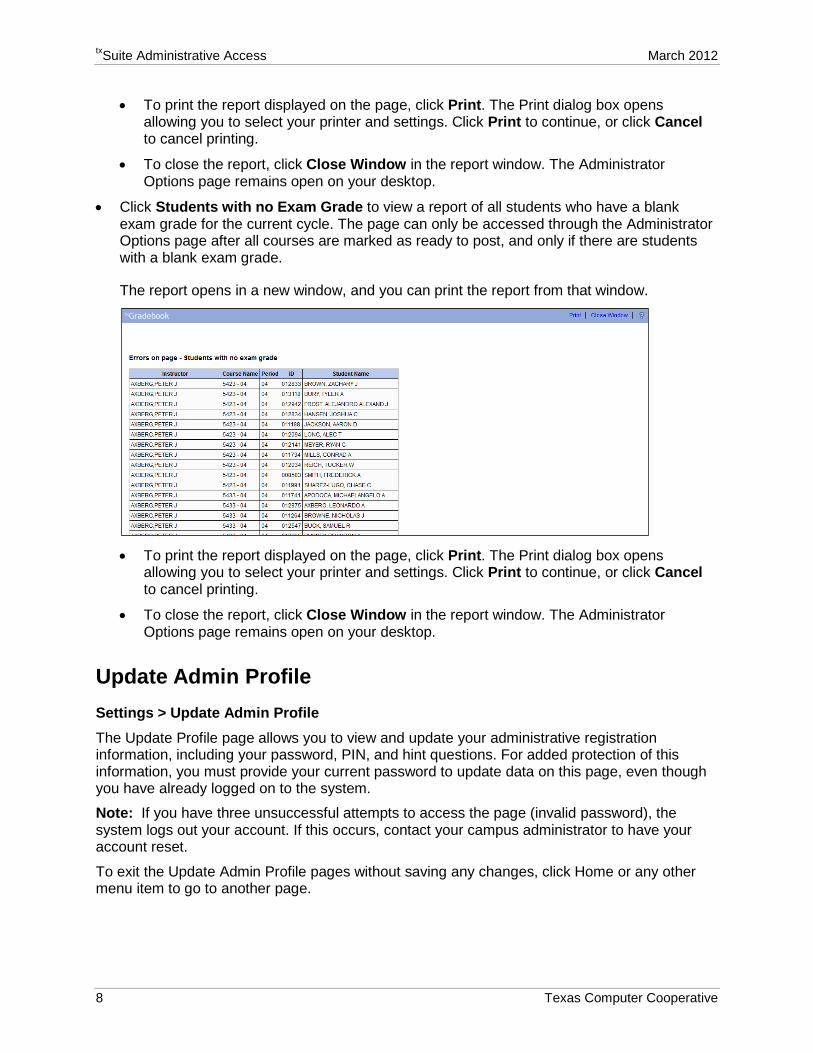
• Click Students with no Exam Grade to view a report of all students who have a blank exam grade for the current cycle. The page can only be accessed through the Administrator Options page after all courses are marked as ready to post, and only if there are students with a blank exam grade.
The report opens in a new window, and you can print the report from that window.
• To print the report displayed on the page, click Print. The Print dialog box opens
allowing you to select your printer and settings. Click Print to continue, or click Cancel to cancel printing.
• To close the report, click Close Window in the report window. The Administrator Options page remains open on your desktop.
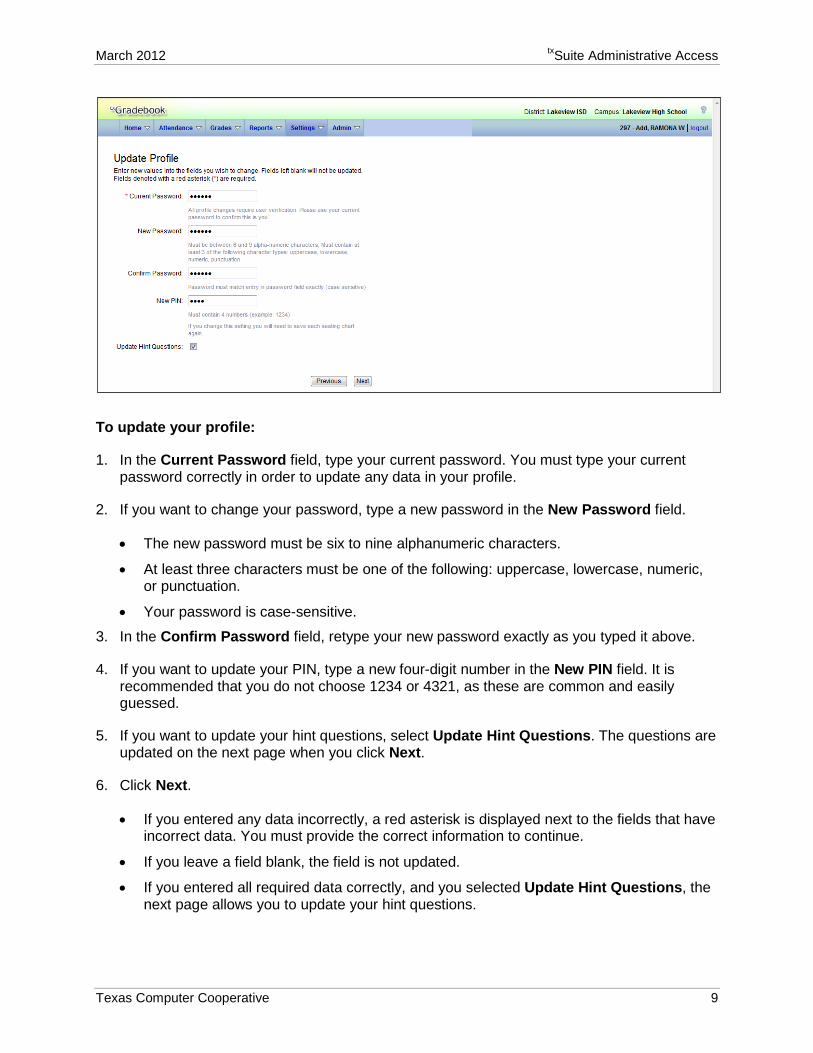
Update Admin Profile Settings > Update Admin Profile The Update Profile page allows you to view and update your administrative registration information, including your password, PIN, and hint questions. For added protection of this information, you must provide your current password to update data on this page, even though you have already logged on to the system.
Note: If you have three unsuccessful attempts to access the page (invalid password), the system logs out your account. If this occurs, contact your campus administrator to have your account reset.
To exit the Update Admin Profile pages without saving any changes, click Home or any other menu item to go to another page.
March 2012 txSuite Administrative Access
Texas Computer Cooperative 9
To update your profile:
1. In the Current Password field, type your current password. You must type your current password correctly in order to update any data in your profile.
2. If you want to change your password, type a new password in the New Password field.
• The new password must be six to nine alphanumeric characters.
• At least three characters must be one of the following: uppercase, lowercase, numeric, or punctuation.
• Your password is case-sensitive.
3. In the Confirm Password field, retype your new password exactly as you typed it above.
4. If you want to update your PIN, type a new four-digit number in the New PIN field. It is recommended that you do not choose 1234 or 4321, as these are common and easily guessed.
5. If you want to update your hint questions, select Update Hint Questions. The questions are updated on the next page when you click Next.
6. Click Next.
• If you entered any data incorrectly, a red asterisk is displayed next to the fields that have incorrect data. You must provide the correct information to continue.
• If you leave a field blank, the field is not updated.
• If you entered all required data correctly, and you selected Update Hint Questions, the next page allows you to update your hint questions.
txSuite Administrative Access Training Guid March 2012
10 Texas Computer Cooperative
• If you entered all required data correctly, and you did not select Update Hint Questions, the Success page is displayed. To finish the Update Profile function, click Finish. You are redirected to the Announcements page.
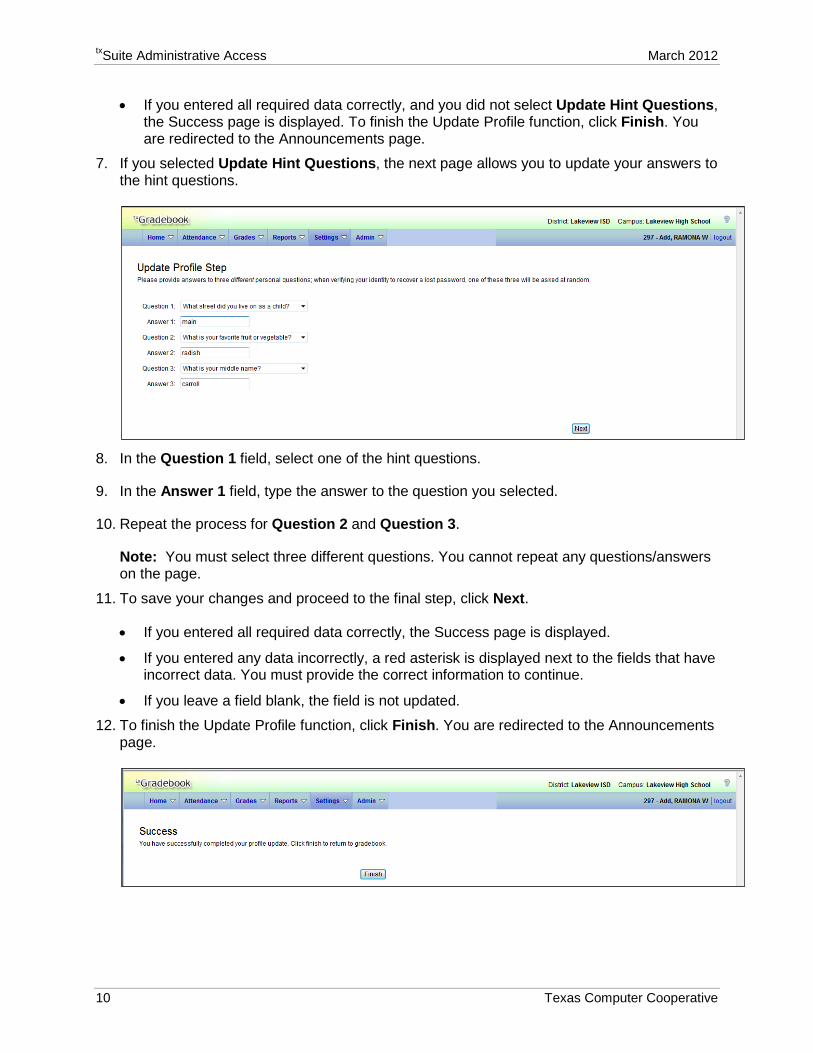
7. If you selected Update Hint Questions, the next page allows you to update your answers to the hint questions.
8. In the Question 1 field, select one of the hint questions.
9. In the Answer 1 field, type the answer to the question you selected.
10. Repeat the process for Question 2 and Question 3.
Note: You must select three different questions. You cannot repeat any questions/answers on the page.
11. To save your changes and proceed to the final step, click Next.
• If you entered all required data correctly, the Success page is displayed.
• If you entered any data incorrectly, a red asterisk is displayed next to the fields that have incorrect data. You must provide the correct information to continue.
• If you leave a field blank, the field is not updated.
12. To finish the Update Profile function, click Finish. You are redirected to the Announcements page.
March 2012 txSuite Administrative Access
Texas Computer Cooperative 11
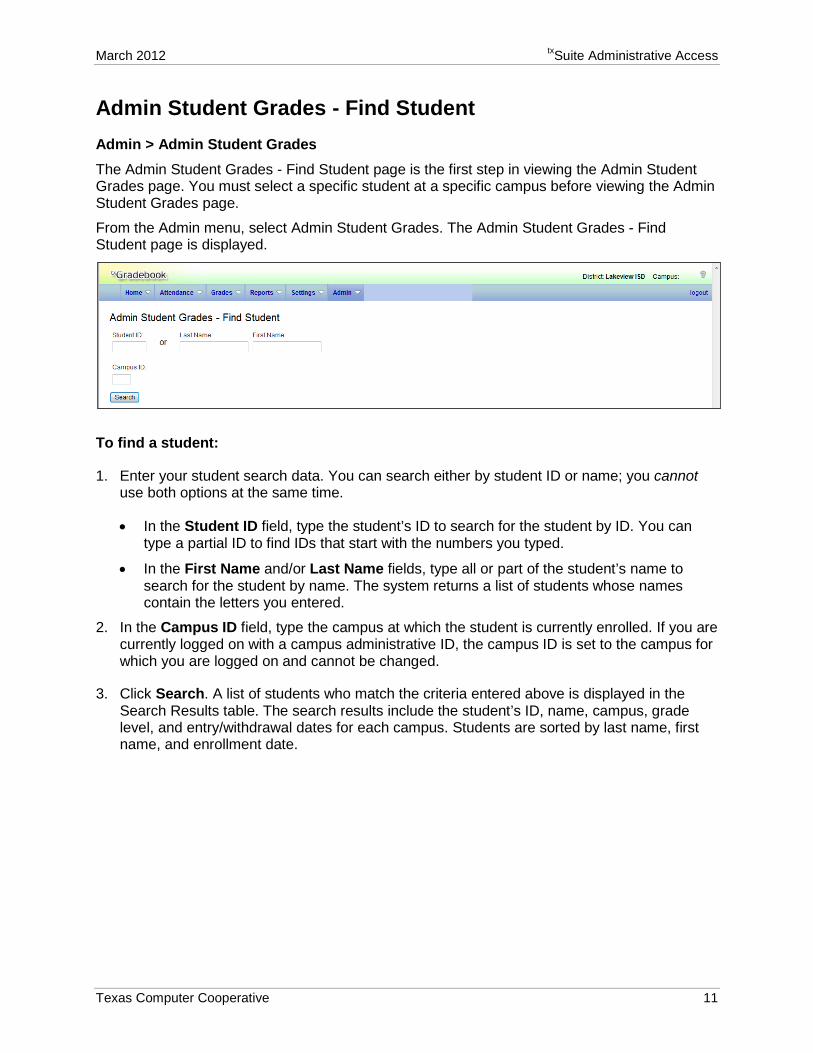
Admin Student Grades - Find Student Admin > Admin Student Grades The Admin Student Grades - Find Student page is the first step in viewing the Admin Student Grades page. You must select a specific student at a specific campus before viewing the Admin Student Grades page.
From the Admin menu, select Admin Student Grades. The Admin Student Grades - Find Student page is displayed.
To find a student:
1. Enter your student search data. You can search either by student ID or name; you cannot use both options at the same time.
• In the Student ID field, type the student’s ID to search for the student by ID. You can type a partial ID to find IDs that start with the numbers you typed.
• In the First Name and/or Last Name fields, type all or part of the student’s name to search for the student by name. The system returns a list of students whose names contain the letters you entered.
2. In the Campus ID field, type the campus at which the student is currently enrolled. If you are currently logged on with a campus administrative ID, the campus ID is set to the campus for which you are logged on and cannot be changed.
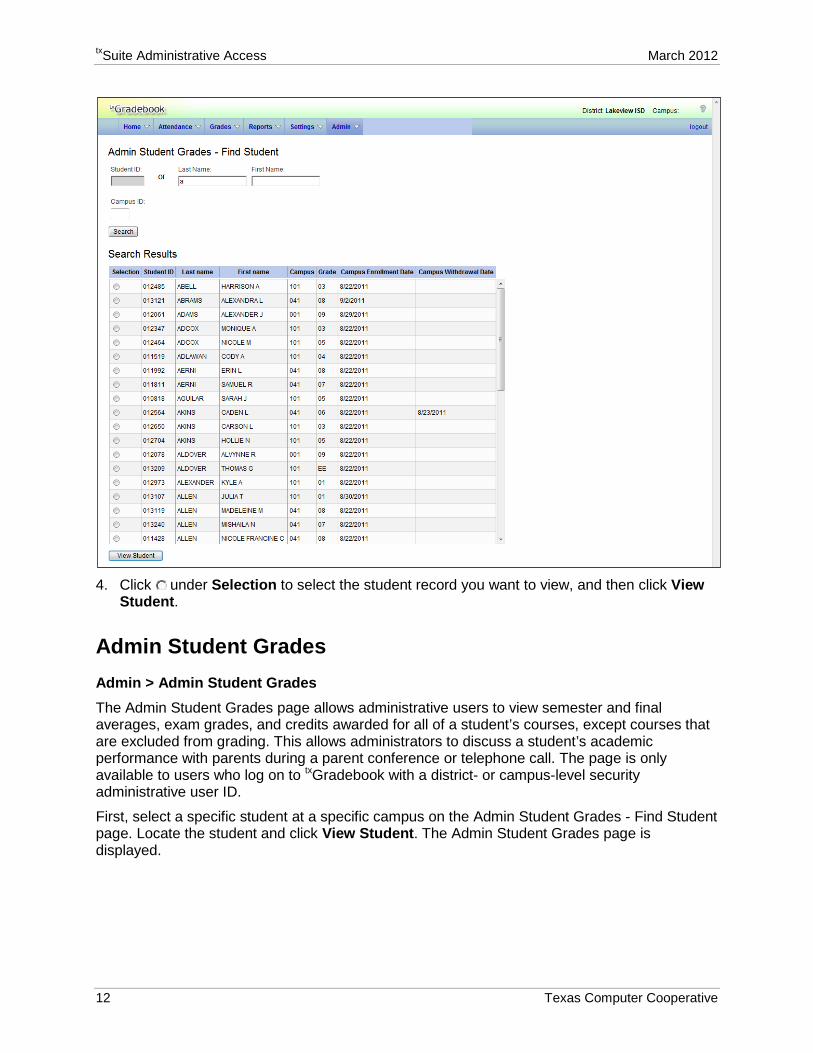
3. Click Search. A list of students who match the criteria entered above is displayed in the Search Results table. The search results include the student’s ID, name, campus, grade level, and entry/withdrawal dates for each campus. Students are sorted by last name, first name, and enrollment date.
txSuite Administrative Access Training Guid March 2012
12 Texas Computer Cooperative
4. Click under Selection to select the student record you want to view, and then click View
Student.
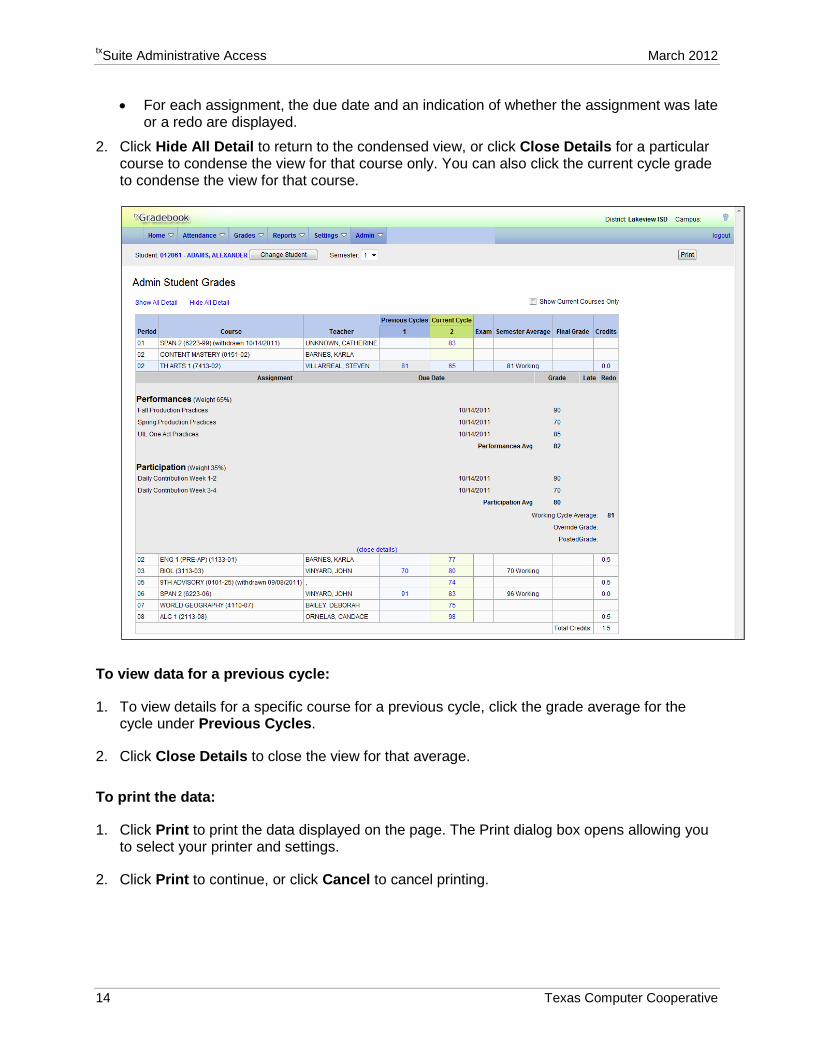
Admin Student Grades Admin > Admin Student Grades The Admin Student Grades page allows administrative users to view semester and final averages, exam grades, and credits awarded for all of a student’s courses, except courses that are excluded from grading. This allows administrators to discuss a student’s academic performance with parents during a parent conference or telephone call. The page is only available to users who log on to txGradebook with a district- or campus-level security administrative user ID.
First, select a specific student at a specific campus on the Admin Student Grades - Find Student page. Locate the student and click View Student. The Admin Student Grades page is displayed.
March 2012 txSuite Administrative Access
Texas Computer Cooperative 13
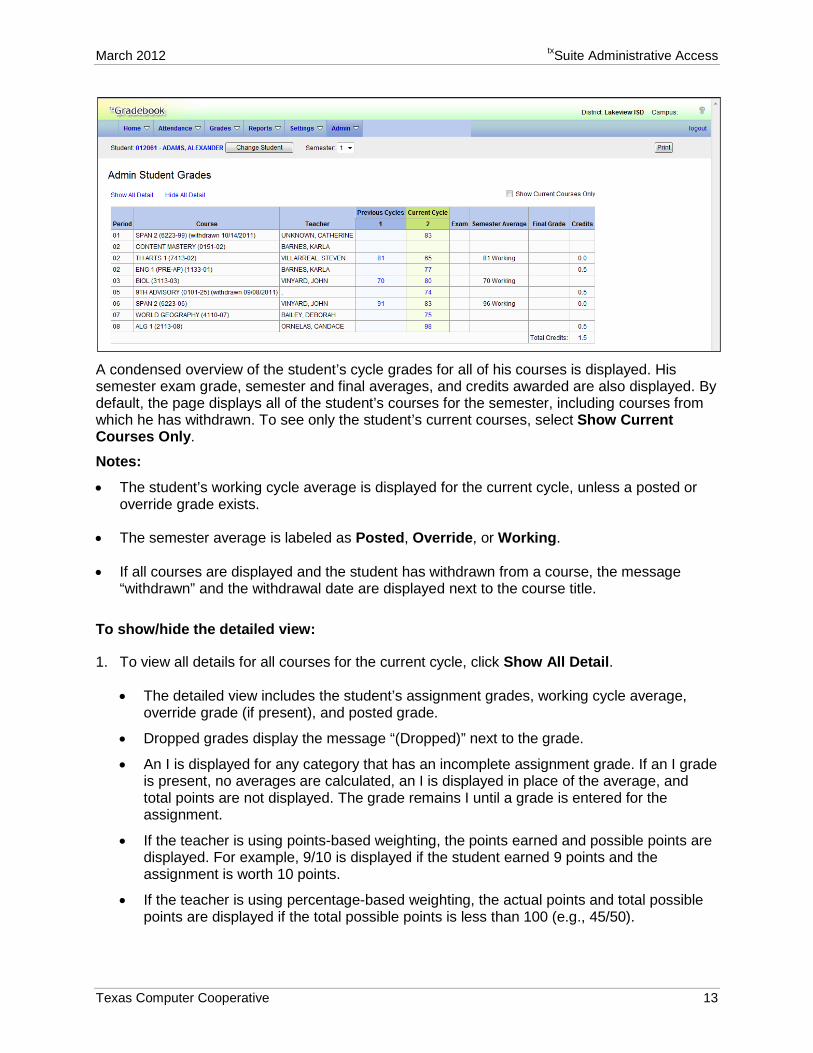
A condensed overview of the student’s cycle grades for all of his courses is displayed. His semester exam grade, semester and final averages, and credits awarded are also displayed. By default, the page displays all of the student’s courses for the semester, including courses from which he has withdrawn. To see only the student’s current courses, select Show Current Courses Only.
Notes:
• The student’s working cycle average is displayed for the current cycle, unless a posted or override grade exists.
• The semester average is labeled as Posted, Override, or Working.
• If all courses are displayed and the student has withdrawn from a course, the message “withdrawn” and the withdrawal date are displayed next to the course title.
To show/hide the detailed view:
1. To view all details for all courses for the current cycle, click Show All Detail.
• The detailed view includes the student’s assignment grades, working cycle average, override grade (if present), and posted grade.
• Dropped grades display the message “(Dropped)” next to the grade.
• An I is displayed for any category that has an incomplete assignment grade. If an I grade is present, no averages are calculated, an I is displayed in place of the average, and total points are not displayed. The grade remains I until a grade is entered for the assignment.
• If the teacher is using points-based weighting, the points earned and possible points are displayed. For example, 9/10 is displayed if the student earned 9 points and the assignment is worth 10 points.
• If the teacher is using percentage-based weighting, the actual points and total possible points are displayed if the total possible points is less than 100 (e.g., 45/50).
txSuite Administrative Access Training Guid March 2012
14 Texas Computer Cooperative
• For each assignment, the due date and an indication of whether the assignment was late or a redo are displayed.
2. Click Hide All Detail to return to the condensed view, or click Close Details for a particular course to condense the view for that course only. You can also click the current cycle grade to condense the view for that course.
To view data for a previous cycle:
1. To view details for a specific course for a previous cycle, click the grade average for the cycle under Previous Cycles.
2. Click Close Details to close the view for that average.
To print the data:
1. Click Print to print the data displayed on the page. The Print dialog box opens allowing you to select your printer and settings.
2. Click Print to continue, or click Cancel to cancel printing.

March 2012 txSuite Administrative Access
Texas Computer Cooperative 15
To select another student:
Click Change Student to select another student for whom to view data. The Admin Student Grades - Find Student page is displayed allowing you to search for another student.
Admin Skills-Referenced Courses (iTCCS only) Admin > Admin Skills-Referenced Courses The Admin Skills-Referenced Courses page is for campuses that are set up to use skills-referenced grading. This page allows you to indicate if a course section is category-based (i.e., regular) or skills-referenced.
To select the assessment type:
1. In the Teacher field, select courses for a specific teacher. Or, select ALL to include all teachers.
2. Select Course ID to retrieve courses by course number, or select Course Name to retrieve courses by name. Then, type the course number or course name in the field and click Search. The course sections are displayed according to your search criteria.
• If SKL is displayed in the Skills-Ref column, the course section is set to skills-referenced and has scores. You cannot change the assessment type unless you delete all existing skills, scores, and assignments.
• If CAT is displayed in the Skills-Ref column, the course section is set to category-based (i.e., regular) and has assignments. You cannot change the assessment type unless you delete all existing categories, grades, and assignments.
txSuite Administrative Access Training Guid March 2012
16 Texas Computer Cooperative
• If the check box is unselected, the assessment type has not been indicated, and the course has no grades/scores. The course section is category-based (i.e., regular) by default. You can switch between category-based and skills-referenced until an assignment grade is entered for the course section.
3. To mark a course section as skills-referenced, select Skills-Ref. You can select multiple course sections.
4. To mark a course section as category-based, unselect Skills-Ref.
5. Click Save to save your changes.
Elementary Skills-Based Grading See the Known Issues section in the Introduction of this guide for more information about this feature.
Admin Elementary Skills-Based Setup
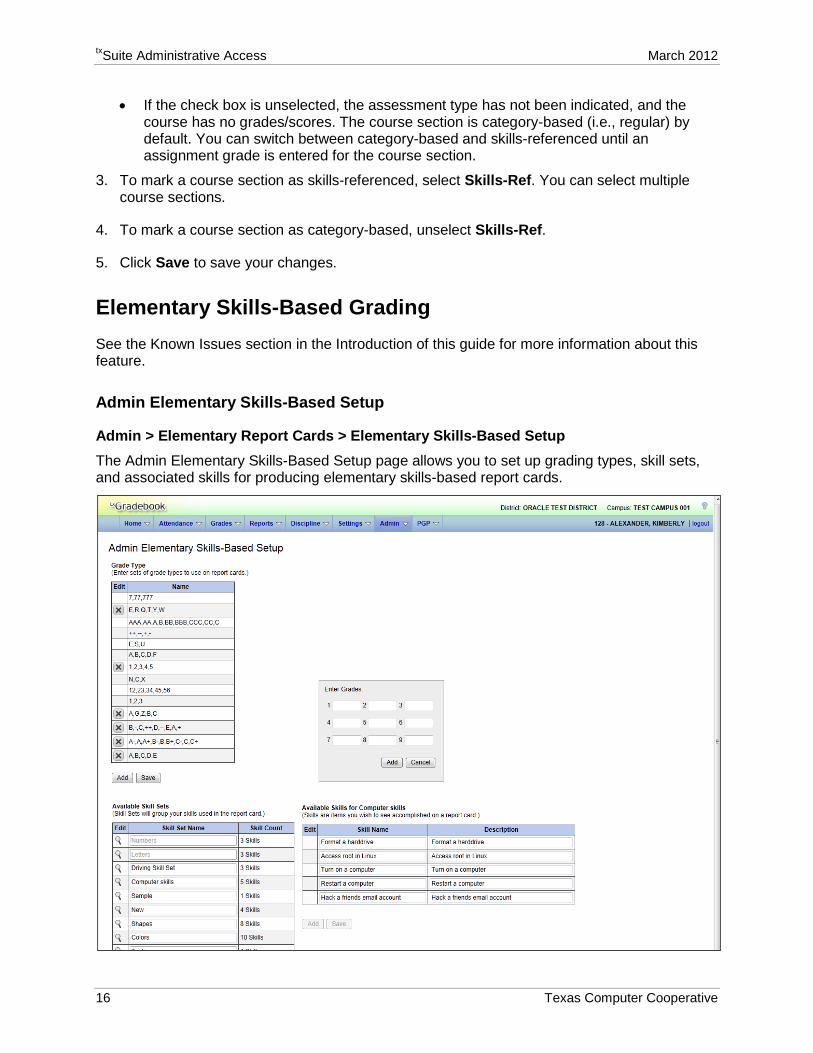
Admin > Elementary Report Cards > Elementary Skills-Based Setup The Admin Elementary Skills-Based Setup page allows you to set up grading types, skill sets, and associated skills for producing elementary skills-based report cards.
March 2012 txSuite Administrative Access
Texas Computer Cooperative 17
To set up elementary skills:
1. Under Grade Type, you can maintain a table of grading types that can be used for elementary skills-based report cards, such as E,S,U. The name should represent the scores that will be used to evaluate the students.
• To add a new grade type, click Add below the Grade Type table. The Enter Grades fields are displayed.
• You can enter up to nine grade types, and each type can have up to three uppercase characters. Any lowercase characters will be converted to uppercase.
• Click Add under the Enter Grades fields to add the grade types to the Grade Type table. Otherwise, click Cancel.
• Click Save.
If your changes were saved successfully, a message is displayed indicating that the grade type changes were saved successfully.
• Click to delete a grade type. The grade type is deleted.
Note: You cannot delete or edit a grade type that is associated with a report card; the is not displayed.
2. Under Available Skill Sets, you can create skill sets for elementary skills-based report cards. For each skill set, you will be able to associate a list of specific skills.
• To add a new skill set, click Add below the Available Skill Sets table. A blank row appears in the table.
• In the Skill Set Name field, type the name of the skill set. You can type up to 50 characters.
• The Skill Count field displays the total number of skills currently associated with each skill set.
• Click Save.
If your changes were saved successfully, a message is displayed indicating that the skill set changes were saved successfully.
• Click to add or edit the specific skills associated with the skill set. The Available Skills for Skillset table is displayed and lists any skills currently associated with the skill set.
• Click to delete a skill set. The skill set is deleted.
Note: Some skill sets are included automatically (i.e., Letters and Numbers) and cannot be deleted. They appear dimmed in the table, and the is not displayed. However, you can click to add additional skills to the predefined list.
3. Under Available Skills for Skillset, you can create a list of specific skills to be associated with a skill set.
• To add a new skill to the selected skill set, click Add below the Available Skills for Skillset table. A blank row appears in the table.
txSuite Administrative Access Training Guid March 2012
18 Texas Computer Cooperative
• In the Skill Name field, type the name of the skill. You can type up to 50 characters.
• In the Description field, type a description of the skill as you want it to be displayed on the report card. The field is required and can be up to 50 characters.
• Click Save.
If your changes were saved successfully, a message is displayed indicating that the skill changes were saved successfully.
• Click to delete a skill. The skill is deleted.
Admin Skills-Based Report Card Setup
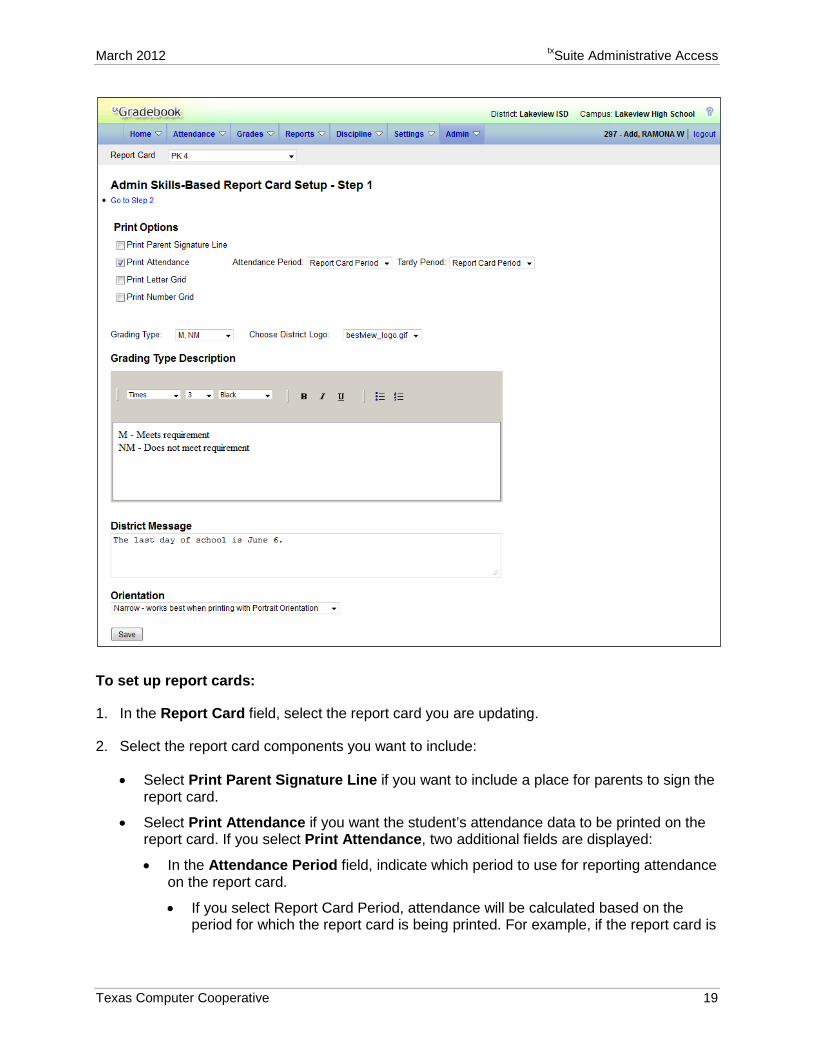
Admin > Elementary Report Cards > Elementary Skills-Based Report Card Setup The Admin Skills-Based Report Card Setup consists of two pages that allow you to set up report cards that teachers can print from the Grades menu. You can create multiple report cards. For each report card, you select and enter data for the components that you want to print on the report card and select the skills that will be assessed on the report card. Each course is associated with a report card, so the report card options are applied to the course.
March 2012 txSuite Administrative Access
Texas Computer Cooperative 19
To set up report cards:
1. In the Report Card field, select the report card you are updating.
2. Select the report card components you want to include:
• Select Print Parent Signature Line if you want to include a place for parents to sign the report card.
• Select Print Attendance if you want the student’s attendance data to be printed on the report card. If you select Print Attendance, two additional fields are displayed:
• In the Attendance Period field, indicate which period to use for reporting attendance on the report card.
• If you select Report Card Period, attendance will be calculated based on the period for which the report card is being printed. For example, if the report card is
txSuite Administrative Access Training Guid March 2012
20 Texas Computer Cooperative
printed for a fifth period reading class, attendance will be pulled for fifth period only. This is the default setting.
• If you select ADA Period, when the report card prints, the program will determine what the ADA period is for the particular student's attendance track and only count absences incurred during that period.
• In the Tardy Period field, indicate which period to use for reporting tardies on the report card.
• If you select Report Card Period, tardies will be calculated based on the period for which the report card is being printed. For example, if the report card is printed for a fifth period reading class, tardies will be pulled for fifth period only. This is the default setting.
• If you select ADA Period, when the report card prints, the program will determine what the ADA period is for the particular student's attendance track and only count tardies incurred during that period.
• If a particular period is used for reporting tardies at the elementary level, you can select the period. This may or may not be the ADA period.
• Select Print Letter Grid if you want to include the letter grid for indicating the student’s recognition skills related to alphabet letters, such as recognizing upper- and lower-case letters. This is only used if the letters skill set is associated with the course.
• Select Print Number Grid if you want to include the number grid for indicating the student’s recognition and ability to write numbers. This is only used if the numbers skill set is associated with the course.
3. In the Grading Type field, select the grading type to be used on the report card. The drop down lists all grading types set up on the Admin > Elementary Skills-Based Setup page.
4. In the Choose District Logo field, you can select a logo to be included at the top of the report card. The drop down lists all images that have been copied to the correct location on the server by the district and are referenced in a key in the config file.
Notes:
• The logo file names will have “_elem_logo” somewhere in the file name (e.g., bestview_elem_logo.gif and bestview_elem_logo_new.gif).
• The default logo for the district will always appear in the drop down, regardless of how the file is named. This is the image file for the log that appears on the txGradebook Login page; it can also be used for the report cards.
5. Under Grading Type Description, you can enter a detailed explanation of the grading type. A blank letter editor and formatting toolbar are displayed. The buttons on the toolbar allow you to change the font, size of font, attributes (bold, italic, underline), alignment, spacing, and other formatting of the text.
For example, if the grading type is E,S,U, the description could be as follows:
• E - Excellent
• S - Satisfactory
• U - Unsatisfactory
March 2012 txSuite Administrative Access
Texas Computer Cooperative 21
This description will print on the report card under Grading Scale. It also appears on the Assignment Grades (skills-based) page when you move the pointer over the Grade Types field.
6. Under District Message, you can type a message that will be displayed on the report card for all students.
7. In the Orientation field, indicate if you want to use the narrow or wide orientation depending on your printer orientation setting.
8. Click Save.
If your changes were saved successfully, a message is displayed indicating that the save was successful.
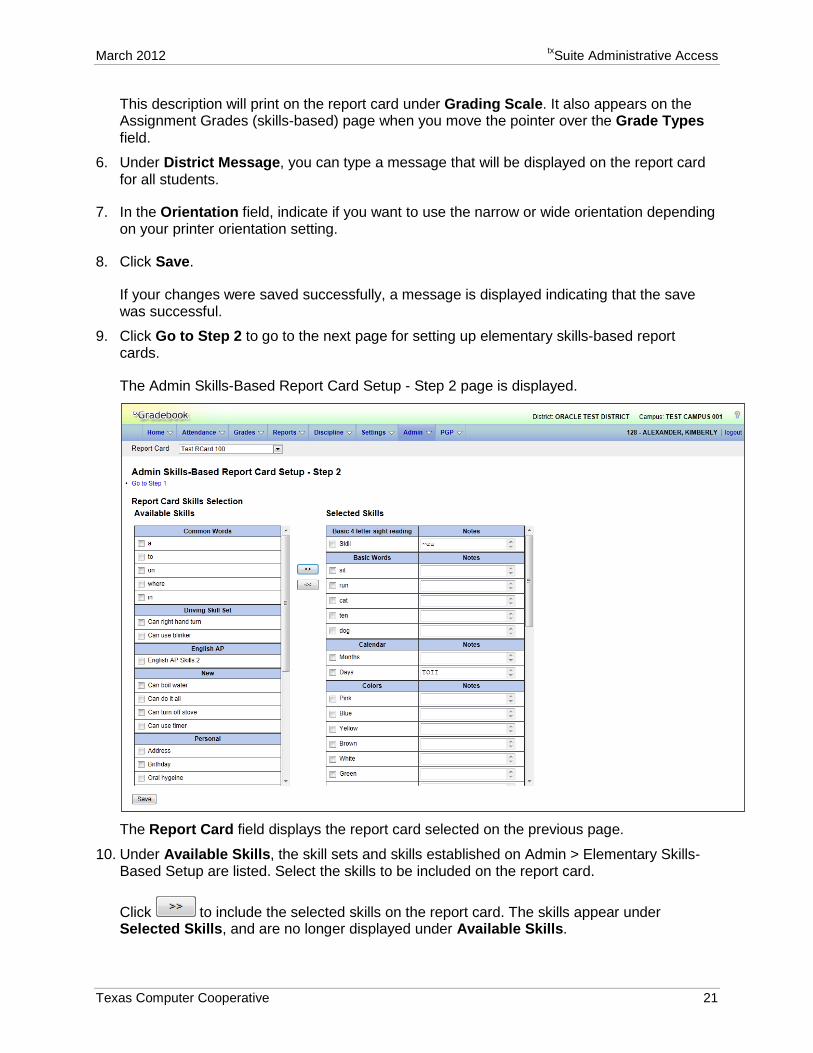
9. Click Go to Step 2 to go to the next page for setting up elementary skills-based report cards.
The Admin Skills-Based Report Card Setup - Step 2 page is displayed.
The Report Card field displays the report card selected on the previous page.
10. Under Available Skills, the skill sets and skills established on Admin > Elementary Skills-Based Setup are listed. Select the skills to be included on the report card.
Click to include the selected skills on the report card. The skills appear under Selected Skills, and are no longer displayed under Available Skills.
txSuite Administrative Access Training Guid March 2012
22 Texas Computer Cooperative
11. In the Notes field for each skill, you can add notes about the skill that will print on the report card.
When you click in the field, the space expands to allow you to view more of the message you are typing. When you click out of the field, the space reverts to displaying only one row of the notes.
12. Under Selected Skills, select any skills to be removed from the report card.
Click to remove the selected skills from the report card. The skills appear under Available Skills, and are no longer displayed under Selected Skills.
13. Click Save.
If your changes were saved successfully, a message is displayed indicating that the save was successful.
14. You can click Go to Step 1 to return to the Admin Skills-Based Report Card Setup - Step 1 page.
Admin Elementary Skills-Based Courses
Admin > Elementary Report Cards > Elementary Skills-Based Courses
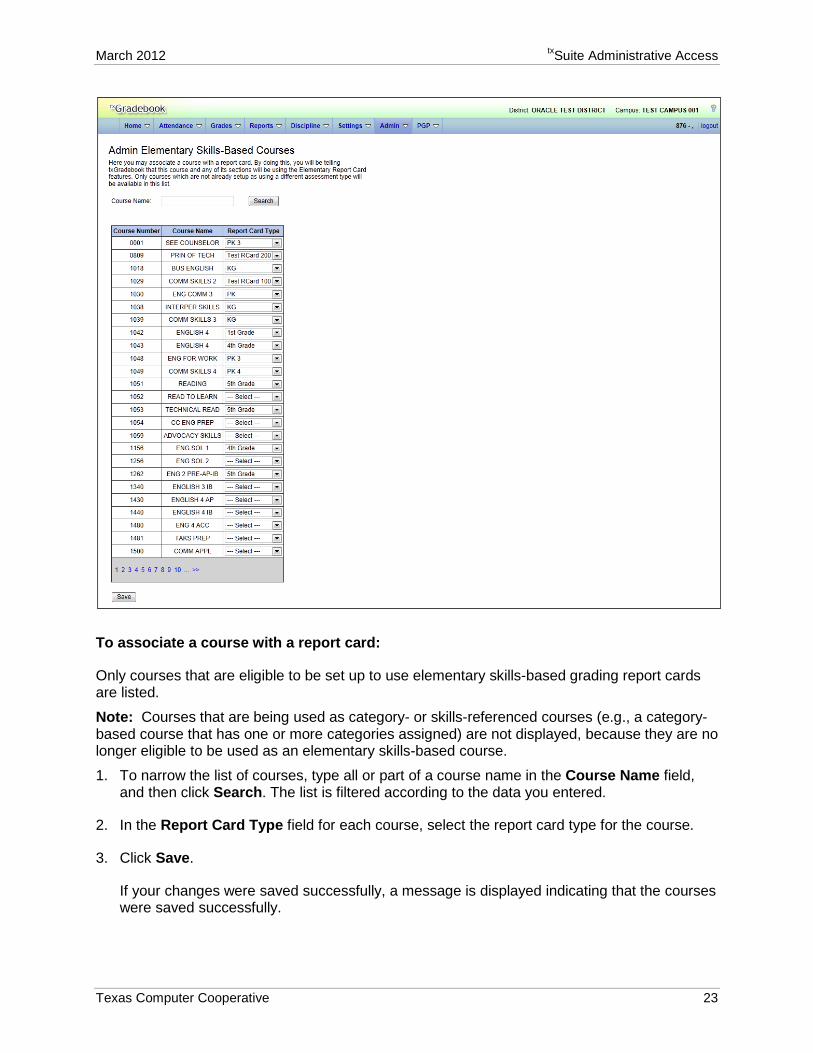
The Admin Elementary Skills-Based Courses page allows you to associate a course (and all of its sections) with a specific elementary skills-based report card. The settings for the report card determine how grading is handled for the course.
Note: If a section is added to a course after the course is selected for elementary skills-based grading, the new section will not have elementary skills-based grading associated with it.
March 2012 txSuite Administrative Access
Texas Computer Cooperative 23
To associate a course with a report card:
Only courses that are eligible to be set up to use elementary skills-based grading report cards are listed.
Note: Courses that are being used as category- or skills-referenced courses (e.g., a category-based course that has one or more categories assigned) are not displayed, because they are no longer eligible to be used as an elementary skills-based course.
1. To narrow the list of courses, type all or part of a course name in the Course Name field, and then click Search. The list is filtered according to the data you entered.
2. In the Report Card Type field for each course, select the report card type for the course.
3. Click Save.
If your changes were saved successfully, a message is displayed indicating that the courses were saved successfully.

txSuite Administrative Access Training Guid March 2012
24 Texas Computer Cooperative
Other Administrative Tasks
Copy Student Groups
Settings > Student Group Manager > Copy Student Groups
Once a teacher has established groups using the Student Group Manager, administrative users can copy the teacher’s groups (and the students in the group) to another teacher. This page is only accessible from the Student Group Manager page. The page is only available for campus- and district-level administrative users.
To copy assignments:
1. From the Student Group Manager page, click Copy groups to another teacher. The Copy Student Groups page is displayed.
2. The Copy From Teacher field displays the teacher ID and name of the teacher you are impersonating (i.e., the teacher selected in the Run as Teacher field on the Administrator Options page). You can select another teacher for which you have access.
• The teacher’s groups are displayed, including the number of students added to each group.
• Select Copy for the group(s) you want to copy from this teacher to another teacher.
You can only copy groups that do not already exist for the other teacher, and you can only copy groups to a teacher who has a txGradebook logon. The Copy field is disabled for all other groups. If you point the mouse over a disabled Copy field, a pop-up message is displayed indicating the reason the group cannot be copied (e.g., “Exists in destination”).
3. By default, the Copy To Teacher field displays the teacher ID and name of the teacher you are impersonating. You can select another teacher.
The selected teacher’s existing groups are displayed, including the number of students added to each group.
March 2012 txSuite Administrative Access
Texas Computer Cooperative 25
4. Click Copy >>. The selected groups are listed under Copy To Teacher and are now included in the other teacher's list of groups.
Note: You can only delete a group that has been copied to another teacher immediately after it has been copied (i.e., if it was copied by mistake). In this case, click under Delete to delete the group. However, once you select another teacher under Copy To Teacher or leave the page, the is no longer displayed under Delete, and you cannot delete the group from the other teacher.
5. Click Back to Student Group Manager to return to the Student Group Manager page.

txSuite Administrative Access Training Guid March 2012
26 Texas Computer Cooperative
March 2012 txSuite Administrative Access
Texas Computer Cooperative 27
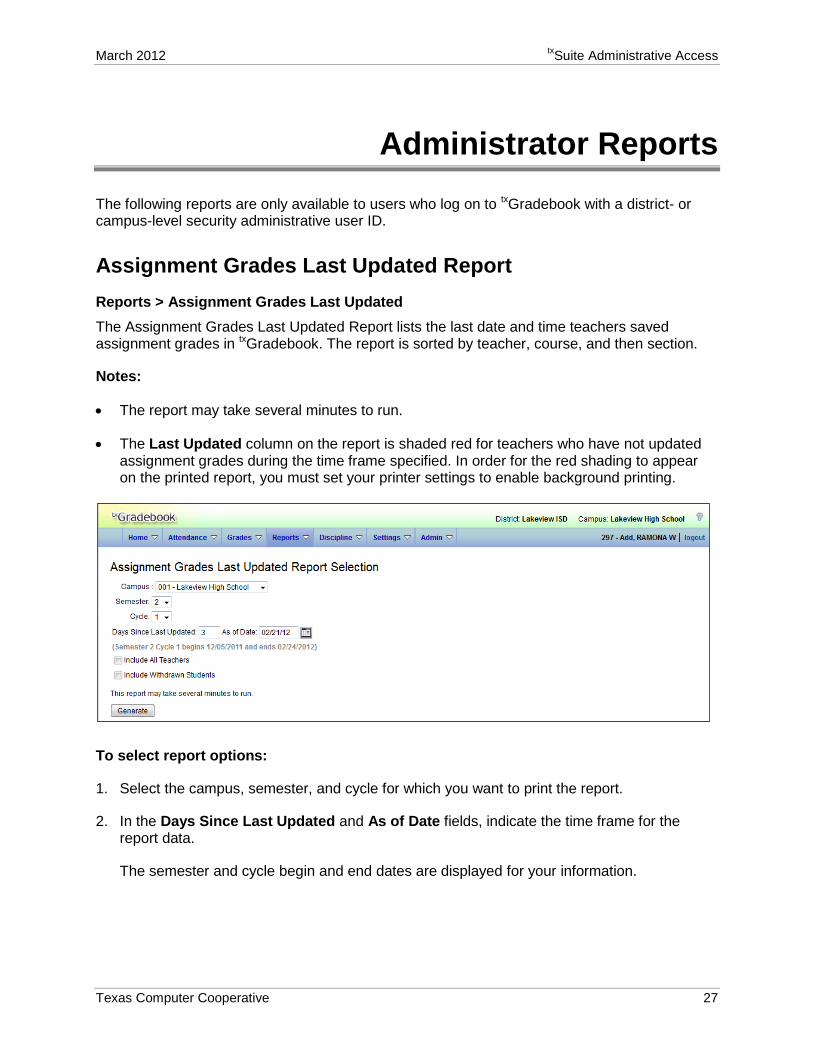
Administrator Reports The following reports are only available to users who log on to txGradebook with a district- or campus-level security administrative user ID.
Assignment Grades Last Updated Report Reports > Assignment Grades Last Updated The Assignment Grades Last Updated Report lists the last date and time teachers saved assignment grades in txGradebook. The report is sorted by teacher, course, and then section.
Notes:
• The report may take several minutes to run.
• The Last Updated column on the report is shaded red for teachers who have not updated assignment grades during the time frame specified. In order for the red shading to appear on the printed report, you must set your printer settings to enable background printing.
To select report options:
1. Select the campus, semester, and cycle for which you want to print the report.
2. In the Days Since Last Updated and As of Date fields, indicate the time frame for the report data.
The semester and cycle begin and end dates are displayed for your information.
txSuite Administrative Access Training Guid March 2012
28 Texas Computer Cooperative
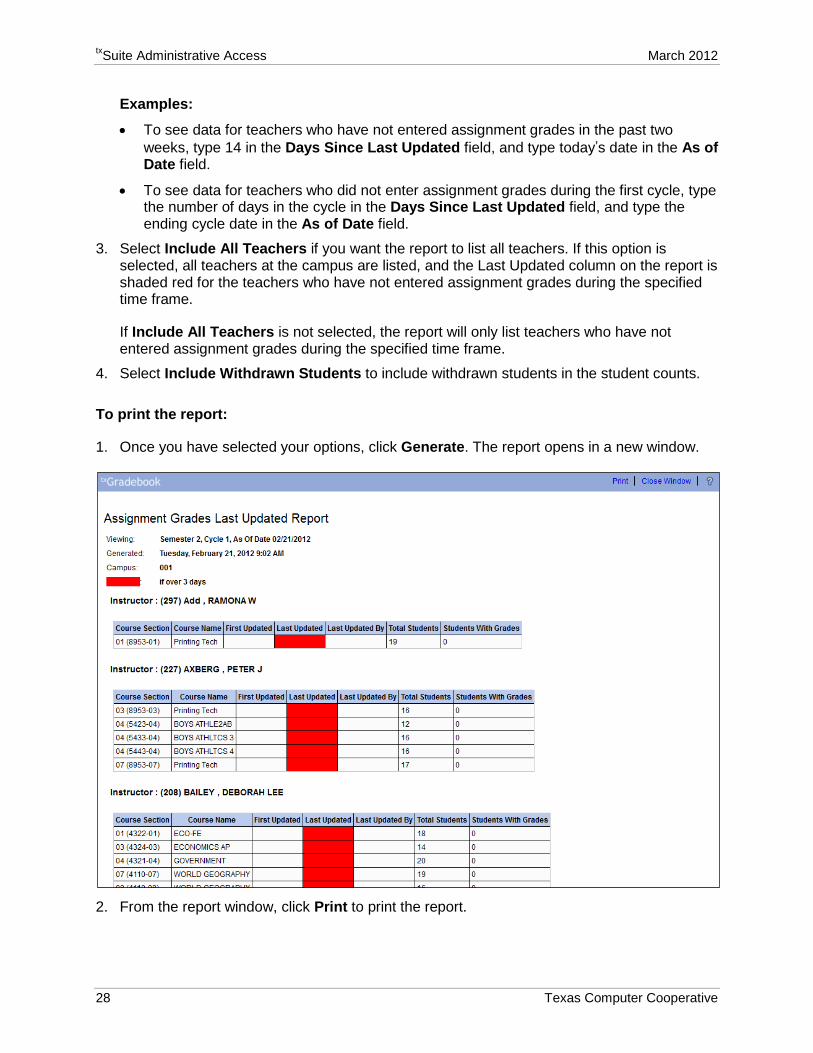
Examples:
• To see data for teachers who have not entered assignment grades in the past two weeks, type 14 in the Days Since Last Updated field, and type today՚s date in the As of Date field.
• To see data for teachers who did not enter assignment grades during the first cycle, type the number of days in the cycle in the Days Since Last Updated field, and type the ending cycle date in the As of Date field.
3. Select Include All Teachers if you want the report to list all teachers. If this option is selected, all teachers at the campus are listed, and the Last Updated column on the report is shaded red for the teachers who have not entered assignment grades during the specified time frame.
If Include All Teachers is not selected, the report will only list teachers who have not entered assignment grades during the specified time frame.
4. Select Include Withdrawn Students to include withdrawn students in the student counts.
To print the report:
1. Once you have selected your options, click Generate. The report opens in a new window.
2. From the report window, click Print to print the report.
March 2012 txSuite Administrative Access
Texas Computer Cooperative 29
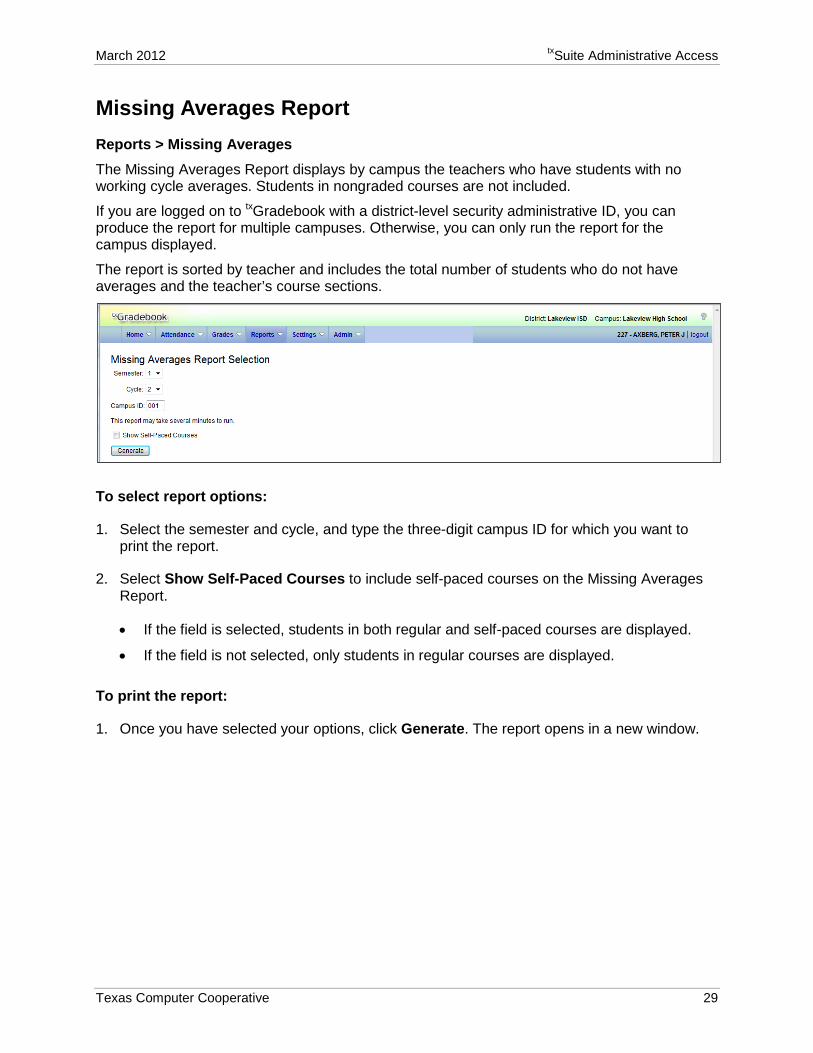
Missing Averages Report Reports > Missing Averages The Missing Averages Report displays by campus the teachers who have students with no working cycle averages. Students in nongraded courses are not included.
If you are logged on to txGradebook with a district-level security administrative ID, you can produce the report for multiple campuses. Otherwise, you can only run the report for the campus displayed.
The report is sorted by teacher and includes the total number of students who do not have averages and the teacher’s course sections.
To select report options:
1. Select the semester and cycle, and type the three-digit campus ID for which you want to print the report.
2. Select Show Self-Paced Courses to include self-paced courses on the Missing Averages Report.
• If the field is selected, students in both regular and self-paced courses are displayed.
• If the field is not selected, only students in regular courses are displayed.
To print the report:
1. Once you have selected your options, click Generate. The report opens in a new window.
txSuite Administrative Access Training Guid March 2012
30 Texas Computer Cooperative
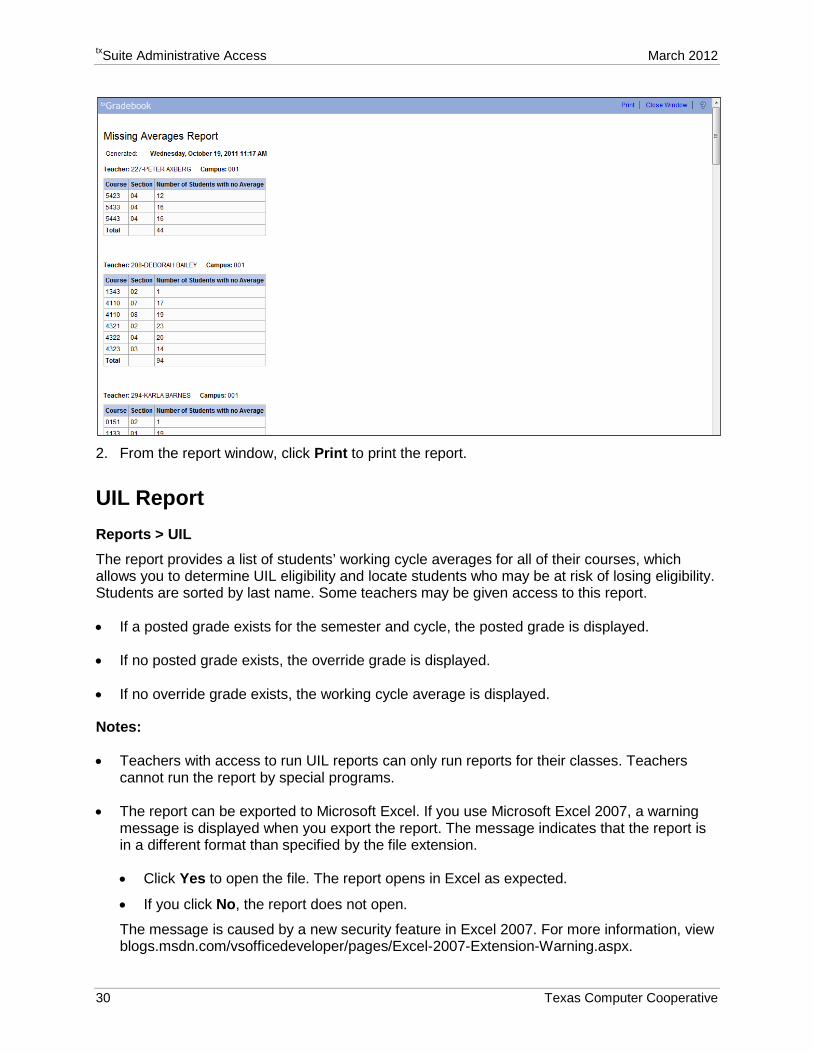
2. From the report window, click Print to print the report.
UIL Report Reports > UIL The report provides a list of students’ working cycle averages for all of their courses, which allows you to determine UIL eligibility and locate students who may be at risk of losing eligibility. Students are sorted by last name. Some teachers may be given access to this report.
• If a posted grade exists for the semester and cycle, the posted grade is displayed.
• If no posted grade exists, the override grade is displayed.
• If no override grade exists, the working cycle average is displayed.
Notes:
• Teachers with access to run UIL reports can only run reports for their classes. Teachers cannot run the report by special programs.
• The report can be exported to Microsoft Excel. If you use Microsoft Excel 2007, a warning message is displayed when you export the report. The message indicates that the report is in a different format than specified by the file extension.
• Click Yes to open the file. The report opens in Excel as expected.
• If you click No, the report does not open.
The message is caused by a new security feature in Excel 2007. For more information, view blogs.msdn.com/vsofficedeveloper/pages/Excel-2007-Extension-Warning.aspx.
March 2012 txSuite Administrative Access
Texas Computer Cooperative 31
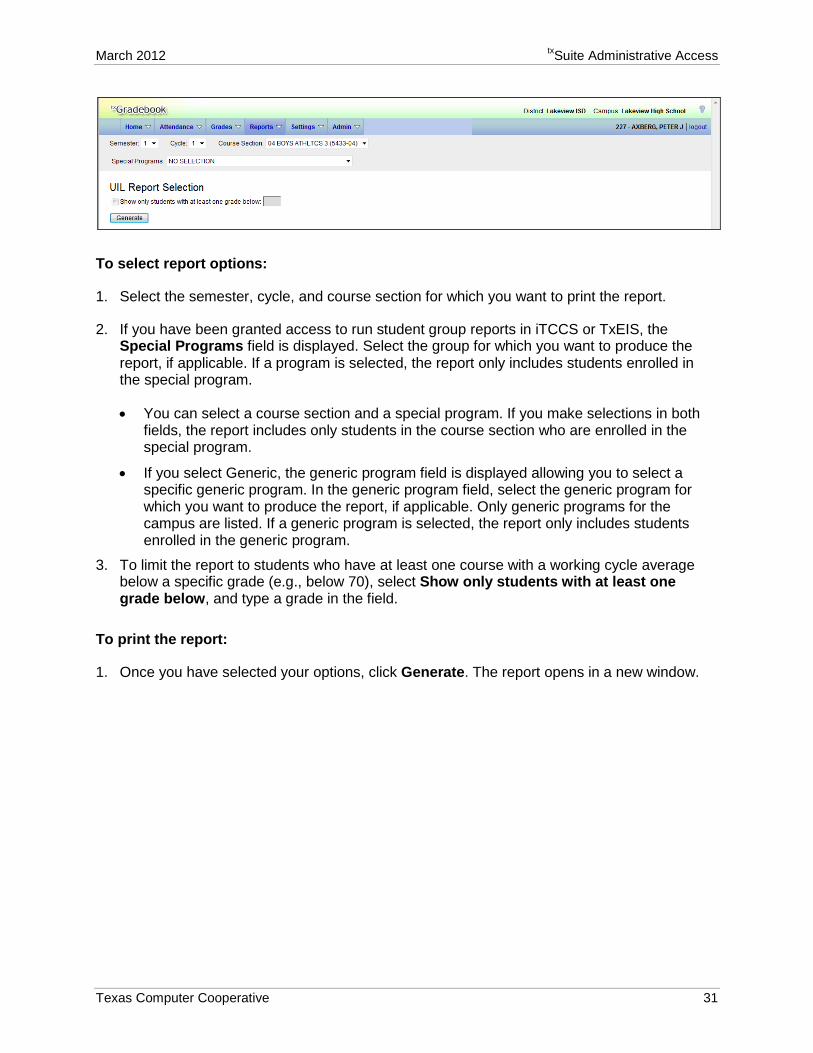
To select report options:
1. Select the semester, cycle, and course section for which you want to print the report.
2. If you have been granted access to run student group reports in iTCCS or TxEIS, the Special Programs field is displayed. Select the group for which you want to produce the report, if applicable. If a program is selected, the report only includes students enrolled in the special program.
• You can select a course section and a special program. If you make selections in both fields, the report includes only students in the course section who are enrolled in the special program.
• If you select Generic, the generic program field is displayed allowing you to select a specific generic program. In the generic program field, select the generic program for which you want to produce the report, if applicable. Only generic programs for the campus are listed. If a generic program is selected, the report only includes students enrolled in the generic program.
3. To limit the report to students who have at least one course with a working cycle average below a specific grade (e.g., below 70), select Show only students with at least one grade below, and type a grade in the field.
To print the report:
1. Once you have selected your options, click Generate. The report opens in a new window.
txSuite Administrative Access Training Guid March 2012
32 Texas Computer Cooperative
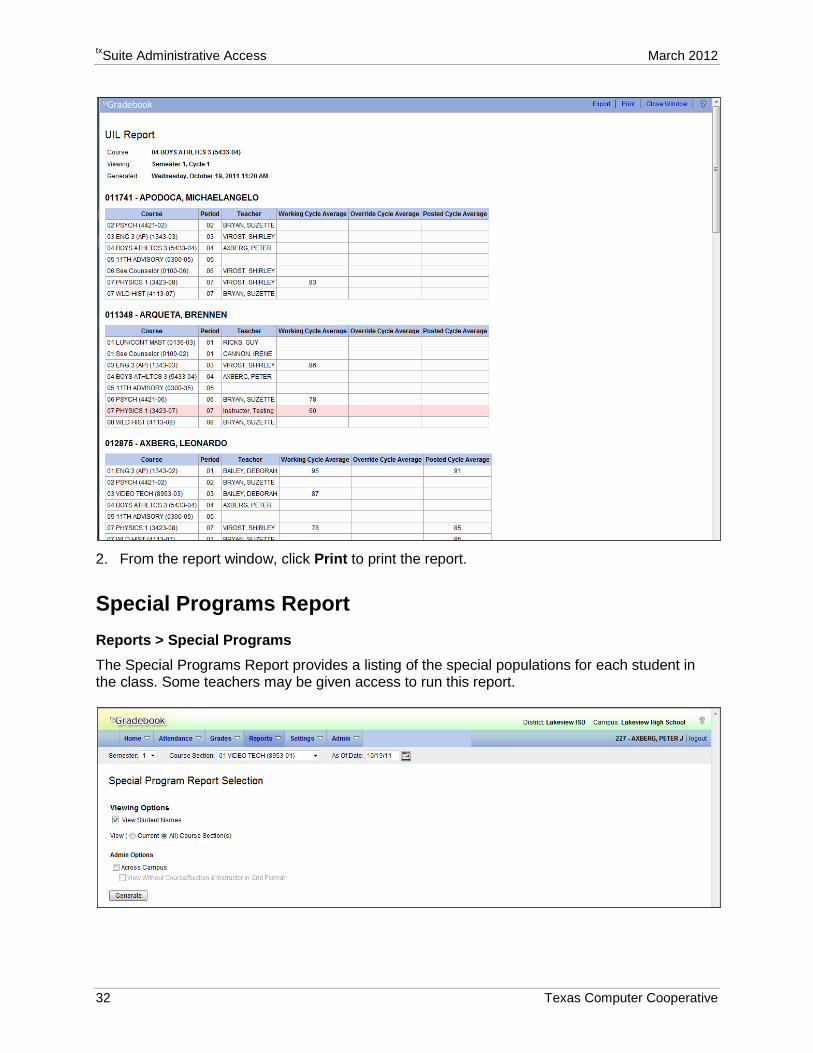
2. From the report window, click Print to print the report.
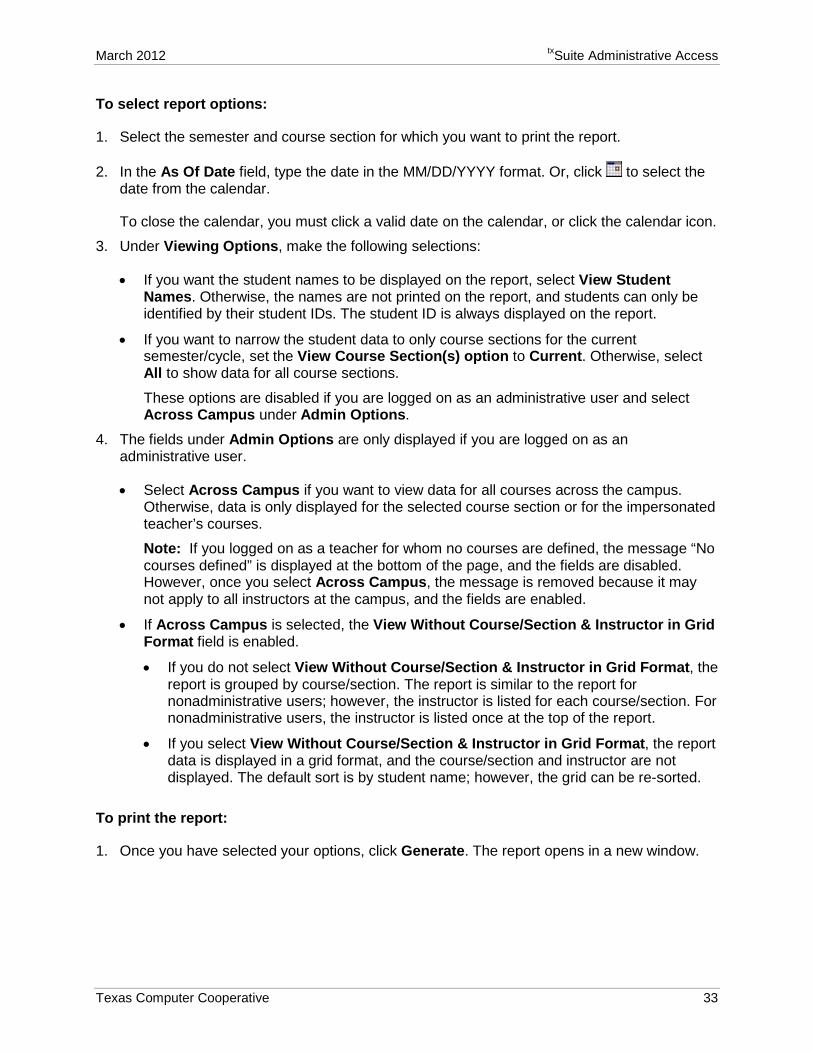
Special Programs Report Reports > Special Programs The Special Programs Report provides a listing of the special populations for each student in the class. Some teachers may be given access to run this report.
March 2012 txSuite Administrative Access
Texas Computer Cooperative 33
To select report options:
1. Select the semester and course section for which you want to print the report.
2. In the As Of Date field, type the date in the MM/DD/YYYY format. Or, click to select the date from the calendar.
To close the calendar, you must click a valid date on the calendar, or click the calendar icon.
3. Under Viewing Options, make the following selections:
• If you want the student names to be displayed on the report, select View Student Names. Otherwise, the names are not printed on the report, and students can only be identified by their student IDs. The student ID is always displayed on the report.
• If you want to narrow the student data to only course sections for the current semester/cycle, set the View Course Section(s) option to Current. Otherwise, select All to show data for all course sections.
These options are disabled if you are logged on as an administrative user and select Across Campus under Admin Options.
4. The fields under Admin Options are only displayed if you are logged on as an administrative user.
• Select Across Campus if you want to view data for all courses across the campus. Otherwise, data is only displayed for the selected course section or for the impersonated teacher’s courses.
Note: If you logged on as a teacher for whom no courses are defined, the message “No courses defined” is displayed at the bottom of the page, and the fields are disabled. However, once you select Across Campus, the message is removed because it may not apply to all instructors at the campus, and the fields are enabled.
• If Across Campus is selected, the View Without Course/Section & Instructor in Grid Format field is enabled.
• If you do not select View Without Course/Section & Instructor in Grid Format, the report is grouped by course/section. The report is similar to the report for nonadministrative users; however, the instructor is listed for each course/section. For nonadministrative users, the instructor is listed once at the top of the report.
• If you select View Without Course/Section & Instructor in Grid Format, the report data is displayed in a grid format, and the course/section and instructor are not displayed. The default sort is by student name; however, the grid can be re-sorted.
To print the report:
1. Once you have selected your options, click Generate. The report opens in a new window.
txSuite Administrative Access Training Guid March 2012
34 Texas Computer Cooperative
2. From the report window, click Print to print the report.
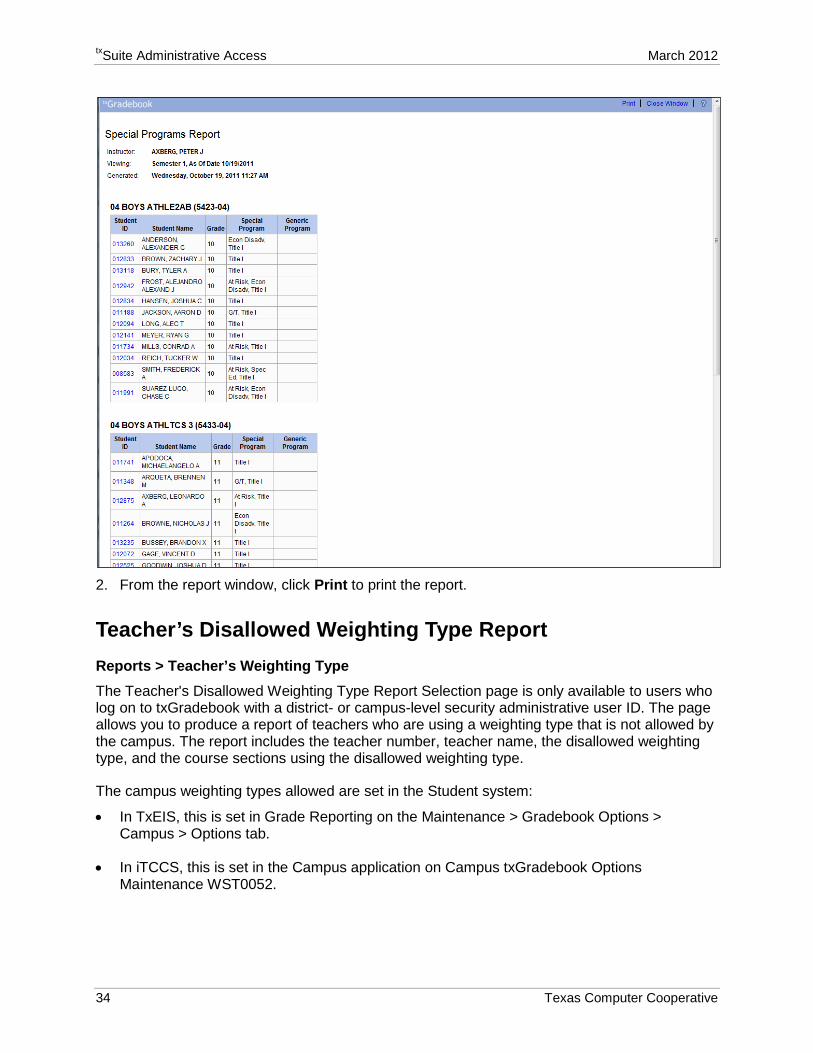
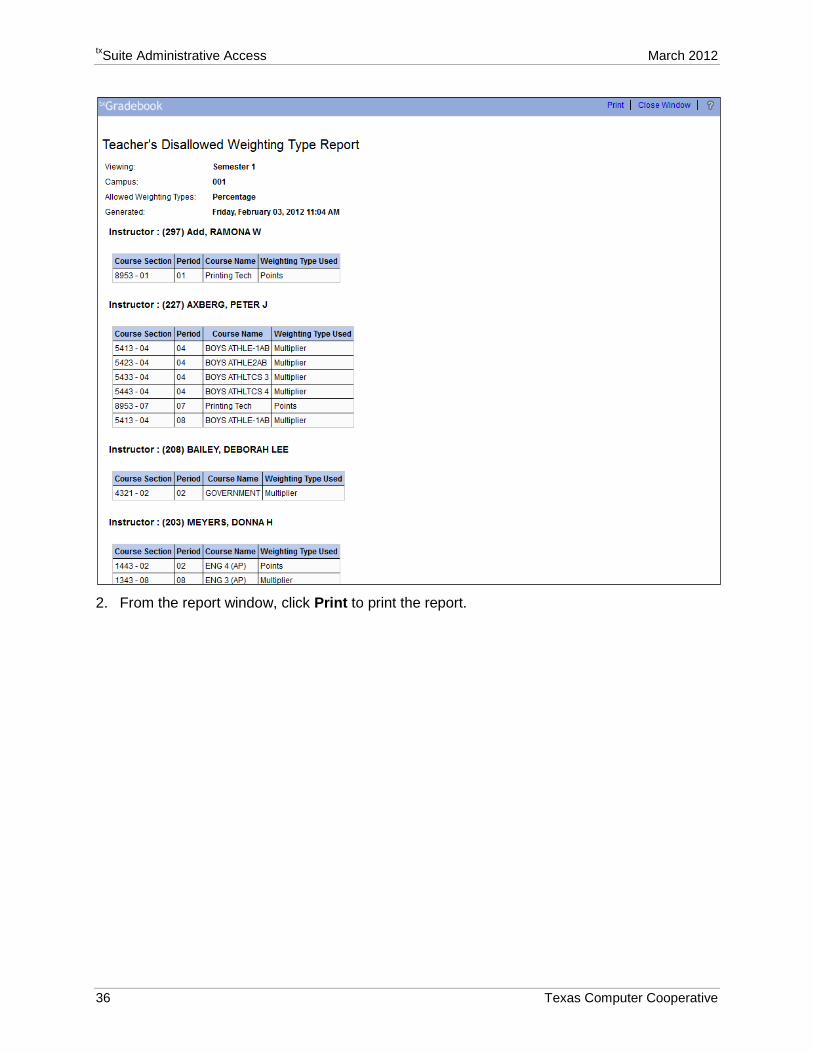
Teacher’s Disallowed Weighting Type Report Reports > Teacher’s Weighting Type The Teacher's Disallowed Weighting Type Report Selection page is only available to users who log on to txGradebook with a district- or campus-level security administrative user ID. The page allows you to produce a report of teachers who are using a weighting type that is not allowed by the campus. The report includes the teacher number, teacher name, the disallowed weighting type, and the course sections using the disallowed weighting type.
The campus weighting types allowed are set in the Student system:
• In TxEIS, this is set in Grade Reporting on the Maintenance > Gradebook Options > Campus > Options tab.
• In iTCCS, this is set in the Campus application on Campus txGradebook Options Maintenance WST0052.
March 2012 txSuite Administrative Access
Texas Computer Cooperative 35
To select report options:
1. Select the campus and semester for which you want to print the report.
2. The Allowed weighting types field displays the weighting types allowed at the selected campus.
To print the report:
1. Once you have selected your options, click Generate. The report opens in a new window.
txSuite Administrative Access Training Guid March 2012
36 Texas Computer Cooperative
2. From the report window, click Print to print the report.
March 2012 txSuite Administrative Access
Texas Computer Cooperative 37
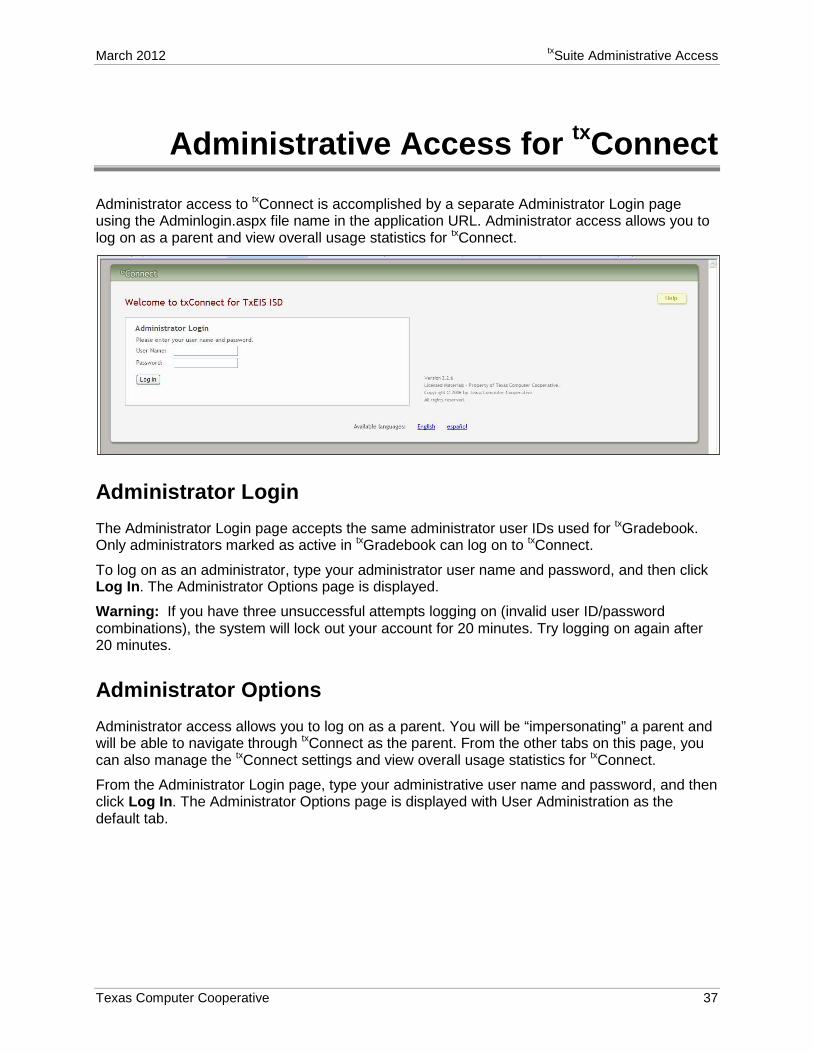
Administrative Access for txConnect Administrator access to txConnect is accomplished by a separate Administrator Login page using the Adminlogin.aspx file name in the application URL. Administrator access allows you to log on as a parent and view overall usage statistics for txConnect.
Administrator Login The Administrator Login page accepts the same administrator user IDs used for txGradebook. Only administrators marked as active in txGradebook can log on to txConnect.
To log on as an administrator, type your administrator user name and password, and then click Log In. The Administrator Options page is displayed.
Warning: If you have three unsuccessful attempts logging on (invalid user ID/password combinations), the system will lock out your account for 20 minutes. Try logging on again after 20 minutes.
Administrator Options Administrator access allows you to log on as a parent. You will be “impersonating” a parent and will be able to navigate through txConnect as the parent. From the other tabs on this page, you can also manage the txConnect settings and view overall usage statistics for txConnect.
From the Administrator Login page, type your administrative user name and password, and then click Log In. The Administrator Options page is displayed with User Administration as the default tab.
txSuite Administrative Access Training Guid March 2012
38 Texas Computer Cooperative
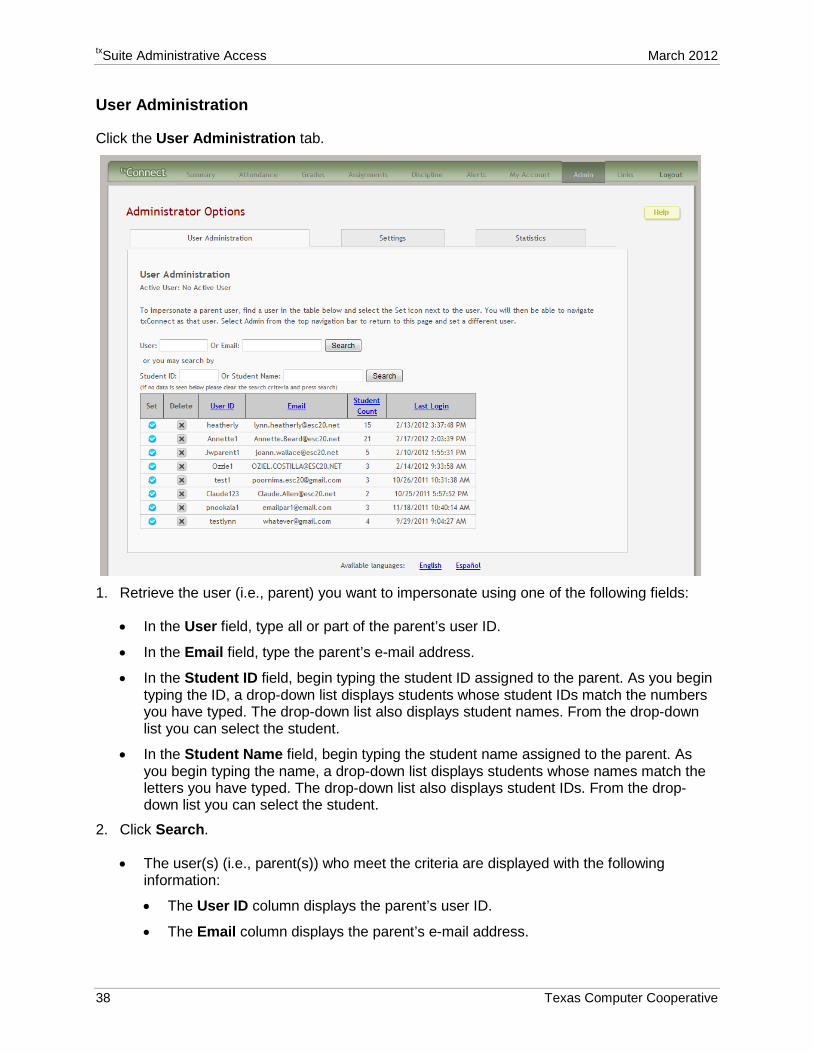
User Administration
Click the User Administration tab.
1. Retrieve the user (i.e., parent) you want to impersonate using one of the following fields:
• In the User field, type all or part of the parent’s user ID.
• In the Email field, type the parent’s e-mail address.
• In the Student ID field, begin typing the student ID assigned to the parent. As you begin typing the ID, a drop-down list displays students whose student IDs match the numbers you have typed. The drop-down list also displays student names. From the drop-down list you can select the student.
• In the Student Name field, begin typing the student name assigned to the parent. As you begin typing the name, a drop-down list displays students whose names match the letters you have typed. The drop-down list also displays student IDs. From the drop-down list you can select the student.
2. Click Search.
• The user(s) (i.e., parent(s)) who meet the criteria are displayed with the following information:
• The User ID column displays the parent’s user ID.
• The Email column displays the parent’s e-mail address.
March 2012 txSuite Administrative Access
Texas Computer Cooperative 39
• The Student Count column displays the number of students associated with the user ID. If you place the pointer over the number in the Student Count column, a pop-up window displays the students assigned to the user ID.
• The Last Login column displays the date and time the user last logged on to txConnect.
• Click the page numbers at the bottom of the grid to view additional users.
• To sort the grid by user ID, student count, or last login, click the column heading. Click it once to sort in ascending order. Click it again to sort in descending order.
3. Once you locate the user you want to impersonate, click .
If you have successfully set yourself as a txConnect parent user, the parent user ID is displayed in the Active User field under User Administration. Once you select a valid txConnect parent user to impersonate, you can navigate through txConnect as if you were that user.
Note: If you logged on with a campus-level administrator ID, the following applies:
• You can only impersonate users who have students at the campus to which you are associated.
• You can only view students associated with the campus to which you are logged on, even if the user you are impersonating has students at other campuses. For example, if you are logged on with a campus-level administrative ID for an elementary campus, and you impersonate a parent who has two students at that elementary campus and one student at the middle school campus, you will not see the middle school student; only the elementary students will be displayed.
• If a student is enrolled at multiple campuses, including the campus to which you are logged on, you can only see data for the student at the campus to which you are logged on.
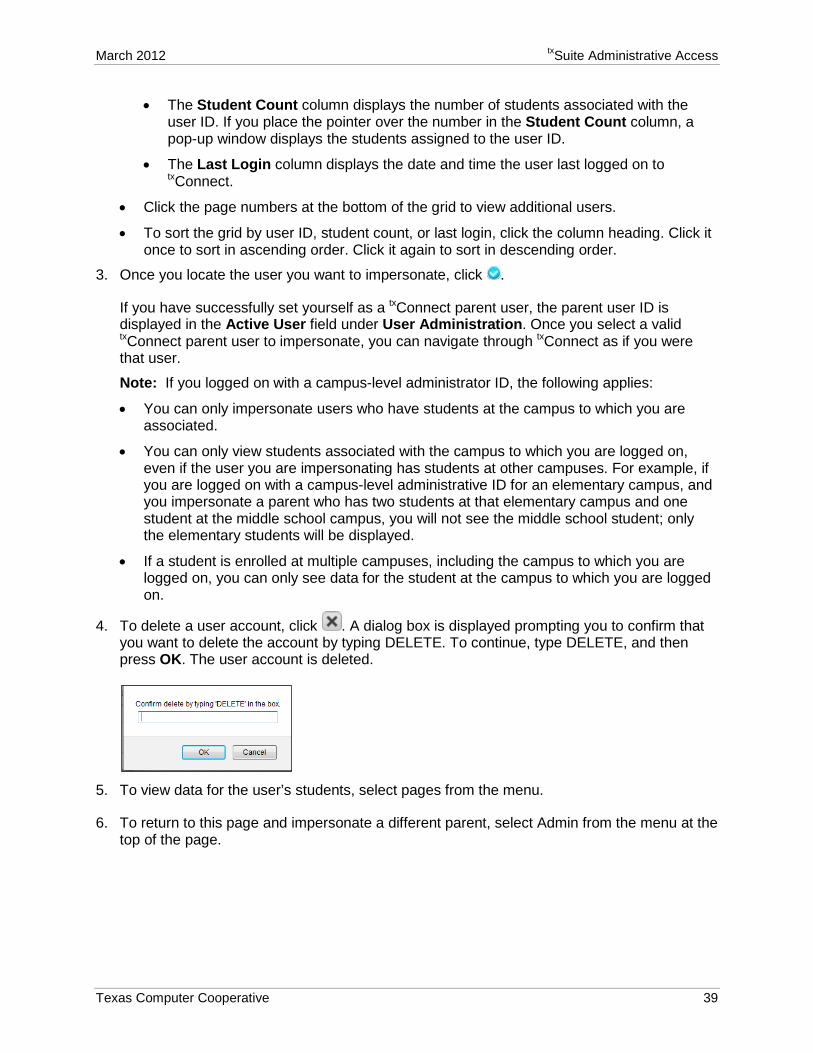
4. To delete a user account, click . A dialog box is displayed prompting you to confirm that you want to delete the account by typing DELETE. To continue, type DELETE, and then press OK. The user account is deleted.
5. To view data for the user’s students, select pages from the menu.
6. To return to this page and impersonate a different parent, select Admin from the menu at the top of the page.
txSuite Administrative Access Training Guid March 2012
40 Texas Computer Cooperative
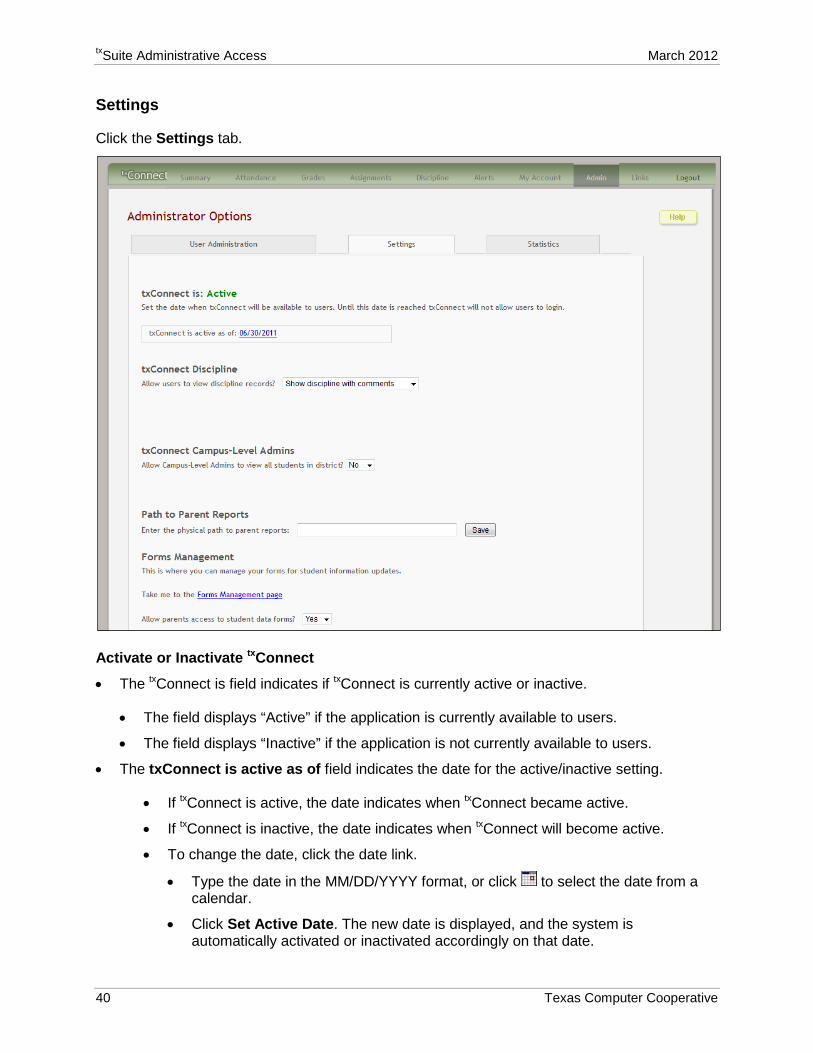
Settings
Click the Settings tab.
Activate or Inactivate txConnect
• The txConnect is field indicates if txConnect is currently active or inactive.
• The field displays “Active” if the application is currently available to users.
• The field displays “Inactive” if the application is not currently available to users.
• The txConnect is active as of field indicates the date for the active/inactive setting.
• If txConnect is active, the date indicates when txConnect became active.
• If txConnect is inactive, the date indicates when txConnect will become active.
• To change the date, click the date link.
• Type the date in the MM/DD/YYYY format, or click to select the date from a calendar.
• Click Set Active Date. The new date is displayed, and the system is automatically activated or inactivated accordingly on that date.
March 2012 txSuite Administrative Access
Texas Computer Cooperative 41
Discipline Under txConnect Discipline, you can indicate if you want to display discipline (with or without comments) for parents to view in txConnect.
• If you select Show discipline with comments, the Discipline page is available for parents in txConnect, and any comments associated with an incident are displayed below the discipline record.
• If you select Show discipline without comments, the Discipline page is available for parents in txConnect, but any comments associated with an incident are not displayed.
• If you select No, the Discipline page is not available for parents in txConnect.
Forms Management (iTCCS Only) Under Forms Management, you can maintain a pool of forms that can be used for student online registration. This is only displayed if form management is enabled by the district in the config file.
1. In the Allow parents access to student data forms field, indicate if you want to allow parents to view and/or access online forms in txConnect.
• If this field is set to Yes, the Edit Settings link will appear on the My Account page next to Students allowing you to register your e-mail address for your students. Also, the edit icon will be displayed in the View/Edit Forms column for the students allowing the primary parent/guardian to access online student registration forms.
• If this field is set to No, parents will not have access to any online student registration functionality in txConnect. The Edit Settings link will not be displayed on the My Account page, and the edit icon under View/Edit Forms will not be enabled for any students.
2. Click the Forms Management page link to open the Forms Management page.
Statistics
Click the Statistics tab.

txSuite Administrative Access Training Guid March 2012
42 Texas Computer Cooperative
Under Statistics, the following information is displayed:
• The Students with Associated Accounts is the district-wide number of students who are associated with a registered parent (i.e., the number of students for whom an account has been created).
• Under Associated Students per Campus is the total number of students associated with a registered parent (i.e., the number of students for whom an account has been created) at each campus.
• The Total Users is the district-wide total number of users who have registered as of today’s date.
• Under Associated Users per Campus is the total number of users with students registered at each campus. Note that a user is counted more than once if he has students at more than one campus, such as a user with a student in middle school and a student in high school.
• The Active Users since field lets you set a date to see the district-wide number of users who have logged on since the specified date. To change the date, click the date link.
• Type the date in the MM/DD/YYYY format, or click to select the date.
• Click Set Range. The statistics are updated to the new numbers.

March 2012 txSuite Administrative Access
Texas Computer Cooperative 43
Form Management (iTCCS Only) The Form Management pages are only available if form management is enabled by the district in the config file.
Forms Management
The Forms Management page allows district-level users to manage forms for online student registration, including static printable forms and customized forms for student online registration and demographic updates. This page can only be accessed from the Administrator Options page.
There are two types of forms that can be maintained via the Forms Management page: static forms and dynamic forms.
• Static forms are documents that cannot be updated online; they can be viewed, printed, completed by hand, and returned to the campus. Static forms will vary by district and campus.
• Dynamic forms are presented online and can be completed and submitted online. These forms may include student online registration and demographic updates.
To access the page:
• From the Administrator Login page, type your administrative user name and password, and then click Log In. The Administrator Options page is displayed with Impersonate User as the default tab.
• Click the Settings tab.
• Under Forms Management, click the Forms Management page link. The Forms Management page is displayed.
txSuite Administrative Access Training Guid March 2012
44 Texas Computer Cooperative
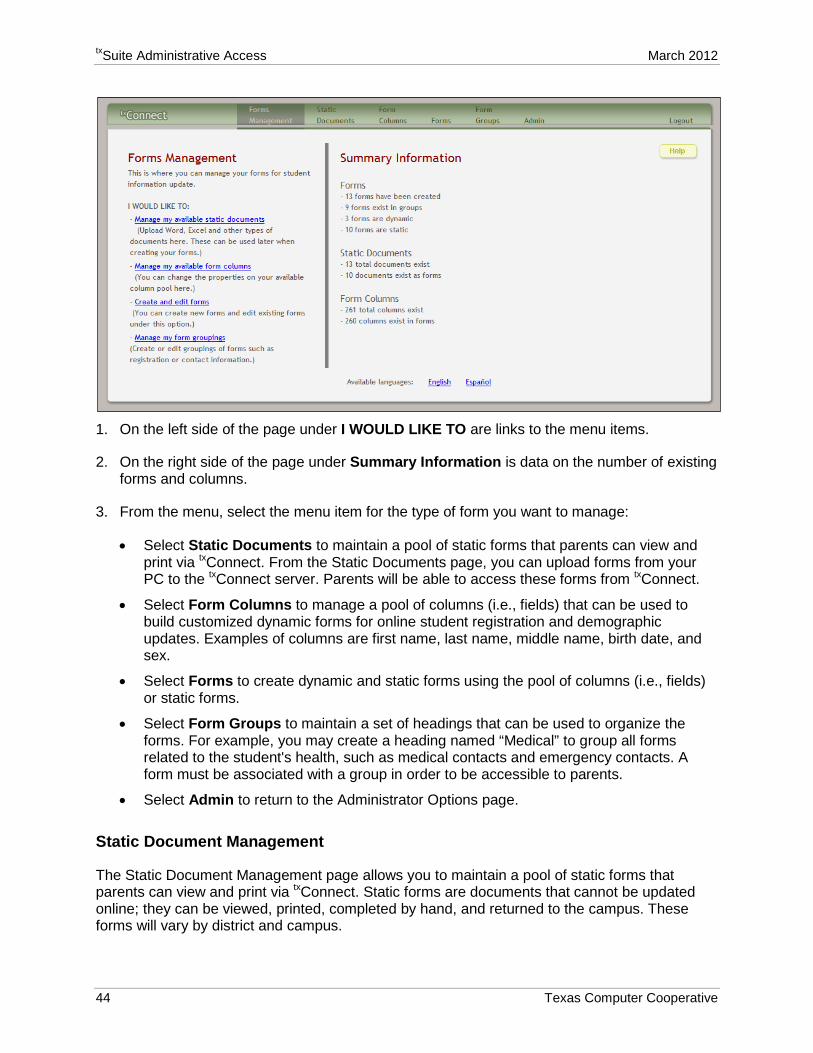
1. On the left side of the page under I WOULD LIKE TO are links to the menu items.
2. On the right side of the page under Summary Information is data on the number of existing forms and columns.
3. From the menu, select the menu item for the type of form you want to manage:
• Select Static Documents to maintain a pool of static forms that parents can view and print via txConnect. From the Static Documents page, you can upload forms from your PC to the txConnect server. Parents will be able to access these forms from txConnect.
• Select Form Columns to manage a pool of columns (i.e., fields) that can be used to build customized dynamic forms for online student registration and demographic updates. Examples of columns are first name, last name, middle name, birth date, and sex.
• Select Forms to create dynamic and static forms using the pool of columns (i.e., fields) or static forms.
• Select Form Groups to maintain a set of headings that can be used to organize the forms. For example, you may create a heading named “Medical” to group all forms related to the student's health, such as medical contacts and emergency contacts. A form must be associated with a group in order to be accessible to parents.
• Select Admin to return to the Administrator Options page.
Static Document Management
The Static Document Management page allows you to maintain a pool of static forms that parents can view and print via txConnect. Static forms are documents that cannot be updated online; they can be viewed, printed, completed by hand, and returned to the campus. These forms will vary by district and campus.
March 2012 txSuite Administrative Access
Texas Computer Cooperative 45
From the Static Documents page, you can upload forms from your PC to the txConnect server. Parents will be able to access these forms from txConnect.
You can upload documents in the following formats:
• .doc (Microsoft Word)
• .docx (Microsoft Word)
• .pdf (Adobe Acrobat)
• .xls (Microsoft Excel)
• .xlsx (Microsoft Excel)
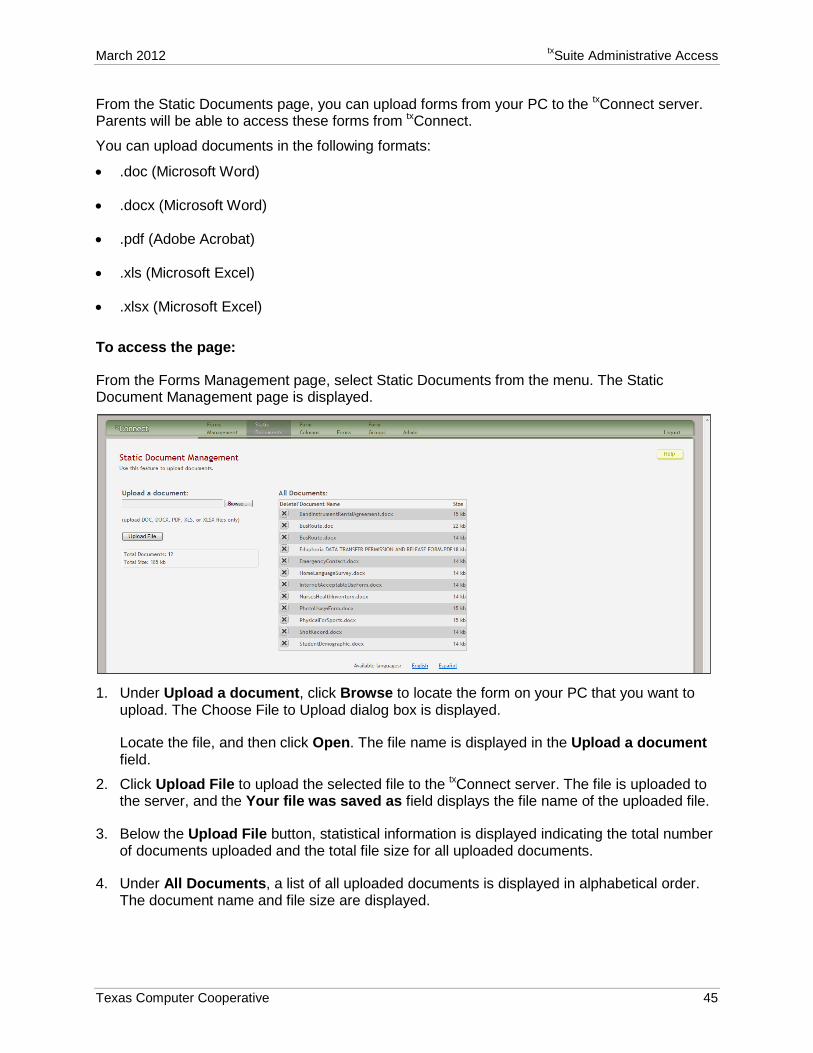
To access the page:
From the Forms Management page, select Static Documents from the menu. The Static Document Management page is displayed.
1. Under Upload a document, click Browse to locate the form on your PC that you want to
upload. The Choose File to Upload dialog box is displayed.
Locate the file, and then click Open. The file name is displayed in the Upload a document field.
2. Click Upload File to upload the selected file to the txConnect server. The file is uploaded to the server, and the Your file was saved as field displays the file name of the uploaded file.
3. Below the Upload File button, statistical information is displayed indicating the total number of documents uploaded and the total file size for all uploaded documents.
4. Under All Documents, a list of all uploaded documents is displayed in alphabetical order. The document name and file size are displayed.
txSuite Administrative Access Training Guid March 2012
46 Texas Computer Cooperative
5. To delete a document from the txConnect server, click for the document you want to delete. The file is deleted.
Note: You cannot delete a document if it is in use (i.e., assigned to a group).
Form Column Management
The Form Column Management page allows the district to manage a pool of columns (i.e., fields) that can be used to build customized dynamic forms for online student registration and demographic updates. Examples of columns are first name, last name, middle name, birth date, and sex. You can set options for each field, such as whether it can be updated by a primary parent/guardian without approval by the campus.
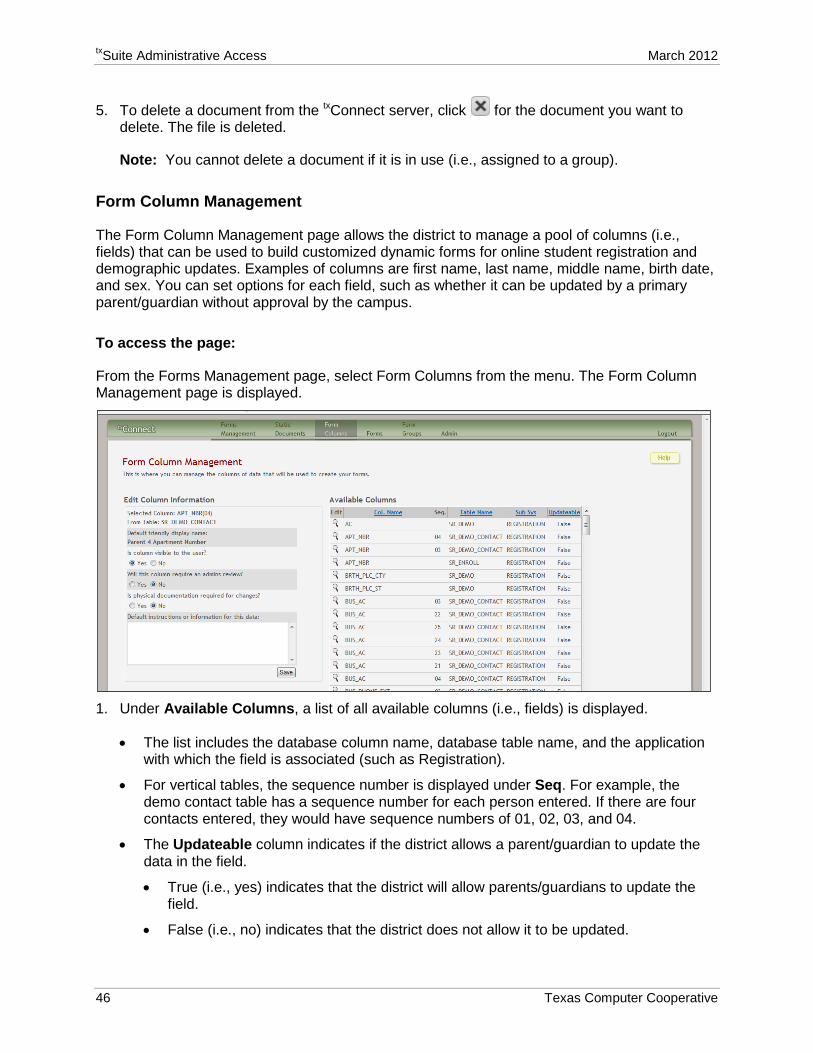
To access the page:
From the Forms Management page, select Form Columns from the menu. The Form Column Management page is displayed.
1. Under Available Columns, a list of all available columns (i.e., fields) is displayed.
• The list includes the database column name, database table name, and the application with which the field is associated (such as Registration).
• For vertical tables, the sequence number is displayed under Seq. For example, the demo contact table has a sequence number for each person entered. If there are four contacts entered, they would have sequence numbers of 01, 02, 03, and 04.
• The Updateable column indicates if the district allows a parent/guardian to update the data in the field.
• True (i.e., yes) indicates that the district will allow parents/guardians to update the field.
• False (i.e., no) indicates that the district does not allow it to be updated.
March 2012 txSuite Administrative Access
Texas Computer Cooperative 47
• You can click the column heading to sort the grid by that column. Click it once to sort the column in ascending order. Click it again to sort the column in descending order.
2. Click under Edit to edit settings for a particular field. The Edit Column Information section is displayed on the left side of the page.
• The Selected Column field indicates the database name for the selected column. If a sequence number exists, it is displayed in parentheses next to the column name.
• The From Table field indicates the database name for the table in which the selected column exists.
• Under Default friendly display name, a friendly name for the selected column is displayed as it will appear on the form. For example, if the database column name is sr_demo.dob, the friendly name might be Student Date of Birth.
• For Is column visible to the user, select Yes to allow the field to be displayed for the primary parent/guardian on a form in txConnect. If you select No, the field cannot be displayed on any forms for parents to see.
• For Will this column require an admin review, select Yes if a campus administrator must review a parent’s/guardian’s change before the change is made to the student’s official record. If you select No, the change will automatically appear in the student’s record when the parent/guardian updates the data.
• For Is physical documentation required for changes, select Yes if the district requires the parent/guardian to submit physical evidence (i.e., paperwork) for changing this field. If you select No, the parent/guardian will be able to change the field without submitting physical evidence.
• Under Default instructions or information for this data, you can type any special instructions that are specific to the field. You can type up to 255 characters.
• Click Save. A message is displayed indicating that the data was saved successfully.
Form Management
The Form Management page allows you to add, delete, and edit forms.
Note: A form must be added to a group in order to be accessible to parents. You can add a forms to a group on the Form Group Management page, which is described later in this chapter.
To access the page:
From the Forms Management page, select Forms from the menu. The Form Management page is displayed.
txSuite Administrative Access Training Guid March 2012
48 Texas Computer Cooperative
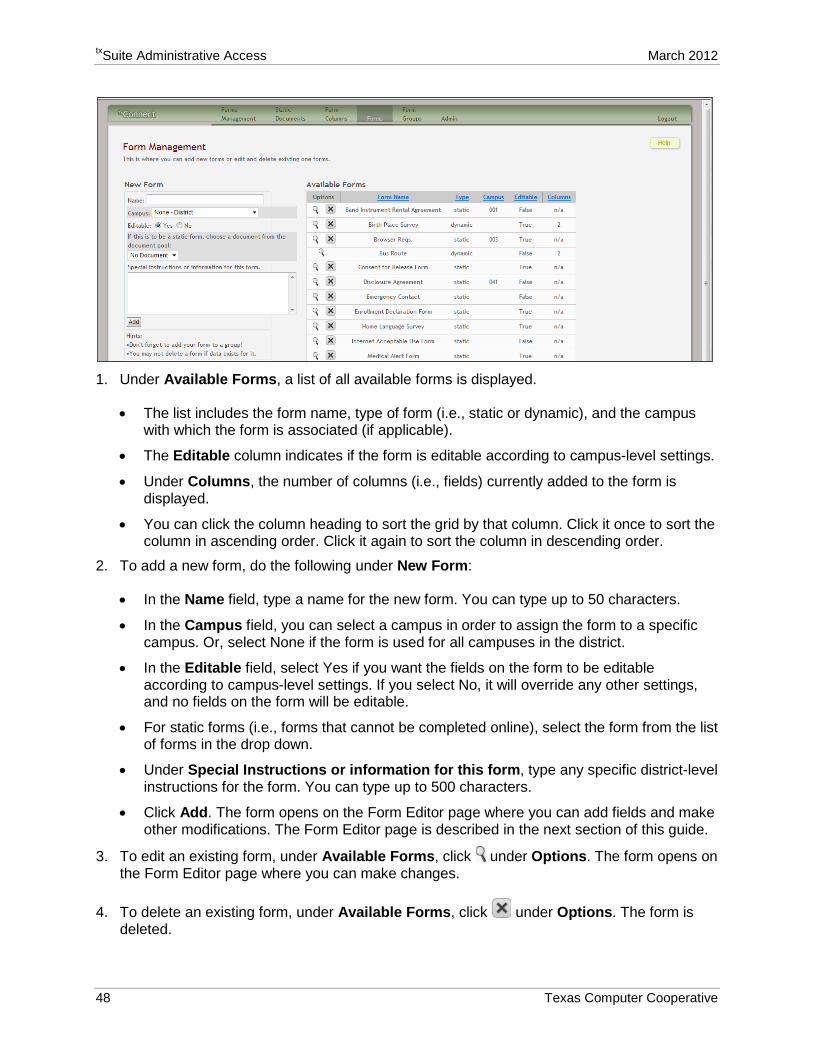
1. Under Available Forms, a list of all available forms is displayed.
• The list includes the form name, type of form (i.e., static or dynamic), and the campus with which the form is associated (if applicable).
• The Editable column indicates if the form is editable according to campus-level settings.
• Under Columns, the number of columns (i.e., fields) currently added to the form is displayed.
• You can click the column heading to sort the grid by that column. Click it once to sort the column in ascending order. Click it again to sort the column in descending order.
2. To add a new form, do the following under New Form:
• In the Name field, type a name for the new form. You can type up to 50 characters.
• In the Campus field, you can select a campus in order to assign the form to a specific campus. Or, select None if the form is used for all campuses in the district.
• In the Editable field, select Yes if you want the fields on the form to be editable according to campus-level settings. If you select No, it will override any other settings, and no fields on the form will be editable.
• For static forms (i.e., forms that cannot be completed online), select the form from the list of forms in the drop down.
• Under Special Instructions or information for this form, type any specific district-level instructions for the form. You can type up to 500 characters.
• Click Add. The form opens on the Form Editor page where you can add fields and make other modifications. The Form Editor page is described in the next section of this guide.
3. To edit an existing form, under Available Forms, click under Options. The form opens on the Form Editor page where you can make changes.
4. To delete an existing form, under Available Forms, click under Options. The form is deleted.
March 2012 txSuite Administrative Access
Texas Computer Cooperative 49
You cannot delete a form if data exists for the form (i.e., a parent has submitted changes associated with the form).
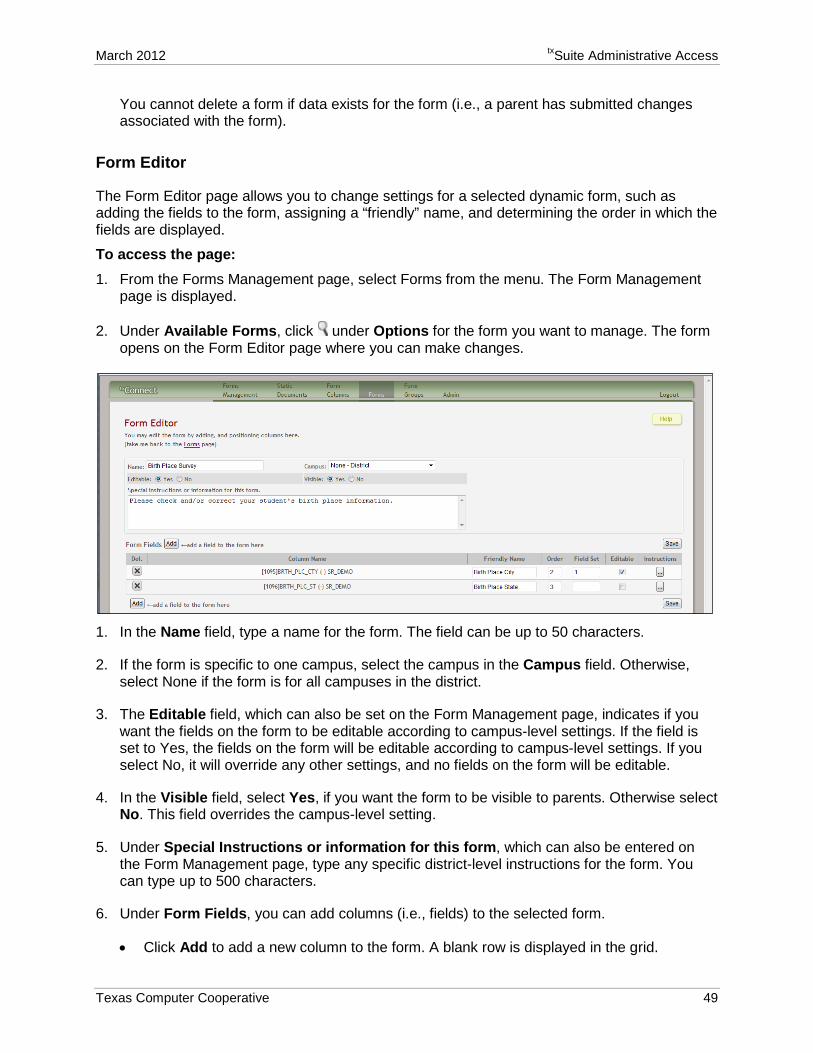
Form Editor
The Form Editor page allows you to change settings for a selected dynamic form, such as adding the fields to the form, assigning a “friendly” name, and determining the order in which the fields are displayed.
To access the page: 1. From the Forms Management page, select Forms from the menu. The Form Management
page is displayed.
2. Under Available Forms, click under Options for the form you want to manage. The form opens on the Form Editor page where you can make changes.
1. In the Name field, type a name for the form. The field can be up to 50 characters.
2. If the form is specific to one campus, select the campus in the Campus field. Otherwise, select None if the form is for all campuses in the district.
3. The Editable field, which can also be set on the Form Management page, indicates if you want the fields on the form to be editable according to campus-level settings. If the field is set to Yes, the fields on the form will be editable according to campus-level settings. If you select No, it will override any other settings, and no fields on the form will be editable.
4. In the Visible field, select Yes, if you want the form to be visible to parents. Otherwise select No. This field overrides the campus-level setting.
5. Under Special Instructions or information for this form, which can also be entered on the Form Management page, type any specific district-level instructions for the form. You can type up to 500 characters.
6. Under Form Fields, you can add columns (i.e., fields) to the selected form.
• Click Add to add a new column to the form. A blank row is displayed in the grid.
txSuite Administrative Access Training Guid March 2012
50 Texas Computer Cooperative
• In the Column Name field, select the table/column you want to add to the form. The drop down lists all possible columns, including the column name, sequence number (if applicable), and table name.
• In the Friendly Name field, type a “friendly” name for the field. For example, if the database column name is sr_demo.dob, the friendly name might be Student Date of Birth. The field can be up to 50 characters.
• The Order column allows you to indicate the order in which you want the fields to be displayed on the form. For example, select 1 if you want to field to be displayed at the top of the form.
• The Field Set field allows you to group related fields together in the form. For example, you could type Contact for all fields that are related to the student’s contact information.
The fields that you want to physically group together should also be together as indicated by the Order field. The fields with the same Field Set are grouped together in a box, but only if they are adjacent in the order. The box is drawn around one or more sequential fields that have a Field Set specified.
• Select Editable if the field can be updated by parents on the form. If the Editable field is selected, the form field will be editable if it is also set to editable at the campus level. If Editable is not selected, it will override any other settings, and the form field will not be editable.
• Under Instructions, click to view any existing default instructions and add additional instructions. A dialog box opens.
• Under Default instructions, any existing default instructions are displayed. They cannot be changed here.
• Under Field Instructions, add or update any additional instructions for the field. These instructions will be appended to the default instructions when the parent accesses the form in txConnect.
• Click Close to close the dialog box.
7. Click Save to save your changes.
8. Click the Forms link below the page title to return to the Form Management page.
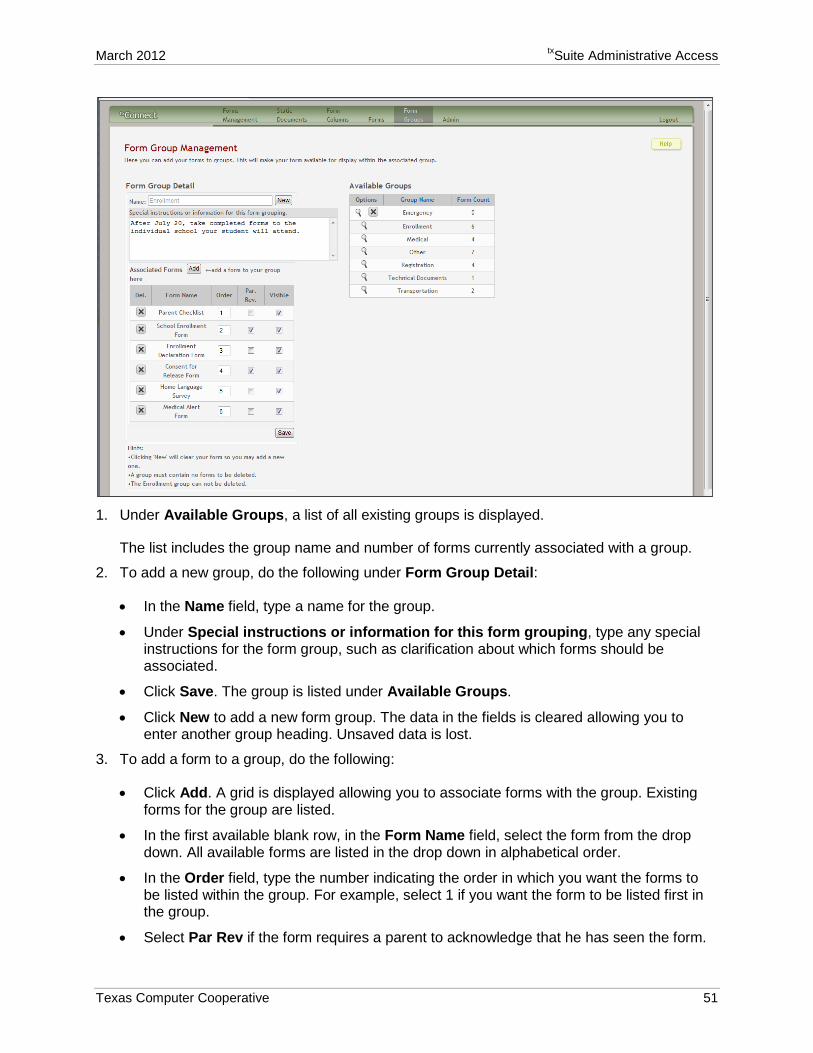
Form Group Management
The Form Group Management page allows you to create form group headings so you can associate related forms. A form must be associated with a group in order to be accessible to parents.
To access the page:
From the Forms Management page, select Form Groups from the menu. The Form Group Management page is displayed.
March 2012 txSuite Administrative Access
Texas Computer Cooperative 51
1. Under Available Groups, a list of all existing groups is displayed.
The list includes the group name and number of forms currently associated with a group.
2. To add a new group, do the following under Form Group Detail:
• In the Name field, type a name for the group.
• Under Special instructions or information for this form grouping, type any special instructions for the form group, such as clarification about which forms should be associated.
• Click Save. The group is listed under Available Groups.
• Click New to add a new form group. The data in the fields is cleared allowing you to enter another group heading. Unsaved data is lost.
3. To add a form to a group, do the following:
• Click Add. A grid is displayed allowing you to associate forms with the group. Existing forms for the group are listed.
• In the first available blank row, in the Form Name field, select the form from the drop down. All available forms are listed in the drop down in alphabetical order.
• In the Order field, type the number indicating the order in which you want the forms to be listed within the group. For example, select 1 if you want the form to be listed first in the group.
• Select Par Rev if the form requires a parent to acknowledge that he has seen the form.
txSuite Administrative Access Training Guid March 2012
52 Texas Computer Cooperative
• Select Visible to make the form visible to parents. If the field is not selected, the form will not be displayed in txConnect, even if it is associated with a group.
4. To edit an existing group, under Available Groups, click under Options. The fields on the left side of the page display the data for the selected group.
5. To delete an existing group, under Available Groups, click under Options. The group is deleted.
Notes:
• You cannot delete a group that has forms associated with it.
• There are several form groups that cannot be deleted, such as Enrollment; you are only able to add forms to these groups.
• Any form that is associated with the Enrollment group heading will be available for students who are not enrolled in the district (i.e., do not have a txConnect logon and parent portal ID). The static forms can be used for enrolling a student in the district.
• If any forms have been associated with the Enrollment group, on the txConnect Login page under New Student, a link is provided to allow parents to download enrollment forms.
• If no forms have been associated with the Enrollment group, the txConnect Login page does not display the New Student link.
March 2012 txSuite Administrative Access
Texas Computer Cooperative 53
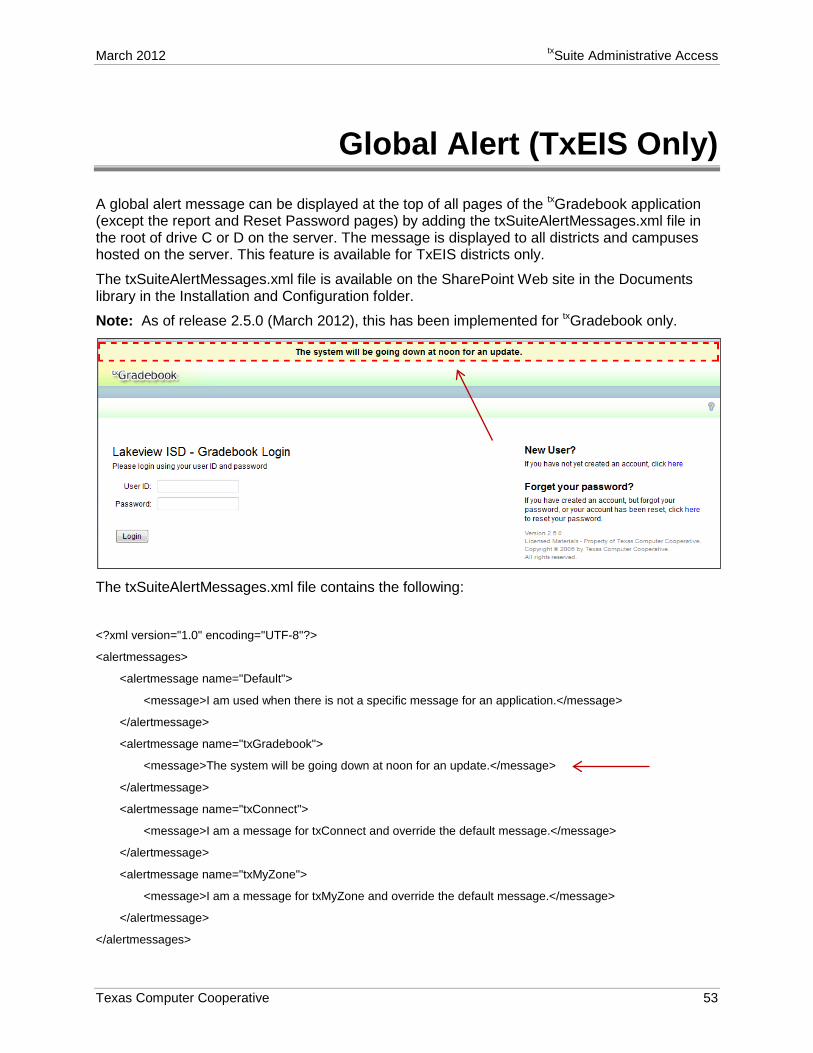
Global Alert (TxEIS Only) A global alert message can be displayed at the top of all pages of the txGradebook application (except the report and Reset Password pages) by adding the txSuiteAlertMessages.xml file in the root of drive C or D on the server. The message is displayed to all districts and campuses hosted on the server. This feature is available for TxEIS districts only.
The txSuiteAlertMessages.xml file is available on the SharePoint Web site in the Documents library in the Installation and Configuration folder.
Note: As of release 2.5.0 (March 2012), this has been implemented for txGradebook only.
The txSuiteAlertMessages.xml file contains the following:
<?xml version="1.0" encoding="UTF-8"?>
<alertmessages>
<alertmessage name="Default">
<message>I am used when there is not a specific message for an application.</message>
</alertmessage>
<alertmessage name="txGradebook">
<message>The system will be going down at noon for an update.</message>
</alertmessage>
<alertmessage name="txConnect">
<message>I am a message for txConnect and override the default message.</message>
</alertmessage>
<alertmessage name="txMyZone">
<message>I am a message for txMyZone and override the default message.</message>
</alertmessage>
</alertmessages>

txSuite Administrative Access Training Guid March 2012
54 Texas Computer Cooperative
The text in the message tag determines the message displayed at the top of all pages in the application.
• The alert is not displayed if the text is blank or the file does not exist in the specified location.
• The default message (i.e., <alertmessage name="Default">) is displayed if a message does not exist for a specific application.
• If text exist for the specific application (e.g., <alertmessage name="txGradebook">), this text is displayed instead of the default message text.
March 2012 txSuite Administrative Access
Texas Computer Cooperative 55
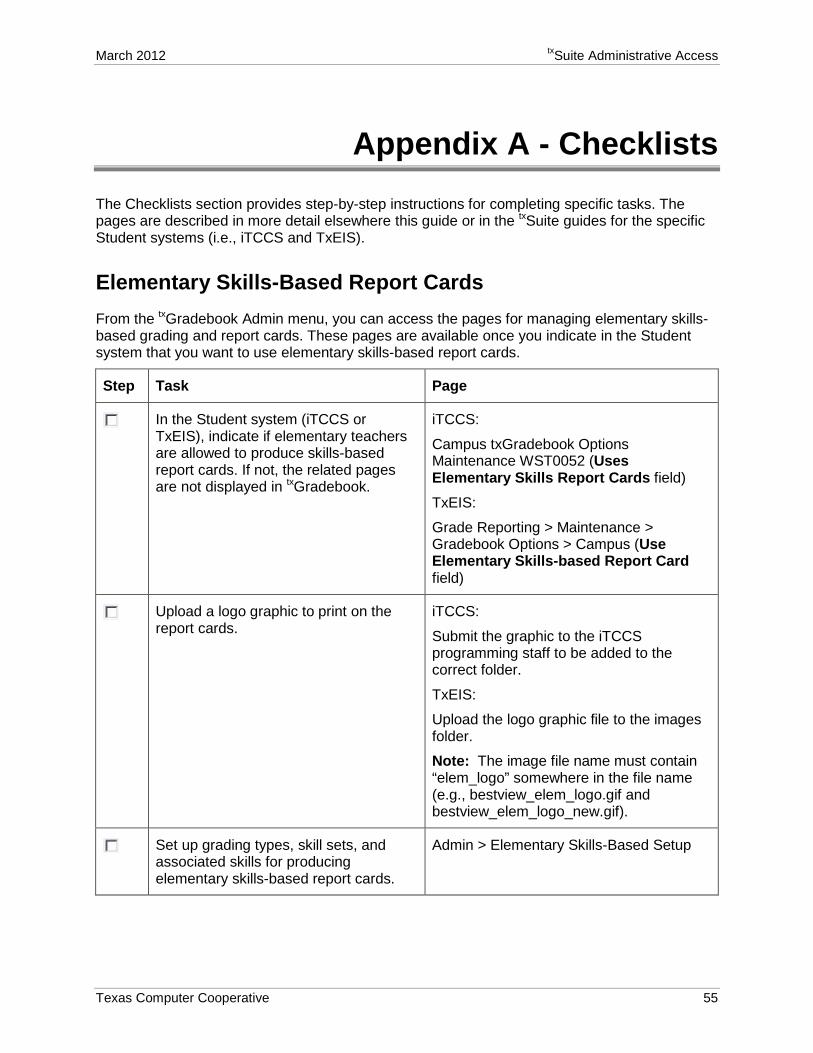
Appendix A - Checklists The Checklists section provides step-by-step instructions for completing specific tasks. The pages are described in more detail elsewhere this guide or in the txSuite guides for the specific Student systems (i.e., iTCCS and TxEIS).
Elementary Skills-Based Report Cards From the txGradebook Admin menu, you can access the pages for managing elementary skills-based grading and report cards. These pages are available once you indicate in the Student system that you want to use elementary skills-based report cards.
Step Task Page
In the Student system (iTCCS or TxEIS), indicate if elementary teachers are allowed to produce skills-based report cards. If not, the related pages are not displayed in txGradebook.
iTCCS:
Campus txGradebook Options Maintenance WST0052 (Uses Elementary Skills Report Cards field)
TxEIS:
Grade Reporting > Maintenance > Gradebook Options > Campus (Use Elementary Skills-based Report Card field)
Upload a logo graphic to print on the report cards.
iTCCS:
Submit the graphic to the iTCCS programming staff to be added to the correct folder.
TxEIS:
Upload the logo graphic file to the images folder.
Note: The image file name must contain “elem_logo” somewhere in the file name (e.g., bestview_elem_logo.gif and bestview_elem_logo_new.gif).
Set up grading types, skill sets, and associated skills for producing elementary skills-based report cards.
Admin > Elementary Skills-Based Setup
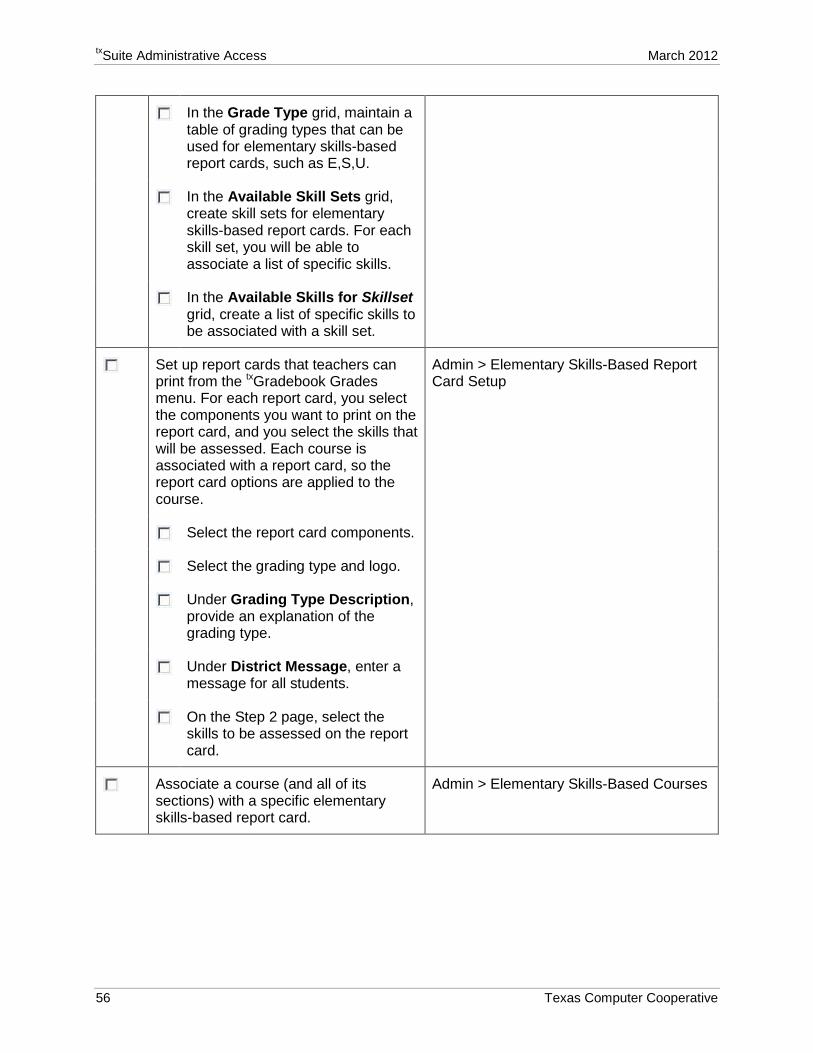
txSuite Administrative Access Training Guid March 2012
56 Texas Computer Cooperative
In the Grade Type grid, maintain a table of grading types that can be used for elementary skills-based report cards, such as E,S,U.
In the Available Skill Sets grid, create skill sets for elementary skills-based report cards. For each skill set, you will be able to associate a list of specific skills.
In the Available Skills for Skillset grid, create a list of specific skills to be associated with a skill set.
Set up report cards that teachers can print from the txGradebook Grades menu. For each report card, you select the components you want to print on the report card, and you select the skills that will be assessed. Each course is associated with a report card, so the report card options are applied to the course.
Admin > Elementary Skills-Based Report Card Setup
Select the report card components.
Select the grading type and logo.
Under Grading Type Description, provide an explanation of the grading type.
Under District Message, enter a message for all students.
On the Step 2 page, select the skills to be assessed on the report card.
Associate a course (and all of its sections) with a specific elementary skills-based report card.
Admin > Elementary Skills-Based Courses
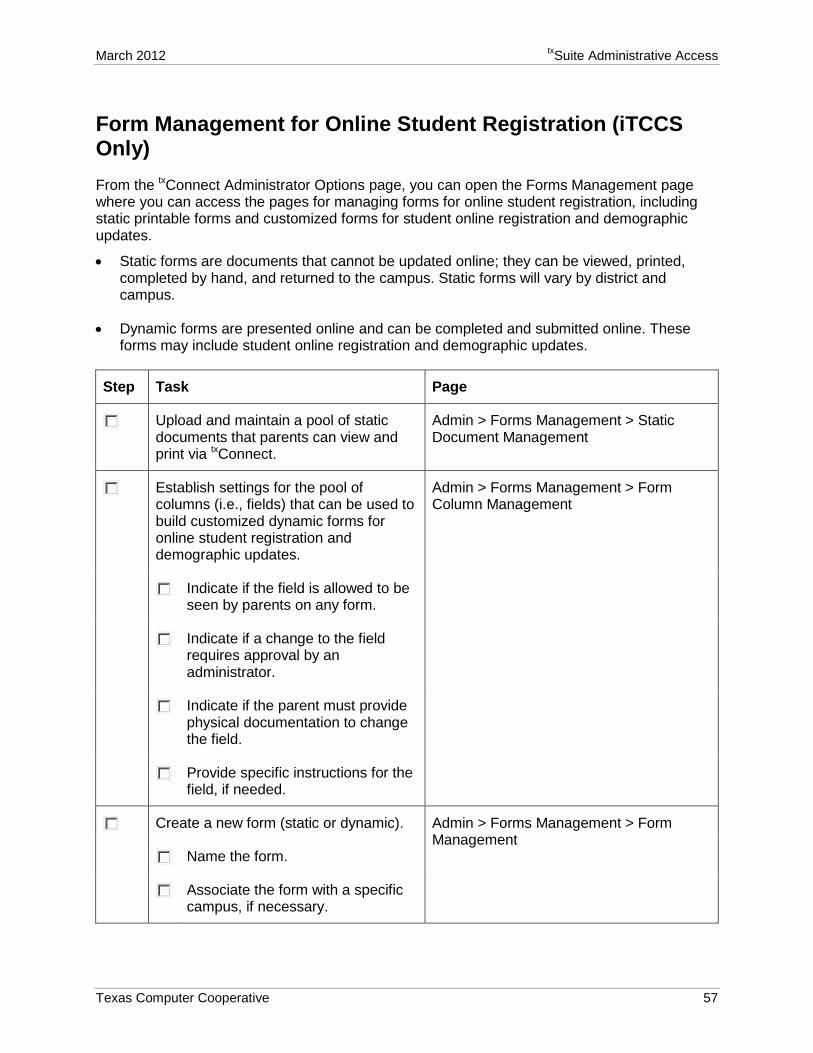
March 2012 txSuite Administrative Access
Texas Computer Cooperative 57
Form Management for Online Student Registration (iTCCS Only) From the txConnect Administrator Options page, you can open the Forms Management page where you can access the pages for managing forms for online student registration, including static printable forms and customized forms for student online registration and demographic updates.
• Static forms are documents that cannot be updated online; they can be viewed, printed, completed by hand, and returned to the campus. Static forms will vary by district and campus.
• Dynamic forms are presented online and can be completed and submitted online. These forms may include student online registration and demographic updates.
Step Task Page
Upload and maintain a pool of static documents that parents can view and print via txConnect.
Admin > Forms Management > Static Document Management
Establish settings for the pool of columns (i.e., fields) that can be used to build customized dynamic forms for online student registration and demographic updates.
Admin > Forms Management > Form Column Management
Indicate if the field is allowed to be seen by parents on any form.
Indicate if a change to the field requires approval by an administrator.
Indicate if the parent must provide physical documentation to change the field.
Provide specific instructions for the field, if needed.
Create a new form (static or dynamic). Admin > Forms Management > Form Management
Name the form.
Associate the form with a specific campus, if necessary.
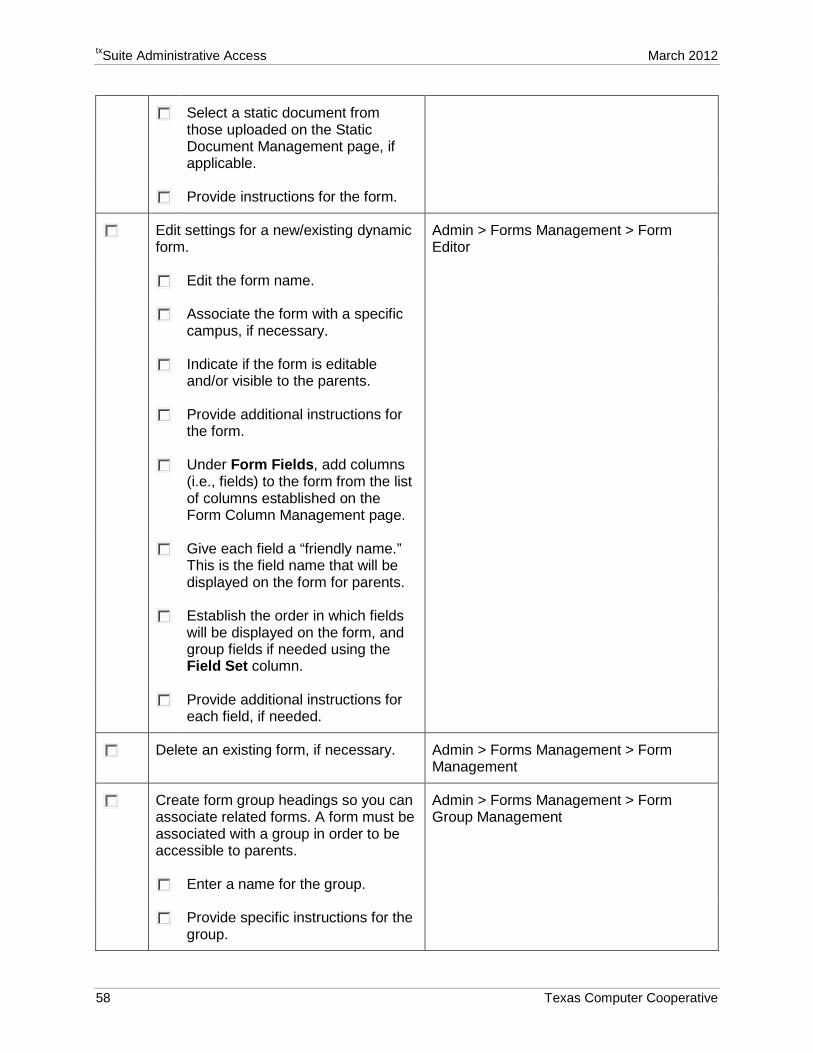
txSuite Administrative Access Training Guid March 2012
58 Texas Computer Cooperative
Select a static document from those uploaded on the Static Document Management page, if applicable.
Provide instructions for the form.
Edit settings for a new/existing dynamic form.
Admin > Forms Management > Form Editor
Edit the form name.
Associate the form with a specific campus, if necessary.
Indicate if the form is editable and/or visible to the parents.
Provide additional instructions for the form.
Under Form Fields, add columns (i.e., fields) to the form from the list of columns established on the Form Column Management page.
Give each field a “friendly name.” This is the field name that will be displayed on the form for parents.
Establish the order in which fields will be displayed on the form, and group fields if needed using the Field Set column.
Provide additional instructions for each field, if needed.
Delete an existing form, if necessary. Admin > Forms Management > Form Management
Create form group headings so you can associate related forms. A form must be associated with a group in order to be accessible to parents.
Admin > Forms Management > Form Group Management
Enter a name for the group.
Provide specific instructions for the group.

March 2012 txSuite Administrative Access
Texas Computer Cooperative 59
Add a form to a group.
Determine the order in which you want the group headings listed.
Delete a group, if necessary.
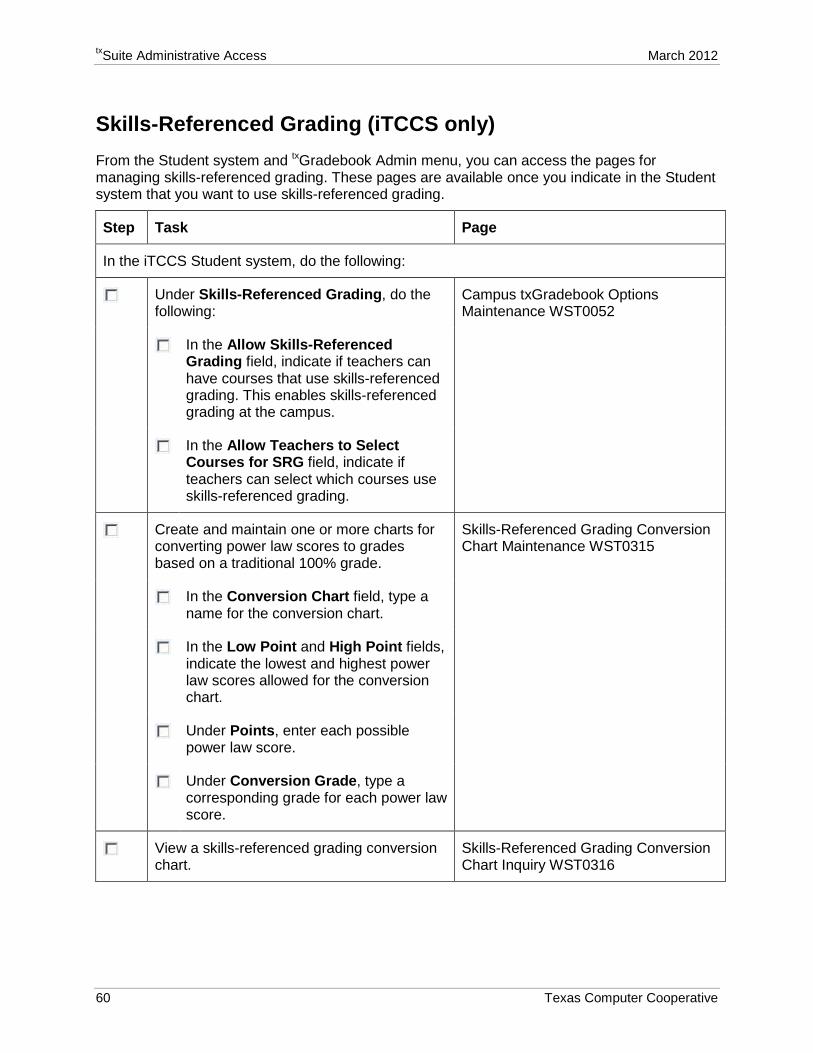
txSuite Administrative Access Training Guid March 2012
60 Texas Computer Cooperative
Skills-Referenced Grading (iTCCS only) From the Student system and txGradebook Admin menu, you can access the pages for managing skills-referenced grading. These pages are available once you indicate in the Student system that you want to use skills-referenced grading.
Step Task Page
In the iTCCS Student system, do the following:
Under Skills-Referenced Grading, do the following:
Campus txGradebook Options Maintenance WST0052
In the Allow Skills-Referenced Grading field, indicate if teachers can have courses that use skills-referenced grading. This enables skills-referenced grading at the campus.
In the Allow Teachers to Select Courses for SRG field, indicate if teachers can select which courses use skills-referenced grading.
Create and maintain one or more charts for converting power law scores to grades based on a traditional 100% grade.
Skills-Referenced Grading Conversion Chart Maintenance WST0315
In the Conversion Chart field, type a name for the conversion chart.
In the Low Point and High Point fields, indicate the lowest and highest power law scores allowed for the conversion chart.
Under Points, enter each possible power law score.
Under Conversion Grade, type a corresponding grade for each power law score.
View a skills-referenced grading conversion chart.
Skills-Referenced Grading Conversion Chart Inquiry WST0316
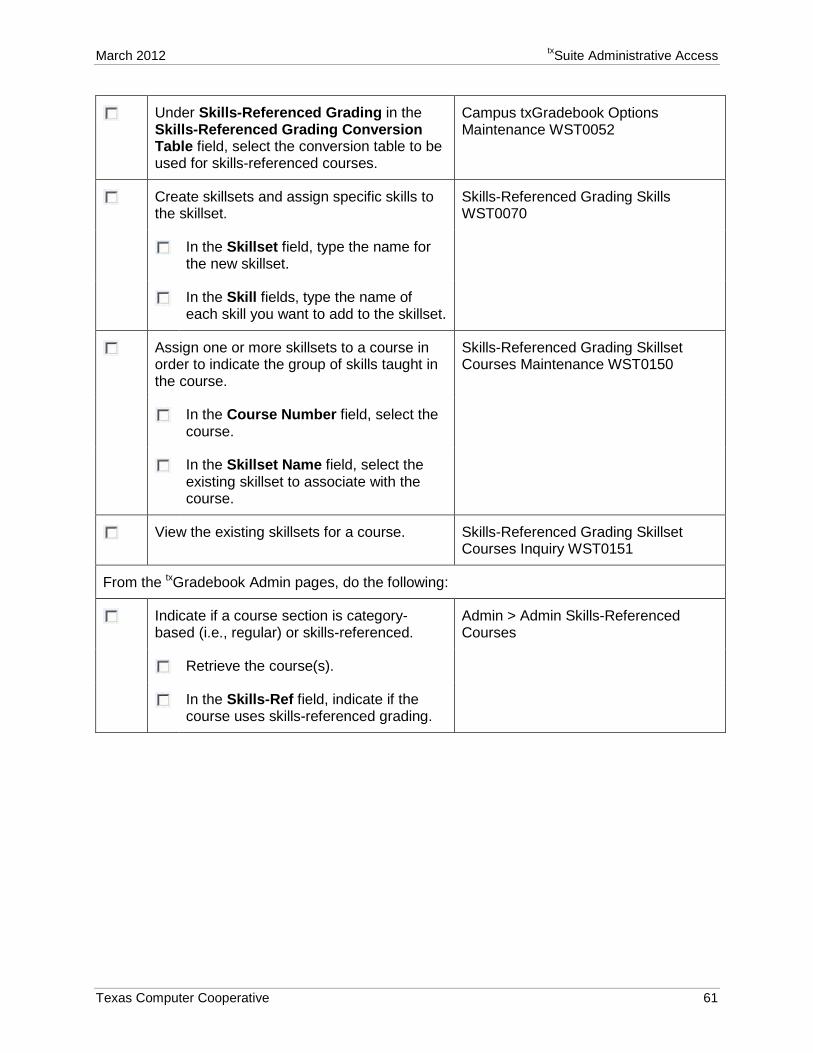
March 2012 txSuite Administrative Access
Texas Computer Cooperative 61
Under Skills-Referenced Grading in the Skills-Referenced Grading Conversion Table field, select the conversion table to be used for skills-referenced courses.
Campus txGradebook Options Maintenance WST0052
Create skillsets and assign specific skills to the skillset.
Skills-Referenced Grading Skills WST0070
In the Skillset field, type the name for the new skillset.
In the Skill fields, type the name of each skill you want to add to the skillset.
Assign one or more skillsets to a course in order to indicate the group of skills taught in the course.
Skills-Referenced Grading Skillset Courses Maintenance WST0150
In the Course Number field, select the course.
In the Skillset Name field, select the existing skillset to associate with the course.
View the existing skillsets for a course. Skills-Referenced Grading Skillset Courses Inquiry WST0151
From the txGradebook Admin pages, do the following:
Indicate if a course section is category-based (i.e., regular) or skills-referenced.
Admin > Admin Skills-Referenced Courses
Retrieve the course(s).
In the Skills-Ref field, indicate if the course uses skills-referenced grading.

txSuite Administrative Access Training Guid March 2012
62 Texas Computer Cooperative
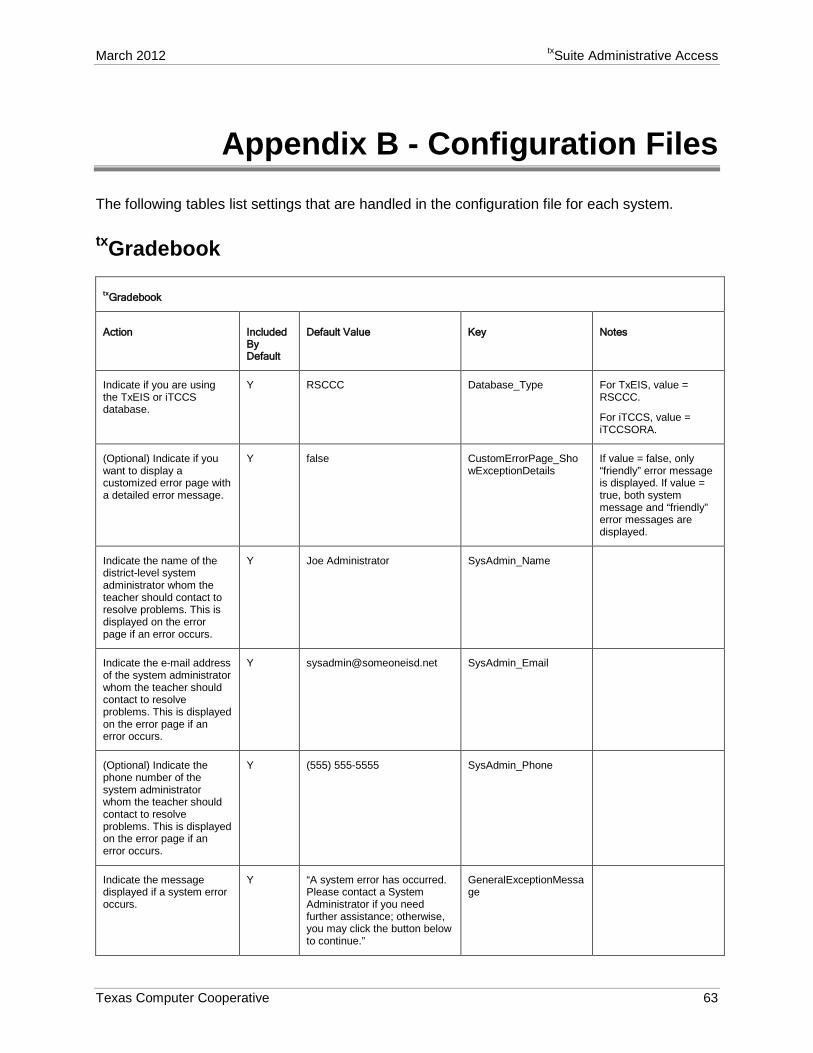
March 2012 txSuite Administrative Access
Texas Computer Cooperative 63
Appendix B - Configuration Files The following tables list settings that are handled in the configuration file for each system.
txGradebook
txGradebook
Action Included By Default
Default Value Key Notes
Indicate if you are using the TxEIS or iTCCS database.
Y RSCCC Database_Type For TxEIS, value = RSCCC.
For iTCCS, value = iTCCSORA.
(Optional) Indicate if you want to display a customized error page with a detailed error message.
Y false CustomErrorPage_ShowExceptionDetails
If value = false, only “friendly” error message is displayed. If value = true, both system message and “friendly” error messages are displayed.
Indicate the name of the district-level system administrator whom the teacher should contact to resolve problems. This is displayed on the error page if an error occurs.
Y Joe Administrator SysAdmin_Name
Indicate the e-mail address of the system administrator whom the teacher should contact to resolve problems. This is displayed on the error page if an error occurs.
Y [email protected] SysAdmin_Email
(Optional) Indicate the phone number of the system administrator whom the teacher should contact to resolve problems. This is displayed on the error page if an error occurs.
Y (555) 555-5555 SysAdmin_Phone
Indicate the message displayed if a system error occurs.
Y “A system error has occurred. Please contact a System Administrator if you need further assistance; otherwise, you may click the button below to continue.”
GeneralExceptionMessage
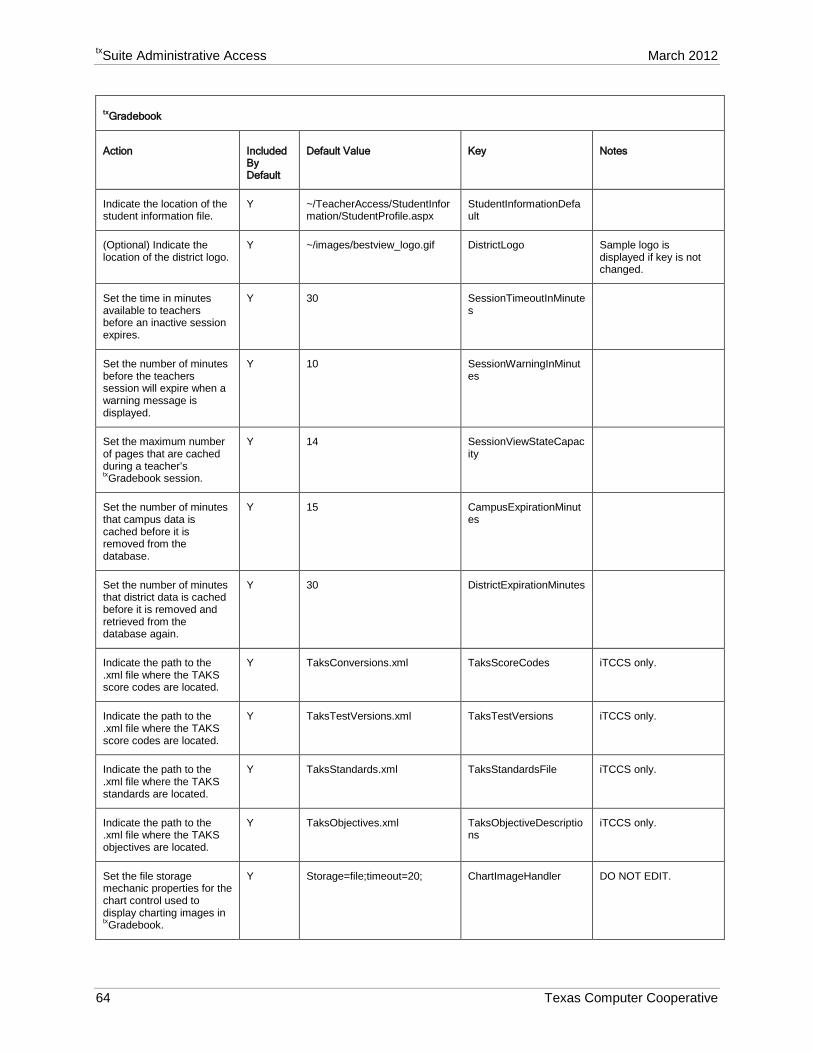
txSuite Administrative Access Training Guid March 2012
64 Texas Computer Cooperative
txGradebook
Action Included By Default
Default Value Key Notes
Indicate the location of the student information file.
Y ~/TeacherAccess/StudentInformation/StudentProfile.aspx
StudentInformationDefault
(Optional) Indicate the location of the district logo.
Y ~/images/bestview_logo.gif DistrictLogo Sample logo is displayed if key is not changed.
Set the time in minutes available to teachers before an inactive session expires.
Y 30 SessionTimeoutInMinutes
Set the number of minutes before the teachers session will expire when a warning message is displayed.
Y 10 SessionWarningInMinutes
Set the maximum number of pages that are cached during a teacher’s txGradebook session.
Y 14 SessionViewStateCapacity
Set the number of minutes that campus data is cached before it is removed from the database.
Y 15 CampusExpirationMinutes
Set the number of minutes that district data is cached before it is removed and retrieved from the database again.
Y 30 DistrictExpirationMinutes
Indicate the path to the .xml file where the TAKS score codes are located.
Y TaksConversions.xml TaksScoreCodes iTCCS only.
Indicate the path to the .xml file where the TAKS score codes are located.
Y TaksTestVersions.xml TaksTestVersions iTCCS only.
Indicate the path to the .xml file where the TAKS standards are located.
Y TaksStandards.xml TaksStandardsFile iTCCS only.
Indicate the path to the .xml file where the TAKS objectives are located.
Y TaksObjectives.xml TaksObjectiveDescriptions
iTCCS only.
Set the file storage mechanic properties for the chart control used to display charting images in txGradebook.
Y Storage=file;timeout=20; ChartImageHandler DO NOT EDIT.
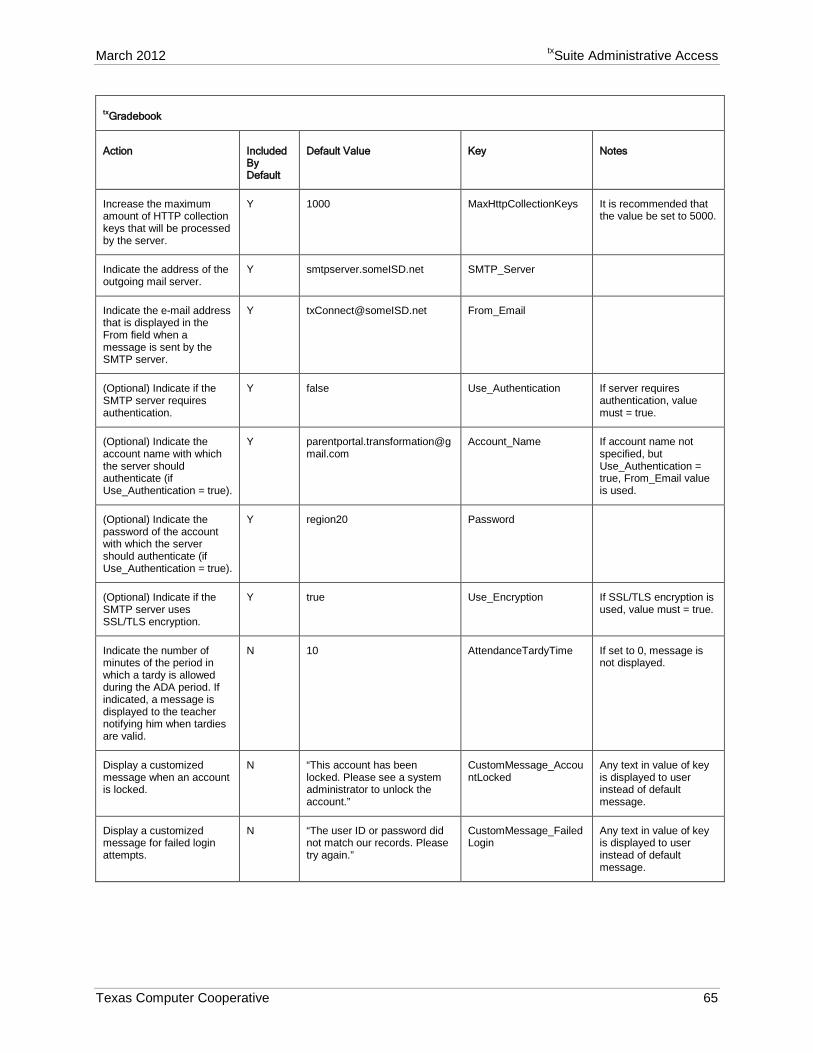
March 2012 txSuite Administrative Access
Texas Computer Cooperative 65
txGradebook
Action Included By Default
Default Value Key Notes
Increase the maximum amount of HTTP collection keys that will be processed by the server.
Y 1000 MaxHttpCollectionKeys It is recommended that the value be set to 5000.
Indicate the address of the outgoing mail server.
Y smtpserver.someISD.net SMTP_Server
Indicate the e-mail address that is displayed in the From field when a message is sent by the SMTP server.
Y [email protected] From_Email
(Optional) Indicate if the SMTP server requires authentication.
Y false Use_Authentication If server requires authentication, value must = true.
(Optional) Indicate the account name with which the server should authenticate (if Use_Authentication = true).
Account_Name If account name not specified, but Use_Authentication = true, From_Email value is used.
(Optional) Indicate the password of the account with which the server should authenticate (if Use_Authentication = true).
Y region20 Password
(Optional) Indicate if the SMTP server uses SSL/TLS encryption.
Y true Use_Encryption If SSL/TLS encryption is used, value must = true.
Indicate the number of minutes of the period in which a tardy is allowed during the ADA period. If indicated, a message is displayed to the teacher notifying him when tardies are valid.
N 10 AttendanceTardyTime If set to 0, message is not displayed.
Display a customized message when an account is locked.
N “This account has been locked. Please see a system administrator to unlock the account.”
CustomMessage_AccountLocked
Any text in value of key is displayed to user instead of default message.
Display a customized message for failed login attempts.
N “The user ID or password did not match our records. Please try again.”
CustomMessage_FailedLogin
Any text in value of key is displayed to user instead of default message.
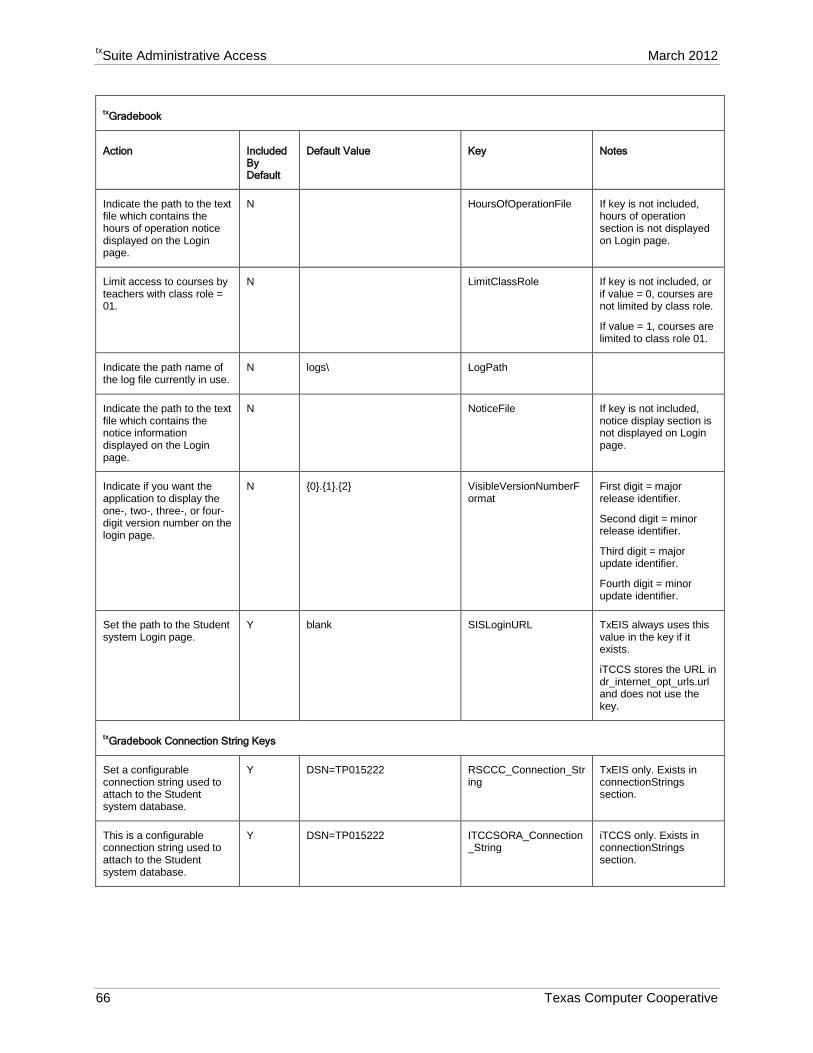
txSuite Administrative Access Training Guid March 2012
66 Texas Computer Cooperative
txGradebook
Action Included By Default
Default Value Key Notes
Indicate the path to the text file which contains the hours of operation notice displayed on the Login page.
N HoursOfOperationFile If key is not included, hours of operation section is not displayed on Login page.
Limit access to courses by teachers with class role = 01.
N LimitClassRole If key is not included, or if value = 0, courses are not limited by class role.
If value = 1, courses are limited to class role 01.
Indicate the path name of the log file currently in use.
N logs\ LogPath
Indicate the path to the text file which contains the notice information displayed on the Login page.
N NoticeFile If key is not included, notice display section is not displayed on Login page.
Indicate if you want the application to display the one-, two-, three-, or four-digit version number on the login page.
N {0}.{1}.{2} VisibleVersionNumberFormat
First digit = major release identifier.
Second digit = minor release identifier.
Third digit = major update identifier.
Fourth digit = minor update identifier.
Set the path to the Student system Login page.
Y blank SISLoginURL TxEIS always uses this value in the key if it exists.
iTCCS stores the URL in dr_internet_opt_urls.url and does not use the key.
txGradebook Connection String Keys
Set a configurable connection string used to attach to the Student system database.
Y DSN=TP015222 RSCCC_Connection_String
TxEIS only. Exists in connectionStrings section.
This is a configurable connection string used to attach to the Student system database.
Y DSN=TP015222 ITCCSORA_Connection_String
iTCCS only. Exists in connectionStrings section.
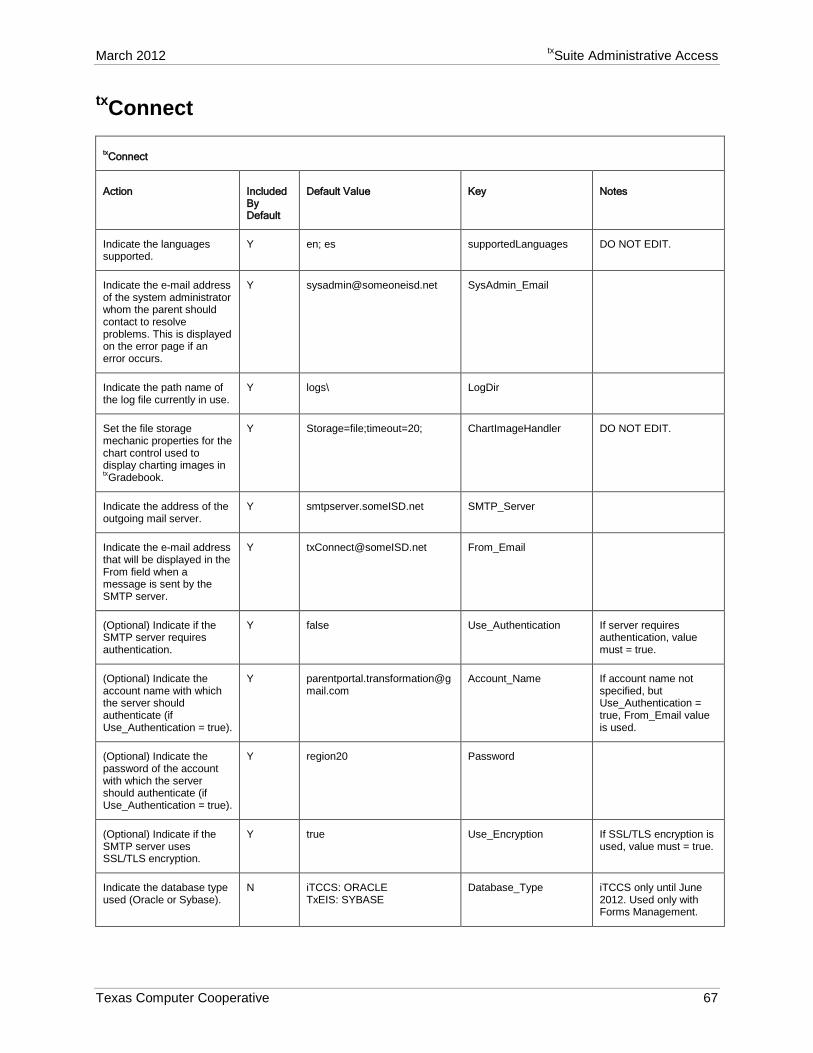
March 2012 txSuite Administrative Access
Texas Computer Cooperative 67
txConnect
txConnect
Action Included By Default
Default Value Key Notes
Indicate the languages supported.
Y en; es supportedLanguages DO NOT EDIT.
Indicate the e-mail address of the system administrator whom the parent should contact to resolve problems. This is displayed on the error page if an error occurs.
Y [email protected] SysAdmin_Email
Indicate the path name of the log file currently in use.
Y logs\ LogDir
Set the file storage mechanic properties for the chart control used to display charting images in txGradebook.
Y Storage=file;timeout=20; ChartImageHandler DO NOT EDIT.
Indicate the address of the outgoing mail server.
Y smtpserver.someISD.net SMTP_Server
Indicate the e-mail address that will be displayed in the From field when a message is sent by the SMTP server.
Y [email protected] From_Email
(Optional) Indicate if the SMTP server requires authentication.
Y false Use_Authentication If server requires authentication, value must = true.
(Optional) Indicate the account name with which the server should authenticate (if Use_Authentication = true).
Account_Name If account name not specified, but Use_Authentication = true, From_Email value is used.
(Optional) Indicate the password of the account with which the server should authenticate (if Use_Authentication = true).
Y region20 Password
(Optional) Indicate if the SMTP server uses SSL/TLS encryption.
Y true Use_Encryption If SSL/TLS encryption is used, value must = true.
Indicate the database type used (Oracle or Sybase).
N iTCCS: ORACLE TxEIS: SYBASE
Database_Type iTCCS only until June 2012. Used only with Forms Management.
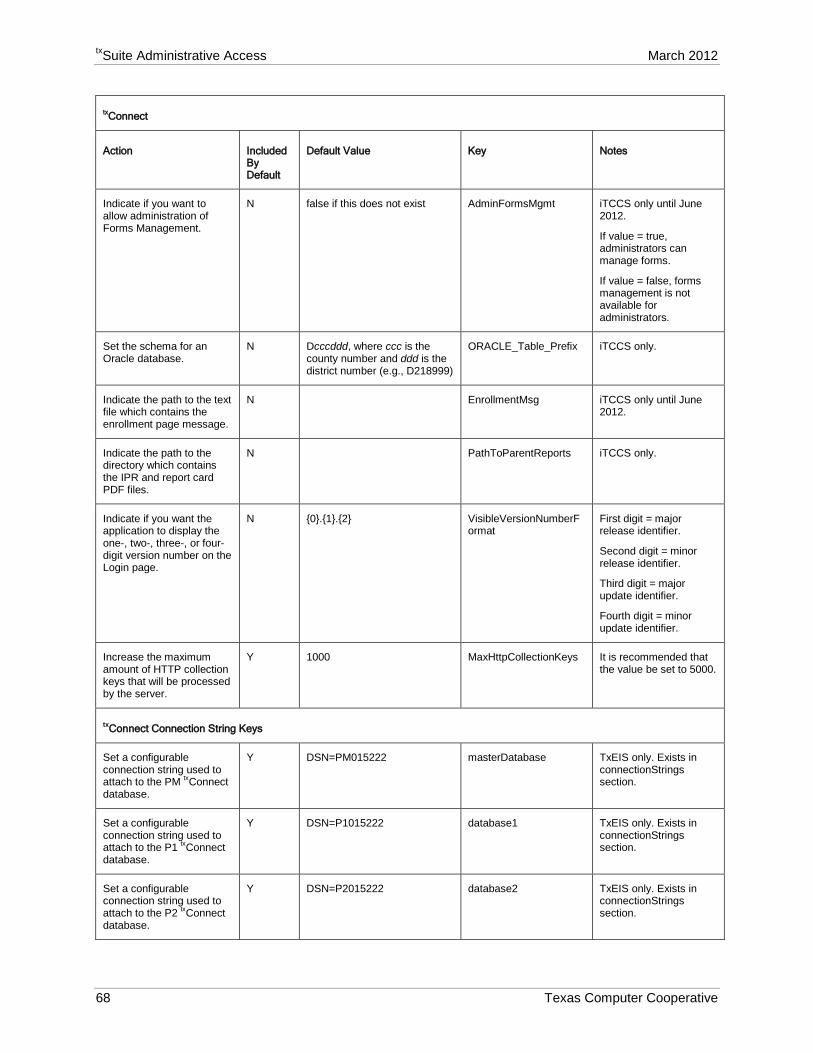
txSuite Administrative Access Training Guid March 2012
68 Texas Computer Cooperative
txConnect
Action Included By Default
Default Value Key Notes
Indicate if you want to allow administration of Forms Management.
N false if this does not exist AdminFormsMgmt iTCCS only until June 2012.
If value = true, administrators can manage forms.
If value = false, forms management is not available for administrators.
Set the schema for an Oracle database.
N Dcccddd, where ccc is the county number and ddd is the district number (e.g., D218999)
ORACLE_Table_Prefix iTCCS only.
Indicate the path to the text file which contains the enrollment page message.
N EnrollmentMsg iTCCS only until June 2012.
Indicate the path to the directory which contains the IPR and report card PDF files.
N PathToParentReports iTCCS only.
Indicate if you want the application to display the one-, two-, three-, or four-digit version number on the Login page.
N {0}.{1}.{2} VisibleVersionNumberFormat
First digit = major release identifier.
Second digit = minor release identifier.
Third digit = major update identifier.
Fourth digit = minor update identifier.
Increase the maximum amount of HTTP collection keys that will be processed by the server.
Y 1000 MaxHttpCollectionKeys It is recommended that the value be set to 5000.
txConnect Connection String Keys
Set a configurable connection string used to attach to the PM txConnect database.
Y DSN=PM015222 masterDatabase TxEIS only. Exists in connectionStrings section.
Set a configurable connection string used to attach to the P1 txConnect database.
Y DSN=P1015222 database1 TxEIS only. Exists in connectionStrings section.
Set a configurable connection string used to attach to the P2 txConnect database.
Y DSN=P2015222 database2 TxEIS only. Exists in connectionStrings section.
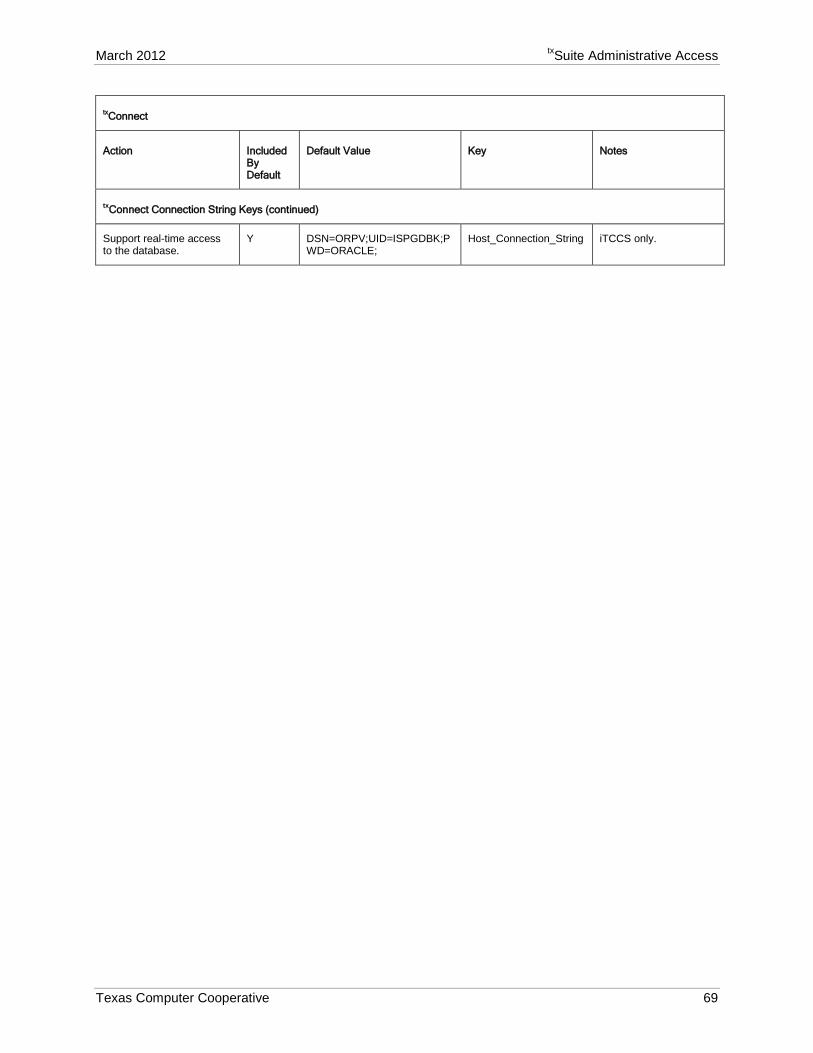
March 2012 txSuite Administrative Access
Texas Computer Cooperative 69
txConnect
Action Included By Default
Default Value Key Notes
txConnect Connection String Keys (continued)
Support real-time access to the database.
Y DSN=ORPV;UID=ISPGDBK;PWD=ORACLE;
Host_Connection_String iTCCS only.
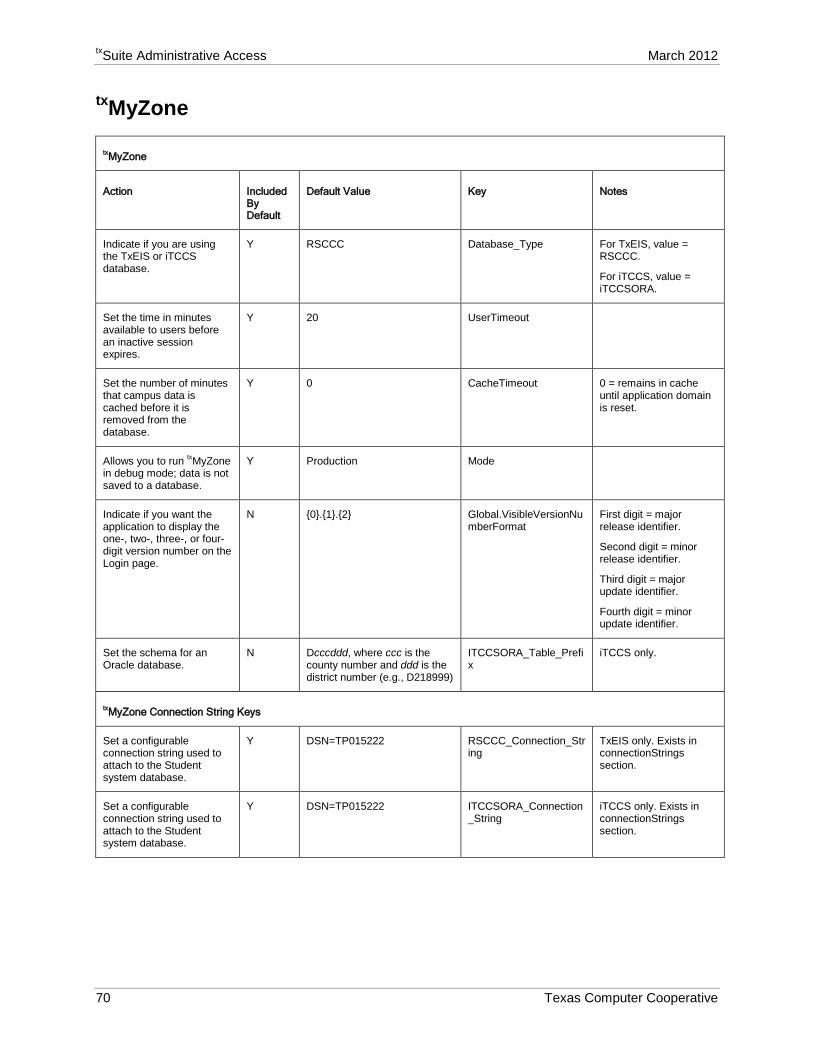
txSuite Administrative Access Training Guid March 2012
70 Texas Computer Cooperative
txMyZone
txMyZone
Action Included By Default
Default Value Key Notes
Indicate if you are using the TxEIS or iTCCS database.
Y RSCCC Database_Type For TxEIS, value = RSCCC.
For iTCCS, value = iTCCSORA.
Set the time in minutes available to users before an inactive session expires.
Y 20 UserTimeout
Set the number of minutes that campus data is cached before it is removed from the database.
Y 0 CacheTimeout 0 = remains in cache until application domain is reset.
Allows you to run txMyZone in debug mode; data is not saved to a database.
Y Production Mode
Indicate if you want the application to display the one-, two-, three-, or four-digit version number on the Login page.
N {0}.{1}.{2} Global.VisibleVersionNumberFormat
First digit = major release identifier.
Second digit = minor release identifier.
Third digit = major update identifier.
Fourth digit = minor update identifier.
Set the schema for an Oracle database.
N Dcccddd, where ccc is the county number and ddd is the district number (e.g., D218999)
ITCCSORA_Table_Prefix
iTCCS only.
txMyZone Connection String Keys
Set a configurable connection string used to attach to the Student system database.
Y DSN=TP015222 RSCCC_Connection_String
TxEIS only. Exists in connectionStrings section.
Set a configurable connection string used to attach to the Student system database.
Y DSN=TP015222 ITCCSORA_Connection_String
iTCCS only. Exists in connectionStrings section.
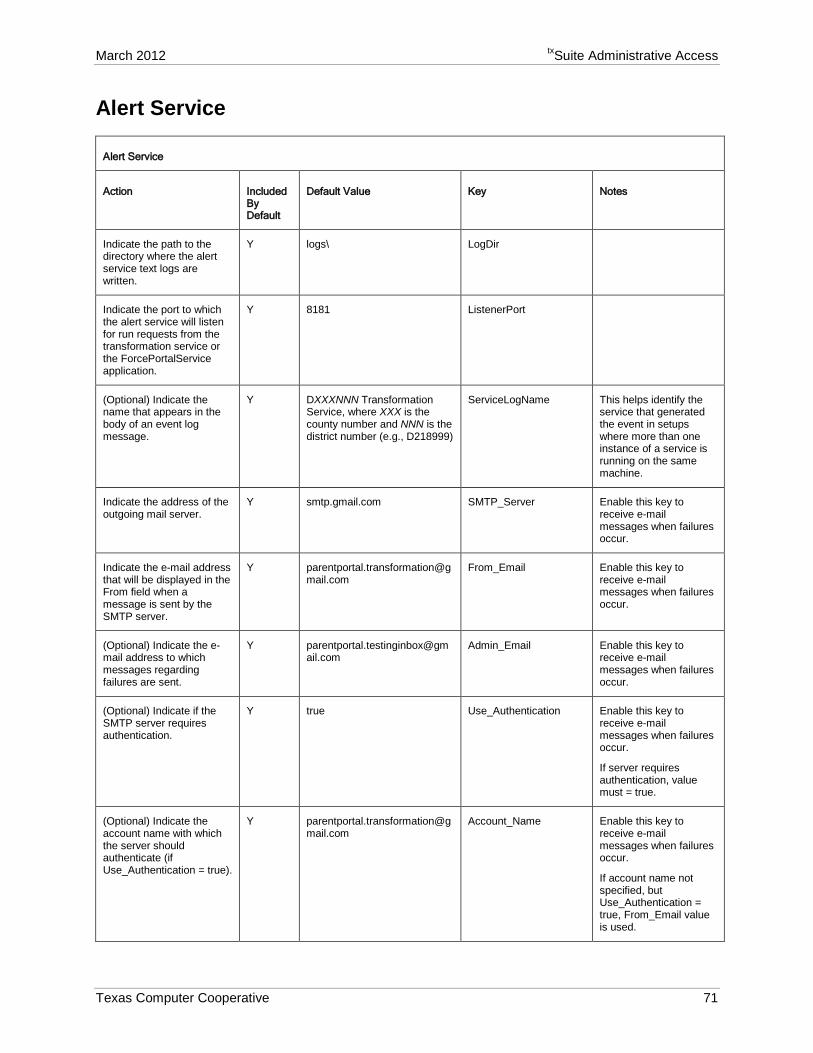
March 2012 txSuite Administrative Access
Texas Computer Cooperative 71
Alert Service
Alert Service
Action Included By Default
Default Value Key Notes
Indicate the path to the directory where the alert service text logs are written.
Y logs\ LogDir
Indicate the port to which the alert service will listen for run requests from the transformation service or the ForcePortalService application.
Y 8181 ListenerPort
(Optional) Indicate the name that appears in the body of an event log message.
Y DXXXNNN Transformation Service, where XXX is the county number and NNN is the district number (e.g., D218999)
ServiceLogName This helps identify the service that generated the event in setups where more than one instance of a service is running on the same machine.
Indicate the address of the outgoing mail server.
Y smtp.gmail.com SMTP_Server Enable this key to receive e-mail messages when failures occur.
Indicate the e-mail address that will be displayed in the From field when a message is sent by the SMTP server.
From_Email Enable this key to receive e-mail messages when failures occur.
(Optional) Indicate the e-mail address to which messages regarding failures are sent.
Admin_Email Enable this key to receive e-mail messages when failures occur.
(Optional) Indicate if the SMTP server requires authentication.
Y true Use_Authentication Enable this key to receive e-mail messages when failures occur.
If server requires authentication, value must = true.
(Optional) Indicate the account name with which the server should authenticate (if Use_Authentication = true).
Account_Name Enable this key to receive e-mail messages when failures occur.
If account name not specified, but Use_Authentication = true, From_Email value is used.
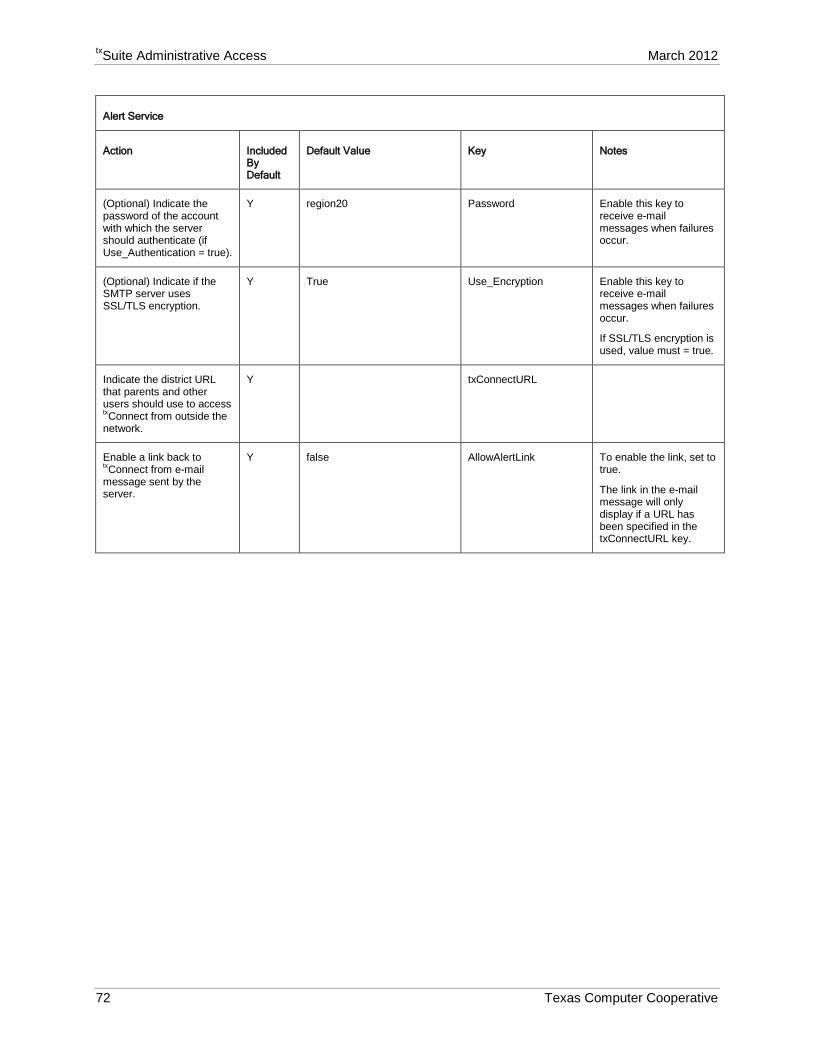
txSuite Administrative Access Training Guid March 2012
72 Texas Computer Cooperative
Alert Service
Action Included By Default
Default Value Key Notes
(Optional) Indicate the password of the account with which the server should authenticate (if Use_Authentication = true).
Y region20 Password Enable this key to receive e-mail messages when failures occur.
(Optional) Indicate if the SMTP server uses SSL/TLS encryption.
Y True Use_Encryption Enable this key to receive e-mail messages when failures occur.
If SSL/TLS encryption is used, value must = true.
Indicate the district URL that parents and other users should use to access txConnect from outside the network.
Y txConnectURL
Enable a link back to txConnect from e-mail message sent by the server.
Y false AllowAlertLink To enable the link, set to true.
The link in the e-mail message will only display if a URL has been specified in the txConnectURL key.
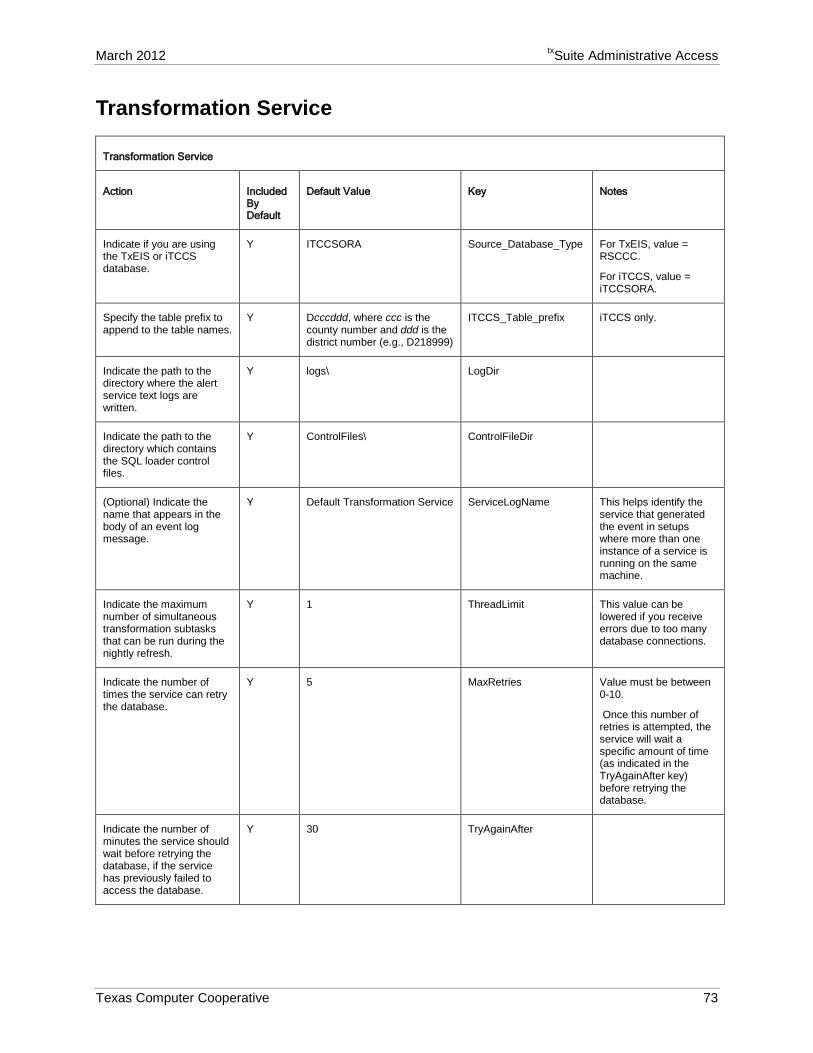
March 2012 txSuite Administrative Access
Texas Computer Cooperative 73
Transformation Service
Transformation Service
Action Included By Default
Default Value Key Notes
Indicate if you are using the TxEIS or iTCCS database.
Y ITCCSORA Source_Database_Type For TxEIS, value = RSCCC.
For iTCCS, value = iTCCSORA.
Specify the table prefix to append to the table names.
Y Dcccddd, where ccc is the county number and ddd is the district number (e.g., D218999)
ITCCS_Table_prefix iTCCS only.
Indicate the path to the directory where the alert service text logs are written.
Y logs\ LogDir
Indicate the path to the directory which contains the SQL loader control files.
Y ControlFiles\ ControlFileDir
(Optional) Indicate the name that appears in the body of an event log message.
Y Default Transformation Service ServiceLogName This helps identify the service that generated the event in setups where more than one instance of a service is running on the same machine.
Indicate the maximum number of simultaneous transformation subtasks that can be run during the nightly refresh.
Y 1 ThreadLimit This value can be lowered if you receive errors due to too many database connections.
Indicate the number of times the service can retry the database.
Y 5 MaxRetries Value must be between 0-10.
Once this number of retries is attempted, the service will wait a specific amount of time (as indicated in the TryAgainAfter key) before retrying the database.
Indicate the number of minutes the service should wait before retrying the database, if the service has previously failed to access the database.
Y 30 TryAgainAfter
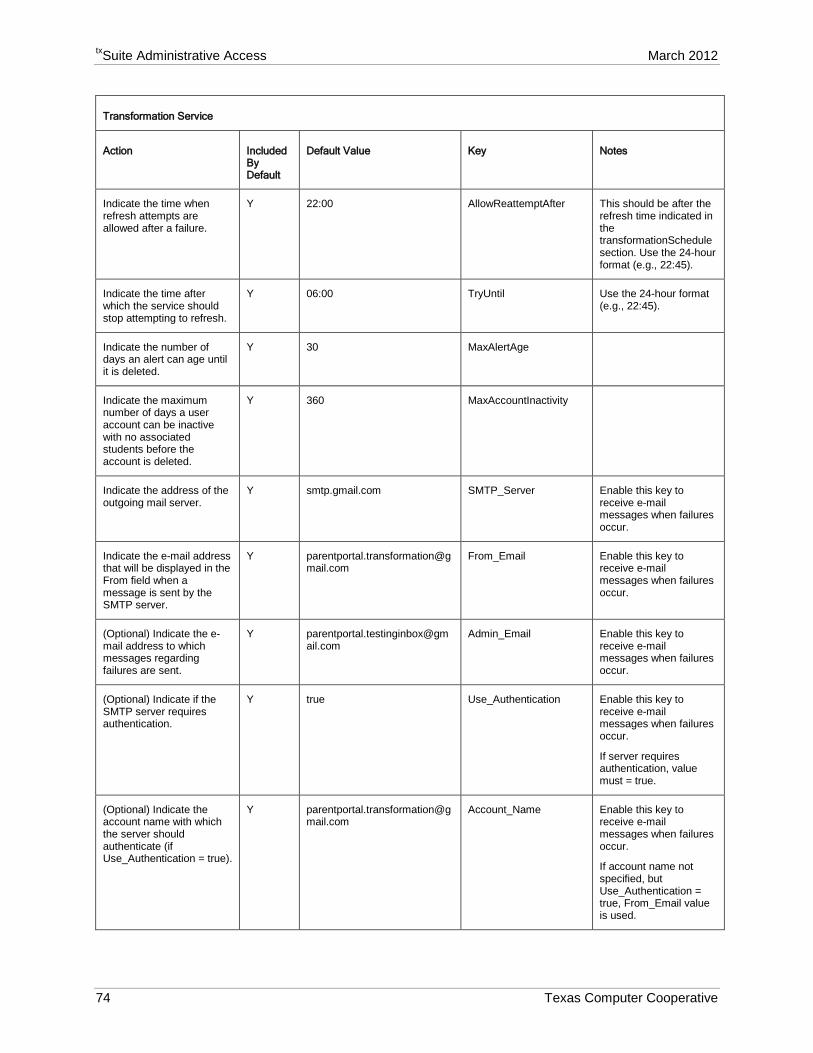
txSuite Administrative Access Training Guid March 2012
74 Texas Computer Cooperative
Transformation Service
Action Included By Default
Default Value Key Notes
Indicate the time when refresh attempts are allowed after a failure.
Y 22:00 AllowReattemptAfter This should be after the refresh time indicated in the transformationSchedule section. Use the 24-hour format (e.g., 22:45).
Indicate the time after which the service should stop attempting to refresh.
Y 06:00 TryUntil Use the 24-hour format (e.g., 22:45).
Indicate the number of days an alert can age until it is deleted.
Y 30 MaxAlertAge
Indicate the maximum number of days a user account can be inactive with no associated students before the account is deleted.
Y 360 MaxAccountInactivity
Indicate the address of the outgoing mail server.
Y smtp.gmail.com SMTP_Server Enable this key to receive e-mail messages when failures occur.
Indicate the e-mail address that will be displayed in the From field when a message is sent by the SMTP server.
From_Email Enable this key to receive e-mail messages when failures occur.
(Optional) Indicate the e-mail address to which messages regarding failures are sent.
Admin_Email Enable this key to receive e-mail messages when failures occur.
(Optional) Indicate if the SMTP server requires authentication.
Y true Use_Authentication Enable this key to receive e-mail messages when failures occur.
If server requires authentication, value must = true.
(Optional) Indicate the account name with which the server should authenticate (if Use_Authentication = true).
Account_Name Enable this key to receive e-mail messages when failures occur.
If account name not specified, but Use_Authentication = true, From_Email value is used.
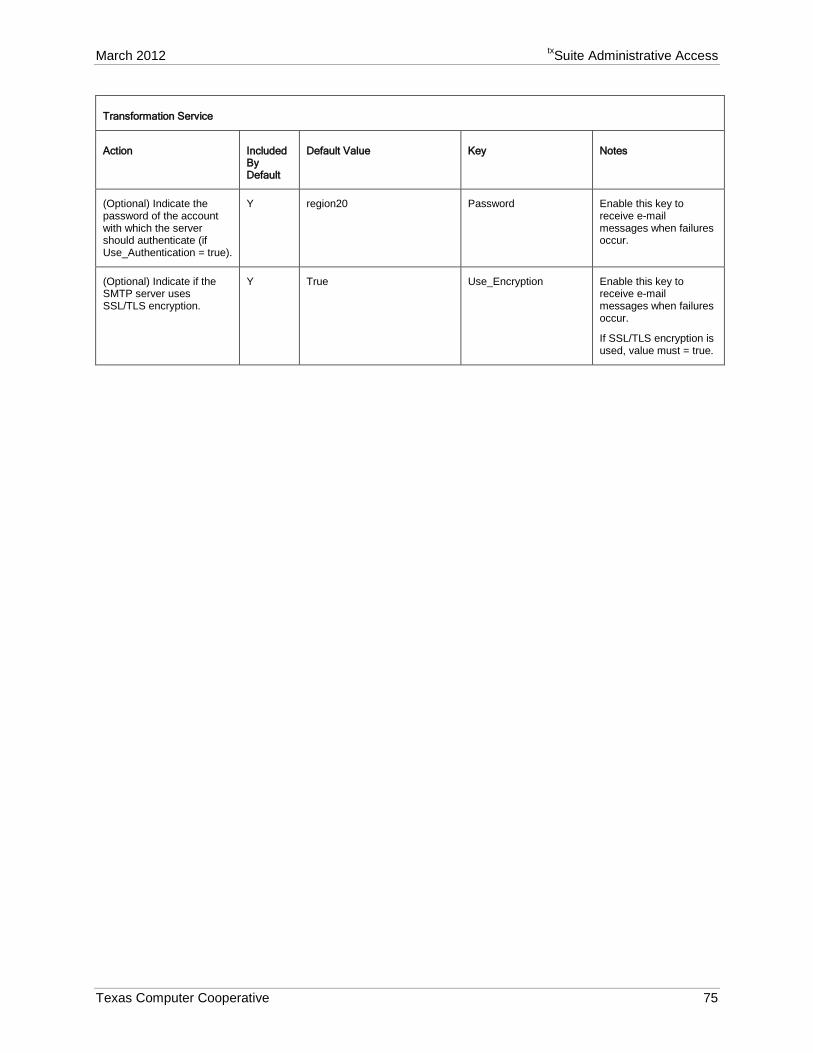
March 2012 txSuite Administrative Access
Texas Computer Cooperative 75
Transformation Service
Action Included By Default
Default Value Key Notes
(Optional) Indicate the password of the account with which the server should authenticate (if Use_Authentication = true).
Y region20 Password Enable this key to receive e-mail messages when failures occur.
(Optional) Indicate if the SMTP server uses SSL/TLS encryption.
Y True Use_Encryption Enable this key to receive e-mail messages when failures occur.
If SSL/TLS encryption is used, value must = true.

txSuite Administrative Access Training Guid March 2012
76 Texas Computer Cooperative


A Tradition of Performance
A Vision for the Future
www.txeis.net