Embed Size (px)
Citation preview
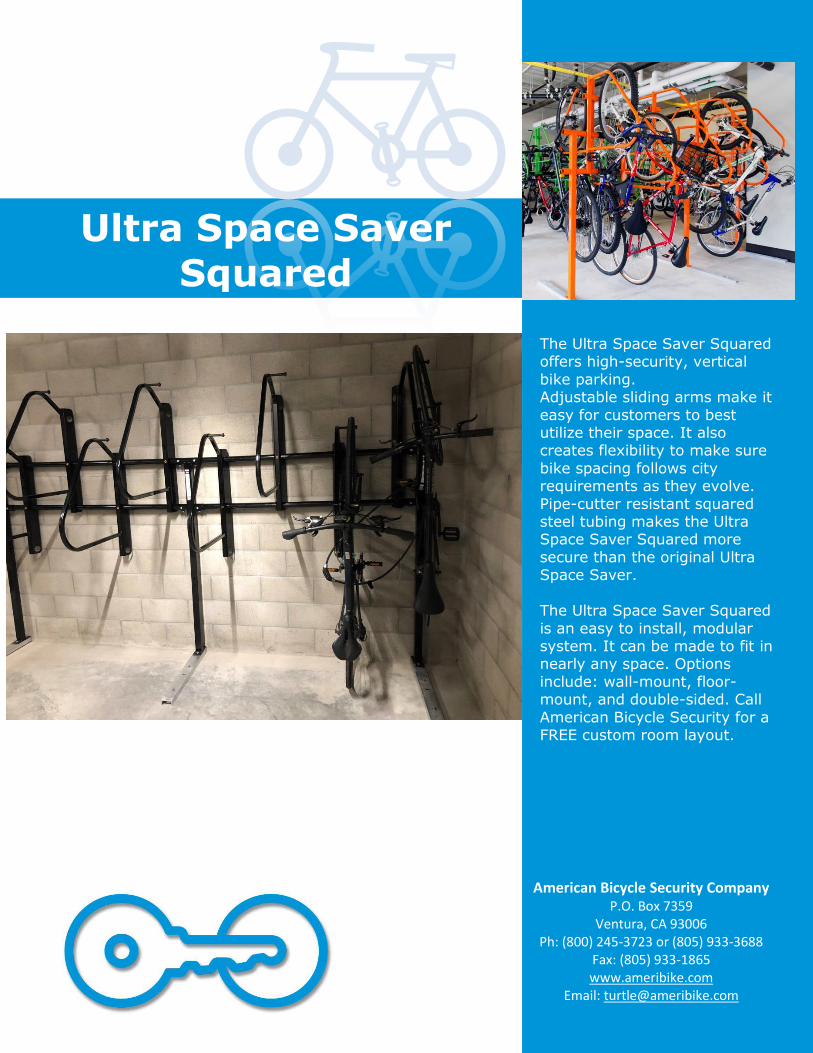
The Ultra Space Saver Squared offers high-security, vertical
bike parking. Adjustable sliding arms make it
easy for customers to best utilize their space. It also creates flexibility to make sure
bike spacing follows city requirements as they evolve.
Pipe-cutter resistant squared steel tubing makes the Ultra Space Saver Squared more
secure than the original Ultra Space Saver.
The Ultra Space Saver Squared
is an easy to install, modular system. It can be made to fit in nearly any space. Options
include: wall-mount, floor-mount, and double-sided. Call
American Bicycle Security for a FREE custom room layout.
American Bicycle Security Company P.O. Box 7359
Ventura, CA 93006 Ph: (800) 245-3723 or (805) 933-3688
Fax: (805) 933-1865 www.ameribike.com
Email: [email protected]
Ultra Space Saver Squared
Page 1 of 6
Ultra Space Saver Squared
American Bicycle Security Company P.O. Box 7359
Ventura, CA 93006 Ph: (800) 245-3723 or (805) 933-3688
Fax: (805) 933-1865 www.ameribike.com
Email: [email protected]
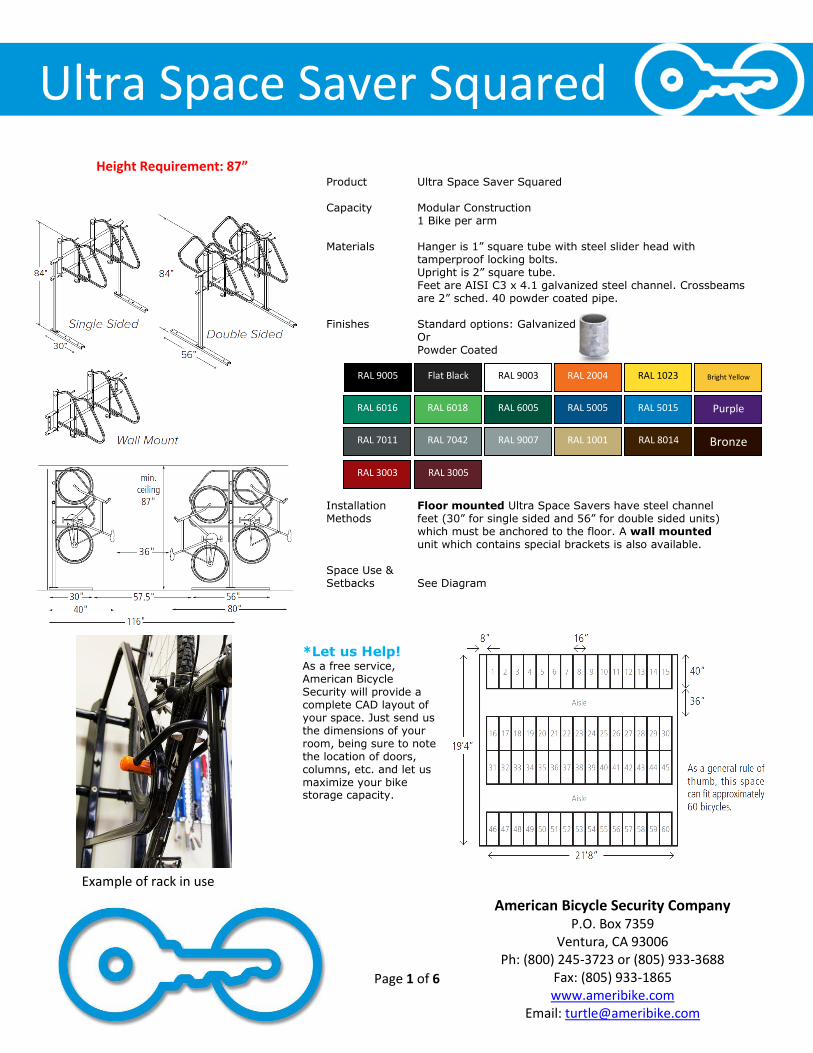
Product Ultra Space Saver Squared
Capacity Modular Construction
1 Bike per arm
Materials Hanger is 1” square tube with steel slider head with tamperproof locking bolts. Upright is 2” square tube. Feet are AISI C3 x 4.1 galvanized steel channel. Crossbeams are 2” sched. 40 powder coated pipe.
Finishes Standard options: Galvanized Or Powder Coated
Installation Methods
Floor mounted Ultra Space Savers have steel channel feet (30” for single sided and 56” for double sided units) which must be anchored to the floor. A wall mounted unit which contains special brackets is also available.
Space Use & Setbacks
See Diagram
*Let us Help! As a free service, American Bicycle Security will provide a complete CAD layout of your space. Just send us the dimensions of your room, being sure to note the location of doors, columns, etc. and let us maximize your bike storage capacity.
Example of rack in use
RAL 9005 RAL 9003
RAL 3003
RAL 2004 RAL 1023
Bright Yellow
RAL 6016 RAL 6018
RAL 6005
RAL 5005
RAL 5015
RAL 7042
RAL 8014
Bronze
RAL 9007
Flat Black
Purple
RAL 7011
RAL 1001
RAL 3005
Height Requirement: 87”
Page 2 of 6
Ultra Space Saver Squared
American Bicycle Security Company P.O. Box 7359
Ventura, CA 93006 Ph: (800) 245-3723 or (805) 933-3688
Fax: (805) 933-1865 www.ameribike.com
Email: [email protected]
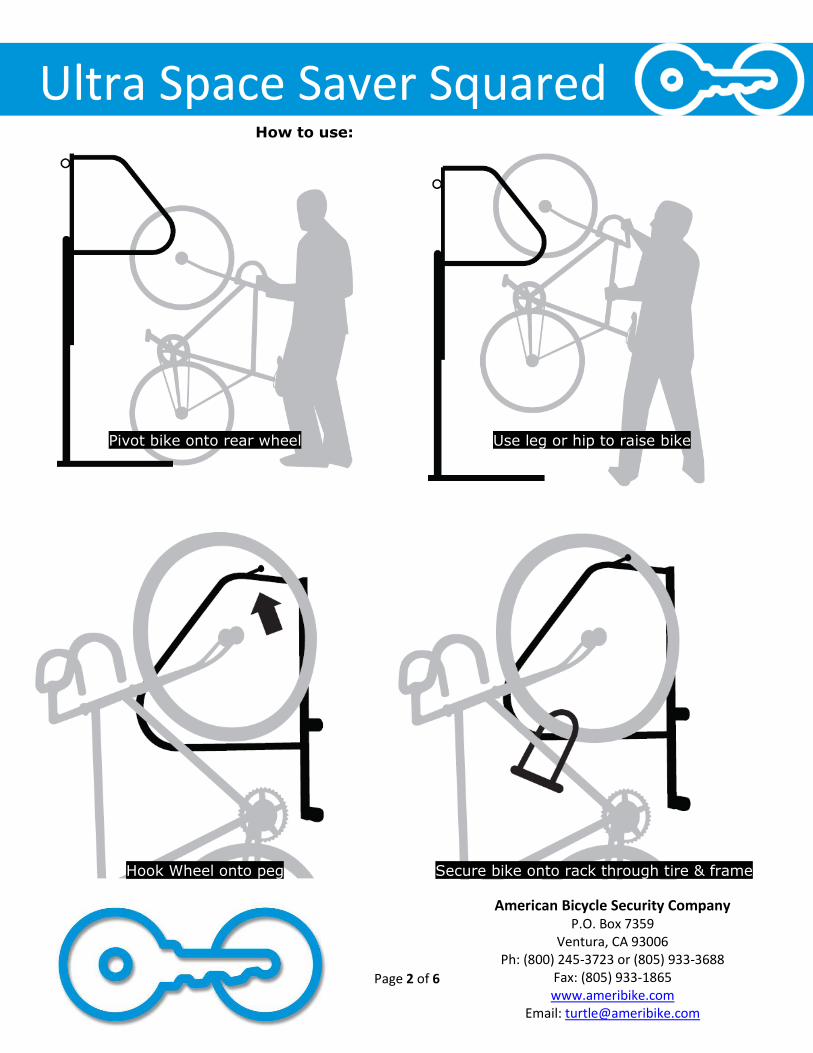
Pivot bike onto rear wheel Use leg or hip to raise bike
Hook Wheel onto peg Secure bike onto rack through tire & frame
How to use:
Page 3 of 6
Ultra Space Saver Squared
American Bicycle Security Company P.O. Box 7359
Ventura, CA 93006 Ph: (800) 245-3723 or (805) 933-3688
Fax: (805) 933-1865 www.ameribike.com
Email: [email protected]
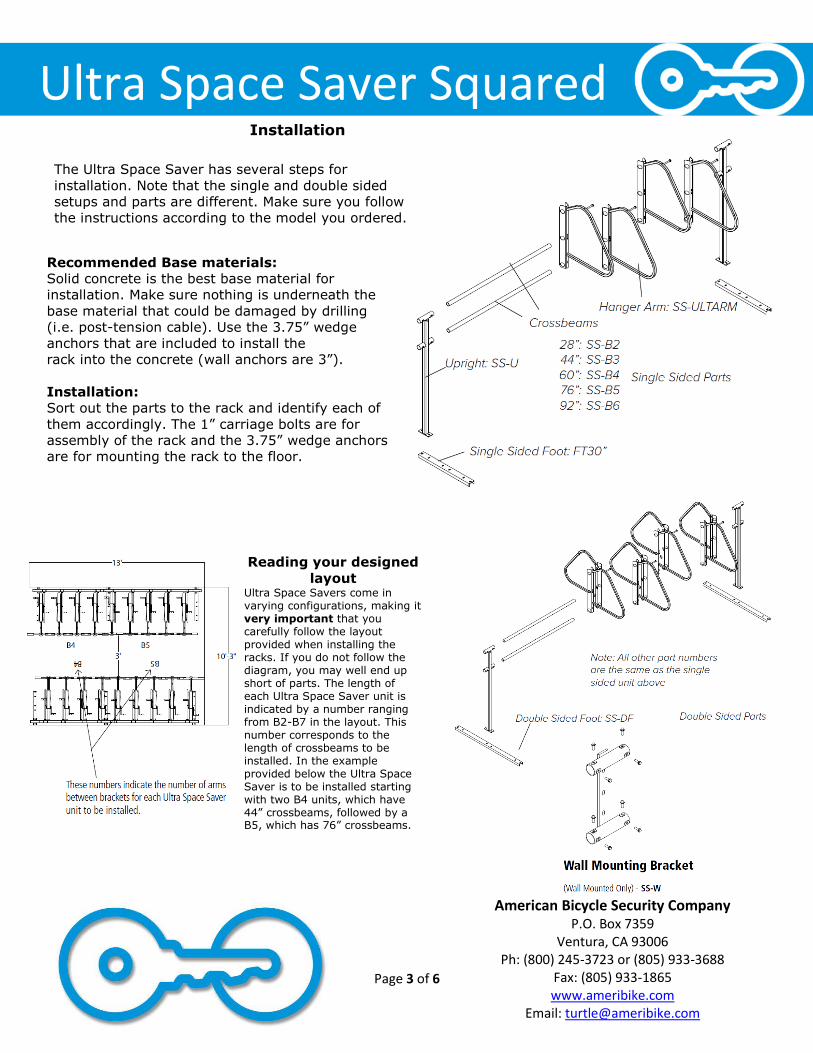
The Ultra Space Saver has several steps for
installation. Note that the single and double sided
setups and parts are different. Make sure you follow
the instructions according to the model you ordered.
Recommended Base materials:
Solid concrete is the best base material for
installation. Make sure nothing is underneath the
base material that could be damaged by drilling
(i.e. post-tension cable). Use the 3.75” wedge
anchors that are included to install the
rack into the concrete (wall anchors are 3”).
Installation:
Sort out the parts to the rack and identify each of
them accordingly. The 1” carriage bolts are for
assembly of the rack and the 3.75” wedge anchors
are for mounting the rack to the floor.
Reading your designed
layout Ultra Space Savers come in varying configurations, making it very important that you carefully follow the layout provided when installing the racks. If you do not follow the diagram, you may well end up short of parts. The length of each Ultra Space Saver unit is indicated by a number ranging from B2-B7 in the layout. This number corresponds to the length of crossbeams to be installed. In the example provided below the Ultra Space Saver is to be installed starting with two B4 units, which have 44” crossbeams, followed by a B5, which has 76” crossbeams.
Installation

Page 4 of 6
Ultra Space Saver Squared
American Bicycle Security Company P.O. Box 7359
Ventura, CA 93006 Ph: (800) 245-3723 or (805) 933-3688
Fax: (805) 933-1865 www.ameribike.com
Email: [email protected]
*Tools Needed for Wall Mount Installation
9/16” Wrench/Socket
3/8” or 1/2” Masonry Drill Bit
(Depending on anchor type)
Tape Measure
Drill (Hammer drill recommended)
Hammer
Level
Marker or pencil
1. Lay out parts on the floor where unit is to be installed and be sure you have all necessary parts.
2. On galvanized cross beams, Place a mark three inches from each end. This mark will show you how far to slide the cross beam into the wall bracket.
3. Place first wall bracket on wall where you want to install the bike rack. Bottom of bracket should be at least 50” from ground. Mark holes for drilling. See figure 3.
4. Drill Holes into wall, put the wall bracket back up and insert wall anchors through holes in bracket and set the
anchors. For setting the anchors and diameter and depth of holes, follow instructions sent with the anchors. Make sure bracket is level. See figure 4.
5. Thread 3/8” by 3/4” tightening bolts into holes in bracket. Insert crossbeams into bracket. Slide on arms and spacers, make sure arms are staggered. At end of last
arm place 3” spacers and install end bracket, making sure cross beams are level. See figure 5
6. If installing more than one set of Ultra Space Saver Squared arms, continue from last installed wall bracket and repeat steps 3-5 above.
Before installing make sure the wall is
strong enough to accommodate the rack
fully loaded with bikes. Steel stud walls are NOT suitable for installation.
Installation Steps:
Wall Mount
Page 5 of 6
Ultra Space Saver Squared
American Bicycle Security Company P.O. Box 7359
Ventura, CA 93006 Ph: (800) 245-3723 or (805) 933-3688
Fax: (805) 933-1865 www.ameribike.com
Email: [email protected]
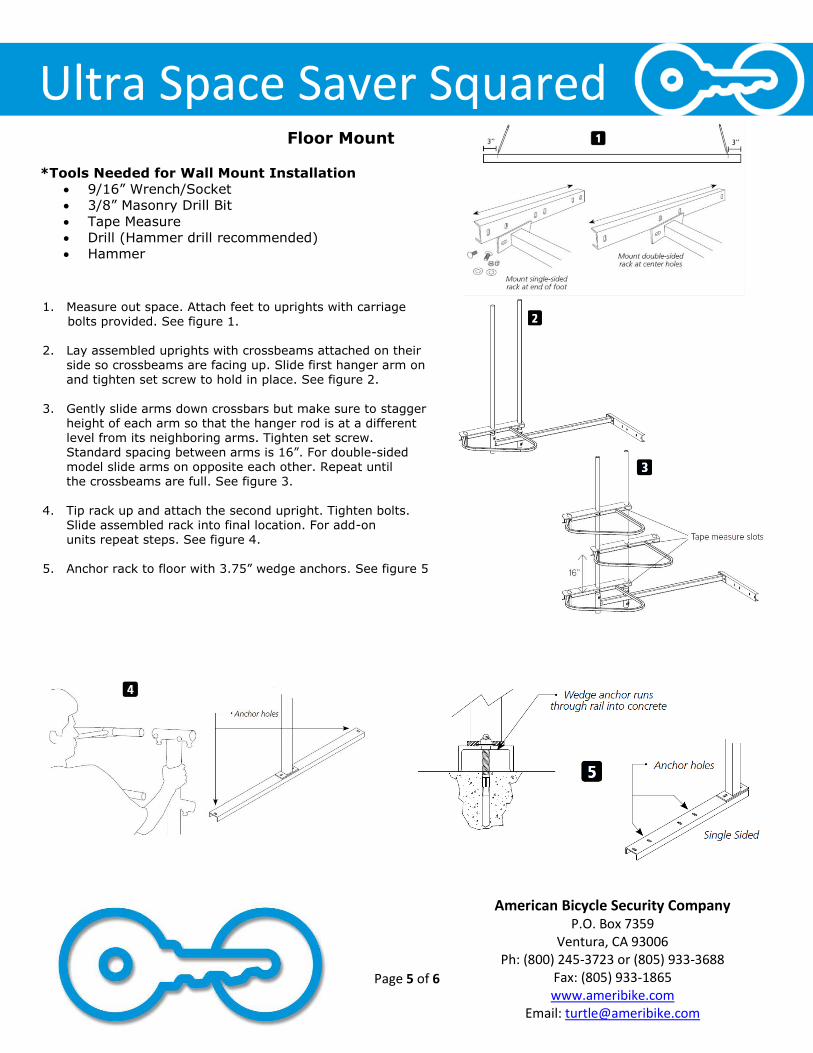
1. Measure out space. Attach feet to uprights with carriage bolts provided. See figure 1.
2. Lay assembled uprights with crossbeams attached on their
side so crossbeams are facing up. Slide first hanger arm on and tighten set screw to hold in place. See figure 2.
3. Gently slide arms down crossbars but make sure to stagger height of each arm so that the hanger rod is at a different level from its neighboring arms. Tighten set screw. Standard spacing between arms is 16”. For double-sided model slide arms on opposite each other. Repeat until the crossbeams are full. See figure 3.
4. Tip rack up and attach the second upright. Tighten bolts.
Slide assembled rack into final location. For add-on units repeat steps. See figure 4.
5. Anchor rack to floor with 3.75” wedge anchors. See figure 5
*Tools Needed for Wall Mount Installation
9/16” Wrench/Socket
3/8” Masonry Drill Bit
Tape Measure
Drill (Hammer drill recommended)
Hammer
Floor Mount
Page 6 of 6
Ultra Space Saver Squared
American Bicycle Security Company P.O. Box 7359
Ventura, CA 93006 Ph: (800) 245-3723 or (805) 933-3688
Fax: (805) 933-1865 www.ameribike.com
Email: [email protected]
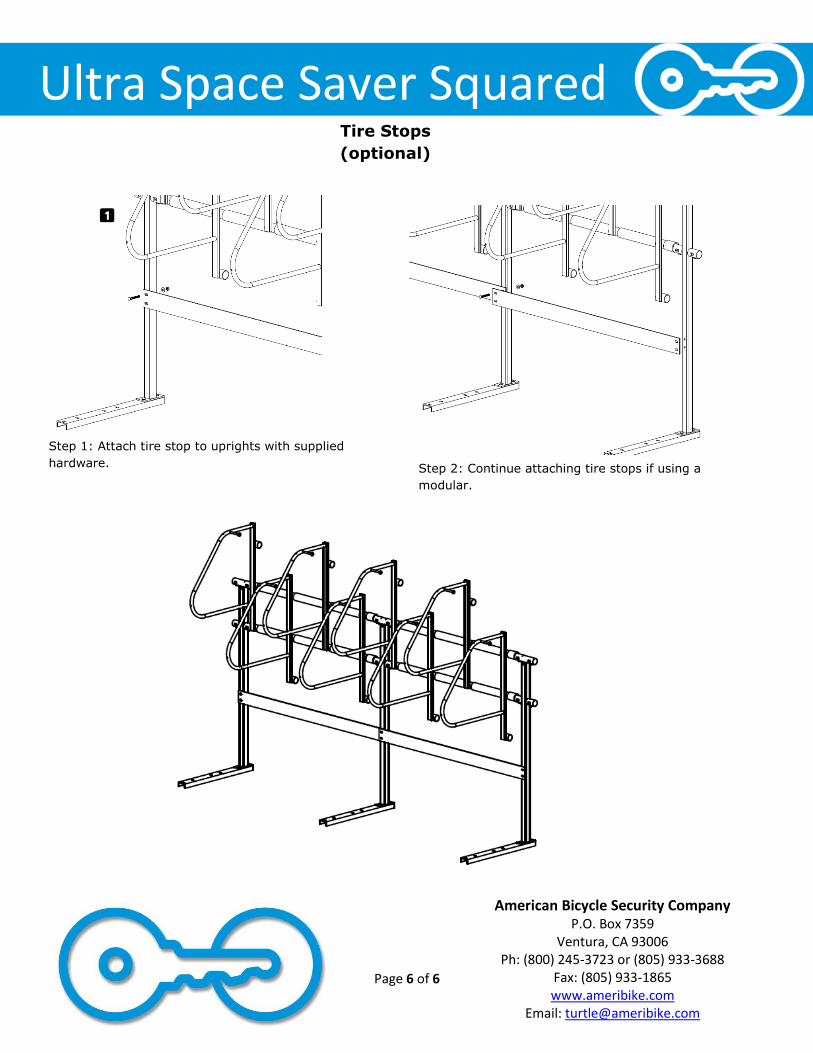
Installation Steps:
Step 1: Attach tire stop to uprights with supplied
hardware.
Tire Stops
(optional)
Step 2: Continue attaching tire stops if using a
modular.
system