Embed Size (px)
Citation preview
Unified Gateway
Remote Access User Guide
Updated January 24th 2018
2
1 About This Document
The Unified Remote Access Portal provides external users access to Manitoba eHealth applications, services and network resources. Connection options are available for connecting over a personal device or Manitoba eHealth managed domain connected devices. This document outlines the process for using the Unified Remote Access Portal solution, enrollment into the service, and its logon options and access methods.
Table of Contents
1 About This Document ....................................................................................... 2
2 Getting Started ................................................................................................. 3
2.1 Second Factor Enrollment ............................................................................ 4
Imprivata ID Enrollment .................................................................................... 4
SMS Enrollment ................................................................................................ 5
Physical Token .................................................................................................. 5
3 Logging into the portal ...................................................................................... 6
3.1 Connection Options .................................................................................... 6
3.2 Manitoba eHealth Web and Citrix Apps Page ................................................. 7
3.3 Logging off Remote Access ........................................................................ 11
4 Using A Personal Device .................................................................................. 12
4.1 Setting up your browser for the first time ................................................... 13
Internet Explorer ............................................................................................. 13
Google Chrome ............................................................................................... 16
Microsoft Edge ................................................................................................ 19
iPad, iPhone or Android browsers ..................................................................... 23
Apple Safari on Macintosh ................................................................................ 25
4.2 Using the Apple iPad/iPhone or Android Citrix Receiver ................................ 27
4.3 Using the Light/HTML5 Receiver ................................................................ 28
4.4 Switching to the light client ....................................................................... 28
4.5 Using the light client ................................................................................. 29
4.6 Switching back to the full client ................................................................. 31
4.7 Accessing the Clinical EPR from a personal device ....................................... 32
5 Common problems and solutions ..................................................................... 38
3
5.1 Desktop clients ......................................................................................... 38
5.2 Mobile/tablet clients .................................................................................. 40
5.3 Application specific problems ..................................................................... 41
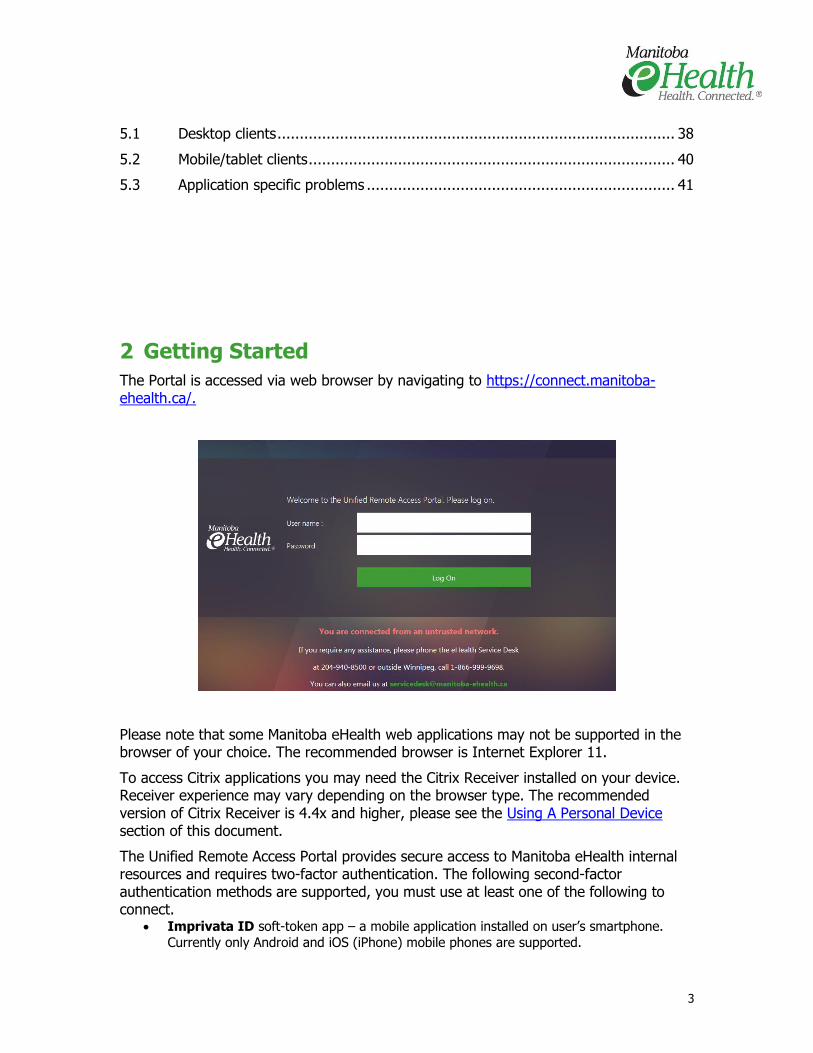
2 Getting Started
The Portal is accessed via web browser by navigating to https://connect.manitoba-ehealth.ca/.
Please note that some Manitoba eHealth web applications may not be supported in the browser of your choice. The recommended browser is Internet Explorer 11.
To access Citrix applications you may need the Citrix Receiver installed on your device. Receiver experience may vary depending on the browser type. The recommended version of Citrix Receiver is 4.4x and higher, please see the Using A Personal Device section of this document.
The Unified Remote Access Portal provides secure access to Manitoba eHealth internal resources and requires two-factor authentication. The following second-factor authentication methods are supported, you must use at least one of the following to connect.
Imprivata ID soft-token app – a mobile application installed on user’s smartphone.
Currently only Android and iOS (iPhone) mobile phones are supported.
4
SMS (text message) code verification – once enabled, a text message with a code is sent
to user’s registered mobile phone number. User then enters the received code when
prompted to get access to the system.
Physical-tokens (VASCO) – traditional hard-token VASCO devices are also supported if
required.
2.1 Second Factor Enrollment
When logging into the portal, if no second factor method is registered you will be prompted to enroll a second factor method. The Enrollment process will ask you to register each method you are enabled for, you may skip a method but you must enroll at least one.
Log into portal with NTDWRHA domain account user name and password.
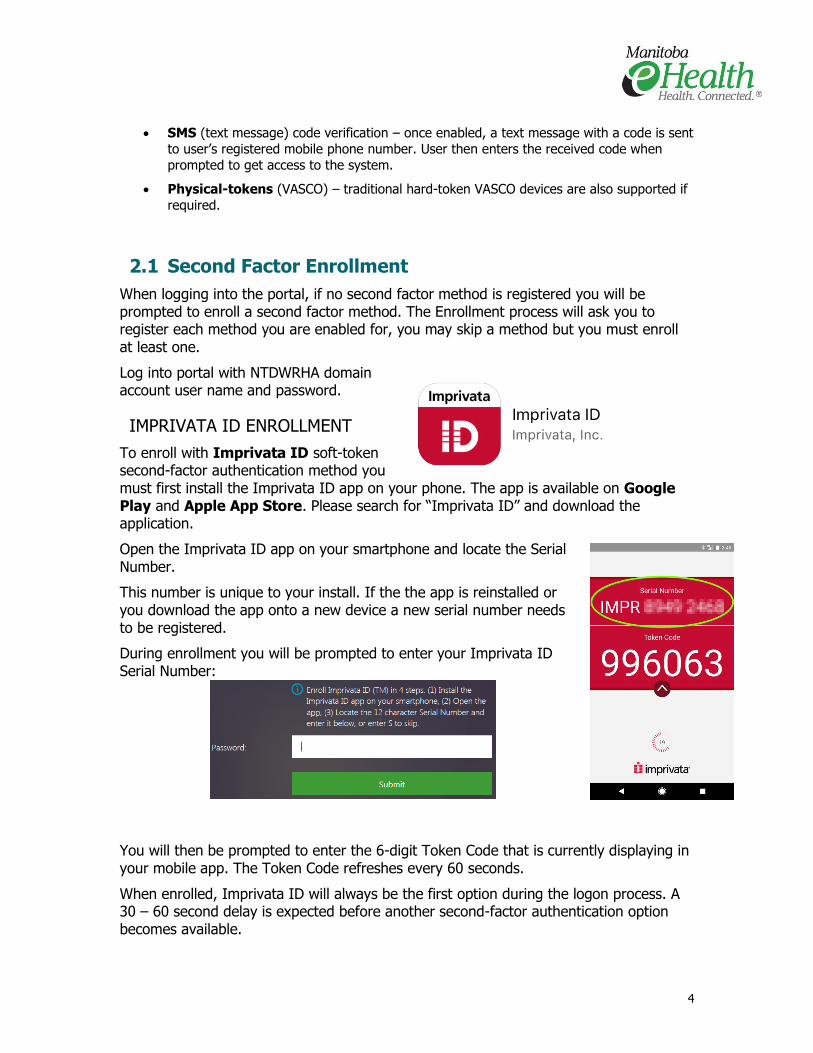
IMPRIVATA ID ENROLLMENT
To enroll with Imprivata ID soft-token second-factor authentication method you must first install the Imprivata ID app on your phone. The app is available on Google Play and Apple App Store. Please search for “Imprivata ID” and download the application.
Open the Imprivata ID app on your smartphone and locate the Serial Number.
This number is unique to your install. If the the app is reinstalled or you download the app onto a new device a new serial number needs to be registered.
During enrollment you will be prompted to enter your Imprivata ID Serial Number:
You will then be prompted to enter the 6-digit Token Code that is currently displaying in your mobile app. The Token Code refreshes every 60 seconds.
When enrolled, Imprivata ID will always be the first option during the logon process. A 30 – 60 second delay is expected before another second-factor authentication option becomes available.
5
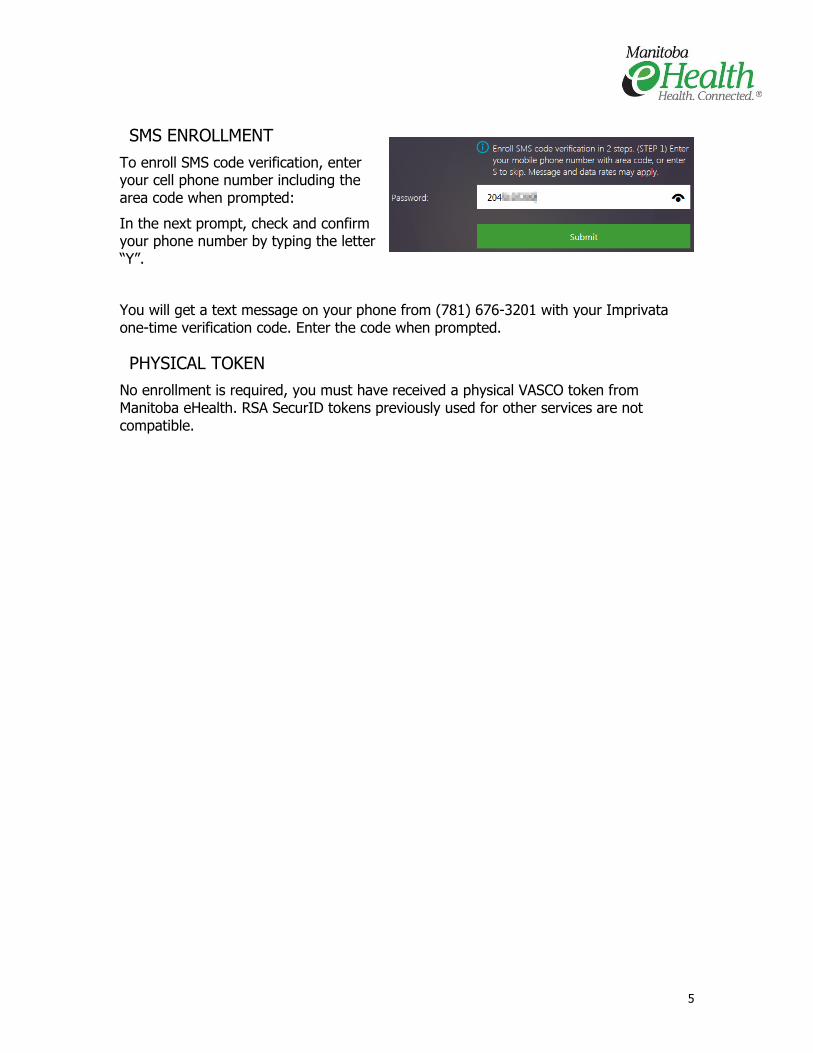
SMS ENROLLMENT
To enroll SMS code verification, enter your cell phone number including the area code when prompted:
In the next prompt, check and confirm your phone number by typing the letter “Y”.
You will get a text message on your phone from (781) 676-3201 with your Imprivata one-time verification code. Enter the code when prompted.
PHYSICAL TOKEN
No enrollment is required, you must have received a physical VASCO token from Manitoba eHealth. RSA SecurID tokens previously used for other services are not compatible.
6
3 Logging into the portal
To login, enter your ntdwrha domain username and password.
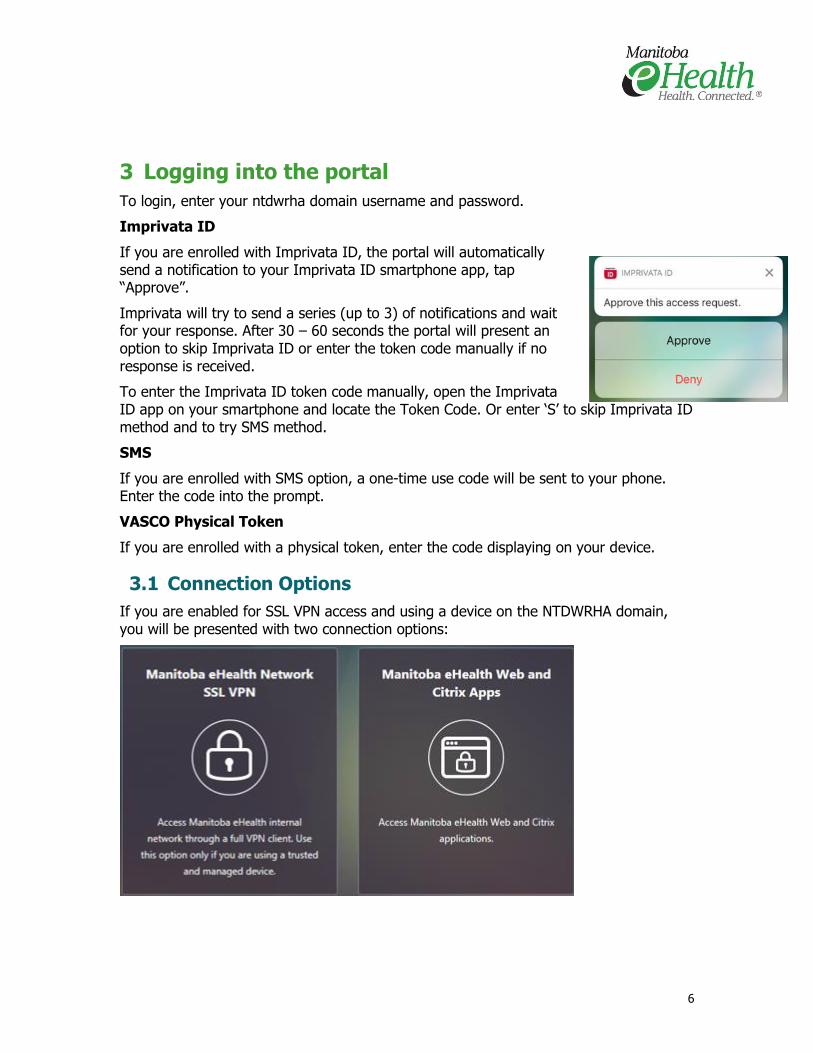
Imprivata ID
If you are enrolled with Imprivata ID, the portal will automatically send a notification to your Imprivata ID smartphone app, tap “Approve”.
Imprivata will try to send a series (up to 3) of notifications and wait for your response. After 30 – 60 seconds the portal will present an option to skip Imprivata ID or enter the token code manually if no response is received.
To enter the Imprivata ID token code manually, open the Imprivata ID app on your smartphone and locate the Token Code. Or enter ‘S’ to skip Imprivata ID method and to try SMS method.
SMS
If you are enrolled with SMS option, a one-time use code will be sent to your phone. Enter the code into the prompt.
VASCO Physical Token
If you are enrolled with a physical token, enter the code displaying on your device.
3.1 Connection Options
If you are enabled for SSL VPN access and using a device on the NTDWRHA domain, you will be presented with two connection options:
7
Manitoba eHealth Network SSL VPN – Is a complete remote office access option offering similar functionality as being in the office. It allows access to network resources, fileshares, and installed applications like Outlook.
Manitoba eHealth Web and Citrix Apps –Provides access to Citrix applications and select Manitoba eHealth Web applications such as Outlook Web App, SharePoint and WRHA Insite. In case you are not eligible for SSL VPN access or your device is not Manitoba eHealth-managed, the Client Choices page will not be shown and the portal will navigate directly to Manitoba eHealth Web and Citrix Apps page.
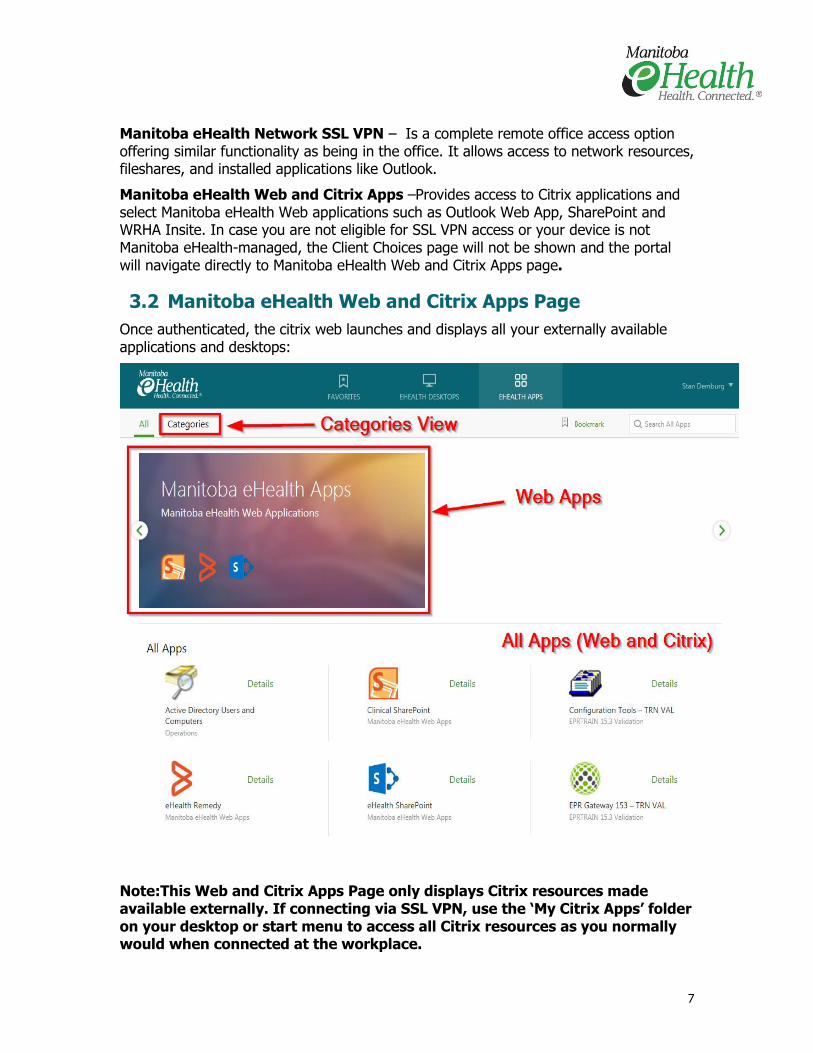
3.2 Manitoba eHealth Web and Citrix Apps Page
Once authenticated, the citrix web launches and displays all your externally available applications and desktops:
Note:This Web and Citrix Apps Page only displays Citrix resources made available externally. If connecting via SSL VPN, use the ‘My Citrix Apps’ folder on your desktop or start menu to access all Citrix resources as you normally would when connected at the workplace.

8
9
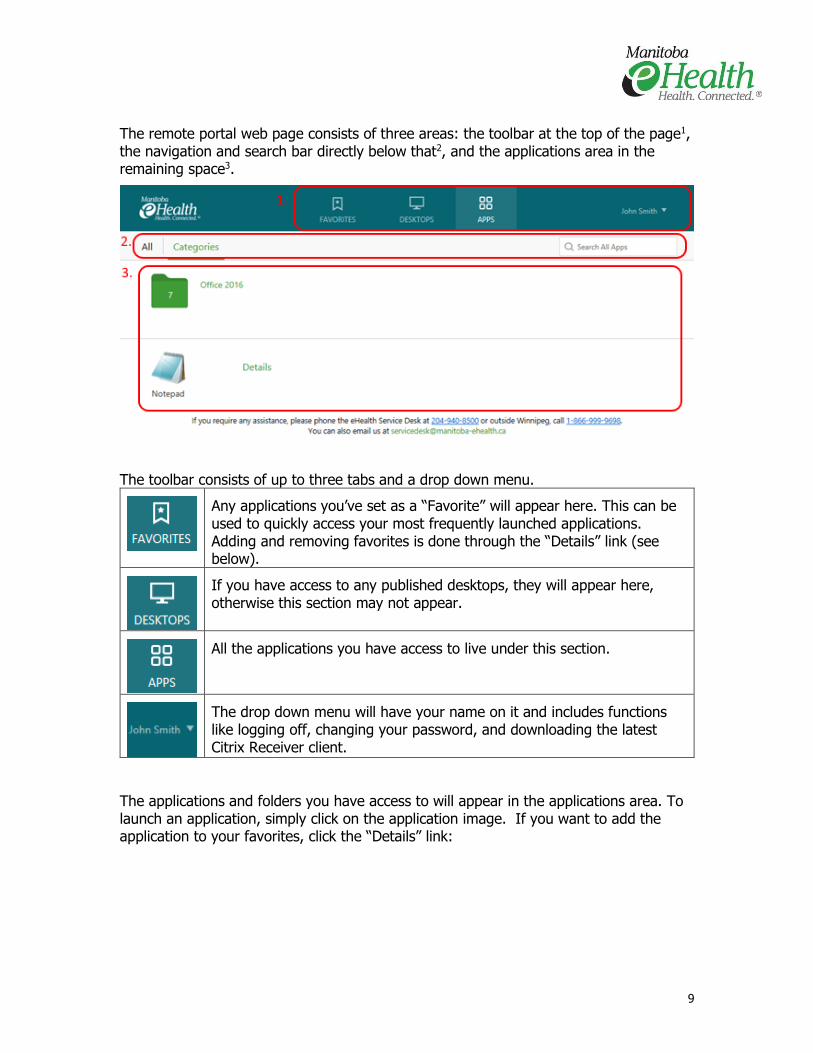
The remote portal web page consists of three areas: the toolbar at the top of the page1, the navigation and search bar directly below that2, and the applications area in the remaining space3.
The toolbar consists of up to three tabs and a drop down menu.
Any applications you’ve set as a “Favorite” will appear here. This can be used to quickly access your most frequently launched applications. Adding and removing favorites is done through the “Details” link (see below).
If you have access to any published desktops, they will appear here, otherwise this section may not appear.
All the applications you have access to live under this section.
The drop down menu will have your name on it and includes functions like logging off, changing your password, and downloading the latest Citrix Receiver client.
The applications and folders you have access to will appear in the applications area. To launch an application, simply click on the application image. If you want to add the application to your favorites, click the “Details” link:
10
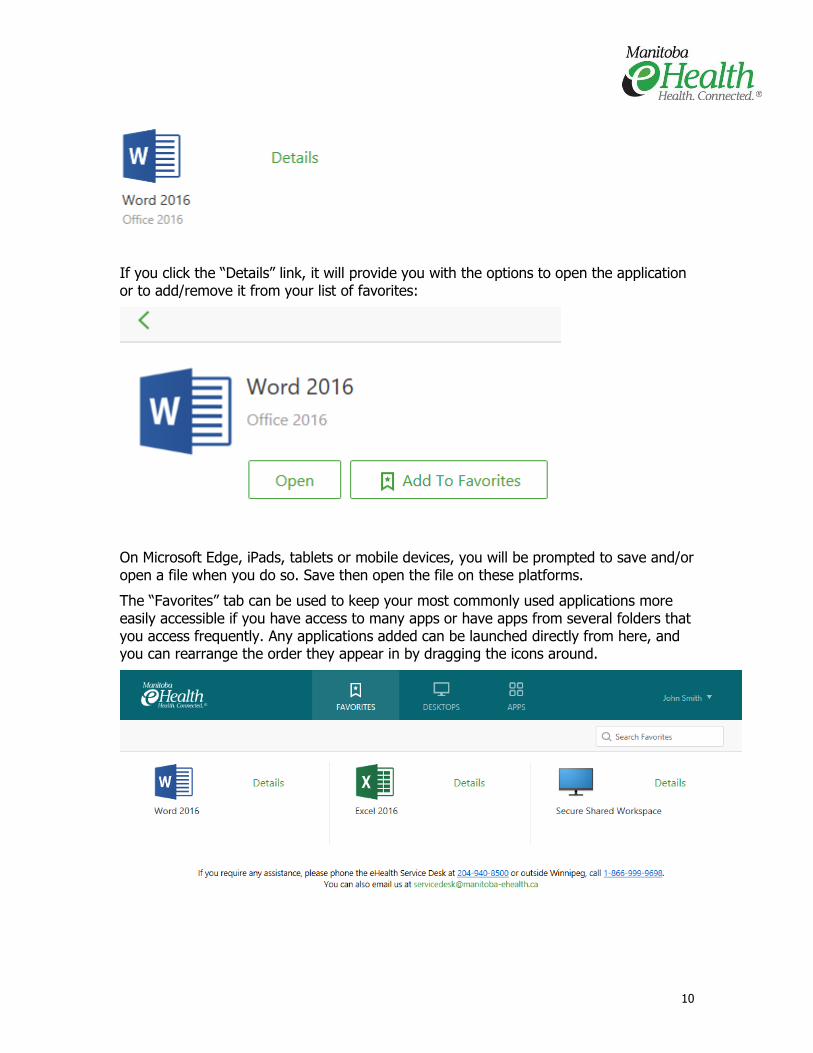
If you click the “Details” link, it will provide you with the options to open the application or to add/remove it from your list of favorites:
On Microsoft Edge, iPads, tablets or mobile devices, you will be prompted to save and/or open a file when you do so. Save then open the file on these platforms.
The “Favorites” tab can be used to keep your most commonly used applications more easily accessible if you have access to many apps or have apps from several folders that you access frequently. Any applications added can be launched directly from here, and you can rearrange the order they appear in by dragging the icons around.
11
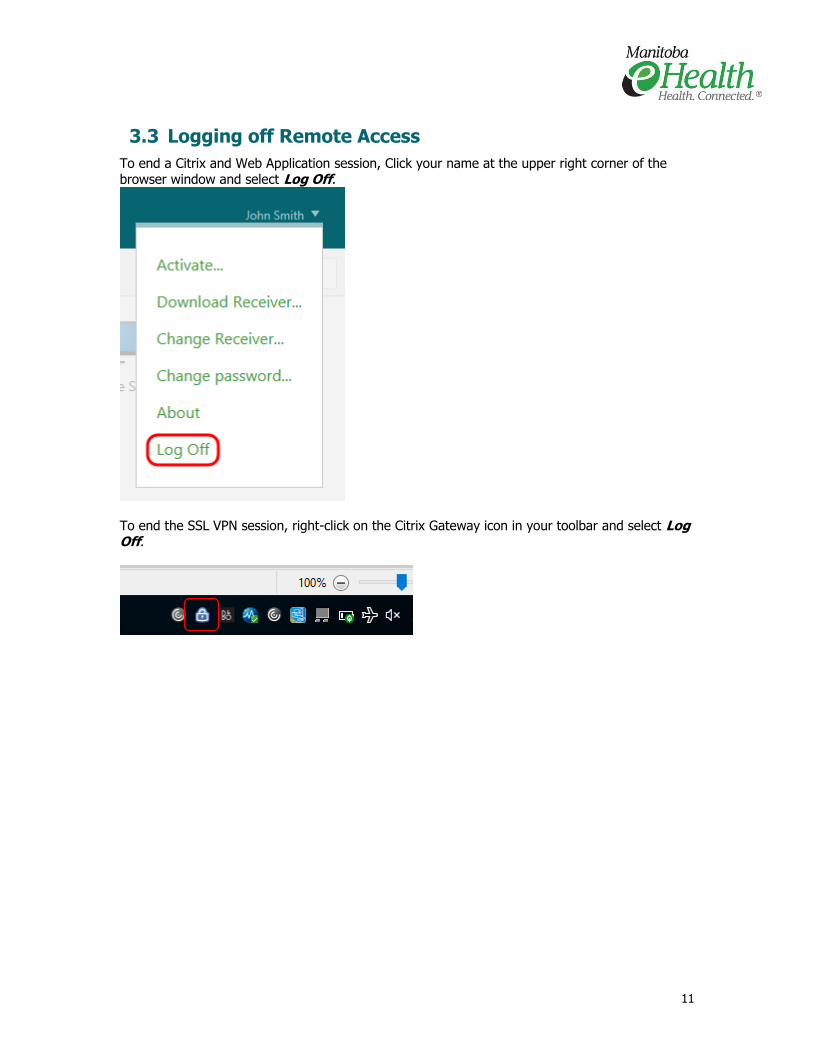
3.3 Logging off Remote Access
To end a Citrix and Web Application session, Click your name at the upper right corner of the browser window and select Log Off.
To end the SSL VPN session, right-click on the Citrix Gateway icon in your toolbar and select Log Off.
12
4 Using A Personal Device
When connecting using a personal device will not display any connection options. Only access using Manitoba eHealth Web and Citrix Apps is available on a personal device, and allows access to certain exertanally published Citrix applications and select Manitoba eHealth Web applications such as Outlook Web App, SharePoint and WRHA Insite. The Unified Remote Access Service provides access to some commonly used applications from any personal or office computer. A Citrix receiver must be installed on the computer to fully use this service. If your computer does not have a Citrix receiver installed and is running a Windows operating system, you will be prompted you to install one.
If you are accessing this service from a Mac OS, iPad or would like to upgrade to the latest client for Windows, please go to https://www.citrix.com/go/receiver.html and download the latest Citrix receiver.
Manitoba eHealth is unable to provide support for devices not provided or managed by Manitoba eHealth, but has tested the service with the following browsers and operating systems:
Browsers o Apple Safari 10.0 o Google Chrome 55 (Windows and Android) o Microsoft Internet Explorer 11 o Microsoft Edge
Operating systems o Windows 10 o Windows 7 Service Pack 1 o Mac OS X 10.10 Yosemite o iOS 10.2 o Android 5.0 and 6.0
Remote access should work with both newer and older versions of these platforms, as well as platforms with Citrix Receiver clients that we have not tested, so this is not an exhaustive list. There may be variations in the steps required for setting up your device if you’re using a different version than is listed above.
These browsers are known to be incompatible with the Application Viewer service and should be avoided:
Mozilla Firefox 52 or later: Always launches applications with the light client. The recommended full client experience is not available with this browser.
13
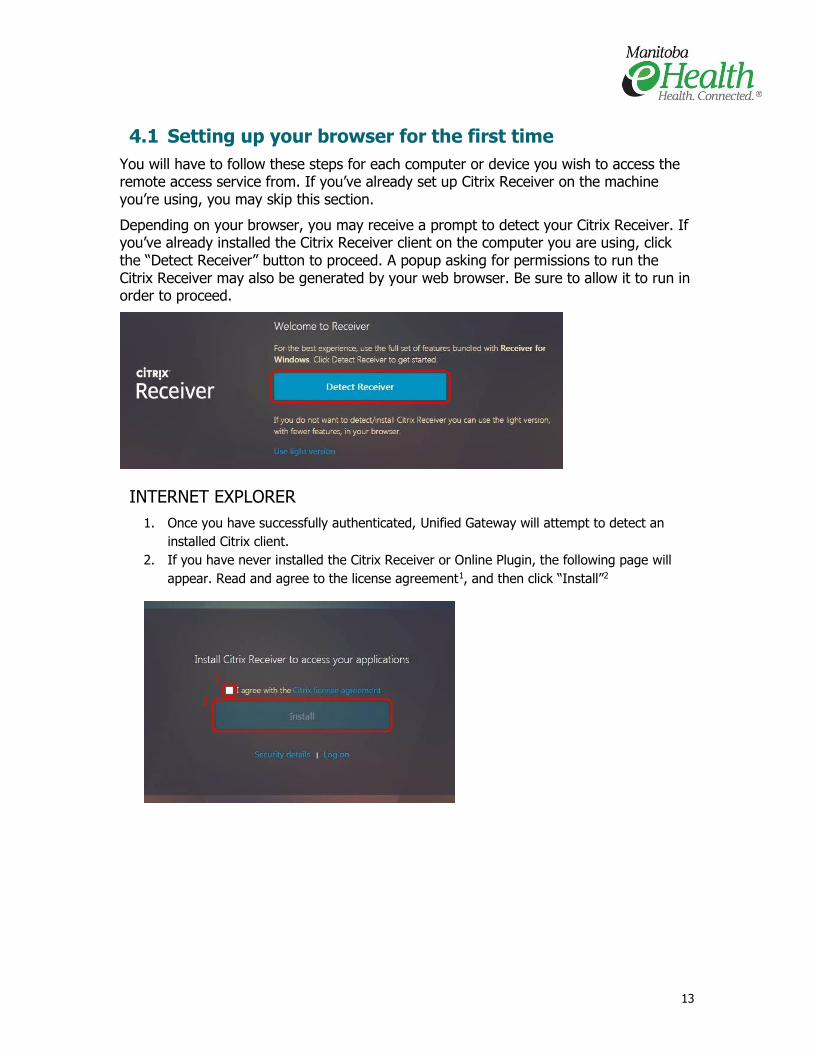
4.1 Setting up your browser for the first time
You will have to follow these steps for each computer or device you wish to access the remote access service from. If you’ve already set up Citrix Receiver on the machine you’re using, you may skip this section.
Depending on your browser, you may receive a prompt to detect your Citrix Receiver. If you’ve already installed the Citrix Receiver client on the computer you are using, click the “Detect Receiver” button to proceed. A popup asking for permissions to run the Citrix Receiver may also be generated by your web browser. Be sure to allow it to run in order to proceed.
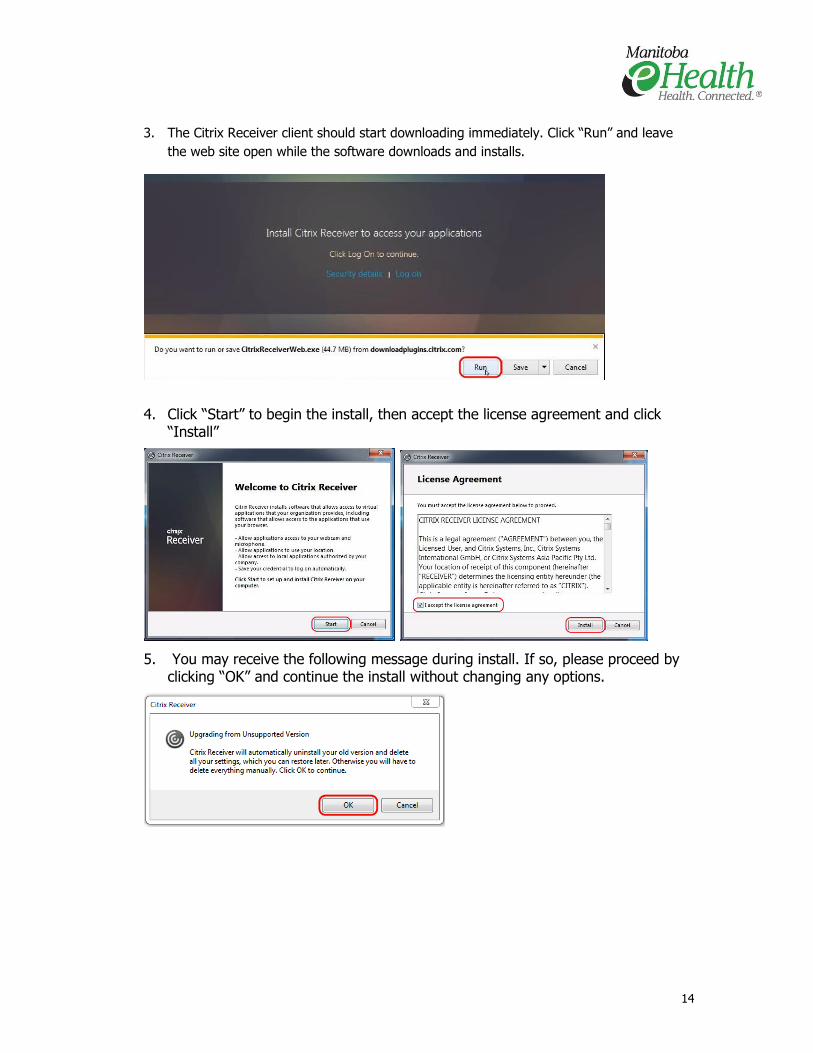
INTERNET EXPLORER
1. Once you have successfully authenticated, Unified Gateway will attempt to detect an
installed Citrix client.
2. If you have never installed the Citrix Receiver or Online Plugin, the following page will
appear. Read and agree to the license agreement1, and then click “Install”2
14
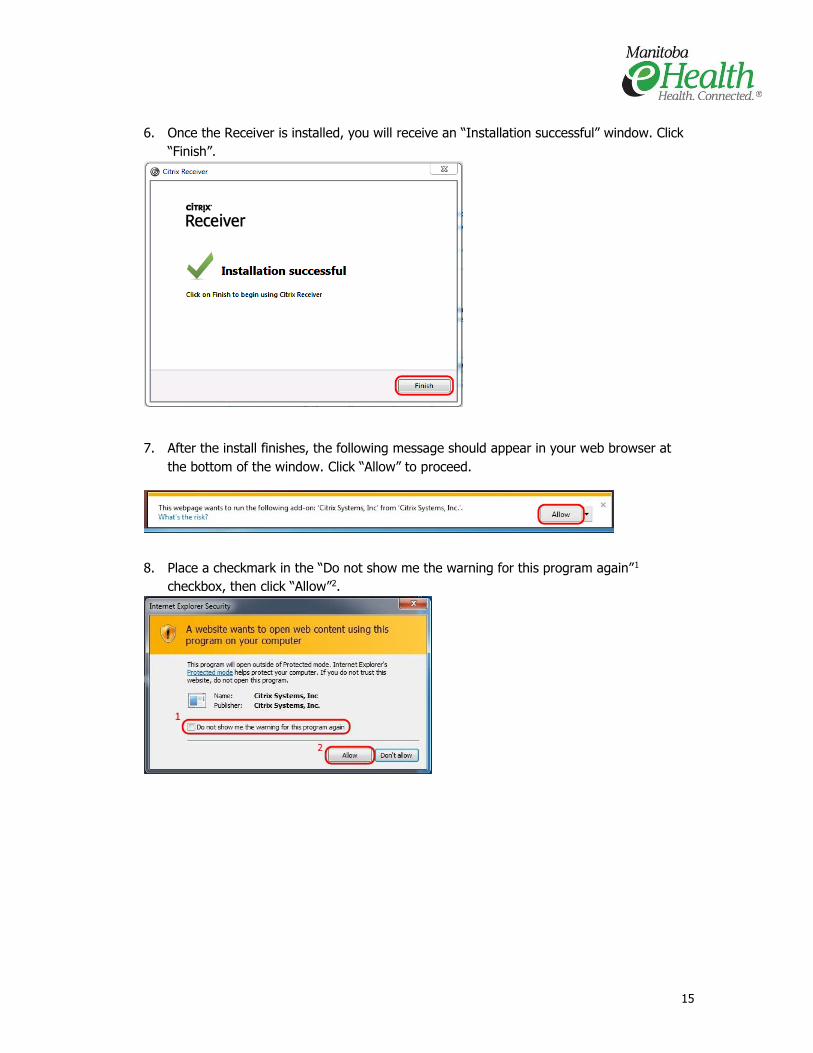
3. The Citrix Receiver client should start downloading immediately. Click “Run” and leave
the web site open while the software downloads and installs.
4. Click “Start” to begin the install, then accept the license agreement and click “Install”
5. You may receive the following message during install. If so, please proceed by clicking “OK” and continue the install without changing any options.
15
6. Once the Receiver is installed, you will receive an “Installation successful” window. Click
“Finish”.
7. After the install finishes, the following message should appear in your web browser at
the bottom of the window. Click “Allow” to proceed.
8. Place a checkmark in the “Do not show me the warning for this program again”1
checkbox, then click “Allow”2.
16
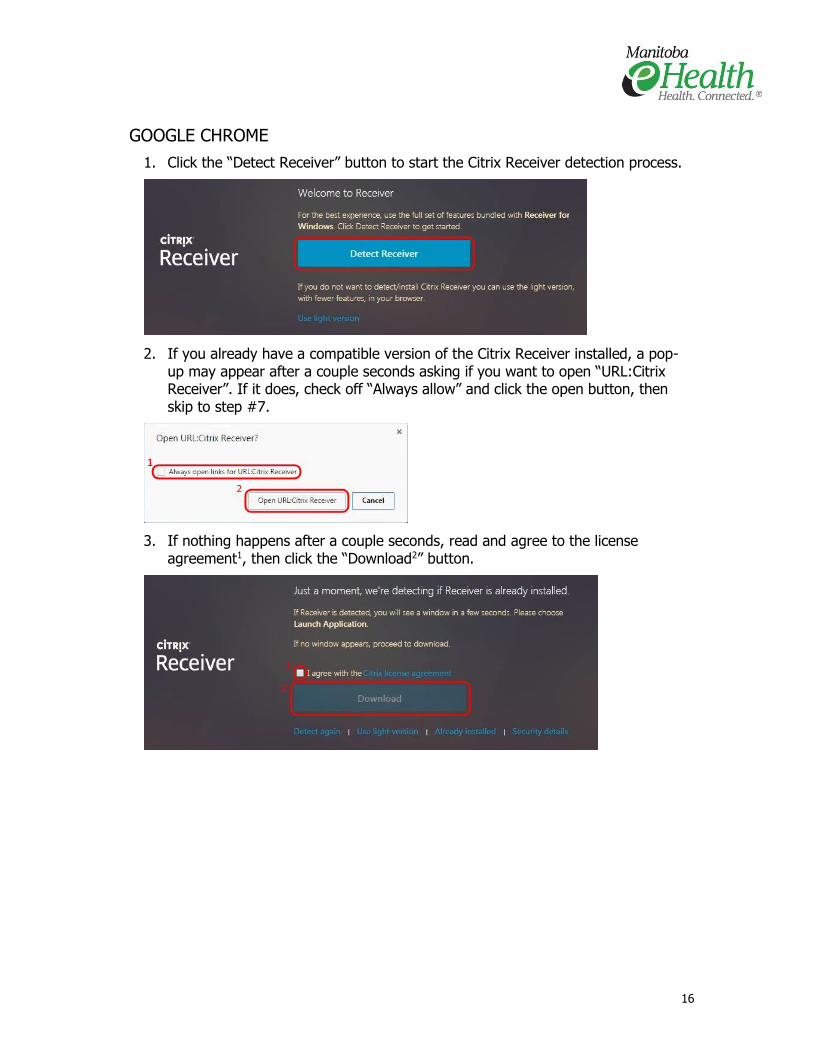
GOOGLE CHROME
1. Click the “Detect Receiver” button to start the Citrix Receiver detection process.
2. If you already have a compatible version of the Citrix Receiver installed, a pop-up may appear after a couple seconds asking if you want to open “URL:Citrix Receiver”. If it does, check off “Always allow” and click the open button, then skip to step #7.
3. If nothing happens after a couple seconds, read and agree to the license agreement1, then click the “Download2” button.
17
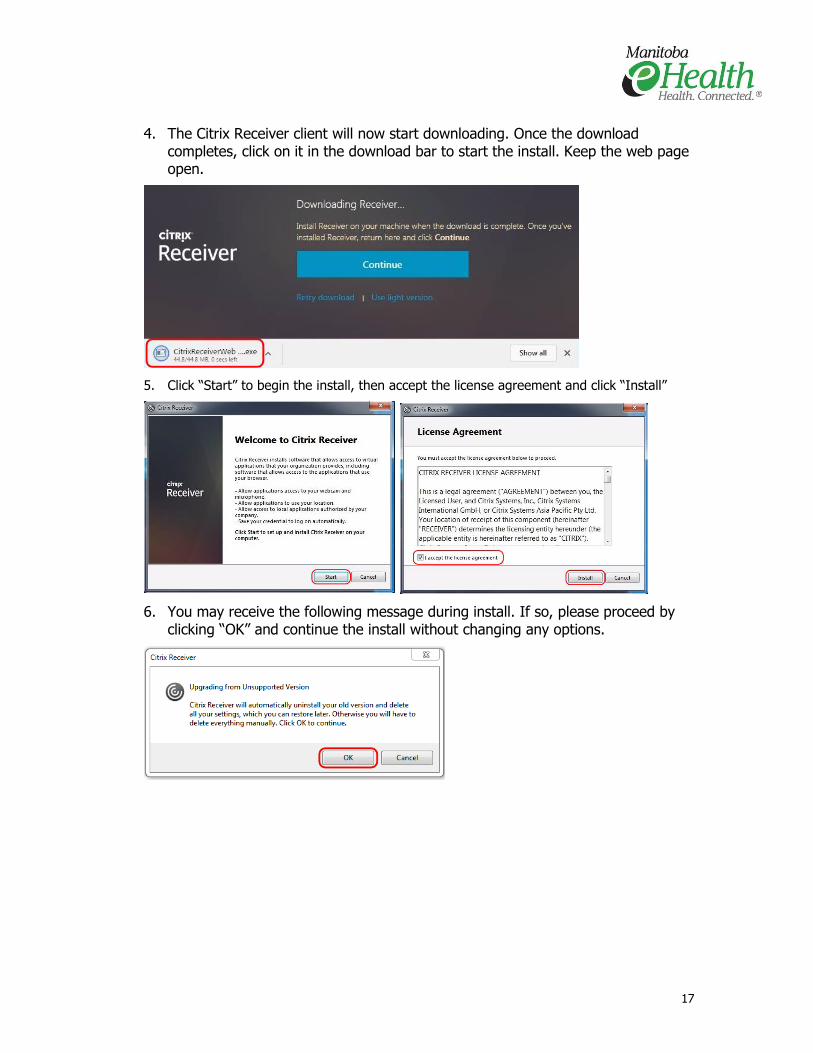
4. The Citrix Receiver client will now start downloading. Once the download completes, click on it in the download bar to start the install. Keep the web page open.
5. Click “Start” to begin the install, then accept the license agreement and click “Install”
6. You may receive the following message during install. If so, please proceed by clicking “OK” and continue the install without changing any options.
18
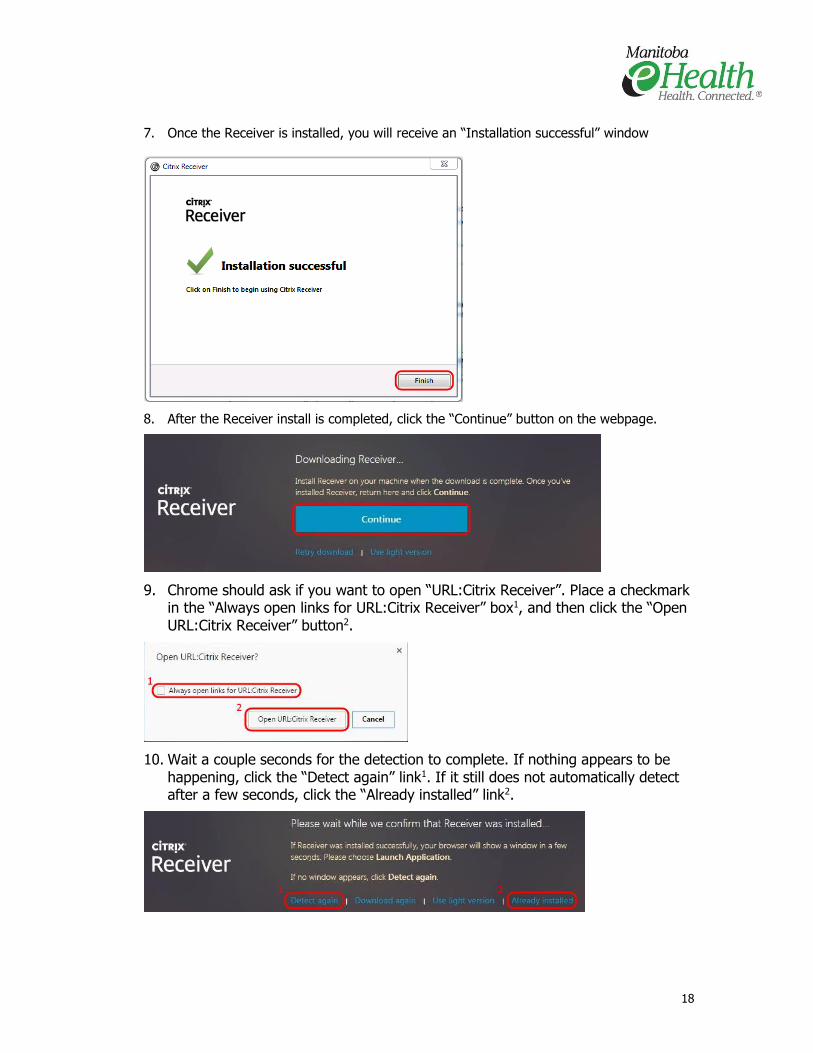
7. Once the Receiver is installed, you will receive an “Installation successful” window
8. After the Receiver install is completed, click the “Continue” button on the webpage.
9. Chrome should ask if you want to open “URL:Citrix Receiver”. Place a checkmark in the “Always open links for URL:Citrix Receiver” box1, and then click the “Open URL:Citrix Receiver” button2.
10. Wait a couple seconds for the detection to complete. If nothing appears to be happening, click the “Detect again” link1. If it still does not automatically detect after a few seconds, click the “Already installed” link2.
19
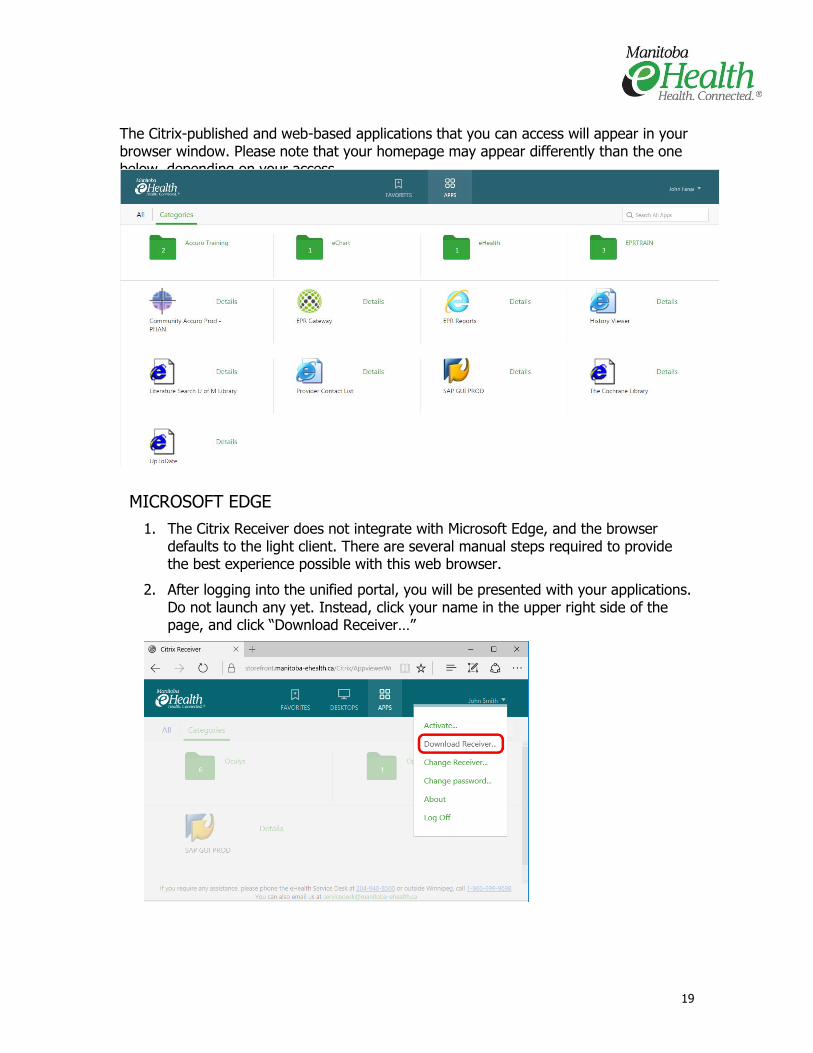
The Citrix-published and web-based applications that you can access will appear in your browser window. Please note that your homepage may appear differently than the one below, depending on your access.
MICROSOFT EDGE
1. The Citrix Receiver does not integrate with Microsoft Edge, and the browser defaults to the light client. There are several manual steps required to provide the best experience possible with this web browser.
2. After logging into the unified portal, you will be presented with your applications. Do not launch any yet. Instead, click your name in the upper right side of the page, and click “Download Receiver…”
20
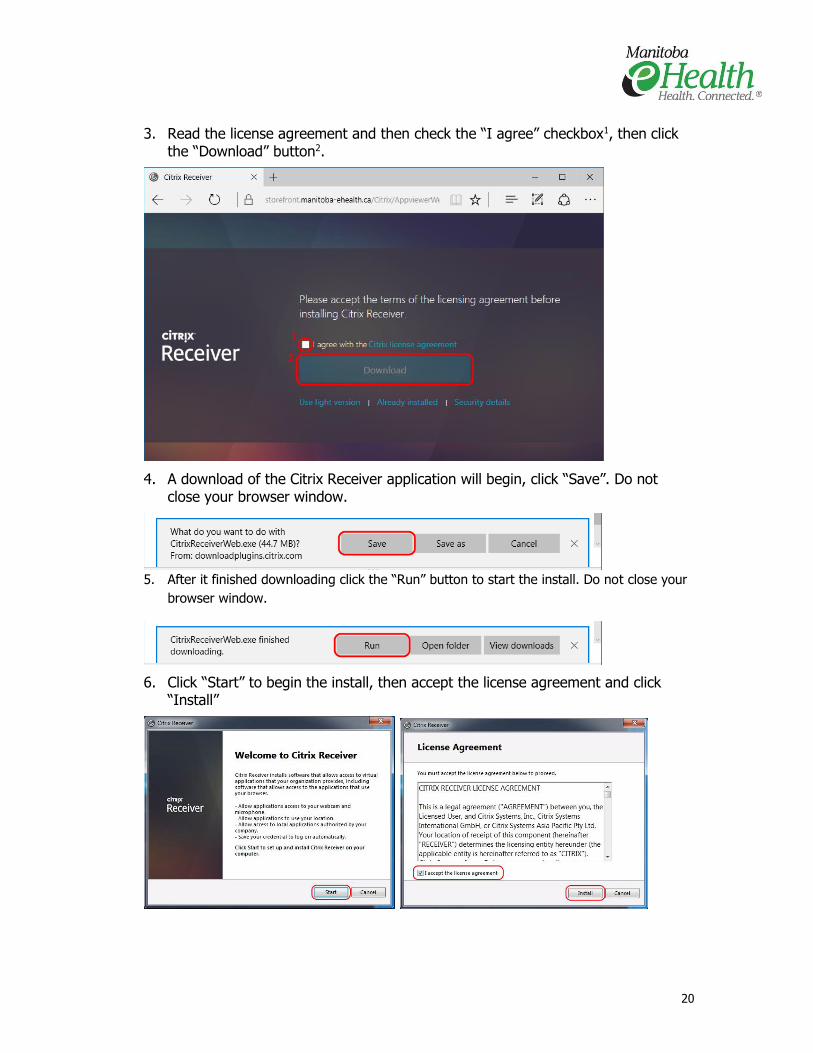
3. Read the license agreement and then check the “I agree” checkbox1, then click the “Download” button2.
4. A download of the Citrix Receiver application will begin, click “Save”. Do not close your browser window.
5. After it finished downloading click the “Run” button to start the install. Do not close your
browser window.
6. Click “Start” to begin the install, then accept the license agreement and click “Install”

21
7. You may receive the following message during install. If so, please proceed by clicking “OK" and continue the install without changing any options.
8. Once the Receiver is installed, you will receive an “Installation Successful” window. Click “Finish”.
22
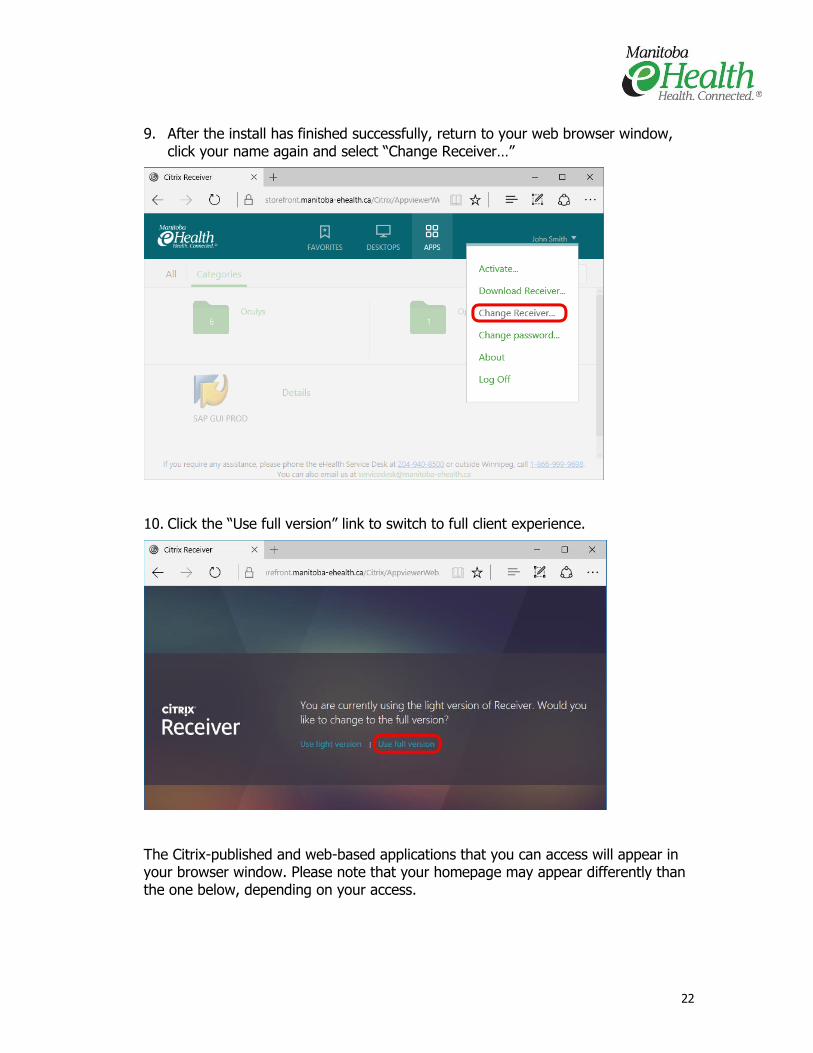
9. After the install has finished successfully, return to your web browser window, click your name again and select “Change Receiver…”
10. Click the “Use full version” link to switch to full client experience.
The Citrix-published and web-based applications that you can access will appear in your browser window. Please note that your homepage may appear differently than the one below, depending on your access.
23
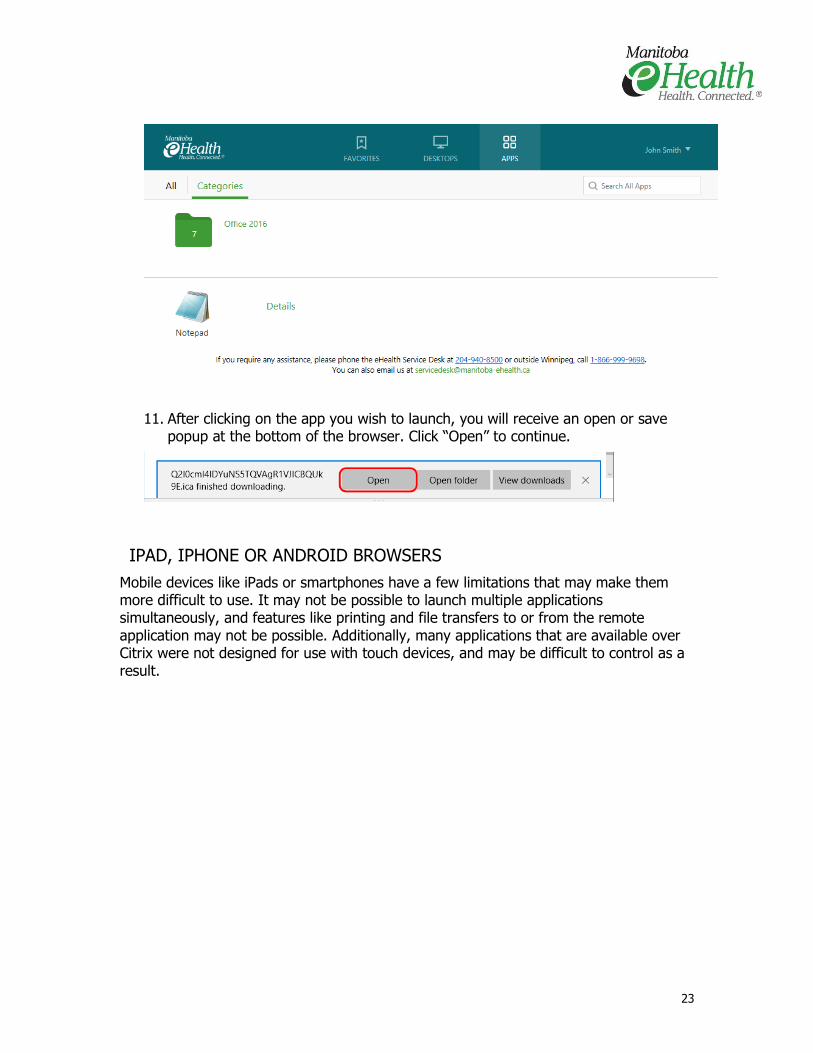
11. After clicking on the app you wish to launch, you will receive an open or save popup at the bottom of the browser. Click “Open” to continue.
IPAD, IPHONE OR ANDROID BROWSERS
Mobile devices like iPads or smartphones have a few limitations that may make them more difficult to use. It may not be possible to launch multiple applications simultaneously, and features like printing and file transfers to or from the remote application may not be possible. Additionally, many applications that are available over Citrix were not designed for use with touch devices, and may be difficult to control as a result.
24
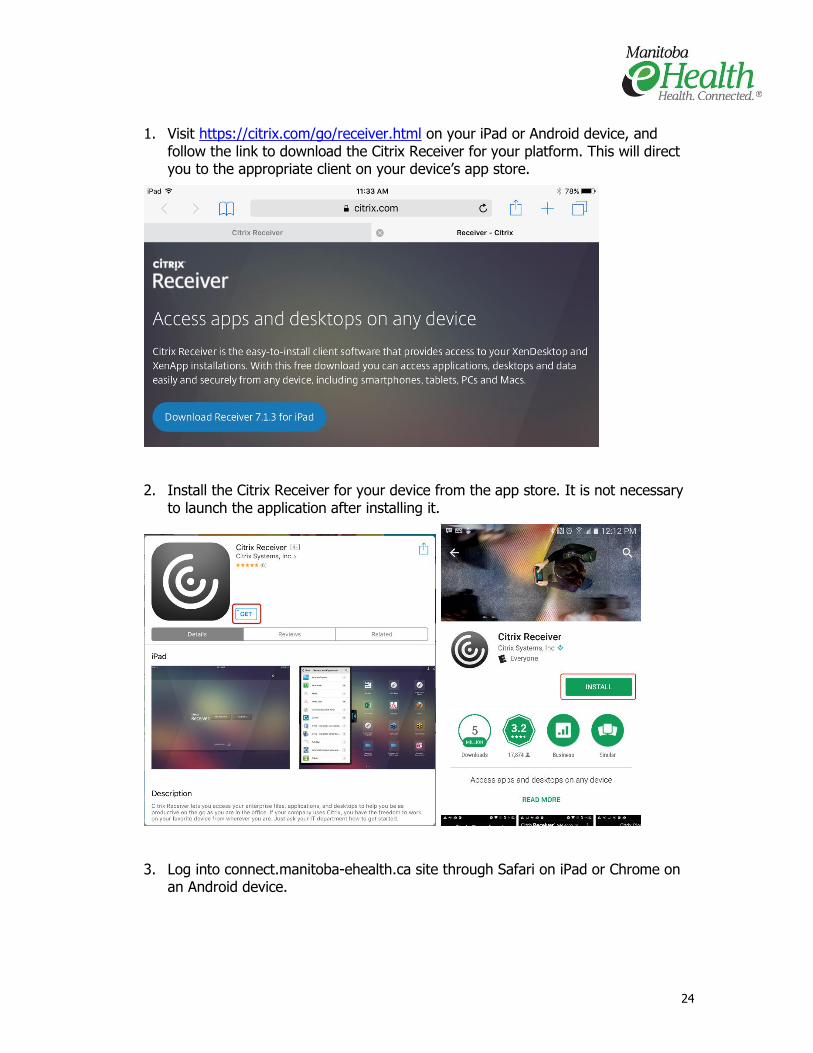
1. Visit https://citrix.com/go/receiver.html on your iPad or Android device, and follow the link to download the Citrix Receiver for your platform. This will direct you to the appropriate client on your device’s app store.
2. Install the Citrix Receiver for your device from the app store. It is not necessary to launch the application after installing it.
3. Log into connect.manitoba-ehealth.ca site through Safari on iPad or Chrome on an Android device.
25
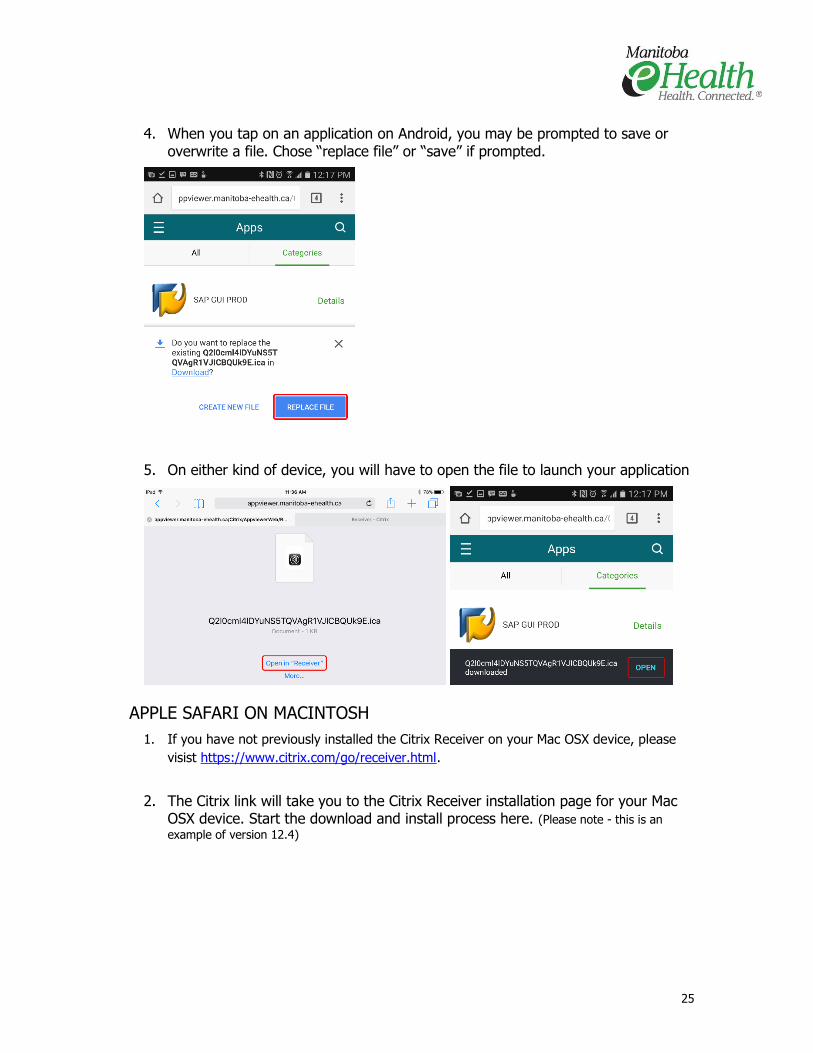
4. When you tap on an application on Android, you may be prompted to save or overwrite a file. Chose “replace file” or “save” if prompted.
5. On either kind of device, you will have to open the file to launch your application
APPLE SAFARI ON MACINTOSH
1. If you have not previously installed the Citrix Receiver on your Mac OSX device, please
visist https://www.citrix.com/go/receiver.html.
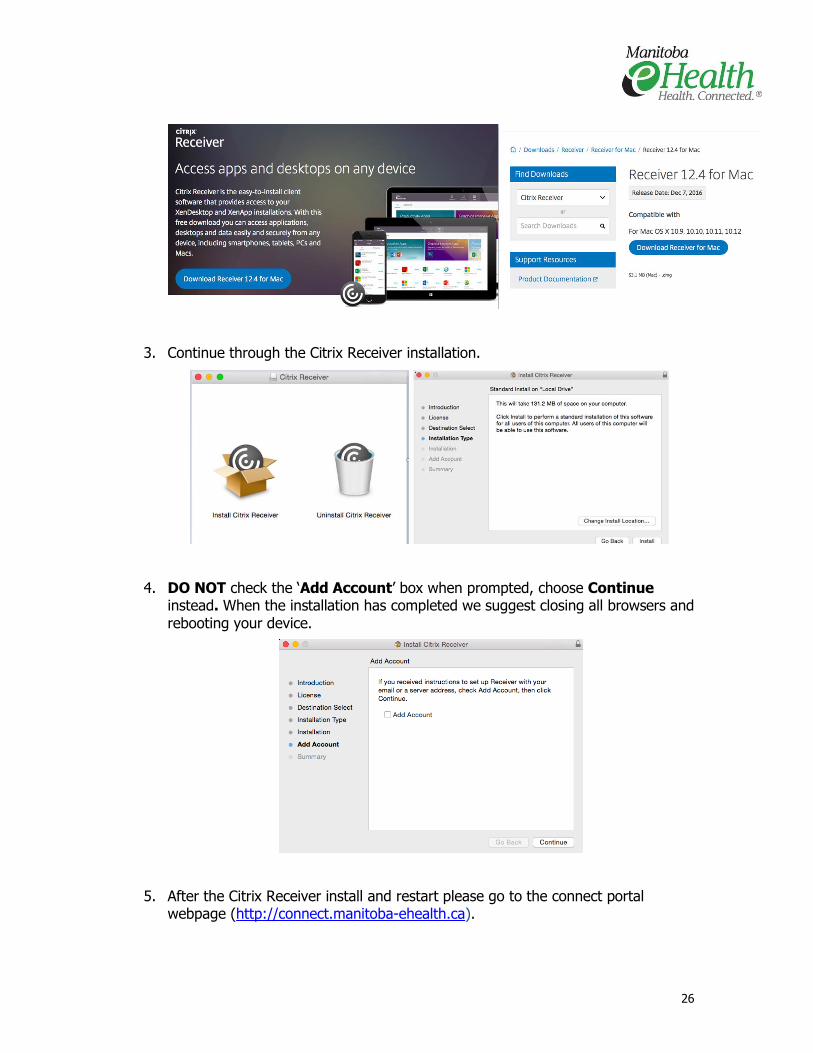
2. The Citrix link will take you to the Citrix Receiver installation page for your Mac OSX device. Start the download and install process here. (Please note - this is an
example of version 12.4)
26
3. Continue through the Citrix Receiver installation.
4. DO NOT check the ‘Add Account’ box when prompted, choose Continue instead. When the installation has completed we suggest closing all browsers and rebooting your device.
5. After the Citrix Receiver install and restart please go to the connect portal webpage (http://connect.manitoba-ehealth.ca).
27
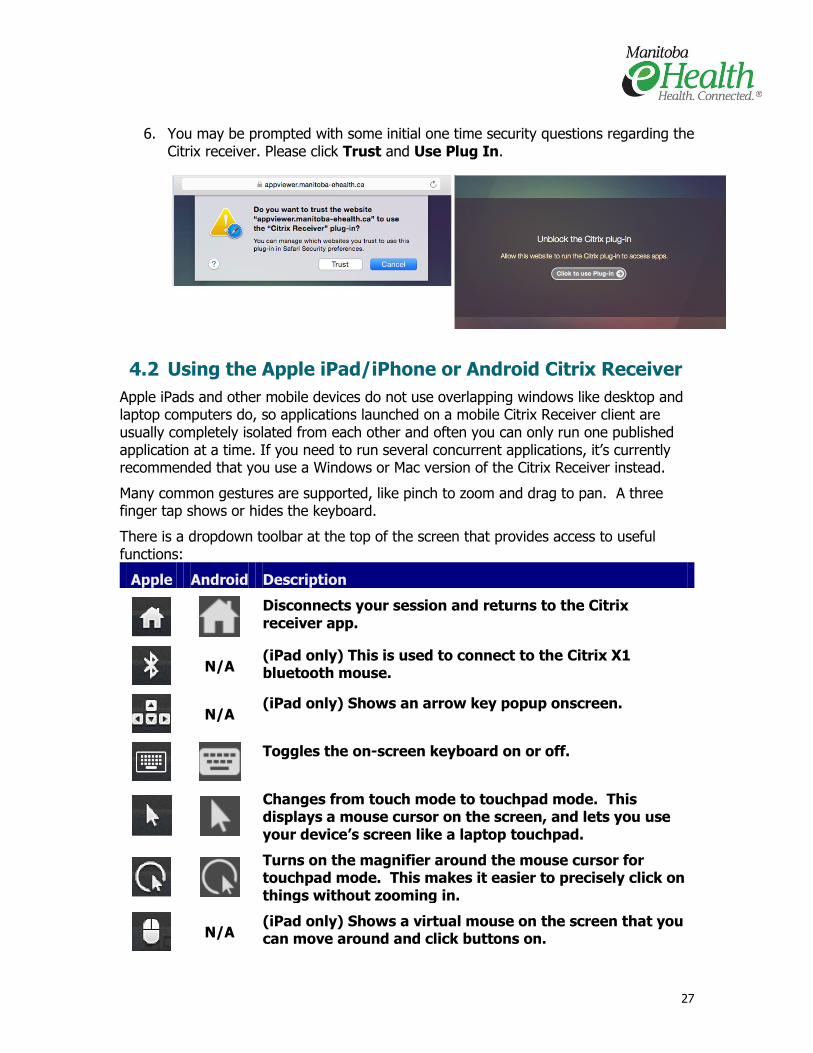
6. You may be prompted with some initial one time security questions regarding the Citrix receiver. Please click Trust and Use Plug In.
4.2 Using the Apple iPad/iPhone or Android Citrix Receiver
Apple iPads and other mobile devices do not use overlapping windows like desktop and laptop computers do, so applications launched on a mobile Citrix Receiver client are usually completely isolated from each other and often you can only run one published application at a time. If you need to run several concurrent applications, it’s currently recommended that you use a Windows or Mac version of the Citrix Receiver instead.
Many common gestures are supported, like pinch to zoom and drag to pan. A three finger tap shows or hides the keyboard.
There is a dropdown toolbar at the top of the screen that provides access to useful functions:
Apple Android Description
Disconnects your session and returns to the Citrix receiver app.
N/A
(iPad only) This is used to connect to the Citrix X1 bluetooth mouse.
N/A
(iPad only) Shows an arrow key popup onscreen.
Toggles the on-screen keyboard on or off.
Changes from touch mode to touchpad mode. This displays a mouse cursor on the screen, and lets you use your device’s screen like a laptop touchpad.
Turns on the magnifier around the mouse cursor for touchpad mode. This makes it easier to precisely click on things without zooming in.
N/A
(iPad only) Shows a virtual mouse on the screen that you can move around and click buttons on.
28
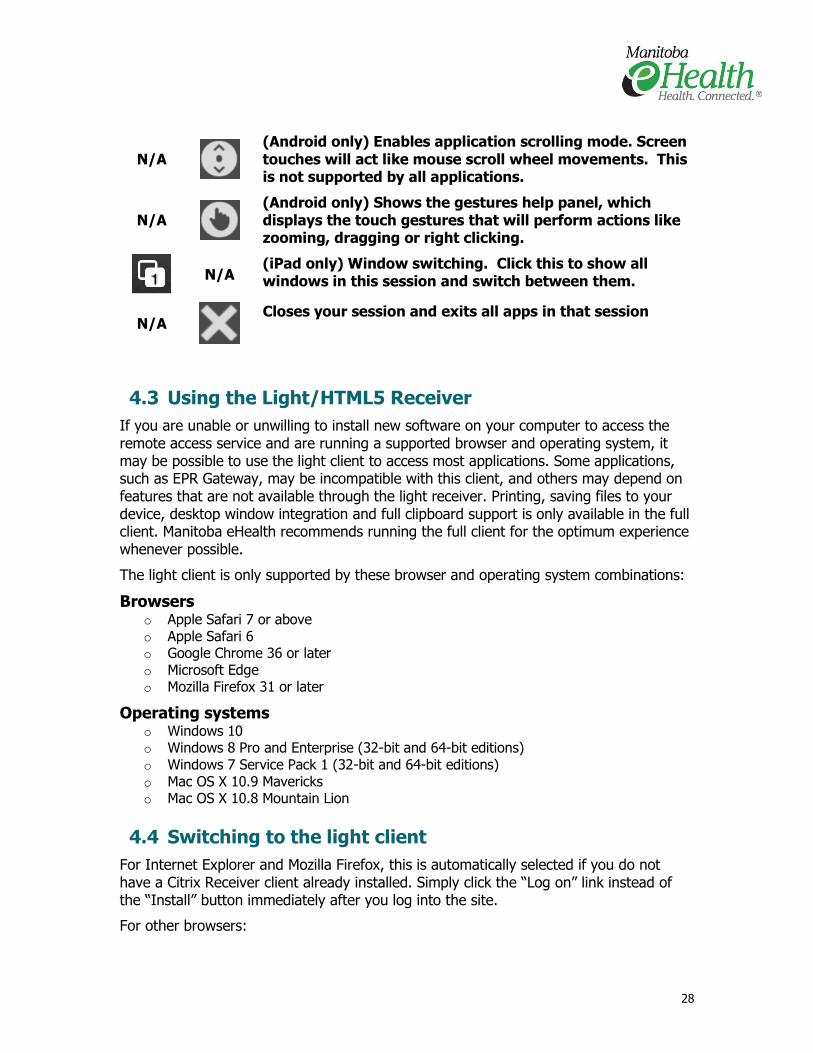
N/A
(Android only) Enables application scrolling mode. Screen touches will act like mouse scroll wheel movements. This is not supported by all applications.
N/A
(Android only) Shows the gestures help panel, which displays the touch gestures that will perform actions like zooming, dragging or right clicking.
N/A
(iPad only) Window switching. Click this to show all windows in this session and switch between them.
N/A
Closes your session and exits all apps in that session
4.3 Using the Light/HTML5 Receiver
If you are unable or unwilling to install new software on your computer to access the remote access service and are running a supported browser and operating system, it may be possible to use the light client to access most applications. Some applications, such as EPR Gateway, may be incompatible with this client, and others may depend on features that are not available through the light receiver. Printing, saving files to your device, desktop window integration and full clipboard support is only available in the full client. Manitoba eHealth recommends running the full client for the optimum experience whenever possible.
The light client is only supported by these browser and operating system combinations:
Browsers o Apple Safari 7 or above o Apple Safari 6 o Google Chrome 36 or later o Microsoft Edge o Mozilla Firefox 31 or later
Operating systems o Windows 10 o Windows 8 Pro and Enterprise (32-bit and 64-bit editions) o Windows 7 Service Pack 1 (32-bit and 64-bit editions) o Mac OS X 10.9 Mavericks o Mac OS X 10.8 Mountain Lion
4.4 Switching to the light client
For Internet Explorer and Mozilla Firefox, this is automatically selected if you do not have a Citrix Receiver client already installed. Simply click the “Log on” link instead of the “Install” button immediately after you log into the site.
For other browsers:
29
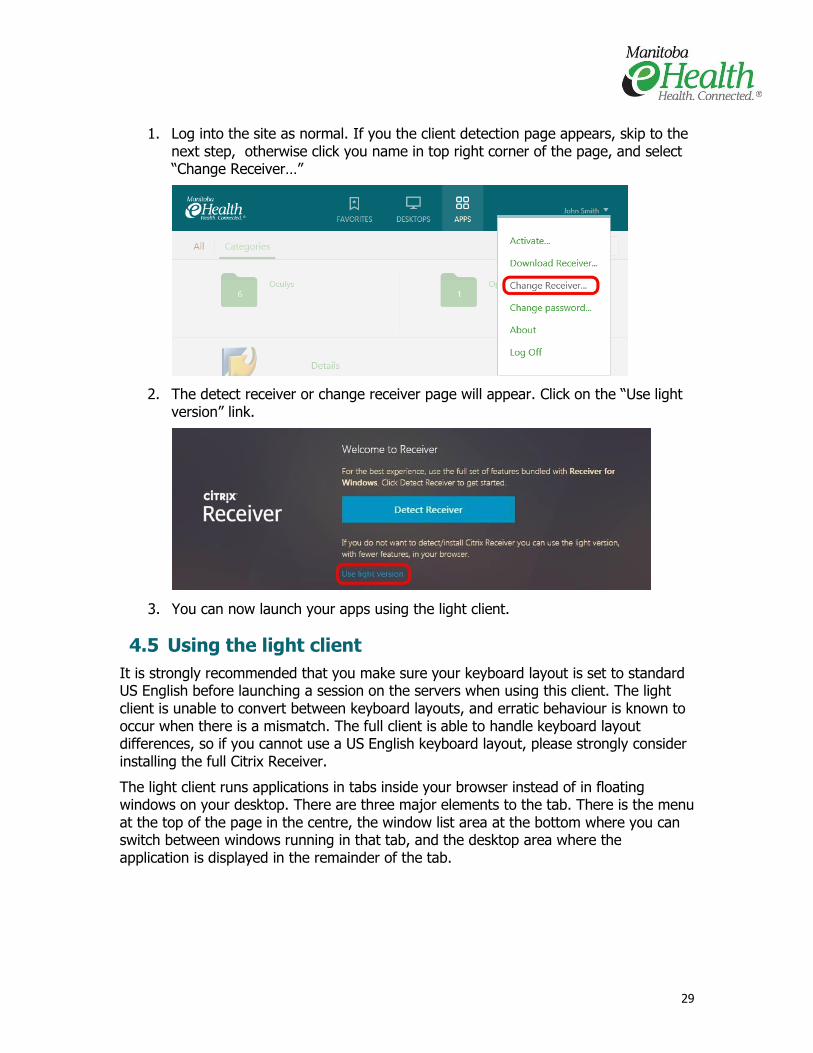
1. Log into the site as normal. If you the client detection page appears, skip to the next step, otherwise click you name in top right corner of the page, and select “Change Receiver…”
2. The detect receiver or change receiver page will appear. Click on the “Use light version” link.
3. You can now launch your apps using the light client.
4.5 Using the light client
It is strongly recommended that you make sure your keyboard layout is set to standard US English before launching a session on the servers when using this client. The light client is unable to convert between keyboard layouts, and erratic behaviour is known to occur when there is a mismatch. The full client is able to handle keyboard layout differences, so if you cannot use a US English keyboard layout, please strongly consider installing the full Citrix Receiver.
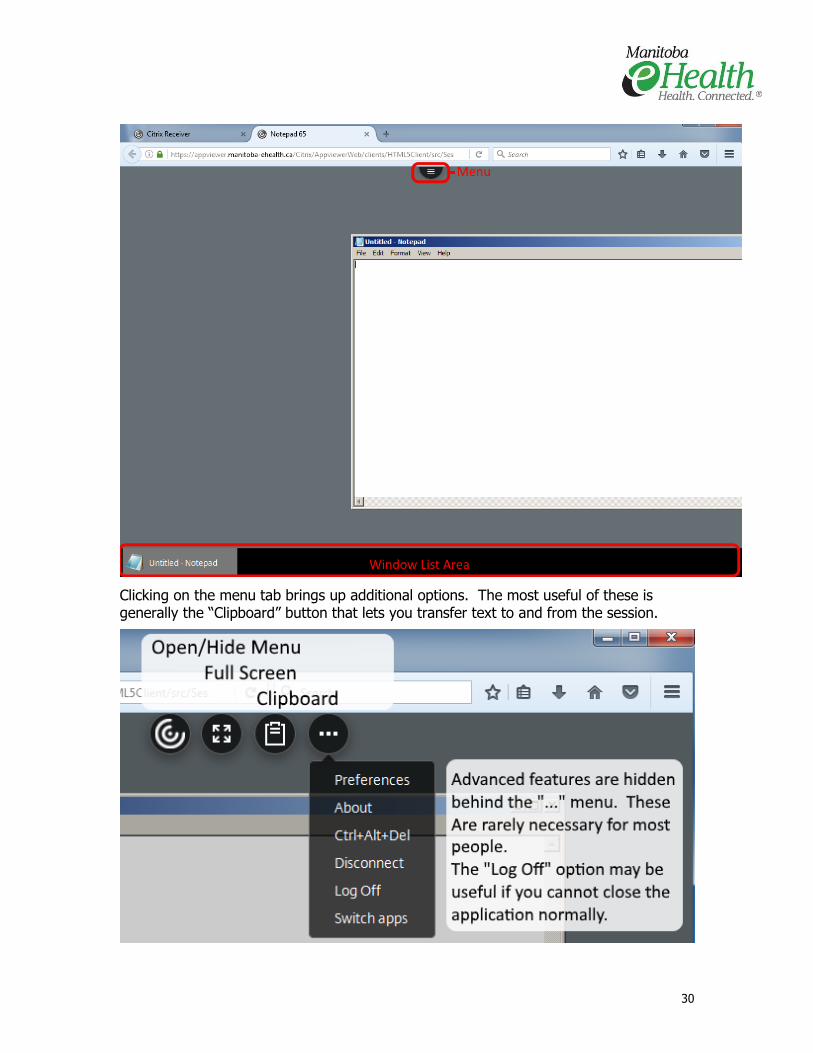
The light client runs applications in tabs inside your browser instead of in floating windows on your desktop. There are three major elements to the tab. There is the menu at the top of the page in the centre, the window list area at the bottom where you can switch between windows running in that tab, and the desktop area where the application is displayed in the remainder of the tab.
30
Clicking on the menu tab brings up additional options. The most useful of these is generally the “Clipboard” button that lets you transfer text to and from the session.
31
4.6 Switching back to the full client
For Internet Explorer and Mozilla Firefox, this is automatically selected if you have a Citrix Receiver client installed. See the section on setting up your browser for more details.
For other browsers:
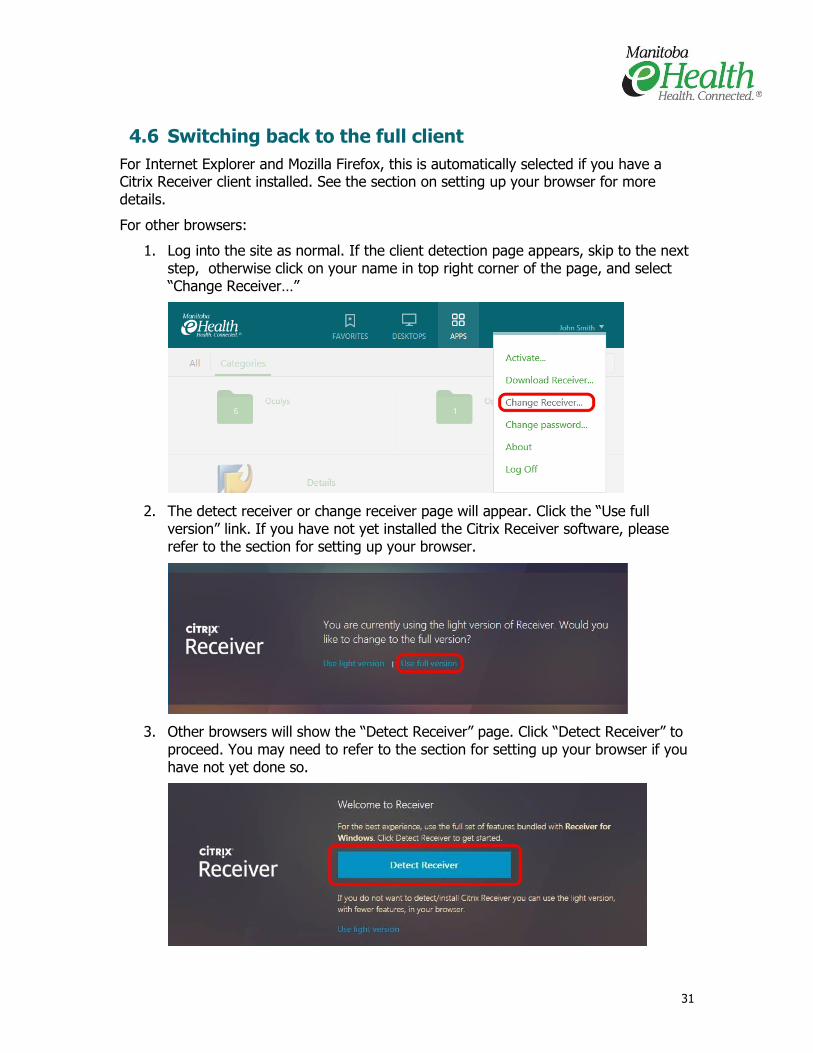
1. Log into the site as normal. If the client detection page appears, skip to the next step, otherwise click on your name in top right corner of the page, and select “Change Receiver…”
2. The detect receiver or change receiver page will appear. Click the “Use full version” link. If you have not yet installed the Citrix Receiver software, please refer to the section for setting up your browser.
3. Other browsers will show the “Detect Receiver” page. Click “Detect Receiver” to proceed. You may need to refer to the section for setting up your browser if you have not yet done so.
32
4. You can now launch your applications using the full client
4.7 Accessing the Clinical EPR from a personal device
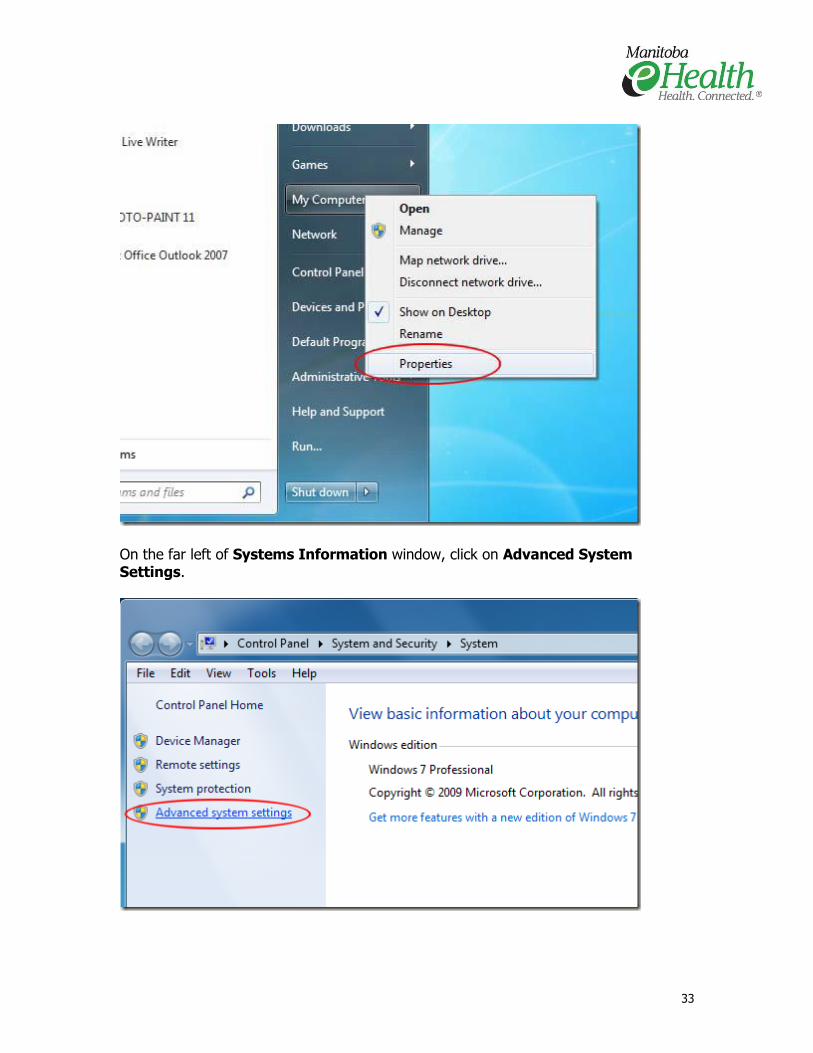
All personal computers or devices accessing the Clinical EPR require a name that follows a specific naming convention. This way, the system will recognize the device when it attempts to access the Clinical EPR. Below you will find out how to: Determine your personal computer/device name Change your computer/device name to the new name NB: Each prescribing physician can register up to two personal computers/devices. Only Windows and Mac OS-based computers can be connected at this time. At this time, iPad connections are not available. Work is ongoing to have these included to access the Clinical EPR, and we will communicate once they are available. How to determine your personal computer/device name Clinical EPR access requires a specific naming convention that the system will recognize. It uses your Winnipeg Regional Health Authority user identification along with some letters and numbers. NB: the computer name contains no spaces and is not case sensitive. It applies to both Windows and Mac computers. First computer/device The naming convention is RAWRHAID. For example, John Smith has a WRHA user ID of jsmith3. His computer name would be RAjsmith3. Second computer/device The same name applies with a “-2” added to the end, as in RAWRHAID-2. So John Smith’s second computer is called RAjsmith3-2. How to change your computer/device name to the new name Before you change your computer’s name, record its current name. Changing the name of a computer can impact existing network connections. Once you have changed your computer’s name, test your connections. If you experience issues with your networks, you will likely need to revert to the original computer name to resolve them. Once resolved, you can again change the computer name to the convention above, remembering to confirm your network connections afterward. Changing Name on Windows 7 1. Log into your computer with administrative rights. 2. Click on Start and then right click on My Computer. Select Properties from the menu.
33
On the far left of Systems Information window, click on Advanced System Settings.
34
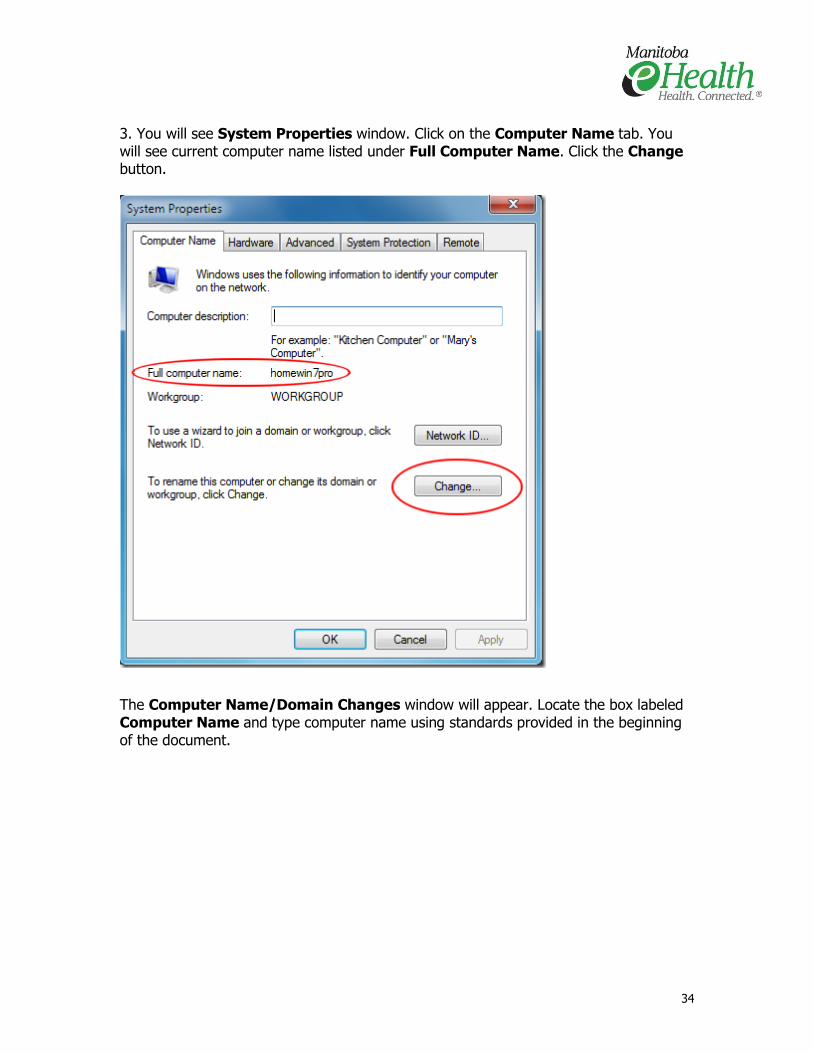
3. You will see System Properties window. Click on the Computer Name tab. You will see current computer name listed under Full Computer Name. Click the Change button.
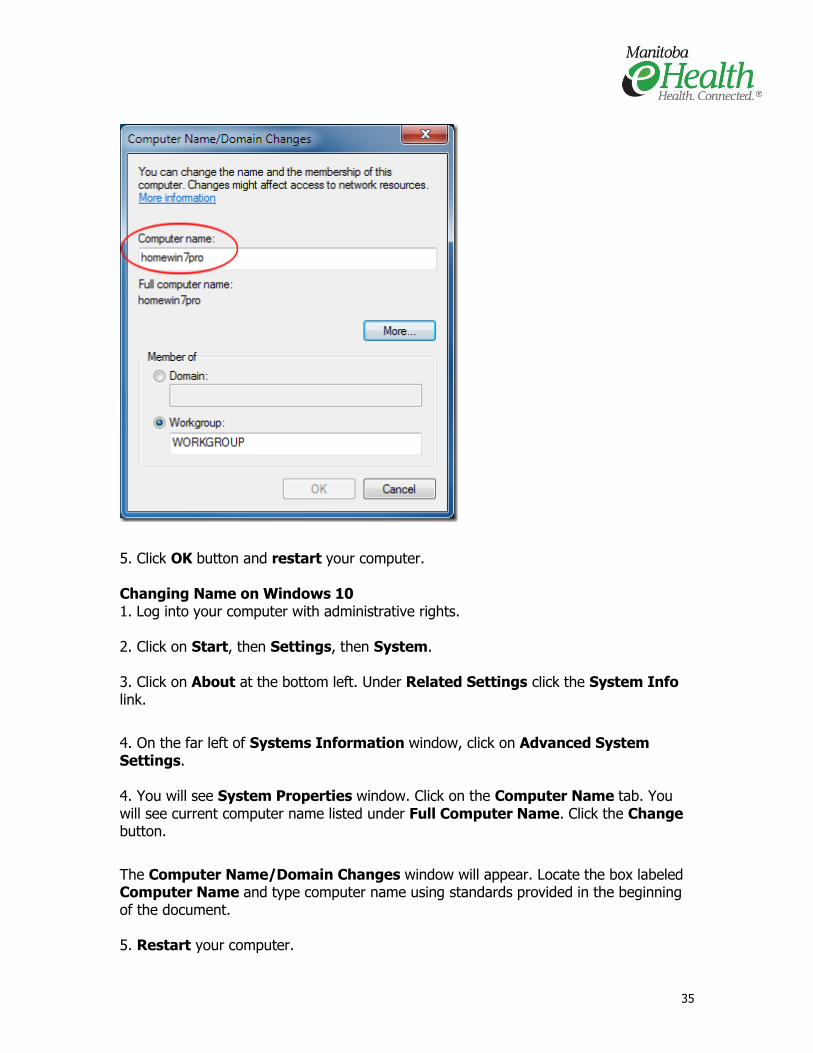
The Computer Name/Domain Changes window will appear. Locate the box labeled Computer Name and type computer name using standards provided in the beginning of the document.
35
5. Click OK button and restart your computer. Changing Name on Windows 10 1. Log into your computer with administrative rights. 2. Click on Start, then Settings, then System. 3. Click on About at the bottom left. Under Related Settings click the System Info link.
4. On the far left of Systems Information window, click on Advanced System Settings. 4. You will see System Properties window. Click on the Computer Name tab. You will see current computer name listed under Full Computer Name. Click the Change button.
The Computer Name/Domain Changes window will appear. Locate the box labeled Computer Name and type computer name using standards provided in the beginning of the document. 5. Restart your computer.
36
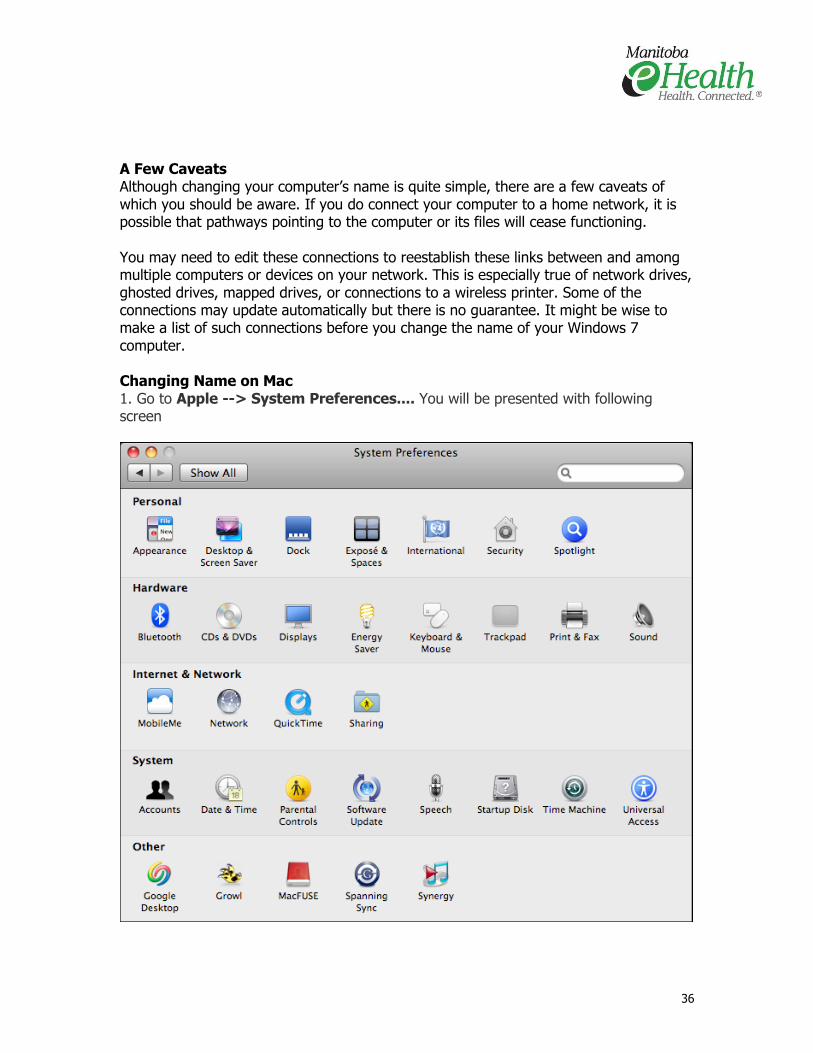
A Few Caveats Although changing your computer’s name is quite simple, there are a few caveats of which you should be aware. If you do connect your computer to a home network, it is possible that pathways pointing to the computer or its files will cease functioning. You may need to edit these connections to reestablish these links between and among multiple computers or devices on your network. This is especially true of network drives, ghosted drives, mapped drives, or connections to a wireless printer. Some of the connections may update automatically but there is no guarantee. It might be wise to make a list of such connections before you change the name of your Windows 7 computer. Changing Name on Mac 1. Go to Apple --> System Preferences.... You will be presented with following screen
37
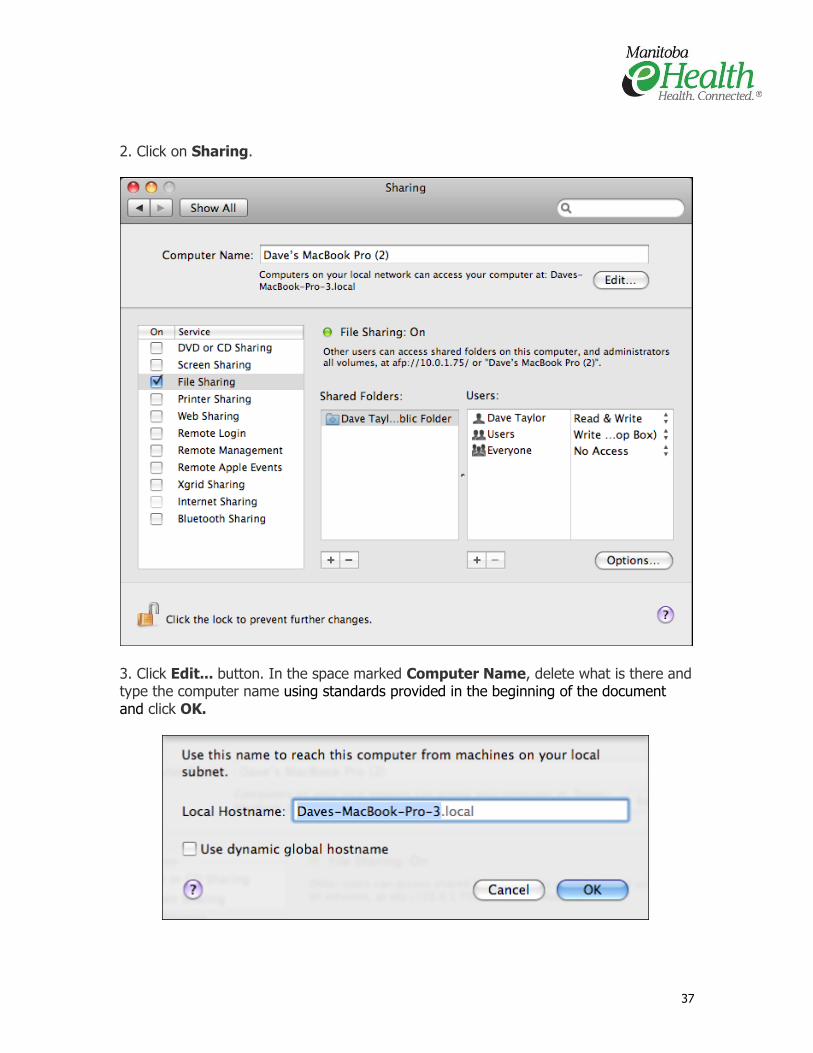
2. Click on Sharing.
3. Click Edit... button. In the space marked Computer Name, delete what is there and type the computer name using standards provided in the beginning of the document and click OK.
38
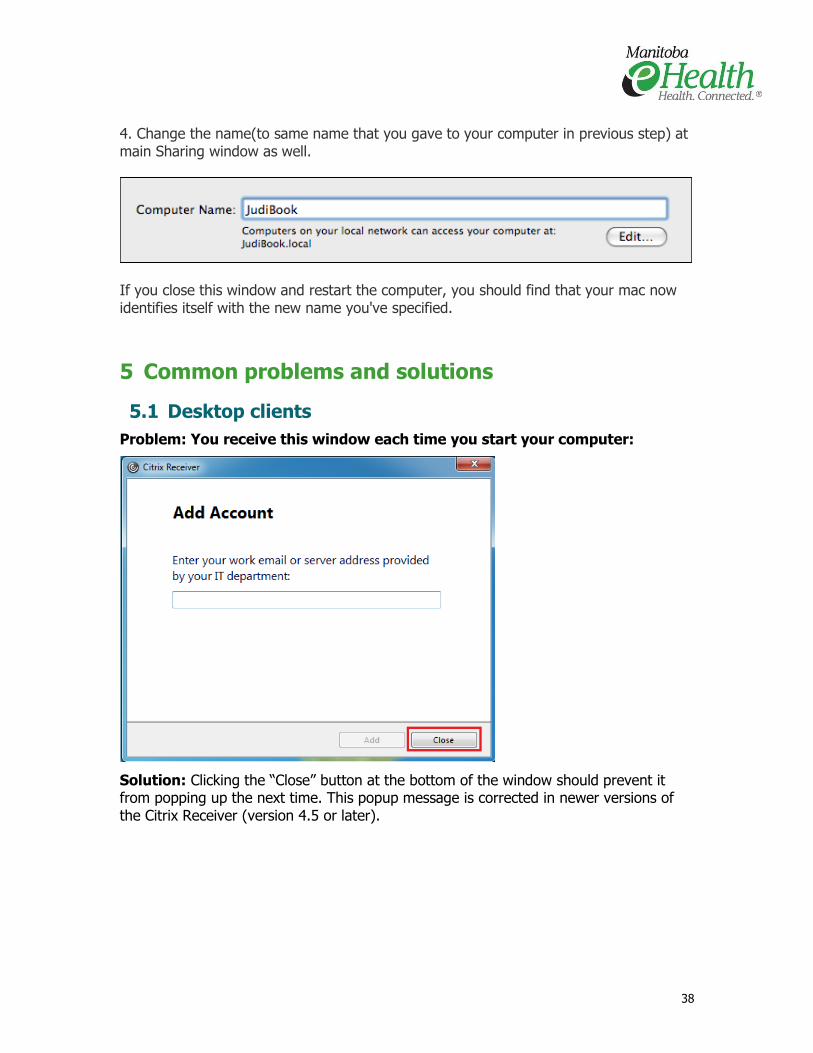
4. Change the name(to same name that you gave to your computer in previous step) at main Sharing window as well.
If you close this window and restart the computer, you should find that your mac now identifies itself with the new name you've specified.
5 Common problems and solutions
5.1 Desktop clients
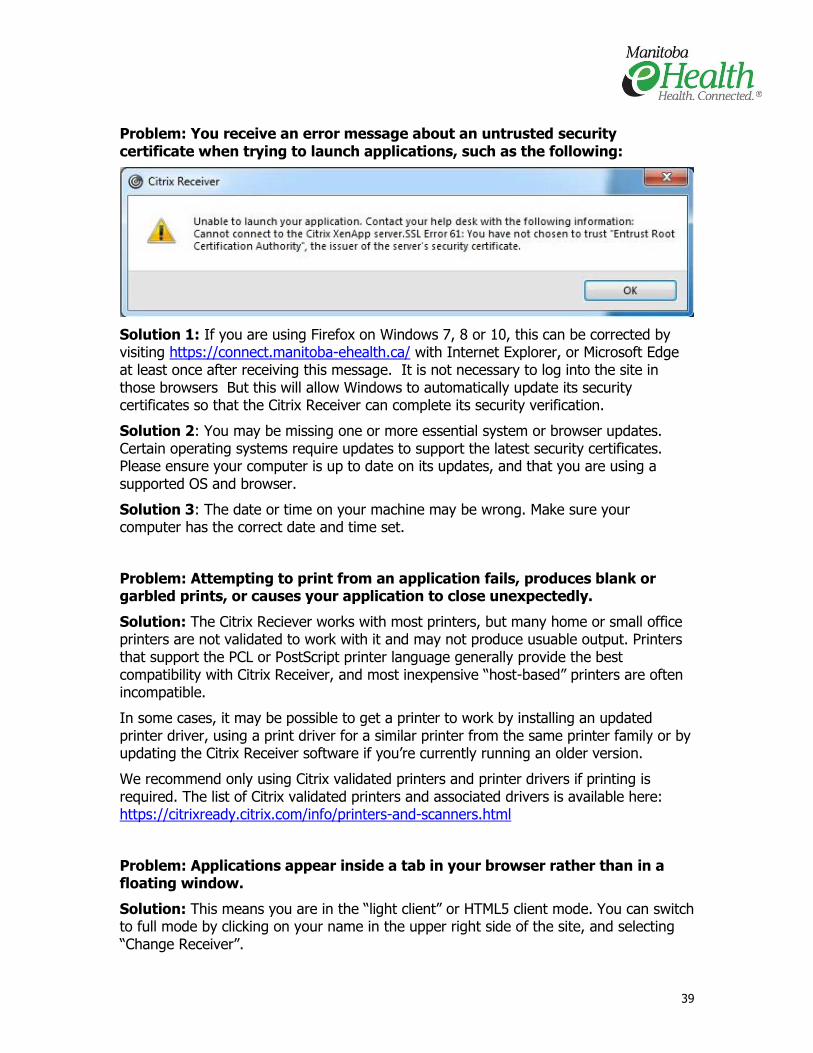
Problem: You receive this window each time you start your computer:
Solution: Clicking the “Close” button at the bottom of the window should prevent it from popping up the next time. This popup message is corrected in newer versions of the Citrix Receiver (version 4.5 or later).
39
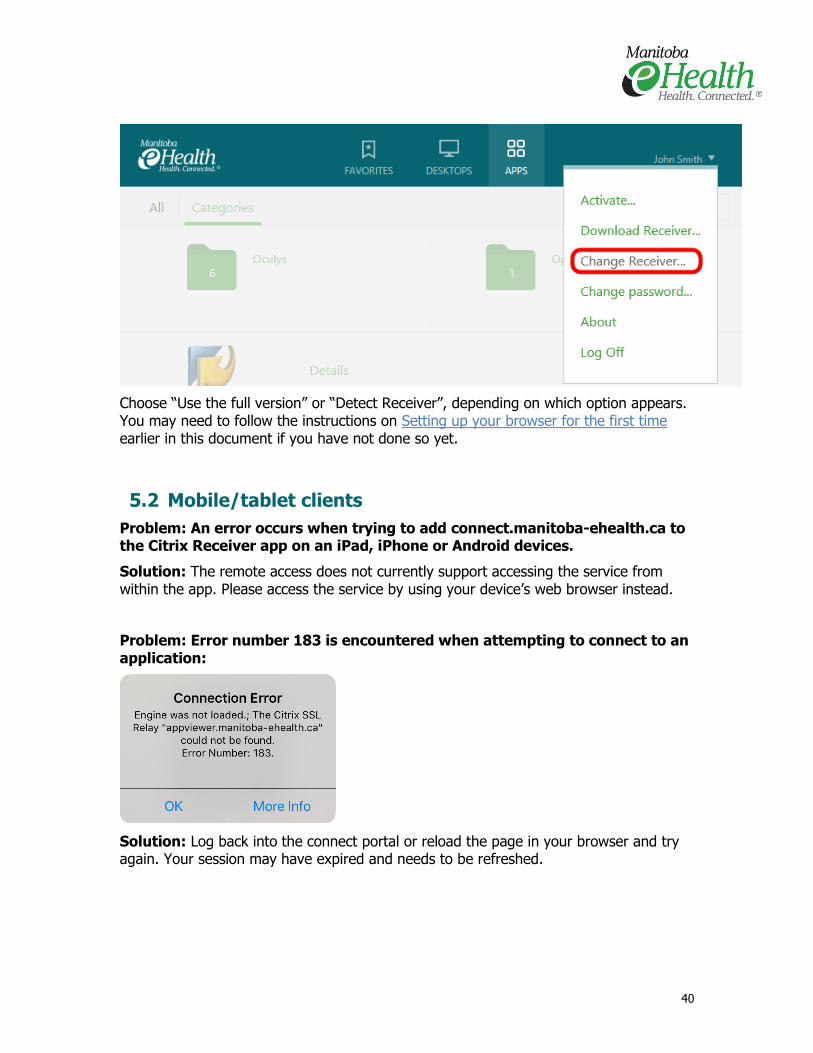
Problem: You receive an error message about an untrusted security certificate when trying to launch applications, such as the following:
Solution 1: If you are using Firefox on Windows 7, 8 or 10, this can be corrected by visiting https://connect.manitoba-ehealth.ca/ with Internet Explorer, or Microsoft Edge at least once after receiving this message. It is not necessary to log into the site in those browsers But this will allow Windows to automatically update its security certificates so that the Citrix Receiver can complete its security verification.
Solution 2: You may be missing one or more essential system or browser updates. Certain operating systems require updates to support the latest security certificates. Please ensure your computer is up to date on its updates, and that you are using a supported OS and browser.
Solution 3: The date or time on your machine may be wrong. Make sure your computer has the correct date and time set.
Problem: Attempting to print from an application fails, produces blank or garbled prints, or causes your application to close unexpectedly.
Solution: The Citrix Reciever works with most printers, but many home or small office printers are not validated to work with it and may not produce usuable output. Printers that support the PCL or PostScript printer language generally provide the best compatibility with Citrix Receiver, and most inexpensive “host-based” printers are often incompatible.
In some cases, it may be possible to get a printer to work by installing an updated printer driver, using a print driver for a similar printer from the same printer family or by updating the Citrix Receiver software if you’re currently running an older version.
We recommend only using Citrix validated printers and printer drivers if printing is required. The list of Citrix validated printers and associated drivers is available here: https://citrixready.citrix.com/info/printers-and-scanners.html
Problem: Applications appear inside a tab in your browser rather than in a floating window.
Solution: This means you are in the “light client” or HTML5 client mode. You can switch to full mode by clicking on your name in the upper right side of the site, and selecting “Change Receiver”.
40
Choose “Use the full version” or “Detect Receiver”, depending on which option appears. You may need to follow the instructions on Setting up your browser for the first time earlier in this document if you have not done so yet.
5.2 Mobile/tablet clients
Problem: An error occurs when trying to add connect.manitoba-ehealth.ca to the Citrix Receiver app on an iPad, iPhone or Android devices.
Solution: The remote access does not currently support accessing the service from within the app. Please access the service by using your device’s web browser instead.
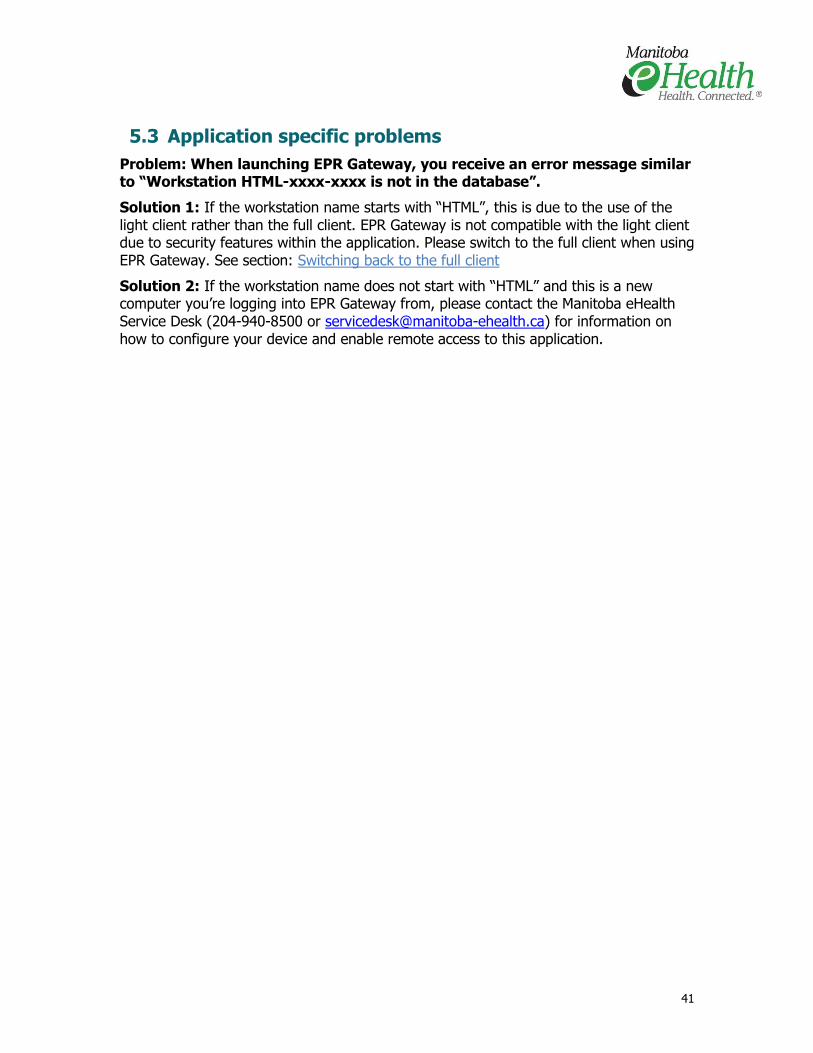
Problem: Error number 183 is encountered when attempting to connect to an application:
Solution: Log back into the connect portal or reload the page in your browser and try again. Your session may have expired and needs to be refreshed.
41
5.3 Application specific problems
Problem: When launching EPR Gateway, you receive an error message similar to “Workstation HTML-xxxx-xxxx is not in the database”.
Solution 1: If the workstation name starts with “HTML”, this is due to the use of the light client rather than the full client. EPR Gateway is not compatible with the light client due to security features within the application. Please switch to the full client when using EPR Gateway. See section: Switching back to the full client
Solution 2: If the workstation name does not start with “HTML” and this is a new computer you’re logging into EPR Gateway from, please contact the Manitoba eHealth Service Desk (204-940-8500 or [email protected]) for information on how to configure your device and enable remote access to this application.