Embed Size (px)
Citation preview
Unix-Practice: Distributed Computing..
Distributed Computing Systems

Distributed Operating Systems
– laboratory exercises
CONTENTS
1 UNIX SYSTEM ........................................................................................................................ 1
1.1 LOGGING INTO THE SYSTEM ............................................................................................................... 1 1.2 UNIX FILESYSTEM .............................................................................................................................. 1 1.3 TEXT FILE PROCESSING COMMANDS ................................................................................................... 3 1.4 PROCESS MANAGEMENT ..................................................................................................................... 3
2 PROCESSES IN UNIX ............................................................................................................ 5
2.1 CREATING A PROCESS ......................................................................................................................... 5 2.2 STARTING A NEW CODE ...................................................................................................................... 6 2.3 WAITING FOR A PROCESS TO TERMINATE ............................................................................................ 7
3 FILES ........................................................................................................................................ 8
3.1 DESCRIPTORS ..................................................................................................................................... 8 3.2 OPEN SYSTEM CALL ............................................................................................................................. 8 3.3 READING DATA ................................................................................................................................... 9 3.4 WRITING DATA ................................................................................................................................... 9 3.5 CLOSING DESCRIPTORS ..................................................................................................................... 10
4 PIPES ....................................................................................................................................... 11
4.1 UNNAMED PIPES ............................................................................................................................... 11 4.2 NAMED PIPES - FIFO ........................................................................................................................ 12
5 SIGNALS ................................................................................................................................ 14
6 NETWORK COMMUNICATION MECHANISMS — BSD SOCKETS ........................ 16
6.1 CLIENT-SERVER COMMUNICATION MODEL ....................................................................................... 16 6.2 TCP/IP PROTOCOL FAMILY .............................................................................................................. 16 6.3 API ROUTINES OPERATING ON BSD SOCKETS................................................................................... 18 6.4 AUXILIARY API ROUTINES OPERATING ON BSD SOCKETS ................................................................ 21 6.5 EXERCISES ....................................................................................................................................... 24
7 PARALLEL VIRTUAL MACHINE .................................................................................... 31
7.1 USING PVM ..................................................................................................................................... 32 7.2 USER INTERFACE ............................................................................................................................. 35 7.3 DYNAMIC PROCESS GROUPS ............................................................................................................ 40 7.4 EXAMPLES IN C ................................................................................................................................ 41
8 REMOTE PROCEDURE CALLS — RPC ......................................................................... 46
8.1 INTRODUCTION................................................................................................................................. 46 8.2 BUILDING RPC BASED DISTRIBUTED APPLICATIONS ........................................................................ 47 8.3 EXTERNAL DATA REPRESENTATION — XDR ................................................................................... 51 8.4 USING RPC BASED REMOTE SERVICES ............................................................................................ 52 8.5 EXERCISES ....................................................................................................................................... 53
9 THE NETWORK FILE SYSTEM ....................................................................................... 63
9.1 PREPARING NFS ............................................................................................................................... 63 9.2 MOUNTING AN NFS VOLUME ........................................................................................................... 63 9.3 THE NFS DAEMONS ......................................................................................................................... 65 9.4 THE EXPORTS FILE ............................................................................................................................ 66 9.5 THE AUTOMOUNTER ........................................................................................................................ 66 9.6 SUN-NFS STEP-BY-STEP ................................................................................................................. 66

Distributed Operating Systems – laboratory exercises
10 IMPLEMENTATION OF JAVA RMI ................................................................................ 54
Distributed Operating Systems
– laboratory exercises
1
1 Unix System
Unix is a general multipurpose distributed operating system, well known in the computing science community. It is a multiuser and multiprocess system, which means that it can serve several users at the same time and each user can run several processes simultaneously. Users can access the system locally – working at the machine running this system, or remotely – accessing this machine from a terminal via a computer network. The user has access to a Unix system only if he has a valid user account in this system, and each access to his account must be registered by explicit logging into the system, whether it is a local or remote access.
1.1 Logging into the system
The user is identified by a username string unique within a given system. The username is passed to a login process – a process continuously waiting for new users. The login process takes a username and a password to check whether the user is allowed to access to the system or not. When this check is positive, the user is logged in (a new session is started) and his working directory becomes his home directory, which is one of account parameters. There is always one distinct process running for each session, called shell process, which acts as a command interpreter. A command in Unix can be:
embedded shell-instruction,
executable program (i.e. application, tool),
shell script containing several commands.
When a shell is waiting for commands a prompt is displayed at the terminal screen. It may look like this:
%
After login, the system runs immediately a default shell process for a given user, another account parameter. One can see his or her own basic user information invoking the following commands:
% who am i
or
% id
Full information about a user identified by some username may be obtained as follows:
% finger username
Each session must be terminated by explicit logging out from the system. Users can log out invoking
% logout
1.2 Unix file system
A file is a fundamental unit of the Unix file system. A file can be:
normal file,
directory – containing several files,
device,
special file – used e.g. for communication purposes.
Distributed Operating Systems – laboratory exercises
2
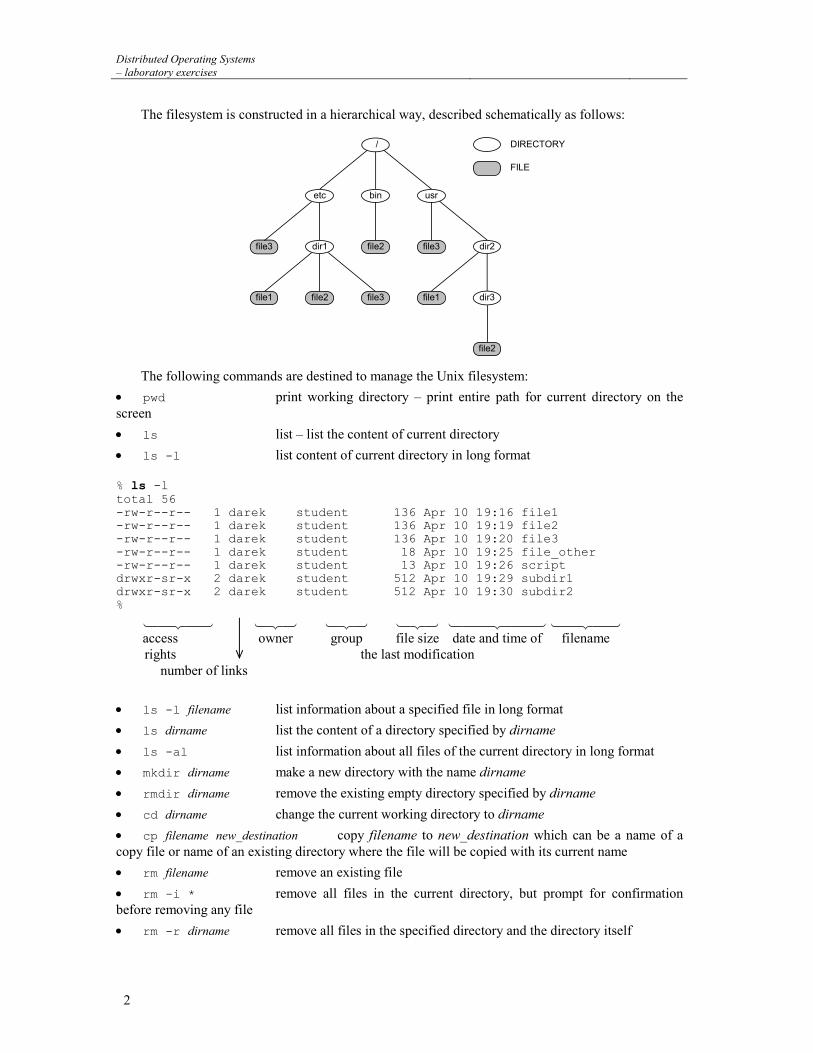
The filesystem is constructed in a hierarchical way, described schematically as follows:
/ DIRECTORY
FILE
usrbinetc
dir1 dir2
dir3
file3
file3
file2
file2 file1file1
file3file2
The following commands are destined to manage the Unix filesystem:
pwd print working directory – print entire path for current directory on the screen
ls list – list the content of current directory
ls -l list content of current directory in long format
% ls -l total 56 -rw-r--r-- 1 darek student 136 Apr 10 19:16 file1 -rw-r--r-- 1 darek student 136 Apr 10 19:19 file2 -rw-r--r-- 1 darek student 136 Apr 10 19:20 file3 -rw-r--r-- 1 darek student 18 Apr 10 19:25 file_other -rw-r--r-- 1 darek student 13 Apr 10 19:26 script drwxr-sr-x 2 darek student 512 Apr 10 19:29 subdir1 drwxr-sr-x 2 darek student 512 Apr 10 19:30 subdir2 %
access owner group file size date and time of filename rights the last modification number of links
ls -l filename list information about a specified file in long format
ls dirname list the content of a directory specified by dirname
ls -al list information about all files of the current directory in long format
mkdir dirname make a new directory with the name dirname
rmdir dirname remove the existing empty directory specified by dirname
cd dirname change the current working directory to dirname
cp filename new_destination copy filename to new_destination which can be a name of a copy file or name of an existing directory where the file will be copied with its current name
rm filename remove an existing file
rm -i * remove all files in the current directory, but prompt for confirmation before removing any file
rm -r dirname remove all files in the specified directory and the directory itself
Distributed Operating Systems
– laboratory exercises
3
Note:
All system commands are described in electronic manual pages, accessible through man command. Example:
% man ls
1.3 Text file processing commands
The following commands are destined to process content of Unix text files.
more command used to output the content of a text file into the terminal screen. The content can be displayed forward and backward by screen or line units.
% more filename – displays the content of the file filename % more *txt – displays the content all files with names ending with txt % more –10 filename – displays by 10 lines a screen % more –10 filename1 filename2 – as above but subsequently filename1 and filename2 % more +40 filename – display begins at line 40 % more +/pattern filename – display begins on the page where pattern is found
head command displays only the beginning of a file content
% head –5 *txt – displays 5 first lines from each file matching *txt
tail command displays only the end of a file content
% tail –30 filename | more – displays 30 last lines from the file filename screen by screen
1.4 Process management
Every program executed in the Unix system is called a process. Each concurrently running process has a unique identifier PID (Process ID) and a parent process (with one minor exception), which has created that process. If a program is executed from a shell command, the shell process becomes the parent of the new process. The following commands are destined to manage user and system processes running in Unix.
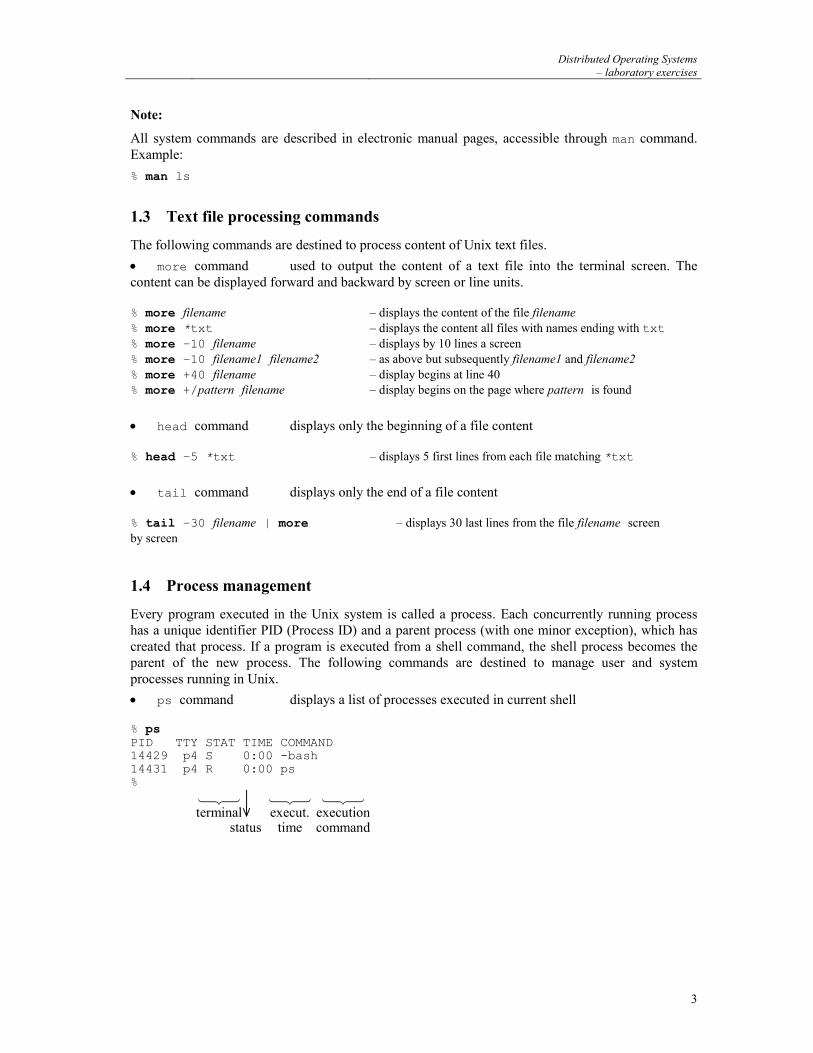
ps command displays a list of processes executed in current shell
% ps PID TTY STAT TIME COMMAND 14429 p4 S 0:00 -bash 14431 p4 R 0:00 ps %
terminal execut. execution status time command
Distributed Operating Systems – laboratory exercises
4
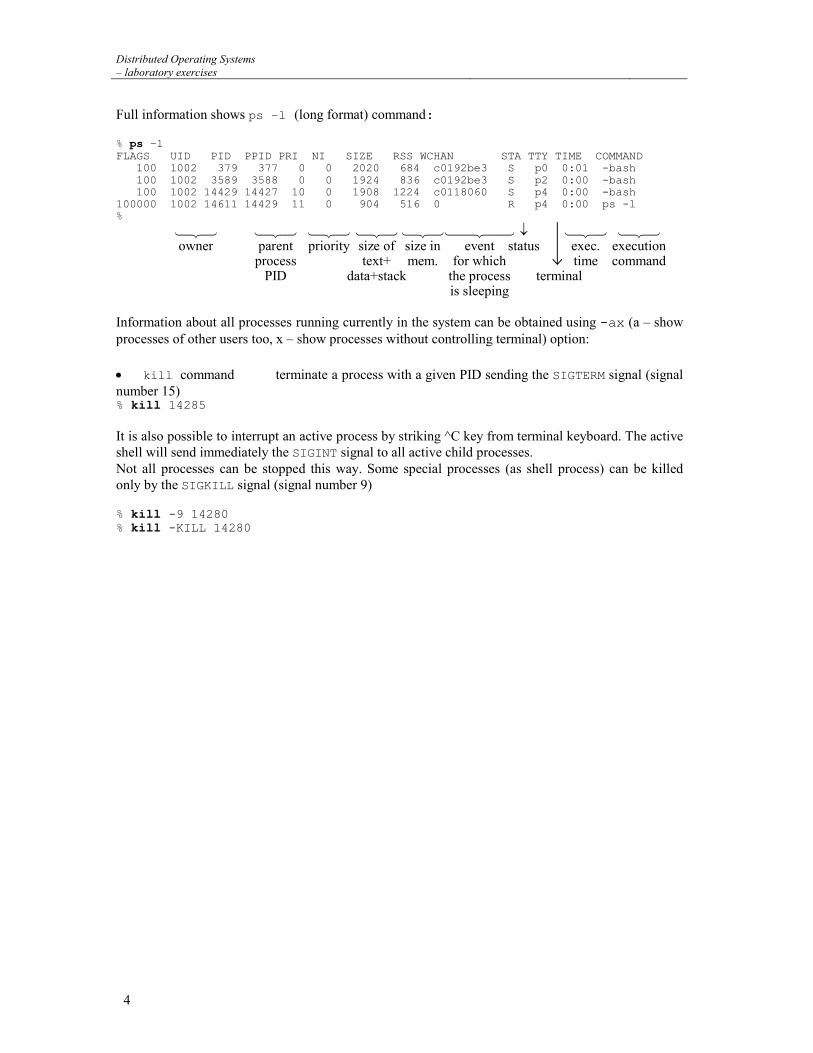
Full information shows ps –l (long format) command:
% ps –l FLAGS UID PID PPID PRI NI SIZE RSS WCHAN STA TTY TIME COMMAND 100 1002 379 377 0 0 2020 684 c0192be3 S p0 0:01 -bash 100 1002 3589 3588 0 0 1924 836 c0192be3 S p2 0:00 -bash 100 1002 14429 14427 10 0 1908 1224 c0118060 S p4 0:00 -bash 100000 1002 14611 14429 11 0 904 516 0 R p4 0:00 ps -l %
owner parent priority size of size in event status exec. execution process text+ mem. for which time command PID data+stack the process terminal is sleeping Information about all processes running currently in the system can be obtained using -ax (a – show processes of other users too, x – show processes without controlling terminal) option:
kill command terminate a process with a given PID sending the SIGTERM signal (signal number 15) % kill 14285
It is also possible to interrupt an active process by striking ^C key from terminal keyboard. The active shell will send immediately the SIGINT signal to all active child processes. Not all processes can be stopped this way. Some special processes (as shell process) can be killed only by the SIGKILL signal (signal number 9)
% kill -9 14280 % kill -KILL 14280
Distributed Operating Systems
– laboratory exercises
5
2 Processes in UNIX
The concept of a process is fundamental to all operating systems. A process consists of an executing (running) program, its current values, state information, and the resources used by the operating system to manage the execution. It is essential to distinguish between a process and a program. A program is a set of instructions and associated data. It is stored in a file or in the memory after invocation, i.e. after starting a process. Thus, a program is only a static component of a process.
2.1 Creating a process
With an exception of some initial processes generated during bootstrapping, all processes are created by a fork system call. The fork system call is called once but returns twice, i.e. it is called by one process and returns to two different processes — to the initiating process called parent and to a newly created one called child.
#include <sys/types.h> #include <unistd.h> pid_t fork();
The fork system call does not take an argument. If the fork call fails it will return -1 and set errno. Otherwise, fork returns the process identifier of the child process (a value greater than 0) to the parent process and a value of 0 to the child process. The return value allows the process to determine if it is the parent or the child.
Example 1 Creating a new process
void main() { printf("Start\n"); if (fork()) printf("Hello from parent\n"); else printf("Hello from child\n"); printf("Stop\n"); }
The process executing the program above prints “start” and splits itself into two processes (it calls the fork system call). Each process prints its own text “hello” and finishes. A process terminates either by calling exit (normal termination) or due to receiving an uncaught signal (see Section 5, Page 14).
#include <unistd.h> void exit(int status);
The argument status is an exit code, which indicates the reason of termination, and can be obtained by the parent process. Each process is identified by a unique value. This value is called in short PID (Process IDentifier). There are two systems calls to determine the PID and the parent PID of the calling process, i.e. getpid and getppid respectively.
Distributed Operating Systems – laboratory exercises
6
Example 2 Using getpid and getppid
void main() { int i; printf("Initial process\t PID %5d \t PPID %5d\n",getpid(), getppid()); for(int i=0;i<3;i++) if (fork()==0) printf("New process\t PID %5d\t PPID %5d\n",getpid(), getppid()); }
2.2 Starting a new code
To start the execution of a new code an exec system call is used.
#include <unistd.h> int execl(const char *path, const char *arg0, ..., const char *argn, char * /*NULL*/); int execv(const char *path, char *const argv[]); int execle(const char *path,char *const arg0[], ... , const char *argn, char * /*NULL*/, char *const envp[]); int execve(const char *path, char *const argv[], char *const envp[]); int execlp(const char *file, const char *arg0, ..., const char *argn, char * /*NULL*/); int execvp (const char *file, char *const argv[]);
The system call replaces the current process image (i.e. the code, data and stack segments) with a new one contained in the file the location of which is passed as the first argument. It does not influence other parameters of the process e.g. PID, parent PID, open files table. There is no return from a successful exec call because the calling process image is overlaid by the new process image. In other words the program code containing the point of call is lost for the process. As mentioned above the path argument is a pointer to the path name of the file containing the program to be executed. The execl system call takes a list of arguments arg0, ..., argn, which point to null-terminated character strings. These strings constitute the argument list available to the new program. This form of exec system call is useful when the list of arguments is known at the time of writing the program. Conventionally at least arg0 should be present. It will become the name of the process, as displayed by the ps command. By convention, arg0 points to a string that is the same as path (or the last component of path). The list of argument strings is terminated by a (char*)0 argument. The execv system call takes an argument argv, which is an array of character pointers to null-terminated strings. These strings constitute the argument list available to the new process image. The execv version is useful when the number of arguments is not known in advance. By convention, argv must have at least one member, and it should point to a string that is the same as path (or its last component). argv is terminated by a null pointer. The execle and execve system calls allow passing an environment to a process. envp is an array of character pointers to null-terminated strings, which constitute the environment for the new process image. envp is terminated by a null pointer. For execl, execv, execvp, and execlp, the C run-time start-off routine places a pointer to the environment of the calling process in the global object extern char **environ, and it is used to pass the environment of the calling process to the new process.
Distributed Operating Systems
– laboratory exercises
7
2.3 Waiting for a process to terminate
To wait for an immediate child to terminate, a wait system call is used.
#include <sys/wait.h> int wait(int *statusp)
wait suspends its caller until a signal is received or one of its child processes terminates or stops due to tracing. If any child has died or stopped due to tracing and this has not been reported using wait, the system call returns immediately with the process ID and exit status of one of those children. If there are no children, return is immediate with the value -1. If statusp is not a NULL pointer, then on return from a successful wait call the status of the child process whose process ID is the return value of wait is stored in the location pointed to by statusp. It indicates the cause of termination and other information about the terminated process in the following manner: If the child process terminated normally, the low-order byte will be 0 and the high-order byte will contain the exit code passed by the child as the argument to the exit system call. If the child process terminated due to an uncaught signal, the low-order byte will contain the signal number, and the high-order byte will be 0.
Distributed Operating Systems – laboratory exercises
8
3 Files
All resources (terminals, printers, disks, tapes, cd-roms, sound cards, network adapters) in Unix are accessed through files. It means the same access as to ordinary files (stored on disks), devices or network. Thus, files are basic mechanisms to store information on disks and tapes, to access devices or to support interprocess communication. This section concerns ordinary files, i.e. the files containing data stored in a filesystem on a disk. It is worth noting that such files should be treated as an array of bytes. Before any information is read or written, a file must be opened or created. Table 1 contains system calls handling files.
Table 1 Basic system calls to operate on files
Function Description open open or create a file read read data from a file into a buffer write write data from a buffer to a file close close a file
3.1 Descriptors
An open file is referenced by a non-negative integer value called descriptor. The descriptor is an index to process open files table. Each process owns a private descriptor table. All read/write operations take a value of descriptor to identify an open file. Three values of a descriptor have special meanings: 0 – standard input 1 – standard output 2 – standard error output These descriptors are initially open for every process. Additionally, every newly created process inherits the open files table from its parent.
3.2 open system call
The open system call is used to perform the opening or creating of a file. It takes two or three arguments.
#include <sys/types.h> #include <sys/stat.h> #include <fcntl.h> int open(char * path, int flags [, int mode ] );
path points to the pathname of a file. open opens the named file for reading and/or writing, as specified by the flags argument, and returns a descriptor for that file. The flags argument may indicate whether the file is to be created if it does not exist yet (by specifying the O_CREAT flag). In this case the file is created with mode mode as described in chmod and modified by the process' umask value. If the path is an empty string, the kernel maps this empty pathname to '.' i.e. the current directory. The value for flags is constructed by ORing flags from the following list (one and only one of the first three flags below must be used): O_RDONLY Open for reading only. O_WRONLY Open for writing only. O_RDWR Open for reading and writing. O_APPEND If set, the seek pointer will be set to the end of the file prior to each write.
Distributed Operating Systems
– laboratory exercises
9
O_CREAT If the file exists, this flag has no effect. Otherwise, the file is created, and the owner ID of the file is set to the effective user ID of the process. O_TRUNC If the file exists and is a regular file, and the file is successfully opened O_RDWR or O_WRONLY, its length is truncated to zero and the mode and owner are unchanged. O_TRUNC has no effect on FIFO special files or directories. This system call returns a non-negative file descriptor on success. On failure, it returns -1 and sets errno to indicate the error.
3.3 Reading data
In order to read data from a file, read system call is used.
int read(int fd, char *buf, int nbyte);
This system call attempts to read nbyte bytes of data from the object referenced by the descriptor fd into the buffer pointed to by buf. Buffer length has to be equal to or greater than nbyte. Unallocated or shorter (less than nbyte) buffer causes unpredicted behaviour of the process. In most cases, the process ends with core dump. Upon successful completion, read returns the number of bytes actually read and placed in the buffer. On failure, it returns -1 and sets errno to indicate the error. If nbyte is not zero and read returns 0, then EOF (end of file) has been reached.
Example 3
char array[10]; read(0,array,10); /* read 10 chars from standard input */ int numbers[3]; read(0,numbers,3); /* read only 3 bytes not integers (integers is 2 or 4 bytes long) */ read(0,numbers,sizeof(numbers)*sizeof(int)); /* correct filling of array */ float *size; read(0, size, sizeof(float)); /* WRONG!! – read into unallocated memory */ float cc; read(0, cc, sizeof(cc)); /* WRONG !! – second parameter should be pointer not value */
3.4 Writing data
To write data into a file, write system call is used.
int write(int fd, char *buf, int nbyte);
This system call attempts to write nbyte bytes of data to the object referenced by the descriptor fd from the buffer pointed to by buf. On success, write returns the number of bytes actually written. On failure, it returns -1 and set errno to indicate the error.
Example 4
char array[10]; write(1,array,10); /* write 10 chars to standard output */ int number; write(2,&number,sizeof(number)); /* write integer to standard error, the argument number is passed by pointer, not by value !! */
Distributed Operating Systems – laboratory exercises
10
3.5 Closing descriptors
If a descriptor is no longer needed, it should be closed.
int close(int fd);
close frees descriptor referenced by fd. It returns 0 on success or -1 on failure and sets errno to indicate the error. After closing, the descriptor may be reused again.
Example 5 Writing data into file
#include <fcntl.h> void main() { int fd; int n,m,i; char buf[10]; /* open file /tmp/xx for writting */ fd = open("/tmp/xx",O_WRONLY ); /* check if open finished successful */ if (fd < 0) { /* open failed – print message and reason of error, e.g. file does not exist */ perror("Failed open"); exit(1); } /* read data from standard input */ n = read(0,buf, sizeof(buf)); /* write data info file */ m = write(fd,buf,n); printf("Read %d, write %d buf: %s\n",n,m,buf); /* close descriptor */ close(fd); }
Distributed Operating Systems
– laboratory exercises
11
4 Pipes
Pipes are a simple, synchronised way of passing information between processes. A pipe is treated as a special file to store data in FIFO manner. The maximum capacity of a pipe is referenced by the constant PIPE_BUF. In most systems pipes are limited to 5120 bytes. On pipes, read and write operations can be performed. write appends data to the input of a pipe while read reads any data from output of a pipe. The data which have been read are removed from the pipe. If the pipe is empty the read is blocked until data are written to the pipe or the pipe is closed. Pipes can be divided into two categories: unnamed pipes named pipes Unnamed pipes may be only used with related processes (parent/child or child/child). They exist as long as processes use them. Named pipes exist as directory entries and they can be used by unrelated processes provided that the processes know the name and location of the entry.
4.1 Unnamed pipes
Unnamed pipes are communication channels between related processes. They are used only between parent and child processes or processes having a common parent (sibling processes) if the parent created the pipe before creating the child processes. Historically pipes were always unidirectional (data flowed only in one direction). In current versions of UNIX, pipes are bi-directional (full duplex). An unnamed pipe is created by means of pipe system call.
int pipe(int fd[2])
If successful, the pipe system call will return 0, and fill in the fd array with two descriptors. In a full duplex setting, if a process writes data to fd[0], then fd[1] is used for reading, otherwise the process writes to fd[1] and fd[0] is used for reading. In a half duplex setting fd[1] is always used for writing and fd[0] is used for reading. If the pipe call fails, it returns -1 and set errno.
Example 6 Communication via an unnamed pipe
#include <stdio.h>
#include <unistd.h>
#include<stdlib.h>
#include<string.h>
void main(int argc, char *argv[]) {
int fd[2];
char message[BUFSIZ];
if (pipe(fd) == -1) { /* create the pipe */
perror("Pipe"); /* pipe fails */
exit(1);
}
switch(fork()) {
case -1: /* fork fails */
perror("Fork");
exit(2);
Distributed Operating Systems – laboratory exercises
12
case 0: /* child process */
close (fd[1]);
if (read(fd[0], message,BUFSIZ)>0) {
printf("Received message %s\n",message);
} else
perror("Read");
break;
default: /* parent process */
close(fd[0]);
if (write(fd[1],argv[1],strlen(argv[1])) > 0) {
printf("Sent message %s\n",argv[1]);
} else
perror("Write");
}
}
In the parent process, the unnecessary descriptor fd[0] is closed and the message (passed to the program via argv) is written to the pipe referenced by fd[1]. The child process closes fd[1] and reads the message from the pipe via the descriptor fd[0].
4.2 Named pipes - FIFO
Named pipes are another type of pipes in UNIX (named pipes are called FIFO interchangeably). They work similarly to unnamed pipes but have some benefits. The named pipe has a directory entry. The directory entry allows using the FIFO for any process which knows its name, unlike unnamed pipes which are restricted only to related processes. Before any operation, the pipe is created by mknod command or mknod system call and must be opened by open system call. Note: open is blocked until another process opens FIFO in a complementary manner.
command: mknod path p system call int mknod(char *path, int mode, int dev)
mknod creates a new file named by the path name pointed to by path. The mode of the new file (in-cluding file type bits) is initialised from mode. The values of the file type bits that are permitted are:
#define S_IFCHR 0020000 /* character special */ #define S_IFBLK 0060000 /* block special */ #define S_IFREG 0100000 /* regular */ #define S_IFIFO 0010000 /* FIFO special */
Values of mode other than those enumerated above are undefined and should not be used. An ordinary user can create only FIFO. mknod returns 0 on success or -1 on failure and sets errno to indicate the error. The following example demonstrates an application of named pipes in a client-server communication.
Example 7 FIFO programs – server and client
/* server program */ #include <fcntl.h> #include <stdio.h> #include <unistd.h> void main() {
Distributed Operating Systems
– laboratory exercises
13
char buf[BUFSIZ]; int fd,n; /* create named pipe (FIFO), set RWX rights for user */ mknod("/tmp/server", S_IFIFO | S_IRWXU,0); /* open FIFO for reading */ fd = open("/tmp/server", O_RDONLY); if (fd < 0 ) { perror("Open"); exit(1); } /* read data from FIFO */ while ((n=read(fd,buf,BUFSIZ-1)) > 0) { buf[n]=0; printf("Read: %s\n",buf); } close (fd); }
/* client program */ #include <fcntl.h> #include <stdio.h> #include <unistd.h> void main() { char buf[BUFSIZ]; int fd,n; /* open FIFO for writing */ fd = open("/tmp/server", O_WRONLY); if (fd < 0 ) { perror("Open"); exit(1); } /* read data from standard input and write to FIFO */ while ((n=read(0,buf,BUFSIZ-1)) > 0) { buf[n]=0; if (write(fd,buf,n) < 0) exit(1); printf("Write[%d]: %s\n",getpid(),buf); } close (fd); }
Distributed Operating Systems – laboratory exercises
14
5 Signals
A signal is generated by some abnormal event that requires attention. It can be initiated by the user at a terminal (quit, interrupt, stop), by a program error (bus error, etc.), by a request of another program (kill), or when a process is stopped because it wishes to access its control terminal while in the background. The signal system call allows the calling process to choose one of three ways to handle the receipt of a specified signal.
#include <signal.h> void (*signal (int sig, void (*func)(int)))(int);
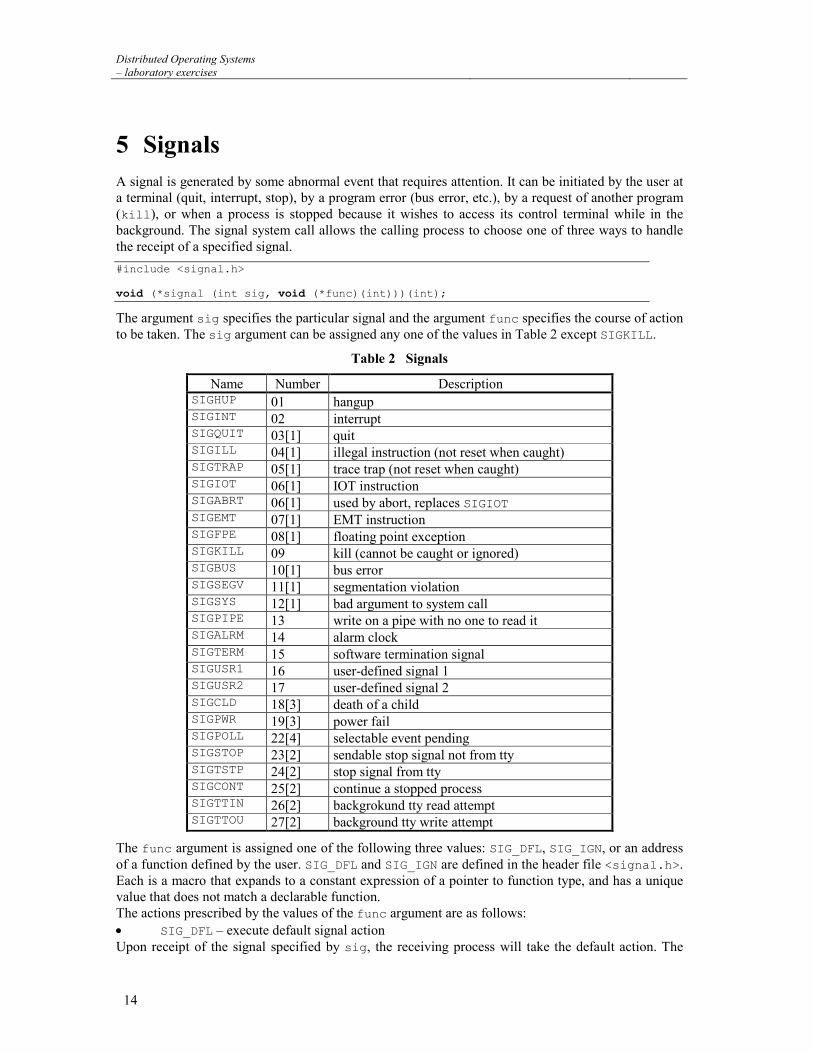
The argument sig specifies the particular signal and the argument func specifies the course of action to be taken. The sig argument can be assigned any one of the values in Table 2 except SIGKILL.
Table 2 Signals
Name Number Description SIGHUP 01 hangup SIGINT 02 interrupt SIGQUIT 03[1] quit SIGILL 04[1] illegal instruction (not reset when caught) SIGTRAP 05[1] trace trap (not reset when caught) SIGIOT 06[1] IOT instruction SIGABRT 06[1] used by abort, replaces SIGIOT SIGEMT 07[1] EMT instruction SIGFPE 08[1] floating point exception SIGKILL 09 kill (cannot be caught or ignored) SIGBUS 10[1] bus error SIGSEGV 11[1] segmentation violation SIGSYS 12[1] bad argument to system call SIGPIPE 13 write on a pipe with no one to read it SIGALRM 14 alarm clock SIGTERM 15 software termination signal SIGUSR1 16 user-defined signal 1 SIGUSR2 17 user-defined signal 2 SIGCLD 18[3] death of a child SIGPWR 19[3] power fail SIGPOLL 22[4] selectable event pending SIGSTOP 23[2] sendable stop signal not from tty SIGTSTP 24[2] stop signal from tty SIGCONT 25[2] continue a stopped process SIGTTIN 26[2] backgrokund tty read attempt SIGTTOU 27[2] background tty write attempt
The func argument is assigned one of the following three values: SIG_DFL, SIG_IGN, or an address of a function defined by the user. SIG_DFL and SIG_IGN are defined in the header file <signal.h>. Each is a macro that expands to a constant expression of a pointer to function type, and has a unique value that does not match a declarable function. The actions prescribed by the values of the func argument are as follows: SIG_DFL – execute default signal action Upon receipt of the signal specified by sig, the receiving process will take the default action. The
Distributed Operating Systems
– laboratory exercises
15
default action usually results in the termination of the process. Those signals with a [1] or a [2] are exceptions to this rule. SIG_IGN – ignore signal Upon receipt of the signal specified by sig, the signal is ignored. Note: the SIGKILL signal cannot be ignored. func – execute user-defined action Upon receipt of the signal sig, the receiving process executes the signal-catching function pointed to by func. The signal number sig is passed as the only argument to the signal-catching function. Additional arguments are passed to the signal-catching function for hardware-generated signals. Before entering the signal-catching function, the value of func for the caught signal is set to SIG_DFL unless the signal is SIGILL, SIGTRAP, or SIGPWR. Upon return from the signal-catching function, the receiving process resumes execution at the point it was interrupted. Note: The SIGKILL signal cannot be caught. A call to signal cancels a pending signal sig except for a pending SIGKILL signal. Upon successful completion, signal returns the previous value of func for the specified signal sig. Otherwise, a value of SIG_ERR is returned and errno is set to indicate the error. SIG_ERR is defined in the include file <signal.h>. The following example shows ignoring a signal.
Example 8 Pseudo nohup – ignoring a signal.
#include <signal.h> void main(int argc, char *argv[]) { if (signal(SIGHUP,SIG_IGN)== SIG_ERR) { perror("SIGHUP"); exit(3); } argv++; execvp(*argv,argv); perror(*argv); /* if exec success it will not go here */ }
Distributed Operating Systems – laboratory exercises
16
6 Network communication mechanisms — BSD sockets
6.1 Client-server communication model
The client-server communication model consists of 2 logical entities, one – a server – waiting for service requests (listening) and the other – a client – issuing service request in an arbitrary chosen moment. Within the TCP/IP protocol family the client must be aware of the actual server location – before sending requests it must know the IP address of the host running server application and a protocol port attached to the application process listening for communication. However, the server is not aware which clients it will serve during its work – the server will discover the location of a given client only after receiving a request from him. Servers can process client requests in two ways: 1. sequentially one request after another – iterative server easy to build and understand, but of poor performance; 2. concurrently, multiple requests at the same time processed by multiple subprocesses – concurrent server.
6.2 TCP/IP protocol family
TCP/IP protocols (Internet protocol family) are the most common inter-process communication protocols in modern operating systems (especially all Unix like systems, NetWare and Windows NT). TCP/IP protocols allow both local communication, between different processes within the same operating system, and remote communication, between processes at different hosts. Application processes have access to TCP, UDP and IP protocols (via API).
userprocess
userprocess
userprocess
TCP/IP Protocol Family OSI RM
data link layer
physical layer
network layer
transport layer
session layer
presentation layer
application layer
UDP
ARP RARPICMP
network link
IP
TCP
Figure 1 Relation between TCP/IP protocol family and OSI Reference Model
6.2.1 Interface to transport protocols In a typical case, application processes can make use of TCP/IP communication accessing TCP or UDP transport protocols (or IP network protocol, in some rare cases) via Application Programming
Distributed Operating Systems
– laboratory exercises
17
Interface routines available for programming languages. The most popular API’s are:
BSD sockets – derived from BSD Unix system line;
TLI (Transport Layer Interface) – derived from System V line.
A socket is an abstract kind of a special file, thus a process can handle the communication just like a file – by means of well-know file operations – read, write, close. A socket is created and opened by a specific network call socket, which returns a descriptor of the socket. Writing to the socket results in sending data across the communication link, and reading from the socket causes the operating system to return data received from the network.
file and socket operations:
open() socket()
connect()
read() read()
write() write()
close() close()
Figure 2 Equivalence between file and socket operations
The same socket can be used in both sending and receiving data. Before the process can send, it has to specify the destination – an endpoint address of the receiver. The actual endpoint address is composed of an address of the computer (IP address of the host) and a location of the application process (the number of the communication port assigned to the process by its operating system). Each client-server communication is identified by a five-element association <protocol, IP address of the client host, port number of the client process, IP address of the server host, port number of the server process>.
6.2.2 Transport modes Transport layer communication between a client and a server can be:
connection-oriented, handled by TCP (Transmission Control Protocol) stream protocol, where all data are transmitted both ways in a stream of bytes, assuring reliability – no corruption, reordering, data losses and duplication can happen. Connection-oriented communication is easy to program. The data are written and read to/from socket exactly as to/from local file, by means of write and read I/O calls (the number of read calls can be different from write calls). However, connection-oriented design requires a separate socket for each connection (is more resource-consuming) and imposes an overhead of connection management.
connectionless, handled by UDP (User Datagram Protocol) protocol, where transmitted data are divided into independent parts (datagrams), with no reliability guaranties – datagrams can be corrupted, lost, reordered or duplicated. As datagrams are independent, the destination should receive as many datagrams as the sender has send.
Distributed Operating Systems – laboratory exercises
18
6.3 API routines operating on BSD sockets
6.3.1 socket network call
The socket network call creates a new socket and opens it for sending/receiving data according to the declared transport protocol.
#include <sys/types.h> #include <sys/socket.h> int socket(int family, int type, int protocol);
family – protocol family, e.g.: PF_UNIX – internal Unix protocols, PF_INET – Internet protocols (TCP/IP), PF_NS – Xerox NS; type – socket type, out of.: SOCK_STREAM – for data stream communication (e.g. TCP), SOCK_DGRAM – for datagram communication (e.g. UDP), SOCK_RAW – for raw data protocols (network layer protocols, like IP); protocol – protocol number taken from the list of available protocols belonging to specified protocol family. The socket network call returns a descriptor for the newly created socket or -1 in case of error.
6.3.2 bind network call
When a socket is created, it does not have any address assigned to it. The bind network call specifies a local endpoint address for a socket. This network call must be invoked by any server process, in order to specify at which port number and network interface address (if its host has several network interfaces) it will listen to clients. A client can also use this network call to assign a concrete local port number instead of letting the operating system assign automatically some unused port.
#include <sys/types.h> #include <sys/socket.h> int bind(int sockfd, struct sockaddr *locaddr, int addrlen);
sockfd – descriptor of an open socket, locaddr – pointer to an endpoint address structure (different protocol families may use distinct structure types), addrlen – size of this endpoint address structure.
The bind network call returns 0 if successful or -1 in case of error. The sockaddr structure is defined as follows:
struct sockaddr { u_short sa_family; /* address family */ char sa_data[14]; /* endpoint address value */ }
When using TCP/IP protocol family it is more convenient to use instead of sockaddr another endpoint address structure — sockaddr_in — predestined to TCP/IP address family. It is defined as follows:

Distributed Operating Systems
– laboratory exercises
19
struct sockaddr_in { u_short sin_family; /* AF_INET */ u_short sin_port; /* portu number */ struct in_addr sin_addr; /* 32-bit IP address */ char sin_zero[8]; /* 0 padding */ }
6.3.3 connect network call
The connect network call, called by a connection-oriented client, assigns a remote endpoint address of the server to an open socket and establishes a connection to this address. If the client did not bind this socket with a local endpoint address, the system will bind it automatically with one of unused ports. Once a connection has been made, the client can transfer data across it, using read and write I/O calls. The connect network call can also be used by a connectionless client, its only goal will be to assign a remote endpoint address of the server allowing the datagrams to be sent and received by simple write and read calls.
#include <sys/types.h> #include <sys/socket.h> int connect(int sockfd, struct sockaddr *servaddr, int addrlen);
sockfd – descriptor of an open socket, servaddr – pointer to an endpoint address structure (different protocol families may use distinct structure types), addrlen – size of this endpoint address structure. The connect network call returns 0 if successful or -1 in case of error.
6.3.4 listen network call
Connection-oriented servers call listen to make a socket ready to accept connections incoming from clients.
int listen(int sockfd, int qsize);
sockfd – descriptor of an open socket, qsize – maximum number of connection requests received but not yet accepted by a server (waiting in a server port queue). The listen network call returns 0 if successful or -1 in case of error.
6.3.5 accept network call
After a server has made a socket ready to accept incoming connections, it calls accept to extract the next connection request waiting in a port queue. If there is such a request in the queue, the server process is blocked by the operating system until a connection request arrives. For each connection a new socket is created, accept returns its descriptor. The server uses the new socket only for the new connection and after it finishes data transfer it closes the socket.
#include <sys/types.h> #include <sys/socket.h> int accept(int sockfd, struct sockaddr *clntaddr, int *addrlen);
sockfd – descriptor of an open socket, clntaddr – pointer to a client endpoint address, addrlen – size of this endpoint address structure. The accept network call returns 0 if successful or -1 in case of error.
Distributed Operating Systems – laboratory exercises
20
6.3.6 read and write I/O calls
Both read and write I/O calls are used in the usual manner, as when accessing normal files. Only this time the data are transferred through a network link.
int read(int sockfd, char *buffer, nbytes); int write(int sockfd, char *buffer, nbytes);
sockfd – descriptor of a socket opened by socket or accept, buffer – pointer to a buffer to store data when receiving by read or containing data to be sent by write, nbytes – number of bytes to be received into the buffer or to be sent from the buffer.
The read and write I/O calls return the actual number of successfully received/sent bytes or -1 in case of error.
6.3.7 send and sendto network calls
These network calls act as write I/O call but they also allow using additional options (flags) when sending data. Furthermore, with sendto network call a connectionless process can specify a remote endpoint address of the receiver.
#include <sys/types.h> #include <sys/socket.h> int send(int sockfd, char *buf, int nbytes, int flags); int sendto(int sockfd, char *buf, int nbytes, int flags, struct sockaddr *to, int addrlen);
sockfd – descriptor of a socket opened by socket or accept, buf – pointer to a buffer containing data to be sent, nbytes – number of bytes to be sent from the buffer, flags – sending options: MSG_OOB – urgent “out-of-band” data to be sent, MSG_DONTROUTE – do not use routing (used for testing routing programs), to – pointer to a receiver endpoint address, addrlen – size of this endpoint address structure.
6.3.8 recv and recvfrom network calls
These network calls act as read I/O call but they also allow using additional options (flags) when receiving data. Furthermore, with recvfrom network call a connectionless process can specify a remote endpoint address of the sender from which it expects a datagram.
#include <sys/types.h> #include <sys/socket.h> int recv(int sockfd, char *buf, int nbytes, int flags); int recvfrom(int sockfd, char *buf, int nbytes, int flags, struct sockaddr *from, int *addrlen);
sockfd – descriptor of a socket opened by socket or accept, buf – pointer to a buffer to store received data, nbytes – receiving buffer size (number of bytes that can be received at once) flags – receiving options: MSG_OOB – urgent “out-of-band” data to be received, MSG_PEEK – read the datagram without deleting it from receiving queue, from – pointer to a sender endpoint address filled by the system after reception, addrlen – pointer to a variable containing the size of this endpoint address structure; on return this variable will contain the size of the actual address.
Distributed Operating Systems
– laboratory exercises
21
6.3.9 close I/O call
The close I/O call deallocates the socket. In the connection-oriented communication this results in the immediate termination of a connection.
int close(int sockfd);
sockfd – descriptor of a socket opened by socket or accept. The close I/O call returns 0 if successful or -1 in case of error.
6.4 Auxiliary API routines operating on BSD sockets
The following routines do not deal directly with transport layer communication but offer additional helpful services operating on BSD sockets.
6.4.1 Managing data representation Interconnected hosts can have different internal data representation in the operational memory, depending on the system architecture. For example, an integer data format can be 4-bytes long on one host, and only 2-bytes long on another. Furthermore, it can be stored in memory starting from the most significant byte on one host, and in the reverse order on another. In order to make all hosts participating in a communication understand each other, a universal network representation has been introduced. When assigning a value to any of the structures mentioned in the previous section, a process should use appropriate conversion to network byte order. Here are the functions used for conversion between host and network representation.
#include <sys/types.h> #include <netinet/in.h> u_long htonl(u_long hostlong); u_short htons(u_short hostshort); u_long ntohl(u_long netlong); u_short ntohs(u_short netshort);
htonl – converts a long integer (4 bytes) from host to network representation; htons – converts a short integer (2 bytes) from host to network representation; ntohl – converts a long integer (4 bytes) from network to host representation; ntohs – converts a short integer (2 bytes) from network to host representation.
6.4.2 Managing network addresses Internet (IP) addresses, represented by 32-bit long integers are commonly printed in a dotted decimal notation. The inet_addr routine is used to convert from a character string containing an IP address in the dotted decimal notation to a 32-bit long integer format.
#include <sys/types.h> #include <sys/socket.h> #include <netinet/in.h> #include <arpa/inet.h> unsigned long inet_addr(char *string);
string – pointer to a character string containing an IP address in the dotted decimal notation, The inet_addr routine returns 32-bit long integer if successful or -1 in case of error.
The inet_ntoa routine performs a reverse conversion from a 32-bit address to an ASCII string.
Distributed Operating Systems – laboratory exercises
22
#include <sys/types.h> #include <sys/socket.h> #include <netinet/in.h> #include <arpa/inet.h> char* inet_ntoa(struct in_addr addr);
addr – a 32-bit IP address in the form of in_addr structure defined as follows:
struct in_addr { u_long s_addr; }
The inet_ntoa routine returns a pointer to an ASCII string.
It is possible to find an IP address of a known host. The gethostbyname network call is used for this purpose.
#include <sys/types.h> #include <sys/socket.h> #include <netdb.h> struct hostent *gethostbyname(char *name);
name – domain name of the host. This network call returns a pointer to a hostent structure defined as follows:
struct hostent { char *h_name; /* host name */ char **h_aliases; /* possible alias names */ int h_addrtype; /* address type (AF_INET) */ int h_length; /* actual address length */ char **h_addr_list; /* actual addresses */ };
The same information can be reached by means of another network call – gethostbyaddr, which searches a server by its IP address.
#include <sys/types.h> #include <sys/socket.h> #include <netdb.h> struct hostent *gethostbyaddr(struct in_addr *addr, int len, int type);
addr – pointer to an IP address; len – length of the address (in bytes), type – address type (AF_INET).
This network call also returns a pointer to a hostent structure.
Similarly, information about services and service ports can be accessed by getservbyname and getservbyport network calls.
#include <netdb.h> struct servent *getservbyname(char *name, char *proto); struct servent *getservbyport(int port, char *proto);
name – pointer to a string containing service name, port – service port number, proto – pointer to a string containing protocol name (e.g. “tcp” or “udp”). These network calls return a pointer to a servent structure defined as follows:
Distributed Operating Systems
– laboratory exercises
23
struct servent { char *s_name; /* oficjalna nazwa serwisu */ char **s_aliases; /* lista nazw alternatywnych */ int s_port; /* numer portu */ char *s_proto; /* nazwa protokołu */ };
An endpoint address currently associated with a socket can be accessed by calling getsockname:
int getsockname(int sockfd, struct sockaddr *addr, int *addrlen);
sockfd – descriptor of an open socket, addr – pointer to an address structure filled on return with the local endpoint address, addrlen – pointer to a variable containing the size of this endpoint address structure; on return this variable will contain the size of the actual address. The getsockname network call returns 0 if successful or -1 in case of error.
Finally, the getpeername network call returns a remote endpoint address of a currently established connection over a socket:
int getpeername(int sockfd, struct sockaddr *addr, int *addrlen);
sockfd – descriptor of an open socket, addr – pointer to an address structure filled on return with the remote endpoint address, addrlen – pointer to a variable containing the size of this endpoint address structure; on return this variable will contain the size of the actual address. The getpeername network call returns 0 if successful or -1 in case of error.
Distributed Operating Systems – laboratory exercises
24
6.5 Exercises
6.5.1 TCP/IP protocols clients
6.5.1.1 Connection oriented communication (stream protocol TCP)
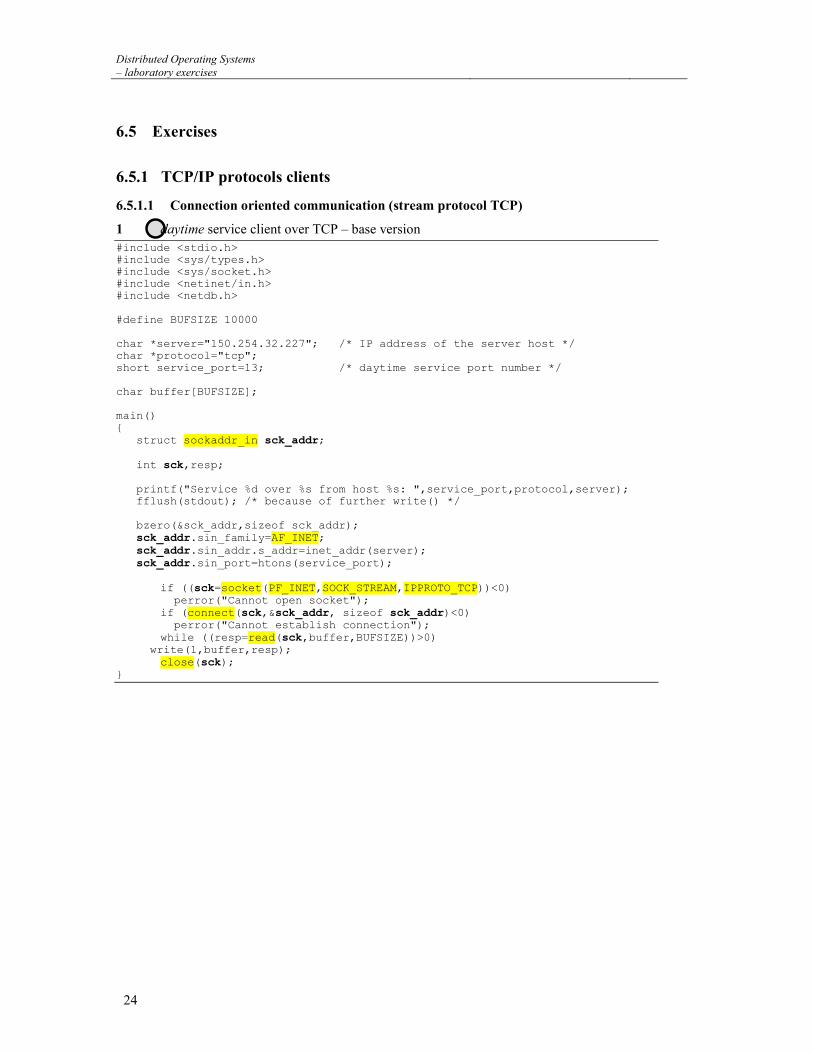
1 daytime service client over TCP – base version
#include <stdio.h> #include <sys/types.h> #include <sys/socket.h> #include <netinet/in.h> #include <netdb.h> #define BUFSIZE 10000 char *server="150.254.32.227"; /* IP address of the server host */ char *protocol="tcp"; short service_port=13; /* daytime service port number */ char buffer[BUFSIZE]; main() { struct sockaddr_in sck_addr; int sck,resp; printf("Service %d over %s from host %s: ",service_port,protocol,server); fflush(stdout); /* because of further write() */ bzero(&sck_addr,sizeof sck_addr); sck_addr.sin_family=AF_INET; sck_addr.sin_addr.s_addr=inet_addr(server); sck_addr.sin_port=htons(service_port); if ((sck=socket(PF_INET,SOCK_STREAM,IPPROTO_TCP))<0) perror("Cannot open socket"); if (connect(sck,&sck_addr, sizeof sck_addr)<0) perror("Cannot establish connection"); while ((resp=read(sck,buffer,BUFSIZE))>0) write(1,buffer,resp); close(sck); }
Distributed Operating Systems
– laboratory exercises
25
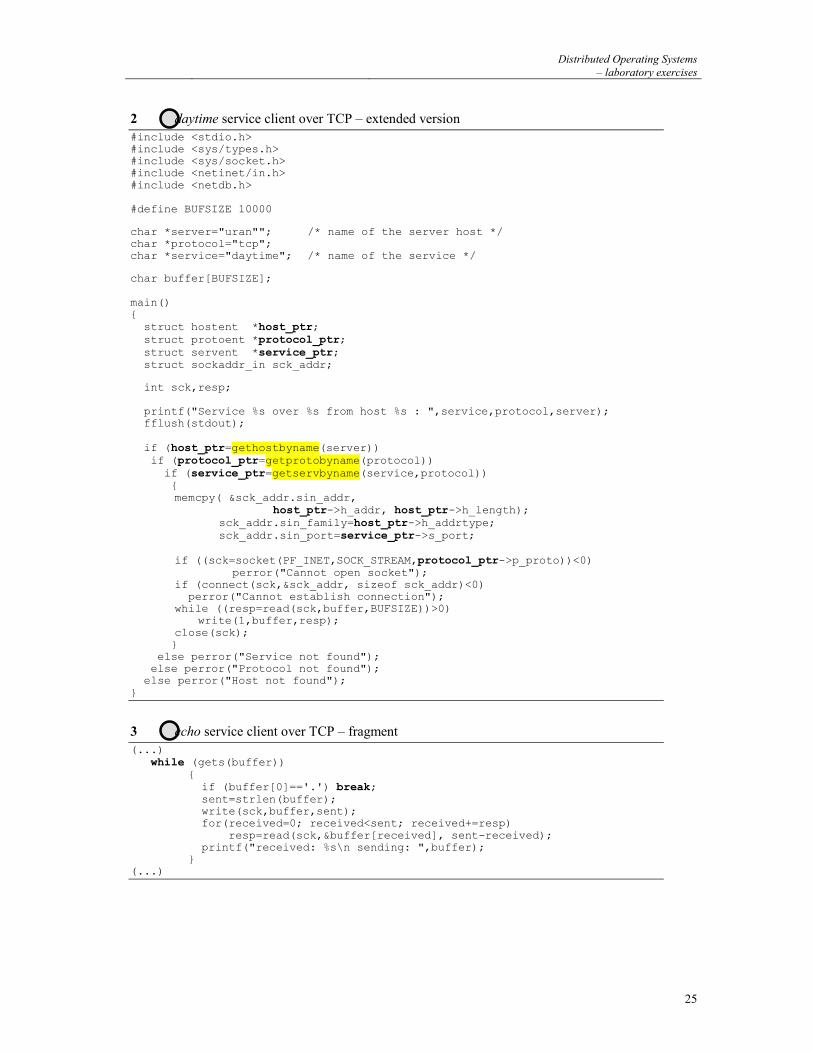
2 daytime service client over TCP – extended version
#include <stdio.h> #include <sys/types.h> #include <sys/socket.h> #include <netinet/in.h> #include <netdb.h> #define BUFSIZE 10000 char *server="uran""; /* name of the server host */ char *protocol="tcp"; char *service="daytime"; /* name of the service */ char buffer[BUFSIZE]; main() { struct hostent *host_ptr; struct protoent *protocol_ptr; struct servent *service_ptr; struct sockaddr_in sck_addr; int sck,resp; printf("Service %s over %s from host %s : ",service,protocol,server); fflush(stdout); if (host_ptr=gethostbyname(server)) if (protocol_ptr=getprotobyname(protocol)) if (service_ptr=getservbyname(service,protocol)) { memcpy( &sck_addr.sin_addr, host_ptr->h_addr, host_ptr->h_length); sck_addr.sin_family=host_ptr->h_addrtype; sck_addr.sin_port=service_ptr->s_port; if ((sck=socket(PF_INET,SOCK_STREAM,protocol_ptr->p_proto))<0) perror("Cannot open socket"); if (connect(sck,&sck_addr, sizeof sck_addr)<0) perror("Cannot establish connection"); while ((resp=read(sck,buffer,BUFSIZE))>0) write(1,buffer,resp); close(sck); } else perror("Service not found"); else perror("Protocol not found"); else perror("Host not found"); }
3 echo service client over TCP – fragment (...) while (gets(buffer)) { if (buffer[0]=='.') break; sent=strlen(buffer); write(sck,buffer,sent); for(received=0; received<sent; received+=resp) resp=read(sck,&buffer[received], sent-received); printf("received: %s\n sending: ",buffer); } (...)
Distributed Operating Systems – laboratory exercises
26
6.5.1.2 Connectionless communication (datagram protocol UDP)
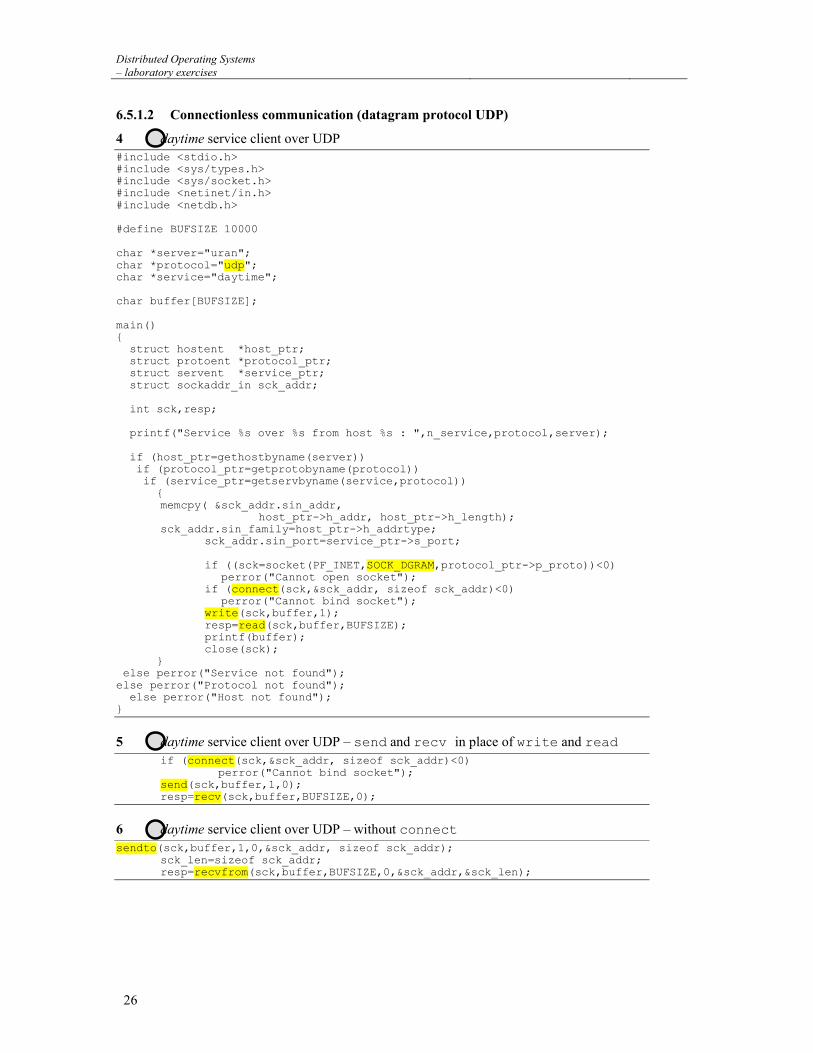
4 daytime service client over UDP
#include <stdio.h> #include <sys/types.h> #include <sys/socket.h> #include <netinet/in.h> #include <netdb.h> #define BUFSIZE 10000 char *server="uran"; char *protocol="udp"; char *service="daytime"; char buffer[BUFSIZE]; main() { struct hostent *host_ptr; struct protoent *protocol_ptr; struct servent *service_ptr; struct sockaddr_in sck_addr; int sck,resp; printf("Service %s over %s from host %s : ",n_service,protocol,server); if (host_ptr=gethostbyname(server)) if (protocol_ptr=getprotobyname(protocol)) if (service_ptr=getservbyname(service,protocol)) { memcpy( &sck_addr.sin_addr, host_ptr->h_addr, host_ptr->h_length); sck_addr.sin_family=host_ptr->h_addrtype; sck_addr.sin_port=service_ptr->s_port; if ((sck=socket(PF_INET,SOCK_DGRAM,protocol_ptr->p_proto))<0) perror("Cannot open socket"); if (connect(sck,&sck_addr, sizeof sck_addr)<0) perror("Cannot bind socket"); write(sck,buffer,1); resp=read(sck,buffer,BUFSIZE); printf(buffer); close(sck); } else perror("Service not found"); else perror("Protocol not found"); else perror("Host not found"); }
5 daytime service client over UDP – send and recv in place of write and read
if (connect(sck,&sck_addr, sizeof sck_addr)<0) perror("Cannot bind socket"); send(sck,buffer,1,0); resp=recv(sck,buffer,BUFSIZE,0);
6 daytime service client over UDP – without connect
sendto(sck,buffer,1,0,&sck_addr, sizeof sck_addr); sck_len=sizeof sck_addr; resp=recvfrom(sck,buffer,BUFSIZE,0,&sck_addr,&sck_len);
Distributed Operating Systems
– laboratory exercises
27
6.5.2 TCP/IP protocols servers
6.5.2.1 Connection oriented communication (stream protocol TCP)
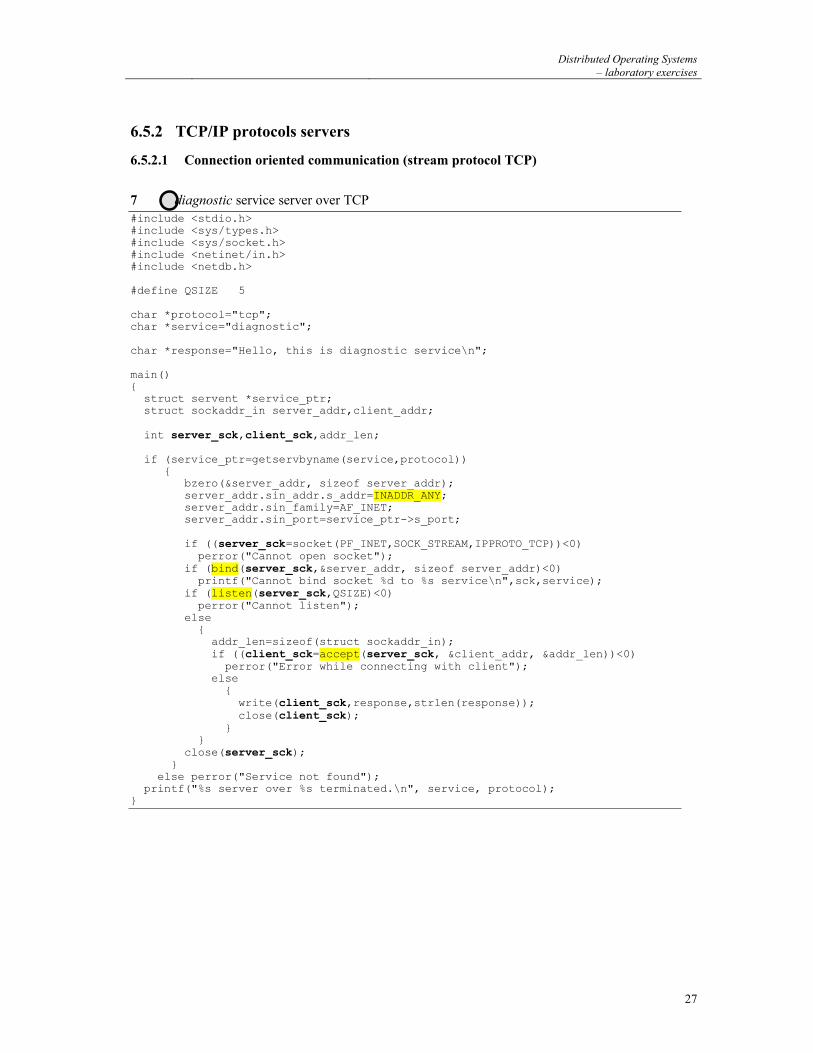
7 diagnostic service server over TCP
#include <stdio.h> #include <sys/types.h> #include <sys/socket.h> #include <netinet/in.h> #include <netdb.h> #define QSIZE 5 char *protocol="tcp"; char *service="diagnostic"; char *response="Hello, this is diagnostic service\n"; main() { struct servent *service_ptr; struct sockaddr_in server_addr,client_addr; int server_sck,client_sck,addr_len; if (service_ptr=getservbyname(service,protocol)) { bzero(&server_addr, sizeof server_addr); server_addr.sin_addr.s_addr=INADDR_ANY; server_addr.sin_family=AF_INET; server_addr.sin_port=service_ptr->s_port; if ((server_sck=socket(PF_INET,SOCK_STREAM,IPPROTO_TCP))<0) perror("Cannot open socket"); if (bind(server_sck,&server_addr, sizeof server_addr)<0) printf("Cannot bind socket %d to %s service\n",sck,service); if (listen(server_sck,QSIZE)<0) perror("Cannot listen"); else { addr_len=sizeof(struct sockaddr_in); if ((client_sck=accept(server_sck, &client_addr, &addr_len))<0) perror("Error while connecting with client"); else { write(client_sck,response,strlen(response)); close(client_sck); } } close(server_sck); } else perror("Service not found"); printf("%s server over %s terminated.\n", service, protocol); }
Distributed Operating Systems – laboratory exercises
28
data from server to client
connectionestablishing
accept()connect()
listen()
bind()
socket()
client server
close()close()
read()
read()write()
socket()
data from client to server
write()
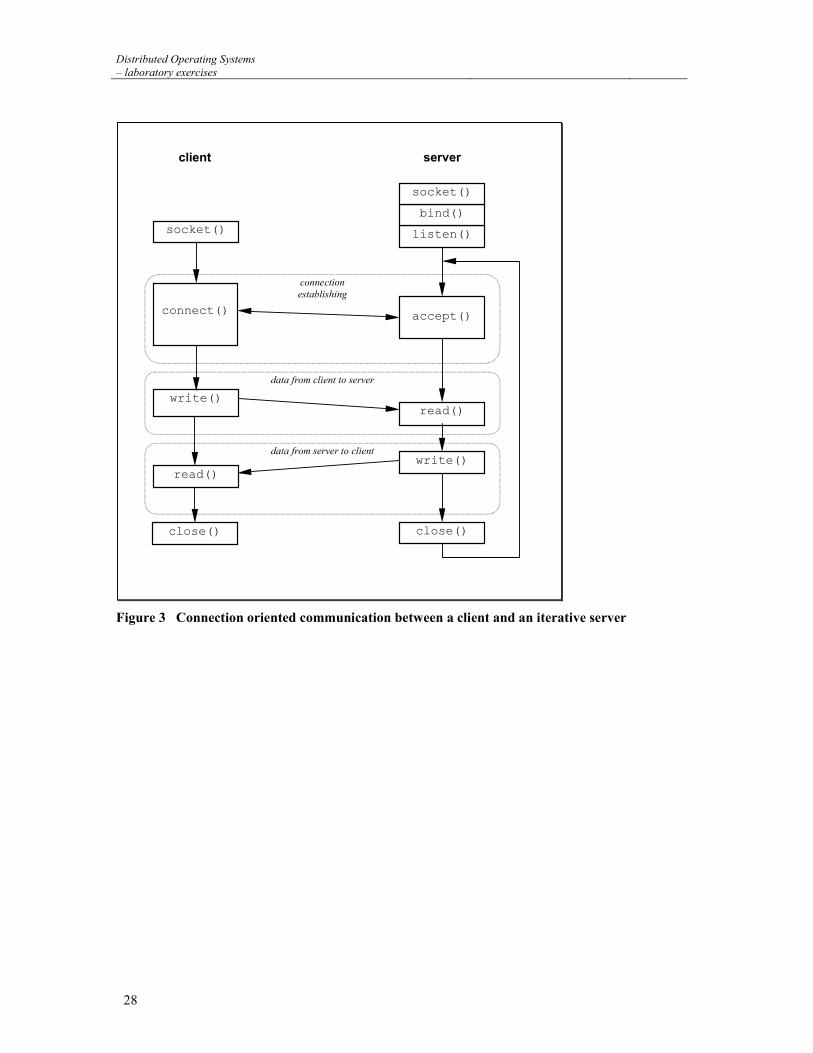
Figure 3 Connection oriented communication between a client and an iterative server
Distributed Operating Systems
– laboratory exercises
29
8 multiprocess server (concurrent)
(...) void quit() { close(server_sck); printf("%s server over %s terminated.\n", service, protocol); exit(0); } main() (...) signal(SIGINT,quit); (...) while(TRUE) { rcv_len=sizeof(struct sockaddr_in); if ((rcv_sck=accept(server_sck, &client_addr, &addr_len))<0) perror("Error while connecting with client"); else { if (fork()==0) { write(client_sck,response,strlen(response)); close(client_sck); exit(0); } close(client_sck); } } (...)
9 daytime service-like server over TCP
#include <time.h> (...) char *gettime() { time_t now; time(&now); return ctime(&now); } main() (...) response=gettime(); (...)
Distributed Operating Systems – laboratory exercises
30
6.5.2.2 Connectionless communication (datagram protocol UDP)
close()
( )
data from server to client
data from client to server
socket()
Client Server
close()
recvfrom()
recvfrom()
socket()
bind()
sendto()
bind()
sendto()
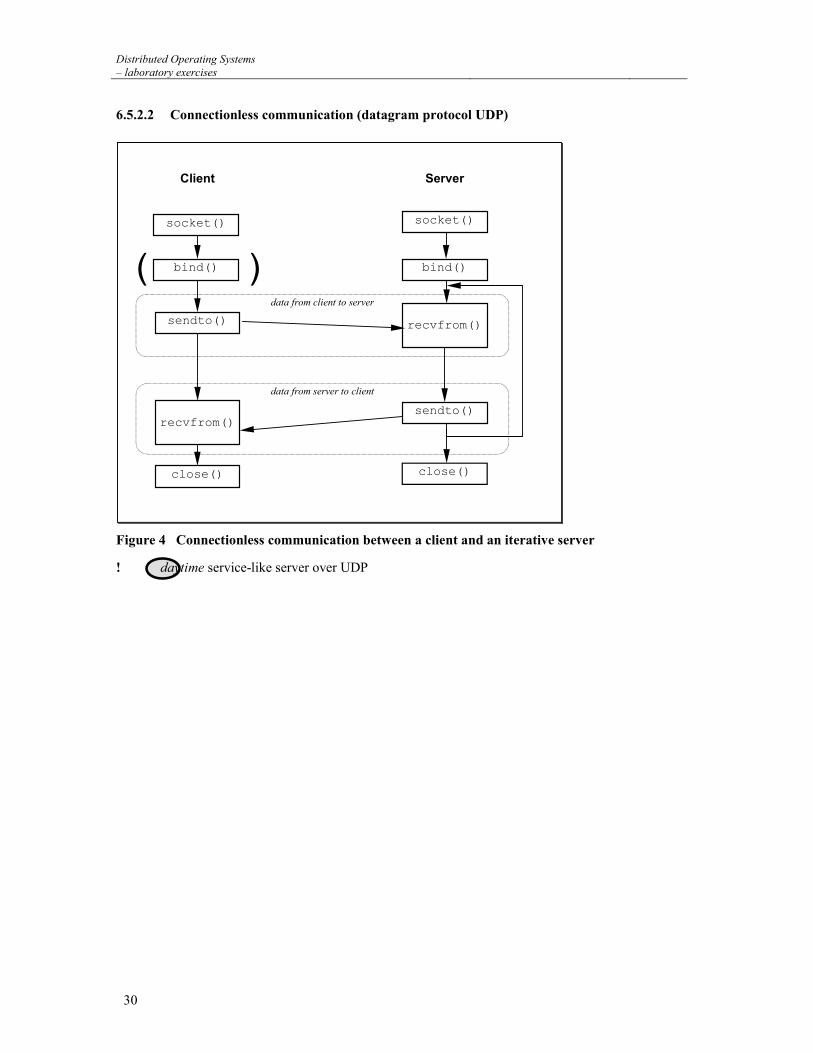
Figure 4 Connectionless communication between a client and an iterative server
! daytime service-like server over UDP
Distributed Operating Systems
– laboratory exercises
31
7 Parallel Virtual Machine*
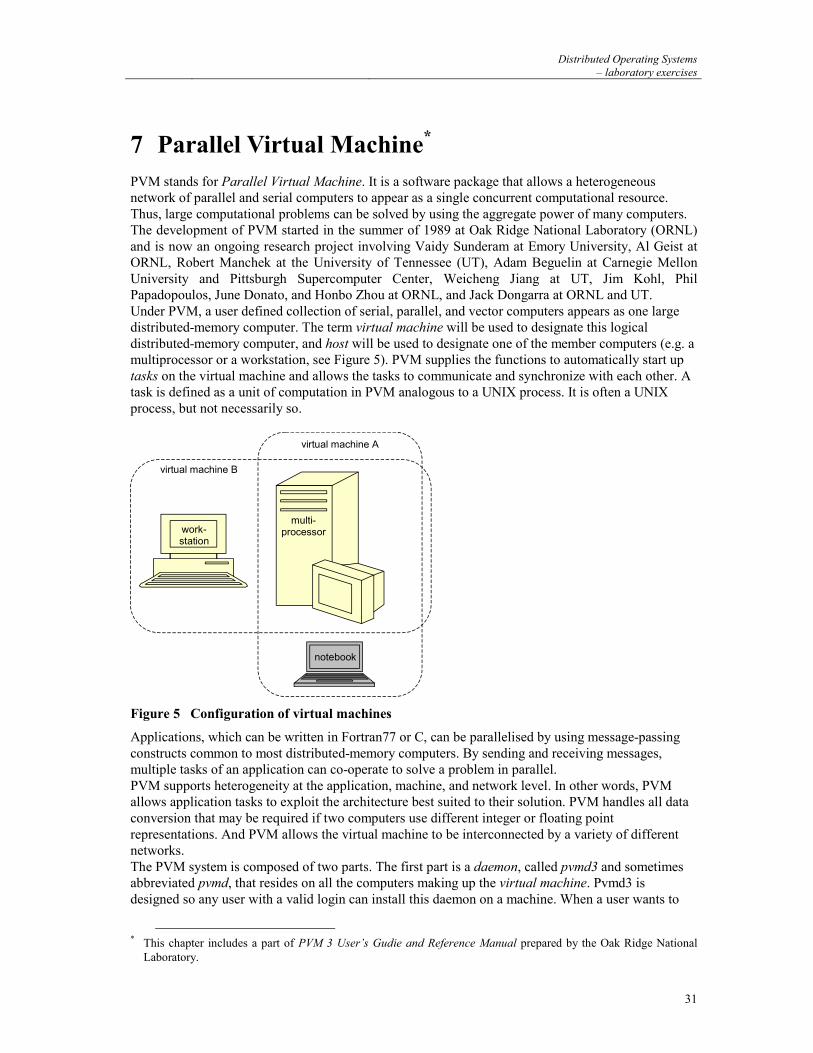
PVM stands for Parallel Virtual Machine. It is a software package that allows a heterogeneous network of parallel and serial computers to appear as a single concurrent computational resource. Thus, large computational problems can be solved by using the aggregate power of many computers. The development of PVM started in the summer of 1989 at Oak Ridge National Laboratory (ORNL) and is now an ongoing research project involving Vaidy Sunderam at Emory University, Al Geist at ORNL, Robert Manchek at the University of Tennessee (UT), Adam Beguelin at Carnegie Mellon University and Pittsburgh Supercomputer Center, Weicheng Jiang at UT, Jim Kohl, Phil Papadopoulos, June Donato, and Honbo Zhou at ORNL, and Jack Dongarra at ORNL and UT. Under PVM, a user defined collection of serial, parallel, and vector computers appears as one large distributed-memory computer. The term virtual machine will be used to designate this logical distributed-memory computer, and host will be used to designate one of the member computers (e.g. a multiprocessor or a workstation, see Figure 5). PVM supplies the functions to automatically start up tasks on the virtual machine and allows the tasks to communicate and synchronize with each other. A task is defined as a unit of computation in PVM analogous to a UNIX process. It is often a UNIX process, but not necessarily so.
virtual machine B
virtual machine A
work-station
notebook
multi-processor
Figure 5 Configuration of virtual machines
Applications, which can be written in Fortran77 or C, can be parallelised by using message-passing constructs common to most distributed-memory computers. By sending and receiving messages, multiple tasks of an application can co-operate to solve a problem in parallel. PVM supports heterogeneity at the application, machine, and network level. In other words, PVM allows application tasks to exploit the architecture best suited to their solution. PVM handles all data conversion that may be required if two computers use different integer or floating point representations. And PVM allows the virtual machine to be interconnected by a variety of different networks. The PVM system is composed of two parts. The first part is a daemon, called pvmd3 and sometimes abbreviated pvmd, that resides on all the computers making up the virtual machine. Pvmd3 is designed so any user with a valid login can install this daemon on a machine. When a user wants to
* This chapter includes a part of PVM 3 User’s Gudie and Reference Manual prepared by the Oak Ridge National
Laboratory.
Distributed Operating Systems – laboratory exercises
32
run a PVM application, he first creates a virtual machine by starting up PVM. The PVM application can then be started from a UNIX prompt on any of the hosts. Multiple users can configure overlapping virtual machines, and each user can execute several PVM applications simultaneously. The second part of the system is a library of PVM interface routines (libpvm3.a). This library contains user callable routines for message passing, spawning processes, co-ordinating tasks, and modifying the virtual machine. Application programs must be linked with this library to use PVM.
7.1 Using PVM
This section explains how to use PVM. It includes the following issues: configuring a virtual machine, compiling PVM programs, and running PVM programs. It starts with the PVM console, that simplifies configuring virtual machine and running application as well as checking (to some extent) influencing the execution.
7.1.1 PVM Console The PVM console, called pvm, is a stand alone PVM task which allows the user to interactively start, query and modify the virtual machine. The console may be started and stopped multiple times on any of the hosts in the virtual machine without affecting PVM or any applications that may be running. When started, pvm determines if PVM is already running and if not automatically executes pvmd on this host, passing pvmd the command line options and hostfile. Thus PVM need not be running to start the console. pvm [-n<hostname>] [hostfile]
The -n option is useful for specifying an alternate name for the master pvmd (in case hostname doesn't match the IP address you want). This is useful if a host has a multiple networks connected to it such as FDDI or ATM, and you want PVM to use a particular network. Once started the console prints the prompt: pvm>
and accepts commands from standard input. The available console commands are: add — followed by one or more host names will add these hosts to the virtual machine. alias — define or list command aliases. conf — lists the configuration of the virtual machine including hostname, pvmd task ID, architecture type, and a relative speed rating. delete— followed by one or more host names deletes these hosts. PVM processes still running on these hosts are lost. echo — echo arguments. halt — kills all PVM processes including console and then shuts down PVM. All daemons exit. help — which can be used to get information about any of the interactive commands. Help may be followed by a command name which will list options and flags available for this command. id — print console task id. jobs — list running jobs. kill — can be used to terminate any PVM process, mstat — show status of specified hosts. ps –a — lists all processes currently on the virtual machine, their locations, their task IDs, and their parents' task IDs. pstat — show status of a single PVM process. quit — exit console leaving daemons and PVM jobs running. reset — kills all PVM processes except consoles and resets all the internal PVM tables and message queues. The daemons are left in an idle state. setenv— display or set environment variables.
Distributed Operating Systems
– laboratory exercises
33
sig — followed by a signal number and tid, sends the signal to the task. spawn — start a PVM application. Options include: -count — number of tasks, default is 1. -(host) — spawn on host, default is any. -(PVM_ARCH) — spawn of hosts of type PVM_ARCH. -? — enable debugging. -> — redirect task output to console. ->file — redirect task output to file. ->>file — redirect task output append to file. unalias — undefine command alias. version — print version of libpvm being used. The console reads $HOME/.pvmrc before reading commands from the tty, so you can do things like: alias ? help alias h help alias j jobs setenv PVM_EXPORT DISPLAY # print my id echo new pvm shell id
The two most popular methods of running PVM 3 are to start pvm then add hosts manually (pvm also accepts an optional hostfile argument) or to start pvmd3 with a hostfile then start pvm if desired. To shut down PVM type halt at a PVM console prompt.
7.1.2 Host File Options The hostfile defines the initial configuration of hosts that PVM combines into a virtual machine. It also contains information about hosts that the user may wish to add to the configuration later. Only one person at a site needs to install PVM, but each PVM user should have their own hostfile, which describes their own personal virtual machine. The hostfile in its simplest form is just a list of hostnames one to a line. Blank lines are ignored, and lines that begin with a # are comment lines. This allows the user to document his hostfile and also provides a handy way to modify the initial configuration by commenting out various hostnames (see Figure 1). Several options can be specified on each line after the hostname. The options are separated by white space. lo=userid allows the user to specify an alternate login name for this host; otherwise, his login name on the start-up machine is used. so=pw will cause PVM to prompt the user for a password on this host. This is useful in the cases where the user has a different userid and password on a remote system. PVM uses rsh by default to start up remote pvmd's, but when pw is specified PVM will use rexec() instead. dx=location_of_pvmd allows the user to specify a location other than the default for this host. This is useful if someone wants to use his own personal copy of pvmd, ep=paths_to_user_executables allows the user to specify a series of paths to search down to find the requested files to spawn on this host. Multiple paths are separated by a colon. If ep is not specified, then PVM looks for the application tasks in $HOME/pvm3/bin/PVM ARCH. sp=value specifies the relative computational speed of the host compared to other hosts in the configuration. The range of possible values is 1 to 1000000 with 1000 as the default. bx=location_of_debugger specifies which debugger script to invoke on this host if debugging is requested in the spawn routine. Note: the environment variable PVM DEBUGGER can also be set. The default debugger is pvm3/lib/debugger. wd=working_directory specifies a working directory in which all spawned tasks on this host will execute. The default is $HOME.
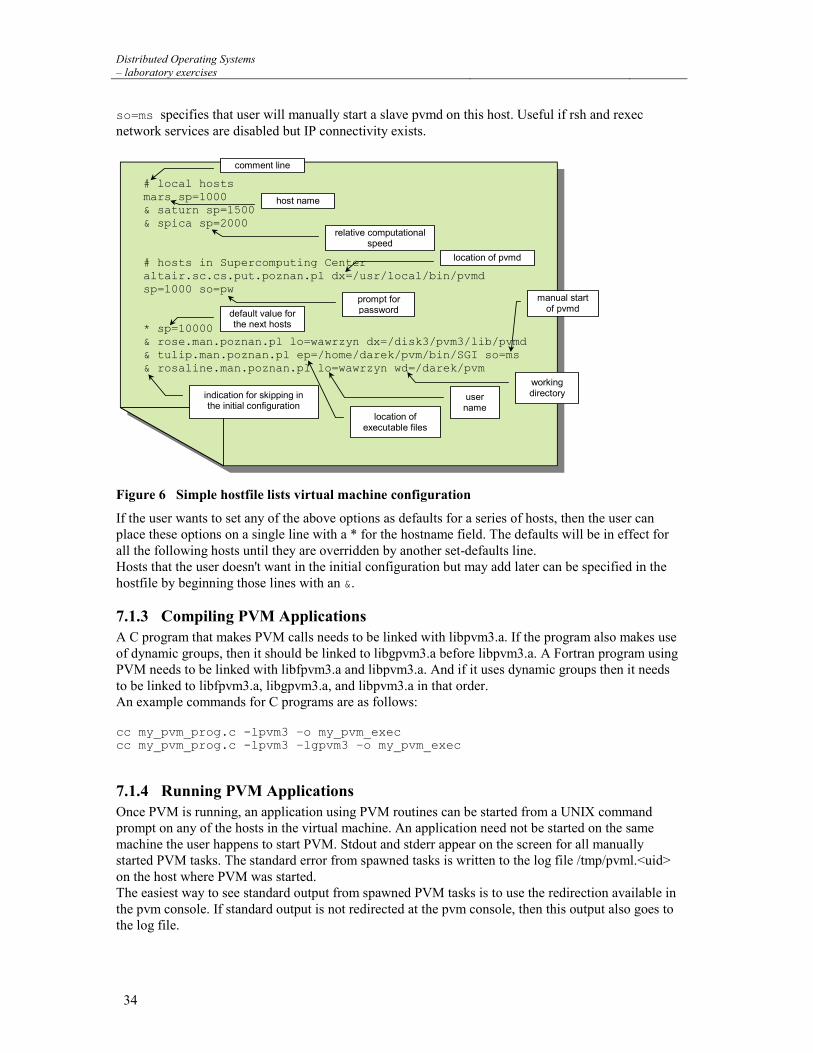
Distributed Operating Systems – laboratory exercises
34
so=ms specifies that user will manually start a slave pvmd on this host. Useful if rsh and rexec network services are disabled but IP connectivity exists.
# local hostsmars sp=1000& saturn sp=1500& spica sp=2000
# hosts in Supercomputing Centeraltair.sc.cs.put.poznan.pl dx=/usr/local/bin/pvmdsp=1000 so=pw
* sp=10000& rose.man.poznan.pl lo=wawrzyn dx=/disk3/pvm3/lib/pvmd& tulip.man.poznan.pl ep=/home/darek/pvm/bin/SGI so=ms& rosaline.man.poznan.pl lo=wawrzyn wd=/darek/pvm
comment line
host name
relative computationalspeed
default value forthe next hosts
workingdirectory
location of pvmd
indication for skipping inthe initial configuration
username
location ofexecutable files
prompt forpassword
manual startof pvmd
Figure 6 Simple hostfile lists virtual machine configuration
If the user wants to set any of the above options as defaults for a series of hosts, then the user can place these options on a single line with a * for the hostname field. The defaults will be in effect for all the following hosts until they are overridden by another set-defaults line. Hosts that the user doesn't want in the initial configuration but may add later can be specified in the hostfile by beginning those lines with an &.
7.1.3 Compiling PVM Applications A C program that makes PVM calls needs to be linked with libpvm3.a. If the program also makes use of dynamic groups, then it should be linked to libgpvm3.a before libpvm3.a. A Fortran program using PVM needs to be linked with libfpvm3.a and libpvm3.a. And if it uses dynamic groups then it needs to be linked to libfpvm3.a, libgpvm3.a, and libpvm3.a in that order. An example commands for C programs are as follows: cc my_pvm_prog.c -lpvm3 –o my_pvm_exec cc my_pvm_prog.c -lpvm3 –lgpvm3 –o my_pvm_exec
7.1.4 Running PVM Applications Once PVM is running, an application using PVM routines can be started from a UNIX command prompt on any of the hosts in the virtual machine. An application need not be started on the same machine the user happens to start PVM. Stdout and stderr appear on the screen for all manually started PVM tasks. The standard error from spawned tasks is written to the log file /tmp/pvml.<uid> on the host where PVM was started. The easiest way to see standard output from spawned PVM tasks is to use the redirection available in the pvm console. If standard output is not redirected at the pvm console, then this output also goes to the log file.
Distributed Operating Systems
– laboratory exercises
35
7.2 User Interface
In this section we give a brief description of the routines in the PVM 3.3 user library. This section is organised by the functions of the routines. For example, in the subsection on Dynamic Configuration (subsection 7.2.3, page 36) is a discussion of the purpose of dynamic configuration, how a user might take advantage of this functionality, and the C PVM routines that pertain to this function. In PVM 3 all PVM tasks are identified by an integer supplied by the local pvmd. In the following descriptions this identifier is called tid. It is similar to the process ID (PID) used in the UNIX system except the tid has encoded in it the location of the process in the virtual machine. This encoding allows for more efficient communication routing, and allows for more efficient integration into multiprocessors. All the PVM routines are written in C. C++ applications can link to the PVM library. Fortran applications can call these routines through a Fortran 77 interface supplied with the PVM 3 source. This interface translates arguments, which are passed by reference in Fortran, to their values if needed by the underlying C routines.
7.2.1 Process Control int tid = pvm_mytid(void)
The routine pvm_mytid enrolls this process into PVM on its first call and generates a unique tid if the process was not started with pvm_spawn. It returns the tid of this process and can be called multiple times. Any PVM system call (not just pvm_mytid) will enroll a task in PVM if the task is not enrolled before the call. int info = pvm_exit(void)
The routine pvm_exit tells the local pvmd that this process is leaving PVM. This routine does not kill the process, which can continue to perform tasks just like any other UNIX process. int numt = pvm_spawn(char *task, char **argv, int flag, char *where, int ntask, int *tids)
The routine pvm_spawn starts up ntask copies of an executable file task on the virtual machine. argv is a pointer to an array of arguments to task with the end of the array specified by NULL. If task takes no arguments then argv is NULL. The flag argument is used to specify options, and is a sum of PvmTaskDefault — PVM chooses where to spawn processes, PvmTaskHost — the where argument specifies a particular host to spawn on, PvmTaskArch — the where argument specifies a PVM_ARCH to spawn on, PvmTaskDebug — starts these processes up under debugger, PvmTaskTrace — the PVM calls in these processes will generate trace data. PvmMppFront — starts process up on MPP front-end/service node. PvmHostCompl — starts process up on complement host set. PvmTaskTrace is a new feature in PVM 3.3. To display the events, a graphical interface, called XPVM has been created. XPVM combines the features of the PVM console, the Xab debugging package, and ParaGraph to display real-time or post mortem executions. On return numt is set to the number of tasks successfully spawned or an error code if no tasks could be started. If tasks were started, then pvm_spawn returns a vector of the spawned tasks' tids and if some tasks could not be started, the corresponding error codes are placed in the last ntask - numt positions of the vector. int info = pvm_kill(int tid)
The routine pvm_kill kills some other PVM task identified by tid. This routine is not designed to kill the calling task, which should be accomplished by calling pvm_exit followed by exit.
7.2.2 Information int tid = pvm_parent(void)
The routine pvm_parent returns the tid of the process that spawned this task or the value of
Distributed Operating Systems – laboratory exercises
36
PvmNoParent if not created by pvm_spawn. int pstat = pvm_pstat(int tid)
The routine pvm_pstat returns the status of a PVM task identified by tid. It returns PvmOk if the task is running, PvmNoTask if not, or PvmBadParam if tid is invalid. int mstat = pvm_mstat(char *host)
The routine pvm_mstat returns PvmOk if host is running, PvmHostFail if unreachable, or PvmNoHost if host is not in the virtual machine. This information can be useful when implementing application level fault tolerance. int info = pvm_config(int *nhost, int *narch, struct pvmhostinfo **hostp)
The routine pvm_config returns information about the virtual machine including the number of hosts, nhost, and the number of different data formats, narch. hostp is a pointer to an array of pvmhostinfo structures. The array is of size nhost. Each pvmhostinfo structure contains the pvmd tid, host name, name of the architecture, and relative CPU speed for that host in the configuration. PVM does not use or determine the speed value. The user can set this value in the hostfile and retrieve it with pvm_config to use in an application. int info = pvm_tasks(int which, int *ntask, struct pvmtaskinfo **taskp)
The routine pvm_tasks returns information about the PVM tasks running on the virtual machine. The integer which specifies which tasks to return information about. The present options are (0), which means all tasks, a pvmd tid, which means tasks running on that host, or a tid, which means just the given task. The number of tasks is returned in ntask. taskp is a pointer to an array of pvmtaskinfo structures. The array is of size ntask. Each taskinfo structure contains the tid, pvmd tid, parent tid, a status flag, and the spawned file name. (PVM doesn't know the file name of manually started tasks). int dtid = pvm_tidtohost(int tid)
If all a user needs to know is what host a task is running on, then pvm_tidtohost can return this information.
7.2.3 Dynamic Configuration int info = pvm_addhosts(char **hosts, int nhost, int *infos) int info = pvm_delhosts(char **hosts, int nhost, int *infos)
The C routines add or delete a set of hosts in the virtual machine. info is returned as the number of hosts successfully added. The argument infos is an array of length nhost that contains the status code for each individual host being added or deleted. This allows the user to check if only one of a set of hosts caused a problem rather than trying to add or delete the entire set of hosts again.
7.2.4 Signaling int info = pvm_sendsig(int tid, int signum)
pvm_sendsig sends a signal signum to another PVM task identified by tid. int info = pvm_notify(int what, int msgtag, int ntask, int *tids)
The routine pvm_notify requests PVM to notify the caller on detecting certain events. The present options are: PvmTaskExit — notify if a task exits. PvmHostDelete — notify if a host is deleted (or fails). PvmHostAdd — notify if a host is added. In response to a notify request, some number of messages are sent by PVM back to the calling task. The messages are tagged with the code (msgtag) supplied to notify. The tids array specifies who to monitor when using TaskExit or HostDelete. The array contains nothing when using HostAdd. Outstanding notifies are consumed by each notification. For example, a HostAdd notification will need to be followed by another call to pvm_notify if this task is to be notified of further hosts being added. If required, the routines pvm_config and pvm_tasks can be used to obtain task and pvmd tids. If the host on which task A is running fails, and task B has asked to be notified if task A exits, then task B will be notified even though the exit was caused indirectly.
Distributed Operating Systems
– laboratory exercises
37
7.2.5 Setting and Getting Options int oldval = pvm_setopt(int what, int val) int val = pvm_getopt(int what)
The routines pvm_setopt and pvm_getopt are a general purpose function to allow the user to set or get options in the PVM system. In PVM 3 pvm_setopt can be used to set several options including: automatic error message printing, debugging level, and communication routing method for all subsequent PVM calls. pvm_setopt returns the previous value of set in oldval. The PVM 3.3 what can take have the following values: PvmRoute (1) — message routing policy, PvmDebugMask (2) — debugmask, PvmAutoErr (3) — auto error reporting, PvmOutputTid (4) — stdout device for children, PvmOutputCode (5) — output msgtag, PvmTraceTid (6) — trace device for children, PvmTraceCode (7) — trace msgtag, PvmFragSize (8) — message fragment size, PvmResvTids (9) — allow messages to be sent to reserved tags and tids. pvm_setopt can set several communication options inside of PVM such as routing method or fragment sizes to use. It can be called multiple times during an application to selectively set up direct task-to-task communication links.
7.2.6 Message Passing Sending a message is composed of three steps in PVM. First, a send buffer must be initialised by a call to pvm_initsend or pvm_mkbuf. Second, the message must be “packed” into this buffer using any number and combination of pvm_pk* routines. Third, the completed message is sent to another process by calling the pvm_send routine or multicast with the pvm_mcast routine. In addition there are collective communication functions that operate over an entire group of tasks, for example, broadcast and scatter/gather. PVM also supplies the routine, pvm_psend, which combines the three steps into a single call. This allows for the possibility of faster internal implementations, particularly by MPP vendors. pvm_psend only packs and sends a contiguous array of a single data type. pvm_psend uses its own send buffer and thus doesn't affect a partially packed buffer to be used by pvm_send. A message is received by calling either a blocking or non-blocking receive routine and then “unpacking” each of the packed items from the receive buffer. The receive routines can be set to accept ANY message, or any message from a specified source, or any message with a specified message tag, or only messages with a given message tag from a given source. There is also a probe function that returns whether a message has arrived, but does not actually receive it. PVM also supplies the routine, pvm_precv, which combines a blocking receive and unpack call. Like pvm_psend, pvm_precv is restricted to a contiguous array of a single data type. Between tasks running on an MPP such as the Paragon or T3D the user should receive a pvm_psend with a pvm_precv. This restriction was done because much faster MPP implementations are possible when pvm_psend and pvm_precv are matched. The restriction is only required within a MPP. When communication is between hosts, pvm_precv can receive messages sent with pvm_psend, pvm_send, pvm_mcast, or pvm_bcast. Conversely, pvm_psend can be received by any of the PVM receive routines. If required, more general receive contexts can be handled by PVM 3. The routine pvm_recvf allows users to define their own receive contexts that will be used by the subsequent PVM receive routines.
7.2.6.1 Message Buffers
The following message buffer routines are required only if the user wishes to manage multiple message buffers inside an application. Multiple message buffers are not required for most message passing between processes. In PVM 3 there is one active send buffer and one active receive buffer per
Distributed Operating Systems – laboratory exercises
38
process at any given moment. The developer may create any number of message buffers and switch between them for the packing and sending of data. The packing, sending, receiving, and unpacking routines only affect the active buffers. int bufid = pvm_mkbuf(int encoding)
The routine pvm_mkbuf creates a new empty send buffer and specifies the encoding method used for packing messages. It returns a buffer identifier bufid. The encoding options are: PvmDataDefault — XDR encoding is used by default because PVM can not know if the user is going to add a heterogeneous machine before this message is sent. If the user knows that the next message will only be sent to a machine that understands the native format, then he can use PvmDataRaw encoding and save on encoding costs. PvmDataRaw — no encoding is done. Messages are sent in their original format. If the receiving process can not read this format, then it will return an error during unpacking. PvmDataInPlace — data left in place. Buffer only contains sizes and pointers to the items to be sent. When pvm_send is called the items are copied directly out of the user's memory. This option decreases the number of times the message is copied at the expense of requiring the user to not modify the items between the time they are packed and the time they are sent. Another use of this option would be to call pack once and modify and send certain items (arrays) multiple times during an application. An example would be passing of boundary regions in a discretized PDE implementation. int bufid = pvm_initsend(int encoding)
The routine pvm_initsend clears the send buffer and creates a new one for packing a new message. The encoding scheme used for this packing is set by encoding. The new buffer identifier is returned in bufid. If the user is only using a single send buffer then pvm_initsend must be called before packing a new message into the buffer, otherwise the existing message will be appended. int info = pvm_freebuf(int bufid)
The routine pvm_freebuf disposes of the buffer with identifier bufid. This should be done after a message has been sent and is no longer needed. Call pvm_mkbuf to create a buffer for a new message if required. Neither of these calls is required when using pvm_initsend, which performs these functions for the user. int bufid = pvm_getsbuf(void)
pvm_getsbuf returns the active send buffer identifier. int bufid = pvm_getrbuf(void)
pvm_getrbuf returns the active receive buffer identifier. int oldbuf = pvm_setsbuf(int bufid)
This routine sets the active send buffer to bufid, saves the state of the previous buffer, and returns the previous active buffer identifier oldbuf. int oldbuf = pvm_setrbuf(int bufid)
This routine sets the active receive buffer to bufid, saves the state of the previous buffer, and returns the previous active buffer identifier oldbuf. If bufid is set to 0 in pvm_setsbuf or pvm_setrbuf then the present buffer is saved and there is no active buffer. This feature can be used to save the present state of an application's messages so that a math library or graphical interface which also use PVM messages will not interfere with the state of the application's buffers. After they complete, the application's buffers can be reset to active. It is possible to forward messages without repacking them by using the message buffer routines. This is illustrated by the following fragment. bufid = pvm_recv(src, tag); oldid = pvm_setsbuf(bufid); info = pvm_send(dst, tag); info = pvm_freebuf(oldid);
7.2.6.2 Packing Data
Each of the following C routines packs an array of the given data type into the active send buffer. They can be called multiple times to pack a single message. Thus a message can contain several arrays each with a different data type. There is no limit to the complexity of the packed messages, but an application should unpack the messages exactly like they were packed. C structures must be passed
Distributed Operating Systems
– laboratory exercises
39
by packing their individual elements. The arguments for each of the routines are a pointer to the first item to be packed, nitem which is the total number of items to pack from this array, and stride which is the stride to use when packing. An exception is pvm_pkstr which by definition packs a NULL terminated character string and thus does not need nitem or stride arguments. int info = pvm_pkbyte(char *cp, int nitem, int stride) int info = pvm_pkcplx(float *xp, int nitem, int stride) int info = pvm_pkdcplx(double *zp, int nitem, int stride) int info = pvm_pkdouble(double *dp, int nitem, int stride) int info = pvm_pkfloat(float *fp, int nitem, int stride) int info = pvm_pkint(int *np, int nitem, int stride) int info = pvm_pklong(long *np, int nitem, int stride) int info = pvm_pkshort(short *np, int nitem, int stride) int info = pvm_pkuint(unsigned int *np, int nitem, int stride) int info = pvm_pkushort(unsigned short *np, int nitem, int stride) int info = pvm_pkulong(unsigned long *np, int nitem, int stride) int info = pvm_pkstr(char *cp) int info = pvm_packf(const char *fmt, ...)
PVM also supplies a packing routine pvm_packf that uses a printf-like format expression to specify what and how to pack data into the send buffer. All variables are passed as addresses if nitem and stride are specified; otherwise, variables are assumed to be values.
7.2.6.3 Sending and Receiving Data
int info = pvm_send(int tid, int msgtag)
The routine pvm_send labels the message with an integer identifier msgtag and sends it immediately to the process tid. int info = pvm_mcast(int *tids, int ntask, int msgtag)
The routine pvm_mcast labels the message with an integer identifier msgtag and broadcasts the message to all tasks specified in the integer array tids (except itself). The tids array is of length ntask. int info = pvm_psend(int tid, int msgtag, void *vp, int cnt, int type)
The routine pvm_psend packs and sends an array of the specified datatype to the task identified by tid. In C the type argument can be any of the following: PVM_STR, PVM_FLOAT, PVM_BYTE, PVM_CPLX, PVM_SHORT, PVM_DOUBLE, PVM_INT, PVM_DCPLX, PVM_LONG, PVM_DCPLX, PVM_USHORT, PVM_UINT, PVM_ULONG. These names are defined in pvm3/include/pvm3.h. int bufid = pvm_recv(int tid, int msgtag)
This blocking receive routine will wait until a message with label msgtag has arrived from tid. A value of -1 in msgtag or tid matches anything (wildcard). It then places the message in a new active receive buffer that is created. The previous active receive buffer is cleared unless it has been saved with a pvm_setrbuf call. int bufid = pvm_nrecv(int tid, int msgtag)
If the requested message has not arrived, then the non-blocking receive pvm_nrecv returns bufid = 0. This routine can be called multiple times for the same message to check if it has arrived while performing useful work between calls. When no more useful work can be performed the blocking receive pvm_recv can be called for the same message. If a message with label msgtag has arrived from tid, pvm_nrecv places this message in a new active receive buffer which it creates and returns the ID of this buffer. The previous active receive buffer is cleared unless it has been saved with a pvm_setrbuf call. A value of -1 in msgtag or tid matches anything (wildcard). int bufid = pvm_probe(int tid, int msgtag)
If the requested message has not arrived, then pvm_probe returns bufid = 0. Otherwise, it returns a bufid for the message, but does not “receive” it. This routine can be called multiple times for the same message to check if it has arrived while performing useful work between calls. In addition pvm_bufinfo can be called with the returned bufid to determine information about the message before receiving it. int info = pvm_bufinfo(int bufid, int *bytes, int *msgtag, int *tid)
The routine pvm_bufinfo returns msgtag, source tid, and length in bytes of the message identified
Distributed Operating Systems – laboratory exercises
40
by bufid. It can be used to determine the label and source of a message that was received with wildcards specified. int bufid = pvm_trecv(int tid, int msgtag, struct timeval *tmout)
PVM also supplies a timeout version of receive. Consider the case where a message is never going to arrive (due to error or failure). The routine pvm_recv would block forever. There are times when the user wants to give up after waiting for a fixed amount of time. The routine pvm_trecv allows the user to specify a timeout period. If the timeout period is set very large then pvm_trecv acts like pvm_recv. If the timeout period is set to zero then pvm_trecv acts like pvm_nrecv. Thus, pvm_trecv fills the gap between the blocking and nonblocking receive functions. int info = pvm_precv(int tid, int msgtag, void *buf, int len, int datatype, int *atid, int *atag, int *alen)
The routine pvm_precv combines the functions of a blocking receive and unpacking the received buffer. It does not return a bufid. Instead, it returns the actual values of tid, msgtag, and len in atid, atag, alen respectively. int (*old)() = pvm_recvf(int (*new)(int buf, int tid, int tag))
The routine pvm_recvf modifies the receive context used by the receive functions and can be used to extend PVM. The default receive context is to match on source and message tag. This can be modified to any user defined comparison function.
7.2.6.4 Unpacking Data
The following C routines unpack (multiple) data types from the active receive buffer. In an application they should match their corresponding pack routines in type, number of items, and stride. nitem is the number of items of the given type to unpack, and stride is the stride. int info = pvm_upkbyte(char *cp, int nitem, int stride) int info = pvm_upkcplx(float *xp, int nitem, int stride) int info = pvm_upkdcplx(double *zp, int nitem, int stride) int info = pvm_upkdouble(double *dp, int nitem, int stride) int info = pvm_upkfloat(float *fp, int nitem, int stride) int info = pvm_upkint(int *np, int nitem, int stride) int info = pvm_upklong(long *np, int nitem, int stride) int info = pvm_upkshort(short *np, int nitem, int stride) int info = pvm_upkuint(unsigned int *np, int nitem, int stride) int info = pvm_upkushort(unsigned short *np, int nitem, int stride) int info = pvm_upkulong(unsigned long *np, int nitem, int stride) int info = pvm_upkstr(char *cp) int info = pvm_unpackf(const char *fmt, ...)
The routine pvm_unpackf uses a printf-like format expression to specify what and how to unpack data from the receive buffer. The argument xp is the array to be unpacked into. The integer argument what specifies the type of data to be unpacked.
7.3 Dynamic Process Groups
The dynamic process group functions are built on top of the core PVM routines. There is a separate library libgpvm3.a that must be linked with user programs that make use of any of the group functions. The pvmd does not perform the group functions. This is handled by a group server that is automatically started when the first group function is invoked. There is some debate about how groups should be handled in a message passing interface. There are efficiency and reliability issues. There are tradeoffs between static verses dynamic groups. And some people argue that only tasks in a group can call group functions. In keeping with the PVM philosophy, the group functions are designed to be very general and transparent to the user at some cost in efficiency. Any PVM task can join or leave any group at any time without having to inform any other task in the affected groups. Tasks can broadcast messages to groups of which they are not a member. And in general any PVM task may call any of the following group functions at any time. The exceptions are pvm_lvgroup, pvm_barrier, and pvm_reduce which by their nature require the calling task to be a member of the specified group.
Distributed Operating Systems
– laboratory exercises
41
int inum = pvm_joingroup(char *group) int info = pvm_lvgroup(char *group)
These routines allow a task to join or leave a user named group. The first call to pvm_joingroup creates a group with name group and puts the calling task in this group. pvm_joingroup returns the instance number (inum) of the process in this group. Instance numbers run from 0 to the number of group members minus 1. In PVM 3 a task can join multiple groups. If a process leaves a group and then rejoins it that process may receive a different instance number. Instance numbers are recycled so a task joining a group will get the lowest available instance number. But if multiple tasks are joining a group there is no guarantee that a task will be assigned its previous instance number. To assist the user in maintaining a contiguous set of instance numbers despite joining and leaving, the pvm_lvgroup function does not return until the task is confirmed to have left. A pvm_joingroup called after this return will assign the vacant instance number to the new task. It is the users responsibility to maintain a contiguous set of instance numbers if his algorithm requires it. If several tasks leave a group and no tasks join, then there will be gaps in the instance numbers. int tid = pvm_gettid(char *group, int inum)
The routine pvm_gettid returns the tid of the process with a given group name and instance number. pvm_gettid allows two tasks with no knowledge of each other to get each other's tid simply by joining a common group. int inum = pvm_getinst(char *group, int tid)
The routine pvm_getinst returns the instance number of tid in the specified group. int size = pvm_gsize(char *group)
The routine pvm_gsize returns the number of members in the specified group. int info = pvm_barrier(char *group, int count)
On calling pvm_barrier the process blocks until count members of a group have called pvm_barrier. In general count should be the total number of members of the group. A count is required because with dynamic process groups PVM can not know how many members are in a group at a given instant. It is an error for processes to call pvm_barrier with a group it is not a member of. It is also an error if the count arguments across a given barrier call do not match. For example it is an error if one member of a group calls pvm_barrier with a count of 4, and another member calls pvm_barrier with a count of 5. int info = pvm_bcast(char *group, int msgtag)
pvm_bcast labels the message with an integer identifier msgtag and broadcasts the message to all tasks in the specified group except itself (if it is a member of the group). For pvm_bcast “all tasks” is defined to be those tasks the group server thinks are in the group when the routine is called. If tasks join the group during a broadcast they may not receive the message. If tasks leave the group during a broadcast a copy of the message will still be sent to them. int info = pvm_reduce(void (*func)(), void *data, int nitem, int datatype, int msgtag, char *group, int root)
pvm_reduce performs a global arithmetic operation across the group, for example, global sum or global max. The result of the reduction operation is returned on root. PVM supplies four predefined functions that the user can place in func. These are: PvmMax, PvmMin, PvmSum, PvmProduct. The reduction operation is performed element-wise on the input data. For example, if the data array contains two floating point numbers and func is PvmMax, then the result contains two numbers — the global maximum of each group member's first number and the global maximum of each member's second number. In addition users can define their own global operation function to place in func.
7.4 Examples in C
This section contains two example programs each illustrating a different way to organise applications in PVM 3. The examples have been purposely kept simple to make them easy to understand and explain. Each of the programs is presented in both C and Fortran for a total of four listings. The first example is a master/slave model with communication between slaves. The second example is a single program multiple data (SPMD) model.
Distributed Operating Systems – laboratory exercises
42
In a master/slave model the master program spawns and directs some number of slave programs which perform computations. PVM is not restricted to this model. For example, any PVM task can initiate processes on other machines. But a master/slave model is a useful programming paradigm and simple to illustrate. The master calls pvm_mytid, which as the first PVM call, enrolls this task in the PVM system. It then calls pvm_spawn to execute a given number of slave programs on other machines in PVM. The master program contains an example of broadcasting messages in PVM. The master broadcasts to the slaves the number of slaves started and a list of all the slave tids. Each slave program calls pvm_mytid to determine their task ID in the virtual machine, then uses the data broadcast from the master to create a unique ordering from 0 to nproc minus 1. Subsequently, pvm_send and pvm_recv are used to pass messages between processes. When finished, all PVM programs call pvm_exit to allow PVM to disconnect any sockets to the processes, flush I/O buffers, and to allow PVM to keep track of which processes are running. In the SPMD model there is only a single program, and there is no master program directing the computation. Such programs are sometimes called hostless programs. There is still the issue of getting all the processes initially started. In example 2 the user starts the first copy of the program. By checking pvm_parent, this copy can determine that it was not spawned by PVM and thus must be the first copy. It then spawns multiple copies of itself and passes them the array of tids. At this point each copy is equal and can work on its partition of the data in collaboration with the other processes. Using pvm_parent precludes starting the SPMD program from the PVM console because pvm_parent will return the tid of the console. This type of SPMD program must be started from a UNIX prompt.
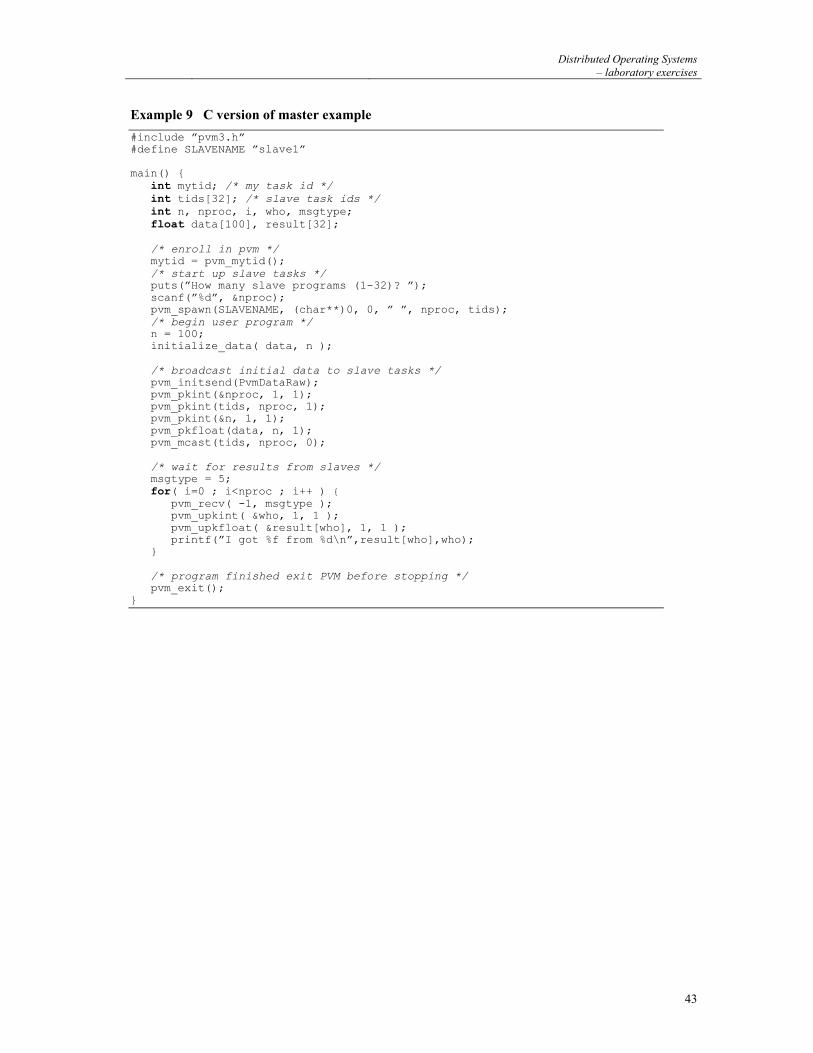
Distributed Operating Systems
– laboratory exercises
43
Example 9 C version of master example
#include ”pvm3.h” #define SLAVENAME ”slave1” main() { int mytid; /* my task id */ int tids[32]; /* slave task ids */ int n, nproc, i, who, msgtype; float data[100], result[32]; /* enroll in pvm */ mytid = pvm_mytid(); /* start up slave tasks */ puts(”How many slave programs (1-32)? ”); scanf(”%d”, &nproc); pvm_spawn(SLAVENAME, (char**)0, 0, ” ”, nproc, tids); /* begin user program */ n = 100; initialize_data( data, n ); /* broadcast initial data to slave tasks */ pvm_initsend(PvmDataRaw); pvm_pkint(&nproc, 1, 1); pvm_pkint(tids, nproc, 1); pvm_pkint(&n, 1, 1); pvm_pkfloat(data, n, 1); pvm_mcast(tids, nproc, 0); /* wait for results from slaves */ msgtype = 5; for( i=0 ; i<nproc ; i++ ) { pvm_recv( -1, msgtype ); pvm_upkint( &who, 1, 1 ); pvm_upkfloat( &result[who], 1, 1 ); printf(”I got %f from %d\n”,result[who],who); } /* program finished exit PVM before stopping */ pvm_exit(); }

Distributed Operating Systems – laboratory exercises
44
Example 10 C version of slave example
#include ”pvm3.h” main() { int mytid; /* my task id */ int tids[32]; /* task ids */ int n, me, i, nproc, master, msgtype; float data[100], result; float work(); /* enroll in pvm */ mytid = pvm_mytid(); /* receive data from master */ msgtype = 0; pvm_recv( -1, msgtype ); pvm_upkint(&nproc, 1, 1); pvm_upkint(tids, nproc, 1); pvm_upkint(&n, 1, 1); pvm_upkfloat(data, n, 1); /* determine which slave I am (0 - nproc-1) */ for( i=0; i<nproc ; i++ ) if( mytid == tids[i] ) {me = i; break;} /* do calculations with data */ result = work( me, n, data, tids, nproc ); /* send result to master */ pvm_initsend( PvmDataDefault ); pvm_pkint( &me, 1, 1 ); pvm_pkfloat( &result, 1, 1 ); msgtype = 5; master = pvm_parent(); pvm_send( master, msgtype ); /* Program finished. Exit PVM before stopping */ pvm_exit(); }
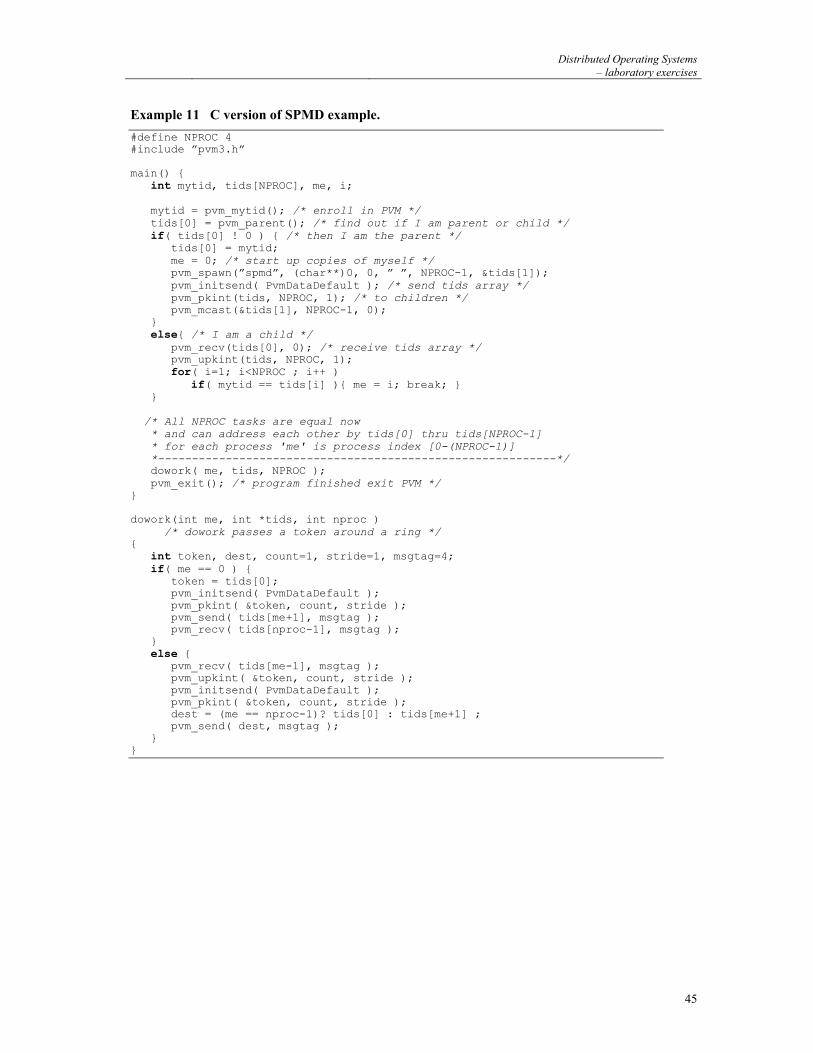
Distributed Operating Systems
– laboratory exercises
45
Example 11 C version of SPMD example.
#define NPROC 4 #include ”pvm3.h” main() { int mytid, tids[NPROC], me, i; mytid = pvm_mytid(); /* enroll in PVM */ tids[0] = pvm_parent(); /* find out if I am parent or child */ if( tids[0] ! 0 ) { /* then I am the parent */ tids[0] = mytid; me = 0; /* start up copies of myself */ pvm_spawn(”spmd”, (char**)0, 0, ” ”, NPROC-1, &tids[1]); pvm_initsend( PvmDataDefault ); /* send tids array */ pvm_pkint(tids, NPROC, 1); /* to children */ pvm_mcast(&tids[1], NPROC-1, 0); } else{ /* I am a child */ pvm_recv(tids[0], 0); /* receive tids array */ pvm_upkint(tids, NPROC, 1); for( i=1; i<NPROC ; i++ ) if( mytid == tids[i] ){ me = i; break; } } /* All NPROC tasks are equal now * and can address each other by tids[0] thru tids[NPROC-1] * for each process 'me' is process index [0-(NPROC-1)] *-----------------------------------------------------------*/ dowork( me, tids, NPROC ); pvm_exit(); /* program finished exit PVM */ } dowork(int me, int *tids, int nproc ) /* dowork passes a token around a ring */ { int token, dest, count=1, stride=1, msgtag=4; if( me == 0 ) { token = tids[0]; pvm_initsend( PvmDataDefault ); pvm_pkint( &token, count, stride ); pvm_send( tids[me+1], msgtag ); pvm_recv( tids[nproc-1], msgtag ); } else { pvm_recv( tids[me-1], msgtag ); pvm_upkint( &token, count, stride ); pvm_initsend( PvmDataDefault ); pvm_pkint( &token, count, stride ); dest = (me == nproc-1)? tids[0] : tids[me+1] ; pvm_send( dest, msgtag ); } }
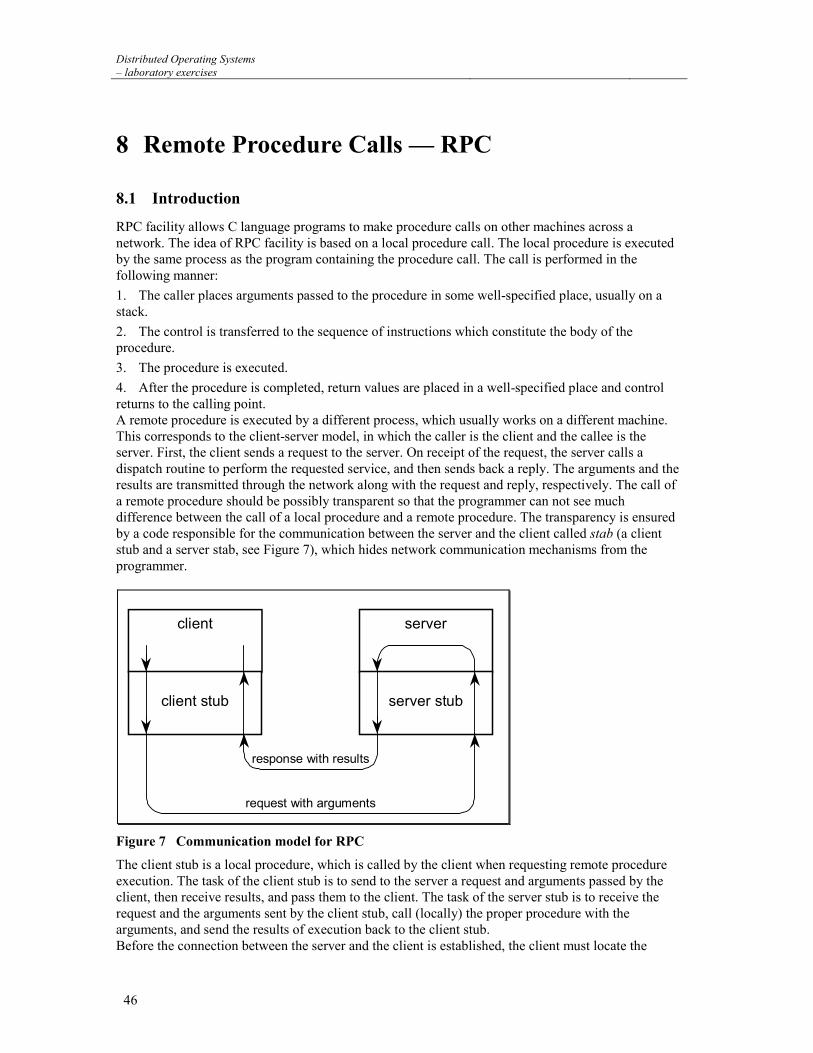
Distributed Operating Systems – laboratory exercises
46
8 Remote Procedure Calls — RPC
8.1 Introduction
RPC facility allows C language programs to make procedure calls on other machines across a network. The idea of RPC facility is based on a local procedure call. The local procedure is executed by the same process as the program containing the procedure call. The call is performed in the following manner:
1. The caller places arguments passed to the procedure in some well-specified place, usually on a stack.
2. The control is transferred to the sequence of instructions which constitute the body of the procedure.
3. The procedure is executed.
4. After the procedure is completed, return values are placed in a well-specified place and control returns to the calling point. A remote procedure is executed by a different process, which usually works on a different machine. This corresponds to the client-server model, in which the caller is the client and the callee is the server. First, the client sends a request to the server. On receipt of the request, the server calls a dispatch routine to perform the requested service, and then sends back a reply. The arguments and the results are transmitted through the network along with the request and reply, respectively. The call of a remote procedure should be possibly transparent so that the programmer can not see much difference between the call of a local procedure and a remote procedure. The transparency is ensured by a code responsible for the communication between the server and the client called stab (a client stub and a server stab, see Figure 7), which hides network communication mechanisms from the programmer.
client
client stub
server
server stub
request with arguments
response with results
Figure 7 Communication model for RPC
The client stub is a local procedure, which is called by the client when requesting remote procedure execution. The task of the client stub is to send to the server a request and arguments passed by the client, then receive results, and pass them to the client. The task of the server stub is to receive the request and the arguments sent by the client stub, call (locally) the proper procedure with the arguments, and send the results of execution back to the client stub. Before the connection between the server and the client is established, the client must locate the

Distributed Operating Systems
– laboratory exercises
47
server on a remote host. To this end, when the server starts, it registers itself with a binding agent, i.e. registers its own name or identifier and a port number at which it is waiting for requests. When the client calls a remote procedure provided by the server, it first asks the binding agent on the remote host about the port number at which the server is waiting (listening), and then sends the request for a remote procedure execution to the port (see Figure 8).
request forserver’slocation
binding agent(portmap or rpcbind)
clientprocess
serverprocess
registration informationof server’slocation
RPC request
Figure 8 Locating an RPC server
8.2 Building RPC Based Distributed Applications
Let us start exploration of RPC technique from a centralised application consisting of a main program and a number of subprograms (functions or procedures). Building a distributed application consists in converting some of the subprograms into remote procedures. The stubs allow avoiding modification of the body of the main program and the body of the subprograms, however, they have to be created. To this end a special tool — rpcgen — is used. Depending on compile-time flags (see Table 3) rpcgen generates a code for the client stub and for the server stub, a header file containing #define statements for basic constants, code for data conversion (XDR), the client and the server side templates, and the makefile template. To generate this, rpcgen requires a protocol specification written in RPC language. The language is a mix of C and Pascal, however, it is closer to C. First of all, the protocol specification contains remote procedure declarations (i.e. specification of arguments and return value). One server can provide several remote procedures, which are grouped in versions. Each procedure is assigned a number, which is unique within the version. The version is also assigned a number, which is unique within the server program. The server program has also a number, which should be distinct from all server numbers on the machine. Thus, a remote procedure is identified by the program number, the version number and the procedure number. All the numbers are long integers. The program numbers (in hexadecimal) are grouped as follows:
0 – 1FFFFFFF Defined by Sun
20000000 – 3FFFFFFFDefined by user
40000000 – 5FFFFFFFUser defined for programs that dynamically allocate numbers
60000000 – FFFFFFFFReserved for future use
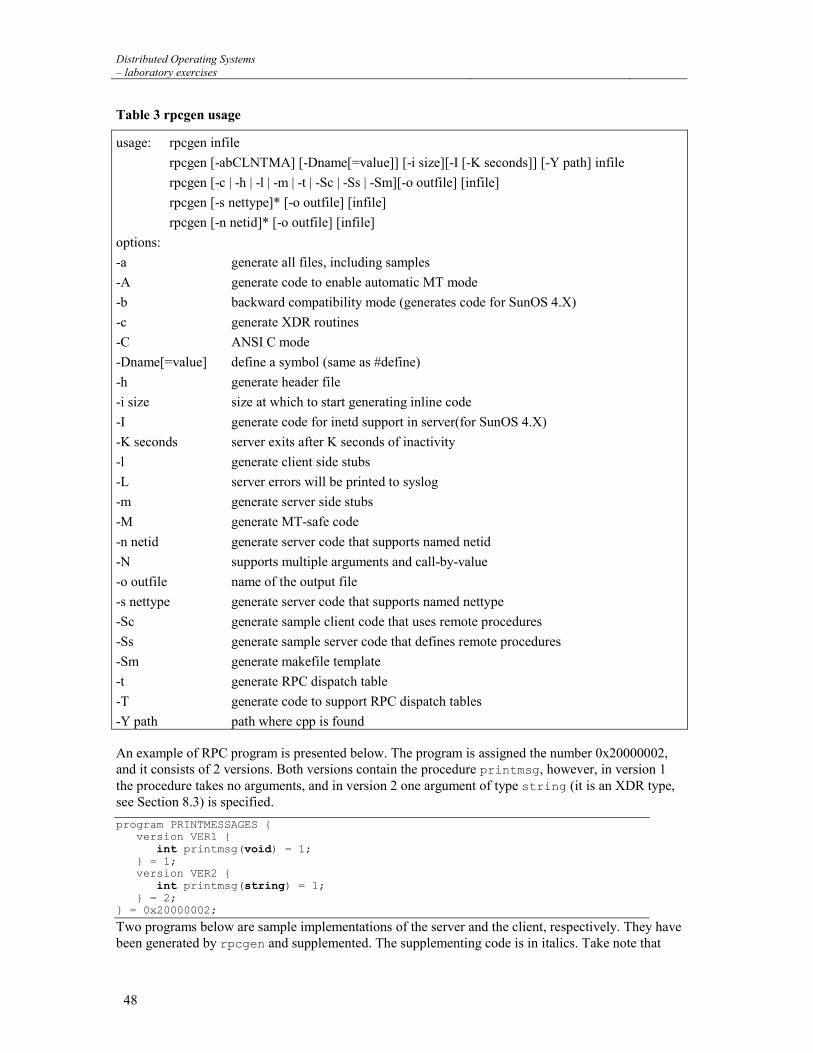
Distributed Operating Systems – laboratory exercises
48
Table 3 rpcgen usage
usage: rpcgen infile
rpcgen [-abCLNTMA] [-Dname[=value]] [-i size][-I [-K seconds]] [-Y path] infile
rpcgen [-c | -h | -l | -m | -t | -Sc | -Ss | -Sm][-o outfile] [infile]
rpcgen [-s nettype]* [-o outfile] [infile]
rpcgen [-n netid]* [-o outfile] [infile]
options:
-a generate all files, including samples
-A generate code to enable automatic MT mode
-b backward compatibility mode (generates code for SunOS 4.X)
-c generate XDR routines
-C ANSI C mode
-Dname[=value] define a symbol (same as #define)
-h generate header file
-i size size at which to start generating inline code
-I generate code for inetd support in server(for SunOS 4.X)
-K seconds server exits after K seconds of inactivity
-l generate client side stubs
-L server errors will be printed to syslog
-m generate server side stubs
-M generate MT-safe code
-n netid generate server code that supports named netid
-N supports multiple arguments and call-by-value
-o outfile name of the output file
-s nettype generate server code that supports named nettype
-Sc generate sample client code that uses remote procedures
-Ss generate sample server code that defines remote procedures
-Sm generate makefile template
-t generate RPC dispatch table
-T generate code to support RPC dispatch tables
-Y path path where cpp is found
An example of RPC program is presented below. The program is assigned the number 0x20000002, and it consists of 2 versions. Both versions contain the procedure printmsg, however, in version 1 the procedure takes no arguments, and in version 2 one argument of type string (it is an XDR type, see Section 8.3) is specified.
program PRINTMESSAGES { version VER1 { int printmsg(void) = 1; } = 1; version VER2 { int printmsg(string) = 1; } = 2; } = 0x20000002;
Two programs below are sample implementations of the server and the client, respectively. They have been generated by rpcgen and supplemented. The supplementing code is in italics. Take note that
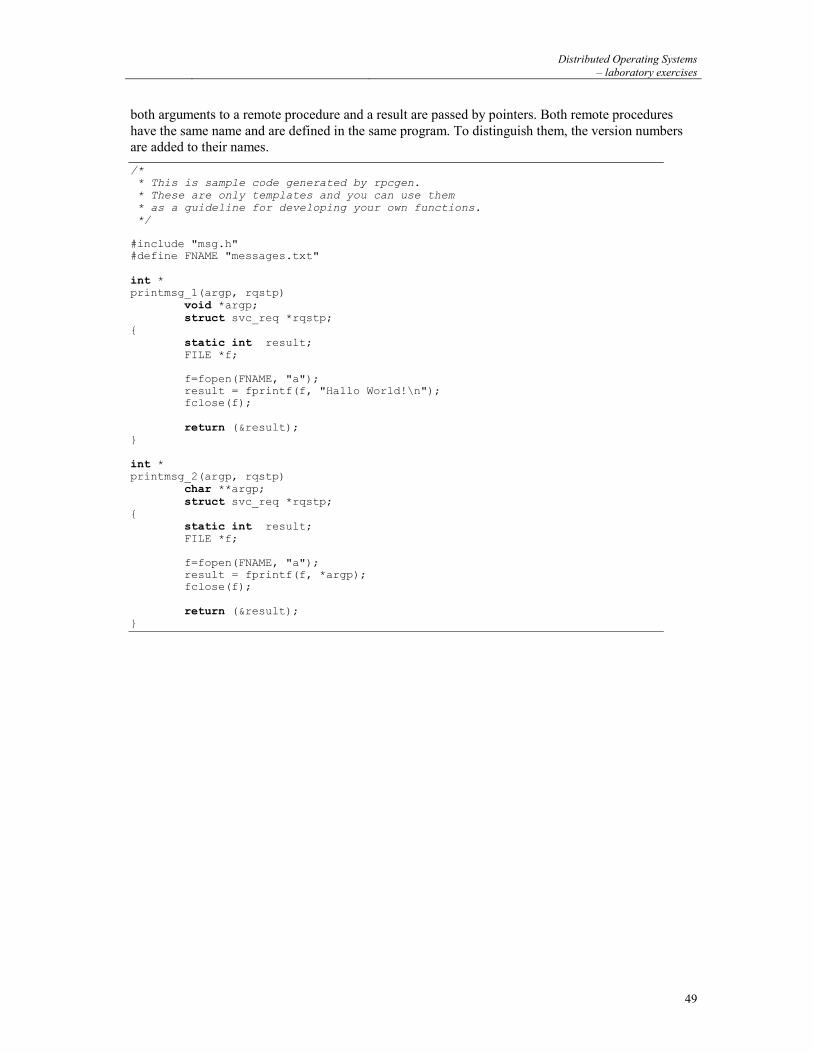
Distributed Operating Systems
– laboratory exercises
49
both arguments to a remote procedure and a result are passed by pointers. Both remote procedures have the same name and are defined in the same program. To distinguish them, the version numbers are added to their names.
/* * This is sample code generated by rpcgen. * These are only templates and you can use them * as a guideline for developing your own functions. */ #include "msg.h" #define FNAME "messages.txt" int * printmsg_1(argp, rqstp) void *argp; struct svc_req *rqstp; { static int result; FILE *f; f=fopen(FNAME, "a"); result = fprintf(f, "Hallo World!\n"); fclose(f); return (&result); } int * printmsg_2(argp, rqstp) char **argp; struct svc_req *rqstp; { static int result; FILE *f; f=fopen(FNAME, "a"); result = fprintf(f, *argp); fclose(f); return (&result); }
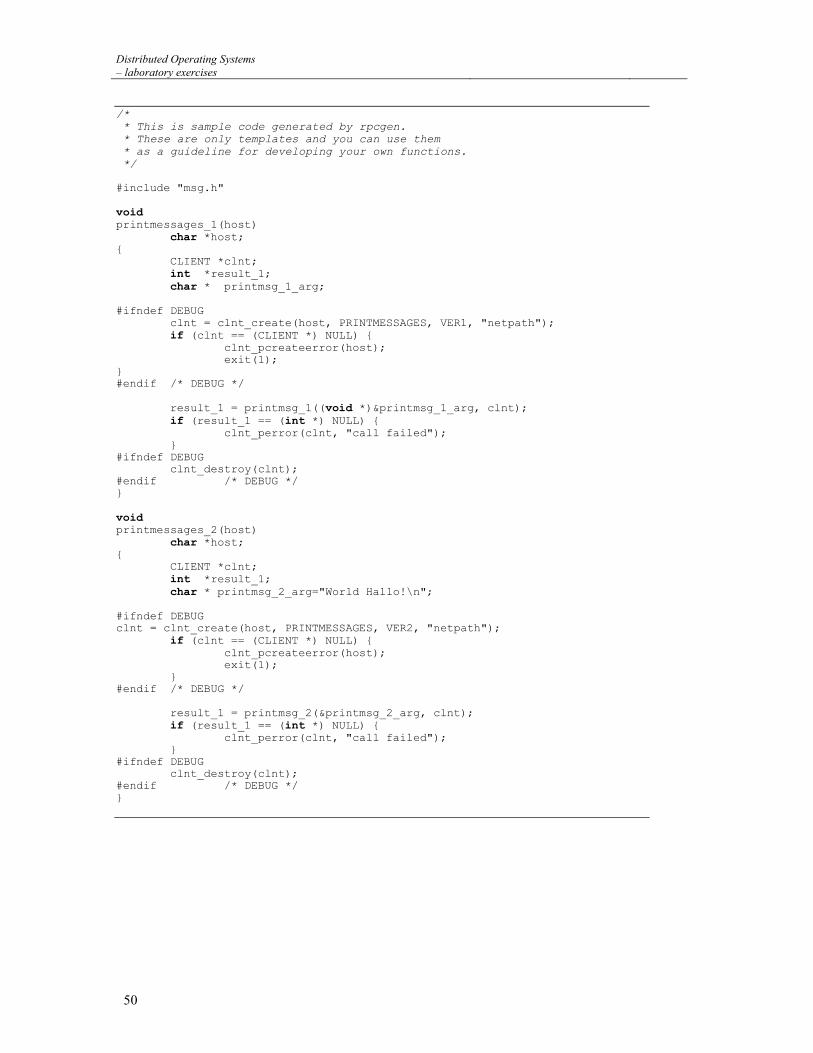
Distributed Operating Systems – laboratory exercises
50
/* * This is sample code generated by rpcgen. * These are only templates and you can use them * as a guideline for developing your own functions. */ #include "msg.h" void printmessages_1(host) char *host; { CLIENT *clnt; int *result_1; char * printmsg_1_arg; #ifndef DEBUG clnt = clnt_create(host, PRINTMESSAGES, VER1, "netpath"); if (clnt == (CLIENT *) NULL) { clnt_pcreateerror(host); exit(1); } #endif /* DEBUG */ result_1 = printmsg_1((void *)&printmsg_1_arg, clnt); if (result_1 == (int *) NULL) { clnt_perror(clnt, "call failed"); } #ifndef DEBUG clnt_destroy(clnt); #endif /* DEBUG */ } void printmessages_2(host) char *host; { CLIENT *clnt; int *result_1; char * printmsg_2_arg="World Hallo!\n"; #ifndef DEBUG clnt = clnt_create(host, PRINTMESSAGES, VER2, "netpath"); if (clnt == (CLIENT *) NULL) { clnt_pcreateerror(host); exit(1); } #endif /* DEBUG */ result_1 = printmsg_2(&printmsg_2_arg, clnt); if (result_1 == (int *) NULL) { clnt_perror(clnt, "call failed"); } #ifndef DEBUG clnt_destroy(clnt); #endif /* DEBUG */ }
Distributed Operating Systems
– laboratory exercises
51
main(argc, argv) int argc; char *argv[]; { char *host; if (argc < 2) { printf("usage: %s server_host\n", argv[0]); exit(1); } host = argv[1]; printmessages_1(host); printmessages_2(host); }
8.3 External Data Representation — XDR
As mentioned above, the server and the client may work on different machines with differing architectures. This raises the problem of data conversion. Therefore, along with RPC, Sun Microsystems has proposed a solution to the problem called External Data Representation (XDR). XDR consists of streams (XDR stream) and filters (XDR filter). Filters are procedures used to convert data between the native format and the standard XDR format (Table 4). The conversion to XDR format is called serialisation and the conversion from XDR format to the native one is called deserialisation. Data converted to XDR format are stored in XDR streams.
Table 4 XDR filters
Filters Description
xdr_char, xdr_u_char, xdr_int, xdr_u_int, xdr_long, xdr_u_long, xdr_short, xdr_u_short, xdr_float, xdr_double
conversion of simple types
prim
itiv
e fi
lter
s
xdr_enum, xdr_bool conversion of enumeration types xdr_void no data conversion (empty filter)
xdr_string, xdr_byte, xdr_array, xdr_vector
conversion of arrays
com
poun
d fi
lter
s xdr_opaque serialisation or deserialisation of data without
format change xdr_union conversion of discriminated union xdr_reference conversion of pointers
Moreover, it is possible to construct a filter for any abstract data-type-like structure, linked list and so on. To simplify construction of such filters an XDR language has been proposed by Sun Microsystems. The XDR language allows us to describe complex data types (Table 5), so that rpcgen can generate XDR filters for the types. Thus, the RPC language, described in the previous section, is an extension of XDR language. It is worth noting that rpcgen supports type declarations, but does not support variable declarations. Thus, the types can be used as formal parameter types and return value types of remote procedures, or as components of more complex types.
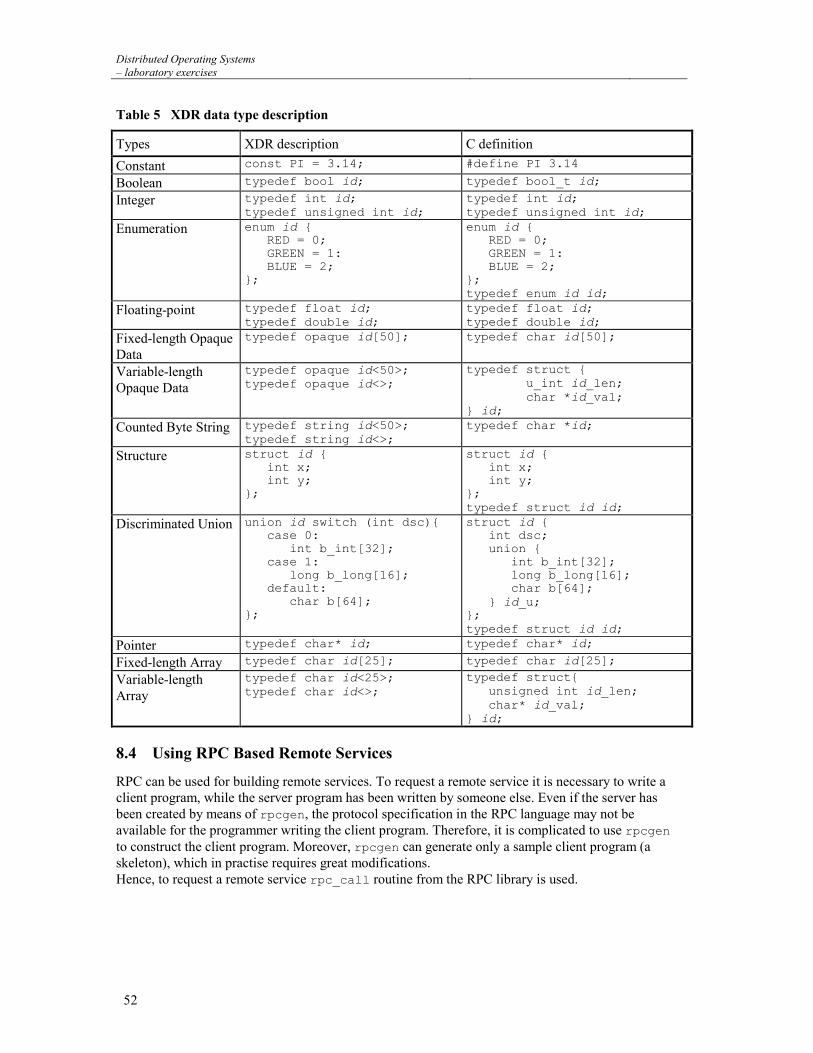
Distributed Operating Systems – laboratory exercises
52
Table 5 XDR data type description
Types XDR description C definition
Constant const PI = 3.14; #define PI 3.14
Boolean typedef bool id; typedef bool_t id;
Integer typedef int id; typedef unsigned int id;
typedef int id; typedef unsigned int id;
Enumeration enum id { RED = 0; GREEN = 1: BLUE = 2; };
enum id { RED = 0; GREEN = 1: BLUE = 2; }; typedef enum id id;
Floating-point typedef float id; typedef double id;
typedef float id; typedef double id;
Fixed-length Opaque Data
typedef opaque id[50]; typedef char id[50];
Variable-length Opaque Data
typedef opaque id<50>; typedef opaque id<>;
typedef struct { u_int id_len; char *id_val; } id;
Counted Byte String typedef string id<50>; typedef string id<>;
typedef char *id;
Structure struct id { int x; int y; };
struct id { int x; int y; }; typedef struct id id;
Discriminated Union union id switch (int dsc){ case 0: int b_int[32]; case 1: long b_long[16]; default: char b[64]; };
struct id { int dsc; union { int b_int[32]; long b_long[16]; char b[64]; } id_u; }; typedef struct id id;
Pointer typedef char* id; typedef char* id;
Fixed-length Array typedef char id[25]; typedef char id[25];
Variable-length Array
typedef char id<25>; typedef char id<>;
typedef struct{ unsigned int id_len; char* id_val; } id;
8.4 Using RPC Based Remote Services
RPC can be used for building remote services. To request a remote service it is necessary to write a client program, while the server program has been written by someone else. Even if the server has been created by means of rpcgen, the protocol specification in the RPC language may not be available for the programmer writing the client program. Therefore, it is complicated to use rpcgen to construct the client program. Moreover, rpcgen can generate only a sample client program (a skeleton), which in practise requires great modifications. Hence, to request a remote service rpc_call routine from the RPC library is used.
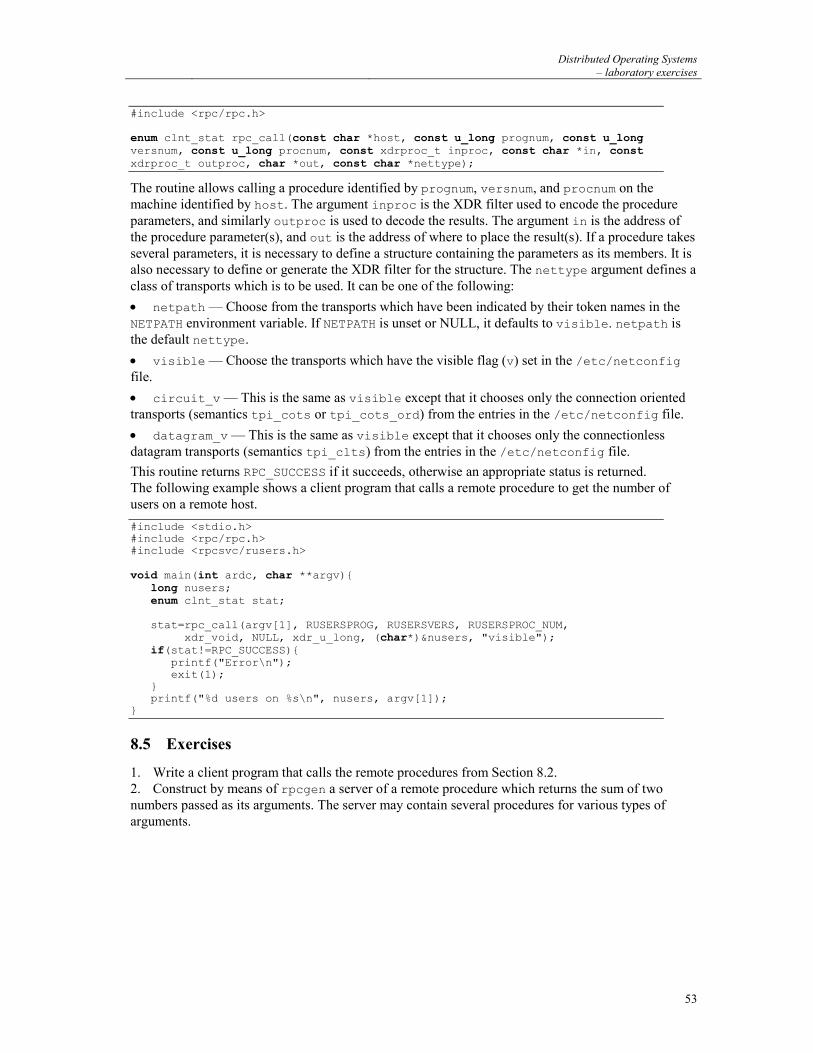
Distributed Operating Systems
– laboratory exercises
53
#include <rpc/rpc.h> enum clnt_stat rpc_call(const char *host, const u_long prognum, const u_long versnum, const u_long procnum, const xdrproc_t inproc, const char *in, const xdrproc_t outproc, char *out, const char *nettype);
The routine allows calling a procedure identified by prognum, versnum, and procnum on the machine identified by host. The argument inproc is the XDR filter used to encode the procedure parameters, and similarly outproc is used to decode the results. The argument in is the address of the procedure parameter(s), and out is the address of where to place the result(s). If a procedure takes several parameters, it is necessary to define a structure containing the parameters as its members. It is also necessary to define or generate the XDR filter for the structure. The nettype argument defines a class of transports which is to be used. It can be one of the following:
netpath — Choose from the transports which have been indicated by their token names in the NETPATH environment variable. If NETPATH is unset or NULL, it defaults to visible. netpath is the default nettype.
visible — Choose the transports which have the visible flag (v) set in the /etc/netconfig file.
circuit_v — This is the same as visible except that it chooses only the connection oriented transports (semantics tpi_cots or tpi_cots_ord) from the entries in the /etc/netconfig file.
datagram_v — This is the same as visible except that it chooses only the connectionless datagram transports (semantics tpi_clts) from the entries in the /etc/netconfig file.
This routine returns RPC_SUCCESS if it succeeds, otherwise an appropriate status is returned. The following example shows a client program that calls a remote procedure to get the number of users on a remote host.
#include <stdio.h> #include <rpc/rpc.h> #include <rpcsvc/rusers.h> void main(int ardc, char **argv){ long nusers; enum clnt_stat stat; stat=rpc_call(argv[1], RUSERSPROG, RUSERSVERS, RUSERSPROC_NUM, xdr_void, NULL, xdr_u_long, (char*)&nusers, "visible"); if(stat!=RPC_SUCCESS){ printf("Error\n"); exit(1); } printf("%d users on %s\n", nusers, argv[1]); }
8.5 Exercises
1. Write a client program that calls the remote procedures from Section 8.2. 2. Construct by means of rpcgen a server of a remote procedure which returns the sum of two numbers passed as its arguments. The server may contain several procedures for various types of arguments.
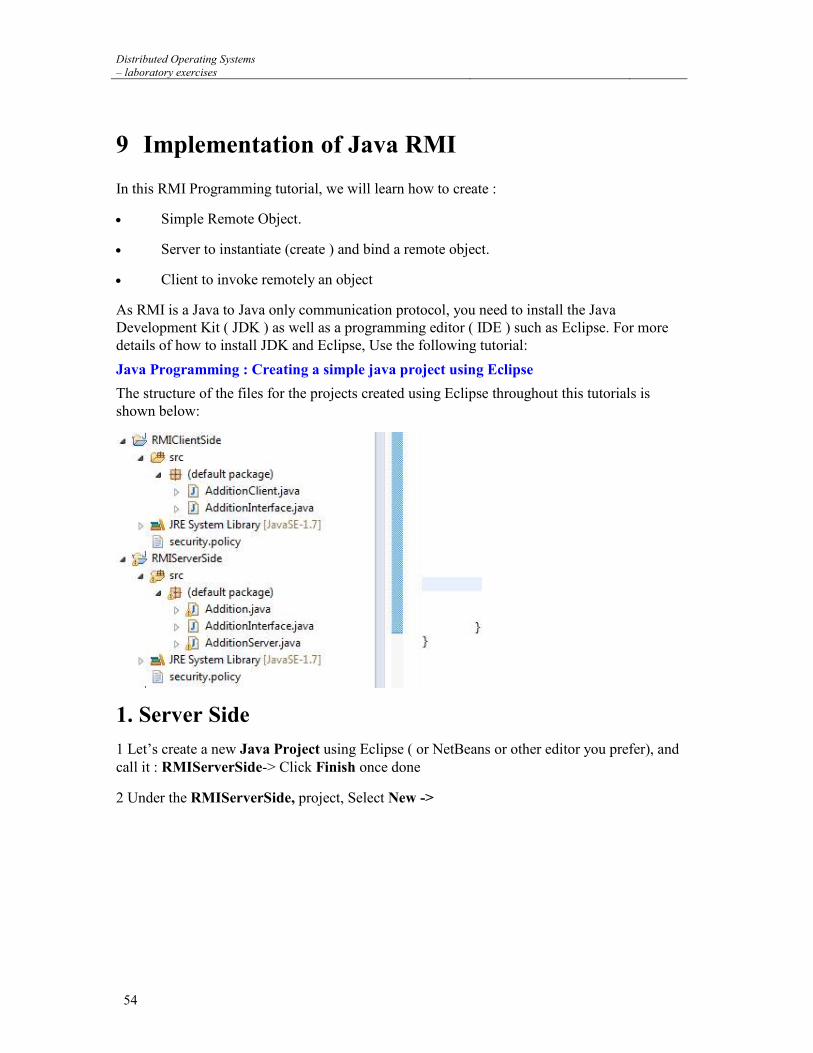
Distributed Operating Systems – laboratory exercises
54
9 Implementation of Java RMI
In this RMI Programming tutorial, we will learn how to create :
Simple Remote Object.
Server to instantiate (create ) and bind a remote object.
Client to invoke remotely an object
As RMI is a Java to Java only communication protocol, you need to install the Java Development Kit ( JDK ) as well as a programming editor ( IDE ) such as Eclipse. For more details of how to install JDK and Eclipse, Use the following tutorial:
Java Programming : Creating a simple java project using Eclipse
The structure of the files for the projects created using Eclipse throughout this tutorials is shown below:
1. Server Side
1 Let’s create a new Java Project using Eclipse ( or NetBeans or other editor you prefer), and call it : RMIServerSide-> Click Finish once done
2 Under the RMIServerSide, project, Select New ->
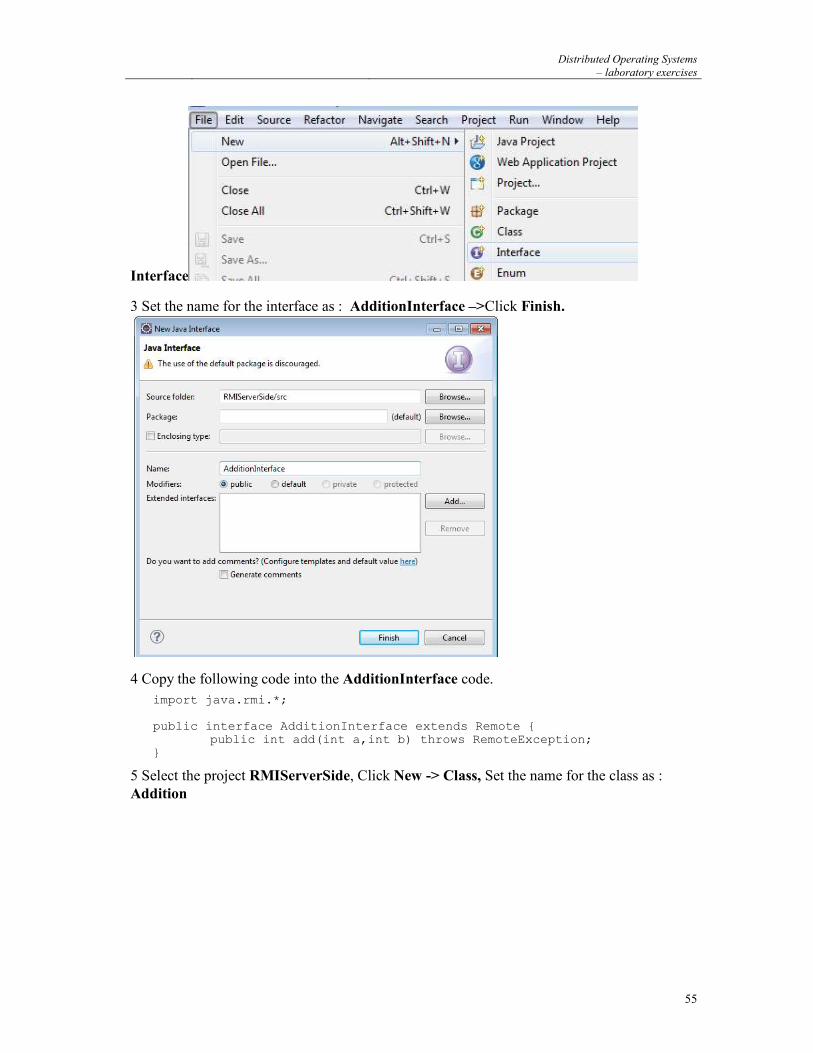
Distributed Operating Systems
– laboratory exercises
55
Interface
3 Set the name for the interface as : AdditionInterface –>Click Finish.
4 Copy the following code into the AdditionInterface code.
import java.rmi.*; public interface AdditionInterface extends Remote { public int add(int a,int b) throws RemoteException; }
5 Select the project RMIServerSide, Click New -> Class, Set the name for the class as : Addition
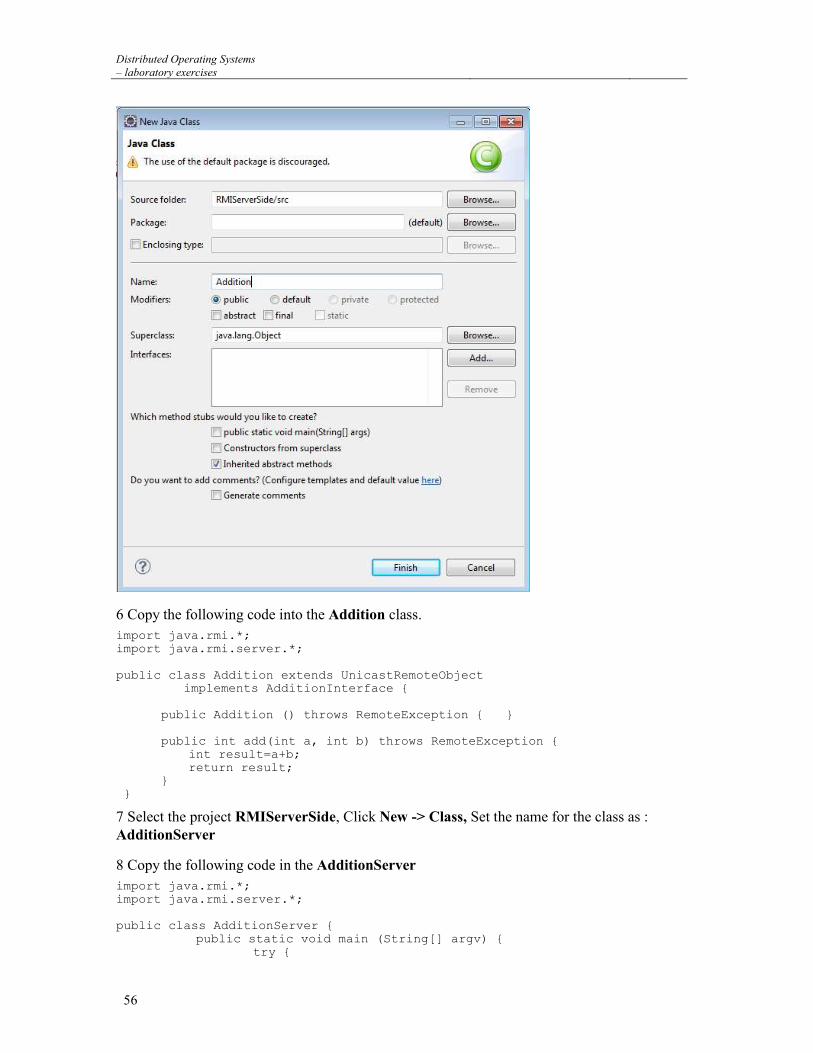
Distributed Operating Systems – laboratory exercises
56
6 Copy the following code into the Addition class.
import java.rmi.*; import java.rmi.server.*; public class Addition extends UnicastRemoteObject implements AdditionInterface { public Addition () throws RemoteException { } public int add(int a, int b) throws RemoteException { int result=a+b; return result; } }
7 Select the project RMIServerSide, Click New -> Class, Set the name for the class as : AdditionServer
8 Copy the following code in the AdditionServer
import java.rmi.*; import java.rmi.server.*; public class AdditionServer { public static void main (String[] argv) { try {

Distributed Operating Systems
– laboratory exercises
57
System.setSecurityManager(new RMISecurityManager()); Addition Hello = new Addition(); Naming.rebind("rmi://localhost/ABC", Hello); System.out.println("Addition Server is ready."); }catch (Exception e) { System.out.println("Addition Server failed: " + e); } } }
9 Under the RMIServerSide, project, Select New -> File
10 Set the name as : security.policy
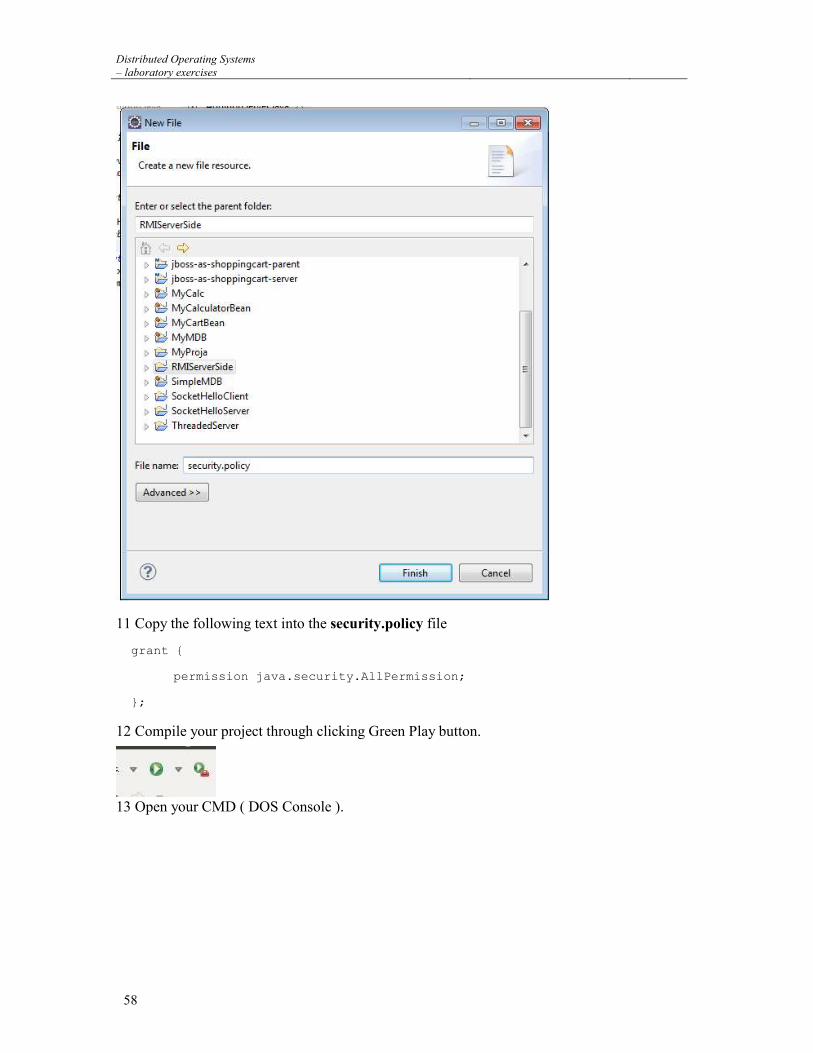
Distributed Operating Systems – laboratory exercises
58
11 Copy the following text into the security.policy file
grant {
permission java.security.AllPermission;
};
12 Compile your project through clicking Green Play button.
13 Open your CMD ( DOS Console ).
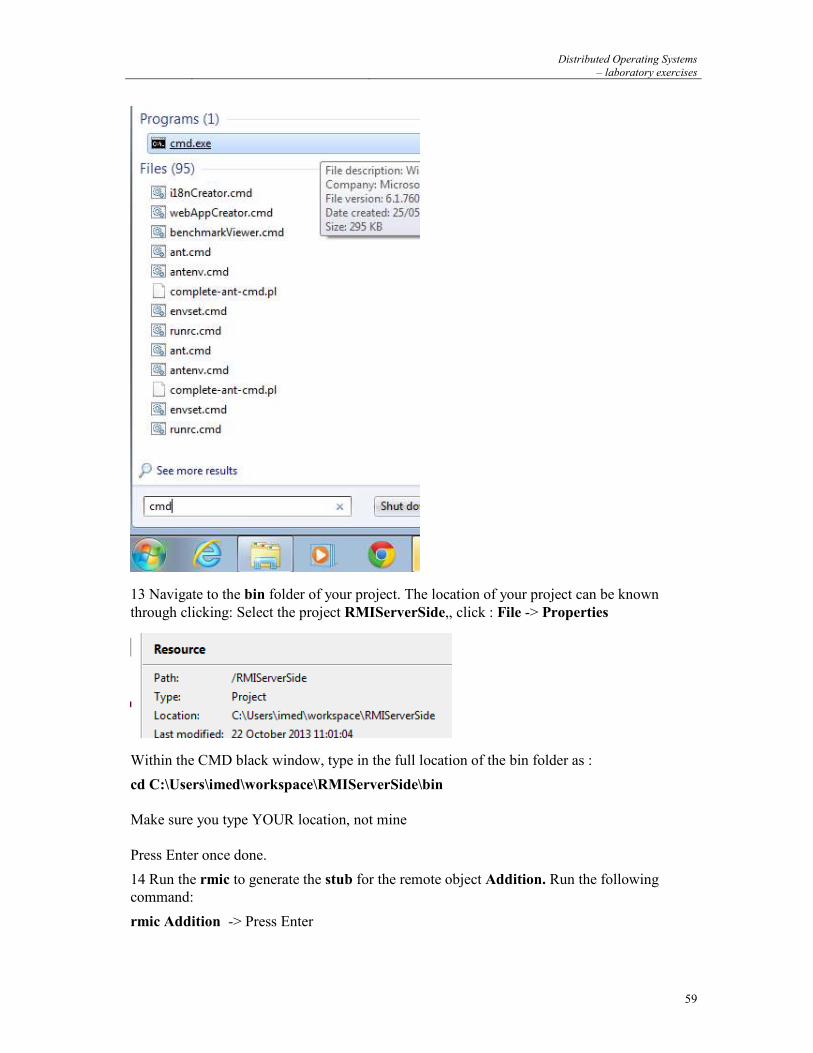
Distributed Operating Systems
– laboratory exercises
59
13 Navigate to the bin folder of your project. The location of your project can be known through clicking: Select the project RMIServerSide,, click : File -> Properties
Within the CMD black window, type in the full location of the bin folder as :
cd C:\Users\imed\workspace\RMIServerSide\bin Make sure you type YOUR location, not mine Press Enter once done.
14 Run the rmic to generate the stub for the remote object Addition. Run the following command:
rmic Addition -> Press Enter
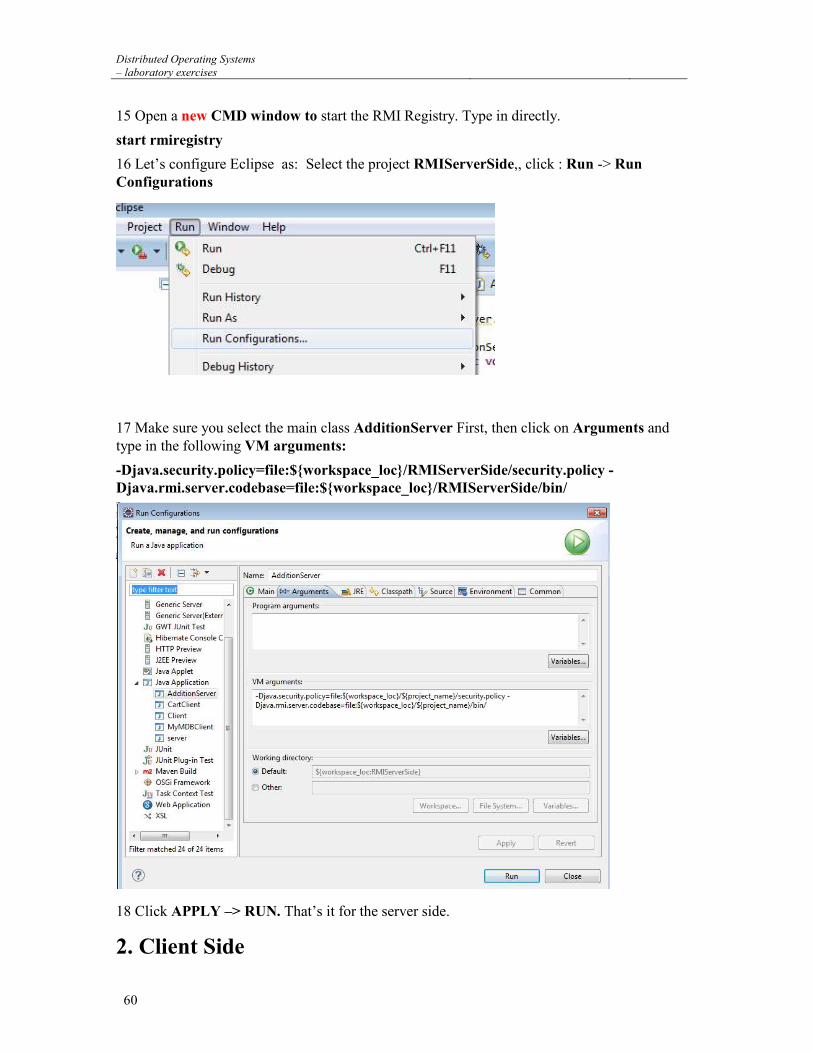
Distributed Operating Systems – laboratory exercises
60
15 Open a new CMD window to start the RMI Registry. Type in directly.
start rmiregistry
16 Let’s configure Eclipse as: Select the project RMIServerSide,, click : Run -> Run Configurations
17 Make sure you select the main class AdditionServer First, then click on Arguments and type in the following VM arguments:
-Djava.security.policy=file:${workspace_loc}/RMIServerSide/security.policy -Djava.rmi.server.codebase=file:${workspace_loc}/RMIServerSide/bin/
18 Click APPLY –> RUN. That’s it for the server side.
2. Client Side
Distributed Operating Systems
– laboratory exercises
61
1 Let’s create a new Java Project using Eclipse ( or NetBeans or other editor you prefer), and call it : RMIClientSide-> Click Finish once done
2 Select the project RMIClientSide, Click New -> Interface, Set the name for the class as : AdditionInterface, Click Finish.
3 Copy the previous code into the AdditionInterface which is :
import java.rmi.*; public interface AdditionInterface extends Remote { public int Add(int a,int b) throws RemoteException; }
4 Select the project RMIClientSide, Click New -> Class, Set the name for the class as : AdditionClient, Click Finish.
5 Copy the following code into the AdditionClient class
import java.rmi.*; public class AdditionClient { public static void main (String[] args) { AdditionInterface hello; try { System.setSecurityManager(new RMISecurityManager()); hello = (AdditionInterface)Naming.lookup("rmi://localhost/ABC"); int result=hello.add(9,10); System.out.println("Result is :"+result); }catch (Exception e) { System.out.println("HelloClient exception: " + e); } } }
6 Under the RMIClientSide, project, Select New -> File -> set the name as : security.policy. Copy the following code into the security file
grant { permission java.security.AllPermission; };
7 Let’s configure Eclipse as: Select the project RMIClientSide, click : Run -> Run Configurations
In case the AdditionClient does not show up on the left side. Double click on Java Application
8 Select The AdditionClient then click Arguments. Type in the following into the VM Arguments:
-Djava.security.policy=file:${workspace_loc}/RMIClientSide/security.policy -Djava.rmi.server.codebase=file:${workspace_loc}/RMIServerSide/bin/
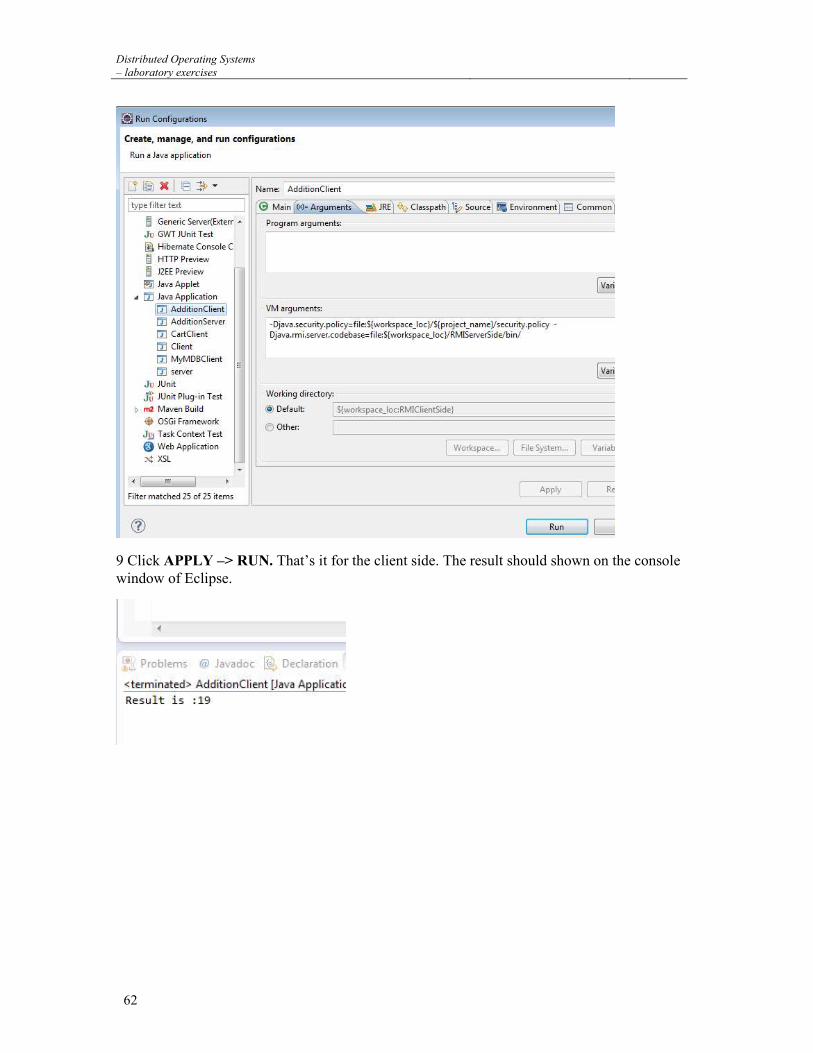
Distributed Operating Systems – laboratory exercises
62
9 Click APPLY –> RUN. That’s it for the client side. The result should shown on the console window of Eclipse.
Distributed Operating Systems
– laboratory exercises
63
10 The Network File System
NFS, the network filesystem, is probably the most prominent network service using RPC. It allows accessing files on remote hosts in exactly the same way as a user would access any local files. This is made possible by a mixture of kernel functionality on the client side (that uses the remote file system) and an NFS server on the server side (that provides the file data). This file access is completely transparent to the client, and works across a variety of server and host architectures. NFS offers a number of advantages: Data accessed by all users can be kept on a central host, with clients mounting this directory at boot time. For example, you can keep all user accounts on one host, and have all hosts on your network mount /home from that host. If installed alongside with NIS, users can then log into any system, and still work on one set of files. Data consuming large amounts of disk space may be kept on a single host. Administrative data may be kept on a single host. Let us have a look now at how NFS works: A client may request to mount a directory from a remote host on a local directory just the same way it can mount a physical device. However, the syntax used to specify the remote directory is different. For example, to mount /home/students from host antares to /usr/home/students on ariel, the administrator would issue the following command on ariel:
mount -t nfs antares:/home/students /usr/home/students
mount will then try to connect to the mountd mount daemon on antares via RPC. The server will check if ariel is permitted to mount the directory in question, and if so, return it a file handle. This file handle will be used in all subsequent requests to files below /usr/home/students. When someone accesses a file over NFS, the kernel places an RPC call to nfsd (the NFS daemon) on the server machine. This call takes the file handle, the name of the file to be accessed, and the user's user and group id as parameters. These are used in determining access rights to the specified file. In order to prevent unauthorized users from reading or modifying files, user and group ids must be the same on both hosts. On most implementations, the NFS functionality of both client and server are implemented as kernel-level daemons that are started from user space at system boot. These are the NFS daemon (nfsd) on the server host, and the Block I/O Daemon (nfsiod) running on the client host. To improve throughput, nfsiod performs asynchronous I/O using read-ahead and write-behind; also, several nfsd daemons are usually run concurrently.
10.1 Preparing NFS
Before you can use NFS, you must make sure your kernel has NFS support compiled in. The easiest way to find out whether your kernel has NFS support enabled is to actually try to mount an NFS file system:
mount antares:/home/students /mnt
If this mount attempt fails with an error message, you must make a new kernel with NFS enabled. Any other error messages are completely harmless. Directory /mnt is a temporary mount directory.
10.2 Mounting an NFS Volume
NFS volumes are mounted very much the way usual file systems are mounted. You invoke mount using the following syntax:
mount -t nfs nfs_volume local_dir options
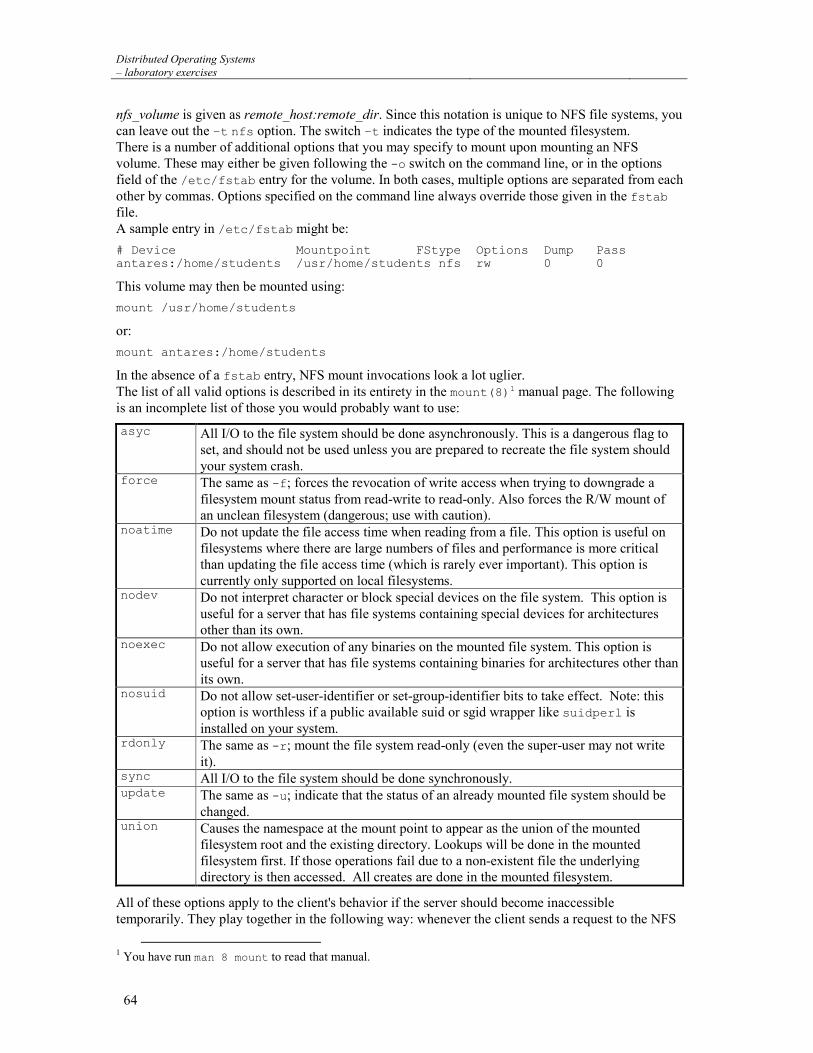
Distributed Operating Systems – laboratory exercises
64
nfs_volume is given as remote_host:remote_dir. Since this notation is unique to NFS file systems, you can leave out the –t nfs option. The switch –t indicates the type of the mounted filesystem. There is a number of additional options that you may specify to mount upon mounting an NFS volume. These may either be given following the -o switch on the command line, or in the options field of the /etc/fstab entry for the volume. In both cases, multiple options are separated from each other by commas. Options specified on the command line always override those given in the fstab file. A sample entry in /etc/fstab might be:
# Device Mountpoint FStype Options Dump Pass antares:/home/students /usr/home/students nfs rw 0 0
This volume may then be mounted using:
mount /usr/home/students
or:
mount antares:/home/students
In the absence of a fstab entry, NFS mount invocations look a lot uglier. The list of all valid options is described in its entirety in the mount(8)1 manual page. The following is an incomplete list of those you would probably want to use:
asyc All I/O to the file system should be done asynchronously. This is a dangerous flag to set, and should not be used unless you are prepared to recreate the file system should your system crash.
force The same as -f; forces the revocation of write access when trying to downgrade a filesystem mount status from read-write to read-only. Also forces the R/W mount of an unclean filesystem (dangerous; use with caution).
noatime Do not update the file access time when reading from a file. This option is useful on filesystems where there are large numbers of files and performance is more critical than updating the file access time (which is rarely ever important). This option is currently only supported on local filesystems.
nodev Do not interpret character or block special devices on the file system. This option is useful for a server that has file systems containing special devices for architectures other than its own.
noexec Do not allow execution of any binaries on the mounted file system. This option is useful for a server that has file systems containing binaries for architectures other than its own.
nosuid Do not allow set-user-identifier or set-group-identifier bits to take effect. Note: this option is worthless if a public available suid or sgid wrapper like suidperl is installed on your system.
rdonly The same as -r; mount the file system read-only (even the super-user may not write it).
sync All I/O to the file system should be done synchronously. update The same as -u; indicate that the status of an already mounted file system should be
changed. union Causes the namespace at the mount point to appear as the union of the mounted
filesystem root and the existing directory. Lookups will be done in the mounted filesystem first. If those operations fail due to a non-existent file the underlying directory is then accessed. All creates are done in the mounted filesystem.
All of these options apply to the client's behavior if the server should become inaccessible temporarily. They play together in the following way: whenever the client sends a request to the NFS
1 You have run man 8 mount to read that manual.

Distributed Operating Systems
– laboratory exercises
65
server, it expects the operation to have finished after a given interval (specified in the timeout option). If no confirmation is received within this time, a so-called minor timeout occurs, and the operation is retried with the timeout interval doubled. After reaching a maximum timeout of 60 seconds, a major timeout occurs. By default, a major timeout will cause the client to print a message to the console and start all over again, this time with an initial timeout interval twice that of the previous cascade. Potentially, this may go on forever. Volumes that stubbornly retry an operation until the server becomes available again are called hard-mounted. The opposite variety, soft-mounted volumes generates an I/O error for the calling process whenever a major timeout occurs. Because of the write-behind introduced by the buffer cache, this error condition is not propagated to the process itself before it calls the write(2) function the next time, so a program can never be sure that a write operation to a soft-mounted volume has succeeded at all. Whether you hard- or soft-mount a volume is not simply a question of taste, but also has to do with what sort of information you want to access from this volume. For example, if you mount your X programs by NFS, you certainly would not want your X session to go berserk just because someone brought the network to a grinding halt by firing up seven copies of xv at the same time, or by pulling the Ethernet plug for a moment. By hard-mounting these, you make sure that your computer will wait until it is able to re-establish contact with your NFS-server. On the other hand, non-critical data such as NFS-mounted news partitions or FTP archives may as well be soft-mounted, so it doesn't hang your session in case the remote machine should be temporarily unreachable, or down. If your network connection to the server is flaky or goes through a loaded router, you may either increase the initial timeout using the timeo option, or hard-mount the volumes, but allow for signals interrupting the NFS call so that you may still abort any hanging file access. Usually, the mountd daemon will in some way or other keep track of which directories have been mounted by what hosts. This information can be displayed using the showmount program, which is also included in the NFS server package. The mountd, however, does not do this yet.
10.3 The NFS Daemons
If you want to provide NFS service to other hosts, you have to run the nfsd and mountd daemons on your machine. As RPC-based programs, they are not managed by inetd, but are started up at boot time, and register themselves with the portmapper. Therefore, you have to make sure to start them only after rpc.portmap is running. Usually, you include the following two lines in your /etc/rc script:
if [ -x /usr/sbin/rpc.mountd ]; then /usr/sbin/rpc.mountd; echo -n " mountd" fi if [ -x /usr/sbin/rpc.nfsd ]; then /usr/sbin/rpc.nfsd; echo -n " nfsd" fi
The ownership information of files a NFS daemon provides to its clients usually contains only numerical user and group id's. If both client and server associate the same user and group names with these numerical id's, they are said to share the same uid/gid space. For example, this is the case when you use NIS to distribute the passwd information to all hosts on your LAN. On some occasions, however, they do not match. Rather updating the uid's and gid's of the client to match those of the server, you can use the ugidd mapping daemon to work around this. Using the map_daemon option explained below, you can tell nfsd to map the server's uid/gid space to the client's uid/gid space with the aid of the ugidd on the client.
Distributed Operating Systems – laboratory exercises
66
10.4 The exports File
While the above options applied to the client's NFS configuration, there is a different set of options on the server side that configure its per-client behavior. These options must be set in the /etc/exports file. By default, mountd will not allow anyone to mount directories from the local host, which is a rather sensible attitude. To permit one or more hosts to NFS-mount a directory, it must exported, that is, must be specified in the exports file. A sample file may look like this:
/home vale(rw) vstout(rw) vlight(rw) /usr/X386 vale(ro) vstout(ro) vlight(ro) /usr/TeX vale(ro) vstout(ro) vlight(ro) / vale(rw,no_root_squash) /home/ftp (ro)
Each line defines a directory, and the hosts allowed to mount it. A host name is usually a fully qualified domain name, but may additionally contain the * and ? wildcard, which act the way they do with the Bourne shell. For instance, lab*.foo.com matches lab01.foo.com as well as laber.foo.com. If no host name is given, as with the /home/ftp directory in the example above, any host is allowed to mount this directory. The host name is followed by an optional, comma-separated list of flags, enclosed in brackets. These flags may take the following values: An error parsing the exports file is reported to syslogd's daemon facility at level notice whenever nfsd or mountd is started up. Note that host names are obtained from the client's IP address by reverse mapping, so you have to have the resolver configured properly. If you use BIND and if you are very security-conscious, you should enable spoof checking in your host.conf file.
10.5 The Automounter
Sometimes it is wasteful to mount all NFS volumes which users might possibly want to access; either because of the sheer number of volumes to be mounted, or because of the time this would take at startup. A viable alternative to this is a so-called automounter. This is a daemon that automatically and transparently mounts any NFS volume as needed, and unmounts them after they have not been used for some time. One of the clever things about an automounter is that it is able to mount a certain volume from alternative places. For instance, you may keep copies of your X programs and support files on two or three hosts, and have all other hosts mount them via NFS. Using an automounter, you may specify all three of them to be mounted on /usr/X386; the automounter will then try to mount any of these until one of the mount attempts succeeds.
10.6 SUN-NFS Step-by-Step
In this example we will configure a nfs server and will mount shared directory from client side.
For this example we are using two systems one linux server one linux clients . To complete these per quest of nfs server follow this link
per quest of nfs server
A linux server with ip address 192.168.0.254 and hostname Server
A linux client with ip address 192.168.0.1 and hostname Client1
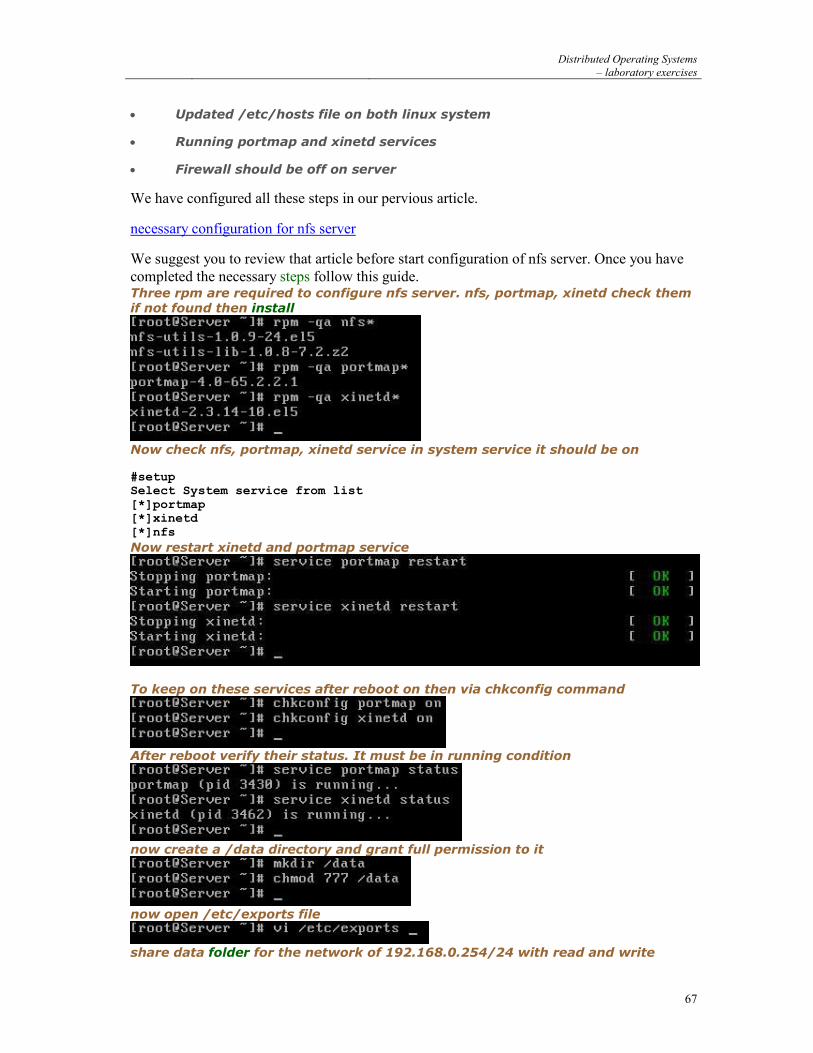
Distributed Operating Systems
– laboratory exercises
67
Updated /etc/hosts file on both linux system
Running portmap and xinetd services
Firewall should be off on server
We have configured all these steps in our pervious article.
necessary configuration for nfs server
We suggest you to review that article before start configuration of nfs server. Once you have completed the necessary steps follow this guide. Three rpm are required to configure nfs server. nfs, portmap, xinetd check them if not found then install
Now check nfs, portmap, xinetd service in system service it should be on #setup Select System service from list [*]portmap [*]xinetd [*]nfs
Now restart xinetd and portmap service
To keep on these services after reboot on then via chkconfig command
After reboot verify their status. It must be in running condition
now create a /data directory and grant full permission to it
now open /etc/exports file
share data folder for the network of 192.168.0.254/24 with read and write
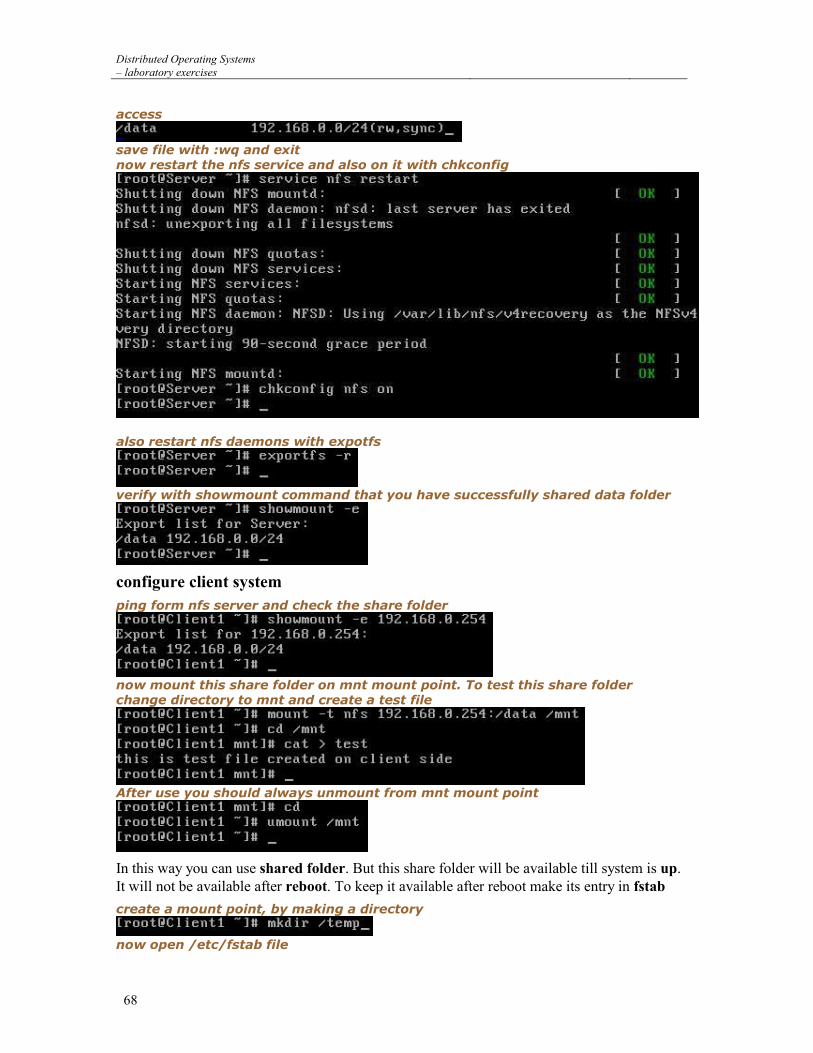
Distributed Operating Systems – laboratory exercises
68
access
save file with :wq and exit now restart the nfs service and also on it with chkconfig
also restart nfs daemons with expotfs
verify with showmount command that you have successfully shared data folder
configure client system
ping form nfs server and check the share folder
now mount this share folder on mnt mount point. To test this share folder change directory to mnt and create a test file
After use you should always unmount from mnt mount point
In this way you can use shared folder. But this share folder will be available till system is up. It will not be available after reboot. To keep it available after reboot make its entry in fstab
create a mount point, by making a directory
now open /etc/fstab file
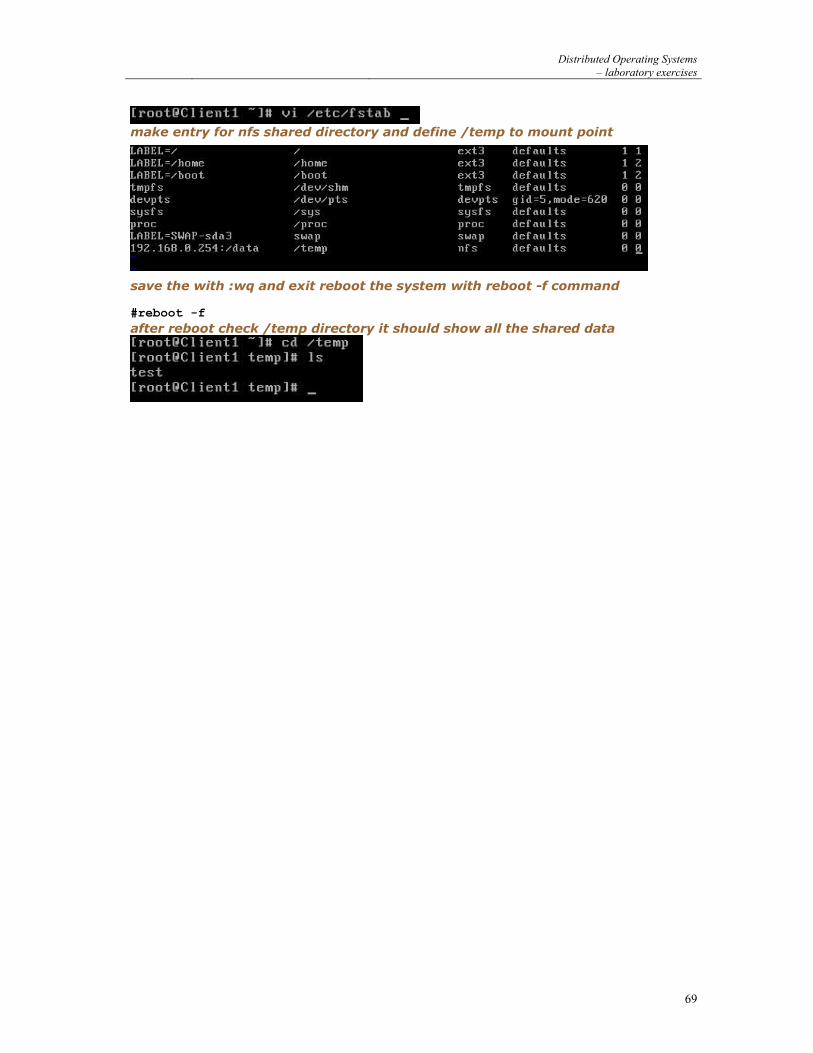
Distributed Operating Systems
– laboratory exercises
69
make entry for nfs shared directory and define /temp to mount point
save the with :wq and exit reboot the system with reboot -f command #reboot -f
after reboot check /temp directory it should show all the shared data