Embed Size (px)
Citation preview
Informatica PowerExchange for Email Server(Version 9.6.1)
User Guide for PowerCenter
Informatica PowerExchange for Email Server User Guide for PowerCenter
Version 9.6.1June 2014
Copyright (c) 1993-2015 Informatica Corporation. All rights reserved.
This software and documentation contain proprietary information of Informatica Corporation and are provided under a license agreement containing restrictions on use and disclosure and are also protected by copyright law. Reverse engineering of the software is prohibited. No part of this document may be reproduced or transmitted in any form, by any means (electronic, photocopying, recording or otherwise) without prior consent of Informatica Corporation. This Software may be protected by U.S. and/or international Patents and other Patents Pending.
Use, duplication, or disclosure of the Software by the U.S. Government is subject to the restrictions set forth in the applicable software license agreement and as provided in DFARS 227.7202-1(a) and 227.7702-3(a) (1995), DFARS 252.227-7013©(1)(ii) (OCT 1988), FAR 12.212(a) (1995), FAR 52.227-19, or FAR 52.227-14 (ALT III), as applicable.
The information in this product or documentation is subject to change without notice. If you find any problems in this product or documentation, please report them to us in writing.
Informatica, Informatica Platform, Informatica Data Services, PowerCenter, PowerCenterRT, PowerCenter Connect, PowerCenter Data Analyzer, PowerExchange, PowerMart, Metadata Manager, Informatica Data Quality, Informatica Data Explorer, Informatica B2B Data Transformation, Informatica B2B Data Exchange Informatica On Demand, Informatica Identity Resolution, Informatica Application Information Lifecycle Management, Informatica Complex Event Processing, Ultra Messaging and Informatica Master Data Management are trademarks or registered trademarks of Informatica Corporation in the United States and in jurisdictions throughout the world. All other company and product names may be trade names or trademarks of their respective owners.
Portions of this software and/or documentation are subject to copyright held by third parties, including without limitation: Copyright DataDirect Technologies. All rights reserved. Copyright © Sun Microsystems. All rights reserved. Copyright © RSA Security Inc. All Rights Reserved. Copyright © Ordinal Technology Corp. All rights reserved.Copyright © Aandacht c.v. All rights reserved. Copyright Genivia, Inc. All rights reserved. Copyright Isomorphic Software. All rights reserved. Copyright © Meta Integration Technology, Inc. All rights reserved. Copyright © Intalio. All rights reserved. Copyright © Oracle. All rights reserved. Copyright © Adobe Systems Incorporated. All rights reserved. Copyright © DataArt, Inc. All rights reserved. Copyright © ComponentSource. All rights reserved. Copyright © Microsoft Corporation. All rights reserved. Copyright © Rogue Wave Software, Inc. All rights reserved. Copyright © Teradata Corporation. All rights reserved. Copyright © Yahoo! Inc. All rights reserved. Copyright © Glyph & Cog, LLC. All rights reserved. Copyright © Thinkmap, Inc. All rights reserved. Copyright © Clearpace Software Limited. All rights reserved. Copyright © Information Builders, Inc. All rights reserved. Copyright © OSS Nokalva, Inc. All rights reserved. Copyright Edifecs, Inc. All rights reserved. Copyright Cleo Communications, Inc. All rights reserved. Copyright © International Organization for Standardization 1986. All rights reserved. Copyright © ej-technologies GmbH. All rights reserved. Copyright © Jaspersoft Corporation. All rights reserved. Copyright © International Business Machines Corporation. All rights reserved. Copyright © yWorks GmbH. All rights reserved. Copyright © Lucent Technologies. All rights reserved. Copyright (c) University of Toronto. All rights reserved. Copyright © Daniel Veillard. All rights reserved. Copyright © Unicode, Inc. Copyright IBM Corp. All rights reserved. Copyright © MicroQuill Software Publishing, Inc. All rights reserved. Copyright © PassMark Software Pty Ltd. All rights reserved. Copyright © LogiXML, Inc. All rights reserved. Copyright © 2003-2010 Lorenzi Davide, All rights reserved. Copyright © Red Hat, Inc. All rights reserved. Copyright © The Board of Trustees of the Leland Stanford Junior University. All rights reserved. Copyright © EMC Corporation. All rights reserved. Copyright © Flexera Software. All rights reserved. Copyright © Jinfonet Software. All rights reserved. Copyright © Apple Inc. All rights reserved. Copyright © Telerik Inc. All rights reserved. Copyright © BEA Systems. All rights reserved. Copyright © PDFlib GmbH. All rights reserved. Copyright ©
Orientation in Objects GmbH. All rights reserved. Copyright © Tanuki Software, Ltd. All rights reserved. Copyright © Ricebridge. All rights reserved. Copyright © Sencha, Inc. All rights reserved. Copyright © Scalable Systems, Inc. All rights reserved. Copyright © jQWidgets. All rights reserved. Copyright © Tableau Software, Inc. All rights reserved. Copyright© MaxMind, Inc. All Rights Reserved. Copyright © TMate Software s.r.o. All rights reserved. Copyright © MapR Technologies Inc. All rights reserved.
This product includes software developed by the Apache Software Foundation (http://www.apache.org/), and/or other software which is licensed under various versions of the Apache License (the "License"). You may obtain a copy of these Licenses at http://www.apache.org/licenses/. Unless required by applicable law or agreed to in writing, software distributed under these Licenses is distributed on an "AS IS" BASIS, WITHOUT WARRANTIES OR CONDITIONS OF ANY KIND, either express or implied. See the Licenses for the specific language governing permissions and limitations under the Licenses.
This product includes software which was developed by Mozilla (http://www.mozilla.org/), software copyright The JBoss Group, LLC, all rights reserved; software copyright © 1999-2006 by Bruno Lowagie and Paulo Soares and other software which is licensed under various versions of the GNU Lesser General Public License Agreement, which may be found at http:// www.gnu.org/licenses/lgpl.html. The materials are provided free of charge by Informatica, "as-is", without warranty of any kind, either express or implied, including but not limited to the implied warranties of merchantability and fitness for a particular purpose.
The product includes ACE(TM) and TAO(TM) software copyrighted by Douglas C. Schmidt and his research group at Washington University, University of California, Irvine, and Vanderbilt University, Copyright (©) 1993-2006, all rights reserved.
This product includes software developed by the OpenSSL Project for use in the OpenSSL Toolkit (copyright The OpenSSL Project. All Rights Reserved) and redistribution of this software is subject to terms available at http://www.openssl.org and http://www.openssl.org/source/license.html.
This product includes Curl software which is Copyright 1996-2013, Daniel Stenberg, <[email protected]>. All Rights Reserved. Permissions and limitations regarding this software are subject to terms available at http://curl.haxx.se/docs/copyright.html. Permission to use, copy, modify, and distribute this software for any purpose with or without fee is hereby granted, provided that the above copyright notice and this permission notice appear in all copies.
The product includes software copyright 2001-2005 (©) MetaStuff, Ltd. All Rights Reserved. Permissions and limitations regarding this software are subject to terms available at http://www.dom4j.org/ license.html.
The product includes software copyright © 2004-2007, The Dojo Foundation. All Rights Reserved. Permissions and limitations regarding this software are subject to terms available at http://dojotoolkit.org/license.
This product includes ICU software which is copyright International Business Machines Corporation and others. All rights reserved. Permissions and limitations regarding this software are subject to terms available at http://source.icu-project.org/repos/icu/icu/trunk/license.html.
This product includes software copyright © 1996-2006 Per Bothner. All rights reserved. Your right to use such materials is set forth in the license which may be found at http:// www.gnu.org/software/ kawa/Software-License.html.
This product includes OSSP UUID software which is Copyright © 2002 Ralf S. Engelschall, Copyright © 2002 The OSSP Project Copyright © 2002 Cable & Wireless Deutschland. Permissions and limitations regarding this software are subject to terms available at http://www.opensource.org/licenses/mit-license.php.
This product includes software developed by Boost (http://www.boost.org/) or under the Boost software license. Permissions and limitations regarding this software are subject to terms available at http:/ /www.boost.org/LICENSE_1_0.txt.
This product includes software copyright © 1997-2007 University of Cambridge. Permissions and limitations regarding this software are subject to terms available at http:// www.pcre.org/license.txt.
This product includes software copyright © 2007 The Eclipse Foundation. All Rights Reserved. Permissions and limitations regarding this software are subject to terms available at http:// www.eclipse.org/org/documents/epl-v10.php and at http://www.eclipse.org/org/documents/edl-v10.php.
This product includes software licensed under the terms at http://www.tcl.tk/software/tcltk/license.html, http://www.bosrup.com/web/overlib/?License, http://www.stlport.org/doc/ license.html, http://asm.ow2.org/license.html, http://www.cryptix.org/LICENSE.TXT, http://hsqldb.org/web/hsqlLicense.html, http://

httpunit.sourceforge.net/doc/ license.html, http://jung.sourceforge.net/license.txt , http://www.gzip.org/zlib/zlib_license.html, http://www.openldap.org/software/release/license.html, http://www.libssh2.org, http://slf4j.org/license.html, http://www.sente.ch/software/OpenSourceLicense.html, http://fusesource.com/downloads/license-agreements/fuse-message-broker-v-5-3- license-agreement; http://antlr.org/license.html; http://aopalliance.sourceforge.net/; http://www.bouncycastle.org/licence.html; http://www.jgraph.com/jgraphdownload.html; http://www.jcraft.com/jsch/LICENSE.txt; http://jotm.objectweb.org/bsd_license.html; . http://www.w3.org/Consortium/Legal/2002/copyright-software-20021231; http://www.slf4j.org/license.html; http://nanoxml.sourceforge.net/orig/copyright.html; http://www.json.org/license.html; http://forge.ow2.org/projects/javaservice/, http://www.postgresql.org/about/licence.html, http://www.sqlite.org/copyright.html, http://www.tcl.tk/software/tcltk/license.html, http://www.jaxen.org/faq.html, http://www.jdom.org/docs/faq.html, http://www.slf4j.org/license.html; http://www.iodbc.org/dataspace/iodbc/wiki/iODBC/License; http://www.keplerproject.org/md5/license.html; http://www.toedter.com/en/jcalendar/license.html; http://www.edankert.com/bounce/index.html; http://www.net-snmp.org/about/license.html; http://www.openmdx.org/#FAQ; http://www.php.net/license/3_01.txt; http://srp.stanford.edu/license.txt; http://www.schneier.com/blowfish.html; http://www.jmock.org/license.html; http://xsom.java.net; http://benalman.com/about/license/; https://github.com/CreateJS/EaselJS/blob/master/src/easeljs/display/Bitmap.js; http://www.h2database.com/html/license.html#summary; http://jsoncpp.sourceforge.net/LICENSE; http://jdbc.postgresql.org/license.html; http://protobuf.googlecode.com/svn/trunk/src/google/protobuf/descriptor.proto; https://github.com/rantav/hector/blob/master/LICENSE; http://web.mit.edu/Kerberos/krb5-current/doc/mitK5license.html; http://jibx.sourceforge.net/jibx-license.html; https://github.com/lyokato/libgeohash/blob/master/LICENSE; https://github.com/hjiang/jsonxx/blob/master/LICENSE; https://code.google.com/p/lz4/; https://github.com/jedisct1/libsodium/blob/master/LICENSE; http://one-jar.sourceforge.net/index.php?page=documents&file=license; https://github.com/EsotericSoftware/kryo/blob/master/license.txt; http://www.scala-lang.org/license.html; https://github.com/tinkerpop/blueprints/blob/master/LICENSE.txt; and http://gee.cs.oswego.edu/dl/classes/EDU/oswego/cs/dl/util/concurrent/intro.html.
This product includes software licensed under the Academic Free License (http://www.opensource.org/licenses/afl-3.0.php), the Common Development and Distribution License (http://www.opensource.org/licenses/cddl1.php) the Common Public License (http://www.opensource.org/licenses/cpl1.0.php), the Sun Binary Code License Agreement Supplemental License Terms, the BSD License (http:// www.opensource.org/licenses/bsd-license.php), the new BSD License (http://opensource.org/licenses/BSD-3-Clause), the MIT License (http://www.opensource.org/licenses/mit-license.php), the Artistic License (http://www.opensource.org/licenses/artistic-license-1.0) and the Initial Developer’s Public License Version 1.0 (http://www.firebirdsql.org/en/initial-developer-s-public-license-version-1-0/).
This product includes software copyright © 2003-2006 Joe WaInes, 2006-2007 XStream Committers. All rights reserved. Permissions and limitations regarding this software are subject to terms available at http://xstream.codehaus.org/license.html. This product includes software developed by the Indiana University Extreme! Lab. For further information please visit http://www.extreme.indiana.edu/.
This product includes software Copyright (c) 2013 Frank Balluffi and Markus Moeller. All rights reserved. Permissions and limitations regarding this software are subject to terms of the MIT license.
This Software is protected by U.S. Patent Numbers 5,794,246; 6,014,670; 6,016,501; 6,029,178; 6,032,158; 6,035,307; 6,044,374; 6,092,086; 6,208,990; 6,339,775; 6,640,226; 6,789,096; 6,823,373; 6,850,947; 6,895,471; 7,117,215; 7,162,643; 7,243,110; 7,254,590; 7,281,001; 7,421,458; 7,496,588; 7,523,121; 7,584,422; 7,676,516; 7,720,842; 7,721,270; 7,774,791; 8,065,266; 8,150,803; 8,166,048; 8,166,071; 8,200,622; 8,224,873; 8,271,477; 8,327,419; 8,386,435; 8,392,460; 8,453,159; 8,458,230; 8,707,336; 8,886,617 and RE44,478, International Patents and other Patents Pending.
DISCLAIMER: Informatica Corporation provides this documentation "as is" without warranty of any kind, either express or implied, including, but not limited to, the implied warranties of noninfringement, merchantability, or use for a particular purpose. Informatica Corporation does not warrant that this software or documentation is error free. The information provided in this software or documentation may include technical inaccuracies or typographical errors. The information in this software and documentation is subject to change at any time without notice.
NOTICES
This Informatica product (the "Software") includes certain drivers (the "DataDirect Drivers") from DataDirect Technologies, an operating company of Progress Software Corporation ("DataDirect") which are subject to the following terms and conditions:
1.THE DATADIRECT DRIVERS ARE PROVIDED "AS IS" WITHOUT WARRANTY OF ANY KIND, EITHER EXPRESSED OR IMPLIED, INCLUDING BUT NOT LIMITED TO, THE IMPLIED WARRANTIES OF MERCHANTABILITY, FITNESS FOR A PARTICULAR PURPOSE AND NON-INFRINGEMENT.
2. IN NO EVENT WILL DATADIRECT OR ITS THIRD PARTY SUPPLIERS BE LIABLE TO THE END-USER CUSTOMER FOR ANY DIRECT, INDIRECT, INCIDENTAL, SPECIAL, CONSEQUENTIAL OR OTHER DAMAGES ARISING OUT OF THE USE OF THE ODBC DRIVERS, WHETHER OR NOT INFORMED OF THE POSSIBILITIES OF DAMAGES IN ADVANCE. THESE LIMITATIONS APPLY TO ALL CAUSES OF ACTION, INCLUDING, WITHOUT LIMITATION, BREACH OF CONTRACT, BREACH OF WARRANTY, NEGLIGENCE, STRICT LIABILITY, MISREPRESENTATION AND OTHER TORTS.
Part Number: PWX-EMU-96100-0001
Table of Contents
Preface . . . . . . . . . . . . . . . . . . . . . . . . . . . . . . . . . . . . . . . . . . . . . . . . . . . . . . . . . . . . . . . . . . . . . . . 6Informatica Resources. . . . . . . . . . . . . . . . . . . . . . . . . . . . . . . . . . . . . . . . . . . . . . . . . . . 6
Informatica My Support Portal. . . . . . . . . . . . . . . . . . . . . . . . . . . . . . . . . . . . . . . . . . . 6
Informatica Documentation. . . . . . . . . . . . . . . . . . . . . . . . . . . . . . . . . . . . . . . . . . . . . 6
Informatica Product Availability Matrixes. . . . . . . . . . . . . . . . . . . . . . . . . . . . . . . . . . . . . 6
Informatica Web Site. . . . . . . . . . . . . . . . . . . . . . . . . . . . . . . . . . . . . . . . . . . . . . . . . 6
Informatica How-To Library. . . . . . . . . . . . . . . . . . . . . . . . . . . . . . . . . . . . . . . . . . . . . 7
Informatica Knowledge Base. . . . . . . . . . . . . . . . . . . . . . . . . . . . . . . . . . . . . . . . . . . . 7
Informatica Support YouTube Channel. . . . . . . . . . . . . . . . . . . . . . . . . . . . . . . . . . . . . . 7
Informatica Marketplace. . . . . . . . . . . . . . . . . . . . . . . . . . . . . . . . . . . . . . . . . . . . . . . 7
Informatica Velocity. . . . . . . . . . . . . . . . . . . . . . . . . . . . . . . . . . . . . . . . . . . . . . . . . . 7
Informatica Global Customer Support. . . . . . . . . . . . . . . . . . . . . . . . . . . . . . . . . . . . . . 7
Chapter 1: Understanding PowerExchange for Email Server. . . . . . . . . . . . . . . . . . . . 8Understanding PowerExchange for Email Server Overview. . . . . . . . . . . . . . . . . . . . . . . . . . . . 8
PowerCenter and Mail Server Integration. . . . . . . . . . . . . . . . . . . . . . . . . . . . . . . . . . . . . . . 8
Designer and Mail Server Integration. . . . . . . . . . . . . . . . . . . . . . . . . . . . . . . . . . . . . . . 8
PowerCenter Integration Service and Mail Server Integration. . . . . . . . . . . . . . . . . . . . . . . 8
Understanding Mail Servers. . . . . . . . . . . . . . . . . . . . . . . . . . . . . . . . . . . . . . . . . . . . . . . . 9
Email Protocols. . . . . . . . . . . . . . . . . . . . . . . . . . . . . . . . . . . . . . . . . . . . . . . . . . . . 10
Messaging Application Programming Interface. . . . . . . . . . . . . . . . . . . . . . . . . . . . . . . . 11
Microsoft Exchange Server. . . . . . . . . . . . . . . . . . . . . . . . . . . . . . . . . . . . . . . . . . . . 11
Chapter 2: Installation and Configuration. . . . . . . . . . . . . . . . . . . . . . . . . . . . . . . . . . . . . 12Installation and Configuration Overview. . . . . . . . . . . . . . . . . . . . . . . . . . . . . . . . . . . . . . . 12
Prerequisites. . . . . . . . . . . . . . . . . . . . . . . . . . . . . . . . . . . . . . . . . . . . . . . . . . . . . 12
Installing and Configuring PowerExchange for Email Server. . . . . . . . . . . . . . . . . . . . . . . 13
Upgrading PowerExchange for Email Server. . . . . . . . . . . . . . . . . . . . . . . . . . . . . . . . . 13
Installing PowerExchange for Email Server. . . . . . . . . . . . . . . . . . . . . . . . . . . . . . . . . . . . . 13
Installing the Client Component. . . . . . . . . . . . . . . . . . . . . . . . . . . . . . . . . . . . . . . . . 13
Installing the Server Component. . . . . . . . . . . . . . . . . . . . . . . . . . . . . . . . . . . . . . . . . 13
Registering the Plug-in. . . . . . . . . . . . . . . . . . . . . . . . . . . . . . . . . . . . . . . . . . . . . . . . . . 15
Registering the Plug-in from the Administrator Tool. . . . . . . . . . . . . . . . . . . . . . . . . . . . . 15
Registering the Plug-in from the Command Line Interface. . . . . . . . . . . . . . . . . . . . . . . . . 15
Chapter 3: Email Sources. . . . . . . . . . . . . . . . . . . . . . . . . . . . . . . . . . . . . . . . . . . . . . . . . . . . 16Email Sources Overview. . . . . . . . . . . . . . . . . . . . . . . . . . . . . . . . . . . . . . . . . . . . . . . . . 16
Creating a DSN for an Email Source Definition. . . . . . . . . . . . . . . . . . . . . . . . . . . . . . . . . . . 16
Connecting to Microsoft Exchange Server Through MAPI. . . . . . . . . . . . . . . . . . . . . . . . . 18
Creating an Email Source Definition. . . . . . . . . . . . . . . . . . . . . . . . . . . . . . . . . . . . . . . . . . 18
4 Table of Contents
Filtering Source Data. . . . . . . . . . . . . . . . . . . . . . . . . . . . . . . . . . . . . . . . . . . . . . . . 18
Importing an Email Source Definition. . . . . . . . . . . . . . . . . . . . . . . . . . . . . . . . . . . . . . 20
Rules and Guidelines for Mail Server Connections. . . . . . . . . . . . . . . . . . . . . . . . . . . . . 21
Updating Email Source Definitions. . . . . . . . . . . . . . . . . . . . . . . . . . . . . . . . . . . . . . . . . . . 22
Editing and Reimporting an Email Source Definition . . . . . . . . . . . . . . . . . . . . . . . . . . . . 22
Editing an Email Source Definition. . . . . . . . . . . . . . . . . . . . . . . . . . . . . . . . . . . . . . . . 22
Troubleshooting Email Sources. . . . . . . . . . . . . . . . . . . . . . . . . . . . . . . . . . . . . . . . . . . . 23
Chapter 4: Email Sessions. . . . . . . . . . . . . . . . . . . . . . . . . . . . . . . . . . . . . . . . . . . . . . . . . . . . 24Email Sessions Overview. . . . . . . . . . . . . . . . . . . . . . . . . . . . . . . . . . . . . . . . . . . . . . . . 24
Configuring an Email Server Application Connection. . . . . . . . . . . . . . . . . . . . . . . . . . . . . . . 24
Rules and Guidelines for Email Server Application Connections. . . . . . . . . . . . . . . . . . . . . 26
Configuring Sessions for Email Sources. . . . . . . . . . . . . . . . . . . . . . . . . . . . . . . . . . . . . . . 27
Appendix A: Datatype Reference. . . . . . . . . . . . . . . . . . . . . . . . . . . . . . . . . . . . . . . . . . . . . 29Email and Transformation Datatypes. . . . . . . . . . . . . . . . . . . . . . . . . . . . . . . . . . . . . . . . . 29
Appendix B: Error Messages. . . . . . . . . . . . . . . . . . . . . . . . . . . . . . . . . . . . . . . . . . . . . . . . . 30Designer Messages. . . . . . . . . . . . . . . . . . . . . . . . . . . . . . . . . . . . . . . . . . . . . . . . . . . . 30
Index. . . . . . . . . . . . . . . . . . . . . . . . . . . . . . . . . . . . . . . . . . . . . . . . . . . . . . . . . . . . 32
Table of Contents 5
PrefaceThe Informatica PowerExchange for Email Server User Guide for PowerCenter provides information about extracting data from an email source. It is written for database administrators and developers who are responsible for extracting data from email sources. This book assumes you have knowledge of mail servers and PowerCenter.
Informatica Resources
Informatica My Support PortalAs an Informatica customer, you can access the Informatica My Support Portal at http://mysupport.informatica.com.
The site contains product information, user group information, newsletters, access to the Informatica customer support case management system (ATLAS), the Informatica How-To Library, the Informatica Knowledge Base, Informatica Product Documentation, and access to the Informatica user community.
Informatica DocumentationThe Informatica Documentation team makes every effort to create accurate, usable documentation. If you have questions, comments, or ideas about this documentation, contact the Informatica Documentation team through email at [email protected]. We will use your feedback to improve our documentation. Let us know if we can contact you regarding your comments.
The Documentation team updates documentation as needed. To get the latest documentation for your product, navigate to Product Documentation from http://mysupport.informatica.com.
Informatica Product Availability MatrixesProduct Availability Matrixes (PAMs) indicate the versions of operating systems, databases, and other types of data sources and targets that a product release supports. You can access the PAMs on the Informatica My Support Portal at https://mysupport.informatica.com/community/my-support/product-availability-matrices.
Informatica Web SiteYou can access the Informatica corporate web site at http://www.informatica.com. The site contains information about Informatica, its background, upcoming events, and sales offices. You will also find product and partner information. The services area of the site includes important information about technical support, training and education, and implementation services.
6
Informatica How-To LibraryAs an Informatica customer, you can access the Informatica How-To Library at http://mysupport.informatica.com. The How-To Library is a collection of resources to help you learn more about Informatica products and features. It includes articles and interactive demonstrations that provide solutions to common problems, compare features and behaviors, and guide you through performing specific real-world tasks.
Informatica Knowledge BaseAs an Informatica customer, you can access the Informatica Knowledge Base at http://mysupport.informatica.com. Use the Knowledge Base to search for documented solutions to known technical issues about Informatica products. You can also find answers to frequently asked questions, technical white papers, and technical tips. If you have questions, comments, or ideas about the Knowledge Base, contact the Informatica Knowledge Base team through email at [email protected].
Informatica Support YouTube ChannelYou can access the Informatica Support YouTube channel at http://www.youtube.com/user/INFASupport. The Informatica Support YouTube channel includes videos about solutions that guide you through performing specific tasks. If you have questions, comments, or ideas about the Informatica Support YouTube channel, contact the Support YouTube team through email at [email protected] or send a tweet to @INFASupport.
Informatica MarketplaceThe Informatica Marketplace is a forum where developers and partners can share solutions that augment, extend, or enhance data integration implementations. By leveraging any of the hundreds of solutions available on the Marketplace, you can improve your productivity and speed up time to implementation on your projects. You can access Informatica Marketplace at http://www.informaticamarketplace.com.
Informatica VelocityYou can access Informatica Velocity at http://mysupport.informatica.com. Developed from the real-world experience of hundreds of data management projects, Informatica Velocity represents the collective knowledge of our consultants who have worked with organizations from around the world to plan, develop, deploy, and maintain successful data management solutions. If you have questions, comments, or ideas about Informatica Velocity, contact Informatica Professional Services at [email protected].
Informatica Global Customer SupportYou can contact a Customer Support Center by telephone or through the Online Support.
Online Support requires a user name and password. You can request a user name and password at http://mysupport.informatica.com.
The telephone numbers for Informatica Global Customer Support are available from the Informatica web site at http://www.informatica.com/us/services-and-training/support-services/global-support-centers/.
Preface 7
C H A P T E R 1
Understanding PowerExchange for Email Server
This chapter includes the following topics:
• Understanding PowerExchange for Email Server Overview, 8
• PowerCenter and Mail Server Integration, 8
• Understanding Mail Servers, 9
Understanding PowerExchange for Email Server Overview
PowerExchange for Email Server provides connectivity between PowerCenter and mail servers to extract email data. Email data includes customer comments and communications, internal research reports, intellectual property, and assets. You can use PowerExchange for Email Server to extract email data from a mail server. You can load the extracted data to a target and then use the data for data mining and analysis.
PowerCenter and Mail Server IntegrationPowerExchange for Email Server integrates mail servers with the Designer and the PowerCenter Integration Service. You can import email messages and contacts metadata into PowerCenter and use it in email mappings.
Designer and Mail Server IntegrationThe Designer connects to the message store of a mail server to import email metadata as a source definition. After importing the source definition, you can create the corresponding email mappings.
PowerCenter Integration Service and Mail Server IntegrationThe PowerCenter Integration Service connects to a mail server or an Outlook PST file through the JavaMail APIs or Microsoft Messaging APIs (MAPI) to read the source data from the message store.
8
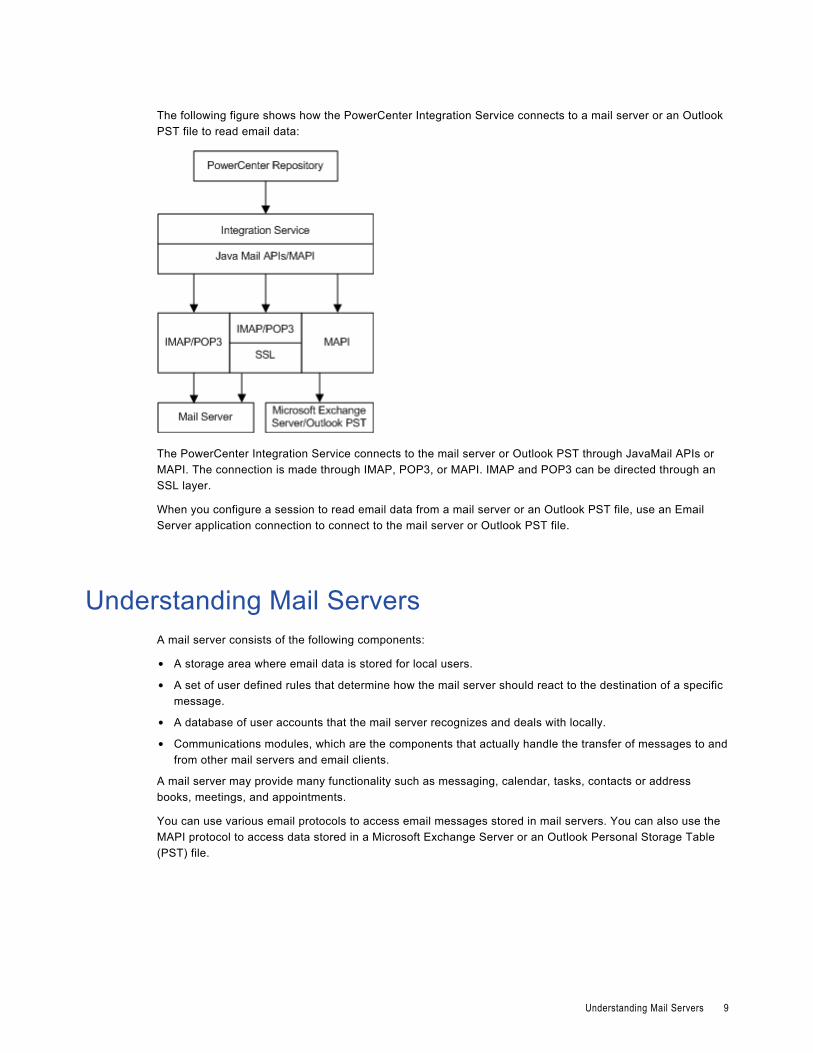
The following figure shows how the PowerCenter Integration Service connects to a mail server or an Outlook PST file to read email data:
The PowerCenter Integration Service connects to the mail server or Outlook PST through JavaMail APIs or MAPI. The connection is made through IMAP, POP3, or MAPI. IMAP and POP3 can be directed through an SSL layer.
When you configure a session to read email data from a mail server or an Outlook PST file, use an Email Server application connection to connect to the mail server or Outlook PST file.
Understanding Mail ServersA mail server consists of the following components:
• A storage area where email data is stored for local users.
• A set of user defined rules that determine how the mail server should react to the destination of a specific message.
• A database of user accounts that the mail server recognizes and deals with locally.
• Communications modules, which are the components that actually handle the transfer of messages to and from other mail servers and email clients.
A mail server may provide many functionality such as messaging, calendar, tasks, contacts or address books, meetings, and appointments.
You can use various email protocols to access email messages stored in mail servers. You can also use the MAPI protocol to access data stored in a Microsoft Exchange Server or an Outlook Personal Storage Table (PST) file.
Understanding Mail Servers 9
Email ProtocolsA protocol is a standard method used by communication channels to transmit information correctly. An email client and a mail server can exchange information with each other using the following protocols:
• Internet Message Access Protocol (IMAP)
• IMAP over Secure Sockets Layer (SSL) (IMAPS)
• Post Office Protocol v3 (POP3)
• POP3 over SSL (POP3S)
• Simple Mail Transfer Protocol (SMTP)
• Hypertext Transfer Protocol (HTTP)
Note: When the PowerCenter Integration Service is running on Windows or UNIX, you can retrieve emails from mail servers such as, Microsoft Exchange Server using MAPI, IMAP, IMAP over SSL, POP3, or POP3 over SSL protocols.
IMAPIMAP accesses electronic mail messages stored on a mail server. It permits a client email program to access remote message stores as if they were local. Online and disconnected operations are the main features of IMAP, though it can process offline too.
IMAPSThe IMAP directed through the SSL is called IMAPS. It is used to provide secure communication with the mail server.
POP3POP3 supports offline mail processing. It has limited capabilities while accessing one mailbox. It is not as capable as IMAP. Emails are delivered to a shared server offline. Personal computer users periodically invoke a mail client program that connects to the server and downloads all the pending emails to their machine.
POP3SThe POP3 directed through the SSL is called POP3S. It is used to provide secure communication with the mail server.
SMTPSMTP is used by the Mail Transfer Agent (MTA) to deliver email to the recipient mail server. The protocol can only be used to send emails, not to receive them.
HTTPHTTP allows a user to access a mailbox and to compose or retrieve emails from an email account. It is also called web-based email. It is not dedicated to email communications.
10 Chapter 1: Understanding PowerExchange for Email Server

Messaging Application Programming InterfaceMAPI is a mature mechanism to access information in Microsoft Exchange Server. Use MAPI to access items and folders within public and private stores and the properties stored with each item. Client applications use MAPI to access user mailbox and public folder information stored in Microsoft Exchange Server and user directory information stored in Active Directory. Client applications using MAPI are typically the email clients and applications that require complex email processing.
Note: You can retrieve emails and contact details from the Outlook PST files and Microsoft Exchange Server using MAPI only when the PowerCenter Integration Service is running on Windows.
Microsoft Exchange ServerMicrosoft Exchange Server is a messaging and collaborative software product developed by Microsoft. Microsoft Exchange Server has the following features:
• Electronic mail
• Shared calendars and tasks
• Contacts or address books
• Mobile and web-based access to information
• Storage for very large amounts of data
Understanding Mail Servers 11
C H A P T E R 2
Installation and ConfigurationThis chapter includes the following topics:
• Installation and Configuration Overview, 12
• Installing PowerExchange for Email Server, 13
• Registering the Plug-in, 15
Installation and Configuration OverviewThis chapter provides information about upgrading, installing, and configuring PowerExchange for Email Server.
PrerequisitesBefore you upgrade or install PowerExchange for Email Server, complete the following tasks:
• Install or upgrade PowerCenter. For more information about the PowerCenter versions that PowerExchange for Email Server is compatible with, see the PowerExchange for Email Server Release Notes.
• Verify that you have read and write permissions on the following directories on each machine that runs the PowerCenter Integration Service or PowerCenter Repository Service:
<PowerCenter Installation Directory>\server\bin<PowerCenter Installation Directory>\server\bin\Plugin<PowerCenter Installation Directory>\server\bin\javalib
The installer must be able to add and overwrite files in these directories.
• Verify that you have read and write permissions on the following directories of each PowerCenter Client machine:
<PowerCenter Installation Directory>\clients\PowerCenterClient\client\bin<PowerCenter Installation Directory>\clients\PowerCenterClient\client\bin\javalib<PowerCenter Installation Directory>\clients\PowerCenterClient\client\bin\Help\<language>
The installer must be able to add and overwrite files in these directories.
12
Installing and Configuring PowerExchange for Email ServerTo install and configure PowerExchange for Email Server, complete the following steps:
1. Install PowerExchange for Email Server.
2. Register the plug-in.
After you install and configure PowerExchange for Email Server, you can create connections to access mail servers. Create a Data Source Name (DSN) on the PowerCenter Client machine to import email definitions. Create connection objects in the Workflow Manager so the PowerCenter Integration Service can connect to mail servers.
Upgrading PowerExchange for Email ServerWhen you upgrade PowerExchange for Email Server, complete the following tasks:
1. Install PowerExchange for Email Server.
2. Upgrade the plug-in registration.
Installing PowerExchange for Email ServerWhen you install PowerExchange for Email Server, you install the following components that allow PowerCenter to access the mail servers:
• Client component. Allows you to import definitions, create mappings, and create connection objects using the PowerCenter Client.
• Server component. Allows the PowerCenter Repository Service to store and access the mail server metadata in the repository and the PowerCenter Integration Service to run Email Server sessions.
Installing the Client ComponentInstall the Client component on each PowerCenter Client machine where you want to create or access mail server metadata.
1. Run install.bat from the installation package.
2. Click Next.
3. Select the Informatica installation directory.
By default, the client is installed in the following location:C:\Informatica\<version folder>
4. Click Next.
5. Click Install to begin the installation.
6. Click Done when the installation is complete.
The client component is installed.
Installing the Server ComponentThe PowerExchange for Email Server server component installs the PowerCenter Integration Service and PowerCenter Repository Service components.
Installing PowerExchange for Email Server 13
If the PowerCenter Integration Service or PowerCenter Repository Service is configured to run on primary and backup nodes, install the PowerExchange for Email Server server component on each node configured to run the PowerCenter Integration Service or PowerCenter Repository Service.
If the PowerCenter Integration Service is configured to run on a grid, install the PowerExchange for Email Server server component on each node configured to run on the grid. If you cannot install the PowerExchange for Email Server server component on each node in the grid, create a resource in the domain and assign it to each node where you installed the PowerExchange for Email Server server component. When you create a session, configure the session to use the resource.
For example, create a custom resource called Email Server. When you create a session, assign the resource as a required resource. The Load Balancer dispatches the Session task to a node that has the resource.
Installing the Server Component on WindowsInstall the PowerExchange for Email Server server component on Windows when the PowerCenter Integration Service or PowerCenter Repository Service runs on Windows.
1. Run install.bat from the installation package.
2. Click Next.
3. Select the Informatica installation directory.
By default, the server components are installed in the following location:C:\Informatica installation directory\<version folder>
4. Click Next.
5. Click Install to begin the installation.
6. Click Done when the installation is complete.
The PowerCenter Integration Service and PowerCenter Repository Service components are installed.
Installing the Server Component on UNIXInstall the PowerExchange for Email Server server component on UNIX when the PowerCenter Integration Service or PowerCenter Repository Service runs on UNIX.
To install the PowerExchange for Email Server server component on the UNIX platforms that support graphical user interface, perform the same steps that you use to install the server components on Windows.
To install the PowerExchange for Email Server server component on the UNIX platforms that use the command line interface, perform the following steps:
1. Enter sh install.sh at the prompt.
2. Enter the path to the Informatica installation directory.
By default, the server components are installed in the following location:<User Home Directory>/Informatica/<version folder>
The PowerCenter Integration Service and PowerCenter Repository Service components are installed.
14 Chapter 2: Installation and Configuration

Registering the Plug-inAfter you complete the installation, register the plug-in with the repository. If you are upgrading from a previous version, update the plug-in registration when you register the plug-in.
To register the plug-in, the repository must be running in exclusive mode. Use the Administrator tool or the pmrep RegisterPlugin command line program to register the plug-in. If you do not have the correct privileges to register the plug-in, contact the user who manages the PowerCenter Repository Service.
The plug-in file is an .xml file that defines the functionality of the adapter. When you install the server component, the installer copies the plug-in file to the following directory: <PowerCenter installation directory>/server/bin/plugin
The name of the plug-in file for PowerExchange for Email Server is EmailServer.xml.
Registering the Plug-in from the Administrator ToolRegister a repository plug-in to add its functionality to the repository.
1. Run the PowerCenter Repository Service in exclusive mode.
2. In the Navigator, select the PowerCenter Repository Service to which you want to add the plug-in.
3. In the Contents panel, click the Plug-ins view.
4. In the Actions menu of the Domain tab, select Register Plug-in.
5. On the Register Plugin page, click the Browse button to locate the plug-in file.
6. Enter your user name, password, and security domain.
The Security Domain field appears when the Informatica Domain contains an LDAP security domain.
7. Click OK.
The PowerCenter Repository Service registers the plug-in with the repository. The results of the registration operation appear in the activity log.
8. Run the PowerCenter Repository Service in normal mode.
Registering the Plug-in from the Command Line InterfaceYou can use the pmrep RegisterPlugin command to register the plug-in from the command line interface.
1. Run the PowerCenter Repository Service in exclusive mode.
2. Run the pmrep Connect command to connect to the Repository Service using a user account with Administrator Repository privilege.
The RegisterPlugin command uses the following syntax:pmrep connect -r <repository name> -d <domain_name> -n <domain user name> -x <domain_password>
3. Find <adaptername>.xml in the following directory:
$INFA_HOME\server\bin\Plugin4. Run the pmrep RegisterPlugin command to update the repository.
The RegisterPlugin command uses the following syntax:
pmrep registerplugin -i <$INFA_HOME\server\bin\Plugin\<adaptername>.xml –e –N
Registering the Plug-in 15
C H A P T E R 3
Email SourcesThis chapter includes the following topics:
• Email Sources Overview, 16
• Creating a DSN for an Email Source Definition, 16
• Creating an Email Source Definition, 18
• Updating Email Source Definitions, 22
• Troubleshooting Email Sources, 23
Email Sources OverviewEmail source definitions represent metadata for emails or contacts stored on a mail server or in an Outlook PST file.
When the PowerCenter Integration Service extracts data from an email source, it converts the data based on the datatypes in the Application Source Qualifier transformation associated with the source.
You can import an email source in the Source Analyzer. To import an email source definition, you need to create a Data Source Name (DSN). A DSN contains information to connect to a mail server, such as the mail server name, protocol, user name, and password.
You can configure the DSN to import source metadata over secure protocols, POP3S and IMAPS. POP3S and IMAPS connectivity require a security certificate signed by the Certification Authority. The certificate needs to be in the keystore called cacerts. You can get the security certificate from your mail server administrator. A certificate is generally stored as a .cer file.
Creating a DSN for an Email Source DefinitionCreate a DSN for each connection to the mail server and provide information specific to the mail server. This information changes for every DSN. You cannot modify a DSN after it is created. You need to create a new DSN to modify any information in the DSN.
1. In the Source Analyzer, click Sources > Import from Email Server.
The Import Email Source dialog box appears.
2. Click the Browse button.
The DSN Creation dialog box appears.
16
3. Enter a name for the DSN.
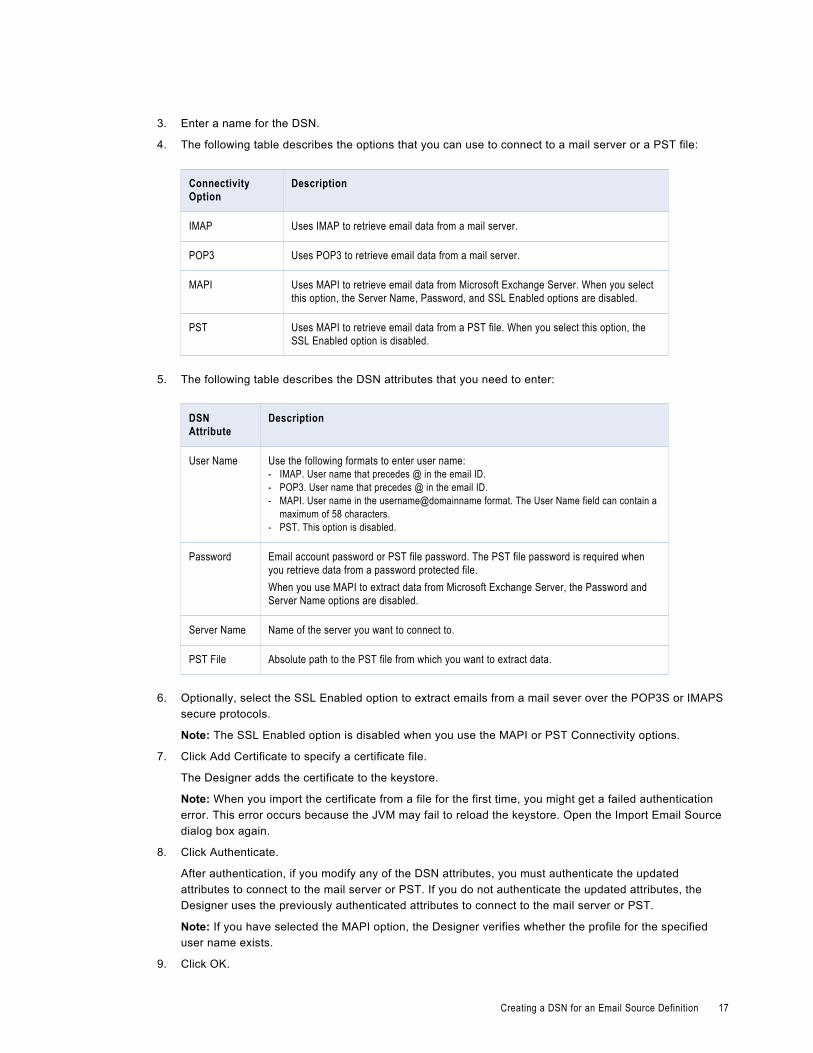
4. The following table describes the options that you can use to connect to a mail server or a PST file:
Connectivity Option
Description
IMAP Uses IMAP to retrieve email data from a mail server.
POP3 Uses POP3 to retrieve email data from a mail server.
MAPI Uses MAPI to retrieve email data from Microsoft Exchange Server. When you select this option, the Server Name, Password, and SSL Enabled options are disabled.
PST Uses MAPI to retrieve email data from a PST file. When you select this option, the SSL Enabled option is disabled.
5. The following table describes the DSN attributes that you need to enter:
DSN Attribute
Description
User Name Use the following formats to enter user name:- IMAP. User name that precedes @ in the email ID.- POP3. User name that precedes @ in the email ID.- MAPI. User name in the username@domainname format. The User Name field can contain a
maximum of 58 characters.- PST. This option is disabled.
Password Email account password or PST file password. The PST file password is required when you retrieve data from a password protected file.When you use MAPI to extract data from Microsoft Exchange Server, the Password and Server Name options are disabled.
Server Name Name of the server you want to connect to.
PST File Absolute path to the PST file from which you want to extract data.
6. Optionally, select the SSL Enabled option to extract emails from a mail sever over the POP3S or IMAPS secure protocols.
Note: The SSL Enabled option is disabled when you use the MAPI or PST Connectivity options.
7. Click Add Certificate to specify a certificate file.
The Designer adds the certificate to the keystore.
Note: When you import the certificate from a file for the first time, you might get a failed authentication error. This error occurs because the JVM may fail to reload the keystore. Open the Import Email Source dialog box again.
8. Click Authenticate.
After authentication, if you modify any of the DSN attributes, you must authenticate the updated attributes to connect to the mail server or PST. If you do not authenticate the updated attributes, the Designer uses the previously authenticated attributes to connect to the mail server or PST.
Note: If you have selected the MAPI option, the Designer verifies whether the profile for the specified user name exists.
9. Click OK.
Creating a DSN for an Email Source Definition 17
Connecting to Microsoft Exchange Server Through MAPIWhen you specify the user name in the DSN Creation dialog box and click Authenticate, the Designer verifies whether the user profile exists.
If the user profile exists, the Designer uses the existing profile to extract metadata. A dialog box appears that prompts you to enter password for the user name. Verify that the user name is the same as specified in the DSN Creation dialog box. Enter password and click OK.
If the user profile does not exist, the Server Name option is enabled. Enter server name and authenticate the user profile.
1. Click Authenticate in the DSN Creation dialog box.
A dialog box appears that prompts you to enter password for the user name.
2. Verify that the user name in the dialog box is the same as specified in the DSN Creation dialog box, and enter password.
3. Click OK. The dialog box can prompt you to enter the password again. Enter password and click OK.
Note: If you click Cancel, the Import Email Source dialog box can close.
Creating an Email Source DefinitionImport an email source definition from a mail server or a PST file. When you connect to a mail server or a PST file, the Import Email Source dialog box lists the folders on the mail server or in the PST file.
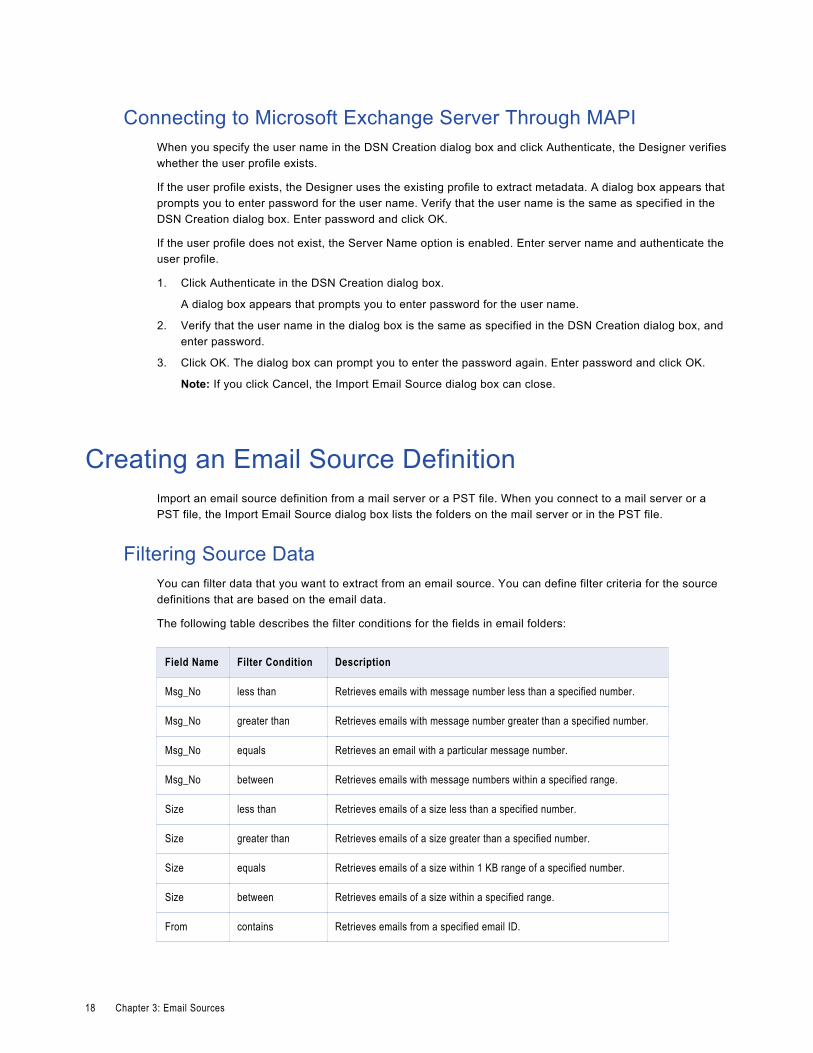
Filtering Source DataYou can filter data that you want to extract from an email source. You can define filter criteria for the source definitions that are based on the email data.
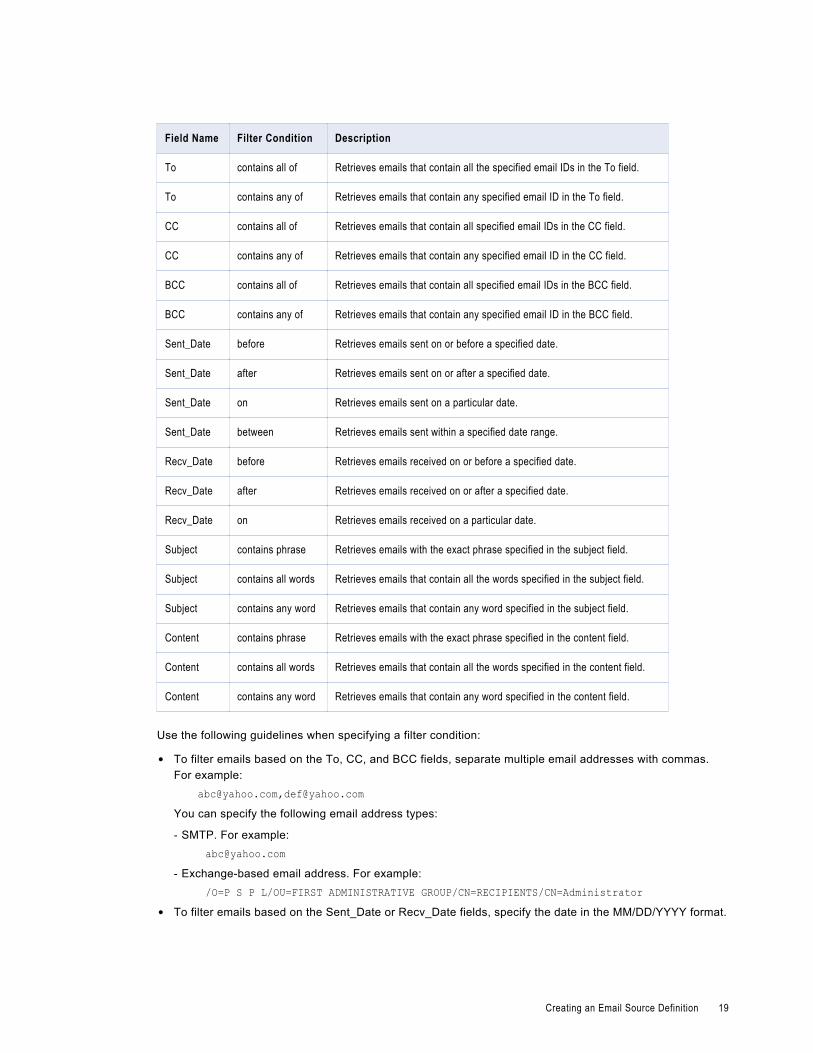
The following table describes the filter conditions for the fields in email folders:
Field Name Filter Condition Description
Msg_No less than Retrieves emails with message number less than a specified number.
Msg_No greater than Retrieves emails with message number greater than a specified number.
Msg_No equals Retrieves an email with a particular message number.
Msg_No between Retrieves emails with message numbers within a specified range.
Size less than Retrieves emails of a size less than a specified number.
Size greater than Retrieves emails of a size greater than a specified number.
Size equals Retrieves emails of a size within 1 KB range of a specified number.
Size between Retrieves emails of a size within a specified range.
From contains Retrieves emails from a specified email ID.
18 Chapter 3: Email Sources
Field Name Filter Condition Description
To contains all of Retrieves emails that contain all the specified email IDs in the To field.
To contains any of Retrieves emails that contain any specified email ID in the To field.
CC contains all of Retrieves emails that contain all specified email IDs in the CC field.
CC contains any of Retrieves emails that contain any specified email ID in the CC field.
BCC contains all of Retrieves emails that contain all specified email IDs in the BCC field.
BCC contains any of Retrieves emails that contain any specified email ID in the BCC field.
Sent_Date before Retrieves emails sent on or before a specified date.
Sent_Date after Retrieves emails sent on or after a specified date.
Sent_Date on Retrieves emails sent on a particular date.
Sent_Date between Retrieves emails sent within a specified date range.
Recv_Date before Retrieves emails received on or before a specified date.
Recv_Date after Retrieves emails received on or after a specified date.
Recv_Date on Retrieves emails received on a particular date.
Subject contains phrase Retrieves emails with the exact phrase specified in the subject field.
Subject contains all words Retrieves emails that contain all the words specified in the subject field.
Subject contains any word Retrieves emails that contain any word specified in the subject field.
Content contains phrase Retrieves emails with the exact phrase specified in the content field.
Content contains all words Retrieves emails that contain all the words specified in the content field.
Content contains any word Retrieves emails that contain any word specified in the content field.
Use the following guidelines when specifying a filter condition:
• To filter emails based on the To, CC, and BCC fields, separate multiple email addresses with commas. For example:
[email protected],[email protected] can specify the following email address types:
- SMTP. For example:[email protected]
- Exchange-based email address. For example:/O=P S P L/OU=FIRST ADMINISTRATIVE GROUP/CN=RECIPIENTS/CN=Administrator
• To filter emails based on the Sent_Date or Recv_Date fields, specify the date in the MM/DD/YYYY format.
Creating an Email Source Definition 19
• To filter emails based on the Msg_No, Size, Sent_Date, and Recv_Date fields, use the “between” condition. For example, use the following filter condition to retrieve emails which are of size between 2000 and 3000, including 2000 and 3000:
Size between 2000,3000• To filter emails based on the Subject or Content field, specify the “contains all words” or “contains any
word” condition as value1,value2,value3. For example:abc,def,xyz
• You can define one condition for each field. All the email messages that match the condition are retrieved.
Importing an Email Source Definition1. In the Source Analyzer, click Sources > Import from Email Server.
The Import Email Source dialog box appears.
2. Select the DSN used to connect to source system.
If you extract metadata from Microsoft Exchange Server, a dialog box prompts you to enter the password. Enter the password and click OK.
3. Enter the password to connect to the mail server.
Note: You must have mail server administrative permissions to view the object. You do not require mail server administrative permissions when you use MAPI to extract metadata from Microsoft Exchange Server.
4. Click Connect.
A list of folders on the mail server or in the PST file appears.
The list of folders that appears in the Select to Import tree view contains all the folders available in the PST file and mail server, such as Calendar and Tasks. These folders can contain non‑email data. The PowerCenter Integration Service retrieves only the email data from these folders.
The PowerCenter Integration Service uses MAPI to retrieve Contacts data from Microsoft Exchange Server.
5. Select the folder you want to import.
When you use POP3, you can access the INBOX folder.
6. Click the right arrows (>>) button to add the selected folder to the import list.
The Field Selection dialog box appears.
The Fields list displays the fields present in the selected folder.
7. Enter a new folder name if required.
8. From the Fields list, select the fields to map and click the right arrows (>>) button.
The mapped fields appear in the Mapped Fields list.
Note: Email body is retrieved through the Content field with MIME parts separated by the character string “--=__=\.”
9. To change the column name or precision, double-click the field name in the Mapped Fields list.
10. Enter a name for the column.
11. Enter the precision for the column.
12. Click OK.
13. To retrieve attachments along with the email data, select Retrieve Attachments.
20 Chapter 3: Email Sources
When you select the Retrieve Attachments option, the Attachment and AttachmentName columns are added to the Mapped Fields list. AttachmentName stores the attachment name along with extension. An Attachment stores the data in binary format. Attachments of up to 100 MB are supported.
Note: The PowerExchange for Email Server can extract multiple attachments regardless of the type of file. The PowerExchange for Email Server extracts nested attachments as single attachment in the binary format.
14. Click Filter to filter email data.
The Filter dialog box appears.
15. Specify the filter criteria for fields.
You can define one condition for each field.
16. Click OK.
17. Optionally, click Data Preview in the Field Selection dialog box to preview data for the mapped fields.
You can preview data if the email source definition is based on the email folder.
18. Click OK.
19. In the Import Email Source dialog box, click OK to import the email source definition.
You can import multiple source definitions from the folders on a mail server or in a PST file.
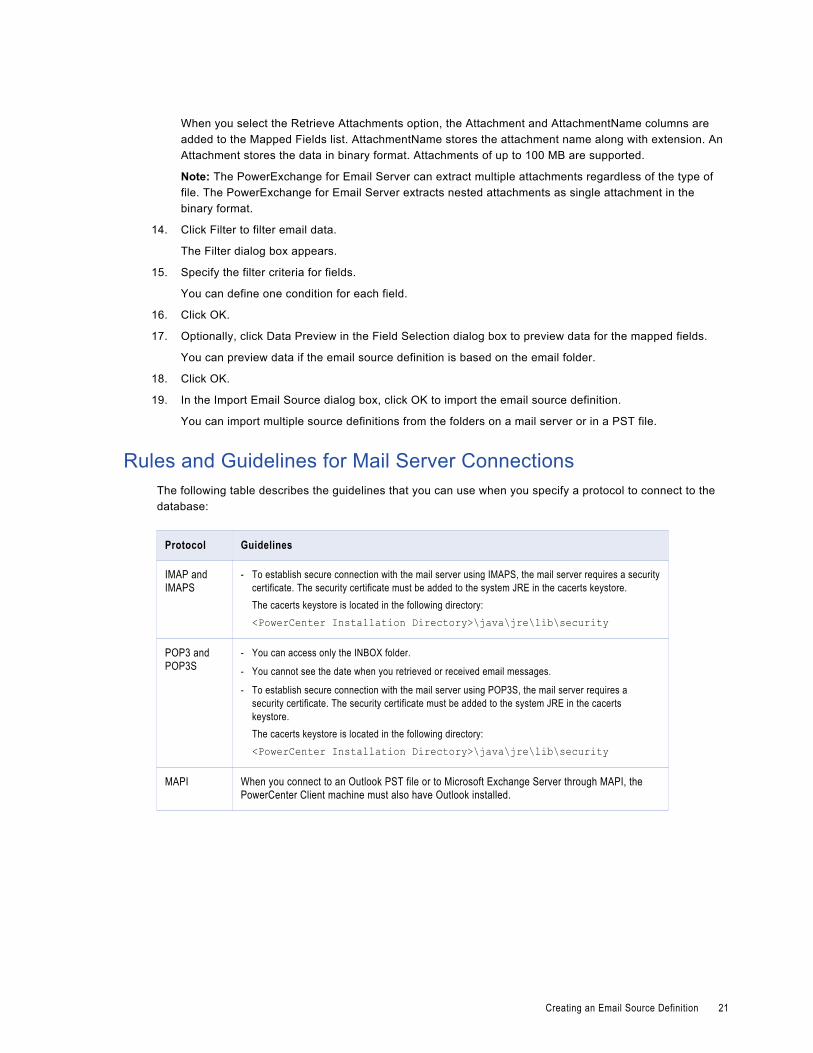
Rules and Guidelines for Mail Server ConnectionsThe following table describes the guidelines that you can use when you specify a protocol to connect to the database:
Protocol Guidelines
IMAP and IMAPS
- To establish secure connection with the mail server using IMAPS, the mail server requires a security certificate. The security certificate must be added to the system JRE in the cacerts keystore.The cacerts keystore is located in the following directory:<PowerCenter Installation Directory>\java\jre\lib\security
POP3 and POP3S
- You can access only the INBOX folder.
- You cannot see the date when you retrieved or received email messages.
- To establish secure connection with the mail server using POP3S, the mail server requires a security certificate. The security certificate must be added to the system JRE in the cacerts keystore.The cacerts keystore is located in the following directory:<PowerCenter Installation Directory>\java\jre\lib\security
MAPI When you connect to an Outlook PST file or to Microsoft Exchange Server through MAPI, the PowerCenter Client machine must also have Outlook installed.
Creating an Email Source Definition 21
Updating Email Source DefinitionsYou can update an email source definition to reflect folders or precision for the fields in the source definition. You can update a source definition in the following ways:
• Reimport the definition. If the changes are significant, you can reimport the definition. This overwrites or renames the existing source definition. You can retain existing descriptions in the source definition being replaced.
• Edit the definition. Manually edit the definition to configure properties that you cannot import or to make minor changes to the definition.
Editing and Reimporting an Email Source DefinitionYou can reimport an email source definition if you want to edit the filter conditions or the columns in the source definition.
1. Open the Import Email Source dialog box.
2. In the DSN list, select the DSN you used to create the source definition.
3. Enter a password and click Connect.
4. In the Imported Folders list, double-click the folder you want to edit.
5. Optionally, in Folder Name, modify the name of the source definition.
If you modify the name of the source definition, the Designer creates a source definition. Otherwise, it updates the existing source definition.
6. Click the right arrows (>>) button to add fields and the left arrows (<<) button to remove fields.
7. Double‑click a field to modify it.
You can edit the field name and precision.
8. Click Add Filter to add or remove filter conditions.
9. To retrieve the attachments along with the email data, select the Retrieve Attachments option.
10. Click OK.
11. In the Import Email Source dialog box, click OK to confirm the changes.
You can also edit the column name and precision for columns in a source definition. To edit the column information, double-click the field name in the right pane of the Field Selection dialog box. The Field Information dialog box appears.
Editing an Email Source DefinitionYou can edit folders, the precision of columns, and filters in a source definition.
1. Double-click the title bar of the source definition in the Source Analyzer.
The source definition appears.
2. Click the Metadata Extensions tab.
3. Enter filter conditions for a field in the Value field. For example, to retrieve emails containing the exact phrase specified in the Subject field, modify the metadata extension named Subject as follows:
contains phrase:email server4. Edit the folder name for the FolderBusinessName metadata extension.
22 Chapter 3: Email Sources
Enter a fully qualified name for a folder if the folder is nested within another folder. Separate the folder names with the delimiter specific to the mail server. For example, if the folder RecentMails is nested within the INBOX folder and slash (/) acts as a delimiter for the mail server, enter the following path:
INBOX/RecentMails
Troubleshooting Email Sources
The Select to Import tree view shows only the INBOX folder when I connect to the mail server.
If you connect to the mail server using POP3, INBOX is the only accessible folder. IMAP and Exchange Server/PST Files support access to all folders.
The Import from Email Server menu option is disabled.
The Import from Email Server menu option may be disabled for the following reasons:
• PowerCenter license key does not contain PowerExchange for Email Server license.
• The license has expired.
• You do not have write permission on the PowerCenter folder.
If you do not have a PowerExchange for Email Server license, or if the license has expired, contact Informatica Global Customer Support. If you do not have write permission on the PowerCenter folder, contact your System Administrator.
Troubleshooting Email Sources 23

C H A P T E R 4
Email SessionsThis chapter includes the following topics:
• Email Sessions Overview, 24
• Configuring an Email Server Application Connection, 24
• Configuring Sessions for Email Sources, 27
Email Sessions OverviewAfter you create mappings in the Designer, you can create a session and use the session to extract, transform, and load data. You can create sessions and workflows in the Workflow Manager.
You can run a session in the following modes:Real-time mode
When you run a session in real-time mode, the PowerCenter Integration Service extracts emails from the mail folder according to the filter specified in the session attributes and the emails that arrive in real time. To run a session in the real-time mode, set the value of the Real-time Flush Latency session property greater than 0. The PowerCenter Integration Service reads the unread, read, recent, or all mails from the mail folder, and it listens for new mails as they arrive in real time.
Note: The real-time mode also requires a PowerCenter Real Time Edition license.
Non-real time mode
When you do not run a session in real-time mode, the PowerCenter Integration Service extracts emails from the mail folder according to the filter specified in the session attributes.
Before the PowerCenter Integration Service extracts data from email sources, you must configure an application connection in the Workflow Manager.
Configuring an Email Server Application ConnectionWhen you configure an Email Server application connection, you specify connection attributes to connect to a mail server database or an Outlook PST file.
1. In the Workflow Manager, click Connections > Application.
The Application Connection Browser dialog box appears.
24
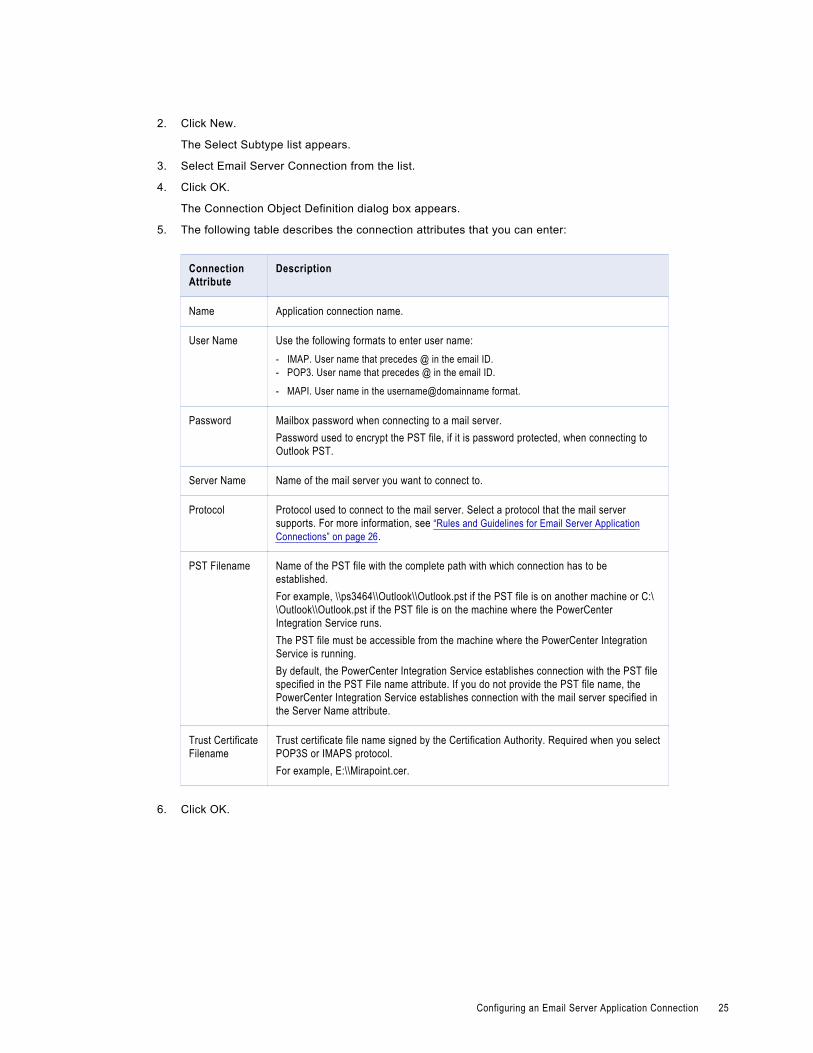
2. Click New.
The Select Subtype list appears.
3. Select Email Server Connection from the list.
4. Click OK.
The Connection Object Definition dialog box appears.
5. The following table describes the connection attributes that you can enter:
Connection Attribute
Description
Name Application connection name.
User Name Use the following formats to enter user name:- IMAP. User name that precedes @ in the email ID.- POP3. User name that precedes @ in the email ID.
- MAPI. User name in the username@domainname format.
Password Mailbox password when connecting to a mail server.Password used to encrypt the PST file, if it is password protected, when connecting to Outlook PST.
Server Name Name of the mail server you want to connect to.
Protocol Protocol used to connect to the mail server. Select a protocol that the mail server supports. For more information, see “Rules and Guidelines for Email Server Application Connections” on page 26.
PST Filename Name of the PST file with the complete path with which connection has to be established.For example, \\ps3464\\Outlook\\Outlook.pst if the PST file is on another machine or C:\\Outlook\\Outlook.pst if the PST file is on the machine where the PowerCenter Integration Service runs.The PST file must be accessible from the machine where the PowerCenter Integration Service is running.By default, the PowerCenter Integration Service establishes connection with the PST file specified in the PST File name attribute. If you do not provide the PST file name, the PowerCenter Integration Service establishes connection with the mail server specified in the Server Name attribute.
Trust Certificate Filename
Trust certificate file name signed by the Certification Authority. Required when you select POP3S or IMAPS protocol.For example, E:\\Mirapoint.cer.
6. Click OK.
Configuring an Email Server Application Connection 25
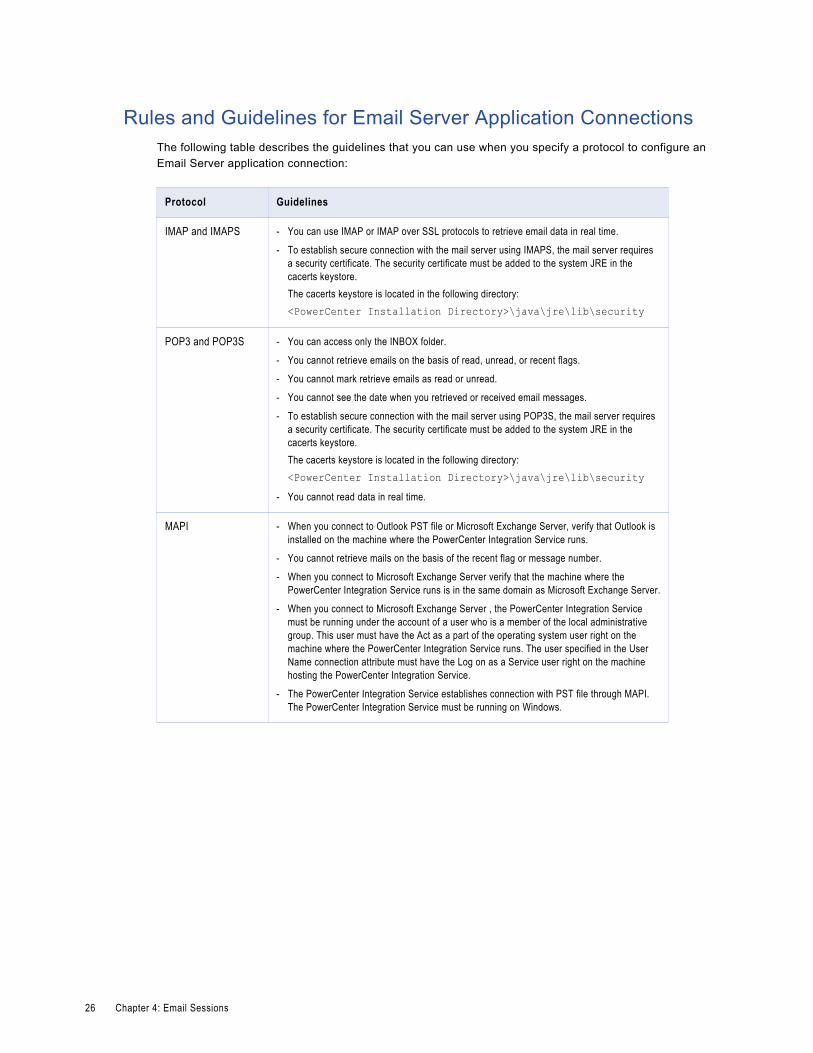
Rules and Guidelines for Email Server Application ConnectionsThe following table describes the guidelines that you can use when you specify a protocol to configure an Email Server application connection:
Protocol Guidelines
IMAP and IMAPS - You can use IMAP or IMAP over SSL protocols to retrieve email data in real time.
- To establish secure connection with the mail server using IMAPS, the mail server requires a security certificate. The security certificate must be added to the system JRE in the cacerts keystore.The cacerts keystore is located in the following directory:<PowerCenter Installation Directory>\java\jre\lib\security
POP3 and POP3S - You can access only the INBOX folder.
- You cannot retrieve emails on the basis of read, unread, or recent flags.
- You cannot mark retrieve emails as read or unread.
- You cannot see the date when you retrieved or received email messages.
- To establish secure connection with the mail server using POP3S, the mail server requires a security certificate. The security certificate must be added to the system JRE in the cacerts keystore.The cacerts keystore is located in the following directory:<PowerCenter Installation Directory>\java\jre\lib\security
- You cannot read data in real time.
MAPI - When you connect to Outlook PST file or Microsoft Exchange Server, verify that Outlook is installed on the machine where the PowerCenter Integration Service runs.
- You cannot retrieve mails on the basis of the recent flag or message number.
- When you connect to Microsoft Exchange Server verify that the machine where the PowerCenter Integration Service runs is in the same domain as Microsoft Exchange Server.
- When you connect to Microsoft Exchange Server , the PowerCenter Integration Service must be running under the account of a user who is a member of the local administrative group. This user must have the Act as a part of the operating system user right on the machine where the PowerCenter Integration Service runs. The user specified in the User Name connection attribute must have the Log on as a Service user right on the machine hosting the PowerCenter Integration Service.
- The PowerCenter Integration Service establishes connection with PST file through MAPI. The PowerCenter Integration Service must be running on Windows.
26 Chapter 4: Email Sessions
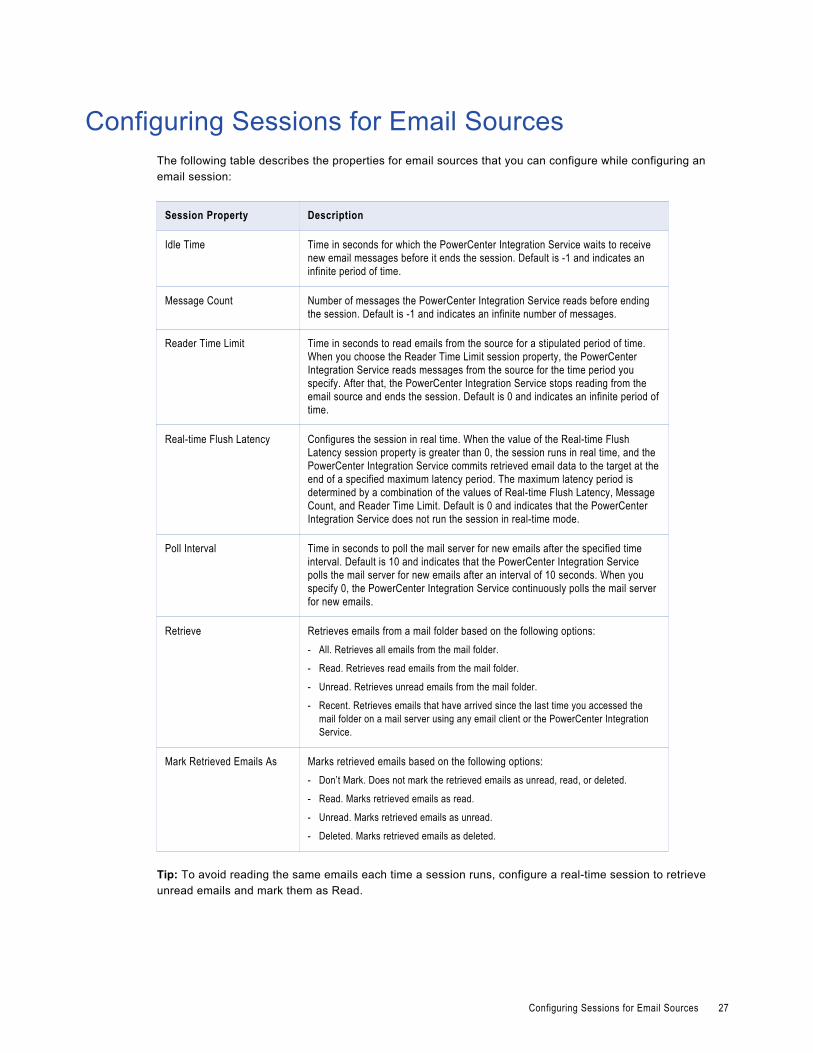
Configuring Sessions for Email SourcesThe following table describes the properties for email sources that you can configure while configuring an email session:
Session Property Description
Idle Time Time in seconds for which the PowerCenter Integration Service waits to receive new email messages before it ends the session. Default is -1 and indicates an infinite period of time.
Message Count Number of messages the PowerCenter Integration Service reads before ending the session. Default is -1 and indicates an infinite number of messages.
Reader Time Limit Time in seconds to read emails from the source for a stipulated period of time. When you choose the Reader Time Limit session property, the PowerCenter Integration Service reads messages from the source for the time period you specify. After that, the PowerCenter Integration Service stops reading from the email source and ends the session. Default is 0 and indicates an infinite period of time.
Real-time Flush Latency Configures the session in real time. When the value of the Real-time Flush Latency session property is greater than 0, the session runs in real time, and the PowerCenter Integration Service commits retrieved email data to the target at the end of a specified maximum latency period. The maximum latency period is determined by a combination of the values of Real-time Flush Latency, Message Count, and Reader Time Limit. Default is 0 and indicates that the PowerCenter Integration Service does not run the session in real-time mode.
Poll Interval Time in seconds to poll the mail server for new emails after the specified time interval. Default is 10 and indicates that the PowerCenter Integration Service polls the mail server for new emails after an interval of 10 seconds. When you specify 0, the PowerCenter Integration Service continuously polls the mail server for new emails.
Retrieve Retrieves emails from a mail folder based on the following options:- All. Retrieves all emails from the mail folder.
- Read. Retrieves read emails from the mail folder.
- Unread. Retrieves unread emails from the mail folder.
- Recent. Retrieves emails that have arrived since the last time you accessed the mail folder on a mail server using any email client or the PowerCenter Integration Service.
Mark Retrieved Emails As Marks retrieved emails based on the following options:- Don’t Mark. Does not mark the retrieved emails as unread, read, or deleted.
- Read. Marks retrieved emails as read.
- Unread. Marks retrieved emails as unread.
- Deleted. Marks retrieved emails as deleted.
Tip: To avoid reading the same emails each time a session runs, configure a real-time session to retrieve unread emails and mark them as Read.
Configuring Sessions for Email Sources 27
By default, the PowerCenter Integration Service runs the session in non-real time mode. In real-time mode, you can configure the Retrieve and Mark Retrieved Mails As session properties. In addition, to run the session in the real-time mode, you need to configure the following session properties:
• Idle Time
• Message Count
• Reader Time Limit
• Real Time Flush Latency
• Poll Interval
By default, all emails are retrieved and they are not marked upon retrieval as read, unread, or deleted. You cannot mark retrieved emails on mail server as Read, Unread, or Deleted when a folder is opened in read-only mode.
Note: You can view load statistics in the session log. The load summary in the Workflow Monitor does not display load statistics.
28 Chapter 4: Email Sessions

A P P E N D I X A
Datatype ReferenceThis appendix includes the following topic:
• Email and Transformation Datatypes, 29
Email and Transformation DatatypesPowerCenter uses the following datatypes in email mappings:
• Email native datatypes. Email datatypes appear in email definitions in a mapping.
• Transformation datatypes. Set of datatypes that appear in the transformations. They are internal datatypes based on ANSI SQL-92 generic datatypes, which the PowerCenter Integration Service uses to move data across platforms. They appear in all transformations in a mapping.
When the PowerCenter Integration Service reads source data, it converts the native datatypes to the comparable transformation datatypes before transforming the data.
The following table lists the Email datatypes that PowerCenter supports and the corresponding transformation datatypes:
EmailDatatype
Description Transformation Datatype
Description
Date/Time Jan 1, 1970 A.D. to Dec 31, 9999 A.D.(precision to millisecond)
Date/Time Jan 1, 0001 A.D. to Dec 31, 9999 A.D.(precision to nanosecond)
DBinary 1 to 104,857,600 bytes Binary 1 to 104,857,600 bytes
Numeric Precision 1 to 31, scale 0 Decimal Precision 1 to 28, scale 0 to 28
String No limit String 1 to 104,857,600 characters
29
A P P E N D I X B
Error MessagesThis appendix includes the following topic:
• Designer Messages, 30
Designer MessagesThe Designer displays messages in message boxes and in the output window. This section lists messages alphabetically.
Connection refused.Explanation: This error occurs when you click the Authenticate button and the mail server you are trying to
connect to does not support the protocol.
User Response: Verify that the protocol over which connection is being established is supported by the target mail server.
-or-
Explanation: The mail server you are trying to connect to has refused the connection.
User Response: Contact the System Administrator.
The Designer could not find the PST file at the specified location.Explanation: The PST file does not exist at the specified location.
User Response: Verify that the PST file exists at the specified location.
Unknown Server.Explanation: This error occurs when you click the Authenticate button. The mail server you are trying to
connect to either does not exist or is not accessible from your machine.
User Response: Verify that the name of the mail server that you want to connect to is correct and the mail server is accessible from your machine.
-or-
Explanation: The mail server you are trying to connect to does not support the protocol.
User Response: Verify that the protocol over which connection is being established is supported by the target mail server.
30
Valid trust certificate not found.Explanation: This error occurs when you click the Authenticate button. You have not added a correct or
valid trust certificate for the mail server to the cacerts keystore of the system JRE and you are connecting to the mail server over a secure protocol such as IMAPS or POP3S.
User Response: Verify that you have added a correct and valid trust certificate for the mail server to the cacerts keystore of the system JRE.
The cacerts keystore is located in the following directory:
{monospace-font}
<PowerCenter Installation Directory>\java\jre\lib\security
</monospace-font}
For example, use the following syntax to add the certificate certificate.cer to the cacerts keystore:
<PowerCenter Installation Directory>\java\bin\keytool -import -alias <certificate alias> -file
certificate.cer -keystore <PowerCenter Installation Directory>\java\jre\lib\security\cacerts –v
Note: For more information about the trust certificates, contact your system administrator.
Designer Messages 31
I N D E X
Aapplication connections
configuring for PowerExchange for Email Server 24
Ccreating
DSN, email source definitions 16
Ddatatypes
PowerExchange for Email Server 29DSN
creating, email source definitions 16
Eemail protocols
HTTP 10IMAP 10IMAPS 10POP3 10POP3S 10SMTP 10
email source definitions creating 18editing 22overview 16reimporting 22
error messages client messages for PowerExchange for Email Server 30
IIdle Time (property)
session property for PowerExchange for Email Server 27IMAP
email protocol 10IMAPS
email protocol 10installing
PowerExchange for Email Server 13
Mmail servers
email protocols 10
mail servers (continued)MAPI 11Microsoft Exchange Server 11understanding 9
MAPI mail server 11
Mark Retrieved Emails As (property) session property for PowerExchange for Email Server 27
Message Count (property) session property for PowerExchange for Email Server 27
Pplug-ins
registering 15registering PowerExchange for Email Server 15updating the registration 15
Poll Interval (property) session property for PowerExchange for Email Server 27
POP3 email protocol 10
POP3S email protocol 10
PowerCenter and Email Server integrating 8
PowerCenter Integration Service and Email Server integrating 8
prerequisites PowerExchange for Email Server 12
RReader Time Limit (property)
session property for PowerExchange for Email Server 27Real-time Flush Latency (property)
session property for PowerExchange for Email Server 27registering
plug-ins 15Retrieve (property)
session property for PowerExchange for Email Server 27
SSMTP
email protocol 10
Uupgrading
PowerExchange for Email Server upgrade tasks 13
32