Embed Size (px)
Citation preview
user guide v1.5
ContentsWelcome to Procreate ______________________ 3
Overview of Procreate ______________________ 4
Getting familiar with Procreate ______________ 5
Quick Gesture List __________________________ 7
Using the brush tool ________________________ 9
Complete control of your brush _____________ 10
Simulate real-life painting ___________________ 11
Custom brushes ____________________________ 12
Brush edit mode ____________________________ 13
Choosing colours ___________________________ 14
Saving your favourite colours _______________ 15
Size and pressure ___________________________ 16
Smudging Colours _________________________ 17
Fixing mistakes ______________________________ 18
Building up artwork _________________________ 19
Blending layers _____________________________ 20
Transforming layers _________________________ 23
Canvas actions ______________________________ 24
Resources __________________________________ 26
Feedback & Support ________________________ 26
About Si ____________________________________ 26
To infinity and beyond! ______________________ 27
Artwork courtesy of Haibo Zhu
2Procreate user guide v1.5

Welcome to ProcreateThank you for your purchase! This guide will help you to quickly become familiar with your new app. Before you know it, you’ll be crafting masterpieces and losing hours to being creative.
Artwork courtesy of Haibo Zhu
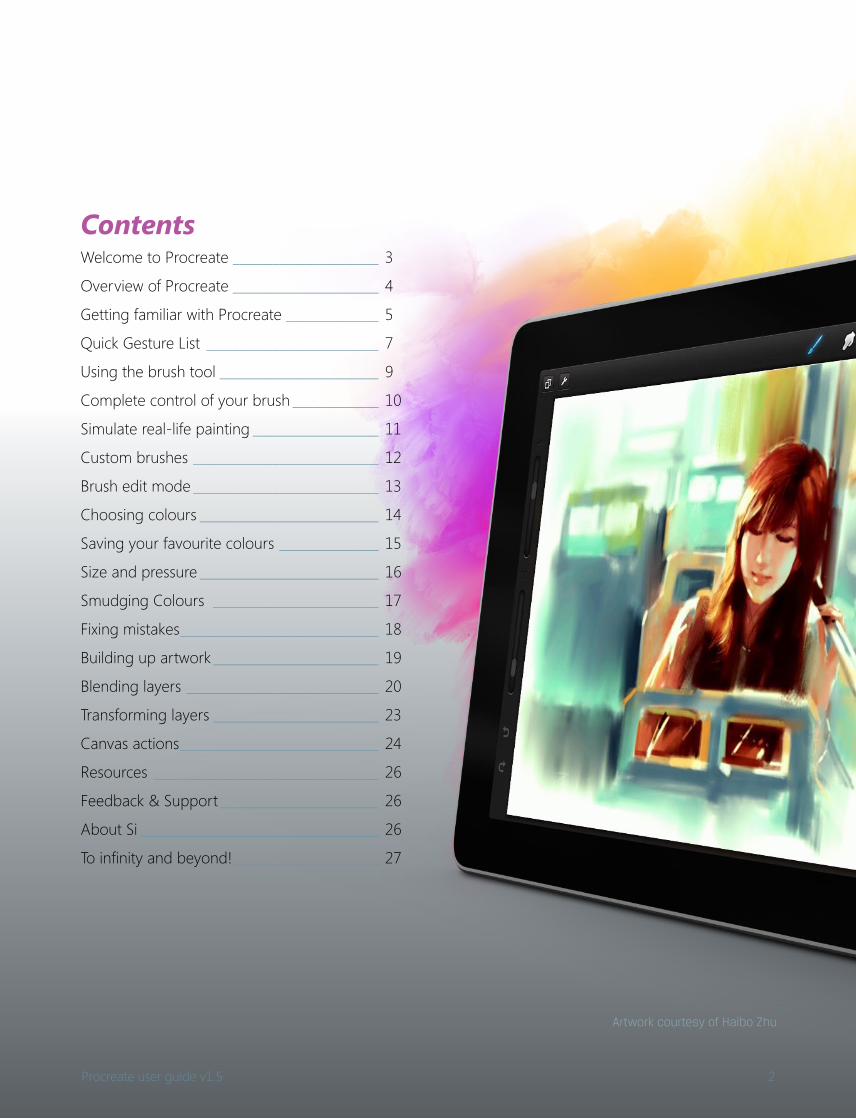
Overview of ProcreateProcreate might just be the most exciting digital painting app on a mobile device. We’ve taken desktop performance, added professional features and squeezed it all into your iPad. Made for professional illustrators and aspiring artists alike, you’ll find yourself creating ridiculously good looking art in no time.
What you’ll learnIn this document you will find a basic walkthrough of the Procreate application. From learning the interface and shortcuts, to getting the most out of the tools and realising the unlimited potential of custom brushes.
You’ll quickly pick up how to:
• Create, duplicate email and export a canvas.• Paint and customise every facet of your brush.• Create your very own brush shape and texture from any image you want.• Simulate real paint with the loading and wetness settings.• Use the smudge tool to blend colours effortlessly.• Control brush results with the precision sliders.• Manipulate the way colour is displayed via layer blends.• Erase mistakes and get the most out of the undo/redo system.• Layer artwork, isolate and merge elements.• Use other handy tools such as flip canvas, transform and import from Photos.• Export PSD & PNG files.
4Procreate user guide v1.5 p Return to Contents
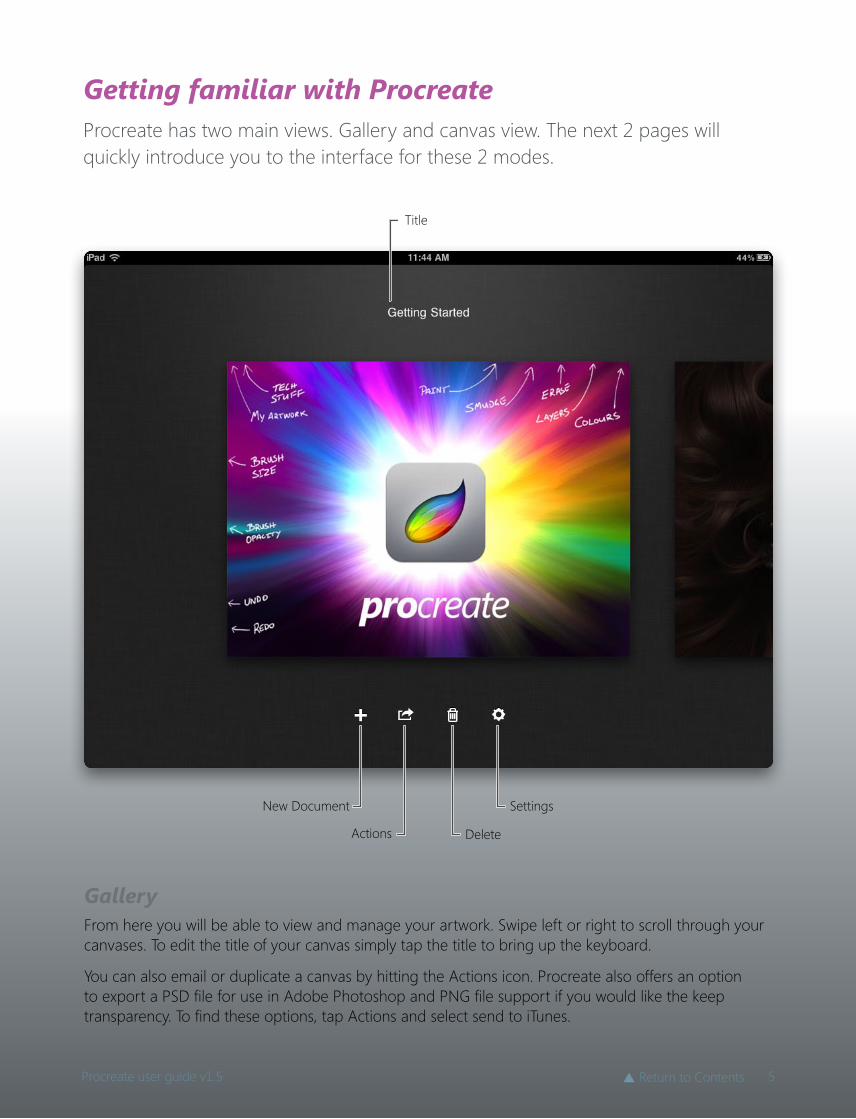
GalleryFrom here you will be able to view and manage your artwork. Swipe left or right to scroll through your canvases. To edit the title of your canvas simply tap the title to bring up the keyboard.
You can also email or duplicate a canvas by hitting the Actions icon. Procreate also offers an option to export a PSD file for use in Adobe Photoshop and PNG file support if you would like the keep transparency. To find these options, tap Actions and select send to iTunes.
New Document Settings
Title
Actions Delete
Getting familiar with ProcreateProcreate has two main views. Gallery and canvas view. The next 2 pages will quickly introduce you to the interface for these 2 modes.
5Procreate user guide v1.5 p Return to Contents
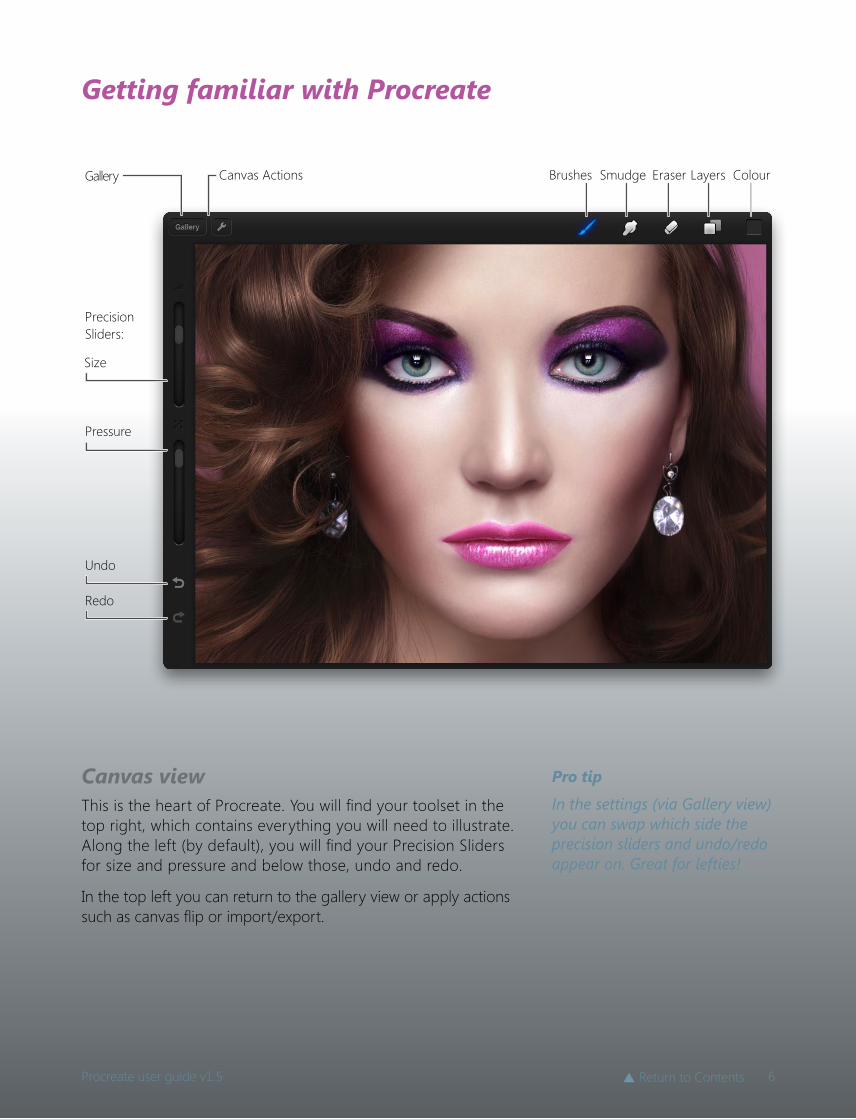
Canvas viewThis is the heart of Procreate. You will find your toolset in the top right, which contains everything you will need to illustrate. Along the left (by default), you will find your Precision Sliders for size and pressure and below those, undo and redo.
In the top left you can return to the gallery view or apply actions such as canvas flip or import/export.
BrushesGallery
Size
Pressure
Precision Sliders:
Undo
Redo
Canvas Actions Smudge Eraser Layers Colour
Getting familiar with Procreate
Pro tip
In the settings (via Gallery view) you can swap which side the precision sliders and undo/redo appear on. Great for lefties!
6Procreate user guide v1.5 p Return to Contents
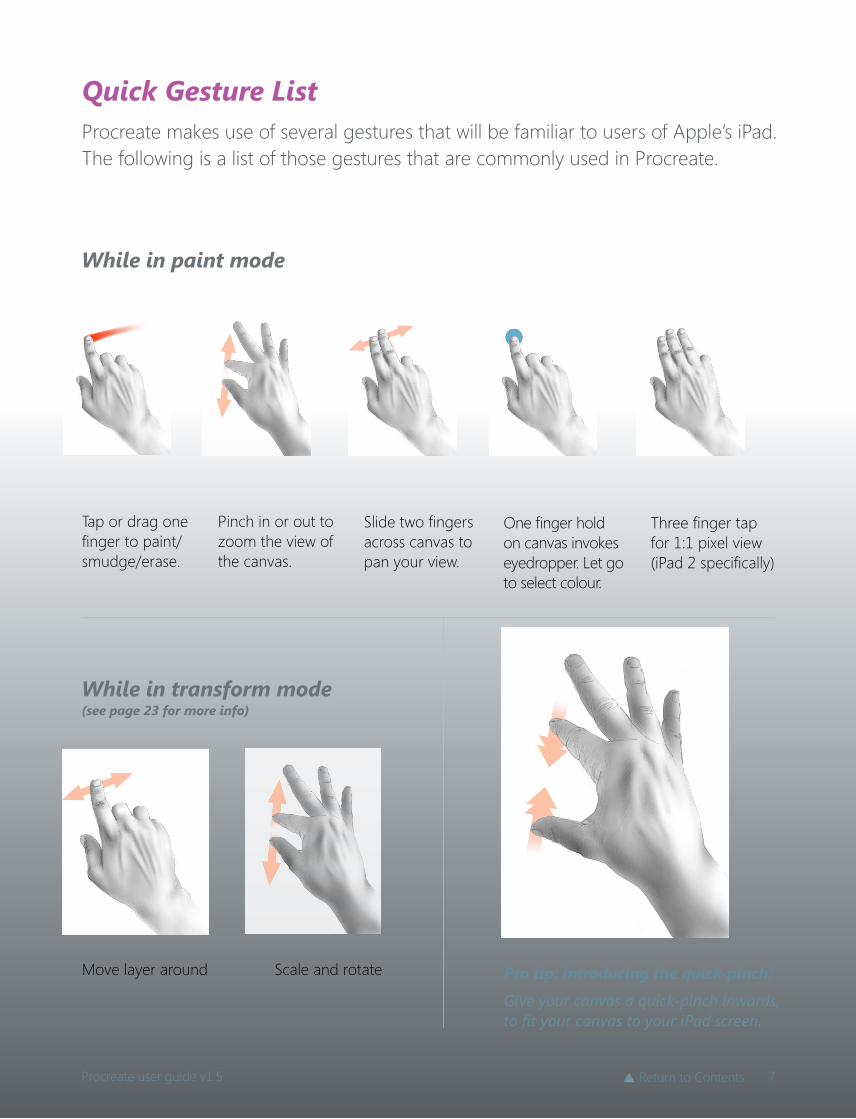
Quick Gesture ListProcreate makes use of several gestures that will be familiar to users of Apple’s iPad. The following is a list of those gestures that are commonly used in Procreate.
Tap or drag one finger to paint/smudge/erase.
Pinch in or out to zoom the view of the canvas.
While in paint mode
Move layer around Scale and rotate
While in transform mode (see page 23 for more info)
Pro tip: Introducing the quick-pinch!
Give your canvas a quick-pinch inwards, to fit your canvas to your iPad screen.
Slide two fingers across canvas to pan your view.
One finger hold on canvas invokes eyedropper. Let go to select colour.
Three finger tap for 1:1 pixel view (iPad 2 specifically)
7Procreate user guide v1.5 p Return to Contents
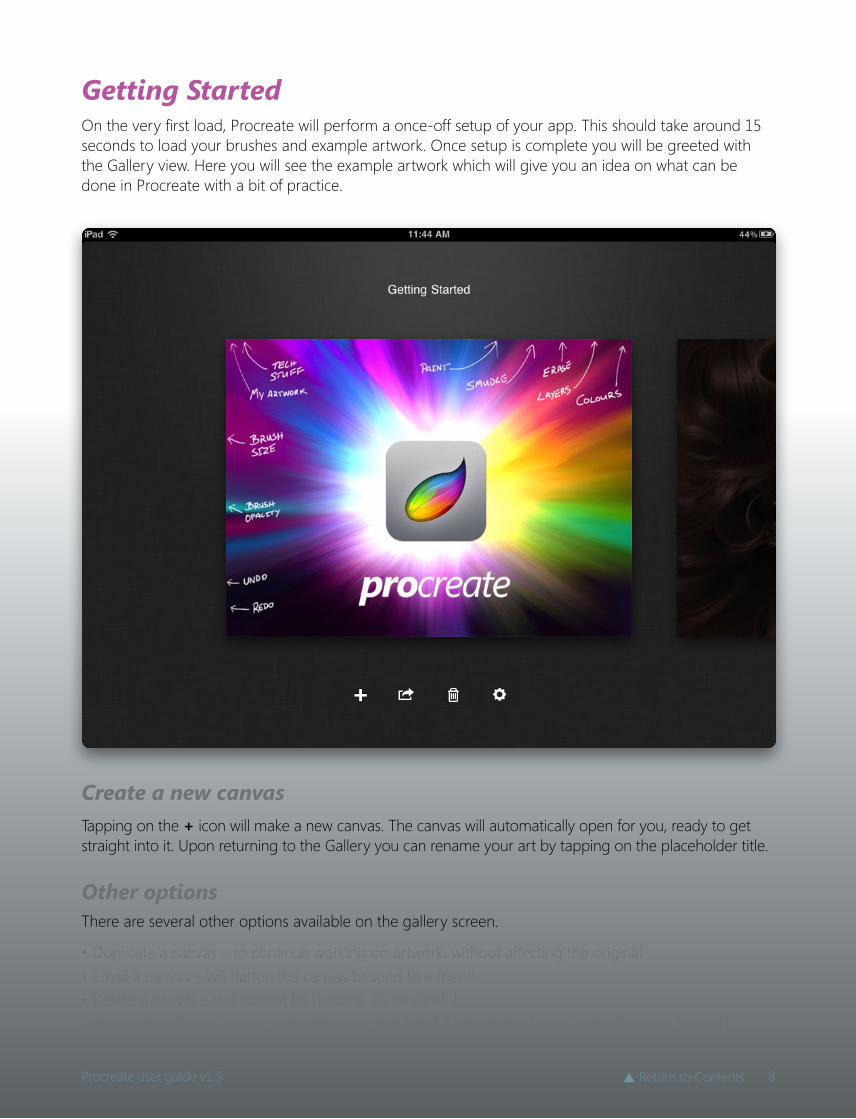
Getting Started On the very first load, Procreate will perform a once-off setup of your app. This should take around 15 seconds to load your brushes and example artwork. Once setup is complete you will be greeted with the Gallery view. Here you will see the example artwork which will give you an idea on what can be done in Procreate with a bit of practice.
Create a new canvasTapping on the + icon will make a new canvas. The canvas will automatically open for you, ready to get straight into it. Upon returning to the Gallery you can rename your art by tapping on the placeholder title.
Other optionsThere are several other options available on the gallery screen.
• Duplicate a canvas – to continue working on artwork, without affecting the original.• Email a canvas – will flatten the canvas to send to a friend.• Delete a canvas – this cannot be undone, so be careful.• Procreate settings – tweak tool settings or find helpful links to the User Guide, iTunes or Support.
8Procreate user guide v1.5 p Return to Contents
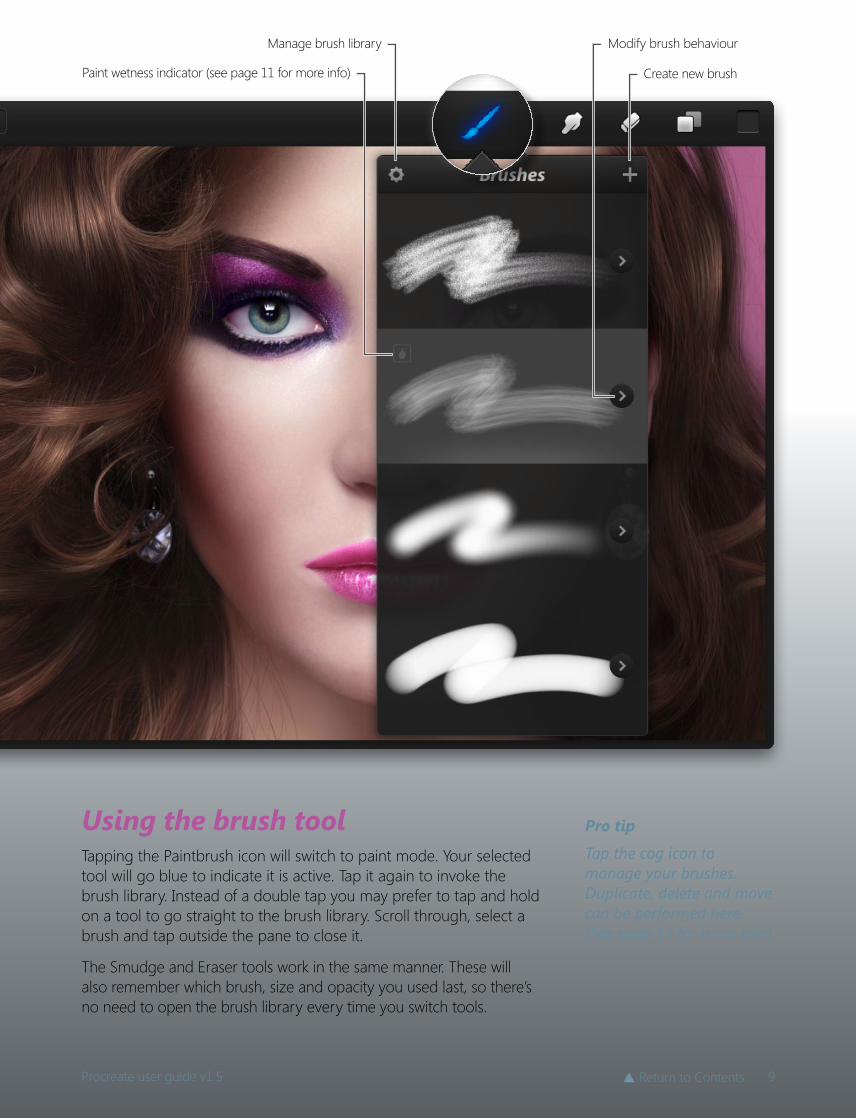
Using the brush toolTapping the Paintbrush icon will switch to paint mode. Your selected tool will go blue to indicate it is active. Tap it again to invoke the brush library. Instead of a double tap you may prefer to tap and hold on a tool to go straight to the brush library. Scroll through, select a brush and tap outside the pane to close it.
The Smudge and Eraser tools work in the same manner. These will also remember which brush, size and opacity you used last, so there’s no need to open the brush library every time you switch tools.
Pro tip
Tap the cog icon to manage your brushes. Duplicate, delete and move can be performed here. (See page 13 for more info)
Create new brush
Manage brush library
Paint wetness indicator (see page 11 for more info)
Modify brush behaviour
9Procreate user guide v1.5 p Return to Contents
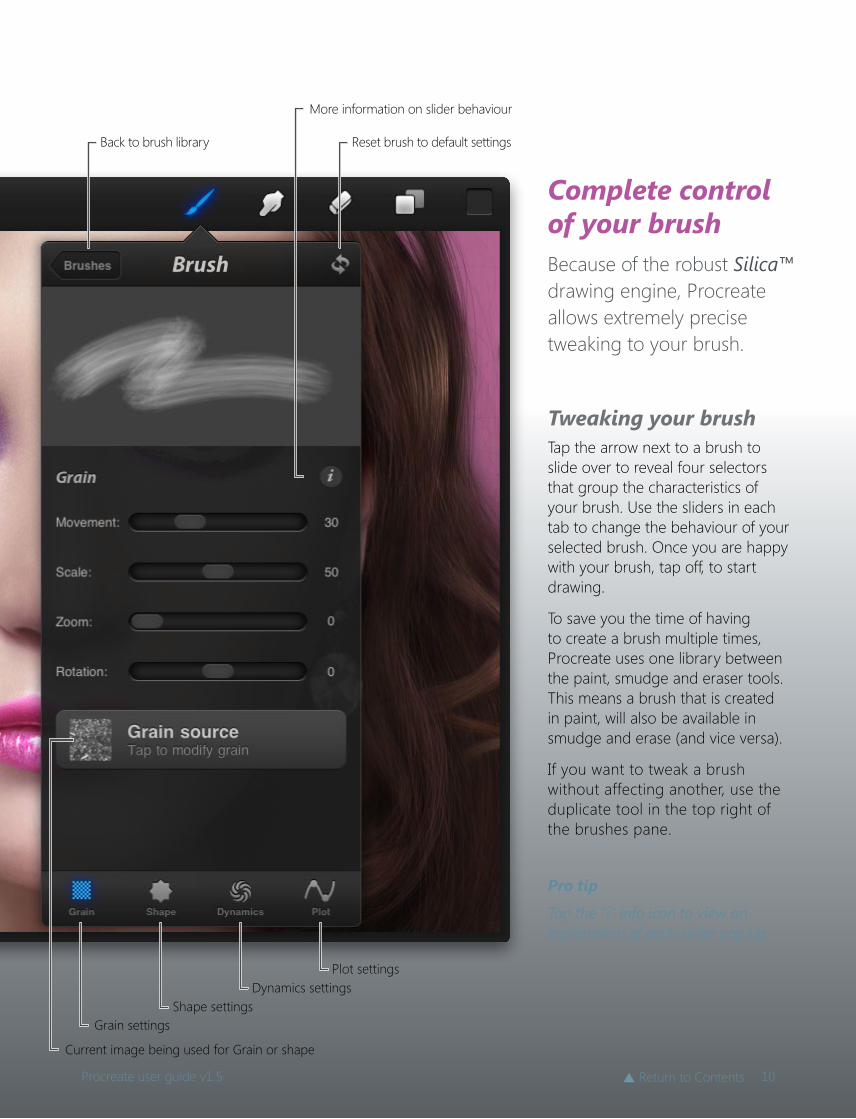
Complete control of your brushBecause of the robust Silica™ drawing engine, Procreate allows extremely precise tweaking to your brush.
Tweaking your brushTap the arrow next to a brush to slide over to reveal four selectors that group the characteristics of your brush. Use the sliders in each tab to change the behaviour of your selected brush. Once you are happy with your brush, tap off, to start drawing.
To save you the time of having to create a brush multiple times, Procreate uses one library between the paint, smudge and eraser tools. This means a brush that is created in paint, will also be available in smudge and erase (and vice versa).
If you want to tweak a brush without affecting another, use the duplicate tool in the top right of the brushes pane.
Pro tip
Tap the “i” info icon to view an explanation of each slider pop up.
Plot settings
Shape settingsDynamics settings
Grain settings
Current image being used for Grain or shape
Reset brush to default settingsBack to brush library
More information on slider behaviour
10Procreate user guide v1.5 p Return to Contents
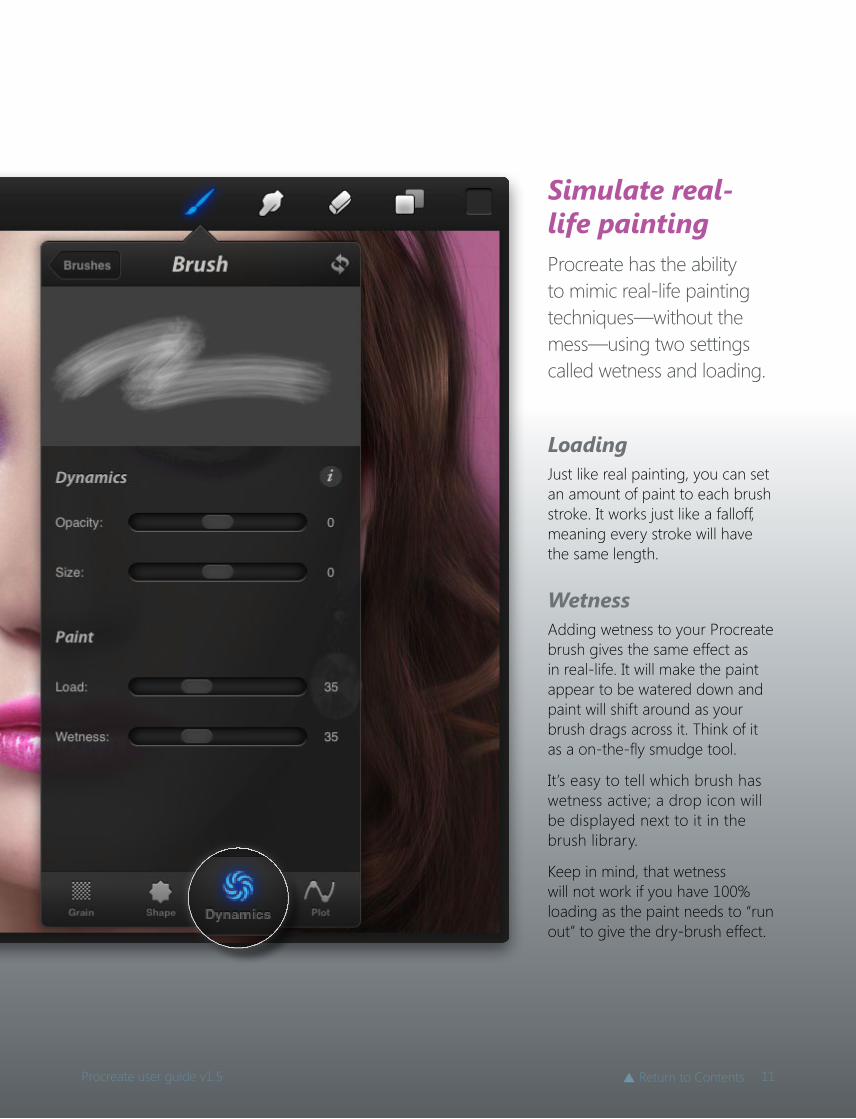
Simulate real-life paintingProcreate has the ability to mimic real-life painting techniques—without the mess—using two settings called wetness and loading.
LoadingJust like real painting, you can set an amount of paint to each brush stroke. It works just like a falloff, meaning every stroke will have the same length.
WetnessAdding wetness to your Procreate brush gives the same effect as in real-life. It will make the paint appear to be watered down and paint will shift around as your brush drags across it. Think of it as a on-the-fly smudge tool.
It’s easy to tell which brush has wetness active; a drop icon will be displayed next to it in the brush library.
Keep in mind, that wetness will not work if you have 100% loading as the paint needs to “run out” to give the dry-brush effect.
11Procreate user guide v1.5 p Return to Contents
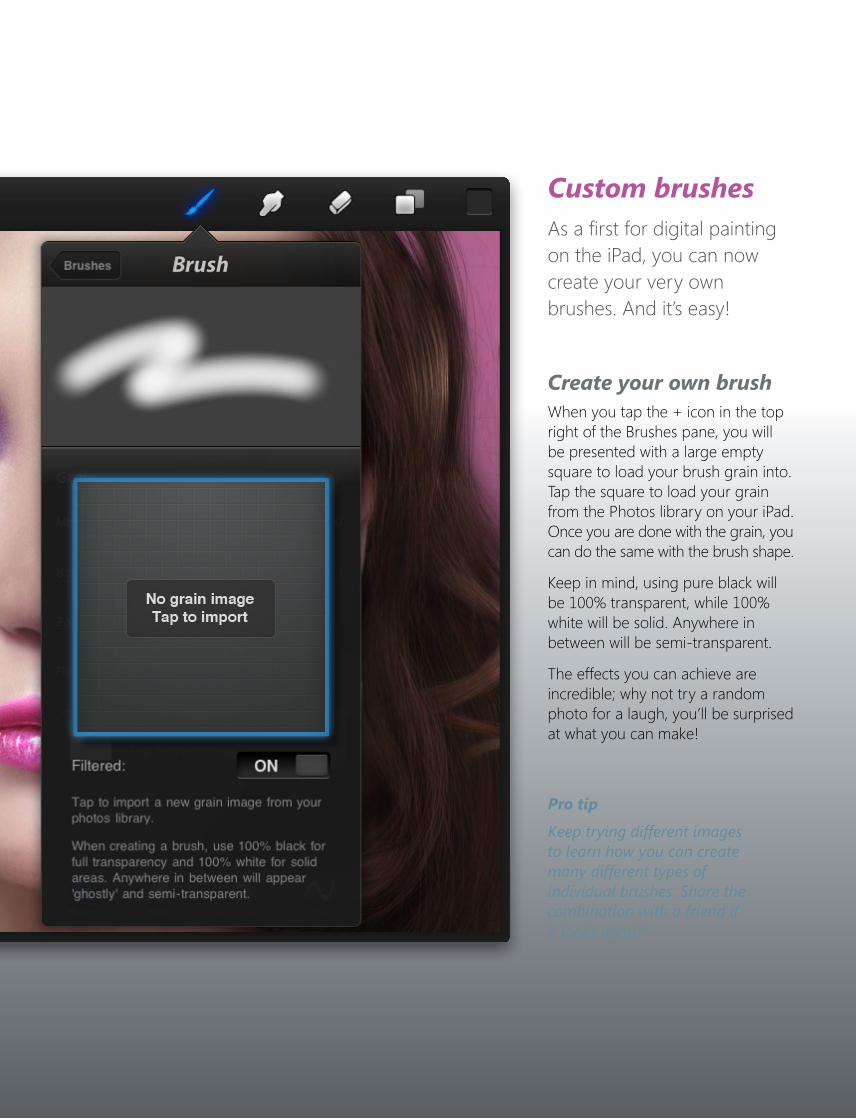
Custom brushesAs a first for digital painting on the iPad, you can now create your very own brushes. And it’s easy!
Create your own brushWhen you tap the + icon in the top right of the Brushes pane, you will be presented with a large empty square to load your brush grain into. Tap the square to load your grain from the Photos library on your iPad. Once you are done with the grain, you can do the same with the brush shape.
Keep in mind, using pure black will be 100% transparent, while 100% white will be solid. Anywhere in between will be semi-transparent.
The effects you can achieve are incredible; why not try a random photo for a laugh, you’ll be surprised at what you can make!
Pro tip
Keep trying different images to learn how you can create many different types of individual brushes. Share the combination with a friend if it looks great!
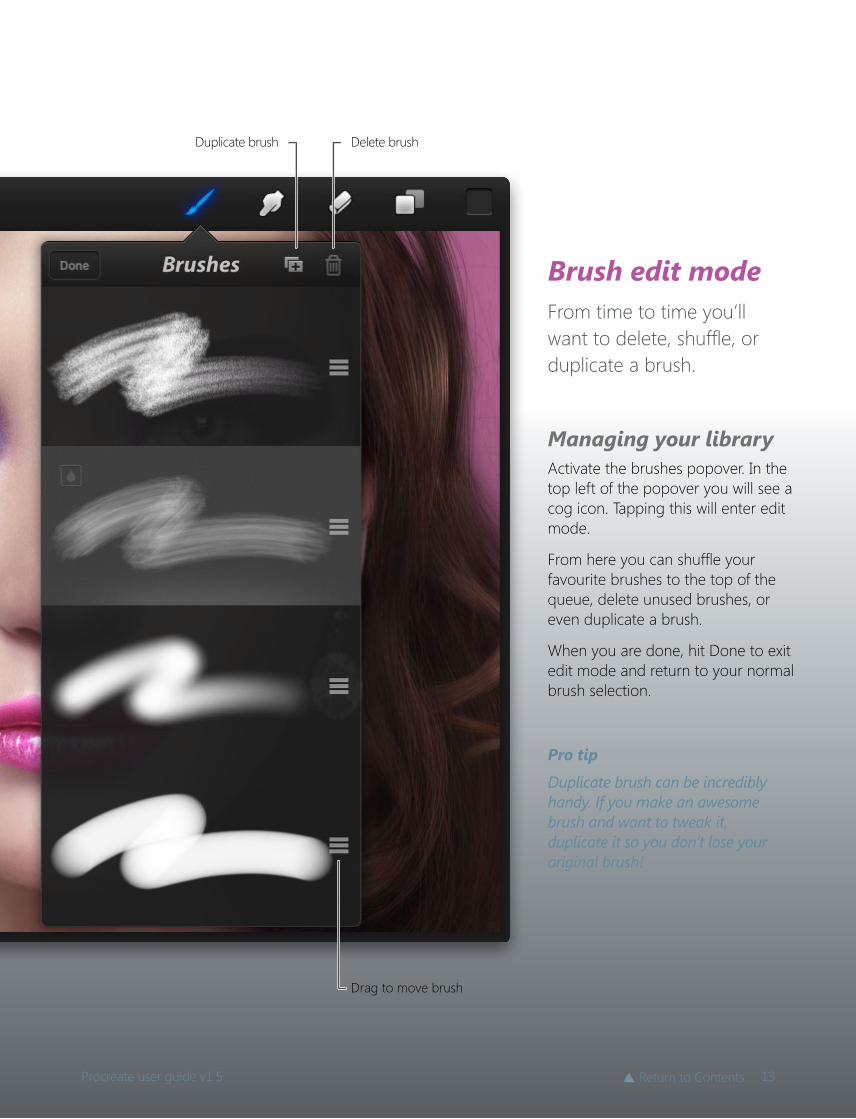
Brush edit modeFrom time to time you’ll want to delete, shuffle, or duplicate a brush.
Managing your libraryActivate the brushes popover. In the top left of the popover you will see a cog icon. Tapping this will enter edit mode.
From here you can shuffle your favourite brushes to the top of the queue, delete unused brushes, or even duplicate a brush.
When you are done, hit Done to exit edit mode and return to your normal brush selection.
Pro tip
Duplicate brush can be incredibly handy. If you make an awesome brush and want to tweak it, duplicate it so you don’t lose your original brush!
Delete brushDuplicate brush
Drag to move brush
13Procreate user guide v1.5 p Return to Contents
Pro tip
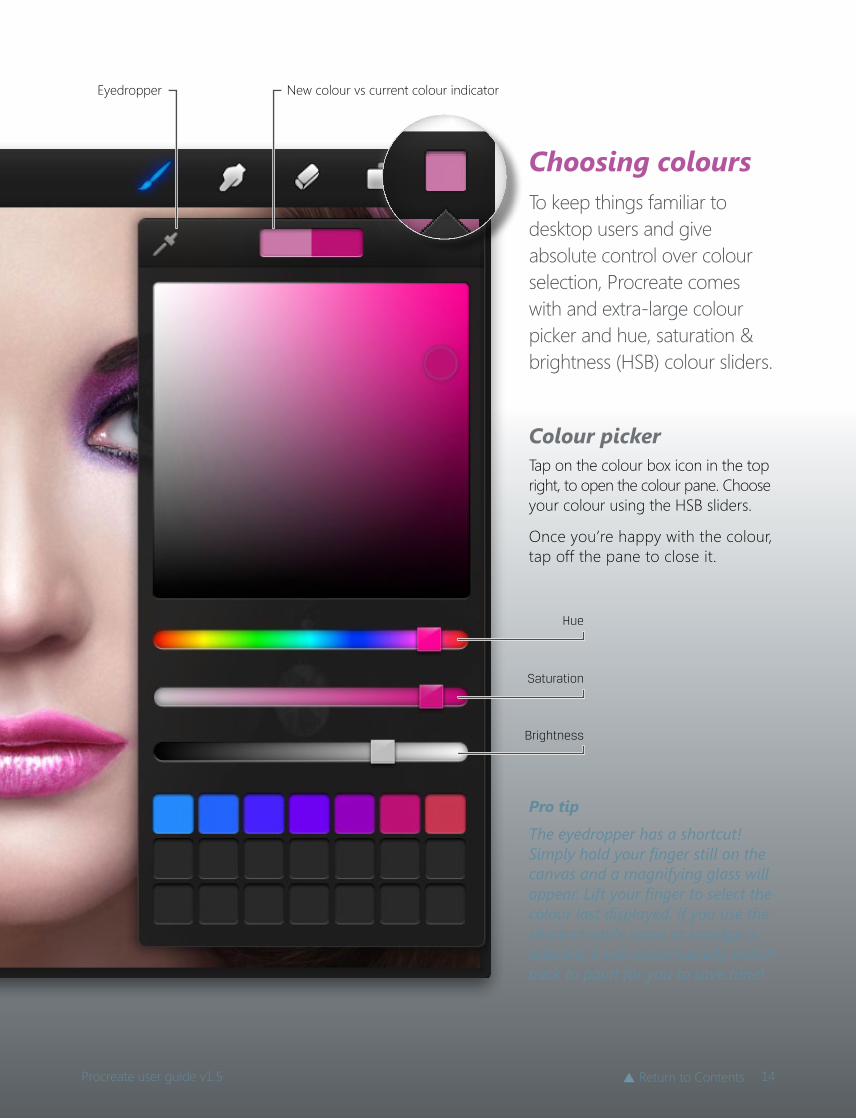
The eyedropper has a shortcut! Simply hold your finger still on the canvas and a magnifying glass will appear. Lift your finger to select the colour last displayed. If you use the shortcut while erase or smudge is selected, it will automatically switch back to paint for you to save time!
Choosing coloursTo keep things familiar to desktop users and give absolute control over colour selection, Procreate comes with and extra-large colour picker and hue, saturation & brightness (HSB) colour sliders.
Colour pickerTap on the colour box icon in the top right, to open the colour pane. Choose your colour using the HSB sliders.
Once you’re happy with the colour, tap off the pane to close it.
Hue
Saturation
Brightness
New colour vs current colour indicatorEyedropper
14Procreate user guide v1.5 p Return to Contents
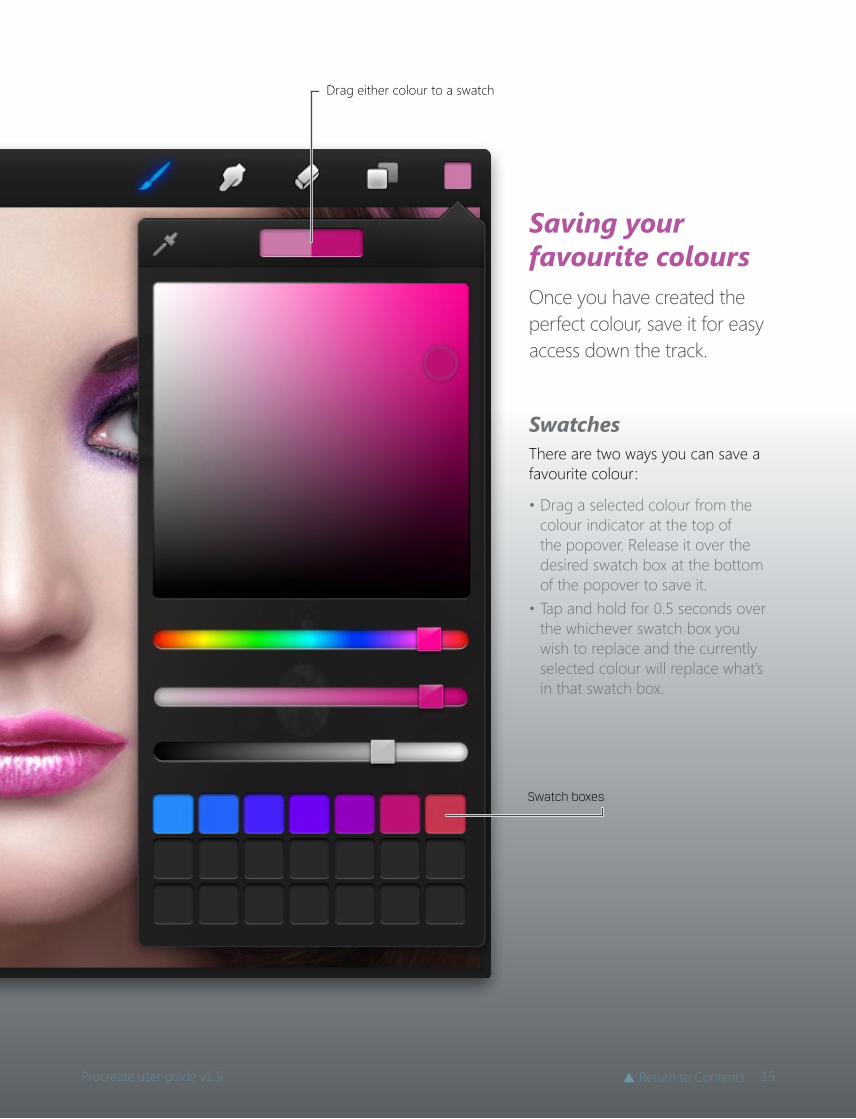
Saving your favourite coloursOnce you have created the perfect colour, save it for easy access down the track.
SwatchesThere are two ways you can save a favourite colour:
• Drag a selected colour from the colour indicator at the top of the popover. Release it over the desired swatch box at the bottom of the popover to save it.
• Tap and hold for 0.5 seconds over the whichever swatch box you wish to replace and the currently selected colour will replace what’s in that swatch box.
Swatch boxes
Drag either colour to a swatch
15Procreate user guide v1.5 p Return to Contents
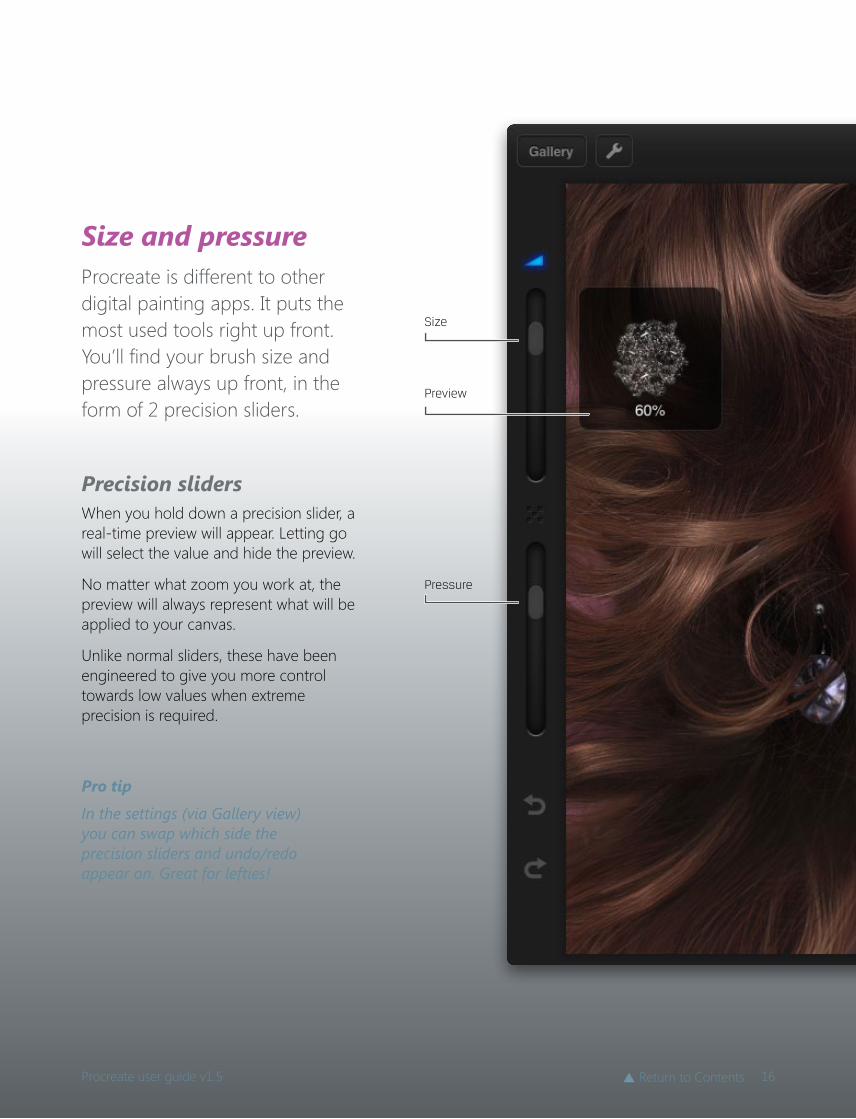
Size
Preview
Pressure
Size and pressureProcreate is different to other digital painting apps. It puts the most used tools right up front. You’ll find your brush size and pressure always up front, in the form of 2 precision sliders.
Precision slidersWhen you hold down a precision slider, a real-time preview will appear. Letting go will select the value and hide the preview.
No matter what zoom you work at, the preview will always represent what will be applied to your canvas.
Unlike normal sliders, these have been engineered to give you more control towards low values when extreme precision is required.
Pro tip
In the settings (via Gallery view) you can swap which side the precision sliders and undo/redo appear on. Great for lefties!
16Procreate user guide v1.5 p Return to Contents
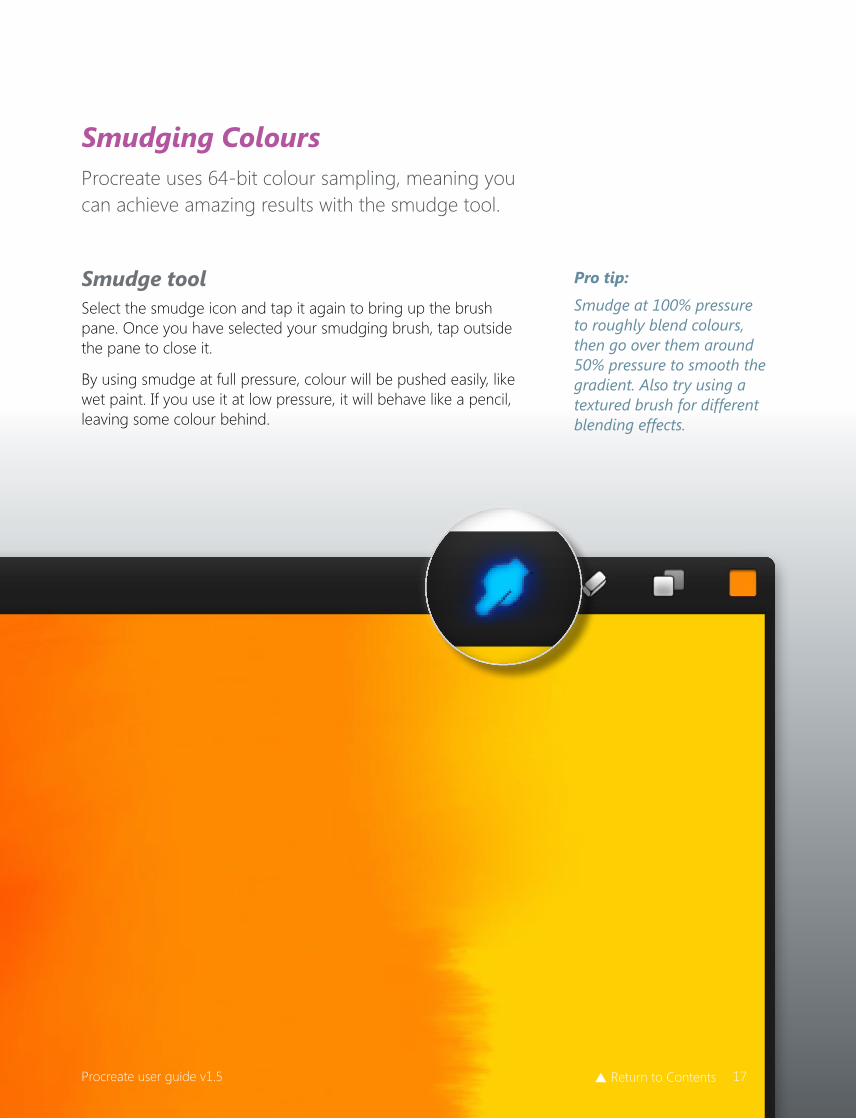
Smudging Colours Procreate uses 64-bit colour sampling, meaning you can achieve amazing results with the smudge tool.
Smudge toolSelect the smudge icon and tap it again to bring up the brush pane. Once you have selected your smudging brush, tap outside the pane to close it.
By using smudge at full pressure, colour will be pushed easily, like wet paint. If you use it at low pressure, it will behave like a pencil, leaving some colour behind.
Pro tip:
Smudge at 100% pressure to roughly blend colours, then go over them around 50% pressure to smooth the gradient. Also try using a textured brush for different blending effects.
17Procreate user guide v1.5 p Return to Contents
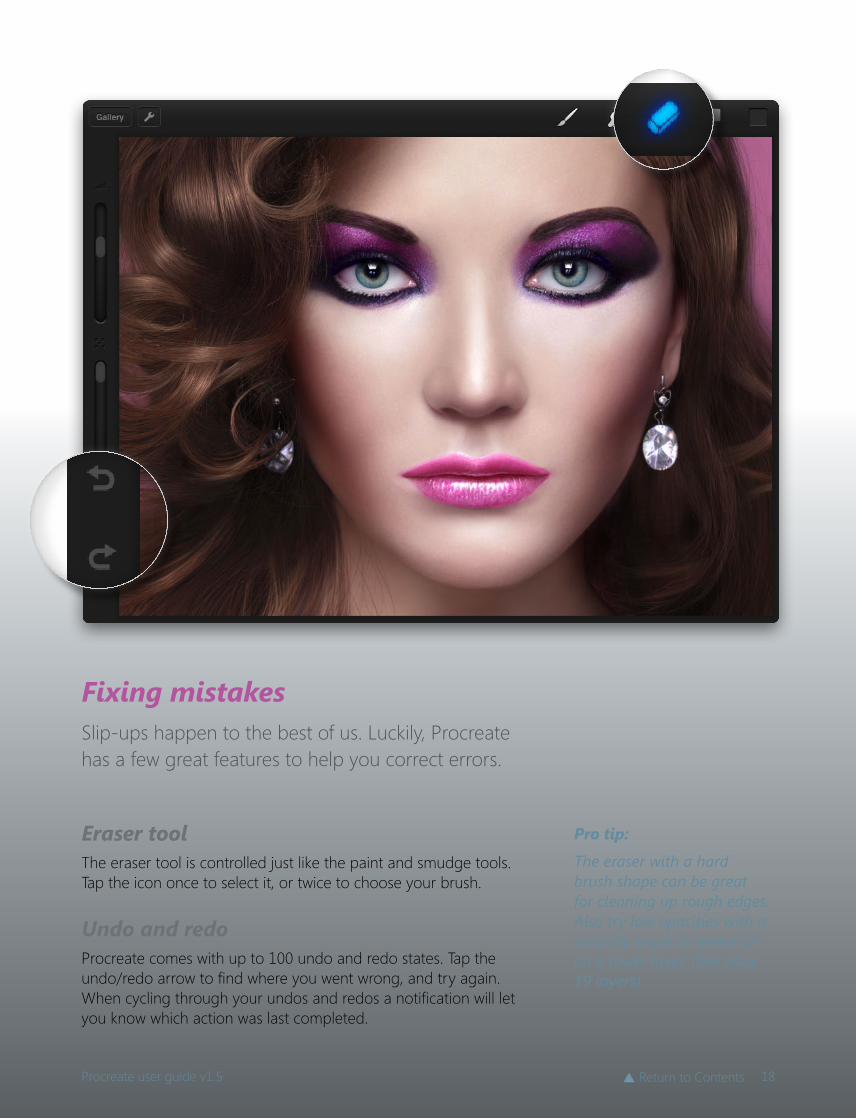
Fixing mistakesSlip-ups happen to the best of us. Luckily, Procreate has a few great features to help you correct errors.
Eraser toolThe eraser tool is controlled just like the paint and smudge tools. Tap the icon once to select it, or twice to choose your brush.
Undo and redoProcreate comes with up to 100 undo and redo states. Tap the undo/redo arrow to find where you went wrong, and try again. When cycling through your undos and redos a notification will let you know which action was last completed.
Pro tip:
The eraser with a hard brush shape can be great for cleaning up rough edges. Also try low opacities with a scratchy brush to reveal art on a lower layer. (See page 19 layers)
18Procreate user guide v1.5 p Return to Contents
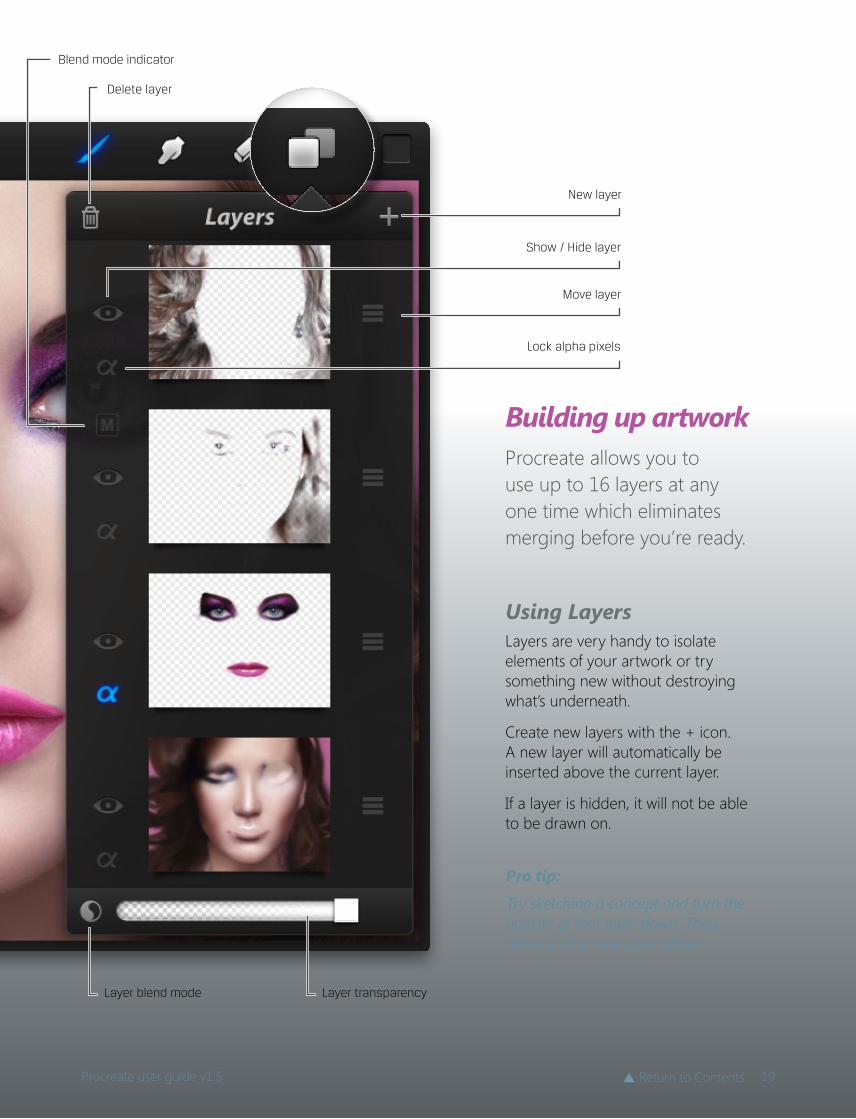
Building up artworkProcreate allows you to use up to 16 layers at any one time which eliminates merging before you’re ready.
Using LayersLayers are very handy to isolate elements of your artwork or try something new without destroying what’s underneath.
Create new layers with the + icon. A new layer will automatically be inserted above the current layer.
If a layer is hidden, it will not be able to be drawn on.
Delete layer
Blend mode indicator
Layer transparencyLayer blend mode
New layer
Show / Hide layer
Lock alpha pixels
Move layer
Pro tip:
Try sketching a concept and turn the opacity of that layer down. Then, refine it on a new layer above.
19Procreate user guide v1.5 p Return to Contents
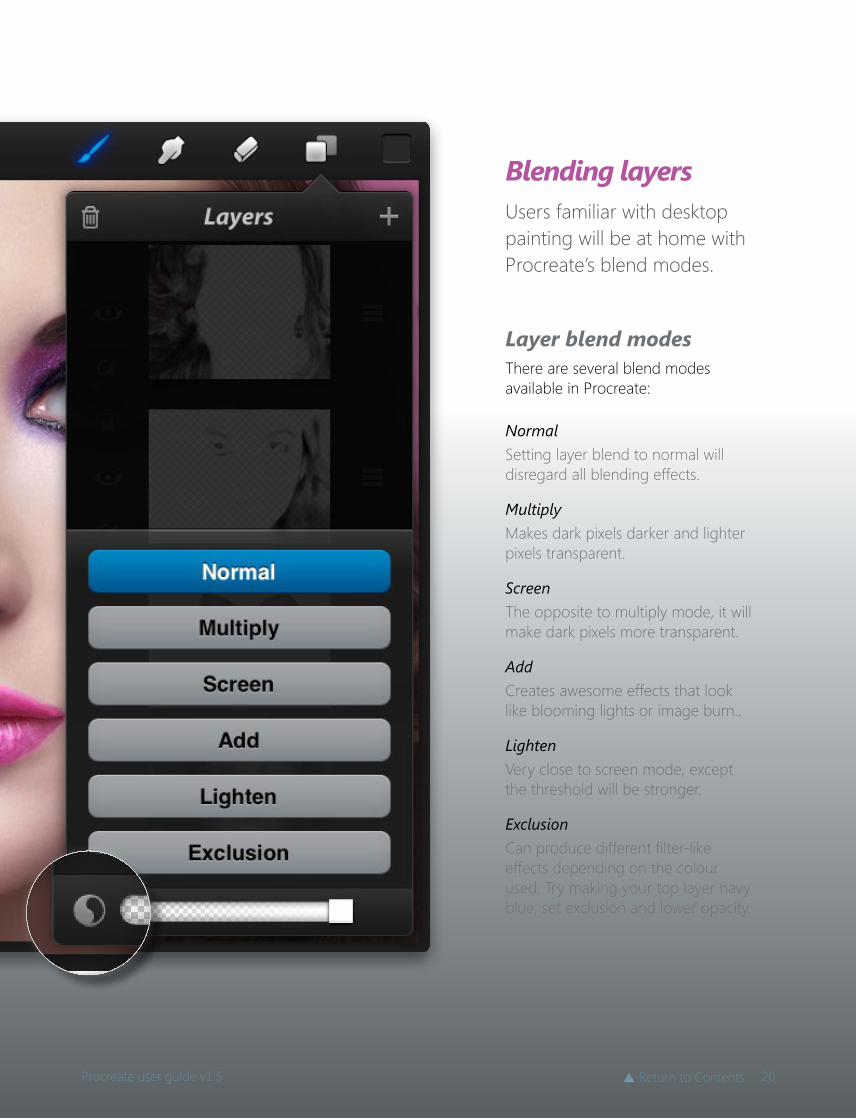
Blending layersUsers familiar with desktop painting will be at home with Procreate’s blend modes.
Layer blend modes There are several blend modes available in Procreate:
NormalSetting layer blend to normal will disregard all blending effects.
MultiplyMakes dark pixels darker and lighter pixels transparent.
ScreenThe opposite to multiply mode, it will make dark pixels more transparent.
AddCreates awesome effects that look like blooming lights or image burn..
LightenVery close to screen mode, except the threshold will be stronger.
ExclusionCan produce different filter-like effects depending on the colour used. Try making your top layer navy blue, set exclusion and lower opacity.
20Procreate user guide v1.5 p Return to Contents
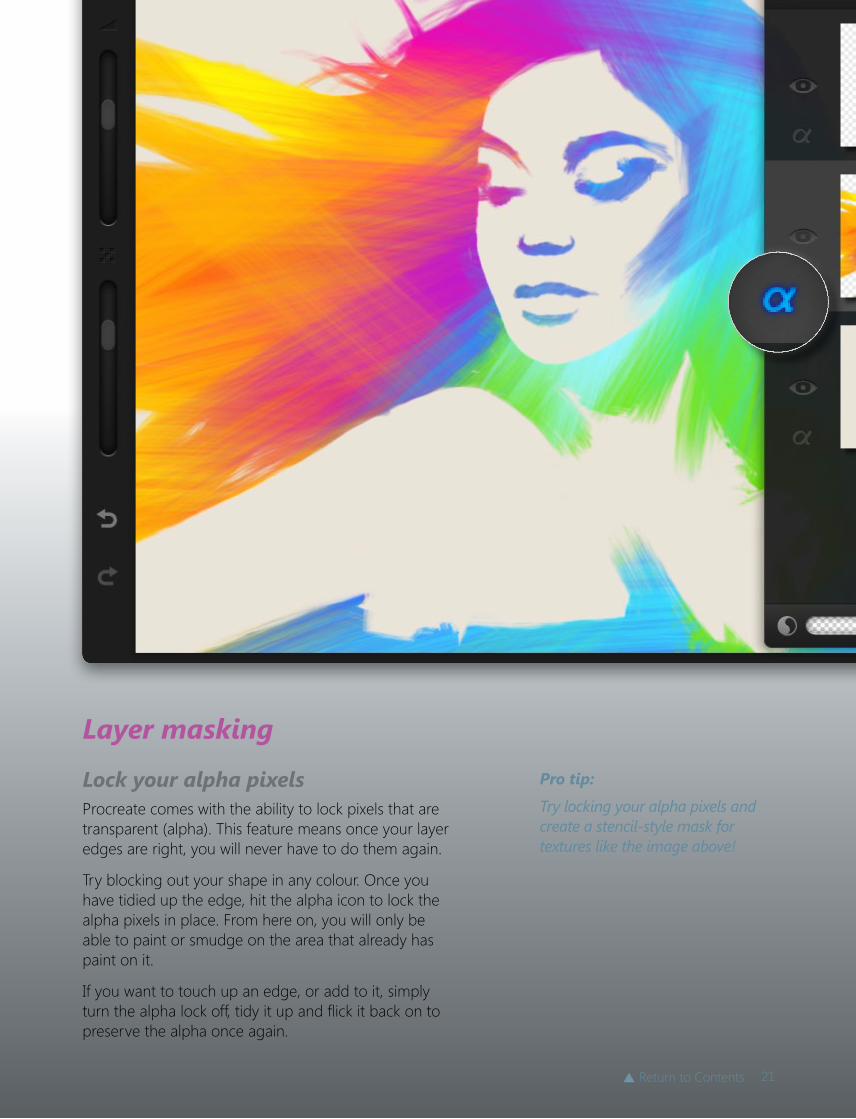
Layer masking
Lock your alpha pixelsProcreate comes with the ability to lock pixels that are transparent (alpha). This feature means once your layer edges are right, you will never have to do them again.
Try blocking out your shape in any colour. Once you have tidied up the edge, hit the alpha icon to lock the alpha pixels in place. From here on, you will only be able to paint or smudge on the area that already has paint on it.
If you want to touch up an edge, or add to it, simply turn the alpha lock off, tidy it up and flick it back on to preserve the alpha once again.
Pro tip:
Try locking your alpha pixels and create a stencil-style mask for textures like the image above!
21p Return to Contents
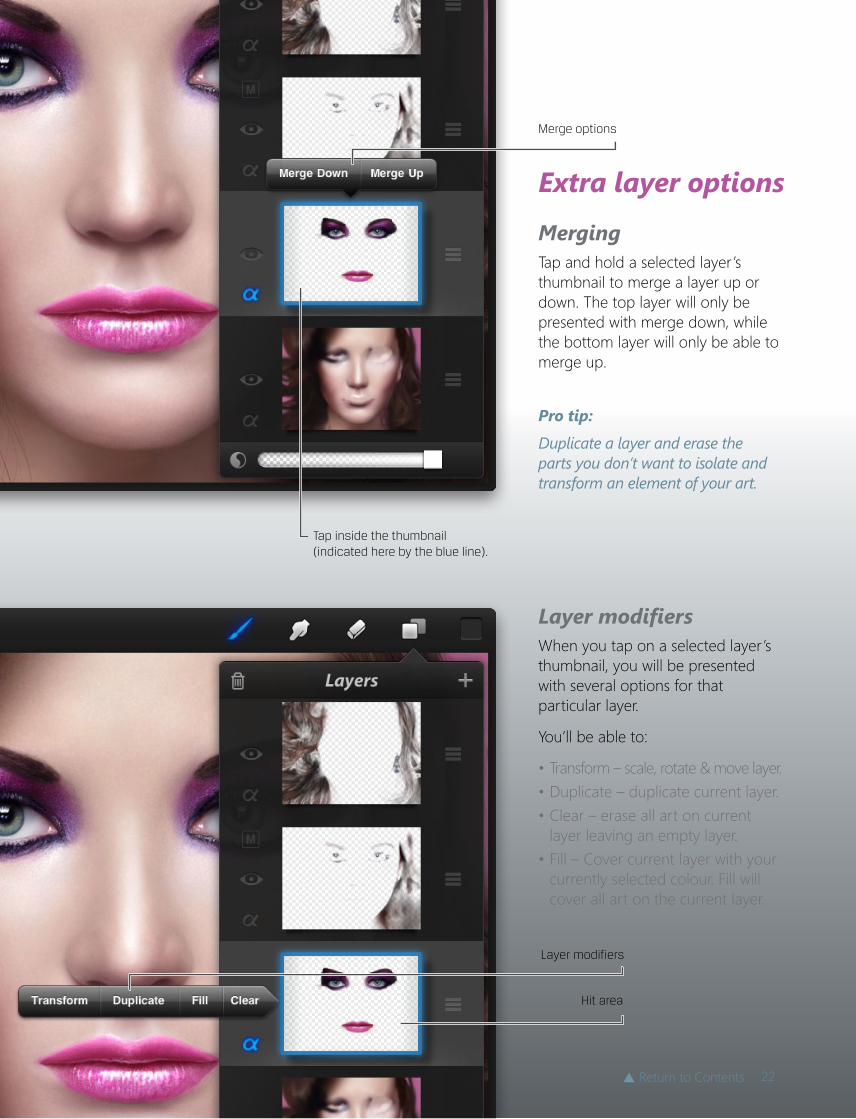
Layer modifiersWhen you tap on a selected layer’s thumbnail, you will be presented with several options for that particular layer.
You’ll be able to:
• Transform – scale, rotate & move layer.• Duplicate – duplicate current layer.• Clear – erase all art on current
layer leaving an empty layer.• Fill – Cover current layer with your
currently selected colour. Fill will cover all art on the current layer.
Layer modifiers
Hit area
Extra layer options
MergingTap and hold a selected layer’s thumbnail to merge a layer up or down. The top layer will only be presented with merge down, while the bottom layer will only be able to merge up.
Merge options
Pro tip:
Duplicate a layer and erase the parts you don’t want to isolate and transform an element of your art.
Tap inside the thumbnail (indicated here by the blue line).
22p Return to Contents
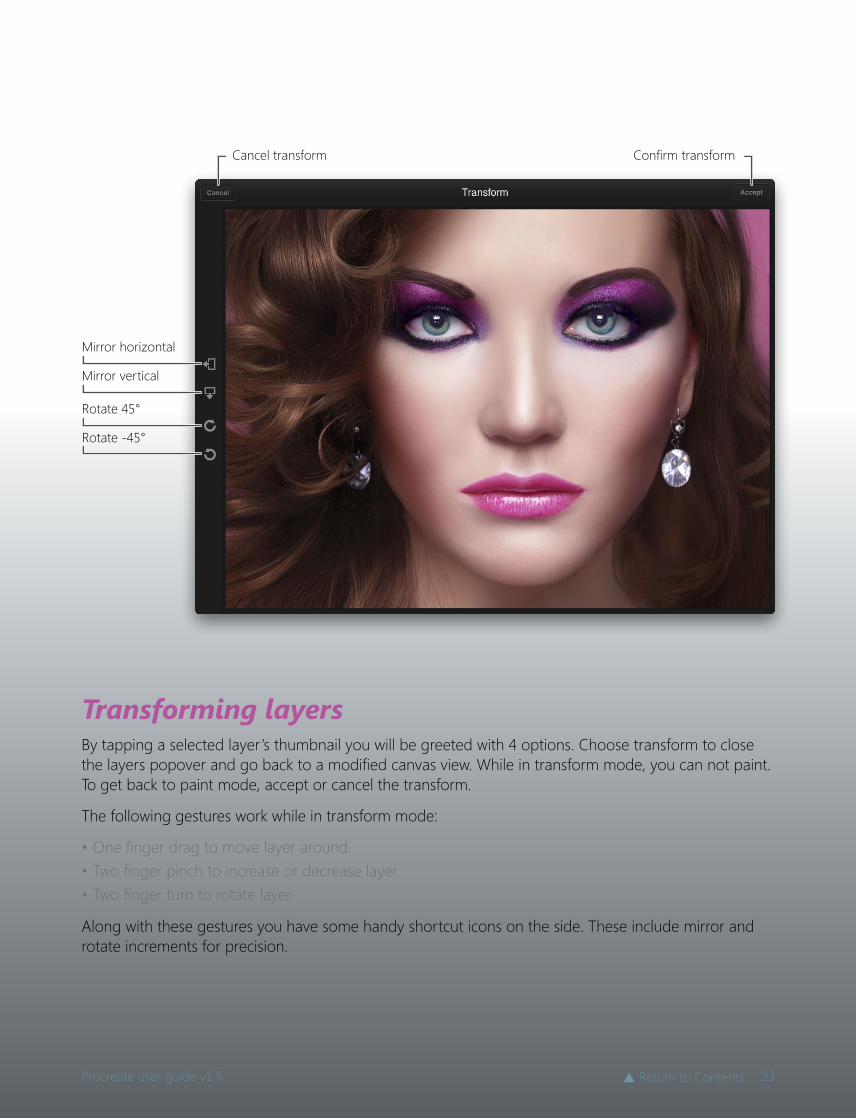
Transforming layersBy tapping a selected layer’s thumbnail you will be greeted with 4 options. Choose transform to close the layers popover and go back to a modified canvas view. While in transform mode, you can not paint. To get back to paint mode, accept or cancel the transform.
The following gestures work while in transform mode:
• One finger drag to move layer around.• Two finger pinch to increase or decrease layer. • Two finger turn to rotate layer.
Along with these gestures you have some handy shortcut icons on the side. These include mirror and rotate increments for precision.
Mirror vertical
Mirror horizontal
Rotate 45°
Rotate -45°
Confirm transformCancel transform
23Procreate user guide v1.5 p Return to Contents
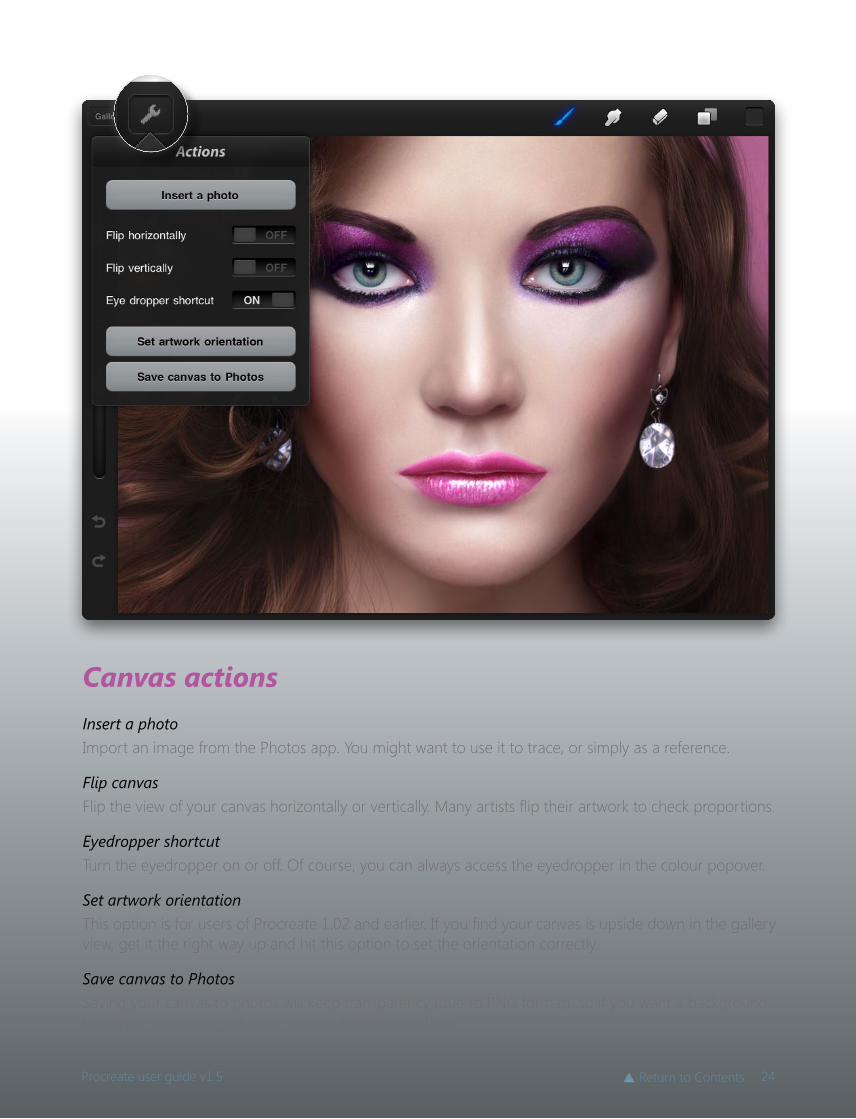
Canvas actionsInsert a photoImport an image from the Photos app. You might want to use it to trace, or simply as a reference.
Flip canvasFlip the view of your canvas horizontally or vertically. Many artists flip their artwork to check proportions.
Eyedropper shortcutTurn the eyedropper on or off. Of course, you can always access the eyedropper in the colour popover.
Set artwork orientationThis option is for users of Procreate 1.02 and earlier. If you find your canvas is upside down in the gallery view, get it the right way up and hit this option to set the orientation correctly.
Save canvas to PhotosSaving your canvas to photos will keep transparency (due to PNG format), so if you want a background to display in photos, just make a white background layer.
24Procreate user guide v1.5 p Return to Contents
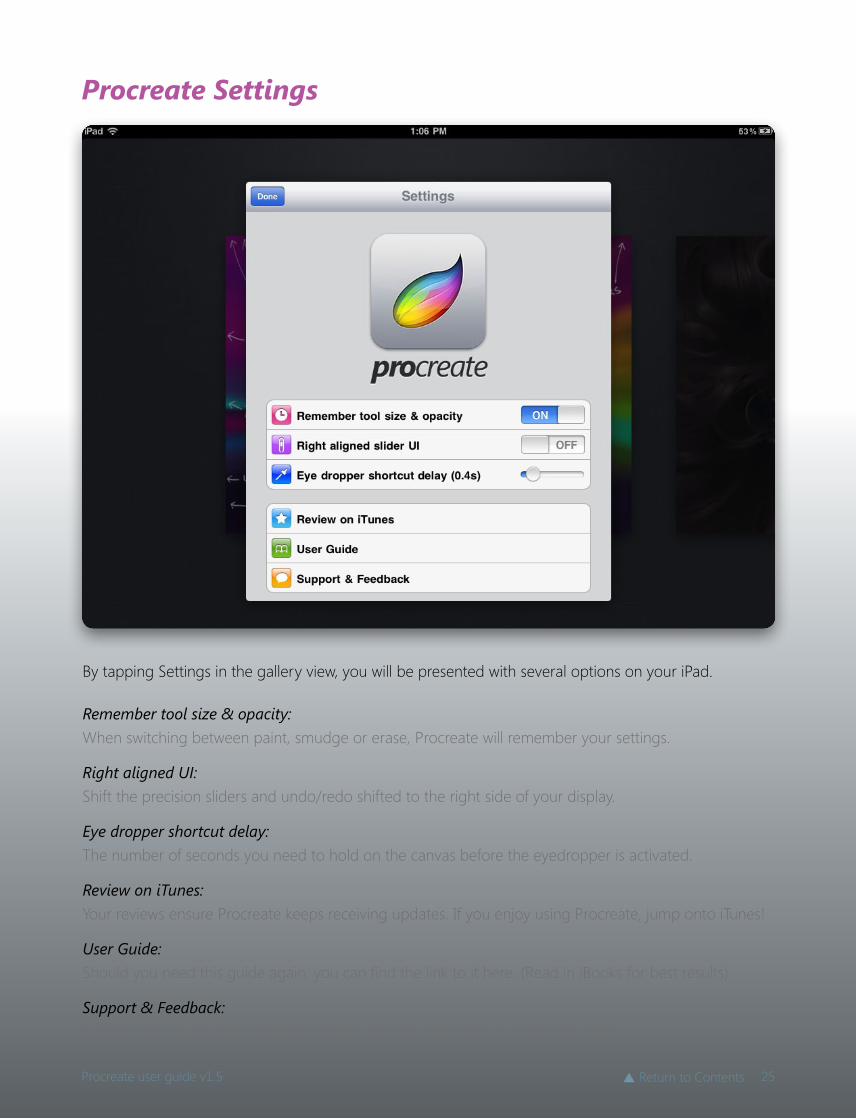
By tapping Settings in the gallery view, you will be presented with several options on your iPad.
Remember tool size & opacity: When switching between paint, smudge or erase, Procreate will remember your settings.
Right aligned UI: Shift the precision sliders and undo/redo shifted to the right side of your display.
Eye dropper shortcut delay: The number of seconds you need to hold on the canvas before the eyedropper is activated.
Review on iTunes: Your reviews ensure Procreate keeps receiving updates. If you enjoy using Procreate, jump onto iTunes!
User Guide: Should you need this guide again, you can find the link to it here. (Read in iBooks for best results)
Support & Feedback: Send your praise/suggestions/bug reports this way. We’d love to hear from you!
Procreate Settings
25Procreate user guide v1.5 p Return to Contents
ResourcesTo help you realise the full potential of Procreate, we have prepared a few gems of wisdom. From videos, media releases, and extra goodies and example art. Visit www.savage.si/procreate/resources for more information.
The internet is a wealth of resources! The artistic community is huge and fortunately, love to share and help each other. Besides the fore-mentioned resources we have, try searching “Procreate iPad” in a search engine or YouTube.
We also have a Flickr group that you can submit your artwork to. While you’re there, why not get some inspiration! www.flickr.com/groups/procreate
Feedback & SupportWe always keep a close eye on what our community has to say. If you have some feedback, we’d love to hear from you. Whether it be praise, suggestions for future updates, or you simply want to know the meaning of life—drop us line at www.savage.si/support
Also, stay up-to-date by following us on Twitter @SiPropaganda, or our blog at www.savage.si/blog
About SiSavage Interactive (aka Si) is 2 artists, a developer and a finance officer – based in Hobart, Australia. When we’re not creating pixel-perfect designs, we like to frag pixels and amuse ourselves on Reddit.
© 2011 Savage Interactive Pty Ltd. All rights reserved. Procreate artwork rights belong to the respective artists. This manual may not be copied, in whole or in part, without the written permission of Savage Interactive. If you do, we will find you.
26Procreate user guide v1.5 p Return to Contents

To infinity and beyond!This guide has only scraped the surface of what you can achieve in Procreate. Keep experimenting with brushes—the possibilities are endless. Enjoy being creative with Procreate.


![Procreate User Guide[1]](https://img.pdfslide.net/doc/110x75/54931496ac795926198b4707/procreate-user-guide1.jpg)