Embed Size (px)
Citation preview
50096-381 Rev D
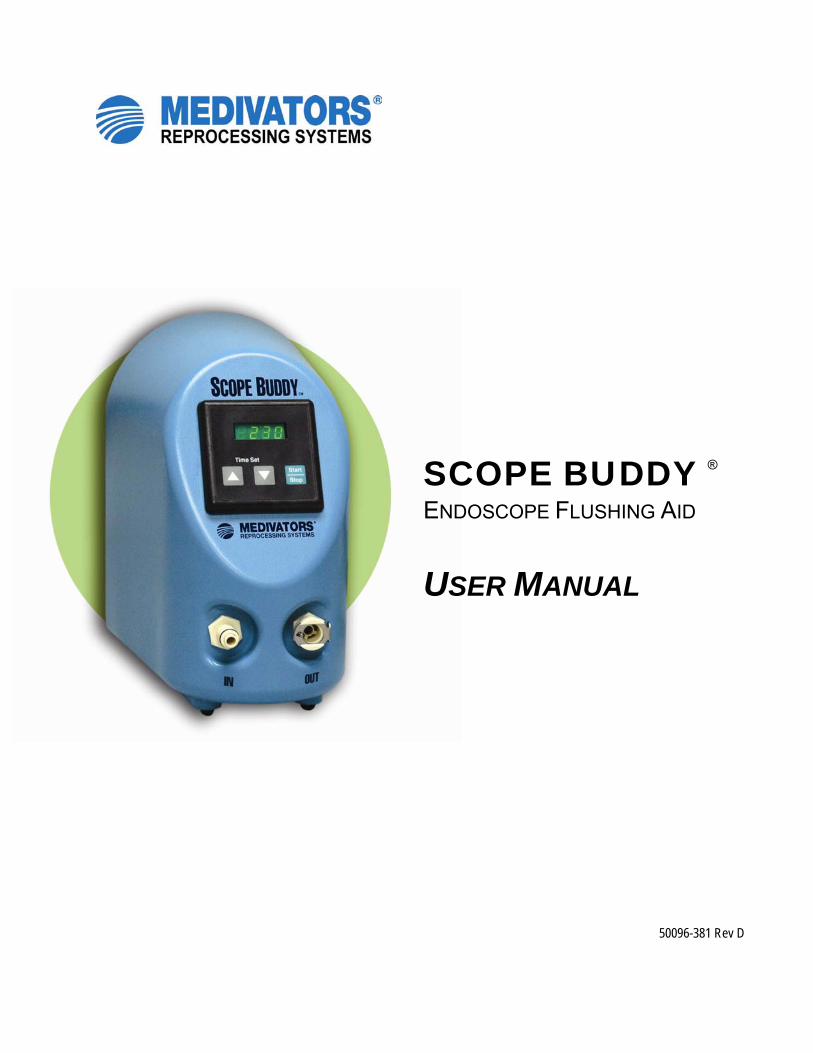
SCOPE BUDDY ENDOSCOPE FLUSHING AID USER MANUAL
®
SCOPE BUDDY USER/SERVICE MANUAL
FUJINON™ is a registered trademark of Fujinon Corporation MEDIVATORS® is a registered trademark of Minntech Corporation. OLYMPUS® is a registered trademark of Olympus Corporation. PENTAX® is a registered trademark of Pentax Precision Instrument Corporation. SCOPE BUDDY® is a trademark of Minntech Corporation. © 2009 Minntech Corporation All rights reserved. This publication is protected by copyright. Copying, disclosure to others, or the use of this publication is prohibited without the express written consent of Minntech Corporation. Minntech reserves the right to make changes in the specifications shown herein without notice or obligation. Contact your Medivators representative or Medivators customer service for more information.
TABLE OF CONTENTS Page
1 INTRODUCTION Using this Manual..................................................................................................................1 Product Description .............................................................................................................1 Product Specifications..........................................................................................................2
2 SAFETY Intended Use ..........................................................................................................................3 Electrical Compliance ..........................................................................................................3 Operator Safety......................................................................................................................4 Endoscope Safety .................................................................................................................4 Notes, Cautions, and Warnings ..........................................................................................5 Guidelines ..............................................................................................................................6 Endoscope Pre-cleaning ................................................................................................6 Cleaning and Disinfection..............................................................................................7
3 SETUP AND FAMILIARIZATION Device Installation .................................................................................................................9 System Components............................................................................................................10 Control Panel ........................................................................................................................11 Tubing Connections.............................................................................................................12
4 DEVICE OPERATION Programming Times............................................................................................................ 13 Elevator Wire Channel – Fujinon Endoscopes……….………………………………......... 14 Forward Water Jet – Fujinon Endoscopes ....................................................................... 15 Endoscope Flushing using a Medivators DSD Hook-up ................................................. 15 Endoscope Flushing using the Endoscope Manufacturer’s All-channel Irrigator ........20
Endoscope Flushing using the Elevator Wire Channel Hook-up – Fujinon Endoscopes .......................................................................................................... 25
Daily Quality Assurance Test .............................................................................................30 Daily Decontamination Procedure......................................................................................33
5 MAINTENANCE & TROUBLESHOOTING Maintenance .........................................................................................................................35 Troubleshooting Guide ........................................................................................................36
6 GLOSSARY ______________________________________________________________ 37
7 WARRANTY _____________________________________________________________________39

SCOPE BUDDY USER/SERVICE MANUAL
MEDIVATORS REPROCESSING SYSTEMS
1
1 INTRODUCTION
Using this Manual This manual describes the features of the Medivators SCOPE BUDDY Endoscope Flushing Aid, including setup, operation, safety, maintenance, and troubleshooting procedures. It is important to follow the provided instructions to keep the device in good operating condition, delivering proper fluid flows, and to ensure long product life. Given the unique design of the electrical and mechanical components used within this product, no user-serviceable parts are contained within the unit and no internal calibration is required. Annual calibration and preventative maintenance schedules are also not required as the unit is designed to be maintenance-free. It is however; strongly recommended that daily quality assurance testing and the daily decontamination procedure be performed to ensure the system is functioning properly and ready for use. Refer to Section 4 for further information. Contact the manufacturer’s representative if you have any questions regarding this product, its use, or operation.
Product Description The Medivators SCOPE BUDDY Endoscope Flushing Aid is designed to facilitate the flushing of rinse water and cleaning solutions through the channels of flexible, immersible endoscopes. This device is to be used during the manual pre-cleaning phase of endoscope reprocessing, prior to the endoscope being placed in an automated endoscope reprocessor (AER) for high level disinfection. The SCOPE BUDDY combines a diaphragm pump, digital timer, and electronic control circuitry to pump fluids through tubing connections to the channels of the endoscope. Three different tubing sets allow connection to most types of endoscopes. The Elevator Wire Channel Hookup allows connection to the Fujinon endoscope’s elevator wire channel, or to the Fujinon endoscope’s Forward Water Jet. The DSD Extension Line allows connection to the DSD hook-up which attaches to the endoscope. The Universal Cleaning Adapter Extension Line and multi-way adapters allow connection to the Universal Cleaning Adapter Hook-up provided with the endoscope.
The SCOPE BUDDY is designed to be used as a flushing aid only during the manual cleaning process of a flexible endoscope. This device is not an endoscope disinfector. All endoscopes must be high-level disinfected prior to use on a patient.

SCOPE BUDDY USER/SERVICE MANUAL
2
Product Specifications
Chassis Dimensions (height - width - depth)
9 ½”H x 6”W x 8”D (Inches) 24.13H x 15.24W x 20.32D (CM’s)
Weight (approx.) 10 lb (4.5kg)
Power Cord and Connector Medical Grade – 6 feet (2.83m) 18AWG, #3 Connector
Electrical Requirements 100 – 250 VAC ±10% 47-63 HZ 1φ
Current Draw < 1.0 Amperes
Breaker and Protection
1 Amp max. at 90 VAC input, Non-replaceable, internal primary current fuse, inrush limiting, thermal shutdown
Maximum Fluid Delivery 1 Liter per minute
Maximum Pump Pressure 29 PSI w/Safety Bypass
Cycle Time Range Setting 0 to 99 minutes/59 seconds
Cycle Completion Indicators Audible and Visual
Electrical Safety Certifications ETL and cETL Listed Conforms to UL 61010-1 Certified to CAN/CSA C22.2 No. 61010-1
Electromagnetic Interference FCC Title 47, Part 15, Class A, EN 55011 and EN 50082-1
Environmental Rating Standard
Designed for Use Indoor Use Only
Installation/ Over Voltage Category II
Classification 1, Ordinary protection
Pollution Degree 2
Operating Temperature Range 15° C to 35° C
Operating Humidity Range 10-75% non-condensing
Storage Temperature Range -29° C to 57° C
Storage Humidity Range 5 – 90% non-condensing
Warranty Period One Year
MEDIVATORS REPROCESSING SYSTEMS
3
2 SAFETY
Intended Use
The Medivators SCOPE BUDDY Endoscope Flushing Aid is an electro-mechanical device intended to pump fluids through channels of flexible, immersible endoscopes. The device is designed to be used as a flushing aid only during the endoscope manual cleaning process. This device is not an endoscope disinfector and does not take the place of an automatic endoscope reprocessor. Endoscopes must be high-level disinfected by an approved endoscope reprocessor or manual HLD soaking prior to use on a patient.
Throughout this manual are notes, cautions, and warnings, which are also represented by specific icons. These are designed to provide important information to the user regarding the proper use and operation of this device. It is important to read and understand all notes, cautions, and warnings, prior to using this product. Should you have any questions or require further clarification, please contact your manufacturer’s representative. Examples of these icons are shown below.
Note: A note refers to important information to which the user should pay special attention.
Notes provide added insight and helpful information which can be useful to the operator.
Caution: This information is an alert to the possibility of a problem with the device associated with its use or misuse.
WARNING: This information is an alert to possible injury or other serious adverse reaction
associated with the use or misuse of this device.
WARNING: Do not use this device on NON-IMMERSIBLE endoscopes or on endoscopes with internal leaks.
Electrical Compliance SCOPE BUDDY has been rigorously tested to stringent electrical certifications and safety standards.
This device meets the laboratory standard for Electromagnetic Interference Requirements for FCC Title 47, Part 15, Class A, EN 55011 and EN 50082-1, and the Electrical Safety Requirements of UL 61010-1, Pollution Degree 2, and Installation Category II Equipment. SCOPE BUDDY carries and is certified to ETL and cETL, the Electrical CE Mark, UL 61010-1, and CAN/CSA C22.2 No. 61010-1.
Caution: This device must always be plugged into an electrical wall outlet that includes an approved Ground Fault Interrupter (GFI) prior to operation of the pump.
!
SCOPE BUDDY USER/SERVICE MANUAL
4
Operator Safety
1. This device is only to be operated by properly trained and qualified personnel who are fully familiar with its intended use and operation.
2. Avoid biological contamination and chemical burns. Always wear appropriate personal protective
equipment (PPE) including clothing, gloves, and safety glasses when handling used endoscopes. 3. Cleaning and detergent solutions for endoscope flushing must be used in accordance with the
regulations governing their use, safety, and shelf life. Decontamination solutions for performing the Scope Buddy Daily Decontamination Cycle must be used in accordance to the regulations governing their direction for use.
4. In case of contact with cleaning solutions, flush eyes or skin with copious amounts of water for a
minimum of 15 minutes. Seek immediate medical attention in case of eye contact. 5. Decontamination solutions can be harmful if swallowed. In case of accidental ingestion, drink large
quantities of water and call a physician immediately. Avoid contact with food. Do not store decontamination solutions near food.
Patient Safety
1. Failure to adhere to the endoscope manufacturer’s recommendations governing the proper cleaning of endoscopes after each patient examination may compromise the efficacy of the subsequent endoscope high level disinfection process.
2. All endoscopes must be high-level disinfected prior to patient use. SCOPE BUDDY is not designed to
replace an automated endoscope disinfector and should never be used to disinfect an endoscope.
Endoscope Safety
Scope Buddy has been designed and tested to meet or exceed endoscope manufacturer’s guidelines including pressure and flow requirements. Medivators Scope Buddy is certified and validated safe for use with Olympus, Pentax, Fujinon and Storz flexible, immersible endoscopes.

MEDIVATORS REPROCESSING SYSTEMS
5
Notes, Cautions, and Warnings General Cautions
• Use only a medical-grade detergent which has bacteriostatic properties, is low-foaming, free-rinsing, and has a neutral pH.
• Detergent and rinse water cleaning solutions can be drawn from either a clean container for a single-pass through Scope Buddy, or recirculated from the sink through Scope Budd. Scope Buddy can be used in either format depending on the facility’s endoscope cleaning procedure.
• For the daily decontamination procedure, select a decontamination solution whose label indicates that it may be used at room temperature to achieve decontamination (see Section 6, Glossary, for definition) of medical instruments. Consult the manufacturer’s label for the appropriate directions for use and decontamination solution contact time.
• Do not use alcohol-based products in or on the SCOPE BUDDY device. Alcohol is not compatible and should never be used to clean, flush, or rinse SCOPE BUDDY. Use of alcohol or alcohol-based products with SCOPE BUDDY will void the warranty. The tubing however can be reprocessed independently using 70% alcohol when not attached.
• Do not use bleach solutions or hydrogen peroxide in or on Scope Buddy. • Do not exceed a detergent, water, decontamination solution temperature of 50°C in Scope Buddy. • Follow the endoscope manufacturer’s instructions and established professional guidelines for
cleaning endoscopes. • The SCOPE BUDDY Endoscope Flushing Aid User Manual is intended to be used in conjunction
with the instructions and labeling provided by the endoscope/accessory manufacturer. Endoscope/accessory manufacturers provide instructions and labeling necessary for users to understand the basic design, specifications, nomenclature, and components of specific flexible endoscopes/accessories.
• Users should be properly trained and instructed to inspect, prepare, use, clean, disinfect, rinse, dry, and store endoscopes. Follow recommended standards as referred by ASTM, ASGE, SGNA, and APIC.
• Read all precaution labels on the Scope Buddy device before using. • Never use Scope Buddy in a manner not specified by the manufacturer. • Ensure that fluid exiting the open end of the endoscope or tubing is not facing a direction that would
allow fluid to be sprayed on personnel, electrical fixtures, or the user. • Scope Buddy, through its’ inherit use, becomes contaminated and requires cleaning and
decontamination. Precautions must be taken to insure the device is properly decontaminated. Please refer to the Daily Decontamination Procedure for further information.
• Duodenoscopes with elevator wire channels (EWC) may require additional cleaning and disinfection steps. It is particularly important for the elevator wire channel to be manually cleaned and fully reprocessed correctly. Extra attention should also be given to the position of the EWC throughout the cleaning process. Refer to the endoscope manufacturer’s instruction for the proper positioning of the elevator wire channel.
• If the Scope Buddy is to be unused for an extended period of time such as overnight, or over the weekend, it should be left full of decontamination fluid or clean rinse water. This maintains pump-head decontamination, lubrication and facilitates priming. Scope Buddy should not be air-purged and store empty between uses. The tubing can be detached from the Scope Buddy unit during this period.
SCOPE BUDDY USER/SERVICE MANUAL
6
Guidelines
Endoscope Pre-cleaning Proper endoscope precleaning is essential to removing microbial burden and bio-debris from the inside and the outside of an endoscope. Precleaning guidelines should always be consulted and followed, and a pre-cleaning process should always be developed and strictly adhered to, to ensure an endoscope is effectively and properly cleaned. Always follow the endoscope manufacturer’s instructions and established professional guidelines to properly preclean an endoscope. • Meticulous manual cleaning of the endoscope or accessory must be performed using an appropriate
detergent solution.
• Carefully brush all channels and valve ports using the detergent solution and cleaning tools designed for this purpose.
• Avoid the use of cotton swabs, gauze pads, and other lint-producing tools.
• Endoscopes should be leak tested before submersion as part of the overall reprocessing protocol as defined in the instrument manufacturer’s instructions. Leak testing detects damage within the interior or exterior of the endoscope.
• Follow instructions for manual pre-cleaning contained in the endoscope manufacturer’s manual.
MEDIVATORS REPROCESSING SYSTEMS
7
Cleaning and Disinfection Always follow the endoscopes manufacturer’s recommendations pertaining to the reprocessing of endoscopes and endoscope accessories to ensure that the endoscopes and accessories will be safe for patient use. A protocol should be developed and followed based on such guidelines. The following professional organizations have published guidelines pertaining to the reprocessing of endoscopes and associated accessories:
Society of Gastroenterology Assoc. for Professionals in Infection Nurses and Associates, Inc. Control and Epidemiology, Inc. 401 North Michigan Ave. 1275 K Street NW, Suite 1000 Chicago, IL 60611-4267 Washington, DC 20005-4006 USA USA Tel: 800-245-7462 Tel: 202-789-1890 Fax: 312-527-6658 Fax: 202-789-1899 www.sgna.org www.apic.org American Society for American Society for Gastrointestinal Endoscopy Testing and Materials 1520 Kensington Rd., Suite 202 100 Barr Harbor Dr. Oak Brook, IL 60523-2141 West Conshohocken, PA 19428-2959 USA USA Tel: 630-573-0600 Tel: 610-832-9585 Fax: 630-573-0691 Fax: 610-832-9555 www.asge.org www.astm.org Association of periOperative Canadian Society of Gastroenterology Registered Nurses, Inc. Nurses & Associates 2170 S. Parker Rd., Suite 300 27 Nicholson Dr. Denver, CO 80231-5711 Lakeside, NS B3T 1B3 USA CANADA Tel: 800-755-2676 Fax: 902-473-4406 Fax: 303-750-3462 www.csgna.com www.aorn.org British Society of Gastroenterological Nurses College of Gastroenterology Australia, Inc. (GENCA) 3 St. Andrews Place PO Box 483 Regents Park Boronia London NW1 4LB Vistoria 3155 ENGLAND Australia Tel: (+44) (0)20 7387 3534 Tel: 1300 788 155 www.bsg.org.uk Fax: 03 9801 6352 www.genca.org

SCOPE BUDDY USER/SERVICE MANUAL
8
MEDIVATORS REPROCESSING SYSTEMS
9
3 SETUP & FAMILIARIZATION
Device Installation • SCOPE BUDDY can only be used with the power supply supplied with the device. Do not attempt to
substitute or use a non-approved replacement power supply.
• The cycle run time can be adjusted by the operator, but always verify the rinse time is appropriate for the endoscope being flushed.
• Do not use alcohol or alcohol-based products, bleach solutions, or hydrogen peroxide in the SCOPE BUDDY.
• The tubing hookups, hookup extensions, and fluid intake line are not autoclavable and must be reprocessed using low temperature decontamination methods only.
• SCOPE BUDDY is designed to be placed on a counter top or mounted to the wall by using the supplied wall-mounting bracket. If mounting to a wall, ensure the bracket is properly secured using the correct mounting hardware, adequate to support at least ten pounds of weight.
• SCOPE BUDDY must be located within a vertical height no greater than three feet above the incoming detergent or rinse water solution. The distance between the top of the fluid solution and SCOPE BUDDY must not exceed three feet.
• SCOPE BUDDY is designed to operate in a damp environment, but should not be immersed in any fluids. Do not use the device if it becomes immersed in any type of fluid, or if fluid is observed leaking from the device.
SCOPE BUDDY USER/SERVICE MANUAL
10
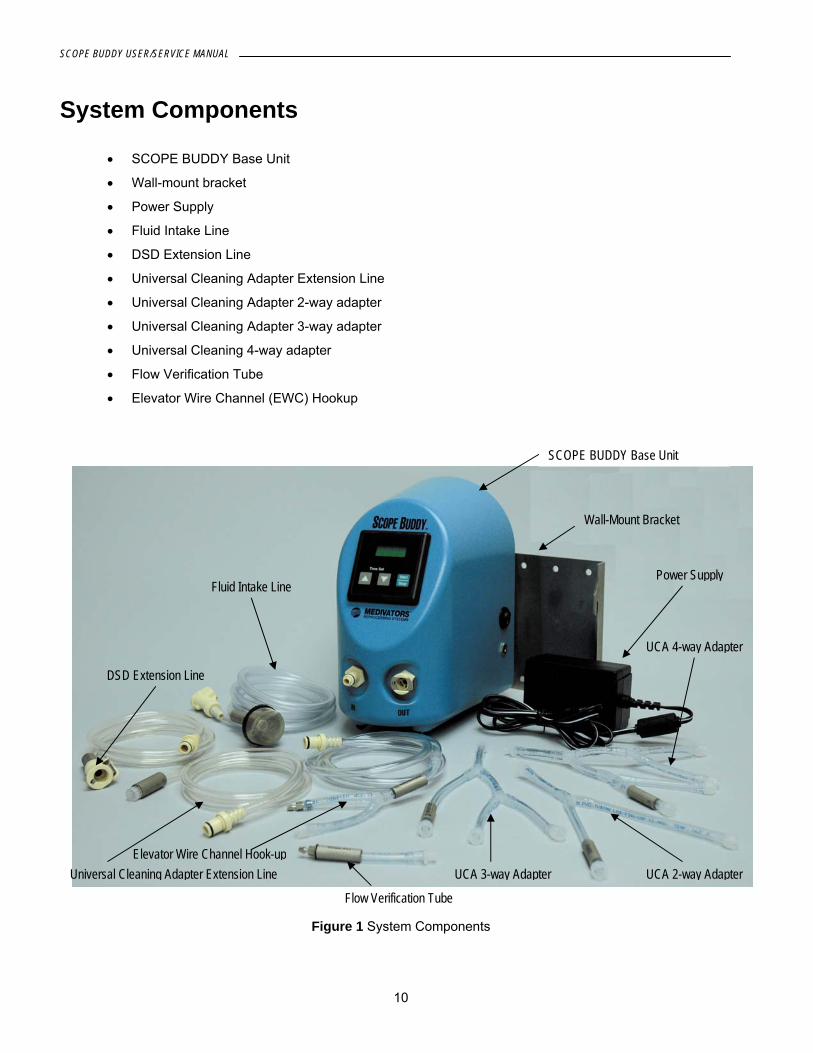
System Components
• SCOPE BUDDY Base Unit
• Wall-mount bracket
• Power Supply
• Fluid Intake Line
• DSD Extension Line
• Universal Cleaning Adapter Extension Line
• Universal Cleaning Adapter 2-way adapter
• Universal Cleaning Adapter 3-way adapter
• Universal Cleaning 4-way adapter
• Flow Verification Tube
• Elevator Wire Channel (EWC) Hookup
Figure 1 System Components
SCOPE BUDDY Base Unit
Wall-Mount Bracket
Power Supply Fluid Intake Line
DSD Extension Line
UCA 3-way Adapter
UCA 4-way Adapter
UCA 2-way Adapter Universal Cleaning Adapter Extension Line
Flow Verification Tube
Elevator Wire Channel Hook-up
MEDIVATORS REPROCESSING SYSTEMS
11
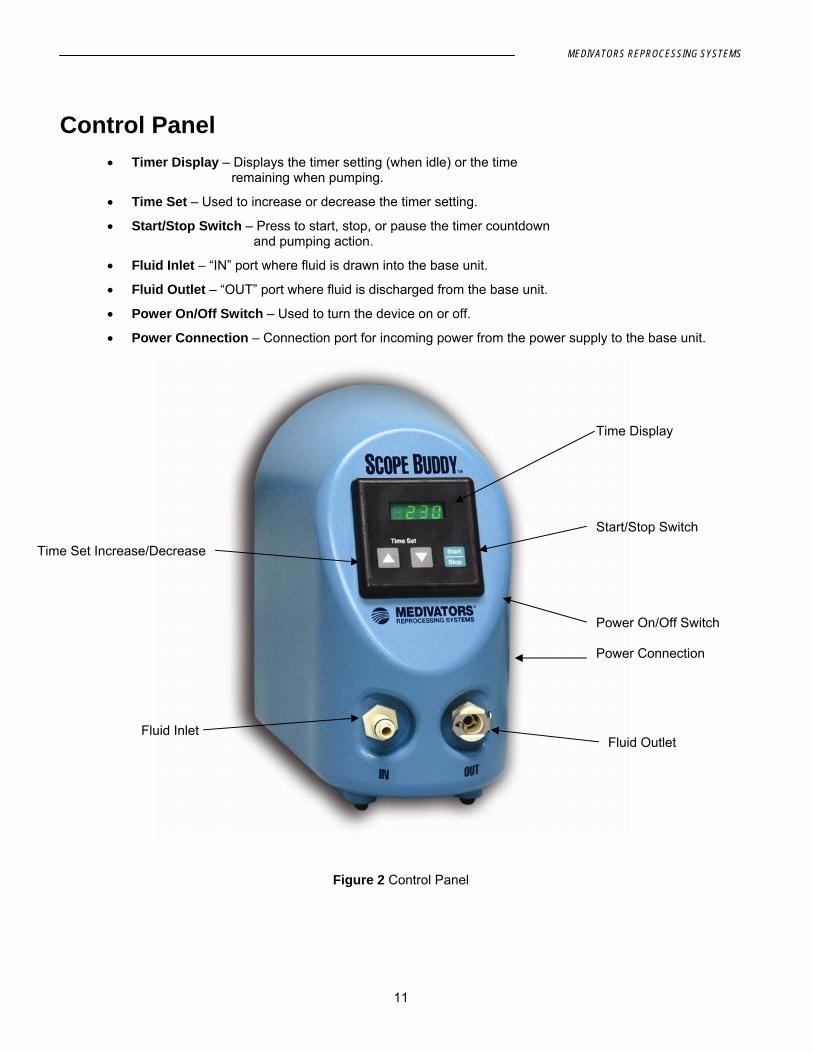
Control Panel
• Timer Display – Displays the timer setting (when idle) or the time remaining when pumping.
• Time Set – Used to increase or decrease the timer setting.
• Start/Stop Switch – Press to start, stop, or pause the timer countdown and pumping action.
• Fluid Inlet – “IN” port where fluid is drawn into the base unit.
• Fluid Outlet – “OUT” port where fluid is discharged from the base unit.
• Power On/Off Switch – Used to turn the device on or off.
• Power Connection – Connection port for incoming power from the power supply to the base unit.
Figure 2 Control Panel
Power On/Off Switch Power Connection
Fluid Inlet
Time Set Increase/Decrease
Time Display
Start/Stop Switch
Fluid Outlet
SCOPE BUDDY USER/SERVICE MANUAL
12
Tubing Connections
The device is designed to function with a wide variety of manufacturer’s endoscopes of various configurations. The device is supplied with different types of tubing connections which allow connection to most endoscopes.
The DSD Extension Line allows connection to a Medivators DSD hook-up which attaches to the endoscope. Refer to the DSD Hook-up Application Guide to identify the correct hook-up to use for the endoscope being flushed and the hook-ups’ Directions for Use Instructions for correct connection.
The Universal Cleaning Adapter Extension Line and multi-way adapters allow connection to the Universal Cleaning Adapter provided with the endoscope. Refer to the endoscope manufacturer’s Instructions for Use to ensure the correct Cleaning Adapter is being used and that it is correctly connected. The Elevator Wire Channel Hook-up allows flushing of the elevator wire channel of a Fujinon Duodenoscope. The Elevator Wire Channel Hook-up is also used to flush the forward water jet of a Fujinon endoscope.
Note: The Fujinon forward water jet adapter is always used in conjunction with the Elevator Wire Channel Hook-up.
Note: When using a Pentax or Fujinon water jet adapter, always verify it does NOT contain a check valve. Only non-check valve forward water jet adapters can be used with Scope Buddy to achieve the correct flushing volume over the stated Rinse Matrix times.
Note: The universal cleaning adapter may be referred to as an All-ChannelIrrigator by some endoscope manufacturers.
Reference the Medivators Hook-up Application Guide which can be downloaded at www.minntech.com/medivators to identify the appropriate DSD hook-up for the manufacturer’s endoscope being cleaned.
The supplied tubing segments which facilitate endoscope connection are: • Fluid Intake Line – Tubing set that allows fluid to be drawn up from the sink into the SCOPE BUDDY.
• DSD Extension Line – Tubing set that allows fluid to be delivered from the machine to the DSD Hook-up.
• Universal Cleaning Adapter Extension Line – Tubing set that allows fluid to be delivered from the machine to the Universal Cleaning Adapter supplied with the manufacturer’s flexible endoscope.
• UCA 2-way Adapter – Tubing adapter which connects to the Universal Cleaning Adapter Extension Line and allows connection to an endoscope’s Universal Cleaning Adapter with 2 connection ports.
• UCA 3-way Adapter – Tubing adapter which connects to the Universal Cleaning Adapter Extension Line and allows connection to an endoscope’s Universal Cleaning Adapter with 3 connection ports.
• UCA 4-way Adapter – Tubing adapter which connects to the Universal Cleaning Adapter Extension Line and allows connection to an endoscope’s Universal Cleaning Adapter with 4 connection ports.
• Elevator Wire Channel Hookup – Tubing set that allows fluid to be delivered from the machine to the elevator wire channel, or to the forward water jet of a Fujinon endoscope.
• Flow Verification Tube – Tubing segment used during the Daily Quality Assurance Test to ensure SCOPE BUDDY is delivering the proper amount of fluid.
Note: A complete set of tubing connections is available by contacting Medivators Customer Support. The reorder part number is 78399-669, and the tubings are only available as a complete set.
MEDIVATORS REPROCESSING SYSTEMS
13
4 DEVICE OPERATION
Programming Times SCOPE BUDDY Programming Times for Olympus, Pentax & Fujinon Brand Endscope are listed below for Scope Buddy units having a serial number >201345.
Programming times are different depending on which version Scope Buddy is being used. Reference the Scope Buddy serial number (found on Scope Buddy’s back panel) to identify which “Scope Buddy Rinse Matrix” is to be used.
• For Scope Buddy units having a serial number ≤ 201344, then use the Scope Buddy Rinse Matrix part number 50096-704.
• For Scope Buddy units having a serial number ≥ 201345, then use the Scope Buddy Rinse Matrix part number 50096-849.
The Scope Buddy Rinse Matrices can be found by logging onto the Medivators website located at: www.minntech.com/medivators. Click on the “Medivators Reprocessing Systems” tab followed by the “Resource Center” dropdown and then “User Library”. Select “Scope Buddy” as the product and then scroll down to the “Users Manuals” heading and “Document Descriptions” to locate the correct Scope Buddy Rinse Matrix.
Always verify the correct Scope Buddy Rinse Matrix is being used based off of the serial number of the unit in use.
Reference the “Scope Buddy Rinse Matrix” to identify the programming time required to flush cleaning and rinse solutions through the endoscope channels during the manual cleaning process.
The time stated assumes that the connection tubings and hookup kits from SCOPE BUDDY to the endoscope are primed and full of fluid. Program times should be extended by 10 seconds if the tubes are not pre-primed.
The rinse matrix times area based on in-house validation tests that were conducted using endoscopes with channels in good working condition, free from restrictions and/or defects. These rinse times represent the grouping of endoscopes. Rinse times may be reduced by individual flow testing of a specific endoscope. Always ensure flushing volumes comply with endoscope manufacturer’s guidelines.
Due to differences in individual endoscope channel performance, users should always verify that the solution volumes meet the manual cleaning requirements of the endoscope manufacturer and or the facility. Use these programming times for Scope Buddy units having serial numbers ≥ 201345.
Programming Time to Flush 90 mls through Olympus Endoscopes including those with an Elevator Wire Channel Small Caliber Endoscopes 30 seconds Gastroscopes 30 seconds Gastroscope : Model GIF-2T100 1 minute Duodenoscopes (including elevator wire channel)
1 minute
Colonoscopes 2 minutes 45 seconds Colonoscopes: (Model CF-140, 160 and 180 (1 and 2 channels), PCF-140, 160 and180, CF-1T140L
30 seconds
Sigmoidoscopes 1 minute Ultrasound Scope 1 minute
SCOPE BUDDY USER/SERVICE MANUAL
14
Programming Time to Flush 100 mls through Pentax Endoscopes including those with an Elevator Wire Channel (serial number ≥201345)
Note: When flushing the Forward Water Jet of a Pentax endoscope, always ensure the forward water jet adapter does not contain a check valve. Only a forward water jet non-check valve adapter can be used. Also, the Forward Water Jet can be flushed simultaneously with the other endoscope channels, and does not require the use of the Elevator Wire Channel Hook-up. The Pentax forward water jet can be flushed using the DSD Hook-up or the All-channel Irrigator Hook-up.
Small Caliber Endoscopes 35 seconds Gastroscopes (including forward water jet w/non-check valve adapter)
35 seconds
Duodenoscopes (including elevator wire channel)
1 minute 5 seconds
Colonoscopes (including forward water jet w/non-check valve adapter)
1 minutes 5 seconds
Sigmoidoscopes 35 seconds (using the forward water jet w/non-check valve adapter
Ultrasound Scope 35 seconds
Programming Time to Flush 100 mls through Fujinon Endoscopes excluding those with an Elevator Wire Channel or a Forward Water Jet (serial number ≥201345) Small Caliber Endoscopes 35 seconds Gastroscopes 1 minute 30 seconds Gastroscope: Model EG-450HR 35 seconds Duodenoscopes (including elevator wire channel)
1 minute 5 seconds
Duodenoscopes (elevator wire channel only, 15 mls)
3 minutes (using EWC hook-up)
Colonoscopes 1 minutes 5 seconds Sigmoidoscopes 1 minute 5 seconds Ultrasound Scope 1 minute 5 seconds Fjuinon Forward Water Jet 1 minute 30 seconds (using EWC
hook-up)
Elevator Wire Channel – Fujinon Endoscopes
SCOPE BUDDY can be used to flush an endoscope’s elevator wire channel (EWC). Due to the internal structure of the Fujinon EWC channel, it must be flushed independently of the other endoscope channels The Fujinon endoscope’s EWC simultaneously with other endoscope channels as the elevator wire channel will not be properly flushed per the endoscope manufacturer’s standards and guidelines. The independent flushing of the elevator wire channel using Scope Buddy’s Elevator Channel Hook-up ensures fluid is delivered directly to this channel. Go to the section labeled “Endoscope Flushing using the Elevator Wire Channel Hook-up – Fujinon Endoscopes” for further instructions. .
MEDIVATORS REPROCESSING SYSTEMS
15
Forward Water Jet – Fujinon Endoscopes The SCOPE BUDDY elevator wire channel (EWC) hook-up must be used to flush the Forward Water Jet of a Fujinon endoscope. The Fujinon endoscope’s forward water jet must be flushed independently and while using Scope Buddy’s Elevator Wire Channel hook-up. These specific endoscope’s have an internally contained check-valve and Scope Buddy’s elevator wire channel hook-up is uniquely designed for this function. The DSD Hook-up or the All-channel Irrigator Hook-up cannot be used to flush the Forward Water Jet of a Fujinon endoscope.
Never flush the Fujinon endoscope’s forward water jet simultaneously with other endoscope channels as the Fujinon endoscope’s forward water jet will not be properly flushed per the endoscope manufacturer’s standards and guidelines. The independent flushing of this channel using Scope Buddy’s EWC Hook-up ensures fluid is delivered directly to this channel. Go to the section labeled “Endoscope Flushing using the Elevator Wire Channel Hook-up – Fujinon Endoscopes” for further instructions.
Endoscope Flushing using a Medivators DSD Hook-Up
Use this step-by-step procedure to properly attach the device to an endoscope using the Fluid Intake Tubing, the DSD Extension Line, and the appropriate Medivators DSD Hook-up. The Fluid Intake Tubing and the DSD Extension Line are provided with the device. The Medivators DSD Hook-up is provided by current users of a Medivators DSD Endoscope Reprocessor. Reference the Medivators Hook-up Application Guide, located at www.minntech.com/medivators to identify the correct DSD Hook-up for the endoscope being cleaned. Refer to the Directions for Use Instructions supplied with the hook-up to ensure correct connection.
When properly connected, fluid will be drawn up from the sink or from a clean container of detergent or rinse water solution, flow through the Fluid Intake Tubing to SCOPE BUDDY, and then out of SCOPE BUDDY and through the DSD Extension Tubing and the DSD Hook-up to the endoscope. This provides fluid delivery for flushing the internal lumens of the endoscope.
Note: If flushing the Forward Water Jet or the Elevator Wire Channel of a Fujinon endoscope, then the elevator wire channel hook-up must be used. The Medivators DSD Hook-up cannot be used. Go to the section labeled “Endoscope Flushing using the Elevator Wire Channel Hook-up – Fujinon Endoscopes” for further instructions.
SCOPE BUDDY USER/SERVICE MANUAL
16
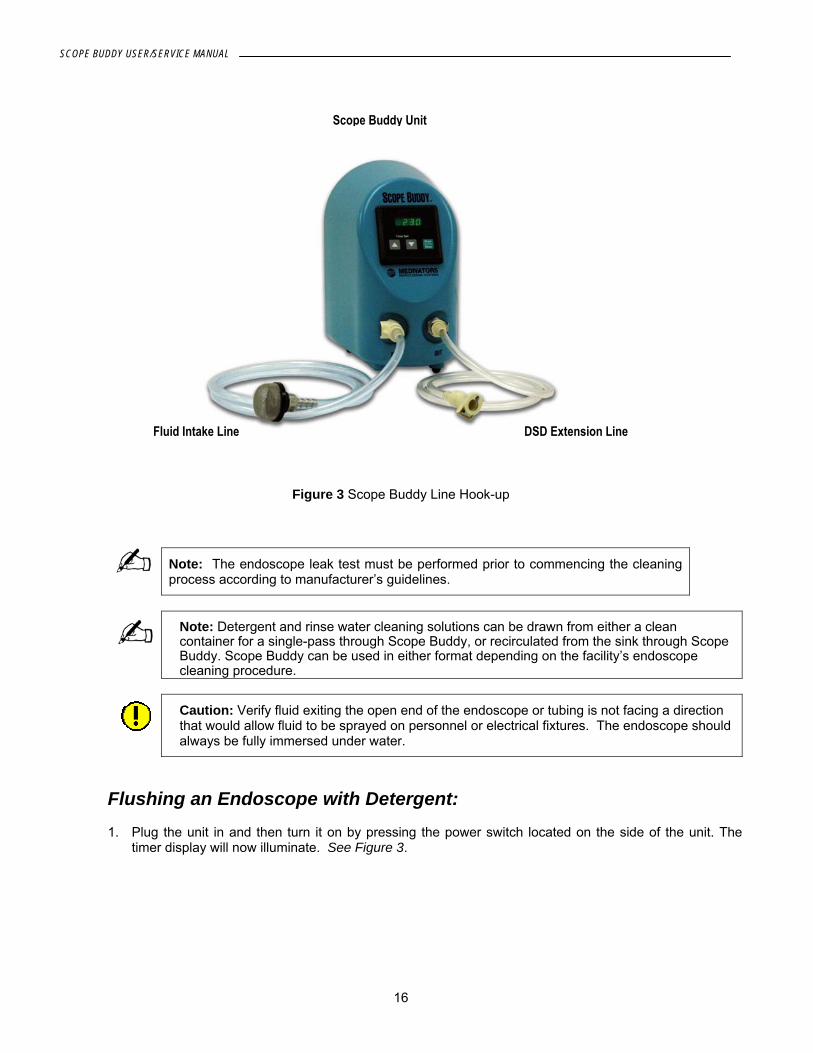
Figure 3 Scope Buddy Line Hook-up
Note: The endoscope leak test must be performed prior to commencing the cleaning process according to manufacturer’s guidelines.
Note: Detergent and rinse water cleaning solutions can be drawn from either a clean container for a single-pass through Scope Buddy, or recirculated from the sink through Scope Buddy. Scope Buddy can be used in either format depending on the facility’s endoscope cleaning procedure.
Caution: Verify fluid exiting the open end of the endoscope or tubing is not facing a direction that would allow fluid to be sprayed on personnel or electrical fixtures. The endoscope should always be fully immersed under water.
Flushing an Endoscope with Detergent:
1. Plug the unit in and then turn it on by pressing the power switch located on the side of the unit. The timer display will now illuminate. See Figure 3.
DSD Extension Line Fluid Intake Line
Scope Buddy Unit
MEDIVATORS REPROCESSING SYSTEMS
17
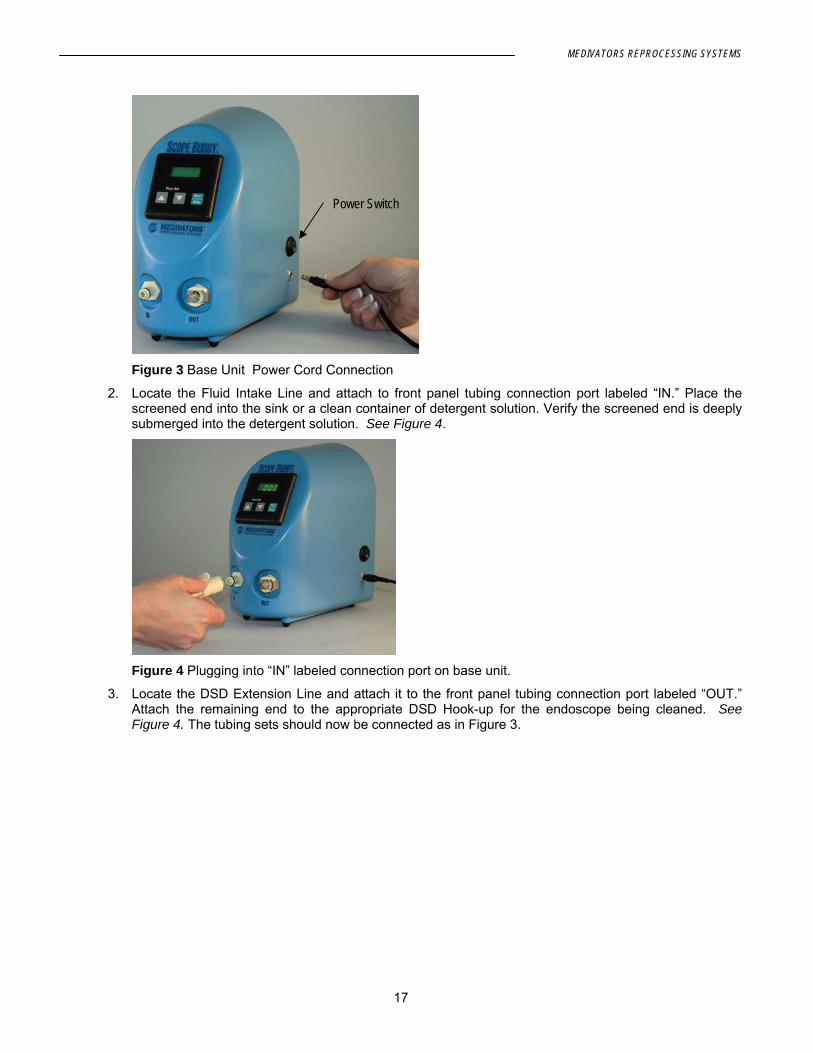
Figure 3 Base Unit Power Cord Connection
2. Locate the Fluid Intake Line and attach to front panel tubing connection port labeled “IN.” Place the screened end into the sink or a clean container of detergent solution. Verify the screened end is deeply submerged into the detergent solution. See Figure 4.
Figure 4 Plugging into “IN” labeled connection port on base unit.
3. Locate the DSD Extension Line and attach it to the front panel tubing connection port labeled “OUT.” Attach the remaining end to the appropriate DSD Hook-up for the endoscope being cleaned. See Figure 4. The tubing sets should now be connected as in Figure 3.
Power Switch
SCOPE BUDDY USER/SERVICE MANUAL
18
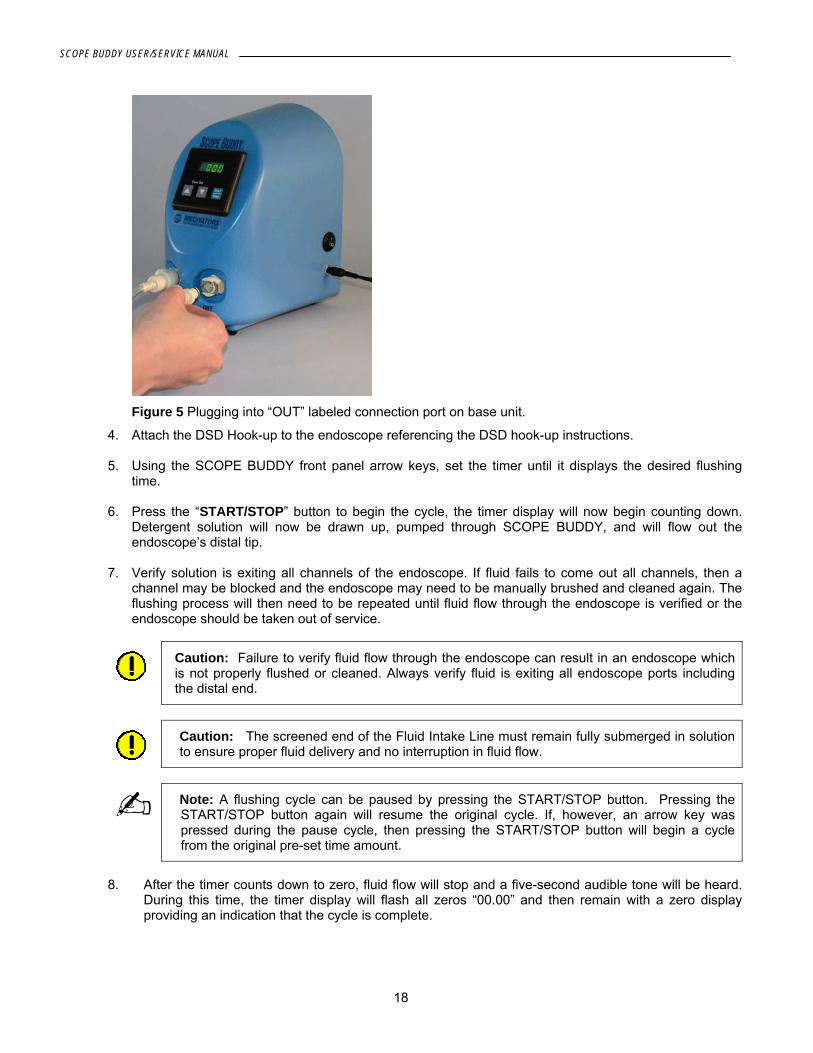
Figure 5 Plugging into “OUT” labeled connection port on base unit.
4. Attach the DSD Hook-up to the endoscope referencing the DSD hook-up instructions.
5. Using the SCOPE BUDDY front panel arrow keys, set the timer until it displays the desired flushing time.
6. Press the “START/STOP” button to begin the cycle, the timer display will now begin counting down. Detergent solution will now be drawn up, pumped through SCOPE BUDDY, and will flow out the endoscope’s distal tip.
7. Verify solution is exiting all channels of the endoscope. If fluid fails to come out all channels, then a channel may be blocked and the endoscope may need to be manually brushed and cleaned again. The flushing process will then need to be repeated until fluid flow through the endoscope is verified or the endoscope should be taken out of service.
Caution: Failure to verify fluid flow through the endoscope can result in an endoscope which is not properly flushed or cleaned. Always verify fluid is exiting all endoscope ports including the distal end.
Caution: The screened end of the Fluid Intake Line must remain fully submerged in solution to ensure proper fluid delivery and no interruption in fluid flow.
Note: A flushing cycle can be paused by pressing the START/STOP button. Pressing the START/STOP button again will resume the original cycle. If, however, an arrow key was pressed during the pause cycle, then pressing the START/STOP button will begin a cycle from the original pre-set time amount.
8. After the timer counts down to zero, fluid flow will stop and a five-second audible tone will be heard.
During this time, the timer display will flash all zeros “00.00” and then remain with a zero display providing an indication that the cycle is complete.
MEDIVATORS REPROCESSING SYSTEMS
19
Purging an Endoscope of Detergent: 1. Remove the Fluid Intake Line from the detergent solution and place on the counter. 2. Press the START/STOP button once to reset the timer to the original pre-set time amount. 3. Press the START/STOP button again to begin pumping. The timer display will now begin counting
down as some of the detergent solution is pumped out the endoscope. Verify fluid is exiting the tip of the endoscope.
4. Press START/STOP button to halt pumping when fluid no longer exits the endoscope. Note: Most
fluid is now purged from the endoscope, but some residual fluid will remain in the endoscope.
Rinsing an Endoscope with Water: 1. Dispose contaminated detergent solution down the drain and thoroughly rinse the sink.
2. Fill the sink or the fluid container with clean rinse water and place the Fluid Intake Line into the
clean water
3. Press the START/STOP button once to reset the timer to the original pre-set time amount.
4. Press the START/STOP button again to begin the cycle; the timer display will now begin counting down. Rinse water will now be drawn up, pumped through the device, and will flow out of the endoscope channels.
5. Verify rinse water is exiting all endoscope channels. If fluid fails to come out of the endoscope, then
the endoscope may need to be manually brushed and cleaned again. The flushing process will then need to be repeated until flow through the endoscope is verified.
Caution: Failure to verify fluid flow through the endoscope can result in an endoscope which is not properly rinsed. Always verify fluid is exiting all endoscope ports at the distal end.
Caution: The screened end of the Fluid Intake Line must remain deeply submerged in solution to ensure proper fluid delivery and no interruption in fluid flow.
Note: A flushing cycle can be paused by pressing the START/STOP button. Pressing the
START/STOP button again will resume the original cycle. If; however, an arrow key was pressed during the pause cycle, then pressing the START/STOP button will begin a cycle from the original pre-set time amount.
6. Once the timer counts down to zero, fluid flow will stop and a five-second audible tone will be heard. During this time, the timer display will flash all zeros “00.00” and then remain with a zero display providing an indication that the cycle is complete.
SCOPE BUDDY USER/SERVICE MANUAL
20
Purging an Endoscope of Rinse Water: 1. Remove the Fluid Intake Line from the rinse water and place on the counter. 2. Press the START/STOP button once to reset the timer to the original pre-set time amount. 3. Press the START/STOP button again to begin pumping. The timer display will now begin counting
down as some of the rinse solution is pumped out the endoscope. Verify fluid is exiting the endoscope.
4. Press START/STOP button to halt pumping when fluid no longer exits the endoscope.
Note: Residual fluid will remain in the endoscope. Do not use SCOPE BUDDY to deliver alcohol to the endoscope. Alcohol should never be used in SCOPE BUDDY.
5. Upon successful completion of these steps, the endoscope is now ready to be placed in an
Automated Endoscope Reprocessor, or it can be manually reprocessed for high-level disinfection. Never use alcohol in SCOPE BUDDY.
Endoscope Flushing using the Endoscope Manufacturer’s All-channel Irrigator
Use this step-by-step procedure to properly attach the device to an endoscope using the Fluid Intake Tubing, the Universal Cleaning Extension Line with multi-way adapters, and the Universal Cleaning Adapter supplied by the endoscope manufacturer
Note: The endoscope’s Universal Cleaning Adapter may be referred to as the All-Channel Irrigator by some endoscope manufacturers.
The Fluid Intake Tubing and the Universal Cleaning Extension Line with multi-way adapters are provided with the SCOPE BUDDY. The Universal Cleaning Adapter is supplied by the endoscope manufacturer. Refer to the endoscope manufacturer’s Instructions for Use to ensure the correct Cleaning Adapter is being used and that it is correctly connected. When properly connected, fluid will be drawn up from the sink or a clean container of detergent or rinse water solution. The fluid will flow through the Fluid Intake Tubing to SCOPE BUDDY, and then out of SCOPE BUDDY and through the Universal Cleaning Extension Line with multi-way adapters and the Universal Cleaning Adapter to the endoscope. This provides fluid delivery for flushing the internal lumens of the endoscope.
Note: If flushing the Forward Water Jet or the Elevator Wire Channel of a Fujinon brand endoscope, then the elevator wire channel hook-up must be used. The Manufacturer’s All-Channel Irrigator or Universal Cleaning Adapter cannot be used. Go to the section labeled “Endoscope Flushing using the Elevator Wire Channel Hook-up – Fujinon Endoscopes” for further instructions.
MEDIVATORS REPROCESSING SYSTEMS
21
Caution: Verify fluid exiting the open end of the endoscope or tubing is not facing a direction that would allow fluid to be sprayed on personnel, or electrical fixtures. The endoscope should always be fully immersed under water.
Note: Detergent and rinse water cleaning solutions can be drawn from either a clean container for a single-pass through Scope Buddy, or recirculated from the sink through Scope Buddy. Scope Buddy can be used in either format depending on the facility’s endoscope cleaning procedure.
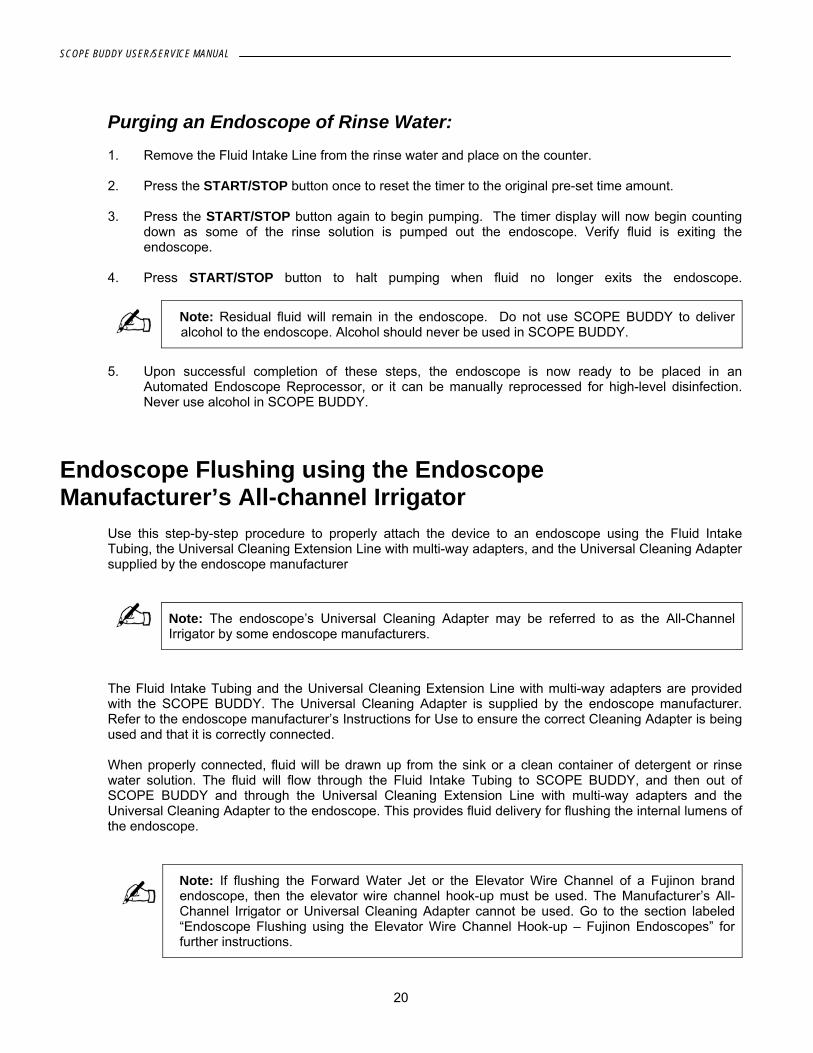
Figure 6 Universal Cleaning Adapter hook-up with 3-way connector
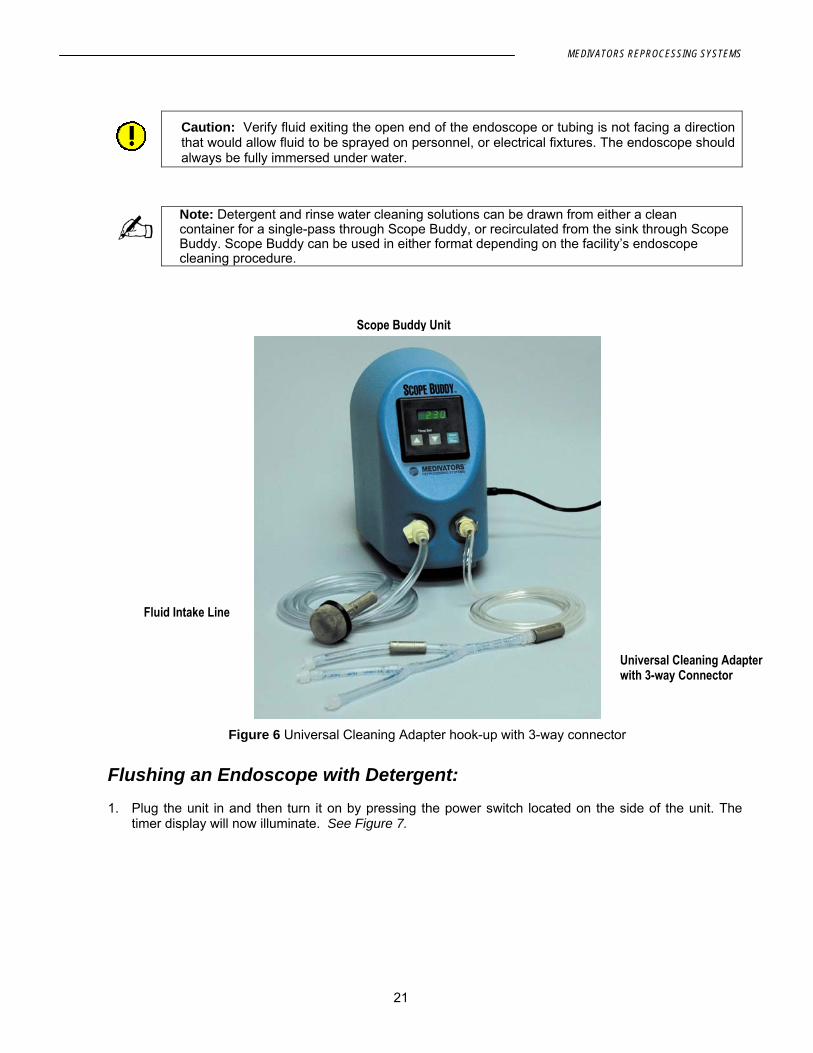
Flushing an Endoscope with Detergent: 1. Plug the unit in and then turn it on by pressing the power switch located on the side of the unit. The
timer display will now illuminate. See Figure 7.
Scope Buddy Unit
Universal Cleaning Adapter with 3-way Connector
Fluid Intake Line
SCOPE BUDDY USER/SERVICE MANUAL
22
Figure 7
2. Locate the Fluid Intake Line and attach it to the front panel tubing connection port labeled “IN.” Place
the screened end into the sink or a clean container of detergent solution. Verify the screened end is deeply submerged into the detergent solution. See Figure 8.
Figure 8 Plugging into “IN” labeled connection port on base unit.
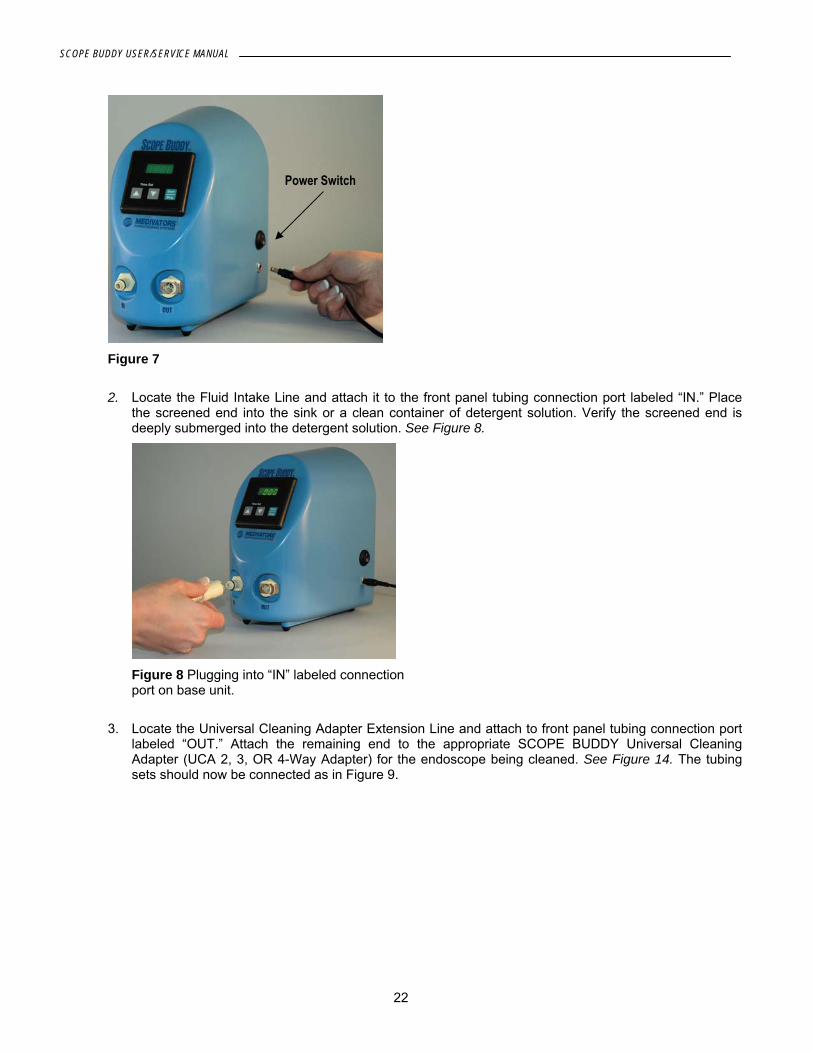
3. Locate the Universal Cleaning Adapter Extension Line and attach to front panel tubing connection port
labeled “OUT.” Attach the remaining end to the appropriate SCOPE BUDDY Universal Cleaning Adapter (UCA 2, 3, OR 4-Way Adapter) for the endoscope being cleaned. See Figure 14. The tubing sets should now be connected as in Figure 9.
Power Switch
MEDIVATORS REPROCESSING SYSTEMS
23
Figure 9 “OUT” labeled connection port on base unit.
4. Attach the endoscope manufacturer’s Universal Cleaning Adapter to the endoscope referencing the
manufacturer’s instructions. Attach the remaining end to the SCOPE BUDDY Universal Cleaning Adapter.
5. Using the SCOPE BUDDY front panel arrow keys, set the timer until it displays the desired flushing
time. 6. Press the “START/STOP” button to begin the cycle, the timer display will now begin counting down.
Detergent solution will now be drawn up, pumped through SCOPE BUDDY, and will flow out the endoscope’s distal tip.
7. Verify solution is exiting all channels of the endoscope. If fluid fails to come out of all channels, then a
channel may be blocked and the endoscope may need to be manually brushed and cleaned again. The flushing process will then need to be repeated until flow through the endoscope is verified, or the endoscope should be taken out of service
Caution: Failure to verify fluid flow through the endoscope can result in an endoscope which is not properly rinsed. Always verify fluid is exiting all endoscope ports at the distal end.
Caution: The screened end of the Fluid Intake Line must remain fully submerged in solution to ensure proper fluid delivery and no interruption in fluid flow.
Note: A flushing cycle can be paused by pressing the START/STOP button. Pressing the START/STOP button again will resume the original cycle. If’ however, an arrow key was pressed during the pause cycle, then pressing the START/STOP button will begin a cycle from the original pre-set time amount.
8. After the timer counts down to zero, fluid flow will stop and a five-second audible tone will be heard.
During this time, the timer display will flash all zeros “00.00” and then remain with a zero display providing an indication that the cycle is complete.
SCOPE BUDDY USER/SERVICE MANUAL
24
Purging an Endoscope of Detergent: 1. Remove the Fluid Intake Line from the detergent solution and place on the counter. 2. Press the START/STOP button once to reset the timer to the original pre-set time amount. 3. Press the START/STOP button again to begin pumping. The timer display will now begin counting
down as some of the detergent solution is pumped out of the endoscope. Verify fluid is exiting the distal tip of the endoscope.
4. Press START/STOP button to halt pumping when fluid no longer exits the endoscope. Note: Most fluid
is now purged from the endoscope, but some residual fluid will remain in the endoscope. Rinsing an Endoscope with Water: 1. Dispose contaminated detergent solution and thoroughly rinse the sink. 2. Fill the sink or the fluid container with clean rinse water and place the Fluid Intake Line into the
clean water. 3. Press the START/STOP button once to reset the timer to the original pre-set time amount.
4. Press the START/STOP button again to begin the cycle; the timer display will now begin counting
down. Rinse water will now be drawn up, pumped through SCOPE BUDDY, and will flow out of the endoscope channels .
5. Verify rinse water is exiting all endoscope channels. If fluid fails to come out of the endoscope, then the
endoscope may need to be manually brushed and cleaned again. The flushing process will then need to be repeated until flow through the endoscope is verified.
MEDIVATORS REPROCESSING SYSTEMS
25
Caution: Failure to verify fluid flow through the endoscope can result in an endoscope which is not properly flushed or cleaned. Always verify fluid is exiting all endoscope ports including the distal end.
Caution: The screened end of the Fluid Intake Line must remain deeply submerged in solution to ensure proper fluid delivery and no interruption in fluid flow.
Note: A flushing cycle can be paused by pressing the start/stop button. Pressing the START/STOP button again will resume the original cycle. If’ however, an arrow key was pressed during the pause cycle, then pressing the START/STOP key will begin a cycle from the original pre-set time amount.
6. Once the timer counts down to zero, fluid flow will stop and a five-second audible tone will be heard. During this time, the timer display will flash all zeros “00.00” and then remain with a zero display providing an indication that the cycle is complete.
Purging an Endoscope of Rinse Water: 1. Remove the Fluid Intake Line from the rinse water and place on the counter. 2. Press the START/STOP button once to reset the timer to the original pre-set time amount. 3. Press the START/STOP button again to begin pumping. The timer display will now begin counting
down as some of the rinse solution is pumped out of the endoscope. Verify fluid is exiting the endoscope.
4. Press START/STOP button to halt pumping when fluid no longer exits the endoscope.
Note: Residual fluid will remain in the endoscope. Do not use SCOPE BUDDY to deliver Alcohol to the endoscope. Alcohol should never be used in SCOPE BUDDY.
5. Upon successful completion of these steps, the endoscope is now ready to be placed in an Automated
Endoscope Reprocessor, or it can be manually reprocessed for high-level disinfection. Never use alcohol in SCOPE BUDDY.
Endoscope Flushing using the Elevator Wire Channel Hook-up – Fujinon Endoscopes
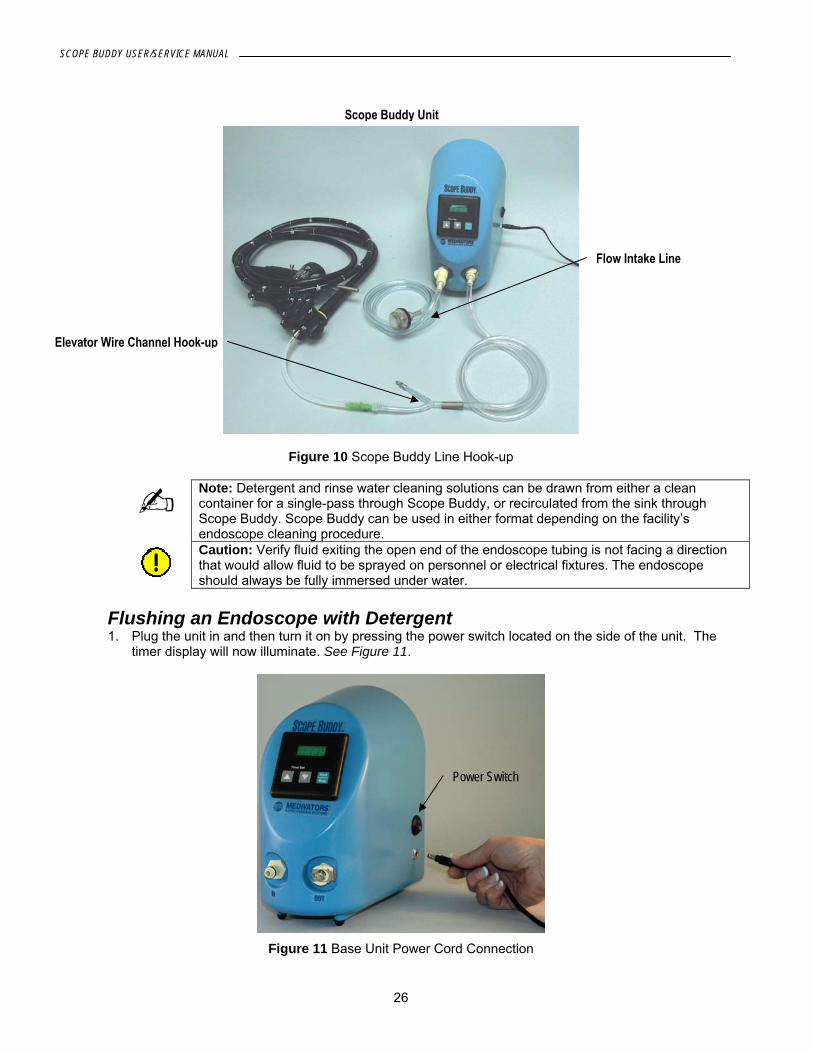
Use this step-by-step procedure to properly flush a Fujinon endoscope’s Elevator Wire Channel, or Fujinon Forward Water Jet. This procedure is used to attach the SCOPE BUDDY to an endoscope using the Fluid Intake Tubing and the Elevator Wire Channel Hook-up. The Fluid Intake Tubing and the Elevator Wire Channel Hook-up are provided with the device. When properly connected, fluid will be drawn up from the sink or from a clean container of detergent or rinse water solution. The fluid will flow through the Fluid Intake Tubing to SCOPE BUDDY, and then out of SCOPE BUDDY and through the Elevator Wire Channel Hook-up to the endoscope. This provides fluid delivery for flushing the individual channel of the endoscope.
SCOPE BUDDY USER/SERVICE MANUAL
26
Figure 10 Scope Buddy Line Hook-up
Note: Detergent and rinse water cleaning solutions can be drawn from either a clean container for a single-pass through Scope Buddy, or recirculated from the sink through Scope Buddy. Scope Buddy can be used in either format depending on the facility’s endoscope cleaning procedure.
Caution: Verify fluid exiting the open end of the endoscope tubing is not facing a direction that would allow fluid to be sprayed on personnel or electrical fixtures. The endoscope should always be fully immersed under water.
Flushing an Endoscope with Detergent 1. Plug the unit in and then turn it on by pressing the power switch located on the side of the unit. The
timer display will now illuminate. See Figure 11.
Figure 11 Base Unit Power Cord Connection
Power Switch
Scope Buddy Unit
Elevator Wire Channel Hook-up
Flow Intake Line
MEDIVATORS REPROCESSING SYSTEMS
27
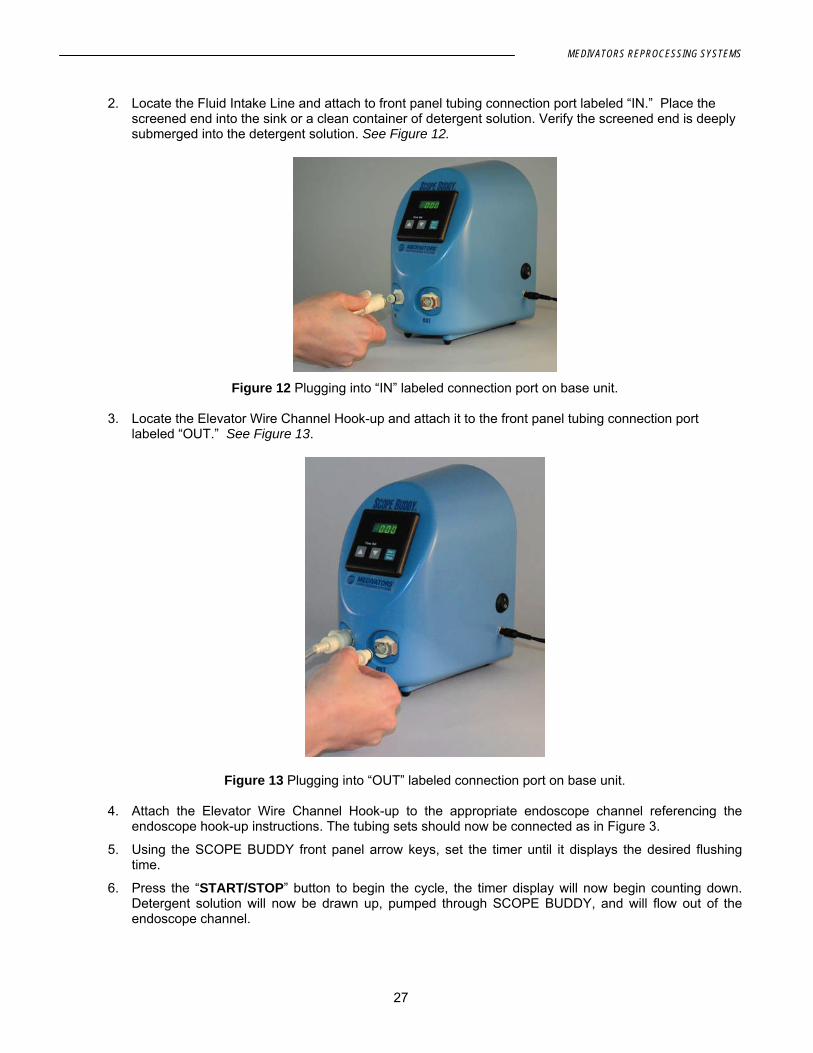
2. Locate the Fluid Intake Line and attach to front panel tubing connection port labeled “IN.” Place the screened end into the sink or a clean container of detergent solution. Verify the screened end is deeply submerged into the detergent solution. See Figure 12.
Figure 12 Plugging into “IN” labeled connection port on base unit.
3. Locate the Elevator Wire Channel Hook-up and attach it to the front panel tubing connection port
labeled “OUT.” See Figure 13.
Figure 13 Plugging into “OUT” labeled connection port on base unit. 4. Attach the Elevator Wire Channel Hook-up to the appropriate endoscope channel referencing the
endoscope hook-up instructions. The tubing sets should now be connected as in Figure 3.
5. Using the SCOPE BUDDY front panel arrow keys, set the timer until it displays the desired flushing time.
6. Press the “START/STOP” button to begin the cycle, the timer display will now begin counting down. Detergent solution will now be drawn up, pumped through SCOPE BUDDY, and will flow out of the endoscope channel.
SCOPE BUDDY USER/SERVICE MANUAL
28
7. Verify solution is exiting the endoscope channel. If fluid fails to come out, then the channel may be blocked and the endoscope may need to be manually brushed and cleaned again. The flushing process will then need to be repeated until flow through the endoscope is verified or the endoscope should be taken out of service.
Caution: Failure to verify fluid flow through the endoscope can result in an endoscope which is not properly flushed or cleaned. Always verify fluid is exiting the endoscope channel.
Caution: The screened end of the Fluid Intake Line must remain fully submerged in solution to ensure proper fluid delivery and no interruption in fluid flow.
Note: A flushing cycle can be paused by pressing the START/STOP button. Pressing the START/STOP button again will resume the original cycle. If, however, an arrow key was pressed during the pause cycle, then pressing the START/STOP button will begin a cycle from the original pre-set time amount.
8. After the timer counts down to zero, fluid flow will stop and a five-second audible tone will be heard.
During this time, the timer display will flash all zeros “00.00” and then remain with a zero display providing an indication that the cycle is complete.
Purging an Endoscope of Detergent 1. Remove the Fluid Intake Line from the detergent solution and place on the counter.
2. Press the START/STOP button once to reset the timer to the original pre-set time amount.
3. Press the START/STOP button again to begin pumping. The timer display will now begin counting down as some of the detergent solution is pumped out the endoscope. Verify fluid is exiting the endoscope.
4. Press START/STOP button to halt pumping when fluid no longer exits the endoscope. Note: Most fluid is now purged from the endoscope, but some residual fluid will remain in the endoscope.
Rinsing an Endoscope with Water 1. Dispose contaminated detergent solution down the drain and thoroughly rinse the sink.
2. Fill the sink or the fluid container with clean rinse water and place the Fluid Intake Line into the clean water.
3. Press the START/STOP button once to reset the timer to the original pre-set time amount.
4. Press the START/STOP button again to begin the cycle; the timer display will now begin counting down. Rinse water will now be drawn up, pumped through the device, and will flow out of the endoscope channel.
5. Verify rinse water is exiting the endoscope channel. If fluid fails to come out of the endoscope, then the endoscope may need to be manually brushed and cleaned again. The flushing process will then need to be repeated until fluid flow through the endoscope is verified.
Caution: Failure to verify fluid flow through the endoscope can result in an endoscope which is not properly rinsed. Always verify fluid is exiting the endoscope channel.

MEDIVATORS REPROCESSING SYSTEMS
29
Caution: The screened end of the Fluid Intake Line must remain deeply submerged in solution to ensure proper fluid delivery and no interruption in fluid flow.
Note: A flushing cycle can be paused by pressing the START/STOP button. Pressing the START/STOP button again will resume the original cycle. If, however, an arrow key was pressed during the pause cycle, then pressing the START/STOP button will begin a cycle from the original pre-set time amount.
6. Once the timer counts down to zero, fluid flow will stop and a five-second audible tone will be heard.
During this time, the timer display will flash all zeros “00.00” and then remain with a zero display providing an indication that the cycle is complete.
Purging an Endoscope of Rinse Water 1. Remove the Fluid Intake Line from the rinse water and place on the counter.
2. Press the START/STOP button once to reset the timer to the original pre-set time amount.
3. Press the START/STOP button again to begin pumping. The timer display will now begin counting down as some of the rinse solution is pumped out the endoscope. Verify fluid is exiting the endoscope channel.
4. Press START/STOP button to halt pumping when fluid no longer exits the endoscope.
Note: Residual fluid will remain in the endoscope. Do not use SCOPE BUDDY to deliver Alcohol to the endoscope. Alcohol should never be used in SCOPE BUDDY.
5. Upon successful completion of these steps, the endoscope is now ready to be placed in an Automated
Endoscope Reprocessor, or it can be manually reprocessed for high-level disinfection.
SCOPE BUDDY USER/SERVICE MANUAL
30
Daily Quality Assurance Test To verify SCOPE BUDDY is operating properly and delivering the correct amount of fluid, the Quality Assurance Flow Validation Test must be performed. This validation test should be performed prior to the first use of the day and quickly determines if the device is delivering the correct volume of fluid. The SCOPE BUDDY validation test is performed using the Flow Verification Tube, Fluid Intake Line, the Universal Cleaning Adapter Extension Line, the SCOPE BUDDY device, and a graduated cylinder. To perform the test, SCOPE BUDDY is preset to pump for a specific period of time and then after pumping, the dispensed fluid is measured to identify if it is within an acceptable volume range. Although the test can be performed at any time, it is recommended that it be run at the start of each work day. Use the following procedure to perform the test.
WARNING: Failure to perform the daily quality test can result in the device not delivering the proper amount of fluid through the channels of an endoscope.
Note: A 200cc graduated cylinder is required to perform this test.
Flow Validation Setup and Tubing Prime:
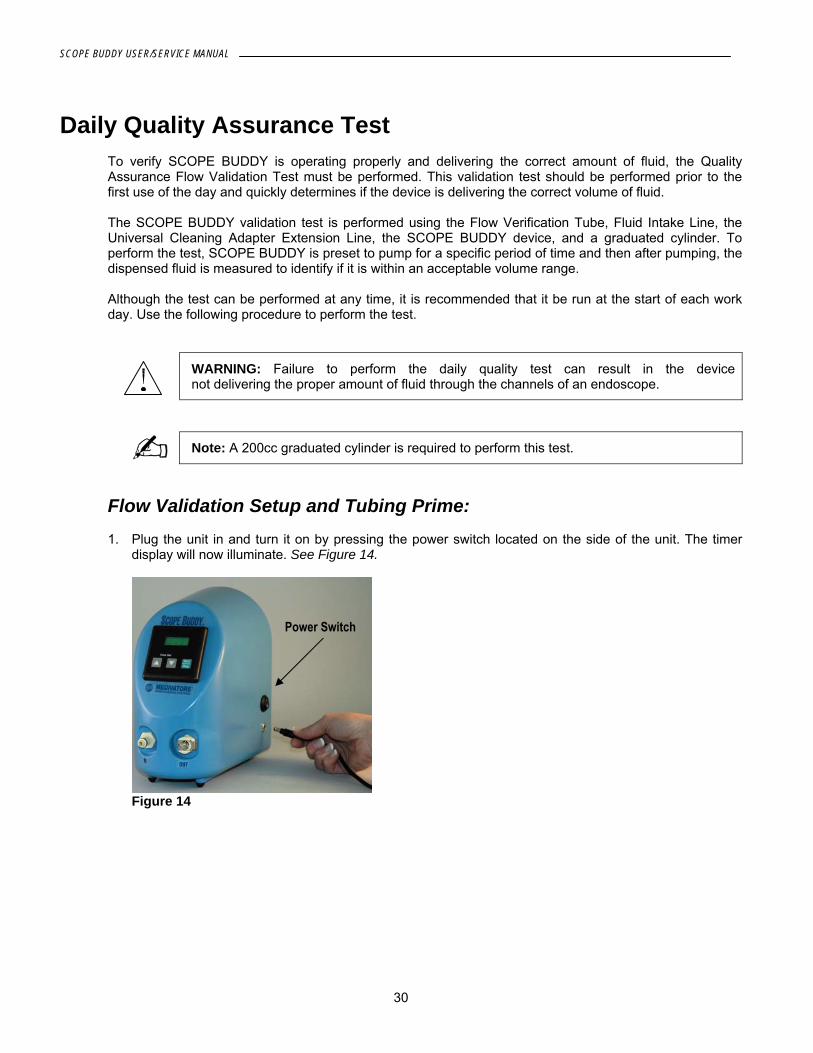
1. Plug the unit in and turn it on by pressing the power switch located on the side of the unit. The timer display will now illuminate. See Figure 14.
Figure 14
Power Switch
MEDIVATORS REPROCESSING SYSTEMS
31
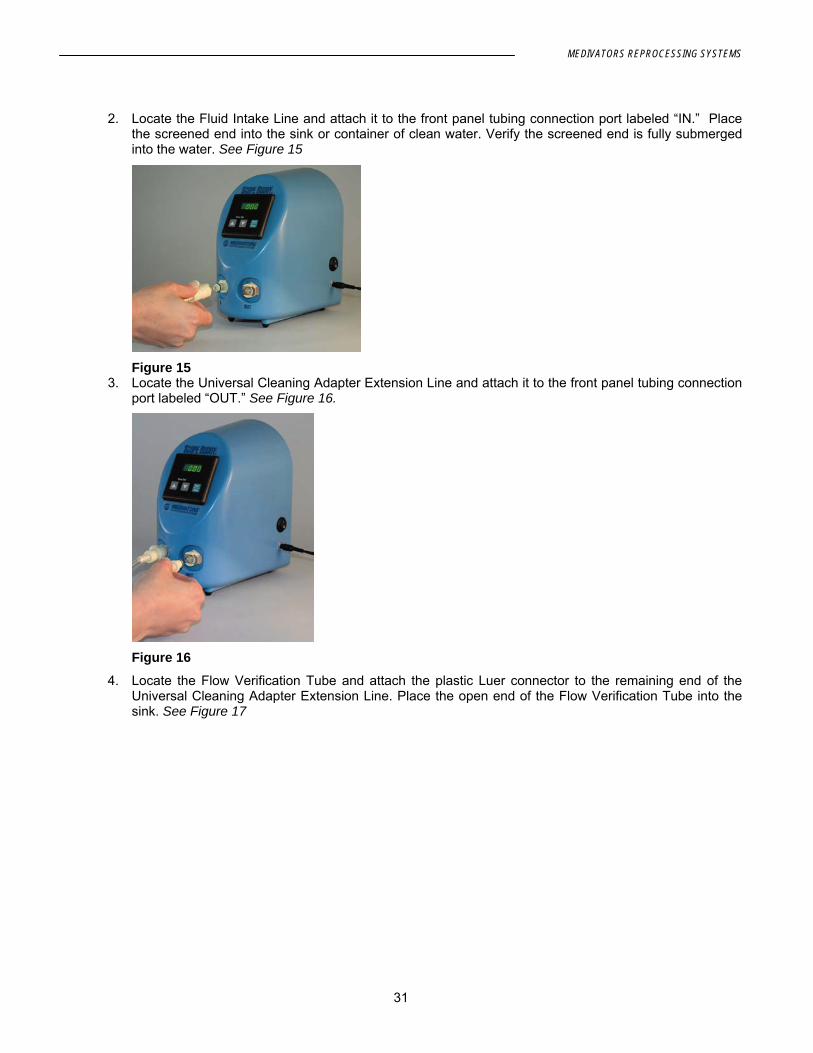
2. Locate the Fluid Intake Line and attach it to the front panel tubing connection port labeled “IN.” Place
the screened end into the sink or container of clean water. Verify the screened end is fully submerged into the water. See Figure 15
Figure 15
3. Locate the Universal Cleaning Adapter Extension Line and attach it to the front panel tubing connection port labeled “OUT.” See Figure 16.
Figure 16
4. Locate the Flow Verification Tube and attach the plastic Luer connector to the remaining end of the Universal Cleaning Adapter Extension Line. Place the open end of the Flow Verification Tube into the sink. See Figure 17
SCOPE BUDDY USER/SERVICE MANUAL
32
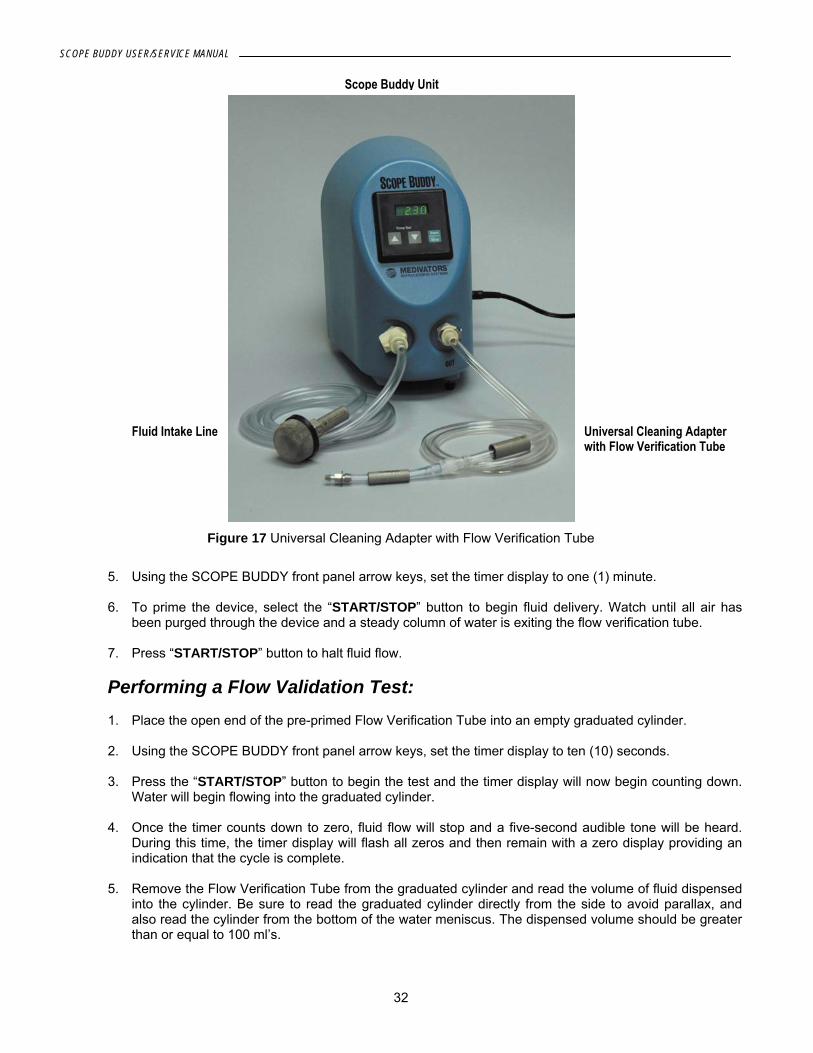
Figure 17 Universal Cleaning Adapter with Flow Verification Tube
5. Using the SCOPE BUDDY front panel arrow keys, set the timer display to one (1) minute. 6. To prime the device, select the “START/STOP” button to begin fluid delivery. Watch until all air has
been purged through the device and a steady column of water is exiting the flow verification tube. 7. Press “START/STOP” button to halt fluid flow. Performing a Flow Validation Test: 1. Place the open end of the pre-primed Flow Verification Tube into an empty graduated cylinder. 2. Using the SCOPE BUDDY front panel arrow keys, set the timer display to ten (10) seconds. 3. Press the “START/STOP” button to begin the test and the timer display will now begin counting down.
Water will begin flowing into the graduated cylinder. 4. Once the timer counts down to zero, fluid flow will stop and a five-second audible tone will be heard.
During this time, the timer display will flash all zeros and then remain with a zero display providing an indication that the cycle is complete.
5. Remove the Flow Verification Tube from the graduated cylinder and read the volume of fluid dispensed
into the cylinder. Be sure to read the graduated cylinder directly from the side to avoid parallax, and also read the cylinder from the bottom of the water meniscus. The dispensed volume should be greater than or equal to 100 ml’s.
Scope Buddy Unit
Universal Cleaning Adapter with Flow Verification Tube
Fluid Intake Line
MEDIVATORS REPROCESSING SYSTEMS
33
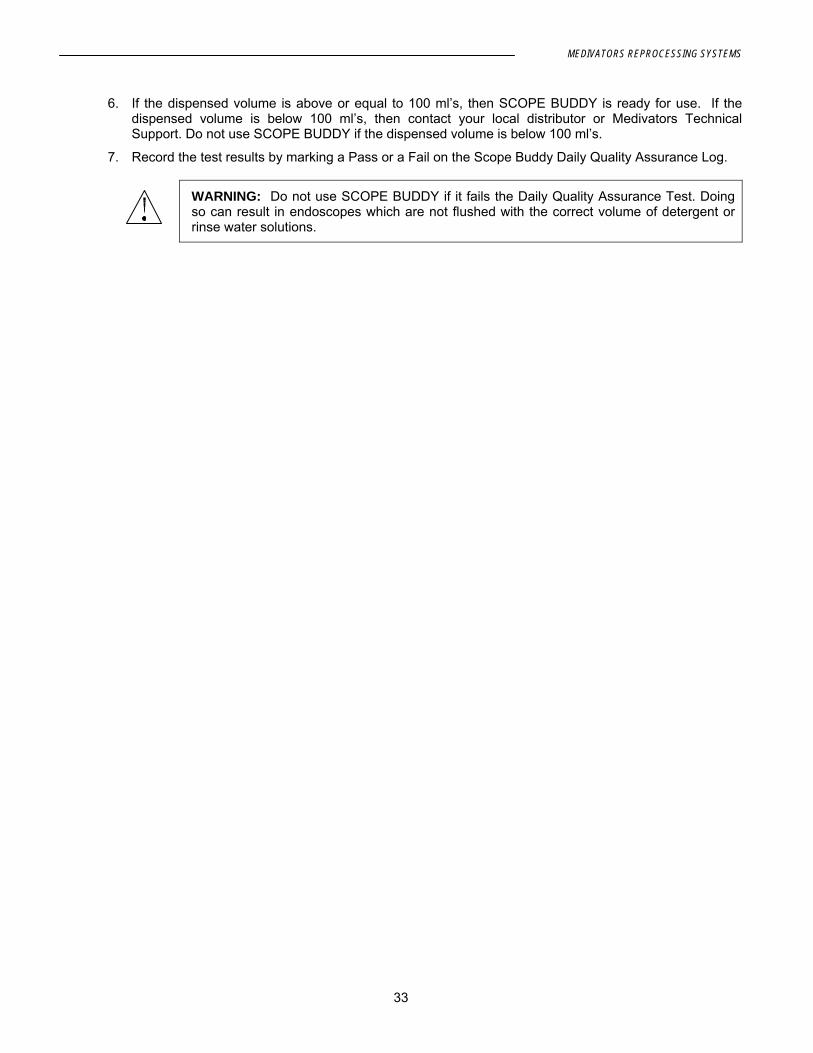
6. If the dispensed volume is above or equal to 100 ml’s, then SCOPE BUDDY is ready for use. If the dispensed volume is below 100 ml’s, then contact your local distributor or Medivators Technical Support. Do not use SCOPE BUDDY if the dispensed volume is below 100 ml’s.
7. Record the test results by marking a Pass or a Fail on the Scope Buddy Daily Quality Assurance Log.
WARNING: Do not use SCOPE BUDDY if it fails the Daily Quality Assurance Test. Doing so can result in endoscopes which are not flushed with the correct volume of detergent or rinse water solutions.
SCOPE BUDDY USER/SERVICE MANUAL
34
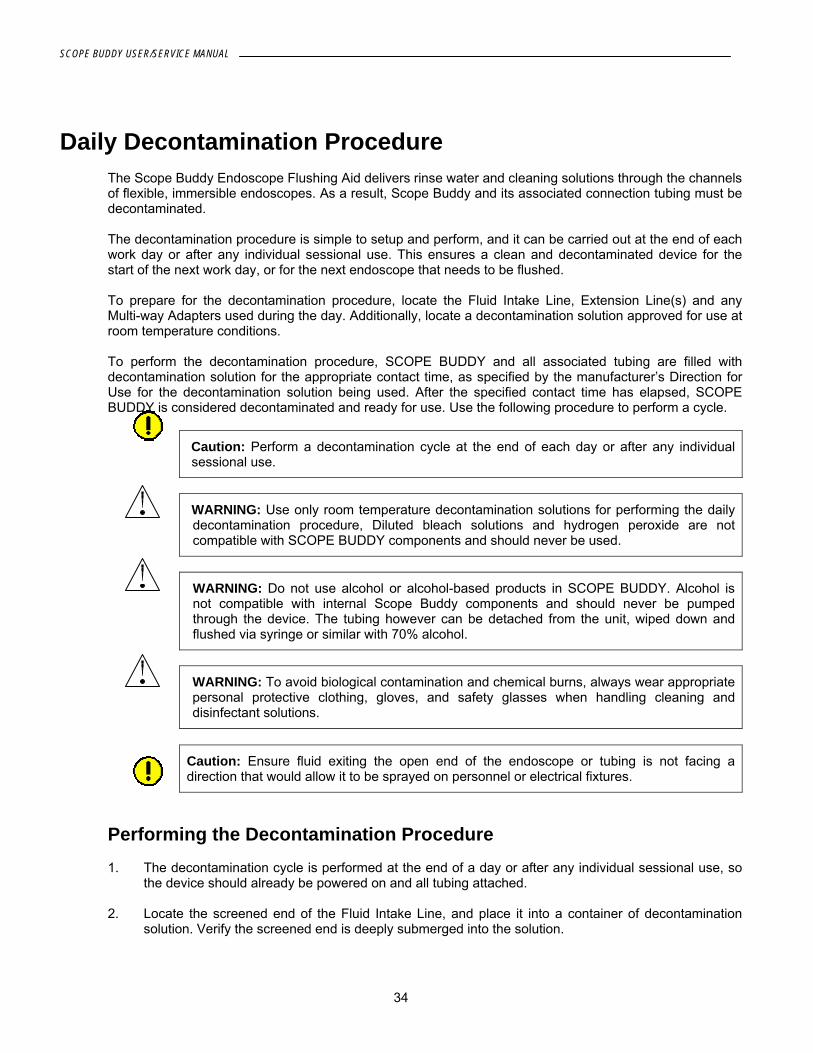
Daily Decontamination Procedure The Scope Buddy Endoscope Flushing Aid delivers rinse water and cleaning solutions through the channels of flexible, immersible endoscopes. As a result, Scope Buddy and its associated connection tubing must be decontaminated. The decontamination procedure is simple to setup and perform, and it can be carried out at the end of each work day or after any individual sessional use. This ensures a clean and decontaminated device for the start of the next work day, or for the next endoscope that needs to be flushed. To prepare for the decontamination procedure, locate the Fluid Intake Line, Extension Line(s) and any Multi-way Adapters used during the day. Additionally, locate a decontamination solution approved for use at room temperature conditions. To perform the decontamination procedure, SCOPE BUDDY and all associated tubing are filled with decontamination solution for the appropriate contact time, as specified by the manufacturer’s Direction for Use for the decontamination solution being used. After the specified contact time has elapsed, SCOPE BUDDY is considered decontaminated and ready for use. Use the following procedure to perform a cycle.
Caution: Perform a decontamination cycle at the end of each day or after any individual sessional use.
WARNING: Use only room temperature decontamination solutions for performing the daily
decontamination procedure, Diluted bleach solutions and hydrogen peroxide are not compatible with SCOPE BUDDY components and should never be used.
WARNING: Do not use alcohol or alcohol-based products in SCOPE BUDDY. Alcohol is not compatible with internal Scope Buddy components and should never be pumped through the device. The tubing however can be detached from the unit, wiped down and flushed via syringe or similar with 70% alcohol.
WARNING: To avoid biological contamination and chemical burns, always wear appropriate personal protective clothing, gloves, and safety glasses when handling cleaning and disinfectant solutions.
Caution: Ensure fluid exiting the open end of the endoscope or tubing is not facing a
direction that would allow it to be sprayed on personnel or electrical fixtures.
Performing the Decontamination Procedure 1. The decontamination cycle is performed at the end of a day or after any individual sessional use, so
the device should already be powered on and all tubing attached. 2. Locate the screened end of the Fluid Intake Line, and place it into a container of decontamination
solution. Verify the screened end is deeply submerged into the solution.
MEDIVATORS REPROCESSING SYSTEMS
35
3. Locate the open end of the outflow tubing and place it into the container of decontamination solution. This creates a closed loop for the passage of decontamination solution.
4. Using the front panel arrow keys, set the timer until it displays either two (2) minutes or the contact
time specified by the manufacturer of the decontamination solution. 5. Select the “START/STOP” button to begin fluid delivery and verify a steady column of
decontamination solution is now passing through the tubing.
• If the timer was set to two minutes, then press the “START/STOP” button to halt fluid flow and referencing the decontamination solution manufacturer’s labeling, allow the solution to remain within SCOPE BUDDY and all connection tubing for a minimum of the full decontamination cycle contact time.
• If the timer was set to the contact time specified by the manufacturer of the decontamination solution, then allow the full SCOPE BUDDY cycle time to complete.
6. The decontamination procedure is now complete, and SCOPE BUDDY is ready to be used for
endoscope flushing.
Note: If SCOPE BUDDY is to be unused for an extended period of time such as overnight or
over the weekend, it should be left full of decontamination fluid or rinse water. This maintains pump-head decontamination, lubrication and facilitates priming. SCOPE BUDDY should not be air-purged and stored empty between uses. The tubing can be detached from the SCOPE BUDDY unit during this period.
SCOPE BUDDY USER/SERVICE MANUAL
36
5 MAINTENANCE & TROUBLESHOOTING
Maintenance The device is designed to provide maintenance-free operation and long-term use. Following the daily routine of performing the quality assurance test and the daily decontamination procedure will verify system functionality to manufacturer’s specifications. SCOPE BUDDY contains no user-serviceable internal parts or components. Routine inspection of all tubing sets is required. Never use tubing that is damaged or nicked, or if its quality is suspect. Only use tubing sets which have been visually inspected and verified to be good. If the device fails to function, contact your local Medivators distributor or Medivators Technical Support.
MEDIVATORS REPROCESSING SYSTEMS
37
Troubleshooting Guide
Problem Corrective Action
Timer display does not illuminate when power switch is turned on
Verify power cord is properly connected If properly connected, then contact Medivators Technical Support
Device display does not count down after the START button is selected
Contact Medivators Technical Support
Timer is counting down, but no fluid draw at intake, or fluid flow from discharge tubing
Verify Intake Tubing is properly connected to front device connection point Verify Intake Tubing end is fully submerged in solution Check if Intake Tubing screen is blocked, clean or replace in necessary Verify Outflow Tubing end is properly connected to front device connection point. With timer counting down, fill intake tubing with fluid and lift it above unit. The unit may now prime and begin pumping fluid. Contact Medivators Technical Support
Device fails flow validation test
Contact Medivators Technical Support
Fluid is leaking from unit Contact Medivators Technical Support
Audible tone is not heard at the end of a pumping cycle
Contact Medivators Technical Support

SCOPE BUDDY USER/SERVICE MANUAL
38
MEDIVATORS REPROCESSING SYSTEMS
39
6 GLOSSARY
Alcohol 70% percent isopropyl or 70% ethyl alcohol. Keep alcohol in a
closed container. Alcohol stored in an open container is a fire hazard and may evaporate.
Cleaning The physical removal of foreign material (e.g., soil and other organic debris) from an endoscope. This process is a vital step and must be performed before an endoscope can be disinfected.
Decontaminated Removal or reduction of the level of pathogenic microorganisms for safe handling and patient use.
Detergent Low-foaming, neutral pH detergent formulations recommended by the manufacturer of the endoscopes.
Disinfection Elimination of all pathogenic microorganisms except bacterial spores on instruments, medical devices, and inanimate objects.
Germicide A broad term that encompasses both disinfectants and antiseptics. A germicide is a chemical agent that destroys microorganisms, particularly pathogenic organisms.
High-level Disinfectant (HLD)
Liquid chemical germicides (LCG) used to achieve high-level disinfection and are cleared by the FDA as chemical sterilants. HLD’s must be used in accordance with the sterilant manufacturer’s requirements for time, temperature, and dilution, to be effective and it must achieve 100% kill of mycobacterium tuberculosis.
High-level Disinfection Process defined by the CDC that destroys all vegetative bacteria, viruses, and fungi, but not necessarily all bacterial endospores.
Hookups Tubing connections which allow an endoscope to attach to a device, such as an endoscope reprocessor
LCG Liquid chemical germicide cleared by the FDA for use as a liquid chemical sterilant to be used as a high-level disinfectant.
MEC Minimum Effective Concentration
MRC Minimum Required Concentration
UCA Universal Cleaning Adapter
Water Clean, potable water or potable water that has been filtered by passage through a 0.2-micron filter or otherwise treated by a method documented to improve the microbiological quality of the water.

SCOPE BUDDY USER/SERVICE MANUAL
40
MEDIVATORS REPROCESSING SYSTEMS
41
7 WARRANTY
Limited Warranty Medivators Reprocessing Systems, a division of Minntech Corporation (the “Company”), warrants that the endoscope reprocessor and associated equipment it manufactures (collectively, the “Products”) will conform to the Company’s written specifications and will be free from defects in material and workmanship under normal use and service for a period (the “Warranty Period”) of fifteen (15) months from date of shipment from the Company or one (1) year from the date of installation, whichever occurs first. Notwithstanding anything herein to the contrary, the Warranty Period for consumables and accessories supplied by the Company, including, but not limited to, endoscope hook-ups, filters, printers, printer supplies, test strips, and accessory bags, is ninety (90) days from the date of installation. The warranty does not cover, and the Company will have no warranty obligation whatsoever with respect to, any damage to a Product caused by or associated with: (i) external causes, including without limitation, accident, vandalism, acts-of-God, power failure or electric power surges, (ii) abuse, misuse or neglect of the Product by the customer or use of unauthorized third party filters or other consumables and accessories, (iii) usage not in accordance with product instructions, (iv) the customer’s failure to perform required preventive maintenance, or (iv) servicing or repair not authorized by the Company. Limitation of Remedy The warranty obligation of the Company hereunder is limited to the repair or replacement (at its option) of the defective Products or any parts it deems defective. This will be customer’s exclusive remedy for a covered defect. In order to recover under the warranty, the customer must notify the Company in the state (if in the U.S.A.) or the country of installation of the defect (describing the problem in reasonable detail) prior to the expiration of the warranty period and within thirty (30) days of discovery of the defect. Upon receiving the Company’s official “return goods authorization” (RGA), the customer must promptly return the defective part or Product to the Company (or the service center indicated on the RGA), freight and insurance prepaid. The Company will not be responsible for any damage during shipment.
Warranty Disclaimer THE WARRANTY ABOVE IS THE COMPANY’S ENTIRE WARRANTY OBLIGATION TO THE PURCHASER OF PRODUCTS. IT IS IN LIEU OF ALL OTHER WARRANTIES OF THE COMPANY, EXPRESS OR IMPLIED, INCLUDING, WITHOUT LIMITATION, WARRANTY OF MERCHANTABILITY OR FITNESS FOR A PARTICULAR PURPOSE, AND THE COMPANY DOES NOT REPRESENT OR WARRANT THAT ANY PRODUCT WILL MEET CUSTOMER’S REQUIREMENTS. THE COMPANY’S RESPONSIBILITY FOR DEFECTS IN A PRODUCT IS LIMITED SOLELY TO REPAIR AND REPLACEMENT AS SET FORTH IN THIS WARRANTY STATEMENT. TO THE EXTENT PERMITTED BY LAW, THE COMPANY SHALL NOT, UNDER ANY CIRCUMSTANCES, BE LIABLE TO CUSTOMER FOR CONSEQUENTIAL, INCIDENTAL, INDIRECT OR SPECIAL DAMAGES OR LOSSES, INCLUDING WITHOUT LIMITATION, DAMAGES ARISING OUT OF OR IN CONNECTION WITH ANY MALFUNCTIONS, DELAYS, LOSS OF PROFIT, INTERRUPTION OF SERVICE, OR LOSS OF BUSINESS OR ANTICIPATORY PROFITS, EVEN IF THE COMPANY HAS BEEN APPRISED OF THE LIKELIHOOD OF SUCH DAMAGES OCCURRING. This Warranty gives the customer of Products specific legal rights, and customers may also have other rights which vary from jurisdiction to jurisdiction. In no event shall the Company’s liability exceed the original purchase price of the covered Product. No representative or agent of the Company has any authority to bind the Company to any other representation or warranty with respect to the Products, and the customer accepts the Products subject to all of the terms above.

SCOPE BUDDY USER/SERVICE MANUAL
42
![The endoscope and instruments for minimally invasive ... › 29...forefront[20] and developed the concept of “endoscope guided surgery” for cases such as colloid cysts. Endoscope](https://img.pdfslide.net/doc/110x75/60d6c0583677e24b0e2e5813/the-endoscope-and-instruments-for-minimally-invasive-a-29-forefront20.jpg)