Embed Size (px)
DESCRIPTION
software manual
Citation preview
Legends
Instruction: Additional instruction for software.
Note: The problems which may occur during your using of the board and how
to resolve and avoid them.
Warning: Harm to human body may occur in the course of using, or damage
to the product may occur due to the improper use of the product.
Caution Note
To avoid electric shock, please do not install the interactive whiteboard at humid
locations or locations with smoke!
After the interactive whiteboard is installed, do not touch its power cable or data
cable!
Keep the interactive whiteboard away from the equipment with strong magnetic filed!
Keep the interactive whiteboard away from fire, electric shock and direct sunlight!
After the interactive whiteboard is installed, make sure the whiteboard is firmly fixed!
When the interactive whiteboard is used together with the projector, do not directly
watch the light beam sent from the projector.
Important note
Only erasable interactive whiteboard can be written on with pen of color (including
normal whiteboard markers and so on), while for other kinds of boards only using the
electronic pens of the interactive whiteboard.
For Dual-pens function, users have to use both pens simultaneously.
Please make sure the whiteboard is correctly connected with the computer, and
normally powered. It is preferable that the connection cables and power cables be
hidden for the wiring so as to prevent the cables from being pulled or drawn.
1
General note Environment around: there must be no intense magnetic field.
If the interactive whiteboard is fixed on the wall surface, it must be vertical to the wall
surface. If the wall is made of metal and magnetic materials, there should be 10
meters distance between the whiteboard and wall.
Do not scratch the surface or frame of the board with sharp or hard objects.
When writing on the board with the electronic pen, please keep the pen upright to the
board and write lightly.
2
Contents
Legends
.......................................................................................................................................................................... 1
Caution Note.................................................................................................................................................................. 1
Content
s.......................................................................................................................................................................... 3
Introduction .................................................................................................................................................................... 4
Brief Introduction
............................................................................................................................................... 4
Feature
s.............................................................................................................................................................. 4
Topological Diagram
.......................................................................................................................................... 4
System Requirements
......................................................................................................................................... 5
Unpacking Interactive Whiteboard................................................................................................................................. 6
1. The interactive whiteboard components
......................................................................................................... 6
2. Standard Accessories
...................................................................................................................................... 6
3. Optional Accessories
...................................................................................................................................... 8
Description of Appearance ............................................................................................................................................. 9
Installation .................................................................................................................................................................... 10
1. Install Interactive Whiteboard
...................................................................................................................... 10
2. Connect Interactive Whiteboard
................................................................................................................... 12
3. Install Battery of Electronic
Pen................................................................................................................... 12
4. Express Installation of InterACT DualPen
Software.................................................................................... 13
5. Step-by-step Installation of InterACT DualPen Software
............................................................................ 19
6. Uninstall InterACT DualPen Software ......................................................................................................
... 24
7. Install USB-RS232 connection cable Driver
............................................................................................. 24
Run the Software .......................................................................................................................................................... 25
1. Startup driver of interactive whiteboard
....................................................................................................... 25
2. Orient the interactive whiteboard
................................................................................................................. 26
3. Startup application software of interactive whiteboard
................................................................................ 27
4. Create an individual account and
password................................................................................................. 28
5. Dual Pens Function
Setup............................................................................................................................ 30
Function Keys.............................................................................................................................................................. 31
Trouble Shooting .......................................................................................................................................................... 32
Performance Index ....................................................................................................................................................... 34
3
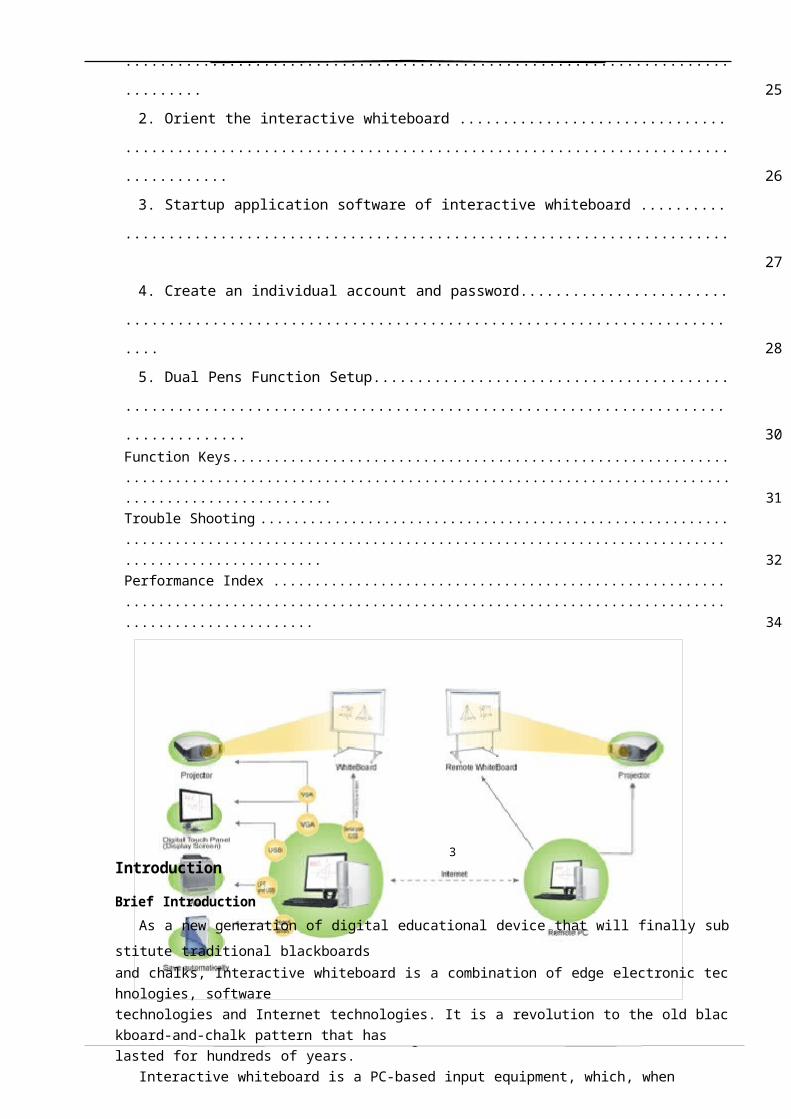
Introduction
Brief Introduction
As a new generation of digital educational device that will finally substitute traditional blackboards
and chalks, Interactive whiteboard is a combination of edge electronic technologies, software
technologies and Internet technologies. It is a revolution to the old blackboard-and-chalk pattern that has
lasted for hundreds of years.
Interactive whiteboard is a PC-based input equipment, which, when connected with projector and PC,
can realized functions such as writing , noting, drawing geometric graphics, editing, printing and storing.
Interactive whiteboard will become mainstream equipment for teaching, meeting, remote education and
information exchange in the future.
Features
Applying special techniques as well as advanced and reliable technologies such as
electromagnetic
induction and digital locating, it can create interactive environment for teaching and demonstration if
connected with PC and projector under the support of dedicated software.
Electronic pen can operate your PC instead of mouse.
Using electronic pen, you can write, note, erase, copy, clone, replay and save files.
The upgradeable and expandable software can offer functions such as partially magnifying, partially
editing, searchlight, replaying, calligraphy effect, camera, screen and customized template.
It also features high tracking accuracy, quick response and sensitive operation. The advanced
processing algorithm adopted in this device results much better response speed and the operation
sensitivity compared to pressure sensitive whiteboard and infrared-ultrasonic whiteboard.
It also boasts of low reflection, high wear-proof, accurate focus, excellent projection effect and
suitability for long time watching. The long-life panel can endures. 10 million times of scribing.
High precision locating: resolution up to 4096×4096.You can write fine Chinese character, English
words, digitals and fine lines on it. Adopting independent IP and proprietary production techniques.
Topological Diagram
4
Minimal Configuration Suggested Configuration
Hardware
Configuration
CPU: 1GHz CPU: 1.7 GHz or more
RAM: 256 MB RAM: 512 MB or more
Software
ConfigurationWindows2000, XP, Vista, Win 7 Windows2000, XP, Vista, Win 7
Microsoft Internet Explorer 6.0.0 Microsoft Internet Explorer 6.0.0 or
later versions

System Requirements 5
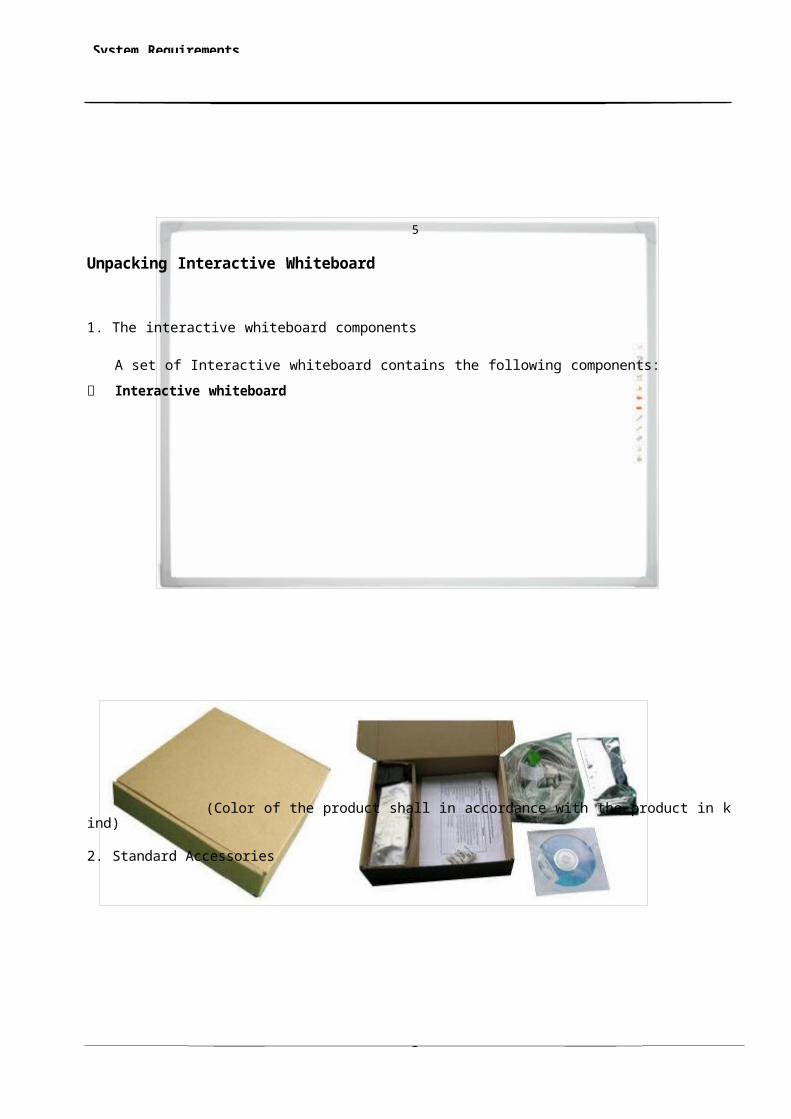
Unpacking Interactive Whiteboard
1. The interactive whiteboard components
A set of Interactive whiteboard contains the following components:
Interactive whiteboard
(Color of the product shall in accordance with the product in kind)
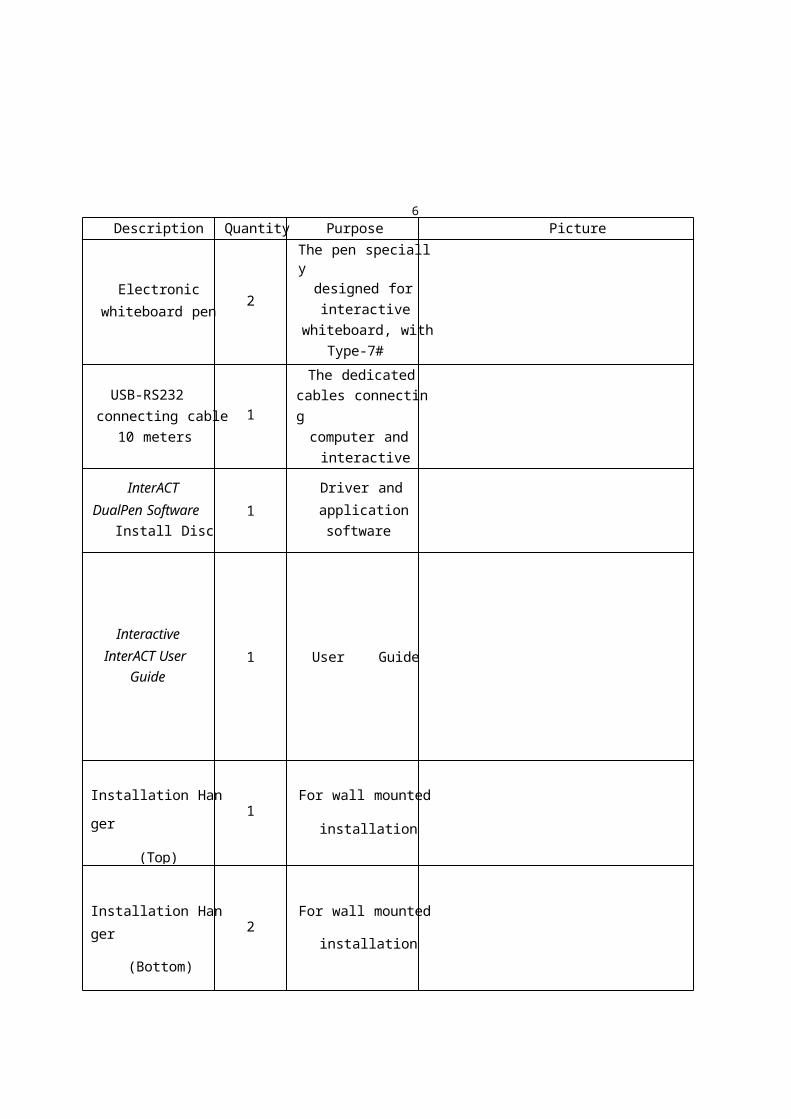
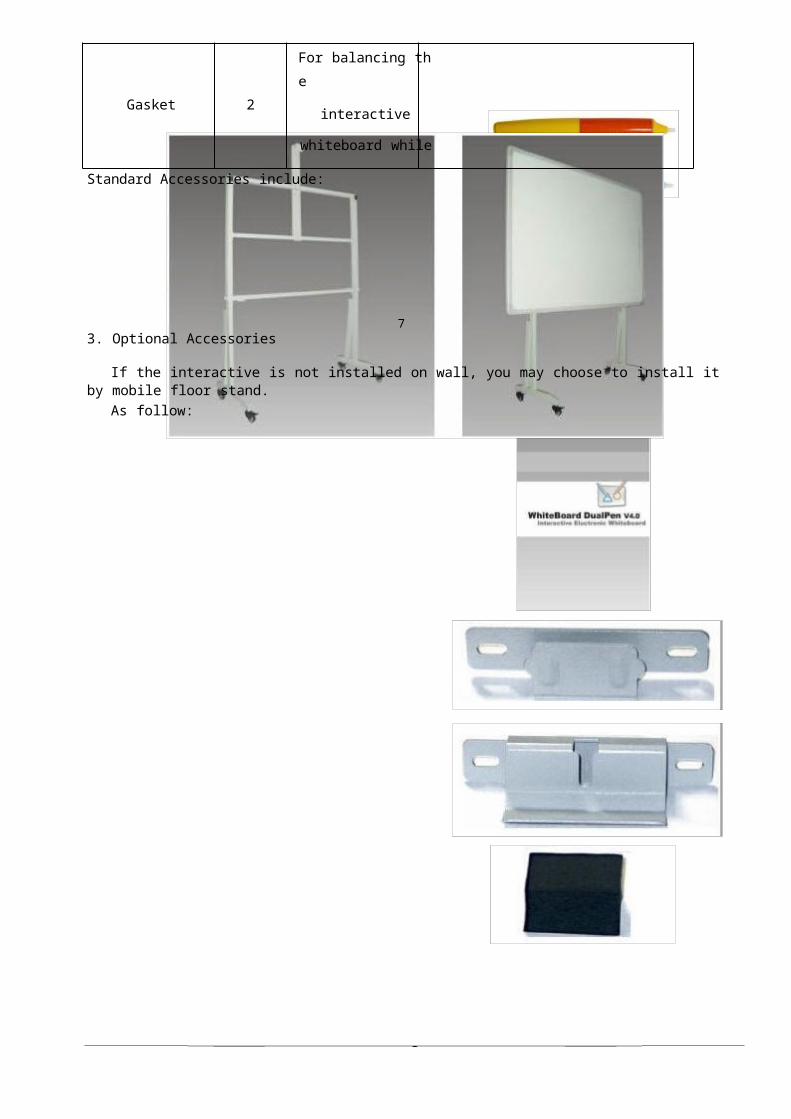
2. Standard Accessories
6
Description Quantity Purpose Picture
Electronic
whiteboard pen2
The pen specially
designed for
interactive
whiteboard, with
Type-7#
batteries of 1.5V.
USB-RS232
connecting cable
10 meters
1
The dedicated
cables connecting
computer and
interactive
whiteboard
InterACT
DualPen SoftwareInstall Disc
1
Driver and
application
software
Interactive
InterACT UserGuide
1 User Guide
Installation Hanger
(Top)1
For wall mounted
installation
Installation Hanger
(Bottom)2
For wall mounted
installation
Gasket 2
For balancing the
interactive
whiteboard while
wall mounted.
Standard Accessories include:
73. Optional Accessories
If the interactive is not installed on wall, you may choose to install it by mobile floor stand.
As follow:
8
Description of Appearance
Appearance of whiteboard:
(Color of the product shall in accordance with the product in kind)
Ⅰ:Writing Area
Ⅱ:Function Keys
Ⅲ:Interface Board
Ⅳ:Pen Container
①Power Socket
②Serial Port
9
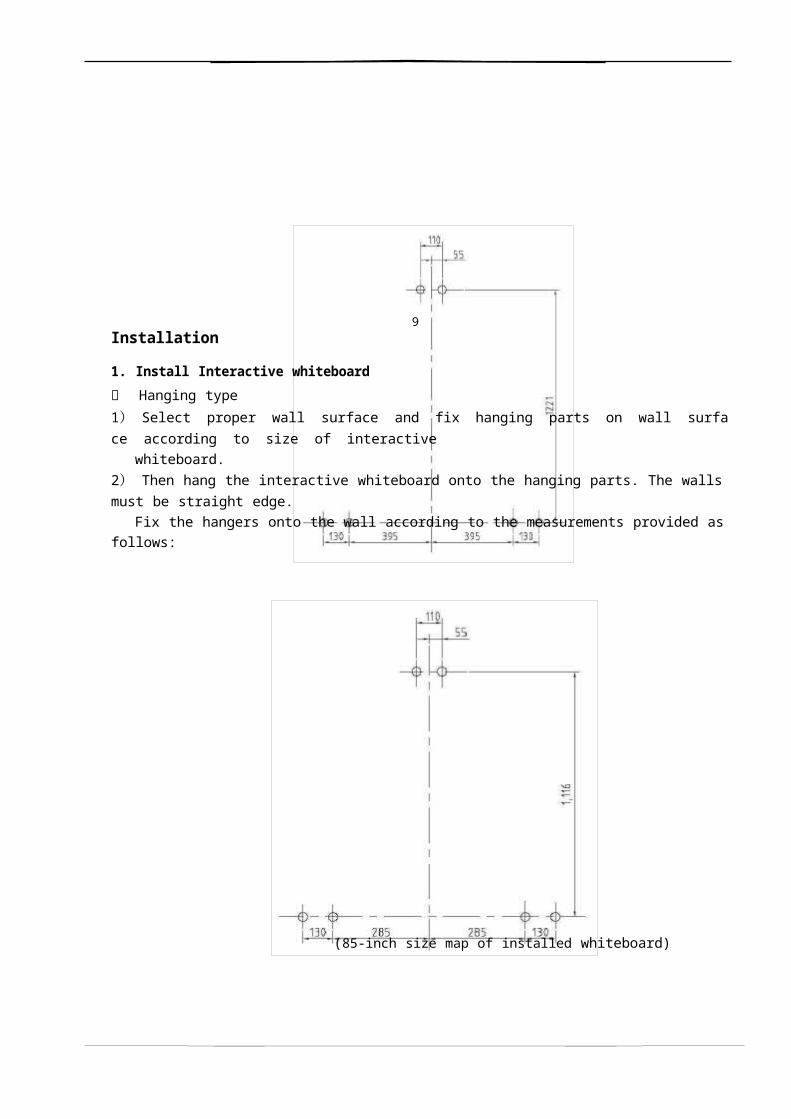
Installation

1. Install Interactive whiteboard
Hanging type
1) Select proper wall surface and fix hanging parts on wall surface according to size of interactiv
e
whiteboard.
2) Then hang the interactive whiteboard onto the hanging parts. The walls must be straight edge.
Fix the hangers onto the wall according to the measurements provided as follows:
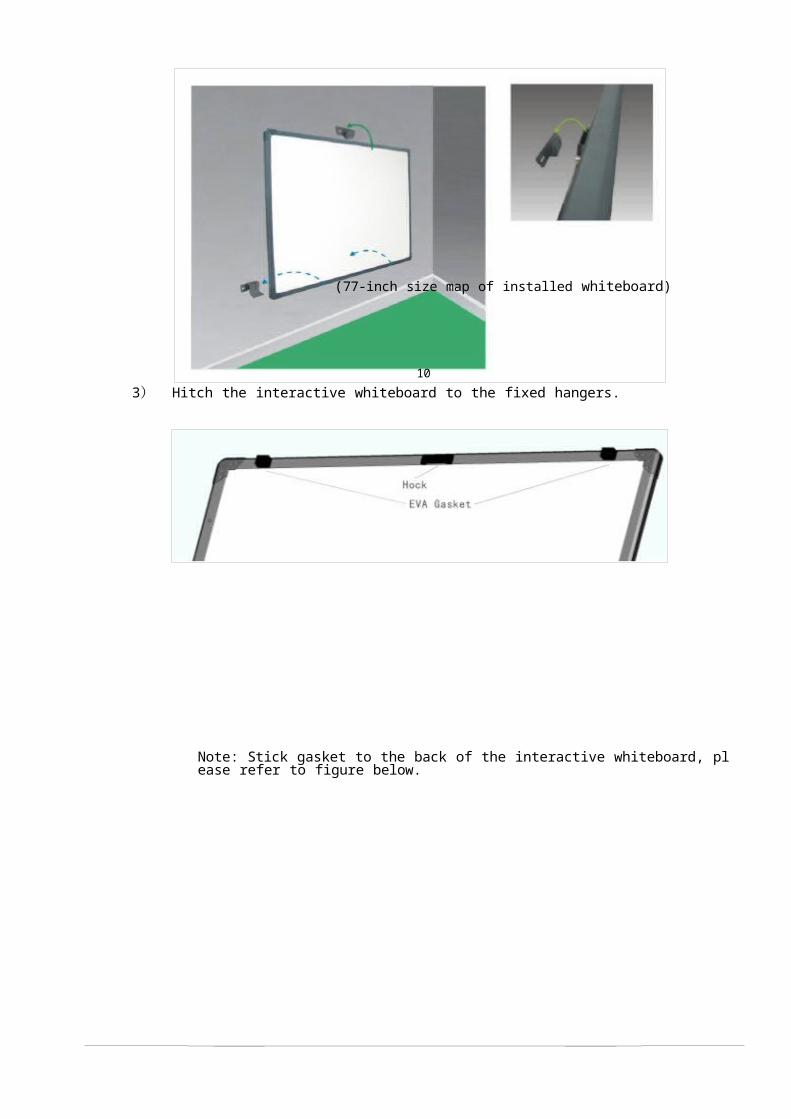
(85-inch size map of installed whiteboard)
(77-inch size map of installed whiteboard)
10
3) Hitch the interactive whiteboard to the fixed hangers.
Note: Stick gasket to the back of the interactive whiteboard, please refer to figure below.
112. Connect Interactive whiteboard
Connect it to USB port of PC , USB supply DC Power
1) Fix interactive whiteboard.2) Connect interactive whiteboard to PC using gorge line.
Interactive whiteboard and PC should be power off when processing all
connections!!!
3. Install Battery of Electronic Pen
Turn the rear cap of the electronic pen counter-clockwise to open it, load one 7# 1.5V battery accordingto the following figure, then tighten the rear cap clockwise.
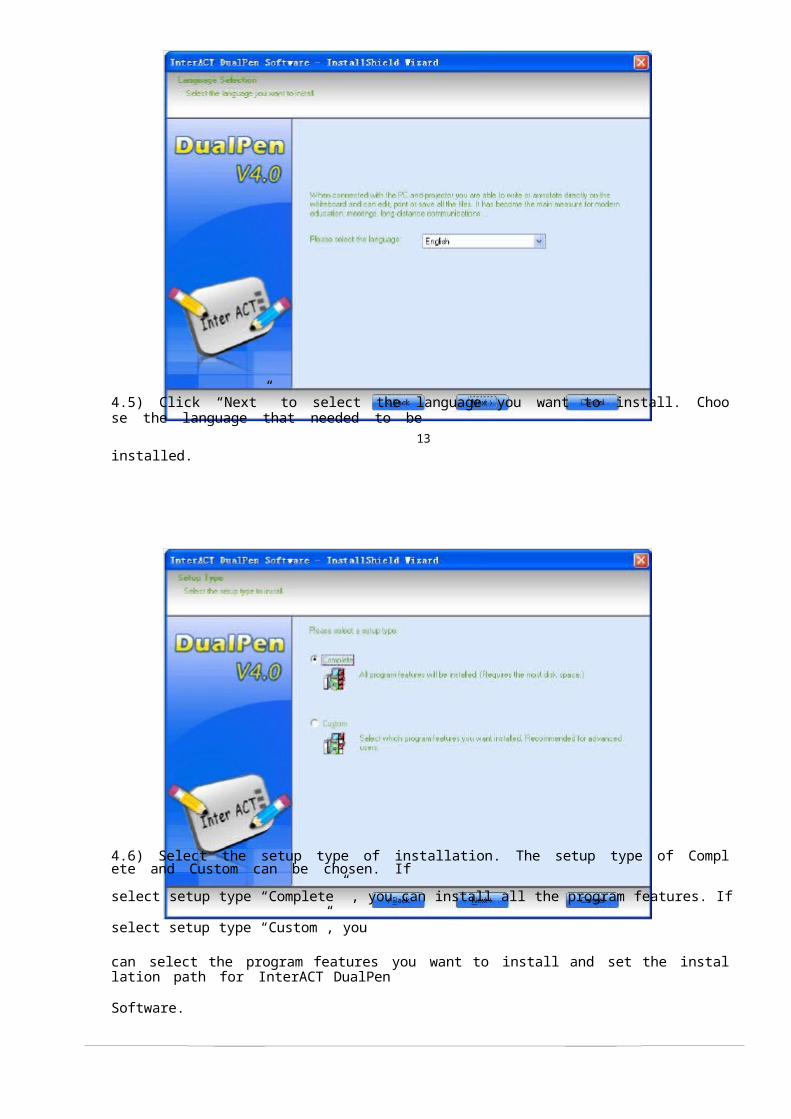
124. Express Installation of InterACT DualPen Software

This installation option is recommended for first time installation of the software.
4.1) Insert InterACT DualPen Software disc.
4.2) Click program logo.
4.3) Proceed to Installation Guide window.
4.4) Click to install InterACT DualPen Driver and InterACT DualPen
Software for Interactive Whiteboard.
4.5) Click “Next” to select the language you want to install. Choose the language that needed to be
13

installed.
4.6) Select the setup type of installation. The setup type of Complete and Custom can be chosen. If
select setup type “Complete” , you can install all the program features. If select setup type “Custom”,
you
can select the program features you want to install and set the installation path for InterACT DualPen
Software.
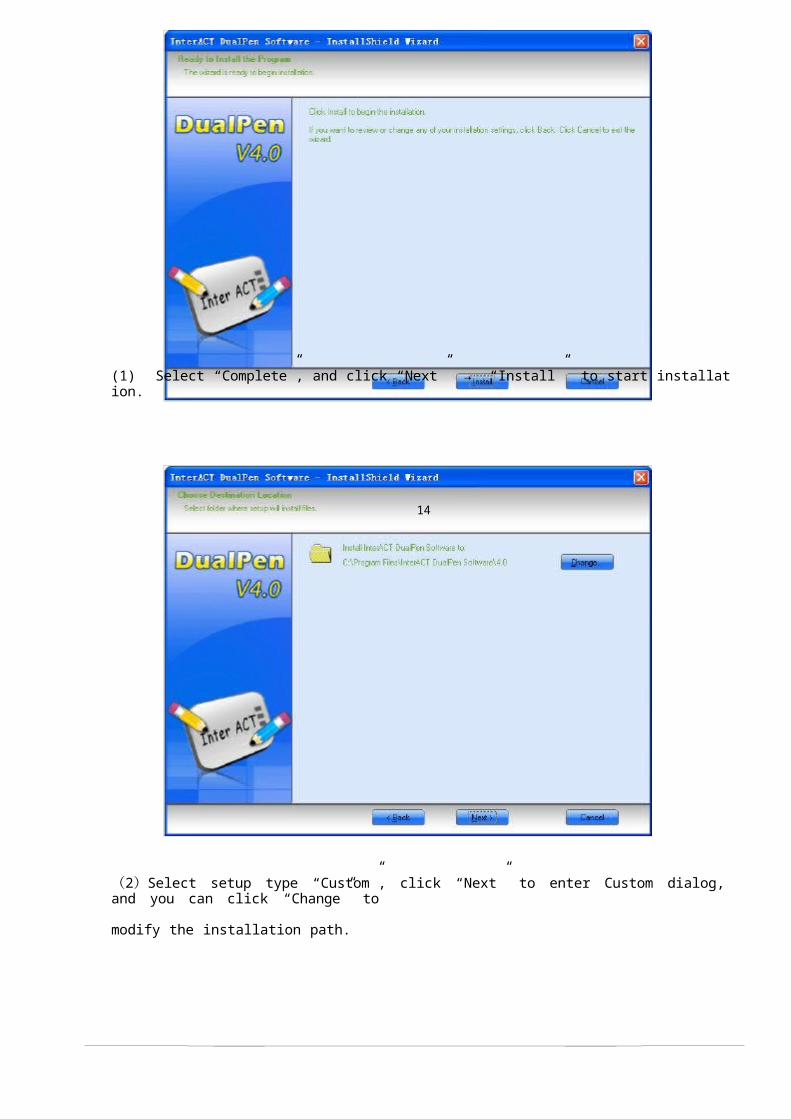
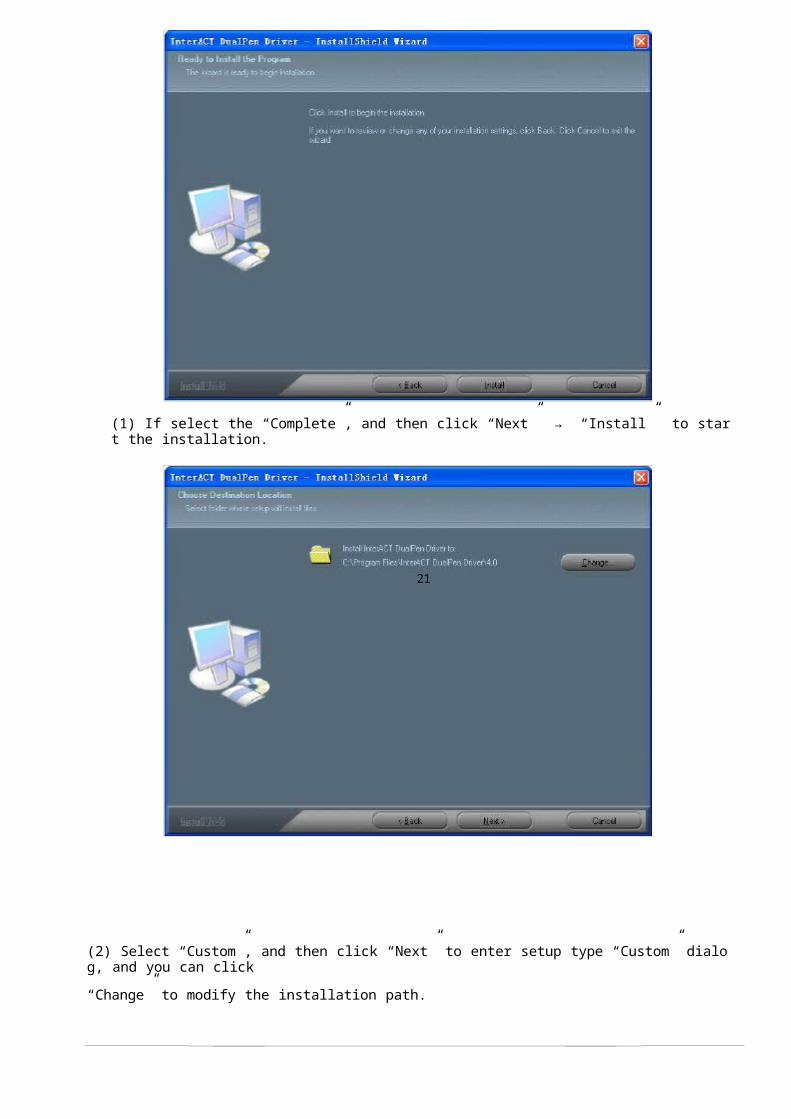
(1) Select “Complete”, and click “Next” → “Install” to start installation.
14
(2)Select setup type “Custom”, click “Next” to enter Custom dialog, and you can click “Change” to
modify the installation path.
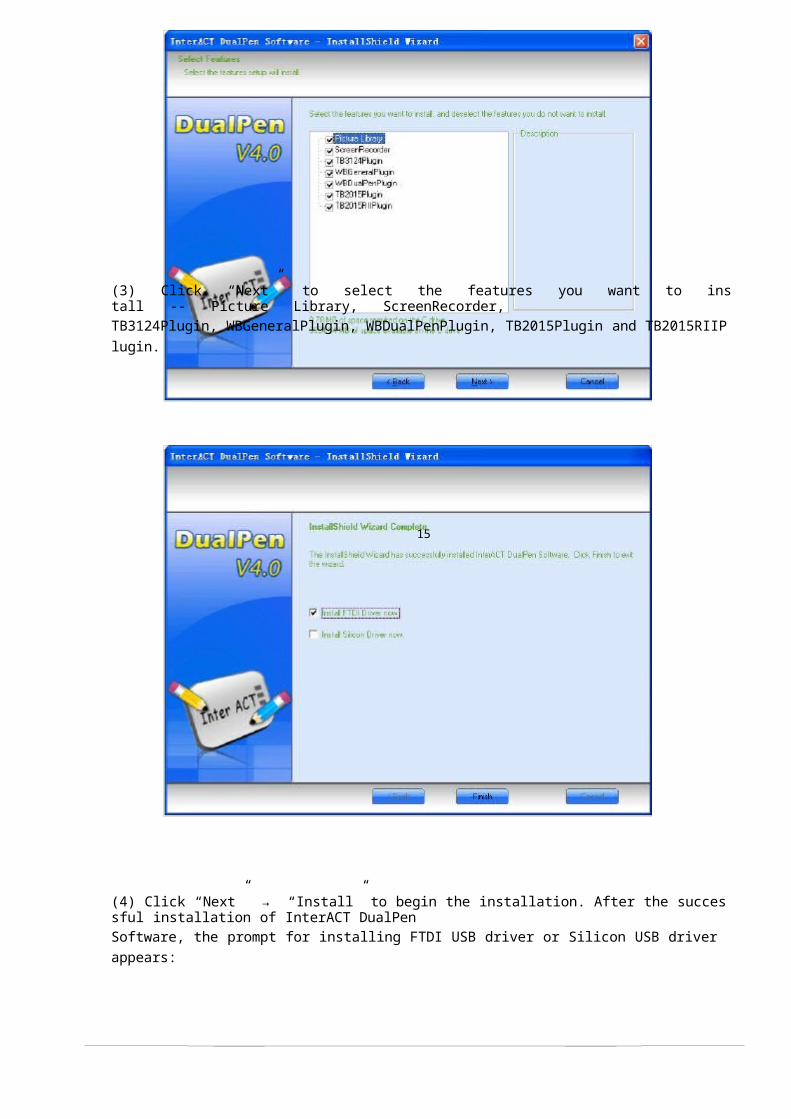
(3) Click “Next” to select the features you want to install -- Picture Library, ScreenRecorder,
TB3124Plugin, WBGeneralPlugin, WBDualPenPlugin, TB2015Plugin and TB2015RIIPlugin.
15
(4) Click “Next” → “Install” to begin the installation. After the successful installation of InterACT DualPen
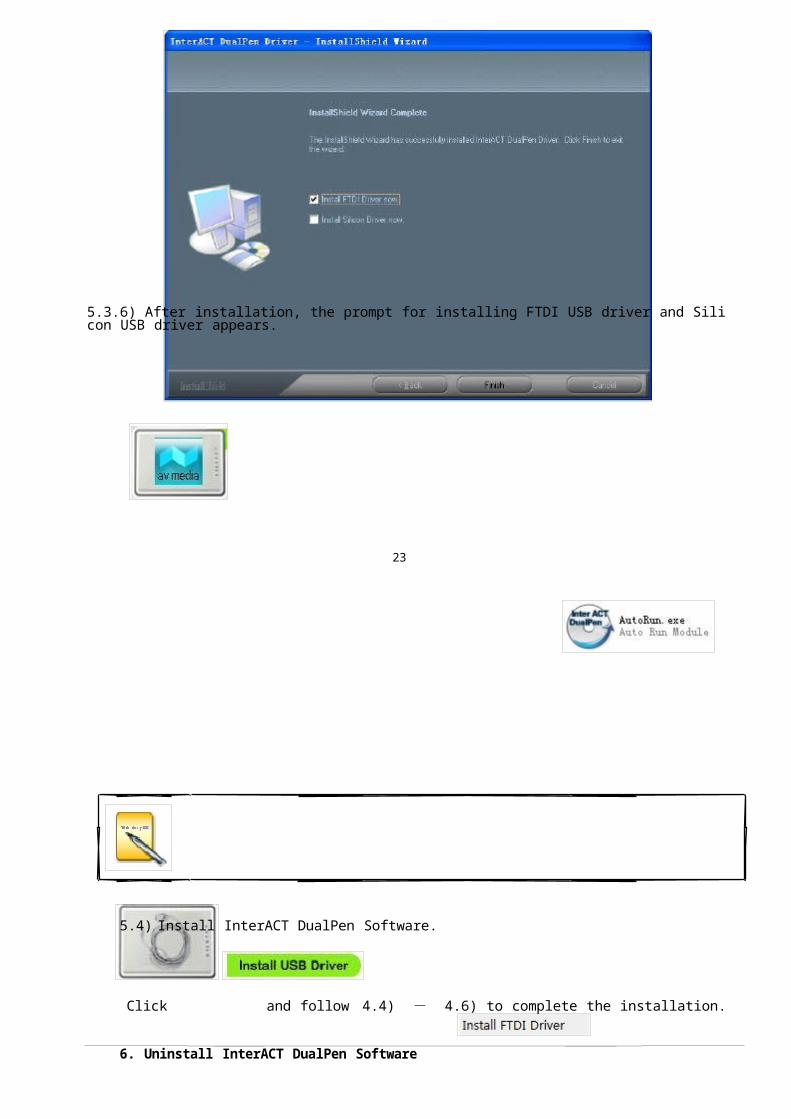
Software, the prompt for installing FTDI USB driver or Silicon USB driver appears:
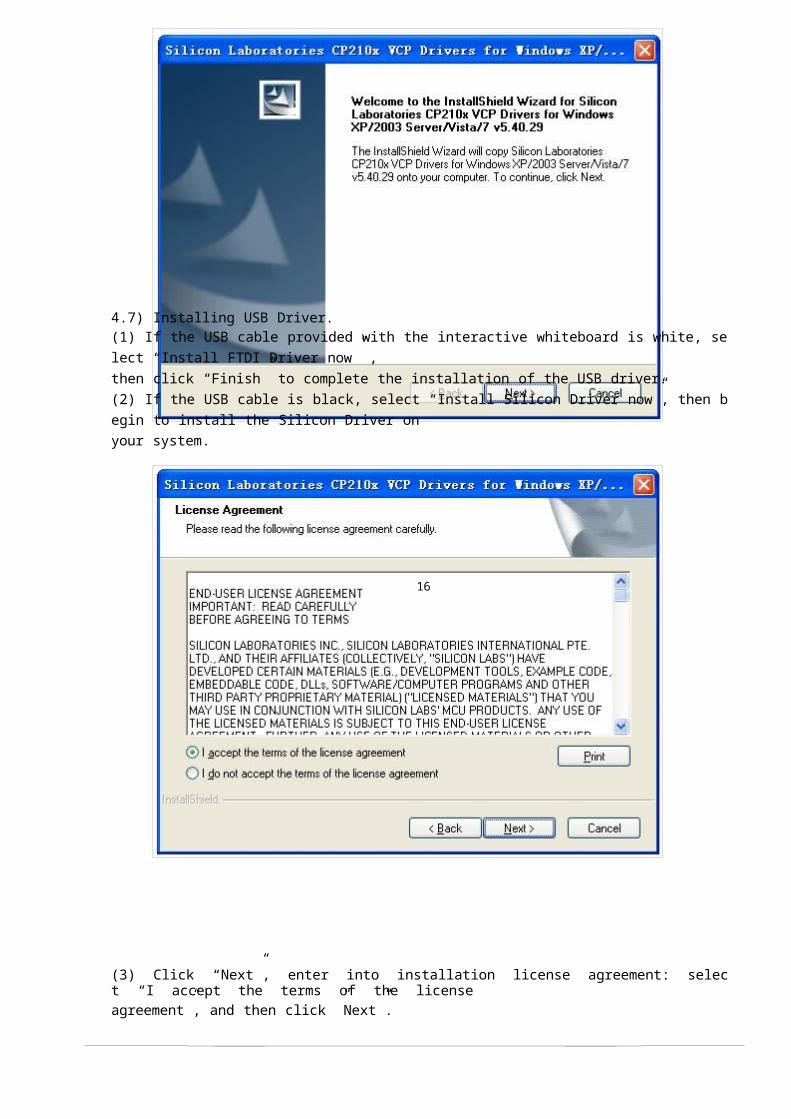
4.7) Installing USB Driver.(1) If the USB cable provided with the interactive whiteboard is white, select “Install FTDI Driver now” ,then click “Finish” to complete the installation of the USB driver.
(2) If the USB cable is black, select “Install Silicon Driver now”, then begin to install the Silicon Driver on
your system.
16
(3) Click “Next”, enter into installation license agreement: select “I accept the terms of the license
agreement”, and then click ”Next”.
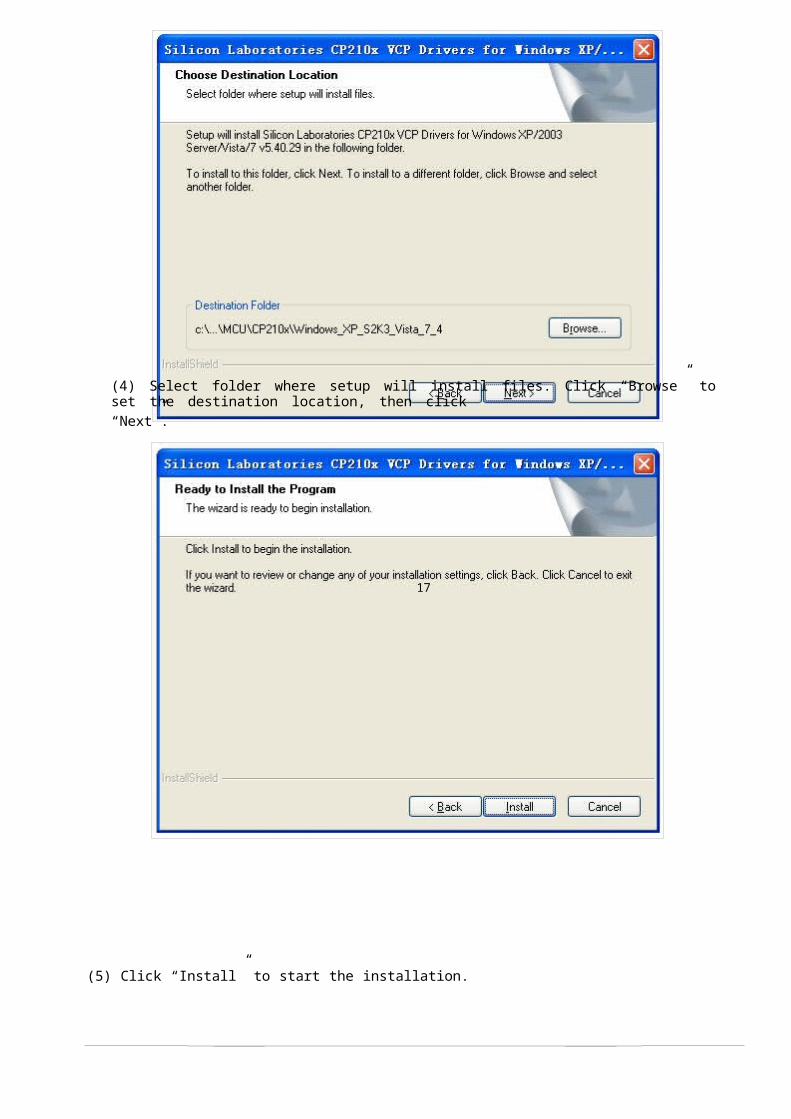
(4) Select folder where setup will install files. Click “Browse” to set the destination location, then click
“Next”.
17
(5) Click “Install” to start the installation.
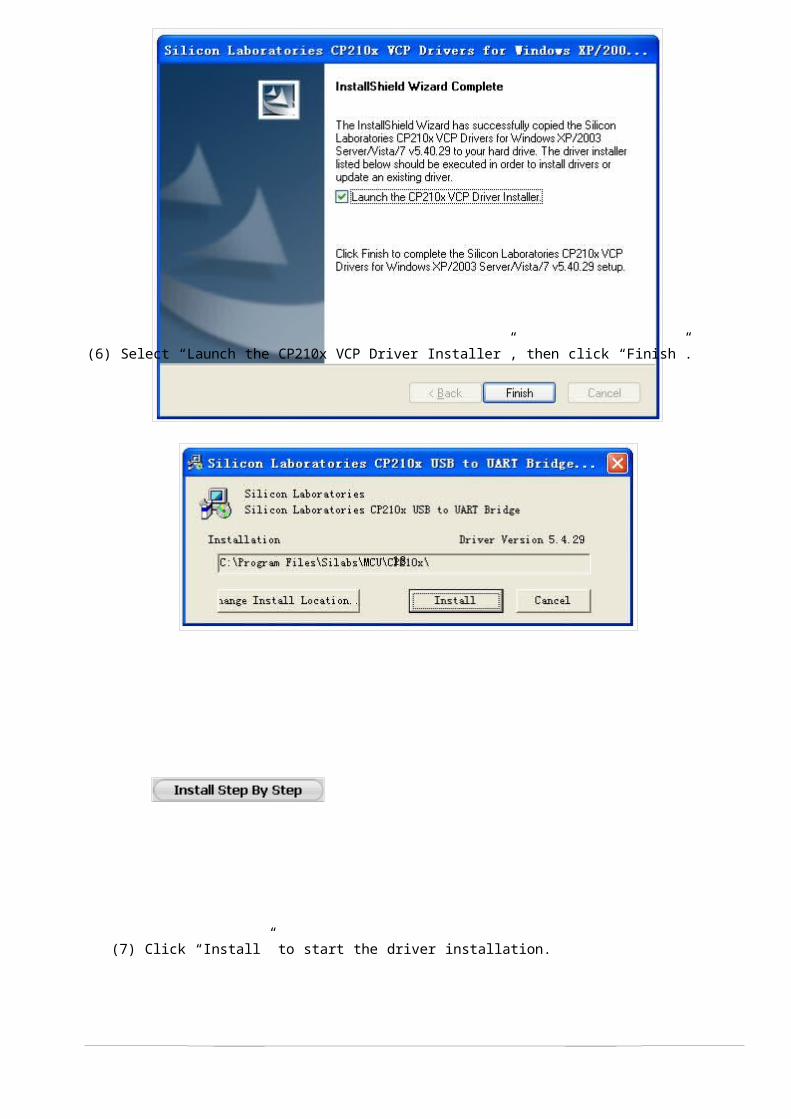
(6) Select “Launch the CP210x VCP Driver Installer”, then click “Finish”.
18
(7) Click “Install” to start the driver installation.
4.8) Complete installation.
5. Step-by-step Installation of InterACT DualPen Software
This installation option is recommended when upgrading InterACT DualPen Software or replacing the
USB cable.
5.1) Follow 4.1) - 4.3) to enter installation guide window.
5.2) Click to install InterACT DualPen Driver, InterACT DualPen Softwa
re
and USB cable by following the step-by-step guide.
19
5.3) Install InterACT DualPen Driver
5.3.1) Click to install driver for Interactive Whiteboard.
5.3.2) Choose the language that needed to be installed.

20
5.3.3) Select the setup type of installation. The setup type of “Complete” and “Custom” can be chosen. If
select setup type “Complete”, you can install all the program features. If select setup type “Custom”,
you
can select the program features you want to install and set the installation path for InterACT DualPen
Driver..
(1) If select the “Complete”, and then click “Next” → “Install” to start the installation.

21
(2) Select “Custom”, and then click “Next” to enter setup type “Custom” dialog, and you can click
“Change” to modify the installation path.
5.3.4) Click “Next”, select the driver(s) you want to install (TB3124Plugin, WBGeneralPlugin,
WBDualPenPlugin, TB2015Plugin and TB2015RIIPlugin).
22
5.3.5) Click “Next” →”Install” to start the installation.
5.3.6) After installation, the prompt for installing FTDI USB driver and Silicon USB driver appears.

23
5.4) Install InterACT DualPen Software.
Click and follow 4.4) - 4.6) to complete the installation.
6. Uninstall InterACT DualPen Software
Click “Start” - “Control Panel” - “Add or Remove Programs”, and select “InterACT Du
alPen
Software”, and then click “Add/Remove”. (Or insert the software disk, click for
guidance of software uninstalling, and process step-by-step as per the instruction.
7. Install USB-RS232 connection cable Driver
There is no need to repeat this step when using Express Installation. This step is only required wh
en
using Step-by-step Installation.
If USB-RS232 connection cable is used, the corresponding driver must beinstalled.
Click to install the driver for USB-RS232 cable.
7.1) Installation of white USB-RS232 cable
If the USB cable provided with the whiteboard is white, click to install the driver. For
24
more information on the installation steps for FTDI Driver, see section 4.7.1).
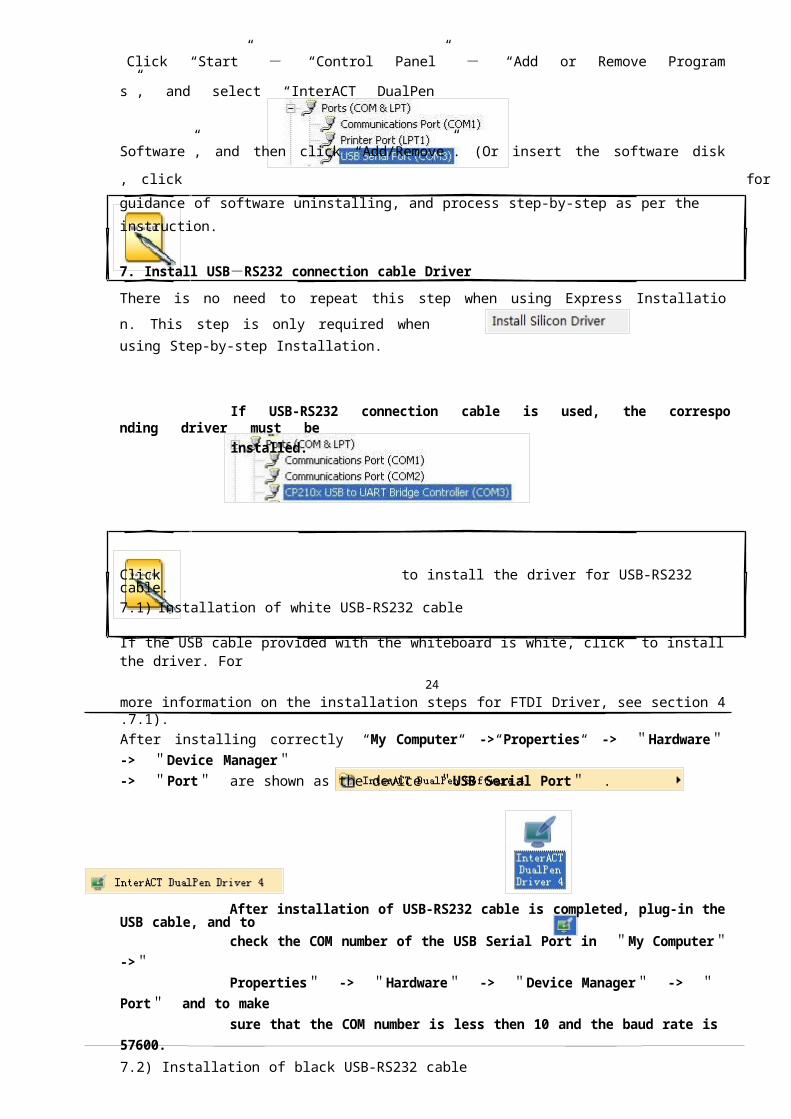
After installing correctly “My Computer“ ->“Properties“ -> "Hardware" -> "Device Manager"-> "Port" are shown as the device "USB Serial Port" .
After installation of USB-RS232 cable is completed, plug-in the USB cable, and tocheck the COM number of the USB Serial Port in "My Computer" ->"Properties" -> "Hardware" -> "Device Manager" -> "Port" and to makesure that the COM number is less then 10 and the baud rate is 57600.
7.2) Installation of black USB-RS232 cable
If the cable provided with the interactive whiteboard black, click to install the
driver.
For more information on the installation steps for Silicon Driver, see section 4.7.2)-4.7.8).
After installing correctly in "My Computer" -> "Properties" -> "Hardware" -> "DeviceManager" -> "Port" can see the device "CP210X USB to UART Bridge Controller".
After installation of USB-RS232 cable is completed, plug-in the USB cable, and tocheck the COM number of the CP210X USB to UART Bridge Controllerin “My Computer” -> "Properties" -> "Hardware" -> "Device Manager
"-> "Port" and to make sure that the COM number is less then 10 and the
baud
rate is 57600.
Run the Software
1. Startup driver of interactive whiteboard
Click "Start"->"All programs"->"
"->"
", or double-click the shortcut icon on the desktop to
start
InterACT DualPen Driver. It will show a tray icon of communication module , in status bar lower-
right
corner of desktop.
25
If it shows"Communication the white board failed", please make sure that the
connecting cable and Interactive whiteboard is correctly connected and the driver for
the USB cable has been correctly installed.
2. Orient the interactive whiteboard
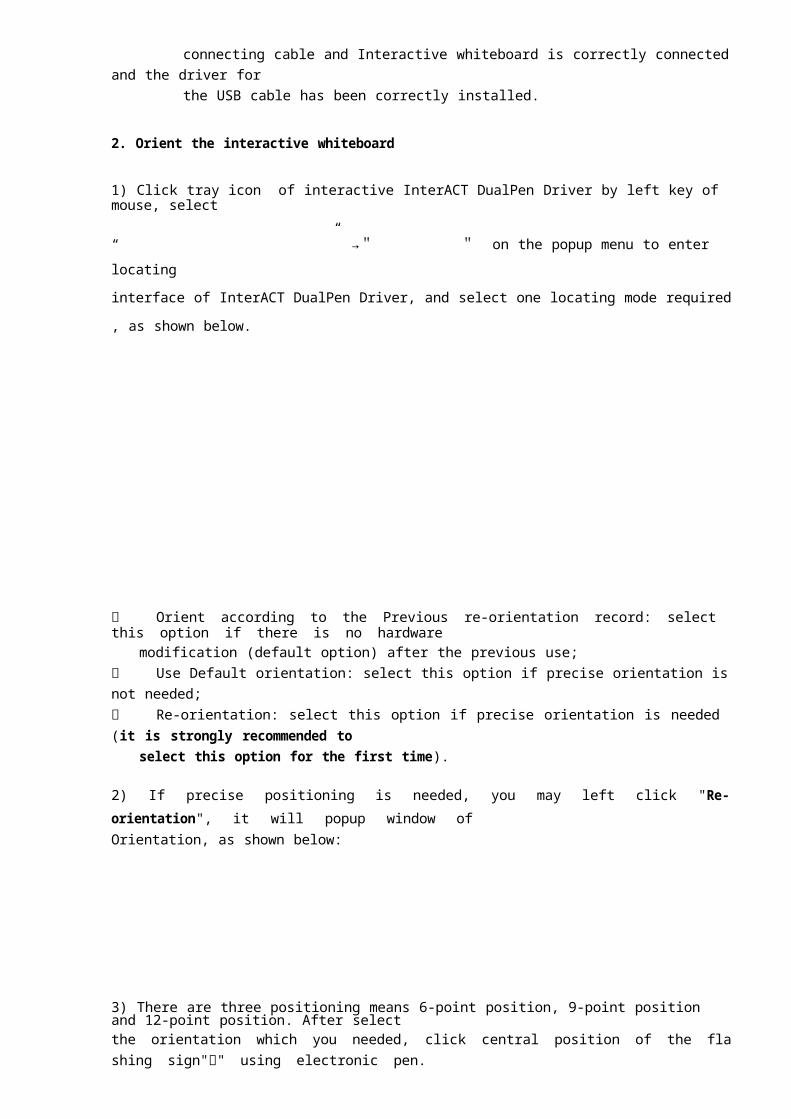
1) Click tray icon of interactive InterACT DualPen Driver by left key of mouse, select
“ ” →" " on the popup menu to enter locating
interface of InterACT DualPen Driver, and select one locating mode required, as shown below.
Orient according to the Previous re-orientation record: select this option if there is no hardware
modification (default option) after the previous use;
Use Default orientation: select this option if precise orientation is not needed;
Re-orientation: select this option if precise orientation is needed (it is strongly recommended toselect this option for the first time).
2) If precise positioning is needed, you may left click "Re-orientation", it will popup window of
Orientation, as shown below:
3) There are three positioning means 6-point position, 9-point position and 12-point position. After select
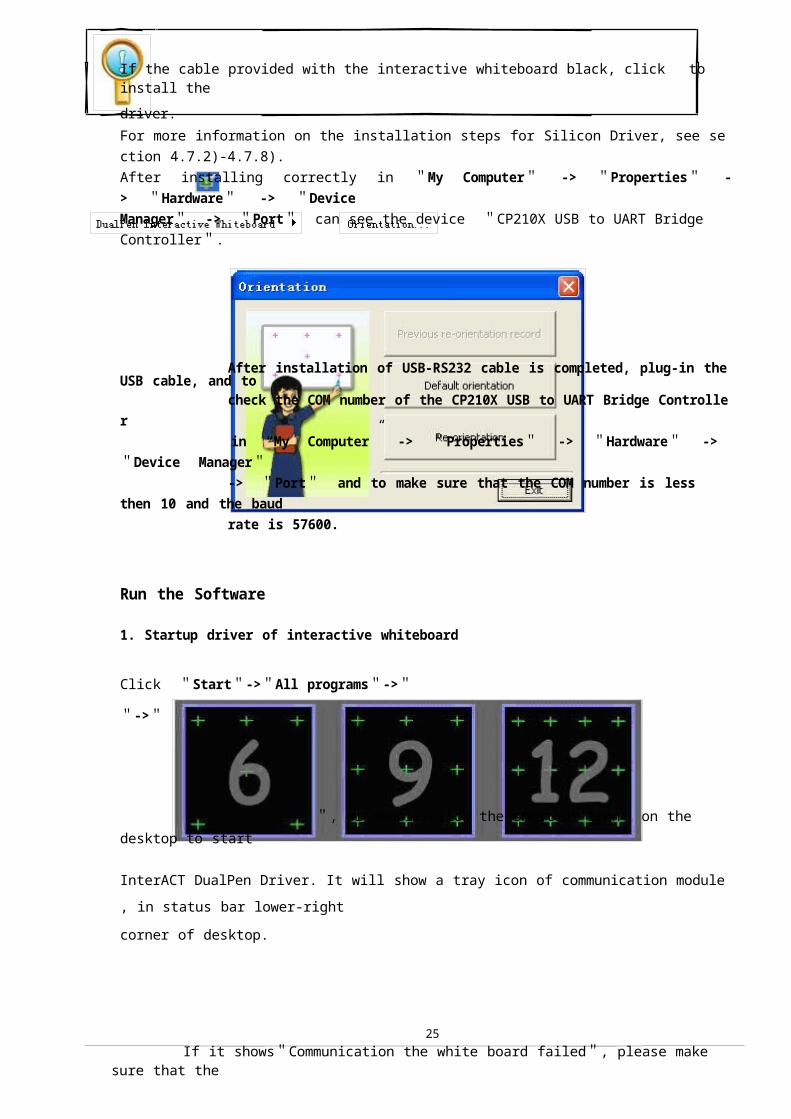
the orientation which you needed, click central position of the flashing sign"十" using electronic pen
.
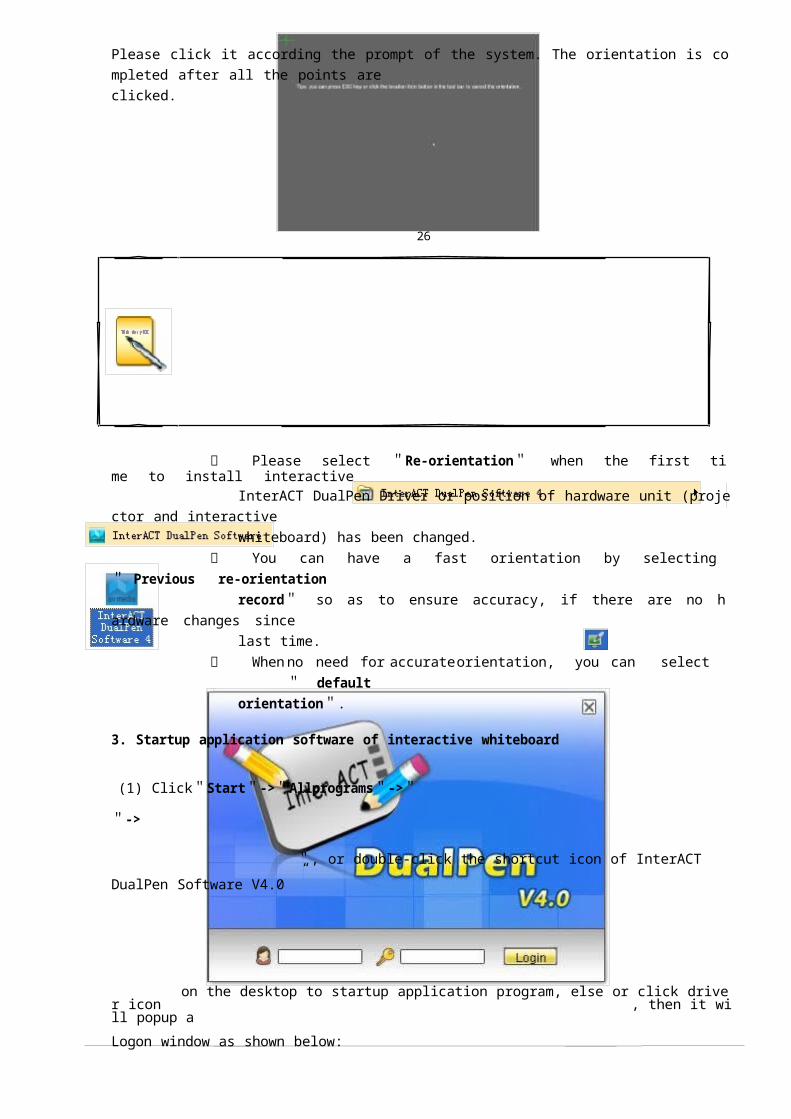
Please click it according the prompt of the system. The orientation is completed after all the points are
clicked.
26
Please select "Re-orientation" when the first time to install interactive
InterACT DualPen Driver or position of hardware unit (projector and interactive
whiteboard) has been changed.
You can have a fast orientation by selecting " Previous re-orientationrecord" so as to ensure accuracy, if there are no hardware changes since
last time.
When no need for accurate orientation, you can select " defaultorientation".
3. Startup application software of interactive whiteboard
(1) Click"Start"->"Allprograms"->"
"->
", or double-click the shortcut icon of InterACT DualPen Software V4.0
”
on the desktop to startup application program, else or click driver icon , then it will popup a
Logon window as shown below:
(2) Users can use default user account or their individual accounts to log-in InterACT DualPen Software.Users are able to create customized toolbar, resources and templates if they are using their individual
27accounts.
4. Create an individual account and password
1) Click "Start" ->"All Programs" ->" "
-> " "and will pop-up the following window:
Key-in the administrator account to enter the software. Default administrator account is: administrator,Password: 123.2) Enter the User Manager window.
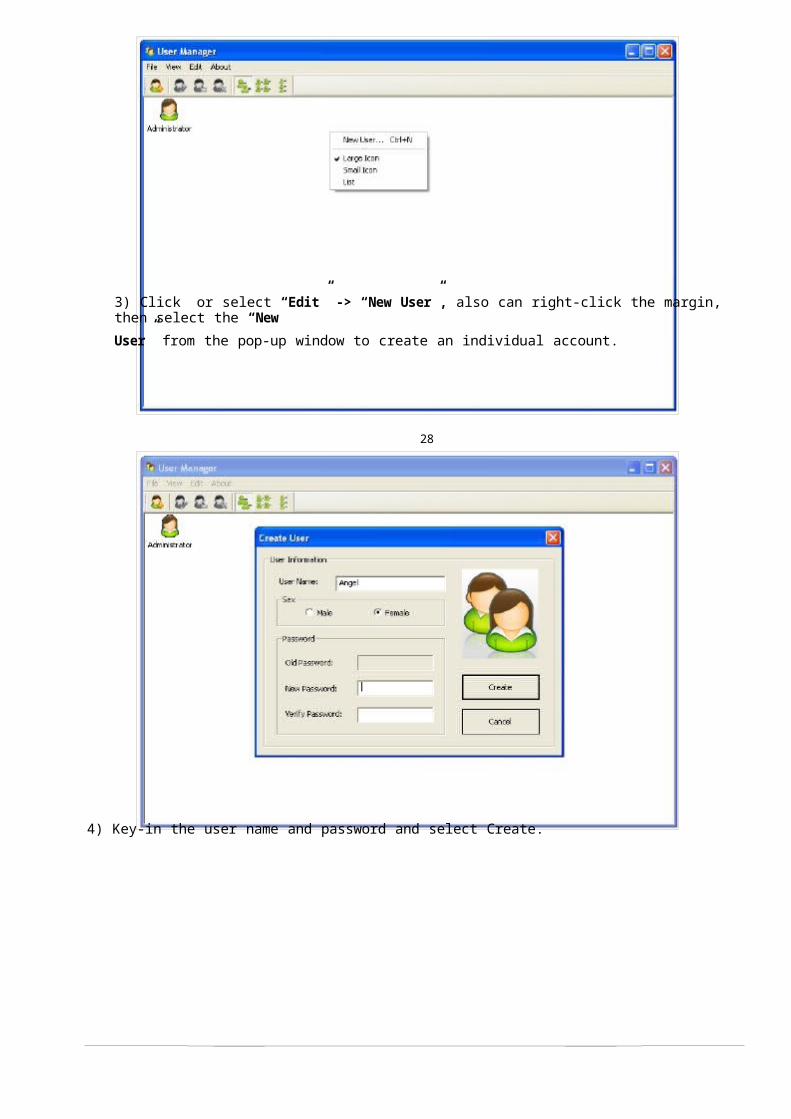
3) Click or select “Edit” -> “New User”, also can right-click the margin, then select the “New
User” from the pop-up window to create an individual account.
28
4) Key-in the user name and password and select Create.
5) The new user will be displayed in the window after the process is completed.
29
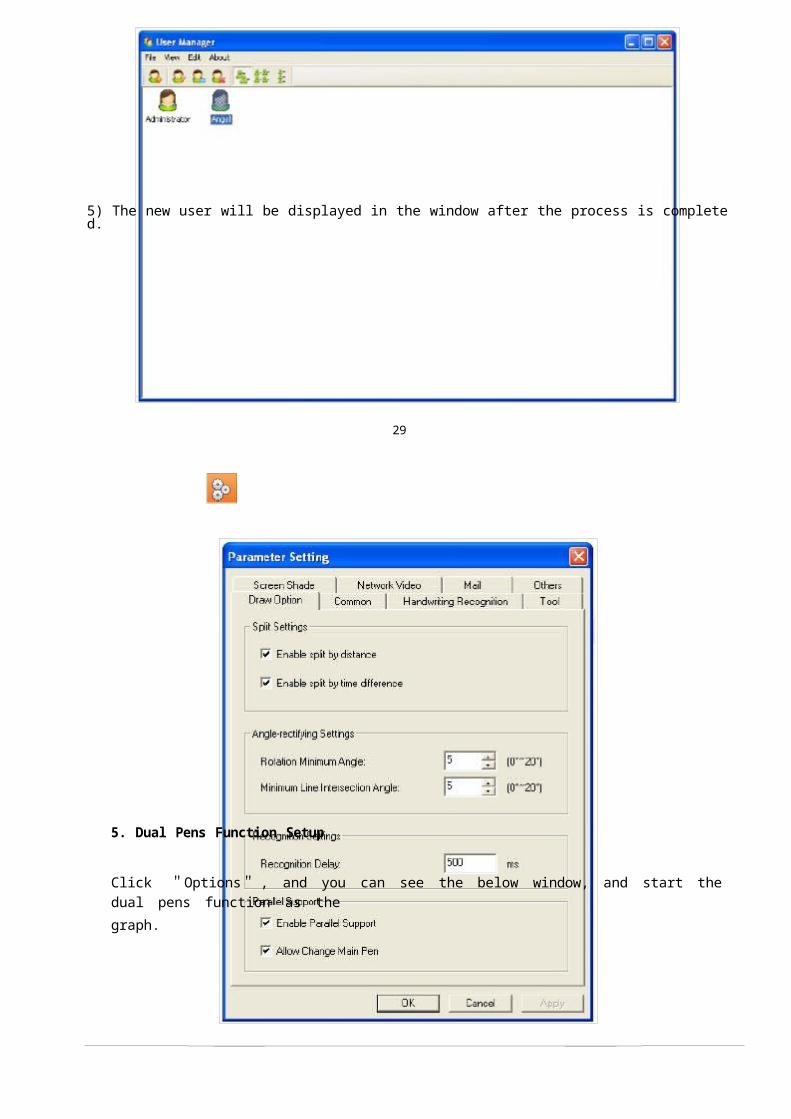
5. Dual Pens Function Setup
Click "Options" , and you can see the below window, and start the dual pens function as the
graph.
30
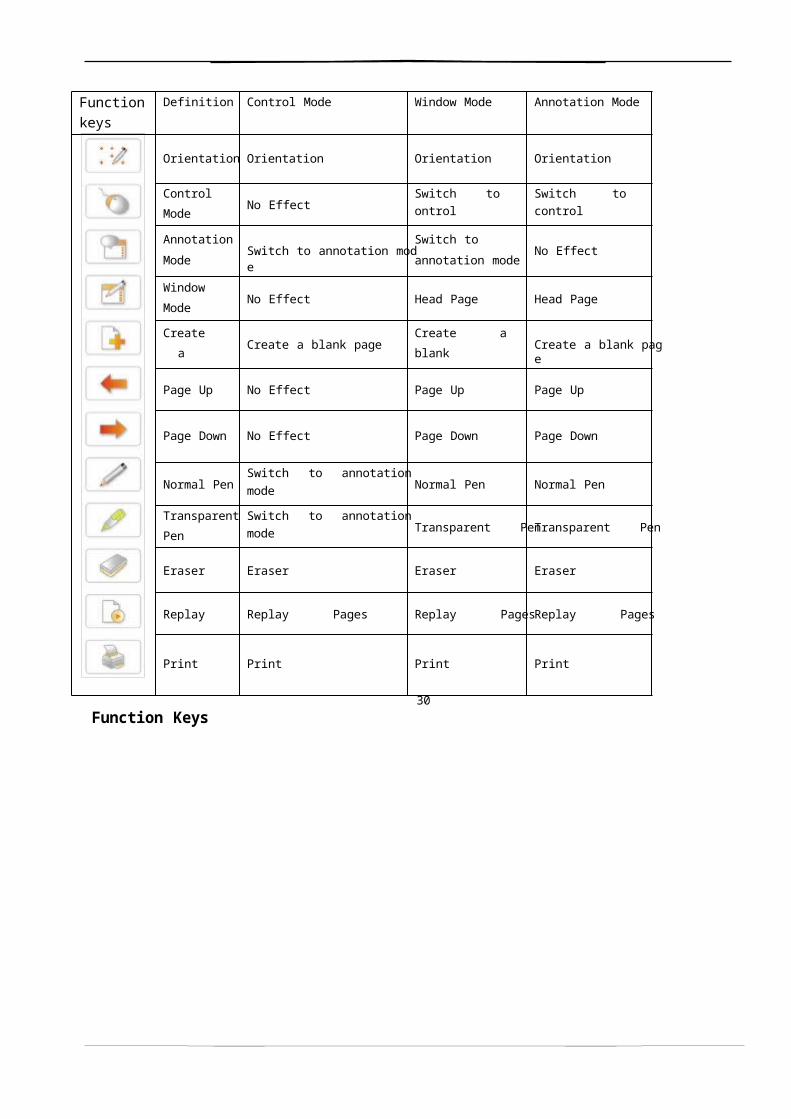
Function Keys
Function
keys
Definition Control Mode Window Mode Annotation Mode
Orientation Orientation Orientation Orientation
Control
ModeNo Effect
Switch to control
mode
Switch to control
mode
Annotation
ModeSwitch to annotation mode
Switch to
annotation modeNo Effect
Window
ModeNo Effect Head Page Head Page
Create a
blank pageCreate a blank page
Create a blank
pageCreate a blank page
Page Up No Effect Page Up Page Up
Page Down No Effect Page Down Page Down
Normal PenSwitch to annotation mode
and use Normal PenNormal Pen Normal Pen
Transparent
Pen
Switch to annotation mode
and use Transparent PenTransparent Pen Transparent Pen
Eraser Eraser Eraser Eraser
Replay Replay Pages Replay Pages Replay Pages
Print Print Print Print
31
Trouble Shooting
1. If it shows “Failed to verify the whiteboard, the program can't run further!“ please checkwhether there is a good connection between whiteboard and PC.
Please check whether having used special-purpose gorge line of whiteboard, and whether there
is
a good connection for gorge line.
When connection is made through the USB2.0 to RS232C cable, check whether it is correctl
y
connected with special-purpose gorge line.
Check whether the whiteboard is power-on (It is normal only when the red indicator lamp on plug
socket of power lightening).
Check whether serial ports from COM1 to COM10 have been occupied, and you must select one
serial port from COM1 to COM10 for whiteboard.
Check whether driver of whiteboard has been setup correctly.
2. When startup software, it shows "Error happen when Loading XML File".
Check the version of Internet Explorer, upgrade IE to version 6.0 when it is 5.0 or lower.
3. Only part of whiteboard can be written on.
Check whether orientation of whiteboard is correct.
4. Some orientation points can not found when orienting the whiteboard.
Check whether lateral deviation and vertical offset of projector are correct. Ensure all content on PC
screen can be projected wholly to whiteboard.
5. Electronic pen cannot write normally.
Check current working mode of software. Writing is effective only under Draw Mode or
Annotation
Mode, and not effective under Control Mode.
Do not press button on electronic pen when writing.
Please keep the neb of electronic pen is vertical to panel of whiteboard.
You should not press the electronic pen tightly.
Check whether the battery is full of power, if not, replace new ones.
6. How to exit from software of InterACT DualPen?
Click Operation Round Plate of "control mode" , click "Exit" in the pop up menu.
Or click "File"( on main menu) "Exit".
or click the " Master Toolbar " icon, on the prompt menu, click "exit".
7. Why image Projected is shape of trapezium? why to adjust it, and how to adjust it?
It may be that projector is not level (like, the front is higher than the back or the back is higher
than
the front),so a trapezium appears.
The image will be in distortion when a trapezium appears, so you must adjust it to norm
al
condition.
Generally, it can be adjusted by using a remote manipulator or to adjust height of projector. For
details, please refer to user's manual of projector.
32
Trapezia Rectangle8. What type of projector is needed to match with the interactive whiteboard?
The projector shall satisfy with three items as below.
1) Front projector;
2) Support resolution of PC;
3) Least luminous power shall be more than 500 Lumina, for detail requirements, please refer to
size of room.
9.
network function is needed.
33
Performance Index
Hardware Platform Common PC, notebook PC
Operation System Windows 2000/XP/Vista/Win 7
Transmission Interface RS-232C/USB / Wireless Module
Resolution 254lines
Precision 0.05mm
Data-signaling Rate 57600 Baud Rate
Operating Principle Wireless electromagnetic induction
Operate Mode Control Mode/ Window Mode / Annotation Mode/ Full-screen
Mode/ Transparent Annotation Mode
USB Power Supply DC 5V 100mA Or Powered by external 5V adapter
Service life of battery
of electronic pen
Different service life for different battery, common alkaline
battery can endures three months
Working Temperature -20℃ ~ +55℃
Working Humidity 30%~80%
Power Capability < 2W
34