Embed Size (px)
Citation preview
Converting a PowerPoint presentation into a Camtasia Studio Audio and Video presentation
Page 1 of 28
Converting a PowerPoint presentation into a
Camtasia Studio Audio and Video presentation
Introduction
This guide suggests the best (most versatile) method for using Camtasia Studio to capture a PowerPoint presentation with an accompanying audio soundtrack.
This is not the only way PowerPoint presentations may be captured by Camtasia Studio and it does require some specialist software, but it will allow
presentations to be edited and updated more easily in the future.
The Concept
There are two ways to capture a PowerPoint presentation:
1) Run the PowerPoint presentation from start to finish in one go, recording the audio sound track as a oner at the same time.
Pros – Provides a more natural feel to the presentation, ensures constant audio input levels.
Cons – Entire presentation needs to be recorded in one go (although ‘errors’ in speech or clicks between slides may be edited out after the
event), makes editing the presentation after the event (for example to update one slide) more fiddly.
2) Record the audio for each slide individually, make screen captures of the individual slides and then bring the two together on the timeline in
Camtasia Studio. Pros – Makes updating the presentation later much easier as individual
slides/sections of audio may be edited, removed or reordered. Cons – Requires the manipulation of multiple files, slide animation will not
be captured.
For presentations where the slides are mostly text (and are without animation) the advantages of the second method are considered to be such that this is the recommended approach. This document explores this method.
The Process
The steps to complete this process are as follows.
1. Create the PowerPoint presentation (this guide will assume this has been
done already). 2. Write a script for the audio (again, this guide assumes this has been
done). 3. Record the audio for slide 1, edit it and save it.
4. Record the audio for slide 2, edit it and save it. 5. Continue recording each audio clip for each slide until they are all
completed.
6. Open PowerPoint and save the slides in the presentation as a series of screenshot images (this is one operation which creates multiple
screenshots).
Converting a PowerPoint presentation into a Camtasia Studio Audio and Video presentation
Page 2 of 28
7. At the end of this process you should have two files for each slide: an audio clip and a screen shot. Thus if your presentation has 4 slides you
will end up with 8 files. 8. Open Camtasia Studio and import all the files associated with the
presentation (audio clips and screen shots) into the Clip Bin. 9. Drag the audio file for slide 1 onto the audio timeline. 10. Drag the screen shot for slide 1 onto the video timeline.
11. Stretch the length of the screen shot for slide 1 so it is equal to the length of audio track 1.
12. Drag the audio file for slide 2 onto the audio timeline and place it after the audio for slide 1.
13. Drag the screen shot for slide 2 onto the video timeline and place it after
the video for slide 1. 14. Stretch the length of the screen shot for slide 2 so it is equal to the length
of audio track 2. 15. Repeat until all the audio and screen shots are in place. 16. Output the presentation from Camtasia Studio in the required format.
17. Transfer the file to the Streaming Server and link to it.
Required Software
Many different software packages will do the trick for the audio and image editing and so if you have a licence for something not listed below and are comfortable using it then use that instead. Otherwise, the following are
recommended and are used in this guide:
Audacity A free audio recording and editing package available from: http://audacity.sourceforge.net/
Camtasia Studio 7
The editing package to make the output file, licence required for use at the University of Stirling
If you wish you could also create the screen shots using some free image editing software such as PhotoScape. Audacity and PhotoScape would need to be
downloaded and installed. To do this you would need to make yourself an administrator on your own machine through the option in Run Advertised
Programs. If you were to use PhotoScape then there is a bug to be aware of. Unfortunately, as you are admin on your machine when you run the install and PhotoScape remembers this, when it tries to reference files in the filestore
associated with the username which performed the install you will see error messages on screen. These occur when switch between tabs to perform different
tasks. These messages can be cleared and the application works fine.
Converting a PowerPoint presentation into a Camtasia Studio Audio and Video presentation
Page 3 of 28
Writing a Script
It is very helpful first to write a transcript of what you wish to say to accompany the PowerPoint presentation. This makes you think about all the steps involved and gives you an opportunity to think about the correct order in which to say
things. Divide the script into sections, one for each slide of the PowerPoint presentation.
Part 1 - Recording and Editing the Audio using Audacity
Recording the Audio
It is recommended that you record your audio using a good quality microphone in a suitably quiet environment with no interference or background noises. Quality audio recordings will lessen the need to use Audacity or Camtasia Studio
as an audio editing tool. The latter is not designed for this, although from the Tools menu the Camtasia Audio Editor (not covered in this guide) can allow
some basic sound file editing. Record a slide at a time and save each slide’s audio separately.
To record the audio this follow these steps:
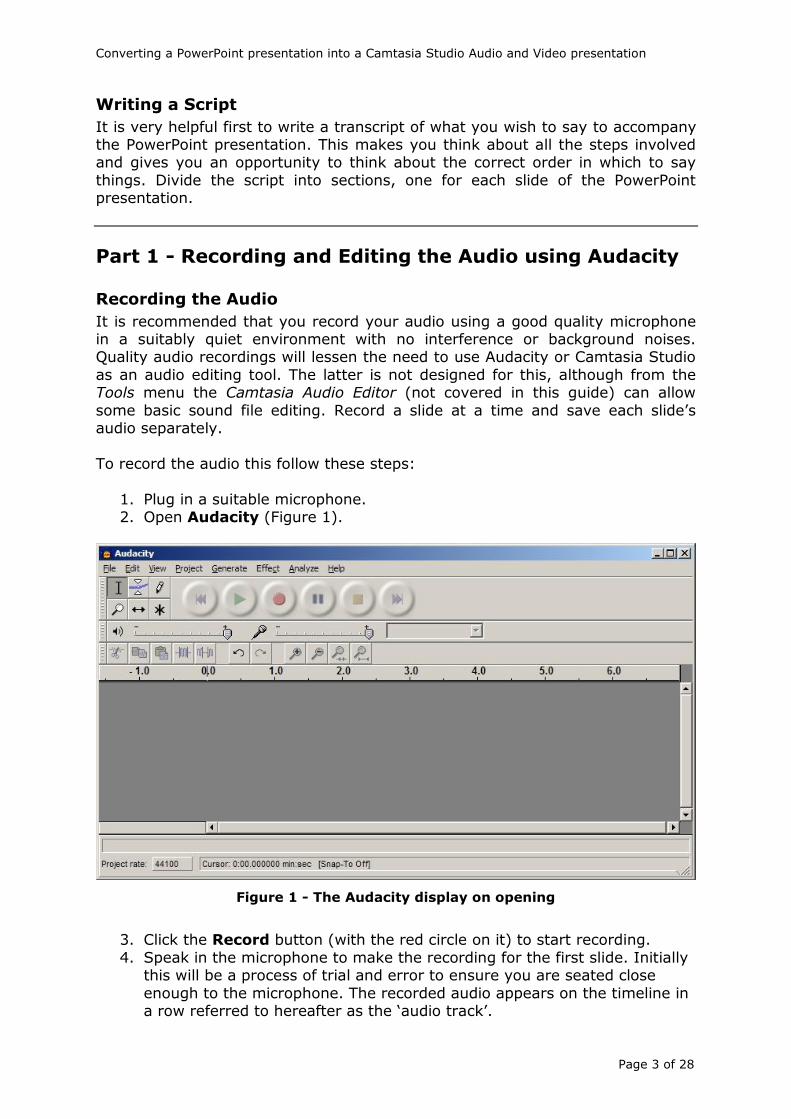
1. Plug in a suitable microphone. 2. Open Audacity (Figure 1).
Figure 1 - The Audacity display on opening
3. Click the Record button (with the red circle on it) to start recording.
4. Speak in the microphone to make the recording for the first slide. Initially this will be a process of trial and error to ensure you are seated close
enough to the microphone. The recorded audio appears on the timeline in a row referred to hereafter as the ‘audio track’.
Converting a PowerPoint presentation into a Camtasia Studio Audio and Video presentation
Page 4 of 28
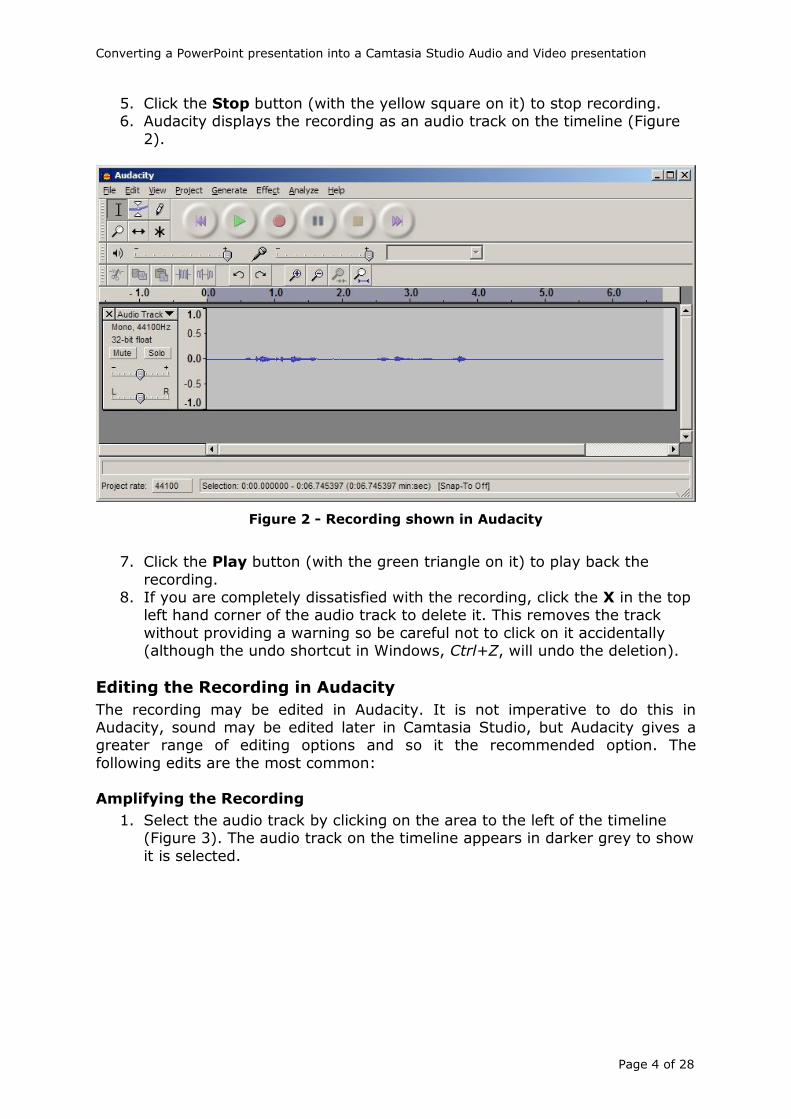
5. Click the Stop button (with the yellow square on it) to stop recording. 6. Audacity displays the recording as an audio track on the timeline (Figure
2).
Figure 2 - Recording shown in Audacity
7. Click the Play button (with the green triangle on it) to play back the
recording. 8. If you are completely dissatisfied with the recording, click the X in the top
left hand corner of the audio track to delete it. This removes the track
without providing a warning so be careful not to click on it accidentally (although the undo shortcut in Windows, Ctrl+Z, will undo the deletion).
Editing the Recording in Audacity
The recording may be edited in Audacity. It is not imperative to do this in Audacity, sound may be edited later in Camtasia Studio, but Audacity gives a greater range of editing options and so it the recommended option. The
following edits are the most common:
Amplifying the Recording
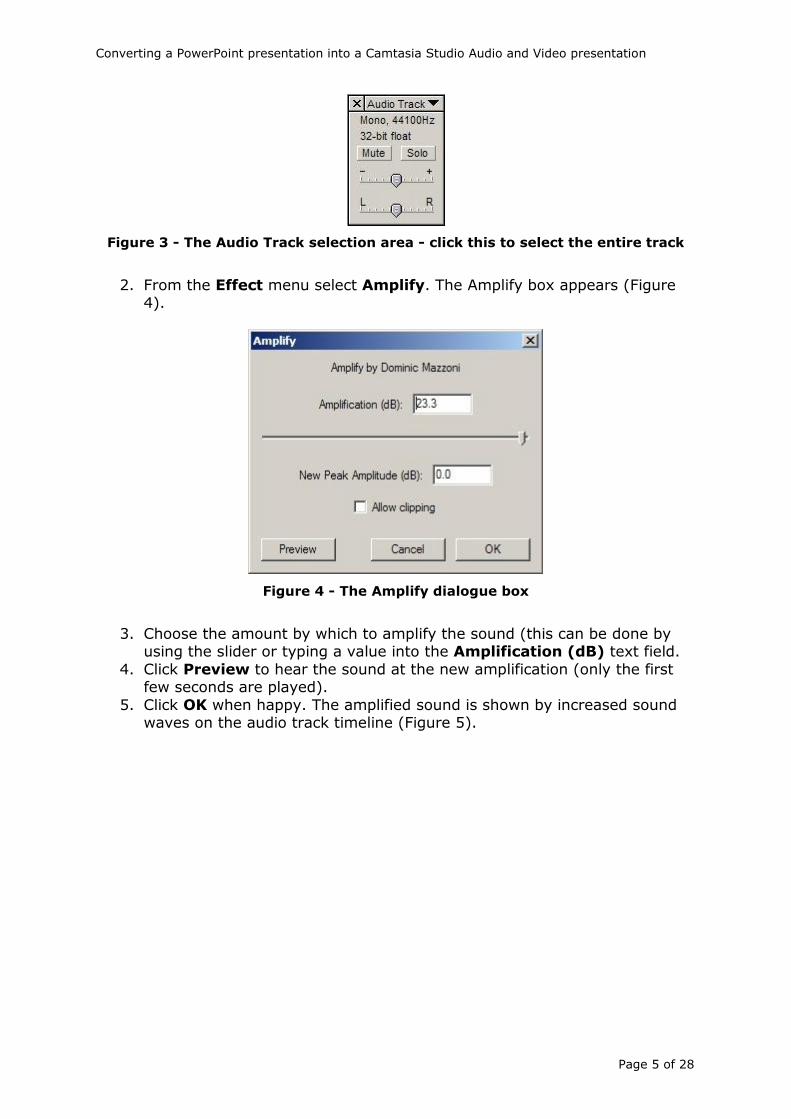
1. Select the audio track by clicking on the area to the left of the timeline (Figure 3). The audio track on the timeline appears in darker grey to show
it is selected.
Converting a PowerPoint presentation into a Camtasia Studio Audio and Video presentation
Page 5 of 28
Figure 3 - The Audio Track selection area - click this to select the entire track
2. From the Effect menu select Amplify. The Amplify box appears (Figure 4).
Figure 4 - The Amplify dialogue box
3. Choose the amount by which to amplify the sound (this can be done by
using the slider or typing a value into the Amplification (dB) text field.
4. Click Preview to hear the sound at the new amplification (only the first few seconds are played).
5. Click OK when happy. The amplified sound is shown by increased sound waves on the audio track timeline (Figure 5).

Converting a PowerPoint presentation into a Camtasia Studio Audio and Video presentation
Page 6 of 28
Figure 5 - The amplified sound shown on the audio track timeline
Cutting away sections of the Recording
This technique can be used to get rid of sections at the start and end of the recording where there is no speech.
1. Click and drag the mouse on the audio track timeline to select a portion of
it to be cut away. Figure 6 shows an example with the section at the end of the audio track highlighted.
Figure 6 - A portion of the audio track selected
Converting a PowerPoint presentation into a Camtasia Studio Audio and Video presentation
Page 7 of 28
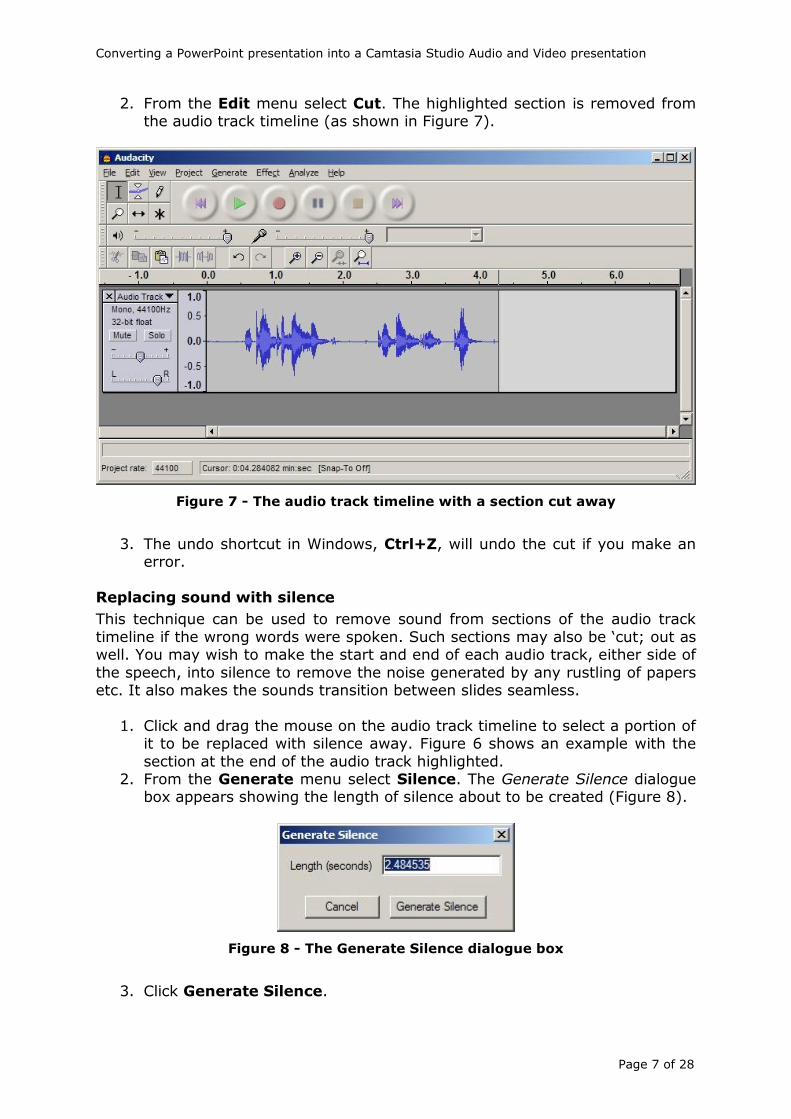
2. From the Edit menu select Cut. The highlighted section is removed from the audio track timeline (as shown in Figure 7).
Figure 7 - The audio track timeline with a section cut away
3. The undo shortcut in Windows, Ctrl+Z, will undo the cut if you make an error.
Replacing sound with silence
This technique can be used to remove sound from sections of the audio track
timeline if the wrong words were spoken. Such sections may also be ‘cut; out as well. You may wish to make the start and end of each audio track, either side of
the speech, into silence to remove the noise generated by any rustling of papers etc. It also makes the sounds transition between slides seamless.
1. Click and drag the mouse on the audio track timeline to select a portion of it to be replaced with silence away. Figure 6 shows an example with the
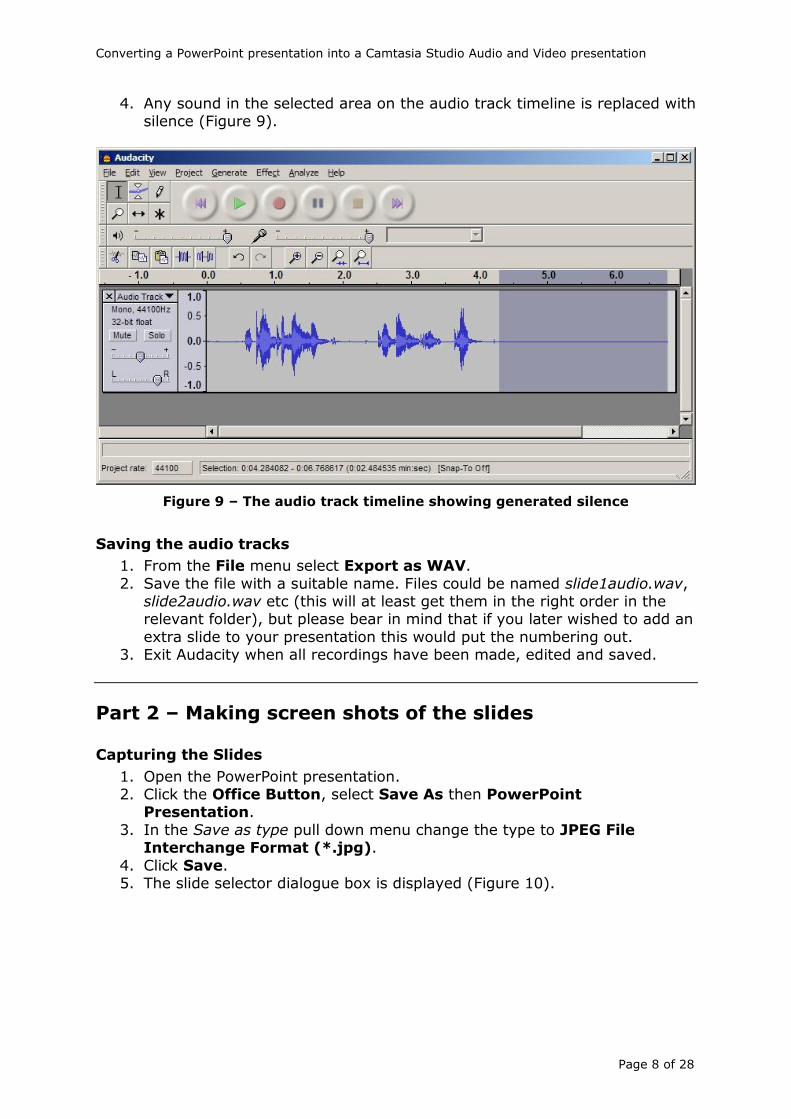
section at the end of the audio track highlighted. 2. From the Generate menu select Silence. The Generate Silence dialogue
box appears showing the length of silence about to be created (Figure 8).
Figure 8 - The Generate Silence dialogue box
3. Click Generate Silence.
Converting a PowerPoint presentation into a Camtasia Studio Audio and Video presentation
Page 8 of 28
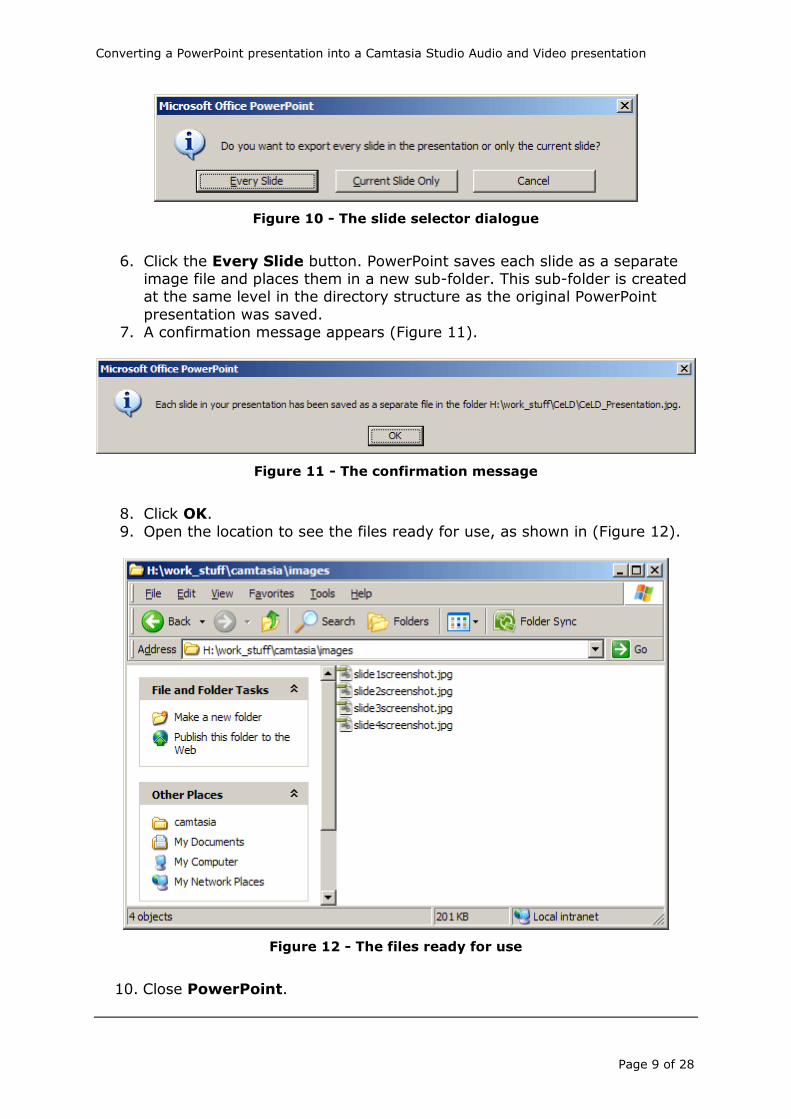
4. Any sound in the selected area on the audio track timeline is replaced with silence (Figure 9).
Figure 9 – The audio track timeline showing generated silence
Saving the audio tracks
1. From the File menu select Export as WAV.
2. Save the file with a suitable name. Files could be named slide1audio.wav, slide2audio.wav etc (this will at least get them in the right order in the relevant folder), but please bear in mind that if you later wished to add an
extra slide to your presentation this would put the numbering out. 3. Exit Audacity when all recordings have been made, edited and saved.
Part 2 – Making screen shots of the slides Capturing the Slides
1. Open the PowerPoint presentation. 2. Click the Office Button, select Save As then PowerPoint
Presentation.
3. In the Save as type pull down menu change the type to JPEG File Interchange Format (*.jpg).
4. Click Save. 5. The slide selector dialogue box is displayed (Figure 10).
Converting a PowerPoint presentation into a Camtasia Studio Audio and Video presentation
Page 9 of 28
Figure 10 - The slide selector dialogue
6. Click the Every Slide button. PowerPoint saves each slide as a separate image file and places them in a new sub-folder. This sub-folder is created at the same level in the directory structure as the original PowerPoint
presentation was saved. 7. A confirmation message appears (Figure 11).
Figure 11 - The confirmation message
8. Click OK.
9. Open the location to see the files ready for use, as shown in (Figure 12).
Figure 12 - The files ready for use
10. Close PowerPoint.
Converting a PowerPoint presentation into a Camtasia Studio Audio and Video presentation
Page 10 of 28
Part 3 – Editing the Audio and Screen shots together in Camtasia Studio Understanding the Timeline in Camtasia Studio
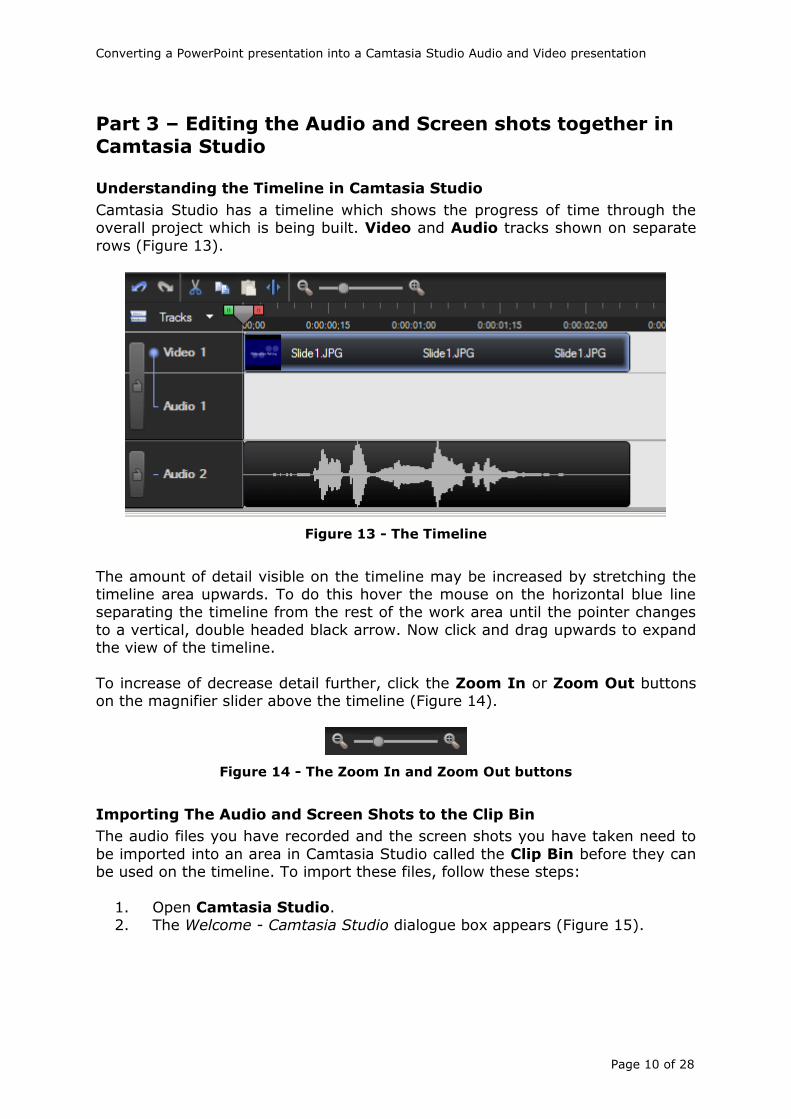
Camtasia Studio has a timeline which shows the progress of time through the overall project which is being built. Video and Audio tracks shown on separate
rows (Figure 13).
Figure 13 - The Timeline
The amount of detail visible on the timeline may be increased by stretching the timeline area upwards. To do this hover the mouse on the horizontal blue line separating the timeline from the rest of the work area until the pointer changes
to a vertical, double headed black arrow. Now click and drag upwards to expand the view of the timeline.
To increase of decrease detail further, click the Zoom In or Zoom Out buttons on the magnifier slider above the timeline (Figure 14).
Figure 14 - The Zoom In and Zoom Out buttons
Importing The Audio and Screen Shots to the Clip Bin
The audio files you have recorded and the screen shots you have taken need to
be imported into an area in Camtasia Studio called the Clip Bin before they can be used on the timeline. To import these files, follow these steps:
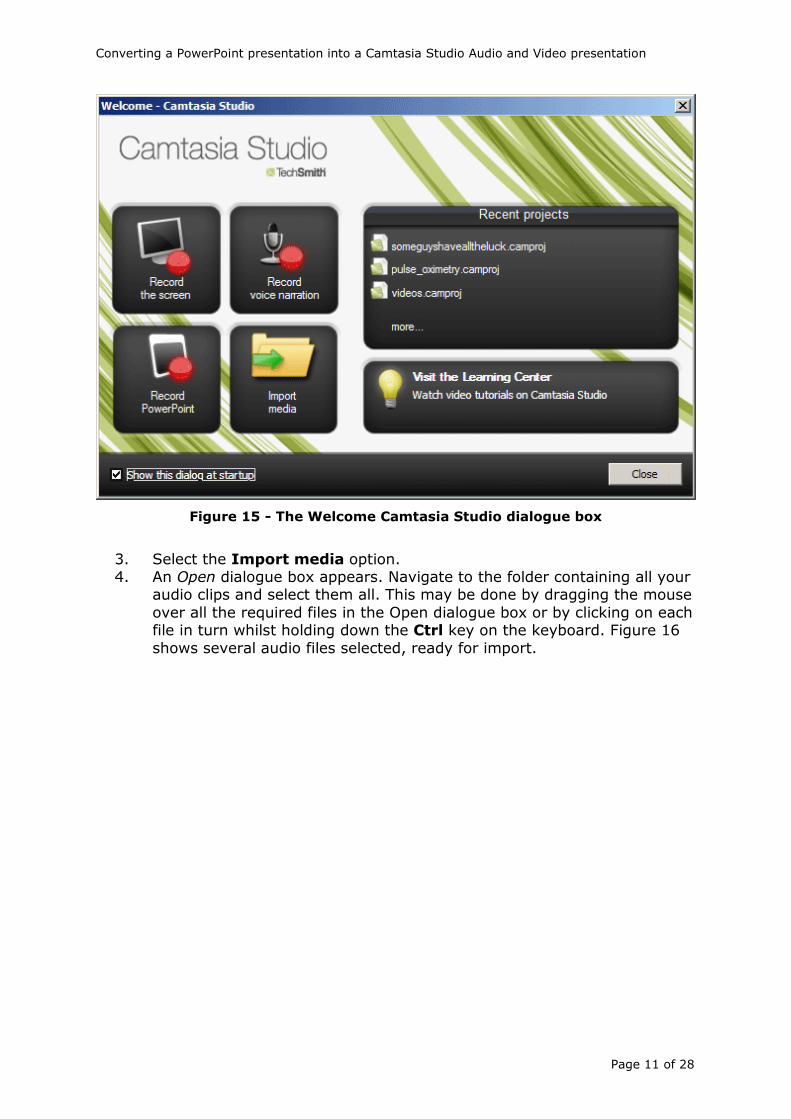
1. Open Camtasia Studio. 2. The Welcome - Camtasia Studio dialogue box appears (Figure 15).
Converting a PowerPoint presentation into a Camtasia Studio Audio and Video presentation
Page 11 of 28
Figure 15 - The Welcome Camtasia Studio dialogue box
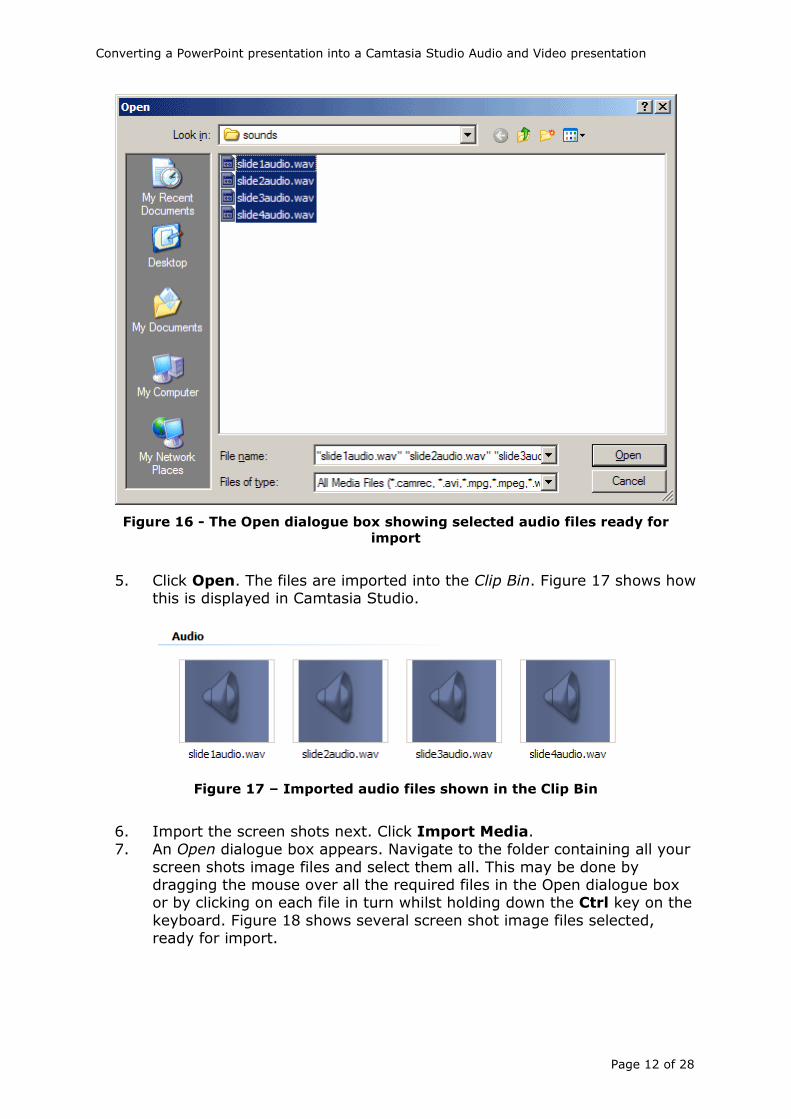
3. Select the Import media option. 4. An Open dialogue box appears. Navigate to the folder containing all your
audio clips and select them all. This may be done by dragging the mouse
over all the required files in the Open dialogue box or by clicking on each file in turn whilst holding down the Ctrl key on the keyboard. Figure 16
shows several audio files selected, ready for import.
Converting a PowerPoint presentation into a Camtasia Studio Audio and Video presentation
Page 12 of 28
Figure 16 - The Open dialogue box showing selected audio files ready for
import
5. Click Open. The files are imported into the Clip Bin. Figure 17 shows how
this is displayed in Camtasia Studio.
Figure 17 – Imported audio files shown in the Clip Bin
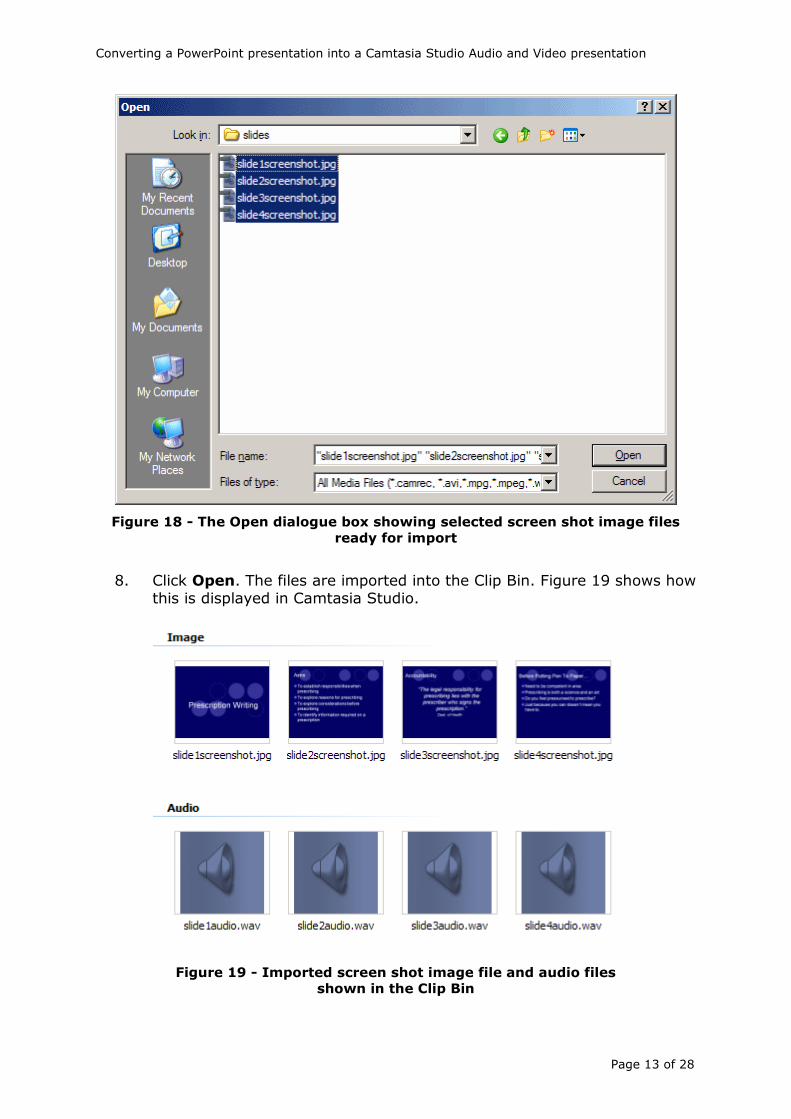
6. Import the screen shots next. Click Import Media. 7. An Open dialogue box appears. Navigate to the folder containing all your
screen shots image files and select them all. This may be done by dragging the mouse over all the required files in the Open dialogue box or by clicking on each file in turn whilst holding down the Ctrl key on the
keyboard. Figure 18 shows several screen shot image files selected, ready for import.
Converting a PowerPoint presentation into a Camtasia Studio Audio and Video presentation
Page 13 of 28
Figure 18 - The Open dialogue box showing selected screen shot image files
ready for import
8. Click Open. The files are imported into the Clip Bin. Figure 19 shows how
this is displayed in Camtasia Studio.
Figure 19 - Imported screen shot image file and audio files
shown in the Clip Bin
Converting a PowerPoint presentation into a Camtasia Studio Audio and Video presentation
Page 14 of 28
9. Save the Camtasia Studio project.
Managing items in the Clip Bin
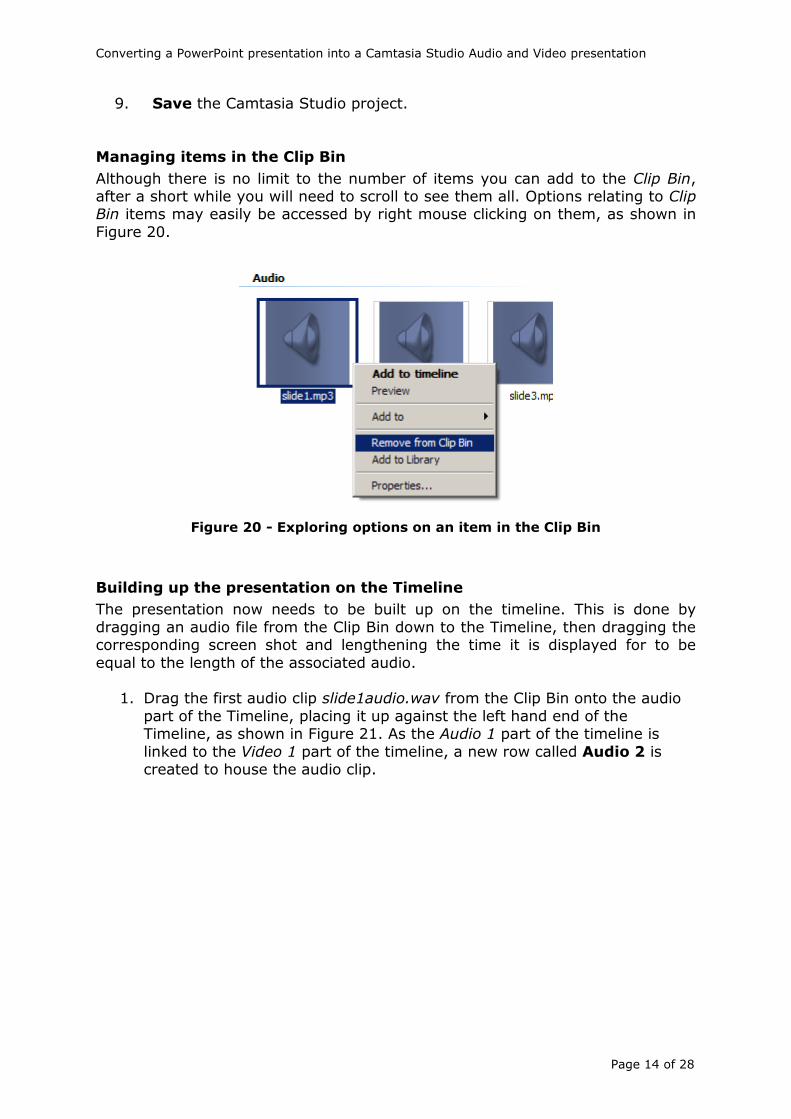
Although there is no limit to the number of items you can add to the Clip Bin, after a short while you will need to scroll to see them all. Options relating to Clip Bin items may easily be accessed by right mouse clicking on them, as shown in
Figure 20.
Figure 20 - Exploring options on an item in the Clip Bin
Building up the presentation on the Timeline
The presentation now needs to be built up on the timeline. This is done by
dragging an audio file from the Clip Bin down to the Timeline, then dragging the corresponding screen shot and lengthening the time it is displayed for to be
equal to the length of the associated audio.
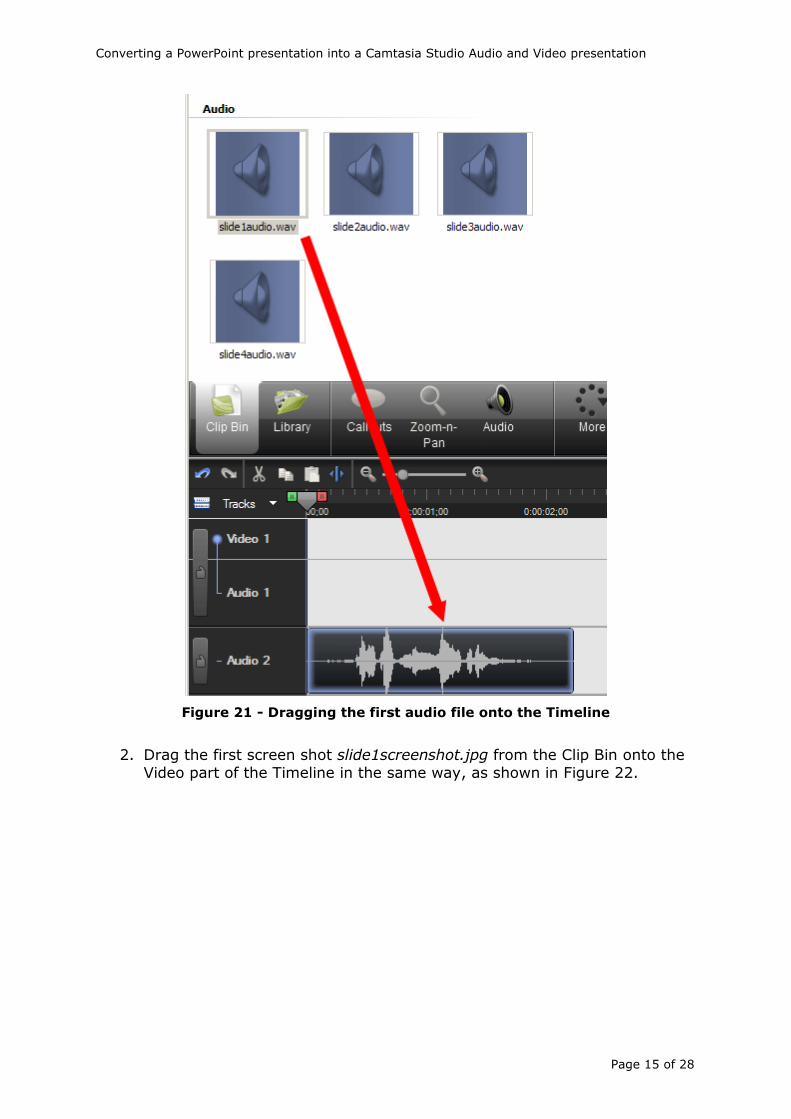
1. Drag the first audio clip slide1audio.wav from the Clip Bin onto the audio
part of the Timeline, placing it up against the left hand end of the Timeline, as shown in Figure 21. As the Audio 1 part of the timeline is
linked to the Video 1 part of the timeline, a new row called Audio 2 is created to house the audio clip.
Converting a PowerPoint presentation into a Camtasia Studio Audio and Video presentation
Page 15 of 28
Figure 21 - Dragging the first audio file onto the Timeline
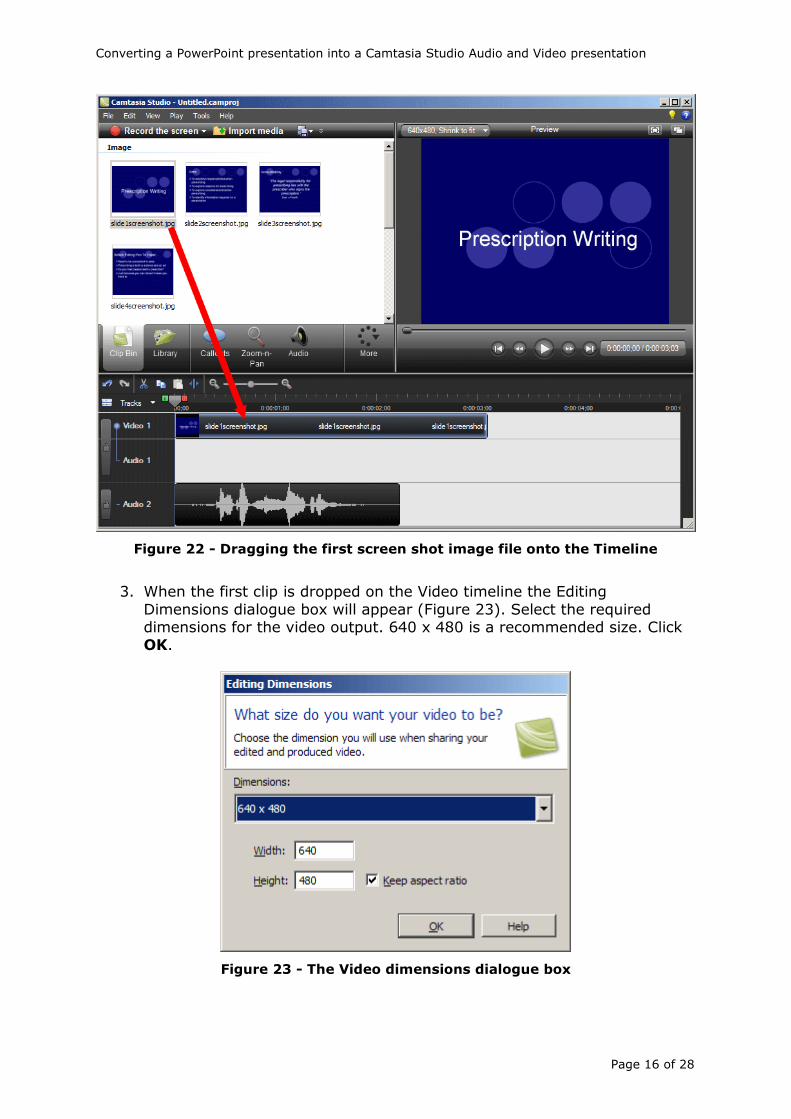
2. Drag the first screen shot slide1screenshot.jpg from the Clip Bin onto the
Video part of the Timeline in the same way, as shown in Figure 22.
Converting a PowerPoint presentation into a Camtasia Studio Audio and Video presentation
Page 16 of 28
Figure 22 - Dragging the first screen shot image file onto the Timeline
3. When the first clip is dropped on the Video timeline the Editing
Dimensions dialogue box will appear (Figure 23). Select the required dimensions for the video output. 640 x 480 is a recommended size. Click OK.
Figure 23 - The Video dimensions dialogue box
Converting a PowerPoint presentation into a Camtasia Studio Audio and Video presentation
Page 17 of 28
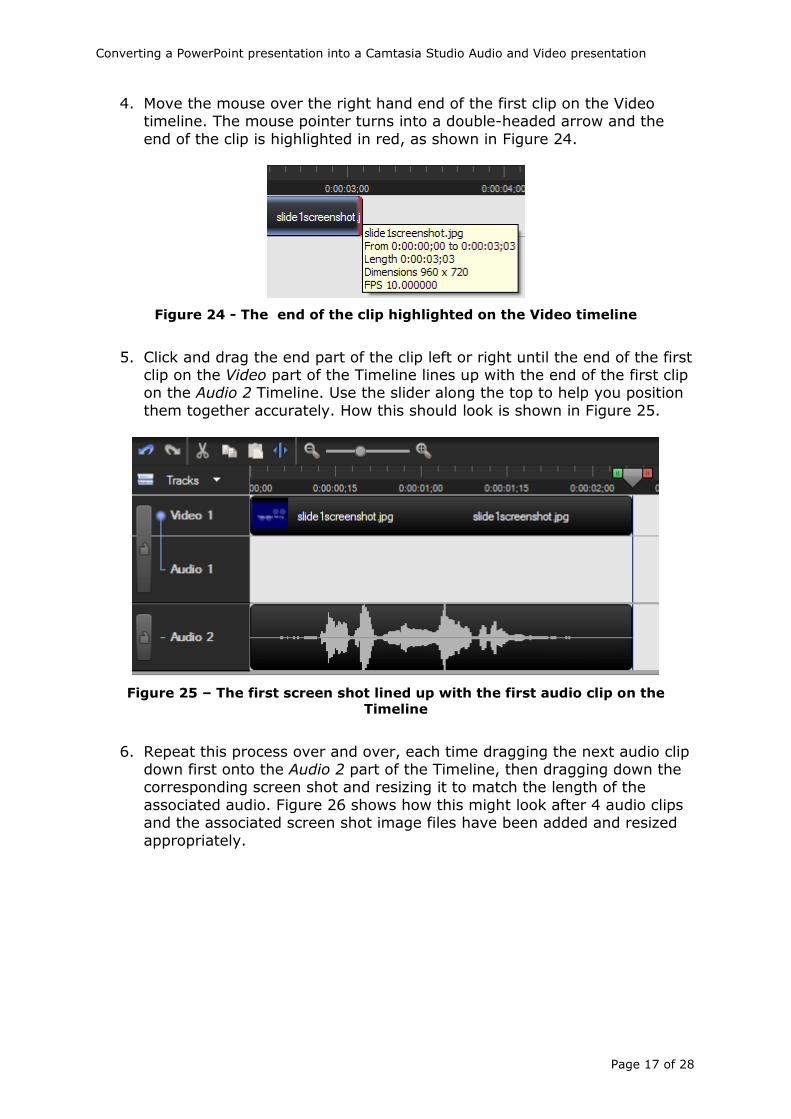
4. Move the mouse over the right hand end of the first clip on the Video timeline. The mouse pointer turns into a double-headed arrow and the
end of the clip is highlighted in red, as shown in Figure 24.
Figure 24 - The end of the clip highlighted on the Video timeline
5. Click and drag the end part of the clip left or right until the end of the first clip on the Video part of the Timeline lines up with the end of the first clip on the Audio 2 Timeline. Use the slider along the top to help you position
them together accurately. How this should look is shown in Figure 25.
Figure 25 – The first screen shot lined up with the first audio clip on the
Timeline
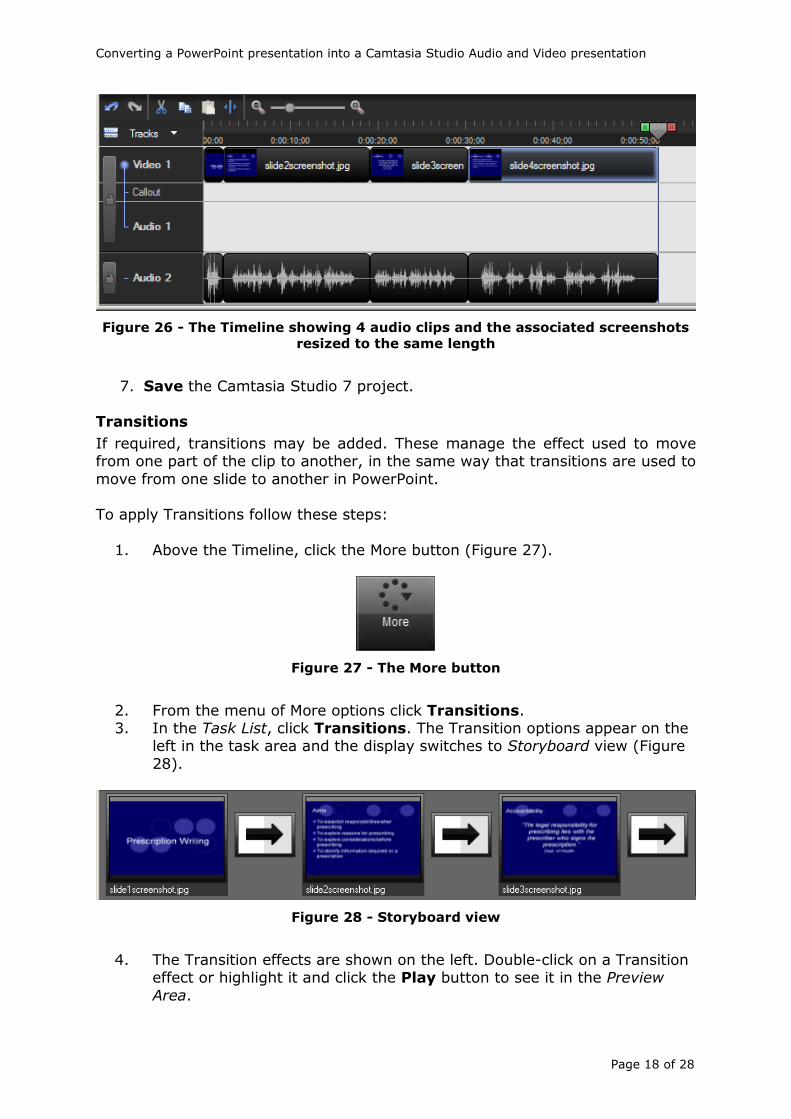
6. Repeat this process over and over, each time dragging the next audio clip down first onto the Audio 2 part of the Timeline, then dragging down the corresponding screen shot and resizing it to match the length of the
associated audio. Figure 26 shows how this might look after 4 audio clips and the associated screen shot image files have been added and resized
appropriately.
Converting a PowerPoint presentation into a Camtasia Studio Audio and Video presentation
Page 18 of 28
Figure 26 - The Timeline showing 4 audio clips and the associated screenshots
resized to the same length
7. Save the Camtasia Studio 7 project. Transitions
If required, transitions may be added. These manage the effect used to move from one part of the clip to another, in the same way that transitions are used to
move from one slide to another in PowerPoint. To apply Transitions follow these steps:
1. Above the Timeline, click the More button (Figure 27).
Figure 27 - The More button
2. From the menu of More options click Transitions. 3. In the Task List, click Transitions. The Transition options appear on the
left in the task area and the display switches to Storyboard view (Figure
28).
Figure 28 - Storyboard view
4. The Transition effects are shown on the left. Double-click on a Transition effect or highlight it and click the Play button to see it in the Preview
Area.
Converting a PowerPoint presentation into a Camtasia Studio Audio and Video presentation
Page 19 of 28
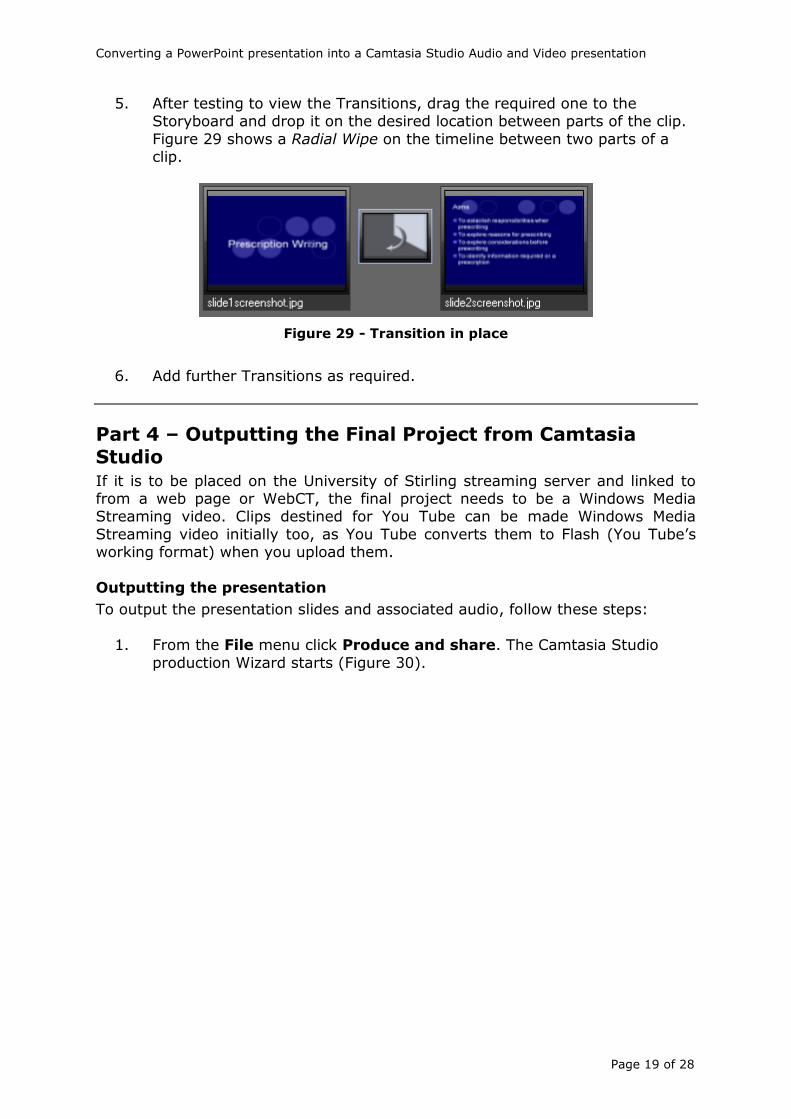
5. After testing to view the Transitions, drag the required one to the Storyboard and drop it on the desired location between parts of the clip.
Figure 29 shows a Radial Wipe on the timeline between two parts of a clip.
Figure 29 - Transition in place
6. Add further Transitions as required.
Part 4 – Outputting the Final Project from Camtasia Studio If it is to be placed on the University of Stirling streaming server and linked to from a web page or WebCT, the final project needs to be a Windows Media Streaming video. Clips destined for You Tube can be made Windows Media
Streaming video initially too, as You Tube converts them to Flash (You Tube’s working format) when you upload them.
Outputting the presentation
To output the presentation slides and associated audio, follow these steps:
1. From the File menu click Produce and share. The Camtasia Studio
production Wizard starts (Figure 30).

Converting a PowerPoint presentation into a Camtasia Studio Audio and Video presentation
Page 20 of 28
Figure 30 - Production Wizard - Step 1
2. The default option here should be Web if the dimensions of 640 x 480 were
selected when the first video clip was dragged onto the Timeline earlier. Use the
pull down to select Custom production settings and then click Next.
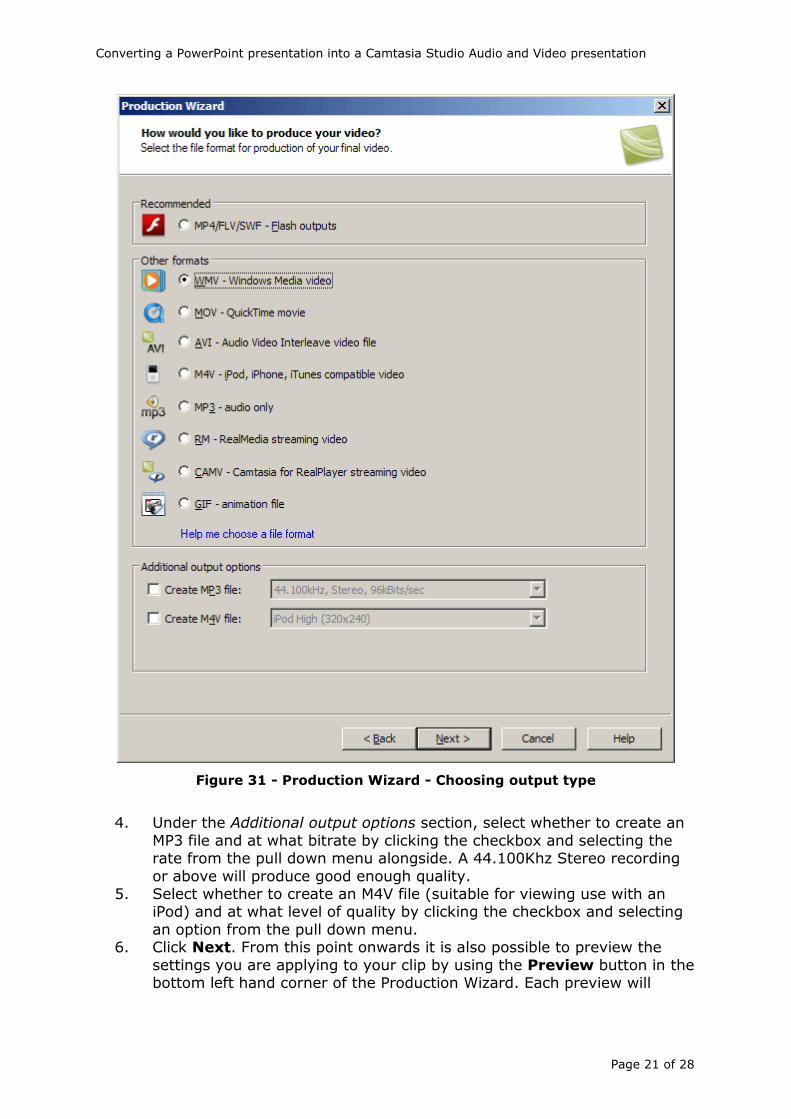
3. In step 2 of the production wizard, select WMV – Windows Media video, as shown in Figure 31.
Converting a PowerPoint presentation into a Camtasia Studio Audio and Video presentation
Page 21 of 28
Figure 31 - Production Wizard - Choosing output type
4. Under the Additional output options section, select whether to create an
MP3 file and at what bitrate by clicking the checkbox and selecting the rate from the pull down menu alongside. A 44.100Khz Stereo recording
or above will produce good enough quality. 5. Select whether to create an M4V file (suitable for viewing use with an
iPod) and at what level of quality by clicking the checkbox and selecting
an option from the pull down menu. 6. Click Next. From this point onwards it is also possible to preview the
settings you are applying to your clip by using the Preview button in the bottom left hand corner of the Production Wizard. Each preview will
Converting a PowerPoint presentation into a Camtasia Studio Audio and Video presentation
Page 22 of 28
require the clip to be compiled and so may take a couple of minutes to be produced.
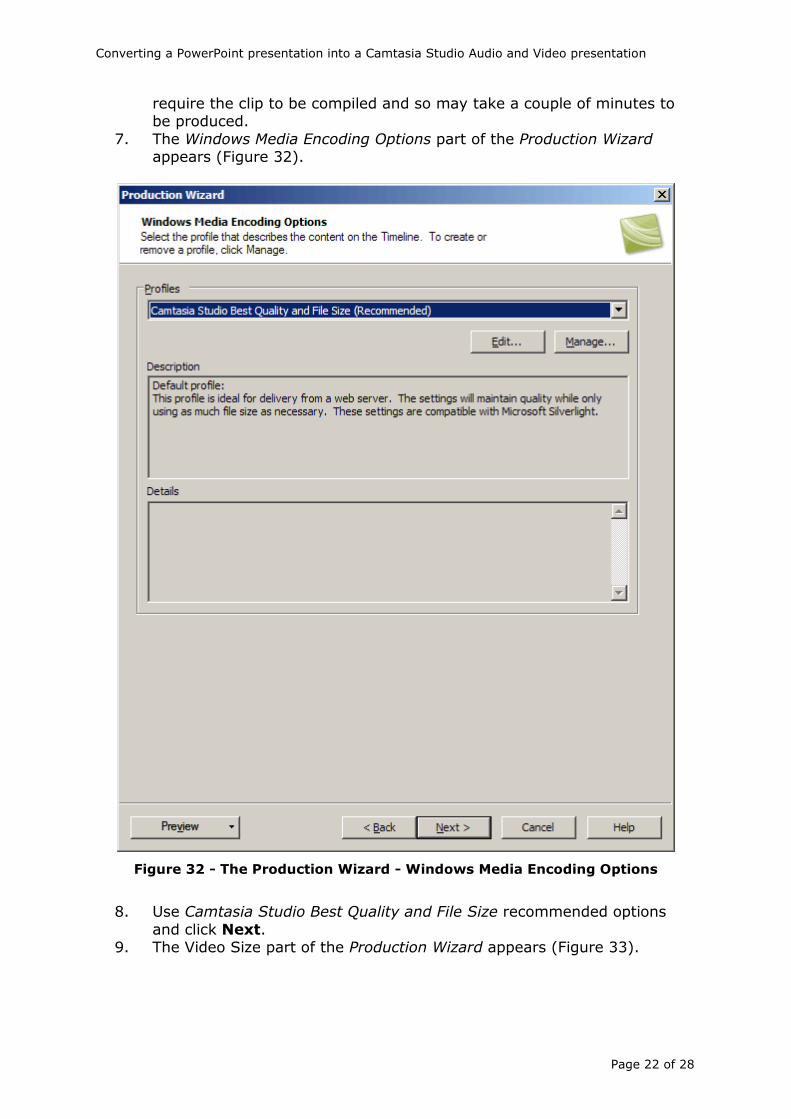
7. The Windows Media Encoding Options part of the Production Wizard appears (Figure 32).
Figure 32 - The Production Wizard - Windows Media Encoding Options
8. Use Camtasia Studio Best Quality and File Size recommended options
and click Next. 9. The Video Size part of the Production Wizard appears (Figure 33).
Converting a PowerPoint presentation into a Camtasia Studio Audio and Video presentation
Page 23 of 28
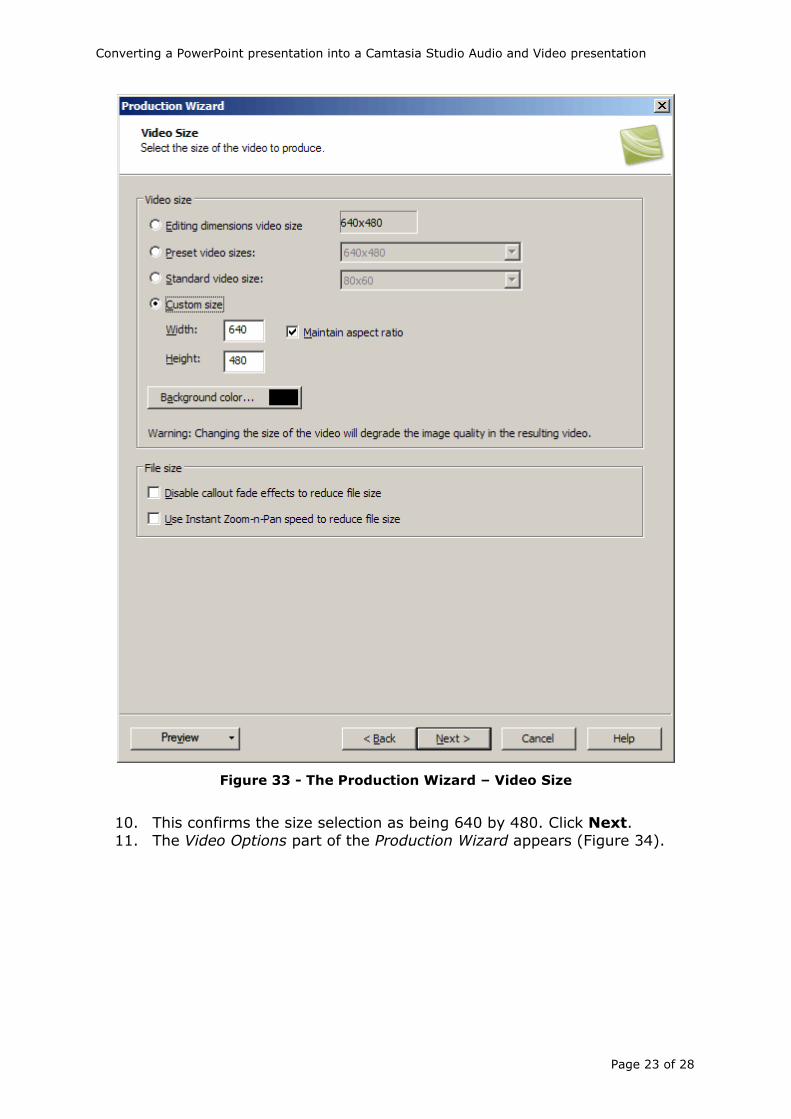
Figure 33 - The Production Wizard – Video Size
10. This confirms the size selection as being 640 by 480. Click Next.
11. The Video Options part of the Production Wizard appears (Figure 34).
Converting a PowerPoint presentation into a Camtasia Studio Audio and Video presentation
Page 24 of 28
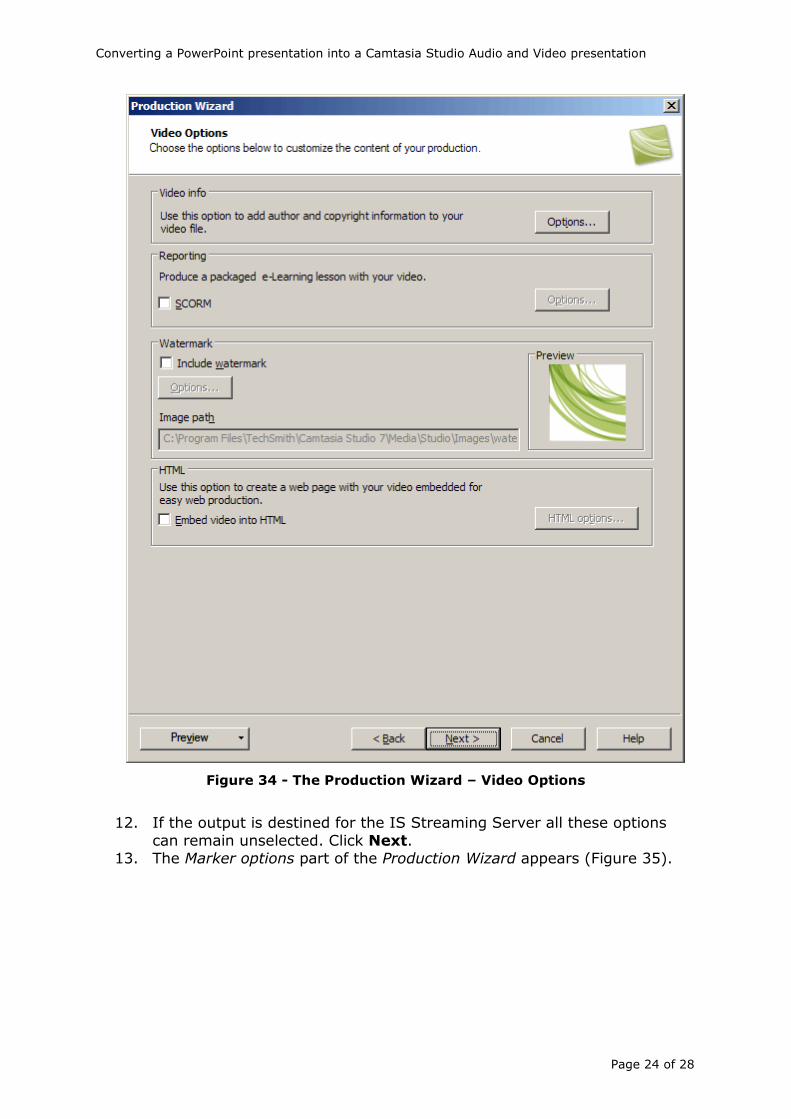
Figure 34 - The Production Wizard – Video Options
12. If the output is destined for the IS Streaming Server all these options
can remain unselected. Click Next. 13. The Marker options part of the Production Wizard appears (Figure 35).
Converting a PowerPoint presentation into a Camtasia Studio Audio and Video presentation
Page 25 of 28
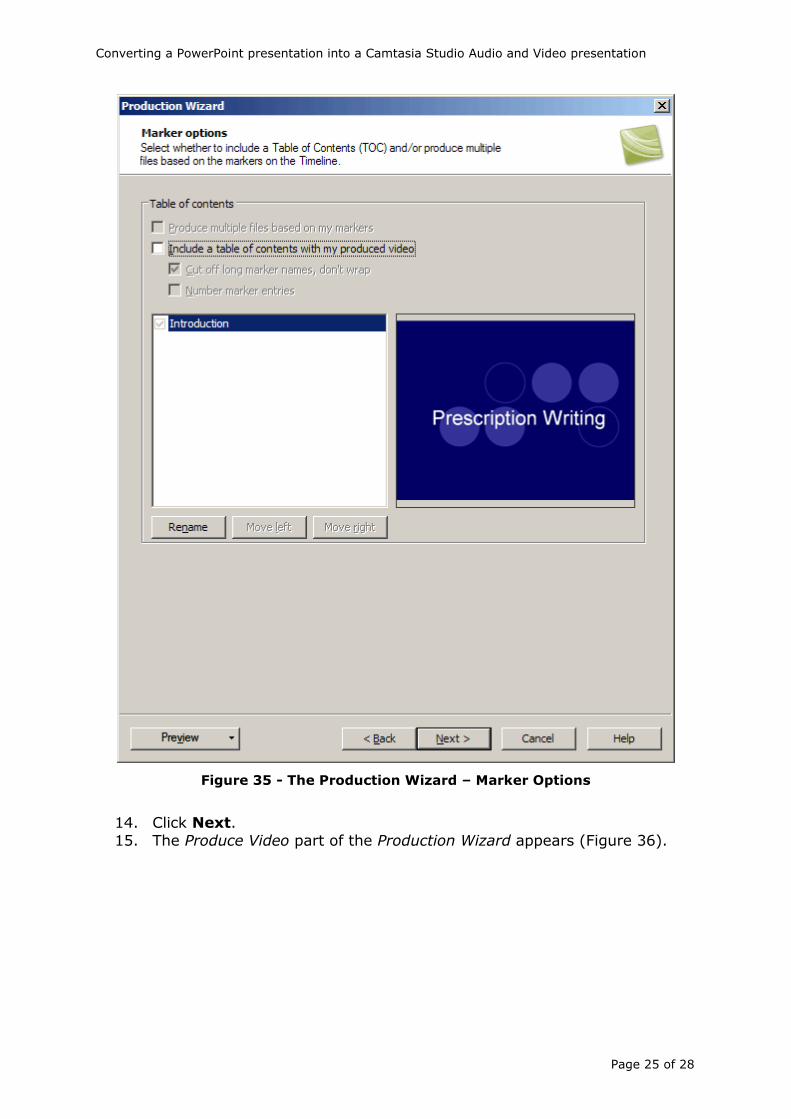
Figure 35 - The Production Wizard – Marker Options
14. Click Next.
15. The Produce Video part of the Production Wizard appears (Figure 36).
Converting a PowerPoint presentation into a Camtasia Studio Audio and Video presentation
Page 26 of 28
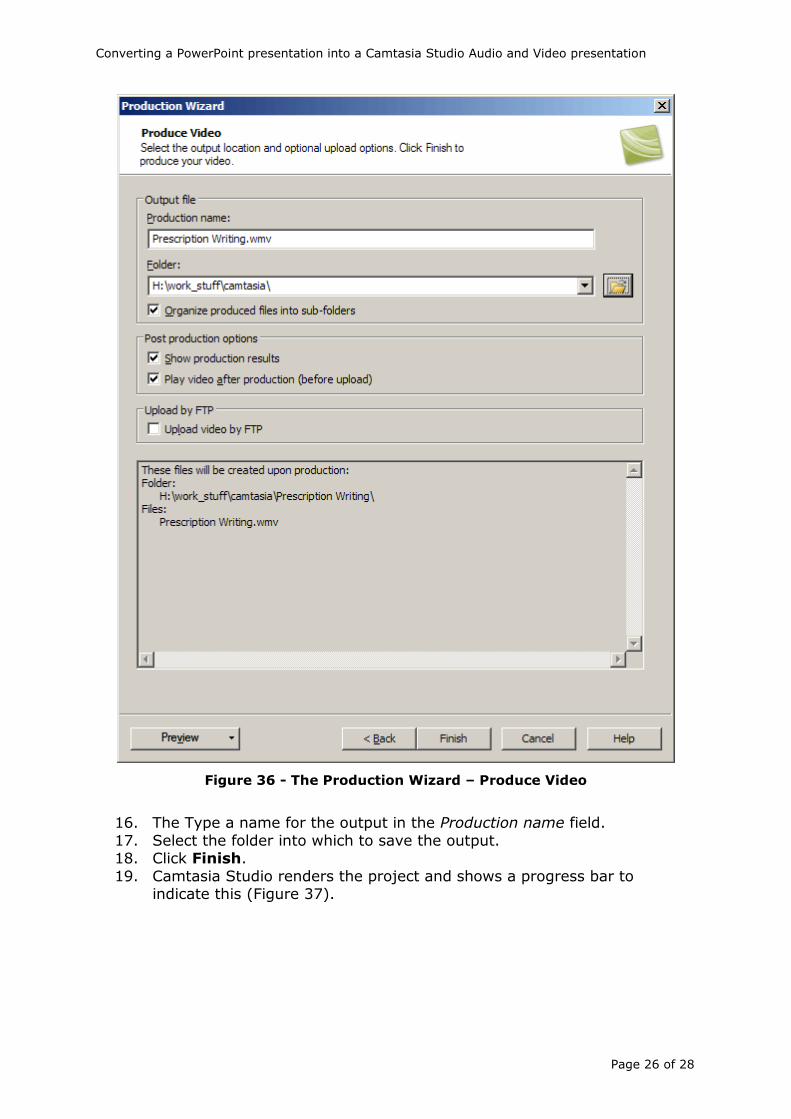
Figure 36 - The Production Wizard – Produce Video
16. The Type a name for the output in the Production name field.
17. Select the folder into which to save the output. 18. Click Finish.
19. Camtasia Studio renders the project and shows a progress bar to indicate this (Figure 37).
Converting a PowerPoint presentation into a Camtasia Studio Audio and Video presentation
Page 27 of 28
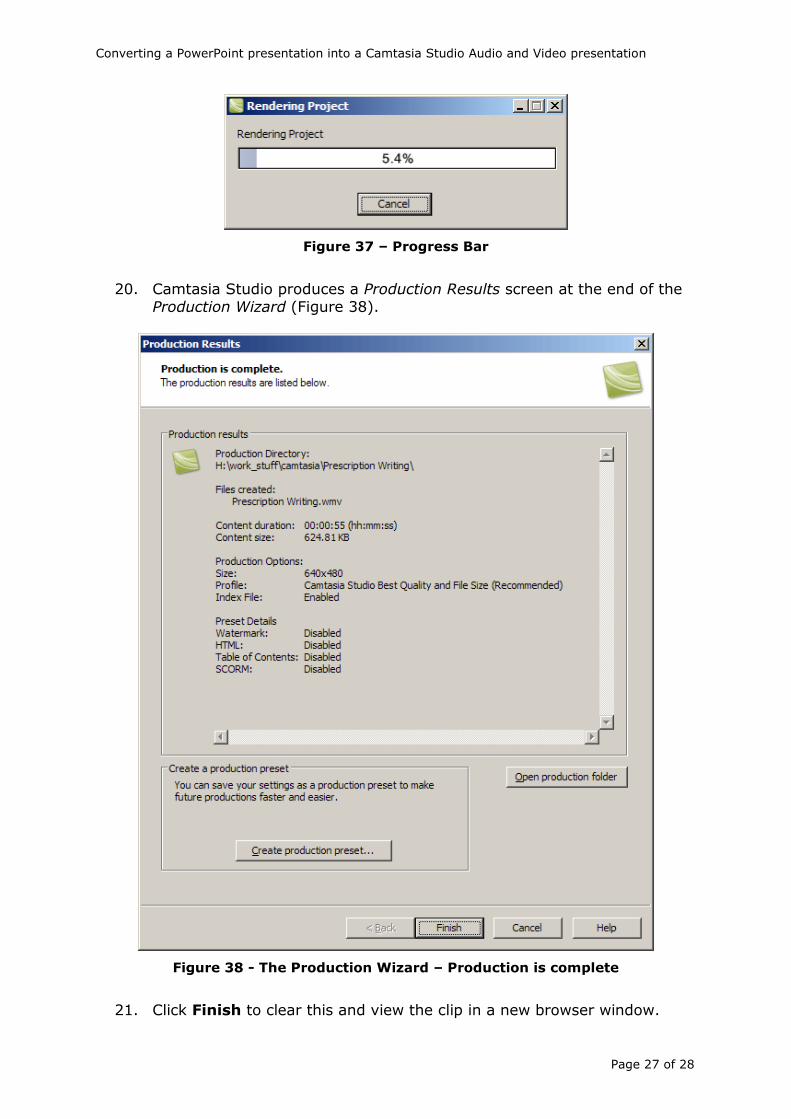
Figure 37 – Progress Bar
20. Camtasia Studio produces a Production Results screen at the end of the Production Wizard (Figure 38).
Figure 38 - The Production Wizard – Production is complete
21. Click Finish to clear this and view the clip in a new browser window.
Converting a PowerPoint presentation into a Camtasia Studio Audio and Video presentation
Page 28 of 28
Part 5 - Transferring the clip to the Streaming Server
Please contact a member of the e-Learning Liaison and Development team in IS to get your output file, a .wmv file, moved onto the Streaming Server. You will
then be emailed a URL which points to the file. This will be of the following format:
mms://video.stir.ac.uk/media/<folder name>/<filename>.wmv
…where <folder name> is the name of the folder in which the file is stored (usually corresponding to the department or module concerned - there may be several folders inside each other in the directory structure) and <filename> is
the name of the file.
This URL may then be used to link to the file on the web. Use the Web Link tool in WebCT to link from a WebCT module. Steve Boulton
Academic Liaison and Development Information Services June 2010


![Camtasia Studio [.pdf]](https://img.pdfslide.net/doc/110x75/58a2fc2b1a28ab722c8bac6b/camtasia-studio-pdf.jpg)