Embed Size (px)
Citation preview
T F W
6 0 4 . 5 4 9 . 9 3 7 96 0 4 . 5 4 9 . 9 5 5 5f l u x w e r x . c o m
All rights reserved. © 2013 | Fluxwerx Illumination Inc.
Fluxwerx Illumination Inc.1364 Cliveden Avenue Delta BC V3M 6K2 Canada
USING FLUXWERX REVIT MODELS IN PROJECTS
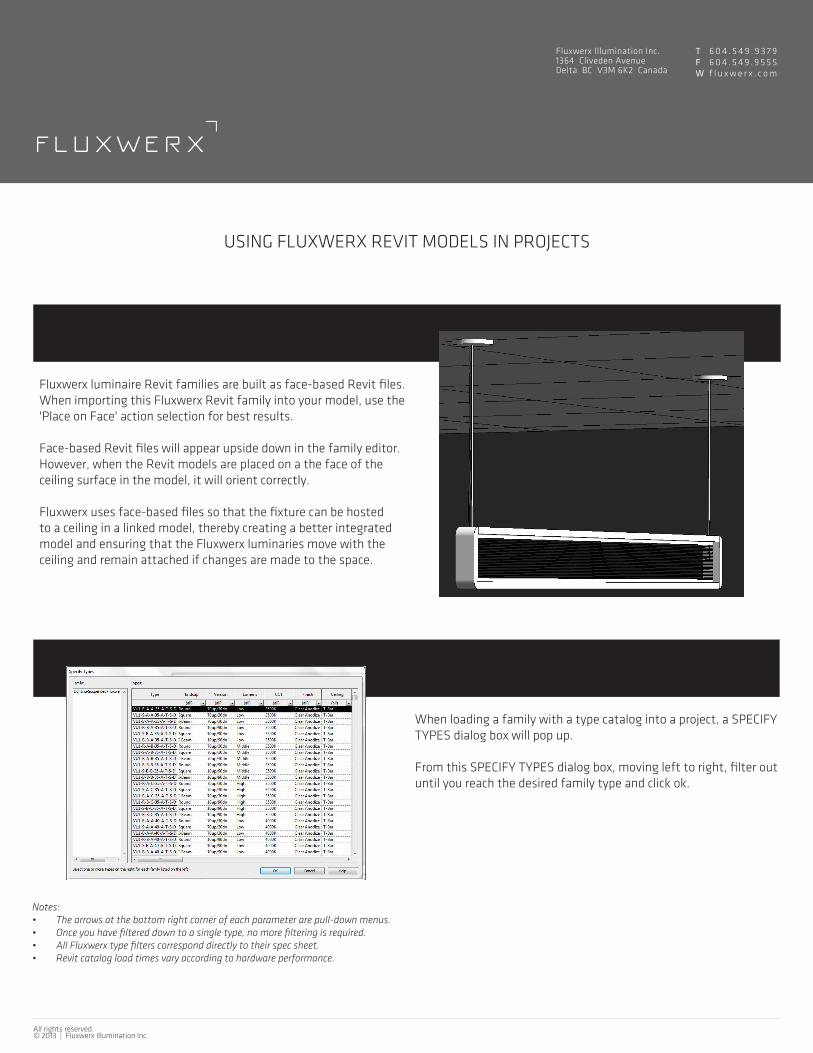
Fluxwerx luminaire Revit families are built as face-based Revit files. When importing this Fluxwerx Revit family into your model, use the 'Place on Face' action selection for best results.
Face-based Revit files will appear upside down in the family editor. However, when the Revit models are placed on a the face of the ceiling surface in the model, it will orient correctly.
Fluxwerx uses face-based files so that the fixture can be hosted to a ceiling in a linked model, thereby creating a better integrated model and ensuring that the Fluxwerx luminaries move with the ceiling and remain attached if changes are made to the space.
STEP 1Importing Face-Based Revit Families
When loading a family with a type catalog into a project, a SPECIFY TYPES dialog box will pop up.
From this SPECIFY TYPES dialog box, moving left to right, filter out until you reach the desired family type and click ok.
STEP 2Loading Families with Type Catalogs
Notes:• Thearrowsatthebottomrightcornerofeachparameterarepull-downmenus.• Onceyouhavefiltereddowntoasingletype,nomorefilteringisrequired.• AllFluxwerxtypefilterscorresponddirectlytotheirspecsheet.• Revitcatalogloadtimesvaryaccordingtohardwareperformance.

All rights reserved. © 2013 | Fluxwerx Illumination Inc.
By loading the type catalog and choosing your ceiling option, the visibilities of the different ceiling options will automatically load into your project. (check boxes determine visibility).
However, there are several options that can be further chosen, in-cluding the orientations of the drivers above the ceiling in the T-Bar and Drywall versions. To turn these visibilities on and off, select the fixture, EDIT TYPE and check the desired box.
STEP 3Choosing Ceiling Options
Because the End Cap and Power Cord visibilities are instance pa-rameters, they cannot be chosen by the Type Catalog.
To choose which end cap you want shown in the model or choose whether the power cord is visible on a particular fixture, select the fixture and check the desired box under the GRAPHICS category.
STEP 4Editing End Cap & Power Cord Graphic Visibilities
Once placed in a project, select an instance and go to its element properties. Click on the EDIT TYPE button.
Click the ellipses button under IES FILE LINK to navigate to your browser. From your browser, save the photometric file from the FLUXWERX website to the default photometric web file folder.
Link the IES file that was downloaded by clicking the Photometric Web File link and selecting the correct IES file from the folder.
STEP 5Associating IES Files to a fixture family