Embed Size (px)
DESCRIPTION
Citation preview
1
2
PLATFORM INTRODUCTIONS HOME, BROADCASTER, PRO BASIC, and PRO FULL
3 3
INTERFACES – ZONES BROWSER FILE SYSTEM / FOLDER STRUCTURE FILE / SEARCH RESULTS
4 4 5 7
AUDIO AND VIDEO TAG SUPPORT 9 GLOBAL SEARCH 13 SEARCHING 14 NETSEARCH 16 TRACK OPTIONS 16 BPM ANALYSIS AND KEY DETECTION 17 COMPUTER BEAT GRID (CBG) AND MANUAL BPM CORRECTION 17 PLAYLIST AND AUTOMIX 19 EDITING AUTOMIX MIX POINTS 22 SIDELIST 23 FILE SYSTEM / FOLDER STRUCTURE ORGANIZATION
FAVORITE FOLDERS VIRTUAL FOLDERS FILTER FOLDERS
24 24 24 25
NESTING FOLDERS WITH VIRTUAL FOLDERS 26 DECK CONTROLS 28 MULTI-DECK CONTROLS 31 INTERNAL MIXER CONTROLS 33 MULTI-DECK INTERNAL MIXER CONTROLS 34 TOOLBAR CONTROLS 35 RHYTHM WINDOW 36 CONFIGURATION SETTINGS
SOUND SETUP OPTIONS PERFORMANCES MAPPERS SKINS INTERNET CODECS VIDEO INFO
37 37 38 41 43 47 48 49 50 51
SAMPLER 52 EFFECTS (AUDIO) 54 VIDEO (FEATURES,TRANSITIONS, EFFECTS) 55 KARAOKE and ROTATION LIST MANAGER – pc version only 57 RECORDING AND BROADCASTING 59 LEGAL INFORMATION (End User License Agreement EULA) 63
TABLE OF CONTENTS
3
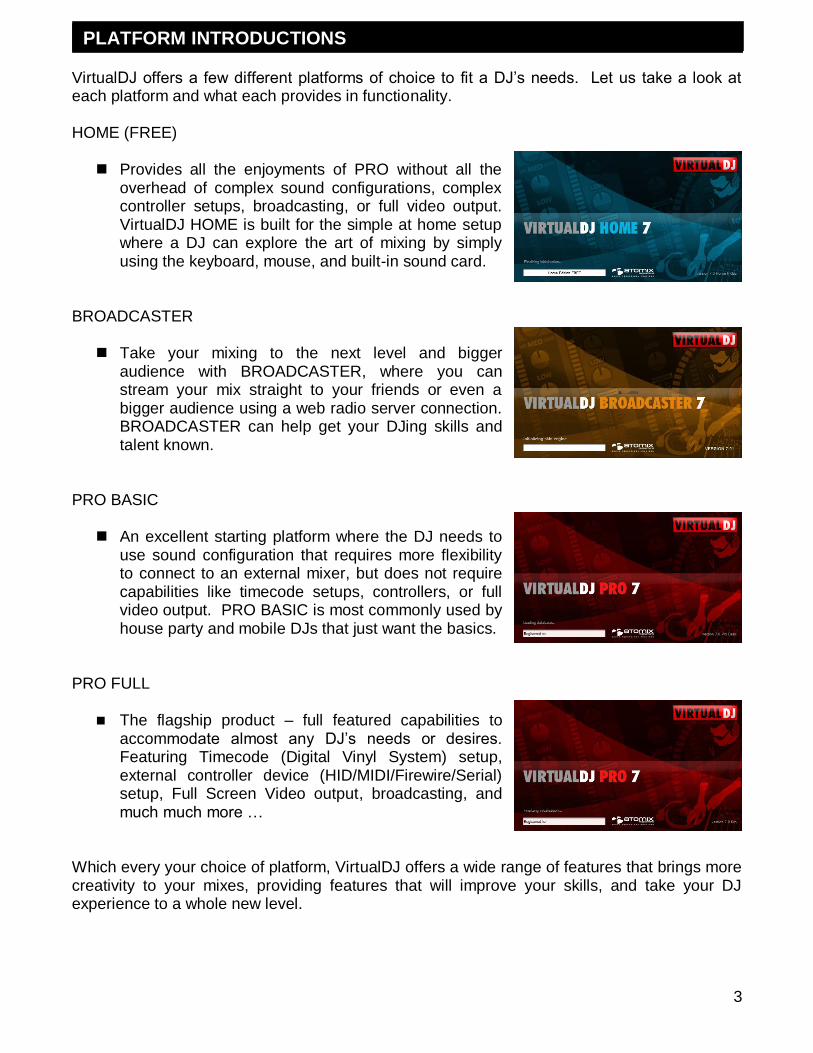
VirtualDJ offers a few different platforms of choice to fit a DJ‘s needs. Let us take a look at each platform and what each provides in functionality. HOME (FREE)
Provides all the enjoyments of PRO without all the overhead of complex sound configurations, complex controller setups, broadcasting, or full video output. VirtualDJ HOME is built for the simple at home setup where a DJ can explore the art of mixing by simply using the keyboard, mouse, and built-in sound card.
BROADCASTER
Take your mixing to the next level and bigger audience with BROADCASTER, where you can stream your mix straight to your friends or even a bigger audience using a web radio server connection. BROADCASTER can help get your DJing skills and talent known.
PRO BASIC
An excellent starting platform where the DJ needs to use sound configuration that requires more flexibility to connect to an external mixer, but does not require capabilities like timecode setups, controllers, or full video output. PRO BASIC is most commonly used by house party and mobile DJs that just want the basics.
PRO FULL
The flagship product – full featured capabilities to accommodate almost any DJ‘s needs or desires. Featuring Timecode (Digital Vinyl System) setup, external controller device (HID/MIDI/Firewire/Serial) setup, Full Screen Video output, broadcasting, and much much more …
Which every your choice of platform, VirtualDJ offers a wide range of features that brings more creativity to your mixes, providing features that will improve your skills, and take your DJ experience to a whole new level.
INTRODUCTION PLATFORM INTRODUCTIONS
4
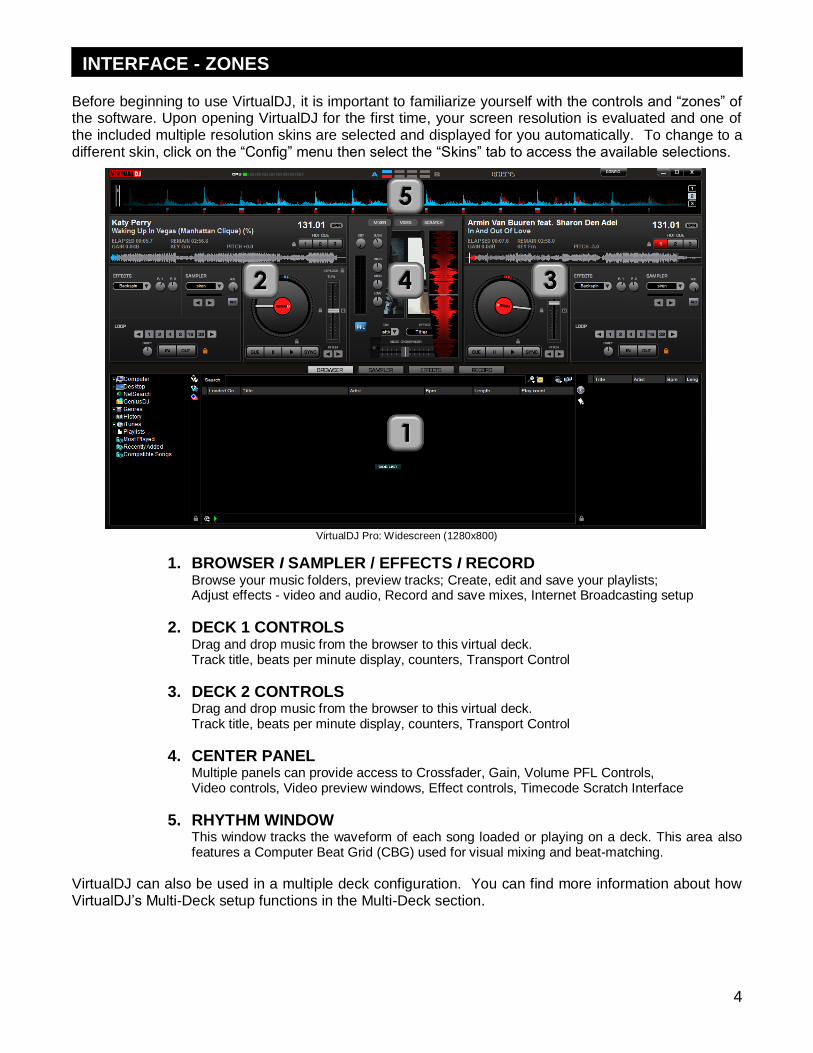
Before beginning to use VirtualDJ, it is important to familiarize yourself with the controls and ―zones‖ of the software. Upon opening VirtualDJ for the first time, your screen resolution is evaluated and one of the included multiple resolution skins are selected and displayed for you automatically. To change to a different skin, click on the ―Config‖ menu then select the ―Skins‖ tab to access the available selections.
VirtualDJ Pro: Widescreen (1280x800)
1. BROWSER I SAMPLER / EFFECTS I RECORD Browse your music folders, preview tracks; Create, edit and save your playlists; Adjust effects - video and audio, Record and save mixes, Internet Broadcasting setup
2. DECK 1 CONTROLS Drag and drop music from the browser to this virtual deck. Track title, beats per minute display, counters, Transport Control
3. DECK 2 CONTROLS Drag and drop music from the browser to this virtual deck. Track title, beats per minute display, counters, Transport Control
4. CENTER PANEL Multiple panels can provide access to Crossfader, Gain, Volume PFL Controls, Video controls, Video preview windows, Effect controls, Timecode Scratch Interface
5. RHYTHM WINDOW This window tracks the waveform of each song loaded or playing on a deck. This area also features a Computer Beat Grid (CBG) used for visual mixing and beat-matching.
VirtualDJ can also be used in a multiple deck configuration. You can find more information about how VirtualDJ‘s Multi-Deck setup functions in the Multi-Deck section.
INTERFACE - ZONES
5
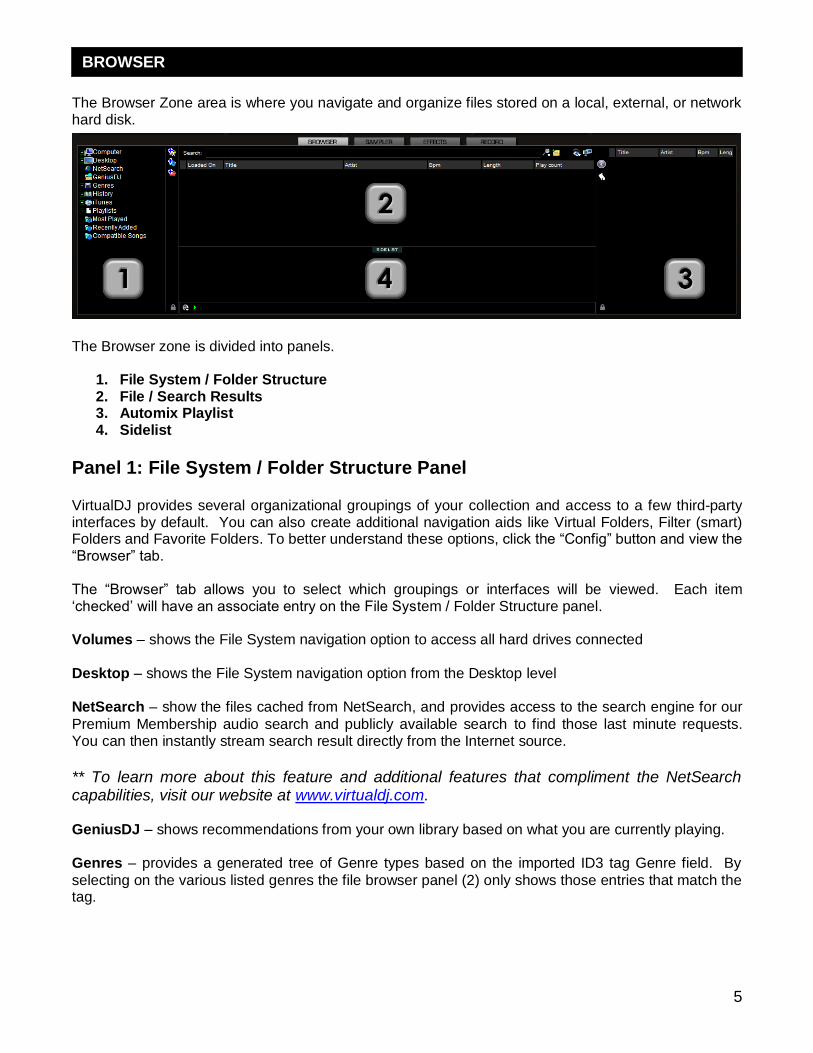
The Browser Zone area is where you navigate and organize files stored on a local, external, or network hard disk.
The Browser zone is divided into panels.
1. File System / Folder Structure 2. File / Search Results 3. Automix Playlist 4. Sidelist
Panel 1: File System / Folder Structure Panel VirtualDJ provides several organizational groupings of your collection and access to a few third-party interfaces by default. You can also create additional navigation aids like Virtual Folders, Filter (smart) Folders and Favorite Folders. To better understand these options, click the ―Config‖ button and view the ―Browser‖ tab. The ―Browser‖ tab allows you to select which groupings or interfaces will be viewed. Each item ‗checked‘ will have an associate entry on the File System / Folder Structure panel. Volumes – shows the File System navigation option to access all hard drives connected
Desktop – shows the File System navigation option from the Desktop level
NetSearch – show the files cached from NetSearch, and provides access to the search engine for our
Premium Membership audio search and publicly available search to find those last minute requests. You can then instantly stream search result directly from the Internet source.
** To learn more about this feature and additional features that compliment the NetSearch capabilities, visit our website at www.virtualdj.com. GeniusDJ – shows recommendations from your own library based on what you are currently playing. Genres – provides a generated tree of Genre types based on the imported ID3 tag Genre field. By
selecting on the various listed genres the file browser panel (2) only shows those entries that match the tag.
BROWSER
6
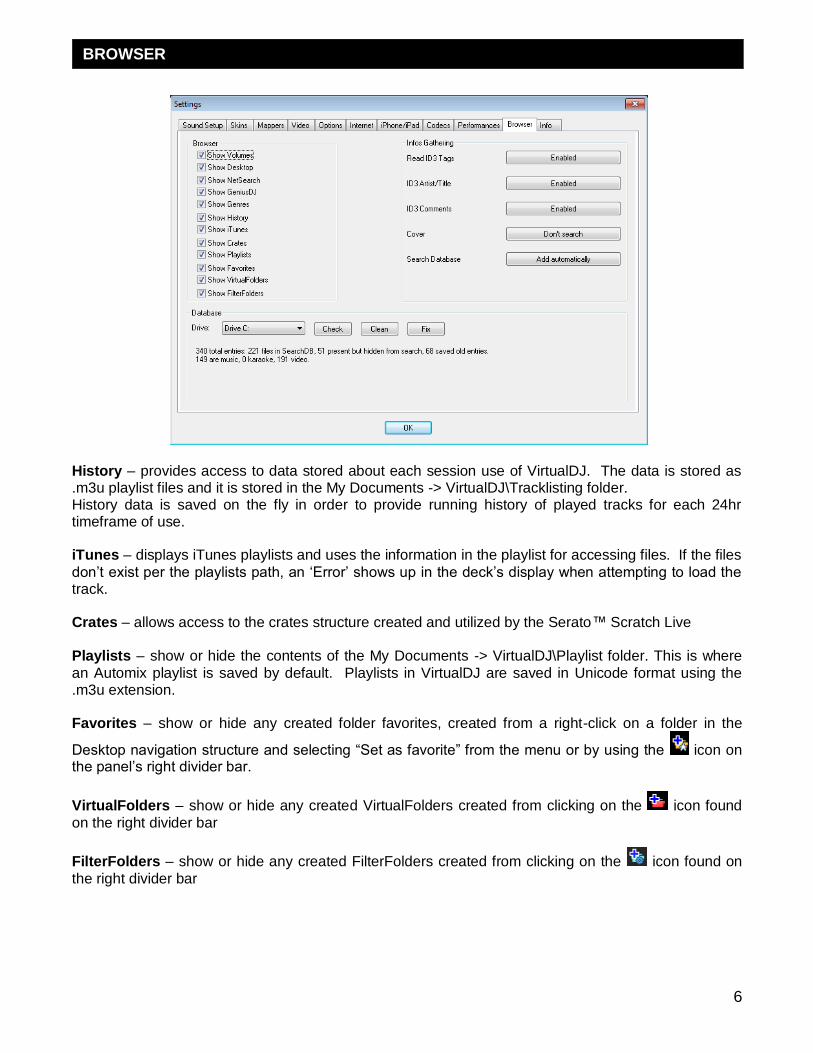
History – provides access to data stored about each session use of VirtualDJ. The data is stored as .m3u playlist files and it is stored in the My Documents -> VirtualDJ\Tracklisting folder. History data is saved on the fly in order to provide running history of played tracks for each 24hr timeframe of use. iTunes – displays iTunes playlists and uses the information in the playlist for accessing files. If the files
don‘t exist per the playlists path, an ‗Error‘ shows up in the deck‘s display when attempting to load the track. Crates – allows access to the crates structure created and utilized by the Serato™ Scratch Live
Playlists – show or hide the contents of the My Documents -> VirtualDJ\Playlist folder. This is where
an Automix playlist is saved by default. Playlists in VirtualDJ are saved in Unicode format using the .m3u extension. Favorites – show or hide any created folder favorites, created from a right-click on a folder in the
Desktop navigation structure and selecting ―Set as favorite‖ from the menu or by using the icon on the panel‘s right divider bar.
VirtualFolders – show or hide any created VirtualFolders created from clicking on the icon found
on the right divider bar
FilterFolders – show or hide any created FilterFolders created from clicking on the icon found on
the right divider bar
BROWSER
7
Panel 2: File / Search Results
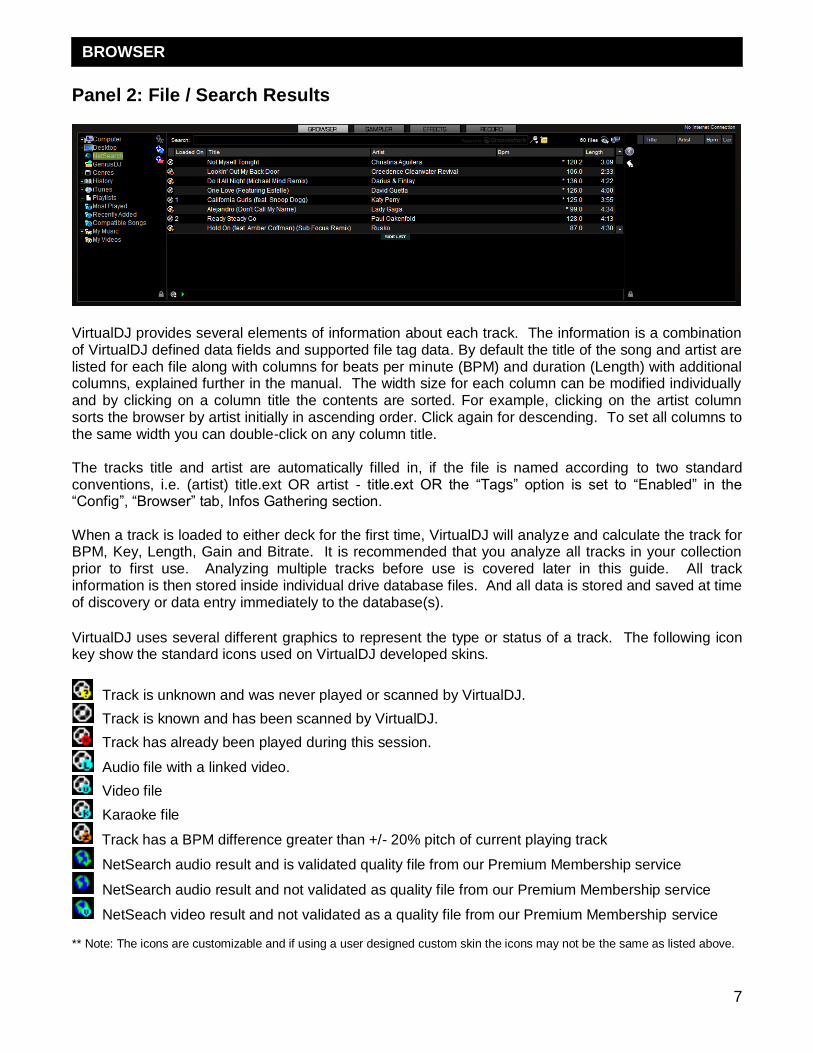
VirtualDJ provides several elements of information about each track. The information is a combination of VirtualDJ defined data fields and supported file tag data. By default the title of the song and artist are listed for each file along with columns for beats per minute (BPM) and duration (Length) with additional columns, explained further in the manual. The width size for each column can be modified individually and by clicking on a column title the contents are sorted. For example, clicking on the artist column sorts the browser by artist initially in ascending order. Click again for descending. To set all columns to the same width you can double-click on any column title. The tracks title and artist are automatically filled in, if the file is named according to two standard conventions, i.e. (artist) title.ext OR artist - title.ext OR the ―Tags‖ option is set to ―Enabled‖ in the ―Config‖, ―Browser‖ tab, Infos Gathering section. When a track is loaded to either deck for the first time, VirtualDJ will analyze and calculate the track for BPM, Key, Length, Gain and Bitrate. It is recommended that you analyze all tracks in your collection prior to first use. Analyzing multiple tracks before use is covered later in this guide. All track information is then stored inside individual drive database files. And all data is stored and saved at time of discovery or data entry immediately to the database(s).
VirtualDJ uses several different graphics to represent the type or status of a track. The following icon key show the standard icons used on VirtualDJ developed skins.
Track is unknown and was never played or scanned by VirtualDJ.
Track is known and has been scanned by VirtualDJ.
Track has already been played during this session.
Audio file with a linked video.
Video file
Karaoke file
Track has a BPM difference greater than +/- 20% pitch of current playing track
NetSearch audio result and is validated quality file from our Premium Membership service
NetSearch audio result and not validated as quality file from our Premium Membership service
NetSeach video result and not validated as a quality file from our Premium Membership service ** Note: The icons are customizable and if using a user designed custom skin the icons may not be the same as listed above.
BROWSER
8
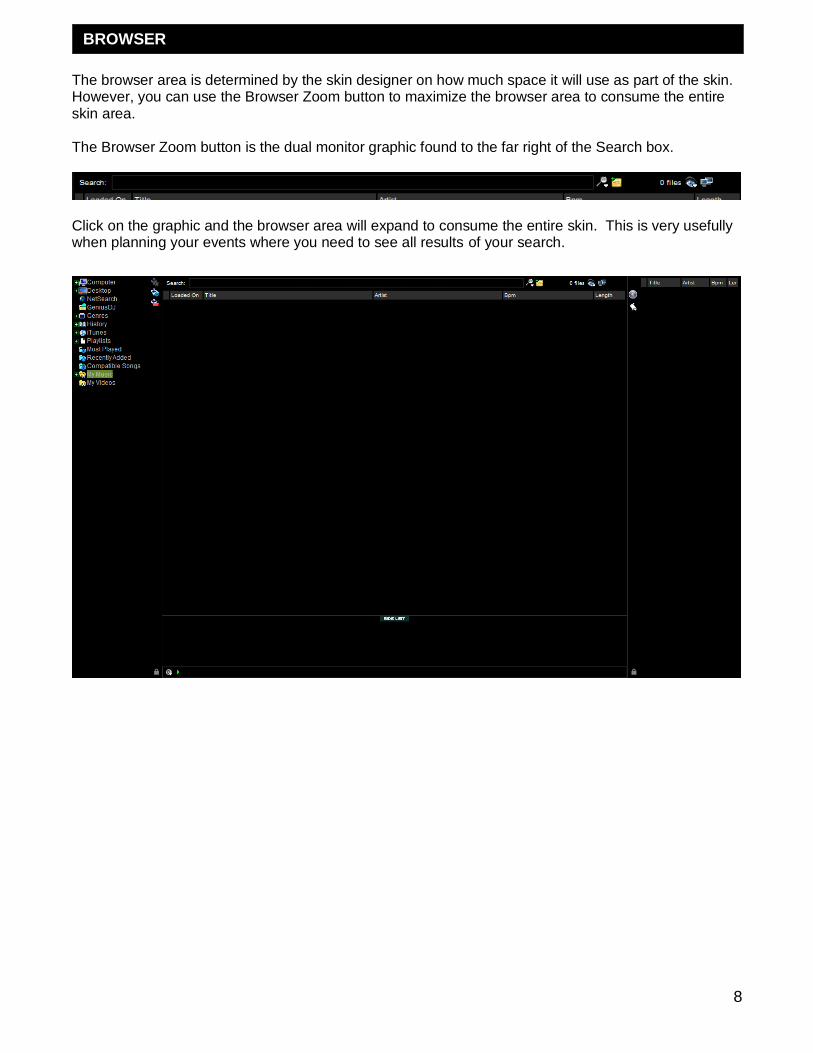
The browser area is determined by the skin designer on how much space it will use as part of the skin. However, you can use the Browser Zoom button to maximize the browser area to consume the entire skin area. The Browser Zoom button is the dual monitor graphic found to the far right of the Search box.
Click on the graphic and the browser area will expand to consume the entire skin. This is very usefully when planning your events where you need to see all results of your search.
BROWSER
9
VirtualDJ supports ID3Tags of MP3 audio files and MP4 and MOV tags of video files. VirtualDJ has always provided the fastest information access about one‘s collection by using VirtualDJ‘s database. Adding direct tag access to every file considerably slows applications ability for timely browsing and searching. VirtualDJ retrieves and stores the tag information in similar fields as part of its own database. The tag information stored can be updated at anytime using the VirtualDJ file menu. Since tag data is not directly accessed, any of the information can be changed using the File Info dialog and it will not affect the tag info of the file. ** VirtualDJ currently supports these types – ID3tags (MP3), MP4, MOV
Retrieving Tag Data This can be accomplished in several methods at different points in time. The first and most common is using the Config -> Browser tab‘s options in the Infos Gathering section. TAGS Enabled – Supported tag fields (BPM, Album, etc.) are read immediately when track first seen. Disabled – Tags are not read and need to be added manually through the browser interface.
ARTIST/TITLE Enabled – If the corresponding tags do not contain data for the Title and Artist fields then the
filename is parsed and used for those fields. Parsing format of the filename is Artist – Title. Disabled – Do not read the tags and use the file name parsing.
COMMENTS Enabled – Load the tag Comment field when track first seen. Disabled – Do not load the tag comment field COVERS Local Search Only – for the CoverFlow viewer files already locally stored will be used (to include
ID3tag embedded) Download Exact Match – if no cover found locally, download a cover that only matches based on
the song‘s information Download No Matter What – if no cover found locally, download anything that closely matches
using the song‘s information Don‟t Search – don‘t ever look for covers if no cover exists
Tag information can also be retrieved by using a right-click on a specific track in the browser and selecting File Info.
AUDIO AND VIDEO TAG SUPPORT
10
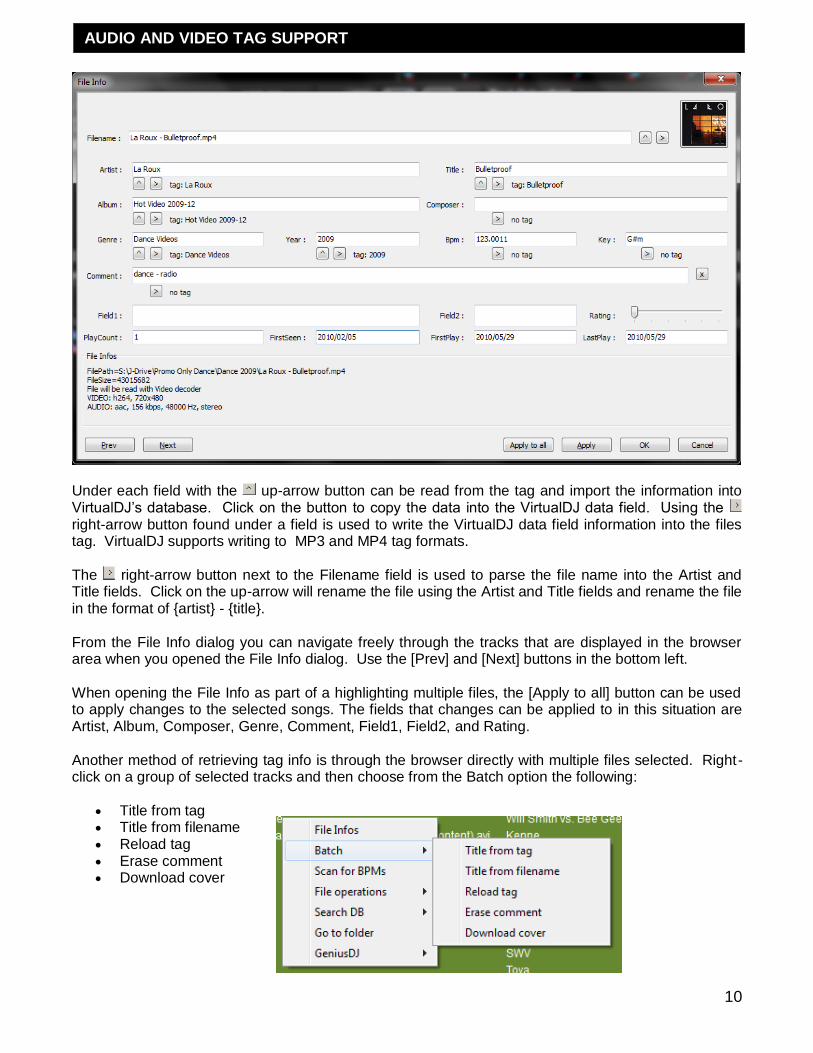
Under each field with the up-arrow button can be read from the tag and import the information into VirtualDJ‘s database. Click on the button to copy the data into the VirtualDJ data field. Using the right-arrow button found under a field is used to write the VirtualDJ data field information into the files tag. VirtualDJ supports writing to MP3 and MP4 tag formats. The right-arrow button next to the Filename field is used to parse the file name into the Artist and Title fields. Click on the up-arrow will rename the file using the Artist and Title fields and rename the file in the format of {artist} - {title}. From the File Info dialog you can navigate freely through the tracks that are displayed in the browser area when you opened the File Info dialog. Use the [Prev] and [Next] buttons in the bottom left. When opening the File Info as part of a highlighting multiple files, the [Apply to all] button can be used to apply changes to the selected songs. The fields that changes can be applied to in this situation are Artist, Album, Composer, Genre, Comment, Field1, Field2, and Rating. Another method of retrieving tag info is through the browser directly with multiple files selected. Right-click on a group of selected tracks and then choose from the Batch option the following:
Title from tag Title from filename Reload tag Erase comment Download cover
AUDIO AND VIDEO TAG SUPPORT
11
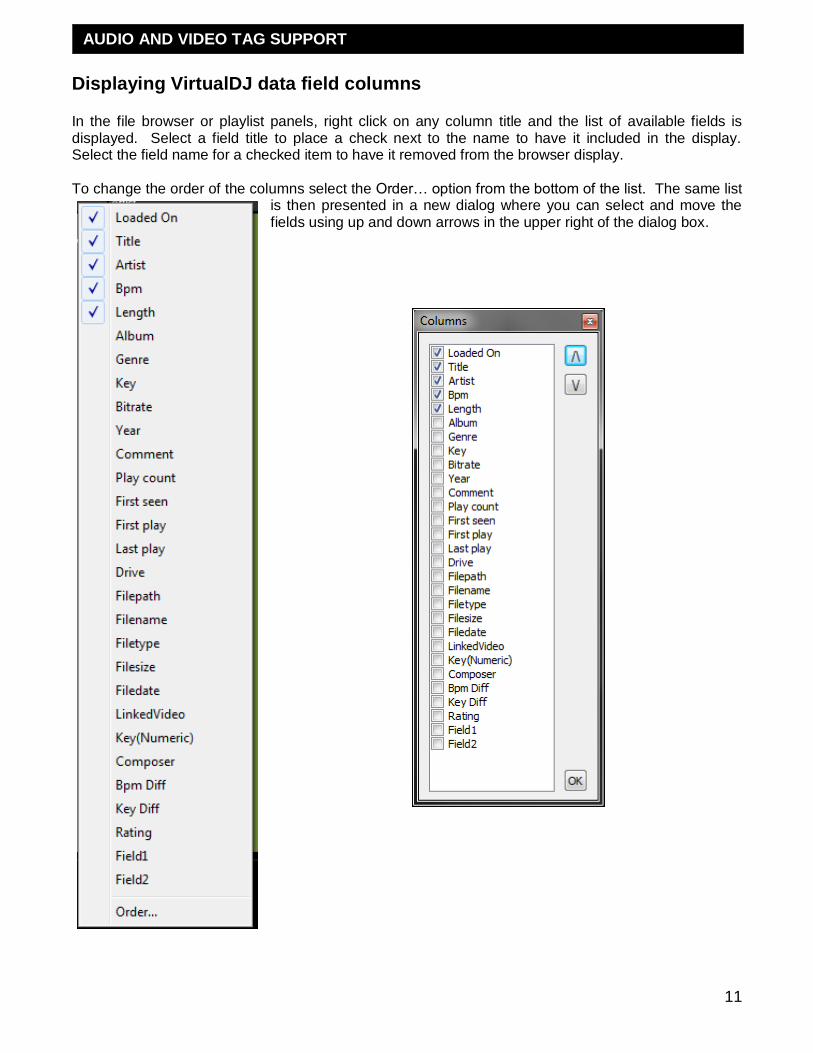
Displaying VirtualDJ data field columns In the file browser or playlist panels, right click on any column title and the list of available fields is displayed. Select a field title to place a check next to the name to have it included in the display. Select the field name for a checked item to have it removed from the browser display. To change the order of the columns select the Order… option from the bottom of the list. The same list
is then presented in a new dialog where you can select and move the fields using up and down arrows in the upper right of the dialog box.
AUDIO AND VIDEO TAG SUPPORT

12
Data Fields
Loaded On – shows the deck that the track is currently loaded on
Title – Title of the track
Artist – Artist of the track
BPM – Beats per Minute as analyzed by VirtualDJ
Length – Length of the track in Minutes:Seconds
Album – Album the track is associated with
Genre – Genre of the track
Key – Key of the track as analyzed by VirtualDJ
Bitrate – the bitrate of the encoded audio file
Year – Year in which the track was produced
Comment – comments about the track
Play Count – stores the running play count of the track
First Seen – stores the date of when the track was first added to the database
First Play – stores the date of when track was first ever played.
Last Play – stores the date of when track was last played
Drive – drive where the track is located
Filepath – absolute file path location of where the track is stored
Filename – file name of the track as reported by the operating system
Filetype – file type based on the file‘s extension
Filesize – file size as reported by the operating system
Filedate – modified date of the track as reported by the operating system ** Filedate is read in real-time and not stored in the VirtualDJ database
LinkedVideo – shows the filename of the video file linked to the track
Key (Number) – stores the analyzed key value of a song in numeric notation
Composer – Composer information for the track.
BPM Diff – dynamically displays the BPM difference compared to the currently playing track.
Key Diff – dynamically displays the Key difference compared to the currently playing track.
Rating – popularity rating field on a 5 point system
Field1 / Field2 – free form text fields to be used for custom information
Key Visual Indicators displayed in the Browser Asterisk ( * ) in BPM column – identifies tracks that have a pronounced beats per minute (BPM)
rhythm for use with Beatlock and Tempo Automix features Exclamation ( ! ) in Time column – indicates that the file is corrupted (probably following a bad copy)
and that it may finish abruptly or there may be excessive noise in the track
AUDIO AND VIDEO TAG SUPPORT
13
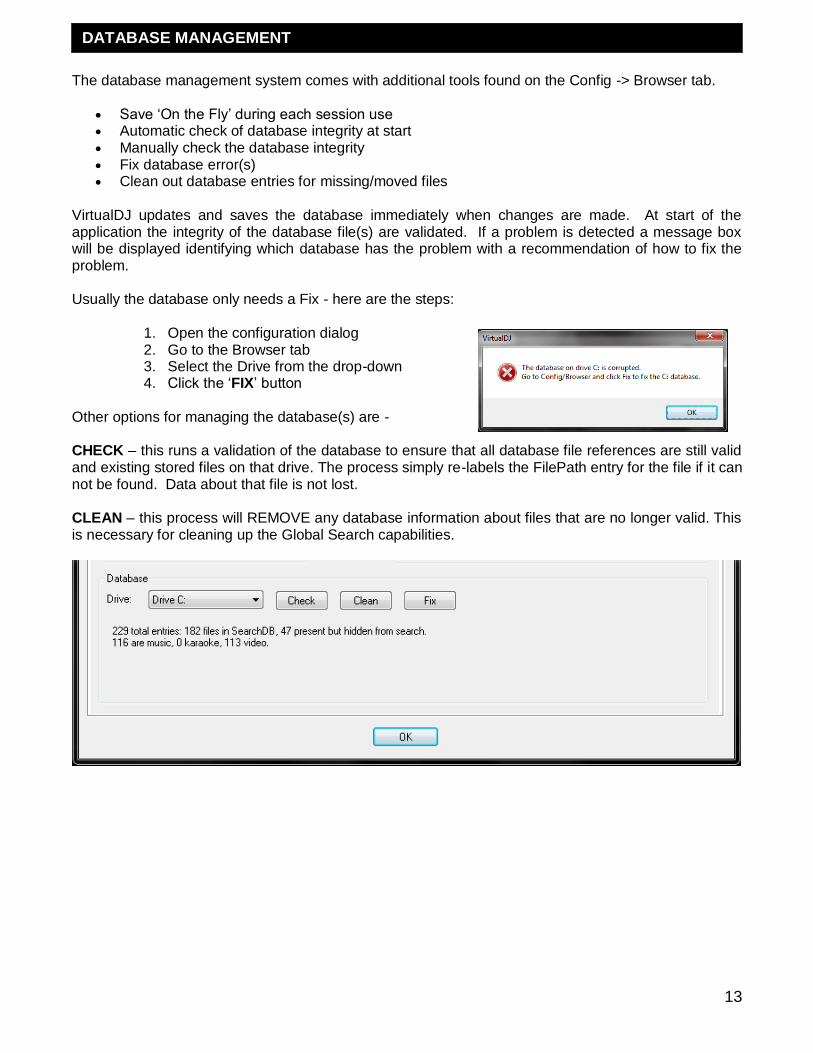
The database management system comes with additional tools found on the Config -> Browser tab.
Save ‗On the Fly‘ during each session use Automatic check of database integrity at start Manually check the database integrity Fix database error(s) Clean out database entries for missing/moved files
VirtualDJ updates and saves the database immediately when changes are made. At start of the application the integrity of the database file(s) are validated. If a problem is detected a message box will be displayed identifying which database has the problem with a recommendation of how to fix the problem. Usually the database only needs a Fix - here are the steps:
1. Open the configuration dialog 2. Go to the Browser tab 3. Select the Drive from the drop-down 4. Click the ‗FIX‘ button
Other options for managing the database(s) are - CHECK – this runs a validation of the database to ensure that all database file references are still valid and existing stored files on that drive. The process simply re-labels the FilePath entry for the file if it can not be found. Data about that file is not lost. CLEAN – this process will REMOVE any database information about files that are no longer valid. This is necessary for cleaning up the Global Search capabilities.
DATABASE MANAGEMENT
14
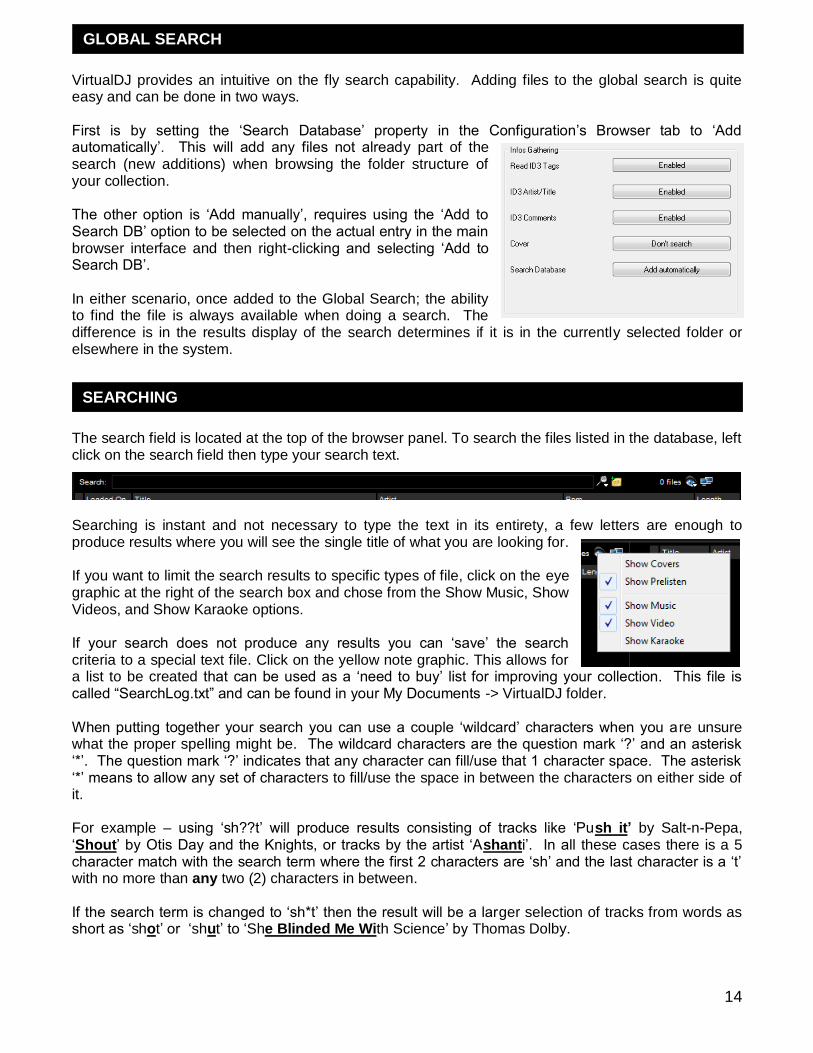
VirtualDJ provides an intuitive on the fly search capability. Adding files to the global search is quite easy and can be done in two ways. First is by setting the ‗Search Database‘ property in the Configuration‘s Browser tab to ‗Add automatically‘. This will add any files not already part of the search (new additions) when browsing the folder structure of your collection. The other option is ‗Add manually‘, requires using the ‗Add to Search DB‘ option to be selected on the actual entry in the main browser interface and then right-clicking and selecting ‗Add to Search DB‘. In either scenario, once added to the Global Search; the ability to find the file is always available when doing a search. The difference is in the results display of the search determines if it is in the currently selected folder or elsewhere in the system.
The search field is located at the top of the browser panel. To search the files listed in the database, left click on the search field then type your search text.
Searching is instant and not necessary to type the text in its entirety, a few letters are enough to produce results where you will see the single title of what you are looking for. If you want to limit the search results to specific types of file, click on the eye graphic at the right of the search box and chose from the Show Music, Show Videos, and Show Karaoke options. If your search does not produce any results you can ‗save‘ the search criteria to a special text file. Click on the yellow note graphic. This allows for a list to be created that can be used as a ‗need to buy‘ list for improving your collection. This file is called ―SearchLog.txt‖ and can be found in your My Documents -> VirtualDJ folder. When putting together your search you can use a couple ‗wildcard‘ characters when you are unsure what the proper spelling might be. The wildcard characters are the question mark ‗?‘ and an asterisk ‗*‘. The question mark ‗?‘ indicates that any character can fill/use that 1 character space. The asterisk ‗*‘ means to allow any set of characters to fill/use the space in between the characters on either side of it. For example – using ‗sh??t‘ will produce results consisting of tracks like ‗Push it‟ by Salt-n-Pepa, ‗Shout‘ by Otis Day and the Knights, or tracks by the artist ‗Ashanti‘. In all these cases there is a 5 character match with the search term where the first 2 characters are ‗sh‘ and the last character is a ‗t‘ with no more than any two (2) characters in between.
If the search term is changed to ‗sh*t‘ then the result will be a larger selection of tracks from words as short as ‗shot‘ or ‗shut‘ to ‗She Blinded Me With Science‘ by Thomas Dolby.
GLOBAL SEARCH
SEARCHING
15
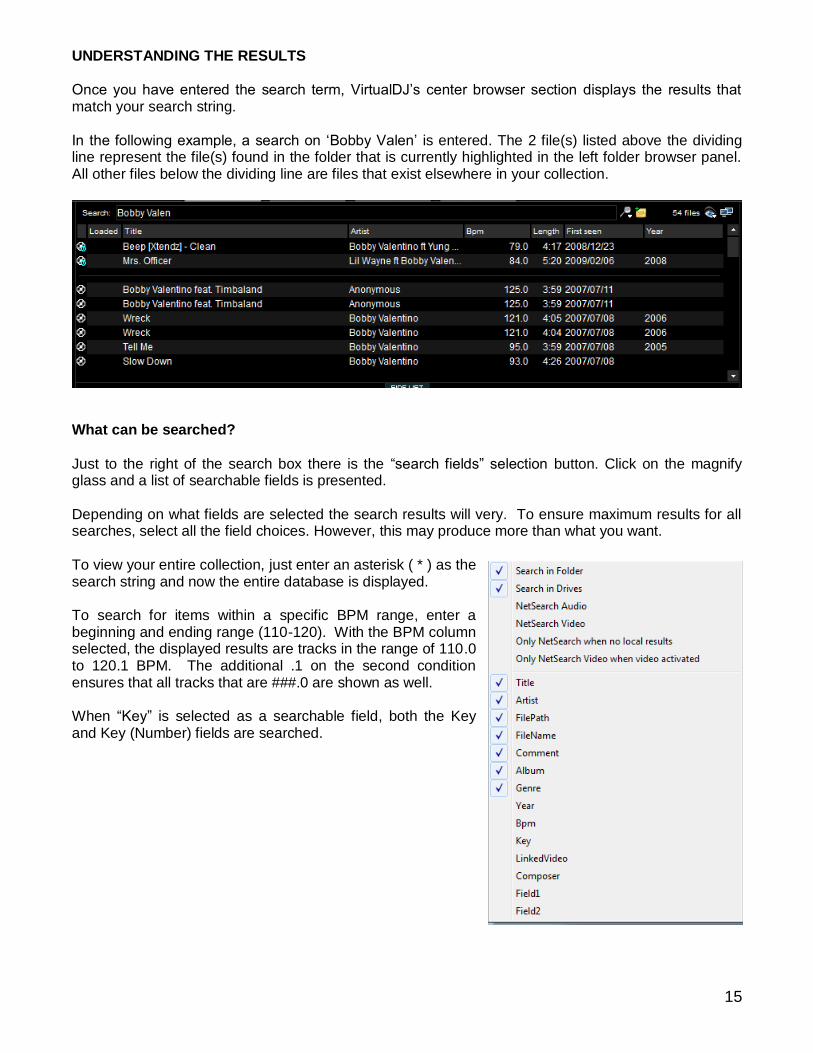
UNDERSTANDING THE RESULTS
Once you have entered the search term, VirtualDJ‘s center browser section displays the results that match your search string. In the following example, a search on ‗Bobby Valen‘ is entered. The 2 file(s) listed above the dividing line represent the file(s) found in the folder that is currently highlighted in the left folder browser panel. All other files below the dividing line are files that exist elsewhere in your collection.
What can be searched?
Just to the right of the search box there is the ―search fields‖ selection button. Click on the magnify glass and a list of searchable fields is presented. Depending on what fields are selected the search results will very. To ensure maximum results for all searches, select all the field choices. However, this may produce more than what you want. To view your entire collection, just enter an asterisk ( * ) as the search string and now the entire database is displayed. To search for items within a specific BPM range, enter a beginning and ending range (110-120). With the BPM column selected, the displayed results are tracks in the range of 110.0 to 120.1 BPM. The additional .1 on the second condition ensures that all tracks that are ###.0 are shown as well. When ―Key‖ is selected as a searchable field, both the Key and Key (Number) fields are searched.
16
With the NetSearch options selected, VirtualDJ will also search the NetSearch services for results matching the search criteria. VirtualDJ will only produce results where the Artist and/or Title of the track match the search criteria. NetSearch can be used by either selecting the NetSearch option from the left navigation panel or by having the NetSearch options activated in for the entire database. You can also set when VirtualDJ should produce results from NetSearch. With the ―Only NetSearch when no local results‖ is selected, then VirtualDJ return results from the search service when no results are found within your collection. Otherwise, if not selected and NetSearch options are active then the NetSearch results will be at the end of the results listed. Search results are displayed in the following order:
Local Selected folder results Entire collection results NetSearch results.
Each separated by a dividing line as mentioned on the previous page. If the NetSearch option in the left panel is selected, then ONLY NetSearch results are always displayed. „Search in Folder‟ and „Search in Drive‟
If both options are selected, then results display shows the separation line between folder results and drive results. With "Search in Folder" selected, but not "Search in Drive"; it shows only the files from the current folder. If ―Search in Drive" selected, but not "Search in Folder"; there is no distinction (separation line) between the files that are in currently browsed folder or from some other location. The result always displays the tracks from the entire search database.
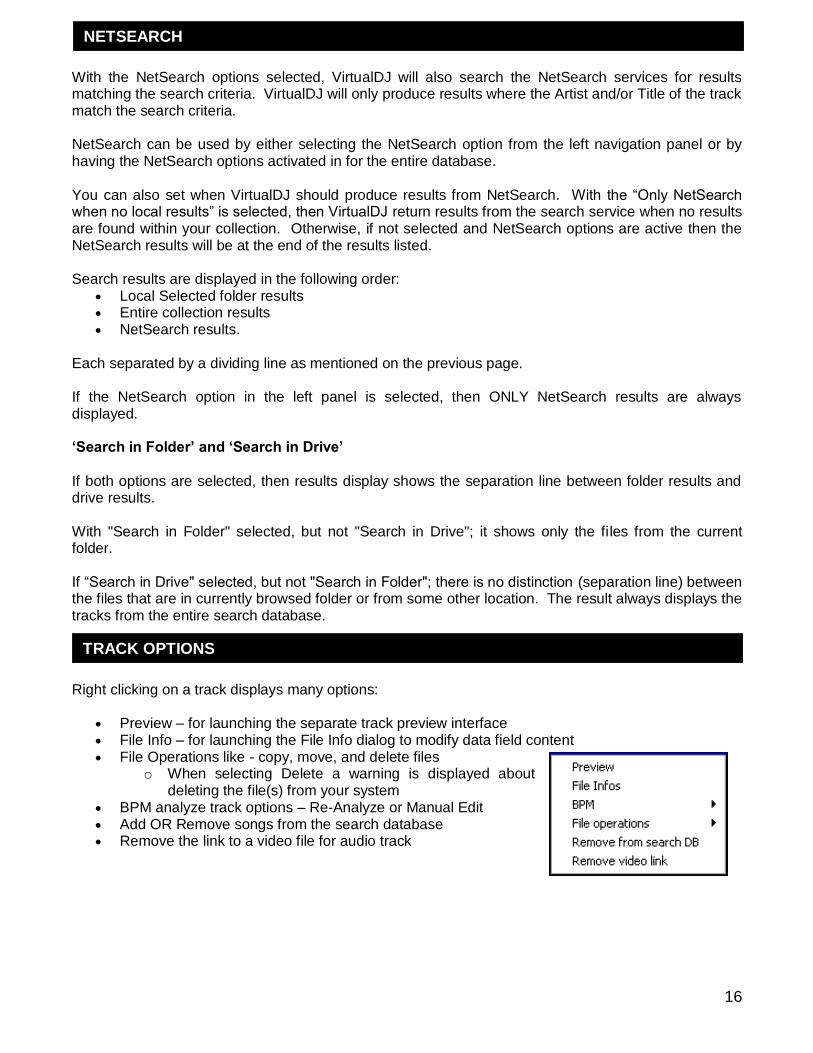
Right clicking on a track displays many options:
Preview – for launching the separate track preview interface File Info – for launching the File Info dialog to modify data field content File Operations like - copy, move, and delete files
o When selecting Delete a warning is displayed about deleting the file(s) from your system
BPM analyze track options – Re-Analyze or Manual Edit Add OR Remove songs from the search database Remove the link to a video file for audio track
TRACK OPTIONS
NETSEARCH

17
The BPM Engine analyzes the audio to determine the tempo of the track. Analyzing a track can be performed 2 ways – Load the track to a deck or right-click on the track in the Brower panel and select BPM -> Re-Analyze. You can also analyze a group of tracks contained in a folder from the left Navigation panel, right-click on the folder and select Scan for BPMs. If the tracks have been analyzed by an external application prior to being loaded into VirtualDJ and that value is stored in the BPM tag, the BPM Engine will use the stored value as a reference when analyzing the track. VirtualDJ will calculate a more precise value to a 0.05 BPM precision not more than +/- 1 beat per minute away from the value of the tag. Part of the BPM Engine is also a Key Detection Engine. Determining the ‗musical key‘ of a track provides the ability to harmonically mix tracks. The Key Detection Engine strongly favors minor keys, as most studio production songs are in minor key. But if the key is strongly major, it will be reported as a major key. If you wish to manually ‗tap-out‘ the beats per minute of a song, you can left-click to the beat on the BPM button of the appropriate deck playing your track. If you would like to assign a keyboard shortcut or assign a button on a controller, the mapping action beat_tap action can be assigned. Last, if the BPM (or the Key) is manually entered using the File Info dialog, then VirtualDJ will use the entered value and will not analyze the BPM or Key. If forced by selecting the BPM -> Re-Analyze function the track is re-analyzed without regard to existing data or how the data was entered.
Part of VirtualDJ‘s BPM Engine is to calculate the Computer Beat Grid (CBG) of the track. The computer beat grid is a 4/4 beat measure indicator for identifying the timing gap of the track. This becomes helpful when manually beat mixing a track or using VirtualDJ‘s synchronized play (SYNC), Beat Lock, or Automix Tempo Mix features.
In rare cases, when the BPM and the CBG is not correctly calculated, you can easily correct manually by right-clicking on the appropriate deck‘s BPM button for the track. With the ‗Adjust BPM Values‘ dialog you are provided several options to make the adjustments. EDIT BPM tab BPM – manually move the value up or down in .1 increments with the arrow buttons. Or, quickly half or double the shown value with the /2 and x2 buttons. Phase – used to adjust the CBG markers. The left and right
arrows makes very fine adjustments, where the ¼ +/- buttons provide ¼ beat adjustments. Re-Analyze – forces the re-analysis of the track disregarding any
manual adjustments or settings. Copy from other deck – copy the BPM of the track on the
opposing deck to be use for the track being modified.
BPM ANALYSIS AND KEY DETECTION
COMPUTER BEAT GRID (CBG) AND MANUAL BPM CORRECTION
18
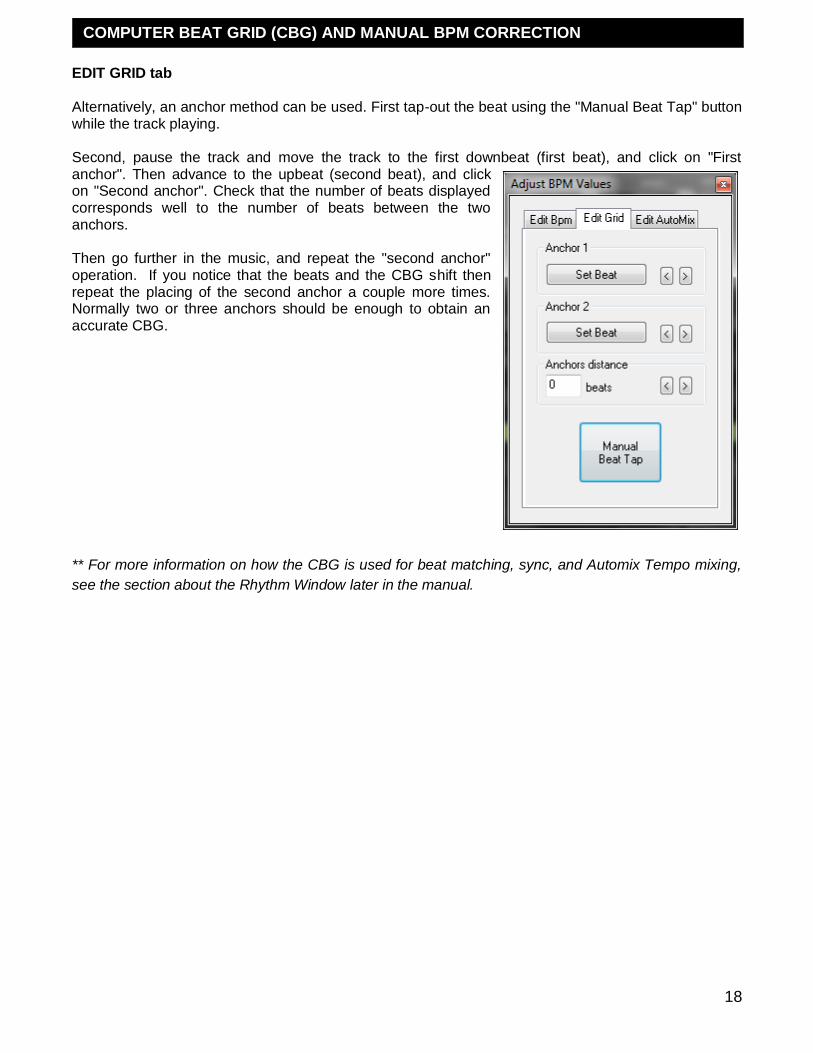
EDIT GRID tab Alternatively, an anchor method can be used. First tap-out the beat using the "Manual Beat Tap" button while the track playing. Second, pause the track and move the track to the first downbeat (first beat), and click on "First anchor". Then advance to the upbeat (second beat), and click on "Second anchor". Check that the number of beats displayed corresponds well to the number of beats between the two anchors. Then go further in the music, and repeat the "second anchor" operation. If you notice that the beats and the CBG shift then repeat the placing of the second anchor a couple more times. Normally two or three anchors should be enough to obtain an accurate CBG.
** For more information on how the CBG is used for beat matching, sync, and Automix Tempo mixing,
see the section about the Rhythm Window later in the manual.
COMPUTER BEAT GRID (CBG) AND MANUAL BPM CORRECTION
19
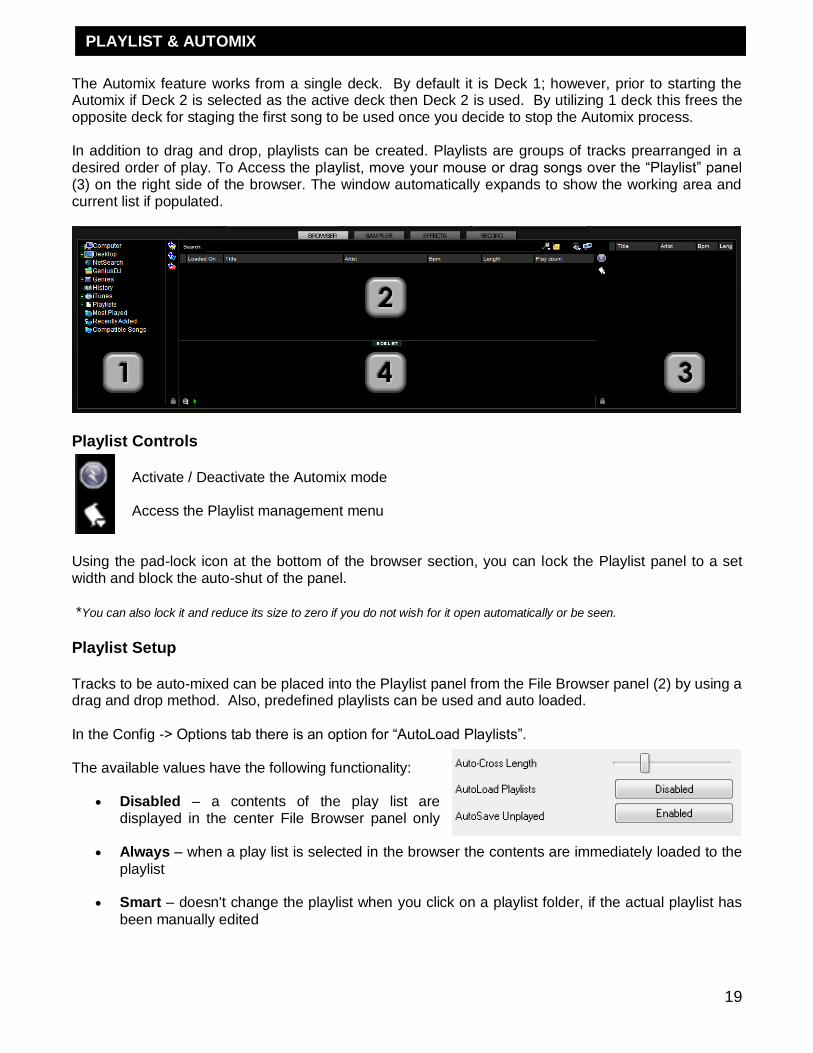
The Automix feature works from a single deck. By default it is Deck 1; however, prior to starting the Automix if Deck 2 is selected as the active deck then Deck 2 is used. By utilizing 1 deck this frees the opposite deck for staging the first song to be used once you decide to stop the Automix process. In addition to drag and drop, playlists can be created. Playlists are groups of tracks prearranged in a desired order of play. To Access the playlist, move your mouse or drag songs over the ―Playlist‖ panel (3) on the right side of the browser. The window automatically expands to show the working area and current list if populated.
Playlist Controls
Activate / Deactivate the Automix mode Access the Playlist management menu
Using the pad-lock icon at the bottom of the browser section, you can lock the Playlist panel to a set width and block the auto-shut of the panel. *You can also lock it and reduce its size to zero if you do not wish for it open automatically or be seen.
Playlist Setup Tracks to be auto-mixed can be placed into the Playlist panel from the File Browser panel (2) by using a drag and drop method. Also, predefined playlists can be used and auto loaded. In the Config -> Options tab there is an option for ―AutoLoad Playlists‖. The available values have the following functionality:
Disabled – a contents of the play list are displayed in the center File Browser panel only
Always – when a play list is selected in the browser the contents are immediately loaded to the
playlist
Smart – doesn't change the playlist when you click on a playlist folder, if the actual playlist has
been manually edited
PLAYLIST & AUTOMIX
20
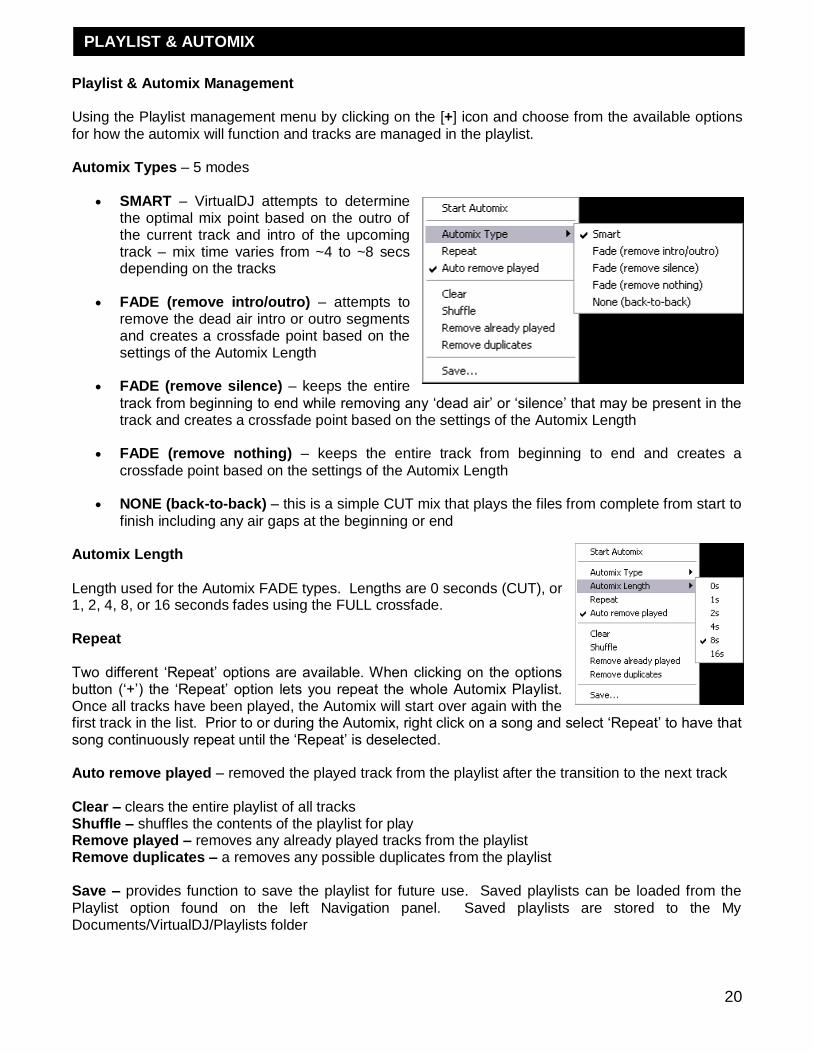
Playlist & Automix Management Using the Playlist management menu by clicking on the [+] icon and choose from the available options
for how the automix will function and tracks are managed in the playlist. Automix Types – 5 modes
SMART – VirtualDJ attempts to determine the optimal mix point based on the outro of the current track and intro of the upcoming track – mix time varies from ~4 to ~8 secs depending on the tracks
FADE (remove intro/outro) – attempts to
remove the dead air intro or outro segments and creates a crossfade point based on the settings of the Automix Length
FADE (remove silence) – keeps the entire
track from beginning to end while removing any ‗dead air‘ or ‗silence‘ that may be present in the track and creates a crossfade point based on the settings of the Automix Length
FADE (remove nothing) – keeps the entire track from beginning to end and creates a
crossfade point based on the settings of the Automix Length NONE (back-to-back) – this is a simple CUT mix that plays the files from complete from start to
finish including any air gaps at the beginning or end Automix Length
Length used for the Automix FADE types. Lengths are 0 seconds (CUT), or 1, 2, 4, 8, or 16 seconds fades using the FULL crossfade. Repeat
Two different ‗Repeat‘ options are available. When clicking on the options button (‗+‘) the ‗Repeat‘ option lets you repeat the whole Automix Playlist. Once all tracks have been played, the Automix will start over again with the first track in the list. Prior to or during the Automix, right click on a song and select ‗Repeat‘ to have that song continuously repeat until the ‗Repeat‘ is deselected. Auto remove played – removed the played track from the playlist after the transition to the next track
Clear – clears the entire playlist of all tracks Shuffle – shuffles the contents of the playlist for play Remove played – removes any already played tracks from the playlist Remove duplicates – a removes any possible duplicates from the playlist
Save – provides function to save the playlist for future use. Saved playlists can be loaded from the
Playlist option found on the left Navigation panel. Saved playlists are stored to the My Documents/VirtualDJ/Playlists folder
PLAYLIST & AUTOMIX
21
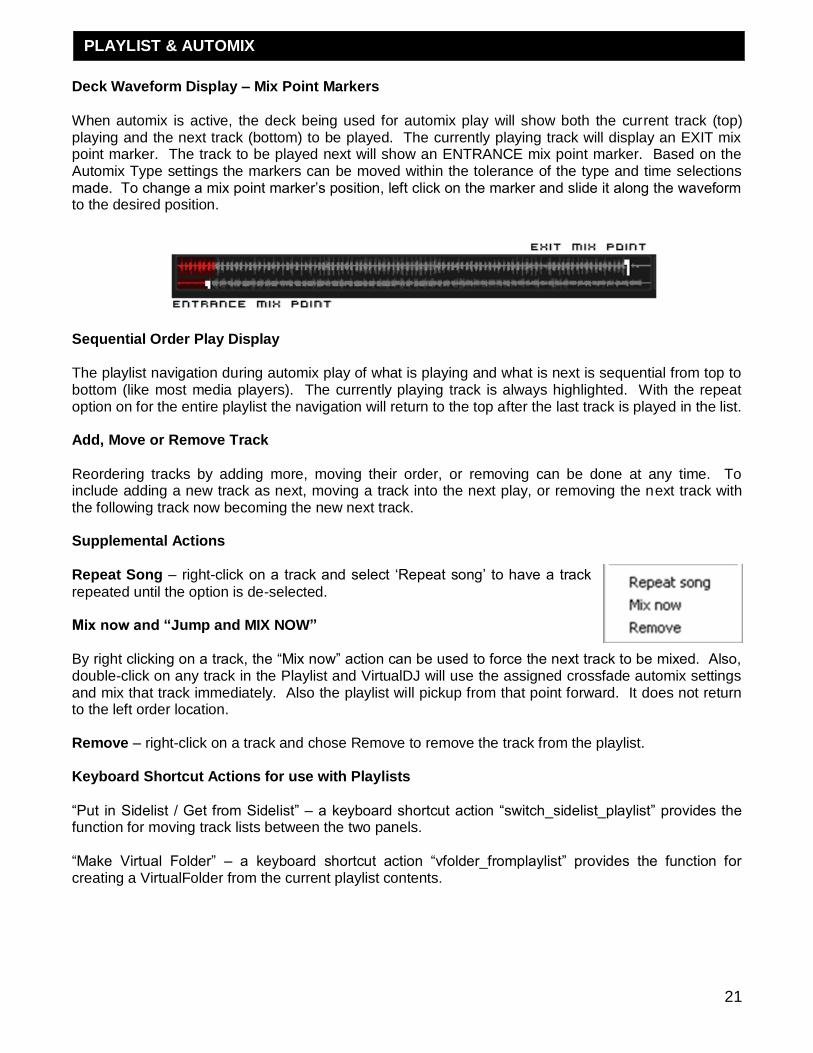
Deck Waveform Display – Mix Point Markers
When automix is active, the deck being used for automix play will show both the current track (top) playing and the next track (bottom) to be played. The currently playing track will display an EXIT mix point marker. The track to be played next will show an ENTRANCE mix point marker. Based on the Automix Type settings the markers can be moved within the tolerance of the type and time selections made. To change a mix point marker‘s position, left click on the marker and slide it along the waveform to the desired position.
Sequential Order Play Display
The playlist navigation during automix play of what is playing and what is next is sequential from top to bottom (like most media players). The currently playing track is always highlighted. With the repeat option on for the entire playlist the navigation will return to the top after the last track is played in the list. Add, Move or Remove Track
Reordering tracks by adding more, moving their order, or removing can be done at any time. To include adding a new track as next, moving a track into the next play, or removing the next track with the following track now becoming the new next track. Supplemental Actions
Repeat Song – right-click on a track and select ‗Repeat song‘ to have a track
repeated until the option is de-selected. Mix now and “Jump and MIX NOW” By right clicking on a track, the ―Mix now‖ action can be used to force the next track to be mixed. Also, double-click on any track in the Playlist and VirtualDJ will use the assigned crossfade automix settings and mix that track immediately. Also the playlist will pickup from that point forward. It does not return to the left order location. Remove – right-click on a track and chose Remove to remove the track from the playlist. Keyboard Shortcut Actions for use with Playlists
―Put in Sidelist / Get from Sidelist‖ – a keyboard shortcut action ―switch_sidelist_playlist‖ provides the function for moving track lists between the two panels. ―Make Virtual Folder‖ – a keyboard shortcut action ―vfolder_fromplaylist‖ provides the function for creating a VirtualFolder from the current playlist contents.
PLAYLIST & AUTOMIX
22
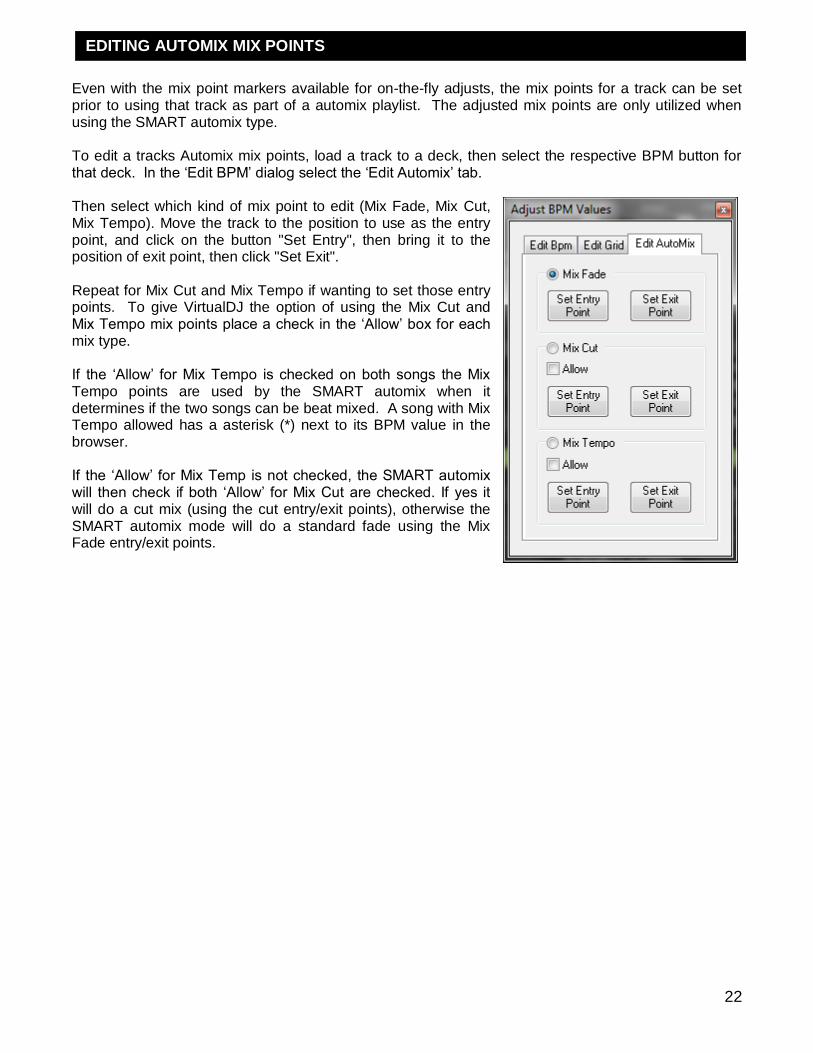
Even with the mix point markers available for on-the-fly adjusts, the mix points for a track can be set prior to using that track as part of a automix playlist. The adjusted mix points are only utilized when using the SMART automix type. To edit a tracks Automix mix points, load a track to a deck, then select the respective BPM button for that deck. In the ‗Edit BPM‘ dialog select the ‗Edit Automix‘ tab. Then select which kind of mix point to edit (Mix Fade, Mix Cut, Mix Tempo). Move the track to the position to use as the entry point, and click on the button "Set Entry", then bring it to the position of exit point, then click "Set Exit". Repeat for Mix Cut and Mix Tempo if wanting to set those entry points. To give VirtualDJ the option of using the Mix Cut and Mix Tempo mix points place a check in the ‗Allow‘ box for each mix type. If the ‗Allow‘ for Mix Tempo is checked on both songs the Mix Tempo points are used by the SMART automix when it determines if the two songs can be beat mixed. A song with Mix Tempo allowed has a asterisk (*) next to its BPM value in the browser. If the ‗Allow‘ for Mix Temp is not checked, the SMART automix will then check if both ‗Allow‘ for Mix Cut are checked. If yes it will do a cut mix (using the cut entry/exit points), otherwise the SMART automix mode will do a standard fade using the Mix Fade entry/exit points.
EDITING AUTOMIX MIX POINTS
23
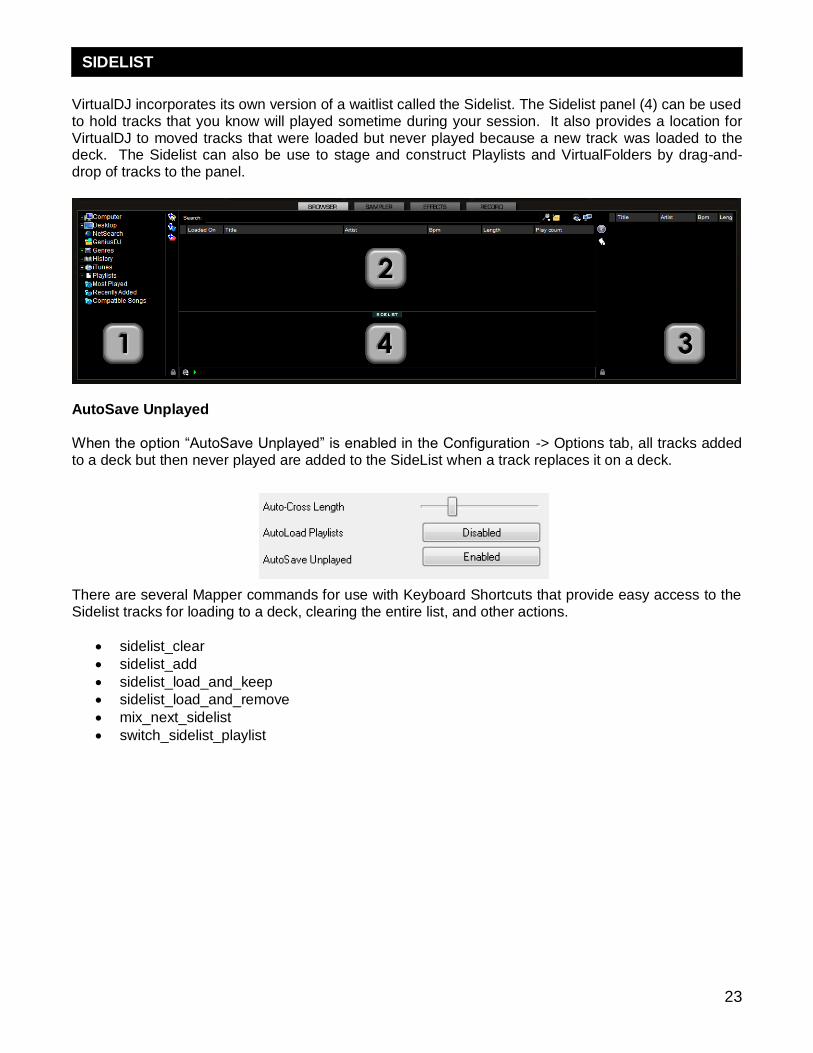
VirtualDJ incorporates its own version of a waitlist called the Sidelist. The Sidelist panel (4) can be used to hold tracks that you know will played sometime during your session. It also provides a location for VirtualDJ to moved tracks that were loaded but never played because a new track was loaded to the deck. The Sidelist can also be use to stage and construct Playlists and VirtualFolders by drag-and-drop of tracks to the panel.
AutoSave Unplayed
When the option ―AutoSave Unplayed‖ is enabled in the Configuration -> Options tab, all tracks added to a deck but then never played are added to the SideList when a track replaces it on a deck. There are several Mapper commands for use with Keyboard Shortcuts that provide easy access to the Sidelist tracks for loading to a deck, clearing the entire list, and other actions.
sidelist_clear
sidelist_add
sidelist_load_and_keep
sidelist_load_and_remove
mix_next_sidelist
switch_sidelist_playlist
SIDELIST
24
In order to simplify browsing and provide better and robust file management capability, VirtualDJ provides three (3) methods for the user to organize the database. On the left panel‘s border are three (3) folder options Create Favorite Folder (monitored folder) – pick a folder from the drive to always display in the browser Create Virtual Folder (unmonitored folders) – create a folder for manually populating with specific files Create Filter Folder (monitored folder) – create a folder based on a filter string that is run every time the folder is selected Right clicking on any of these folders provides access to various operations. For Favorite folders options include Add or Remove contents of favorite to Search DB, and BPM Analyze options. Filter folders contain an option for accessing the filter dialog for changing the filter string. Virtual folders have a Rename option. All folders have options for moving the order of the folders up and down in the tree and for removing or deleting the folder.
You may want to define a collection of directories which are most frequently used – for example, ―Hits of 2006‖ or ―My Music.‖ The best solution is using the Favorite Folders. Think of Favorite Folders as Shortcuts to a folder in the operating system. To setup a Favorite Folder, browse the Desktop navigation item from the File System/Folder Structure panel to the desired folder location. Click and highlight the desired folder, then click the yellow favorite
folder icon . The directory selected will be added to the end of the list, on the same level as the ―Desktop‖ folder. To remove a favorite folder reference, select it and click the icon again. The same actions can be taken by right-clicking on the desired folder and choosing ―Set as favorite‖ from the menu. And, to remove a favorite folder simply right-click on the favorite and choose ―Remove from favorite‖.
Virtual folders also aid in quick access to tracks. A virtual folder holds a collection of shortcuts to tracks.
Create a virtual folder by clicking on the red VirtualFolder icon and giving the new folder a title. Now browse the database or run various searches looking for tracks that are being grouped together. Drag and drop the tracks into the new VirtualFolder and next time you want to play these tracks refer to the virtual folder. Please note that dragging tracks into a virtual folder will not physically move the files into that folder — it will only create a shortcut to where the files are located. To remove a virtual folder, right-click on it and select ―remove.‖
FAVORITE FOLDERS
VIRTUAL FOLDERS
FILE SYSTEM / FOLDER STRUCTURE ORGANIZATION
25
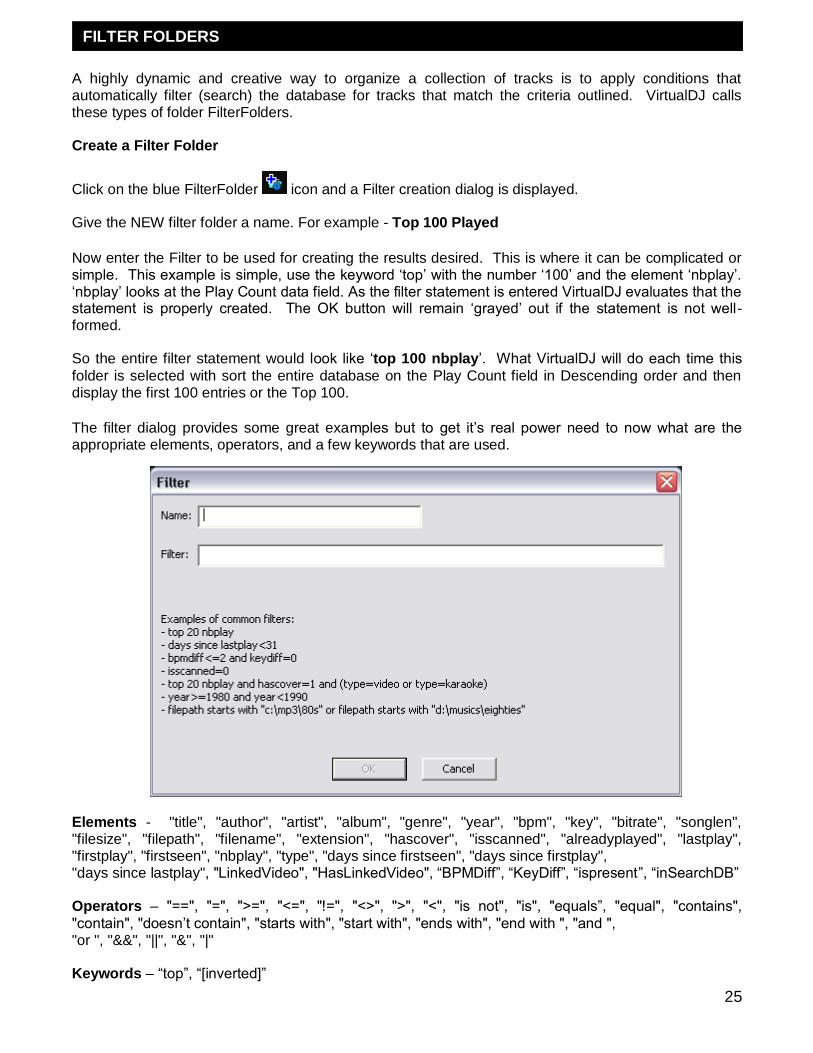
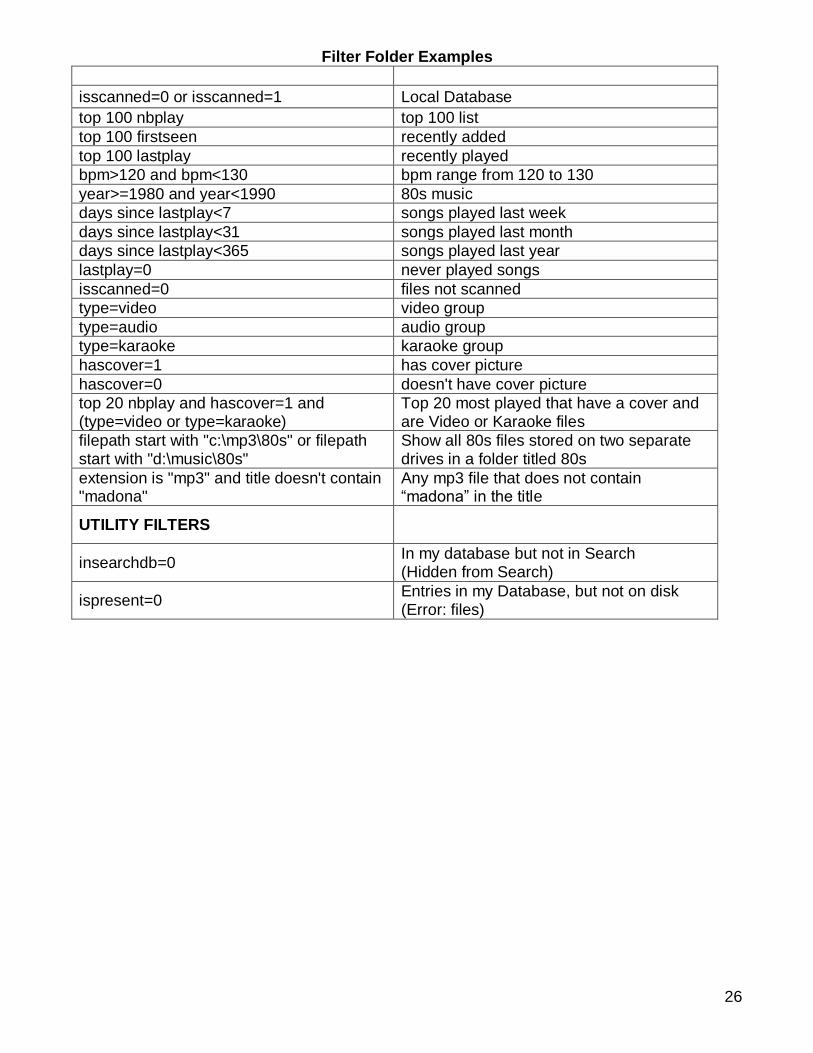
A highly dynamic and creative way to organize a collection of tracks is to apply conditions that automatically filter (search) the database for tracks that match the criteria outlined. VirtualDJ calls these types of folder FilterFolders. Create a Filter Folder
Click on the blue FilterFolder icon and a Filter creation dialog is displayed. Give the NEW filter folder a name. For example - Top 100 Played
Now enter the Filter to be used for creating the results desired. This is where it can be complicated or simple. This example is simple, use the keyword ‗top‘ with the number ‗100‘ and the element ‗nbplay‘. ‗nbplay‘ looks at the Play Count data field. As the filter statement is entered VirtualDJ evaluates that the statement is properly created. The OK button will remain ‗grayed‘ out if the statement is not well-formed. So the entire filter statement would look like ‗top 100 nbplay‘. What VirtualDJ will do each time this
folder is selected with sort the entire database on the Play Count field in Descending order and then display the first 100 entries or the Top 100.
The filter dialog provides some great examples but to get it‘s real power need to now what are the appropriate elements, operators, and a few keywords that are used.
Elements - "title", "author", "artist", "album", "genre", "year", "bpm", "key", "bitrate", "songlen", "filesize", "filepath", "filename", "extension", "hascover", "isscanned", "alreadyplayed", "lastplay", "firstplay", "firstseen", "nbplay", "type", "days since firstseen", "days since firstplay", "days since lastplay", "LinkedVideo", "HasLinkedVideo", ―BPMDiff‖, ―KeyDiff‖, ―ispresent‖, ―inSearchDB‖ Operators – "==", "=", ">=", "<=", "!=", "<>", ">", "<", "is not", "is", "equals‖, "equal", "contains",
"contain", "doesn‘t contain", "starts with", "start with", "ends with", "end with ", "and ", "or ", "&&", "||", "&", "|" Keywords – ―top‖, ―[inverted]‖
FILTER FOLDERS
26
Filter Folder Examples
FILTER Expected Result
isscanned=0 or isscanned=1 Local Database
top 100 nbplay top 100 list
top 100 firstseen recently added
top 100 lastplay recently played
bpm>120 and bpm<130 bpm range from 120 to 130
year>=1980 and year<1990 80s music
days since lastplay<7 songs played last week
days since lastplay<31 songs played last month
days since lastplay<365 songs played last year
lastplay=0 never played songs
isscanned=0 files not scanned
type=video video group
type=audio audio group
type=karaoke karaoke group
hascover=1 has cover picture
hascover=0 doesn't have cover picture
top 20 nbplay and hascover=1 and (type=video or type=karaoke)
Top 20 most played that have a cover and are Video or Karaoke files
filepath start with "c:\mp3\80s" or filepath start with "d:\music\80s"
Show all 80s files stored on two separate drives in a folder titled 80s
extension is "mp3" and title doesn't contain "madona"
Any mp3 file that does not contain ―madona‖ in the title
UTILITY FILTERS
insearchdb=0 In my database but not in Search (Hidden from Search)
ispresent=0 Entries in my Database, but not on disk (Error: files)
27
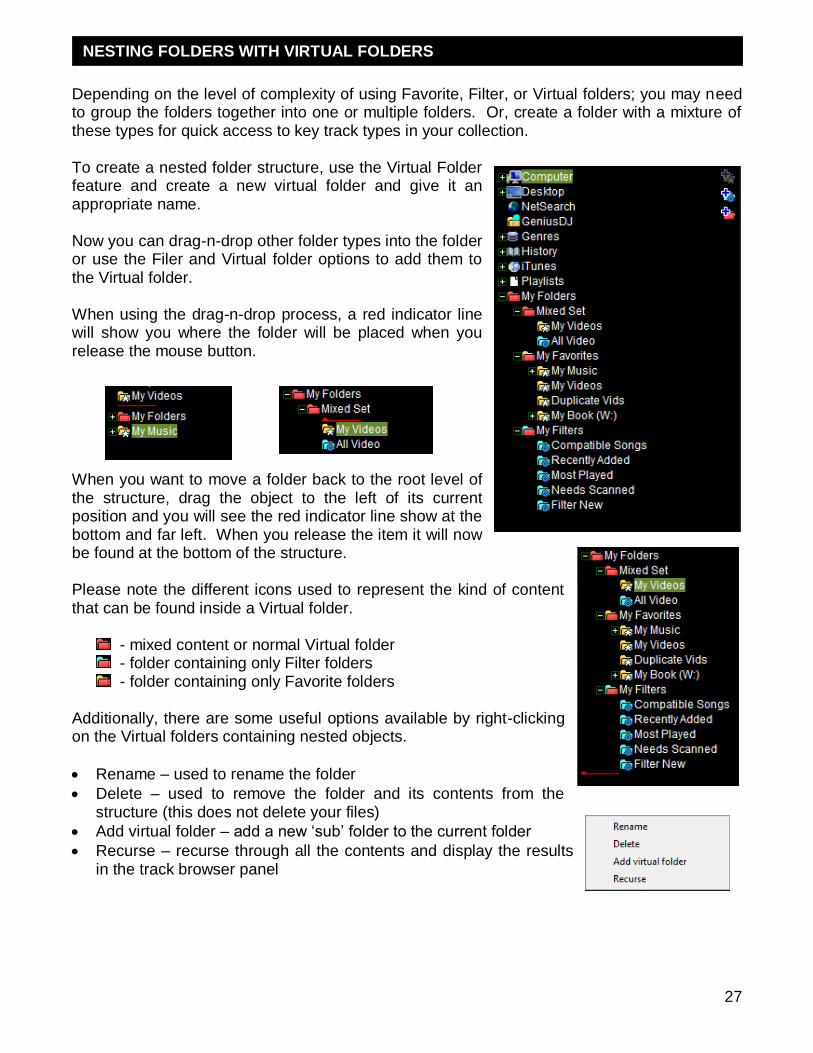
Depending on the level of complexity of using Favorite, Filter, or Virtual folders; you may need to group the folders together into one or multiple folders. Or, create a folder with a mixture of these types for quick access to key track types in your collection. To create a nested folder structure, use the Virtual Folder feature and create a new virtual folder and give it an appropriate name. Now you can drag-n-drop other folder types into the folder or use the Filer and Virtual folder options to add them to the Virtual folder. When using the drag-n-drop process, a red indicator line will show you where the folder will be placed when you release the mouse button.
When you want to move a folder back to the root level of the structure, drag the object to the left of its current position and you will see the red indicator line show at the bottom and far left. When you release the item it will now be found at the bottom of the structure. Please note the different icons used to represent the kind of content that can be found inside a Virtual folder.
- mixed content or normal Virtual folder - folder containing only Filter folders - folder containing only Favorite folders
Additionally, there are some useful options available by right-clicking on the Virtual folders containing nested objects.
Rename – used to rename the folder
Delete – used to remove the folder and its contents from the structure (this does not delete your files)
Add virtual folder – add a new ‗sub‘ folder to the current folder
Recurse – recurse through all the contents and display the results in the track browser panel
NESTING FOLDERS WITH VIRTUAL FOLDERS
28
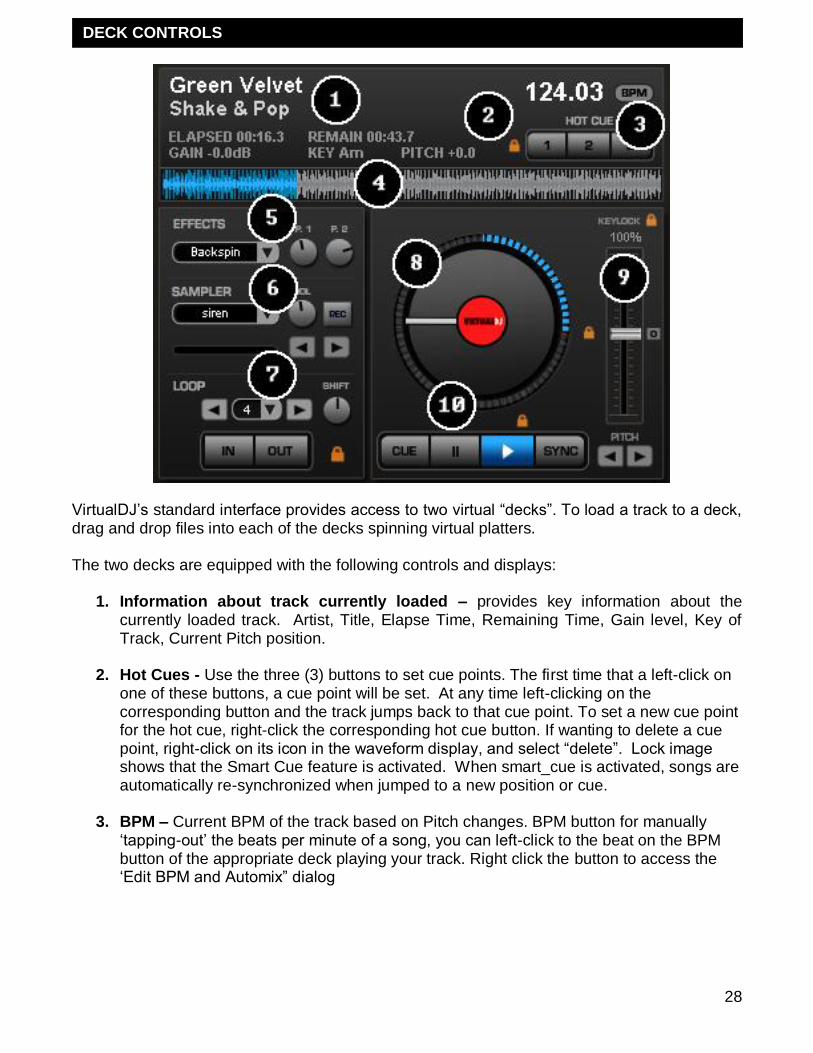
VirtualDJ‘s standard interface provides access to two virtual ―decks‖. To load a track to a deck, drag and drop files into each of the decks spinning virtual platters. The two decks are equipped with the following controls and displays:
1. Information about track currently loaded – provides key information about the currently loaded track. Artist, Title, Elapse Time, Remaining Time, Gain level, Key of Track, Current Pitch position.
2. Hot Cues - Use the three (3) buttons to set cue points. The first time that a left-click on
one of these buttons, a cue point will be set. At any time left-clicking on the corresponding button and the track jumps back to that cue point. To set a new cue point for the hot cue, right-click the corresponding hot cue button. If wanting to delete a cue point, right-click on its icon in the waveform display, and select ―delete‖. Lock image shows that the Smart Cue feature is activated. When smart_cue is activated, songs are automatically re-synchronized when jumped to a new position or cue.
3. BPM – Current BPM of the track based on Pitch changes. BPM button for manually
‗tapping-out‘ the beats per minute of a song, you can left-click to the beat on the BPM button of the appropriate deck playing your track. Right click the button to access the ‗Edit BPM and Automix‖ dialog
DECK CONTROLS
29
4. Waveform display for currently - This view shows the visual waveform of the entire
track, allows for viewing the remaining duration of the audio, as well as what has already been played. When highlighted in blue or red (Using the default skins), that area of the waveform indicates what has been played and the current position of the audio. The remaining grey area of the waveform shows the length of the audio remaining. Inside the waveform itself, the lighter part indicates the presence of beats whereas the darker part indicates the presence of vocals
5. Effects
Effects Selection Drop-down arrow - Select which effect to apply. Effects Selection Drop-down window - When clicked this will apply the effect selected. Parameter 1 & 2 knobs - These two knobs adjust parameters of the effect selected in the drop-down window, although not all effects require or make use of these knobs.
6. Loop Sampler -
Sample Selection Drop-down arrow - Choose which sample to use. There are 12
slots which are available to record, load and play samples. Sample Selection window - When clicked this will play the sample listed in the
selection window. VOL - Controls the level of gain applied to the loop sample. REC button - When initiated, this function records the loop to the sample slot selected. If no loop is currently set on this deck, a 4 bar loop will be recorded by default. Sampler Loop controls – used to half or double the samples length.
7. Loop Set /Control
Loop In/Out - A loop is any area of a track that repeats seamlessly. Press ―Loop In‖ at the point where the loop is to start. Press ―Loop Out‖ when the desired point to mark the end point of the loop. The audio between the two points will begin to loop continuously. To release the loop and continue play of the track press ―Loop Out‖ again and the audio will continue from the end point of the loop. To set a new loop, just press ―Loop In‖ again while the loop is disengaged, and then press ―Loop Out‖ to begin the new loop. Shift Knob - Adjusts the loop length by half length or double length increments. Smart Lock button - Allows the loop buttons to work together to create loops
synchronized to BPM. Loop Length - This indicates the length of the loop according to beat measures.
Increase or decrease the length of the loop from 1/4 to 16 measures.
8. Virtual Turntable – can be used with the mouse to scratch, back cue, and pause a playing track. The virtual table also has a position marker on it for visualizing a scratch position. Around the outer edge of the virtual table is a position ring that gives a reference to percentage of a tracks completion.
DECK CONTROLS

30
9. Pitch slider / Pitch buttons
Controls the speed/pitch of the track when moving the slider. Moving it downward the speed of the music speeds up. By moving upward the speed slows down. The ―Zero‖ button lets you smoothly bring the pitch back to 100%. Double click on it to bring it back instantly. The two Pitch buttons are used to temporarily change the speed of the track playing. This is useful when you want to make a quick adjustment to a track if the beat of the track is not exactly matching up with the beat of the track playing on the other deck. The speed will be affected as long as you are pressing down ―+‖ or ―-―. KeyLock
When enabled changing the pitch of the song does not change the tone of the track. Keylock can be enabled at any point along the pitch range to maintain the desired tone at that pitch while still being able to further adjust the pitch. When disabled tone changes based on the pitch used – slower pitch = slower deeper tone, faster pitch – faster higher (chipmunk) sounding tone.
10. Transport
Cue - Returns and pauses the music at the default Cue Point. To set a Cue Point,
pause the song, seek to the desired position (for example by rotating the virtual turntable), and then click on ―Cue‖. Also, a right-click on the ―Cue‖ button will set a Cue Point while the track is playing. Once on the Cue Point, pressing and holding down ―Cue‖ allows for temporary play of this point. To delete a Cue Point, right-click on its icon on the Waveform display, and select ―delete‖. Stutter/Play - Starts the music. Pressing ―Stutter/Play‖ while the song is already playing, will restart the music from the last position you pressed ―Play‖ from, creating a ―stutter‖ effect. Pause - Stops the audio where it is currently playing. Subsequent clicks while stopped cycles through the beginning of the song and all the Cue Points. Right-clicking while stopped automatically goes to the first detected beat in the song. Sync - When clicking ―Sync‖, VirtualDJ will sync the tempo of the deck to the opposite deck‘s tempo.
Press ―Sync‖ while the song is paused; only the pitch will be adjusted. Press ―Sync‖ while the song is playing, the beats will be smoothly aligned too. Right-click on ―Sync‖, the song will align on beat while the button is pressed.
DECK CONTROLS
31
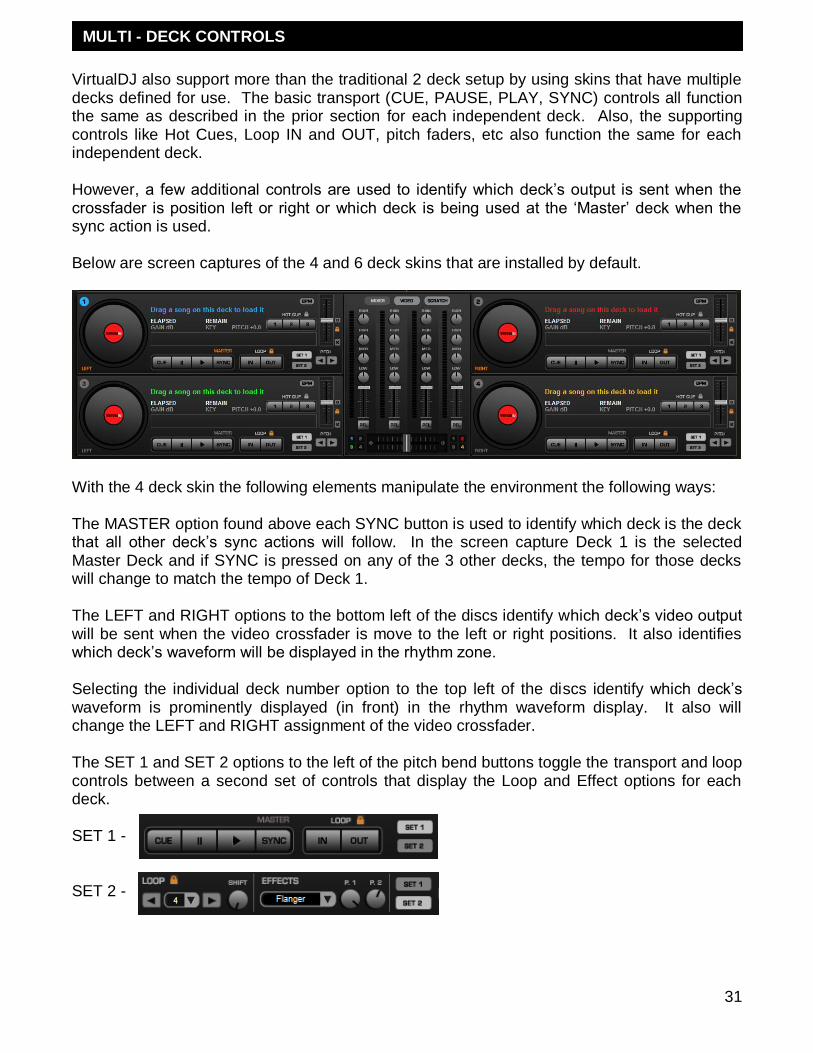
VirtualDJ also support more than the traditional 2 deck setup by using skins that have multiple decks defined for use. The basic transport (CUE, PAUSE, PLAY, SYNC) controls all function the same as described in the prior section for each independent deck. Also, the supporting controls like Hot Cues, Loop IN and OUT, pitch faders, etc also function the same for each independent deck. However, a few additional controls are used to identify which deck‘s output is sent when the crossfader is position left or right or which deck is being used at the ‗Master‘ deck when the sync action is used. Below are screen captures of the 4 and 6 deck skins that are installed by default.
With the 4 deck skin the following elements manipulate the environment the following ways: The MASTER option found above each SYNC button is used to identify which deck is the deck that all other deck‘s sync actions will follow. In the screen capture Deck 1 is the selected Master Deck and if SYNC is pressed on any of the 3 other decks, the tempo for those decks will change to match the tempo of Deck 1. The LEFT and RIGHT options to the bottom left of the discs identify which deck‘s video output will be sent when the video crossfader is move to the left or right positions. It also identifies which deck‘s waveform will be displayed in the rhythm zone. Selecting the individual deck number option to the top left of the discs identify which deck‘s waveform is prominently displayed (in front) in the rhythm waveform display. It also will change the LEFT and RIGHT assignment of the video crossfader. The SET 1 and SET 2 options to the left of the pitch bend buttons toggle the transport and loop controls between a second set of controls that display the Loop and Effect options for each deck. SET 1 - SET 2 -
MULTI - DECK CONTROLS MULTI - DECK CONTROLS
32
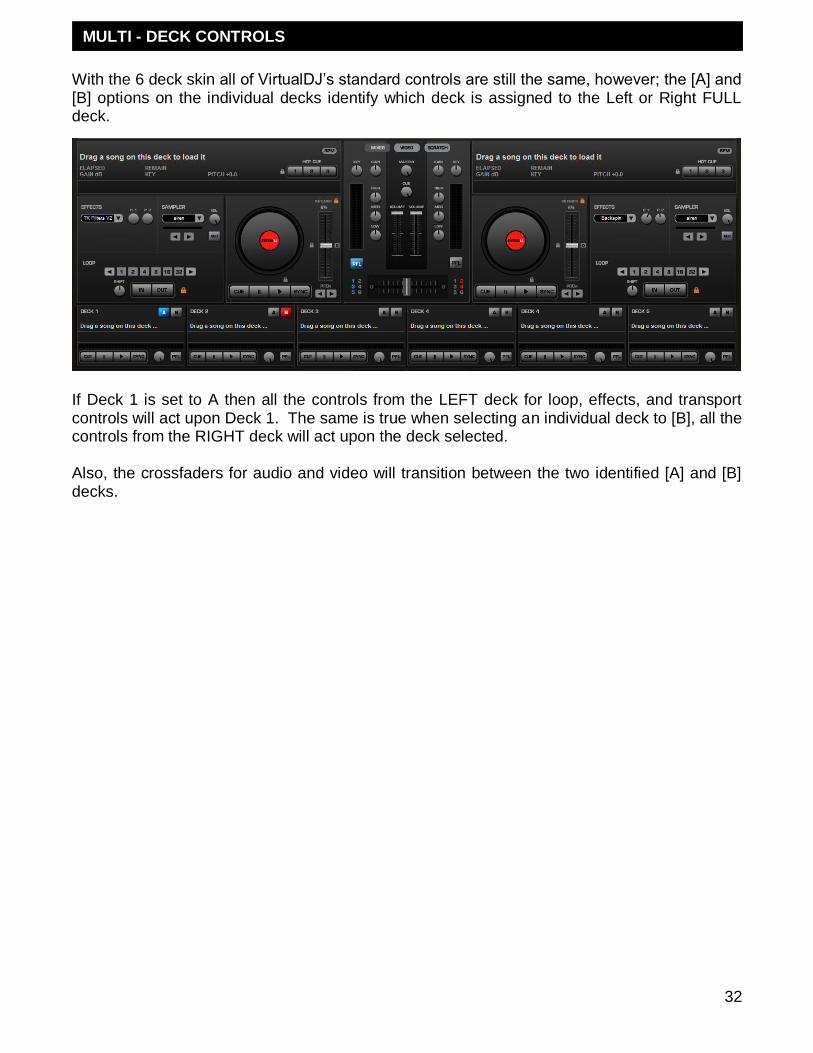
With the 6 deck skin all of VirtualDJ‘s standard controls are still the same, however; the [A] and [B] options on the individual decks identify which deck is assigned to the Left or Right FULL deck.
If Deck 1 is set to A then all the controls from the LEFT deck for loop, effects, and transport controls will act upon Deck 1. The same is true when selecting an individual deck to [B], all the controls from the RIGHT deck will act upon the deck selected. Also, the crossfaders for audio and video will transition between the two identified [A] and [B] decks.
MULTI - DECK CONTROLS
33
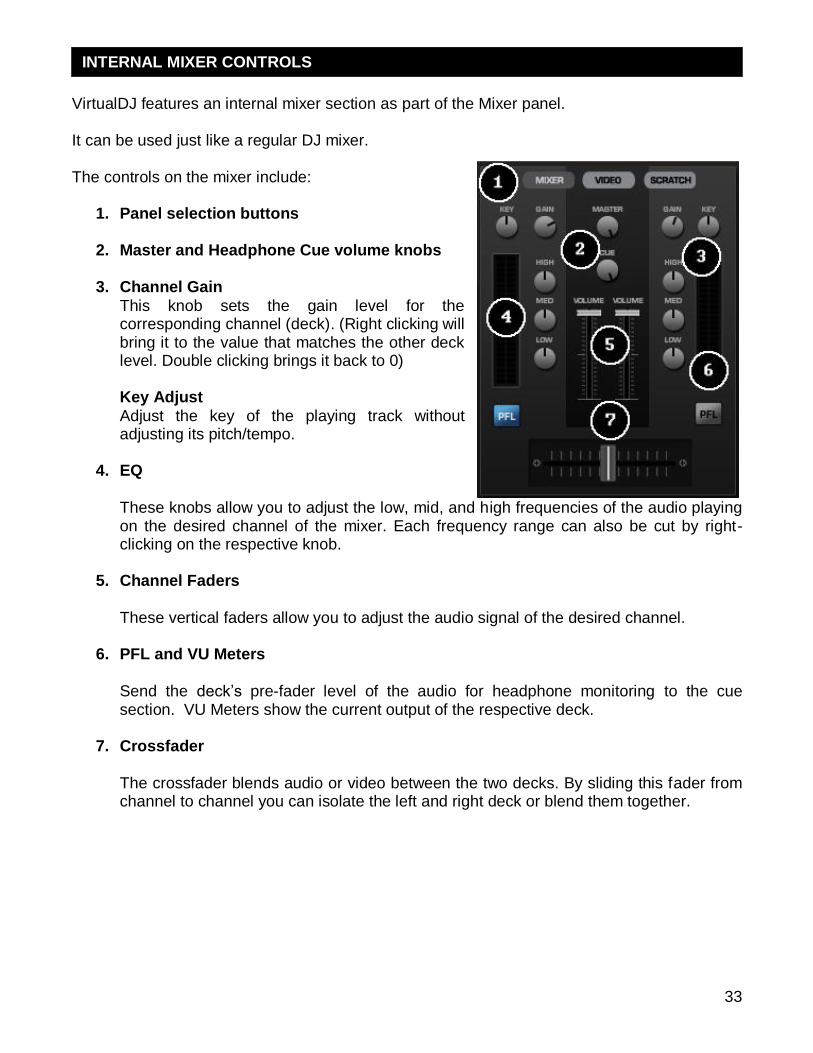
VirtualDJ features an internal mixer section as part of the Mixer panel. It can be used just like a regular DJ mixer. The controls on the mixer include:
1. Panel selection buttons 2. Master and Headphone Cue volume knobs
3. Channel Gain
This knob sets the gain level for the corresponding channel (deck). (Right clicking will bring it to the value that matches the other deck level. Double clicking brings it back to 0) Key Adjust
Adjust the key of the playing track without adjusting its pitch/tempo.
4. EQ
These knobs allow you to adjust the low, mid, and high frequencies of the audio playing on the desired channel of the mixer. Each frequency range can also be cut by right-clicking on the respective knob.
5. Channel Faders
These vertical faders allow you to adjust the audio signal of the desired channel.
6. PFL and VU Meters
Send the deck‘s pre-fader level of the audio for headphone monitoring to the cue section. VU Meters show the current output of the respective deck.
7. Crossfader
The crossfader blends audio or video between the two decks. By sliding this fader from channel to channel you can isolate the left and right deck or blend them together.
INTERNAL MIXER CONTROLS
34
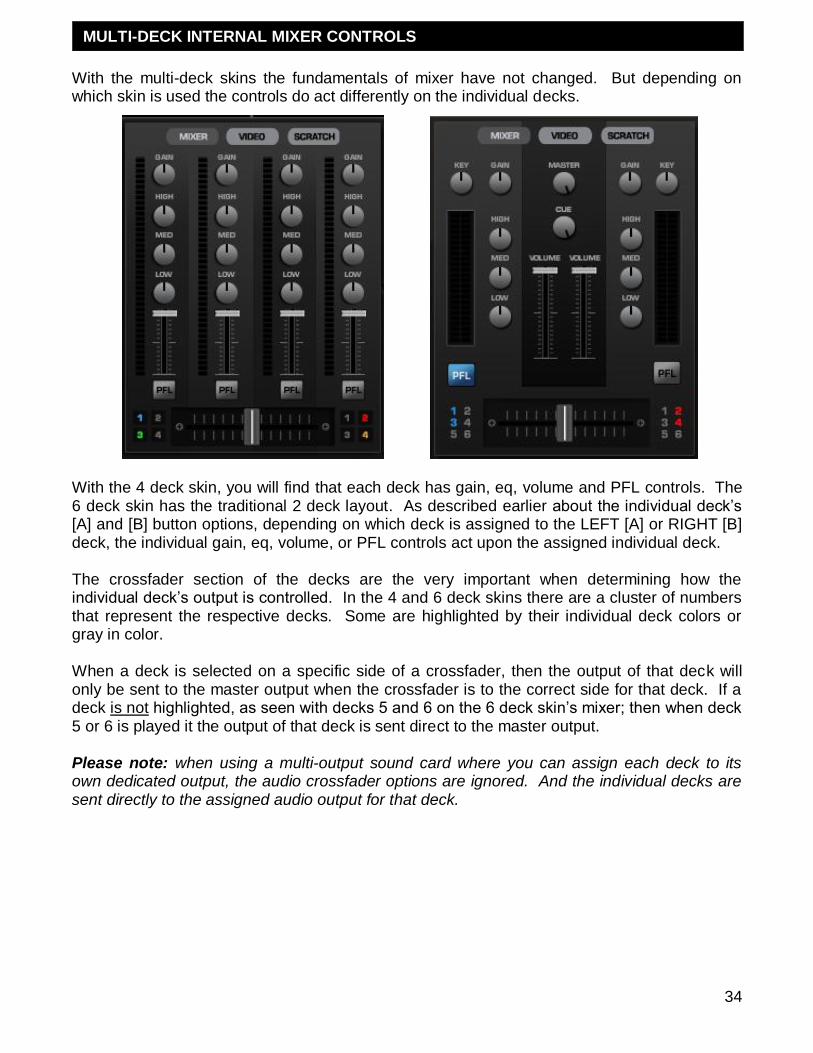
With the multi-deck skins the fundamentals of mixer have not changed. But depending on which skin is used the controls do act differently on the individual decks.
With the 4 deck skin, you will find that each deck has gain, eq, volume and PFL controls. The 6 deck skin has the traditional 2 deck layout. As described earlier about the individual deck‘s [A] and [B] button options, depending on which deck is assigned to the LEFT [A] or RIGHT [B] deck, the individual gain, eq, volume, or PFL controls act upon the assigned individual deck. The crossfader section of the decks are the very important when determining how the individual deck‘s output is controlled. In the 4 and 6 deck skins there are a cluster of numbers that represent the respective decks. Some are highlighted by their individual deck colors or gray in color. When a deck is selected on a specific side of a crossfader, then the output of that deck will only be sent to the master output when the crossfader is to the correct side for that deck. If a deck is not highlighted, as seen with decks 5 and 6 on the 6 deck skin‘s mixer; then when deck 5 or 6 is played it the output of that deck is sent direct to the master output. Please note: when using a multi-output sound card where you can assign each deck to its own dedicated output, the audio crossfader options are ignored. And the individual decks are sent directly to the assigned audio output for that deck.
MULTI-DECK INTERNAL MIXER CONTROLS
35
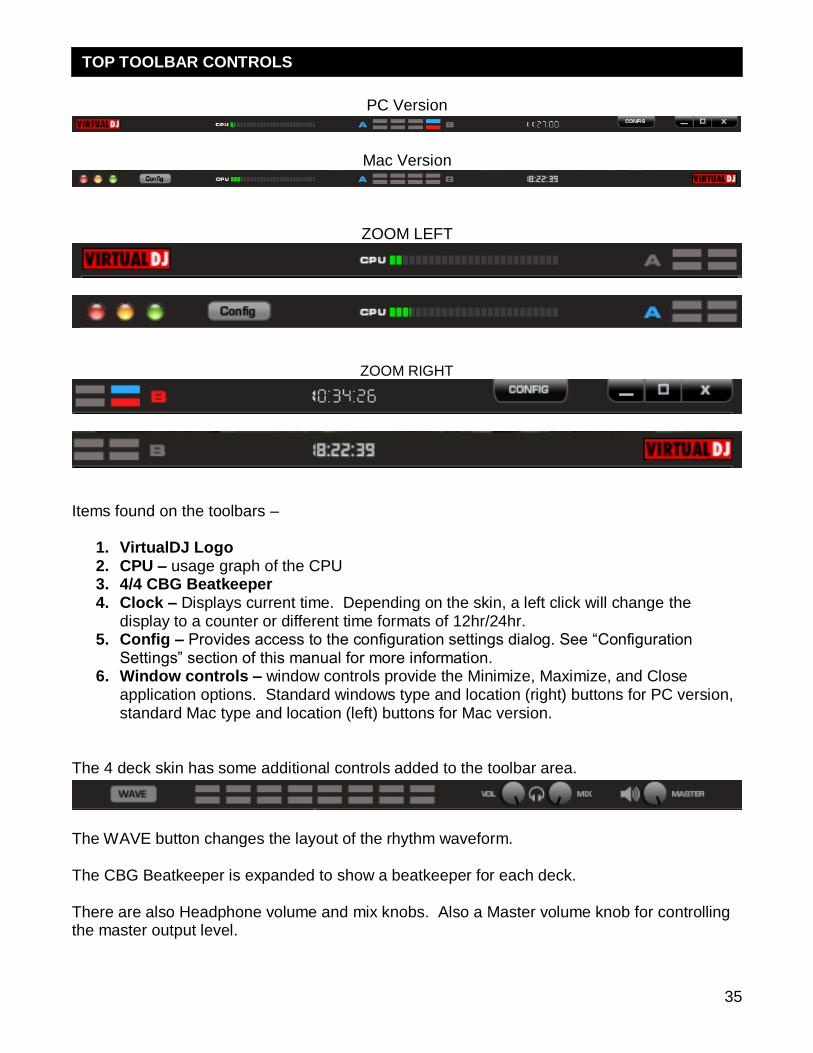
PC Version
Mac Version
ZOOM LEFT
ZOOM RIGHT
Items found on the toolbars –
1. VirtualDJ Logo 2. CPU – usage graph of the CPU 3. 4/4 CBG Beatkeeper 4. Clock – Displays current time. Depending on the skin, a left click will change the
display to a counter or different time formats of 12hr/24hr. 5. Config – Provides access to the configuration settings dialog. See ―Configuration
Settings‖ section of this manual for more information. 6. Window controls – window controls provide the Minimize, Maximize, and Close
application options. Standard windows type and location (right) buttons for PC version, standard Mac type and location (left) buttons for Mac version.
The 4 deck skin has some additional controls added to the toolbar area.
The WAVE button changes the layout of the rhythm waveform. The CBG Beatkeeper is expanded to show a beatkeeper for each deck. There are also Headphone volume and mix knobs. Also a Master volume knob for controlling the master output level.
TOP TOOLBAR CONTROLS
36
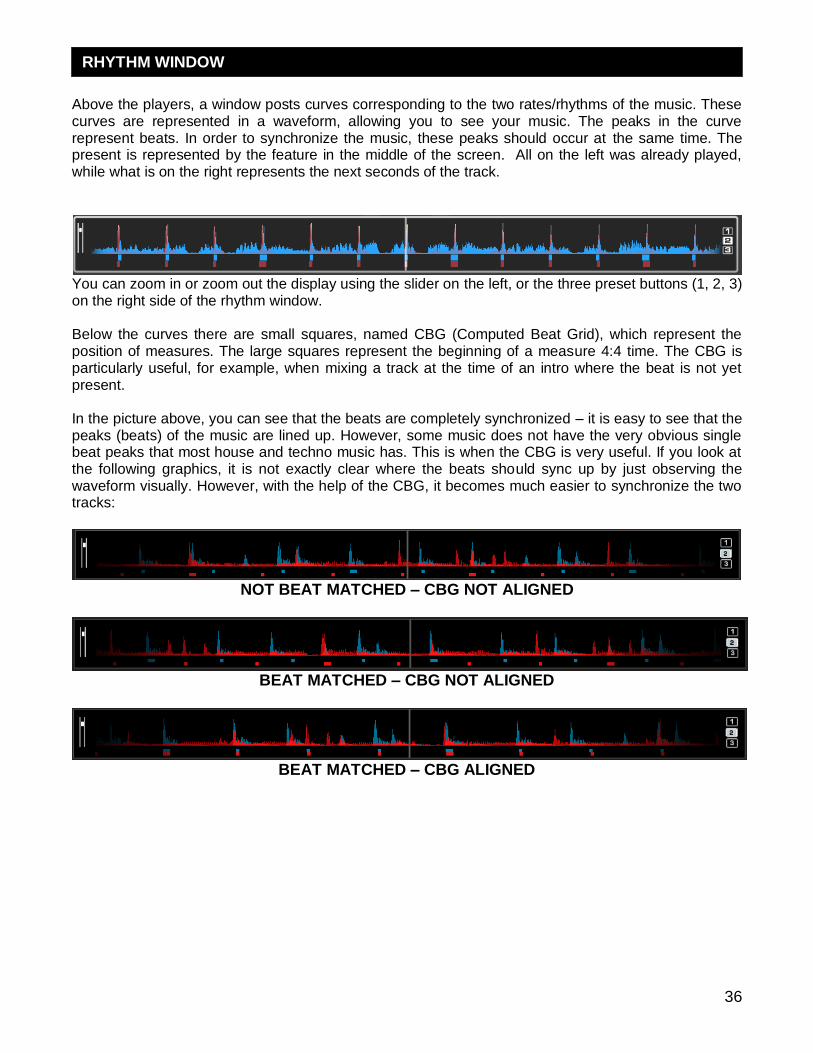
Above the players, a window posts curves corresponding to the two rates/rhythms of the music. These curves are represented in a waveform, allowing you to see your music. The peaks in the curve represent beats. In order to synchronize the music, these peaks should occur at the same time. The present is represented by the feature in the middle of the screen. All on the left was already played, while what is on the right represents the next seconds of the track.
You can zoom in or zoom out the display using the slider on the left, or the three preset buttons (1, 2, 3) on the right side of the rhythm window. Below the curves there are small squares, named CBG (Computed Beat Grid), which represent the position of measures. The large squares represent the beginning of a measure 4:4 time. The CBG is particularly useful, for example, when mixing a track at the time of an intro where the beat is not yet present. In the picture above, you can see that the beats are completely synchronized – it is easy to see that the peaks (beats) of the music are lined up. However, some music does not have the very obvious single beat peaks that most house and techno music has. This is when the CBG is very useful. If you look at the following graphics, it is not exactly clear where the beats should sync up by just observing the waveform visually. However, with the help of the CBG, it becomes much easier to synchronize the two tracks:
NOT BEAT MATCHED – CBG NOT ALIGNED
BEAT MATCHED – CBG NOT ALIGNED
BEAT MATCHED – CBG ALIGNED
RHYTHM WINDOW
37
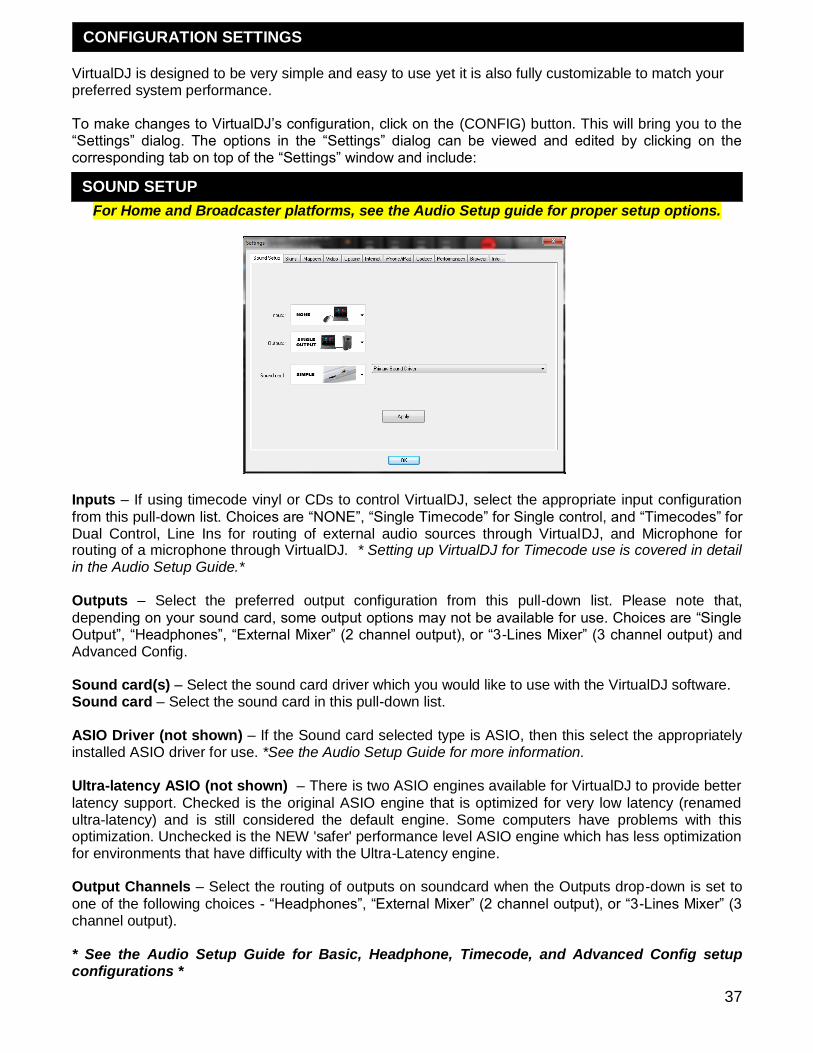
VirtualDJ is designed to be very simple and easy to use yet it is also fully customizable to match your preferred system performance. To make changes to VirtualDJ‘s configuration, click on the (CONFIG) button. This will bring you to the ―Settings‖ dialog. The options in the ―Settings‖ dialog can be viewed and edited by clicking on the corresponding tab on top of the ―Settings‖ window and include:
For Home and Broadcaster platforms, see the Audio Setup guide for proper setup options.
Inputs – If using timecode vinyl or CDs to control VirtualDJ, select the appropriate input configuration
from this pull-down list. Choices are ―NONE‖, ―Single Timecode‖ for Single control, and ―Timecodes‖ for Dual Control, Line Ins for routing of external audio sources through VirtualDJ, and Microphone for routing of a microphone through VirtualDJ. * Setting up VirtualDJ for Timecode use is covered in detail in the Audio Setup Guide.*
Outputs – Select the preferred output configuration from this pull-down list. Please note that,
depending on your sound card, some output options may not be available for use. Choices are ―Single Output‖, ―Headphones‖, ―External Mixer‖ (2 channel output), or ―3-Lines Mixer‖ (3 channel output) and Advanced Config. Sound card(s) – Select the sound card driver which you would like to use with the VirtualDJ software. Sound card – Select the sound card in this pull-down list. ASIO Driver (not shown) – If the Sound card selected type is ASIO, then this select the appropriately installed ASIO driver for use. *See the Audio Setup Guide for more information. Ultra-latency ASIO (not shown) – There is two ASIO engines available for VirtualDJ to provide better
latency support. Checked is the original ASIO engine that is optimized for very low latency (renamed ultra-latency) and is still considered the default engine. Some computers have problems with this optimization. Unchecked is the NEW 'safer' performance level ASIO engine which has less optimization for environments that have difficulty with the Ultra-Latency engine. Output Channels – Select the routing of outputs on soundcard when the Outputs drop-down is set to
one of the following choices - ―Headphones‖, ―External Mixer‖ (2 channel output), or ―3-Lines Mixer‖ (3 channel output). * See the Audio Setup Guide for Basic, Headphone, Timecode, and Advanced Config setup configurations *
SOUND SETUP
CONFIGURATION SETTINGS
38
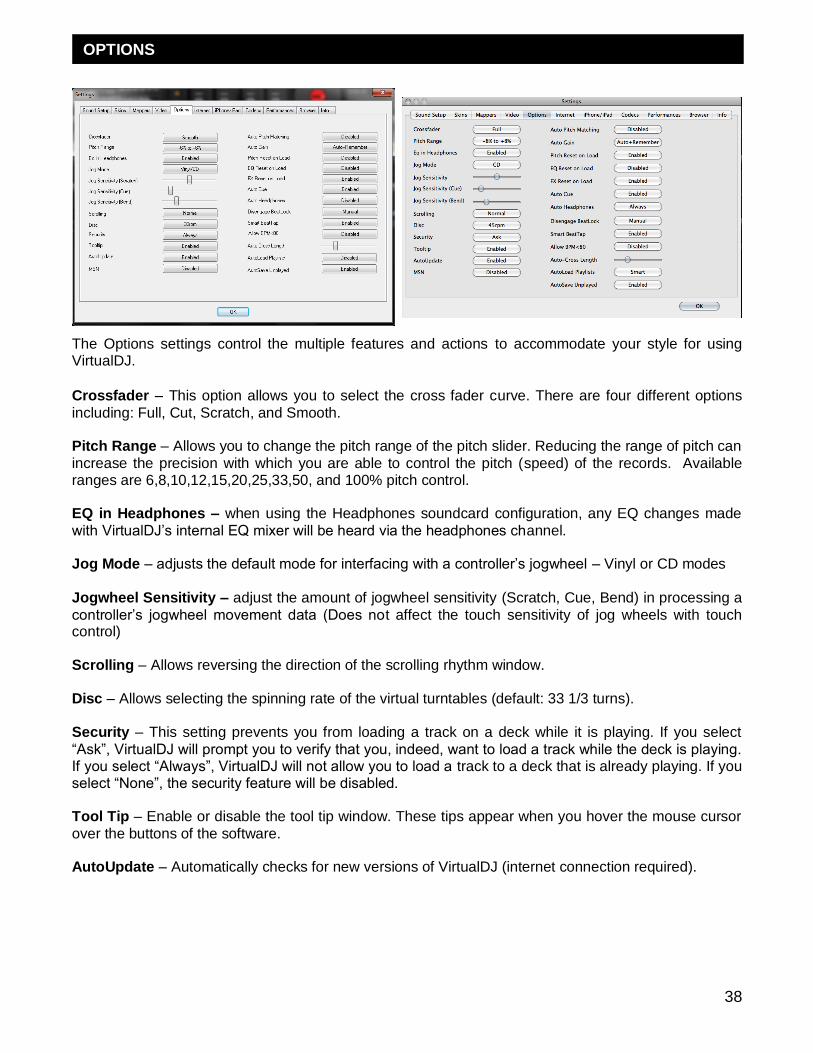
The Options settings control the multiple features and actions to accommodate your style for using VirtualDJ.
Crossfader – This option allows you to select the cross fader curve. There are four different options
including: Full, Cut, Scratch, and Smooth. Pitch Range – Allows you to change the pitch range of the pitch slider. Reducing the range of pitch can
increase the precision with which you are able to control the pitch (speed) of the records. Available ranges are 6,8,10,12,15,20,25,33,50, and 100% pitch control. EQ in Headphones – when using the Headphones soundcard configuration, any EQ changes made
with VirtualDJ‘s internal EQ mixer will be heard via the headphones channel. Jog Mode – adjusts the default mode for interfacing with a controller‘s jogwheel – Vinyl or CD modes
Jogwheel Sensitivity – adjust the amount of jogwheel sensitivity (Scratch, Cue, Bend) in processing a
controller‘s jogwheel movement data (Does not affect the touch sensitivity of jog wheels with touch control) Scrolling – Allows reversing the direction of the scrolling rhythm window. Disc – Allows selecting the spinning rate of the virtual turntables (default: 33 1/3 turns). Security – This setting prevents you from loading a track on a deck while it is playing. If you select
―Ask‖, VirtualDJ will prompt you to verify that you, indeed, want to load a track while the deck is playing. If you select ―Always‖, VirtualDJ will not allow you to load a track to a deck that is already playing. If you select ―None‖, the security feature will be disabled. Tool Tip – Enable or disable the tool tip window. These tips appear when you hover the mouse cursor
over the buttons of the software. AutoUpdate – Automatically checks for new versions of VirtualDJ (internet connection required).
OPTIONS
39
MSN – When activated, this option will allow your Windows LIVE Messenger to show the music you are playing. To take advantage of this feature, you need to make sure that the ―what I am listening‖ option is on in your MSN Messenger. Auto Pitch Matching – When loading a song, automatically adjusts the pitch so that the BPM matches
the BPM of the song currently playing. Auto Gain – This is the auto gain adjustment setting for VirtualDJ. The values are :
Disabled – Use the raw db level of the track as it was recorded, ripped, or normalized Auto – normalize the track to a 0db level for play Auto+Remember – normalize the track to a 0db level for play if loaded for first time, then
remember the last db gain adjust for next loading of the track. Remember – loads the track the first time using the Disabled setting, then remember the last db
gain adjust for next loading of the track Pitch Reset on Load – If you enable this option, the pitch slider will be reset to 0% every time you load
a track. EQ Reset on Load – If enabled, this option will reset the equalizer on the deck when you load a new
track to the deck. FX Reset on Load – If enabled, this option will reset (turn off) the FX on the deck when you load a new
track to the deck. Auto Cue – If enabled, will advance track position to the first cue point if one exists (or with the first beat of the song if no cue exists and if ―always‖ is selected) when loading a track. Auto Headphones – This option allows for automatic switching of headphone cues. If you select ―on load‖, the headphone cue will switch the headphone cue when you load a new track. If you select ―always‖ the headphone cue will switch when you load a new track or scratch a track that is already playing.
OPTIONS
40
Disengage Beatlock – Once engaged, the Beatlock feature will keep the deck locked to the beat on the other deck, no matter if you are scratching or changing the pitch on the other deck. Disengage ―on load‖ or ―on switch‖ will automatically disengage the beatlock feature when the deck is loaded/switched. Smart BeatTap – When enabled and using the beat_tap action, it will automatically "snap" to the
nearest plausible BPM and phase. This allows for very accurate BPM by just tapping 3 or 4 beats, the first tap will set the phase only, snapping to the nearest beat (you can tap only once to change the phase or the 4:4 strong beat, for example). One tap will not change the bpm. Subsequent taps will not change the phase, but change the bpm to the nearest plausible bpm value. Allow BPM <80 – Allows adjustment to the BPM Engine‘s value range. Disabled the range is set between 80 and 240. A setting of Smart sets the range for values between 60 and 240. Auto-Cross Length – Use this slider to specify the duration of the fade during automatic mixing. If this is set to 0 (left side), the tracks will play from start to finish. AutoLoad Playlists – See page 15 – ―Playlist Setup‖
AutoSave Unplayed – See page 19 – ―AutoSave Unplayed‖
OPTIONS
41
VirtualDJ Performance Settings tab is for optimizing performance to the capabilities of the computer. Depending on the system‘s resources, some settings will work better than others.
NOTE: When new components (controllers, soundcards, external drive, and software) are added to the
system, performance options may require changing to achieve a new best possible performance based on the additions or changes to the system.
Soundcard Latency – the amount of time it takes for a device to respond to a command. Latency makes a
significant difference when using timecoded vinyl, CDs, MIDI or external control devices. The lower the latency setting the more instantly the software will respond, but the more likely you will hear glitches and pops if your computer is not fast enough to process the audio.
NOTE: in ASIO mode, some soundcard drivers don‘t work well with a latency forced by the
software. In such case, use the ―Auto‖ value (as pictured), and set the latency in the soundcard‘s control panel.
Safe Mode – When using a DirectX mode setting (like Simple, Dual, Mono or 4.1), VirtualDJ is less
likely to produce glitches and pops if your CPU is momentarily busy. The performance trade off is scratching and pitch adjustments will use more CPU, especially with advanced algorithms. So, if using advanced Master Tempo this will probably need to be disabled, unless the computer is very fast.
NOTE: this option has no effect on ASIO or Low-Latency modes
Scratch – Allows for adjustment to how VirtualDJ reacts to scratch motions
Optimize for:
Quality – VirtualDJ will optimize the scratching algorithm for the best sound quality
Latency – VirtualDJ will optimize the scratching algorithm for the best latency
PERFORMANCE SETTINGS
42
Master Tempo PureScratch (no Master Tempo) – Don't use timestretch, but focus on getting a pure scratching sound. This option can be used when you want VirtualDJ to act like traditional turntables and focus on providing a quality scratch sound. Fast Stretching – apply a real time / high quality time-stretching algorithm using a minimal amount of processor power Advanced Stretching – apply a real time / higher quality time-stretching algorithm where the
quality is better at extreme pitch changes at the expense of a slightly higher use of processor power Memory
Max Load – Specifies the maximum limit beyond which the track will not be loaded in memory.
Loading tracks which are too long in memory can put a strain on your system performance and cause poor quality playback. This function makes it possible to play long tracks without overloading the memory of your computer by streaming the tracks direct from the hard disk. Acceptable values are in minutes and any track below the assigned value will be loaded into memory. To always load all tracks into memory use the value - infinite Skin Resizing Fast Resizing – when changing the size of VirtualDJ's skin, the graphic engine will try to minimize CPU usage to perform the resizing of the skin Quality Resizing – when changing the size of VirtualDJ's skin, the graphic engine will try to
resize the skin as faithfully as possible
PERFORMANCE SETTINGS
PERFORMANCE SETTINGS
43
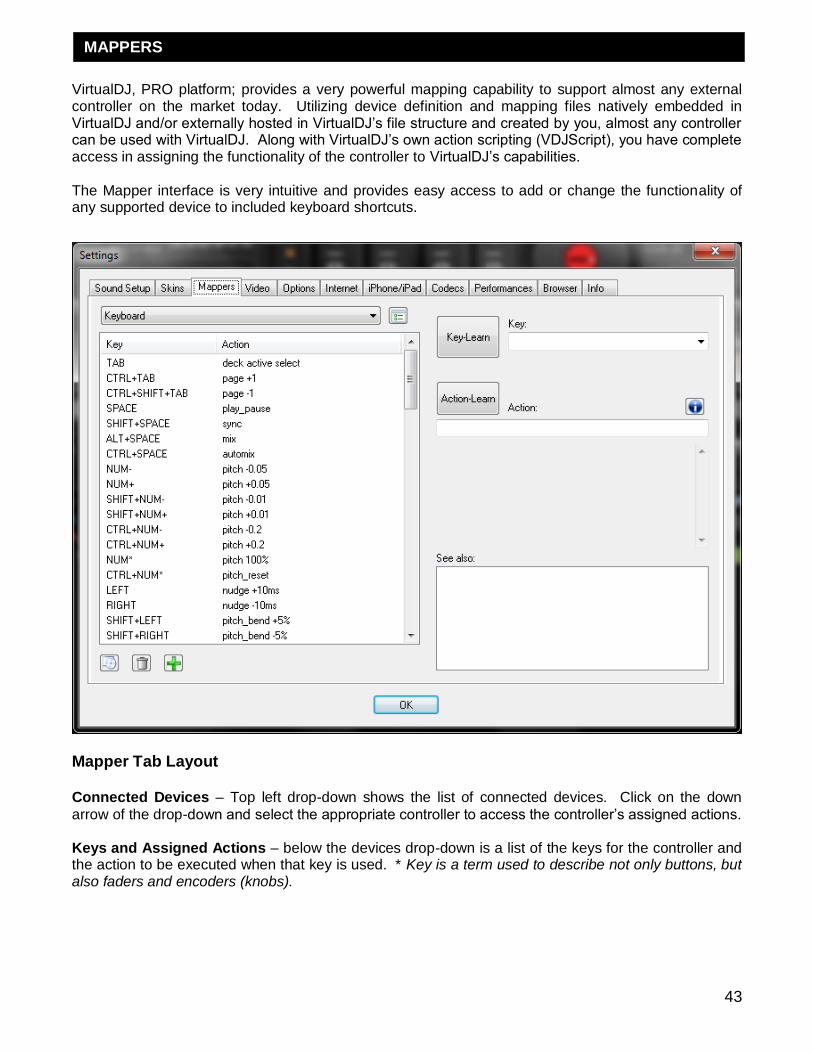
VirtualDJ, PRO platform; provides a very powerful mapping capability to support almost any external controller on the market today. Utilizing device definition and mapping files natively embedded in VirtualDJ and/or externally hosted in VirtualDJ‘s file structure and created by you, almost any controller can be used with VirtualDJ. Along with VirtualDJ‘s own action scripting (VDJScript), you have complete access in assigning the functionality of the controller to VirtualDJ‘s capabilities. The Mapper interface is very intuitive and provides easy access to add or change the functionality of any supported device to included keyboard shortcuts.
Mapper Tab Layout
Connected Devices – Top left drop-down shows the list of connected devices. Click on the down
arrow of the drop-down and select the appropriate controller to access the controller‘s assigned actions. Keys and Assigned Actions – below the devices drop-down is a list of the keys for the controller and the action to be executed when that key is used. * Key is a term used to describe not only buttons, but also faders and encoders (knobs).
MAPPERS
44
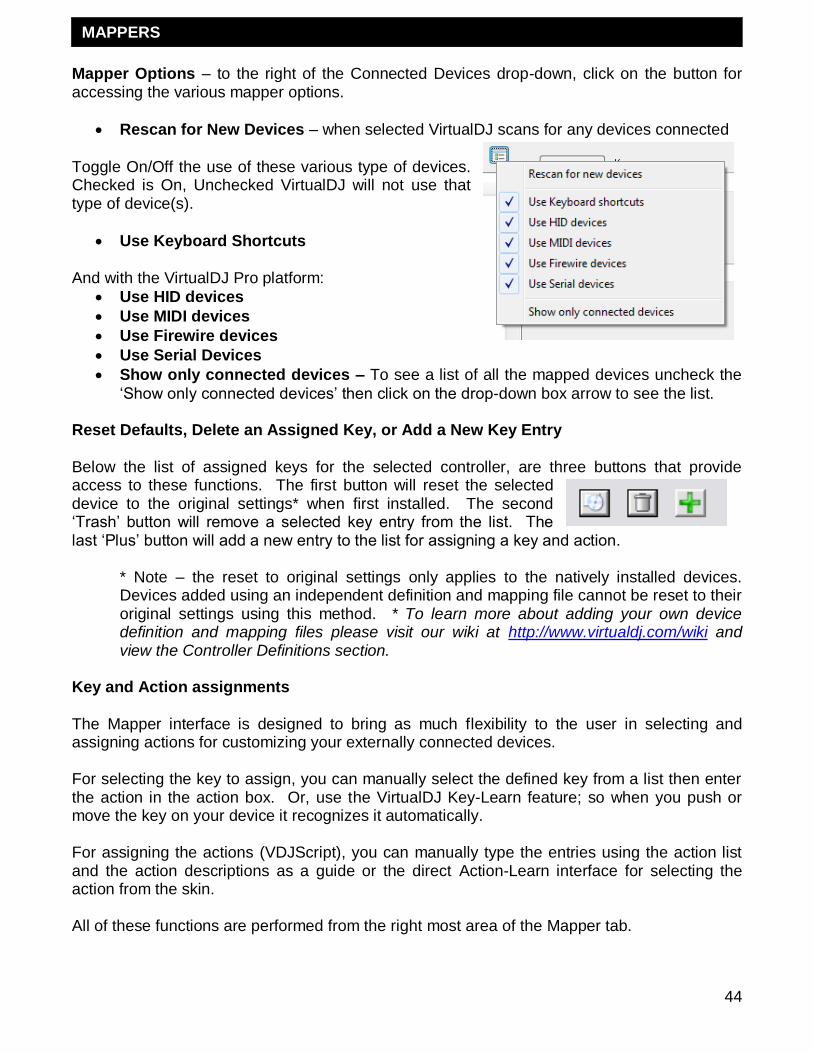
Mapper Options – to the right of the Connected Devices drop-down, click on the button for accessing the various mapper options.
Rescan for New Devices – when selected VirtualDJ scans for any devices connected
Toggle On/Off the use of these various type of devices. Checked is On, Unchecked VirtualDJ will not use that type of device(s).
Use Keyboard Shortcuts
And with the VirtualDJ Pro platform:
Use HID devices
Use MIDI devices
Use Firewire devices
Use Serial Devices
Show only connected devices – To see a list of all the mapped devices uncheck the
‗Show only connected devices‘ then click on the drop-down box arrow to see the list. Reset Defaults, Delete an Assigned Key, or Add a New Key Entry Below the list of assigned keys for the selected controller, are three buttons that provide access to these functions. The first button will reset the selected device to the original settings* when first installed. The second ‗Trash‘ button will remove a selected key entry from the list. The last ‗Plus‘ button will add a new entry to the list for assigning a key and action.
* Note – the reset to original settings only applies to the natively installed devices. Devices added using an independent definition and mapping file cannot be reset to their original settings using this method. * To learn more about adding your own device definition and mapping files please visit our wiki at http://www.virtualdj.com/wiki and view the Controller Definitions section.
Key and Action assignments
The Mapper interface is designed to bring as much flexibility to the user in selecting and assigning actions for customizing your externally connected devices. For selecting the key to assign, you can manually select the defined key from a list then enter the action in the action box. Or, use the VirtualDJ Key-Learn feature; so when you push or move the key on your device it recognizes it automatically. For assigning the actions (VDJScript), you can manually type the entries using the action list and the action descriptions as a guide or the direct Action-Learn interface for selecting the action from the skin. All of these functions are performed from the right most area of the Mapper tab.
MAPPERS

45
Assign a Key and Action using Key-Learn + Action-Learn The fastest and most likely the easiest is using the Key-Learn in combination with the Action-Learn skin selection options.
1. Select your controller from the devices drop-down
2. Click the Plus button at the bottom to Add a new entry (Key-Learn is on by default)
3. Press or Move the appropriate item on the
controller. You should see a key descriptor show in the Key drop-down list that represents the key you just touched/moved.
4. Click on the Action-Learn button and the
mapper dialog will disappear exposing the skin for selecting the appropriate action to assign.
5. Click on the skin element whose action you
now want to assign to the device‘s key. (If an action is on a subpanel of the skin, then you must have that panel showing before you start this process.)
6. The mapper dialog will appear and have the selected skin elements action in the Action box.
Now you can manually modify the action by adding additional parameters and actions. If you don‘t want to modify the selected action and want to assign more of your controller‘s keys to finish the mapping, just repeat steps 2 thru 6 above until you have completely mapped your controller. Assign a Key and Action manually
After clicking the Plus button to add a new entry, select the down arrow of the Key drop-down and select from the list of Key names that you want to assign. You can also still use the Key-Learn to select your key from the controller as well. After the key is identified, start typing the action you want performed in the Action box. Actions are composed of a verb word with parameters that follow and influences how the action performs. Underneath the Action box, is a description box that explains what the action does and what parameters can be assigned. If you are unsure of the action names, in the ‗See also‘ box is a list of the actions that can be applied to a key. This list will reduce in the number of entries as you type in the action box to show you the actions that most resemble what you are typing.
MAPPERS
46
Actions and Parameters (VDJScript) There are a large number of actions that have various types of parameters that can be added to give various levels of control when the action is applied. The standard for using the action with the parameter is - <action verb> <action parameter> . e.g. pitch +0.05 – changes the pitch slider to a position +0.05 from zero position. * To learn more about the actions visit our wiki at http://www.virtualdj.com/wiki and review the VDJScript section. * And examples of useful actions are on our wiki at http://www.virtualdj.com/wiki/VDJScript%20 Examples.html
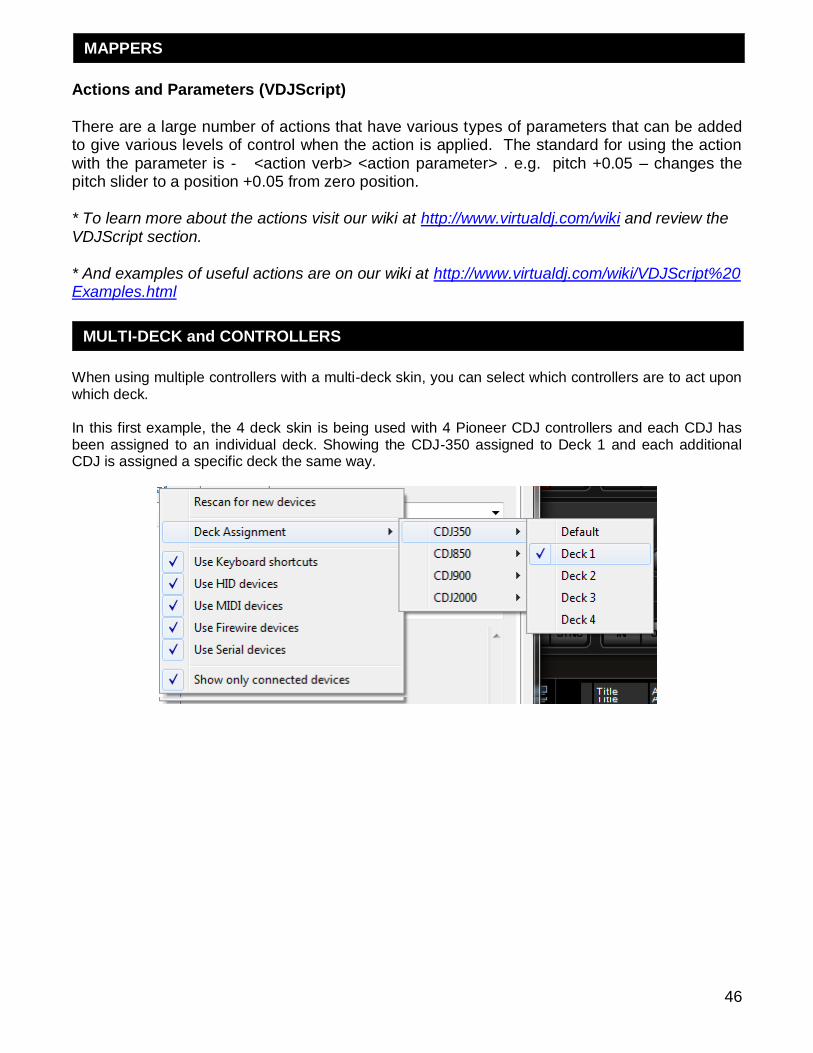
When using multiple controllers with a multi-deck skin, you can select which controllers are to act upon which deck. In this first example, the 4 deck skin is being used with 4 Pioneer CDJ controllers and each CDJ has been assigned to an individual deck. Showing the CDJ-350 assigned to Deck 1 and each additional CDJ is assigned a specific deck the same way.
MAPPERS
MULTI-DECK and CONTROLLERS
47
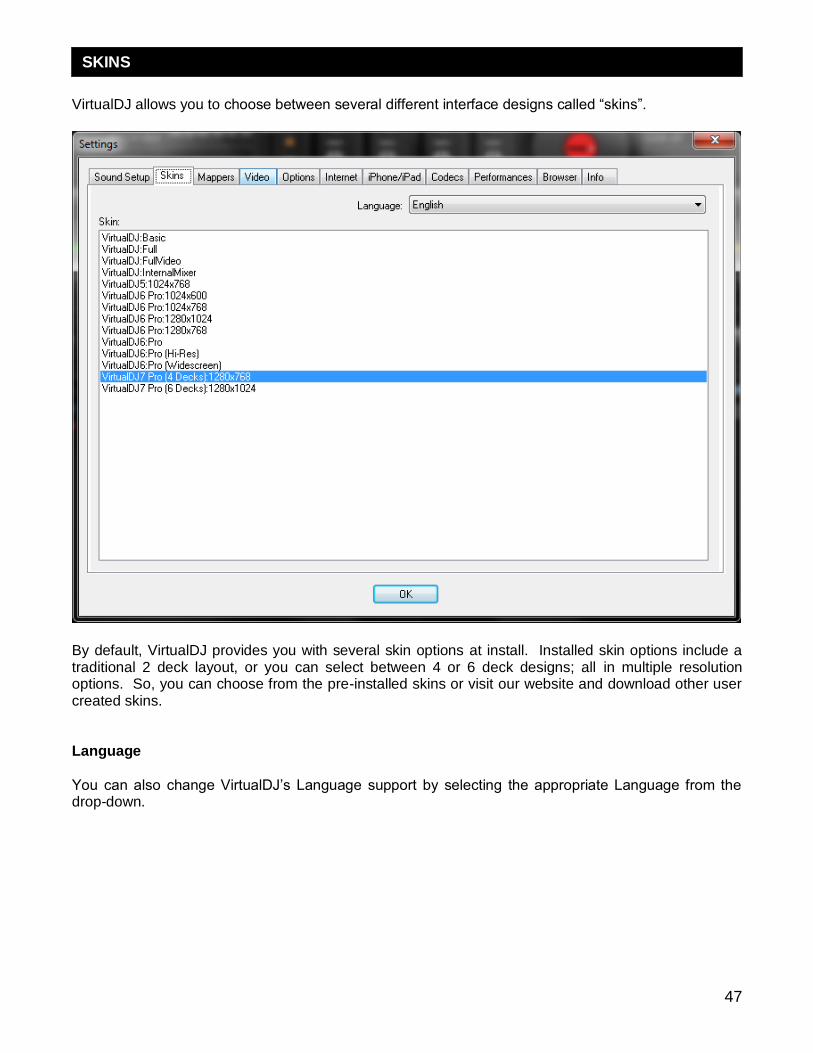
VirtualDJ allows you to choose between several different interface designs called ―skins‖.
By default, VirtualDJ provides you with several skin options at install. Installed skin options include a traditional 2 deck layout, or you can select between 4 or 6 deck designs; all in multiple resolution options. So, you can choose from the pre-installed skins or visit our website and download other user created skins.
Language
You can also change VirtualDJ‘s Language support by selecting the appropriate Language from the drop-down.
SKINS

48
VirtualDJ can now take advantage of many features while connected to the Internet. These features (MusicGroups, NetSearch, etc...) require you to have an active Membership on the VirtualDJ website, and to provide your login and password on this tab.
The MusicGroups feature is the ability for a DJ to show their playlists to other DJs, and help new DJs improve their music selection. You can create your own MusicGroup to display your own playlist, or one can ask to join more general MusicGroups in order to contribute to a larger group. VirtualDJ provides two kinds of Memberships: Premium Membership and Free Membership. The Premium Membership provides access to the NetSearch feature described on page 4 of this guide and access add-ons, premium technical support, and recognition from the VirtualDJ community. You can learn more about this membership by visiting - http://www.virtualdj.com/products/membership.html The Free Membership provides users to a sampling of the Netsearch features by allowing 2 full streams of NetSearch content per day and access to 30 second snippets of content after the use of the 2 full streams. Visit the VirtualDJ.com home page for more information on these great features!
INTERNET
49
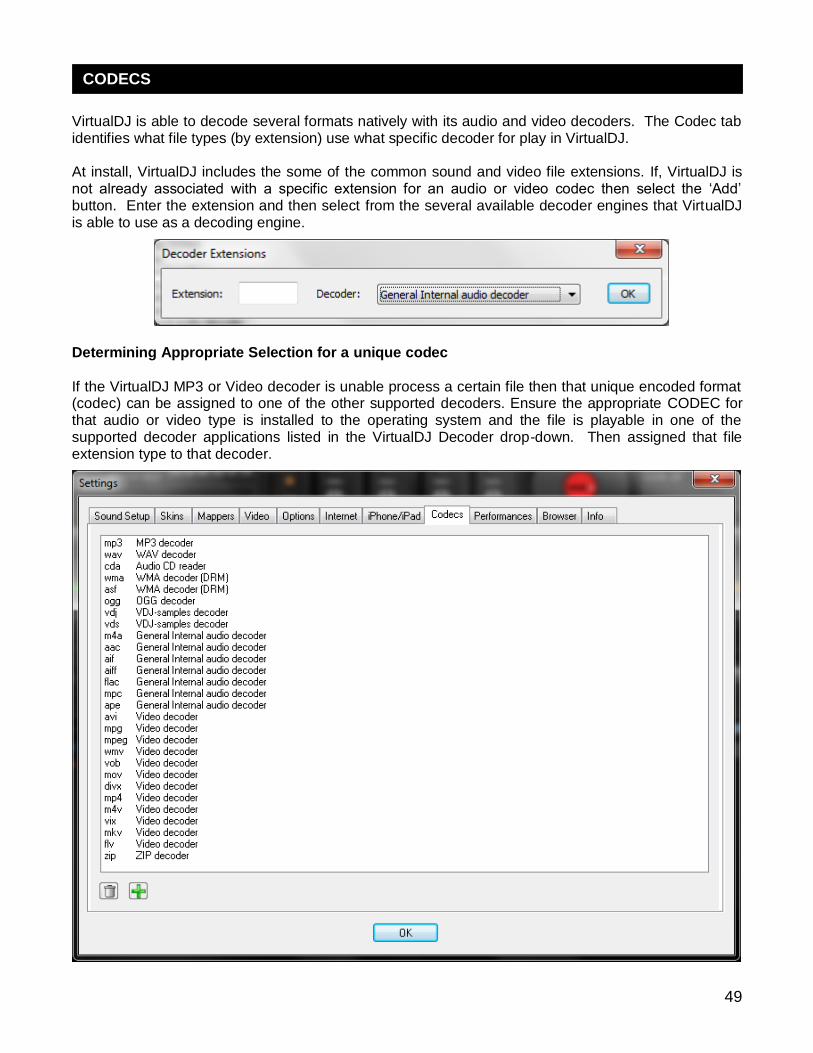
VirtualDJ is able to decode several formats natively with its audio and video decoders. The Codec tab identifies what file types (by extension) use what specific decoder for play in VirtualDJ. At install, VirtualDJ includes the some of the common sound and video file extensions. If, VirtualDJ is not already associated with a specific extension for an audio or video codec then select the ‗Add‘ button. Enter the extension and then select from the several available decoder engines that VirtualDJ is able to use as a decoding engine.
Determining Appropriate Selection for a unique codec
If the VirtualDJ MP3 or Video decoder is unable process a certain file then that unique encoded format (codec) can be assigned to one of the other supported decoders. Ensure the appropriate CODEC for that audio or video type is installed to the operating system and the file is playable in one of the supported decoder applications listed in the VirtualDJ Decoder drop-down. Then assigned that file extension type to that decoder.
CODECS
50
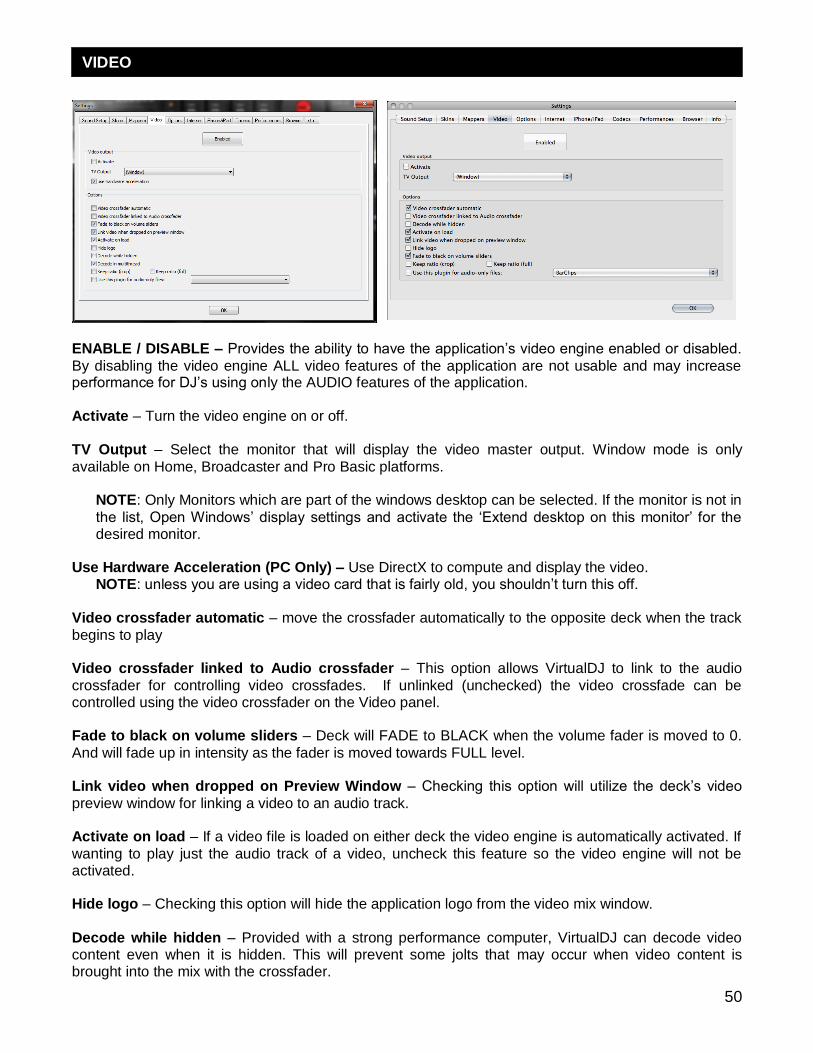
ENABLE / DISABLE – Provides the ability to have the application‘s video engine enabled or disabled.
By disabling the video engine ALL video features of the application are not usable and may increase performance for DJ‘s using only the AUDIO features of the application. Activate – Turn the video engine on or off.
TV Output – Select the monitor that will display the video master output. Window mode is only
available on Home, Broadcaster and Pro Basic platforms.
NOTE: Only Monitors which are part of the windows desktop can be selected. If the monitor is not in
the list, Open Windows‘ display settings and activate the ‗Extend desktop on this monitor‘ for the desired monitor.
Use Hardware Acceleration (PC Only) – Use DirectX to compute and display the video.
NOTE: unless you are using a video card that is fairly old, you shouldn‘t turn this off.
Video crossfader automatic – move the crossfader automatically to the opposite deck when the track
begins to play Video crossfader linked to Audio crossfader – This option allows VirtualDJ to link to the audio
crossfader for controlling video crossfades. If unlinked (unchecked) the video crossfade can be controlled using the video crossfader on the Video panel. Fade to black on volume sliders – Deck will FADE to BLACK when the volume fader is moved to 0.
And will fade up in intensity as the fader is moved towards FULL level. Link video when dropped on Preview Window – Checking this option will utilize the deck‘s video
preview window for linking a video to an audio track. Activate on load – If a video file is loaded on either deck the video engine is automatically activated. If
wanting to play just the audio track of a video, uncheck this feature so the video engine will not be activated. Hide logo – Checking this option will hide the application logo from the video mix window.
Decode while hidden – Provided with a strong performance computer, VirtualDJ can decode video content even when it is hidden. This will prevent some jolts that may occur when video content is brought into the mix with the crossfader.
VIDEO
51
Decode in multi-thread – Decode the video streams using all available CPUs/GPUs (faster, but on
some computers it can sometimes fail to load the video) Keep ratio (crop) – Keep the videos in 16/9 or 4/3 no matter what the screen resolution is, by cropping
the videos on the sides Keep ratio (full) – Keep the videos in 16/9 or 4/3 no matter what the screen resolution is, by adding black bars on the sides Audio Only Plug-in – Check this option and select the desired plug-in from the drop-down box. When playing audio-only files, this option will activate the plug-in to act as a visual. Example plug-in selection is the Clipbank.
The VirtualDJ Info tab provides the version number along with copyright statement for the application. There are three useful buttons: Check for Updates: makes and internet query to the VirtualDJ Download Center and checks to see if
any updates are available. [Internet Connection required] Download Plug-ins: Launches the browser associated with http request an directs the browser to the
‗Add-ons‘ section of the website. Reset to Factory settings: Reset VirtualDJ‘s settings back to the recommended defaults. All
configuration tabs are affected by the change. ** DO NOT use when playing LIVE. When clicked it forces a restart of the software to apply the changes.
VIDEO
INFO
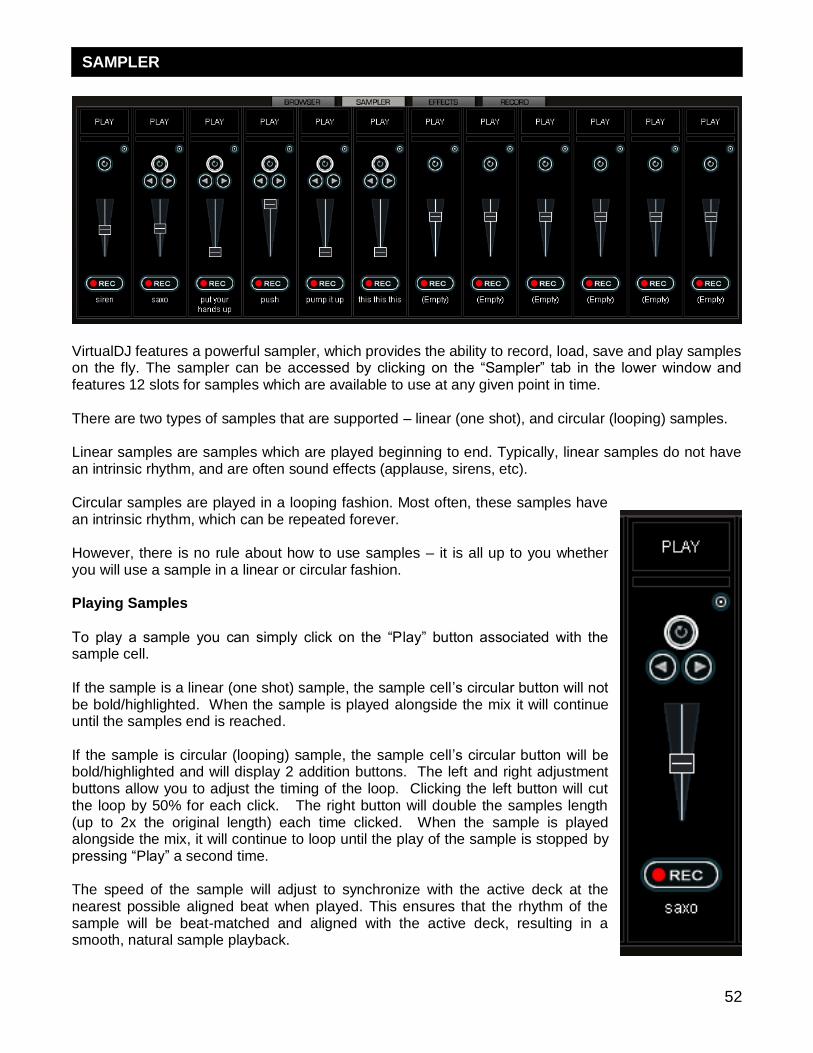
52
VirtualDJ features a powerful sampler, which provides the ability to record, load, save and play samples on the fly. The sampler can be accessed by clicking on the ―Sampler‖ tab in the lower window and features 12 slots for samples which are available to use at any given point in time. There are two types of samples that are supported – linear (one shot), and circular (looping) samples. Linear samples are samples which are played beginning to end. Typically, linear samples do not have an intrinsic rhythm, and are often sound effects (applause, sirens, etc). Circular samples are played in a looping fashion. Most often, these samples have an intrinsic rhythm, which can be repeated forever. However, there is no rule about how to use samples – it is all up to you whether you will use a sample in a linear or circular fashion. Playing Samples
To play a sample you can simply click on the ―Play‖ button associated with the sample cell. If the sample is a linear (one shot) sample, the sample cell‘s circular button will not be bold/highlighted. When the sample is played alongside the mix it will continue until the samples end is reached. If the sample is circular (looping) sample, the sample cell‘s circular button will be bold/highlighted and will display 2 addition buttons. The left and right adjustment buttons allow you to adjust the timing of the loop. Clicking the left button will cut the loop by 50% for each click. The right button will double the samples length (up to 2x the original length) each time clicked. When the sample is played alongside the mix, it will continue to loop until the play of the sample is stopped by pressing ―Play‖ a second time. The speed of the sample will adjust to synchronize with the active deck at the nearest possible aligned beat when played. This ensures that the rhythm of the sample will be beat-matched and aligned with the active deck, resulting in a smooth, natural sample playback.
SAMPLER
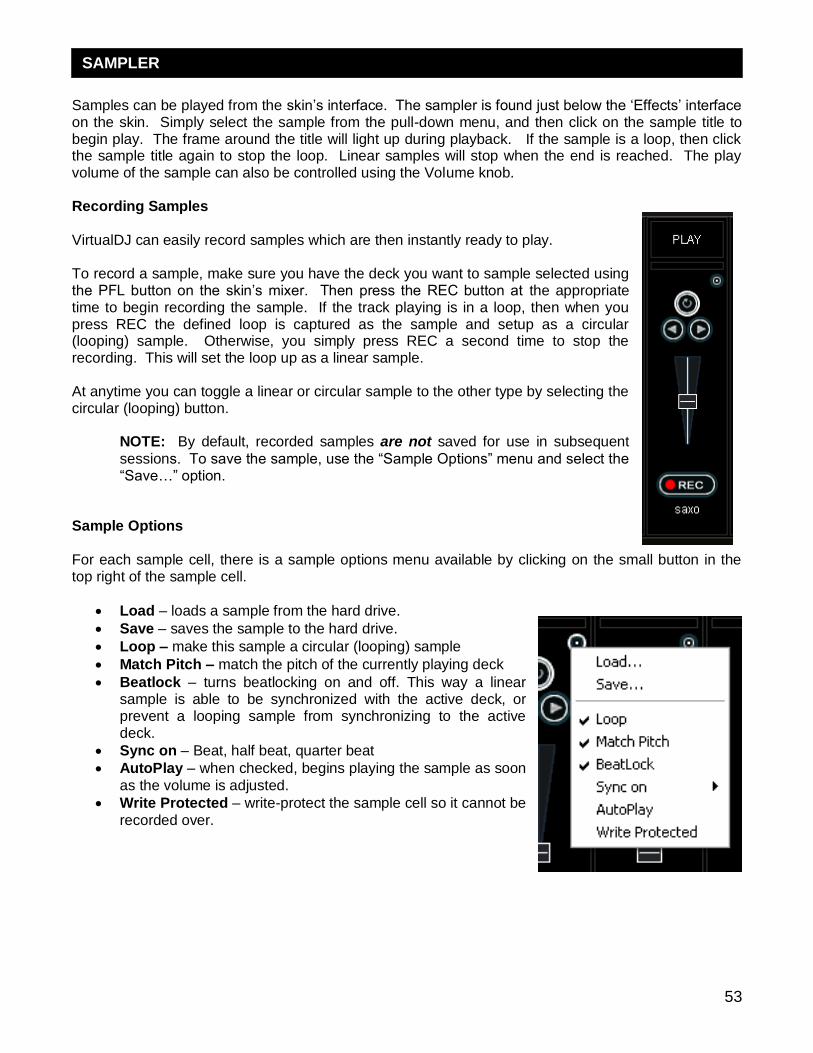
53
Samples can be played from the skin‘s interface. The sampler is found just below the ‗Effects‘ interface on the skin. Simply select the sample from the pull-down menu, and then click on the sample title to begin play. The frame around the title will light up during playback. If the sample is a loop, then click the sample title again to stop the loop. Linear samples will stop when the end is reached. The play volume of the sample can also be controlled using the Volume knob. Recording Samples VirtualDJ can easily record samples which are then instantly ready to play. To record a sample, make sure you have the deck you want to sample selected using the PFL button on the skin‘s mixer. Then press the REC button at the appropriate time to begin recording the sample. If the track playing is in a loop, then when you press REC the defined loop is captured as the sample and setup as a circular (looping) sample. Otherwise, you simply press REC a second time to stop the recording. This will set the loop up as a linear sample. At anytime you can toggle a linear or circular sample to the other type by selecting the circular (looping) button.
NOTE: By default, recorded samples are not saved for use in subsequent
sessions. To save the sample, use the ―Sample Options‖ menu and select the ―Save…‖ option.
Sample Options
For each sample cell, there is a sample options menu available by clicking on the small button in the top right of the sample cell.
Load – loads a sample from the hard drive.
Save – saves the sample to the hard drive.
Loop – make this sample a circular (looping) sample
Match Pitch – match the pitch of the currently playing deck
Beatlock – turns beatlocking on and off. This way a linear sample is able to be synchronized with the active deck, or prevent a looping sample from synchronizing to the active deck.
Sync on – Beat, half beat, quarter beat
AutoPlay – when checked, begins playing the sample as soon
as the volume is adjusted.
Write Protected – write-protect the sample cell so it cannot be
recorded over.
SAMPLER
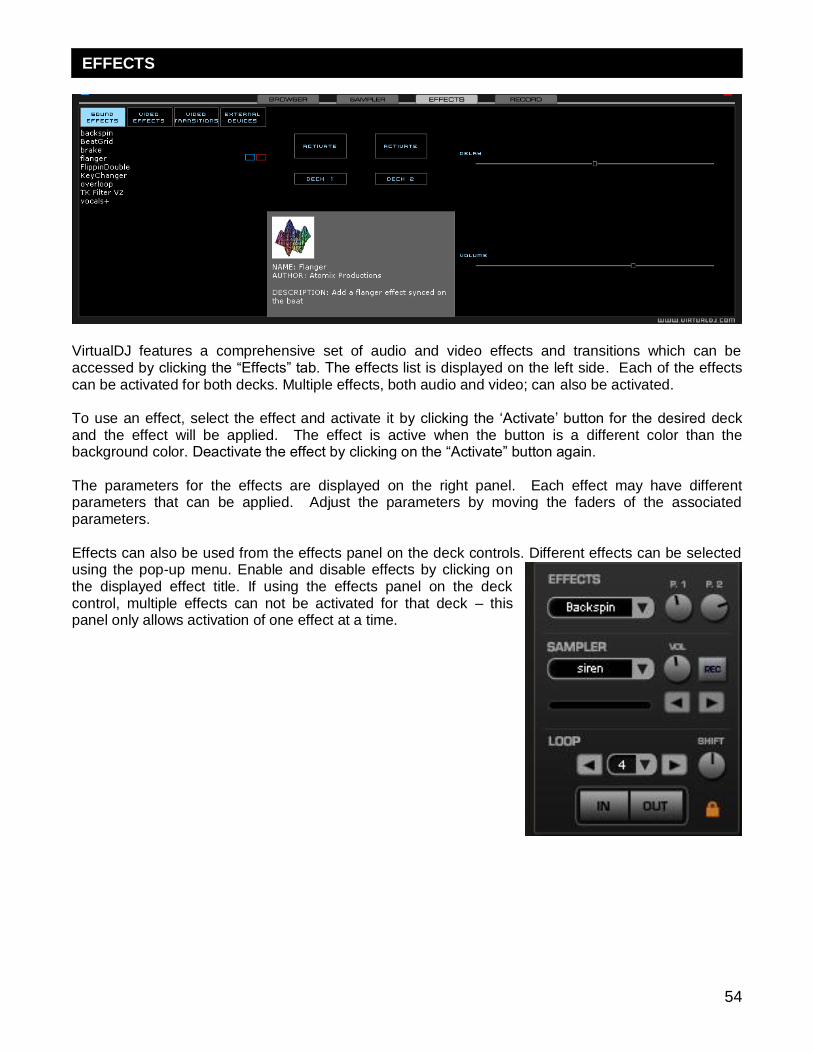
54
VirtualDJ features a comprehensive set of audio and video effects and transitions which can be accessed by clicking the ―Effects‖ tab. The effects list is displayed on the left side. Each of the effects can be activated for both decks. Multiple effects, both audio and video; can also be activated. To use an effect, select the effect and activate it by clicking the ‗Activate‘ button for the desired deck and the effect will be applied. The effect is active when the button is a different color than the background color. Deactivate the effect by clicking on the ―Activate‖ button again. The parameters for the effects are displayed on the right panel. Each effect may have different parameters that can be applied. Adjust the parameters by moving the faders of the associated parameters. Effects can also be used from the effects panel on the deck controls. Different effects can be selected using the pop-up menu. Enable and disable effects by clicking on the displayed effect title. If using the effects panel on the deck control, multiple effects can not be activated for that deck – this panel only allows activation of one effect at a time.
EFFECTS
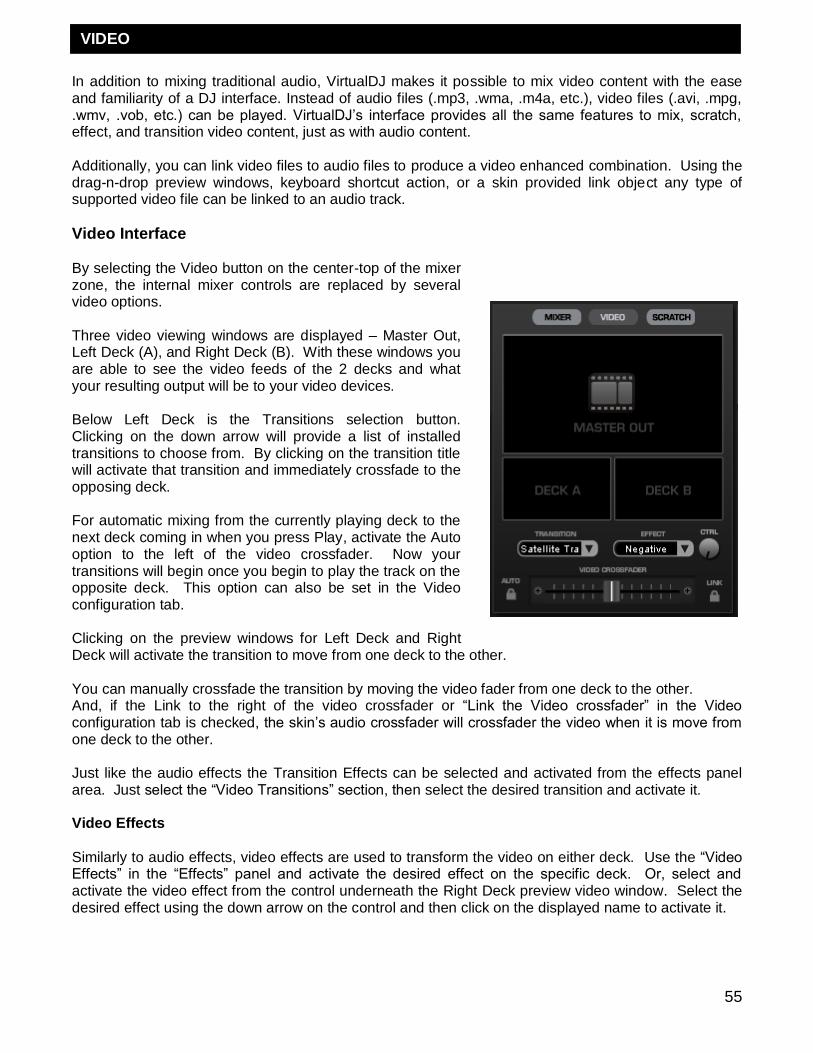
55
In addition to mixing traditional audio, VirtualDJ makes it possible to mix video content with the ease and familiarity of a DJ interface. Instead of audio files (.mp3, .wma, .m4a, etc.), video files (.avi, .mpg, .wmv, .vob, etc.) can be played. VirtualDJ‘s interface provides all the same features to mix, scratch, effect, and transition video content, just as with audio content. Additionally, you can link video files to audio files to produce a video enhanced combination. Using the drag-n-drop preview windows, keyboard shortcut action, or a skin provided link object any type of supported video file can be linked to an audio track.
Video Interface
By selecting the Video button on the center-top of the mixer zone, the internal mixer controls are replaced by several video options. Three video viewing windows are displayed – Master Out, Left Deck (A), and Right Deck (B). With these windows you are able to see the video feeds of the 2 decks and what your resulting output will be to your video devices. Below Left Deck is the Transitions selection button. Clicking on the down arrow will provide a list of installed transitions to choose from. By clicking on the transition title will activate that transition and immediately crossfade to the opposing deck. For automatic mixing from the currently playing deck to the next deck coming in when you press Play, activate the Auto option to the left of the video crossfader. Now your transitions will begin once you begin to play the track on the opposite deck. This option can also be set in the Video configuration tab. Clicking on the preview windows for Left Deck and Right Deck will activate the transition to move from one deck to the other. You can manually crossfade the transition by moving the video fader from one deck to the other. And, if the Link to the right of the video crossfader or ―Link the Video crossfader‖ in the Video configuration tab is checked, the skin‘s audio crossfader will crossfader the video when it is move from one deck to the other. Just like the audio effects the Transition Effects can be selected and activated from the effects panel area. Just select the ―Video Transitions‖ section, then select the desired transition and activate it. Video Effects
Similarly to audio effects, video effects are used to transform the video on either deck. Use the ―Video Effects‖ in the ―Effects‖ panel and activate the desired effect on the specific deck. Or, select and activate the video effect from the control underneath the Right Deck preview video window. Select the desired effect using the down arrow on the control and then click on the displayed name to activate it.
VIDEO

56
Video Files in the Browser
Video files are distinguished in the Browser with a small, blue ―V‖ on their icon . And, audio files
with linked videos are distinguished in the Browser with a small, blue ―L‖ on their icon . When playing a video/linked audio file, a video window will open in VirtualDJ. If the installed video card has a TV output or a second output screen, the secondary output can be specified as the output for full-screen display, instead of the windowed output. The desired output is specified by using settings in the Configuration dialog on the Video tab. If full-screen output does not appear, check that the output is recognized in Windows display properties, and that Windows is in a dual monitor mode (not clone). For more information, see the video card manufacture‘s instruction manual. VirtualDJ provides an installed Rip DVD utility for ripping the video files from a DVD to the computer‘s hard disk in a high-quality .VOB format. Optimization In general, video mixing is much heavier in computer resources than audio mixing so certain optimization may help performance, especially when dealing with full frame rate video (such as DVD in high definition). There are several parameters which determine the speed with which VirtualDJ decompresses and displays video content – the size of memory present on your video card, the speed of the graphics processor (GPU), the speed of the main central processor (CPU), and the access speed of the hard disk. Another parameter which largely influences performance is the type of file. An MPEG1 format file is much faster to decompress than a VOB format file. In a similar way, a file with a 320x240 resolution is much faster to decompress than a file with a 720x576 resolution. By default, VirtualDJ decompresses only the content which is visible in the video mix window. This means that if there are two clips which are playing but only one is visible, VirtualDJ will only decompress the video which is visible. If both video files are shown in the mix window, then VirtualDJ will decompress both. This makes the software perform quicker and also allows it to perform better on slower machines. However, this may result in small jolts at the time of transitions. If the computer configuration is sufficiently powerful, we recommend checking the ―Decode while hidden‖ box in the ―Video‖ settings in the ―Config‖ menu to obtain more fluid transitions. And finally, we recommend the use of an output resolution no greater than the resolution of the video files. If using higher resolutions, low-resolution content will not look any better but will be using more computer resources. A resolution of 800x600 should be sufficient if using high-quality DVD video.
VIDEO
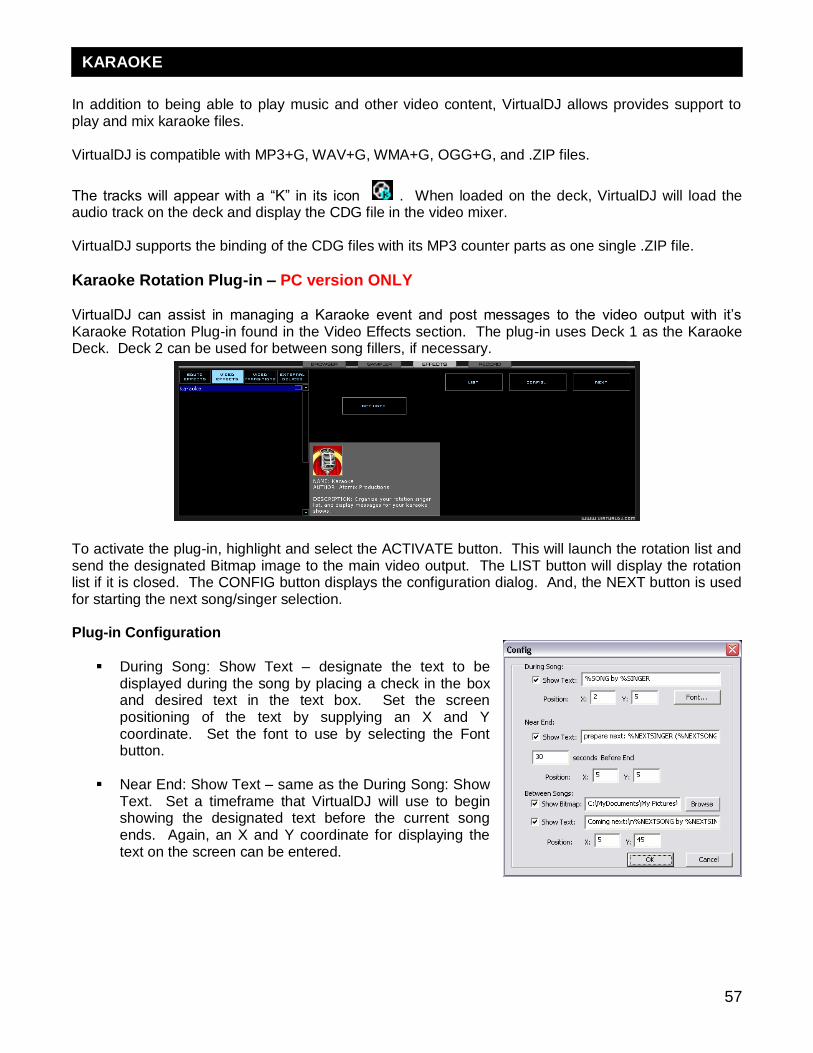
57
In addition to being able to play music and other video content, VirtualDJ allows provides support to play and mix karaoke files. VirtualDJ is compatible with MP3+G, WAV+G, WMA+G, OGG+G, and .ZIP files.
The tracks will appear with a ―K‖ in its icon . When loaded on the deck, VirtualDJ will load the audio track on the deck and display the CDG file in the video mixer. VirtualDJ supports the binding of the CDG files with its MP3 counter parts as one single .ZIP file.
Karaoke Rotation Plug-in – PC version ONLY VirtualDJ can assist in managing a Karaoke event and post messages to the video output with it‘s Karaoke Rotation Plug-in found in the Video Effects section. The plug-in uses Deck 1 as the Karaoke Deck. Deck 2 can be used for between song fillers, if necessary.
To activate the plug-in, highlight and select the ACTIVATE button. This will launch the rotation list and send the designated Bitmap image to the main video output. The LIST button will display the rotation list if it is closed. The CONFIG button displays the configuration dialog. And, the NEXT button is used for starting the next song/singer selection. Plug-in Configuration
During Song: Show Text – designate the text to be displayed during the song by placing a check in the box and desired text in the text box. Set the screen positioning of the text by supplying an X and Y coordinate. Set the font to use by selecting the Font button.
Near End: Show Text – same as the During Song: Show
Text. Set a timeframe that VirtualDJ will use to begin showing the designated text before the current song ends. Again, an X and Y coordinate for displaying the text on the screen can be entered.
KARAOKE

58
Between Songs
o Show Bitmap – a Bitmap can be used to display a background in between each song played
o Show Text – use to show information about
specials or next song/singer between the songs. Use the X and Y coordinates for where to display the text.
Available variables to be used with the displayed text are %SONG, %SINGER, %NEXTSONG, and %NEXTSINGER. Rotation List Manager To use the rotation list manager, simply drag and drop the karaoke track from the VirtualDJ Browser onto the list. The plug-in will ask for a Singer‘s name each time a song is added to the list. If a singer‘s name needs to be changed or added, then update the Singer text box and pressing OK to update the Singer information on the video output. The songs are displayed by Title, Artist, and Singer. You can change the order of the list at any time by drag-n-drop of the track to a new location in the list. Songs already sung by the singer are indicated with an asterisk ( * ) by their name. And an asterisk is added for each time that song has gone through the rotation. At the bottom of the list is a check box for activating the Repeat Playlist option. This allows for the list manager to keep as a ‗rotation‘ list or unchecked the list items will disappear once added to the deck. The [ >> ] button will send the selected (highlighted) track to the deck and immediately begin playing the track.
KARAOKE ROTATION PLUG-IN
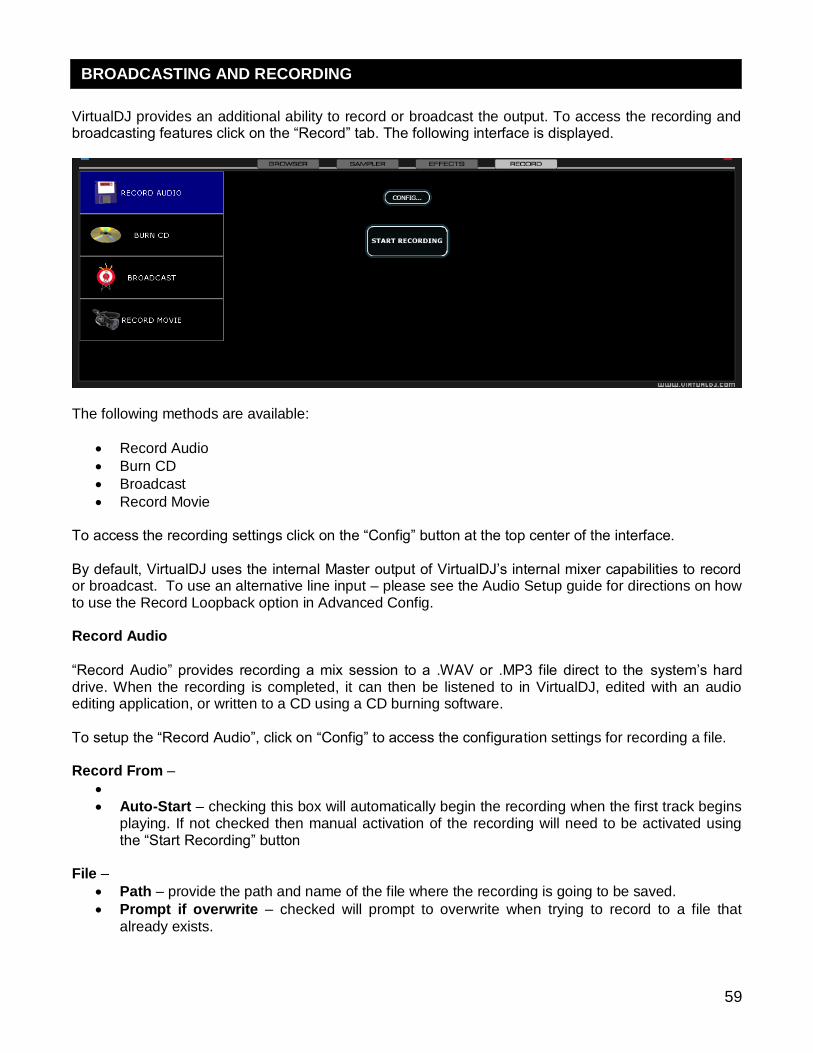
59
VirtualDJ provides an additional ability to record or broadcast the output. To access the recording and broadcasting features click on the ―Record‖ tab. The following interface is displayed.
The following methods are available:
Record Audio
Burn CD
Broadcast
Record Movie
To access the recording settings click on the ―Config‖ button at the top center of the interface. By default, VirtualDJ uses the internal Master output of VirtualDJ‘s internal mixer capabilities to record or broadcast. To use an alternative line input – please see the Audio Setup guide for directions on how to use the Record Loopback option in Advanced Config. Record Audio
―Record Audio‖ provides recording a mix session to a .WAV or .MP3 file direct to the system‘s hard drive. When the recording is completed, it can then be listened to in VirtualDJ, edited with an audio editing application, or written to a CD using a CD burning software. To setup the ―Record Audio‖, click on ―Config‖ to access the configuration settings for recording a file. Record From –
Auto-Start – checking this box will automatically begin the recording when the first track begins playing. If not checked then manual activation of the recording will need to be activated using the ―Start Recording‖ button
File –
Path – provide the path and name of the file where the recording is going to be saved.
Prompt if overwrite – checked will prompt to overwrite when trying to record to a file that
already exists.
BROADCASTING AND RECORDING

60
Split in multiple files – checked will split the session as separate tracks, instead of one large audio file. When splitting to separate tracks, a ―Cut‖ button appears next to the ―Start Recording‖ button to demarcate tracks. The ―Auto-split on crossfade‖ option will automatically demarcate tracks when the crossfader in the VirtualDJ interface begins to move to the deck being mixed in.
Format – select the audio file format to be used when recording.
WAV – will record a .WAV audio file
MP3 – will record an .MP3 audio file
Encoder – this is the path to the MP3 encoder for use in recording the MP3. If the encoder to
use is in a different folder than the VirtualDJ folder, use the browse button o ( ,,, ) to navigate and select the encoder‘s location
Bitrate – select the bitrate to use in recording the MP3. A bitrate of 192Kbps is recommended for CD-quality recording.
Once the choices are set, click ―OK‖ and then ―Start Recording‖ when ready. Press ―Stop Recording‖ when finished with the session. Burn CD VirtualDJ can record the session in a CD image format for quick burning of a session to CD. Select ―Burn CD‖ for VirtualDJ to record the session as a .BIN/.CUE file type which contains all the necessary information for burning software that supports image types of BIN and CUE. Click on ―Config‖ to access the configuration settings for CD recording. Record From –
Auto-Start – checking this box will automatically begin the recording when the first track
begins playing. If not checked then manual activation of the recording will need to be activated using the ―Start Recording‖ button
File –
Path – provide the path and name of the file where the recording is going to be saved.
Prompt if overwrite – checked will prompt to overwrite when trying to record to a file that already exists.
Once the choices are set, click ―OK‖ and then ―Start Recording‖ when ready. Press ―Stop Recording‖ when finished with the session. And, to demarcate tracks use the ―Cut‖ button found next to the ―Start Recording‖ button. When finished recording the .BIN/.CUE file specified in the File Path field can be burned with a .BIN/.CUE supported CD-burning application. For more information about burning .BIN/.CUE files, consult the documentation of provided by the CD burning software.
61
Broadcasting to the Internet (“Broadcast”) with BROADCASTER, PRO BASIC, or PRO FULL platforms VirtualDJ provides a method for broadcasting the session in real time on the Internet as a ―webcast.‖. This way people around the world can listen to the mix session. Click on ―Config‖ to access the configuration settings for recording a file. Record From –
Auto-Start – checking this box will automatically begin the recording when the first track begins
playing. If not checked then manual activation of the recording will need to be activated using the ―Start Recording‖ button
Format –
Icecast – OGG format streaming
Shoutcast – MP3 format streaming Shoutcast will also need to know which MP3 Encoder will be used.
Encoder – Use the browse button ( … ) to navigate the computer folder structure and select the encoder file to use.
Bitrate - Select the desired bitrate for the encoding. NOTE: Higher bitrates will consume a large
bandwidth in the internet connection to stream and listen to MP3 audio. Server –
There are two ways to broadcast the mix session. Broadcast using a dedicated radio server, or broadcast direct the computer. Broadcast from my own computer – this option turns the computer into a webcast station. This way
once the ―Start Recording‖ but is click the webcast will begin. Max number of clients – this is the maximum listeners that the webcast may have.
NOTE: Please remember that the bandwidth of the Internet connection needs to be able to
accommodate the number of listeners. Decreasing the quality of the audio signal (the bitrate) makes it possible to accommodate a greater number of listeners.
When ready to broadcast click on ―Start Recording‖. VirtualDJ will indicate the address of the webcast (for example http://123.45.67.89/Virtual.ogg). The address then can be sent to the intended listeners so they can connect and listen to the webcast using their favorite Internet audio players. NOTE:
If using a router, port forwarding maybe required for connection to the webcast server on the broadcasting computer.
Broadcast to a radio server – this option allows setup of broadcasting the mix session to an existing
web radio server. Enter the address of the web radio server, login, and password, and VirtualDJ will automatically broadcast the mix to the server using the format in set in the Format section.
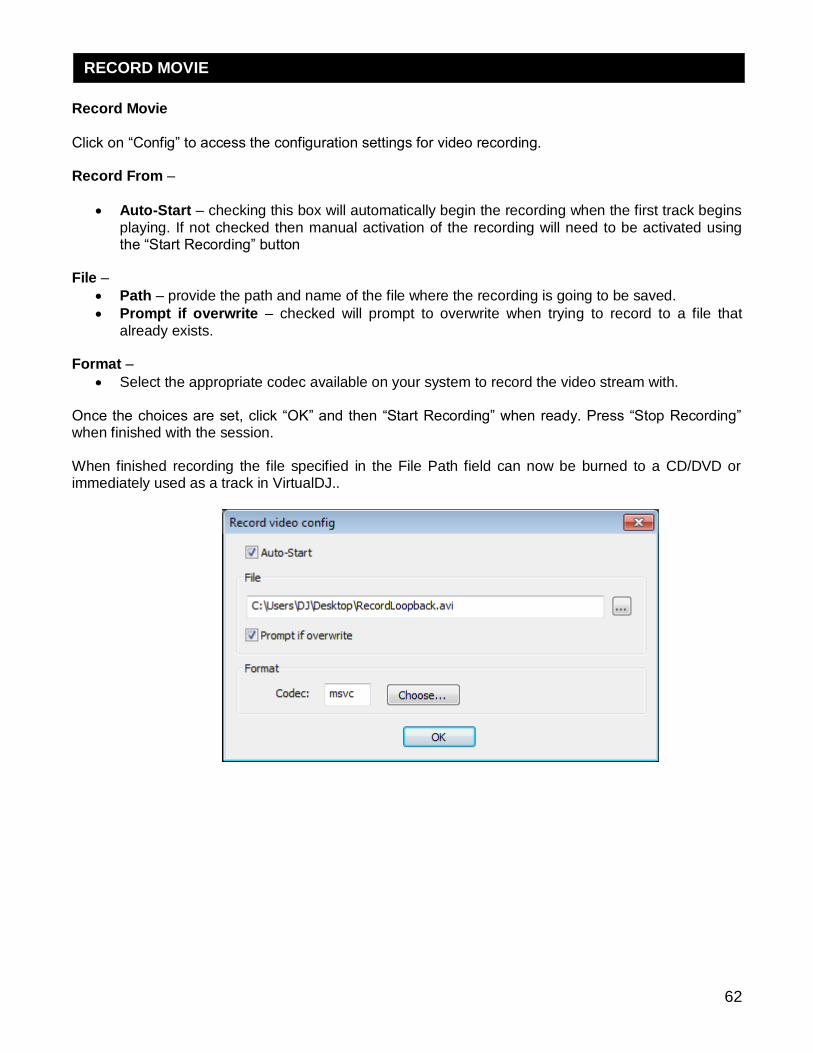
62
Record Movie
Click on ―Config‖ to access the configuration settings for video recording. Record From –
Auto-Start – checking this box will automatically begin the recording when the first track begins
playing. If not checked then manual activation of the recording will need to be activated using the ―Start Recording‖ button
File –
Path – provide the path and name of the file where the recording is going to be saved.
Prompt if overwrite – checked will prompt to overwrite when trying to record to a file that
already exists.
Format –
Select the appropriate codec available on your system to record the video stream with.
Once the choices are set, click ―OK‖ and then ―Start Recording‖ when ready. Press ―Stop Recording‖ when finished with the session. When finished recording the file specified in the File Path field can now be burned to a CD/DVD or immediately used as a track in VirtualDJ..
RECORD MOVIE
63
http://www.atomixproductions.com http://www.virtualdj.com
Atomix Productions Inc.
Los Angeles CA 90036, USA VirtualDJ Copyright: Copyright 1997-2010 Atomix Productions All Rights Reserved Number IDDN.FR.001.040012.01.R.C.2000.000.31400. Trademarks: The VirtualDJ Logo is a registered trademark of Atomix Productions VirtualDJ is a registered trademark of Atomix Productions License and restrictions: According to the EULA (End User License Agreement) accepted by every user upon installation of VirtualDJ: You MAY NOT make or distribute copies of VirtualDJ, or electronically transfer VirtualDJ from one computer to another over a network. You MAY NOT decompile, reverse engineer, disassemble, or otherwise reduce VirtualDJ to less than human perceivable form. You MAY NOT modify or create derivate works from VirtualDJ. You MAY NOT sell, to rent, to transfer or sublicense the software. You may not sell, to rent, to transfer or sublicense hardware on which the software is installed, without written prior agreement of Atomix Productions.
Reproduction of this manual in full or in part without written permission from Atomix Productions is prohibited.
LEGAL INFORMATION
EULA SUMMARY: - This license gives you the right to install and use the software on a maximum of two computers, by one person. - It does not give you the right to rent or sell computer systems, on which the software is installed, or to rent or sell the s oftware or part of it. - The software is distributed "as-is" and no warranty of any kind is expressed. - Atomix Productions and its suppliers retain all intellectual property rights in the software. - Once activated, the software cannot be refunded, unless found to be defective by Atomix Technical Support. - Software purchased on-line for instant download through our website is considered opened at the time of purchase, and therefore no refund can be given. ----- VirtualDJ End User License Agreement ----- By clicking on "I accept" you agree to be bound by the following terms. If you don't, please click on "cancel", remove all copies and return the product to the place of purchase within 30 days of your purchase for a full refund. 1. PERMITTED USE AND RESTRICTIONS You are granted one license to: - install and use the Software on one computer. - install and use the Software on a second computer, if this computer is normally used by the same person and the Software will not be used on both computers at the same time. - make back-up copies of the Software for archival purposes. This license does NOT allow you to: - rent, lease, sell, lend, distribute, publish, bundle or sublicense the Software or any part of it. - rent, lease, sell, lend or distribute hardware on which the Software is installed, unless specifically authorized by Atomix Productions. - electronically transfer the Software from one computer to another or over a network. - decompile, reverse engineer, disassemble, or otherwise reduce the Software to a human-perceivable form. - modify the Software or create derivative works based upon the Software. 2. OWNERSHIP The foregoing license gives you limited rights to use the Software. Atomix and its suppliers retain all right, title and interest, including all copyrights, in and to the Software and all copies thereof. All rights not specifically granted in this EULA, including International Copyrights, are reserved by Atomix and its suppliers. 3. COPYRIGHT INFRINGEMENT Unauthorized copying, distribution, modification, public display, or public performance of copyrighted works is an infringement of the copyright holders' rights. As a condition to your agreement with Atomix, you agree that you will not use the Software to infringe the intellectual property rights of others in any way. 4. WARRANTY Atomix warrants that the media, on which the Software is furnished, if any, will be free from defects in materials and workmanship. Atomix offers no warranty of performance, express or implied, with regard to the licensed software and all accompanying mater ials. Atomix further disclaims all other warranties, express or implied, including but not limited to the implied warranties of merchantability and fitness for a particular purpose, with regar d to the licensed software and all accompanying materials. 5. CUSTOMER REMEDY Your exclusive remedy under the above limited warranty shall be, at Atomix option, either a full refund of the purchase price or correction of the defective software or media. Notice is hereby given however, that absent any defects, there will be no refunds issued on activated software. 6. DISCLAIMER OF DAMAGES You assume responsibility for, among other things, (i) the selection of the Licensed Software to achieve your intended results, (ii) the acquisition of other software (including any programming or operating system software) and/or equipment compatible with the Licensed Software, and (iii) the installation, use and results obtained from the Licensed Software. Further, for the express purpose of limiting the liability against Atomix, you agree that, to the maximum extent permitted by law, ATOMIX SHALL IN NO EVENT BE LIABLE FOR ANY DAMAGES WHATSOEVER (INCLUDING WITHOUT LIMITATION, DAMAGES FOR LOSS OF BUSINESS PROFITS, BUSINESS INTERRUPTION, LOSS OF BUSINESS INFORMATION, OR ANY OTHER PECUNIARY LOSS) ARISING OUT OF THE USE OR INABILITY TO USE THE LICENSED SOFTWARE, WHETHER DIRECT, INDIRECT, INCIDENTAL, CONSEQUENTIAL, SPECIAL OR OTHERWISE, REGARDLESS OF THE FORM OF ACTION, EVEN IF ATOMIX HAS BEEN ADVISED OF THE POSSIBILITY OF SUCH DAMAGES. 7. GENERAL PROVISIONS The software is protected by the copyright laws of the U.S. and other countries. If any part of this agreement is found to be invalid or unenforceable, the remaining terms will stay in effect. This agreement shall be governed by the laws of the state of Delaware, USA.
2
Copyright © 2009 written by Christopher J. Stoll