Embed Size (px)
Citation preview
Visual Sound • Workhorse Manual • �

Visual Sound • Workhorse Manual • �
Visual Sound • Workhorse Manual • �
Dear Workhorse Owner,
Congratulations on your new amp! We appreciate you seeing (and hearing) the quality that we worked so hard to put into the Workhorse. Thanks for buying one!
When R.G. Keen (Visual Sound chief engineer) and I first began designing the Workhorse amps, we had only two goals in mind: �) Make sure it sounds great, both clean and with effects pedals; �) Make sure it doesn’t break!
As a company known for making great-sounding effects pedals, we wanted to design an amp which would make all pedals (Visual Sound and other brands) sound the way they were designed to sound. So, we decided to have just one great, clean channel and to provide our most versatile overdrive/distortion pedal, Jekyll & Hyde, with the amps to handle the duty of extra channels. That way, you get great tone all the time.
For reliability, we went over the top on features. In fact, the same rules of design used in military equipment (think F-�6 fighter jets) were applied to the Workhorse amps.
There are a few other features of your Workhorse amp which have never been seen on an amp before: The Hubcap speaker grill for sound dispersion, an easy user biasing system, and even a free high-quality amp cover with your amp, including pockets on the sides for things like the power cable, guitar cables, etc.
Maybe we thought about everything a little too much! But once you start to use your Workhorse, I think you’ll be glad we did!
Enjoy!
Bob WeilPresident – Visual Sound LLC
Visual Sound • Workhorse Manual • �
Table of Contents
Caution/ Safety Precautions. . . . . . . . . . . . . . . . . . . . . . . . . . . . . . . . . . . . 5
Quick Start/ Immediate Gratification/ Sample Settings . . . . . . . . . . . . . . . 8
Registration Information/ Benefits . . . . . . . . . . . . . . . . . . . . . . . . . . . . . . . 11
Front Panel Details . . . . . . . . . . . . . . . . . . . . . . . . . . . . . . . . . . . . . . . . . . .12
Rear Panel Details . . . . . . . . . . . . . . . . . . . . . . . . . . . . . . . . . . . . . . . . . . . 15
Tube Orientation/ Bias Adjustment Details . . . . . . . . . . . . . . . . . . . . . . . . 17
Troubleshooting- Support/Service Contacts . . . . . . . . . . . . . . . . . . . . . . . 18
All content and images contained herein ©2006 Visual Sound, LLC
Visual Sound • Workhorse Manual • �
WorkHorse Amplifiers- An Owner’s Manual
Caution & Safety Precautions
Before you start – here are some safety precautions that you need to observe. We want you to play music for a long time and, although we’ve tried hard to make your new amplifier safe to use, there are some precautions to observe.
Proper line voltageYour Workhorse amplifier comes set up for the country where it’s sold. It is possible to change the line voltages inside the amp for most countries other than Japan’s �00Vac. You can, for instance, change a ��0Vac USA amplifier to play on ��0/��0Vac for your European tour and vice versa. We recommend that you NOT do that unless you are experienced with electrical equipment. Take it to your tech to do this one. The change is simple, but the consequences of getting it wrong are fairly hefty in terms of damage to the amp.
What about �00Vac, ��0Vac, ���Vac, ���V, ��7, ���V… ? When set for ��0Vac your amp will work for all voltages between ��0Vac through ���Vac. Likewise, if you have ��0Vac, the amp will work just about as well as on ��0Vac.
Right line cord in good repairWe specified a removable line cord for the amp, with a standard IEC power entry receptacle. This receptacle will accept replaceable line cords similar to the ones used on every computer in use today. So, if you lose your Workhorse power cord, don’t worry… you can find another one just about anywhere. As easy as it is to put a good line cord on, never use an old, frayed, or otherwise damaged line cord.
Visual Sound • Workhorse Manual • 6
Correct fuse valuesThere is one user-replaceable fuse in your amp. It’s in the IEC power receptacle. If your fuse ever blows, always replace it with the identical size and rating fuse. Never, ever replace it with a higher rated fuse on the theory that you were coasting along just at the edge of the fuse rating and a slightly bigger one will let you keep playing. That fuse was selected, not to protect the internal components, but – literally – to keep your amp from starting a fire in the event of some dire disaster inside. It’s a safety protection fuse, and under normal circumstances your amp will never come close to popping it. If it does pop, put in an exact replacement. If that one pops too, your amp needs a trip to a properly trained amplifier technician. There are other fuses inside your amp, but they are there to lower the cost of a failure, and are not in general going to be helpful to you to replace on your own. Remember – fuses don’t blow for no reason at all. There was a reason your fuse popped. Don’t put your amp at risk by removing the fire protection fuse and changing its value.
Unplug your amp before servicing itWhile most of us have been raised with this warning, it bears repeating. If there is a line cord or AC power plugged into your amp, it is potentially deadly to open the case. That applies whether the power switch is on or not.
As a precaution to you, we made it difficult to remove the case with the line cord plugged into the back of the amp – we want you to remove that line cord from the amp. Unlike many other amplifiers, the Workhorse series has been designed to make itself safe in a short time after it’s turned off by running down the power supply capacitors so they don’t hold a deadly voltage for a long time. But any good amp tech will tell you that he’ll still be very careful.
Again, if you ever should have to remove the back cover from the amplifier chassis, unplug the amplifier from the wall and wait for five minutes before removing the cover.
Better yet, don’t take that cover off. Take it to a trained tech.
Visual Sound • Workhorse Manual • 7
Safe use (don’t stand in water, play in the rain, etc.)This is another one of those things we’ve all been told, but sometimes like to ignore. Don’t!! Electrical safety is deadly serious. When you’re holding a guitar, you’re connected to a bare wire that’s hard-wired to the AC power distribution system. True, we’ve done everything humanly possible to ensure that the wire you connect to is the safety ground wire, but funny things can happen outdoors with long extension cords, wet ground, and many pieces of electrical equipment hooked up. It might not even be your equipment that’s faulty. One of the other amps, the PA, or an effects board may have a problem with its power supply that leaks some AC line voltage out. You’re OK as long as you don’t touch it, or stand on wet ground near it, pour drinks into it, things like that. But if you’re holding your grounded guitar and touch the wrong patch of wet equipment, you may be signing up for a funeral.
Here are the don’ts: • Don’t play in the rain •Don’t play on wet ground, or wet floors •Don’t use equipment that’s had liquid spilled into it. If you’re not on a dry surface, you can get zapped – and some zaps are deadly.
Okay. Now that we’ve covered the general safety rules for using your new Workhorse, are you ready to play? If your Workhorse is chomping at the bit (get it?), you can go straight to the Quick Start in the next section and you’ll be up and running in no time. If, on the other hand, you’d like to savor the experience of learning about your new Workhorse Amplifier, you can skip to page �� and continue reading.
Visual Sound • Workhorse Manual • �
Quick Start & Immediate Gratification
1. plug your guitar in...Since your Workhorse Amplifier came with our best-selling Jekyll & Hyde pedal, you’ll want to plug your guitar into the pedal’s input and use a standard guitar cable to plug the output of the pedal into the amplifier input. Connect the supplied power cable to both the AC input of the pedal and the 9v power supply input on the face of the amp controls.
2. Turn the amplifier on...To turn the amplifier on, set the Standby switch to the muted position, then flip the On/Off switch to the On position.
When you turn the amplifier on, you will have to wait for the vacuum tubes inside the amplifier to heat up. This will take approximately two minutes.
The warm-up time on Workhorse amplifiers is slower than most vacuum tube amplifiers. This was done deliberately to ensure that the vacuum tubes start up slowly and softly with no sudden surge of electricity to their heaters. This helps extend the life of your tubes.
Once the heat up time has elapsed, the amplifier will be ready to operate. Flip the standby switch to the on position like the power switch and begin playing.
3. Setting Your Jekyll & Hyde Pedal... There has never been an overdrive pedal quite like this one. Two separate overdrives in one pedal, each with separate controls, but with the ability to use them individually or together. The Jekyll half is designed to accurately reproduce the sound of the TS-�0� original TubeScreamer, but with more volume potential and a Bass Boost switch. Hyde is a heavier distortion with more bottom end and is extremely versatile. Not just a Turbo version of Jekyll, Hyde has a wide range of sounds that can be discovered by using the EQ knob to scoop out the midrange or add more, a Sharp/Blunt switch to go from a more compressed distortion to very bright, and the usual Drive, Tone, and Volume knobs to set the overall style of sound. With the ability to use both halves separately or together, the sonic possibilities are endless. Following are some settings to get you started:
Visual Sound • Workhorse Manual • 9
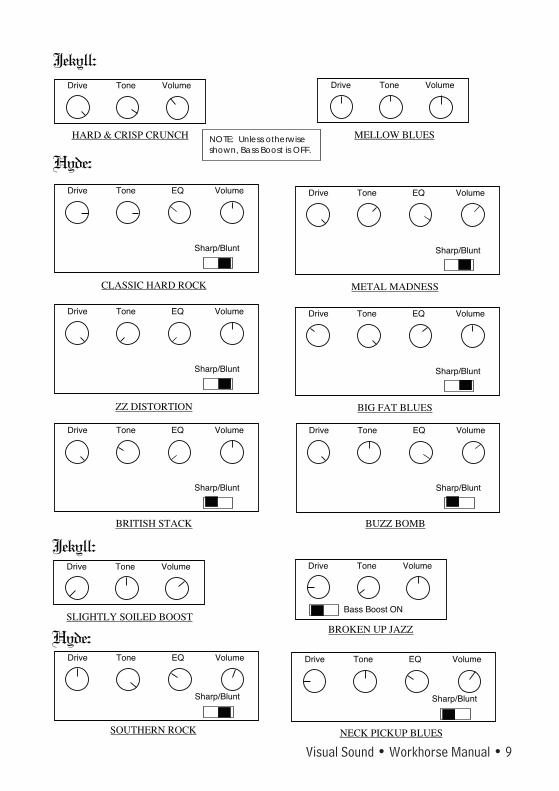
Welcome to Jekyll & Hyde Ultimate Overdrive!There has never been an overdrive pedal quite like this one. Two separate overdrives in one pedal, each with separate controls, butwith the ability to use them individually or together. The Jekyll half is designed to accurately reproduce the sound of the TS-808original TubeScreamer, but with more volume potential. Hyde is a heavier distortion with more bottom end and is extremelyversatile. Not just a “Turbo” version of Jekyll, Hyde has a wide range of sounds that can be discovered by using the EQ knob toscoop out the midrange or add more, a Sharp/Blunt switch to go from a more compressed distortion to very bright, and the usualDrive, Tone, and Volume knobs to set the overall style of sound. With the ability to use both halves separately or together, the sonicpossibilities are endless. Following are some settings to get you started: (Use Visual Sound 1 SPOT, Ibanez, Dunlop, Boss PSA,Morley or other regulated 9VDC center negative polarity adapters, or 9V alkaline battery.)
Jekyll:
Hyde:
Drive Tone Volume
HARD & CRISP CRUNCH
Drive Tone Volume
MELLOW BLUES
Drive Tone EQ Volume
Sharp/Blunt
CLASSIC HARD ROCK
Drive Tone EQ Volume
Sharp/Blunt
METAL MADNESS
Drive Tone EQ Volume
Sharp/Blunt
ZZ DISTORTION
Drive Tone EQ Volume
Sharp/Blunt
BIG FAT BLUES
Drive Tone EQ Volume
Sharp/Blunt
Drive Tone EQ Volume
Sharp/Blunt
BRITISH STACK BUZZ BOMB
Ver. 06/05
NOTE: Unless otherwiseshown, Bass Boost is OFF.
Drive Tone EQ Volume
Sharp/Blunt
More Settings...Jekyll:
Hyde:
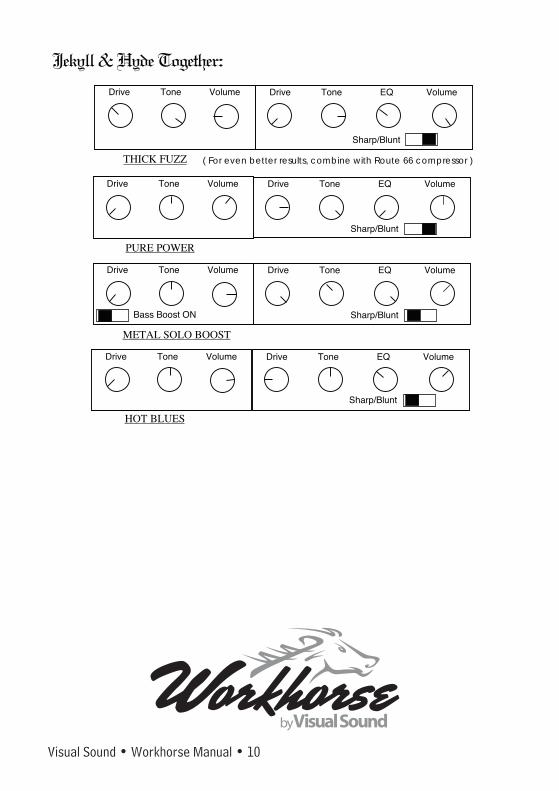
Jekyll & Hyde Together:
Beware using Jekyll & Hyde together with both Drive knobs all the way up as it may cause feedback.All Visual Sound pedals are warranted for 1 year from purchase. If you ever have any problems or questions, just call 800-686-3317
or e-mail [email protected]. Visit our website for updates: www.visualsound.net
Drive Tone Volume
SLIGHTLY SOILED BOOST
Drive Tone Volume
BROKEN UP JAZZ
Drive Tone EQ Volume
Sharp/Blunt
SOUTHERN ROCK
Drive Tone EQ Volume
Sharp/Blunt
NECK PICKUP BLUES
THICK FUZZ
Drive Tone Volume
Drive Tone EQ Volume
Sharp/Blunt
PURE POWER
Drive Tone Volume
Drive Tone EQ Volume
Sharp/Blunt
METAL SOLO BOOST
Drive Tone Volume
Drive Tone EQ Volume
Sharp/Blunt
HOT BLUES
Drive Tone Volume
Bass Boost ON
Bass Boost ON
( For even better results, combine with Route 66 compressor )
Visual Sound • Workhorse Manual • �0
Drive Tone EQ Volume
Sharp/Blunt
More Settings...Jekyll:
Hyde:
Jekyll & Hyde Together:
Beware using Jekyll & Hyde together with both Drive knobs all the way up as it may cause feedback.All Visual Sound pedals are warranted for 1 year from purchase. If you ever have any problems or questions, just call 800-686-3317
or e-mail [email protected]. Visit our website for updates: www.visualsound.net
Drive Tone Volume
SLIGHTLY SOILED BOOST
Drive Tone Volume
BROKEN UP JAZZ
Drive Tone EQ Volume
Sharp/Blunt
SOUTHERN ROCK
Drive Tone EQ Volume
Sharp/Blunt
NECK PICKUP BLUES
THICK FUZZ
Drive Tone Volume
Drive Tone EQ Volume
Sharp/Blunt
PURE POWER
Drive Tone Volume
Drive Tone EQ Volume
Sharp/Blunt
METAL SOLO BOOST
Drive Tone Volume
Drive Tone EQ Volume
Sharp/Blunt
HOT BLUES
Drive Tone Volume
Bass Boost ON
Bass Boost ON
( For even better results, combine with Route 66 compressor )
Visual Sound • Workhorse Manual • ��
Registration information & benefitsWe’ve included a warranty card to show you where to go on the Visual Sound website for warranty registration. We know that registration cards have a bad reputation in general and are sometimes a pain to fill out, but we decided to do it anyway. Here’s why...
Registration cards were a good idea back when they were used for what they were supposed to be used for. They provided a link to customers who bought a manufacturer’s product and gave that manufacturer a channel through which to share important updates and news about the product. Registration cards also helped to keep counterfeit products (which are less well made) out of circulation. The bad reputation came when manufacturers started using them almost entirely for the side effects... these include selling names for junk email lists and other advertising that frankly is best left undone.
Here at Visual Sound we all try to have real lives outside the office, and we don’t like this kind of thing either. We almost didn’t include the card because of that. But we finally decided that the advantages outweighed the bad impression a warranty card would leave. Now, we’re able to contact you if there is a late-breaking safety or operational issue with your amp, or if we release an update for better performance. Lastly, it gives us some benefits that will help us in the future, like knowing where our amps sell best and why. That lets us better serve you and your musical needs.
We will not compile mailing lists from our warranty registrations and sell them, or bombard you with advertising. Period.
Visual Sound • Workhorse Manual • ��
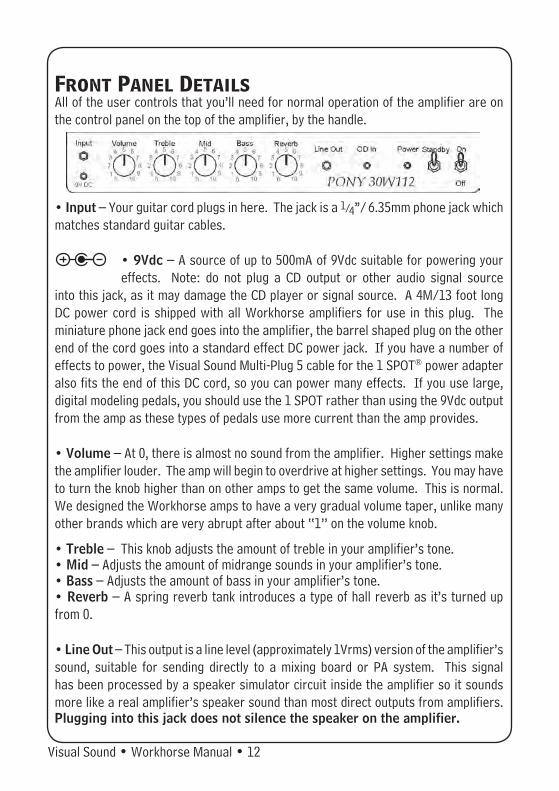
Front Panel DetailsAll of the user controls that you’ll need for normal operation of the amplifier are on the control panel on the top of the amplifier, by the handle.
• Input – Your guitar cord plugs in here. The jack is a 1/4’’/ 6.��mm phone jack which matches standard guitar cables.
• 9Vdc – A source of up to �00mA of 9Vdc suitable for powering your effects. Note: do not plug a CD output or other audio signal source
into this jack, as it may damage the CD player or signal source. A �M/�� foot long DC power cord is shipped with all Workhorse amplifiers for use in this plug. The miniature phone jack end goes into the amplifier, the barrel shaped plug on the other end of the cord goes into a standard effect DC power jack. If you have a number of effects to power, the Visual Sound Multi-Plug � cable for the � SPOT® power adapter also fits the end of this DC cord, so you can power many effects. If you use large, digital modeling pedals, you should use the � SPOT rather than using the 9Vdc output from the amp as these types of pedals use more current than the amp provides.
• Volume – At 0, there is almost no sound from the amplifier. Higher settings make the amplifier louder. The amp will begin to overdrive at higher settings. You may have to turn the knob higher than on other amps to get the same volume. This is normal. We designed the Workhorse amps to have a very gradual volume taper, unlike many other brands which are very abrupt after about ‘‘�’’ on the volume knob.
• Treble – This knob adjusts the amount of treble in your amplifier’s tone. • Mid – Adjusts the amount of midrange sounds in your amplifier’s tone. • Bass – Adjusts the amount of bass in your amplifier’s tone. • Reverb – A spring reverb tank introduces a type of hall reverb as it’s turned up from 0.
• Line Out – This output is a line level (approximately �Vrms) version of the amplifier’s sound, suitable for sending directly to a mixing board or PA system. This signal has been processed by a speaker simulator circuit inside the amplifier so it sounds more like a real amplifier’s speaker sound than most direct outputs from amplifiers. Plugging into this jack does not silence the speaker on the amplifier.
Visual Sound • Workhorse Manual • ��
Front Panel Details (cont.)
• CD In – (Pony model only) – This input accepts a stereo �/�’’/�.�mm miniature phone plug from the headphone jack of a CD player or other stereo signal source. The two inputs are mixed to mono, and then mixed into the output sound of the amplifier. Using a mono plug in this jack will not damage the amplifier. One interesting use of this input is to connect an amplifier modeling unit output to the amp. This offers you the flexibility of digital modelers with the smoothness of real vacuum tube power.
• Power – This indicator light is lit whenever the amplifier power switch is turned on and the internal power supply is operating correctly.
• Standby – This control allows you to mute the amplifier when you plan to be away from it for a period of time and want it to remain quiet. It leaves the vacuum tubes heated up and ready to play instantly when you return to the amplifier and flip the standby switch back to the operating setting. Notice that the switch position which lets the amplifier make sound is the same direction as ‘‘ON’’ on the On/Off switch. The muted or quiet standby position is in the same direction as the ‘‘Off’’ setting of the power switch. In the illustration, both the On/Off switch and the Standby switch are shown in the On or ready to play position.
• On/Off – This is the main power switch for the amplifier. Turning this to the ‘‘ON’’ position allows the amplifier to work. The ‘‘Off’’ position interrupts the power from the AC power socket to the amplifier’s internal power supply.
Turning the amplifier onTo turn the amplifier on, set the Standby switch to the muted position, then flip the On/Off switch to the ‘‘ON’’ position.
When you turn the amplifier on, you will have to wait for the vacuum tubes inside the amplifier to heat up. This will take approximately two minutes.
The warm-up time on Workhorse amplifiers is slower than most vacuum tube amplifiers. This was done deliberately to ensure that the vacuum tubes start up slowly and softly with no sudden surge of electricity to their heaters. This helps extend the life of your tubes.
Visual Sound • Workhorse Manual • ��
Once the heat-up time has elapsed, the amplifier will be ready to operate. Flip the standby switch to the ‘‘ON’’ position like the power switch and begin playing.
Turning the amplifier offWhen you are finished playing the amplifier, turn the power switch to ‘‘Off’’. The position of the Standby switch does not matter. This amplifier has been designed so that its internal power supply will discharge any remaining voltage from the internal capacitors within a few minutes of the time the On/Off switch is turned off.
CAUTION: do not turn the On/Off switch on and off rapidly. This partially defeats the soft power-on circuitry inside the amp. No amp damage should occur, but you may cause nuisance tripping of the internal fuses and may wear your tubes out more quickly than they would otherwise wear out.
Visual Sound • Workhorse Manual • ��
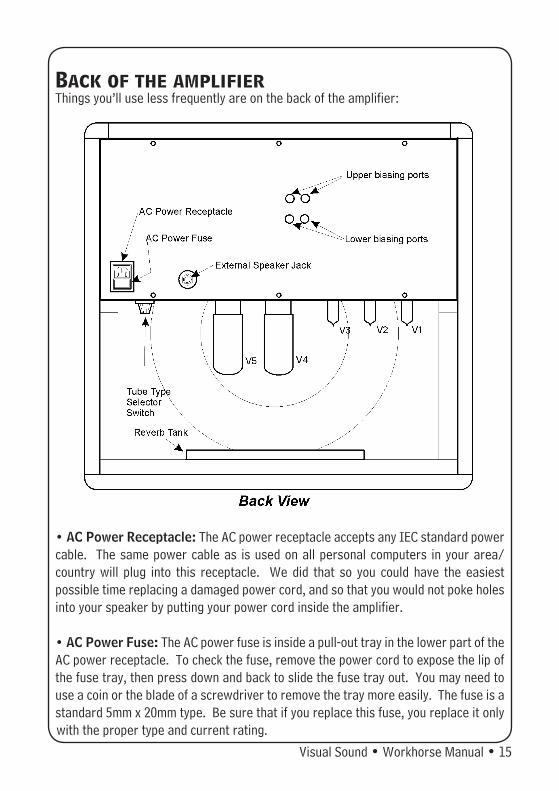
Back of the amplifierThings you’ll use less frequently are on the back of the amplifier:
• AC Power Receptacle: The AC power receptacle accepts any IEC standard power cable. The same power cable as is used on all personal computers in your area/country will plug into this receptacle. We did that so you could have the easiest possible time replacing a damaged power cord, and so that you would not poke holes into your speaker by putting your power cord inside the amplifier.
• AC Power Fuse: The AC power fuse is inside a pull-out tray in the lower part of the AC power receptacle. To check the fuse, remove the power cord to expose the lip of the fuse tray, then press down and back to slide the fuse tray out. You may need to use a coin or the blade of a screwdriver to remove the tray more easily. The fuse is a standard �mm x �0mm type. Be sure that if you replace this fuse, you replace it only with the proper type and current rating.
Visual Sound • Workhorse Manual • �6
• External Speaker Jack: You can plug another speaker cabinet in here. The internal speaker will continue to operate in conjunction with the external speaker cabinet. The jack switches taps on the output transformer for you. On the Pony, this switches between the � and � ohms tap, so plug � ohm speaker cabinets into this model. We do not recommend plugging a � ohm speaker cabinet into the Pony’s external speaker jack. On the 60W��� model, the switch is between � ohms and � ohms, so plug � ohm or � ohm speaker cabinets into this amplifier. Do not use 16 ohm speaker cabinets with Workhorse amps.
• Upper biasing ports: These holes are here so you can look through them to see if your output tubes are biased correctly. The holes correspond to the output tubes; the left hole shows you the biasing lights for V� on the left side of the chassis, and the right hole shows you the biasing lights for V�, which is to the right of V�. If you see no lights inside, the tubes are biased too cold. A green light indicates proper biasing, and a red light shows for a bias point which is too hot. Sometimes you will get both green and red lights at the same time. This is no cause for alarm – the bias is just at the edge between green and red. That’s OK.
• Lower biasing ports: This is where you adjust the bias. Use only the small plastic screwdriver that came with your Workhorse for this adjustment, and be gentle. If you force the screwdriver in too far, you may damage the bias adjustment control. (If you lose the plastic screwdriver at some point, a #� Phillips head screwdriver can also be used.) The adjustment holes correspond to the upper biasing ports above them. After the amp has warmed up for at least � minutes, flip the Standby switch to the On (play) position and look through one of the Upper Biasing Ports. Insert the plastic screwdriver into the hole below it and turn the adjustor clockwise until the green LED comes on. Do the same with the second biasing port. You may need to go back to the first port and re-adjust it as the two tubes interact with each other a bit. When both LED’s are green, you’re ready to play… and you just saved yourself some time and money by not having to bring your Workhorse to an amp tech! You should check the biasing every few weeks or so in case the tubes have changed their values slightly due to heat, heavy playing, etc.
Visual Sound • Workhorse Manual • �7
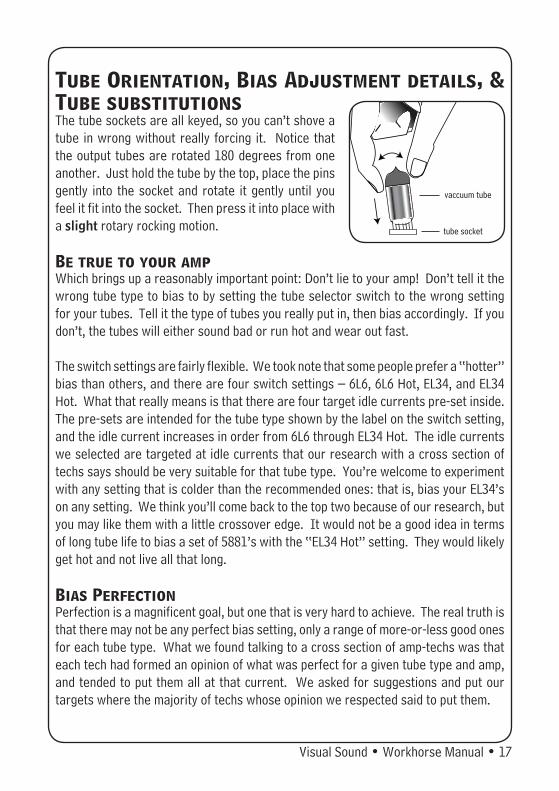
Tube Orientation, Bias Adjustment details, & Tube substitutionsThe tube sockets are all keyed, so you can’t shove a tube in wrong without really forcing it. Notice that the output tubes are rotated ��0 degrees from one another. Just hold the tube by the top, place the pins gently into the socket and rotate it gently until you feel it fit into the socket. Then press it into place with a slight rotary rocking motion.
Be true to your ampWhich brings up a reasonably important point: Don’t lie to your amp! Don’t tell it the wrong tube type to bias to by setting the tube selector switch to the wrong setting for your tubes. Tell it the type of tubes you really put in, then bias accordingly. If you don’t, the tubes will either sound bad or run hot and wear out fast.
The switch settings are fairly flexible. We took note that some people prefer a ‘‘hotter’’ bias than others, and there are four switch settings – 6L6, 6L6 Hot, EL��, and EL�� Hot. What that really means is that there are four target idle currents pre-set inside. The pre-sets are intended for the tube type shown by the label on the switch setting, and the idle current increases in order from 6L6 through EL�� Hot. The idle currents we selected are targeted at idle currents that our research with a cross section of techs says should be very suitable for that tube type. You’re welcome to experiment with any setting that is colder than the recommended ones: that is, bias your EL��’s on any setting. We think you’ll come back to the top two because of our research, but you may like them with a little crossover edge. It would not be a good idea in terms of long tube life to bias a set of ����’s with the ‘‘EL�� Hot’’ setting. They would likely get hot and not live all that long.
Bias PerfectionPerfection is a magnificent goal, but one that is very hard to achieve. The real truth is that there may not be any perfect bias setting, only a range of more-or-less good ones for each tube type. What we found talking to a cross section of amp-techs was that each tech had formed an opinion of what was perfect for a given tube type and amp, and tended to put them all at that current. We asked for suggestions and put our targets where the majority of techs whose opinion we respected said to put them.
tube socket
vaccuum tube
Visual Sound • Workhorse Manual • ��
Troubleshooting- Support & Service Your Workhorse amplifier is designed not to need service very much. The circuits inside are designed to self-protect against many problems that would otherwise need service.
For instance, there are inrush slow-down parts to stop the sudden surge of electricity into the amplifier when it’s first turned on, both on the main AC power line and on the tube heaters themselves. There are also transient suppressors, devices designed to eat up sudden spikes that can puncture the insulation of transformers. These are like lightning protectors, but on a smaller scale.
One of the primary objectives of the design were to make the tubes the most likely components to need replacement. And the tubes are operated under conditions that make them last as long as possible, given that they actually have to give us good amplification tone.
But sometimes a tube will fail – after all, that’s why they have sockets – and there are other protective parts in there that could fail. Worse yet, sometimes a failing tube will kill some other part. So let’s look at what to do when it doesn’t work.
There is a certain order in which we need to do the troubleshooting steps so we can be sure to get to the right conclusion. So the steps are numbered, with instructions about where to go next.
�) Flip on the power switch from Off to On. Does the ‘‘AC Power’’ LED come on? a) Yes – go to step �. b) No – go to step �.�) AC Power LED does not come on a) No AC power from the AC wall socket: i) Check to see that the AC line cord is plugged into the wall securely, and also into the back of the amp. If that does not fix it, go to step �aii. ii) If the cord is plugged in properly, move the AC line cord to another AC power outlet that will power a lamp. If that does not fix it, go to step �aiii. iii) If the AC power LED still does not come on, try substituting another power cord. Bad cords
Visual Sound • Workhorse Manual • �9
do sometimes happen. If that doesn’t help, go to step �b. b) Bad AC power fuse: i) Unplug the AC cord from the AC power socket on the back of the amp and remove the fuse from the fuse holder. Is the fuse blown?(�) Yes, the fuse is blown. Replace the fuse with exactly the same amperage and type rating. It is important to use the same type because the amp requires a Slo-Blo type fuse to allow the start up surge through to run the amp without blowing. IMPORTANT!! If the new fuse blows within a short time, take the amplifier to a service technician for repair before using it again. There is a possible safety hazard that the fuse is protecting you from. Do NOT replace the fuse with a higher rated fuse and continue using the amp. You are causing a potential fire hazard if you do this.(�) No, the fuse is not blown. Put the original fuse back in the holder and try it again. (a) If it does not work now, go to step �c. (b) If it now works, take it to a technician and have him fix the faulty fuse connections. When removing and replacing the fuse makes the amp work, the connections to the fuse or AC power line are intermittent and should be cleaned up properly and safely by someone trained to work safely with AC power wiring. c) Internal failure: Go to step �.�) Internal failure: The amplifier has some internal circuit failure that requires a trained service technician to repair it safely and without further damage to the amp.�) Does the amplifier make sound after a short warm up time? a) Yes – go to step 6. b) No, no sound – go to step �.�) No sound at all with power indicator on: a) Be sure that the volume control is not turned all the way down. Don’t tell anyone, and we won’t either. b) Check for a worn out tube. If sound does not return after rocking the tubes in their sockets, look for heater glow in each tube. A tube that does not have a slight orange heater glow may have a burned-out heater. Note which tube has no glow and go to �c. c) Check for poorly seated tubes. Rotary-rock the tubes in their sockets; if sound returns, the sockets are dirty. Remove and reinstall the tubes.
Visual Sound • Workhorse Manual • �0
This should keep the amp functioning until you can take it to a service technician to get the tube sockets cleaned. If you had a tube which had no heater glow and still doesn’t have a heater glow after rotary rocking the tubes in their sockets, replace the tube with a known-good tube of the same type. d) Check for faulty or loose speaker wires. If speaker wires are loose on the speakers, re-seat them firmly on the speaker connection tabs. Check to see that the internal speaker cable is firmly seated in its jack, plugging and unplugging it a time or two with the amp turned off. Then try again. e) Otherwise, take the amplifier to a service technician for repair.6) Amp makes sound: a) Sound cuts in and out suddenly; replace your guitar cord temporarily with a known good one and try again. If it still cuts out, wiggle the guitar cord in the input jack while a note is sounding. If the amp still cuts out, check the wires going to the speaker to ensure that they are making good contact. Then, if it still cuts out, take it to a tech to repair the intermittent jack or wiring. b) Sound cuts in and out when playing loud notes; take the amp to a service technician for repair of the internal circuit problem. c) Sound is ugly/distorted; i) If you have recently replaced the power output tubes, follow the biasing procedure to rebias the output tubes correctly. ii) Otherwise replace preamp tubes with a known-good spare tube, one at a time. If replacing preamp tubes one at a time does not cause sound to be clear, take the amplifier to a service technician for repair. d) Hum or buzz; i) Loud hum coming from the cabinet but NOT the speaker; turn the power off immediately and take the amp to a service technician for repair. This could be a problem affecting the amplifier’s safety and needs to be repaired before any more use of the amplifier. ii) Hum from speaker (�) Check your guitar cord by replacing it with a known-good one.
Visual Sound • Workhorse Manual • ��
(�) Check the reverb cable inside the amp. Are both send and receive plugs firmly seated in the jacks for the cable? iii) Buzzing sound from speaker (�) Constant buzzing (a) Check guitar cord as in 6dii (b) Check for fluorescent light- induced buzz by taking the amplifier to a place where there are no fluorescent lights on the same circuits. (c) Internal problem – go to step �. (�) Buzzy tone only on notes (a) Plug in an external speaker and try the amp again. If the buzz comes from the internal speaker but not the external speaker, the internal speaker may be faulty. Take the amp to a service technician to have the speaker checked. (b) If both internal and external speakers are buzzy only on notes, rebias the amplifier carefully. If that does not make the buzzy tone go away, take the amplifier to a service technician for repair. e) Loud hiss i) Pull the input cord out. Still got a bad hiss? Go to step �. This usually indicates a failure causing high frequency oscillation. This problem should be incredibly rare, but it’s not impossible. f) No reverb i) Check to see that the reverb cable is properly seated in the spring unit and that the reverb control is turned up. ii) If that does not help, go to step �. g) Burning smell, or smoke i) Turn it off, unplug it and take it in to a qualified tech for repair.
Visual Sound • Workhorse Manual • ��
Authorized Technicians:Any authorized Fender® amplifier service technician is also authorized to do repair work on Workhorse amplifiers. Have your local authorized Fender® amplifier service technician contact Visual Sound with any questions they might have.
Fender® is a registered trademark of Fender Musical Instruments Corporation and has no affiliation with
Visual Sound LLC.
Please feel free to contact Visual Sound directly regarding any questions or problems with your Workhorse amplifier by going to www.visualsound.net. Up-to-date contact information can be found there.

Visual Sound • Workhorse Manual • ��

Visual Sound • Workhorse Manual • ��