Embed Size (px)
Citation preview
Vodafone PC SMS 2010 (Software version 4.7.1)
User Manual
July 19, 2010
2 10/11/2010
Table of contents 1. Introduction ...................................................................................................................... 4
1.1 System Requirements ................................................................................................ 4
1.2 Reply-to-Inbox............................................................................................................. 4
1.3 What’s new?................................................................................................................ 4
2. Installation........................................................................................................................ 6
3. Registering a PC SMS 2010 account ................................................................................... 10
4. Sending a SMS message.................................................................................................... 15
4.1 In Windows:............................................................................................................... 15
4.2 In Outlook Express ................................................................................................... 15
4.3 In Internet Explorer ................................................................................................... 16
4.4 In Microsoft Outlook 2007 ........................................................................................ 18
4.5 In Windows Mail / Windows Live Mail...................................................................... 19
4.6 Character count ........................................................................................................ 20
5. Scheduled Messages ........................................................................................................ 22
5.1 Selecting recipients from the Address Book .......................................................... 22
5.2 Adding a new contact ............................................................................................... 23
5.3 Adding a new group.................................................................................................. 24
5.4 Automatic name checking........................................................................................ 25
5.5 Signatures or Templates .......................................................................................... 25
5.6 Outbox ....................................................................................................................... 26
6. View Incoming SMS .......................................................................................................... 27
6.1 Viewing incoming SMS............................................................................................. 27
7. Outbox folder .................................................................................................................. 28
7.1 View the Outbox folder ............................................................................................. 28
7.2 View a message ........................................................................................................ 29
7.3 Edit and resend a message ...................................................................................... 29
7.4 Delete messages in the Outbox folder .................................................................... 29
8. Sent Messages folder ....................................................................................................... 30
8.1 View the Sent Messages folder ................................................................................ 30
8.2 View a message ........................................................................................................ 31
3 10/11/2010
8.3 Edit and forward a message..................................................................................... 31
8.4 Delete messages in the Sent Messages folder ....................................................... 31
9. Message Template ........................................................................................................... 33
9.1 Creating a message template................................................................................... 33
9.2 Using a message template ....................................................................................... 34
9.3 Removing a message template ................................................................................ 35
9.4 Creating a Signature ................................................................................................. 35
9.5 How to use signatures.............................................................................................. 35
10. Internet Explorer Toolbar ................................................................................................. 36
10.1 Using the PC SMS Toolbar ....................................................................................... 36
10.2 Access Menu............................................................................................................. 36
10.3 Deactivating PCSMS Toolbar ................................................................................... 36
11. Microsoft Outlook (2007) .................................................................................................. 38
12. Outlook Express, Windows Mail, Windows Live Mail ............................................................ 39
13. Live Update ..................................................................................................................... 41
14. Options ........................................................................................................................... 42
14.1 General tab ................................................................................................................ 42
14.2 Account tab ............................................................................................................... 43
14.3 SMS tab...................................................................................................................... 44
14.4 Scheduling tab .......................................................................................................... 45
14.5 Alerts tab ................................................................................................................... 46
15. Uninstall ......................................................................................................................... 47
4 10/11/2010
1. Introduction Thank you for choosing Vodafone PC SMS 2010. PC SMS 2010 allows you to send SMS text messages from a
PC running the Microsoft® Windows® Operating System to any mobile phone worldwide.
This guide will help you get started with PC SMS 2010, from the installation to exploring most of the features.
Shown views and icons in this documentation might seem different if your operating system differs.
1.1 System Requirements
PC SMS 2010 uses the Internet to send messages, and thus it requires an active internet connection. There are
no restrictions on the speed of the connection, and a modem connection will do just as fine as a LAN
connection.
The new PC SMS 2010 is compatible with Microsoft® Windows® XP (Home or Professional), Windows Vista and
Windows 7 (all versions) and with Internet Explorer 6.0, 7.0 and 8. For Windows XP, Active Desktop should be
activated.
1.2 Reply-to-Inbox
It is possible to receive SMS replies from the recipient. These messages will be sent back to the e-mail inbox of
Outlook Express.
A requirement for this functionality is that the e-mail address supplied when installing and registering PC SMS
2010 must match one of the e-mail accounts/e-mail addresses used in the Outlook. If an incorrect e-mail
address was supplied during registration, the e-mail address can be changed in the Accounts tab in SMS
Options
1.3 What’s new?
Vodafone PC SMS 2010 has some great new features for you in order to send messages to your contacts. As of
2010 PC SMS now offers:
• Plug-in for Microsoft Outlook Express
• Plug-in for Microsoft Outlook 2007
• Support for Windows Mail (Windows Vista and Windows 7 versions only)
• Windows Sidebar Gadget (Windows Vista & Windows 7 only)
• Plug-in for Internet Explorer (6.0, 7.0 and 8.0)
• Desktop version
• Integration with your Windows Contacts or Outlook contact lists
• Scheduled messages
5 10/11/2010
• Reply option from recipients
6 10/11/2010
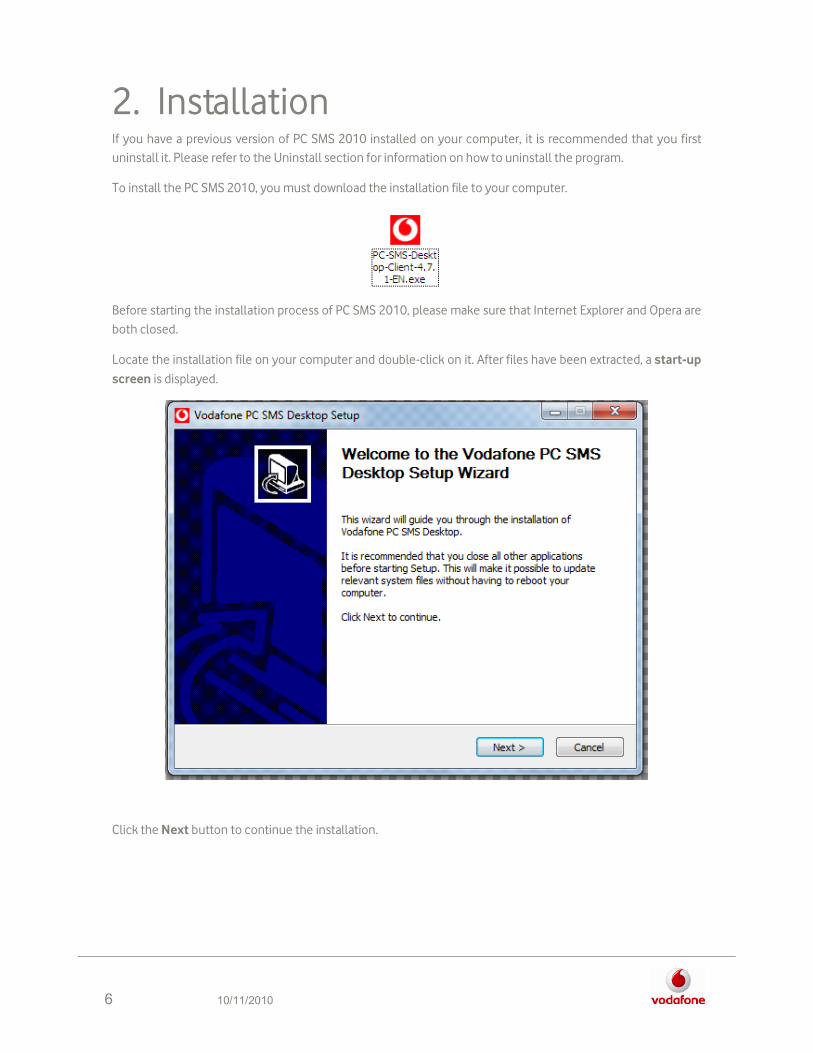
2. Installation If you have a previous version of PC SMS 2010 installed on your computer, it is recommended that you first
uninstall it. Please refer to the Uninstall section for information on how to uninstall the program.
To install the PC SMS 2010, you must download the installation file to your computer.
Before starting the installation process of PC SMS 2010, please make sure that Internet Explorer and Opera are
both closed.
Locate the installation file on your computer and double-click on it. After files have been extracted, a start-up
screen is displayed.
Click the Next button to continue the installation.
7 10/11/2010
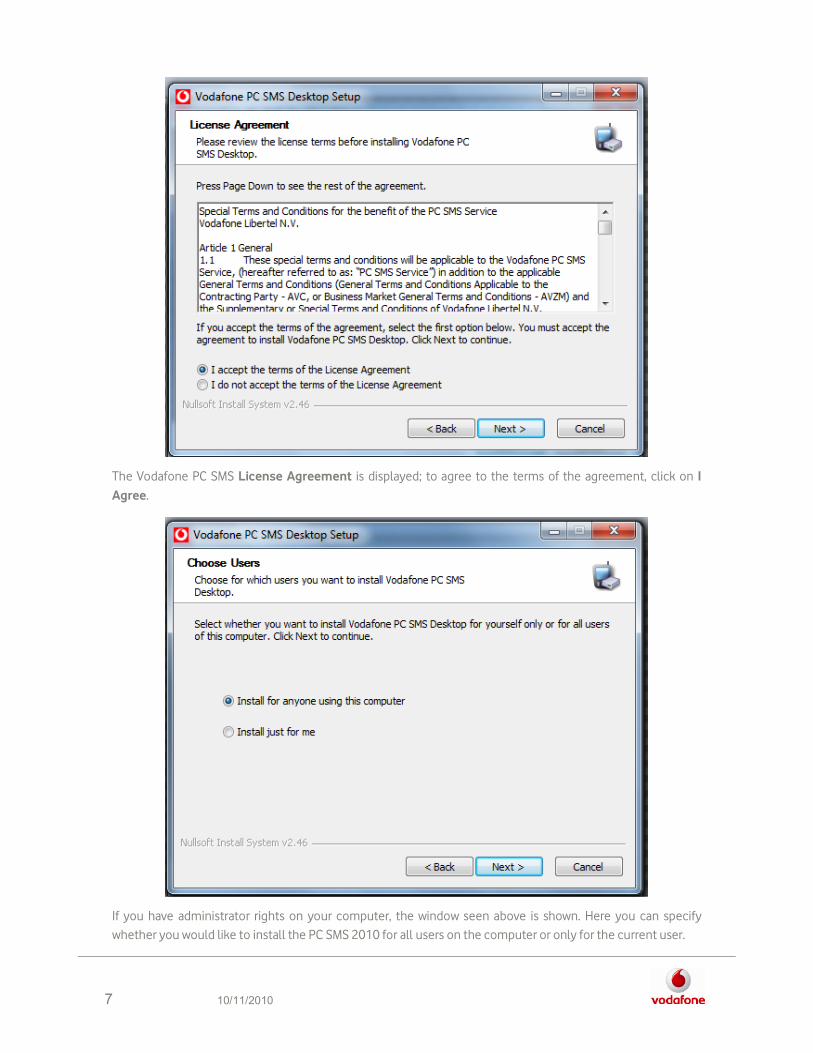
The Vodafone PC SMS License Agreement is displayed; to agree to the terms of the agreement, click on I
Agree.
If you have administrator rights on your computer, the window seen above is shown. Here you can specify
whether you would like to install the PC SMS 2010 for all users on the computer or only for the current user.
8 10/11/2010
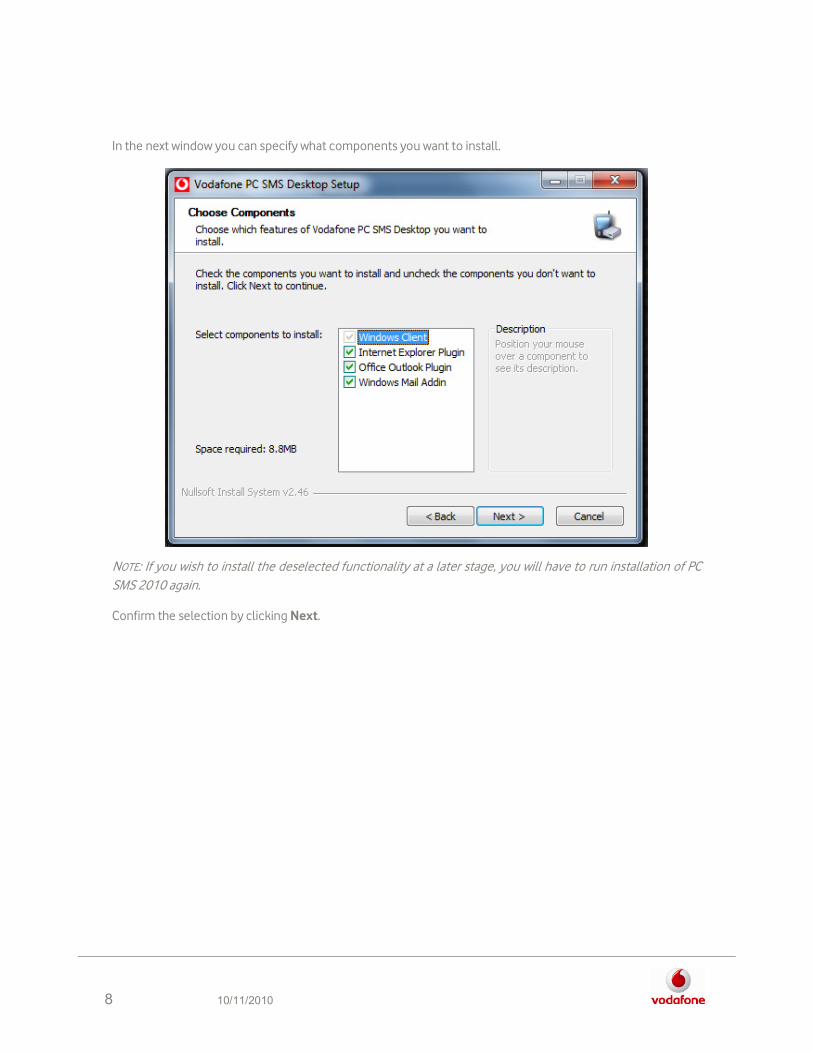
In the next window you can specify what components you want to install.
NOTE: If you wish to install the deselected functionality at a later stage, you will have to run installation of PC
SMS 2010 again.
Confirm the selection by clicking Next.
9 10/11/2010
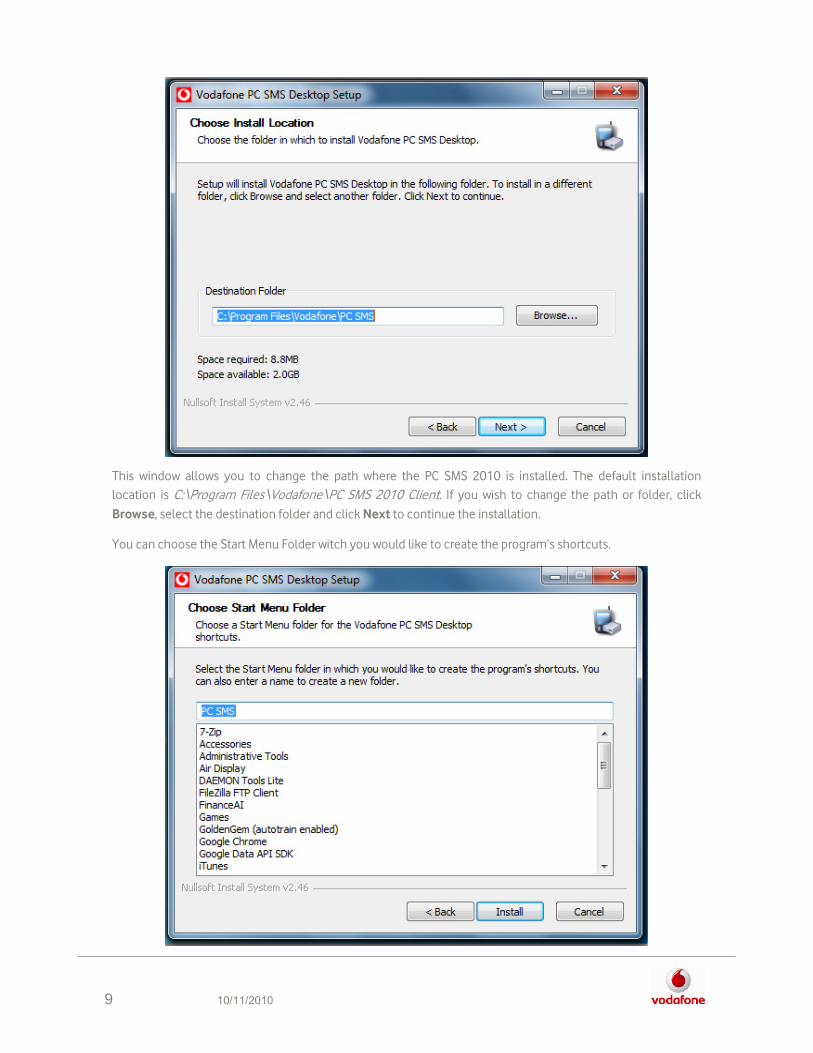
This window allows you to change the path where the PC SMS 2010 is installed. The default installation
location is C:\Program Files\Vodafone\PC SMS 2010 Client. If you wish to change the path or folder, click
Browse, select the destination folder and click Next to continue the installation.
You can choose the Start Menu Folder witch you would like to create the program’s shortcuts.
10 10/11/2010
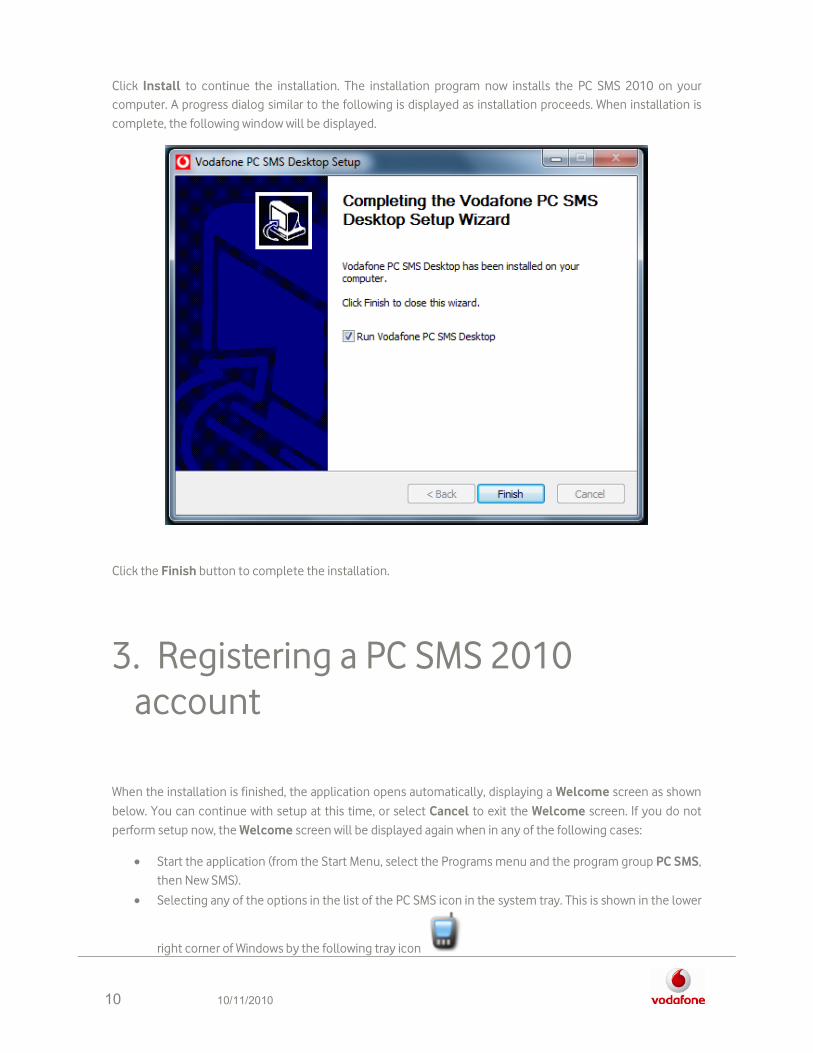
Click Install to continue the installation. The installation program now installs the PC SMS 2010 on your
computer. A progress dialog similar to the following is displayed as installation proceeds. When installation is
complete, the following window will be displayed.
Click the Finish button to complete the installation.
3. Registering a PC SMS 2010 account
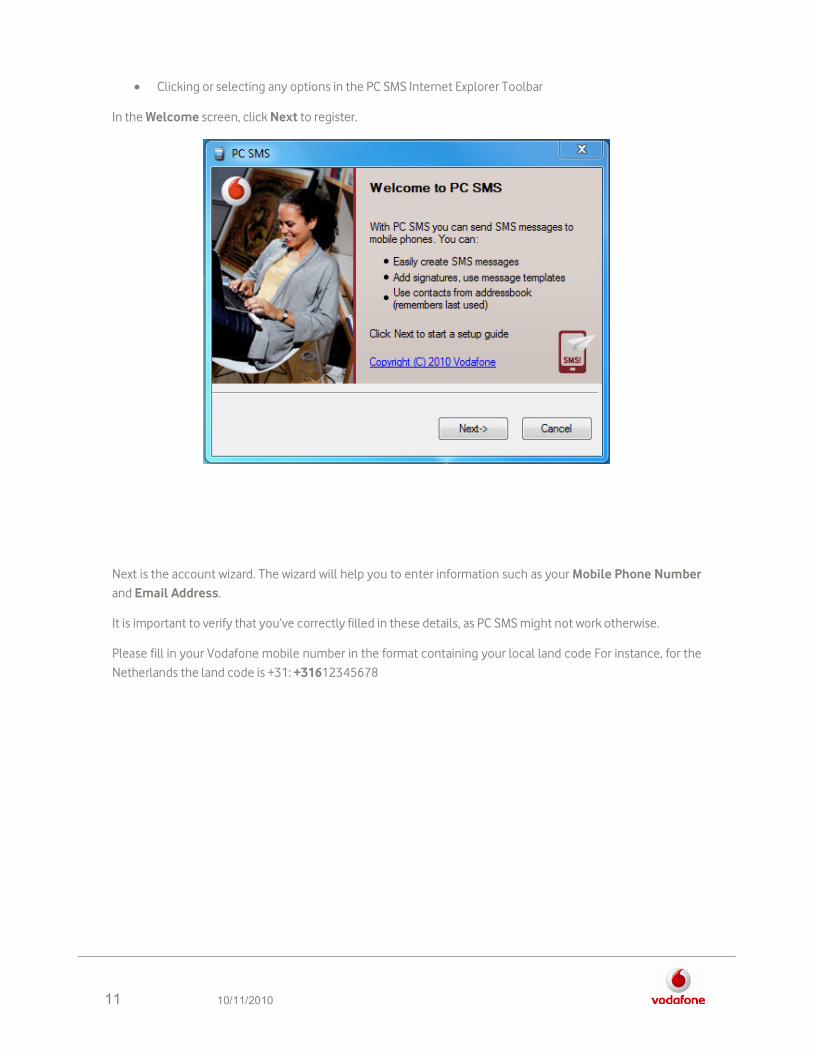
When the installation is finished, the application opens automatically, displaying a Welcome screen as shown
below. You can continue with setup at this time, or select Cancel to exit the Welcome screen. If you do not
perform setup now, the Welcome screen will be displayed again when in any of the following cases:
• Start the application (from the Start Menu, select the Programs menu and the program group PC SMS,
then New SMS).
• Selecting any of the options in the list of the PC SMS icon in the system tray. This is shown in the lower
right corner of Windows by the following tray icon
11 10/11/2010
• Clicking or selecting any options in the PC SMS Internet Explorer Toolbar
In the Welcome screen, click Next to register.
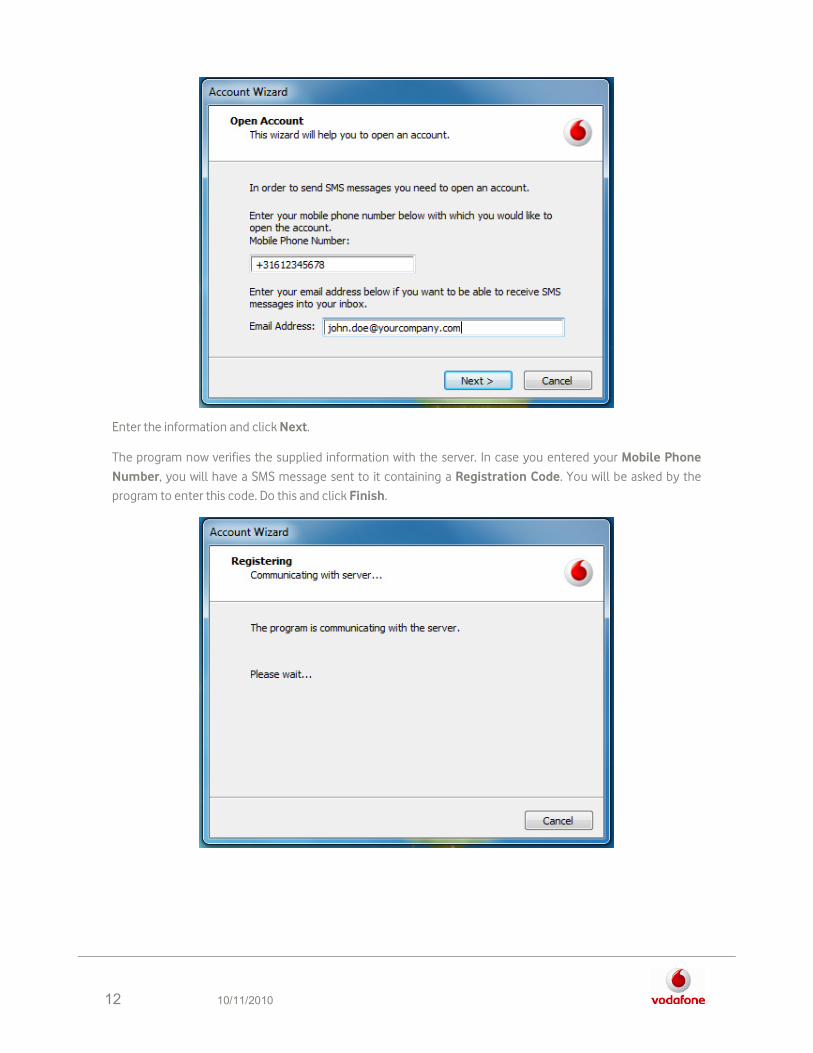
Next is the account wizard. The wizard will help you to enter information such as your Mobile Phone Number
and Email Address.
It is important to verify that you’ve correctly filled in these details, as PC SMS might not work otherwise.
Please fill in your Vodafone mobile number in the format containing your local land code For instance, for the
Netherlands the land code is +31: +31612345678
12 10/11/2010
Enter the information and click Next.
The program now verifies the supplied information with the server. In case you entered your Mobile Phone
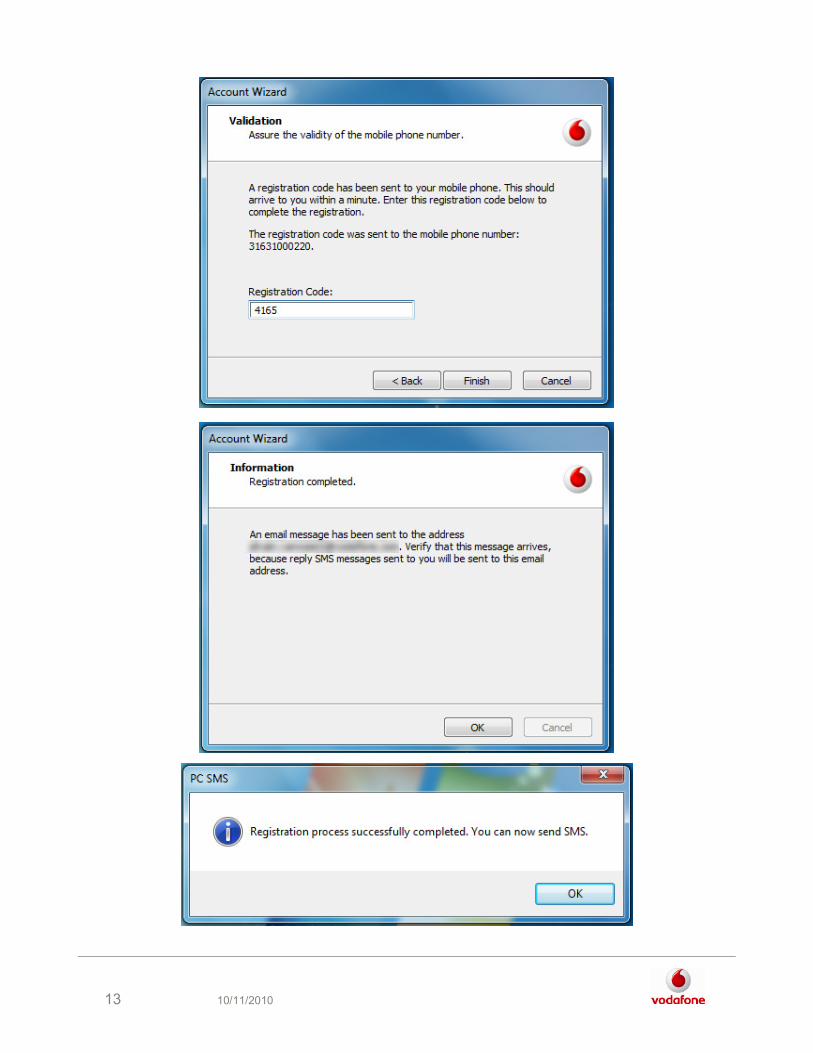
Number, you will have a SMS message sent to it containing a Registration Code. You will be asked by the
program to enter this code. Do this and click Finish.
13 10/11/2010

14 10/11/2010
After entering the registration code, the program will ask you to confirm that you have received a registration
e-mail. Verify that you have received the e-mail and click OK.
You now have opened the account and can start sending SMS messages.
15 10/11/2010
4. Sending a SMS message
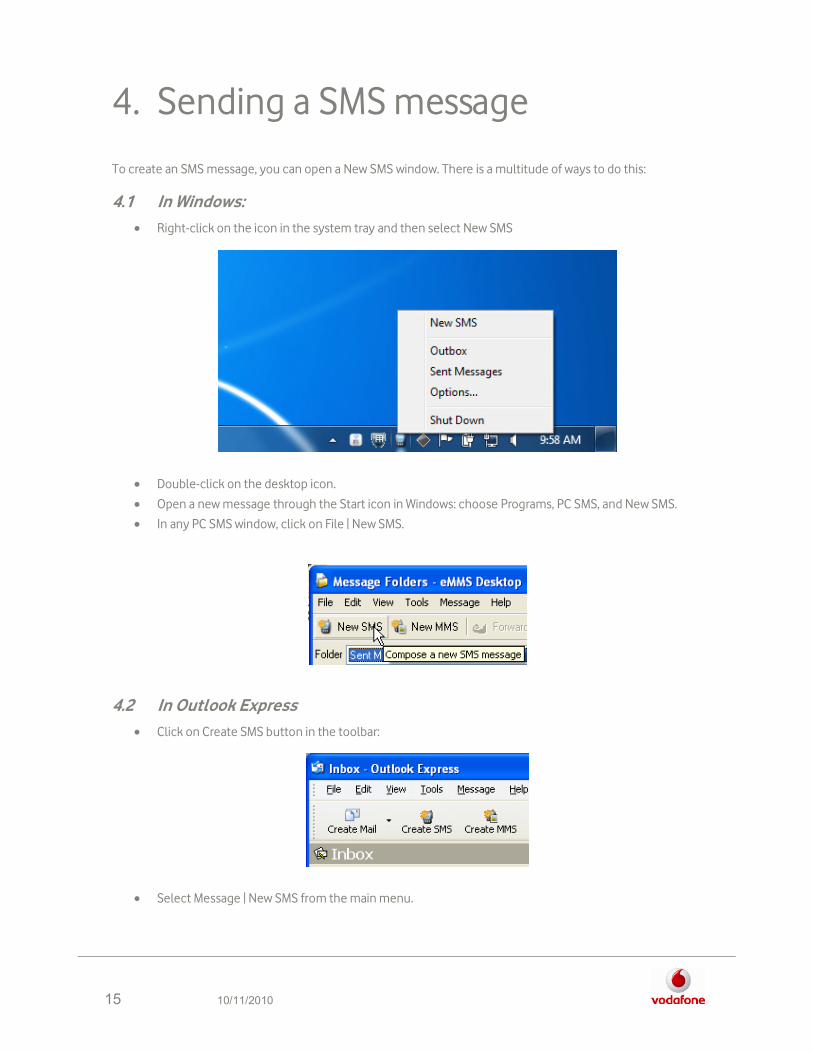
To create an SMS message, you can open a New SMS window. There is a multitude of ways to do this:
4.1 In Windows:
• Right-click on the icon in the system tray and then select New SMS
• Double-click on the desktop icon.
• Open a new message through the Start icon in Windows: choose Programs, PC SMS, and New SMS.
• In any PC SMS window, click on File | New SMS.
4.2 In Outlook Express
• Click on Create SMS button in the toolbar:
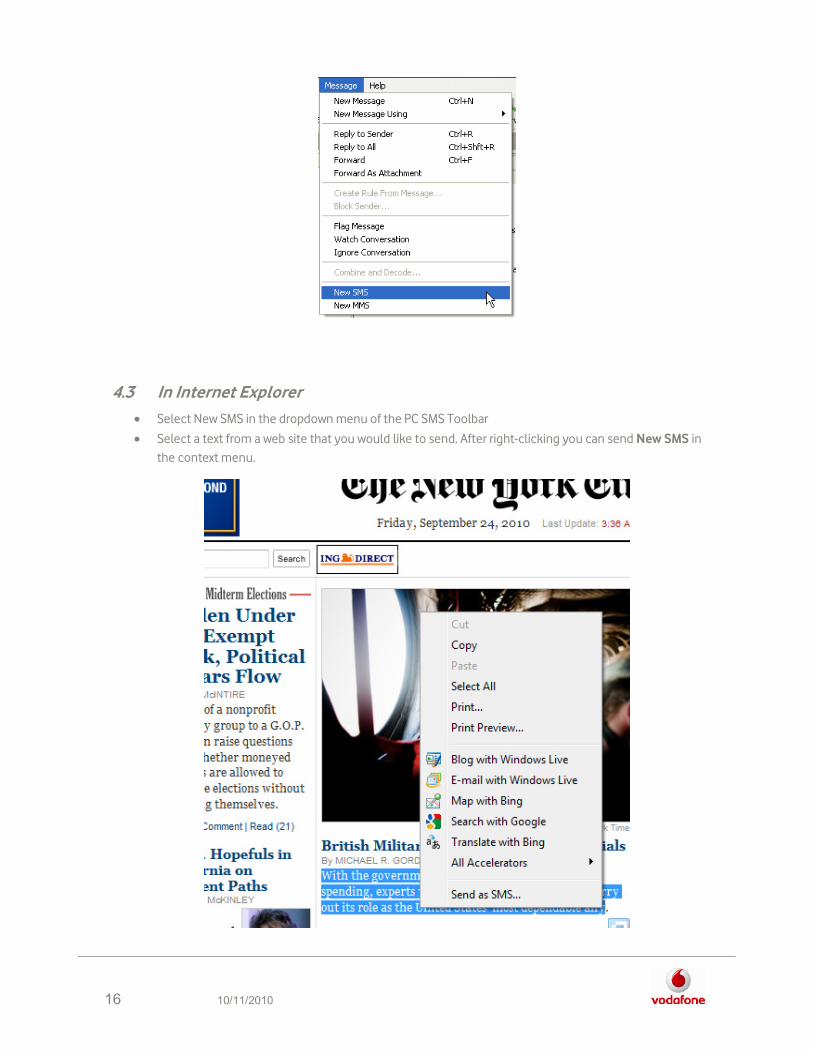
• Select Message | New SMS from the main menu.
16 10/11/2010
4.3 In Internet Explorer
• Select New SMS in the dropdown menu of the PC SMS Toolbar
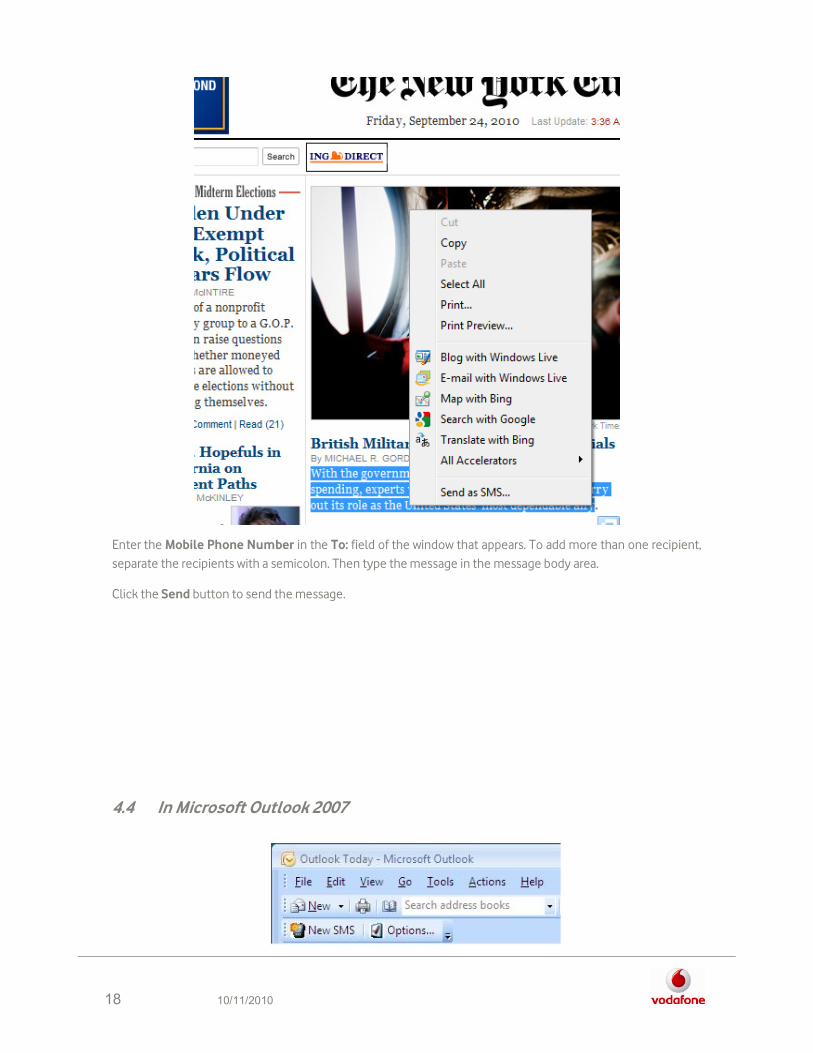
• Select a text from a web site that you would like to send. After right-clicking you can send New SMS in
the context menu.
17 10/11/2010
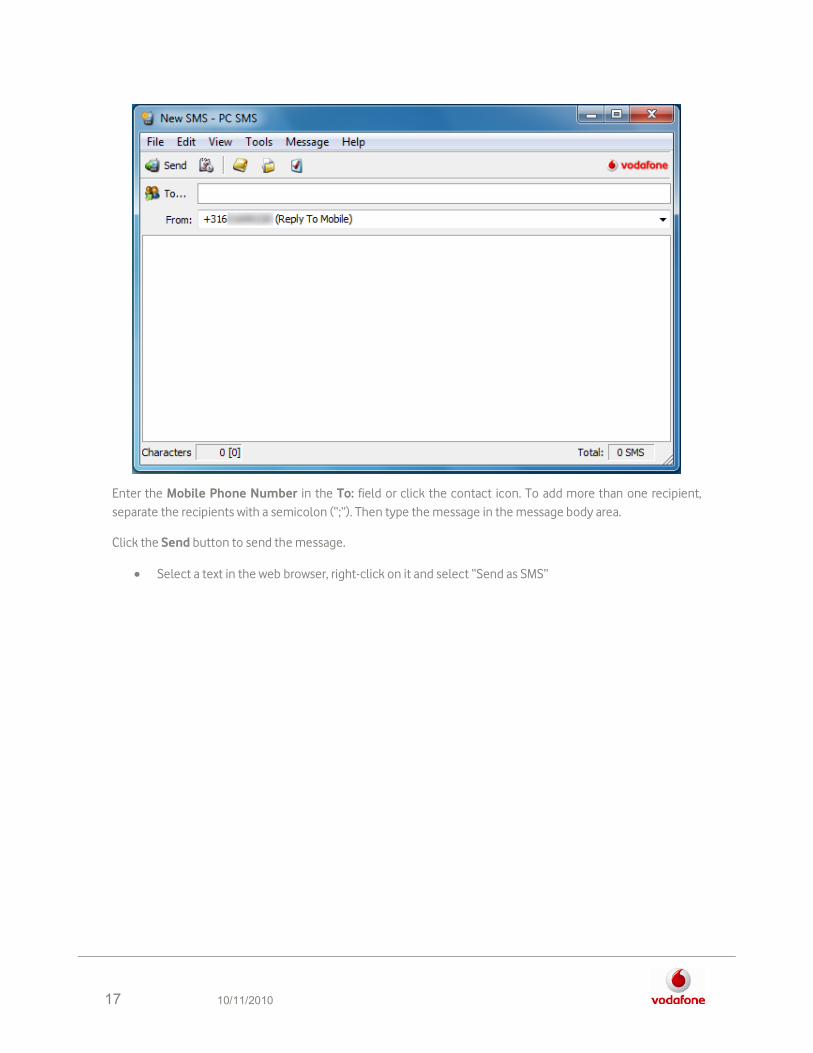
Enter the Mobile Phone Number in the To: field or click the contact icon. To add more than one recipient,
separate the recipients with a semicolon (“;”). Then type the message in the message body area.
Click the Send button to send the message.
• Select a text in the web browser, right-click on it and select “Send as SMS”
18 10/11/2010
Enter the Mobile Phone Number in the To: field of the window that appears. To add more than one recipient,
separate the recipients with a semicolon. Then type the message in the message body area.
Click the Send button to send the message.
4.4 In Microsoft Outlook 2007
19 10/11/2010
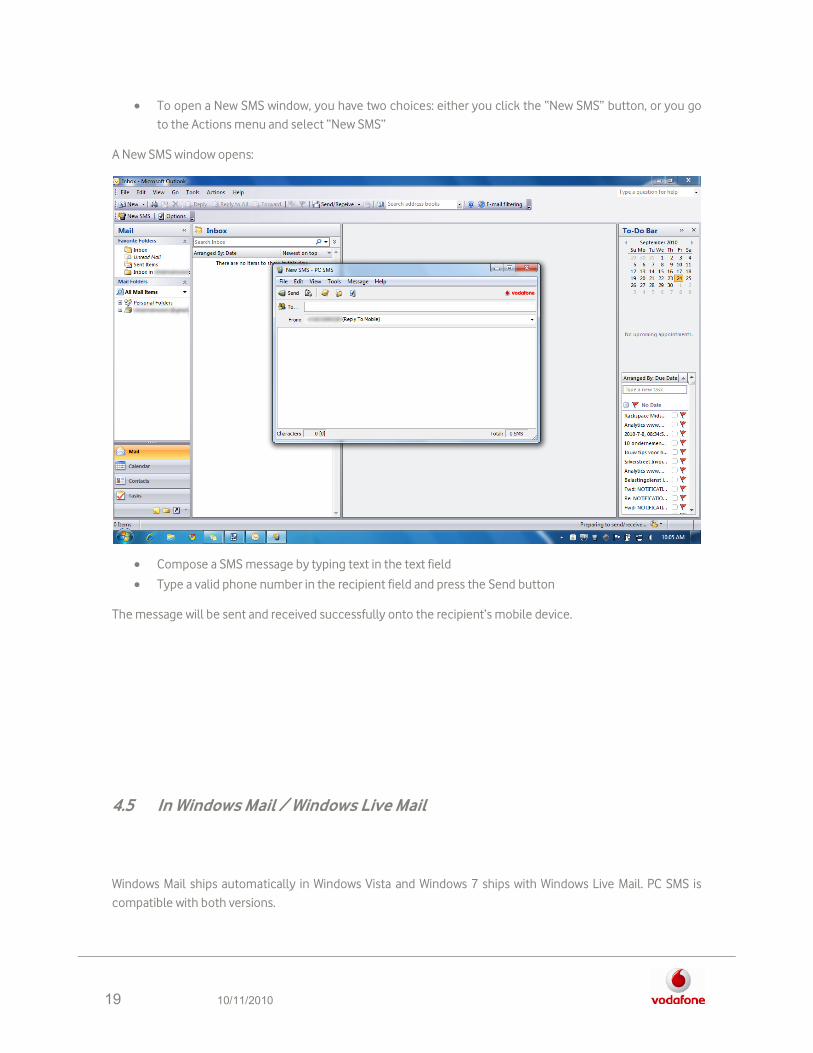
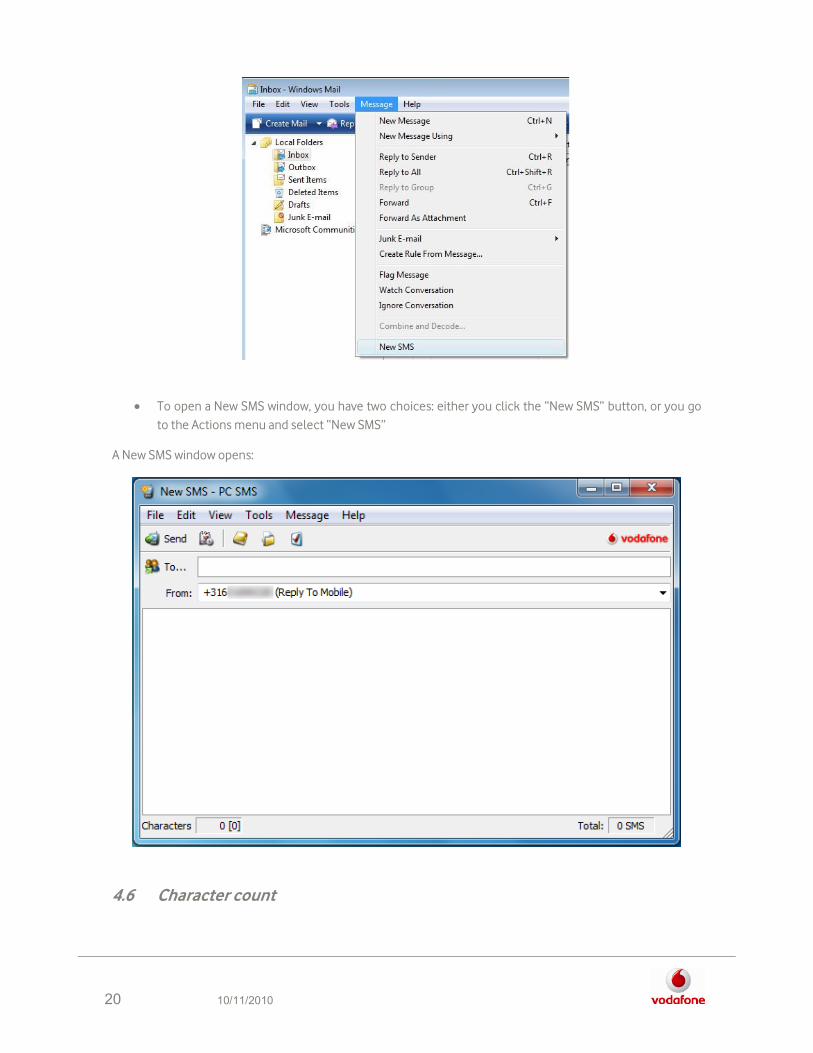
• To open a New SMS window, you have two choices: either you click the “New SMS” button, or you go
to the Actions menu and select “New SMS”
A New SMS window opens:
• Compose a SMS message by typing text in the text field
• Type a valid phone number in the recipient field and press the Send button
The message will be sent and received successfully onto the recipient’s mobile device.
4.5 In Windows Mail / Windows Live Mail
Windows Mail ships automatically in Windows Vista and Windows 7 ships with Windows Live Mail. PC SMS is
compatible with both versions.
20 10/11/2010
• To open a New SMS window, you have two choices: either you click the “New SMS” button, or you go
to the Actions menu and select “New SMS”
A New SMS window opens:
4.6 Character count
21 10/11/2010
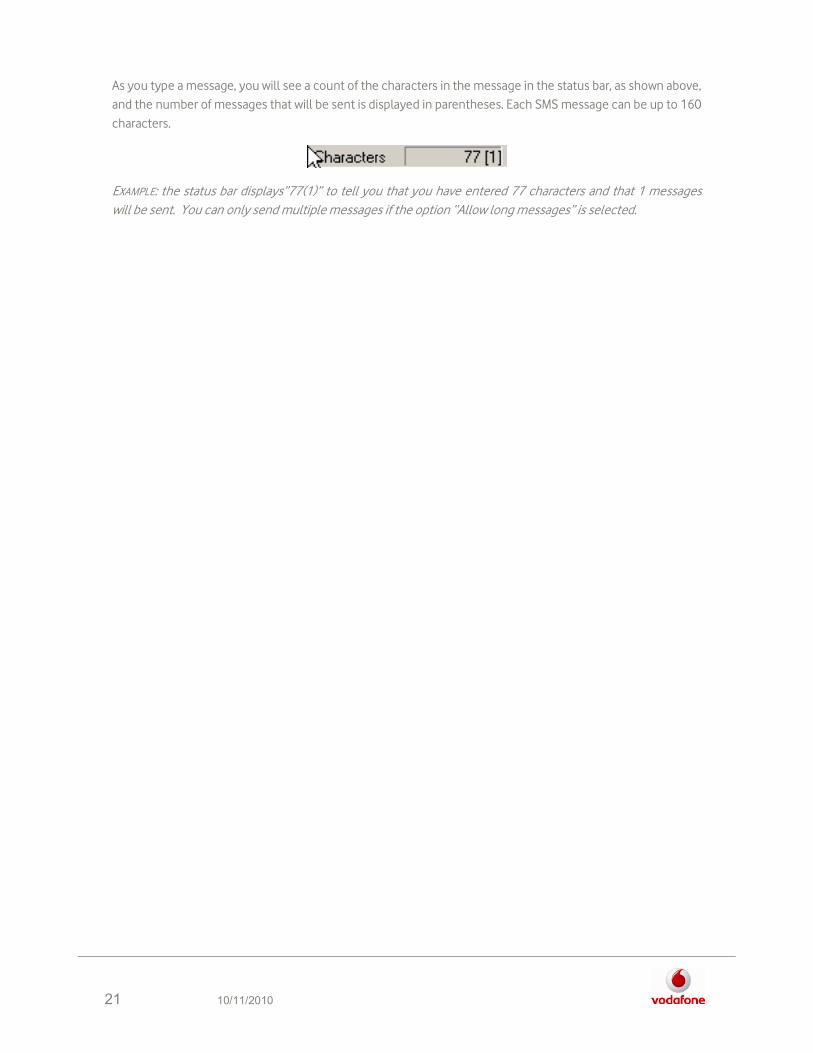
As you type a message, you will see a count of the characters in the message in the status bar, as shown above,
and the number of messages that will be sent is displayed in parentheses. Each SMS message can be up to 160
characters.
EXAMPLE: the status bar displays”77(1)” to tell you that you have entered 77 characters and that 1 messages
will be sent. You can only send multiple messages if the option “Allow long messages” is selected.
22 10/11/2010
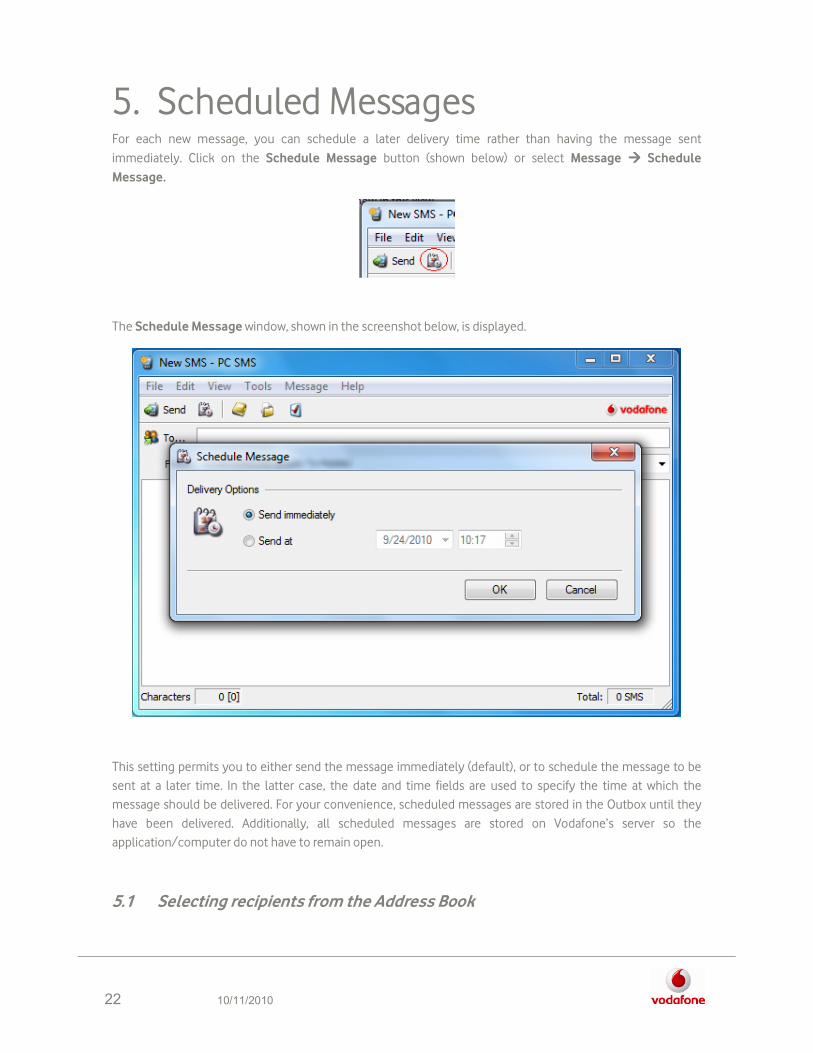
5. Scheduled Messages For each new message, you can schedule a later delivery time rather than having the message sent
immediately. Click on the Schedule Message button (shown below) or select Message ���� Schedule
Message.
The Schedule Message window, shown in the screenshot below, is displayed.
This setting permits you to either send the message immediately (default), or to schedule the message to be
sent at a later time. In the latter case, the date and time fields are used to specify the time at which the
message should be delivered. For your convenience, scheduled messages are stored in the Outbox until they
have been delivered. Additionally, all scheduled messages are stored on Vodafone’s server so the
application/computer do not have to remain open.
5.1 Selecting recipients from the Address Book
23 10/11/2010
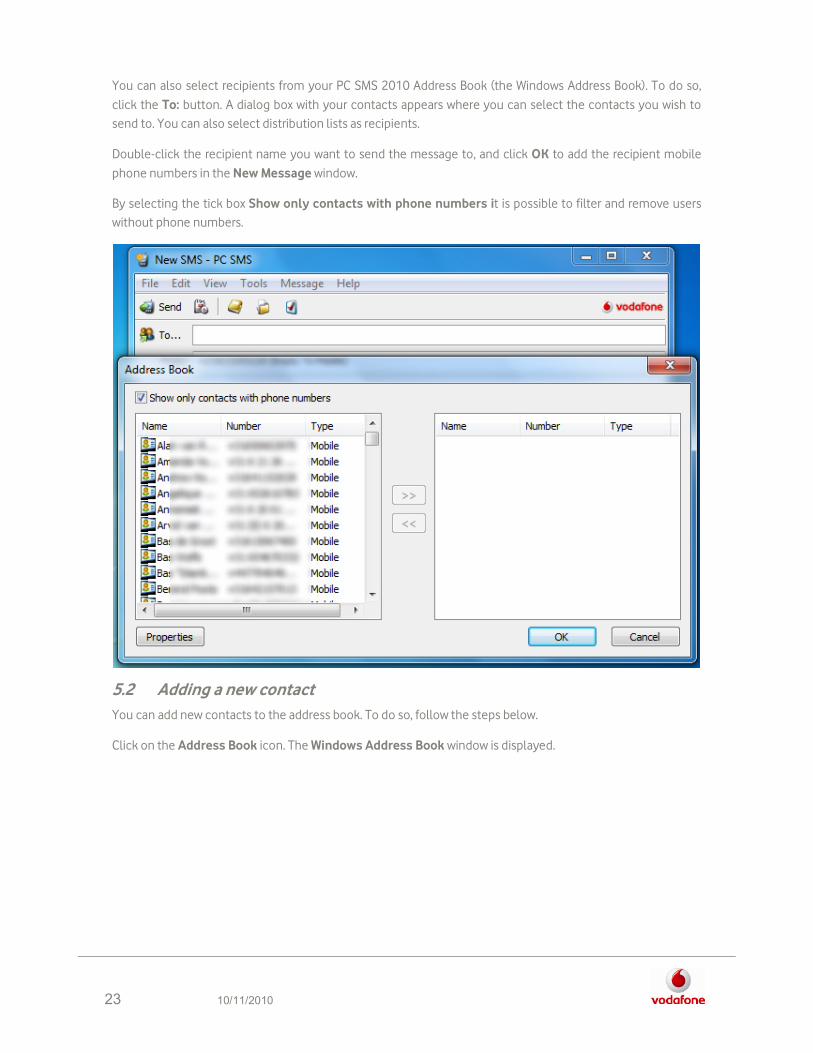
You can also select recipients from your PC SMS 2010 Address Book (the Windows Address Book). To do so,
click the To: button. A dialog box with your contacts appears where you can select the contacts you wish to
send to. You can also select distribution lists as recipients.
Double-click the recipient name you want to send the message to, and click OK to add the recipient mobile
phone numbers in the New Message window.
By selecting the tick box Show only contacts with phone numbers it is possible to filter and remove users
without phone numbers.
5.2 Adding a new contact
You can add new contacts to the address book. To do so, follow the steps below.
Click on the Address Book icon. The Windows Address Book window is displayed.
24 10/11/2010
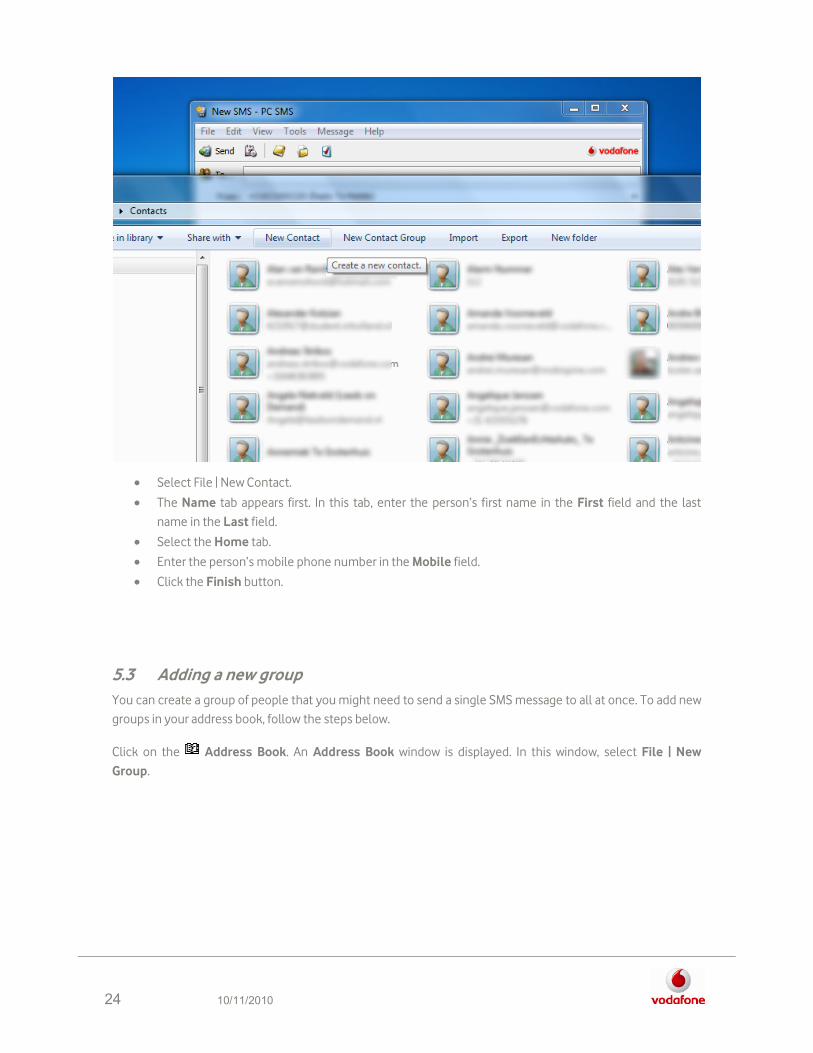
• Select File | New Contact.
• The Name tab appears first. In this tab, enter the person’s first name in the First field and the last
name in the Last field.
• Select the Home tab.
• Enter the person’s mobile phone number in the Mobile field.
• Click the Finish button.
5.3 Adding a new group
You can create a group of people that you might need to send a single SMS message to all at once. To add new
groups in your address book, follow the steps below.
Click on the Address Book. An Address Book window is displayed. In this window, select File | New
Group.
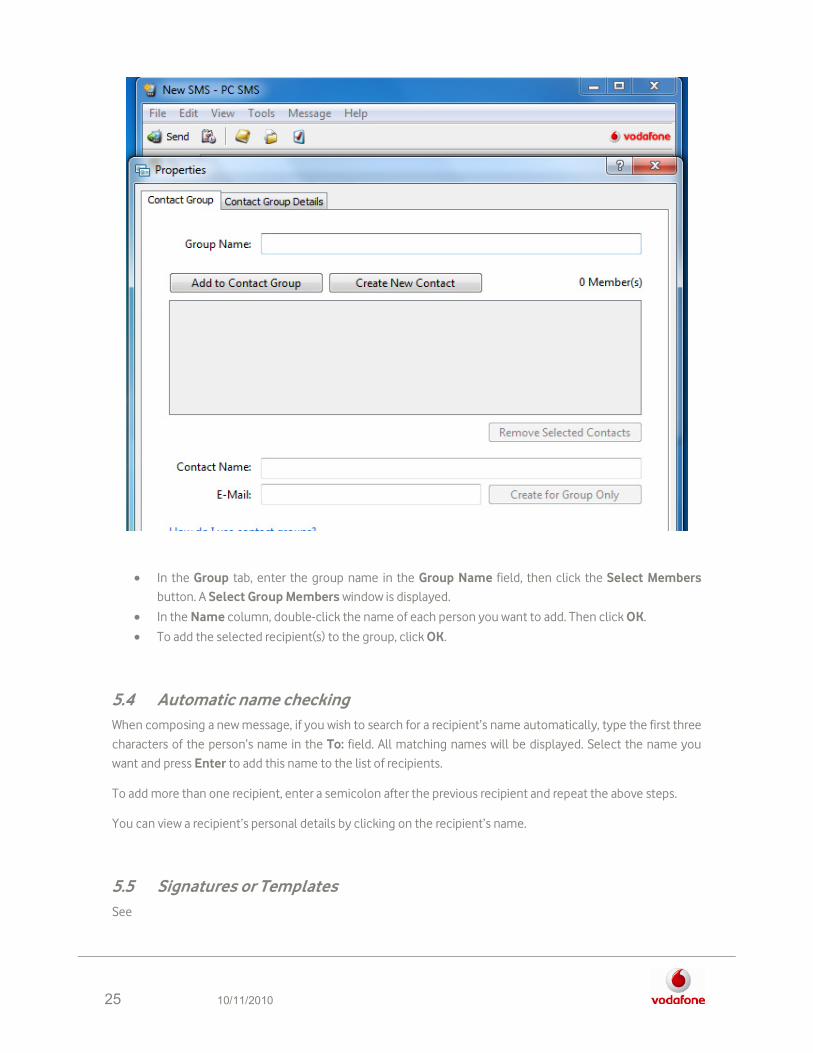
25 10/11/2010
• In the Group tab, enter the group name in the Group Name field, then click the Select Members
button. A Select Group Members window is displayed.
• In the Name column, double-click the name of each person you want to add. Then click OK.
• To add the selected recipient(s) to the group, click OK.
5.4 Automatic name checking
When composing a new message, if you wish to search for a recipient’s name automatically, type the first three
characters of the person’s name in the To: field. All matching names will be displayed. Select the name you
want and press Enter to add this name to the list of recipients.
To add more than one recipient, enter a semicolon after the previous recipient and repeat the above steps.
You can view a recipient’s personal details by clicking on the recipient’s name.
5.5 Signatures or Templates
See
26 10/11/2010
Message Template section for a description of how to created and insert signatures or templates.
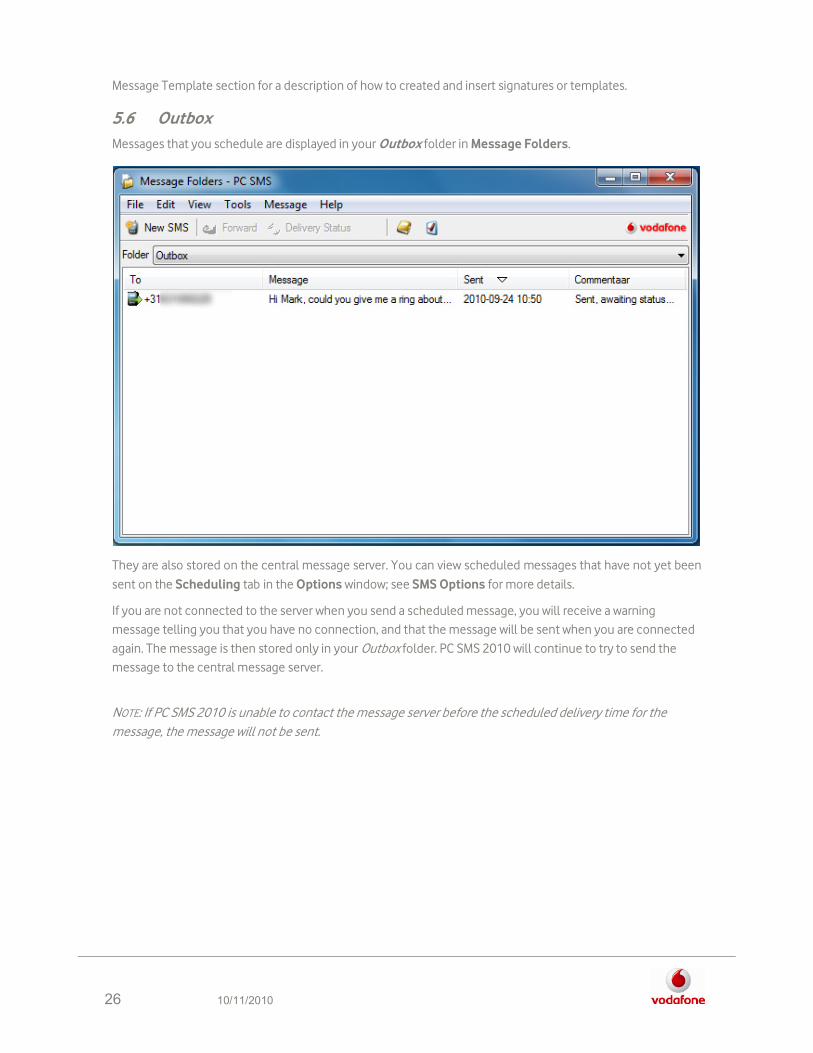
5.6 Outbox
Messages that you schedule are displayed in your Outbox folder in Message Folders.
They are also stored on the central message server. You can view scheduled messages that have not yet been
sent on the Scheduling tab in the Options window; see SMS Options for more details.
If you are not connected to the server when you send a scheduled message, you will receive a warning
message telling you that you have no connection, and that the message will be sent when you are connected
again. The message is then stored only in your Outbox folder. PC SMS 2010 will continue to try to send the
message to the central message server.
NOTE: If PC SMS 2010 is unable to contact the message server before the scheduled delivery time for the
message, the message will not be sent.
27 10/11/2010
6. View Incoming SMS PC SMS offers to receive SMS replies from the recipient. The replied messages from your recipients will be sent
back to your e-mail inbox in the supported Outlook versions.
6.1 Viewing incoming SMS
All incoming SMS messages are received in the Outlook inbox (if the e-mail address to the Outlook inbox was
supplied at registration). The messages are similar to e-mails but with some differences. The sender is the
mobile phone number of the person who replied to the message.
Each message can be opened in the same way you open an e-mail. When opened, you can forward, reply or
delete each message. It is also possible to mark the message and use the buttons in the Outlook Express
toolbar.
28 10/11/2010
7. Outbox folder After you press the Send button, the message is temporary stored in the Outbox until it is sent from your
computer. If your computer does not have an Internet connection when you send the message, it is kept in the
Outbox until the Internet connection is restored. If there is a failure when sending a message, it will be kept in
the Outbox, possible for you to manually resend at a later stage.
Note: When you set a message to be sent at a later time (see Schedule Message), the message will be stored in
the Outbox until the time you have entered.
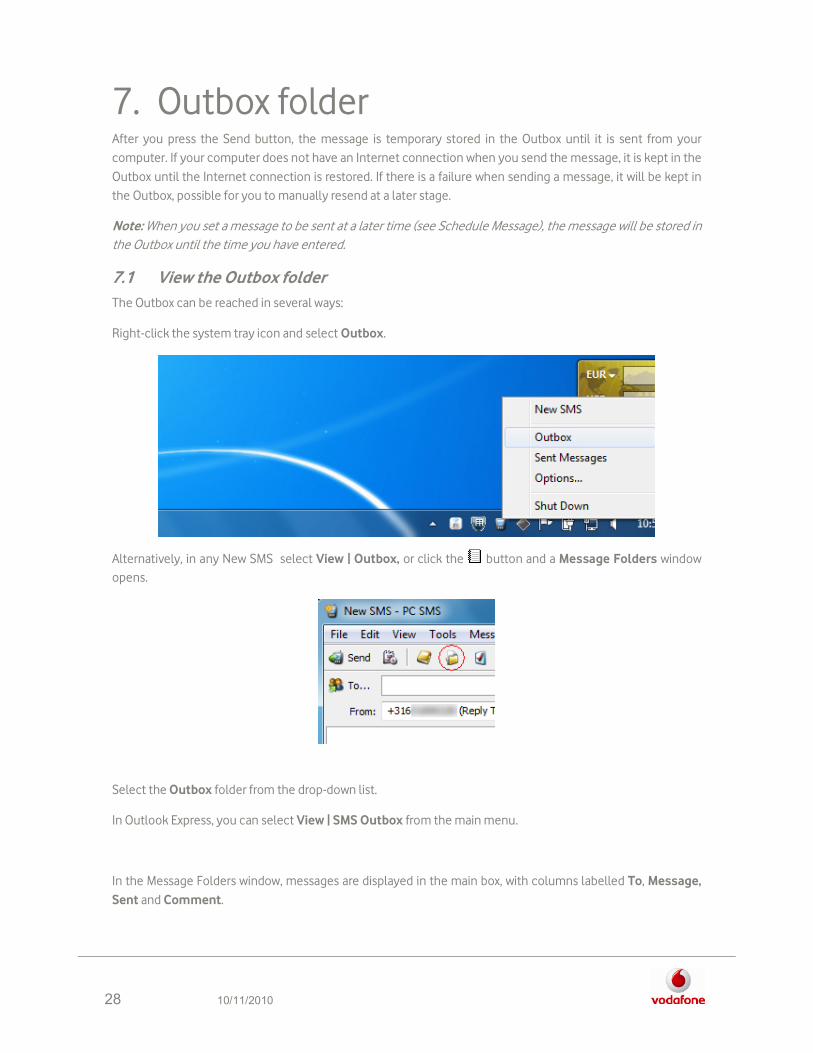
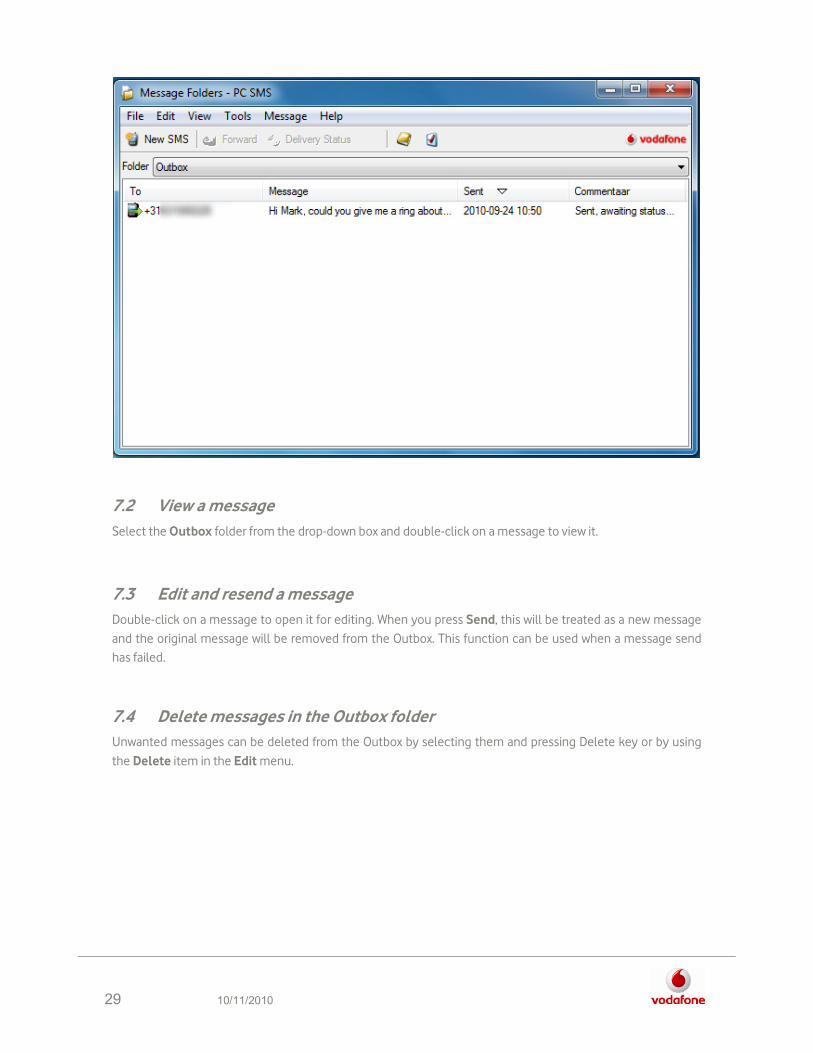
7.1 View the Outbox folder
The Outbox can be reached in several ways:
Right-click the system tray icon and select Outbox.
Alternatively, in any New SMS select View | Outbox, or click the button and a Message Folders window
opens.
Select the Outbox folder from the drop-down list.
In Outlook Express, you can select View | SMS Outbox from the main menu.
In the Message Folders window, messages are displayed in the main box, with columns labelled To, Message,
Sent and Comment.
29 10/11/2010
7.2 View a message
Select the Outbox folder from the drop-down box and double-click on a message to view it.
7.3 Edit and resend a message
Double-click on a message to open it for editing. When you press Send, this will be treated as a new message
and the original message will be removed from the Outbox. This function can be used when a message send
has failed.
7.4 Delete messages in the Outbox folder
Unwanted messages can be deleted from the Outbox by selecting them and pressing Delete key or by using
the Delete item in the Edit menu.
30 10/11/2010
8. Sent Messages folder All messages that have been sent from your computer are stored in the Sent Messages folder. You can view
the details of the sent messages, including their status.
8.1 View the Sent Messages folder
The Sent Messages folder can be reached in several ways:
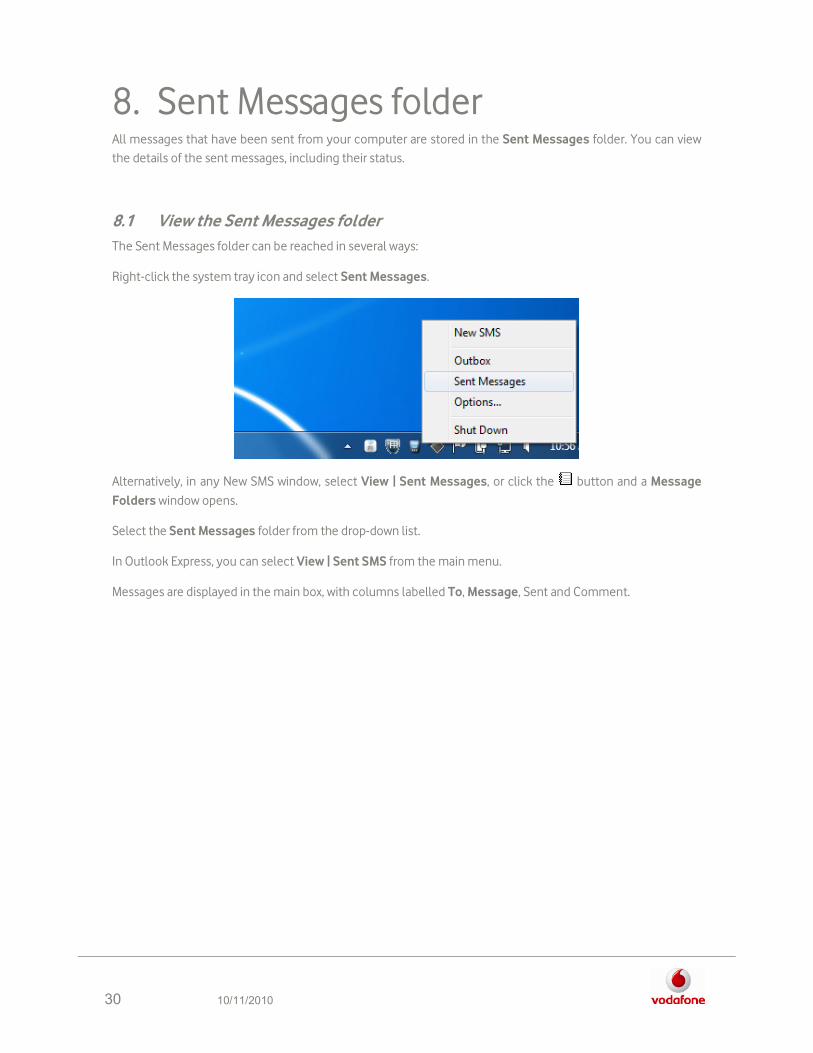
Right-click the system tray icon and select Sent Messages.
Alternatively, in any New SMS window, select View | Sent Messages, or click the button and a Message
Folders window opens.
Select the Sent Messages folder from the drop-down list.
In Outlook Express, you can select View | Sent SMS from the main menu.
Messages are displayed in the main box, with columns labelled To, Message, Sent and Comment.
31 10/11/2010
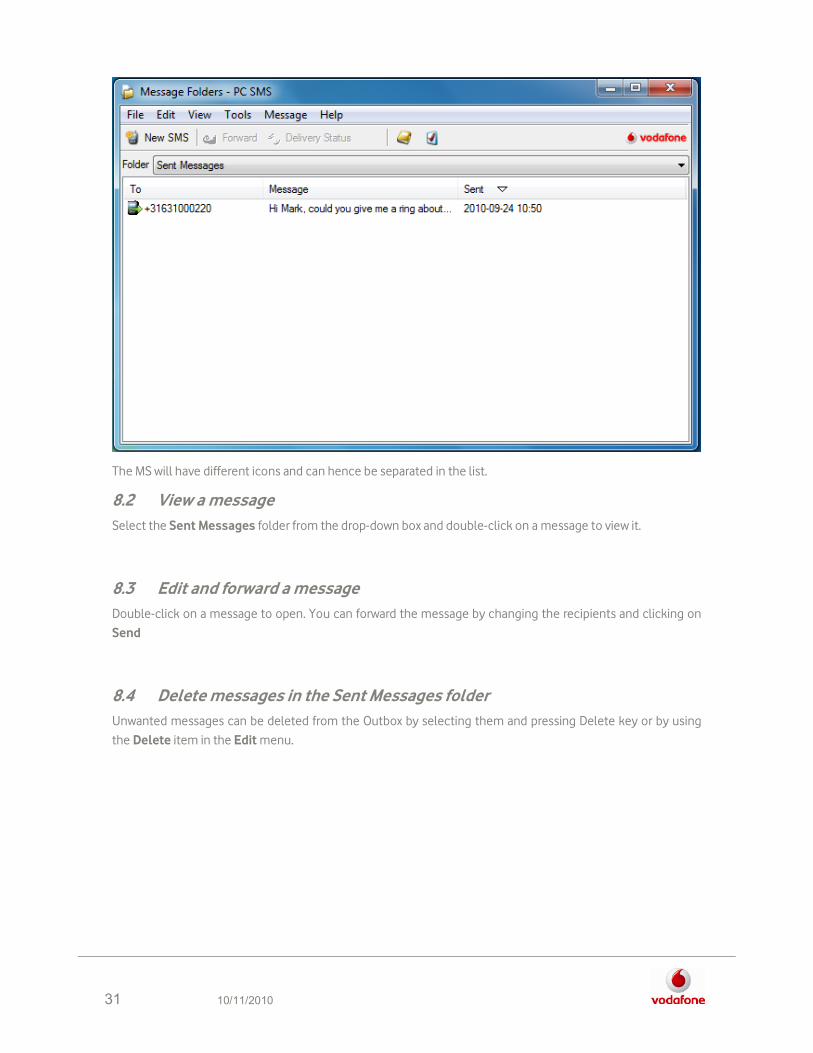
The MS will have different icons and can hence be separated in the list.
8.2 View a message
Select the Sent Messages folder from the drop-down box and double-click on a message to view it.
8.3 Edit and forward a message
Double-click on a message to open. You can forward the message by changing the recipients and clicking on
Send
8.4 Delete messages in the Sent Messages folder
Unwanted messages can be deleted from the Outbox by selecting them and pressing Delete key or by using
the Delete item in the Edit menu.

32 10/11/2010
33 10/11/2010
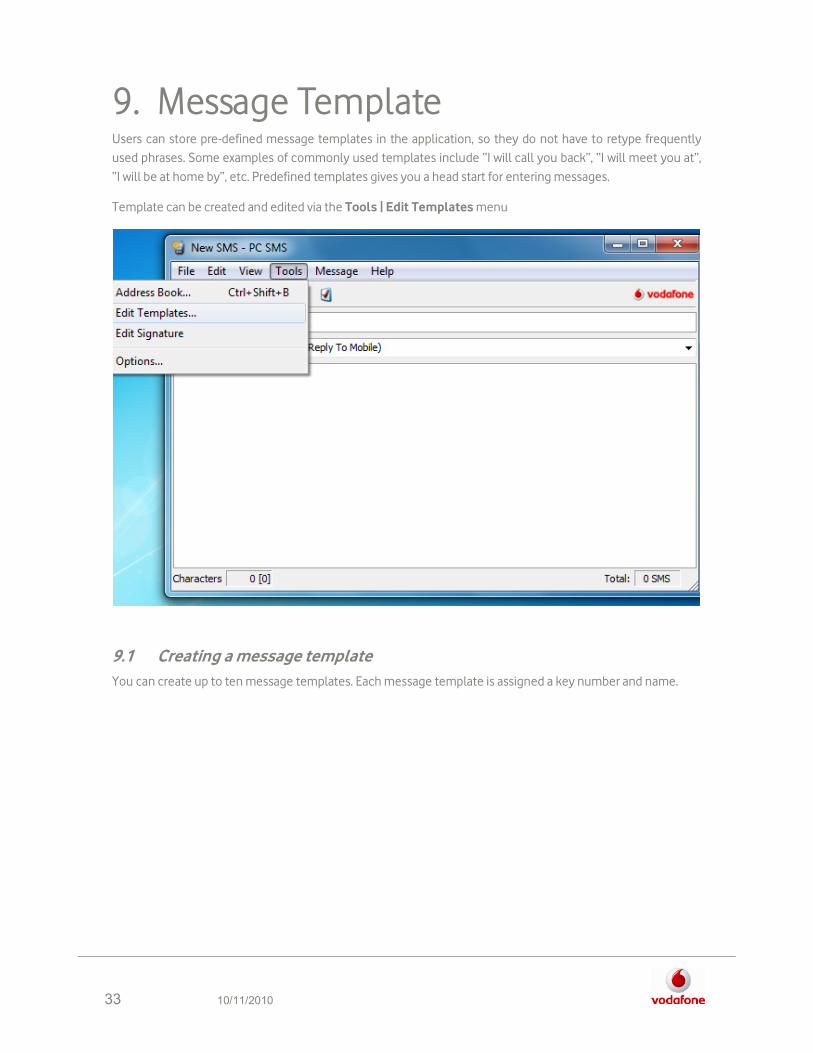
9. Message Template Users can store pre-defined message templates in the application, so they do not have to retype frequently
used phrases. Some examples of commonly used templates include “I will call you back”, “I will meet you at”,
“I will be at home by”, etc. Predefined templates gives you a head start for entering messages.
Template can be created and edited via the Tools | Edit Templates menu
9.1 Creating a message template
You can create up to ten message templates. Each message template is assigned a key number and name.
34 10/11/2010
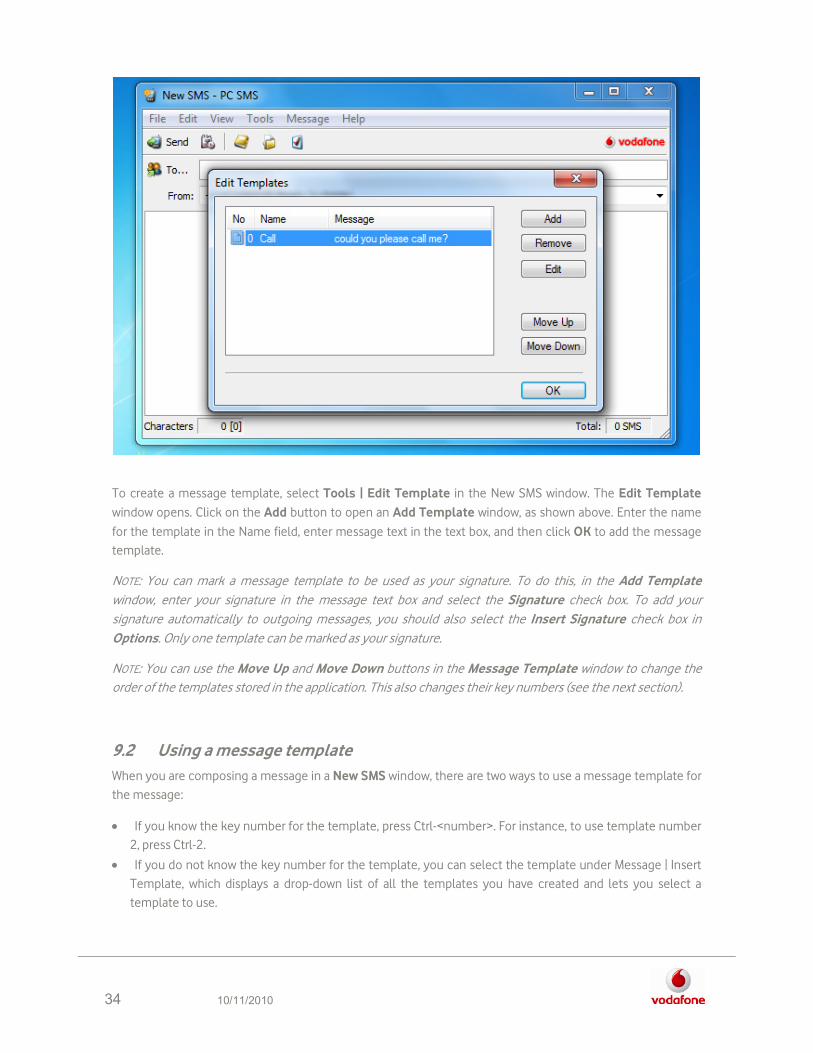
To create a message template, select Tools | Edit Template in the New SMS window. The Edit Template
window opens. Click on the Add button to open an Add Template window, as shown above. Enter the name
for the template in the Name field, enter message text in the text box, and then click OK to add the message
template.
NOTE: You can mark a message template to be used as your signature. To do this, in the Add Template
window, enter your signature in the message text box and select the Signature check box. To add your
signature automatically to outgoing messages, you should also select the Insert Signature check box in
Options. Only one template can be marked as your signature.
NOTE: You can use the Move Up and Move Down buttons in the Message Template window to change the
order of the templates stored in the application. This also changes their key numbers (see the next section).
9.2 Using a message template
When you are composing a message in a New SMS window, there are two ways to use a message template for
the message:
• If you know the key number for the template, press Ctrl-<number>. For instance, to use template number
2, press Ctrl-2.
• If you do not know the key number for the template, you can select the template under Message | Insert
Template, which displays a drop-down list of all the templates you have created and lets you select a
template to use.

35 10/11/2010
9.3 Removing a message template
In the main menu of the New Message window, select Tools | Edit Templates. The Edit Templates window
is displayed. Select the template you wish to remove and click the Remove button.
9.4 Creating a Signature
Besides templates, also signatures can be used. PC SMS 2010 offers two kinds of signature, one for Reply to
Mobile and one for Reply to Inbox. The reason for the two signatures is that e.g. the user sometimes wishes to
have a signature only when creating Reply to Inbox messages.
Signatures can be created and edited via the Tools | Edit Signature | for Reply to Mobile or For Reply to
Inbox menu.
9.5 How to use signatures
Whenever a signature is available, it is automatically inserted into the text field when opening a New SMS
window. If e.g. a signature is available for Reply to Inbox, it is inserted when the user selects Reply to Inbox in
the From selector. When switching to Reply to Inbox, the signature is automatically replaced with the
corresponding signature.
36 10/11/2010
10. Internet Explorer Toolbar With the PC SMS Internet Explorer Toolbar, Vodafone offers a new and rapid way to send SMS messages
through your web browser.
10.1 Using the PC SMS Toolbar
After installation of PC SMS 2010, the PC SMS Toolbar will be visible in Internet Explorer as an additional
toolbar.
Note: During installation, it is possible to deselect PC SMS Toolbar and it will hence not be installed. If you wish
to use PC SMS Toolbar at later stage, the application must be installed again.
With the PC SMS Toolbar it is easy to create and send a SMS Message. It is possible to write up to 160
characters. Texts longer than 160 characters will be truncated.
10.2 Access Menu
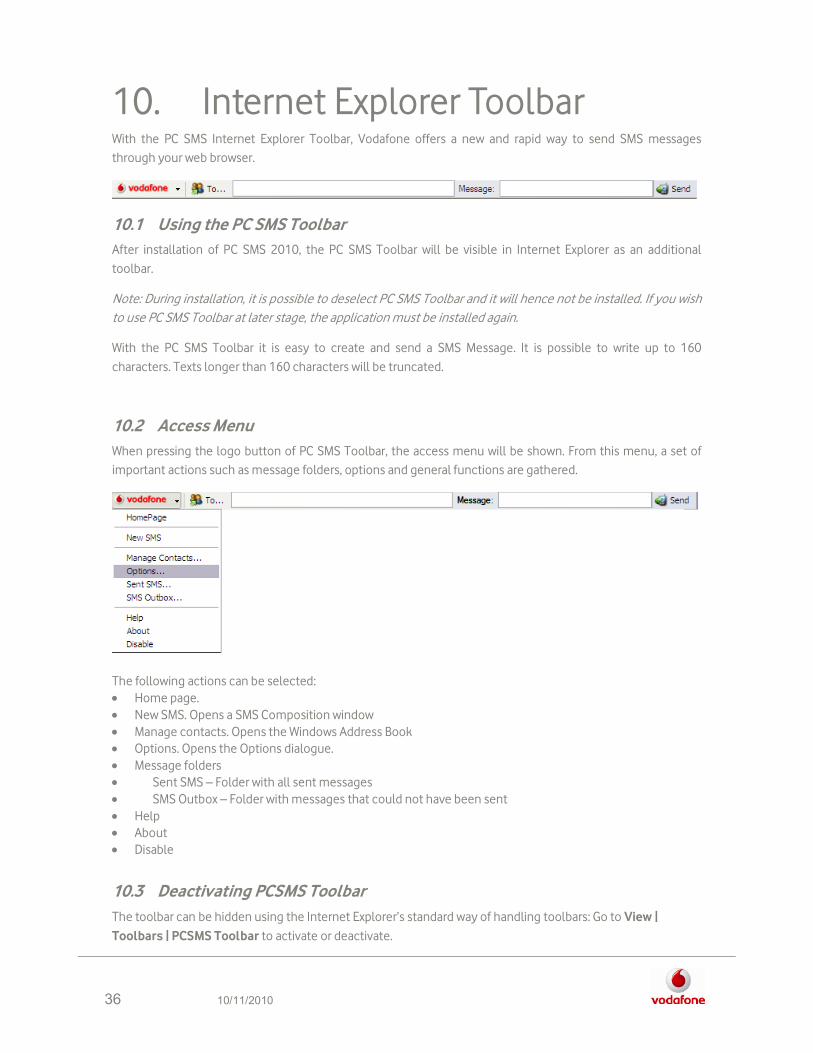
When pressing the logo button of PC SMS Toolbar, the access menu will be shown. From this menu, a set of
important actions such as message folders, options and general functions are gathered.
The following actions can be selected:
• Home page.
• New SMS. Opens a SMS Composition window
• Manage contacts. Opens the Windows Address Book
• Options. Opens the Options dialogue.
• Message folders
• Sent SMS – Folder with all sent messages
• SMS Outbox – Folder with messages that could not have been sent
• Help
• About
• Disable
10.3 Deactivating PCSMS Toolbar
The toolbar can be hidden using the Internet Explorer’s standard way of handling toolbars: Go to View |
Toolbars | PCSMS Toolbar to activate or deactivate.

37 10/11/2010

38 10/11/2010
11. Microsoft Outlook (2007)
• To open a New SMS window, you have two choices: either you click the “New SMS” button, or you go to
the Actions menu and select “New SMS”
A New SMS window opens:
• Compose a SMS message by typing text in the text field
• Type a valid phone number in the recipient field and press the Send button
The message will be sent and received successfully onto the recipient’s mobile device.
39 10/11/2010
12. Outlook Express, Windows Mail, Windows Live Mail
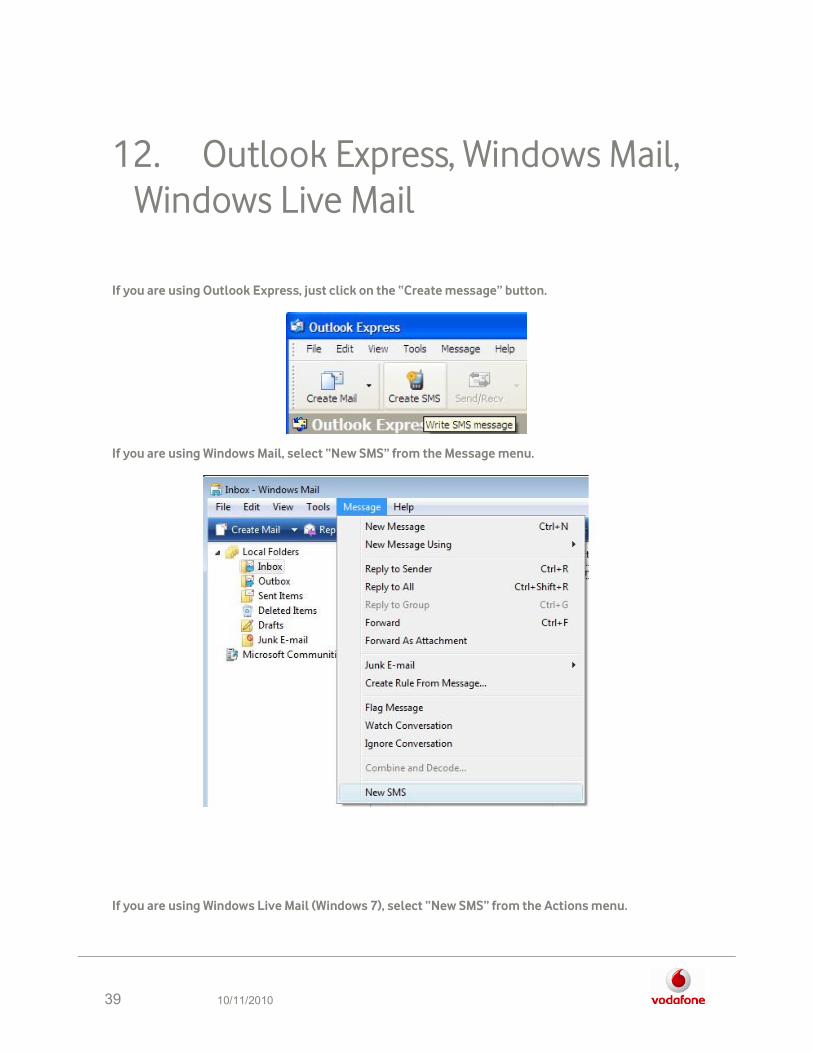
If you are using Outlook Express, just click on the “Create message” button.
If you are using Windows Mail, select “New SMS” from the Message menu.
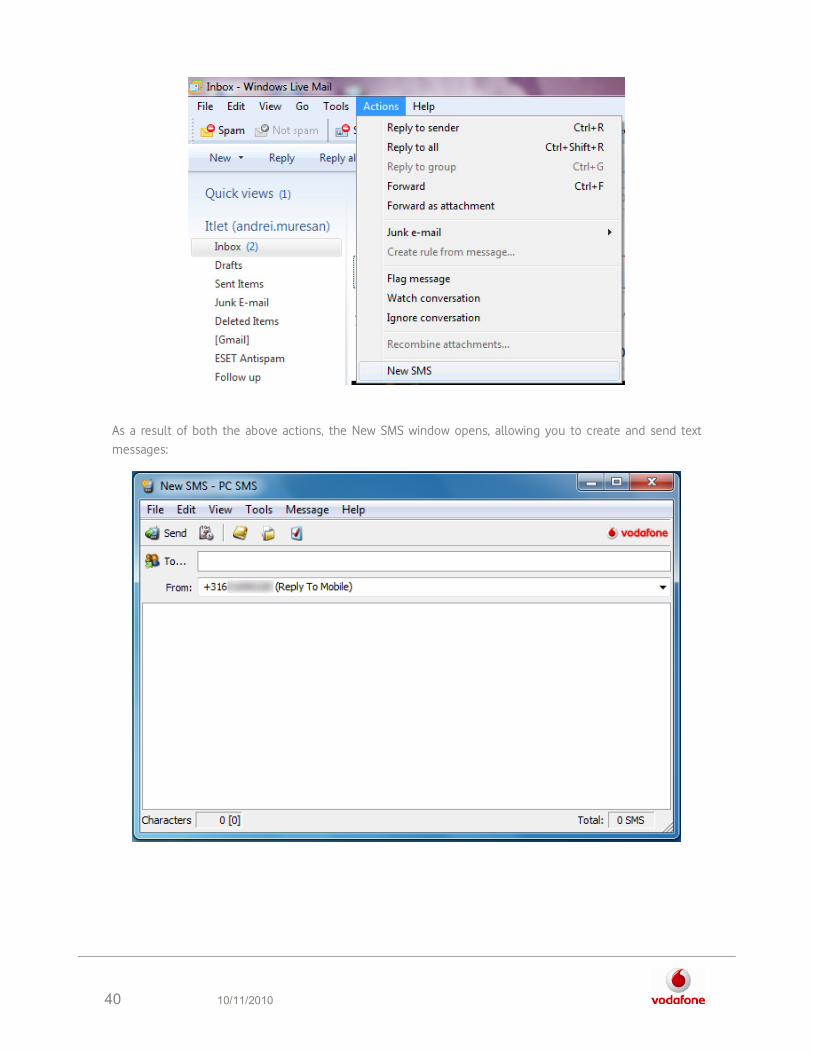
If you are using Windows Live Mail (Windows 7), select “New SMS” from the Actions menu.
40 10/11/2010
As a result of both the above actions, the New SMS window opens, allowing you to create and send text
messages:
41 10/11/2010
13. Live Update Every time PC SMS 2010 is communicating with the main server, it will request information about newer
versions of the program. When a version never than the currently installed is available, a pop-up will be shown
in the lower right corner of Windows. When clicking on this window, a Web page will be opened where the new
version can be downloaded.

42 10/11/2010
14. Options The Options window allows you to configure PC SMS 2010 to meet your specific needs.
To open the Options window, you can click on the Options button in any New Message window, or select
Tools ���� Options in any PC SMS 2010 window. You can also select Tools | SMS Options from the main menu
in Outlook Express.
The Options button is available from all windows in PC SMS 2010.
14.1 General tab
The first tab in the Options window is the General tab, shown in the screenshot below
Regional settings
This setting allows you to select the default home country for PC SMS 2010. This should be the country in
which your mobile phone is registered.
Start up
This section allows you to specify what action the program will take when you double-click on the icon in the
system tray and desktop icon. Select the desired action from the drop-down list.
The Run this program when Windows starts checkbox determines whether PC SMS 2010 should start
automatically when you start the Windows operating system on your computer. Select the checkbox to start
PC SMS 2010 automatically.
43 10/11/2010
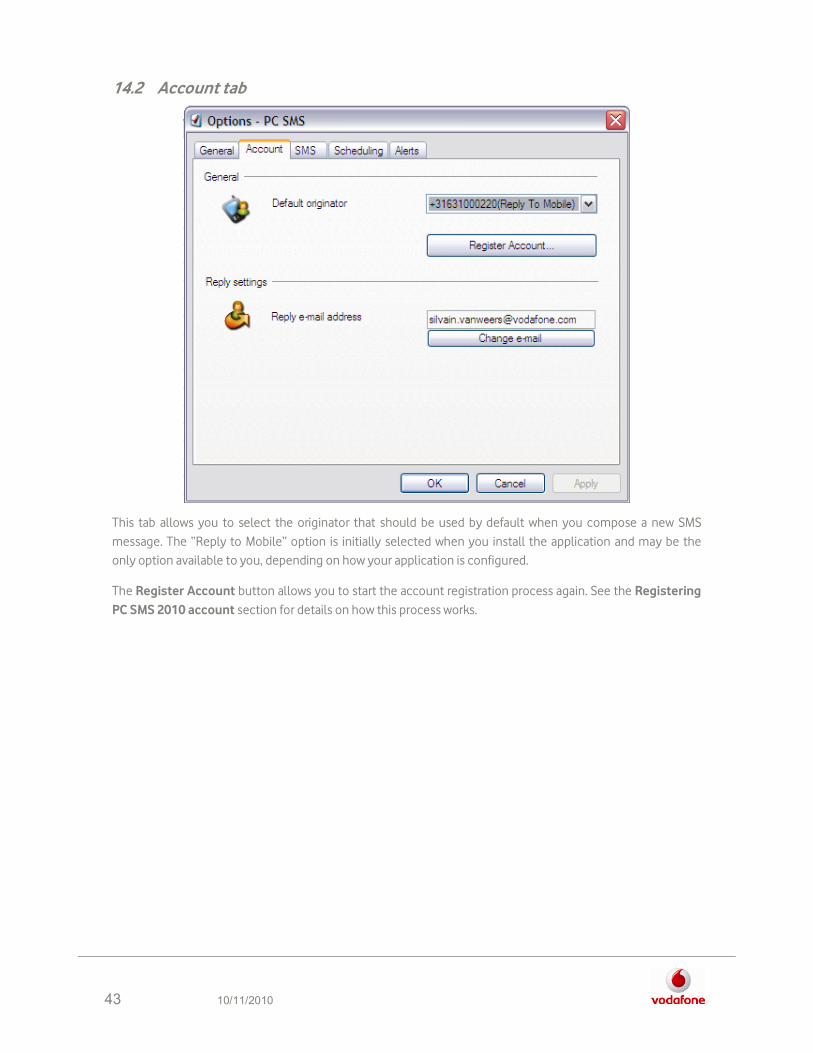
14.2 Account tab
This tab allows you to select the originator that should be used by default when you compose a new SMS
message. The “Reply to Mobile” option is initially selected when you install the application and may be the
only option available to you, depending on how your application is configured.
The Register Account button allows you to start the account registration process again. See the Registering
PC SMS 2010 account section for details on how this process works.

44 10/11/2010
14.3 SMS tab
Message Format
This setting specifies how a message will be sent, by default, when the message exceeds the maximum SMS
message length of 160 characters.
The following are the three available options.
• Send only one SMS per message. If the message exceeds 160 characters, the message is rejected.
• Allow long messages. You can type more than 160 characters. As the option text says, messages longer
than 160 characters will be sent as multiple linked SMS messages.
The Always Insert Signature checkbox determines whether your signature is inserted automatically when
you compose a message. For more information about specifying a signature, see the Creating a message
template section.
45 10/11/2010
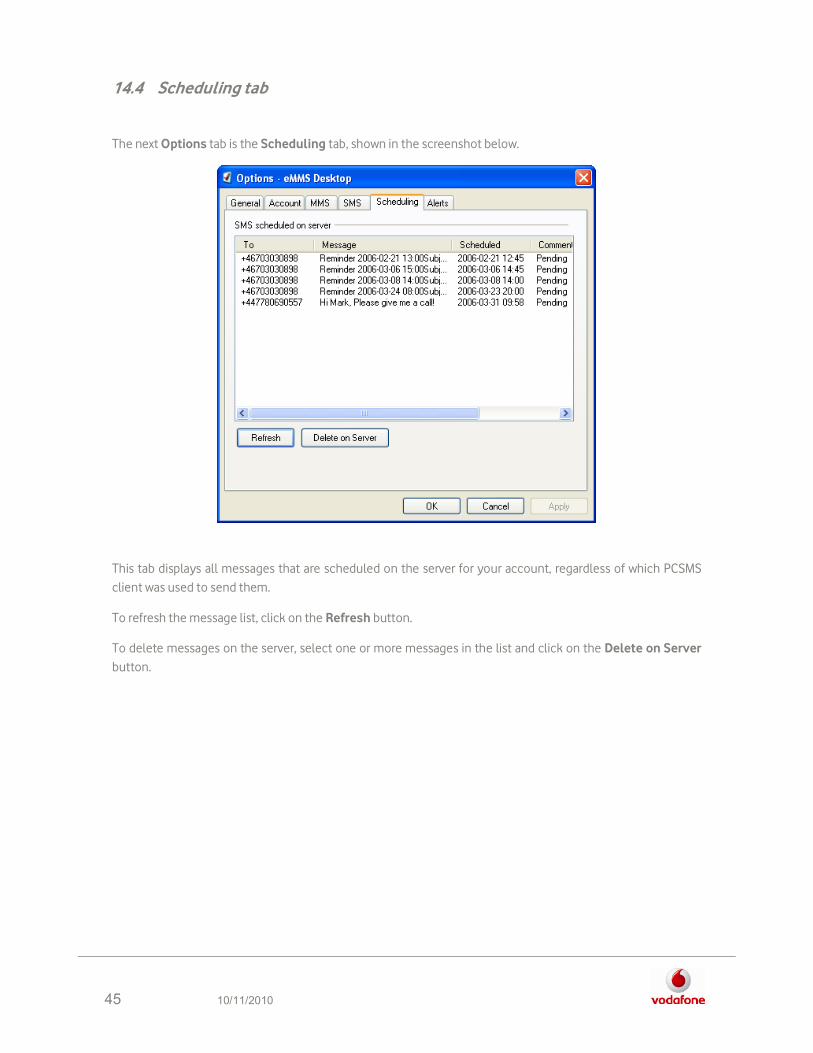
14.4 Scheduling tab
The next Options tab is the Scheduling tab, shown in the screenshot below.
This tab displays all messages that are scheduled on the server for your account, regardless of which PCSMS
client was used to send them.
To refresh the message list, click on the Refresh button.
To delete messages on the server, select one or more messages in the list and click on the Delete on Server
button.
46 10/11/2010
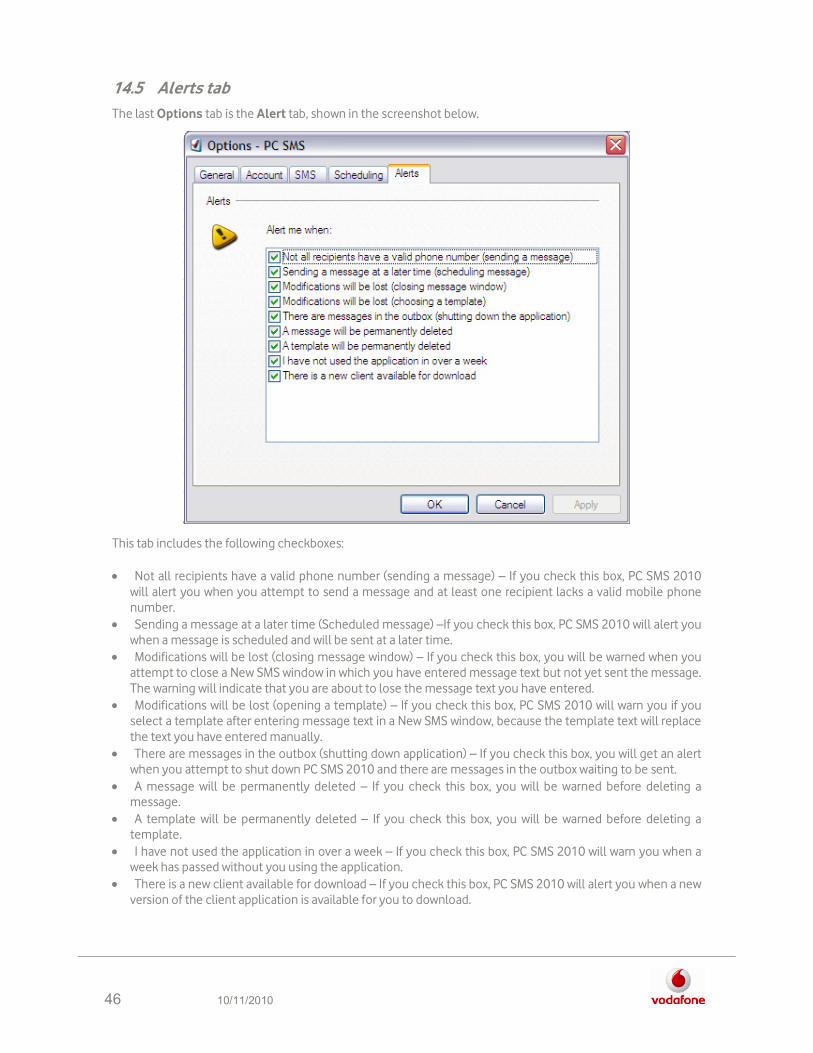
14.5 Alerts tab
The last Options tab is the Alert tab, shown in the screenshot below.
This tab includes the following checkboxes:
• Not all recipients have a valid phone number (sending a message) – If you check this box, PC SMS 2010 will alert you when you attempt to send a message and at least one recipient lacks a valid mobile phone number.
• Sending a message at a later time (Scheduled message) –If you check this box, PC SMS 2010 will alert you when a message is scheduled and will be sent at a later time.
• Modifications will be lost (closing message window) – If you check this box, you will be warned when you attempt to close a New SMS window in which you have entered message text but not yet sent the message. The warning will indicate that you are about to lose the message text you have entered.
• Modifications will be lost (opening a template) – If you check this box, PC SMS 2010 will warn you if you select a template after entering message text in a New SMS window, because the template text will replace the text you have entered manually.
• There are messages in the outbox (shutting down application) – If you check this box, you will get an alert when you attempt to shut down PC SMS 2010 and there are messages in the outbox waiting to be sent.
• A message will be permanently deleted – If you check this box, you will be warned before deleting a message.
• A template will be permanently deleted – If you check this box, you will be warned before deleting a template.
• I have not used the application in over a week – If you check this box, PC SMS 2010 will warn you when a week has passed without you using the application.
• There is a new client available for download – If you check this box, PC SMS 2010 will alert you when a new version of the client application is available for you to download.
47 10/11/2010
15. Uninstall The program is most easily uninstalled by selecting Start Menu | Programs | PC SMS 2010 | Uninstall and
follow the instructions. Another possibility is described below.
Before continuing with the uninstall process please make sure that the PC SMS 2010 application, Outlook
Express and Internet Explorer are closed.
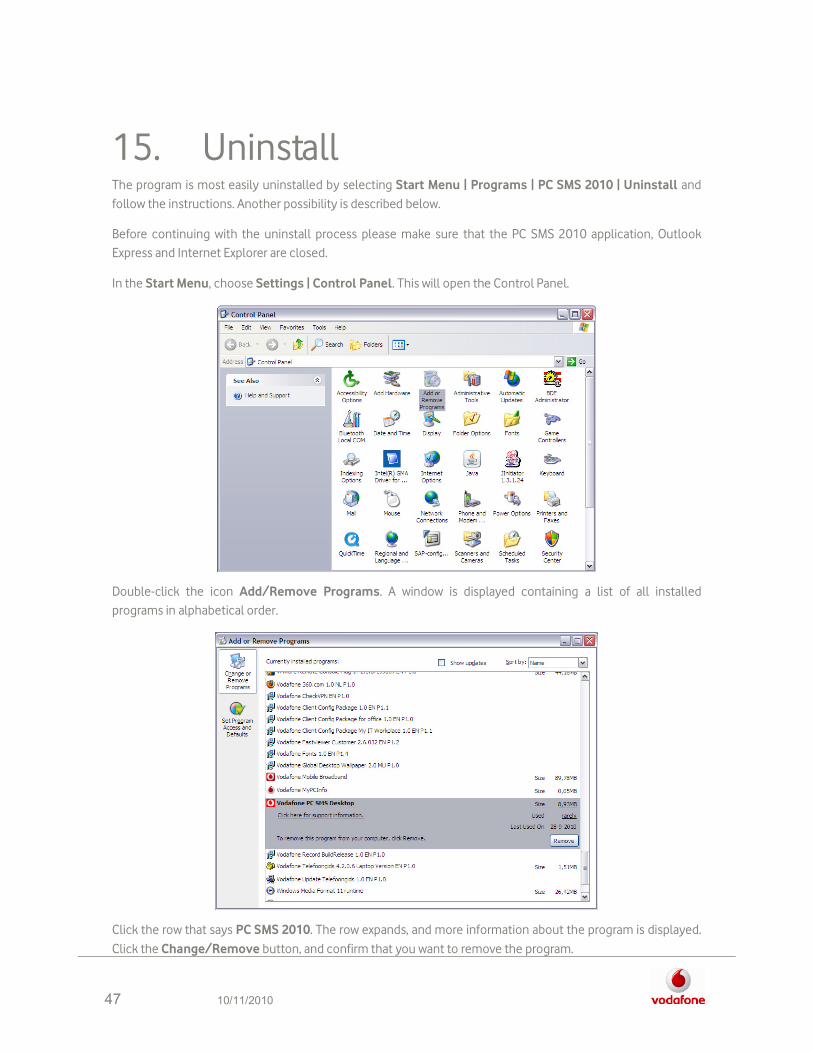
In the Start Menu, choose Settings | Control Panel. This will open the Control Panel.
Double-click the icon Add/Remove Programs. A window is displayed containing a list of all installed
programs in alphabetical order.
Click the row that says PC SMS 2010. The row expands, and more information about the program is displayed.
Click the Change/Remove button, and confirm that you want to remove the program.
48 10/11/2010
NOTE: The Add/Remove Programs window may look a bit different on some computers, depending on what
Windows version you have.
Click the OK button to Uninstall.
After you click OK, the installed files and directories are removed from the computer. Click the Finish button
to complete the un-installation.
The PC SMS 2010 is now removed from your machine, and un-installation is completed.
Note: the Outbox and the Sent Messages folders will still remain after the un-installation to prevent unwanted
loss of information.