Embed Size (px)
DESCRIPTION
Warhammer 40K tactical tips
Citation preview
Warhammer Tactica 8
ByNathan Veerasamy
This book is completely unofficial and in no way endorsed by Games Workshop Limited.
******Created by ebook converter - www.ebook-converter.com******
******ebook converter DEMO - www.ebook-converter.com*******

Foreword
This book has to be paid for before you readit.
The nominal payment of £2 can be made by Pay Pal to the author. PAYPAL Email – [email protected] If you have stumbled upon this book by chance then please pay via PayPal. This book has been published out of charity. The payment of £2 is minisculebut will be aggregated and given to charity annually. A copy of the receipt from thecharity will be provided, on request from any buyer.
If you genuinely cannot pay, then please do something for charity instead and Ishall consider that payment has been made.
Thank you for your contribution NV
******Created by ebook converter - www.ebook-converter.com******
******ebook converter DEMO - www.ebook-converter.com*******

1st Kindle version 30 June 2012 Acknowledgements 1) Brian Sinn (‘Mr Malorian’) for his comments on the book, producing the video andpublicising the book on his YouTube channel 2) Steven Catarassa for editing the Contents page 3) Michal Boltz for publicising the book on his website and amongst his fellowWarhammer players in Poland 4) Emiliano Javier Di Liscia for various edits Thank you for your kind help and support
******Created by ebook converter - www.ebook-converter.com******
******ebook converter DEMO - www.ebook-converter.com*******
CONTENTS
1. ARMY LISTS 1RATE OF SLAYING 1RATE OF DEPLETION 2UNIT SIZE 3FORMING THE ARMY LIST 6COMMON PRINCIPLES 6ANALYSIS OF APPENDIX 2 AND 3 FOR EACH ARMY 7Beastmen 12Bretonnia 15Daemons 18Dark Elves 22Dwarfs 25Empire 28High Elves 30Lizardmen 32Ogres 34Orcs & Goblins 37‘Skav 39‘T Kings 42Vampire Counts 45Warriors of Chaos 51Wood Elves 53THE EFFECT OF CHARACTERS 55
******Created by ebook converter - www.ebook-converter.com******
******ebook converter DEMO - www.ebook-converter.com*******
2. SOME BASICS 56CHOOSING THE RIGHT SPELLS 56ORDER OF DEPLOYMENT 56TYPES OF DEPLOYMENT 58Standard Central 58Two prong flank 59Refused Flank 60Weakened Flank 61Abandoned Flank 62Chequerboard and Screens 62Gun lines 64Gambit deployment 65Defensive bubble 66POSITIONING THE GENERAL, CHARACTERS AND THE ARMYCENTRE 66MIN. GAP BETWEEN FRIENDLY UNITS AT DEPLOYMENT 67DEPLOYMENT AND TERRAIN 68Cover, LOS and exposure 69LOS and unhindered movement 70Combat and Terrain 71Buildings 71STUPIDITY & ANIMOSITY 72RE-DEPLOYMENT AND CLOSEST PROXIMITY COMPARISON 73FORMULATING A GENERAL STRATEGY 75CHECKS BEFORE CHARGE DECLARATIONS & MOVEMENT 76CHOOSING THE RIGHT CHARGE RESPONSE 78SPACE AND MAXIMISING MANOEUVRABILITY 81Why is space important? 81Increasing your space and reducing the enemy’s 83Denying space to prevent/weaken charges 85ADVANCING LIMITATIONS AND RETREATING 86COMBAT AVOIDANCE 88INCREASING ATTACKS 91REINFORCING A WEAKENED UNIT 92SLOWING DOWN THE ENEMY 92March blocking 94GENERAL’S POSITION AND RALLYING ORDER 95CASCADING MASS PANIC 95
******Created by ebook converter - www.ebook-converter.com******
******ebook converter DEMO - www.ebook-converter.com*******
SHOOTING BASICS 98Move or Shoot? 98Concentrated shooting and Target selection 99Rounds of available shooting 99Effective Shooting Range 100Terrain and shooting 100Shooting while in Cover 102WARMACHINES 102DEFENDING AGAINST SHOOTING 104Using Large units 104Multiple unit exposure 104DEFLECTING/DIVERTING CHARGES 107LURE AND AMBUSH 109RESPONDING TO LURES 110ANVIL AND HAMMER 111BEHIND ENEMY LINES 113PLANNING PURSUITS AND FLEEING 114Safe Zone 116DECISIONS IN TURN 5 117CHANGING TACTICS IN THE LAST TURN 118
3. MAGIC 120HOW TO GET ALL THE SPELLS YOU WANT 120HOW MANY POWER DICE SHOULD BE USED AND WHICH SPELLS SHOULDBE CAST 120DEFENDING AGAINST MAGIC 123POSITION OF WIZARDS 124SELECTING SPELL TARGETS 125MAGIC AT THE START AND IN THE LATTER HALF 126CUSTOMISING THE MAGIC PHASE 127SPELLS COMBINATIONS 128
4. SHOOTING 130SHOOTING EFFECTIVELY 130COMPARISON OF SHOOTING UNITS 130HEAVY SHOOTING 132SWIFT REFORM AGAINST THE GUN-LINE 134SHOOTING BATTLE 1: BRETONNIANS VS DARK ELVES 136SHOOTING BATTLE 2 BLOOD DAEMONS VS DARK ELVES 139
******Created by ebook converter - www.ebook-converter.com******
******ebook converter DEMO - www.ebook-converter.com*******
FINAL COMMENT ON HEAVY SHOOTING LISTS 145
5. COMBAT 149USING APPENDIX 6 149CHARGE OR NOT TO CHARGE 149WINNING AND ANCHORING A FLANK 153ANCHORING A WON FLANK 154SACRIFICIALS 155THE SACRIFICIAL CLIP 156DEFLECTING CHARGES AND BLOCKING CHARGERS 159SHELTERED FLEEING 160FAST CAVALRY LURE 161BLOCKING AND PREVENTING CHARGES 161Position of the Blocking Unit 161Safe Zone - revisited 165Common block – Preventing a wheel 166Blocking the Wheeling Arc by 1” 167Wide unit versus the long unit 167THE 4 UNIT PRISON 169REFORMING BLOCK 172COMBINING SHELTERED FLEEING AND THE BLOCKED CHARGE 173PREVENTING COMBAT REFORM 175DISRUPTING THE ENEMY FRONT LINE 176LAYERED MSU DEFENCE 178DOUBLE LURES 179MINIMISING ATTACKS 180COMBAT DECISIONS 181TEMPT INTO A FAILED CHARGE USING TERRAIN 182MULTI-WARHEAD FORMATION 183USING BUILDINGS FOR COMBAT PROTECTION 184BUILDINGS AND COMBAT AVOIDANCE 185FAST CAVALRY DODGE 186SACRIFICING CHARGES TO MAKE SPACE 187THE STUBBORN COLUMN 189Using Zombies 190Using Dryads or Skirmishers 191Using Changeling/Horrors orDreadlord/Blackguard 191
APPENDICES
******Created by ebook converter - www.ebook-converter.com******
******ebook converter DEMO - www.ebook-converter.com*******
APPENDIX 1: 193Toughness 3 193Toughness 4 198Toughness 5 201Toughness 6 202Toughness 2 202 APPENDIX 2 203HOW TO USE THESE TABLES 203BEASTS 206Combat Rating per point 208BRETONNIA 209Combat Rating per point 210DAEMONS 211Combat Rating per point 213DARK ELVES 213Combat Rating per point 215DWARFS 216Combat Rating per point 217EMPIRE 218Combat Rating per point 217HIGH ELVES 218Combat Rating per point 220LIZARDMEN 222Combat Rating per point 224OGRES 225Combat Rating per point 227ORCS & GOBLINS 228Combat Rating per point 230SKAV 231Combat Rating per point 233T’ KINGS 234Combat Rating per point 236VAMPIRE COUNTS 237Combat Rating per point 239WARRIORS OF CHAOS 240Combat Rating per point 242WOOD ELVES 243Combat Rating per point 244 APPENDIX 3 246 Daemonic Instability Test 264 APPENDIX 4 - SHOOTING 265 APPENDIX 5 – RANKINGS PER POINT 276 APPENDIX 6 – COMBAT RANKINGS 284
******Created by ebook converter - www.ebook-converter.com******
******ebook converter DEMO - www.ebook-converter.com*******

APPENDIX 7 – REVISING THE POINTS SYSTEM 287iii
******Created by ebook converter - www.ebook-converter.com******
******ebook converter DEMO - www.ebook-converter.com*******
1. ARMY LISTS
Unlike my previous Warhammer Tactica for 7th ed, I shall begin by discussing army listsand the basis for choosing units for a tournament list. In doing so, I shall firstconcentrate on the combat phase. It is the most important phase because the average unit,and the army as a whole, is subjected to far more rounds of combat than shooting ormagic. The other phases, magic and shooting are not being omitted but will beincorporated later on. Typically there will be 1 or 2 units subjected to 1 or 2 (but notmore than 3) destructive spells. About the same number of units are subjected to slightlymore rounds of enemy shooting whereas 3 or so units will be fighting 4 rounds ofcombat or more. Most of the other units at some stage will also be involved in combat.Close combat alone accounts for nearly twice as many casualties than magic andshooting combined, in tournaments. That justifies its primacy in forming army lists. This Tactica is for 2250 Pitched battles in the main and ignores Specialcharacters unless they are upgrades. For 2500 or 2000 points or more battles, simplyscale up or down. Other scenarios other than Battleline or pitched battles will also usemost of these tactics suitably modified. I might deal with them in a future book. You have to be fully conversant with all the main rules and the various armybook rules which I shall not repeat here for copyright reasons. In addition you will haveto know or refer to all the stat lines for all army units.
I shall start with 2 major considerations – the rate of slaying and rate of depletion
Rate of slaying This is simply how many casualties will be inflicted by a unit in each round ofcombat. The first table of Appendix 1 shows the probability of inflicting a casualty for 1attack at different Strengths (3- 6) on a Toughness 3 unit with different saves and eitherlower or higher Weapon Skills. It will be evident as you read on that S7 or more is lessimportant. The other tables show what happens if the attacking unit has combinations ofHatred, Killing Blow or Poisoned attacks and then comes the sets of tables for Stomps,T5, T6 and T2. By multiplying the value, in a cell in any table, by the unit’s total number ofattacks, the rate of slaying is obtained. A few examples will illustrate this:1) 20 Dark Elf Warriors vs 20 Saurus with HW (Hand Weapons).
Dark Elves strike first with Hatred. Looking at the table for T4 +H (againstToughness 4 with the attacker having Hatred), Saurus have a 4+ and 6+W save while
******Created by ebook converter - www.ebook-converter.com******
******ebook converter DEMO - www.ebook-converter.com*******
Dark elves attack at a higher WS. The table gives a value of 0.124. This is the numberof wounds per attack. Multiplying this by the total number of attacks, 11, gives 1.4wounds.
Saurus attack back. Refer to the table for Toughness 3. Saurus have a higher Sattack and Dark elves have a 5+ 6+W save. This gives a value of 0.232. 16 attacks fromthe Saurus unit will slay 3.7 Dark Elves.
Assuming for simplicity that the static combat resolution (called static CR)bonuses are the same for both units, Saurus have won the combat by 3.7-1.4 = 2.3.(Static CR is the sum of combat bonuses discounting wounds inflicted). 2) Clanrats, Zombies, Dwarf Warriors, Goblins or Orcs, Horrors, Ungors or Skeletonsvs Bretonnians’ Knights of the RealmReferring to the Toughness 3 table, these units will slay 0.028 knights per attack or 35.7attacks are needed to slay just one knight! The above is an example of how the tables for slaying will be used – toevaluate how many casualties each of your units can dish out per round of combat. If thenumber of casualties is high enough, then it will either eventually annihilate the enemyunit or force it to take a break test; provided the unit itself suffers less casualties and isnot itself destroyed or breaks from combat. Hence we come to the second aspect – to calculate whether your unit itself cansurvive.
Rate of depletion At the end of each combat round, a unit is reduced by a certain number ofmodels. I have termed the probable number of models it loses per round of combat asthe rate of unit depletion. If 2 units are in combat, then the unit with a higher rate ofdepletion should eventually lose all its models. The rate of unit depletion is integral todetermining whether combat will be won or lost.
In Warhammer however, the Break test speeds up the process of winning or losingcombat. It is more likely that a unit breaks before every model is slain. After breaking,however the fleeing unit could rally and fight again.
There are therefore 5 factors which determine whether combat has beeneffectively won –A) Rate of depletion (of your units)B) Rate of slaying (of your units)C) Ability to pass or fail Break testsD) Likelihood of fleeing and escaping
******Created by ebook converter - www.ebook-converter.com******
******ebook converter DEMO - www.ebook-converter.com*******
E) Rallying (safely) after fleeing. (A) as will be seen later, is the most important factor and under the right
circumstance can overcome (B) and enhance (C). The rate of depletion can be read from the same tables for slaying in Appendix 1.
Select a unit and choose a table with its Toughness and save. The tables are limited tojust Toughness 6 as units with Toughness 7 or more tend to be Monsters, most of which,you will come to realise, should not be included in competitive lists.
Since the number of attacks can vary depending on the relative size of your unitcompared to the enemy unit, how good your chosen unit is will depend on the enemy unitit faces. It is necessary therefore to calculate how your unit will fare against everysingle enemy unit – a permutation running into the hundreds. Appendix 6 has a list ofwhat is the probable outcome for the best 3 or 4 combat units of each army against 2 testunits. You can use this Appendix when you are fighting a battle to find out whether yourunit has a good chance of winning or losing combat and hence decide what each of yourunits has to do when pitted against different enemy units – retreat, charge, divert,sacrifice itself, hide etc. There will emerge from these comparisons, units that are bestat slaying in combat and units that are best in lasting the longest. Units that can fulfilboth criteria are very rare so you will have to assign the either the role of slaying orholding (small depletion rate) for most of your units. These units necessarily varydepending on the stats of your unit.
Note that I am making a one to one combat comparison of units first. Multiple
charges and many to one combats are quite probable in Warhammer. Indeed several(correctly chosen) units attacking a single unit on many fronts will ensure a fastervictory and is the basis of the more elaborate chapters on manoeuvring, discussed later.
Unit SizeIf you do not enjoy calculations, skip the next few paragraphs to the emboldened
paragraphs.The maximum number of attacks on a 5 wide unit is 50 – 5 attacks from the front
row models + 1 Support attack + 1 Horde Support attacks multiplied by 7 + champion.The maximum rate of depletion per attack (from Appendix 2) is about 0.777. This givesa theoretical maximum of 39 for the unit’s rate of depletion. No unit is capable of this. Ishall instead use 17 (16.7 rounded up) which is the best figure from Appendix 2 and 3.Since there is a maximum of 10 rounds of combat, we can then calculate the maximumunit size. N.B. 11 rounds of combat is the theoretical maximum but this is only possible
******Created by ebook converter - www.ebook-converter.com******
******ebook converter DEMO - www.ebook-converter.com*******
in the unlikely scenario that you have allowed your army to be charged by the strongestcombat unit in turn 2. Even 10 is unusually high and avoidable, so I shall use 9 roundsas my maximum.
For a T3 unit - 9 X 17 = 153Considering combat only, the T3 or T4 unit with no armour saves need to be
at least 153 strong, while the T3 unit with a 5+AS and 6+W in combat, needs to beabout 129 strong, to survive 9 rounds of one on one combat with an exceptionallystrong unit.
There are other modifiers to this figure – additional attacks from characters by the
attacker, better armour saves of the defender plus casualties from shooting and magic.I will deal with shooting and magic in more detail later. For now, it is only
necessary to estimate the number of casualties a unit will suffer from shooting andmagic. Since no unit can successfully charge in the very first turn, it will therefore besubjected to at least a few rounds of shooting and magic before managing to be incombat. Terrain, and other units will reduce the exact number of shooting rounds whiledispel scrolls and dispel dice will reduce the number of spells cast.
I shall assume a success rate in shooting of 2X 40 shots at BS4 and 1 templateweapon hitting the unit in the middle. Casualties from the template weapon will beabout 10 maximum and that from BS shooting about 20, giving a generous total of 30. Itis quite easy for some armies to come up with a list with more shots than this but thatwill be at the expense of good combat units. Such armies can only perform well againsta select few enemy armies and will fail miserably against many tournament armies. Youcould add a bigger total for casualties from shooting if you want to but then thedepletion rate in combat will be less (more shooting units = less strong combat units) soit all balances out to the same maximum figure more or less.
Magic is a different prospect because of irresistible force but I shall assume thatlevel 6 spells have been dispelled or scrolled in the first turn. I shall also ignore (forthe moment) spells like Infernal Gateway which could wipe out a unit completely. Ahighly improbable dice roll or more than one such roll could weaken an army so much,that defeat is inevitable. There is nothing you can do against such ill luck, so I shallmake an estimate based on reasonably higher probabilities e.g. 2 D6 S4 magic missilehits and/or one 6th spell hit on a unit. I can assume then that the number of casualtiesfrom magic to be a maximum of 20.
This brings us to an estimate of the maximum unit sizes of 153+50=203 for nosaves and 129+45=173 for units with some saves e.g. a 5+AS and 6+Ward in combat :
Therefore the unit with no armour saves need to be about 200 strong, while
that with a 5+AS and 6+W in combat needs to be about 173 strong to survive to thelast turn, provided enemy units only engages it in frontal combat only and is always
******Created by ebook converter - www.ebook-converter.com******
******ebook converter DEMO - www.ebook-converter.com*******
smaller in size. This assumes that the unit will pass all Steadfast break tests or isUnbreakable.
This then simplifies defence strategy at 5000pts or more for some armies,
e.g. ‘Skav or Orcs and Goblins. – Simply have at least a few units of 250 and theother units can be 200 or so models and pray that Dwellers Be low (or spellsaffecting whole units) are not cast!
There are other factors to consider before you simply jump on this simplistic
formula: 1) Characters – It is necessary to have at least one, to function as the general. They costa large amount of points while adding an additional 100 Victory points if slain. 2) Panic – It is unlikely that such a large unit will Panic from >25% casualties but itmight Panic from a) Other friendly breaking units b) Spells or shooting that forces aPanic check c) Friendly units fleeing through it. 3) Break Tests – This is the more common way of winning combat. The difference in therate of slaying and deflection adds to combat resolution (CR) bonuses and makes itmore likely for a unit to break before it is completely wiped out. 4) The unit will be attacked on its flanks and rear as well – This becomes much lesslikely if you employ several units of 200 models. If a large unit is subjected to multiplecharges, frontal, rear and flank, its rate of depletion will be much higher. Therefore it isdesirable to avoid being rear or flanked or multi charged, especially by strong units. Atthe same time your strong units should aim to flank or rear charge enemy units toincrease their rate of depletion. How this is done is discussed in later chapters. 5) The number of casualties per attack e.g. no saves @ T3 is 0.56. This is based on theworse case scenario where the unit is solely attacked by a huge unit of S4 or S5 with abetter WS. By careful manoeuvring, it is possible to avoid such units and engage weakerenemy units of S3 and T3 for example. The S5 or S6 enemy units can be deflected byfeeding them with Sacrificials or engaged with your own elite units. Ideally units will have to be the maximum size, have high strength attacks at agood WS, be Unbreakable with an un-killable General to overcome the above adverseeffects.
******Created by ebook converter - www.ebook-converter.com******
******ebook converter DEMO - www.ebook-converter.com*******
Forming the Army ListCommon principles This then is the base line from which we can consider army lists and tactics –1) Unit sizeLarge units of 100/200 or more - which are almost impossible to destroy by wounding.These units will hold against the strongest enemy combat units and withstand a sizeableamount of shooting and magic. 2) Number of unitsThe total number of units will have to match or be more than the enemy’s units to createa one on one combat. Simply having one giant unit of 500 models does not worktactically. Having fewer units than the enemy requires a good rate of depletion for theseunits as at least one unit will be subjected to flank and/or rear charges as well as afrontal charge. At 2250 points there will not be more than 4 super-sized units (‘Skavcould have 5) and most armies will have just 1 or 2 with 2 or 3 more at smaller sizes ofbetween 30 -60 strong. There may or may not be 1 or 2 small units. That brings a totalof 3 to 6 combat units plus 2 or 3 small units. Armies with cheap units can fulfil (1) and (2) easily but armies with minimumpoint cost of more than 10 points will have to rely on other army-list set ups. This willbe discussed in detail in the next section. 3) Units with a higher rate of slaying than a rate of depletion to defeat enemy units.These units are essentially elite units (but could still be Core). Their unit size will besmaller than (1) because of their point cost but they must still exist in sufficient numbersto perform their task of winning Victory points (VP). 4) Fast moving units are preferred but not absolutely essential, provided of course theunit can march and get into combat by turns 2 or 3. (see Shooting Chapter) 5) Being Steadfast in combat is not difficult to achieve. This makes being Unbreakableor Stubborn of lesser importance. However, it is important to note that you have to slayevery model of an Unbreakable unit. The same is true for Stubborn units that pass theirbreak tests. These units then manage to remain in combat longer than other units. 6) Immune to psychology or Immune to Panic and high Leadership however are verydesirable. High Leadership is needed to pass Break tests. If the general is not closeenough or if his Leadership(Ld) is too low, a BSB is then needed.
******Created by ebook converter - www.ebook-converter.com******
******ebook converter DEMO - www.ebook-converter.com*******
7) An indestructible general. A slain general costs 100 VP – enough for a clear win.The general has to survive all 6 turns if possible or sufficient VPs have to be won tocompensate for a slain general. It is obvious that none of the armies can fully satisfy all these criteria but thesefactors must be kept in mind as lesser variants of them will be present in Warhammertournaments. I shall now turn to individual armies and select units that satisfy the abovecriteria as closely as possible. (N.B. this is for a 2250 point battle – scale up or downaccordingly for 2000 points or 2500 points). In calculating the rate of slaying and depletion, there are differentpermutations of frontage – attacking unit wider, defending unit wider or the samewidth etc. This changes from 1 round to the next according to the actual fighting lineand so I have simplified matters within reason. I have fixed the width of the test units.For Appendix 3, I have also fixed the number of points for each unit at 565 points.
Different size bases also modify the number of models in base contact. The unitof 2.5cm bases will be 6 models against 5 models of the 2cm base.
For bases of the same size, a ratio of 7 wide for the unit with superior attacksagainst 5 wide for the defensive unit is likely.
The whole idea in this next section is not to create an exact army list but to give
you a platform from which you can modify viable and competitive lists according toyour taste and adopted tactics.
Analysis of Appendix 2 and 3 for each army
I have selected the units below as tests in Appendix 2. Savage Orc Biguns andChosen units only, are the test units in Appendix 3 –(AS = Armour Save; W = Ward save)A cheap and just above average unit(Empire Swordsmen Horde); A cavalry unit that has excellent saves and good attacks2+AS, 5+W; Lance or 6 or 7 wide when attacking) ; (Bretonnian Knights of theRealm) (6 or 7 wide when attacking) ; A unit with very good attacks6+W (Savage Orc Biguns with 2HW)
******Created by ebook converter - www.ebook-converter.com******
******ebook converter DEMO - www.ebook-converter.com*******
A unit with one of the best attacks and good saves.(‘Tze Chosen Horde with 2HW + Banner of Rage) – 50S4 attacks or a 3+ Ward save Chosen unit are also possibilities but it is obviousthat such units have been fortunate with their Eye of the Gods roll and will steam rollthrough any single frontal opposing unit.
For Appendix 3, the Chosen unit used for testing is one of the best – rolling for+1AS on the Eye of the Gods chart. N.B. The figures for the Savage Orcs are more or less the same as a 4 wide 8 OgreBull unit with 2HW. – 33A + 3 Impact hits plus 3 Stomps. The calculations are summarised in Appendix 2.
The second section of Appendix 2, the Combat Ratings table incorporates the
point values of units into the rates of slaying and depletion and gives an indication of the‘value’ of each unit in combat. This will be the starting point when you write up yourarmy list.
Appendix 3 is another variation assessing combat worthiness. It is based on 565points for both sides. It is a comparison of units against 2 strong units - Savage OrcBiguns and ‘Tze Chosen with GW (Great Weapons) and the Banner of Rage. The finalfigures of this Appendix shows the probability of how long a unit is able to maintainSteadfast or whether it breaks in combat in the first round against the 2 test units. Thebigger this figure is the better the unit.
Appendix 3 also calculates the Ld test modifier which is needed when thishappens i.e. by how much Ld is reduced when the first non Steadfast break test is taken.By comparing these figures of each army unit with that of other army units, you will beable to assess the relative strengths of units available to you and hence choose the bestunits.
Other test units could be used but the idea here is to give you an indication of the
relative combat worthiness of units at your disposal and as you read on you will realisethe test units are good enough. There are other ways of using the tables in theAppendices to calculate the effectiveness of each unit but having experimented withdifferent ways; I have come up with one method which is sufficient to form a generalidea of how to write army lists.
Appendix 2 should not be used to compare your army units against enemy units. Itis meant to compare units within your army and create a general idea of their relativestrengths. Simply compare the figures of slaying and depletion with each other. Higher
******Created by ebook converter - www.ebook-converter.com******
******ebook converter DEMO - www.ebook-converter.com*******
rates of slaying or lower rates of depletion are superior. Note however that this is donestrictly to form army lists.
The Appendices show figures for certain Test units used. If other test units areused the figures will be slightly different but the relative strengths or weaknesses ofvarious units in your army will not change by much with different test units.
Remember that these Appendices should be used to assess relative strengths ofunits within your army.
They are INDICATIVE of relative unit strengths and should not be regarded asconclusive.
If you use it to compare strengths with other army units, some of your conclusions
will be inaccurate. Appendix 5 and 6 show the rankings of 108 units. Note that althoughunits tend to stay within a band, their rankings change with different test units.
An example of how to use the tables should enlighten you:
Example:From Appendix 2, in 5 wide formation, Ungors have a lower rate of depletion per
point than Gors but this is slightly higher when they are in horde formation. Appendix 3however shows that Ungors will last longer as Steadfast because of their bigger unitsize. Therefore Ungors should be used as a holding unit.
Now suppose you were to compare between armies, it may sometimes be acorrect comparison (but not always) e.g. Goblins and Ungors:
Ungors have a low rate of depletion but Night Goblins are even lower when theynet the enemy. Comparing their rates of Slaying, Ungors are better against elite units butonly slightly. Therefore when Night Goblins face Ungors, either side could win combat.Looking at Appendix 3 however show that, per point, Night Goblins are better and thisis confirmed by the Combat Ratings in Appendix 2. Therefore Night Goblins can bebigger in size and by virtue of this, remain Steadfast against Ungors.
In this case the comparison using the figures turns out to be valid but this is nottrue when you start comparing very different units e.g. T3 and T4 with very differentsaves and strengths. E.g. From Appendix 6, a comparison of High Elf Spearmen andSaurus produces conflicting results for Slaying and Depletion. If you want to find outwhether Saurus will win in combat against High Elf Spearmen, you have to useAppendix 1 for the actual calculation – Saurus wins assuming equal static CR.
The way I have used the 3 Appendices to form army lists is summarised at the top
of Appendix 2. You could follow all the instructions for your army/armies and thendetermine for yourself which units and what sizes are needed.
By simply looking at the figures in table 2 you will reach some obvious
******Created by ebook converter - www.ebook-converter.com******
******ebook converter DEMO - www.ebook-converter.com*******
conclusions which I have not mentioned like unit (A) is better at holding because ithas a lower rate of depletion than unit (B) or unit (C) is has a higher rate of slayingthan unit (A) or can win combat when it charges etc. I will not mention these obviousconclusions in my analysis below
If you cannot stomach too many mathematical figures, then simply skip the
Appendices and read the army specific analysis, listed for every army, below.I strongly suggest that you read through as many army subsections below to give
yourself a good idea of how to write army lists.
I have divided the next section of how to write army specific lists into anumber of sub-sections (underlined below). I will explain what is contained in thesesub sections first. Viable combat units – A short list of combat units including some which
may seem effective but are generally not. Sacrificials – Units that will be sacrificed to gain strategic and combat advantages. This is fully discussed in the Combat Manoeuvres Chapter. Other possible units – Units that could be used e.g. for shooting, magic or
combat support.
List – This subsection discusses the main ideas of how the army should be composed. I have also included in this sub-section some of the consequential basic strategies from this army list and how they are expected to be countered. Many armies have no units that can hold against everything and must choose enemy units they wish to engage in combat carefully and avoid or evade the strongest units. How this is done is discussed in the Combat Chapter. The full tactics? – Hopefully this will be gleaned after you have read the other chapters following this, which outlines in detail various tactics, strategies and manoeuvres available to all armies. Other tactics 1) MUST HAVE - Units or magic items that are essential. Some armies are fortunate to have a magic item or two which gains a
******Created by ebook converter - www.ebook-converter.com******
******ebook converter DEMO - www.ebook-converter.com*******

significant advantage either for the character or the unitit is with or both. (See (4) below)
2) DON’T Forget – This section is really for the novice and contains special army rules which are commonly forgotten by beginners. It may also prove to be useful as a reminder list for armies you do not face commonly. 3) LOOK OUT for – Dangerous Units, special abilities, magic items peculiar to this army AND/OR Dangerous units, special abilities of enemy units which it has to face. 4) Useful Magic Items: An army must have a Dispel Scroll or its equivalent plus items giving Ward saves, armour saves, for its general and characters. It must also have sufficient magical attacks to deal with Ethereals. I shall assume this will automatically be included in your army list and this section will focus on other items. Items granting special attacks like Flaming, armour negating, multiple wounds, good attack enhancers, shooting or magic enhancements etc are useful but not wholly essential and it is up to you entirely whether you choose to include them or not. Some of these items will be mentioned here. You will have to find out what each item does as once again I will not describe them in detail. 5) This section will deal with any other tactical considerations if any. 6) Character considerations – For most armies, a combat general (with the
best saves possible to last the whole battle) and 2 Wizards (see Magic chapter) are a common composition. Sometimes certain characters have specialised functions or items or have to be combined with certain units. These considerations will be discussed here.
Beastmen Viable combat units
******Created by ebook converter - www.ebook-converter.com******
******ebook converter DEMO - www.ebook-converter.com*******
Minotaurs, Gors, Bestigors, Ungors SacrificialsWarhounds, possibly Ungors Other possible unitsUngor Raiders, Centigors ListBest 2 Slaying units per point - Minotaurs, BestigorsBest 2 holding units per point – Gors, Ungors From Appendix 2, it is tempting to field a Deathstar. However the MinotaurDeathstar will fail against many armies. A 110 strong Swordsmen horde will last themandatory 8/9 rounds against them while the elite enemy units mop up the rest of thearmy. 25 Chosen or 45 Savage Orcs will be destroyed within 6 rounds but a secondelite unit can then charge and destroy the remaining 4 or so Minotaurs in about 3 or 4rounds. Therefore the Minotaur Deathstar is ineffective!
Armed with great weapons a Minotaur unit serves mainly as a hammer and not ananvil. (see Anvil and Hammer in the Some Basics Chapter ). 8 Minotaurs in combat is aformidable unit but since it is armed with great weapons, some wounds wouldinevitably be lost. Estimating this as 6 wounds lost from magic and shooting plus about8 wounds from the first round of combat, the ideal size of the Minotaur unit is around11- 13 models. This leaves room for another unit of 3 or 4 models – too small! It ispossible to have 2 units with a full command but the lack of static CR (combatresolution – see Combat Chapter) of a Minotaur unit, makes a Bestigor unit a betterchoice.
Bloodgreed increases a Minotaur’s effectiveness in combat but the reduction inthe pursuit move makes it difficult for Minotaurs to destroy units fleeing from combat.On the charge, Minotaurs are as good as the Chosen since they benefit from impact hits.They must therefore get into combat as quickly as possible. Bloodgreed then helps themto mature like fine wine when they win. Choosing a weak unit for the first time incombat enables them to tackle elite units later even when their numbers have beenreduced. The main core unit choice is the Gor unit armed with hand weapon and shields.Two hand weapons could be used since they improve the rate of slaying. Use this optionif you already have 2 units that can hold reasonably well in combat otherwise stick withhand weapon and shield as there are other Beastmen units which slay more effectively.From Appendix 2, using an average depletion rate of 7, the minimum size is about 70.(7X6 +20 +10). A second but smaller horde unit could be the next Core choice or
******Created by ebook converter - www.ebook-converter.com******
******ebook converter DEMO - www.ebook-converter.com*******
alternatively a massive single unit is a possible choice.The Gor Horde performs better than the Ungor Horde per point and in terms of
rate of depletion (Appendix 2). The core units should therefore comprise of Gors onlyaccording to Appendix 2. Appendi x 3 however shows that for the same number ofpoints allocated, the Ungor unit will stay in combat longer than Gors. Therefore if youchoose to have Ungors it must be a large unit >100 models or so. A second unit that willalso hold reasonably well could consist of Gors. They should be armed with handweapons and shields since they have to remain in combat as long as possible. Gors alsoperform better in combat with Primal Fury especially if accompanied by a character.
Two or three units of 5 Warhounds will act as Sacrificials. This leaves about 450points for characters which because of the low Leadership has to include a BSB. It is better not to use a large unit of Minotaurs but a moderate size of about 6-8and then throw in a mixture of Gors or Bestigors. As can be seen in Appendix 2, theseunits function well against Swordsmen or similar units, and will have to employ thestandard tactic of avoiding ultra strong enemy units while destroying weaker units. ( seeCombat Avoidance in the Some Basics Chapter). Bestigors complement the Minotaurunit best since they should have the appropriate static CR and can be of a reasonablesize. Razorgors are not worth having. They are only effective against strong unitswhen they charge. Their weakness is a lack of static CR and enemies with S5 or betterattacks. Since Minotaurs perform better for the same points, it would be better tosubstitute them with Minotaurs. I have not factored in the effects of Primal Fury. The rate of slaying willimprove as a result of this, approximately adding 1 or 2 more wounds to the table inAppendix 2. For this reason, Gors, Ungors and Bestigors should be kept within 12” ofthe general as much as possible. The army composition is therefore:1) Large units of Ungors and Gors2) 2 or 3 units of Warhounds3) Characters including a BSB4) Units of Bestigors and/or Minotaurs for the rest of the army.
Other Beastmen tactics 1) MUST HAVE :a) Chalice of Dark Rain. 1 use only but makes enemy shooting more difficult to hitb) BSB with Beast Banner in a unit of Ungors or Gors to overcome the low Ld. +1S tothe unit
******Created by ebook converter - www.ebook-converter.com******
******ebook converter DEMO - www.ebook-converter.com*******
2) DON’T Forget:a) Primal Fury rolls before each combatb) Rolling for Ambushing units at the start of the turn 3) LOOK OUT for –a) Forced Leadership tests for units too far for Inspiring Presenceb) Concentrated, heavy shooting 4) Useful Magic Items:a) Wargor in Chariot with Brass cleaver. This confers 1A for each enemy model in btb(base to base) except in challenges. b ) Stone of Spite – bound spell. Every arcane item within range inflicts hits o n thebearer. Unleash this against enemy wizards while keeping the bearer away from yourbearers of arcane items. c) Blackened plate better WS against Flaming and benefits the unit. d) Steel claws plus Many limbed (Gift) adds extra attacks to the bearer 5) Ambush As soon as one unit Ambushes successfully, the enemy battleline is disrupted.Enemy units will have to manoeuvre to cover their flanks and rears. However, theprobability of ambushing at the right place successfully is 1/6 and is a gamble. If youhave much more units than the enemy and it has a long gunline or weak units on eachflank, then ambushing is a sound tactic as there is now a 50% chance of your ambushingunit entering the battlefield from a table edge where it can confront a desirable enemytarget unit. 6) Character considerations Two choices for the general – Doombull or Beastlord. The Beastlord has abetter Leadership but the Doombull is more survivable. Take your pick! The general’sunit (e.g. Bestigors) could be given the Standard of Discipline to increase his Ld but thatunit does not benefit from Inspiring Presence. Bretonnia
******Created by ebook converter - www.ebook-converter.com******
******ebook converter DEMO - www.ebook-converter.com*******
Viable combat unitsErrant Knights; Knights of the Realm, Questing knights SacrificialsPeasants, possibly Mounted Yeomen. Other possible unitsTrebuchet, Grail Knights List There are 4 very important features of the Bretonnian knight units: A) They nearly always win the first round of combat when they charge but their rate ofslaying reduces disastrously in subsequent rounds. Appendix 2 shows that they winagainst all the test units but only on the turn they charge B) The lance formation, from Appendix 2 and 3, nearly always guarantees a win whencharging but does not fare very well in the following rounds. Since, the whole idea is tobreak enemy units, the lance formation must then endeavour to have more ranks than theunit it charges. This prevents Steadfast in the enemy and forces a break test at lower Ldvalues. From Appendix 3, it can be seen that a lance formation of 8 or 9 ranks has agood chance of breaking (only in the turn the lance knights charge) nearly all units ofequivalent points cost. This is why a few Bret units, if not all, will be in this very longshape. Such an elongated unit (commonly called a ‘bus’ or ‘train’) will be unwieldy andneeds to manoeuvre to escape the pitfalls outlined below. The common enemy reactionfrom this would be to reform so that it has more ranks – 18 lance knights is equivalent to30 infantry in ranks or, 18 knights in lance formation will prevent 30 infantry from beingSteadfast . It will require 30 or more knights to prevent Steadfast in a unit of 50 infantry!The Bret player therefore cannot generally depend on a single charge to break enemyunits. Against Daemons or Undead, Stubborn or Unbreakable units, combat willalmost certainly extend to more than one round and the balance than tips against Bretknights in lance formation. The same problem occurs for a lance formation unit that islured and then flanked charged – the bane of all knight units.
Against weak or small T3 enemy units, a combat reform to 7 wide will help toslay the enemy unit faster; but this is rare. Against T4 and stronger units, a combatreform also makes the difference between slaying and depletion smaller butunfortunately the rate of depletion increases. The simple rule is if you’re losing combatthen it is better not to combat reform but maintain the lance formation. If however theenemy unit is much smaller, a combat reform to 7 wide will finish them off quickly.
******Created by ebook converter - www.ebook-converter.com******
******ebook converter DEMO - www.ebook-converter.com*******
C) The rate of depletion, although small is still substantial because of the size of theBretonnian knight units. Protracted combat does not benefit the Bretonnian knights and itis important to calculate how long combat against a unit will last before charging it. D) A double charge is not necessarily the desirable Bretonnian objective. It is goodwhen the rate of slaying is still in Bret’s favour in the 2nd and subsequent rounds ofcombat i.e against non elite units or non horde units.i) Considering the double charge first:
This is not difficult to achieve if you break the many units of knights intoinseparable pairs which are treated as one i.e. deploying and moving a pair of unitstogether. The rate of slaying is doubled while the rate of depletion will be slightlyreduced if both units are placed next to each other almost in contact. Flank charges areof course even better.ii) When facing strong units like Savage Orcs or Chosen, then charging insuccession (i.e. charge with one unit and then charge with the other unit in the nextround) might be a better strategy since a charging Lance Bret unit should win the firstround of combat. Of course the problem is the first unit that charged must remain incombat for 1 round of the enemy’s turn. This might mean passing a break test. A quickcheck of Appendix 2 shows that this will be at -1 or -2 CR (combat resolution), notideal but low enough to take a risk especially with a BSB close by. The army will comprise of:1) Lance formation knights mainly 12 or 15 strong. Questing Knights are an obviouschoice for Special. Appendix 2 shows they are the best hammer unit for Bretonnians. 2units of Questing Knights could be used. Knights of the Realm have a better WS and Ldbut Errant knights are cheaper and ranked higher. One unit of Knights of the Realm and 1unit of Knights Errant, both of around 14 should cover the Core points but having atleast 4 blocks or more of Lance formation knights will be a solid army.2) Peasants or Peasant Yeomen as Sacrificials3) Men at Arms could also be used but it will have to be a unit of 96+20 or more toremain in combat for 6 rounds against elite units. In this case, the Men at Arms unit willhold units that are dangerous against the knight units and allow them to engage otherdesirable units. From Appendix 2, Men at arms have a good rate of slaying per pointand are therefore useful in support of the lance knights. The problem is the disparity inmovement rates. Knights will be well ahead in the battlefield and too far away for theMen at Arms to support. So the easier choice is to use Questing knights instead.
If you do opt for Men at Arms then you could use, sparingly, the tactic of holdingwith one unit while allowing a flanking unit to break and hopefully rally (see Anvil andthe Breaking Hammer in the Combat Chapter). This tactic is unfortunately flawed for
******Created by ebook converter - www.ebook-converter.com******
******ebook converter DEMO - www.ebook-converter.com*******
Bretonnians because the knight units will lose the Blessing when they flee. Other Bretonnian tactics 1) MUST HAVE :a) Virtues e.g of Confidence and/or Audacity, Duty or Joust and issue challenges.b) Prophetess and Lore of Life. This is one of the ways to offset diminishing numbers.c) Errantry Banner 2) DON’T Forgeta) Impetuous roll for Errant Knightsb) Deploy with the view that you will not have the 1st turnc) Virtues during challengesd) Ward Saves and their loss after fleeing; Lance formation attacks and the reducednumber of attacks in future roundse) Stomps for Pegasusf) Damsels in 2nd rank have LOS 3) LOOK OUT for:a) Lures (see Combat Chapter) aimed to set up a flank chargeb) Armour negating weapons/attacks 4) Useful Magic Items: Grail Shield with the Grail vow, Sirienne’s Locket, RubyGoblet, Tress of Isoulde. 5) One army list has a Lord on a Hippogriff or Royal Pegasus with the Questing vow,great weapon, Gromril helm, and Sirienne's locket. The 1 wound per phase is combinedwith Lore of life and the Lord makes short lasting attacks against small units andwarmachines etc. Unfortunately, this list does not give the same returns for points spentagainst all armies and has no use when there are no small units etc available. 6) Character considerations – Damsels and Prophetesses will be safe in the middle of alance unit and still be able to cast spells. Since the BSB will have a reduced armoursave, he will be targeted. One way of keeping him alive longer is maintaining the lanceformation and moving him to the second rank. Daemons Viable units –
******Created by ebook converter - www.ebook-converter.com******
******ebook converter DEMO - www.ebook-converter.com*******
Bloodletters, Plaguebearers, Horrors, Flesh Hounds + Karanak, Flamers, General and characters – 600 points minimum leaving 1650 points. SacrificialsFuriesOther possible units: Daemonettes, Bloodcrushers Appendix 2 shows Bloodletters are the best overall unit. Plaguebearers are thebest anvil or holding unit while Bloodcrushers are best at slaying. However the pointscost of Bloodcrushers limits their numbers and hence their effectiveness. The differencebetween the holding ability of Bloodletters or Daemonettes and Plaguebearers is not bigbecause of their WSs, a stat-line which is often overlooked by beginners. This caseclearly illustrates the importance of WS and how under some circumstances Tougher orStronger units can underperform if their WS is low.
The choices for the army list is therefore narrowed: List
There are two main variants of the Daemon army1) The true Blood army2) The modified Blood army As the name suggests the Blood army consists of a Bloodthirster general andBloodletters only. 3 large blocks of around 40, 40, 30 Bloodletters will use up most ofthe available points. One or two Khern Heralds are also included plus maybe someFuries as Sacrificials. The Bloodthirster is given some Daemonic Gifts to enhance itscapabilities – see below. The modified Blood army replaces one Bloodletter block for one or more ofthe following- Horrors to cast magic and provide additional magic defence. This unit may or may notinclude a ‘Tze Herald and Changeling but is not expected to last more than 4 rounds incombat. It has 1 advantage of Flaming attacks which is useful in stopping enemy unitsfrom regenerating if they can.- Plaguebearers with or without a ‘Nurg Herald. This is the best holding unit- Flesh hounds with Karanak or Bloodcrushers. This unit will charge in tandem with ablock of Bloodletters- Flamers. Mainly to shoot and provide Flaming attacks- Daemonettes with the ‘Slan Herald has 1 reason to be chosen – as the carrier of theuseful Gift, Siren Song. If a ‘Keeper is your general, it is still tactically manageable toprovide it with Siren Song.
******Created by ebook converter - www.ebook-converter.com******
******ebook converter DEMO - www.ebook-converter.com*******
A common mistake amongst novices is to assume that the Bloodthirster shouldbe able to win combat easily. From Appendix 2, it can be seen that the Bloodthirster’smaximum rate of slaying is 4.3 maximum which is just over the static CR of 4 of a fullyranked unit. Against a Swordsmen horde a Bloodthirster will lose combat every 5rounds or so but the enemy will still be Steadfast. Charging an average/largeSwordsmen horde with a Bloodthirster will not win any victory points without theelement of luck. Charging units, better than Swordsmen, carries a greater risk of losingcombat. Against a fully ranked unit of S5 or better, the Bloodthirster is expected to losecombat. A rate of depletion of 0.139 against S6 and 0.167 against S7 or better equatesto 1 wound from every 6 or 7 attacks. A Bloodthirster should therefore avoid hugehorde units (which will tie it up and may even kill it eventually) and a fully ranked up(more than 3 ranks) unit of S5 or better. This then reduces the function of the Bloodthirster and other Greater Daemonsto supporting another Daemon unit already in combat via a flank or even frontal charge.The Greater Daemon will offset the imbalance in rate of slaying to depletion.
All Core units function best with an accompanying Herald. The opposition will ofcourse try to slay the Herald as quickly as possible to remove his main support ability,his Locus. Three Heralds can be given Daemonic Robes while the ‘Nurg Heraldnormally has Noxious Vapours. This plus the Greater Daemon and his Gifts will amountto a massive, 790 points.
If you choose to have Horrors, then only 1 unit should be used. A second unit willnot be able to have any spells since the first unit has them. The best spell for Horrors isthe Gift of Chaos when in combat and Bolt of Change against small units. Therefore aunit size of 30 is a good size. This leaves only sufficient points for 2 blocks ofBloodletters at a reduced size with possibly 1 more Herald. It can be seen that Daemons cannot directly engage 50 Chosen or similar ultrastrong enemy units. They will have to deal with them using Sacrificials etc as explainedpreviously. This might mean having 2 Sacrificial units of Furies or allowing at least 1other low point unit to be slain. These small Daemon units have to accomplish their taskof destroying as many small enemy units before being charged by units like the Chosen. The other combat units for this task are Flamers and Flesh Hounds.Bloodcrushers are too expensive. These units can only survive by flanking or rearcharging large units already in combat. If attacking in isolation, they will deal withsmall units or enemy Sacrificials. Only 1 unit is normally needed.
Flamers are an important part of the army as they can shoot and destroy smallenemy units and enemy sacrificial units at long range. They are probably the best unit forthe task of harrying the enemy, taking out small units and enemy shooting units. 1 largeFlamer unit guarantees concentrated shooting while several small Flamer units are much
******Created by ebook converter - www.ebook-converter.com******
******ebook converter DEMO - www.ebook-converter.com*******
better at surviving against ranged attacks. These units should be grouped together so thatthey can amass and focus their shooting on one target unit (see Concentrated Shootingin the Some Basics Chapter). Their flaming attacks also serve to negate RegeneratingMonsters and units. . Of all the secondary unit choices, I would rate Flamers as the best.
(see Daemonic Instability table just before Appendix 4)The army composition is:
1) Bloodthirster and Bloodletters in blocks of >30 only2 ) 2 Bloodletter blocks of between 30 – 40, plus any or some of the following –Plaguebearers (the best Daemon anvil), Flamers (my choice), Horrors, Flesh Hounds.The Bloodthirster could also be replaced by a ‘Keeper. Other Daemonic tactics 1) MUST HAVE:a) Heralds for core unitsb) Siren Song if there are ‘Slani characters.c) Spell Breaker or Spell Destroyer 2) DON’T Forget:a) Karanak (if you use him) has to choose an enemy target at the startb) Heralds Locic) Abilities of Changeling, Karanak etcd) Horrors and how their spells depend on their numbers 3) LOOK OUT for:a) Spells from Round 2 onwards. If you use a Bloodthirster only, the army will haveless magical defence.b) Isolating the Greater Daemon. Remember he is not invulnerablec) The position of Heralds in the unit. Enemy units will try to destroy Heralds as quicklyas possible and reducing the number of models in base contact with the Herald isdesirable except for the ‘Nurg herald with certain gifts.d) Daemonic Instability tests will enable Daemonic units to remain in combat longerthan expected – refer to the end of Appendix 3. 4) Useful Magic Items: Popular Gifts include Daemonic Robes, Siren Song, NoxiousVapours, Master of Sorcery, Armour of Khern, Obsidian Armour, Dark Insanity andMany headed Monstrosity. 5) Siren Song/s given to Keeper and ‘Slan Herald. This is used to either create flankcharges or break up enemy lines, explained below. Since it is a one use item, it is best
******Created by ebook converter - www.ebook-converter.com******
******ebook converter DEMO - www.ebook-converter.com*******
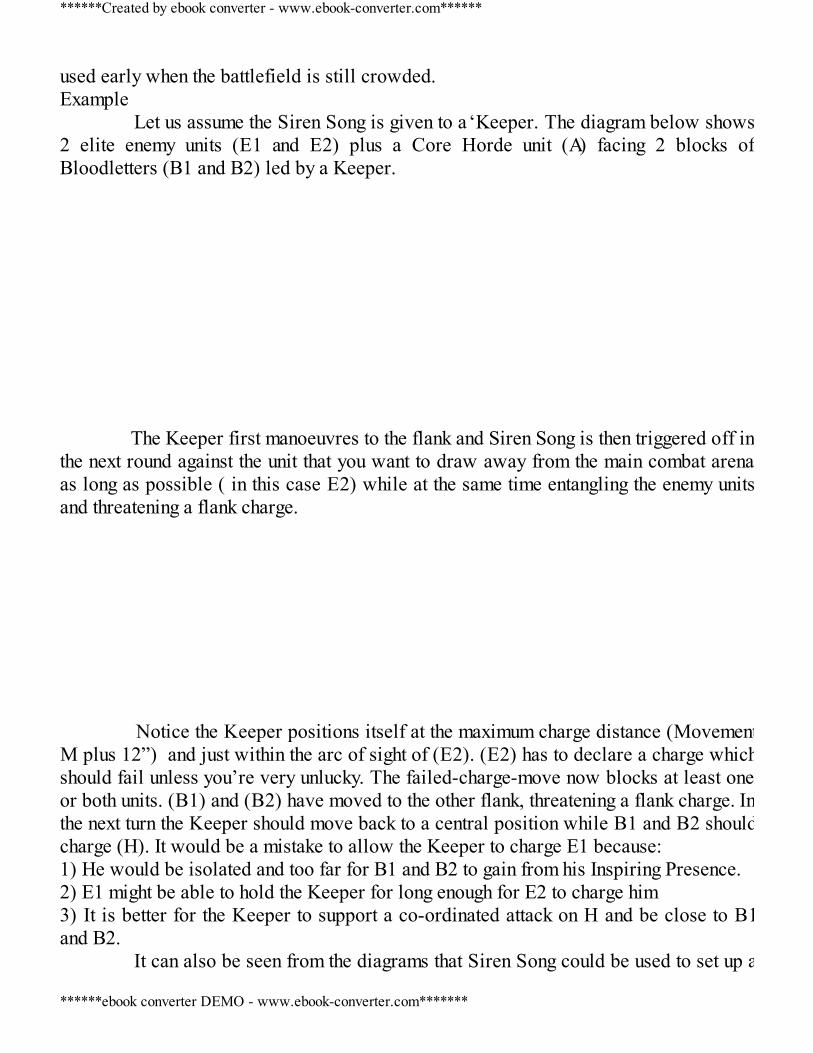
used early when the battlefield is still crowded.Example Let us assume the Siren Song is given to a ‘Keeper. The diagram below shows2 elite enemy units (E1 and E2) plus a Core Horde unit (A) facing 2 blocks ofBloodletters (B1 and B2) led by a Keeper. The Keeper first manoeuvres to the flank and Siren Song is then triggered off inthe next round against the unit that you want to draw away from the main combat arenaas long as possible ( in this case E2) while at the same time entangling the enemy unitsand threatening a flank charge. Notice the Keeper positions itself at the maximum charge distance (MovementM plus 12”) and just within the arc of sight of (E2). (E2) has to declare a charge whichshould fail unless you’re very unlucky. The failed-charge-move now blocks at least oneor both units. (B1) and (B2) have moved to the other flank, threatening a flank charge. Inthe next turn the Keeper should move back to a central position while B1 and B2 shouldcharge (H). It would be a mistake to allow the Keeper to charge E1 because:1) He would be isolated and too far for B1 and B2 to gain from his Inspiring Presence.2) E1 might be able to hold the Keeper for long enough for E2 to charge him3) It is better for the Keeper to support a co-ordinated attack on H and be close to B1and B2. It can also be seen from the diagrams that Siren Song could be used to set up a
******Created by ebook converter - www.ebook-converter.com******
******ebook converter DEMO - www.ebook-converter.com*******
flank charge on (H)
Finally, there is a list which uses Screamers – 2 blocks of 18 Screamers, aBloodthirster, 1 or 2 Heralds of ‘Nurg in a single block of 44 Plaguebearers. This is acombat avoidance army (see Some Basics Chapter) in which the Screamers use theirSlashing attack to destroy as many small units as possible. (see the section onHexwraiths under Vampire Counts)
6) The best choice of general is the Bloodthirster followed by the ‘Keeper. The Lord ofChange is a remote possibility but too magic dependent ( see chapter on Magic) Dark Elves Viable combat unitsDark Elf Warriors, Repeater Crossbowmen, Black Guard, War Hydra SacrificialsHarpies, Dark Riders Other possible unitsShades, Executioners, Cold One Knights, Cauldron List
As an exception, I have added a Monster, the War Hydra, as it can hold in combatwell while slaying the enemy effectively. In fact the data from Appendix 2 stronglyrecommends 2 War Hydras as obligatory along with the best overall unit – BlackGuard.
Sacrificial units range from Harpies, the smallest possible unit of Executioners orRepeater Crossbowmen.
The rest of the army is more difficult to choose as the difference between units issmall. Executioners perform very well but only if there is an accompanying Cauldronwhich is expensive. Cold One Knights have the best saves in the army but are expensiveand hence will not be large enough to have ranks. In addition they suffer from Stupidity.
Although the rate of slaying and depletion is in favour of the War Hydra for all thetest units in Appendix 2, it must be noted that the War Hydra cannot remain in combatfor more than 4 rounds and therefore has to choose its enemy units with that in mind.Small infantry units are the preferred targets but make sure that there is no risk of theall-important Hydra Regeneration being destroyed by Flaming attacks. Always notewhere enemy characters are, which units can carry magical Banners and which of those
******Created by ebook converter - www.ebook-converter.com******
******ebook converter DEMO - www.ebook-converter.com*******
units seem to be ‘making its way’ towards the Hydra. That unit will inevitably carry theFlaming Banner.
In general, the Dark Elf army has to avoid combat rather than rush towards it,when fighting many other armies. So deploy tactically, allowing room for earlymanoeuvres (see Deployment Chapter).
Elves are too expensive to be in a super-sized horde formation. The size of Elvenunits are smaller. A quick engagement followed by a swift retreat will prove to besuccessful. The only unit that can remain in combat for a long period is the Black Guard.
Black Guard can hold in combat for several rounds because they are Stubborn andeffectively they simply need to have at least a few models alive to keep remaining incombat. They still, however, need to have their flanks protected. This can be done bycombat avoidance techniques (see Combat Chapter).
Flank charges can be set up for the important Black Guard unit using the WarHydra or Sacrificial units (see Combat Chapter).
An interesting variation of this army list uses the Cauldron. The favoured Khainiteunit for this are Executioners who switch from a 5+ Ward save to +1A according to thestrength of their enemy. The army marches forward in bubble formation with theCauldron at the centre. The Cauldron however will not last long against a commonhorde enemy unit or elite units From Appendix 4, Dark Riders have a better probability of inflicting woundsby shooting than repeater crossbowmen but per point cost, repeater crossbowmen aremarginally better than Dark Riders. The manoeuvrability of Dark Riders as FastCavalry makes them useful in deflecting charges, creating space and threatening to movebehind enemy lines. They are therefore essential in the Dark Elf shooting army
The army composition is therefore:
1) At least 1 Hydra and large Black Guard unit (20 max)2) Sorceresses (as discussed in the Magic Chapter) and Pendant Dreadlord3) Spearelves to take up most of the Core with Harpies, Dark Riders and/or maybeRepeater Crossbowmen as Sacrificials.4) The other choices are a matter of taste – Repeater Crossbowmen, Executioners(usually with a Cauldron), Cold one Knights – more than 2 ranks. The choice willdetermine the tactics needed.5) A heavy shooting army is possible using Repeater Crossbowmen, Shades andsometimes a Bolt thrower. Refer to the Shooting Chapter for this. Other Dark Elven tactics 1) MUST HAVEa) Hydras (preferably 2)
******Created by ebook converter - www.ebook-converter.com******
******ebook converter DEMO - www.ebook-converter.com*******
b) Pendant of Khaeleth 2) DON’T Forgeta) The uniqueness of the Dark Elven magic phase – Power of Darkness and using themaximum number of dice to cast instead of 6b) Hatred and Warrior Elitec) Pendant of Khaeleth – how it worksd) Cauldron’s bonus at the start of the turn 3) LOOK OUT fora) Flaming attacks against the Hydrab) Dark Elf Assassins – although not popular now, they can still kill enemy charactersespecially wizards. A Shade-star army has been used in the past. This is not a ‘sure-win’-option asexplained in the Shooting chapter but is one of the rare heavy shooting armies thatmight work using the right shooting strategy. Magic is an important feature for Dark Elves since it is the only army whereWizards can use more than 6 dice to cast spells. The merits of the different Loresavailable and how to complement the army’s performance with magic are discussed inthe Magic chapter.
Cold One Knights could be added to the list in a large block of 20 or more sincetheir rate of depletion is one of the lowest and they have good attacks. They can manageto beat some good units like Savage Orcs but will fail against the Chosen. Theirdisadvantages are Stupidity (obviated by the Stupidity Banner) and they also restrict thepoints available to Black Guards. 4) Useful Magic Items: Pendant of Khaeleth, Null Talisman, Standard of Hag Gref,Focus Familiar, Ring of Hotek, Crystal of Midnight, Guiding Eye, Lifetaker. If youchoose a heavy shooting list then the Guiding Eye is definitely an item worth having,even with a Sorceress. 5) A list that tempts some players consists of a Dreadlord on a mount - darksteed/Pegasus/Dragon with Pendant of Khaeleth, Crown of Command, Armour ofDarkness and a 5 point magic weapon. The Stubborn Dreadlord then charges on its ownwith impunity expecting to pass break tests and saves. While this may well happen theDreadlord will end up winning no Victory points because it is in turn unable to breaklarge enemy units quickly. At the same time, if the mount can be attacked separately, itwill in all likelihood be slain and the other Dark Elf combat units might be too far away
******Created by ebook converter - www.ebook-converter.com******
******ebook converter DEMO - www.ebook-converter.com*******
to benefit from the important Inspiring Presence. This Dreadlord will end up huntingsmall units etc – hardly worth the point cost. 6) Character considerations – The Dreadlord normally has a 1+ AS and the Pendantmaking him almost indestructible. He should join and complement a strong combat unite.g. Black Guard. The other characters are Sorceresses chosen in the standard waymentioned in the Magic Chapter. Dwarfs Viable combat unitsDwarf Warriors, Longbeards, Quarrellers, Thunderers, Rangers, Hammerers, Miners,Ironbreakers. Dwarfs have an unusual situation where all infantry units could function well in combat.I have omitted Rangers in Appendix 2 because they are similar to other units in combat. SacrificialsNo obvious Sacrificials. Cheap warmachines may/will be sacrificed but a lack ofmobility makes them ineffective for this use. Other possible unitsBolt Thrower, Grudge Thrower, Flame Cannon, Anvil of Doom, Gyrocopter List Dwarf infantry units perform very well in combat. The difference between thebest two combat units and the other units, including shooting units, is much smaller thanany other army. Even warmachines perform far better in combat than other armies sincethey are Stubborn. The choice of combat units can vary considerably and still produce acombative army. It is possible for instance to omit Ironbreakers and have Longbeardsand Hammerers but it is also possible to omit some combat units and have a gun-line.The Core unit requirements necessitate choosing Warriors and/or Longbeards plusmaybe Thunderers or Quarrellers or both. Rangers are also a very good option. If you choose to have Quarrellers thenmaking them Rangers increases shooting and since they are no slouches in combat theycould double up as hunters of small units. However, Longbeards or Warrior Rangersare better at this task. In writing up the army list, it is best to start by first deciding on your anvil andhammer unit. (This is an appropriately named common tactic for Dwarven armies.) The
******Created by ebook converter - www.ebook-converter.com******
******ebook converter DEMO - www.ebook-converter.com*******
anvil unit could be Ironbreakers, Longbeards or Warriors while Hammerers (as theirname suggests) or Longbeards should be the hammer. From the tables in Appendix 2, Ironbreakers is the best anvil but Appendix 3shows that Warriors with HW and Shields are the cheaper option against good S6 units.In sufficient numbers, Ironbreakers can hold against any S4 units. In 10 rounds ofcombat they will lose about 14 against the Chosen. Adding 20 for static CR (see pg 2)and another 10 for shooting and magic gives a size of 44. This will hold against S4 unitsbut for S5 or S6 it becomes too expensive. A unit of 40 – 50 Warriors is a cheaperchoice in this case. This size however reduces the points available for other units. So iti s far better to have Hammerers at about 30 models leaving just enough points for aMiner unit plus maybe a warmachine or 2. If you omit the Ironbreaker unit thenLongbeards have to be armed with HW and Shield to function as a second anvil. Theunit size could be in excess of 50 for each anvil unit.
There is no sacrosanct exact number for each unit. The numbers you choose willdetermine the tactics needed. Just remember that Warriors with HW and Shields arecheap while Ironbreakers can also absorb S3 and S4 range attacks far better.Longbeards and Hammerers are the best hammer units but Warriors with GW arecheaper. It is simply a question of balance.
No more than 1 Sacrificial unit is needed - either 5 Ironbreakers or 5 Hammererssince they are the cheapest but shooting units could serve as Sacrificials to a smallextent. There are not many points left after this. Many Dwarf players dispense withsacrificials altogether and have a gun-line of warmachines and shooting units (see SomeBasics Chapter).
However after reading this book, you will find that an out and outgun-line is actually not competitive. Choosing a select few shooting units for a Dwarvenarmy however will prove fruitful. The choice is huge – Grudge Thrower, Cannon, Boltthrowers, Organ Gun, Flame cannon and Gyrocopter all have their uses. Adding theright engineering runes (see below) is necessary but all this reduces the points availablefor combat units.
Enemy units will try to ‘hammer’ the Dwarven hammer unit while pushing itsholding unit against the Dwarven Anvil. They will also try to break up the Dwarfs frontline and use superior mobility to try to set up flank charges. Anchoring and winningflanks (see Combat Chapter) in addition to maintaining a steady battleline is importantto the army’s combat success. The army composition is then:1) Hammerers, Warriors with HW and Shields2) At least one Runed Warmachine – Grudge Thrower, Bolt thrower, Flame Cannon,Gyrocopter etc3) Characters with Runes mentioned below
******Created by ebook converter - www.ebook-converter.com******
******ebook converter DEMO - www.ebook-converter.com*******
4) Longbeards with HW plus Ironbreakers or another unit of Warriors to provide threeor 4 big infantry blocks5) Thunderers or Quarrellers can serve as Sacrificials but so could any cheapwarmachine. Other Dwarven tactics 1) MUST HAVEa) Runes – Spellbreaking or Spell Eater.b) Master Rune of Challenge – forces an enemy unit to charge. This is similar to SirenSong – see Daemons abovec) Engineering Runes for warmachines – enhances Strength, to hit, re-roll misfires etcd) Talisman, Weapon and Armour Runes – improve saves, increase To hit or Strength,ASF, destroys enemy magic weapons etc 2) DON’T Forgeta) Relentless march and -1” to flee and pursueb) Hatred of Orcs and Goblinsc) Stubborn warmachine crewd) Expect to be charged rather than charge 3) LOOK OUT fora) Flyers, Fast Cavalry and fast moving mobile units running rings around a Dwarvenunit.b) Dwarven characters always have a tricky rune up their short sleeves. 4) Useful Magic Items: Runes mentioned above plus Rune of Accuracy, Rune ofSkewering, Rune of Forging, Rune of Burning, Master Rune of Balance, Rune ofDetermination, Rune of Battle, Master Rune of Grungni, Rune of Slowness, Rune ofStone, Rune of Iron, Rune of Might, Rune of Cleaving, Rune of Snorri Spangelhelm,Rune of Fury. 5) Anvil of Doom or not? This is a debatable question. The Anvil costs many points andwill be an irritation to the enemy. It cannot destroy large enemy units but will enableunits to move faster especially Miners. It all boils down to a matter of taste whether youchoose to have the Anvil of Doom or not. 6) Character considerations – If you have chosen a few warmachines e.g. Bolt throwers,Grudge throwers, Cannon, then an Engineer will boost their performance and should begiven appropriate Runes.
******Created by ebook converter - www.ebook-converter.com******
******ebook converter DEMO - www.ebook-converter.com*******
The Dwarf Lord is the best choice for the army general. Empire Viable combat unitsHalberdiers, Swordsmen, Spearmen, Knightly Orde r s , Greatswords, Inner CircleKnights, Reiksguard Knights, Demigryph Knights, Steam Tank SacrificialsDetachments, Halberdiers, Swordsmen Other possible unitsLuminark of Hysh, Hellstorm Rocket battery, Handgunners, Crossbowmen,Hellblaster Empire has tremendous versatility and the most varied army lists are possible.The Steam Tank is the best possible holding unit and 2 Steam Tanks are a good choice.Its main drawback is it is susceptible to cannon fire. 2 shots from a cannon coulddestroy it. (see (5) below) The best units are knights and their sizes should be maximised. All 25% of thepoints needed for Core could be used for a unit of Inner Circle Knights. Two units arealso possible, one with 1+ save and lances and the other with GW. Keeping to the sametheme, the Special units could also consist of knights. From Appendix 2, Demigryphknights seem marginally better than Reiksguard knights but either/both units could beincluded. A large Demigryph knight unit will be unwieldy unfortunately. Reiksguardalso have a huge advantage of being Stubborn and therefore should stay in combatlonger. Adding Warrior Priests to some of these cavalry units will boost theirperformance. Coupled with the double Steam Tank, this army will move fast and beable to engage the army quickly and select appropriate enemy units to charge. Cavalrycannot however function entirely on its own and will be defeated by the strongest units.Sacrificials like Swordsmen and Halberdiers that serve the purpose of diverting thesestrong enemy units will be much slower than cavalry so a certain amount of juggling andmanoeuvring is still needed. The second type of army list uses the detachment rule to full advantage. EachRegimental infantry unit should have a character to benefit from the Hold the Line rulefor itself and its detachments. One detachment could be made a Sacrificial of 5 modelswhile the other should be half the size of the Regimental unit. At all times these 3 unitsshould be kept next to each other. If more than one Regimental unit is used than a single
******Created by ebook converter - www.ebook-converter.com******
******ebook converter DEMO - www.ebook-converter.com*******
character could shuttle between units and join the unit about to engage in combat.Swordsmen are the best holding unit per point and if used the size of Swordsmen
will be about 110. The detachment unit for these Swordsmen should be Halberdiers.The other Regimental unit could be Greatswords with Halberdiers or Swordsmen as theDetachment. Greatswords have a good slaying rate – exceeding Demigryphs per point,and because of this they could wait for the enemy to charge the detachment and thenflank charge. Other units: The Luminark confers a Ward save to units and could be includedfor this purpose mainly. Since a double Steam Tank will be used there is no need for aCannon but a Mortar or Helstrom Rocket battery are possible shooting units. Pistoliersare a very useful unit which will harass the enemy units and constantly threaten toinfiltrate past their frontline. Although Flagellants are better, they still deplete tooquickly and there are other alternatives. List Either an all cavalry army with Inner Circle knights as Core and Reiksguardand Demigryphs as Special with accompanying Warrior Priests.Or some infantry (Swordsmen, Greatswords, Halberdiers) can be included in very largeblocks with accompanying characters and detachments.Sacrificials – either detachments or small units of Swordsmen, HalberdiersHelstrom is a good choice for a shooting alternative. 1 or preferably 2 Steam Tanksshould be included. 1) MUST HAVEa) Steam Tankb) Large Knight unit/sd) Warrior Priests or characters with good saves in combat units 2) DON’T Forgeta) Detachment Rulesb) Sniper rules if you do use the Hochlandc) Generating Steam points at the start. The number of Steam points must be lowered asthe Steam Tank loses wounds. Use the Steam Gun on T3 infantry as often as possible.d) Hold the Line for units with a character 3) WATCH OUT fora) High strength or weapons which ignore armour saves against knights or the SteamTank. 4) Useful Magic Items: Van Horstmann’s Speculum, Steel Standard, Griffon Standard,
******Created by ebook converter - www.ebook-converter.com******
******ebook converter DEMO - www.ebook-converter.com*******
5) a) One way of enhancing the Steam Tank’s performance is to choose Lore of Life forthe Battle Wizard. Just try to cast any spell and then use the attribute to recover SteamTank wounds.b) The all cavalry army is probably the best option 6) Character considerations:
Warrior Priests must be included in the army. In an all-cavalry army, these priestsshould try their best to provide a 5+W for their unit when their rate of depletion shouldbe raised or re-roll wounds to improve slaying. The Hatred plus charge bonuses is avery good combination for cavalry. A 5pt magic weapon will then create the obligatorymagical attacks.
There are 3 possible choices for the army general – a Templar Grandmaster forthe all cavalry army, the General for both infantry or cavalry army and the Arch Lectoron the War Altar. Even though the War Altar is reasonably resilient, it is better not toallow the War Altar to be drawn into early combat.
In the magic phase, only Warrior Priests (and the Arch Lector if he is present)could attempt to cast. A Lore of Life low level wizard could also be included.
The Standard of Discipline as usual is useful in a mediocre Ld army like Empire.
High Elves Viable combat unitsSpearelves, Swordmasters, Phoenix Guard, White Lions, Dragon Princes Sacrificials:Great Eagles Other possible unitsArchers There is one obvious unit which must be included in the HE army – PhoenixGuard. Allocating the full 50% for Special units to Phoenix guards is very tempting buteither one of the other two Special units can also be included by slightly reducing thesize of one Phoenix Guard unit. Since Phoenix guards can absorb shooting and magicand hold reasonably, against the Chosen, they are the ideal holding unit for High Elves.A block of 40 and another block of 20 is a good combination or you could replace thesmaller block with Swordmasters.
******Created by ebook converter - www.ebook-converter.com******
******ebook converter DEMO - www.ebook-converter.com*******
The only reason to include White Lions is because they are Stubborn but theirdepletion rate is too high to justify their inclusion. The Core unit can be a single block of Lothern Seaguard or Spearmen with orwithout Archers. Per point, Spearmen are better than Seaguard but the Seaguard canshoot which gives another dimension to the army. The rest of the points can be given tocharacters and a unit, like Dragon Princes, to tackle smaller/weakened enemy units. Two eagles will provide the necessary Sacrificials and flank protectionleaving just under 400 points for characters. The only other possible unit is the Repeater Bolt thrower but like the remainingunits it consumes too many points and will be an immediate target for the enemy. Like many other armies, High Elves have to delay combat against the strongestarmies and choose units that they want to engage in the latter half of the battle. Theenemy will try to engage one unit on several fronts as early as possible in the hope ofbreaking and destroying it. Not only will this lose a substantial amount of Victory pointsbut the High Elf army will seem a little thin if this happens. The 2 Sacrificial Eagleshave a vital role to play in absorbing or deflecting early enemy threats and if notpositioned well, will be ignored completely. List The army composition is:1) At least one large block of Phoenix Guard2) A second elite infantry block of either Phoenix Guard or Swordmasters.3) Spearmen or Lothern Seaguard or both for the Core requirement. This must be kept tothe minimum to maximise points for the important Special units.4) 2 Eagles plus either a 3rd Sacrificial unit or Dragon Princes.5) A Prince as general with the usual items and either 1 or 2 Mages (see below) 1) MUST HAVEa) Phoenix Guardb) Seerstaff – This saves valuable points for the Wizard allocation (See MagicChapter). The best spells are then chosen and always cast. 2) DON’T Forgeta) ASF - Always make a note of each enemy unit’s Initiative before engaging them.Elven higher Initiative enables you to re-roll missed hits. This creates a huge advantage– as shown in Appendix 2b) Study the plethora of magic items carefully 3) LOOK OUT fora) Large units with multiple attacks
******Created by ebook converter - www.ebook-converter.com******
******ebook converter DEMO - www.ebook-converter.com*******
b) Losing a whole unit too early – The army will look small and fragile then. The enemyhas to be engaged later in the game, avoiding some units and charging the weaker oneswhich will break quickly as usual.c) ASF + High Initiative improves HE’s combat 4) Useful Magic Items: Vambraces of Defence, Talisman of Loec, Banner of the WorldDragon, Book of Hoeth, Talisman of Saphery, Annulian Crystal, Folariath’s robe. 5) Most tournaments ban the Book of Hoeth but if it is not, the procedure for its usestarts from the moment you choose spells. The Seerstaff mage chooses the 2 spells thatare not required. The bearer of the Book of Hoeth then chooses the same lore andautomatically gets the 4 remaining spells since spells cannot be duplicated. These willcontain the most potent spells which are then cast with the 6 maximum dice ensuring avery high probability of irresistible force. The Lore of Life combo, discussed in theMagic Chapter, could also be used plus the Banner of Sorcery. If the Book of Hoeth is not used, then the Seerstaff mage simply chooses thebest 2 spells against the opposing army. The Lore of Life is a good choice because itoffers some compensation for the small units; enabling valuable lost wounds to berecovered while threatening the commonly larger sized enemy units with Dwellersbelow. 6) Character considerations – The standard composition of 2 Mages and a Prince is bestwith the Prince joining the Phoenix Guard unit. Lizardmen Viable combat unitsSaurus Warriors, Skinks, Temple Guard, Kroxigors, Stegadon, Ancient Stegadon SacrificialsSkinks Other possible unitsSalamanders, Skink Skirmishers, Chameleon Skinks List Lizardmen is one of the 4 or 5 armies where there is a good choice of combatunits. The choices are further simplified by 4 units standing out clearly from the others.These are Saurus, Skinks, Temple Guard and Stegadons.
******Created by ebook converter - www.ebook-converter.com******
******ebook converter DEMO - www.ebook-converter.com*******
Stegadons will lose combat because of static CR i.e fully ranked up units with astandard. Even though its rate of slaying is bigger, it still loses to a horde Swordsmenunit by a combat resolution of (4-3.5) 0.5 for a Stegadon and by 0.7 for an AncientStegadon. However it is Stubborn and could still choose to charge these units as it coulddestroy some units completely while passing its break tests especially if the general isclose enough. The unit it charges cannot be too big – a maximum of 33 Swordsmen willbe destroyed by a Stegadon before it itself perishes. The equivalent figure is 40Swordsmen for the Ancient Stegadon. This figure will be smaller for better units – T4etc.
Since the Slann is obligatory, it follows that he will have to be placed in a unit ofTemple Guard. 48 Temple Guard would be able to withstand 6 rounds of combat – fromAppendix 2 but uses up too many points. A balance has to be struck between this unitand Saurus which is the best unit overall. The Temple Guard unit should serve more asa protective unit for the Slann with Saurus engaging in combat and Skinks used asSacrificials. Therefore the Saurus units should be maximised e.g. 2 units of around 50each will withstand almost 8 rounds of combat each and be able to hold the enemy atbay while the Temple Guard unit only needs to be in combat late in the game and can belimited to 20 or 25. The heavy hitters can then be Kroxigors or Stegadons but once againthey must be selective in combat.
Poisoned shooting can destroy Monsters in just a few rounds and while it may betempting to focus on Skinks and shooting, this option will not work in the tournamentenvironment as explained in the Shooting Chapter. Skinks and even Chameleon Skinksare still useful, not only as Sacrificials but for harassing the enemy with their shooting.They are better off armed with blowpipes instead of javelins.
The army will comprise ofSlann, Temple Guard, Units of Saurus with Skinks as Sacrificials. Stegadons may alsobe added. Other tactics1) MUST HAVEa) Slann with Disciplines – Focus of Mystery, Soul of Stone,b) Saurus 2) DON’T Forgeta) Slann can cast magic missiles while in combatb) FAQ for Cold Blooded Ld tests with additional dice (e.g. with 4 dice) 3) LOOK OUT fora) Initiative tests e.g. Pit of Shades, Purple Sunb) ASF elite enemy units.
******Created by ebook converter - www.ebook-converter.com******
******ebook converter DEMO - www.ebook-converter.com*******
c) Cold Blooded rules making units very difficult to break 4) Useful Magic Items:Cupped Hands, Bane Head, Diadem of Power, Divine Plaque of Protection, MaimingShield, Piranha Blade.Other useful Disciplines for the Slann are, Focused Rumination, Higher Sate ofConsciousness and Unfathomable presence 5) Bane Head is usually combined with Piranha Blade to quadruple wounds. It can alsobe combined with Cupped Hands to slay enemy Wizards. The Slann rolls 6 dice gettingIrresistible force and then using the Cupped hands to transfer the miscast to an enemywizard. 6) Character considerations:
A Scar Veteran armed with a simple magic weapon gives the magical attacksoption. Since the Cold Blooded Ld test has a high % probability of success, a BSB isnot really needed. However it can still be present as it effectively makes Saurus unitsalmost impossible to break. An Old blood is also a worthy alternative if you prefer anarmy which depends less on magic.
The Engine of the Gods as a mount is too costly and makes the army too dependenton magic. The Skink Priest riding it will be immediately targeted and will grant theenemy easy VPs. Ogres Viable combat unitsOgre Bulls, Ironguts, Maneaters, Mournfang Cavalry, Thundertusk, Sabretusk Pack SacrificialsSabretusk Pack, Gnoblars, Gnoblar Trappers Other possible unitsLeadbelchers, Yhetees, Maneaters, Thundertusk, Stonehorn, Ironblaster, GnoblarScraplauncher List Ogre units are one of the best at slaying and should be able to win the firstround of combat in most encounters. The rate of depletion however is also high and thusquickly reduces Ogre units to small sizes. This makes Ogres ideal against small units
******Created by ebook converter - www.ebook-converter.com******
******ebook converter DEMO - www.ebook-converter.com*******
but significantly weaker in protracted combat especially against units with a largewound pool. Mournfang cavalry are the best Slayers in the army and a unit of 6-8Mournfang will inflict more wounds on the enemy than it suffers, even on the Chosen.However by the end of the first or second round of combat, the number of Mournfangmodels remaining is so small that the unit becomes ineffective and is normallydestroyed completely. The army list is therefore centred on maximising the size of units instead of theold MSU style sometimes used in 7th edition. Since the cheapest model is the Ogre Bull,having a large unit of Ogre Bulls is the first step in forming your army list. Next is thechoice of weapons and whether you should include the more expensive Ironguts.Against Chosen and elite units, Ogre Bulls deplete at about 2 – 3 models per round ofcombat. Adding another 2 -3 models for shooting and magic losses gives a minimumsize of 9. Two units of 9 -15 Bulls will take between a third to half the points available.If you have heavy hitting units then it is not necessary to upgrade the large Bull unit with2HW. The hand weapon and shield option provides better saves. Even this is not goodenough against elite infantry and the strategy for Ogres should not be Anvil andHammer. The usual combat avoidance against elite enemy infantry should be used but ifthere is no choice then elite enemy units can be defeated by hitting them consecutively(but only in later rounds) i.e. charge with one unit and slay as many as possible and thencharge with another unit and slay as many as possible. You have to gauge this carefullyas the two units used will be reduced to very small units (or a unit only!) after combat. Ironguts are more effective against cavalry but so are Mournfang. Both unitscould be included but will serve the same function of taking on heavy cavalry and smallunits. The choice is yours! The easiest Sacrificial choice is a single Sabre tusk. 3 units of 1 Sabretusk willdeflect and delay charges by dangerous enemy units against your combat blocks. Youcould also use Gnoblars as alternative Sacrificials with 1 or 2 Sabretusks. A small unit of Yhetees could be used to provide magical attacks – againstEthereals etc – as an alternative to having magical attacks from characters only. Finally the Ironblaster and Thundertusk are useful inclusions since they canshoot and move. Ironblasters are particularly good at shooting and taking out Monstersetc. while Thundertusk has a stone thrower that suffers no casualties when it misfiresand also serve the purpose of improving combat efficiency of units close by. Some players are over excited by the different combinations available toManeaters. A quick check on Appendix 2 and 3 will set that right. There are betteralternatives in combat than Maneaters. It is their special rules which merit theirinclusion in an Ogre army. The best 2 choices of ‘Been there Done That’ abilities areScouts and Sniper. Armed with a brace of Ogre Pistols, 12 shots from 6 Maneaters in 2ranks at BS4, should be able to kill a Wizard or even a Wizard Lord in 1 turn ofshooting!
******Created by ebook converter - www.ebook-converter.com******
******ebook converter DEMO - www.ebook-converter.com*******
The list should consist of 1 or 2 units of >12 Bulls e.g. 15 Bulls plus a smallerunit of Bulls. The last unit is a matter of taste and could be Maneaters, MournfangCavalry, the Ironblaster, Ironguts or a Thundertusk. 2 or 3 units of 1 Sabretusk will actas Sacrificials. Other tactics1) MUST HAVEa) At least one large unit of 12 or more Ogre Bullsb) Sabretusks as Sacrificialsc) Hellheart - see below 2) DON’T Forgeta) Impact hits and Stomps. Roll of 10 or more for D3 hits.b) Butchers and Slaughtermasters are immune to Poisonc) Tyrant’s Big Names – see belowd) No Misfires for the Ironblaster and Thundertuske) Sabretusks do not benefit from Inspiring Presencef) Be aware of the positions of enemy wizards so that Hellheart can be unleashed mostdestructively 3) LOOK OUT for:a) Losing models from ranged attacks in early rounds. Unlike other armies the loss of 1or 2 models mattersb) Maneater Sniping Scoutsc) A Butcher or Slaughtermaster and his unit approaching strangely close to enemywizards probably means he has the Hellheart and has to be avoided e.g. by forcing thatunit into combat while moving the wizards away. 4) Useful Magic Items:Hellheart – needs to used early when as many enemy wizards are estimated to be inrange;Grut’s Sickle, Dragonhide Banner, Greedy Fist, Gnoblar Thiefstone;Popular Big Names include Kineater, Mountaineater, Longstrider and Deathcheater 5) Although Ogres excel in the combat phase they also perform reasonably during theother phases. During the magic phase, the Augment spells from the Lore of the GreatMaw are the ones to watch out for since there are quite a few good ones. Try to makeunits that might lose combat Stubborn. In the shooting phase, the Ironblaster andThundertusk’s stone thrower will be expected to hit at least once per game.
******Created by ebook converter - www.ebook-converter.com******
******ebook converter DEMO - www.ebook-converter.com*******
Enemy units will prefer to charge Ogre units to avoid Impact hits. Against M4or less, moving to a distance of 13” might tempt the enemy to charge. There is then a>50% chance of a failed charge and so another unit could be positioned in preparationfor this and a flank charge. M6 also make Ogres almost as good as cavalry at preventingretreats (see The Basics Chapter) Sabretusks unlike other Sacrificials will probably run off the board if they flee. Each Sabretusk unit can be expected to be used only once especially if they have toflee. When they are positioned to deflect charges (see Combat Chapter), they should beprepared to hold as a charge reaction 6) Character considerations – The Tyrant has the highest Ld and is the best choice as thearmy general. A Slaughtermaster could be the general instead with a Butcher and aBruiser BSB. The general’s unit should be given the Standard of Discipline if possible.This increases the Tyrant’s Ld to a respectable 10. Orcs & Goblins Viable combat unitsOrc Boyz, Savage Orc Boyz, Orc Boyz Biguns, Savage Orc Biguns, Night Goblins,Black Orcs, Trolls SacrificialsWolf Riders, Spider Riders, Goblins, Snotlings Other possible unitsSpear Chukka, Rock Lobber, Doom Diver, Goblin Chariot, Fanatics in NG unit List
The cheapest infantry block is the Night Goblin unit. Netters are mandatory. If thenets work, 130 Night Goblins are sufficient. (83+50). Two such blocks could be usedbut only 1 is really necessary. The next block, from the Combat Ratings table should beSavage Orcs Biguns. Only 1 unit of Biguns is allowed so we have to move on to the nextbest unit – Trolls. Filling the remaining points with Trolls is not advisable because oftheir Stupidity and the possibility of encountering Flaming attacks. The general mustalso be close to the Trolls up to turn 5 or 6 for Inspiring Presence to reduce the chanceof Stupidity.
The fourth and possibly fifth unit is more difficult to choose. Orcs with HW andshields have the smallest rate of depletion; Savage Orcs have the most attacks whileBlack Orcs are the heaviest hitters. Any one of these 3 units can fill the slot as could
******Created by ebook converter - www.ebook-converter.com******
******ebook converter DEMO - www.ebook-converter.com*******
another block of Trolls.Sacrificials could be Wolf Riders or Snotlings. Snotlings are a safer bet since
they do not suffer from Animosity while Wolf Riders are far more mobile.Tactically, the first three units could fulfil most of the necessary functions of a
viable army. The army focuses on combat with Night Goblins holding almost any unitthrown against it while Savage Orc Biguns and Trolls dish out a bucketful of attacks andslay the opposing unit. Savage Orcs also have a reasonable rate of depletion to hold andcan perform both tasks of slaying and holding quite well. The army’s composition is quite predictable with only 1 or 2 units that can bevaried: 1 large Night Goblin block of about 100-135, 1 block of 40-50 Savage OrcBiguns, 1 block of Trolls, Snotlings and/or Wolf Riders as Sacrificials and the final unitis chosen from the four discussed previously. Other tactics1) MUST HAVEa) Netters, Night Goblinsb) Savage Orcs Biguns with 2 HW 2) DON’T Forgeta) Animosity Rolls at the start of the turn – Consider the consequences of failing this inthe next turn before you move unitsb) Stupidity rolls for Trolls and keeping the general close to themc) Choppa bonuses in the first roundd) Fear Elves, Night Goblins’ and Dwarfs’ Hatrede) Waagh’s Lore Attributes 3) LOOK OUT fora) Initiative tests e.g. Pit of Shades and Purple Sunb) Playing against Orcs, the most dangerous units are Savage Orc Biguns and Trolls. 4) Useful Magic Items:There is no Orc Shiny Stuff that impresses! Magic items should be chosen from theCommon Magic item pool. 5) The Troll Vomit attack may seem to be good against well armoured units like cavalrybut it is actually less effective than the normal attacks – see Appendix 2.
Big Waagh is a better lore overall than Little Waagh which only has 1 dangerousspell – Curse of the Bad Moon. Against most armies the Orc units should surge forward and expect to wincombat or remain Steadfast. Warriors of Chaos and a few other elite units are the only
******Created by ebook converter - www.ebook-converter.com******
******ebook converter DEMO - www.ebook-converter.com*******
problems and some manoeuvring and combat avoidance is needed against these units. Night Goblin Fanatics? Don’t overestimate the damage that they will dish out.This could range from nothing to a dozen enemy models or worse they might reduce thenumbers in your units. It is basically a gamble to have Fanatics that work well. Onepopular Fanatic trick is:
Position the large block (or Sacrificial unit) so that it will take a charge from anenemy unit. Put the unit with Fanatics behind this block so that there is a distance of justunder 8" between the fronts of the 2 units.
When the enemy moves in for the charge, release the Fanatics past your own unit –maybe 1 or 2 through the O&G unit if there is no space. D6 hits are inflicted on thecharged O&G unit but the Fanatics are placed in front of this unit. There is no optionsince the Fanatics have to be placed past a unit it goes through. Chargers suffer 2D6 xno. of Fanatics hits. I’ve seen this used but I don’t find it does significant damage tomerit the inclusion of Fanatics.
Netters however must definitely be included as it is the presence of Nets whichbolster the Night Goblin’s performance in combat.
The popular O&G lists sometimes have magical attacks confined to 1 characteronly. If this is an infantry character then Hexwraiths and Ethereals will be a problem.One solution is using magic spells of Shamans but this doesn’t guarantee success.Adding another cheap character with a magic weapon should be sufficient. 6) Character considerations A Black Orc Warboss ensures that at least one unit will overcome adverseAnimosity rolls but a Orc Warboss is also possible since it requires fewer points andhas the same Ld.
The Shamans will be Orcs chosen at levels in the manner described in the MagicChapter.
Since Night Goblins Big Bosses are cheap and T4, a number of them could alsobe used to bolster the front line of the Night Goblin unit. They will of course be targetedby the enemy and this might offset the Night Goblins use of holding against the bestenemy units possible without surrendering VPs. There are cheaper options which carrya smaller risk of losing VPs than having a large number of Night Goblin Big Bosses. ‘Skav Viable Units – Clanrats, Slaves, Stormvermin, Gutter Runners, Plague Monks, Hell Pit, SacrificialsNight Runners, Giant Rats,
******Created by ebook converter - www.ebook-converter.com******
******ebook converter DEMO - www.ebook-converter.com*******
Other possible unitsWeapons Teams – Poisoned Wind Mortar (best), Warpfire Thrower, Poisoned WindGlobadiers, Plague Claw Catapult, Warplightning Cannon, Screaming Bell and PlagueFurnace as mounts List ‘Skav is one of the few armies that can have the maximum needed againstChosen. 2 or 3 blocks of 140 - 160 Slaves with no upgrades plus the Grey Seer on aScreaming Bell still leaves points for a block or two of about 40-50 Clanrats with orwithout a weapons team. 3 or 4 units serve as Sacrificials and here there is a widechoice of units to choose from – 5 Poisoned Wind Globadiers, 10 Night Runners, 20Slaves or the cheapest, 1 Packmaster and 5 Giant Rats. The tactics here is simply to castthe 13th spell and destroy small units completely. N.B. against Bretonnians and Ogres adifferent devastating spell is required e.g. Plague, Wither from the Plague lore orScorch from the Ruin Lore. The Grey Seer would of course be protected from Miscastsby an Earthing Rod. The Slaves simply absorb all combat attacks while the Sacrificialsdeflect potentially dangerous attacks. While this may seem a negative strategy, ‘Skav does not have much choice.Gun-lines are possible with a number of Weapons Teams but as will be seen in theShooting Chapter, this simply won’t win battles on its own and also offer easy Victorypoints to the opposition. Weapons Teams just like Gutter Runners should not be left out.Gutter Runners will shoot down any Monster or Greater Daemon etc with theirpoisoned shooting and if these are absent, then they could be Sneaky Infiltrators againstWarmachines and shooting units or remain behind the lines to deter units who are tryingto encircle the combat units. Weapons teams provide a cheap way of providing thenecessary magical attacks. The huge blocks of Slaves will be able to shelter the Grey Seer and his unit ofClanrats sufficiently except against flyers. Flying Monsters, Bloodthirster and units offlyers will have to be dealt with by Gutter Runner Shooting. The numbers needed willbe large – see Shooting Chapter. This should also be combined with ranged magic fromthe Greyseer. The Storm Banner could be used – either in a small unit of Plague Monks orcarried by a BSB with good saves
144 Slaves without shields will last 9 rounds against Chosen or 29 S5 attacks perround. With Shields only 121 are needed and cost only 12 points more. The units withshields also fare much better against S6 combat attacks.
The Hell Pit Abomination does not feature in the Appendices because it will beslain and cost valuable VPs. Because of its Too Horrible to Die rules it could be chosenif you want to gamble at rolling 6s!
******Created by ebook converter - www.ebook-converter.com******
******ebook converter DEMO - www.ebook-converter.com*******
The army composition is:1) 2 or 3 blocks of Slaves @150 or slightly less.2) 1 or 2 blocks of Clanrats with Greyseer3) Weapons Teams and/or Gutter Runners4) 1 or 2 units of Night Runners or Giant Rats as Sacrificials5) Warlock Engineer level 0 with Doom Rocket. He can be treated as a suicidalcharacter i.e. position him to use the Doom Rocket as effectively as possibledisregarding any future danger to himself. A simple rule to estimate the distance of theRocket is to use 7” as an average for every 2 dice. Shoot the Rocket early and aim forthe centre of the thickest concentration of enemy units. The diagram below shows how this is done. The Warlock Engineer marches tothe left flank and nominates the direction that will pass through all units. 4 dice shouldbe rolled – the minimum distance of 4” will hit E3 while the maximum of 24 will hit E4with the most likely outcome of 14” hitting both E1 and E2.
Other modifications of the composition above involves removing a unit ofClanrats or Slaves – i.e. leaving 3 blocks. These are replaced by combinations of thefollowing:1) Some shooting units – Warplightning Cannon, PlagueClaw Catapult or WeaponsTeams like Poisoned Wind Mortar, Warpfire Thrower or the Ratling Gun. They all havethe usual ‘Skav dire sting in the tail but their magical ranged attacks will be usefulagainst Ethereals.2) Tunnelling Poisoned Gutter Runners –15 is a good unit size but small units alsowork. This unit/s can charge the gunline if there is one or use their poisoned throwingstars to wound Monsters4) Plague Furnace with a Plague Priest and a block of Plague Monks which is good incombat but still cannot match the Chosen. A risky unit to use as it could cost youvaluable victory points if defeated and will leave much fewer points for Slaves andClanrats. Other tactics
******Created by ebook converter - www.ebook-converter.com******
******ebook converter DEMO - www.ebook-converter.com*******
1) MUST HAVEa) Large blocks of Slaves and Grey Seer in a Clanrat unit. The Grey Seer could bemounted on a Screaming Bell.b) Cheapest Warlock Engineer with Doom Rocket – see abovec) Warpstone Tokens and Earthing Rod for Greyseer2) DON’T Forgeta) Special ‘Skav rules: +1 for fleeing; Strength in Numbers; Refusing Challengesb) Ring the Bell, if you use one, at the start of the shooting phase and the Grey Seer cancast with 360o LOS over units.3) LOOK OUT fora) Flank charges – they nullify rank bonuses and hence Ldb) Flyers. 4) Useful Magic Items: Warpstone tokens, Doom Rocket 5) To quickly attack small and weak enemy units, Gutter Runners could be deployed asScouts. Then a block of Nightrunners could move up 6" using Slinking Advance tosupport them. The Gutter Runner champion should be given Smoke bombs to quickly hitand then flee without getting caught. 6) Character considerations As mentioned above, a Grey Seer and a Doom rocket Warlock Engineer areobvious choices. One experimental list has 4 Chieftains in a unit with a BSB and Shroudof dripping death (or Banner of Under Empire) with Scrying stone, Shadow Trinket andthe Iron Curse Icon. This works only to a limited extent and the characters will be anobvious target for the enemy to try to win VPs. Some players employ more than 1 suicide Engineer e.g. 1 with Doom Rocket, 1with Death Globe and 1 with Brass Orb plus maybe an Assassin with an Infernal Bomb.A generous estimate would be 10 models slain from each item above. This could slay aunit of 40 but it could also mean 3 dead Engineers and a dead Assassin. ‘T Kings Viable combat unitsSkeleton Warriors, Skeleton Chariots, Skeleton Horsemen, Tomb Guard, Necropolisknights SacrificialsSkeleton Bowmen, Skeleton Warriors
******Created by ebook converter - www.ebook-converter.com******
******ebook converter DEMO - www.ebook-converter.com*******

Other possible unitsScorpion, Tomb Swarm, Carrion, Screaming Skull Catapult, Casket of Souls,Hierotitan, Warsphinx List The first block will be 100 or more Skeleton warriors with HW and shields.Appendix 2 and 3 shows that there i s one other clearly good unit – Tomb Guard.Chariots are good only when they charge and then will be destroyed in subsequentrounds. Necropolis Knights, Ushabti and Warsphinx fare better than Chariots againstSavage Orcs. Per point these 3 units are to be preferred to Chariots. Choosing one fromthese 3 is not easy though.
The Warsphinx is best when comparing rates of slaying and depletion but it has nostatic CR (other than when charging) and because of the Undead rules will lose anadditional wound or 2 to elite units while only narrowly defeating fully ranked up coreunits.
Necropolis Knights perform better than Ushabti against Savage Orcs and Coreunits but both units like the Warsphinx will be knocked out in 2 rounds by Chosen.There is one advantage to Necropolis knights - they benefit from Entombed Beneath theSands rules which compensates somewhat for this slow moving army.
Other units like the Casket of Souls, Hierotitan, Screaming Skull and TombScorpion also do not survive in combat against elite units but provide support in themagic and shooting phase. The Casket can slay 3 or 4 models if the Light of Death is notdispelled and then has a 50% of slaying the same amount again. An estimated totalnumber of wounds inflicted by the Casket will not exceed 20 for the battle. TheHierotitan adds dice to the power pool. The value of this is dubious against armies withgood magic defence – refer to the Magic Chapter. The Screaming Skull Catapult (SSC)however costs the least number of points and has a better chance of inflicting more than20 wounds if 2 are used. It has useful Flaming attacks and causes Panic when woundsare inflicted.
Sacrificial units can be chosen from 10 Skeleton Archers or 5 SkeletonHorsemen. Horsemen are faster (as fast as ‘T Kings can be!) while Archers willprovide some shooting as well.
Combat has to be selective. If there is a good chance of winning combat, anUndead unit will perform very well and slowly grind the enemy to dust. If however it isengaging an enemy unit which wins, the loss of wounds due to the Unstable rulesexacerbates its predicament. It will deplete very rapidly and disappear. Coupled withits inability to march, Tomb King units will have to avoid combat through Sacrificialdiversions in the early stages and then choose a weak or weakened enemy unit to fight
******Created by ebook converter - www.ebook-converter.com******
******ebook converter DEMO - www.ebook-converter.com*******
against. It has to use its Lore attribute to restore wounds as often as possible to offsetthe balance in combat ability with strong enemy units.
The army composition is as follows:
1) A block of 100 – 130 Skeleton warriors with HW and Shields. They can take 4rounds of combat against the best enemy units. Including characters, like Tomb Princes,Tomb Heralds and Necrotects will enhance their performance but remember that thesecharacters will be targeted and will perish eventually if attacked by good enemy units.A second, smaller block of Skeleton warriors of about 50 – 70 could be added to this toensure that there will be 2 good holding units. These blocks of Skeleton Warriors canonly win VPs against weak or small units.2) One unit of 40 or more Tomb Guard to take on the mediocre units supported byanother Tomb Guard unit plus either Necropolis knights, Scorpion, Ushabti or aWarsphinx.3) At least one SSC and Skeleton Archers or Horsemen can function as Sacrificials. Other tactics1) MUST HAVEa) Large block of Skeleton Warriorsb) Tomb Guard 2) DON’T Forgeta) 6+ Regeneration for Hierophant’s unitb) Rolling at the start of the turn for Entombed Beneath the Sandsc) Flammable charactersd) The Cursee) Undead Constructs rules 3) LOOK OUT for –a) Enemy with good magical defence – Dwarfs, Slannb) Units with multiple attacks. They will prove dangerous to Skeleton blocks.c) Attacks on characters to stop My Will be Done. In most circumstances it is better forthe character to be in a challenge to reduce the number of attacks on him unless ofcourse the challenge is against a good combat character. Positioning these characters tominimise base contact with the enemy has to be done prior to charging or being charged.d) The Hierophant. The enemy will seek him out in every turn. If he has to be moved outof a sheltering unit, check that he will not be subjected to ranged attacks in the nextenemy turn. Watch out especially for ranged attacks that can isolate characters. 4) Useful Magic Items:
******Created by ebook converter - www.ebook-converter.com******
******ebook converter DEMO - www.ebook-converter.com*******
Standard of Undying Legion; Banner of Hidden Dead (It does help when you have a fewEntombed beneath the Sands’ units but this Banner and its bearer is altogether tooexpensive); Neffara’s Scrolls of Mighty Incantations 5) A Bubble deployment (See Some Basics Chapter) is traditionally used by ‘T Kings.Make sure you have assessed the terrain carefully to find out various places suitable toshelter the Hierophant should the need arise. As a rule the Hierophant should avoidjoining combat units. ‘T Kings have in the past been magic dependent. Using the Lore of Nehekaraensures good augments and some models will be resurrected in most magic phases.Although this lore is sound against some armies, the Lore of Light is a better alternativeagainst Daemons, Vampires or another Tomb King army.
Here’s a dubious trick to preserve the Hierophant which you might have to look
out for: The BSB Tomb Herald is given Banner of the Hidden Dead and joins the level2 Liche Priest who is the Hierophant in a unit of 2 characters only. The bearer of theBanner then nominates his unit to have the Entombed Beneath the Sands ability. When itcomes to the T’ King’s turn, no dice is rolled for Entombed Beneath the Sands.
The Hierophant and BSB never emerges on the battlefield. He is present ofcourse – beneath the sands but can never be destroyed.
This hinges on the absence of the word “must” in the Ambushers rule as opposedto “must” appearing in the combat rules on pg 48. i.e. whereas units in combat mustfight because the rules explicitly uses that word then the absence of the word ‘must’ inthe Ambushers rules points to rolling to Ambush as not being compulsory.
This is not an argument I would advocate although I would not mind playingagainst such a list. Whether this Hierophant is acceptable or not I’ll leave you to debatewith your opponent! 6) Character considerations – Two characters will obviously have to be given goodsaves – the Hierophant and the Tomb King/Prince. If you choose a Tomb Prince as yourgeneral, then there should be enough points for a second Tomb Prince but with reducedsaves. The characters with magic will be a Liche High Priest and a Liche Priest asdiscussed in the Magic Chapter. Vampire Counts Viable combat unitsGhouls, Skeleton Warriors, Grave Guard, Black Knights, Hexwraiths, Bloodknights,Cairn Wraiths
******Created by ebook converter - www.ebook-converter.com******
******ebook converter DEMO - www.ebook-converter.com*******

SacrificialsZombies, Dire Wolves Other possible units: Mortis Engine List The 2 problems of the Vampire army are the Unstable rule and the weak Coreunits. Since all Core units are weaker than Swordsmen, the minimum number of pointsshould be spent on them. They should also avoid combat as far as possible or be used todeflect and divert enemy units. One solution is having 70 Dire Wolves in 7 or 14 units. 3 or 4 units shouldserve as Sacrificials while the others should attack the enemy’s Sacrificials, shootingunits or weak small units if any. With their Vanguard ability this is quite easily achievedbut I am not recommending this risky Core choice. A single block could be used to fulfil the Core requirements. From the combatratings per point in Appendix 2, this unit should be skeleton warriors armed with handweapon (HW) and shields. This large unit of 100 skeletons should be able to last 4 or 5rounds against a single frontal unit. The best overall unit are Grave Guards and therefore one or two large blocksare advisable. 4 other Special units namely, Black Knights, Crypt Horrors, Vargheistsand Hexwraiths are viable in combat. The first 3 do not last long enough against Chosenand similar elite units and should engage small or weaker units only. Hexwraiths may seem to be a very good unit. Unfortunately (or fortunately!),they have a maximum limit of just 10 and therefore start off any combat against a fullyranked up unit with a -3 (or -4) static CR (combat resolution) deficit. At S3, theprobable number of wounds per round of this unit against Swordsmen would be10X0.347 + 5X0.139 = 4.2. If they are charged by a Swordsmen unit, they win combatby 0.2 (effectively a draw = lose combat by 1, Musician) and if they charge they win by1.2.
Losing combat by 1, loses 1 more model by crumbling and also the rank bonus of1 i.e. they will continue to lose combat in future rounds – a draw still loses because theydo not have a Musician. If they charge, the Swordsmen unit should be able to hold themup long enough for a unit or character with magical attacks to charge them. Then theywill deplete even faster. Hexwraiths should therefore try to avoid being in combat andespecially being charged by fully ranked up units.
There is a risky option of employing 2 or 3 units of 10 Hexwraiths and using theirSpectral form as often as possible while avoiding combat. An army list that employsmore than 1 unit of 10 Hexwraiths will be leaving fewer points for other units.Hexwraiths will be dealt with later in greater detail along with Cairnwraiths.
******Created by ebook converter - www.ebook-converter.com******
******ebook converter DEMO - www.ebook-converter.com*******
A quick mention here first. If you do use Cairnwraiths, then you could use themwith Skeleton warriors as part of the double charge tactic mentioned in the Combatchapter. The skeletons provide the static CR while the Cairnwraiths inflict wounds.This will not work however after a combat reform which will definitely happen to bringin more models in base contact with the skeletons.
Once again we have another VC unit which cannot hold for long enough in combatagainst very strong elite units. The strongest unit are Bloodknights which, based on wounds inflicted alone,will beat the Chosen. Since their unit size is smaller, they run the danger of running outof models in combat against a fully ranked up large enemy unit. This feature of necessarily having some smaller units then determines thetactics the VC player has to follow. While VC elite units are good in combat, they stillhave to be selective against enemy units they choose to charge. Large enemy elite blocksare to be avoided in general. The Core unit/s has to steer away from early combat.Ethereal unit/s have to find out where the dangerous magical attacks will come from andavoid them while Hexwraiths maximise their Spectral Hunters’ attacks. Special unitsfocus on knocking out small and weak enemy units or engage the strong units at the righttime later in the game with the support of Invocation of Nehek – explained below. It is important to remember that the rate of depletion is further increased by theUnstable rule. This has to be factored in when determining how long a unit will last incombat.For example,
Against 28 Savage Orcs, 28 Grave Guard slay at 5.8 and deplete at 8.9 on the firstturn, thus losing 3 more from instability and a rank. Grave Guard starts losing combatand deplete at 1 model more and will last just 3 more rounds before they are annihilated– leaving 8 Savage Orcs.
Black Knights slay at 6.2 and deplete at 6.4 but will probably have a smaller rankbonus and lose more models. The same is true for Crypt Horrors who although cause 3more Savage Orcs wounds than are inflicted on them, will still eventually beannihilated. The Vampire army can prolong its survival in prolonged combat using theInvocation of Nehek. On average this will resurrect 7 models (Level 4 + D6=7assuming D6 average =3) and will probably be cast about 2 or 3 times. In the scenarioof Grave Guard vs Savage Orcs, this could just about tip the balance in favour of theGrave Guard.
Combat has to be selective. If there is a good chance of winning combat, anUndead unit will perform very well and slowly grind the enemy to dust. If however it is
******Created by ebook converter - www.ebook-converter.com******
******ebook converter DEMO - www.ebook-converter.com*******
engaging an enemy unit which wins, the loss of wounds due to the Unstable rulesexacerbates its predicament. It will deplete very rapidly and disappear just like theTomb King army. The army composition is:1) 100 Skeleton warriors as Core2) 2 X 5 Dire Wolves as Sacrificials3) A 10 Hexwraith unit. I would not recommend more than 2 such units as this reducespoints needed elsewhere4) Grave Guards with magic Banner – 2 large blocks.5) Several possibilities for the next unit choice:A) Unit of Black KnightsB) 1 Grave Guard block with magic Banner and 9-12 Crypt HorrorsC) Mortis Engine plus smaller blocks of aboveD) Small unit of Vargheists or Bloodknights with above Other Vampire Count Tactics1) MUST HAVEa) More than 1 Wizardb) Grave Guard unit with Banner of Barrowsc) 100 Skeletons as Core 2) DON’T Forgeta) 12” distance of units from Vampires to march. Keep units that have to march closeenough to a Vampire.2) Special abilities of the Mortis Engine if you have one – e.g. Cumulative Regeneration3) Invocation of Nehek cast with 1 dice by a level 4 is not an auto-cast 3) LOOK OUT for1) Ranged attacks that can isolate characters2) Enemy Units/Characters with magical attacks 4) Useful Magic Items:Good Vampiric Powers – Red Fury, Curse of the Revenant, Aura of Dark Majesty, DarkAcolyte, Forbidden Lore, Fear Incarnate, Beguile and Master Strike 5) Let’s look more closely at the maximum limit of 3 units of 10 Hexwraiths. They havethe Vanguard ability and being Ethereal can shelter behind appropriate terrain. In thefirst turn, they will inflict 30 S5 hits slaying 25 T3 models. Repeated 6 times this willslay 150 models. This is an absolute maximum figure and in a real battle, the total willbe smaller than this. We can expect 3 rounds of Spectral Hunters’ inflicted wounds i.e.
******Created by ebook converter - www.ebook-converter.com******
******ebook converter DEMO - www.ebook-converter.com*******
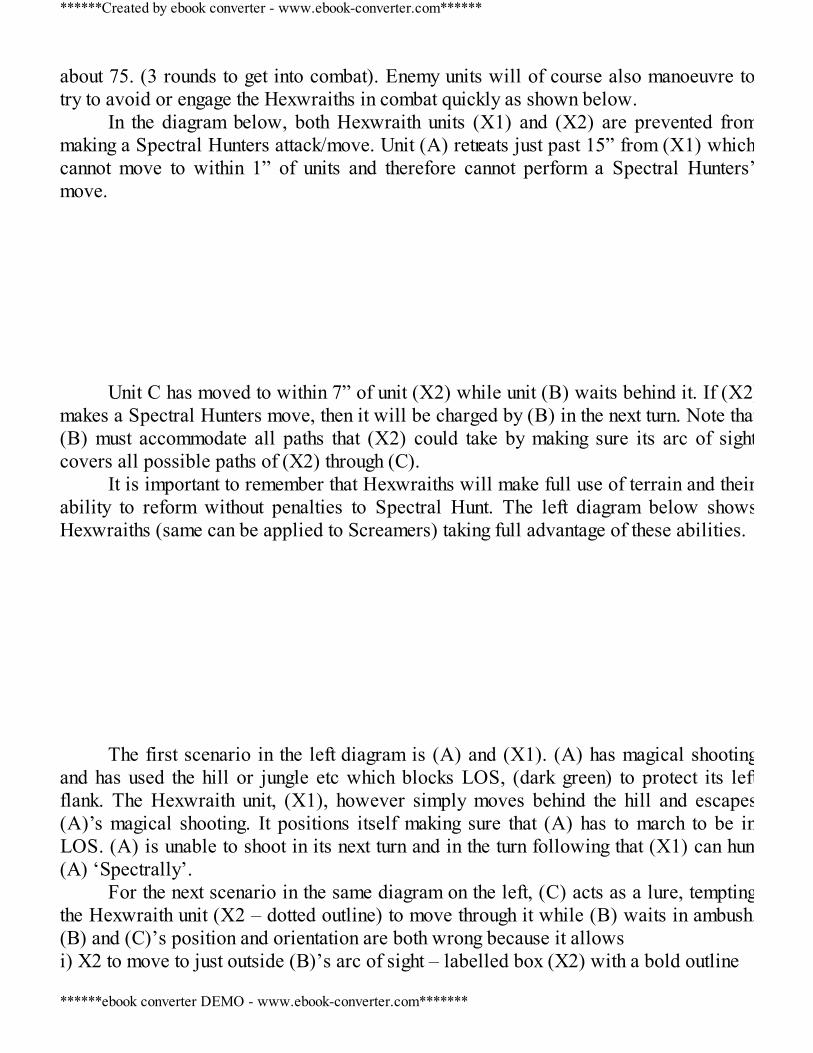
about 75. (3 rounds to get into combat). Enemy units will of course also manoeuvre totry to avoid or engage the Hexwraiths in combat quickly as shown below.
In the diagram below, both Hexwraith units (X1) and (X2) are prevented frommaking a Spectral Hunters attack/move. Unit (A) retreats just past 15” from (X1) whichcannot move to within 1” of units and therefore cannot perform a Spectral Hunters’move.
Unit C has moved to within 7” of unit (X2) while unit (B) waits behind it. If (X2)
makes a Spectral Hunters move, then it will be charged by (B) in the next turn. Note that(B) must accommodate all paths that (X2) could take by making sure its arc of sightcovers all possible paths of (X2) through (C).
It is important to remember that Hexwraiths will make full use of terrain and theirability to reform without penalties to Spectral Hunt. The left diagram below showsHexwraiths (same can be applied to Screamers) taking full advantage of these abilities.
The first scenario in the left diagram is (A) and (X1). (A) has magical shooting
and has used the hill or jungle etc which blocks LOS, (dark green) to protect its leftflank. The Hexwraith unit, (X1), however simply moves behind the hill and escapes(A)’s magical shooting. It positions itself making sure that (A) has to march to be inLOS. (A) is unable to shoot in its next turn and in the turn following that (X1) can hunt(A) ‘Spectrally’.
For the next scenario in the same diagram on the left, (C) acts as a lure, temptingthe Hexwraith unit (X2 – dotted outline) to move through it while (B) waits in ambush.(B) and (C)’s position and orientation are both wrong because it allowsi) X2 to move to just outside (B)’s arc of sight – labelled box (X2) with a bold outline
******Created by ebook converter - www.ebook-converter.com******
******ebook converter DEMO - www.ebook-converter.com*******
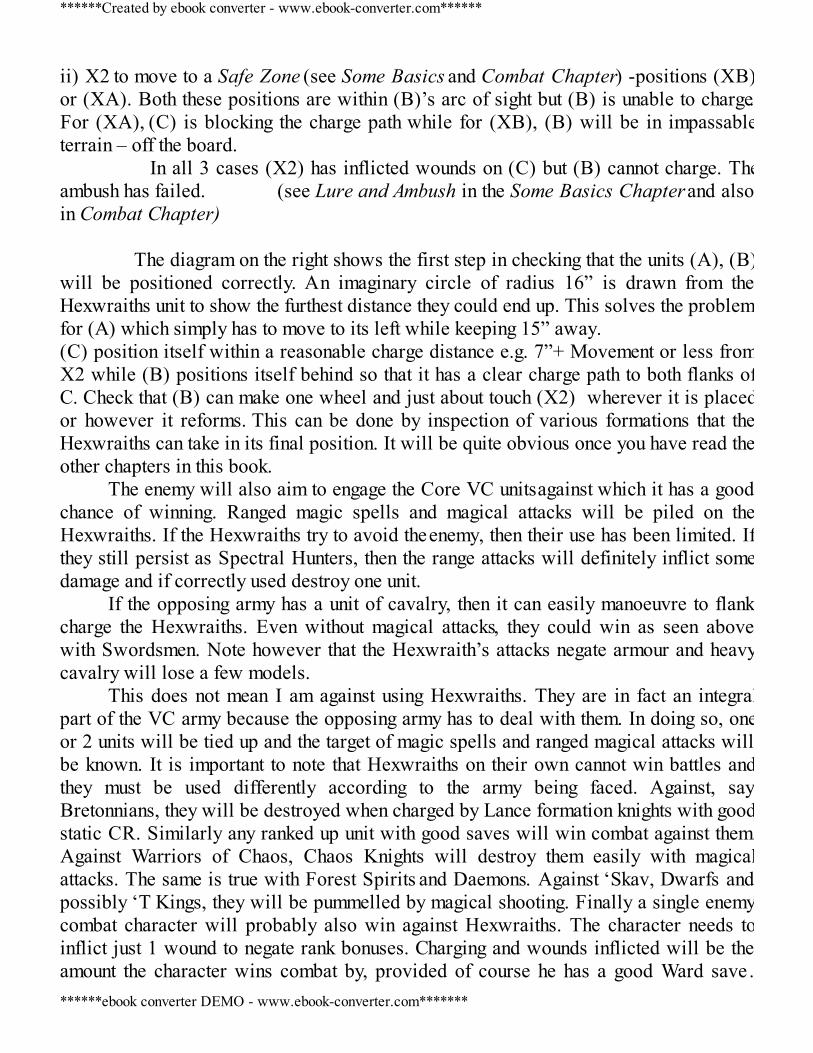
ii) X2 to move to a Safe Zone (see Some Basics and Combat Chapter) -positions (XB)or (XA). Both these positions are within (B)’s arc of sight but (B) is unable to charge.For (XA), (C) is blocking the charge path while for (XB), (B) will be in impassableterrain – off the board. In all 3 cases (X2) has inflicted wounds on (C) but (B) cannot charge. Theambush has failed. (see Lure and Ambush in the Some Basics Chapter and alsoin Combat Chapter) The diagram on the right shows the first step in checking that the units (A), (B)will be positioned correctly. An imaginary circle of radius 16” is drawn from theHexwraiths unit to show the furthest distance they could end up. This solves the problemfor (A) which simply has to move to its left while keeping 15” away.(C) position itself within a reasonable charge distance e.g. 7”+ Movement or less fromX2 while (B) positions itself behind so that it has a clear charge path to both flanks ofC. Check that (B) can make one wheel and just about touch (X2) wherever it is placedor however it reforms. This can be done by inspection of various formations that theHexwraiths can take in its final position. It will be quite obvious once you have read theother chapters in this book.
The enemy will also aim to engage the Core VC units against which it has a goodchance of winning. Ranged magic spells and magical attacks will be piled on theHexwraiths. If the Hexwraiths try to avoid the enemy, then their use has been limited. Ifthey still persist as Spectral Hunters, then the range attacks will definitely inflict somedamage and if correctly used destroy one unit.
If the opposing army has a unit of cavalry, then it can easily manoeuvre to flankcharge the Hexwraiths. Even without magical attacks, they could win as seen abovewith Swordsmen. Note however that the Hexwraith’s attacks negate armour and heavycavalry will lose a few models.
This does not mean I am against using Hexwraiths. They are in fact an integralpart of the VC army because the opposing army has to deal with them. In doing so, oneor 2 units will be tied up and the target of magic spells and ranged magical attacks willbe known. It is important to note that Hexwraiths on their own cannot win battles andthey must be used differently according to the army being faced. Against, sayBretonnians, they will be destroyed when charged by Lance formation knights with goodstatic CR. Similarly any ranked up unit with good saves will win combat against them.Against Warriors of Chaos, Chaos Knights will destroy them easily with magicalattacks. The same is true with Forest Spirits and Daemons. Against ‘Skav, Dwarfs andpossibly ‘T Kings, they will be pummelled by magical shooting. Finally a single enemycombat character will probably also win against Hexwraiths. The character needs toinflict just 1 wound to negate rank bonuses. Charging and wounds inflicted will be theamount the character wins combat by, provided of course he has a good Ward save .
******Created by ebook converter - www.ebook-converter.com******
******ebook converter DEMO - www.ebook-converter.com*******
Hexwraiths and Ethereals must therefore avoid these situations. Cairn wraiths fare a lot better in combat, especially against average units butagain will be beaten by static CR. On the positive side, by manoeuvring Etherealsproperly and avoiding the dangers you are now aware of, Ethereal units will have animpact on the battlefield. They will knock out any small unit without magical attacks.The 2 units to be used are Hexwraiths for their Spectral form ability and Cairnwraithsfor their multiple S5 hits. An extreme list of 9 Cairnwraith heroes joining a unit of 10 Cairnwraiths, 3units of 10 Hexwraiths, a Wight King or Vampire Lord with good saves as general, DireWolves Sacrificials and a single block of Skeleton Warriors as Core will be quitedevastating to armies where the only magical attacks are from characters in combat ormagical spells. This same VC army will in turn be easily destroyed by Daemons or aForest Spirit army. 6) Character considerationsThe best choice of general is the Vampire Lord, fulfilling both roles of being good incombat while casting magic. He needs more protection than usual to prevent Undeadcrumbling. It is probably better not to engage him too early until you have an idea of allthe magic items of the opposing army and the possible damage they might specificallyinflict on the general. The other character choices are easily filled by Vampire heroesbut the Wight King can also be chosen because he is tougher.
A Vampire that hunts, e.g. enemy wizards, on its own is not recommended. ThisVampire will slay one wizard but then will be easily trapped and finally slain. Warriors of Chaos Viable combat unitsChaos Warriors, Marauders, Marauder Horsemen, Chosen, Chaos Knights SacrificialsChaos Warhounds Other possible unitsHellcannon, Chaos Ogres, Warshrine Dragon Ogres, Trolls, List The WS5 and WS6 of Chaos Warriors and Chosen, reduces the efficacy of theMark of ‘Nurg, since it will be facing enemy units with a lower weapon skill most ofthe time. If the enemy is WS3 which is reduced to WS2 then they require 5s to hit. This
******Created by ebook converter - www.ebook-converter.com******
******ebook converter DEMO - www.ebook-converter.com*******
is the only significant advantage of the Mark of ‘Nurg. Warriors or Chosen will winagainst these units easily anyway. So the Mark of ‘Nurg should not be used for these 2units. Khern and ‘Tze are the best 2 Chaos marks. Any mixture of these Marks can beused as can be seen from Appendix 2. It is prudent for the holding unit to have the Markof ‘Tze while the hammer units are given the Mark of Khern. The table of combat ratings shows that Marauders in horde formation withgreat weapons will be an excellent choice. Ideally 100 or more would work well butthis will reduce the size of the Warrior and Chosen units, so a little trimming isnecessary.
A Hellcannon is not obligatory in a WOC army since it functions as awarmachine. It has an advantage of not being easily destroyed by units commonly usedagainst warmachines. Its misfire table helps because it forces enemy wizards to roll onthe miscast table.
The army list is built around the superb combat units available.
1) A unit of 20-25 Chosen with the Mark of ‘Tze or Khern. 2 units are extravagant butwill also work well2) A unit of 25 – 50 Chaos Warriors. The size and Chaos Mark, ‘Tze or Khern of thisunit depends on (3).3) The 3rd infantry block could bea) Another block of Chaos Warriors with a different Mark from the aboveb) A large block of about 80 Khern Marauders with GW.4) Chaos Warhounds and/or Marauder Horsemen as Sacrificials5) The last unit is a matter of taste – a unit of Chaos Knights will provide some speed tothe army plus magical attacks. A Hellcannon could be included as an alternative. Other tactics 1) MUST HAVEa) Chosen block with Mark of ‘Tze or Khernb) Banner of Rage – given to Warriors, Chosen or even Knights – any of these units withthe Mark of ‘Tzec) Favour of the Gods – given to the Chosen champion to re-roll on the Eye of the Gods(N.B. some players may dispute that this can be done) 2) DON’T Forgeta) Rolling for the Eye of the Gods; especially at the start of the battle for Chosenb) Re-rolling any failed Panic tests
******Created by ebook converter - www.ebook-converter.com******
******ebook converter DEMO - www.ebook-converter.com*******
3) LOOK OUT for –a) Fast moving units which will try their best to dodge and weave in between M4 unitsb) Playing against Warriors, you should generally avoid early combat and make sureyou deploy with that in mind. 4) Useful Magic Items:Useful Gifts of the Gods include: Third Eye of ‘Tze, Conjoined HomunculusBerserker Sword, Armour of Damnation, Collar of Khern, Infernal Puppet, BloodskullPendant, 5) Tactics for WOC are simple because of their proficiency in combat. Move forwardand charge! As usual watch out for flank charges but you will find that even withmultiple charges in the flank and front WOC units could still win combat. 6) Character considerations – The Chaos Lord is the best general.
A one character army is sufficient but since Chaos Sorcerers are T4 with armoursaves they could also be included. Wood Elves Viable combat unitsEternal Guard, Dryads, Wardancers, Wild Riders, Treeman SacrificialsPossible units – Glade Guards, Dryads Other possible unitsGlade Riders There is no choice for the Wood elf army but to hit and run. There are no unitsto tackle the super Chosen unit or any good horde unit. Therefore Wood elves have toshoot to reduce or eradicate smaller enemy units. This makes the Hail of Doom arrowand Bow of Loren necessary in the army. Other magical arrow may also be thrown inlike Arcane Bodkins.
Combat has to be selective and finished quickly, ideally in 1 turn. Any extendedcombat is to the Wood Elf’s detriment unless of course a flank or rear charge is beingset up which could destroy the enemy unit. There is of course 1 exception which is theBranchwraith with the Annoyance of Netlings in a challenge. Other than obviously
******Created by ebook converter - www.ebook-converter.com******
******ebook converter DEMO - www.ebook-converter.com*******
seeking to destroy the challenger, the Annoyance of Netlings can also hold up a strongchallenger for several turns. All Dryad and Wardancer (a big maybe!) units must try to remain in woods andengage the enemy in combat in woods. These skirmishing units will benefit from beingStubborn while the enemy loses Steadfast. If these units are confronted by a strong unit,then they should manoeuvre into a Safe Zone (see Planning Pursuits and Retreats inthe Some Basics Chapter) while threatening to flank charge.
Positioning the Woodland Ambush terrain must be planned with this in mind.Using Tree singing and moving this woodland terrain and other woodland towards eachother (usually towards a central position on the battlefield) will increase their effectivesize and create the beneficial scenario of having the main combat arena covered mainlyby woodland.
Appendix 2 and 3 show that 3 units should be used – Dryads, Treekin and theTreeman. Dryads can outlast Savage Orcs if they are Stubborn while the Treeman willlast about 3-4 rounds. Treekin will defeat Savage Orcs and per point are the bestoverall unit.
The army should comprise of1) Treekin – 8-12 or more2) A large block, or two medium sized blocks of Dryads3) Treeman,4) Glade Guard – size and number of units is best kept small if you prefer more combat.Heavy shooting works only against some armies for Wood Elves. (see ShootingChapter)5) 2 Great Eagles as Sacrificials Other Tactics 1) MUST HAVEa) Bow of Loren (normally combined with a magic arrow e.g. Arcane Bodkins andsometimes further boosted by magic spells e.g. Savage Beast of Horros)b) Hail of Doomc) Alter Kindred character with Helm of the Huntd) Treekin 2) DON’T Forgeta) Stomps for Warhawk Ridersb) Rules for Combat in Forests – Stubborn Skirmishes; No Steadfast for other units etc 3) WATCH OUT for1) Fast moving heavy hitters e.g. heavy cavalry
******Created by ebook converter - www.ebook-converter.com******
******ebook converter DEMO - www.ebook-converter.com*******
2) Daemons and other units with magical attacks 4) Useful Magic Items:A useful Spite is: Annoyance of Netlings,Magic Items – Briarsheath, Arcane Bodkins, Dragontooth arrows, Amaranthine Broach,Stone of Crystal Mere, Stone of Rebirth, Moonstone of the Hidden Ways5 ) Some WE players like to focus on shooting – lots of Glade Guard etc and someprefer a highly evasive army – an army of of MSU Glade Riders and Wild Riders only.Whilst these armies will win against some army lists, they do not function well intournaments as there are quite a few lists they cannot cope with. For the heavy shootingWE list see Shooting Chapter. The mobile and evasive Glade Riders list will failmiserably against the standard Bretonnian lists, Lizardmen, ‘Skav and Warriors ofChaos. There are some tricks which the Glade Riders could employ (see Fast CavalryDodge etc in the Combat Chapter) but beware that the opponent who knows these trickswill be able to counter them. 6) Character considerationsThe Hail of Doom, Alter Kindred character and the Branchwraith with Annoyance ofNetlings have been mentioned. The Highborn is the best general choice. This leavesfewer points for the magic users than usual. The Spellweaver has access to the usefulLore of Life but is expensive.
The effect of Characters All of the above tactics have to be modified in view of characters. Thefollowing factors must be taken into account if you wish to charge an enemy unit withcharacters or if you have a character in your unit:1) Combat Characters add more attacks at a higher than average WS and usually at highS.2) Wizards are weak in combat with just 1 attack except for Ogre Kingdoms, GreaterDaemons (and to a lesser extent Heralds) and Vampires. Orc, Warriors of Chaos andBeasts have T4 Wizards.3) The BSB allows break tests to be re-rolled while adding to CR while InspiringPresence or characters in units will improve the units Ld.4) Characters also confer special abilities to units they are in or units close to themenhancing friendly units or reducing the abilities of enemy units. Generals and combatcharacters need good saves from magic items and magic items to enhance theirperformance.
******Created by ebook converter - www.ebook-converter.com******
******ebook converter DEMO - www.ebook-converter.com*******
You need to know all these abilities as written in the different army books and
also all the magic items that every enemy unit might have. Again I will not state whatthey are.
2. SOME BASICS
These basic ideas will be explained in the order that they appear in the game,starting from just before deployment and then on to deployment, movement, magic,shooting, combat and ending in turn 6.
Choosing the right spellsThis is undertaken just before deployment. If you have a choice of spells, then choose the ones that are most effectiveagainst your opponents. Do not stick with a favourite spell but always assess theenemy’s weaknesses and strengths To illustrate this with a few examples: Lore of Light is stronger against Undeadand Daemons. Against Bretonnians, spells with hits that negate armour saves arepreferable. Pha’s protection is effective against shooting armies. A low Leadershiparmy is susceptible to Panic or Fear causing magic. There are more details in the chapter on Magic.
Order of deployment Deployment is a cat and mouse game that will affect the entire battle. The maxim of deployment is: “Wait and see” i.e. watch what and where youropponent deploys.
The most dangerous units or the unit most likely to be targeted in the firstfew rounds should be deployed last. Similarly there will be units that have to defendagainst these enemy units. Wait and see! Do not be too proactive but react to youropponent’s deployment. There is no need to take the initiative here. Both you and youropponent will be hoping for easy units to blast away with shooting; or weak, but pointsheavy, units within easy reach of strong elites.
******Created by ebook converter - www.ebook-converter.com******
******ebook converter DEMO - www.ebook-converter.com*******
There are five important considerations during deployment: A) Ranged Attacks: How effective is the enemy shooting and ranged magic spells andhow susceptible is the enemy to your shooting? If you are deploying a gun-line, wait until the favoured targets have beendeployed. If facing a gun-line deploy the units out of range, shelter or deploy the‘shooting absorbent’ units first. On the other hand if the gun-line has not been deployedyou could pre-empt its deployment by temptingly exposing a cheap unit. Large targets must be deployed so that they can move quickly and at the sametime not be unduly exposed to shooting. B) Speed: How fast is the enemy in general and what problems will its fast units pose?Conversely how effective are your fast units? This is a crucial consideration as it is the most difficult to rectify if you havemade a mistake. Flyers can easily spoil any good deployment. Fast heavy cavalry couldeasily dominate one flank and sweep through the centre. Pick the unit to defend againstthem (usually another cavalry unit) and deploy this unit after the fast moving enemy unithas been deployed. Measure the distance to Scouts and prevent them from infiltratingbehind your battle line (see Minimum Gap). Do not forget the Vanguard rule. If youropponent gets the first turn, his or her Vanguard units will try their best to move into themidst of your battle line and disrupt it as shown in the left diagram below. (V3), theVanguard unit has managed to move behind enemy units I1 and I3 because they are morethan 3” apart – 1” spacing on either side plus 1” narrowest unit width of V3. The diagram on the right shows how I3 is correctly orientated to prevent anyinfiltration by (V3) (see also Behind Enemy lines later in this Chapter). C) Terrain: This is explained in greater detail later on in this chapter. D) Combining forces: Some units have to be deployed close together to be effective. As
******Created by ebook converter - www.ebook-converter.com******
******ebook converter DEMO - www.ebook-converter.com*******
soon as you have deployed one combat unit, create a mental picture of where the otherunits should go. Make sure you have left sufficient space for them and no units areunintentionally isolated. E) Enemy deployment: In particular, the closest enemy unit, the fastest units, Ambushingand Tunnelling units and the most dangerous units. Identify all these first before placingyour first unit. Use Appendix 6 to assess whether you need to engage the enemy early oravoid combat for a few rounds. Also create a general tactic, using Appendix 2 and 6 ofhow you should confront the enemy i.e. which of your units should take on which enemyunits and which should not. Adjustments will have to be made later so make sure youhave enough room to manoeuvre. Note exactly where enemy wizards are placed. This gives you an idea of wherethe ranged magical attacks will come from. You will not be able to avoid some of these,since characters are deployed last, if you do not get the first turn. The position of theenemy’s general will give you an idea of whether he will be an outright combatcharacter e.g. placed in a combat unit or whether he is intended to mainly supportcombat e.g. slightly behind combat units.
It is best to be out of range of certain characters who have nasty special abilitieslike an Alter Noble, Vampires or Warlock Engineer with a Doom Rocket. Always notewhere they are in every turn and if you have them, they have to be preserved andsheltered during deployment and the 1st turn to make full use of their abilities.
Types of deployment Key for diagrams in this section:
******Created by ebook converter - www.ebook-converter.com******
******ebook converter DEMO - www.ebook-converter.com*******
Standard CentralThis is the common deployment for balanced armies with a mixture of fast units, slowunits, shooting, magic and combat units. The fast units (usually cavalry) are deployed on one or more flanks. Thecentral units are expected to hold against early attacks. The objective of this deploymentis to dominate one or more flanks early and then to assist the ranked up central units inlater turns.
Although, this is a common form of deployment, it is by no means rigid. Onecavalry unit for instance may be deployed more centrally if it has a good chance ofbreaking certain enemy units or sometimes to support the infantry units. (See RetreatingLimitations later in this chapter). If this deployment option is viable, then it is alsopossible to incorporate the strengths of other types of deployment below and modify thisdeployment if appropriate. Two prong flank
******Created by ebook converter - www.ebook-converter.com******
******ebook converter DEMO - www.ebook-converter.com*******
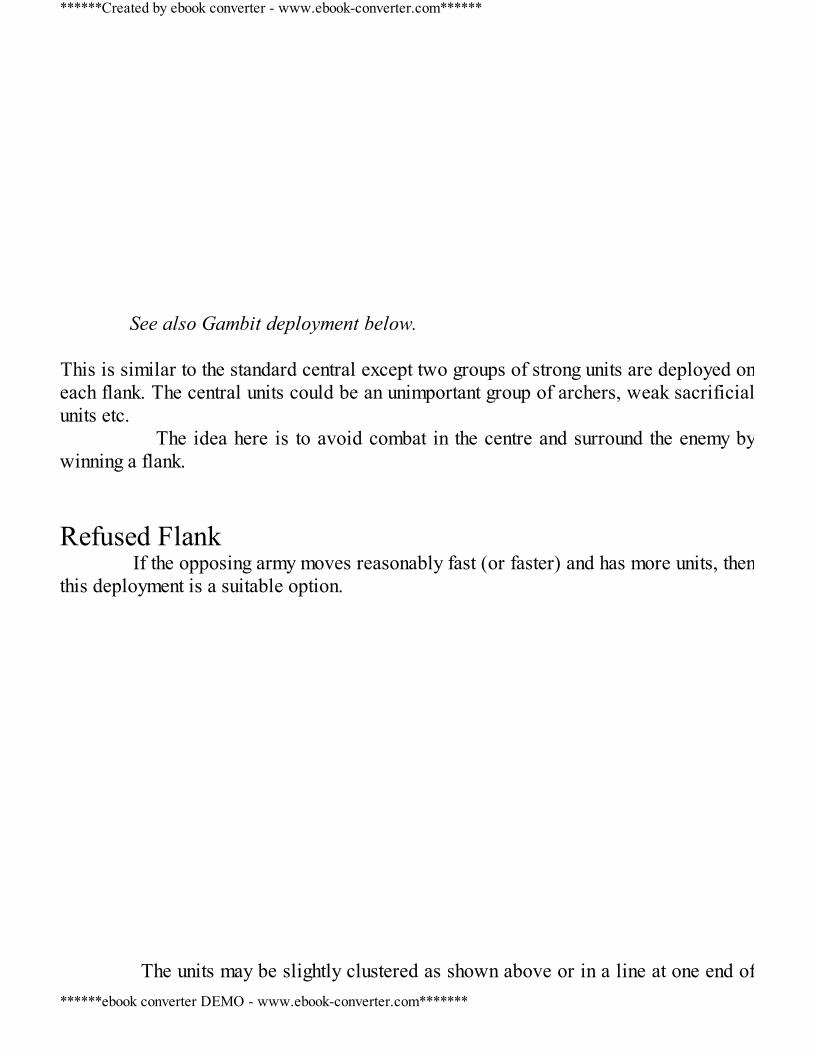
See also Gambit deployment below. This is similar to the standard central except two groups of strong units are deployed oneach flank. The central units could be an unimportant group of archers, weak sacrificialunits etc. The idea here is to avoid combat in the centre and surround the enemy bywinning a flank. Refused Flank If the opposing army moves reasonably fast (or faster) and has more units, thenthis deployment is a suitable option. The units may be slightly clustered as shown above or in a line at one end of
******Created by ebook converter - www.ebook-converter.com******
******ebook converter DEMO - www.ebook-converter.com*******
the deployment zone. The other end or flank is left vacant and is the refused flank. As in all other deployments, terrain and the deployment objectives willdetermine exactly where each unit is placed. Deploy the more central units first so that your opponent does not read yourintentions. Hopefully he or she will deploy a few units in the flank that you wish tovacate. Continue deploying the more central units until as many enemy units aredeployed in the refused flank. The army is stronger in the left flank of the diagram above. Therefore it caneasily dominate this flank early in the game. To do this, it must move swiftly movedown the left flank and dominate it with a superior number of units. This is why there isa cavalry unit on the extreme left.(See also Anchoring a flank in the Combat chapter) If the opposing army is much faster than yours, then this deployment will onlywork if you dominate the strong flank in the first two turns. Notice a single unit of heavy cavalry in the diagram above faces the refusedflank. This unit serves to slow down any fast but weak, cavalry or flyers or similarunits. Alternatively, a unit that will slow attackers, like swarms or a cheap Unbreakableunit could be placed here for the same purpose. Weakened FlankThis is a different version of the Refused flank. One or two units are placed in one flankwhile the majority of the army is deployed on the other side of the deployment zone. The units placed in the weakened flank are either skirmishers which can move
******Created by ebook converter - www.ebook-converter.com******
******ebook converter DEMO - www.ebook-converter.com*******
easily, fast and cheap light cavalry or flyers. In the diagram above (S) represents theseunits.Their purpose is to slow down the oncoming enemy units in this flank. This is achievedby either march blocking, luring and fleeing or when everything else fails, allowing theenemy to charge them. The Sacrificial units (S) must not be too close to the side of the table as theymove forward. They must be able to flee without leaving the battlefield. When theyengage in a battle which they are meant to lose, care must be taken in ensuring that thepursuit or overrun lines takes the enemy unit away from the centre. (See Line of pursuitand fleeing later in this Chapter). The Sacrificials could easily be used on either or both flanks for the samepurposes of march-blocking and slowing down the enemy. Abandoned Flank This may appear to be similar to the Weakened and Gambit deployment but hasimportant differences. It is a tactic most suitable for armies with at least one or twoflying units or fast or manoeuvrable cavalry. The idea here is to trick your opponent into thinking that the majority of yourunits will be placed in the later abandoned flank. On the right in this case. No unitsshould be deployed in the other flank until all the units in the abandoned flank have beendeployed. A unit, flying or fast (F2) is deployed in the abandoned flank first (on the rightin the diagram) or at least early during deployment. Unit (I1) should be deployed next
******Created by ebook converter - www.ebook-converter.com******
******ebook converter DEMO - www.ebook-converter.com*******
followed by another unit (F1). These units should be facing at an angle towards thecentre and preferably should be partially or fully sheltered. This should tempt theopponent to place some elite units or war machines, archers, gun lines etc directlyopposite. As soon as this is done, the rest of the army is deployed in the other half –units (I) and (W). In the first turn the flyers or fast moving units, (F1) and (F2) will move rightacross to the left half of the battlefield.A flank has therefore been abandoned and the opposing army faces the task of a longmarch before it can engage the enemy. (See also March blocking later in this Chapter) Chequerboard and ScreensThis is necessary and commonly used in horde armies. Placing a unit behind anotherrestricts the movement options of the unit at the back. The chequerboard formationallows both the unit in front and behind to move fairly freely. The faster units are not necessarily deployed in front to ‘free’ the units behind.A unit of fast cavalry could easily be deployed at the back and squeeze past a choice ofunits. Fast units (C1) and (I2) could also be deployed in front of long rangewarmachines and then “open up” to reveal these big guns and enlarge their shooting arc. Instead of a chequerboard formation, some units may be intentionally placed infront of another unit as shown in the diagram below. They act as a Screen and musttherefore cover as much area as possible and are deployed directly in front of enemyshooting. Unit (S) in the diagram below screens both I1 and I2. It will move in tandem
******Created by ebook converter - www.ebook-converter.com******
******ebook converter DEMO - www.ebook-converter.com*******
with the unit it protects until destroyed or when a screen is no longer needed.
Gun lines Many of the principles here apply to shooting units in general and not just gun-lines.There are some obvious rules in deploying gun lines:i) Do not crowd every shooting unit on a hill if it is available unless your gun line issmall.ii) Do not arrange the gun lines units in a perfect straight line so that an enemy unit cansweep right through them, overrunning one unit after another, shown by the diagram onthe left.
******Created by ebook converter - www.ebook-converter.com******
******ebook converter DEMO - www.ebook-converter.com*******
The staggered V or (inverted V as in the diagram above, right) formation is a better gunline formation. This of course restricts LOS slightly but prevents the obliteration ofevery shooting unit in consecutive turns.Adjust each unit so that no 3 units are in a straight line as far as possible. iii) Study the terrain and identify the areas of enemy infiltration. Your shooting unitsmust be within range of these important areas. The bigger this area, the more effectivethe gun line becomes. The warmachines, W and G and the Archers (A), have been positioned so thattheir LOS to the area of enemy infiltration is maximised. iv) Balance the need to protect the gun line and to support your combat troops. Thisbalance will be in constant flux throughout the game. A Slayer character for instance,might be initially deployed to protect Dwarven cannon and Bolt throwers. If thesewarmachines face imminent destruction, then it might be better off for the Slayer tosupport combat elsewhere. Gambit deployment This again appears to be similar to the Weakened and Abandoned flankdeployments but has important differences.The solitary unit, the Gambit, is placed in this flank acting merely as an annoying thornto draw away the enemy. Its survival is secondary as its main function is to distract theenemy. To do this, it cannot merely be a weak sacrificial unit e.g. Snotlings. It has to
******Created by ebook converter - www.ebook-converter.com******
******ebook converter DEMO - www.ebook-converter.com*******
constantly harass the enemy so that they feel compelled to destroy it. A single cheap Bolt thrower could do this or a unit of two of Night Runnerswith slings or a small unit of Skinks etc. Terrain plays an important part here. If the gambit is placed behindimpenetrable terrain it will be doubly annoying as it would be difficult to get to them.On the other hand, it might be necessary to deploy the gambit in open ground so that therest of the army is sheltered. In this case, the gambit should be placed as close aspossible to a table corner. The Gambit unit (G) will constantly harass the enemy by shooting etc. If theenemy ignores this gambit, then it is possible that one or two enemy units will dwindlein numbers. If the Gambit is ‘taken’ then an enemy combat unit has been successfullyremoved from the main combat arena. Defensive bubbleThis army is centred around an important unit or character e.g. the Hierophant of a TKing army, the Vampire Lord or possibly the Cauldron of Blood. The protected unit is (H) in the diagram below. It is protected on all sides fromshooting and does not have to engage in combat. It usually improves the ability of someor all units around it (e.g. Cauldron of Blood) or in the case of a Hierophant, is toofragile and must be protected at all costs. The idea of the defensive bubble is to maximise the benefits of the central unitat the same time protecting it from attacks. The army does not have to remain static and could actually move forward
******Created by ebook converter - www.ebook-converter.com******
******ebook converter DEMO - www.ebook-converter.com*******
while still retaining the bubble formation.
Positioning the general, characters and the armycentre Since characters are deployed last, there is every chance that the general mightnot be in the right place or even in the right unit.As soon as you have decided which deployment type to employ, create a mental pictureof the army and place a dice at the army centre. This is usually where the general willbe deployed if he is on foot. Since he is moving at the same rate as the slow unit he isin, it makes sense that he starts centrally, relative to the army A flying general, a lord on a dragon, could easily be drawn away from the maincombat arena and so could a general in a cavalry unit. They will not necessarily bedeployed centrally. Wizards are best sheltered in large infantry blocks. Fighting characters in a unitor on their own must not be blocked by friendly units or terrain and must have sufficientfreedom to move quickly into combat. Characters’ ability to move from one unit toanother could also be used to bolster any weaknesses or dominate any area. A BSB supports other units and must also be sufficiently sheltered so that it canget into the main combat arena quickly without being wounded.
******Created by ebook converter - www.ebook-converter.com******
******ebook converter DEMO - www.ebook-converter.com*******
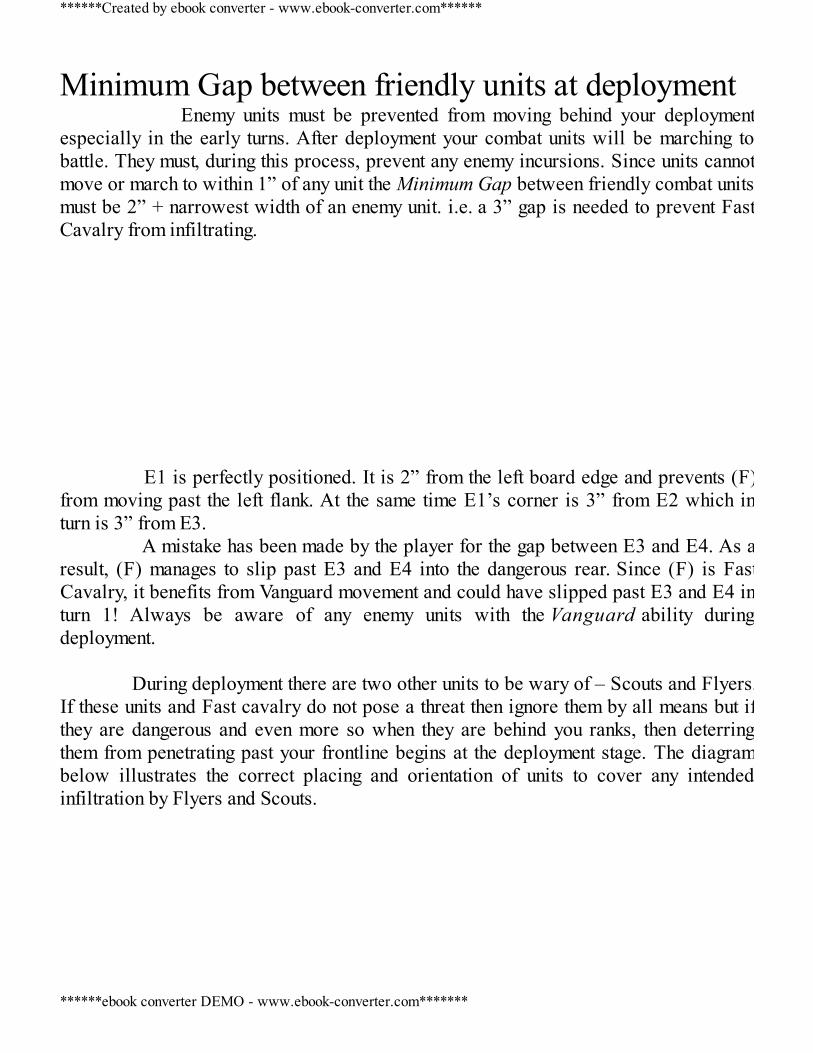
Minimum Gap between friendly units at deployment Enemy units must be prevented from moving behind your deploymentespecially in the early turns. After deployment your combat units will be marching tobattle. They must, during this process, prevent any enemy incursions. Since units cannotmove or march to within 1” of any unit the Minimum Gap between friendly combat unitsmust be 2” + narrowest width of an enemy unit. i.e. a 3” gap is needed to prevent FastCavalry from infiltrating. E1 is perfectly positioned. It is 2” from the left board edge and prevents (F)from moving past the left flank. At the same time E1’s corner is 3” from E2 which inturn is 3” from E3. A mistake has been made by the player for the gap between E3 and E4. As aresult, (F) manages to slip past E3 and E4 into the dangerous rear. Since (F) is FastCavalry, it benefits from Vanguard movement and could have slipped past E3 and E4 inturn 1! Always be aware of any enemy units with the Vanguard ability duringdeployment. During deployment there are two other units to be wary of – Scouts and Flyers.If these units and Fast cavalry do not pose a threat then ignore them by all means but ifthey are dangerous and even more so when they are behind you ranks, then deterringthem from penetrating past your frontline begins at the deployment stage. The diagrambelow illustrates the correct placing and orientation of units to cover any intendedinfiltration by Flyers and Scouts.
******Created by ebook converter - www.ebook-converter.com******
******ebook converter DEMO - www.ebook-converter.com*******
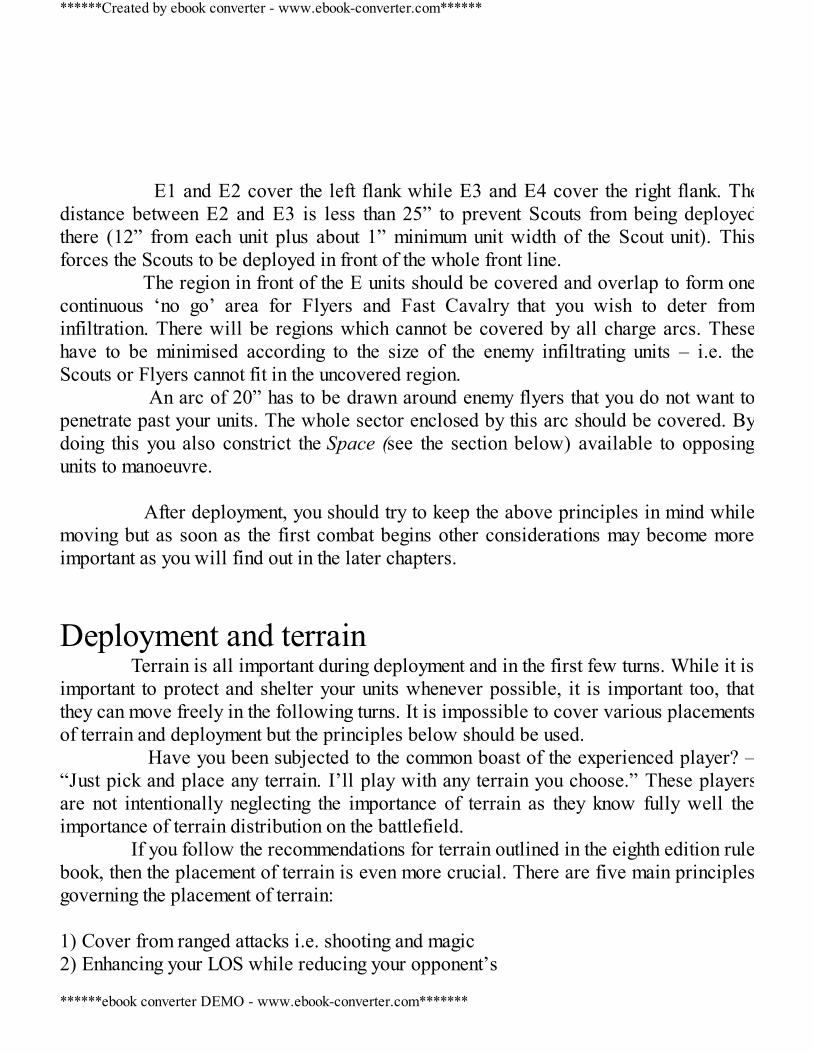
E1 and E2 cover the left flank while E3 and E4 cover the right flank. Thedistance between E2 and E3 is less than 25” to prevent Scouts from being deployedthere (12” from each unit plus about 1” minimum unit width of the Scout unit). Thisforces the Scouts to be deployed in front of the whole front line. The region in front of the E units should be covered and overlap to form onecontinuous ‘no go’ area for Flyers and Fast Cavalry that you wish to deter frominfiltration. There will be regions which cannot be covered by all charge arcs. Thesehave to be minimised according to the size of the enemy infiltrating units – i.e. theScouts or Flyers cannot fit in the uncovered region. An arc of 20” has to be drawn around enemy flyers that you do not want topenetrate past your units. The whole sector enclosed by this arc should be covered. Bydoing this you also constrict the Space (see the section below) available to opposingunits to manoeuvre. After deployment, you should try to keep the above principles in mind whilemoving but as soon as the first combat begins other considerations may become moreimportant as you will find out in the later chapters.
Deployment and terrain Terrain is all important during deployment and in the first few turns. While it isimportant to protect and shelter your units whenever possible, it is important too, thatthey can move freely in the following turns. It is impossible to cover various placementsof terrain and deployment but the principles below should be used. Have you been subjected to the common boast of the experienced player? –“Just pick and place any terrain. I’ll play with any terrain you choose.” These playersare not intentionally neglecting the importance of terrain as they know fully well theimportance of terrain distribution on the battlefield. If you follow the recommendations for terrain outlined in the eighth edition rulebook, then the placement of terrain is even more crucial. There are five main principlesgoverning the placement of terrain: 1) Cover from ranged attacks i.e. shooting and magic2) Enhancing your LOS while reducing your opponent’s
******Created by ebook converter - www.ebook-converter.com******
******ebook converter DEMO - www.ebook-converter.com*******
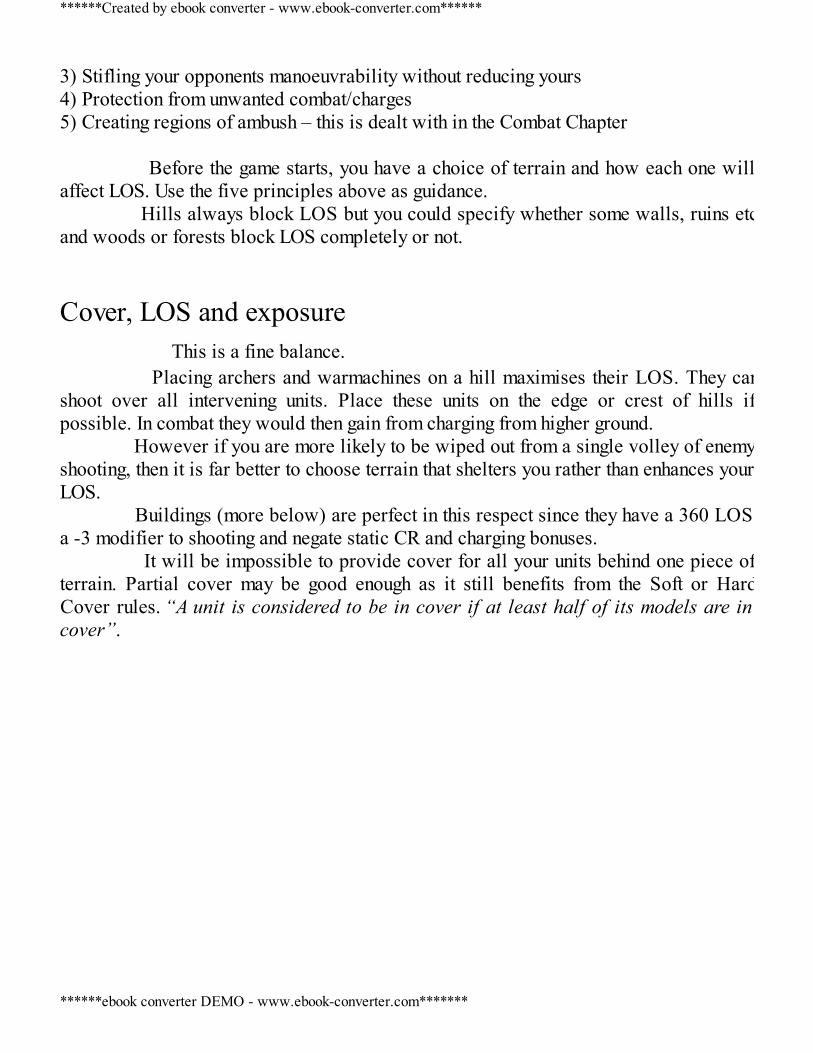
3) Stifling your opponents manoeuvrability without reducing yours4) Protection from unwanted combat/charges5) Creating regions of ambush – this is dealt with in the Combat Chapter Before the game starts, you have a choice of terrain and how each one willaffect LOS. Use the five principles above as guidance. Hills always block LOS but you could specify whether some walls, ruins etcand woods or forests block LOS completely or not. Cover, LOS and exposure This is a fine balance. Placing archers and warmachines on a hill maximises their LOS. They canshoot over all intervening units. Place these units on the edge or crest of hills ifpossible. In combat they would then gain from charging from higher ground. However if you are more likely to be wiped out from a single volley of enemyshooting, then it is far better to choose terrain that shelters you rather than enhances yourLOS. Buildings (more below) are perfect in this respect since they have a 360 LOS,a -3 modifier to shooting and negate static CR and charging bonuses. It will be impossible to provide cover for all your units behind one piece ofterrain. Partial cover may be good enough as it still benefits from the Soft or HardCover rules. “A unit is considered to be in cover if at least half of its models are incover”.
******Created by ebook converter - www.ebook-converter.com******
******ebook converter DEMO - www.ebook-converter.com*******
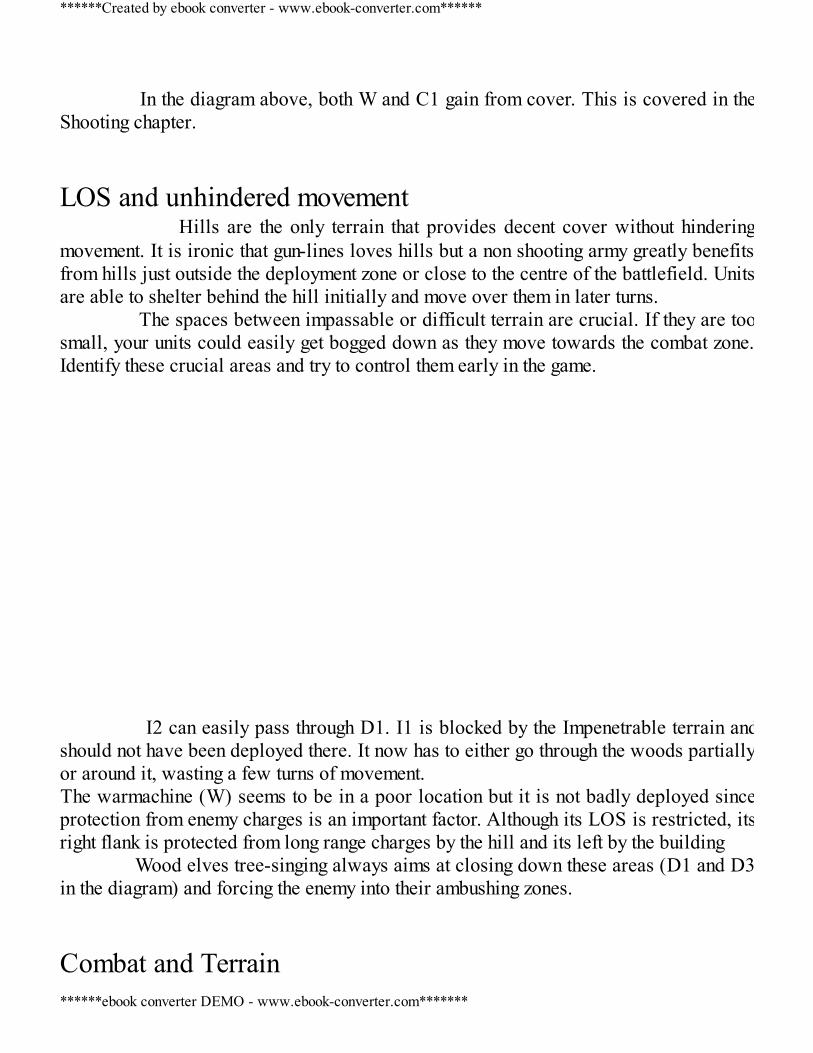
In the diagram above, both W and C1 gain from cover. This is covered in theShooting chapter. LOS and unhindered movement Hills are the only terrain that provides decent cover without hinderingmovement. It is ironic that gun-lines loves hills but a non shooting army greatly benefitsfrom hills just outside the deployment zone or close to the centre of the battlefield. Unitsare able to shelter behind the hill initially and move over them in later turns. The spaces between impassable or difficult terrain are crucial. If they are toosmall, your units could easily get bogged down as they move towards the combat zone.Identify these crucial areas and try to control them early in the game. I2 can easily pass through D1. I1 is blocked by the Impenetrable terrain andshould not have been deployed there. It now has to either go through the woods partiallyor around it, wasting a few turns of movement.The warmachine (W) seems to be in a poor location but it is not badly deployed sinceprotection from enemy charges is an important factor. Although its LOS is restricted, itsright flank is protected from long range charges by the hill and its left by the building Wood elves tree-singing always aims at closing down these areas (D1 and D3in the diagram) and forcing the enemy into their ambushing zones. Combat and Terrain
******Created by ebook converter - www.ebook-converter.com******
******ebook converter DEMO - www.ebook-converter.com*******
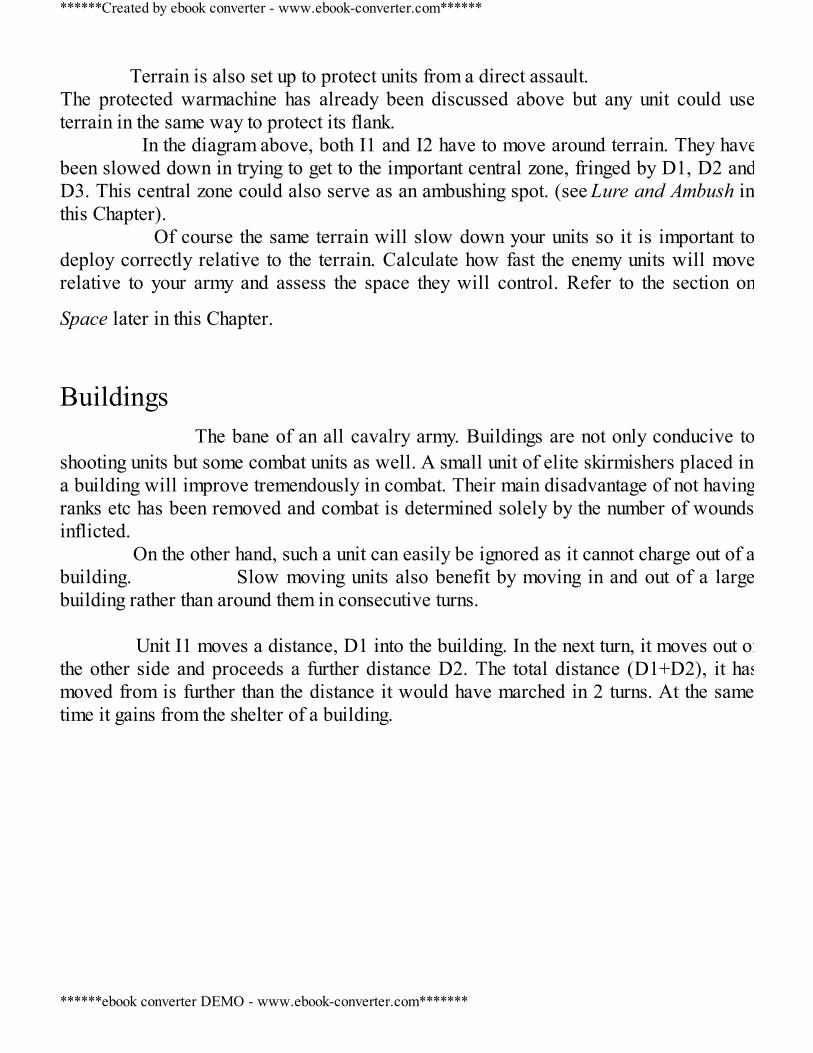
Terrain is also set up to protect units from a direct assault.The protected warmachine has already been discussed above but any unit could useterrain in the same way to protect its flank. In the diagram above, both I1 and I2 have to move around terrain. They havebeen slowed down in trying to get to the important central zone, fringed by D1, D2 andD3. This central zone could also serve as an ambushing spot. (see Lure and Ambush inthis Chapter). Of course the same terrain will slow down your units so it is important todeploy correctly relative to the terrain. Calculate how fast the enemy units will moverelative to your army and assess the space they will control. Refer to the section on
Space later in this Chapter. Buildings The bane of an all cavalry army. Buildings are not only conducive toshooting units but some combat units as well. A small unit of elite skirmishers placed ina building will improve tremendously in combat. Their main disadvantage of not havingranks etc has been removed and combat is determined solely by the number of woundsinflicted. On the other hand, such a unit can easily be ignored as it cannot charge out of abuilding. Slow moving units also benefit by moving in and out of a largebuilding rather than around them in consecutive turns. Unit I1 moves a distance, D1 into the building. In the next turn, it moves out ofthe other side and proceeds a further distance D2. The total distance (D1+D2), it hasmoved from is further than the distance it would have marched in 2 turns. At the sametime it gains from the shelter of a building.
******Created by ebook converter - www.ebook-converter.com******
******ebook converter DEMO - www.ebook-converter.com*******
See also Using Terrain to Shelter and Ambush in the Combat Chapter.
Stupidity & Animosity If you are unfortunate to have units that suffer from Stupidity, then there areways of minimising its effects. a) Keep the Stupid units close to the general to benefit from his Leadership. At the timeof writing Dark Elf Cold One Knights are one of the very few units who could have aLeadership higher or equal to the general. They therefore can move away from thegeneral. b) Deploy Stupid units so that they will not obstruct other units if they fail their test. Tryto maintain this throughout the game.
******Created by ebook converter - www.ebook-converter.com******
******ebook converter DEMO - www.ebook-converter.com*******
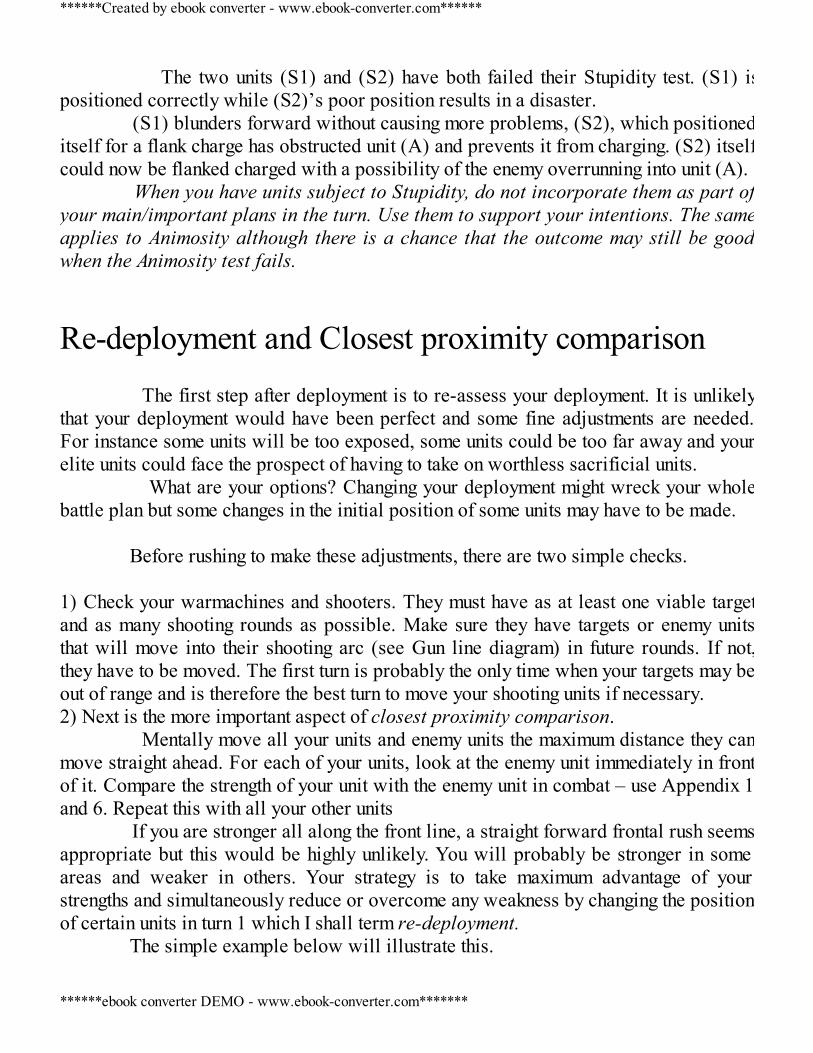
The two units (S1) and (S2) have both failed their Stupidity test. (S1) ispositioned correctly while (S2)’s poor position results in a disaster. (S1) blunders forward without causing more problems, (S2), which positioneditself for a flank charge has obstructed unit (A) and prevents it from charging. (S2) itselfcould now be flanked charged with a possibility of the enemy overrunning into unit (A). When you have units subject to Stupidity, do not incorporate them as part ofyour main/important plans in the turn. Use them to support your intentions. The sameapplies to Animosity although there is a chance that the outcome may still be goodwhen the Animosity test fails.
Re-deployment and Closest proximity comparison The first step after deployment is to re-assess your deployment. It is unlikelythat your deployment would have been perfect and some fine adjustments are needed.For instance some units will be too exposed, some units could be too far away and yourelite units could face the prospect of having to take on worthless sacrificial units. What are your options? Changing your deployment might wreck your wholebattle plan but some changes in the initial position of some units may have to be made. Before rushing to make these adjustments, there are two simple checks. 1) Check your warmachines and shooters. They must have as at least one viable targetand as many shooting rounds as possible. Make sure they have targets or enemy unitsthat will move into their shooting arc (see Gun line diagram) in future rounds. If not,they have to be moved. The first turn is probably the only time when your targets may beout of range and is therefore the best turn to move your shooting units if necessary.2) Next is the more important aspect of closest proximity comparison. Mentally move all your units and enemy units the maximum distance they canmove straight ahead. For each of your units, look at the enemy unit immediately in frontof it. Compare the strength of your unit with the enemy unit in combat – use Appendix 1and 6. Repeat this with all your other units If you are stronger all along the front line, a straight forward frontal rush seemsappropriate but this would be highly unlikely. You will probably be stronger in someareas and weaker in others. Your strategy is to take maximum advantage of yourstrengths and simultaneously reduce or overcome any weakness by changing the positionof certain units in turn 1 which I shall term re-deployment. The simple example below will illustrate this.
******Created by ebook converter - www.ebook-converter.com******
******ebook converter DEMO - www.ebook-converter.com*******
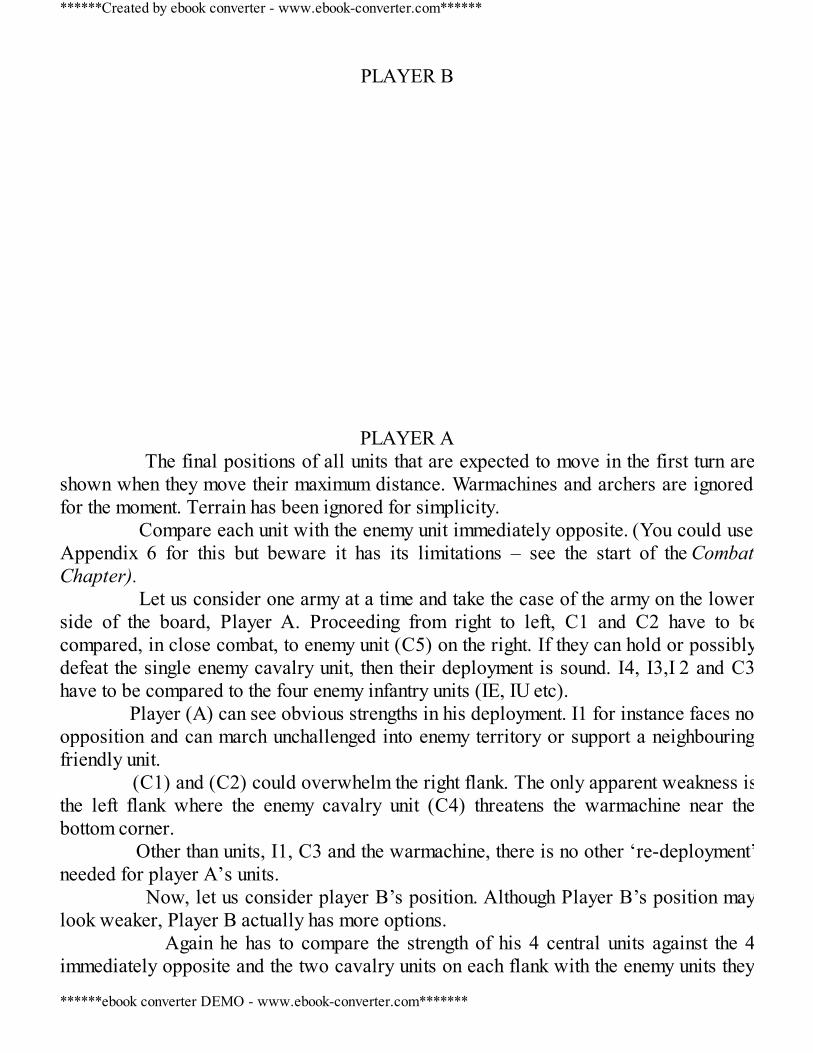
PLAYER B
PLAYER A The final positions of all units that are expected to move in the first turn areshown when they move their maximum distance. Warmachines and archers are ignoredfor the moment. Terrain has been ignored for simplicity. Compare each unit with the enemy unit immediately opposite. (You could useAppendix 6 for this but beware it has its limitations – see the start of the CombatChapter). Let us consider one army at a time and take the case of the army on the lowerside of the board, Player A. Proceeding from right to left, C1 and C2 have to becompared, in close combat, to enemy unit (C5) on the right. If they can hold or possiblydefeat the single enemy cavalry unit, then their deployment is sound. I4, I3,I 2 and C3have to be compared to the four enemy infantry units (IE, IU etc). Player (A) can see obvious strengths in his deployment. I1 for instance faces noopposition and can march unchallenged into enemy territory or support a neighbouringfriendly unit. (C1) and (C2) could overwhelm the right flank. The only apparent weakness isthe left flank where the enemy cavalry unit (C4) threatens the warmachine near thebottom corner. Other than units, I1, C3 and the warmachine, there is no other ‘re-deployment’needed for player A’s units. Now, let us consider player B’s position. Although Player B’s position maylook weaker, Player B actually has more options. Again he has to compare the strength of his 4 central units against the 4immediately opposite and the two cavalry units on each flank with the enemy units they
******Created by ebook converter - www.ebook-converter.com******
******ebook converter DEMO - www.ebook-converter.com*******

face directly. The result of the closest proximity comparison for player B is opposite to theresult for A. Player (B) has an obvious weakness in its left flank. He is also stronger onthe right but has a gap against enemy unit I1. The ‘redeployment’ for player (B) could be swapping places for unit (IE) witha more resilient unit (IU), a re-positioning of one or two central units towards eitherflank. An extreme case of swinging C4 right over to the centre or the left flank is alsopossible. I shall examine the possibilities in the next section.
Formulating a general strategyThe closest proximity comparison will enable each player to produce a general strategy. Using the example above:Player A must make these decisions:1) Abandoning the left flank and use I1 for the central attack2) Protecting the left flank with I13) Moving I1 right into the depths of enemy territory and taking out the warmachines, orsurround the enemy, threatening the flanks of (IE) or (C4).4) Protecting the left flank with cavalry unit C3.5) Challenging the right flank with both (C1) and (C2) or with just one unit while theother performs the same function as (3) above. Player B must decide:1) How to take full advantage of unit (C4)’s position by:a) Moving behind enemy lines and threatening a rear chargeb) Destroying the warmachine first and then supporting his centre from the backc) Nullify the threat of I1 by guarding that flank or threatening a flank charge (seeAnchoring a flank in the Combat Chapter)2) Overcome his weakness on the opposite flank by slowing down (See Slowing downthe enemy) or diverting (C1) and (C2) (see Deflecting Charges). (C5) could alsoattempt to lure and ambush (C1) and (C2) by possibly using the archers (A).3) Prevent a flank charge in the centre or sacrificing a flank charge.4) Abandoning the left flank and use (C5) to support the centre5) Plug the gap (next to I1) in his right flank with a rightward shift of units as they moveforward or ignoring that gap and hope to break through the centre with fewer units thanthe enemy. How the above can be carried out is discussed in isolation in future chapters.
******Created by ebook converter - www.ebook-converter.com******
******ebook converter DEMO - www.ebook-converter.com*******
Once you are conversant with the basic strategies, come back to this section and try toproduce a good general strategy. A complete strategy of course will depend on the armyyou are facing. Speed If your opponent’s units are faster and more manoeuvrable (Skirmishers aremore manoeuvrable than ranked up infantry while Fast cavalry is more manoeuvrablethan heavy cavalry), then your scope for re-deployment is limited. In this case yourstrategy must be to slow down the enemy while you prepare your traps and ambushes(see Combat Chapter). At the same time use your fast units to bait the enemy, win aflank, move behind their lines, dominate or restrict space and support your slower units. Obvious sacrificials It might not be your intention to sacrifice any unit/s but after deployment itmay be obvious that a unit or two has to be left unprotected.
Checks before Charge Declarations & Movement During your Movement phase and especially the Remaining Moves phase,before you finalise all moves, it is wise to make the following checks. Since you mightchange your mind quite easily during this phase, it is advisable that you place markers (Iuse dice) at the positions of each unit, either at the original position or at the pointwhere you want to move them. This then helps you to visualise the final position of allyour units The Key words are:1) Block2) Expose3) Enemy Charge range4) Retreat or flee5) Increase Space6) Charge Effectively in the next turn7) Enhance range or Arc of sight
The 4 negative checks (for each unit whether moved or not)1) Is the unit within Enemy charge range or will be within enemy charge range at the
******Created by ebook converter - www.ebook-converter.com******
******ebook converter DEMO - www.ebook-converter.com*******
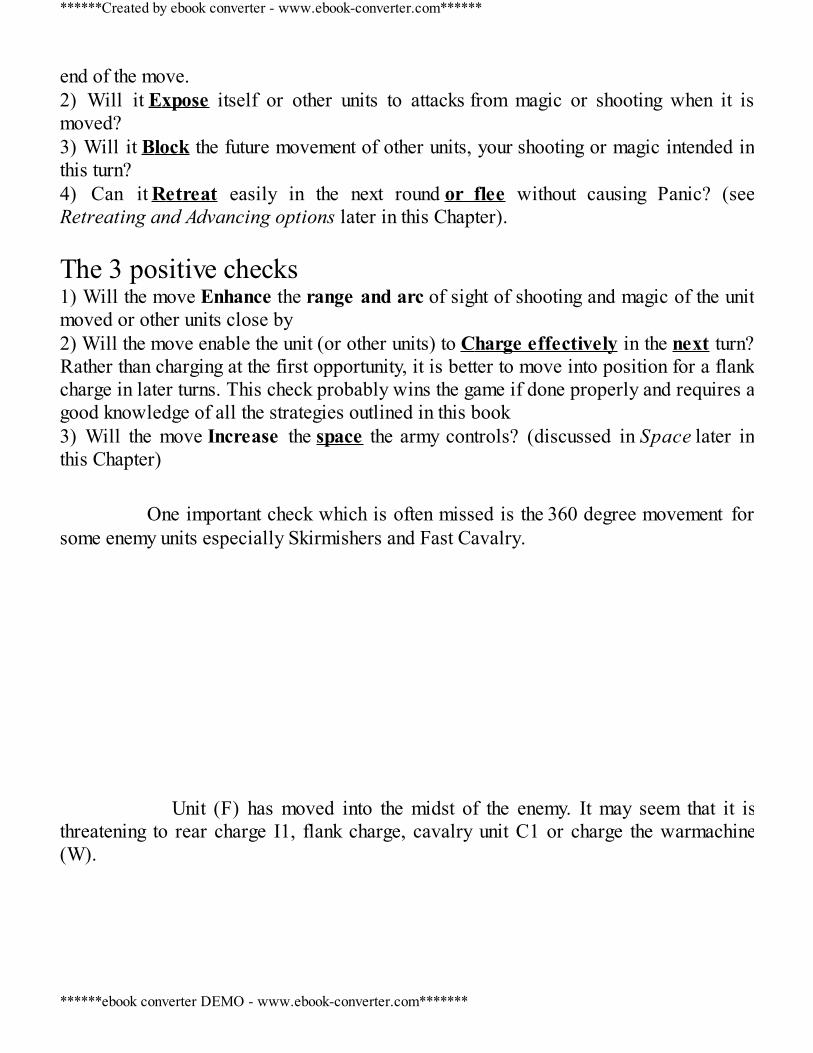
end of the move.2) Will it Expose itself or other units to attacks from magic or shooting when it ismoved?3) Will it Block the future movement of other units, your shooting or magic intended inthis turn?4) Can it Retreat easily in the next round or flee without causing Panic? (seeRetreating and Advancing options later in this Chapter). The 3 positive checks1) Will the move Enhance the range and arc of sight of shooting and magic of the unitmoved or other units close by2) Will the move enable the unit (or other units) to Charge effectively in the next turn?Rather than charging at the first opportunity, it is better to move into position for a flankcharge in later turns. This check probably wins the game if done properly and requires agood knowledge of all the strategies outlined in this book3) Will the move Increase the space the army controls? (discussed in Space later inthis Chapter) One important check which is often missed is the 360 degree movement forsome enemy units especially Skirmishers and Fast Cavalry. Unit (F) has moved into the midst of the enemy. It may seem that it isthreatening to rear charge I1, flank charge, cavalry unit C1 or charge the warmachine(W).
******Created by ebook converter - www.ebook-converter.com******
******ebook converter DEMO - www.ebook-converter.com*******
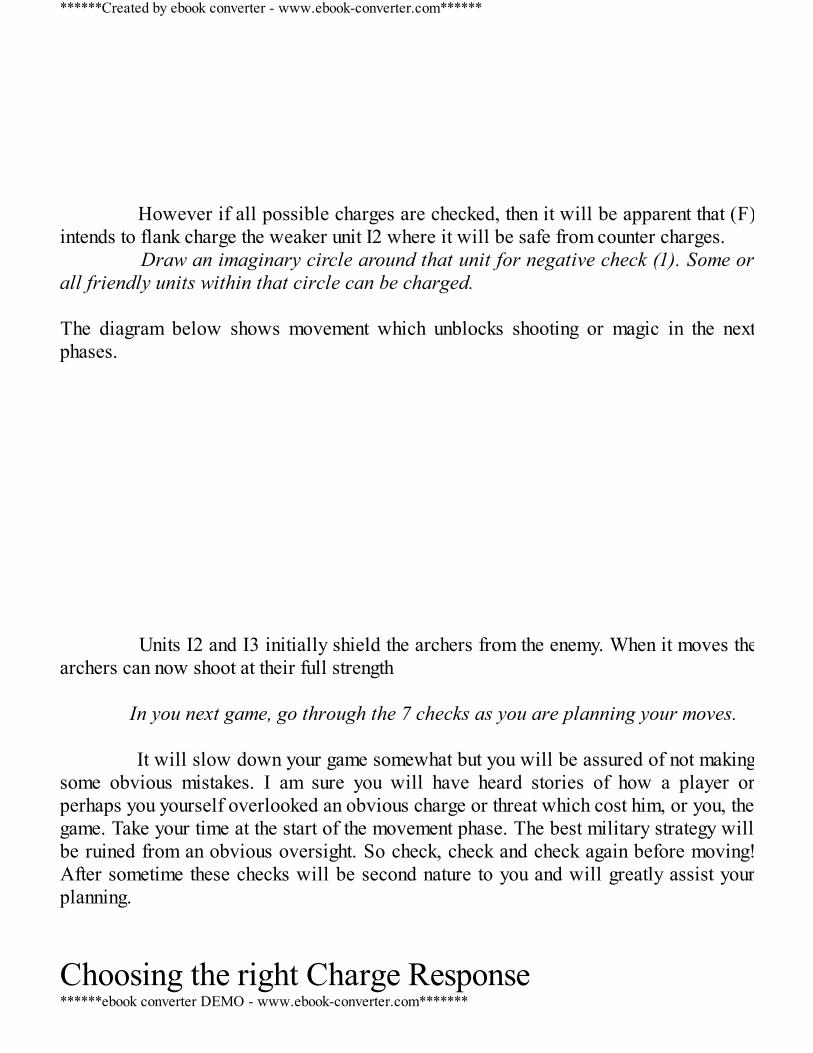
However if all possible charges are checked, then it will be apparent that (F)intends to flank charge the weaker unit I2 where it will be safe from counter charges. Draw an imaginary circle around that unit for negative check (1). Some orall friendly units within that circle can be charged. The diagram below shows movement which unblocks shooting or magic in the nextphases. Units I2 and I3 initially shield the archers from the enemy. When it moves thearchers can now shoot at their full strength In you next game, go through the 7 checks as you are planning your moves. It will slow down your game somewhat but you will be assured of not makingsome obvious mistakes. I am sure you will have heard stories of how a player orperhaps you yourself overlooked an obvious charge or threat which cost him, or you, thegame. Take your time at the start of the movement phase. The best military strategy willbe ruined from an obvious oversight. So check, check and check again before moving!After sometime these checks will be second nature to you and will greatly assist yourplanning.
Choosing the right Charge Response
******Created by ebook converter - www.ebook-converter.com******
******ebook converter DEMO - www.ebook-converter.com*******
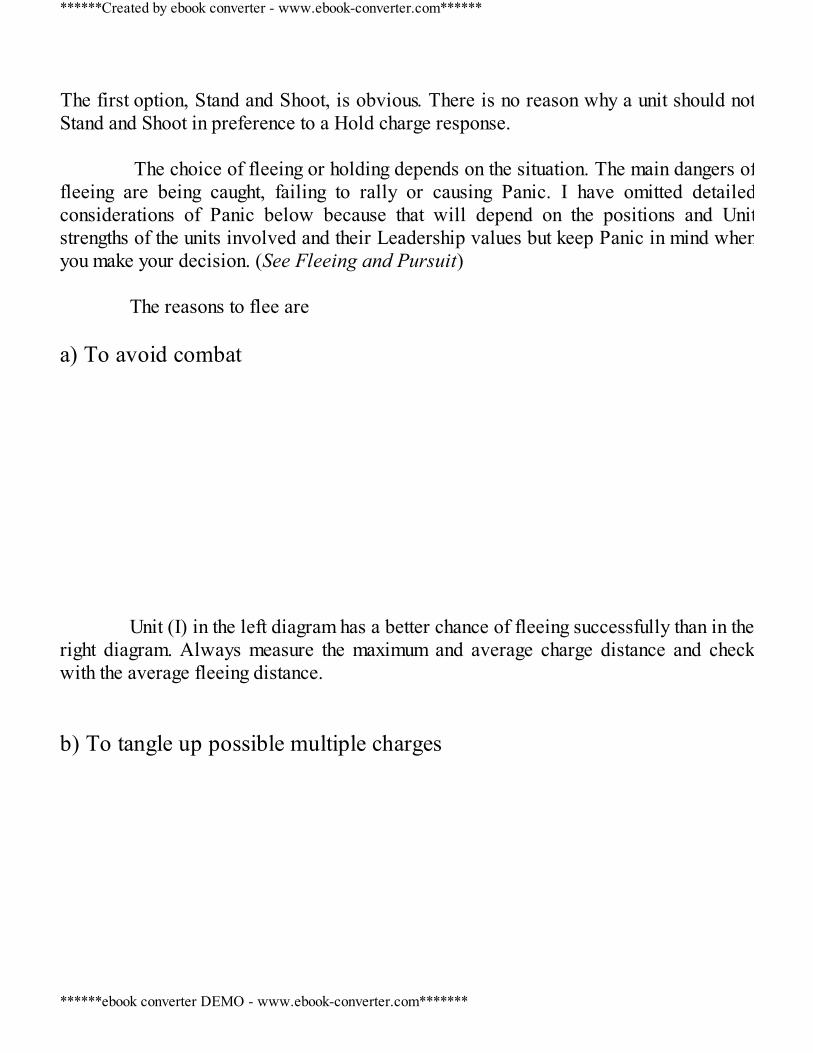
The first option, Stand and Shoot, is obvious. There is no reason why a unit should notStand and Shoot in preference to a Hold charge response. The choice of fleeing or holding depends on the situation. The main dangers offleeing are being caught, failing to rally or causing Panic. I have omitted detailedconsiderations of Panic below because that will depend on the positions and Unitstrengths of the units involved and their Leadership values but keep Panic in mind whenyou make your decision. (See Fleeing and Pursuit) The reasons to flee are a) To avoid combat Unit (I) in the left diagram has a better chance of fleeing successfully than in theright diagram. Always measure the maximum and average charge distance and checkwith the average fleeing distance. b) To tangle up possible multiple charges
******Created by ebook converter - www.ebook-converter.com******
******ebook converter DEMO - www.ebook-converter.com*******

(C) declares a charge on unit (B). If (B) flees and (I) then declares a charge on(A) (mistakenly), then (C) could end up in front of (I) in the move charges phase. (I)’scharge now fails. Some delicate estimates have to be made to arrive at this situation. (B) has tohave sufficient distance to escape and (C)’s failed charge has to be estimated correctlyto take it into (I)’s path. In a different scenario with the units at different distances, it is also possiblefor (B) to flee so that it is caught. (C) would then move its full distance which wouldtake it into (I)’s path.. This is much easier to plan since (C) will move a greaterdistance. The correct sequence of charges above should have been1) (I) charges (A) followed by2) (C) charges (B).Or (I) could have redirected into (B) if it could charge (B) unobstructed c) To move the enemy unit 1” from the board edge
In the diagram on the left, the unit (W) will be obviously caught but the charger(C) is now off the board. The diagram on the right shows the failed charge distancefalling just short of the board edge. This has the same effect as the diagram on the left.Charger (C) will not be facing any enemy units and cannot charge in the next round. d) It is an obvious sacrificial e) To lure the enemy unit for another unit to ambush (See Lure and Ambushlater in this Chapter The reasons for holding as a charge response are simply opposite to that forfleeing. A unit will hold as a charge response if:a) It will win combat
******Created by ebook converter - www.ebook-converter.com******
******ebook converter DEMO - www.ebook-converter.com*******
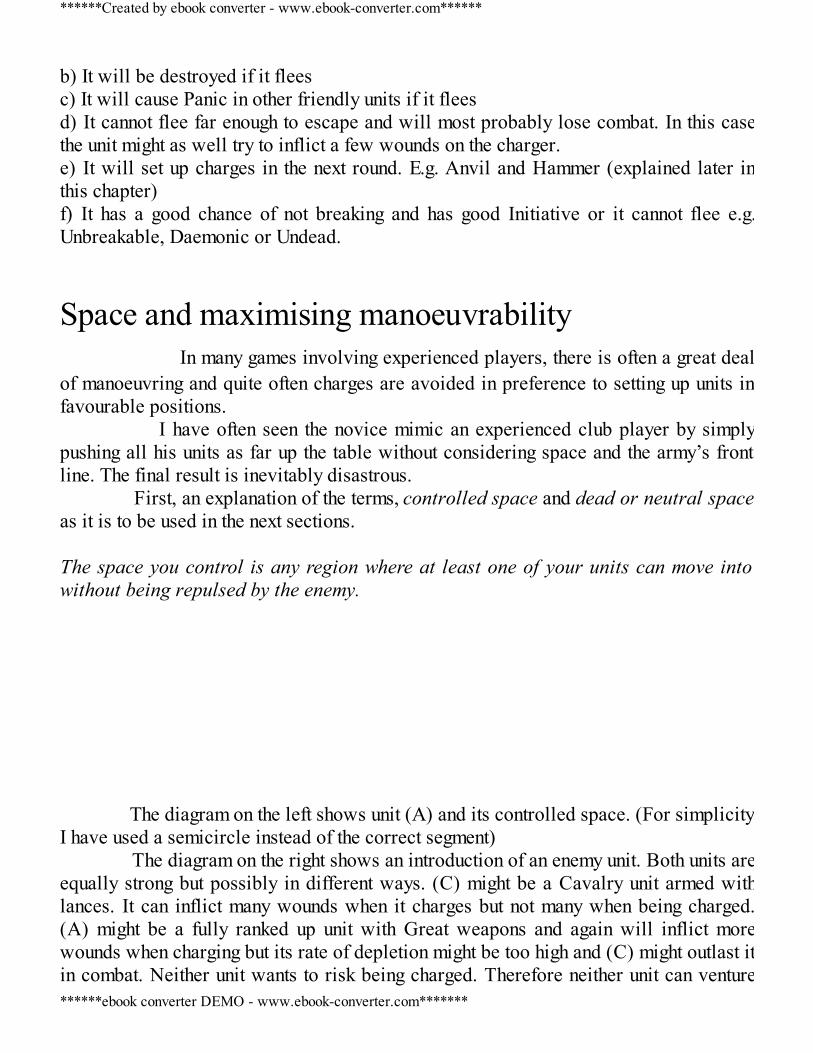
b) It will be destroyed if it fleesc) It will cause Panic in other friendly units if it fleesd) It cannot flee far enough to escape and will most probably lose combat. In this casethe unit might as well try to inflict a few wounds on the charger.e) It will set up charges in the next round. E.g. Anvil and Hammer (explained later inthis chapter)f) It has a good chance of not breaking and has good Initiative or it cannot flee e.g.Unbreakable, Daemonic or Undead.
Space and maximising manoeuvrability In many games involving experienced players, there is often a great dealof manoeuvring and quite often charges are avoided in preference to setting up units infavourable positions. I have often seen the novice mimic an experienced club player by simplypushing all his units as far up the table without considering space and the army’s frontline. The final result is inevitably disastrous. First, an explanation of the terms, controlled space and dead or neutral spaceas it is to be used in the next sections. The space you control is any region where at least one of your units can move intowithout being repulsed by the enemy. The diagram on the left shows unit (A) and its controlled space. (For simplicityI have used a semicircle instead of the correct segment) The diagram on the right shows an introduction of an enemy unit. Both units areequally strong but possibly in different ways. (C) might be a Cavalry unit armed withlances. It can inflict many wounds when it charges but not many when being charged.(A) might be a fully ranked up unit with Great weapons and again will inflict morewounds when charging but its rate of depletion might be too high and (C) might outlast itin combat. Neither unit wants to risk being charged. Therefore neither unit can venture
******Created by ebook converter - www.ebook-converter.com******
******ebook converter DEMO - www.ebook-converter.com*******
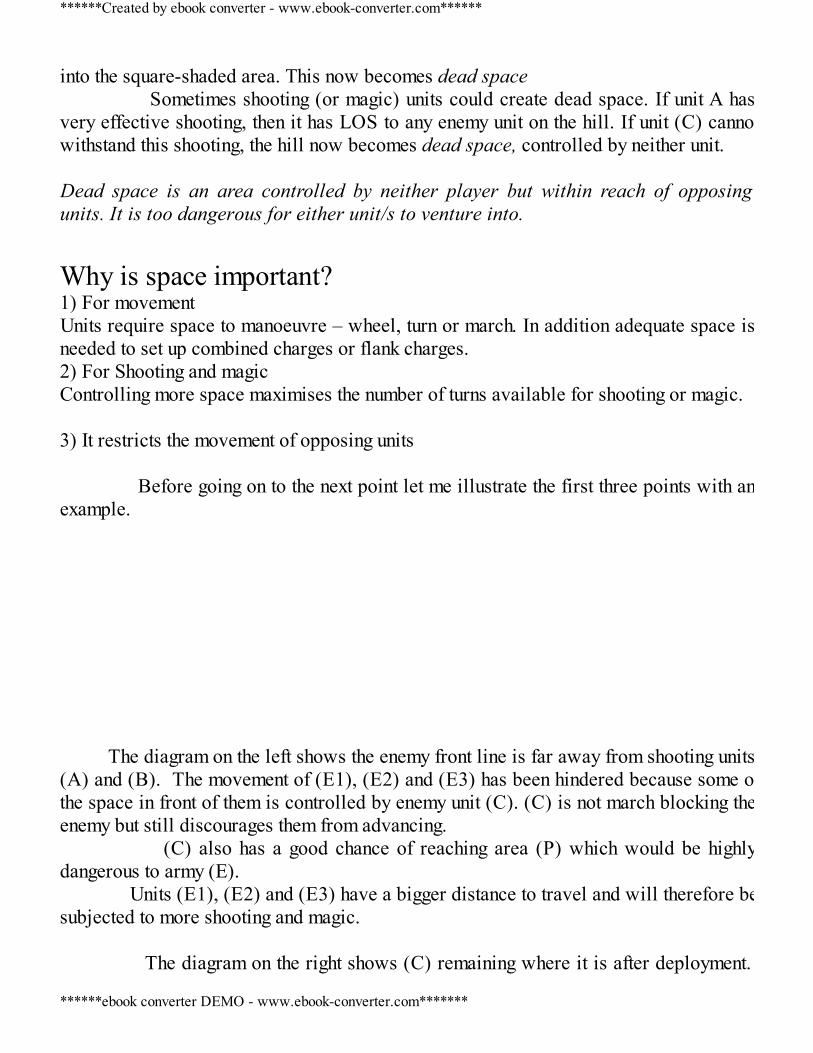
into the square-shaded area. This now becomes dead space Sometimes shooting (or magic) units could create dead space. If unit A hasvery effective shooting, then it has LOS to any enemy unit on the hill. If unit (C) cannotwithstand this shooting, the hill now becomes dead space, controlled by neither unit. Dead space is an area controlled by neither player but within reach of opposingunits. It is too dangerous for either unit/s to venture into. Why is space important?1) For movementUnits require space to manoeuvre – wheel, turn or march. In addition adequate space isneeded to set up combined charges or flank charges.2) For Shooting and magicControlling more space maximises the number of turns available for shooting or magic. 3) It restricts the movement of opposing units Before going on to the next point let me illustrate the first three points with anexample.
The diagram on the left shows the enemy front line is far away from shooting units(A) and (B). The movement of (E1), (E2) and (E3) has been hindered because some ofthe space in front of them is controlled by enemy unit (C). (C) is not march blocking theenemy but still discourages them from advancing. (C) also has a good chance of reaching area (P) which would be highlydangerous to army (E). Units (E1), (E2) and (E3) have a bigger distance to travel and will therefore besubjected to more shooting and magic. The diagram on the right shows (C) remaining where it is after deployment.
******Created by ebook converter - www.ebook-converter.com******
******ebook converter DEMO - www.ebook-converter.com*******
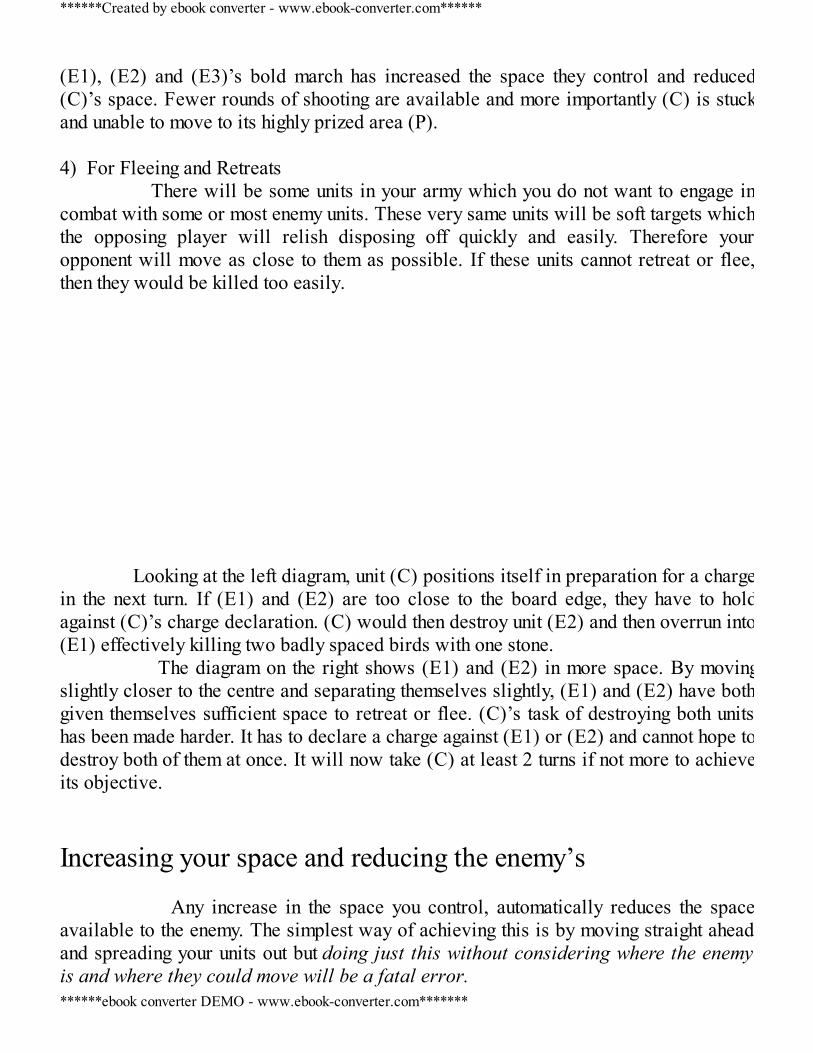
(E1), (E2) and (E3)’s bold march has increased the space they control and reduced(C)’s space. Fewer rounds of shooting are available and more importantly (C) is stuckand unable to move to its highly prized area (P). 4) For Fleeing and Retreats There will be some units in your army which you do not want to engage incombat with some or most enemy units. These very same units will be soft targets whichthe opposing player will relish disposing off quickly and easily. Therefore youropponent will move as close to them as possible. If these units cannot retreat or flee,then they would be killed too easily. Looking at the left diagram, unit (C) positions itself in preparation for a chargein the next turn. If (E1) and (E2) are too close to the board edge, they have to holdagainst (C)’s charge declaration. (C) would then destroy unit (E2) and then overrun into(E1) effectively killing two badly spaced birds with one stone. The diagram on the right shows (E1) and (E2) in more space. By movingslightly closer to the centre and separating themselves slightly, (E1) and (E2) have bothgiven themselves sufficient space to retreat or flee. (C)’s task of destroying both unitshas been made harder. It has to declare a charge against (E1) or (E2) and cannot hope todestroy both of them at once. It will now take (C) at least 2 turns if not more to achieveits objective. Increasing your space and reducing the enemy’s Any increase in the space you control, automatically reduces the spaceavailable to the enemy. The simplest way of achieving this is by moving straight aheadand spreading your units out but doing just this without considering where the enemyis and where they could move will be a fatal error.
******Created by ebook converter - www.ebook-converter.com******
******ebook converter DEMO - www.ebook-converter.com*******
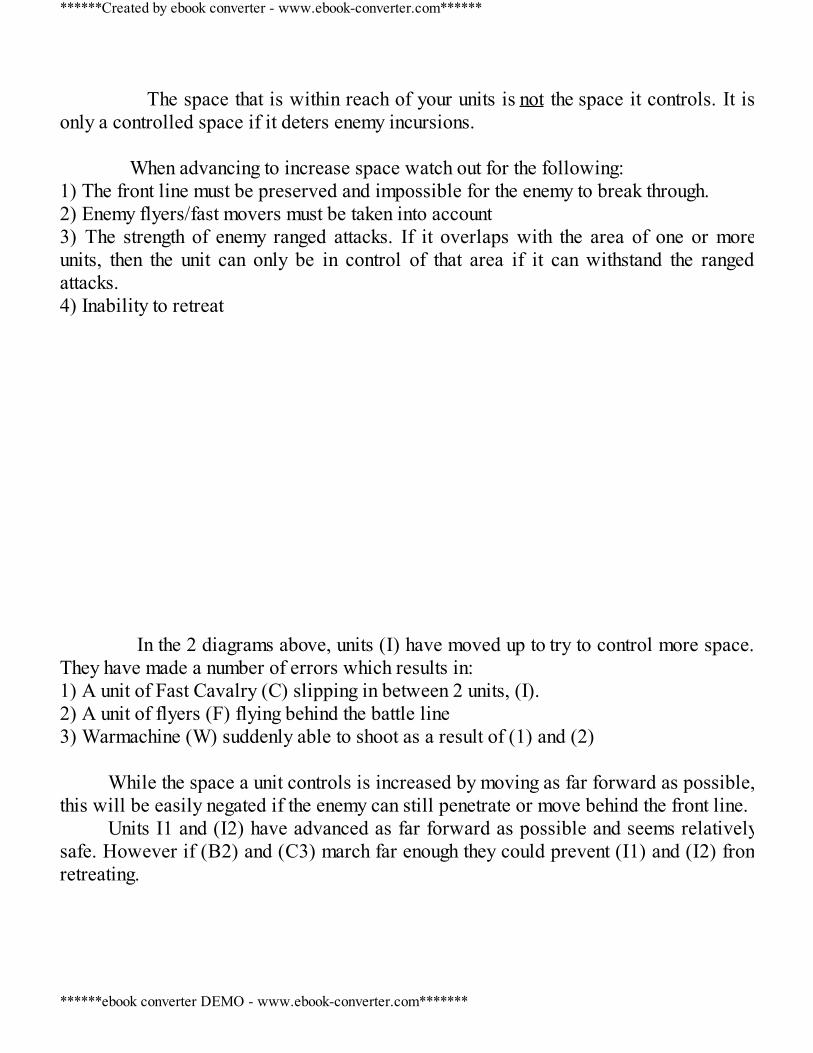
The space that is within reach of your units is not the space it controls. It isonly a controlled space if it deters enemy incursions. When advancing to increase space watch out for the following:1) The front line must be preserved and impossible for the enemy to break through.2) Enemy flyers/fast movers must be taken into account3) The strength of enemy ranged attacks. If it overlaps with the area of one or moreunits, then the unit can only be in control of that area if it can withstand the rangedattacks.4) Inability to retreat In the 2 diagrams above, units (I) have moved up to try to control more space.They have made a number of errors which results in: 1) A unit of Fast Cavalry (C) slipping in between 2 units, (I).2) A unit of flyers (F) flying behind the battle line3) Warmachine (W) suddenly able to shoot as a result of (1) and (2)
While the space a unit controls is increased by moving as far forward as possible,this will be easily negated if the enemy can still penetrate or move behind the front line.
Units I1 and (I2) have advanced as far forward as possible and seems relativelysafe. However if (B2) and (C3) march far enough they could prevent (I1) and (I2) fromretreating.
******Created by ebook converter - www.ebook-converter.com******
******ebook converter DEMO - www.ebook-converter.com*******
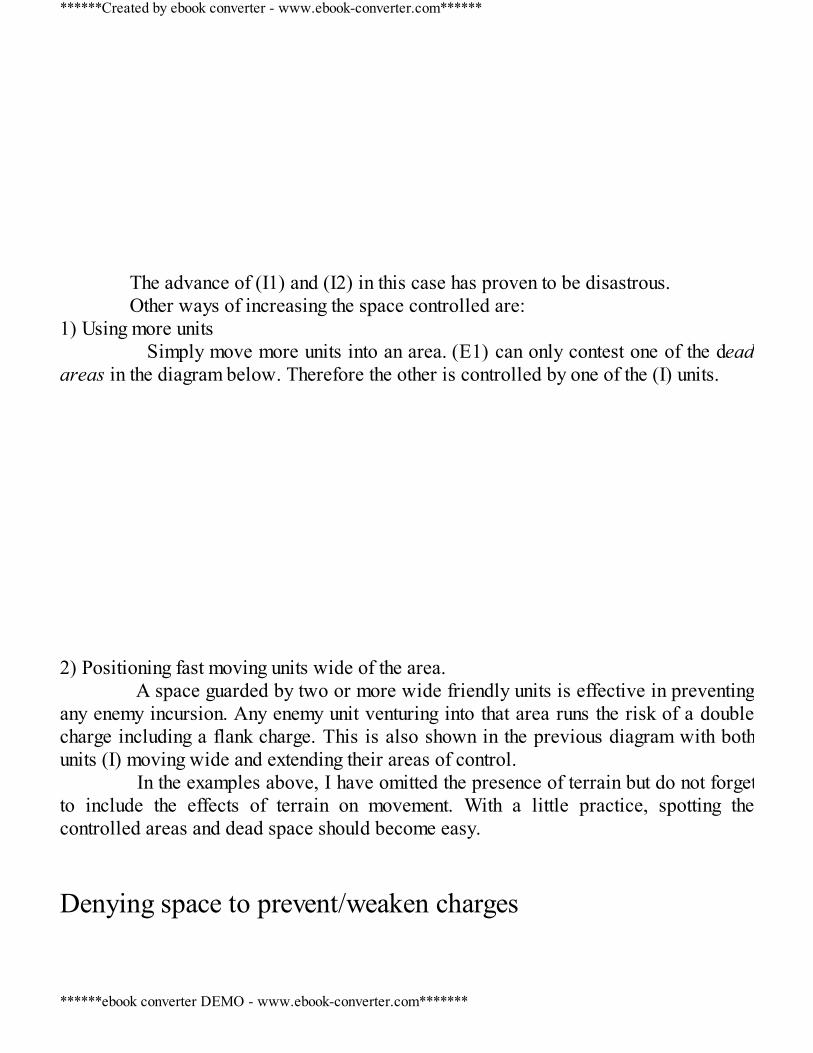
The advance of (I1) and (I2) in this case has proven to be disastrous. Other ways of increasing the space controlled are:1) Using more units Simply move more units into an area. (E1) can only contest one of the deadareas in the diagram below. Therefore the other is controlled by one of the (I) units. 2) Positioning fast moving units wide of the area. A space guarded by two or more wide friendly units is effective in preventingany enemy incursion. Any enemy unit venturing into that area runs the risk of a doublecharge including a flank charge. This is also shown in the previous diagram with bothunits (I) moving wide and extending their areas of control. In the examples above, I have omitted the presence of terrain but do not forgetto include the effects of terrain on movement. With a little practice, spotting thecontrolled areas and dead space should become easy. Denying space to prevent/weaken charges
******Created by ebook converter - www.ebook-converter.com******
******ebook converter DEMO - www.ebook-converter.com*******
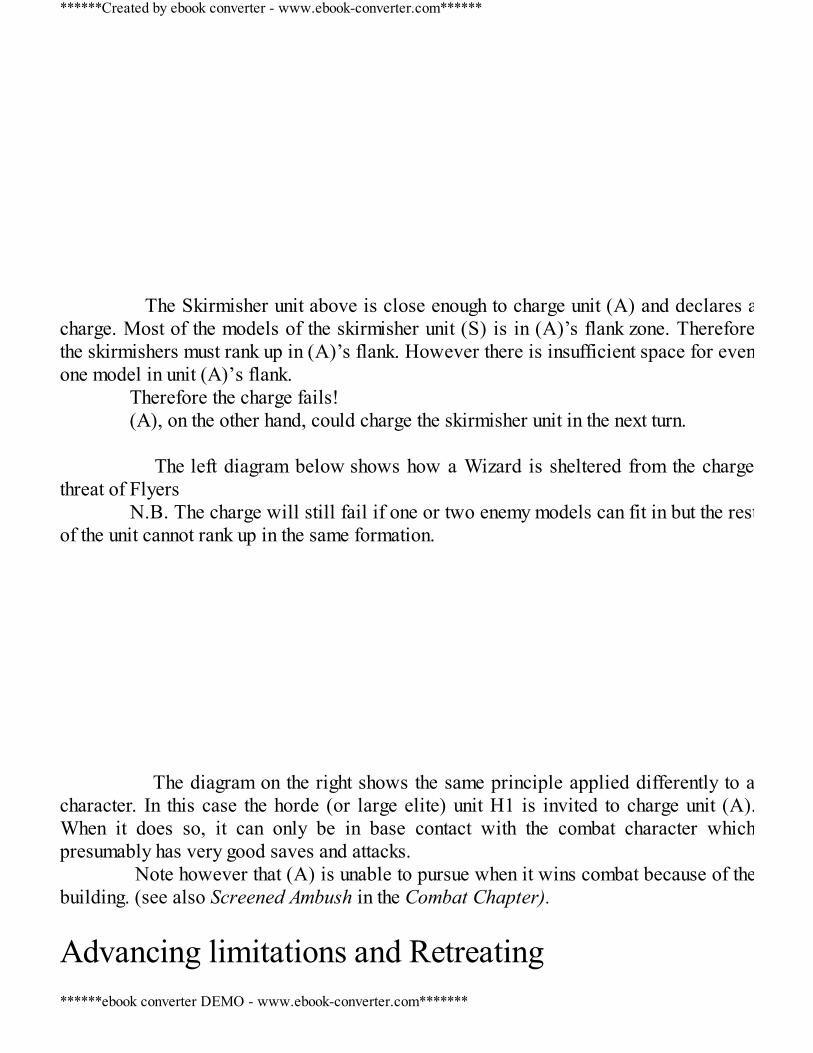
The Skirmisher unit above is close enough to charge unit (A) and declares acharge. Most of the models of the skirmisher unit (S) is in (A)’s flank zone. Thereforethe skirmishers must rank up in (A)’s flank. However there is insufficient space for evenone model in unit (A)’s flank. Therefore the charge fails! (A), on the other hand, could charge the skirmisher unit in the next turn. The left diagram below shows how a Wizard is sheltered from the chargethreat of Flyers N.B. The charge will still fail if one or two enemy models can fit in but the restof the unit cannot rank up in the same formation. The diagram on the right shows the same principle applied differently to acharacter. In this case the horde (or large elite) unit H1 is invited to charge unit (A).When it does so, it can only be in base contact with the combat character whichpresumably has very good saves and attacks. Note however that (A) is unable to pursue when it wins combat because of thebuilding. (see also Screened Ambush in the Combat Chapter).
Advancing limitations and Retreating
******Created by ebook converter - www.ebook-converter.com******
******ebook converter DEMO - www.ebook-converter.com*******
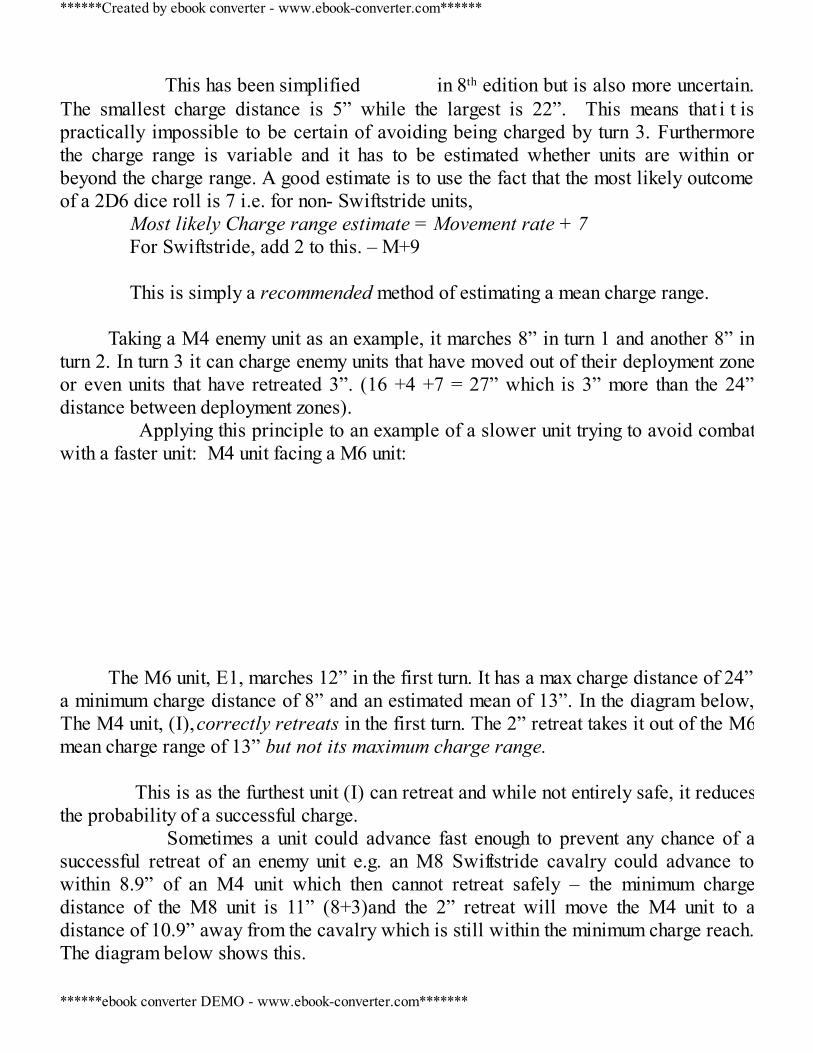
This has been simplified in 8th edition but is also more uncertain.The smallest charge distance is 5” while the largest is 22”. This means that i t ispractically impossible to be certain of avoiding being charged by turn 3. Furthermorethe charge range is variable and it has to be estimated whether units are within orbeyond the charge range. A good estimate is to use the fact that the most likely outcomeof a 2D6 dice roll is 7 i.e. for non- Swiftstride units, Most likely Charge range estimate = Movement rate + 7 For Swiftstride, add 2 to this. – M+9 This is simply a recommended method of estimating a mean charge range.
Taking a M4 enemy unit as an example, it marches 8” in turn 1 and another 8” inturn 2. In turn 3 it can charge enemy units that have moved out of their deployment zoneor even units that have retreated 3”. (16 +4 +7 = 27” which is 3” more than the 24”distance between deployment zones). Applying this principle to an example of a slower unit trying to avoid combatwith a faster unit: M4 unit facing a M6 unit:
The M6 unit, E1, marches 12” in the first turn. It has a max charge distance of 24”,a minimum charge distance of 8” and an estimated mean of 13”. In the diagram below,The M4 unit, (I), correctly retreats in the first turn. The 2” retreat takes it out of the M6mean charge range of 13” but not its maximum charge range. This is as the furthest unit (I) can retreat and while not entirely safe, it reducesthe probability of a successful charge. Sometimes a unit could advance fast enough to prevent any chance of asuccessful retreat of an enemy unit e.g. an M8 Swiftstride cavalry could advance towithin 8.9” of an M4 unit which then cannot retreat safely – the minimum chargedistance of the M8 unit is 11” (8+3)and the 2” retreat will move the M4 unit to adistance of 10.9” away from the cavalry which is still within the minimum charge reach.The diagram below shows this.
******Created by ebook converter - www.ebook-converter.com******
******ebook converter DEMO - www.ebook-converter.com*******
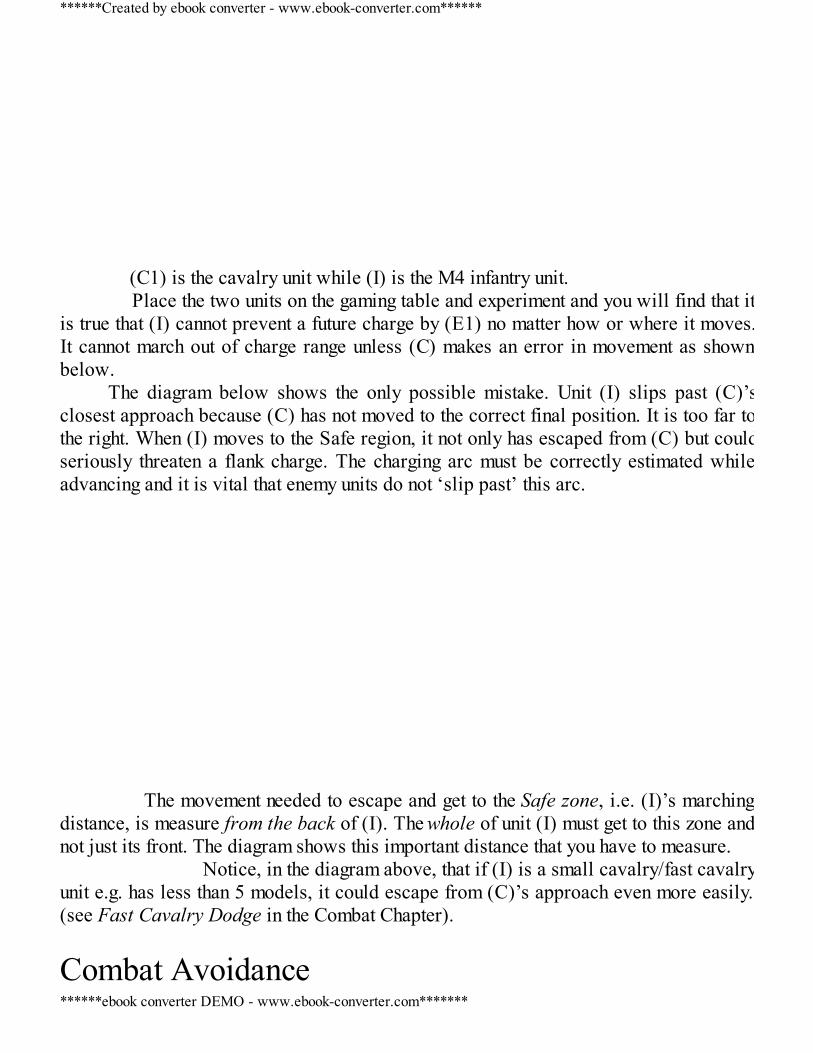
(C1) is the cavalry unit while (I) is the M4 infantry unit. Place the two units on the gaming table and experiment and you will find that itis true that (I) cannot prevent a future charge by (E1) no matter how or where it moves.It cannot march out of charge range unless (C) makes an error in movement as shownbelow.
The diagram below shows the only possible mistake. Unit (I) slips past (C)’sclosest approach because (C) has not moved to the correct final position. It is too far tothe right. When (I) moves to the Safe region, it not only has escaped from (C) but couldseriously threaten a flank charge. The charging arc must be correctly estimated whileadvancing and it is vital that enemy units do not ‘slip past’ this arc. The movement needed to escape and get to the Safe zone, i.e. (I)’s marchingdistance, is measure from the back of (I). The whole of unit (I) must get to this zone andnot just its front. The diagram shows this important distance that you have to measure. Notice, in the diagram above, that if (I) is a small cavalry/fast cavalryunit e.g. has less than 5 models, it could escape from (C)’s approach even more easily.(see Fast Cavalry Dodge in the Combat Chapter).
Combat Avoidance
******Created by ebook converter - www.ebook-converter.com******
******ebook converter DEMO - www.ebook-converter.com*******

This is a general strategy employed by weak units to escape from strongenemy units. It is achieved by combining the various manoeuvres of advancing andretreating mentioned above plus other manoeuvres which will be discussed in thecombat chapter.
An army which is mobile and has a big movement value M6 or better could moveand avoid combat against very strong but slower units e.g. M4 or less. It thenconcentrates on mopping up as many small (or weak) units as possible. If there arenone, then this army will depend on magic or shooting to try to weaken enemy unitssufficiently before manoeuvring for a flank charge. Let’s go though the process step by step:1) Compare movement rates. Combat avoidance is difficult for M4 units and practicallyimpossible for Tomb Kings and M3 dwarfs against faster enemy troops (M6 or fasterbut even M5 can make it difficult). Instead of relying on combat avoidance techniques,Dwarfs and Tomb Kings should concentrate on choosing combat i.e. making sure eachunit moves to fight against a suitable enemy unit or combines against an enemy unit. 2) If you can choose terrain then choose them in this order of preference – buildings,hills and impassable terrain. Study the terrain placement carefully before deployment.There will be some areas that can shelter or protect a flank of a unit, some areas that arefavourable to ambushes and possibly one to make a ‘last stand’. Don’t forget that enemyunits could reach and control these areas before your units. Concentrate on getting to themost accessible areas first and create Dead Spaces wherever possible. Always moveunit/s just behind hills or close to a building (See Buildings strategies in Some Basicsand Combat) while maintaining sufficient space to move when threatened. The diagram shows units (A), (B) and (C) moving towards hills. (A) and (B) arewrongly positioned.
(A) is too far away. When (E1) moves onto the hill in the next turn, (A) cannot
******Created by ebook converter - www.ebook-converter.com******
******ebook converter DEMO - www.ebook-converter.com*******
escape into a Safe Zone.(B) has moved to threaten a flank charge. This achieves nothing since (E2) can
reform to face (B) while (E3) can move onto the hill and will control that area andthreaten (B).
(C) has moved into a good position. The hill is temporarily Dead Space. If (E1)moves onto the hill, (C) can slip past into (E1)’s flank. In later turns, (C) could move tothe back of (E1) forcing (E1) to charge ‘backwards’ - away from the frontline. (E2)could join in to prevent (C) from escaping to a Safe Zone later but this would mean 2units committed to (C) and taken away from the other battle areas. 3) Make sure that your diversionary Sacrificials will not be wiped out in the first 2rounds. They have to be sheltered from range attacks during deployment whilst beingwithin distance of the units they are protecting. The first charge declarations will bemade from turn 2 onwards and these Sacrificials must be able to move to Divert orBlock enemy units.
4) The first step in combat avoidance starts with deployment. Deploy within the12” deployment zone and make sure there is enough space for units to swap places ormove into safer areas.
Just after deployment and before the first turn, think and plan carefully. Take yourtime. The decisions you make here are crucial. Forget about shooting and magic for themoment and just focus on probable combat results. Calculate (using Appendix 1,2 and 3if necessary) which enemy units you can engage in combat with your combat units. Itmight be easier or faster to pick the enemy units that you cannot afford to engage incombat either singly or with a combination of units. Are there any weak enemy units orunits that your stronger combat units can expect to defeat? If so how many rounds ofcombat will it take and can you prevent the best enemy units from joining in this combat.Remember combat avoidance is not avoiding combat completely but to select combatcorrectly. Once you have an idea of how many turns the best enemy unit/s have to beavoided and which enemy units you have to defeat, you can then start considering theRedeployment stage. Put yourself in your opponent’s shoes and work out how youwould move his strongest units in the next turn. There will be several permutations ofpossible moves and it is a matter of experience to pick out the most important. Use the 7‘Beerice’ checks I mentioned previously. Once you’ve got an idea of where the enemyunits would be, start planning how you would move your units to delay combat. Picturethe positions of enemy units for each expected enemy position and then picture how youwould ideally place your units relative to them. After a few trials you will find thatcertain units will have to be in certain areas to guarantee success against all goodmoves made by your opponent. I usually use dice to do this. Work out whether you canmove your units to these positions. Try to cover as many eventualities as possible.
******Created by ebook converter - www.ebook-converter.com******
******ebook converter DEMO - www.ebook-converter.com*******
Usually you will not be able to do this and something has to be sacrificed.Only now do you start considering your magic and shooting. You should know by
now which enemy units will cause problems and which could be easy pickings. If youcannot move all your units into ideal positions, then consider sacrificing a unit andshooting certain enemy units. Magic is a gamble and should always be incorporated intoyour early plans as a last ditch attempt.
Usually one unit will have to be pushed right up towards the most dangerous partof the enemy front line while units further behind readjust their positions. Make sure thatthis unit will be within reach and not blocked by your own units. Look at the spacesavailable for your other units to move into or towards. Are there any possible Lures,Retreats, Diversions, Blocks and Ambushes that you can set up? Use these manoeuvresto break up the enemy frontline, split the combat zones into more than one area andprevent enemy units being combined in battle.
Watch out for opportunities to break through the enemy front line. Ideally a strongunit which is able to move behind the enemy front line is a serious threat. It has to bedealt with and enemy units will have to turn around to face it. It should then be able tomove out of or away from charge range. If the unit cannot do this then it should not havebeen moved there in the first place i.e. beware of gaps in the enemy frontline whichactually serve to lure units and then trap them.
Once the enemy units have moved and it is your next turn, go through the sameprocess again. If there are any possible charges for your units then do not declare themuntil you have considered charge reactions and the positions of your units after combat.
Increasing Attacks Some units, e.g. elite units like Swordmasters, Chosen, etc are able to inflictseveral wounds in combat. Their number of attacks should be maximised. These unitsare best if they are 7 models wide instead of 5 at deployment. They should be widerthan the enemy unit they wish to engage. On the charge they will have a good chance ofinflicting a large number of wounds and prevent as many enemy models from hittingback.
******Created by ebook converter - www.ebook-converter.com******
******ebook converter DEMO - www.ebook-converter.com*******
If an elite unit faces an inevitable charge from a weaker unit and woundsalone inflicted (by the elite unit) could win the combat then change formation so thatthe elite unit is wider than the charging unit - it should have 1 or 2 extra models inits frontage. A quick word on changing combat formations especially of a weakened unit ora unit that has been substantially depleted. A unit of Monstrous infantry of just 4 models is best placed in a 2 X 2formation. This reduces its frontage and therefore its unit of depletion. For 6 models, a3X3 formation is normally better if each model has 3 attacks. +1 Cr is gained from theadditional rank while all models can use all their attacks in combat. An old trick which has been prevented by the FAQ is deploying a unit 3 wide.Weak characters like Wizards or even a BSB are placed in the second rank while theCommand group is in the front rank. The unit reforms and keeps the characters in thesecond rank.
Reinforcing a weakened unit A unit that is reduced in numbers still has some uses. In combat, it may lackranks or be outnumbered but on some occasions can help other units in combatespecially against wide or wider enemy units. By placing the smaller unit next to a fully ranked up unit they could complementeach other in combat. Engaging in combat also enables the smaller unit to evade theunwanted attention of shooting and magic
******Created by ebook converter - www.ebook-converter.com******
******ebook converter DEMO - www.ebook-converter.com*******
Unit (E2) is down to just 5 models. Unit (E1) is fully ranked up. Enemy unit(A) is wider than both and is threatening a charge which (E2) cannot retreat from.Simply placing (E1) and (E2) so that their fronts are 1” apart and on the same straightline, forces (A) to charge both units. This occurs because (A)’s final alignment willbring it into contact with both units no matter how it is adjusted. If (E2) is a strong elite unit, then it could inflict wounds while (E1) providesthe static combat bonuses. In addition (E2) could position its champion and if it has acharacter, the character as well, in one corner in base contact with (E1) to increase itschances of inflicting wounds. The above should only be used if the extra wounds inflicted by (A) (on E1) isnot bigger than the static CR created by (E1).
Slowing down the enemy Enemy units which canA) break many of your unitsB) inflict numerous wounds, in combat and are fast moving should be slowed down.The reasons are:i) to position other friendly units for a future flank charge orii) to wait for the arrival of a unit strong enough to deal with them oriii) simply to tie them down as long as possible to minimise their damage Unbreakable units are the best unit to stop a rampaging enemy unit. They arecommonly referred to as ‘tar pits’. The calibre of the Unbreakable unit plays a big partin its ability to hold up dangerous enemy elite units. Most of these units have poor or noarmour saves but quite often are able to dish out quite a lot of punishment. On thecharge, such units are not to be trifled with. When charged, although less dangerous, Unbreakable units should still be ableto hold enemy units for more than 1 turn of combat. Even if an Unbreakable unit ischarged in the flank or rear they could still hold, as only the number of wounds inflictedon them matters. They should be pushed up against the enemy unit and used as the Anvil– (see Anvil and Hammer). Another unit can then flank the enemy unit in the next turn. Daemon units are a close second but will probably suffer wounds from a badroll if they lose combat.
******Created by ebook converter - www.ebook-converter.com******
******ebook converter DEMO - www.ebook-converter.com*******
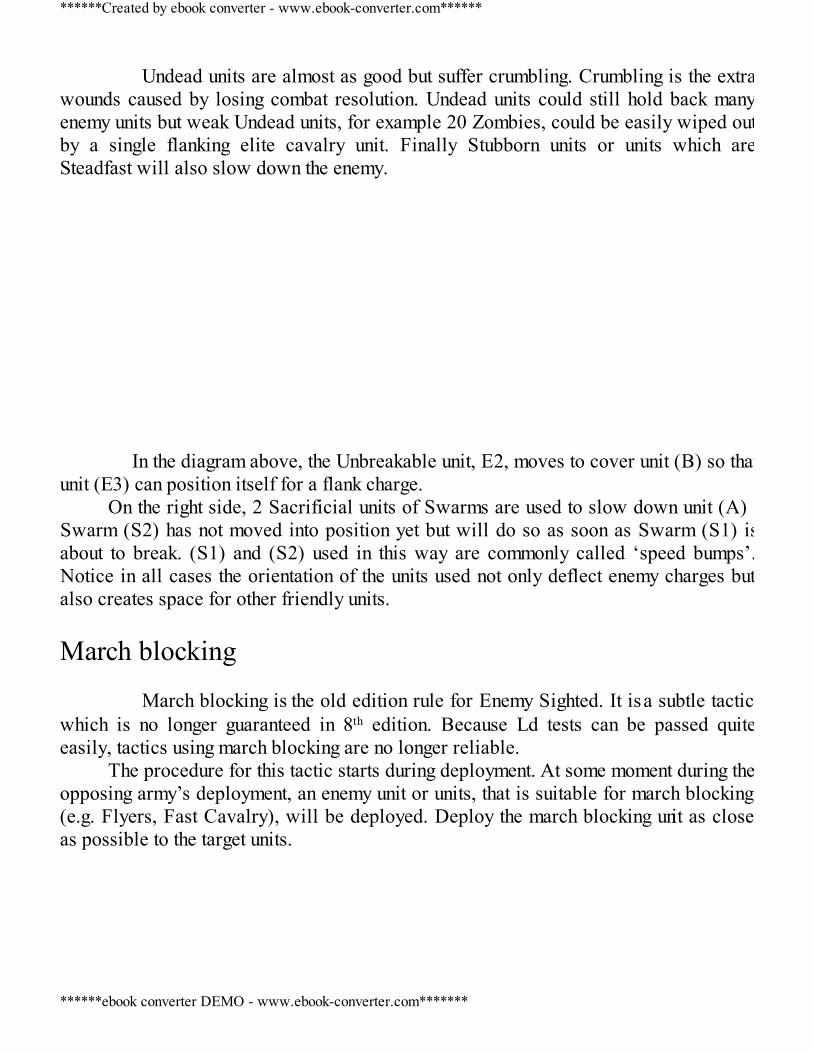
Undead units are almost as good but suffer crumbling. Crumbling is the extrawounds caused by losing combat resolution. Undead units could still hold back manyenemy units but weak Undead units, for example 20 Zombies, could be easily wiped outby a single flanking elite cavalry unit. Finally Stubborn units or units which areSteadfast will also slow down the enemy. In the diagram above, the Unbreakable unit, E2, moves to cover unit (B) so thatunit (E3) can position itself for a flank charge.
On the right side, 2 Sacrificial units of Swarms are used to slow down unit (A) .Swarm (S2) has not moved into position yet but will do so as soon as Swarm (S1) isabout to break. (S1) and (S2) used in this way are commonly called ‘speed bumps’.Notice in all cases the orientation of the units used not only deflect enemy charges butalso creates space for other friendly units. March blocking March blocking is the old edition rule for Enemy Sighted. It is a subtle tacticwhich is no longer guaranteed in 8th edition. Because Ld tests can be passed quiteeasily, tactics using march blocking are no longer reliable.
The procedure for this tactic starts during deployment. At some moment during theopposing army’s deployment, an enemy unit or units, that is suitable for march blocking(e.g. Flyers, Fast Cavalry), will be deployed. Deploy the march blocking unit as closeas possible to the target units.
******Created by ebook converter - www.ebook-converter.com******
******ebook converter DEMO - www.ebook-converter.com*******
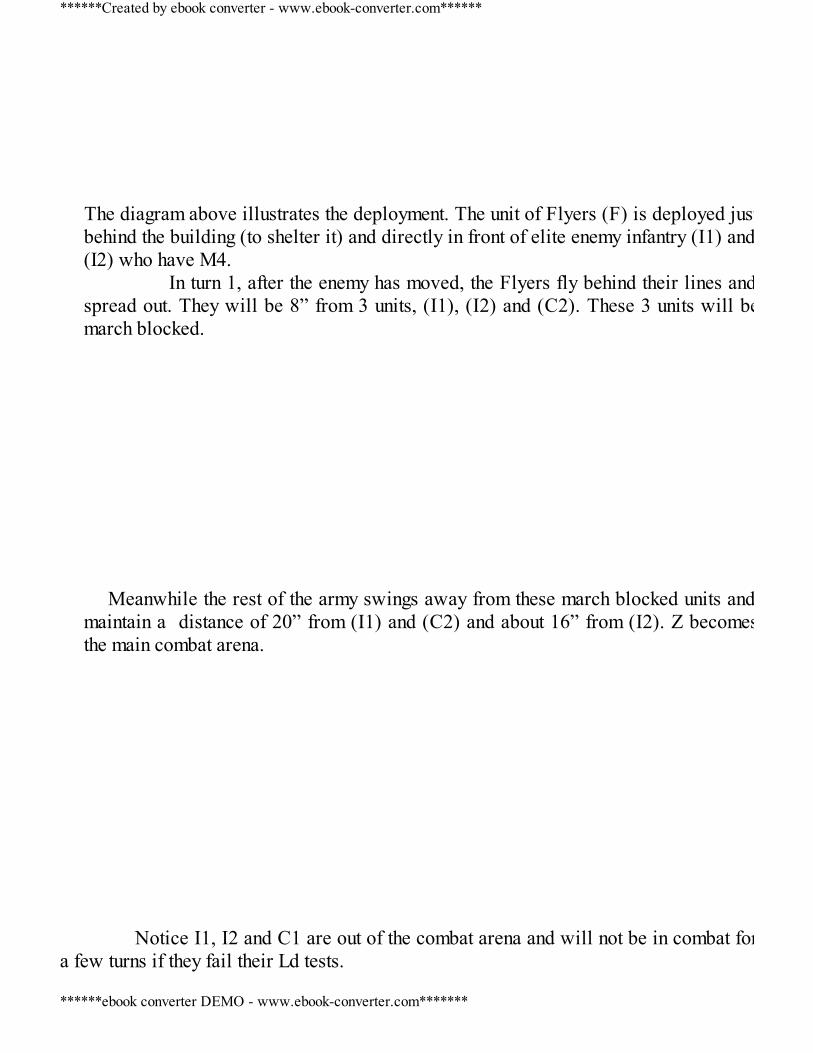
The diagram above illustrates the deployment. The unit of Flyers (F) is deployed justbehind the building (to shelter it) and directly in front of elite enemy infantry (I1) and(I2) who have M4. In turn 1, after the enemy has moved, the Flyers fly behind their lines andspread out. They will be 8” from 3 units, (I1), (I2) and (C2). These 3 units will bemarch blocked.
Meanwhile the rest of the army swings away from these march blocked units and
maintain a distance of 20” from (I1) and (C2) and about 16” from (I2). Z becomesthe main combat arena.
Notice I1, I2 and C1 are out of the combat arena and will not be in combat fora few turns if they fail their Ld tests.
******Created by ebook converter - www.ebook-converter.com******
******ebook converter DEMO - www.ebook-converter.com*******
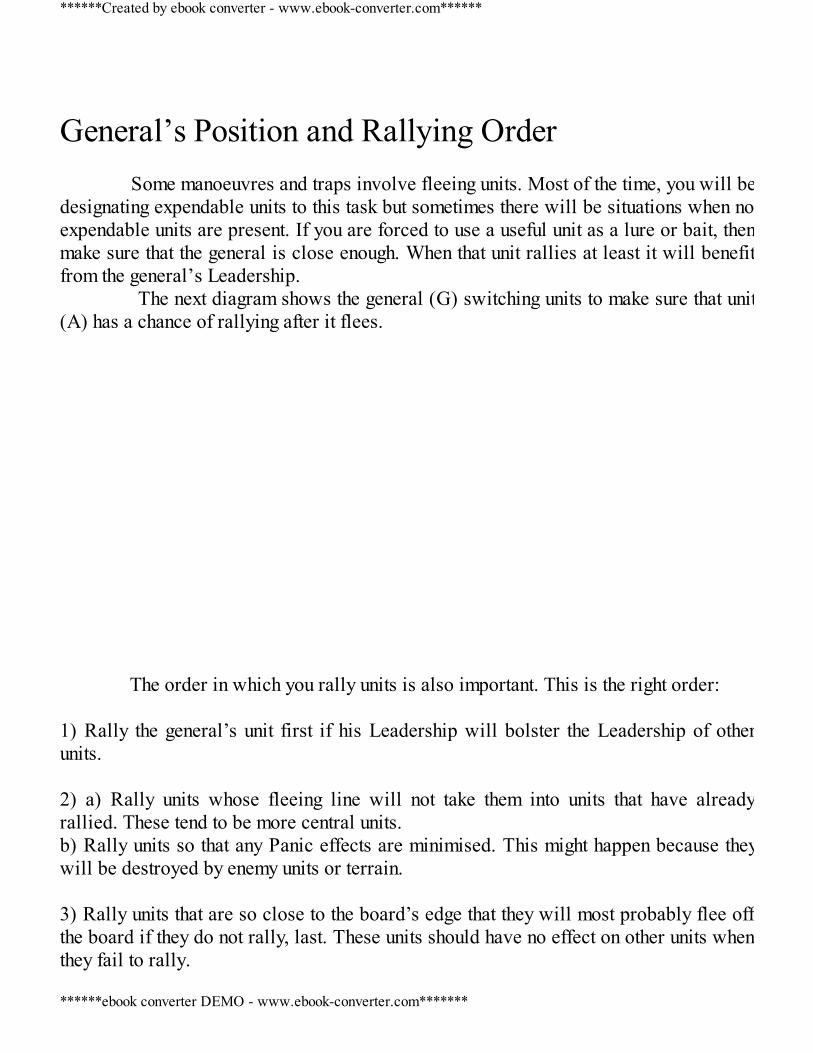
General’s Position and Rallying Order Some manoeuvres and traps involve fleeing units. Most of the time, you will bedesignating expendable units to this task but sometimes there will be situations when noexpendable units are present. If you are forced to use a useful unit as a lure or bait, thenmake sure that the general is close enough. When that unit rallies at least it will benefitfrom the general’s Leadership. The next diagram shows the general (G) switching units to make sure that unit(A) has a chance of rallying after it flees. The order in which you rally units is also important. This is the right order: 1) Rally the general’s unit first if his Leadership will bolster the Leadership of otherunits. 2) a) Rally units whose fleeing line will not take them into units that have alreadyrallied. These tend to be more central units.b) Rally units so that any Panic effects are minimised. This might happen because theywill be destroyed by enemy units or terrain. 3) Rally units that are so close to the board’s edge that they will most probably flee offthe board if they do not rally, last. These units should have no effect on other units whenthey fail to rally.
******Created by ebook converter - www.ebook-converter.com******
******ebook converter DEMO - www.ebook-converter.com*******
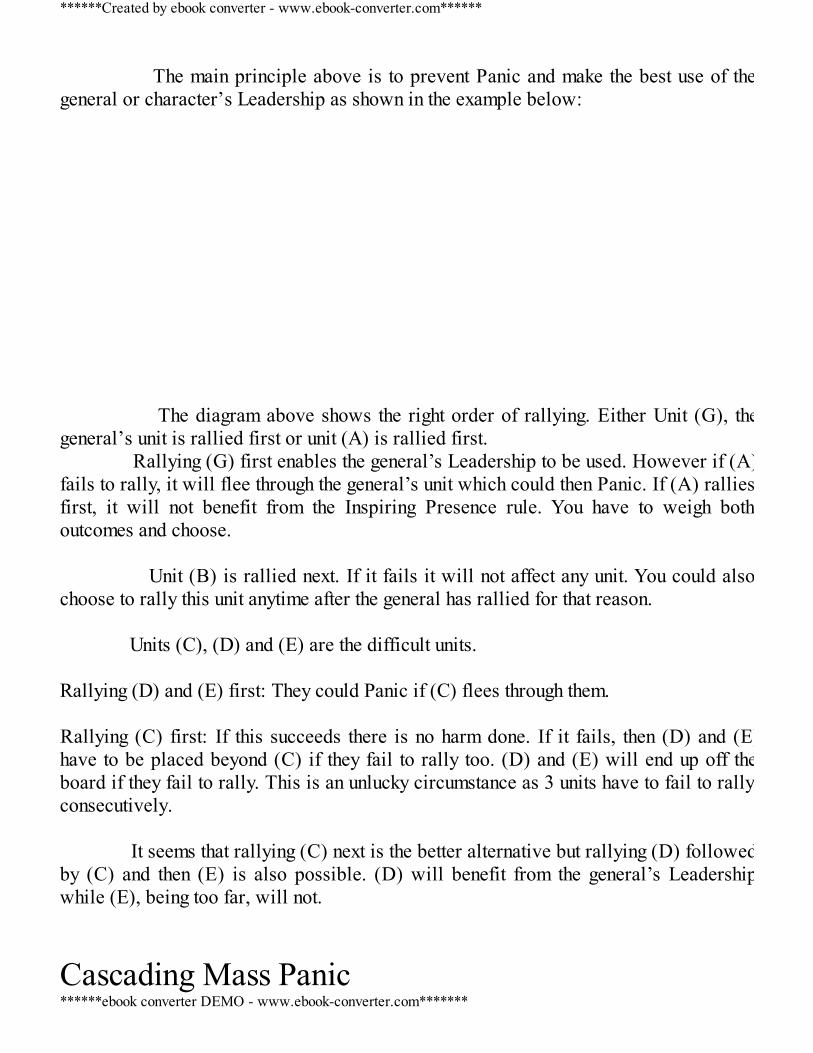
The main principle above is to prevent Panic and make the best use of thegeneral or character’s Leadership as shown in the example below: The diagram above shows the right order of rallying. Either Unit (G), thegeneral’s unit is rallied first or unit (A) is rallied first. Rallying (G) first enables the general’s Leadership to be used. However if (A)fails to rally, it will flee through the general’s unit which could then Panic. If (A) ralliesfirst, it will not benefit from the Inspiring Presence rule. You have to weigh bothoutcomes and choose. Unit (B) is rallied next. If it fails it will not affect any unit. You could alsochoose to rally this unit anytime after the general has rallied for that reason. Units (C), (D) and (E) are the difficult units. Rallying (D) and (E) first: They could Panic if (C) flees through them. Rallying (C) first: If this succeeds there is no harm done. If it fails, then (D) and (E)have to be placed beyond (C) if they fail to rally too. (D) and (E) will end up off theboard if they fail to rally. This is an unlucky circumstance as 3 units have to fail to rallyconsecutively. It seems that rallying (C) next is the better alternative but rallying (D) followedby (C) and then (E) is also possible. (D) will benefit from the general’s Leadershipwhile (E), being too far, will not.
Cascading Mass Panic
******Created by ebook converter - www.ebook-converter.com******
******ebook converter DEMO - www.ebook-converter.com*******
Units (A1) – (A7) have a Leadership of 5. (A1) is the only unit within range of the
enemy. It is forced to take a Panic test (or Terror or Fear) and fails miserably. As (A1) flees it runs through (A2) and (A3) who in turn test for Panic and fail.(A2) and (A3) run through units (A4) – (A7) who could easily fail their Panic test. A whole army could be crippled from one failed Psychology test. In these armies, the position of the general is more critical than ever. Thegeneral must survive. If your army comprises of numerous low Leadership units thenpreserve the general. Shelter him from shooting and magic and avoid gambling him indangerous combats. If you are facing such an army, then target the general liberally with spells orshooting especially those that can isolate characters.
Shooting Basics Move or Shoot? Are your warmachines and shooters within the right range? If not they have tobe moved. Look at the large spaces where the enemy will probably infiltrate.Do your shooters have adequate LOS to these spaces in this turn and future turns? When it is the enemy’s shooting phase, reverse the process above by asking thesame questions for enemy shooters. It is then easier to evaluate which units should orneed to be sheltered but remember this has to be done in your Movement phase.
******Created by ebook converter - www.ebook-converter.com******
******ebook converter DEMO - www.ebook-converter.com*******

If the shooting unit is not threatened, target selection is easier. It is astraight choice between inflicting as many wounds as possible or thinning down adangerous unit. A target with low toughness and armour saves could suffer manycasualties but you may have to target a unit with a higher toughness or good armoursaves to fit in with your overall strategy. There is a delicate balance between the twochoices and it is up to you to study the situation carefully each round and prioritise. Shooting on its own cannot destroy a big strong unit in the first few rounds butcombat will. In the early rounds of the battle: If your combat units can handle most of the enemy’s combat troops easily,then choose the targets most susceptible to shooting and either destroy themcompletely or reduce them to an ineffectual size. If not, use your shooting to thin down any enemy combat unit to give yourcombat units a fighting chance. In later turns, the strategy for shooting should be changed. Since the battle isnearly over, shooting should not mainly be used to thin down units. Use shooting to destroy enemy units completely or to inflict sufficientwounds for a Panic test that might take them off the board Use shooting to pick out and destroy any isolated characters. Concentrated shooting and Target selection If you have more than one shooting unit, then it is far better to concentrate allyour shooting on one enemy unit. Your shooting units do not have to be deployed in onearea for this. Simply make sure they are within range of the general area where thejuiciest targets are, or are expected to move towards.
******Created by ebook converter - www.ebook-converter.com******
******ebook converter DEMO - www.ebook-converter.com*******
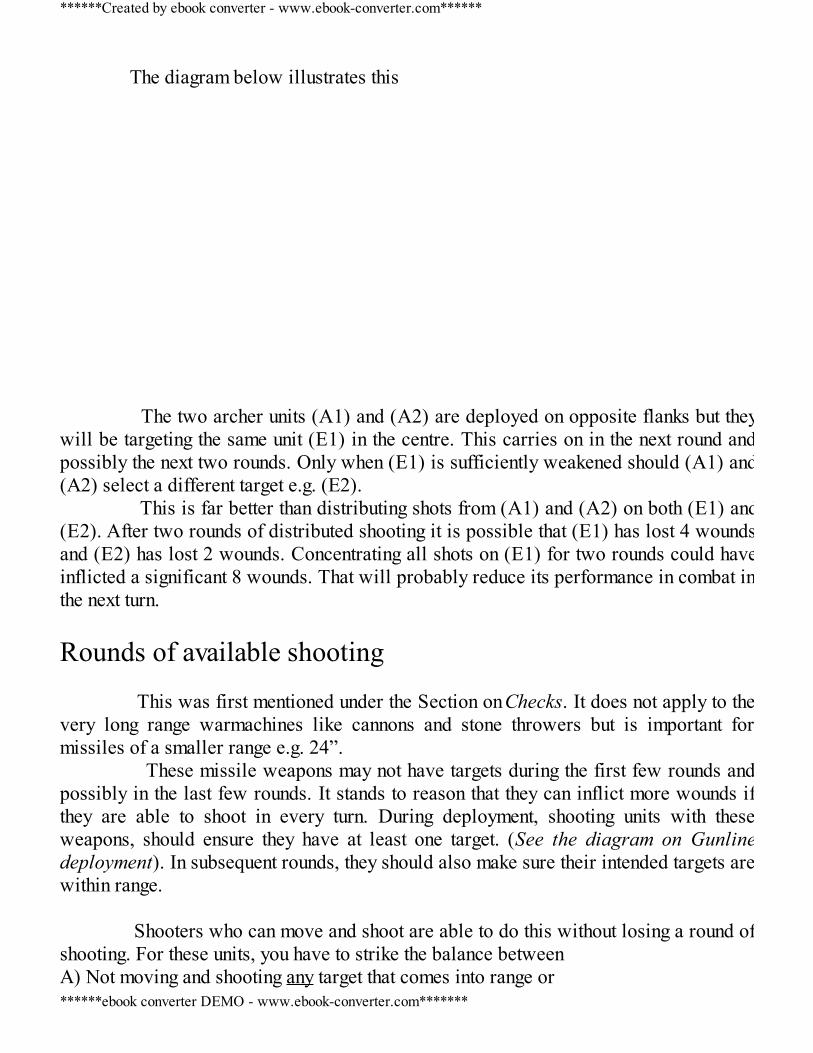
The diagram below illustrates this The two archer units (A1) and (A2) are deployed on opposite flanks but theywill be targeting the same unit (E1) in the centre. This carries on in the next round andpossibly the next two rounds. Only when (E1) is sufficiently weakened should (A1) and(A2) select a different target e.g. (E2). This is far better than distributing shots from (A1) and (A2) on both (E1) and(E2). After two rounds of distributed shooting it is possible that (E1) has lost 4 woundsand (E2) has lost 2 wounds. Concentrating all shots on (E1) for two rounds could haveinflicted a significant 8 wounds. That will probably reduce its performance in combat inthe next turn. Rounds of available shooting This was first mentioned under the Section on Checks. It does not apply to thevery long range warmachines like cannons and stone throwers but is important formissiles of a smaller range e.g. 24”. These missile weapons may not have targets during the first few rounds andpossibly in the last few rounds. It stands to reason that they can inflict more wounds ifthey are able to shoot in every turn. During deployment, shooting units with theseweapons, should ensure they have at least one target. (See the diagram on Gunlinedeployment). In subsequent rounds, they should also make sure their intended targets arewithin range. Shooters who can move and shoot are able to do this without losing a round ofshooting. For these units, you have to strike the balance betweenA) Not moving and shooting any target that comes into range or
******Created by ebook converter - www.ebook-converter.com******
******ebook converter DEMO - www.ebook-converter.com*******
B) Moving to a better position to shoot the correct targets you have identified The presence of a few fast moving units will also curtail the number of roundsavailable to shooting. A mainly cavalry army like Bretonnians would limit the numberof shooting rounds to just one or two.
If you are facing an army which relies heavily on shooting you must ensure thatyour deployment and movement will take you as quickly as possible into combat or thegun-lines. If however you rely on shooting, a little fancy footwork especially aroundterrain would help you gain an extra round or two of shooting. Effective Shooting Range For Move or Fire shooting units, the shooting range is simply the range of themissile weapon. However some shooting units can move and shoot. This makes theireffective range their M (Movement value) plus the range of the missile weapon bigger.Skinks have an effective range of M5+12 = 17”. Two types of units, Skirmishers andFast Cavalry have an even bigger effective range since they can march and shoot.Chameleon Skinks, Skink Skirmishers and Gutter Runners for instance have an effectiverange of 22” – M5X2 + 12”. Empire Pistoliers also benefit from this. Their effectiverange is 28”.
To avoid being shot at, enemy units must place themselves beyond the effectiverange. Terrain and shootingHills Hills are the ideal terrain for shooting units since they offer the advantage ofLOS over intervening units Buildings Buildings are important for shooting units as they offer ample shelter and allow360o LOS. On the other hand buildings are also a good stop over point as you charge upto warmachines and shooting units. The diagrams below illustrate these principles.
******Created by ebook converter - www.ebook-converter.com******
******ebook converter DEMO - www.ebook-converter.com*******
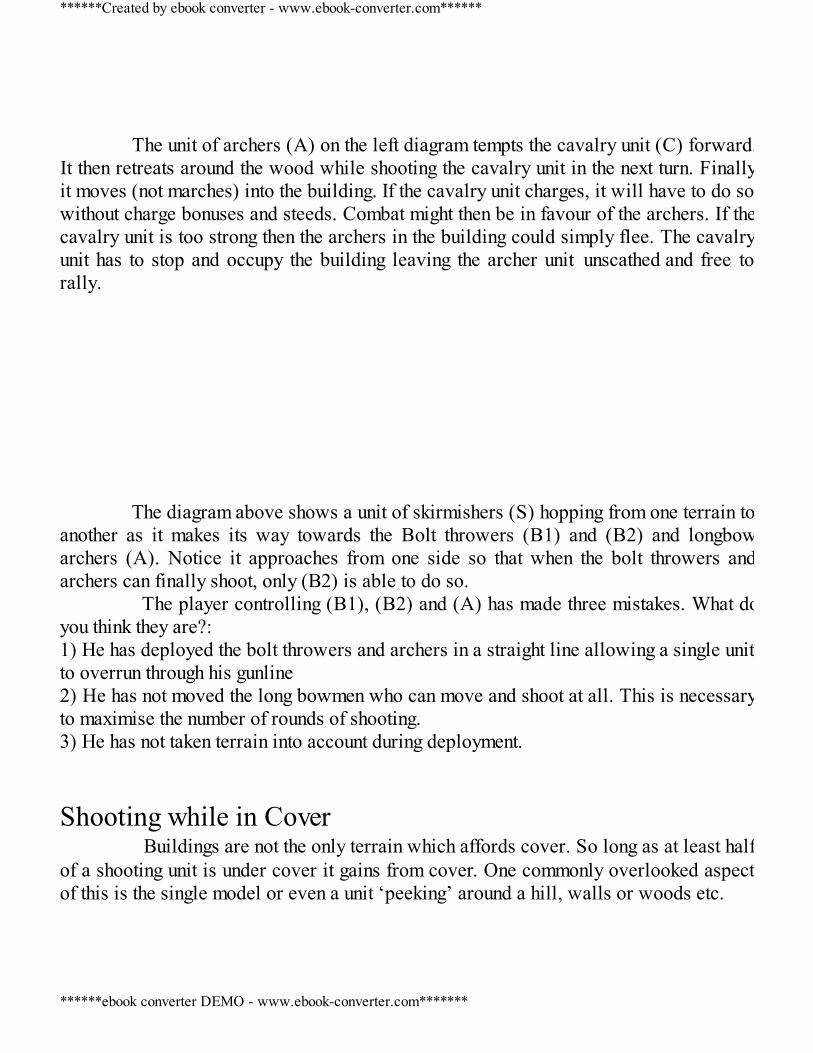
The unit of archers (A) on the left diagram tempts the cavalry unit (C) forward.It then retreats around the wood while shooting the cavalry unit in the next turn. Finallyit moves (not marches) into the building. If the cavalry unit charges, it will have to do sowithout charge bonuses and steeds. Combat might then be in favour of the archers. If thecavalry unit is too strong then the archers in the building could simply flee. The cavalryunit has to stop and occupy the building leaving the archer unit unscathed and free torally. The diagram above shows a unit of skirmishers (S) hopping from one terrain toanother as it makes its way towards the Bolt throwers (B1) and (B2) and longbowarchers (A). Notice it approaches from one side so that when the bolt throwers andarchers can finally shoot, only (B2) is able to do so. The player controlling (B1), (B2) and (A) has made three mistakes. What doyou think they are?:1) He has deployed the bolt throwers and archers in a straight line allowing a single unitto overrun through his gunline2) He has not moved the long bowmen who can move and shoot at all. This is necessaryto maximise the number of rounds of shooting.3) He has not taken terrain into account during deployment. Shooting while in Cover Buildings are not the only terrain which affords cover. So long as at least halfof a shooting unit is under cover it gains from cover. One commonly overlooked aspectof this is the single model or even a unit ‘peeking’ around a hill, walls or woods etc.
******Created by ebook converter - www.ebook-converter.com******
******ebook converter DEMO - www.ebook-converter.com*******
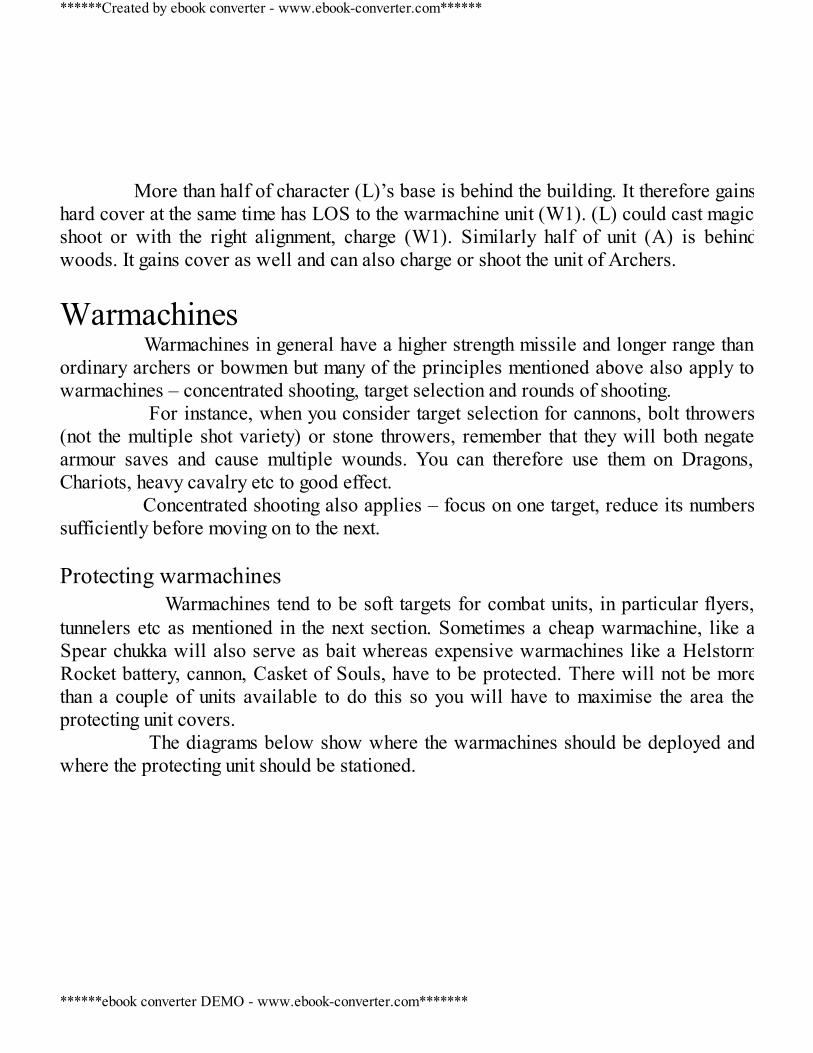
More than half of character (L)’s base is behind the building. It therefore gainshard cover at the same time has LOS to the warmachine unit (W1). (L) could cast magic,shoot or with the right alignment, charge (W1). Similarly half of unit (A) is behindwoods. It gains cover as well and can also charge or shoot the unit of Archers.
Warmachines Warmachines in general have a higher strength missile and longer range thanordinary archers or bowmen but many of the principles mentioned above also apply towarmachines – concentrated shooting, target selection and rounds of shooting. For instance, when you consider target selection for cannons, bolt throwers(not the multiple shot variety) or stone throwers, remember that they will both negatearmour saves and cause multiple wounds. You can therefore use them on Dragons,Chariots, heavy cavalry etc to good effect. Concentrated shooting also applies – focus on one target, reduce its numberssufficiently before moving on to the next. Protecting warmachines Warmachines tend to be soft targets for combat units, in particular flyers,tunnelers etc as mentioned in the next section. Sometimes a cheap warmachine, like aSpear chukka will also serve as bait whereas expensive warmachines like a HelstormRocket battery, cannon, Casket of Souls, have to be protected. There will not be morethan a couple of units available to do this so you will have to maximise the area theprotecting unit covers. The diagrams below show where the warmachines should be deployed andwhere the protecting unit should be stationed.
******Created by ebook converter - www.ebook-converter.com******
******ebook converter DEMO - www.ebook-converter.com*******
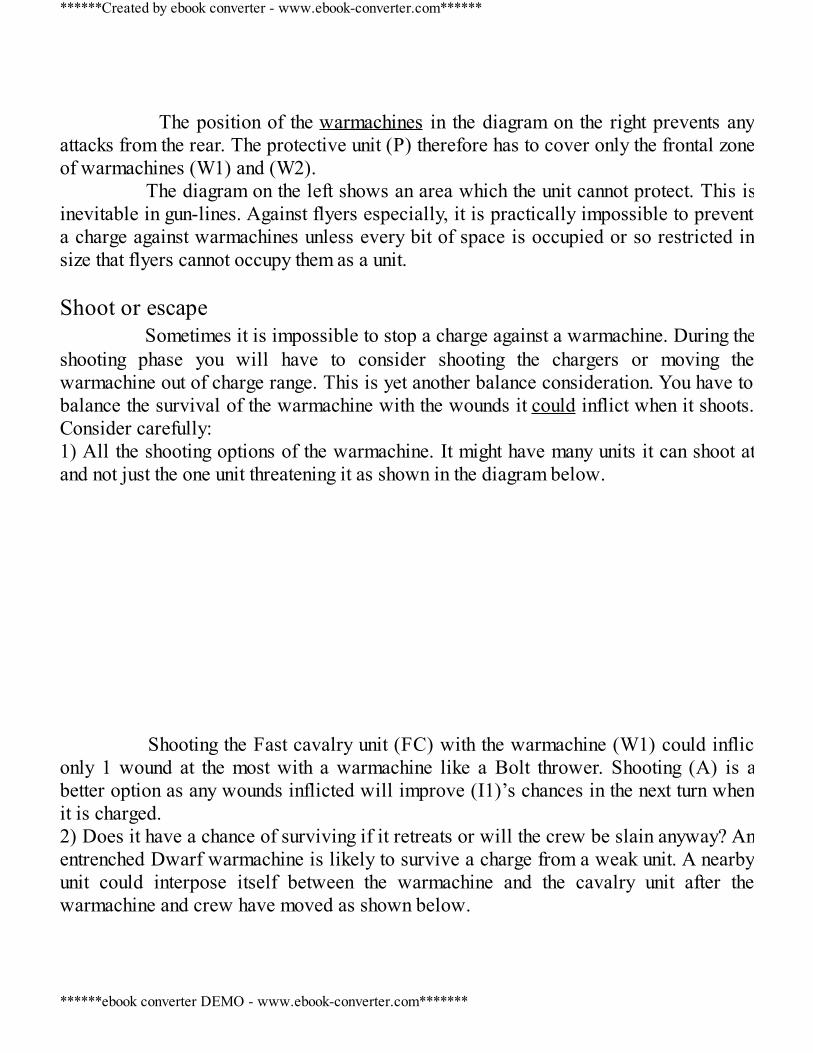
The position of the warmachines in the diagram on the right prevents anyattacks from the rear. The protective unit (P) therefore has to cover only the frontal zoneof warmachines (W1) and (W2). The diagram on the left shows an area which the unit cannot protect. This isinevitable in gun-lines. Against flyers especially, it is practically impossible to preventa charge against warmachines unless every bit of space is occupied or so restricted insize that flyers cannot occupy them as a unit. Shoot or escape Sometimes it is impossible to stop a charge against a warmachine. During theshooting phase you will have to consider shooting the chargers or moving thewarmachine out of charge range. This is yet another balance consideration. You have tobalance the survival of the warmachine with the wounds it could inflict when it shoots.Consider carefully:1) All the shooting options of the warmachine. It might have many units it can shoot atand not just the one unit threatening it as shown in the diagram below. Shooting the Fast cavalry unit (FC) with the warmachine (W1) could inflictonly 1 wound at the most with a warmachine like a Bolt thrower. Shooting (A) is abetter option as any wounds inflicted will improve (I1)’s chances in the next turn whenit is charged.2) Does it have a chance of surviving if it retreats or will the crew be slain anyway? Anentrenched Dwarf warmachine is likely to survive a charge from a weak unit. A nearbyunit could interpose itself between the warmachine and the cavalry unit after thewarmachine and crew have moved as shown below.
******Created by ebook converter - www.ebook-converter.com******
******ebook converter DEMO - www.ebook-converter.com*******
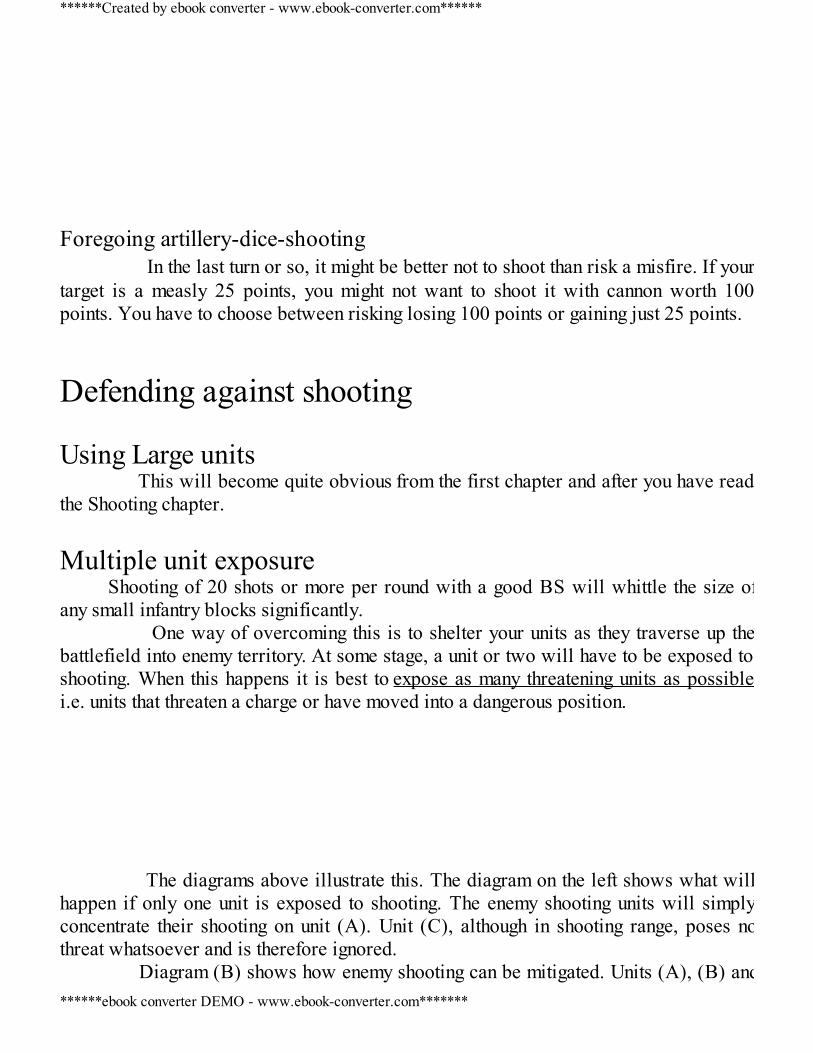
Foregoing artillery-dice-shooting In the last turn or so, it might be better not to shoot than risk a misfire. If yourtarget is a measly 25 points, you might not want to shoot it with cannon worth 100points. You have to choose between risking losing 100 points or gaining just 25 points.
Defending against shooting Using Large units This will become quite obvious from the first chapter and after you have readthe Shooting chapter. Multiple unit exposure
Shooting of 20 shots or more per round with a good BS will whittle the size ofany small infantry blocks significantly. One way of overcoming this is to shelter your units as they traverse up thebattlefield into enemy territory. At some stage, a unit or two will have to be exposed toshooting. When this happens it is best to expose as many threatening units as possiblei.e. units that threaten a charge or have moved into a dangerous position. The diagrams above illustrate this. The diagram on the left shows what willhappen if only one unit is exposed to shooting. The enemy shooting units will simplyconcentrate their shooting on unit (A). Unit (C), although in shooting range, poses nothreat whatsoever and is therefore ignored. Diagram (B) shows how enemy shooting can be mitigated. Units (A), (B) and
******Created by ebook converter - www.ebook-converter.com******
******ebook converter DEMO - www.ebook-converter.com*******
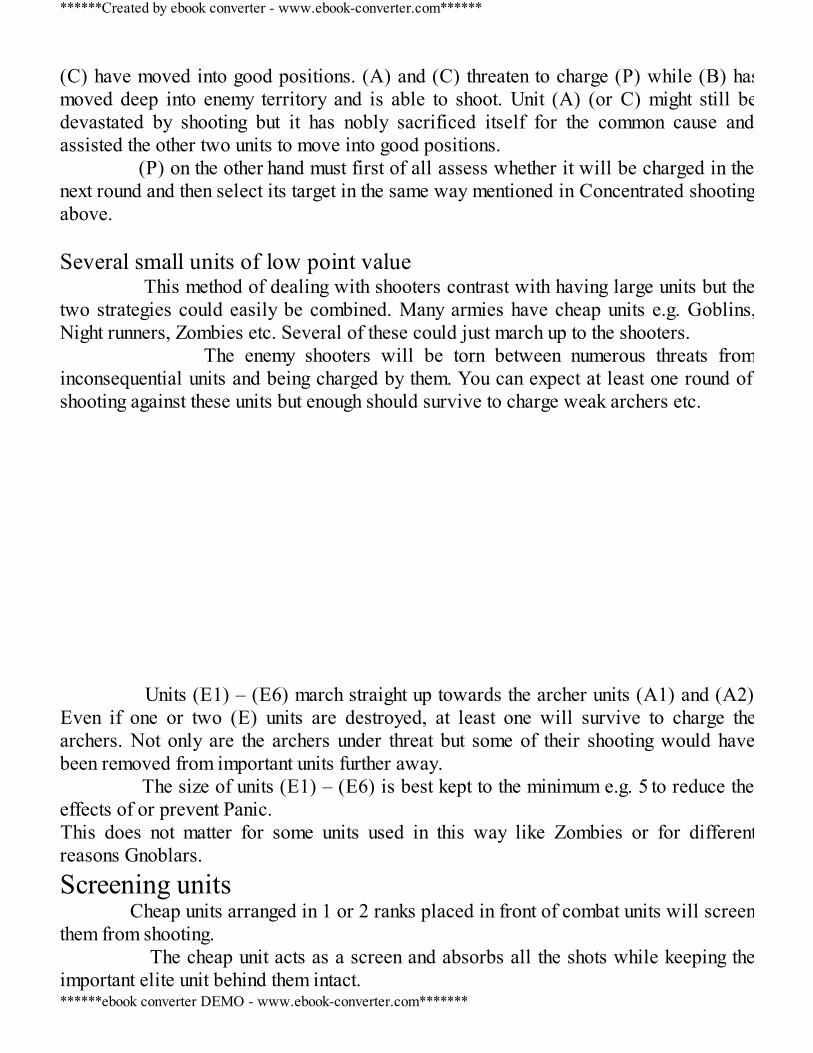
(C) have moved into good positions. (A) and (C) threaten to charge (P) while (B) hasmoved deep into enemy territory and is able to shoot. Unit (A) (or C) might still bedevastated by shooting but it has nobly sacrificed itself for the common cause andassisted the other two units to move into good positions. (P) on the other hand must first of all assess whether it will be charged in thenext round and then select its target in the same way mentioned in Concentrated shootingabove. Several small units of low point value This method of dealing with shooters contrast with having large units but thetwo strategies could easily be combined. Many armies have cheap units e.g. Goblins,Night runners, Zombies etc. Several of these could just march up to the shooters. The enemy shooters will be torn between numerous threats frominconsequential units and being charged by them. You can expect at least one round ofshooting against these units but enough should survive to charge weak archers etc. Units (E1) – (E6) march straight up towards the archer units (A1) and (A2).Even if one or two (E) units are destroyed, at least one will survive to charge thearchers. Not only are the archers under threat but some of their shooting would havebeen removed from important units further away. The size of units (E1) – (E6) is best kept to the minimum e.g. 5 to reduce theeffects of or prevent Panic.This does not matter for some units used in this way like Zombies or for differentreasons Gnoblars.Screening units Cheap units arranged in 1 or 2 ranks placed in front of combat units will screenthem from shooting. The cheap unit acts as a screen and absorbs all the shots while keeping theimportant elite unit behind them intact.
******Created by ebook converter - www.ebook-converter.com******
******ebook converter DEMO - www.ebook-converter.com*******
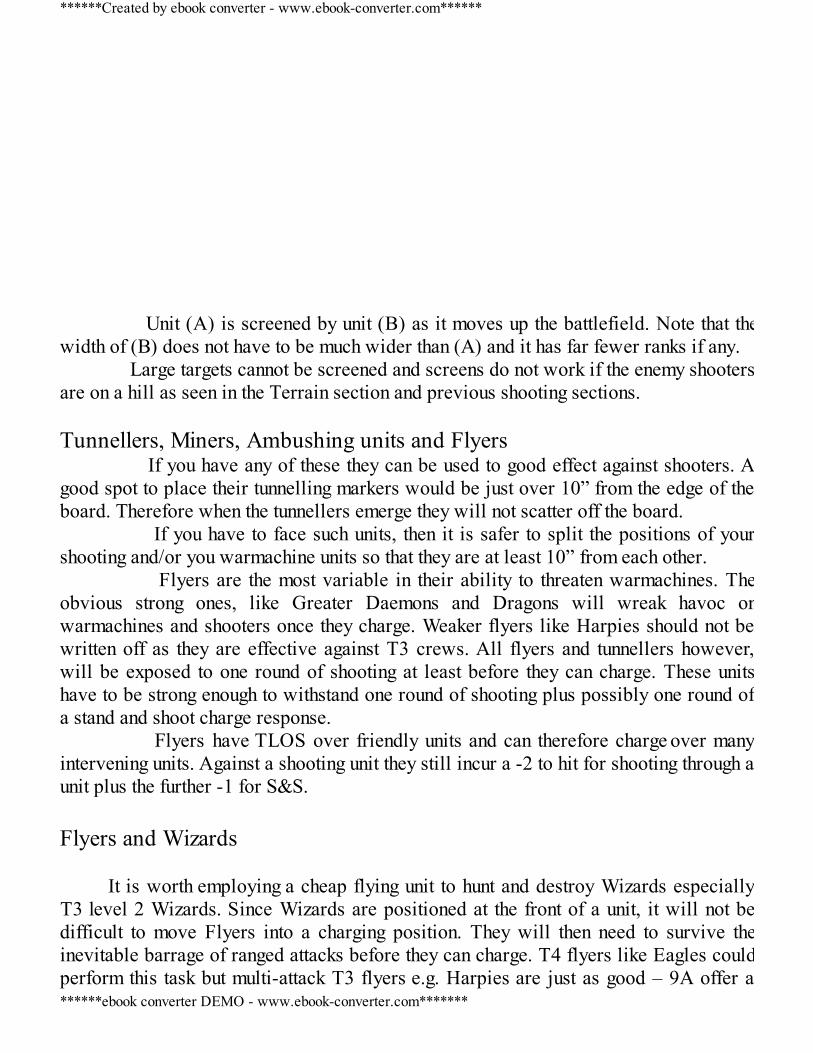
Unit (A) is screened by unit (B) as it moves up the battlefield. Note that thewidth of (B) does not have to be much wider than (A) and it has far fewer ranks if any. Large targets cannot be screened and screens do not work if the enemy shootersare on a hill as seen in the Terrain section and previous shooting sections. Tunnellers, Miners, Ambushing units and Flyers If you have any of these they can be used to good effect against shooters. Agood spot to place their tunnelling markers would be just over 10” from the edge of theboard. Therefore when the tunnellers emerge they will not scatter off the board. If you have to face such units, then it is safer to split the positions of yourshooting and/or you warmachine units so that they are at least 10” from each other. Flyers are the most variable in their ability to threaten warmachines. Theobvious strong ones, like Greater Daemons and Dragons will wreak havoc onwarmachines and shooters once they charge. Weaker flyers like Harpies should not bewritten off as they are effective against T3 crews. All flyers and tunnellers however,will be exposed to one round of shooting at least before they can charge. These unitshave to be strong enough to withstand one round of shooting plus possibly one round ofa stand and shoot charge response. Flyers have TLOS over friendly units and can therefore charge over manyintervening units. Against a shooting unit they still incur a -2 to hit for shooting through aunit plus the further -1 for S&S. Flyers and Wizards
It is worth employing a cheap flying unit to hunt and destroy Wizards especiallyT3 level 2 Wizards. Since Wizards are positioned at the front of a unit, it will not bedifficult to move Flyers into a charging position. They will then need to survive theinevitable barrage of ranged attacks before they can charge. T4 flyers like Eagles couldperform this task but multi-attack T3 flyers e.g. Harpies are just as good – 9A offer a
******Created by ebook converter - www.ebook-converter.com******
******ebook converter DEMO - www.ebook-converter.com*******
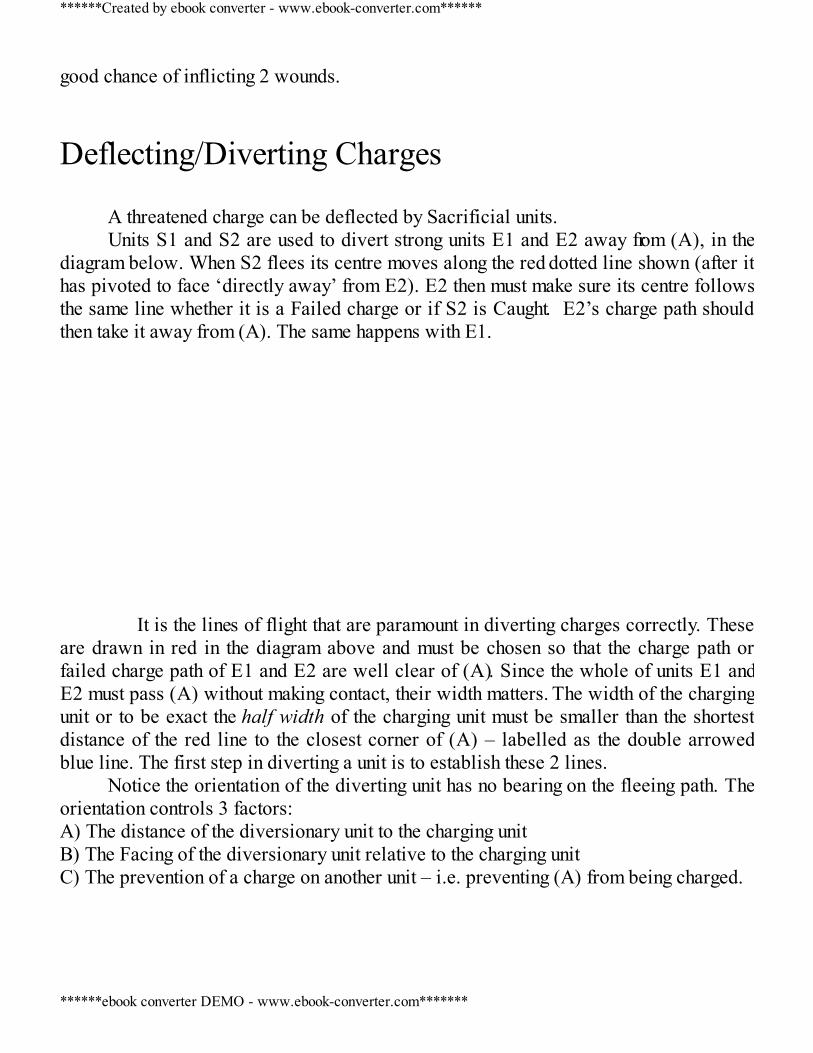
good chance of inflicting 2 wounds.
Deflecting/Diverting Charges
A threatened charge can be deflected by Sacrificial units.Units S1 and S2 are used to divert strong units E1 and E2 away from (A), in the
diagram below. When S2 flees its centre moves along the red dotted line shown (after ithas pivoted to face ‘directly away’ from E2). E2 then must make sure its centre followsthe same line whether it is a Failed charge or if S2 is Caught. E2’s charge path shouldthen take it away from (A). The same happens with E1. It is the lines of flight that are paramount in diverting charges correctly. Theseare drawn in red in the diagram above and must be chosen so that the charge path orfailed charge path of E1 and E2 are well clear of (A). Since the whole of units E1 andE2 must pass (A) without making contact, their width matters. The width of the chargingunit or to be exact the half width of the charging unit must be smaller than the shortestdistance of the red line to the closest corner of (A) – labelled as the double arrowedblue line. The first step in diverting a unit is to establish these 2 lines.
Notice the orientation of the diverting unit has no bearing on the fleeing path. Theorientation controls 3 factors:A) The distance of the diversionary unit to the charging unitB) The Facing of the diversionary unit relative to the charging unitC) The prevention of a charge on another unit – i.e. preventing (A) from being charged.
******Created by ebook converter - www.ebook-converter.com******
******ebook converter DEMO - www.ebook-converter.com*******
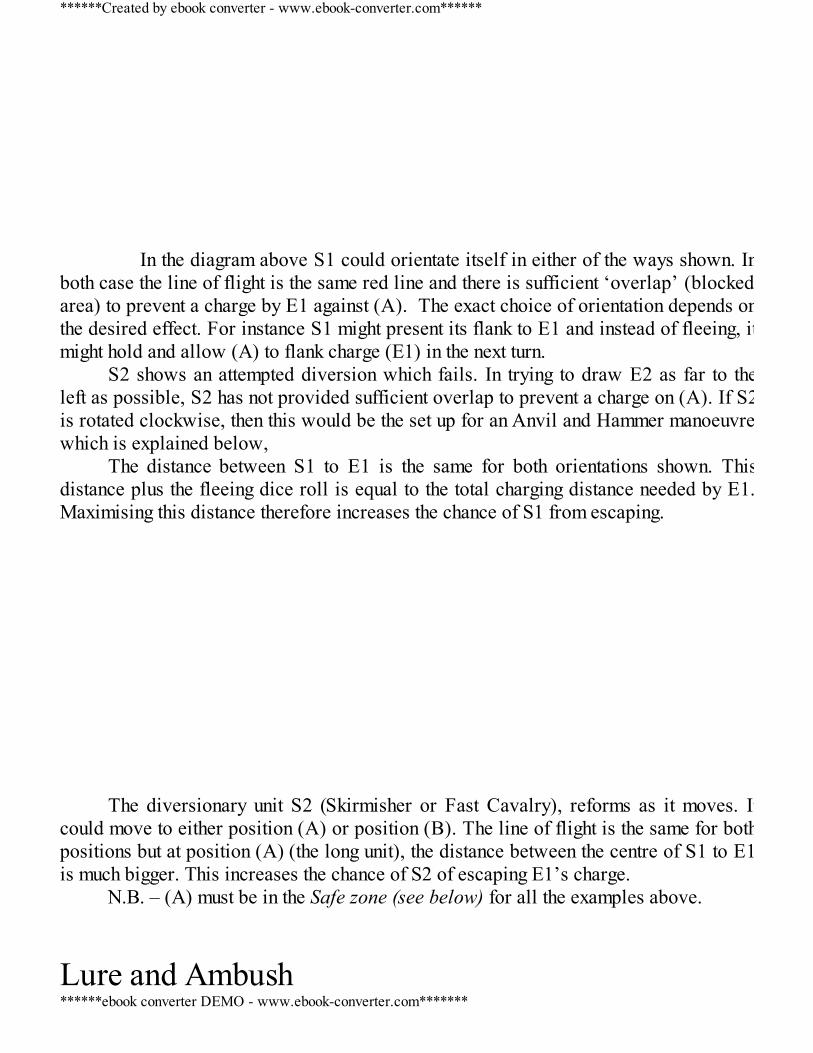
In the diagram above S1 could orientate itself in either of the ways shown. Inboth case the line of flight is the same red line and there is sufficient ‘overlap’ (blockedarea) to prevent a charge by E1 against (A). The exact choice of orientation depends onthe desired effect. For instance S1 might present its flank to E1 and instead of fleeing, itmight hold and allow (A) to flank charge (E1) in the next turn.
S2 shows an attempted diversion which fails. In trying to draw E2 as far to theleft as possible, S2 has not provided sufficient overlap to prevent a charge on (A). If S2is rotated clockwise, then this would be the set up for an Anvil and Hammer manoeuvrewhich is explained below,
The distance between S1 to E1 is the same for both orientations shown. Thisdistance plus the fleeing dice roll is equal to the total charging distance needed by E1.Maximising this distance therefore increases the chance of S1 from escaping.
The diversionary unit S2 (Skirmisher or Fast Cavalry), reforms as it moves. It
could move to either position (A) or position (B). The line of flight is the same for bothpositions but at position (A) (the long unit), the distance between the centre of S1 to E1is much bigger. This increases the chance of S2 of escaping E1’s charge.
N.B. – (A) must be in the Safe zone (see below) for all the examples above.
Lure and Ambush
******Created by ebook converter - www.ebook-converter.com******
******ebook converter DEMO - www.ebook-converter.com*******
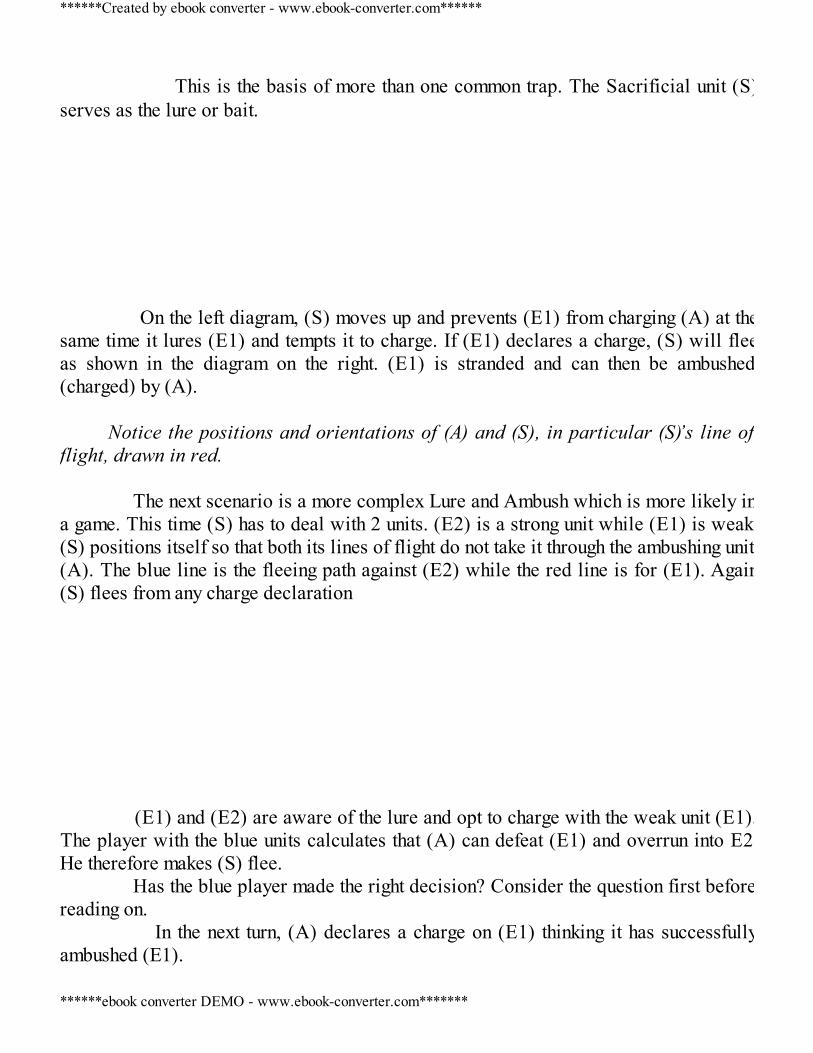
This is the basis of more than one common trap. The Sacrificial unit (S)serves as the lure or bait. On the left diagram, (S) moves up and prevents (E1) from charging (A) at thesame time it lures (E1) and tempts it to charge. If (E1) declares a charge, (S) will fleeas shown in the diagram on the right. (E1) is stranded and can then be ambushed(charged) by (A).
Notice the positions and orientations of (A) and (S), in particular (S)’s line offlight, drawn in red. The next scenario is a more complex Lure and Ambush which is more likely ina game. This time (S) has to deal with 2 units. (E2) is a strong unit while (E1) is weak.(S) positions itself so that both its lines of flight do not take it through the ambushing unit(A). The blue line is the fleeing path against (E2) while the red line is for (E1). Again(S) flees from any charge declaration (E1) and (E2) are aware of the lure and opt to charge with the weak unit (E1).The player with the blue units calculates that (A) can defeat (E1) and overrun into E2.He therefore makes (S) flee. Has the blue player made the right decision? Consider the question first beforereading on. In the next turn, (A) declares a charge on (E1) thinking it has successfullyambushed (E1).
******Created by ebook converter - www.ebook-converter.com******
******ebook converter DEMO - www.ebook-converter.com*******
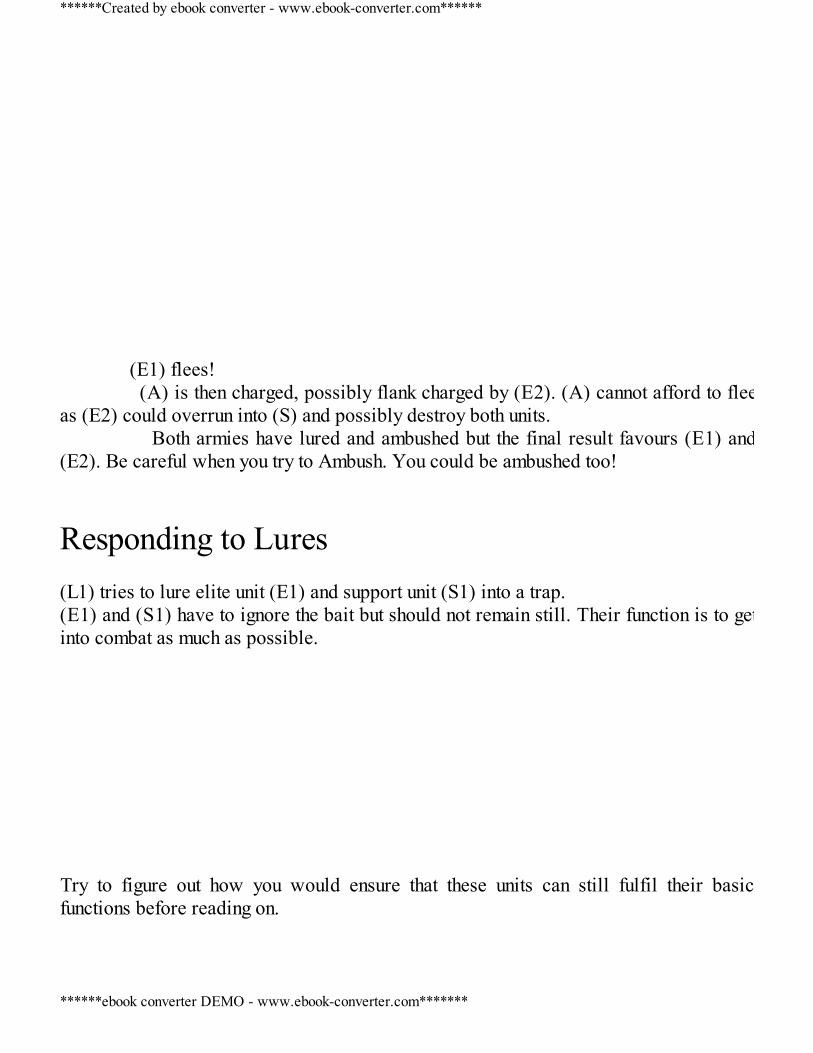
(E1) flees! (A) is then charged, possibly flank charged by (E2). (A) cannot afford to fleeas (E2) could overrun into (S) and possibly destroy both units. Both armies have lured and ambushed but the final result favours (E1) and(E2). Be careful when you try to Ambush. You could be ambushed too!
Responding to Lures (L1) tries to lure elite unit (E1) and support unit (S1) into a trap.(E1) and (S1) have to ignore the bait but should not remain still. Their function is to getinto combat as much as possible. Try to figure out how you would ensure that these units can still fulfil their basicfunctions before reading on.
******Created by ebook converter - www.ebook-converter.com******
******ebook converter DEMO - www.ebook-converter.com*******
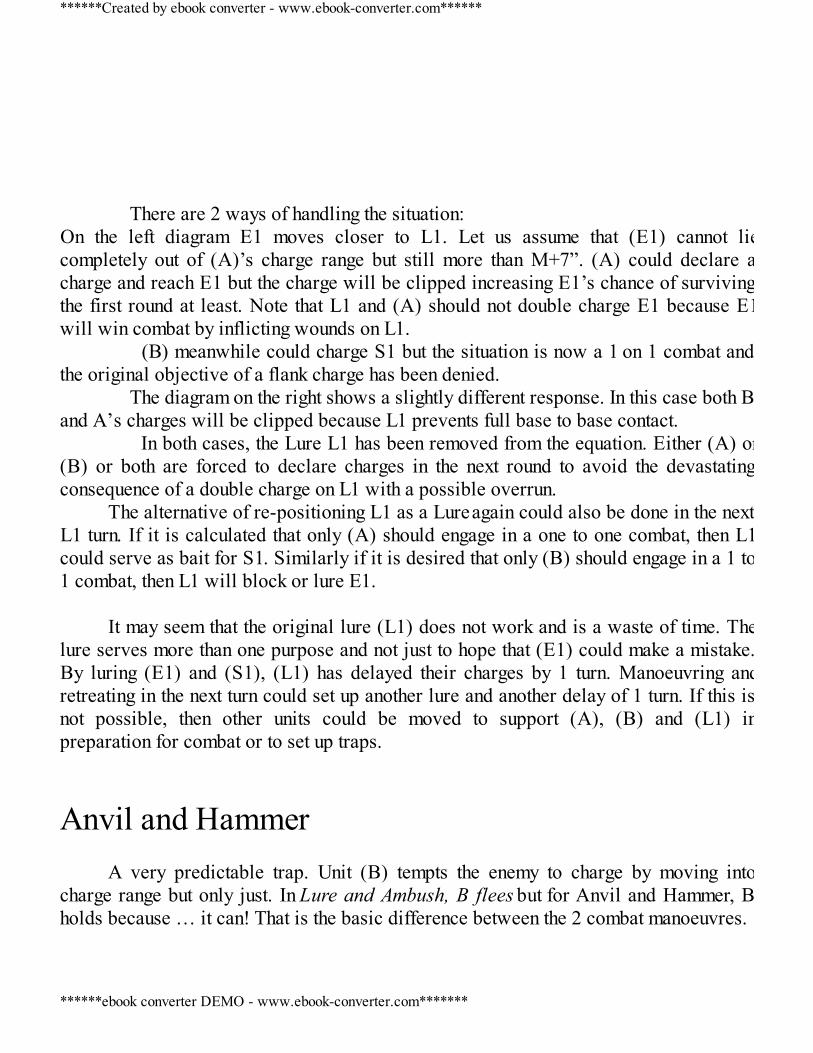
There are 2 ways of handling the situation:On the left diagram E1 moves closer to L1. Let us assume that (E1) cannot liecompletely out of (A)’s charge range but still more than M+7”. (A) could declare acharge and reach E1 but the charge will be clipped increasing E1’s chance of survivingthe first round at least. Note that L1 and (A) should not double charge E1 because E1will win combat by inflicting wounds on L1. (B) meanwhile could charge S1 but the situation is now a 1 on 1 combat andthe original objective of a flank charge has been denied. The diagram on the right shows a slightly different response. In this case both Band A’s charges will be clipped because L1 prevents full base to base contact. In both cases, the Lure L1 has been removed from the equation. Either (A) or(B) or both are forced to declare charges in the next round to avoid the devastatingconsequence of a double charge on L1 with a possible overrun.
The alternative of re-positioning L1 as a Lure again could also be done in the nextL1 turn. If it is calculated that only (A) should engage in a one to one combat, then L1could serve as bait for S1. Similarly if it is desired that only (B) should engage in a 1 to1 combat, then L1 will block or lure E1.
It may seem that the original lure (L1) does not work and is a waste of time. The
lure serves more than one purpose and not just to hope that (E1) could make a mistake.By luring (E1) and (S1), (L1) has delayed their charges by 1 turn. Manoeuvring andretreating in the next turn could set up another lure and another delay of 1 turn. If this isnot possible, then other units could be moved to support (A), (B) and (L1) inpreparation for combat or to set up traps.
Anvil and Hammer
A very predictable trap. Unit (B) tempts the enemy to charge by moving intocharge range but only just. In Lure and Ambush, B flees but for Anvil and Hammer, Bholds because … it can! That is the basic difference between the 2 combat manoeuvres.
******Created by ebook converter - www.ebook-converter.com******
******ebook converter DEMO - www.ebook-converter.com*******
In Anvil and Hammer, a resilient unit (low rate of depletion) is used to hold acharging enemy unit. In the next turn the Hammer units (in this case C and A) willcharge the flank preferably. Either or both of these units could charge depending on thesituation; e.g. 1 unit only will charge if the other flank is needed to deter other enemyunits from charging later OR both units could charge to add a further +1 to static CR andinflict more wounds. These hammer units have a high rate of slaying which meansusually an above average rate of depletion. However this is less of a concern becausethere will be no support attacks for the enemy’s flank models. Therefore even though theHammer unit/s have a high rate of depletion, they will be subjected to less attacks –usually about half which brings it in line with the Anvil unit’s rate of depletion. The main problem with the Anvil and Hammer manoeuvre is that the flankingunit/s are exposing their flanks. Two units are also being used against one – anuncommon situation in 8th edition. Anvil and Breaking Hammer This is a variation of the Anvil and Hammer in which the Hammer unit breaksfrom combat while the Anvil unit remains Steadfast. The Hammer unit then rallies andrecharges the enemy unit again. 2 turns would have passed before this happens making itless dependable. A second hammer unit could be used to plug in the gap. It will meancommitting 3 units to a single combat or possibly a single enemy unit – a situation thatdoes not arise very often.
This tactic may however be used when the enemy unit is on the verge of beenannihilated or breaking from combat. The Hammer unit then tips the balance of combatresolution to cause the enemy to lose combat.
Behind enemy lines Once a unit has managed to move behind the enemy’s front line, it becomes a
******Created by ebook converter - www.ebook-converter.com******
******ebook converter DEMO - www.ebook-converter.com*******
huge threat or at least an irritating thorn amongst your units. Other than the obvious rearcharge and march blocking (explained above), it also fulfils other purposes. Destroying enemy fleers, warmachines and weak units Warmachines quite often remain static throughout the battle and becomes anobvious target for any unit behind enemy lines. Similarly weakened units or isolatedcharacter and characters/units that are hiding behind terrain should also be targeted.Plan this before attempting to move behind the enemy’s front line. Study the area behindthe enemy’s front line carefully and then gauge whether your Flyers, Scouts, FastCavalry or any other unit suitable for this purpose can take on the enemy warmachinesetc. Any fleeing enemy unit can also be easily destroyed as it has to flee again whencharged. These units can easily be caught or chased off the board if you position yourunit correctly behind enemy lines. The diagrams in the next section show all this. Cutting off retreats/flights A unit behind the enemy front line also acts as a cut-off unit against enemyretreats. Unit (A) has moved past (E1) and (E2) and now changes formation into a longline behind them – assuming it is a skirmisher or fast cavalry unit. If it is not, any unitthat can squeeze in between (E1) and (E2) will fulfil the same role.
Unit (B) is in combat with (E1) and has a good chance of breaking them. If (E1)does break and flees successfully from (B), (A) could charge and destroy E1 in the nextround. Unit (C) moves forward and threatens to charge (E3) in its next turn. If (E3)flees as a charge response, it has to take Dangerous Terrain tests as its models movethrough (A). Furthermore, from the 1” rule it has to be placed beyond (A) and this mighttake it off the board i.e. destroyed.
******Created by ebook converter - www.ebook-converter.com******
******ebook converter DEMO - www.ebook-converter.com*******
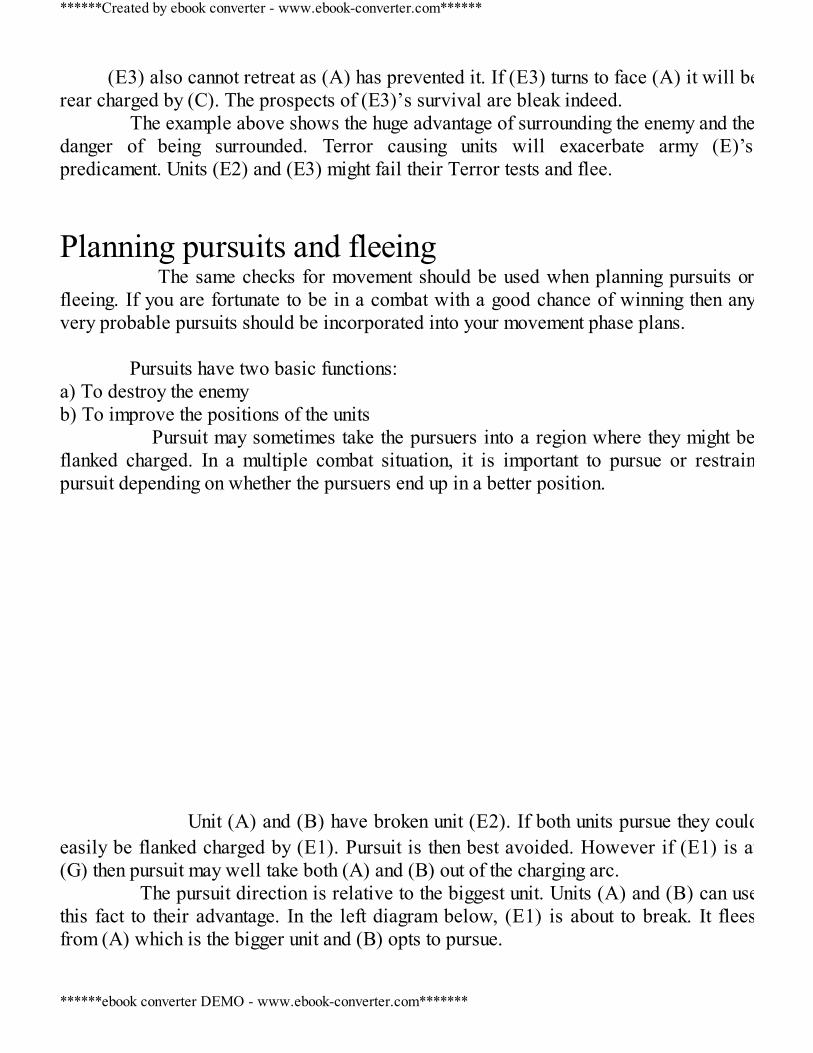
(E3) also cannot retreat as (A) has prevented it. If (E3) turns to face (A) it will berear charged by (C). The prospects of (E3)’s survival are bleak indeed. The example above shows the huge advantage of surrounding the enemy and thedanger of being surrounded. Terror causing units will exacerbate army (E)’spredicament. Units (E2) and (E3) might fail their Terror tests and flee.
Planning pursuits and fleeing The same checks for movement should be used when planning pursuits orfleeing. If you are fortunate to be in a combat with a good chance of winning then anyvery probable pursuits should be incorporated into your movement phase plans. Pursuits have two basic functions:a) To destroy the enemyb) To improve the positions of the units Pursuit may sometimes take the pursuers into a region where they might beflanked charged. In a multiple combat situation, it is important to pursue or restrainpursuit depending on whether the pursuers end up in a better position.
Unit (A) and (B) have broken unit (E2). If both units pursue they couldeasily be flanked charged by (E1). Pursuit is then best avoided. However if (E1) is at(G) then pursuit may well take both (A) and (B) out of the charging arc. The pursuit direction is relative to the biggest unit. Units (A) and (B) can usethis fact to their advantage. In the left diagram below, (E1) is about to break. It fleesfrom (A) which is the bigger unit and (B) opts to pursue.
******Created by ebook converter - www.ebook-converter.com******
******ebook converter DEMO - www.ebook-converter.com*******
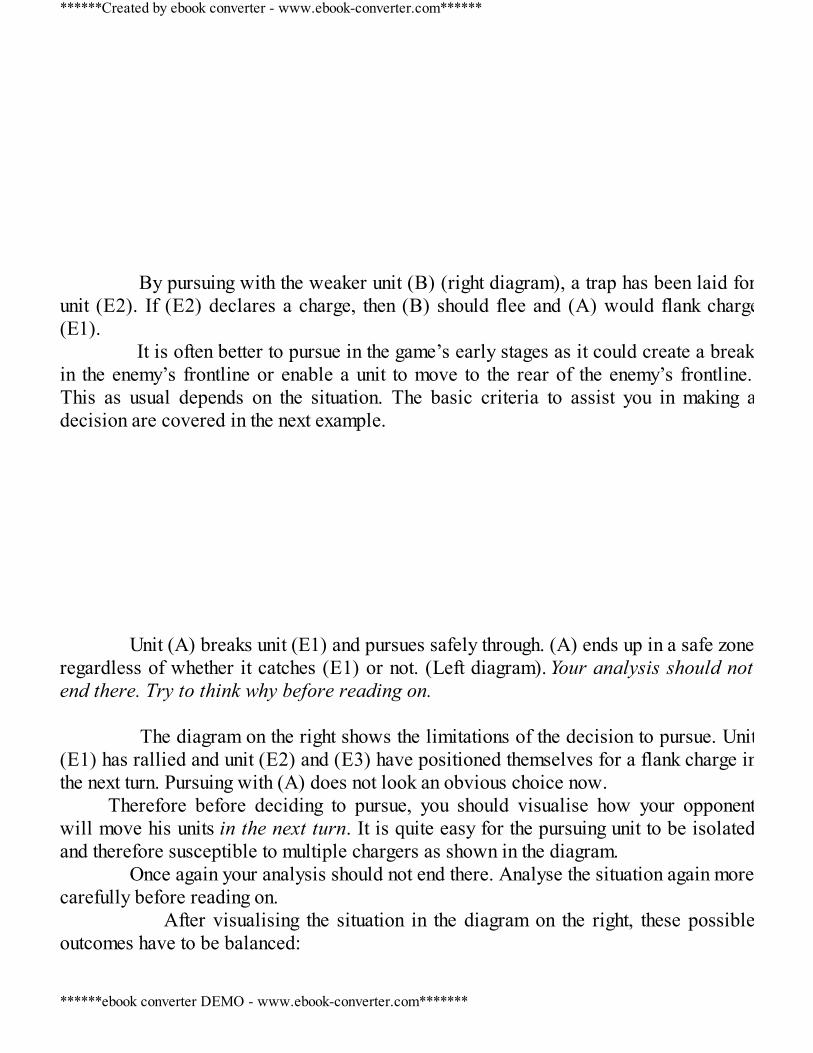
By pursuing with the weaker unit (B) (right diagram), a trap has been laid forunit (E2). If (E2) declares a charge, then (B) should flee and (A) would flank charge(E1). It is often better to pursue in the game’s early stages as it could create a breakin the enemy’s frontline or enable a unit to move to the rear of the enemy’s frontline.This as usual depends on the situation. The basic criteria to assist you in making adecision are covered in the next example. Unit (A) breaks unit (E1) and pursues safely through. (A) ends up in a safe zoneregardless of whether it catches (E1) or not. (Left diagram). Your analysis should notend there. Try to think why before reading on. The diagram on the right shows the limitations of the decision to pursue. Unit(E1) has rallied and unit (E2) and (E3) have positioned themselves for a flank charge inthe next turn. Pursuing with (A) does not look an obvious choice now.
Therefore before deciding to pursue, you should visualise how your opponentwill move his units in the next turn. It is quite easy for the pursuing unit to be isolatedand therefore susceptible to multiple chargers as shown in the diagram. Once again your analysis should not end there. Analyse the situation again morecarefully before reading on. After visualising the situation in the diagram on the right, these possibleoutcomes have to be balanced:
******Created by ebook converter - www.ebook-converter.com******
******ebook converter DEMO - www.ebook-converter.com*******
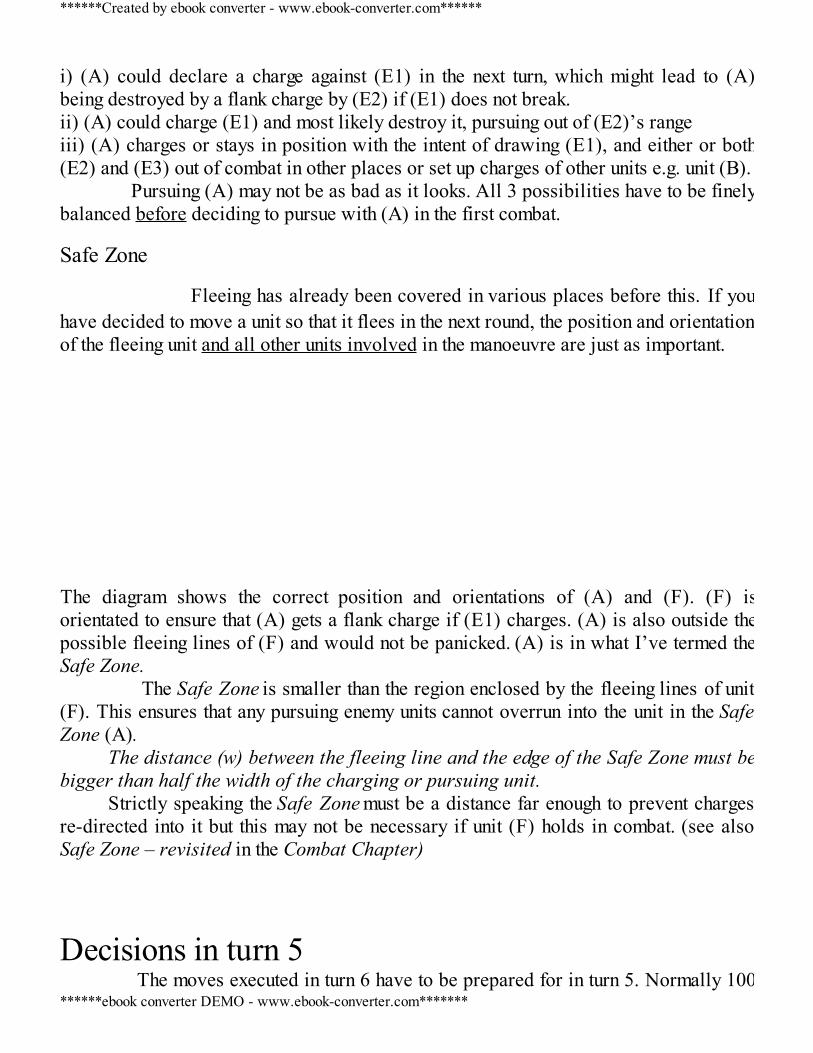
i) (A) could declare a charge against (E1) in the next turn, which might lead to (A)being destroyed by a flank charge by (E2) if (E1) does not break.ii) (A) could charge (E1) and most likely destroy it, pursuing out of (E2)’s rangeiii) (A) charges or stays in position with the intent of drawing (E1), and either or both(E2) and (E3) out of combat in other places or set up charges of other units e.g. unit (B). Pursuing (A) may not be as bad as it looks. All 3 possibilities have to be finelybalanced before deciding to pursue with (A) in the first combat.
Safe Zone
Fleeing has already been covered in various places before this. If youhave decided to move a unit so that it flees in the next round, the position and orientationof the fleeing unit and all other units involved in the manoeuvre are just as important. The diagram shows the correct position and orientations of (A) and (F). (F) isorientated to ensure that (A) gets a flank charge if (E1) charges. (A) is also outside thepossible fleeing lines of (F) and would not be panicked. (A) is in what I’ve termed theSafe Zone. The Safe Zone is smaller than the region enclosed by the fleeing lines of unit(F). This ensures that any pursuing enemy units cannot overrun into the unit in the SafeZone (A).
The distance (w) between the fleeing line and the edge of the Safe Zone must bebigger than half the width of the charging or pursuing unit.
Strictly speaking the Safe Zone must be a distance far enough to prevent chargesre-directed into it but this may not be necessary if unit (F) holds in combat. (see alsoSafe Zone – revisited in the Combat Chapter)
Decisions in turn 5 The moves executed in turn 6 have to be prepared for in turn 5. Normally 100
******Created by ebook converter - www.ebook-converter.com******
******ebook converter DEMO - www.ebook-converter.com*******
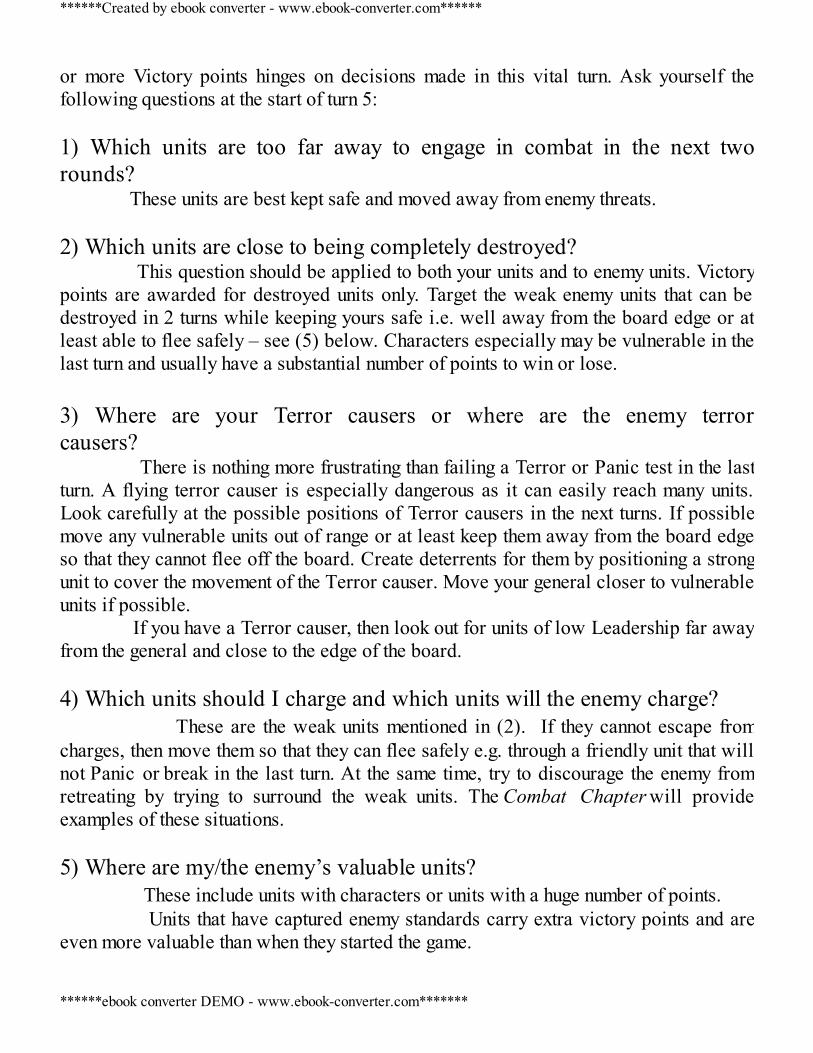
or more Victory points hinges on decisions made in this vital turn. Ask yourself thefollowing questions at the start of turn 5: 1) Which units are too far away to engage in combat in the next tworounds? These units are best kept safe and moved away from enemy threats. 2) Which units are close to being completely destroyed? This question should be applied to both your units and to enemy units. Victorypoints are awarded for destroyed units only. Target the weak enemy units that can bedestroyed in 2 turns while keeping yours safe i.e. well away from the board edge or atleast able to flee safely – see (5) below. Characters especially may be vulnerable in thelast turn and usually have a substantial number of points to win or lose. 3) Where are your Terror causers or where are the enemy terrorcausers? There is nothing more frustrating than failing a Terror or Panic test in the lastturn. A flying terror causer is especially dangerous as it can easily reach many units.Look carefully at the possible positions of Terror causers in the next turns. If possiblemove any vulnerable units out of range or at least keep them away from the board edgeso that they cannot flee off the board. Create deterrents for them by positioning a strongunit to cover the movement of the Terror causer. Move your general closer to vulnerableunits if possible. If you have a Terror causer, then look out for units of low Leadership far awayfrom the general and close to the edge of the board. 4) Which units should I charge and which units will the enemy charge? These are the weak units mentioned in (2). If they cannot escape fromcharges, then move them so that they can flee safely e.g. through a friendly unit that willnot Panic or break in the last turn. At the same time, try to discourage the enemy fromretreating by trying to surround the weak units. The Combat Chapter will provideexamples of these situations. 5) Where are my/the enemy’s valuable units? These include units with characters or units with a huge number of points. Units that have captured enemy standards carry extra victory points and areeven more valuable than when they started the game.
******Created by ebook converter - www.ebook-converter.com******
******ebook converter DEMO - www.ebook-converter.com*******
Changing tactics in the last turn In the very last turn, your strategy changes dramatically. 1) Forget space and retreatsWinning space is no longer necessary. Chase fleers in the last turn even if theprobability of destroying them is small. If with some luck you succeed, the destroyedunit might force a Panic test and possibly more destroyed units. 2) Strike the right balance between marching to safety or charging. Many of the traps and manoeuvres discussed previously have little use in thelast turn. You may set up a charge in turn 5 but by turn 6, charge only if you are certainof winning. Winning in this case means gaining victory points and not merely winningcombat. Charging an Unbreakable unit at full strength would be fool-hardy if you cannotdestroy it. If it is unlikely that the enemy unit will break then it might be better to focuson weak units. You should consider only victory points when deciding to charge in turn 6.Charge units that will be annihilated, not just units that will break but units that willa) be completely destroyed by combatb) break and have a very good chance of being caught when they flee – either yourcharging unit is much faster or the fleeing unit is close to the board edge or impenetrableterrain which means the pursuing unit will catch them.
It may be tempting to gamble on a do or die charge but would you be willing torisk losing a 200 point unit for the sake of a possible 100 points? As usual weigh theconsequences very carefully. 2) Use magic and shooting judiciously A magic user does not have to cast in the very last turn. Compare the pointvalues. Does the caster have more points than the spell target? A miscast could destroya wizard while the magic spell might be easily dispelled or do very little. Shooting units should definitely shoot if they use their ballistic skill only.Shooting units that use artillery dice and could misfire do not have to shoot in the verylast turn. The risk here is smaller than in magic but if the shooting target is worth littleor no points then there is no need to shoot.3) Always flee when charged if it can be done safely. Assuming your opponent has made the right choice of charging his strong unit
******Created by ebook converter - www.ebook-converter.com******
******ebook converter DEMO - www.ebook-converter.com*******

against your weak unit and if you’re almost certain of losing combat, then fleeing mightgive you a better chance of survival. If of course your opponent has made a mistake and underestimated your unit,then hold and try to destroy the charger.
******Created by ebook converter - www.ebook-converter.com******
******ebook converter DEMO - www.ebook-converter.com*******

3. MAGIC
How to get all the spells you want Pg 490 of the main rule book states that each spell (barring Signature spells and
some Invocations or Prayers) is known once in the same army. By using a level 4 and alevel 2.Wizard you can obtain all 6 spells including the most potent ones. It is logicalthat the most dangerous or useful spells be given to the level 4 Wizard. The bestprocedure for this is as follows: 1) Assign both Wizards to the same lore2) Roll for the first two spells for the level 2 Wizard. The probability of him getting thebest 2 spells is lower than for the other spells.3) The level 4 wizard then automatically gets the other 4 spells.4) Swap any spells that are not effective against the army you are facing with thesignature spell if necessary. The best outcome would be if the level 4 gets the best 4 spells but thedifference is only +2 to cast.
The same objective could be achieved with 3 level 2 Wizards. This might bebetter for some Lores like the Lore of Light. 3 Lore of Light Wizards increases thestrength of the Banishment spell.
How many power dice should be used and whichspells should be cast The first step in the magic phase is to decide which spells you should cast. Youshould have one or two spells which your opponent desperately wants to dispel becausethey are too dangerous. If you do not have such spells, then the magic phase is simply atoken gesture to inflict a few wounds here and there, augment your units slightly orattempt to wound a weak unit. I shall assume that you do have a dangerous spell eitherthrough luck or by following the procedure in the above section. For most armies, the magic phase will be an attempt to successfully cast your
******Created by ebook converter - www.ebook-converter.com******
******ebook converter DEMO - www.ebook-converter.com*******

most dangerous spell or failing that, a spell that significantly supports your units later orinflicts significant damage on the opposing army. This will mean casting different spellsexcept for Vampire Counts and sometimes, ‘T Kings. For Vampire Counts, the aimcould be to cast Invocation of Nehek. Casting it several times will ensure at least onesuccess. For ‘T Kings, the secondary objective could be to simply cast successfully tobenefit from the attribute. The other Lores contain one or sometimes 2 dangerous spellsand the main principle in the magic phase is to use your power dice judiciously so itincreases the probability of a successful cast of this dangerous spell. Again I shall assume you have read all the army books and you are fullyconversant with all spells and their potency against your army.
Unless you enjoy a gamble always use a sufficient number of power dice toensure a good chance of casting a spell. The more dice you use the more likely that anIF( Irresistible force) roll is the outcome. It may also force your opponent to use extradice just to make sure he does dispel your attempt to cast.
In the first or second turn at the most, the whole objective is to get rid of youropponent’s dispel scroll. Use 6 dice, or if you have less than 6, use all the dice andattempt to cast the best spell available. In future rounds or when you have much morethan 6 power dice, you could split the pool, using 6 dice for the best spell and the restfor the next best. Example 1:Empire with 2 Priests (P) and (Q). The objective here is to make (P) and the unit he isin, Unbreakable as they have just charged a larger unit of Vampire count GraveGuard. Empire has 7 Power Dice while Vampire Counts have 5 Dispel dice and noDispel Scroll. VC has a +4 to dispel while Empire has +0. Decide what you would do for each army before reading on.The wrong approach and order of casting would be this: 1) Priest P prays for Shield of Faith gambling on 1 dice, power level 3 on his unit:
There is a 33% chance of failing to cast since a 4+ is needed to cast. The empireplayer has revealed his intentions with his first move. His opponent has now beenalerted to the danger to his skeleton unit and can repulse it easily.
Another way which also has a poor chance is to roll all 6 dice first for Shield ofFaith. This will be cast successfully but the opponent now can use 5 dice to dispelwhich added to the +4 to dispel is equivalent to, or slightly better than 6 dice. This leaves 1 dice left which again has a 33% chance of failing. A better way might be to use 4 dice for the first spell and 3 dice for the second
******Created by ebook converter - www.ebook-converter.com******
******ebook converter DEMO - www.ebook-converter.com*******
or the other way round. This will at least set the opponent into thinking whether heshould gamble on 3 or 4 dice to dispel the first spell. He knows that there will beanother spell later which will be equally dangerous and will have to be dispelled again.Your opponent will have to consider whether an extra dispel dice should be used just tomake sure he dispels the first spell. If he fails to dispel the first spell, he faces theprospect of reducing the probability of dispelling the second spell. The basic idea in the above example is to make sure that your opponent has tothink about how many dice he has to use each time. Hopefully this forces him to usemore dispel dice for the first spell. Another way of tackling the above example is to roll 3 dice for the first Shieldof Faith, 2 dice for Shield of Faith (with a different Priest) and then roll for Soulfirewith the final 2 dice. The opponent will have to use 2 dice, 2 dice and 1 dice for thefinal spell. There is a better chance of succeeding with the last spell but equally there isa higher probability of ‘Not enough Power’ for the second spell and wasted dicecaused by Broken Concentration. Therefore another basic principle of using power dice is to make sure that alarge number of dice is used to cast the first spell just to make sure that BrokenConcentration does not happen. How many dice depends on how certain you want tobe.
For instance, a level 2 wizard wishing to cast a spell with a casting level of 8:6 dice could be used which has a 0% chance of failure. 5 dice has a 99% chance ofsuccess, while 4 dice has a 93% chance of success. Example 2:A level 4 Slann vs a level 4 Greater Daemon. A 4 and a 3 were rolled for the magicphase. The Slann is using the Lore of Life. He knows all the spells, can add an extrapower dice when casting and can re-roll miscasts. Rolling dice which are approximately equal for Winds of Magic alwaysfavours the power dice pool. E.g. 4, 4 becomes 8PD and 4DD.
The Slann knows he has a very good chance of succeeding with one good spell.Regrowth and Dwellers Below are the 2 spells which would benefit his army. Decide what you would do for each army before reading on. Consider first the case when the Slann uses 6 dice to cast Dwellers below. 7dice altogether is used with a good chance of getting IF (Irresistible force). 7 powerdice versus 4 dispel dice also highly favours the casting player. It is very likely thatDwellers below will succeed. The next spell, Regrowth, however needs an 8 with just
******Created by ebook converter - www.ebook-converter.com******
******ebook converter DEMO - www.ebook-converter.com*******
2 dice. Next, consider splitting the pool into 5 and 2 dice. 6 dice can be used to castDwellers while 3 dice can be used to cast Regrowth. In this case there is still a goodchance of both spells succeeding..
Using 6 dice for Dwellers increases its chance of being cast successfully but not asecond spell. Splitting the power pool into 5 and 2 dice has a good chance ofsucceeding with 2 spells..
A third option of casting 3 spells could also be used e.g. Throne of Vines with2+1 dice, followed by Flesh to Stone with 2+1 dice and finally Regrowth with 3+1dice. In this case the Daemon army will have to ignore one spell, probably Flesh toStone. There is the immediate benefit of the Lore Attribute recovering wounds for amodel.
Throne of Vines has a huge advantage of being a Remains in Play spell andtherefore will use up the opponents power or dispel dice in the future.
This second example illustrates the importance of knowing every Lore and their
attributes well, to take full advantage of them. It also shows how armies with a Slannhave a strong magical attack. Dwarfs on the other hand have a strong magical defence.
Finding the balance between magical attack and magical defence is armydependent and also a matter of taste. Some armies inherent strengths in the magic phaseis sometimes further modified by special abilities or magic items. These are VampireCounts, Lizardmen with a Slann, ‘Skav, ‘Tzeian Warriors, High Elves, Dark Elves andOgres. As usual I will not go into details, you have to find out what these abilities oritems are from the army books.
If you wish to cast 6th level spells with as many dice as possible then make sure
your main caster (lvl4 usually) has an Earthing Rod which offers some protectionagainst Miscasts.
Defending against magic Dispel Scrolls and Dispel Dice A Dispel Scroll is absolutely vital for magic defence. Every army needs tohave at one of these. Some armies could have more than one item that functions like aDispel Scroll e.g. Daemons and Dwarfs. Usually a scroll is given to a cheap wizardcalled a scroll caddie (a wizard whose main purpose is to have scrolls). It is important to look at the expected number of spells that will be cast perphase as this will indicate how many times you have to dispel per magic phase. Keep an
******Created by ebook converter - www.ebook-converter.com******
******ebook converter DEMO - www.ebook-converter.com*******
eye on your opponent’s power dice pool after each casting attempt and always makesure you have sufficient dice to dispel the most dangerous spell/s. The most important consideration in magical defence is to identify thedangerous spells and concentrate on dispelling them. Look, as well at the casting level of the most dangerous spell. This gives youan idea of how many dice your opponent will use. If he casts this spell first then it is agood idea to use as many or even all your dispel dice to dispel his casting attempt. If hedoes not cast it first then you will have set aside a sufficient number of dice for thispurpose. If you prefer to be safe, the number of dice you set aside could be one morethan the maximum he can use. There will be occasions when you will be at a horribledisadvantage e.g. a 3 Dispel dice pool versus a 6 Power dice pool. There’s nothingmore you can do then but to hope for a double 6 when rolling. In other scenarios, youmight have to let a weak spell through. When you do this, do also consider the effects ofthe Lore Attribute before deciding.
Position of Wizards The position of the casting Wizard is a small dilemma. On the one hand,you want him to be within range of the enemy during your magic phase, on the other it ispreferable that he is kept out of enemy ranged attacks. If none of your spells requireLOS or need to be in range of the enemy, then by all means, keep you highest levelWizard at a safe distance from enemy ranged attacks. If he is about to engage in combatwith his sheltering unit, move him to a position which minimises the number of enemymodels in base contact. The Wizard is best placed in a non vital combat unit e.g archers or cheap coreinfantry greater than 5 models. Except for Beastmen, Vampires, Warriors of Chaos,Branchwraiths, Bretonnians and sometimes Orc Shamans and Butchers, wizards shouldavoid combat. Bretonnian Damsels and Prophetesses are in the second rank most of thetime. They are quite safe and can cast spells while being in a combat unit, making themsafe. The other Wizards exceptions are T4 or T5 and some are armoured making themperform as well as their sheltering unit in combat. Even then there is a risk as enemyunits will focus their attacks on Wizards while in combat.
Sometimes out of necessity a wizard has to be moved out of his sheltering unit. Incases like this make sure that the wizard isa ) positioned so that charges against him are prevented – (see Denying Space toprevent Charges in the Some Basics Chapter)b) within 3” of a unit of the same base size – to benefit from Look Out Sir!
******Created by ebook converter - www.ebook-converter.com******
******ebook converter DEMO - www.ebook-converter.com*******
If a weak enemy unit has moved to a flank of an elite/good unit with a Wizard,move the Wizard to the opposite flank. The unit itself is unconcerned with a flank chargeas it knows it can win through superior wounds or static CR. When combat reformingmake sure the wizard minimises or avoids base contact.
Shooting/Ranged magic protection could also be achieved by placing the Wizardin a long range shooting unit itself. If the unit is destroyed, the Wizard with its high Ldshould be able to pass the Panic test and could then switch units or move to benefit froma Look out sir from a close enough unit. Finally look out for opportunities to kill a wizard by magic, shooting orcombat. This has a two fold effect of improving your magic phase by possibly removingthe enemy’s bonus to dispel and also removing the threat of adverse magic spells onyour units. Remember that the enemy will also be doing the same.
Selecting spell targets The magic phase has similarities to the shooting phase but with the importantdifference that it cannot be incorporated into your general plans. It is impossible topredict whether magic will succeed until probably the last few turns. (See the nextsection). Always have an objective in mind before you embark on spell casting. Iillustrated this in Examples (1) and (2) in the previous section. Make sure that your wizards are within range and wherever possible maximisetheir options by moving them so that they have a selection of spell targets. Fortunatelythe movement phase precedes the magic phase, so you can always make a few‘positional adjustments’ if you forget. If you have the same important spell on severalwizards then make sure that all or as many of them are within range of your target. Donot leave the casting of such spells to the last but make one attempt early. It is verylikely that your opponent knows or can easily anticipate that you can cast this spellseveral times and he might let an early attempt of this spell through
Remember which spells are effective against which unit e.g. if a magic missilehas no armour saves, then move your wizard to within range of a heavily armoured unitif possible. Remember which spells are unique in offering protection (e.g. 5+Ward frommissiles; +1 T etc) or enhancing a special unit’s abilities (e.g. make them Stubborn,Unbreakable etc). As you can see knowledge of the details of your spell is extremely important. Itis a good idea to re-read through the spell descriptions of your available spells beforeannouncing you want to embark on the magic phase or the Remaining moves phase. If you intend to inflict wounds on a particular enemy unit then focus all spellson that unit only. This is similar to the principles in shooting.
******Created by ebook converter - www.ebook-converter.com******
******ebook converter DEMO - www.ebook-converter.com*******
For example, you have two wizards who know Fireball, with Burning Headand Fiery Blast as their second spells. After attempting to cast Fireball on Unit (A)which is dispelled, do not then target a different unit with Fiery Blast. Target the sameunit with 2 Fireballs, Fiery Blast or Burning Head. At least one spell would succeed. Ifany two spells are not dispelled, then they would inflict a large number of wounds. Bound spells These have less of an impact in 8th edition but still carry the element ofsurprise e.g. an Arch Lector on a War Altar which might have been passive duringprevious magic phases suddenly sees an advantage in casting the Banishment spell.
Magic at the start and in the latter half Magic is dealt with differently as each player turn progresses. There is noclear line of demarcation between two halves of the game as far as magic is concernedbut important pointers are, the turn/s when the enemy and your own dispel scrolls aredisposed off, the moment when a main Wizard is engaged in combat or the death of oneor more Wizards. Broadly speaking, tactics in the magic phase are different after theseevents. Magic in the first few turns During the first few turns, do not expect to be successful with any spells. Theobjective is to draw out your opponent’s dispel scroll (or similar item/s). Treat anyspell that goes through as a bonus. Attempting to cast Remains in Play spells are alsoprioritised during these early rounds. Magical defence in the first half should be aimed at evading the most dangerousspell/s. Your units should be kept unscathed or as close to the maximum size as possibleso that they can shoot or engage in combat effectively. The same principles as defenceagainst shooting applies (see Concentrated Shooting and Multiple unit exposure underthe Some Basics Chapter) Use a dispel scroll only when absolutely necessary e.g. todispel a high dice roll of a dangerous spell. Always make sure that the dispel scrollcarrier is kept safe in the early rounds. If he is most likely to engage in combat or is themost threatened, then make sure the scroll is used and not wasted. If the size of the targeted unit is large enough to absorb some hits, then save thedispel dice for other spells if necessary. If at any time a wizard’s sheltering unit isdepleted simply move him into another unit. Do not move a wizard out of a unit in theearly stages of the battle unless you have absolutely no choice. It is difficult to preventan isolated wizard from being attacked and it will definitely attract the enemy’sattention.
******Created by ebook converter - www.ebook-converter.com******
******ebook converter DEMO - www.ebook-converter.com*******
Magic in the last few turns By mid battle, it is likely that a wizard is engaged in combat or has been slainfrom either side. The army which has lost the highest level wizard will be weaker inboth its magic phase and its enemy’s. Other wizards slain will also reduce the spellsavailable. It is possible for wizards to leave units in the last few turns when it is clearthat it would be difficult to target them. In the very last turn wizards should actuallyleave units so that they can move freely and can be in definite range of their spelltargets. Finally in the last turn some spells are reduced in importance. Pha’s Protectionfor example may be redundant because there are no missile attacks left in the enemy’sarmy. A standard D6 S4 magic missile would only dent a large unit and is best used incompletely obliterating a unit. Choose your targets with Victory points in mind. (SeeDecisions in turn 5 in the Some Basics Chapter).
Customising the magic phase Many of the obvious uses of spells should already be known to you e.g. PurpleSun is effective against low Initiative units. Savage beast of Horros is excellent ataugmenting attacks while Pann’s Impenetrable belt is good against depletion. I havelisted below only some of the spells that are effective against certain army lists. 1) Against Gunlinesa) Lore of Light:Pha’s Protection ( 4+ to shoot warmachines; -1 to hit including combat);Net of Amyntok – The unit takes a S test when it moves (includes pursue and flee) orshoots. Note above spells last for only 1 round.b) Lore of Metal:Transmutation of Lead: -1 to WS, BS and AS. Assisting Gunlines or shooting units:a) Enchanted Blades of Aiban - +1 to Hitb) Harmonic Convergence – re-roll Hits and Woundsc) Curse of Arrow Attraction 2) Against cavalry or heavily armoured unitsLore of Metal:
******Created by ebook converter - www.ebook-converter.com******
******ebook converter DEMO - www.ebook-converter.com*******
a)Plague of Rust – -1AS for rest of the battle; best in turn 1b) Searing Doom (2D6 wounding on AS value) and Final Transmutation – both fromLore of Metal 3) Against hordes and large unitsLore of Life: Dwellers Below – S test for every model.Lore of Metal: Final Transmutation – slays on 5+All vortex spells or spells that hit under a template 4) Against Hierophant, Vampire, spell casters – Gehenna’s Golden Hounds from theLore of Metal can specifically target them within a sheltering unit.Lore of Death’s Fate of Bjuna, Caress of Laniph and Spirit Leech also do the same. 5) Against heavily armoured charactersLore of Metala) Gehenna’s Golden Hounds: D6 hits wounding on AS value – Look out sir rolled foreach hitb) Final Transmutation – no AS or Ward saves on a roll of 5+. The next list should also be well known to most players. It containscombinations of spells that are quite devastating. In an actual game the likelihood ofthese combos is small. If you have managed to cast the first spell and your opponent hasrun out of dispel dice or cannot dispel, then cast the second spell for a game crushingblow.
Spells combinations 1. Fulminating flame cage (Lore of fire) + Wind blast (Lore of heavens)
The unit is forced to move and then every model in the unit takes a hit.
2. Enchanted blades (Lore of metal) + Transmutation of lead (Lore of metal) +1 to hit followed by a -1 WS and -2AS (overall) on the enemy
3. Phas protection + Speed of light (both from Lore of Light) Hits on 3+. The enemy unit needs 6's
4. Speed of light + Birona’s timewarp (both from Lore of Light)A very popular combination.This enables hits to be re-rolled in every turn at the highest WS.
******Created by ebook converter - www.ebook-converter.com******
******ebook converter DEMO - www.ebook-converter.com*******
5. Net of Amyntok (Lore of Light) + The Withering (Lore of shadows) or Soulblight(Lore of Death).This can be used against spell-casters to stop them from casting spells, shooting units tostop shooting, fast units to stop them from moving or to stop units poised to charge.Other variations of this spell includes combining The Withering or Soulblight withdirect damage spells or magic missiles or The Withering or Soulblight with a spell thattargets a character specifically e.g. Fate of Bjuna, Caress of Laniph.
6. Melkoth’s Mystifiying miasma + either Penumbral Pendulum or Pit of Shades (allfrom (Lore of Shadow) or Purple Sun (Lore of Death).Lowering the Initiative and then forcing an Initiative test. Another variation of this combines Melkoth’s withTransmutation of Lead on aunit poised to charge to reduce the WS as much as possible.
7. Steed of shadows + Pendulum (both from Lore of Shadow) or Burning Head fromLore of Fire
This is best cast in the early turns. The Wizard will be exposed but a whole lineof models will be hit by the second spell.
8. Doom and Darkness (Lore of Death) or Phantasmagoria (Daemons Lore of ‘Slan) +Pavane of ‘Slan or Slicing Shards of ‘Slan (Daemons Lore of ‘Slan)
This is a well known combo where the Ld is reduced and then damage (or furtherdamage) is inflicted based on a Ld test. 9. Throne of Vines + Dwellers Below or Regrowth (Lore of Life)
A well known combo for Lore of Life first tried by my friend Viz in his first 8th edgame. Throne of Vines is cast first. If it succeeds then 6 dice can be used to cast the nextspell without fear of miscasts plus additional benefits from some Lore of Life spells.
Other variations of this combo is casting Throne of Vines and then combining withspells requiring a large number of dice. Miscasts will be more likely but ignored.
******Created by ebook converter - www.ebook-converter.com******
******ebook converter DEMO - www.ebook-converter.com*******
4. SHOOTING
Shooting Effectively The total number of shots has to be maximised bya) Shooting and manoeuvring or retreating where appropriate. The techniques ofcreating space (See Combat Chapter) have to be used to prevent the enemy fromconstricting your shooting units into a small space. The shooting units should also bepositioned with care. (See Gunlines in Some Basics)b) Unblocking sheltered enemy units. This is mainly the job of Scouts, Fast Cavalry etc.which should move around the flanks to harass and maybe flush out the hiding units.Care has to be taken that the Scouts do not in turn expose themselves to a charge(especially an early charge) which could destroy themc) Making sure every shooting unit has at least one target per roundd) Making sure that not too many enemy units are locked in combat. This starts tohappen from turn 2 or turn 3 onwards. Since shooting units are not good at combat, itwill be easy for the enemy to choose appropriate units to win combat against them. Ifsuch units are not destroyed or sufficiently weakened, then they could destroy a shootingunit in a single charge or at least force a break test. This is the main reason why it is farbetter to minimise the size of shooting units and expect them to break in combat. Onceagain positioning is important and the possibility of fleeing, breaking and causing Panichas to reduced or eliminated.
Comparison of shooting units
Appendix 4 shows the probability of wounding for various shooting units. I haveonly listed the viable shooting units i.e. the units whose shooting will have a significanteffect. For other units, shooting is a bonus which could reap rewards but on the basis ofprobability and correct play, will not. I have expected enemy units to manoeuvre to thebest distances possible and calculated the total number of shots accordingly.
The table shows the probability of a single model inflicting a wound before his
unit is charged. By multiplying this by the total number of shooting models, you will have an idea
of how many wounds you will inflict by about the end of turn 3. How many more
******Created by ebook converter - www.ebook-converter.com******
******ebook converter DEMO - www.ebook-converter.com*******
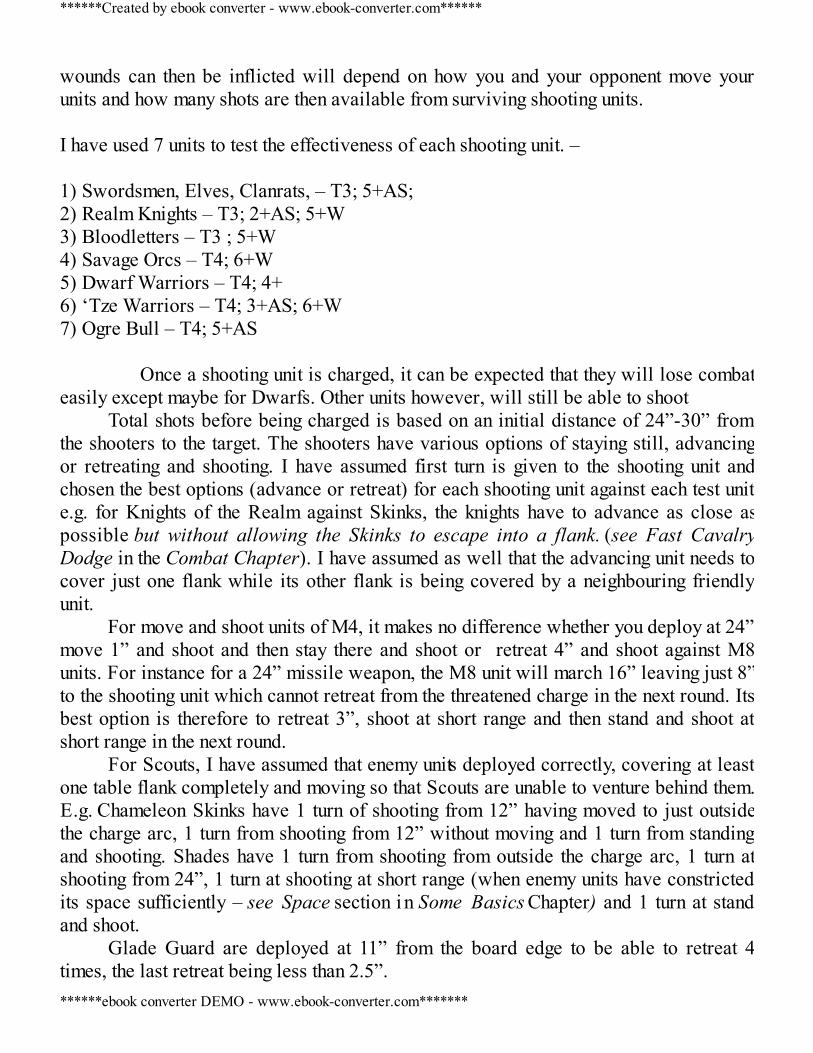
wounds can then be inflicted will depend on how you and your opponent move yourunits and how many shots are then available from surviving shooting units. I have used 7 units to test the effectiveness of each shooting unit. – 1) Swordsmen, Elves, Clanrats, – T3; 5+AS;2) Realm Knights – T3; 2+AS; 5+W3) Bloodletters – T3 ; 5+W4) Savage Orcs – T4; 6+W5) Dwarf Warriors – T4; 4+6) ‘Tze Warriors – T4; 3+AS; 6+W7) Ogre Bull – T4; 5+AS
Once a shooting unit is charged, it can be expected that they will lose combateasily except maybe for Dwarfs. Other units however, will still be able to shoot
Total shots before being charged is based on an initial distance of 24”-30” fromthe shooters to the target. The shooters have various options of staying still, advancingor retreating and shooting. I have assumed first turn is given to the shooting unit andchosen the best options (advance or retreat) for each shooting unit against each test unite.g. for Knights of the Realm against Skinks, the knights have to advance as close aspossible but without allowing the Skinks to escape into a flank. (see Fast CavalryDodge in the Combat Chapter). I have assumed as well that the advancing unit needs tocover just one flank while its other flank is being covered by a neighbouring friendlyunit.
For move and shoot units of M4, it makes no difference whether you deploy at 24”move 1” and shoot and then stay there and shoot or retreat 4” and shoot against M8units. For instance for a 24” missile weapon, the M8 unit will march 16” leaving just 8”to the shooting unit which cannot retreat from the threatened charge in the next round. Itsbest option is therefore to retreat 3”, shoot at short range and then stand and shoot atshort range in the next round.
For Scouts, I have assumed that enemy units deployed correctly, covering at leastone table flank completely and moving so that Scouts are unable to venture behind them.E.g. Chameleon Skinks have 1 turn of shooting from 12” having moved to just outsidethe charge arc, 1 turn from shooting from 12” without moving and 1 turn from standingand shooting. Shades have 1 turn from shooting from outside the charge arc, 1 turn atshooting from 24”, 1 turn at shooting at short range (when enemy units have constrictedits space sufficiently – see Space section i n Some Basics Chapter) and 1 turn at standand shoot.
Glade Guard are deployed at 11” from the board edge to be able to retreat 4times, the last retreat being less than 2.5”.
******Created by ebook converter - www.ebook-converter.com******
******ebook converter DEMO - www.ebook-converter.com*******
Appendix 4 shows the data for shooting. Dividing these figures by the points foreach model gives the shooting ‘worthiness’ of the different models.
3 units stand out – Dark Elf Crossbowmen, Glade Guard and Shades. DE repeatercrossbowmen are more or less the same with Glade Guard; Glade Guard being betteragainst some units while DE repeater crossbowmen are better against others. Shades inturn are marginally better than both while Dark Riders are not far behind.
This then points to the Dark Elf shooting army as being the best and that is what Ishall use to test against 2 armies later in this chapter.
Heavy ShootingBefore that, I shall analyse heavy shooting lists. The best shooting army are Dark
Elves – from Appendix 4(b). From this analysis, I can arrive at a good estimate of theperformance of other heavy shooting army lists by scaling down using Appendix 4(b) asa guide. Dark Elves’ main advantage is their density of shooting, their good BS, ArmourPiercing shots and their ability to move and shoot. Lizardmen shooting lists are not as good because of the short range of theirshooting – 12”. The target unit will be within a reasonable distance to declare a charge.Even M4 infantry has just over 50% chance of succeeding. So, although Poisonedshooting of Skinks is a good advantage it is offset by the short range and BS3. Goblins could also shoot but since they have a more certain and better role incombat, they will be wasted as a shooting unit. Dwarfs and Empire both have higher points cost per shot at a lower BS and areMove or Shoot. It is easier to charge a Move or Shoot unit since it cannot retreat. If itdoes it loses a round of shooting. Glade Guard and Glade Riders also Move and shoot at BS4 with Glade Guardshooting at S4 at a short range of 15”. This will be within cavalry’s average chargerange but not infantry’s. The number of shooting rounds against cavalry units is thenunchanged – 3 rounds max. From Appendix 4(b), it will take 50 Glade Guard to kill 10knights or 47 to kill 40 Bloodletters before they are charged.
Compare these figures with 53 and 51 Repeater Crossbowmen to do the same job.The number slain is very slightly better for Glade Guard but per point, Dark ElvesCrossbowmen are clearly better – between 4% - 14% better. Furthermore Dark ElfCrossbowmen are better in combat both at Slaying and rate of Depletion.
There are other advantages of Glade Guard over Dark Elves crossbowmen whichcannot be overlooked. Range is further for the Glade Guard longbow and half thenumber of Glade Guard units can be deployed as Scouts.
A comparison of Glade Riders and Dark Riders again yields a result even more infavour of the Dark Elf unit – Dark Riders slay more and are much better per point.
******Created by ebook converter - www.ebook-converter.com******
******ebook converter DEMO - www.ebook-converter.com*******
All this does not mean you should not have Skinks, Pistoliers, Thunderers orGlade Guard. It simply illustrates the point that to find out how Lizardmen, Empire, Dwarf orWood Elves’ shooting lists fare, it will be sufficient to scale down the results derivedin the next section which tests Dark Elves. What about warmachines? They have their uses but have the disadvantages ofbeing Move or Shoot, carry a 1/6 chance of a misfire, could miss their target completelyand are costly. Against that, they have very long ranges and high strengths. Again I amnot discounting their usage completely but based on probability, the only warmachinethat could slay anything close to 10 knights or 40 Bloodletters mentioned above for thesame number of points cost, belong to Bretonnia (Trebuchet) and ‘Skav (Warp lightningCannon) – which on probability is almost twice as good as the average Stone thrower.The Helstrom comes next – at 1.5 times that of the average stone thrower, followed veryclosely by the Gyrocopter.
Trebuchets/WLCs are good because of their higher strength. The rate of slayingfor the average stone thrower for a shot on exact target is about 10 against a T3, 5+AS.For the duration of the battle, using a rough estimate of 1.0 – 1.5 times this figure yieldsthe total number slain to be 10-15 (no shots in turn 1 – sheltered enemy; 1 shot in turn 2and charged in turn 3). The Trebuchet slays 20 – 30 while the Helstrom and Gyrocopterwould slay between 12- 22. The VPs (most likely) won by this shooting could be lessthan the cost of these warmachines if it shoots at cheap Core units.
To offset the greater probability of warmachines missing than hitting, several areneeded. This is why gun-line lists use numerous warmachines and shooting units. The 3 armies which could have a gun-line list are Empire, ‘Skav and Dwarfs.Dwarfs will have a mixture of Grudge Throwers, Flame Cannons and maybe an OrganGun plus Thunderers or Quarrellers. A ‘Skav gun-line will have 2 WarplightningCannons (or 1 Warplightning Cannon and 1 Plague Claw Catapult) with 3 or 4 WeaponsTeams e.g. 3 Poisoned Wind Mortar and 1 Warpfire Thrower. An Empire gun-line willhave a battery of Mortars and Helstrom Rockets plus shooting from Outriders andPistoliers. I would like to emphasise that all 3 gun-lines will be defeated by army listswhich have fast moving and heavily armoured units. Very large units could also handlegun-lines quite well. A battlefield with lots of terrain will also spell doom for thesegun-lines. The exact mechanics is not difficult to work out. Appendix 4 provides the BSshooting data.
A reasonable estimate of warmachine casualties will be 1/6 chance of a direct hitper battle i.e.1 direct hit from each small template shooting. Flame template shooting(except for the Flame cannon) is at close range but again a 1/6 probability is
******Created by ebook converter - www.ebook-converter.com******
******ebook converter DEMO - www.ebook-converter.com*******
reasonable. Each small template hit will slay 8 models with a 1” base and with noarmour saves and 13 models with a 2cm base with no armour saves. Add the possibilityof a partial hit, my estimate of 20 casualties from warmachines is quite reasonable.
Swift Reform against the Gun-line A unit that has Swift Reforms can “move as normal” while a unit that reforms“cannot move more than twice its normal rate” – quoted from the main rule book. Using these rules a large unit could charge and overrun into several units of a gun-linewith the furthest or closest model moving to 3 X its movement value instead of 2 X.
Unit (A) starts at about 3X its M value from the closest shooting unit G3. It couldmarch and get closer to G3 and threaten it with a charge but it must do so withoutallowing G3 to move ‘around’ it. (A) first performs a Swift Reform and broadens its frontage as much aspossible while making sure that the furthest model moves only 2M. This is shown inblue in the above diagram (A) then either moves sideways (up to it full M value) to ensure it is still gainsfrom shooting cover by the hill. In other circumstance (A) could move straight ahead orwheel until it is as close as 1” from G3. It must do so bearing in mind that G3 has to beprevented from moving away from its charge arc. G3 cannot avoid being charged andwhen it is, the overrun will take (A) into G2 or G1 followed by another overrun in thenext round into other units
******Created by ebook converter - www.ebook-converter.com******
******ebook converter DEMO - www.ebook-converter.com*******
The main advantage of this is not only the extra distance gained by (A) towardsits intended charge target but also the overrun/s. The overrun prevents the survivingwarmachine from shooting (A) since it is not in combat. This is an importantconsideration when charging warmachines and shooting units. Make sure that the charge path of a unit that charges a weak shooting unitwill enable it to overrun into other weak units or warmachines etc if possible.
The proximity of (A) to G3 will also increase the danger of any shooting to
‘scatter’ onto G3. In the next section, I shall test the following Dark Elf list against Bretonnian
knights and then against a Blood Daemon army:100 Repeater Crossbowmen – 50 with and 50 without shields2 X 15 ShadesDreadlord; Supreme Sorceress; 20 Blackguard
Bretonnians are made up of 11 Knights Errant (B4), 8 Questing (B1), 10 Knights Errant(B3), 8 Knights of the Realm (B2), Damsel. BSB and Lord.
Shooting Battle 1: Bretonnians vs Dark Elves
I have included 6 pieces of terrain of average size which slightly favours theshooting army and given the first turn to Dark Elves.
******Created by ebook converter - www.ebook-converter.com******
******ebook converter DEMO - www.ebook-converter.com*******
Key: Blue = BretonnianWhite = Dark ElvesRed = Daemons
Deployment – B4 leaves a small gap unprotected to tempt the Scouting Shadesunit, S2, to deploy close to the bottom board edge. The average charge distance of anM8 Swiftstride unit is 17”, so S2 will have to be beyond this distance. If S2 deploysclose to the board edge, it can be easily trapped by B4 in 2 turns. B2 will first securethe bottom edge in the same way as Winning a Flank (– see Combat Chapter) while B3covers its left flank. S2 therefore deploys about 20” away while leaving room to retreatsafely (See Retreat in Some basics Chapter).
Turn 1: Notice S1 and S2 retreating safely while some of the smaller Repeater
Crossbowmen units move forward. These smal l repeater crossbow units can beexpected to sacrifice themselves at the end of turn 2 to maximise shooting for the otherunits in later turns. The Black Guard unit positions itself to deal with charges of a
******Created by ebook converter - www.ebook-converter.com******
******ebook converter DEMO - www.ebook-converter.com*******
weakened unit preferably, while at the same time sheltering any potential fleeingshooting (see Sheltered fleeing in the Combat Chapter). Notice the Dark Elves units arebeginning to surround the Bretonnians in an arc.
Shooting: 2 Bretonnian units could be targeted. S2 shoots B4 while S1 shoots B1.1.1 slain in B4 (0.037X30 = 1.11) and 1.7 slain in B1 (0.056X30=1.68)B1 makes sure that S1 cannot infiltrate. B2 – B4 naturally have to choose to stay on theleft flank while threatening as many units as possible as they march up.
End of Turn 1: Turn 2: Dark Elves units, X2 and X5 retreat further while X1, X3 and X6 offerthemselves as bait. S2 moves to B4’s flank while X7 also does the same whilemaintaining a 20” distance. X8 moves onto the hill so that it is in range.
Turn 2 Dark Elves Shooting phase
******Created by ebook converter - www.ebook-converter.com******
******ebook converter DEMO - www.ebook-converter.com*******
Shooting: X1 and half of S1 shoot B1 (15X0.056 + 20X0.028 = 1.2) killing 1.2. X2 –X5 shoot B3 killing 3.7(40X 0.019 +80X0.037= 3.72) while X6, X7, X8 and S2 (shortrange) shoot B4 killing 2.8 knights (60X 0.019 + 30X 0.055). Turn 3: B1 charges X1 which flees behind S1. B2 charges X2, B3 charges X3 and B4charges X4 which all Stand and Shoot. B2 loses 0.38 (20X 0.019) B3 loses 0.74 (20 X0.037) B4 loses 0.76 (40X 0.019).B1 now has 5 knights, B2 has 7.6, B3 has 5.4 knights and B4 has 6.3 knights. There arealso 3 characters in these units. They will probably break X2, X3 and X4 and run themdown.400 VPs to Bretonnians and none to Dark Elves so far.Dark Elves have 60 Crossbowmen and 30 Shades. In turn 4, I expect units X5-X8 and S2 to shoot B4 which should have reformed to faceat least 2 of these units. Shooting will be at short range for units X5 and X6 and shootingwill slay, 6.4 knights (30X 0.055 + 60X 0.055 + 40X 0.037=6.43) destroying the unit. B3 will probably have charged or be charged by the Black Guard unit whileB2 will destroy X1 in this turn while being able to trap S1 in the next turn. S1 shootingon B1 this turn will slay 2.5 knights (0.083X30=2.49). B1 has only 2.5 knights left andS1 will concentrate on destroying that unit completely in turn 5 even though they arethreatened with a charge. Final result B1 and B4 destroyed by shooting. B3 and Black Guard neutraliseeach other and B2, S2, X7, X8 and all characters survive. Victory for Bretonnians by
******Created by ebook converter - www.ebook-converter.com******
******ebook converter DEMO - www.ebook-converter.com*******

about 300 VP. The total number of knights slain is 24. This factors up to 130 RepeaterCrossbowmen using Appendix 4(b). Using this figure I can expect that this DE shootingarmy will slay a maximum of: 144 Swordsmen100 Bloodletters98 Savage Orcs96 Dwarfs48 Warriors28 Ogres
These figures are based on about 615 shots altogether. As the next battle willshow, a more realistic figure for casualties is smaller because unlike the Bret knightswho freely exposed themselves to shooting, the infantry units in these armies will movewith greater care and try to split the shooting between units while trying to shelter eachother. The expected number of casualties will be closer to those in the next game. Except for Dwarfs, these armies should have large enough units to absorb allthe expected casualties and still charge and win in combat. Dwarfs, fortunately haveranged attacks to compensate for their bigger % of casualties.
So, shooting alone will not win the battle.
Shooting Battle 2 Blood Daemons vs Dark Elves
Deployment: Daemons have decided to prevent infiltration by Scouts bycompletely covering the whole table. D3 is in horde formation for this purpose but willuse Swift reform to change formation and move later. D1 and D2 are 7 wide. D2 ismore than 28” from X4 –X8. Dark Elves have a chance of killing the Bloodthirster byshooting with both Shades units and have deployed them close to the Bloodthirster. TheBlack Guard unit has time to adjust to threats on the left flank and so aligns to face theright flank for the moment.
Daemons have the option of swinging their units to the left or to the right flank.
******Created by ebook converter - www.ebook-converter.com******
******ebook converter DEMO - www.ebook-converter.com*******
Turn 1:
Units X1, X2, X3, X4 and X5 advance slightly whilst X6, X7 and X8 advance onthe right. S1 retreats onto the hill. Because they are outside the shooting range even aftermoving (28”), X6, X7 and X8 march. This move prepares these units to deflect chargesetc if needed. If the Daemon army does not move, then in the next turn, these units shouldbe in shooting range.
S1 and S2 shoot D3 slaying 8.3 Bloodletters (30X0.111+30X0.167 = 8.34). TheBloodletter unit, D3 moves to win the right flank (see Winning a Flank in the CombatChapter) and Anchors itself correctly while the Bloodthirster moves into charge range.Similarly D1 tries to wrest control of the left flank. D2 moves towards the centre todiscourage any advances there.The aim is to constrict the Dark Elf army. Turn 2X1 shuffles back while X4 and X5 move forward to get into range to shoot. X2 and X3Swift reforms and then shuffles back. X6, X6 and X8 move forward while S1 and S2march back as far as they can. Dark Elves must retreat without losing Space (asexplained in Some Basics). The mistake would be not to move X6, 7 and 8 and then endup in a log jam later on with the possibility of the enemy units overrunning when theywin combat. This is shown in the next diagram.
A wrong Dark Elf retreat results in this at Daemons turn 3
******Created by ebook converter - www.ebook-converter.com******
******ebook converter DEMO - www.ebook-converter.com*******
The diagram above depicts the probable situation if Dark Elves do not createthis Space for themselves. D2 and D3 have not been completely destroyed after 3rounds of shooting. S1 and X8 have been charged with an Overrun path that will takethem into X6, X7 and S2. 5 units would be destroyed with nothing to show except aflank charge on D3 – an advantage which is only temporary as D2 would probably endup flank charging the Black Guard unit.
If instead of the diagram above, S1 chooses to retreat behind the Black Guardunit, D2 could have charged X6 with a good chance of overrunning into X5 or X7. S1meanwhile cannot shoot for a whole turn. It would also get in the way of S2 trying toretreat from the left flank to the centre, away from the attention of the Bloodthirster.
There must be space for the important units i.e. the best 2 shootingUnits (S1 and S2), and the Black Guard unit to manoeuvre. In doing this, one or moreunits will have to be exposed to a charge. Make sure that you have selected the units theenemy will engage and destroy. These units must necessarily have the smallest Victorypoints. In this case X6, X7 or X8 will have to move forward and lure the enemy orsacrifice themselves while diverting them into spaces for future shooting or maybe acounter charge. This is an important principle when several units are retreating.
******Created by ebook converter - www.ebook-converter.com******
******ebook converter DEMO - www.ebook-converter.com*******
Turn 2 Dark Elf Shooting phase
Daemons are trying to split up Dark Elf shooting as much as possible bythreatening several units at the same time. D1 is within good charge distance of X1 andX2 on the left flank. On the right flank B4 and D3 are threatening S1, S2 and X8.
Shooting: Assuming 2/3 of X1, X2 and X3 have LOS to D1. They shoot and slay2.2 Bloodletters (40X 0.055 =2.2). X4, X5, and X6 shoot D2 and slay 5.5 Bloodletters(100X 0.055 =5.5). X7, X8, half of S1 and 1/3 of S2 shoot D3 and slay 7.2 Bloodletters(20X 0.055 + 20X 0.028+ 50X0.111=7.2)
Daemons turn 2: If D3 charges X7, it will flee, leaving D3 woefully short ofcharge targets when the Dark Elf units retreat in the next round. The same is true for D1.Therefore the Daemon unit marches again. This ensures that there will be a choice ofunits to charge in the next turn.
D3 position itself just over 1” from X7 which is immobilized! It cannot escapefrom the charge, neither can it try to wheel clockwise. This is similar to the WheelingArc Trap (see Combat Chapter). D3 however can wheel past it when it charges. B4now flies up towards S1 which also effectively trapped. It takes about 135 shots to killthe Bloodthirster so he is safe.
******Created by ebook converter - www.ebook-converter.com******
******ebook converter DEMO - www.ebook-converter.com*******
End of turn 2
Turn 3
X1 offers itself as a sacrifice to divert D1 away from the centre. X2, X4, X7 andX8 do not move so that they can shoot at short range.
Dark Elf Shooting Phase Turn 3
******Created by ebook converter - www.ebook-converter.com******
******ebook converter DEMO - www.ebook-converter.com*******
X5 and X6 retreat slightly to increase the charge distance slightly. S1 marches out of theway to wait and see what happens and is hoping to move in between the flanks of D2,D3. X3 has achieved this by marching into the ‘safe zone’ of D1.
S2 marches back 10” and shoots. It knows it is doomed and marches back tosecure a stand and shoot from the inevitable charge.X1 and X2 shoot D1 slaying 6.7 (40X0.167 = 6.68). X4, X5, X6 and S1 shoot D2slaying 14. (40 X 0.167 + 60X 0.111 + 30X 0.028 = 14.18)X7 and X8 shoot D3 slaying 6.7 (40 X 0.167 = 6.68)About 12 shooters from S2 shoot the Bloodthirster inflicting 0.9 wounds (24 X 0.0185 =0.444)
D1 is down to 26 models charges X2 which holds because it cannot stand andshoot. D2 is down to 25 models charges X5 which flees and D2 redirects into X6 whichstands and shoots. D3 is down to 22 models and charges X7. X7 has to hold because ithas a very low chance of fleeing successfully.
The Bloodthirster is down to 4.6 wounds and charges S2 which I will assumepasses the Terror test and stands and shoots inflicting another 0.444 wounds.
I will assume that all charge rolls succeed since the dice roll required is 7 or less.X2, X6, S2 and X7 should all lose combat heavily and break. X7 will either be
completely destroyed or reduced to <25%. D3 should overrun into X8. X6 will breakand flee past the Black Guard unit so D2 will either overrun into the Black Guard unitor charge it in the next turn. X2 would have fled off the board or was caught by D1 – Ishall assume it was caught.S2 would have been destroyed but will have inflicted 0.55 wounds on the Bloodthirsterwho is down to 3.4 wounds.
D1, D2, D3 should lose 3 models from combat. They are down to 23, 22 and 19models. Turn 4
5 units, X1, X3, X4, X5 and S1 have moved to shoot D1. They inflict 15 wounds(90 X 0.111 + 30 X 0.055 + 30X 0.111 = 14.97). D1 is down to just 4 models whichhas no way of escaping shooting and will probably charge X4 hoping for lucky rolls incombat.
******Created by ebook converter - www.ebook-converter.com******
******ebook converter DEMO - www.ebook-converter.com*******
Dark Elf Shooting Phase Turn 4
In turns 5 and 6, I shall assume that the Black Guard unit is still alive even thoughit is flanked or rear charged by the Bloodthirster. The Dreadlord would have issued achallenge and survived against the Bloodthirster.
D3 meanwhile would have been subjected to some shooting and might lose 15wounds at the most leaving it down to 4 models to march and hide behind the hills. Itwill be difficult for these 2 units to wipe out 20-25 Black Guard in 5 rounds of combatand for the Black Guard unit to destroy 22 Bloodletters. It is likely though that theymanage to kill the Khern Herald. So at the end of the battle Dark Elves will have lost S2, X6, X7 and X8 whileDaemons would have lost D1 and a Khern Herald. A draw is the probable result.Daemons could win if the Bloodthirster successfully charges 1 of the Repeatercrossbowmen units and D3 survives being shot at. Dark Elves could win if D3 isdestroyed while the Bloodthirster engages in combat with the Black Guard unit. In all around 75 Bloodletters were slain by shooting. This is 75% of the
******Created by ebook converter - www.ebook-converter.com******
******ebook converter DEMO - www.ebook-converter.com*******
amount predicted by Battle 1. Final Comment on Heavy Shooting Lists The 2 battles I have illustrated should give you an idea of how the Dark Elfshooting army will perform. It will be impossible to accurately predict what exactlywill happen but the 2 battles and Appendix 4 show that: 1) An all shooting army has clear limitations and is not a guaranteed victor againstall armies. 2) Other all (or nearly all) -shooting lists are less strong than Dark Elves and sinceDark Elves shooting lists lie on the margins of tournament viability, I would stronglyadvise against heavy shooting lists in a tournament. You could of course field a heavy shooting Dark Elf list as illustrated abovebut I feel this is the only list close to being viable. Lizardmen, like Empire and Dwarfshave better options than a mainly shooting list.
Wood Elves is a different kettle of fish. There does not seem to be sufficientchoice here and shooting is necessary to some degree. There is a fine balance betweenthe number of Glade Guard, Glade Guard Scouts (the best shooting units per point) andDryads and Treekin (the best combat units per point). Other possible shooting lists for Dark Elves and Wood Elves would use moreFast cavalry units combined with the Fast Cavalry Dodge explained in the combatchapter. Some possible heavy shooting lists worth experimenting with: Dark Elves 1100 Repeater Crossbows in 5 units of 20This list will probably slay a maximum of 83 Swordsmen or 14 Knights of the Realm,58 Bloodletters, 56 Savage Orcs, 56 Dwarf Warriors, 28 ‘Tze Warriors or 8 Ogresbefore suffering heavy losses. Dark Elves 240 Repeater Crossbows30 Dark Riders+15 Shades+ Reaper Bolt Thrower
******Created by ebook converter - www.ebook-converter.com******
******ebook converter DEMO - www.ebook-converter.com*******
Dark Elves 360 Repeater Crossbowmen10 Dark Riders20 ShadesThis list will slay a maximum of 124 Swordsmen or 26 Knights of the Realm, 77Bloodletters, 74 Savage Orcs, 74 Dwarf Warriors, 37 ‘Tze Warriors or 21 Ogresbefore being charged by the enemy. Dark Elves 4 (I used this list in the 2 battles above)100 Repeater Crossbowmen – 50 with and 50 without shields2 X 15 ShadesDreadlord; (Supreme) Sorceress; 20 Blackguard Lizardmen100 Skink Skirmishers2X 10 Chameleon Skinks1 Stegadon or 3 Salamanders Lizardmen 2185 Skink Skirmishers in units of 10 & 2040 Skinks in units of 102 X 10 Chameleon Skinks3 SalamandersSlann w 3 disciplines Dispel Scroll in a unit of 20 Temple Guard Empire 15 Pistoliers30 Outriders2 Steam Tanks Empire 25 Pistoliers50 Outriders10 KnightsSteam TankGrandmaster + 1 Warrior Priest + 1 Wiz Dwarf 130 Thunderers
******Created by ebook converter - www.ebook-converter.com******
******ebook converter DEMO - www.ebook-converter.com*******
30 QuarrellersA few Warmachines with RunesBolt throwers at S8 is just as good as a Cannon and cheaper. They don’t misfire andcould hit on 2+ with the right runes. However they slay only a handful of models perround of shooting.The Grudge thrower, Flame Cannon and Gyrocopter shooting are able to slay moremodels per round of shooting. Only the Bolt thrower and Gyrocopter’s shooting is notsubject to a Misfire. Dwarf 260 ThunderersA few Warmachines with Runes ‘Skav20 Gutter Runners to complement the Slave Hordes – NOT replace themA choice of Weapons Teams and Warmachines – This has already been covered in thefirst Chapter for ‘Skav. Wood Elves130 Glade Guard – some deployed as ScoutsOr a mixture of Glade Guard and Glade Riders.
******Created by ebook converter - www.ebook-converter.com******
******ebook converter DEMO - www.ebook-converter.com*******

******Created by ebook converter - www.ebook-converter.com******
******ebook converter DEMO - www.ebook-converter.com*******

5. COMBAT
Using Appendix 6 This Appendix ranks all 108 units in terms of their rate of slaying and depletionagainst 2 test units – Swordsmen horde and Savage Orcs Biguns, when they benefit fromthe Choppa rule. It does not take into account static CR, Ethereals and there are noFlaming or magical attacks. Using an example: Let’s say you are playing High Elves against Lizardmen.You’re not sure whether your Spearmen horde is able to take on the Saurus horde withHW. Appendix 6 gives these figures For HE Spearmen Against Swordsmen - 24 (Slaying) ; 88 (Depletion)For HE Spearmen Against Sav Orcs (B) - 19 (Slaying) ; 82 (Depletion)For Saurus Against Swordsmen - 33 (Slaying) ; 44 (Depletion)For Saurus Against Sav Orcs - 36 (Slaying) ; 57 (Depletion)
24 is compared with 33 – 24 is better, 19 with 36 – 19 is better, 88 with 44 – 44is better and 82 with 57 – 57 is better. If both Slaying and Depletion favour one unit,then that unit should win but in this case this is not true. The depletion rate favoursSaurus in both test cases but the slaying rate favours the Spearelves.
This indicates that the margin of victory will not be large. The difference (orratio) between the 2 depletion rates is much bigger than the difference/ratio between the2 slaying rates – Spearelves depletion of 88 is much bigger (twice) than 44 for Sauruswhereas Slaying ration (33:24=1.4) is not as big. Therefore Saurus is expected to win against Spearelves by a small margin –assuming the same static CR. A quick calculation using Appendix 1 will confirm this. It is more accurate to calculate using Appendix 1 but Appendix 6 provides aquick check. Be careful though, Combat rankings are dependent on the test unit used andAppendix 6 is by no means prescriptive. Double check with Appendix 3 or better stillcalculate using Appendix 1 if you want to find out whether to pit your unit against acertain enemy unit.
Charge or not to charge This is straight forward in execution but is the most complex tactically. Skill is
******Created by ebook converter - www.ebook-converter.com******
******ebook converter DEMO - www.ebook-converter.com*******
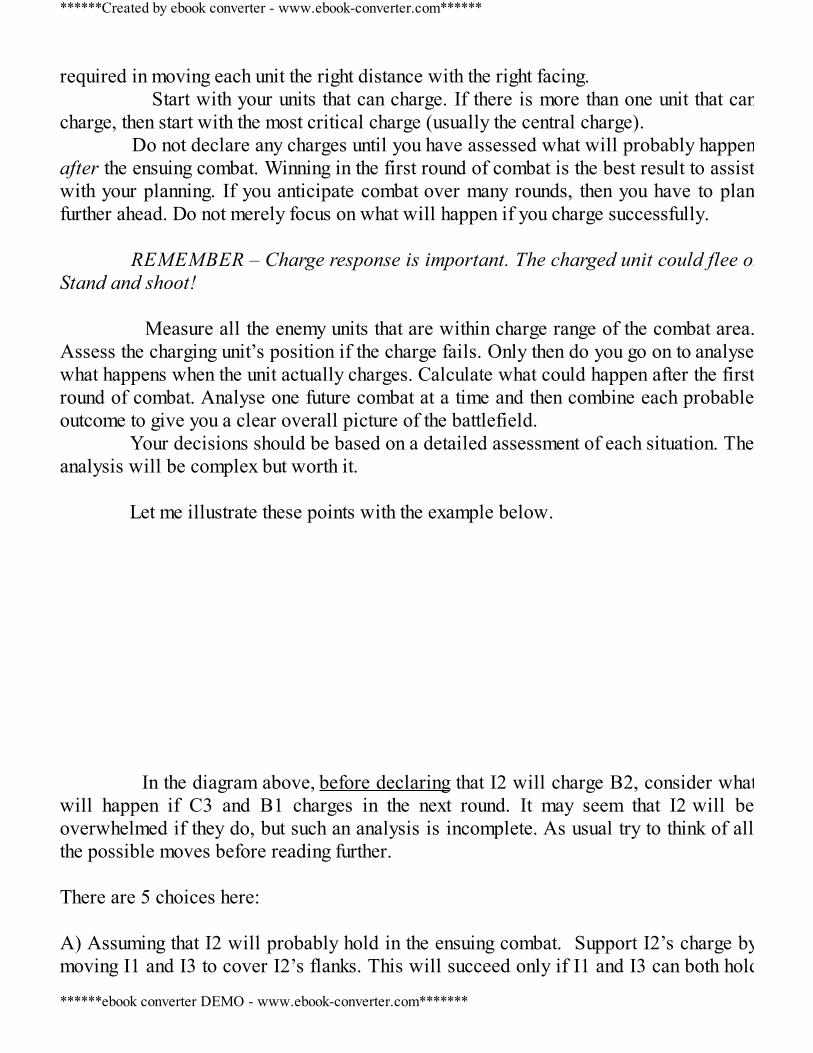
required in moving each unit the right distance with the right facing. Start with your units that can charge. If there is more than one unit that cancharge, then start with the most critical charge (usually the central charge). Do not declare any charges until you have assessed what will probably happenafter the ensuing combat. Winning in the first round of combat is the best result to assistwith your planning. If you anticipate combat over many rounds, then you have to planfurther ahead. Do not merely focus on what will happen if you charge successfully. REMEMBER – Charge response is important. The charged unit could flee orStand and shoot! Measure all the enemy units that are within charge range of the combat area.Assess the charging unit’s position if the charge fails. Only then do you go on to analysewhat happens when the unit actually charges. Calculate what could happen after the firstround of combat. Analyse one future combat at a time and then combine each probableoutcome to give you a clear overall picture of the battlefield. Your decisions should be based on a detailed assessment of each situation. Theanalysis will be complex but worth it. Let me illustrate these points with the example below. In the diagram above, before declaring that I2 will charge B2, consider whatwill happen if C3 and B1 charges in the next round. It may seem that I2 will beoverwhelmed if they do, but such an analysis is incomplete. As usual try to think of allthe possible moves before reading further. There are 5 choices here: A) Assuming that I2 will probably hold in the ensuing combat. Support I2’s charge bymoving I1 and I3 to cover I2’s flanks. This will succeed only if I1 and I3 can both hold
******Created by ebook converter - www.ebook-converter.com******
******ebook converter DEMO - www.ebook-converter.com*******
when charged by B1 and C3. Three individual combats will have to be assessed,making this the most dangerous and probably the least effective choice. B) Ignore I2’s plight and assume that it breaks. Position I1 and I3 to take on B2 when itbreaks and pursues I2. Alternatively only I1 is positioned to flank charge B2 while I3moves up to deter C3. C) Assume that I2 will probably hold in the ensuing combat. Move I1 and I3 out of thecharge range of all enemy units (in this case B2 and C3) but position/orientate them sothat they can combine and charge B2 (or any other enemy unit). This is a pessimisticchoice and calls into question why I2’s charge was made in the first place
******Created by ebook converter - www.ebook-converter.com******
******ebook converter DEMO - www.ebook-converter.com*******

D) This is the most defensive option. Do not charge with I2 but move all three units, I1,I2 and I3 out of enemy charge range. E) This choice sacrifices a unit for a stronger charge option in future rounds. Move oneunit (I3 in this case) as far as possible to tempt and lure the enemy and position the othertwo units to combine charges and flank charge in your next turn. (as explained in Lureand Ambush) F) The last option is what happens if the enemy flees! This is quite easily overlooked bya beginner who is eager to crush a seemingly weak unit. First of all, do you think unit B2is likely to flee. Remember that if it is Immune to psychology it cannot.The reasons for fleeing have already been explained in Some Basics.You have to balance the prospect of losing I2 in the next round with forcing B2 to flee.If you do not want to lose I2 easily, then do not declare a charge.
******Created by ebook converter - www.ebook-converter.com******
******ebook converter DEMO - www.ebook-converter.com*******
If B2 does flee, all is not lost. You could still make it dangerous for B1 and C3to flank charge I2. I1 and I3 have moved up in anticipation of a flank charge by either B1 or C3. IfB1 and C3 do charge they risk a flank charge in the next turn.It is important to note that I2 itself could flee if the enemy declares a charge/s against it.Flank charges for I1 and I3 could be set up by making sure they are in the Safe Zone(explained in Some Basics).
As you can see, the decision to charge or not to charge does not involve just the
pair of charging and target units but all the units in the vicinity. The decision is not simply whether you should charge or not but what youexpect to happen, how you should move neighbouring units and how would yousafeguard against counter measures made by opposing units.
Winning and anchoring a flank Flanks in the next 2 sections refer to the board’s flanks and not a particularunit’s flanks. They can be won by either outnumbering the number of enemy units and/orhaving units which move faster, in the right place.
******Created by ebook converter - www.ebook-converter.com******
******ebook converter DEMO - www.ebook-converter.com*******
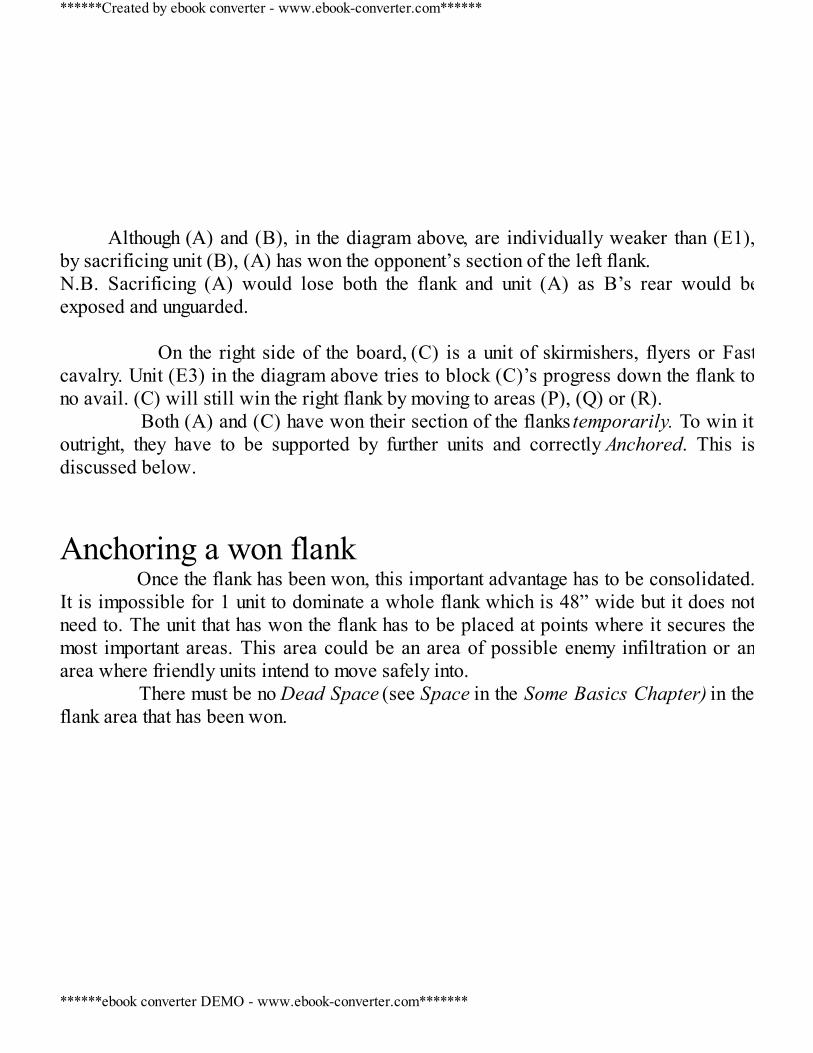
Although (A) and (B), in the diagram above, are individually weaker than (E1),by sacrificing unit (B), (A) has won the opponent’s section of the left flank.N.B. Sacrificing (A) would lose both the flank and unit (A) as B’s rear would beexposed and unguarded. On the right side of the board, (C) is a unit of skirmishers, flyers or Fastcavalry. Unit (E3) in the diagram above tries to block (C)’s progress down the flank tono avail. (C) will still win the right flank by moving to areas (P), (Q) or (R). Both (A) and (C) have won their section of the flanks temporarily. To win itoutright, they have to be supported by further units and correctly Anchored. This isdiscussed below.
Anchoring a won flank Once the flank has been won, this important advantage has to be consolidated.It is impossible for 1 unit to dominate a whole flank which is 48” wide but it does notneed to. The unit that has won the flank has to be placed at points where it secures themost important areas. This area could be an area of possible enemy infiltration or anarea where friendly units intend to move safely into. There must be no Dead Space (see Space in the Some Basics Chapter) in theflank area that has been won.
******Created by ebook converter - www.ebook-converter.com******
******ebook converter DEMO - www.ebook-converter.com*******
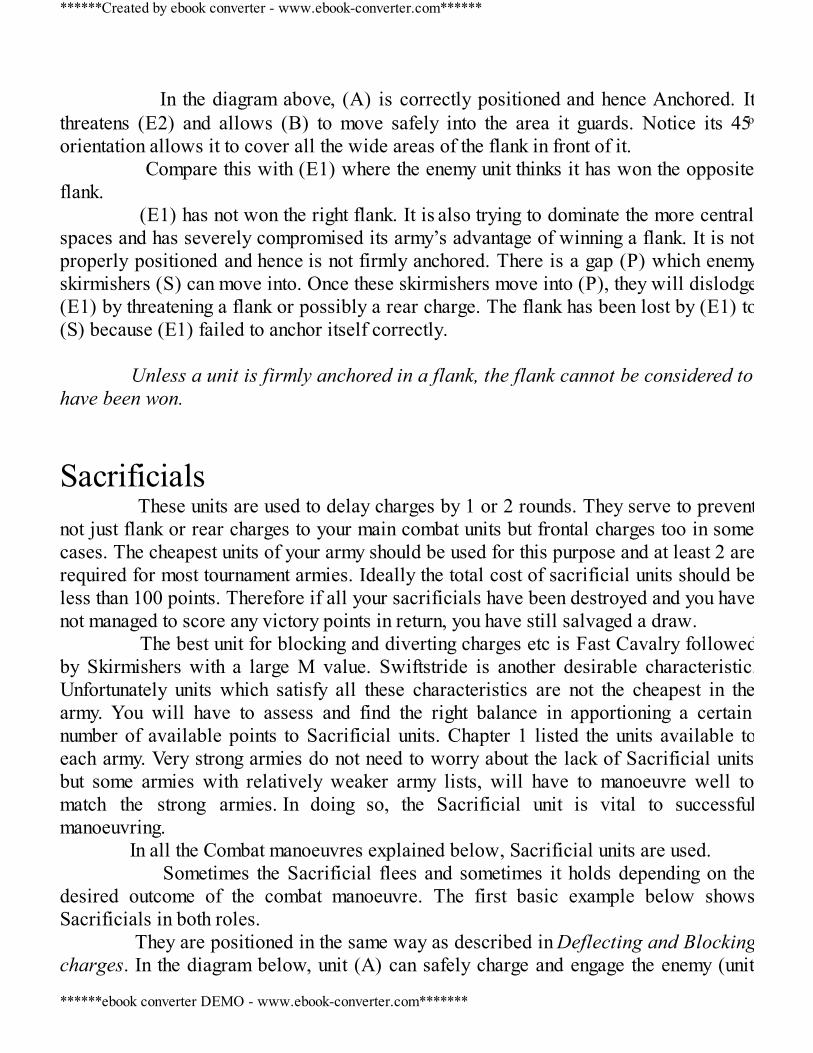
In the diagram above, (A) is correctly positioned and hence Anchored. Itthreatens (E2) and allows (B) to move safely into the area it guards. Notice its 45o
orientation allows it to cover all the wide areas of the flank in front of it. Compare this with (E1) where the enemy unit thinks it has won the oppositeflank. (E1) has not won the right flank. It is also trying to dominate the more centralspaces and has severely compromised its army’s advantage of winning a flank. It is notproperly positioned and hence is not firmly anchored. There is a gap (P) which enemyskirmishers (S) can move into. Once these skirmishers move into (P), they will dislodge(E1) by threatening a flank or possibly a rear charge. The flank has been lost by (E1) to(S) because (E1) failed to anchor itself correctly. Unless a unit is firmly anchored in a flank, the flank cannot be considered tohave been won.
Sacrificials These units are used to delay charges by 1 or 2 rounds. They serve to preventnot just flank or rear charges to your main combat units but frontal charges too in somecases. The cheapest units of your army should be used for this purpose and at least 2 arerequired for most tournament armies. Ideally the total cost of sacrificial units should beless than 100 points. Therefore if all your sacrificials have been destroyed and you havenot managed to score any victory points in return, you have still salvaged a draw. The best unit for blocking and diverting charges etc is Fast Cavalry followedby Skirmishers with a large M value. Swiftstride is another desirable characteristic.Unfortunately units which satisfy all these characteristics are not the cheapest in thearmy. You will have to assess and find the right balance in apportioning a certainnumber of available points to Sacrificial units. Chapter 1 listed the units available toeach army. Very strong armies do not need to worry about the lack of Sacrificial unitsbut some armies with relatively weaker army lists, will have to manoeuvre well tomatch the strong armies. In doing so, the Sacrificial unit is vital to successfulmanoeuvring. In all the Combat manoeuvres explained below, Sacrificial units are used. Sometimes the Sacrificial flees and sometimes it holds depending on thedesired outcome of the combat manoeuvre. The first basic example below showsSacrificials in both roles. They are positioned in the same way as described in Deflecting and Blockingcharges. In the diagram below, unit (A) can safely charge and engage the enemy (unit
******Created by ebook converter - www.ebook-converter.com******
******ebook converter DEMO - www.ebook-converter.com*******
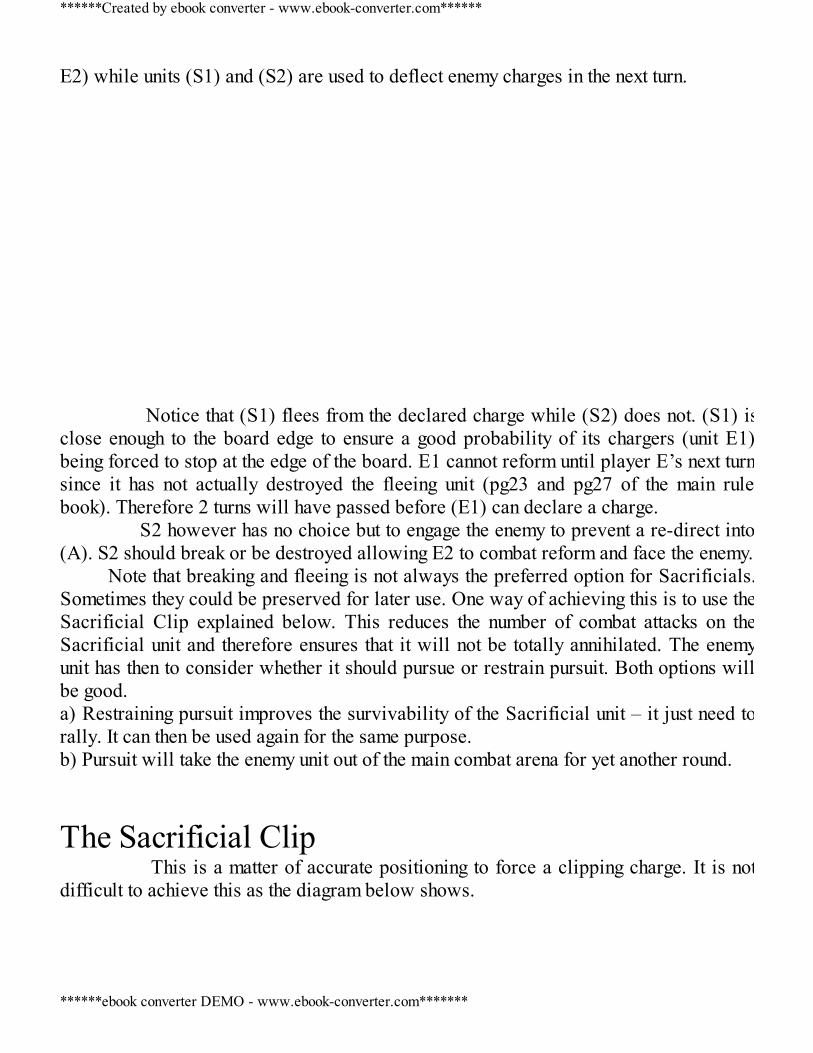
E2) while units (S1) and (S2) are used to deflect enemy charges in the next turn. Notice that (S1) flees from the declared charge while (S2) does not. (S1) isclose enough to the board edge to ensure a good probability of its chargers (unit E1)being forced to stop at the edge of the board. E1 cannot reform until player E’s next turnsince it has not actually destroyed the fleeing unit (pg23 and pg27 of the main rulebook). Therefore 2 turns will have passed before (E1) can declare a charge. S2 however has no choice but to engage the enemy to prevent a re-direct into(A). S2 should break or be destroyed allowing E2 to combat reform and face the enemy.
Note that breaking and fleeing is not always the preferred option for Sacrificials.Sometimes they could be preserved for later use. One way of achieving this is to use theSacrificial Clip explained below. This reduces the number of combat attacks on theSacrificial unit and therefore ensures that it will not be totally annihilated. The enemyunit has then to consider whether it should pursue or restrain pursuit. Both options willbe good.a) Restraining pursuit improves the survivability of the Sacrificial unit – it just need torally. It can then be used again for the same purpose.b) Pursuit will take the enemy unit out of the main combat arena for yet another round.
The Sacrificial Clip This is a matter of accurate positioning to force a clipping charge. It is notdifficult to achieve this as the diagram below shows.
******Created by ebook converter - www.ebook-converter.com******
******ebook converter DEMO - www.ebook-converter.com*******
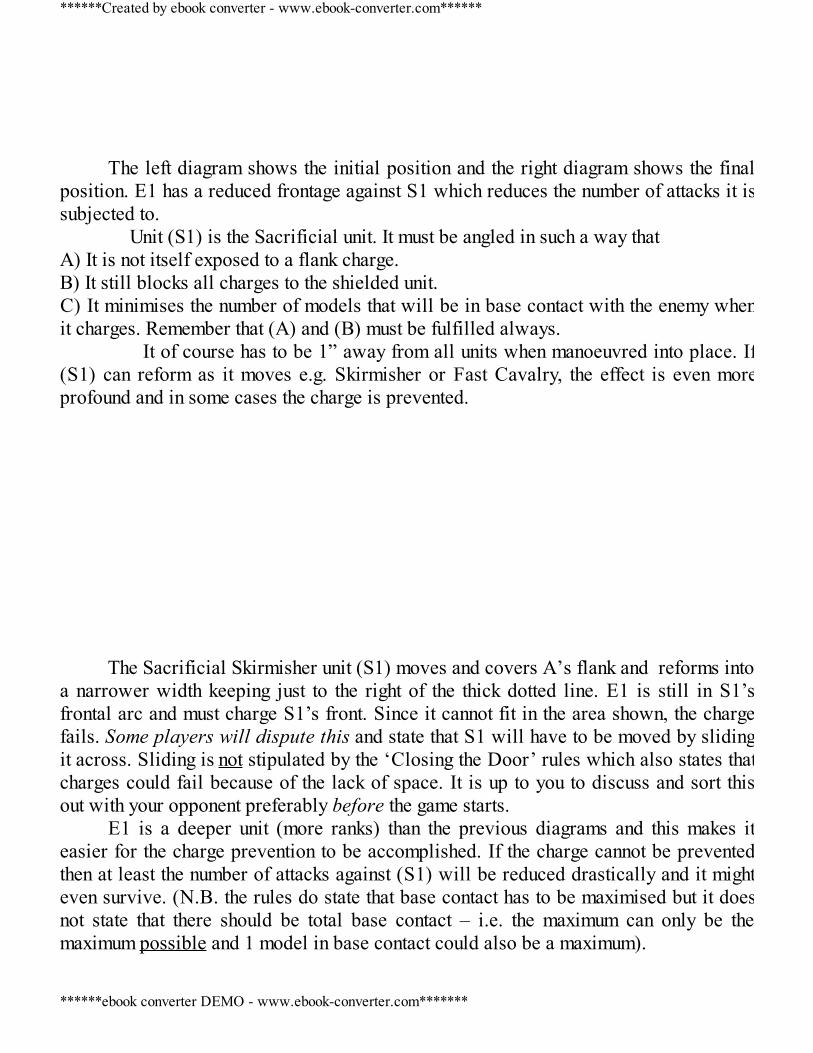
The left diagram shows the initial position and the right diagram shows the final
position. E1 has a reduced frontage against S1 which reduces the number of attacks it issubjected to. Unit (S1) is the Sacrificial unit. It must be angled in such a way thatA) It is not itself exposed to a flank charge.B) It still blocks all charges to the shielded unit.C) It minimises the number of models that will be in base contact with the enemy whenit charges. Remember that (A) and (B) must be fulfilled always. It of course has to be 1” away from all units when manoeuvred into place. If(S1) can reform as it moves e.g. Skirmisher or Fast Cavalry, the effect is even moreprofound and in some cases the charge is prevented.
The Sacrificial Skirmisher unit (S1) moves and covers A’s flank and reforms into
a narrower width keeping just to the right of the thick dotted line. E1 is still in S1’sfrontal arc and must charge S1’s front. Since it cannot fit in the area shown, the chargefails. Some players will dispute this and state that S1 will have to be moved by slidingit across. Sliding is not stipulated by the ‘Closing the Door’ rules which also states thatcharges could fail because of the lack of space. It is up to you to discuss and sort thisout with your opponent preferably before the game starts.
E1 is a deeper unit (more ranks) than the previous diagrams and this makes iteasier for the charge prevention to be accomplished. If the charge cannot be preventedthen at least the number of attacks against (S1) will be reduced drastically and it mighteven survive. (N.B. the rules do state that base contact has to be maximised but it doesnot state that there should be total base contact – i.e. the maximum can only be themaximum possible and 1 model in base contact could also be a maximum).
******Created by ebook converter - www.ebook-converter.com******
******ebook converter DEMO - www.ebook-converter.com*******
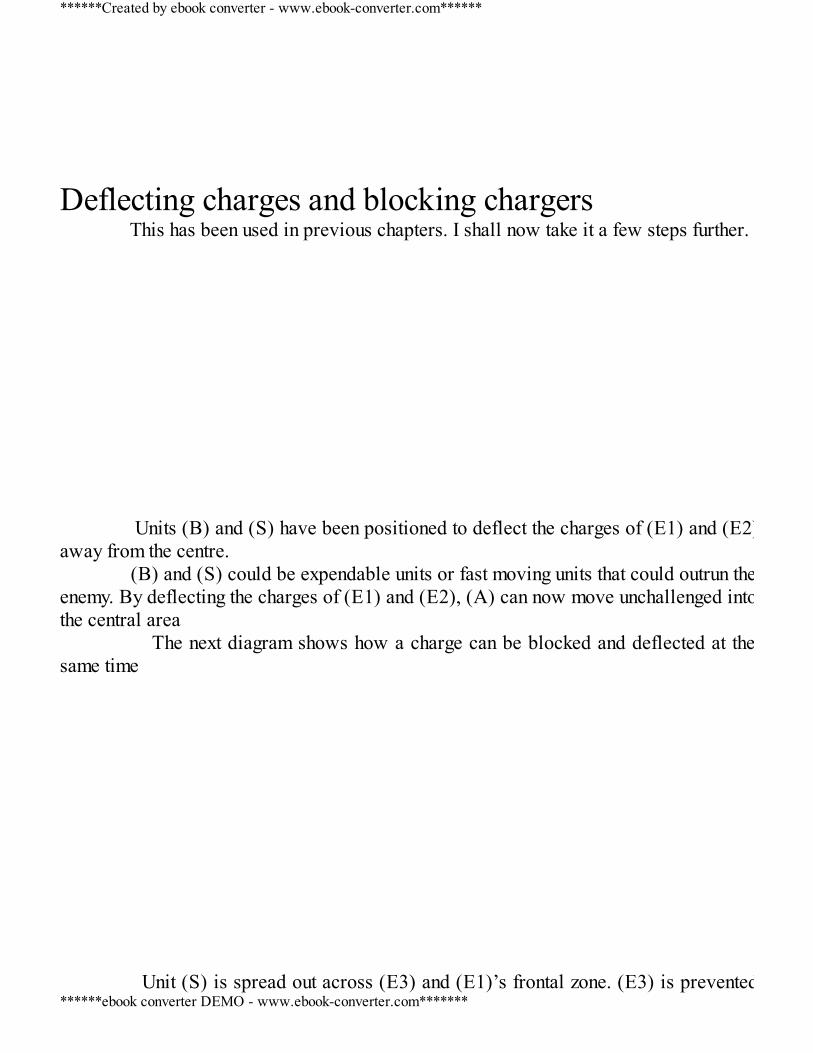
Deflecting charges and blocking chargers This has been used in previous chapters. I shall now take it a few steps further. Units (B) and (S) have been positioned to deflect the charges of (E1) and (E2)away from the centre. (B) and (S) could be expendable units or fast moving units that could outrun theenemy. By deflecting the charges of (E1) and (E2), (A) can now move unchallenged intothe central area The next diagram shows how a charge can be blocked and deflected at thesame time Unit (S) is spread out across (E3) and (E1)’s frontal zone. (E3) is prevented
******Created by ebook converter - www.ebook-converter.com******
******ebook converter DEMO - www.ebook-converter.com*******
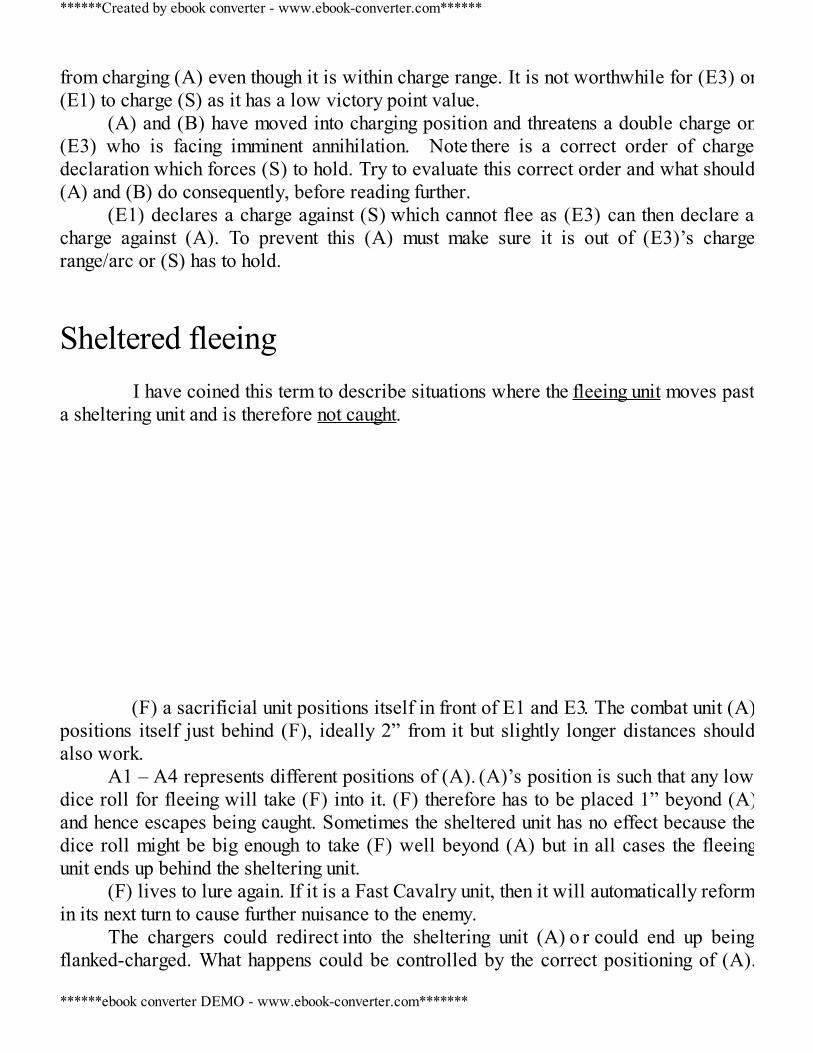
from charging (A) even though it is within charge range. It is not worthwhile for (E3) or(E1) to charge (S) as it has a low victory point value.
(A) and (B) have moved into charging position and threatens a double charge on(E3) who is facing imminent annihilation. Note there is a correct order of chargedeclaration which forces (S) to hold. Try to evaluate this correct order and what should(A) and (B) do consequently, before reading further.
(E1) declares a charge against (S) which cannot flee as (E3) can then declare acharge against (A). To prevent this (A) must make sure it is out of (E3)’s chargerange/arc or (S) has to hold.
Sheltered fleeing I have coined this term to describe situations where the fleeing unit moves pasta sheltering unit and is therefore not caught. (F) a sacrificial unit positions itself in front of E1 and E3. The combat unit (A)positions itself just behind (F), ideally 2” from it but slightly longer distances shouldalso work.
A1 – A4 represents different positions of (A). (A)’s position is such that any lowdice roll for fleeing will take (F) into it. (F) therefore has to be placed 1” beyond (A)and hence escapes being caught. Sometimes the sheltered unit has no effect because thedice roll might be big enough to take (F) well beyond (A) but in all cases the fleeingunit ends up behind the sheltering unit.
(F) lives to lure again. If it is a Fast Cavalry unit, then it will automatically reformin its next turn to cause further nuisance to the enemy.
The chargers could redirect into the sheltering unit (A) o r could end up beingflanked-charged. What happens could be controlled by the correct positioning of (A).
******Created by ebook converter - www.ebook-converter.com******
******ebook converter DEMO - www.ebook-converter.com*******
There are 4 possible positions for (A), labelled (A1), (A2), (A3) and (A4). Eachposition is chosen to produce a different desired effect. Position (A1): This is simply the Safe Zone mentioned in previous sections. Inthis case, it does not matter which enemy unit declares a charge against (F), A1 willcharge that unit or accept a re-directed charge against it. Position (A2): A re-direct is possible here as well but there might be no spacefor E1 and a re-directed charge by E3 will be clipped. If the former is desired, then (A)will have to be placed at a distance to E1 slightly smaller than the depth of unit E1. Positions A3 and A4: The sheltered flee occurs for only one declared charge.In the case of A3, both charges cannot be re-directed into (A) and (A) threatens a flankcharge on (E1). For (A4), E1’s charge will fail and stop 1” behind E3 while E3’scharge will be clipped. You should be able to work out why yourself.
Fast Cavalry lure Fast Cavalry have been used quite extensively in this chapter. When used as alure, Fast Cavalry benefits from being able to rally after fleeing from a charge.
The Fast Cavalry unit is arranged in a long line in a single rank usually. Thisenables the unit to block 3 or 4 units at the same time. Units (E3) and (E4) are blockedfrontally while the flank of the Fast cavalry unit is used to block (E2). Note the linesjoining the centre of the enemy unit to the centre of the Fast cavalry unit. These aredrawn in red on the diagram. The Safe Zone will be an area within the most vertical ofthese lines. This is where the unit that is sheltered from charges will have to move into– unit (A) in this case.
2 strong units could be positioned on either side to create a flank charge. If this isthe desired objective, then make sure that the fleeing Fast Cavalry unit does not causePanic or enable a redirect into these units, by checking the fleeing path. After the FCflees and rallies, it can reform into a narrower frontage to make it easier to escape
******Created by ebook converter - www.ebook-converter.com******
******ebook converter DEMO - www.ebook-converter.com*******
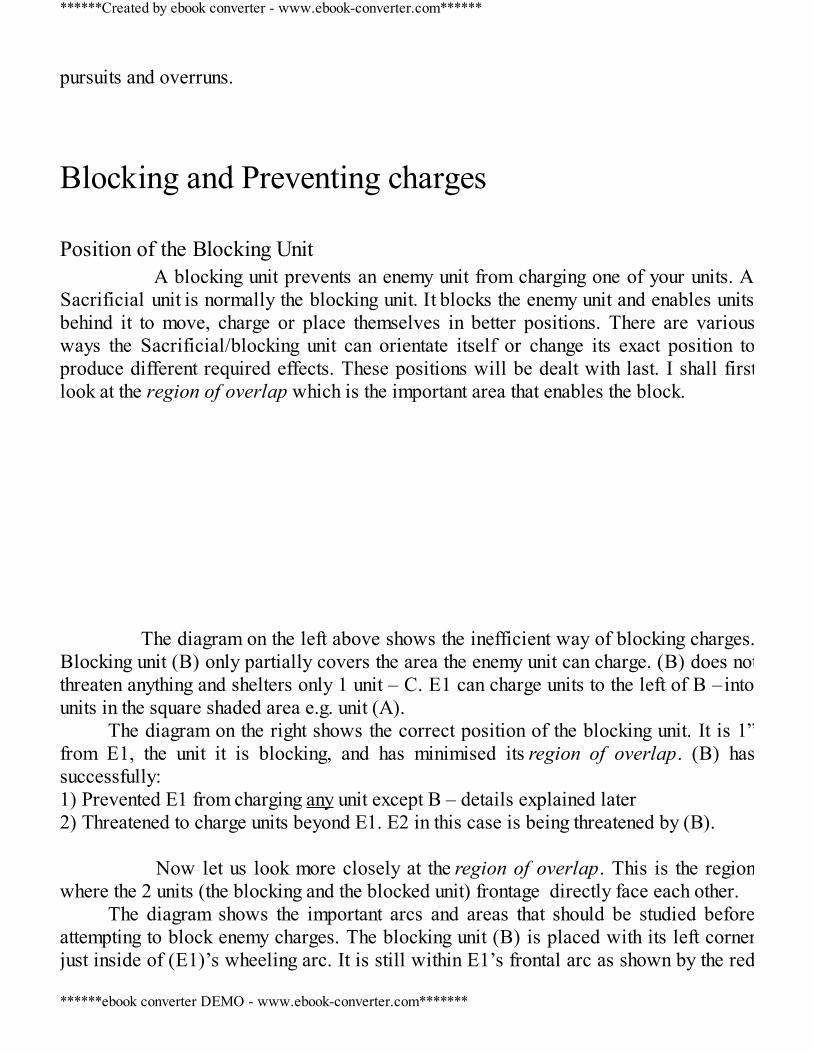
pursuits and overruns.
Blocking and Preventing charges
Position of the Blocking Unit A blocking unit prevents an enemy unit from charging one of your units. ASacrificial unit is normally the blocking unit. It blocks the enemy unit and enables unitsbehind it to move, charge or place themselves in better positions. There are variousways the Sacrificial/blocking unit can orientate itself or change its exact position toproduce different required effects. These positions will be dealt with last. I shall firstlook at the region of overlap which is the important area that enables the block. The diagram on the left above shows the inefficient way of blocking charges.Blocking unit (B) only partially covers the area the enemy unit can charge. (B) does notthreaten anything and shelters only 1 unit – C. E1 can charge units to the left of B – intounits in the square shaded area e.g. unit (A).
The diagram on the right shows the correct position of the blocking unit. It is 1”from E1, the unit it is blocking, and has minimised its region of overlap. (B) hassuccessfully:1) Prevented E1 from charging any unit except B – details explained later2) Threatened to charge units beyond E1. E2 in this case is being threatened by (B). Now let us look more closely at the region of overlap. This is the regionwhere the 2 units (the blocking and the blocked unit) frontage directly face each other.
The diagram shows the important arcs and areas that should be studied beforeattempting to block enemy charges. The blocking unit (B) is placed with its left cornerjust inside of (E1)’s wheeling arc. It is still within E1’s frontal arc as shown by the red
******Created by ebook converter - www.ebook-converter.com******
******ebook converter DEMO - www.ebook-converter.com*******
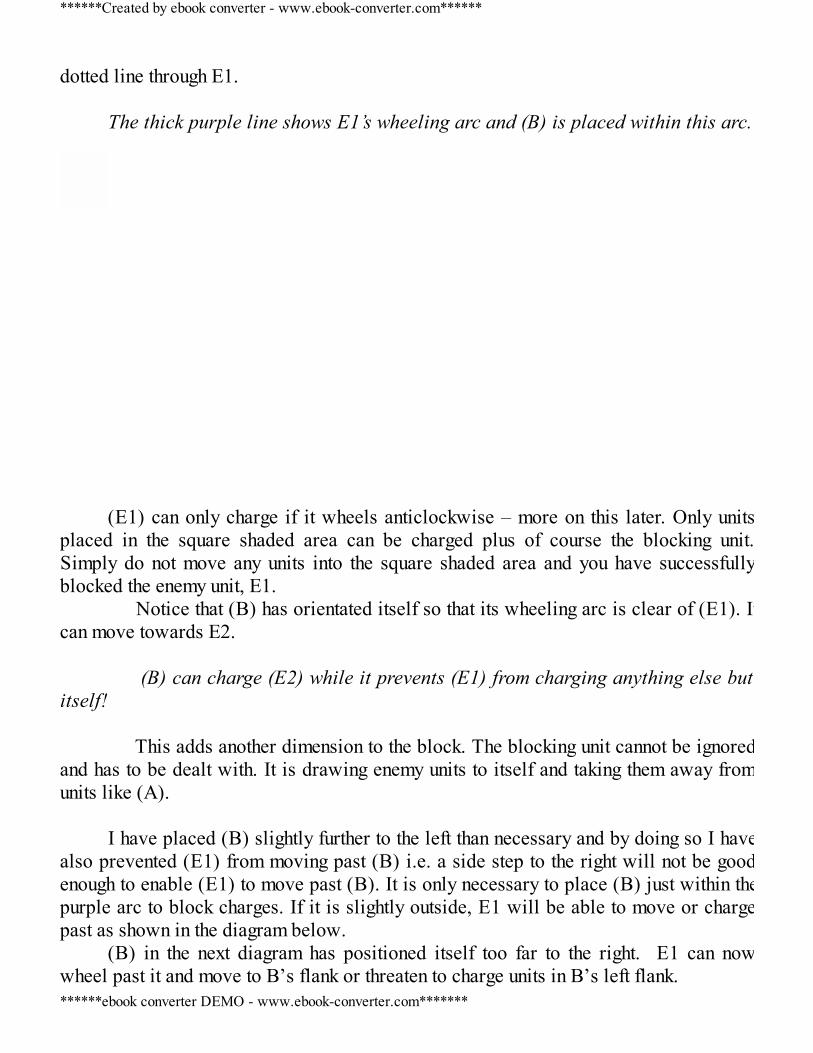
dotted line through E1. The thick purple line shows E1’s wheeling arc and (B) is placed within this arc.
(E1) can only charge if it wheels anticlockwise – more on this later. Only units
placed in the square shaded area can be charged plus of course the blocking unit.Simply do not move any units into the square shaded area and you have successfullyblocked the enemy unit, E1. Notice that (B) has orientated itself so that its wheeling arc is clear of (E1). Itcan move towards E2. (B) can charge (E2) while it prevents (E1) from charging anything else butitself! This adds another dimension to the block. The blocking unit cannot be ignoredand has to be dealt with. It is drawing enemy units to itself and taking them away fromunits like (A).
I have placed (B) slightly further to the left than necessary and by doing so I have
also prevented (E1) from moving past (B) i.e. a side step to the right will not be goodenough to enable (E1) to move past (B). It is only necessary to place (B) just within thepurple arc to block charges. If it is slightly outside, E1 will be able to move or chargepast as shown in the diagram below.
(B) in the next diagram has positioned itself too far to the right. E1 can nowwheel past it and move to B’s flank or threaten to charge units in B’s left flank.
******Created by ebook converter - www.ebook-converter.com******
******ebook converter DEMO - www.ebook-converter.com*******

Notice E1 is a narrower unit. The width of E1 determines the ease in making thismanoeuvre successful. It should not be too narrow or too wide. If E1 is very wide, thenit will be harder to make sure that it lies in (B)’s frontal arc. (B) will then have to bemoved further to the left. If (E1) is too narrow, it will be harder for (B) to wheel past itwhile keeping it in its frontal arc. A maths comment which you can ignore.
{The initial geometry for the wheeling arcs is quite basic, involving perpendicular bisectors and
isosceles triangles but the final exact position and orientation involves some complex trigonometry. I shall notbother you with the details}
The sequence and checks to establish the correct position of (B) is:
1) Measure the minimum 1” distance from the enemy unit you wish to block, choosing acorner (Q) according to what you would like to achieve (more on this below) 2) Frontal arc:Place the movement tray slightly to the left or right of this corner, making sure it iswithin the wheeling arc of the enemy unit, E1. Orientate the tray so that E1 is always inthe frontal arc. Most players use a piece of paper folded in half to get the 45 degreesneeded for this.
******Created by ebook converter - www.ebook-converter.com******
******ebook converter DEMO - www.ebook-converter.com*******
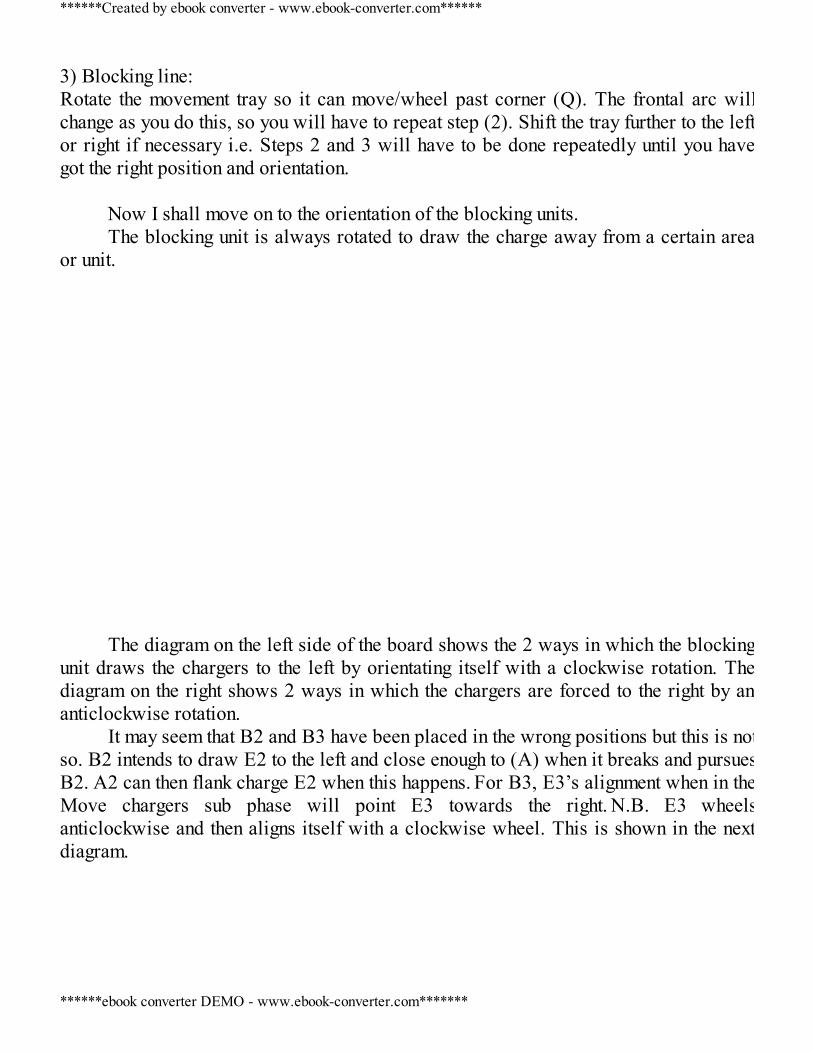
3) Blocking line:Rotate the movement tray so it can move/wheel past corner (Q). The frontal arc willchange as you do this, so you will have to repeat step (2). Shift the tray further to the leftor right if necessary i.e. Steps 2 and 3 will have to be done repeatedly until you havegot the right position and orientation.
Now I shall move on to the orientation of the blocking units.The blocking unit is always rotated to draw the charge away from a certain area
or unit. The diagram on the left side of the board shows the 2 ways in which the blocking
unit draws the chargers to the left by orientating itself with a clockwise rotation. Thediagram on the right shows 2 ways in which the chargers are forced to the right by ananticlockwise rotation.
It may seem that B2 and B3 have been placed in the wrong positions but this is notso. B2 intends to draw E2 to the left and close enough to (A) when it breaks and pursuesB2. A2 can then flank charge E2 when this happens. For B3, E3’s alignment when in theMove chargers sub phase will point E3 towards the right. N.B. E3 wheelsanticlockwise and then aligns itself with a clockwise wheel. This is shown in the nextdiagram.
******Created by ebook converter - www.ebook-converter.com******
******ebook converter DEMO - www.ebook-converter.com*******
E1 should wheel anticlockwise and not clockwise. The anticlockwise wheel
seems counter intuitive but is the correct wheel. Some beginners are not aware of thisand may have to be reminded. Notice the anticlockwise wheel has shifted E1 further tothe right of the board. You have to be aware of this when working out the fleeing andpursuit lines.
Position and rotate the blocking unit according to what you want to block, what
you want to threaten with the blocking unit and where you expect the enemy chargers toend up in your next turn.
During the charge move, the charger should wheel so that it maximises models.
This wheel unfortunately ‘shifts’ the charger closer to the sheltered area i.e. thesheltered area and the Safe Zone could actually become smaller depending on how theenemy unit wheels and aligns itself as explained in the next section.
Safe Zone - revisitedThe Safe Zone is the region where other units can be placed safely while a
Sacrificial unit diverts or blocks an enemy unit. This region is determined by the fleeinglines and overrun lines but the width (or half width) of the enemy unit also affects thisregion. The safe region could shift depending on how the enemy unit maximises itselfbecause its width/front will shift slightly.
The diagram below shows unit E1 being blocked by (B). It is a mistake to thinkthat the left border of the Safe Zone is the line PQ. The actual Safe Zone is smaller thanthis.
******Created by ebook converter - www.ebook-converter.com******
******ebook converter DEMO - www.ebook-converter.com*******
The next diagram shows the 2 possible positions after E1 charges. It aligns itself
differently but has maximised base contact correctly. E1 would choose to maximise inthe way shown on the left diagram if it wishes to overrun into (A) while the diagram onthe right shows E1 maximising to overrun into (C).
The correct left border of the Safe Zone is the line RS and not PQ. (D) is the only
unit in the Safe Zone whilst (A) and (C) are incorrectly placed.The example above shows that the half-width of the blocked unit has to be made 1
model wider than it actually is when determining lines of pursuit and overrun (or width= 2 models wider).
Common block – Preventing a wheel
To recapitulate the well-known basic way of blocking: (S), a sacrificial unitpositions itself so that its right edge just overlaps with (E1). (E1) cannot charge (A)
******Created by ebook converter - www.ebook-converter.com******
******ebook converter DEMO - www.ebook-converter.com*******
because it is blocked by (S). The distance of (A) from E1 will have to be more than that of (S) from E1 sothat a charge straight ahead is prevented. The position of (A) must be far enough to theright to prevent a clockwise wheel and a straight move by E1 from reaching (A). Notethat (S) prevents an anticlockwise wheel but not a clockwise wheel. I will assume you would have noted these basics in the more complex blockingtechniques coming up next as I shall be incorporating them without mentioning them. Blocking the Wheeling Arc by 1” Page 14 of the main rule book states that a wheel has its centre at one of the 2front corners.
In the left diagram, (S) is positioned exactly 1” from the right corner of E1. E1 isthen unable to wheel anticlockwise as that will bring it within 1” of (S). E1 cannotmarch past (A) and will have to charge (S) which might mean exposing its flank or rearto (A). If E1 does not want to charge (S) or (A) then it can only advance a short distancebefore it has to stop 1” from (A) or retreat straight back until it is more than 1” clear of(S).
In the diagram on the right (A) has positioned itself in E1’s flank. Although hasLOS to (A), it cannot charge because the wheel needed would bring E1 into contactwith (S). E1 faces a flank charge a turn later. It can only retreat and hope that the movetakes (A) away from the flank. The adjustments in this case are the same for (S) but (A)has to be orientated and positioned at certain angles. The exact angle is explained in the4 unit prison below. The depth of E1 must also be greater than 1” for this to work. There are similarities in the above manoeuvre with some of the others– 4 unit
******Created by ebook converter - www.ebook-converter.com******
******ebook converter DEMO - www.ebook-converter.com*******
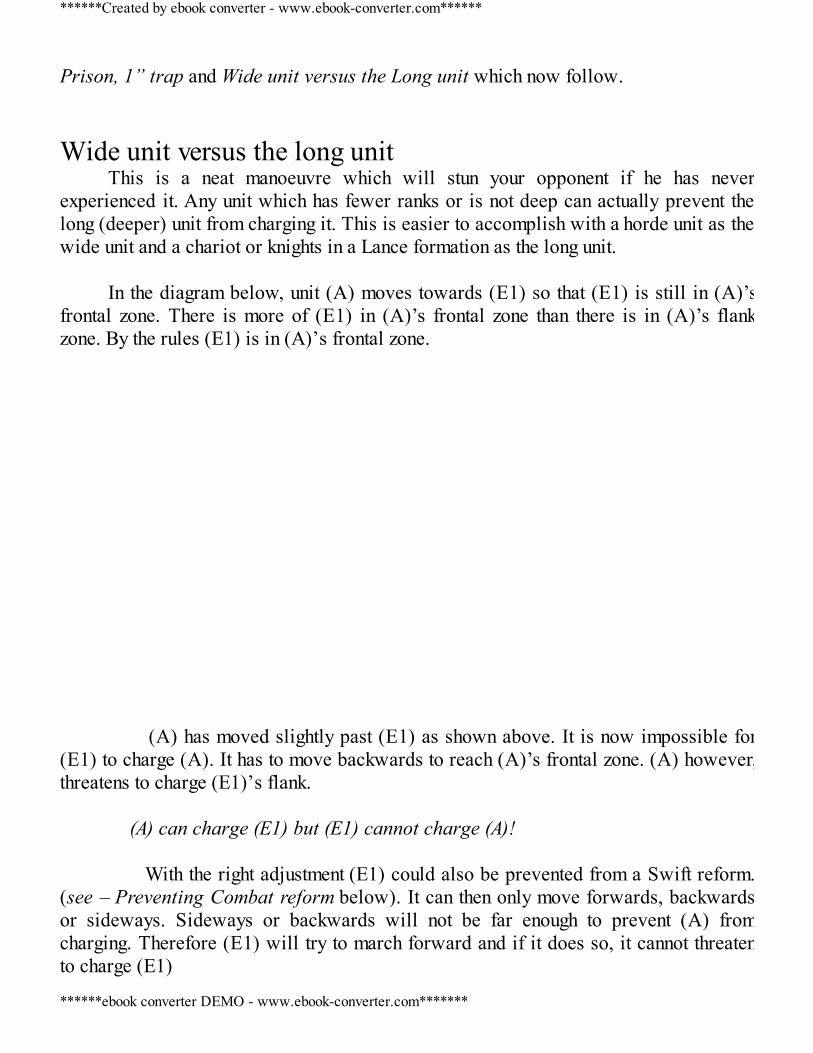
Prison, 1” trap and Wide unit versus the Long unit which now follow. Wide unit versus the long unit
This is a neat manoeuvre which will stun your opponent if he has neverexperienced it. Any unit which has fewer ranks or is not deep can actually prevent thelong (deeper) unit from charging it. This is easier to accomplish with a horde unit as thewide unit and a chariot or knights in a Lance formation as the long unit.
In the diagram below, unit (A) moves towards (E1) so that (E1) is still in (A)’s
frontal zone. There is more of (E1) in (A)’s frontal zone than there is in (A)’s flankzone. By the rules (E1) is in (A)’s frontal zone.
(A) has moved slightly past (E1) as shown above. It is now impossible for(E1) to charge (A). It has to move backwards to reach (A)’s frontal zone. (A) however,threatens to charge (E1)’s flank. (A) can charge (E1) but (E1) cannot charge (A)! With the right adjustment (E1) could also be prevented from a Swift reform.(see – Preventing Combat reform below). It can then only move forwards, backwardsor sideways. Sideways or backwards will not be far enough to prevent (A) fromcharging. Therefore (E1) will try to march forward and if it does so, it cannot threatento charge (E1)
******Created by ebook converter - www.ebook-converter.com******
******ebook converter DEMO - www.ebook-converter.com*******
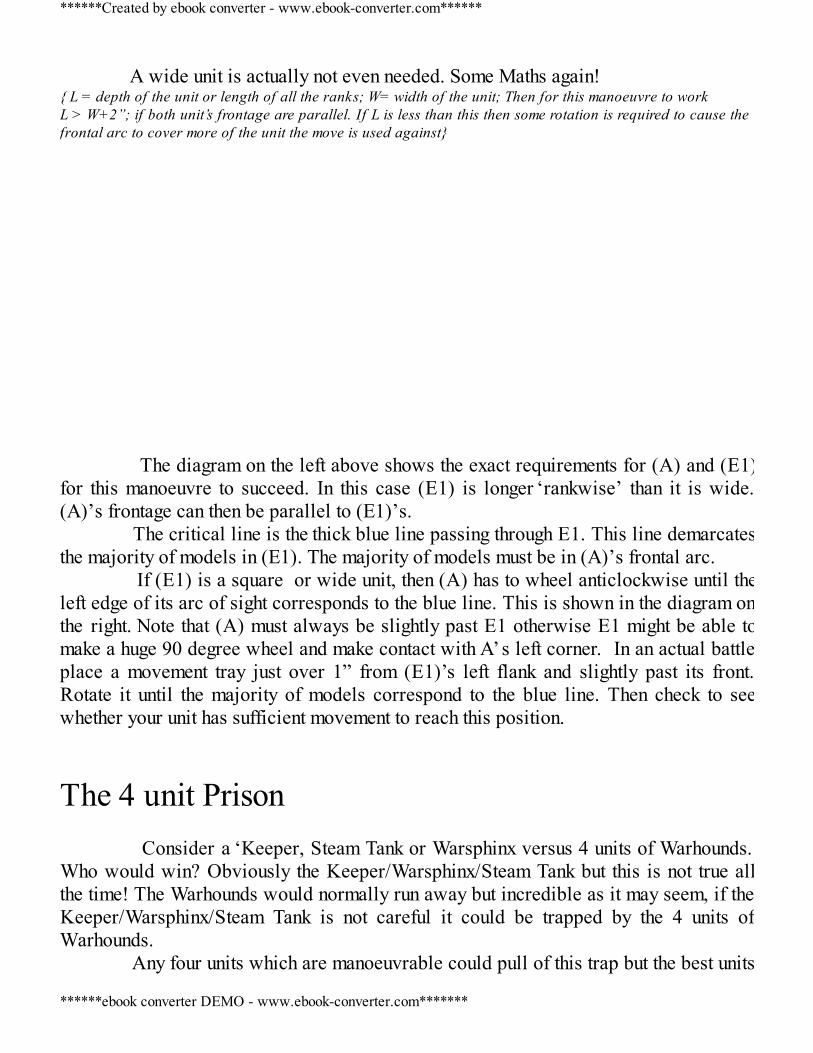
A wide unit is actually not even needed. Some Maths again!{ L = depth of the unit or length of all the ranks; W= width of the unit; Then for this manoeuvre to workL > W+2”; if both unit’s frontage are parallel. If L is less than this then some rotation is required to cause thefrontal arc to cover more of the unit the move is used against}
The diagram on the left above shows the exact requirements for (A) and (E1)for this manoeuvre to succeed. In this case (E1) is longer ‘rankwise’ than it is wide.(A)’s frontage can then be parallel to (E1)’s. The critical line is the thick blue line passing through E1. This line demarcatesthe majority of models in (E1). The majority of models must be in (A)’s frontal arc. If (E1) is a square or wide unit, then (A) has to wheel anticlockwise until theleft edge of its arc of sight corresponds to the blue line. This is shown in the diagram onthe right. Note that (A) must always be slightly past E1 otherwise E1 might be able tomake a huge 90 degree wheel and make contact with A’s left corner. In an actual battleplace a movement tray just over 1” from (E1)’s left flank and slightly past its front.Rotate it until the majority of models correspond to the blue line. Then check to seewhether your unit has sufficient movement to reach this position.
The 4 unit Prison Consider a ‘Keeper, Steam Tank or Warsphinx versus 4 units of Warhounds.Who would win? Obviously the Keeper/Warsphinx/Steam Tank but this is not true allthe time! The Warhounds would normally run away but incredible as it may seem, if theKeeper/Warsphinx/Steam Tank is not careful it could be trapped by the 4 units ofWarhounds. Any four units which are manoeuvrable could pull of this trap but the best units
******Created by ebook converter - www.ebook-converter.com******
******ebook converter DEMO - www.ebook-converter.com*******
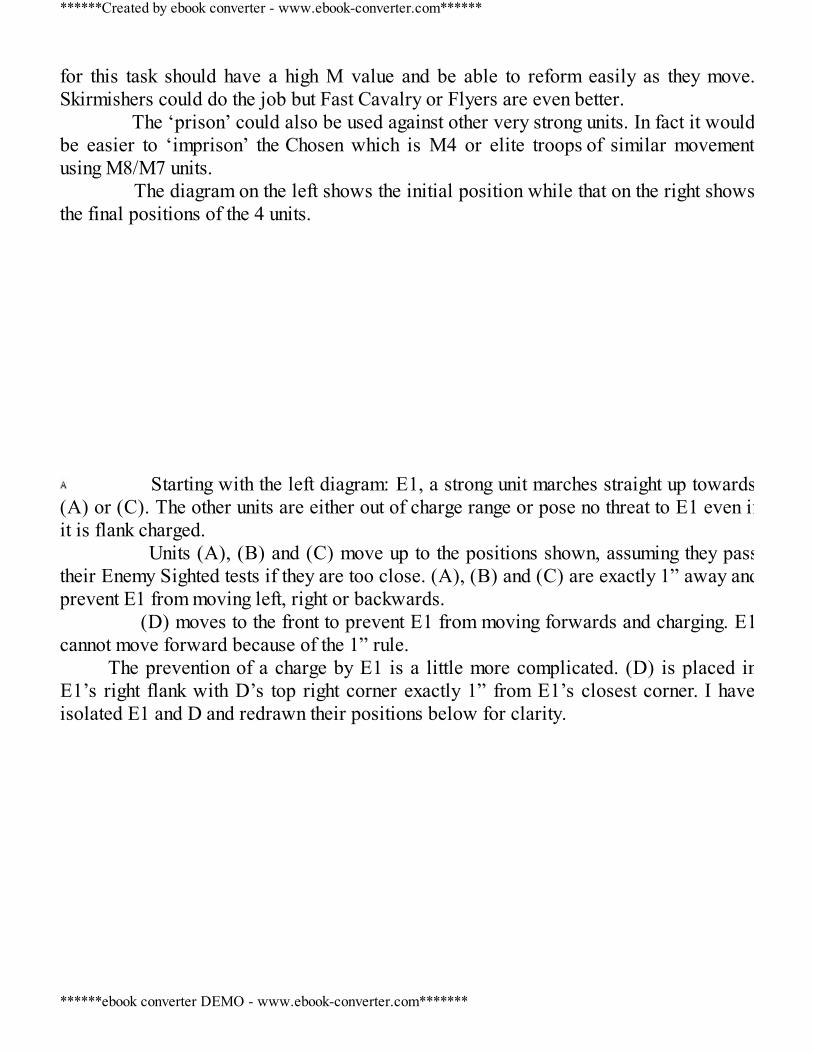
for this task should have a high M value and be able to reform easily as they move.Skirmishers could do the job but Fast Cavalry or Flyers are even better. The ‘prison’ could also be used against other very strong units. In fact it wouldbe easier to ‘imprison’ the Chosen which is M4 or elite troops of similar movementusing M8/M7 units. The diagram on the left shows the initial position while that on the right showsthe final positions of the 4 units. Starting with the left diagram: E1, a strong unit marches straight up towards
(A) or (C). The other units are either out of charge range or pose no threat to E1 even ifit is flank charged. Units (A), (B) and (C) move up to the positions shown, assuming they passtheir Enemy Sighted tests if they are too close. (A), (B) and (C) are exactly 1” away andprevent E1 from moving left, right or backwards. (D) moves to the front to prevent E1 from moving forwards and charging. E1cannot move forward because of the 1” rule.
The prevention of a charge by E1 is a little more complicated. (D) is placed inE1’s right flank with D’s top right corner exactly 1” from E1’s closest corner. I haveisolated E1 and D and redrawn their positions below for clarity.
******Created by ebook converter - www.ebook-converter.com******
******ebook converter DEMO - www.ebook-converter.com*******
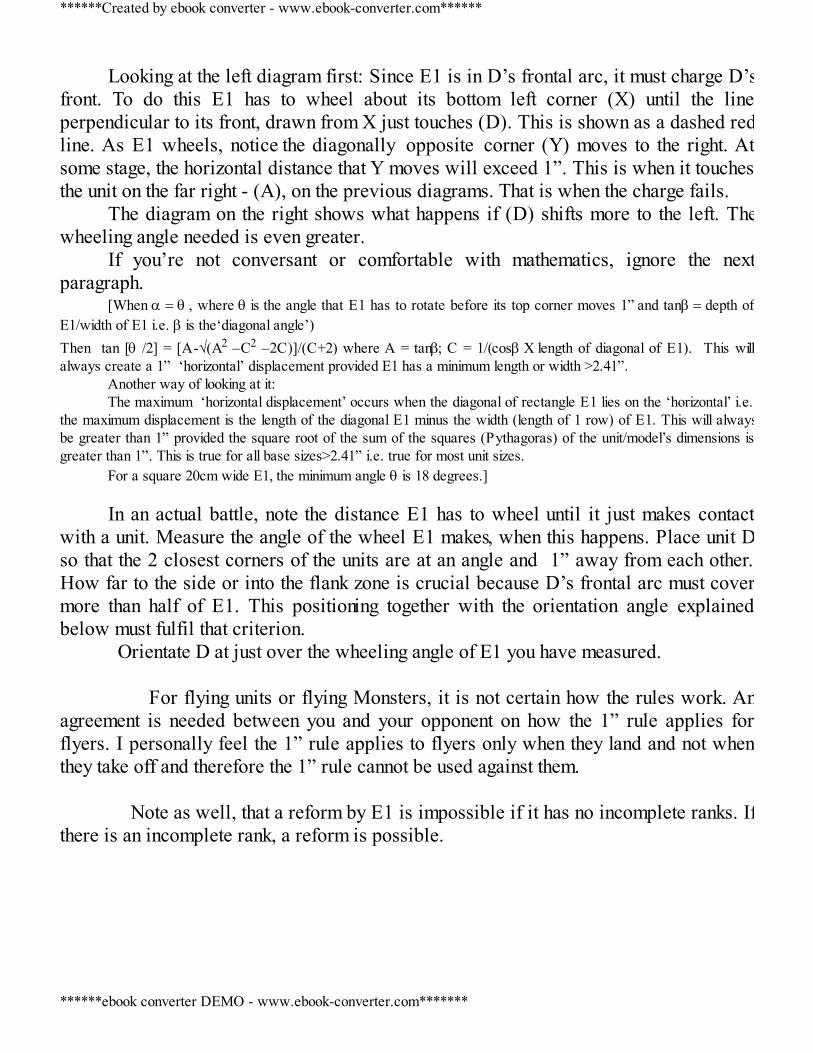
Looking at the left diagram first: Since E1 is in D’s frontal arc, it must charge D’sfront. To do this E1 has to wheel about its bottom left corner (X) until the lineperpendicular to its front, drawn from X just touches (D). This is shown as a dashed redline. As E1 wheels, notice the diagonally opposite corner (Y) moves to the right. Atsome stage, the horizontal distance that Y moves will exceed 1”. This is when it touchesthe unit on the far right - (A), on the previous diagrams. That is when the charge fails.
The diagram on the right shows what happens if (D) shifts more to the left. Thewheeling angle needed is even greater.
If you’re not conversant or comfortable with mathematics, ignore the nextparagraph.
[When a = q , where q is the angle that E1 has to rotate before its top corner moves 1” and tanb = depth ofE1/width of E1 i.e. b is the‘diagonal angle’)Then tan [q /2] = [A-√(A2 –C2 –2C)]/(C+2) where A = tanb; C = 1/(cosb X length of diagonal of E1). This willalways create a 1” ‘horizontal’ displacement provided E1 has a minimum length or width >2.41”.
Another way of looking at it:The maximum ‘horizontal displacement’ occurs when the diagonal of rectangle E1 lies on the ‘horizontal’ i.e.
the maximum displacement is the length of the diagonal E1 minus the width (length of 1 row) of E1. This will alwaysbe greater than 1” provided the square root of the sum of the squares (Pythagoras) of the unit/model’s dimensions isgreater than 1”. This is true for all base sizes>2.41” i.e. true for most unit sizes.
For a square 20cm wide E1, the minimum angle q is 18 degrees.] In an actual battle, note the distance E1 has to wheel until it just makes contact
with a unit. Measure the angle of the wheel E1 makes, when this happens. Place unit Dso that the 2 closest corners of the units are at an angle and 1” away from each other.How far to the side or into the flank zone is crucial because D’s frontal arc must covermore than half of E1. This positioning together with the orientation angle explainedbelow must fulfil that criterion.
Orientate D at just over the wheeling angle of E1 you have measured. For flying units or flying Monsters, it is not certain how the rules work. Anagreement is needed between you and your opponent on how the 1” rule applies forflyers. I personally feel the 1” rule applies to flyers only when they land and not whenthey take off and therefore the 1” rule cannot be used against them. Note as well, that a reform by E1 is impossible if it has no incomplete ranks. Ifthere is an incomplete rank, a reform is possible.
******Created by ebook converter - www.ebook-converter.com******
******ebook converter DEMO - www.ebook-converter.com*******
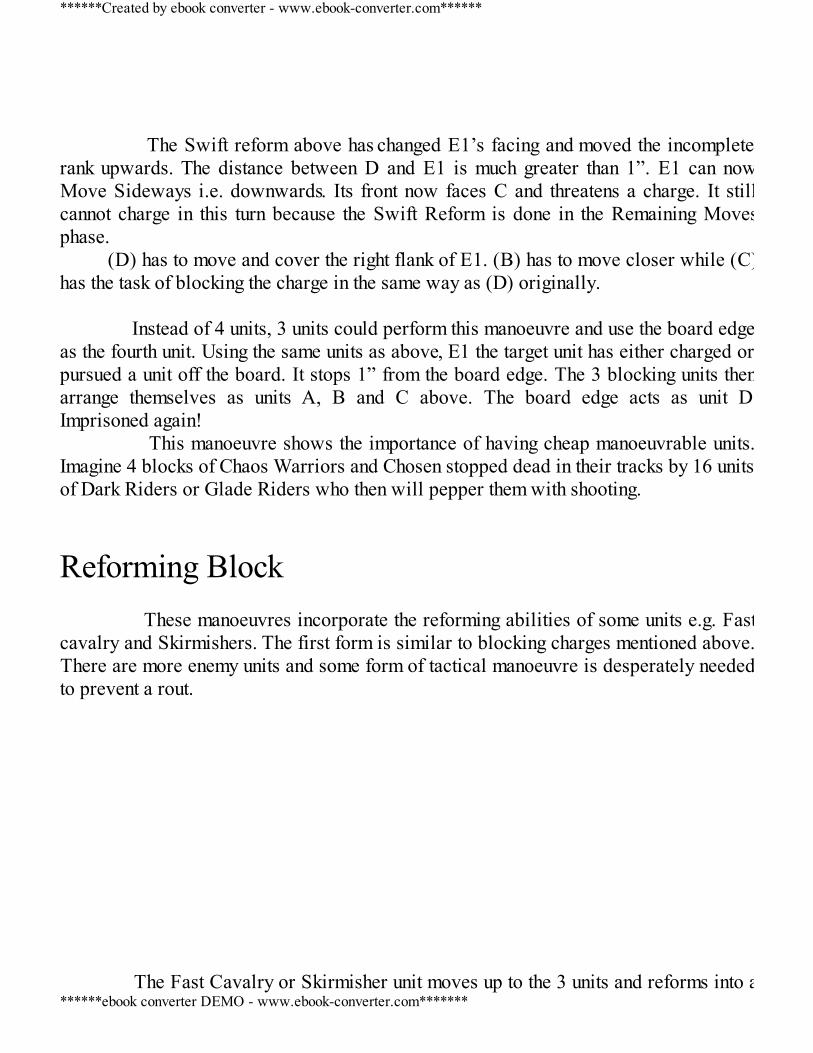
The Swift reform above has changed E1’s facing and moved the incompleterank upwards. The distance between D and E1 is much greater than 1”. E1 can nowMove Sideways i.e. downwards. Its front now faces C and threatens a charge. It stillcannot charge in this turn because the Swift Reform is done in the Remaining Movesphase.
(D) has to move and cover the right flank of E1. (B) has to move closer while (C)has the task of blocking the charge in the same way as (D) originally. Instead of 4 units, 3 units could perform this manoeuvre and use the board edgeas the fourth unit. Using the same units as above, E1 the target unit has either charged orpursued a unit off the board. It stops 1” from the board edge. The 3 blocking units thenarrange themselves as units A, B and C above. The board edge acts as unit D.Imprisoned again! This manoeuvre shows the importance of having cheap manoeuvrable units.Imagine 4 blocks of Chaos Warriors and Chosen stopped dead in their tracks by 16 unitsof Dark Riders or Glade Riders who then will pepper them with shooting.
Reforming Block These manoeuvres incorporate the reforming abilities of some units e.g. Fastcavalry and Skirmishers. The first form is similar to blocking charges mentioned above.There are more enemy units and some form of tactical manoeuvre is desperately neededto prevent a rout. The Fast Cavalry or Skirmisher unit moves up to the 3 units and reforms into a
******Created by ebook converter - www.ebook-converter.com******
******ebook converter DEMO - www.ebook-converter.com*******
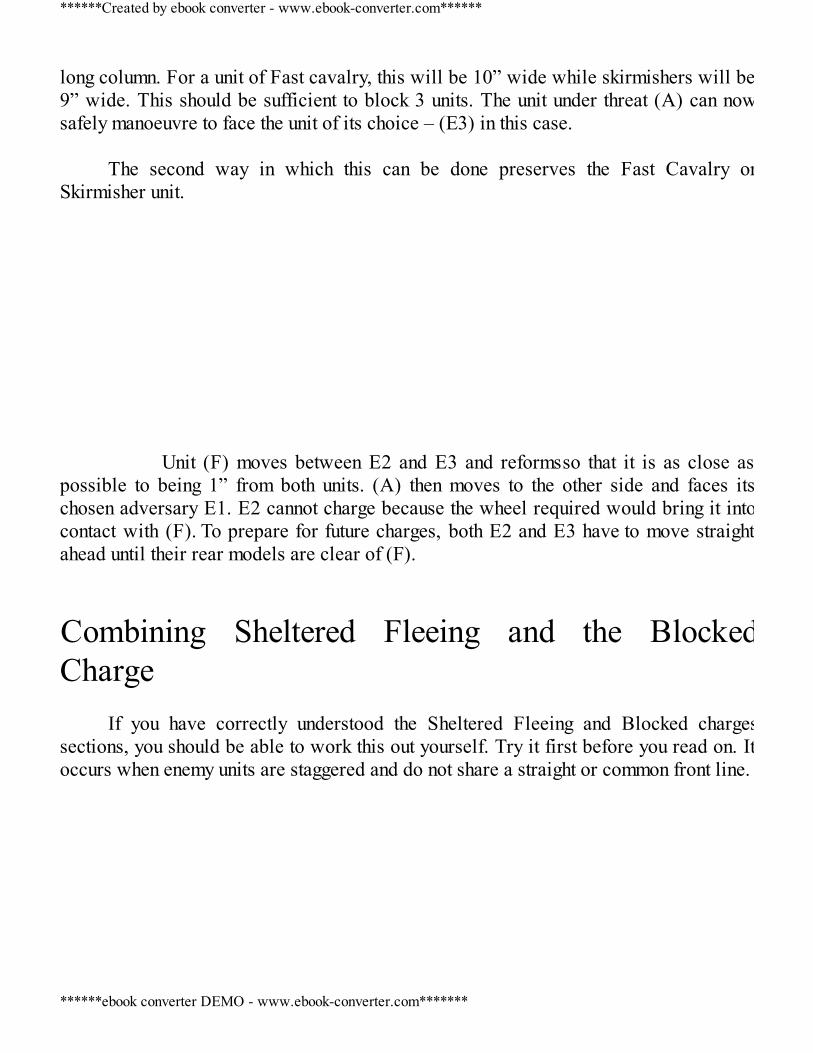
long column. For a unit of Fast cavalry, this will be 10” wide while skirmishers will be9” wide. This should be sufficient to block 3 units. The unit under threat (A) can nowsafely manoeuvre to face the unit of its choice – (E3) in this case.
The second way in which this can be done preserves the Fast Cavalry orSkirmisher unit. Unit (F) moves between E2 and E3 and reforms so that it is as close aspossible to being 1” from both units. (A) then moves to the other side and faces itschosen adversary E1. E2 cannot charge because the wheel required would bring it intocontact with (F). To prepare for future charges, both E2 and E3 have to move straightahead until their rear models are clear of (F).
Combining Sheltered Fleeing and the BlockedCharge
If you have correctly understood the Sheltered Fleeing and Blocked charges
sections, you should be able to work this out yourself. Try it first before you read on. Itoccurs when enemy units are staggered and do not share a straight or common front line.
******Created by ebook converter - www.ebook-converter.com******
******ebook converter DEMO - www.ebook-converter.com*******

The first step is to use elementary geometry to work out whether you can pull of
this manoeuvre. Measure half the width of unit E1. (I shall call this (w) ). Use themeasuring tape to estimate various lines of pursuit for E1, if S1 is placed somewhere inthe red region. This is shown as the white dashed lines in the left diagram. For each ofthese white lines measure the perpendicular distance from corner X to this line. I havedone this for the middle white line and labelled it as XY. Measure the distance XY andcompare it with (w).Three conditions are needed for this manoeuvre to succeed:i) XY must be smaller than half of the width of E1 (w)ii) S1 must somehow fit in the coloured red region so that its centre lies on the whiteline and it has to be >1” from all units.iii) The charging unit (E1) cannot redirect into the unit in combat (A) – i.e. E1 is in(A)’s frontal arc or is too far away. To achieve the second condition (ii), place S1 with its centre on the chosenpursuit path and rotate until the distance between itself and other units is maximised. Ifin doing so, S1 cannot be 1” from neighbouring units, then the manoeuvre cannot bedone. For the third condition to be met, (A) has to check whether E1 is in its frontalarc when it is in base contact. Some Maths follows: (Assuming both the fronts of E1 and (A) are parallel, L is the length of E1 and W its width, then the SUMof the vertical distance and horizontal distance of the corner of (A) from the closest corner of E1 must be Greater thanhalf of L minus W) There is a certain amount of leeway for this.
To ensure that E1 cannot charge its front (A) has to make sure that none of its front‘juts out’. (A) could do this by wheeling a certain amount and then Closing the Doorwith its top right corner as far to the right as maximisation of models in base contactwill allow.
The next diagram shows the final positions of the units.
******Created by ebook converter - www.ebook-converter.com******
******ebook converter DEMO - www.ebook-converter.com*******
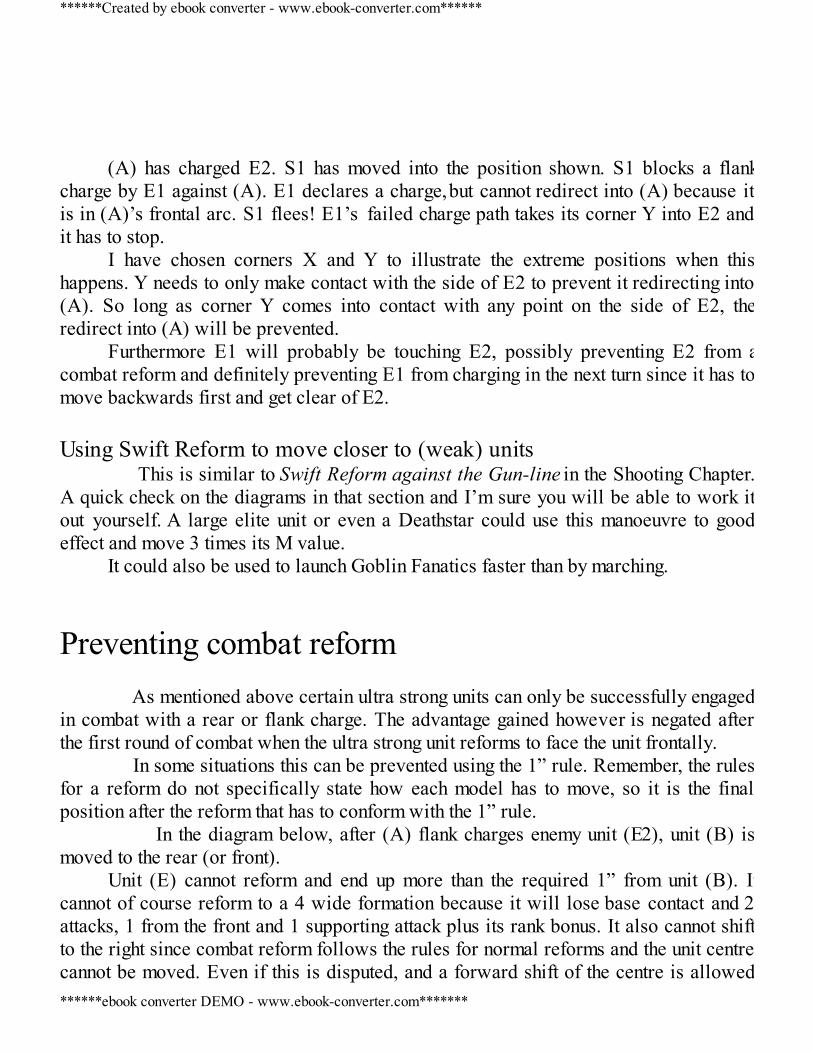
(A) has charged E2. S1 has moved into the position shown. S1 blocks a flank
charge by E1 against (A). E1 declares a charge, but cannot redirect into (A) because itis in (A)’s frontal arc. S1 flees! E1’s failed charge path takes its corner Y into E2 andit has to stop.
I have chosen corners X and Y to illustrate the extreme positions when thishappens. Y needs to only make contact with the side of E2 to prevent it redirecting into(A). So long as corner Y comes into contact with any point on the side of E2, theredirect into (A) will be prevented.
Furthermore E1 will probably be touching E2, possibly preventing E2 from acombat reform and definitely preventing E1 from charging in the next turn since it has tomove backwards first and get clear of E2. Using Swift Reform to move closer to (weak) units This is similar to Swift Reform against the Gun-line in the Shooting Chapter.A quick check on the diagrams in that section and I’m sure you will be able to work itout yourself. A large elite unit or even a Deathstar could use this manoeuvre to goodeffect and move 3 times its M value.
It could also be used to launch Goblin Fanatics faster than by marching.
Preventing combat reform As mentioned above certain ultra strong units can only be successfully engagedin combat with a rear or flank charge. The advantage gained however is negated afterthe first round of combat when the ultra strong unit reforms to face the unit frontally. In some situations this can be prevented using the 1” rule. Remember, the rulesfor a reform do not specifically state how each model has to move, so it is the finalposition after the reform that has to conform with the 1” rule. In the diagram below, after (A) flank charges enemy unit (E2), unit (B) ismoved to the rear (or front).
Unit (E) cannot reform and end up more than the required 1” from unit (B). Itcannot of course reform to a 4 wide formation because it will lose base contact and 2attacks, 1 from the front and 1 supporting attack plus its rank bonus. It also cannot shiftto the right since combat reform follows the rules for normal reforms and the unit centrecannot be moved. Even if this is disputed, and a forward shift of the centre is allowed
******Created by ebook converter - www.ebook-converter.com******
******ebook converter DEMO - www.ebook-converter.com*******
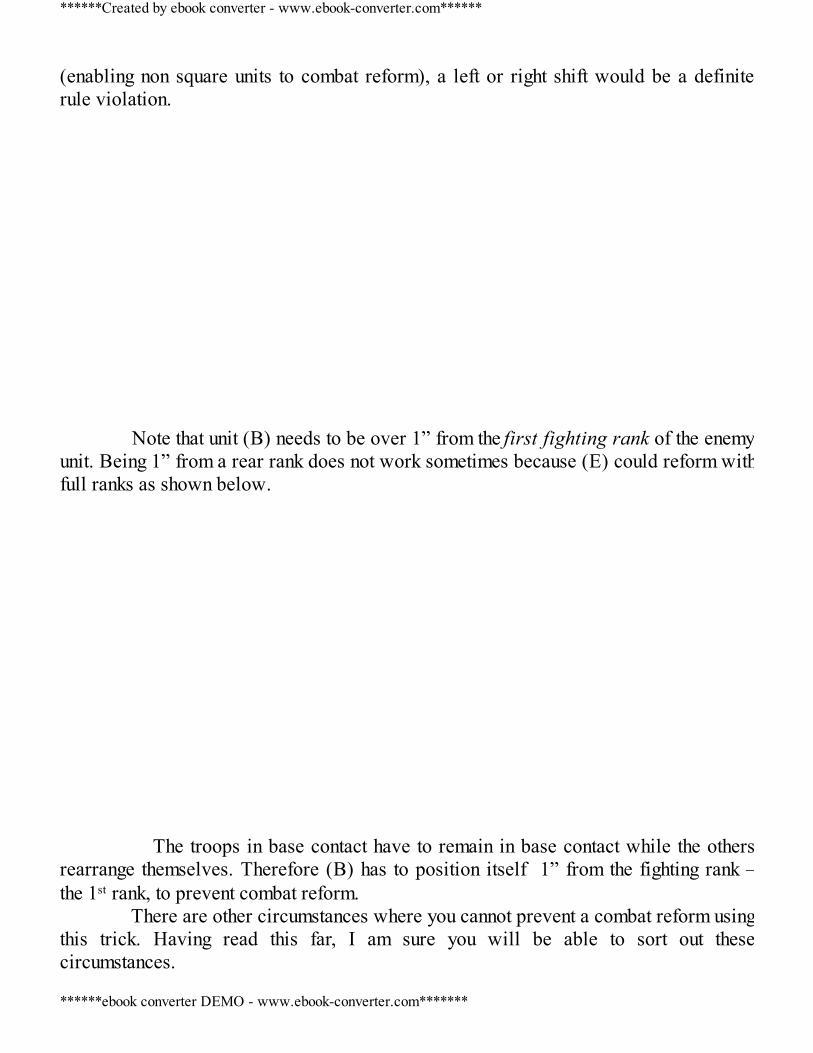
(enabling non square units to combat reform), a left or right shift would be a definiterule violation.
Note that unit (B) needs to be over 1” from the first fighting rank of the enemyunit. Being 1” from a rear rank does not work sometimes because (E) could reform withfull ranks as shown below. The troops in base contact have to remain in base contact while the othersrearrange themselves. Therefore (B) has to position itself 1” from the fighting rank –the 1st rank, to prevent combat reform. There are other circumstances where you cannot prevent a combat reform usingthis trick. Having read this far, I am sure you will be able to sort out thesecircumstances.
******Created by ebook converter - www.ebook-converter.com******
******ebook converter DEMO - www.ebook-converter.com*******
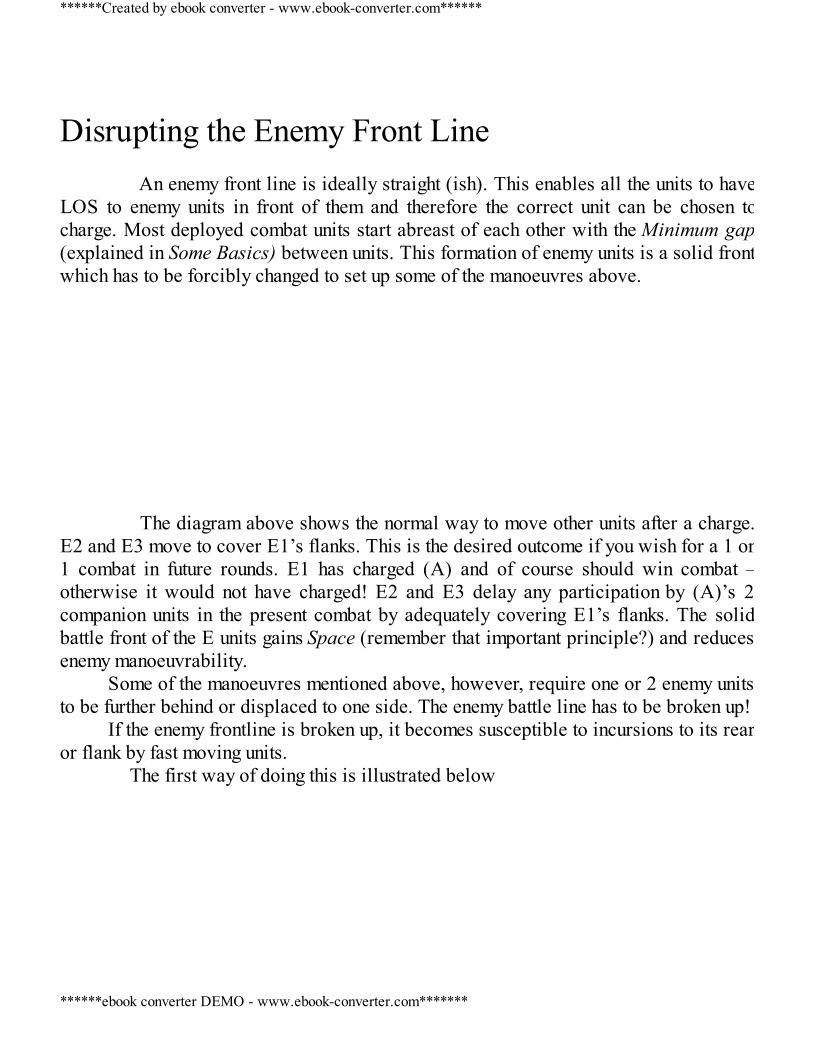
Disrupting the Enemy Front Line An enemy front line is ideally straight (ish). This enables all the units to haveLOS to enemy units in front of them and therefore the correct unit can be chosen tocharge. Most deployed combat units start abreast of each other with the Minimum gap(explained in Some Basics) between units. This formation of enemy units is a solid frontwhich has to be forcibly changed to set up some of the manoeuvres above. The diagram above shows the normal way to move other units after a charge.E2 and E3 move to cover E1’s flanks. This is the desired outcome if you wish for a 1 on1 combat in future rounds. E1 has charged (A) and of course should win combat –otherwise it would not have charged! E2 and E3 delay any participation by (A)’s 2companion units in the present combat by adequately covering E1’s flanks. The solidbattle front of the E units gains Space (remember that important principle?) and reducesenemy manoeuvrability.
Some of the manoeuvres mentioned above, however, require one or 2 enemy unitsto be further behind or displaced to one side. The enemy battle line has to be broken up!
If the enemy frontline is broken up, it becomes susceptible to incursions to its rearor flank by fast moving units. The first way of doing this is illustrated below
******Created by ebook converter - www.ebook-converter.com******
******ebook converter DEMO - www.ebook-converter.com*******
The left diagram shows units (A) and (B) outnumbered by 3 enemy units. (B) does
not want a double charge by E3 and E4 but can hold against a double charge by E2 andE3. (B) Swift Reforms and becomes wider and moves up to cover all 3 charges while(A) marches up and covers (B)’s flank.
E3 charges (B) rather than be charged in the next round. E4 however cannot as(A) blocks its charge path. It could charge (A) but face the likelihood of all 3 unitsbeing scattered after combat ends. E2 the weaker unit cannot march and has to MoveSideways. At the end of that movement phase, the frontline of the E units have beenbroken up and it is possible then for a fast mobile unit (shown in dark blue) to infiltratebehind them.
The second way of breaking up the enemy front line is using diversionary units –explained in Diverting charges in Some Basics.
The diversionary units will break up the enemy frontline is either or both ofthem are charged. In the last version below a single Sacrificial unit if used to break up the enemyfrontline of 3 units.
******Created by ebook converter - www.ebook-converter.com******
******ebook converter DEMO - www.ebook-converter.com*******
(A) shuffles into the Safe Zone and a charge by any one of the E units willblock the path of the other 2. If the E units chose to remain where they are, they wouldlose the advantage of having more units in the battle zone. Reinforcements will moveinto the areas shown by the big arrows. When (E)’s frontline is broken up by a unitcharging S1, other units can move into these same areas (shown by the big arrows) andpose a serious threat to the flanks or rear of the E units.
Layered MSU defence MSU armies are a rarity in 8th ed but if you use several Sacrificials or some ofyour units have been heavily depleted, then this is a technique which will delay yourunits from being wiped out completely. Only high Ld units can be used for this becausefleeing units have to rally immediately. Units (A) and (B) have been reduced to small sizes while (C) faces the threatof 2 units E1 and E2. C1 is able to defeat E1 in combat but is too weak to face E2 aswell. (A) and (B) move towards E2 to divert it away. (A) is placed as close aspossible while (B) is further behind. Ideally E2 should not be able to redirect into (B)as it is too far behind but if this is not possible, then (B) should be allowed to hold andbreak without allowing an overrun into (A). When (B) breaks from combat and it is not caught, (A) will then move to divertor block (E2) from charging (C). If (B) is caught (E2) would have moved quite a bit andwould be more easily blocked by (A). As usual the pursuit lines must be planned suchthat (E2) is taken away from the combat involving (C) and (E1). 4 turns would have elapsed, giving (C) sufficient time to win combat. Both (A)and (B) would have been destroyed but at least (C) would have a chance of winning andcompensating for their loss.
******Created by ebook converter - www.ebook-converter.com******
******ebook converter DEMO - www.ebook-converter.com*******
Double Lures As the name suggests 2 lures are used here. The lures could be Sacrificials butunits with high Ld could also be used. The lures usually escape unharmed in thismanoeuvre and can then be used elsewhere to divert, block or maybe create anotherdouble lure.
(A) and (B) are the 2 lures in the diagram below. (A) is the first lure. It is positioned so that it blocks any direct charges to (B)and (C). E2 either has to declare a charge against (A) or move out of this position withthe prospect that the same double lure might be used again. (B)’s position needs careful adjustment. It has to be placed behind (A) so thatE2 cannot reach (A) when it flees. At the same time (B) must block a redirected chargeby E2 on (C) after (A) flees. The dotted purple line is the critical line that prevents thisfrom happening. (B)’s flight line must also overlap (C) so that it escapes i.e. both (A)and (B) have used Sheltered Fleeing. (E2) could accept a Failed charge and stop 1” from (B) – an unlikely outcomesince it will have achieved nothing and could possibly expose it’s flank to (B). (E2)will most probably redirect into (B). (B) then flees and since E2 can redirect only once(E2) must stop 1” away from (C) E2’s charge attempt is guaranteed to be a Failed charge by the Double lure! By setting the lines of flight correctly as described in the previous sections, aflank charge would have been set up for (C). This is the likely position after (B) flees.
******Created by ebook converter - www.ebook-converter.com******
******ebook converter DEMO - www.ebook-converter.com*******
(C) is only just in (E2)’s flank arc. In an actual battle, the left flank of (C)should have been secured and Anchored. Once (C) has won the battle against E2, itshould be able to sweep to the right and engage other enemy units. If (A) and (B) are Fast Cavalry units they would rally in the next turn and moveto cover the right flank or assist other units in this region or the whole double lure couldbe set up again. In fact the double lure offers a way of drawing an enemy unit away fromcombat throughout the battle. The only way of overcoming this double lure is for asecond charge declaration on the fleeing unit. I am sure you can sort out the detailsyourself by now.
Minimising attacks Forced clipping could also be used to minimise attacks on one unit in amultiple charge. These could be attacks by the charged unit or the charger.
******Created by ebook converter - www.ebook-converter.com******
******ebook converter DEMO - www.ebook-converter.com*******

There are two variations shown in the diagram above. In both of them, thefaster unit (and the unit that wishes to avoid as many attacks as possible), starts at aposition which is slightly behind the stronger unit. (Ch), the chariot unit is behind (E1), the stronger infantry unit.(C) the Fast Cavalry unit is also positioned behind a stronger infantry unit (B). Both (C) and (Ch) can just about make contact with the unit they are charging.Therefore they are unable to maximise models in base contact with them when theywheel during the charge move. Clipping cannot be avoided. The necessary clipped charge of (C) and (Ch) enables more models of (B) and(E1) to maximise base contact and have more attacks. Notice that once again a powerful character has been positioned in the cornerof (B) to guarantee that he will be in combat. The chariot unit’s (Ch) main function in this case is to inflict impact hits anduse the extra dice for pursuit if the enemy unit breaks. The cavalry unit (C)similarly grants an extra dice for pursuit against (E2).
Combat decisions 1) Challenges with Mounts –
If the mounted character is almost certain that he will win combat, then it is verylikely that he will have a higher Initiative than his mount. Since he will strike first, hewill probably slay the challenger. All the mounts attacks will then be wasted – pg 103of the main rule book. Therefore if you are facing a character on a mount in a unit then itis better to accept or issue a challenge with a champion especially if the mount hasmultiple attacks. On the other hand if you are a character on a mount, it might be bettersometimes, not to issue challenges. Example: Against a dragon always challenge with achampion – dragon’s attacks are wasted.
If the unit consists of only a character on a mount, then the character must firstassess the rate of depletion against him. If it is too high then he is better off in issuing achallenge. 2) Horde and Combat reforms:
The balance between maintaining a horde formation or having more ranks to beSteadfast simply depends on the rates of slaying and depletion. 3) Combining units:
A S3T3 unit is charged, loses combat but holds from Steadfast. Ideally a 2nd unit
******Created by ebook converter - www.ebook-converter.com******
******ebook converter DEMO - www.ebook-converter.com*******
can manoeuvre for a flank attack negating ranks gaining a total of +5 CR (+3CR fromnegating ranks, +1 from charge and +1 from flank) i.e. a unit could charge the flank eventhough its rate of slaying is 4 less (5 less in the first turn) than its rate of depletion.There will be an overall improvement in CR which might tip the balance against theenemy.
If the Steadfast unit is losing combat by a large amount then it is still possible forcertain units to flank charge the enemy unit. An elite unit that will inflict a large numberof wounds could do this – it inflicts lots of wounds, breaks from combat, rallies andlaunches itself again to inflict more wounds.
This tactic fails with Undead units.
Tempt into a failed charge using terrain The basic rule used here is that the line of fleeing is determined by the centreof the charging unit to the centre of the fleeing unit.
There are not many opportunities for springing this trap as the enemy units have to bepositioned at certain places relative to difficult terrain. The diagram shows an infantry unit (B) moving around some dangerous orimpassable terrain. It is now within charge distance of the chariot (Ch) and the cavalryunit (C1). (B) flees when (C) and (Ch) declare charges. Without the impassable terrain,(B) would have been easily caught by (C1). However the impassable terrain causesboth Ch and C1 to stop while (B) flees past it. The result is a failed charge for C1 andCh. If the terrain is merely Dangerous, then Ch and C1 will have to pass Dangerousterrain tests. There is one additional sting in the tail.
******Created by ebook converter - www.ebook-converter.com******
******ebook converter DEMO - www.ebook-converter.com*******
If (C1) and (Ch) do not declare a charge against (B), then (B) will declare acharge against one of them in the next round! A flank charge if they do not move. (C1) and (Ch) could ignore (B) and turn to face it but unit (A) has been movedto cover this possibility. (A) threatens another flank or rear charge
Multi-warhead formation The main principle of this is multiple characters in a sheltering unit makingseparate charges. It is commonly used to good effect in Vampire Count armies but couldalso be used in Bretonnians, Goblins, ‘Skav and Empire, in fact any army where thereare several combat or fighting characters. The characters C1, C2 and C3 could have been in the unit, SU at the start of thegame or moved into it during the previous turn. SU then manoeuvres into position so thatC1, C2 and C3 are within charge range of their respective targets. During the enemy’s turn, SU will be subjected to heavy shooting and mustwithstand this without panicking, through a combination of good armour saves and largesize or ideally by being immune to psychology. In their next turn, C2 charges the unit of archers, A1, while C3 charges anotherunit A2. C1 has been positioned specially on the extreme left so that it could flankcharge the infantry unit I1. C1, C2 and C3 are expected to win combat and in one fellswoop would have destroyed 3 units. All 3 characters will be exposed in the nextenemy turn, therefore the enemy units must be chosen carefully and there must besufficient support to prevent all or most of the characters from being destroyed insubsequent rounds. The choice of SU is simply a unit that can reach the required position withoutpanicking or being completely destroyed. It should not be a strong unit as a strong unitwould be better charging with fighting characters. A cheap sacrificial unit e.g. DireWolves would be ideal. SU could simply act as a diversionary unit for the characters
******Created by ebook converter - www.ebook-converter.com******
******ebook converter DEMO - www.ebook-converter.com*******
after they have charged and shelter them from being individually attacked after winningcombat and overrunning etc. Another use of this unit is to prevent a frenzied unit with a character beingforced to charge a specific unit. The character in this case should be faster than thefrenzied unit it is in. When the character charges out of the unit it can reach other weakenemy units without having to charge the obvious bait offered to the Frenzied unit The enemy offers A1 as a bait for the Frenzied unit. C1 declares a charge on I1while C2 declares a charge on A2 or A1. SU has not been lured into a charge since itcannot declare a charge on. The lure and bait trap has been obviated.
Using Buildings for Combat ProtectionI used this in a Dark Elves play-test of this book. Unit (B) has run out of units that
can assist it in combat against 3 strong enemy units It moves to just a few inches of the building and faces to the left. (B)’s rear is
******Created by ebook converter - www.ebook-converter.com******
******ebook converter DEMO - www.ebook-converter.com*******

protected by the board edge while its right flank cannot be charged. If (E1) enters the building, it cannot charge out of the building and will eitheremerge from the side it came from or in front of (B) where it will be flanked charged.The building therefore completely protects (B)’s right flank.
Buildings and Combat Avoidance A unit that moves out of a building can never be charged by a unit entering abuilding. Furthermore only certain units can garrison a building. Cavalry, Monsters,Chariots and Monstrous Cavalry cannot occupy a building even though they can assaultit. These rules form the basis for combat avoidance using buildings. (B) is threatened by (E2) and moves to the other side of the building. Fromposition (1) to position (2). If (E2) moves to (B)’s position at (1), (B) then moves out of E2’s charge arc bymoving to position (3). (B) more or less runs around the building always out of reach orcharge arc of (E2). To catch a unit that tries this (E2) has to employ another unit to cover the farside of the building.
If (E2) enters the building, (B) is still safe.
******Created by ebook converter - www.ebook-converter.com******
******ebook converter DEMO - www.ebook-converter.com*******

(E2) could emerge from side S1. It cannot move when it emerges (pg 127 of themain rule book). It will have to try to position itself so that it can charge (B) but indoing so, its flank will be exposed to (B).
(B) then has 2 options – it could move to side S2 after a Swift Reform or garrisonthe building. Since (E2) is facing away from the building it will be unable to charge inthe next turn.
It can be seen that faced with this situation. (E2)’s worse choice is to garrison thebuilding.
Fast Cavalry Dodge Fast cavalry units are extremely mobile and when they face slow movingenemy units, they could run rings around them, dodging any attempt to charge – hence thephrase I have coined above. The diagram below shows (A), a slow moving (relatively) enemy unit, facing aFast Cavalry unit which has M8 movement. If the Fast Cavalry unit is close enough itwill be able to dodge any attempted charge by (A)
For a change, I have drawn the diagram as close as possible to a scale- diagram. The importance distance – the critical distance is drawn in purple.
Some Maths first – ignore if you prefer:{Geometry of critical distancew = half-width of opposing unitd = half-depth of Fast cavalry unitC = critical distanceMC = Marching distance of Fast Cavalry unit
******Created by ebook converter - www.ebook-converter.com******
******ebook converter DEMO - www.ebook-converter.com*******
C= [(MC +d)/√2 – w]}
For the average M8 Fast Cavalry unit, the critical distance against a 5” wide unitis 9.5” i.e. once the Fast Cavalry unit gets to within this distance it should be able to runaround (A) without any danger of being charged.
There are a few ways (A) can prevent this:a) Using terrain or board edgesb) Using another unit to cover the FC unitc) Make sure that the FC unit does not come within 9.5”. This is quite easy since themean charge distance of M4 units is 11”. (A) should declare a charge as soon as FC issighted within its charge arc and within 11”.d) The width of (A) also matters. If it is wider it will cover a larger area. After (FC), in the diagram above has moved into the Safe Zone, (A) will moveto face it and threaten a charge. This could be achieved by a Swift Reform and move ora march after passing a Ld test. Whichever (A) chooses, it cannot move to a distance ofmore than 9.5” and still have FC in its charge arc. (FC) is therefore able to ‘dodge’again in the next turn and in future turns. Once (A) is subjected to a Fast Cavalry dodge, it should either ignore itcompletely or hunt other units or use another unit to assist in trapping the ‘dodgy’ FastCavalry unit. Look at the diagram on the Minimum Gap section in the Some BasicsChapter, to work out how this can be done.
Sacrificing charges to make spaceDead space has to be broken by the army sometimes.
A single sacrificial move might also be necessary to create space elsewhere. Inthe diagram below, it is assumed that all units are fairly evenly matched in terms ofstatic CR and ability in combat.
Unit (A3) is on the verge of breaking. Army (E) has anticipated this and movedunits (E2) and (E4) aggressively. Army (A) faces the prospect of losing combat andbeing overwhelmed in the centre.
******Created by ebook converter - www.ebook-converter.com******
******ebook converter DEMO - www.ebook-converter.com*******
This could be followed by (E1) and (E2) swamping the left flank with superiornumbers. They could win that flank and later swing towards the centre destroying army(A) completely. (E4) meanwhile holds threats from the other flank in check. None of the units are within enemy charging distance so far. Without looking atthe next diagram see if you can find a way out of this quandary. The next diagram shows how space could be created through careful placementand reducing the obvious dangers above. It shows how unit (A1) sacrifices itself to create space on the left for anotherunit, (A2), which now threatens the centre. Notice how (A1) orientates itself so that thedouble charge of (E1) and (E2) will progress away from the centre. (E1) and (E2) arebeing channelled away from the main combat arena. Although unit (A1) will bedestroyed, it will take 2 units to remove it. Space has been created in (A)’s left flank. (A2) can now safely swing aroundto the left and threaten the centre. It can flank charge (E3) if it breaks (A3) and pursues;or it can simply create even more space by moving behind enemy lines, a verydangerous manoeuvre for army (E).Notice too that (A4) simply slips out of charge range of (E4) while still threatening (E3)and guarding the right flank. Without looking at the next diagram decide what you would now do if you areplaying army (E)
******Created by ebook converter - www.ebook-converter.com******
******ebook converter DEMO - www.ebook-converter.com*******

The overall situation is army (A) now threatens to wrest the centre away andthen sweep right The other units of army E now has to take this into account. (E1) and (E2) willhave to charge (A1) and hope for an immediate victory. This is better than charging withonly (E1) as (E2) still cannot manoeuvre past (A1). Charging with both units alsoguarantees the maximum number of attacks. Both (E1) and (E2) should pursue when (A1) breaks. This doubles the chanceof catching it and also enables both units to swing around behind army (A) in the latterhalf of the game. It is likely that unit (E4) will turn to face (A2). It should move as far towardsthe centre as possible again to regain some of the space that (E3) has lost. It shouldthreaten (A4)’s flank if (A4) charges (E3). At the same time it should not be within(A4)’s charge range. This move by (E4) is crucial to army (E) and has to be precise. Unit (E3) will pursue when (A3) breaks and hope that it will somehow holdagainst a flank (or rear charge!). Army (A) is dominating the central space at themoment but it will be more evenly contested when (E1) and (E2) enters the fray. Army (A) has averted disaster and gained the upper hand temporarily allbecause (A2) has gained space through (A1)’s sacrificial move. Gaining and usingspace correctly as you can see is imperative.
The Stubborn Column This formation can only be used under certain circumstances and with certainunits, the best being a standard Dreadlord in a Blackguard unit. I will deal with theworst and un-recommended unit for this - Zombies
******Created by ebook converter - www.ebook-converter.com******
******ebook converter DEMO - www.ebook-converter.com*******
Using Zombies Chapter 1 categorically stated that Zombies are not good units for Vampires butin this section I intend to show how they could be used to hold against any unit in somesituations. There is an extreme formation which assists Zombie survival. It is based onthe simple matter of making sure that the attacks against them are minimised. First a few initial calculations using 9 rounds of combat and Chosen horde with4 attacks at S6. Zombies have a depletion rate of 3.3 for 1 in base contact and 2 supportattacks. Against 1 Mournfang in base contact and 1 support attack, this figure is 5.7 (or7.0 if Impact hits in the first round are included). Since there will be 2 Chosen or 2Mournfang in base contact, then the depletion rate is 6.6 against Chosen or 11.4 againstMournfang. Doubling this for crumbling and multiplying by 9 gives a maximum size of118 against Chosen or 205 against Mournfang. 205 Zombies can therefore survive combat against any amount of Chosen orMournfang provided they arrange themselves in the formation shown below. Why not then simply have many such units for an auto-draw? There areinsufficient points, there may be no space for the long column and flanks have to beprotected.
The diagram below shows how a similar VC list is deployed and then moves intoa fan-like army formation with columns of Zombies.
******Created by ebook converter - www.ebook-converter.com******
******ebook converter DEMO - www.ebook-converter.com*******
The vampire in between the Zombie units is orientated to prevent any unit fromcharging them or him (see Blocking and Preventing Charges above). The vampire canalso cast Invocation to restore lost Zombies. This is just an extreme example of how attacks by enemy units with multipleattacks like Ogres, Bloodknights, Dragon Princes, Chosen, Savage Orcs etc. can beminimised. It will be ineffective against other types of units. Using Dryads or Skirmishers I am still not advocating choosing Zombies as Core but the formation abovecan be used when your large Stubborn or Unbreakable unit has to hold against someelite units. The narrow formation shown, loses rank bonuses - +3 max. Therefore whenfacing elite units that slay at greater than +4 per round, adopting this narrow formationenables them to hold for much longer.
This tactic should only be used if in doing so the rate of depletion is reduced bymore than 3.
In the example below, the Branchwraith with Annoyance of Netlings is in front ofa long line of Dryads The Branchwraith issues a challenge in the hope that it will not slay theacceptor of the challenge or be slain himself. No other attacks are possible except forthose in the challenge. The unit of Dryads remain Stubborn and will be able to hold aslong as the Branchwraith survives and the challenge does not end. If there is noBranchwraith, the Dryads could still use this formation to reduce their rate of depletionagainst multi- attack enemy units e.g. Ogres, Bloodknights, Dragon Princes,Swordmasters, Chosen, Savage Orcs etc.
******Created by ebook converter - www.ebook-converter.com******
******ebook converter DEMO - www.ebook-converter.com*******
Using Changeling/Horrors or Dreadlord/Blackguard Another variation of this uses the Changeling at the top of a long line ofHorrors with a Tzeentch Herald behind him. The Changeling simply swaps whateverstats are necessary to make sure he wounds the enemy model in base contact. TheHerald provides the Ward Save for added protection. The Horrors will lose combatplus a loss of +3 for ranks but the overall CR might be lower than what it would havebeen.
Yet another scenario: A Dreadlord at the front of a long column of BlackGuard. This is probably the scenario where this tactic is most effective as theDreadlord with the Pendant and 1+ AS, is practically impossible to kill. No BlackGuard will be slain and this Stubborn unit will hold against anything attacking itssingle model front! In all the scenarios above, it is assumed that the unit of Black Guard, Dryads orHorrors have reformed before the charging round and there is no threat of future flankcharges.
******Created by ebook converter - www.ebook-converter.com******
******ebook converter DEMO - www.ebook-converter.com*******
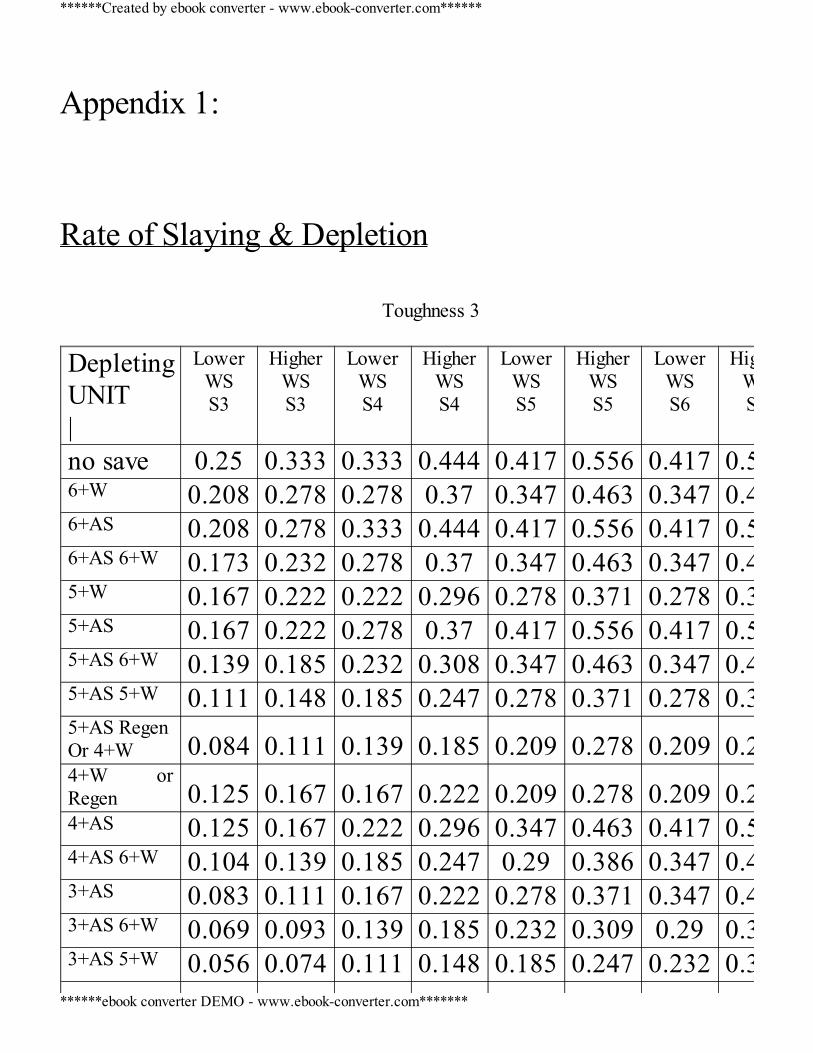
Appendix 1: Rate of Slaying & Depletion
Toughness 3
DepletingUNIT|
LowerWSS3
HigherWSS3
LowerWSS4
HigherWSS4
LowerWSS5
HigherWSS5
LowerWSS6
HigherWSS6
no save 0.25 0.333 0.333 0.444 0.417 0.556 0.417 0.5566+W 0.208 0.278 0.278 0.37 0.347 0.463 0.347 0.4636+AS 0.208 0.278 0.333 0.444 0.417 0.556 0.417 0.5566+AS 6+W 0.173 0.232 0.278 0.37 0.347 0.463 0.347 0.4635+W 0.167 0.222 0.222 0.296 0.278 0.371 0.278 0.3715+AS 0.167 0.222 0.278 0.37 0.417 0.556 0.417 0.5565+AS 6+W 0.139 0.185 0.232 0.308 0.347 0.463 0.347 0.4635+AS 5+W 0.111 0.148 0.185 0.247 0.278 0.371 0.278 0.3715+AS RegenOr 4+W 0.084 0.111 0.139 0.185 0.209 0.278 0.209 0.2784+W orRegen 0.125 0.167 0.167 0.222 0.209 0.278 0.209 0.2784+AS 0.125 0.167 0.222 0.296 0.347 0.463 0.417 0.5564+AS 6+W 0.104 0.139 0.185 0.247 0.29 0.386 0.347 0.4633+AS 0.083 0.111 0.167 0.222 0.278 0.371 0.347 0.4633+AS 6+W 0.069 0.093 0.139 0.185 0.232 0.309 0.29 0.3863+AS 5+W 0.056 0.074 0.111 0.148 0.185 0.247 0.232 0.309
******Created by ebook converter - www.ebook-converter.com******
******ebook converter DEMO - www.ebook-converter.com*******
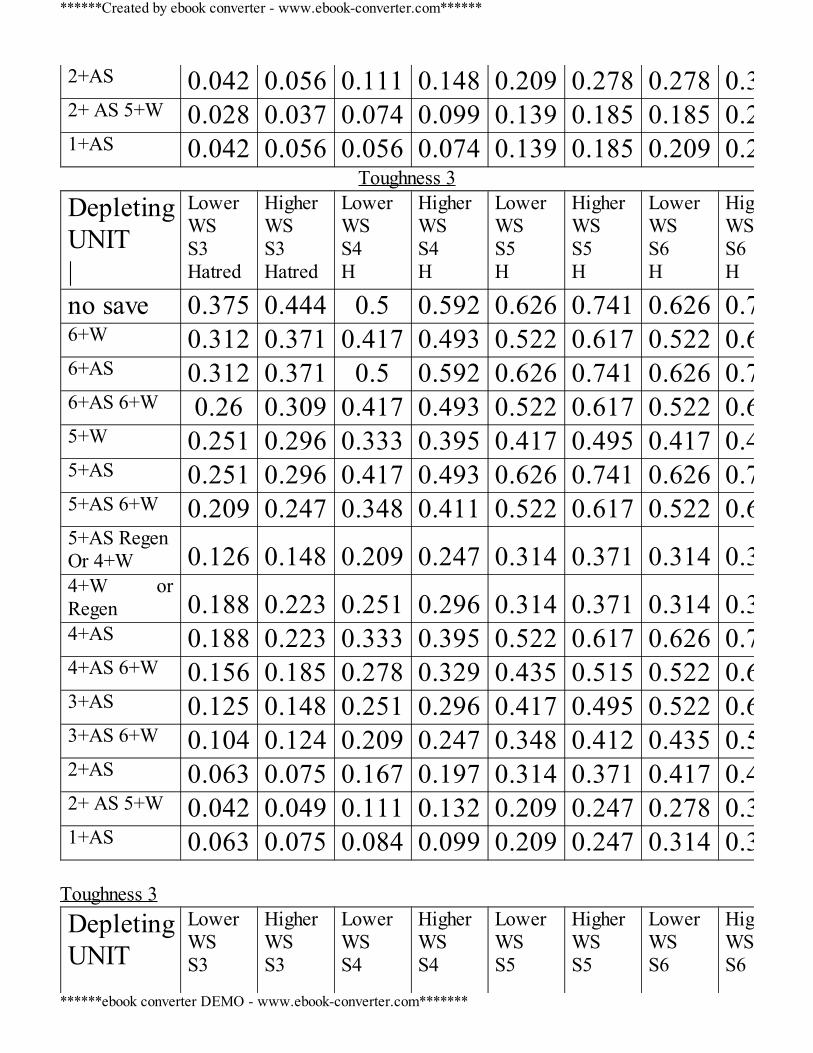
2+AS 0.042 0.056 0.111 0.148 0.209 0.278 0.278 0.3712+ AS 5+W 0.028 0.037 0.074 0.099 0.139 0.185 0.185 0.2471+AS 0.042 0.056 0.056 0.074 0.139 0.185 0.209 0.278
Toughness 3DepletingUNIT|
LowerWSS3Hatred
HigherWSS3Hatred
LowerWSS4H
HigherWSS4H
LowerWSS5H
HigherWSS5H
LowerWSS6H
HigherWSS6H
no save 0.375 0.444 0.5 0.592 0.626 0.741 0.626 0.7416+W 0.312 0.371 0.417 0.493 0.522 0.617 0.522 0.6176+AS 0.312 0.371 0.5 0.592 0.626 0.741 0.626 0.7416+AS 6+W 0.26 0.309 0.417 0.493 0.522 0.617 0.522 0.6175+W 0.251 0.296 0.333 0.395 0.417 0.495 0.417 0.4955+AS 0.251 0.296 0.417 0.493 0.626 0.741 0.626 0.7415+AS 6+W 0.209 0.247 0.348 0.411 0.522 0.617 0.522 0.6175+AS RegenOr 4+W 0.126 0.148 0.209 0.247 0.314 0.371 0.314 0.3714+W orRegen 0.188 0.223 0.251 0.296 0.314 0.371 0.314 0.3714+AS 0.188 0.223 0.333 0.395 0.522 0.617 0.626 0.7414+AS 6+W 0.156 0.185 0.278 0.329 0.435 0.515 0.522 0.6173+AS 0.125 0.148 0.251 0.296 0.417 0.495 0.522 0.6173+AS 6+W 0.104 0.124 0.209 0.247 0.348 0.412 0.435 0.5152+AS 0.063 0.075 0.167 0.197 0.314 0.371 0.417 0.4952+ AS 5+W 0.042 0.049 0.111 0.132 0.209 0.247 0.278 0.3291+AS 0.063 0.075 0.084 0.099 0.209 0.247 0.314 0.371
Toughness 3DepletingUNIT
LowerWSS3
HigherWSS3
LowerWSS4
HigherWSS4
LowerWSS5
HigherWSS5
LowerWSS6
HigherWSS6
******Created by ebook converter - www.ebook-converter.com******
******ebook converter DEMO - www.ebook-converter.com*******
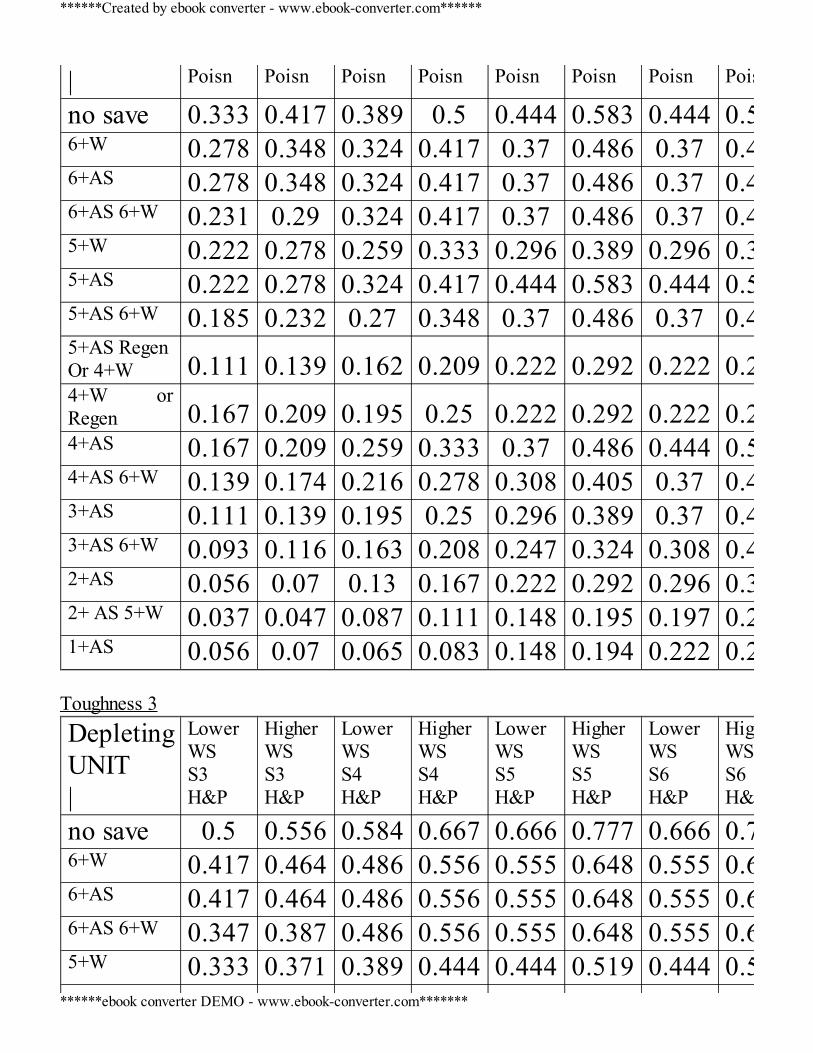
| Poisn Poisn Poisn Poisn Poisn Poisn Poisn Poisn
no save 0.333 0.417 0.389 0.5 0.444 0.583 0.444 0.5836+W 0.278 0.348 0.324 0.417 0.37 0.486 0.37 0.4866+AS 0.278 0.348 0.324 0.417 0.37 0.486 0.37 0.4866+AS 6+W 0.231 0.29 0.324 0.417 0.37 0.486 0.37 0.4865+W 0.222 0.278 0.259 0.333 0.296 0.389 0.296 0.3895+AS 0.222 0.278 0.324 0.417 0.444 0.583 0.444 0.5835+AS 6+W 0.185 0.232 0.27 0.348 0.37 0.486 0.37 0.4865+AS RegenOr 4+W 0.111 0.139 0.162 0.209 0.222 0.292 0.222 0.2924+W orRegen 0.167 0.209 0.195 0.25 0.222 0.292 0.222 0.2924+AS 0.167 0.209 0.259 0.333 0.37 0.486 0.444 0.5834+AS 6+W 0.139 0.174 0.216 0.278 0.308 0.405 0.37 0.4863+AS 0.111 0.139 0.195 0.25 0.296 0.389 0.37 0.4863+AS 6+W 0.093 0.116 0.163 0.208 0.247 0.324 0.308 0.4052+AS 0.056 0.07 0.13 0.167 0.222 0.292 0.296 0.3892+ AS 5+W 0.037 0.047 0.087 0.111 0.148 0.195 0.197 0.2591+AS 0.056 0.07 0.065 0.083 0.148 0.194 0.222 0.292
Toughness 3DepletingUNIT|
LowerWSS3H&P
HigherWSS3H&P
LowerWSS4H&P
HigherWSS4H&P
LowerWSS5H&P
HigherWSS5H&P
LowerWSS6H&P
HigherWSS6H&P
no save 0.5 0.556 0.584 0.667 0.666 0.777 0.666 0.7776+W 0.417 0.464 0.486 0.556 0.555 0.648 0.555 0.6486+AS 0.417 0.464 0.486 0.556 0.555 0.648 0.555 0.6486+AS 6+W 0.347 0.387 0.486 0.556 0.555 0.648 0.555 0.6485+W 0.333 0.371 0.389 0.444 0.444 0.519 0.444 0.519
******Created by ebook converter - www.ebook-converter.com******
******ebook converter DEMO - www.ebook-converter.com*******
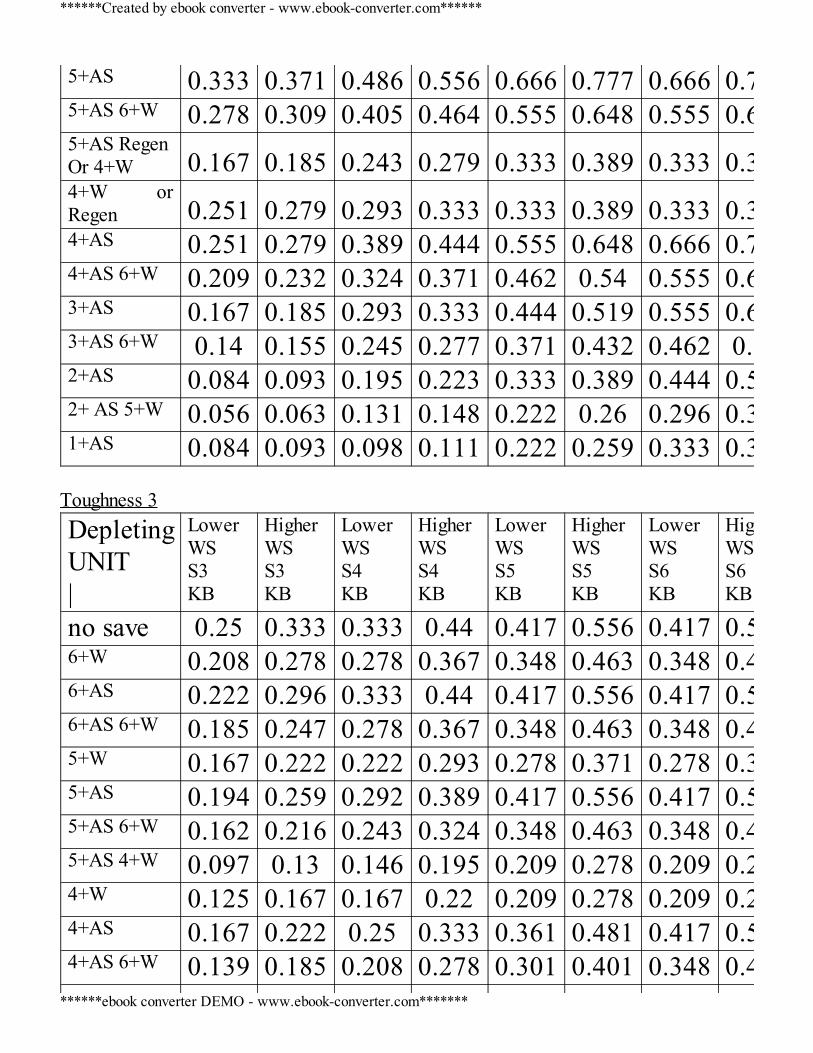
5+AS 0.333 0.371 0.486 0.556 0.666 0.777 0.666 0.7775+AS 6+W 0.278 0.309 0.405 0.464 0.555 0.648 0.555 0.6485+AS RegenOr 4+W 0.167 0.185 0.243 0.279 0.333 0.389 0.333 0.3894+W orRegen 0.251 0.279 0.293 0.333 0.333 0.389 0.333 0.3894+AS 0.251 0.279 0.389 0.444 0.555 0.648 0.666 0.7774+AS 6+W 0.209 0.232 0.324 0.371 0.462 0.54 0.555 0.6483+AS 0.167 0.185 0.293 0.333 0.444 0.519 0.555 0.6483+AS 6+W 0.14 0.155 0.245 0.277 0.371 0.432 0.462 0.542+AS 0.084 0.093 0.195 0.223 0.333 0.389 0.444 0.5192+ AS 5+W 0.056 0.063 0.131 0.148 0.222 0.26 0.296 0.3451+AS 0.084 0.093 0.098 0.111 0.222 0.259 0.333 0.389
Toughness 3DepletingUNIT|
LowerWSS3KB
HigherWSS3KB
LowerWSS4KB
HigherWSS4KB
LowerWSS5KB
HigherWSS5KB
LowerWSS6KB
HigherWSS6KB
no save 0.25 0.333 0.333 0.44 0.417 0.556 0.417 0.5566+W 0.208 0.278 0.278 0.367 0.348 0.463 0.348 0.4636+AS 0.222 0.296 0.333 0.44 0.417 0.556 0.417 0.5566+AS 6+W 0.185 0.247 0.278 0.367 0.348 0.463 0.348 0.4635+W 0.167 0.222 0.222 0.293 0.278 0.371 0.278 0.3715+AS 0.194 0.259 0.292 0.389 0.417 0.556 0.417 0.5565+AS 6+W 0.162 0.216 0.243 0.324 0.348 0.463 0.348 0.4635+AS 4+W 0.097 0.13 0.146 0.195 0.209 0.278 0.209 0.2784+W 0.125 0.167 0.167 0.22 0.209 0.278 0.209 0.2784+AS 0.167 0.222 0.25 0.333 0.361 0.481 0.417 0.5564+AS 6+W 0.139 0.185 0.208 0.278 0.301 0.401 0.348 0.463
******Created by ebook converter - www.ebook-converter.com******
******ebook converter DEMO - www.ebook-converter.com*******
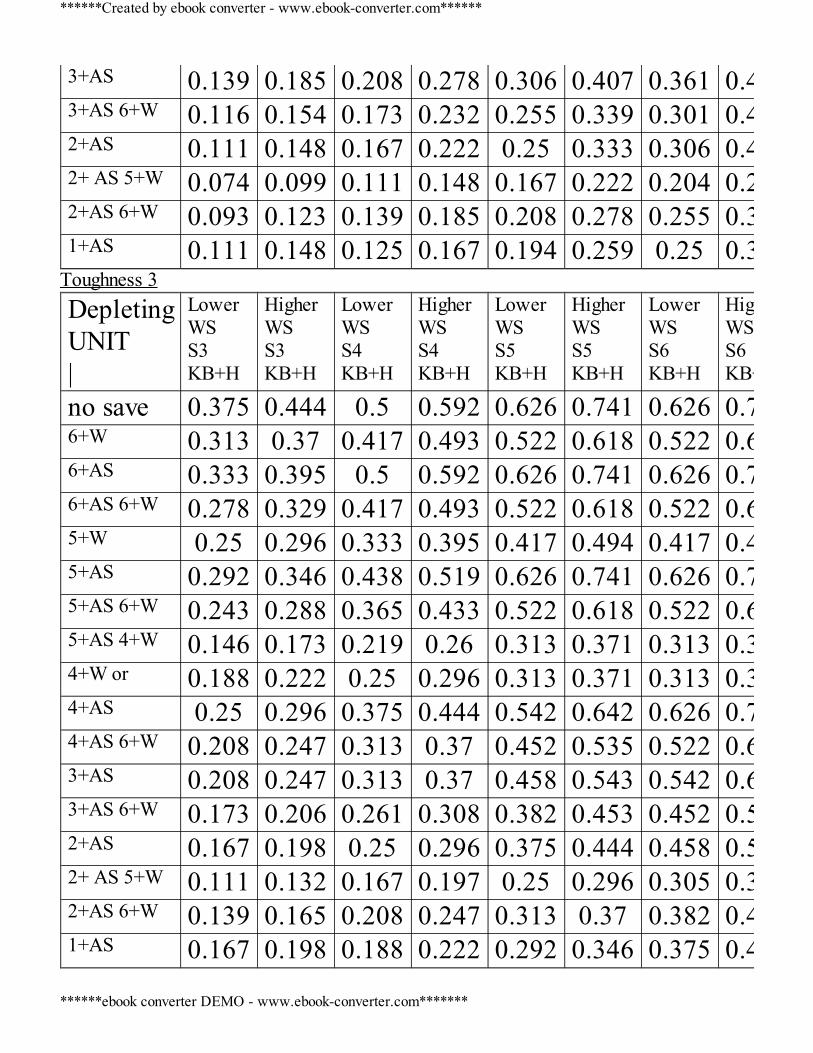
3+AS 0.139 0.185 0.208 0.278 0.306 0.407 0.361 0.4813+AS 6+W 0.116 0.154 0.173 0.232 0.255 0.339 0.301 0.4012+AS 0.111 0.148 0.167 0.222 0.25 0.333 0.306 0.4072+ AS 5+W 0.074 0.099 0.111 0.148 0.167 0.222 0.204 0.2712+AS 6+W 0.093 0.123 0.139 0.185 0.208 0.278 0.255 0.3391+AS 0.111 0.148 0.125 0.167 0.194 0.259 0.25 0.333
Toughness 3DepletingUNIT|
LowerWSS3KB+H
HigherWSS3KB+H
LowerWSS4KB+H
HigherWSS4KB+H
LowerWSS5KB+H
HigherWSS5KB+H
LowerWSS6KB+H
HigherWSS6KB+H
no save 0.375 0.444 0.5 0.592 0.626 0.741 0.626 0.7416+W 0.313 0.37 0.417 0.493 0.522 0.618 0.522 0.6186+AS 0.333 0.395 0.5 0.592 0.626 0.741 0.626 0.7416+AS 6+W 0.278 0.329 0.417 0.493 0.522 0.618 0.522 0.6185+W 0.25 0.296 0.333 0.395 0.417 0.494 0.417 0.4945+AS 0.292 0.346 0.438 0.519 0.626 0.741 0.626 0.7415+AS 6+W 0.243 0.288 0.365 0.433 0.522 0.618 0.522 0.6185+AS 4+W 0.146 0.173 0.219 0.26 0.313 0.371 0.313 0.3714+W or 0.188 0.222 0.25 0.296 0.313 0.371 0.313 0.3714+AS 0.25 0.296 0.375 0.444 0.542 0.642 0.626 0.7414+AS 6+W 0.208 0.247 0.313 0.37 0.452 0.535 0.522 0.6183+AS 0.208 0.247 0.313 0.37 0.458 0.543 0.542 0.6423+AS 6+W 0.173 0.206 0.261 0.308 0.382 0.453 0.452 0.5352+AS 0.167 0.198 0.25 0.296 0.375 0.444 0.458 0.5432+ AS 5+W 0.111 0.132 0.167 0.197 0.25 0.296 0.305 0.3622+AS 6+W 0.139 0.165 0.208 0.247 0.313 0.37 0.382 0.4531+AS 0.167 0.198 0.188 0.222 0.292 0.346 0.375 0.444
******Created by ebook converter - www.ebook-converter.com******
******ebook converter DEMO - www.ebook-converter.com*******
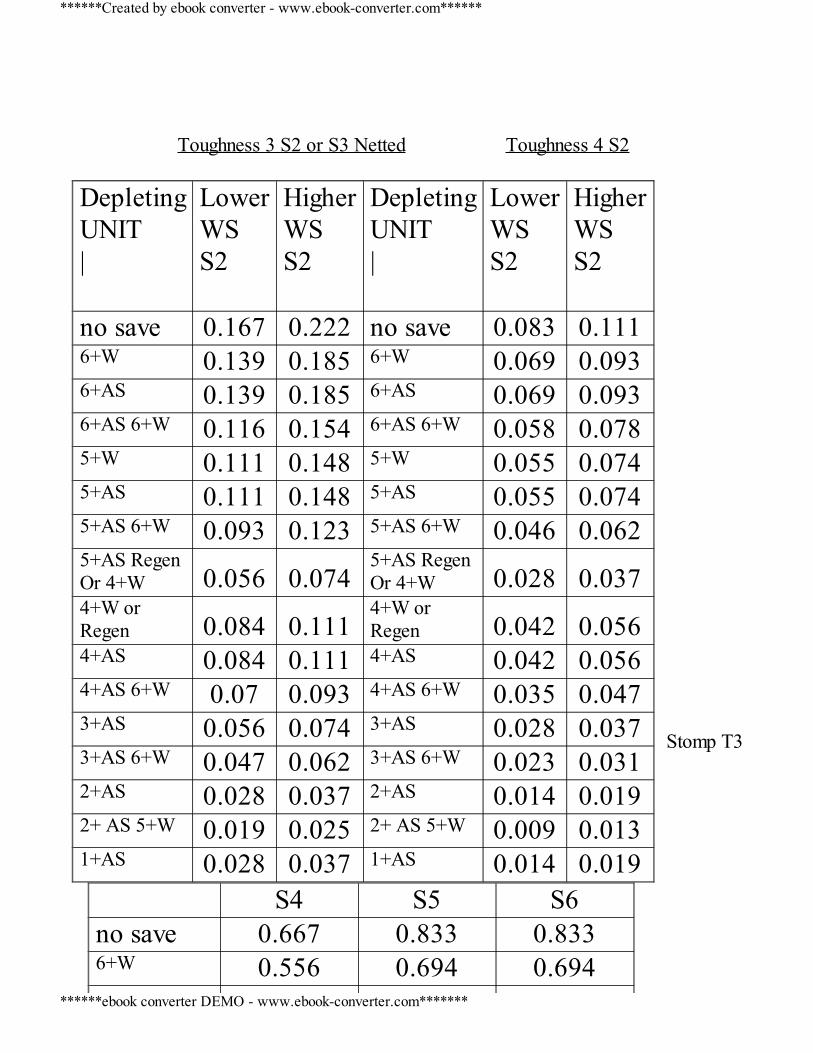
DepletingUNIT|
LowerWSS2
HigherWSS2
DepletingUNIT|
LowerWSS2
HigherWSS2
no save 0.167 0.222 no save 0.083 0.1116+W 0.139 0.185 6+W 0.069 0.0936+AS 0.139 0.185 6+AS 0.069 0.0936+AS 6+W 0.116 0.154 6+AS 6+W 0.058 0.0785+W 0.111 0.148 5+W 0.055 0.0745+AS 0.111 0.148 5+AS 0.055 0.0745+AS 6+W 0.093 0.123 5+AS 6+W 0.046 0.0625+AS RegenOr 4+W 0.056 0.074
5+AS RegenOr 4+W 0.028 0.037
4+W orRegen 0.084 0.111
4+W orRegen 0.042 0.056
4+AS 0.084 0.111 4+AS 0.042 0.0564+AS 6+W 0.07 0.093 4+AS 6+W 0.035 0.0473+AS 0.056 0.074 3+AS 0.028 0.0373+AS 6+W 0.047 0.062 3+AS 6+W 0.023 0.0312+AS 0.028 0.037 2+AS 0.014 0.0192+ AS 5+W 0.019 0.025 2+ AS 5+W 0.009 0.0131+AS 0.028 0.037 1+AS 0.014 0.019
Toughness 3 S2 or S3 Netted Toughness 4 S2
Stomp T3
S4 S5 S6no save 0.667 0.833 0.8336+W 0.556 0.694 0.694
******Created by ebook converter - www.ebook-converter.com******
******ebook converter DEMO - www.ebook-converter.com*******
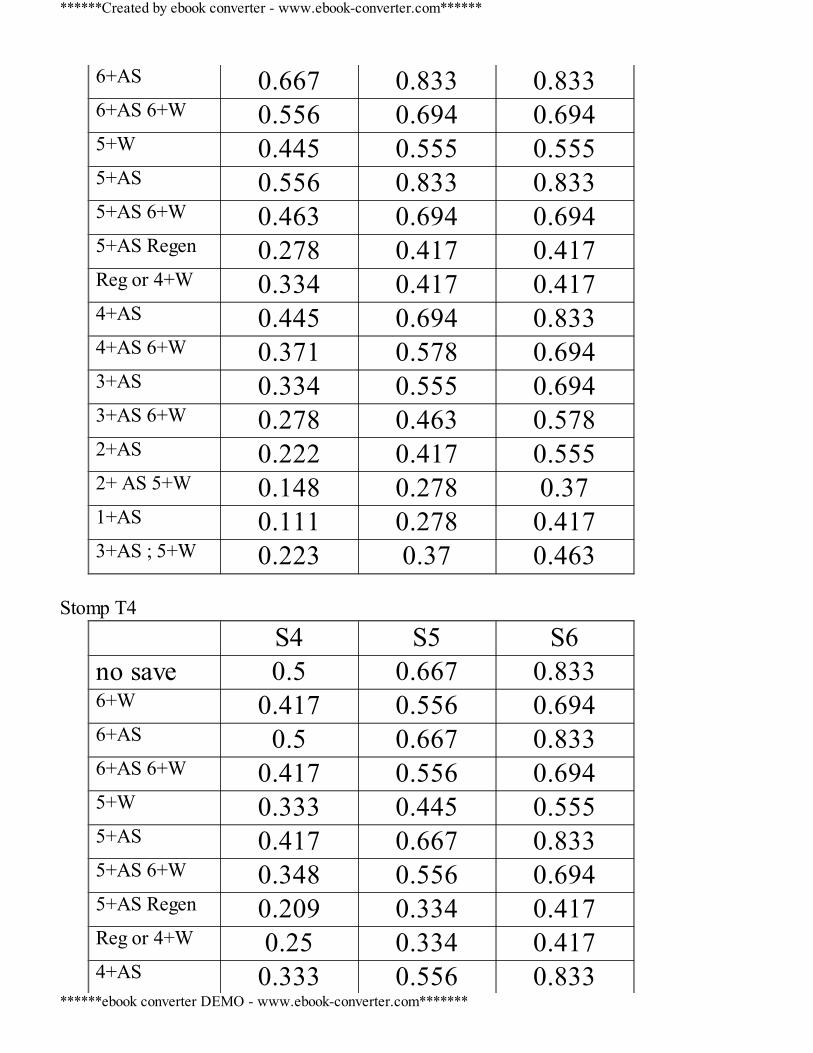
6+AS 0.667 0.833 0.8336+AS 6+W 0.556 0.694 0.6945+W 0.445 0.555 0.5555+AS 0.556 0.833 0.8335+AS 6+W 0.463 0.694 0.6945+AS Regen 0.278 0.417 0.417Reg or 4+W 0.334 0.417 0.4174+AS 0.445 0.694 0.8334+AS 6+W 0.371 0.578 0.6943+AS 0.334 0.555 0.6943+AS 6+W 0.278 0.463 0.5782+AS 0.222 0.417 0.5552+ AS 5+W 0.148 0.278 0.371+AS 0.111 0.278 0.4173+AS ; 5+W 0.223 0.37 0.463
Stomp T4
S4 S5 S6no save 0.5 0.667 0.8336+W 0.417 0.556 0.6946+AS 0.5 0.667 0.8336+AS 6+W 0.417 0.556 0.6945+W 0.333 0.445 0.5555+AS 0.417 0.667 0.8335+AS 6+W 0.348 0.556 0.6945+AS Regen 0.209 0.334 0.417Reg or 4+W 0.25 0.334 0.4174+AS 0.333 0.556 0.833
******Created by ebook converter - www.ebook-converter.com******
******ebook converter DEMO - www.ebook-converter.com*******
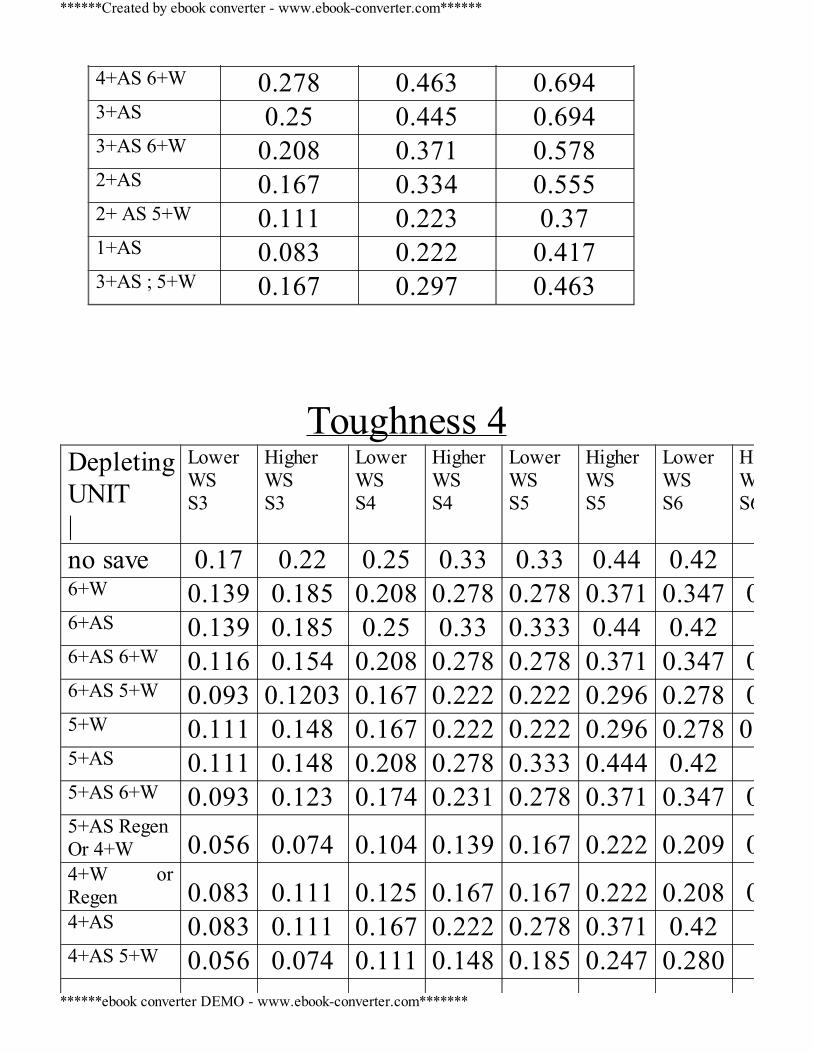
4+AS 6+W 0.278 0.463 0.6943+AS 0.25 0.445 0.6943+AS 6+W 0.208 0.371 0.5782+AS 0.167 0.334 0.5552+ AS 5+W 0.111 0.223 0.371+AS 0.083 0.222 0.4173+AS ; 5+W 0.167 0.297 0.463
Toughness 4DepletingUNIT|
LowerWSS3
HigherWSS3
LowerWSS4
HigherWSS4
LowerWSS5
HigherWSS5
LowerWSS6
HigherWSS6
no save 0.17 0.22 0.25 0.33 0.33 0.44 0.42 0.556+W 0.139 0.185 0.208 0.278 0.278 0.371 0.347 0.4636+AS 0.139 0.185 0.25 0.33 0.333 0.44 0.42 0.556+AS 6+W 0.116 0.154 0.208 0.278 0.278 0.371 0.347 0.4636+AS 5+W 0.093 0.1203 0.167 0.222 0.222 0.296 0.278 0.3715+W 0.111 0.148 0.167 0.222 0.222 0.296 0.278 0.37045+AS 0.111 0.148 0.208 0.278 0.333 0.444 0.42 0.555+AS 6+W 0.093 0.123 0.174 0.231 0.278 0.371 0.347 0.4635+AS RegenOr 4+W 0.056 0.074 0.104 0.139 0.167 0.222 0.209 0.2754+W orRegen 0.083 0.111 0.125 0.167 0.167 0.222 0.208 0.2784+AS 0.083 0.111 0.167 0.222 0.278 0.371 0.42 0.554+AS 5+W 0.056 0.074 0.111 0.148 0.185 0.247 0.280 0.37
******Created by ebook converter - www.ebook-converter.com******
******ebook converter DEMO - www.ebook-converter.com*******
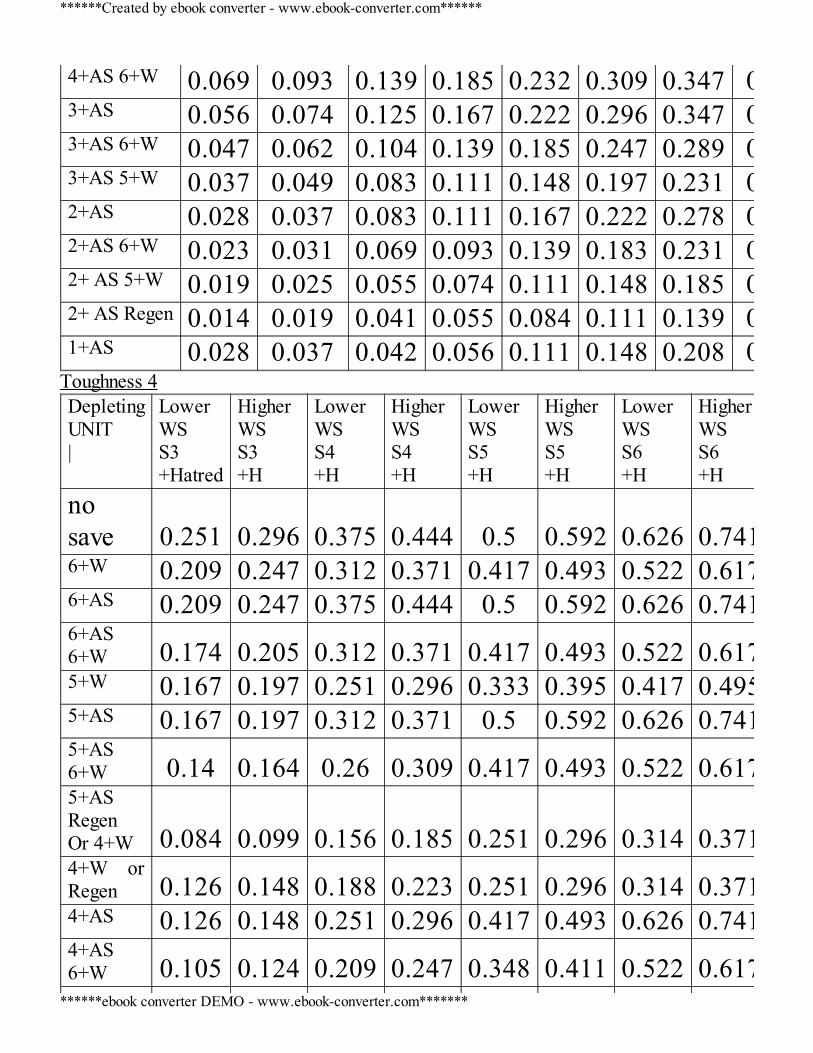
4+AS 6+W 0.069 0.093 0.139 0.185 0.232 0.309 0.347 0.4583+AS 0.056 0.074 0.125 0.167 0.222 0.296 0.347 0.4633+AS 6+W 0.047 0.062 0.104 0.139 0.185 0.247 0.289 0.3863+AS 5+W 0.037 0.049 0.083 0.111 0.148 0.197 0.231 0.3092+AS 0.028 0.037 0.083 0.111 0.167 0.222 0.278 0.3712+AS 6+W 0.023 0.031 0.069 0.093 0.139 0.183 0.231 0.3092+ AS 5+W 0.019 0.025 0.055 0.074 0.111 0.148 0.185 0.2472+ AS Regen 0.014 0.019 0.041 0.055 0.084 0.111 0.139 0.1861+AS 0.028 0.037 0.042 0.056 0.111 0.148 0.208 0.278
Toughness 4DepletingUNIT|
LowerWSS3+Hatred
HigherWSS3+H
LowerWSS4+H
HigherWSS4+H
LowerWSS5+H
HigherWSS5+H
LowerWSS6+H
HigherWSS6+H
nosave 0.251 0.296 0.375 0.444 0.5 0.592 0.626 0.7416+W 0.209 0.247 0.312 0.371 0.417 0.493 0.522 0.6176+AS 0.209 0.247 0.375 0.444 0.5 0.592 0.626 0.7416+AS6+W 0.174 0.205 0.312 0.371 0.417 0.493 0.522 0.6175+W 0.167 0.197 0.251 0.296 0.333 0.395 0.417 0.4955+AS 0.167 0.197 0.312 0.371 0.5 0.592 0.626 0.7415+AS6+W 0.14 0.164 0.26 0.309 0.417 0.493 0.522 0.6175+ASRegenOr 4+W 0.084 0.099 0.156 0.185 0.251 0.296 0.314 0.3714+W orRegen 0.126 0.148 0.188 0.223 0.251 0.296 0.314 0.3714+AS 0.126 0.148 0.251 0.296 0.417 0.493 0.626 0.7414+AS6+W 0.105 0.124 0.209 0.247 0.348 0.411 0.522 0.617
******Created by ebook converter - www.ebook-converter.com******
******ebook converter DEMO - www.ebook-converter.com*******
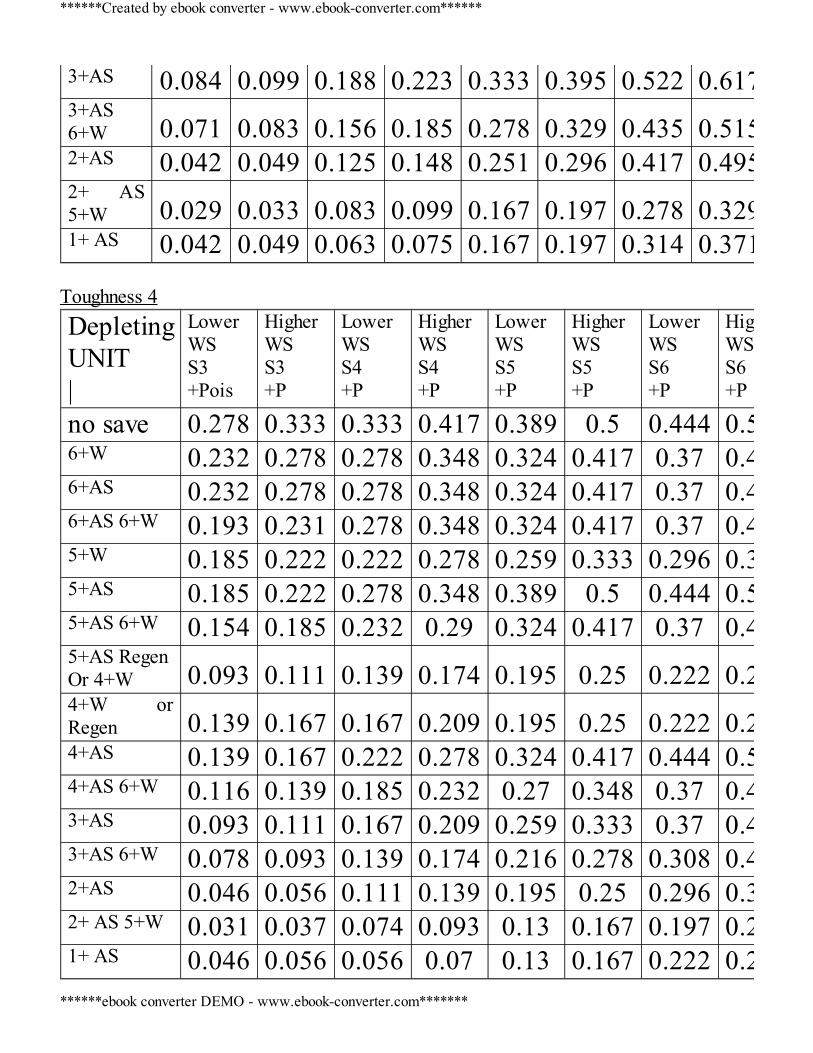
3+AS 0.084 0.099 0.188 0.223 0.333 0.395 0.522 0.6173+AS6+W 0.071 0.083 0.156 0.185 0.278 0.329 0.435 0.5152+AS 0.042 0.049 0.125 0.148 0.251 0.296 0.417 0.4952+ AS5+W 0.029 0.033 0.083 0.099 0.167 0.197 0.278 0.3291+ AS 0.042 0.049 0.063 0.075 0.167 0.197 0.314 0.371
Toughness 4DepletingUNIT|
LowerWSS3+Pois
HigherWSS3+P
LowerWSS4+P
HigherWSS4+P
LowerWSS5+P
HigherWSS5+P
LowerWSS6+P
HigherWSS6+P
no save 0.278 0.333 0.333 0.417 0.389 0.5 0.444 0.5836+W 0.232 0.278 0.278 0.348 0.324 0.417 0.37 0.4866+AS 0.232 0.278 0.278 0.348 0.324 0.417 0.37 0.4866+AS 6+W 0.193 0.231 0.278 0.348 0.324 0.417 0.37 0.4865+W 0.185 0.222 0.222 0.278 0.259 0.333 0.296 0.3895+AS 0.185 0.222 0.278 0.348 0.389 0.5 0.444 0.5835+AS 6+W 0.154 0.185 0.232 0.29 0.324 0.417 0.37 0.4865+AS RegenOr 4+W 0.093 0.111 0.139 0.174 0.195 0.25 0.222 0.2924+W orRegen 0.139 0.167 0.167 0.209 0.195 0.25 0.222 0.2924+AS 0.139 0.167 0.222 0.278 0.324 0.417 0.444 0.5834+AS 6+W 0.116 0.139 0.185 0.232 0.27 0.348 0.37 0.4863+AS 0.093 0.111 0.167 0.209 0.259 0.333 0.37 0.4863+AS 6+W 0.078 0.093 0.139 0.174 0.216 0.278 0.308 0.4052+AS 0.046 0.056 0.111 0.139 0.195 0.25 0.296 0.3892+ AS 5+W 0.031 0.037 0.074 0.093 0.13 0.167 0.197 0.2591+ AS 0.046 0.056 0.056 0.07 0.13 0.167 0.222 0.292
******Created by ebook converter - www.ebook-converter.com******
******ebook converter DEMO - www.ebook-converter.com*******
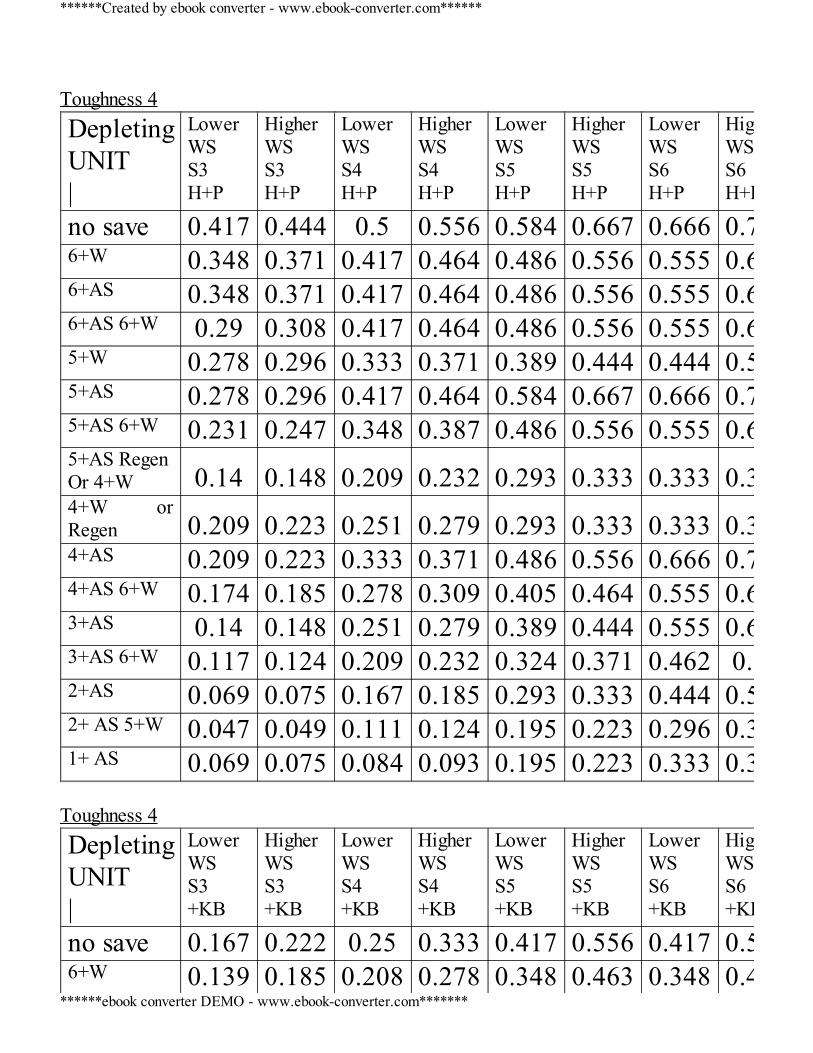
Toughness 4DepletingUNIT|
LowerWSS3H+P
HigherWSS3H+P
LowerWSS4H+P
HigherWSS4H+P
LowerWSS5H+P
HigherWSS5H+P
LowerWSS6H+P
HigherWSS6H+P
no save 0.417 0.444 0.5 0.556 0.584 0.667 0.666 0.7776+W 0.348 0.371 0.417 0.464 0.486 0.556 0.555 0.6486+AS 0.348 0.371 0.417 0.464 0.486 0.556 0.555 0.6486+AS 6+W 0.29 0.308 0.417 0.464 0.486 0.556 0.555 0.6485+W 0.278 0.296 0.333 0.371 0.389 0.444 0.444 0.5195+AS 0.278 0.296 0.417 0.464 0.584 0.667 0.666 0.7775+AS 6+W 0.231 0.247 0.348 0.387 0.486 0.556 0.555 0.6485+AS RegenOr 4+W 0.14 0.148 0.209 0.232 0.293 0.333 0.333 0.3894+W orRegen 0.209 0.223 0.251 0.279 0.293 0.333 0.333 0.3894+AS 0.209 0.223 0.333 0.371 0.486 0.556 0.666 0.7774+AS 6+W 0.174 0.185 0.278 0.309 0.405 0.464 0.555 0.6483+AS 0.14 0.148 0.251 0.279 0.389 0.444 0.555 0.6483+AS 6+W 0.117 0.124 0.209 0.232 0.324 0.371 0.462 0.542+AS 0.069 0.075 0.167 0.185 0.293 0.333 0.444 0.5192+ AS 5+W 0.047 0.049 0.111 0.124 0.195 0.223 0.296 0.3451+ AS 0.069 0.075 0.084 0.093 0.195 0.223 0.333 0.389
Toughness 4DepletingUNIT|
LowerWSS3+KB
HigherWSS3+KB
LowerWSS4+KB
HigherWSS4+KB
LowerWSS5+KB
HigherWSS5+KB
LowerWSS6+KB
HigherWSS6+KB
no save 0.167 0.222 0.25 0.333 0.417 0.556 0.417 0.5566+W 0.139 0.185 0.208 0.278 0.348 0.463 0.348 0.463
******Created by ebook converter - www.ebook-converter.com******
******ebook converter DEMO - www.ebook-converter.com*******
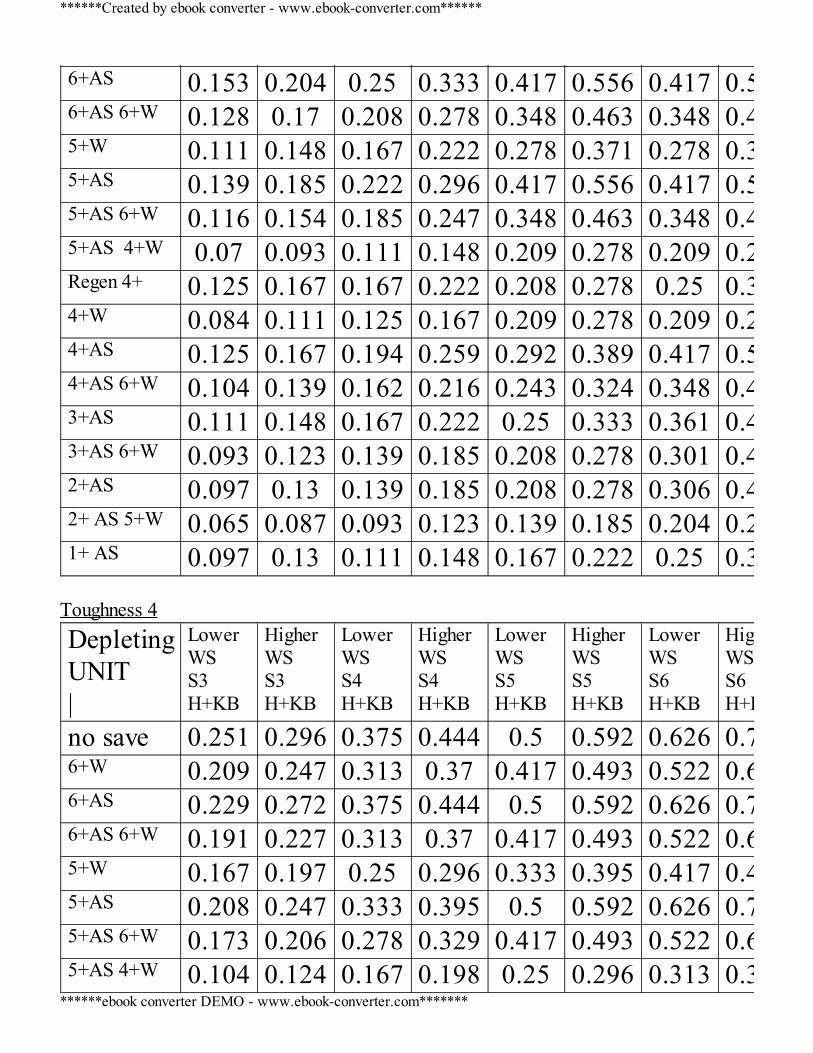
6+AS 0.153 0.204 0.25 0.333 0.417 0.556 0.417 0.5566+AS 6+W 0.128 0.17 0.208 0.278 0.348 0.463 0.348 0.4635+W 0.111 0.148 0.167 0.222 0.278 0.371 0.278 0.3715+AS 0.139 0.185 0.222 0.296 0.417 0.556 0.417 0.5565+AS 6+W 0.116 0.154 0.185 0.247 0.348 0.463 0.348 0.4635+AS 4+W 0.07 0.093 0.111 0.148 0.209 0.278 0.209 0.278Regen 4+ 0.125 0.167 0.167 0.222 0.208 0.278 0.25 0.3334+W 0.084 0.111 0.125 0.167 0.209 0.278 0.209 0.2784+AS 0.125 0.167 0.194 0.259 0.292 0.389 0.417 0.5564+AS 6+W 0.104 0.139 0.162 0.216 0.243 0.324 0.348 0.4633+AS 0.111 0.148 0.167 0.222 0.25 0.333 0.361 0.4813+AS 6+W 0.093 0.123 0.139 0.185 0.208 0.278 0.301 0.4012+AS 0.097 0.13 0.139 0.185 0.208 0.278 0.306 0.4072+ AS 5+W 0.065 0.087 0.093 0.123 0.139 0.185 0.204 0.2711+ AS 0.097 0.13 0.111 0.148 0.167 0.222 0.25 0.333
Toughness 4DepletingUNIT|
LowerWSS3H+KB
HigherWSS3H+KB
LowerWSS4H+KB
HigherWSS4H+KB
LowerWSS5H+KB
HigherWSS5H+KB
LowerWSS6H+KB
HigherWSS6H+KB
no save 0.251 0.296 0.375 0.444 0.5 0.592 0.626 0.7416+W 0.209 0.247 0.313 0.37 0.417 0.493 0.522 0.6186+AS 0.229 0.272 0.375 0.444 0.5 0.592 0.626 0.7416+AS 6+W 0.191 0.227 0.313 0.37 0.417 0.493 0.522 0.6185+W 0.167 0.197 0.25 0.296 0.333 0.395 0.417 0.4945+AS 0.208 0.247 0.333 0.395 0.5 0.592 0.626 0.7415+AS 6+W 0.173 0.206 0.278 0.329 0.417 0.493 0.522 0.6185+AS 4+W 0.104 0.124 0.167 0.198 0.25 0.296 0.313 0.371
******Created by ebook converter - www.ebook-converter.com******
******ebook converter DEMO - www.ebook-converter.com*******
Regen 4+ 0.188 0.222 0.313 0.296 0.313 0.37 0.375 0.4444+W 0.126 0.148 0.188 0.222 0.25 0.296 0.313 0.3714+AS 0.188 0.222 0.292 0.346 0.438 0.519 0.626 0.7414+AS 6+W 0.157 0.185 0.243 0.288 0.365 0.433 0.522 0.6183+AS 0.167 0.198 0.25 0.296 0.375 0.444 0.542 0.6423+AS 6+W 0.139 0.165 0.208 0.247 0.313 0.37 0.452 0.5352+AS 0.146 0.173 0.208 0.247 0.313 0.37 0.458 0.5432+ AS 5+W 0.097 0.115 0.139 0.165 0.209 0.247 0.305 0.3621+ AS 0.146 0.173 0.167 0.198 0.25 0.296 0.375 0.444
T5
S2 orS3
S2 orS3 S4 S4 S5 S5 S6 S6
LWS HWS LWS HWS LWS HWS LWS HWSno 0.083 0.111 0.167 0.222 0.25 0.333 0.333 0.4445+W 0.055 0.074 0.111 0.148 0.167 0.222 0.222 0.2964+ 0.042 0.056 0.111 0.148 0.208 0.278 0.333 0.4444+5+W 0.028 0.037 0.074 0.099 0.139 0.185 0.222 0.2964+Regen 0.021 0.028 0.056 0.074 0.104 0.139 0.167 0.1114+6+W 0.035 0.047 0.093 0.123 0.173 0.232 0.278 0.373+ 0.028 0.037 0.084 0.111 0.167 0.222 0.278 0.373+5+W 0.018 0.025 0.056 0.074 0.111 0.148 0.185 0.247
T5 Hatred
S2 orS3
S2 orS3 S4 S4 S5 S5 S6 S6
******Created by ebook converter - www.ebook-converter.com******
******ebook converter DEMO - www.ebook-converter.com*******
LWS HWS LWS HWS LWS HWS LWS HWSnosaves 0.125 0.148 0.25 0.296 0.375 0.444 0.5 0.5935+W 0.083 0.099 0.167 0.197 0.25 0.296 0.333 0.395
T5 Poisoned
S2 orS3
S2 orS3 S4 S4 S5 S5 S6 S6
LWS HWS LWS HWS LWS HWS LWS HWSnosaves 0.152 0.204 0.222 0.296 0.292 0.389 0.361 0.4815+W 0.101 0.136 0.148 0.197 0.195 0.259 0.241 0.321
T5 Hatred + Poisoned S2 or
S3S2 or
S3 S4 S4 S5 S5 S6 S6 LWS HWS LWS HWS LWS HWS LWS HWSnosaves 0.228 0.272 0.333 0.395 0.438 0.519 0.542 0.6415+W 0.152 0.181 0.222 0.263 0.292 0.346 0.361 0.427
T6 S2 or
S3S2 or
S3 S4 S4 S5 S5 S6 S6 LWS HWS LWS HWS LWS HWS LWS HWSNosaves 0.083 0.111 0.083 0.111 0.167 0.222 0.25 0.3335+ 0.055 0.074 0.069 0.093 0.167 0.222 0.25 0.3334+ 0.042 0.056 0.055 0.074 0.139 0.185 0.25 0.3333+ 0.028 0.037 0.042 0.056 0.111 0.148 0.208 0.2783+5+W 0.019 0.025 0.028 0.037 0.074 0.099 0.139 0.185
******Created by ebook converter - www.ebook-converter.com******
******ebook converter DEMO - www.ebook-converter.com*******
T2 S3 S3 S4 S4 S5 S5 S6 S6 LWS HWS LWS HWS LWS HWS LWS HWSnosaves 0.167 0.444 0.417 0.556 0.417 0.556 0.417 0.5566+ 0.139 0.37 0.417 0.556 0.417 0.556 0.417 0.5566+ W 0.139 0.37 0.348 0.463 0.348 0.463 0.348 0.4636+6+ W 0.116 0.308 0.348 0.463 0.348 0.463 0.348 0.4633+ 0.056 0.148 0.209 0.278 0.278 0.371 0.348 0.4632+ 0.028 0.074 0.139 0.185 0.209 0.278 0.278 0.371
T2
S3 S3 S4 S4 S5 S5 S6 S6 LWS HWS LWS HWS LWS HWS LWS HWSnosaves 0.167 0.444 0.417 0.556 0.417 0.556 0.417 0.5566+ 0.139 0.37 0.417 0.556 0.417 0.556 0.417 0.5566+ W 0.139 0.37 0.348 0.463 0.348 0.463 0.348 0.4636+6+ W 0.116
0.308 0.348 0.463 0.348 0.463 0.348 0.463
NG w Nets vs WS4 S4 T4, 6+W ; Slay=0.127; Deplete = 0.254 NG w Nets vs WS4 S5 T4, 6+W ; Slay=0.127; Deplete = 0.386 NG w Nets vs WS6 S6 (and above) T4, 3+ 6+W ; Slay=0.028; Deplete = 0.463
Appendix 2 Each army’s viable units are tested against the following (all with champions): 1) An average Horde unit(Empire Swordsmen Horde); 2) A cavalry unit that has excellent saves
******Created by ebook converter - www.ebook-converter.com******
******ebook converter DEMO - www.ebook-converter.com*******
(14 Knights of the Realm, 7 wide) 3) A unit with very good attacks(Savage Orc Biguns 2HW) 4) A unit with one of the best attacks and good saves.(‘Tze Chosen 7 wide with 2HW + Banner of Rage)– 50S4 attacks and/or a 3+ Ward save Chosen unit are also possibilities but it isobvious that such units have been fortunate with their Eye of the Gods roll and willsteam roll through any single frontal opposing unit. A) Unless otherwise stated: 7 wide vs Savage Orcs and Chosen; Realm = 7 wide X2 ranksB) Horde tested for most viable Horde units onlyC) Horde formation rejected if it cannot compete with Savage Orcs min.
How to use these tables A) Look at the Combat Ratings table first. This is a comparison per point for eachviable army combat unit against Savage Orcs (the first 2 columns) and Chosen (2columns on the right). Column (S) represent the unit’s rate of Slaying while (D) denotestheir rate of depletion. A higher value for (S) shows a better rate of slaying but a lowervalue for (D) shows a better rate of depletion. Pick 2 or 3 units with the best (S) and 2or 3 with the best (D).N.B. – Do also check Appendix 3 where S6 Chosen are used. The figures will beslightly different. B) Next look at the table which compares the army against the four test units –Swordsmen etc. For each unit you have chosen in part (A), work out i) How large the unit has to be – multiply the rate of depletion by 6 or 8 – to last 6 or 8rounds of combat. This gives you the total number of wounds needed in that unit. If youmultiply again by the points per model (or per wound for multi-wound units) you obtainthe total number of points needed for that unit. You now know the size of that unit and itstotal number of points. How many points you use must be within the army list limits –50% for Special etc. For the moment ignore the total number of points for all the units.Just work out the maximum desired sizes. Later you will trim the units down until youreach the correct number of total points plus the points for characters. ii) How many models/wounds of the test units they will slay/inflict during this time. Youcould multiply the rate of slaying by the estimated/expected number of rounds in combat
******Created by ebook converter - www.ebook-converter.com******
******ebook converter DEMO - www.ebook-converter.com*******
(6-8 is a good max estimate as above) for the total wounds but there is an easier way. Ifthe rate of slaying is higher than the rate of depletion, the unit will win combat (for thesame static CR) – simple as that. They could win it in the first round or for more than 1round – depending on static CR, the difference between their slaying rate and depletionrate and their numbers. E.g. slaying at 6 and depleting at 3 with static CR which is 1or 2less wins while a static CR of 4 less, loses. If they always win then it is a matter of howmany rounds they will last against Steadfast/Unbreakable units – which is alsoAppendix 3. C) Now that you’ve chosen your units and their approximate sizes, go back to theCombat Ratings table. You are now going to assess the combat worthiness of your unitscompared to other armies.
The small figures at the top show your units’ combat rankings. Notice that thefigures for the charging or 1st round is slightly different and that the figures againstSavage Orcs column are different from that of the Chosen. Don’t worry about thesedifferences for the moment.
Anvil/Holding units:Look at the combat rating under the depletion column for you units which have the
task of holding against the enemy. If the combat rating is less than 50 then you know thatyour unit is better than average at holding or as an anvil. A figure of 20 say means it is avery good anvil unit provided of course it passes Steadfast. Since these figures arebased on 1 round of combat, 2 other checks are needed. Check the table showingSlaying and Depletion and the figure for Depletion. Calculate how long the unit will lastbefore it depletes completely or to a small number. Some units e.g. Steam Tank, Hydrahave an excellent rate of Depletion but not a big enough wound pool (total expectednumber of wounds in the unit). Check Appendix 3 as well which shows how long it willlast as Steadfast or how long before it is wiped out. You will now have an idea of howlong these Anvil units will last – some might last >10 rounds against all units but mostwill last between 3-6 rounds against the best enemy units. They will last longer againstrelatively weaker units. You know now whether your anvil units can engage elite unitsor for how long they should try to avoid strong units.
Slaying/Hammer units:For these units you have to check how well they slay and their rate of depletion.
These units cannot kill if they themselves break from combat. Check the tables asexplained above for Slaying, Depletion and Combat rankings. Cross reference withAppendix 3 as well. You should now have an idea of how well your Hammer units willperform and when they should engage or avoid combat.
You now not only have a rough idea of your army composition but also how theywill perform and which units can hold effectively, which will slay well, which perform
******Created by ebook converter - www.ebook-converter.com******
******ebook converter DEMO - www.ebook-converter.com*******

well for a limited number of rounds and which should avoid combat as much aspossible.
When you face specific armies, compare each unit’s rate of slaying, depletion andcombat ranking with your units. This will give you an idea of which units need tomanoeuvre after deploying and Closest proximity comparison. (see Some BasicsChapter) Using the Beastmen table as an example:A) Gors with HW and Shields are the best holding unit (Combat rating 50 for the Dcolumn against Chosen)B) These Gors deplete at the worst rate of 7.2 (against Chosen of course). Multiplyingthat by 8 (i.e. to last 8 rounds of combat) gives the optimum unitsize of 57. Add 20 or so for shooting, magic and to maintain Steadfast gives a total of 77i.e. unit size of 80 should work.C) Since these Gors will die but not be totally annihilated or broken (provided they donot fail Steadfast break tests) against Chosen you now have a good anvil or holding unit.Next move on to the good slayers. The table shows Minotaurs as the best attacking unitbut they deplete quite quickly and their numbers will be small due to their points cost.Minotaurs have to be selective in choosing enemies to attack. 6 Minotaurs will last 5rounds against Swordsmen and slay 44 Swordsmen. They will last just over 2 roundsagainst Savage Orcs while slaying 22 Savage Orcs. This then gives you an idea of theeffectiveness of Minotaurs and against which units they should be pitted. You could obviously also use these tables to check how well your army willfare against every other army. This is done by comparing rankings in Appendix 6.Remember that higher (S) values are stronger but lower (D) values are better andAppendix 6 is NOT conclusive – see Combat Chapter.Cross check with Appendix 3 which uses a different format of a fixed 565 points and S6Chosen for comparison. KEY: Figure in Bracket = For 1st round of combat or when charging A forward slash / = This could be for special abilities in the first round e.g. /Hatred Or that could be lost e.g. when a Daemonic Herald is killed
/Killing Blow etc Refer to the descriptor in the Unit
******Created by ebook converter - www.ebook-converter.com******
******ebook converter DEMO - www.ebook-converter.com*******
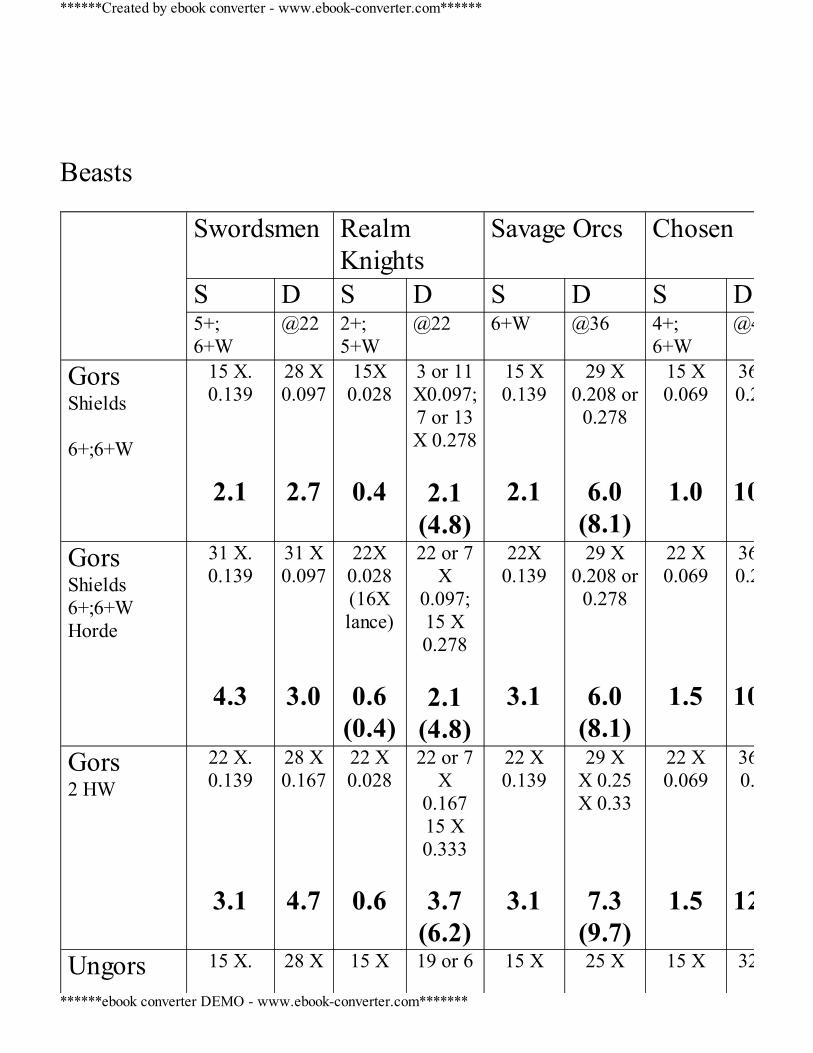
Beasts Swordsmen Realm
KnightsSavage Orcs Chosen
S D S D S D S D5+;6+W
@22
2+;5+W
@22 6+W @36 4+;6+W
@43
GorsShields 6+;6+W
15 X.0.139
2.1
28 X0.097
2.7
15X0.028
0.4
3 or 11X0.097;7 or 13X 0.278
2.1
(4.8)
15 X0.139
2.1
29 X0.208 or
0.278
6.0(8.1)
15 X0.069
1.0
360.278
10
GorsShields6+;6+WHorde
31 X.0.139
4.3
31 X0.097
3.0
22X0.028(16Xlance)
0.6(0.4)
22 or 7X
0.097;15 X0.278
2.1
(4.8)
22X0.139
3.1
29 X0.208 or
0.278
6.0(8.1)
22 X0.069
1.5
36 X0.278
10
Gors2 HW
22 X.0.139
3.1
28 X0.167
4.7
22 X0.028
0.6
22 or 7X
0.16715 X0.333
3.7
(6.2)
22 X0.139
3.1
29 XX 0.25X 0.33
7.3(9.7)
22 X0.069
1.5
360.33
12
Ungors 15 X. 28 X 15 X 19 or 6 15 X 25 X 15 X 32
******Created by ebook converter - www.ebook-converter.com******
******ebook converter DEMO - www.ebook-converter.com*******
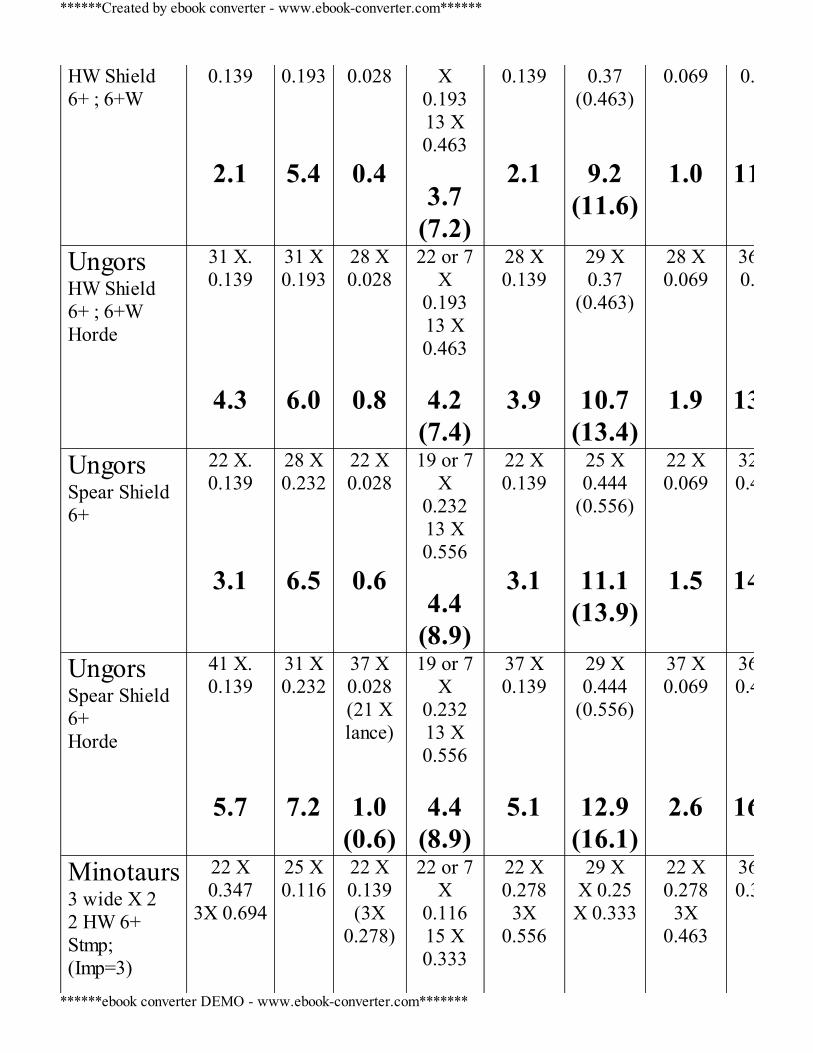
HW Shield6+ ; 6+W
0.139
2.1
0.193
5.4
0.028
0.4
X0.19313 X0.463
3.7
(7.2)
0.139
2.1
0.37(0.463)
9.2(11.6)
0.069
1.0
0.37
11.8
UngorsHW Shield6+ ; 6+WHorde
31 X.0.139
4.3
31 X0.193
6.0
28 X0.028
0.8
22 or 7X
0.19313 X0.463
4.2
(7.4)
28 X0.139
3.9
29 X0.37
(0.463)
10.7(13.4)
28 X0.069
1.9
36 X0.37
13.3
UngorsSpear Shield6+
22 X.0.139
3.1
28 X0.232
6.5
22 X0.028
0.6
19 or 7X
0.23213 X0.556
4.4
(8.9)
22 X0.139
3.1
25 X0.444
(0.556)
11.1(13.9)
22 X0.069
1.5
32 X0.444
14
UngorsSpear Shield6+Horde
41 X.0.139
5.7
31 X0.232
7.2
37 X0.028(21 Xlance)
1.0(0.6)
19 or 7X
0.23213 X0.556
4.4
(8.9)
37 X0.139
5.1
29 X0.444
(0.556)
12.9(16.1)
37 X0.069
2.6
36 X0.444
16
Minotaurs3 wide X 22 HW 6+Stmp;(Imp=3)
22 X0.347
3X 0.694
25 X0.116
22 X0.139(3X
0.278)
22 or 7X
0.11615 X0.333
22 X0.278
3X0.556
29 XX 0.25X 0.333
22 X0.278
3X0.463
36 X0.333
******Created by ebook converter - www.ebook-converter.com******
******ebook converter DEMO - www.ebook-converter.com*******
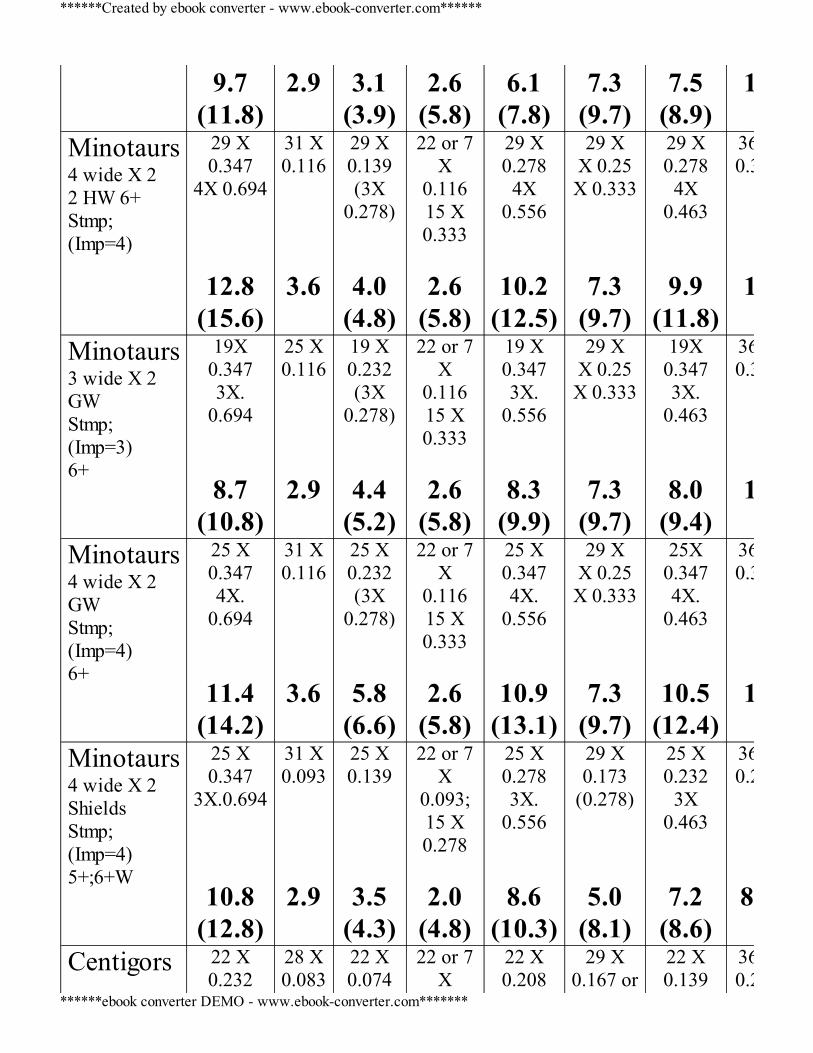
9.7(11.8)
2.9
3.1(3.9)
2.6(5.8)
6.1(7.8)
7.3(9.7)
7.5(8.9)
12
Minotaurs4 wide X 22 HW 6+Stmp;(Imp=4)
29 X0.347
4X 0.694
12.8(15.6)
31 X0.116
3.6
29 X0.139(3X
0.278)
4.0(4.8)
22 or 7X
0.11615 X0.333
2.6
(5.8)
29 X0.278
4X0.556
10.2(12.5)
29 XX 0.25X 0.333
7.3(9.7)
29 X0.278
4X0.463
9.9(11.8)
36 X0.333
12
Minotaurs3 wide X 2GWStmp;(Imp=3)6+
19X0.3473X.
0.694
8.7(10.8)
25 X0.116
2.9
19 X0.232(3X
0.278)
4.4(5.2)
22 or 7X
0.11615 X0.333
2.6
(5.8)
19 X0.3473X.
0.556
8.3(9.9)
29 XX 0.25X 0.333
7.3(9.7)
19X0.3473X.
0.463
8.0(9.4)
36 X0.333
12
Minotaurs4 wide X 2GWStmp;(Imp=4)6+
25 X0.3474X.
0.694
11.4(14.2)
31 X0.116
3.6
25 X0.232(3X
0.278)
5.8(6.6)
22 or 7X
0.11615 X0.333
2.6
(5.8)
25 X0.3474X.
0.556
10.9(13.1)
29 XX 0.25X 0.333
7.3(9.7)
25X0.3474X.
0.463
10.5(12.4)
36 X0.333
12
Minotaurs4 wide X 2ShieldsStmp;(Imp=4)5+;6+W
25 X0.347
3X.0.694
10.8(12.8)
31 X0.093
2.9
25 X0.139
3.5(4.3)
22 or 7X
0.093;15 X0.278
2.0
(4.8)
25 X0.2783X.
0.556
8.6(10.3)
29 X0.173
(0.278)
5.0(8.1)
25 X0.232
3X0.463
7.2(8.6)
36 X0.232
8
Centigors 22 X0.232
28 X0.083
22 X0.074
22 or 7X
22 X0.208
29 X0.167 or
22 X0.139
36 X0.222
******Created by ebook converter - www.ebook-converter.com******
******ebook converter DEMO - www.ebook-converter.com*******
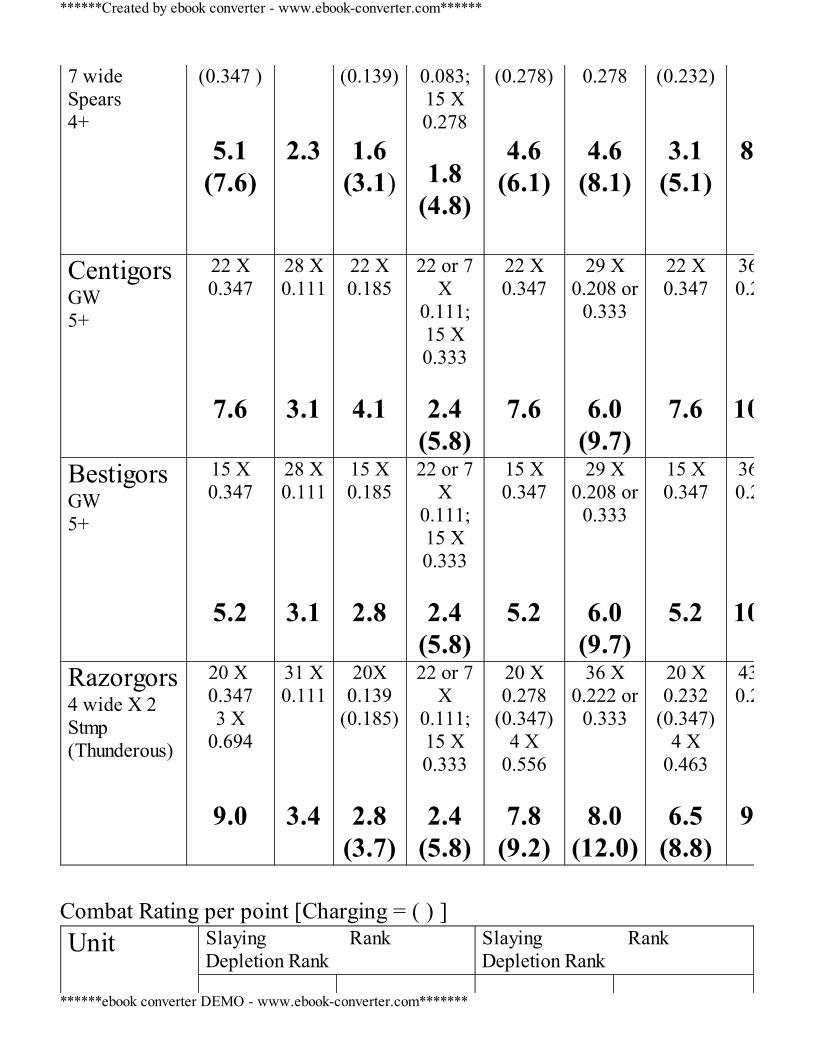
7 wideSpears4+
(0.347 )
5.1(7.6)
2.3
(0.139)
1.6(3.1)
0.083;15 X0.278
1.8
(4.8)
(0.278)
4.6(6.1)
0.278
4.6(8.1)
(0.232)
3.1(5.1)
8
CentigorsGW5+
22 X0.347
7.6
28 X0.111
3.1
22 X0.185
4.1
22 or 7X
0.111;15 X0.333
2.4
(5.8)
22 X0.347
7.6
29 X0.208 or
0.333
6.0(9.7)
22 X0.347
7.6
36 X0.278
10
BestigorsGW5+
15 X0.347
5.2
28 X0.111
3.1
15 X0.185
2.8
22 or 7X
0.111;15 X0.333
2.4
(5.8)
15 X0.347
5.2
29 X0.208 or
0.333
6.0(9.7)
15 X0.347
5.2
36 X0.278
10.0
Razorgors4 wide X 2Stmp(Thunderous)
20 X 0.3473 X
0.694
9.0
31 X0.111
3.4
20X0.139
(0.185)
2.8(3.7)
22 or 7X
0.111;15 X0.333
2.4
(5.8)
20 X0.278
(0.347)4 X
0.556
7.8(9.2)
36 X0.222 or
0.333
8.0(12.0)
20 X0.232
(0.347)4 X
0.463
6.5(8.8)
43 X0.222
9.5
Combat Rating per point [Charging = ( ) ]Unit Slaying Rank
Depletion RankSlaying Rank Depletion Rank
******Created by ebook converter - www.ebook-converter.com******
******ebook converter DEMO - www.ebook-converter.com*******
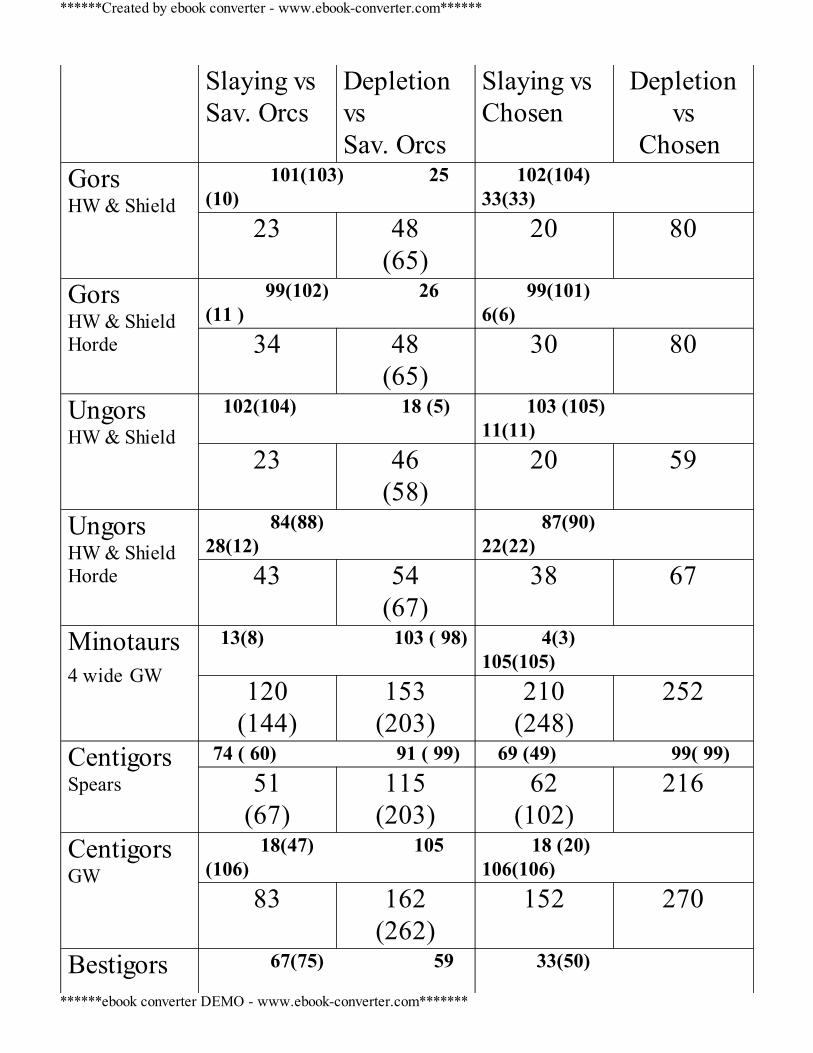
Slaying vsSav. Orcs
DepletionvsSav. Orcs
Slaying vsChosen
Depletionvs
Chosen GorsHW & Shield
101(103) 25(10)
102(104) 33(33)
23 48(65)
20 80
GorsHW & ShieldHorde
99(102) 26(11 )
99(101) 6(6)
34 48(65)
30 80
UngorsHW & Shield
102(104) 18 (5) 103 (105) 11(11)
23 46(58)
20 59
UngorsHW & ShieldHorde
84(88) 28(12)
87(90) 22(22)
43 54(67)
38 67
Minotaurs4 wide GW
13(8) 103 ( 98) 4(3) 105(105)
120(144)
153(203)
210(248)
252
CentigorsSpears
74 ( 60) 91 ( 99) 69 (49) 99( 99)51
(67)115
(203)62
(102)216
CentigorsGW
18(47) 105(106)
18 (20) 106(106)
83 162(262)
152 270
Bestigors 67(75) 59 33(50)
******Created by ebook converter - www.ebook-converter.com******
******ebook converter DEMO - www.ebook-converter.com*******
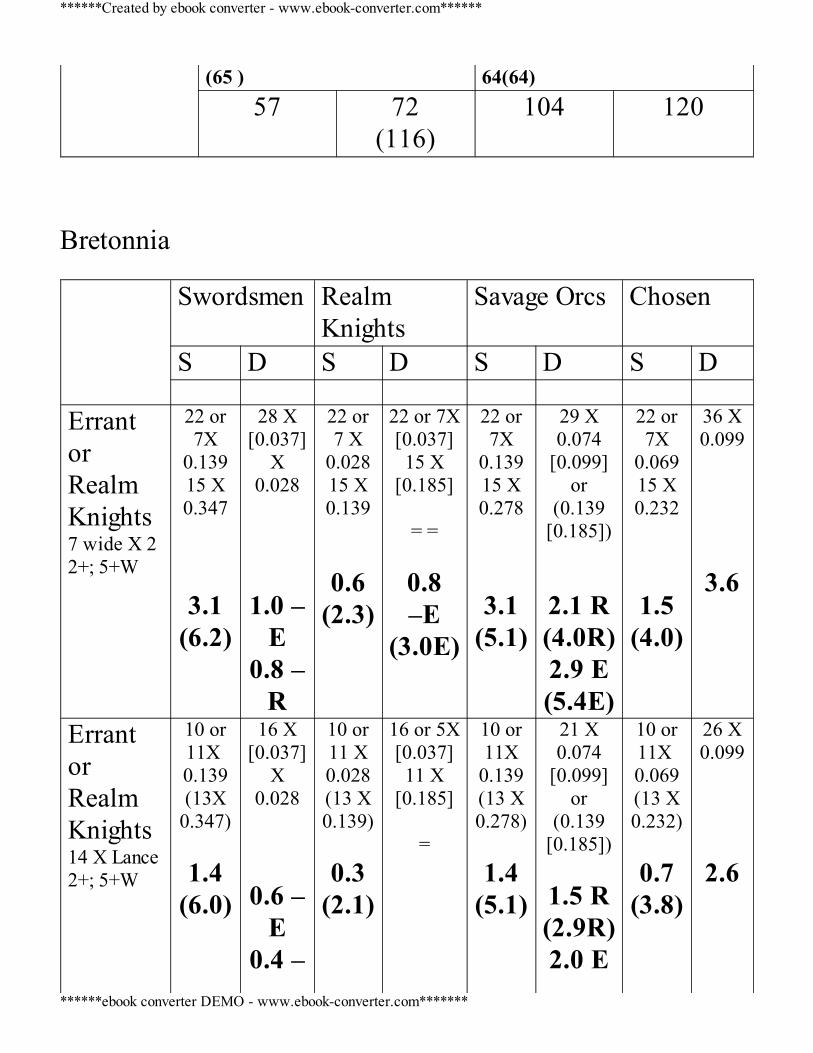
(65 ) 64(64)57 72
(116)104 120
Bretonnia Swordsmen Realm
KnightsSavage Orcs Chosen
S D S D S D S D
ErrantorRealmKnights7 wide X 22+; 5+W
22 or7X
0.13915 X0.347
3.1(6.2)
28 X[0.037]
X0.028
1.0 –E
0.8 –R
22 or7 X
0.02815 X0.139
0.6(2.3)
22 or 7X[0.037]15 X
[0.185]
= =
0.8–E
(3.0E)
22 or7X
0.13915 X0.278
3.1(5.1)
29 X0.074
[0.099]or
(0.139[0.185])
2.1 R(4.0R)2.9 E(5.4E)
22 or7X
0.06915 X0.232
1.5(4.0)
36 X0.099
3.6
ErrantorRealmKnights14 X Lance2+; 5+W
10 or11X 0.139(13X
0.347)
1.4(6.0)
16 X[0.037]
X0.028
0.6 –E
0.4 –
10 or11 X0.028(13 X0.139)
0.3
(2.1)
16 or 5X[0.037]11 X
[0.185] =
10 or11X
0.139(13 X0.278)
1.4
(5.1)
21 X0.074
[0.099]or
(0.139[0.185])
1.5 R(2.9R)2.0 E
10 or11X 0.069(13 X0.232)
0.7
(3.8)
26 X0.099
2.6
******Created by ebook converter - www.ebook-converter.com******
******ebook converter DEMO - www.ebook-converter.com*******
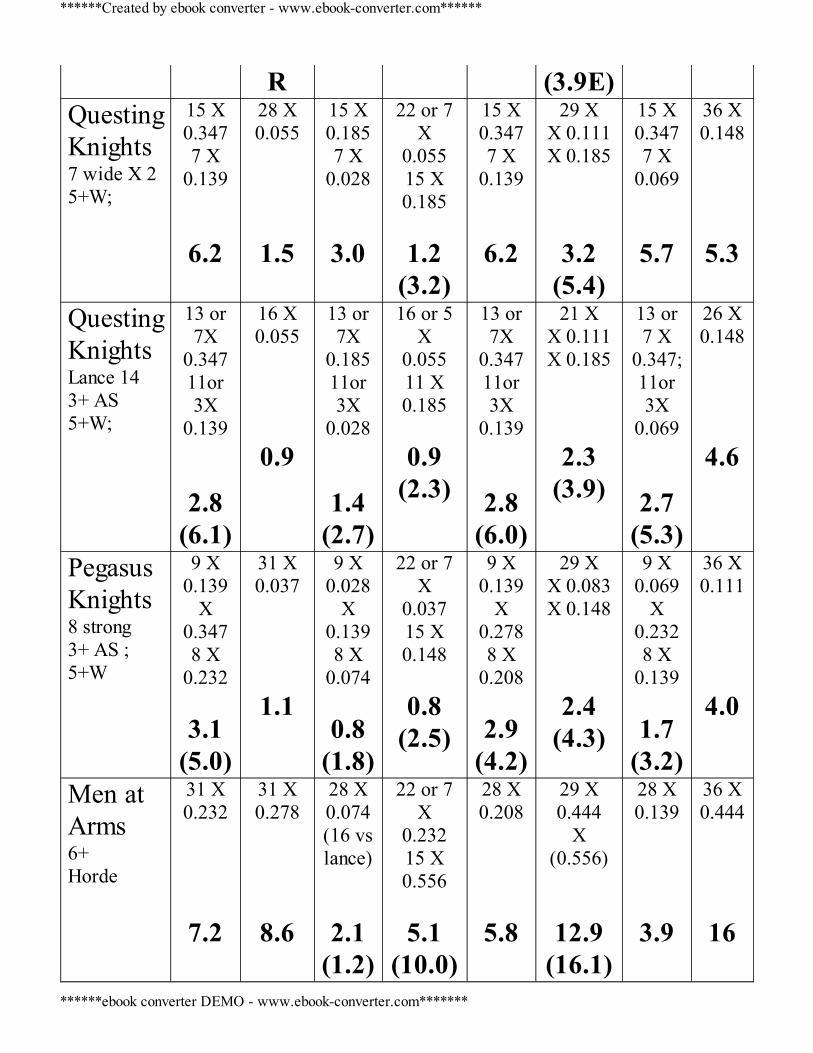
R (3.9E)QuestingKnights7 wide X 25+W;
15 X0.3477 X
0.139
6.2
28 X0.055
1.5
15 X0.1857 X
0.028
3.0
22 or 7X
0.05515 X0.185
1.2
(3.2)
15 X0.3477 X
0.139
6.2
29 XX 0.111X 0.185
3.2(5.4)
15 X0.3477 X
0.069
5.7
36 X0.148
5.3
QuestingKnightsLance 143+ AS5+W;
13 or7X
0.34711or3X
0.139
2.8(6.1)
16 X0.055
0.9
13 or7X
0.18511or3X
0.028
1.4(2.7)
16 or 5X
0.05511 X0.185
0.9
(2.3)
13 or7X
0.34711or3X
0.139
2.8(6.0)
21 XX 0.111X 0.185
2.3(3.9)
13 or7 X
0.347;11or3X
0.069
2.7(5.3)
26 X0.148
4.6
PegasusKnights8 strong3+ AS ; 5+W
9 X0.139
X0.3478 X
0.232
3.1(5.0)
31 X0.037
1.1
9 X0.028
X0.1398 X
0.074
0.8(1.8)
22 or 7X
0.03715 X0.148
0.8
(2.5)
9 X0.139
X0.2788 X
0.208
2.9(4.2)
29 XX 0.083X 0.148
2.4(4.3)
9 X0.069
X0.2328 X
0.139
1.7(3.2)
36 X0.111
4.0
Men atArms6+Horde
31 X0.232
7.2
31 X0.278
8.6
28 X0.074(16 vslance)
2.1(1.2)
22 or 7X
0.23215 X0.556
5.1
(10.0)
28 X0.208
5.8
29 X0.444
X(0.556)
12.9(16.1)
28 X0.139
3.9
36 X0.444
16
******Created by ebook converter - www.ebook-converter.com******
******ebook converter DEMO - www.ebook-converter.com*******
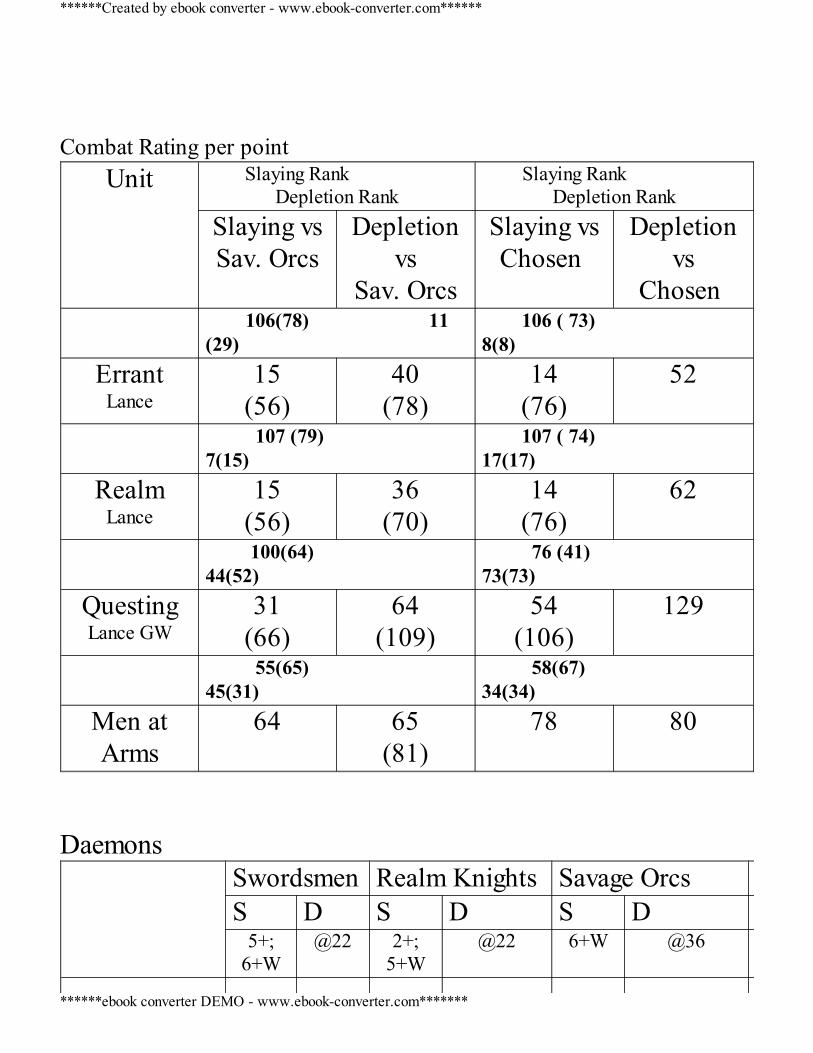
Combat Rating per point
Unit Slaying Rank Depletion Rank
Slaying Rank Depletion Rank
Slaying vsSav. Orcs
Depletionvs
Sav. Orcs
Slaying vsChosen
Depletionvs
Chosen 106(78) 11
(29) 106 ( 73) 8(8)
ErrantLance
15(56)
40(78)
14(76)
52
107 (79) 7(15)
107 ( 74) 17(17)
RealmLance
15(56)
36(70)
14(76)
62
100(64) 44(52)
76 (41) 73(73)
QuestingLance GW
31(66)
64(109)
54(106)
129
55(65) 45(31)
58(67) 34(34)
Men atArms
64 65(81)
78
80
Daemons Swordsmen Realm Knights Savage Orcs
S D S D S D5+;
6+W@22 2+;
5+W@22 6+W @36
******Created by ebook converter - www.ebook-converter.com******
******ebook converter DEMO - www.ebook-converter.com*******
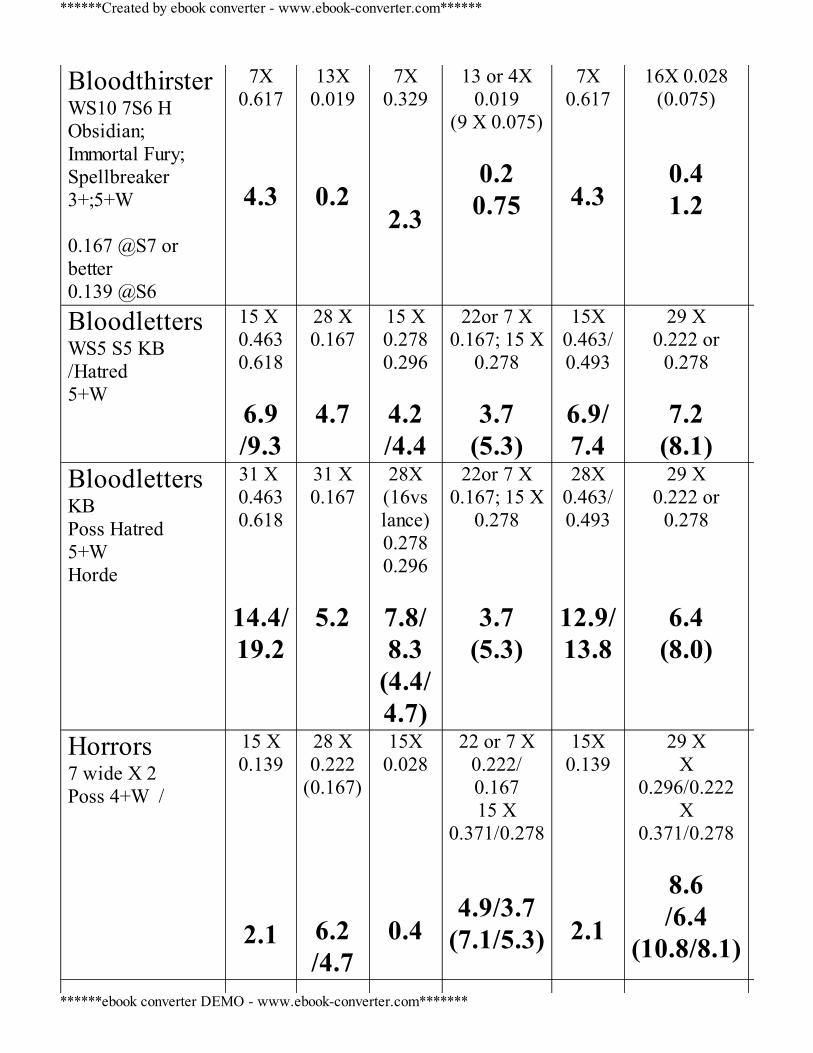
BloodthirsterWS10 7S6 HObsidian;Immortal Fury;Spellbreaker3+;5+W 0.167 @S7 orbetter0.139 @S6
7X0.617
4.3
13X0.019
0.2
7X0.329
2.3
13 or 4X0.019
(9 X 0.075)
0.20.75
7X0.617
4.3
16X 0.028(0.075)
0.41.2
BloodlettersWS5 S5 KB/Hatred5+W
15 X 0.4630.618
6.9/9.3
28 X0.167
4.7
15 X0.2780.296
4.2/4.4
22or 7 X0.167; 15 X
0.278
3.7(5.3)
15X0.463/0.493
6.9/7.4
29 X0.222 or
0.278
7.2(8.1)
BloodlettersKBPoss Hatred5+WHorde
31 X 0.4630.618
14.4/19.2
31 X0.167
5.2
28X(16vslance)0.2780.296
7.8/8.3
(4.4/4.7)
22or 7 X0.167; 15 X
0.278
3.7(5.3)
28X0.463/0.493
12.9/13.8
29 X0.222 or
0.278
6.4(8.0)
Horrors7 wide X 2Poss 4+W /
15 X0.139
2.1
28 X0.222
(0.167)
6.2/4.7
15X0.028
0.4
22 or 7 X0.222/0.16715 X
0.371/0.278
4.9/3.7(7.1/5.3)
15X0.139
2.1
29 XX
0.296/0.222X
0.371/0.278
8.6/6.4
(10.8/8.1)
******Created by ebook converter - www.ebook-converter.com******
******ebook converter DEMO - www.ebook-converter.com*******
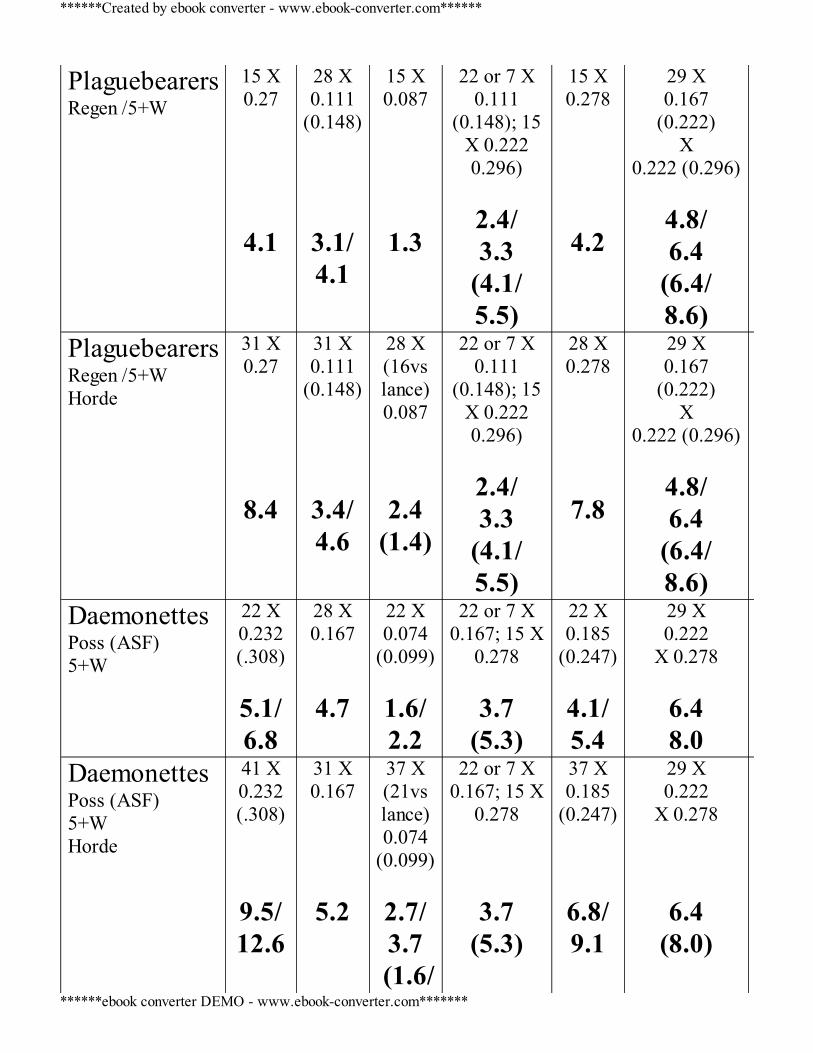
PlaguebearersRegen /5+W
15 X0.27
4.1
28 X0.111
(0.148)
3.1/4.1
15 X0.087
1.3
22 or 7 X0.111
(0.148); 15X 0.2220.296)
2.4/3.3
(4.1/5.5)
15 X0.278
4.2
29 X0.167
(0.222)X
0.222 (0.296)
4.8/6.4
(6.4/8.6)
PlaguebearersRegen /5+WHorde
31 X0.27
8.4
31 X0.111
(0.148)
3.4/4.6
28 X(16vslance)0.087
2.4(1.4)
22 or 7 X0.111
(0.148); 15X 0.2220.296)
2.4/3.3
(4.1/5.5)
28 X0.278
7.8
29 X0.167
(0.222)X
0.222 (0.296)
4.8/6.4
(6.4/8.6)
DaemonettesPoss (ASF)5+W
22 X0.232(.308)
5.1/6.8
28 X0.167
4.7
22 X0.074
(0.099)
1.6/2.2
22 or 7 X0.167; 15 X
0.278
3.7(5.3)
22 X0.185
(0.247)
4.1/5.4
29 X0.222
X 0.278
6.48.0
DaemonettesPoss (ASF)5+WHorde
41 X0.232(.308)
9.5/12.6
31 X0.167
5.2
37 X(21vslance)0.074
(0.099)
2.7/3.7(1.6/
22 or 7 X0.167; 15 X
0.278
3.7(5.3)
37 X0.185
(0.247)
6.8/9.1
29 X0.222
X 0.278
6.4(8.0)
******Created by ebook converter - www.ebook-converter.com******
******ebook converter DEMO - www.ebook-converter.com*******
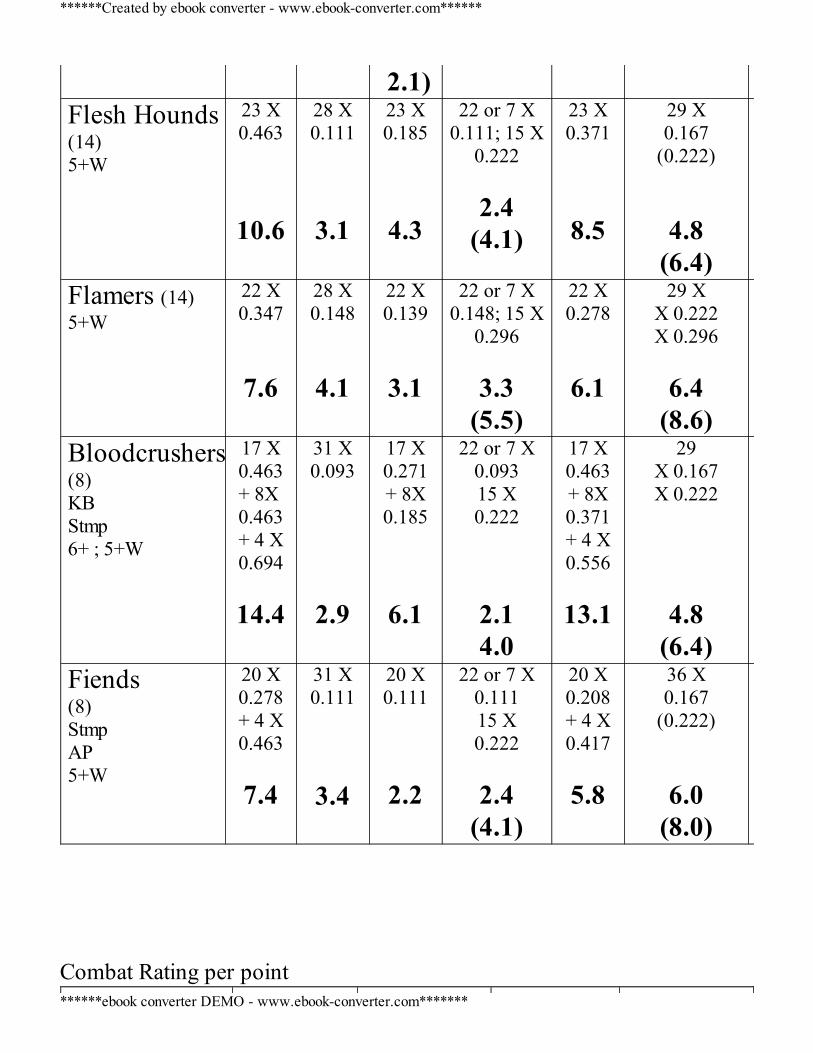
2.1)Flesh Hounds(14)5+W
23 X0.463
10.6
28 X0.111
3.1
23 X0.185
4.3
22 or 7 X0.111; 15 X
0.222
2.4(4.1)
23 X0.371
8.5
29 X0.167
(0.222)
4.8(6.4)
Flamers (14)5+W
22 X0.347
7.6
28 X0.148
4.1
22 X0.139
3.1
22 or 7 X0.148; 15 X
0.296
3.3(5.5)
22 X0.278
6.1
29 XX 0.222X 0.296
6.4
(8.6)Bloodcrushers(8)KBStmp6+ ; 5+W
17 X0.463+ 8X 0.463+ 4 X0.694
14.4
31 X0.093
2.9
17 X0.271+ 8X0.185
6.1
22 or 7 X0.09315 X0.222
2.14.0
17 X0.463+ 8X0.371+ 4 X0.556
13.1
29X 0.167X 0.222
4.8(6.4)
Fiends(8)StmpAP5+W
20 X0.278+ 4 X0.463
7.4
31 X0.111
3.4
20 X0.111
2.2
22 or 7 X0.11115 X0.222
2.4
(4.1)
20 X0.208+ 4 X0.417
5.8
36 X0.167
(0.222)
6.0(8.0)
Combat Rating per point
******Created by ebook converter - www.ebook-converter.com******
******ebook converter DEMO - www.ebook-converter.com*******
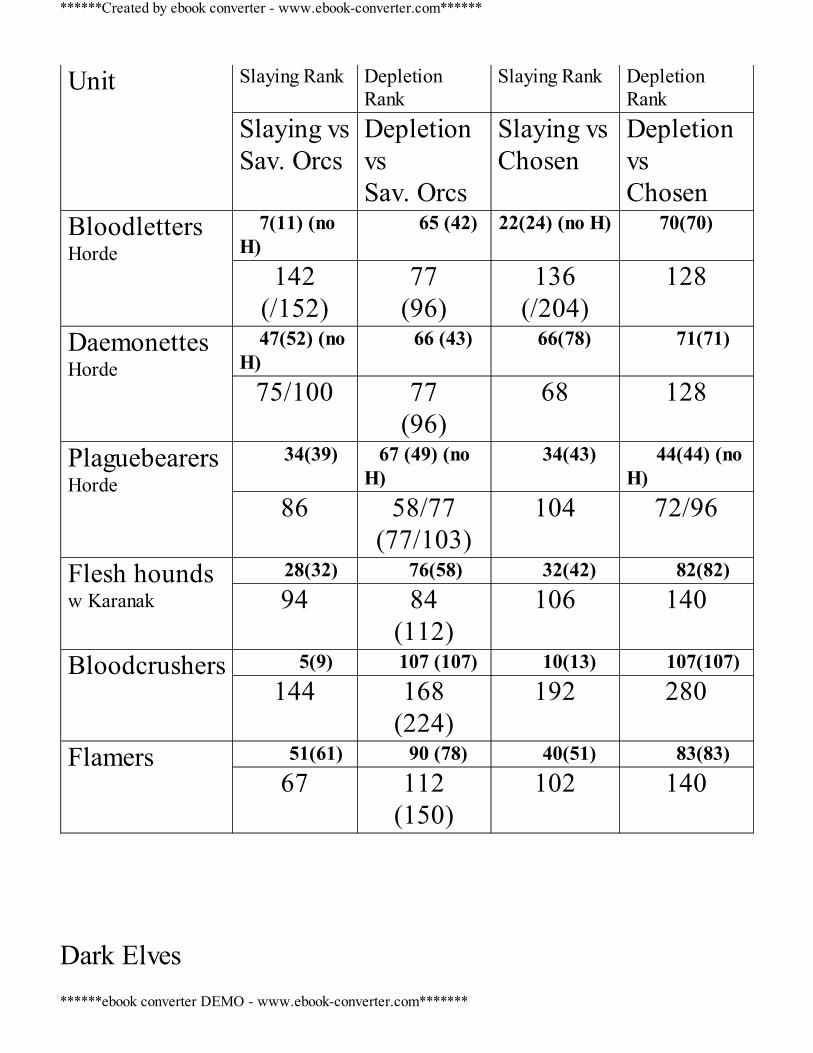
Unit Slaying Rank DepletionRank
Slaying Rank DepletionRank
Slaying vsSav. Orcs
DepletionvsSav. Orcs
Slaying vsChosen
DepletionvsChosen
BloodlettersHorde
7(11) (noH)
65 (42) 22(24) (no H) 70(70)
142(/152)
77(96)
136(/204)
128
DaemonettesHorde
47(52) (noH)
66 (43) 66(78) 71(71)
75/100 77(96)
68 128
PlaguebearersHorde
34(39) 67 (49) (noH)
34(43) 44(44) (noH)
86 58/77(77/103)
104 72/96
Flesh houndsw Karanak
28(32) 76(58) 32(42) 82(82)94 84
(112)106 140
Bloodcrushers 5(9) 107 (107) 10(13) 107(107)144 168
(224)192 280
Flamers 51(61) 90 (78) 40(51) 83(83)67 112
(150)102 140
Dark Elves
******Created by ebook converter - www.ebook-converter.com******
******ebook converter DEMO - www.ebook-converter.com*******
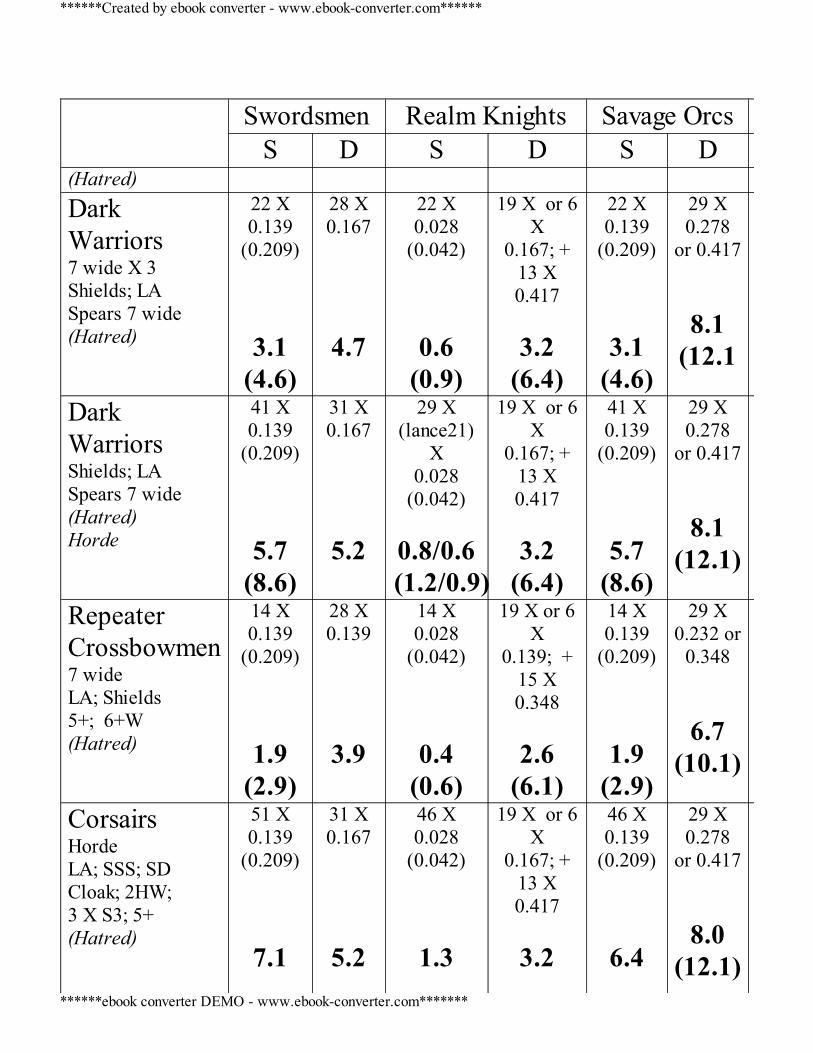
Swordsmen Realm Knights Savage Orcs
S D S D S D(Hatred) DarkWarriors7 wide X 3Shields; LASpears 7 wide(Hatred)
22 X0.139
(0.209)
3.1(4.6)
28 X0.167
4.7
22 X0.028
(0.042)
0.6(0.9)
19 X or 6X
0.167; +13 X0.417
3.2
(6.4)
22 X0.139
(0.209)
3.1(4.6)
29 X0.278
or 0.417
8.1(12.1
DarkWarriorsShields; LASpears 7 wide(Hatred)Horde
41 X0.139
(0.209)
5.7(8.6)
31 X0.167
5.2
29 X(lance21)
X0.028
(0.042)
0.8/0.6(1.2/0.9)
19 X or 6X
0.167; +13 X0.417
3.2
(6.4)
41 X0.139
(0.209)
5.7(8.6)
29 X0.278
or 0.417
8.1(12.1)
RepeaterCrossbowmen7 wideLA; Shields5+; 6+W(Hatred)
14 X0.139
(0.209)
1.9(2.9)
28 X0.139
3.9
14 X0.028
(0.042)
0.4(0.6)
19 X or 6X
0.139; +15 X0.348
2.6
(6.1)
14 X0.139
(0.209)
1.9(2.9)
29 X0.232 or
0.348
6.7(10.1)
CorsairsHordeLA; SSS; SDCloak; 2HW;3 X S3; 5+(Hatred)
51 X0.139
(0.209)
7.1
31 X0.167
5.2
46 X0.028
(0.042)
1.3
19 X or 6X
0.167; +13 X0.417
3.2
46 X0.139
(0.209)
6.4
29 X0.278
or 0.417
8.0(12.1)
******Created by ebook converter - www.ebook-converter.com******
******ebook converter DEMO - www.ebook-converter.com*******
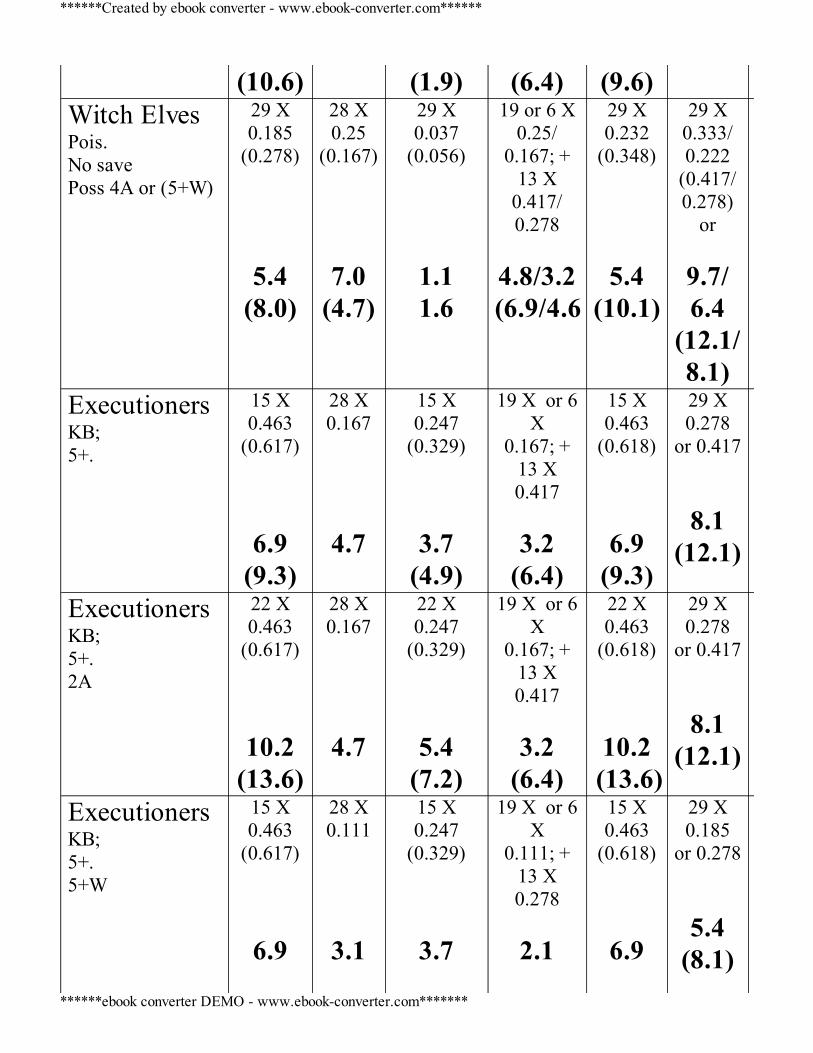
(10.6) (1.9) (6.4) (9.6)Witch ElvesPois.No savePoss 4A or (5+W)
29 X0.185
(0.278)
5.4(8.0)
28 X0.25
(0.167)
7.0(4.7)
29 X0.037
(0.056)
1.11.6
19 or 6 X0.25/
0.167; +13 X
0.417/0.278
4.8/3.2(6.9/4.6
29 X0.232
(0.348)
5.4(10.1)
29 X0.333/0.222
(0.417/0.278)
or
9.7/6.4
(12.1/8.1)
ExecutionersKB;5+.
15 X0.463
(0.617)
6.9(9.3)
28 X0.167
4.7
15 X0.247
(0.329)
3.7(4.9)
19 X or 6X
0.167; +13 X0.417
3.2
(6.4)
15 X0.463
(0.618)
6.9(9.3)
29 X0.278
or 0.417
8.1(12.1)
ExecutionersKB;5+.2A
22 X0.463
(0.617)
10.2(13.6)
28 X0.167
4.7
22 X0.247
(0.329)
5.4(7.2)
19 X or 6X
0.167; +13 X0.417
3.2
(6.4)
22 X0.463
(0.618)
10.2(13.6)
29 X0.278
or 0.417
8.1(12.1)
ExecutionersKB;5+.5+W
15 X0.463
(0.617)
6.9
28 X0.111
3.1
15 X0.247
(0.329)
3.7
19 X or 6X
0.111; +13 X0.278
2.1
15 X0.463
(0.618)
6.9
29 X0.185
or 0.278
5.4(8.1)
******Created by ebook converter - www.ebook-converter.com******
******ebook converter DEMO - www.ebook-converter.com*******
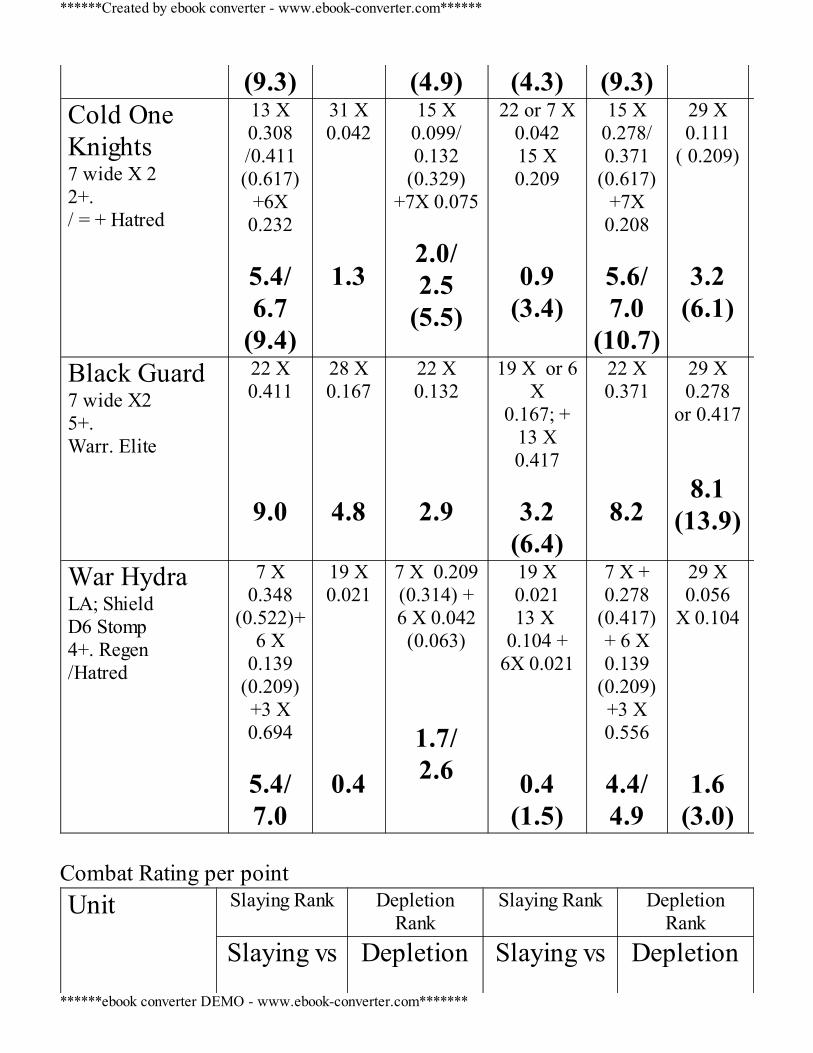
(9.3) (4.9) (4.3) (9.3)Cold OneKnights7 wide X 22+./ = + Hatred
13 X0.308/0.411(0.617)
+6X0.232
5.4/6.7
(9.4)
31 X0.042
1.3
15 X0.099/0.132
(0.329)+7X 0.075
2.0/2.5
(5.5)
22 or 7 X0.04215 X0.209
0.9(3.4)
15 X0.278/0.371
(0.617)+7X0.208
5.6/7.0
(10.7)
29 X0.111
( 0.209)
3.2(6.1)
Black Guard7 wide X25+.Warr. Elite
22 X0.411
9.0
28 X0.167
4.8
22 X0.132
2.9
19 X or 6X
0.167; +13 X0.417
3.2
(6.4)
22 X0.371
8.2
29 X0.278
or 0.417
8.1(13.9)
War HydraLA; ShieldD6 Stomp4+. Regen/Hatred
7 X0.348
(0.522)+6 X
0.139(0.209)+3 X0.694
5.4/7.0
19 X0.021
0.4
7 X 0.209(0.314) +6 X 0.042(0.063)
1.7/2.6
19 X0.02113 X
0.104 +6X 0.021
0.4(1.5)
7 X +0.278
(0.417)+ 6 X0.139
(0.209)+3 X0.556
4.4/4.9
29 X0.056
X 0.104
1.6(3.0)
Combat Rating per pointUnit Slaying Rank Depletion
RankSlaying Rank Depletion
RankSlaying vs Depletion Slaying vs Depletion
******Created by ebook converter - www.ebook-converter.com******
******ebook converter DEMO - www.ebook-converter.com*******

Sav. Orcs vsSav. Orcs
Chosen vsChosen
DarkWarriorsShields Horde
62(72) 35(32) 74(84) 42(42)63 57
(84)56 93
Xbowmen 104(106) 63(55) 104(106) 68 (68)21 74
(111)20 121
CorsairsHorde
49(55) 72(68) 67(80) 76(76)70 80
(121)64 133
Executioners 43(49) 83(74) 35(44) 88(88)76 97
(144)104 160
Cold OneKnights
63(19) 78(84) 70 (16) 84(84)62
(117)86
(165)62
(176)143
Black Guard 30(35) 89(90) 47(58) 93(93)90 105
(181)92 173
Hydra 75(82) 33(50) 64(76) 41(41)48 56
(105)72 91
Dwarfs
Swordsmen RealmKnights
Savage Orcs Chosen
S D S D S D S D
******Created by ebook converter - www.ebook-converter.com******
******ebook converter DEMO - www.ebook-converter.com*******
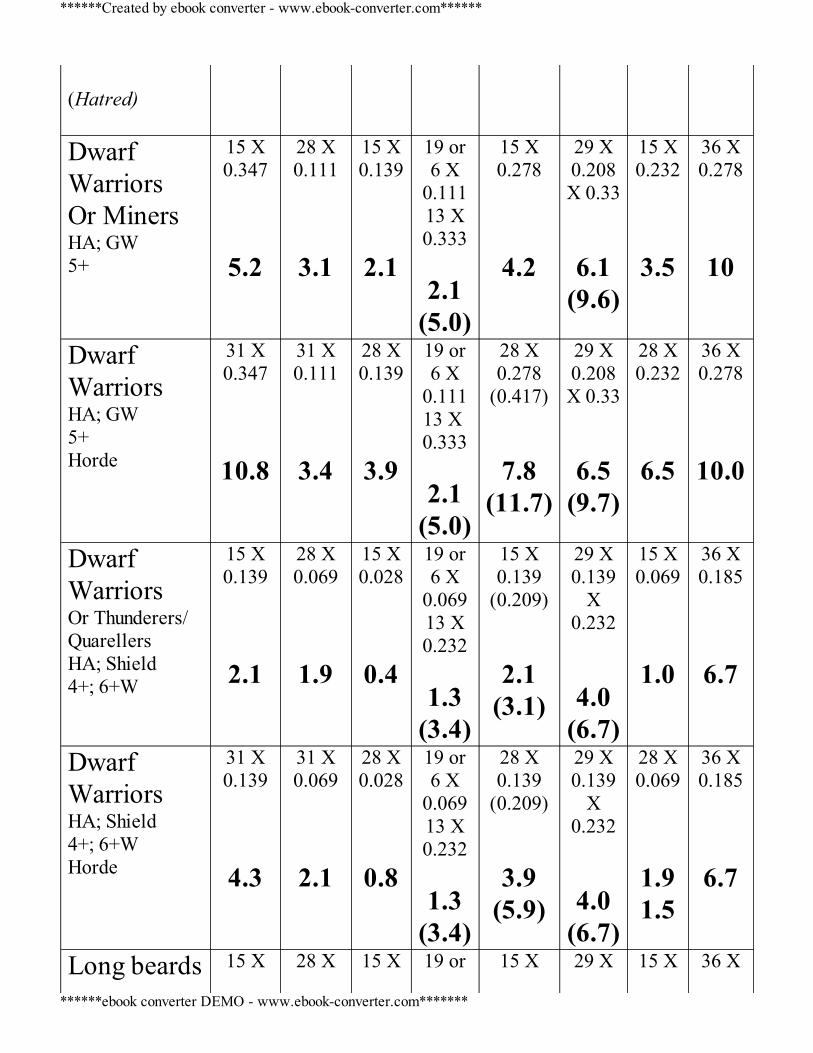
(Hatred)
DwarfWarriorsOr MinersHA; GW5+
15 X0.347
5.2
28 X0.111
3.1
15 X0.139
2.1
19 or6 X
0.11113 X0.333
2.1
(5.0)
15 X0.278
4.2
29 X0.208X 0.33
6.1(9.6)
15 X0.232
3.5
36 X0.278
10
DwarfWarriorsHA; GW5+Horde
31 X0.347
10.8
31 X0.111
3.4
28 X0.139
3.9
19 or6 X
0.11113 X 0.333
2.1
(5.0)
28 X0.278
(0.417)
7.8(11.7)
29 X0.208X 0.33
6.5(9.7)
28 X0.232
6.5
36 X0.278
10.0
DwarfWarriorsOr Thunderers/QuarellersHA; Shield4+; 6+W
15 X0.139
2.1
28 X0.069
1.9
15 X0.028
0.4
19 or6 X
0.06913 X0.232
1.3
(3.4)
15 X0.139
(0.209)
2.1(3.1)
29 X0.139
X0.232
4.0(6.7)
15 X0.069
1.0
36 X0.185
6.7
DwarfWarriorsHA; Shield4+; 6+WHorde
31 X0.139
4.3
31 X0.069
2.1
28 X0.028
0.8
19 or6 X
0.06913 X0.232
1.3
(3.4)
28 X0.139
(0.209)
3.9(5.9)
29 X0.139
X0.232
4.0(6.7)
28 X0.069
1.91.5
36 X0.185
6.7
Long beards 15 X 28 X 15 X 19 or 15 X 29 X 15 X 36 X
******Created by ebook converter - www.ebook-converter.com******
******ebook converter DEMO - www.ebook-converter.com*******
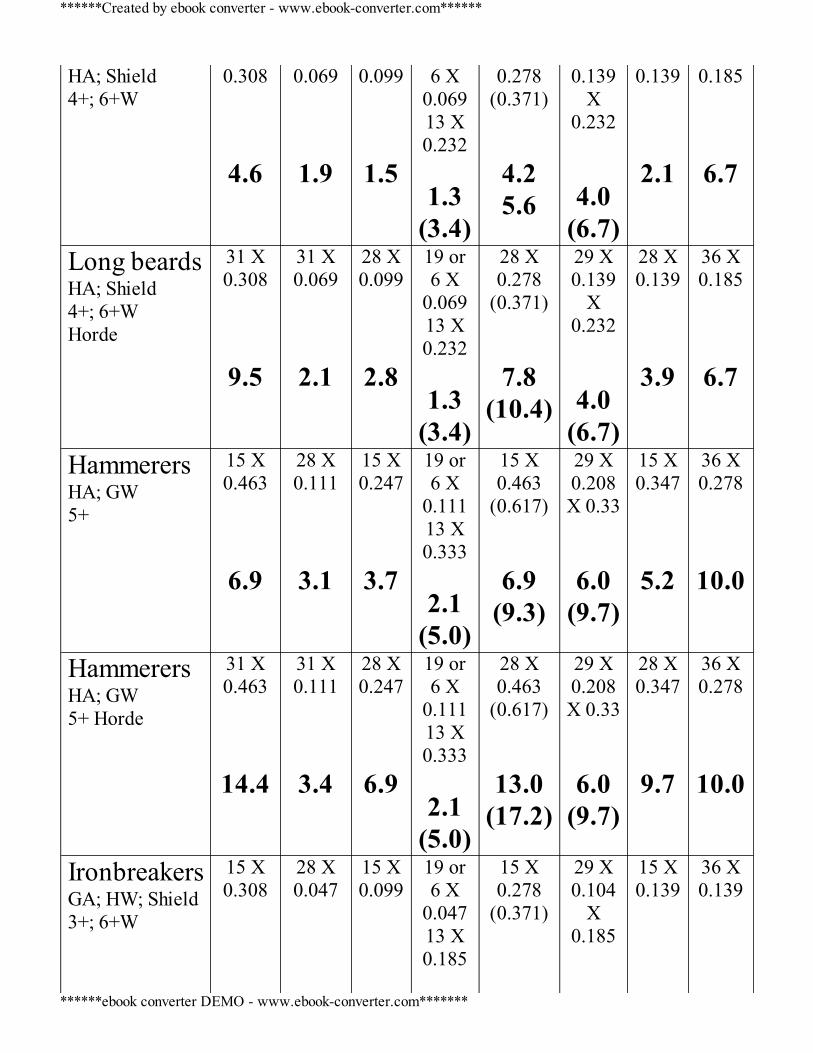
HA; Shield4+; 6+W
0.308
4.6
0.069
1.9
0.099
1.5
6 X0.06913 X0.232
1.3
(3.4)
0.278(0.371)
4.25.6
0.139X
0.232
4.0(6.7)
0.139
2.1
0.185
6.7
Long beardsHA; Shield4+; 6+WHorde
31 X0.308
9.5
31 X0.069
2.1
28 X0.099
2.8
19 or6 X
0.06913 X0.232
1.3
(3.4)
28 X0.278
(0.371)
7.8(10.4)
29 X0.139
X0.232
4.0(6.7)
28 X0.139
3.9
36 X0.185
6.7
HammerersHA; GW5+
15 X0.463
6.9
28 X0.111
3.1
15 X0.247
3.7
19 or6 X
0.11113 X0.333
2.1
(5.0)
15 X0.463
(0.617)
6.9(9.3)
29 X0.208X 0.33
6.0(9.7)
15 X0.347
5.2
36 X0.278
10.0
HammerersHA; GW5+ Horde
31 X0.463
14.4
31 X0.111
3.4
28 X0.247
6.9
19 or6 X
0.11113 X0.333
2.1
(5.0)
28 X0.463
(0.617)
13.0(17.2)
29 X0.208X 0.33
6.0(9.7)
28 X0.347
9.7
36 X0.278
10.0
IronbreakersGA; HW; Shield3+; 6+W
15 X0.308
28 X0.047
15 X0.099
19 or6 X
0.04713 X0.185
15 X0.278
(0.371)
29 X0.104
X0.185
15 X0.139
36 X0.139
******Created by ebook converter - www.ebook-converter.com******
******ebook converter DEMO - www.ebook-converter.com*******
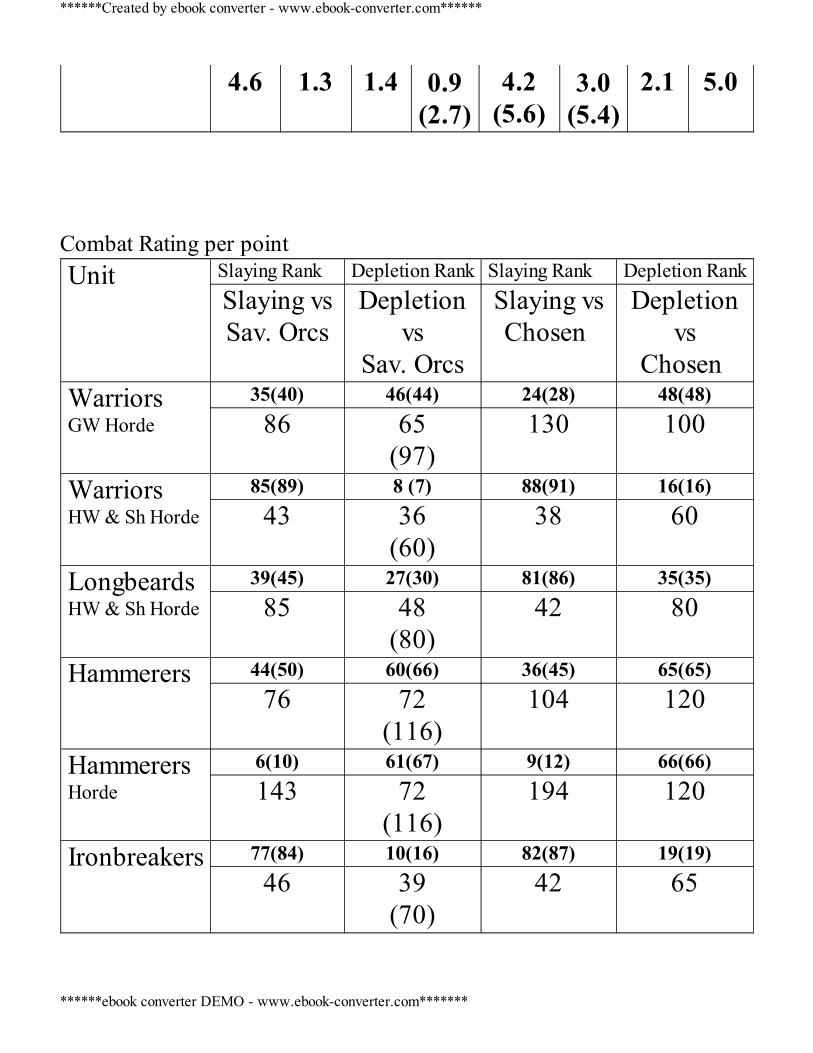
4.6 1.3 1.4 0.9(2.7)
4.2(5.6)
3.0(5.4)
2.1 5.0
Combat Rating per pointUnit Slaying Rank Depletion Rank Slaying Rank Depletion Rank
Slaying vsSav. Orcs
Depletionvs
Sav. Orcs
Slaying vsChosen
Depletionvs
Chosen WarriorsGW Horde
35(40) 46(44) 24(28) 48(48)86 65
(97)130 100
WarriorsHW & Sh Horde
85(89) 8 (7) 88(91) 16(16)43 36
(60)38 60
LongbeardsHW & Sh Horde
39(45) 27(30) 81(86) 35(35)85 48
(80)42 80
Hammerers
44(50) 60(66) 36(45) 65(65)76 72
(116)104 120
HammerersHorde
6(10) 61(67) 9(12) 66(66)143 72
(116)194 120
Ironbreakers 77(84) 10(16) 82(87) 19(19)46 39
(70)42 65
******Created by ebook converter - www.ebook-converter.com******
******ebook converter DEMO - www.ebook-converter.com*******

Empire Swordsmen Realm
KnightsSavage Orcs Chosen
S D S D S D S
Halberdiers5 wideLA6+
11 X0.232
2.6
22 X0.278
6.1
11 X0.075
0.8
6 X0.20813 X
X 0.2780.556
4.9
(8.5)
11 X0.208
2.3
25 X0.444
(0.556)
11.1(13.9)
11 X0.139
1.5
HalberdiersLA6+Horde
31 X0.232
7.2
31 X0.278
8.6
28 X0.075
2.1
7 X0.20815 X0.2780.556
5.6
(9.8)
28 X0.208
5.8
29 X0.444
(0.556)
12.9(16.1)
28 X0.139
3.9
SpearmenLA Sh5+Horde
41 X0.139
5.7
31 X0.222
6.9
35 X0.028
1.0
7 X0.20815 X0.2780.556
5.6
(9.8)
37 X0.139
5.1
29 X0.37
X 0.556
10.7(16.1)
37 X0.069
2.6
Swords-men
11 X0.139
31 X0.139
11 X0.028
19or6X 0.139
11 X
11 X0.139
25 X0.232
X 0.347
11 X0.069
******Created by ebook converter - www.ebook-converter.com******
******ebook converter DEMO - www.ebook-converter.com*******
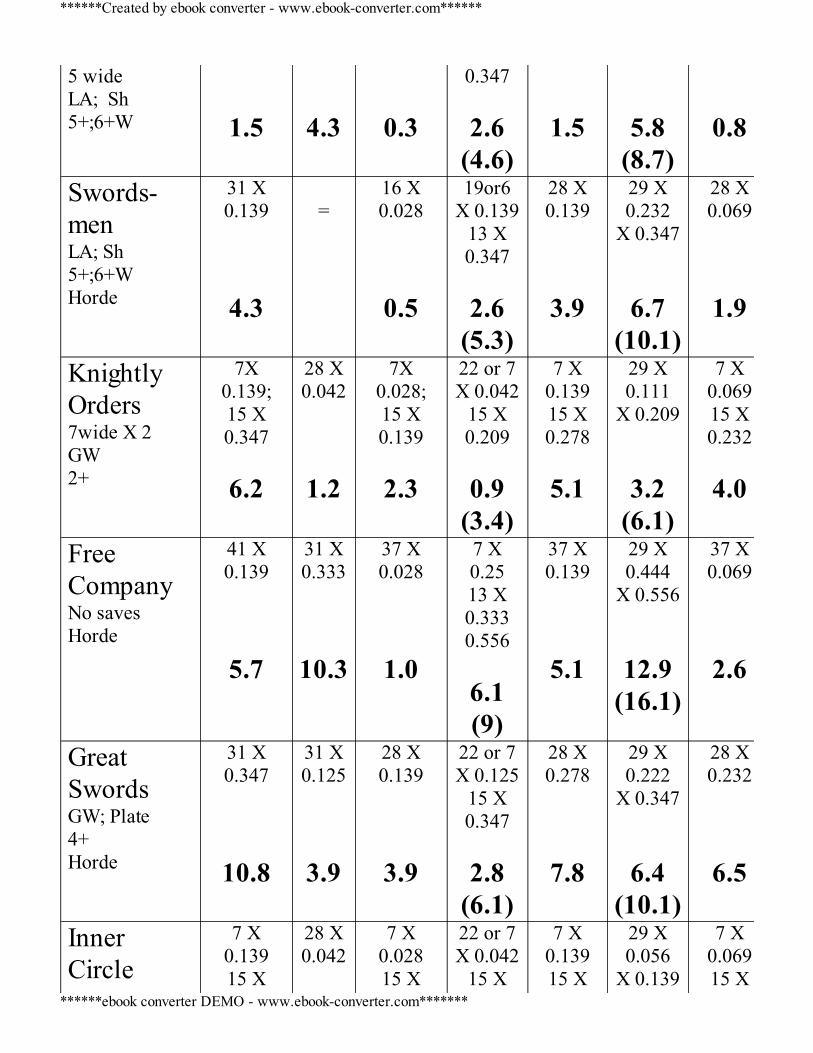
5 wideLA; Sh5+;6+W
1.5
4.3
0.3
0.347
2.6(4.6)
1.5
5.8(8.7)
0.8
Swords-menLA; Sh5+;6+WHorde
31 X0.139
4.3
=
16 X0.028
0.5
19or6X 0.139
13 X0.347
2.6
(5.3)
28 X0.139
3.9
29 X0.232
X 0.347
6.7(10.1)
28 X0.069
1.9
KnightlyOrders7wide X 2GW2+
7X0.139;15 X0.347
6.2
28 X0.042
1.2
7X0.028;15 X0.139
2.3
22 or 7X 0.042
15 X0.209
0.9
(3.4)
7 X0.13915 X0.278
5.1
29 X0.111
X 0.209
3.2(6.1)
7 X0.06915 X0.232
4.0
FreeCompanyNo savesHorde
41 X0.139
5.7
31 X0.333
10.3
37 X0.028
1.0
7 X0.2513 X0.3330.556
6.1(9)
37 X0.139
5.1
29 X0.444
X 0.556
12.9(16.1)
37 X0.069
2.6
GreatSwordsGW; Plate4+Horde
31 X0.347
10.8
31 X0.125
3.9
28 X0.139
3.9
22 or 7X 0.125
15 X0.347
2.8
(6.1)
28 X0.278
7.8
29 X0.222
X 0.347
6.4(10.1)
28 X0.232
6.5
InnerCircle
7 X0.13915 X
28 X0.042
7 X0.02815 X
22 or 7X 0.042
15 X
7 X0.13915 X
29 X0.056
X 0.139
7 X0.06915 X
******Created by ebook converter - www.ebook-converter.com******
******ebook converter DEMO - www.ebook-converter.com*******
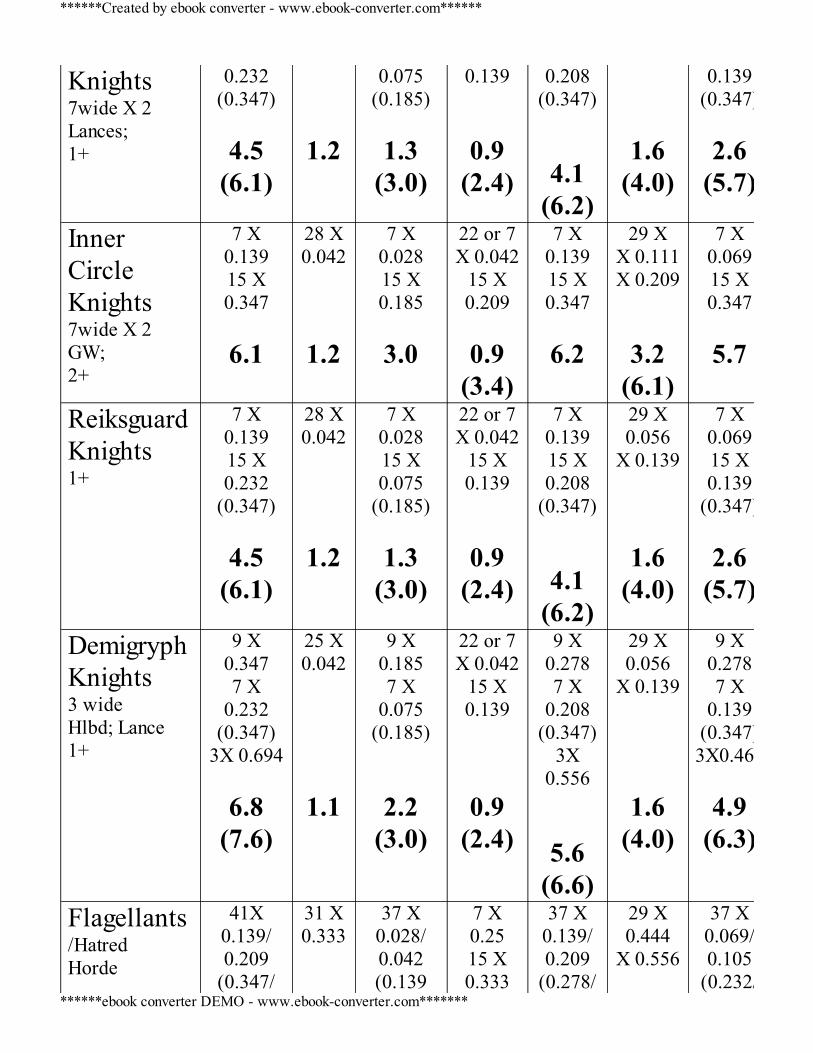
Knights7wide X 2Lances; 1+
0.232(0.347)
4.5
(6.1)
1.2
0.075(0.185)
1.3
(3.0)
0.139
0.9(2.4)
0.208(0.347)
4.1(6.2)
1.6(4.0)
0.139(0.347)
2.6
(5.7)
InnerCircleKnights7wide X 2GW;2+
7 X0.13915 X0.347
6.1
28 X0.042
1.2
7 X0.02815 X0.185
3.0
22 or 7X 0.042
15 X0.209
0.9
(3.4)
7 X0.13915 X0.347
6.2
29 XX 0.111X 0.209
3.2(6.1)
7 X0.06915 X0.347
5.7
ReiksguardKnights1+
7 X0.13915 X0.232
(0.347)
4.5(6.1)
28 X0.042
1.2
7 X0.02815 X0.075
(0.185)
1.3(3.0)
22 or 7X 0.042
15 X0.139
0.9(2.4)
7 X0.13915 X0.208
(0.347)
4.1(6.2)
29 X0.056
X 0.139
1.6(4.0)
7 X0.06915 X0.139
(0.347)
2.6(5.7)
DemigryphKnights3 wideHlbd; Lance1+
9 X0.3477 X
0.232(0.347)
3X 0.694
6.8(7.6)
25 X0.042
1.1
9 X0.1857 X
0.075(0.185)
2.2(3.0)
22 or 7X 0.042
15 X0.139
0.9(2.4)
9 X0.2787 X
0.208(0.347)
3X0.556
5.6(6.6)
29 X0.056
X 0.139
1.6(4.0)
9 X0.2787 X
0.139(0.347)3X0.463
4.9
(6.3)
Flagellants/HatredHorde
41X0.139/0.209
(0.347/
31 X0.333
37 X0.028/0.042(0.139
7 X0.2515 X0.333
37 X0.139/0.209
(0.278/
29 X0.444
X 0.556
37 X0.069/0.105
(0.232/
******Created by ebook converter - www.ebook-converter.com******
******ebook converter DEMO - www.ebook-converter.com*******
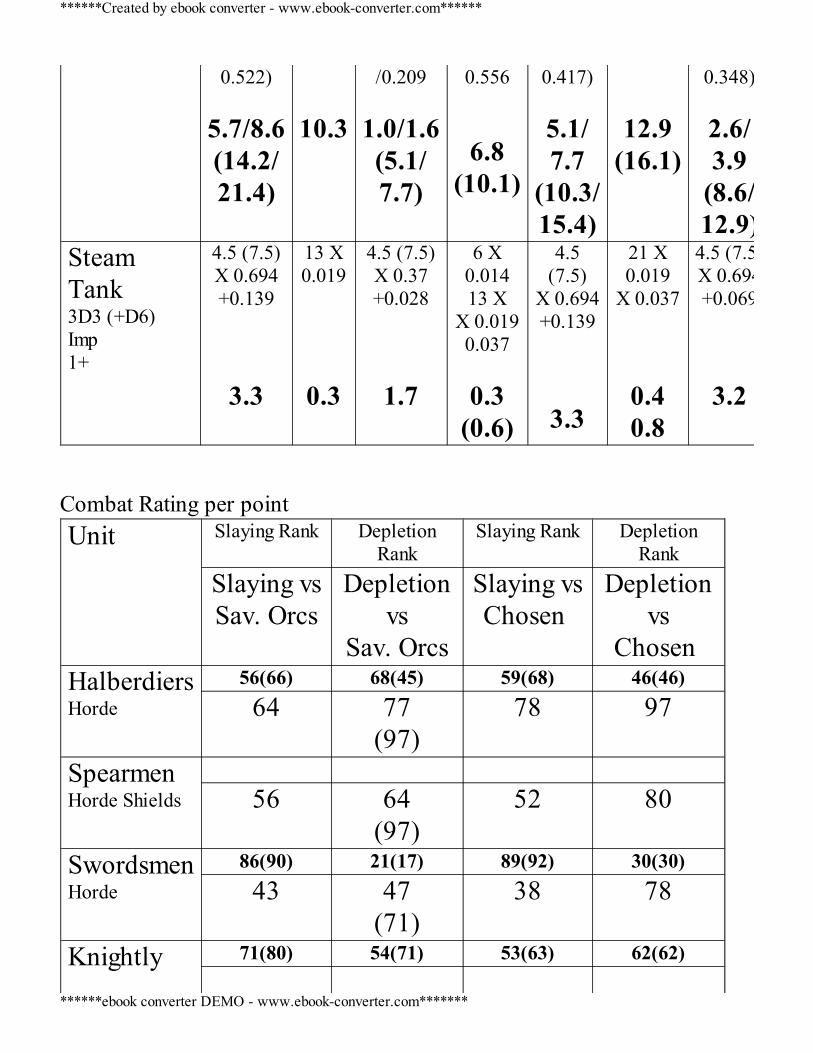
0.522)
5.7/8.6(14.2/21.4)
10.3
/0.209
1.0/1.6(5.1/7.7)
0.556
6.8(10.1)
0.417)
5.1/7.7
(10.3/15.4)
12.9(16.1)
0.348)
2.6/3.9
(8.6/12.9)
SteamTank3D3 (+D6)Imp1+
4.5 (7.5)X 0.694+0.139
3.3
13 X0.019
0.3
4.5 (7.5)X 0.37+0.028
1.7
6 X0.01413 X
X 0.0190.037
0.3
(0.6)
4.5(7.5)
X 0.694+0.139
3.3
21 X0.019
X 0.037
0.40.8
4.5 (7.5)X 0.694+0.069
3.2
Combat Rating per pointUnit Slaying Rank Depletion
RankSlaying Rank Depletion
RankSlaying vsSav. Orcs
Depletionvs
Sav. Orcs
Slaying vsChosen
Depletionvs
Chosen HalberdiersHorde
56(66) 68(45) 59(68) 46(46)64 77
(97)78 97
SpearmenHorde Shields
56 64
(97)52 80
SwordsmenHorde
86(90) 21(17) 89(92) 30(30)43 47
(71)38 78
Knightly 71(80) 54(71) 53(63) 62(62)
******Created by ebook converter - www.ebook-converter.com******
******ebook converter DEMO - www.ebook-converter.com*******
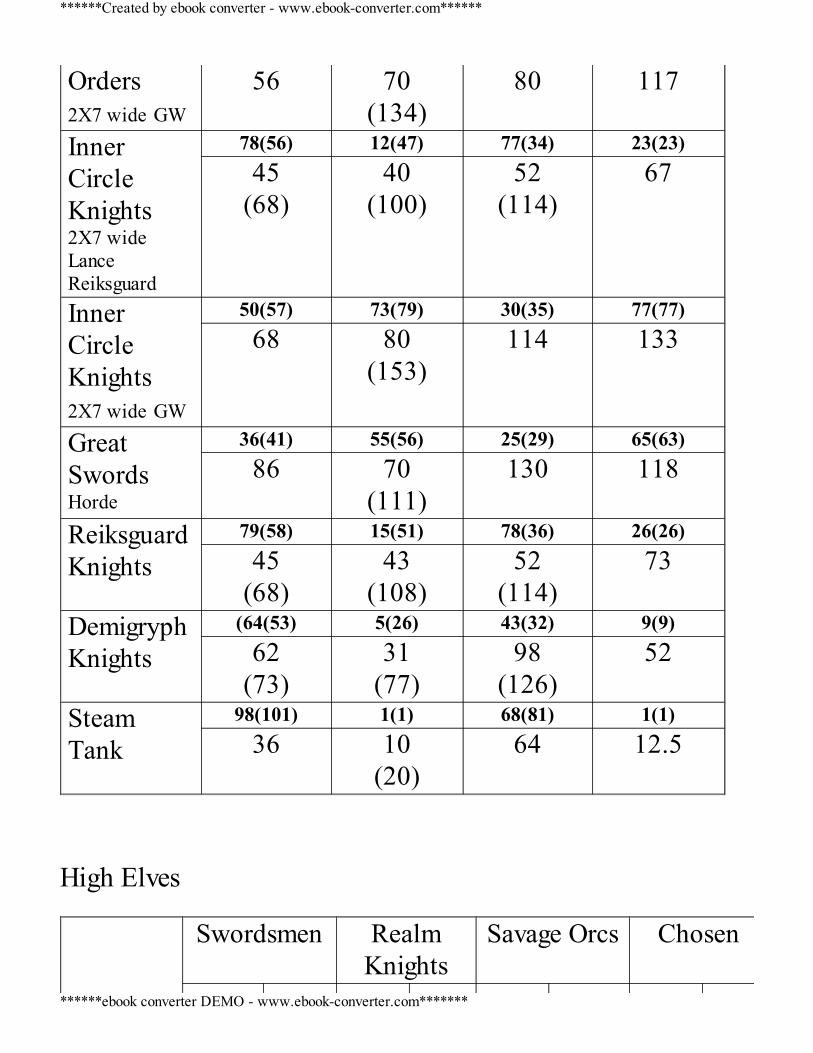
Orders2X7 wide GW
56 70(134)
80 117
InnerCircleKnights2X7 wideLanceReiksguard
78(56) 12(47) 77(34) 23(23)45
(68)40
(100)52
(114)67
InnerCircleKnights2X7 wide GW
50(57) 73(79) 30(35) 77(77)68 80
(153)114 133
GreatSwordsHorde
36(41) 55(56) 25(29) 65(63)86 70
(111)130 118
ReiksguardKnights
79(58) 15(51) 78(36) 26(26)45
(68)43
(108)52
(114)73
DemigryphKnights
(64(53) 5(26) 43(32) 9(9)62
(73)31
(77)98
(126)52
SteamTank
98(101) 1(1) 68(81) 1(1)36 10
(20)64 12.5
High Elves
Swordsmen RealmKnights
Savage Orcs Chosen
******Created by ebook converter - www.ebook-converter.com******
******ebook converter DEMO - www.ebook-converter.com*******
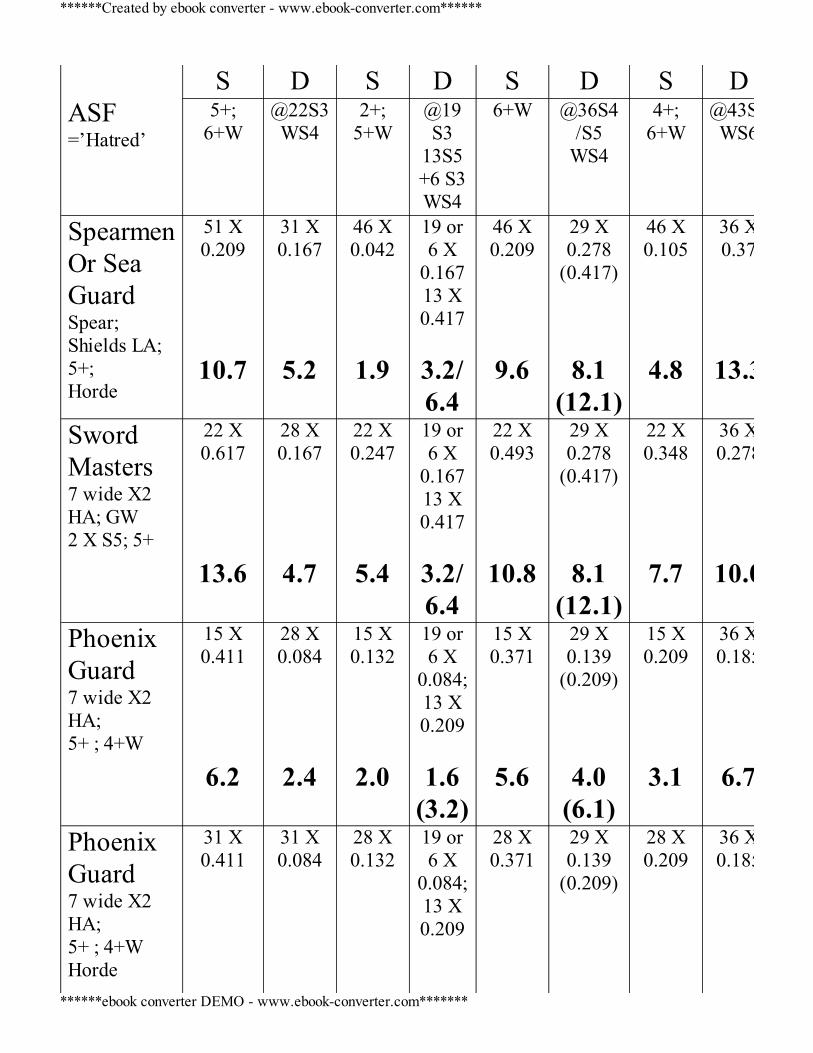
ASF=’Hatred’
S D S D S D S D5+;
6+W@22S3WS4
2+;5+W
@19S3
13S5+6 S3WS4
6+W @36S4/S5
WS4
4+;6+W
@43S4WS6
SpearmenOr SeaGuardSpear;Shields LA;5+;Horde
51 X0.209
10.7
31 X0.167
5.2
46 X0.042
1.9
19 or6 X
0.16713 X0.417
3.2/6.4
46 X0.209
9.6
29 X0.278
(0.417)
8.1(12.1)
46 X0.105
4.8
36 X0.37
13.3
SwordMasters7 wide X2HA; GW2 X S5; 5+
22 X0.617
13.6
28 X0.167
4.7
22 X0.247
5.4
19 or6 X
0.16713 X0.417
3.2/6.4
22 X0.493
10.8
29 X0.278
(0.417)
8.1(12.1)
22 X0.348
7.7
36 X0.278
10.0
PhoenixGuard7 wide X2HA;5+ ; 4+W
15 X0.411
6.2
28 X0.084
2.4
15 X0.132
2.0
19 or6 X
0.084;13 X0.209
1.6
(3.2)
15 X0.371
5.6
29 X0.139
(0.209)
4.0(6.1)
15 X0.209
3.1
36 X0.185
6.7
PhoenixGuard7 wide X2HA;5+ ; 4+WHorde
31 X0.411
31 X0.084
28 X0.132
19 or6 X
0.084;13 X0.209
28 X0.371
29 X0.139
(0.209)
28 X0.209
36 X0.185
******Created by ebook converter - www.ebook-converter.com******
******ebook converter DEMO - www.ebook-converter.com*******

12.7 2.6 3.7 1.6(3.2)
10.4 4.0(6.1)
5.9 6.7
WhiteLions7 wide X2HA; CloakGW5+
15 X0.463
6.9
28 X0.167
4.7
15 X0.247
3.7
19 or6 X
0.16713 X0.417
3.2
(6.4)
15 X0.463
6.9
29 X0.278
(0.417)
8.0(12.1)
15 X0.347
5.2
36 X0.37
13.3
DragonPrincesLance;2 X S52+
7X0.13915 X0.247
(0.617)
4.7(10.2)
28 X0.042
1.2
7 X0.02815 X0.049
(0.247)
0.9(3.9)
22 or7 X
0.042;15 X0.209
0.9
(3.4)
7 X0.13915 X0.247
(0.493)
4.7(8.4)
31 X0.111
(0.209)
3.4(6.5)
7 X0.069;15 X0.105
(0.348)
2.1(5.7)
43 X0.148
6.4
Combat Rating per pointUnit Slaying Rank Depletion
RankSlaying Rank Depletion
RankSlaying vsSav. Orcs
Depletionvs
Sav. Orcs
Slaying vsChosen
Depletionvs
Chosen SpearmenHorde
20(26) 62(53) 45(56) 67(67)106 73
(109)96 120
Sea GuardHorde
21(27) 84(76) 46(57) 90(90)106 97
(145)96 161
Swordmasters 15(18) 96(91) 16(18) 87(87)
******Created by ebook converter - www.ebook-converter.com******
******ebook converter DEMO - www.ebook-converter.com*******
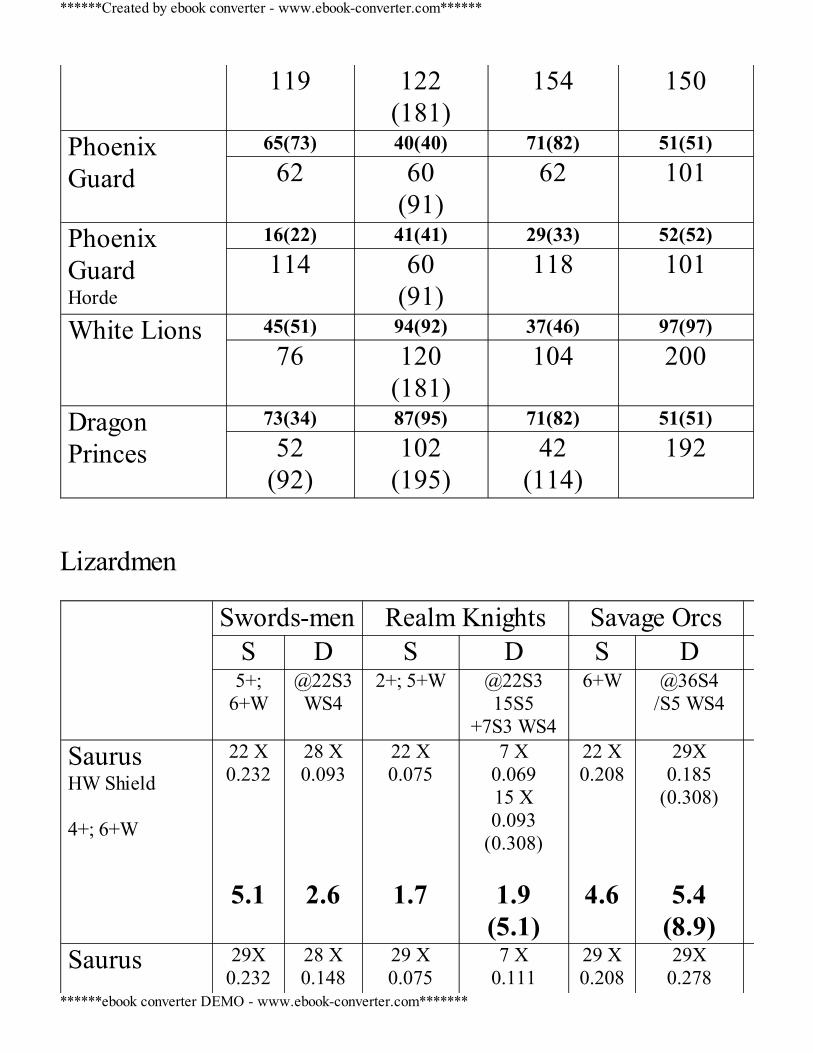
119 122(181)
154 150
PhoenixGuard
65(73) 40(40) 71(82) 51(51)62 60
(91)62 101
PhoenixGuardHorde
16(22) 41(41) 29(33) 52(52)114 60
(91)118 101
White Lions 45(51) 94(92) 37(46) 97(97)76 120
(181)104 200
DragonPrinces
73(34) 87(95) 71(82) 51(51)52
(92)102
(195)42
(114)192
Lizardmen Swords-men Realm Knights Savage Orcs
S D S D S D5+;
6+W@22S3WS4
2+; 5+W @22S315S5
+7S3 WS4
6+W @36S4/S5 WS4
SaurusHW Shield 4+; 6+W
22 X0.232
5.1
28 X0.093
2.6
22 X0.075
1.7
7 X0.06915 X0.093
(0.308)
1.9(5.1)
22 X0.208
4.6
29X0.185
(0.308)
5.4(8.9)
Saurus 29X0.232
28 X0.148
29 X0.075
7 X0.111
29 X0.208
29X0.278
******Created by ebook converter - www.ebook-converter.com******
******ebook converter DEMO - www.ebook-converter.com*******
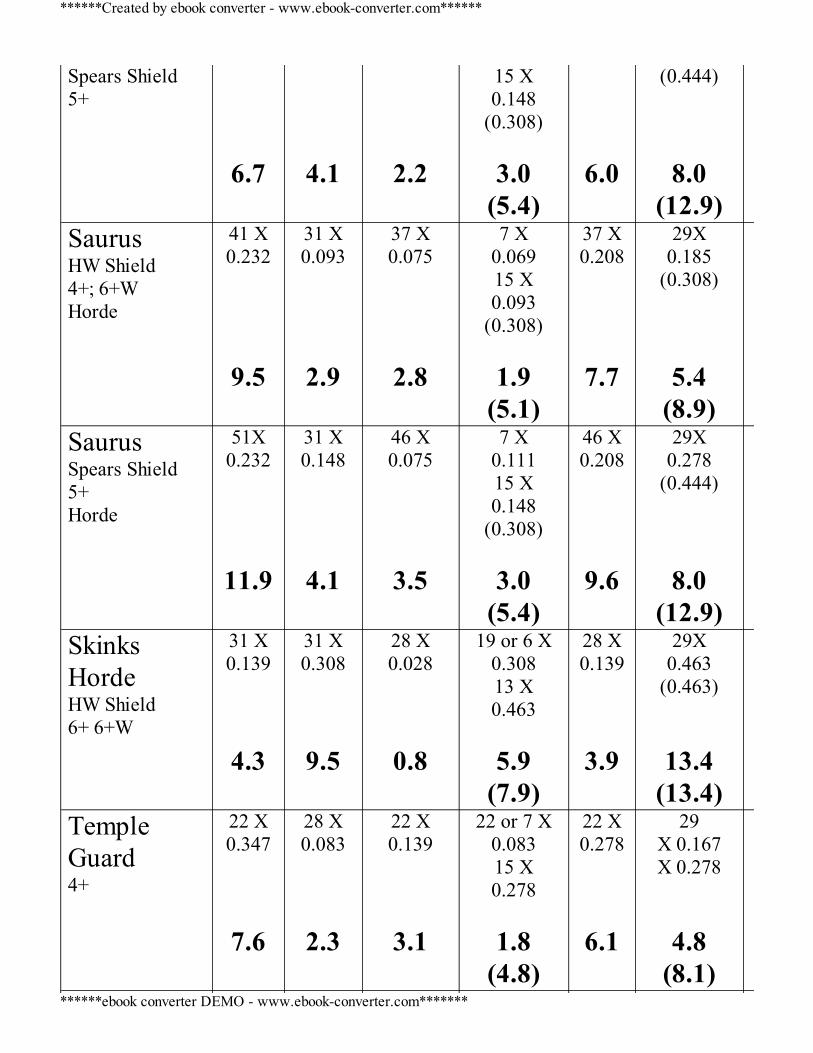
Spears Shield5+
6.7
4.1
2.2
15 X0.148
(0.308)
3.0(5.4)
6.0
(0.444)
8.0(12.9)
SaurusHW Shield4+; 6+WHorde
41 X0.232
9.5
31 X0.093
2.9
37 X0.075
2.8
7 X0.06915 X0.093
(0.308)
1.9(5.1)
37 X0.208
7.7
29X0.185
(0.308)
5.4(8.9)
SaurusSpears Shield5+Horde
51X0.232
11.9
31 X0.148
4.1
46 X0.075
3.5
7 X0.11115 X0.148
(0.308)
3.0(5.4)
46 X0.208
9.6
29X0.278
(0.444)
8.0(12.9)
SkinksHordeHW Shield6+ 6+W
31 X0.139
4.3
31 X0.308
9.5
28 X0.028
0.8
19 or 6 X0.30813 X0.463
5.9
(7.9)
28 X0.139
3.9
29X0.463
(0.463)
13.4(13.4)
TempleGuard 4+
22 X0.347
7.6
28 X0.083
2.3
22 X0.139
3.1
22 or 7 X0.08315 X0.278
1.8
(4.8)
22 X0.278
6.1
29X 0.167X 0.278
4.8(8.1)
******Created by ebook converter - www.ebook-converter.com******
******ebook converter DEMO - www.ebook-converter.com*******
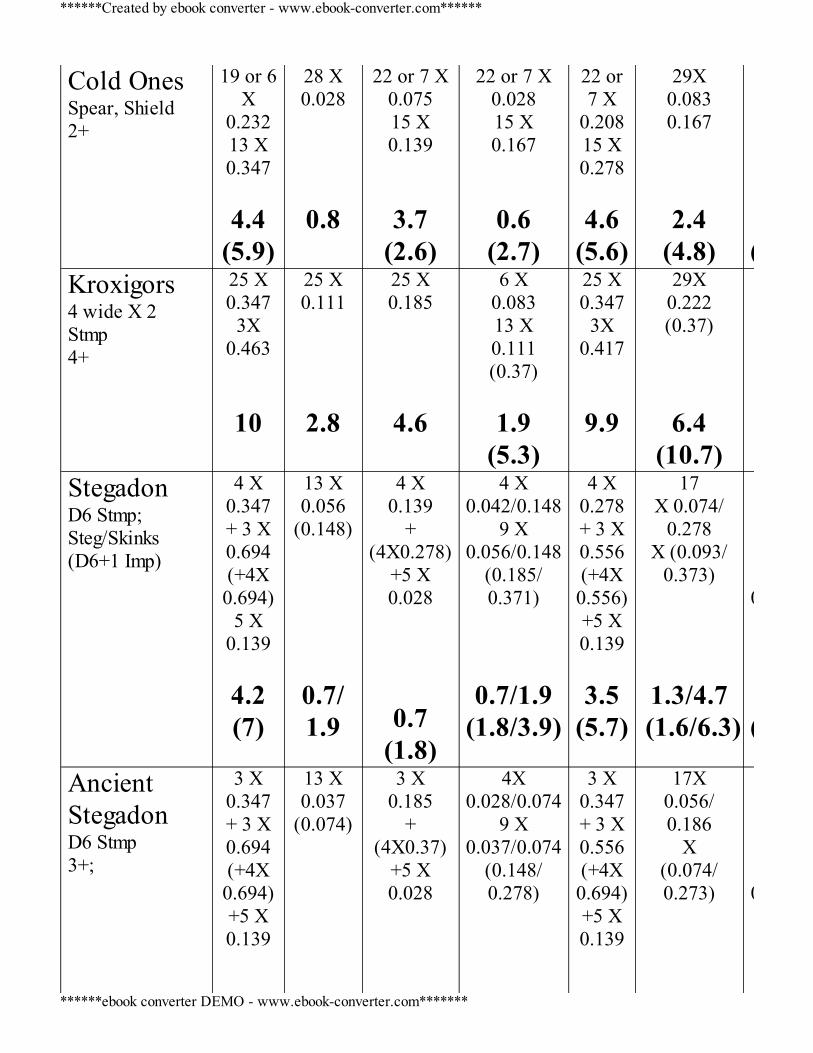
Cold OnesSpear, Shield2+
19 or 6X
0.23213 X0.347
4.4
(5.9)
28 X0.028
0.8
22 or 7 X0.07515 X0.139
3.7(2.6)
22 or 7 X0.02815 X0.167
0.6(2.7)
22 or7 X
0.20815 X0.278
4.6
(5.6)
29X0.0830.167
2.4(4.8) (4.5)
Kroxigors4 wide X 2Stmp4+
25 X0.347
3X0.463
10
25 X0.111
2.8
25 X0.185
4.6
6 X0.08313 X0.111(0.37)
1.9
(5.3)
25 X0.347
3X0.417
9.9
29X0.222(0.37)
6.4(10.7)
StegadonD6 Stmp;Steg/Skinks(D6+1 Imp)
4 X0.347+ 3 X0.694(+4X0.694)
5 X0.139
4.2(7)
13 X0.056
(0.148)
0.7/1.9
4 X0.139
+(4X0.278)
+5 X0.028
0.7(1.8)
4 X0.042/0.148
9 X0.056/0.148
(0.185/0.371)
0.7/1.9(1.8/3.9)
4 X0.278+ 3 X0.556(+4X0.556)+5 X0.139
3.5
(5.7)
17X 0.074/
0.278X (0.093/
0.373)
1.3/4.7(1.6/6.3)
0.463
(4.5)
AncientStegadonD6 Stmp3+;
3 X0.347+ 3 X0.694(+4X0.694)+5 X0.139
13 X0.037
(0.074)
3 X0.185
+(4X0.37)
+5 X0.028
4X0.028/0.074
9 X0.037/0.074
(0.148/0.278)
3 X0.347+ 3 X0.556(+4X0.694)+5 X0.139
17X0.056/0.186
X(0.074/0.273)
0.694
******Created by ebook converter - www.ebook-converter.com******
******ebook converter DEMO - www.ebook-converter.com*******

3.8(6.6)
0.5(1.0)
0.7
(2.2)
0.4/1.0(1.4/2.8)
3.4(6.2)
1.0/3.2(1.3/4.6) (6.2)
Salamanders2X 4 wide5+
12 X0.347
4.2
31 X0.148
4.6
12 X0.139
1.7
7 X0.111;15 X0.148
(0.444)
3.0(7.4)
12 X0.278
3.3
29 XX 0.278X 0.444
8.0(12.9)
Combat Rating per pointUnit Slaying Rank Depletion
RankSlaying Rank Depletion
RankSlaying vsSav. Orcs
Depletionvs
Sav. Orcs
Slaying vsChosen
Depletionvs
Chosen SaurusHW & ShieldHorde
40(46) 38(46) 41(52) 27(27)85
59(98)
102 74
SaurusSpear Horde
22(28) 82(80) 27(31) 36(36)106
96
(154)128 80
Skinks 93(100) 49(13) 98(100) 37(37)43 67
(67)38 84
Kroxigors4 wide Krox
14(17) 93 (96) 6(10) 86(86)120 117
(195)200 146
Temple 42(53) 67(71) 42(53) 72(72)
******Created by ebook converter - www.ebook-converter.com******
******ebook converter DEMO - www.ebook-converter.com*******
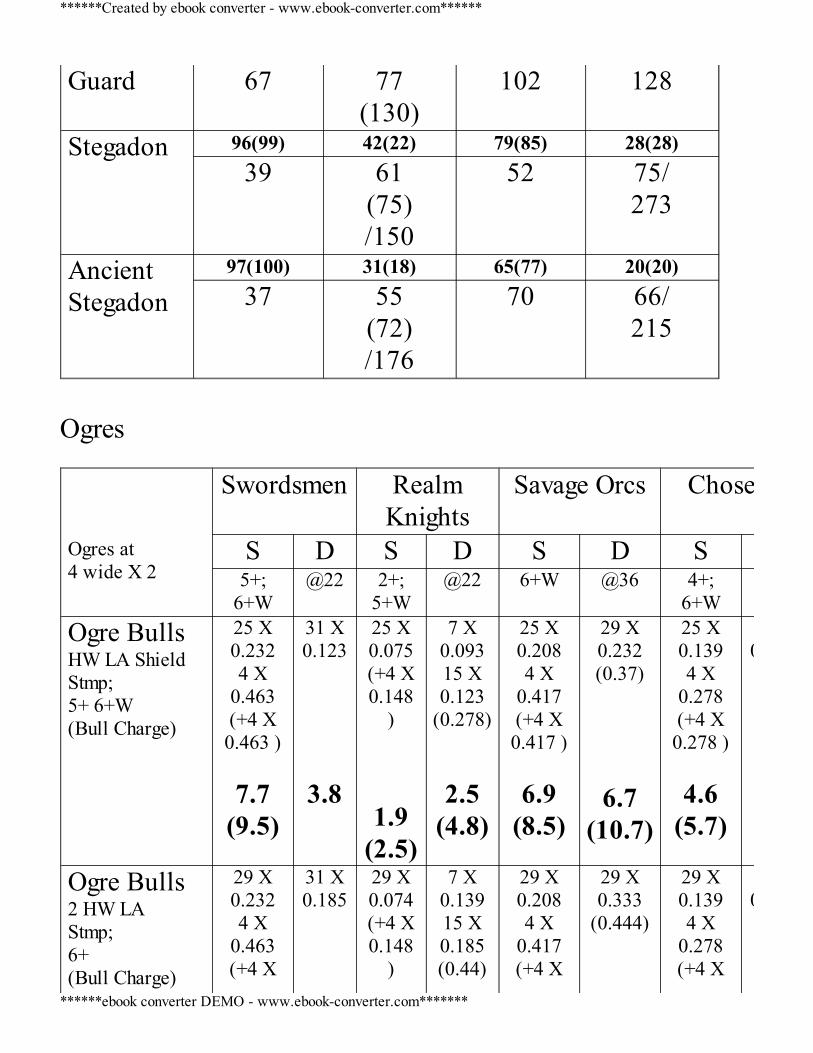
Guard 67 77(130)
102 128
Stegadon 96(99) 42(22) 79(85) 28(28)39 61
(75)/150
52 75/273
AncientStegadon
97(100) 31(18) 65(77) 20(20)37 55
(72)/176
70 66/215
Ogres Ogres at4 wide X 2
Swordsmen RealmKnights
Savage Orcs Chosen
S D S D S D S5+;
6+W@22 2+;
5+W@22 6+W @36 4+;
6+W@43
Ogre BullsHW LA ShieldStmp;5+ 6+W(Bull Charge)
25 X0.2324 X
0.463(+4 X0.463 )
7.7
(9.5)
31 X0.123
3.8
25 X0.075(+4 X0.148
)
1.9(2.5)
7 X0.09315 X0.123
(0.278)
2.5(4.8)
25 X0.2084 X
0.417(+4 X0.417 )
6.9
(8.5)
29 X0.232(0.37)
6.7(10.7)
25 X0.1394 X
0.278(+4 X0.278 )
4.6
(5.7)
360.232
Ogre Bulls2 HW LAStmp;6+(Bull Charge)
29 X0.2324 X
0.463(+4 X
31 X0.185
29 X0.074(+4 X0.148
)
7 X0.13915 X0.185(0.44)
29 X0.2084 X
0.417(+4 X
29 X0.333
(0.444)
29 X0.1394 X
0.278(+4 X
30.33
******Created by ebook converter - www.ebook-converter.com******
******ebook converter DEMO - www.ebook-converter.com*******
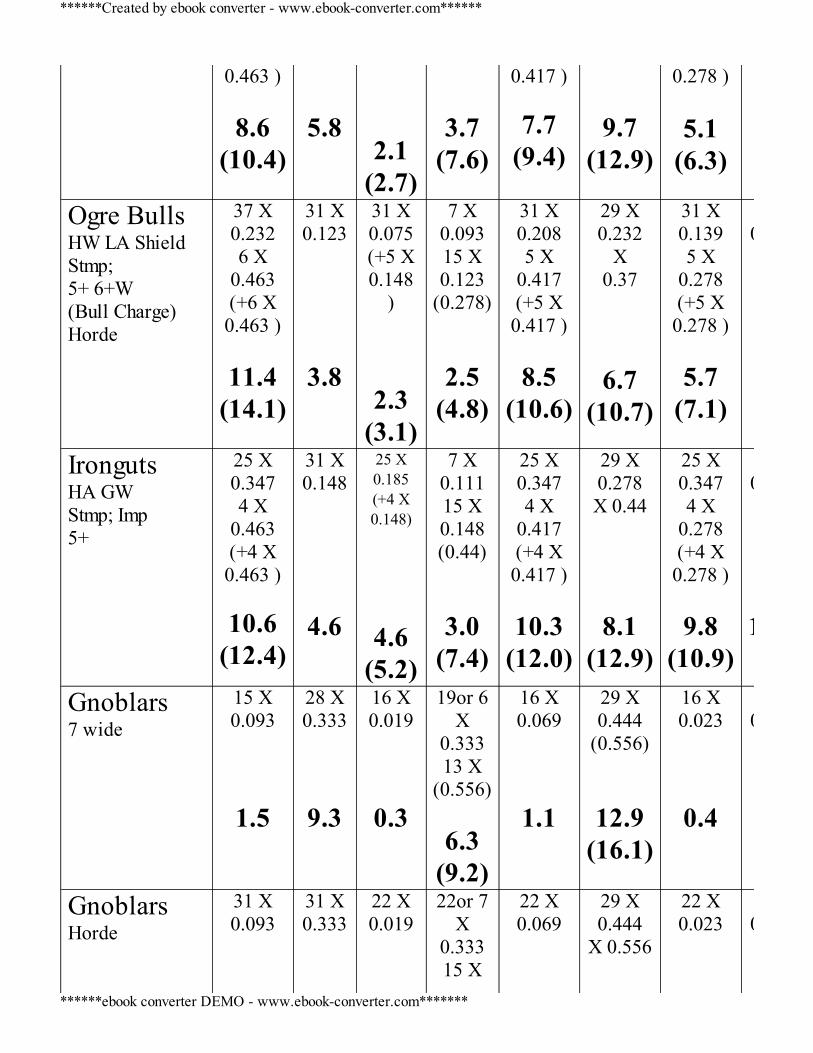
0.463 )
8.6(10.4)
5.8
2.1(2.7)
3.7(7.6)
0.417 )
7.7(9.4)
9.7(12.9)
0.278 )
5.1(6.3)
Ogre BullsHW LA ShieldStmp;5+ 6+W(Bull Charge)Horde
37 X0.2326 X
0.463(+6 X0.463 )
11.4
(14.1)
31 X0.123
3.8
31 X0.075(+5 X0.148
)
2.3(3.1)
7 X0.09315 X0.123
(0.278)
2.5(4.8)
31 X0.2085 X
0.417(+5 X0.417 )
8.5
(10.6)
29 X0.232
X0.37
6.7(10.7)
31 X0.1395 X
0.278(+5 X0.278 )
5.7
(7.1)
360.232
IrongutsHA GWStmp; Imp5+
25 X0.3474 X
0.463(+4 X0.463 )
10.6(12.4)
31 X0.148
4.6
25 X0.185(+4 X0.148)
4.6(5.2)
7 X0.11115 X0.148(0.44)
3.0(7.4)
25 X0.3474 X
0.417(+4 X0.417 )
10.3
(12.0)
29 X0.278X 0.44
8.1(12.9)
25 X0.3474 X
0.278(+4 X0.278 )
9.8
(10.9)
360.278
1
Gnoblars7 wide
15 X0.093
1.5
28 X0.333
9.3
16 X0.019
0.3
19or 6X
0.33313 X
(0.556)
6.3(9.2)
16 X0.069
1.1
29 X0.444
(0.556)
12.9(16.1)
16 X0.023
0.4
360.444
GnoblarsHorde
31 X0.093
31 X0.333
22 X0.019
22or 7X
0.33315 X
22 X0.069
29 X0.444
X 0.556
22 X0.023
30.444
******Created by ebook converter - www.ebook-converter.com******
******ebook converter DEMO - www.ebook-converter.com*******
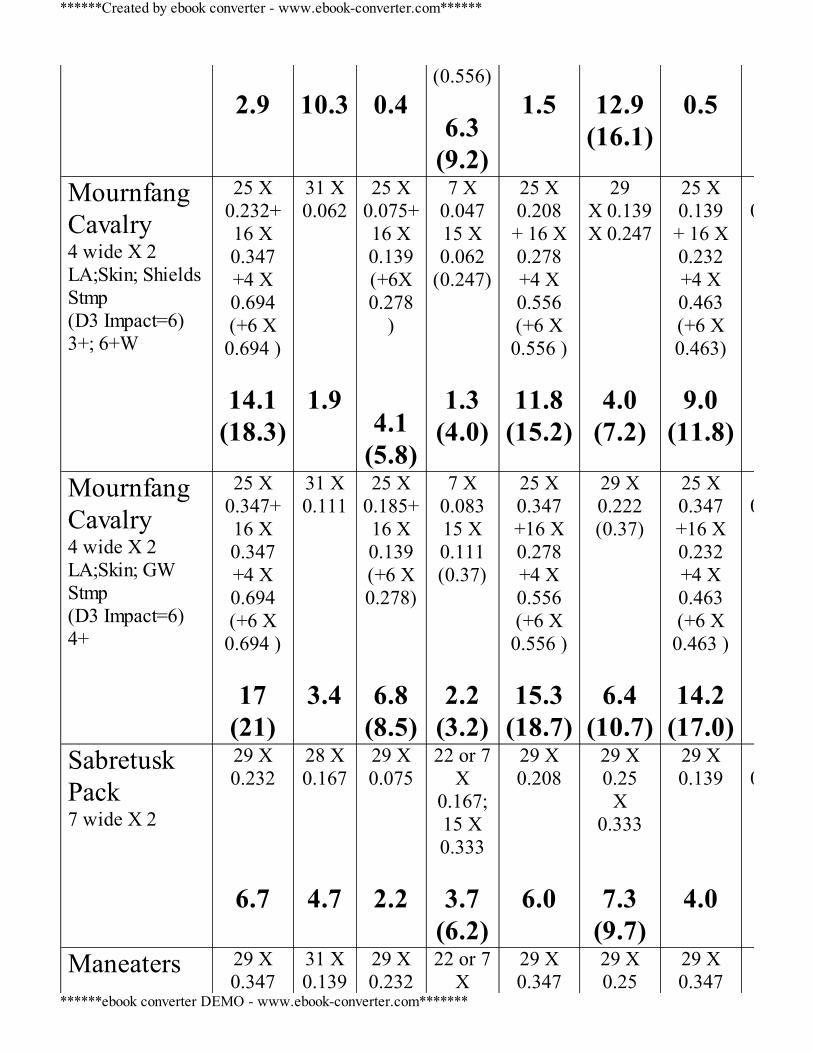
2.9
10.3
0.4
(0.556)
6.3(9.2)
1.5
12.9
(16.1)
0.5
MournfangCavalry4 wide X 2LA;Skin; ShieldsStmp(D3 Impact=6)3+; 6+W
25 X0.232+16 X0.347+4 X0.694(+6 X0.694 )
14.1
(18.3)
31 X0.062
1.9
25 X0.075+16 X0.139(+6X0.278
)
4.1(5.8)
7 X0.04715 X0.062
(0.247)
1.3(4.0)
25 X0.208+ 16 X0.278+4 X0.556(+6 X0.556 )
11.8
(15.2)
29X 0.139X 0.247
4.0(7.2)
25 X0.139+ 16 X0.232+4 X0.463(+6 X0.463)
9.0
(11.8)
360.139
MournfangCavalry4 wide X 2LA;Skin; GWStmp(D3 Impact=6)4+
25 X0.347+16 X0.347+4 X0.694(+6 X0.694 )
17
(21)
31 X0.111
3.4
25 X0.185+16 X0.139(+6 X0.278)
6.8(8.5)
7 X0.08315 X0.111(0.37)
2.2(3.2)
25 X0.347+16 X0.278+4 X0.556(+6 X0.556 )
15.3
(18.7)
29 X0.222(0.37)
6.4(10.7)
25 X0.347+16 X0.232+4 X0.463(+6 X0.463 )
14.2
(17.0)
360.222
SabretuskPack7 wide X 2
29 X0.232
6.7
28 X0.167
4.7
29 X0.075
2.2
22 or 7X
0.167;15 X0.333
3.7
(6.2)
29 X0.208
6.0
29 X0.25
X0.333
7.3(9.7)
29 X0.139
4.0
360.33
Maneaters 29 X0.347
31 X0.139
29 X0.232
22 or 7X
29 X0.347
29 X0.25
29 X0.347
3
******Created by ebook converter - www.ebook-converter.com******
******ebook converter DEMO - www.ebook-converter.com*******
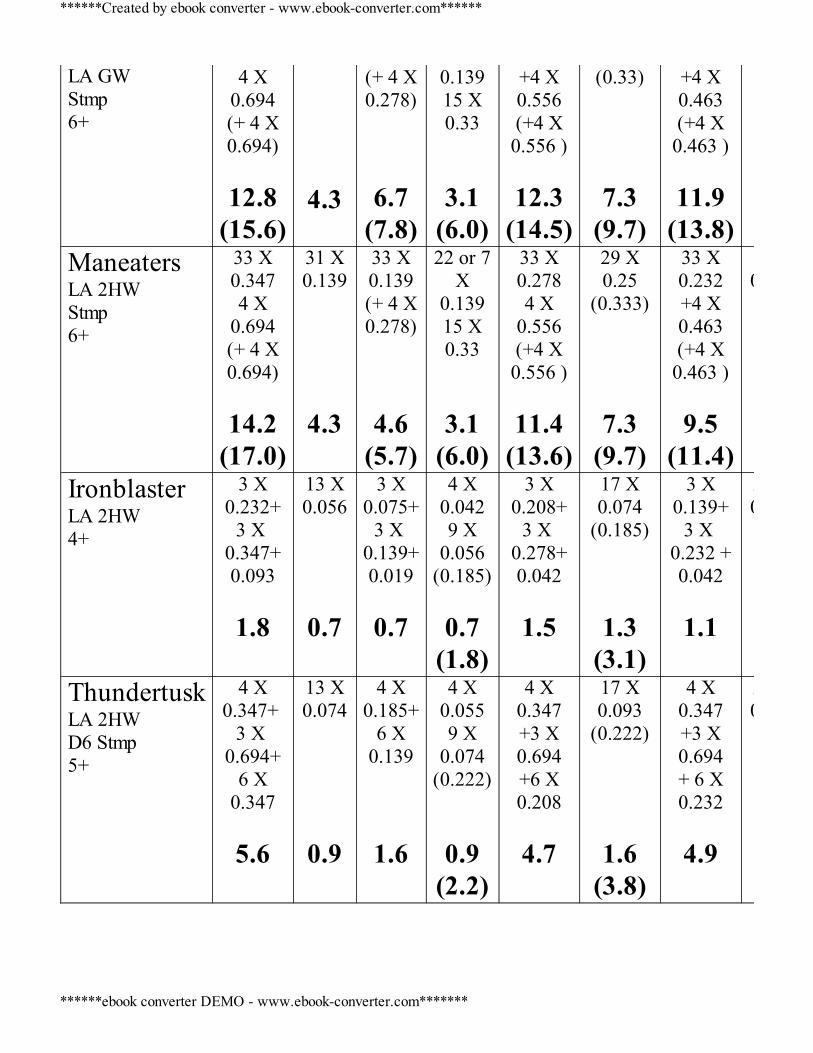
LA GWStmp6+
4 X0.694(+ 4 X0.694)
12.8
(15.6)
4.3
(+ 4 X0.278)
6.7(7.8)
0.13915 X0.33
3.1(6.0)
+4 X0.556(+4 X0.556 )
12.3
(14.5)
(0.33)
7.3(9.7)
+4 X0.463(+4 X0.463 )
11.9
(13.8)ManeatersLA 2HWStmp6+
33 X0.3474 X
0.694(+ 4 X0.694)
14.2
(17.0)
31 X0.139
4.3
33 X0.139(+ 4 X0.278)
4.6(5.7)
22 or 7X
0.13915 X0.33
3.1(6.0)
33 X0.2784 X
0.556(+4 X0.556 )
11.4
(13.6)
29 X0.25
(0.333)
7.3(9.7)
33 X0.232+4 X0.463(+4 X0.463 )
9.5
(11.4)
360.33
IronblasterLA 2HW4+
3 X0.232+
3 X 0.347+0.093
1.8
13 X0.056
0.7
3 X0.075+
3 X 0.139+0.019
0.7
4 X0.0429 X
0.056(0.185)
0.7
(1.8)
3 X0.208+
3 X 0.278+0.042
1.5
17 X0.074
(0.185)
1.3(3.1)
3 X0.139+
3 X 0.232 +0.042
1.1
21 X0.074
ThundertuskLA 2HWD6 Stmp5+
4 X0.347+
3 X 0.694+
6 X0.347
5.6
13 X0.074
0.9
4 X0.185+
6 X0.139
1.6
4 X0.0559 X
0.074(0.222)
0.9(2.2)
4 X0.347+3 X0.694+6 X0.208
4.7
17 X0.093
(0.222)
1.6(3.8)
4 X0.347+3 X0.694+ 6 X0.232
4.9
210.093
******Created by ebook converter - www.ebook-converter.com******
******ebook converter DEMO - www.ebook-converter.com*******
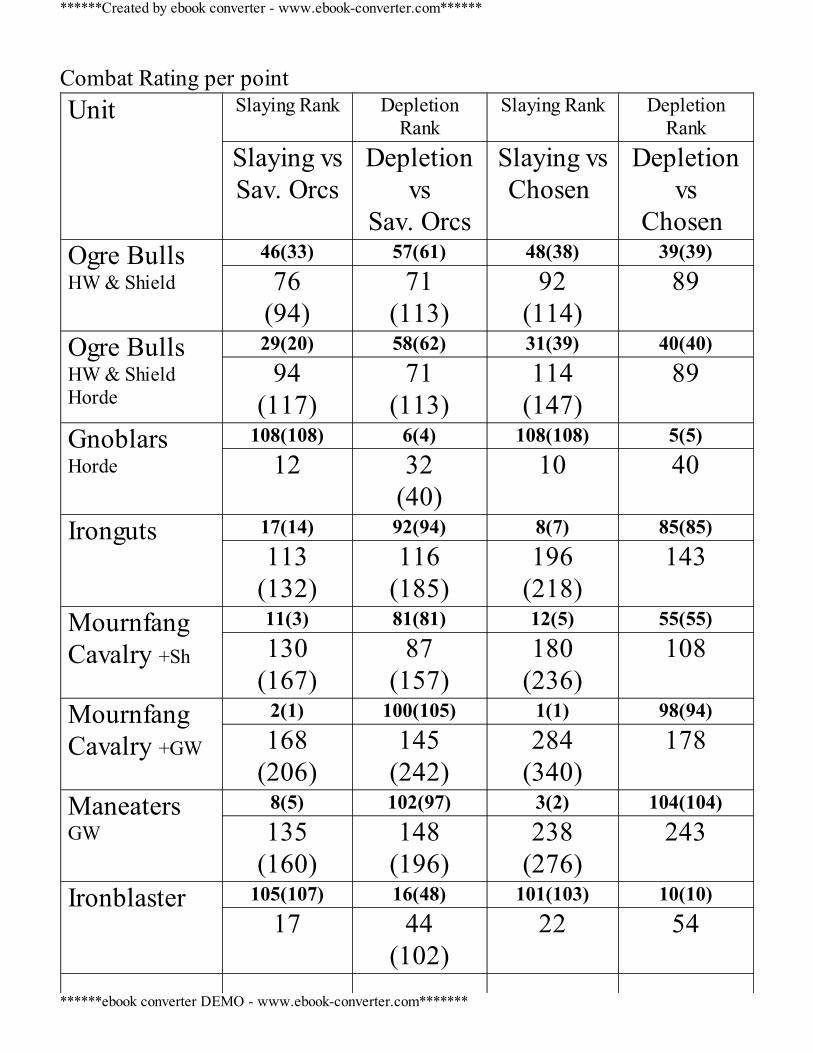
Combat Rating per pointUnit Slaying Rank Depletion
RankSlaying Rank Depletion
RankSlaying vsSav. Orcs
Depletionvs
Sav. Orcs
Slaying vsChosen
Depletionvs
Chosen Ogre BullsHW & Shield
46(33) 57(61) 48(38) 39(39)76
(94)71
(113)92
(114)89
Ogre BullsHW & ShieldHorde
29(20) 58(62) 31(39) 40(40)94
(117)71
(113)114
(147)89
GnoblarsHorde
108(108) 6(4) 108(108) 5(5)12 32
(40)10 40
Ironguts 17(14) 92(94) 8(7) 85(85)113
(132)116
(185)196
(218)143
MournfangCavalry +Sh
11(3) 81(81) 12(5) 55(55)130
(167)87
(157)180
(236)108
MournfangCavalry +GW
2(1) 100(105) 1(1) 98(94)168
(206)145
(242)284
(340)178
ManeatersGW
8(5) 102(97) 3(2) 104(104)135
(160)148
(196)238
(276)243
Ironblaster 105(107) 16(48) 101(103) 10(10)17 44
(102)22 54
******Created by ebook converter - www.ebook-converter.com******
******ebook converter DEMO - www.ebook-converter.com*******
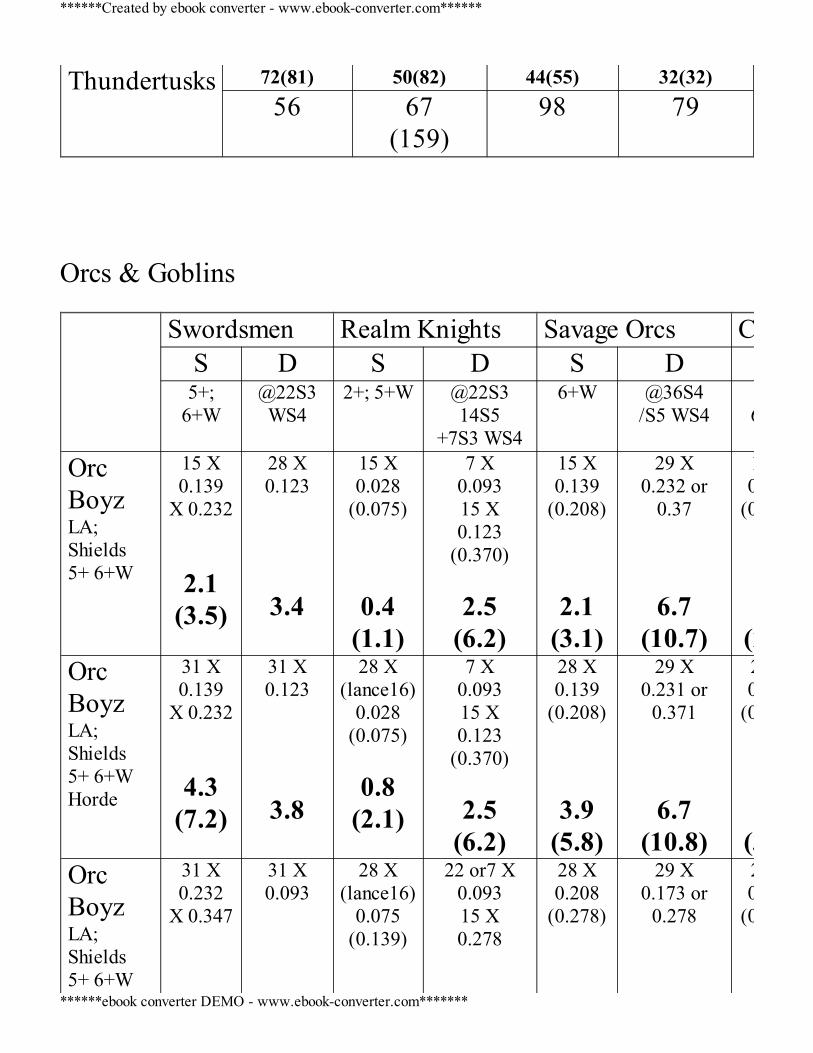
Thundertusks 72(81) 50(82) 44(55) 32(32)56 67
(159)98 79
Orcs & Goblins Swordsmen Realm Knights Savage Orcs Chosen
S D S D S D5+;
6+W@22S3WS4
2+; 5+W @22S314S5
+7S3 WS4
6+W @36S4/S5 WS4 6+W
OrcBoyzLA;Shields5+ 6+W
15 X0.139
X 0.232
2.1(3.5)
28 X0.123
3.4
15 X0.028
(0.075)
0.4(1.1)
7 X0.09315 X0.123
(0.370)
2.5(6.2)
15 X0.139
(0.208)
2.1(3.1)
29 X0.232 or
0.37
6.7(10.7)
150.069
(0.139)
1.0(2
OrcBoyzLA;Shields5+ 6+WHorde
31 X0.139
X 0.232
4.3(7.2)
31 X0.123
3.8
28 X(lance16)
0.028(0.075)
0.8
(2.1)
7 X0.09315 X0.123
(0.370)
2.5(6.2)
28 X0.139
(0.208)
3.9(5.8)
29 X0.231 or
0.371
6.7(10.8)
20.069
(0.139)
1.9(3.
OrcBoyzLA;Shields5+ 6+W
31 X0.232
X 0.347
31 X0.093
28 X(lance16)
0.075(0.139)
22 or7 X0.09315 X0.278
28 X0.208
(0.278)
29 X0.173 or
0.278
280.139
(0.232)
******Created by ebook converter - www.ebook-converter.com******
******ebook converter DEMO - www.ebook-converter.com*******
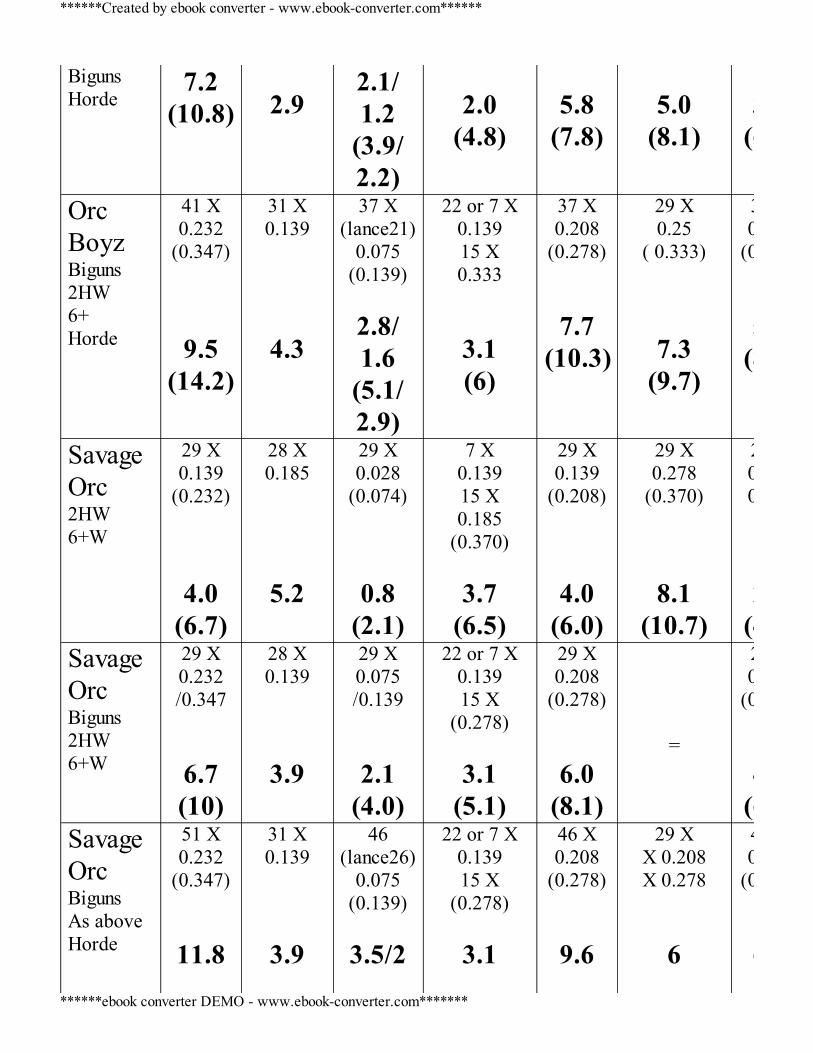
BigunsHorde
7.2(10.8)
2.9
2.1/1.2
(3.9/2.2)
2.0
(4.8)
5.8
(7.8)
5.0
(8.1)3
(6
OrcBoyzBiguns2HW6+Horde
41 X0.232
(0.347)
9.5(14.2)
31 X0.139
4.3
37 X(lance21)
0.075(0.139)
2.8/1.6
(5.1/2.9)
22 or 7 X0.13915 X0.333
3.1(6)
37 X0.208
(0.278)
7.7(10.3)
29 X0.25
( 0.333)
7.3(9.7)
370.139
(0.232
5.1(8
SavageOrc2HW6+W
29 X0.139
(0.232)
4.0(6.7)
28 X0.185
5.2
29 X0.028
(0.074)
0.8(2.1)
7 X0.13915 X0.185
(0.370)
3.7(6.5)
29 X0.139
(0.208)
4.0(6.0)
29 X0.278
(0.370)
8.1(10.7)
290.0690.139
2.0(4.0)
SavageOrcBiguns2HW6+W
29 X0.232/0.347
6.7(10)
28 X0.139
3.9
29 X0.075/0.139
2.1(4.0)
22 or 7 X0.13915 X
(0.278)
3.1(5.1)
29 X0.208
(0.278)
6.0(8.1)
=
290.139
(0.232
4(6.7
SavageOrcBigunsAs aboveHorde
51 X0.232
(0.347)
11.8
31 X0.139
3.9
46(lance26)
0.075(0.139)
3.5/2
22 or 7 X0.13915 X
(0.278)
3.1
46 X0.208
(0.278)
9.6
29 XX 0.208X 0.278
6
460.139
(0.232)
6
******Created by ebook converter - www.ebook-converter.com******
******ebook converter DEMO - www.ebook-converter.com*******
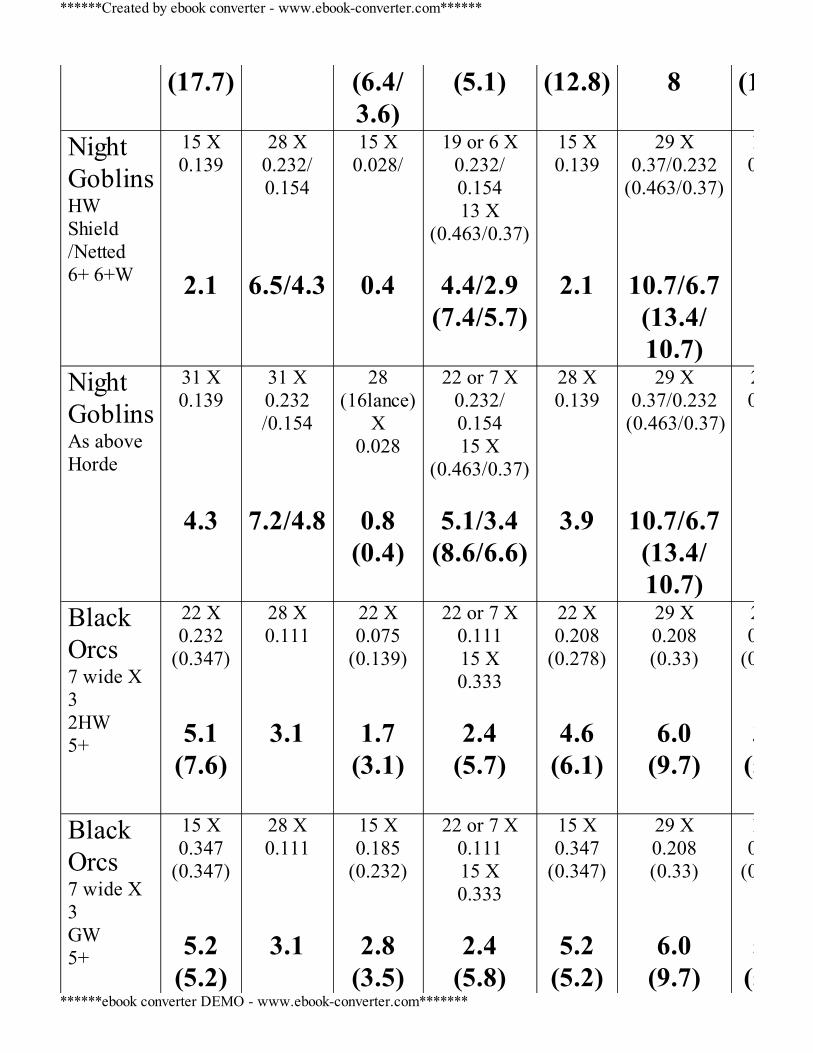
(17.7) (6.4/3.6)
(5.1) (12.8) 8 (10
NightGoblinsHWShield/Netted6+ 6+W
15 X0.139
2.1
28 X0.232/0.154
6.5/4.3
15 X0.028/
0.4
19 or 6 X0.232/0.15413 X
(0.463/0.37)
4.4/2.9(7.4/5.7)
15 X0.139
2.1
29 X0.37/0.232
(0.463/0.37)
10.7/6.7(13.4/10.7)
150.069
1.0
NightGoblinsAs aboveHorde
31 X0.139
4.3
31 X0.232/0.154
7.2/4.8
28(16lance)
X0.028
0.8(0.4)
22 or 7 X0.232/0.15415 X
(0.463/0.37)
5.1/3.4(8.6/6.6)
28 X0.139
3.9
29 X0.37/0.232
(0.463/0.37)
10.7/6.7(13.4/10.7)
280.069
1
BlackOrcs7 wide X32HW5+
22 X0.232
(0.347)
5.1(7.6)
28 X0.111
3.1
22 X0.075
(0.139)
1.7(3.1)
22 or 7 X0.11115 X0.333
2.4
(5.7)
22 X0.208
(0.278)
4.6(6.1)
29 X0.208(0.33)
6.0(9.7)
220.139
(0.232)
3.1(5.1)
BlackOrcs7 wide X3GW5+
15 X0.347
(0.347)
5.2(5.2)
28 X0.111
3.1
15 X0.185
(0.232)
2.8(3.5)
22 or 7 X0.11115 X0.333
2.4
(5.8)
15 X0.347
(0.347)
5.2(5.2)
29 X0.208(0.33)
6.0(9.7)
150.347
(0.347)
5.2(5.2)
******Created by ebook converter - www.ebook-converter.com******
******ebook converter DEMO - www.ebook-converter.com*******
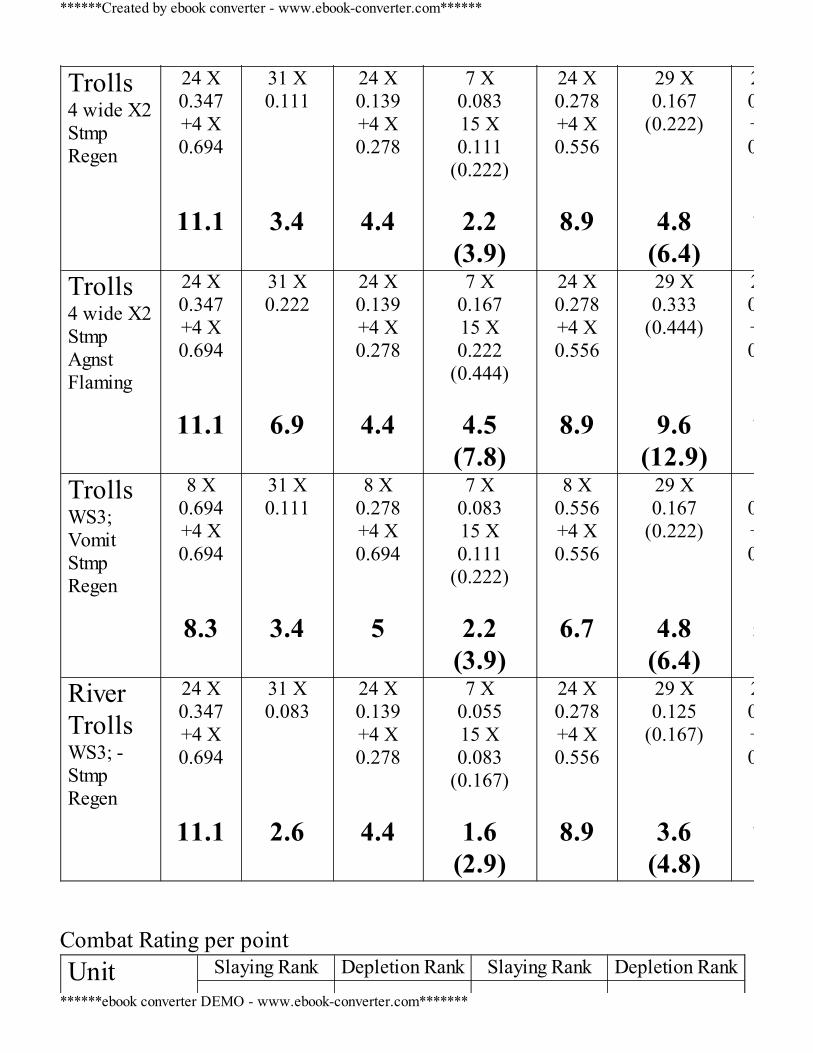
Trolls4 wide X2StmpRegen
24 X0.347+4 X0.694
11.1
31 X0.111
3.4
24 X0.139+4 X0.278
4.4
7 X0.08315 X0.111
(0.222)
2.2(3.9)
24 X0.278+4 X0.556
8.9
29 X0.167
(0.222)
4.8(6.4)
240.232+4 X0.463
7.4
Trolls4 wide X2StmpAgnstFlaming
24 X0.347+4 X0.694
11.1
31 X0.222
6.9
24 X0.139+4 X0.278
4.4
7 X0.16715 X0.222
(0.444)
4.5(7.8)
24 X0.278+4 X0.556
8.9
29 X0.333
(0.444)
9.6(12.9)
240.232+4 X0.463
7.4
TrollsWS3;VomitStmpRegen
8 X0.694+4 X0.694
8.3
31 X0.111
3.4
8 X0.278+4 X0.694
5
7 X0.08315 X0.111
(0.222)
2.2(3.9)
8 X0.556+4 X0.556
6.7
29 X0.167
(0.222)
4.8(6.4)
0.463+4 X0.556
5.9
RiverTrollsWS3; -StmpRegen
24 X0.347+4 X0.694
11.1
31 X0.083
2.6
24 X0.139+4 X0.278
4.4
7 X0.05515 X0.083
(0.167)
1.6(2.9)
24 X0.278+4 X0.556
8.9
29 X0.125
(0.167)
3.6(4.8)
240.232+4 X0.463
7.4
Combat Rating per pointUnit Slaying Rank Depletion Rank Slaying Rank Depletion Rank
******Created by ebook converter - www.ebook-converter.com******
******ebook converter DEMO - www.ebook-converter.com*******
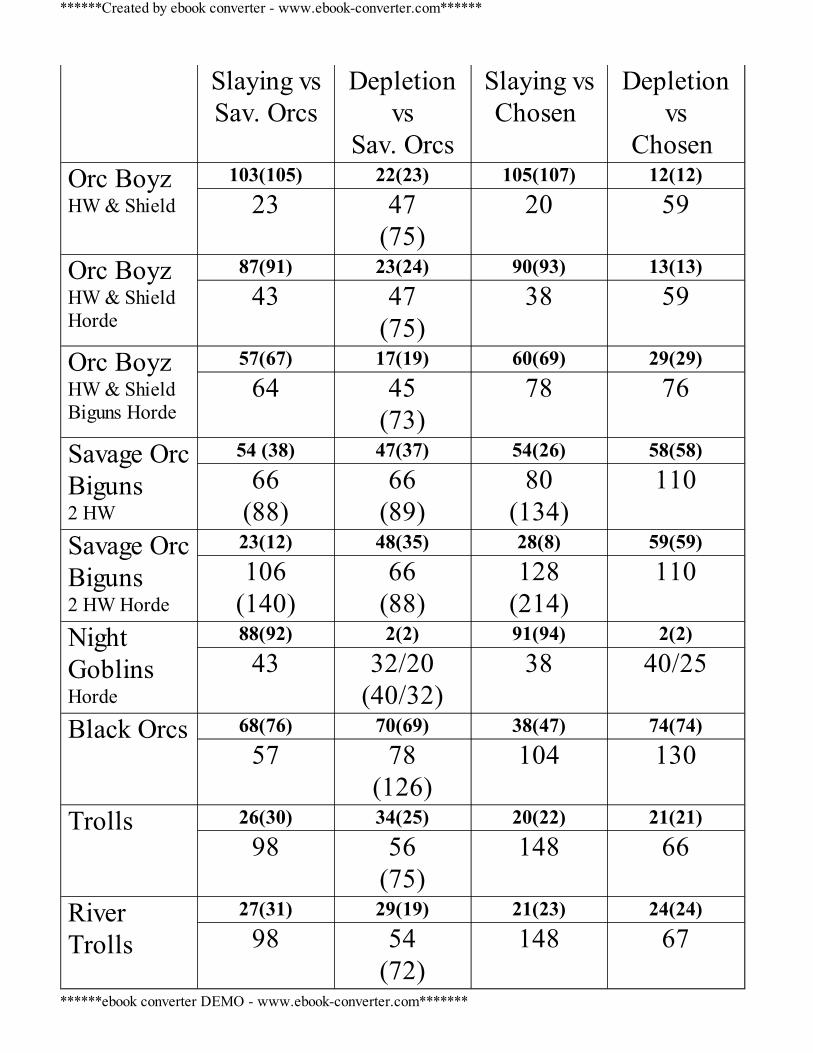
Slaying vsSav. Orcs
Depletionvs
Sav. Orcs
Slaying vsChosen
Depletionvs
Chosen Orc BoyzHW & Shield
103(105) 22(23) 105(107) 12(12)23 47
(75)20 59
Orc BoyzHW & ShieldHorde
87(91) 23(24) 90(93) 13(13)43 47
(75)38 59
Orc BoyzHW & ShieldBiguns Horde
57(67) 17(19) 60(69) 29(29)64 45
(73)78 76
Savage OrcBiguns2 HW
54 (38) 47(37) 54(26) 58(58)66
(88)66
(89)80
(134)110
Savage OrcBiguns2 HW Horde
23(12) 48(35) 28(8) 59(59)106
(140)66
(88)128
(214)110
NightGoblinsHorde
88(92) 2(2) 91(94) 2(2)43 32/20
(40/32)38 40/25
Black Orcs 68(76) 70(69) 38(47) 74(74)
57 78(126)
104 130
Trolls 26(30) 34(25) 20(22) 21(21)98 56
(75)148 66
RiverTrolls
27(31) 29(19) 21(23) 24(24)98 54
(72)148 67
******Created by ebook converter - www.ebook-converter.com******
******ebook converter DEMO - www.ebook-converter.com*******
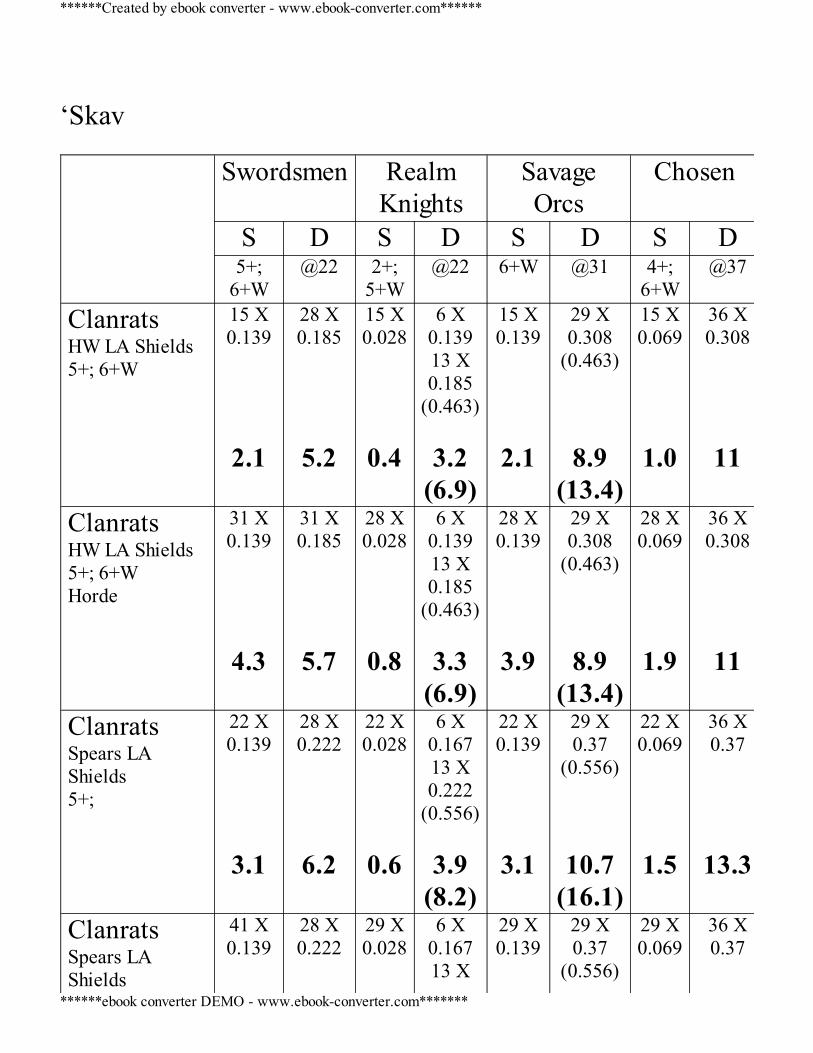
‘Skav Swordsmen Realm
KnightsSavageOrcs
Chosen
S D S D S D S D5+;
6+W@22 2+;
5+W@22 6+W @31 4+;
6+W@37
ClanratsHW LA Shields5+; 6+W
15 X0.139
2.1
28 X0.185
5.2
15 X0.028
0.4
6 X0.13913 X0.185
(0.463)
3.2(6.9)
15 X0.139
2.1
29 X0.308
(0.463)
8.9(13.4)
15 X0.069
1.0
36 X0.308
11
ClanratsHW LA Shields5+; 6+WHorde
31 X0.139
4.3
31 X0.185
5.7
28 X0.028
0.8
6 X0.13913 X0.185
(0.463)
3.3(6.9)
28 X0.139
3.9
29 X0.308
(0.463)
8.9(13.4)
28 X0.069
1.9
36 X0.308
11
ClanratsSpears LAShields5+;
22 X0.139
3.1
28 X0.222
6.2
22 X0.028
0.6
6 X0.16713 X0.222
(0.556)
3.9(8.2)
22 X0.139
3.1
29 X0.37
(0.556)
10.7(16.1)
22 X0.069
1.5
36 X0.37
13.3
ClanratsSpears LAShields
41 X0.139
28 X0.222
29 X0.028
6 X0.16713 X
29 X0.139
29 X0.37
(0.556)
29 X0.069
36 X0.37
******Created by ebook converter - www.ebook-converter.com******
******ebook converter DEMO - www.ebook-converter.com*******
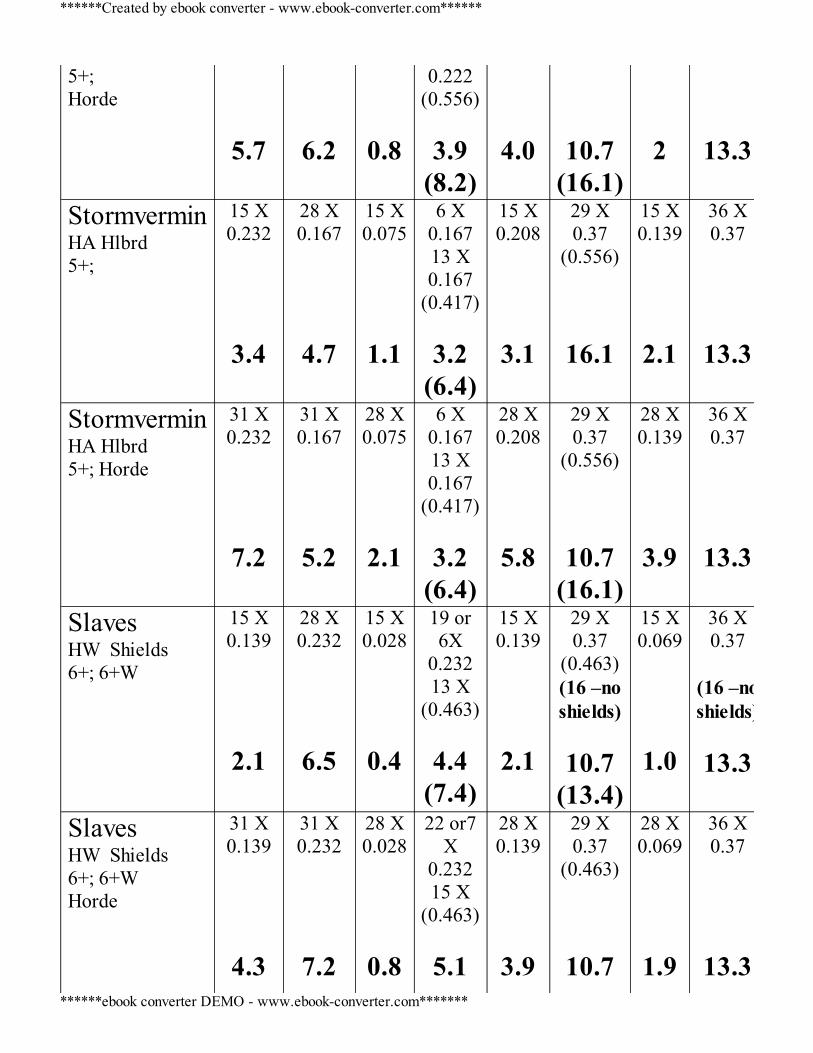
5+;Horde
5.7
6.2
0.8
0.222(0.556)
3.9
(8.2)
4.0
10.7(16.1)
2
13.3
StormverminHA Hlbrd5+;
15 X0.232
3.4
28 X0.167
4.7
15 X0.075
1.1
6 X0.16713 X0.167
(0.417)
3.2(6.4)
15 X0.208
3.1
29 X0.37
(0.556)
16.1
15 X0.139
2.1
36 X0.37
13.3
StormverminHA Hlbrd5+; Horde
31 X0.232
7.2
31 X0.167
5.2
28 X0.075
2.1
6 X0.16713 X0.167
(0.417)
3.2(6.4)
28 X0.208
5.8
29 X0.37
(0.556)
10.7(16.1)
28 X0.139
3.9
36 X0.37
13.3
SlavesHW Shields6+; 6+W
15 X0.139
2.1
28 X0.232
6.5
15 X0.028
0.4
19 or6X
0.23213 X
(0.463)
4.4(7.4)
15 X0.139
2.1
29 X0.37
(0.463)(16 –noshields)
10.7
(13.4)
15 X0.069
1.0
36 X0.37
(16 –noshields)
13.3
SlavesHW Shields6+; 6+WHorde
31 X0.139
4.3
31 X0.232
7.2
28 X0.028
0.8
22 or7X
0.23215 X
(0.463)
5.1
28 X0.139
3.9
29 X0.37
(0.463)
10.7
28 X0.069
1.9
36 X0.37
13.3
******Created by ebook converter - www.ebook-converter.com******
******ebook converter DEMO - www.ebook-converter.com*******
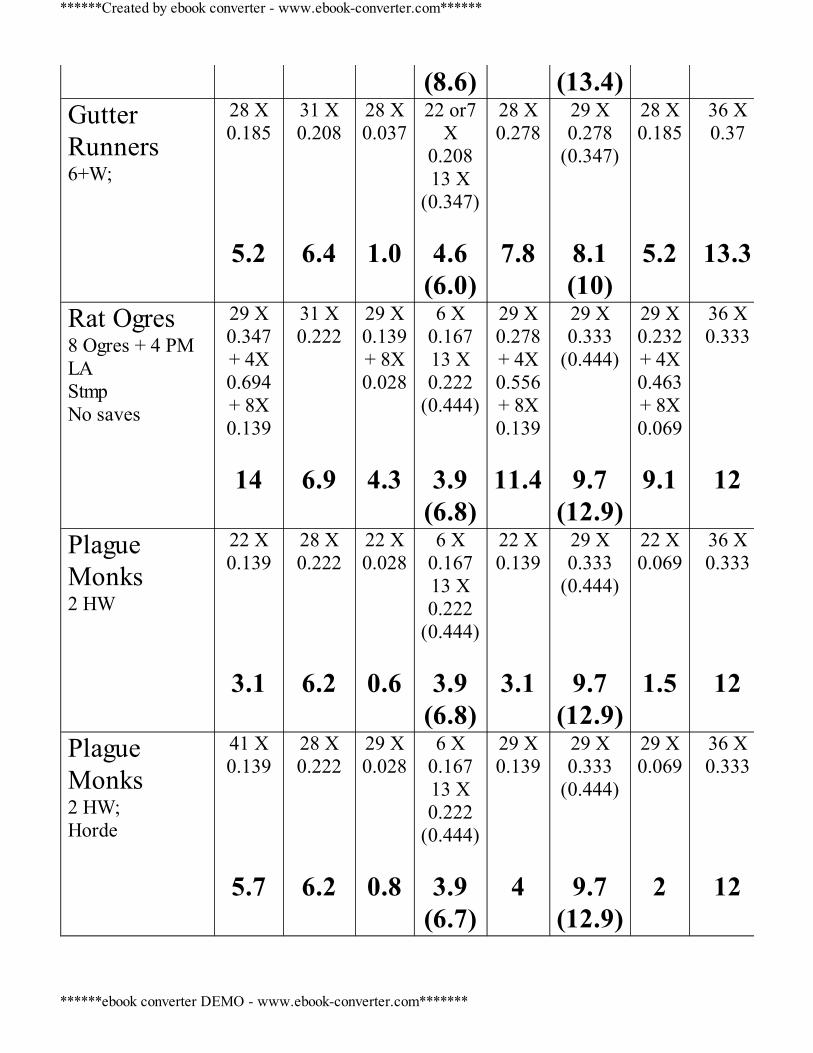
(8.6) (13.4) GutterRunners6+W;
28 X0.185
5.2
31 X0.208
6.4
28 X0.037
1.0
22 or7X
0.20813 X
(0.347)
4.6(6.0)
28 X0.278
7.8
29 X0.278
(0.347)
8.1(10)
28 X0.185
5.2
36 X0.37
13.3
Rat Ogres8 Ogres + 4 PMLAStmpNo saves
29 X0.347+ 4X0.694+ 8X0.139
14
31 X0.222
6.9
29 X0.139+ 8X0.028
4.3
6 X0.16713 X0.222
(0.444)
3.9(6.8)
29 X0.278+ 4X0.556+ 8X0.139
11.4
29 X0.333
(0.444)
9.7(12.9)
29 X0.232+ 4X0.463+ 8X0.069
9.1
36 X0.333
12
PlagueMonks2 HW
22 X0.139
3.1
28 X0.222
6.2
22 X0.028
0.6
6 X0.16713 X0.222
(0.444)
3.9(6.8)
22 X0.139
3.1
29 X0.333
(0.444)
9.7(12.9)
22 X0.069
1.5
36 X0.333
12
PlagueMonks2 HW;Horde
41 X0.139
5.7
28 X0.222
6.2
29 X0.028
0.8
6 X0.16713 X0.222
(0.444)
3.9(6.7)
29 X0.139
4
29 X0.333
(0.444)
9.7(12.9)
29 X0.069
2
36 X0.333
12
******Created by ebook converter - www.ebook-converter.com******
******ebook converter DEMO - www.ebook-converter.com*******
Combat Rating per pointUnit Slaying Rank Depletion Rank Slaying Rank Depletion Rank
Slaying vsSav. Orcs
Depletionvs
Sav. Orcs
Slaying vsChosen
Depletionvs
Chosen ClanratsHW & ShieldHorde
89(93) 13(8) 92(95) 7(7)43 40
(60)38 50
ClanratsSpears & Sh
81(86) 30(38) 84(88) 25(25)44 54
(89)40 67
SlavesHorde
90(94) 4(3) 93(96) 3(3)43 27
(34)38 33
StormVermin(Horde)
58(68) 64(59) 61(70) 43(43)64 75
(112)78 93
GutterRunnersPoisnd
37(42) 98(86) 39(48) 101(101)86 137
(170)104 226
Rat Ogres 12(16) 97(89) 11(15) 91(91)125 132
(176)182 164
PlagueMonks
82(87) 51(39) 85(89) 38(38)44 68
(90)40 84
******Created by ebook converter - www.ebook-converter.com******
******ebook converter DEMO - www.ebook-converter.com*******
‘T Kings Swordsmen Realm
KnightsSavage Orcs Chosen
S D S D S D S D5+;
6+W@22 2+;
5+W@19 6+W @31 4+;
6+W@
SkeletonWarriorsLA HWShield;5+; 6+W
15 X0.139
2.1
28 X0.185
5.1
15 X0.028
0.4
19 or6X
0.18513 X
(0.463)
3.5(7.1)
15 X0.139
2.1
29 X0.308
(0.463 )
(+6.811.3C)8.9
(13.4)
15 X0.069
1.0
360.308
(+10C)11
SkeletonwarriorsLA HW Shield5+; 6+WHorde
31 X0.139
4.3
31 X0.185
5.7
28 X0.028
0.8
19 or6X
0.18513 X
(0.463)
3.5(7.1)
28 X0.139
3.9
29 X0.308
(0.463 )
(+5C)+9.5C)8.9
(13.4)
28 X0.069
1.9
360.308
(+9.111
SkeletonwarriorsMy Will LAHW Shield5+; 6+WHorde
31 X0.185
5.7
31 X0.139
4.3
28 X0.037
1
19 or 6X
0.13913 X
(0.347)
2.6(5.3)
28 X0.185
5.2
29 X0.232
(0.347 )
(+1.5C)+4.8C)6.7(10)
28 X0.069
1.9
36 X0.308
(+9.1C)11
Skeleton 22 X 28 X 22 X 19 or 22 X 29 X 22 X 36
******Created by ebook converter - www.ebook-converter.com******
******ebook converter DEMO - www.ebook-converter.com*******
WarriorsLA SpearsShield5+;
0.139
3.1
0.222
6.2
0.028
0.6
6X0.22213 X
(0.556)
4.2
(8.6)
0.139
3.1
0.37(0.556 )
(+7.6C)+13C)10.7
(16.1)
0.069
1.5
0.37
(+11.813.3
SkeletonWarriorsLA SpearsShield5+;Horde
41 X0.139
5.7
31 X0.222
6.9
37 X0.028
1
19 or 6X0.22213 X
(0.556)
4.2(8.6)
37 X0.139
5.1
29 X0.37
(0.556)
(+5.6C)+11C)10.7
(16.1)
37 X0.069
2.5
36 X0.37
(+10.8C)13.3
SkeletonWarriorsMy Will LASpears Shield5+;Horde
41 X0.185
7.6
31 X0.167
5.2
37 X0.037
1.4
19 or 6X
0.16713 X
(0.417)
3.2(6.4)
37 X0.185
6.8
29 X0.278
(0.417)
(+1.3C)+5.3C)8.1
(12.1)
37 X0.069
2.5
36 X0.37
(+10.8C)13.3
SkeletonHorsemenLA SpearShield4+;
22 or 7X
0.13915 X
(0.232)
3.1(4.5)
28 X0.167
4.7
22 or 7X
0.02815 X
(0.075)
0.6(1.3)
22 or 7X
0.167;15 X0.463
3.7(8.1)
22 or7X
0.13915 X
(0.208)
3.1(4.1)
29 X0.206
( 0.463)
6.0(13.4)
22 or7X
0.06915 X
(0.139)
1.5(2.6)
36 X0.2
10.7
******Created by ebook converter - www.ebook-converter.com******
******ebook converter DEMO - www.ebook-converter.com*******
SkeletonChariots2X 4 wideD6 S4 Imps5+
29 or 8X
0.13921X
(0.232)(+12 X0.463)
4
(11.5)
22 X0.148
3.3
29 or8X
0.02821X
(0.075)(+12 X0.463)
0.8
(7.4)
22 or 7X
0.14815 X0.444
3.3(7.7)
29 or 80.13921X
(0.208)(+12 X0.417)
4.0(10.5)
29 X0.278
(0.444)
(+6.1/4.4C)8.1
(12.9)
29 or 80.06921X
(0.139)(+12 X0.278)
2
(6.8)
36 X0.278
(+8/3.210
TombGuardsLA Shield KB5+; 6+W
15 X0.243
3.6
28 X0.123
3.4
15 X0.111
1.7
6 X0.09313 X0.123(0.37 )
2.2
(5.4)
15 X0.208
3.1
29 X0.232(0.37 )
(+3.6/7.6C)6.7
(10.7)
15 X0.162
2.4
36 X0.232
(+68.4
TombGuardsLA Shield KB5+; 6+WHorde
31 X0.243
7.5
31 X0.123
3.8
28 X0.111
3.1
6 X0.09313 X0.123(0.37 )
2.2
(5.4)
28 X0.208
5.8
29 X0.232(0.37 )
(+0.9/4.9C)6.7
(10.7)
28 X0.162
4.5
36 X0.232
(+3.98.4
TombGuardsLA Shield KB5+; 6+WHorde
31 X0.324
10
31 X0.093
2.9
28 X0.185
5.2
19 or 6X
0.09313 X
(0.278)
1.8(4.2)
28 X0.278
7.8
29 X0.173
(0.278 )
(+0C)5.0
(8.0)
28 X0.162
4.5
36 X0.232
(+3.98.4
Necropolis 17 X0.243
28 X0.056
17 X0.111
22 or 7X
17 X0.208
29 X0.125
17 X0.162
36 X0.167
******Created by ebook converter - www.ebook-converter.com******
******ebook converter DEMO - www.ebook-converter.com*******
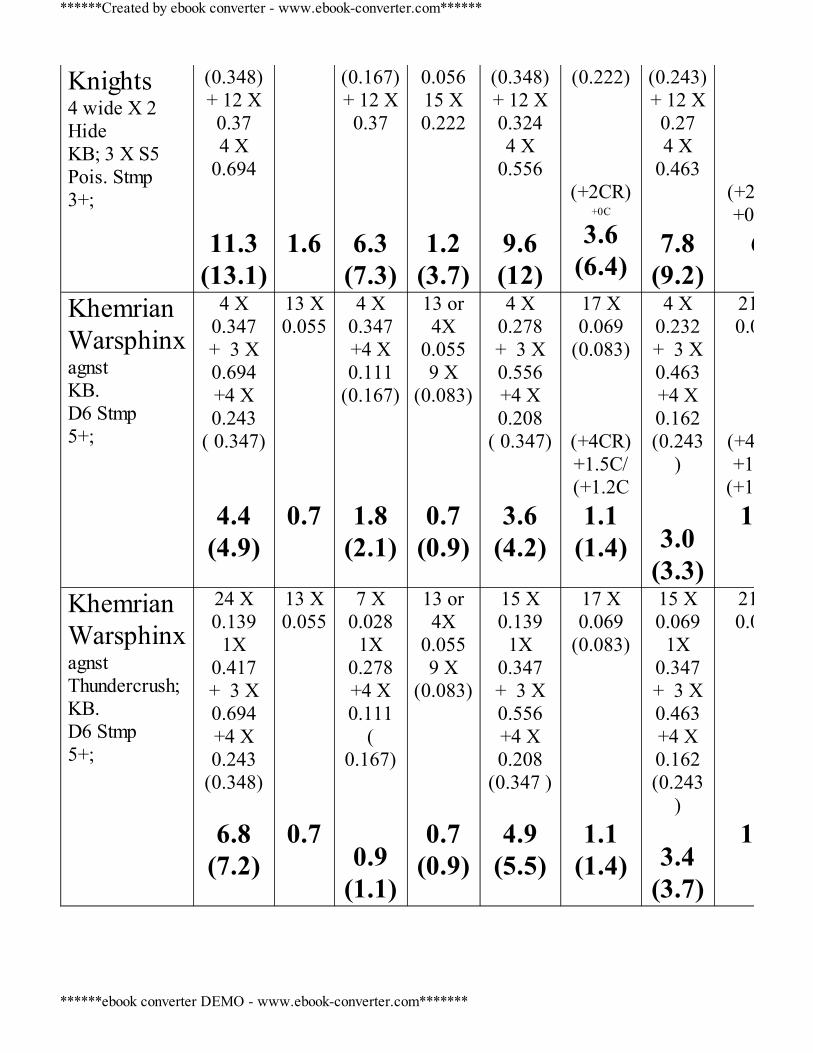
Knights4 wide X 2HideKB; 3 X S5Pois. Stmp3+;
(0.348)+ 12 X0.374 X
0.694
11.3(13.1)
1.6
(0.167)+ 12 X0.37
6.3(7.3)
0.05615 X0.222
1.2(3.7)
(0.348)+ 12 X0.3244 X
0.556
9.6(12)
(0.222)
(+2CR)+0C
3.6(6.4)
(0.243)+ 12 X0.274 X
0.463
7.8(9.2)
(+2+0.2C
6
KhemrianWarsphinxagnstKB.D6 Stmp5+;
4 X0.347+ 3 X0.694+4 X0.243
( 0.347)
4.4(4.9)
13 X0.055
0.7
4 X0.347+4 X0.111
(0.167)
1.8(2.1)
13 or4X
0.0559 X
(0.083)
0.7(0.9)
4 X0.278+ 3 X0.556+4 X0.208
( 0.347)
3.6(4.2)
17 X0.069
(0.083)
(+4CR)+1.5C/(+1.2C1.1
(1.4)
4 X0.232+ 3 X0.463+4 X0.162(0.243
)
3.0(3.3)
21 X0.069
(+4+1.4C
(+1.1C)1.4
KhemrianWarsphinxagnstThundercrush;KB.D6 Stmp5+;
24 X0.139
1X0.417+ 3 X0.694+4 X0.243
(0.348)
6.8(7.2)
13 X0.055
0.7
7 X0.028
1X0.278+4 X0.111
(0.167)
0.9(1.1)
13 or4X
0.0559 X
(0.083)
0.7(0.9)
15 X0.139
1X0.347+ 3 X0.556+4 X0.208
(0.347 )
4.9(5.5)
17 X0.069
(0.083)
1.1(1.4)
15 X0.069
1X0.347+ 3 X0.463+4 X0.162(0.243
)
3.4(3.7)
21 X0.069
1.4
******Created by ebook converter - www.ebook-converter.com******
******ebook converter DEMO - www.ebook-converter.com*******

Combat Rating per pointUnitDepletion afterUnstable‘Crumbling’
Slaying Rank Depletion Rank Slaying Rank Depletion RankSlaying vsSav. Orcs
Depletionvs
Sav. Orcs
Slaying vsChosen
Depletionvs
Chosen SkeletonWarriorsHW & ShieldHorde
91(95) 56(64) 94(97) 49(49)43 70
(115)38 100
SkeletonWarriorsHW & ShieldHorde My Will
69(77) 14(21) 95(98) 50(50)57 41
(74)38 100
SkeletonWarriorsSpears ShieldHorde My Will
75 56
(104)50 144
SkeletonHorsemenLA; Sh; Spears
34
(45)124
(318)30
(52)278
SkeletonChariots
83 (21) 108(107) 86(25) 103(103)44
(116)260
(317)40
(136)242
TombGuardHW;Sh
59(69) 77(87) 50(60) 78(78)64 84
(172)90 135
TombGuardHW;Sh MyWill
38(43) 32(36) 51(61) 79(79)86 55
(88)90 135
Necropolis 24(15) 71(73) 15(14) 75(75)
******Created by ebook converter - www.ebook-converter.com******
******ebook converter DEMO - www.ebook-converter.com*******
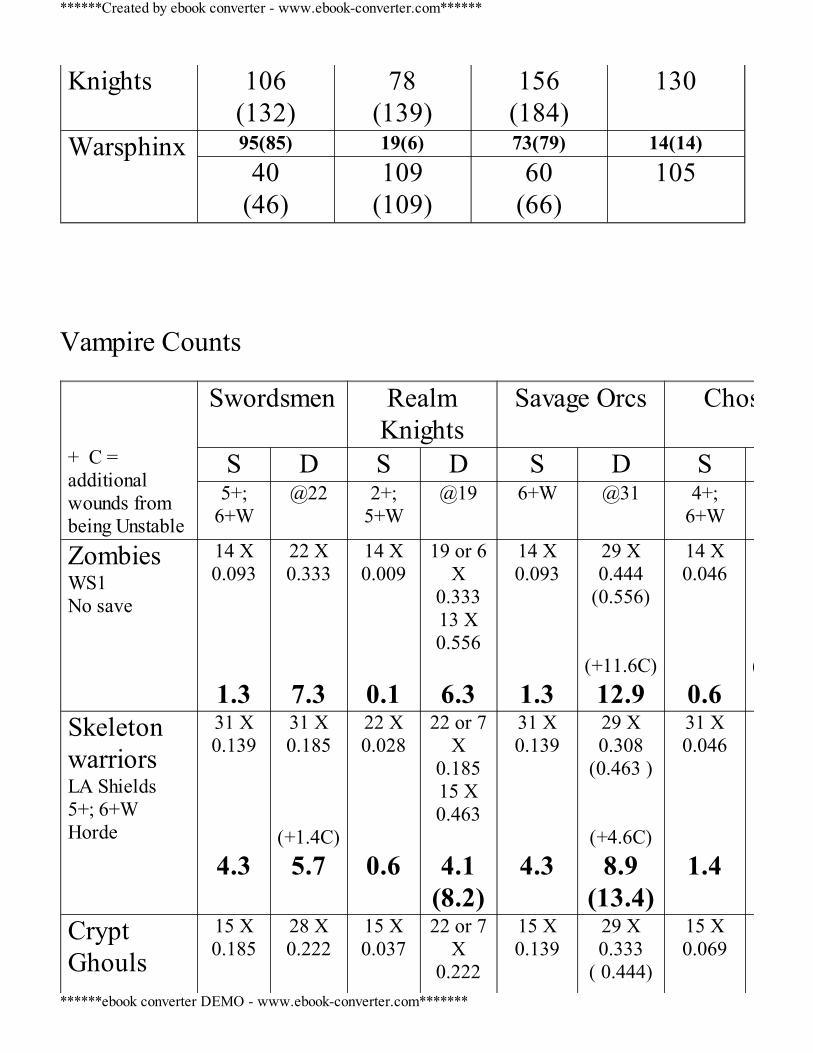
Knights 106(132)
78(139)
156(184)
130
Warsphinx 95(85) 19(6) 73(79) 14(14)40
(46)109
(109)60
(66)105
Vampire Counts + C =additionalwounds frombeing Unstable
Swordsmen RealmKnights
Savage Orcs Chosen
S D S D S D S5+;
6+W@22 2+;
5+W@19 6+W @31 4+;
6+W
ZombiesWS1No save
14 X0.093
1.3
22 X0.333
7.3
14 X0.009
0.1
19 or 6X
0.33313 X0.556
6.3
14 X0.093
1.3
29 X0.444
(0.556)
(+11.6C)12.9
14 X0.046
0.6(+15.4C)
SkeletonwarriorsLA Shields5+; 6+WHorde
31 X0.139
4.3
31 X0.185
(+1.4C)5.7
22 X0.028
0.6
22 or 7X
0.18515 X0.463
4.1
(8.2)
31 X0.139
4.3
29 X0.308
(0.463 )
(+4.6C)8.9
(13.4)
31 X0.046
1.4
CryptGhouls
15 X0.185
28 X0.222
15 X0.037
22 or 7X
0.222
15 X0.139
29 X0.333
( 0.444)
15 X0.069
******Created by ebook converter - www.ebook-converter.com******
******ebook converter DEMO - www.ebook-converter.com*******
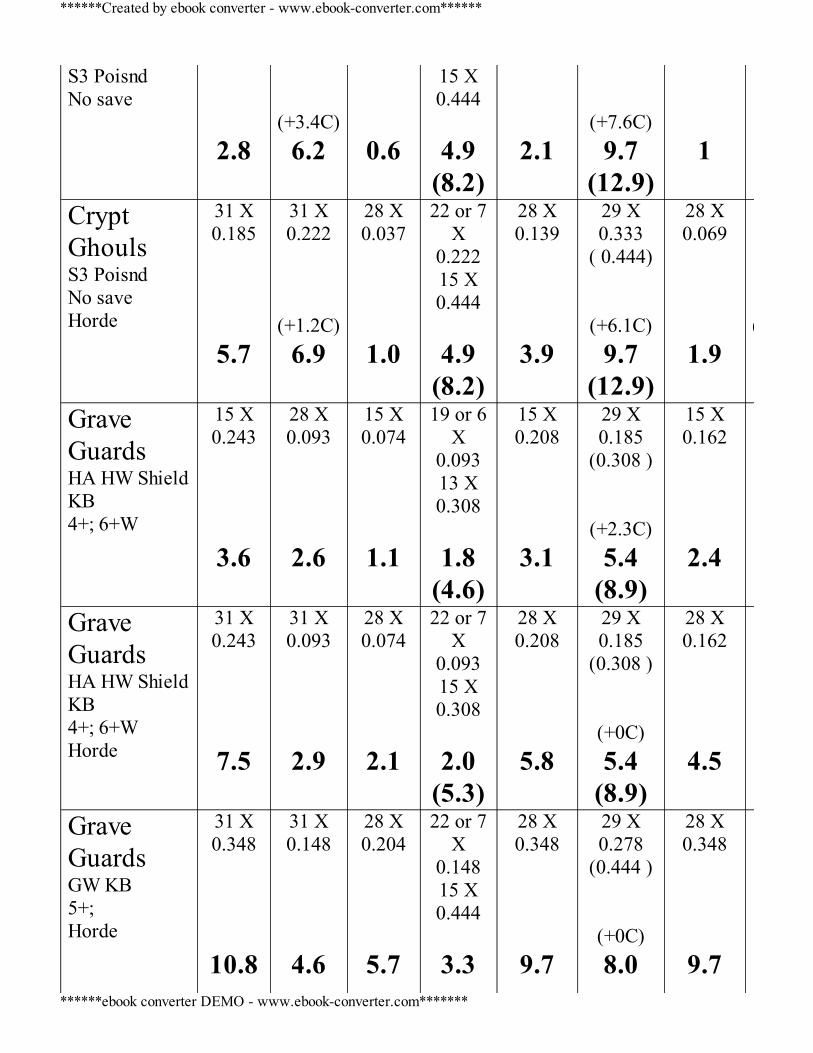
S3 PoisndNo save
2.8
(+3.4C)6.2
0.6
15 X0.444
4.9
(8.2)
2.1
(+7.6C)9.7
(12.9)
1
CryptGhoulsS3 PoisndNo saveHorde
31 X0.185
5.7
31 X0.222
(+1.2C)6.9
28 X0.037
1.0
22 or 7X
0.22215 X0.444
4.9
(8.2)
28 X0.139
3.9
29 X0.333
( 0.444)
(+6.1C)9.7
(12.9)
28 X0.069
1.9
(+10.1C)
GraveGuardsHA HW ShieldKB4+; 6+W
15 X0.243
3.6
28 X0.093
2.6
15 X0.074
1.1
19 or 6X
0.09313 X0.308
1.8
(4.6)
15 X0.208
3.1
29 X0.185
(0.308 )
(+2.3C)5.4
(8.9)
15 X0.162
2.4
GraveGuardsHA HW ShieldKB4+; 6+WHorde
31 X0.243
7.5
31 X0.093
2.9
28 X0.074
2.1
22 or 7X
0.09315 X0.308
2.0
(5.3)
28 X0.208
5.8
29 X0.185
(0.308 )
(+0C)5.4
(8.9)
28 X0.162
4.5
GraveGuardsGW KB5+;Horde
31 X0.348
10.8
31 X0.148
4.6
28 X0.204
5.7
22 or 7X
0.14815 X0.444
3.3
28 X0.348
9.7
29 X0.278
(0.444 )
(+0C)8.0
28 X0.348
9.7
******Created by ebook converter - www.ebook-converter.com******
******ebook converter DEMO - www.ebook-converter.com*******
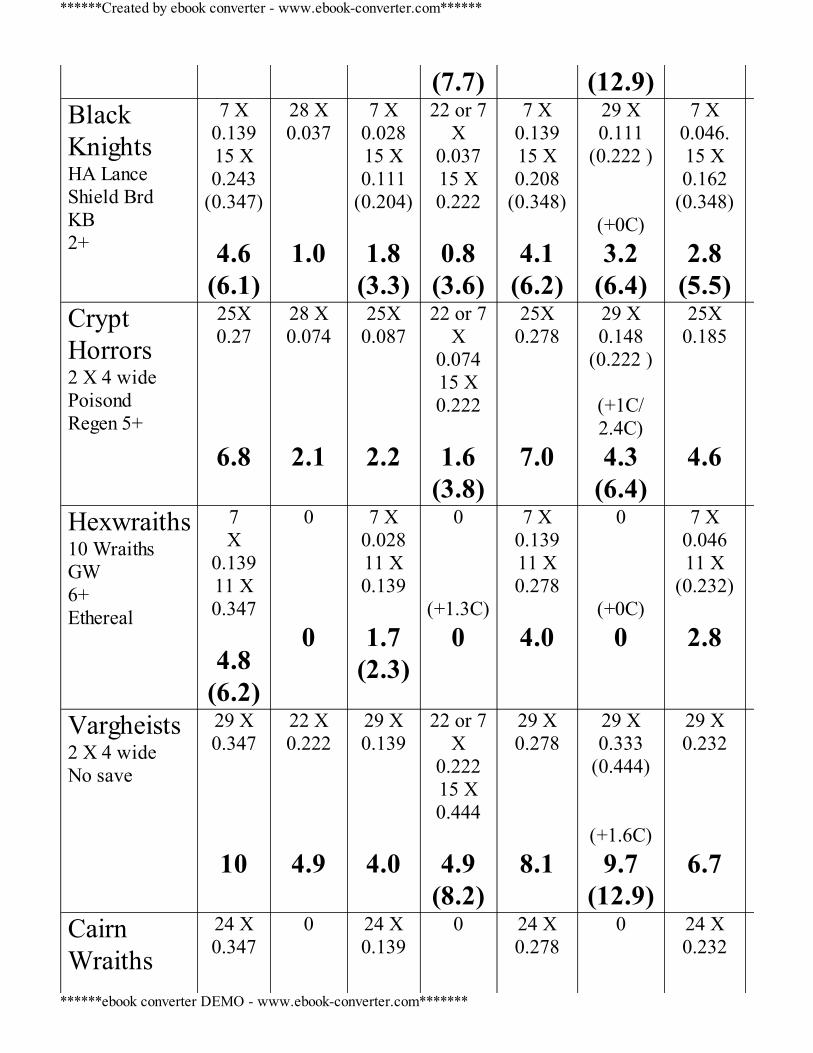
(7.7) (12.9)BlackKnightsHA LanceShield BrdKB2+
7 X0.13915 X0.243
(0.347)
4.6(6.1)
28 X0.037
1.0
7 X0.02815 X0.111
(0.204)
1.8(3.3)
22 or 7X
0.03715 X0.222
0.8
(3.6)
7 X0.13915 X0.208
(0.348)
4.1(6.2)
29 X0.111
(0.222 )
(+0C)3.2
(6.4)
7 X0.046.15 X0.162
(0.348)
2.8(5.5)
CryptHorrors2 X 4 widePoisondRegen 5+
25X0.27
6.8
28 X0.074
2.1
25X0.087
2.2
22 or 7X
0.07415 X0.222
1.6
(3.8)
25X0.278
7.0
29 X0.148
(0.222 )
(+1C/2.4C)4.3
(6.4)
25X0.185
4.6
Hexwraiths10 WraithsGW6+Ethereal
7X
0.13911 X0.347
4.8
(6.2)
0 0
7 X0.02811 X0.139
1.7
(2.3)
0
(+1.3C)0
7 X0.13911 X0.278
4.0
0
(+0C)0
7 X0.04611 X
(0.232)
2.8
Vargheists2 X 4 wideNo save
29 X0.347
10
22 X0.222
4.9
29 X0.139
4.0
22 or 7X
0.22215 X0.444
4.9
(8.2)
29 X0.278
8.1
29 X0.333
(0.444)
(+1.6C)9.7
(12.9)
29 X0.232
6.7
CairnWraiths
24 X0.347
0
24 X0.139
0
24 X0.278
0
24 X0.232
******Created by ebook converter - www.ebook-converter.com******
******ebook converter DEMO - www.ebook-converter.com*******
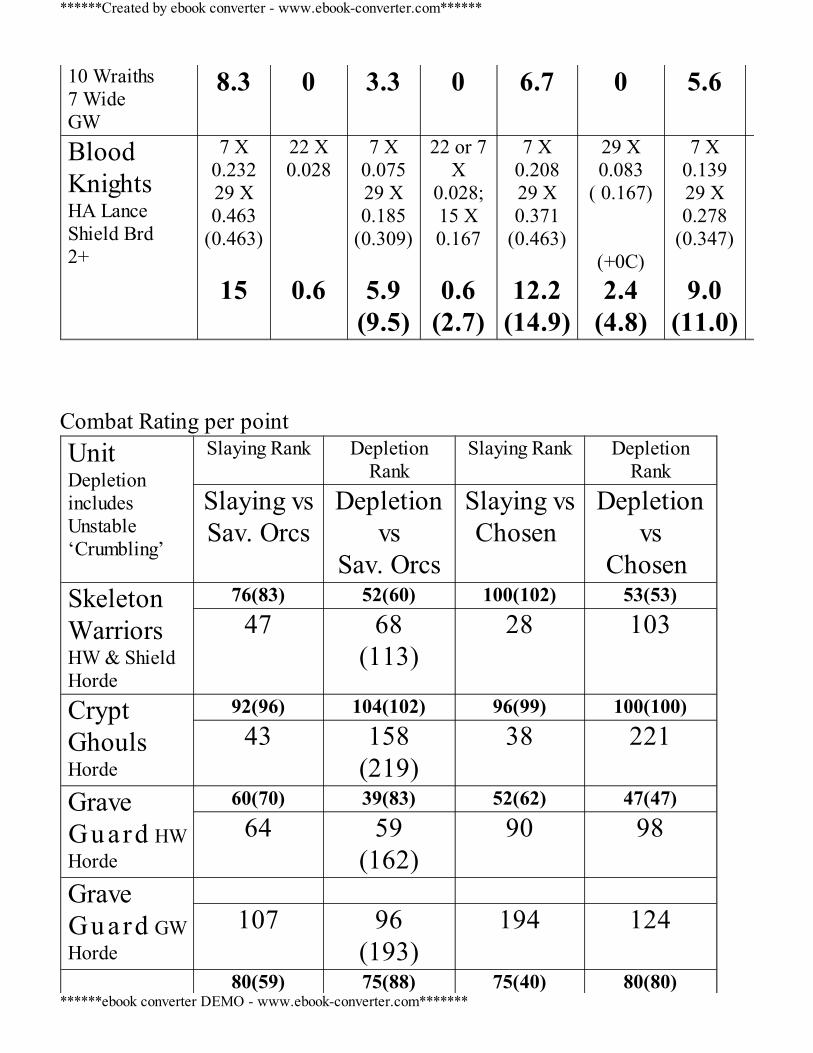
10 Wraiths7 WideGW
8.3 0
3.3 0 6.7 0 5.6
BloodKnightsHA LanceShield Brd2+
7 X0.23229 X0.463
(0.463)
15
22 X0.028
0.6
7 X0.07529 X0.185
(0.309)
5.9(9.5)
22 or 7X
0.028;15 X0.167
0.6
(2.7)
7 X0.20829 X0.371
(0.463)
12.2(14.9)
29 X0.083
( 0.167)
(+0C)2.4
(4.8)
7 X0.13929 X0.278
(0.347)
9.0(11.0)
Combat Rating per pointUnitDepletionincludesUnstable‘Crumbling’
Slaying Rank DepletionRank
Slaying Rank DepletionRank
Slaying vsSav. Orcs
Depletionvs
Sav. Orcs
Slaying vsChosen
Depletionvs
Chosen SkeletonWarriorsHW & ShieldHorde
76(83) 52(60) 100(102) 53(53)47 68
(113)28 103
CryptGhoulsHorde
92(96) 104(102) 96(99) 100(100)43 158
(219)38 221
GraveGu ard HWHorde
60(70) 39(83) 52(62) 47(47)64 59
(162)90 98
GraveGu ard GWHorde
107 96
(193)194 124
80(59) 75(88) 75(40) 80(80)
******Created by ebook converter - www.ebook-converter.com******
******ebook converter DEMO - www.ebook-converter.com*******
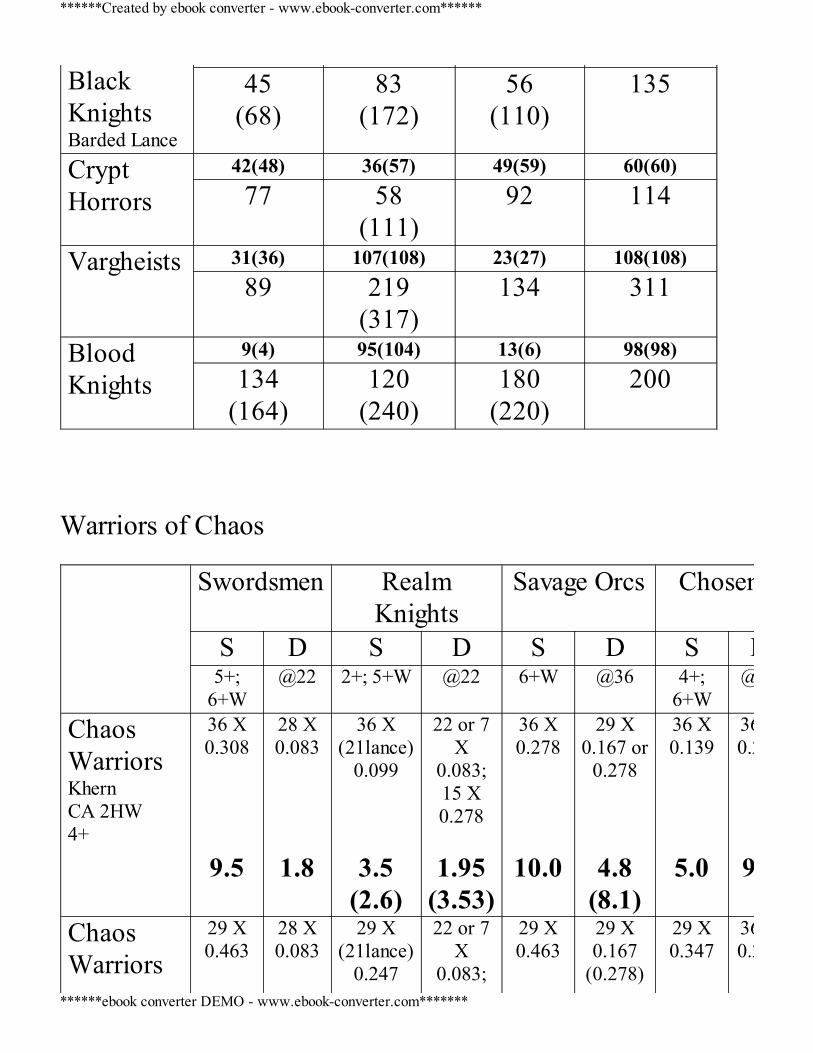
BlackKnightsBarded Lance
45(68)
83(172)
56(110)
135
CryptHorrors
42(48) 36(57) 49(59) 60(60)77 58
(111)92 114
Vargheists 31(36) 107(108) 23(27) 108(108)89 219
(317)134 311
BloodKnights
9(4) 95(104) 13(6) 98(98)134
(164)120
(240)180
(220)200
Warriors of Chaos Swordsmen Realm
KnightsSavage Orcs Chosen
S D S D S D S D5+;
6+W@22 2+; 5+W @22 6+W @36 4+;
6+W@43
ChaosWarriorsKhernCA 2HW4+
36 X0.308
9.5
28 X0.083
1.8
36 X(21lance)
0.099
3.5(2.6)
22 or 7X
0.083;15 X0.278
1.95
(3.53)
36 X0.278
10.0
29 X0.167 or
0.278
4.8(8.1)
36 X0.139
5.0
360.222
9.5
ChaosWarriors
29 X0.463
28 X0.083
29 X(21lance)
0.247
22 or 7X
0.083;
29 X0.463
29 X0.167
(0.278)
29 X0.347
360.222
******Created by ebook converter - www.ebook-converter.com******
******ebook converter DEMO - www.ebook-converter.com*******
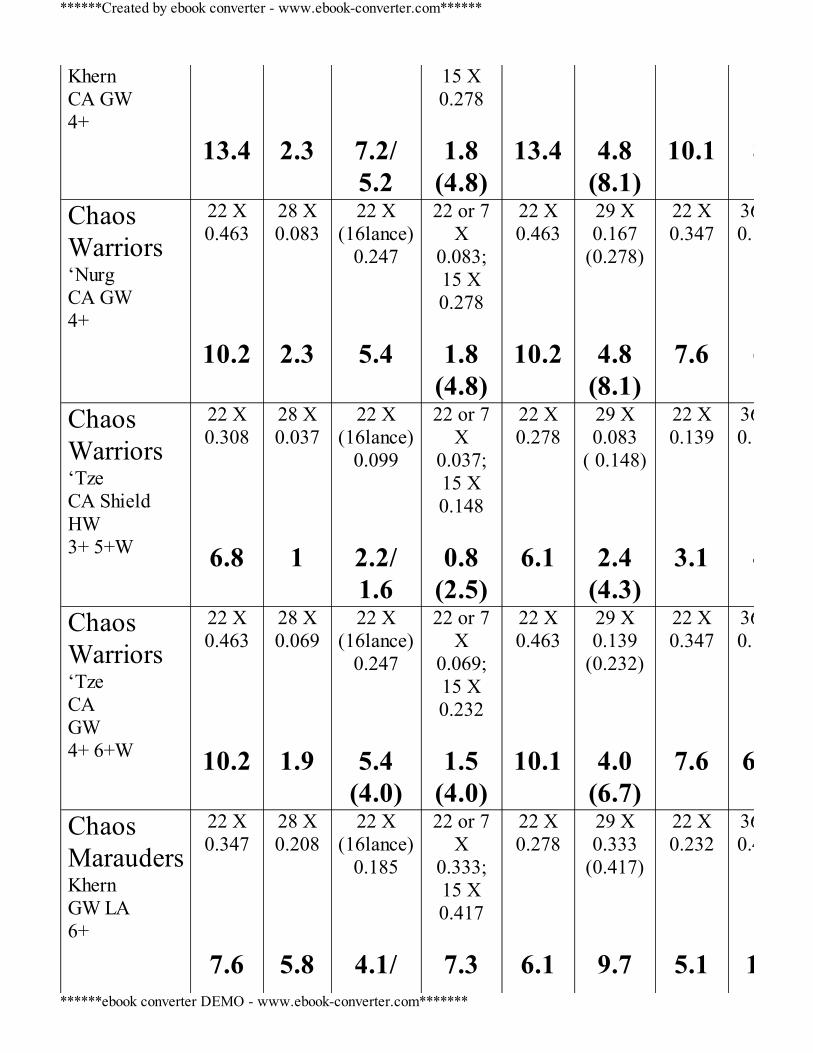
KhernCA GW4+
13.4
2.3
7.2/5.2
15 X0.278
1.8
(4.8)
13.4
4.8(8.1)
10.1 8
ChaosWarriors‘NurgCA GW4+
22 X0.463
10.2
28 X0.083
2.3
22 X(16lance)
0.247
5.4
22 or 7X
0.083;15 X0.278
1.8
(4.8)
22 X0.463
10.2
29 X0.167
(0.278)
4.8(8.1)
22 X0.347
7.6
360.167
6
ChaosWarriors‘TzeCA ShieldHW3+ 5+W
22 X0.308
6.8
28 X0.037
1
22 X(16lance)
0.099
2.2/1.6
22 or 7X
0.037;15 X0.148
0.8
(2.5)
22 X0.278
6.1
29 X0.083
( 0.148)
2.4(4.3)
22 X0.139
3.1
36 X0.111
4
ChaosWarriors‘TzeCAGW4+ 6+W
22 X0.463
10.2
28 X0.069
1.9
22 X(16lance)
0.247
5.4(4.0)
22 or 7X
0.069;15 X0.232
1.5
(4.0)
22 X0.463
10.1
29 X0.139
(0.232)
4.0(6.7)
22 X0.347
7.6
36 X0.18
6.7
ChaosMaraudersKhernGW LA6+
22 X0.347
7.6
28 X0.208
5.8
22 X(16lance)
0.185
4.1/
22 or 7X
0.333;15 X0.417
7.3
22 X0.278
6.1
29 X0.333
(0.417)
9.7
22 X0.232
5.1
360.444
16
******Created by ebook converter - www.ebook-converter.com******
******ebook converter DEMO - www.ebook-converter.com*******

3 (8.6) (12.1)ChaosMaraudersKhernGW LA6+Horde
41 X0.347
14.2
31 X0.208
6.4
37 X(21lance)
0.185
6.8(3.9)
22 or 7X
0.333;15 X0.417
7.3
(8.6)
37 X0.278
10.2
29 X0.333
(0.417)
9.7(12.1)
37 X0.232
8.6
360.444
16
ChaosMarauders‘TzeHW LAShields5+; 5+WHorde
31 X0.139
4.3
31 X0.111
3.4
28 X(13lance)
0.028
0.8(0.4)
22 or 7X
0.11115 X
(0.278)
2.4(4.9)
28 X0.139
3.9
29 X0.185
(0.278)
5.4(8.1)
28 X0.069
1.9
360.247
8.9
MarauderHorsemenKhernLA; Shields;Flails4+
22 or7X
0.13915X
(0.347)
3.1(6.2)
28 X0.125
3.5
22 or 7X0.02815X
(0.139)
0.6(2.3)
22 or 7X
0.125;15 X
(0.347)
2.8(6.1)
22 or7X
0.13915X
(0.278)
3.1(5.1)
29 X0.222
(0.347)
6.4(10.1)
22 or7X
0.06915X
(0.232)
1.5(4.0)
36 X0.296
10.7
Chosen ‘Tze; BoR;HW&Sh3+ 5+W
29 X0.308
8.9
28 X0.037
1
29 X0.099
2.9
22 or 7X
0.03715 X0.148
0.8
(2.5)
29 X0.278
8.1
29 X0.083
(0.148)
2.4(4.3)
29 X0.139
4.0
36 X0.083
3
Chosen ‘Tze; BoR;GW
29 X0.463
28 X0.069
29 X0.247
22 or 7X
0.069
29 X0.463
29 X0.139
(0.232)
29 X0.347
36 X0.139
******Created by ebook converter - www.ebook-converter.com******
******ebook converter DEMO - www.ebook-converter.com*******
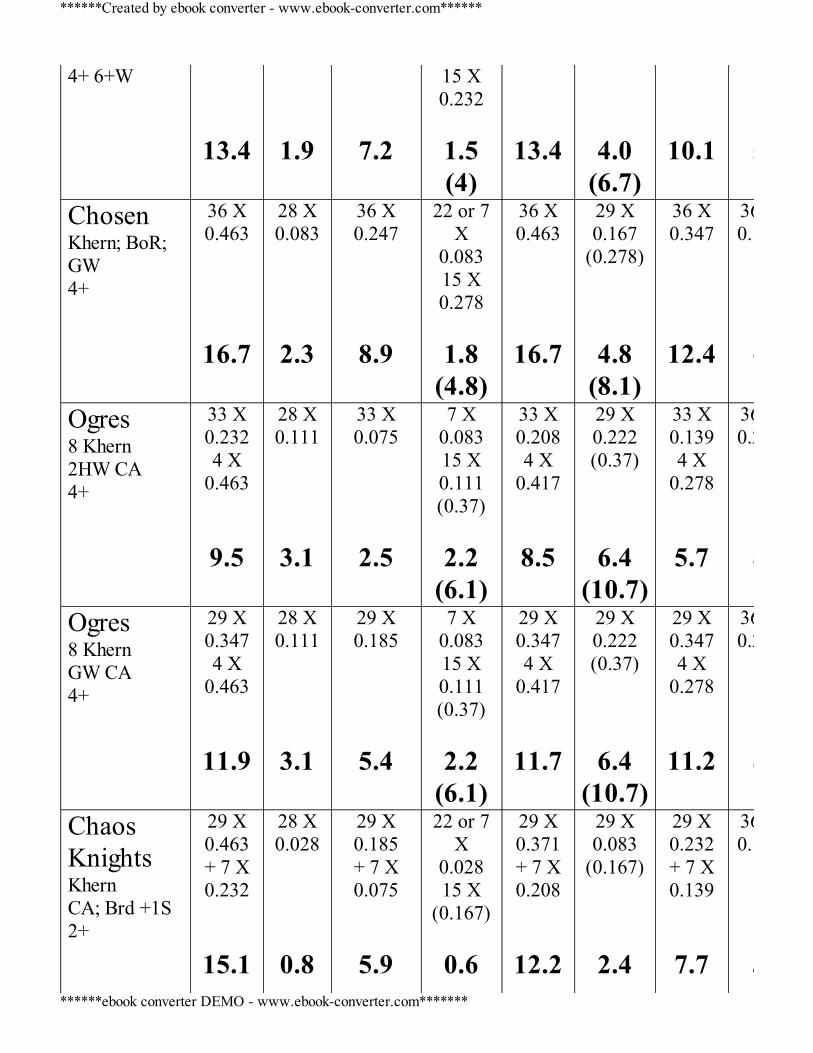
4+ 6+W
13.4
1.9
7.2
15 X0.232
1.5(4)
13.4
4.0(6.7)
10.1 5
Chosen Khern; BoR;GW4+
36 X0.463
16.7
28 X0.083
2.3
36 X0.247
8.9
22 or 7X
0.08315 X0.278
1.8
(4.8)
36 X0.463
16.7
29 X0.167
(0.278)
4.8(8.1)
36 X0.347
12.4
36 X0.167
6
Ogres8 Khern2HW CA4+
33 X0.2324 X
0.463
9.5
28 X0.111
3.1
33 X0.075
2.5
7 X0.08315 X0.111(0.37)
2.2
(6.1)
33 X0.2084 X
0.417
8.5
29 X0.222(0.37)
6.4(10.7)
33 X0.1394 X
0.278
5.7
36 X0.222
8
Ogres8 KhernGW CA4+
29 X0.3474 X
0.463
11.9
28 X0.111
3.1
29 X0.185
5.4
7 X0.08315 X0.111(0.37)
2.2
(6.1)
29 X0.3474 X
0.417
11.7
29 X0.222(0.37)
6.4(10.7)
29 X0.3474 X
0.278
11.2
36 X0.222
8
ChaosKnightsKhernCA; Brd +1S2+
29 X0.463+ 7 X0.232
15.1
28 X0.028
0.8
29 X0.185+ 7 X0.075
5.9
22 or 7X
0.02815 X
(0.167)
0.6
29 X0.371+ 7 X0.208
12.2
29 X0.083
(0.167)
2.4
29 X0.232+ 7 X0.139
7.7
36 X0.111
4
******Created by ebook converter - www.ebook-converter.com******
******ebook converter DEMO - www.ebook-converter.com*******
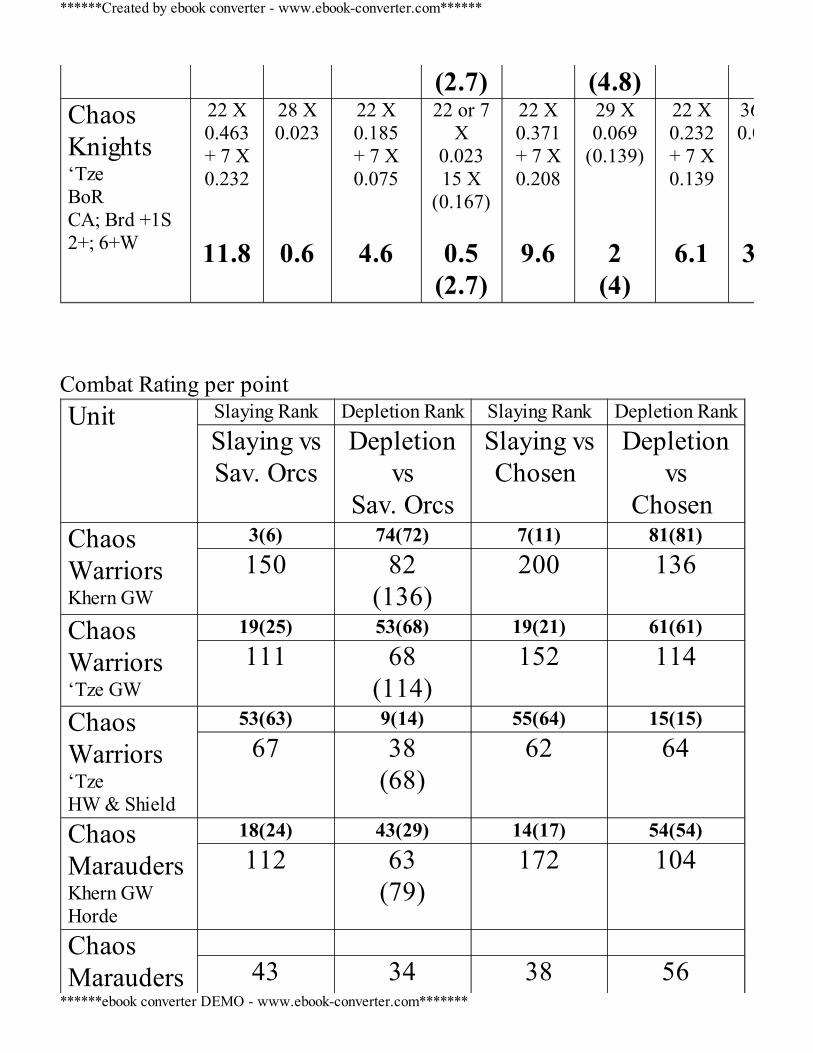
(2.7) (4.8)ChaosKnights‘TzeBoRCA; Brd +1S2+; 6+W
22 X0.463+ 7 X0.232
11.8
28 X0.023
0.6
22 X0.185+ 7 X0.075
4.6
22 or 7X
0.02315 X
(0.167)
0.5(2.7)
22 X0.371+ 7 X0.208
9.6
29 X0.069
(0.139) 2
(4)
22 X0.232+ 7 X0.139
6.1
36 X0.093
3.3
Combat Rating per pointUnit Slaying Rank Depletion Rank Slaying Rank Depletion Rank
Slaying vsSav. Orcs
Depletionvs
Sav. Orcs
Slaying vsChosen
Depletionvs
Chosen ChaosWarriorsKhern GW
3(6) 74(72) 7(11) 81(81)150 82
(136)200 136
ChaosWarriors‘Tze GW
19(25) 53(68) 19(21) 61(61)111 68
(114)152 114
ChaosWarriors‘TzeHW & Shield
53(63) 9(14) 55(64) 15(15)67 38
(68)62 64
ChaosMaraudersKhern GWHorde
18(24) 43(29) 14(17) 54(54)112 63
(79)172 104
ChaosMarauders
43 34 38 56
******Created by ebook converter - www.ebook-converter.com******
******ebook converter DEMO - www.ebook-converter.com*******
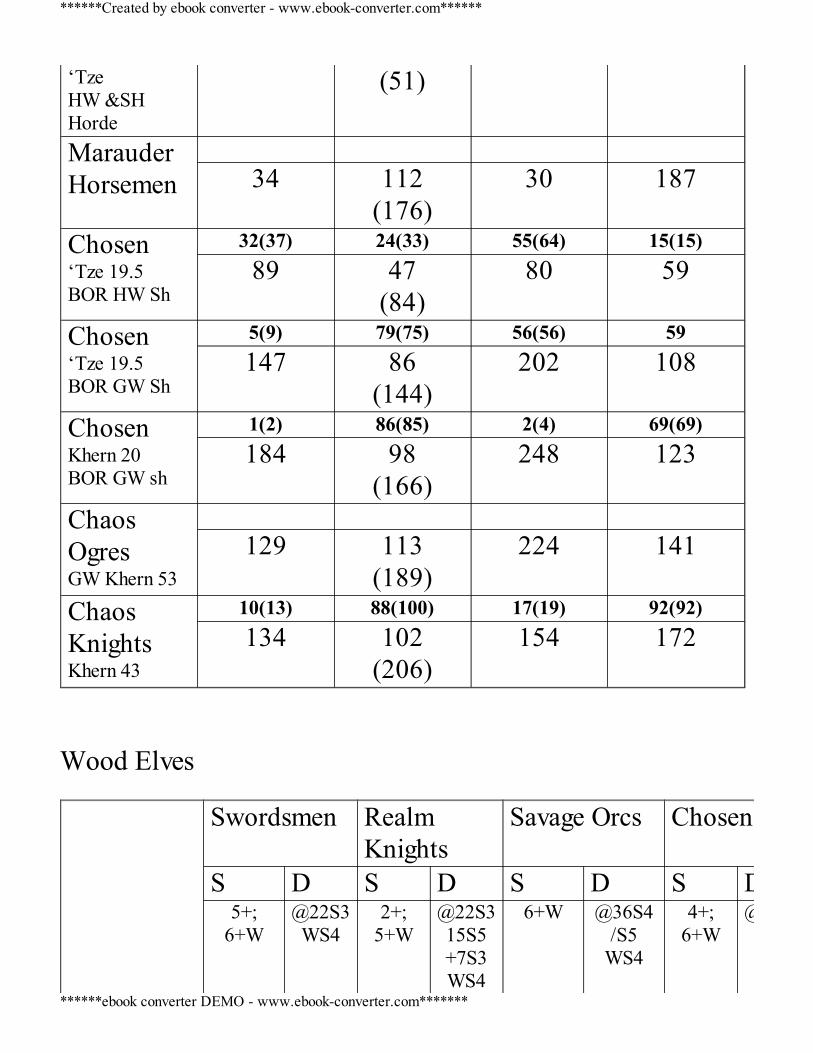
‘TzeHW &SHHorde
(51)
MarauderHorsemen
34 112
(176)30 187
Chosen ‘Tze 19.5BOR HW Sh
32(37) 24(33) 55(64) 15(15)89 47
(84)80 59
Chosen ‘Tze 19.5BOR GW Sh
5(9) 79(75) 56(56) 59147 86
(144)202 108
Chosen Khern 20BOR GW sh
1(2) 86(85) 2(4) 69(69)184 98
(166)248 123
ChaosOgresGW Khern 53
129 113
(189)224 141
ChaosKnightsKhern 43
10(13) 88(100) 17(19) 92(92)134 102
(206)154 172
Wood Elves Swordsmen Realm
KnightsSavage Orcs Chosen
S D S D S D S D5+;
6+W@22S3WS4
2+;5+W
@22S315S5+7S3WS4
6+W @36S4/S5
WS4
4+;6+W
@43S4
******Created by ebook converter - www.ebook-converter.com******
******ebook converter DEMO - www.ebook-converter.com*******
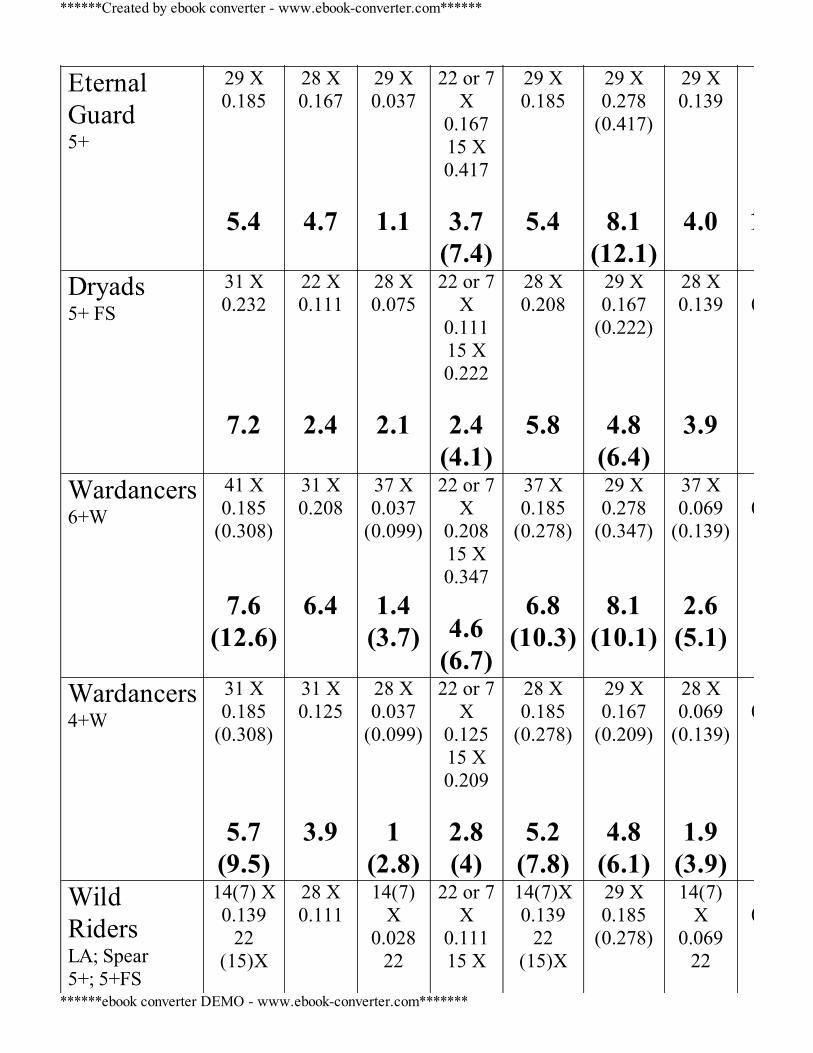
EternalGuard5+
29 X0.185
5.4
28 X0.167
4.7
29 X0.037
1.1
22 or 7X
0.16715 X0.417
3.7
(7.4)
29 X0.185
5.4
29 X0.278
(0.417)
8.1(12.1)
29 X0.139
4.0 13.3
Dryads5+ FS
31 X0.232
7.2
22 X0.111
2.4
28 X0.075
2.1
22 or 7X
0.11115 X0.222
2.4
(4.1)
28 X0.208
5.8
29 X0.167
(0.222)
4.8(6.4)
28 X0.139
3.9
0.222
Wardancers6+W
41 X0.185
(0.308)
7.6(12.6)
31 X0.208
6.4
37 X0.037
(0.099)
1.4(3.7)
22 or 7X
0.20815 X0.347
4.6
(6.7)
37 X0.185
(0.278)
6.8(10.3)
29 X0.278
(0.347)
8.1(10.1)
37 X0.069
(0.139)
2.6(5.1)
0.278
Wardancers4+W
31 X0.185
(0.308)
5.7(9.5)
31 X0.125
3.9
28 X0.037
(0.099) 1
(2.8)
22 or 7X
0.12515 X0.209
2.8(4)
28 X0.185
(0.278)
5.2(7.8)
29 X0.167
(0.209)
4.8(6.1)
28 X0.069
(0.139)
1.9(3.9)
0.167
WildRidersLA; Spear5+; 5+FS
14(7) X0.139
22(15)X
28 X0.111
14(7)X
0.02822
22 or 7X
0.11115 X
14(7)X0.139
22(15)X
29 X0.185
(0.278)
14(7)X
0.06922
0.
******Created by ebook converter - www.ebook-converter.com******
******ebook converter DEMO - www.ebook-converter.com*******
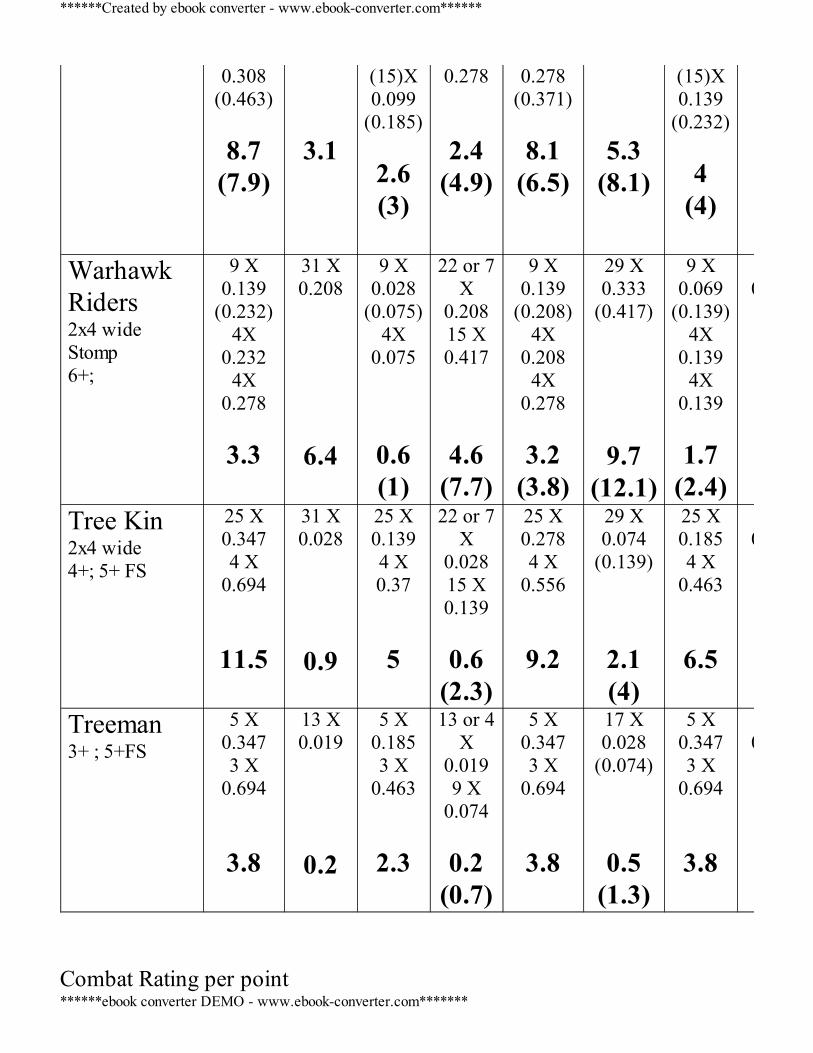
0.308(0.463)
8.7
(7.9)
3.1
(15)X0.099
(0.185)
2.6(3)
0.278
2.4(4.9)
0.278(0.371)
8.1
(6.5)
5.3(8.1)
(15)X0.139
(0.232) 4
(4)
WarhawkRiders2x4 wideStomp6+;
9 X0.139
(0.232)4X
0.2324X
0.278
3.3
31 X0.208
6.4
9 X0.028
(0.075)4X
0.075
0.6(1)
22 or 7X
0.20815 X0.417
4.6(7.7)
9 X0.139
(0.208)4X
0.2084X
0.278
3.2(3.8)
29 X0.333
(0.417)
9.7(12.1)
9 X0.069
(0.139)4X
0.1394X
0.139
1.7(2.4)
0.444
Tree Kin2x4 wide4+; 5+ FS
25 X0.3474 X
0.694
11.5
31 X0.028
0.9
25 X0.1394 X0.37
5
22 or 7X
0.02815 X0.139
0.6
(2.3)
25 X0.2784 X
0.556
9.2
29 X0.074
(0.139)
2.1(4)
25 X0.1854 X
0.463
6.5
0.099
Treeman3+ ; 5+FS
5 X0.3473 X
0.694
3.8
13 X0.019
0.2
5 X0.1853 X
0.463
2.3
13 or 4X
0.0199 X
0.074
0.2(0.7)
5 X0.3473 X
0.694
3.8
17 X0.028
(0.074)
0.5(1.3)
5 X0.3473 X
0.694
3.8
0.037
Combat Rating per point
******Created by ebook converter - www.ebook-converter.com******
******ebook converter DEMO - www.ebook-converter.com*******

Unit Slaying Rank Depletion Rank Slaying Rank Depletion RankSlaying vsSav. Orcs
Depletionvs
Sav. Orcs
Slaying vsChosen
Depletionvs
Chosen EternalGuard
66(74) 85(77) 56(65) 89(89)59 97
(145)80
160
Dryads 61(71) 37(27) 62(71) 45(45)64 58
(77)78
96
Wardancers+1A
48(23) 101(93) 80(54) 95(95)75
(113)146
(182)52
(102)180
Wardancers4+W
70(44) 80(54) 97(72) 57(57)57
(86)86
(110)38
(78)108
WildRiders
33(54) 99(101) 57(66) 102(102)89
(72)138
(210)80
(80)231
Treekin 25(29) 20(34) 26(30) 31(31)101 46
(87)130 78
Treeman 94(98) 3(9) 63(75) 4(4)42 24
(62)76 38
******Created by ebook converter - www.ebook-converter.com******
******ebook converter DEMO - www.ebook-converter.com*******
Appendix 3 565 points per unit KEY (with reference to Beastmen). Most important figures are: The number of rounds before losing Steadfast and the Modifier of the first break test to betaken after losing Steadfast. e.g. For Gors with no saves below -3.3 = This is the number of rounds of combat these Gors will last against Savage Orcs of the
same number of points. They then have to take a Break test at -4 to their Leadership.The more negative this number the longer the unit will last. If this number is positivethe unit WINS against Savage Orcs. If it is zero, it loses combat in the first round.
-3.5 = This is the number of rounds of combat these Gors will last against Chosen of the
same number of points. They then have to take a Break test at -15.3 to their
******Created by ebook converter - www.ebook-converter.com******
******ebook converter DEMO - www.ebook-converter.com*******
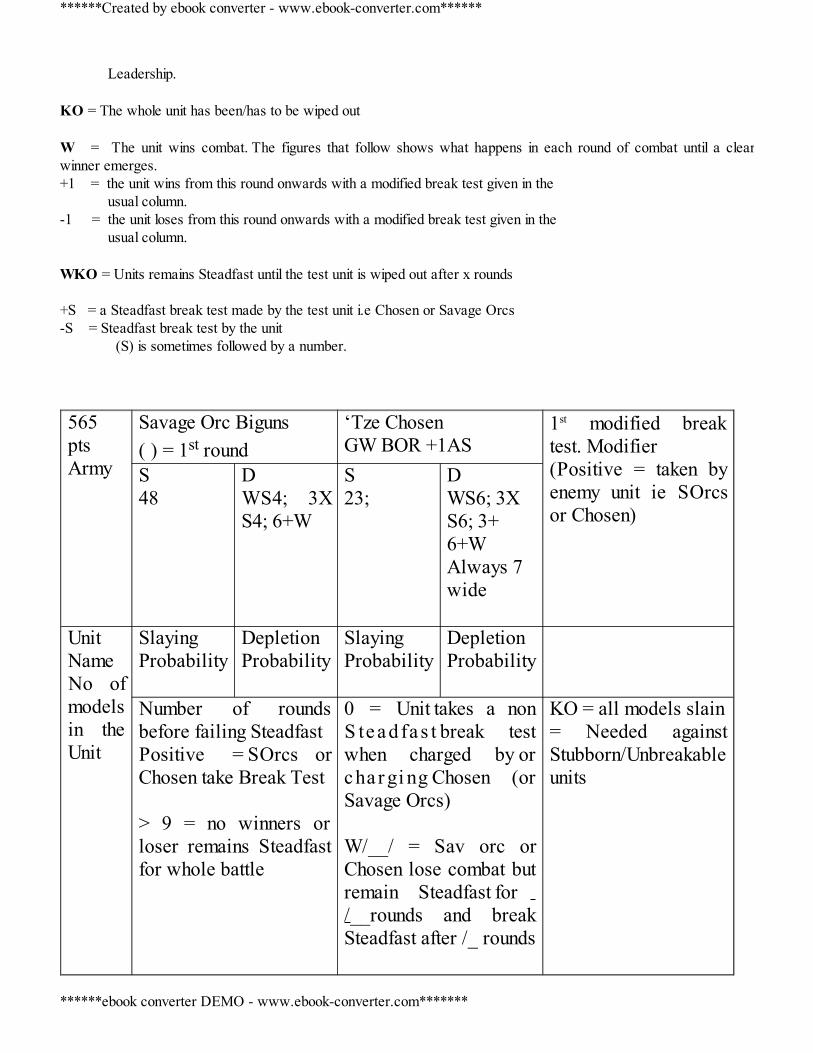
Leadership. KO = The whole unit has been/has to be wiped out W = The unit wins combat. The figures that follow shows what happens in each round of combat until a clearwinner emerges.+1 = the unit wins from this round onwards with a modified break test given in the
usual column.-1 = the unit loses from this round onwards with a modified break test given in the
usual column. WKO = Units remains Steadfast until the test unit is wiped out after x rounds +S = a Steadfast break test made by the test unit i.e Chosen or Savage Orcs-S = Steadfast break test by the unit (S) is sometimes followed by a number.
565ptsArmy
Savage Orc Biguns( ) = 1st round
‘Tze ChosenGW BOR +1AS
1st modified breaktest. Modifier(Positive = taken byenemy unit ie SOrcsor Chosen)
S48
DWS4; 3XS4; 6+W
S23;
DWS6; 3XS6; 3+6+WAlways 7wide
UnitNameNo ofmodelsin theUnit
SlayingProbability
DepletionProbability
SlayingProbability
DepletionProbability
Number of roundsbefore failing SteadfastPositive = SOrcs orChosen take Break Test > 9 = no winners orloser remains Steadfastfor whole battle
0 = Unit takes a nonS teadfa s t break testwhen charged by orcha r gi ng Chosen (orSavage Orcs) W/__/ = Sav orc orChosen lose combat butremain Steadfast for /__rounds and breakSteadfast after /_ rounds
KO = all models slain= Needed againstStubborn/Unbreakableunits
******Created by ebook converter - www.ebook-converter.com******
******ebook converter DEMO - www.ebook-converter.com*******
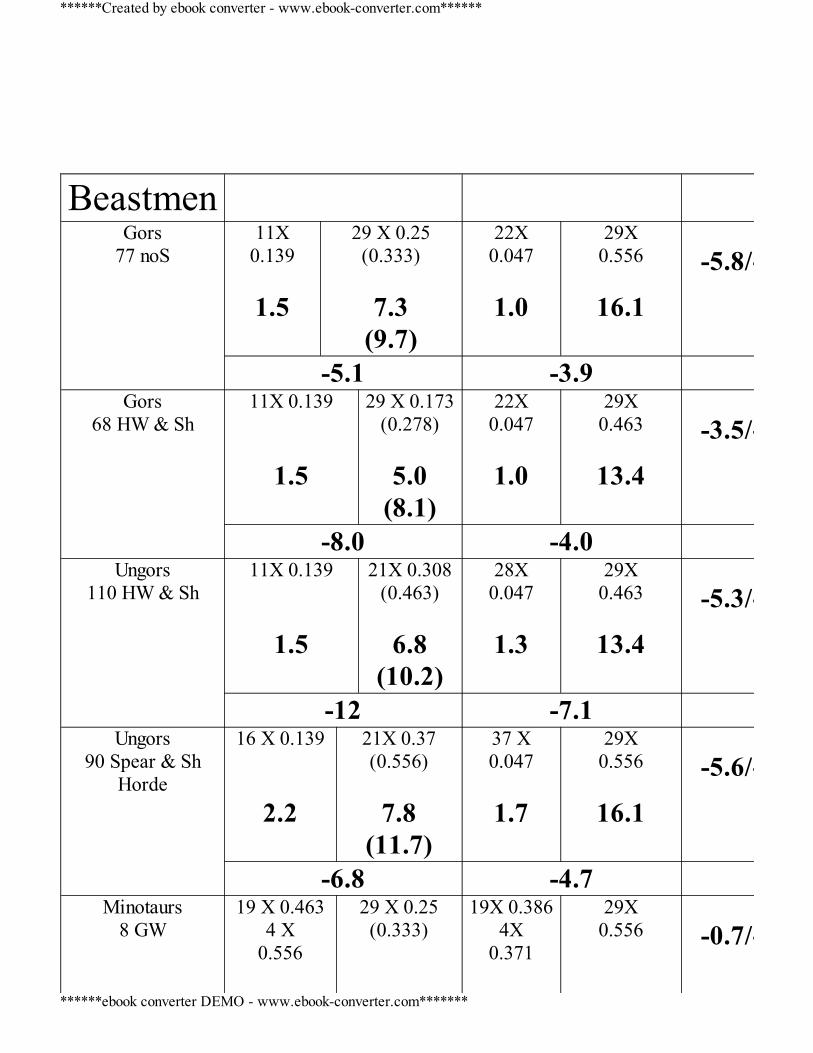
Beastmen
Gors77 noS
11X0.139
1.5
29 X 0.25(0.333)
7.3
(9.7)
22X0.047
1.0
29X0.556
16.1
-5.8/-15.1
-5.1 -3.9
Gors68 HW & Sh
11X 0.139
1.5
29 X 0.173(0.278)
5.0
(8.1)
22X0.047
1.0
29X0.463
13.4
-3.5/-12.4
-8.0 -4.0
Ungors110 HW & Sh
11X 0.139
1.5
21X 0.308(0.463)
6.8
(10.2)
28X0.047
1.3
29X0.463
13.4
-5.3/-12.
-12 -7.1
Ungors90 Spear & Sh
Horde
16 X 0.139
2.2
21X 0.37(0.556)
7.8
(11.7)
37 X0.047
1.7
29X0.556
16.1
-5.6/-14
-6.8 -4.7
Minotaurs8 GW
19 X 0.4634 X
0.556
29 X 0.25(0.333)
19X 0.3864X
0.371
29X0.556
-0.7/-10.3
******Created by ebook converter - www.ebook-converter.com******
******ebook converter DEMO - www.ebook-converter.com*******
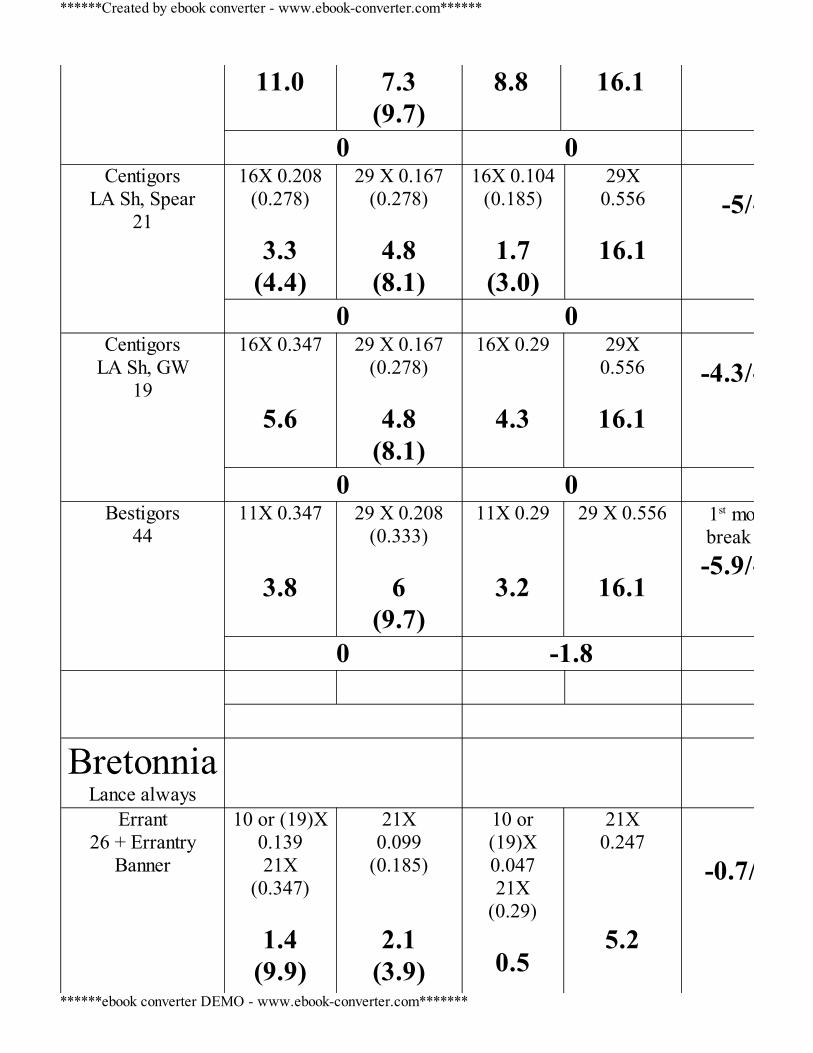
11.0 7.3(9.7)
8.8 16.1
0 0
CentigorsLA Sh, Spear
21
16X 0.208(0.278)
3.3
(4.4)
29 X 0.167(0.278)
4.8
(8.1)
16X 0.104(0.185)
1.7
(3.0)
29X0.556
16.1
-5/-15
0 0
CentigorsLA Sh, GW
19
16X 0.347
5.6
29 X 0.167(0.278)
4.8
(8.1)
16X 0.29
4.3
29X0.556
16.1
-4.3/-12.9
0 0
Bestigors44
11X 0.347
3.8
29 X 0.208(0.333)
6
(9.7)
11X 0.29
3.2
29 X 0.556
16.1
1st modifiedbreak test @-5.9/-12.9
0 -1.8
BretonniaLance always
Errant26 + Errantry
Banner
10 or (19)X0.13921X
(0.347)
1.4(9.9)
21X0.099
(0.185)
2.1(3.9)
10 or(19)X0.04721X
(0.29)
0.5
21X0.247
5.2
-0.7/
******Created by ebook converter - www.ebook-converter.com******
******ebook converter DEMO - www.ebook-converter.com*******

(7)W,+S/-1 W,+1
Knights of theRealm 22
10 or (16)X0.13918X
(0.278)
1.4(7.2)
21X0.075
(0.139)
1.6(2.9)
10 or(16)X0.04718X
(0.185)
0.5(4.1)
21X0.247
5.2
-0.2/-3.7
W,+S/-1 0/-S/-1Men at Arms
10711X 0.208
2.3
25X0.444
(0.556)
11.1(13.9)
11X 0.104
1.1
25X0.556
13.9
-8.8/-12.8
-7.2 -6.6
Questing Knights19
3(14)X0.139
7(16)X0.347
2.8
(7.5)
21X0.111
(0.185)
2.3(3.9)
3(14)X0.047
7(16)X0.29
2.2
(5.3)
21X0.309
6.5
-0.5/-1.2
W,+S/-1 -1.5
Pegasus Knights9
6X0.208
7X0.139
(0.278)3X
0.417
3.5
29X0.083
(0.148)
2.4
6X0.104
7X0.047
(0.185)3X
0.208
1.6
29X0.309
8.9
-1.9/-6
******Created by ebook converter - www.ebook-converter.com******
******ebook converter DEMO - www.ebook-converter.com*******
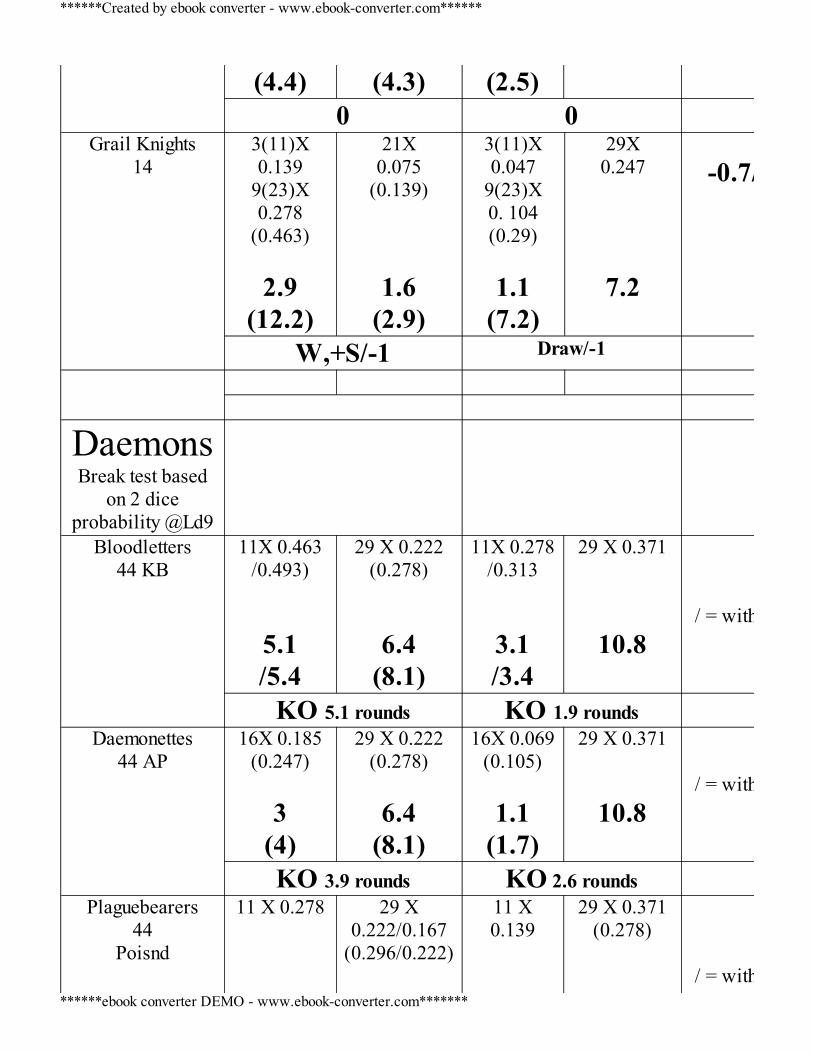
(4.4) (4.3) (2.5)0 0
Grail Knights14
3(11)X0.139
9(23)X0.278
(0.463)
2.9(12.2)
21X0.075
(0.139)
1.6(2.9)
3(11)X0.047
9(23)X0. 104(0.29)
1.1
(7.2)
29X0.247
7.2
-0.7/
W,+S/-1 Draw/-1
DaemonsBreak test based
on 2 diceprobability @Ld9
Bloodletters44 KB
11X 0.463/0.493)
5.1/5.4
29 X 0.222(0.278)
6.4(8.1)
11X 0.278/0.313
3.1/3.4
29 X 0.371
10.8
/ = with Herald
KO 5.1 rounds KO 1.9 rounds
Daemonettes44 AP
16X 0.185(0.247)
3
(4)
29 X 0.222(0.278)
6.4
(8.1)
16X 0.069(0.105)
1.1
(1.7)
29 X 0.371
10.8
/ = with Herald
KO 3.9 rounds KO 2.6 rounds
Plaguebearers44
Poisnd
11 X 0.278
29 X0.222/0.167
(0.296/0.222)
11 X0.139
29 X 0.371(0.278)
/ = with Herald
******Created by ebook converter - www.ebook-converter.com******
******ebook converter DEMO - www.ebook-converter.com*******

3.1 6.4/4.8(8.6/6.4)
1.5
10.8/8.1
KO 8.7 rounds KO 3 rounds
Horrors39 Changeling
11X 0.139
1.5
29 X0.296/0.222
(0.371/0.278)
8.6/6.4(10.8/8.1)
11X 0.047
0.5
29 X 0.371/0.278
10.8(8.1)
/ = with Herald
KO 3 rounds KO 2.9 rounds
Flesh Hounds14
KaranakNo Cmd
19(15)X0.371
(4X 0.493)
7/7.5
29 X 0.167(0.222)
4.8(6.4)
19(15)X0.185
(4X 0.278)
3.5/3.9
29 X 0.371
10.8
/ = with Karanak
KO 8.8 rounds KO 1.3 rounds
Flamers16
SkirmishNo Cmd
11X 0.278
3.1
29 X 0.222(0.296)
6.4
(8.6)
11X 0.185 2
29 X 0.371
10.8
KO 2.4 rounds KO 1 round
DarkElves
DE Spearmen78
16X 0.139(0.209)
2.2
(3.3)
25 X 0.278(0.417)
7
(10.4)
16X 0.047(0.071)
0.75(1.1)
25 X 0.556
16.1
-4.8/-14.3
******Created by ebook converter - www.ebook-converter.com******
******ebook converter DEMO - www.ebook-converter.com*******
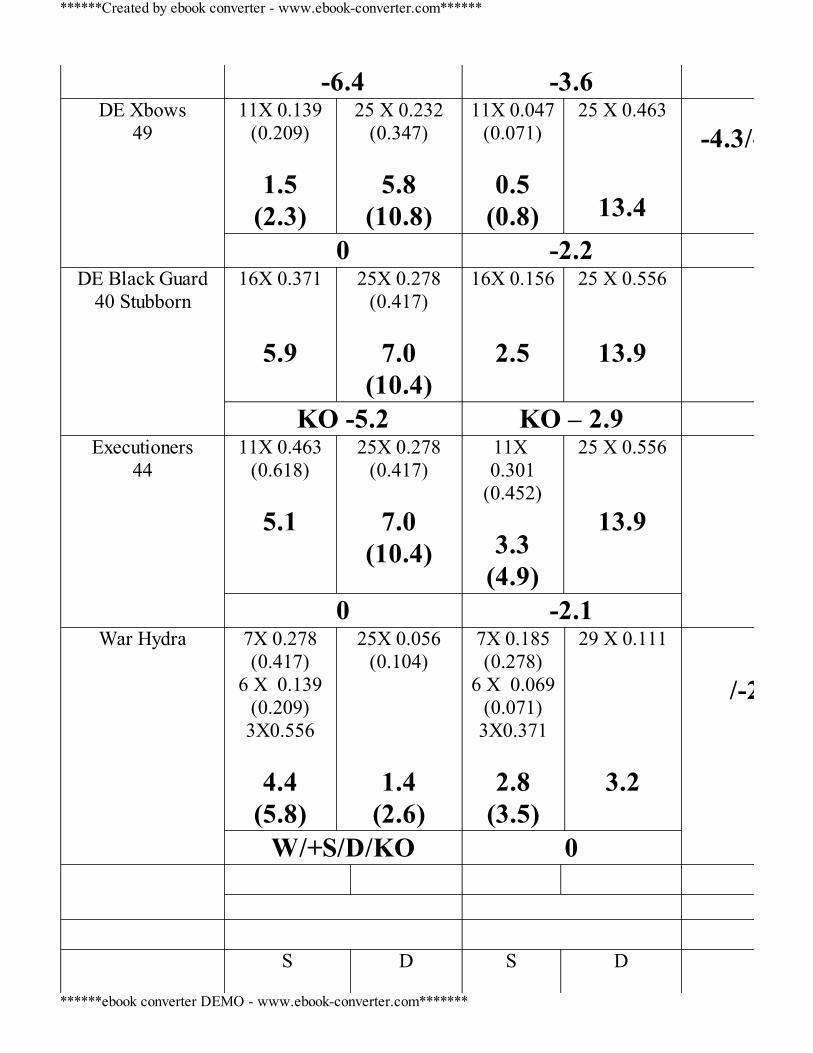
-6.4 -3.6
DE Xbows49
11X 0.139(0.209)
1.5
(2.3)
25 X 0.232(0.347)
5.8
(10.8)
11X 0.047(0.071)
0.5
(0.8)
25 X 0.463
13.4
-4.3/-12.9
0 -2.2
DE Black Guard40 Stubborn
16X 0.371
5.9
25X 0.278(0.417)
7.0
(10.4)
16X 0.156
2.5
25 X 0.556
13.9
KO -5.2 KO – 2.9
Executioners44
11X 0.463(0.618)
5.1
25X 0.278(0.417)
7.0
(10.4)
11X 0.301
(0.452)
3.3(4.9)
25 X 0.556
13.9
0 -2.1War Hydra 7X 0.278
(0.417)6 X 0.139
(0.209)3X0.556
4.4
(5.8)
25X 0.056(0.104)
1.4(2.6)
7X 0.185(0.278)
6 X 0.069(0.071)3X0.371
2.8
(3.5)
29 X 0.111
3.2
/-2.7
W/+S/D/KO 0
S D S D
******Created by ebook converter - www.ebook-converter.com******
******ebook converter DEMO - www.ebook-converter.com*******
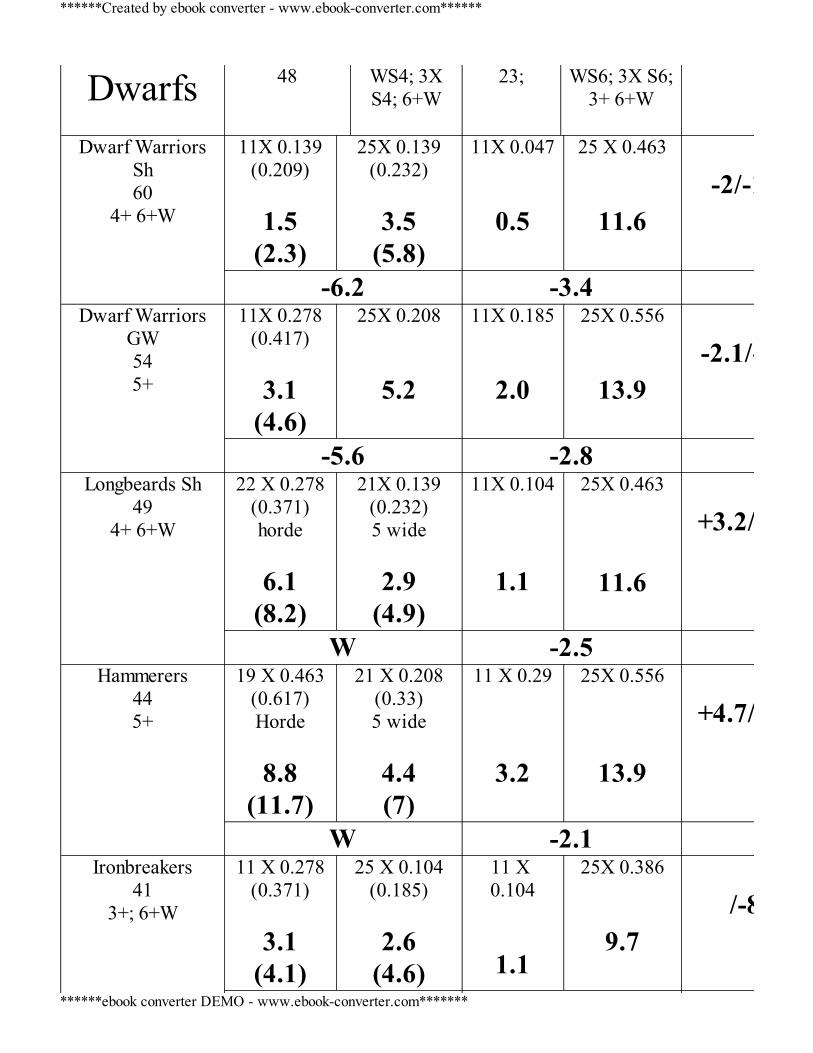
Dwarfs 48 WS4; 3XS4; 6+W
23; WS6; 3X S6;3+ 6+W
Dwarf Warriors
Sh60
4+ 6+W
11X 0.139(0.209)
1.5
(2.3)
25X 0.139(0.232)
3.5
(5.8)
11X 0.047
0.5
25 X 0.463
11.6
-2/-11.1
-6.2 -3.4
Dwarf WarriorsGW545+
11X 0.278(0.417)
3.1
(4.6)
25X 0.208
5.2
11X 0.185
2.0
25X 0.556
13.9
-2.1/-11.9
-5.6 -2.8
Longbeards Sh49
4+ 6+W
22 X 0.278(0.371)horde
6.1
(8.2)
21X 0.139(0.232)5 wide
2.9
(4.9)
11X 0.104
1.1
25X 0.463
11.6
+3.2/-10.5
W -2.5
Hammerers445+
19 X 0.463(0.617)Horde
8.8
(11.7)
21 X 0.208(0.33)5 wide
4.4(7)
11 X 0.29
3.2
25X 0.556
13.9
+4.7/-10.7
W -2.1
Ironbreakers41
3+; 6+W
11 X 0.278(0.371)
3.1
(4.1)
25 X 0.104(0.185)
2.6
(4.6)
11 X 0.104
1.1
25X 0.386
9.7
/-8
******Created by ebook converter - www.ebook-converter.com******
******ebook converter DEMO - www.ebook-converter.com*******
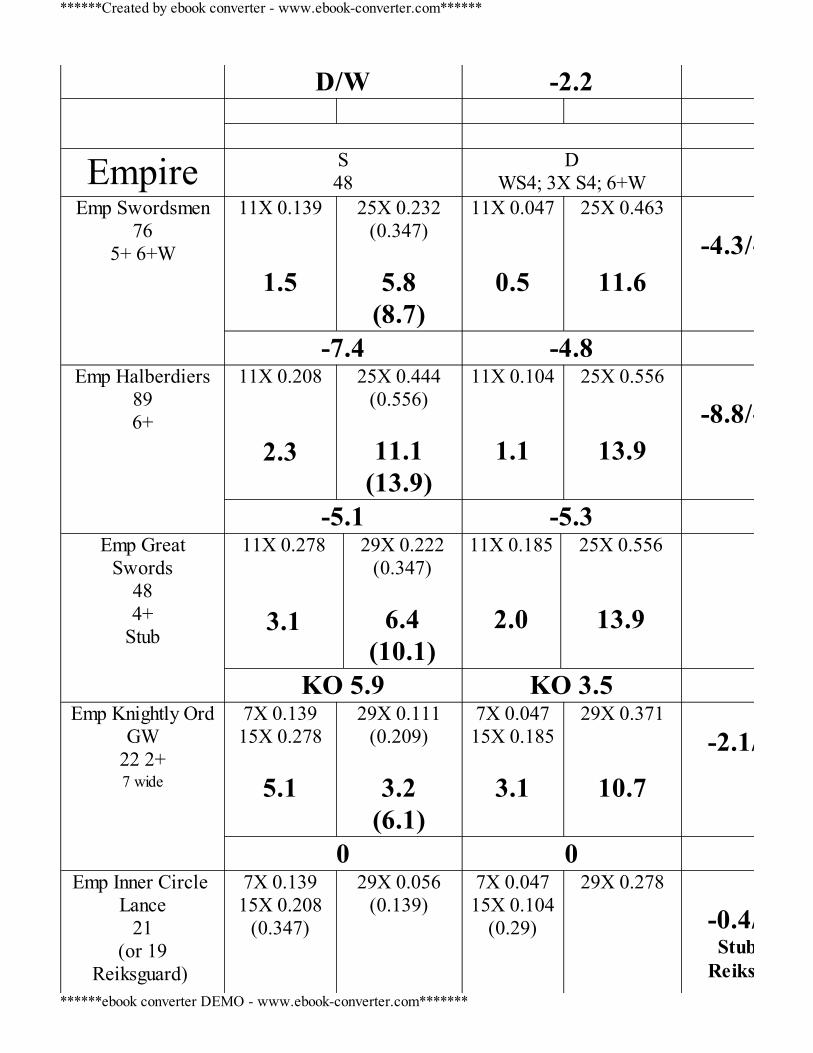
D/W -2.2
Empire S48
DWS4; 3X S4; 6+W
Emp Swordsmen76
5+ 6+W
11X 0.139
1.5
25X 0.232(0.347)
5.8
(8.7)
11X 0.047
0.5
25X 0.463
11.6
-4.3/-11.1
-7.4 -4.8
Emp Halberdiers896+
11X 0.208
2.3
25X 0.444(0.556)
11.1
(13.9)
11X 0.104
1.1
25X 0.556
13.9
-8.8/-12.8
-5.1 -5.3
Emp GreatSwords
484+
Stub
11X 0.278
3.1
29X 0.222(0.347)
6.4
(10.1)
11X 0.185
2.0
25X 0.556
13.9
KO 5.9 KO 3.5
Emp Knightly OrdGW
22 2+7 wide
7X 0.13915X 0.278
5.1
29X 0.111(0.209)
3.2
(6.1)
7X 0.04715X 0.185
3.1
29X 0.371
10.7
-2.1/-7.3
0 0
Emp Inner Circle Lance
21(or 19
Reiksguard)
7X 0.13915X 0.208
(0.347)
29X 0.056(0.139)
7X 0.04715X 0.104
(0.29)
29X 0.278
-0.4/-3.8Stubborn
Reiksguard
******Created by ebook converter - www.ebook-converter.com******
******ebook converter DEMO - www.ebook-converter.com*******
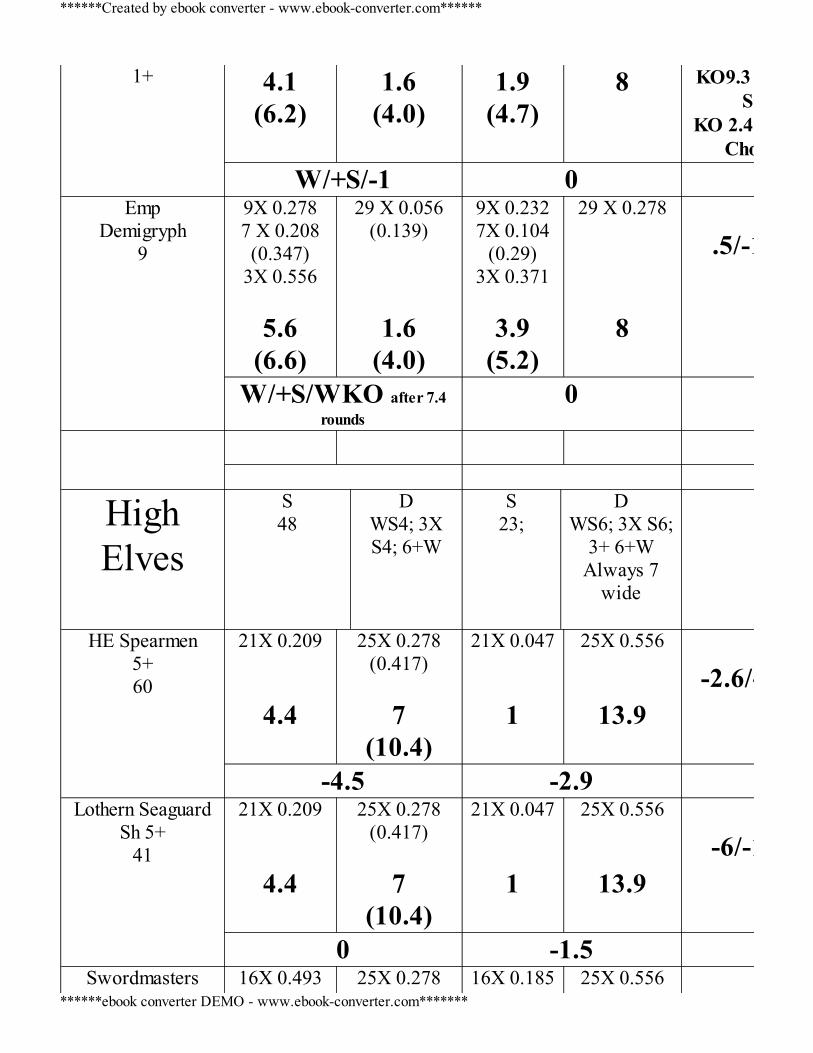
1+ 4.1(6.2)
1.6(4.0)
1.9(4.7)
8 KO9.3 againstSO
KO 2.4 againstChosen
W/+S/-1 0
EmpDemigryph
9
9X 0.2787 X 0.208(0.347)
3X 0.556
5.6(6.6)
29 X 0.056(0.139)
1.6(4.0)
9X 0.2327X 0.104
(0.29)3X 0.371
3.9
(5.2)
29 X 0.278 8
.5/-10.9
W/+S/WKO after 7.4rounds
0
HighElves
S48
DWS4; 3XS4; 6+W
S23;
DWS6; 3X S6;
3+ 6+WAlways 7
wide
HE Spearmen5+60
21X 0.209
4.4
25X 0.278(0.417)
7
(10.4)
21X 0.047 1
25X 0.556
13.9
-2.6/-12.9
-4.5 -2.9
Lothern SeaguardSh 5+
41
21X 0.209
4.4
25X 0.278(0.417)
7
(10.4)
21X 0.047 1
25X 0.556
13.9
-6/-12.9
0 -1.5
Swordmasters 16X 0.493 25X 0.278 16X 0.185 25X 0.556
******Created by ebook converter - www.ebook-converter.com******
******ebook converter DEMO - www.ebook-converter.com*******

35
7.9
(0.417) 7
(10.4)
3
13.9
-2.5/-10.9
0/Draw/KO -1.1
Phoenix Guard35
11X 0.371
4.1
25X 0.139(0.209)
3.5
(5.2)
11X 0.104
1.1
25X 0.278 7
-1.1/-5.9
0/Draw/KO -2.1
Dragon Princes17
16X 0.247(0.493)
5X 0.139
4.6(8.6)
25X 0.111(0.209)
2.8(5.2)
16X 0.047(0.185)
5X 0.047 1
(3.2)
25X 0.495
12.4
-0.2/-9.2
W;+S/-1 0
White Lions35
Stubborn
11X 0.617
6.8
25X 0.278(0.417)
7
(10.4)
11X 0.29
3.2
25X 0.556
13.9
-3.6/-10.7
KO - 3.5 KO - 2.5
Lizardmen
SaurusSh 48
4+ 6+W
16X 0.208
29 X 0.185(0.308)
16X 0.104
29 X 0.463
-5.6/-11.7
******Created by ebook converter - www.ebook-converter.com******
******ebook converter DEMO - www.ebook-converter.com*******
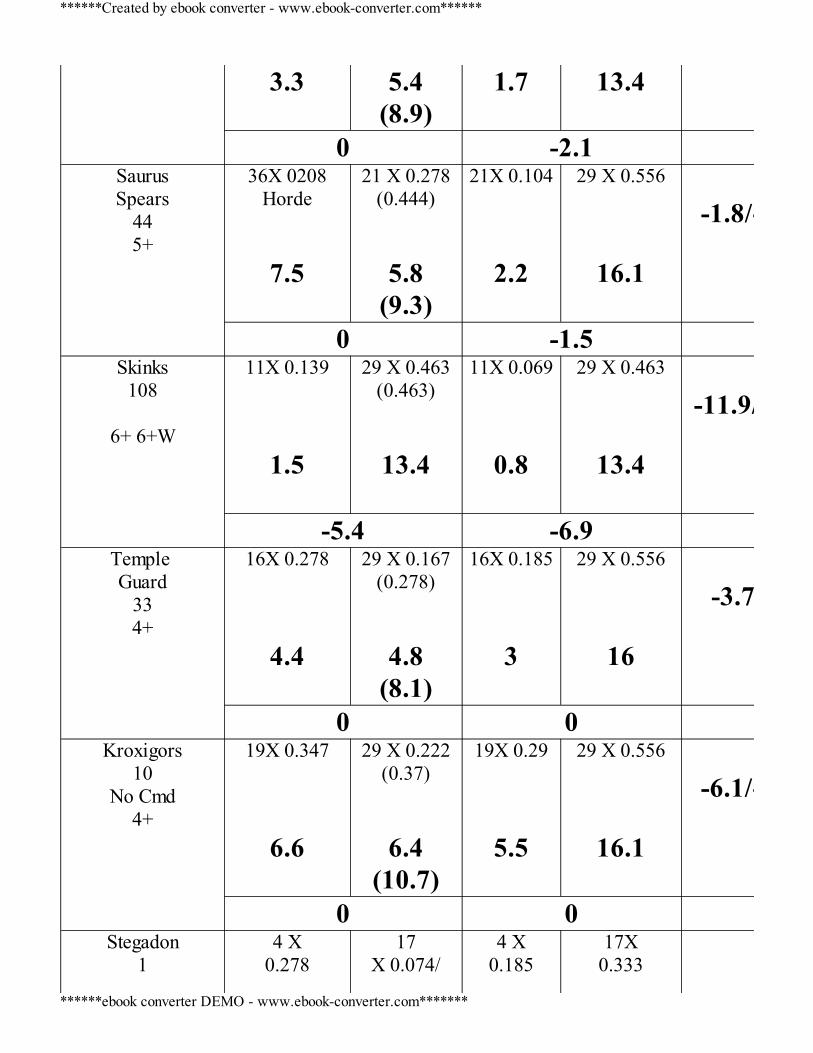
3.3 5.4(8.9)
1.7 13.4
0 -2.1
SaurusSpears
445+
36X 0208Horde
7.5
21 X 0.278(0.444)
5.8(9.3)
21X 0.104
2.2
29 X 0.556
16.1
-1.8/-13.9
0 -1.5
Skinks108
6+ 6+W
11X 0.139
1.5
29 X 0.463(0.463)
13.4
11X 0.069
0.8
29 X 0.463
13.4
-11.9/-12.6
-5.4 -6.9
Temple Guard
334+
16X 0.278
4.4
29 X 0.167(0.278)
4.8(8.1)
16X 0.185 3
29 X 0.556
16
-3.7/-13
0 0
Kroxigors10
No Cmd4+
19X 0.347
6.6
29 X 0.222(0.37)
6.4(10.7)
19X 0.29
5.5
29 X 0.556
16.1
-6.1/-12.6
0 0
Stegadon1
4 X0.278
17X 0.074/
4 X0.185
17X0.333
******Created by ebook converter - www.ebook-converter.com******
******ebook converter DEMO - www.ebook-converter.com*******
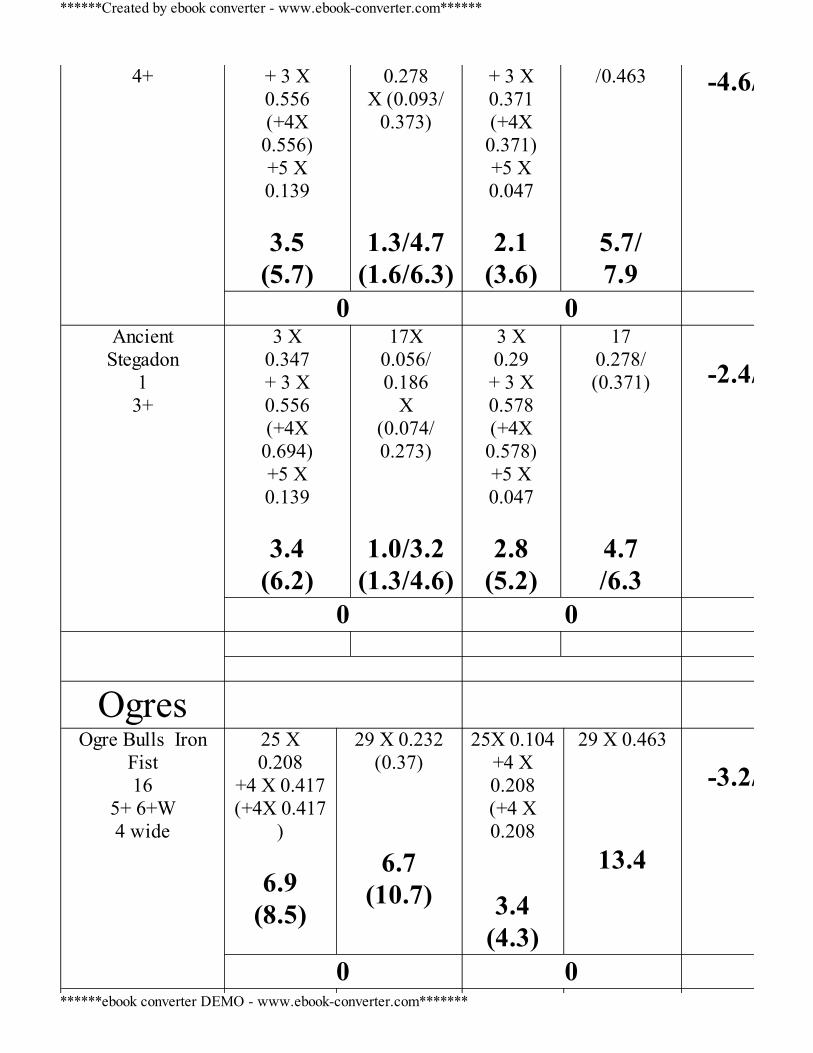
4+ + 3 X0.556(+4X0.556)+5 X0.139
3.5
(5.7)
0.278X (0.093/
0.373)
1.3/4.7(1.6/6.3)
+ 3 X0.371(+4X0.371)+5 X0.047
2.1
(3.6)
/0.463
5.7/7.9
-4.6/-8.3
0 0
AncientStegadon
13+
3 X0.347+ 3 X0.556(+4X0.694)+5 X0.139
3.4
(6.2)
17X0.056/0.186
X(0.074/0.273)
1.0/3.2(1.3/4.6)
3 X0.29+ 3 X0.578(+4X0.578)+5 X0.047
2.8
(5.2)
170.278/(0.371)
4.7/6.3
-2.4/-5.1
0 0
Ogres
Ogre Bulls IronFist16
5+ 6+W4 wide
25 X0.208
+4 X 0.417(+4X 0.417
)
6.9(8.5)
29 X 0.232(0.37)
6.7(10.7)
25X 0.104+4 X0.208(+4 X0.208
3.4(4.3)
29 X 0.463
13.4
-3.2/-9.1
0 0
******Created by ebook converter - www.ebook-converter.com******
******ebook converter DEMO - www.ebook-converter.com*******
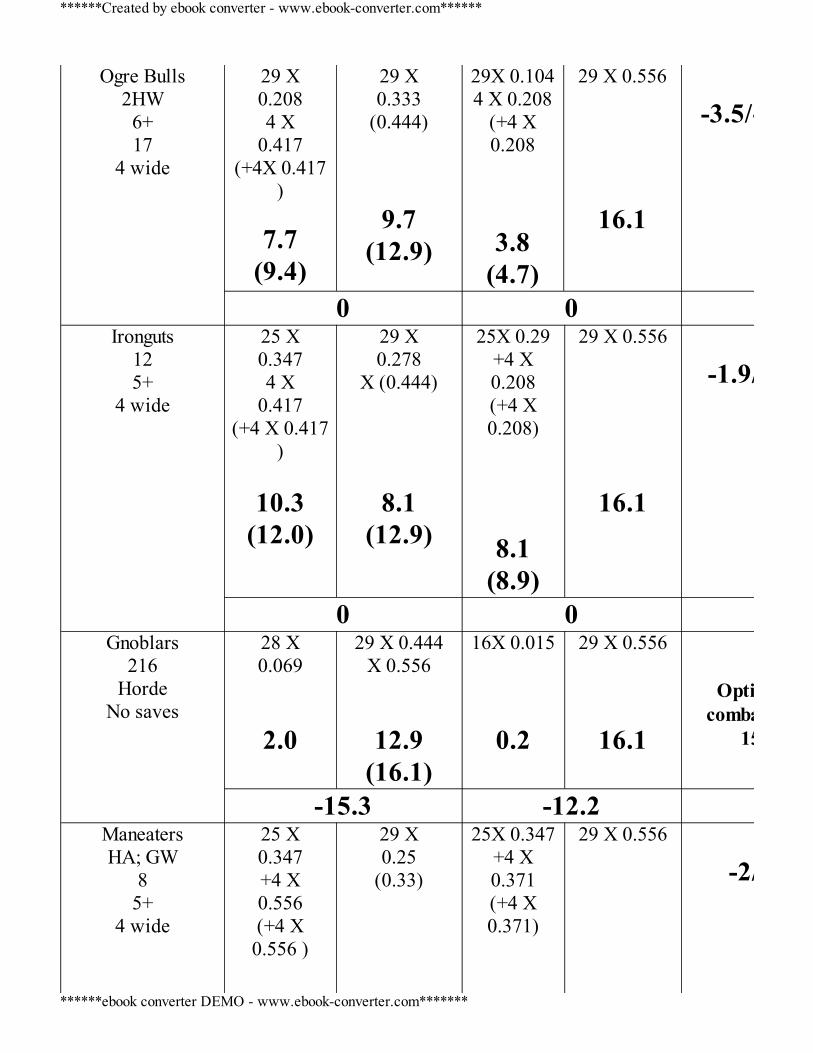
Ogre Bulls2HW
6+17
4 wide
29 X0.2084 X
0.417(+4X 0.417
)
7.7(9.4)
29 X0.333
(0.444)
9.7(12.9)
29X 0.1044 X 0.208
(+4 X0.208
3.8(4.7)
29 X 0.556
16.1
-3.5/-11.4
0 0
Ironguts125+
4 wide
25 X0.3474 X
0.417(+4 X 0.417
)
10.3(12.0)
29 X0.278
X (0.444)
8.1(12.9)
25X 0.29+4 X0.208(+4 X0.208)
8.1(8.9)
29 X 0.556
16.1
-1.9/-7.2
0 0
Gnoblars216
HordeNo saves
28 X0.069
2.0
29 X 0.444X 0.556
12.9(16.1)
16X 0.015
0.2
29 X 0.556
16.1
Optimumcombat
155
-15.3 -12.2
ManeatersHA; GW
85+
4 wide
25 X0.347+4 X0.556(+4 X0.556 )
29 X0.25
(0.33)
25X 0.347+4 X0.371(+4 X0.371)
29 X 0.556
-2/-9
******Created by ebook converter - www.ebook-converter.com******
******ebook converter DEMO - www.ebook-converter.com*******
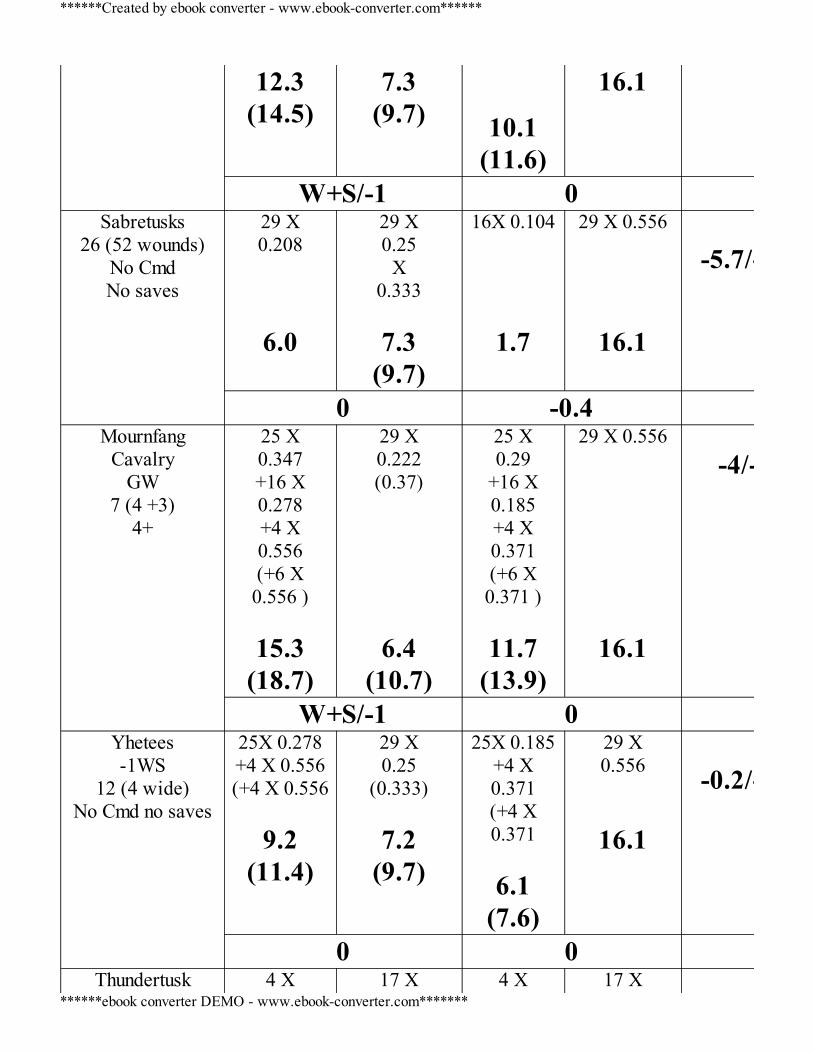
12.3(14.5)
7.3(9.7)
10.1(11.6)
16.1
W+S/-1 0
Sabretusks26 (52 wounds)
No CmdNo saves
29 X0.208
6.0
29 X0.25
X0.333
7.3
(9.7)
16X 0.104
1.7
29 X 0.556
16.1
-5.7/-17.4
0 -0.4
MournfangCavalry
GW7 (4 +3)
4+
25 X0.347+16 X0.278+4 X0.556(+6 X0.556 )
15.3
(18.7)
29 X0.222(0.37)
6.4(10.7)
25 X0.29
+16 X0.185+4 X0.371(+6 X0.371 )
11.7
(13.9)
29 X 0.556
16.1
-4/-
W+S/-1 0
Yhetees-1WS
12 (4 wide)No Cmd no saves
25X 0.278+4 X 0.556(+4 X 0.556
9.2
(11.4)
29 X0.25
(0.333)
7.2(9.7)
25X 0.185+4 X0.371(+4 X0.371
6.1
(7.6)
29 X0.556
16.1
-0.2/-16.1
0 0
Thundertusk 4 X 17 X 4 X 17 X
******Created by ebook converter - www.ebook-converter.com******
******ebook converter DEMO - www.ebook-converter.com*******
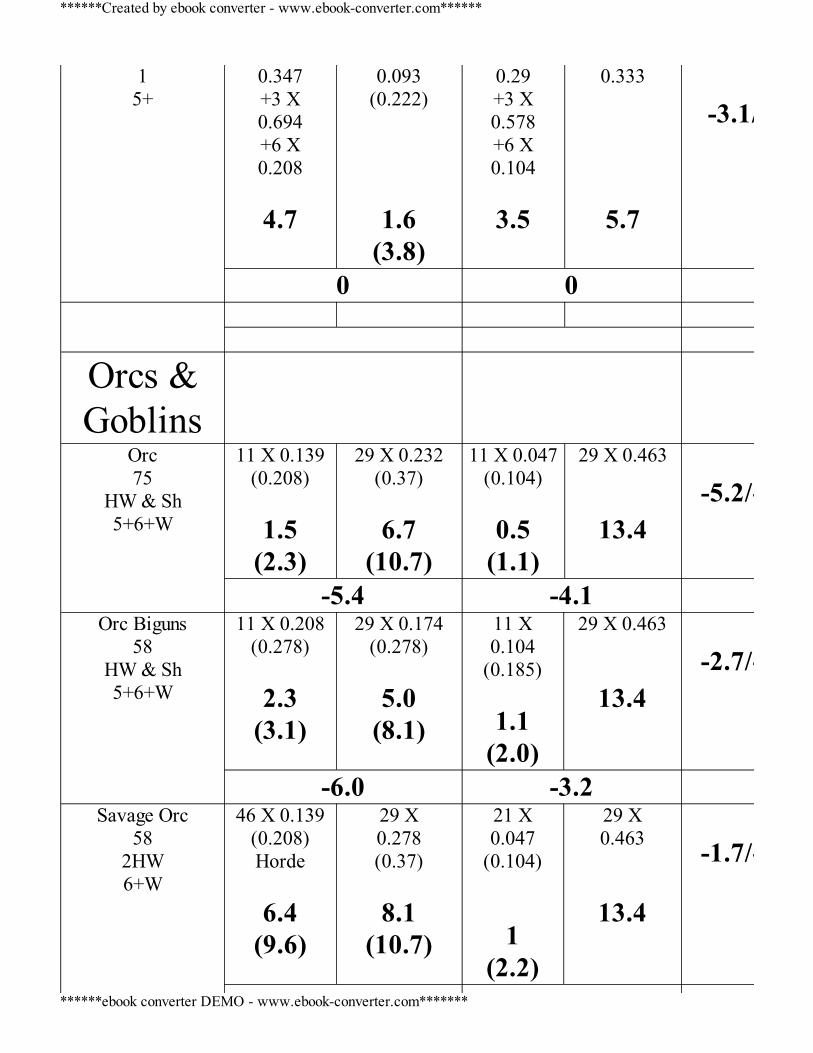
15+
0.347+3 X0.694+6 X0.208
4.7
0.093(0.222)
1.6(3.8)
0.29+3 X0.578+6 X0.104
3.5
0.333
5.7
-3.1/-2.2
0 0
Orcs &Goblins
Orc75
HW & Sh5+6+W
11 X 0.139(0.208)
1.5
(2.3)
29 X 0.232(0.37)
6.7
(10.7)
11 X 0.047(0.104)
0.5
(1.1)
29 X 0.463
13.4
-5.2/-12.9
-5.4 -4.1
Orc Biguns58
HW & Sh5+6+W
11 X 0.208(0.278)
2.3
(3.1)
29 X 0.174(0.278)
5.0
(8.1)
11 X0.104
(0.185)
1.1(2.0)
29 X 0.463
13.4
-2.7/-12.3
-6.0 -3.2
Savage Orc58
2HW6+W
46 X 0.139(0.208)Horde
6.4
(9.6)
29 X0.278(0.37)
8.1
(10.7)
21 X0.047
(0.104) 1
(2.2)
29 X0.463
13.4
-1.7/-12.4
******Created by ebook converter - www.ebook-converter.com******
******ebook converter DEMO - www.ebook-converter.com*******
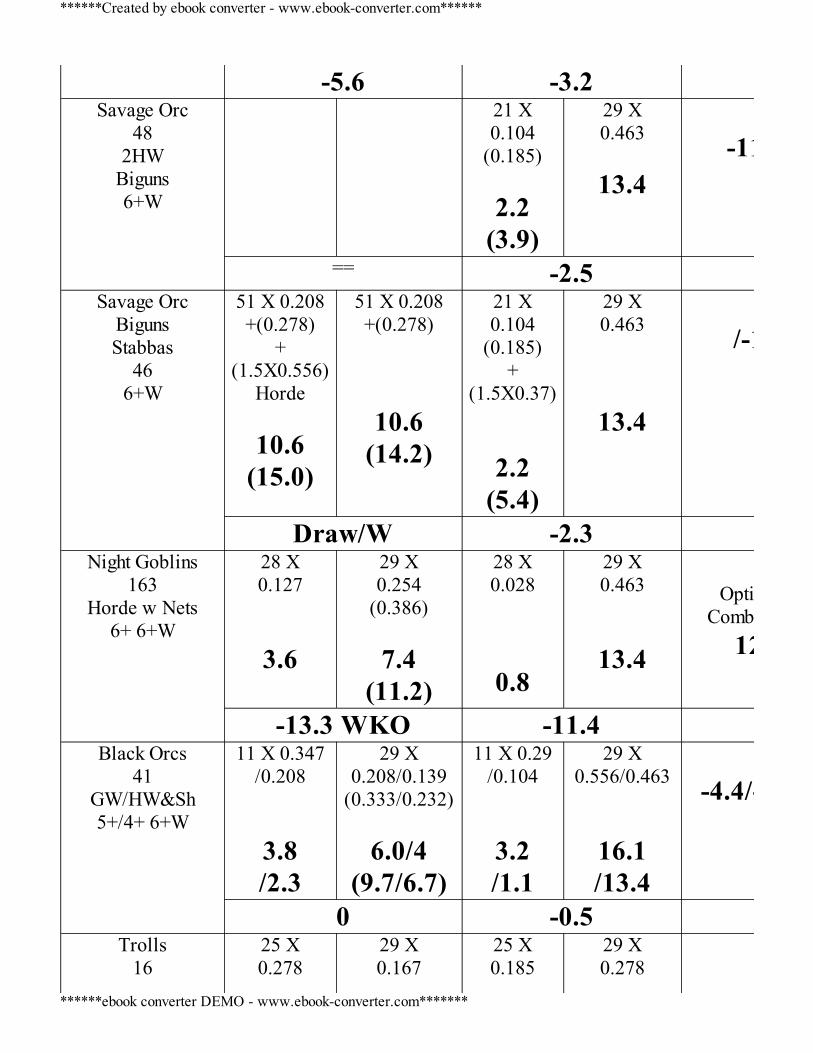
-5.6 -3.2
Savage Orc48
2HWBiguns6+W
21 X0.104
(0.185)
2.2(3.9)
29 X0.463
13.4
-11
== -2.5
Savage OrcBigunsStabbas
466+W
51 X 0.208+(0.278)
+(1.5X0.556)
Horde
10.6(15.0)
51 X 0.208+(0.278)
10.6(14.2)
21 X0.104
(0.185)+
(1.5X0.37)
2.2(5.4)
29 X0.463
13.4
/-12
Draw/W -2.3
Night Goblins163
Horde w Nets6+ 6+W
28 X0.127
3.6
29 X0.254
(0.386)
7.4(11.2)
28 X0.028
0.8
29 X0.463
13.4
Optimum
Combat 128
-13.3 WKO -11.4
Black Orcs41
GW/HW&Sh5+/4+ 6+W
11 X 0.347/0.208
3.8/2.3
29 X0.208/0.139
(0.333/0.232)
6.0/4(9.7/6.7)
11 X 0.29/0.104
3.2/1.1
29 X0.556/0.463
16.1/13.4
-4.4/-12.3
0 -0.5
Trolls16
25 X0.278
29 X0.167
25 X0.185
29 X0.278
******Created by ebook converter - www.ebook-converter.com******
******ebook converter DEMO - www.ebook-converter.com*******
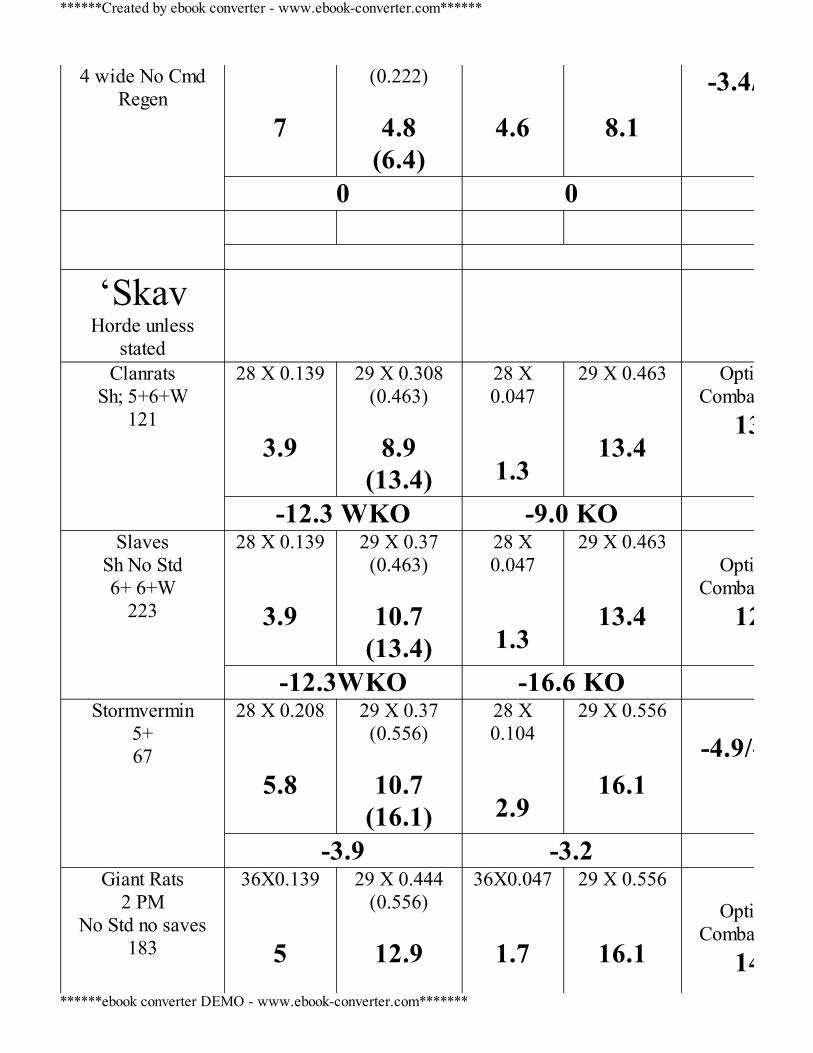
4 wide No CmdRegen
7
(0.222)
4.8(6.4)
4.6
8.1
-3.4/-3.5
0 0
‘SkavHorde unless
stated
ClanratsSh; 5+6+W
121
28 X 0.139
3.9
29 X 0.308(0.463)
8.9
(13.4)
28 X0.047
1.3
29 X 0.463
13.4
OptimumCombat
134
-12.3 WKO -9.0 KO
SlavesSh No Std6+ 6+W
223
28 X 0.139
3.9
29 X 0.37(0.463)
10.7
(13.4)
28 X0.047
1.3
29 X 0.463
13.4
Optimum
Combat 120
-12.3WKO -16.6 KO
Stormvermin5+67
28 X 0.208
5.8
29 X 0.37(0.556)
10.7
(16.1)
28 X0.104
2.9
29 X 0.556
16.1
-4.9/-13.2
-3.9 -3.2
Giant Rats2 PM
No Std no saves183
36X0.139 5
29 X 0.444(0.556)
12.9
36X0.047
1.7
29 X 0.556
16.1
Optimum
Combat 14
******Created by ebook converter - www.ebook-converter.com******
******ebook converter DEMO - www.ebook-converter.com*******
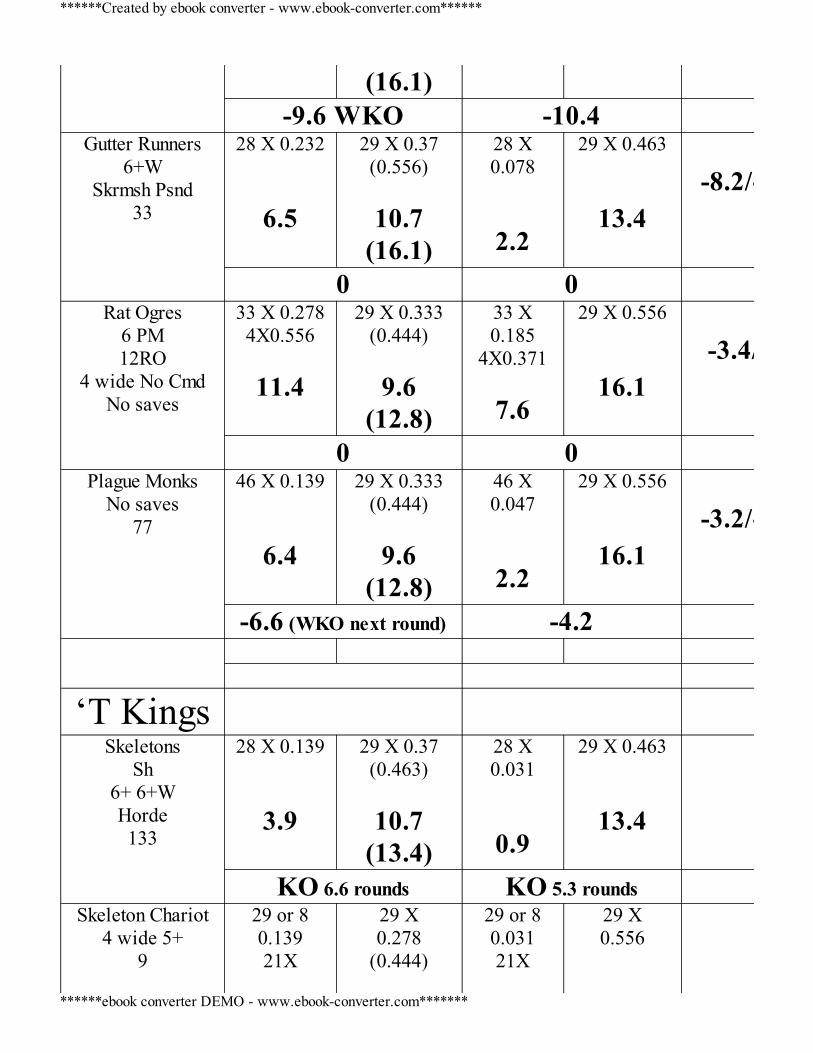
(16.1)-9.6 WKO -10.4
Gutter Runners6+W
Skrmsh Psnd33
28 X 0.232
6.5
29 X 0.37(0.556)
10.7
(16.1)
28 X0.078
2.2
29 X 0.463
13.4
-8.2/-15.2
0 0
Rat Ogres6 PM12RO
4 wide No CmdNo saves
33 X 0.2784X0.556
11.4
29 X 0.333(0.444)
9.6
(12.8)
33 X0.185
4X0.371
7.6
29 X 0.556
16.1
-3.4/-8.5
0 0
Plague MonksNo saves
77
46 X 0.139
6.4
29 X 0.333(0.444)
9.6
(12.8)
46 X0.047
2.2
29 X 0.556
16.1
-3.2/-13.9
-6.6 (WKO next round) -4.2
‘T Kings
SkeletonsSh
6+ 6+WHorde133
28 X 0.139
3.9
29 X 0.37(0.463)
10.7
(13.4)
28 X0.031
0.9
29 X 0.463
13.4
KO 6.6 rounds KO 5.3 rounds
Skeleton Chariot4 wide 5+
9
29 or 80.13921X
29 X0.278
(0.444)
29 or 80.03121X
29 X0.556
******Created by ebook converter - www.ebook-converter.com******
******ebook converter DEMO - www.ebook-converter.com*******
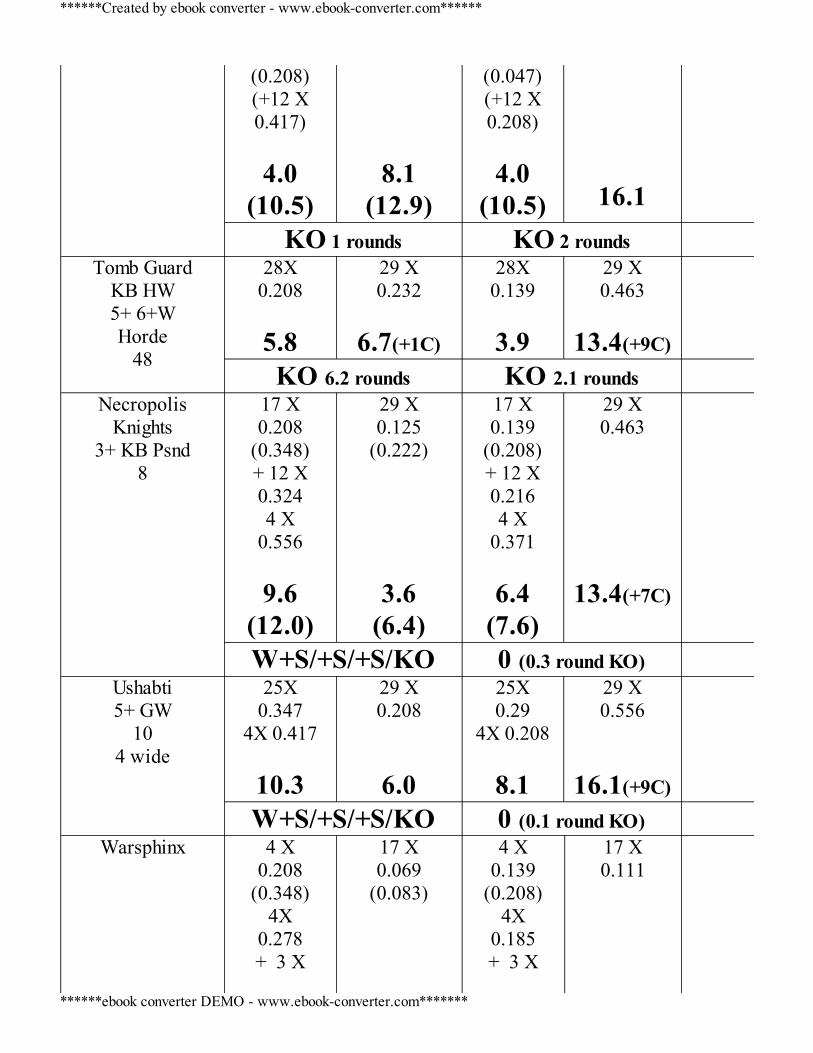
(0.208)(+12 X0.417)
4.0
(10.5)
8.1(12.9)
(0.047)(+12 X0.208)
4.0
(10.5)
16.1KO 1 rounds KO 2 rounds
Tomb GuardKB HW5+ 6+WHorde
48
28X0.208
5.8
29 X0.232
6.7(+1C)
28X0.139
3.9
29 X0.463
13.4(+9C)
KO 6.2 rounds KO 2.1 rounds
NecropolisKnights
3+ KB Psnd8
17 X0.208
(0.348)+ 12 X0.3244 X
0.556
9.6(12.0)
29 X0.125
(0.222)
3.6(6.4)
17 X0.139
(0.208)+ 12 X0.2164 X
0.371
6.4(7.6)
29 X0.463
13.4(+7C)
W+S/+S/+S/KO 0 (0.3 round KO)
Ushabti5+ GW
104 wide
25X0.347
4X 0.417
10.3
29 X0.208
6.0
25X0.29
4X 0.208
8.1
29 X0.556
16.1(+9C)
W+S/+S/+S/KO 0 (0.1 round KO)
Warsphinx 4 X0.208
(0.348)4X
0.278+ 3 X
17 X0.069
(0.083)
4 X0.139
(0.208)4X
0.185+ 3 X
17 X0.111
******Created by ebook converter - www.ebook-converter.com******
******ebook converter DEMO - www.ebook-converter.com*******
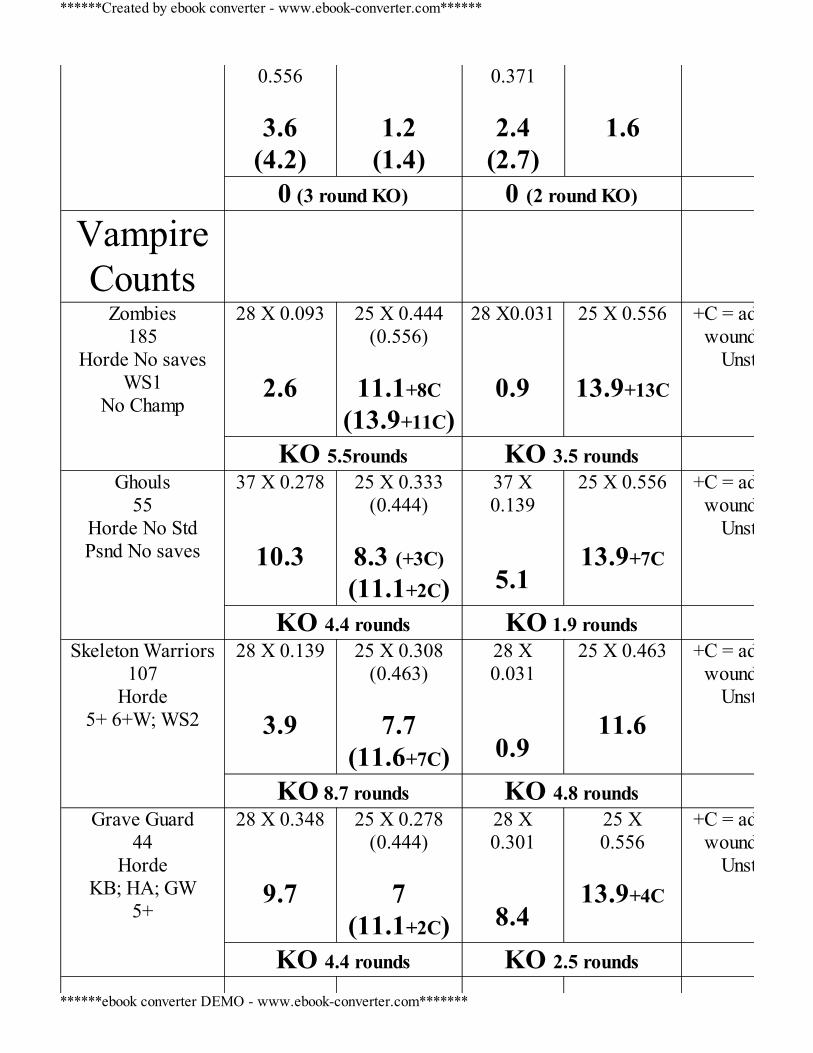
0.556
3.6(4.2)
1.2(1.4)
0.371
2.4(2.7)
1.6
0 (3 round KO) 0 (2 round KO)
VampireCounts
Zombies185
Horde No savesWS1
No Champ
28 X 0.093
2.6
25 X 0.444(0.556)
11.1+8C
(13.9+11C)
28 X0.031
0.9
25 X 0.556
13.9+13C
+C = additionalwounds form
Unstable
KO 5.5rounds KO 3.5 rounds
Ghouls55
Horde No StdPsnd No saves
37 X 0.278
10.3
25 X 0.333(0.444)
8.3 (+3C)(11.1+2C)
37 X0.139
5.1
25 X 0.556
13.9+7C
+C = additionalwounds form
Unstable
KO 4.4 rounds KO 1.9 rounds
Skeleton Warriors107
Horde5+ 6+W; WS2
28 X 0.139
3.9
25 X 0.308(0.463)
7.7
(11.6+7C)
28 X0.031
0.9
25 X 0.463
11.6
+C = additionalwounds form
Unstable
KO 8.7 rounds KO 4.8 rounds
Grave Guard44
HordeKB; HA; GW
5+
28 X 0.348
9.7
25 X 0.278(0.444)
7
(11.1+2C)
28 X0.301
8.4
25 X0.556
13.9+4C
+C = additionalwounds form
Unstable
KO 4.4 rounds KO 2.5 rounds
******Created by ebook converter - www.ebook-converter.com******
******ebook converter DEMO - www.ebook-converter.com*******
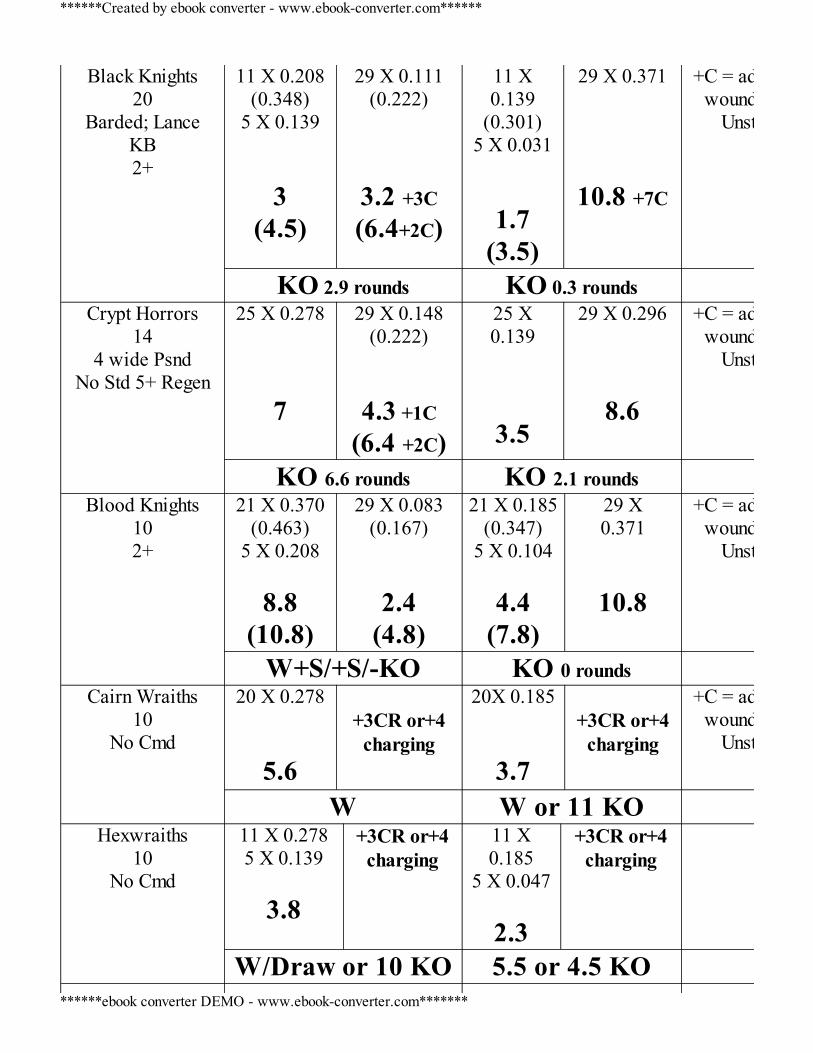
Black Knights20
Barded; LanceKB2+
11 X 0.208(0.348)
5 X 0.139 3
(4.5)
29 X 0.111(0.222)
3.2 +3C(6.4+2C)
11 X0.139
(0.301)5 X 0.031
1.7(3.5)
29 X 0.371
10.8 +7C
+C = additionalwounds form
Unstable
KO 2.9 rounds KO 0.3 rounds
Crypt Horrors14
4 wide PsndNo Std 5+ Regen
25 X 0.278 7
29 X 0.148(0.222)
4.3 +1C(6.4 +2C)
25 X0.139
3.5
29 X 0.296
8.6
+C = additionalwounds form
Unstable
KO 6.6 rounds KO 2.1 rounds
Blood Knights102+
21 X 0.370(0.463)
5 X 0.208
8.8(10.8)
29 X 0.083(0.167)
2.4(4.8)
21 X 0.185(0.347)
5 X 0.104
4.4(7.8)
29 X0.371
10.8
+C = additionalwounds form
Unstable
W+S/+S/-KO KO 0 rounds
Cairn Wraiths10
No Cmd
20 X 0.278
5.6
+3CR or+4
charging
20X 0.185
3.7
+3CR or+4
charging
+C = additionalwounds form
Unstable
W W or 11 KO
Hexwraiths10
No Cmd
11 X 0.2785 X 0.139
3.8
+3CR or+4charging
11 X0.185
5 X 0.047
2.3
+3CR or+4charging
W/Draw or 10 KO 5.5 or 4.5 KO
******Created by ebook converter - www.ebook-converter.com******
******ebook converter DEMO - www.ebook-converter.com*******
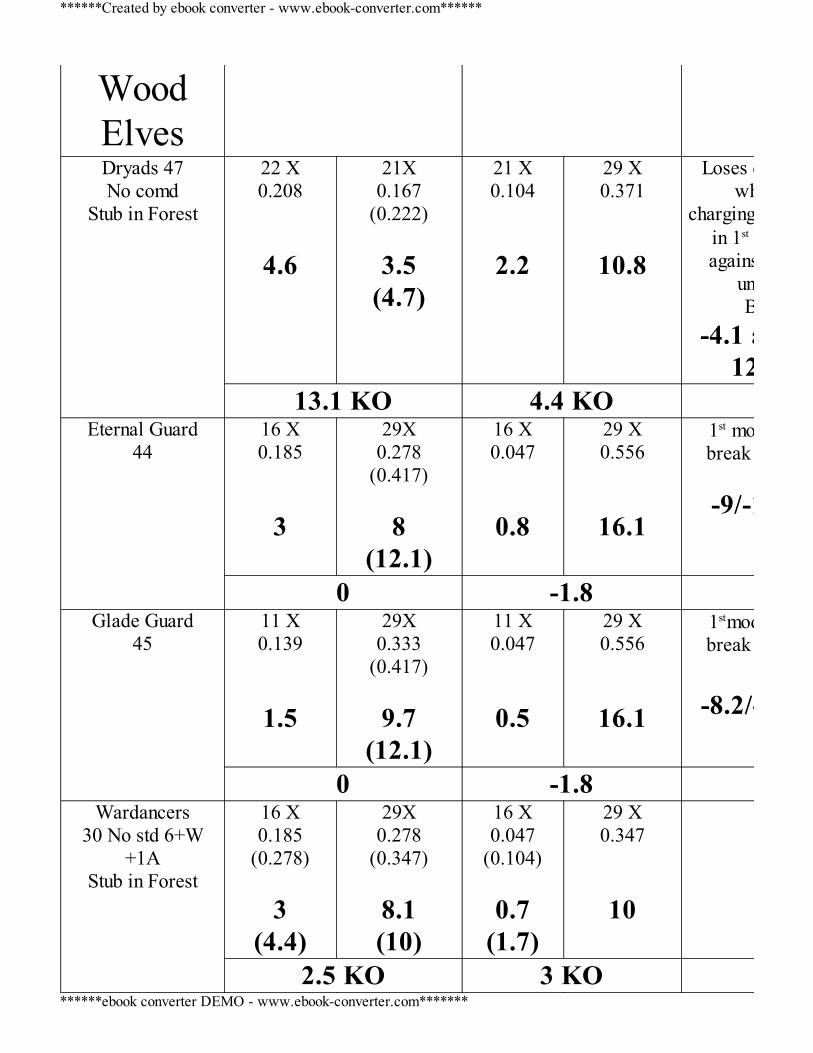
WoodElves
Dryads 47No comd
Stub in Forest
22 X0.208
4.6
21X0.167
(0.222)
3.5(4.7)
21 X0.104
2.2
29 X0.371
10.8
Loses combatwhen
charging/chargedin 1st roundagainst both
unitsBy
-4.1 and -12.6
13.1 KO 4.4 KO
Eternal Guard44
16 X0.185
3
29X0.278
(0.417) 8
(12.1)
16 X0.047
0.8
29 X0.556
16.1
1st modifiedbreak test @
-9/-15.3
0 -1.8 Glade Guard
4511 X0.139
1.5
29X0.333
(0.417)
9.7(12.1)
11 X0.047
0.5
29 X0.556
16.1
1stmodified break test @
-8.2/-15.6
0 -1.8 Wardancers
30 No std 6+W+1A
Stub in Forest
16 X0.185
(0.278) 3
(4.4)
29X0.278
(0.347)
8.1(10)
16 X0.047
(0.104)
0.7(1.7)
29 X0.347
10
2.5 KO 3 KO
******Created by ebook converter - www.ebook-converter.com******
******ebook converter DEMO - www.ebook-converter.com*******
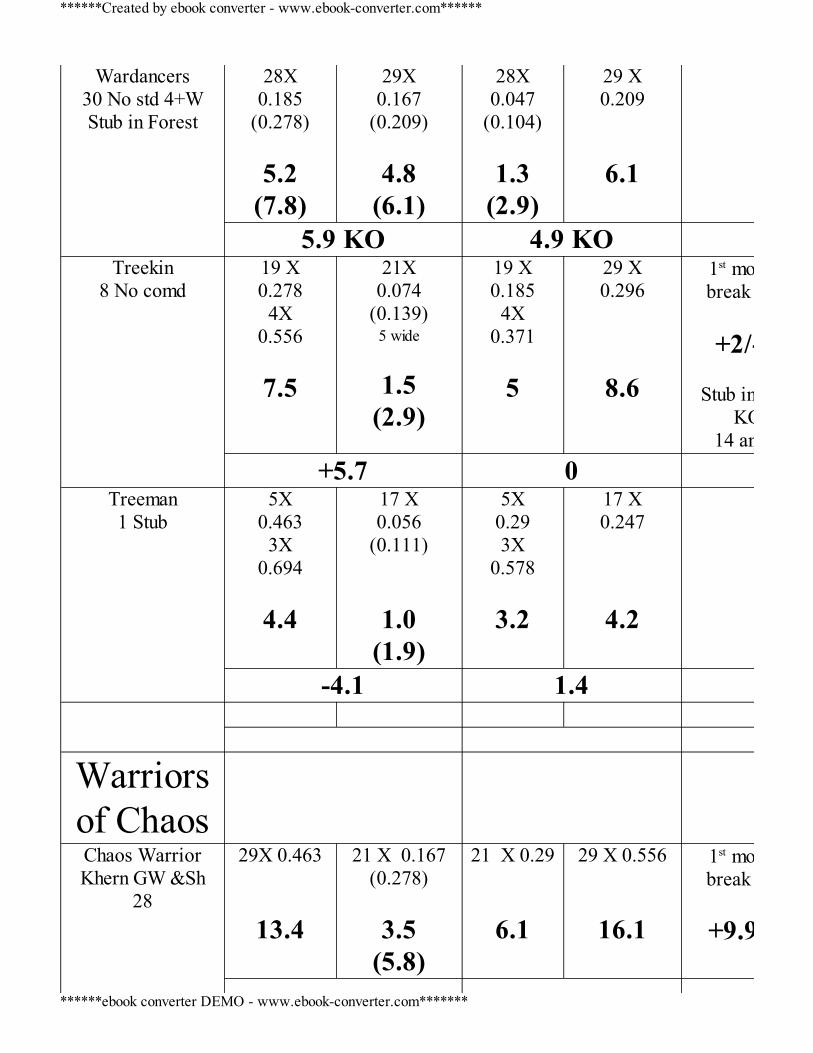
Wardancers30 No std 4+WStub in Forest
28X0.185
(0.278)
5.2(7.8)
29X0.167
(0.209)
4.8(6.1)
28X0.047
(0.104)
1.3(2.9)
29 X0.209
6.1
5.9 KO 4.9 KO
Treekin8 No comd
19 X0.278
4X0.556
7.5
21X0.074
(0.139)5 wide
1.5
(2.9)
19 X0.185
4X0.371
5
29 X0.296
8.6
1st modifiedbreak test @
+2/-
Stub in
KO =14 and 2.8
+5.7 0
Treeman1 Stub
5X0.463
3X0.694
4.4
17 X0.056
(0.111)
1.0(1.9)
5X0.293X
0.578
3.2
17 X0.247
4.2
-4.1 1.4
Warriorsof Chaos
Chaos WarriorKhern GW &Sh
28
29X 0.463
13.4
21 X 0.167(0.278)
3.5
(5.8)
21 X 0.29
6.1
29 X 0.556
16.1
1st modifiedbreak test @
+9.9
******Created by ebook converter - www.ebook-converter.com******
******ebook converter DEMO - www.ebook-converter.com*******
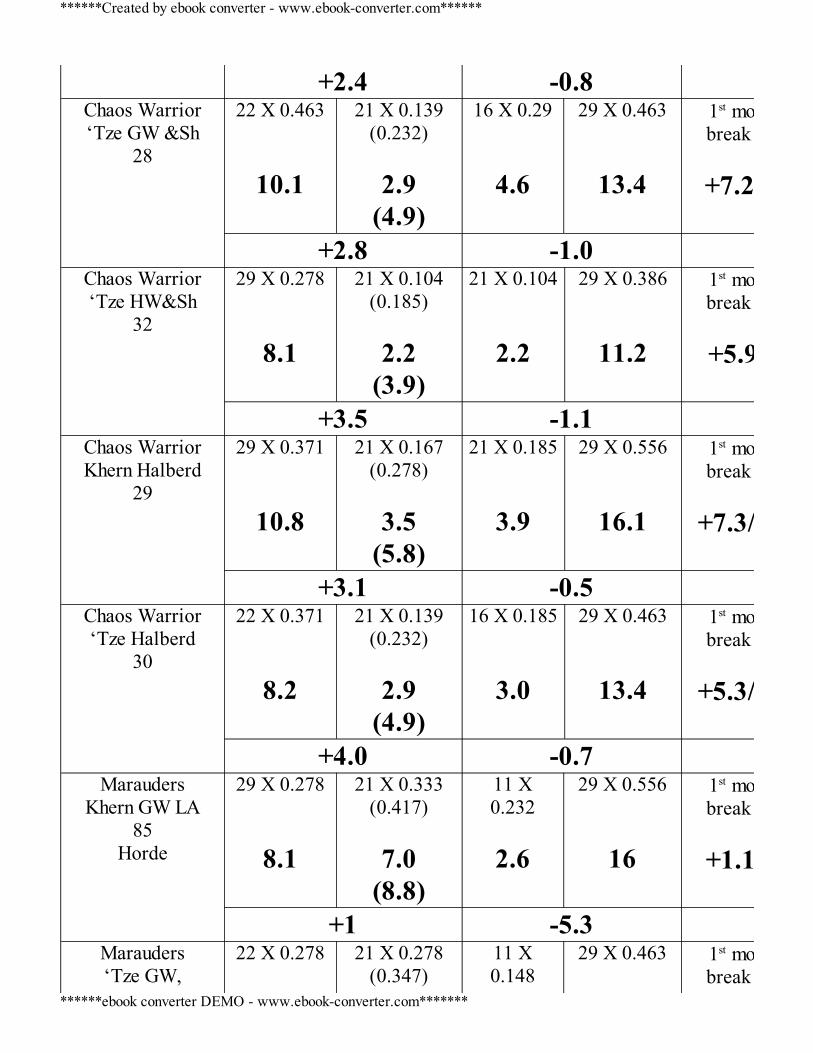
+2.4 -0.8
Chaos Warrior‘Tze GW &Sh
28
22 X 0.463
10.1
21 X 0.139(0.232)
2.9
(4.9)
16 X 0.29
4.6
29 X 0.463
13.4
1st modifiedbreak test @
+7.2/-8.8
+2.8 -1.0
Chaos Warrior‘Tze HW&Sh
32
29 X 0.278
8.1
21 X 0.104(0.185)
2.2
(3.9)
21 X 0.104
2.2
29 X 0.386
11.2
1st modifiedbreak test @
+5.9
+3.5 -1.1
Chaos WarriorKhern Halberd
29
29 X 0.371
10.8
21 X 0.167(0.278)
3.5
(5.8)
21 X 0.185
3.9
29 X 0.556
16.1
1st modifiedbreak test @
+7.3/-12.2
+3.1 -0.5
Chaos Warrior‘Tze Halberd
30
22 X 0.371
8.2
21 X 0.139(0.232)
2.9
(4.9)
16 X 0.185
3.0
29 X 0.463
13.4
1st modifiedbreak test @
+5.3/-10.4
+4.0 -0.7
MaraudersKhern GW LA
85Horde
29 X 0.278
8.1
21 X 0.333(0.417)
7.0
(8.8)
11 X0.232
2.6
29 X 0.556
16
1st modifiedbreak test @
+1.1/KO
+1 -5.3
Marauders‘Tze GW,
22 X 0.278
21 X 0.278(0.347)
11 X0.148
29 X 0.463
1st modifiedbreak test @
******Created by ebook converter - www.ebook-converter.com******
******ebook converter DEMO - www.ebook-converter.com*******
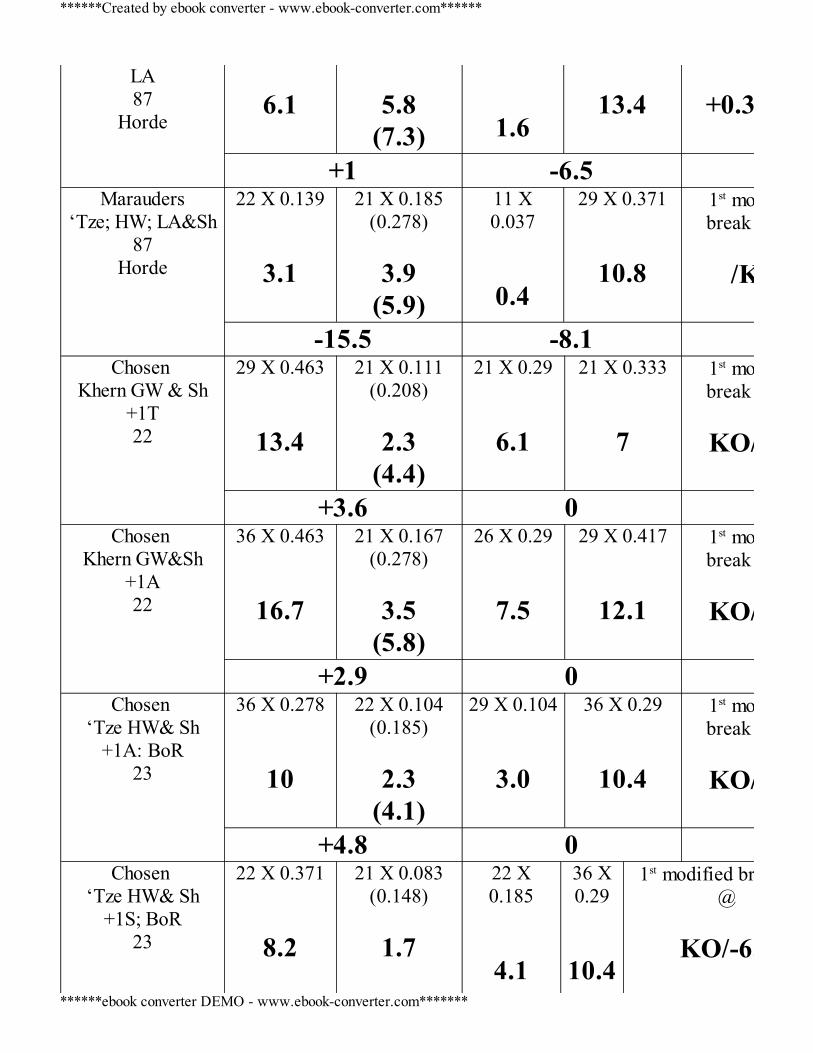
LA87
Horde
6.1
5.8
(7.3)
1.6
13.4
+0.3/KO
+1 -6.5
Marauders‘Tze; HW; LA&Sh
87Horde
22 X 0.139
3.1
21 X 0.185(0.278)
3.9
(5.9)
11 X0.037
0.4
29 X 0.371
10.8
1st modifiedbreak test @
/KO
-15.5 -8.1
Chosen Khern GW & Sh
+1T22
29 X 0.463
13.4
21 X 0.111(0.208)
2.3
(4.4)
21 X 0.29
6.1
21 X 0.333 7
1st modifiedbreak test @
KO/-1.1
+3.6 0
Chosen Khern GW&Sh
+1A22
36 X 0.463
16.7
21 X 0.167(0.278)
3.5
(5.8)
26 X 0.29
7.5
29 X 0.417
12.1
1st modifiedbreak test @
KO/-4.6
+2.9 0
Chosen ‘Tze HW& Sh
+1A: BoR23
36 X 0.278
10
22 X 0.104(0.185)
2.3
(4.1)
29 X 0.104
3.0
36 X 0.29
10.4
1st modifiedbreak test @
KO/-7.4
+4.8 0
Chosen ‘Tze HW& Sh
+1S; BoR23
22 X 0.371
8.2
21 X 0.083(0.148)
1.7
22 X0.185
4.1
36 X0.29
10.4
1st modified break test@
KO/-6.3
******Created by ebook converter - www.ebook-converter.com******
******ebook converter DEMO - www.ebook-converter.com*******
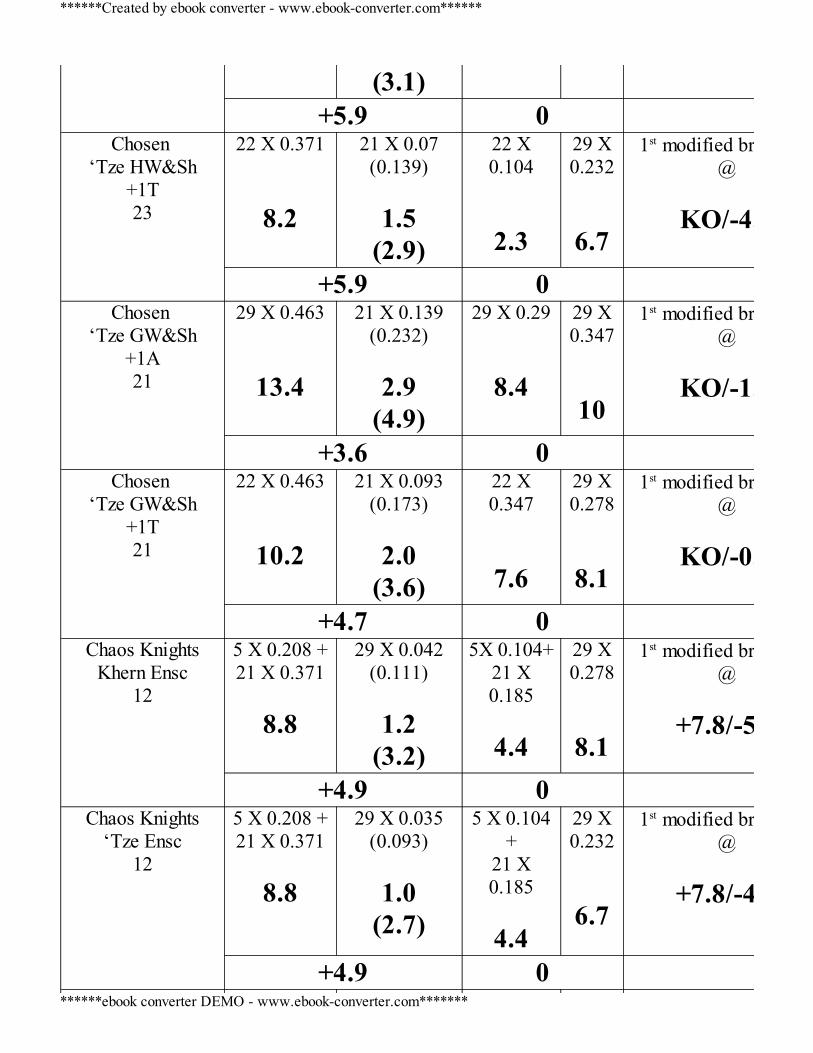
(3.1) +5.9 0
Chosen ‘Tze HW&Sh
+1T23
22 X 0.371
8.2
21 X 0.07(0.139)
1.5
(2.9)
22 X0.104
2.3
29 X0.232
6.7
1st modified break test@
KO/-4.4
+5.9 0
Chosen ‘Tze GW&Sh
+1A21
29 X 0.463
13.4
21 X 0.139(0.232)
2.9
(4.9)
29 X 0.29
8.4
29 X0.347
10
1st modified break test@
KO/-1.6
+3.6 0
Chosen ‘Tze GW&Sh
+1T21
22 X 0.463
10.2
21 X 0.093(0.173)
2.0
(3.6)
22 X0.347
7.6
29 X0.278
8.1
1st modified break test@
KO/-0.5
+4.7 0
Chaos KnightsKhern Ensc
12
5 X 0.208 +21 X 0.371
8.8
29 X 0.042(0.111)
1.2
(3.2)
5X 0.104+21 X0.185
4.4
29 X0.278
8.1
1st modified break test@
+7.8/-5.7
+4.9 0
Chaos Knights‘Tze Ensc
12
5 X 0.208 +21 X 0.371
8.8
29 X 0.035(0.093)
1.0
(2.7)
5 X 0.104+
21 X0.185
4.4
29 X0.232
6.7
1st modified break test@
+7.8/-4.3
+4.9 0
******Created by ebook converter - www.ebook-converter.com******
******ebook converter DEMO - www.ebook-converter.com*******
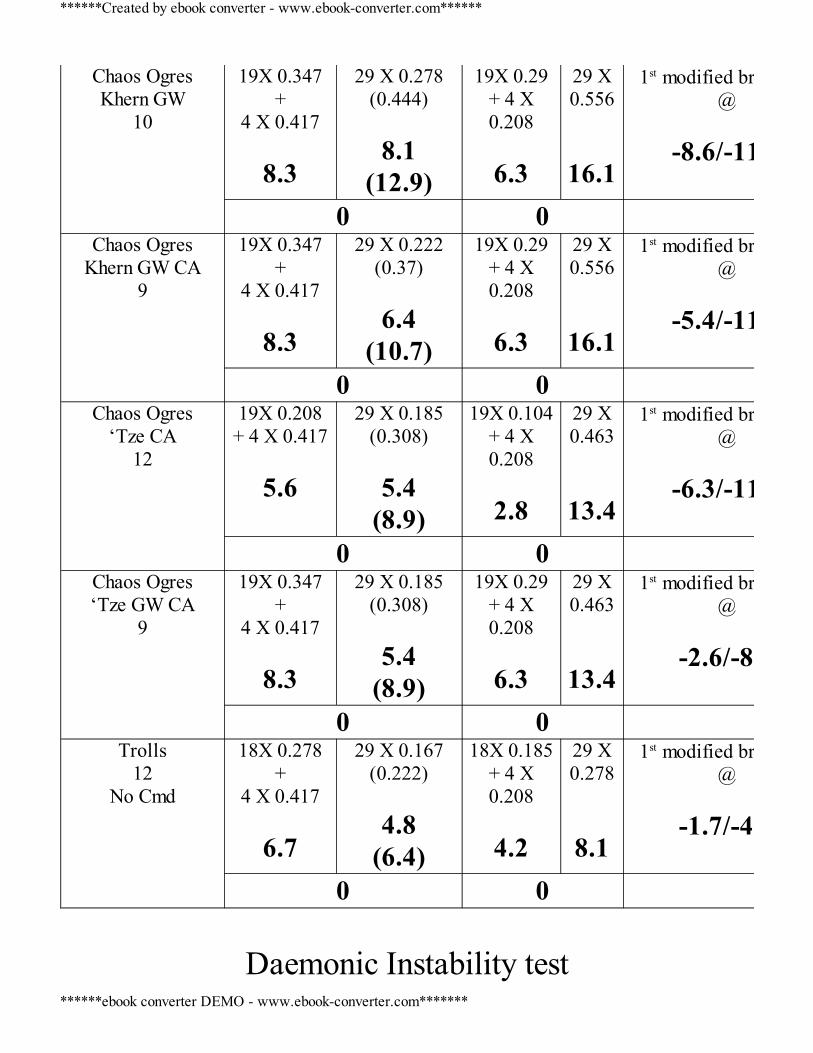
Chaos OgresKhern GW
10
19X 0.347+
4 X 0.417
8.3
29 X 0.278(0.444)
8.1
(12.9)
19X 0.29+ 4 X0.208
6.3
29 X0.556
16.1
1st modified break test@
-8.6/-11.8
0 0
Chaos OgresKhern GW CA
9
19X 0.347+
4 X 0.417
8.3
29 X 0.222(0.37)
6.4
(10.7)
19X 0.29+ 4 X0.208
6.3
29 X0.556
16.1
1st modified break test@
-5.4/-11.8
0 0
Chaos Ogres‘Tze CA
12
19X 0.208+ 4 X 0.417
5.6
29 X 0.185(0.308)
5.4
(8.9)
19X 0.104+ 4 X0.208
2.8
29 X0.463
13.4
1st modified break test@
-6.3/-11.6
0 0
Chaos Ogres‘Tze GW CA
9
19X 0.347+
4 X 0.417
8.3
29 X 0.185(0.308)
5.4
(8.9)
19X 0.29+ 4 X0.208
6.3
29 X0.463
13.4
1st modified break test@
-2.6/-8.1
0 0
Trolls12
No Cmd
18X 0.278+
4 X 0.417
6.7
29 X 0.167(0.222)
4.8
(6.4)
18X 0.185+ 4 X0.208
4.2
29 X0.278
8.1
1st modified break test@
-1.7/-4.9
0 0
Daemonic Instability test
******Created by ebook converter - www.ebook-converter.com******
******ebook converter DEMO - www.ebook-converter.com*******
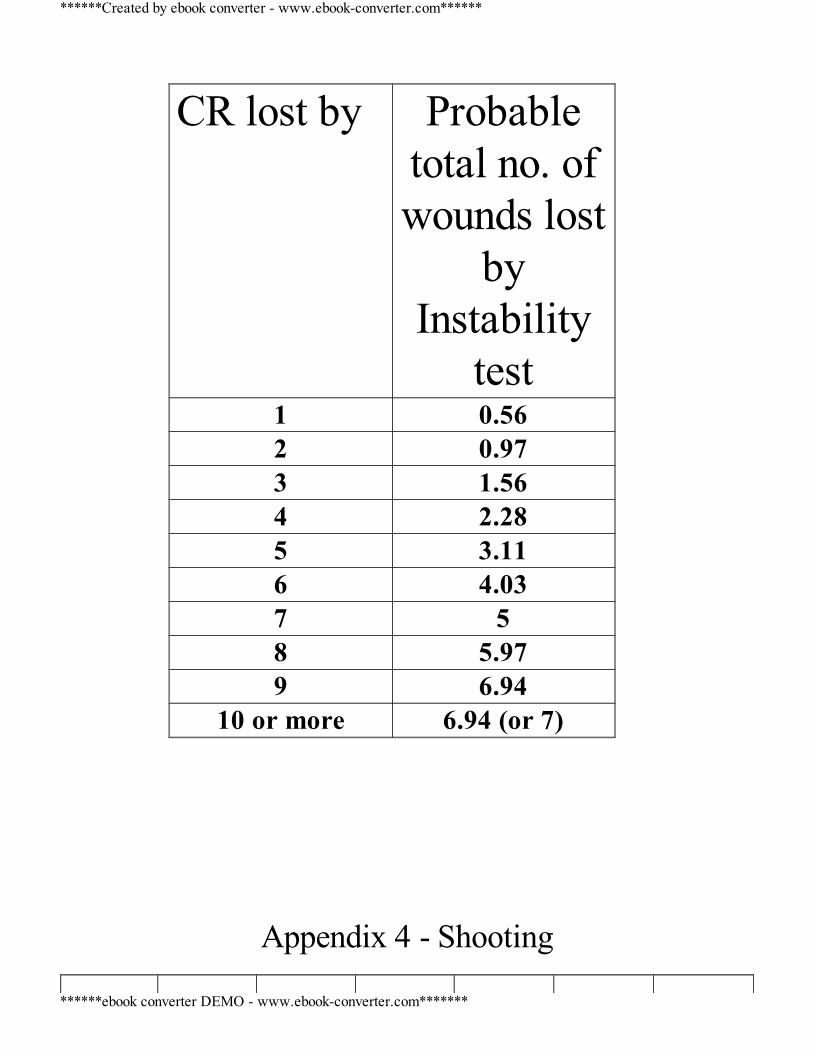
CR lost by Probabletotal no. ofwounds lost
byInstability
test1 0.562 0.973 1.564 2.285 3.116 4.037 58 5.979 6.94
10 or more 6.94 (or 7)
Appendix 4 - Shooting
******Created by ebook converter - www.ebook-converter.com******
******ebook converter DEMO - www.ebook-converter.com*******
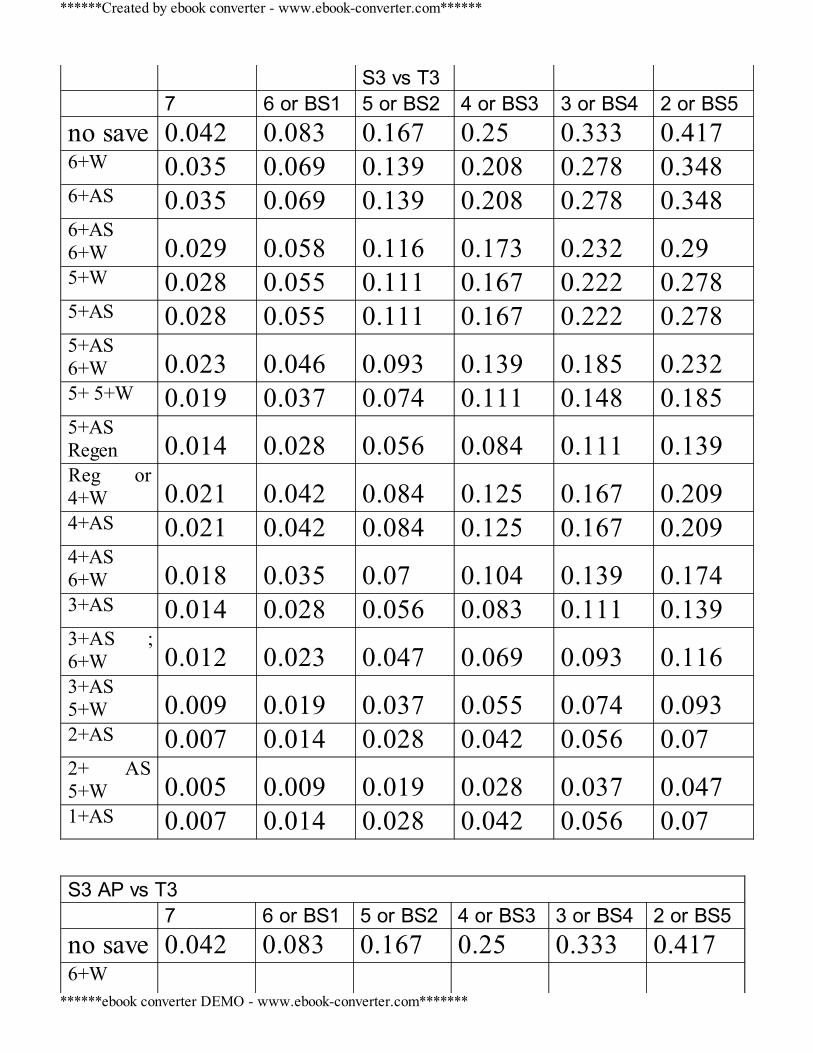
S3 vs T3 7 6 or BS1 5 or BS2 4 or BS3 3 or BS4 2 or BS5no save 0.042 0.083 0.167 0.25 0.333 0.4176+W 0.035 0.069 0.139 0.208 0.278 0.3486+AS 0.035 0.069 0.139 0.208 0.278 0.3486+AS6+W 0.029 0.058 0.116 0.173 0.232 0.295+W 0.028 0.055 0.111 0.167 0.222 0.2785+AS 0.028 0.055 0.111 0.167 0.222 0.2785+AS6+W 0.023 0.046 0.093 0.139 0.185 0.2325+ 5+W 0.019 0.037 0.074 0.111 0.148 0.1855+ASRegen 0.014 0.028 0.056 0.084 0.111 0.139Reg or4+W 0.021 0.042 0.084 0.125 0.167 0.2094+AS 0.021 0.042 0.084 0.125 0.167 0.2094+AS6+W 0.018 0.035 0.07 0.104 0.139 0.1743+AS 0.014 0.028 0.056 0.083 0.111 0.1393+AS ;6+W 0.012 0.023 0.047 0.069 0.093 0.1163+AS5+W 0.009 0.019 0.037 0.055 0.074 0.0932+AS 0.007 0.014 0.028 0.042 0.056 0.072+ AS5+W 0.005 0.009 0.019 0.028 0.037 0.0471+AS 0.007 0.014 0.028 0.042 0.056 0.07
S3 AP vs T3 7 6 or BS1 5 or BS2 4 or BS3 3 or BS4 2 or BS5no save 0.042 0.083 0.167 0.25 0.333 0.4176+W
******Created by ebook converter - www.ebook-converter.com******
******ebook converter DEMO - www.ebook-converter.com*******

0.035 0.069 0.139 0.208 0.278 0.3486+AS 0.042 0.083 0.167 0.25 0.333 0.4176+AS6+W 0.035 0.069 0.139 0.208 0.278 0.3485+W 0.028 0.055 0.111 0.167 0.222 0.2785+AS 0.035 0.069 0.139 0.208 0.278 0.3485+AS6+W 0.029 0.058 0.116 0.173 0.232 0.295+ 5+W 0.023 0.046 0.093 0.139 0.185 0.2325+ASRegen 0.018 0.035 0.07 0.104 0.139 0.174Reg or4+W 0.021 0.042 0.084 0.125 0.167 0.2094+AS 0.028 0.055 0.111 0.167 0.222 0.2784+AS6+W 0.023 0.046 0.093 0.139 0.185 0.2323+AS 0.021 0.042 0.084 0.125 0.167 0.2093+AS ;6+W 0.018 0.035 0.07 0.104 0.139 0.1743+AS5+W 0.014 0.028 0.056 0.083 0.111 0.1392+AS 0.014 0.028 0.056 0.083 0.111 0.1392+ AS5+W 0.009 0.019 0.037 0.055 0.074 0.0931+AS 0.007 0.014 0.028 0.042 0.056 0.07S3 Poisoned vs T3 7 6 or BS1 5 or BS2 4 or BS3 3 or BS4 2 or BS5no save 0.167 0.167 0.25 0.333 0.417 0.56+W 0.139 0.139 0.208 0.278 0.348 0.4176+AS 0.139 0.139 0.208 0.278 0.348 0.4176+AS6+W 0.116 0.116 0.173 0.232 0.29 0.3485+W 0.111 0.111 0.167 0.222 0.278 0.333
******Created by ebook converter - www.ebook-converter.com******
******ebook converter DEMO - www.ebook-converter.com*******
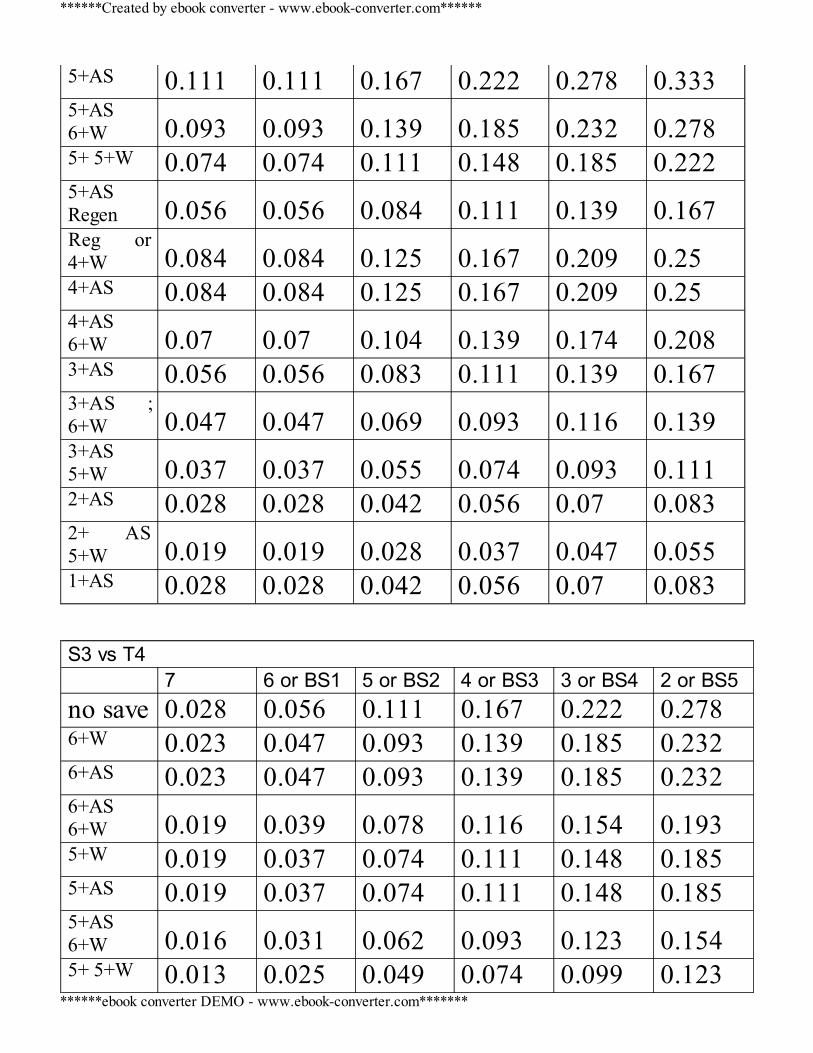
5+AS 0.111 0.111 0.167 0.222 0.278 0.3335+AS6+W 0.093 0.093 0.139 0.185 0.232 0.2785+ 5+W 0.074 0.074 0.111 0.148 0.185 0.2225+ASRegen 0.056 0.056 0.084 0.111 0.139 0.167Reg or4+W 0.084 0.084 0.125 0.167 0.209 0.254+AS 0.084 0.084 0.125 0.167 0.209 0.254+AS6+W 0.07 0.07 0.104 0.139 0.174 0.2083+AS 0.056 0.056 0.083 0.111 0.139 0.1673+AS ;6+W 0.047 0.047 0.069 0.093 0.116 0.1393+AS5+W 0.037 0.037 0.055 0.074 0.093 0.1112+AS 0.028 0.028 0.042 0.056 0.07 0.0832+ AS5+W 0.019 0.019 0.028 0.037 0.047 0.0551+AS 0.028 0.028 0.042 0.056 0.07 0.083
S3 vs T4 7 6 or BS1 5 or BS2 4 or BS3 3 or BS4 2 or BS5no save 0.028 0.056 0.111 0.167 0.222 0.2786+W 0.023 0.047 0.093 0.139 0.185 0.2326+AS 0.023 0.047 0.093 0.139 0.185 0.2326+AS6+W 0.019 0.039 0.078 0.116 0.154 0.1935+W 0.019 0.037 0.074 0.111 0.148 0.1855+AS 0.019 0.037 0.074 0.111 0.148 0.1855+AS6+W 0.016 0.031 0.062 0.093 0.123 0.1545+ 5+W 0.013 0.025 0.049 0.074 0.099 0.123
******Created by ebook converter - www.ebook-converter.com******
******ebook converter DEMO - www.ebook-converter.com*******
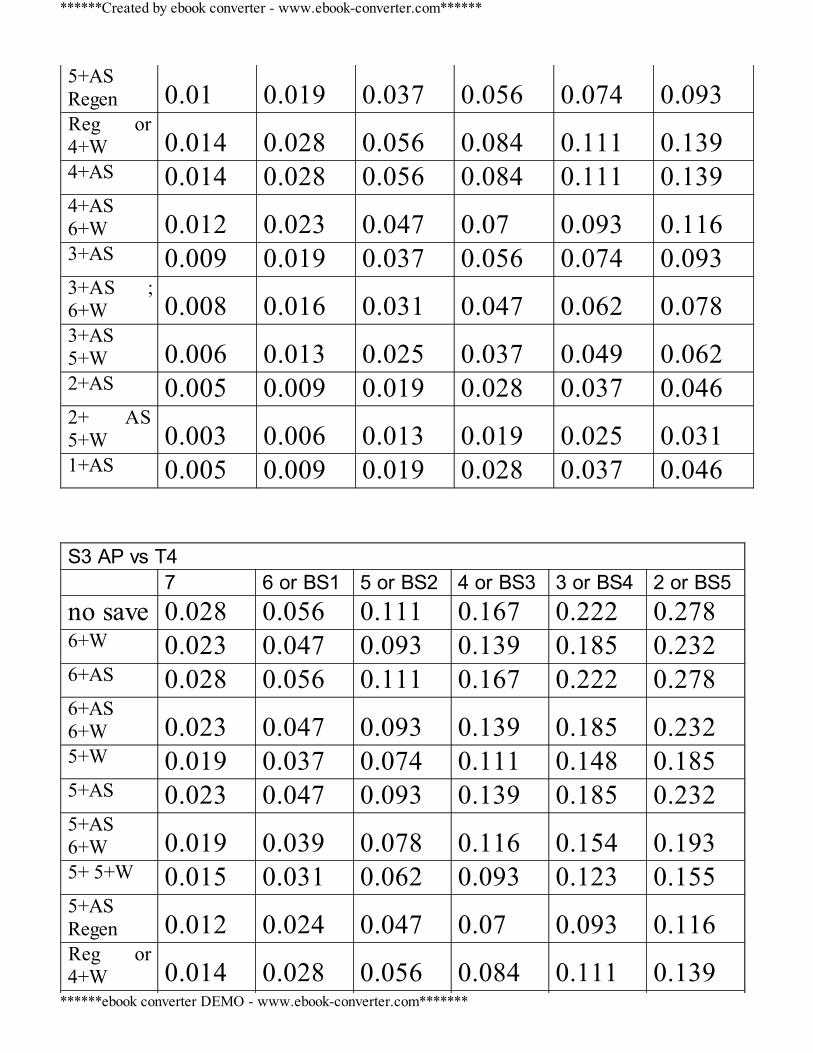
5+ASRegen 0.01 0.019 0.037 0.056 0.074 0.093Reg or4+W 0.014 0.028 0.056 0.084 0.111 0.1394+AS 0.014 0.028 0.056 0.084 0.111 0.1394+AS6+W 0.012 0.023 0.047 0.07 0.093 0.1163+AS 0.009 0.019 0.037 0.056 0.074 0.0933+AS ;6+W 0.008 0.016 0.031 0.047 0.062 0.0783+AS5+W 0.006 0.013 0.025 0.037 0.049 0.0622+AS 0.005 0.009 0.019 0.028 0.037 0.0462+ AS5+W 0.003 0.006 0.013 0.019 0.025 0.0311+AS 0.005 0.009 0.019 0.028 0.037 0.046
S3 AP vs T4 7 6 or BS1 5 or BS2 4 or BS3 3 or BS4 2 or BS5no save 0.028 0.056 0.111 0.167 0.222 0.2786+W 0.023 0.047 0.093 0.139 0.185 0.2326+AS 0.028 0.056 0.111 0.167 0.222 0.2786+AS6+W 0.023 0.047 0.093 0.139 0.185 0.2325+W 0.019 0.037 0.074 0.111 0.148 0.1855+AS 0.023 0.047 0.093 0.139 0.185 0.2325+AS6+W 0.019 0.039 0.078 0.116 0.154 0.1935+ 5+W 0.015 0.031 0.062 0.093 0.123 0.1555+ASRegen 0.012 0.024 0.047 0.07 0.093 0.116Reg or4+W 0.014 0.028 0.056 0.084 0.111 0.139
******Created by ebook converter - www.ebook-converter.com******
******ebook converter DEMO - www.ebook-converter.com*******
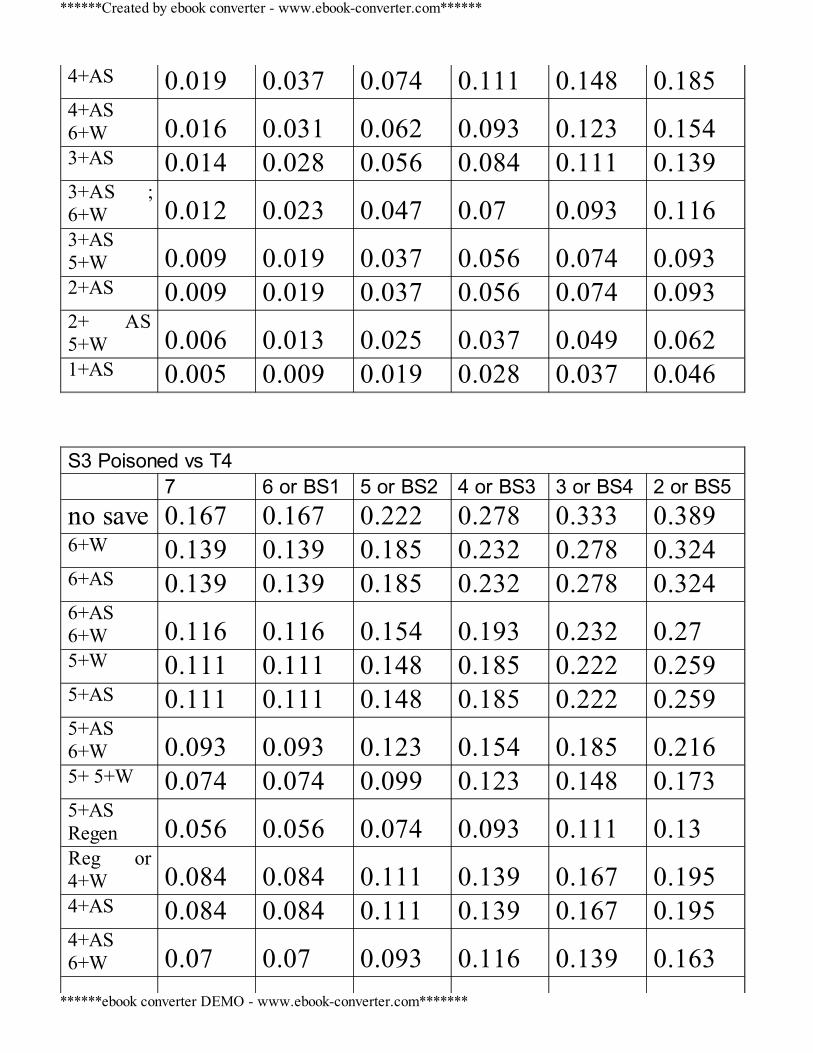
4+AS 0.019 0.037 0.074 0.111 0.148 0.1854+AS6+W 0.016 0.031 0.062 0.093 0.123 0.1543+AS 0.014 0.028 0.056 0.084 0.111 0.1393+AS ;6+W 0.012 0.023 0.047 0.07 0.093 0.1163+AS5+W 0.009 0.019 0.037 0.056 0.074 0.0932+AS 0.009 0.019 0.037 0.056 0.074 0.0932+ AS5+W 0.006 0.013 0.025 0.037 0.049 0.0621+AS 0.005 0.009 0.019 0.028 0.037 0.046
S3 Poisoned vs T4 7 6 or BS1 5 or BS2 4 or BS3 3 or BS4 2 or BS5no save 0.167 0.167 0.222 0.278 0.333 0.3896+W 0.139 0.139 0.185 0.232 0.278 0.3246+AS 0.139 0.139 0.185 0.232 0.278 0.3246+AS6+W 0.116 0.116 0.154 0.193 0.232 0.275+W 0.111 0.111 0.148 0.185 0.222 0.2595+AS 0.111 0.111 0.148 0.185 0.222 0.2595+AS6+W 0.093 0.093 0.123 0.154 0.185 0.2165+ 5+W 0.074 0.074 0.099 0.123 0.148 0.1735+ASRegen 0.056 0.056 0.074 0.093 0.111 0.13Reg or4+W 0.084 0.084 0.111 0.139 0.167 0.1954+AS 0.084 0.084 0.111 0.139 0.167 0.1954+AS6+W 0.07 0.07 0.093 0.116 0.139 0.163
******Created by ebook converter - www.ebook-converter.com******
******ebook converter DEMO - www.ebook-converter.com*******
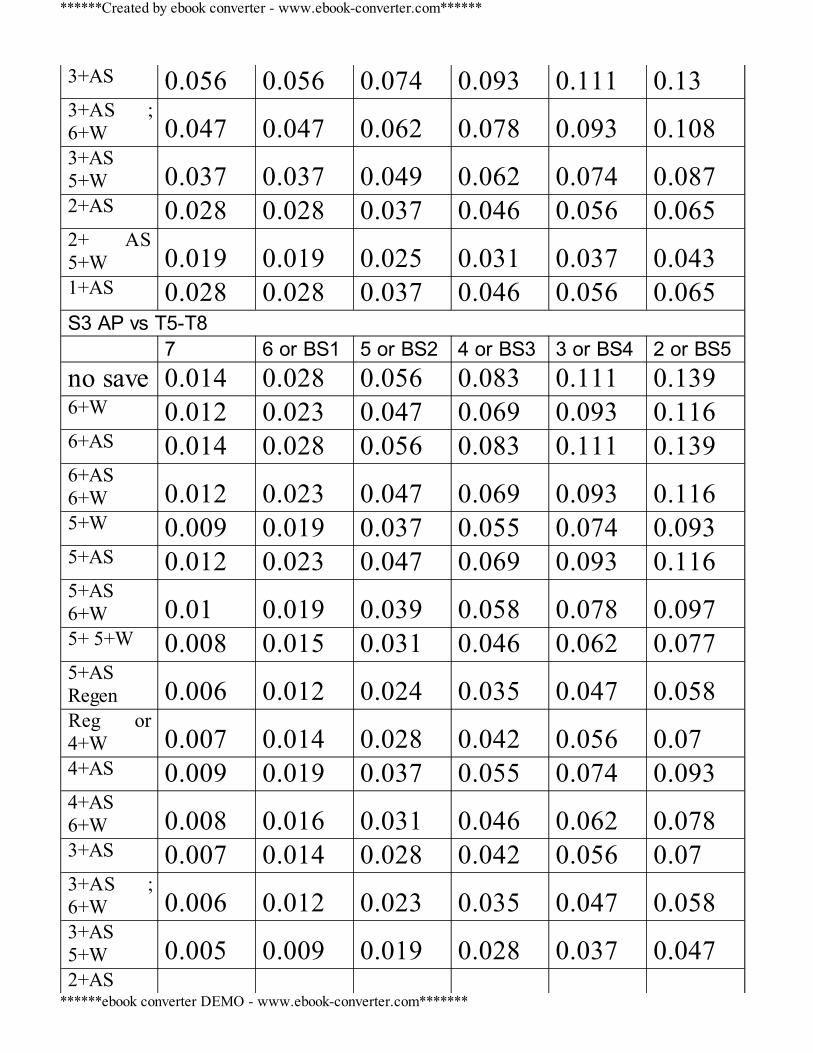
3+AS 0.056 0.056 0.074 0.093 0.111 0.133+AS ;6+W 0.047 0.047 0.062 0.078 0.093 0.1083+AS5+W 0.037 0.037 0.049 0.062 0.074 0.0872+AS 0.028 0.028 0.037 0.046 0.056 0.0652+ AS5+W 0.019 0.019 0.025 0.031 0.037 0.0431+AS 0.028 0.028 0.037 0.046 0.056 0.065S3 AP vs T5-T8 7 6 or BS1 5 or BS2 4 or BS3 3 or BS4 2 or BS5no save 0.014 0.028 0.056 0.083 0.111 0.1396+W 0.012 0.023 0.047 0.069 0.093 0.1166+AS 0.014 0.028 0.056 0.083 0.111 0.1396+AS6+W 0.012 0.023 0.047 0.069 0.093 0.1165+W 0.009 0.019 0.037 0.055 0.074 0.0935+AS 0.012 0.023 0.047 0.069 0.093 0.1165+AS6+W 0.01 0.019 0.039 0.058 0.078 0.0975+ 5+W 0.008 0.015 0.031 0.046 0.062 0.0775+ASRegen 0.006 0.012 0.024 0.035 0.047 0.058Reg or4+W 0.007 0.014 0.028 0.042 0.056 0.074+AS 0.009 0.019 0.037 0.055 0.074 0.0934+AS6+W 0.008 0.016 0.031 0.046 0.062 0.0783+AS 0.007 0.014 0.028 0.042 0.056 0.073+AS ;6+W 0.006 0.012 0.023 0.035 0.047 0.0583+AS5+W 0.005 0.009 0.019 0.028 0.037 0.0472+AS
******Created by ebook converter - www.ebook-converter.com******
******ebook converter DEMO - www.ebook-converter.com*******
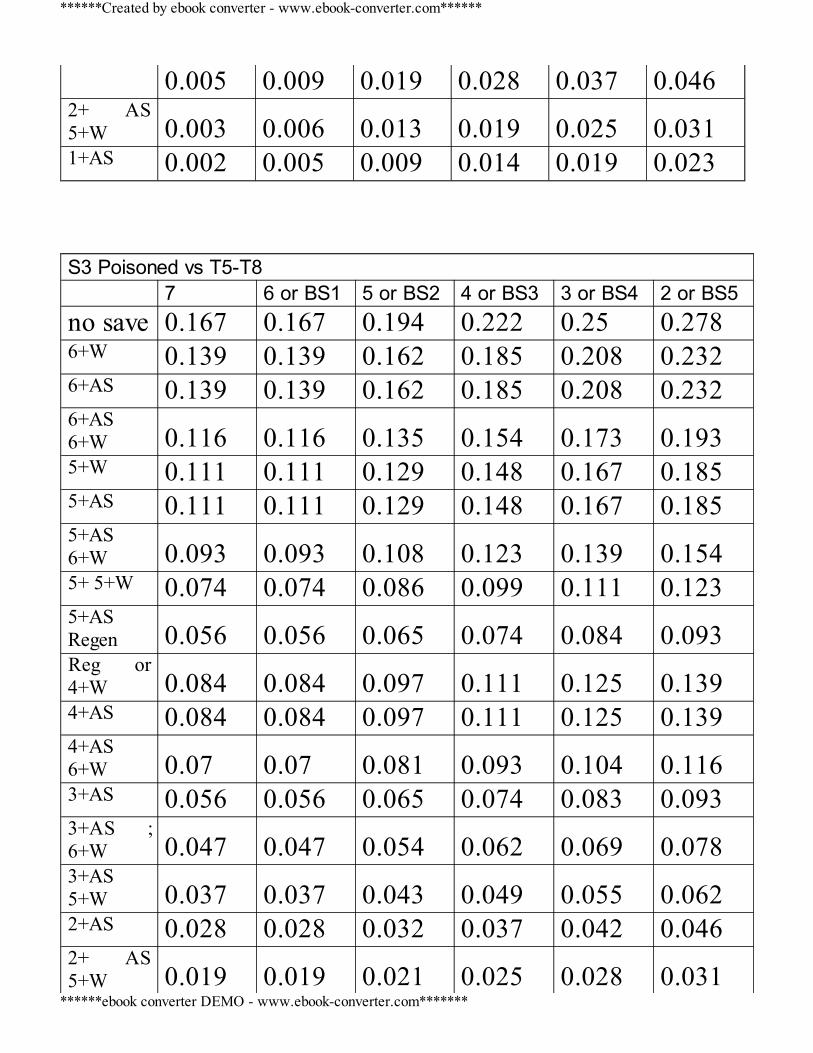
0.005 0.009 0.019 0.028 0.037 0.0462+ AS5+W 0.003 0.006 0.013 0.019 0.025 0.0311+AS 0.002 0.005 0.009 0.014 0.019 0.023
S3 Poisoned vs T5-T8 7 6 or BS1 5 or BS2 4 or BS3 3 or BS4 2 or BS5no save 0.167 0.167 0.194 0.222 0.25 0.2786+W 0.139 0.139 0.162 0.185 0.208 0.2326+AS 0.139 0.139 0.162 0.185 0.208 0.2326+AS6+W 0.116 0.116 0.135 0.154 0.173 0.1935+W 0.111 0.111 0.129 0.148 0.167 0.1855+AS 0.111 0.111 0.129 0.148 0.167 0.1855+AS6+W 0.093 0.093 0.108 0.123 0.139 0.1545+ 5+W 0.074 0.074 0.086 0.099 0.111 0.1235+ASRegen 0.056 0.056 0.065 0.074 0.084 0.093Reg or4+W 0.084 0.084 0.097 0.111 0.125 0.1394+AS 0.084 0.084 0.097 0.111 0.125 0.1394+AS6+W 0.07 0.07 0.081 0.093 0.104 0.1163+AS 0.056 0.056 0.065 0.074 0.083 0.0933+AS ;6+W 0.047 0.047 0.054 0.062 0.069 0.0783+AS5+W 0.037 0.037 0.043 0.049 0.055 0.0622+AS 0.028 0.028 0.032 0.037 0.042 0.0462+ AS5+W 0.019 0.019 0.021 0.025 0.028 0.031
******Created by ebook converter - www.ebook-converter.com******
******ebook converter DEMO - www.ebook-converter.com*******
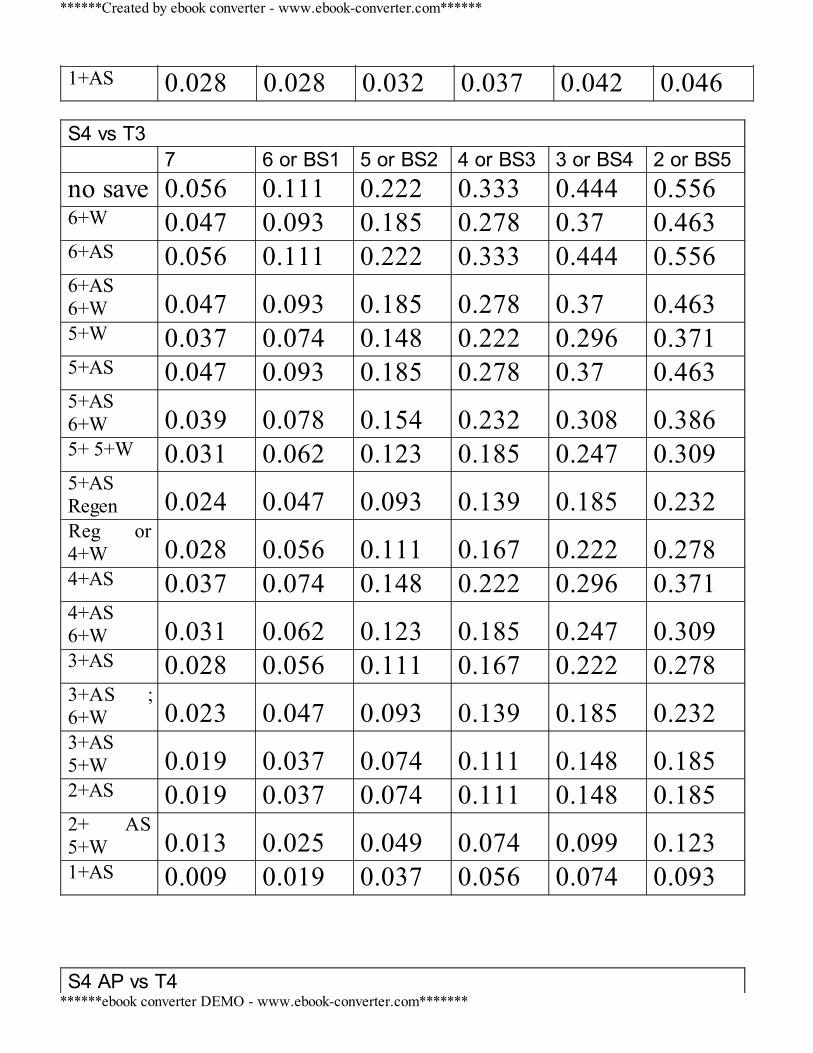
1+AS 0.028 0.028 0.032 0.037 0.042 0.046
S4 vs T3 7 6 or BS1 5 or BS2 4 or BS3 3 or BS4 2 or BS5no save 0.056 0.111 0.222 0.333 0.444 0.5566+W 0.047 0.093 0.185 0.278 0.37 0.4636+AS 0.056 0.111 0.222 0.333 0.444 0.5566+AS6+W 0.047 0.093 0.185 0.278 0.37 0.4635+W 0.037 0.074 0.148 0.222 0.296 0.3715+AS 0.047 0.093 0.185 0.278 0.37 0.4635+AS6+W 0.039 0.078 0.154 0.232 0.308 0.3865+ 5+W 0.031 0.062 0.123 0.185 0.247 0.3095+ASRegen 0.024 0.047 0.093 0.139 0.185 0.232Reg or4+W 0.028 0.056 0.111 0.167 0.222 0.2784+AS 0.037 0.074 0.148 0.222 0.296 0.3714+AS6+W 0.031 0.062 0.123 0.185 0.247 0.3093+AS 0.028 0.056 0.111 0.167 0.222 0.2783+AS ;6+W 0.023 0.047 0.093 0.139 0.185 0.2323+AS5+W 0.019 0.037 0.074 0.111 0.148 0.1852+AS 0.019 0.037 0.074 0.111 0.148 0.1852+ AS5+W 0.013 0.025 0.049 0.074 0.099 0.1231+AS 0.009 0.019 0.037 0.056 0.074 0.093
S4 AP vs T4
******Created by ebook converter - www.ebook-converter.com******
******ebook converter DEMO - www.ebook-converter.com*******
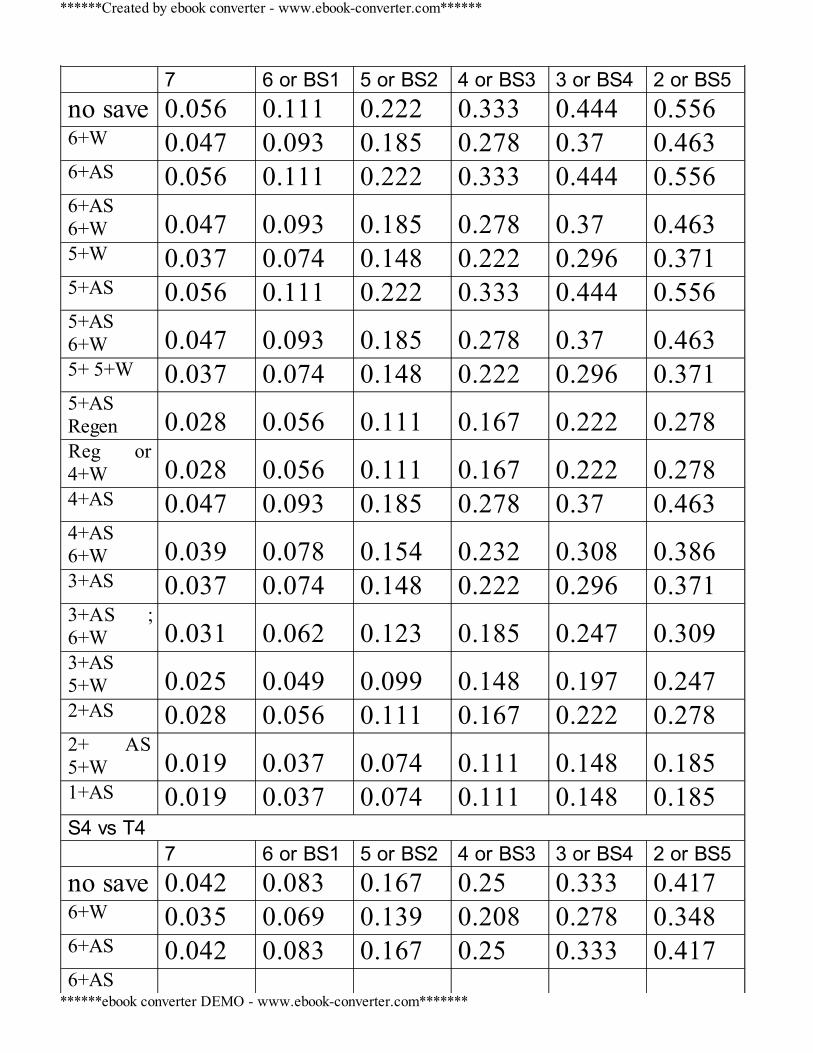
7 6 or BS1 5 or BS2 4 or BS3 3 or BS4 2 or BS5no save 0.056 0.111 0.222 0.333 0.444 0.5566+W 0.047 0.093 0.185 0.278 0.37 0.4636+AS 0.056 0.111 0.222 0.333 0.444 0.5566+AS6+W 0.047 0.093 0.185 0.278 0.37 0.4635+W 0.037 0.074 0.148 0.222 0.296 0.3715+AS 0.056 0.111 0.222 0.333 0.444 0.5565+AS6+W 0.047 0.093 0.185 0.278 0.37 0.4635+ 5+W 0.037 0.074 0.148 0.222 0.296 0.3715+ASRegen 0.028 0.056 0.111 0.167 0.222 0.278Reg or4+W 0.028 0.056 0.111 0.167 0.222 0.2784+AS 0.047 0.093 0.185 0.278 0.37 0.4634+AS6+W 0.039 0.078 0.154 0.232 0.308 0.3863+AS 0.037 0.074 0.148 0.222 0.296 0.3713+AS ;6+W 0.031 0.062 0.123 0.185 0.247 0.3093+AS5+W 0.025 0.049 0.099 0.148 0.197 0.2472+AS 0.028 0.056 0.111 0.167 0.222 0.2782+ AS5+W 0.019 0.037 0.074 0.111 0.148 0.1851+AS 0.019 0.037 0.074 0.111 0.148 0.185S4 vs T4 7 6 or BS1 5 or BS2 4 or BS3 3 or BS4 2 or BS5no save 0.042 0.083 0.167 0.25 0.333 0.4176+W 0.035 0.069 0.139 0.208 0.278 0.3486+AS 0.042 0.083 0.167 0.25 0.333 0.4176+AS
******Created by ebook converter - www.ebook-converter.com******
******ebook converter DEMO - www.ebook-converter.com*******
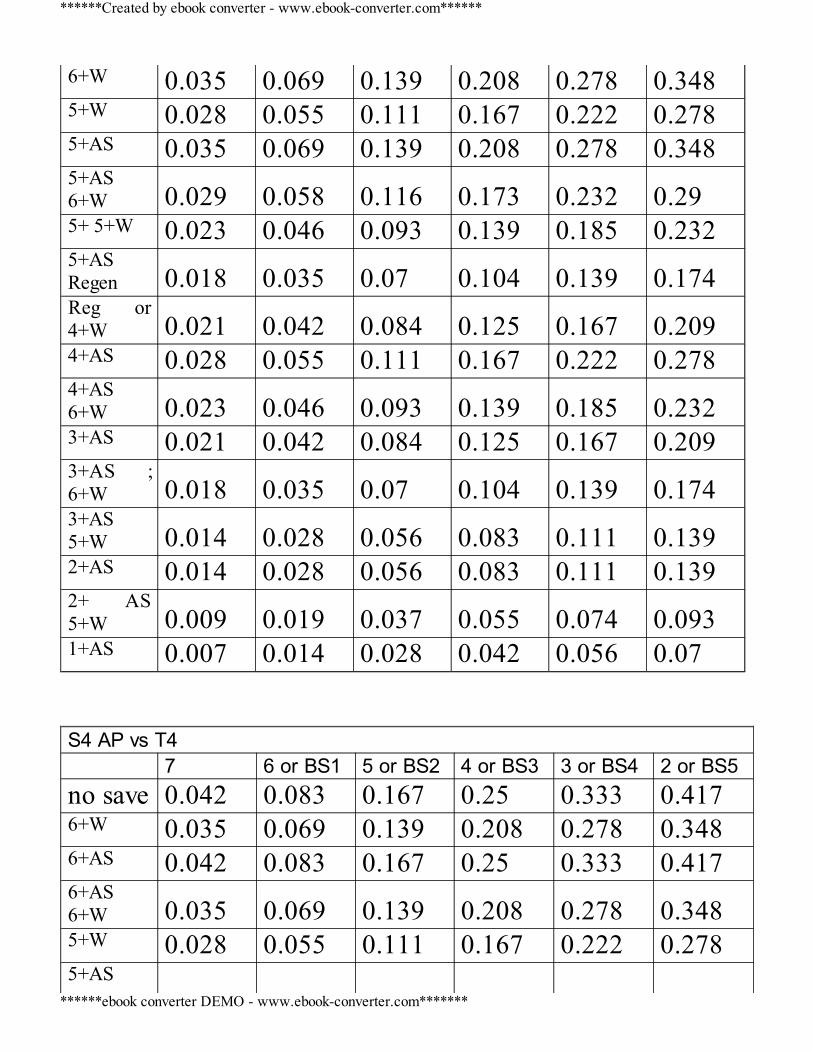
6+W 0.035 0.069 0.139 0.208 0.278 0.3485+W 0.028 0.055 0.111 0.167 0.222 0.2785+AS 0.035 0.069 0.139 0.208 0.278 0.3485+AS6+W 0.029 0.058 0.116 0.173 0.232 0.295+ 5+W 0.023 0.046 0.093 0.139 0.185 0.2325+ASRegen 0.018 0.035 0.07 0.104 0.139 0.174Reg or4+W 0.021 0.042 0.084 0.125 0.167 0.2094+AS 0.028 0.055 0.111 0.167 0.222 0.2784+AS6+W 0.023 0.046 0.093 0.139 0.185 0.2323+AS 0.021 0.042 0.084 0.125 0.167 0.2093+AS ;6+W 0.018 0.035 0.07 0.104 0.139 0.1743+AS5+W 0.014 0.028 0.056 0.083 0.111 0.1392+AS 0.014 0.028 0.056 0.083 0.111 0.1392+ AS5+W 0.009 0.019 0.037 0.055 0.074 0.0931+AS 0.007 0.014 0.028 0.042 0.056 0.07
S4 AP vs T4 7 6 or BS1 5 or BS2 4 or BS3 3 or BS4 2 or BS5no save 0.042 0.083 0.167 0.25 0.333 0.4176+W 0.035 0.069 0.139 0.208 0.278 0.3486+AS 0.042 0.083 0.167 0.25 0.333 0.4176+AS6+W 0.035 0.069 0.139 0.208 0.278 0.3485+W 0.028 0.055 0.111 0.167 0.222 0.2785+AS
******Created by ebook converter - www.ebook-converter.com******
******ebook converter DEMO - www.ebook-converter.com*******
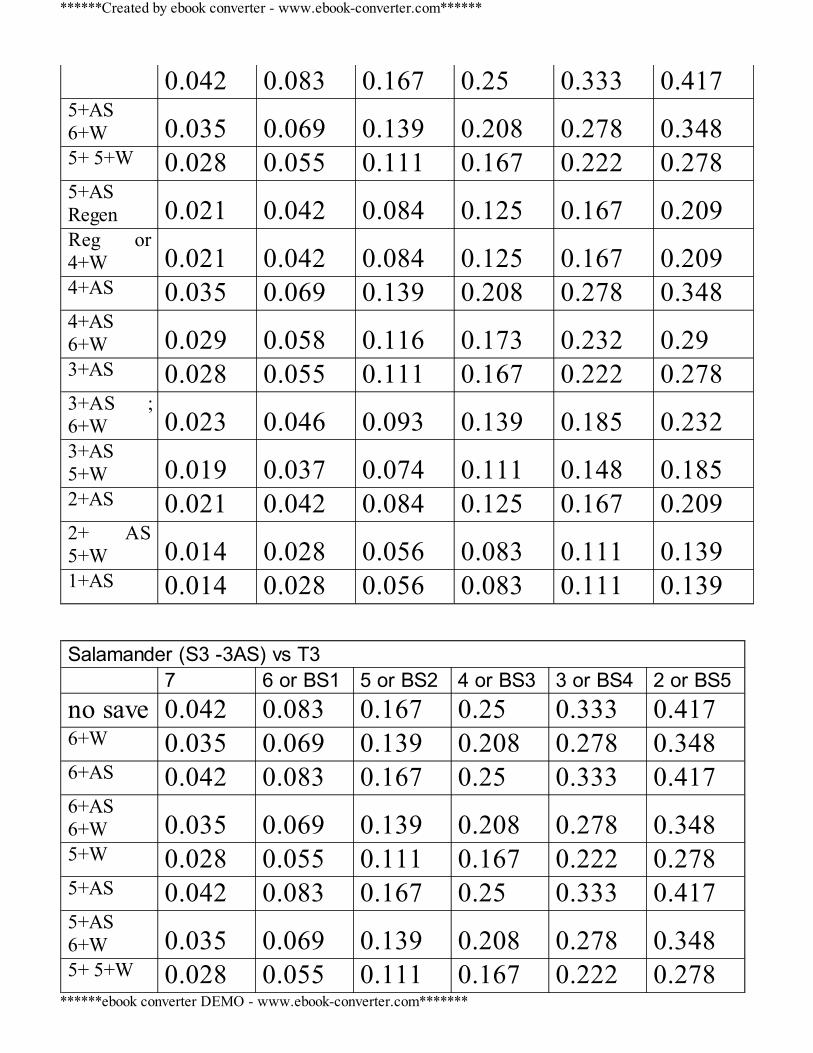
0.042 0.083 0.167 0.25 0.333 0.4175+AS6+W 0.035 0.069 0.139 0.208 0.278 0.3485+ 5+W 0.028 0.055 0.111 0.167 0.222 0.2785+ASRegen 0.021 0.042 0.084 0.125 0.167 0.209Reg or4+W 0.021 0.042 0.084 0.125 0.167 0.2094+AS 0.035 0.069 0.139 0.208 0.278 0.3484+AS6+W 0.029 0.058 0.116 0.173 0.232 0.293+AS 0.028 0.055 0.111 0.167 0.222 0.2783+AS ;6+W 0.023 0.046 0.093 0.139 0.185 0.2323+AS5+W 0.019 0.037 0.074 0.111 0.148 0.1852+AS 0.021 0.042 0.084 0.125 0.167 0.2092+ AS5+W 0.014 0.028 0.056 0.083 0.111 0.1391+AS 0.014 0.028 0.056 0.083 0.111 0.139
Salamander (S3 -3AS) vs T3 7 6 or BS1 5 or BS2 4 or BS3 3 or BS4 2 or BS5no save 0.042 0.083 0.167 0.25 0.333 0.4176+W 0.035 0.069 0.139 0.208 0.278 0.3486+AS 0.042 0.083 0.167 0.25 0.333 0.4176+AS6+W 0.035 0.069 0.139 0.208 0.278 0.3485+W 0.028 0.055 0.111 0.167 0.222 0.2785+AS 0.042 0.083 0.167 0.25 0.333 0.4175+AS6+W 0.035 0.069 0.139 0.208 0.278 0.3485+ 5+W 0.028 0.055 0.111 0.167 0.222 0.278
******Created by ebook converter - www.ebook-converter.com******
******ebook converter DEMO - www.ebook-converter.com*******
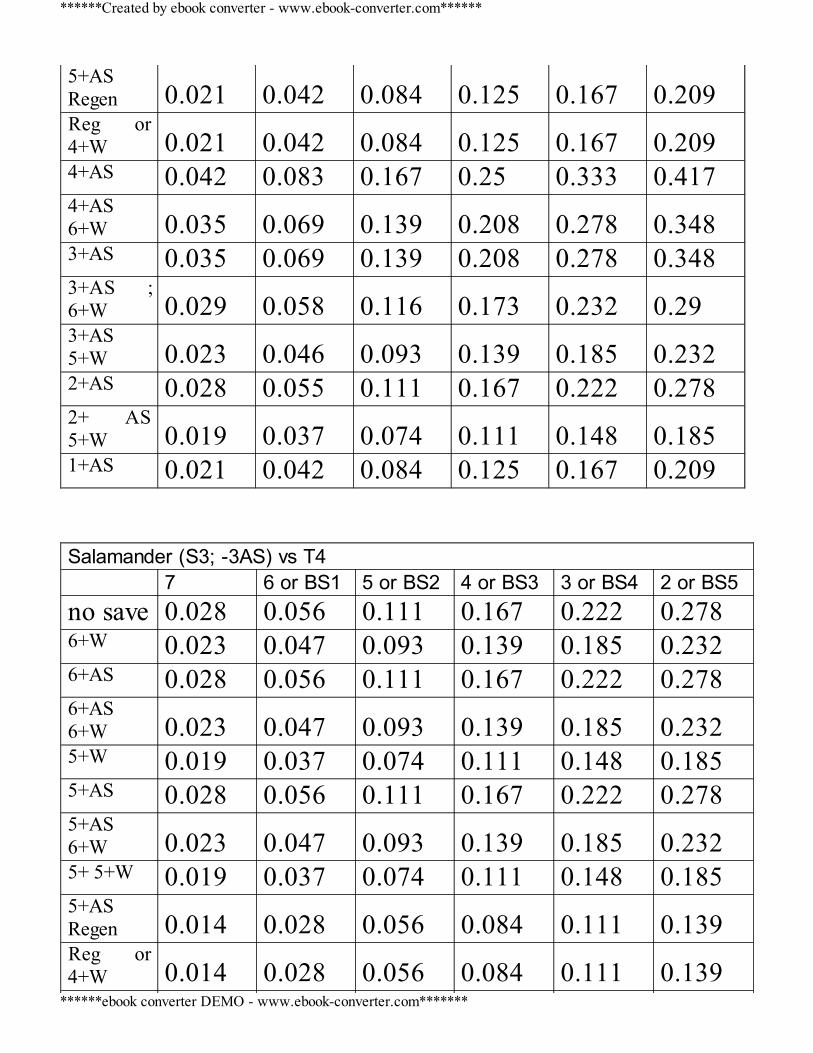
5+ASRegen 0.021 0.042 0.084 0.125 0.167 0.209Reg or4+W 0.021 0.042 0.084 0.125 0.167 0.2094+AS 0.042 0.083 0.167 0.25 0.333 0.4174+AS6+W 0.035 0.069 0.139 0.208 0.278 0.3483+AS 0.035 0.069 0.139 0.208 0.278 0.3483+AS ;6+W 0.029 0.058 0.116 0.173 0.232 0.293+AS5+W 0.023 0.046 0.093 0.139 0.185 0.2322+AS 0.028 0.055 0.111 0.167 0.222 0.2782+ AS5+W 0.019 0.037 0.074 0.111 0.148 0.1851+AS 0.021 0.042 0.084 0.125 0.167 0.209
Salamander (S3; -3AS) vs T4 7 6 or BS1 5 or BS2 4 or BS3 3 or BS4 2 or BS5no save 0.028 0.056 0.111 0.167 0.222 0.2786+W 0.023 0.047 0.093 0.139 0.185 0.2326+AS 0.028 0.056 0.111 0.167 0.222 0.2786+AS6+W 0.023 0.047 0.093 0.139 0.185 0.2325+W 0.019 0.037 0.074 0.111 0.148 0.1855+AS 0.028 0.056 0.111 0.167 0.222 0.2785+AS6+W 0.023 0.047 0.093 0.139 0.185 0.2325+ 5+W 0.019 0.037 0.074 0.111 0.148 0.1855+ASRegen 0.014 0.028 0.056 0.084 0.111 0.139Reg or4+W 0.014 0.028 0.056 0.084 0.111 0.139
******Created by ebook converter - www.ebook-converter.com******
******ebook converter DEMO - www.ebook-converter.com*******
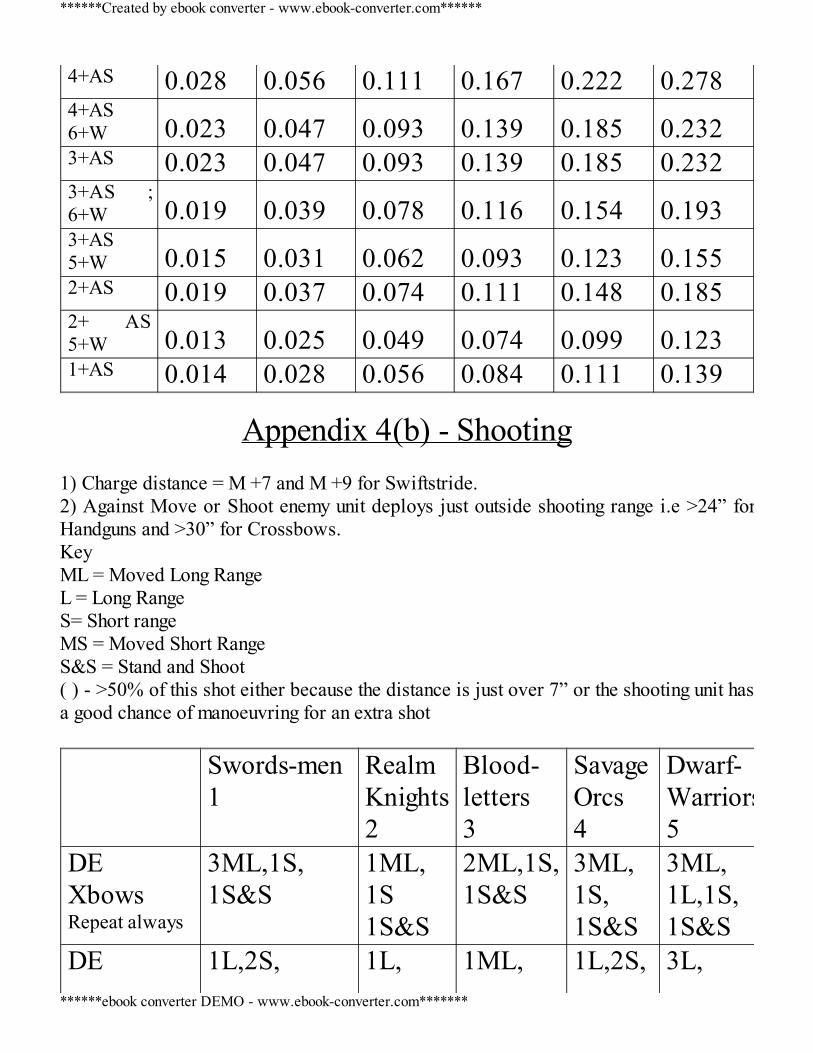
4+AS 0.028 0.056 0.111 0.167 0.222 0.2784+AS6+W 0.023 0.047 0.093 0.139 0.185 0.2323+AS 0.023 0.047 0.093 0.139 0.185 0.2323+AS ;6+W 0.019 0.039 0.078 0.116 0.154 0.1933+AS5+W 0.015 0.031 0.062 0.093 0.123 0.1552+AS 0.019 0.037 0.074 0.111 0.148 0.1852+ AS5+W 0.013 0.025 0.049 0.074 0.099 0.1231+AS 0.014 0.028 0.056 0.084 0.111 0.139
Appendix 4(b) - Shooting
1) Charge distance = M +7 and M +9 for Swiftstride.2) Against Move or Shoot enemy unit deploys just outside shooting range i.e >24” forHandguns and >30” for Crossbows.KeyML = Moved Long RangeL = Long RangeS= Short rangeMS = Moved Short RangeS&S = Stand and Shoot( ) - >50% of this shot either because the distance is just over 7” or the shooting unit hasa good chance of manoeuvring for an extra shot
Swords-men
1RealmKnights2
Blood-letters3
SavageOrcs4
Dwarf-Warriors5
DEXbowsRepeat always
3ML,1S,1S&S
1ML,1S1S&S
2ML,1S,1S&S
3ML,1S,1S&S
3ML,1L,1S,1S&S
DE 1L,2S, 1L, 1ML, 1L,2S, 3L,
******Created by ebook converter - www.ebook-converter.com******
******ebook converter DEMO - www.ebook-converter.com*******
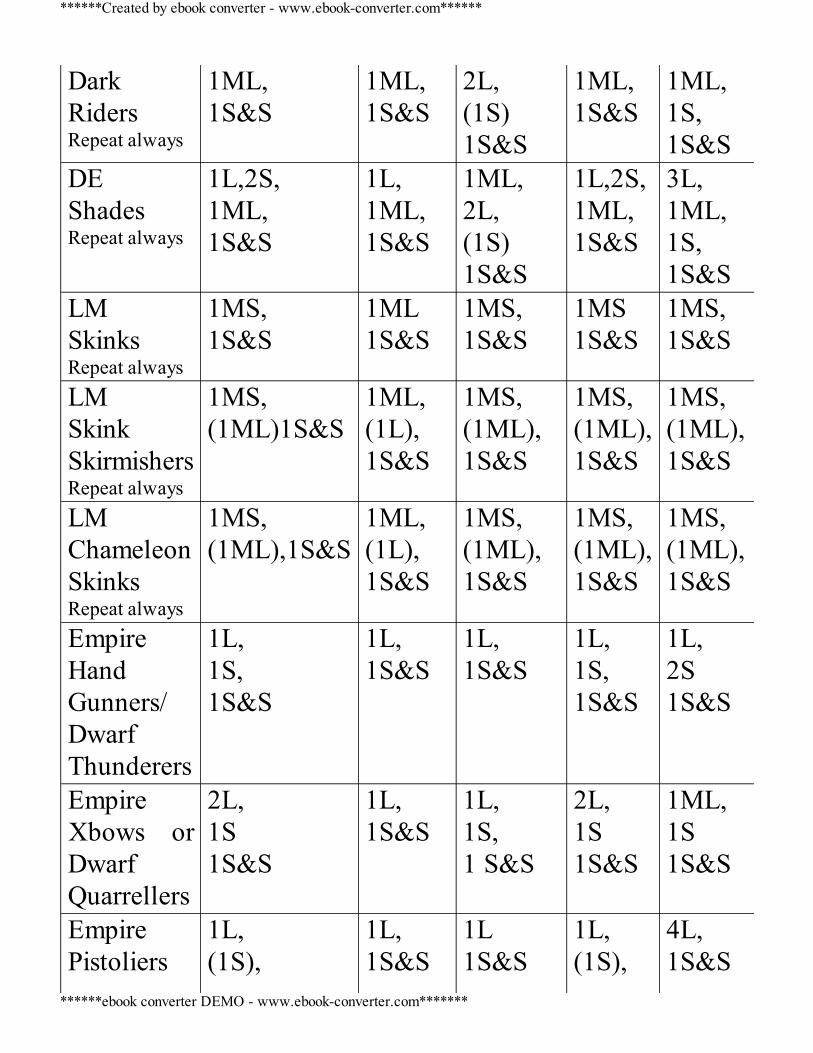
DarkRidersRepeat always
1ML,1S&S
1ML,1S&S
2L,(1S)1S&S
1ML,1S&S
1ML,1S,1S&S
DEShadesRepeat always
1L,2S,1ML,1S&S
1L,1ML,1S&S
1ML,2L,(1S)1S&S
1L,2S,1ML,1S&S
3L,1ML,1S,1S&S
LMSkinksRepeat always
1MS,1S&S
1ML1S&S
1MS,1S&S
1MS1S&S
1MS,1S&S
LMSkinkSkirmishersRepeat always
1MS,(1ML)1S&S
1ML,(1L),1S&S
1MS,(1ML),1S&S
1MS,(1ML),1S&S
1MS,(1ML),1S&S
LMChameleonSkinksRepeat always
1MS,(1ML),1S&S
1ML,(1L),1S&S
1MS,(1ML),1S&S
1MS,(1ML),1S&S
1MS,(1ML),1S&S
EmpireHandGunners/DwarfThunderers
1L,1S,1S&S
1L,1S&S
1L,1S&S
1L,1S,1S&S
1L,2S1S&S
EmpireXbows orDwarfQuarrellers
2L,1S1S&S
1L,1S&S
1L,1S,1 S&S
2L,1S1S&S
1ML,1S1S&S
EmpirePistoliers
1L,(1S),
1L,1S&S
1L1S&S
1L,(1S),
4L,1S&S
******Created by ebook converter - www.ebook-converter.com******
******ebook converter DEMO - www.ebook-converter.com*******
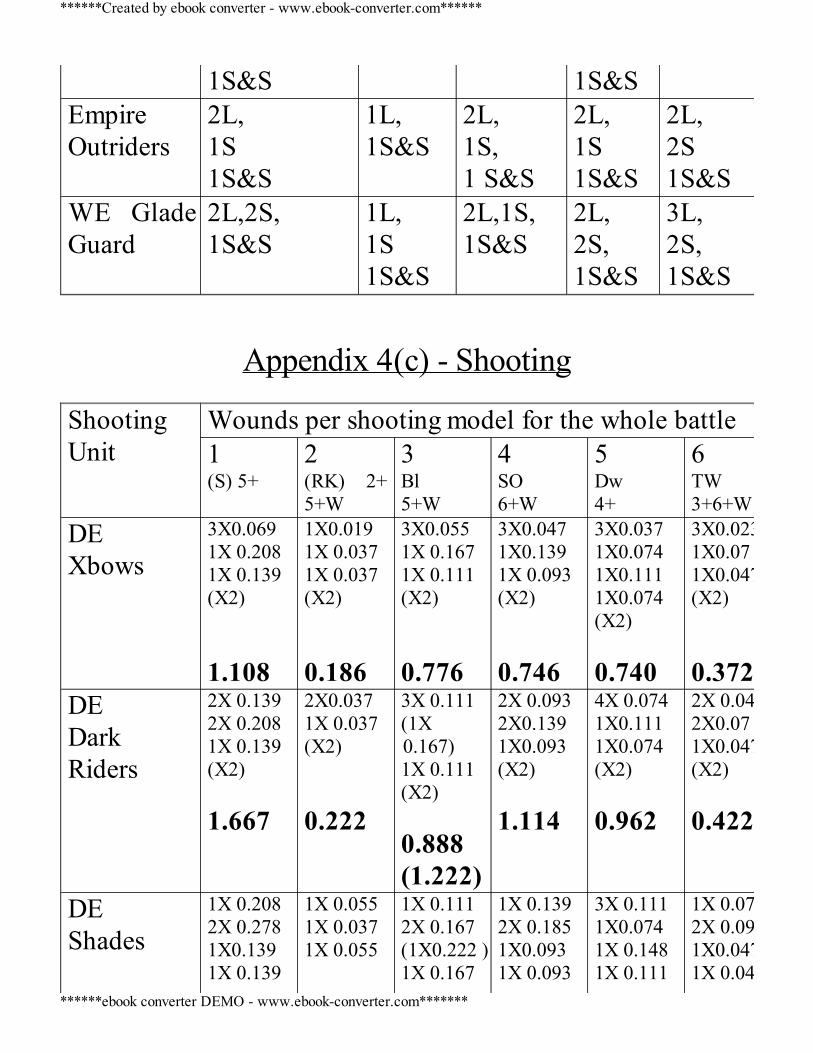
1S&S 1S&SEmpireOutriders
2L,1S1S&S
1L,1S&S
2L,1S,1 S&S
2L,1S1S&S
2L,2S1S&S
WE GladeGuard
2L,2S,1S&S
1L,1S1S&S
2L,1S,1S&S
2L,2S,1S&S
3L,2S,1S&S
Appendix 4(c) - Shooting
ShootingUnit
Wounds per shooting model for the whole battle1(S) 5+
2(RK) 2+5+W
3Bl5+W
4SO6+W
5Dw4+
6TW3+6+W
DEXbows
3X0.0691X 0.2081X 0.139(X2) 1.108
1X0.0191X 0.0371X 0.037(X2) 0.186
3X0.0551X 0.1671X 0.111(X2) 0.776
3X0.0471X0.1391X 0.093(X2) 0.746
3X0.0371X0.0741X0.1111X0.074(X2) 0.740
3X0.0231X0.071X0.047(X2) 0.372
DEDarkRiders
2X 0.1392X 0.2081X 0.139(X2) 1.667
2X0.0371X 0.037(X2) 0.222
3X 0.111(1X0.167)1X 0.111(X2) 0.888(1.222)
2X 0.0932X0.1391X0.093(X2) 1.114
4X 0.0741X0.1111X0.074(X2) 0.962
2X 0.0472X0.071X0.047(X2) 0.422
DEShades
1X 0.2082X 0.2781X0.1391X 0.139
1X 0.0551X 0.0371X 0.055
1X 0.1112X 0.167(1X0.222 )1X 0.167
1X 0.1392X 0.1851X0.0931X 0.093
3X 0.1111X0.0741X 0.1481X 0.111
1X 0.072X 0.0931X0.0471X 0.047
******Created by ebook converter - www.ebook-converter.com******
******ebook converter DEMO - www.ebook-converter.com*******
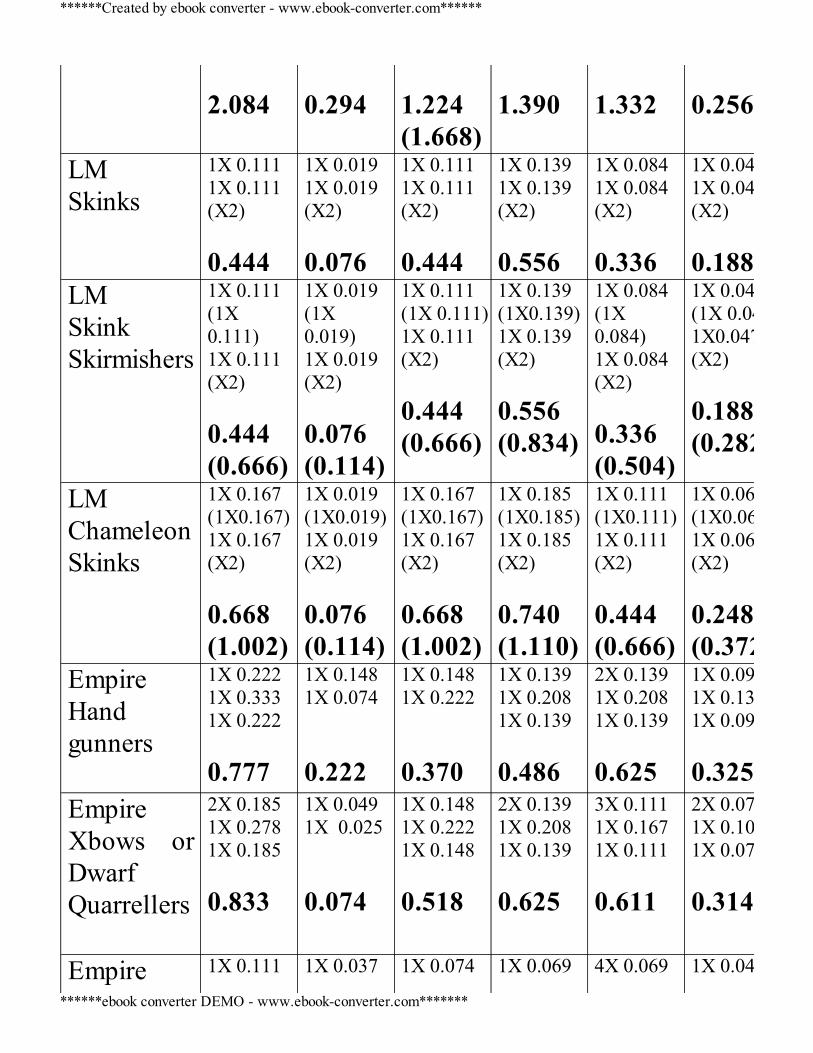
2.084
0.294
1.224(1.668)
1.390
1.332
0.256
LMSkinks
1X 0.1111X 0.111(X2) 0.444
1X 0.0191X 0.019(X2) 0.076
1X 0.1111X 0.111(X2) 0.444
1X 0.1391X 0.139(X2) 0.556
1X 0.0841X 0.084(X2) 0.336
1X 0.0471X 0.047(X2) 0.188
LMSkinkSkirmishers
1X 0.111(1X0.111)1X 0.111(X2) 0.444(0.666)
1X 0.019(1X0.019)1X 0.019(X2) 0.076(0.114)
1X 0.111(1X 0.111)1X 0.111(X2) 0.444(0.666)
1X 0.139(1X0.139)1X 0.139(X2) 0.556(0.834)
1X 0.084(1X0.084)1X 0.084(X2) 0.336(0.504)
1X 0.047(1X 0.047)1X0.047(X2) 0.188(0.282)
LMChameleonSkinks
1X 0.167(1X0.167)1X 0.167(X2) 0.668(1.002)
1X 0.019(1X0.019)1X 0.019(X2) 0.076(0.114)
1X 0.167(1X0.167)1X 0.167(X2) 0.668(1.002)
1X 0.185(1X0.185)1X 0.185(X2) 0.740(1.110)
1X 0.111(1X0.111)1X 0.111(X2) 0.444(0.666)
1X 0.062(1X0.062)1X 0.062(X2) 0.248(0.372)
EmpireHandgunners
1X 0.2221X 0.3331X 0.222 0.777
1X 0.1481X 0.074 0.222
1X 0.1481X 0.222 0.370
1X 0.1391X 0.2081X 0.139 0.486
2X 0.1391X 0.2081X 0.139 0.625
1X 0.0931X 0.1391X 0.093 0.325
EmpireXbows orDwarfQuarrellers
2X 0.1851X 0.2781X 0.185 0.833
1X 0.0491X 0.025 0.074
1X 0.1481X 0.2221X 0.148 0.518
2X 0.1391X 0.2081X 0.139 0.625
3X 0.1111X 0.1671X 0.111 0.611
2X 0.071X 0.1041X 0.07 0.314
Empire 1X 0.111 1X 0.037 1X 0.074 1X 0.069 4X 0.069 1X 0.046
******Created by ebook converter - www.ebook-converter.com******
******ebook converter DEMO - www.ebook-converter.com*******

Pistoliers (1X0.222)1X 0.056(0.111)(X2) 0.334(0.888)
1X 0.019(X2) 0.112
1X 0.037(X2) 0.222
(1X0.139)1X 0.035(0.069)(X2) 0.208(0.277)
1X 0.035(X2) 0.311
(1X0.093)1X0.023(0.046)(X2) 0.138(0.370)
EmpireOutriders
1X 0.2221X 0.3331X 0.222(X3) 2.331
1X 0.0741X 0.037(X3) 0.333
1X 0.2221X 0.296(X3) 1.554
1X 0.1391X 0.2081X 0.139(X3) 1.45
2X 0.1391X 0.2081X 0.139(X3) 1.875
1X 0.0931X 0.1391X 0.093(X3) 0.65
DwarfThunderers
1X 0.3331X 0.4441X 0.333 1.110
1X 0.1111X 0.074 0.185
1X 0.2221X 0.296 0.518
1X 0.2081X 0.2781X0.208 0.694
2X 0.2081X 0.2781X0.208 0.902
1X 0.1391X0.1851X 0.139 0.463
WE GladeGuard
2X 0.1672 X0.371X0.278
1.352
1X0.0281X 0.0991X 0.074
0.201
2X0.1671X 0.2961X 0.222
0.852
2X 0.1392X 0.2781X 0.208
1.042
3X 0.0842X 0.2221X 0.167
0.863
2X0.0472X 139
1X 0.104
0.476 Shooting at Monsters – Long Range/short rangeDE Xbows vs Sphinx = 0.047; 0.069 (x2) (106 or 72 shots to kill)DE Xbows vs Steam Tank = 0.009; 0.014 (x2) (1111 or 714)DE Xbows vs Stegadon = 0.037(2/3) + (1/3)(1/27); 0.055(2/3) +
(1/3)(7/216) = 0.037;0.047 (135 or 106) Skinks vs Sphinx = 0.129; 0.148 (39 or 34 shots to kill)Skinks vs Steam Tank = 0.032; 0.037 (312 or 270 to kill)
******Created by ebook converter - www.ebook-converter.com******
******ebook converter DEMO - www.ebook-converter.com*******
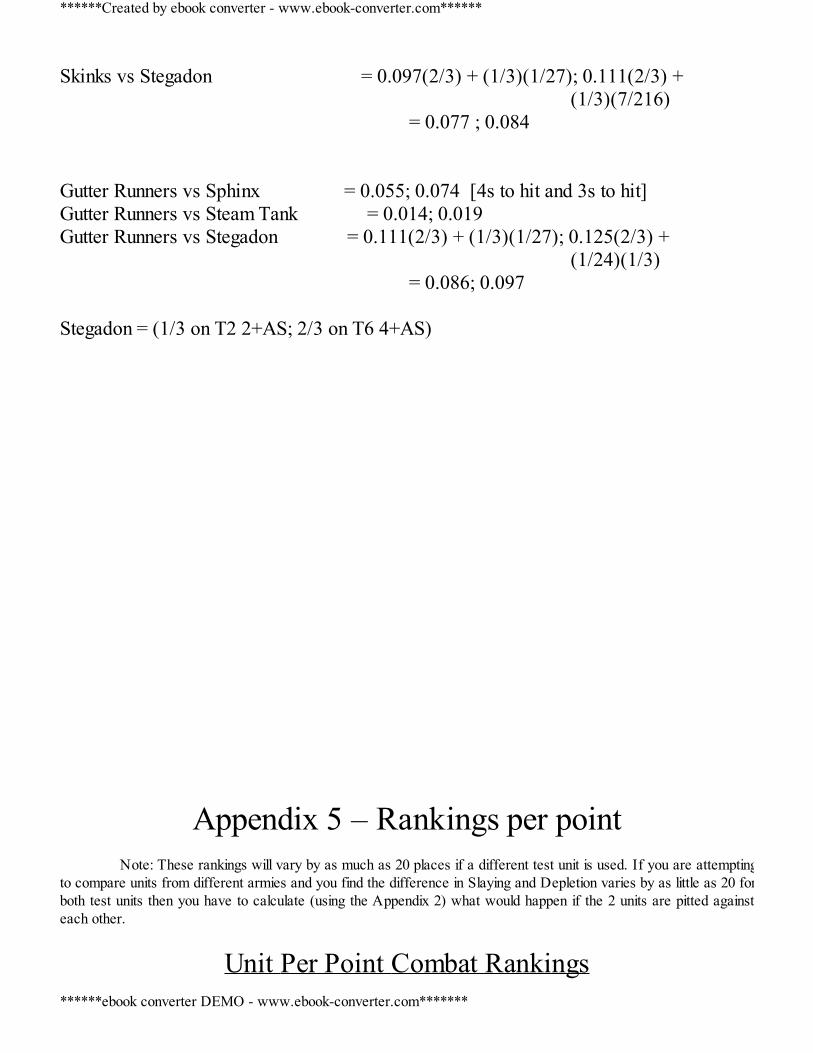
Skinks vs Stegadon = 0.097(2/3) + (1/3)(1/27); 0.111(2/3) + (1/3)(7/216)
= 0.077 ; 0.084 Gutter Runners vs Sphinx = 0.055; 0.074 [4s to hit and 3s to hit]Gutter Runners vs Steam Tank = 0.014; 0.019Gutter Runners vs Stegadon = 0.111(2/3) + (1/3)(1/27); 0.125(2/3) +
(1/24)(1/3) = 0.086; 0.097 Stegadon = (1/3 on T2 2+AS; 2/3 on T6 4+AS)
Appendix 5 – Rankings per point Note: These rankings will vary by as much as 20 places if a different test unit is used. If you are attemptingto compare units from different armies and you find the difference in Slaying and Depletion varies by as little as 20 forboth test units then you have to calculate (using the Appendix 2) what would happen if the 2 units are pitted againsteach other.
Unit Per Point Combat Rankings
******Created by ebook converter - www.ebook-converter.com******
******ebook converter DEMO - www.ebook-converter.com*******
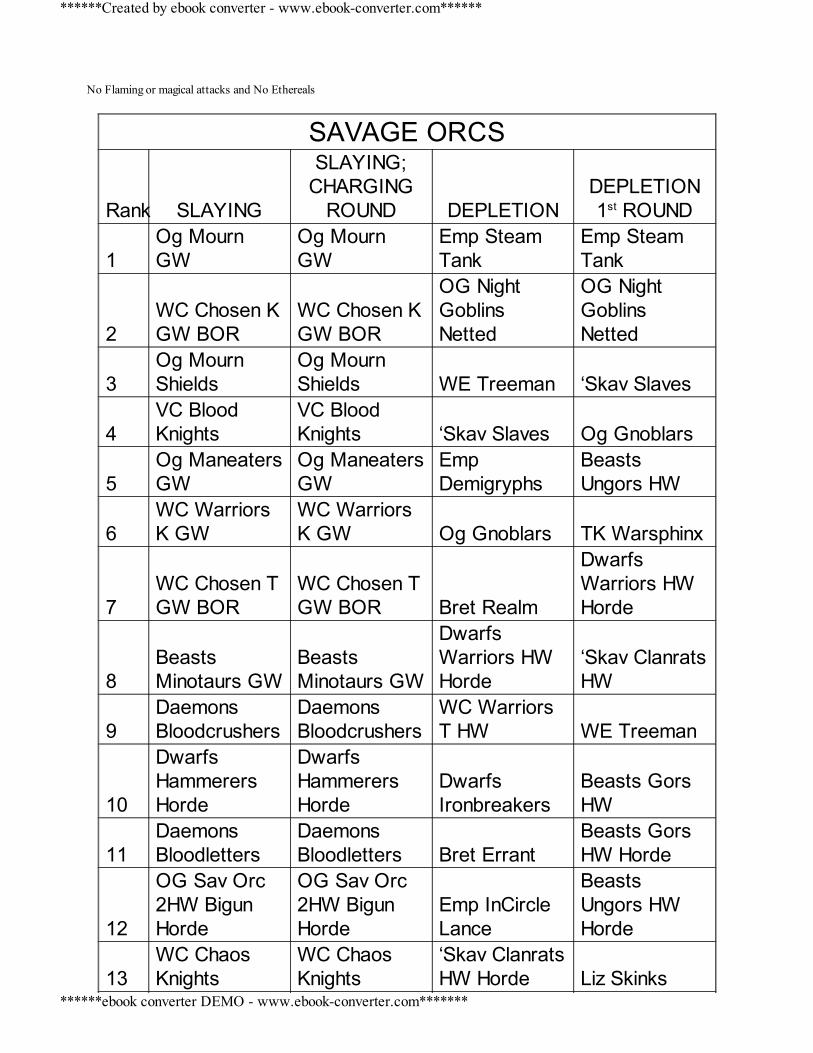
No Flaming or magical attacks and No Ethereals
SAVAGE ORCS
Rank SLAYING
SLAYING;CHARGING
ROUND DEPLETIONDEPLETION1st ROUND
1Og MournGW
Og MournGW
Emp SteamTank
Emp SteamTank
2WC Chosen KGW BOR
WC Chosen KGW BOR
OG NightGoblinsNetted
OG NightGoblinsNetted
3Og MournShields
Og MournShields WE Treeman ‘Skav Slaves
4VC BloodKnights
VC BloodKnights ‘Skav Slaves Og Gnoblars
5Og ManeatersGW
Og ManeatersGW
EmpDemigryphs
BeastsUngors HW
6WC WarriorsK GW
WC WarriorsK GW Og Gnoblars TK Warsphinx
7WC Chosen TGW BOR
WC Chosen TGW BOR Bret Realm
DwarfsWarriors HWHorde
8BeastsMinotaurs GW
BeastsMinotaurs GW
DwarfsWarriors HWHorde
‘Skav ClanratsHW
9DaemonsBloodcrushers
DaemonsBloodcrushers
WC WarriorsT HW WE Treeman
10
DwarfsHammerersHorde
DwarfsHammerersHorde
DwarfsIronbreakers
Beasts GorsHW
11DaemonsBloodletters
DaemonsBloodletters Bret Errant
Beasts GorsHW Horde
12
OG Sav Orc2HW BigunHorde
OG Sav Orc2HW BigunHorde
Emp InCircleLance
BeastsUngors HWHorde
13WC ChaosKnights
WC ChaosKnights
‘Skav ClanratsHW Horde Liz Skinks
******Created by ebook converter - www.ebook-converter.com******
******ebook converter DEMO - www.ebook-converter.com*******

14 Og Ironguts Og Ironguts
TK SkeletonWS5 HWHorde
WC WarriorsT HW
15TK NecropolisKnights
TK NecropolisKnights
EmpReiksguard Bret Realm
16‘Skav RatOgres
‘Skav RatOgres Og Ironblaster
DwarfsIronbreakers
17 Liz Kroxigors Liz Kroxigors
OG OrcHW&Sh BigunHorde
EmpSwordsmen
18HESwordmasters
HESwordmasters
BeastsUngors HW Liz Anc Steg
19DE Cold OneKnights
DE Cold OneKnights TK Warsphinx
OG RiverTrolls
20Og Bulls HWHorde
Og Bulls HWHorde WE TreeKin
OG OrcHW&Sh BigunHorde
21 TK Chariots TK ChariotsEmpSwordsmen
TK SkeletonWS5 HWHorde
22HE PhoenixGuards Horde
HE PhoenixGuards Horde
OG OrcHW&Sh Liz Steg
23
WEWardancers+1A
WEWardancers+1A
OG OrcHW&Sh Horde
OG OrcHW&Sh
24
WCMarauders KGW
WCMarauders KGW
WC Chosen THW BOR
OG OrcHW&Sh Horde
25WC WarriorsT GW
WC WarriorsT GW
Beasts GorsHW OG Trolls
26 HE Spears HE SpearsBeasts GorsHW Horde
EmpDemigryphs
27 HE Seaguard HE SeaguardDwarfsLongbeards WE Dryads
28Liz SaurusSpear Horde
Liz SaurusSpear Horde
BeastsUngors HWHorde Bret Errant
******Created by ebook converter - www.ebook-converter.com******
******ebook converter DEMO - www.ebook-converter.com*******
29 WE TreeKin WE TreeKinOG RiverTrolls
WCMarauders KGW
30 OG Trolls OG Trolls‘Skav ClanratsSpears Horde
DwarfsLongbeards
31OG RiverTrolls
OG RiverTrolls Liz Anc Steg
BretMen@Arms
32DaemonsFlesh Hounds
DaemonsFlesh Hounds
TK TombGuard HWWS5 DE Warriors
33 Og Bulls HW Og Bulls HW DE HydraWC Chosen THW BOR
34HE DragonPrinces
HE DragonPrinces OG Trolls WE TreeKin
35DEBlackGuard
DEBlackGuard DE Warriors
OG Sav Orc2HW BigunHorde
36 VC Vargheists VC VargheistsVC CryptHorrors
TK TombGuard HWWS5
37WC Chosen THW BOR
WC Chosen THW BOR WE Dryads
OG Sav Orc2HW Bigun
38OG Sav Orc2HW Bigun
OG Sav Orc2HW Bigun
Liz SaurusHW Horde
‘Skav ClanratsSpears
39DaemonsPlaguebearers
DaemonsPlaguebearers
VC GraveGuard HWHorde
‘Skav PlagueMonks
40
DwarfsWarriors GWHorde
DwarfsWarriors GWHorde
HE PhoenixGuards
HE PhoenixGuards
41Emp GreatSwords
Emp GreatSwords
HE PhoenixGuards Horde
HE PhoenixGuards Horde
42 ‘Skav Gutters ‘Skav Gutters Liz StegDaemonsBloodletters
43
TK TombGuard HWWS5
TK TombGuard HWWS5
WCMarauders KGW
DaemonsDaemonettes
******Created by ebook converter - www.ebook-converter.com******
******ebook converter DEMO - www.ebook-converter.com*******
44
WEWardancers4+W
WEWardancers4+W Bret Questing
DwarfsWarriors GWHorde
45DwarfsLongbeards
DwarfsLongbeards
BretMen@Arms
EmpHalberdier
46Liz SaurusHW Horde
Liz SaurusHW Horde
DwarfsWarriors GWHorde
Liz SaurusHW Horde
47BeastsCentigors GW
BeastsCentigors GW
OG Sav Orc2HW Bigun
Emp InCircleLance
48VC CryptHorrors
VC CryptHorrors
OG Sav Orc2HW BigunHorde Og Ironblaster
49DEExecutioners
DEExecutioners Liz Skinks
DaemonsPlaguebearers
50DwarfsHammerrers
DwarfsHammerrers
OgThundertusk DE Hydra
51HE WhiteLions
HE WhiteLions
‘Skav PlagueMonks
EmpReiksguard
52DaemonsDaemonettes
DaemonsDaemonettes
VC SkeletonsHW Horde Bret Questing
53EmpDemigryphs
EmpDemigryphs
WC WarriorsT GW HE Spears
54WE WildRiders
WE WildRiders
Emp KnightllyOrders GW
WEWardancers4+W
55 DE Corsairs DE CorsairsEmp GreatSwords DE Xbowmen
56Emp InCircleLance
Emp InCircleLance
TK SkeletonWS2 HWHorde
Emp GreatSwords
57Emp InCircleGW
Emp InCircleGW Og Bulls HW
VC CryptHorrors
58EmpReiksguard
EmpReiksguard
Og Bulls HWHorde
DaemonsFlesh Hounds
59VC BlackKnights
VC BlackKnights
BeastsBestigors
‘SkavStormvermin
******Created by ebook converter - www.ebook-converter.com******
******ebook converter DEMO - www.ebook-converter.com*******
60
BeastsCentigorsSpears
BeastsCentigorsSpears
DwarfsHammerrers
VC SkeletonsHW Horde
61DaemonsFlamers
DaemonsFlamers
DwarfsHammerersHorde Og Bulls HW
62LizTempleGuard
LizTempleGuard HE Spears
Og Bulls HWHorde
63WC WarriorsT HW
WC WarriorsT HW DE Xbowmen
WC WarriorsT GW
64 Bret Questing Bret Questing‘SkavStormvermin
TK SkeletonWS2 HWHorde
65BretMen@Arms
BretMen@Arms
DaemonsBloodletters
BeastsBestigors
66EmpHalberdier
EmpHalberdier
DaemonsDaemonettes
DwarfsHammerrers
67
OG OrcHW&Sh BigunHorde
OG OrcHW&Sh BigunHorde
DaemonsPlaguebearers
DwarfsHammerersHorde
68‘SkavStormvermin
‘SkavStormvermin
EmpHalberdier DE Corsairs
69
TK TombGuard HWWS2
TK TombGuard HWWS2
LizTempleGuard
OG BlackOrcs
70
VC GraveGuard HWHorde
VC GraveGuard HWHorde
OG BlackOrcs
LizTempleGuard
71 WE Dryads WE DryadsTK NecropolisKnights
Emp KnightllyOrders GW
72 DE Warriors DE Warriors DE CorsairsWC WarriorsK GW
73HE PhoenixGuards
HE PhoenixGuards
Emp InCircleGW
TK NecropolisKnights
74WE EternalGuard
WE EternalGuard
WC WarriorsK GW
DEExecutioners
Beasts Beasts VC Black WC Chosen T
******Created by ebook converter - www.ebook-converter.com******
******ebook converter DEMO - www.ebook-converter.com*******
75 Bestigors Bestigors Knights GW BOR
76OG BlackOrcs
OG BlackOrcs
DaemonsFlesh Hounds HE Seaguard
77
TK SkeletonWS5 HWHorde
TK SkeletonWS5 HWHorde
TK TombGuard HWWS2
WE EternalGuard
78 Bret Errant Bret ErrantDE Cold OneKnights
DaemonsFlamers
79 Bret Realm Bret RealmWC Chosen TGW BOR
Emp InCircleGW
80Emp KnightllyOrders GW
Emp KnightllyOrders GW
WEWardancers4+W
Liz SaurusSpear Horde
81OgThundertusk
OgThundertusk
Og MournShields
Og MournShields
82 DE Hydra DE HydraLiz SaurusSpear Horde
OgThundertusk
83VC SkeletonsHW Horde
VC SkeletonsHW Horde
DEExecutioners
VC GraveGuard HWHorde
84DwarfsIronbreakers
DwarfsIronbreakers HE Seaguard
DE Cold OneKnights
85 TK Warsphinx TK WarsphinxWE EternalGuard
WC Chosen KGW BOR
86‘Skav ClanratsSpears
‘Skav ClanratsSpears
WC Chosen KGW BOR ‘Skav Gutters
87‘Skav PlagueMonks
‘Skav PlagueMonks
HE DragonPrinces
TK TombGuard HWWS2
88
BeastsUngors HWHorde
BeastsUngors HWHorde
WC ChaosKnights
VC BlackKnights
89
DwarfsWarriors HWHorde
DwarfsWarriors HWHorde
DEBlackGuard
‘Skav RatOgres
90EmpSwordsmen
EmpSwordsmen
DaemonsFlamers
DEBlackGuard
******Created by ebook converter - www.ebook-converter.com******
******ebook converter DEMO - www.ebook-converter.com*******
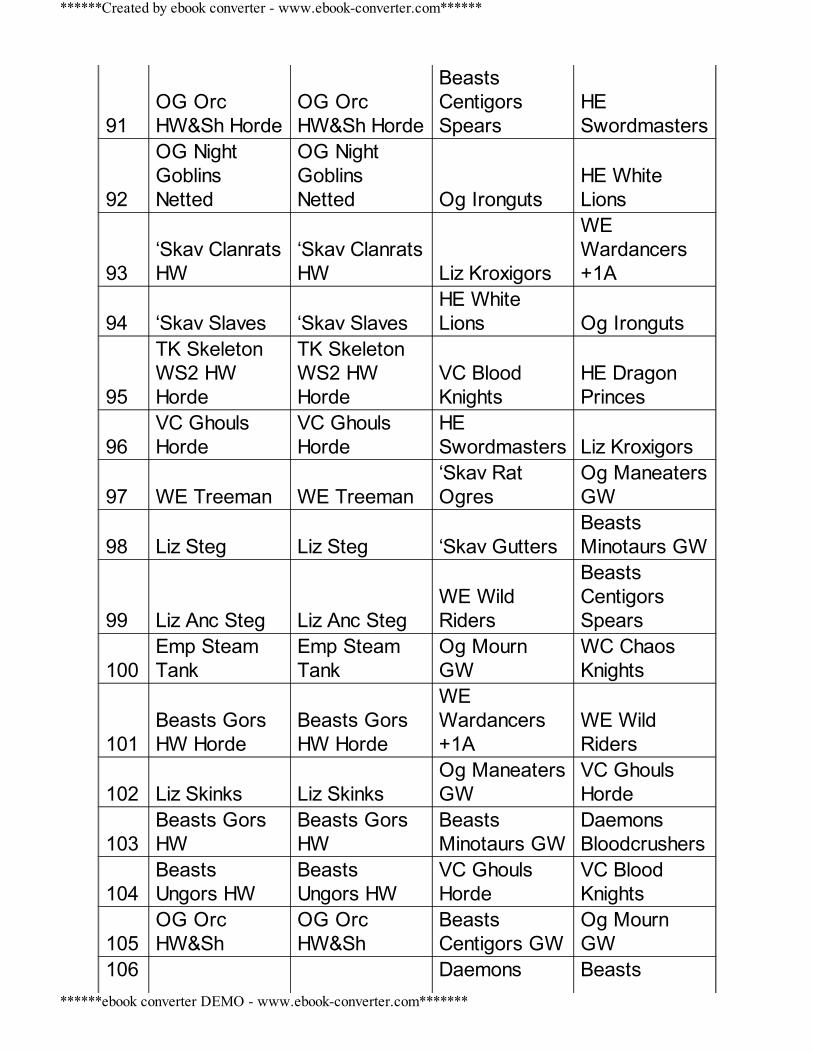
91OG OrcHW&Sh Horde
OG OrcHW&Sh Horde
BeastsCentigorsSpears
HESwordmasters
92
OG NightGoblinsNetted
OG NightGoblinsNetted Og Ironguts
HE WhiteLions
93‘Skav ClanratsHW
‘Skav ClanratsHW Liz Kroxigors
WEWardancers+1A
94 ‘Skav Slaves ‘Skav SlavesHE WhiteLions Og Ironguts
95
TK SkeletonWS2 HWHorde
TK SkeletonWS2 HWHorde
VC BloodKnights
HE DragonPrinces
96VC GhoulsHorde
VC GhoulsHorde
HESwordmasters Liz Kroxigors
97 WE Treeman WE Treeman‘Skav RatOgres
Og ManeatersGW
98 Liz Steg Liz Steg ‘Skav GuttersBeastsMinotaurs GW
99 Liz Anc Steg Liz Anc StegWE WildRiders
BeastsCentigorsSpears
100Emp SteamTank
Emp SteamTank
Og MournGW
WC ChaosKnights
101Beasts GorsHW Horde
Beasts GorsHW Horde
WEWardancers+1A
WE WildRiders
102 Liz Skinks Liz SkinksOg ManeatersGW
VC GhoulsHorde
103Beasts GorsHW
Beasts GorsHW
BeastsMinotaurs GW
DaemonsBloodcrushers
104BeastsUngors HW
BeastsUngors HW
VC GhoulsHorde
VC BloodKnights
105OG OrcHW&Sh
OG OrcHW&Sh
BeastsCentigors GW
Og MournGW
106 Daemons Beasts
******Created by ebook converter - www.ebook-converter.com******
******ebook converter DEMO - www.ebook-converter.com*******
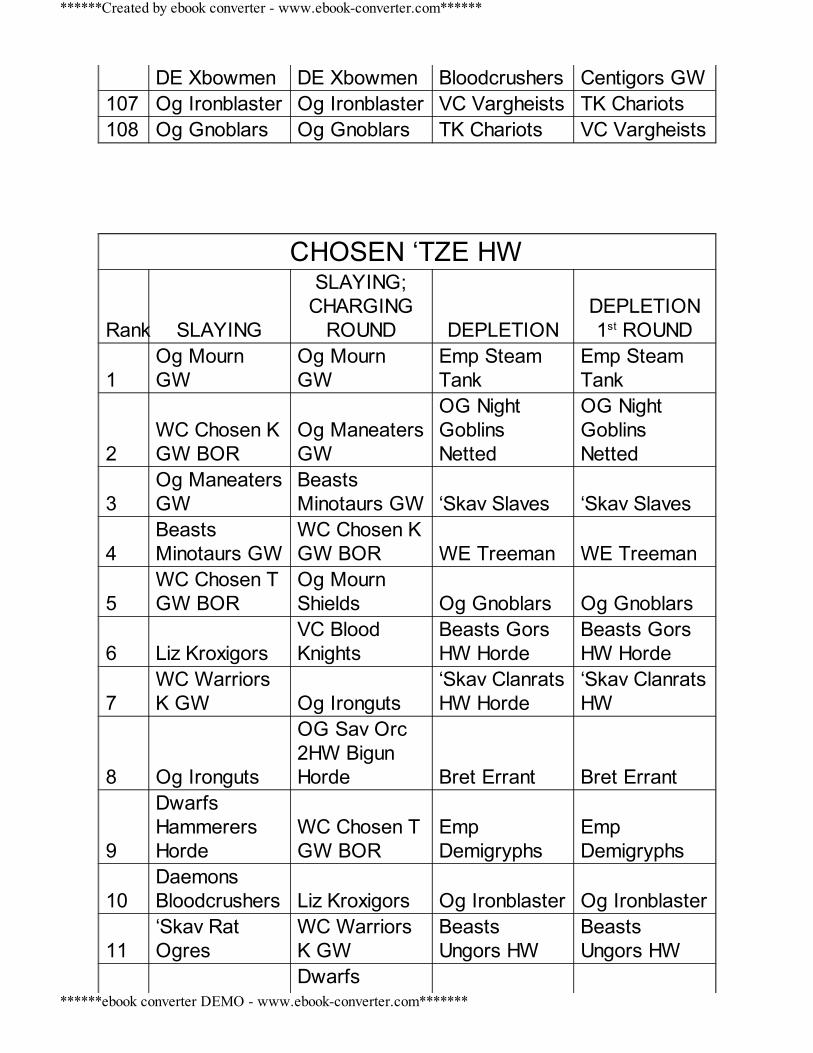
DE Xbowmen DE Xbowmen Bloodcrushers Centigors GW107 Og Ironblaster Og Ironblaster VC Vargheists TK Chariots108 Og Gnoblars Og Gnoblars TK Chariots VC Vargheists
CHOSEN ‘TZE HW
Rank SLAYING
SLAYING;CHARGING
ROUND DEPLETIONDEPLETION1st ROUND
1Og MournGW
Og MournGW
Emp SteamTank
Emp SteamTank
2WC Chosen KGW BOR
Og ManeatersGW
OG NightGoblinsNetted
OG NightGoblinsNetted
3Og ManeatersGW
BeastsMinotaurs GW ‘Skav Slaves ‘Skav Slaves
4BeastsMinotaurs GW
WC Chosen KGW BOR WE Treeman WE Treeman
5WC Chosen TGW BOR
Og MournShields Og Gnoblars Og Gnoblars
6 Liz KroxigorsVC BloodKnights
Beasts GorsHW Horde
Beasts GorsHW Horde
7WC WarriorsK GW Og Ironguts
‘Skav ClanratsHW Horde
‘Skav ClanratsHW
8 Og Ironguts
OG Sav Orc2HW BigunHorde Bret Errant Bret Errant
9
DwarfsHammerersHorde
WC Chosen TGW BOR
EmpDemigryphs
EmpDemigryphs
10DaemonsBloodcrushers Liz Kroxigors Og Ironblaster Og Ironblaster
11‘Skav RatOgres
WC WarriorsK GW
BeastsUngors HW
BeastsUngors HW
Dwarfs
******Created by ebook converter - www.ebook-converter.com******
******ebook converter DEMO - www.ebook-converter.com*******
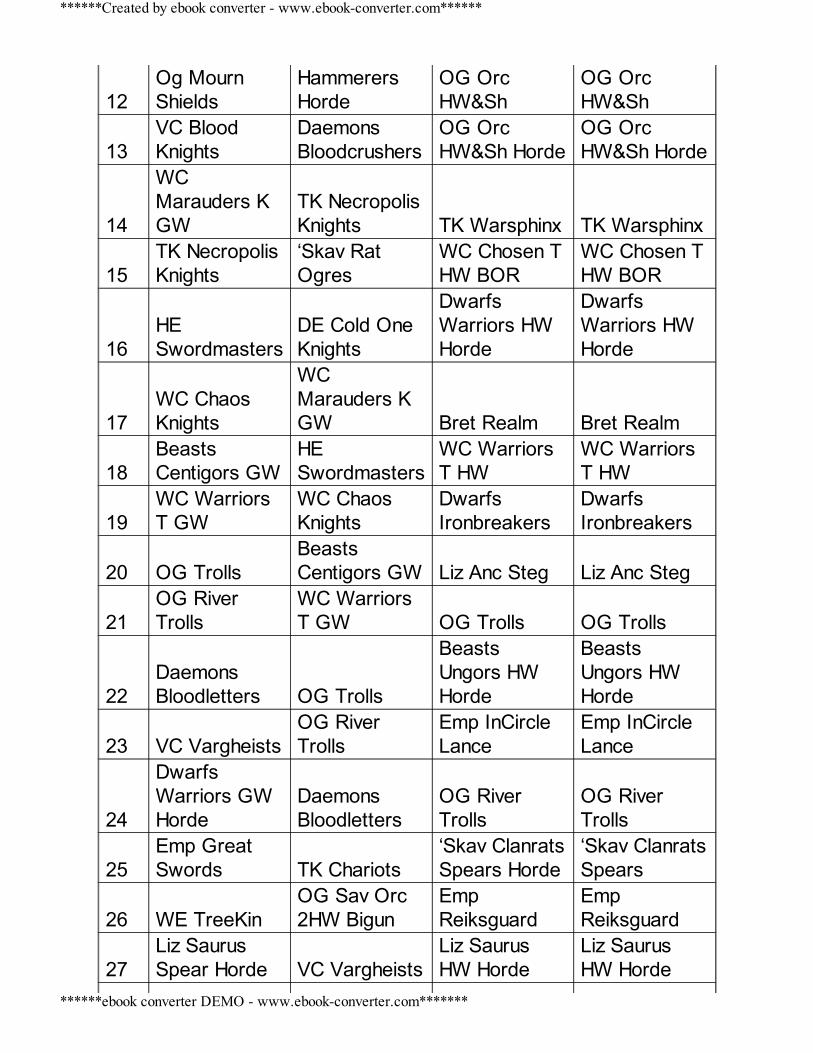
12Og MournShields
HammerersHorde
OG OrcHW&Sh
OG OrcHW&Sh
13VC BloodKnights
DaemonsBloodcrushers
OG OrcHW&Sh Horde
OG OrcHW&Sh Horde
14
WCMarauders KGW
TK NecropolisKnights TK Warsphinx TK Warsphinx
15TK NecropolisKnights
‘Skav RatOgres
WC Chosen THW BOR
WC Chosen THW BOR
16HESwordmasters
DE Cold OneKnights
DwarfsWarriors HWHorde
DwarfsWarriors HWHorde
17WC ChaosKnights
WCMarauders KGW Bret Realm Bret Realm
18BeastsCentigors GW
HESwordmasters
WC WarriorsT HW
WC WarriorsT HW
19WC WarriorsT GW
WC ChaosKnights
DwarfsIronbreakers
DwarfsIronbreakers
20 OG TrollsBeastsCentigors GW Liz Anc Steg Liz Anc Steg
21OG RiverTrolls
WC WarriorsT GW OG Trolls OG Trolls
22DaemonsBloodletters OG Trolls
BeastsUngors HWHorde
BeastsUngors HWHorde
23 VC VargheistsOG RiverTrolls
Emp InCircleLance
Emp InCircleLance
24
DwarfsWarriors GWHorde
DaemonsBloodletters
OG RiverTrolls
OG RiverTrolls
25Emp GreatSwords TK Chariots
‘Skav ClanratsSpears Horde
‘Skav ClanratsSpears
26 WE TreeKinOG Sav Orc2HW Bigun
EmpReiksguard
EmpReiksguard
27Liz SaurusSpear Horde VC Vargheists
Liz SaurusHW Horde
Liz SaurusHW Horde
******Created by ebook converter - www.ebook-converter.com******
******ebook converter DEMO - www.ebook-converter.com*******
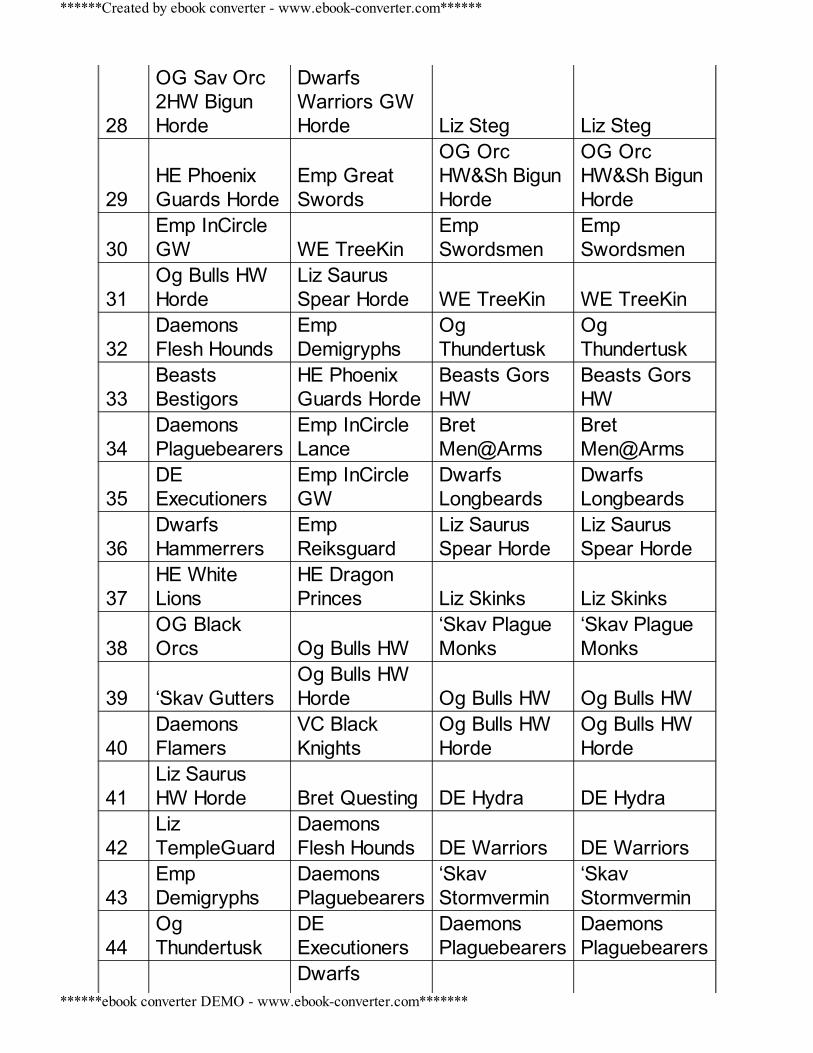
28
OG Sav Orc2HW BigunHorde
DwarfsWarriors GWHorde Liz Steg Liz Steg
29HE PhoenixGuards Horde
Emp GreatSwords
OG OrcHW&Sh BigunHorde
OG OrcHW&Sh BigunHorde
30Emp InCircleGW WE TreeKin
EmpSwordsmen
EmpSwordsmen
31Og Bulls HWHorde
Liz SaurusSpear Horde WE TreeKin WE TreeKin
32DaemonsFlesh Hounds
EmpDemigryphs
OgThundertusk
OgThundertusk
33BeastsBestigors
HE PhoenixGuards Horde
Beasts GorsHW
Beasts GorsHW
34DaemonsPlaguebearers
Emp InCircleLance
BretMen@Arms
BretMen@Arms
35DEExecutioners
Emp InCircleGW
DwarfsLongbeards
DwarfsLongbeards
36DwarfsHammerrers
EmpReiksguard
Liz SaurusSpear Horde
Liz SaurusSpear Horde
37HE WhiteLions
HE DragonPrinces Liz Skinks Liz Skinks
38OG BlackOrcs Og Bulls HW
‘Skav PlagueMonks
‘Skav PlagueMonks
39 ‘Skav GuttersOg Bulls HWHorde Og Bulls HW Og Bulls HW
40DaemonsFlamers
VC BlackKnights
Og Bulls HWHorde
Og Bulls HWHorde
41Liz SaurusHW Horde Bret Questing DE Hydra DE Hydra
42LizTempleGuard
DaemonsFlesh Hounds DE Warriors DE Warriors
43EmpDemigryphs
DaemonsPlaguebearers
‘SkavStormvermin
‘SkavStormvermin
44OgThundertusk
DEExecutioners
DaemonsPlaguebearers
DaemonsPlaguebearers
Dwarfs
******Created by ebook converter - www.ebook-converter.com******
******ebook converter DEMO - www.ebook-converter.com*******
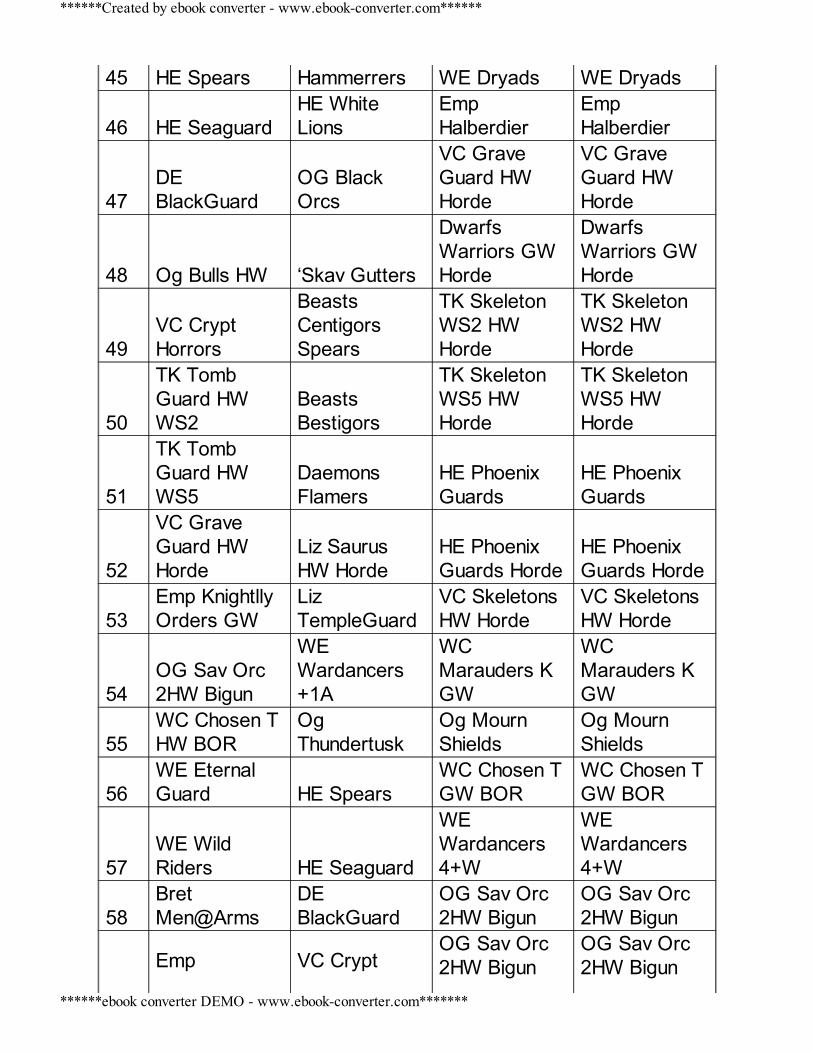
45 HE Spears Hammerrers WE Dryads WE Dryads
46 HE SeaguardHE WhiteLions
EmpHalberdier
EmpHalberdier
47DEBlackGuard
OG BlackOrcs
VC GraveGuard HWHorde
VC GraveGuard HWHorde
48 Og Bulls HW ‘Skav Gutters
DwarfsWarriors GWHorde
DwarfsWarriors GWHorde
49VC CryptHorrors
BeastsCentigorsSpears
TK SkeletonWS2 HWHorde
TK SkeletonWS2 HWHorde
50
TK TombGuard HWWS2
BeastsBestigors
TK SkeletonWS5 HWHorde
TK SkeletonWS5 HWHorde
51
TK TombGuard HWWS5
DaemonsFlamers
HE PhoenixGuards
HE PhoenixGuards
52
VC GraveGuard HWHorde
Liz SaurusHW Horde
HE PhoenixGuards Horde
HE PhoenixGuards Horde
53Emp KnightllyOrders GW
LizTempleGuard
VC SkeletonsHW Horde
VC SkeletonsHW Horde
54OG Sav Orc2HW Bigun
WEWardancers+1A
WCMarauders KGW
WCMarauders KGW
55WC Chosen THW BOR
OgThundertusk
Og MournShields
Og MournShields
56WE EternalGuard HE Spears
WC Chosen TGW BOR
WC Chosen TGW BOR
57WE WildRiders HE Seaguard
WEWardancers4+W
WEWardancers4+W
58BretMen@Arms
DEBlackGuard
OG Sav Orc2HW Bigun
OG Sav Orc2HW Bigun
Emp VC CryptOG Sav Orc2HW Bigun
OG Sav Orc2HW Bigun
******Created by ebook converter - www.ebook-converter.com******
******ebook converter DEMO - www.ebook-converter.com*******
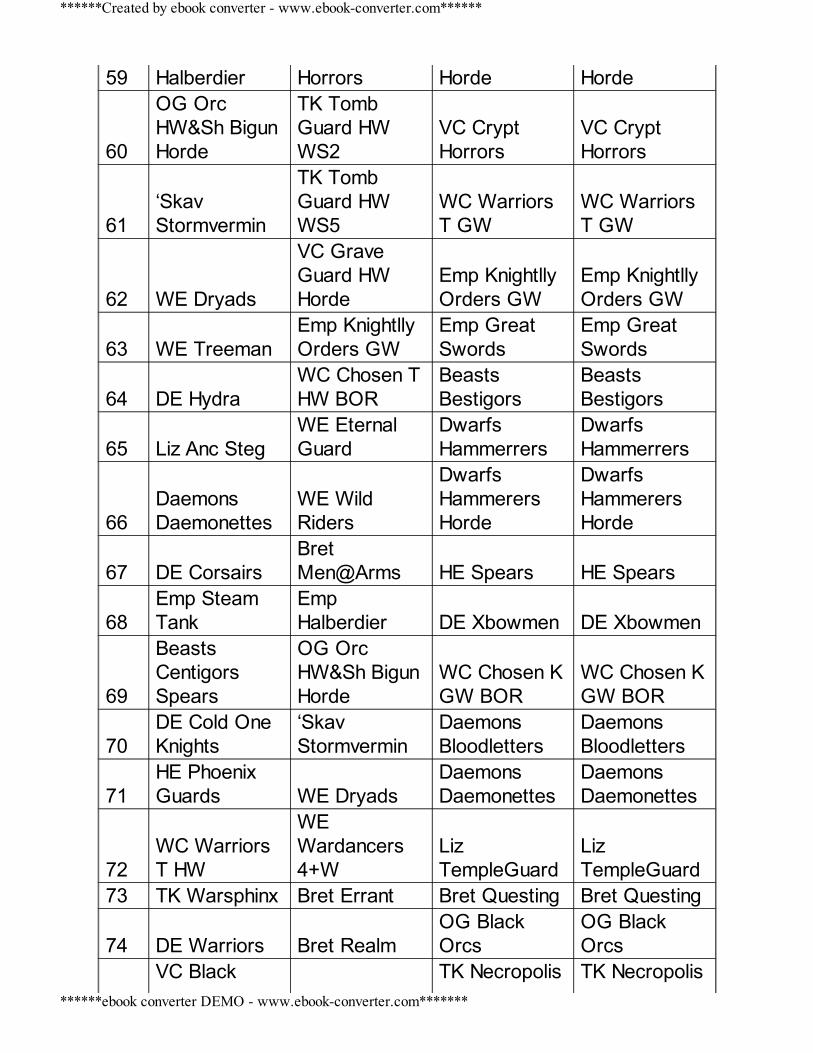
59 Halberdier Horrors Horde Horde
60
OG OrcHW&Sh BigunHorde
TK TombGuard HWWS2
VC CryptHorrors
VC CryptHorrors
61‘SkavStormvermin
TK TombGuard HWWS5
WC WarriorsT GW
WC WarriorsT GW
62 WE Dryads
VC GraveGuard HWHorde
Emp KnightllyOrders GW
Emp KnightllyOrders GW
63 WE TreemanEmp KnightllyOrders GW
Emp GreatSwords
Emp GreatSwords
64 DE HydraWC Chosen THW BOR
BeastsBestigors
BeastsBestigors
65 Liz Anc StegWE EternalGuard
DwarfsHammerrers
DwarfsHammerrers
66DaemonsDaemonettes
WE WildRiders
DwarfsHammerersHorde
DwarfsHammerersHorde
67 DE CorsairsBretMen@Arms HE Spears HE Spears
68Emp SteamTank
EmpHalberdier DE Xbowmen DE Xbowmen
69
BeastsCentigorsSpears
OG OrcHW&Sh BigunHorde
WC Chosen KGW BOR
WC Chosen KGW BOR
70DE Cold OneKnights
‘SkavStormvermin
DaemonsBloodletters
DaemonsBloodletters
71HE PhoenixGuards WE Dryads
DaemonsDaemonettes
DaemonsDaemonettes
72WC WarriorsT HW
WEWardancers4+W
LizTempleGuard
LizTempleGuard
73 TK Warsphinx Bret Errant Bret Questing Bret Questing
74 DE Warriors Bret RealmOG BlackOrcs
OG BlackOrcs
VC Black TK Necropolis TK Necropolis
******Created by ebook converter - www.ebook-converter.com******
******ebook converter DEMO - www.ebook-converter.com*******
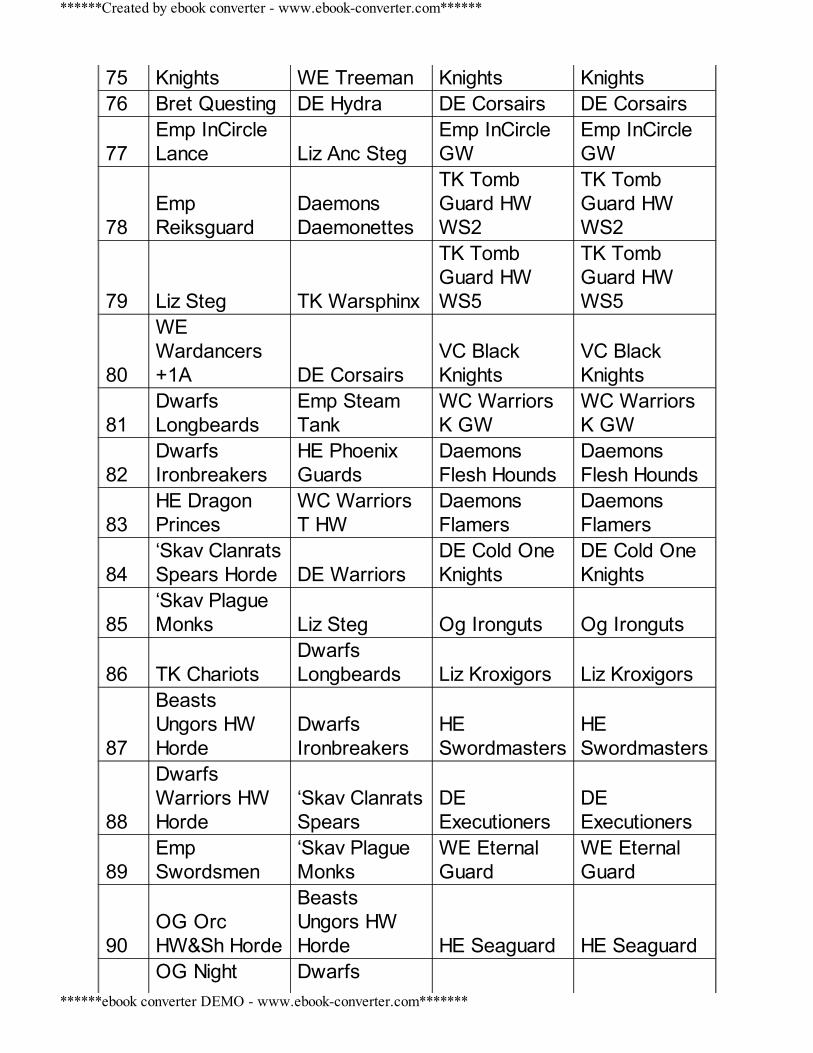
75 Knights WE Treeman Knights Knights76 Bret Questing DE Hydra DE Corsairs DE Corsairs
77Emp InCircleLance Liz Anc Steg
Emp InCircleGW
Emp InCircleGW
78EmpReiksguard
DaemonsDaemonettes
TK TombGuard HWWS2
TK TombGuard HWWS2
79 Liz Steg TK Warsphinx
TK TombGuard HWWS5
TK TombGuard HWWS5
80
WEWardancers+1A DE Corsairs
VC BlackKnights
VC BlackKnights
81DwarfsLongbeards
Emp SteamTank
WC WarriorsK GW
WC WarriorsK GW
82DwarfsIronbreakers
HE PhoenixGuards
DaemonsFlesh Hounds
DaemonsFlesh Hounds
83HE DragonPrinces
WC WarriorsT HW
DaemonsFlamers
DaemonsFlamers
84‘Skav ClanratsSpears Horde DE Warriors
DE Cold OneKnights
DE Cold OneKnights
85‘Skav PlagueMonks Liz Steg Og Ironguts Og Ironguts
86 TK ChariotsDwarfsLongbeards Liz Kroxigors Liz Kroxigors
87
BeastsUngors HWHorde
DwarfsIronbreakers
HESwordmasters
HESwordmasters
88
DwarfsWarriors HWHorde
‘Skav ClanratsSpears
DEExecutioners
DEExecutioners
89EmpSwordsmen
‘Skav PlagueMonks
WE EternalGuard
WE EternalGuard
90OG OrcHW&Sh Horde
BeastsUngors HWHorde HE Seaguard HE Seaguard
OG Night Dwarfs
******Created by ebook converter - www.ebook-converter.com******
******ebook converter DEMO - www.ebook-converter.com*******
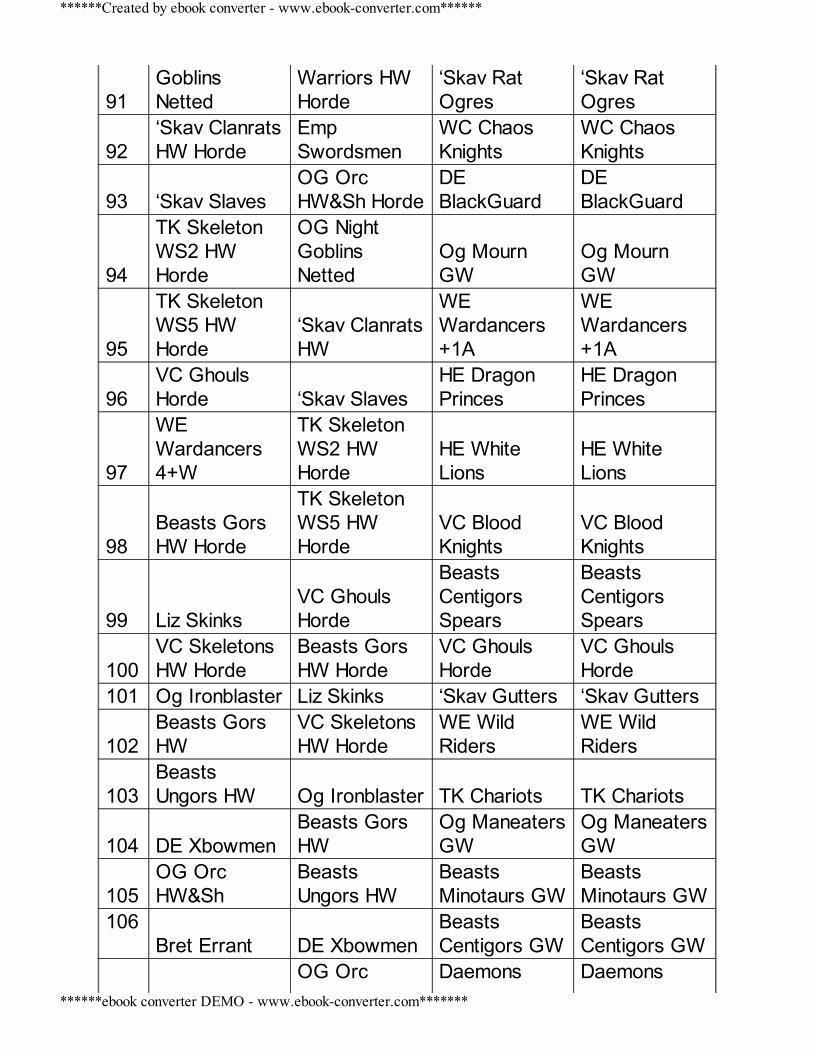
91GoblinsNetted
Warriors HWHorde
‘Skav RatOgres
‘Skav RatOgres
92‘Skav ClanratsHW Horde
EmpSwordsmen
WC ChaosKnights
WC ChaosKnights
93 ‘Skav SlavesOG OrcHW&Sh Horde
DEBlackGuard
DEBlackGuard
94
TK SkeletonWS2 HWHorde
OG NightGoblinsNetted
Og MournGW
Og MournGW
95
TK SkeletonWS5 HWHorde
‘Skav ClanratsHW
WEWardancers+1A
WEWardancers+1A
96VC GhoulsHorde ‘Skav Slaves
HE DragonPrinces
HE DragonPrinces
97
WEWardancers4+W
TK SkeletonWS2 HWHorde
HE WhiteLions
HE WhiteLions
98Beasts GorsHW Horde
TK SkeletonWS5 HWHorde
VC BloodKnights
VC BloodKnights
99 Liz SkinksVC GhoulsHorde
BeastsCentigorsSpears
BeastsCentigorsSpears
100VC SkeletonsHW Horde
Beasts GorsHW Horde
VC GhoulsHorde
VC GhoulsHorde
101 Og Ironblaster Liz Skinks ‘Skav Gutters ‘Skav Gutters
102Beasts GorsHW
VC SkeletonsHW Horde
WE WildRiders
WE WildRiders
103BeastsUngors HW Og Ironblaster TK Chariots TK Chariots
104 DE XbowmenBeasts GorsHW
Og ManeatersGW
Og ManeatersGW
105OG OrcHW&Sh
BeastsUngors HW
BeastsMinotaurs GW
BeastsMinotaurs GW
106 Bret Errant DE Xbowmen
BeastsCentigors GW
BeastsCentigors GW
OG Orc Daemons Daemons
******Created by ebook converter - www.ebook-converter.com******
******ebook converter DEMO - www.ebook-converter.com*******
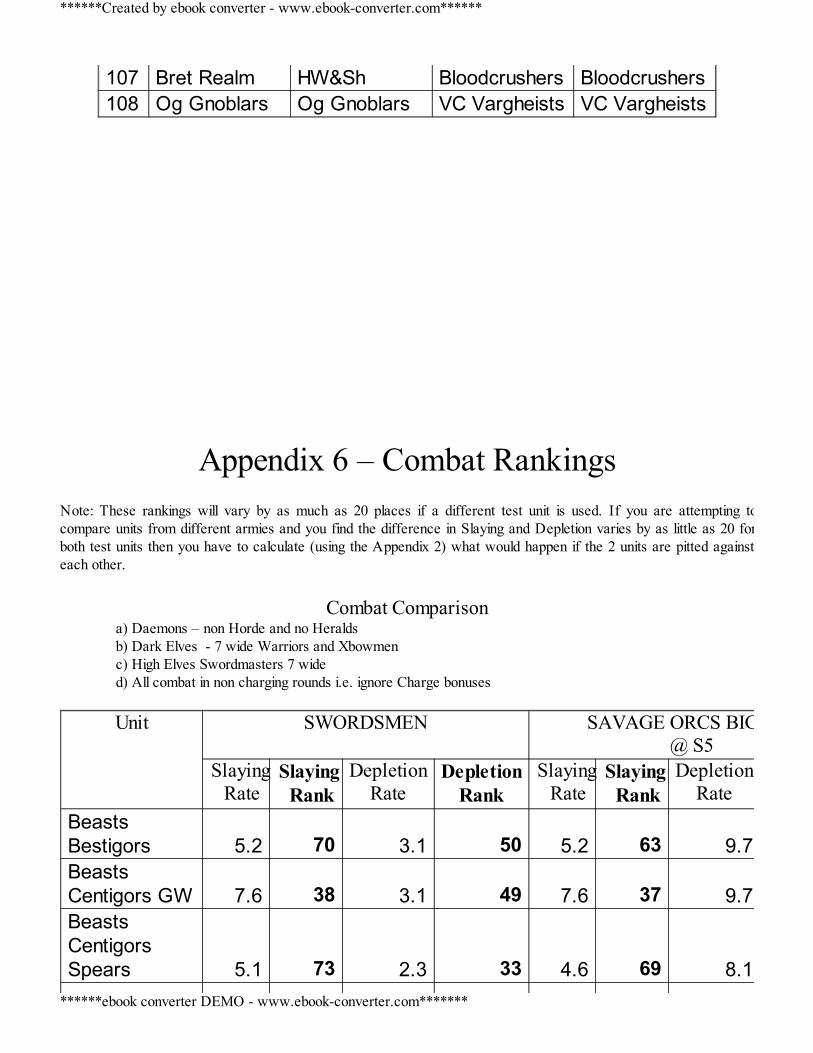
107 Bret Realm HW&Sh Bloodcrushers Bloodcrushers108 Og Gnoblars Og Gnoblars VC Vargheists VC Vargheists
Appendix 6 – Combat Rankings Note: These rankings will vary by as much as 20 places if a different test unit is used. If you are attempting tocompare units from different armies and you find the difference in Slaying and Depletion varies by as little as 20 forboth test units then you have to calculate (using the Appendix 2) what would happen if the 2 units are pitted againsteach other.
Combat Comparison a) Daemons – non Horde and no Heralds b) Dark Elves - 7 wide Warriors and Xbowmen c) High Elves Swordmasters 7 wide d) All combat in non charging rounds i.e. ignore Charge bonuses
Unit SWORDSMEN SAVAGE ORCS BIGUNS@ S5
SlayingRate
SlayingRank
DepletionRate
DepletionRank
SlayingRate
SlayingRank
DepletionRate
BeastsBestigors 5.2 70 3.1 50 5.2 63 9.7BeastsCentigors GW 7.6 38 3.1 49 7.6 37 9.7BeastsCentigorsSpears 5.1 73 2.3 33 4.6 69 8.1
******Created by ebook converter - www.ebook-converter.com******
******ebook converter DEMO - www.ebook-converter.com*******
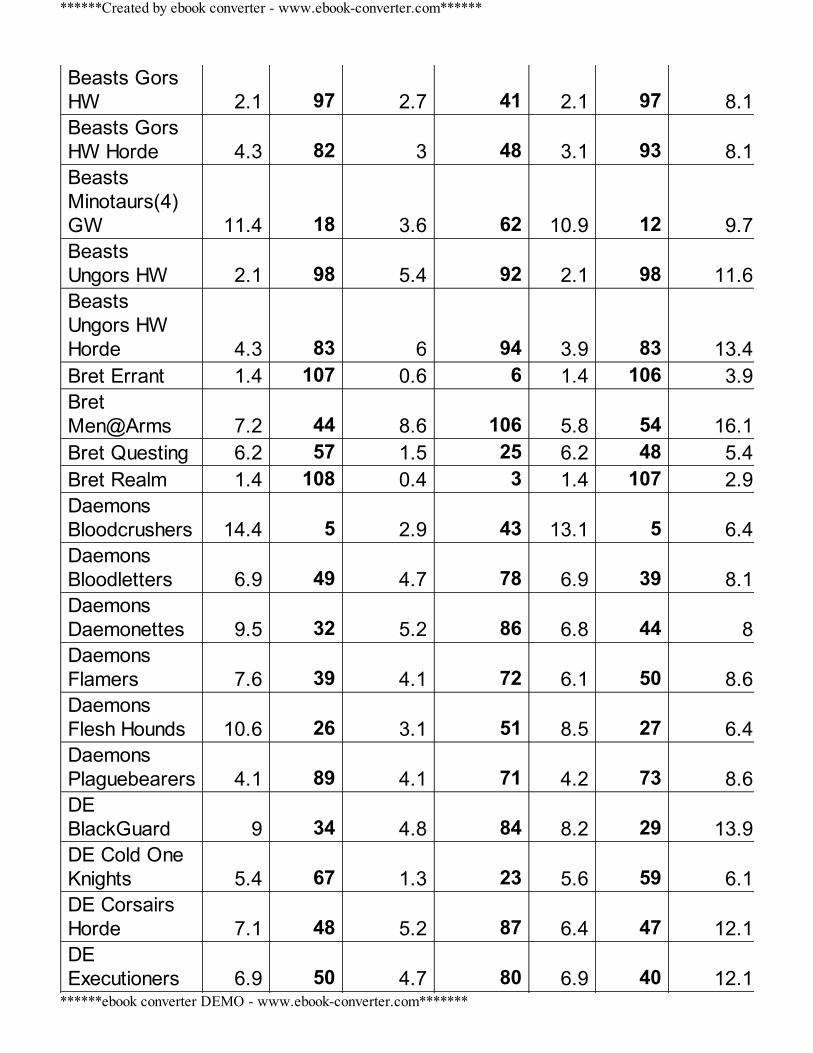
Beasts GorsHW 2.1 97 2.7 41 2.1 97 8.1Beasts GorsHW Horde 4.3 82 3 48 3.1 93 8.1BeastsMinotaurs(4)GW 11.4 18 3.6 62 10.9 12 9.7BeastsUngors HW 2.1 98 5.4 92 2.1 98 11.6BeastsUngors HWHorde 4.3 83 6 94 3.9 83 13.4Bret Errant 1.4 107 0.6 6 1.4 106 3.9BretMen@Arms 7.2 44 8.6 106 5.8 54 16.1Bret Questing 6.2 57 1.5 25 6.2 48 5.4Bret Realm 1.4 108 0.4 3 1.4 107 2.9DaemonsBloodcrushers 14.4 5 2.9 43 13.1 5 6.4DaemonsBloodletters 6.9 49 4.7 78 6.9 39 8.1DaemonsDaemonettes 9.5 32 5.2 86 6.8 44 8DaemonsFlamers 7.6 39 4.1 72 6.1 50 8.6DaemonsFlesh Hounds 10.6 26 3.1 51 8.5 27 6.4DaemonsPlaguebearers 4.1 89 4.1 71 4.2 73 8.6DEBlackGuard 9 34 4.8 84 8.2 29 13.9DE Cold OneKnights 5.4 67 1.3 23 5.6 59 6.1DE CorsairsHorde 7.1 48 5.2 87 6.4 47 12.1DEExecutioners 6.9 50 4.7 80 6.9 40 12.1
******Created by ebook converter - www.ebook-converter.com******
******ebook converter DEMO - www.ebook-converter.com*******
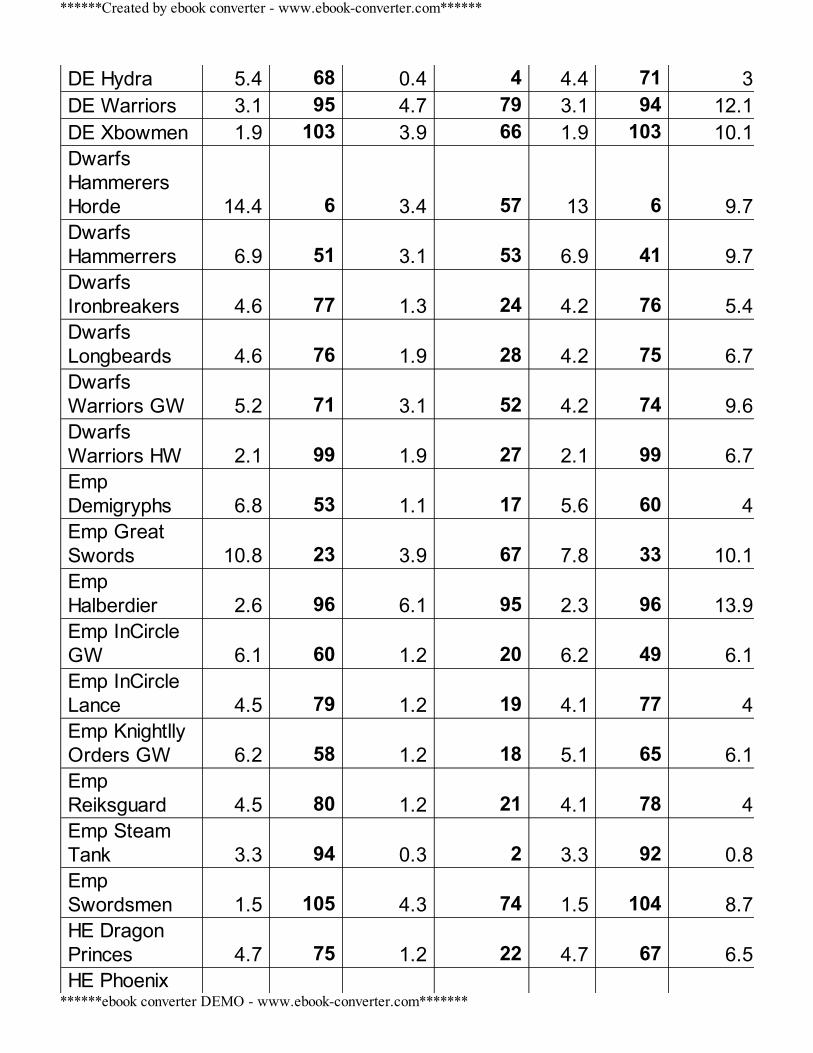
DE Hydra 5.4 68 0.4 4 4.4 71 3DE Warriors 3.1 95 4.7 79 3.1 94 12.1DE Xbowmen 1.9 103 3.9 66 1.9 103 10.1DwarfsHammerersHorde 14.4 6 3.4 57 13 6 9.7DwarfsHammerrers 6.9 51 3.1 53 6.9 41 9.7DwarfsIronbreakers 4.6 77 1.3 24 4.2 76 5.4DwarfsLongbeards 4.6 76 1.9 28 4.2 75 6.7DwarfsWarriors GW 5.2 71 3.1 52 4.2 74 9.6DwarfsWarriors HW 2.1 99 1.9 27 2.1 99 6.7EmpDemigryphs 6.8 53 1.1 17 5.6 60 4Emp GreatSwords 10.8 23 3.9 67 7.8 33 10.1EmpHalberdier 2.6 96 6.1 95 2.3 96 13.9Emp InCircleGW 6.1 60 1.2 20 6.2 49 6.1Emp InCircleLance 4.5 79 1.2 19 4.1 77 4Emp KnightllyOrders GW 6.2 58 1.2 18 5.1 65 6.1EmpReiksguard 4.5 80 1.2 21 4.1 78 4Emp SteamTank 3.3 94 0.3 2 3.3 92 0.8EmpSwordsmen 1.5 105 4.3 74 1.5 104 8.7HE DragonPrinces 4.7 75 1.2 22 4.7 67 6.5HE Phoenix
******Created by ebook converter - www.ebook-converter.com******
******ebook converter DEMO - www.ebook-converter.com*******
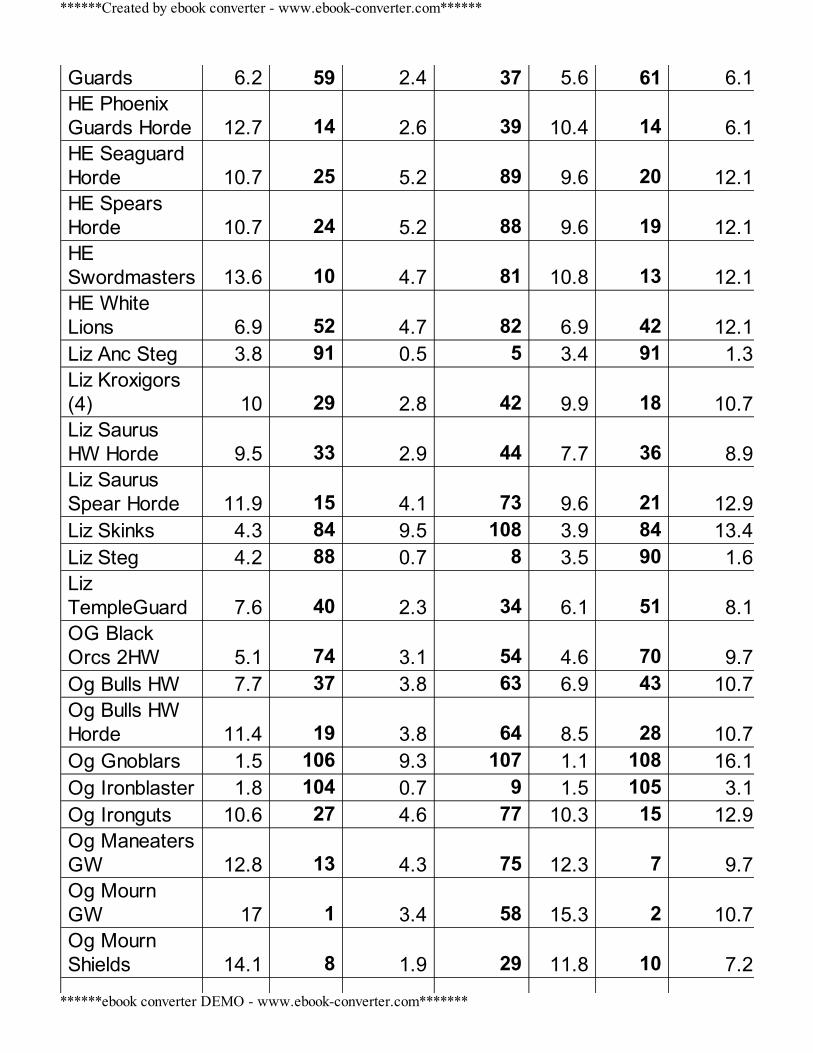
Guards 6.2 59 2.4 37 5.6 61 6.1HE PhoenixGuards Horde 12.7 14 2.6 39 10.4 14 6.1HE SeaguardHorde 10.7 25 5.2 89 9.6 20 12.1HE SpearsHorde 10.7 24 5.2 88 9.6 19 12.1HESwordmasters 13.6 10 4.7 81 10.8 13 12.1HE WhiteLions 6.9 52 4.7 82 6.9 42 12.1Liz Anc Steg 3.8 91 0.5 5 3.4 91 1.3Liz Kroxigors(4) 10 29 2.8 42 9.9 18 10.7Liz SaurusHW Horde 9.5 33 2.9 44 7.7 36 8.9Liz SaurusSpear Horde 11.9 15 4.1 73 9.6 21 12.9Liz Skinks 4.3 84 9.5 108 3.9 84 13.4Liz Steg 4.2 88 0.7 8 3.5 90 1.6LizTempleGuard 7.6 40 2.3 34 6.1 51 8.1OG BlackOrcs 2HW 5.1 74 3.1 54 4.6 70 9.7Og Bulls HW 7.7 37 3.8 63 6.9 43 10.7Og Bulls HWHorde 11.4 19 3.8 64 8.5 28 10.7Og Gnoblars 1.5 106 9.3 107 1.1 108 16.1Og Ironblaster 1.8 104 0.7 9 1.5 105 3.1Og Ironguts 10.6 27 4.6 77 10.3 15 12.9Og ManeatersGW 12.8 13 4.3 75 12.3 7 9.7Og MournGW 17 1 3.4 58 15.3 2 10.7Og MournShields 14.1 8 1.9 29 11.8 10 7.2
******Created by ebook converter - www.ebook-converter.com******
******ebook converter DEMO - www.ebook-converter.com*******
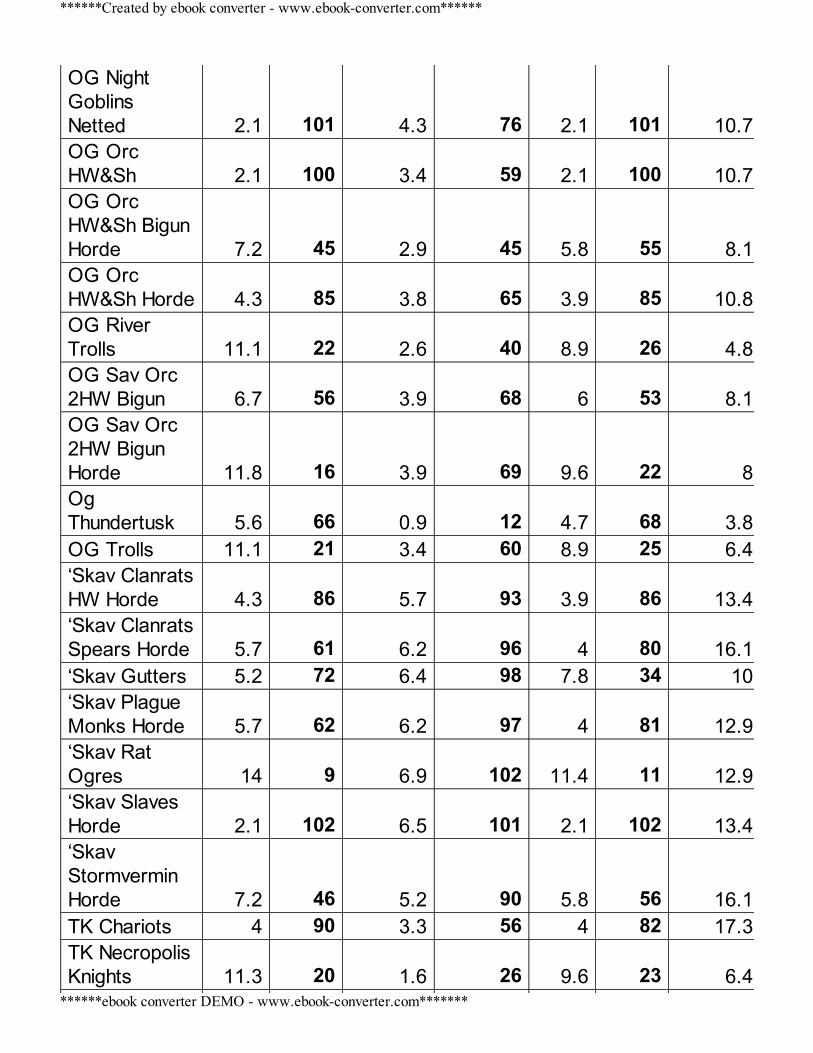
OG NightGoblinsNetted 2.1 101 4.3 76 2.1 101 10.7OG OrcHW&Sh 2.1 100 3.4 59 2.1 100 10.7OG OrcHW&Sh BigunHorde 7.2 45 2.9 45 5.8 55 8.1OG OrcHW&Sh Horde 4.3 85 3.8 65 3.9 85 10.8OG RiverTrolls 11.1 22 2.6 40 8.9 26 4.8OG Sav Orc2HW Bigun 6.7 56 3.9 68 6 53 8.1OG Sav Orc2HW BigunHorde 11.8 16 3.9 69 9.6 22 8OgThundertusk 5.6 66 0.9 12 4.7 68 3.8OG Trolls 11.1 21 3.4 60 8.9 25 6.4‘Skav ClanratsHW Horde 4.3 86 5.7 93 3.9 86 13.4‘Skav ClanratsSpears Horde 5.7 61 6.2 96 4 80 16.1‘Skav Gutters 5.2 72 6.4 98 7.8 34 10‘Skav PlagueMonks Horde 5.7 62 6.2 97 4 81 12.9‘Skav RatOgres 14 9 6.9 102 11.4 11 12.9‘Skav SlavesHorde 2.1 102 6.5 101 2.1 102 13.4‘SkavStormverminHorde 7.2 46 5.2 90 5.8 56 16.1TK Chariots 4 90 3.3 56 4 82 17.3TK NecropolisKnights 11.3 20 1.6 26 9.6 23 6.4
******Created by ebook converter - www.ebook-converter.com******
******ebook converter DEMO - www.ebook-converter.com*******
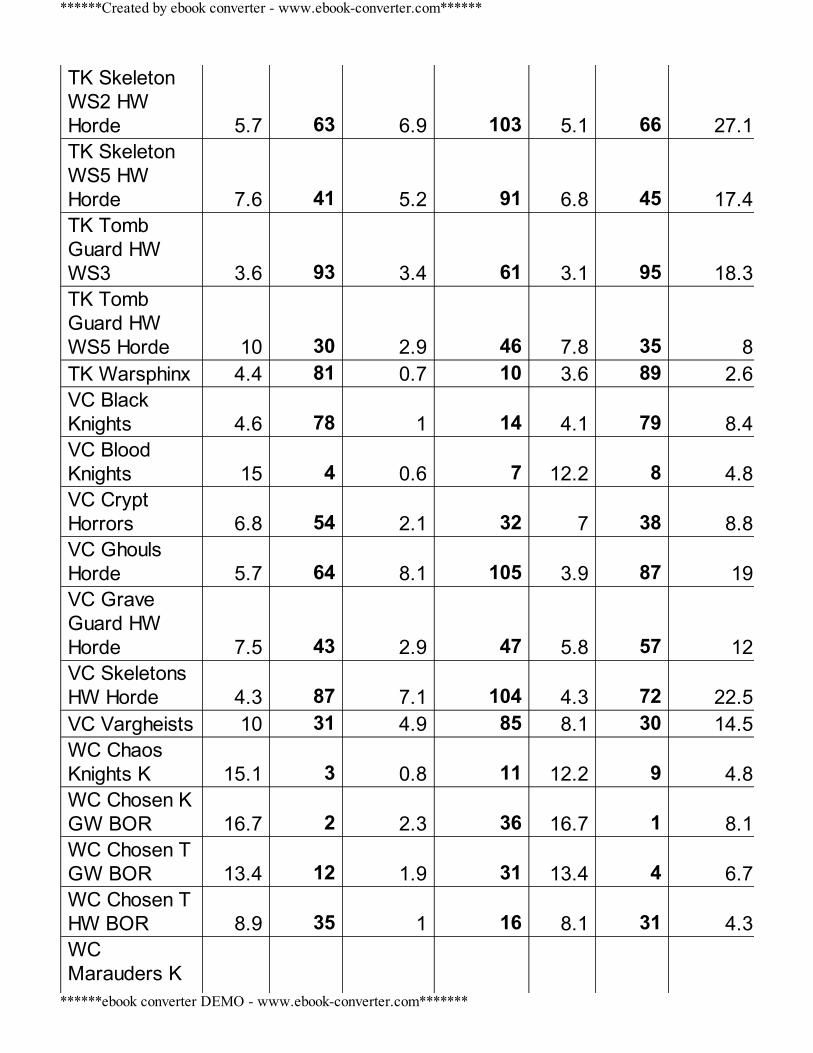
TK SkeletonWS2 HWHorde 5.7 63 6.9 103 5.1 66 27.1TK SkeletonWS5 HWHorde 7.6 41 5.2 91 6.8 45 17.4TK TombGuard HWWS3 3.6 93 3.4 61 3.1 95 18.3TK TombGuard HWWS5 Horde 10 30 2.9 46 7.8 35 8TK Warsphinx 4.4 81 0.7 10 3.6 89 2.6VC BlackKnights 4.6 78 1 14 4.1 79 8.4VC BloodKnights 15 4 0.6 7 12.2 8 4.8VC CryptHorrors 6.8 54 2.1 32 7 38 8.8VC GhoulsHorde 5.7 64 8.1 105 3.9 87 19VC GraveGuard HWHorde 7.5 43 2.9 47 5.8 57 12VC SkeletonsHW Horde 4.3 87 7.1 104 4.3 72 22.5VC Vargheists 10 31 4.9 85 8.1 30 14.5WC ChaosKnights K 15.1 3 0.8 11 12.2 9 4.8WC Chosen KGW BOR 16.7 2 2.3 36 16.7 1 8.1WC Chosen TGW BOR 13.4 12 1.9 31 13.4 4 6.7WC Chosen THW BOR 8.9 35 1 16 8.1 31 4.3WCMarauders K
******Created by ebook converter - www.ebook-converter.com******
******ebook converter DEMO - www.ebook-converter.com*******
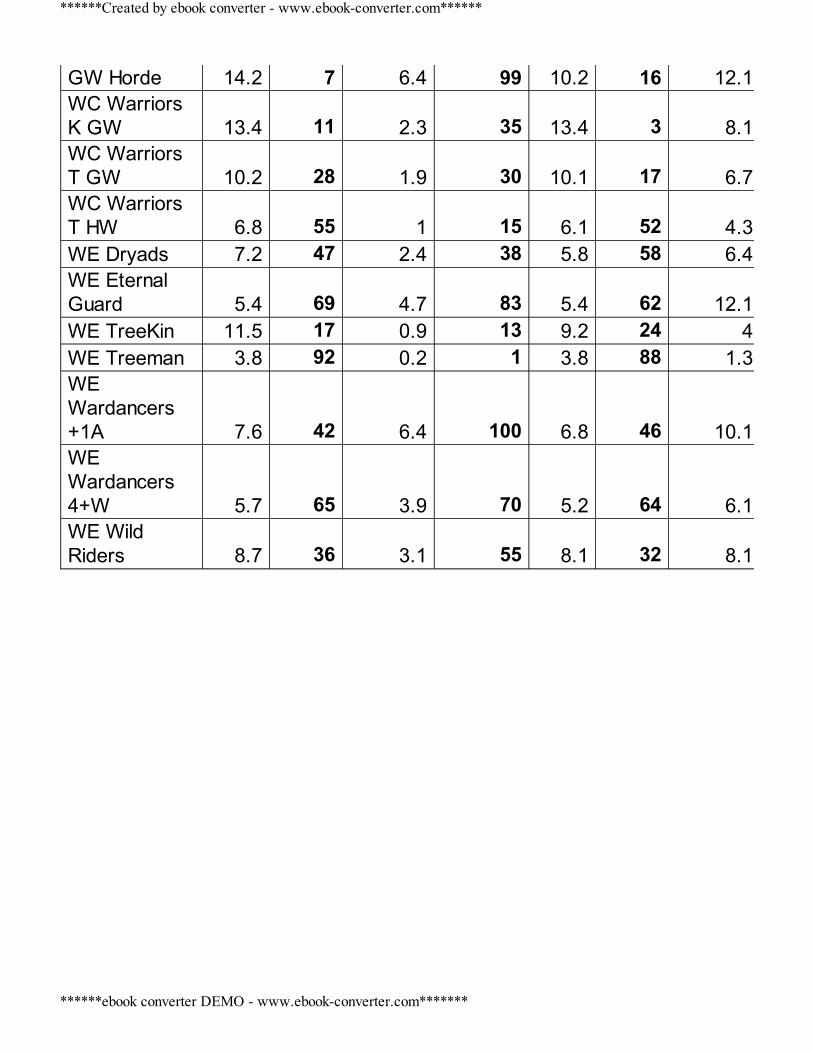
GW Horde 14.2 7 6.4 99 10.2 16 12.1WC WarriorsK GW 13.4 11 2.3 35 13.4 3 8.1WC WarriorsT GW 10.2 28 1.9 30 10.1 17 6.7WC WarriorsT HW 6.8 55 1 15 6.1 52 4.3WE Dryads 7.2 47 2.4 38 5.8 58 6.4WE EternalGuard 5.4 69 4.7 83 5.4 62 12.1WE TreeKin 11.5 17 0.9 13 9.2 24 4WE Treeman 3.8 92 0.2 1 3.8 88 1.3WEWardancers+1A 7.6 42 6.4 100 6.8 46 10.1WEWardancers4+W 5.7 65 3.9 70 5.2 64 6.1WE WildRiders 8.7 36 3.1 55 8.1 32 8.1
******Created by ebook converter - www.ebook-converter.com******
******ebook converter DEMO - www.ebook-converter.com*******

******Created by ebook converter - www.ebook-converter.com******
******ebook converter DEMO - www.ebook-converter.com*******
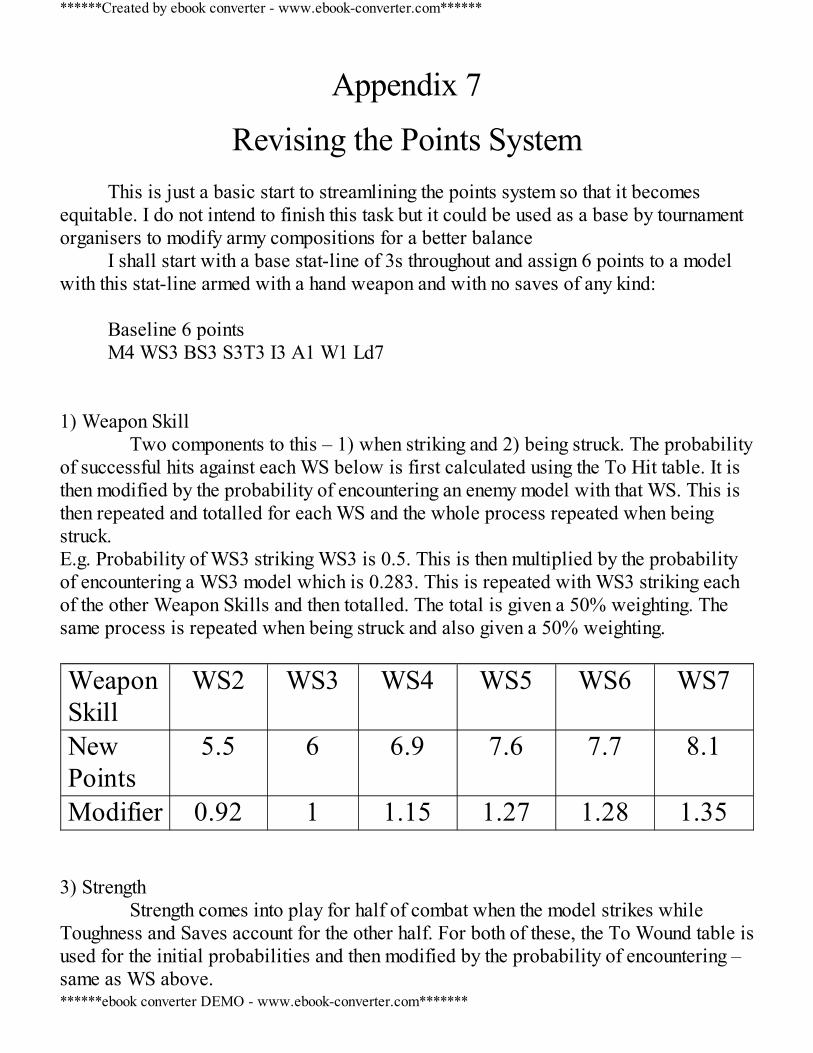
Appendix 7
Revising the Points System This is just a basic start to streamlining the points system so that it becomes
equitable. I do not intend to finish this task but it could be used as a base by tournamentorganisers to modify army compositions for a better balance
I shall start with a base stat-line of 3s throughout and assign 6 points to a modelwith this stat-line armed with a hand weapon and with no saves of any kind:
Baseline 6 pointsM4 WS3 BS3 S3T3 I3 A1 W1 Ld7
1) Weapon Skill Two components to this – 1) when striking and 2) being struck. The probabilityof successful hits against each WS below is first calculated using the To Hit table. It isthen modified by the probability of encountering an enemy model with that WS. This isthen repeated and totalled for each WS and the whole process repeated when beingstruck.E.g. Probability of WS3 striking WS3 is 0.5. This is then multiplied by the probabilityof encountering a WS3 model which is 0.283. This is repeated with WS3 striking eachof the other Weapon Skills and then totalled. The total is given a 50% weighting. Thesame process is repeated when being struck and also given a 50% weighting. WeaponSkill
WS2 WS3 WS4 WS5 WS6 WS7
NewPoints
5.5 6 6.9 7.6 7.7 8.1
Modifier 0.92 1 1.15 1.27 1.28 1.35 3) Strength Strength comes into play for half of combat when the model strikes whileToughness and Saves account for the other half. For both of these, the To Wound table isused for the initial probabilities and then modified by the probability of encountering –same as WS above.
******Created by ebook converter - www.ebook-converter.com******
******ebook converter DEMO - www.ebook-converter.com*******

Since higher strength hits also negate armour, additional points should be assignedto accommodate this ability. This will be done when calculating the modifiers for saves. Strength S2 S3 S4 S5 S6 S7HalfPoints
1.88 3 4.18 5.38 5.96 6.05
4) ToughnessToughness T2 T3 T4 T5 T6HalfPoints
2.02 3 4.22 5.61 6.57
5) Wounds, Number of attacks and StompsThe number of points for strength is multiplied by the number of attacks while thenumber of points for Toughness is multiplied by the number of wounds. The two valuesare then added up and multiplied by the WS Points modifier. Stomps are equivalent to another strength hit which is multiplied by 1.76 andadded to the above. Impact hits are estimated to be equivalent to 0.5 of a Stomp. There should also be a modifier for the greater number of support attacks forMonstrous Infantry. Since support attacks depend on greater numbers, this modifiershould come into play only when purchasing additional models greater than 3 i.e. thefirst 3 Monstrous Infantry models have points values as stated below but additionalmodels should cost more. I estimate between 15-30% more. Charge bonus modifier e.g. Lance or Choppa modifier. I have estimated this as1/3 of attacks at the increased strength. 6) Cavalry – Normal mounts/steeds add another attack at S3. This is worth 3 points. Ignoring Movement rate, Ballistic Skill, Initiative, Leadership, assuming no Saves andno Special abilities like Hatred etc, the table below gives the new points for some units.
New Points for Models – No Saves
UNIT NEW
POINTS UNIT NEW
POINTS
******Created by ebook converter - www.ebook-converter.com******
******ebook converter DEMO - www.ebook-converter.com*******
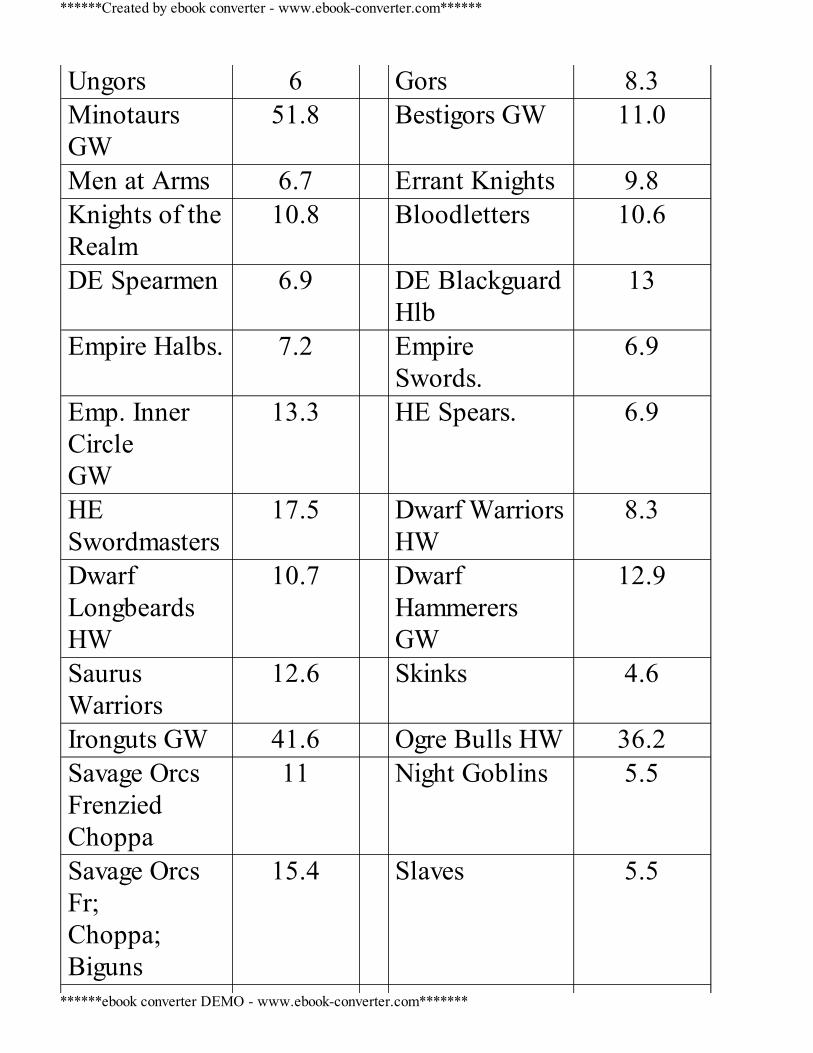
Ungors 6 Gors 8.3MinotaursGW
51.8 Bestigors GW 11.0
Men at Arms 6.7 Errant Knights 9.8Knights of theRealm
10.8 Bloodletters 10.6
DE Spearmen 6.9 DE BlackguardHlb
13
Empire Halbs. 7.2 EmpireSwords.
6.9
Emp. InnerCircle GW
13.3 HE Spears. 6.9
HESwordmasters
17.5 Dwarf WarriorsHW
8.3
DwarfLongbeardsHW
10.7 DwarfHammerersGW
12.9
SaurusWarriors
12.6 Skinks 4.6
Ironguts GW 41.6 Ogre Bulls HW 36.2Savage OrcsFrenziedChoppa
11 Night Goblins 5.5
Savage OrcsFr;Choppa;Biguns
15.4 Slaves 5.5
******Created by ebook converter - www.ebook-converter.com******
******ebook converter DEMO - www.ebook-converter.com*******
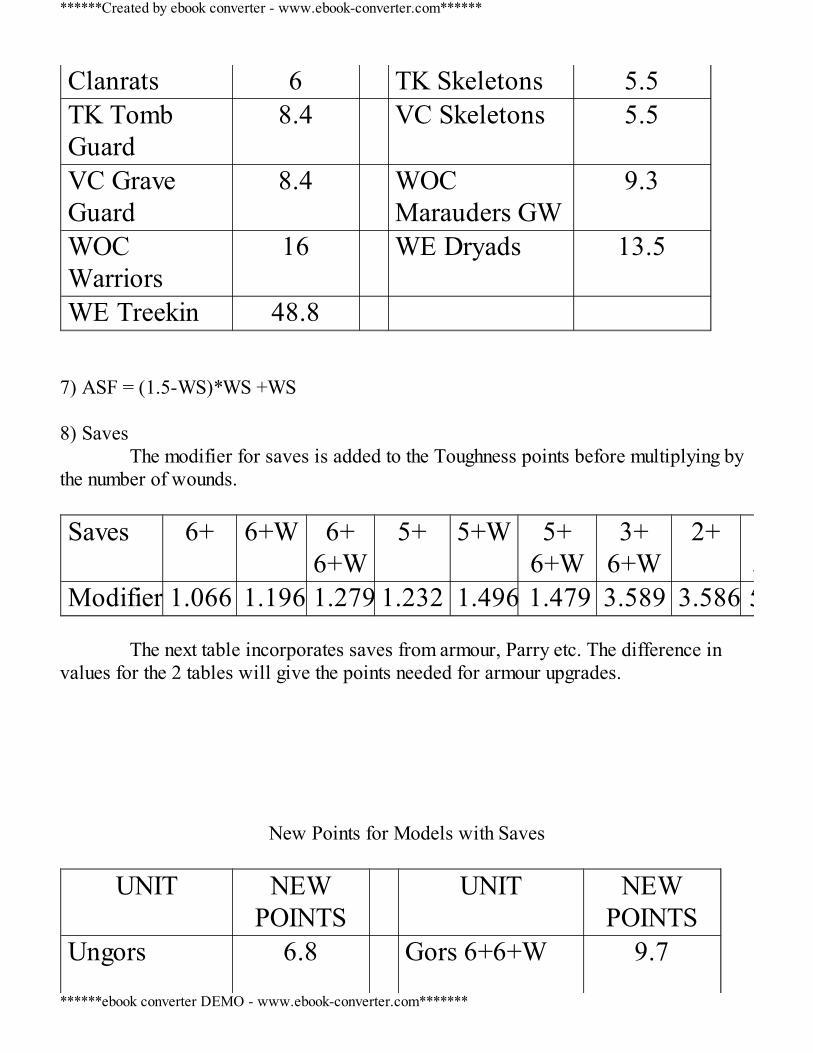
Clanrats 6 TK Skeletons 5.5TK TombGuard
8.4 VC Skeletons 5.5
VC GraveGuard
8.4 WOCMarauders GW
9.3
WOCWarriors
16 WE Dryads 13.5
WE Treekin 48.8 7) ASF = (1.5-WS)*WS +WS 8) Saves The modifier for saves is added to the Toughness points before multiplying bythe number of wounds. Saves 6+ 6+W 6+
6+W5+ 5+W 5+
6+W3+
6+W2+
5+WModifier 1.066 1.196 1.279 1.232 1.496 1.479 3.589 3.586 5.379
The next table incorporates saves from armour, Parry etc. The difference invalues for the 2 tables will give the points needed for armour upgrades.
New Points for Models with Saves
UNIT NEWPOINTS
UNIT NEWPOINTS
Ungors 6.8 Gors 6+6+W 9.7
******Created by ebook converter - www.ebook-converter.com******
******ebook converter DEMO - www.ebook-converter.com*******
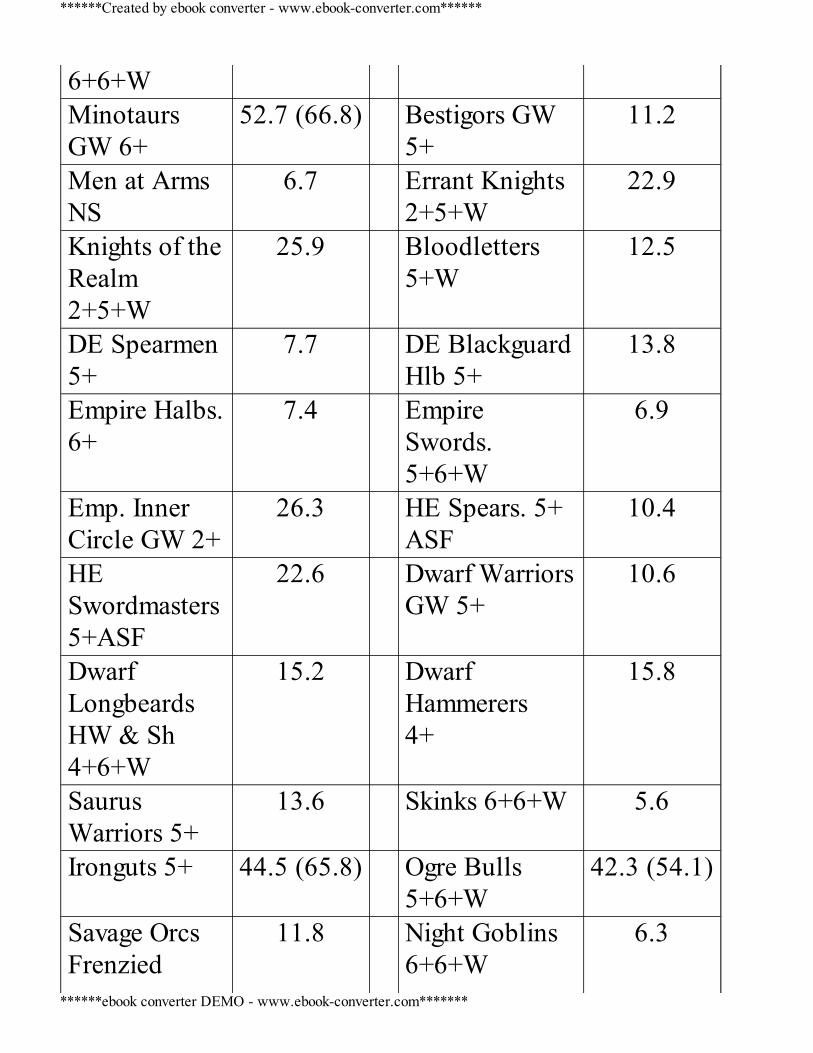
6+6+WMinotaursGW 6+
52.7 (66.8) Bestigors GW5+
11.2
Men at ArmsNS
6.7 Errant Knights2+5+W
22.9
Knights of theRealm2+5+W
25.9 Bloodletters5+W
12.5
DE Spearmen5+
7.7 DE BlackguardHlb 5+
13.8
Empire Halbs.6+
7.4 EmpireSwords.5+6+W
6.9
Emp. InnerCircle GW 2+
26.3 HE Spears. 5+ASF
10.4
HESwordmasters5+ASF
22.6 Dwarf WarriorsGW 5+
10.6
DwarfLongbeardsHW & Sh4+6+W
15.2 DwarfHammerers4+
15.8
SaurusWarriors 5+
13.6 Skinks 6+6+W 5.6
Ironguts 5+ 44.5 (65.8) Ogre Bulls5+6+W
42.3 (54.1)
Savage OrcsFrenzied
11.8 Night Goblins6+6+W
6.3
******Created by ebook converter - www.ebook-converter.com******
******ebook converter DEMO - www.ebook-converter.com*******
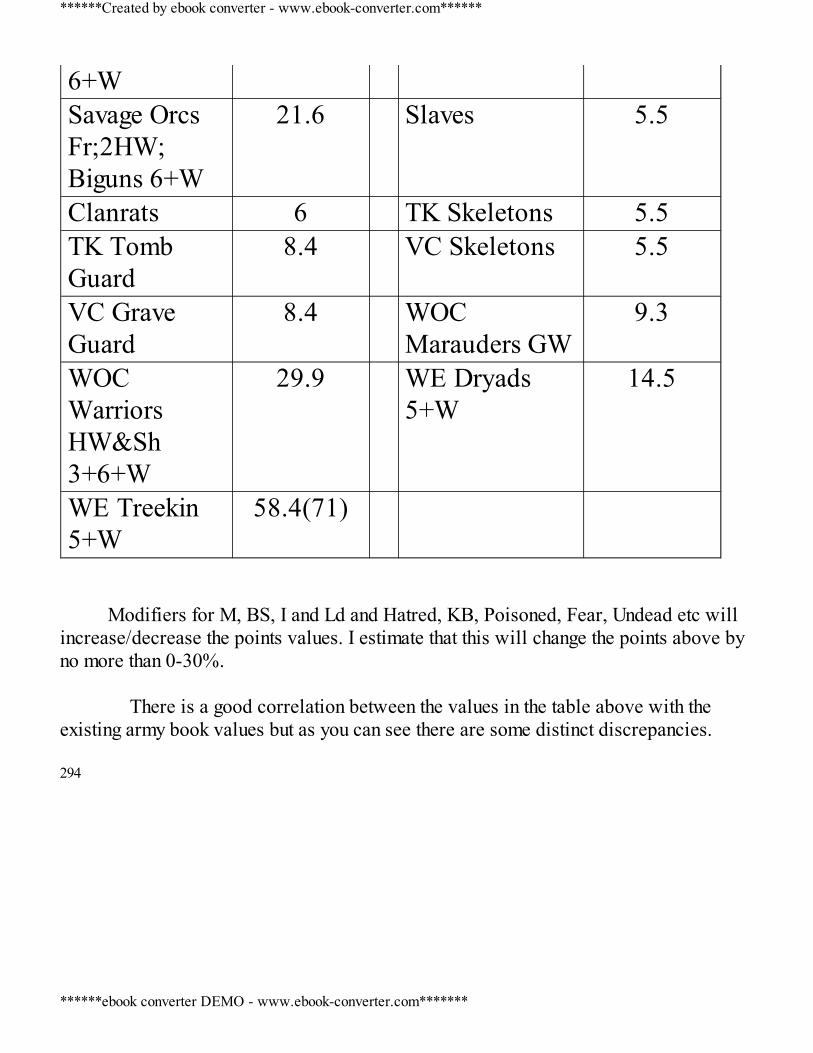
6+WSavage OrcsFr;2HW;Biguns 6+W
21.6 Slaves 5.5
Clanrats 6 TK Skeletons 5.5TK TombGuard
8.4 VC Skeletons 5.5
VC GraveGuard
8.4 WOCMarauders GW
9.3
WOCWarriorsHW&Sh3+6+W
29.9 WE Dryads5+W
14.5
WE Treekin5+W
58.4(71)
Modifiers for M, BS, I and Ld and Hatred, KB, Poisoned, Fear, Undead etc willincrease/decrease the points values. I estimate that this will change the points above byno more than 0-30%.
There is a good correlation between the values in the table above with theexisting army book values but as you can see there are some distinct discrepancies. 294
******Created by ebook converter - www.ebook-converter.com******
******ebook converter DEMO - www.ebook-converter.com*******