Embed Size (px)
Citation preview
BELLSOUTH 100 ELECTRONIC INCUBATOR
Operating InstructionsProudly made in Australia.
Standard Manual Turning, pages 1-11
Fully Automatic Turning 12-17
Semi-Automatic Turning 17-19.
IMPORTANT: Read the instructions thoroughly before commencing with incubation.
CONTENTS
1. In the box you will find the following items:
A/ The top case containing the view port, heating element, electronic thermostat under cover, indicator lamp and temperature sensor
B/ The base with its cast water channels and black entry bungs
C/ A perforated metal steel floor that sits in the base and
D/ The thermometer and its screw and mounting bracket.
1

2
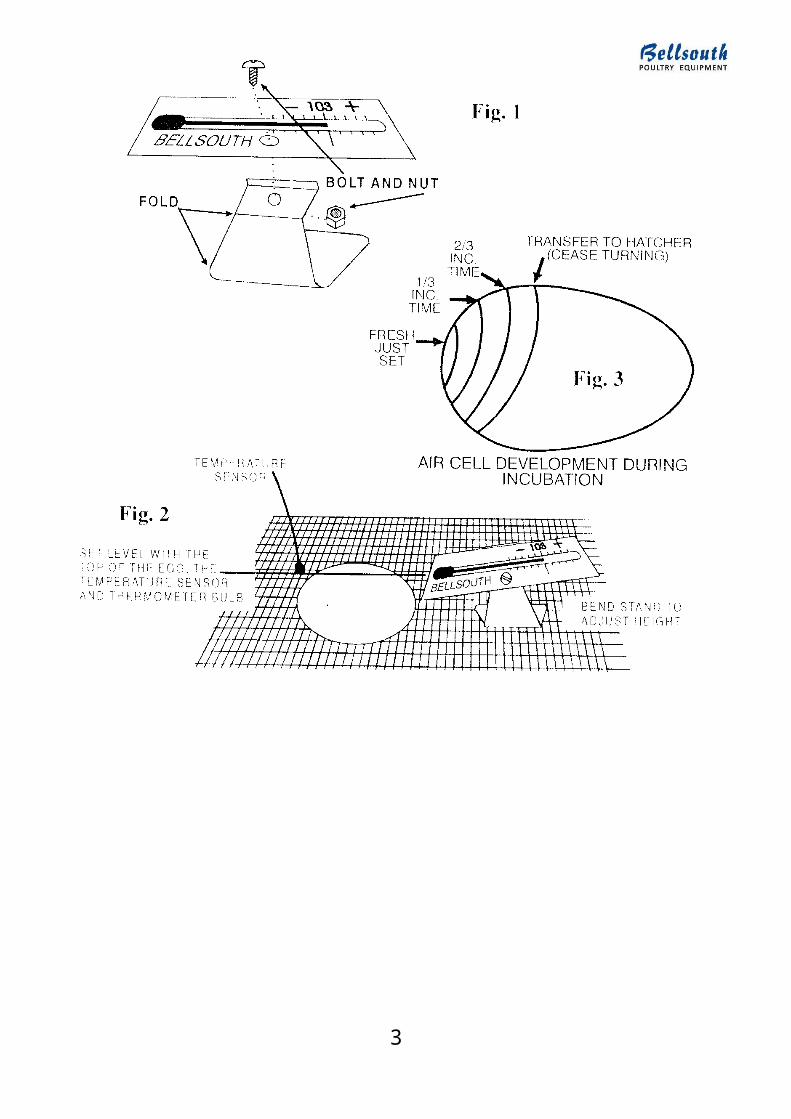
2. Remove thermometer from the box. The stainless steel stand has two lines drawn on it. Bend the stand along the lines and then screw the thermometer onto the stand (See Fig 1). The bottom of the thermometer bulb should be level with, or just above, the top of the eggs. Adjust the height by bending the stand (See Fig 2). Place the thermometer where it can be seen through the view port. The idea is to mimic the broody bird.The broody bird places the heat of her body on top of the eggs, so we place the thermometer to measure the temperature on top of the eggs.
3
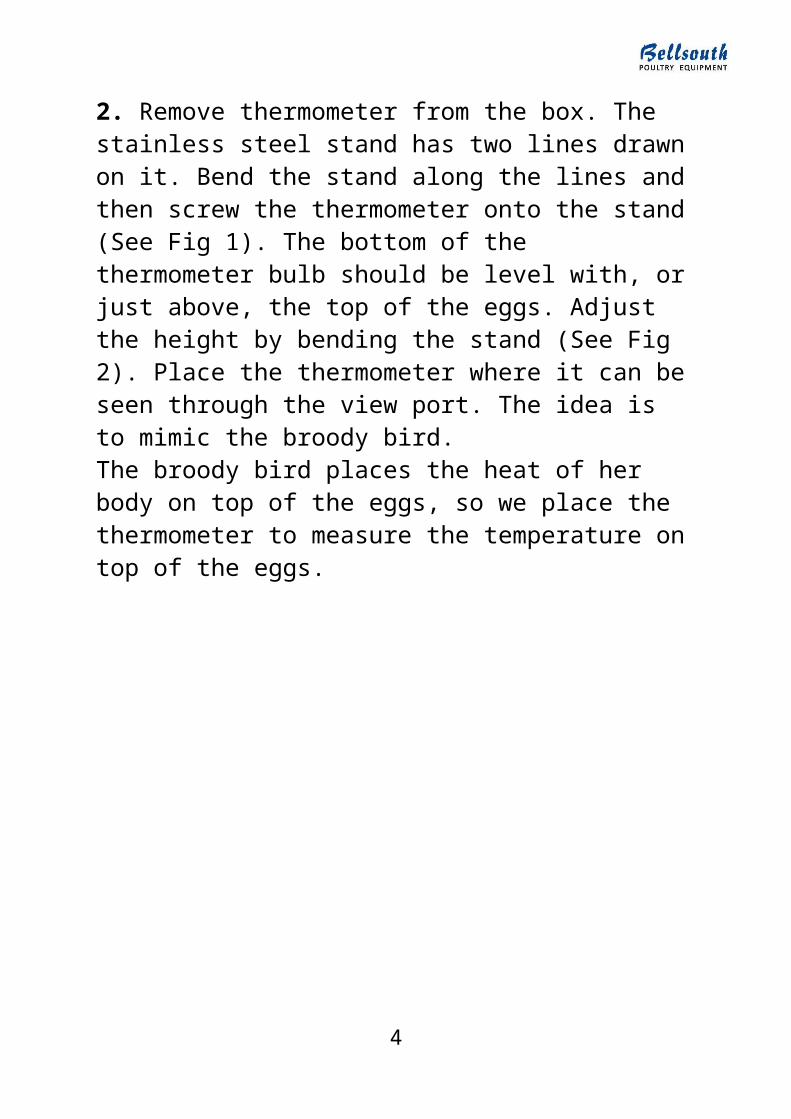
3. Adjust the end of the temperature sensor lead until it is just clear of the top of the eggs (See Fig 2). It is usual for the sensor to be l-3mm above the top surface of the egg. Place the top of the incubator over the base and check that the thermometer is easily read through the view port. Do not put eggs in the incubator until temperature has been stabilised.
Plug in the incubator to the 240Volt supply and immediately the indicator lamp will glow. This indicates that the heater is heating. The thermostat has been pre-set to approximately 103 degrees F (103°F).This temperature will rise and eventually the lamp will commence flashing. Usually this will occur within a few degrees of the set temperature. Leave the machine at least 1 hour to stabilise, then adjust the control up or down a little as indicated by the thermometer until the temperature remains stable at 103°F. The temperature controller is on top of the incubator. When the incubator reaches temperature set, the lamp will flash continuously. Allow at least twenty minutes between adjustments.
Please note: Temperature is measured in Fahrenheit inside the incubator.
The indicator lamp will tell you the following.
a) If the indicator glows brightly, the element is giving full heat
b) If the lamp is turning on and off then it is working and is stabilising
4
c) If the lamp is on for about the same time it is off, then the temperature is stable, check it is 103°F and make small adjustments if necessary. Allow 20 minutes between adjustments
d) If the lamp is off the heater has turned off.
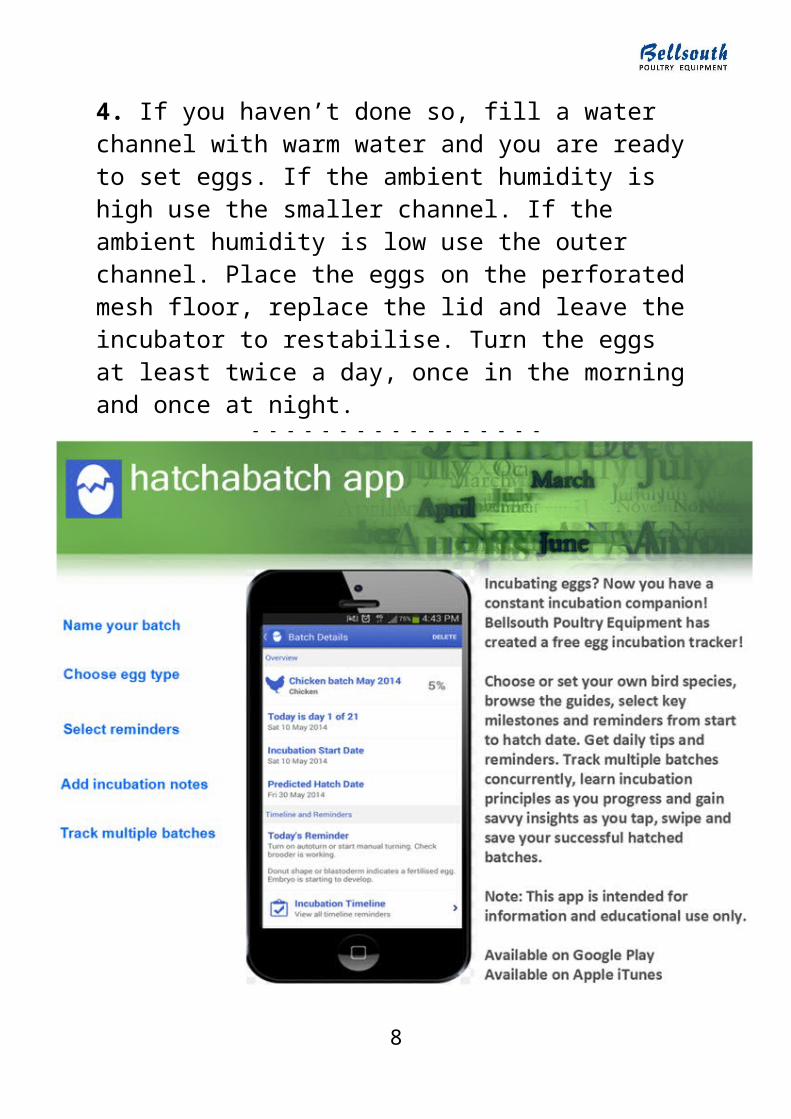
4. If you haven’t done so, fill a water channel with warm water and you are ready to set eggs. If the ambient humidity is high use the smaller channel. If the ambient humidity is low use the outer channel. Place the eggs on the perforated mesh floor, replace the lid and leave the incubator to restabilise. Turn the eggs at least twice a day, once in the morning and once at night.
- - - - - - - - - - - - - - - - -
5
GUIDELINES FOR GOOD HATCHING RESULTS
1. Healthy breeders lay healthy eggs. There is no replacement for eggs from birds correctly mated, in prime health, and fed on rations specially prepared for breeding. Ordinary laying rations do not have the vitamin concentrations required for excellent hatching results. Soluble vitamins added to the water are often the difference between excellent and average results.
2. Choose only those eggs which are smooth, clean, average in size and not deformed. Experience shows that other eggs will not hatch as well.
3. Once the egg is laid, nothing can be done to improve its hatchability. Poor storage will greatly reduce the hatch. Eggs should be stored around 15°C, with a relative humidity of 85 % and to be turned once a day. Eggs should be set within 7 days of being laid.
4. The key to successful operation is in the temperature. Remember the broody hen uses body temperature on the top of the eggs. So for good results, all eggs in the incubator should be close to the same size.
5. Set thermometer with the bulb level, with the top of the eggs, and 103 degrees F as the set temperature. Thermometer and temperature sensor should be at the same height as the top of the eggs but should not touch the eggs (see Fig 2). Remember a few minutes setting up correctly will save a lot of distress.
6
6. Turning the eggs. The turning of the eggs is the next most critical factor. Turning the eggs is important for allowing the embryo access to the nutrients in the egg. Turning should be done at least twice a day, once in the morning and once at night. It is easier if the eggs are marked on one side with a cross and on the other with a zero. The eggs should be carefully turned a full 180 degrees. Avoid jarring and bumping the eggs as this can damage the embryos.
7. The moisture in the incubator is important as it prevents the egg from drying out. A dried out egg will not develop properly and will cause the chick to be stuck in the shell even if it lives to hatch time. However, too much moisture will mean that many chicks will actually drown in the egg before hatch time. Chicks with shells stuck on them, or chipped and not hatched, are symptoms of marginal high humidity. The water channels in the base provide correct moisture for most situations. Select the inner channel for damp climates, the outer channel for normal climates, and both channels for dry climates. However, in some rare cases, additional moisture may be added by sprinkling the eggs. Experience has shown that over 90% of situations will only require the outer water channel throughout the incubation process. So try the first batch with the outer channel and alter this if required. When using the automatic turner, start by filling only the inside water channel. Remember, too much water is just as bad as not enough so don’t use too much.
TIP if the water dries out in less than a week, it is on the dry side, if the water takes 2 weeks to dry out, then it’s on the wet side. Depth doesn’t matter, it is surface area that matters.
7
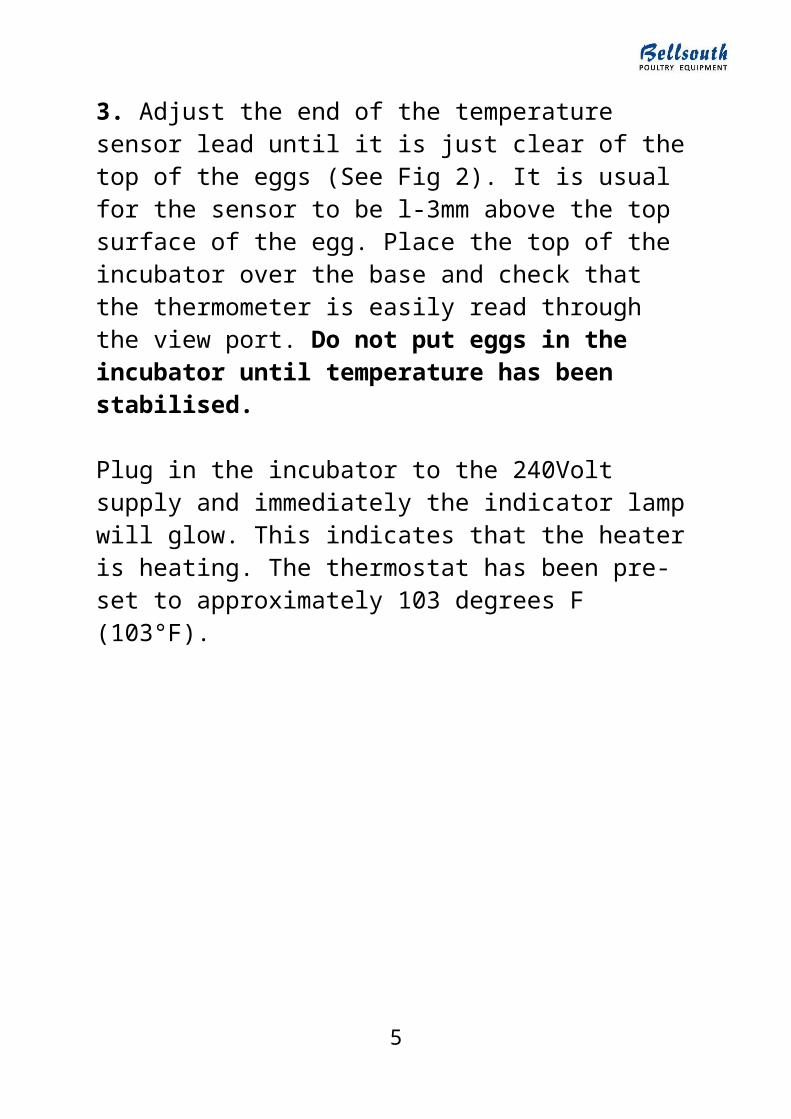
8. Candling the eggs is a useful technique for assessing the process of incubation. Candling is carried out in a darkened room using a small light source. This can be a torch with a cover attached and a hole about 15 to 20mm diameter. When directed at the large end of the egg the inside of the egg will be illuminated. Look through the side of the egg. This will show the air cell, and the growth of the embryo. The development of the air cell is shown in (Fig 3). The eggs to be candled every 7 days. Any clear eggs, eggs where the embryo is stuck on the shell, or eggs with broken blood vessels should be removed. Experience will show up these eggs. Healthy embryos will show up as a spidery network of veins with a central embryo.
9. Hatching time means special treatment for the eggs. The eggs should not be turned after 18 days (chicken eggs). Ensure that the outer water channel is full with warm water. Leave the lid on the incubator after this time and the humidity will build up for the hatch. There is usually no need to add extra water to the incubator for the hatch. Too much water at this time will mean very wet chicks. If the chicks are too wet, then use only the inside water channel during the whole incubation period.
Do not open the lid again until all the chicks have hatched. Opening the lid at this stage will only damage the hatch. Many chicks are ruined lifting the lid to check the hatch.
The chicks can be removed from the incubator once they have fluffed up. This will usually take up to 24 hours.The chicks should now be placed in a suitable brooder.
8
10. After removing the chicks from the incubator, the base should be washed before it dries out. Warm soapy water is used for cleaning the base. A few drops of White King in the water for the water channels will help kill any bacteria which has come into the incubator on the eggs.
11. Some hints on failures
Early hatch. Too high average incubator temperature. Late hatch. Too low average incubator temperature.Early deaths before 6 days. High temperature surge or poor egg storage.Late deaths about 18 days not pipped. Poor breeder diet, inadequate humidity, incorrect temperature.Dead in shell, at pipping. Genetic factors, insufficient turning, incorrect temperature, or too much humidity.Wet chicks at hatch. High average humidity during incubation or at hatch time.
12. Diagnosing Machine Malfunctions
Incubator temperature too low
1) Possibly room temperature too low. If the lamp is on all the time and the incubator is below the set temperature this indicates the room temperature is too low and the incubator cannot make up the heat loss to the room, or perhaps there is a draught. Ensure that the incubator is not on the floor or near a window. If the temperature is too low when turned to maximum (+ direction) and the lamp is turning on and off, then the thermostat is out of calibration.
9
2) Temperature too low, element cold, lamp off, possible blown fuse or a dead thermostat.
3) If the power is turned on and the lamp flashes momentarily, but there is no heat, possible element failure.
4) Do not cover the incubator with a towel if temperature is low. It will block the ventilation holes and upset the air distribution in the incubator.
Incubator temperature too high
1/ If the temperature is drifting upwards above 103F and the light is almost always off, this indicates the room temperature is close to the maximum allowable (30° C). This effect is most prominent in summer and with a full batch of eggs in the last 4 days of the hatch cycle. To assist, remove the bungs in the lid of the incubator to increase the airflow, or reduce the room temperature below 30 degrees.
2/ If the temperature is turning on and off, but the control is set to minimum (- direction), then this indicates the thermostat is out of calibration.
3/ Faulty thermometer. Thermometers are vital to correct operation and the use of different brands of thermometer may give quite different results. Always use the correct thermometer with your incubator.
10
Temperature erratic
1/ Room temperature varies too much. The ideal is around 20 degrees, but wide variations make it hard to achieve consistent temperatures.
2/ Corrosion or dirt on the thermostat. Replace thermostat.
3/ Worn control shaft. Touching the shaft, or tapping the lid causes the lamp to switch on and off. Replace thermostat.
4/ Temperature drifts and also humidity is high. Is the incubator on a plain table, or on carpet or a towel, which blocks the air ventilation holes. Place on plain table only.
11
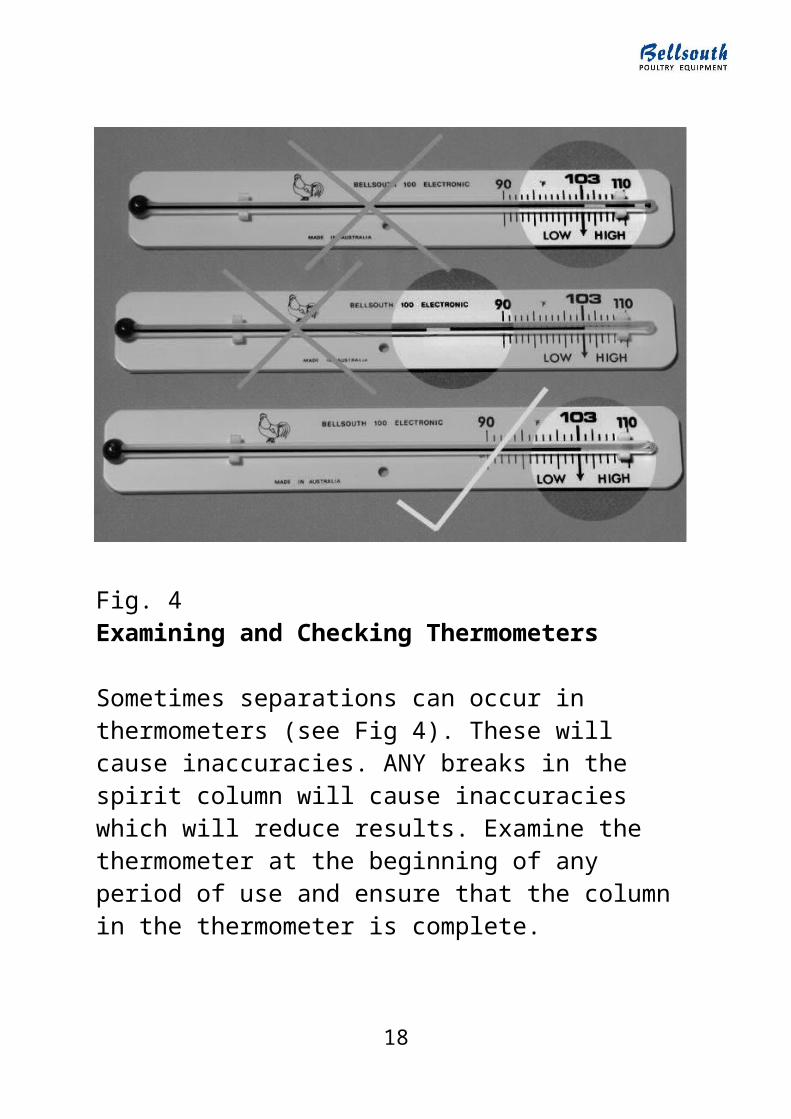
Fig. 4
Examining and Checking Thermometers
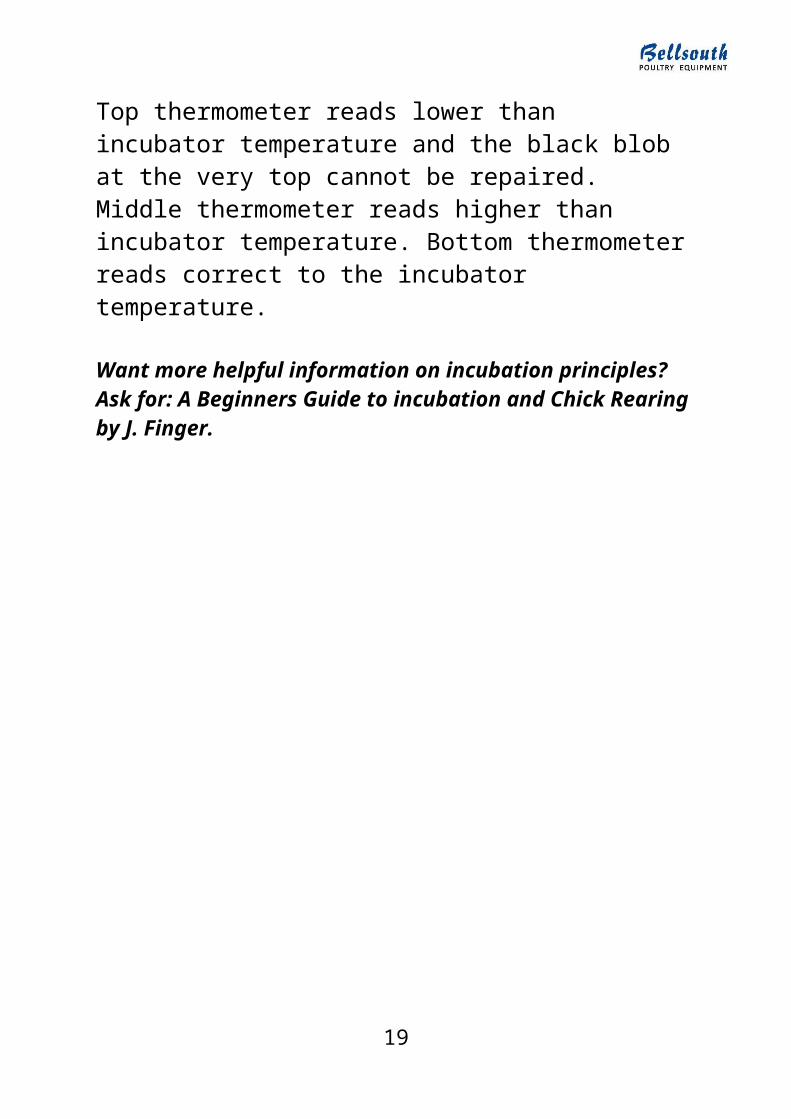
Sometimes separations can occur in thermometers (see Fig 4). These will cause inaccuracies. ANY breaks in the spirit column will cause inaccuracies which will reduce results. Examine the thermometer at the beginning of any period of use and ensure that the column in the thermometer is complete.
Top thermometer reads lower than incubator temperature and the black blob at the very top cannot be repaired. Middle thermometer reads higher than incubator temperature. Bottom thermometer reads correct to the incubator temperature.
Want more helpful information on incubation principles? Ask for: A Beginners Guide to incubation and Chick Rearing by J. Finger.
12
Bellsouth 100 Automatic Turner
Using the Bellsouth 100 New Turner
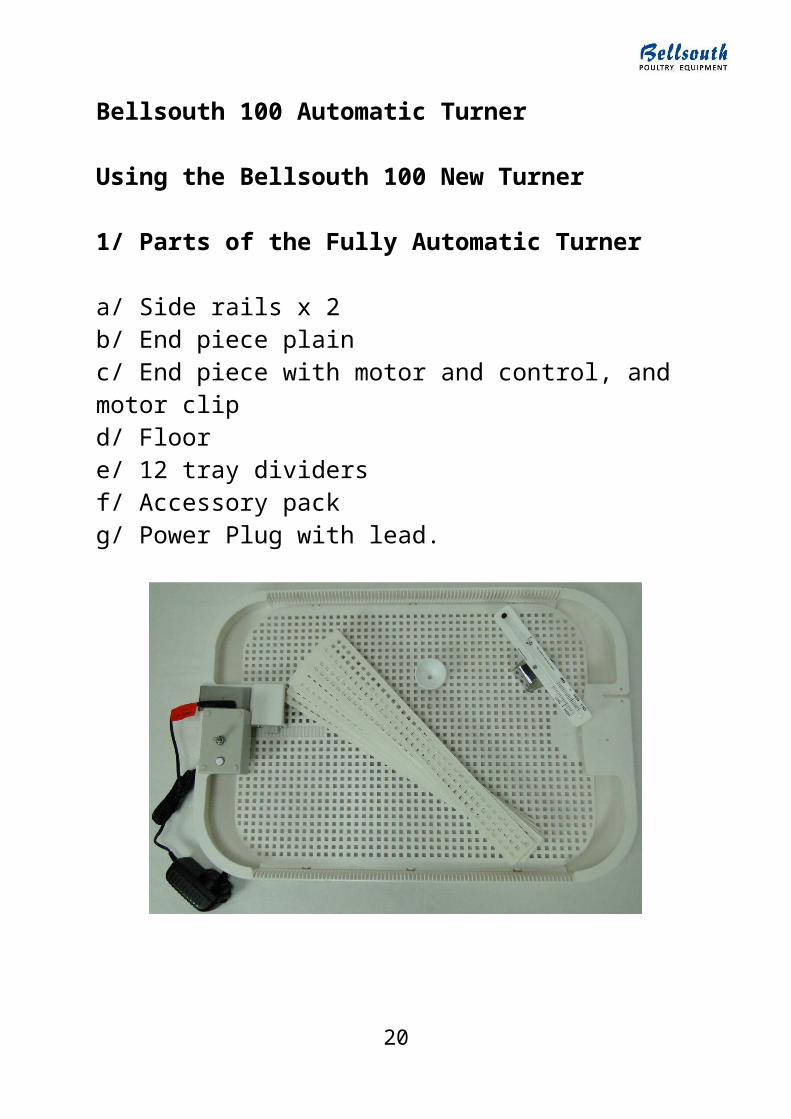
1/ Parts of the Fully Automatic Turner
a/ Side rails x 2 b/ End piece plainc/ End piece with motor and control, and motor clipd/ Floore/ 12 tray dividersf/ Accessory packg/ Power Plug with lead.
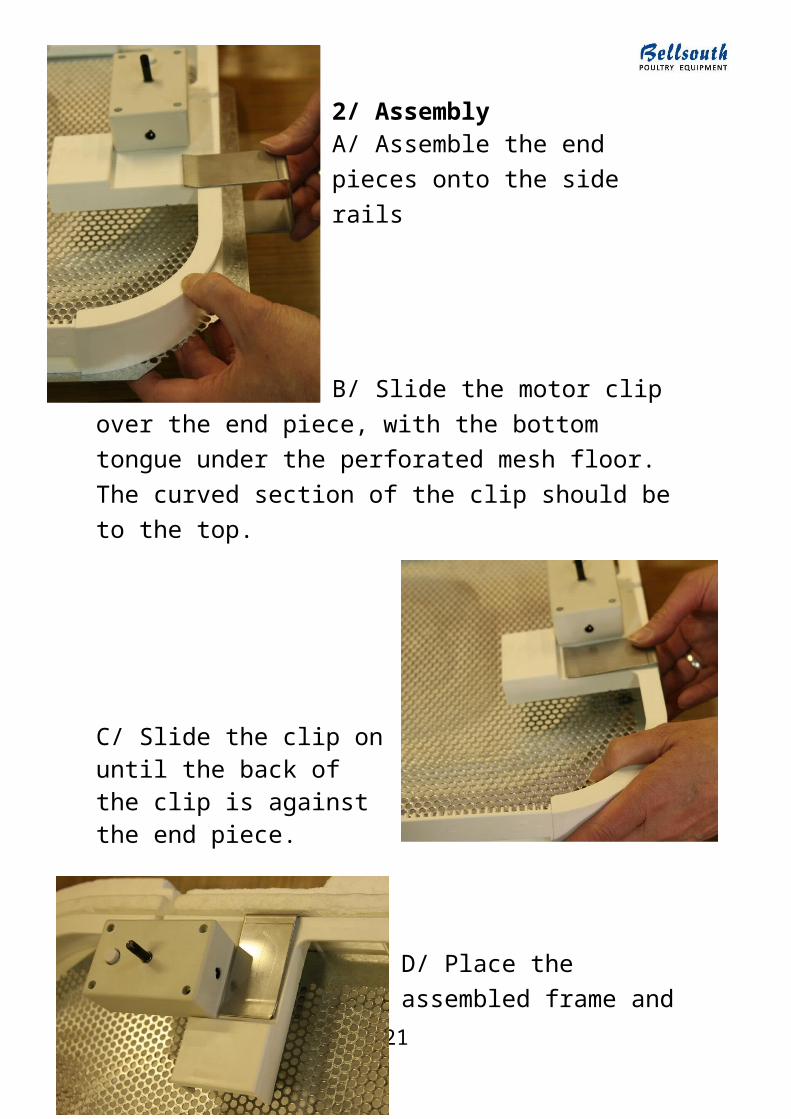
2/ AssemblyA/ Assemble the end pieces onto the side rails
13
B/ Slide the motor clip over the end piece, with the bottom tongue under the perforated mesh floor. The curved section of the clip should be to the top.
C/ Slide the clip on until the back of the clip is against the end piece.
D/ Place the assembled frame and perf mesh floor into the incubator base. Remove bung from the control end of the incubator base.
E/ Place the tray into the turner frame with the gear teeth under the motor. Lift the motor slightly to slide the tray into place.
14
F/ Check the side clearance of the floor inside the side rails. It should be 1mm to 3mm, if the side movement is more than 3mm, then use an extra tray divider between the polystyrene and side rail.
G/ Check the motor is engaged in the gear and plug in the power pack. Plug the power pack into a good quality surge protector 240 volt power socket and switch on. The tray will move towards the motor until it reaches the home location, then after 15 seconds the motor will run again, to an outward position controlled by the control knob. Pressing the button will cause the motor to run until it reaches its limit.
15
Top Tip: Using a good quality surge protector is an effective way to protect your incubator from power spikes and brown outs.
3/ Loading
16
A/ Place an egg on the tray and place the thermometer on one of the tray dividers using the bracket in the accessory pack, in a place where the thermometer can be read through the window. Adjust the height of the thermometer bulb to the top of the egg (manual instructions, page 2 and 3).B/ Place the first tray divider near the motor end. Place a row of eggs on the tray and place a second divider in place. Ensure the dividers allow several millimetres clearance of the eggs. If the eggs touch both dividers at the same time they will skid and not roll over. Too many eggs in each row may make the eggs bind on each other. Fill the tray with rows making sure the rows are parallel.
TIP: If eggs roll up over each other, place blunt ends together and pointy ends together.
17
C/ Press the button and check
the eggs roll over, adjust the
stroke if needed, anticlockwise
will reduce the turn stroke,
clockwise to increase the stroke.
18
4/ Incubating eggsA/ If the temperature has not been checked before installation, watch carefully after placing the lid on the incubator, to ensure the temperature is set correctly. The lamp will be flashing.B/ Use the auto turner until 3 days before hatch is due. It is best if the turner is removed during hatch to keep it clean. Chicks do best hatching on the mesh floor rather than in the turning tray.C/ Use the mini funnel to fill the water channels, the locator holes are marked on the base. Use a matchstick or blunt skewer as a dipstick measure for the water level.
5/ Cleaning the turnerIt is important that the turner is kept clean so that it slides smoothly.Wash the floor, side rails and dividers in warm soapy water and make sure the rollers on the sides roll freely when placed back together.DO NOT WASH THE DRIVE MOTOR, CONTROL BOX, OR POWER PACK. Wipe these with a damp cloth to keep clean.
SEMI AUTOMATIC TURNER
The use of the semi-automatic is similar to the fully automatic in set up, with the exception that the drive is replaced with the push rod and knob found in the semi auto accessory pack.
The thermometer mounting, tray spacing, and incubator operation are all the same. Egg turning should be a minimum of twice per day.
19
SEMI AUTOMATIC TURNER UPGRADE KIT
The conversion from semi-automatic to fully automatic is a simple procedure. The upgrade kit consists of a new end piece with drive, perforated plastic base (with track) and power pack. If you have a wire floor you will need a perforated metal floor for the automatic turner to sit on.
Installation1/ Remove the push rod from the tray, and remove the nut and bolt from the tray. Check the side float of the tray is 1 to 3mm (see auto turn instructions page 12-17)
2/ Modify the tray using a knife or file to cut out a recess in the end of the tray for the stop switch. The cut-out is 2 squares wide and one square deep and half height of the tray.
Plan view showing the gear track.
End view showing half height Angle view of cut-out of tray
3/ Take off one old end piece, slide the end upwards while holding the side rail down and replace it with the new drive
20
end piece. Fit the motor clip in place (see page 13). Make sure the tray is in so the teeth of the drive gear engage in the teeth of the tray
4/ Plug in the power, test the turning, set up the eggs and thermometer as for Automatic turn (pages 12-17).
Some Incubation Settings and TimesTemperature
Set all eggs with thermometer level with top of the eggs, 103 degrees F. Remember if the temperature is correct hatch will occur on the correct day for the species.
Humidity
Judge humidity is correct by the air cell development in the egg (Figure 3).
Hatch Times (stop turning 3 days before hatch)Chickens 21 daysDucks Domestic 28 daysMuscovy Duck 25 daysGoose 28 to 25 days dependent on speciesQuail (Com/Jap) 17 daysBobwhite 23 daysPheasants 23 to 28 days dependent on speciesPartridge 23 days.
21