Embed Size (px)
Citation preview
WIND RATED ROLLER DOORS
INSTALLATION GUIDE
Revised July 2015
THESE INSTRUCTIONS ARE PROVIDED FOR THE USE BY EXPERIENCED INSTALLERS OF GARAGE DOORS
BY UNDERTAKING THE INSTALLATION OF THIS DOOR, THE INSTALLER UNDERSTANDS THE DANGERS
ASSOCIATED WITH THE INSTALLATION.
Steel-Line Garage Doors IS NOT RESPONSIBLE FOR ANY AND ALL LIABILITY RESULTING IN THE INJURY
AND OR DEATH DERIVED FROM AN IMPROPER INSTALLATION.
Wind Rated Roller Door Installation Guide Revised July 2017
2 of 17
GENERAL WARNING!
To install this door safely, a number of precautions must be taken. For safety of all concerned, pay heed to the warnings and instructions given below.
SPECIAL SAFETY WARNINGS OR REMARKS IN THIS MANUAL ARE INDICATED WITH THIS SYMBOL. PLEASE READ WARNINGS CAREFULLY.
• Please read this installation manual completely prior to installation. It is very important to install this door correctly in order to achieve proper and safe operation.
• The Steel-Line Wind Rated Roller Door is designed as a roller door to exceed the wind load requirements of cyclonic regions C & D in Australia, in sizes to suit a maximum daylight opening of 5100mm High x 5400mm Wide. The door weight, depending on size, can be as much as 295kg (649lbs) and the forces generated in the springs are generally equal to the door weight. Proper care must be taken not to release those forces violently as it could result in serious physical injury.
• All the components which have been supplied are designed for this specific roller door. Replacement or adding additional components may have an adverse effect on the performance, safety and the guarantee of the door.
• Shaft of door is under strong spring tension. Do not attempt to loosen U-bolts on shaft while under tension, without ensuring a suitable pipe wrench is locked onto shaft and wedged against wall, or held securely while loosening the U-bolt. Otherwise the sudden release of the spring forces will result in severe risk of injury.
• All instructions are given as if viewing the door from inside looking out.
July 2017 All reference to “brickwork” removed. 2013 removed from NCC. Fixing note added. Mechanical liftin device replaced “block & tackle”.
July 2015 Flaring of track replaced by plastic guide lead-in & direct chain drive option removed. Security clip ‘N’ wind rated roller door drawing added. Wind Rated was Cyclonic in title & text.
July 2014 General revision with inclusion of C2 only rated doors
Wind Rated Roller Door Installation Guide Revised July 2017
3 of 17
SECTION 1: Pre-Installation Checks A Roller Door is designed to be fitted behind the opening so the following dimensions and conditions need to be checked, before fully unpacking the door for installation.
Refer back of Section 3 of this guide for Wind Rated Roller Door Technical Data Sheet.
1. Opening Width: Check that the curtain supplied overlaps the daylight opening width by a minimum of 50mm.
2. Side Clearance: The minimum side clearances are (based on 50mm overlap):
Plain Side Direct/Planetary Gear
Drive Side
Windlock 150mm 235mm
NB: If door is to be motorised you will need to check with motor installation instructions for side room required
for that motor.
3. Opening Height: Your door will fit any opening height up to that stated on the package.
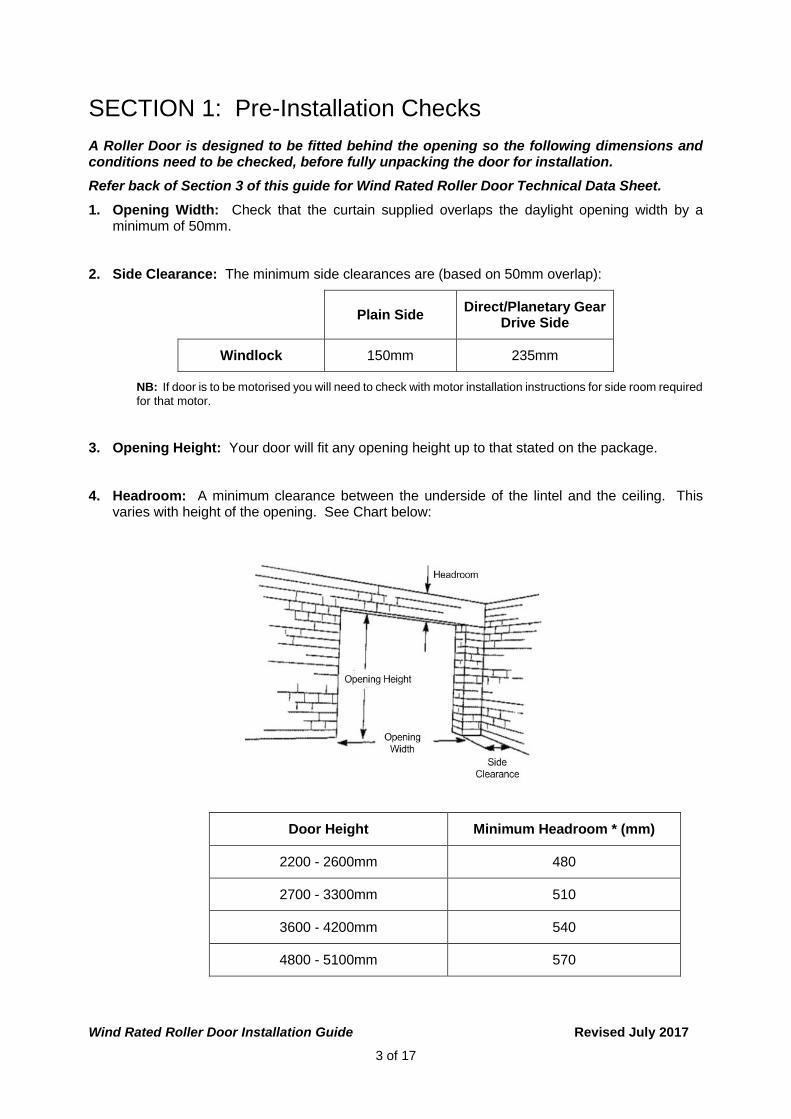
4. Headroom: A minimum clearance between the underside of the lintel and the ceiling. This varies with height of the opening. See Chart below:
Door Height Minimum Headroom * (mm)
2200 - 2600mm 480
2700 - 3300mm 510
3600 - 4200mm 540
4800 - 5100mm 570
Wind Rated Roller Door Installation Guide Revised July 2017
4 of 17
* This clearance must extend for a minimum of 600mm back from the opening. The headroom stated above is minimum required if whole door is to be hidden from view from outside the garage. It is possible to use less headroom than stated, but there will be a corresponding reduction in door daylight open height.
5. Structural Condition of Opening: ENSURE THE AREA AROUND THE OPENING IS STRONG ENOUGH TO SUPPORT THE DOOR AND THE WIND LOADS THE DOOR CAN IMPOSE ON THE OPENING DURING CYCLONIC CONDITIONS, AS SPECIFIED AS NATIONAL BUILDING CODE (NCC).
The lintel and jamb surface where the door is to be fitted must be flush and reasonably smooth. Small irregularities are acceptable.
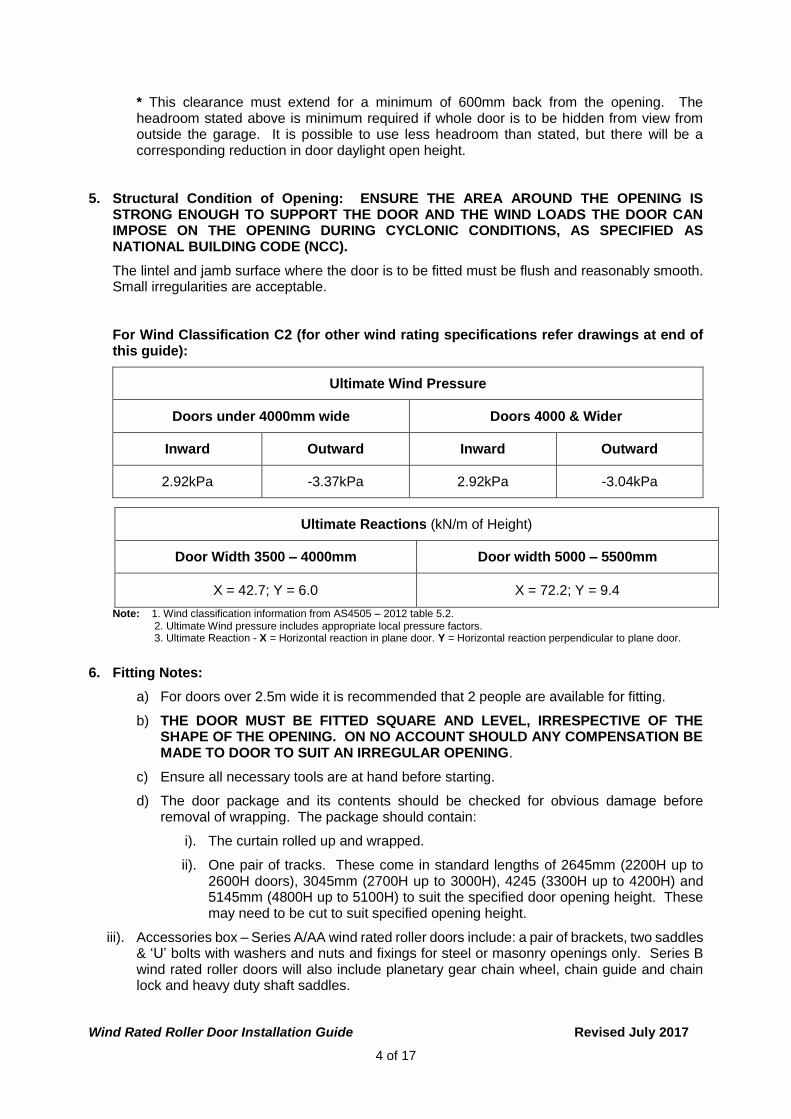
For Wind Classification C2 (for other wind rating specifications refer drawings at end of this guide):
Ultimate Wind Pressure
Doors under 4000mm wide Doors 4000 & Wider
Inward Outward Inward Outward
2.92kPa -3.37kPa 2.92kPa -3.04kPa
Ultimate Reactions (kN/m of Height)
Door Width 3500 – 4000mm Door width 5000 – 5500mm
X = 42.7; Y = 6.0 X = 72.2; Y = 9.4
Note: 1. Wind classification information from AS4505 – 2012 table 5.2. 2. Ultimate Wind pressure includes appropriate local pressure factors. 3. Ultimate Reaction - X = Horizontal reaction in plane door. Y = Horizontal reaction perpendicular to plane door.
6. Fitting Notes:
a) For doors over 2.5m wide it is recommended that 2 people are available for fitting.
b) THE DOOR MUST BE FITTED SQUARE AND LEVEL, IRRESPECTIVE OF THE SHAPE OF THE OPENING. ON NO ACCOUNT SHOULD ANY COMPENSATION BE MADE TO DOOR TO SUIT AN IRREGULAR OPENING.
c) Ensure all necessary tools are at hand before starting.
d) The door package and its contents should be checked for obvious damage before removal of wrapping. The package should contain:
i). The curtain rolled up and wrapped.
ii). One pair of tracks. These come in standard lengths of 2645mm (2200H up to 2600H doors), 3045mm (2700H up to 3000H), 4245 (3300H up to 4200H) and 5145mm (4800H up to 5100H) to suit the specified door opening height. These may need to be cut to suit specified opening height.
iii). Accessories box – Series A/AA wind rated roller doors include: a pair of brackets, two saddles & ‘U’ bolts with washers and nuts and fixings for steel or masonry openings only. Series B wind rated roller doors will also include planetary gear chain wheel, chain guide and chain lock and heavy duty shaft saddles.
Wind Rated Roller Door Installation Guide Revised July 2017
5 of 17
NB: Fixings supplied should suit most steel or masonry openings designed for these doors. If supplied fixings cannot be used alternative fixings can be used, but must as a minimum be equivalent to, or better than, specifications of supplied fixings
iv). IF THERE IS ANY OBVIOUS DAMAGE YOUR SUPPLIER SHOULD BE CONTACTED IMMEDIATELY.
Wind Rated Roller Door Installation Guide Revised July 2017
6 of 17
SECTION 2: Installation
DO NOT CUT PACKAGING AROUND ROLLED CURTAIN UNTIL INSTRUCTED IN STEP 3.
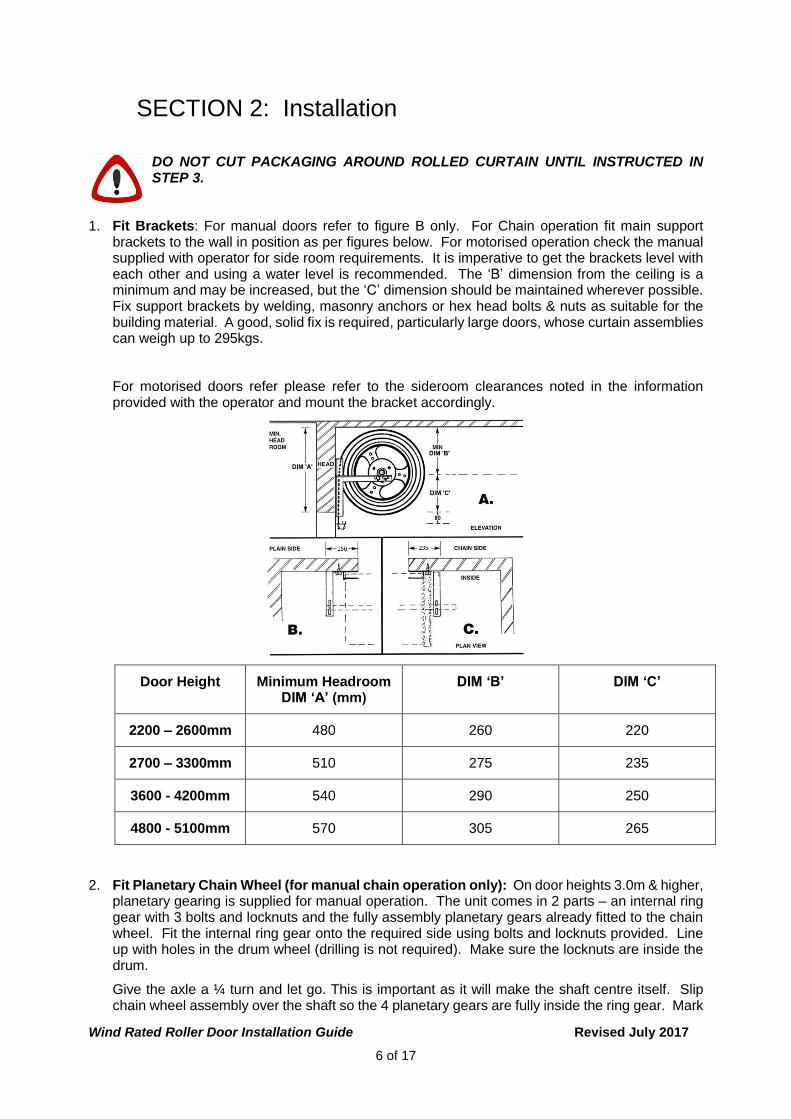
1. Fit Brackets: For manual doors refer to figure B only. For Chain operation fit main support brackets to the wall in position as per figures below. For motorised operation check the manual supplied with operator for side room requirements. It is imperative to get the brackets level with each other and using a water level is recommended. The ‘B’ dimension from the ceiling is a minimum and may be increased, but the ‘C’ dimension should be maintained wherever possible. Fix support brackets by welding, masonry anchors or hex head bolts & nuts as suitable for the building material. A good, solid fix is required, particularly large doors, whose curtain assemblies can weigh up to 295kgs.
For motorised doors refer please refer to the sideroom clearances noted in the information provided with the operator and mount the bracket accordingly.
Door Height Minimum Headroom DIM ‘A’ (mm)
DIM ‘B’ DIM ‘C’
2200 – 2600mm 480 260 220
2700 – 3300mm 510 275 235
3600 - 4200mm 540 290 250
4800 - 5100mm 570 305 265
2. Fit Planetary Chain Wheel (for manual chain operation only): On door heights 3.0m & higher, planetary gearing is supplied for manual operation. The unit comes in 2 parts – an internal ring gear with 3 bolts and locknuts and the fully assembly planetary gears already fitted to the chain wheel. Fit the internal ring gear onto the required side using bolts and locknuts provided. Line up with holes in the drum wheel (drilling is not required). Make sure the locknuts are inside the drum.
Give the axle a ¼ turn and let go. This is important as it will make the shaft centre itself. Slip chain wheel assembly over the shaft so the 4 planetary gears are fully inside the ring gear. Mark
Wind Rated Roller Door Installation Guide Revised July 2017
7 of 17
the position of the hole on the little piece of metal tubing coming out of the chain wheel and drill an appropriate hole through the axle. Slip bolt through and secure with lock nut. Fit chain guide on shaft under chain wheel. Fit shaft collar to opposite end of axle leaving about 1mm gap between it and drum wheel.
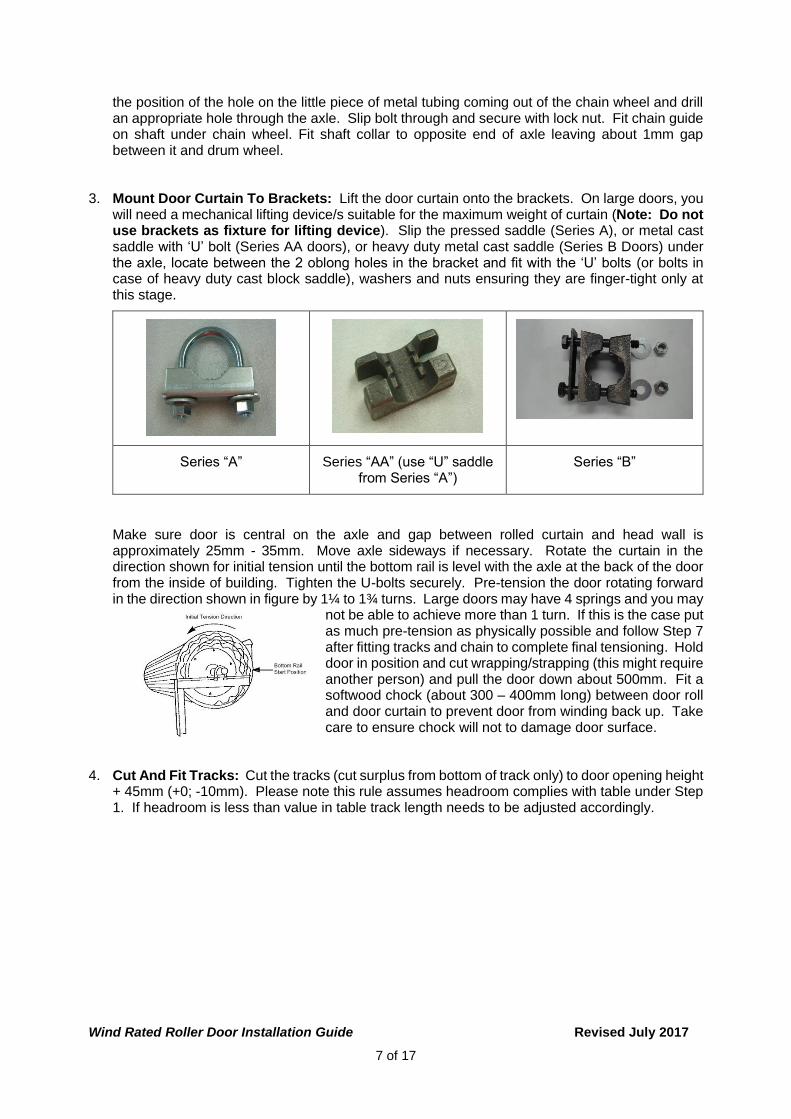
3. Mount Door Curtain To Brackets: Lift the door curtain onto the brackets. On large doors, you will need a mechanical lifting device/s suitable for the maximum weight of curtain (Note: Do not use brackets as fixture for lifting device). Slip the pressed saddle (Series A), or metal cast saddle with ‘U’ bolt (Series AA doors), or heavy duty metal cast saddle (Series B Doors) under the axle, locate between the 2 oblong holes in the bracket and fit with the ‘U’ bolts (or bolts in case of heavy duty cast block saddle), washers and nuts ensuring they are finger-tight only at this stage.
Series “A” Series “AA” (use “U” saddle from Series “A”)
Series “B”
Make sure door is central on the axle and gap between rolled curtain and head wall is approximately 25mm - 35mm. Move axle sideways if necessary. Rotate the curtain in the direction shown for initial tension until the bottom rail is level with the axle at the back of the door from the inside of building. Tighten the U-bolts securely. Pre-tension the door rotating forward in the direction shown in figure by 1¼ to 1¾ turns. Large doors may have 4 springs and you may
not be able to achieve more than 1 turn. If this is the case put as much pre-tension as physically possible and follow Step 7 after fitting tracks and chain to complete final tensioning. Hold door in position and cut wrapping/strapping (this might require another person) and pull the door down about 500mm. Fit a softwood chock (about 300 – 400mm long) between door roll and door curtain to prevent door from winding back up. Take care to ensure chock will not to damage door surface.
4. Cut And Fit Tracks: Cut the tracks (cut surplus from bottom of track only) to door opening height + 45mm (+0; -10mm). Please note this rule assumes headroom complies with table under Step 1. If headroom is less than value in table track length needs to be adjusted accordingly.
Wind Rated Roller Door Installation Guide Revised July 2017
8 of 17
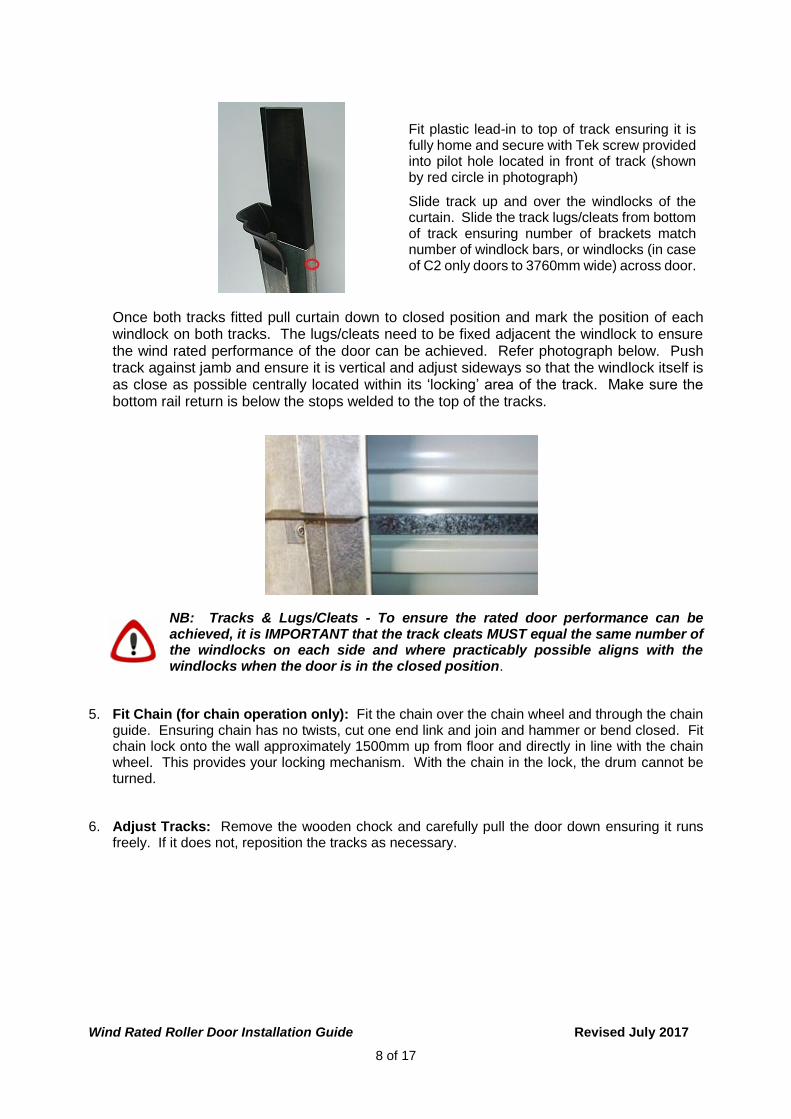
Fit plastic lead-in to top of track ensuring it is fully home and secure with Tek screw provided into pilot hole located in front of track (shown by red circle in photograph)
Slide track up and over the windlocks of the curtain. Slide the track lugs/cleats from bottom of track ensuring number of brackets match number of windlock bars, or windlocks (in case of C2 only doors to 3760mm wide) across door.
Once both tracks fitted pull curtain down to closed position and mark the position of each windlock on both tracks. The lugs/cleats need to be fixed adjacent the windlock to ensure the wind rated performance of the door can be achieved. Refer photograph below. Push track against jamb and ensure it is vertical and adjust sideways so that the windlock itself is as close as possible centrally located within its ‘locking’ area of the track. Make sure the bottom rail return is below the stops welded to the top of the tracks.
NB: Tracks & Lugs/Cleats - To ensure the rated door performance can be achieved, it is IMPORTANT that the track cleats MUST equal the same number of the windlocks on each side and where practicably possible aligns with the windlocks when the door is in the closed position.
5. Fit Chain (for chain operation only): Fit the chain over the chain wheel and through the chain guide. Ensuring chain has no twists, cut one end link and join and hammer or bend closed. Fit chain lock onto the wall approximately 1500mm up from floor and directly in line with the chain wheel. This provides your locking mechanism. With the chain in the lock, the drum cannot be turned.
6. Adjust Tracks: Remove the wooden chock and carefully pull the door down ensuring it runs freely. If it does not, reposition the tracks as necessary.
Wind Rated Roller Door Installation Guide Revised July 2017
9 of 17
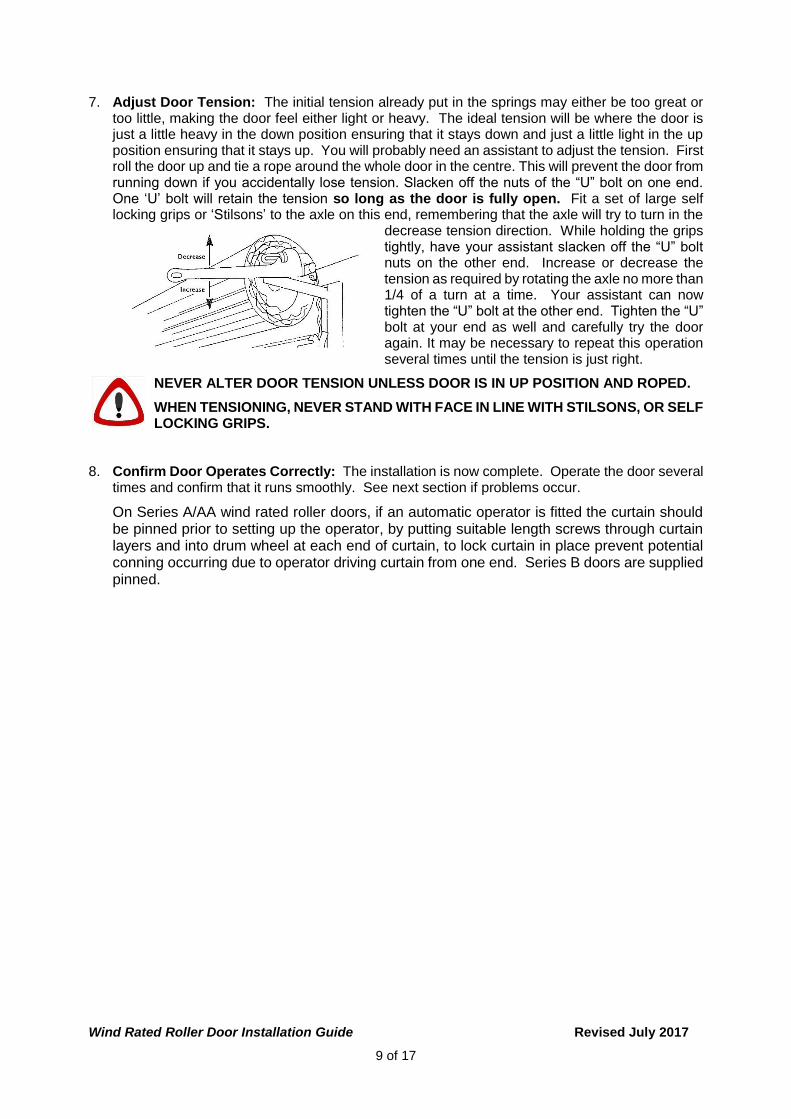
7. Adjust Door Tension: The initial tension already put in the springs may either be too great or too little, making the door feel either light or heavy. The ideal tension will be where the door is just a little heavy in the down position ensuring that it stays down and just a little light in the up position ensuring that it stays up. You will probably need an assistant to adjust the tension. First roll the door up and tie a rope around the whole door in the centre. This will prevent the door from running down if you accidentally lose tension. Slacken off the nuts of the “U” bolt on one end. One ‘U’ bolt will retain the tension so long as the door is fully open. Fit a set of large self locking grips or ‘Stilsons’ to the axle on this end, remembering that the axle will try to turn in the
decrease tension direction. While holding the grips tightly, have your assistant slacken off the “U” bolt nuts on the other end. Increase or decrease the tension as required by rotating the axle no more than 1/4 of a turn at a time. Your assistant can now tighten the “U” bolt at the other end. Tighten the “U” bolt at your end as well and carefully try the door again. It may be necessary to repeat this operation several times until the tension is just right.
NEVER ALTER DOOR TENSION UNLESS DOOR IS IN UP POSITION AND ROPED.
WHEN TENSIONING, NEVER STAND WITH FACE IN LINE WITH STILSONS, OR SELF LOCKING GRIPS.
8. Confirm Door Operates Correctly: The installation is now complete. Operate the door several times and confirm that it runs smoothly. See next section if problems occur.
On Series A/AA wind rated roller doors, if an automatic operator is fitted the curtain should be pinned prior to setting up the operator, by putting suitable length screws through curtain layers and into drum wheel at each end of curtain, to lock curtain in place prevent potential conning occurring due to operator driving curtain from one end. Series B doors are supplied pinned.
Wind Rated Roller Door Installation Guide Revised July 2017
10 of 17
SECTION 3: Problem Check
1. Difficult To Operate In Either Direction:
a) Check curtain not jamming in the tracks.
b) Check running clearance in the tracks (≈ 2mm per side).
c) Check tracks are upright and clean. Lubricate with silicon spray only.
2. Difficult To Close OR Open: Decrease OR increase spring tension (see Step 7 above).
3. Track/Shaft Relationship: If the door is very difficult to close the last 600mm, check the tracks are fitted in correct relationship to the brackets and that the axle is correct distance from wall (210mm – 250mm) i.e. repeat Step 4.
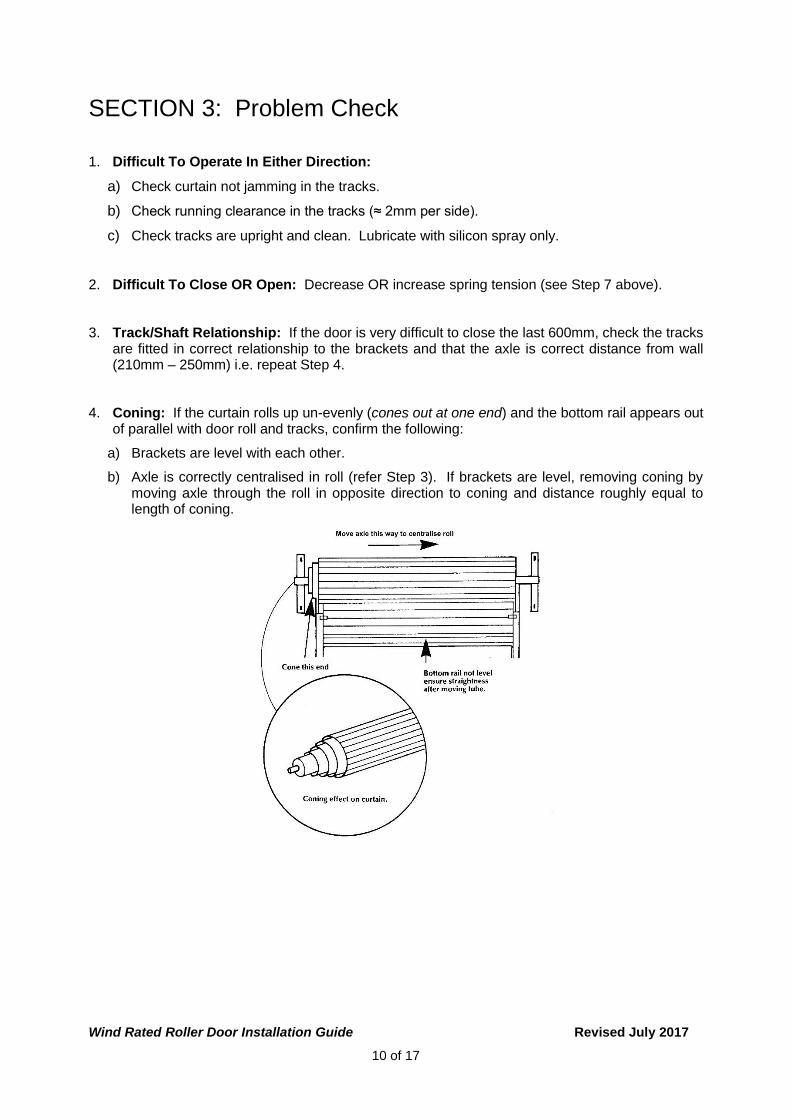
4. Coning: If the curtain rolls up un-evenly (cones out at one end) and the bottom rail appears out of parallel with door roll and tracks, confirm the following:
a) Brackets are level with each other.
b) Axle is correctly centralised in roll (refer Step 3). If brackets are level, removing coning by moving axle through the roll in opposite direction to coning and distance roughly equal to length of coning.
Wind Rated Roller Door Installation Guide Revised July 2017
11 of 17

Wind Rated Roller Door Installation Guide Revised July 2017
12 of 17
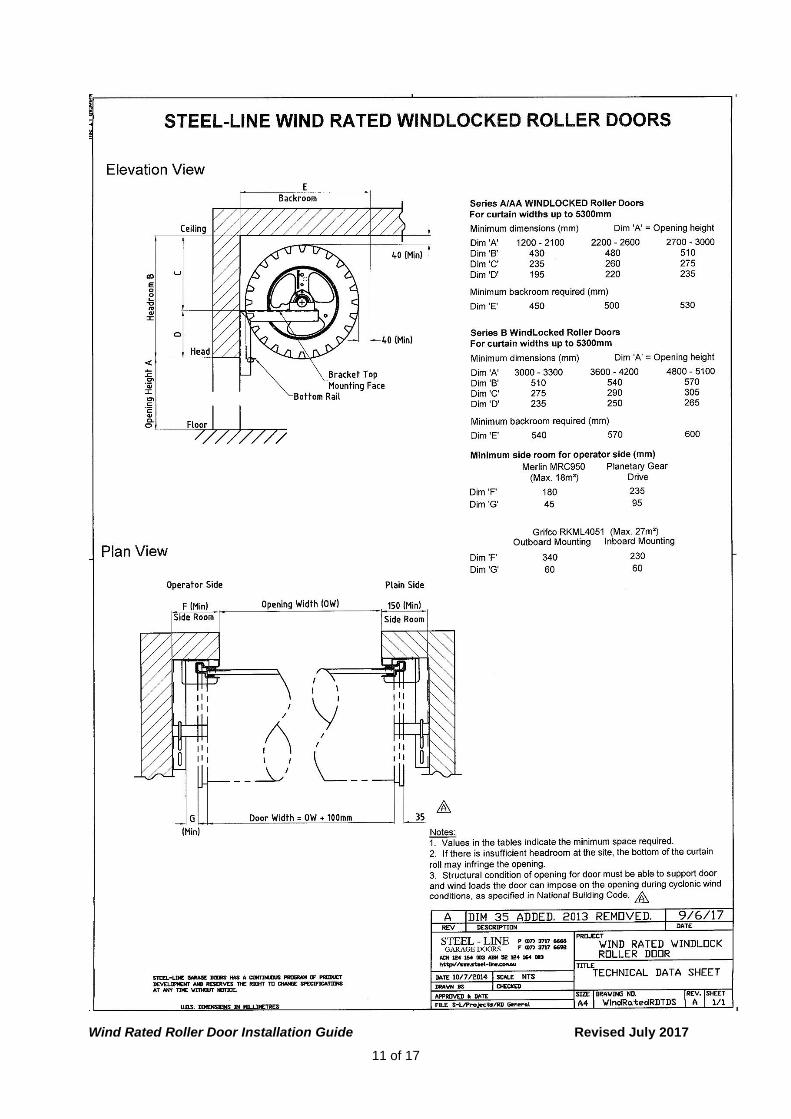
SECTION 4: Drawings
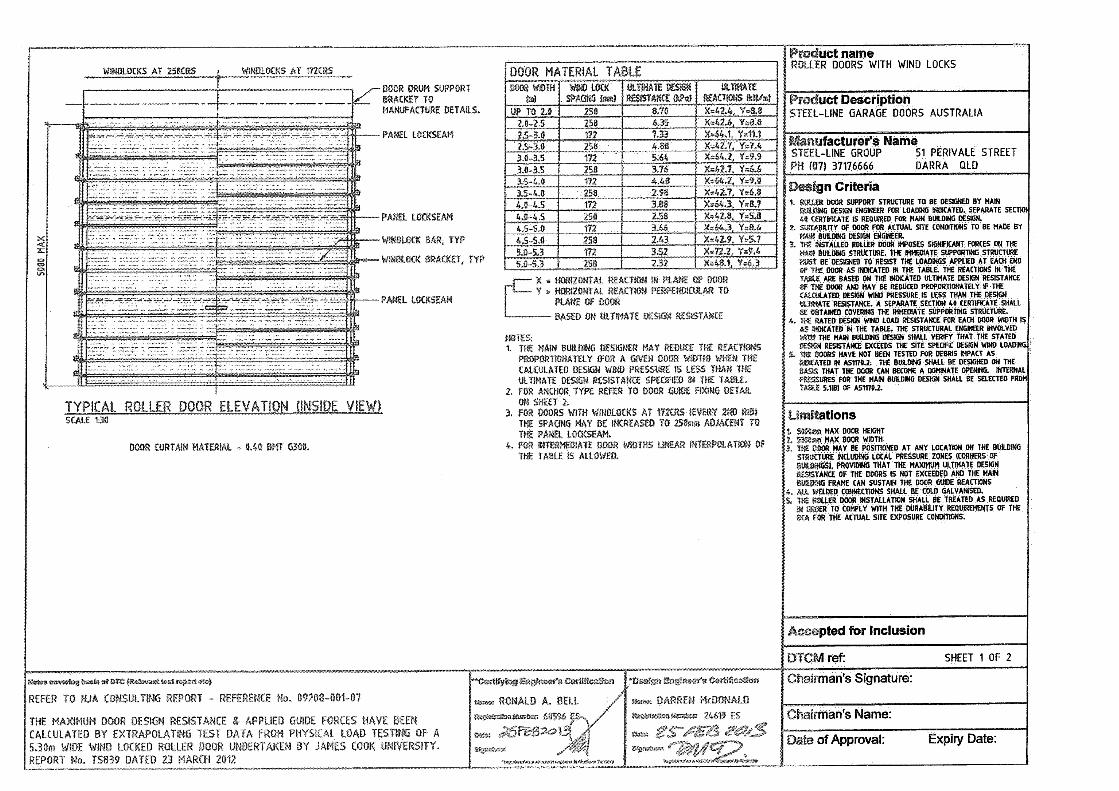
Roller Doors With Windlocks – Sheet 1 of 2
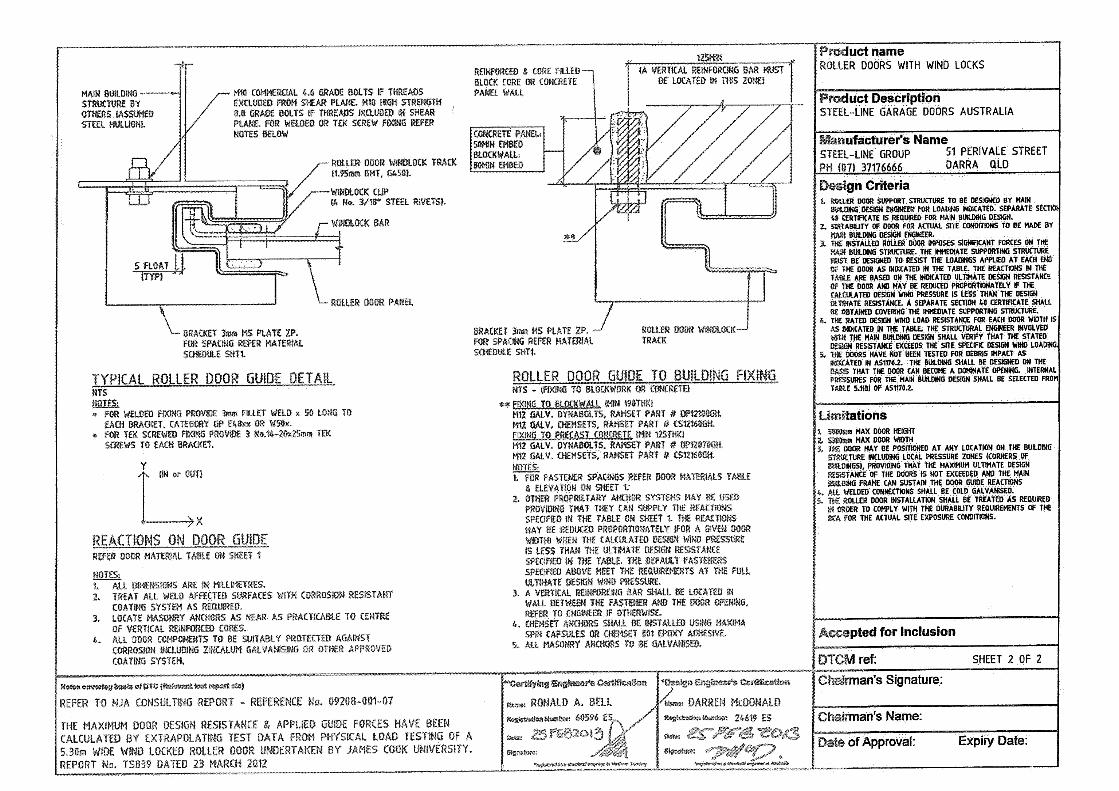
Roller Doors With Windlocks – Sheet 2 of 2
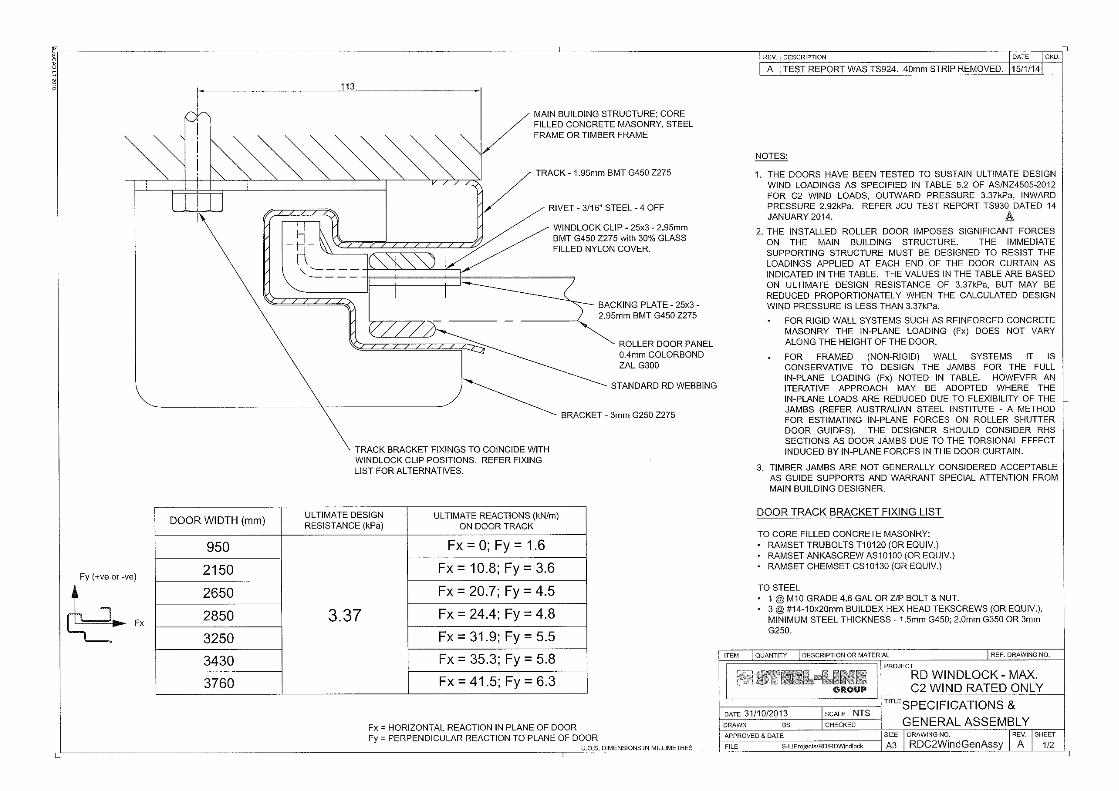
C2 Only Wind Rated Roller Doors – Sheet 1 of 2 *
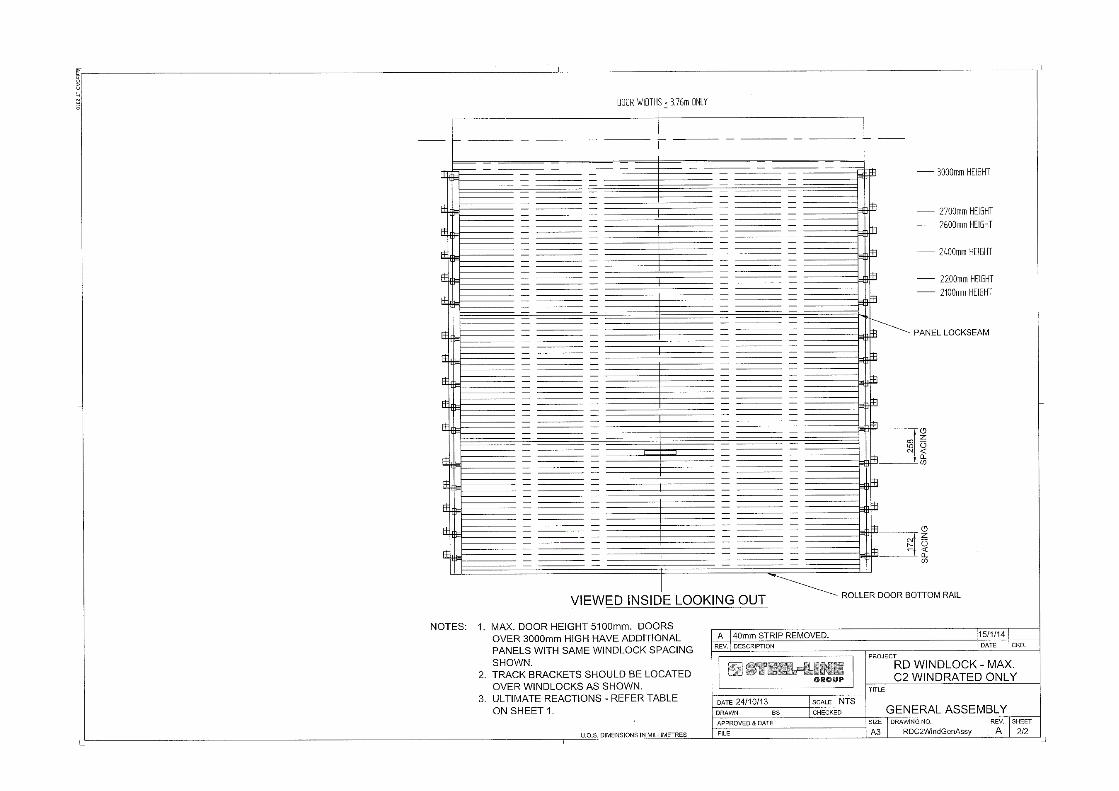
C2 Only Wind Rated Roller Doors – Sheet 2 of 2 *
* Maximum door width is 3760mm and no windlock bars fitted
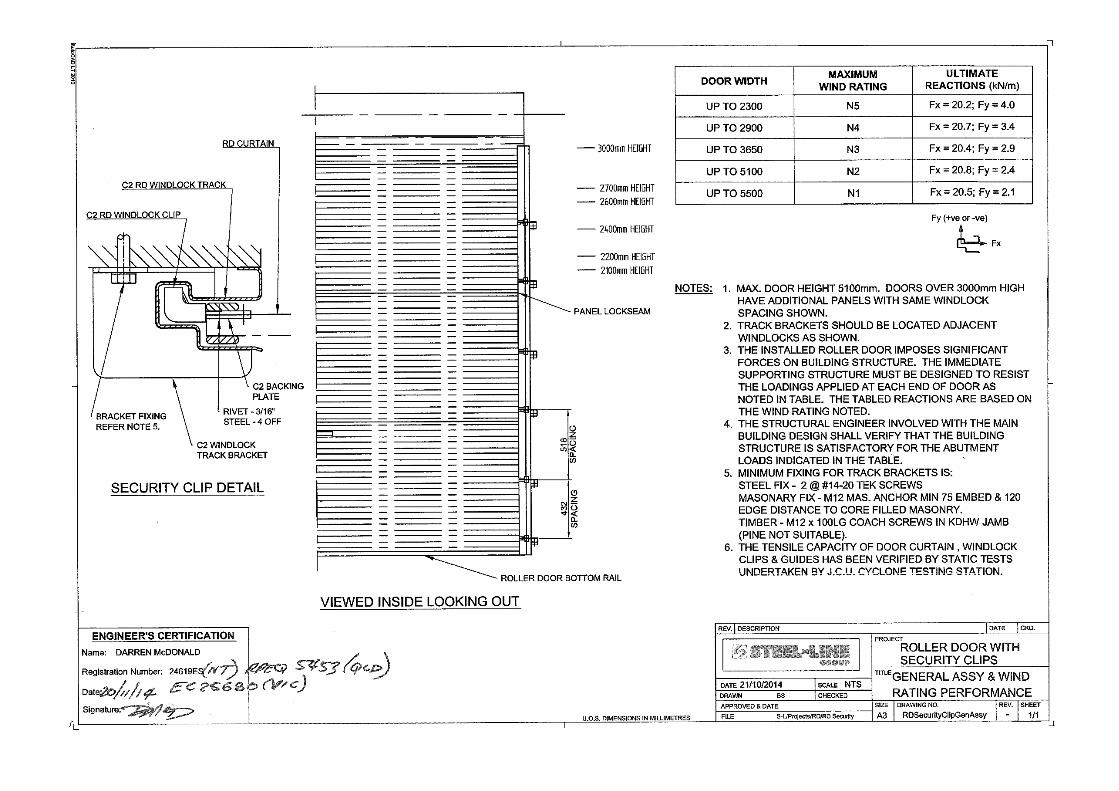
Non-Cyclonic Wind Rated Security Clip Roller Door