Embed Size (px)
Citation preview
CENTER FOR STEM RESEARCH
Hofstra University
WISEngineering Mobile
Learning Facilitator's Guide
Version
2
C E N T E R F O R S T E M R E S E A R C H H O F S T R A U N I V E R S I T Y
WISEngineering Mobile Guide
Center for STEM Research, Hofstra University 773 Fulton Ave.
Hempstead, NY 11549 Phone 516.463.6482 • Fax 516.463.6482
Table of Contents
1. Introduction ........................... Error! Bookmark not defined. 2. Getting Started ..................................................................... 2
3. Create WISEngineering Activities ......................................... 4
Create New Project Run ................................................................. 4
Create New Student Account .......................................................... 5
Add New Project ............................................................................. 6
4. Run Activity Session ............................................................. 7
Running Session in OFFLINE Mode ............................................... 7
Navigation ....................................................................................... 8
Lab Information ............................................................................... 9
Design Journal .............................................................................. 10
Session Summary Report ............................................................. 11
Post Activity Reminders ................................................................ 11
5. Trouble Shooting ................................................................ 11
Fatal Error or Exceptions .............................................................. 13
Navigation Problems ..................................................................... 13
C E N T E R F O R S T E M R E S E A R C H
1
Introduction
elcome! Learning facilitators!
This guide provides the essential information that you will need to run activity sessions with WGG2.0, the Android App for WISEngineering.
What Is Possible With WGG2.0
With the new WISEngineering Mobile system, learners can complete all projects without the use of desktop computers! If you do not have reliable WIFI at the club, WGG2.0 provides the offline mode for running most of the activities without the need of network. Check Section 4.1 for details!
With the pin code distributed by you, learners can register themselves using the tablet. They can use tablets to take pictures and videos and exchange and share ideas. Your teacher’s account has all the student account features. In addition, you can submit an activity summary report after each session is completed.
When You Still Need Desktop Version
You will still need your desktop version of WISEngineering for:
Creating and sharing a new project
Starting a new run of a project
Grading and providing student feedback
Performing learning outcome analysis
Chapter
1
W
C E N T E R F O R S T E M R E S E A R C H
2
Getting Started
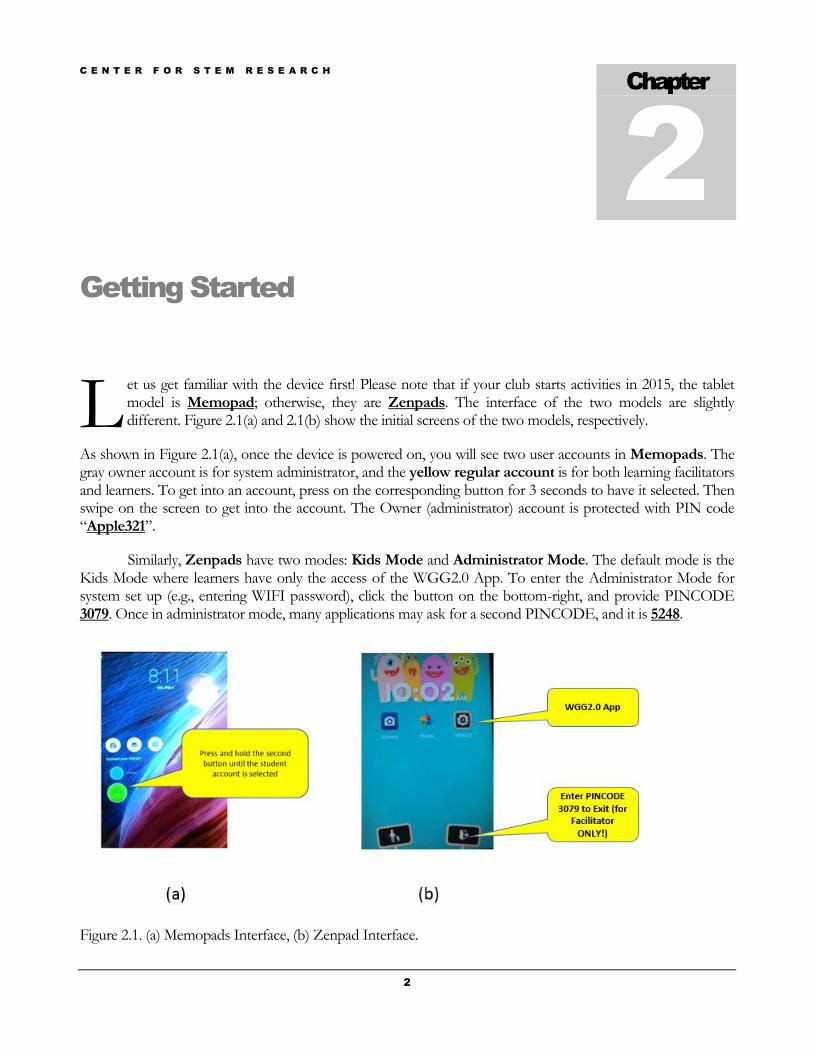
et us get familiar with the device first! Please note that if your club starts activities in 2015, the tablet model is Memopad; otherwise, they are Zenpads. The interface of the two models are slightly different. Figure 2.1(a) and 2.1(b) show the initial screens of the two models, respectively.
As shown in Figure 2.1(a), once the device is powered on, you will see two user accounts in Memopads. The gray owner account is for system administrator, and the yellow regular account is for both learning facilitators and learners. To get into an account, press on the corresponding button for 3 seconds to have it selected. Then swipe on the screen to get into the account. The Owner (administrator) account is protected with PIN code “Apple321”.
Similarly, Zenpads have two modes: Kids Mode and Administrator Mode. The default mode is the Kids Mode where learners have only the access of the WGG2.0 App. To enter the Administrator Mode for system set up (e.g., entering WIFI password), click the button on the bottom-right, and provide PINCODE 3079. Once in administrator mode, many applications may ask for a second PINCODE, and it is 5248.
Figure 2.1. (a) Memopads Interface, (b) Zenpad Interface.
Chapter
2
L
C E N T E R F O R S T E M R E S E A R C H
3
Set Up WIFI
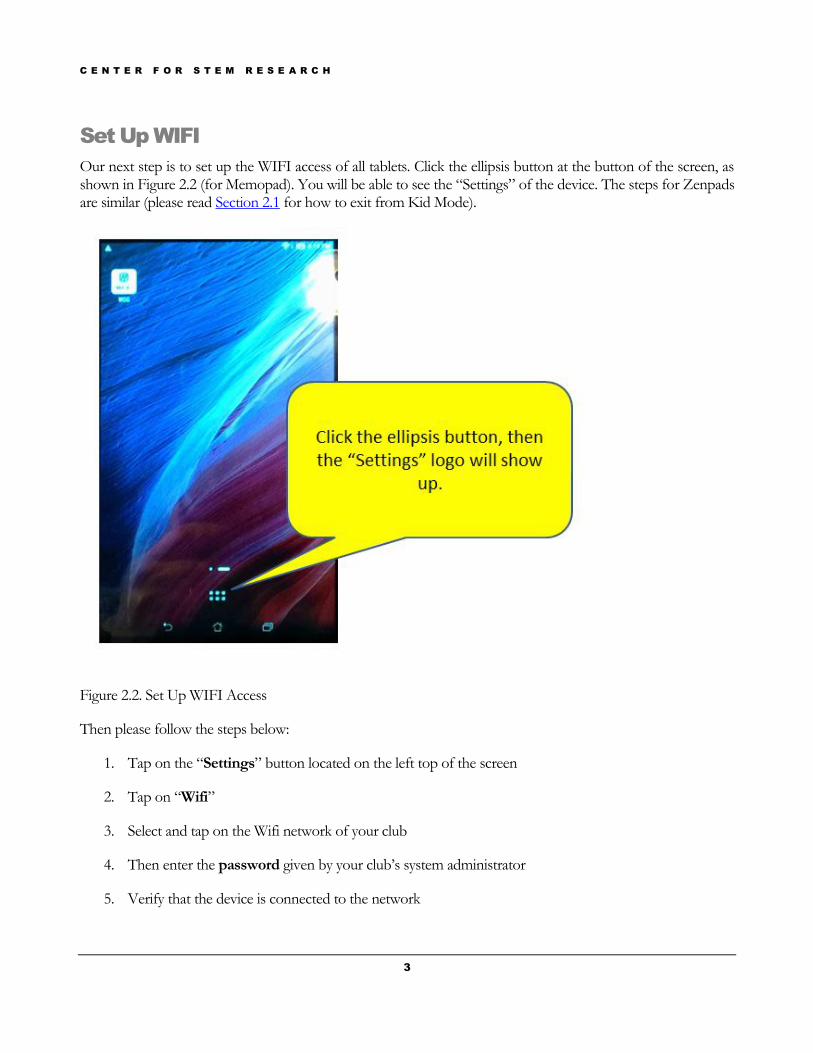
Our next step is to set up the WIFI access of all tablets. Click the ellipsis button at the button of the screen, as shown in Figure 2.2 (for Memopad). You will be able to see the “Settings” of the device. The steps for Zenpads are similar (please read Section 2.1 for how to exit from Kid Mode).
Figure 2.2. Set Up WIFI Access
Then please follow the steps below:
1. Tap on the “Settings” button located on the left top of the screen
2. Tap on “Wifi”
3. Select and tap on the Wifi network of your club
4. Then enter the password given by your club’s system administrator
5. Verify that the device is connected to the network
C E N T E R F O R S T E M R E S E A R C H
4
Create WISEngineering Activities
e now discuss how we can start a WISEngineering project. You will first need the desktop version of the system first. Visit Hofstra WISEngineering site at the following URL: http://wgg3.hofstra.edu/
Start New Project Run
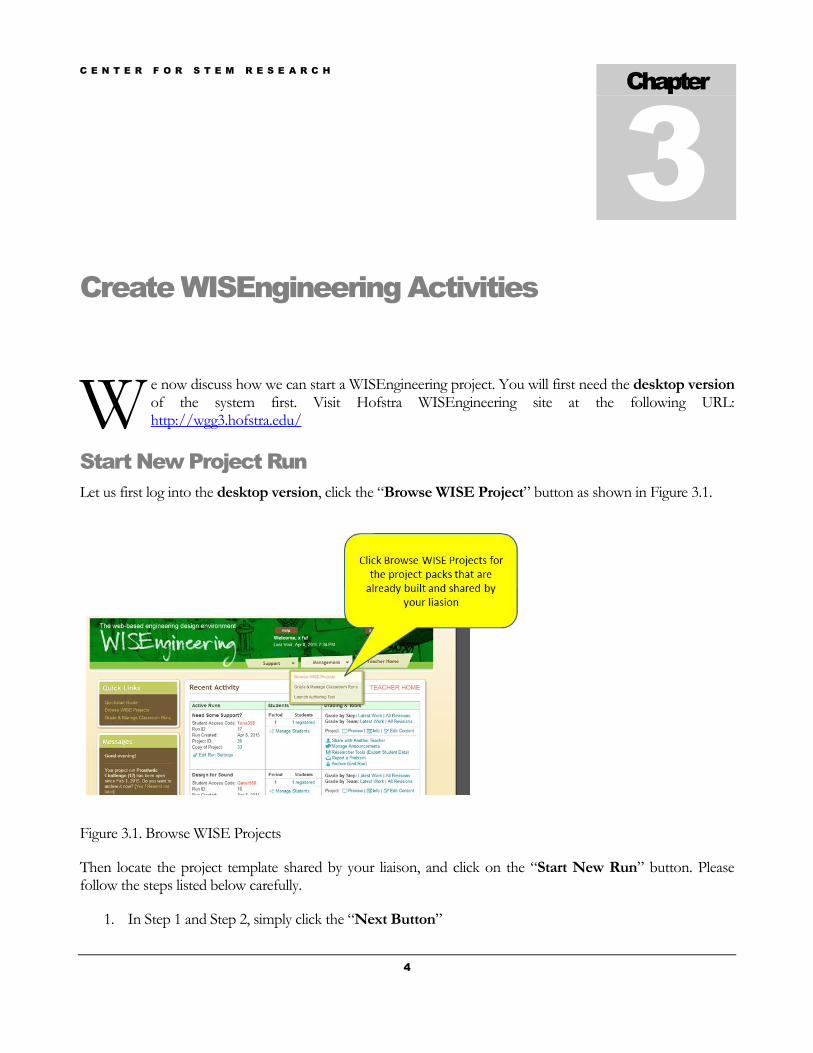
Let us first log into the desktop version, click the “Browse WISE Project” button as shown in Figure 3.1.
Figure 3.1. Browse WISE Projects
Then locate the project template shared by your liaison, and click on the “Start New Run” button. Please follow the steps listed below carefully.
1. In Step 1 and Step 2, simply click the “Next Button”
Chapter
3
W
C E N T E R F O R S T E M R E S E A R C H
5
2. Click the “Next” button for the rest of the steps.
3. Now write down the Student Access Code and then distribute them to your students.
Register New Student
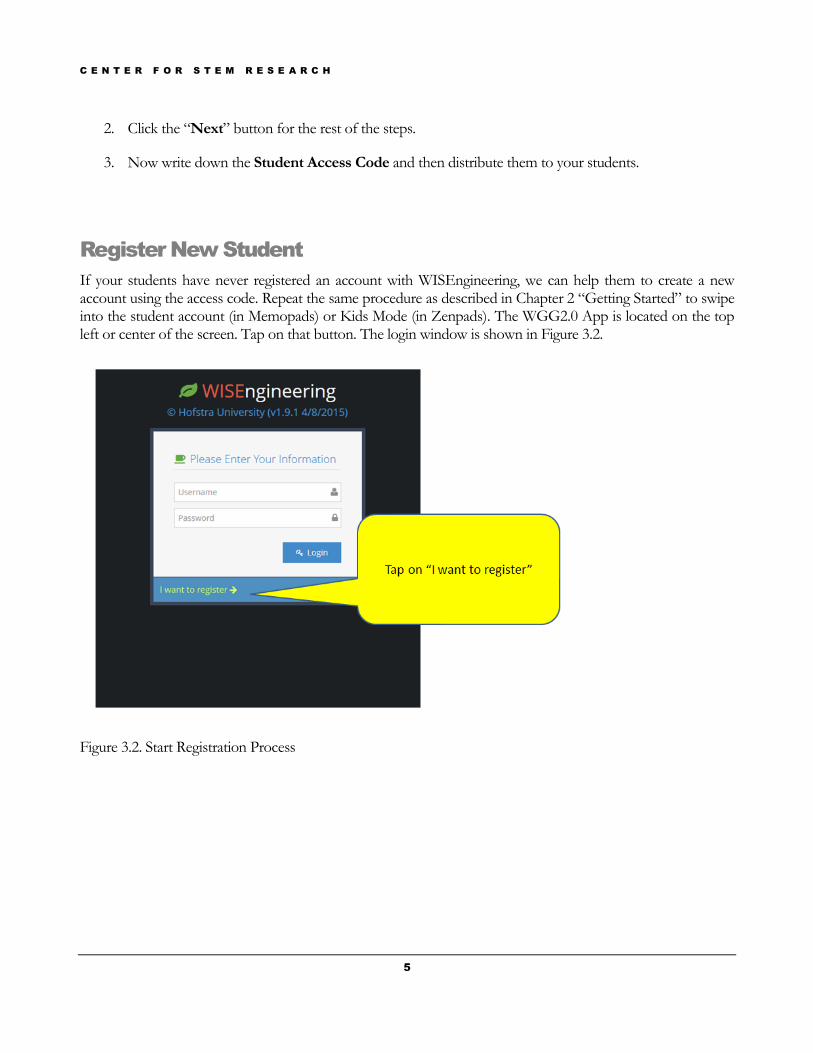
If your students have never registered an account with WISEngineering, we can help them to create a new account using the access code. Repeat the same procedure as described in Chapter 2 “Getting Started” to swipe into the student account (in Memopads) or Kids Mode (in Zenpads). The WGG2.0 App is located on the top left or center of the screen. Tap on that button. The login window is shown in Figure 3.2.
Figure 3.2. Start Registration Process
C E N T E R F O R S T E M R E S E A R C H
6
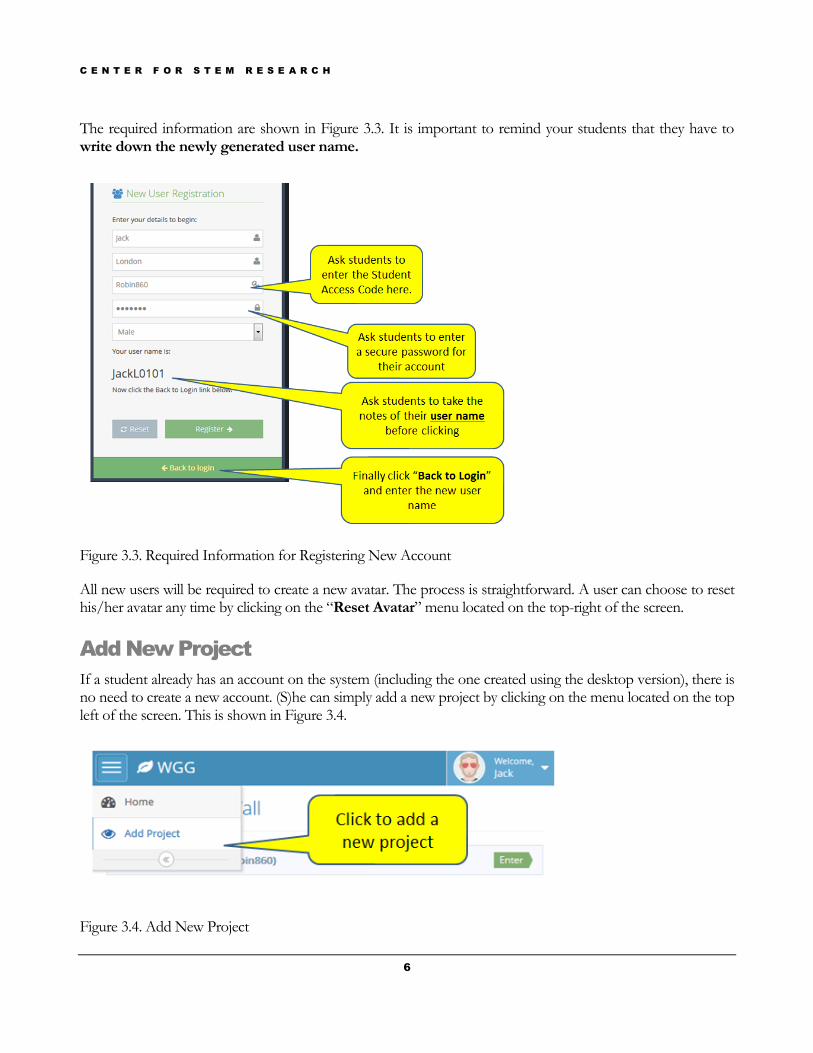
The required information are shown in Figure 3.3. It is important to remind your students that they have to write down the newly generated user name.
Figure 3.3. Required Information for Registering New Account
All new users will be required to create a new avatar. The process is straightforward. A user can choose to reset his/her avatar any time by clicking on the “Reset Avatar” menu located on the top-right of the screen.
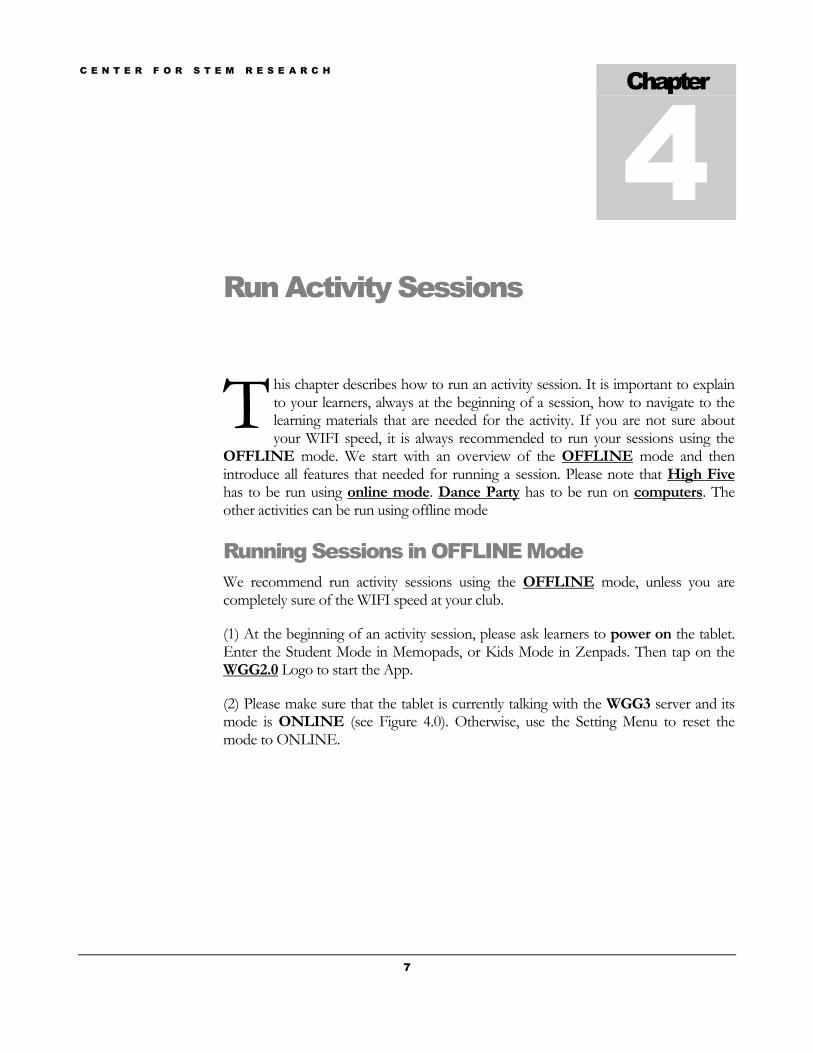
Add New Project
If a student already has an account on the system (including the one created using the desktop version), there is no need to create a new account. (S)he can simply add a new project by clicking on the menu located on the top left of the screen. This is shown in Figure 3.4.
Figure 3.4. Add New Project
C E N T E R F O R S T E M R E S E A R C H
7
Run Activity Sessions
his chapter describes how to run an activity session. It is important to explain to your learners, always at the beginning of a session, how to navigate to the learning materials that are needed for the activity. If you are not sure about your WIFI speed, it is always recommended to run your sessions using the
OFFLINE mode. We start with an overview of the OFFLINE mode and then introduce all features that needed for running a session. Please note that High Five has to be run using online mode. Dance Party has to be run on computers. The other activities can be run using offline mode
Running Sessions in OFFLINE Mode
We recommend run activity sessions using the OFFLINE mode, unless you are completely sure of the WIFI speed at your club.
(1) At the beginning of an activity session, please ask learners to power on the tablet. Enter the Student Mode in Memopads, or Kids Mode in Zenpads. Then tap on the WGG2.0 Logo to start the App.
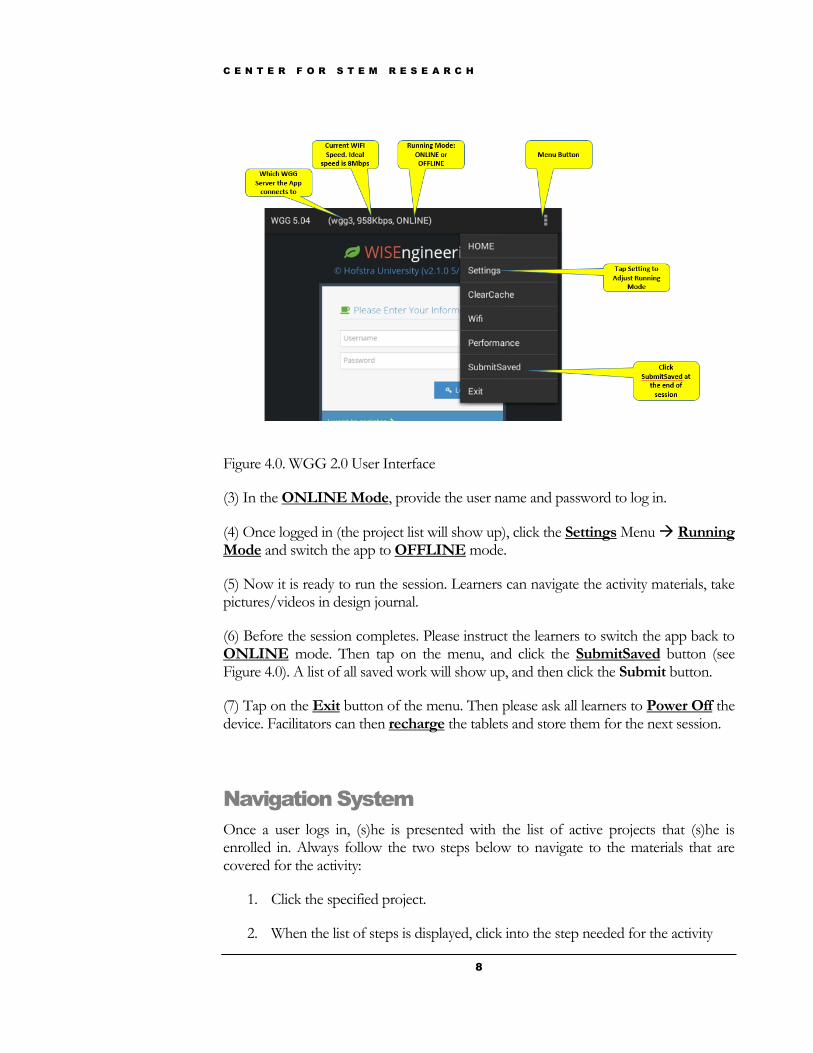
(2) Please make sure that the tablet is currently talking with the WGG3 server and its mode is ONLINE (see Figure 4.0). Otherwise, use the Setting Menu to reset the mode to ONLINE.
Chapter
4
T
C E N T E R F O R S T E M R E S E A R C H
8
Figure 4.0. WGG 2.0 User Interface
(3) In the ONLINE Mode, provide the user name and password to log in.
(4) Once logged in (the project list will show up), click the Settings Menu Running Mode and switch the app to OFFLINE mode.
(5) Now it is ready to run the session. Learners can navigate the activity materials, take pictures/videos in design journal.
(6) Before the session completes. Please instruct the learners to switch the app back to ONLINE mode. Then tap on the menu, and click the SubmitSaved button (see Figure 4.0). A list of all saved work will show up, and then click the Submit button.
(7) Tap on the Exit button of the menu. Then please ask all learners to Power Off the device. Facilitators can then recharge the tablets and store them for the next session.
Navigation System
Once a user logs in, (s)he is presented with the list of active projects that (s)he is enrolled in. Always follow the two steps below to navigate to the materials that are covered for the activity:
1. Click the specified project.
2. When the list of steps is displayed, click into the step needed for the activity
C E N T E R F O R S T E M R E S E A R C H
9
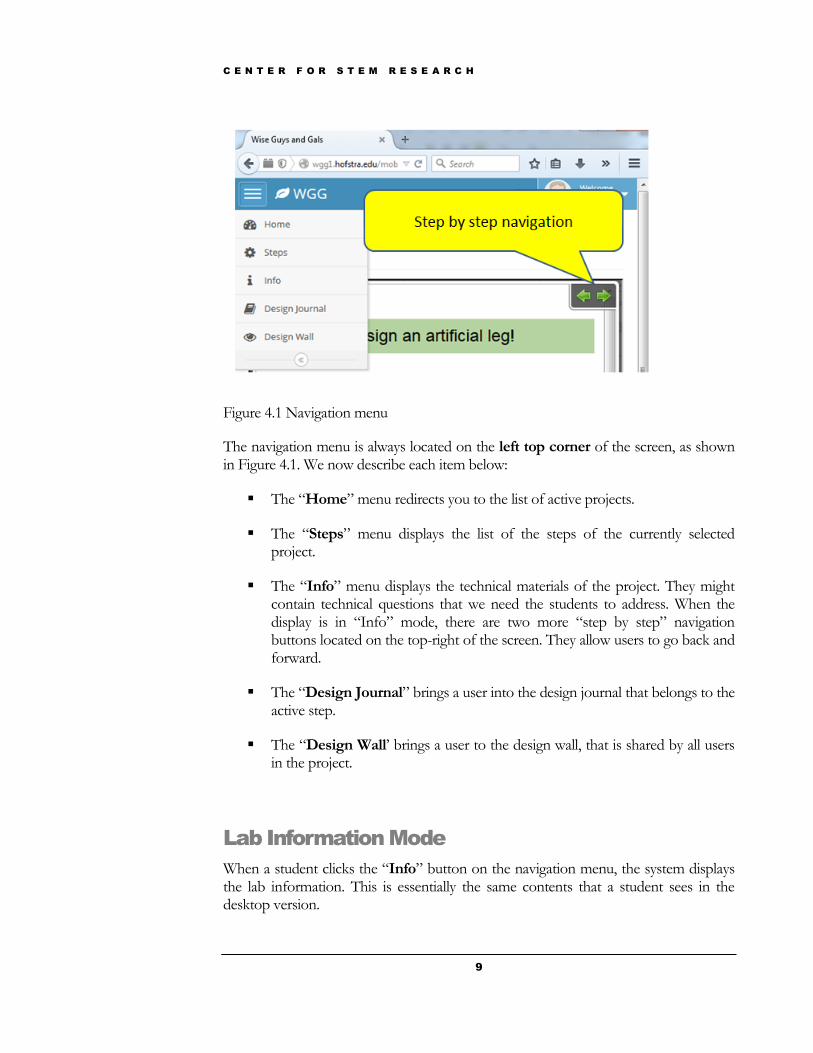
Figure 4.1 Navigation menu
The navigation menu is always located on the left top corner of the screen, as shown in Figure 4.1. We now describe each item below:
The “Home” menu redirects you to the list of active projects.
The “Steps” menu displays the list of the steps of the currently selected project.
The “Info” menu displays the technical materials of the project. They might contain technical questions that we need the students to address. When the display is in “Info” mode, there are two more “step by step” navigation buttons located on the top-right of the screen. They allow users to go back and forward.
The “Design Journal” brings a user into the design journal that belongs to the active step.
The “Design Wall’ brings a user to the design wall, that is shared by all users in the project.
Lab Information Mode
When a student clicks the “Info” button on the navigation menu, the system displays the lab information. This is essentially the same contents that a student sees in the desktop version.
C E N T E R F O R S T E M R E S E A R C H
10
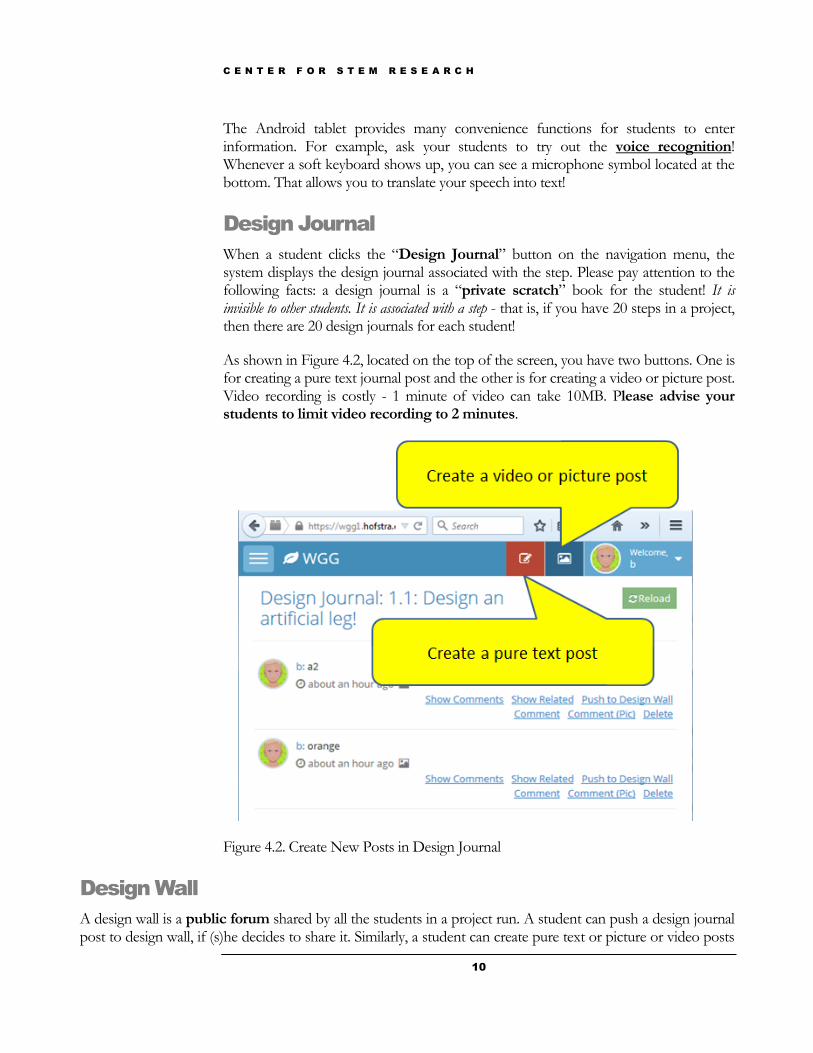
The Android tablet provides many convenience functions for students to enter information. For example, ask your students to try out the voice recognition! Whenever a soft keyboard shows up, you can see a microphone symbol located at the bottom. That allows you to translate your speech into text!
Design Journal
When a student clicks the “Design Journal” button on the navigation menu, the system displays the design journal associated with the step. Please pay attention to the following facts: a design journal is a “private scratch” book for the student! It is invisible to other students. It is associated with a step - that is, if you have 20 steps in a project, then there are 20 design journals for each student!
As shown in Figure 4.2, located on the top of the screen, you have two buttons. One is for creating a pure text journal post and the other is for creating a video or picture post. Video recording is costly - 1 minute of video can take 10MB. Please advise your students to limit video recording to 2 minutes.
Figure 4.2. Create New Posts in Design Journal
Design Wall
A design wall is a public forum shared by all the students in a project run. A student can push a design journal post to design wall, if (s)he decides to share it. Similarly, a student can create pure text or picture or video posts
C E N T E R F O R S T E M R E S E A R C H
11
in design wall. The system provides several convenient buttons for students to filter information and interact with each other
As shown in Figure 4.2, for each design journal or design wall post, there are a number of link buttons provided:
The “Comment” button is used to reply to a post.
The “Comment (Pic)” button is used to reply with a picture or a video.
The “Delete” button is used for deleting a post. Only the author of a post or a teacher of the club can delete a post.
The “Show Comments” button displays all replies to a post.
The “Show Related” button displays all posts that are associated with the same step of the project.
Session Summary Report
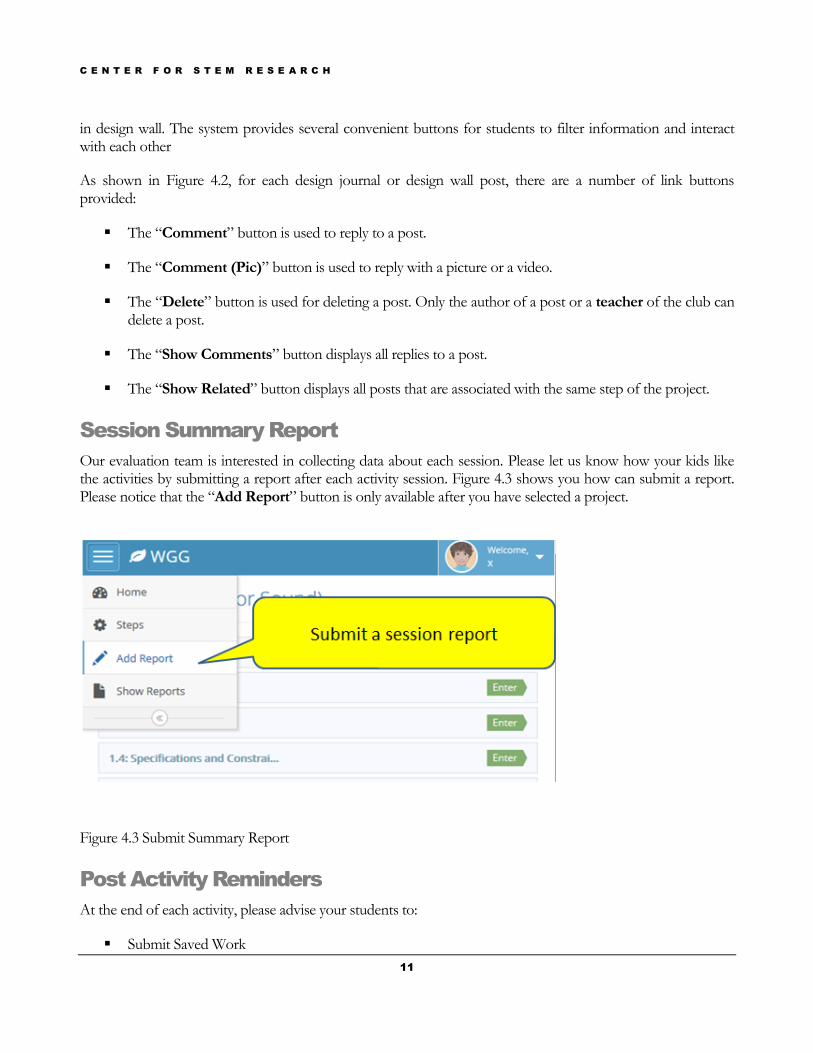
Our evaluation team is interested in collecting data about each session. Please let us know how your kids like the activities by submitting a report after each activity session. Figure 4.3 shows you how can submit a report. Please notice that the “Add Report” button is only available after you have selected a project.
Figure 4.3 Submit Summary Report
Post Activity Reminders
At the end of each activity, please advise your students to:
Submit Saved Work

C E N T E R F O R S T E M R E S E A R C H
12
Log off the account.
Power down the tablet.
Charge the tablet.
C E N T E R F O R S T E M R E S E A R C H
13
Trouble Shooting
his chapter lists some frequently seen problems and the solutions.
Fatal Error or Exceptions
Whenever you encounter fatal error or exceptions, please simply exit from the app and then restart it.
Navigation Problems
Try click the “Home” button first on the top-left corner. If it still does not work, log out and try log-in again.
Chapter
5
T