WorkbookTP 1131
With CD-ROM
Festo Didactic
8023445 en
Building automation with KNX
S4
E4 E6
S13
E7 E1 E8
S11
S7
E5
S10
S1
S12
S6
S9
E2
S8
E3
S5S3
S2
3 4 3
3 3
S3, 4, 5, 6, 7, 8
S9, 10, 11, 12, 13 E4, 5, 6, 7, 8
T1 E2, 3
3
4
4 3
4 3
S1 S2 E1
3
3
3
3
3

Order no.: 8023445
Edition: 12/2013
Author: Nils Karlsson
Layout: 12/2013, Frank Ebel
© Festo Didactic GmbH & Co. KG, 73770 Denkendorf, Germany, 2014
Internet: www.festo-didactic.com
E-mail: [email protected]
The purchaser shall receive a single right of use which is non-exclusive, non-time-limited and limited
geographically to use at the purchaser's site/location as follows.
The purchaser shall be entitled to use the work to train his/her staff at the purchaser's site/location and
shall also be entitled to use parts of the copyright material as the basis for the production of his/her own
training documentation for the training of his/her staff at the purchaser's site/location with
acknowledgement of source and to make copies for this purpose. In the case of schools/technical colleges
and training centres, the right of use shall also include use by school and college students and trainees at
the purchaser's site/location for teaching purposes.
The right of use shall in all cases exclude the right to publish the copyright material or to make this available
for use on intranet, Internet and LMS platforms and databases such as Moodle, which allow access by a
wide variety of users, including those outside of the purchaser's site/location.
Entitlement to other rights relating to reproductions, copies, adaptations, translations, microfilming and
transfer to and storage and processing in electronic systems, no matter whether in whole or in part, shall
require the prior consent of Festo Didactic GmbH & Co. KG.
Please note
Most of the exercises and tasks in this book can be completed using TP 1131, Festo KNX-board
Basic. In order to complete all the tasks, you will require hardware that matches the following
specifications.
The following equipment must be ordered separately:
Product name Order no. Used in exercise/task
KNX EduTrainer® Awning/Blinds 574177 Exercise 4, Tasks 4a and 4b
KNX EduTrainer® Heating actuator 574175 Exercise 6, Task 6a
KNX EduTrainer® Line coupler 574176 Exercise 6, Task 7a
KNX EduTrainer® Development board 8023966 Exercises 1D - 8D
KNX energy actuator 8023970 Exercise 4D
KNX IP/WiFi module 8023967 Exercise 5D
KNX logic module 8023968 Exercise 7D
KNX air quality module 8023969 Exercise 8D
© Festo Didactic GmbH & Co. KG 8023445 III
Table of contents
Use for intended purpose _________________________________________________________________ VIII
Introduction _____________________________________________________________________________ IX
Notes for the teacher/trainer ________________________________________________________________ XI
Contents of the CD-ROM ___________________________________________________________________ XI
Remarks from the author __________________________________________________________________ XII
Part 1 – Introduction to KNX _________________________________________________________________ 1
1.0.1 KNX/EIB ___________________________________________________________________________ 1
1.0.2 KNX – General information ____________________________________________________________ 2
1.0.3 The ETS software __________________________________________________________________ 4
1.0.4 The KNX board hardware _____________________________________________________________ 5
Exercise 1 ________________________________________________________________________________ 6
1.1.1 Switching __________________________________________________________________________ 6
1.1.2 Communication between software and hardware _________________________________________ 8
1.1.3 Learning to search in ETS _____________________________________________________________ 9
1.1.4 Creating a database _________________________________________________________________ 9
1.1.5 Creating a project _________________________________________________________________ 10
1.1.6 Building view _____________________________________________________________________ 11
1.1.7 Importing products ________________________________________________________________ 12
1.1.8 Incorporating participants __________________________________________________________ 16
1.1.9 Programming physical addresses ____________________________________________________ 17
1.1.10 Creating group addresses __________________________________________________________ 19
1.1.11 Connecting group addresses to participants ___________________________________________ 20
1.1.12 Programming applications __________________________________________________________ 21
1.1.13 Telegrams _______________________________________________________________________ 22
1.1.14 Comments _______________________________________________________________________ 23
1.1.15 Restarting ETS ____________________________________________________________________ 23
1.1.16 Changing language ________________________________________________________________ 24
1.1.17 “Copying” the database ____________________________________________________________ 25
1.1.18 Summary ________________________________________________________________________ 26
Task 1a ________________________________________________________________________________ 27
1.1.19 Lighting in a 2-room flat ____________________________________________________________ 27
1.1.20 Extra task 1a _____________________________________________________________________ 28
Task 1b ________________________________________________________________________________ 29
1.1.21 Lighting in a 3-room flat ____________________________________________________________ 29
1.1.22 Extra task 1b _____________________________________________________________________ 30
Table of contents
IV © Festo Didactic GmbH & Co. KG 8023445
Task 1c ________________________________________________________________________________ 31
1.1.23 Lighting in an open-plan solution – office ______________________________________________ 31
1.1.24 Extra task 1c _____________________________________________________________________ 32
1.1.25 Exercise task _____________________________________________________________________ 33
Exercise 2 ______________________________________________________________________________ 34
2.0.1 Dimming ________________________________________________________________________ 34
2.0.2 New project ______________________________________________________________________ 34
2.0.3 Changing parameters ______________________________________________________________ 36
2.0.4 Parameters for dimmer actuators ____________________________________________________ 37
2.0.5 Parameters for pushbutton actuators _________________________________________________ 38
Task 2a ________________________________________________________________________________ 40
2.0.6 Controlling lighting in a small flat ____________________________________________________ 40
Task 2b ________________________________________________________________________________ 42
2.0.7 Controlling lighting in a large flat _____________________________________________________ 42
Exercise 3 ______________________________________________________________________________ 44
3.0.1 Time channels and “switch off all” function ____________________________________________ 44
3.0.2 Creating multiple group addresses ___________________________________________________ 45
3.0.3 Partial changes ___________________________________________________________________ 46
Task 3a ________________________________________________________________________________ 47
3.0.4 Time-controlled lighting in a flat _____________________________________________________ 47
Task 3b ________________________________________________________________________________ 49
3.0.5 Switch off all function for flat ________________________________________________________ 49
Exercise 4 ______________________________________________________________________________ 51
4.0.1 Sun protection ___________________________________________________________________ 51
4.0.2 Licence requirements ______________________________________________________________ 51
4.0.3 Copying a project _________________________________________________________________ 52
4.0.4 Installing the plug-in _______________________________________________________________ 53
4.0.5 Setting the parameters for the blind actuator ___________________________________________ 54
4.0.6 Setting parameters in the plug-in program _____________________________________________ 54
4.0.7 Pushbutton actuator design _________________________________________________________ 55
Task 4a ________________________________________________________________________________ 57
4.0.8 Controlling blinds/awnings _________________________________________________________ 57
Task 4b ________________________________________________________________________________ 59
4.0.9 Wind and rain alarm for awning ______________________________________________________ 59
Table of contents
© Festo Didactic GmbH & Co. KG 8023445 V
Exercise 5 ______________________________________________________________________________ 61
5.0.1 Implementing alarms ______________________________________________________________ 61
5.0.2 Devices _________________________________________________________________________ 62
5.0.3 Changing the building view _________________________________________________________ 62
5.0.4 Importing and incorporating multiple participants _______________________________________ 63
5.0.5 Address structuring _______________________________________________________________ 63
5.0.6 Changing parameters on the input module _____________________________________________ 64
5.0.7 Adjusting the function after testing ___________________________________________________ 65
Task 5a ________________________________________________________________________________ 66
5.0.8 Time-controlled lighting in an office __________________________________________________ 66
Task 5b ________________________________________________________________________________ 68
5.0.9 Dimming lighting in a living room with a porch __________________________________________ 68
5.0.10 Extra task________________________________________________________________________ 69
5.0.11 Dimming lighting with an alarm in a living room with a porch ______________________________ 70
5.0.12 Extra task 5c _____________________________________________________________________ 71
Task 5d ________________________________________________________________________________ 72
5.0.13 Lighting with motion sensing in a hotel ________________________________________________ 72
5.0.14 Extra task 5d _____________________________________________________________________ 73
Task 5e ________________________________________________________________________________ 74
5.0.15 Lighting and automatic blinds in a doctor's surgery ______________________________________ 74
Exercise 6 ______________________________________________________________________________ 76
6.0.1 Heating regulation ________________________________________________________________ 76
6.0.2 KNX Heating _____________________________________________________________________ 77
6.0.3 Importing, incorporating and changing the parameters of valve motors _____________________ 77
6.0.4 Changing the regulator parameters ___________________________________________________ 78
6.0.5 Connecting the regulator to the heating actuator ________________________________________ 79
Task 6a ________________________________________________________________________________ 81
6.0.6 Clean room with lighting, automatic blinds and automatic door opening _____________________ 81
6.0.7 Extra task 6a _____________________________________________________________________ 83
Table of contents
VI © Festo Didactic GmbH & Co. KG 8023445
Exercise 7 ______________________________________________________________________________ 84
7.0.1 Line coupler______________________________________________________________________ 84
7.0.2 KNX Line coupler __________________________________________________________________ 85
7.0.3 Topology ________________________________________________________________________ 86
7.0.4 Importing and incorporating a line coupler _____________________________________________ 87
7.0.5 Group addresses from the line coupler ________________________________________________ 87
7.0.6 Diagnostic tool ___________________________________________________________________ 88
Task 7a ________________________________________________________________________________ 89
7.0.7 Controlling with the line coupler _____________________________________________________ 89
Summary of Part 1 _______________________________________________________________________ 91
Part 2 - Development _____________________________________________________________________ 97
8.0.1 Introduction _____________________________________________________________________ 97
Exercise 1D _____________________________________________________________________________ 98
8.1.1 Dimming LED lighting ______________________________________________________________ 98
8.1.2 Suggested solution ________________________________________________________________ 98
8.1.3 Testing _________________________________________________________________________ 100
Exercise 2D ____________________________________________________________________________ 101
8.2.1 Measuring energy ________________________________________________________________ 101
8.2.2 Electrical safety __________________________________________________________________ 101
8.2.3 Suggested solution _______________________________________________________________ 102
8.2.4 Data types ______________________________________________________________________ 103
8.2.5 Creating group addresses for reading ________________________________________________ 104
8.2.6 Testing _________________________________________________________________________ 105
Exercise 3D ____________________________________________________________________________ 106
8.3.1 Power control ___________________________________________________________________ 106
8.3.2 Suggested solution _______________________________________________________________ 107
8.3.3 Testing _________________________________________________________________________ 110
8.3.4 Energy optimisation ______________________________________________________________ 111
8.3.5 Energy actuator – switch function ___________________________________________________ 111
8.3.6 Energy actuator – frequency monitoring ______________________________________________ 114
8.3.7 Energy actuator – power monitoring _________________________________________________ 114
8.3.8 Energy actuator – current monitoring ________________________________________________ 117
8.3.9 Energy actuator – voltage monitoring ________________________________________________ 117
8.3.10 Energy actuator – energy consumption _______________________________________________ 118
8.3.11 Energy actuator – energy balancing __________________________________________________ 119
8.3.12 Energy actuator – iTools ___________________________________________________________ 120
8.3.13 Energy actuator - exercise example, 1-phase __________________________________________ 121
8.3.14 Energy actuator - exercise example, 3-phase __________________________________________ 122
Table of contents
© Festo Didactic GmbH & Co. KG 8023445 VII
Exercise 4D ____________________________________________________________________________ 126
8.4.1 Monitoring via LAN or wi-fi _________________________________________________________ 126
8.4.2 Suggested solution _______________________________________________________________ 126
8.4.3 Extra task_______________________________________________________________________ 130
8.4.4 Contact via the Internet ___________________________________________________________ 130
8.4.5 Wireless ________________________________________________________________________ 131
8.4.6 Bus monitoring __________________________________________________________________ 132
8.4.7 Priority _________________________________________________________________________ 133
8.4.8 Dummy ________________________________________________________________________ 133
Exercise 5D ____________________________________________________________________________ 134
8.5.1 Visualisation with Facility Pilot or smartphones ________________________________________ 134
8.5.2 Visualisation with Facility Pilot _____________________________________________________ 134
8.5.3 Visualisation with smartphones _____________________________________________________ 138
8.5.4 OPC ___________________________________________________________________________ 139
Exercise 6D ____________________________________________________________________________ 140
8.6.1 Logic-lighting in a sports hall _______________________________________________________ 140
8.6.2 Suggested solution _______________________________________________________________ 141
8.6.3 Testing _________________________________________________________________________ 145
Exercise 7D ____________________________________________________________________________ 146
8.7.1 Controlling ventilation using air quality sensors ________________________________________ 146
8.7.2 Suggested solution _______________________________________________________________ 146
8.7.3 Testing _________________________________________________________________________ 149
Exercise 8D ____________________________________________________________________________ 150
8.8.1 Constant lighting control __________________________________________________________ 150
8.8.2 Suggested solution _______________________________________________________________ 151
8.8.3 Testing _________________________________________________________________________ 156
8.8.4 Extra task_______________________________________________________________________ 156
VIII © Festo Didactic GmbH & Co. KG 8023445
Use for intended purpose
The training package for “Building automation with KNX” may only be used:
For its intended purpose in teaching and training applications
When its safety functions are in flawless condition
The components included in the training package are designed in accordance with the latest technology as
well as recognised safety rules. However, life and limb of the user and third parties may be endangered, and
the components may be impaired, if they are used incorrectly.
The learning system from Festo Didactic has been developed and produced exclusively for training and
further education in the field of automation technology. The training companies and/or trainers must ensure
that all trainees observe the safety instructions described in this workbook.
Festo Didactic hereby excludes any and all liability for damages suffered by trainees, the training company
and/or any third parties, which occur during use of the equipment sets in situations which serve any
purpose other than training and/or vocational education, unless such damages have been caused by Festo
Didactic due to malicious intent or gross negligence.
Warning
The equipment referred to in this workbook is training equipment, and should be used in an
environment suitable for purpose. KNX basic is protected against short-circuiting by a 6.3 A fuse.
However, fault currents caused by incorrect connection of external equipment will not necessarily
trip this fuse. In order to create an environmentally safe environment, we recommend using a
residual current device.
© Festo Didactic GmbH & Co. KG 8023445 IX
Introduction
Building automation is more than just a word. It is a concept. It encapsulates the automation of your home
to a level where everything looks after itself (or at least, as much as possible).
Some aspects of automation enable you to do things better, helping your residents and making you feel
more at home. But at the end of the day, it's the economic benefits that really matter. A large part of
building automation is about making your home more energy-efficient.
Automation should make life easier – this is the industry's guiding principle. We aim to safeguard
production methods, and good quality the the result of successful automation. We also talking about
recouping investment costs. Automation needs to be worth the money paid for it.
In the field of building automation, it can be difficult to determine whether this is the case. Everyone
understands that automatic motion sensors or timers in lighting systems can save money. Many people
know that money can be earned by maintaining constant heating levels in a building. Some people know
that building automation can help, but very few truly know how to go about implementing it.
Most of what can be automated “about the house” can also be done by hand – as long as you're at home
and have the time. Much of what can be carried out automatically is completed with the aid of small,
intelligent units. For example, there are relatively low-cost fittings with a built-in motion detector that light
up an area when someone triggers a response in the sensor.
There are also sensors that raise your awning when the wind is too strong, or when it is about to rain. If your
room gets too cold, a valve opens in your radiator to warm the place up a bit. The ventilation system starts
up automatically if the quality of the air drops below a pre-set level, etc. etc...
The field of building automation works on the challenge of how to control different things. The end goal is
total integration. Everything could be controlled and monitored via your smartphone, for example.
Building automation covers many different areas:
Heating/air conditioning
Lighting
Ventilation
Comfort (multimedia etc.)
Alarm and security
Surveillance and display
Control
Introduction
X © Festo Didactic GmbH & Co. KG 8023445
This book aims to explain how you can control and integrate all this – and much more – with the help of KNX.
The book is split into two parts, and is based on the PBL (problem-based learning) principle.
Throughout your training, we will often refer to the four key concepts of data, understanding, familiarity
and proficiency. Together, these concepts give us knowledge.
Part 1
This introductory chapter is intended for those who have no prior experience with KNX, and to introduce the
basics of ETS. Part 1 is partially structured like a manual, providing a step-by-step explanation of how to
work with the software. You will learn how to create a project, program participants, interlink participants,
handle parameter settings etc. In order to see how it works, you will be using the software on your KNX
boards. Sometimes, you will return to old settings and add new functions to them. You will import and
install a number of participants. You will be provided with screen dumps for comparison, so that you can see
if you are on the right track.
The tasks take many different forms, and you can experiment with solutions yourself by using different
functions. Whether this works or not, either way you will have learned something. There are solutions
suggested on the CD provided with this book.
At the same time, this part serves as a reference for you to go back to if you get stuck on later exercises,
e.g. to see how to deal with changes of address, participant imports etc.
The exercises are sandwiched with tasks. On your KNX-Basic, you can create transparencies for office
environments, flats etc. Here, you can decide for yourself where your participant is located “in reality”, but
your choices will be based on your KNX board. Your pushbutton actuators will sometimes be spread out, but
you will only use one or two together with different rockers on them for the different rooms.
There are no solutions provided for these tasks. Likewise, there are no “blow-by-blow” instructions or
exercises to explain every detail. Once you have solve the task according to the specifications of the
“customer”, you will give it a test run.
You will become familiar with KNX through practical experience.
At the end of each task there are extra tasks. These are based on the assumption that the customer see
potential in their KNX installation and wants to use it in a different way. These extra tasks are challenges
designed to allow more advanced students to prove their skills further. They will give you a better idea of
your own ability. You should only do them if you know how. Failing doesn't help anyone's confidence.
Part 1 deals with data, understanding and familiarity.
Introduction
© Festo Didactic GmbH & Co. KG 8023445 XI
Part 2
The final chapter is intended for those who wish to further their development. In this section, your will also
have to prove that you can solve tasks you have devised yourself.
Some of the hardware demonstrated here is available in the form of “options”. If you have the time and
opportunity, you can make up your own exercises.
Examples include weather stations and alarm modules. You will also have the opportunity to install a control
system in the KNX Development-Board and make it communicate with your KNX installation. You define the
limits. As such, KNX development is intended to show you what is possible. Here, you can use the
participants available to you. No matter what brand they are, you can get them to communication with the
other participants on your other KNX boards.
You will be provided with suggestions for feasible solutions and given the chance to develop these or bring
in your own ideas. This section is intended to stimulate your logical thinking and analytical faculties.
Part 2 deals with preparation.
Notes for the teacher/trainer
Identification in the workbook
Solutions and supplements in graphics or diagrams appear in red.
Identification in the worksheets
Texts which require completion are identified with a grid or grey table cells. Texts and pictures (e. g.
screenshots) can be filled via Adobe Acrobat.
Contents of the CD-ROM
The workbook and the worksheets are included on the CD-ROM as a PDF file. The CD-ROM also provides you
with additional media.
The CD-ROM contains the following folders:
Product data
Software (link to the KNX Association)
Product data
Product data are provided for various components included in the training package. These data are helpful
when using and commissioning the components.
Software
A link to the KNX Association is provided for downloading the ETS4 software.
XII © Festo Didactic GmbH & Co. KG 8023445
Remarks from the author
This book has been produced together with Festo Didactic Germany, and is designed as an aid for learning
how to program ETS using Festo Didactic equipment.
The exercise hardware KNX Basic and KNX Line coupler together cover the KNX course Basic. You can take
this course in one of the KNX-certified training centres. If you pass, you can call yourself a “KNX partner”,
and you will receive access to information on KNX that will allow you to continue your studies. The
theoretical part of KNX is different to that contained in the workbook. There, you will learn how telegrams
are structured etc. The practical part (which requires you to solve tasks using ETS) is similar to Part 2 of this
book.
If you also use KNX Heating, KNX Blind and your own participants on KNX Development, you will cover the
hardware requirements for the KNX course Advanced.
This course also includes parameter settings and the use of the diagnostic tool. If you pass this course, you
can work with KNX professionally. Here too, the book differs from what you go through on the KNX course.
The advanced course is based on spending time working with KNX and building familiarity with the hardware
and software.
The material can also be used as an excellent tool for practical moments in FASFAS01 (Building
automation 1), which is an optional course on the Electricity and Energy programme.
Since this book does not cover all the areas and points for the above courses we recommend the EUU book
“Building automation”, published by the Electricity publishing house and written by the same author as this
book. This can then complement and support you on your quest for an extensive understanding of the
thrilling field of building automation.
Mönsterås
2012-09-20
Nils Karlsson

© Festo Didactic GmbH & Co. KG 8023445 1
Part 1 – Introduction to KNX
1.0.1 KNX/EIB
KNX is an organisation, an association of companies that produce products for modern building automation.
In total, more than 300 companies follow the standards that KNX stands for. This standard means that the
companies need to follow certain rules for how data (telegram) is sent and received. This allows all products
to communicate with one another, regardless of manufacturer.
This is highly unusual. Most manufacturing companies have no interest in allowing their competitors into
their inner sanctum. Designs are registered and patented in order to prevent other people and companies
from using parts of them to create another – potentially better – function.
Within the field of KNX, this principle is reversed. Because the manufacturers have to follow set rules, the
customer is always able to combine and thus customise their requirements.
Competition keeps product prices down and, perhaps most importantly of all, KNX is future-proof thanks to
the continuous development of new products and functions. Products bearing the EIB and KNX logos have
been around for more than 20 years.
In the field of KNX, we talk about “participants”. These are usually pushbutton actuators, (rockers) and
actuators (on/off or with dimmer function). There are sensors and other actuators that can be used to
regulate temperature or the movement of an awning, for example. There are thousands of different
participants, all of which can communicate with each other because they follow the same standard.
In terms of hardware, there are twin lines for communication and power supply. Data (telegrams) are sent
from pushbutton actuators or other sensors to switch an actuator, which in turn switches on the lights, for
example. If the pre-set value for a temperature sensor is reached, a heating actuator can switch on or off.
You can define what happens with the aid of the ETS software.
ETS has been developed by KNX, and is essential for interweaving all the products. After importing
participants, you can program functions by changing parameters. These parameters can be downloaded
together with unique addresses that allow them to communicate. ETS can also be used to diagnose and log
traffic.
It is the KNX organisation's job to monitor and make sure everything works
properly. In order to sell a product marked with the KNX logo, the
manufacturer must first have the product certified. In addition to this check,
which ensures that products comply with the standards, KNX also works with
training.
Part 1 – Introduction to KNX
2 © Festo Didactic GmbH & Co. KG 8023445
Different certification levels are possible within KNX. Those who complete the Basic course can refer to
themselves as “KNX partners”. After working with KNX for a while (recommended), they can then enter the
Advanced course.
The last step is KNX Tutor, which gives partners the right to train and certify others taking part in the BAsic
and Advanced courses.
1.0.2 KNX – General information
What can you do with KNX? There is no limit, actually. Anything you can imagine that needs doing in the field
of building automation is covered by the variety of products available. You can decide for yourself what to
use, according to your needs. Obviously, controlling and monitoring everything would mean an increase in
costs – but the option is there.
The home functions that are most commonly controlled with KNX are the lighting and heating/air
conditioning. A KNX installation is more expensive than a traditional electrical installation. However, with
some consideration and planning, it can be seen simply as an investment, as it can earn you a lot of money
in the long run by saving energy. In addition to that, the built-in alarm functions provide added security.
This feeling of having everything under control is invaluable in pure money terms, yet it is very important
when planning out a KNX installation.
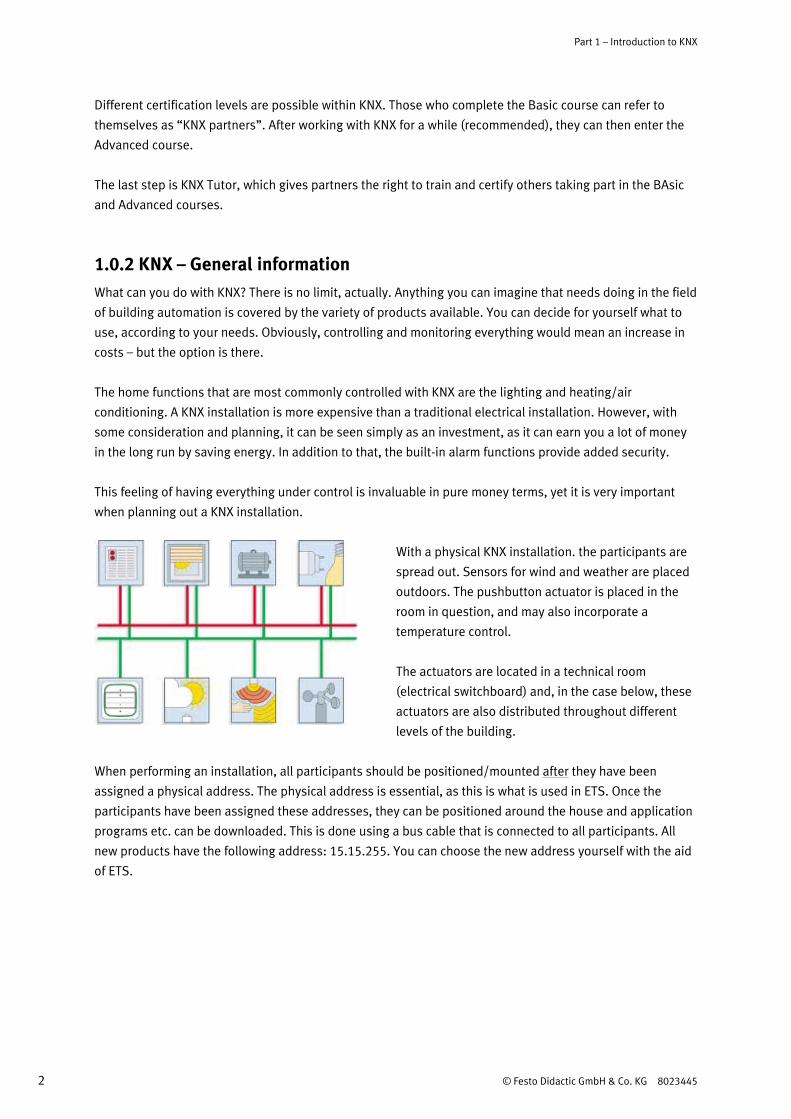
With a physical KNX installation. the participants are
spread out. Sensors for wind and weather are placed
outdoors. The pushbutton actuator is placed in the
room in question, and may also incorporate a
temperature control.
The actuators are located in a technical room
(electrical switchboard) and, in the case below, these
actuators are also distributed throughout different
levels of the building.
When performing an installation, all participants should be positioned/mounted after they have been
assigned a physical address. The physical address is essential, as this is what is used in ETS. Once the
participants have been assigned these addresses, they can be positioned around the house and application
programs etc. can be downloaded. This is done using a bus cable that is connected to all participants. All
new products have the following address: 15.15.255. You can choose the new address yourself with the aid
of ETS.

Part 1 – Introduction to KNX
© Festo Didactic GmbH & Co. KG 8023445 3
The first part of the address corresponds to the area. The second refers to the line, while the third part is
specific to the participant itself. For example, the address for a pushbutton actuator could be 0.1.14, which
would mean it is in area 0, on line 1 and has been assigned the individual number 14. The maximum number
of participants for a single line is 64.
If you need more than 64 participants, you will need more lines. If you want participants on different lines to
be able to communicate with one another, you will need to use a line coupler. If you have more than one
area, you will require an area coupler. The maximum number of participants that can communicate with one
another is thus enough to automate very large buildings.
The procedure for installing KNX begins with a requirements analysis. What do you want to achieve? What
do you want to check, monitor and control? What is your budget? It is also important to take into account
future requirements and desired modifications.
Once the specifications have been drawn up, you can order all the hardware you require. However, you
don't need to wait until it has arrived before beginning programming.
All KNX product suppliers are required to provide information on their products. This may take the form of
a manual and/or installation description in PDF format. However, by far the most important thing is the file
you need to import into your project. This file can be found on the supplier's homepage. It may be a vd file,
e.g. *.vd3, or a product file named *.knxprod.
Part 1 – Introduction to KNX
4 © Festo Didactic GmbH & Co. KG 8023445
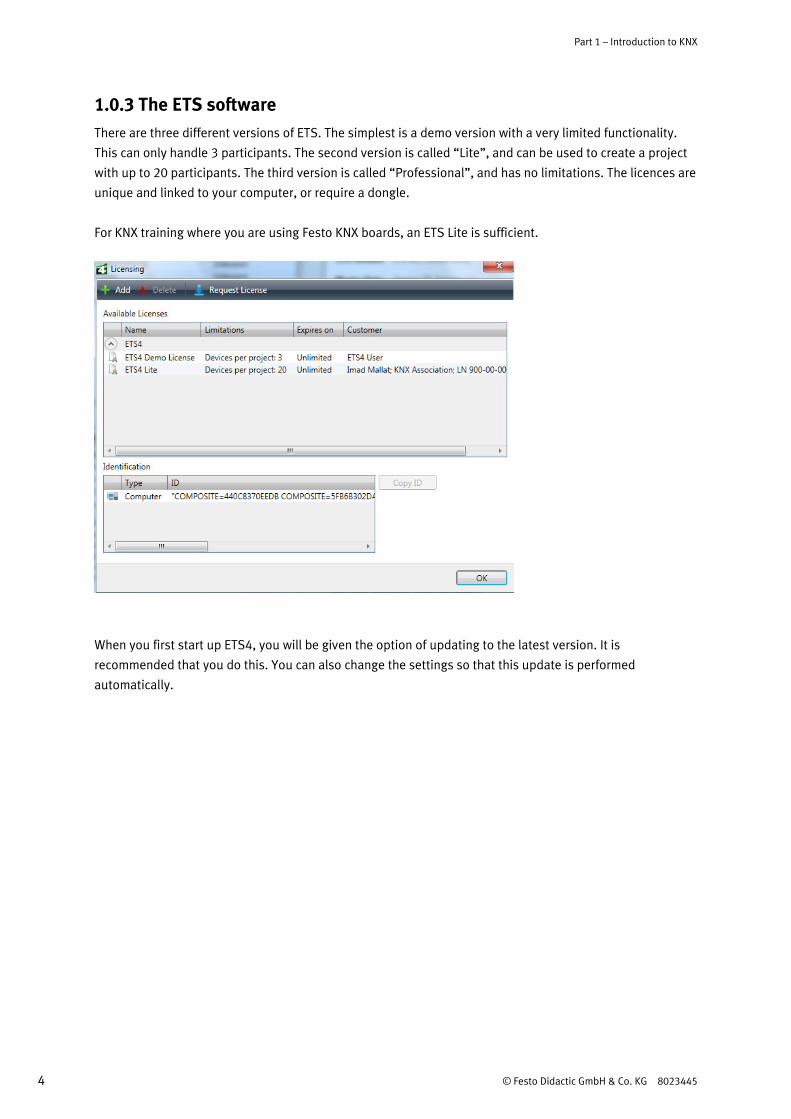
1.0.3 The ETS software
There are three different versions of ETS. The simplest is a demo version with a very limited functionality.
This can only handle 3 participants. The second version is called “Lite”, and can be used to create a project
with up to 20 participants. The third version is called “Professional”, and has no limitations. The licences are
unique and linked to your computer, or require a dongle.
For KNX training where you are using Festo KNX boards, an ETS Lite is sufficient.
When you first start up ETS4, you will be given the option of updating to the latest version. It is
recommended that you do this. You can also change the settings so that this update is performed
automatically.
Part 1 – Introduction to KNX
© Festo Didactic GmbH & Co. KG 8023445 5
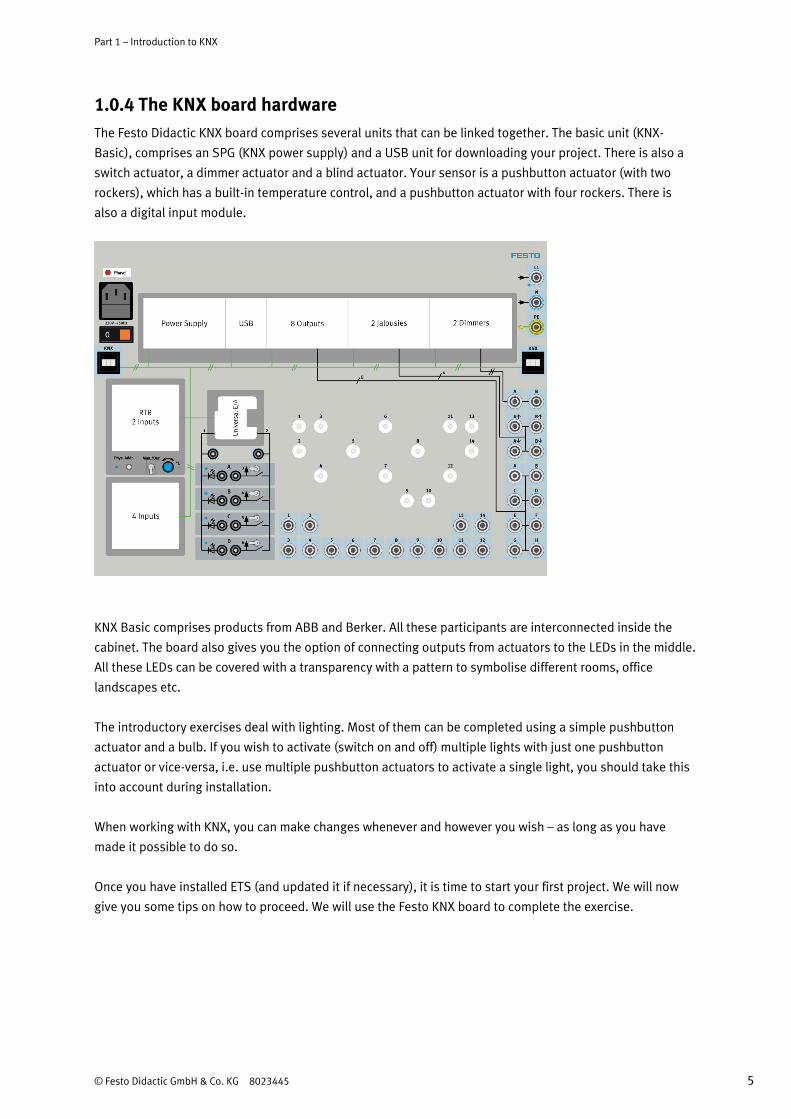
1.0.4 The KNX board hardware
The Festo Didactic KNX board comprises several units that can be linked together. The basic unit (KNX-
Basic), comprises an SPG (KNX power supply) and a USB unit for downloading your project. There is also a
switch actuator, a dimmer actuator and a blind actuator. Your sensor is a pushbutton actuator (with two
rockers), which has a built-in temperature control, and a pushbutton actuator with four rockers. There is
also a digital input module.
KNX Basic comprises products from ABB and Berker. All these participants are interconnected inside the
cabinet. The board also gives you the option of connecting outputs from actuators to the LEDs in the middle.
All these LEDs can be covered with a transparency with a pattern to symbolise different rooms, office
landscapes etc.
The introductory exercises deal with lighting. Most of them can be completed using a simple pushbutton
actuator and a bulb. If you wish to activate (switch on and off) multiple lights with just one pushbutton
actuator or vice-versa, i.e. use multiple pushbutton actuators to activate a single light, you should take this
into account during installation.
When working with KNX, you can make changes whenever and however you wish – as long as you have
made it possible to do so.
Once you have installed ETS (and updated it if necessary), it is time to start your first project. We will now
give you some tips on how to proceed. We will use the Festo KNX board to complete the exercise.
Part 1 – Introduction to KNX
6 © Festo Didactic GmbH & Co. KG 8023445
Exercise 1
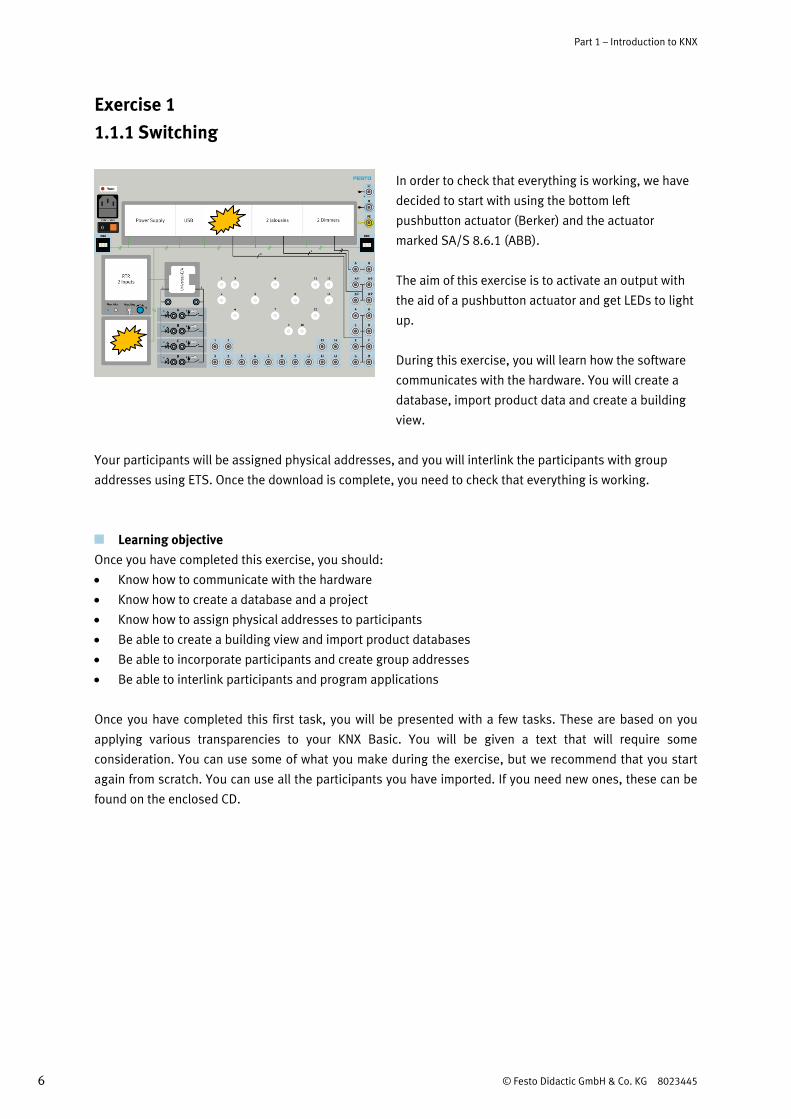
1.1.1 Switching
In order to check that everything is working, we have
decided to start with using the bottom left
pushbutton actuator (Berker) and the actuator
marked SA/S 8.6.1 (ABB).
The aim of this exercise is to activate an output with
the aid of a pushbutton actuator and get LEDs to light
up.
During this exercise, you will learn how the software
communicates with the hardware. You will create a
database, import product data and create a building
view.
Your participants will be assigned physical addresses, and you will interlink the participants with group
addresses using ETS. Once the download is complete, you need to check that everything is working.
Learning objective
Once you have completed this exercise, you should:
Know how to communicate with the hardware
Know how to create a database and a project
Know how to assign physical addresses to participants
Be able to create a building view and import product databases
Be able to incorporate participants and create group addresses
Be able to interlink participants and program applications
Once you have completed this first task, you will be presented with a few tasks. These are based on you
applying various transparencies to your KNX Basic. You will be given a text that will require some
consideration. You can use some of what you make during the exercise, but we recommend that you start
again from scratch. You can use all the participants you have imported. If you need new ones, these can be
found on the enclosed CD.

Part 1 – Introduction to KNX Exercise 1 – Switching
© Festo Didactic GmbH & Co. KG 8023445 7
Problem description
A customer requires lighting for their flat. The first room has two circuit breakers, both of which need to be
able to activate all the lights in this room.
In the second (smaller) room, all the lights need to be activated using just one circuit breaker.
Use the pushbutton actuator with 4 rockers for the large room and “pretend” that the top row belongs to S1.
The second and third rows belong to S2 and S3 respectively. Use the SA/S switch actuators to control the
lighting.
Abridged specification of requirements
In the first room of this flat, it should be possible to switch E1, E2 and E3 on and off using S1.
In the second room, S2 or S3 should be able to switch E4, E5, E6 and E7 on and off.
Layout
Installation diagram
Installation plan
Exercise 1 – Switching Part 1 – Introduction to KNX
8 © Festo Didactic GmbH & Co. KG 8023445
Equipment
ETS4 software
USB cable
KNX Basic
Product databases for SA/S switch actuator (ABB) and 4-fold pushbutton actuator (Berker)
Manuals for the above participants
Transparency no. 1
If you are familiar with how to use ETS, you can skip to the end of this chapter.
The first task is in 1.1.19. This is the task shown above.
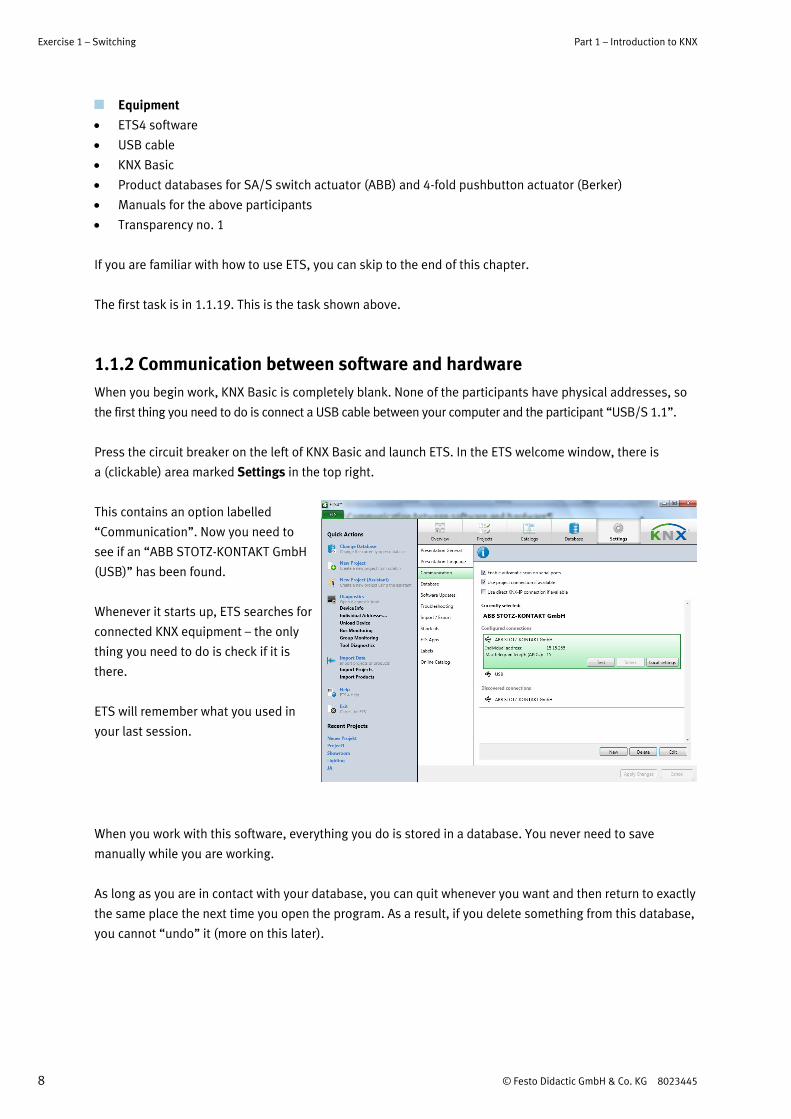
1.1.2 Communication between software and hardware
When you begin work, KNX Basic is completely blank. None of the participants have physical addresses, so
the first thing you need to do is connect a USB cable between your computer and the participant “USB/S 1.1”.
Press the circuit breaker on the left of KNX Basic and launch ETS. In the ETS welcome window, there is
a (clickable) area marked Settings in the top right.
This contains an option labelled
“Communication”. Now you need to
see if an “ABB STOTZ-KONTAKT GmbH
(USB)” has been found.
Whenever it starts up, ETS searches for
connected KNX equipment – the only
thing you need to do is check if it is
there.
ETS will remember what you used in
your last session.
When you work with this software, everything you do is stored in a database. You never need to save
manually while you are working.
As long as you are in contact with your database, you can quit whenever you want and then return to exactly
the same place the next time you open the program. As a result, if you delete something from this database,
you cannot “undo” it (more on this later).
Part 1 – Introduction to KNX Exercise 1 – Switching
© Festo Didactic GmbH & Co. KG 8023445 9
1.1.3 Learning to search in ETS
At the start, i.e. before you have built a functioning installation, you can try scrolling around a little and
looking at the options available to you. This way, you can learn how to maximise individual windows, dock
them together, move them onto the desktop etc.
Tip: click on the top left of the ETS window to either view your project as it was when you exited or see all
the see all you options, such as communication, settings etc.
You can also try clicking on the orange/brown arrows to “Undo” and “Redo”. At the beginning, it is easy to
click the wrong thing.
1.1.4 Creating a database
If your communication is working, you can now start a new project. First of all, you need to create
a database. This is where all the information on your project will be stored.
Click on Database in the top left corner. If you already have one or more databases, you can choose to open
one of them. You will always be given the option of creating a new database. That is what we will do.
Name it “New database” and click OK.
The system will now generate a new database, which will be stored in your area of the computer you are
using. (If this doesn't work, you can check to see whether your name on the computer is the same as your
login name. If this is the case, change the name on the computer or create a new user).
A backup copy of the database will be created automatically when you exit ETS. You can select this function
under “Database”. Here, you can also enter search paths etc...
Afterwards, the database will contain different projects, and thus all the information on the participants you
import into the project.

Exercise 1 – Switching Part 1 – Introduction to KNX
10 © Festo Didactic GmbH & Co. KG 8023445
1.1.5 Creating a project
Your first database (new database) is now completely empty. The first thing we are going to do is create a
new project. As you can see, there is a wizard in the column on the left.
Click on the second option, New project. You now need to choose a name, backbone and TP (twisted pair)
medium, as well as 3 levels.
The project will then be created, and you will be presented with a new view. This environment (the ETS
programming environment) is where everything happens.
At the top is the name of the project (here “New project”). You will also see two windows: Building view and
Group addresses. At this point, there are still no participants in your project. If you do not see these
windows, you can open them by clicking Workplace and then Open new window.
Before importing these participants, we are going to create a building with a room where you would
physically place your participants (if this was a real job).
Part 1 – Introduction to KNX Exercise 1 – Switching
© Festo Didactic GmbH & Co. KG 8023445 11
1.1.6 Building view
The Festo KNX Board is based on the principle of you learning to work with hardware and software on the
board in front of you. “In the real world”, your participants will be spread throughout the building. Before we
try to solve the task, we will therefore create a house and name the top level “1 Villa Road”. This is the
address of “your” house.
This fictional house has two floors. The ground floor contains a technical room with an electrical control
centre. This is where all the actuators – the units that affect things – are located. A switch actuator is
equivalent to a contactor. Other actuators may control the direction or speed of a motor, or the intensity of
a light fitting.
The room contains various sensors and pushbutton actuators. For KNX, we refer to these using the general
term “sensors”. Outside the room, i.e. in the corridors, above the windows etc., there are other devices such
as awnings, rain and wind sensors etc.
We will start indoors.
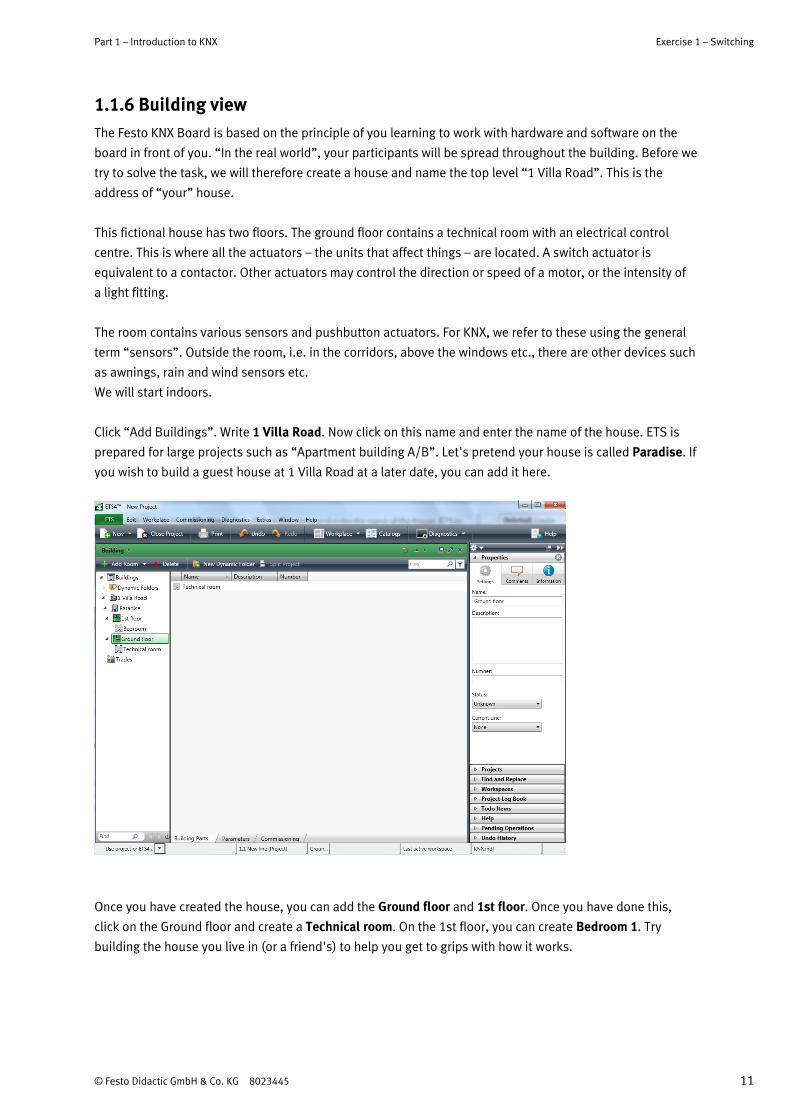
Click “Add Buildings”. Write 1 Villa Road. Now click on this name and enter the name of the house. ETS is
prepared for large projects such as “Apartment building A/B”. Let's pretend your house is called Paradise. If
you wish to build a guest house at 1 Villa Road at a later date, you can add it here.
Once you have created the house, you can add the Ground floor and 1st floor. Once you have done this,
click on the Ground floor and create a Technical room. On the 1st floor, you can create Bedroom 1. Try
building the house you live in (or a friend's) to help you get to grips with how it works.
Exercise 1 – Switching Part 1 – Introduction to KNX
12 © Festo Didactic GmbH & Co. KG 8023445
You can delete or rename the building or parts thereof whenever you wish. Click on the name and “Change”
on the the right. You can also “undo” or “redo what you undid” using the arrows in the main menu at the
top. Try out as many options as possible so you can get used to using ETS.
This will help your later on with understanding the structure of the program and where to place your
participants. This way, you will also find out how to enter a description of a house, floor, room etc. For
example, if Bedroom 1 is your room, you can write that in the description space. You can write anything you
want here, e.g. that you intend on installing a blind in this room later on. These comments form part of the
documentation that follows your project.
1.1.7 Importing products
If you have followed the instructions, you will now have created a building view with multiple levels. We will
now incorporate/import participants for each individual room. As such, we need to create an option to do
this. Click Catalogues above the building view. The window that now opens is empty. There are no
participants in your database. You need to import them.
All the participants on your KNX Boards have a product file that needs to be imported to your database. This
can be found on the CD. The file for the actuator is in the ABB folder, when the file for the pushbutton
actuator is in the Berker folder.
Before going any further, you need to copy the entire contents of the disc to a location on your computer.
Create a folder called “KNX” under C:\. Next, create a new folder and call it “Festo”. After that, copy the
whole disc to this location. Once this is complete, you can continue.
Click Import and find the file for the actuator.
It is located in the folder C:\KNX\Festo\Produktdaten\ABB\SA-S 8.6.1 Switch Actuator. In this folder are two
further folders marked DE and EN. These contain PDF manuals etc. The files you are looking for are called
either *.vd* or *.knxprod. In this case, you need a *vd3 file. Some vd files may contain multiple options. For
example, a pushbutton actuator vd file may contain information on other buttons/rockers in the same
series, or a vd file for an actuator may contain a number of actuators with different number of outputs and
load limits.
Part 1 – Introduction to KNX Exercise 1 – Switching
© Festo Didactic GmbH & Co. KG 8023445 13
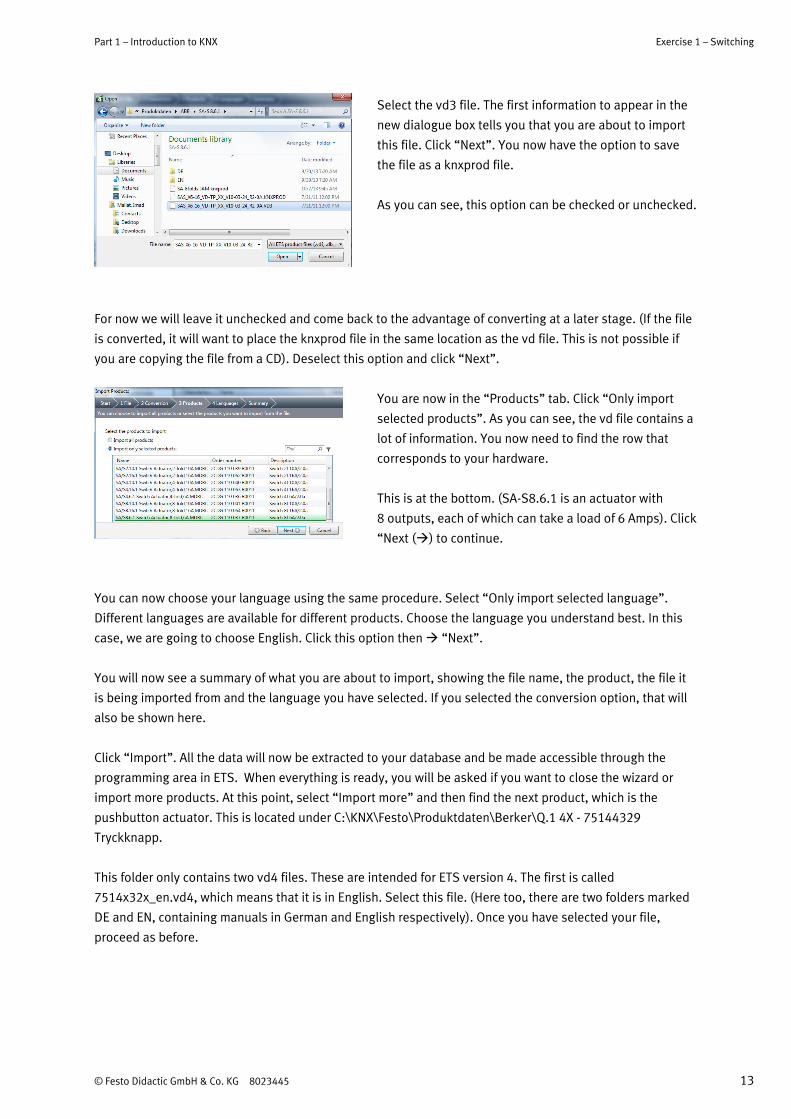
Select the vd3 file. The first information to appear in the
new dialogue box tells you that you are about to import
this file. Click “Next”. You now have the option to save
the file as a knxprod file.
As you can see, this option can be checked or unchecked.
For now we will leave it unchecked and come back to the advantage of converting at a later stage. (If the file
is converted, it will want to place the knxprod file in the same location as the vd file. This is not possible if
you are copying the file from a CD). Deselect this option and click “Next”.
You are now in the “Products” tab. Click “Only import
selected products”. As you can see, the vd file contains a
lot of information. You now need to find the row that
corresponds to your hardware.
This is at the bottom. (SA-S8.6.1 is an actuator with
8 outputs, each of which can take a load of 6 Amps). Click
“Next () to continue.
You can now choose your language using the same procedure. Select “Only import selected language”.
Different languages are available for different products. Choose the language you understand best. In this
case, we are going to choose English. Click this option then “Next”.
You will now see a summary of what you are about to import, showing the file name, the product, the file it
is being imported from and the language you have selected. If you selected the conversion option, that will
also be shown here.
Click “Import”. All the data will now be extracted to your database and be made accessible through the
programming area in ETS. When everything is ready, you will be asked if you want to close the wizard or
import more products. At this point, select “Import more” and then find the next product, which is the
pushbutton actuator. This is located under C:\KNX\Festo\Produktdaten\Berker\Q.1 4X - 75144329
Tryckknapp.
This folder only contains two vd4 files. These are intended for ETS version 4. The first is called
7514x32x_en.vd4, which means that it is in English. Select this file. (Here too, there are two folders marked
DE and EN, containing manuals in German and English respectively). Once you have selected your file,
proceed as before.
Exercise 1 – Switching Part 1 – Introduction to KNX
14 © Festo Didactic GmbH & Co. KG 8023445
Click “Next”. This time, we will select “Save the converted file”. Overwrite (change) the suggested name to
4vippor.knxprod. This will make it easier for you to find the file later on.
Now click “Next” to continue. Select “Import selected products”. You now need to select the product that
corresponds to your hardware. If you choose the wrong product, you will not be able to program the product
later on. If you select them all you will crowd the catalogue, making it difficult to find the file you want.
Each pushbutton actuator comprises 4 rockers (4-fold). Select the bottom one (this is the one on our KNX
Board) and then continue.
Now you need to choose your langue from the two options you see. German is always available. The reason
for this is that KNX has been developed in Germany from the beginning. However, most products are also
available in other languages, such as English, French, Italian and sometimes even Swedish.
Since a lot of your programming will be done in English, we shall only use English from now on. We will also
change the language to English in ETS (more on this later).
When you continue, you will see that the system is going to create a knxprod file and store it in the area
where you found your vd file. If you choose this method (convert to knxprod), each time you fetch a file, you
can keep them all in one folder. Of course, there is no need to have files that contain data on participants
you do not have or in languages you don't understand.
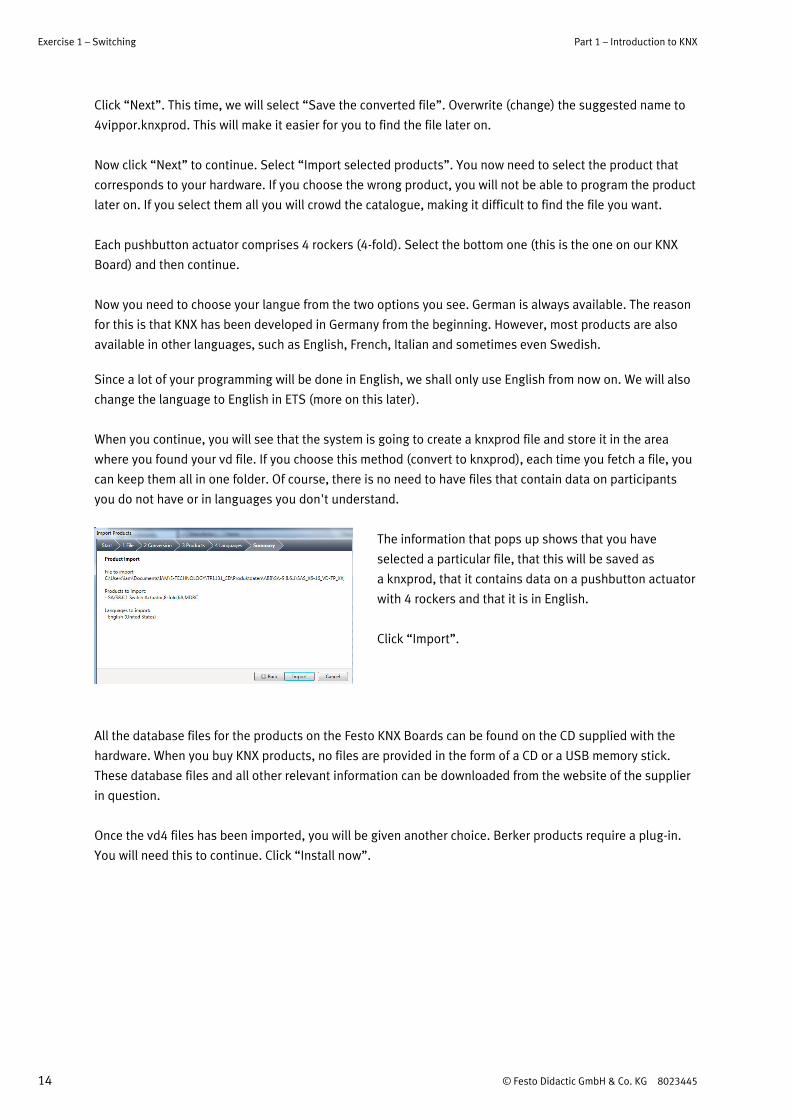
The information that pops up shows that you have
selected a particular file, that this will be saved as
a knxprod, that it contains data on a pushbutton actuator
with 4 rockers and that it is in English.
Click “Import”.
All the database files for the products on the Festo KNX Boards can be found on the CD supplied with the
hardware. When you buy KNX products, no files are provided in the form of a CD or a USB memory stick.
These database files and all other relevant information can be downloaded from the website of the supplier
in question.
Once the vd4 files has been imported, you will be given another choice. Berker products require a plug-in.
You will need this to continue. Click “Install now”.
Part 1 – Introduction to KNX Exercise 1 – Switching
© Festo Didactic GmbH & Co. KG 8023445 15
Once this is complete, a dialogue box that says “All elements imported successfully” will appear. This is
followed once more by a query as to what you want to do next. We are not going to import anything else, but
we still need to check that we have a knxprod file for the pushbutton actuator.
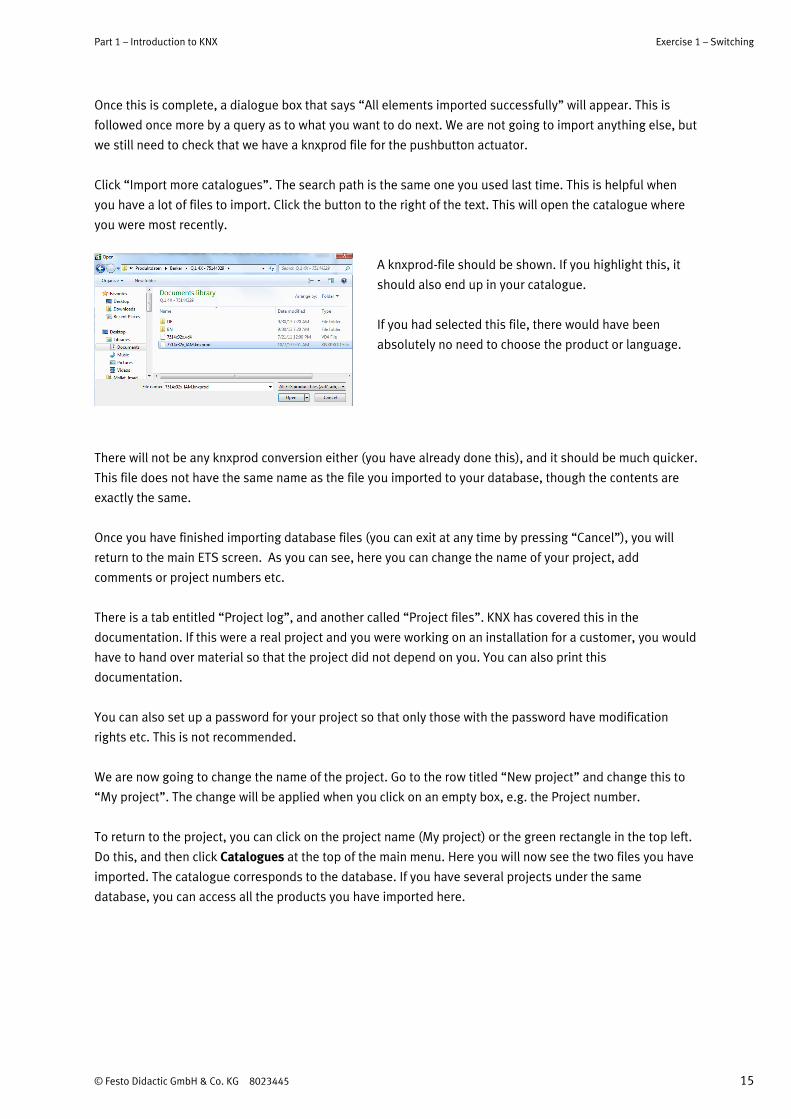
Click “Import more catalogues”. The search path is the same one you used last time. This is helpful when
you have a lot of files to import. Click the button to the right of the text. This will open the catalogue where
you were most recently.
A knxprod-file should be shown. If you highlight this, it
should also end up in your catalogue.
If you had selected this file, there would have been
absolutely no need to choose the product or language.
There will not be any knxprod conversion either (you have already done this), and it should be much quicker.
This file does not have the same name as the file you imported to your database, though the contents are
exactly the same.
Once you have finished importing database files (you can exit at any time by pressing “Cancel”), you will
return to the main ETS screen. As you can see, here you can change the name of your project, add
comments or project numbers etc.
There is a tab entitled “Project log”, and another called “Project files”. KNX has covered this in the
documentation. If this were a real project and you were working on an installation for a customer, you would
have to hand over material so that the project did not depend on you. You can also print this
documentation.
You can also set up a password for your project so that only those with the password have modification
rights etc. This is not recommended.
We are now going to change the name of the project. Go to the row titled “New project” and change this to
“My project”. The change will be applied when you click on an empty box, e.g. the Project number.
To return to the project, you can click on the project name (My project) or the green rectangle in the top left.
Do this, and then click Catalogues at the top of the main menu. Here you will now see the two files you have
imported. The catalogue corresponds to the database. If you have several projects under the same
database, you can access all the products you have imported here.
Exercise 1 – Switching Part 1 – Introduction to KNX
16 © Festo Didactic GmbH & Co. KG 8023445
1.1.8 Incorporating participants
The windows (dialogue boxes) are stacked horizontally in the default ETS layout.
This can be changed at the top of the Windows menu. You can also drag your window “outside” ETS. This is
good if you have a large monitor, or multiple monitors. This gives you a better overview, which makes
programming easier.
We will start by closing the Group addresses window. Do this by clicking the cross in the top right-hand
corner. The other two windows will then automatically expand to fill the whole screen. If you wish to change
windows, simply use the up and down arrows in each window. Take some time to test out all the options.
You can always recover any window you have removed by mistake by going to Workplace then Open new
window.
Now it is time to add participants to your project. As you can see, you are currently in area 1 and line 1. This
information is also displayed at the bottom of ETS. The address was selected when you created a new
project. Now click on 1 Villa Road, then Paradise, then Ground floor and finally Technical room.
You now need to drag one of the participants from Catalogues to the empty space on the right of the
building view. Select the actuator, (ABB SA/S8.6.1 Switch Actuator, 8-fold, 6A, MDRC). This needs to be
placed in the technical room, and various components in other areas of the house need to be supplied with
power via this actuator. One of the channels will be physically connected to the lighting in Bedroom 1.
Another channel on your actuator will be connected to the other room. This is what happens in a real house.
On your KNX board, you do this using the lab cables on the top.
Once you have dragged the participant to the empty area, it will automatically be assigned the address
1.1.1. The next participant you drag into the Building view will be assigned 1.1.2. If you had several identical
actuators, you would be able to continue with this process. Let's say we need 24 different outputs that give
you the option of switching 24 different positions throughout the house on (supplying with voltage) or off.
From these actuators, you can also lay cables to different wall sockets, lights etc. All you need to do is drag
these into the technical room in the building view, and they will be given the addresses 1.1.1, 1.1.2, 1.1.3
etc.
You can remove these products whenever you want. The next participant will then take the vacant number.
Try out dragging different products (you only have two for now) into this area, then right clicking and
selecting “Delete”, pressing Delete on your keyboard or clicking the red cross in the menu at the top. It is a
good idea for you to play around in ETS as much as possible at this point. Your project is not yet complete,
and it is easy to start again from scratch if you have to.
Later on, you will enter parameters and enable participants to communicate with one another. All this work
would be lost if you were to delete them from the building view.
Part 1 – Introduction to KNX Exercise 1 – Switching
© Festo Didactic GmbH & Co. KG 8023445 17
You can also “Undo” or “Redo” deletion of participants in the building view. These buttons are located in
the menu at the top of ETS. Remember that deletion of database files (i.e. files belonging to the participants)
from the catalogue cannot be undone. If they are deleted, they will have to be re-imported. For this reason,
the system will always ask for confirmation before deleting these files: “Are you sure you want to do this?”
Once you have finished practising incorporating and deleting participants, you need to reset everything so
that you only have on participant in the Technical room. This participant should have the address 1.1.1.
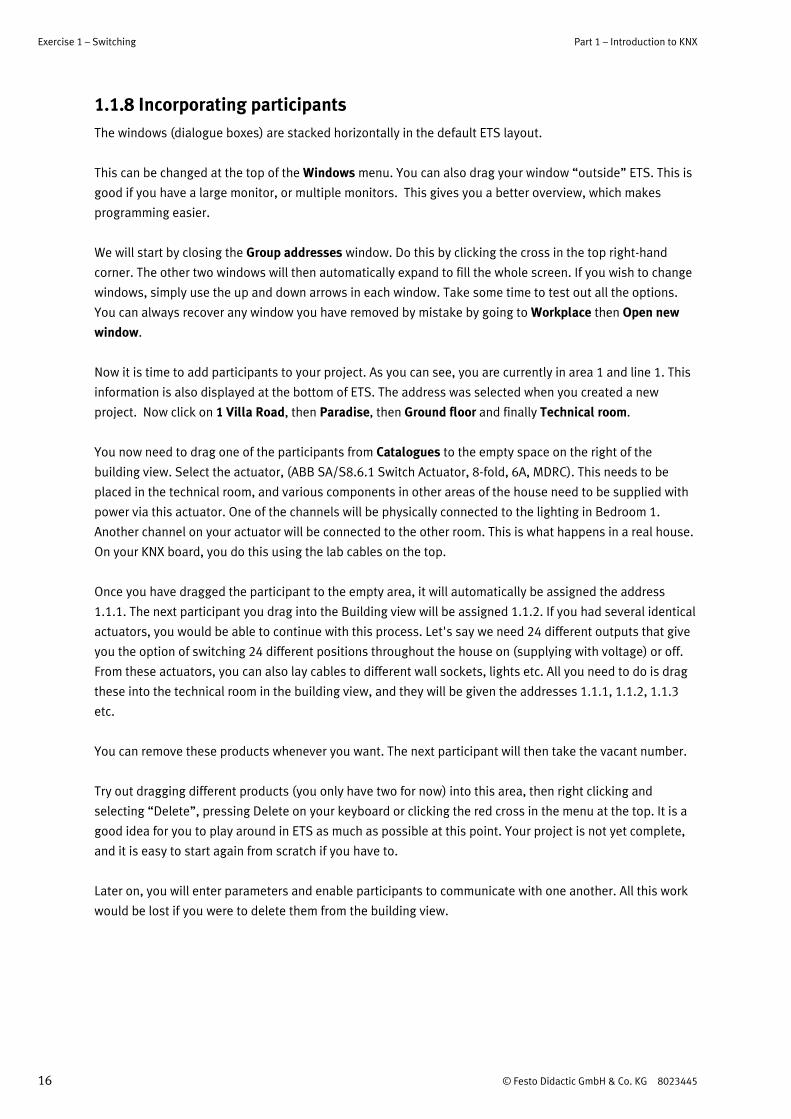
It is now time to add the next participant: the pushbutton
actuator. We are going to put this in Bedroom 1. Click 1st
floor then Bedroom 1.
Drag the participant “Push button 4fold comfort with
labeling field” to the empty space.
As you will see, it is given the address 1.1.2.
There are now two more things to do before you can make something happen “for real”, i.e. physically
activate the actuator with the pushbutton actuator.
Both participants need to be assigned the same address in reality as the one you have in the program.
They will communicate with each other using group addresses.
1.1.9 Programming physical addresses
You now need to connect Festo KNX Basic to your computer using a USB cable, and make sure that your KNX
Basic is connected to a 240 V power supply. Press the circuit breaker for KNX Basic.
Click on “ETS” and check that you have established contact with KNX under “Settings” and
“Communication”. Click “Test” and check to that you get a green “OK” at the side of this “button”.
Click “ETS” and select 1.1.1 in the building view.
Exercise 1 – Switching Part 1 – Introduction to KNX
18 © Festo Didactic GmbH & Co. KG 8023445
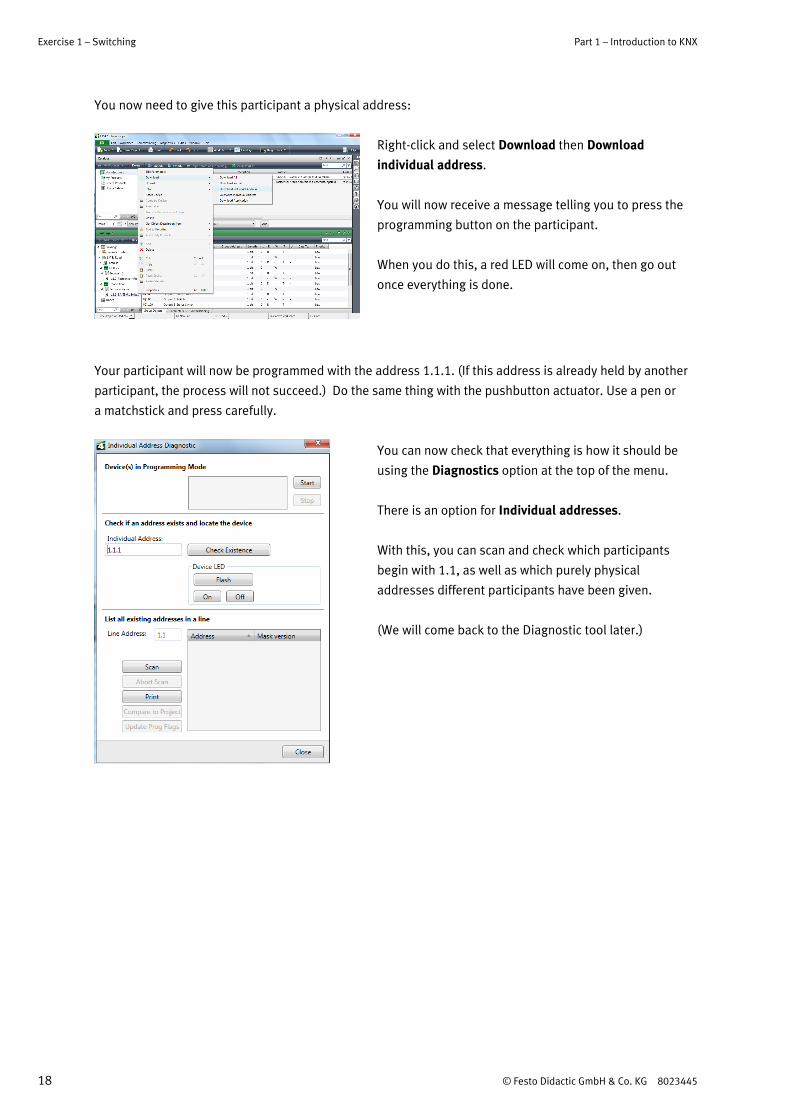
You now need to give this participant a physical address:
Right-click and select Download then Download
individual address.
You will now receive a message telling you to press the
programming button on the participant.
When you do this, a red LED will come on, then go out
once everything is done.
Your participant will now be programmed with the address 1.1.1. (If this address is already held by another
participant, the process will not succeed.) Do the same thing with the pushbutton actuator. Use a pen or
a matchstick and press carefully.
You can now check that everything is how it should be
using the Diagnostics option at the top of the menu.
There is an option for Individual addresses.
With this, you can scan and check which participants
begin with 1.1, as well as which purely physical
addresses different participants have been given.
(We will come back to the Diagnostic tool later.)

Part 1 – Introduction to KNX Exercise 1 – Switching
© Festo Didactic GmbH & Co. KG 8023445 19
1.1.10 Creating group addresses
It is now time to enable your participants to communicate with one another. If you click 1.1.1 or 1.1.2 in the
building view, you will see a column with the heading “Group addresses”. This is the column the addresses
need to be dragged to. First, we need to create the addresses.
Go to Workplace and click Open New Panel.
Select Group Addresses.
As you can see, it's getting a little cramped in ETS. Close
Catalogues by clicking the cross in the top right-hand
corner.
You only need this window when you are adding
participants to your program.
Click the green cross (Add Main Groups) in “Group addresses”. Enter the word “Lighting” and click “OK”.
(This area – the top area – is where you will later enter words such as Heating, Ventilation, Alarm etc.)
Once you have done this, select the word “Lighting” and
click the cross again, i.e. “Add Middle Groups”.
We are going to use this group for all the lighting on the
1st floor, so we enter “Lighting 1st floor”
We are now going to write down a number of group addresses. Let's say this pushbutton actuator/rocker is
going to be in the room where the adults sleep. As such, the top button should be convenient for turning the
main (ceiling) lights in this bedroom on and off. The other might be used to activate the bedside lamps,
while the third, above it, can be used to turn the lights in the hall on and off. We can then use the last one
for turning out all the lights in the house. We will come back to this later.
Exercise 1 – Switching Part 1 – Introduction to KNX
20 © Festo Didactic GmbH & Co. KG 8023445
Let's start with the top rocker. The name is completely arbitrary, but it is useful if it indicates how it
works/what it does and where in the house it does it. For example, if it is labelled Bedroom 1 – Ceiling – I/O,
we know that it simply switches the lights on and off. The next address might be Bedroom 1 – Bed – I/O.
(I/O is the standard abbreviation for On and Off. Later on we will look at dimmers, which will then be
labelled “Dim”.)
Try entering what you want, and changing it if you are not satisfied. Regardless of what you enter, the
physical telegram address – here 0/0/1 or 0/0/2 is used for the communication. As you will see, a useful
name is of great advantage in this area, as the same address will be in two places (at least), and the more
information there is in the name, the easier it will be to work out how to connect it.
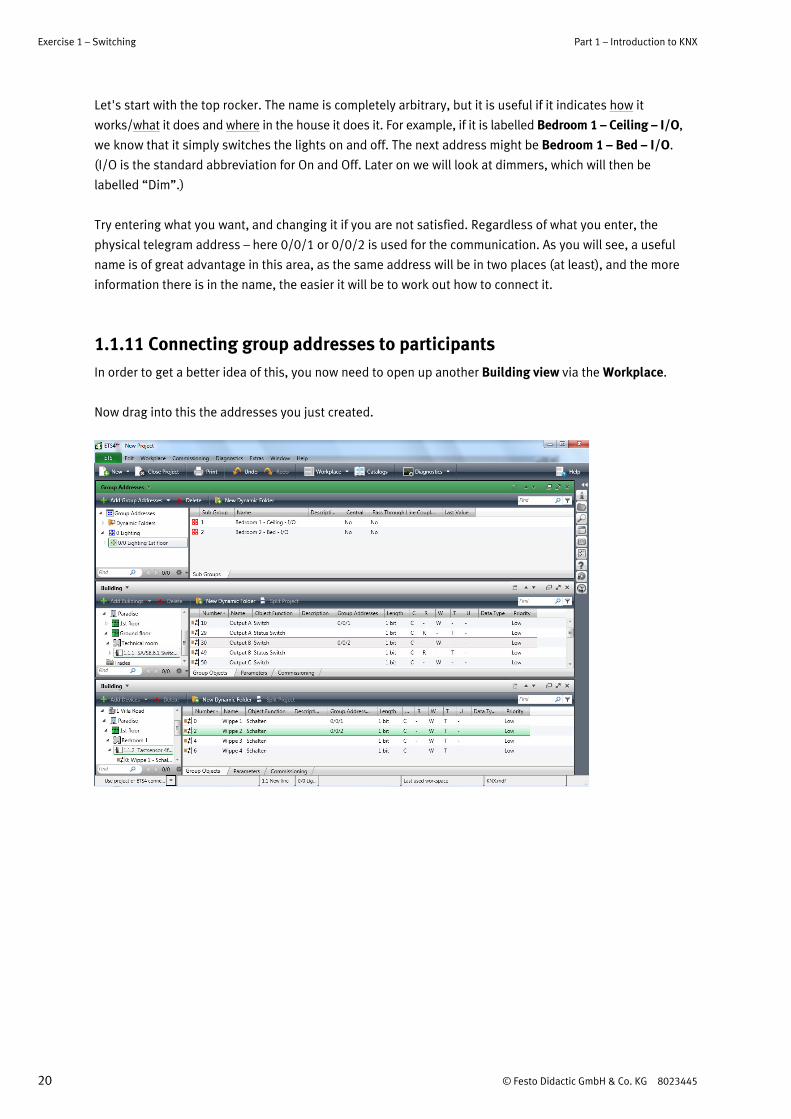
1.1.11 Connecting group addresses to participants
In order to get a better idea of this, you now need to open up another Building view via the Workplace.
Now drag into this the addresses you just created.
Part 1 – Introduction to KNX Exercise 1 – Switching
© Festo Didactic GmbH & Co. KG 8023445 21
0/0/1 should be assigned to Output A Switch, which is the first channel on the actuator.
0/0/2 should be assigned to Output B Switch, which is the second channel on the actuator.
0/0/1 should also be assigned to Rocker 1 Switching, which is the top rocker on the pushbutton actuator.
0/0/2 should be assigned to Rocker 2 Switching, which is the second rocker on the pushbutton actuator.
The easiest way to do this is by dragging them to the red area for each address using the mouse. If you drag
them to the wrong place, you can remove them by right-clicking and selecting “Delete connection”.
1.1.12 Programming applications
We are now going to download this application and give it a test run. This is similar to the earlier procedure,
except that now the participants have already been assigned their physical addresses, we will go to
“Program application” instead:
Move the cursor to 1.1.1. Right-click and select Program then “Program application”.
Do the same for 1.1.2.
Now test your installation.
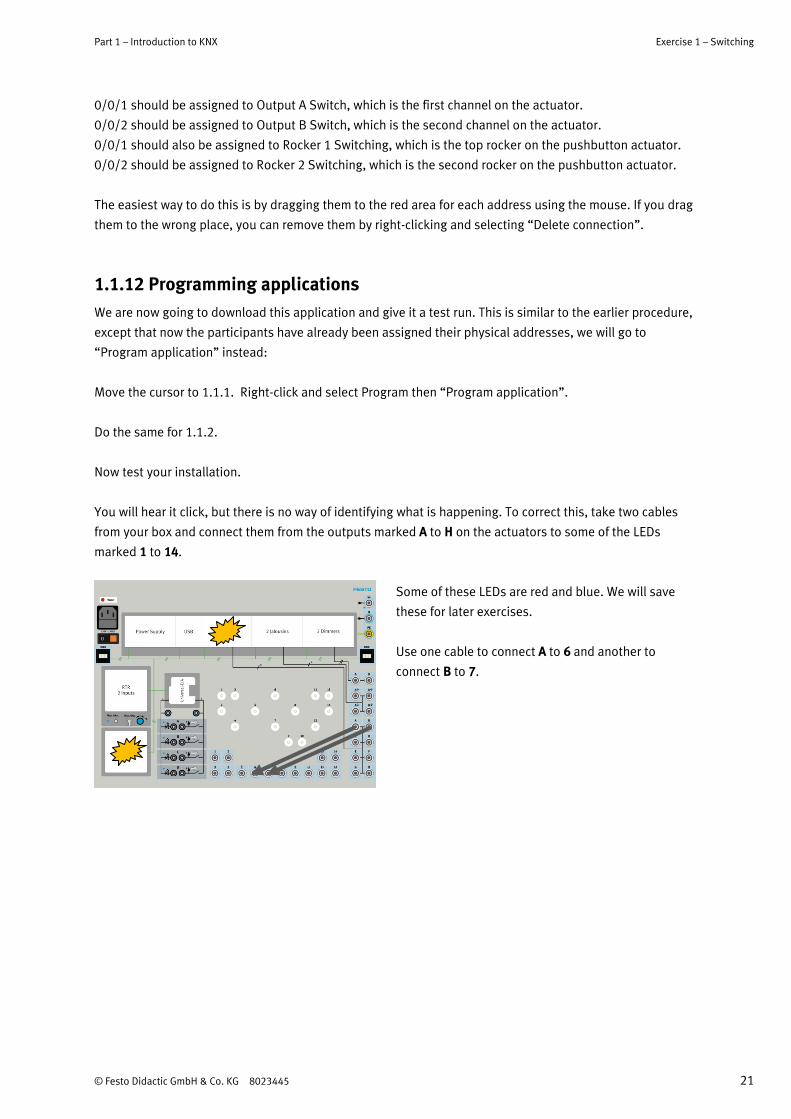
You will hear it click, but there is no way of identifying what is happening. To correct this, take two cables
from your box and connect them from the outputs marked A to H on the actuators to some of the LEDs
marked 1 to 14.
Some of these LEDs are red and blue. We will save
these for later exercises.
Use one cable to connect A to 6 and another to
connect B to 7.

Exercise 1 – Switching Part 1 – Introduction to KNX
22 © Festo Didactic GmbH & Co. KG 8023445
Try pressing the button again. You will see that the LEDs light up if you press the left-hand side of the rocker
and go out if you press the right. There is also a little indicator on the same button that shows what you
have just done. This indicator goes out after a few seconds.
At the moment, your pushbutton actuator is configured to work with switching. The actuator has no delay –
it responds as soon as you press the button.
1.1.13 Telegrams
When you press the button, a telegram is sent along the TP (twisted pair) cable, which is in contact with all
the participants. A 29-volt direct current is used to supply power to the participants, and an alternating
current signal is applied to this. The data traffic rate is 9600 bits/s, and the signal only takes a few
milliseconds to arrive.
The participants that listen to and read the telegram (actuators) only respond to what they have been
programmed to react to. KNX works with distributed intelligence, and if communication between the
pushbutton actuator and the actuator does not work, nothing will happen. In case of errors, the telegram is
automatically re-sent twice. After this, the button has to be pressed again.
It is very rare for this not to work. KNX is highly stable. What exactly happens is not important; what matters
is that it works. As a KNX programmer, you cannot do much wrong. For example, it is not possible to
program the application program for the pushbutton actuator or vice-versa. Each participant has a chip with
built-in information regarding what should happen, and if this does not happen, the participant reports this
and the download is stopped.
The telegram's “traffic” is defined by flags. If you double-click on a group address, you will see columns for
these flags. These contain the status for communication (which is a “must”): write, read, transfer or update.
The default setting for sensors (pushbutton actuators etc.) is “transfer”. The first participant to read a
telegram sends an OK (handshake) back to the participant that sent it. There is also an option to set the
importance of the telegram by changing the priority to low, high or alarm. Practise changing the status then
downloading your application and testing it again.
Part 1 – Introduction to KNX Exercise 1 – Switching
© Festo Didactic GmbH & Co. KG 8023445 23
1.1.14 Comments
It is very important to keep track of the physical addresses in order to avoid all these interruptions. Each
participant has a small white plate where you can write the address in pencil. Pushbutton actuators do not
have this option – here you should use small labels instead.
In ETS there is a menu on the right. When you open this (expand), you will see 9 different folders. The top
one is called Properties. Here you can change the address and name, and enter comments in the
description, e.g. where the pushbutton actuators are located or what they do. The PDF document for the
pushbutton actuator says that the rockers are called 1-2, 3-4, 5-6 and 7-8. As such, a comment might say
“1 = ceiling light on, 2 = ceiling light off” etc.
Use your own “language”. It makes no difference if you call this a pushbutton actuator or a rocker. Say that
the button is in Bedroom 1 and that it switches the ceiling light and bedside lamp on and off. As soon as you
see another blank space in ETS, you know that your description has been entered successfully.
1.1.15 Restarting ETS
Let's say you're finished for the day now, and you're going to continue working on this project tomorrow. In
this case, it's a good idea to go to your Project log book and write down a bit about what you have done.
These notes will be helpful when you return to the project. You may not always be able to remember what
you were doing the previous day.
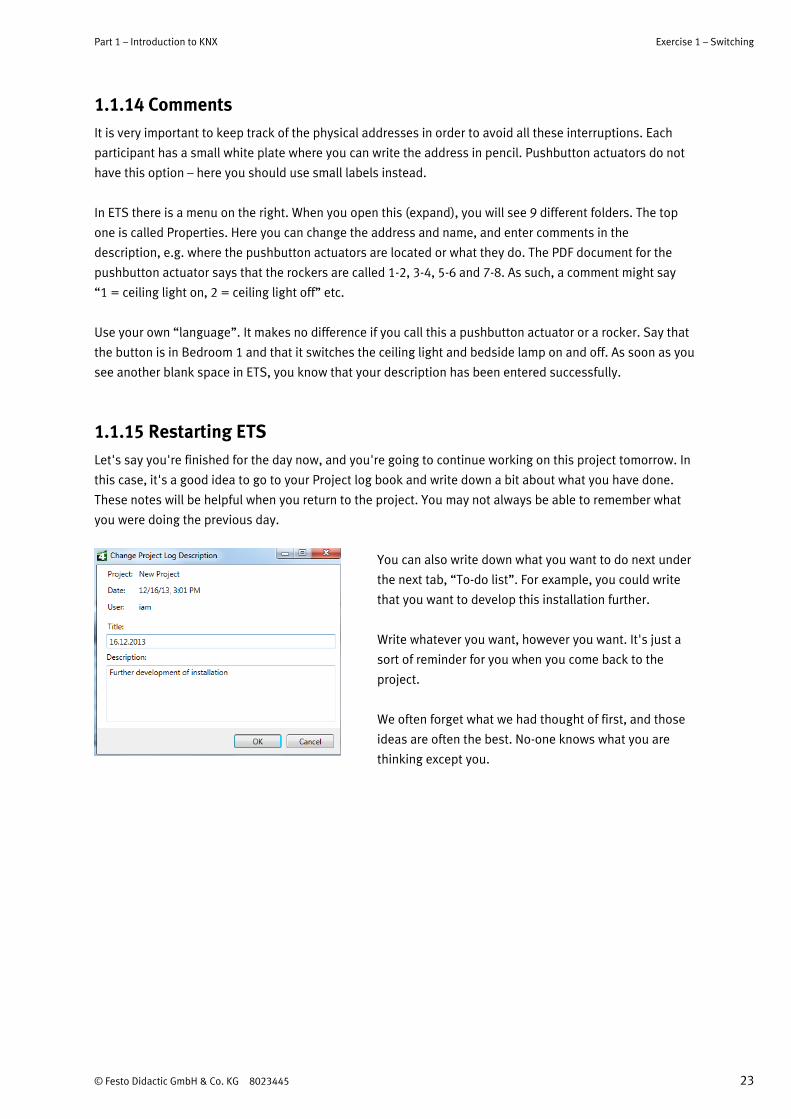
You can also write down what you want to do next under
the next tab, “To-do list”. For example, you could write
that you want to develop this installation further.
Write whatever you want, however you want. It's just a
sort of reminder for you when you come back to the
project.
We often forget what we had thought of first, and those
ideas are often the best. No-one knows what you are
thinking except you.
Exercise 1 – Switching Part 1 – Introduction to KNX
24 © Festo Didactic GmbH & Co. KG 8023445
Now we are going to shut down the whole ETS program. Click on the cross in the top right-hand corner.
Open ETS again. As you can see, you are automatically brought back to the database you were working in
before. You can change this setting, but we recommend leaving it as it is. You can also see the name “My
project” under “Project overview”. Click on this. When you go into a project, you nee to expand everything.
Start by closing one of the building views. All your settings can still be seen in the area on the right.
ETS automatically saves everything you do in real-time. If you are working on a database that is stored on
a network, you need to be in contact with the network every time you start up ETS.
The hardware also remembers what you have done. If you shut off the power, there will be enough residual
power from your KNX power supply for the chips in all the participants to save and remember all your
settings before they are completely de-energised. This backup is a built-in system feature, and part of the
standard.
The technology is based on the principle that the hardware notices when the voltage drops and saves all the
values, dimmer levels etc. straight away in a memory within the participant. Once power is restored, your
dimmer actuator returns to the previous level.
1.1.16 Changing language
We are now going to switch to the English version of ETS. You will notice little difference, except for the fact
that the names on your menus will be different.
Some words in KNX are hard to translate. The Swedish word for changing parameters in KNX is
“parametering”. In English we simply use the term “change parameters”. You will soon see that English is
easier to work with. For example, “On” and “Off” are much more widely recognised than the Swedish words
“Till” and “Från”. Swedish often uses typical “Swenglish” words that mix Swedish and English, such as
“Dimra” for “Dim”.
Click the ETS button in the top left. Select “Settings” then “Language”. Then choose English as your
language, and also as the desired product language. Finally, click “Apply”. You must restart ETS to apply the
changes.
Now everything is in English. If you feel more comfortable doing so, you can use the same method to change
the system to your own language. Feel free to play around, but remember how to change it back.
Part 1 – Introduction to KNX Exercise 1 – Switching
© Festo Didactic GmbH & Co. KG 8023445 25
Click on “My project”. Scroll around your project and change the names if necessary so that they can be
understood by everyone, not just those who understand your native language. Make sure you also change
the descriptions; use the English word “Pushbutton” on the top row. Names of rooms etc. should also be in
English, e.g. “Bedroom”.
1.1.17 “Copying” the database
We are now going to change the name of the database. Click ETS (top left) and select Database. As you can
see, there is no direct option for changing the name. As such, we will make a backup of the existing
database (new database) and name the copy “Festo KNX” instead. Click “Save”.
Then create a new database and give it the same name as you entered when making your backup, in this
case “Festo KNX”. (When you create a new database, the current one will be closed.)
Enter the name “Festo KNX” and click “OK”. A new database has now been created.
Next, click “Restore database” and use your copy (backup), which should be called Festo KNX.bak. The
contents of this backup will now be stored in the newly created database. You now have two identical
databases – one called “New database” and one called “Festo KNX”. The one that is currently open is the
one you created, which contains one project (“My project”). This also contains the database files you
imported earlier. The building view and your group addresses can still be seen in the project.
Click ETS and change the name from “My project” to “KNX 1 - Lighting on/off”. Now go into the project log
and change the text describing your project to English.
Highlight the comment “Today's date”, click “Edit” and change “Title” and “Description” to something that
describes what the project is about. Translate your old text to “simplified English”, i.e. write it in as simple
a way as possible.
Exercise 1 – Switching Part 1 – Introduction to KNX
26 © Festo Didactic GmbH & Co. KG 8023445
1.1.18 Summary
You have now “created” a project that is entirely in English. In the next section, we are going to use this
database, “Festo KNX”, and create more projects in it. The database will be filled with many projects and
a large number of different participants. You will soon see how easy this is.
This is the procedure for programming KNX with ETS. From now on, you will no longer receive such clear
instructions. You now know how to create a database and a project. You know how to import participants
and incorporate them into your project.
You have learned how to give them a physical address and how to interlink them using group addresses.
The last thing you learned was how to download your settings and test the system.
This simple, small, introductory project probably took quite a long time. If it is not working by now and you
still don't know why, you will find the next tasks difficult. If this is the case, we recommend that you start
again from the beginning in order to get more familiar with ETS.
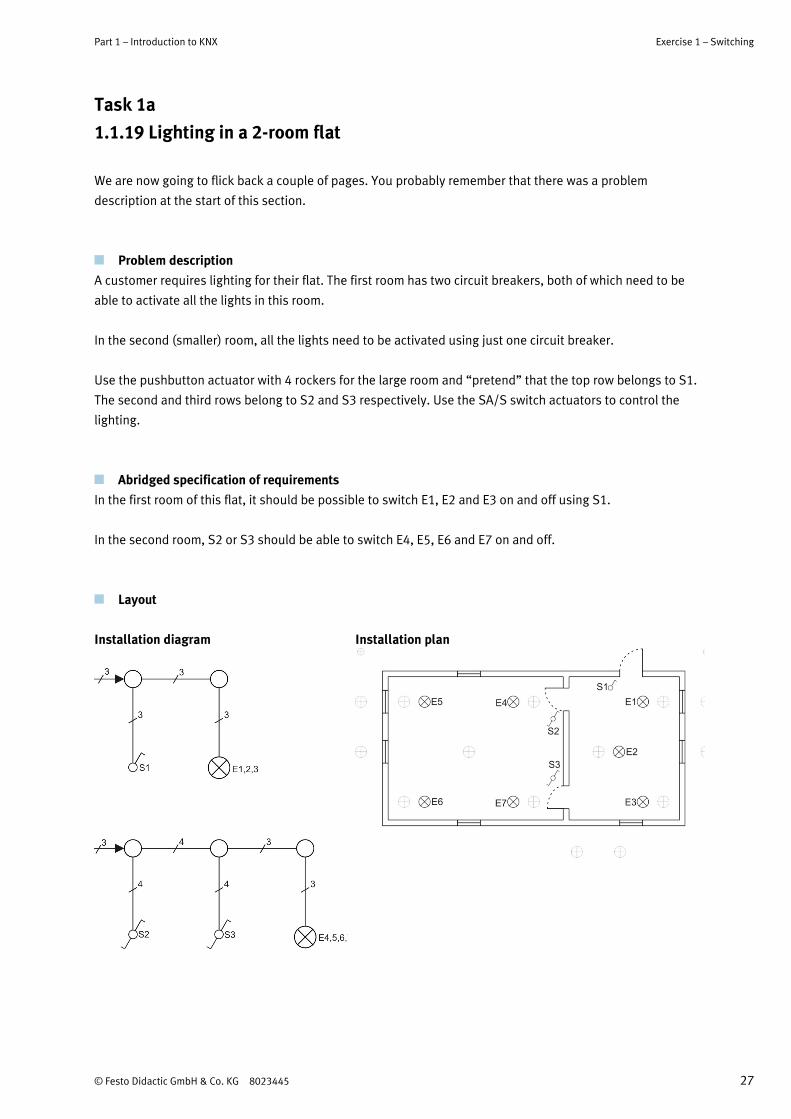
Part 1 – Introduction to KNX Exercise 1 – Switching
© Festo Didactic GmbH & Co. KG 8023445 27
Task 1a
1.1.19 Lighting in a 2-room flat
We are now going to flick back a couple of pages. You probably remember that there was a problem
description at the start of this section.
Problem description
A customer requires lighting for their flat. The first room has two circuit breakers, both of which need to be
able to activate all the lights in this room.
In the second (smaller) room, all the lights need to be activated using just one circuit breaker.
Use the pushbutton actuator with 4 rockers for the large room and “pretend” that the top row belongs to S1.
The second and third rows belong to S2 and S3 respectively. Use the SA/S switch actuators to control the
lighting.
Abridged specification of requirements
In the first room of this flat, it should be possible to switch E1, E2 and E3 on and off using S1.
In the second room, S2 or S3 should be able to switch E4, E5, E6 and E7 on and off.
Layout
Installation diagram
Installation plan
Exercise 1 – Switching Part 1 – Introduction to KNX
28 © Festo Didactic GmbH & Co. KG 8023445
Equipment
ETS4 software
USB cable
KNX Basic
Product databases for SA/S switch actuator (ABB) and 4-fold pushbutton actuator (Berker)
Manuals for the above participants
Transparency no. 1
You were instructed to use the pushbutton actuator with 4 rockers for the large room and “pretend” that the
top row belongs to S1. The second and third rows belong to S2 and S3 respectively. Use the SA/S switch
actuators to control the lighting.
Your task is now to alter the existing installation to make this happen.
You can change your existing building view, but remember that you have to use the same pushbutton
actuator for all lighting points, so you can place it in any room you like. In a proper installation, of course,
these sensors (rockers/pushbutton actuators) will be placed at different locations throughout the room(s).
Place the transparency on your KNX Basic and connect the cables. Change your program to match the
specifications above and test it.
Once you have solved this task, you can move on to the next one.
1.1.20 Extra task 1a
If you wish, you can also try incorporating a “switch off all” function. Use the right-hand side of the bottom
rocker for this.
Tip: use the same telegram for this as for all the points where you already have “off”.
Part 1 – Introduction to KNX Exercise 1 – Switching
© Festo Didactic GmbH & Co. KG 8023445 29
Task 1b
1.1.21 Lighting in a 3-room flat
The following task is a continuation of the previous one. You can re-use some of what you have already
done and add new outputs. As you can see, you will need more than four rockers. As such, you will need to
reconfigure your rockers so that each one can be used as a button itself.
You can alter the parameter settings to give each pushbutton actuator a toggle function. This is useful for
this task, as you will need at least 5 different buttons.
In one of the later exercises, you will use the other rocker, which also has a built-in controller.
Problem description
A customer requires lighting for their flat. We have three rooms whose lighting needs to be controlled by
different pushbutton actuators. In the room on the right, both pushbutton actuators should be used to turn
on all the lights. In each of the other two rooms, all the lights should be switched on using the respective
circuit breakers.
Use the top two rockers on the pushbutton actuator for the right-hand room. Control the lighting in the top
room with the third row, and use the next row for the lighting in the bottom room. Use the switch actuator to
activate the lighting.
Abridged specification of requirements
In the flat, it should be possible to switch E1, E2 and E3 on and off using either S1, S2 or S3.
S4 should be able to switch E4 and E5 on and off.
S5 should be able to switch E6 and E7 on and off.
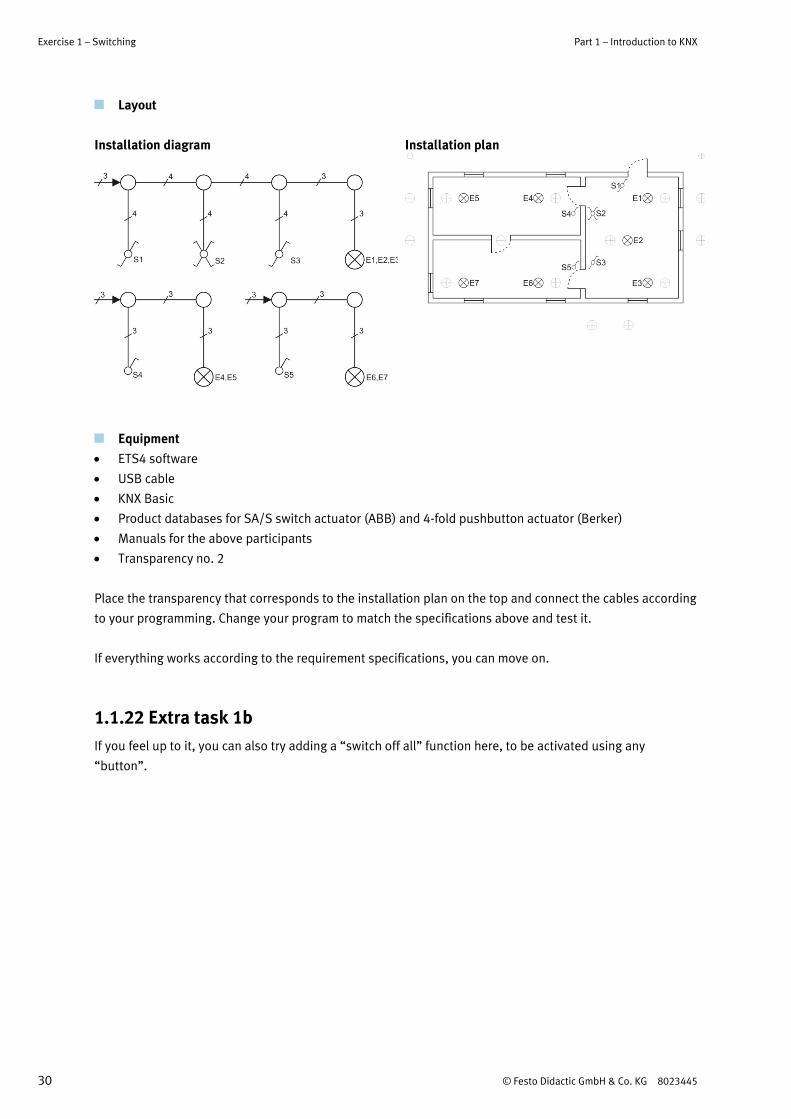
Exercise 1 – Switching Part 1 – Introduction to KNX
30 © Festo Didactic GmbH & Co. KG 8023445
Layout
Installation diagram
Installation plan
Equipment
ETS4 software
USB cable
KNX Basic
Product databases for SA/S switch actuator (ABB) and 4-fold pushbutton actuator (Berker)
Manuals for the above participants
Transparency no. 2
Place the transparency that corresponds to the installation plan on the top and connect the cables according
to your programming. Change your program to match the specifications above and test it.
If everything works according to the requirement specifications, you can move on.
1.1.22 Extra task 1b
If you feel up to it, you can also try adding a “switch off all” function here, to be activated using any
“button”.
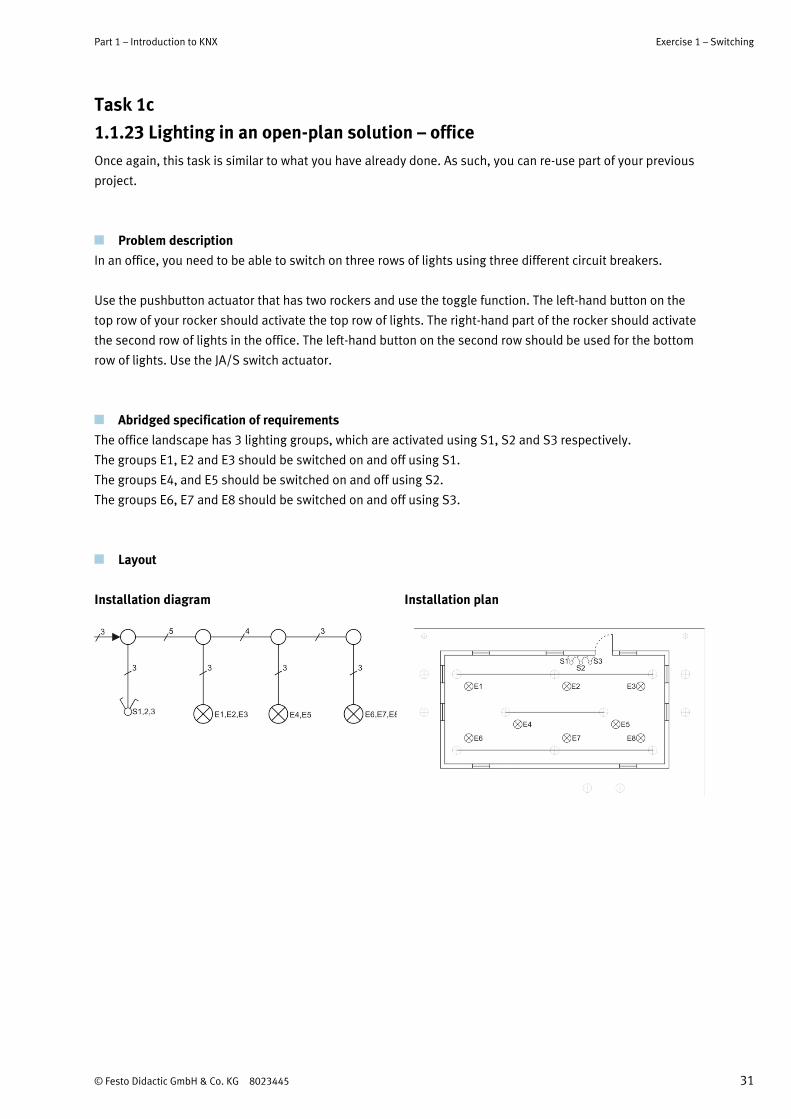
Part 1 – Introduction to KNX Exercise 1 – Switching
© Festo Didactic GmbH & Co. KG 8023445 31
Task 1c
1.1.23 Lighting in an open-plan solution – office
Once again, this task is similar to what you have already done. As such, you can re-use part of your previous
project.
Problem description
In an office, you need to be able to switch on three rows of lights using three different circuit breakers.
Use the pushbutton actuator that has two rockers and use the toggle function. The left-hand button on the
top row of your rocker should activate the top row of lights. The right-hand part of the rocker should activate
the second row of lights in the office. The left-hand button on the second row should be used for the bottom
row of lights. Use the JA/S switch actuator.
Abridged specification of requirements
The office landscape has 3 lighting groups, which are activated using S1, S2 and S3 respectively.
The groups E1, E2 and E3 should be switched on and off using S1.
The groups E4, and E5 should be switched on and off using S2.
The groups E6, E7 and E8 should be switched on and off using S3.
Layout
Installation diagram
Installation plan
Exercise 1 – Switching Part 1 – Introduction to KNX
32 © Festo Didactic GmbH & Co. KG 8023445
Equipment
ETS4 software
USB cable
KNX Basic
Product databases for SA/S switch actuator (ABB) and 4-fold pushbutton actuator (Berker)
Manuals for the above participants
Transparency no. 3
1.1.24 Extra task 1c
Connect the cables so that you can use the top row of the pushbutton actuator with four rockers to switch
E1, E2 and E4 on and off. Use the second row for E2 and E7, and the third row for E3, E5 and E8. The right-
hand button on the last row should have a toggle function for “switch all off/on”.
Part 1 – Introduction to KNX Exercise 1 – Switching
© Festo Didactic GmbH & Co. KG 8023445 33
1.1.25 Exercise task
Number the activities below in the order in which they should be carried out.
8 Add participants to a project
5 Open or create a project
6 Import participants
10 Create group addresses
1 Read through the requirement specifications
9 Set the parameters
4 Open or create a database
3 Check that the communication is working (ETS <-> KNX)
11 Link the group addresses to your participants
15 Document your work
7 Give the participants physical addresses
12 Program the applications
2 Power up your KNX installation (KNX board)
13 Test run
14 Adjust/modify - test run
7 Create a building view
© Festo Didactic GmbH & Co. KG 8023445 I
Table of contents
Part 1 – Introduction to KNX _________________________________________________________________ 1
1.0.1 KNX/EIB ___________________________________________________________________________ 1
1.0.2 KNX – General information ____________________________________________________________ 2
1.0.3 The ETS software __________________________________________________________________ 4
1.0.4 The KNX board hardware _____________________________________________________________ 5
Exercise 1 ________________________________________________________________________________ 6
1.1.1 Switching __________________________________________________________________________ 6
1.1.2 Communication between software and hardware _________________________________________ 8
1.1.3 Learning to search in ETS _____________________________________________________________ 9
1.1.4 Creating a database _________________________________________________________________ 9
1.1.5 Creating a project _________________________________________________________________ 10
1.1.6 Building view _____________________________________________________________________ 11
1.1.7 Importing products ________________________________________________________________ 12
1.1.8 Incorporating participants __________________________________________________________ 16
1.1.9 Programming physical addresses ____________________________________________________ 17
1.1.10 Creating group addresses __________________________________________________________ 19
1.1.11 Connecting group addresses to participants ___________________________________________ 20
1.1.12 Programming applications __________________________________________________________ 21
1.1.13 Telegrams _______________________________________________________________________ 22
1.1.14 Comments _______________________________________________________________________ 23
1.1.15 Restarting ETS ____________________________________________________________________ 23
1.1.16 Changing language ________________________________________________________________ 24
1.1.17 “Copying” the database ____________________________________________________________ 25
1.1.18 Summary ________________________________________________________________________ 26
Task 1a ________________________________________________________________________________ 27
1.1.19 Lighting in a 2-room flat ____________________________________________________________ 27
1.1.20 Extra task 1a _____________________________________________________________________ 28
Task 1b ________________________________________________________________________________ 29
1.1.21 Lighting in a 3-room flat ____________________________________________________________ 29
1.1.22 Extra task 1b _____________________________________________________________________ 30
II © Festo Didactic GmbH & Co. KG 8023445
Task 1c ________________________________________________________________________________ 31
1.1.23 Lighting in an open-plan solution – office ______________________________________________ 31
1.1.24 Extra task 1c _____________________________________________________________________ 32
1.1.25 Exercise task _____________________________________________________________________ 33
Exercise 2 ______________________________________________________________________________ 34
2.0.1 Dimming ________________________________________________________________________ 34
2.0.2 New project ______________________________________________________________________ 34
2.0.3 Changing parameters ______________________________________________________________ 36
2.0.4 Parameters for dimmer actuators ____________________________________________________ 37
2.0.5 Parameters for pushbutton actuators _________________________________________________ 38
Task 2a ________________________________________________________________________________ 40
2.0.6 Controlling lighting in a small flat ____________________________________________________ 40
Task 2b ________________________________________________________________________________ 42
2.0.7 Controlling lighting in a large flat _____________________________________________________ 42
Exercise 3 ______________________________________________________________________________ 44
3.0.1 Time channels and “switch off all” function ____________________________________________ 44
3.0.2 Creating multiple group addresses ___________________________________________________ 45
3.0.3 Partial changes ___________________________________________________________________ 46
Task 3a ________________________________________________________________________________ 47
3.0.4 Time-controlled lighting in a flat _____________________________________________________ 47
Task 3b ________________________________________________________________________________ 49
3.0.5 Switch off all function for flat ________________________________________________________ 49
Exercise 4 ______________________________________________________________________________ 51
4.0.1 Sun protection ___________________________________________________________________ 51
4.0.2 Licence requirements ______________________________________________________________ 51
4.0.3 Copying a project _________________________________________________________________ 52
4.0.4 Installing the plug-in _______________________________________________________________ 53
4.0.5 Setting the parameters for the blind actuator ___________________________________________ 54
4.0.6 Setting parameters in the plug-in program _____________________________________________ 54
4.0.7 Pushbutton actuator design _________________________________________________________ 55
Task 4a ________________________________________________________________________________ 57
4.0.8 Controlling blinds/awnings _________________________________________________________ 57
Task 4b ________________________________________________________________________________ 59
4.0.9 Wind and rain alarm for awning ______________________________________________________ 59
© Festo Didactic GmbH & Co. KG 8023445 III
Exercise 5 ______________________________________________________________________________ 61
5.0.1 Implementing alarms ______________________________________________________________ 61
5.0.2 Devices _________________________________________________________________________ 62
5.0.3 Changing the building view _________________________________________________________ 62
5.0.4 Importing and incorporating multiple participants _______________________________________ 63
5.0.5 Address structuring _______________________________________________________________ 63
5.0.6 Changing parameters on the input module _____________________________________________ 64
5.0.7 Adjusting the function after testing ___________________________________________________ 65
Task 5a ________________________________________________________________________________ 66
5.0.8 Time-controlled lighting in an office __________________________________________________ 66
Task 5b ________________________________________________________________________________ 68
5.0.9 Dimming lighting in a living room with a porch __________________________________________ 68
5.0.10 Extra task________________________________________________________________________ 69
5.0.11 Dimming lighting with an alarm in a living room with a porch ______________________________ 70
5.0.12 Extra task 5c _____________________________________________________________________ 71
Task 5d ________________________________________________________________________________ 72
5.0.13 Lighting with motion sensing in a hotel ________________________________________________ 72
5.0.14 Extra task 5d _____________________________________________________________________ 73
Task 5e ________________________________________________________________________________ 74
5.0.15 Lighting and automatic blinds in a doctor's surgery ______________________________________ 74
Exercise 6 ______________________________________________________________________________ 76
6.0.1 Heating regulation ________________________________________________________________ 76
6.0.2 KNX Heating _____________________________________________________________________ 77
6.0.3 Importing, incorporating and changing the parameters of valve motors _____________________ 77
6.0.4 Changing the regulator parameters ___________________________________________________ 78
6.0.5 Connecting the regulator to the heating actuator ________________________________________ 79
Task 6a ________________________________________________________________________________ 81
6.0.6 Clean room with lighting, automatic blinds and automatic door opening _____________________ 81
6.0.7 Extra task 6a _____________________________________________________________________ 83
IV © Festo Didactic GmbH & Co. KG 8023445
Exercise 7 ______________________________________________________________________________ 84
7.0.1 Line coupler______________________________________________________________________ 84
7.0.2 KNX Line coupler __________________________________________________________________ 85
7.0.3 Topology ________________________________________________________________________ 86
7.0.4 Importing and incorporating a line coupler _____________________________________________ 87
7.0.5 Group addresses from the line coupler ________________________________________________ 87
7.0.6 Diagnostic tool ___________________________________________________________________ 88
Task 7a ________________________________________________________________________________ 89
7.0.7 Controlling with the line coupler _____________________________________________________ 89
Summary of Part 1 _______________________________________________________________________ 91
Part 2 - Development _____________________________________________________________________ 97
8.0.1 Introduction _____________________________________________________________________ 97
Exercise 1D _____________________________________________________________________________ 98
8.1.1 Dimming LED lighting ______________________________________________________________ 98
8.1.2 Your solution _____________________________________________________________________ 98
8.1.3 Testing _________________________________________________________________________ 100
Exercise 2D ____________________________________________________________________________ 101
8.2.1 Measuring energy ________________________________________________________________ 101
8.2.2 Electrical safety __________________________________________________________________ 101
8.2.3 Your solution ____________________________________________________________________ 102
8.2.4 Data types ______________________________________________________________________ 103
8.2.5 Creating group addresses for reading ________________________________________________ 104
8.2.6 Testing _________________________________________________________________________ 105
Exercise 3D ____________________________________________________________________________ 106
8.3.1 Power control ___________________________________________________________________ 106
8.3.2 Your solution ____________________________________________________________________ 107
8.3.3 Testing _________________________________________________________________________ 110
8.3.4 Energy optimisation ______________________________________________________________ 111
8.3.5 Energy actuator – switch function ___________________________________________________ 111
8.3.6 Energy actuator – frequency monitoring ______________________________________________ 114
8.3.7 Energy actuator – power monitoring _________________________________________________ 114
8.3.8 Energy actuator – current monitoring ________________________________________________ 117
8.3.9 Energy actuator – voltage monitoring ________________________________________________ 117
8.3.10 Energy actuator – energy consumption _______________________________________________ 118
8.3.11 Energy actuator – energy balancing __________________________________________________ 119
8.3.12 Energy actuator – iTools ___________________________________________________________ 120
8.3.13 Energy actuator - exercise example, 1-phase __________________________________________ 121
8.3.14 Energy actuator - exercise example, 3-phase __________________________________________ 122
© Festo Didactic GmbH & Co. KG 8023445 V
Exercise 4D ____________________________________________________________________________ 126
8.4.1 Monitoring via LAN or wi-fi _________________________________________________________ 126
8.4.2 Your solution ____________________________________________________________________ 126
8.4.3 Extra task_______________________________________________________________________ 130
8.4.4 Contact via the Internet ___________________________________________________________ 130
8.4.5 Wireless ________________________________________________________________________ 131
8.4.6 Bus monitoring __________________________________________________________________ 132
8.4.7 Priority _________________________________________________________________________ 133
8.4.8 Dummy ________________________________________________________________________ 133
Exercise 5D ____________________________________________________________________________ 134
8.5.1 Visualisation with Facility Pilot or smartphones ________________________________________ 134
8.5.2 Visualisation with Facility Pilot _____________________________________________________ 134
8.5.3 Visualisation with smartphones _____________________________________________________ 138
8.5.4 OPC ___________________________________________________________________________ 139
Exercise 6D ____________________________________________________________________________ 140
8.6.1 Logic-lighting in a sports hall _______________________________________________________ 140
8.6.2 Your solution ____________________________________________________________________ 141
8.6.3 Testing _________________________________________________________________________ 145
Exercise 7D ____________________________________________________________________________ 146
8.7.1 Controlling ventilation using air quality sensors ________________________________________ 146
8.7.2 Your solution ____________________________________________________________________ 146
8.7.3 Testing _________________________________________________________________________ 149
Exercise 8D ____________________________________________________________________________ 150
8.8.1 Constant lighting control __________________________________________________________ 150
8.8.2 Your solution ____________________________________________________________________ 151
8.8.3 Testing _________________________________________________________________________ 156
8.8.4 Extra task_______________________________________________________________________ 156

VI © Festo Didactic GmbH & Co. KG 8023445

© Festo Didactic GmbH & Co. KG 8023445 Name: __________________________________ Date: ____________ 1
Part 1 – Introduction to KNX
1.0.1 KNX/EIB
KNX is an organisation, an association of companies that produce products for modern building automation.
In total, more than 300 companies follow the standards that KNX stands for. This standard means that the
companies need to follow certain rules for how data (telegram) is sent and received. This allows all products
to communicate with one another, regardless of manufacturer.
This is highly unusual. Most manufacturing companies have no interest in allowing their competitors into
their inner sanctum. Designs are registered and patented in order to prevent other people and companies
from using parts of them to create another – potentially better – function.
Within the field of KNX, this principle is reversed. Because the manufacturers have to follow set rules, the
customer is always able to combine and thus customise their requirements.
Competition keeps product prices down and, perhaps most importantly of all, KNX is future-proof thanks to
the continuous development of new products and functions. Products bearing the EIB and KNX logos have
been around for more than 20 years.
In the field of KNX, we talk about “participants”. These are usually pushbutton actuators, (rockers) and
actuators (on/off or with dimmer function). There are sensors and other actuators that can be used to
regulate temperature or the movement of an awning, for example. There are thousands of different
participants, all of which can communicate with each other because they follow the same standard.
In terms of hardware, there are twin lines for communication and power supply. Data (telegrams) are sent
from pushbutton actuators or other sensors to switch an actuator, which in turn switches on the lights, for
example. If the pre-set value for a temperature sensor is reached, a heating actuator can switch on or off.
You can define what happens with the aid of the ETS software.
ETS has been developed by KNX, and is essential for interweaving all the products. After importing
participants, you can program functions by changing parameters. These parameters can be downloaded
together with unique addresses that allow them to communicate. ETS can also be used to diagnose and log
traffic.
It is the KNX organisation's job to monitor and make sure everything works
properly. In order to sell a product marked with the KNX logo, the
manufacturer must first have the product certified. In addition to this check,
which ensures that products comply with the standards, KNX also works with
training.
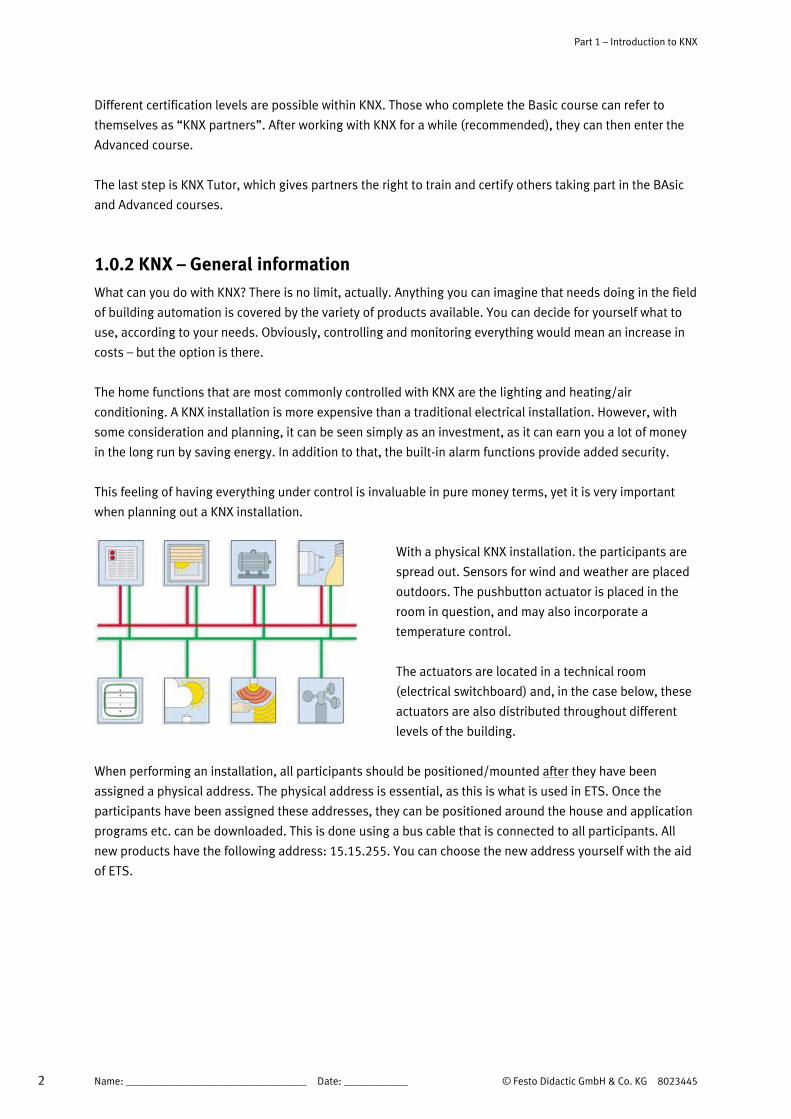
Part 1 – Introduction to KNX
2 Name: __________________________________ Date: ____________ © Festo Didactic GmbH & Co. KG 8023445
Different certification levels are possible within KNX. Those who complete the Basic course can refer to
themselves as “KNX partners”. After working with KNX for a while (recommended), they can then enter the
Advanced course.
The last step is KNX Tutor, which gives partners the right to train and certify others taking part in the BAsic
and Advanced courses.
1.0.2 KNX – General information
What can you do with KNX? There is no limit, actually. Anything you can imagine that needs doing in the field
of building automation is covered by the variety of products available. You can decide for yourself what to
use, according to your needs. Obviously, controlling and monitoring everything would mean an increase in
costs – but the option is there.
The home functions that are most commonly controlled with KNX are the lighting and heating/air
conditioning. A KNX installation is more expensive than a traditional electrical installation. However, with
some consideration and planning, it can be seen simply as an investment, as it can earn you a lot of money
in the long run by saving energy. In addition to that, the built-in alarm functions provide added security.
This feeling of having everything under control is invaluable in pure money terms, yet it is very important
when planning out a KNX installation.
With a physical KNX installation. the participants are
spread out. Sensors for wind and weather are placed
outdoors. The pushbutton actuator is placed in the
room in question, and may also incorporate a
temperature control.
The actuators are located in a technical room
(electrical switchboard) and, in the case below, these
actuators are also distributed throughout different
levels of the building.
When performing an installation, all participants should be positioned/mounted after they have been
assigned a physical address. The physical address is essential, as this is what is used in ETS. Once the
participants have been assigned these addresses, they can be positioned around the house and application
programs etc. can be downloaded. This is done using a bus cable that is connected to all participants. All
new products have the following address: 15.15.255. You can choose the new address yourself with the aid
of ETS.

Part 1 – Introduction to KNX
© Festo Didactic GmbH & Co. KG 8023445 Name: __________________________________ Date: ____________ 3
The first part of the address corresponds to the area. The second refers to the line, while the third part is
specific to the participant itself. For example, the address for a pushbutton actuator could be 0.1.14, which
would mean it is in area 0, on line 1 and has been assigned the individual number 14. The maximum number
of participants for a single line is 64.
If you need more than 64 participants, you will need more lines. If you want participants on different lines to
be able to communicate with one another, you will need to use a line coupler. If you have more than one
area, you will require an area coupler. The maximum number of participants that can communicate with one
another is thus enough to automate very large buildings.
The procedure for installing KNX begins with a requirements analysis. What do you want to achieve? What
do you want to check, monitor and control? What is your budget? It is also important to take into account
future requirements and desired modifications.
Once the specifications have been drawn up, you can order all the hardware you require. However, you
don't need to wait until it has arrived before beginning programming.
All KNX product suppliers are required to provide information on their products. This may take the form of
a manual and/or installation description in PDF format. However, by far the most important thing is the file
you need to import into your project. This file can be found on the supplier's homepage. It may be a vd file,
e.g. *.vd3, or a product file named *.knxprod.
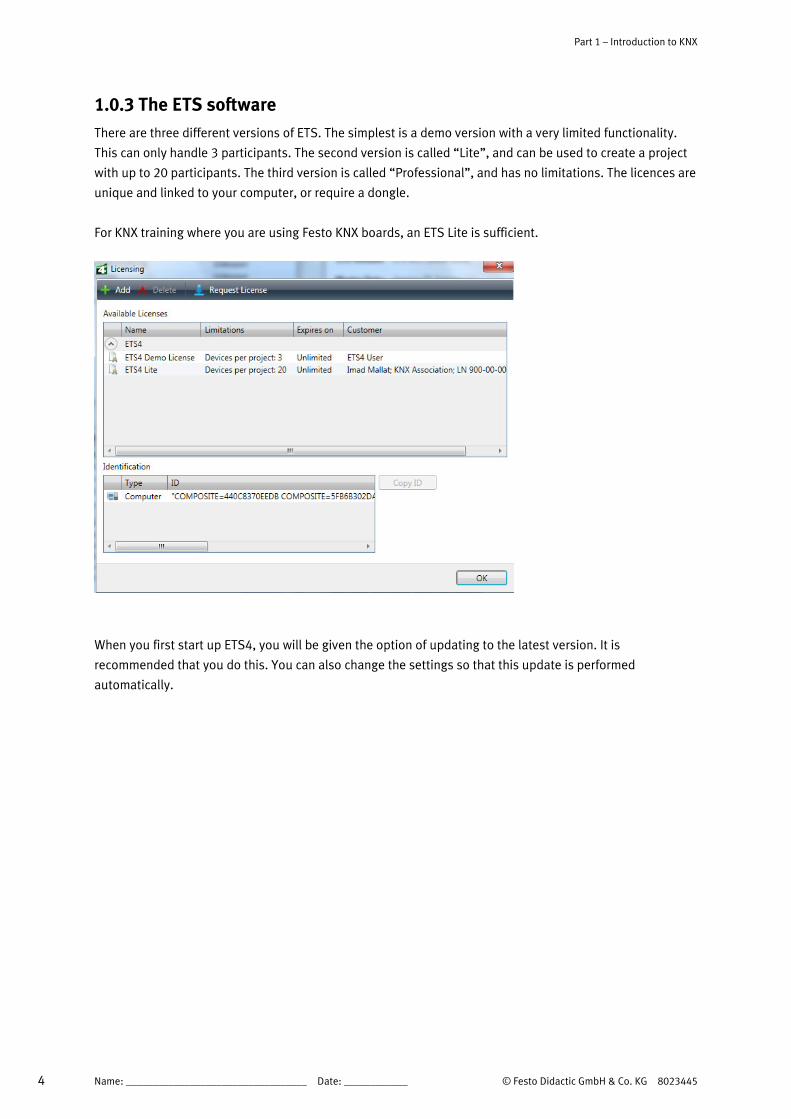
Part 1 – Introduction to KNX
4 Name: __________________________________ Date: ____________ © Festo Didactic GmbH & Co. KG 8023445
1.0.3 The ETS software
There are three different versions of ETS. The simplest is a demo version with a very limited functionality.
This can only handle 3 participants. The second version is called “Lite”, and can be used to create a project
with up to 20 participants. The third version is called “Professional”, and has no limitations. The licences are
unique and linked to your computer, or require a dongle.
For KNX training where you are using Festo KNX boards, an ETS Lite is sufficient.
When you first start up ETS4, you will be given the option of updating to the latest version. It is
recommended that you do this. You can also change the settings so that this update is performed
automatically.
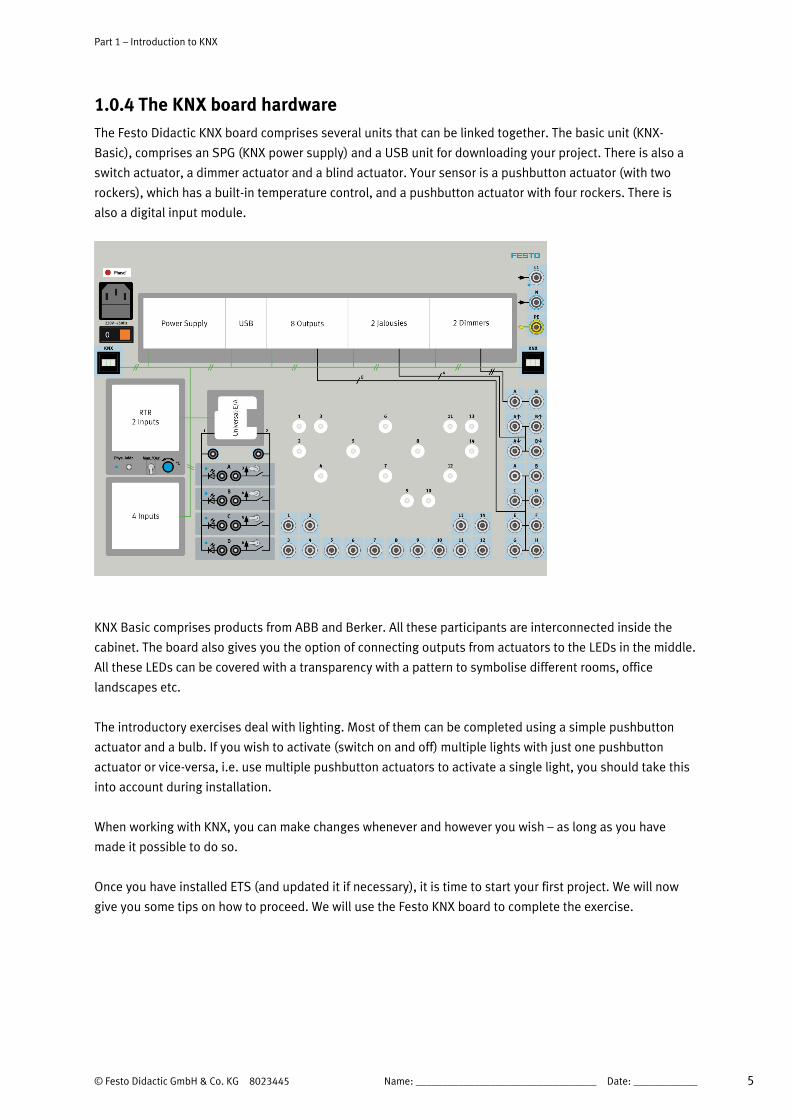
Part 1 – Introduction to KNX
© Festo Didactic GmbH & Co. KG 8023445 Name: __________________________________ Date: ____________ 5
1.0.4 The KNX board hardware
The Festo Didactic KNX board comprises several units that can be linked together. The basic unit (KNX-
Basic), comprises an SPG (KNX power supply) and a USB unit for downloading your project. There is also a
switch actuator, a dimmer actuator and a blind actuator. Your sensor is a pushbutton actuator (with two
rockers), which has a built-in temperature control, and a pushbutton actuator with four rockers. There is
also a digital input module.
KNX Basic comprises products from ABB and Berker. All these participants are interconnected inside the
cabinet. The board also gives you the option of connecting outputs from actuators to the LEDs in the middle.
All these LEDs can be covered with a transparency with a pattern to symbolise different rooms, office
landscapes etc.
The introductory exercises deal with lighting. Most of them can be completed using a simple pushbutton
actuator and a bulb. If you wish to activate (switch on and off) multiple lights with just one pushbutton
actuator or vice-versa, i.e. use multiple pushbutton actuators to activate a single light, you should take this
into account during installation.
When working with KNX, you can make changes whenever and however you wish – as long as you have
made it possible to do so.
Once you have installed ETS (and updated it if necessary), it is time to start your first project. We will now
give you some tips on how to proceed. We will use the Festo KNX board to complete the exercise.
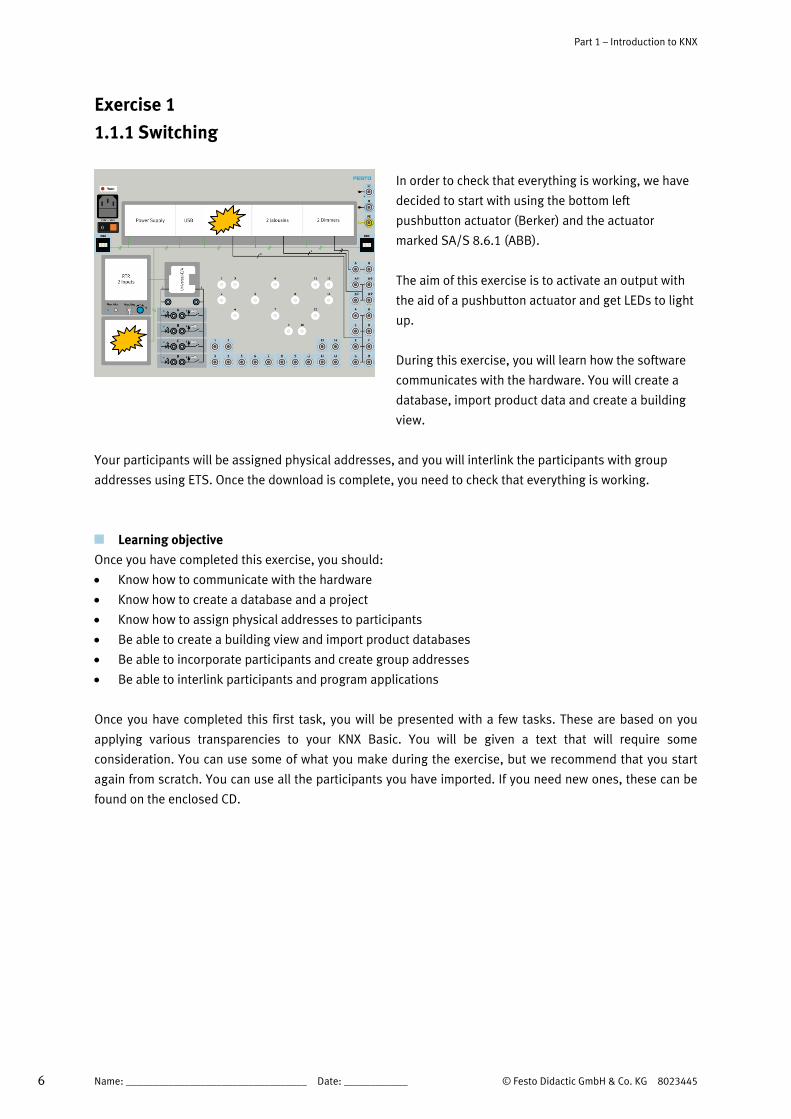
Part 1 – Introduction to KNX
6 Name: __________________________________ Date: ____________ © Festo Didactic GmbH & Co. KG 8023445
Exercise 1
1.1.1 Switching
In order to check that everything is working, we have
decided to start with using the bottom left
pushbutton actuator (Berker) and the actuator
marked SA/S 8.6.1 (ABB).
The aim of this exercise is to activate an output with
the aid of a pushbutton actuator and get LEDs to light
up.
During this exercise, you will learn how the software
communicates with the hardware. You will create a
database, import product data and create a building
view.
Your participants will be assigned physical addresses, and you will interlink the participants with group
addresses using ETS. Once the download is complete, you need to check that everything is working.
Learning objective
Once you have completed this exercise, you should:
Know how to communicate with the hardware
Know how to create a database and a project
Know how to assign physical addresses to participants
Be able to create a building view and import product databases
Be able to incorporate participants and create group addresses
Be able to interlink participants and program applications
Once you have completed this first task, you will be presented with a few tasks. These are based on you
applying various transparencies to your KNX Basic. You will be given a text that will require some
consideration. You can use some of what you make during the exercise, but we recommend that you start
again from scratch. You can use all the participants you have imported. If you need new ones, these can be
found on the enclosed CD.
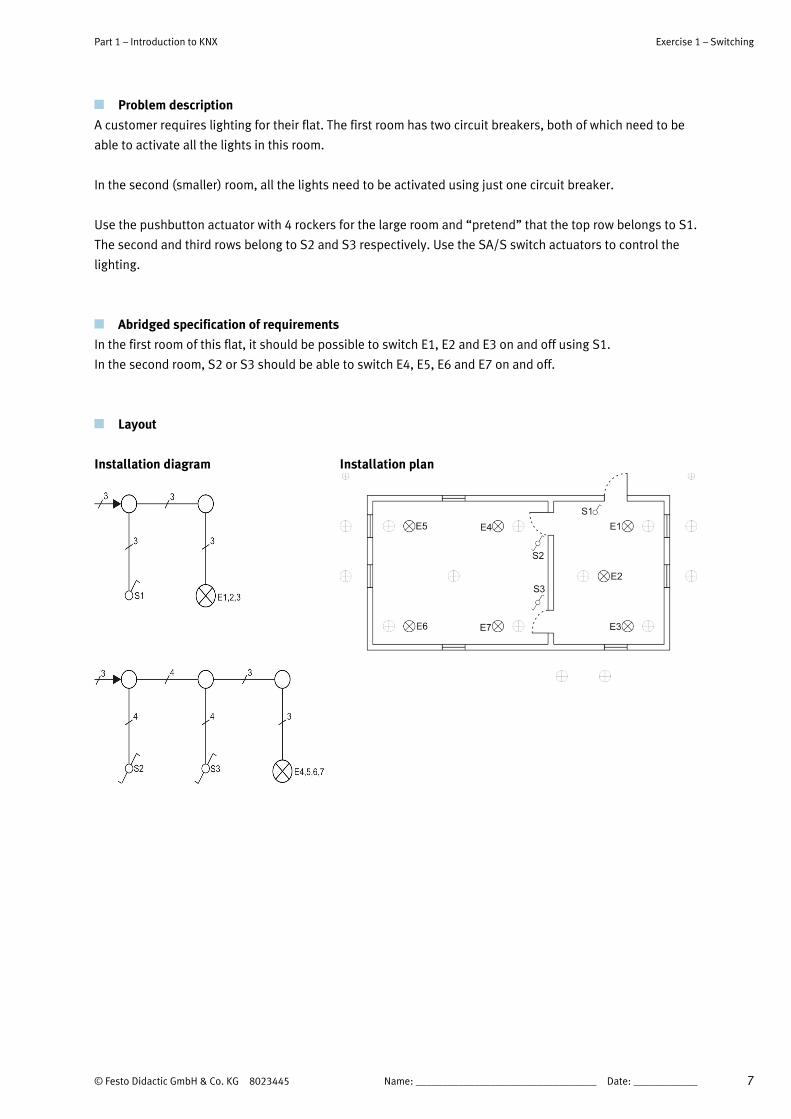
Part 1 – Introduction to KNX Exercise 1 – Switching
© Festo Didactic GmbH & Co. KG 8023445 Name: __________________________________ Date: ____________ 7
Problem description
A customer requires lighting for their flat. The first room has two circuit breakers, both of which need to be
able to activate all the lights in this room.
In the second (smaller) room, all the lights need to be activated using just one circuit breaker.
Use the pushbutton actuator with 4 rockers for the large room and “pretend” that the top row belongs to S1.
The second and third rows belong to S2 and S3 respectively. Use the SA/S switch actuators to control the
lighting.
Abridged specification of requirements
In the first room of this flat, it should be possible to switch E1, E2 and E3 on and off using S1.
In the second room, S2 or S3 should be able to switch E4, E5, E6 and E7 on and off.
Layout
Installation diagram
Installation plan

Exercise 1 – Switching Part 1 – Introduction to KNX
8 Name: __________________________________ Date: ____________ © Festo Didactic GmbH & Co. KG 8023445
Equipment
ETS4 software
USB cable
KNX Basic
Product databases for SA/S switch actuator (ABB) and 4-fold pushbutton actuator (Berker)
Manuals for the above participants
Transparency no. 1
If you are familiar with how to use ETS, you can skip to the end of this chapter.
The first task is in 1.1.19. This is the task shown above.
1.1.2 Communication between software and hardware
When you begin work, KNX Basic is completely blank. None of the participants have physical addresses, so
the first thing you need to do is connect a USB cable between your computer and the participant “USB/S 1.1”.
Press the circuit breaker on the left of KNX Basic and launch ETS. In the ETS welcome window, there is
a (clickable) area marked Settings in the top right.
This contains an option labelled
“Communication”. Now you need to
see if an “ABB STOTZ-KONTAKT GmbH
(USB)” has been found.
Whenever it starts up, ETS searches for
connected KNX equipment – the only
thing you need to do is check if it is
there.
ETS will remember what you used in
your last session.
When you work with this software, everything you do is stored in a database. You never need to save
manually while you are working.
As long as you are in contact with your database, you can quit whenever you want and then return to exactly
the same place the next time you open the program. As a result, if you delete something from this database,
you cannot “undo” it (more on this later).
Part 1 – Introduction to KNX Exercise 1 – Switching
© Festo Didactic GmbH & Co. KG 8023445 Name: __________________________________ Date: ____________ 9
1.1.3 Learning to search in ETS
At the start, i.e. before you have built a functioning installation, you can try scrolling around a little and
looking at the options available to you. This way, you can learn how to maximise individual windows, dock
them together, move them onto the desktop etc.
Tip: click on the top left of the ETS window to either view your project as it was when you exited or see all
the see all you options, such as communication, settings etc.
You can also try clicking on the orange/brown arrows to “Undo” and “Redo”. At the beginning, it is easy to
click the wrong thing.
1.1.4 Creating a database
If your communication is working, you can now start a new project. First of all, you need to create
a database. This is where all the information on your project will be stored.
Click on Database in the top left corner. If you already have one or more databases, you can choose to open
one of them. You will always be given the option of creating a new database. That is what we will do.
Name it “New database” and click OK.
The system will now generate a new database, which will be stored in your area of the computer you are
using. (If this doesn't work, you can check to see whether your name on the computer is the same as your
login name. If this is the case, change the name on the computer or create a new user).
A backup copy of the database will be created automatically when you exit ETS. You can select this function
under “Database”. Here, you can also enter search paths etc...
Afterwards, the database will contain different projects, and thus all the information on the participants you
import into the project.
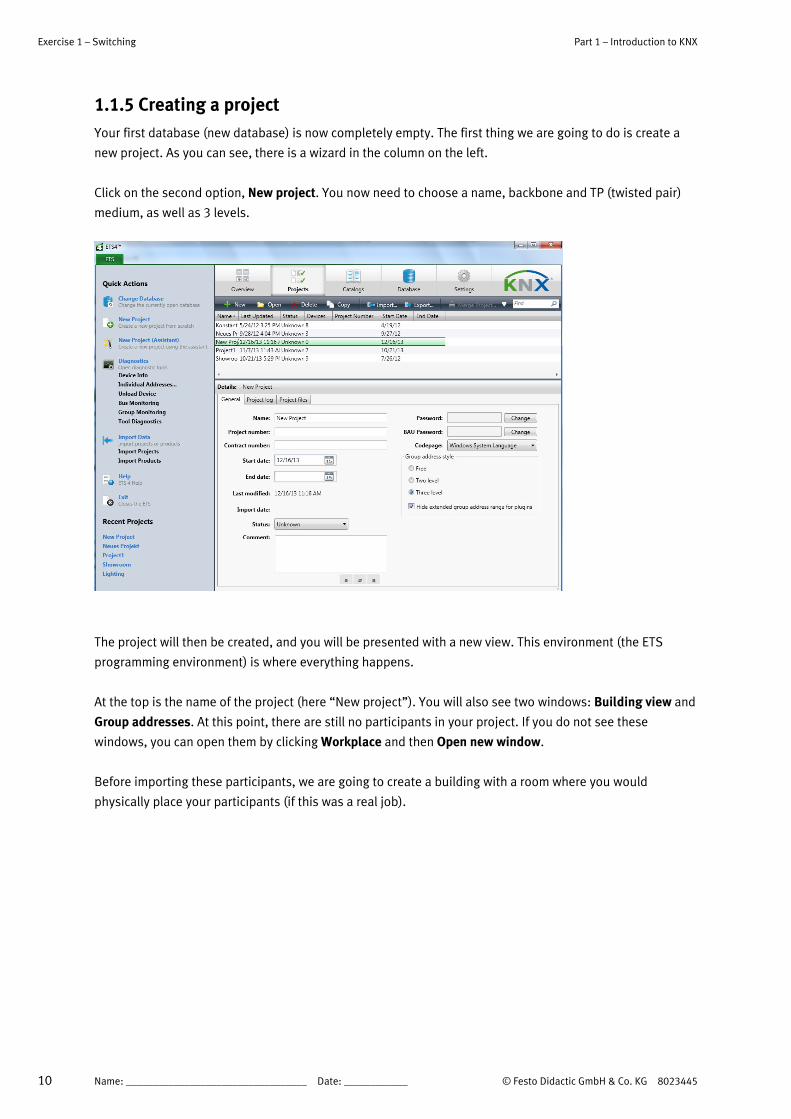
Exercise 1 – Switching Part 1 – Introduction to KNX
10 Name: __________________________________ Date: ____________ © Festo Didactic GmbH & Co. KG 8023445
1.1.5 Creating a project
Your first database (new database) is now completely empty. The first thing we are going to do is create a
new project. As you can see, there is a wizard in the column on the left.
Click on the second option, New project. You now need to choose a name, backbone and TP (twisted pair)
medium, as well as 3 levels.
The project will then be created, and you will be presented with a new view. This environment (the ETS
programming environment) is where everything happens.
At the top is the name of the project (here “New project”). You will also see two windows: Building view and
Group addresses. At this point, there are still no participants in your project. If you do not see these
windows, you can open them by clicking Workplace and then Open new window.
Before importing these participants, we are going to create a building with a room where you would
physically place your participants (if this was a real job).

Part 1 – Introduction to KNX Exercise 1 – Switching
© Festo Didactic GmbH & Co. KG 8023445 Name: __________________________________ Date: ____________ 11
1.1.6 Building view
The Festo KNX Board is based on the principle of you learning to work with hardware and software on the
board in front of you. “In the real world”, your participants will be spread throughout the building. Before we
try to solve the task, we will therefore create a house and name the top level “1 Villa Road”. This is the
address of “your” house.
This fictional house has two floors. The ground floor contains a technical room with an electrical control
centre. This is where all the actuators – the units that affect things – are located. A switch actuator is
equivalent to a contactor. Other actuators may control the direction or speed of a motor, or the intensity of
a light fitting.
The room contains various sensors and pushbutton actuators. For KNX, we refer to these using the general
term “sensors”. Outside the room, i.e. in the corridors, above the windows etc., there are other devices such
as awnings, rain and wind sensors etc.
We will start indoors.
Click “Add Buildings”. Write 1 Villa Road. Now click on this name and enter the name of the house. ETS is
prepared for large projects such as “Apartment building A/B”. Let's pretend your house is called Paradise. If
you wish to build a guest house at 1 Villa Road at a later date, you can add it here.
Once you have created the house, you can add the Ground floor and 1st floor. Once you have done this,
click on the Ground floor and create a Technical room. On the 1st floor, you can create Bedroom 1. Try
building the house you live in (or a friend's) to help you get to grips with how it works.
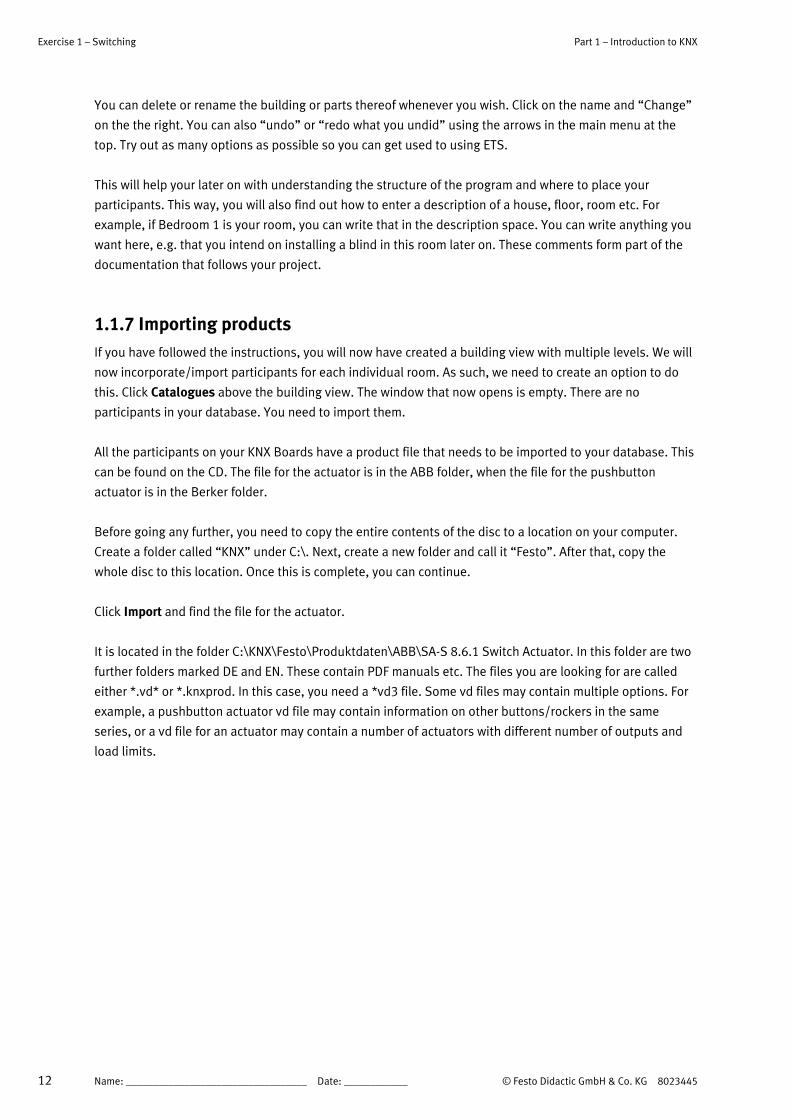
Exercise 1 – Switching Part 1 – Introduction to KNX
12 Name: __________________________________ Date: ____________ © Festo Didactic GmbH & Co. KG 8023445
You can delete or rename the building or parts thereof whenever you wish. Click on the name and “Change”
on the the right. You can also “undo” or “redo what you undid” using the arrows in the main menu at the
top. Try out as many options as possible so you can get used to using ETS.
This will help your later on with understanding the structure of the program and where to place your
participants. This way, you will also find out how to enter a description of a house, floor, room etc. For
example, if Bedroom 1 is your room, you can write that in the description space. You can write anything you
want here, e.g. that you intend on installing a blind in this room later on. These comments form part of the
documentation that follows your project.
1.1.7 Importing products
If you have followed the instructions, you will now have created a building view with multiple levels. We will
now incorporate/import participants for each individual room. As such, we need to create an option to do
this. Click Catalogues above the building view. The window that now opens is empty. There are no
participants in your database. You need to import them.
All the participants on your KNX Boards have a product file that needs to be imported to your database. This
can be found on the CD. The file for the actuator is in the ABB folder, when the file for the pushbutton
actuator is in the Berker folder.
Before going any further, you need to copy the entire contents of the disc to a location on your computer.
Create a folder called “KNX” under C:\. Next, create a new folder and call it “Festo”. After that, copy the
whole disc to this location. Once this is complete, you can continue.
Click Import and find the file for the actuator.
It is located in the folder C:\KNX\Festo\Produktdaten\ABB\SA-S 8.6.1 Switch Actuator. In this folder are two
further folders marked DE and EN. These contain PDF manuals etc. The files you are looking for are called
either *.vd* or *.knxprod. In this case, you need a *vd3 file. Some vd files may contain multiple options. For
example, a pushbutton actuator vd file may contain information on other buttons/rockers in the same
series, or a vd file for an actuator may contain a number of actuators with different number of outputs and
load limits.
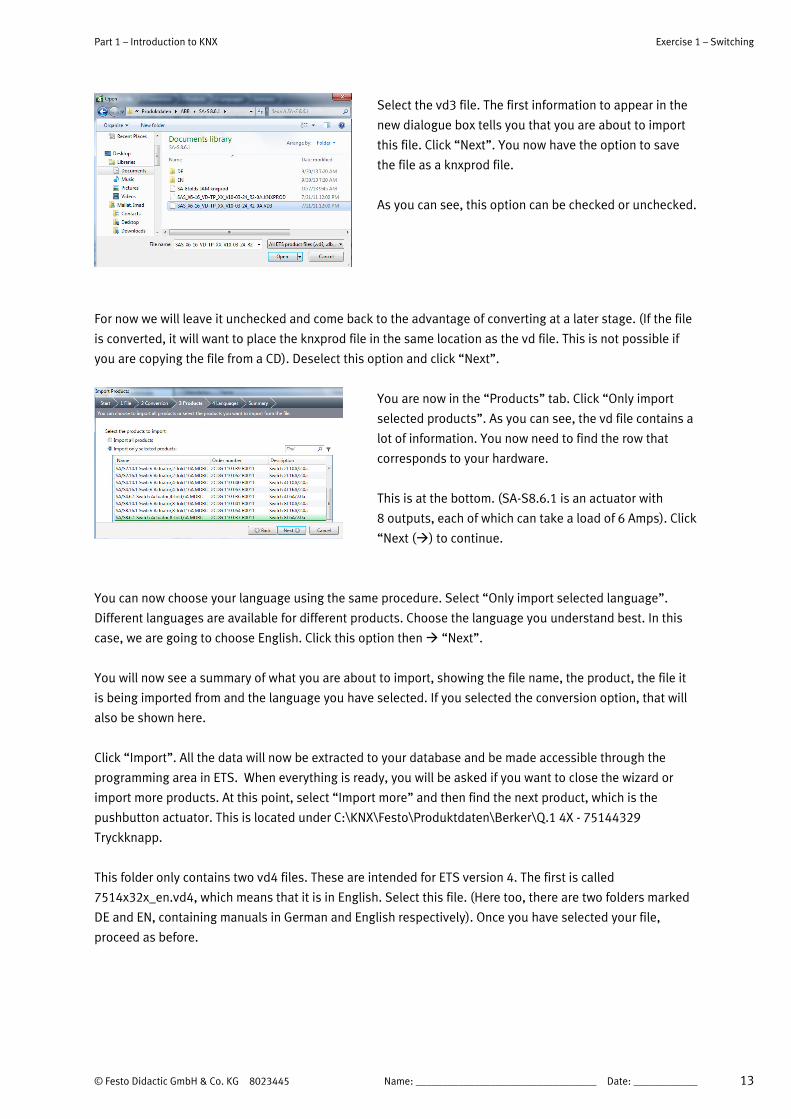
Part 1 – Introduction to KNX Exercise 1 – Switching
© Festo Didactic GmbH & Co. KG 8023445 Name: __________________________________ Date: ____________ 13
Select the vd3 file. The first information to appear in the
new dialogue box tells you that you are about to import
this file. Click “Next”. You now have the option to save
the file as a knxprod file.
As you can see, this option can be checked or unchecked.
For now we will leave it unchecked and come back to the advantage of converting at a later stage. (If the file
is converted, it will want to place the knxprod file in the same location as the vd file. This is not possible if
you are copying the file from a CD). Deselect this option and click “Next”.
You are now in the “Products” tab. Click “Only import
selected products”. As you can see, the vd file contains a
lot of information. You now need to find the row that
corresponds to your hardware.
This is at the bottom. (SA-S8.6.1 is an actuator with
8 outputs, each of which can take a load of 6 Amps). Click
“Next () to continue.
You can now choose your language using the same procedure. Select “Only import selected language”.
Different languages are available for different products. Choose the language you understand best. In this
case, we are going to choose English. Click this option then “Next”.
You will now see a summary of what you are about to import, showing the file name, the product, the file it
is being imported from and the language you have selected. If you selected the conversion option, that will
also be shown here.
Click “Import”. All the data will now be extracted to your database and be made accessible through the
programming area in ETS. When everything is ready, you will be asked if you want to close the wizard or
import more products. At this point, select “Import more” and then find the next product, which is the
pushbutton actuator. This is located under C:\KNX\Festo\Produktdaten\Berker\Q.1 4X - 75144329
Tryckknapp.
This folder only contains two vd4 files. These are intended for ETS version 4. The first is called
7514x32x_en.vd4, which means that it is in English. Select this file. (Here too, there are two folders marked
DE and EN, containing manuals in German and English respectively). Once you have selected your file,
proceed as before.
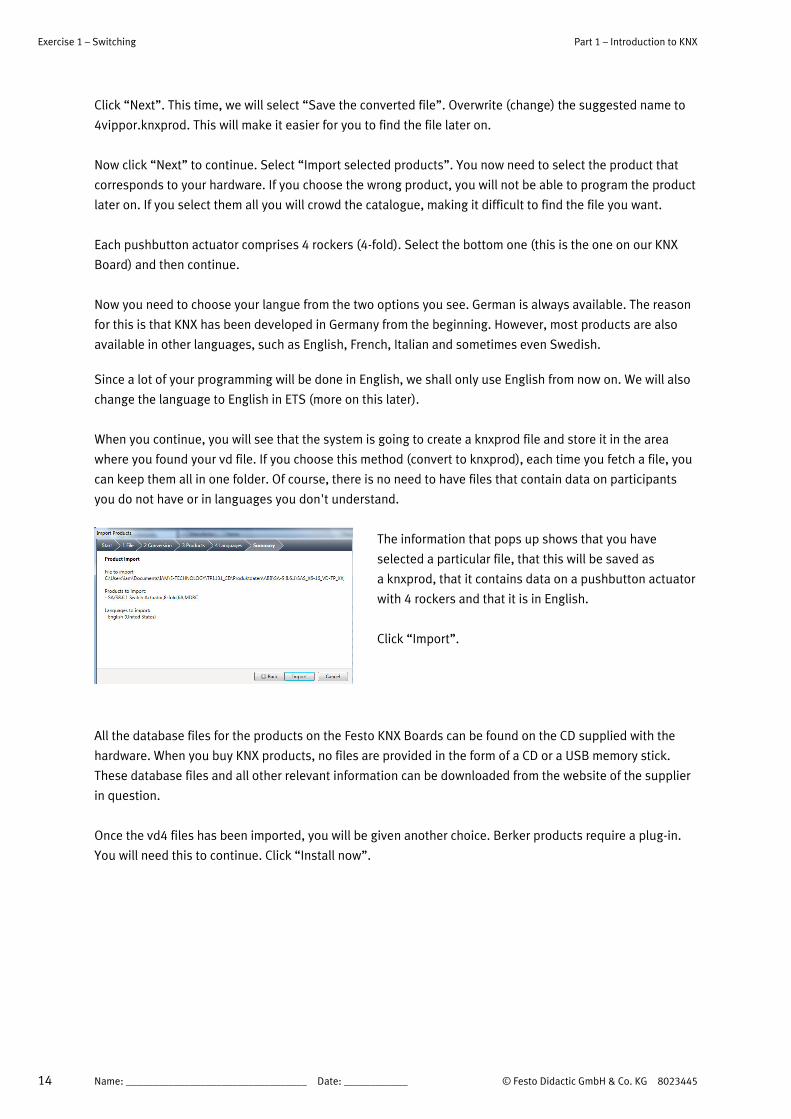
Exercise 1 – Switching Part 1 – Introduction to KNX
14 Name: __________________________________ Date: ____________ © Festo Didactic GmbH & Co. KG 8023445
Click “Next”. This time, we will select “Save the converted file”. Overwrite (change) the suggested name to
4vippor.knxprod. This will make it easier for you to find the file later on.
Now click “Next” to continue. Select “Import selected products”. You now need to select the product that
corresponds to your hardware. If you choose the wrong product, you will not be able to program the product
later on. If you select them all you will crowd the catalogue, making it difficult to find the file you want.
Each pushbutton actuator comprises 4 rockers (4-fold). Select the bottom one (this is the one on our KNX
Board) and then continue.
Now you need to choose your langue from the two options you see. German is always available. The reason
for this is that KNX has been developed in Germany from the beginning. However, most products are also
available in other languages, such as English, French, Italian and sometimes even Swedish.
Since a lot of your programming will be done in English, we shall only use English from now on. We will also
change the language to English in ETS (more on this later).
When you continue, you will see that the system is going to create a knxprod file and store it in the area
where you found your vd file. If you choose this method (convert to knxprod), each time you fetch a file, you
can keep them all in one folder. Of course, there is no need to have files that contain data on participants
you do not have or in languages you don't understand.
The information that pops up shows that you have
selected a particular file, that this will be saved as
a knxprod, that it contains data on a pushbutton actuator
with 4 rockers and that it is in English.
Click “Import”.
All the database files for the products on the Festo KNX Boards can be found on the CD supplied with the
hardware. When you buy KNX products, no files are provided in the form of a CD or a USB memory stick.
These database files and all other relevant information can be downloaded from the website of the supplier
in question.
Once the vd4 files has been imported, you will be given another choice. Berker products require a plug-in.
You will need this to continue. Click “Install now”.

Part 1 – Introduction to KNX Exercise 1 – Switching
© Festo Didactic GmbH & Co. KG 8023445 Name: __________________________________ Date: ____________ 15
Once this is complete, a dialogue box that says “All elements imported successfully” will appear. This is
followed once more by a query as to what you want to do next. We are not going to import anything else, but
we still need to check that we have a knxprod file for the pushbutton actuator.
Click “Import more catalogues”. The search path is the same one you used last time. This is helpful when
you have a lot of files to import. Click the button to the right of the text. This will open the catalogue where
you were most recently.
A knxprod-file should be shown. If you highlight this, it
should also end up in your catalogue.
If you had selected this file, there would have been
absolutely no need to choose the product or language.
There will not be any knxprod conversion either (you have already done this), and it should be much quicker.
This file does not have the same name as the file you imported to your database, though the contents are
exactly the same.
Once you have finished importing database files (you can exit at any time by pressing “Cancel”), you will
return to the main ETS screen. As you can see, here you can change the name of your project, add
comments or project numbers etc.
There is a tab entitled “Project log”, and another called “Project files”. KNX has covered this in the
documentation. If this were a real project and you were working on an installation for a customer, you would
have to hand over material so that the project did not depend on you. You can also print this
documentation.
You can also set up a password for your project so that only those with the password have modification
rights etc. This is not recommended.
We are now going to change the name of the project. Go to the row titled “New project” and change this to
“My project”. The change will be applied when you click on an empty box, e.g. the Project number.
To return to the project, you can click on the project name (My project) or the green rectangle in the top left.
Do this, and then click Catalogues at the top of the main menu. Here you will now see the two files you have
imported. The catalogue corresponds to the database. If you have several projects under the same
database, you can access all the products you have imported here.
Exercise 1 – Switching Part 1 – Introduction to KNX
16 Name: __________________________________ Date: ____________ © Festo Didactic GmbH & Co. KG 8023445
1.1.8 Incorporating participants
The windows (dialogue boxes) are stacked horizontally in the default ETS layout.
This can be changed at the top of the Windows menu. You can also drag your window “outside” ETS. This is
good if you have a large monitor, or multiple monitors. This gives you a better overview, which makes
programming easier.
We will start by closing the Group addresses window. Do this by clicking the cross in the top right-hand
corner. The other two windows will then automatically expand to fill the whole screen. If you wish to change
windows, simply use the up and down arrows in each window. Take some time to test out all the options.
You can always recover any window you have removed by mistake by going to Workplace then Open new
window.
Now it is time to add participants to your project. As you can see, you are currently in area 1 and line 1. This
information is also displayed at the bottom of ETS. The address was selected when you created a new
project. Now click on 1 Villa Road, then Paradise, then Ground floor and finally Technical room.
You now need to drag one of the participants from Catalogues to the empty space on the right of the
building view. Select the actuator, (ABB SA/S8.6.1 Switch Actuator, 8-fold, 6A, MDRC). This needs to be
placed in the technical room, and various components in other areas of the house need to be supplied with
power via this actuator. One of the channels will be physically connected to the lighting in Bedroom 1.
Another channel on your actuator will be connected to the other room. This is what happens in a real house.
On your KNX board, you do this using the lab cables on the top.
Once you have dragged the participant to the empty area, it will automatically be assigned the address
1.1.1. The next participant you drag into the Building view will be assigned 1.1.2. If you had several identical
actuators, you would be able to continue with this process. Let's say we need 24 different outputs that give
you the option of switching 24 different positions throughout the house on (supplying with voltage) or off.
From these actuators, you can also lay cables to different wall sockets, lights etc. All you need to do is drag
these into the technical room in the building view, and they will be given the addresses 1.1.1, 1.1.2, 1.1.3
etc.
You can remove these products whenever you want. The next participant will then take the vacant number.
Try out dragging different products (you only have two for now) into this area, then right clicking and
selecting “Delete”, pressing Delete on your keyboard or clicking the red cross in the menu at the top. It is a
good idea for you to play around in ETS as much as possible at this point. Your project is not yet complete,
and it is easy to start again from scratch if you have to.
Later on, you will enter parameters and enable participants to communicate with one another. All this work
would be lost if you were to delete them from the building view.

Part 1 – Introduction to KNX Exercise 1 – Switching
© Festo Didactic GmbH & Co. KG 8023445 Name: __________________________________ Date: ____________ 17
You can also “Undo” or “Redo” deletion of participants in the building view. These buttons are located in
the menu at the top of ETS. Remember that deletion of database files (i.e. files belonging to the participants)
from the catalogue cannot be undone. If they are deleted, they will have to be re-imported. For this reason,
the system will always ask for confirmation before deleting these files: “Are you sure you want to do this?”
Once you have finished practising incorporating and deleting participants, you need to reset everything so
that you only have on participant in the Technical room. This participant should have the address 1.1.1.
It is now time to add the next participant: the pushbutton
actuator. We are going to put this in Bedroom 1. Click 1st
floor then Bedroom 1.
Drag the participant “Push button 4fold comfort with
labeling field” to the empty space.
As you will see, it is given the address 1.1.2.
There are now two more things to do before you can make something happen “for real”, i.e. physically
activate the actuator with the pushbutton actuator.
Both participants need to be assigned the same address in reality as the one you have in the program.
They will communicate with each other using group addresses.
1.1.9 Programming physical addresses
You now need to connect Festo KNX Basic to your computer using a USB cable, and make sure that your KNX
Basic is connected to a 240 V power supply. Press the circuit breaker for KNX Basic.
Click on “ETS” and check that you have established contact with KNX under “Settings” and
“Communication”. Click “Test” and check to that you get a green “OK” at the side of this “button”.
Click “ETS” and select 1.1.1 in the building view.

Exercise 1 – Switching Part 1 – Introduction to KNX
18 Name: __________________________________ Date: ____________ © Festo Didactic GmbH & Co. KG 8023445
You now need to give this participant a physical address:
Right-click and select Download then Download
individual address.
You will now receive a message telling you to press the
programming button on the participant.
When you do this, a red LED will come on, then go out
once everything is done.
Your participant will now be programmed with the address 1.1.1. (If this address is already held by another
participant, the process will not succeed.) Do the same thing with the pushbutton actuator. Use a pen or
a matchstick and press carefully.
You can now check that everything is how it should be
using the Diagnostics option at the top of the menu.
There is an option for Individual addresses.
With this, you can scan and check which participants
begin with 1.1, as well as which purely physical
addresses different participants have been given.
(We will come back to the Diagnostic tool later.)

Part 1 – Introduction to KNX Exercise 1 – Switching
© Festo Didactic GmbH & Co. KG 8023445 Name: __________________________________ Date: ____________ 19
1.1.10 Creating group addresses
It is now time to enable your participants to communicate with one another. If you click 1.1.1 or 1.1.2 in the
building view, you will see a column with the heading “Group addresses”. This is the column the addresses
need to be dragged to. First, we need to create the addresses.
Go to Workplace and click Open New Panel.
Select Group Addresses.
As you can see, it's getting a little cramped in ETS. Close
Catalogues by clicking the cross in the top right-hand
corner.
You only need this window when you are adding
participants to your program.
Click the green cross (Add Main Groups) in “Group addresses”. Enter the word “Lighting” and click “OK”.
(This area – the top area – is where you will later enter words such as Heating, Ventilation, Alarm etc.)
Once you have done this, select the word “Lighting” and
click the cross again, i.e. “Add Middle Groups”.
We are going to use this group for all the lighting on the
1st floor, so we enter “Lighting 1st floor”
We are now going to write down a number of group addresses. Let's say this pushbutton actuator/rocker is
going to be in the room where the adults sleep. As such, the top button should be convenient for turning the
main (ceiling) lights in this bedroom on and off. The other might be used to activate the bedside lamps,
while the third, above it, can be used to turn the lights in the hall on and off. We can then use the last one
for turning out all the lights in the house. We will come back to this later.
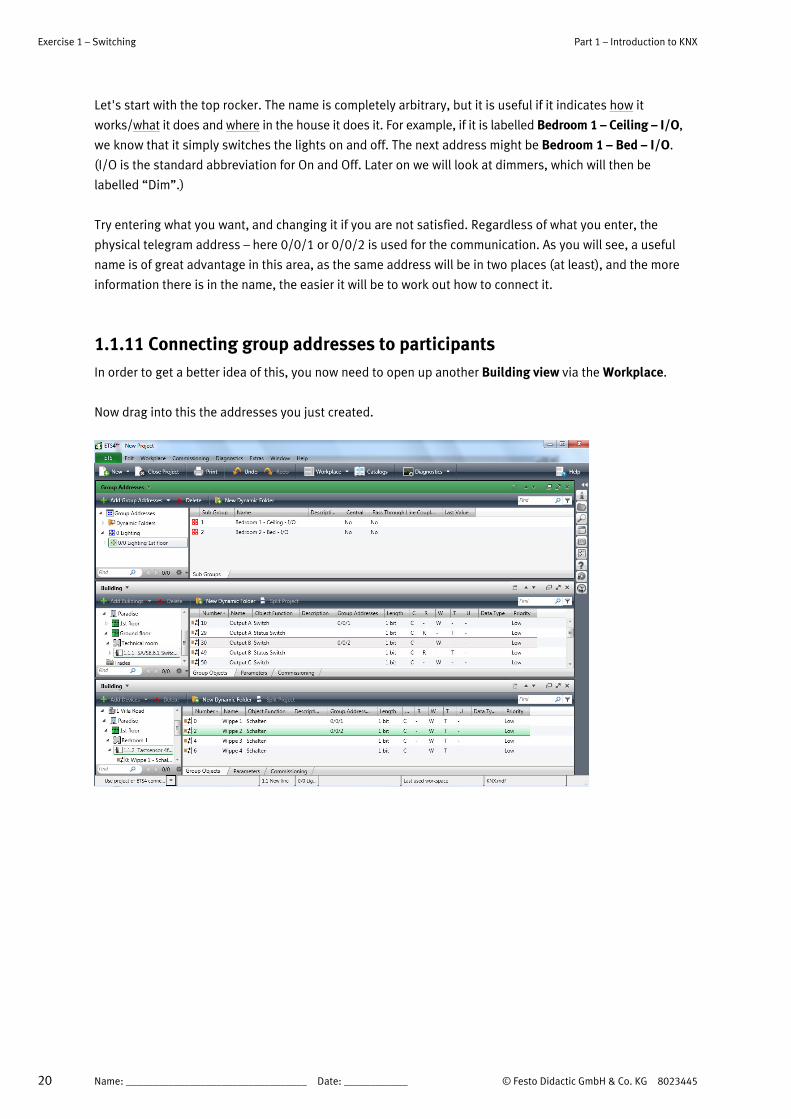
Exercise 1 – Switching Part 1 – Introduction to KNX
20 Name: __________________________________ Date: ____________ © Festo Didactic GmbH & Co. KG 8023445
Let's start with the top rocker. The name is completely arbitrary, but it is useful if it indicates how it
works/what it does and where in the house it does it. For example, if it is labelled Bedroom 1 – Ceiling – I/O,
we know that it simply switches the lights on and off. The next address might be Bedroom 1 – Bed – I/O.
(I/O is the standard abbreviation for On and Off. Later on we will look at dimmers, which will then be
labelled “Dim”.)
Try entering what you want, and changing it if you are not satisfied. Regardless of what you enter, the
physical telegram address – here 0/0/1 or 0/0/2 is used for the communication. As you will see, a useful
name is of great advantage in this area, as the same address will be in two places (at least), and the more
information there is in the name, the easier it will be to work out how to connect it.
1.1.11 Connecting group addresses to participants
In order to get a better idea of this, you now need to open up another Building view via the Workplace.
Now drag into this the addresses you just created.

Part 1 – Introduction to KNX Exercise 1 – Switching
© Festo Didactic GmbH & Co. KG 8023445 Name: __________________________________ Date: ____________ 21
0/0/1 should be assigned to Output A Switch, which is the first channel on the actuator.
0/0/2 should be assigned to Output B Switch, which is the second channel on the actuator.
0/0/1 should also be assigned to Rocker 1 Switching, which is the top rocker on the pushbutton actuator.
0/0/2 should be assigned to Rocker 2 Switching, which is the second rocker on the pushbutton actuator.
The easiest way to do this is by dragging them to the red area for each address using the mouse. If you drag
them to the wrong place, you can remove them by right-clicking and selecting “Delete connection”.
1.1.12 Programming applications
We are now going to download this application and give it a test run. This is similar to the earlier procedure,
except that now the participants have already been assigned their physical addresses, we will go to
“Program application” instead:
Move the cursor to 1.1.1. Right-click and select Program then “Program application”.
Do the same for 1.1.2.
Now test your installation.
You will hear it click, but there is no way of identifying what is happening. To correct this, take two cables
from your box and connect them from the outputs marked A to H on the actuators to some of the LEDs
marked 1 to 14.
Some of these LEDs are red and blue. We will save
these for later exercises.
Use one cable to connect A to 6 and another to
connect B to 7.

Exercise 1 – Switching Part 1 – Introduction to KNX
22 Name: __________________________________ Date: ____________ © Festo Didactic GmbH & Co. KG 8023445
Try pressing the button again. You will see that the LEDs light up if you press the left-hand side of the rocker
and go out if you press the right. There is also a little indicator on the same button that shows what you
have just done. This indicator goes out after a few seconds.
At the moment, your pushbutton actuator is configured to work with switching. The actuator has no delay –
it responds as soon as you press the button.
1.1.13 Telegrams
When you press the button, a telegram is sent along the TP (twisted pair) cable, which is in contact with all
the participants. A 29-volt direct current is used to supply power to the participants, and an alternating
current signal is applied to this. The data traffic rate is 9600 bits/s, and the signal only takes a few
milliseconds to arrive.
The participants that listen to and read the telegram (actuators) only respond to what they have been
programmed to react to. KNX works with distributed intelligence, and if communication between the
pushbutton actuator and the actuator does not work, nothing will happen. In case of errors, the telegram is
automatically re-sent twice. After this, the button has to be pressed again.
It is very rare for this not to work. KNX is highly stable. What exactly happens is not important; what matters
is that it works. As a KNX programmer, you cannot do much wrong. For example, it is not possible to
program the application program for the pushbutton actuator or vice-versa. Each participant has a chip with
built-in information regarding what should happen, and if this does not happen, the participant reports this
and the download is stopped.
The telegram's “traffic” is defined by flags. If you double-click on a group address, you will see columns for
these flags. These contain the status for communication (which is a “must”): write, read, transfer or update.
The default setting for sensors (pushbutton actuators etc.) is “transfer”. The first participant to read a
telegram sends an OK (handshake) back to the participant that sent it. There is also an option to set the
importance of the telegram by changing the priority to low, high or alarm. Practise changing the status then
downloading your application and testing it again.
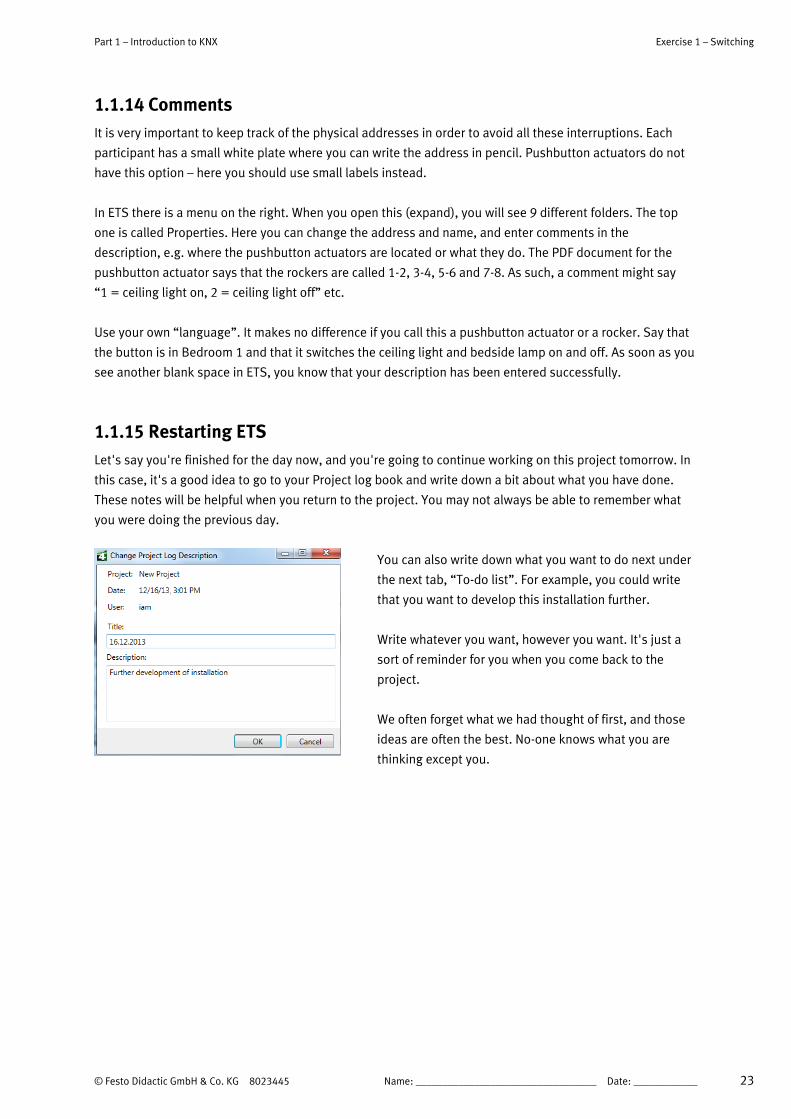
Part 1 – Introduction to KNX Exercise 1 – Switching
© Festo Didactic GmbH & Co. KG 8023445 Name: __________________________________ Date: ____________ 23
1.1.14 Comments
It is very important to keep track of the physical addresses in order to avoid all these interruptions. Each
participant has a small white plate where you can write the address in pencil. Pushbutton actuators do not
have this option – here you should use small labels instead.
In ETS there is a menu on the right. When you open this (expand), you will see 9 different folders. The top
one is called Properties. Here you can change the address and name, and enter comments in the
description, e.g. where the pushbutton actuators are located or what they do. The PDF document for the
pushbutton actuator says that the rockers are called 1-2, 3-4, 5-6 and 7-8. As such, a comment might say
“1 = ceiling light on, 2 = ceiling light off” etc.
Use your own “language”. It makes no difference if you call this a pushbutton actuator or a rocker. Say that
the button is in Bedroom 1 and that it switches the ceiling light and bedside lamp on and off. As soon as you
see another blank space in ETS, you know that your description has been entered successfully.
1.1.15 Restarting ETS
Let's say you're finished for the day now, and you're going to continue working on this project tomorrow. In
this case, it's a good idea to go to your Project log book and write down a bit about what you have done.
These notes will be helpful when you return to the project. You may not always be able to remember what
you were doing the previous day.
You can also write down what you want to do next under
the next tab, “To-do list”. For example, you could write
that you want to develop this installation further.
Write whatever you want, however you want. It's just a
sort of reminder for you when you come back to the
project.
We often forget what we had thought of first, and those
ideas are often the best. No-one knows what you are
thinking except you.

Exercise 1 – Switching Part 1 – Introduction to KNX
24 Name: __________________________________ Date: ____________ © Festo Didactic GmbH & Co. KG 8023445
Now we are going to shut down the whole ETS program. Click on the cross in the top right-hand corner.
Open ETS again. As you can see, you are automatically brought back to the database you were working in
before. You can change this setting, but we recommend leaving it as it is. You can also see the name “My
project” under “Project overview”. Click on this. When you go into a project, you nee to expand everything.
Start by closing one of the building views. All your settings can still be seen in the area on the right.
ETS automatically saves everything you do in real-time. If you are working on a database that is stored on
a network, you need to be in contact with the network every time you start up ETS.
The hardware also remembers what you have done. If you shut off the power, there will be enough residual
power from your KNX power supply for the chips in all the participants to save and remember all your
settings before they are completely de-energised. This backup is a built-in system feature, and part of the
standard.
The technology is based on the principle that the hardware notices when the voltage drops and saves all the
values, dimmer levels etc. straight away in a memory within the participant. Once power is restored, your
dimmer actuator returns to the previous level.
1.1.16 Changing language
We are now going to switch to the English version of ETS. You will notice little difference, except for the fact
that the names on your menus will be different.
Some words in KNX are hard to translate. The Swedish word for changing parameters in KNX is
“parametering”. In English we simply use the term “change parameters”. You will soon see that English is
easier to work with. For example, “On” and “Off” are much more widely recognised than the Swedish words
“Till” and “Från”. Swedish often uses typical “Swenglish” words that mix Swedish and English, such as
“Dimra” for “Dim”.
Click the ETS button in the top left. Select “Settings” then “Language”. Then choose English as your
language, and also as the desired product language. Finally, click “Apply”. You must restart ETS to apply the
changes.
Now everything is in English. If you feel more comfortable doing so, you can use the same method to change
the system to your own language. Feel free to play around, but remember how to change it back.
Part 1 – Introduction to KNX Exercise 1 – Switching
© Festo Didactic GmbH & Co. KG 8023445 Name: __________________________________ Date: ____________ 25
Click on “My project”. Scroll around your project and change the names if necessary so that they can be
understood by everyone, not just those who understand your native language. Make sure you also change
the descriptions; use the English word “Pushbutton” on the top row. Names of rooms etc. should also be in
English, e.g. “Bedroom”.
1.1.17 “Copying” the database
We are now going to change the name of the database. Click ETS (top left) and select Database. As you can
see, there is no direct option for changing the name. As such, we will make a backup of the existing
database (new database) and name the copy “Festo KNX” instead. Click “Save”.
Then create a new database and give it the same name as you entered when making your backup, in this
case “Festo KNX”. (When you create a new database, the current one will be closed.)
Enter the name “Festo KNX” and click “OK”. A new database has now been created.
Next, click “Restore database” and use your copy (backup), which should be called Festo KNX.bak. The
contents of this backup will now be stored in the newly created database. You now have two identical
databases – one called “New database” and one called “Festo KNX”. The one that is currently open is the
one you created, which contains one project (“My project”). This also contains the database files you
imported earlier. The building view and your group addresses can still be seen in the project.
Click ETS and change the name from “My project” to “KNX 1 - Lighting on/off”. Now go into the project log
and change the text describing your project to English.
Highlight the comment “Today's date”, click “Edit” and change “Title” and “Description” to something that
describes what the project is about. Translate your old text to “simplified English”, i.e. write it in as simple
a way as possible.
Exercise 1 – Switching Part 1 – Introduction to KNX
26 Name: __________________________________ Date: ____________ © Festo Didactic GmbH & Co. KG 8023445
1.1.18 Summary
You have now “created” a project that is entirely in English. In the next section, we are going to use this
database, “Festo KNX”, and create more projects in it. The database will be filled with many projects and
a large number of different participants. You will soon see how easy this is.
This is the procedure for programming KNX with ETS. From now on, you will no longer receive such clear
instructions. You now know how to create a database and a project. You know how to import participants
and incorporate them into your project.
You have learned how to give them a physical address and how to interlink them using group addresses.
The last thing you learned was how to download your settings and test the system.
This simple, small, introductory project probably took quite a long time. If it is not working by now and you
still don't know why, you will find the next tasks difficult. If this is the case, we recommend that you start
again from the beginning in order to get more familiar with ETS.
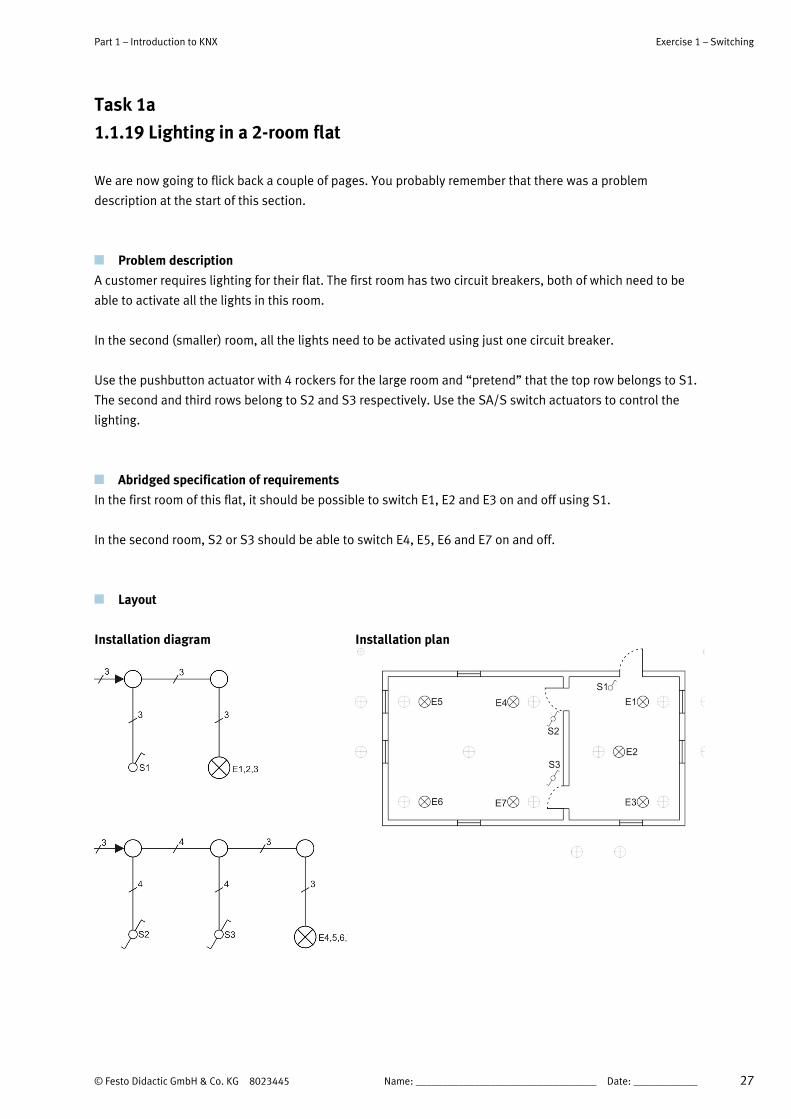
Part 1 – Introduction to KNX Exercise 1 – Switching
© Festo Didactic GmbH & Co. KG 8023445 Name: __________________________________ Date: ____________ 27
Task 1a
1.1.19 Lighting in a 2-room flat
We are now going to flick back a couple of pages. You probably remember that there was a problem
description at the start of this section.
Problem description
A customer requires lighting for their flat. The first room has two circuit breakers, both of which need to be
able to activate all the lights in this room.
In the second (smaller) room, all the lights need to be activated using just one circuit breaker.
Use the pushbutton actuator with 4 rockers for the large room and “pretend” that the top row belongs to S1.
The second and third rows belong to S2 and S3 respectively. Use the SA/S switch actuators to control the
lighting.
Abridged specification of requirements
In the first room of this flat, it should be possible to switch E1, E2 and E3 on and off using S1.
In the second room, S2 or S3 should be able to switch E4, E5, E6 and E7 on and off.
Layout
Installation diagram
Installation plan
Exercise 1 – Switching Part 1 – Introduction to KNX
28 Name: __________________________________ Date: ____________ © Festo Didactic GmbH & Co. KG 8023445
Equipment
ETS4 software
USB cable
KNX Basic
Product databases for SA/S switch actuator (ABB) and 4-fold pushbutton actuator (Berker)
Manuals for the above participants
Transparency no. 1
You were instructed to use the pushbutton actuator with 4 rockers for the large room and “pretend” that the
top row belongs to S1. The second and third rows belong to S2 and S3 respectively. Use the SA/S switch
actuators to control the lighting.
Your task is now to alter the existing installation to make this happen.
You can change your existing building view, but remember that you have to use the same pushbutton
actuator for all lighting points, so you can place it in any room you like. In a proper installation, of course,
these sensors (rockers/pushbutton actuators) will be placed at different locations throughout the room(s).
Place the transparency on your KNX Basic and connect the cables. Change your program to match the
specifications above and test it.
Once you have solved this task, you can move on to the next one.
1.1.20 Extra task 1a
If you wish, you can also try incorporating a “switch off all” function. Use the right-hand side of the bottom
rocker for this.
Tip: use the same telegram for this as for all the points where you already have “off”.

Part 1 – Introduction to KNX Exercise 1 – Switching
© Festo Didactic GmbH & Co. KG 8023445 Name: __________________________________ Date: ____________ 29
Task 1b
1.1.21 Lighting in a 3-room flat
The following task is a continuation of the previous one. You can re-use some of what you have already
done and add new outputs. As you can see, you will need more than four rockers. As such, you will need to
reconfigure your rockers so that each one can be used as a button itself.
You can alter the parameter settings to give each pushbutton actuator a toggle function. This is useful for
this task, as you will need at least 5 different buttons.
In one of the later exercises, you will use the other rocker, which also has a built-in controller.
Problem description
A customer requires lighting for their flat. We have three rooms whose lighting needs to be controlled by
different pushbutton actuators. In the room on the right, both pushbutton actuators should be used to turn
on all the lights. In each of the other two rooms, all the lights should be switched on using the respective
circuit breakers.
Use the top two rockers on the pushbutton actuator for the right-hand room. Control the lighting in the top
room with the third row, and use the next row for the lighting in the bottom room. Use the switch actuator to
activate the lighting.
Abridged specification of requirements
In the flat, it should be possible to switch E1, E2 and E3 on and off using either S1, S2 or S3.
S4 should be able to switch E4 and E5 on and off.
S5 should be able to switch E6 and E7 on and off.
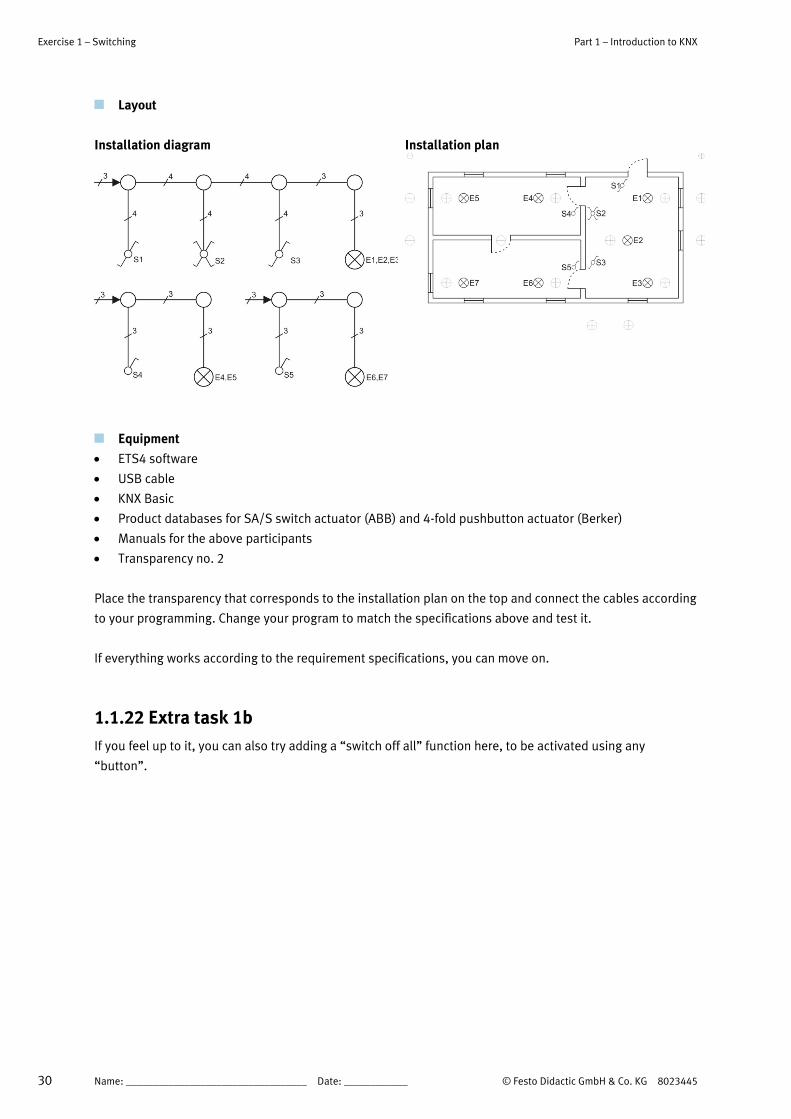
Exercise 1 – Switching Part 1 – Introduction to KNX
30 Name: __________________________________ Date: ____________ © Festo Didactic GmbH & Co. KG 8023445
Layout
Installation diagram
Installation plan
Equipment
ETS4 software
USB cable
KNX Basic
Product databases for SA/S switch actuator (ABB) and 4-fold pushbutton actuator (Berker)
Manuals for the above participants
Transparency no. 2
Place the transparency that corresponds to the installation plan on the top and connect the cables according
to your programming. Change your program to match the specifications above and test it.
If everything works according to the requirement specifications, you can move on.
1.1.22 Extra task 1b
If you feel up to it, you can also try adding a “switch off all” function here, to be activated using any
“button”.
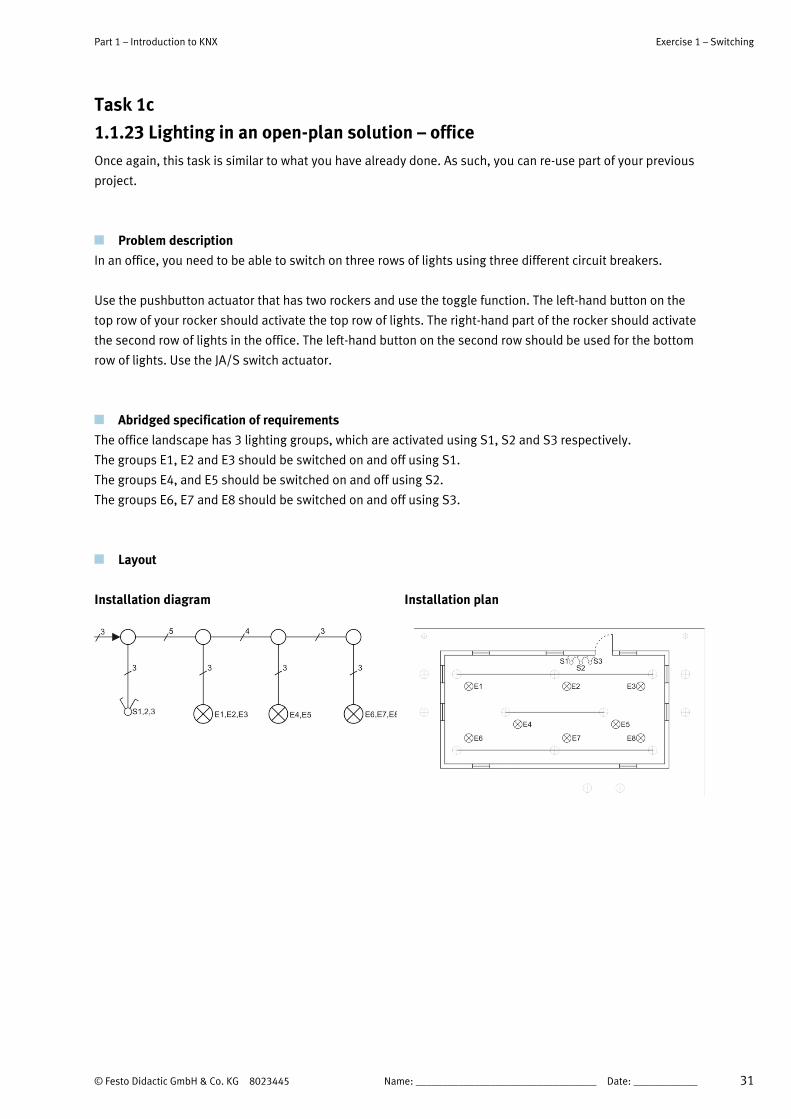
Part 1 – Introduction to KNX Exercise 1 – Switching
© Festo Didactic GmbH & Co. KG 8023445 Name: __________________________________ Date: ____________ 31
Task 1c
1.1.23 Lighting in an open-plan solution – office
Once again, this task is similar to what you have already done. As such, you can re-use part of your previous
project.
Problem description
In an office, you need to be able to switch on three rows of lights using three different circuit breakers.
Use the pushbutton actuator that has two rockers and use the toggle function. The left-hand button on the
top row of your rocker should activate the top row of lights. The right-hand part of the rocker should activate
the second row of lights in the office. The left-hand button on the second row should be used for the bottom
row of lights. Use the JA/S switch actuator.
Abridged specification of requirements
The office landscape has 3 lighting groups, which are activated using S1, S2 and S3 respectively.
The groups E1, E2 and E3 should be switched on and off using S1.
The groups E4, and E5 should be switched on and off using S2.
The groups E6, E7 and E8 should be switched on and off using S3.
Layout
Installation diagram
Installation plan

Exercise 1 – Switching Part 1 – Introduction to KNX
32 Name: __________________________________ Date: ____________ © Festo Didactic GmbH & Co. KG 8023445
Equipment
ETS4 software
USB cable
KNX Basic
Product databases for SA/S switch actuator (ABB) and 4-fold pushbutton actuator (Berker)
Manuals for the above participants
Transparency no. 3
1.1.24 Extra task 1c
Connect the cables so that you can use the top row of the pushbutton actuator with four rockers to switch
E1, E2 and E4 on and off. Use the second row for E2 and E7, and the third row for E3, E5 and E8. The right-
hand button on the last row should have a toggle function for “switch all off/on”.
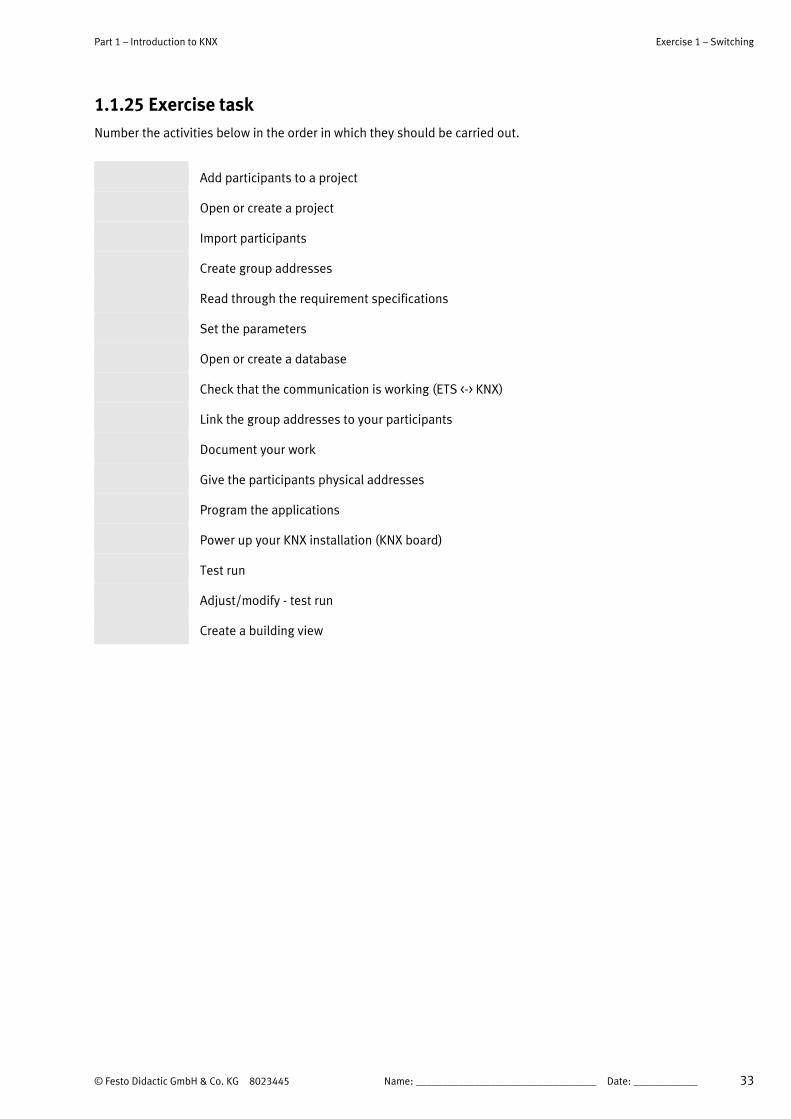
Part 1 – Introduction to KNX Exercise 1 – Switching
© Festo Didactic GmbH & Co. KG 8023445 Name: __________________________________ Date: ____________ 33
1.1.25 Exercise task
Number the activities below in the order in which they should be carried out.
Add participants to a project
Open or create a project
Import participants
Create group addresses
Read through the requirement specifications
Set the parameters
Open or create a database
Check that the communication is working (ETS <-> KNX)
Link the group addresses to your participants
Document your work
Give the participants physical addresses
Program the applications
Power up your KNX installation (KNX board)
Test run
Adjust/modify - test run
Create a building view
Recommended