FILE=PHPSQL Tutorial - part 2.docx by Greg Tisdell, updated on 7 October 2012 1
Create Basic Databases and Integrate with a Website – Lesson 4 Projects Combining PHP and MySQL In this lesson we will be creating a simple mailing list which will be running from your domain. If you wish you can develop it on your local computer using WAMPServer, but the intention is for this project to be running ‘live’. A point to recall is that, when using WAMPServer on localhost, the username will be root with no password. When using your domain the database is db.username.cessnock-ict.net, with the username being your usual username and a password of ‘student1’ In this lesson you’ll learn the methods for creating a managed distribution list, which can be used to send out newsletters or similar, to a list of email addresses stored in a web database. The mailing mechanism you’ll use is not meant to be a replacement for mailing list software, which is specifically designed for bulk messages. This is only designed for small lists of fewer than a few hundred email addresses. To make this project work you will need to:
• Create a subscribe/unsubscribe form and script • Create a front end for sending you message • Create the script that sends your message
Plan Your System Before you start with any database project (well actually any project) you need to stop and think of the elements you will need for your mechanism. You will need:
1. A table to hold email addresses 2. A way for users to add or remove their email addresses 3. A form and script for sending the message
Create the Subscribers Table To create your table, you can either use a script, login to MySQL locally as we have in previous lessons, or use the phpMyAdmin interface. Personally I recommend you try using the phpMyAdmin interface by opening a browser window and typing the address db.username.cessnock-ict.net. You should have used it 2 tutorials ago (Part 7). You really only need one field in the subscribers table – to hold the email address of the user. However, you should have an ID field just for consistency among your tables, and also because referencing an ID is a lot simpler than referencing a long email address in where clauses. So in this case your MySQL statement would look like this:
CREATE TABLE subscribers ( Id int not null primary key auto_increment, Email varchar (150) unique not null
); Note the use of unique in the field definition for Email. This means that although Id is the primary key, duplicates should not be allowed in the Email field either. The Email is a unique key and the Id field is the primary key. Go ahead and create the table in your existing (default) database e.g. my default database is gtisdelldb
FILE=PHPSQL Tutorial - part 2.docx by Greg Tisdell, updated on 7 October 2012 2
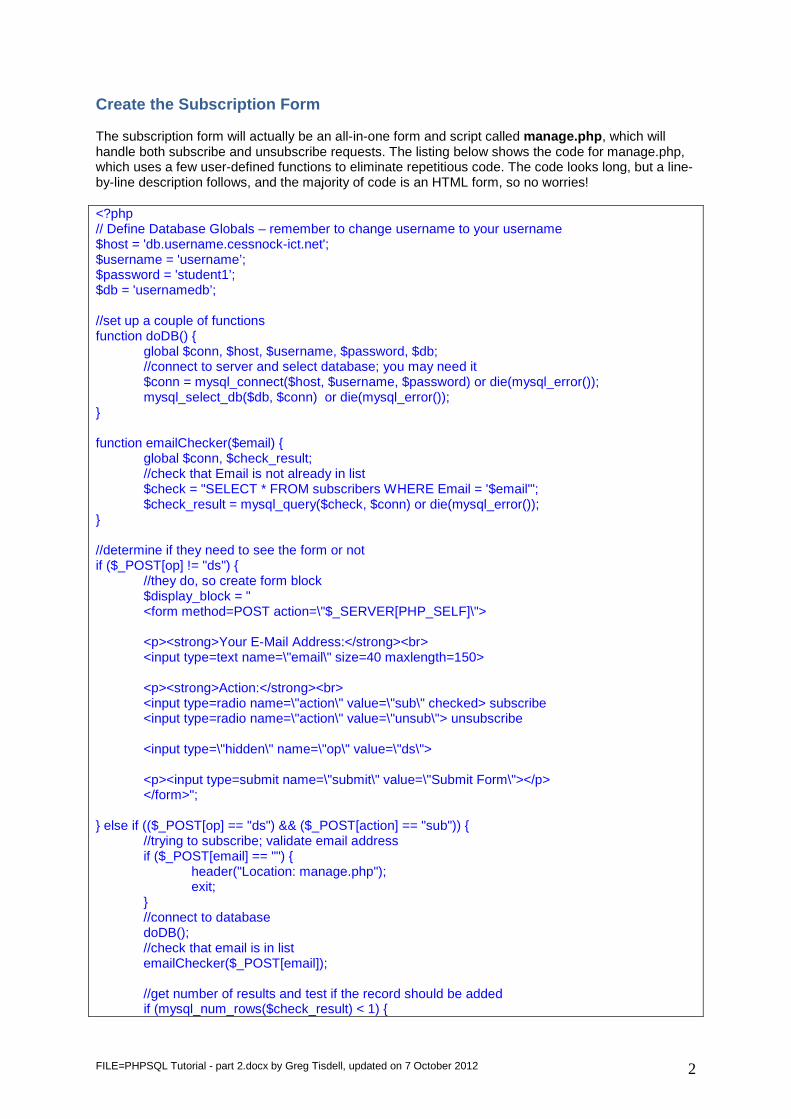
Create the Subscription Form The subscription form will actually be an all-in-one form and script called manage.php, which will handle both subscribe and unsubscribe requests. The listing below shows the code for manage.php, which uses a few user-defined functions to eliminate repetitious code. The code looks long, but a line-by-line description follows, and the majority of code is an HTML form, so no worries! <?php // Define Database Globals – remember to change username to your username $host = 'db.username.cessnock-ict.net'; $username = 'username’; $password = 'student1’; $db = 'usernamedb’; //set up a couple of functions function doDB() { global $conn, $host, $username, $password, $db; //connect to server and select database; you may need it $conn = mysql_connect($host, $username, $password) or die(mysql_error()); mysql_select_db($db, $conn) or die(mysql_error()); } function emailChecker($email) { global $conn, $check_result; //check that Email is not already in list $check = "SELECT * FROM subscribers WHERE Email = '$email'"; $check_result = mysql_query($check, $conn) or die(mysql_error()); } //determine if they need to see the form or not if ($_POST[op] != "ds") { //they do, so create form block $display_block = " <form method=POST action=\"$_SERVER[PHP_SELF]\"> <p><strong>Your E-Mail Address:</strong><br> <input type=text name=\"email\" size=40 maxlength=150> <p><strong>Action:</strong><br> <input type=radio name=\"action\" value=\"sub\" checked> subscribe <input type=radio name=\"action\" value=\"unsub\"> unsubscribe <input type=\"hidden\" name=\"op\" value=\"ds\"> <p><input type=submit name=\"submit\" value=\"Submit Form\"></p> </form>"; } else if (($_POST[op] == "ds") && ($_POST[action] == "sub")) { //trying to subscribe; validate email address if ($_POST[email] == "") { header("Location: manage.php"); exit; } //connect to database doDB(); //check that email is in list emailChecker($_POST[email]); //get number of results and test if the record should be added if (mysql_num_rows($check_result) < 1) {
FILE=PHPSQL Tutorial - part 2.docx by Greg Tisdell, updated on 7 October 2012 3
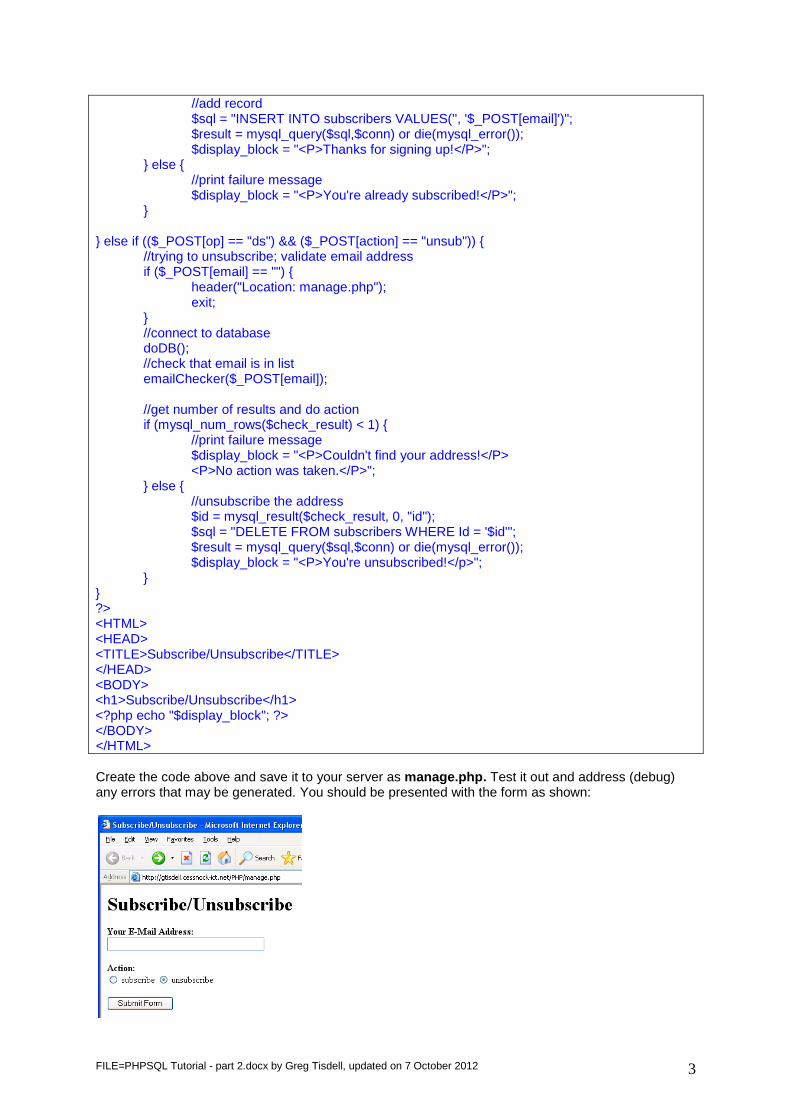
//add record $sql = "INSERT INTO subscribers VALUES('', '$_POST[email]')"; $result = mysql_query($sql,$conn) or die(mysql_error()); $display_block = "<P>Thanks for signing up!</P>"; } else { //print failure message $display_block = "<P>You're already subscribed!</P>"; } } else if (($_POST[op] == "ds") && ($_POST[action] == "unsub")) { //trying to unsubscribe; validate email address if ($_POST[email] == "") { header("Location: manage.php"); exit; } //connect to database doDB(); //check that email is in list emailChecker($_POST[email]); //get number of results and do action if (mysql_num_rows($check_result) < 1) { //print failure message $display_block = "<P>Couldn't find your address!</P> <P>No action was taken.</P>"; } else { //unsubscribe the address $id = mysql_result($check_result, 0, "id"); $sql = "DELETE FROM subscribers WHERE Id = '$id'"; $result = mysql_query($sql,$conn) or die(mysql_error()); $display_block = "<P>You're unsubscribed!</p>"; } } ?> <HTML> <HEAD> <TITLE>Subscribe/Unsubscribe</TITLE> </HEAD> <BODY> <h1>Subscribe/Unsubscribe</h1> <?php echo "$display_block"; ?> </BODY> </HTML> Create the code above and save it to your server as manage.php. Test it out and address (debug) any errors that may be generated. You should be presented with the form as shown:
FILE=PHPSQL Tutorial - part 2.docx by Greg Tisdell, updated on 7 October 2012 4
While the code above may be long but it’s not complicated. In fact it could be longer if it were not for the user-defined function (doDB and emailChecker) at the top. The doDB() function simply makes the database connections, while emailChecker() is used in several contexts which we will examine. Picking it to pieces The main logic of the code starts with:
if ($_POST[op] != "ds") { Because this script performs several actions, we need to determine which action it is currently attempting. If the value of $_POST[op] is not “ds” (which stands for “do something”), we know the user has not submitted the form – therefore we must show it to the user. It’s basically a way of checking the form was submitted correctly, and if it wasn’t then start the process from scratch. The section of this block of code (lines 29-42) create the form to be displayed. Now if the value is “ds” and the value of the radio button is set, then there are two other possibilities:
1. Subscribe 2. Unsubscibe
Subscribe
else if (($_POST[op] == "ds") && ($_POST[action] == "sub")) { If the value of $_POST[op] is “ds” and the value of $_POST[action] is “sub” then we know the user is trying to subscribe. To subscribe, the user will need an email address, so we check for one by using the statement block:
if ($_POST[email] == "") { header("Location: manage.php"); exit; }
If the email component of the POST is empty then the process is cancelled and the user is presented with a new version of the script – which will present the form again. However, if the test fails (in other words there is something in the email input box), then we can:
1. open the database – doDB() 2. check to see if the email already exists in the database – emailChecker() 3. perform one of two action depending on whether the email already exists – either add the
record or display an error message.
if (mysql_num_rows($check_result) < 1) { //add record $sql = "INSERT INTO subscribers VALUES('', '$_POST[email]')"; $result = mysql_query($sql,$conn) or die(mysql_error()); $display_block = "<P>Thanks for signing up!</P>"; } else { //print failure message $display_block = "<P>You're already subscribed!</P>"; }
If the number of rows returned by executing the SQL statement is less than 1, it would mean that there is no entry in the database for the email address supplied. Anything else would mean there was a matching email address and a suitable message (“You’re already subscribed”) would be created. Unsubscribe
else if (($_POST[op] == "ds") && ($_POST[action] == "unsub")) {
FILE=PHPSQL Tutorial - part 2.docx by Greg Tisdell, updated on 7 October 2012 5
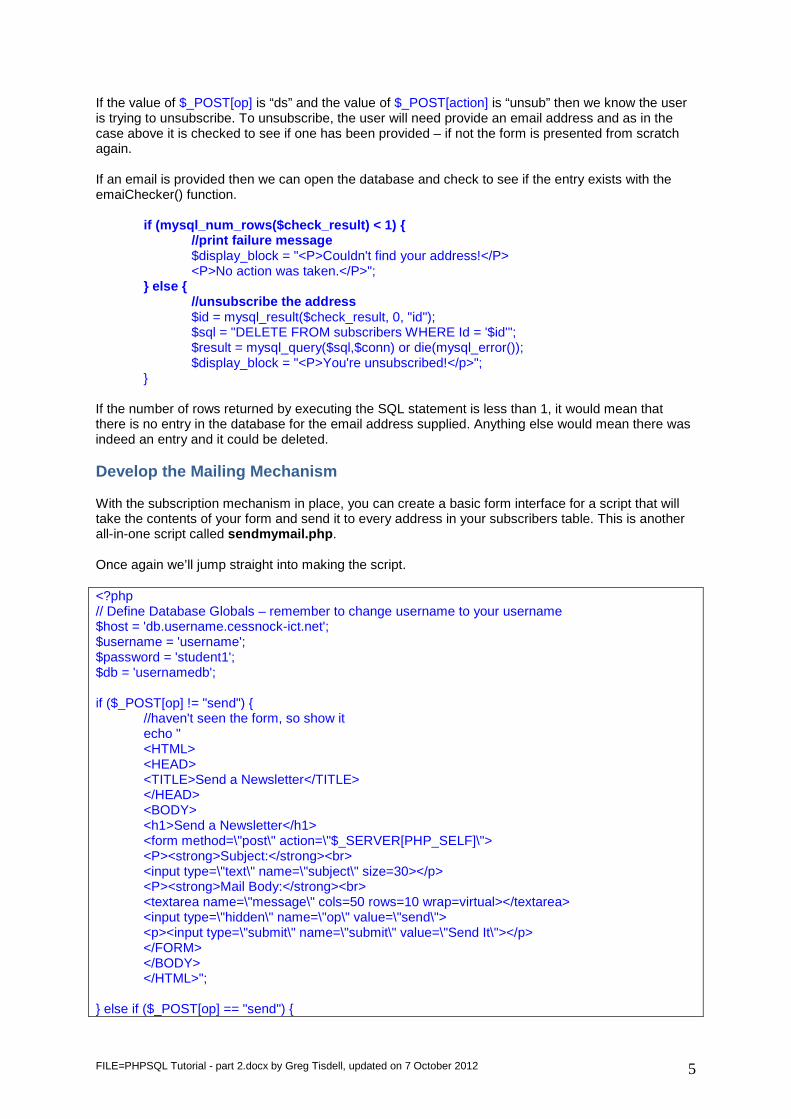
If the value of $_POST[op] is “ds” and the value of $_POST[action] is “unsub” then we know the user is trying to unsubscribe. To unsubscribe, the user will need provide an email address and as in the case above it is checked to see if one has been provided – if not the form is presented from scratch again. If an email is provided then we can open the database and check to see if the entry exists with the emaiChecker() function. if (mysql_num_rows($check_result) < 1) { //print failure message $display_block = "<P>Couldn't find your address!</P> <P>No action was taken.</P>"; } else { //unsubscribe the address $id = mysql_result($check_result, 0, "id"); $sql = "DELETE FROM subscribers WHERE Id = '$id'"; $result = mysql_query($sql,$conn) or die(mysql_error()); $display_block = "<P>You're unsubscribed!</p>"; } If the number of rows returned by executing the SQL statement is less than 1, it would mean that there is no entry in the database for the email address supplied. Anything else would mean there was indeed an entry and it could be deleted. Develop the Mailing Mechanism With the subscription mechanism in place, you can create a basic form interface for a script that will take the contents of your form and send it to every address in your subscribers table. This is another all-in-one script called sendmymail.php. Once again we’ll jump straight into making the script. <?php // Define Database Globals – remember to change username to your username $host = 'db.username.cessnock-ict.net'; $username = 'username'; $password = 'student1'; $db = 'usernamedb'; if ($_POST[op] != "send") { //haven't seen the form, so show it echo " <HTML> <HEAD> <TITLE>Send a Newsletter</TITLE> </HEAD> <BODY> <h1>Send a Newsletter</h1> <form method=\"post\" action=\"$_SERVER[PHP_SELF]\"> <P><strong>Subject:</strong><br> <input type=\"text\" name=\"subject\" size=30></p> <P><strong>Mail Body:</strong><br> <textarea name=\"message\" cols=50 rows=10 wrap=virtual></textarea> <input type=\"hidden\" name=\"op\" value=\"send\"> <p><input type=\"submit\" name=\"submit\" value=\"Send It\"></p> </FORM> </BODY> </HTML>"; } else if ($_POST[op] == "send") {
FILE=PHPSQL Tutorial - part 2.docx by Greg Tisdell, updated on 7 October 2012 6
//want to send form, so check for required fields if (($_POST[subject] =="") || ($_POST[message] == "")) { header("Location: sendmymail.php"); exit; } //connect to database $conn = mysql_connect($host, $username, $password) or die(mysql_error()); mysql_select_db($db, $conn) or die(mysql_error()); //get emails from subscribers list $sql = "SELECT Email FROM subscribers"; $result = mysql_query($sql,$conn) or die(mysql_error()); //create a From: mailheader $headers = "From: Your Mailing List <[email protected]>"; //loop through results and send mail while ($row = mysql_fetch_array($result)) { set_time_limit(0); $email = $row['Email']; mail("$email", stripslashes($_POST[subject]), stripslashes($_POST[message]), $headers); echo "newsletter sent to: $email<br>"; } } ?> Save the code above as sendmymail.php and test it out. Remember it will only send emails to those accounts that are valid email addresses in the subscribers table. If there are any problems, the mail will be bounced (or an error message created) by the Mailer Daemon. Try an example like this:
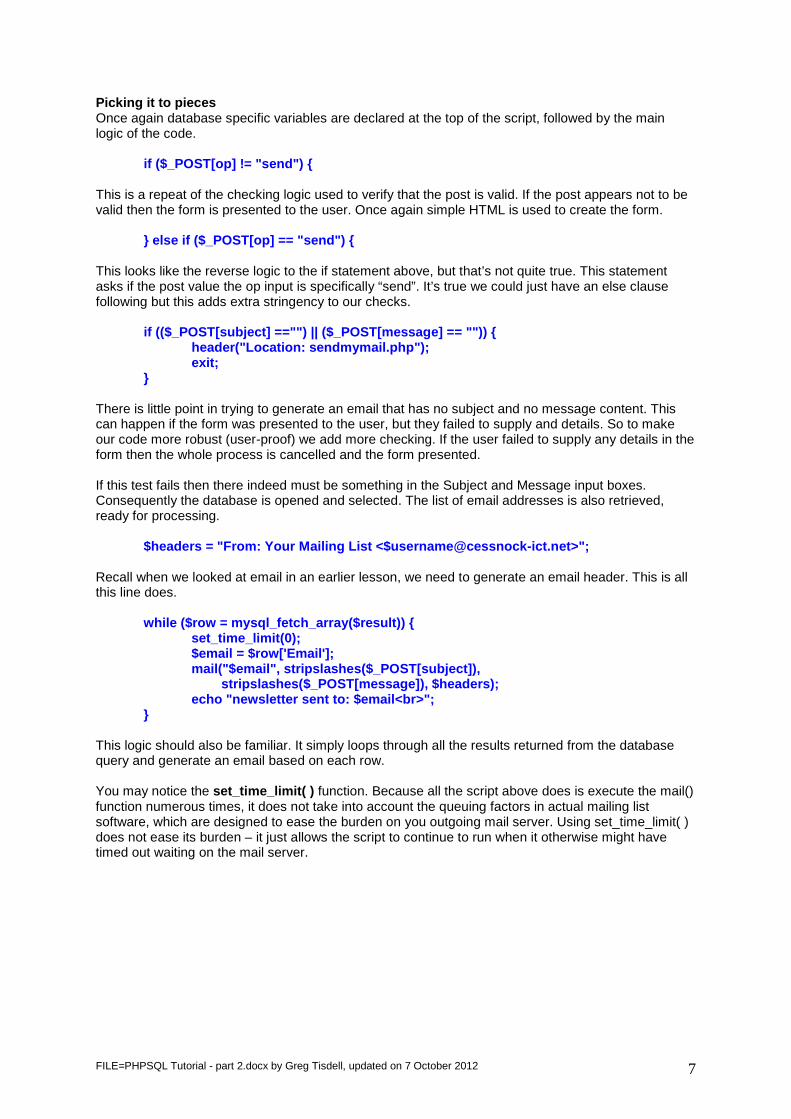
Check your email account at your email server after each attempt to run the script. Keep in mind that email is not an immediate technology – follows the principle of store and forward. So it can take a little while to arrive in your Inbox.
FILE=PHPSQL Tutorial - part 2.docx by Greg Tisdell, updated on 7 October 2012 7
Picking it to pieces Once again database specific variables are declared at the top of the script, followed by the main logic of the code.
if ($_POST[op] != "send") { This is a repeat of the checking logic used to verify that the post is valid. If the post appears not to be valid then the form is presented to the user. Once again simple HTML is used to create the form.
} else if ($_POST[op] == "send") { This looks like the reverse logic to the if statement above, but that’s not quite true. This statement asks if the post value the op input is specifically “send”. It’s true we could just have an else clause following but this adds extra stringency to our checks. if (($_POST[subject] =="") || ($_POST[message] == "")) { header("Location: sendmymail.php"); exit; } There is little point in trying to generate an email that has no subject and no message content. This can happen if the form was presented to the user, but they failed to supply and details. So to make our code more robust (user-proof) we add more checking. If the user failed to supply any details in the form then the whole process is cancelled and the form presented. If this test fails then there indeed must be something in the Subject and Message input boxes. Consequently the database is opened and selected. The list of email addresses is also retrieved, ready for processing. $headers = "From: Your Mailing List <[email protected]>"; Recall when we looked at email in an earlier lesson, we need to generate an email header. This is all this line does. while ($row = mysql_fetch_array($result)) { set_time_limit(0); $email = $row['Email']; mail("$email", stripslashes($_POST[subject]), stripslashes($_POST[message]), $headers); echo "newsletter sent to: $email<br>"; } This logic should also be familiar. It simply loops through all the results returned from the database query and generate an email based on each row. You may notice the set_time_limit( ) function. Because all the script above does is execute the mail() function numerous times, it does not take into account the queuing factors in actual mailing list software, which are designed to ease the burden on you outgoing mail server. Using set_time_limit( ) does not ease its burden – it just allows the script to continue to run when it otherwise might have timed out waiting on the mail server.
FILE=PHPSQL Tutorial - part 2.docx by Greg Tisdell, updated on 7 October 2012 8
Exercises Challenge 1 Use the PHP Manual to establish the purpose and syntax of the addslashes() and stripslashes() built-in functions. You might find this information extremely valuable in a real working web database project. Challenge 2 If you used a local MySQL/PHP setup like WAMPServer, then make this mailing list work from your cessnock-ict.net domain. Add another email address ([email protected]) to your database and generate another sample mail-out. Challenge 3 Modify your database and forms to include the user’s name, not just the email address. Make sure you add a few more records to make sure the additions work. Challenge 4 Our code is not robust enough for the addition of email addresses. There should be some form of checking that the email address submitted fits the pattern of email addresses i.e. the address:
1. starts with at least 1 or more numbers or characters, 2. followed by the @ symbol, 3. followed by some more characters, 4. followed by a dot and a few more characters.
Research a ‘Regular Expression’ and include it in your validation prior to adding a new record. It can be server-sided using PHP or client-sided using JavaScript.
Recommended