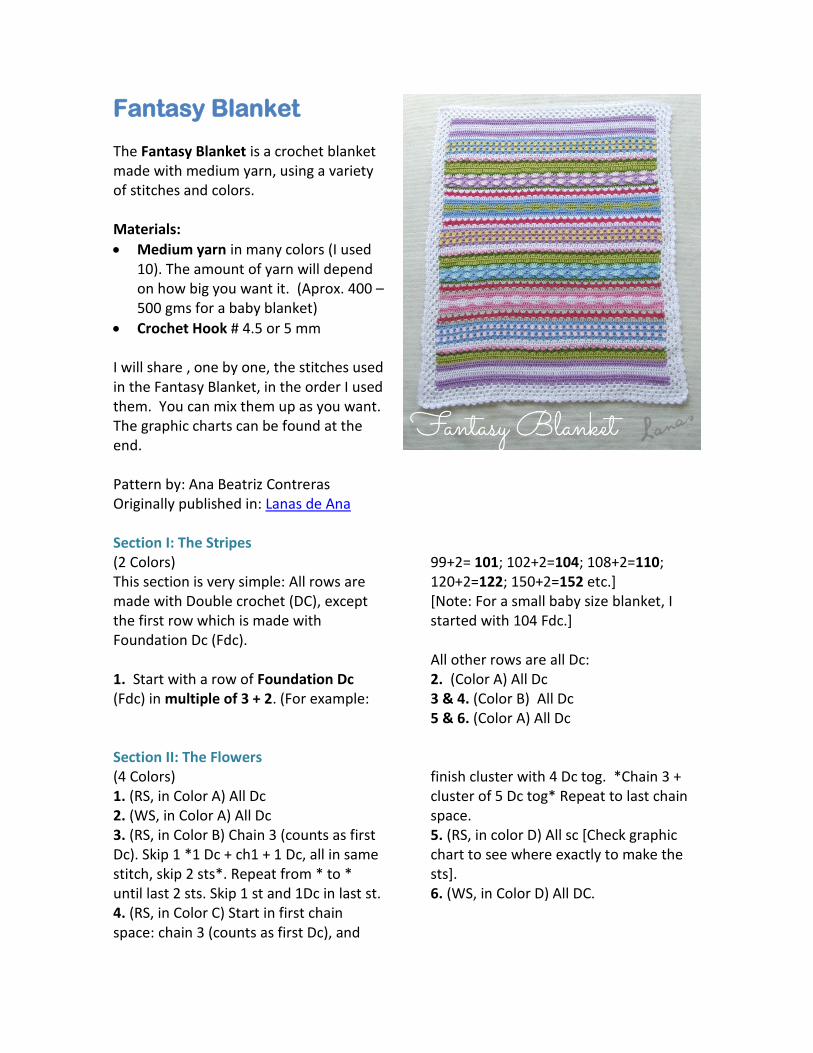
Fantasy Blanket The Fantasy Blanket is a crochet blanket made with medium yarn, using a variety of stitches and colors. Materials:
Medium yarn in many colors (I used 10). The amount of yarn will depend on how big you want it. (Aprox. 400 – 500 gms for a baby blanket)
Crochet Hook # 4.5 or 5 mm I will share , one by one, the stitches used in the Fantasy Blanket, in the order I used them. You can mix them up as you want. The graphic charts can be found at the end. Pattern by: Ana Beatriz Contreras Originally published in: Lanas de Ana Section I: The Stripes (2 Colors) This section is very simple: All rows are made with Double crochet (DC), except the first row which is made with Foundation Dc (Fdc). 1. Start with a row of Foundation Dc (Fdc) in multiple of 3 + 2. (For example:
99+2= 101; 102+2=104; 108+2=110; 120+2=122; 150+2=152 etc.] [Note: For a small baby size blanket, I started with 104 Fdc.] All other rows are all Dc: 2. (Color A) All Dc 3 & 4. (Color B) All Dc 5 & 6. (Color A) All Dc
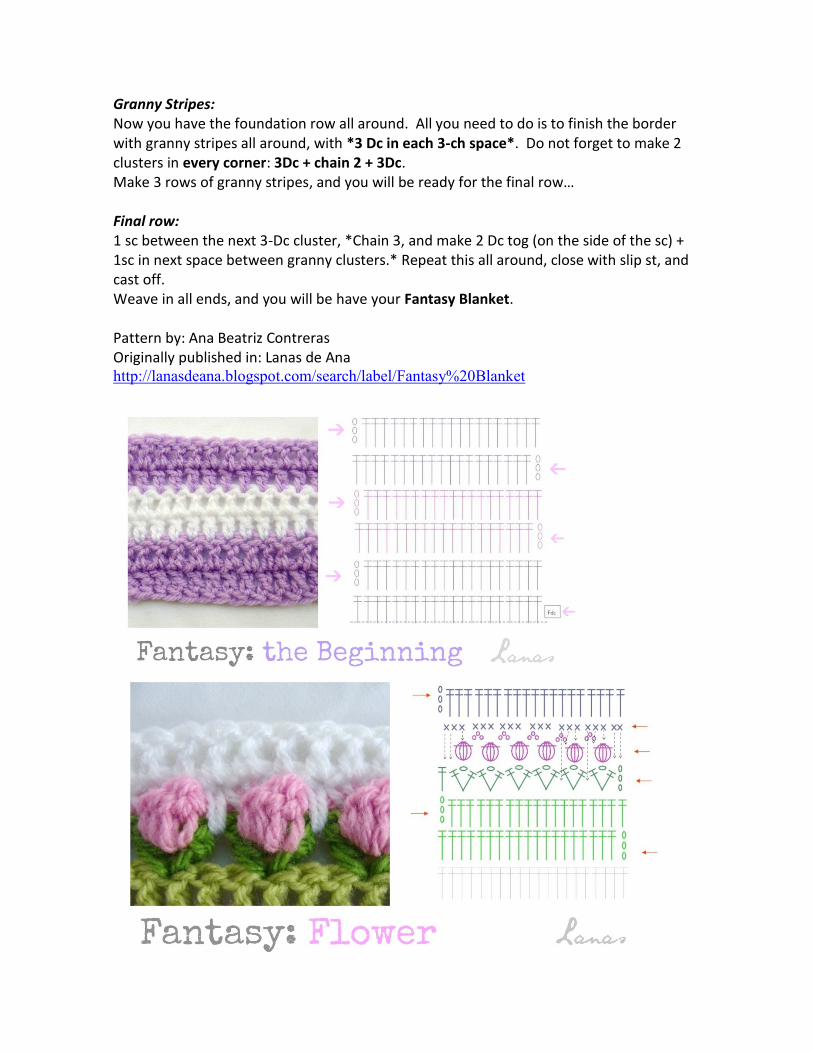
Section II: The Flowers (4 Colors) 1. (RS, in Color A) All Dc 2. (WS, in Color A) All Dc 3. (RS, in Color B) Chain 3 (counts as first Dc). Skip 1 *1 Dc + ch1 + 1 Dc, all in same stitch, skip 2 sts*. Repeat from * to * until last 2 sts. Skip 1 st and 1Dc in last st. 4. (RS, in Color C) Start in first chain space: chain 3 (counts as first Dc), and
finish cluster with 4 Dc tog. *Chain 3 + cluster of 5 Dc tog* Repeat to last chain space. 5. (RS, in color D) All sc [Check graphic chart to see where exactly to make the sts]. 6. (WS, in Color D) All DC.
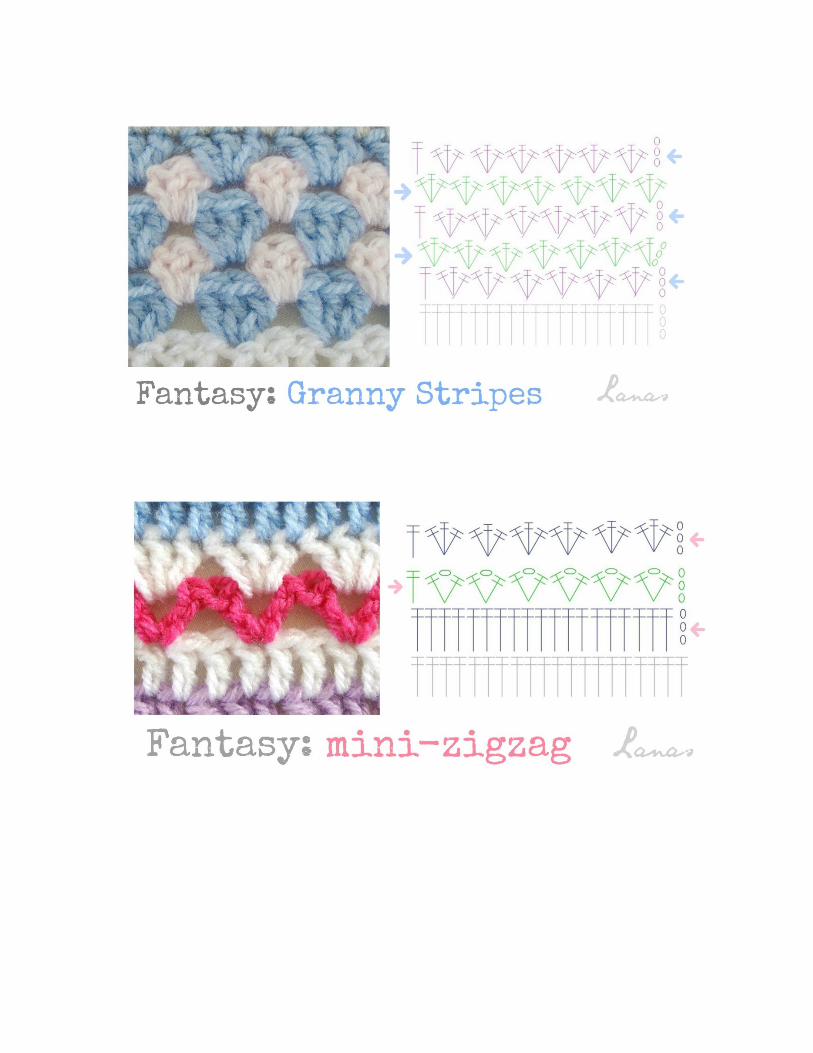
Take note of the following tips: * The petals start and end on the 1-ch space (of the stems). * The background (“sky”) starts on which seems the 4th row, but actually are part of the 5th row. It is a row of all sc’s. Take note of the arrows, which indicate where you need to make them. *The third sc is made on top of the petals, the fourth in the 3-chain space, and the fifth joins the 3-ch space and the space between the stems* (repeat between * and *). This is the row that will make the flower pop out. * If you feel the flower cluster is too bulky, make it with 4dc tog (instead of 5). Sections III: Granny Stripes This section is made with two colors: Color A (baby blue), Color B (light pink) 1. [RS] Chain 3 (counts as first dc). Skip 1
st and make 3 dc in the next st. *Skip 2 st, make 3 dc in next st* [repeat from * to* until the last 2 sts.] Skip 1 st and make 1 dc in last st. 2. [WS] Make 3dc clusters in space between clusters (including the singe dc at the beginning and end).
3. [RS] repeat row 1 4. [WS] repeat row 2 5. [RS] repeat row 1 Note: Be advised that in the even rows (2 and 4), there will always be an extra stitch. Therefore, make sure that you start and end as the chart shows (with uneven rows).
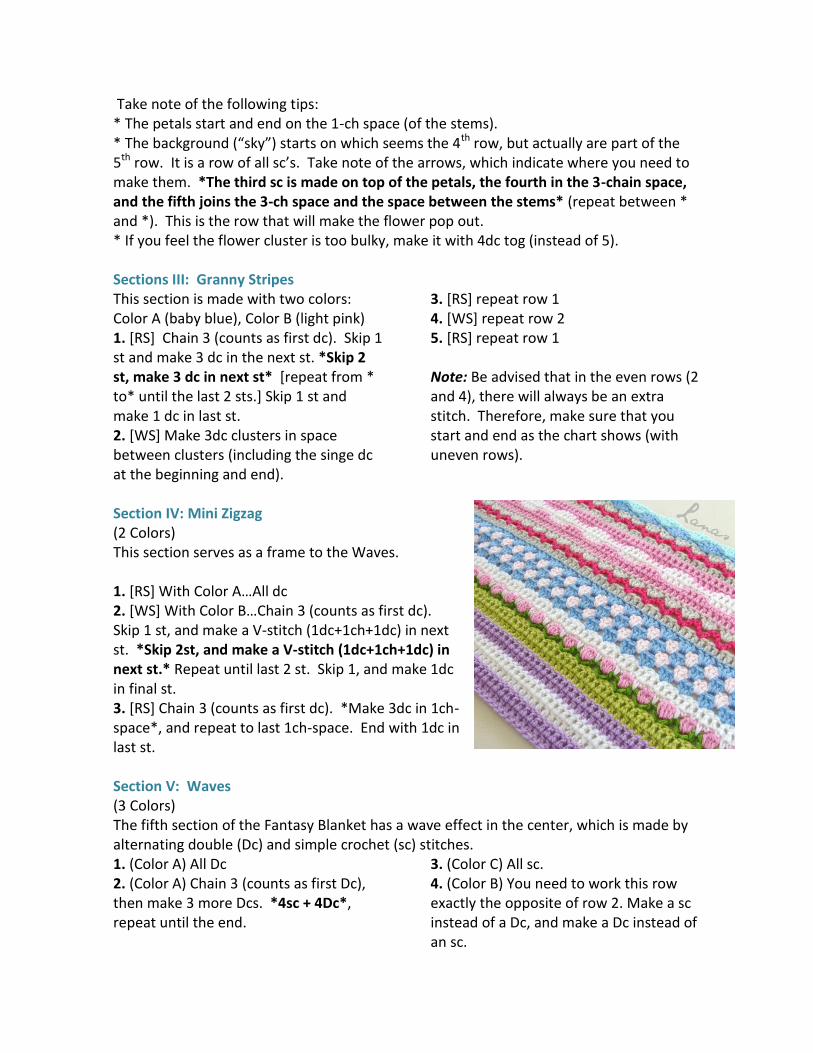
Section IV: Mini Zigzag (2 Colors) This section serves as a frame to the Waves. 1. *RS+ With Color A…All dc 2. *WS+ With Color B…Chain 3 (counts as first dc). Skip 1 st, and make a V-stitch (1dc+1ch+1dc) in next st. *Skip 2st, and make a V-stitch (1dc+1ch+1dc) in next st.* Repeat until last 2 st. Skip 1, and make 1dc in final st. 3. [RS] Chain 3 (counts as first dc). *Make 3dc in 1ch-space*, and repeat to last 1ch-space. End with 1dc in last st. Section V: Waves (3 Colors) The fifth section of the Fantasy Blanket has a wave effect in the center, which is made by alternating double (Dc) and simple crochet (sc) stitches. 1. (Color A) All Dc 2. (Color A) Chain 3 (counts as first Dc), then make 3 more Dcs. *4sc + 4Dc*, repeat until the end.
3. (Color C) All sc. 4. (Color B) You need to work this row exactly the opposite of row 2. Make a sc instead of a Dc, and make a Dc instead of an sc.
5. (Color B) Make each stitch exactly as you see it below in row 4. Dc over a Dc, and sc over a sc. 6. (Color C) All sc.
7. (Color A) Repeat row 2, exactly the same. 8. (Color A) All Dc.
Note: This is the only section that does not follow the multiple of 3 +2, because the waves are made in a rhythm of 4 stitches (4 Dc + 4 sc). If the number of stitches you are working with is not a multiple of 4, divide the “floating stitches” in 2 and add them at the beginning and end. Example of calculations: 104 st./4=26 waves 110 st./4=27 waves + 2st [with the floating 2sts, you need to make the first and last waves with 5 sts] 122 st./4=30 waves +2st 152 st./4=38 waves Take note that this wave section is preceded and followed by a zigzag row, which serves as a frame. Section VI: Shells (3 Colors) This last section is formed by alternating 5 Dc-shells, with a border of sc. 1. (Color C) All sc 2. (Color A) Start with sc1, then skip 2 sts., and form a 5-Dc shell in the next st. *Skip 2 sts., 1 sc in next st. Skip 2 sts., and form a shell with 5 Dc in the next st.* (repeat from * to *, until the last 2 sts). 2 sc. 3. (Color B) Chain 3 in first st. (counts as first Dc). 3 Dc in next st. (Counts as half-
shell). *1 sc (in middle Dc of shell below); 1 shell (5 Dc in sc below)* Repeat, and finish with half-shell (3 Dc in last st). 4. Repeat row 2. 5. Repeat row 3. 6. (Color C) All sc.
Construction of the Fantasy Blanket The original Fantasy Blanket was designed as a baby blanket. But it can be made any size you want. If you are making a bigger blanket, just repeat the sequence more times. Once you have made all the stitches in order, you can repeat them all from the beginning. For a baby blanket, you repeat them one more time, and finish with the Flowers and the Stripes. Here is a graphic chart of the distribution and order of the stitches:
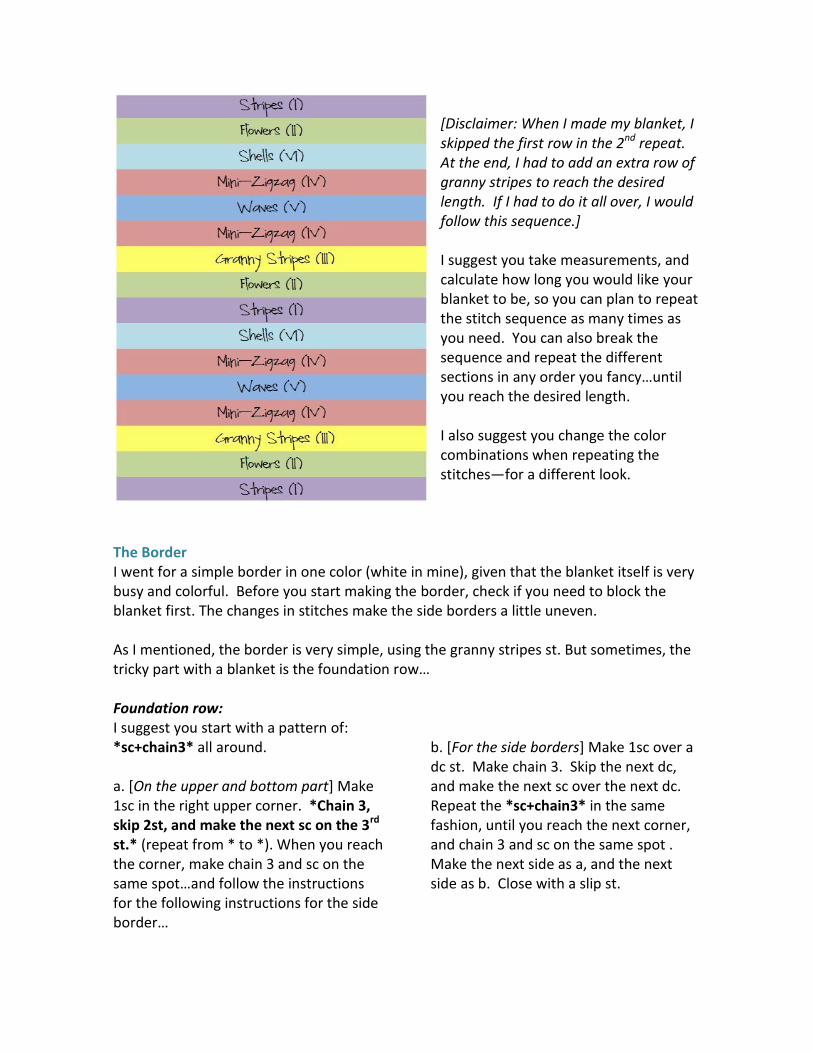
[Disclaimer: When I made my blanket, I skipped the first row in the 2nd repeat. At the end, I had to add an extra row of granny stripes to reach the desired length. If I had to do it all over, I would follow this sequence.] I suggest you take measurements, and calculate how long you would like your blanket to be, so you can plan to repeat the stitch sequence as many times as you need. You can also break the sequence and repeat the different sections in any order you fancy…until you reach the desired length. I also suggest you change the color combinations when repeating the stitches—for a different look.
The Border I went for a simple border in one color (white in mine), given that the blanket itself is very busy and colorful. Before you start making the border, check if you need to block the blanket first. The changes in stitches make the side borders a little uneven. As I mentioned, the border is very simple, using the granny stripes st. But sometimes, the tricky part with a blanket is the foundation row… Foundation row: I suggest you start with a pattern of: *sc+chain3* all around. a. [On the upper and bottom part] Make 1sc in the right upper corner. *Chain 3, skip 2st, and make the next sc on the 3rd st.* (repeat from * to *). When you reach the corner, make chain 3 and sc on the same spot…and follow the instructions for the following instructions for the side border…
b. [For the side borders] Make 1sc over a dc st. Make chain 3. Skip the next dc, and make the next sc over the next dc. Repeat the *sc+chain3* in the same fashion, until you reach the next corner, and chain 3 and sc on the same spot . Make the next side as a, and the next side as b. Close with a slip st.
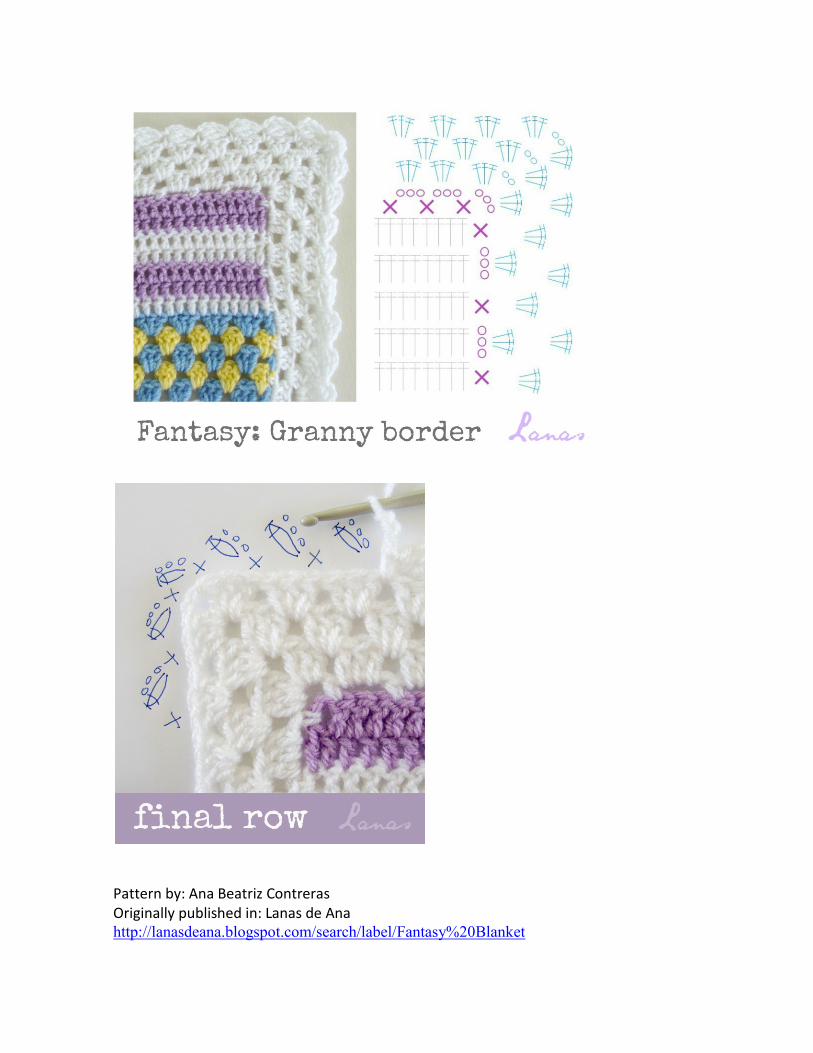
Granny Stripes: Now you have the foundation row all around. All you need to do is to finish the border with granny stripes all around, with *3 Dc in each 3-ch space*. Do not forget to make 2 clusters in every corner: 3Dc + chain 2 + 3Dc. Make 3 rows of granny stripes, and you will be ready for the final row… Final row: 1 sc between the next 3-Dc cluster, *Chain 3, and make 2 Dc tog (on the side of the sc) + 1sc in next space between granny clusters.* Repeat this all around, close with slip st, and cast off. Weave in all ends, and you will be have your Fantasy Blanket. Pattern by: Ana Beatriz Contreras Originally published in: Lanas de Ana http://lanasdeana.blogspot.com/search/label/Fantasy%20Blanket

Pattern by: Ana Beatriz Contreras Originally published in: Lanas de Ana http://lanasdeana.blogspot.com/search/label/Fantasy%20Blanket
Recommended


![X CROCHET HEXAGONS BLANKET | CROCHET | …...Size U.S. H/8 (5 mm) crochet hook or size needed to obtain gauge. Stitch marker. MEASUREMENTS Approx 46 x 53" [117 x 134.5 cm]. GAUGE 13](https://img.pdfslide.net/doc/110x75/5e587f63d6aba8425b7f0815/x-crochet-hexagons-blanket-crochet-size-us-h8-5-mm-crochet-hook-or.jpg)


![VERTICAL HERRINGBONE CROCHET BLANKET ......VERTICAL HERRINGBONE CROCHET BLANKET | CROCHET Rep last 2 rows for pat until work from beg measures approx 52" [132 cm], ending on 4th row](https://img.pdfslide.net/doc/110x75/5e39a95ffe0db85fca427b51/vertical-herringbone-crochet-blanket-vertical-herringbone-crochet-blanket.jpg)