Managing Volumes and Users

Information in this document is subject to change without notice. Examples provided are fictitious. No part of this document may be reproduced or transmitted in any form, or by any means, electronic or mechanical, for any purpose, in whole or in part, without the express written permission of Actuate Corporation.
© 1995 - 2015 by Actuate Corporation. All rights reserved. Printed in the United States of America.
Contains information proprietary to:Actuate Corporation, 951 Mariners Island Boulevard, San Mateo, CA 94404
www.opentext.comwww.actuate.com
The software described in this manual is provided by Actuate Corporation under an Actuate License agreement. The software may be used only in accordance with the terms of the agreement. Actuate software products are protected by U.S. and International patents and patents pending. For a current list of patents, please see http://www.actuate.com/patents.
Actuate Corporation trademarks and registered trademarks include:Actuate, ActuateOne, the Actuate logo, Archived Data Analytics, BIRT, BIRT 360, BIRT Analytics, The BIRT Company, BIRT Content Services, BIRT Data Analyzer, BIRT for Statements, BIRT iHub, BIRT Metrics Management, BIRT Performance Analytics, Collaborative Reporting Architecture, e.Analysis, e.Report, e.Reporting, e.Spreadsheet, Encyclopedia, Interactive Viewing, OnPerformance, The people behind BIRT, Performancesoft, Performancesoft Track, Performancesoft Views, Report Encyclopedia, Reportlet, X2BIRT, and XML reports.
Actuate products may contain third-party products or technologies. Third-party trademarks or registered trademarks of their respective owners, companies, or organizations include: Mark Adler and Jean-loup Gailly (www.zlib.net): zLib. Adobe Systems Incorporated: Flash Player, Source Sans Pro font. Amazon Web Services, Incorporated: Amazon Web Services SDK. Apache Software Foundation (www.apache.org): Ant, Axis, Axis2, Batik, Batik SVG library, Commons Command Line Interface (CLI), Commons Codec, Commons Lang, Commons Math, Crimson, Derby, Hive driver for Hadoop, Kafka, log4j, Pluto, POI ooxml and ooxml-schema, Portlet, Shindig, Struts, Thrift, Tomcat, Velocity, Xalan, Xerces, Xerces2 Java Parser, Xerces-C++ XML Parser, and XML Beans. Daniel Bruce (www.entypo.com): Entypo Pictogram Suite. Castor (www.castor.org), ExoLab Project (www.exolab.org), and Intalio, Inc. (www.intalio.org): Castor. Alessandro Colantonio: CONCISE Bitmap Library. d3-cloud. Day Management AG: Content Repository for Java. Dygraphs Gallery. Eclipse Foundation, Inc. (www.eclipse.org): Babel, Data Tools Platform (DTP) ODA, Eclipse SDK, Graphics Editor Framework (GEF), Eclipse Modeling Framework (EMF), Jetty, and Eclipse Web Tools Platform (WTP). Bits Per Second, Ltd. and Graphics Server Technologies, L.P.: Graphics Server. Dave Gandy: Font Awesome. Gargoyle Software Inc.: HtmlUnit. GNU Project: GNU Regular Expression. Google Charts. Groovy project (groovy.codehaus.org): Groovy. Guava Libraries: Google Guava. HighSlide: HighCharts. headjs.com: head.js. Hector Project: Cassandra Thrift, Hector. Jason Hsueth and Kenton Varda (code.google.com): Protocole Buffer. H2 Database: H2 database. IDAutomation.com, Inc.: IDAutomation. IDRsolutions Ltd.: JPedal JBIG2. InfoSoft Global (P) Ltd.: FusionCharts, FusionMaps, FusionWidgets, PowerCharts. InfoVis Toolkit. Matt Inger (sourceforge.net): Ant-Contrib. Matt Ingenthron, Eric D. Lambert, and Dustin Sallings (code.google.com): Spymemcached. International Components for Unicode (ICU): ICU library. JCraft, Inc.: JSch. jQuery: jQuery, JQuery Sparklines. Yuri Kanivets (code.google.com): Android Wheel gadget. LEAD Technologies, Inc.: LEADTOOLS. The Legion of the Bouncy Castle: Bouncy Castle Crypto APIs. Bruno Lowagie and Paulo Soares: iText. Membrane SOA Model. MetaStuff: dom4j. Microsoft Corporation (Microsoft Developer Network): CompoundDocument Library. Mozilla: Mozilla XML Parser. MySQL Americas, Inc.: MySQL Connector/J. Netscape Communications Corporation, Inc.: Rhino. NodeJS. nullsoft project: Nullsoft Scriptable Install System. OOPS Consultancy: XMLTask. OpenSSL Project: OpenSSL. Oracle Corporation: Berkeley DB, Java Advanced Imaging, JAXB, Java SE Development Kit (JDK), Jstl, Oracle JDBC driver. PostgreSQL Global Development Group: pgAdmin, PostgreSQL, PostgreSQL JDBC driver. Progress Software Corporation: DataDirect Connect XE for JDBC Salesforce, DataDirect JDBC, DataDirect ODBC. Quality Open Software: Simple Logging Facade for Java (SLF4J), SLF4J API and NOP. Raphael. RequireJS. Rogue Wave Software, Inc.: Rogue Wave Library SourcePro Core, tools.h++. Sencha Inc.: Extjs, Sencha Touch. Shibboleth Consortium: OpenSAML, Shibboleth Identity Provider. Matteo Spinelli: iscroll. StAX Project (stax.codehaus.org): Streaming API for XML (StAX). Sam Stephenson (prototype.conio.net): prototype.js. SWFObject Project (code.google.com): SWFObject. ThimbleWare, Inc.: JMemcached. Twittr: Twitter Bootstrap. VMWare: Hyperic SIGAR. Woodstox Project (woodstox.codehaus.org): Woodstox Fast XML processor (wstx-asl). World Wide Web Consortium (W3C) (MIT, ERCIM, Keio): Flute, JTidy, Simple API for CSS. XFree86 Project, Inc.: (www.xfree86.org): xvfb. ZXing Project (code.google.com): ZXing.
All other brand or product names are trademarks or registered trademarks of their respective owners, companies, or organizations.
Document No. 141215-2-530304 June 19, 2015
i
ContentsAbout Managing Volumes and Users . . . . . . . . . . . . . . . . . . . . . . . . . . . . . .iii
Chapter 1Getting started . . . . . . . . . . . . . . . . . . . . . . . . . . . . . . . . . . . . . . . . . . . . . . . . 1About volume management . . . . . . . . . . . . . . . . . . . . . . . . . . . . . . . . . . . . . . . . . . . . . . . . . . . . . . . . . 2
Logging in to Information Console . . . . . . . . . . . . . . . . . . . . . . . . . . . . . . . . . . . . . . . . . . . . . . . . 2Understanding volumes and users . . . . . . . . . . . . . . . . . . . . . . . . . . . . . . . . . . . . . . . . . . . . . . . . . 5
Chapter 2Setting up application users and groups . . . . . . . . . . . . . . . . . . . . . . . . . . . 7Understanding iHub Administration . . . . . . . . . . . . . . . . . . . . . . . . . . . . . . . . . . . . . . . . . . . . . . . . . 8About user types . . . . . . . . . . . . . . . . . . . . . . . . . . . . . . . . . . . . . . . . . . . . . . . . . . . . . . . . . . . . . . . . . . 8Accessing iHub Administration . . . . . . . . . . . . . . . . . . . . . . . . . . . . . . . . . . . . . . . . . . . . . . . . . . . . . 9About users . . . . . . . . . . . . . . . . . . . . . . . . . . . . . . . . . . . . . . . . . . . . . . . . . . . . . . . . . . . . . . . . . . . . . . 10Creating a user . . . . . . . . . . . . . . . . . . . . . . . . . . . . . . . . . . . . . . . . . . . . . . . . . . . . . . . . . . . . . . . . . . . 10Editing a user . . . . . . . . . . . . . . . . . . . . . . . . . . . . . . . . . . . . . . . . . . . . . . . . . . . . . . . . . . . . . . . . . . . . 14Viewing the list of users . . . . . . . . . . . . . . . . . . . . . . . . . . . . . . . . . . . . . . . . . . . . . . . . . . . . . . . . . . . 16
Filtering the list of users using a search string . . . . . . . . . . . . . . . . . . . . . . . . . . . . . . . . . . . . . . 17Filtering the list of users by user group . . . . . . . . . . . . . . . . . . . . . . . . . . . . . . . . . . . . . . . . . . . . 18
Deleting users . . . . . . . . . . . . . . . . . . . . . . . . . . . . . . . . . . . . . . . . . . . . . . . . . . . . . . . . . . . . . . . . . . . . 18About User Groups . . . . . . . . . . . . . . . . . . . . . . . . . . . . . . . . . . . . . . . . . . . . . . . . . . . . . . . . . . . . . . . 20Creating a user group . . . . . . . . . . . . . . . . . . . . . . . . . . . . . . . . . . . . . . . . . . . . . . . . . . . . . . . . . . . . . 21Editing a user group . . . . . . . . . . . . . . . . . . . . . . . . . . . . . . . . . . . . . . . . . . . . . . . . . . . . . . . . . . . . . . 23Viewing the list of user groups . . . . . . . . . . . . . . . . . . . . . . . . . . . . . . . . . . . . . . . . . . . . . . . . . . . . . 24Deleting user groups . . . . . . . . . . . . . . . . . . . . . . . . . . . . . . . . . . . . . . . . . . . . . . . . . . . . . . . . . . . . . . 25Accessing Logout and My Profile . . . . . . . . . . . . . . . . . . . . . . . . . . . . . . . . . . . . . . . . . . . . . . . . . . . 27
Chapter 3Managing volume-level operations . . . . . . . . . . . . . . . . . . . . . . . . . . . . . . . 29Working at the volume level . . . . . . . . . . . . . . . . . . . . . . . . . . . . . . . . . . . . . . . . . . . . . . . . . . . . . . . . 30
Setting volume privileges . . . . . . . . . . . . . . . . . . . . . . . . . . . . . . . . . . . . . . . . . . . . . . . . . . . . . . . . 31Setting volume archiving and purging policies . . . . . . . . . . . . . . . . . . . . . . . . . . . . . . . . . . . . . 32Setting volume-level printer options . . . . . . . . . . . . . . . . . . . . . . . . . . . . . . . . . . . . . . . . . . . . . . 35Understanding service requirements . . . . . . . . . . . . . . . . . . . . . . . . . . . . . . . . . . . . . . . . . . . . . . 37Scheduling an archiving cycle . . . . . . . . . . . . . . . . . . . . . . . . . . . . . . . . . . . . . . . . . . . . . . . . . . . . 37
About user and user group limits . . . . . . . . . . . . . . . . . . . . . . . . . . . . . . . . . . . . . . . . . . . . . . . . . . . 38
Chapter 4Exploring administrative capabilities . . . . . . . . . . . . . . . . . . . . . . . . . . . . . 41Using the /Applications folder . . . . . . . . . . . . . . . . . . . . . . . . . . . . . . . . . . . . . . . . . . . . . . . . . . . . . 42About locale maps . . . . . . . . . . . . . . . . . . . . . . . . . . . . . . . . . . . . . . . . . . . . . . . . . . . . . . . . . . . . . . . . 42
ii
Using Advanced Jobs . . . . . . . . . . . . . . . . . . . . . . . . . . . . . . . . . . . . . . . . . . . . . . . . . . . . . . . . . . . . . .43Using the available job monitoring options . . . . . . . . . . . . . . . . . . . . . . . . . . . . . . . . . . . . . . . . .43Filtering jobs . . . . . . . . . . . . . . . . . . . . . . . . . . . . . . . . . . . . . . . . . . . . . . . . . . . . . . . . . . . . . . . . . . .49Editing a scheduled job . . . . . . . . . . . . . . . . . . . . . . . . . . . . . . . . . . . . . . . . . . . . . . . . . . . . . . . . . .50Deleting a scheduled job . . . . . . . . . . . . . . . . . . . . . . . . . . . . . . . . . . . . . . . . . . . . . . . . . . . . . . . . .51Cloning a job . . . . . . . . . . . . . . . . . . . . . . . . . . . . . . . . . . . . . . . . . . . . . . . . . . . . . . . . . . . . . . . . . . .52
Index . . . . . . . . . . . . . . . . . . . . . . . . . . . . . . . . . . . . . . . . . . . . . . . . . . . . . . . 53

A b o u t M a n a g i n g Vo l u m e s a n d U s e r s iii
A b o u t M a n a g i n gV o l u m e s a n d U s e r s
Managing Volumes and Users discusses how to administer a BIRT iHub System volume. The chapters in this guide are:
■ About Managing Volumes and Users. This chapter provides an overview of this guide.
■ Chapter 1. Getting started. This chapter discusses how to connect to a volume and how to use Information Console.
■ Chapter 2. Setting up application users and groups. This chapter discusses how to create and work with users and user groups.
■ Chapter 3. Managing volume-level operations. This chapter discusses volume-level management tasks, such as archiving files, setting volume privileges, enabling DHTML document caching, and setting volume-level printer options.
■ Chapter 4. Exploring administrative capabilities. This chapter discusses miscellaneous administrative best practices, capabilities, and tasks.

iv M a n a g i n g Vo l u m e s a n d U s e r s
C h a p t e r 1 , G e t t i n g s t a r t e d 1
C h a p t e r
1Chapter 1Getting started
This chapter discusses the topic, About volume management.
2 M a n a g i n g Vo l u m e s a n d U s e r s
About volume managementBIRT iHub is a document server that generates, manages and securely delivers BIRT documents stored in a volume. A volume is a disk-based repository containing designs, documents, information objects, shared libraries, and user information. You access a volume by logging in to Information Console.
BIRT iHub extracts data from common data sources, such as relational databases and other data sources. BIRT iHub includes the following components, which are accessible using a standard browser:
■ Information ConsoleUse this console to perform volume management tasks such as:
■ Running designs
■ Scheduling designs based on time and events
■ Viewing and sharing documents
■ Managing user and user group access to designs and documents using privileges
■ Distributing documents
■ Accessing scheduled and completed jobs
■ Information Console—iHub AdministrationUse this console to perform user management tasks such as:
■ Create users.
■ Create user groups.
■ Manage user membership to user groups.
An out-of-the-box BIRT iHub installation comes with a default volume, named Default Volume. Default Volume contains samples of volume content. If you do not specify a volume name when logging in to Visualization Suite, you access Default Volume by default. To access a different volume, you specify the volume name when logging in.
Logging in to Information ConsoleThe following section describes logging in to Information Console as the default user, Administrator, as a user having no home folder, and how to log in to access a volume other than Default Volume.
C h a p t e r 1 , G e t t i n g s t a r t e d 3
How to log in to Information Console
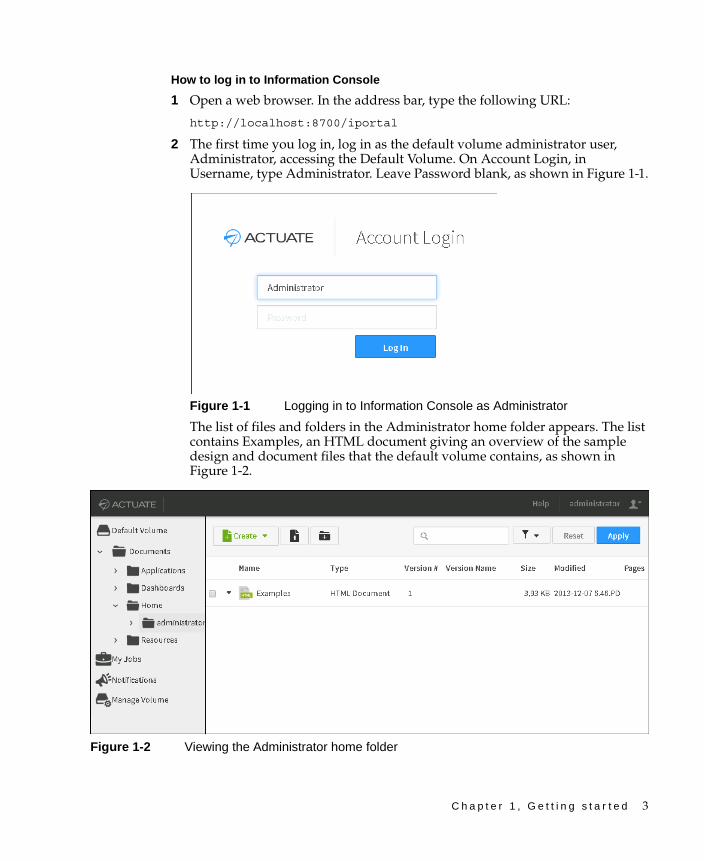
1 Open a web browser. In the address bar, type the following URL:
http://localhost:8700/iportal
2 The first time you log in, log in as the default volume administrator user, Administrator, accessing the Default Volume. On Account Login, in Username, type Administrator. Leave Password blank, as shown in Figure 1-1.
Figure 1-1 Logging in to Information Console as Administrator
The list of files and folders in the Administrator home folder appears. The list contains Examples, an HTML document giving an overview of the sample design and document files that the default volume contains, as shown in Figure 1-2.
Figure 1-2 Viewing the Administrator home folder

4 M a n a g i n g Vo l u m e s a n d U s e r s
Logging in as a user with no home folder By default, Administrator has a home folder in Information Console, /Home/administrator, as shown in Figure 1-2. When a user having a home folder logs in to Information Console, the list of files and folders in that user’s home folder appears. If a user does not have a home folder, the list of files and folders in the volume root folder, named Documents, appears, as shown in Figure 1-3. The volume administrator can create a home folder for a user when creating the user.
Accessing a volume other than Default VolumeTo access a different volume, type the volume name, a backslash, and the user name in Username when logging in to Information Console. For example, in Figure 1-4, Administrator is logging in to Information Console accessing sales_volume.
Figure 1-4 Logging in to Information Console accessing sales_volume
Figure 1-3 Logging in as a user that does not have a home folder
C h a p t e r 1 , G e t t i n g s t a r t e d 5
Understanding volumes and usersIn System Console, the system administrator creates a cluster typically consisting of two or more machines, or nodes. Then, the system administrator can create one or more volumes in the cluster.
If the system administrator has enabled e-mail notification and specifies a volume administrator e-mail address when creating a volume, BIRT iHub creates a password with which to access the volume when it is created. Then, BIRT iHub e-mails the password to the volume administrator. The volume administrator accesses the volume by logging in to Information Console using the following credentials:
■ Username: <volume name>\administrator
■ Password: <volume password BIRT iHub creates and e-mails to the volume administrator>
Only the BIRT iHub default user, Administrator, can access a newly created volume. When logging in to Information Console, the user name is not case-sensitive.
If the system administrator does not specify a volume administrator e-mail address when creating a volume, BIRT iHub does not create a password. The volume administrator can access the volume without using a password, logging in to Information Console using the following credentials:
■ Username: <volume name>\administrator
■ Password: (blank)
In Information Console, the administrator can choose My Profile to create a password for the volume.
Users are specific to a volume. A newly created volume has no users except the default user, Administrator. The Administrator user logs in to Information Console, specifying the volume. Then, the Administrator user can create one or more users of the volume. One user can access only one volume, but the administrator can create a user having the same name and password on any number of volumes.

6 M a n a g i n g Vo l u m e s a n d U s e r s
C h a p t e r 2 , S e t t i n g u p a p p l i c a t i o n u s e r s a n d g r o u p s 7
C h a p t e r
2Chapter 2Setting up application
users and groupsThis chapter contains the following topics:
■ Understanding iHub Administration
■ Accessing iHub Administration
■ About user types
■ About users
■ Creating a user
■ Editing a user
■ Viewing the list of users
■ Deleting users
■ About User Groups
■ Creating a user group
■ Editing a user group
■ Viewing the list of user groups
■ Deleting user groups
■ Accessing Logout and My Profile

8 M a n a g i n g Vo l u m e s a n d U s e r s
Understanding iHub AdministrationAn application administrator uses iHub Administration to create users and user groups, and assign users to user groups. Users perform tasks such as running designs to create documents, viewing, and working with documents. A user group supports assigning privileges on items such as designs, documents, and folders to a group of users.
About user typesInformation Console supports the following types of users and user groups:
■ AdministratorThe default user. The Administrator user has privileges to perform all tasks in BIRT iHub System.
■ AdministratorsA user group. A user belonging to the Administrators user group has privileges to perform all tasks in the BIRT iHub System. Only the default user, Administrator, or a user belonging to the Administrators user group can:
■ Access iHub Administration and create users and user groups.
■ Access My Jobs—Advanced Jobs.
■ Assign privileges on any item in a volume.
■ Configure Datamart Security when scheduling a job.
■ Select a resource group when scheduling a job.
■ Use Information Console—Manage Volume to set properties pertaining to an entire volume.
This book refers to a user having Administrators user group privileges as the administrator.
■ AllA user group. All users belong to the All user group by default. The administrator assigns a privilege to the All user group to assign the privilege to all users.
■ UserWhen differentiating between a user that has Administrators user group privileges in Information Console and a user that does not, a user is any user that does not have Administrators user group privileges, and an administrator is a user that does have Administrators user group privileges. Otherwise, user is a term that can refer to any user. In Information Console, a user with
C h a p t e r 2 , S e t t i n g u p a p p l i c a t i o n u s e r s a n d g r o u p s 9
appropriate privileges can schedule jobs, view documents, and administer files and folders.
Accessing iHub AdministrationOnly an application administrator can access iHub Administration. The application administrator accesses iHub Administration from Information Console.
How to access iHub Administration
1 Open a web browser. In the address bar, type the following URL:
http://localhost:8700/iportal
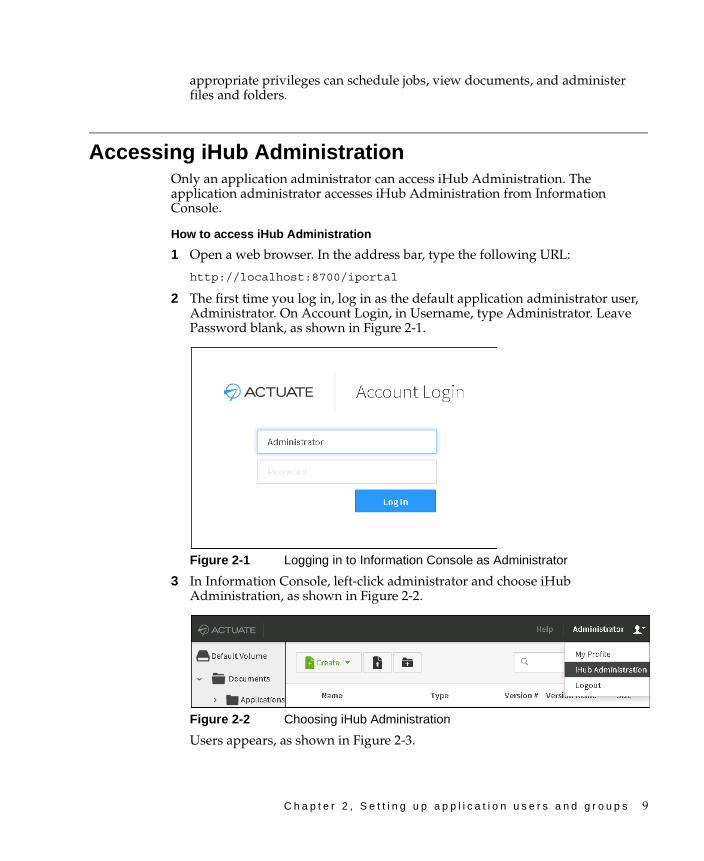
2 The first time you log in, log in as the default application administrator user, Administrator. On Account Login, in Username, type Administrator. Leave Password blank, as shown in Figure 2-1.
Figure 2-1 Logging in to Information Console as Administrator
3 In Information Console, left-click administrator and choose iHub Administration, as shown in Figure 2-2.
Figure 2-2 Choosing iHub Administration
Users appears, as shown in Figure 2-3.
10 M a n a g i n g Vo l u m e s a n d U s e r s
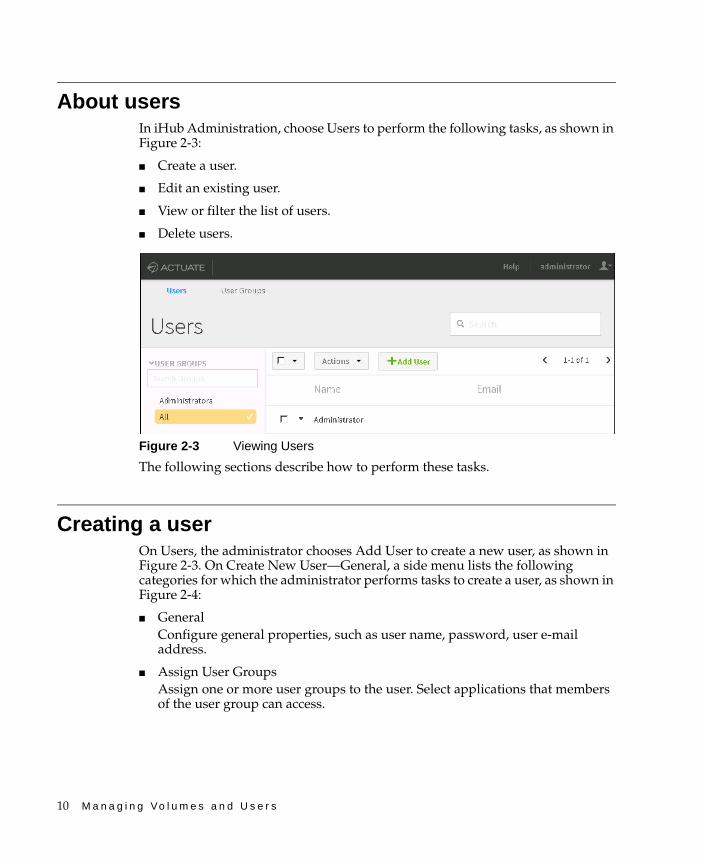
About usersIn iHub Administration, choose Users to perform the following tasks, as shown in Figure 2-3:
■ Create a user.
■ Edit an existing user.
■ View or filter the list of users.
■ Delete users.
Figure 2-3 Viewing Users
The following sections describe how to perform these tasks.
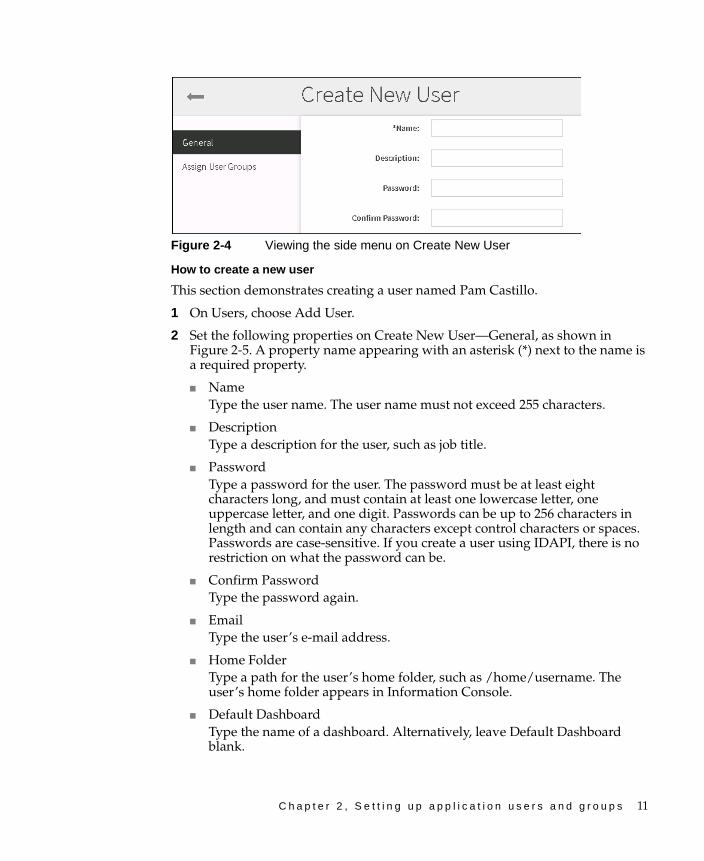
Creating a userOn Users, the administrator chooses Add User to create a new user, as shown in Figure 2-3. On Create New User—General, a side menu lists the following categories for which the administrator performs tasks to create a user, as shown in Figure 2-4:
■ GeneralConfigure general properties, such as user name, password, user e-mail address.
■ Assign User GroupsAssign one or more user groups to the user. Select applications that members of the user group can access.
C h a p t e r 2 , S e t t i n g u p a p p l i c a t i o n u s e r s a n d g r o u p s 11
Figure 2-4 Viewing the side menu on Create New User
How to create a new user
This section demonstrates creating a user named Pam Castillo.
1 On Users, choose Add User.
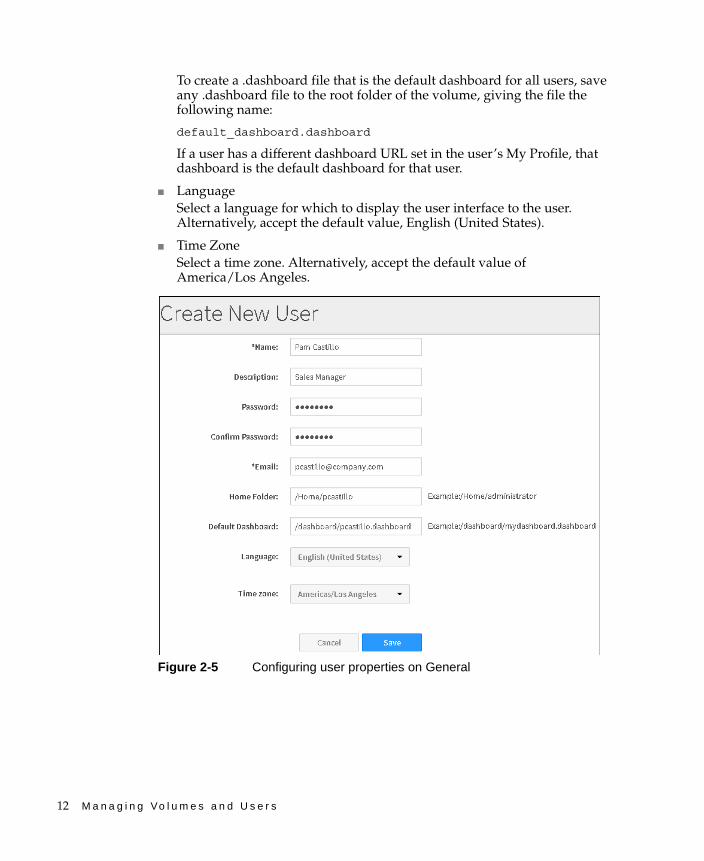
2 Set the following properties on Create New User—General, as shown in Figure 2-5. A property name appearing with an asterisk (*) next to the name is a required property.
■ NameType the user name. The user name must not exceed 255 characters.
■ DescriptionType a description for the user, such as job title.
■ PasswordType a password for the user. The password must be at least eight characters long, and must contain at least one lowercase letter, one uppercase letter, and one digit. Passwords can be up to 256 characters in length and can contain any characters except control characters or spaces. Passwords are case-sensitive. If you create a user using IDAPI, there is no restriction on what the password can be.
■ Confirm PasswordType the password again.
■ EmailType the user’s e-mail address.
■ Home FolderType a path for the user’s home folder, such as /home/username. The user’s home folder appears in Information Console.
■ Default DashboardType the name of a dashboard. Alternatively, leave Default Dashboard blank.
12 M a n a g i n g Vo l u m e s a n d U s e r s
To create a .dashboard file that is the default dashboard for all users, save any .dashboard file to the root folder of the volume, giving the file the following name:
default_dashboard.dashboard
If a user has a different dashboard URL set in the user’s My Profile, that dashboard is the default dashboard for that user.
■ LanguageSelect a language for which to display the user interface to the user. Alternatively, accept the default value, English (United States).
■ Time ZoneSelect a time zone. Alternatively, accept the default value of America/Los Angeles.
Figure 2-5 Configuring user properties on General
C h a p t e r 2 , S e t t i n g u p a p p l i c a t i o n u s e r s a n d g r o u p s 13
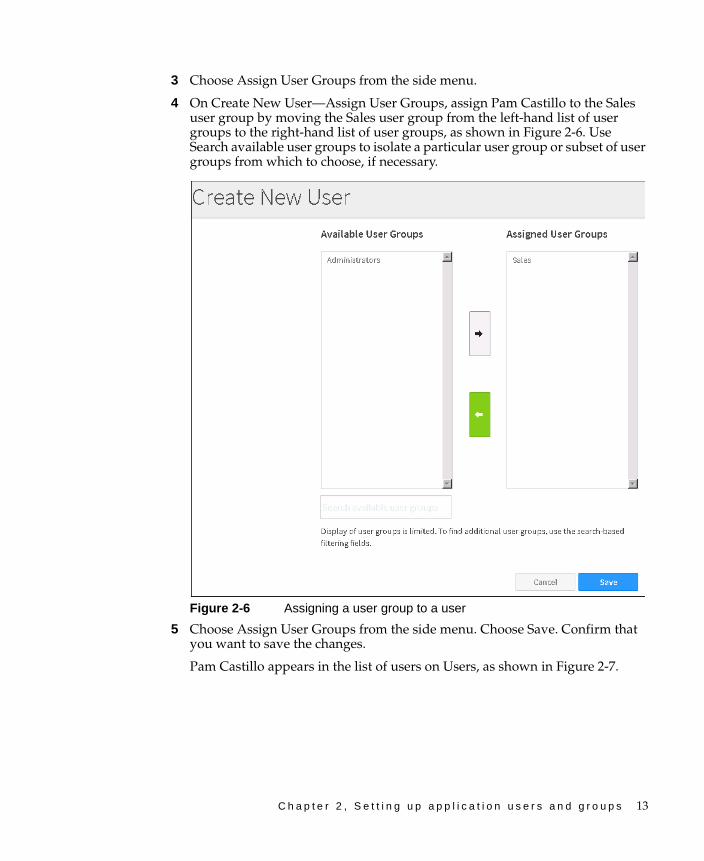
3 Choose Assign User Groups from the side menu.
4 On Create New User—Assign User Groups, assign Pam Castillo to the Sales user group by moving the Sales user group from the left-hand list of user groups to the right-hand list of user groups, as shown in Figure 2-6. Use Search available user groups to isolate a particular user group or subset of user groups from which to choose, if necessary.
Figure 2-6 Assigning a user group to a user
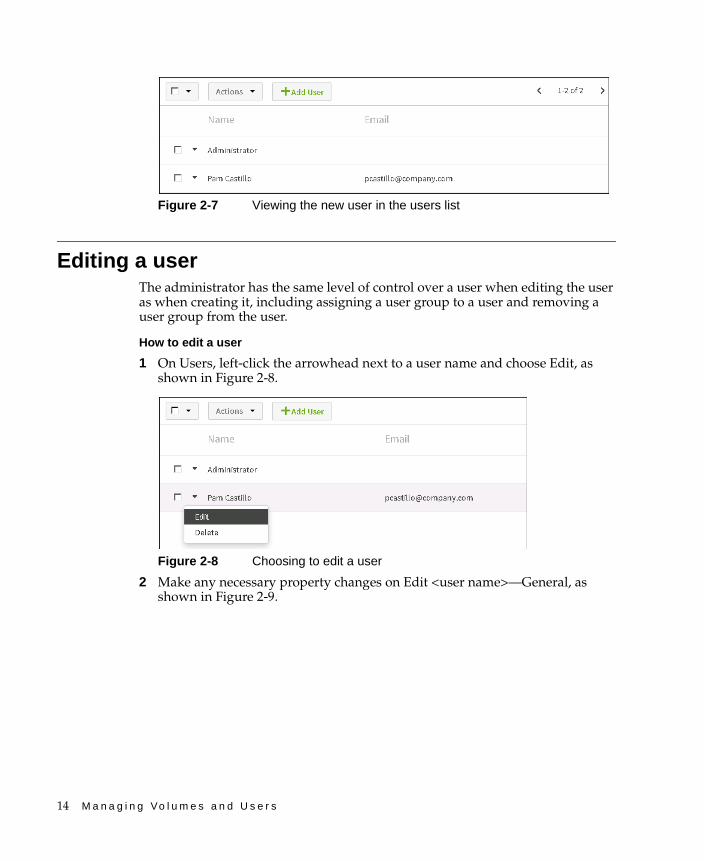
5 Choose Assign User Groups from the side menu. Choose Save. Confirm that you want to save the changes.
Pam Castillo appears in the list of users on Users, as shown in Figure 2-7.
14 M a n a g i n g Vo l u m e s a n d U s e r s
Figure 2-7 Viewing the new user in the users list
Editing a userThe administrator has the same level of control over a user when editing the user as when creating it, including assigning a user group to a user and removing a user group from the user.
How to edit a user
1 On Users, left-click the arrowhead next to a user name and choose Edit, as shown in Figure 2-8.
Figure 2-8 Choosing to edit a user
2 Make any necessary property changes on Edit <user name>—General, as shown in Figure 2-9.

C h a p t e r 2 , S e t t i n g u p a p p l i c a t i o n u s e r s a n d g r o u p s 15
Figure 2-9 Editing a user
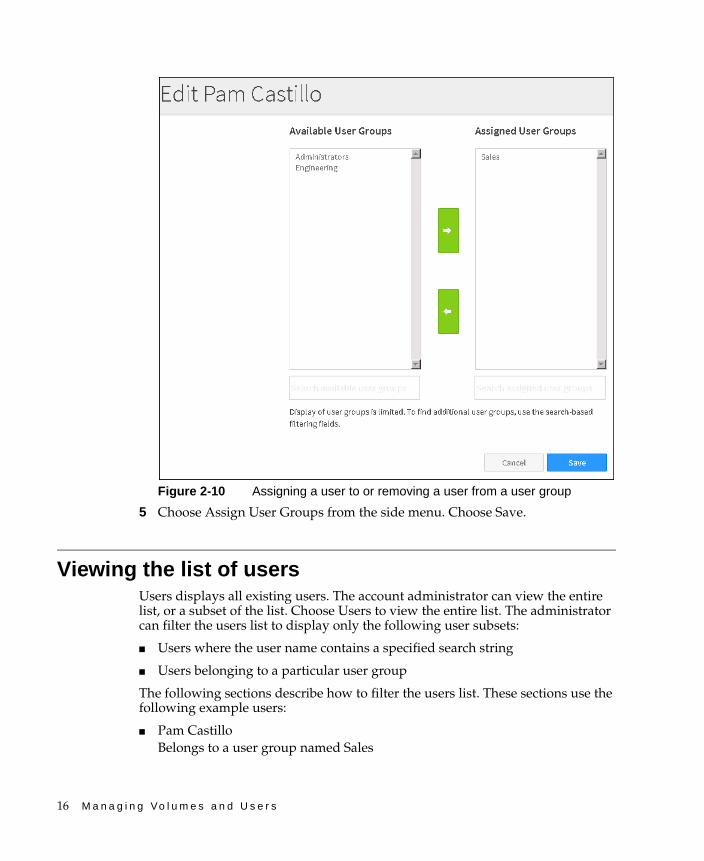
3 Choose User Groups from the side menu.
4 On Edit <user name>—User Groups, assign one or more user groups to a user by moving one or more user groups from the left-hand user group list to the right-hand user group list using the right arrow. Remove one or more user groups from a user by moving one or more user groups from the right-hand user group list to the left-hand user group list using the left arrow, as shown in Figure 2-10. Use Search available user groups or Search assigned user groups to isolate a particular user group or subset of user groups from which to choose, if necessary.
16 M a n a g i n g Vo l u m e s a n d U s e r s
Figure 2-10 Assigning a user to or removing a user from a user group
5 Choose Assign User Groups from the side menu. Choose Save.
Viewing the list of usersUsers displays all existing users. The account administrator can view the entire list, or a subset of the list. Choose Users to view the entire list. The administrator can filter the users list to display only the following user subsets:
■ Users where the user name contains a specified search string
■ Users belonging to a particular user group
The following sections describe how to filter the users list. These sections use the following example users:
■ Pam CastilloBelongs to a user group named Sales
C h a p t e r 2 , S e t t i n g u p a p p l i c a t i o n u s e r s a n d g r o u p s 17
■ Walter OsborneBelongs to a user group named Engineering
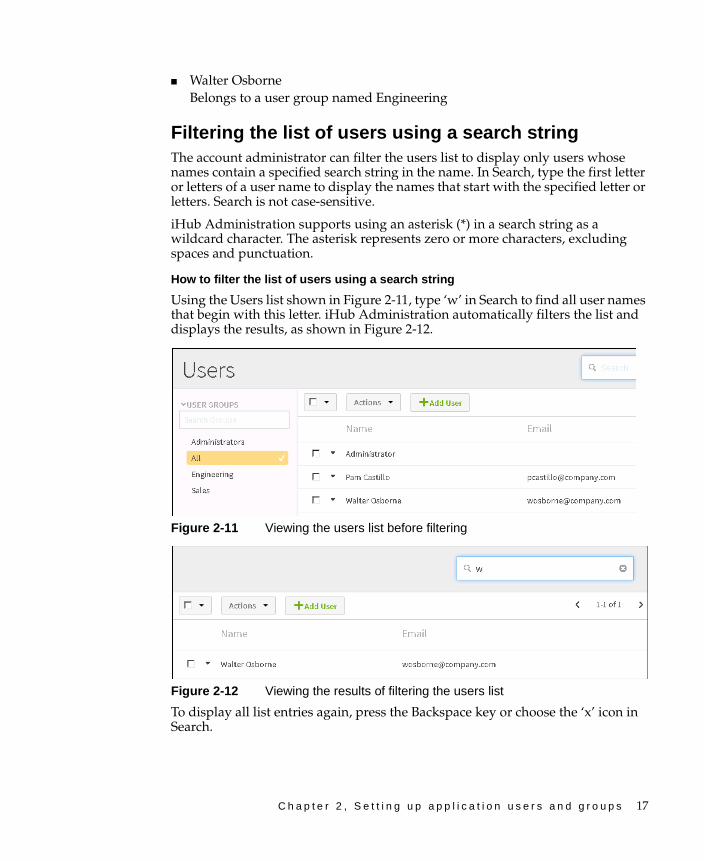
Filtering the list of users using a search stringThe account administrator can filter the users list to display only users whose names contain a specified search string in the name. In Search, type the first letter or letters of a user name to display the names that start with the specified letter or letters. Search is not case-sensitive.
iHub Administration supports using an asterisk (*) in a search string as a wildcard character. The asterisk represents zero or more characters, excluding spaces and punctuation.
How to filter the list of users using a search string
Using the Users list shown in Figure 2-11, type ‘w’ in Search to find all user names that begin with this letter. iHub Administration automatically filters the list and displays the results, as shown in Figure 2-12.
Figure 2-11 Viewing the users list before filtering
Figure 2-12 Viewing the results of filtering the users list
To display all list entries again, press the Backspace key or choose the ‘x’ icon in Search.
18 M a n a g i n g Vo l u m e s a n d U s e r s
Filtering the list of users by user groupThe account administrator can filter the users list to display only the users belonging to a selected user group.
How to filter the list of users by user group
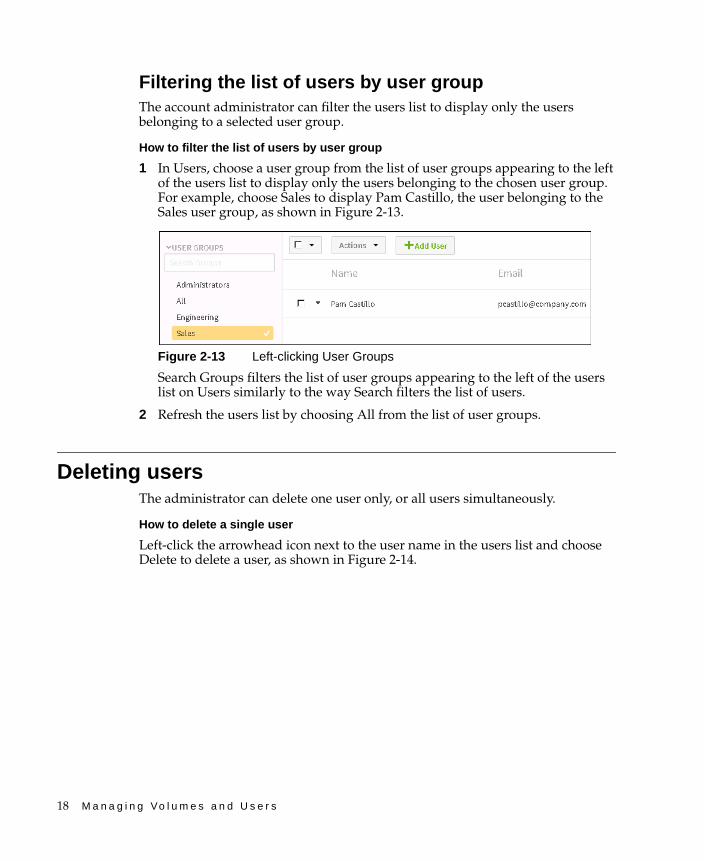
1 In Users, choose a user group from the list of user groups appearing to the left of the users list to display only the users belonging to the chosen user group. For example, choose Sales to display Pam Castillo, the user belonging to the Sales user group, as shown in Figure 2-13.
Figure 2-13 Left-clicking User Groups
Search Groups filters the list of user groups appearing to the left of the users list on Users similarly to the way Search filters the list of users.
2 Refresh the users list by choosing All from the list of user groups.
Deleting usersThe administrator can delete one user only, or all users simultaneously.
How to delete a single user
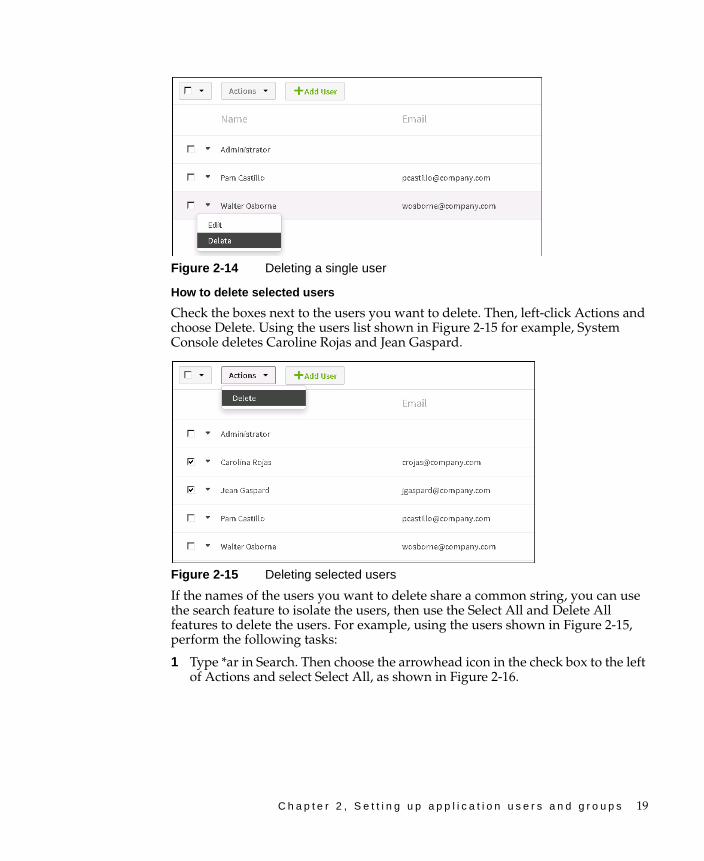
Left-click the arrowhead icon next to the user name in the users list and choose Delete to delete a user, as shown in Figure 2-14.
C h a p t e r 2 , S e t t i n g u p a p p l i c a t i o n u s e r s a n d g r o u p s 19
Figure 2-14 Deleting a single user
How to delete selected users
Check the boxes next to the users you want to delete. Then, left-click Actions and choose Delete. Using the users list shown in Figure 2-15 for example, System Console deletes Caroline Rojas and Jean Gaspard.
Figure 2-15 Deleting selected users
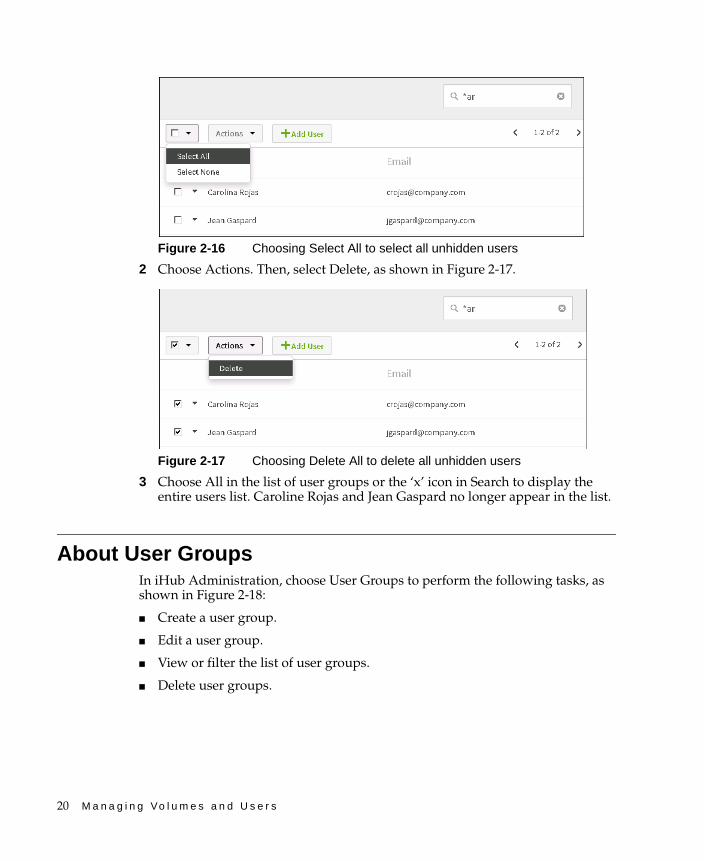
If the names of the users you want to delete share a common string, you can use the search feature to isolate the users, then use the Select All and Delete All features to delete the users. For example, using the users shown in Figure 2-15, perform the following tasks:
1 Type *ar in Search. Then choose the arrowhead icon in the check box to the left of Actions and select Select All, as shown in Figure 2-16.
20 M a n a g i n g Vo l u m e s a n d U s e r s
Figure 2-16 Choosing Select All to select all unhidden users
2 Choose Actions. Then, select Delete, as shown in Figure 2-17.
Figure 2-17 Choosing Delete All to delete all unhidden users
3 Choose All in the list of user groups or the ‘x’ icon in Search to display the entire users list. Caroline Rojas and Jean Gaspard no longer appear in the list.
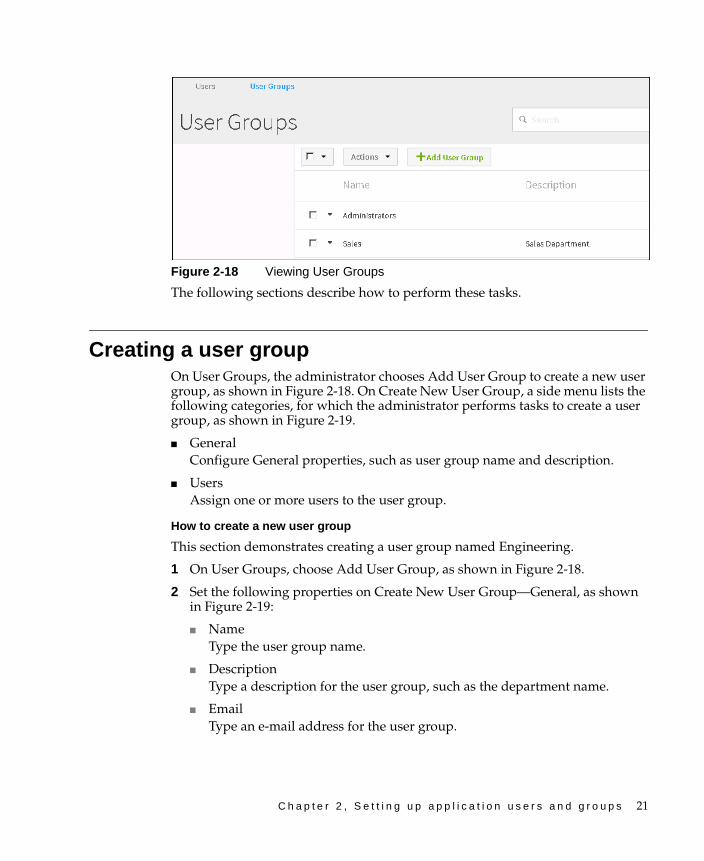
About User GroupsIn iHub Administration, choose User Groups to perform the following tasks, as shown in Figure 2-18:
■ Create a user group.
■ Edit a user group.
■ View or filter the list of user groups.
■ Delete user groups.
C h a p t e r 2 , S e t t i n g u p a p p l i c a t i o n u s e r s a n d g r o u p s 21
Figure 2-18 Viewing User Groups
The following sections describe how to perform these tasks.
Creating a user groupOn User Groups, the administrator chooses Add User Group to create a new user group, as shown in Figure 2-18. On Create New User Group, a side menu lists the following categories, for which the administrator performs tasks to create a user group, as shown in Figure 2-19.
■ GeneralConfigure General properties, such as user group name and description.
■ UsersAssign one or more users to the user group.
How to create a new user group
This section demonstrates creating a user group named Engineering.
1 On User Groups, choose Add User Group, as shown in Figure 2-18.
2 Set the following properties on Create New User Group—General, as shown in Figure 2-19:
■ NameType the user group name.
■ DescriptionType a description for the user group, such as the department name.
■ EmailType an e-mail address for the user group.
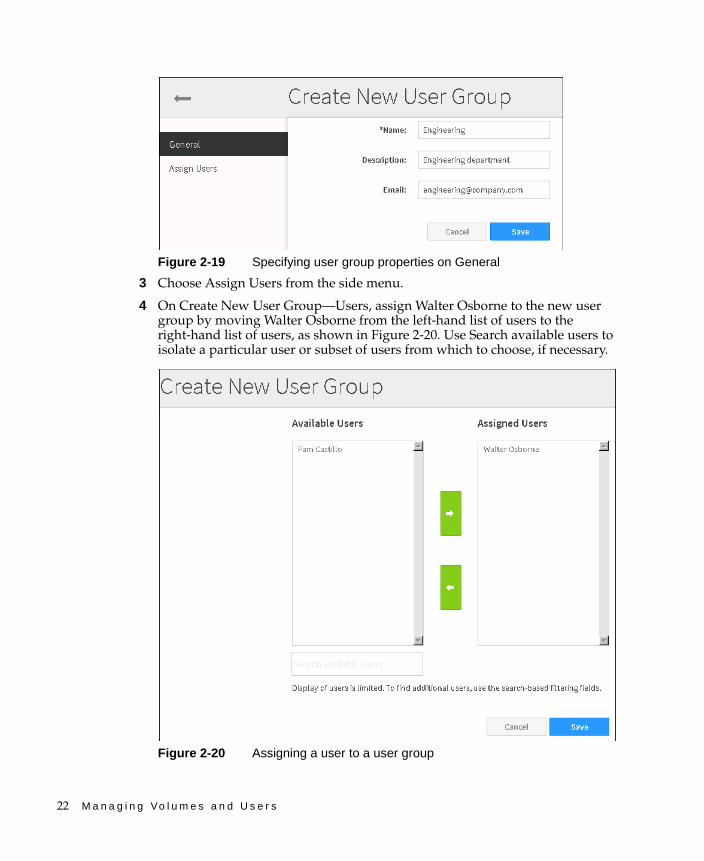
22 M a n a g i n g Vo l u m e s a n d U s e r s
Figure 2-19 Specifying user group properties on General
3 Choose Assign Users from the side menu.
4 On Create New User Group—Users, assign Walter Osborne to the new user group by moving Walter Osborne from the left-hand list of users to the right-hand list of users, as shown in Figure 2-20. Use Search available users to isolate a particular user or subset of users from which to choose, if necessary.
Figure 2-20 Assigning a user to a user group
C h a p t e r 2 , S e t t i n g u p a p p l i c a t i o n u s e r s a n d g r o u p s 23
Choose Save. Confirm that you want to save the changes.
Engineering appears in the list of user groups on User Groups.
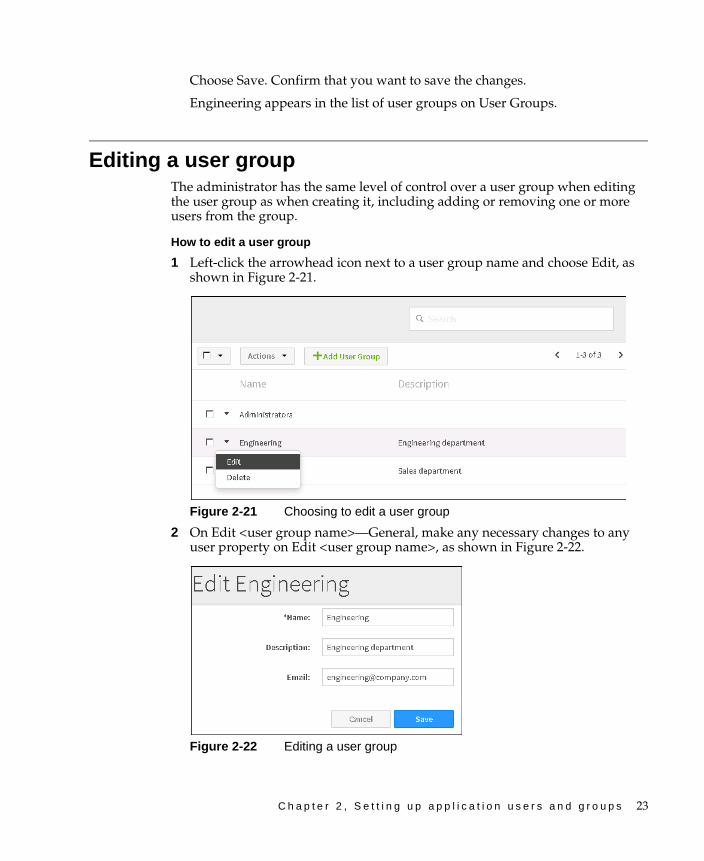
Editing a user groupThe administrator has the same level of control over a user group when editing the user group as when creating it, including adding or removing one or more users from the group.
How to edit a user group
1 Left-click the arrowhead icon next to a user group name and choose Edit, as shown in Figure 2-21.
Figure 2-21 Choosing to edit a user group
2 On Edit <user group name>—General, make any necessary changes to any user property on Edit <user group name>, as shown in Figure 2-22.
Figure 2-22 Editing a user group
24 M a n a g i n g Vo l u m e s a n d U s e r s
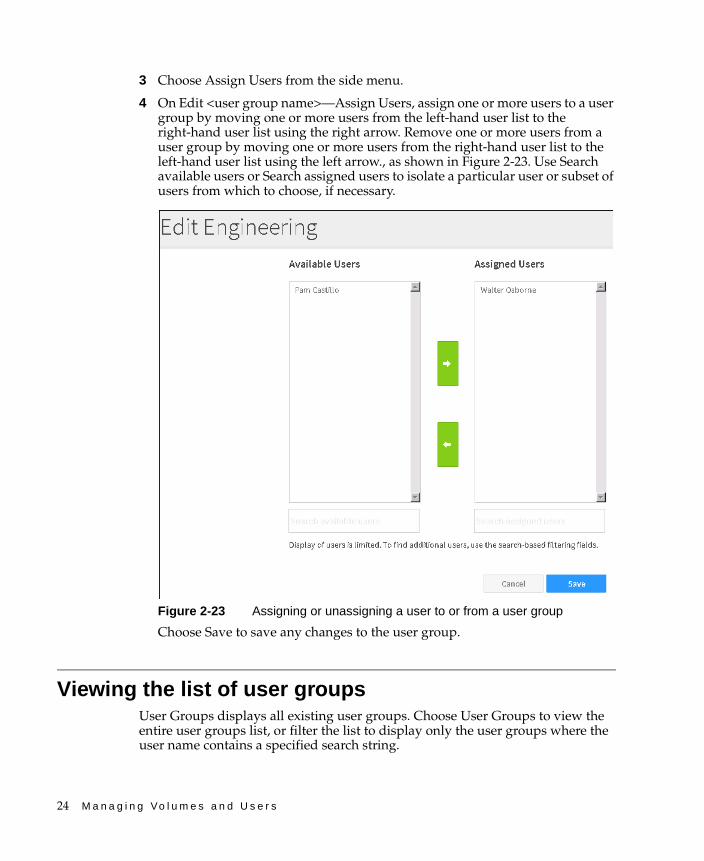
3 Choose Assign Users from the side menu.
4 On Edit <user group name>—Assign Users, assign one or more users to a user group by moving one or more users from the left-hand user list to the right-hand user list using the right arrow. Remove one or more users from a user group by moving one or more users from the right-hand user list to the left-hand user list using the left arrow., as shown in Figure 2-23. Use Search available users or Search assigned users to isolate a particular user or subset of users from which to choose, if necessary.
Figure 2-23 Assigning or unassigning a user to or from a user group
Choose Save to save any changes to the user group.
Viewing the list of user groupsUser Groups displays all existing user groups. Choose User Groups to view the entire user groups list, or filter the list to display only the user groups where the user name contains a specified search string.
C h a p t e r 2 , S e t t i n g u p a p p l i c a t i o n u s e r s a n d g r o u p s 25
iHub Administration supports using an asterisk (*) in a search string as a wildcard character. The asterisk represents zero or more characters, excluding spaces and punctuation.
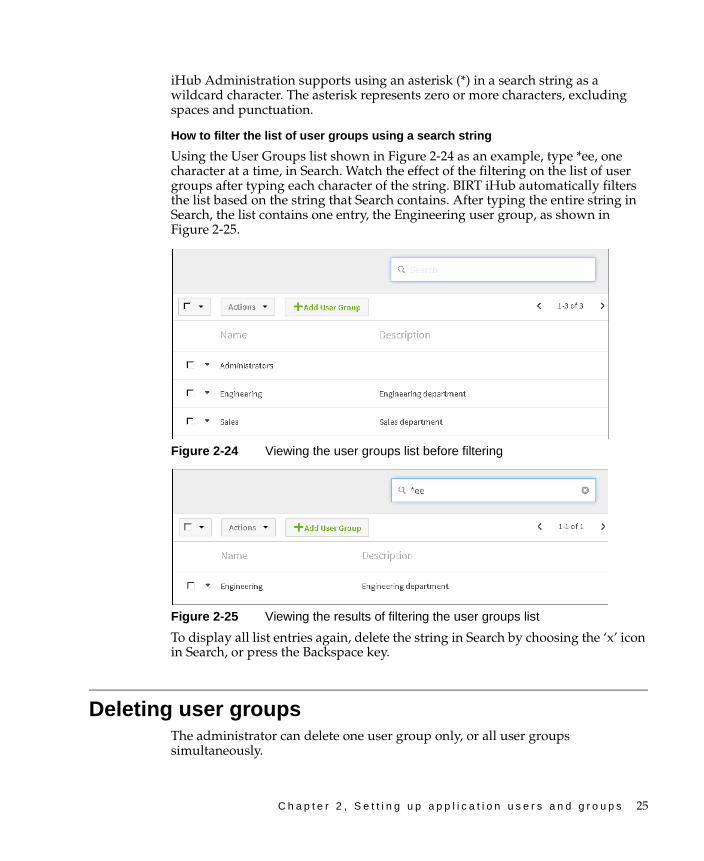
How to filter the list of user groups using a search string
Using the User Groups list shown in Figure 2-24 as an example, type *ee, one character at a time, in Search. Watch the effect of the filtering on the list of user groups after typing each character of the string. BIRT iHub automatically filters the list based on the string that Search contains. After typing the entire string in Search, the list contains one entry, the Engineering user group, as shown in Figure 2-25.
Figure 2-24 Viewing the user groups list before filtering
Figure 2-25 Viewing the results of filtering the user groups list
To display all list entries again, delete the string in Search by choosing the ‘x’ icon in Search, or press the Backspace key.
Deleting user groupsThe administrator can delete one user group only, or all user groups simultaneously.

26 M a n a g i n g Vo l u m e s a n d U s e r s
How to delete a single user group
Left-click the arrowhead icon next to the user group name in the list of user groups and choose Delete to delete a user group, as shown in Figure 2-26.
Figure 2-26 Deleting a single user group
How to delete selected user groups
Check the boxes next to the user groups you want to delete. Then, left-click Actions and choose Delete All. Using the user groups list shown in Figure 2-27 for example, System Console deletes Eastern and Western.
Figure 2-27 Deleting selected user groups
If the names of the user groups you want to delete share a common string, you can use the search feature to isolate the user groups, then use the Select All and Delete All features to delete the user groups. For example, using the user groups shown in Figure 2-27, perform the following tasks:
C h a p t e r 2 , S e t t i n g u p a p p l i c a t i o n u s e r s a n d g r o u p s 27
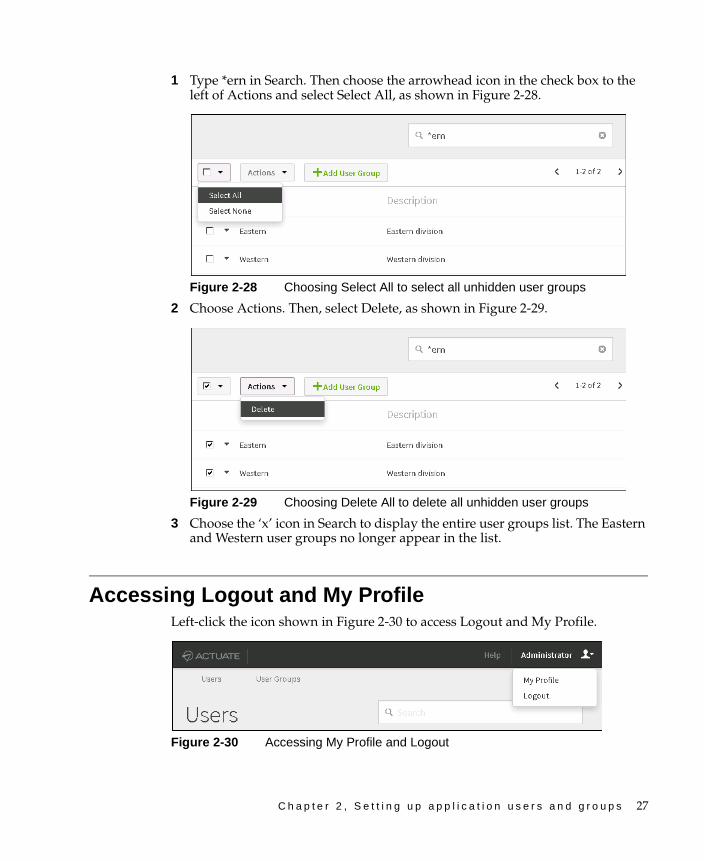
1 Type *ern in Search. Then choose the arrowhead icon in the check box to the left of Actions and select Select All, as shown in Figure 2-28.
Figure 2-28 Choosing Select All to select all unhidden user groups
2 Choose Actions. Then, select Delete, as shown in Figure 2-29.
Figure 2-29 Choosing Delete All to delete all unhidden user groups
3 Choose the ‘x’ icon in Search to display the entire user groups list. The Eastern and Western user groups no longer appear in the list.
Accessing Logout and My ProfileLeft-click the icon shown in Figure 2-30 to access Logout and My Profile.
Figure 2-30 Accessing My Profile and Logout
28 M a n a g i n g Vo l u m e s a n d U s e r s
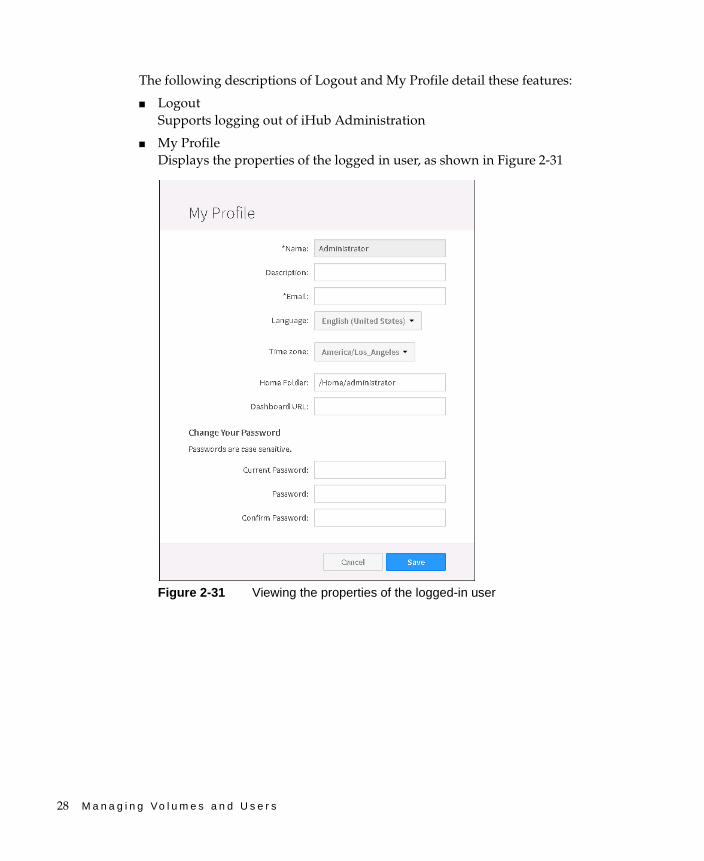
The following descriptions of Logout and My Profile detail these features:
■ LogoutSupports logging out of iHub Administration
■ My Profile Displays the properties of the logged in user, as shown in Figure 2-31
Figure 2-31 Viewing the properties of the logged-in user
C h a p t e r 3 , M a n a g i n g v o l u m e - l e v e l o p e r a t i o n s 29
C h a p t e r
3Chapter 3Managing volume-level
operationsThis chapter contains the following topics:
■ Working at the volume level
■ About user and user group limits
30 M a n a g i n g Vo l u m e s a n d U s e r s
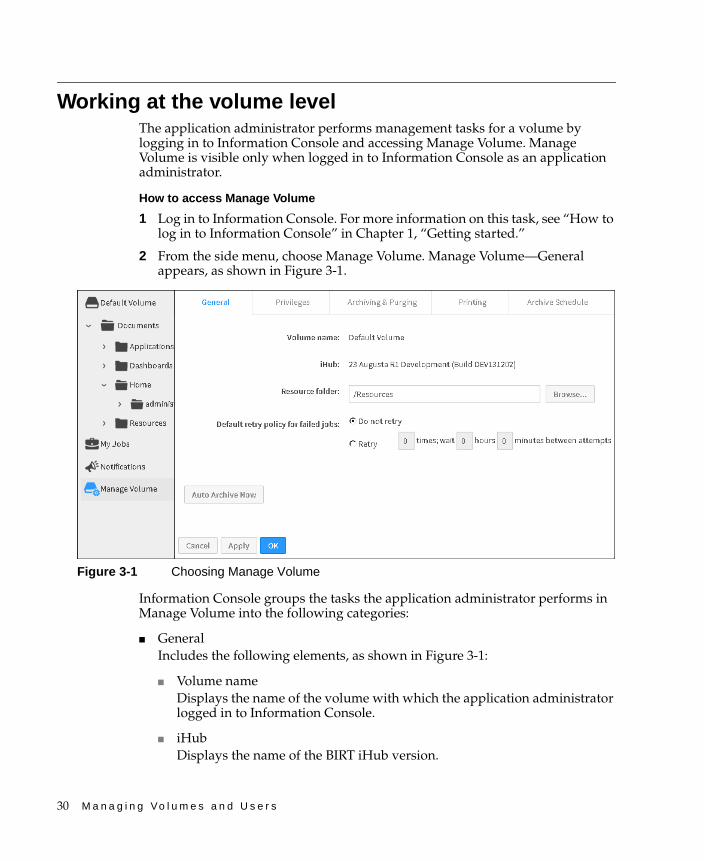
Working at the volume levelThe application administrator performs management tasks for a volume by logging in to Information Console and accessing Manage Volume. Manage Volume is visible only when logged in to Information Console as an application administrator.
How to access Manage Volume
1 Log in to Information Console. For more information on this task, see “How to log in to Information Console” in Chapter 1, “Getting started.”
2 From the side menu, choose Manage Volume. Manage Volume—General appears, as shown in Figure 3-1.
Information Console groups the tasks the application administrator performs in Manage Volume into the following categories:
■ GeneralIncludes the following elements, as shown in Figure 3-1:
■ Volume nameDisplays the name of the volume with which the application administrator logged in to Information Console.
■ iHubDisplays the name of the BIRT iHub version.
Figure 3-1 Choosing Manage Volume
C h a p t e r 3 , M a n a g i n g v o l u m e - l e v e l o p e r a t i o n s 31
■ Resource folderDisplays the name of the folder containing sample resources. /Resources is the default.
■ Default retry policy for failed jobsChoose whether to retry a job that has failed. If choosing to retry a failed job, specify the number of times to retry the job, and the hours and minutes between attempts.
■ Auto Archive NowChoose Auto Archive Now to run an archiving cycle immediately. Auto Archive Now changes to Stop Archive Thread after choosing. Choose Stop Archive Thread to stop the archiving cycle.
■ PrivilegesAssign privileges such as read, write, and execute on the volume root folder to users and user groups. For more information, see “Setting volume privileges,” later in this chapter.
■ Archiving and Purging
■ Set an autoarchiving policy for the volume.
■ Set a volume-level purge policy for job notices.
For more information, see “Setting volume archiving and purging policies,” later in this chapter.
■ PrintingSet volume-level printing properties. For more information, see “Setting volume-level printer options,” later in this chapter.
■ Archive ScheduleSchedule an archiving cycle. For more information, see “Scheduling an archiving cycle,” later in this chapter.
The following sections describe these categories.
Setting volume privilegesBy default, all volume users have visible and read privilege on the volume root folder. The All user group represents all users. Assigning visible and read privileges to the All user group assigns these privileges to all users. The application administrator can assign privileges on the root folder to any user or user group.
How to set privileges on the volume root folder
1 Choose Manage Volume from the side menu in Information Console. Then, select Privileges.
32 M a n a g i n g Vo l u m e s a n d U s e r s
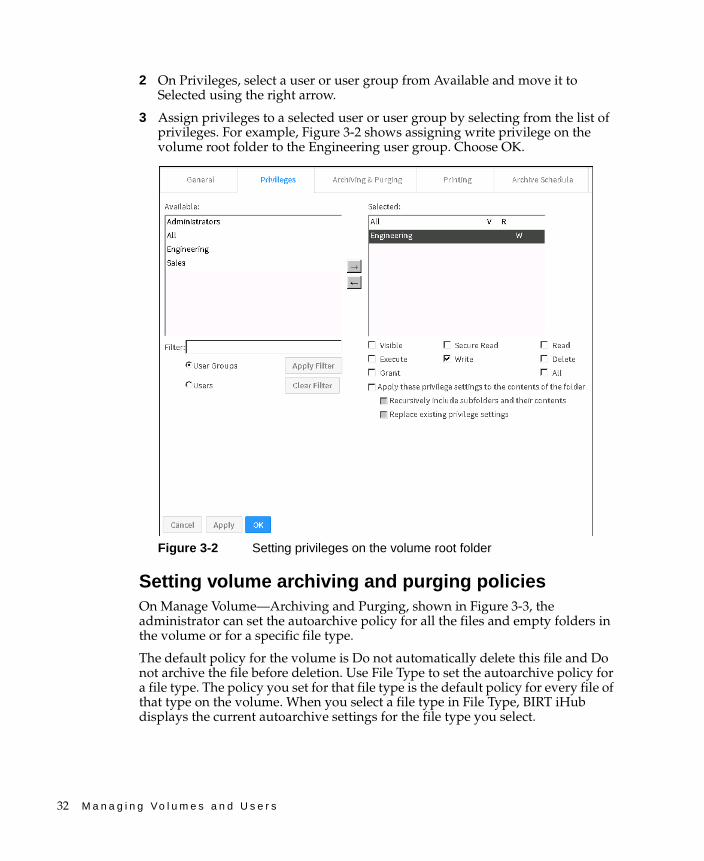
2 On Privileges, select a user or user group from Available and move it to Selected using the right arrow.
3 Assign privileges to a selected user or user group by selecting from the list of privileges. For example, Figure 3-2 shows assigning write privilege on the volume root folder to the Engineering user group. Choose OK.
Figure 3-2 Setting privileges on the volume root folder
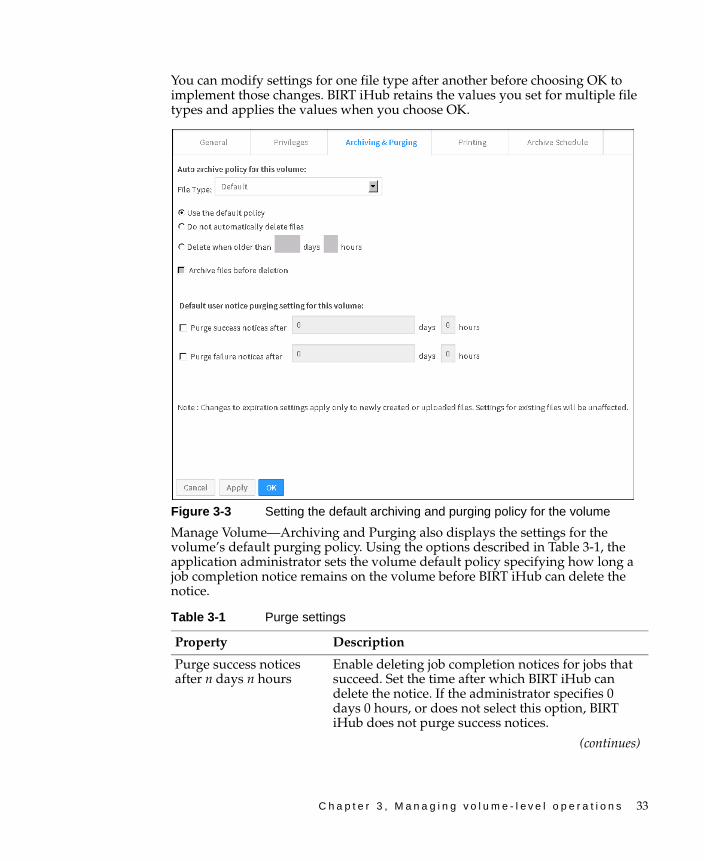
Setting volume archiving and purging policiesOn Manage Volume—Archiving and Purging, shown in Figure 3-3, the administrator can set the autoarchive policy for all the files and empty folders in the volume or for a specific file type.
The default policy for the volume is Do not automatically delete this file and Do not archive the file before deletion. Use File Type to set the autoarchive policy for a file type. The policy you set for that file type is the default policy for every file of that type on the volume. When you select a file type in File Type, BIRT iHub displays the current autoarchive settings for the file type you select.
C h a p t e r 3 , M a n a g i n g v o l u m e - l e v e l o p e r a t i o n s 33
You can modify settings for one file type after another before choosing OK to implement those changes. BIRT iHub retains the values you set for multiple file types and applies the values when you choose OK.
Figure 3-3 Setting the default archiving and purging policy for the volume
Manage Volume—Archiving and Purging also displays the settings for the volume’s default purging policy. Using the options described in Table 3-1, the application administrator sets the volume default policy specifying how long a job completion notice remains on the volume before BIRT iHub can delete the notice.
Table 3-1 Purge settings
Property Description
Purge success notices after n days n hours
Enable deleting job completion notices for jobs that succeed. Set the time after which BIRT iHub can delete the notice. If the administrator specifies 0 days 0 hours, or does not select this option, BIRT iHub does not purge success notices.
(continues)
34 M a n a g i n g Vo l u m e s a n d U s e r s
Archiving files and removing empty foldersBy performing the following volume autoarchiving tasks, application administrators and users specify the policy that BIRT iHub uses to delete files and empty folders, and archive files and folders in the volume:
■ Using Information Console, an administrator can set the autoarchive policy for the entire volume and for specific files and folders.
■ A user can set the autoarchive policy for specific files and folders. A user must have read, write, and delete privileges on the file or folder. When submitting a job, a user can also set the autoarchive policy on the output document.
The following points are useful to know when setting autoarchive policy:
■ The volume autoarchive policy is the default policy for every file and folder in the volume. If you change the policy for a file type, specific file, or folder, that policy supersedes the volume policy.
■ If you specify a policy for a particular folder that differs from its parent folder policy, all the files and folders in that particular folder inherit its policy as the default policy.
■ If you specify a policy for a particular file, that policy supersedes the policy the file inherits from its containing folder.
■ If you do not specify a policy for a file type on Properties—Auto Archive for a folder, any file of that file type within the folder inherits the folder policy.
■ The autoarchive process removes a folder if it is empty or if the following conditions are true:
■ Every subfolder is empty.
■ The age of every file in the folder has expired.
BIRT iHub determines whether to perform autoarchiving on an item by processing volume contents using the following order of precedence and evaluating:
■ The policy on an individual file or empty folder
■ The policy for the specific file type or folder, from the containing folder’s File Type list
Purge failure notices after n days n hours
Enable deleting job completion notices for jobs that fail. Set the time after which BIRT iHub can delete the notice. If the administrator specifies 0 days 0 hours, or does not select this option, BIRT iHub does not purge failure notices.
Table 3-1 Purge settings (continued)
Property Description
C h a p t e r 3 , M a n a g i n g v o l u m e - l e v e l o p e r a t i o n s 35
■ The containing folder’s default policy
■ The policy for the specific file type or folder, from the File Type list of the folder containing the folder
■ The policy for the specific file type or folder, from the File Type list of folders that are higher in the hierarchy
■ The policy for the volume
To see a folder’s autoarchive policy, point to the arrowhead icon next to a folder and choose Auto Archive. On Auto Archive policy for this folder, choose View Policy.
To see a file’s auto archive policy, left-click the arrowhead icon next to the file and choose Details. The policy appears under the Auto Archive heading.
When BIRT iHub performs autoarchiving, it starts from the volume’s root folder. For each file whose age has expired, BIRT iHub deletes the file. If the Archive files before deletion option is selected, BIRT iHub calls the archive application for the volume, then deletes the file if the archive process succeeds. If the archive process fails, BIRT iHub does not delete the file.
Setting volume-level printer optionsThe volume recognizes and supports printers that are set up for BIRT iHub. You do not have to install printers specifically for the volume. You do, however, customize printer settings for each printer that is available to the volume.
Only an application administrator can set printer options at the volume level. Users can accept values for these printer properties as defaults, or set them on individual print jobs.
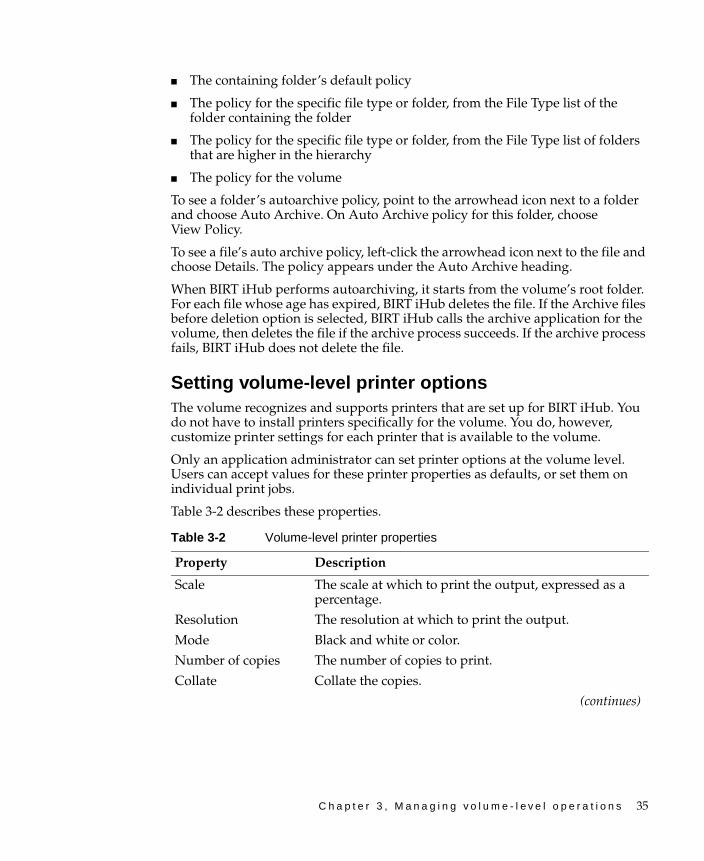
Table 3-2 describes these properties.
Table 3-2 Volume-level printer properties
Property Description
Scale The scale at which to print the output, expressed as a percentage.
Resolution The resolution at which to print the output.
Mode Black and white or color.
Number of copies The number of copies to print.
Collate Collate the copies.
(continues)
36 M a n a g i n g Vo l u m e s a n d U s e r s
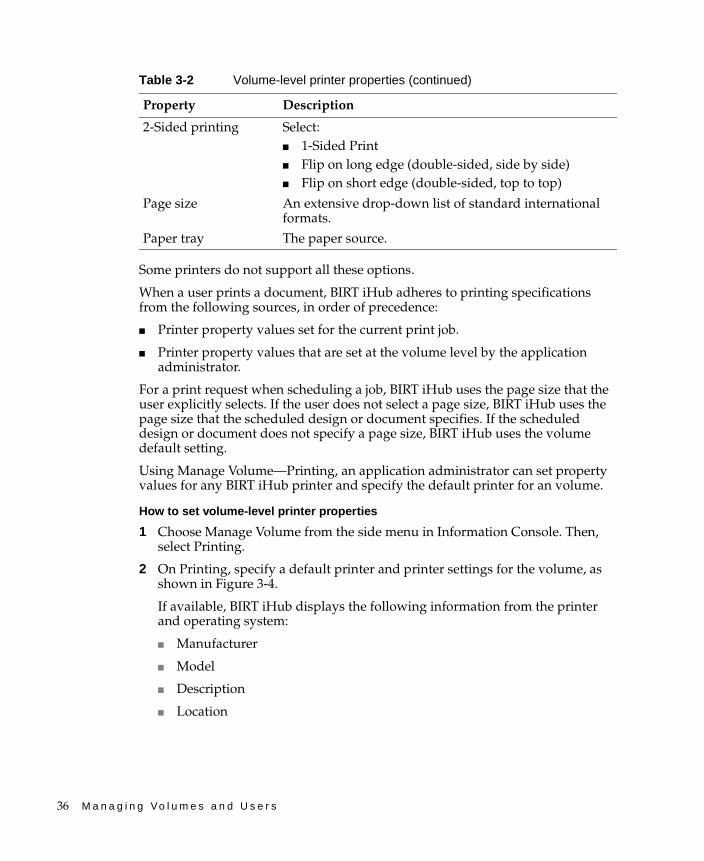
Some printers do not support all these options.
When a user prints a document, BIRT iHub adheres to printing specifications from the following sources, in order of precedence:
■ Printer property values set for the current print job.
■ Printer property values that are set at the volume level by the application administrator.
For a print request when scheduling a job, BIRT iHub uses the page size that the user explicitly selects. If the user does not select a page size, BIRT iHub uses the page size that the scheduled design or document specifies. If the scheduled design or document does not specify a page size, BIRT iHub uses the volume default setting.
Using Manage Volume—Printing, an application administrator can set property values for any BIRT iHub printer and specify the default printer for an volume.
How to set volume-level printer properties
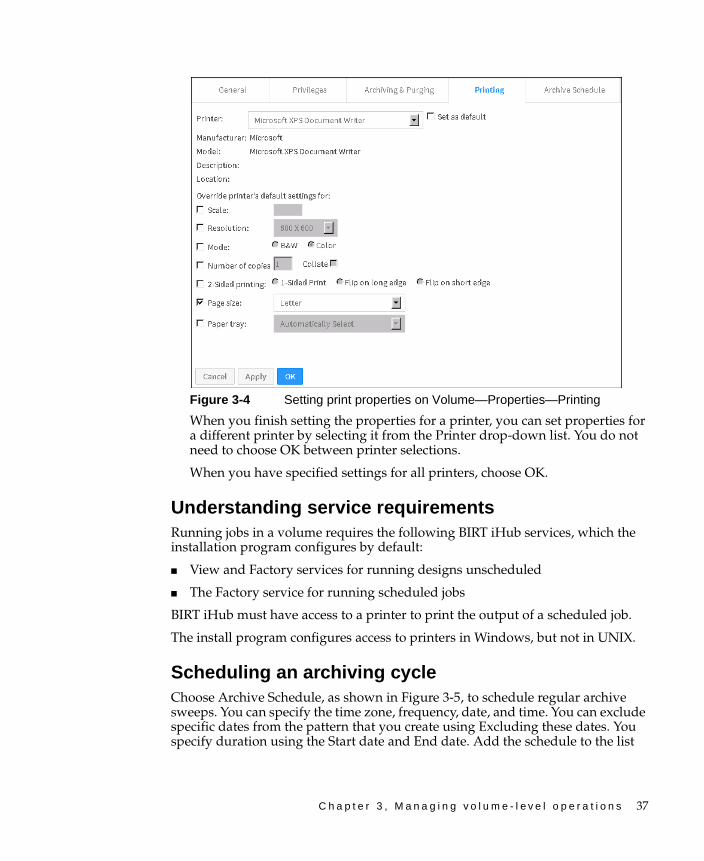
1 Choose Manage Volume from the side menu in Information Console. Then, select Printing.
2 On Printing, specify a default printer and printer settings for the volume, as shown in Figure 3-4.
If available, BIRT iHub displays the following information from the printer and operating system:
■ Manufacturer
■ Model
■ Description
■ Location
2-Sided printing Select:■ 1-Sided Print■ Flip on long edge (double-sided, side by side)■ Flip on short edge (double-sided, top to top)
Page size An extensive drop-down list of standard international formats.
Paper tray The paper source.
Table 3-2 Volume-level printer properties (continued)
Property Description
C h a p t e r 3 , M a n a g i n g v o l u m e - l e v e l o p e r a t i o n s 37
Figure 3-4 Setting print properties on Volume—Properties—Printing
When you finish setting the properties for a printer, you can set properties for a different printer by selecting it from the Printer drop-down list. You do not need to choose OK between printer selections.
When you have specified settings for all printers, choose OK.
Understanding service requirementsRunning jobs in a volume requires the following BIRT iHub services, which the installation program configures by default:
■ View and Factory services for running designs unscheduled
■ The Factory service for running scheduled jobs
BIRT iHub must have access to a printer to print the output of a scheduled job.
The install program configures access to printers in Windows, but not in UNIX.
Scheduling an archiving cycleChoose Archive Schedule, as shown in Figure 3-5, to schedule regular archive sweeps. You can specify the time zone, frequency, date, and time. You can exclude specific dates from the pattern that you create using Excluding these dates. You specify duration using the Start date and End date. Add the schedule to the list

38 M a n a g i n g Vo l u m e s a n d U s e r s
of schedules by choosing Add Schedule Line. Remove a schedule by selecting the schedule from the list of schedules and choosing Delete Schedule Line.
By default, BIRT iHub performs an autoarchive sweep once daily.
Figure 3-5 Configuring an archiving schedule
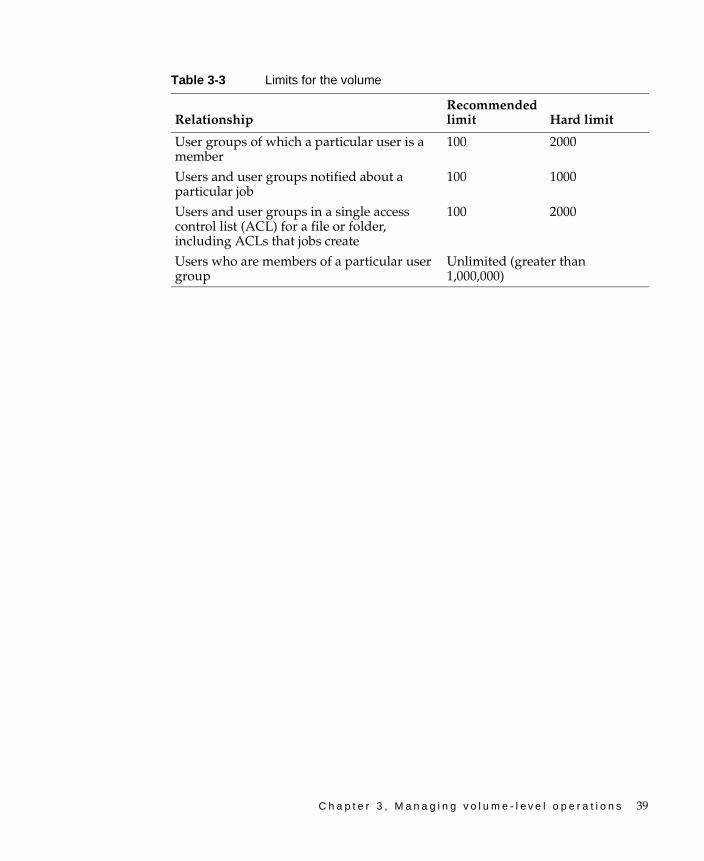
About user and user group limitsSome of the relationships in the volume have recommended and hard limits. If you adhere to the recommended limits, the appearance, behavior, and performance of Information Console is acceptable. Your web browser imposes the hard limits. Table 3-3 shows the limits for the volume.
C h a p t e r 3 , M a n a g i n g v o l u m e - l e v e l o p e r a t i o n s 39
Table 3-3 Limits for the volume
RelationshipRecommended limit Hard limit
User groups of which a particular user is a member
100 2000
Users and user groups notified about a particular job
100 1000
Users and user groups in a single access control list (ACL) for a file or folder, including ACLs that jobs create
100 2000
Users who are members of a particular user group
Unlimited (greater than 1,000,000)

40 M a n a g i n g Vo l u m e s a n d U s e r s
C h a p t e r 4 , E x p l o r i n g a d m i n i s t r a t i v e c a p a b i l i t i e s 41
C h a p t e r
4Chapter 4Exploring administrative
capabilitiesThis chapter contains the following topics:
■ Using the /Applications folder
■ About locale maps
■ Using Advanced Jobs
42 M a n a g i n g Vo l u m e s a n d U s e r s
Using the /Applications folderIn Information Console, /Applications is a folder for BIRT iHub applications that developers publish. Actuate recommends that the administrator perform the following actions regarding the /Applications folder as a best practice:
■ Create a user group named Developers for example, then assign read, execute, and write privilege on the /Applications folder to the Developers user group.
■ Assign only execute privilege on the /Applications folder to users who are not developers and to the default All user group so that the /Applications folder is visible only to users belonging to the Developers user group. Users who do not belong to the Developers user group can still access an application in /Applications using a URL such as http://localhost:8700/iportal/Applications/<application name> after logging in to Information Console. The application developer or administrator provides this URL.
About locale mapsThe administrator can customize a date, time, or currency expression for a particular locale by modifying a date, time, or currency format for that locale in a locale map. A localemap.xml file contains a Locale ID element for each language in which Information Console displays content. The Locale ID element contains subelements specifying the date, time, and currency formats for each language. BIRT iHub uses the following locale maps:
■ AC_SERVER_HOME\web\iportal\WEB-INF\localemap.xmlFormats time stamps that Information Console displays in:
■ The Modified column of a file or folder listing
■ The Finished column of a My Jobs or Notifications listing
■ AC_SERVER_HOME\etc\localemap.xmlFormats a date or time that one of the following items generates when used in an output document name or output document version name:
■ A predefined date-and-time format keyword
■ A date format symbol
■ A time format symbol
If you update localemap.xml, you must restart the cluster for the changes to take effect. In a cluster, the same localemap.xml files must reside on every BIRT iHub machine to achieve consistency among nodes. For information about starting and stopping a cluster, see Chapter 5, “Managing Clusters,” in System Administration Guide.

C h a p t e r 4 , E x p l o r i n g a d m i n i s t r a t i v e c a p a b i l i t i e s 43
A locale definition in localemap.xml does not necessarily specify a value for every date, time, or currency field. For a field with no specified value, BIRT iHub uses the default locale’s value for that field. In a localmap.xml file, the Locale ID named “default” specifies the default date, time, and currency formats.
For more information about date and time formats, see Chapter 3, “Scheduling and managing jobs,” in Using Information Console.
Using Advanced JobsMy Jobs displays basic information about the status of jobs. For each category in My Jobs, there is a basic view available to all users and an Advanced Jobs view available only to the administrator. The administrator can cancel a scheduled job or override settings specified by a user. Additionally, when performing advanced scheduling tasks, the administrator can use the file menu next to each job to perform additional actions. For more information on My Jobs, see Chapter 3, “Scheduling and managing jobs,” in Using Information Console.
Using the available job monitoring optionsFor scheduled jobs, administrators can perform the following tasks:
■ View details for a job.
■ View and modify scheduling properties for one or more jobs.
■ Clone a job.
■ Delete a job.
For scheduled jobs waiting for an event, pending, or running administrators can cancel one or more of these jobs simultaneously.
For completed jobs administrators can perform the following tasks:
■ Retry one or more jobs
■ Delete one or more jobs
■ Open DocumentOpens the output document. You can also choose the output document name to view the output document.
■ Print Document on ServerDisplays the same printing properties as on Advanced Scheduling—Print. Configure print properties and choose OK to print the output document on the server.
44 M a n a g i n g Vo l u m e s a n d U s e r s
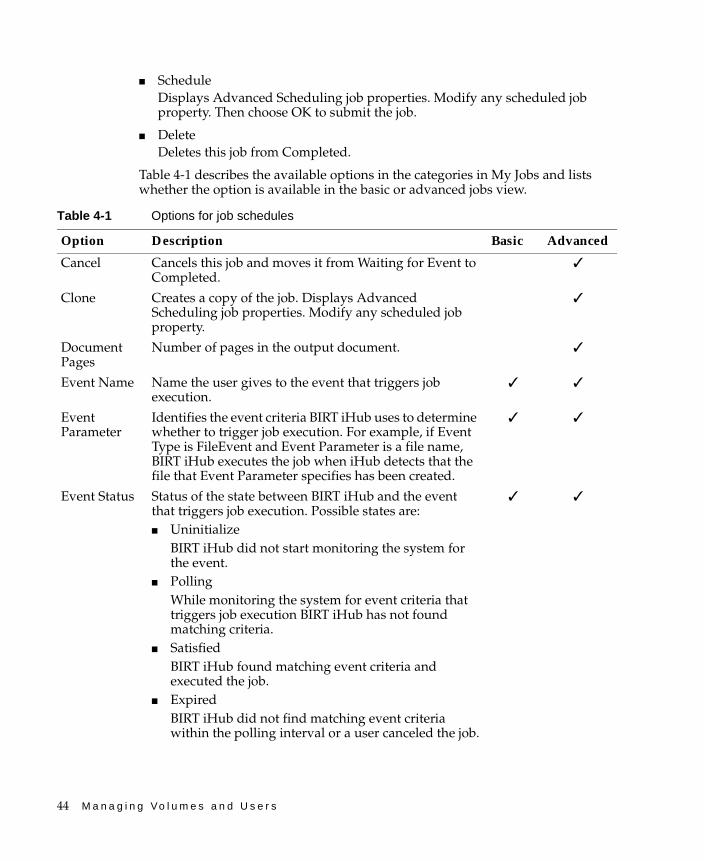
■ ScheduleDisplays Advanced Scheduling job properties. Modify any scheduled job property. Then choose OK to submit the job.
■ DeleteDeletes this job from Completed.
Table 4-1 describes the available options in the categories in My Jobs and lists whether the option is available in the basic or advanced jobs view.
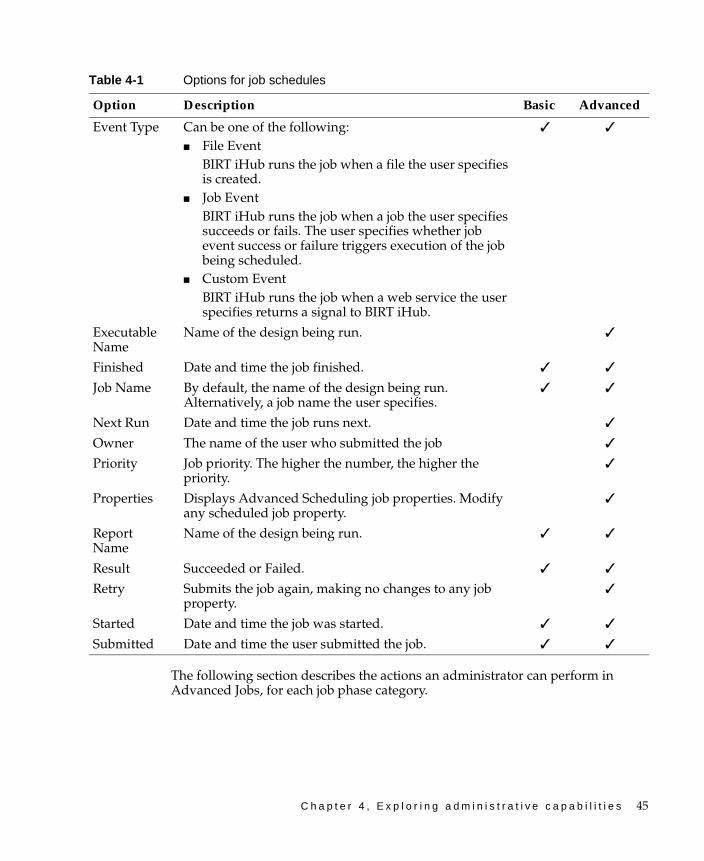
Table 4-1 Options for job schedules
Option Description Basic Advanced
Cancel Cancels this job and moves it from Waiting for Event to Completed.
✓
Clone Creates a copy of the job. Displays Advanced Scheduling job properties. Modify any scheduled job property.
✓
Document Pages
Number of pages in the output document. ✓
Event Name Name the user gives to the event that triggers job execution.
✓ ✓
Event Parameter
Identifies the event criteria BIRT iHub uses to determine whether to trigger job execution. For example, if Event Type is FileEvent and Event Parameter is a file name, BIRT iHub executes the job when iHub detects that the file that Event Parameter specifies has been created.
✓ ✓
Event Status Status of the state between BIRT iHub and the event that triggers job execution. Possible states are:■ Uninitialize
BIRT iHub did not start monitoring the system for the event.
■ PollingWhile monitoring the system for event criteria that triggers job execution BIRT iHub has not found matching criteria.
■ SatisfiedBIRT iHub found matching event criteria and executed the job.
■ ExpiredBIRT iHub did not find matching event criteria within the polling interval or a user canceled the job.
✓ ✓
C h a p t e r 4 , E x p l o r i n g a d m i n i s t r a t i v e c a p a b i l i t i e s 45
The following section describes the actions an administrator can perform in Advanced Jobs, for each job phase category.
Event Type Can be one of the following:■ File Event
BIRT iHub runs the job when a file the user specifies is created.
■ Job EventBIRT iHub runs the job when a job the user specifies succeeds or fails. The user specifies whether job event success or failure triggers execution of the job being scheduled.
■ Custom EventBIRT iHub runs the job when a web service the user specifies returns a signal to BIRT iHub.
✓ ✓
Executable Name
Name of the design being run. ✓
Finished Date and time the job finished. ✓ ✓
Job Name By default, the name of the design being run. Alternatively, a job name the user specifies.
✓ ✓
Next Run Date and time the job runs next. ✓
Owner The name of the user who submitted the job ✓
Priority Job priority. The higher the number, the higher the priority.
✓
Properties Displays Advanced Scheduling job properties. Modify any scheduled job property.
✓
Report Name
Name of the design being run. ✓ ✓
Result Succeeded or Failed. ✓ ✓
Retry Submits the job again, making no changes to any job property.
✓
Started Date and time the job was started. ✓ ✓
Submitted Date and time the user submitted the job. ✓ ✓
Table 4-1 Options for job schedules
Option Description Basic Advanced
46 M a n a g i n g Vo l u m e s a n d U s e r s
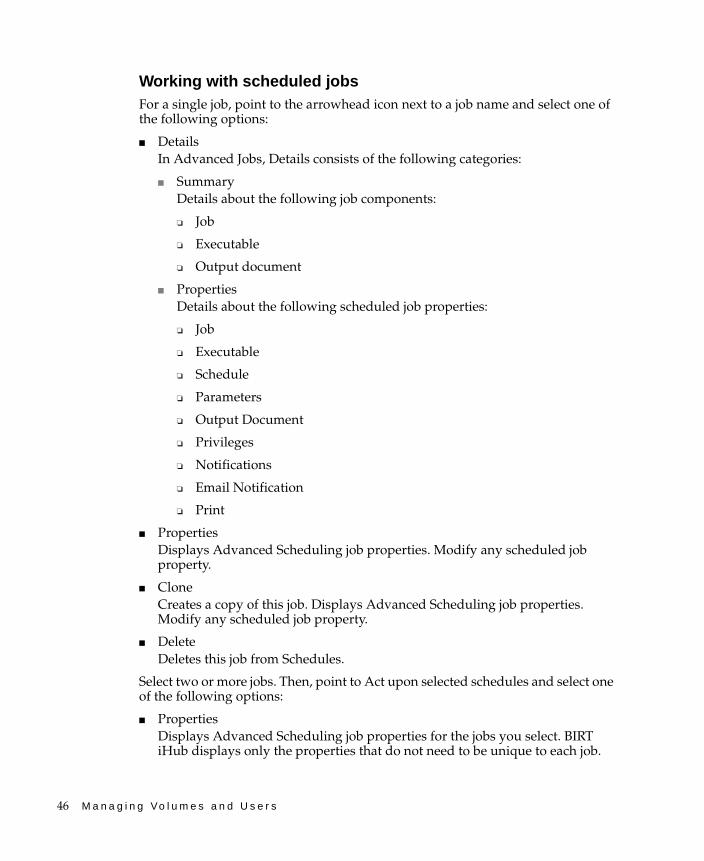
Working with scheduled jobsFor a single job, point to the arrowhead icon next to a job name and select one of the following options:
■ DetailsIn Advanced Jobs, Details consists of the following categories:
■ SummaryDetails about the following job components:
❏ Job
❏ Executable
❏ Output document
■ PropertiesDetails about the following scheduled job properties:
❏ Job
❏ Executable
❏ Schedule
❏ Parameters
❏ Output Document
❏ Privileges
❏ Notifications
❏ Email Notification
■ PropertiesDisplays Advanced Scheduling job properties. Modify any scheduled job property.
■ CloneCreates a copy of this job. Displays Advanced Scheduling job properties. Modify any scheduled job property.
■ DeleteDeletes this job from Schedules.
Select two or more jobs. Then, point to Act upon selected schedules and select one of the following options:
■ PropertiesDisplays Advanced Scheduling job properties for the jobs you select. BIRT iHub displays only the properties that do not need to be unique to each job.

C h a p t e r 4 , E x p l o r i n g a d m i n i s t r a t i v e c a p a b i l i t i e s 47
For example, BIRT iHub does not show job name or output document name because these properties must remain unique for each job. Modify any scheduled job property that appears.
■ DeleteDeletes the jobs you select from Schedules.
Working with jobs waiting for an eventFor a single job, point to the arrowhead icon next to the job name and select one of the following options:
■ DetailsIn Advanced Jobs, Details consists of the following categories:
■ SummaryDetails about the following job components:
❏ Job
❏ Executable
❏ Output document
■ PropertiesDetails about the following scheduled job properties:
❏ Job
❏ Executable
❏ Schedule
❏ Parameters
❏ Output Document
❏ Privileges
❏ Notifications
❏ Email Notification
■ CancelCancels this job and moves it from Waiting for Event to Completed.
For two or more jobs, select the jobs. Then, select Actions➛Cancel to cancel the jobs you select. BIRT iHub moves the jobs from Waiting for Event to Completed.
Working with pending jobsThe selectable options on Pending for a single job and for two or more jobs are the same options as on Waiting for Event.
48 M a n a g i n g Vo l u m e s a n d U s e r s
Working with running jobsThe selectable options on Running for a single job and for two or more jobs are the same options as on Waiting for Event.
Working with completed jobsFor a single job that succeeds, point to the arrowhead icon next to the job name and select one of the following options:
■ DetailsIn Advanced Jobs, Details consists of the following categories:
■ SummaryDetails about the following job components:
❏ Job
❏ Executable
❏ Output document
■ StatusDetails about the outcome of the completed job include the following information:
❏ Results
❏ Status
■ PropertiesDetails about the following scheduled job properties:
❏ Job
❏ Executable
❏ Schedule
❏ Parameters
❏ Output Document
❏ Privileges
❏ Notifications
❏ Email Notification
■ Open DocumentOpens the output document. You can also choose the output document name to view the output document.
C h a p t e r 4 , E x p l o r i n g a d m i n i s t r a t i v e c a p a b i l i t i e s 49
■ Print Document on ServerDisplays the same printing properties as on Advanced Scheduling—Print. Configure print properties and choose OK to print the output document on the server.
■ ScheduleDisplays Advanced Scheduling job properties. Modify any scheduled job property. Then, choose OK to submit the job.
■ DeleteDeletes this job from Completed.
For a single job that fails, point to the arrowhead icon next to the job name and select one of the following options:
■ DetailsDisplays the same details as for a single job that succeeds.
■ RetrySubmits the job, making no changes to any job property.
■ ScheduleDisplays Advanced Scheduling job properties. Modify any scheduled job property. Then, choose OK to submit the job.
■ DeleteDeletes this job from Completed.
For two or more jobs, select the jobs. Then, point to Actions and select one of the following options:
■ Retry
■ Delete
Filtering jobsUsers can specify filter conditions in any job category to view specific jobs. This feature is useful when a job category contains a long list of jobs. Additionally, an administrator can specify filters in Advanced Jobs—Schedules and Advanced Jobs—Completed to view scheduled jobs that meet the following conditions:
■ Active
■ Canceled
■ Expired
■ Failed
■ Succeeded
50 M a n a g i n g Vo l u m e s a n d U s e r s
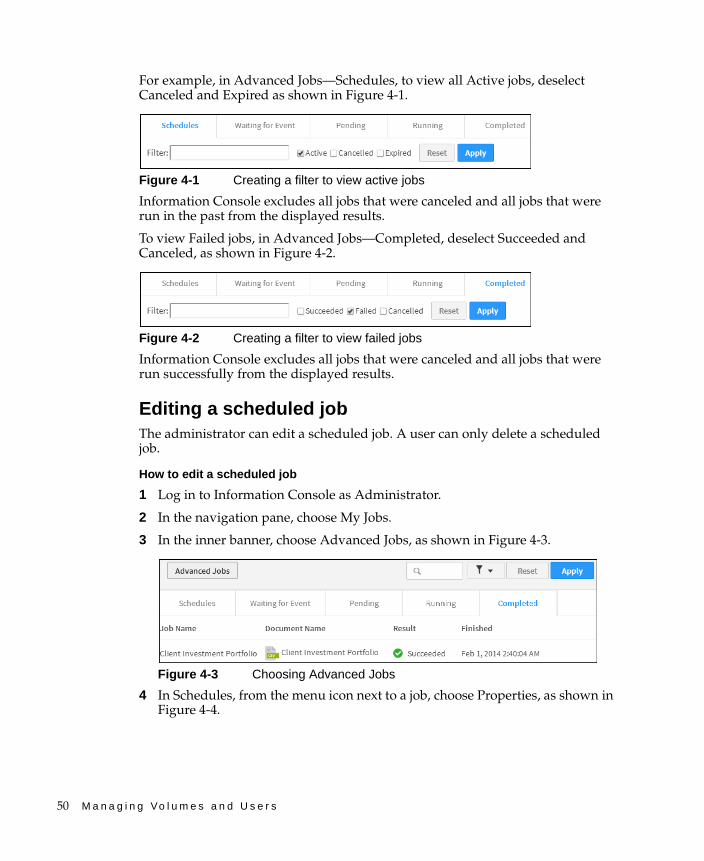
For example, in Advanced Jobs—Schedules, to view all Active jobs, deselect Canceled and Expired as shown in Figure 4-1.
Figure 4-1 Creating a filter to view active jobs
Information Console excludes all jobs that were canceled and all jobs that were run in the past from the displayed results.
To view Failed jobs, in Advanced Jobs—Completed, deselect Succeeded and Canceled, as shown in Figure 4-2.
Figure 4-2 Creating a filter to view failed jobs
Information Console excludes all jobs that were canceled and all jobs that were run successfully from the displayed results.
Editing a scheduled jobThe administrator can edit a scheduled job. A user can only delete a scheduled job.
How to edit a scheduled job
1 Log in to Information Console as Administrator.
2 In the navigation pane, choose My Jobs.
3 In the inner banner, choose Advanced Jobs, as shown in Figure 4-3.
Figure 4-3 Choosing Advanced Jobs
4 In Schedules, from the menu icon next to a job, choose Properties, as shown in Figure 4-4.
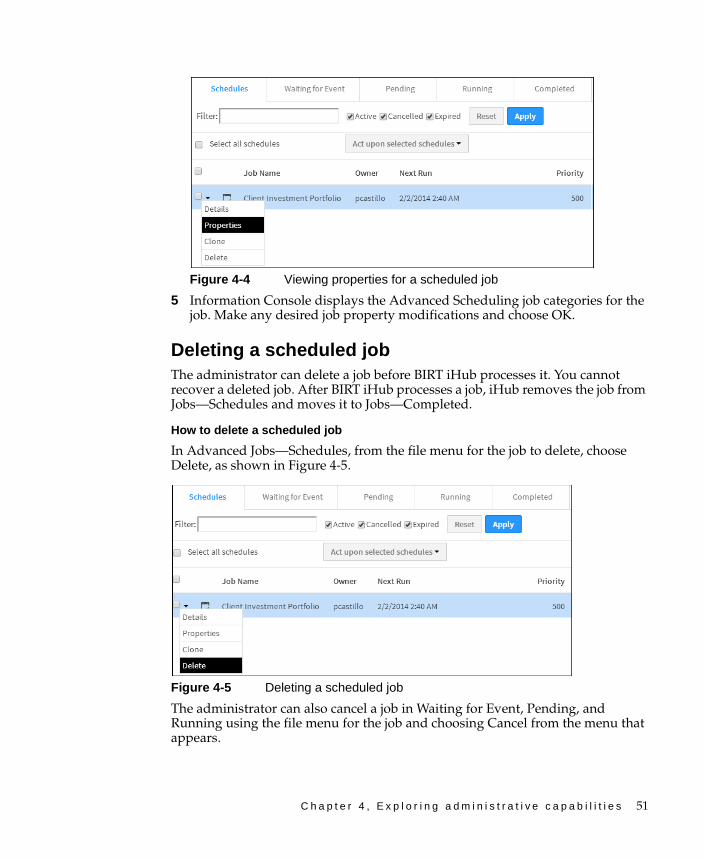
C h a p t e r 4 , E x p l o r i n g a d m i n i s t r a t i v e c a p a b i l i t i e s 51
Figure 4-4 Viewing properties for a scheduled job
5 Information Console displays the Advanced Scheduling job categories for the job. Make any desired job property modifications and choose OK.
Deleting a scheduled jobThe administrator can delete a job before BIRT iHub processes it. You cannot recover a deleted job. After BIRT iHub processes a job, iHub removes the job from Jobs—Schedules and moves it to Jobs—Completed.
How to delete a scheduled job
In Advanced Jobs—Schedules, from the file menu for the job to delete, choose Delete, as shown in Figure 4-5.
Figure 4-5 Deleting a scheduled job
The administrator can also cancel a job in Waiting for Event, Pending, and Running using the file menu for the job and choosing Cancel from the menu that appears.
52 M a n a g i n g Vo l u m e s a n d U s e r s
Cloning a jobThe administrator can create a copy of a job by selecting Clone in the file menu. Information Console displays Advanced Scheduling job properties. You can modify any scheduled job property.
How to clone a job
In Advanced Jobs—Schedules, from the file menu for the job to clone, choose Clone. Information Console displays the Advanced Scheduling job categories for the new job. Make any desired job property modifications and choose OK to schedule the job.
I n d e x 53
IndexAaccess control lists
creating 39access permissions. See privilegesaccessing
console applications 2adding
archiving policies 34security roles 39
Administrator user 8Administrator user group 8administrators
managing volumes and 2Archive Schedule button 37archiving
folders 34report files 34–37
Archiving and Purging page (Volume Properties) 32
archiving policiescreating 34inheriting 34setting on volumes 32
archiving rules 32area charts
See also chartsautoarchiving 34–37axes values
See also charts
Bbar charts
See also chartsBIRT iHub. See iHub SystemBIRT reports
See also reportsBIRT repository. See volumesbrowsers. See web browsers
Ccanceling jobs 51character strings. See strings
clusters 42Collate property 35columns
See also fieldsconfigurations
printing and 37specifying locale-specific formats and 43
creatingaccess control lists 39archiving policies 34security roles 39
customizingdate-and-time formats 42printer settings 35
Ddata
See also valuesretrieving from
data sources 2data filters. See filtersdata points
See also chartsdata repository
See also volumesdata rows. See rowsdata series
See also chartsdata sources
retrieving data from 2default archiving policy 32default printer 36deleting
jobs 51, 52notifications 33
displayingprinter information 36
Do not archive file before deletion setting 32Do not automatically delete setting 32documentation iiidocuments
See also reportsDuplex property 36
54 M a n a g i n g Vo l u m e s a n d U s e r s
FFactory service 37fields
See also columnsFile type property 32file types
archiving specific 32, 34files
archiving 34–37folders
archiving 34formats
customizing 42functions
See also methods
Ggraphs. See charts
IiHub
autoarchiving and 34localizing reports and 43printing reports and 36
iHub services 37Information Console
archiving and 34localizing reports and 42
inheritingarchiving policies 34
installing system printers 35
Jjobs
canceling 51deleting 51, 52printing reports and 36, 37running scheduled 37running unscheduled 37
Lline charts
See also chartslocale maps 42locales
formatting date and time values for 42
MManagement Console
localizing reports and 42managing users and 8setting volume properties and 38
manuals. See documentationmethods
See also functionsMode property 35
Nnotifications
deleting 33Number of copies property 35
Oonline documentation iiioutput
printing and 37
PPage size property 36permissions. See privilegesprint options 36printer settings 35printers
scheduling jobs and 37setting properties for 35specifying default 36viewing information about 36
printingreport documents 36
Printing page (Volume Properties) 36privileges
archiving reports and 34properties
autoarchive 34printing 35volumes 33
Properties page (Job Schedules) 51protecting data. See securityPurge failure notices after property 34Purge success notices after property 33
I n d e x 55
purging notifications 33purging rules 32
Qqueries
See also SQL statements
Rrecords. See rowsrelational databases
See also databasesreport documents
See also reportsReport Encyclopedia. See volumesreport files
archiving 34–37reporting system. See iHub Systemreports
printing 36repository
See also volumesResolution property 35roles
accessing reports and 8assigning to users 39creating 39
runningscheduled jobs 37unscheduled jobs 37
SScale property 35scatter charts
See also chartsscheduled jobs
canceling 51running 37
Schedules page (Job Schedules) 51, 52security roles
accessing reports and 8assigning to users 39creating 39
seriesSee also charts
serversSee also iHub servers
SQL statementsSee also queries
summary valuesSee also aggregate data
system printers 35
Ttext strings. See stringstypes. See data types
UUniform resource locators. See URLsUNIX systems
printing reports and 37updating
locale maps 42users
assigning security roles 39setting printer options for 35
Vvalues
See also dataView service 37viewing
printer information 36volumes
aging items in 34archiving items in 34–37printing reports and 35–37removing items from 34running jobs and 37setting properties for 33
Wweb browsers
accessing console applications and 2setting volume properties and 38
Windows systemsprinting reports and 37
Xx-axis values
See also charts

56 M a n a g i n g Vo l u m e s a n d U s e r s
Yy-axis values
See also charts
Recommended