Nature Trail Development on Small Acreages
MP488
University of Arkansas United States Department of Agriculture and County Governments Cooperating
TABLE OF CONTENTS
Introduction 1 Trail Planning 2 Steep Slopes and Cliffs 20
21 21 22 23 23 25 25 25 26 26 27
Construct the Tread 14 28
Types of Tread Materials 14 31
Install Structures 17 32 33
Wildlife and Plant Impacts 3 Crossing Wet Soil Tread and Soil Impacts 4 Crossing Waterways and Gullies Visual Appeal 6 Trails That Cross or Utilize Roads Determine Trail Uses 7 Crossing Fences and Gates
Establish Design Standards 7 Sign the Trail Select the Corridor 10 Trail Maintenance
Scout the Trail Corridor 11 Removing Slough and Berm Grading Your Map 12 Tread Maintenance Additional Points to Consider 13 Removing Roots and Stumps
Mark Trail Location 13 Rock Removal Clear the Trail 13 To Learn More
Select Tread Materials 14 Tools for Trail Building
Avoid Tread Edging 16 Trail Planning for Public Access
Crossing Flat Land 17 References and Additional Resources Crossing a Hillside 17 Acknowledgments
Climbing and Descending
Appendix A
Appendix B
Appendix C
AUTHORS Becky McPeake PhD Professor - Wildlife University of Arkansas Division of
Agriculture Little Rock Jamie Schuler Assistant Professor of Silviculture University of Arkansas at
Monticello Kirsten Bartlow Watchable Wildlife Coordinator Arkansas Game and Fish
Commission Little Rock
Photo credits (front cover) Bicycling adults hiking ATV riding mountain biking horseback trail riding and birdwatching photos courtesy of Arkansas State Parks children hiking by Steve Hillebrand US Fish and Wildlife Service
Nature Trail Development on Small Acreages
Introduction Nature trails are popular for wildlife viewing
walking hiking horseback riding bike riding and other outdoor activities Land managers often design and maintain trails in expansive public use areas There is increasing interest from home owners business owners wildlife enterprise entrepreneurs school teachers boy scouts hospital personnel parks department staff and others to develop and maintain nature trails on smaller landholdings
The purpose of this publication is to provide an introduction to trail design for those who intend to develop trails for nature walking hiking horseback riding or ATVs on less than 40 acres Some technical aspects are presented for those planning to expend resources for constructing trails such as around schoolyards or community facilities or as part of a wildlife enterprise
Many trail design and maintenance features are the same regardless of property size With proper planning and construction nature trails can be designed to minimize human disturbance and impacts on wildlife plants soils and waterways A well-designed trail can aid in land management such as through simplifying timber evaluations or creating fire breaks Properly built trails also provide opportushynities to teach youngsters about wildlife forestry and natural resources
Construction costs can be reduced if you are willing to build it yourself (Figure 1) The equipment needed to construct a trail depends on the purpose of the trail and the type of trail use Hand tools can be
used to create a low-impact natural-looking path with minimal disturbance to vegetation Those wanting a larger trail bed for horses ATVs or other uses may need a rubber-tracked back-hoe mini skid steer or a light dozer Additional information about equipment is available in Appendix A
Several firms specialize in trail building around the region and country The Professional Trail Builders Association (PTBA) (httpwwwtrailbuildersorg) offers a list of trail builders for hire by region and by expertise American Trails (wwwamericantrailsorg) is another good resource for locating trail builders as well as materials and supplies
FIGURE 1 Hand tools such as a Pulaski (right) and McLeod fire tool (left) can be used to construct and maintain trails Photo by Ted Toth National Park Service volunteer
NATURE TRAIL DEVELOPMENT ON SMALL ACREAGES bull 1
CONTOUR TRAILS The Sustainable Solution
bull Outsloped tread bull Sustainable grades bull Frequent grade reversals bull Erosion resistance bull Path that traverses along the sideslope bull Provision for sheet flow of runoff bull Positive user experiences bull Low maintenance
FIGURE 2 An example of a sustainable trail Photo courtesy of the US Forest Service
Trail Planning Designed with sustainability in mind a nature
trail can provide years of enjoyment A well-designed trail will save time and money over the long term and minimize future trail maintenance A trail that just ldquohappensrdquo is almost always too steep or narrow doesnrsquot follow the contour and has erosion problems Sustainable trails require minimal maintenance because their design and materials hold up to recreational use and severe weather conditions Sustainable trails wonrsquot be eroded by water and use wonrsquot affect water quality or the natural ecosystem meet the needs of the trail user and do no harm to the natural environment (Figure 2)
A trail that just ldquohappensrdquo is almost always too steep or narrow doesnrsquot follow the contour and has erosion problems
The primary key to developing a sustainable trail is keeping water off the trail A trail built on top of a ridge straight up and down the side of a hill (Figure 3) or in a bottom will hold water and erode An ideal trail is built on the side of the ridge slightly slanted outward and kept clear of rocks branches or other debris several yards on both side of the trail Such obstructions can cause water to pool or create an erosive rut on the trail
FIGURE 3 This cup-shaped trail forces water down its center and is not sustainable Rocks side logs and other debris that funnel water onto the trail should be removed periodically Photo by Becky McPeake UA Division of Agriculture Cooperative Extension Service
An incredible amount of work is necessary for scouting design layout construction and mainteshynance of a trail Good planning includes under standshying the lay of the land Design the trail with the trail user in mind and the desired difficulty level of the trail A trail designed for strollers wheelchairs or tricycles would be different than one for backwoods hikers
2 bull NATURE TRAIL DEVELOPMENT ON SMALL ACREAGES
Solid planning is essential If yoursquove ever encountered a trail disaster chances are it resulted from poor planning Some glaring examples are
bull Building out-of-rhythm sections (abrupt turns) Why did this happen The trailrsquos rhythm and flow werenrsquot checked before cutting it in
bull Water funneling down and eroding the tread Why did this happen The trail grade was designed too steep
bull Multiple trails or rogue trails Why did this happen The trail wasnrsquot laid out in the best place to begin with
The best trail developers and maintainers are those with trail eye the ability to anticipate threats to trail integrity and to head off problems Seek local experts who have experience in planning and constructing trails Contact the US Forest Service Arkansas State Parks city parks department or others in your area Discuss your trail plan with them
Wildlife and Plant Impacts Wildlife and wildflowers add interest to a trail
hike Yet trails can adversely affect plants and wildlife Plant sustainability is affected by soil erosion wildshyflower picking or harvesting of plants and repeated trampling off trail Wildlife are affected in different ways depending on the type of species and flushing distance type and intensity of human activity and time of year or day
Research has documented behavioral responses of wildlife to trail users Flight initiation distance is the distance at which an animal starts to move away from an approaching threat such as a trail user Flight initiation distance has been recorded for a variety of
species (Table 1) These distances are based on being approached by a single person on foot Flight initiashytion distance serves as a general guideline for estabshylishing buffers from critical wildlife areas Since flight initiation distance measures the starting distance at which the animal begins to evade a threat wider buffers may be need to minimize wildlife disturbance If groups of people will be using a trail wider buffers may be desired Adding 130 to 170 feet of buffer is recommended for reducing wildlife disturbance if space allows However many other factors influence flight initiation distance Flight initiation may diminish over time as wildlife become habituated to human activity
To reduce impacts of trails and trail users on wildlife and plants best trail practices are
bull Align trails along or near existing human-created edges or natural edges rather than bisecting undisturbed areas
bull Keep a trail and its zone of influence away from specific areas of known sensitive species
bull Avoid or limit access to critical habitat patches
bull Provide diverse trail experiences so that trail users are less inclined to create trails of their own
bull Use spur trails or dead-end trails to provide access to sensitive areas because these trails have less volume
bull Generally concentrate activity along trails rather than disperse it
bull Keep trail construction impact as narrow as possible
bull Concentrate weed control at road and trail crossings trailheads and riparian areas
TABLE 1 Flight initiation distance of selected Arkansas wildlife species1
Flight Initiation Distance Flight Initiation Distance
Species Flight Distance (feet) Species Flight Distance (feet)
Elk 280 to 660 Groundhog 26 to 82
Bald Eagle 165 to 2900 Meadowlark 100
Gray Squirrel 9 to 17 American Robin 30 to 46
Great Blue Heron 660 White-Tailed Deer 328
Great Egret 330
1 Flight distances are reported from research publications Anecdotally the authors have observed flight initiation at smaller distances for Great Blue Heron and White-Tailed Deer that have become habituated to people
NATURE TRAIL DEVELOPMENT ON SMALL ACREAGES bull 3
Tread and Soil Impacts Tread is the actual travel surface of the trail This
is where the rubber (or hoof) meets the trail Tread is constructed and maintained to support the designed use for your trail For dirt trails the tread should be mineral soil with little to no vegetation Forces such as soil type annual precipitation and other factors may influence how long the tread remains stable before maintenance is needed
The tread surface should match the intended use Easier trails should have a smooth tread surface Backcountry trails can be rougher and more challengshying Leaving some obstacles in the trail helps slow down users
Surface water should flow in thin sheets across the trail instead of down the trail To do so locate the trail on the contour Diversion should be used only if efforts fail to eliminate pooling or streaming Running water erodes tread and can even lead to the loss of the trail itself It is more important to understand how the forces of water and gravity combine to move dirt than it is to actually dig dirt
Follow the contour to keep water from running down the trail Tread whenever elevated should have a slight outslope of 4 to 6 percent of the tread width (nominally 15 to 3 inches from high side to low side) to drain better (Figure 4) Other design elements are a rolling contour trail building the trail on the sideslope maintaining sustainable grades and
FIGURE 4 A sustainable trail with soil tread having a 4- to 6-percent outslope (15 to 3 inches from high side to low side) Photo by Glen Moody National Park Service Buffalo National River
It is more important to understand how the forces of water and gravity combine to move dirt than it is to actually dig dirt
outsloped tread These trail designs let water continue to sheet across the trail where it will do little damage
Soil type and texture have a major influence on soil drainage and durability Texture refers to the size of individual soil particles (Table 2) Clay and silt are the soil components with the smallest particles Small particles tend to be muddy when wet and dusty when dry Clay and silt donrsquot provide good drainage Sand is made of large particles that donrsquot bind together at all and is very unstable The best soil type for a trail is a mixture of clay silt and sand
Knowing soil types along a planned trail will help with developing a solid stable tread Soil maps and accompanying data tables describe the suitability of soil types for roads structures farming forestry etc Soil maps are available from your local soil and water conservation district USDA Natural Resources Conshyservation Service county Extension office or the Web Soil Survey at httpwebsoilsurveynrcsusdagov (Figure 5)
Reduce soil erosion by locating trails on soils with low erodibility (eg coarse-textured low organic matter low soil moisture minimal slopes) Design trails to follow the contour Use rolling grades and other measures to route runoff away from the trail Build a boardwalk across wet soils and avoid steep slopes Avoid developing trails in potentially erosive or sensitive areas If necessary to build in these areas use trail surface materials like crushed gravel to reduce erosion
Trails along waterways or riparian corridors are critical areas for many ecological functions which can be negatively impacted by poorly designed and managed nature trails To minimize impacts and maintenance issues locate the primary trail to the outside of the riparian corridor and then provide access to the waterway at strategic points
4 bull NATURE TRAIL DEVELOPMENT ON SMALL ACREAGES
Key considerations for trails along riparian corridors are
bull Locate primary trail outside of the riparian corridor
bull Leave some riparian areas as refuges without trails
bull Provide access to stream at strategic locations
bull Minimize the number of times a trail crosses a stream
bull Avoid crossings at confluences where two or more streams meet
The best time to analyze a trail is during or immediately after a hard rain You might try walking your trail in the rain during construction and watch what the water is doing and how your drains and structures are holding up Think about soil type slope distance of flow and water volume before deciding your course of action
TABLE 2 Soil Ribbon Test
To conduct a soil ribbon test roll a handful of moist soil back and forth between both hands into a tube shape Squeeze it between your thumb and forefinger to form the longest and thinnest ribbon possible Match how it feels and the texture properties with the attributes below
Texture Feel Ribbon Best Trail Soil1
Sand Grainy Canrsquot form a ribbon Add clay and silt
Loam Soft with some graininess Thick and very short
Silt Floury Makes flakes rather than a ribbon Add sand and clay
Sandy Clay Substantial graininess Thin fairly long ndash 50 to 76 mm (2 to 3 inches) ndash holds its own weight
Add silt
Clay Smooth Very thin and very long ndash 76 mm (3 inches)
Add sand and silt
1Adding soil to improve trails is realistic only for short stretches where ground is most vulnerable
FIGURE 5 Information about soil types on your property is available online from the Web Soil Survey or at your local Natural Resources Conservation Service office Saline County Arkansas
NATURE TRAIL DEVELOPMENT ON SMALL ACREAGES bull 5
Visual Appeal Many people regardless of background prefer
similar visual elements in the landscape Some of these include
bull Waterscapes (eg lakes meandering streams)
bull Manicured landscapes
bull Savanna or park-like landscapes
bull Trees in scale with surrounding features
bull Absence of dead or downed wood
bull Clean waterways with no or limited woody debris
bull Large mature trees and trees with broad canopies
bull Spaces defined by edges (eg pasture bordered by woods)
Many of these visual elements are not desirable for achieving goals for water quality soil protection and wildlife habitat Naturalistic landscapes providing valuable ecological functions are often viewed as untidy and undesirable while manicured landscapes with limited ecological functions are perceived as demonstrating stewardship and are visually desirable
The challenge is to design trails that minimize impact on desired ecological functions while providshying visual appeal and instilling long-term commitment to practices that benefit soil water and wildlife Though not visually appealing to some grassy or shrubby buffers near streambanks reduce soil erosion improve water quality and provide habitat for a number of wildlife species Building trails on a streambank is not advisable (Figure 6)
Strategies for enhancing the visual preference of buffers are
bull Design the part of the buffer viewable by the public to be visually pleasing while the interior can be designed to achieve the desired ecological functions
bull Use selective mowing to indicate stewardship without greatly reducing the ecological functions
bull Provide visual frames to contain and provide order around the buffer (eg wooden fence)
bull Use interpretive signs and education programs to increase awareness and preference
FIGURE 6 This trail was built too close to the stream Buffers reduce soil erosion improve water quality and provide habitat for wildlife Photo by John Pennington UA Division of Agriculture Cooperative Extension Service
The challenge is to design trails that minimize impact on desired ecological functions while providing visual appeal and instilling long-term commitment to practices that benefit soil water and wildlife
bull Enhance visual interest and diversity by increasing seasonal color and by varying plant heights textures and forms
bull Provide simple habitat improvement such as nesting boxes and feeders Wildlife usually increase visual preference
6 bull NATURE TRAIL DEVELOPMENT ON SMALL ACREAGES
Determine Trail Uses When planning a trail it is important to
understand how the trail will be used how much it will be used and what quality of user experience you want to offer
Multi-Use or Single-Use Multi-use trails work if
bull There are many primary users but only a few secondary users
bull The trail is used in different seasons by different users
bull The trail is designed and maintained to accommodate all users
bull Clear rules are posted about how to behave (pass regulate speed etc) when encountering other types of trail users
Consider a single-use trail if
bull Different types of users have different levels of tolerance for noise effort in using the trail speed of travel or influence on the tread
bull You want to offer a high-quality trail experience for one type of user
How Much Use How much will the trail be used at any one time
day season or year As trail use increases
bull Increase tread and clearing width
bull Create a more durable tread
What Quality of Experience Design your trail to fit the user experience that
you want to offer Consider
bull Physical ability of trail users For example reduce trail grade if you want to accommodate people with a range of physical abilities
bull Exposure to personal risk (eg injury getting lost)
bull Duration of the experience Is it 30 minutes or 3 hours
bull Purpose for the trail If the trail simply leads to a destination choose the shortest and easiest sustainable route If the trail itself is the destinashytion choose the most interesting route
Preference studies have identified attributes that trail users find desirable in trails These attributes can be used to enhance the recreational experience and increase trail usage Key design considerations are
bull Trails passing through several types of plant communities are generally more preferred
bull Incorporate waterscapes and historical or cultural elements as anchor points where possible (eg old stone walls streams)
bull Trails passing through open areas with few trees or distinct features are less preferred A mixture of open and enclosed areas is desirable
bull Create a sense of mystery through a curvilinear path alignment
bull Provide trails that are connected accessible to users and that encourage multiple uses
bull Design trails to reduce exposure to noise and air pollution
bull Create vantage points where users can view wildlife other trail users or interesting features
bull Trails for small acreages should be loops that bring users back to the starting point
bull Trail maps trail head marker andor bulletin boards are useful for conveying information to visitors about your trail
Establish Design Standards Before scouting the trail corridor set your design
standards Keeping users on the trail and water off the trail is the primary goal for all trail designs Base the design standards on trail uses (Table 3) the quality of experience (including the level of risk) and construcshytion resources budget and expertise Modify the design standards to fit your needs
Consider these aspects of the trail design trail configuration trail length tread surface tread width clearing width clearing height grade turning radius sight distance water crossings and special requirements
NATURE TRAIL DEVELOPMENT ON SMALL ACREAGES bull 7
TAB
LE 3 Reco
mm
end
ed trail d
esign
stand
ards fo
r hikin
g h
orses b
iking
ATV
s and
off-h
igh
way m
oto
rcycles
Trail Use
Co
nfig
uratio
n
Len
gth
Tread
S
urface
Tread
Wid
th
Clearin
gW
idth
C
learing
Heig
ht
Grad
e T u
rn
Rad
ius
Sig
ht
Distan
ce W
ater C
rossin
g
Oth
erU
ses U
niq
ue
Facilities
Hikin
g
Loop or multiple loops
for day hikes variety inlandscape frequentcurves and gradechanges spur trails topoints of interest
5-15m
iles M
ineral soilem
beddedrocks bed shyrock asphaltor concrete
2-3 feetlight useor 1-w
ay
4-6 feetheavy useor 2-w
ay
4-6 feetlight useor 1-w
ay
6-10 feetheavy useor 2-w
ay
8 feet 1-7 percentpreferred10 percent m
aximum
sustained40 percent for shortdistances
Not critical
but 6 feetpreferred
Not critical
but 50 feetrecom
mended
especially atroad crossings
Stepping stones or
ford if water less than
2 feet deep culvert orboardw
alk 3-4 feetw
ide for light use5-6 feet for heavy use at least on handrail ifboardw
alk is high-usem
ore than 12 feet longor m
ore than 4 feetover w
ater
Low-use
horsebackriding
Resting
benches
Ho
rse
Loop or multiple loops
with variety of scenery
and terrain and openparade area 1-w
aytraf fic avoid w
ater and road crossings avoidw
et areas and steepslopes w
here it isdifficult to m
aintain tread
5-25m
iles M
ineral soilcrushedcom
pactedgravel
2-4 feetlight useor 1-w
ay
6-8 feetheavy useor 2-w
ay
8 feetlight useor 1-w
ay
12 feetheavy useor 2-w
ay
10 feetm
inimum
12 feetpreferred
1-10 percentpreferred10 percentm
aximum
sustained20 percentfor shortdistances
6 feet 50 feet
minim
um
100 feetpreferred
and atroad crossings
Ford slow
-moving
water less than 3 feet
deep ndash select site w
ith stable sand or gravel base soil-covered culvert isbetter than bridgebridge only if w
ater isdeep and sw
ift must
be well-designed
Hiking
Parking w
ithtrailer spacetether line orcam
psites with
tether lines orcorrals w
ater m
anure dump
Tou
ring
B
ike
Loops and linear trails1-w
ay traffic 5-50m
iles Lim
estonefines othercrushed stone38 inch orless 2 inchasphalt over3-4 inch baseof com
pactedgravel
3-6 feetlight useor 1-w
ay
8-10 feetheavy useor 2-w
ay
8 feetlight useor 1-w
ay
10-14 feetheavy useor 2-w
ay
8-10 feet 1-3 percentpreferred5-10 percentm
aximum
sustained15 percentfor shortdistances
Radius infeet =(125 x
velocity inM
PH
) + 15
50 feetm
inimum
100 feetat road and
water crossingsand on 2-w
aytrails
Culvert or boardw
alkw
ith handrails orientdeck boards 45deg-90deg todirection of travelw
idth 4-8 feet for lightuse or 1-w
ay 10 feet for heavy use or 2-w
ay
Hiking
Bike rack
Mo
un
tainB
ike
5-20m
iles M
ineral soilbedrock
2-3 feet 6-8 feet
4 feetm
inimum
8 feetpreferred
All-Terrain
V
ehicle
(AT
V)
Trail system w
ith loops of varying difficulty easy trails provideaccess to difficult trails 2-w
ay trails occasionalobstacles
5-20m
iles M
ineral soilbedrockloose rocks less than6 inches in diam
eter
5-7 feetlight useor 1-w
ay
8-12 feetheavy useor 2-w
ay
6-10 feet 8 feet
0-25 percentpreferred25 percent m
aximum
sustained45 percentfor lt
100yards
10 feetm
inimum
25 feetm
aximum
50 feetm
inimum
100 feetpreferred
Culvert w
ith handrailsor boardw
alk with
curbs orient deckboards 45deg-90deg todirection of travelw
idth 4-8 feet for lightuse or 1-w
ay 10 feet for heavy use or 2-w
ay
MountainbikeO
HM
Parking w
ithtrailer spacew
arm-up loop
rest stops orshelters after15 m
iles
Off-H
igh
way
Mo
torcycles
5-50m
iles M
ineral soilbedrockrocks firm
ly em
bedded intread surface
15 - 2 feetlight useor 1-w
ay
3-6 feetheavy useor 2-w
ay
6-8 feet 8 feet
0-30 percentpreferred25 percent m
aximum
sustained50 percentfor lt
100yards
4 feetm
inimum
10 feetm
aximum
50 feetm
inimum
100 feetpreferred
Culvert w
ith handrailsor boardw
alk with
curbs orient deckboards 90deg to directionof travel w
idth 4-6 feetfor light use or 1-w
ay 10 feet for heavy useor 2-w
ay
MountainbikeA
TV
Parking w
ithtrailer spacew
arm-up loop
rest stops orshelters after15 m
iles
8 bull NATURE TRAIL DEVELOPMENT ON SMALL ACREAGES
Keeping users on the trail and water off the trail is the primary goal for all trail designs
Trail configuration is the overall shape of the trail
bull Linear trails are appropriate for long distance travel (several miles) or where the land ownership (right-of-way) is too narrow to permit developshyment of a loop trail
bull Spur trails are short linear trails that take users to points of interest or connect different loop trails
bull Loop trails permit the user to begin and end at the same location without repeating any part of the trail
bull Stacked loop trails (a series of interconnected loops) permit users options for different distances routes or destinations
FIGURE 7 Tread width clearing width and clearing height Text by the authors photo by Brian Lockhart USDA Forest Service Bugwoodorg
Tread surface refers to the type of surface material (eg soil gravel rock) and its condition (eg smooth rolling rough) High-use trails require more durable materials and smoother surfaces than light-use trails
Tread width (Figure 7) is the width of the useable trail surface In general the tread width that is suitshyable for light-use or one-way travel should be doubled for heavy-use or two-way travel For example common trail widths are 18 inches 24 inches and 42 inches depending on user type
Clearing width (Figure 7) is the total width to which rocks trees tree limbs and other obstacles should be removed As a general rule clear at least 2 feet on each side of the tread Where a trail passes through dense vegetation vary the clearing width to avoid an unnatural tunnel effect In general maintain clearing width from the ground up to the clearing height except you may leave vegetation rocks and other objects less than 2 feet tall near the tread edge
Clearing height (Figure 7) is the height above the tread surface to which overhanging rocks tree limbs and other obstructions must be removed As a general rule clear 8 feet for hikers and bikers and 10 feet for horse riders Keep in mind that leaves will bend deciduous tree branches 1 to 2 feet lower in summer than in winter and ice or snow will bend evergreen tree branches and raise the tread surface
Turning radius is the radius of an arc drawn through the centerline of the tread where the trail curves As travel speed increases particularly on bike trails consider lengthening the turning radius widenshying the trail or clearing a runout zone
Sight distance is the distance that a user can see down the trail from any point on the trail Adhere to the recommended minimum sight distance but vary sight distances to add interest For bike trails lengthen sight distance to allow faster travel and reduce sight distance to slow travel
Water crossings refer to the type of structures recommended for crossing bodies of water A ford stepping stones culvert or boardwalk may be approshypriate Your choices will be affected by the type of user type of trail experience offered type of water body length of crossing legal status of the water body your ingenuity and your budget
NATURE TRAIL DEVELOPMENT ON SMALL ACREAGES bull 9
Select the Corridor Perhaps the most enjoyable step in trail design is
exploring the corridor to determine where to place the trail A trail corridor is a wide swath through the landshyscape that encompasses the trail Analyze the entire area refining the trail location as you gather more information
Keep in mind that the rolling contour trail is sustainable and requires low maintenance When establishing design standards and selecting the trail corridor remember the design features for a rolling contour trail are
bull Locating a new section of trail on a sideslope
bull Keeping the trail grade less than half of the grade of the hillside
bull Building with a full bench cut to create a solid durable tread
bull Constructing plenty of grade reversals
bull Outsloping the tread
bull Compacting the entire trail tread
Maps help you identify land uses on your property and neighboring properties (eg cropland pasture forest river lake) roads trails buildings and utility rights-of-way Aerial photographs of your property (Figure 8) are available at no charge from the Natural Resources Conservation Service or
the Farm Service Agency office in each county (httpofficesscegovusdagovlocatorapp) Aerial photos are also available on the internet through the Spatial Analysis Laboratory at the University of Arkansas at Monticello (httpsal uamontedu) Geostor (httpwwwgeostor arkansasgov) or private companies such as Google Earth (httpearthgooglecom) Look for photos in a scale of at least 4 inches to 1 mile but preferably 8 inches to 1 mile
Topographic maps (124000 scale) are very helpful in all terrain especially if your trail covers a large geographic area (Figure 9) They show elevation changes forest and open areas rivers lakes wetlands buildings roads trails cemeteries and other features Topographic maps are available from the US Geologshyical Survey the Arkansas Geological Survey commershycial CDs and DVDs map dealers and recreational outfitters
When evaluating large sites other maps or geographic information systems may provide informashytion on water resources rights-of-way utilities land uses roads land ownership vegetation cover types wildlife habitat flood zones etc Possible sources include the Arkansas Game and Fish Commission Arkansas Natural Heritage Commission The Nature Conservancy of Arkansas local planning and zoning authority and universities
FIGURE 8 An aerial photograph helps identify land uses and with trail planning CA Vines 4-H Center Ferndale
FIGURE 9 A topographic map shows elevation The more closely spaced the lines the steeper the slope Ferndale Arkansas Source MyTopocom
10 bull NATURE TRAIL DEVELOPMENT ON SMALL ACREAGES
Scout the Trail Corridor Use topographic maps or aerial photos to map the
potential route Use these maps or sketch a map to identify control points (ie places where the trail has to go) because of
bull Destination
bull Water crossings
bull Rock outcrops
bull Desired features
To clearly see landscape details scout when deciduous trees have lost their leaves Look for natural pathways that require little clearing or construction (eg hillside bench or river bank terrace)
If possible scout in all seasons to reveal attractive features and hazards that may affect location construction or maintenance Look for
bull Spring high water ephemeral (temporary or seasonal) ponds flowers
bull Summer dense foliage normal water level
bull Fall foliage color
bull Winter icicles snow scenes frozen water
Note existing trails and roads control points obstacles points of interest and anchor points Take notes and mark locations on a map and record GPS coordinates These GPS coordinates can be provided to trail builders and users for navigation
Existing trails and pathways Existing trails and roads may be good links to new trails Scout the corrishydor in both directions However existing trails or old roadways typically were not designed properly and show evidence of erosion pooling or other features that warrant their abandonment
On existing trails place a priority on
bull Correcting truly unsafe situations As an example repair impassable washouts along a cliff or reroute the trail
bull Correcting problems that cause significant trail damage such as erosion
bull Restoring the trail to the planned design standard
Maintain the trail when the need is first noticed to prevent more severe and costly damage later Some trails may need to be abandoned and reconstructed elsewhere to avoid these problems
Control points Control points are physical or legal constraints on a trailrsquos location Ownership or management unit boundaries a steep slope forcing a trail through a narrow section of hillside a cliff that forces a trail around one end a wetland forcing the trail along a narrow upland ridge or a stream that can be crossed easily in only a few places are examples of control points
Maintain the trail when the need is first noticed to prevent more severe and costly damage later
A special point of interest may also serve as a control point Run your trail past significant points of interest eg unusual landforms (sink hole hill valley gorge) different forest types or ages forest opening grassland farmland especially if it attracts feeding wildlife scenic vista boulders rock outcrop wetland ephemeral (temporary or seasonal) pond lake river creek waterfall historic site (may also be an obstacle) archeological site (may also be an obstashycle) wildlife habitats (den trees rock piles dense thickets layers of forest vegetation water sources sand banks cliffs caves crevices) and an old homeshystead Attract wildlife to the trail corridor with nesting boxes breeding sites food plots feeding stations roost poles watering devices and other constructed habitats
Obstacles Obstacles can include a steep slope rocky soil boulder field rock slide cliff rock ledge eroding bank steep-sided gully gorge subject to flash floods water body wetland habitat for rare species historic and cultural sites fence highway sources of objectionable sound and objectionable views Some obstacles may require expensive crossing structures
Anchor points At frequent intervals take the trail past subtle anchor points (eg large or unusual tree rock patch of shrubs) that add interest and draw attention to landscape features
NATURE TRAIL DEVELOPMENT ON SMALL ACREAGES bull 11
Grading Your Map After roughing out your route go back again and
pay attention to the finer details on your map Include positive control points ndash features such as a scenic overlook a waterfall or pond Avoid negative control points ndash areas that have noxious weeds critical wildlife habitat or undesirable soil conditions
Grade is the slope angle along the trailrsquos center-line Grade can be expressed as a percent or an angle Percent is easier to understand Percent grade is the rise (elevation change) divided by the run (horizontal distance) multiplied by 100 For example (rise of 10 feet) (run of 100 feet) x 100 = 10 percent You can measure the grade with a commercial or homeshymade clinometer (Figure 10)
It is easy for trail users to travel long distances on low grades High grades require more work and should extend for shorter distances Follow the 10-Percent Guideline When plotting the trail on a map connect the control points following contour lines Keep the grade of each uphill and downhill section less than 10 percent for distances no more than 100 feet A 3-percent grade is the maximum for disabled access
Plotting your trail with 10-percent grades on a topographic map will help keep the route at a
sustainable grade When marking your new trail outshydoors yoursquoll have more flexibility for tweaking the grades and the actual trail route Note that elevation change up or down is always a positive number
Plotting your trail with 10-percent grades on a topographic map will help keep the route at a sustainable grade
FIGURE 10 A clinometer is a useful tool for evaluating trail grade Photo by Becky McPeake UA Division of Agriculture Cooperative Extension Service
How to make and use a clinometer
Make a clinometer with a protractor short string and small weight
To measure grade 1 Sight along the protractorrsquos flat edge and read the
degree aligned with the string 2 Determine the slope angle
90deg ndash (angle read on protractor) = slope angle in degrees
Example 90deg ndash 80deg = 10deg slope
To convert degrees of slope to percent slope 1 Look up the tangent of the slope angle in degrees
on a scientific calculator or in a tangent table in a book
2 Determine the percent of slope Tangent (of slope angle in degrees) x 100 = slope Example Tangent (10deg) x 100 = 0176 x 100 = 176 or 18 slope
Drawing courtesy of Baughman and Serres (2006)
12 bull NATURE TRAIL DEVELOPMENT ON SMALL ACREAGES
Additional Points to Consider Marking the lower side of the trail improves the
bull Avoid placing your trail in areas with threatened or endangered flora fauna geology and natural plant communities Ask the Arkansas Department of Natural Heritage (501-324-9619 wwwnaturalheritageorg) or the Arkansas Game and Fish Commission (800-364-4263 wwwagfc com) about whether these resources are likely to be found on or near the trail location
bull Protect cultural resources such as historic structures (buildings dams bridges fire towers etc) archaeological sites (above and below ground) and cemeteries (including unplatted historic cemeteries burial mounds and other ancient burial sites) Cultural resources can be damaged by soil disturbance soil compaction rutting change in public access and change in vegetation and other features Whenever a government permit license or funding is needed for a project a cultural resources management review may be required To learn about locations of cultural sites contact the Arkansas Historic Preservation Program (501-324-9880 httpwwwarkansaspreservationorg)
bull Discuss your trail project with neighbors to learn about the impact on their properties and potential linkages to other trail systems
bull Consider your budget for land and right-of-way acquisition construction and maintenance This will put a reality check on your design plans
bull If building trails for public use trail preferences and layout need to be considered further See Appendix B
Mark Trail Location Tie surveyorrsquos plastic flagging (comes on a roll like
tape) in trees and brush or use construction flag markers to give a rough idea about where the trail will go As you mark the trail keep your design standards in mind
Mark the lower side of the trail using one of these materials
bull Rolls of plastic flagging (tie strips to branches)
bull Wire flags (stiff wire 2 feet or longer with plastic flag)
bull Wooden stakes (12-18 inches or longer) topped with brightly colored flagging or paint
visibility of the length and depth of the bench cut Plus the marker is not in the way when swinging the Pulaski or other trail-cutting tool as it would be if the marker were placed in the center of the trail
Space the markers approximately 20 feet apart in dense vegetation and up to 100 yards in open fields Write cumulative distances on markers every 100 feet to make it easy to match markers with trail maps and notes
Map the route Use a global positioning device or a compass and distance measurements to develop a trail map
bull Mark structures and special instructions on the map
bull Make special note of places that require deviations from trail standards
bull Photograph sites where trail structures are needed to assist in planning materials and equipment or to show potential contractors what these sites look like
Instead of clearing large trees consider passing on the upper side to avoid damaging roots with the digging Plus this will save you some work as tree roots are difficult to dig through
Obtain permits for crossing streams wetlands railroads highways rights-of-way etc
Begin constructing the trail soon after flagging before markers are moved or damaged
Clear the Trail Clear the trail in these stages
1 Remove small trees shrubs and limbs from large trees
2 Rake debris from the trail
3 Cut large trees
4 Remove stumps and boulders
5 Move soil to level the tread
The extent of clearing needed depends on the clearing height and width of the trail the quality of the user experience (eg a rough challenging trail or a smooth easy trail) and the primary season of use (eg ice or snow may cover some obstacles in winter)
NATURE TRAIL DEVELOPMENT ON SMALL ACREAGES bull 13
Construct the Tread Create a tread surface that is smooth properly
outsloped and durable enough for intended users Save effort by placing the trail on soils that withstand trail use
For most soils trail construction and compaction are best when soil is neither wet nor bone dry Some soils may work better a few days after a rain when soil conditions are favorable
Select Tread Materials Consider how tread materials will react to
compaction displacement and erosion
Compact the tread as much as possible during initial construction paying close attention to mainshytaining an outslope Compaction comes from the downward force from feet hooves wheels etc When a tread is fully compacted it holds its shape and resists displacement and erosion Some materials have better compaction properties than others Tread mateshyrials that do not compact (eg sand organic soil water-saturated soil) or that compact too much (eg peat) will not retain a desired shape Excessive compaction tends to lower the tread and encourages water to collect in depressions
Displacement is sideways force that moves tread material off the trail raising trail edges over time Displacement also lowers the tread enabling water to collect in depressions Water and wind erosion remove tread material destroying the tread The potential for erosion from running water increases as the slope andor volume of water increases If possible use materials for the tread from the immedishyate surroundings Natural materials are inexpensive and blend well with the landscape
Consider hardening the tread with rock pavers or other materials as a last resort when the tread cannot be rerouted to fix the problem Circumstances which may require tread additions are when
bull Drainage is poor and mud is a problem
bull Flowing water causes unacceptable erosion
bull Tread material compacts or displaces too much to retain the desired tread shape over the long term
bull Tread must be narrow and clearly delineated to protect the surrounding area
The potential for erosion from running water increases as the slope andor volume of water increases
Types of Tread Materials Typically the tread material that is most
sustainable and lowest maintenance is mineral soil However depending on the situation other tread materials may be suitable Following are strengths and weaknesses of different tread materials
Soil Mineral soil is composed primarily of sand (005 to 20 mm ndash coarse texture) silt (0002 to 005 mm ndash medium texture) and clay (0002 mm ndash fine texture) Soil with a high percentage of silt moderate percentage of sand and small percentage of clay makes a very durable tread Such a soil resists excessive comshypaction and erosion while allowing internal drainage
Soil composed mainly of sand will not erode with water or become muddy but because sand does not compact it is subject to displacement and wind erosion Soil with a high clay and silt content is subshyject to water erosion and mud Soil composed mainly of clay retains water and can be muddy and slippery when wet and unless it is highly compacted it is also subject to water erosion
Typically the tread material that is most sustainable and lowest maintenance is mineral soil
Organic soil (humus) is composed of decomposing plant materials Soil composed mainly of decomposed organic material will compact and erode and can become water saturated and muddy Soil composed mainly of undecomposed organic material compacts too much to be suitable as tread material
Bedrock If a feature of the site smooth bedrock makes a very durable tread It can be slippery for horses especially on slopes
Vegetation Vegetation survives best on a lightly used wide trail in full sunlight (Figure 11) Typically little sunlight reaches the ground in forested environ shyments particularly where tread width is kept to a minimum
14 bull NATURE TRAIL DEVELOPMENT ON SMALL ACREAGES
FIGURE 11 A grass tread is appropriate for lightly-used trails in full sunlight Heavy equipment or a bush hog may be needed for maintaining this type of trail Photo by Chris Stuhlinger University of Arkansas at Monticello
In Arkansas natural vegetation should be discouraged along trails to reduce tick habitat and transfer of tick-borne diseases Contact your local county Extension agent for advice about appropriate herbicides to use along your trail
Duff is un-decomposed organic matter (eg leaves twigs moss pieces of bark and wood) that litters a forest floor Duff does not compact well and is easily displaced Duff should not be on the tread For shaping during construction remove duff from the tread to expose the mineral soil
Wood Chips Maintaining wood chips on a trail can be a maintenance issue However wood chips can be used to define the tread on newly constructed foot trails to suppress vegetation growth and to raise the tread in muddy areas Apply a 3- to 4-inch layer of large wood chips that do not contain leaves or small diameter twigs which decay rapidly Hauling and spreading wood chips requires extensive labor and wood chips need to be replaced every three years as they decay or are displaced In most situations wood chips should be a temporary tread material
Rock Rocky material includes gravel (from sand to 3 inches diameter) cobbles (3 to 10 inches) stones (10 to 24 inches) or boulders (greater than 24 inches) Rocks are useful on trails that receive heavy use especially by horses or where a very firm smooth tread is needed such as for touring bicycles or ATVs (Figure 12) Rocky material resists excessive comshypaction and displacement and provides a very strong
tread If protruding rocks are hazardous or too bumpy for your quality standards excavate rocks or chip off the protruding piece If the tread is really rocky horses will require quality shoes If the tread is sandy or soft horses may not need shoes and hooves can be maintained using ldquonatural hoof carerdquo
Crushed rocks compact and resist displacement better than rounded rocks (eg from beaches river beds and glacial till) Crushed rock made from hard rock is more durable than from soft rock A tread composed entirely of rounded cobbles is prone to disshyplacement but when embedded in clay cobbles add durability to the tread If used in a mixture of sizes including plenty of small particles to fill voids rocks interlock well To achieve a smooth firm surface mix small gravel with rock dust from a commercial-scale rock crusher For small jobs haul a portable rock crusher to the work site To produce a small quantity of gravel for chinking crevices crush rocks with a sledgehammer or the rounded end of a steel pry bar
FIGURE 12 Gravel can be an effective tread particularly for ATVs but expensive for privately owned trails on small acreages Photo courtesy of the National Park Service
Paving StonesBricks Concrete paving stones and bricks are available in many sizes and shapes Interlocking pavers may be most useful These manushyfactured materials are uniform in size easy to handle and easy to acquire However pavers are heavy to transport and expensive and their uniform geometric shapes and colors may not match native materials
NATURE TRAIL DEVELOPMENT ON SMALL ACREAGES bull 15
Porous Pavement Grids Sectional grids made from plastic or steel are laid directly on the ground to provide traction while protecting underlying soil from erosion Vegetation can grow through the grid Consider grids for nature trails on moderately steep slopes that are prone to erosion
Solid Pavement Panels Easy-to-install plastic panels (approximately 4 feet long x 4 feet wide x 2 inches thick) that lock end-to-end can provide a firm walkway over sand or gravel
Asphalt Asphalt is a good choice where a hard surface is needed such as for wheelchairs touring bicycles in-line skaters or heavy hiking use Asphalt is expensive compared to natural surfaces and crushed rock and the site must be accessible to the equipment needed to apply and roll it Tree roots may uplift and fracture asphalt laid on shallow soil over bedrock Asphalt applied with heavy equipment is most durable but tread width is limited by the equipment typically 8 feet or wider Where a narrow tread is desired lay asphalt by hand but it will be less durable Use a hot mix for new construction or large repairs Use a cold mix for small repairs less than 1 cubic yard Asphalt can be colored to some extent by the gravel used in the mix
Concrete Use concrete in the same situations mentioned under asphalt Concrete is more durable than asphalt but also more expensive Haul large quantities to the site by truck mix small quantities on-site You can color concrete with additives to blend with the surrounding site For better traction on steep slopes broom the surface trowel grooves across the tread or leave the surface unfinished
Avoid Tread Edging Edging a trail with rocks logs timbers or other
material should be avoided (Figure 13) Tread edging on the lower side of a trail (ie that is higher than the tread) is almost always a wrong choice This creates a berm or dam that holds water on the trail causing erosion and other trail maintenance issues
If tread edging is intended to hold tread fill material in place (eg sand gravel asphalt) install hard continuous edging (eg preservative treated
2 x 4-inch lumber 4- to 8-inch diameter round logs or sawn timbers) along the lower side of the tread Where the trail curves cut shorter pieces or use edging material that can be bent The tread must be lower than the outslope and not catch water or debris coming off the trail Otherwise tread edging will create a maintenance nightmare
Edging a trail with rocks logs timbers or other material is almost always a wrong choice
FIGURE 13 Do not edge your trail with logs or rocks as these funnel water down your trail causing erosion Leaves are poor tread because they do not compact well can become slick and are easily displaced Photo by Jamie Schuler University of Arkansas at Monticello
16 bull NATURE TRAIL DEVELOPMENT ON SMALL ACREAGES
Install Structures The structures you need to cross obstacles on a
trail depend upon the conditions you encounter the type of user experience you want to offer the amount of use accessibility and your budget
Crossing Flat Land Flat land may seem like an easy place to build a
trail but if the soil is mainly clay or silt or the water table is high poor drainage may lead to mud puddles Generally it is best to avoid building a natural surface trail on flat land Solutions include relocating the trail where there is side-hill drainage or raising the tread above the surrounding flat ground
Crossing a Hillside A hillside trail must quickly drain surface water
off the tread while maintaining its shape and a grade that is comfortable for trail users Options for crossing a hillside include full-bench and cut-and-fill trails retaining walls diverting water across the tread and if all else fails diverting water flowing down the tread
Full-Bench and Cut-and-Fill Trails (Figure 14) A flat outslope trail bed cut from a hillside provides a safe and comfortable crossing for users In a full-bench trail the full width of the tread is cut from the hillside A full-bench trail usually has a well-compacted base because the underlying material has been in place for a long time
FIGURE 14 Full-bench and cut-and-fill trails provide safe travel across steep slopes Drawing courtesy of Baughman and Serres (2006)
be difficult to compact especially with hand tools If fill material is not well compacted horses and vehicles may destroy the tread If fill material must be used for part of the trail bed use large rocks to form the trail bed and serve as edging then cover them with tightly compacted soil Backslope is the area above a trail where material has been cut from a hillside in the process of leveling the tread The backslope grade necessary to prevent soil erosion depends on the material A backslope of 32 (horizontal run vertical rise) is adequate for stable materials whereas a backslope of 41 may be needed on erodible materials Never create a vertical backslope
Outslopes Where a trail crosses a hillside with medium- to coarse-textured soil outslope the tread to quickly drain off surface water (Figure 15) A 2- to 5-percent outslope is quite common and suitable for most trail users
FIGURE 15 Outslope and flat Drawing courtesy of Baughman and Serres (2006)
Some trail designers recommend no outslope on horse trails Horses tend to walk on the outside edge of a tread and will crumble the edge over time A flat tread is safer for horses that may slip when the surface is wet If you build a flat-cross-section trail divert water from the tread using a rolling grade
Retaining Walls Where a trail cuts across a slope and vegetation does not stabilize exposed soil aboveIf part of the tread is built upon fill material that or below the tread a retaining wall will prevent soil was cut from the hillside it is a cut-and-fill trail (eg erosion A retaining wall below the tread may be more half-bench or quarter-bench trail) Fill material may
NATURE TRAIL DEVELOPMENT ON SMALL ACREAGES bull 17
durable than one along the backslope Building a retaining wall to support the tread may negate the need for cutting into the backslope thus preserving natural vegetation that holds the soil Tie walls into the embankment with a deadman (eg geotextile fabric logs or large rocks embedded into both the embankment and the wall) Build walls without mortar or install drain pipes to allow water to seep through the wall
Divert Water Flowing Down the Tread Where the tread has a relatively flat or concave cross-section some water will run down the length of the trail To prevent soil erosion divert water off the tread with a rolling grade check or as a last resort using waterbars
bull Rolling Grade A rolling grade divides the trail into narrow watersheds with undulating crests and dips like a gentle roller coaster (Figure 16) Water drains off at the dips Ideally no part of the tread is completely level Outslope the bottom of each dip and make the outlet wide enough (about 15 feet) to drain off water without clogging
Place tread dips at natural drainage ways and at other locations as needed Rolling grade is most appropriate when traversing hill slopes (fall lines) of 20 to 70 percent On hill slopes less than 20 percent water does not drain well at the dips
Drainage dips can deposit sediment into watershyways To reduce sedimentation consider these alternatives maintain a low tread grade on the approach to the drainage design a small tread watershed with a short slope toward the waterway harden the tread or maintain a nearly level tread and install a boardwalk or culvert over the waterway
Also use rolling grade to ascenddescend hillsides In those situations rolling grade is most effective when the tread grade is less than 1frasl4 to 1frasl3 of the hill slope For example if the hill slope is 45 percent the tread grade should not exceed 15 percent and 10 percent is preferred As the trail climbs perishyodically reverse the grade downhill for a few steps to create a dip that allows water to drain off
Even when a trail is outsloped insloped or center-crowned a rolling grade is desirable These cross-sectional shapes are difficult to sustain over long periods without substantial maintenance
Adjust the size of each tread watershed depending on these factors
ndash When the watershed above the tread is large increasing the potential for runoff make tread watersheds small
ndash If the water infiltration rate of the upslope soil is slow resulting in more potential runoff make tread watersheds small
ndash If the potential for erosion is high make tread watersheds small Hardening the tread placshying the trail beneath a tree canopy that will intercept precipitation and reduce splash eroshysion or reducing tread width to minimize exposed soil will also reduce risk of erosion
ndash Where trail grade is steep make tread watersheds small or reduce the trail grade by lengthening the trail or adding switchbacks or turns Tread erosion risk is relatively low when tread grade is less than 5 percent
FIGURE 16 A rolling grade uses undulating crests and dips to divert water off the tread Photo by John M Randall The Nature Conservancy bugwoodorg
18 bull NATURE TRAIL DEVELOPMENT ON SMALL ACREAGES
moderate when tread grade is 5 to 10 percent and higher when tread grade is greater than 10 percent
ndash When hill grade is steep make tread watershysheds small Tread dips drain best when there is a substantial difference between the tread grade and hill grade
bull Waterbars Waterbars are usually used only as a last resort when other water diversions fail and the trail cannot be rerouted A waterbar is an obstruction placed across a trail tread to divert surface water off the tread (Figure 17) Waterbars may be needed on a sloping trail with a flat cross-section (no outslope) or where rolling grade is not adequate to divert water at tread dips However given a choice trail design experts prefer rolling grades over waterbars Waterbars commonly fail when sediment fills the drain requiring frequent maintenance to keep any level of effectiveness Water tops the waterbar and continues down the tread A rolling grade is quicker to install than a waterbar plus it typically works better
Because most waterbars create a significant bump in the trail they are not desirable on trails used for bicycling or ATVs A rubber waterbar can be used for bicycle trails When waterbars are placed on horse trails horses tend to compact the soil immediately above and below the waterbar leading to depressions that collect water and mud Horses also can damage waterbars because of their weight and strength When used on horse trails anchor waterbars well Other options are open-topped culverts usually made of wood that direct water off the road surface while minimizing impedance to most users
If a rolling grade or rerouting the trail is not possible place waterbars at a 30deg to 45deg angle across a trail Where heavy runoff is expected place stones at the outflow to disperse water without causing soil erosion The tread must be outsloped above the waterbar and ideally water never reaches the waterbar If a waterbar diverts water into a ditch make sure the bar does not protrude into the ditch where it might catch debris and block the ditch
FIGURE 17 Trail before and after waterbars were installed to divert water off the tread Waterbars should be installed only as a last resort Photo courtesy of Maine Department of Environmental Protection Bureau of Land and Water Quality
NATURE TRAIL DEVELOPMENT ON SMALL ACREAGES bull 19
Use judgment and experimentation in spacing waterbars Closer spacing is needed where the trail grade is steep the soil is erodible or you want a high-quality tread without the expense of hardshyening materials Refer to the Best Management Practices of the Arkansas Forestry Commission (wwwforestrystatearus 501-296-1940) for details
Climbing and Descending Steep Slopes and Cliffs
A climbing turn is a sustainable and effective trail design for most Arkansas hills and mountains Occasionally other designs such as switchbacks fixed ropes climbing causeways or steps may be required
Climbing Turns Well-constructed climbing turns require little maintenance However next to waterbars climbing turns are the trail structure most often constructed inappropriately The tread is out-sloped so that water runs perpendicular across the trail without impedance from rocks branches or other debris either beside or on the trail A climbing turn continues to change grade through the turn It is built on the slope surface and where it turns it climbs at the same rate as the slope itself If the slope is 15 pershycent the turn forces travelers to climb at 15 percent It becomes increasingly difficult to travel if the slope is steeper than 20 percent
The advantages of climbing turns in appropriate terrain is that a larger radius turn (13 to 20 feet) is relatively easy to construct Trails that serve off-highway-vehicle traffic often use insloped or banked climbing turns so that riders can keep up enough speed for control Climbing turns are also easier than switchbacks for horses to negotiate
Well-constructed climbing turns require little maintenance However they are the trail structure most often constructed inappropriately
Switchbacks A switchback reduces trail grade by lengthening the trail in a zigzag pattern (Figure 18) Design each trail segment to conform to the desired grade as much as possible Place a switchback where the trail reaches an impassable obstacle or begins to run too far in the wrong direction Avoid closely spaced switchbacks to discourage trail users from taking shortcuts leading to erosion
FIGURE 18 Switchbacks help the user traverse a steep slope at a comfortable pace Photo by Ken Cheetham
To further reduce shortcuts locate switchbacks at interesting focal points (eg conspicuous tree boulder or rock outcrop) and place barriers (eg boulders logs thorny bushes) in the cutoff zone Build the switchback platform with a 2- to 5-percent grade On a very steep slope install a retaining wall to support the platform or install steps If the main trail has a substantially steeper grade than the platform create a transition grade as the trail approaches the switchback platform Divert surface water off the trail above the switchback by means of inslope to a ditch Design the switchback with the correct turning radius for the intended users Switchbacks may not be practical for ATVs because of the long turning radius they require
Fixed Ropes On a lightly used foot trail with a steep slope and soil that becomes slippery when wet a rope can help hikers climb or descend the hill Tie a rope (1frasl2 inch or larger diameter) to a firm object at the top of the slope and lay the rope along the tread or tie it to trees along the trail as a handrail
20 bull NATURE TRAIL DEVELOPMENT ON SMALL ACREAGES
Climbing Causeways When a slope has an uneven surface or is constructed of erodible materials a climbing causeway builds up the tread in short sections A climbing causeway (Figure 19) is useful on hiking and sometimes horse trails but hazardous for bicyclists motorcyclists and ATVs Use 6- to 10-inch diameter logs or sawtimber as crossbars at 4-foot or longer intervals to prevent fill material from migrating downhill Using the same material place logs along each side of the tread to hold fill material in place Fill the spaces between logs with soil or gravel varying the fill depth to create long steps that provide the desired grade A climbing causeway is most useful on grades of 10 to 20 percent For steeper grades consider installing steps
FIGURE 19 A climbing causeway gradually builds the tread grade in sections Photo by Ted Toth National Park Service volunteer
Steps Where trail grade exceeds 20 percent steps help prevent erosion while aiding hikers and horses Make step height (rise) 5 to 9 inches (71frasl2 inches is ideal) and step depth (run) at least 10 inches You can vary step depth up to several feet to fit the hill slope (Figure 20)
Make simple steps by anchoring logs sawn timbers or large stones across the tread and backfilling with soil Make more durable steps from 6- to 8-inch
FIGURE 20 Box steps aid hikers with navigating steep slopes Photo by Ted Toth National Park Service volunteer
diameter logs or sawn timbers positioned into a three-sided box fastened with steel rods and backfilled with soil or gravel
Crossing Wet Soil Poorly drained soil on flat land may become
muddy after rainfall or where groundwater seeps from a hillside and flows across the trail Construct trails to avoid such sensitive areas which attract wildlife and harbor unique plant species Trail development may adversely affect wildlife and plants using the seep or shallow water area A well-designed trail can provide nature-viewing opportunities at a distance without harming wet areas If disturbance is unavoidable refer to an accredited publication such as Wetland Trail Design and Construction by the US Department of Transportation Federal Highway Administration listed in the References section Seek assistance from your local Natural Resources Conservation Service since disturbing wetlands may require a permit
Crossing Waterways and Gullies Stepping stones ford or culverts help users cross
open water in springs streams and rivers
Stepping Stones and Fords On a primitive trail hikers appreciate stepping stones that are firmly imbedded in the stream bottom They might also wade across a slow-moving stream (less than 2 feet deep) through a ford Horses can ford a slow-moving stream (less than 3 feet deep) Place a ford where the streambed has firm sand or gravel (Figure 21) On horse trails remove large rocks from the streambed to prevent tripping If a small dam is installed to stabilize water depth and bottom structure a government permit may be required
NATURE TRAIL DEVELOPMENT ON SMALL ACREAGES bull 21
FIGURE 21 Stream crossings for trails and ATVs should be perpendicular to the stream and located where erosion and streambed damage is minimized Photo courtesy of the Adirondack Council
Culverts Install a culvert to channel water across a trail allowing trail users to cross a narrow stream (Figure 22) An open-top log or rock culvert is easy to clean when it becomes clogged but it creates a hazard for some trail users A pipe culvert covered with soil can be used by all trail users Pipe culverts may be steel (durable but heavy) or plastic (less durable but lightweight for transporting into areas with difficult access) If the culvert is too small high water will wash it out or flood land upstream from the culvert Culverts located downstream from a forest require significant amounts of maintenance to keep debris from clogging the system To permit fish movement on streams a culvert should slope no more than 1 percent and its end must be flush with the stream
FIGURE 22 Install a culvert pipe which can handle high water and is flush with the stream bottom with rocks around the upstream end to reduce erosion Photo by Doug Rowley National Park Service
bottom Place rocks around the culvertrsquos upstream end to armor the bank against erosion Seek professional advice from a soil and water expert such as an Arkansas Stream Team Coordinator with the Arkansas Game and Fish Commission (800-364-4263) to gauge the appropriate diameter culvert to install
Boardwalks A boardwalk (Figure 23) enables trail users to cross over wetlands fragile vegetation or unstable soil On hiking trails make the boardwalk deck (tread) from 2 x 6-inch lumber Use thicker lumber on boardwalks intended for heavier users such as ATVs or horses Some boardwalk materials are made from recycled products For more informashytion about boardwalks check publications in the References section of this guide
FIGURE 23 Boardwalks allow users to cross over wet or sensitive landscapes UA Garvan Woodland Gardens Photo by Jerry W Davis US Forest Service (retired)
Bridges Bridges are expensive to build and require a high level of expertise First consider other alternatives such as trail re-alignment culverts causeways or boardwalks If bridge building is necessary seek engineering assistance
Trails That Cross or Utilize Roads As a trail approaches a road crossing add a tight
turn ridges and dips in the tread andor narrow the clearing width to slow down users On the final approach the trail must be at a right (90deg) angle to the road nearly level and have a sight distance adequate for trail users to see the oncoming road in time to stop Expand the clearing width 1frac12 to 2 times its normal width or thin forest trees to provide good visibility from the trail toward the road
22 bull NATURE TRAIL DEVELOPMENT ON SMALL ACREAGES
If the trail may be entered from a public road install a barrier (eg posts a gate boulders mound of dirt) to prohibit unauthorized entry Install a sign visible from the road that indicates which trail uses are prohibited or permitted
Crossing Fences and Gates Fences may be necessary to restrain trail users
from entering an area to designate a property boundshyary or to contain livestock Hikers can cross a fence at a stile or a gate A gate is necessary for all other users Trail users have a tendency to leave a gate open when it should be closed or closed when it should be left open To keep a gate open fasten it so that it cannot be closed To keep a gate closed place a spring or counterweight on the gate or tilt it to close automatishycally from its own weight Install a latch that locks automatically when the gate closes and place a sign on the gate ldquoPlease Close Gaterdquo
Gate width can help regulate the types of users For example a 2frac12-foot-wide gate will admit hikers and bicyclists but exclude horses and ATVs A 6-footshywide gate will admit all users except full-sized SUVs and pickup trucks
Some gates are more visual barriers than physical barriers such as a single horizontal bar (log or steel pipe) steel cable or several vertical posts spaced across the tread This type of simple gate along with a sign that defines what types of trail users may enter will discourage some potential users but some unauthorized trail users may go around or under the gate If you are serious about keeping out certain types of users your gate and adjoining fence must create a physical barrier Other barriers also may be appropriate such as an earthen berm trench or large boulders Install light reflectors on gates whether you expect people to use the trail at night or not Reflecshytors are especially important safety features on gates that may be entered by motorized vehicles when gates are made from a single horizontal pole or cable that is not clearly visible at night
Sign the Trail If the trail is for personal use signs are probably
not necessary Trails for visitors or guests need
markings to keep them on the trail and prevent them from becoming lost Four types of signs may be needed trailhead sign confidence markers direcshytional signs and warning signs
Trailhead Sign A sign placed at the beginning of the trail may include some or all of the following information
bull Map showing trail route key features along the trail a ldquoyou are hererdquo mark north arrow and map scale or distances along major trail segments
bull Name or number of trail if there is more than one trail
bull Types of trail uses permitted (eg hiking) and uses specifically prohibited
bull How the trail is marked (eg paint marks signs rock cairns)
bull Rules for trail use (eg stay on the trail pets must be on a leash hikers get off the trail to let horses pass)
bull Warnings including hazards along the trail (eg poisonous plants venomous snakes dangerous animals steep cliffs falling rocks unsafe drinking water) and environmental features that must be protected (eg fragile vegetation rare animals natural spring)
bull How to contact the landowner and emergency help (eg sheriff fire hospital)
Post trailhead information on a large rectangular board sized to include all relevant information To protect signs from weather build a small roof over the sign board andor enclose signs in a shallow box with a window
Lay out the trailhead sign in components that can be changed without remaking the entire sign Print signs in fade-resistant ink (Photographs and some inks fade when exposed to sunlight) Make letters at least 1 inch for headers and frac14 inch for body text
NATURE TRAIL DEVELOPMENT ON SMALL ACREAGES bull 23
FIGURE 24 These plastic blazes (confidence markers) for three color-coded trails were affixed with aluminum nails Their angle indicates users need to veer left Photo by Becky McPeake UA Division of Agriculture Cooperative Extension Service
Confidence Markers Blazes or confidence markers placed strategically along the trail (Figure 24) reassure users that they are on the trail Place them at least every 1frasl4 mile in open country and much closer where the trail could be lost (eg at significant turns where the trail crosses roads or other trails or where the tread is indistinct from the surrounding landscape)
bull Paint marks on trees or rocks use a template to create a geometric design and change colors for different trails in the same area
bull Use aluminum nails to fasten 4- to 6-inch steel aluminum or plastic markers to a tree or prefershyably a post so they are visible in both directions along the trail
bull Inscribe a board or order prefabricated markers with an emblem trail number or name routed painted or burned into it
Directional Markers A directional marker may be needed to direct trail users to the trailhead or at a sharp bend fork or trail crossing At trail intersecshytions place a sign that provides information about
where each trail leads and how far away the next significant feature can be found Rounded posts proshyvide the most flexibility in positioning directional signs to point in the correct direction Fasten a crossshybar beneath the soil to prevent vandals from twisting the post
Warning Signs The trailhead sign should alert trail users about hazards along the trail or environshymental resources that require protection Place warning signs where trail users actually encounter hazardous situations or fragile environmental resources A good warning sign will tell trail users what to do or not do why and what the consequences are Be friendly but persuasive Consider using humor through your words or drawings Drawings are as good as words if their meaning is clear
The following are poor warning signs because they give no reason for the required action bull Stay Out bull Keep Off
Here are better warning signs
bull Be polite give a reason Please stay on the trail Protect the fragile glade
bull More forceful Stay behind the fence dangerous water strong currents
bull It may help to give a warning and explain the consequences
$100 fine for walking on the endangered running buffalo clover
bull Trail users appreciate humor and still get the message
Please stay on the trail so you donrsquot disturb the rattlesnakes (The real purpose is to keep people from trampling vegetation)
Please stay on the trail so you donrsquot trample the poison ivy (This may be the reason or it may be a way to keep trail users from short-cutting a switchback)
bull You also can provide a mixture of signs along a trail some that are polite and others that are more forceful
Please stay on the trail to protect fragile wetland plants
Walking on the trail is free Walking on wetland vegetation costs $100
24 bull NATURE TRAIL DEVELOPMENT ON SMALL ACREAGES
Trail Maintenance Good trails require little maintenance other than
periodic removal of fallen trees or other hazards and delimbing or pruning to maintain trail width A well-designed trail will keep surface water from running down the trail and eroding the pathway and surrounding environment The goal is to keep tread material on the trail and keep it well drained Standshying water results in soft boggy tread or failure of the tread and support structures If problems arise such as water damage to your trail consider rerouting the problem sections Some short sections of eroded trails may not be major problems and could eventually stabilize themselves A short section of eroded trail may cause less environmental damage than construcshytion of a longer rerouted section Carefully weigh your options
Good trails require little maintenance other than periodic removal of fallen trees or other hazards and delimbing or pruning to maintain trail width
Removing Slough and Berm On hillside trails slough (pronounced ldquosluffrdquo) is
soil rock and debris that has moved downhill to the inside of the tread narrowing it Slough needs to be removed (Figure 25) Removing slough is hard work and is often not done adequately Leaving slough is another reason trails ldquocreeprdquo downhill Loosen compacted slough with a mattock or Pulaski then remove the soil with a shovel or McLeod Use excess soil to fill holes in the tread Reshape the tread to restore its outslope Avoid disturbing the entire cutbank unless absolutely necessary
FIGURE 25 Remove the slough and berm leaving the trail outsloped so water will run off One fistrsquos worth of drop for the length of a Pulaski is a good rule of thumb
Berm is soil that has built up on the outside of the tread forming a barrier that prevents water from runshyning off the trail Berms are a natural consequence of tread surface erosion and inadequate compaction during construction Berms prevent water from flowshying off the trail Water runs down the tread itself gathering volume and soil as it goes Berm formation is the single largest contributor to erosion of the tread surface Removing berms is almost always the best practice Observe erosion on trails with and without berms See what works best in your area
Berms especially when associated with tread creep may form a false edge A false edge has almost no ability to bear weight This is probably the least stable trail feature on most trails and the major contributor to step-throughs and wrecks Berms should not be constructed intentionally Maintaining an outsloped tread will keep users on the center of the trail and water off of it
Pull the lower edge berm back onto the tread surface and use it to restore the outslope Use any slough material in the same fashion Remove and widely scatter organic debris well beyond the clearing limits preferably out of sight
Tread Maintenance Tread maintenance (Figure 26) aims for a solid
outsloped surface Remove all the debris that has fallen on the tread the sticks and stones and candy wrappers Maintain tread at the designed width This means filling ruts holes and low spots It includes
FIGURE 26 Trails may require periodic maintenance to fix problems with slough and berm Photo courtesy of the National Park Service
NATURE TRAIL DEVELOPMENT ON SMALL ACREAGES bull 25
removing obstacles such as protruding roots and rocks It also means repairing any sections that have been damaged by landslides uprooted trees washouts or boggy conditions
If puddling continues to occur on an existing trail a knick (dip) may be constructed to move water off the trail A knick is usually about 5 feet long and in a semicircle to remove water from a puddling area
Removing Roots and Stumps Removing roots and stumps is hard work
Explosives and stump grinders are good alternatives for removing stumps but chances are yoursquoll have to do the work by hand A sharpened pick mattock or Pulaski is most often used to chop roots If you are relying on some type of winch system to help pull out the stump be sure to leave the stump high enough to latch on for leverage
Not all roots and stumps are problems Before removing consider whether a stump was left the last time around to help keep the trail from creeping downhill If roots are perpendicular to the tread fairly flush and not a tripping hazard leave them Remove roots that are parallel with the tread (Figure 27) They cause erosion and create slipping hazards Look for the reason the roots were exposed and fix that problem
Rock Removal The secret to moving heavy rocks is to think first
For very large rocks motorized equipment drills and
FIGURE 27 Roots which run parallel to the tread create soil erosion and are a tripping hazard Photo by Becky McPeake UA Division of Agriculture Cooperative Extension Service
blasting may be required Other solutions include ramping the trail over them or rerouting the trail around them
Smaller rock-moving jobs require some of the same processes and tools used for removing larger rocks Plan out where the rock should go and anticishypate how it might roll Be patient ndash moving rock in a hurry almost always results in the rock ending up in the wrong location
Tools of the trade include
bull Lots of high-quality rockbars donrsquot settle for the cheap digging bars you need something with high tensile strength
bull Pick mattock
bull Sledge hammer
bull Eye protection gloves and hardhat donrsquot even think of swinging a tool at a rock without wearing these
bull Gravel box rock bag rucksack rock litter items useful for carrying rock of various sizes
bull Winch and cable systems some rocks can be dragged or lifted into place
When dealing with rocks work smarter not harder Skidding rocks is easiest Rolling them is sometimes necessary Lifting rocks is the last resort
The two most common injuries in rock work are pinched (or smashed) fingers and tweaked (or blown out) backs Both sets of injuries are a direct result of using muscles first and brains last High-quality rock work is almost always a methodical even tedious task Safe work is ALWAYS faster than taking time out for a trip to the infirmary Keep your fingers clear any time you deal with rocks Twisting your upper body while holding a heavy rock usually isnrsquot a good idea When lifting rocks keep your back straight and lift with the strong muscles of your legs
Rockbars work great for moving medium and large rocks Use the bars to pry rocks out of the ground and then to guide them around When several people have two or three bars under various sides of a large rock they can apply leverage to the stone and virtually float it to a new location with a rowing motion Use small rocks or logs as a fulcrum for better leverage
26 bull NATURE TRAIL DEVELOPMENT ON SMALL ACREAGES
It may seem like fun at the time but avoid the temptation to kick a large stone loose When rocks careen down the hillside they may knock down small trees gouge bark wipe out trail structures and start rockslides Even worse is the possibility an out-ofshycontrol rock might cross a trail or road below you hitting someone If there is any possibility of people below close the trail or road or post sentries in safe locations to warn travelers of the danger
You might construct a barrier by laying logs against two trees to stop a rolling rock before it gains much momentum Once a rock is loose do not try to stop it
To load a large rock into a wheelbarrow lean the wheelbarrow back on its handles roll the rock in gently over the handles (or rocks placed there) and tip the wheelbarrow forward onto its wheels
To Learn More This handbook provides a basic introduction to
trail development Experts who have experience in planning and constructing trails include the US Forest Service Arkansas State Parks city parks department or others in your area Listed below are some statewide contacts about various aspects of trail construction Additional written references are listed and provide more detailed descriptions of procedures for trail design and maintenance
bull District Conservationist For rules affecting trails over streams and wetshylands contact the USDA Natural Resources Conservation Service ndash Arkansas at 501-301-3122 or visit a local service center (wwwarnrcsusdagov)
bull CityCountyState Roads and Highways Contact the governing road authority to learn about rules for trails that cross or follow roads
bull Arkansas State Highway and Transportation Department Their Recreational Trails Program provides funding to local project sponsors (public and privatenonprofit agencies) for construction and maintenance of motorized and non-motorized recreational trails and trail support facilities (501-569-2209 httpwww arkansashighwayscomrecreational_trailsaspx)
bull Arkansas Department of Parks and Tourism For information about building trails in Arkansas call 501-682-7777 or visit a nearby state park and ask to speak with a trail construction expert
bull University of Arkansas Cooperative Extension Agent County-based assistance with soil samples plantings herbicides some wildlife and pond management Contact the University of Arkansas Division of Agriculture Cooperative Extension Service 501-671-2000 and ask for the Extension agriculture agent in your county httpwwwuaexedu
bull Watchable Wildlife Program Listings of trails and tips for watching wildlife in Arkansas Contact the Arkansas Game and Fish Commission 1-800-364-4263 and ask for the Watchable Wildlife Coordinator or go online at httpwwwagfccomspeciesPages SpeciesWatchableWildlifeaspx
bull Arkansas Stream Teams Biologists provide assisshytance with streambank stabilization projects constructing culverts and reducing soil erosion Contact the Arkansas Game and Fish Commission 1-800-364-4263 and ask for the Stream Team Coordinator in your area or go online at httpwwwagfccomfishing PagesFishingProgramsASTaspx
bull Arkansas Trails Council The Council can help locate trail groups in your area as well as trail events and training opportunities Members are charged with building and maintaining the Arkansas Trails System List which is comprised of some of the best trails in the state The Council strives to provide the managers of the trails with some well-deserved recognition Any trail is eligible and anyone can apply to be on the list Information including trail building resources is available at httpwwwarkansastrailscouncil com
NATURE TRAIL DEVELOPMENT ON SMALL ACREAGES bull 27
Appendix A Tools for Trail Building
Removing Small Trees Shrubs and Limbs from Large Trees bull Lopping Shears Most lopping shears with scissor
or anvil heads cut stems up to 1-inch in diameter some models cut 3-inch stems Overall length is 26 to 35 inches Longer handles offer a greater reach and cut larger stems more easily Ratchet heads offer powerful cutting with short handles
bull Bow Saw Bow saws vary in length A 24- to 30-inch blade will cut 6-inch diameter wood It cuts horizontal logs more efficiently than standing trees Some models fold for easy carrying
Bow Saw
bull Pruning Saw A pruning sawrsquos curved blade cuts on the pull stroke Models with 6- to 10-inch blades and folding handles can be carried in your pocket and cut limbs up to 3 inches Models 14 to 21 inches long with fixed handles cut limbs up to 6 inches
Pruning Saw
bull Pole Saw A pole saw has a 14- to 17-inch curved blade attached to a 4-foot or longer handle Use it to prune high limbs An additional limb hook is useful for pulling down cut limbs that get hung up in a tree Some models have a scissor- or anvil-type pruning head in addition to a saw
bull Pole Pruner A pole pruner with a scissor or anvil pruning head attached to a 10- to 12-foot long pole (often breaks down into two pieces for easier
carrying) cuts high limbs up to 1frac14-inch diameter Use a pole pruner to cut flexible limbs but use a pole saw to cleanly cut limbs close to the main tree stem
Cutting Large Trees Training is necessary before using any mechanical
equipment and in particular these saws
bull One-Person Crosscut Saw A one-person saw from 3 to 4frac12 feet in length will fell trees or cut logs from 6 to 16+ inches in diameter
bull Two-Person Crosscut Saw Use a two-person crosscut saw to fell trees or cuts logs from 6 to 16+ inches in diameter
Two-Person Crosscut Saw
bull Chain Saw A chain saw with a 16- to 24-inch bar cuts most trees and logs Carry extra bar oil fuel and chain file Wear a hardhat with face shield ear muffs long-sleeved shirt gloves tear-resistant pants or chaps and sturdy boots
bull Chain Saw-Powered Stump Grinder Cuts stumps prunes and removes roots clears brush minor dirt work Relatively small and portable
bull Pry Bar Use a tempered steel pry bar approxishymately 1 inch in diameter and 4 to 6 feet long to move logs and boulders Or cut a tree about 4 inches in diameter and 10 feet long for prying
bull Plastic Wedge When felling a tree place plastic wedge(s) in the back cut to prevent the tree from leaning back and pinching the saw blade
Removing Stumps and Boulders bull Shovel Select a shovel with a long handle wide
blade and pointed but curved tip Never use a wooden-handled shovel as a pry bar
28 bull NATURE TRAIL DEVELOPMENT ON SMALL ACREAGES
bull Pick Mattock A pick mattock has a wooden handle about 3 feet long and a steel head with a 4-inch-wide strong hoe on one side and a long spike on the other side Use it to dig up stumps rocks and compacted soil
Pick Mattock
Cutter Mattock
bull Cutter Mattock A cutter mattock has a wooden handle about 3 feet long and a steel head with a 4-inch-wide strong hoe on one side and a long narrow (dull) ax on the other side Use it to dig up stumps rocks and compacted soil and cut tree roots
bull Pulaski A Pulaski has a wooden handle about 3 feet long and a steel head with an ax on one side and a lightweight mattock head (narrow hoe) on the other side Use it to dig up tree stumps and cut roots
Pulaski
bull Ax Look for a long-handled ax to cut tree roots split wood or cut a felling notch into a large tree When felling trees or cutting logs use a saw for greater safety and efficiency A single-bladed ax with a hammer head on one side can be used to pound stakes and wedges but a sledge hammer is safer
bull Steel Wedge Use a steel wedge with a sledge hammer to split wood
bull Rock Chisel Split or break rocks using an 8shyto 12-inch-long chisel with a broad chisel tip
Rockand a 3- to 5-pound Chiselhammer
bull Feather Wedges Use a hammer to drive this set of three wedges into a wide crack to split a boulder These wedges will not become stuck in a boulder as will a single steel wedge or rock chisel
bull Sledge Hammer Use sledge hammers in various weights to pound rock chisels wood chisels and feather wedges A sledge hammer is also used to break off large rocks protruding into the tread
bull Rock Sling A rock sling is shaped like a litterstrecher Two to four people use it to carry heavy rocks Its two poles may be steel pipe or wooden poles about 6 feet long The sling fashioned from chain or strong rope should sag close to the ground when a rock is rolled into the center
Rock Sling
Steel chain
bull Rock Bag Use this canvas bag with loop handles to carry rocks soil or duff
bull Winch A ratchet winch gives a 21 mechanical advantage a Griphoistreg offers a 301 advantage to move boulders and tree stumps
bull Power Drill A gasoline-powered drill (jack hammer or rock drill) with a chisel tip breaks up large boulders or bores holes into rock for inserting explosives
NATURE TRAIL DEVELOPMENT ON SMALL ACREAGES bull 29
bull Explosives Explosives may be necessary to uproot stumps or break large boulders You need a license to purchase and use explosives A Boulder Bustertrade is an alternative device that requires minimal certification and training but breaks boulders larger than 6 feet in diameter It is a firing mechanism attached to a short pipe that fits into a rock crevice or hole a steel plate that covers the hole and an explosive charge about the size and shape of a shotgun shell
bull Bulldozer Use a small bulldozer with a roll bar and steel cage to clear rocks and trees and to excashyvate and level the tread To uproot a large tree cut off the stem leaving a 4-foot-high stump for the bulldozer blade to push against Use the blade to undercut roots on each side of a big stump before lifting it
bull Mini-Excavator Size varies but the smallest mini-excavator has caterpillar treads that span only 4frac12 feet a cab for the operator and a mechanical arm with a bucket at the end Use it to excavate soil rocks and tree stumps On a steep slope it can excavate soil to form a flat trail bed ahead of its treads
Moving Soil Duff and Fill Material bull Shovel Select a shovel with a long handle wide
blade and pointed but curved tip
bull McLeod Fire Tool A McLeod fire tool has a 6-foot handle and steel head with a 10-inch-wide hoe on one side and a heavy-duty rake on the other side Use it to clear small rocks twigs and branches and to loosen soil to smooth a tread
McLeod Fire Tool
bull Duff Blanket Rake or shovel duff from the trail bed onto a sheet of canvas or other heavy fabric draw the four corners together then carry the lightweight duff away and dump it
bull Bucket Use 5-gallon plastic buckets with wire handles to haul fill material by hand
bull Fill Boxes and Bags for HorsesMules In remote areas mules and horses can carry fill material in wooden boxes or heavy fabric bags attached to each side of a loading frame saddle
bull Wagon Use a small wagon especially one with a dump bed to move fill material and supplies Pull it with an ATV or other appropriate vehicle
Safety Equipment bull Hard Hat Wear a hard hat when felling trees
cutting branches over your head or whenever there is a possibility of being hit by flying or falling debris When operating a chainwale attach a face shield to the hard hat
bull Safety GogglesGlasses Wear safety goggles or glasses for all trail-clearing work especially when working in a forest or brushland or when cutting or chopping wood and breaking rocks
bull Ear Muffs Ear muffs for sound protection are essential when operating or working near noisy equipment
bull Long-Sleeved Shirt and Pants They are nearly always appropriate to wear for protection from minor scrapes cuts punctures irritating plants biting insects and thorns or when operating power tools
bull Tear-Resistant Pants or Chaps Wear these when operating a chain saw or working in thorny brush
bull Gloves Wear gloves to protect your hands from blisters cuts and scratches and when operating a chain saw
bull Boots Sturdy boots provide ankle support and protection from saw blades thorns sharp rocks and other hazards
Tool Storage and Maintenance bull Storage Make rectangular wooden boxes to haul
long-handled shovels pry bars axes Pulaskis McLeod tools etc Carry small tools in plastic buckets and boxes
bull Maintenance Clean tools to remove soil and rust Use wire brushes steel wool scrub brushes and water as needed Thoroughly dry tools coat steel surfaces with oil to resist rust sharpen cutting tools and hang them for long-term storage
30 bull NATURE TRAIL DEVELOPMENT ON SMALL ACREAGES
Appendix B Trail Planning for Public Access
Trail User Preferences As a general guideline for local trails the target
population should be lt 5 miles from the trail For regional trails people may be willing to travel 15 or more miles to use a greenway trail Accommodate multiple modes of travel but consider separating conflicting use (eg biking and horseback riding)
Human psychology also plays a role in trail planning A useful trail must be easy to find easy to travel and convenient to use Trails exist simply because they are an easier way of getting someplace
Greenway trails have documented low crime rates compared to other developed land uses Vegetation can be managed to reduce the perception of fear or crime Dense naturalistic vegetation along one side of a trail is not perceived as unsafe as long as the other side is visually open Provide 100 feet of both forward and rear visibility on trails where possible
Trail Layout A connected trail system offers a more pleasant
safe and continuous recreational experience than unconnected trails Design trails to provide safe passage across potential barriers such as roads (eg through trail bridges and underpasses) Abandoned railroad lines may be converted to trails often serving as an important regional trail in an area
Requirements for trail planning vary but they usually include an understanding of your soil water and wildlife They may also include construction skills such as building boardwalks or culverts and landshyscape design such as trail and bench placement Communicating with persons skilled in documenting environmental and permitting requirements may also be required
Align trails along or near existing human-created or natural edges rather than bisecting undisturbed areas Riparian (streamside) corridors are critical areas for many ecological functions which can be negatively
impacted by poorly designed and managed recreational trails To minimize impacts and mainteshynance issues locate the primary trail to the outside of the riparian corridor and then provide access to the riparian area at strategic points
See the References section for additional resources about trails for public use
Converting Pathways to Trails Sometimes existing pathways such as abandoned
railways or logging roads can also be used as trails Or trails can be designed for future conversion to logging roads if a timber harvest is planned in future years
Modifying Logging Roads If a logging skid trail or haul road will be used both for logging and recreational use design it to accommodate logging equipment If the skid trail or road will not be used for 10 years for logging purposes then design it more like a recreational trail When the time comes to use it for logging make temporary modifications (eg harden the tread install temporary stream-crossing devices for heavy equipment expand the clearing width and install more durable culverts or other drainage devices)
Converting Railroad Grades Ballast stones make a poor tread The stones are uniform in size and provide fast water drainage but the surface is rough and the stones are subject to displacement A thin layer of ballast stones makes a good base on which to place a more compacted surface of soil or small gravel If the railroad bed is too narrow remove some fill to achieve a wider bed If land ownership permits it divert the trail off the railroad bed from time to time to relieve boredom from long straight sight-lines Save bridges but modify decks and railings to create a tread surface and width suitable for trail users
NATURE TRAIL DEVELOPMENT ON SMALL ACREAGES bull 31
Appendix C References and Additional Resources
Appalachian Trail Design Construction and Maintenance by William Birchard Jr and Robert D Proudman 2000
Baughman Mel and Terry Serres Trail Design for Small Properties 2006 St Paul MN University of Minnesota Extension 30 p Copies available from Extension Store as Item 08425 httpshopextensionumneduPublication DetailaspxID=1817 or call 1-800-876-8636
Bentrap Gary Conservation Buffers Design Guideshylines for Buffers Corridors and Greenways 2008 USDA Forest Service httpwwwunledunac bufferguidelinesdocconservation_bufferspdf
Building Dry Stone Retaining Walls National Center for Preservation Technology and Training National Park Service ndash Cultural Resources Department of the Interior Web video 2002-06 March 2009 wwwncpttnpsgov
The Complete Guide to Trail Building and Maintenance by Carl Demrow and David Salisbury 1998
Equestrian Design Guidebook for Trails Trailheads and Campgrounds by USDA Forest Service httpwwwfhwadotgovenvironment fspubs07232816indexhtm
Equestrian Trail Guidelines for Construction and Maintenance by Missouri Department of Conservation httpmdc4mdcmogov documents 16131pdf
Hesselbarth Woody Porian Vachowski and Mary Ann Davies Trail Construction and Maintenance Noteshybook US Department of Transportation Federal Highway Administration 2007 httpwwwfhwa dotgovenvironmentfspubs07232806
Lightly on the Land The SCAD Trail-Building and Maintenance Manual by Robert C Birkby 1996
Low-Water Crossings Geomorphic Biological and Engineering Design Considerations by Kim Clarkin Gordon Keller Terry Warhol and Suzan Hixson USDA Forest Service publication with accompanying AutoCAD drawing CD 2006 httpwwwfsfedusengpubspdf LowWaterCrossingsLo_pdf1_Intropdf
National Off-Highway Vehicle Conservation Councilrsquos (NOHVCC) Trail Building Resources Develops and provides a wide spectrum of programs materials and information or ldquotoolsrdquo to individuals clubs associations and agencies in order to further a positive future for responsible off-highway vehicle recreation httpnohvcc orgeducation
Recreational Horse Trails in Rural and Wildland Areas Design Construction and Maintenance by Gene W Wood httpwwwClemsonedu forbook_formhtm
So You Want to Build a Trail ndash A Guide to Developing Urban Trails by Arkansas State Parks To get a free copy e-mail John Beneke State Trails Coordinashytor Arkansas State Parks at johnbeneke arkansasgov
Trail Construction and Maintenance Handbook by US Department of Transportation Federal Highway Administration wwwfhwadotgov environment fspubs07232806page02htm
Trail Planning Design and Development Guidelines (for trail building professionals) by Minnesota Department of Natural Resources www minnesotasbookstorecom 651-297-3000
Trail Solutions IMBArsquos Guide to Building Sweet Singletrack by International Mountain Bicycling Association 2004
Trails Training DVD Series by the USDA Forest Service and the US Department of Transportation wwwfhwadotgovenvironmentrectrails trailpubhtm
US Department of Transportation Federal Highways Commission Recreational Trails Program Publications httpwwwfhwadotgov environmentrectrails publicationshtm
Wetland Trail Design and Construction by US Department of Transportation Federal Highway Administration httpwwwfhwadotgov environmentfspubs 01232833tochtm
Woodland Trails Layout Building and Maintenance by Shad Baker in Kentucky Woodlands Magazine 4(1) April 2009
32 bull NATURE TRAIL DEVELOPMENT ON SMALL ACREAGES
Acknowledgments
We are indebted to Bert Turner trail director for Master Naturalists and Burn Park trails in North Little Rock for educating the authors about trail development and reviewing this manuscript
We appreciate Mel Baughman and Terry Serres from the University of Minnesota Extension Service for permission to use their publication entitled Trail Design for Small Properties which comprises the majority of this handbook The reference for their publication is
Baughman M and T Serres Trail Design for
Small Properties 2006 St Paul MN University of Minnesota Extension 30 p Copies available from Extension Store as Item 08425 httpshopextensionumneduPublication DetailaspxID=1817 or call 1-800-876-8636
We also appreciate Gary Bentrup for permission to use portions of Conservation Buffers Design
Guidelines for Buffers Corridors and Greenways
USDA Forest Service available online at httpwwwunledunacbufferguidelinesdocs conservation_bufferspdf
Another resource for this publication was Trail Construction and Maintenance Notebook by Woody Hesselbarth Brian Vachowski and Mary Ann Davies of the US Department of Transportashytion Federal Highway Administration which can be found online at httpwwwfhwadotgov environmentfspubs07232806
We appreciate review comments provided from several University of Arkansas Division of Agriculshyture faculty namely Karl VanDevender Bio and Agricultural Engineering Mark Russell Animal Sciencesrsquo Equine Instructor and Mike Klumpp 4-H and Youth Development
This publication was made possible in part by a
319(h) grant from the Arkansas Natural Resources
Commission and the Environmental Protection Agency
The information given herein is for educational purposes only Reference to commercial products or trade names is made with the understanding that no discrimination is intended and no endorsement by the University of Arkansas Division of Agriculture Cooperative Extension Service is implied
NATURE TRAIL DEVELOPMENT ON SMALL ACREAGES bull 33
Printed by University of Arkansas Cooperative Extension Service Printing Services
Issued in furtherance of Cooperative Extension work Acts of May 8 and June 30 1914 in cooperation with the US Department of Agriculture Director Cooperative Extension Service University of Arkansas The Arkansas Cooperative Extension Service offers its programs to all eligible persons regardless of race color national origin religion gender age disability marital or veteran status or any other legally protected status and is an Affirmative ActionEqual Opportunity Employer
MP488-PD-1-11N
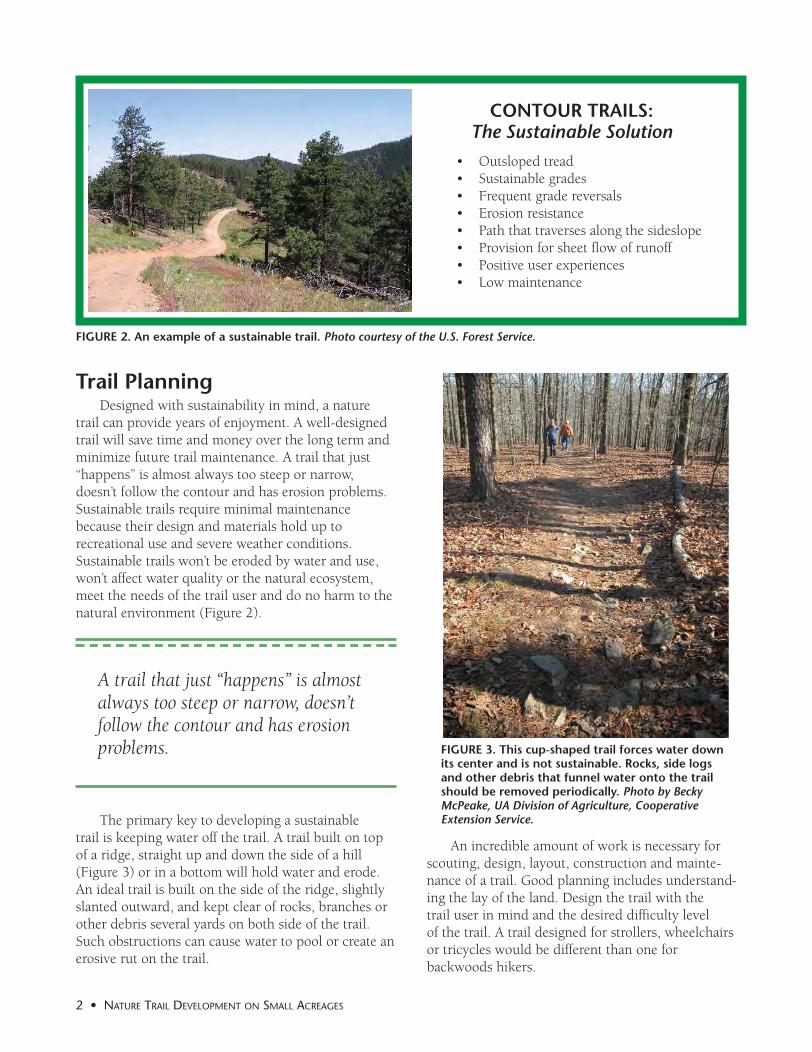
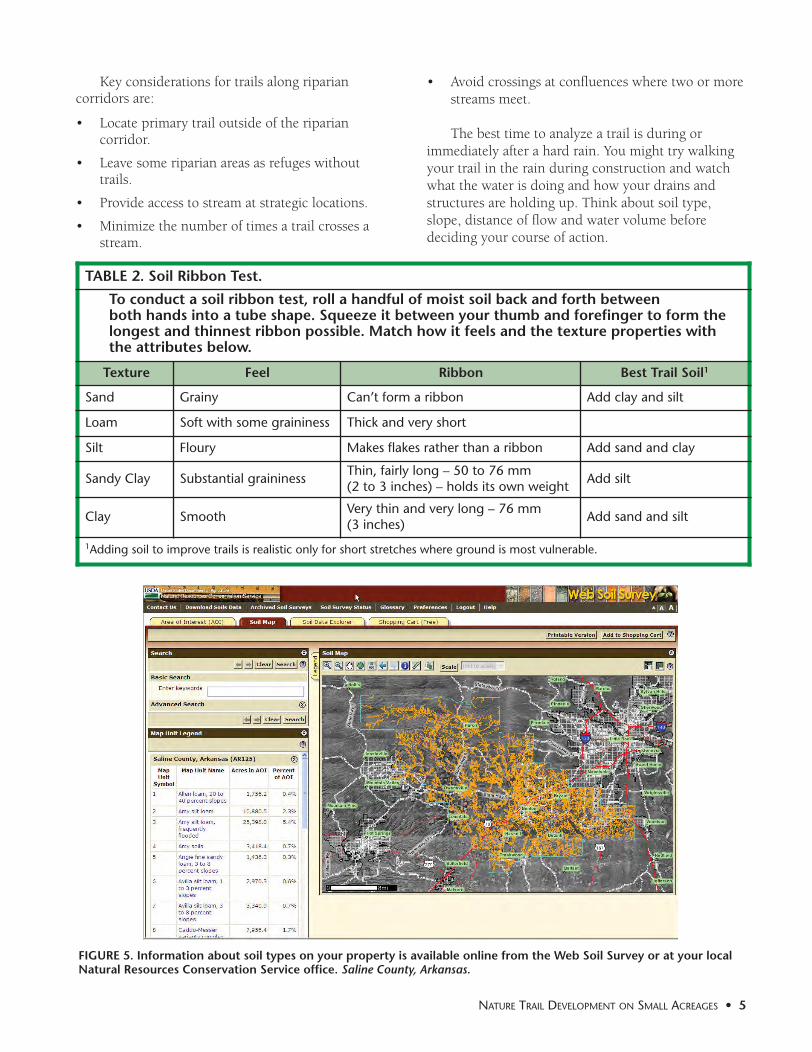
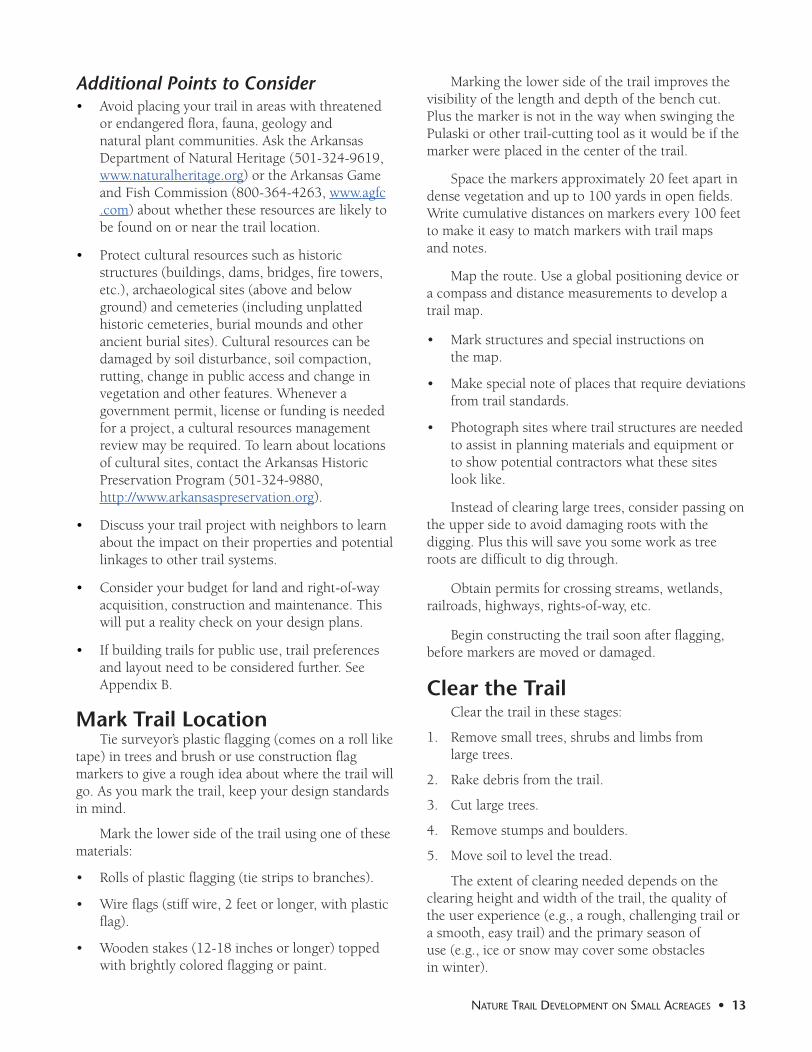
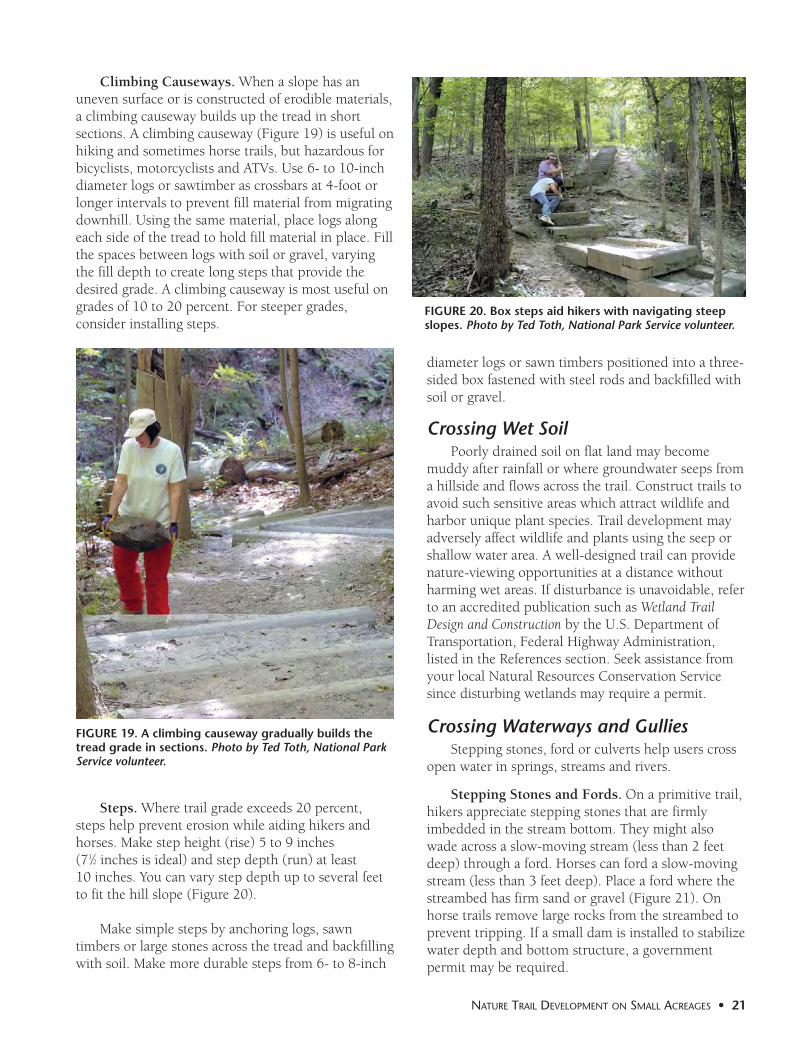
Recommended