Using PowerTeacher in the Bartlesville Public Schools Page 11 of 27 8/2014 Revision for PowerTeacher 2.8; Created by Granger Meador
Setting Up Your Gradebook
Before using your Gradebook each year you need to set up Grade Categories and then do a Grade Setup to set the Term Weights and other calculation options. You can also input Class Info for student and parents to view when accessing the grades online by selecting the Class Content icon, selecting the Class Info mode button, and typing in a custom display name and description. That information will appear above the individual assignment grades in the public portal and if you drill down to a course’s assignments in PowerTeacher on a student’s Quick Lookup screen.
Setting Up Grade Categories
Categories provide a way to organize assignments in your gradebook. You’ll want to create any particular categories that would be helpful when assessing how students are doing in different aspects of your courses. (NOTE: if you use a weighted method of grading, you must set up categories BEFORE you do Grade Setup.) Open the Tools menu and click on Categories. You will see the existing categories (some are already set up by PowerSchool). As you highlight each, you can see the settings for that category on the right. The example shows the some custom settings created for a science lab. Points Possible has a default value which you should change to the number of points that you typically assign to such that category of work; however, you can later change that value as you create individual assignments in the category. Extra Points is another default to allow bonus points above a perfect score if you wish; again, you can later change that value on individual assignments. Score Type should be set to Points for all categories. To change the settings (change the name, abbreviation, color, points, publishing settings, or description), highlight the category name on the left and make changes on the right. Closing the window or highlighting another category name on the left will save the changes. Additionally, you can ADD more categories by clicking on the plus (+) button at the bottom of the left column. A new category titled Category is added and you must define it on the right. (NOTE: categories MUST have an abbreviation.) • Categories are defined for the entire gradebook. You should set up any and all categories that you will need for your
classes. • You may not delete categories that are “in use.” Categories not in use may be deleted by highlighting their names in
the left pane and clicking on the minus (-) button at the bottom of the left column.
Using PowerTeacher in the Bartlesville Public Schools Page 12 of 27 8/2014 Revision for PowerTeacher 2.8; Created by Granger Meador
Grade Setup
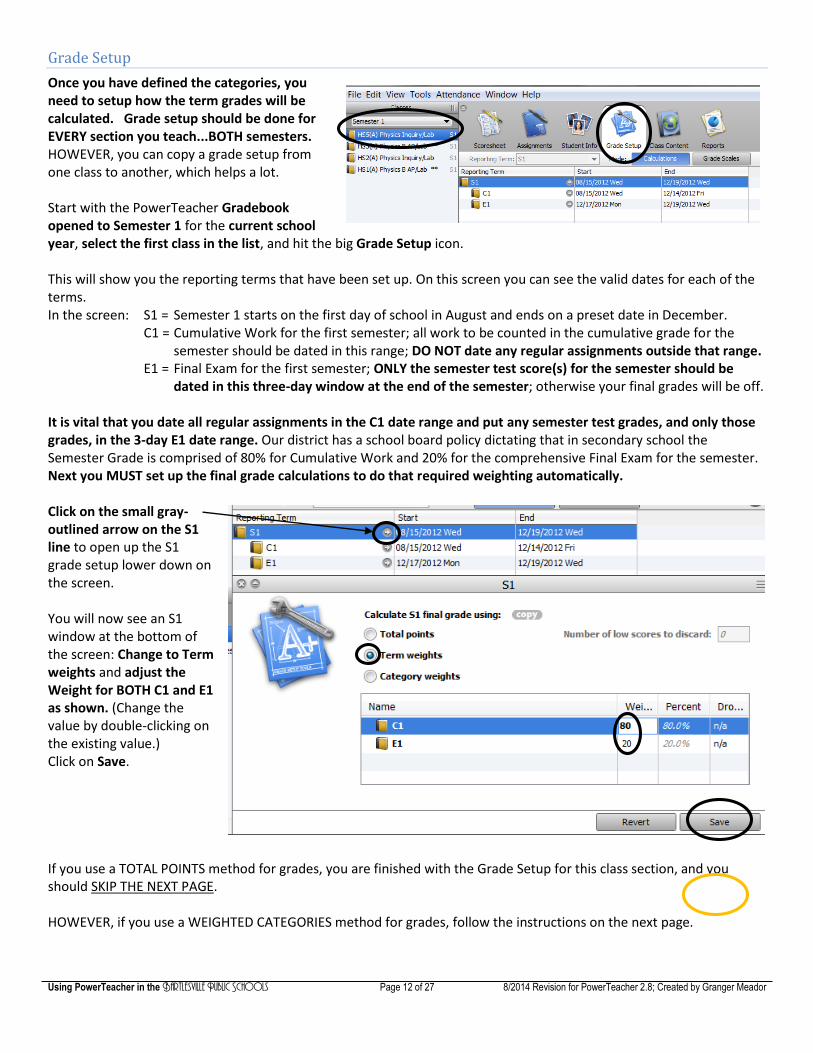
Once you have defined the categories, you need to setup how the term grades will be calculated. Grade setup should be done for EVERY section you teach...BOTH semesters. HOWEVER, you can copy a grade setup from one class to another, which helps a lot. Start with the PowerTeacher Gradebook opened to Semester 1 for the current school year, select the first class in the list, and hit the big Grade Setup icon. This will show you the reporting terms that have been set up. On this screen you can see the valid dates for each of the terms. In the screen: S1 = Semester 1 starts on the first day of school in August and ends on a preset date in December.
C1 = Cumulative Work for the first semester; all work to be counted in the cumulative grade for the semester should be dated in this range; DO NOT date any regular assignments outside that range.
E1 = Final Exam for the first semester; ONLY the semester test score(s) for the semester should be dated in this three-day window at the end of the semester; otherwise your final grades will be off.
It is vital that you date all regular assignments in the C1 date range and put any semester test grades, and only those grades, in the 3-day E1 date range. Our district has a school board policy dictating that in secondary school the Semester Grade is comprised of 80% for Cumulative Work and 20% for the comprehensive Final Exam for the semester. Next you MUST set up the final grade calculations to do that required weighting automatically. Click on the small gray-outlined arrow on the S1 line to open up the S1 grade setup lower down on the screen. You will now see an S1 window at the bottom of the screen: Change to Term weights and adjust the Weight for BOTH C1 and E1 as shown. (Change the value by double-clicking on the existing value.) Click on Save. If you use a TOTAL POINTS method for grades, you are finished with the Grade Setup for this class section, and you should SKIP THE NEXT PAGE. HOWEVER, if you use a WEIGHTED CATEGORIES method for grades, follow the instructions on the next page.
Using PowerTeacher in the Bartlesville Public Schools Page 13 of 27 8/2014 Revision for PowerTeacher 2.8; Created by Granger Meador
Weighted Categories Setup
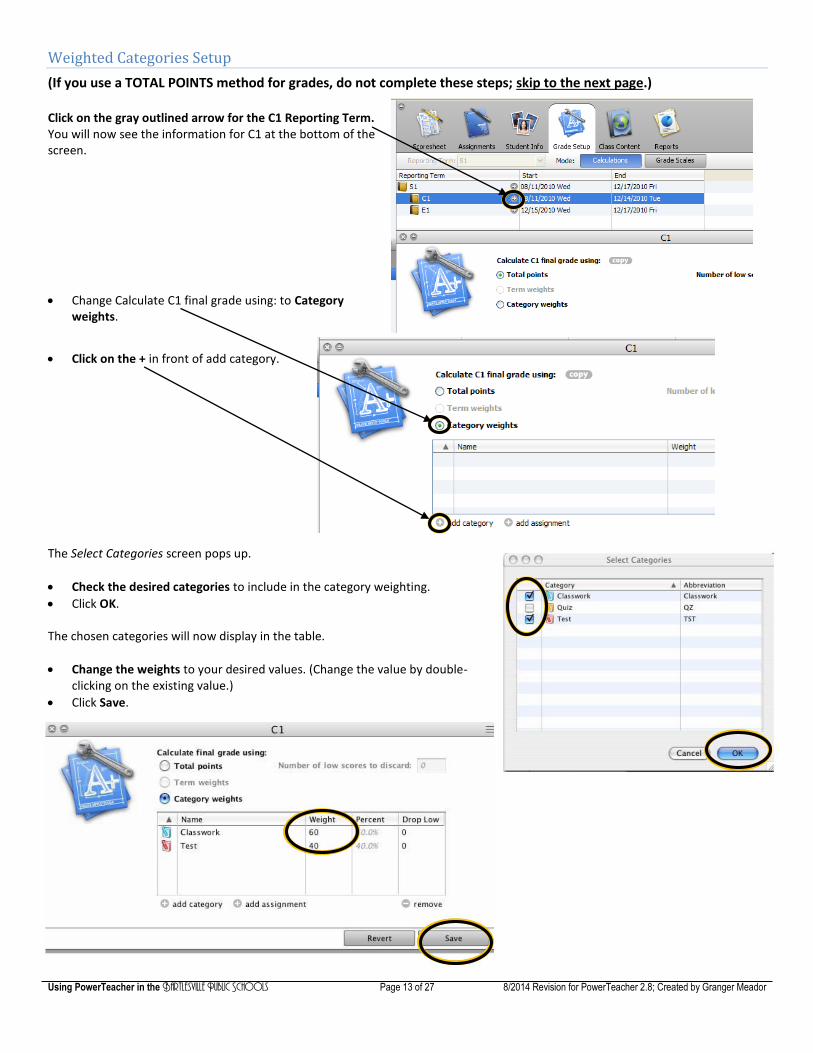
(If you use a TOTAL POINTS method for grades, do not complete these steps; skip to the next page.) Click on the gray outlined arrow for the C1 Reporting Term. You will now see the information for C1 at the bottom of the screen.
Change Calculate C1 final grade using: to Category weights.
Click on the + in front of add category. The Select Categories screen pops up.
Check the desired categories to include in the category weighting.
Click OK.
The chosen categories will now display in the table.
Change the weights to your desired values. (Change the value by double-clicking on the existing value.)
Click Save.
Using PowerTeacher in the Bartlesville Public Schools Page 14 of 27 8/2014 Revision for PowerTeacher 2.8; Created by Granger Meador
Copying a Grade Setup
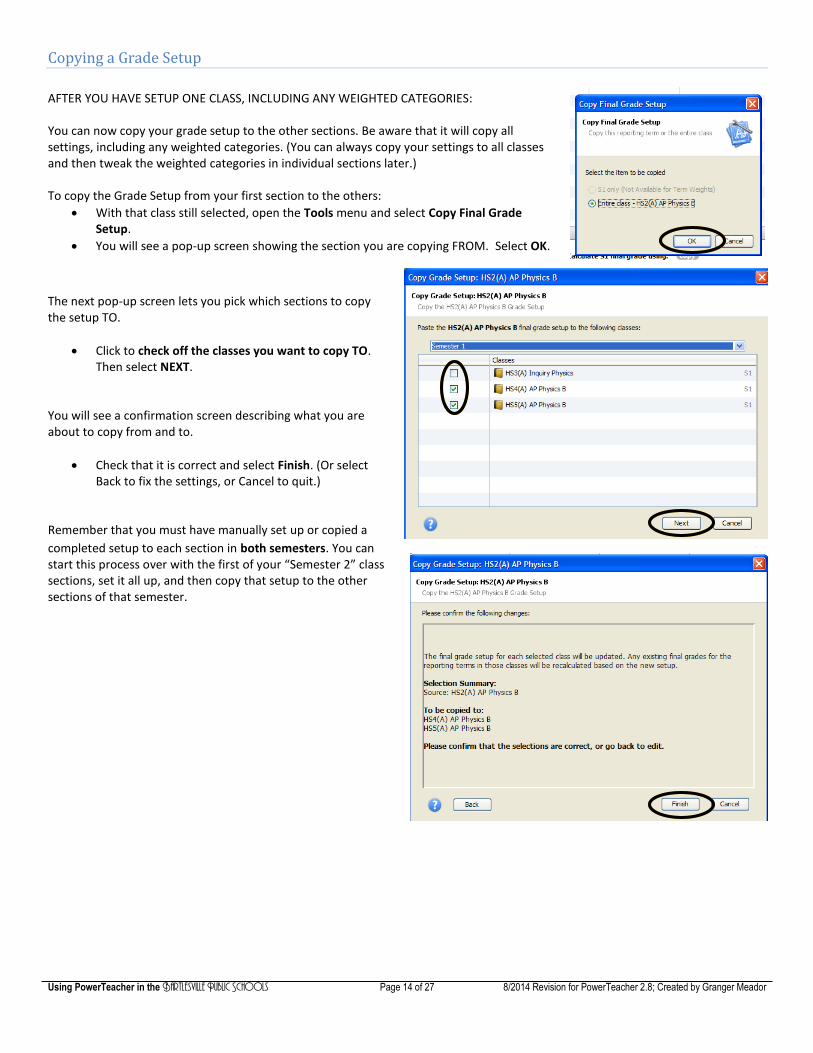
AFTER YOU HAVE SETUP ONE CLASS, INCLUDING ANY WEIGHTED CATEGORIES:
You can now copy your grade setup to the other sections. Be aware that it will copy all settings, including any weighted categories. (You can always copy your settings to all classes and then tweak the weighted categories in individual sections later.) To copy the Grade Setup from your first section to the others:
With that class still selected, open the Tools menu and select Copy Final Grade Setup.
You will see a pop-up screen showing the section you are copying FROM. Select OK.
The next pop-up screen lets you pick which sections to copy the setup TO.
Click to check off the classes you want to copy TO. Then select NEXT.
You will see a confirmation screen describing what you are about to copy from and to.
Check that it is correct and select Finish. (Or select Back to fix the settings, or Cancel to quit.)
Remember that you must have manually set up or copied a
completed setup to each section in both semesters. You can start this process over with the first of your “Semester 2” class sections, set it all up, and then copy that setup to the other sections of that semester.
Recommended