TruVision HD-TVI 1080P Camera Configuration Manual
P/N 1073162-EN • REV A • ISS 31MAR16
Copyright © 2016 United Technologies Corporation. All rights reserved. Interlogix is part of UTC Climate, Controls & Security, a unit of United Technologies Corporation.
Trademarks and patents
The TruVision and Interlogix names and logos are trademarks of United Technologies. Other trade names used in this document may be trademarks or registered trademarks of the manufacturers or vendors of the respective products.
Manufacturer Interlogix 2955 Red Hill Avenue, Costa Mesa, CA 92626-5923, USA Authorized EU manufacturing representative: UTC Fire & Security B.V. Kelvinstraat 7, 6003 DH Weert, The Netherlands
Contact information For contact information, see www.interlogix.com or www.utcfssecurityproducts.eu.
Customer support For contact information, see www.interlogix.com or www.utcfssecurityproducts.eu
TruVision HD-TVI 1080P Camera Configuration Manual 1
Content
Introduction 2
HD-TVI 1080P IR Bullet Cameras 2
HD-TVI 1080P IR Dome Cameras 2
HD-TVI 1080P Box Cameras 2
Programming 3
Using the camera Menu button 3
Using a TVI output 3
TVS-C200 CVBS OSD controller 4
Menu trees 6
TVB-2403/4403 and TVD-2403/4403 cameras 6
TVC-2401/4401 cameras 6
TVB-2404/4404, TVB-2405/4405, TVD-2404/4404 and TVD-2405/4405 cameras 7
TVB-2406/4406 cameras 7
Configuration 8
Video Out 8
Languages 8
Setup 8
Smart Focus 8
Scene 8
Lens 8
Exposure 9
Backlight 10
White Balance 11
Day & Night 12
NR 13
Special 14
Adjust 17
Reset 18
Exit 18
2 TruVision HD-TVI 1080P Camera Configuration Manual
Introduction This is the configuration manual for following camera models:
HD-TVI 1080P IR Bullet Cameras TVB-2403 (1080P TVI Bullet Camera, Fixed Lens, IR, PAL)
TVB-4403 (1080P TVI Bullet Camera, Fixed Lens, IR, NTSC)
TVB-2404 (1080P TVI Bullet Camera, VF Lens, IR, PAL)
TVB-4404 (1080P TVI Bullet Camera, VF Lens, IR, NTSC)
TVB-2405 (1080P TVI Bullet Camera, Motorized Lens, IR, PAL)
TVB-4405 (1080P TVI Bullet Camera, Motorized Lens, IR, NTSC)
TVB-2406 (1080P TVI Bullet Camera, Motorized Lens, IR, PAL)
TVB-4406 (1080P TVI Bullet Camera, Motorized Lens, IR, NTSC)
HD-TVI 1080P IR Dome Cameras TVD-2403 (1080P TVI Dome Camera, Fixed Lens, IR, PAL)
TVD-4403 (1080P TVI Dome Camera, Fixed Lens, IR, NTSC)
TVD-2404 (1080P TVI Mini Dome Camera, VF Lens, IR, PAL)
TVD-4404 (1080P TVI Mini Dome Camera, VF Lens, IR, NTSC)
TVD-2405 (1080P TVI Dome Camera, Motorized Lens, IR, PAL)
TVD-4405 (1080P TVI Dome Camera, Motorized Lens, IR, NTSC)
HD-TVI 1080P Box Cameras TVC-2401 (1080P TVI Box Camera, PAL)
TVC-4401 (1080P TVI Box Camera, NTSC)
TruVision HD-TVI 1080P Camera Configuration Manual 3
Programming Once the camera hardware has been installed, the camera can be configured using the built-in OSD button, a TVI DVR menu, or the OSD TVS-C200 controller (purchased separately).
Note: TVC-2401/4401 does not support the TruVision TVS-C200 OSD controller.
Using the camera Menu button For the cameras with built-in OSD button, please press the Menu button to call up the OSD menu and select an OSD item.
Press the button up/down to move the cursor up or down to an OSD item.
Press the button left/right to move the cursor left or right to adjust the value of a selected OSD item
For more details, please refer to the TVI camera installation manuals.
Using a TVI output Programming over the camera’s TVI output can be done via the connected TVI DVR.
Access the PTZ menu of the connected DVR, select TruVision-Coax protocol and use the PTZ control panel to configure the camera.
Table 1: Using the OSD control button Button direction Description
Iris+ Click Iris+ to access to the camera OSD menu and select an OSD item.
Up Moves the cursor upward to select an item
Left Moves the cursor left to select or adjust the parameters of the selected item.
Right Moves the cursor to the right to select or adjust the parameters of the selected item.
Down Moves the cursor downward to select an item.
Zoom Adjust the camera zoom in and zoom out
Focus Adjust the camera focus
Note:
TVB-2405/TVB-4405 and TVD-2405/TVD-4405 have motorized lenses. Use the ZOOM and FOCUS buttons to adjust its zoom and focus.
TVB-2406/TVB-4406 camera has auto-focus capability. When this feature is enabled, the camera can adjust itself to achieve the best focus automatically.
4 TruVision HD-TVI 1080P Camera Configuration Manual
For more details, refer to the TVI DVR user manual.
TVS-C200 CVBS OSD controller Interlogix offers two different versions of the OSD controller: the TVS-C100 controller and the TVS-C200 controller. Please choose the corresponding controller by referring to the product datasheets.
The cameras listed in the “Introduction” section support TruVision Coax OSD control protocol and require the TVS-C200 for OSD control.
The TVS-C200 is used to program the camera’s 960H CVBS output, not for the TVI video output. Programming the camera’s TVI output can be done via a TVI DVR.
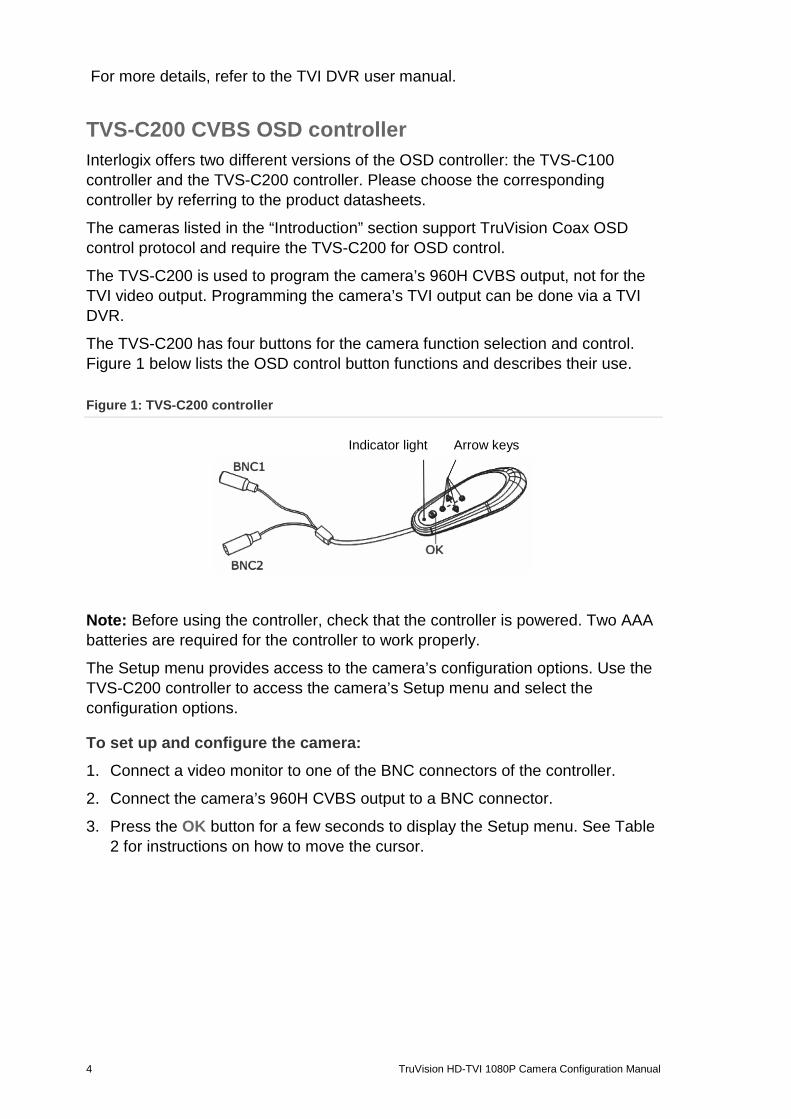
The TVS-C200 has four buttons for the camera function selection and control. Figure 1 below lists the OSD control button functions and describes their use.
Figure 1: TVS-C200 controller
Indicator light Arrow keys
Note: Before using the controller, check that the controller is powered. Two AAA batteries are required for the controller to work properly.
The Setup menu provides access to the camera’s configuration options. Use the TVS-C200 controller to access the camera’s Setup menu and select the configuration options.
To set up and configure the camera: 1. Connect a video monitor to one of the BNC connectors of the controller.
2. Connect the camera’s 960H CVBS output to a BNC connector.
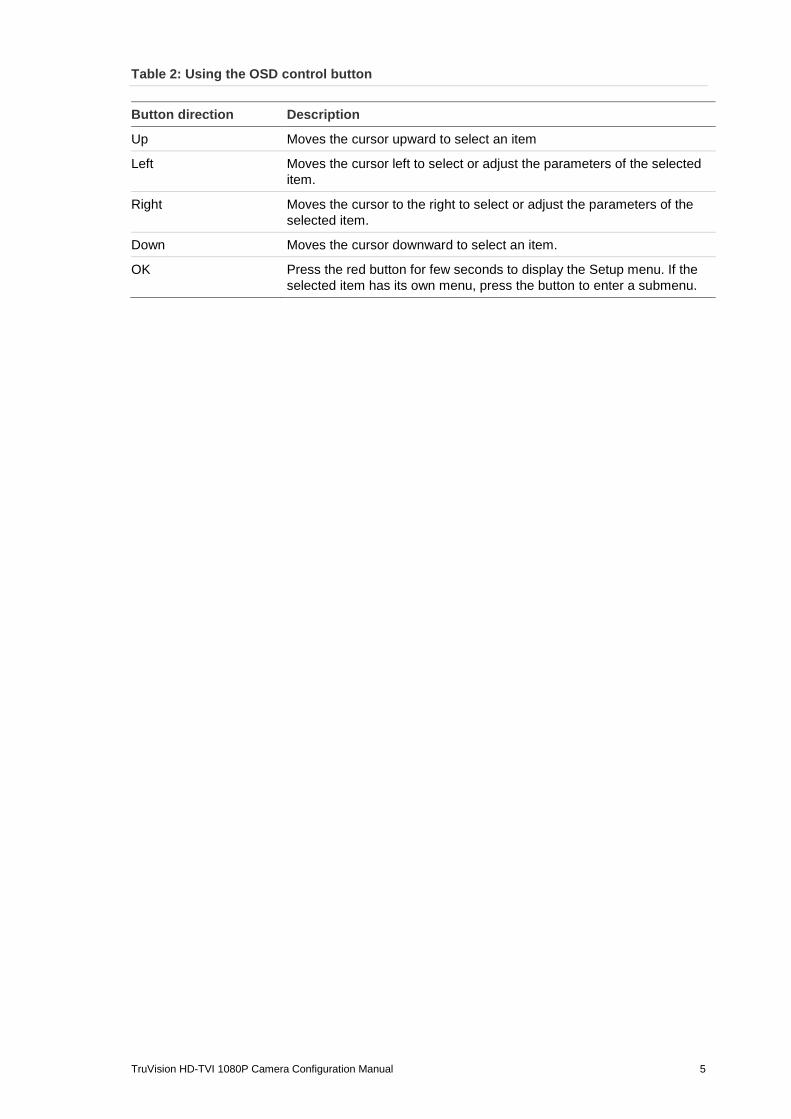
3. Press the OK button for a few seconds to display the Setup menu. See Table 2 for instructions on how to move the cursor.
TruVision HD-TVI 1080P Camera Configuration Manual 5
Table 2: Using the OSD control button Button direction Description
Up Moves the cursor upward to select an item
Left Moves the cursor left to select or adjust the parameters of the selected item.
Right Moves the cursor to the right to select or adjust the parameters of the selected item.
Down Moves the cursor downward to select an item.
OK Press the red button for few seconds to display the Setup menu. If the selected item has its own menu, press the button to enter a submenu.
6 TruVision HD-TVI 1080P Camera Configuration Manual
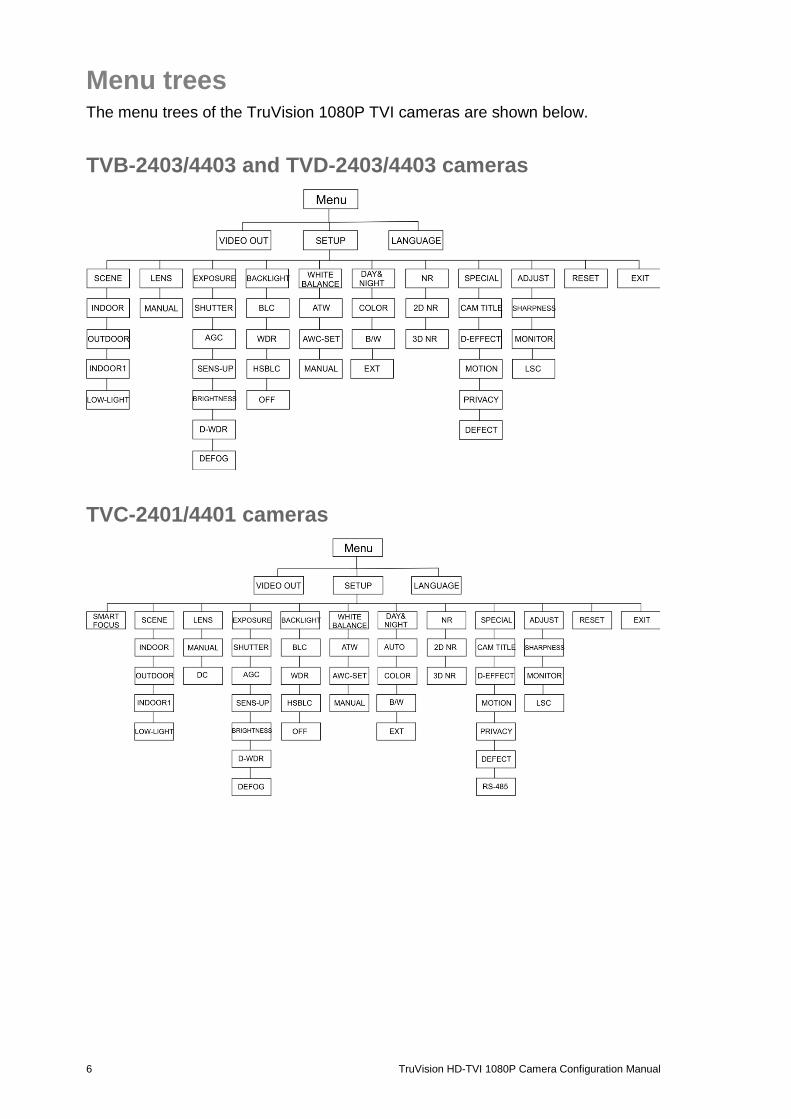
Menu trees The menu trees of the TruVision 1080P TVI cameras are shown below.
TVB-2403/4403 and TVD-2403/4403 cameras
TVC-2401/4401 cameras
TruVision HD-TVI 1080P Camera Configuration Manual 7
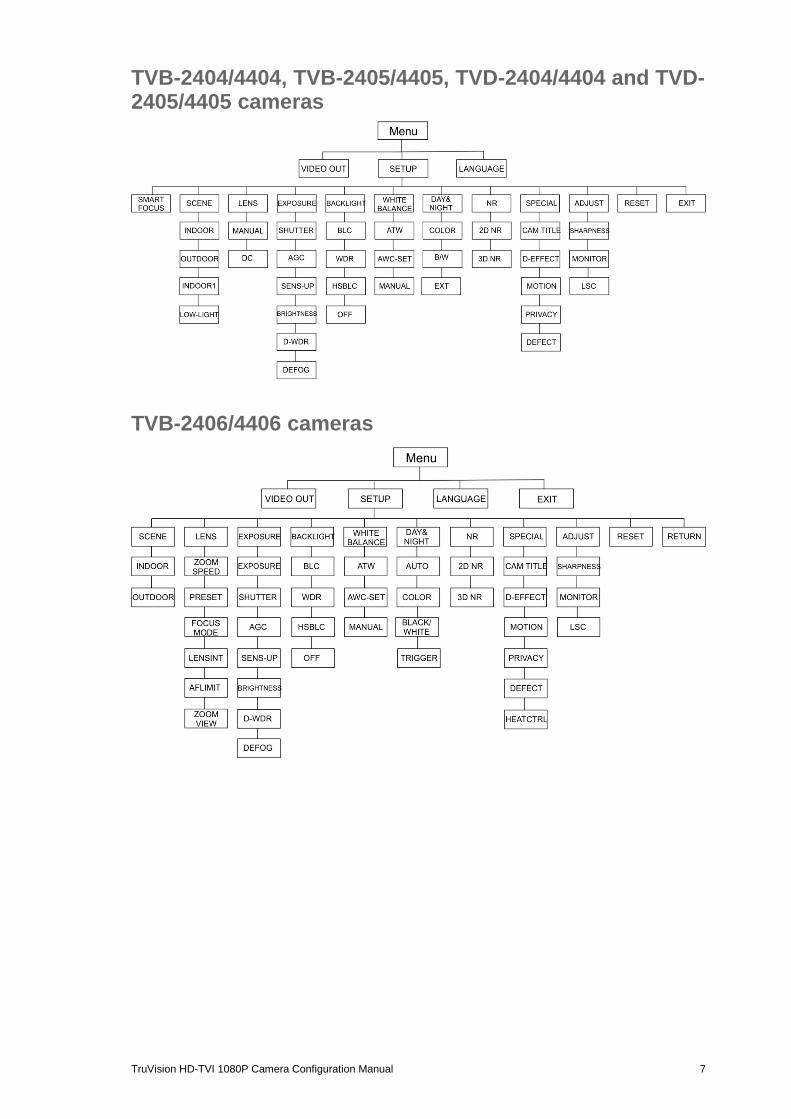
TVB-2404/4404, TVB-2405/4405, TVD-2404/4404 and TVD-2405/4405 cameras
TVB-2406/4406 cameras
8 TruVision HD-TVI 1080P Camera Configuration Manual
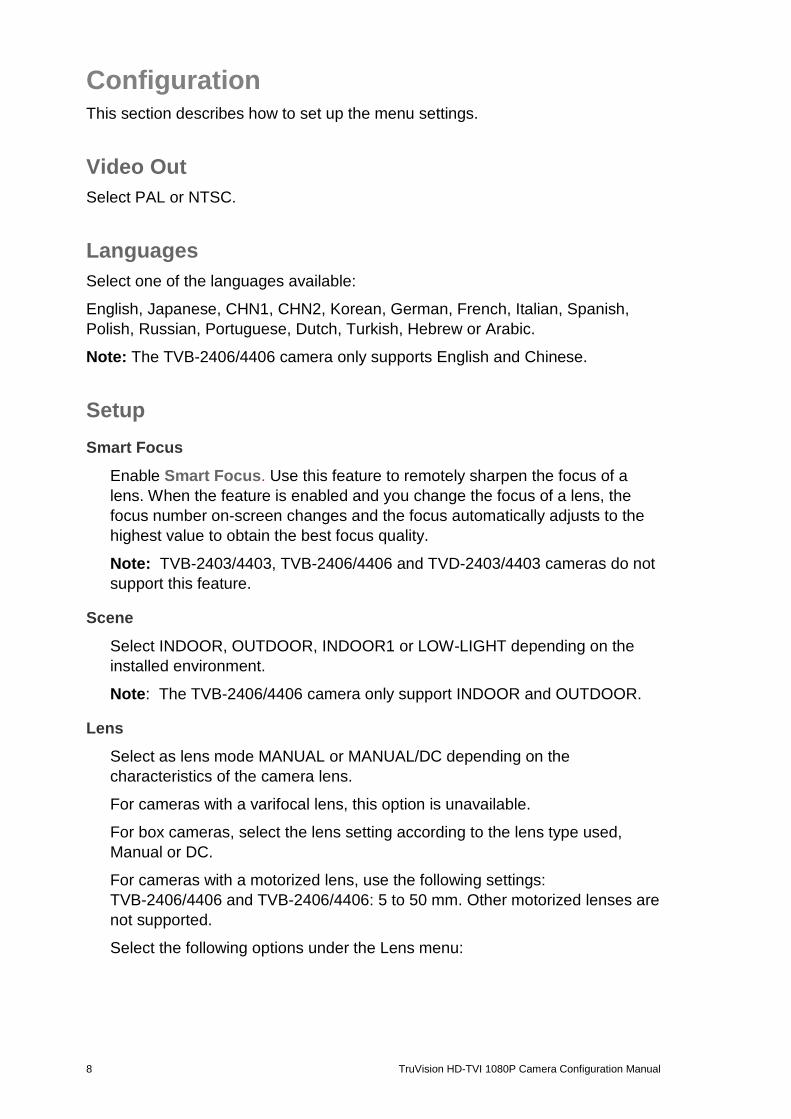
Configuration This section describes how to set up the menu settings.
Video Out Select PAL or NTSC.
Languages Select one of the languages available:
English, Japanese, CHN1, CHN2, Korean, German, French, Italian, Spanish, Polish, Russian, Portuguese, Dutch, Turkish, Hebrew or Arabic.
Note: The TVB-2406/4406 camera only supports English and Chinese.
Setup Smart Focus
Enable Smart Focus. Use this feature to remotely sharpen the focus of a lens. When the feature is enabled and you change the focus of a lens, the focus number on-screen changes and the focus automatically adjusts to the highest value to obtain the best focus quality.
Note: TVB-2403/4403, TVB-2406/4406 and TVD-2403/4403 cameras do not support this feature.
Scene
Select INDOOR, OUTDOOR, INDOOR1 or LOW-LIGHT depending on the installed environment.
Note: The TVB-2406/4406 camera only support INDOOR and OUTDOOR.
Lens
Select as lens mode MANUAL or MANUAL/DC depending on the characteristics of the camera lens.
For cameras with a varifocal lens, this option is unavailable.
For box cameras, select the lens setting according to the lens type used, Manual or DC.
For cameras with a motorized lens, use the following settings: TVB-2406/4406 and TVB-2406/4406: 5 to 50 mm. Other motorized lenses are not supported.
Select the following options under the Lens menu:
TruVision HD-TVI 1080P Camera Configuration Manual 9
ZOOM SPEED Move the cursor left/right to adjust the zoom speed.
PRESET Set the lens pre-set, delete or call pre-configured lens preset. A total of 64 presets can be set.
FOCUS MODE Select Manual, Auto, or Trigger mode. Auto mode: The camera focuses automatically. Manual mode: Click Zoom+ and Zoom- to focus. Trigger mode: The image will not refocus if it is changed.
LENSINIT Lens initialization. Reset the lens to calibrate it.
AFLIMIT Auto Focus Limit. Select the minimum auto focus distance: 20 m, 10 m, 6 m, 3 m, 1.5 m, 1 m, 30 cm, or 10 cm.
ZOOM VIEW Display the zoom factor on the OSD.
Exposure
Select as exposure mode MANUAL or IRIS-PRI (Iris Priority). This function is only available for the TVB-2406/4406 camera.
Only the TVB-2406/4406 camera supports the lens auto-focus function.
Note: When Manual is selected, the SENS-UP settings are disabled. When IRIS-PRI is selected, SHUTTER and AGC settings are disabled.
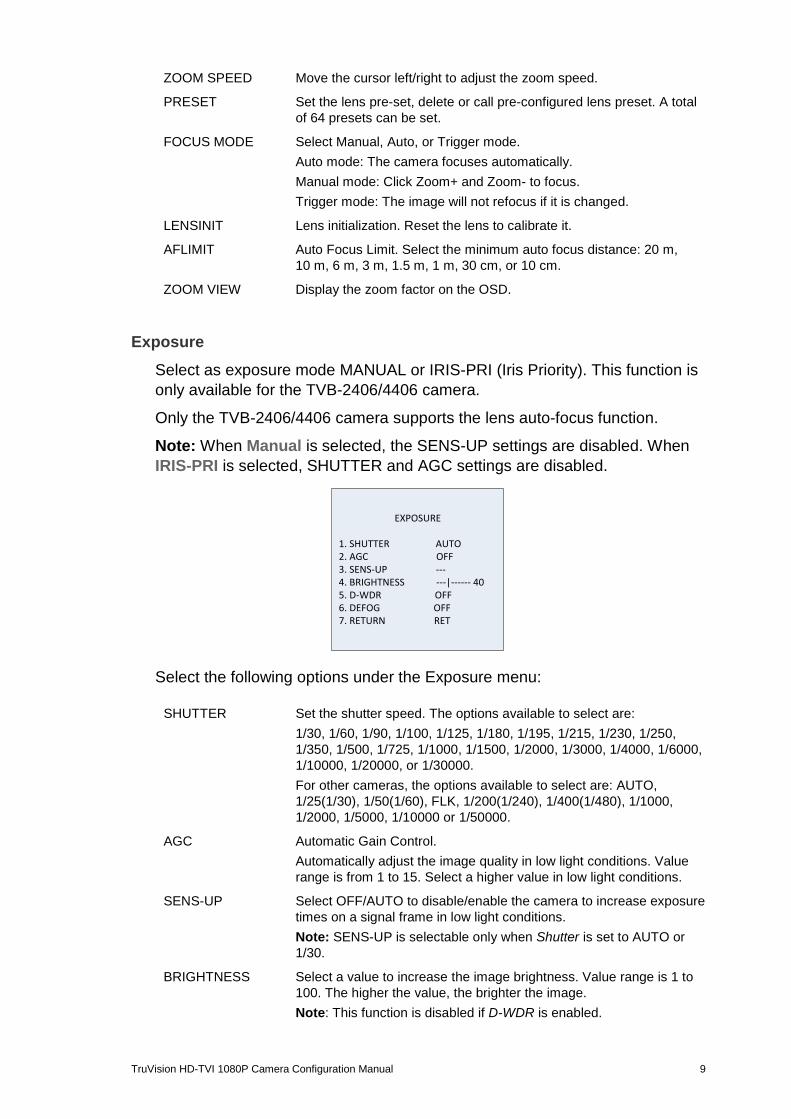
EXPOSURE
1. SHUTTER AUTO2. AGC OFF3. SENS-UP ---4. BRIGHTNESS ---|------ 405. D-WDR OFF6. DEFOG OFF7. RETURN RET
Select the following options under the Exposure menu: SHUTTER
Set the shutter speed. The options available to select are: 1/30, 1/60, 1/90, 1/100, 1/125, 1/180, 1/195, 1/215, 1/230, 1/250, 1/350, 1/500, 1/725, 1/1000, 1/1500, 1/2000, 1/3000, 1/4000, 1/6000, 1/10000, 1/20000, or 1/30000. For other cameras, the options available to select are: AUTO, 1/25(1/30), 1/50(1/60), FLK, 1/200(1/240), 1/400(1/480), 1/1000, 1/2000, 1/5000, 1/10000 or 1/50000.
AGC Automatic Gain Control. Automatically adjust the image quality in low light conditions. Value range is from 1 to 15. Select a higher value in low light conditions.
SENS-UP Select OFF/AUTO to disable/enable the camera to increase exposure times on a signal frame in low light conditions. Note: SENS-UP is selectable only when Shutter is set to AUTO or 1/30.
BRIGHTNESS Select a value to increase the image brightness. Value range is 1 to 100. The higher the value, the brighter the image. Note: This function is disabled if D-WDR is enabled.

10 TruVision HD-TVI 1080P Camera Configuration Manual
D-WDR Digital Wide Dynamic Range. Select ON/OFF to enable /disable the function. It helps to balance the brightness level of the whole image. Note: When D-WDR is enabled, the brightness function is disabled.
DEFOG During foggy or rainy weather, the camera image becomes hazy. The defog function can increase the image contrast and brightness level to show more detail. Note: Enabling the defog function increases the contrast of the image. It is recommended to set Defog to OFF during normal weather.
DEFOG
1. POS/SIZE 2. GRADATION LOW 3. DEFAULT 4. RETURN RET
POS/SIZE: Set the position and size of the defogged area. GRADATION: Set LOW, MIDDLE or HIGH for the defog gradation. DEFAULT: Restore the defog settings back to default.
Backlight
Select the following options under the Backlight menu: BLC
Backlight compensation (BLC) improves image quality when the background illumination is high. It prevents the object in the center of the image from appearing too dark. Select OFF, BLC, WDR or HSBLC to improve image quality.
BLC
1. GAIN MIDDLE2. AREA 3. DEFAULT 4. RETURN RET
BLC submenus: GAIN: Set the gain as High, Middle, or Low. The higher the gain value, the clearer the image. AREA: Press direction buttons to define the BLC position and size. DEFAULT: Restore the BLC settings back to default.
WDR Wide Dynamic Range. It provides clear images when there are both very bright and very dark areas on the image. GAIN: Set the gain as High, Middle, or Low. The higher the value, the clearer the image. WDR BRIGHT: Set the brightness from 0 to 100. The higher the
TruVision HD-TVI 1080P Camera Configuration Manual 11
value, the brighter the image. WDR OFFSET: Set the offset from 0 to 100. The higher the value, the brighter the dark area of the image.
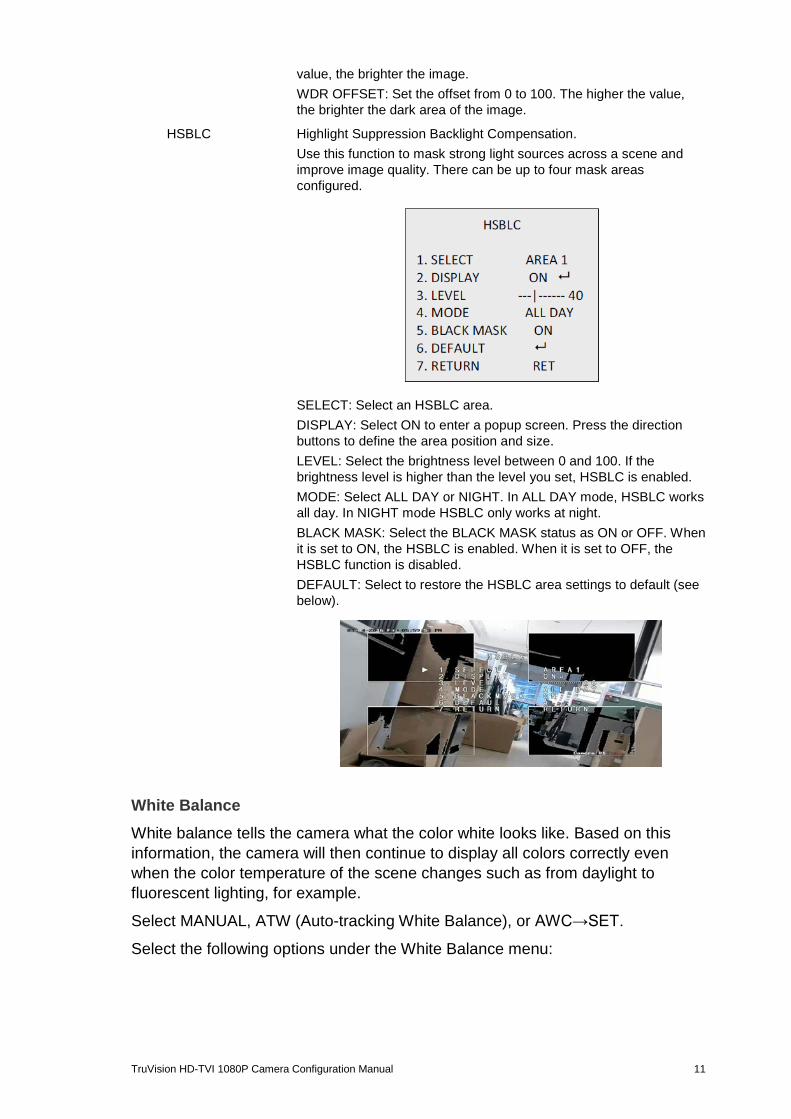
HSBLC Highlight Suppression Backlight Compensation. Use this function to mask strong light sources across a scene and improve image quality. There can be up to four mask areas configured.
SELECT: Select an HSBLC area. DISPLAY: Select ON to enter a popup screen. Press the direction buttons to define the area position and size. LEVEL: Select the brightness level between 0 and 100. If the brightness level is higher than the level you set, HSBLC is enabled. MODE: Select ALL DAY or NIGHT. In ALL DAY mode, HSBLC works all day. In NIGHT mode HSBLC only works at night. BLACK MASK: Select the BLACK MASK status as ON or OFF. When it is set to ON, the HSBLC is enabled. When it is set to OFF, the HSBLC function is disabled. DEFAULT: Select to restore the HSBLC area settings to default (see below).
White Balance White balance tells the camera what the color white looks like. Based on this information, the camera will then continue to display all colors correctly even when the color temperature of the scene changes such as from daylight to fluorescent lighting, for example.
Select MANUAL, ATW (Auto-tracking White Balance), or AWC→SET.
Select the following options under the White Balance menu:
12 TruVision HD-TVI 1080P Camera Configuration Manual
MANUAL Adjust the white balance by customizing the Blue and Red value, which range from 1 to 100.
MANUAL WB
BLUE ---|------ 51 RED ---|------ 50 RETURN RET
ATW Select ATW for the white balance to be automatically adjusted according to the scene illumination.
AWC→SET If enabled, this function will only adjust the WB once. It is best used in a stable environment.
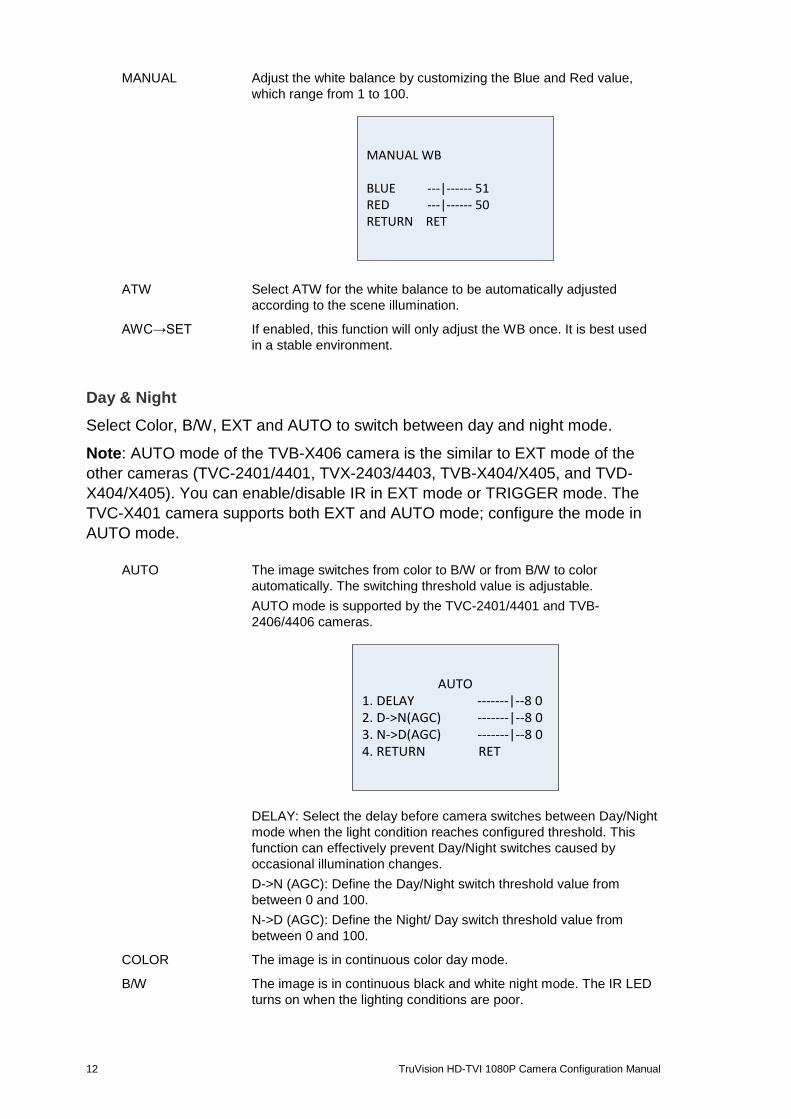
Day & Night Select Color, B/W, EXT and AUTO to switch between day and night mode.
Note: AUTO mode of the TVB-X406 camera is the similar to EXT mode of the other cameras (TVC-2401/4401, TVX-2403/4403, TVB-X404/X405, and TVD-X404/X405). You can enable/disable IR in EXT mode or TRIGGER mode. The TVC-X401 camera supports both EXT and AUTO mode; configure the mode in AUTO mode. AUTO The image switches from color to B/W or from B/W to color
automatically. The switching threshold value is adjustable. AUTO mode is supported by the TVC-2401/4401 and TVB-2406/4406 cameras.
AUTO1. DELAY -------|--8 02. D->N(AGC) -------|--8 0 3. N->D(AGC) -------|--8 0 4. RETURN RET
DELAY: Select the delay before camera switches between Day/Night mode when the light condition reaches configured threshold. This function can effectively prevent Day/Night switches caused by occasional illumination changes. D->N (AGC): Define the Day/Night switch threshold value from between 0 and 100. N->D (AGC): Define the Night/ Day switch threshold value from between 0 and 100.
COLOR The image is in continuous color day mode.
B/W The image is in continuous black and white night mode. The IR LED turns on when the lighting conditions are poor.
TruVision HD-TVI 1080P Camera Configuration Manual 13
EXT The image switches from color to B/W or from B/W to color automatically according to the light conditions.
TRIGGER This function is only available with the TVB-2406/4406 camera. Select Enable/Disable to turn the IR LED ON/OFF.
NR Noise reduction (NR) reduces noise, especially in low light conditions, and improves image quality.
Select the following options under the NR menu: 2D NR Select ON/OFF to enable/disable the feature. It reduces the noise in
a single frame to get a clearer image at night.
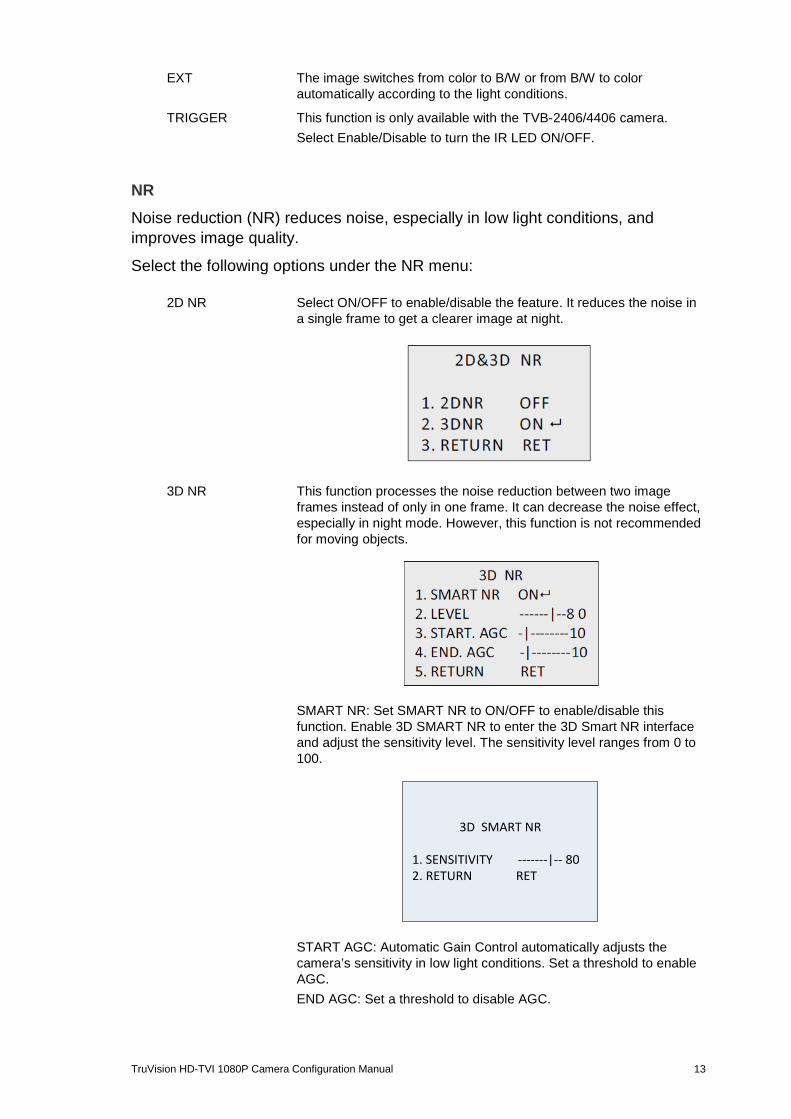
3D NR This function processes the noise reduction between two image frames instead of only in one frame. It can decrease the noise effect, especially in night mode. However, this function is not recommended for moving objects.
SMART NR: Set SMART NR to ON/OFF to enable/disable this function. Enable 3D SMART NR to enter the 3D Smart NR interface and adjust the sensitivity level. The sensitivity level ranges from 0 to 100.
3D SMART NR
1. SENSITIVITY -------|-- 80 2. RETURN RET
START AGC: Automatic Gain Control automatically adjusts the camera’s sensitivity in low light conditions. Set a threshold to enable AGC. END AGC: Set a threshold to disable AGC.
14 TruVision HD-TVI 1080P Camera Configuration Manual
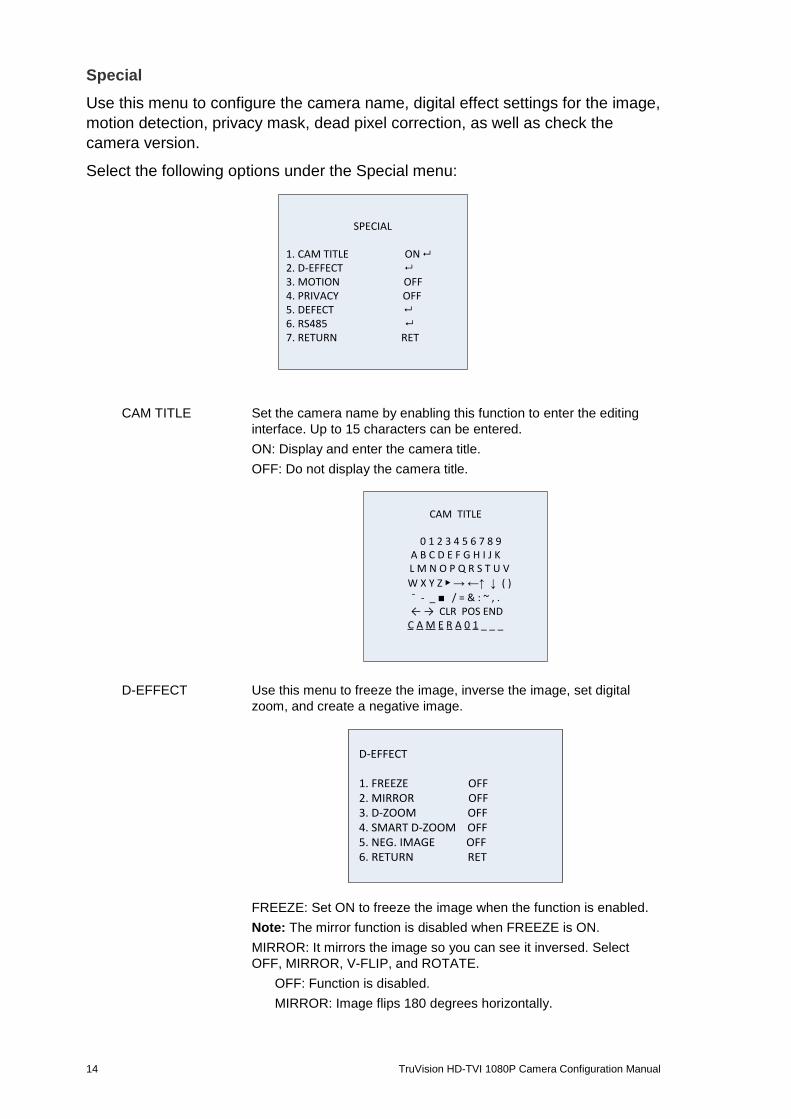
Special Use this menu to configure the camera name, digital effect settings for the image, motion detection, privacy mask, dead pixel correction, as well as check the camera version.
Select the following options under the Special menu:
SPECIAL
1. CAM TITLE ON 2. D-EFFECT 3. MOTION OFF4. PRIVACY OFF5. DEFECT 6. RS485 7. RETURN RET
CAM TITLE Set the camera name by enabling this function to enter the editing
interface. Up to 15 characters can be entered. ON: Display and enter the camera title. OFF: Do not display the camera title.
CAM TITLE
0 1 2 3 4 5 6 7 8 9A B C D E F G H I J K
L M N O P Q R S T U V W X Y Z ▶ → ←↑ ↓ ( )
¯ - _ ■ / = & : ~ , . ← → CLR POS END
C A M E R A 0 1 _ _ _
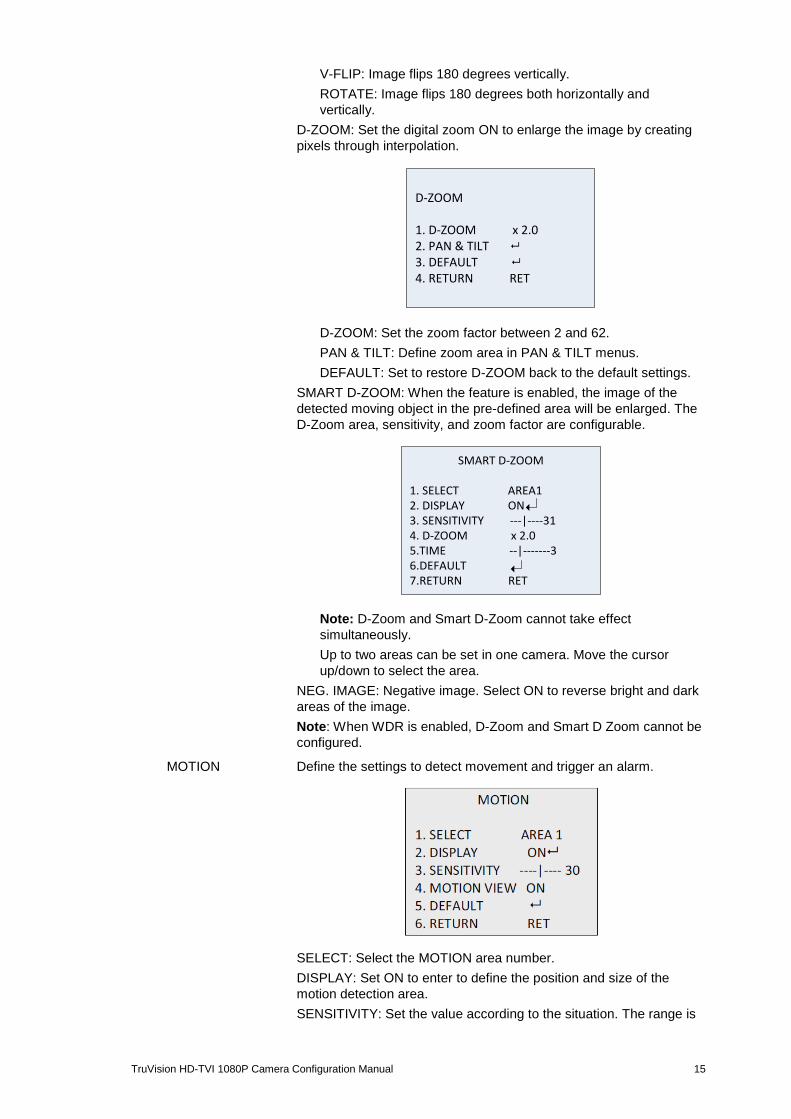
D-EFFECT Use this menu to freeze the image, inverse the image, set digital zoom, and create a negative image.
D-EFFECT
1. FREEZE OFF2. MIRROR OFF3. D-ZOOM OFF4. SMART D-ZOOM OFF5. NEG. IMAGE OFF6. RETURN RET
FREEZE: Set ON to freeze the image when the function is enabled. Note: The mirror function is disabled when FREEZE is ON. MIRROR: It mirrors the image so you can see it inversed. Select OFF, MIRROR, V-FLIP, and ROTATE.
OFF: Function is disabled. MIRROR: Image flips 180 degrees horizontally.
TruVision HD-TVI 1080P Camera Configuration Manual 15
V-FLIP: Image flips 180 degrees vertically. ROTATE: Image flips 180 degrees both horizontally and vertically.
D-ZOOM: Set the digital zoom ON to enlarge the image by creating pixels through interpolation.
D-ZOOM
1. D-ZOOM x 2.02. PAN & TILT 3. DEFAULT 4. RETURN RET
D-ZOOM: Set the zoom factor between 2 and 62. PAN & TILT: Define zoom area in PAN & TILT menus. DEFAULT: Set to restore D-ZOOM back to the default settings.
SMART D-ZOOM: When the feature is enabled, the image of the detected moving object in the pre-defined area will be enlarged. The D-Zoom area, sensitivity, and zoom factor are configurable.
SMART D-ZOOM
1. SELECT AREA12. DISPLAY ON 3. SENSITIVITY ---|----31 4. D-ZOOM x 2.05.TIME --|-------36.DEFAULT 7.RETURN RET
Note: D-Zoom and Smart D-Zoom cannot take effect simultaneously. Up to two areas can be set in one camera. Move the cursor up/down to select the area.
NEG. IMAGE: Negative image. Select ON to reverse bright and dark areas of the image. Note: When WDR is enabled, D-Zoom and Smart D Zoom cannot be configured.
MOTION Define the settings to detect movement and trigger an alarm.
SELECT: Select the MOTION area number. DISPLAY: Set ON to enter to define the position and size of the motion detection area. SENSITIVITY: Set the value according to the situation. The range is
16 TruVision HD-TVI 1080P Camera Configuration Manual
from 0 to 60. The higher the value, the higher the sensitivity level to trigger an alarm. Note: Branch movement, rain drops, snowflakes, flashing lights in the defined area may be detected and trigger a false alarm. In such cases, adjust the sensitive value. MOTION VIEW: Enabled this feature to trigger a flickering transparent red mosaic on the detected area when motion is detected. Set it to OFF to disable. DEFAULT: Select to restore settings back to default.
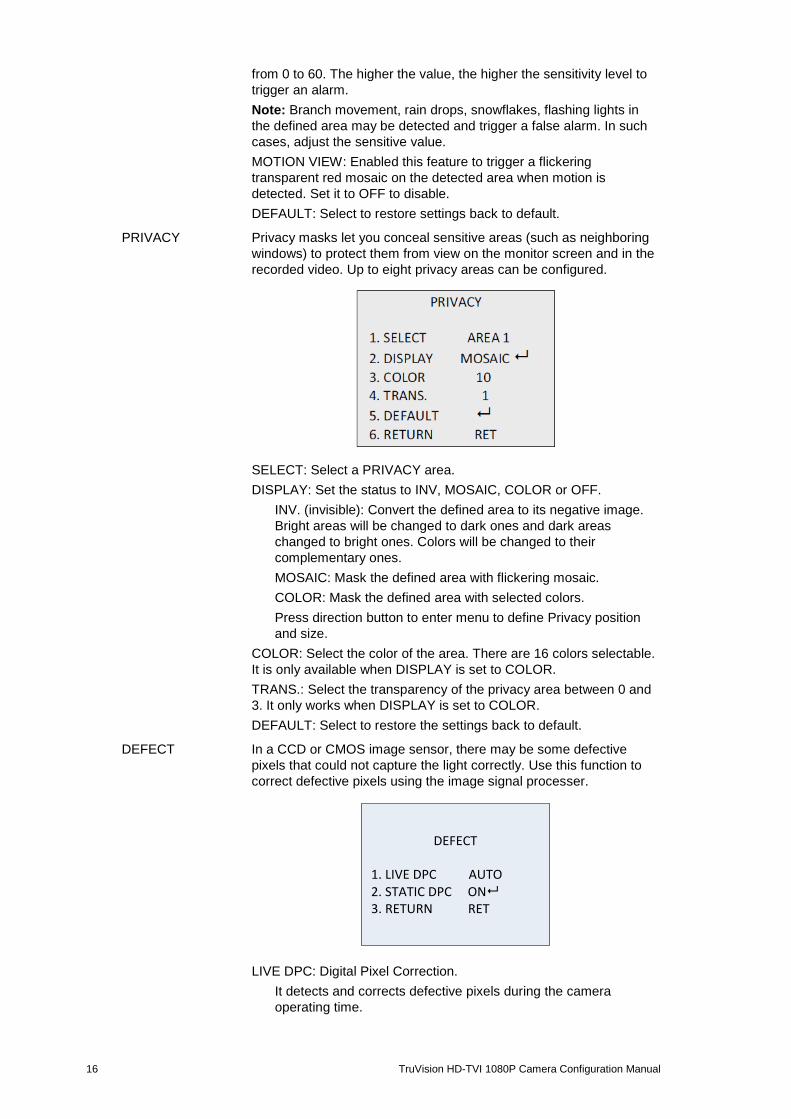
PRIVACY Privacy masks let you conceal sensitive areas (such as neighboring windows) to protect them from view on the monitor screen and in the recorded video. Up to eight privacy areas can be configured.
SELECT: Select a PRIVACY area. DISPLAY: Set the status to INV, MOSAIC, COLOR or OFF.
INV. (invisible): Convert the defined area to its negative image. Bright areas will be changed to dark ones and dark areas changed to bright ones. Colors will be changed to their complementary ones. MOSAIC: Mask the defined area with flickering mosaic. COLOR: Mask the defined area with selected colors. Press direction button to enter menu to define Privacy position and size.
COLOR: Select the color of the area. There are 16 colors selectable. It is only available when DISPLAY is set to COLOR. TRANS.: Select the transparency of the privacy area between 0 and 3. It only works when DISPLAY is set to COLOR. DEFAULT: Select to restore the settings back to default.
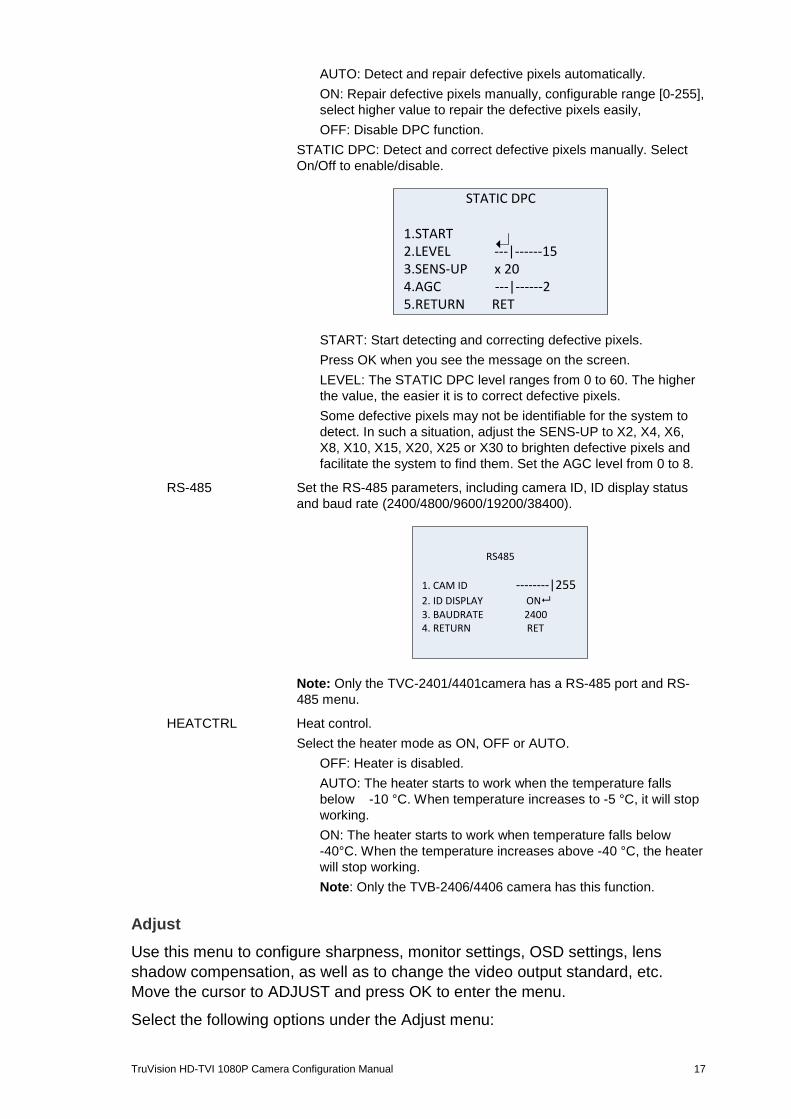
DEFECT In a CCD or CMOS image sensor, there may be some defective pixels that could not capture the light correctly. Use this function to correct defective pixels using the image signal processer.
DEFECT
1. LIVE DPC AUTO 2. STATIC DPC ON 3. RETURN RET
LIVE DPC: Digital Pixel Correction. It detects and corrects defective pixels during the camera operating time.
TruVision HD-TVI 1080P Camera Configuration Manual 17
AUTO: Detect and repair defective pixels automatically. ON: Repair defective pixels manually, configurable range [0-255], select higher value to repair the defective pixels easily, OFF: Disable DPC function.
STATIC DPC: Detect and correct defective pixels manually. Select On/Off to enable/disable.
STATIC DPC
1.START 2.LEVEL ---|------153.SENS-UP x 204.AGC ---|------25.RETURN RET
START: Start detecting and correcting defective pixels. Press OK when you see the message on the screen. LEVEL: The STATIC DPC level ranges from 0 to 60. The higher the value, the easier it is to correct defective pixels. Some defective pixels may not be identifiable for the system to detect. In such a situation, adjust the SENS-UP to X2, X4, X6, X8, X10, X15, X20, X25 or X30 to brighten defective pixels and facilitate the system to find them. Set the AGC level from 0 to 8.
RS-485 Set the RS-485 parameters, including camera ID, ID display status and baud rate (2400/4800/9600/19200/38400).
RS485
1. CAM ID --------|2552. ID DISPLAY ON�3. BAUDRATE 2400 4. RETURN RET
Note: Only the TVC-2401/4401camera has a RS-485 port and RS-485 menu.
HEATCTRL Heat control. Select the heater mode as ON, OFF or AUTO.
OFF: Heater is disabled. AUTO: The heater starts to work when the temperature falls below -10 °C. When temperature increases to -5 °C, it will stop working. ON: The heater starts to work when temperature falls below -40°C. When the temperature increases above -40 °C, the heater will stop working. Note: Only the TVB-2406/4406 camera has this function.
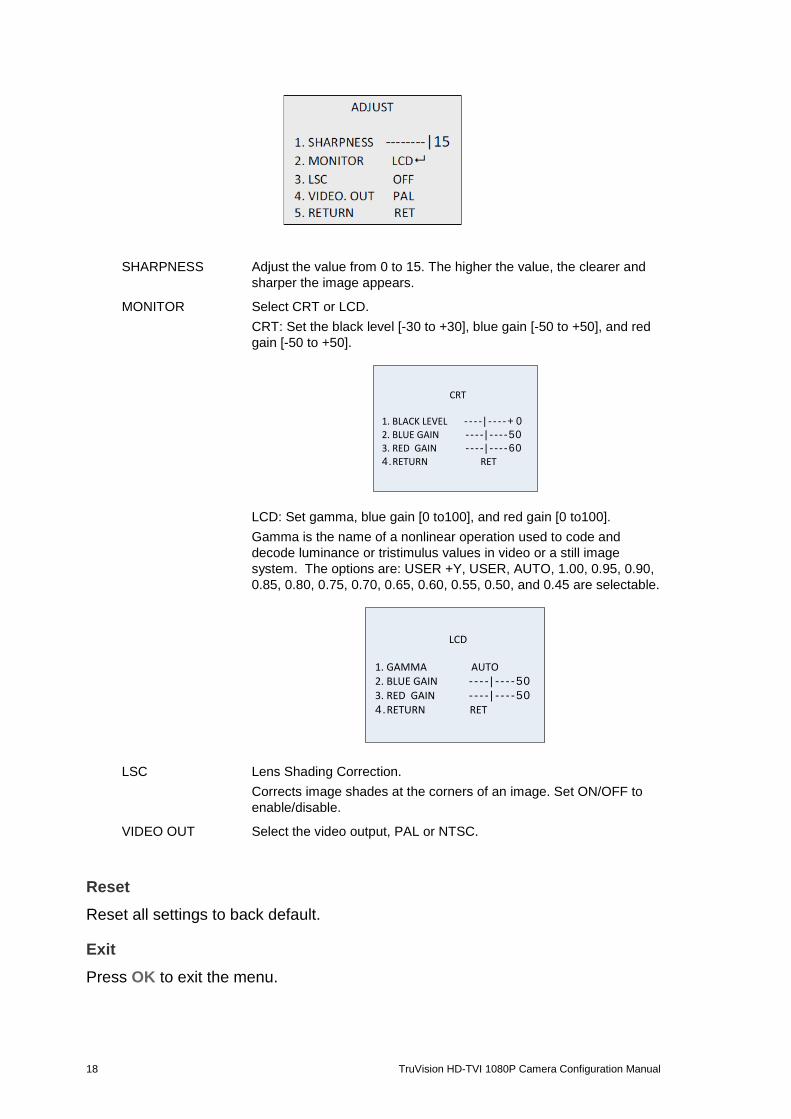
Adjust Use this menu to configure sharpness, monitor settings, OSD settings, lens shadow compensation, as well as to change the video output standard, etc. Move the cursor to ADJUST and press OK to enter the menu.
Select the following options under the Adjust menu:
18 TruVision HD-TVI 1080P Camera Configuration Manual
SHARPNESS Adjust the value from 0 to 15. The higher the value, the clearer and
sharper the image appears.
MONITOR Select CRT or LCD. CRT: Set the black level [-30 to +30], blue gain [-50 to +50], and red gain [-50 to +50].
CRT
1. BLACK LEVEL ----|----+0 2. BLUE GAIN ----|----503. RED GAIN ----|----60 4.RETURN RET
LCD: Set gamma, blue gain [0 to100], and red gain [0 to100]. Gamma is the name of a nonlinear operation used to code and decode luminance or tristimulus values in video or a still image system. The options are: USER +Y, USER, AUTO, 1.00, 0.95, 0.90, 0.85, 0.80, 0.75, 0.70, 0.65, 0.60, 0.55, 0.50, and 0.45 are selectable.
LCD
1. GAMMA AUTO 2. BLUE GAIN ----|----503. RED GAIN ----|----50 4.RETURN RET
LSC Lens Shading Correction. Corrects image shades at the corners of an image. Set ON/OFF to enable/disable.
VIDEO OUT Select the video output, PAL or NTSC.
Reset Reset all settings to back default.
Exit Press OK to exit the menu.
Recommended


![TVI Camera... · 2018-12-18 · TVI CAMERA PRIVACY ZONE 설정 방법 [2/11] Confidential & Proprietary ㈜아이디스의 기술자산으로서 기술자료 관리부서의 허가](https://img.pdfslide.net/doc/110x75/5e9d0a1bcfa1300258616048/tvi-camera-2018-12-18-tvi-camera-privacy-zone-ee-211-confidential.jpg)