1 Using the Horus Scope v 2.0
Using the Horus ScopeThe Horus Scope, designed specifically for telemedicine, is an easy-to-use hand-held photo/video system. The device includes several interchangeable lenses and incorporates high definition camera technology to stream or record images and video of the human body. It also integrates easily with OTNhub eVisit Videoconference, enabling you to share your examination with others in a videoconference.
The Horus Scope and its attachments are “class 1” medical devices*. The unit is certified for use on the OTN Network when connected as an auxiliary camera source with OTNhub eVisit Videoconference. The camera connects via a USB cable into a PC or Mac.
The Horus Scope ships with a charging station, a cable for power/data and a power adapter. The attachments available are: a general viewing scope, a dermascope, and an otoscope (each sold separately).
Table of Contents
1 Getting Started Checklist .............................................................. 2
Certifying and Completing a Test Call ........................3
2 Understanding the Horus Scope Device ..................................4
Controls and Features ............................................................4
Lens Attachments ....................................................................5
Screen Display Features ........................................................6
Live View Screen .................................................................6
3 Setting Up and Preparing the Device ....................................... 7
Installing the Battery............................................................... 7
Charging the Battery .............................................................. 7
Power Indicator ...................................................................8
Standby Mode ......................................................................8
Attaching a Lens .......................................................................9
Detaching a lens..................................................................9
4 Using the Horus Scope ................................................................. 10
Powering On and Choosing Screen Mode .................... 10
Using the Scope with OTNhub Videoconference ........11
Sharing or Taking Pictures and Video .............................13
Photo Mode .........................................................................13
Video Mode ..........................................................................13
Completing Your Clinical Session ................................13
Cleaning and Disinfecting ................................................... 14
Using Setup Mode ...................................................................15
5 Best Practices ....................................................................................17
Room Preparation ...................................................................17
Camera Considerations .........................................................17
Video Recommendations .....................................................17
6 Troubleshooting ...............................................................................18
eVisit (Videoconference)
* The Medical Devices Bureau of Health Canada recognizes four classes of medical devices. Class I devices present the lowest potential risk and do not require a licence. Each class is based on the level of control necessary to assure the safety and effectiveness of the device as well as the risk the device poses to the patient and/or the user.
2 Using the Horus Scope v 2.0
1 Getting Started Checklist
Before you begin us installing your Horus Scope camera, please ensure you have all the necessary permissions and equipment.
You must have:
1. Contacted your OTN Account Manager to complete the required forms to set up your USB medical peripheral device and coordinate with your equipment purchase.
2. OTNhub user credentials to access the OTNhub Videoconference service.
3. Received your Horus Scope camera kit
4. Verified that your computer (PC/Mac) meets the required specifications for OTNhub Videoconference service. See the eVisit Technical Readiness guide.
5. Received a ‘Welcome’ email from OTN that contains information about completing initial certification of the device prior to use.
• If you have not received a “Welcome” email, please contact your OTN Account Manager.
• Information about accessing the e-training materials for the Horus Scope camera will be included in the “Welcome” package.
6. If all the above is complete, then you may proceed with certification of your new medical peripheral. (See Certifying Your USB Medical Peripheral and Completing a Test Call on page 3.)
3 Using the Horus Scope v 2.0
2. Ask the OTN Technical Support person to certify your videoconference system with the Horus Scope.
3. OTN Technical Support will send out certification a notice after you have successfully completed the test.
Once you have setup and prepared the Horus Scope, powered it on, and connected it to your computer, it is time to do a test call with OTN Technical Support and complete the certification process.
It is important to test the Horus Scope as an additional camera source within OTNhub Videoconference prior to using the device in a clinical event.
1. For Technical Support, call 1-855-654-0888 and choose option 2.
Certifying Your USB Medical Peripheral and Completing a Test Call
Note: Your Horus Scope will be added to the OTNhub Directory as a medical peripheral associated with your site only after you have completed a successful test.
4 Using the Horus Scope v 2.0
2 Understanding the Horus Scope Device
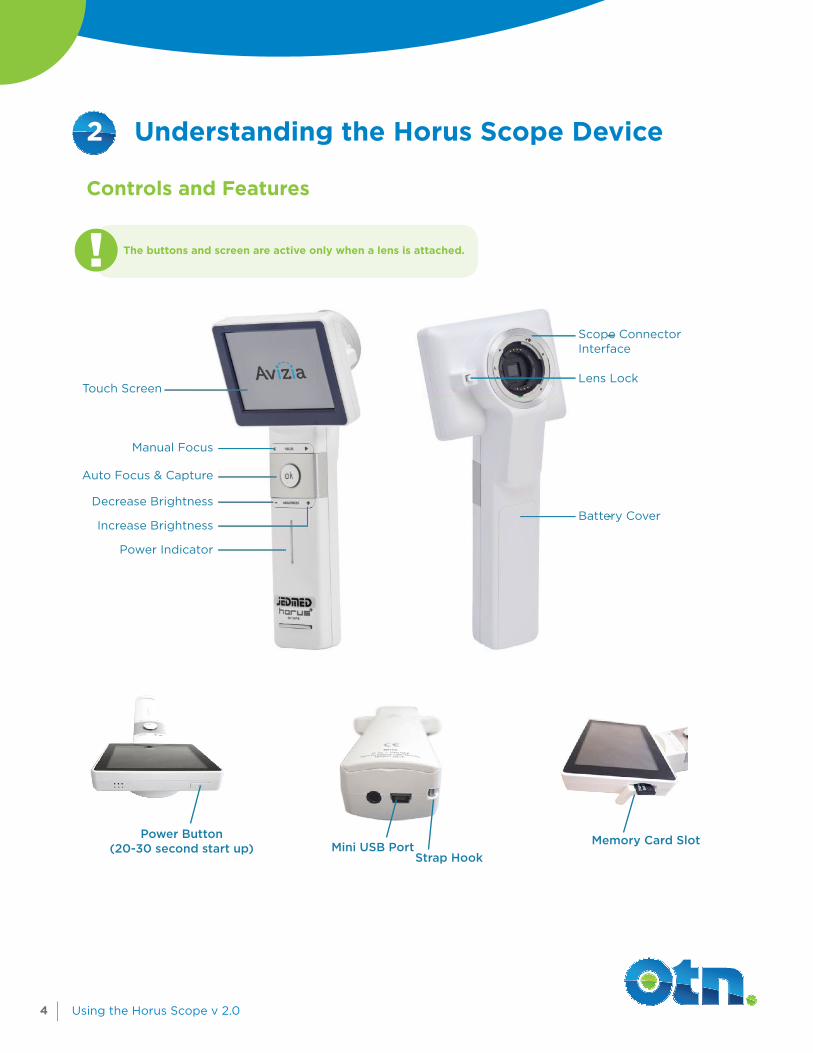
Controls and Features
The buttons and screen are active only when a lens is attached.
Power Button (20-30 second start up) Mini USB Port
Strap HookMemory Card Slot
Touch Screen
Manual Focus
Auto Focus & Capture
Decrease Brightness
Increase Brightness
Power Indicator
Scope Connector Interface
Lens Lock
Battery Cover
5 Using the Horus Scope v 2.0
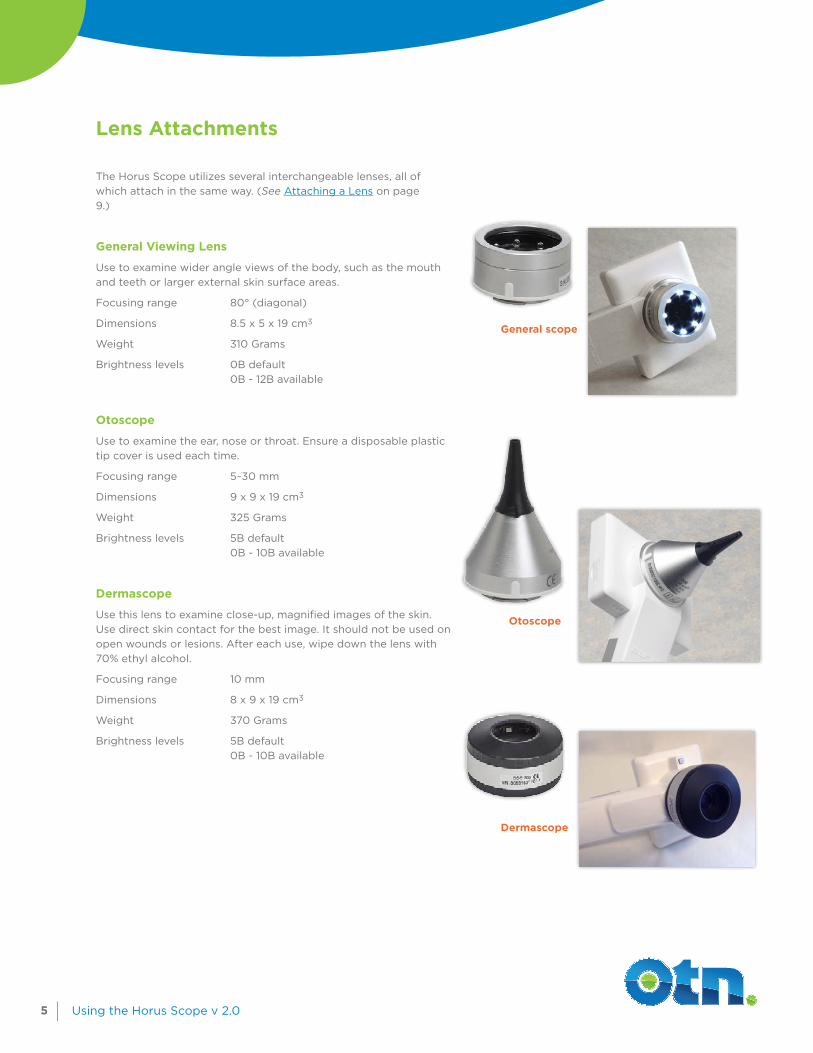
Lens Attachments
The Horus Scope utilizes several interchangeable lenses, all of which attach in the same way. (See Attaching a Lens on page 9.)
General Viewing Lens
Use to examine wider angle views of the body, such as the mouth and teeth or larger external skin surface areas.
Focusing range 80° (diagonal)
Dimensions 8.5 x 5 x 19 cm3
Weight 310 Grams
Brightness levels 0B default 0B - 12B available
Otoscope
Use to examine the ear, nose or throat. Ensure a disposable plastic tip cover is used each time.
Focusing range 5~30 mm
Dimensions 9 x 9 x 19 cm3
Weight 325 Grams
Brightness levels 5B default 0B - 10B available
Dermascope
Use this lens to examine close-up, magnified images of the skin. Use direct skin contact for the best image. It should not be used on open wounds or lesions. After each use, wipe down the lens with 70% ethyl alcohol.
Focusing range 10 mm
Dimensions 8 x 9 x 19 cm3
Weight 370 Grams
Brightness levels 5B default 0B - 10B available
General scope
Otoscope
Dermascope
6 Using the Horus Scope v 2.0
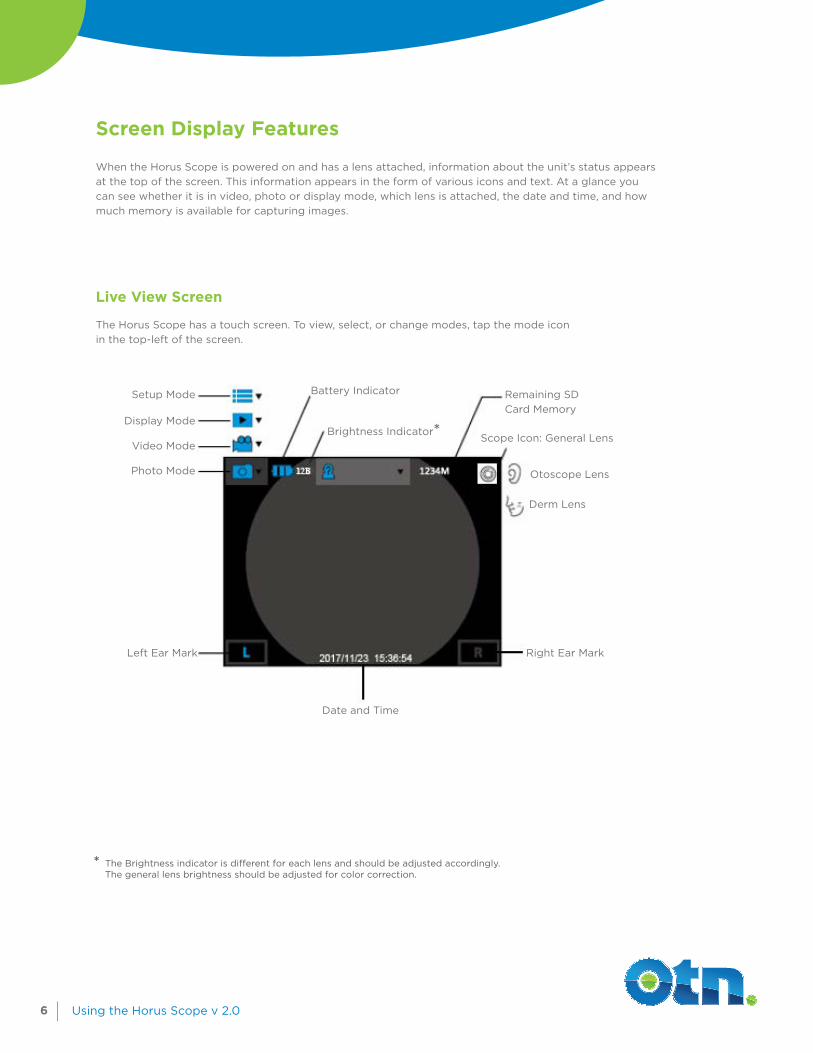
Screen Display Features
When the Horus Scope is powered on and has a lens attached, information about the unit’s status appears at the top of the screen. This information appears in the form of various icons and text. At a glance you can see whether it is in video, photo or display mode, which lens is attached, the date and time, and how much memory is available for capturing images.
Live View Screen
The Horus Scope has a touch screen. To view, select, or change modes, tap the mode icon in the top-left of the screen.
Setup Mode
Display Mode
Video Mode
Photo Mode
Battery Indicator
Brightness Indicator*Scope Icon: General Lens
Otoscope Lens
Derm Lens
Right Ear MarkLeft Ear Mark
Date and Time
Remaining SD Card Memory
* The Brightness indicator is different for each lens and should be adjusted accordingly. The general lens brightness should be adjusted for color correction.
7 Using the Horus Scope v 2.0
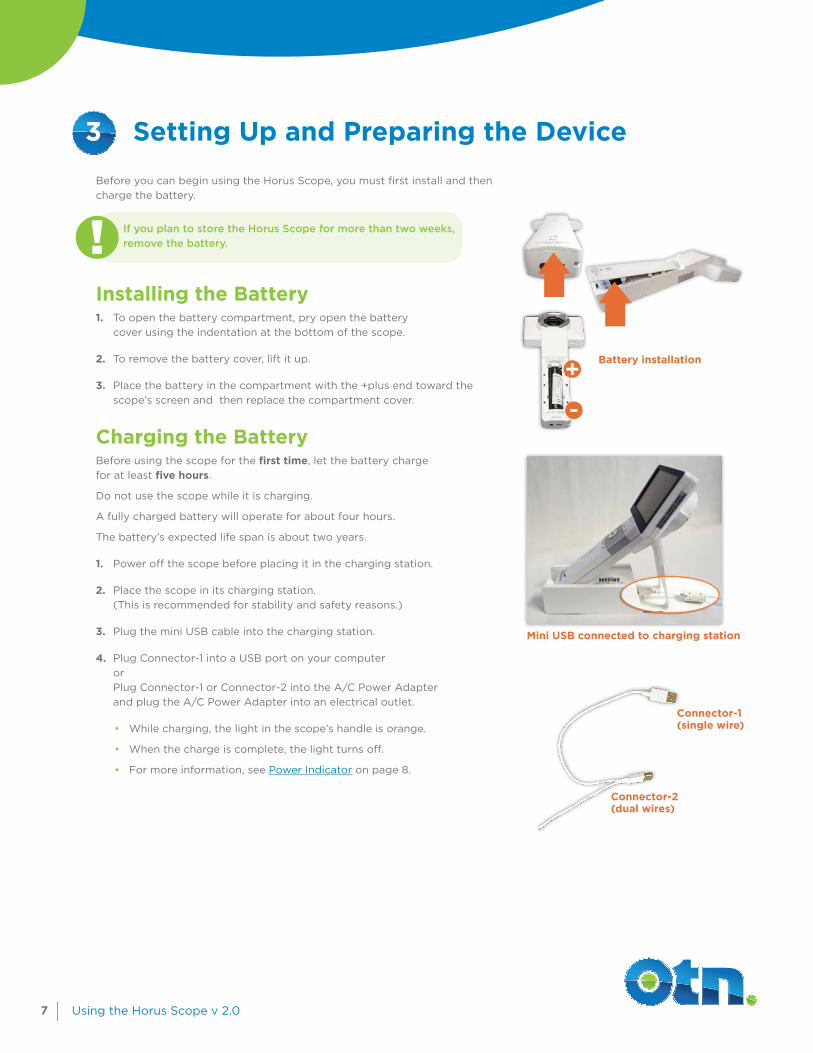
3 Setting Up and Preparing the DeviceBefore you can begin using the Horus Scope, you must first install and then charge the battery.
Installing the Battery1. To open the battery compartment, pry open the battery
cover using the indentation at the bottom of the scope.
2. To remove the battery cover, lift it up.
3. Place the battery in the compartment with the +plus end toward the scope’s screen and then replace the compartment cover.
Charging the BatteryBefore using the scope for the first time, let the battery charge for at least five hours.
Do not use the scope while it is charging.
A fully charged battery will operate for about four hours.
The battery’s expected life span is about two years.
1. Power off the scope before placing it in the charging station.
2. Place the scope in its charging station. (This is recommended for stability and safety reasons.)
3. Plug the mini USB cable into the charging station.
4. Plug Connector-1 into a USB port on your computer or Plug Connector-1 or Connector-2 into the A/C Power Adapter and plug the A/C Power Adapter into an electrical outlet.
• While charging, the light in the scope’s handle is orange.
• When the charge is complete, the light turns off.
• For more information, see Power Indicator on page 8.
+
-
If you plan to store the Horus Scope for more than two weeks, remove the battery.
Connector-1(single wire)
Mini USB connected to charging station
Battery installation
Connector-2(dual wires)
8 Using the Horus Scope v 2.0
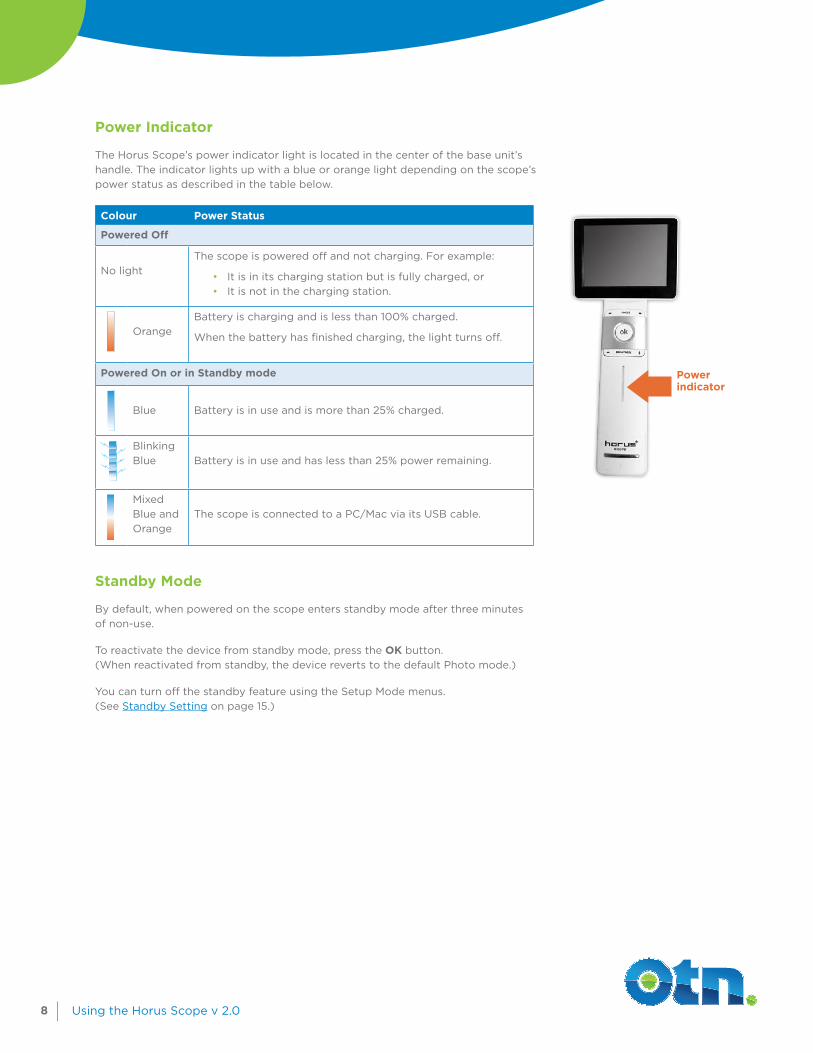
Power Indicator
The Horus Scope’s power indicator light is located in the center of the base unit’s handle. The indicator lights up with a blue or orange light depending on the scope’s power status as described in the table below.
Colour Power Status
Powered Off
No light
The scope is powered off and not charging. For example:
• It is in its charging station but is fully charged, or • It is not in the charging station.
Orange
Battery is charging and is less than 100% charged.
When the battery has finished charging, the light turns off.
Powered On or in Standby mode
Blue
Battery is in use and is more than 25% charged.
Blinking Blue
Battery is in use and has less than 25% power remaining.
Mixed Blue and Orange
The scope is connected to a PC/Mac via its USB cable.
Standby Mode
By default, when powered on the scope enters standby mode after three minutes of non-use.
To reactivate the device from standby mode, press the OK button. (When reactivated from standby, the device reverts to the default Photo mode.)
You can turn off the standby feature using the Setup Mode menus. (See Standby Setting on page 15.)
Power indicator
9 Using the Horus Scope v 2.0
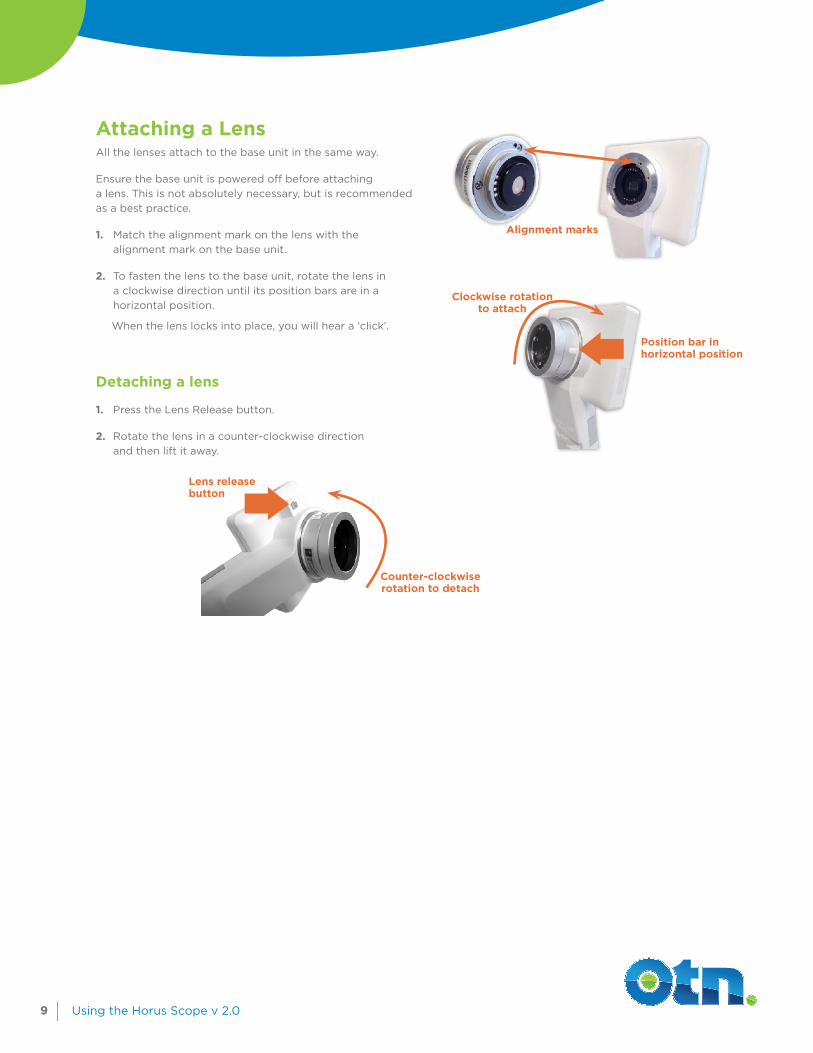
Attaching a LensAll the lenses attach to the base unit in the same way.
Ensure the base unit is powered off before attaching a lens. This is not absolutely necessary, but is recommended as a best practice.
1. Match the alignment mark on the lens with the alignment mark on the base unit.
2. To fasten the lens to the base unit, rotate the lens in a clockwise direction until its position bars are in a horizontal position.
When the lens locks into place, you will hear a ‘click’.
Detaching a lens
1. Press the Lens Release button.
2. Rotate the lens in a counter-clockwise direction and then lift it away.
Clockwise rotation to attach
Counter-clockwise rotation to detach
Alignment marks
Lens release button
Position bar in horizontal position
10 Using the Horus Scope v 2.0
4 Using the Horus Scope
Before powering on the Horus Scope, ensure that:
• The batteries are properly installed and the unit is charged. (See Charging the Battery on page 7.)
• A lens is attached. (See Attaching a Lens on page 9.)
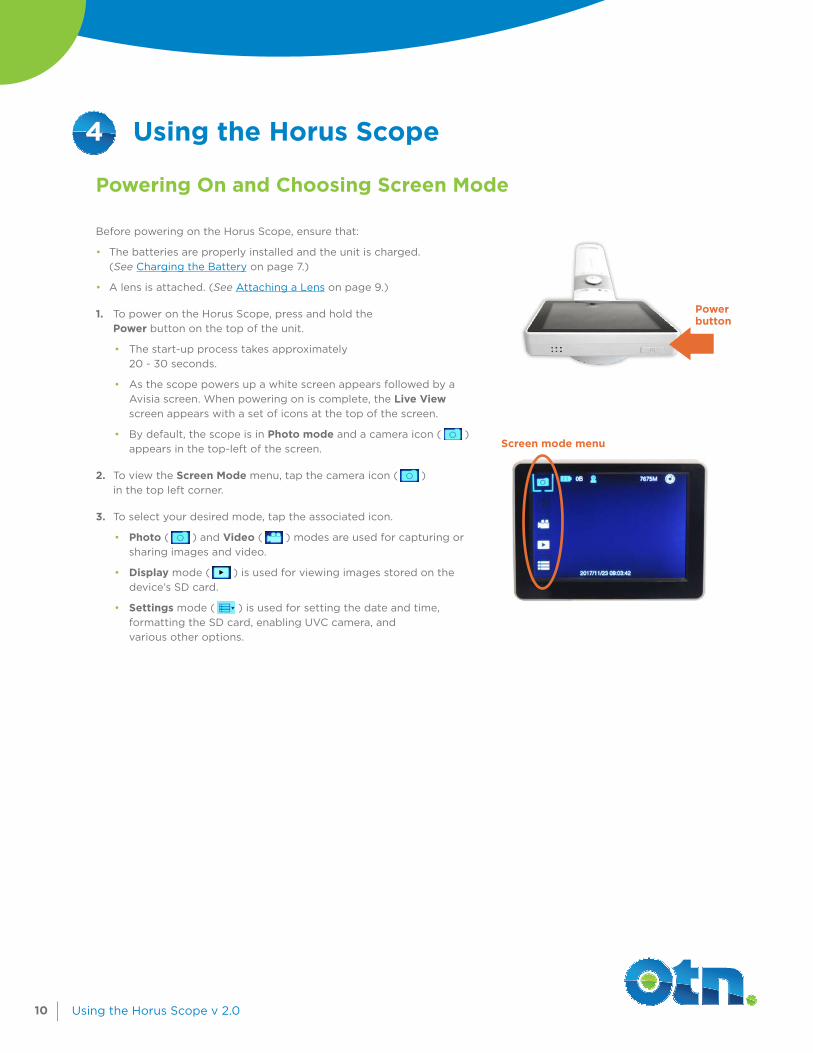
1. To power on the Horus Scope, press and hold the Power button on the top of the unit.
• The start-up process takes approximately 20 - 30 seconds.
• As the scope powers up a white screen appears followed by a Avisia screen. When powering on is complete, the Live View screen appears with a set of icons at the top of the screen.
• By default, the scope is in Photo mode and a camera icon ( ) appears in the top-left of the screen.
2. To view the Screen Mode menu, tap the camera icon ( ) in the top left corner.
3. To select your desired mode, tap the associated icon.
• Photo ( ) and Video ( ) modes are used for capturing or sharing images and video.
• Display mode ( ) is used for viewing images stored on the device’s SD card.
• Settings mode ( ) is used for setting the date and time, formatting the SD card, enabling UVC camera, and various other options.
Power button
Screen mode menu
Powering On and Choosing Screen Mode
11 Using the Horus Scope v 2.0
Using the Scope with OTNhub Videoconference
If you are in a videoconference and want to share the Horus Scope live images with another participant, you can switch from your standard webcam and use the Horus Scope instead.
First, power on and prepare the Horus Scope, connect it to your computer and then log in to otnhub.ca and assign the scope as the video camera.
Prepare Horus Scope
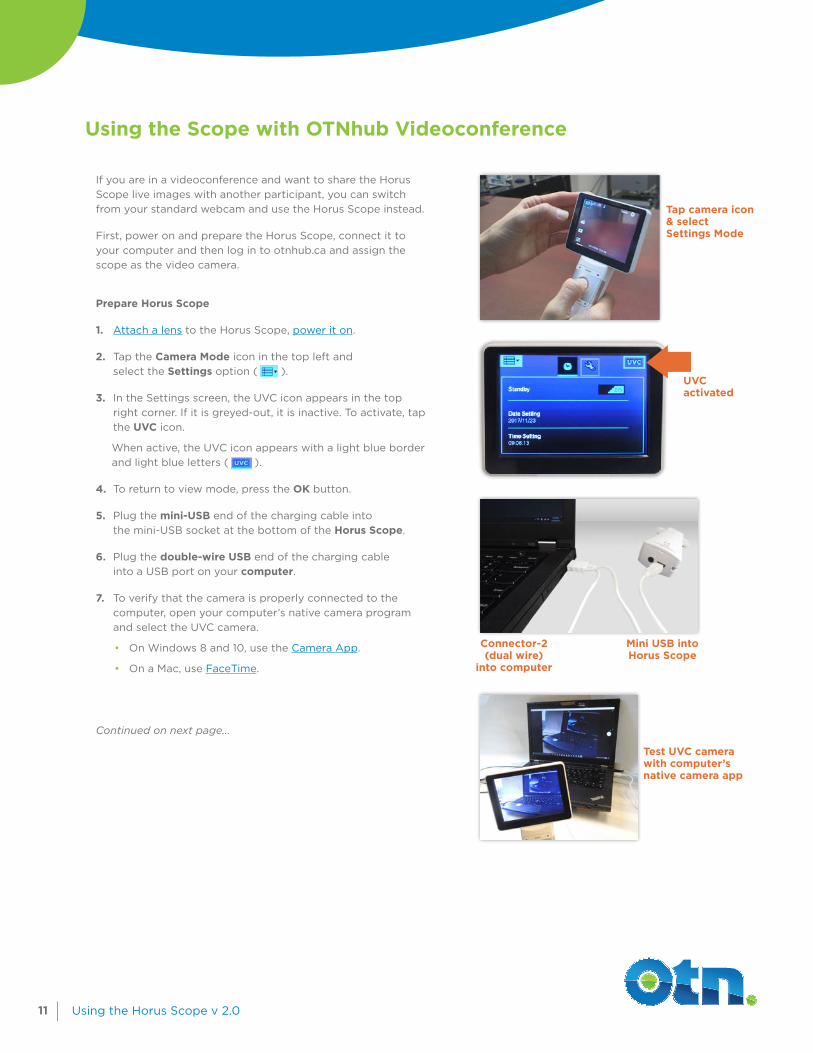
1. Attach a lens to the Horus Scope, power it on.
2. Tap the Camera Mode icon in the top left and select the Settings option ( ).
3. In the Settings screen, the UVC icon appears in the top right corner. If it is greyed-out, it is inactive. To activate, tap the UVC icon.
When active, the UVC icon appears with a light blue border and light blue letters ( ).
4. To return to view mode, press the OK button.
5. Plug the mini-USB end of the charging cable into the mini-USB socket at the bottom of the Horus Scope.
6. Plug the double-wire USB end of the charging cable into a USB port on your computer.
7. To verify that the camera is properly connected to the computer, open your computer’s native camera program and select the UVC camera.
• On Windows 8 and 10, use the Camera App.
• On a Mac, use FaceTime.
Continued on next page...
UVC activated
Test UVC camera with computer’s native camera app
Tap camera icon & selectSettings Mode
Connector-2(dual wire)
into computer
Mini USB into Horus Scope
12 Using the Horus Scope v 2.0
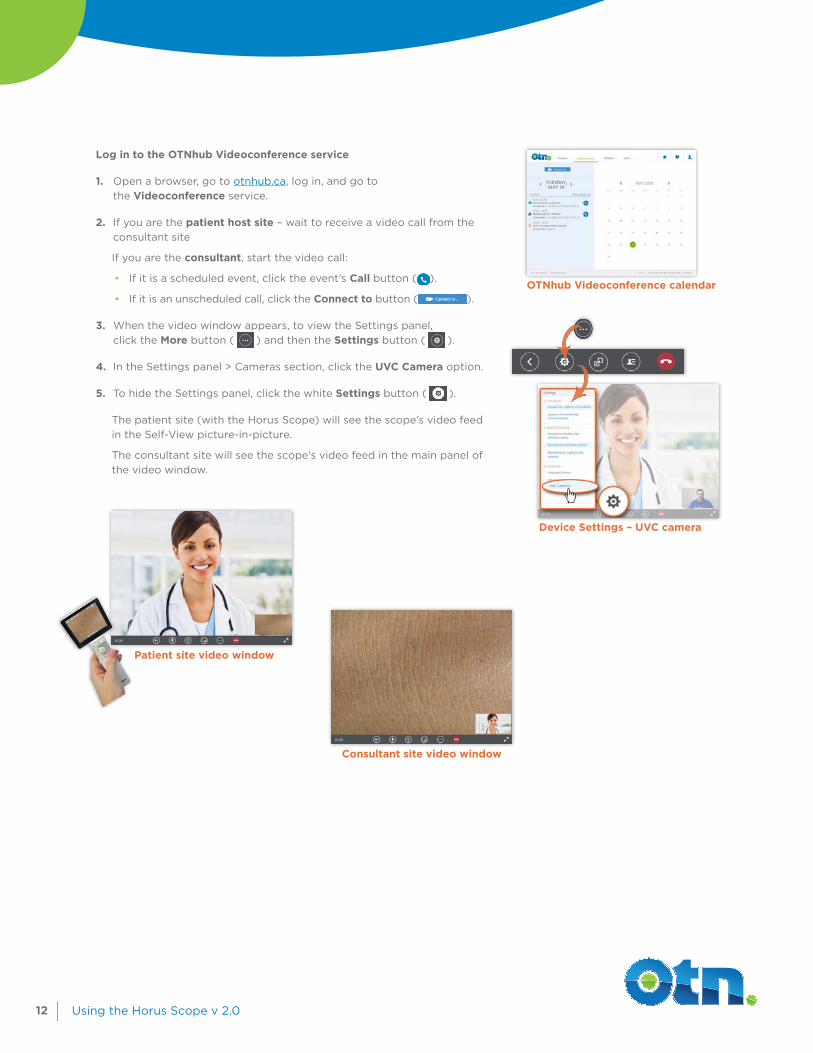
OTNhub Videoconference calendar
Patient site video window
Consultant site video window
Log in to the OTNhub Videoconference service
1. Open a browser, go to otnhub.ca, log in, and go to the Videoconference service.
2. If you are the patient host site – wait to receive a video call from the consultant site
If you are the consultant, start the video call:
• If it is a scheduled event, click the event’s Call button ( ).
• If it is an unscheduled call, click the Connect to button ( ).
3. When the video window appears, to view the Settings panel, click the More button ( ) and then the Settings button ( ).
4. In the Settings panel > Cameras section, click the UVC Camera option.
5. To hide the Settings panel, click the white Settings button ( ).
The patient site (with the Horus Scope) will see the scope’s video feed in the Self-View picture-in-picture.
The consultant site will see the scope’s video feed in the main panel of the video window.
Device Settings – UVC camera

13 Using the Horus Scope v 2.0
Select either photo or video mode.
Position the camera at the area of interest.
To adjust the brightness, use your thumb to press the Brightness Level button: right side to increase light (+) or left side to decrease light (-) .
• The brightness level appears at the top of the screen.
• Default light levels settings include:
Otoscope = 5BDermascope = 5BGeneral Imaging Lens = 0B
Photo Mode
In photo mode, you can adjust focus automatically or manually.
1. To automatically adjust focus, point the lens at the desired target and gently press half-way down the OK button.
To manually adjust focus, press the left and right ends of the Focus button ( ).
2. To take a picture and store it on the SD card, press the OK button completely down.
When you capture an image, the screen displays the image in auto-review mode. Similar to Display mode, you can zoom in/out and move around in the image.
3. To return to the Live View, press the OK button.
Video Mode
In video mode, you can adjust focus only manually.
1. To manually adjust focus, press the left and right ends of the Focus button ( ).
2. To take start recording a video, press the OK button.
3. To return to the Live View, press the OK button.
Completing Your Clinical Session
After you have finished your videoconference, be sure to format the Horus Scope’s SD card. This is important for privacy and security reasons.
See Format SD Card on page 16.
Sharing or Taking Pictures and Video
Screen mode
Brightness level
14 Using the Horus Scope v 2.0
The Horus Scope is a precision instrument and as such it requires special care.
The Horus Scope should be cleaned and disinfected, but it is not intended to be sterilized.
Before cleaning the Horus Scope, ensure that it is:
• Powered off.• Disconnected from the USB cable. • Removed from its charging station.
Horus Scope Unit & Charging Station
Disinfect the scope (screen and handle) and its charging station with a soft cloth either moistened with alcohol (70% ethyl alcohol) or with Virox (a more concentrated form of hydrogen peroxide).
Wait for the cleaning liquid to dry off before powering on the Horus Scope or placing it in the charging station or connecting it with a USB cable.
Optical Lens
Clean the optical lens with lens cleaning cloth or lens cleaning tissue.
Cleaning and Disinfecting
15 Using the Horus Scope v 2.0
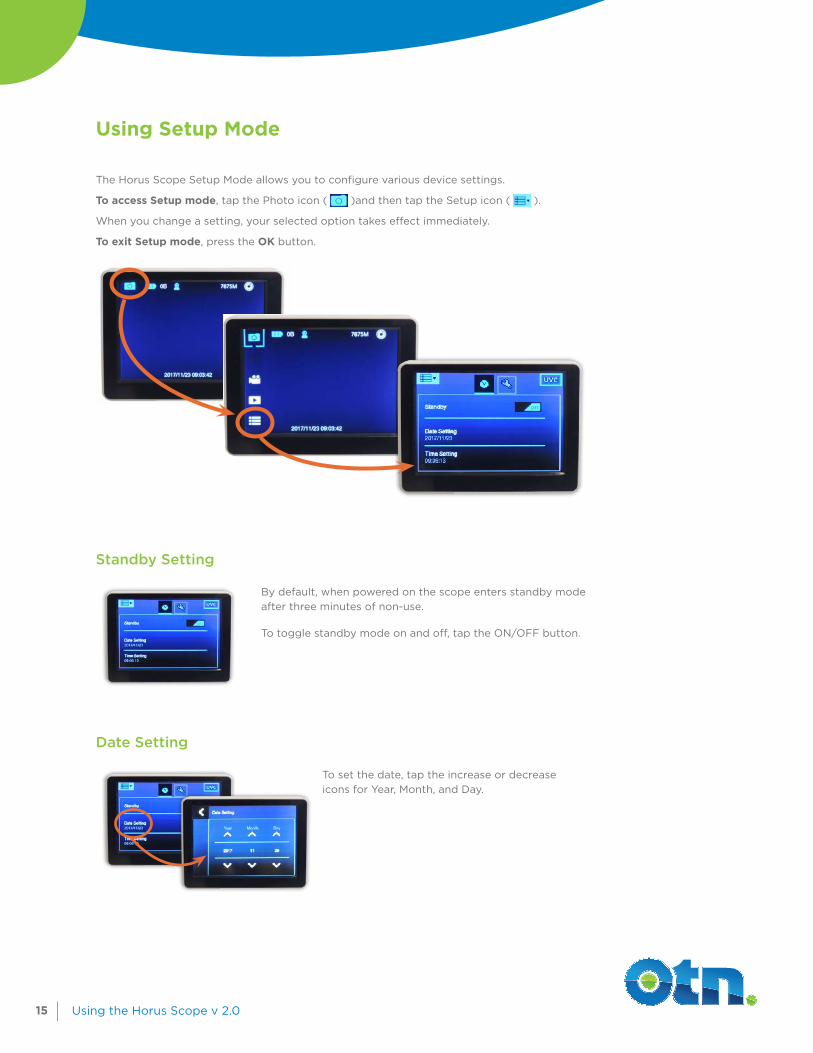
The Horus Scope Setup Mode allows you to configure various device settings.
To access Setup mode, tap the Photo icon ( )and then tap the Setup icon ( ).
When you change a setting, your selected option takes effect immediately.
To exit Setup mode, press the OK button.
Using Setup Mode
Standby Setting
By default, when powered on the scope enters standby mode after three minutes of non-use.
To toggle standby mode on and off, tap the ON/OFF button.
Date Setting
To set the date, tap the increase or decrease icons for Year, Month, and Day.
16 Using the Horus Scope v 2.0
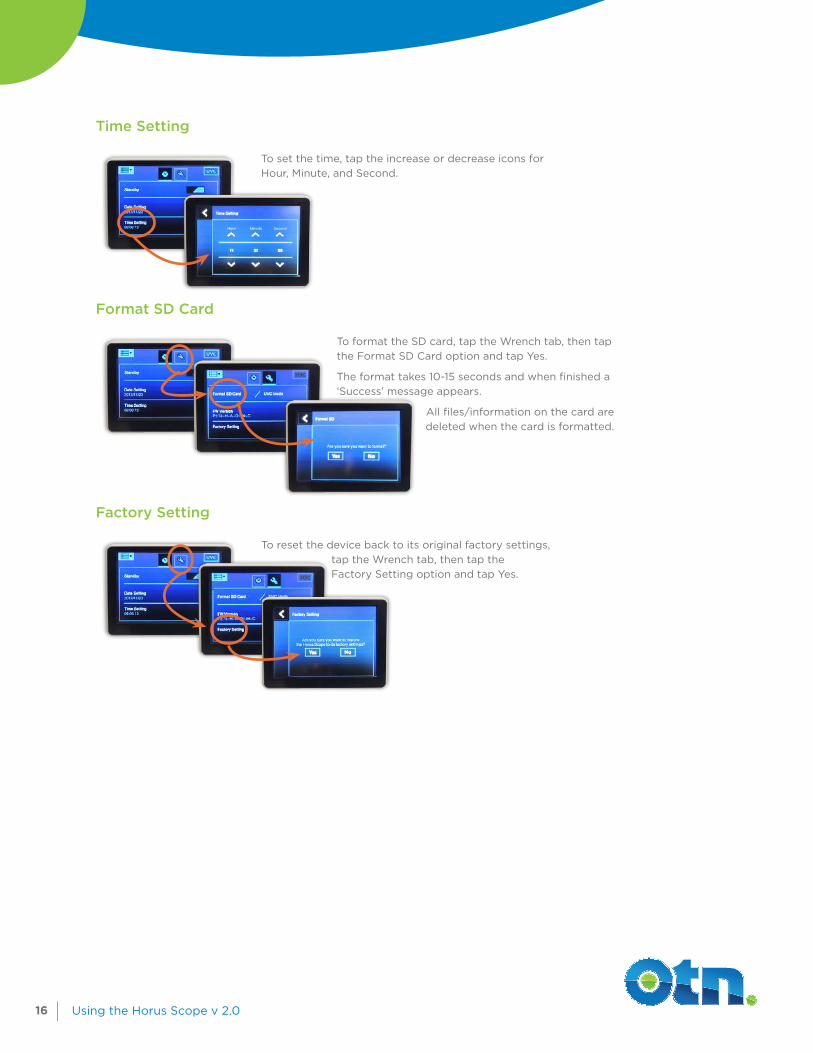
Time Setting
To set the time, tap the increase or decrease icons for Hour, Minute, and Second.
Format SD Card
To format the SD card, tap the Wrench tab, then tap the Format SD Card option and tap Yes.
The format takes 10-15 seconds and when finished a ‘Success’ message appears.
All files/information on the card are deleted when the card is formatted.
Factory Setting
To reset the device back to its original factory settings, tap the Wrench tab, then tap the Factory Setting option and tap Yes.

17 Using the Horus Scope v 2.0
5 Best Practices
Room Preparation• Arrange the furniture in the room so that you can easily see your own image on your monitor.
Have a chair positioned for the patient in such a way that you can check both ears without pulling cables.
• Check to ensure you are sending a good image to the Consultant by adjusting the screen layout.
• It may be easier for the nurse to also be seated for the exam to provide a steady image. This will minimize motion and improve the quality of the image transmitted.
• Anticipate the areas on the patient’s body that will require close- up examination prior to the start of the consultation and prepare the sites for easy viewing when the patient arrives.
• Become acquainted with Horus Scope and test the equipment prior to use in a clinical setting.
Camera Considerations• It is important that your camera is plugged into your PC/Mac and powered on before you log
into the OTNhub.
• It is recommended to use the live video feed rather than using pre-existing stored images.
• Always delete stored images at the end of the consultation so that the images are not confused with other patient images.
• Never copy images from the Horus Scope to another computer or storage device.
• To ensure that sensitive information is not compromised never remove the Micro SD card from the Horus Scope.
• Check that the USB cable has been properly plugged into USB port to ensure that the camera scope does not lose connection.
• Make sure the camera scope has been sufficiently charged before the consultation. The battery should charge for at least 5 hours.
• Make sure that the camera scope is oriented properly to ensure that the image is vertical.
Video Recommendations• Use the best possible connection – wired is better than wireless.
• If you use a laptop, ensure you use your computer’s ‘high performance’ power plan.
• Good lighting is important for a high-quality videoconference. Make sure there is enough light and avoid sitting where there is a bright light behind you.
• Before starting a clinical consultation, confirm with the person you are calling that they are ready and expecting your video call.
• Allocate a few minutes at the start of the session to confirm that both you and the party you’re calling have good quality audio and video before starting the clinical consultation.
18 Using the Horus Scope v 2.0
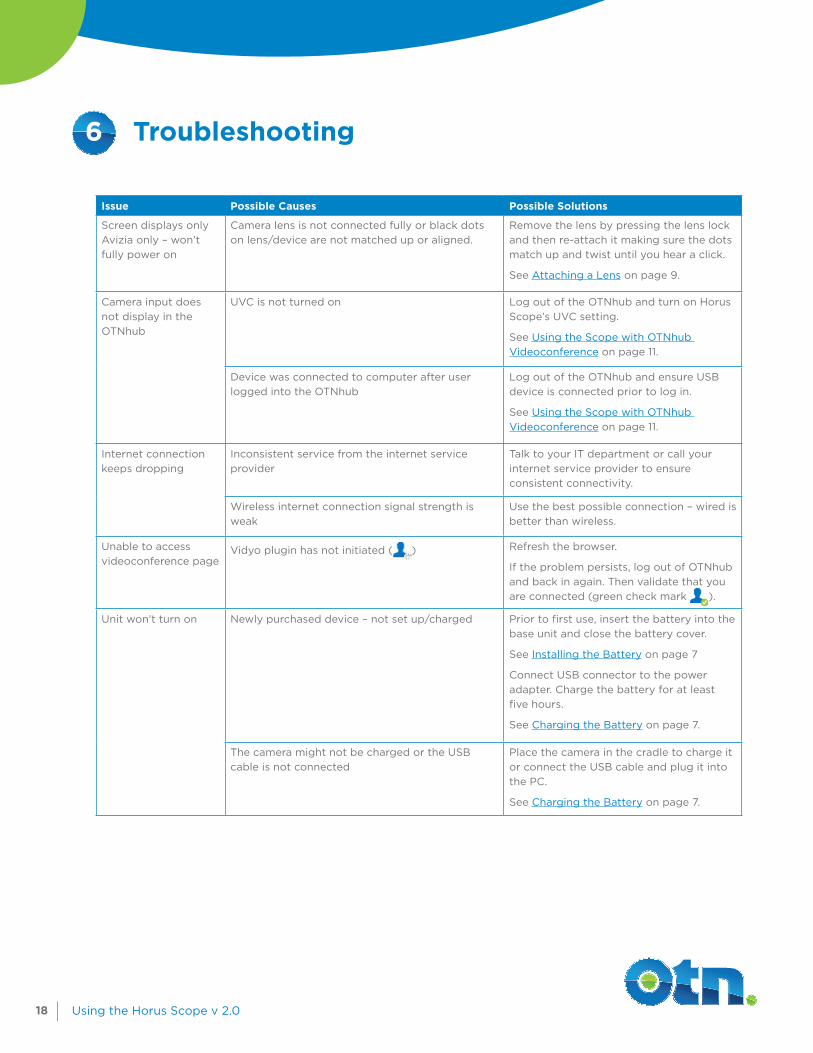
6 Troubleshooting
Issue Possible Causes Possible Solutions
Screen displays only Avizia only – won’t fully power on
Camera lens is not connected fully or black dots on lens/device are not matched up or aligned.
Remove the lens by pressing the lens lock and then re-attach it making sure the dots match up and twist until you hear a click.
See Attaching a Lens on page 9.
Camera input does not display in the OTNhub
UVC is not turned on Log out of the OTNhub and turn on Horus Scope’s UVC setting.
See Using the Scope with OTNhub Videoconference on page 11.
Device was connected to computer after user logged into the OTNhub
Log out of the OTNhub and ensure USB device is connected prior to log in.
See Using the Scope with OTNhub Videoconference on page 11.
Internet connection keeps dropping
Inconsistent service from the internet service provider
Talk to your IT department or call your internet service provider to ensure consistent connectivity.
Wireless internet connection signal strength is weak
Use the best possible connection – wired is better than wireless.
Unable to access videoconference page
Vidyo plugin has not initiated ( ) Refresh the browser.
If the problem persists, log out of OTNhub and back in again. Then validate that you are connected (green check mark ).
Unit won’t turn on Newly purchased device – not set up/charged Prior to first use, insert the battery into the base unit and close the battery cover.
See Installing the Battery on page 7
Connect USB connector to the power adapter. Charge the battery for at least five hours.
See Charging the Battery on page 7.
The camera might not be charged or the USB cable is not connected
Place the camera in the cradle to charge it or connect the USB cable and plug it into the PC.
See Charging the Battery on page 7.

Ontario Telemedicine Network 105 Moatfield Drive, Suite 1100
Toronto, ON M3B 0A2
www.otn.ca
Recommended